

Page 1

QUICK REFERENCE GUIDE
HYBRID
2017 ROGUE
Page 2

1
3
2
4
5
7
8
6
20
21
17
10 11 129
22
151413 16
1
Vehicle Information Display*
2
Headlight and Turn Signal Switch
3
Low Tire Pressure Warning Light
Instrument Brightness
4
Control Button*
5
Twin Trip Odometer Reset Button
6
Wiper and Washer Switch
*See your Owner’s Manual for information.
1918
Steering Wheel Switches for
Audio Control*/Navigation/
7
Vehicle Information Display
Cruise Control/
8
Bluetooth® Switches
Vehicle Dynamic Control (VDC)
9
OFF Switch*
10
Sport Mode Switch
11
Power Liftgate Switch
12
Power Liftgate Main Switch
13
ECO Mode Switch
14
Safety Shield Button
15
AWD Lock Switch*
16
Hill Descent Control (HDC) Switch
17
Steering Wheel Tilt Adjustment
23
18
Fuel-ller Door Release
19
Hood Release*
20
Audio and Navigation System
Heater and Air
21
Conditioner (automatic)
Front Passenger Air Bag
22
Status Light*
23
USB Port/Aux Jack/Power Outlet
Page 3
TABLE OF CONTENTS
NEW SYSTEM FEATURES
Approaching Vehicle Sound for Pedestrians (VSP) .....................................2
Around View® Monitor with Moving Object Detection (MOD) (if so equipped) .........2
Drive Mode ..............................................................................4
Blind Spot Warning (BSW) ...............................................................4
Forward Emergency Braking (FEB) (if so equipped) ....................................5
Hill Start Assist (HSA) ....................................................................5
Hill Descent Control (HDC) (if so equipped) .............................................5
NissanConnect
SiriusXM Travel Link and SiriusXM Trac (if so equipped) ............................. 7
ESSENTIAL INFORMATION
Tire Pressure Monitoring System (TPMS) with Easy-Fill Tire Alert ..................... 8
PureDrive™ Hybrid System Warning Light and Hybrid Awareness .....................9
Loose Fuel Cap and Fuel-ller Door.....................................................9
Towing Your Vehicle....................................................................10
Outside Temperature Display..........................................................10
Clock Set/Adjustment .................................................................11
FIRST DRIVE FEATURES
Nissan Intelligent Key® System ........................................................12
Power Liftgate (if so equipped) ........................................................13
ND
2
Row Seats . . . . . . . . . . . . . . . . . . . . . . . . . . . . . . . . . . . . . . . . . . . . . . . . . . . . . . . . . . . . . . . . . . . . . . . . . .14
All-Wheel Drive (AWD) Lock Switch (if so equipped)....................................15
Tilt and Telescopic Steering Wheel Adjustments ......................................15
Assist Charge Gauge...................................................................15
Starting/Stopping the Hybrid System .................................................16
Front Seat Adjustments................................................................16
Outside Mirror Control Switch .........................................................16
Headlight Control Switch ..............................................................17
Wiper and Washer Switch ..............................................................18
Center Console Storage Box...........................................................18
Heater and Air Conditioner (automatic) (if so equipped) ..............................19
FM/AM/SiriusXM® Satellite Radio with CD Player (if so equipped)....................20
Power Panoramic Moonroof (if so equipped) ..........................................21
USB (Universal Serial Bus) Connection Port/Aux Jack and iPod® Interface ..........22
Cruise Control (if so equipped)........................................................22
Intelligent Cruise Control (ICC) (if so equipped)....................................... 23
SYSTEM GUIDE
Vehicle Information Display...........................................................24
NissanConnect
Hands-free Text Messaging Assistant (if so equipped) ...............................26
Bluetooth® Hands-free Phone System ...............................................27
• System Operating Tips ...........................................................27
Bluetooth® System without Navigation (if so equipped) .............................28
Bluetooth® System with Navigation (if so equipped) .................................29
Navigation System (if so equipped)....................................................31
SM
Services (if so equipped) .............................................6
SM
Mobile Apps (if so equipped) .......................................25
Additional information about your vehicle is also available in your Owner’s Manual,
Navigation System Owner’s Manual and at www.NissanUSA.com.
Please see your Owner’s Manual for important safety information and system operation
limitations.
• A cellular telephone should not be used for any purpose while driving so full attention may
be given to vehicle operation.
• Always wear your seat belt.
• Supplemental air bags do not replace proper seat belt usage.
• Children 12 and under should always ride in the rear seat properly secured in child restraints
or seat belts according to their age and weight.
For more information, refer to the “Safety — Seats, seat belts and supplemental restraint system
(section 1)”, the “Monitor, climate, audio, phone and voice recognition systems (section 4)” and the
“Starting and driving (section 5)” of your Owner’s Manual.
• Do not drink and drive.
Page 4
NEW SYSTEM FEATURES
APPROACHING VEHICLE SOUND FOR PEDESTRIANS (VSP)
The VSP system helps alert pedestrians to the presence of the vehicle when it is
being driven at a low-speed.
When the vehicle starts to move, it produces a sound. The sound stops when the
vehicle speed reaches approximately 19 mph (30 km/h) while accelerating.
Please see your Owner’s Manual for important safety information, system limitations, and additional
operating and feature information.
For more information, refer to the “HEV overview (section HEV)” of your Owner’s Manual.
AROUND VIEW® MONITOR WITH MOVING OBJECT DETECTION
(MOD) (if so equipped)
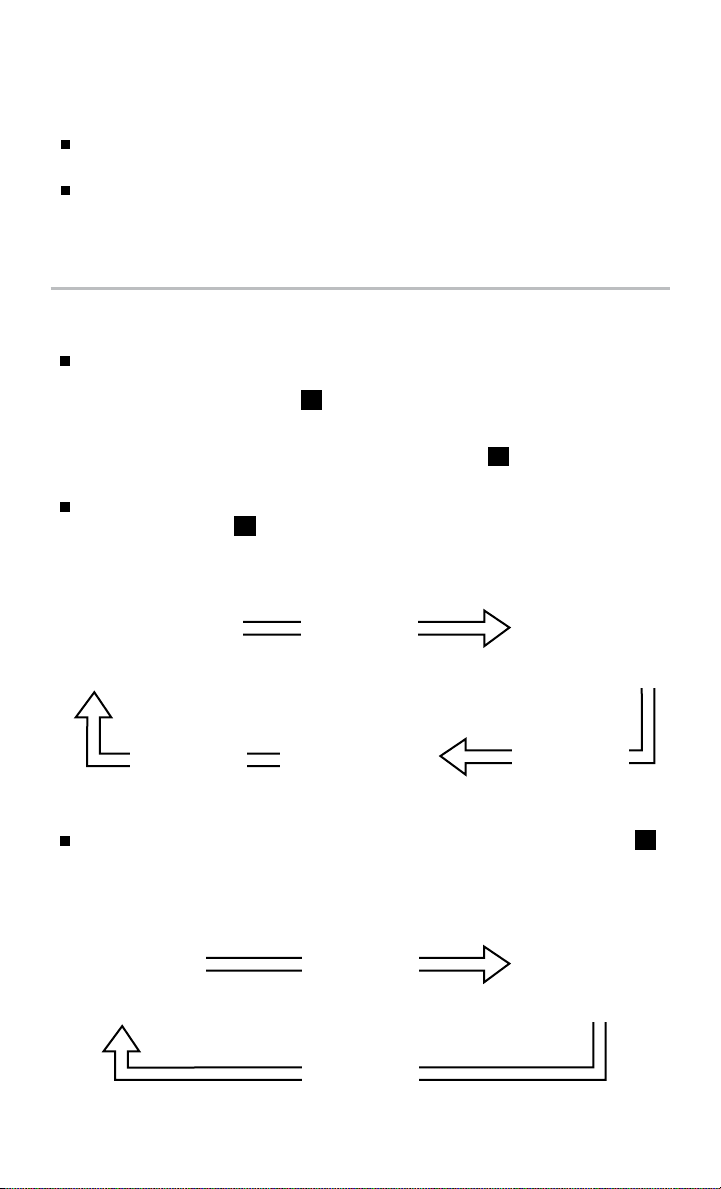
With the ignition switch in the ON position,
the Around View® Monitor is activated by
pressing the CAMERA button
the control panel, or by moving the shift lever
to the R (REVERSE) position. The monitor
displays various views of the position of
thevehicle.
When the shift lever is in the P (PARK), N (NEUTRAL) or D (DRIVE) position and
the CAMERA button
Start from any Control Panel screen
1
1
, located on
1
is pressed, the following views will display in order:
Front view & bird’s-eye view
Press
Front view & front-side view
Press Press
When the shift lever is in the R (REVERSE) position and the CAMERA button 1
is pressed, the following views will display in order:
Rear view & bird’s-eye view
2
To view detailed instructional videos regarding these and other features,
Press
Press
please go to www.nissanownersinfo.mobi.
Rear view & front-side view
Page 5
The colored guide lines on the display screen indicate vehicle width and
approximate distances to objects with reference to the vehicle body line.
• Red 1.5 ft (0.5 m); Yellow 3 ft (1 m);
Green 7 ft (2 m) and 10 ft (3 m).
For information regarding how to access
additional viewing cycles, please see your
Owner’s Manual.
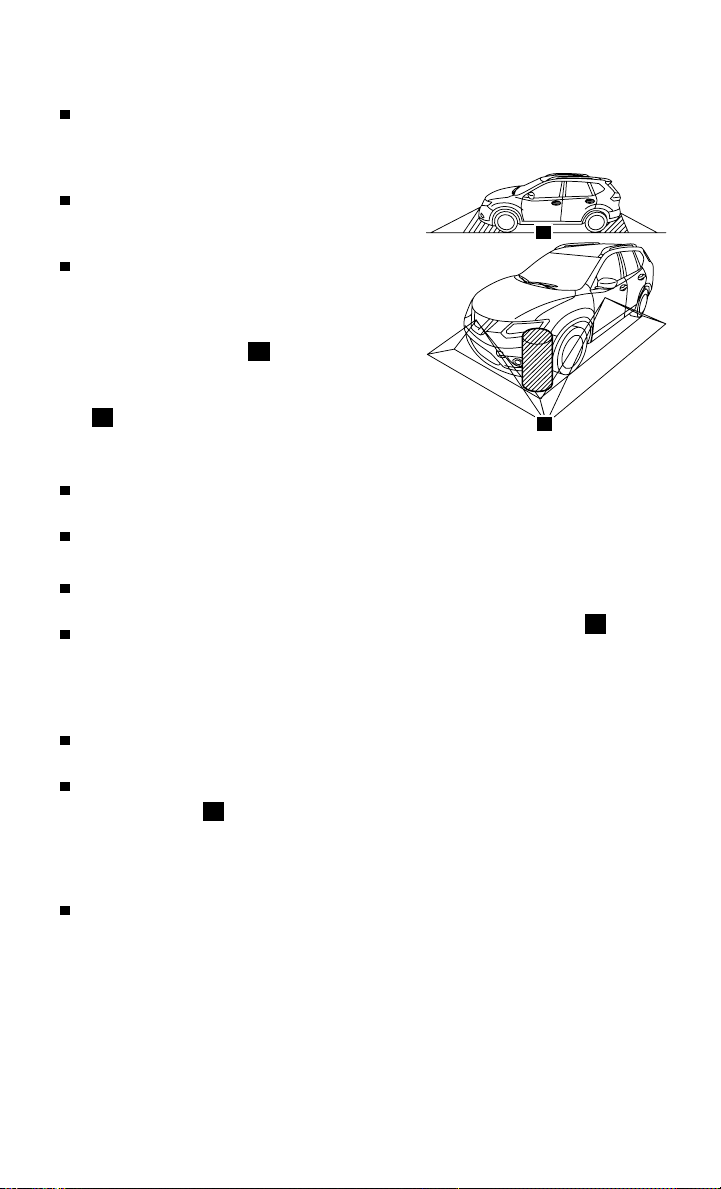
There are some areas where the system will
2
not detect objects.
• When in the front or the rear view display, an
object below the bumper or on the ground
may not be detected
2
.
• When in the bird’s-eye view, a tall object near
the seams of the camera detecting areas
3
will not appear in the monitor.
3
• The distance between objects viewed on the
Around View Monitor diers from the actual distance.
Always check your surroundings and turn to look behind you before
moving the vehicle.
Objects in the bird’s-eye view will appear further than the actual distance.
MOVING OBJECT DETECTION (MOD) (if so equipped)
The MOD system helps inform the driver of
moving objects around the vehicle.
The system will operate when the shift
4
lever is in the P (PARK), R (REVERSE),
N (NEUTRAL) or D (DRIVE) position
and the vehicle is driven at speeds of
approximately 5 mph (8 km/h) or less.
If the MOD system detects moving objects, a
yellow frame will be displayed on the camera image and a chime will sound.
When the following is displayed:
4
• Blue MOD icon
; the system is active.
• Gray MOD icon; the system is not active.
• No MOD icon; the system is o. The indicator will also be o if all of the warning
systems are deactivated using the Settings menu.
The MOD system will not operate if the liftgate is open.
Please see your Owner’s Manual for important safety information, system limitations, and additional
operating and feature information.
For more information, refer to the “Monitor, climate, audio, phone and voice recognition systems
(section 4)” of your Owner’s Manual.
To view detailed instructional videos regarding these and other features,
please go to www.nissanownersinfo.mobi.
3
Page 6

NEW SYSTEM FEATURES
DRIVE MODE
NORMAL
Normal drive mode is recommended for
normal, everyday driving and is the default
mode of your vehicle.
ECO (if so equipped)
ECO drive mode is recommended to
help maximize fuel economy. Performance
may be reduced.
• Press the ECO button
1
on the instrument panel to activate.
• The ECO drive mode indicator light illuminates on the instrument panel.
SPORT
SPORT drive mode is recommended for an enhanced performance feel. Fuel
economy may be reduced.
2
• Press the SPORT button
on the instrument panel to activate.
• The SPORT drive mode indicator light illuminates on the instrument panel.
Please see your Owner’s Manual for important safety information, system limitations, and additional
operating and feature information.
For more information, refer to the “Starting and driving (section 5)” of your Owner’s Manual.
BLIND SPOT WARNING (BSW)
The BSW system helps to alert the driver
when another vehicle moves into the
vehicle’s blind spot area.
An indicator light located near the outside
mirrors
detect a vehicle in the detection zone.
The indicator light
illuminate after the ignition switch is ON
and the BSW system is enabled to indicate
that the BSW system is operational.
Push the warning systems switch
temporarily turn the system o. When the
system is o, the indicator light
The indicator light 3 on the switch will also be o if all of the warning systems
are deactivated using the Settings menu.
Please see your Owner’s Manual for important safety information, system limitations, and additional
operating and feature information.
For more information, refer to the “Instruments and controls (section 2)” and the “Starting and driving
(section 5)” of your Owner’s Manual.
1
will illuminate if the radar sensors
3
on the switch will
2
3
on the switch is o.
to
2
1
1
2
3
4
To view detailed instructional videos regarding these and other features,
please go to www.nissanownersinfo.mobi.
Page 7
FORWARD EMERGENCY BRAKING (FEB) (if so equipped)
The FEB system can assist the driver when there is a risk of a forward collision
with a vehicle ahead in the traveling lane.
The FEB system operates at speeds greater than 3 mph (5 km/h).
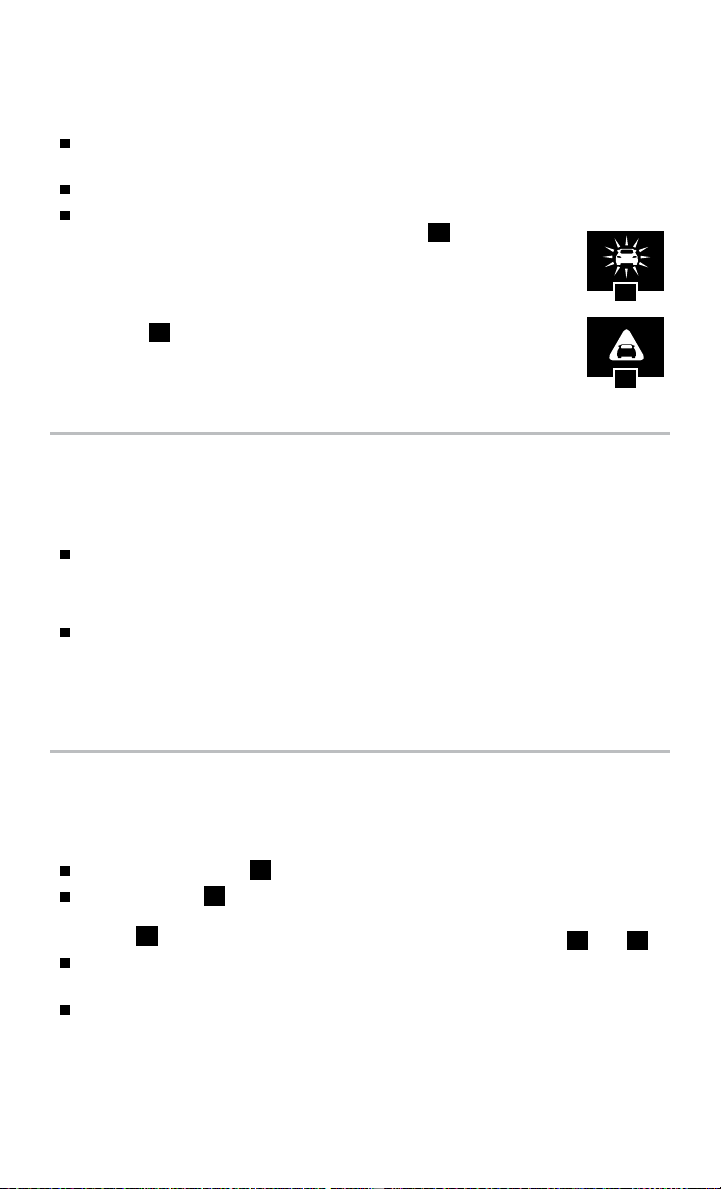
If there is a risk of a forward collision, an audible tone will sound
and the vehicle ahead detection indicator light
1
will illuminate. If
the driver applies the brakes after the warning and the FEB system
detects that there is still the possibility of a forward collision, the
system will automatically increase the braking force. If the driver
1
does not take action, the FEB system will issue a second visual
warning
Please see your Owner’s Manual for important safety information, system limitations, and
additional operating and feature information.
For more information, refer to the “Starting and driving (section 5)” of your Owner’s Manual.
2
, an audible warning and also apply partial braking.
2
HILL START ASSIST (HSA)
The HSA system allows time for the driver to release the brake pedal and apply the
accelerator when the vehicle is parked on a hill. The brakes are applied automatically
for 2 seconds after the driver releases the brake pedal.
The HSA system will operate automatically under these conditions:
• The shift lever is shifted into a forward or a reverse gear.
• The vehicle is stopped completely on a hill by applying the brake.
The HSA system will not operate when the shift lever is in the N (NEUTRAL) or
P (PARK) position or on a at and level road.
Please see your Owner’s Manual for important safety information, system limitations, and additional
operating and feature information.
For more information, refer to the “Starting and driving (section 5)” of your Owner’s Manual.
HILL DESCENT CONTROL (HDC) (if so equipped)
The HDC system is designed to apply the brakes to help control the speed of the
vehicle and reduce the workload of the driver while descending steep hills. To
activate the system:
The AWD LOCK switch 1 must be on.
The HDC switch 2 must be on. To
deactivate the HDC system, push the HDC
switch
The shift lever must be in a forward or
a reverse gear.
The HDC system operates at speeds of 15 mph (25 km/h) and below.
Please see your Owner’s Manual for important safety information, system limitations, and additional
operating and feature information.
For more information, refer to the “Starting and driving (section 5)” of your Owner’s Manual.
2
to the OFF position.
To view detailed instructional videos regarding these and other features,
please go to www.nissanownersinfo.mobi.
21
5
Page 8

NEW SYSTEM FEATURES
NISSANCONNECTSM SERVICES (if so equipped)
NissanConnectSM Services is a collection of security and convenience services that
adds innovation to your daily drive.
To enroll in NissanConnect Services, create an account or log into your Nissan Owner
Portal with your Vehicle Identication Number or VIN. Under the NissanConnect
Services tab, select the red button next to Manage Subscription. Follow the prompts
to enroll in NissanConnect Services. Next, download the NissanConnect Services
companion app and log into it using your Nissan Owner Portal ID and password.
For full details on NissanConnect Services or to enroll your vehicle,
please visit www.NissanUSA.com/connect or call 855-426-6628.
Here is a quick overview of some of the features that may be available for your
vehicle. A full description of these and other NissanConnect Services can be found in
your Navigation System Owner’s Manual.
Automatic Collision Notication is a service that generates an automatic
connection between the vehicle and the Emergency Response Center when the
vehicle has been involved in an accident that was severe enough to deploy the
air bags.
Emergency Call connects you to a NissanConnect Services Specialist who will
assist in the dispatch of emergency services to the vehicle location. To use this
feature, press the SOS button on the overhead console. The SOS button should
only be used in emergency situations.
Roadside Assistance dispatches roadside assistance to the vehicle location in
non-emergency situations. Roadside Assistance can be accessed by touching
the headset icon on the map screen, via NissanConnect Services companion
app or by calling the Roadside Assistance provider directly.
Stolen Vehicle Locator is a service that works in coordination with law
enforcement agencies to assist in the recovery of a stolen vehicle.
Remote Hybrid System Start/Stop uses your smartphone to heat up or cool
down your vehicle to the comfortable temperature it was when you left it.
Remote Door Lock/Unlock is used when you forget to lock your vehicle or if
you need to open it and do not have the keys. To use this feature, log into the
NissanConnect Services companion app or website or contact a NissanConnect
Services Response Specialist.
Assisted Search is a feature that allows you to verbally request
point-of-interest or destination data from a live operator
by touching the headset icon on the map screen.
Journey Planner allows you to send a route with a destination and up to ve
way points directly to the vehicle.
6
To view detailed instructional videos regarding these and other features,
please go to www.nissanownersinfo.mobi.
Page 9

Boundary Alert is a feature that allows you
to monitor the movement of your vehicle in
and out of specied regions you have set on
1
the Monitoring section of the NissanConnect
Services web portal or companion app.
Speed Alert sends you alerts when your
vehicle speed exceeds a threshold you
have set on the NissanConnect Services
web portal or companion app.
To access these features in your vehicle:
1. Press the APPS button
1
on the
control panel.
2
2. Touch the “NissanConnect Services” key
Please see your Owner’s Manual for important safety
information, system limitations, and additional operating and
feature information.
Please see your Navigation System Owner’s Manual for important safety information, system limitations
and additional operating information.
.
2
SiriusXM TRAVEL LINK AND SiriusXM TRAFFIC (if so equipped)
Your vehicle’s Navigation System is
equipped with SiriusXM Travel Link and
SiriusXM Trac capabilities.
SiriusXM Travel Link provides access to real-
time weather information and forecasts,
nearby fuel prices, movie listings, sports
scores and stock quotes.
SiriusXM Trac provides information that
may help to avoid delays due to trac
incidents. Trac jams, roadwork, road
closures around the current location, etc., are
represented graphically on the map by icons
depicting the nature of the event. Incidents
on the route are automatically displayed as
they are approached.
Please see your Owner’s Manual for important safety information, system limitations, and additional
operating and feature information.
For more information, refer to the “Navigation (section 4)” and the “General system
information (section 6)” of your Navigation System Owner’s Manual.
To view detailed instructional videos regarding these and other features,
please go to www.nissanownersinfo.mobi.
7
Page 10

ESSENTIAL INFORMATION
TIRE PRESSURE MONITORING SYSTEM (TPMS) WITH
EASY-FILL TIRE ALERT
A Tire Pressure Low - Add Air warning
message will appear in the vehicle
information display
pressure warning light
when one or more tires are low in pressure
and air is needed.
• The tire pressures should be checked when
the tires are cold. The tires are considered cold after the vehicle has been
parked for 3 hours or more or driven less than 1 mi (1.6 km) at moderate speeds.
When adding air to an under-inated tire, the TPMS with Easy-Fill Tire Alert
provides visual and audible signals outside the vehicle to help you inate the tire
to the recommended COLD tire pressure.
To use the Easy-Fill Tire Alert system:
1. Move the shif t lever to the P (PARK) position and apply the parking brake.
2. Place the ignition switch in the ON position. Do not start the hybrid system.
3. Add air to the under-inated tire, and within a few seconds, the hazard
warning lights will start ashing.
4. When the designated tire pressure is reached, the horn will beep once and the
hazard warning ashers will stop ashing.
5. Repeat this procedure for any additional under-inated tires.
After the tire pressures are adjusted, drive the vehicle at speeds above 16 mph
(25 km/h). The Tire Pressure Low - Add Air warning message and low tire
pressure warning light
In addition to the Tire Pressure Low - Add Air warning message, you can view
the individual tire’s pressure in the vehicle information display as well as the
recommended pressure, denoted by blue lettering, for each tire.
When the low tire pressure warning light 2 ashes for 1 minute and then
remains on, the TPMS is not functioning properly. Have the system checked. It is
recommended you visit a Nissan dealer for this service.
Tire pressure rises and falls depending on the heat caused by the vehicle’s
operation and the outside temperature. Low outside temperature can lower
the temperature of the air inside the tire, which can cause a lower tire ination
pressure. This may cause the low tire pressure warning light
the warning light illuminates, check the tire pressure in your tires.
• Check the tire pressure (including the spare tire) often and always prior to long
distance trips.
The Tire and Loading Information label contains valuable information. Please
refer to the “Technical and consumer information (section 10)” of your Owner’s
Manual for the location of the Tire and Loading Information label.
Please see your Owner’s Manual for important safety information, system limitations, and additional
operating and feature information.
For more information, refer to the “Instruments and controls (section 2)”, the “Starting and driving
(section 5)” and the “Do-it-yourself (section 8)” of your Owner’s Manual.
8
To view detailed instructional videos regarding these and other features,
1
and the low tire
2
will illuminate
2
will extinguish.
please go to www.nissanownersinfo.mobi.
Tire Pressure
Low - Add Air
1
2
2
to illuminate. If
Page 11

PUREDRIVE™ HYBRID SYSTEM WARNING LIGHT AND
HYBRID AWARENESS
PUREDRIVE™ HYBRID SYSTEM WARNING LIGHT
This light will illuminate when the ignition
switch is in the ON position and will
extinguish when the hybrid system is started.
The light will also illuminate when a
malfunction occurs in the electric motor or
hybrid system.
When this light illuminates while driving, immediately stop the vehicle in a safe
location and contact a Nissan dealer.
If the hybrid system warning light blinks while driving, it may indicate that the
Li-ion battery charge is low and you cannot continue to drive.
HYBRID AWARENESS
Your vehicle is virtually silent in the electric mode. If you exit your vehicle while it
is on but the hybrid system is not running, the hybrid system will automatically
start, informing you that the vehicle is still on.
Do not store your Nissan Intelligent Key® within the detection range of the
vehicle. This may cause welcome lights and other functions to activate, creating
unwanted battery drain.
The hybrid system is designed for optimum eciency and performance.
Activation of the electric mode may vary with driving conditions and driver
input. A full battery display does not indicate that the vehicle should be in the
electric mode.
Please see your Owner’s Manual for important safety information, system limitations, and additional
operating and feature information.
For more information, refer to the “HEV overview (section HEV)” and the “Instruments and controls
(section 2)” of your Owner’s Manual.
LOOSE FUEL CAP AND FUEL-FILLER DOOR
LOOSE FUEL CAP
A Loose Fuel Cap warning message
will appear in the vehicle information
display
1
when the fuel-ller cap is not
tightenedcorrectly.
To tighten, turn the cap clockwise until a
single click is heard.
The warning message will extinguish when
the vehicle detects the fuel-ller cap is properly tightened and the
located on the steering wheel, is pressed.
If the cap is not properly tightened, the Malfunction Indicator Light
may illuminate.
FUEL-FILLER DOOR
The fuel-ller door is located on the passenger’s side of the vehicle.
To view detailed instructional videos regarding these and other features,
please go to www.nissanownersinfo.mobi.
1
button,
9
Page 12

ESSENTIAL INFORMATION
To open the fuel-ller door, pull the
release lever
instrument panel to the left of the
2
located on the
,
steering wheel.
Please see your Owner’s Manual for important safety
information, system limitations, and additional
operating and feature information.
For more information, refer to the “Instruments and controls (section 2)” and the “Pre-driving checks
and adjustments (section 3)” of your Owner’s Manual.
2
TOWING YOUR VEHICLE
ALL-WHEEL DRIVE (AWD) VEHICLE (if so equipped)
An all-wheel drive vehicle must be towed with all wheels o the ground.
For proper towing and to avoid accidental damage to your vehicle, NISSAN
recommends that a service operator tow your vehicle after carefully reading the
Owner’s Manual precautions.
Please see your Owner’s Manual for important safety information, system limitations, and additional
operating and feature information.
For more information, refer to the “In case of emergency (section 6)” and the “Technical and consumer
information (section 10)” of your Owner’s Manual.
OUTSIDE TEMPERATURE DISPLAY
When the ignition switch is in the ON position,
the outside air temperature will appear in the
vehicle information display 1.
If the outside air temperature is below 24°F
(-4°C), the outside temperature display will
have snowake 2 blinking for 20 seconds
then remain illuminated with the ignition
switch in the ON position.
If the outside air temperature is between 26°F
and 37°F (-3°C and +3°C), the outside temperature display will have a snowake
2
blink continuously with the ignition switch in the ON position.
If the outside air temperature is 39°F (+4°C) the outside temperature
display with have a snowake 2 that will blink and then extinguish.
Please see your Owner’s Manual for important safety information, system limitations, and additional
operating and feature information.
For more information, refer to the “Instruments and controls (section 2)” of your Owner’s Manual.
2
1
10
To view detailed instructional videos regarding these and other features,
please go to www.nissanownersinfo.mobi.
Page 13

CLOCK SET/ADJUSTMENT
WITHOUT NAVIGATION (if so equipped)
Press the ENTER/SETTING button 1 to
show the “Settings” screen on the display.
Turn the TUNE/FOLDER knob 2 to navigate
the options.
Press the ENTER/SETTING button 1 to
select “Clock adjust”.
Press the ENTER/SETTING button 1 to
highlight the hours and minutes.
Turn the TUNE/FOLDER knob 2 to adjust the value.
Press the ENTER/SETTING button 1 again to set the value.
WITH NAVIGATION (if so equipped)
To adjust the time and the appearance of the clock on the display:
3
1. Press the
button
.
2. Select the “Settings” key.
3. Select the “System” key.
4. Select the “Clock” key.
The following settings can be adjusted:
• Time Format: The clock can be set to 12
hours or 24 hours.
• Date Format: The date can be changed to
one of ve dierent formats.
• Clock Mode: From here, the clock mode options are:
· Manual: Allows for the option “Set Clock Manually”. Select this to begin
setting the clock manually using the “+” or “–” to adjust the hours, minutes,
day and month up or down.
4
· Time Zone: Select the “Time Zone” key
to choose from the applicable time zone
list and/or select “Daylight Savings Time”
to switch between ON and OFF.
· Auto: Automatically sets the clock to the
vehicle’s current location.
Press the BACK button 5 to return to the previous screen.
Please see your Owner’s Manual for important safety information, system limitations, and additional
operating and feature information.
For more information, refer to the “Monitor, climate, audio, phone and voice recognition systems
(section 4)” of your Owner’s Manual.
4
1
3
5
2
To view detailed instructional videos regarding these and other features,
please go to www.nissanownersinfo.mobi.
11
Page 14

FIRST DRIVE FEATURES
NISSAN INTELLIGENT KEY® SYSTEM
The Nissan Intelligent Key® System allows you to lock or unlock the vehicle and open
your liftgate. It is important to make sure the Intelligent Key is with you (that is, in
your pocket or purse).
REMOTE HYBRID SYSTEM START* (if so equipped)
The remote start operating range is approximately 200 ft (60 m) from the
vehicle. The eective operating range may be shorter if there are walls, strong
radio wave sources near the operating location or other obstructions between
the key and the vehicle.
For the remote start to function, the vehicle must be in the P (PARK) position
with the ignition o and all doors must be closed and locked. Please see your
Owner’s Manual for additional information.
To start your vehicle remotely:
1. Press the
2. Within 5 seconds, press and hold the hybrid system start
button
The hybrid system will start, and the parking lights will turn on.
The automatic climate control system will begin heating
or cooling the vehicle depending on the outside (ambient)
temperature, cabin (in-car) temperature and the last user mode.
During this period, the climate control display and buttons will
be inoperable until the ignition switch is turned ON.
The hybrid system will run for 10 minutes and then turn o.
Repeat steps 1 and 2 to extend the time for an additional 10-minute period.
Remote start can only be activated for a maximum of 20 minutes.
• After two remote starts, the ignition switch must be cycled before the remote
start can be used again.
• To cancel the remote start, press the hybrid system start
To start driving, depress the brake pedal and press the ignition switch
START/STOP button.
LOCKING AND UNLOCKING THE VEHICLE
The operating range of the Intelligent Key is within 31.5 in (80 cm)
from each request switch.
To lock the vehicle, push either door
handle request switch
request switch
on the key fob.
To unlock the vehicle, perform one of the
following procedures:
• Push either door handle request switch
3
once and the corresponding door
will unlock. Push the request switch
again within 5 seconds; all other doors will
unlock, or
12
button 1 to lock all doors.
2
for at least 2 seconds.
3
4
To view detailed instructional videos regarding these and other features,
, push the liftgate
or press the button 1
3
please go to www.nissanownersinfo.mobi.
button 2.
4
2
1
5
6
7
3
Page 15

• Press the
the
button
button
5
on the key fob to unlock the driver’s side door. Press
5
again; all other doors will unlock.
LIFTGATE RELEASE
To open the liftgate, press the
To close the liftgate, press the
The Intelligent Key can also be used to activate the panic alarm by pressing and
holding the
alarm and headlights will stay on for a period of time.
button
for more than 1 second. Once activated, the panic
7
button
button
6
for longer than 1 second.
6
again for longer than 1 second.
INTELLIGENT KEY BATTERY DISCHARGE
If the battery of the Intelligent Key is discharged or environmental conditions
interfere with the Intelligent Key operation, start the hybrid system according to
the following procedure:
1. Move the shif t lever to the P (PARK) position.
2. Firmly apply the foot brake.
3. Touch the ignition switch with the Intelligent Key, and a chime will sound.
4. Within 10 seconds after the chime sounds, press the ignition switch
START/STOP button while depressing the brake pedal, and the hybrid
system will start.
* State laws may apply; review local laws before using.
Please see your Owner’s Manual for important safety information, system limitations, and additional
operating and feature information.
For more information, refer to the “Pre-driving checks and adjustments (section 3)” of your
Owner’s Manual.
POWER LIFTGATE (if so equipped)
When the liftgate is closed and locked, the
liftgate will open automatically by:
• Pushing the power liftgate switch
instrument panel.
• Pushing the liftgate opener switch
The liftgate must be unlocked, or you must
have the Intelligent Key with you (that is, in
your pocket or purse).
• Pressing the
Intelligent Key® for more than 1 second.
The power liftgate operation can be turned
button
3
on or o by the power liftgate on/o switch
4
on the instrument panel.
• When the power liftgate on/o switch
pushed to the OFF position, power operation
is not available using the power liftgate
5
switch
opener switch
on the liftgate or the liftgate
2
.
1
on the
2
.
on the Nissan
4
is
41
2
5
3
To view detailed instructional videos regarding these and other features,
please go to www.nissanownersinfo.mobi.
13
Page 16

FIRST DRIVE FEATURES
LIFTGATE POSITION SETTING (if so equipped)
The liftgate can be set to open to a specic height (Garage Mode) by performing
the following:
1. Open the lif tgate using the request switch or the Intelligent Key.
2. Pull the liftgate down and move it to the desired height position (the liftgate
will have some resistance when being manually adjusted).
5
3. Push and hold the power liftgate switch
than 3 seconds or until two beeps are heard.
The liftgate will open to the selected position setting. To change the position of
the liftgate, repeat steps 1 through 3 for setting the position of the liftgate.
MOTION-ACTIVATED LIFTGATE (if so equipped)
To operate the liftgate without the use
of the liftgate opener switch
Nissan Intelligent Key®, simply use a kicking
motion inside the active region
2
or the
6
, aiming
between the ground and rear bumper.
• For this feature to work, you must have the
Intelligent Key with you (that is, in your hand,
pocket, or purse).
Ensure your foot is o the ground and that you do not kick the underside of
your vehicle.
After 2 seconds, if you have performed the operation correctly, the vehicle will
beep three times and the liftgate will open.
Please see your Owner’s Manual for important safety information, system limitations, and additional
operating and feature information.
For more information, refer to the “Pre-driving checks and adjustments (section 3)” of your
Owner’s Manual.
located on the liftgate for more
6
2ND ROW SEATS
Lift the seatback release lever 1 to fold the
seatback forward.
Please see your Owner’s Manual for important safety
information, system limitations, and additional operating
and feature information.
For more information, refer to the “Safety — Seats, seat belts
and supplemental restraint system (section 1)” of your
Owner’s Manual.
14
To view detailed instructional videos regarding these and other features,
please go to www.nissanownersinfo.mobi.
1
Page 17

ALL-WHEEL DRIVE (AWD) LOCK SWITCH (if so equipped)
Rogue uses an intuitive AWD system.
The AWD Lock mode is intended only for low-speed such as during take o
LOCK MODE
AWD Lock mode is recommended when maximum torque is needed at the
rear wheels. Using AWD Lock mode makes it easy to take o when the vehicle
is stuck. Maximum AWD torque is sent to the rear wheels at any pedal position
during take o.
Push the AWD LOCK switch 1 to activate.
The AWD LOCK mode indicator light
1
illuminates on the instrument panel.
After take o, AWD LOCK mode returns to Auto
mode automatically depending on vehicle speed.
AUTO MODE
Intuitive AWD sends torque to the rear wheels as needed.
Please see your Owner’s Manual for important safety information, system limitations, and additional
operating and feature information.
For more information, refer to the “Instruments and controls (section 2)” and
the “Starting and driving (section 5)” of your Owner’s Manual.
TILT AND TELESCOPIC STEERING WHEEL ADJUSTMENTS
Release the lock lever by pulling it down.
Adjust the steering wheel forward or
backward by moving it to the desired position.
Adjust the steering wheel up or down to the
desired position.
Lock the steering wheel in place by pushing the
lock lever up rmly.
Please see your Owner’s Manual for important safety
information, system limitations, and additional operating and
feature information.
For more information, refer to the “Pre-driving checks and adjustments (section 3)” of your
Owner’s Manual.
ASSIST CHARGE GAUGE
This shows the power consumed 2 or
generated
Please see your Owner’s Manual for important safety
information, system limitations, and additional operating and
feature information.
For more information, refer to the “HEV Overview (section
HEV)” and the “Instruments and controls (section 2)” of your Owner’s Manual.
by the electric motor.
1
1 2
To view detailed instructional videos regarding these and other features,
please go to www.nissanownersinfo.mobi.
15
Page 18

FIRST DRIVE FEATURES
STARTING/STOPPING THE HYBRID SYSTEM
It is important to make sure the Nissan
Intelligent Key® is with you (that is, in your
pocket or purse).
Depress the brake pedal.
Press the ignition switch START/STOP
button to start the hybrid system.
TURNING THE HYBRID SYSTEM OFF
Move the shift lever to the P (PARK) position.
Press the ignition switch START/STOP button to turn the hybrid system o.
AUTO ACCESSORY
With the vehicle in the P (PARK) position, the Intelligent key with you (that is, in
your pocket or purse) and the ignition placed from ON to OFF, the radio can still
be used for a period of time or until the driver’s door is opened.
Please see your Owner’s Manual for important safety information, system limitations, and additional
operating and feature information.
For more information, refer to the “Starting and driving (section 5)” of your Owner’s Manual.
FRONT POWER SEAT ADJUSTMENTS
To slide the seat forward or backward, push the switch 1 forward or backward.
To recline the seatback, push the switch 2 forward or backward.
SEAT LIFTER (driver’s seat)
To raise or lower the front portion or height of
the seat, push the switch
LUMBAR SUPPORT (driver’s seat)
To adjust the seat lumbar support, push the
front or back end of the switch
Please see your Owner’s Manual for important safety information, system limitations, and additional
operating and feature information.
For more information, refer to the “Safety — Seats, seat belts and supplemental restraint system
(section 1)” of your Owner’s Manual.
1
up or down.
3
.
1
3
2
OUTSIDE MIRROR CONTROL SWITCH
Move the small switch 1 to select the right
or left side mirror.
Adjust each mirror to the desired position
using the large switch 2.
To prevent accidentally moving the mirror,
move the small switch 1 to the center
(neutral) position.
Please see your Owner’s Manual for important safety
information, system limitations, and additional operating and feature information.
For more information, refer to the “Pre-driving checks and adjustments (section 3)” of your
Owner’sManual.
16
To view detailed instructional videos regarding these and other features,
please go to www.nissanownersinfo.mobi.
2
1
Page 19
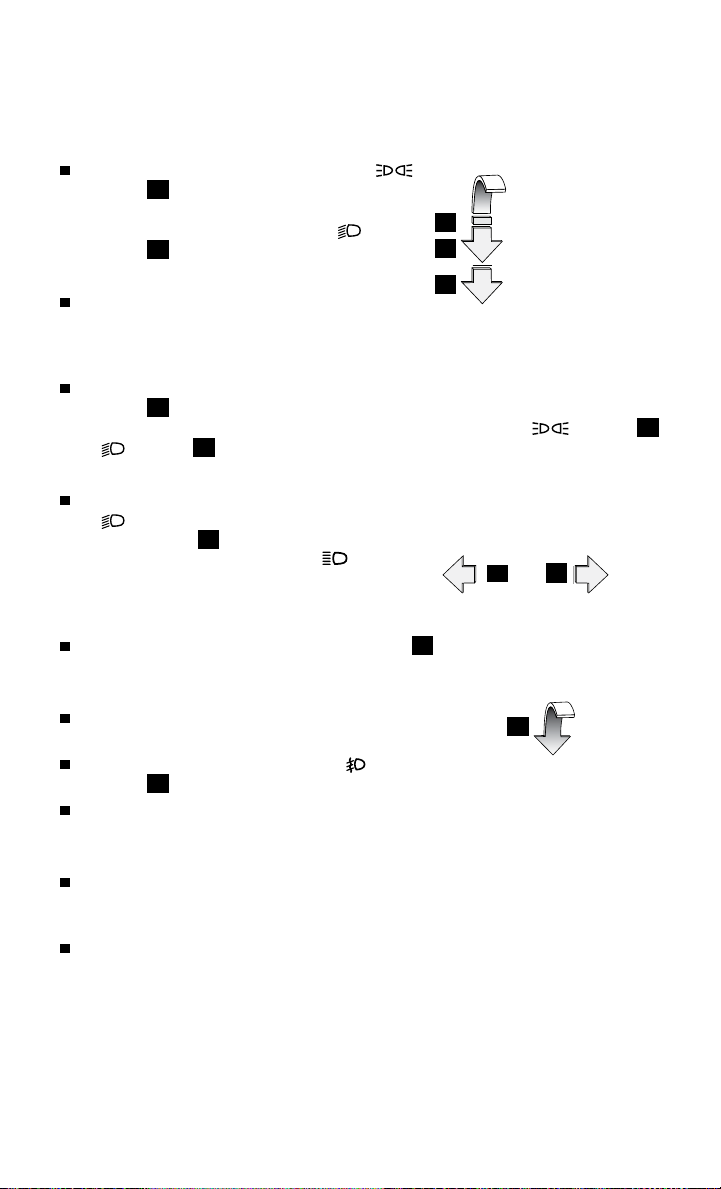
HEADLIGHT CONTROL SWITCH
HEADLIGHT CONTROL
Turn the headlight control switch to the
position 1 to turn on the front parking,
side marker, tail, license plate and instrument
panel lights. Turn the switch to the
2
position
to turn on the headlights.
AUTOLIGHT SYSTEM (if so equipped)
The autolight system will automatically turn
the headlights on when it is dark and o
when it is light. The system will keep the headlights on for a period of time after
you turn the ignition o and all doors are closed.
To activate the autolight system, turn the headlight control switch to the AUTO
position
3
then turn the ignition switch to ON. To deactivate the autolight
system, turn the headlight control switch to the OFF position,
or
position
2
.
HIGH BEAM SELECT
With the headlights ON (either in the AUTO
or
position), push the headlight control
switch forward
4
to select the high beam
function. The blue indicator light
illuminate in the instrument panel. Pull the
headlight switch back to the original position
to select the low beam. The blue indicator light will extinguish.
Pull and release the headlight control switch 5 to ash the headlight high
beams on and o.
FOG LIGHT SWITCH (if so equipped)
The headlights must be on and the low
beams selected for the fog lights to operate.
Turn the switch (inside collar) to the
position
Turn the switch (inside collar) to the OFF
6
to turn the fog lights on.
position to turn the fog lights o.
LANE CHANGE SIGNAL
Move the lever up or down until the turn signal begins to ash but the
lever does not latch to signal a lane change. Hold the lever until the lane
change is completed.
Move the lever up or down until the turn signal begins to ash but the lever
does not latch and release the lever. The turn signal will automatically ash
three times.
Choose the appropriate method to signal a lane change based on the road and
trac conditions.
Please see your Owner’s Manual for important safety information, system limitations, and additional
operating and feature information.
For more information, refer to the “Instruments and controls (section 2)” of your Owner’s Manual.
To view detailed instructional videos regarding these and other features,
please go to www.nissanownersinfo.mobi.
will
1
2
3
position
4
5
6
1
17
Page 20
FIRST DRIVE FEATURES
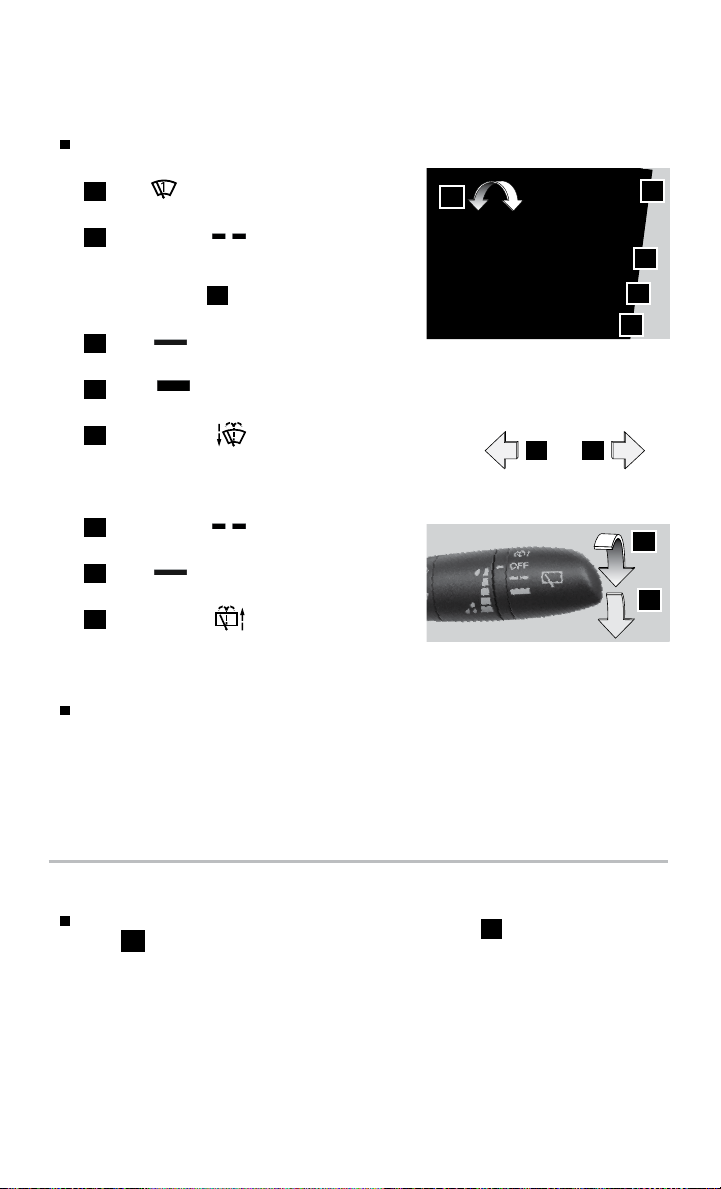
WIPER AND WASHER SWITCH
Move the lever to one of the following positions to operate the
windshield wipers:
Mist — One sweep operation of the
1
front wipers.
Intermittent
2
operate intermittently, and the speed
— Front wipers
3
can be adjusted by twisting the time
control ring
3
to increase or decrease
wiper speed.
Low — Front wipers operate at a
4
continuous low-speed.
High — Front wipers operate at a
5
continuous high-speed.
Front Washer
6
you to activate the front washer. The
— Pull the lever toward
6 9
front wipers will operate severaltimes.
REAR WIPER AND WASHER
Intermittent — Rear wiper operates
7
intermittently.
Low — Rear wiper operates at a
8
continuous low-speed.
Rear Washer
9
forward to activate the rear washer.
— Push the lever
The rear wiper will operate several times.
DRIP WIPER
Once the wiper spray cycle is nished, there will be a short delay. Then
the wipers will sweep one more time to clear o any remaining drips from
the windshield.
Please see your Owner’s Manual for important safety information, system limitations, and additional
operating and feature information.
For more information, refer to the “ Instrumen ts and control s (section 2)” and the “Do- it-yourself
(section 8)” of your Owner’s Manual.
MIST
LO
HI
OFF
INT
5
1
2
4
7
INT
8
ON
CENTER CONSOLE STORAGE BOX
To access the storage bin, pull up on the
lever
Please see your Owner’s Manual for important safety
information, system limitations, and additional operating and
feature information.
For more information, refer to the “Instruments and controls (section 2)” of your Owner’s Manual.
18
.
1
To view detailed instructional videos regarding these and other features,
please go to www.nissanownersinfo.mobi.
1
Page 21
1
4
5
6
2
3
8
9
10
7
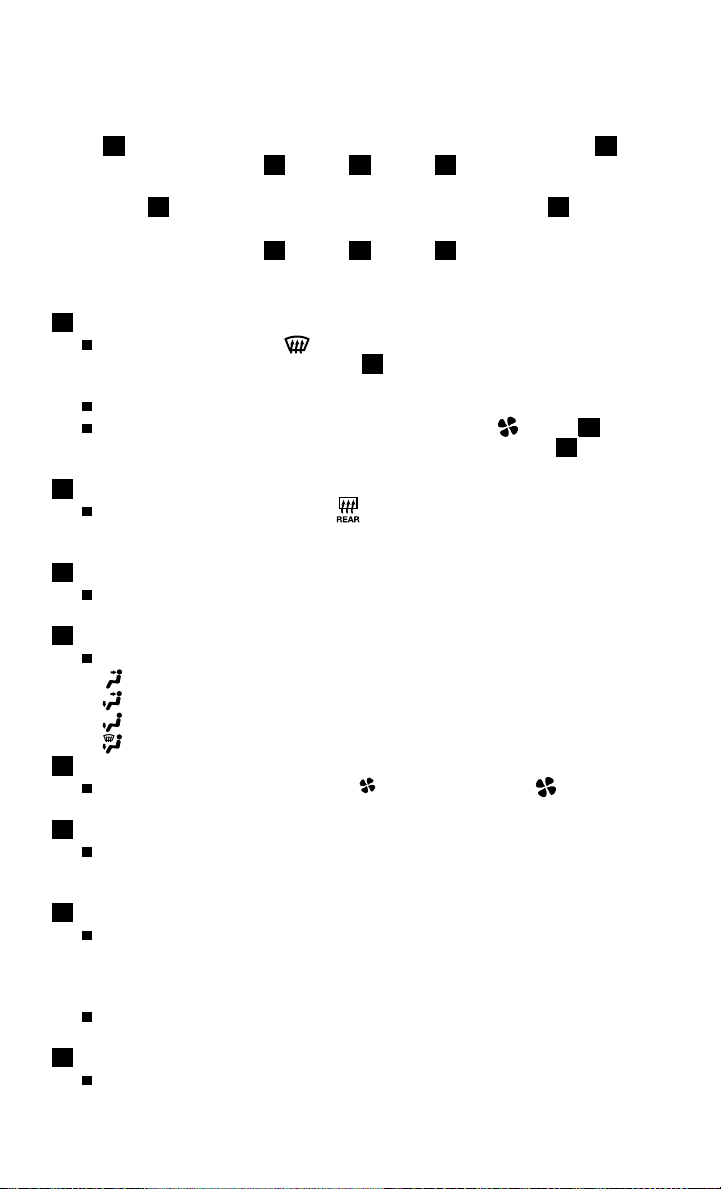
HEATER AND AIR CONDITIONER (automatic) (if so equipped)
1
DEFROSTING FRONT AND SIDE WINDOWS
Press the front defroster
the windows, press the A/C button
from the air.
Turn the temperature control dial left or right to set the desired temperature.
To set the front defroster on high, press the fan speed
the way up and turn the driver’s side temperature control dial
to the right.
2
DEFROSTING REAR WINDOW AND OUTSIDE MIRRORS (if so equipped)
Push the rear window defroster
turn the rear defroster o. This function automatically turns o after
approximately 15 minutes.
3
ON•OFF BUTTON/DRIVER’S SIDE TEMPERATURE CONTROL DIAL
Press the ON/OFF button to turn the climate controls on or o. Turn the
temperature control dial to the left for cooler air or the right for warmer air.
4
MODE BUTTON
Press the MODE button to cycle through the following air ow outlets:
5
Air ows from the center and side vents.
Air ows from the center, side and foot vents.
Air ows mainly from the foot vents.
Air ows from the front defroster and foot vents.
FAN SPEED CONTROL BUTTONS
Press the fan speed control button for low fan speeds or
fanspeeds.
6
A/C ON•OFF BUTTON
Press the A/C button to turn the air conditioner system on or o.
This system helps cool and dehumidify the air inside the cabin and defog
thewindows.
7
DUAL BUTTON/PASSENGER’S SIDE TEMPERATURE CONTROL DIAL
Press the DUAL button to turn the passenger’s side temperature controls
on or o. This will allow the passenger’s side temperature to be adjusted
independently from the driver’s side by turning the passenger’s side
temperature control dial.
Turn the passenger’s side temperature control dial left for cooler air or right
for warmer air.
8
AIR RECIRCULATION BUTTON
The air recirculation button is used to avoid outside odors.
FRONT button. If it is dicult to defrost
6
. This feature removes humidity
switch. Push the switch again to manually
button
5
all
3
all the way
for high
To view detailed instructional videos regarding these and other features,
please go to www.nissanownersinfo.mobi.
19
Page 22

FIRST DRIVE FEATURES
Press the air recirculation button
turn o.
The air recirculation mode cannot be activated when the climate control
system is in the front defroster mode
foot vent mode
9
AUTO BUTTON
Press the AUTO button to turn the system on, and the system will
automatically control the inside temperature (automatic cooling and/or
dehumidied heating), air ow distribution and fan speed.
10
FRESH AIR INTAKE BUTTON
Press the fresh air intake
compartment. The fresh air intake indicator light on the button will illuminate.
Please see your Owner’s Manual for important safety information, system limitations, and additional
operating and feature information.
For more information, refer to the “Instruments and controls (section 2)” and the “Monitor, climate,
audio, phone and voice recognition systems (section 4)” of your Owner’s Manual.
5
6
1 2
.
button to draw outside air into the passenger
4
once to turn on and press again to
FRONT or the front defroster and
3
FM/AM/SiriusXM® SATELLITE RADIO WITH CD PLAYER
(if so equipped)
1
POWER BUTTON/VOLUME CONTROL KNOB
Press the POWER button to turn the system on or o.
Turn the VOLUME control knob to the right or left to increase or decrease
thevolume.
2
ENTER|AUDIO BUTTON/TUNE•SCROLL KNOB
Press the ENTER|AUDIO button to go to the audio settings screen.
To manually tune the radio, turn the TUNE•SCROLL knob left or right.
3
SEEK BUTTONS
To tune and stop at the previous or next broadcast station, press the seek
buttons
For satellite radio to switch to the rst channel of the previous or next
category, press the seek buttons
To change tracks on a CD, press the seek buttons or .
To rewind or fast forward a track on a CD, press and hold the seek
buttons
20
or .
or .
or .
To view detailed instructional videos regarding these and other features,
please go to www.nissanownersinfo.mobi.
Page 23

4
STATION SELECT KEYS
Twelve stations can be set for the FM band, six for the AM band and 18 for
satellite radio.
To store a station in a preset, you must rst select a radio band by pressing
the FM•AM button
5
or SXM button 6 then tune to the desired FM, AM or
satellite radio station.
Next touch and hold the desired station select key (1-6) until a beep is heard
and the sound is briey muted. The channel indicator will appear on the
display and the sound will resume. Programing is now complete.
To retrieve a previously set station, select the radio band where the preset
was stored then touch the corresponding station select key (1-6).
Please see your Owner’s Manual for important safety information, system limitations, and additional
operating and feature information.
For more information, refer to the “Monitor, climate, audio, phone and voice recognition systems
(section 4)” of your Owner’s Manual.
POWER PANORAMIC MOONROOF (if so equipped)
To fully open or close the moonroof, push the switch to the OPEN position 1 or
the CLOSE position
To stop the moonroof, push the switch once more while it is opening or closing.
To tilt the moonroof open, press the tilt
button
3
. To close the moonroof, push the
switch to the CLOSE position
AUTO-REVERSE
When the auto-reverse function is activated, the
moonroof will automatically open or tilt up when
the control unit detects something caught in the
moonroof when the moonroof is closing or tilting down.
Please see your Owner’s Manual for important safety information, system limitations, and additional
operating and feature information.
For more information, refer to the “Instruments and controls (section 2)” of your Owner’s Manual.
2
and release it. The roof will automatically open or close.
2
.
1
3
2
To view detailed instructional videos regarding these and other features,
please go to www.nissanownersinfo.mobi.
21
Page 24

FIRST DRIVE FEATURES
USB (Universal Serial Bus) CONNECTION PORT/AUX JACK AND
iPOD® INTERFACE
The USB port/Aux jack 1 is located beneath
the climate controls and are illuminated for
better visibility when the headlight switch is
in the ON position.
When a compatible USB memory device,
iPod®
or auxiliary device is plugged into the
USB port/Aux jack, compatible audio les stored on the device can be played
through the vehicle’s audio system.
Please see your Owner’s Manual for important safety information, system limitations, and additional
operating and feature information.
For more information, refer to the “Monitor, climate, audio, phone and voice recognition systems
(section 4)” of your Owner’s Manual.
CRUISE CONTROL (if so equipped)
The cruise control system enables you to set
a constant cruising speed once the vehicle
has reached 25 mph (40 km/h). The system
will automatically maintain the set speed until
you tap the brake pedal, accelerate, cancel or
turn the system o.
To activate the cruise control, push the ON/
OFF switch
CRUISE indicator light in the instrument panel
will illuminate.
To set a cruising speed, accelerate the vehicle to the desired speed, push the
SET – switch
in the instrument panel will illuminate, and the set speed will display next to the
indicator light. Take your foot o the accelerator pedal. Your vehicle will maintain
the set speed.
To reset at a faster cruising speed, push and hold the RES + switch
steering wheel. When the vehicle attains the desired speed, release theswitch.
To reset at a slower cruising speed, push and hold the SET – switch2 on the
steering wheel. Release the switch when the vehicle slows to the desiredspeed.
To cancel the preset speed, tap the brake pedal or push the CANCEL switch
on the steering wheel.
To turn o cruise control, push the ON/OFF switch
Both the CRUISE indicator light and green circle indicator light in the instrument
panel will extinguish.
Please see your Owner’s Manual for important safety information, system limitations, and additional
operating and feature information.
For more information, refer to the “Starting and driving (section 5)” of your Owner’s Manual.
1
on the steering wheel. The
2
on the steering wheel and release. A green circle indicator light
1
3
2
1
3
1
on the steering wheel.
4
on the
4
22
To view detailed instructional videos regarding these and other features,
please go to www.nissanownersinfo.mobi.
Page 25
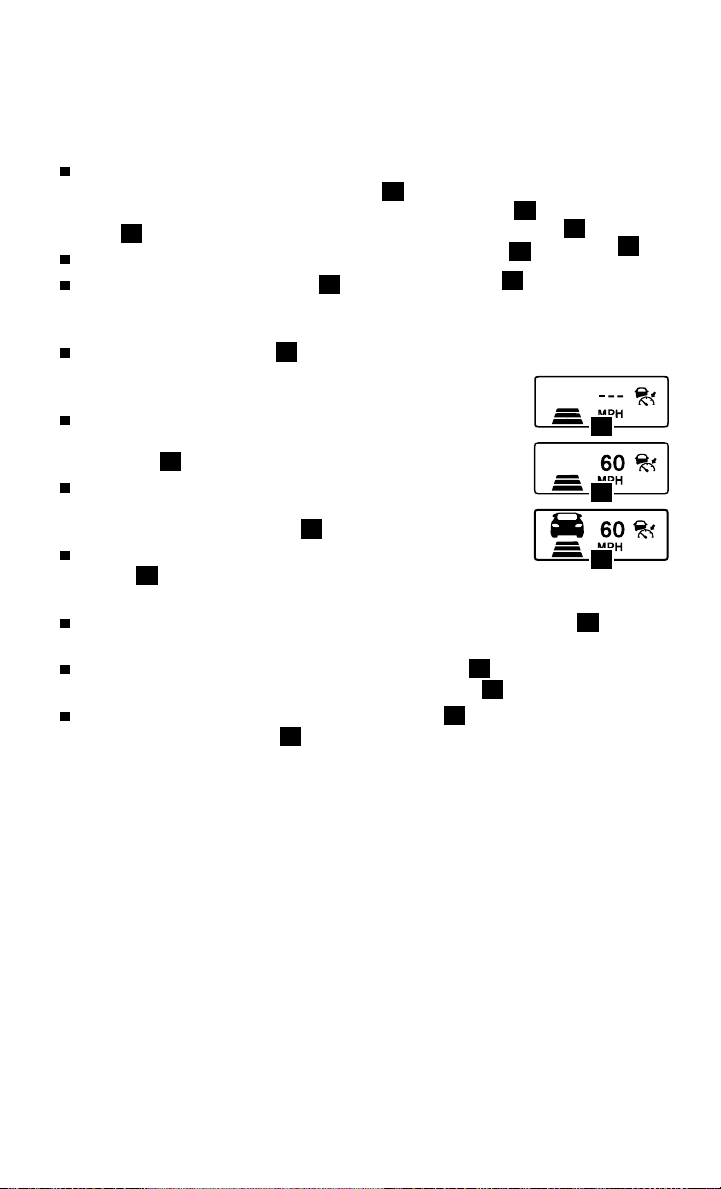
INTELLIGENT CRUISE CONTROL (ICC) (if so equipped)
VEHICLE-TO-VEHICLE DISTANCE CONTROL MODE
To set Vehicle-To-Vehicle Distance Control
on the
1
1
7
8
3
1
2
5
6
3
on the
8
on the steering wheel
on the steering wheel.
mode, press the CRUISE ON/OFF button
on the steering wheel. The CRUISE indicator
light 2 will illuminate.
Accelerate to the desired speed.
Push down on the SET/- switch
3
steering wheel and release it. ICC will be set
to the desired speed.
Press the distance button
wheel repeatedly to change the set distance
4
on the steering
between long, middle and short.
When a vehicle is not detected ahead of you in the lane,
the set distance and set vehicle speed indicator lights will
illuminate 5 in set mode.
When a vehicle is detected ahead of you in the lane, the
vehicle ahead detection, set distance and set vehicle speed
indicator lights will illuminate 6 in set mode.
To reset at a faster cruising speed, push and hold the RES/+
switch
the desired speed, release the switch.
To reset at a slower cruising speed, push and hold the SET/- switch
7
on the steering wheel. When the vehicle attains
steering wheel. Release the switch when the vehicle slows to the desired speed.
To cancel the preset speed, push the CANCEL switch
or tap the brake pedal. The set vehicle speed indicator 5 will extinguish.
To turn o ICC, press the CRUISE ON/OFF button
The CRUISE indicator light 2 in the instrument panel will extinguish.
Please see your Owner’s Manual for important safety information, system limitations, and additional
operating and feature information.
For more information, refer to the “Starting and driving (section 5)” of your Owner’s Manual.
4
To view detailed instructional videos regarding these and other features,
please go to www.nissanownersinfo.mobi.
23
Page 26

SYSTEM GUIDE
VEHICLE INFORMATION DISPLAY
The vehicle information display 1 displays items such as:
Vehicle settings
Trip computer information
Drive system warnings and settings
Audio information
Nissan Intelligent Key® operation information
(if so equipped)
Navigation turn-by-turn (if so equipped)
Chassis control
Cruise control system information
Indicators and warnings
Tire pressure information
USING THE VEHICLE INFORMATION DISPLAY
The vehicle information display can be changed
using the OK button
located on the steering wheel.
3
Press the OK button 2 on the steering
wheel to change the display mode.
Press the buttons 3 on the steering wheel
up or down to navigate through the vehicle information display menu.
Press the OK button 2 on the steering wheel to change or select an item.
Press the button 4 on the steering wheel to go back to the previous menu.
START-UP DISPLAY
When the ignition switch is in the ON position, the vehicle information display will
support four of the following modes:
Active system status (if so equipped)
Fuel economy
Trip computer
RESETTING THE TRIP COMPUTER
1. Press the
computer mode.
2. Press the OK button
3. Select one of the following items:
“Cancel” - returns to the previous screen
without resetting the trip computer.
“Distance”- resets the current trip computer
distance and time of the selected trip computer.
“All” - resets all linked values for the selected drive computer. This includes
distance and time, average fuel economy and average speed information for the
selected drive computer.
24
To view detailed instructional videos regarding these and other features,
2
and the
button 3 on the steering wheel until you reach the trip
2
please go to www.nissanownersinfo.mobi.
or buttons
.
Warnings (if there are any)
Tire pressure information
1
2
3
4
5
Page 27

SETTINGS
The setting mode allows you to change the information displayed in the vehicle
information display:
Driver Assistance Tire Pressures Meter Settings Unit
Vehicle Settings Language Maintenance Factory Reset
Alerts
Please see your Owner’s Manual for important safety information, system limitations, and additional
operating and feature information.
For more information, refer to the “Instruments and controls (section 2)” of your Owner’s Manual.
NISSANCONNECTSM MOBILE APPS (if so equipped)
Your vehicle may be equipped with NissanConnect
to control various compatible smartphone applications through the vehicle’s
display screen. A basic package is included for a period of time from the original
in-service date of the vehicle.
To enroll in NissanConnect
SM
Mobile Apps:
1. Create a Nissan Owner Portal account at owners.nissanusa.com.
· Make sure to include your vehicle’s VIN when creating your account.
2. Under the NissanConnect Mobile Apps tab, select the red button next to
Manage Subscription to enroll.
SM
3. Next, download the NissanConnect
Mobile Apps companion app from
Google Play or the Apple App Store. Log into the companion app using your
Nissan Owner Portal ID and password.
4. Launch the app, select “United States”, and accept the Terms and Conditions.
5. Select “Sign In”, then sign in with the email username and password you
created when registering on the Nissan Owner Portal website.
Pair your cellular phone to the vehicle.
· For Android® devices, the smartphone must be connected through the
Bluetooth® Hands-free Phone system.
· For iPhone® on vehicles WITH Navigation, the device must be connected to the
vehicle’s USB port using your cellular phone’s USB cable.
· For iPhone® on vehicles WITHOUT Navigation, connect the device using the
Bluetooth® Hands-free Phone system.
You can select which apps you want activated in the vehicle from the
NissanConnect
SM
Mobile Apps companion app by selecting “Manage My Apps”.
Some apps shown in the companion app may not appear in your vehicle
depending on availability for your model.
Some applications require you to have the app downloaded and installed
on your cellular phone, while others require you to enter your username and
password to log in. Not all apps shown on the NissanConnect app site are
available on all models.
To help identify specic app available for your vehicle or to contact a specialist
via chat, please visit www.NissanUSA.com/connect/support.
SM
Mobile Apps, allowing you
To view detailed instructional videos regarding these and other features,
please go to www.nissanownersinfo.mobi.
25
Page 28

SYSTEM GUIDE
Your available apps will only appear on the screen when your smartphone
is connected to both the vehicle and the Internet. For additional information
on connecting your device, see your Owner’s Manual or visit
www.NissanUSA.com/bluetooth.
The NissanConnect
on your device and the connected icon 1
must be green before using your apps. If the
disconnected icon 2 is displayed, press the
APPS button
the connection is established.
To access your apps with the vehicle controls,
start your vehicle and then press the
button 3 on the control panel. The system
may take a few seconds to boot up before
the NissanConnect
enabled. This is normal.
If available, your apps can be accessed once the vehicle and cellular phone are
connected through the NissanConnectSM Mobile Apps companion app.
Please see your Owner’s Manual for important safety information, system limitations, and additional
operating and feature information.
For more information, refer to the “Monitor, climate, audio, phone and voice recognition systems
(section 4)” of your Owner’s Manual.
HANDS-FREE TEXT MESSAGING ASSISTANT* (if so equipped)
This system allows for sending and receiving
text messages through the vehicle’s interface.
Using predened or custom messages, send
a text to an entry stored in your Bluetooth®
Hands-free Phone System.
Once enabled, the text message, sender and
delivery time are shown on the control panel
display when the vehicle speed is less than
5 mph (8 km/h).
Text messages have the option of being read aloud at all vehicle speeds.
Many cellular phones may require special permission to enable text
messaging. Check the cellular phone’s screen during Bluetooth® pairing.
For some cellular phones, you may need to enable “Notications” in
the cellular phone’s Bluetooth® menu for text messages to appear
on the touch-screen display. For more detailed information and
instructions, refer to your cellular phone’s Owner’s Manual.
SM
app must be running
3
multiple times to ensure
APPS button
3
1
2
APPS
3
is
26
To view detailed instructional videos regarding these and other features,
please go to www.nissanownersinfo.mobi.
Page 29

Text message integration requires that the cellular phone support
Message Access Prole (MAP) for both receiving and sending text
messages. Some cellular phones may not support all text messaging
features. Please see www.NissanUSA.com/bluetooth for compatibility
information as well as your device’s Owner’s Manual.
* Laws in some jurisdictions may restrict the use of “Text-to-Speech”. Some of the applications and
features, such as social networking and texting, may also be restricted. Check local regulations for any
requirements before using these features.
Please see your Owner’s Manual for important safety information, system limitations, and additional
operating and feature information.
For more information, refer to the “Monitor, climate, audio, phone and voice recognition systems
(section 4)” of your Owner’s Manual.
BLUETOOTH® HANDS-FREE PHONE SYSTEM*
A cellular telephone should not be used
while driving so full attention may be given to
vehicle operation.
SYSTEM OPERATING TIPS
Press the
interrupt the voice prompts at any time and
speak a command after the tone.
To use the system faster, you may speak the
second level commands with the main menu
command on the main menu. For example,
press the
and after the tone, say “Call Michael Smith”.
The “Help” command can be used to hear a
list of available commands at any time.
Reduce background noise as much as
possible by closing windows and pointing
HVAC vents away from the ceiling.
Speak naturally without long pauses and without raising your voice.
To cancel a Nissan Voice Recognition session, say “Quit” or press and hold the
button on the steering wheel.
To decrease or increase the volume of the voice prompts, push the volume
control switches
on the audio system while the system is responding.
Voice commands can be used to operate various Bluetooth® system features
using the Nissan Voice Recognition system. See your Owner’s Manual for
detailed information.
For more detailed information and instructions, refer to your cellular phone’s
Owner’s Manual and visit www.NissanUSA.com/bluetooth.
* Some jurisdictions prohibit the use of cellular telephones while driving.
Please see your Owner’s Manual for important safety information, system limitations, and additional
operating and feature information.
For more information, refer to the “Monitor, climate, audio, phone and voice recognition systems
(section 4)” of your Owner’s Manual.
button on the steering wheel to
button on the steering wheel,
on the steering wheel or turn the VOLUME control knob
or
To view detailed instructional videos regarding these and other features,
please go to www.nissanownersinfo.mobi.
27
Page 30

SYSTEM GUIDE
BLUETOOTH® SYSTEM WITHOUT NAVIGATION* (if so equipped)
PAIRING PROCEDURE
1. Press the
available commands.
2. Say: “Add Phone”. The system acknowledges the command and asks you to
initiate connecting from the cellular phone handset.
• A cellular phone can also be added at any time by selecting
“Settings” > “Bluetooth” > “Add Phone”.
3. Initiate pairing from the cellular phone.
• The connecting procedure varies according to each cellular phone model.
For detailed connecting instructions and a list of compatible cellular phones,
please visit www.NissanUSA.com/bluetooth.
• When prompted, compare the PIN on the display with the PIN shown on the
handset. If your device does not support Secure Simple Pairing and requests
you to input a PIN, enter “1234” from the handset.
PHONEBOOK REGISTRATION
When the cellular phone is connected to the in-vehicle module, the data stored
in the cellular phone, such as phonebook, outgoing call logs, incoming call logs
and missed call logs, is automatically transferred and registered to the system.
The availability of this function depends on each cellular phone. The copying
procedure also varies according to each cellular phone. See your cellular phone’s
Owner’s Manual for more information.
Up to 1,000 entries per registered cellular phone can be stored in
thephonebook.
MAKING A CALL
1. Press the
2. Say: “Call”. The system acknowledges the command and announces the next set
of available commands.
3. Say the registered person’s name. The system acknowledges the command and
announces the next set of available commands.
4. Say: “Yes”. The system acknowledges the command and makes the call.
RECEIVING/ENDING A CALL
To accept the call, press the
To reject the call, press the button on the steering wheel.
To hang up, press the button on the steering wheel.
* Some jurisdictions prohibit the use of cellular telephones while driving.
Please see your Owner’s Manual for important safety information, system limitations, and additional
operating and feature information.
For more information, refer to the “Monitor, climate, audio, phone and voice recognition systems
(section 4)” of your Owner’s Manual.
button on the steering wheel. The system announces the
button on the steering wheel. A tone will sound.
button on the steering wheel.
28
To view detailed instructional videos regarding these and other features,
please go to www.nissanownersinfo.mobi.
Page 31

BLUETOOTH® SYSTEM WITH NAVIGATION* (if so equipped)
Send predened or custom text messages through your vehicle’s
Bluetooth®system.
Receive texts through your vehicle’s Bluetooth® system that can be read to you.
Bluetooth® Streaming Audio allows you to use a compatible Bluetooth® device
to play audio les. Once your compatible device is connected to the vehicle’s
audio system, the audio les will play through the vehicle’s speakers.
CONNECTING PROCEDURE
1. Press the
control panel.
2. Select the “Settings” key
3. Select the “Phone & Bluetooth” key
4. Select the “Connect New Device” key
5. Initiate the connecting process from the
handset. The system will display the message:
“Is PIN XXXXXX displayed on your
Bluetooth device?”
If the PIN is displayed on your Bluetooth®
device, select “Yes” to complete the
connecting process.
button on the
1
.
2
.
3
.
2
1
3
VEHICLE PHONEBOOK
To access the vehicle phonebook:
1. Press the
2. Select the “Phonebook” key
button on the control panel.
4
.
3. Choose the desired entry from the
5
4
displayed list.
MAKING A CALL
1. Press the
button on the control panel. The
“PHONE” screen 5 will appear on the display.
2. Select one of the following options to make a call:
“Phonebook”: Select the name from an entry stored in the vehicle phonebook.
“Call Lists”: Select the name from the incoming, outgoing or missed
callhistory.
“Redial”: Dial the last outgoing call from the vehicle.
: Input the phone number manually using the keypad displayed on
thescreen.
To view detailed instructional videos regarding these and other features,
please go to www.nissanownersinfo.mobi.
29
Page 32

SYSTEM GUIDE
RECEIVING/ENDING A CALL
To accept the incoming call, either:
• Press the
wheel, or
• Select the
To reject the incoming call, either:
• Press the
wheel, or
• Select the
To end a call, either:
• Press the
• Select the
* Some jurisdictions prohibit the use of cellular telephones while driving.
Please see your Owner’s Manual for important safety information, system limitations, and additional
operating and feature information.
For more information, refer to the “Monitor, climate, audio, phone and voice recognition systems
(section 4)” of your Owner’s Manual.
button on the steering
icon on the screen.
button on the steering
icon on the screen.
button on the steering wheel, or
icon on the screen.
30
To view detailed instructional videos regarding these and other features,
please go to www.nissanownersinfo.mobi.
Page 33

11
1
2
10 8
4
5
3 9
NAVIGATION SYSTEM (if so equipped)
Your Navigation System can calculate a route from your current location to
a preferred destination. The real-time map display and turn-by-turn voice
guidance will lead you along the route.
The Navigation System will continually update your vehicle’s position. If you
have deviated from the original route, it will recalculate the route from your
current location.
To help promote safe driving, some functions cannot be operated or have
limited operation when the vehicle speed is above 5 mph (8 km/h). The
on-screen text and keys for these restricted functions will be grayed-out or
muted and cannot be selected while driving. These functions will become
available again when the vehicle speed is reduced to 5 mph (8 km/h). Voice
commands may be available for some of the restricted functions. For more
information, refer to the “Monitor, climate, audio, phone and voice recognition
systems (section 4)” of your Owner’s Manual.
1
NAV button – Press to access the functions of the Navigation System.
2
MAP button – Press to display the current location map screen.
3
VOLUME control knob – Turn right to increase the volume or left to decrease
the volume.
4
key – Touch to zoom the map in.
5
key – Touch to zoom the map out.
6
Voice Commands and Settings.
7
modes. While the mode is being displayed, the brightness can be adjusted using
the TUNE/SCROLL knob. Press and hold to turn the display o. Press again to
turn the display on.
8
9
TUNE/SCROLL knob – Turn to scroll through the items in a list. Press to select a
menu item.
10
Touch-screen display
11
SD-card location – An SD-card with map data must be inserted here for map
functions to operate.
Please see your Owner’s Manual for important safety information, system limitations, and additional
operating and feature information.
For more information, refer to your Navigation System Owner’s Manual.
button – Press to access SiriusXM Trac, MyApps, SiriusXM Travel Link,
button – Press to change the display brightness between day and night
BACK button – Press to return to the previous screen.
To view detailed instructional videos regarding these and other features,
please go to www.nissanownersinfo.mobi.
6
7
31
Page 34

MEMO
Page 35

MEMO
Page 36
Helpful Resources
Below is a list of helpful resources that can
be used to learn more about the vehicle’s
systems and feature operations.
Vehicle Owner’s Manual
Navigation Owner’s Manual (if so equipped)
Printed Quick Reference Guide (this document)
www.NissanUSA.com/bluetooth
www.NissanUSA.com/connect
www.youtube.com/user/NissanUSA
Nissan Consumer Aairs: 1-800-647-7261
Electronic Quick Reference Guide
(Use Quick Response (QR) code or URL below.)
Nissan Quick Guide (available in the iPhone App
Store or Android Google Play Store for download to
your smartphone)
To view detailed instructional videos,
go to www.nissanownersinfo.mobi/2017/rogue
or snap this barcode with an appropriate barcode reader.
This Quick Reference Guide is intended to provide an overview of some of the unique features of your new
vehicle. Please see your Owner’s Manual for important safety information and system operation limitations.
Features and equipment in your vehicle may vary depending on model, trim level, options selected, order, date
of production, region or availability. Therefore, you may nd information about features or equipment that are
not included or installed on your vehicle.
All information, specications and illustrations in this Quick Reference Guide are those in eect at the time
of printing. NISSAN reserves the right to change specications, performance, design or component suppliers
without notice and without obligation. From time to time, NISSAN may update or revise this Quick Reference
Guide to provide owners with the most accurate information currently available. Please carefully read and
retain with this Quick Reference Guide all revision updates sent to you by NISSAN to ensure you have access
to accurate and up-to-date information regarding your vehicle. Current versions of vehicle Quick Reference
Guides, Owner’s Manuals and any updates can also be found in the Owner section of the NISSAN website at
https://owners.nissanusa.com/nowners/navigation/manualsGuide. If you have questions concerning
any information in your Owner’s Manual, contact NISSAN Consumer Aairs. See the NISSAN CUSTOMER CARE
PROGRAM page in the Owner’s Manual for contact information.
Nissan, the Nissan Brand Symbol, Z and
Nissan model names are Nissan trademarks.
© 2017 Nissan North America, Inc.
QR17E A HT32U1
Printing: March 2017 (02)
 Loading...