

Page 1
2020 PATHFINDER
OWNER’S MANUAL
and MAINTENANCE INFORMATION
For your safety, read carefully and keep in this vehicle.
Page 2

OWNER’S MANUAL SUPPLEMENT
The information containedwithinthissupplementrevisesoraddstothe“Tire Pressure” section of
the “WHEELS AND TIRES” section in the “Do-it-yourself” section in the 2020 NISSAN PATHFINDER
Owner’s Manual.
Read carefully and keep in the vehicle.
Printing: March 2020
Publication No. SU20EA 0R52U0
Page 3

WHEELS AND TIRES
If you have a flat tire, refer to “Flat tire” in
the “In case of emergency” section of
this manual.
TIRE PRESSURE
Tire Pressure Monitoring System
(TPMS)
WARNING
Radio waves could aversely effect electric medical equipment.
Those who use a pacemaker
should contact the electric medical equipment manufacturer for
the possible influences before
use.
This vehicle is equipped with the Tire
Pressure Monitoring System (TPMS).
It monitors tire pressure of all tires
except the spare. When the low tire
pressure warning light is lit and the
“Tire Pressure Low - Add Air” warning
appears in the vehicle information
display, one or more of your tires is
significantly under-inflated. If
equipped, the system also displays
pressure of all tires (except the spare
tire) on the display screen by sending a signal from a sensor that is
installed in each wheel.
The TPMS will activate only when the
vehicle is driven at speeds above 16
mph (25 km/h). Also, this system
may not detect a sudden drop in tire
pressure (for example a flat tirewhile
driving).
For additional information, refer to
“Low tire pressure warning light” in
the “Instruments and controls” section, “Tire Pressure Monitoring System (TPMS)” in the “Starting and driving” section and “Flat tire” in the “In
case of emergency” section of this
manual.
Tire inflation pressure
Check the tire pressures (including
the spare) often and always prior to
long distance trips. The recommended tire pressure specifications
are shown on the F.M.V.S.S./C.M.V.S.S.
certification label or the Tire and
Loading Information label under the
“Cold TirePressure” heading. TheTire
and Loading Information label is affixed to the driver side center pillar.
Tire pressures should be checked
regularly because:
• Most tires naturally lose air over
time.
• Tires can lose air suddenly when
driven over potholes or other objects or if the vehicle strikes a curb
while parking.
Page 4
The tire pressures should be
checked when the tires are cold.The
tires are considered COLD after the
vehicle has been parked for 3 or
more hours,or driven lessthan 1 mile
(1.6 km) at moderate speeds.
The TPMS with Easy-Fill Tire Alert
provides visual and audible signals
outside the vehicle for inflating tires
to the recommended COLD tire
pressure. For additional information,
refer to “TPMS with Easy-Fill Tire
Alert” in the “Starting and driving”
section of this manual.
Incorrect tire pressure, including
under inflation, may adversely affect tire life and vehicle handling.
WARNING
• Improperly inflated tires can
fail suddenly and cause an
accident.
• The Gross Vehicle Weight Rat-
ing (GVWR) is located on the
F.M.V.S.S./C.M.V.S.S. certification label. The vehicle weight
capacity isindicated on theTire
and Loading Information label.
Do not load your vehicle beyond this capacity. Overloading your vehicle may result in
reducedtire life, unsafeoperating conditions due to premature tire failure, or unfavorable
handling characteristics and
could also lead to a serious accident. Loading beyond the
specified capacity may also result in failure of other vehicle
components.
• Before taking a long trip, or
whenever you heavily load
your vehicle, use a tire pressure
gauge to ensure that the tire
pressures are at the specified
level.
• For additional information re-
garding tires, refer to “Important Tire Safety Information”
(US) or “Tire Safety Information” (Canada) in the Warranty
Information Booklet.
Page 5
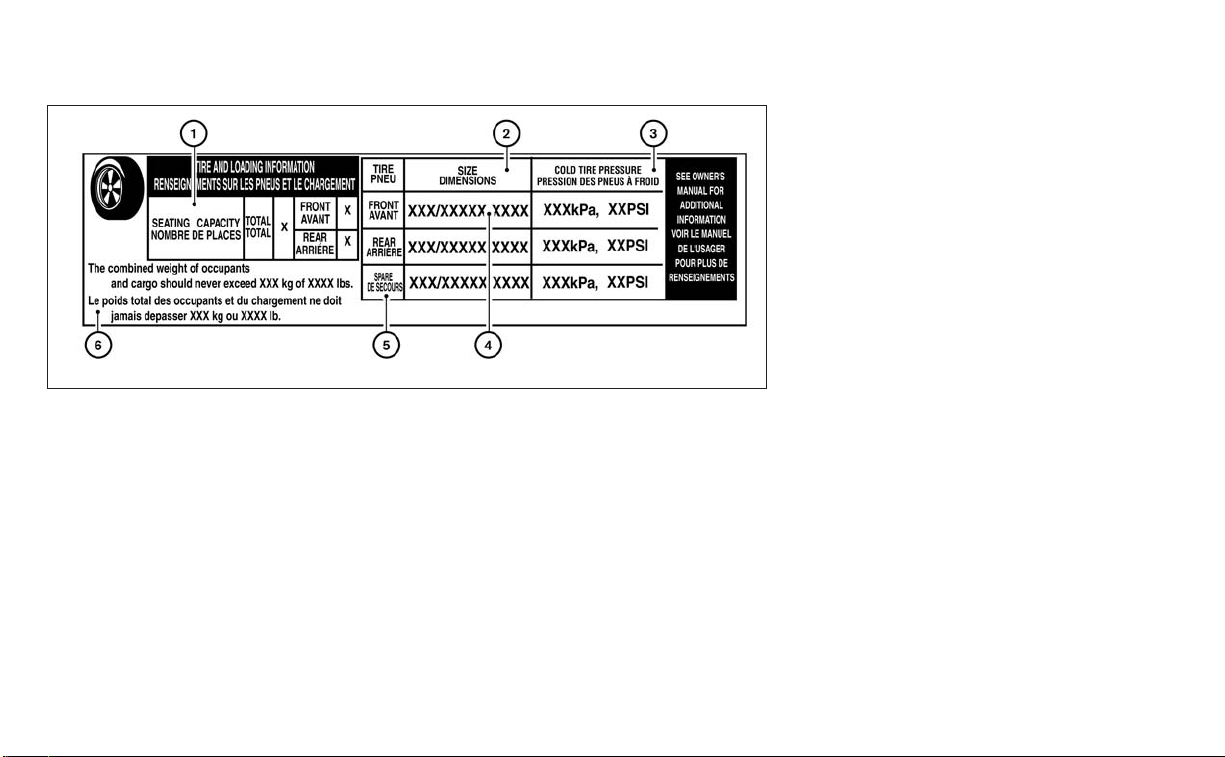
Tire and Loading Information
label
1
Seating capacity: The maximum
䊊
number of occupants that can
be seated in the vehicle.
2
Original tire size: The size of the
䊊
tires originallyinstalled on the vehicle at the factory.
3
Cold tirepressure: Inflatethe tires
䊊
to this pressure when the tires
are cold. Tires are considered
COLD after the vehicle has been
parked for 3 or more hours, or
driven less than 1 mile (1.6 km) at
moderate speeds. The recommended cold tire inflation is set
by the manufacturer to provide
the best balance of tire wear, vehicle handling, driveability, tire
noise, etc., up to the vehicle's
GVWR.
4
Tire size - refer to “Tire labeling” in
䊊
this section.
LDI2737
5
Spare tire size.
䊊
6
Vehicle load limit: Refer to “Ve-
䊊
hicle loading information” in the
“Technical and consumer information” section of this manual.
Page 6
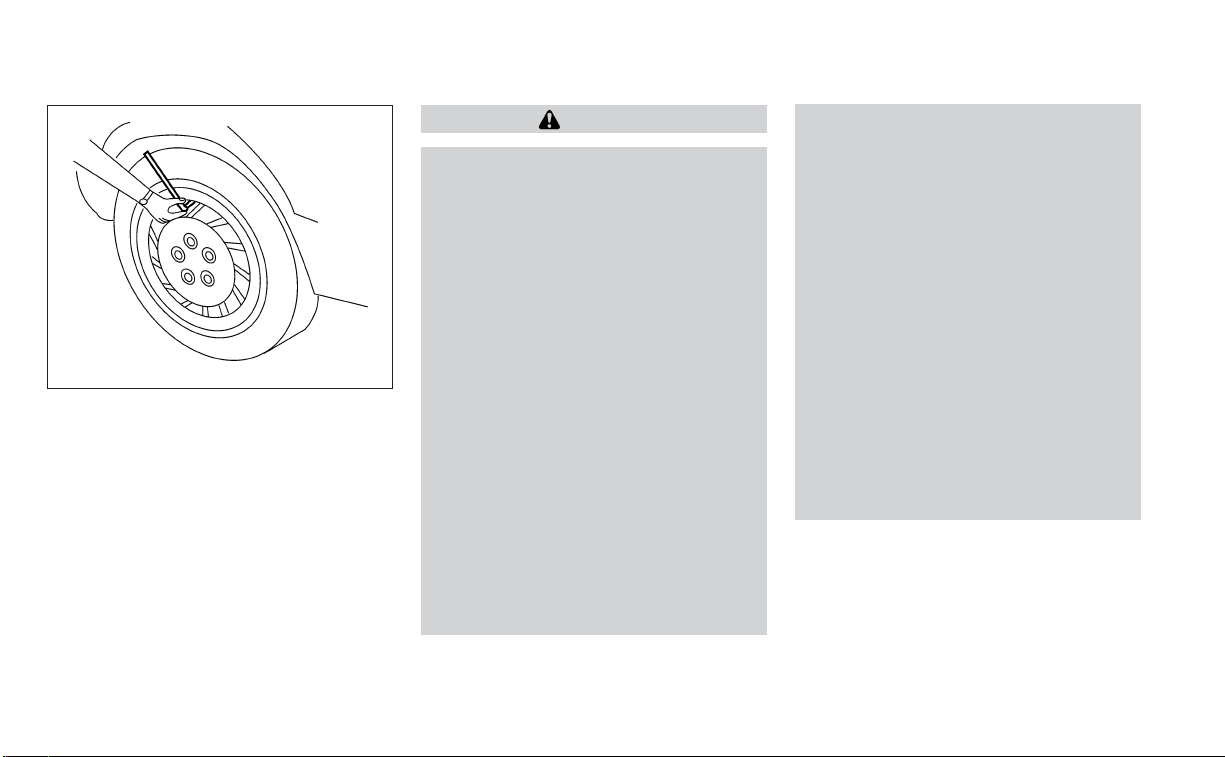
Checking tire pressure
LDI0393
WARNING
• Driving at high speeds, 100
mph (160 km/h) or higher sustained where it is legal to do so,
can cause tires to have excessive heat build up, which may
result in a tire failure causing
loss of control, crash, injuries or
even death. Some high-speed
rated tires require inflation
pressure adjustment for highspeed operation. When speed
limits and road conditions allow vehicle driving at high
speeds, make sure tires are
rated to support high speed
operation, tires are in optimal
conditions and pressure is adjusted to correct cold inflation
pressure for high speed
operation.
• If your vehicle is equipped with
P235/55R20 tire sizes, tires require adjustment to the inflation pressure when driving the
vehicle at speeds of 100 mph
(160 km/h) or higher where it is
legal to do so. See recommended tire inflation chart for
correct operating pressure.
• After vehiclehigh speed opera-
tion has ended, readjust the
tire pressure to the recommended cold inflation pressure. For additional information please refer to the
"Checking tire pressure" section of this manual.
1. Remove the valve stem cap from
the tire.
Page 7
2. Press the pressure gauge
squarely onto the valve stem. Do
not press too hard or force the
valve stem sideways, or air will escape. If the hissing sound of air
escaping from the tire is heard
while checking the pressure, reposition the gauge to eliminate
this leakage.
3. Remove the gauge.
4. Read the tire pressure on the
gauge stem and compare to the
specification shown on the Tire
and Loading Information label.
5. Add air to the tire as needed. If too
much air is added, press the core
of the valve stem briefly with the
tip of the gauge stem to release
pressure. Recheck the pressure
and add or release air as needed.
6. Install the valve stem cap.
7. Check the pressure of all other
tires, including the spare.
8. Check the pressure when driving
the vehicle at speeds of 100 mph
(160 km/h) or higher where it is
legal to do so.
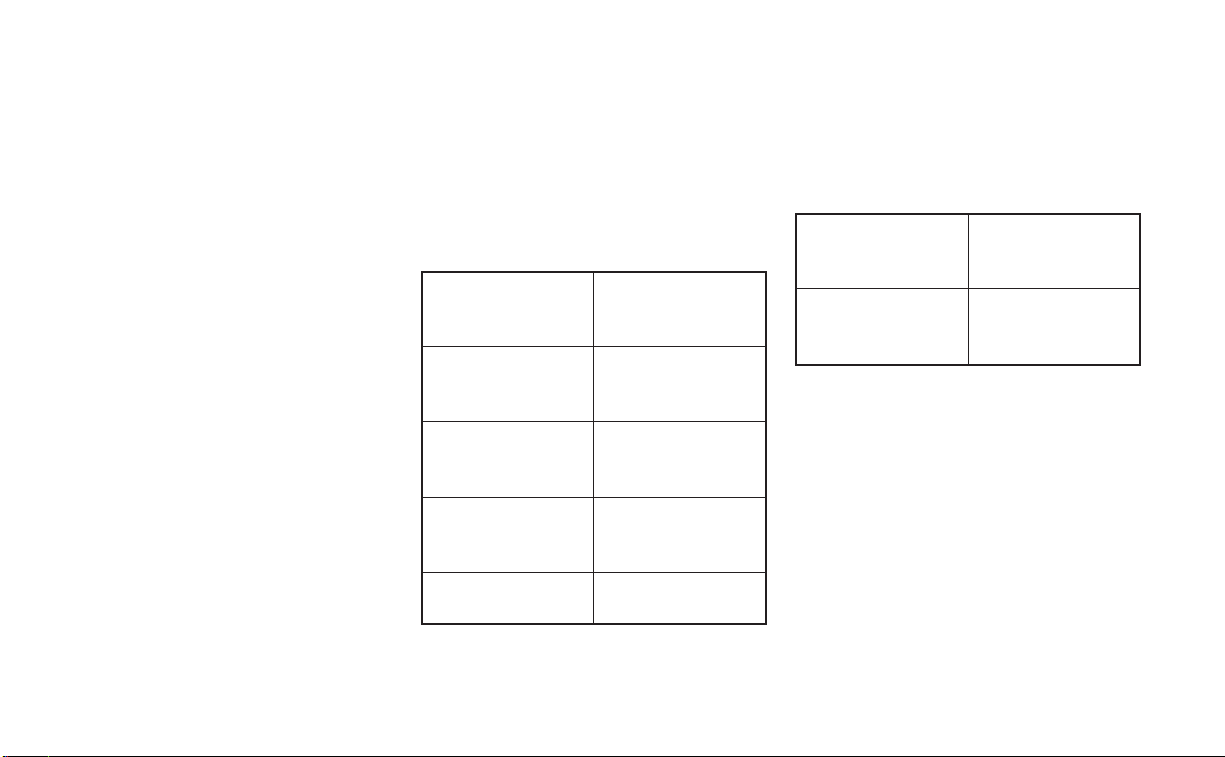
Size Cold Tire
Inflation
Pressure
Front and Rear
Original Tire:
33 psi, 230 kPa
235/65R18
Front and Rear
Original Tire:
35 psi, 240 kPa
235/55R20
Front and Rear
Original Tire:
36 psi, 250 kPa
255/60R18
Spare Tire:
T165/90D18
60 psi, 420 kPa
Recommended tire inflation pressures at speeds of 100 mph (160
km/h) or higher where it is legal to
do so.
Size Cold Tire
Inflation
Pressure
Front and Rear
Original Tire:
38 psi, 260 kPa
235/55R20
Page 8
CALIFORNIA PROPOSITION 65 WARNING
WARNING
Operating, servicing and maintaining a passenger
vehicle or off-highway motor vehicle can expose you to
chemicals including engine exhaust, carbon monoxide,
phthalates, and lead, which are known to the State of
California to cause cancer and birth defects or other
reproductive harm. To minimize exposure, avoid
breathing exhaust, do not idle the engine except as
necessary, service your vehicle in a well-ventilated area
and wear gloves or wash your hands frequently when
servicing your vehicle. For more information go to
www.P65Warnings.ca.gov/passenger-vehicle.
Page 9
FOREWORD READ FIRST—THEN DRIVE SAFELY
This manual was prepared to help you understand the operation and maintenance
of yourvehicle so thatyou may enjoymany
miles (kilometers) of driving pleasure.
Please read through this manual before
operating your vehicle.
A separate Warranty Information Booklet explains details about the warranties
covering your vehicle. The “Maintenance
and schedules” section of this manual
explains details about maintaining and
servicing your vehicle. Additionally, a
separate Customer Care/Lemon Law
Booklet (U.S. only) will explain how to resolve any concerns you may have with
your vehicle, and clarify your rights under your state’s lemon law.
When you require any service or have any
questions, a NISSAN dealer will be glad to
assist you with the extensive resources
available to them.
In addition to factory-installed options,
your vehicle may also be equipped with
additional accessories installed prior todelivery. It is recommended that you visit a
NISSAN dealer for details concerning the
particular accessories with which your vehicle is equipped. It is important that you
familiarize yourself with all disclosures,
warnings, cautions and instructions concerning proper use of such accessories
prior to operating the vehicle and/or accessory. It is recommended that you visit a
NISSAN dealer for details concerning the
particular accessories with which your vehicle is equipped.
Before driving your vehicle, pleaseread this
Owner’s Manual carefully. This will ensure
familiarity with controls and maintenance
requirements, assisting you in the safe operation of your vehicle.
WARNING
IMPORTANT SAFETY INFORMATION
REMINDERS!
Follow these important driving rules to
help ensure a safe and comfortable trip
for you and your passengers!
∙ NEVER drive under the influence of al-
cohol or drugs.
∙ ALWAYS observe posted speed limits
and never drive too fast for
conditions.
∙ ALWAYS give your full attention to
driving and avoid using vehicle features or taking other actions that
could distract you.
∙ ALWAYS use your seat belts and ap-
propriate childrestraint systems.Preteen children should be seated in the
rear seat.
Page 10
∙ ALWAYS provide information about
the proper use of vehicle safety features to all occupants of the vehicle.
∙ ALWAYS review this Owner’s Manual
for important safety information.
For descriptionsspecified for 4-wheel drive
models, a 4WD mark is placed atthe beginning of the applicable sections/items.
As with other vehicles with features for
off-road use, failure to operate 4-wheel
drive models correctly may result in loss
of control or an accident. For additional
information, refer to “Driving safety precautions” in the “Starting and driving”
section of this manual.
ON-PAVEMENT AND OFF-ROAD DRIVING
This vehicle will handle and maneuver
differently from an ordinary passenger car because it has a higher center
of gravity for off-road use. As with
other vehicles with features of this
type, failure to operate this vehicle
correctly may result in loss of control
or an accident.
For additional information, refer to
“On-pavement and off-road driving
precautions”, “Avoiding collision and
rollover” and “Driving safety precautions” in the “Starting and driving”
section of this manual.
MODIFICATION OF YOUR VEHICLE
This vehicle should not be modified.
Modification could affect its
performance, safety, emissions or durability and may even violate governmental regulations. In addition, damage or performance problems
resulting from modifications may not
be covered under NISSAN warranties.
WARNING
Installing an aftermarket On-Board Diagnostic (OBD) plug-in device that uses
the port during normal driving, for example remote insurance company
monitoring, remote vehiclediagnostics,
telematics or engine reprogramming,
may cause interference or damage to
vehicle systems.We do not recommend
or endorse the use of any aftermarket
OBD plug-in devices, unless specifically
approved by NISSAN. The vehicle warranty may not cover damage caused by
any aftermarket plug-in device.
Page 11
WHEN READING THE MANUAL
This manual includes information for all
features and equipment available on this
model. Features and equipment in your vehicle may vary depending on model, trim
level, options selected, order, date of production, region or availability. Therefore,
you mayfind informationabout featuresor
equipment that are not included or installed on your vehicle.
All information, specifications and illustrations in this manual are those in effect at
the time of printing. NISSAN reserves the
right to change specifications, performance, design or component suppliers
without notice and without obligation.
From time to time, NISSAN may update or
revise this manual to provide Owners with
the most accurate information currently
available. Please carefully read and retain
with this manual all revision updates sent
to you by NISSAN to ensure you have access to accurate and up-to-date information regarding your vehicle. Current versions of vehicle Owner’s Manuals and any
updates can also be found in the Owner
section of the NISSAN website at
https://owners.nissanusa.com/nowners/
navigation/manualsGuide
questions concerning any information in
your Owner’s Manual, contact NISSANCon-
. If you have
sumer Affairs. Refer to NISSAN CUSTOMER
CARE PROGRAM page in this Owner’s
Manual for contact information.
IMPORTANT INFORMATION ABOUT
THIS MANUAL
Youwill see various symbols in this manual.
They are used in the following ways:
WARNING
This is used to indicate the presence of
a hazard that could cause death or serious personal injury. To avoid or reduce
the risk, the procedures must be followed precisely.
CAUTION
This is used to indicate the presence of
a hazard that could cause minor or
moderate personal injury or damage to
your vehicle.To avoid or reduce the risk,
the procedures must be followed
carefully.
APD1005
If you see this symbol, it means “Do not do
this” or “Do not let this happen.”
If you see a symbol similar to these in an
illustration, it means the arrow points to
the front of the vehicle.
Arrows in an illustration that are similar to
these indicate movement or action.
Arrows in an illustrationthat aresimilar to these
call attention to an item in the illustration.
Page 12

CALIFORNIA PERCHLORATE
ADVISORY
Some vehicle parts, such as lithium batteries, may contain perchlorate material.
The following advisory is provided: “Perchlorate Material – special handling may
apply. For additional information, refer
to www.dtsc.ca.gov/hazardouswaste/
perchlorate/”.
© 2019 NISSAN NORTH AMERICA, INC.
All rights reserved. No part of this Owner’s
Manual may be reproduced or stored in a
retrieval system, or transmitted in any
form, or by any means, electronic, mechanical, photocopying, recording or otherwise, without the prior written permission of Nissan North America, Inc.
Page 13

NISSAN CUSTOMER CARE PROGRAM
NISSAN CARES . . .
Both NISSAN and your NISSAN dealer are dedicated to serving all your automotive needs. Your satisfaction with your vehicle and your
NISSAN dealer are our primary concerns. Your NISSAN dealer is always available to assist you with all your automobile sales and service
needs.
However, if there is something that your
NISSAN dealer cannot assist you with or
you would like to provide NISSAN directly
with comments or questions, please contact the NISSAN Consumer Affairs Department using our toll-free number:
For U.S. customers
1-800-NISSAN-1
(1-800-647-7261)
For Canadian customers
1-800-387-0122
The Consumer Affairs Department will ask
for the following information:
– Your name, address, and telephone
number
– Vehicle identification number (attached
to the top of the instrument panel on the
driver’s side)
– Date of purchase
– Current odometer reading
– Your NISSAN dealer’s name
– Your comments or questions
OR
You can write to NISSAN with the information at:
For U.S. customers
Nissan North America, Inc.
Consumer Affairs Department
P.O. Box 685003
Franklin, TN 37068-5003
or via e-mail at:
[email protected]
For Canadian customers
Nissan Canada Inc.
5290 Orbitor Drive
Mississauga, Ontario L4W 4Z5
or via e-mail at:
[email protected]
If you prefer, visit us at:
www.nissanusa.com (for U.S. customers)
or
www.nissan.ca (for Canadian customers)
We appreciate your interest in NISSAN and thank you for buying a quality NISSAN vehicle.
Page 14

Page 15
Table of
Illustrated table of contents
0
Contents
Safety—Seats, seat belts and supplemental restraint system
Instruments and controls
Pre-driving checks and adjustments
Monitor, climate, audio, phone and voice recognition systems
Starting and driving
In case of emergency
Appearance and care
Do-it-yourself
Maintenance and schedules
Technical and consumer information
Index
1
2
3
4
5
6
7
8
9
10
11
Page 16

Page 17

0 Illustrated table of contents
Air bags, seat belts and child restraints ..........0-2
Exterior front ....................................0-3
Exterior rear .....................................0-4
Passenger compartment........................0-5
Instrument panel................................0-6
Engine compartment check locations ...........0-8
Warning and indicator lights .....................0-9
Page 18
AIR BAGS, SEAT BELTS AND CHILD
RESTRAINTS
1. Folding 3rd row bench (P. 1-2)
2. Folding 2nd row bench (P. 1-2)
3. Roof-mounted curtain side-impact
and rollover supplemental air bag
(P. 1-53)
4. Head restraints/headrests (P. 1-12)
5. Seat belts with pretensioner(s) and
shoulder height adjuster (P. 1-18,
1-53)
6. Supplemental air bags (P. 1-53)
7. Occupant classification sensor
(weight sensor) (P. 1-53)
8. Seats (P. 1-2)
9. Front seat-mounted side-impact
supplemental air bag (P. 1-53)
10. LATCH (Lower Anchors and Tethers
for CHildren) (P. 1-30)
11. Second row seat top tether strap
anchor (located on bottom of
seatback) (P. 1-30)
Refer to the page number indicated in
parentheses for operating details.
0-2 Illustrated table of contents
LII2466
Page 19
EXTERIOR FRONT
1. Front view camera (if so equipped)
(P. 4-11)
2. Engine hood (P. 3-23)
3. Wiper and washer switch (P. 2-37)
4. Windshield-washer fluid (P. 8-12)
5. Power windows (P. 2-66)
6. Door locks (P. 3-5)
NISSAN Intelligent Key® (P. 3-2)
Keys (P. 3-2)
7. Mirrors (P. 3-36)
Side view camera (if so equipped)
(P. 4-11)
8. Tire pressure (P. 8-28)
Flat tire (P. 6-3)
Tire chains (P. 8-28)
9. Fog light switch (if so equipped)
(P. 2-40)
10. Replacing bulbs (P. 8-25)
Headlight and turn signal switch
(P. 2-40)
LED Daytime Running Lights (DRL)
system (P. 2-40)
Refer to the page number indicated in
parentheses for operating details.
LII2560
Illustrated table of contents 0-3
Page 20
EXTERIOR REAR
1. Rear window wiper and washer
switch (P. 2-37)
2. Towing (P. 10-17)
3. Liftgate release (P. 3-23)
Rearview camera (P. 4-3, 4-11)
4. Rear sonar sensors (P. 5-79)
5. Replacing bulbs (P. 8-25)
6. Fuel-filler cap (P. 3-30)
Fuel recommendation (P. 10-2)
Fuel-filler door (P. 3-30)
7. Child safety rear door lock (P. 3-5)
Refer to the page number indicated in
parentheses for operating details.
0-4 Illustrated table of contents
LII2561
Page 21
PASSENGER COMPARTMENT
1. Glove box (P. 2-58)
2. Sun visors (P. 3-34)
3. Map lights (P. 2-72)
4. Power moonroof (if so equipped)
(P. 2-69)
5. Luggage hooks (P. 2-58)
6. Cup holders (P. 2-58)
7. Console box (P. 2-58)
Refer to the page number indicated in
parentheses for operating details.
LII2458
Illustrated table of contents 0-5
Page 22
INSTRUMENT PANEL
0-6 Illustrated table of contents
LII2409
1. Vents (P. 4-32)
2. Headlight/fog light (if so
equipped)/turn signal switch
(P. 2-40)
3. Instrument brightness control
(P. 2-43)
4. Driver supplemental air bag (P.1-53)
Horn (P. 2-45)
5. Meters and gauges (P. 2-4)
Warning and indicator lights
(P. 2-11)
Vehicle information display (P. 2-19)
6. Twin trip odometer reset switch
(P. 2-5)
7. Wiper and washer switch (P. 2-37)
Rear window wiper and washer
switch (P. 2-37)
8. Control panel*
9. Center display*
Navigation system*
(if so equipped)
10. Front passenger air bag status
light (P. 1-53)
11. Front passenger supplemental air
bag (P. 1-53)
12. Glove box (P. 2-58)
13. Automatic heater and air
conditioning controls (P. 4-33)
Page 23

14. Audio system controls*
15. Hazard warning flasher switch
(P. 6-2)
16. Push-button ignition switch
(P. 5-11)
17. Cruise control switches
(if so equipped) (P. 5-41)
Intelligent Cruise Control (ICC)
switches (if so equipped) (P. 5-43)
18. Tilt and telescopic steering wheel
control (P. 3-33)
19. Control panel and vehicle information display switches (P. 2-20)
Bluetooth® Hands-Free Phone
System*
20. Hood release (P. 3-23)
21. Vehicle Dynamic Control (VDC) OFF
switch (P. 2-50)
TOW mode switch (P. 2-53)
Liftgate instrument panel switch
(if so equipped) (P. 3-23)
Warning systems switch
(if so equipped) (P. 2-51)
Heated steering wheel switch
(if so equipped) (P. 2-48)
Power inverter switch
(if so equipped) (P. 2-52)
*: Refer to the separate NissanConnect®
Owner’s Manual.
Refer to the page number indicated in
parenthesis for operating details.
Illustrated table of contents 0-7
Page 24
ENGINE COMPARTMENT CHECK
LOCATIONS
VQ35DD engine
1. Power steering fluid reservoir
(P. 8-11)
2. Engine coolant reservoir (P. 8-5)
3. Drive belt location (P.8-16)
4. Fuse box (P. 8-21)
5. Engine oil filler cap (P. 8-7)
6. Brake fluid reservoir (P. 8-12)
7. Air cleaner (P. 8-17)
8. Fuse box (P. 8-21)
9. Fuse/Fusible link box (P. 8-21)
10. Battery (P. 8-14)
11. Engine oil dipstick (P. 8-7)
12. Radiator cap (P. 8-5)
13. Windshield-washer fluid reservoir
(P. 8-12)
Refer to the page number indicated in
parentheses for operating details.
0-8 Illustrated table of contents
LDI3291
Page 25
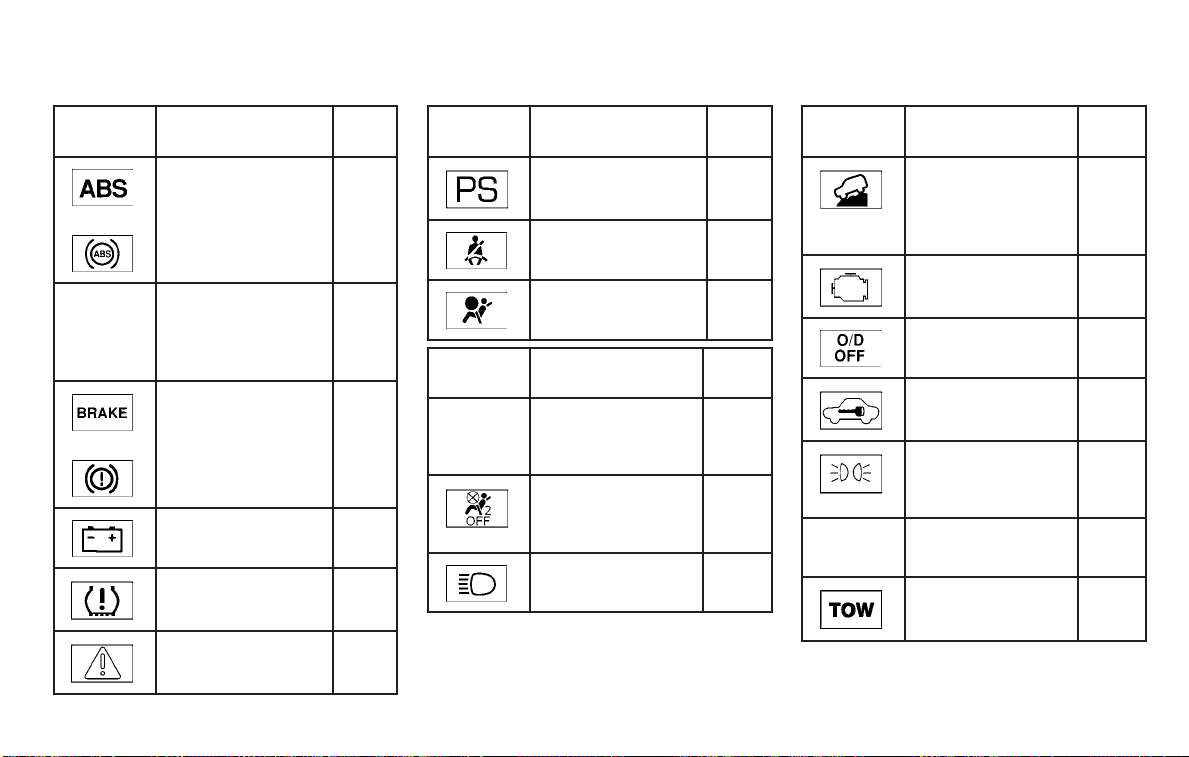
WARNING AND INDICATOR LIGHTS
Warning
light
or
or
Name Page
Anti-lock Braking
System (ABS)
warning light
Automatic Emergency Braking
(AEB) system
warning light
Brake warning
light
Charge warning
light
Low tire pressure
warning light
Master warning
light
2-12
2-12
2-12
2-13
2-13
2-15
Warning
light
Indicator
light
Name Page
Power steering
warning light
Seat belt warning
light and chime
Supplemental air
bag warning light
Name Page
Front fog light indicator light (if so
equipped)
Front passenger
air bag status
light
High beam indicator light (blue)
2-15
2-15
2-16
2-16
2-16
2-16
Indicator
light
Name Page
Hill descent control system ON
indicator light (if
so equipped)
Malfunction Indicator Light (MIL)
Overdrive OFF
indicator light
Security indicator
light
Side light and
headlight indicator light (green)
Slip indicator light 2-18
TOW mode ON
indicator light
2-16
2-17
2-18
2-18
2-18
2-18
Illustrated table of contents 0-9
Page 26
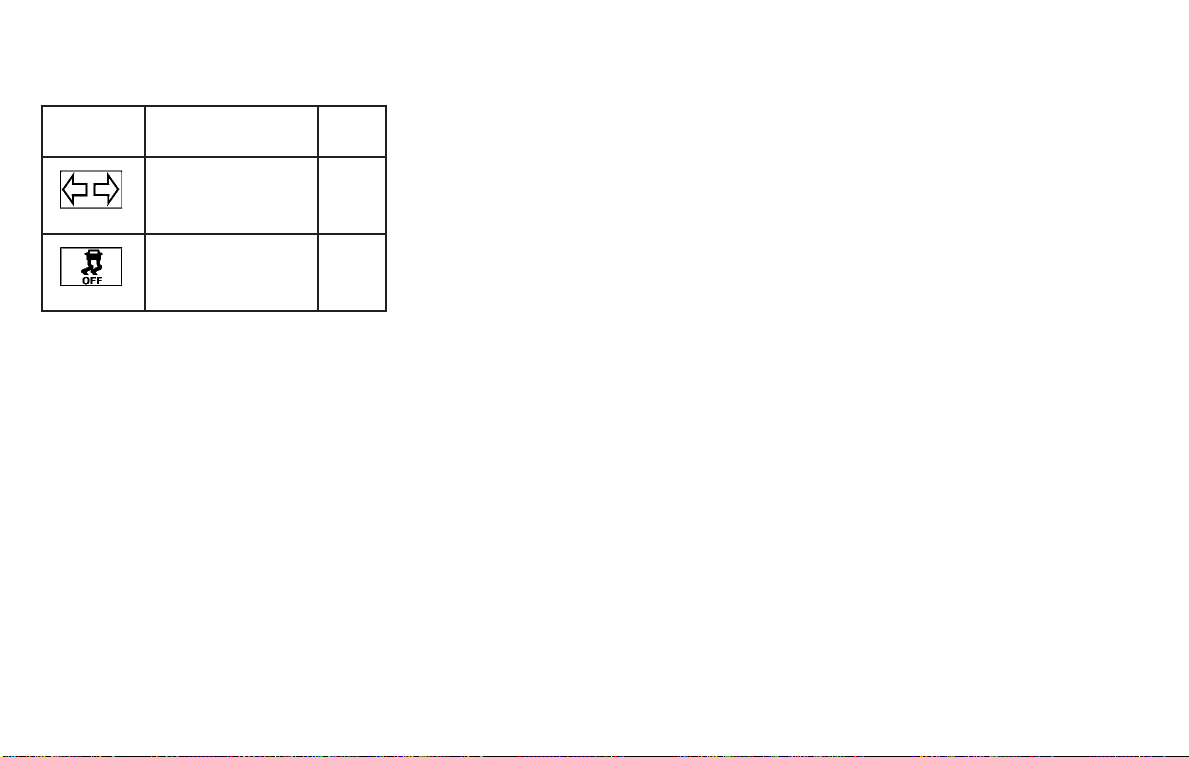
Indicator
light
Name Page
Turn signal/
hazard indicator
lights
Vehicle Dynamic
Control (VDC) OFF
indicator light
0-10 Illustrated table of contents
2-18
2-18
Page 27

MEMO
Illustrated table of contents 0-11
Page 28

1 Safety—Seats, seat belts and
supplemental restraint system
Seats............................................ 1-2
Front manual seat adjustment
(if so equipped) ................................1-3
Front power seat adjustment
(if so equipped) ............................... 1-5
2nd row bench seat adjustment...............1-7
3rd row bench seat adjustment .............. 1-9
Armrests .....................................1-10
Flexible seating ...............................1-10
Head restraints/headrests ......................1-12
Adjustable head restraint/headrest
components .................................1-13
Non-adjustable head restraint/
headrest components........................1-14
Remove......................................1-14
Removable (without Dual Head
Restraint/Headrest Rear Seat Mobile
Entertainment System (MES) only) ............1-15
Install.........................................1-15
Adjust ........................................1-15
Folding head restraint/headrest..............1-17
Seatbelts.......................................1-18
Precautions on seat belt usage...............1-18
Seat belt warning light........................1-21
Pregnant women.............................1-21
Injured persons...............................1-21
Three-point type seat belt with
retractor .....................................1-21
Seat belt extenders..........................1-26
Seat belt maintenance ...................... 1-27
Child safety..................................... 1-27
Infants ......................................1-28
Small children ...............................1-28
Larger children ..............................1-28
Child restraints .................................1-30
Precautions on child restraints ..............1-30
LATCH (Lower Anchors and Tethers for
CHildren) system ............................ 1-32
Rear-facing child restraint installation
using LATCH .................................1-35
Rear-facing child restraint installation
using the seat belts .........................1-37
Forward-facing child restraint
installation using LATCH .....................1-40
Forward-facing child restraint
installation using the seat belts..............1-43
Booster
Supplemental Restraint System (SRS)...........1-53
seats ...............................1-49
Page 29

Precautions on SRS..........................1-53
Supplemental air bag warning labels ........ 1-72
Supplemental air bag warning light..........1-73
Page 30
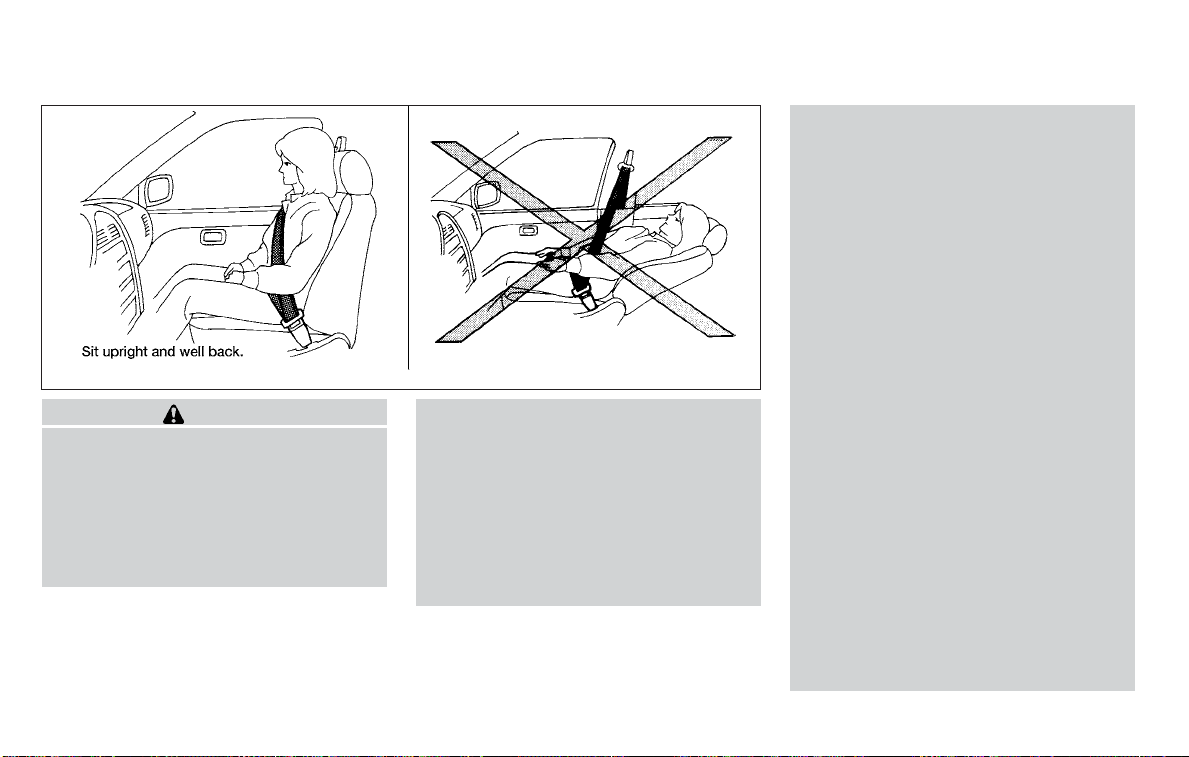
SEATS
WARNING
∙ Do not ride in a moving vehicle when
the seatback is reclined. This can be
dangerous. The shoulder belt will not
be against your body. In an accident,
you could be thrown into it and receive neck or other serious injuries.
You could also slide under the lap belt
and receive serious internal injuries.
ARS1152
∙ For the most effective protection
when the vehicle is in motion,the seat
should be upright. Always sit well
back and upright in the seat with both
feet on the floor and adjust the seat
properly. For additional information,
refer to “Precautions on seat belt usage” in this section.
∙ After adjustment, gently rock in the
seat tomake sureit is securely locked.
∙ Do not leave children unattended in-
side the vehicle. They could unknowingly activate switches or controls or
make the vehicle move. Unattended
children could become involved in serious accidents.
∙ To help avoid risk of injury or death
through unintended operation of the
vehicle and/or its systems, do not
leave children,people who require the
assistance of others or pets unattended in your vehicle. Additionally,
the temperature inside a closed vehicle on a warm day can quickly become high enough to cause a significant risk of injury or death to people
and pets.
∙ Do not adjust the driver’s seat while
driving so full attention may be given
to vehicle operation. The seat may
move suddenly and could cause loss
of control of the vehicle.
∙ The seatback should not be reclined
any more than needed for comfort.
Seat belts are most effective when the
passenger sits well back and straight
up in the seat. If the seatback is reclined, the risk of sliding under the lap
belt and being injured is increased.
1-2 Safety—Seats, seat belts and supplemental restraint system
Page 31
CAUTION
When adjusting the seat positions, be
sure not to contact any moving parts to
avoid possible injuries and/or damage.
FRONT MANUAL SEAT
ADJUSTMENT (if so equipped)
Your vehicle seats can be adjusted manually. For additional information about adjusting the seats, referto the stepsoutlined
in this section.
LRS2160 LRS2161
Forward and backward
Pull the center of the bar up and hold it
while you slide the seat forward or backward to the desired position. Release the
bar to lock the seat in position.
Safety—Seats, seat belts and supplemental restraint system 1-3
Reclining
To recline the seatback, pull the lever up
and lean back. To bring the seatback forward, pull the lever up and lean your body
forward. Release the lever to lock the seatback in position.
The reclining feature allows adjustment of
the seatback for occupants of different
sizes for added comfort and to help obtain
proper seat belt fit. For additional information, refer to “Precautions on seat belt usage” in this section. Also, the seatback can
be reclined to allow occupants to rest
when the vehicle is stopped and the shift
lever is in the P (Park) position.
Page 32
LRS2202 LRS2132
Seat lifter (driver’s seat)
Pull up or push down the adjusting lever to
adjust the seat height until the desired position is achieved.
Lumbar support (driver’s seat)
The lumbar support feature provides adjustable lower back support to the driver.
Move the lever as shown to adjust the seat
lumbar area.
1-4 Safety—Seats, seat belts and supplemental restraint system
Page 33
FRONT POWER SEAT ADJUSTMENT
(if so equipped)
Operating tips
∙ The power seat motor has an auto-
reset overload protection circuit. If the
motor stops during operation, wait
30 seconds then reactivate the switch.
∙ Do not operate the power seat switch
for a long period of time when the engine is off. This will discharge the battery.
Reclining
Move the recline switch as shown until the
desired angle is obtained.
The reclining feature allows adjustment of
the seatback for occupants of different
sizes for added comfort and to help obtain
proper seat belt fit. For additional information, refer to “Precautions on seat belt usage” in this section. Also, the seatback can
be reclined to allow occupants to rest
when the vehicle is stopped and the shift
lever is in P (Park).
LRS2662
For additional information, refer to “Automatic drive positioner” in the “Pre-driving
checks and adjustments” section of this
manual.
Forward and backward
Moving the switch as shown will slide the
seat forward or backward to the desired
position.
Safety—Seats, seat belts and supplemental restraint system 1-5
Page 34
LRS2636
Seat lifter (driver’s seat)
Move the switch as shown to adjust the
angle and height of the seat cushion.
Lumbar support (driver’s seat)
The lumbar support feature provides adjustable lower back support to the driver.
Move the lever as shown (manual) or push
the switch as shown (power) to adjust the
seat lumbar area.
Manual (if so equipped)
1-6 Safety—Seats, seat belts and supplemental restraint system
LRS2132
LRS2270
Power (if so equipped)
Page 35
LRS2143
Outboard seats
2ND ROW BENCH SEAT
ADJUSTMENT
Forward and backward
Pull the center of the bar
while you slide the seat forward or backward to the desired position. Release the
bar to lock the seat in position.
1
up and hold it
䊊
Reclining
To recline the seatback, pull up on the lever
2
and lean back. To bring the seatback
䊊
forward, pull the lever
body forward. Release the lever to lock the
seatback in position.
The recline feature allows adjustment of
the seatback for occupants of different
sizes for added comfort and to help obtain
proper seat belt fit. For additional information, refer to “Precautions on seat belt usage” in this section. Also, the seatback can
be reclined to allow occupants to rest
when the vehicle is stopped and the shift
lever is in P (Park).
∙ After adjustment, gently rock in the
seat tomake sureit is securely locked.
∙ Do not ride in a moving vehicle when
the seatback is reclined. This can be
dangerous. The shoulder belt will not
be against your body. In an accident,
you could be thrown into it and receive neck or other serious injuries.
You could also slide under the lap belt
and receive serious internal injuries.
2
up and lean your
䊊
WARNING
∙ For the most effective protection
when the vehicle is in motion,the seat
should be upright. Always sit well
back and upright in the seat and adjust the seat belt properly. For additional information, refer to “Precautions on seat belt usage” in this
section.
Safety—Seats, seat belts and supplemental restraint system 1-7
Page 36
LRS2142
One touch walk-in function
The 3rd row can be accessed from outside
the vehicle by using the seatback release
lever locatedon the upper outboard side of
the seatback on the 2nd row bench seat. If
a child safety seat is installed on the passenger’s side of the 2nd row seat, the 3rd
row can be accessed withoutremoving the
child safety seat.
Multi-mode
WARNING
When returning the seat to its original
position, confirm that the seat and
seatback are locked properly.
CAUTION
∙ Be careful not to pinch your hand or
foot or bump your head when operating the walk-in seat.
∙ Do not drive with the 2nd row seat
tipped up.
∙ Be careful not to allow the 2nd row
seat to pinch, hit any part ofyour body
or other people when operating the
2nd row seat. Make sure the seat path
is clear of all objects before moving
the seat.
To enter the 3rd row from outside the vehicle, lift up on the seatback lever located
on the upper outboard side of the seatback on the 2nd row bench seat. This will
release the back of the seat and fold up the
seat cushion. This will also release the seat
tracks so you will be able to slide the seat
forward or backward.
Slide the entire seat forward for access to
the 3rd row.
To return the seat to a locked position,
push the upper seatback rearward until
the seatback and tracks are locked. Push
the seat cushion down.
Child seat access mode
The passenger’s side of the 2nd row seat
can be slid forward for easy entry or exit
from the 3rdrow benchseat withouta child
safety seat being removed.
To enter the 3rd row from outside the vehicle, lift up on the seatback lever located
on the upper outboard side of the seatback on the 2nd row bench seat. This will
release the seatback. Then tilt the seat and
release the tracks so you will be able to
slide the seat forward or backward.
Slide the entire seat forward for access to
the rear seats.
To return the seat to a locked position,
push the upper seatback rearward until
the seatback and track are locked.
1-8 Safety—Seats, seat belts and supplemental restraint system
Page 37
WARNING
∙ Do not leave a child in the child safety
seat when operating the child seat access mode.
∙ When returning the seat to its original
position, confirm that the seat and
seatback are locked properly.
CAUTION
∙ Be careful not to pinch your hand or
foot or bump your head when operating the walk-in seat.
∙ Do not drive with the 2nd row seat
tipped up.
∙ Be careful not to allow the 2nd row
seat to pinch, hit any part ofyour body
or other people when operating the
2nd row seat. Make sure the seat path
is clear of all objects before moving
the seat.
Exiting the 3rd row
To exit the 3rd row from either seating position, lift the upper seatback release lever
to the uppermost position.This will release
the back of the seat, then fold the seat
cushion up and release the tracks.
Slide the entire seat forward.
To return the seat to a locked position,
push the upper seatback rearward until
the seatback and track are locked.
WARNING
When returning the seat to its original
position, confirm that the seat and
seatback are locked properly.
CAUTION
Be careful not to pinch your hand or
foot or bump your head when operating the walk-in seat.
Safety—Seats, seat belts and supplemental restraint system 1-9
LRS2913
3RD ROW BENCH SEAT
ADJUSTMENT
Reclining
To recline the seatback,pull up on the latch
located on the outside corner of each seatback. Lean back until the desired angle is
obtained.
To bring the seatback forward again, pull
up on the latch and pull the seatback upright until the desired angle is obtained.
The recline feature allows adjustment of
the seatback for occupants of different
sizes for added comfort and to help obtain
Page 38
proper seat belt fit. For additional information, refer to “Precautions on seat belt usage” in this section. Also, the seatback can
be reclined to allow occupants to rest
when the vehicle is stopped and the shift
lever is in P (Park).
WARNING
∙ After adjustment, gently rock in the
seat tomake sureit is securely locked.
∙ Do not ride in a moving vehicle when
the seatback is reclined. This can be
dangerous. The shoulder belt will not
be against your body. In an accident,
you could be thrown into it and receive neck or other serious injuries.
You could also slide under the lap belt
and receive serious internal injuries.
∙ For the most effective protection
when the vehicle is in motion,the seat
should be upright. Always sit well
back and upright in the seat and adjust the seat belt properly. For additional information, refer to “Precautions on seat belt usage” in this
section.
LRS2924
ARMRESTS
The 2nd row bench seat comes equipped
with an armrest. Pull the armrest down as
shown.
FLEXIBLE SEATING
WARNING
∙ Never allow anyone to ride in the
cargo area or on the rear seats when
they are in the fold-down position. Ina
collision, people riding in these areas
without proper restraints are more
likely to be seriously injured or killed.
∙ Do not allow peopleto ride in any area
of your vehicle that is not equipped
with seats and seat belts. Be sure everyone in your vehicle is in a seat and
using a seat belt properly.
∙ Do not allow more than one person to
use the same seat belt.
∙ Do not fold down the rear seats when
occupants are in the rear seat area or
any luggage is on the rear seats.
– Make sure that the seat path is
clear before moving the seat.
– Be careful not to allow hands or
feet toget caught orpinched in the
seat.
∙ Head restraints/headrests should be
adjusted properly as they may provide significant protection against injury in an accident. Always replace
and adjust them properly if they have
been removed for any reason.
∙ If the head restraints/headrests are
removed for any reason, they should
be securely stored to prevent them
from causing injury to passengers or
damage to the vehicle in case of sudden braking or an accident.
1-10 Safety—Seats, seat belts and supplemental restraint system
Page 39
∙ When returning the seatbacks to the
upright position, be certain they are
completely secured in the latched position. If they are not completely secured, passengers may be injured in
an accident or sudden stop.
∙ Properly secure all cargo to help pre-
vent it from sliding or shifting. Do not
place cargo higher than the seatbacks. In a sudden stop or collision,
unsecured cargo could cause personal injury.
3. Lift up onthe reclinelever on the side of
the outboard seats to fold the seatbacks flat.
4. To return the 2nd row bench seats to a
seating position, push up on the seatback until it latches in place.
LRS2144
Folding the 2nd row bench seat
To fold the 2nd row bench seat flat for
maximum cargo hauling:
1. Make sure that the head
restraints/headrests are lowered or removed. To remove the head
restraint/headrest, push and hold the
lock knob while moving the head
restraint/headrest in an upward direction. Store the head restraint/headrest
properly so it is not loose in the vehicle.
2. Stow the 2nd row seat belts in the seat
belt hooks found on the sides of the
vehicle.
Safety—Seats, seat belts and supplemental restraint system 1-11
Page 40
HEAD RESTRAINTS/HEADRESTS
LRS2915
Folding the 3rd row seats
To fold the 3rd row seats flat for maximum
cargo capacity:
A
1. Pull the strap
restraint/headrest forward.
2. Stow the 3rd row seat belts in the seat
belt hooks
cargo area.
3. Pull up on the latch
upper corner of each seatback and
lower the seatback forward over the
seat base.
to release the head
䊊
D
found on the sides of the
䊊
B
located in the
䊊
To return the 3rd row seats to a seating
position:
C
1. Use the pull straps
seatback. Pull back until the seatback
latches into position. Make sure to
properly raise each seatback to an
upright and secured position.
2. Do not use the pull strap to return the
head restraint/headrest to the upright
position. Pull back on the head
restraint/headrest until it latches in the
upright position.
to raise each
䊊
WARNING
When the seat is returned to the normal
seating position, the head
restraints/headrests must be returned
to the upright position to properly protect vehicle occupants.
WARNING
Head restraints/headrests supplement
the other vehicle safety systems. They
may provide additional protection
against injury in certain rear end collisions. Adjustable head
restraints/headrests must be adjusted
properly, as specified in this section.
Check the adjustment after someone
else uses the seat. Do not attach anything to the head restraint/headrest
stalk, except for Genuine NISSAN accessories specifically tested for use with
the vehicle’s head restraint/headrest
stalk. Do not remove the head
restraint/headrest. Do not use the seat
if the head restraint/headrest has been
removed. If the headrestraint/headrest
was removed,reinstall andproperly adjust the head restraint/headrest before
an occupant uses the seating position.
Failure to follow these instructions can
reduce the effectiveness of the head
restraints/headrests. This may increase the risk of serious injury or death
in a collision.
1-12 Safety—Seats, seat belts and supplemental restraint system
Page 41

LRS2308 LRS2300
The illustration shows the seating
positions equipped with head restraints/
headrests.
䉱 Indicates the seating position is
equipped with a head restraint.
䡲 Indicatesthe seatingposition isequipped
with a headrest.
+ Indicates the seating position is not
equipped with a head restraint or headrest
(if applicable).
∙ Your vehicle is equipped with a head
restraint/headrest that may be integrated, adjustable or non-adjustable.
∙ Adjustable head restraints/headrests
have multiplenotches along thestalk(s)
to lock them in a desired adjustment
position.
∙ The non-adjustable head restraints/
headrests have a single locking notch
to secure them to the seat frame.
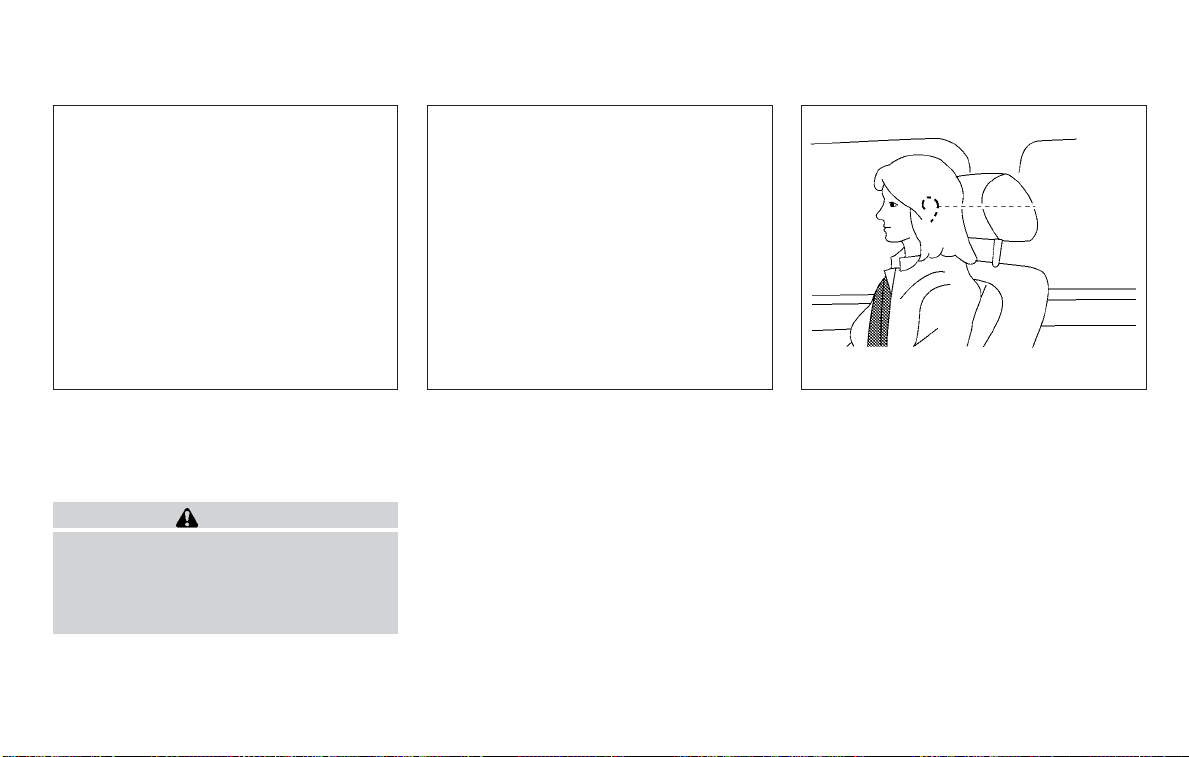
∙ Proper Adjustment:
– For the adjustable type, align the
head restraint/headrest so the center of your ear is approximately level
with the center of the head
restraint/headrest.
– If your ear position is still higher than
the recommended alignment, place
the head restraint/headrest at the
highest position.
∙ If the head restraint/headrest has been
removed, ensure that it is reinstalled
and locked in place before riding in that
designated seating position.
Safety—Seats, seat belts and supplemental restraint system 1-13
ADJUSTABLE HEAD RESTRAINT/
HEADREST COMPONENTS
1. Removable head restraint/headrest
2. Multiple notches
3. Lock knob
4. Stalks
Page 42
LRS2299 LRS2302
NON-ADJUSTABLE HEAD
RESTRAINT/HEADREST
COMPONENTS
1. Removable head restraint/headrest
2. Single notch
3. Lock knob
4. Stalks
5. Reinstall and properly adjust the head
restraint/headrest before an occupant
uses the seating position.
REMOVE
Use the following procedure to remove the
head restraint/headrest:
1. Pull the head restraint/headrest up to
the highest position.
2. Push and hold the lock knob.
3. Remove the head restraint/headrest
from the seat.
4. Store the head restraint/headrest
properly in a secure place so it is not
loose in the vehicle.
1-14 Safety—Seats, seat belts and supplemental restraint system
Page 43
LRS2302 LRS2303 WRS0134
REMOVABLE (without Dual Head
Restraint/Headrest Rear Seat
Mobile Entertainment System
(MES) only)
CAUTION
Do not remove head restraint/headrest
from vehicles equipped with Dual Head
Restraint/Headrest Rear Seat Mobile
Entertainment System (MES). Removal
may damage the system wiring.
INSTALL
1. Align the head restraint/headrest
stalks with the holes in the seat. Make
sure that the headrestraint/headrestis
facing the correct direction. The stalk
with the notch (notches)
installed in the hole with the lock knob
2
.
䊊
2. Push and hold the lock knob and push
the head restraint/headrest down.
3. Properly adjust the head restraint/
headrest before an occupant uses the
seating position.
Safety—Seats, seat belts and supplemental restraint system 1-15
1
must be
䊊
ADJUST
For adjustable head restraint/headrest
Adjust the head restraint/headrest so the
center islevel with thecenter of your ears. If
your ear position is still higher than the
recommended alignment, place the head
restraint/headrest at the highest position.
Page 44
LRS2351 LRS2305 LRS2306
For non-adjustable head restraint/headrest
Make sure the head restraint/headrest is
positioned so the lock knob is engaged in
the notch before riding in that designated
seating position.
Raise
To raise the head restraint/headrest, pull it
up.
Make sure the head restraint/headrest is
positioned so the lock knob is engaged in
the notch before riding in that designated
seating position.
1-16 Safety—Seats, seat belts and supplemental restraint system
Lower
To lower, push and hold the lock knob and
push the head restraint/headrest down.
Make sure the head restraint/headrest is
positioned so the lock knob is engaged in
the notch before riding in that designated
seating position.
Page 45
LRS2307
FOLDING HEAD RESTRAINT/
HEADREST
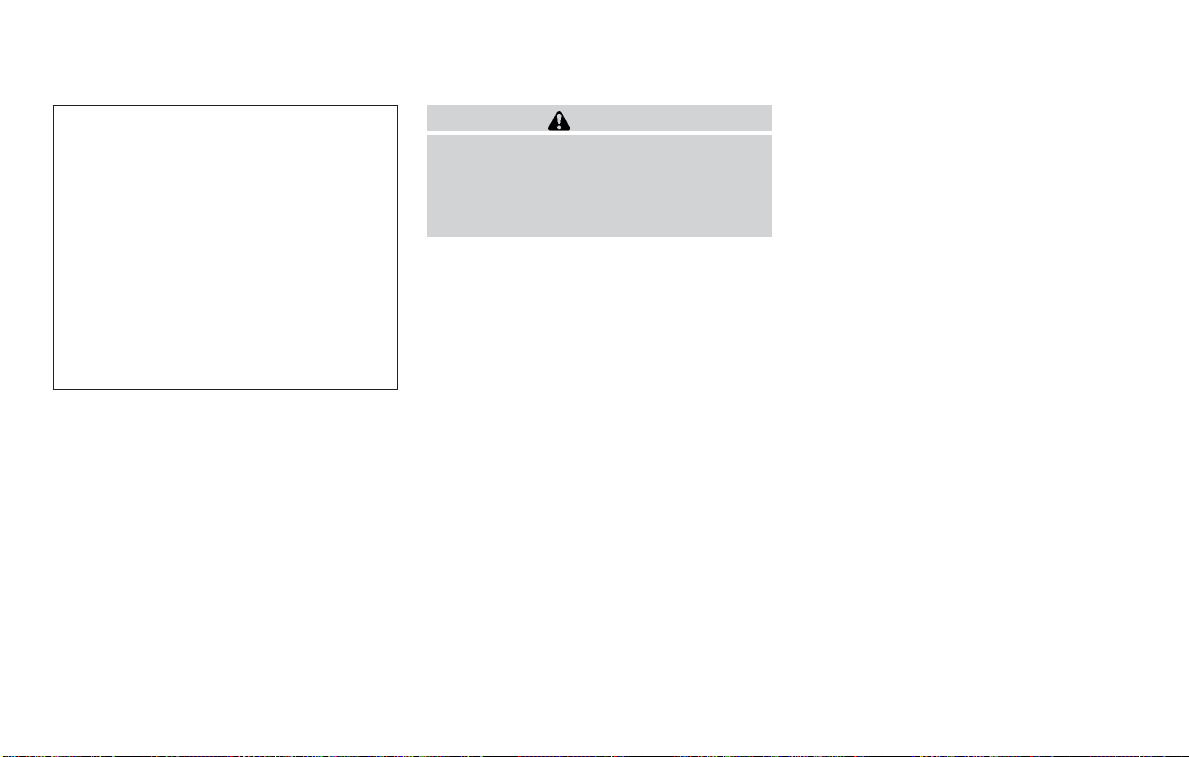
To fold thehead restraint/headrest, pull the
strap located on the rear of the head
restraint/headrest.
If the head restraint/headrest has been
folded, make sure that it is returned to the
upright position.
Make sure the head restraint/headrest is
positioned so the lock knobs are engaged
in the notches before riding in that designated seating position.
WARNING
When the seat is returned to the normal
seating position, the head
restraint/headrest must be returned to
the upright position to properly protect
vehicle occupants.
Safety—Seats, seat belts and supplemental restraint system 1-17
Page 46
SEAT BELTS
PRECAUTIONS ON SEAT BELT
USAGE
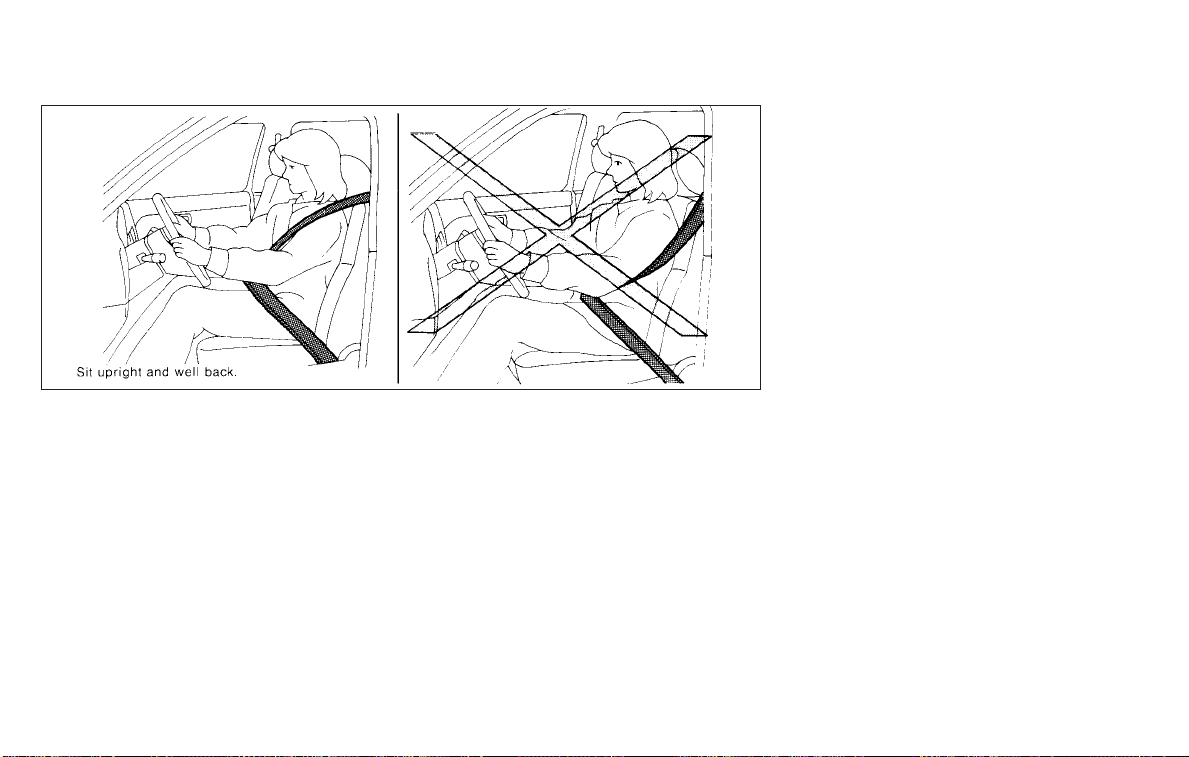
If you are wearing your seat belt properly
adjusted and you are sitting upright and
well back in your seat with both feet on the
floor,your chances of being injured or killed
in a collision and/or the severity of injury
may be greatly reduced. NISSAN strongly
encourages you and all of your passengers
to buckle up every time you drive, even if
your seating position includes a supplemental air bag.
SSS0136
Most U.S. states and Canadian provinces
or territories specify that seat belts be
worn at all times when a vehicle is being
driven.
1-18 Safety—Seats, seat belts and supplemental restraint system
Page 47
WARNING
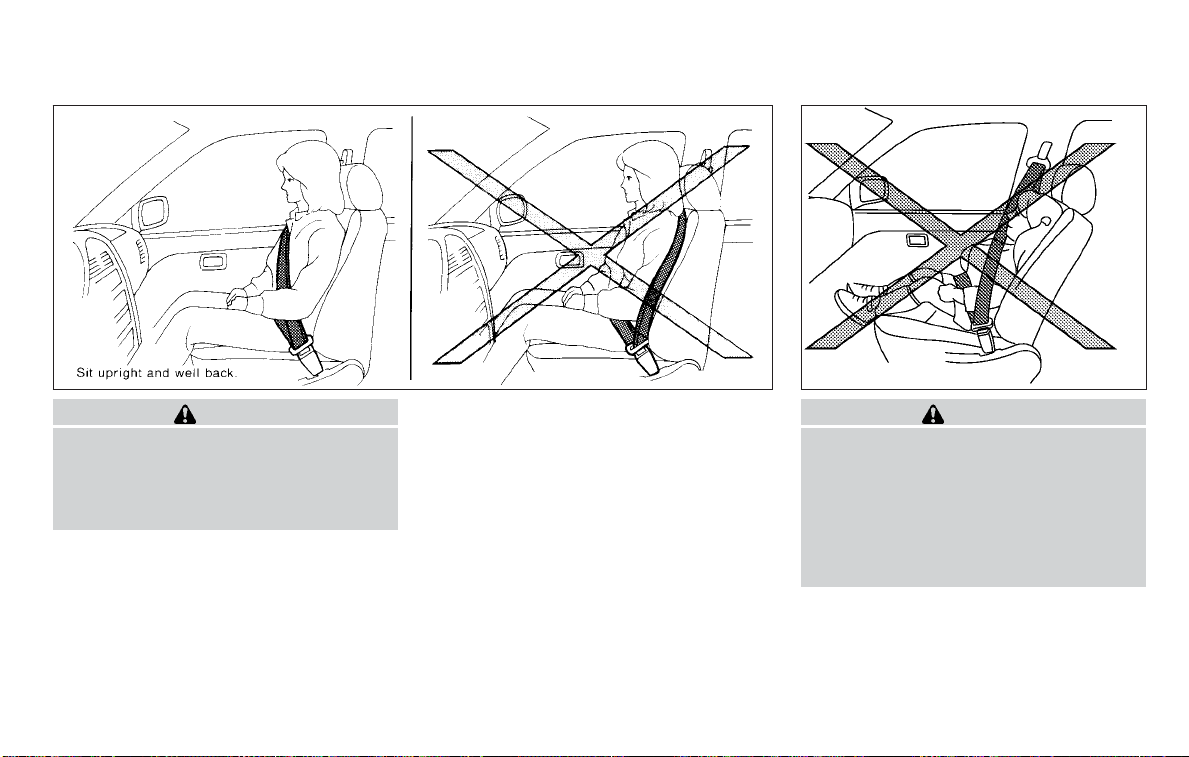
∙ Every person who drives or rides in
this vehicle should use a seat belt at
all times. Children should be in the
rear seats and in an appropriate
restraint.
SSS0134 SSS0016
WARNING
∙ The seat belt should be properly ad-
justed to a snug fit. Failure to do so
may reduce the effectiveness of the
entire restraint system and increase
the chance or severity of injury in an
accident. Serious injury or death can
occur if the seat belt is not worn
properly.
Safety—Seats, seat belts and supplemental restraint system 1-19
Page 48
SSS0014
WARNING
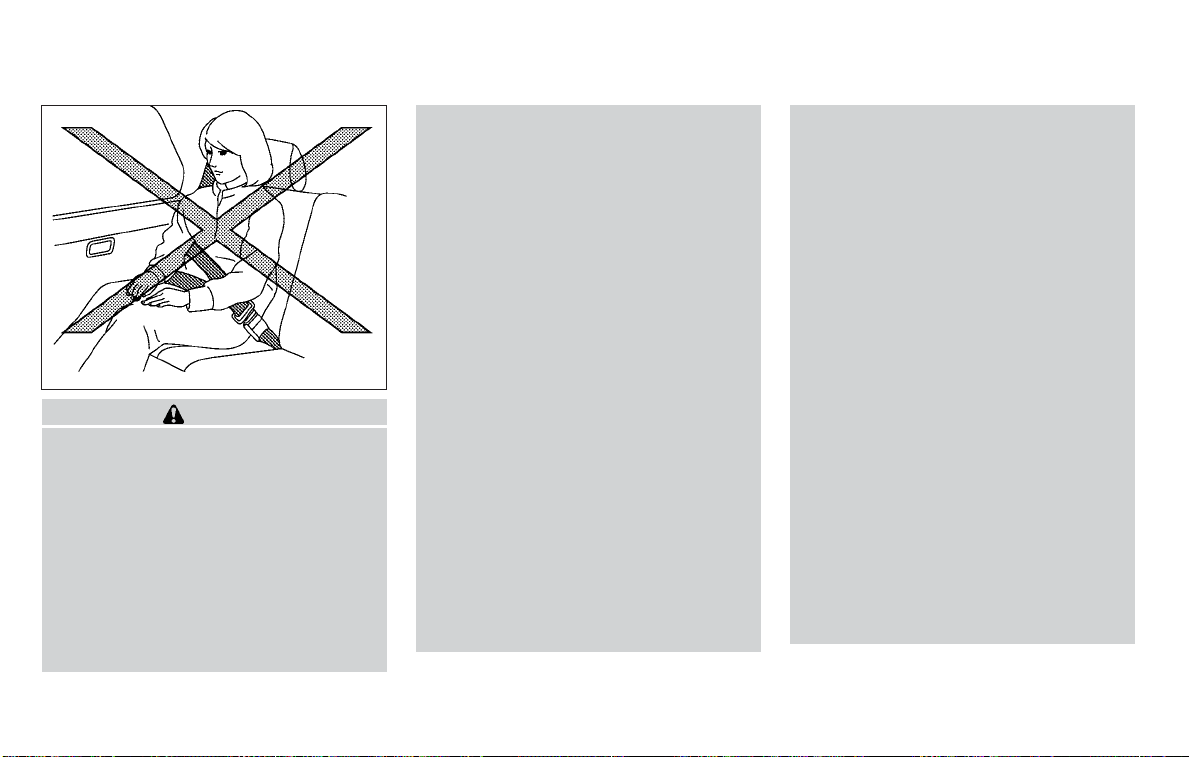
∙ Always route the shoulder belt over
your shoulder and across your chest.
Never put the belt behind your back,
under your arm or across your neck.
The belt should be away from your
face and neck, but not falling off your
shoulder.
∙ Position the lap belt as low and snug
as possible AROUND THE HIPS, NOT
THE WAIST. A lap belt worn too high
could increase therisk ofinternal injuries in an accident.
∙ Be sure the seat belt tongue is se-
curely fastened to the proper buckle.
∙ Do not wear the seat belt inside out or
twisted. Doing so may reduce its
effectiveness.
∙ Do not allow more than one person to
use the same seat belt.
∙ Never carry morepeople inthe vehicle
than there are seat belts.
∙ If the seat belt warning light glows
continuously while the ignition is
turned ONwith alldoors closedand all
seat belts fastened, it may indicate a
malfunction in the system. Have the
system checked. It is recommended
that you visit a NISSAN dealer for this
service.
∙ No changes should be made to the
seat belt system. For example, do not
modify the seat belt, add material, or
install devices that may change the
seat belt routing or tension. Doing so
may affect the operation of the seat
belt system. Modifying or tampering
with the seat belt system may result
in serious personal injury.
∙ Once seat belt pretensioner(s) have
activated, they cannot be reused and
must be replaced together with the
retractor. It is recommended that you
visit a NISSAN dealer for this service.
∙ All seat belt assemblies, including re-
tractors and attaching hardware,
should be inspected after any collision. It is recommended that you visit
a NISSAN dealer for this service.
NISSAN recommends that all seat belt
assemblies inuse during a collision be
replaced unless the collision was minor and the belts show no damage
and continue to operate properly.
Seat belt assemblies not in use during
a collision should also be inspected
and replaced if either damage or improper operation is noted.
∙ All child restraints and attaching
hardware should be inspected after
any collision. Always follow the restraint manufacturer’s inspection instructions and replacement recommendations. The child restraints
should be replaced if they are
damaged.
1-20 Safety—Seats, seat belts and supplemental restraint system
Page 49
LRS0786
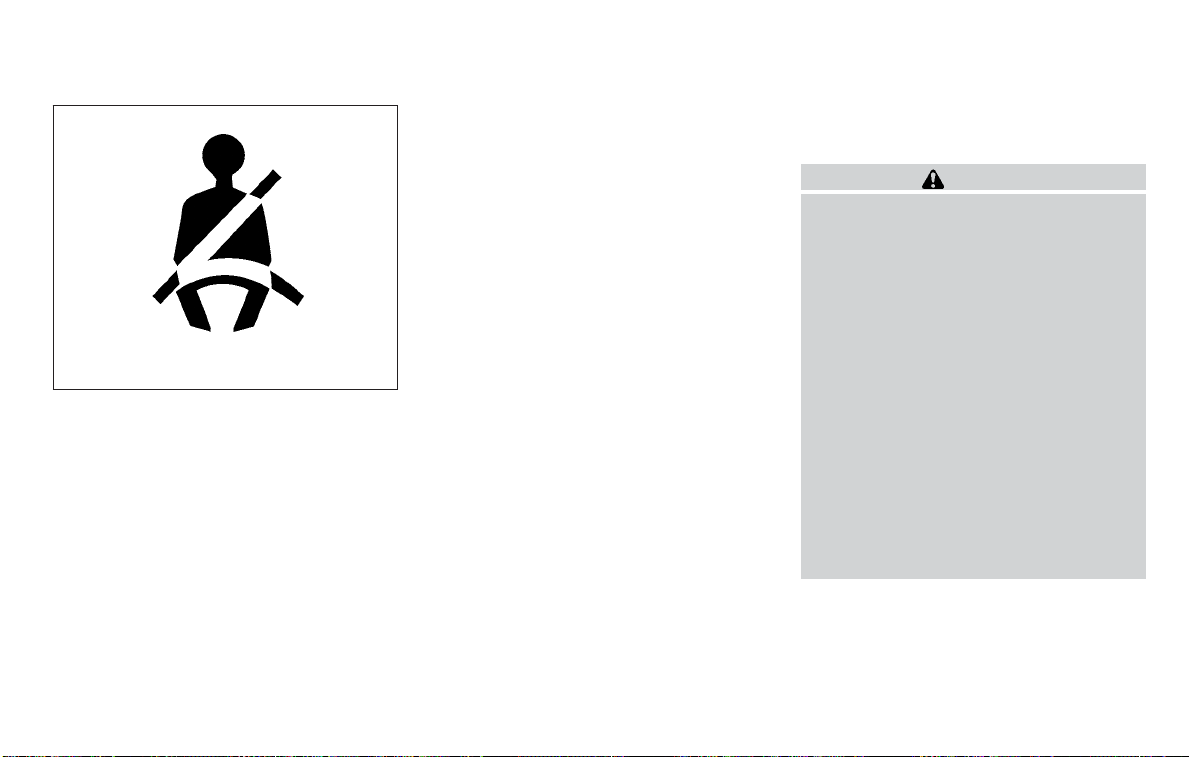
SEAT BELT WARNING LIGHT
Both the driver’s and passenger’s front
seats are equipped with a seat belt warning light. The warning light, located on the
instrument panel, will show the status of
the driver and passenger seat belt.
NOTE:
The front passenger seat belt warning
light will not light up if the seat is not
occupied.
For additional information, refer to “Warning lights, indicator lights and audible reminders” in the “Instruments and controls”
section of this manual.
PREGNANT WOMEN
NISSAN recommends that pregnant
women useseat belts. The seat beltshould
be worn snug and always position the lap
belt as low as possible around the hips,not
the waist. Place the shoulder belt over your
shoulder and across your chest. Never run
the lap/shoulder belt over your abdominal
area. Contact your doctor for specific recommendations.
INJURED PERSONS
NISSAN recommends that injured persons
use seat belts. Check with your doctor for
specific recommendations.
THREE-POINT TYPE SEAT BELT
WITH RETRACTOR
WARNING
∙ Every person who drives or rides in
this vehicle should use a seat belt at
all times. Children should be in the
rear seats and in an appropriate
restraint.
∙ Do not ride in a moving vehicle when
the seatback is reclined. This can be
dangerous. The shoulder belt will not
be against your body. In an accident,
you could be thrown into it and receive neck or other serious injuries.
You could also slide under the lap belt
and receive serious internal injuries.
∙ For the most effective protection
when the vehicle is in motion,the seat
should be upright. Always sit well
back and upright in the seat with both
feet on the floor and adjust the seat
belt properly.
Safety—Seats, seat belts and supplemental restraint system 1-21
Page 50
∙ Do not allow children to play with the
seat belts. Most seating positions are
equipped with Automatic Locking Retractor (ALR) mode seat belts. If the
seat belt becomes wrapped around a
child’s neck with the ALR mode activated, the child can be seriously injured or killed if the seat belt retracts
and becomes tight. This can occur
even if the vehicle is parked.Unbuckle
the seat belt to release the child.If the
seat belt cannot be unbuckled or is
already unbuckled, release the child
by cutting the seat beltwith a suitable
tool (such as a knife or scissors) to
release the seat belt.
LRS2160
Manual frontseat shown (if so equipped)
Fastening the seat belts
1. Adjust the seat. For additional information, refer to “Seats” in this section.
1-22 Safety—Seats, seat belts and supplemental restraint system
Page 51
Power front seat shown (if so equipped)
Safety—Seats, seat belts and supplemental restraint system 1-23
LRS2662
LRS2674
2. Slowly pull the seat belt out of the retractor and insert the tongue into the
A
buckle
latch engage.
until you hear and feel the
䊊
∙ The retractor is designed to lock
during a sudden stop or on impact.
A slow pulling motion permits the
seat belt to move and allows you
some freedom of movement in the
seat.
∙ If the seat belt cannot be pulled
from its fully retracted position,
firmly pull the belt and release it.
Then smoothly pull the belt out of
the retractor.
Page 52
LRS2675
3. Position the lap belt portion low and
snug on the hips
4. Pull the shoulder belt portion toward
the retractor to take up extra slack
Be surethe shoulder belt is routed over
your shoulder and across your chest.
The front passenger seat and the rear
seating positions’ three-point seat belts
have two modes of operation:
∙ Emergency Locking Retractor (ELR)
∙ Automatic Locking Retractor (ALR)
B
as shown.
䊊
䊊
C
The ELR mode allows the seat belt to extend and retract to allow the driver and
passengers some freedom of movement
in the seat. The ELR locks the seat belt
when the vehicle slows down rapidly or
during certain impacts.
The ALR mode (child restraint mode) locks
the seat belt for child restraint installation.
When the ALR mode is activated, the seat
belt cannot be extended again until the
seat belt tongue is detached from the
buckle and fully retracted. The seat belt returns to the ELR mode after the seat belt
fully retracts. For additional information,refer to “Child restraints” in this section.
The ALR mode should be used only for
child restraint installation. During nor-
.
mal seat belt useby anoccupant, the ALR
mode should not be activated. If it is activated, it may cause uncomfortable seat
belt tension. It can also change the operation of the front passenger air bag.
For additional information, refer to
“Front passenger air bag and status
light” in this section.
WARNING
When fastening the seat belts, be certain that the seatbacks are completely
secured in the latched position. If they
are not completelysecured, passengers
may beinjured in an accident or sudden
stop.
1-24 Safety—Seats, seat belts and supplemental restraint system
Page 53
WRS0139 SSS0896
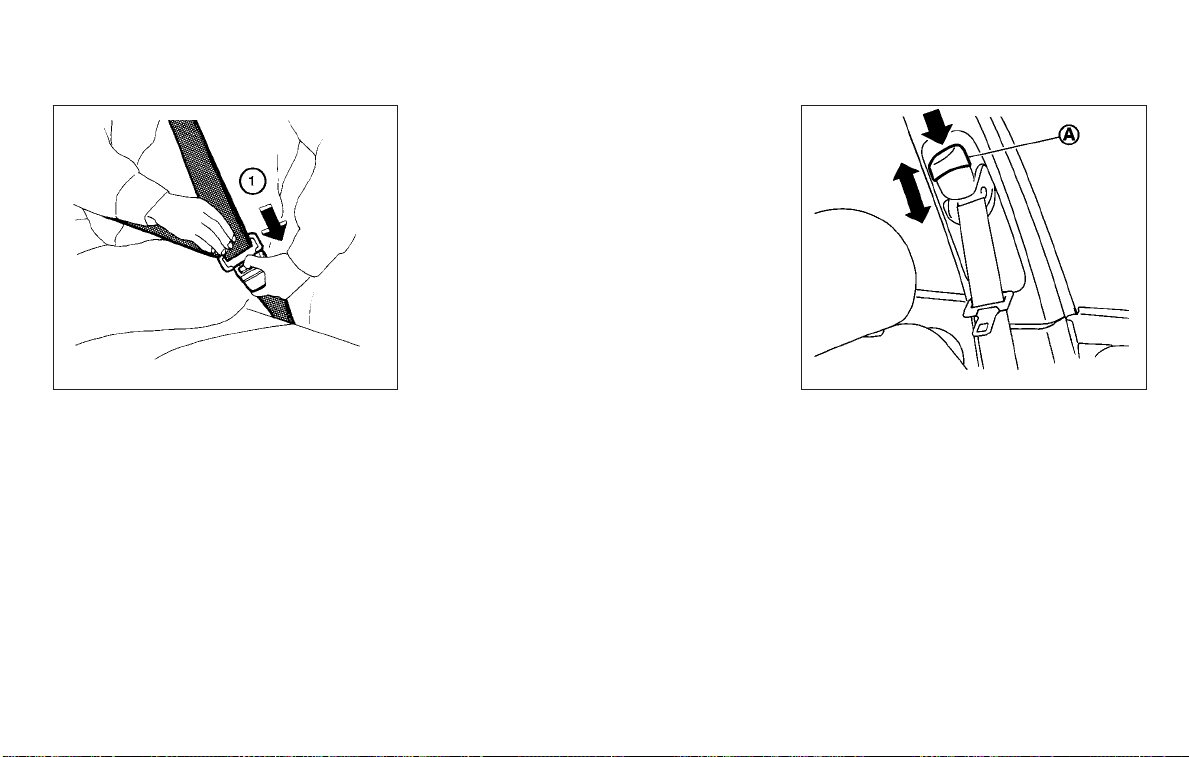
Unfastening the seat belts
To unfasten the seat belt, press the button
on the buckle
cally retracts.
1
. The seat belt automati-
䊊
Checking seat belt operation
Seat belt retractors are designed to lock
seat belt movement by two separate
methods:
∙ When theseat belt is pulled quicklyfrom
the retractor
∙ When the vehicle slows down rapidly
To increase your confidence in the seat
belts, check the operation as follows:
∙ Grasp the shoulder belt and pull for-
ward quickly. The retractor should lock
and restrict further belt movement.
If the retractor does not lock during this
check, getthe system checked.It is recommended that you visit a NISSAN dealer for
this service, or to learn more about seat
belt operation.
Safety—Seats, seat belts and supplemental restraint system 1-25
A
Shoulder belt height adjust button
䊊
Shoulder belt height adjustment
(front and 2nd row outboard
seats)
The shoulder belt anchor height should be
adjusted to the position best for you. For
additional information, refer to “Precautions on seat belt usage” in this section.
A
To adjust, press the button
move the shoulder belt anchor to the desired position so that the belt passes over
the center of the shoulder. The belt should
be away from your face and neck, but not
and then
䊊
Page 54
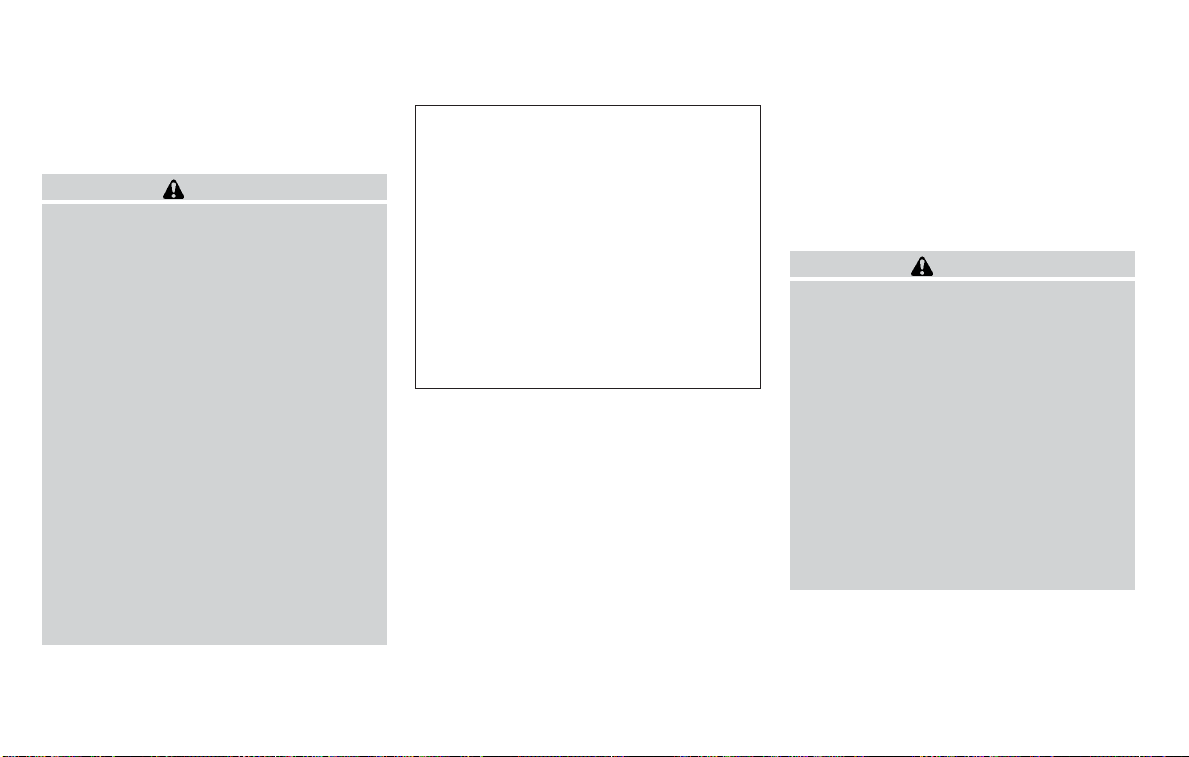
falling off of your shoulder. Release the adjustment button to lock the shoulder belt
anchor into position.
WARNING
∙ After adjustment, release the adjust-
ment button and try to move the
shoulder belt anchor up and down to
make sure it is securely fixed in
position.
∙ The shoulder belt anchor height
should be adjusted to the position
best for you. Failure to do so may reduce the effectiveness of the entire
restraint system and increase the
chance or severity of injury in an
accident.
∙ The shoulder belt should rest on the
middle of the shoulder. It must not
rest against the neck.
∙ Be sure that the seat belt is not
twisted in any way.
∙ Be sure that the shoulder belt anchor
is secured by trying to move the
shoulder belt anchor up and down after adjustment.
3rd row shown; 2nd row similar
Seat belt hook
When the seat belt is not in use and when
folding down the rear seats, hook the rear
seat belts on the seat belt hooks.
SEAT BELT EXTENDERS
If,because of body size or driving position, it
is not possible to properly fit the
lap/shoulder beltand fasten it,an extender
that is compatible with the installed seat
belts is available for purchase. The extender adds approximately 8 in (200 mm)
of length and are available for the:
1-26 Safety—Seats, seat belts and supplemental restraint system
LRS2157
∙ Driver and front passenger seating po-
sition
∙ 2nd and 3rd row seating position
It is recommended that you visit a NISSAN
dealer for assistance with purchasing an
extender if an extender is required.
WARNING
∙ Only NISSAN seat belt extenders,
made by the same company which
made the original equipment seat
belts, should be used with NISSAN
seat belts.
∙ Adults and children who can use the
standard seat belt should not use an
extender. Such unnecessary use
could result in serious personal injury
in the event of an accident.
∙ Never use seat belt extenders to in-
stall child restraints. If the child restraint is not secured properly, the
child could be seriously injured or
killed in a collision or a sudden stop.
Page 55
CHILD SAFETY
SEAT BELT MAINTENANCE
∙ To clean the seat belt webbing, apply
a mildsoap solution or any solutionrecommended for cleaning upholstery or
carpet. Then wipe witha cloth andallow
the seatbelts to dry in theshade. Do not
allow the seat belts to retract until they
are completely dry.
∙ If dirt builds up in the shoulder belt
guide of the seat belt anchors, the
seat belts may retract slowly. Wipe the
shoulder belt guide with a clean, dry
cloth.
∙ Periodically checkto see that the seat
belt and the metal components, such
as buckles, tongues, retractors, flexible
wires and anchors, work properly. If
loose parts, deterioration, cuts or other
damage on the webbing is found, the
entire seat belt assembly should be replaced.
WARNING
Do not allow children to play with the
seat belts. Most seating positions are
equipped with Automatic Locking Retractor (ALR) mode seat belts.If the seat
belt becomes wrapped around a child’s
neck with the ALR mode activated, the
child can be seriously injured or killed if
the seat belt retracts and becomes
tight. This can occur even if the vehicle
is parked. Unbuckle the seat belt to release thechild. Ifthe seat belt cannot be
unbuckled or is already unbuckled, release the child by cutting the seat belt
with a suitable tool (such as a knife or
scissors) to release the seat belt.
Children need adults to help protect
them. They need to be properly restrained.
In addition to the general information in
this manual, child safety information is
available from many other sources, including doctors, teachers, government traffic
safety offices, and community organizations. Every child is different, so be sure to
learn the best way to transport your child.
There are three basic types of child restraint systems:
∙ Rear-facing child restraints
∙ Forward-facing child restraints
∙ Booster seats
The properrestraint depends on the child’s
size. Generally, infants up to about 1 year
and lessthan 20 lbs. (9 kg)should beplaced
in rear-facing child restraints. Forwardfacing child restraints are available for children who outgrow rear-facing child restraints and are at least 1 year old. Booster
seats are used to help position a vehicle
lap/shoulder belt on a child who can no
longer use a forward-facing child restraint.
WARNING
Infants and children need special protection. The vehicle’s seat belts may not
fit them properly.The shoulder belt may
come too close to the face or neck. The
lap belt may not fit over their small hip
bones. In an accident, an improperly fitting seat belt could cause serious or fatal injury. Always use appropriate child
restraints.
Safety—Seats, seat belts and supplemental restraint system 1-27
Page 56

All U.S. states and Canadian provinces or
territories require the use of approved child
restraintsfor infants and small children.For
additional information, refer to “Child restraints” in this section.
A child restraint may be secured in the vehicle by using either the LATCH (Lower Anchors and Tethers for CHildren) system or
with the vehicle seat belt. For additional
information, refer to “Child restraints” in this
section.
NISSAN recommends that all pre-teens
and children be restrained in the rear
seat. Studies show that children are
safer when properly restrained in the
rear seat than in the front seat.
This is especially important because
your vehicle has a supplemental restraint system (air bag system) for the
front passenger.For additional information, refer to “Supplemental Restraint
System (SRS)” in this section.
INFANTS
Infants up to at least 1 year old should be
placed in a rear-facing child restraint.
NISSAN recommends that infants be
placed in child restraints that comply with
Federal Motor Vehicle Safety Standards or
Canadian Motor Vehicle Safety Standards.
Youshould choose a child restraint that fits
your vehicle and always follow the manufacturer’s instructions for installation and
use.
SMALL CHILDREN
Children that are over 1 year old and weigh
at least 20 lbs. (9 kg) should remain in a
rear-facing child restraint as long as possible up to the height or weight limit of the
child restraint. Children who outgrow the
height or weight limit of the rear-facing
child restraint and are at least 1 year old
should besecured ina forward-facingchild
restraintwith aharness. Referto themanufacturer’s instructions for minimum and
maximum weight and height recommendations. NISSAN recommends that small
children be placed in child restraints that
comply with Federal Motor Vehicle Safety
Standards or Canadian Motor Vehicle
Safety Standards. You should choose a
child restraint that fits your vehicle and always follow the manufacturer’s instructions for installation and use.
1-28 Safety—Seats, seat belts and supplemental restraint system
LARGER CHILDREN
Children should remain in a forward-facing
child restraint with a harness until they
reach the maximum height or weight limit
allowed by the child restraint manufacturer.
Once achild outgrowsthe height or weight
limit of the harness-equipped forwardfacing child restraint, NISSAN recommends
that the child be placed in a commercially
available booster seat to obtain proper
seat belt fit. For a seat belt tofit properly, the
booster seat should raise the child so that
the shoulder belt is properly positioned
across the chest and the top, middle portion of the shoulder. The shoulder belt
should not cross the neck or face and
should not fall off the shoulder. The lap belt
should lie snugly across the lower hips or
upper thighs, not the abdomen. A booster
seat can only be used in seating positions
that have a three-point type seat belt. The
booster seat should fit the vehicle seat and
have a label certifying that it complies with
Federal Motor Vehicle Safety Standards or
Canadian Motor Vehicle Safety Standards.
Page 57
A booster seat should be used until the
child can pass the seat belt fit test below:
∙ Are thechild’s backand hipsagainst the
vehicle seatback?
∙ Is the child able to sit without slouch-
ing?
∙ Do the child’s knees bend easily over
the front edge of the seat with feet flat
on the floor?
∙ Can the child safely wear the seat belt
(lap belt low and snug across the hips
and shoulder belt across mid-chest
and shoulder)?
∙ Is the child able to use the properly ad-
justed head restraint/headrest?
∙ Will the child be able to stay in position
for the entire ride?
NOTE:
Laws in some communities may follow
different guidelines. Check local and
state regulations to confirm your child is
using the correct restraint systembefore
traveling.
WARNING
Never let a child stand or kneel on any
seat and do not allow a child in the
cargo area. The child could be seriously
injured or killed in a sudden stop or
collision.
LRS2690
If you answered no to any of these questions, the child should remain in a booster
seat using a three-point type seat belt.
Safety—Seats, seat belts and supplemental restraint system 1-29
Page 58
CHILD RESTRAINTS
ARS1098 WRS0256
PRECAUTIONS ON CHILD
RESTRAINTS
WARNING
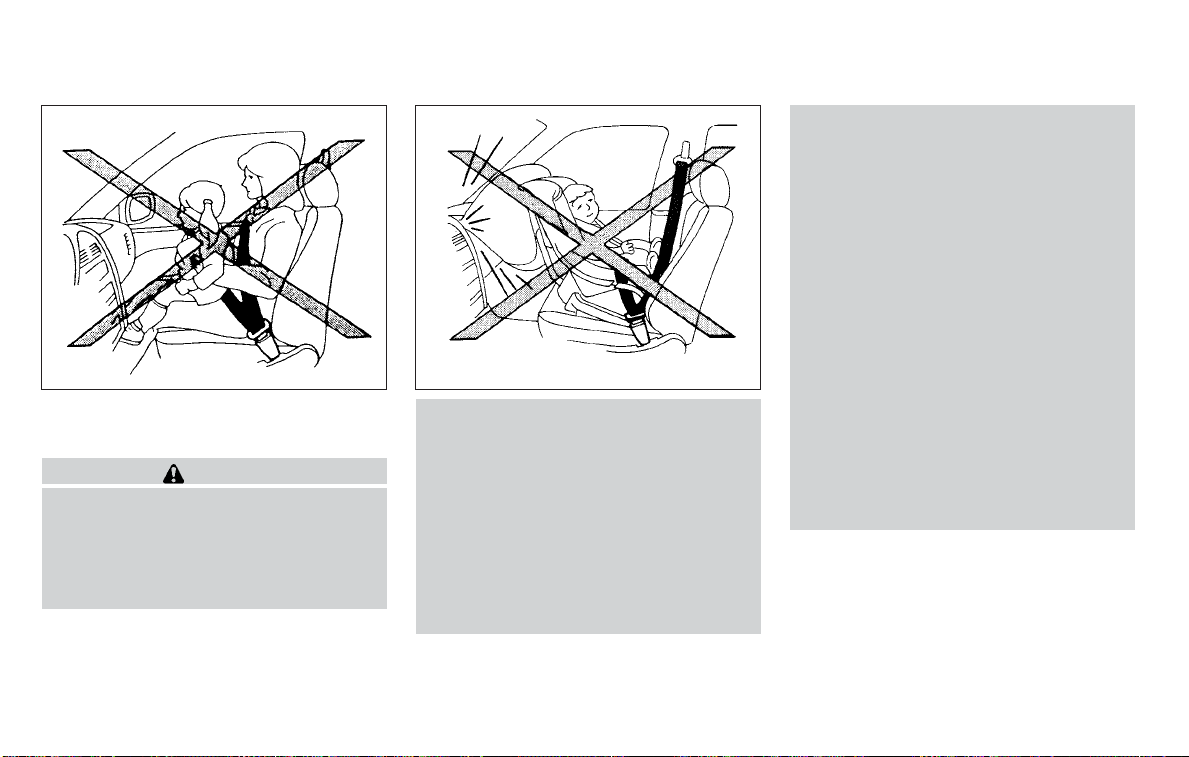
∙ Failure to follow the warnings and in-
structions for proper use and installation of child restraints could result in
serious injury or death of a child or
other passengers in a sudden stop or
collision:
– The child restraint must be used
and installed properly. Always follow all of the child restraint manufacturer’s instructions for installation and use.
– Infants and children should never
be held on anyone’s lap. Even the
strongest adult cannot resist the
forces of a collision.
– Do not put a seat belt around both
a child and another passenger.
– NISSAN recommends that all child
restraints be installed in the rear
seat. Studies show that children
are safer when properly restrained
in the rear seat than in the front
seat. If you must install a forwardfacing child restraint in the front
seat, refer to “Forward-facing child
restraintinstallation using the seat
belts” in this section.
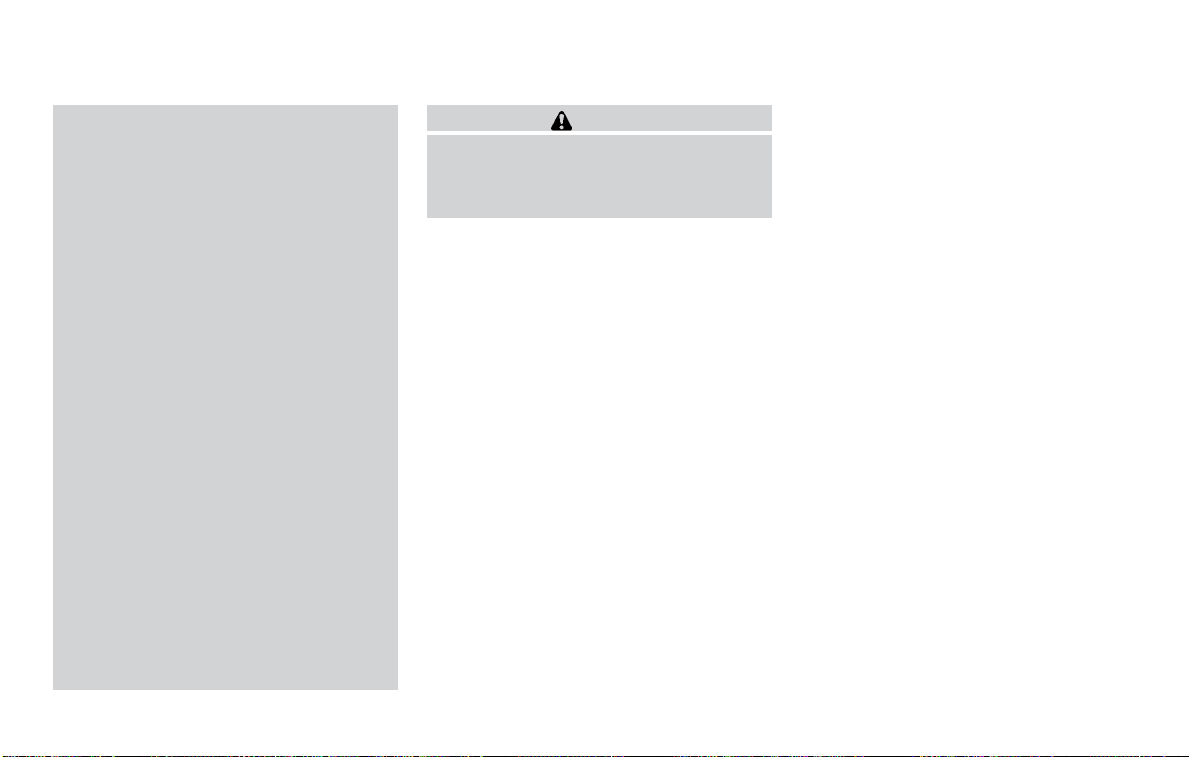
– Even with the NISSANAdvanced Air
Bag System, never install a rearfacing child restraint in the front
seat. An inflating air bag could seriously injure or kill a child. A rearfacing child restraint must only be
used in the rear seat.
– Be sure to purchase a child re-
straint that will fit the child and vehicle. Some child restraints may
not fit properly in your vehicle.
1-30 Safety—Seats, seat belts and supplemental restraint system
Page 59
–
Child restraint anchorages are designed to withstand only those
loads imposed by correctly fitted
child restraints. Under no circumstances are they to be used to attach adult seat belts, or other items
or equipment to the vehicle. Doing
so could damage the child restraint
anchorages. The child restraint will
not be properly installed using the
damaged anchorage, and a child
could beseriously injured orkilled in
a collision.
– Never use the anchor points for
adult seat belts, or other items.
– A child restraint with a top tether
strap should not be used in the
front passenger seat.
Keep seatbacks as upright as pos-
–
sible after fitting the child restraint.
– Infants and children should always
be placed in an appropriate child
restraint while in the vehicle.
∙ When the child restraint is not in use,
keep it secured with the LATCHsystem
or a seat belt. In a sudden stop or collision, loose objects can injure occupants or damage the vehicle.
CAUTION
A child restraint in a closed vehicle can
become very hot. Check the seating
surface and buckles before placing a
child in the child restraint.
This vehicle is equipped with a universal
child restraint anchor system, referred to
as the LATCH (Lower Anchors and Tethers
for CHildren) system. Some child restraints
include rigid or webbing-mounted attachments that can be connected to these anchors. For additional information, refer to
“LATCH (Lower Anchors and Tethers for
CHildren) system” in this section.
If you do not have a LATCH compatible
child restraint,the vehicle seat belts can be
used.
Several manufacturers offer child restraints for infants and children of various
sizes. When selecting any child restraint,
keep the following points in mind:
∙ Choose only a restraint with a label cer-
tifying that it complies with Federal Motor Vehicle Safety Standard 213 or Canadian Motor Vehicle Safety Standard 213.
∙ Check the child restraint in your vehicle
to be sure it is compatible with the vehicle’s seat and seat belt system.
∙ If the child restraint is compatible with
your vehicle, place your child in the child
restraint and check the various adjustments to be sure the child restraint is
compatible with your child. Choose a
child restraint that is designed for your
child’s height and weight. Always follow
all recommended procedures.
∙ If the combined weight of the child and
child restraint is less than 65 lbs.
(29.5 kg), you may use either the LATCH
anchors or the seat belt to install the
child restraint (not both at the same
time).
∙ If the combined weight of the child and
child restraint is greater than 65 lbs.
(29.5 kg), use the vehicle’s seat belt (not
the lower anchors) to install the child
restraint.
∙ Be sure to follow the child restraint
manufacturer’s instructions for installation.
Safety—Seats, seat belts and supplemental restraint system 1-31
Page 60
All U.S. states and Canadian provinces or
territories require that infants and small
children be restrained in an approved
child restraint at all times while the vehicle is being operated. Canadian law requires the top tether strap on forwardfacing child restraints be secured to the
designated anchor point on the vehicle.
hicle’s seat belt (not the lower anchors) to
install the child restraint. Be sure to follow
the child restraint manufacturer’s instructions for installation.
The LATCH lower anchor points are provided to install child restraints in the following positions only:
∙ 2nd row bench seat – outboard seating
positions
LATCH lower anchor
LATCH system lower anchor locations -
bench seat
LATCH (Lower Anchors and
Tethers for CHildren) SYSTEM
Your vehicle is equipped with special anchor points that are used with LATCH system compatible child restraints. This system may also be referred to as the ISOFIX
or ISOFIX compatible system. With this system, you do not have to use a vehicle seat
belt to secure the child restraint unless the
combined weight of the child and child restraint exceeds 65 lbs. (29.5 kg). If the combined weight of the child and child restraint
is greater than 65 lbs. (29.5 kg), use the ve-
1-32 Safety—Seats, seat belts and supplemental restraint system
LRS2922
WARNING
Failure to follow the warnings and instructions for proper use and installation of child restraints could result in
serious injury or death of a child or
other passengers in a sudden stop or
collision:
– Attach LATCH system compatible
child restraints only at the locations shown in the illustration.
– Do not secure a child restraint in
the 2nd row center position using
the LATCH system anchors. The
child restraint will not be secured
properly.
Page 61
– Inspect the lower anchors by in-
serting your fingers into the lower
anchor area. Feel to make sure
there are no obstructions over the
anchors such as seat belt webbing
or seat cushion material. The child
restraint will not be secured properly if the lower anchors are
obstructed.
– Child restraint anchorages are de-
signed to withstand only those
loads imposed by correctly fitted
child restraints. Under no circumstances are they to be used to attach adult seat belts, or other items
or equipment to the vehicle. Doing
so could damage the child restraint anchorages. The child restraint will not be properly installed using the damaged
anchorages, and a child could be
seriously injured or killed in a
collision.
LRS3036
LATCH lower anchor location
LATCH lower anchor location
The LATCH lower anchors are located as
shown. A label is attached to the seatback
to help you locate the LATCH lower anchors.
LRS2930
LATCH label locations 2nd row bench
Safety—Seats, seat belts and supplemental restraint system 1-33
Page 62
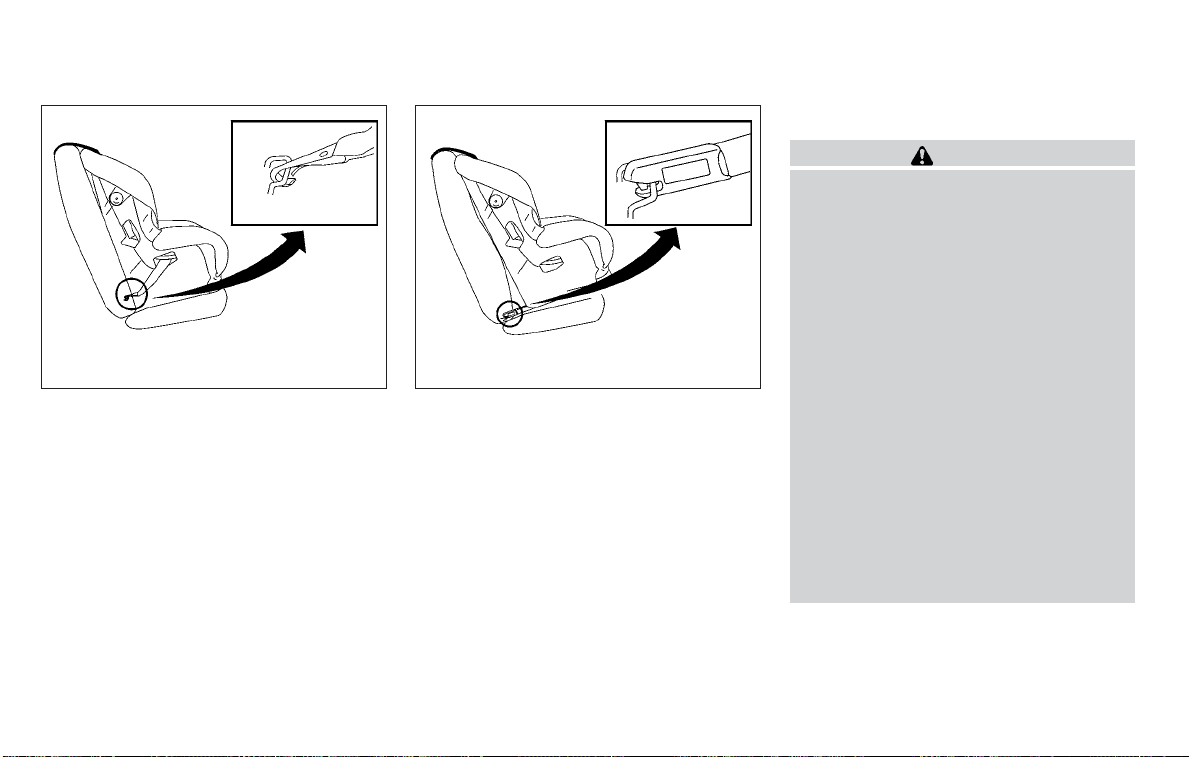
LRS0661
LATCH webbing-mounted attachment
Installing child restraint LATCH
lower anchor attachments
LATCH compatible child restraints include
two rigid or webbing-mounted attachments that can be connected to two anchors located at certain seating positions
in your vehicle.With this system, you do not
have touse avehicle seat belt to secure the
child restraint. Checkyour child restraint for
a label stating that it is compatible with
LATCH. This information may also be in the
instructions provided by the child restraint
manufacturer.
LRS0662
LATCH rigid-mounted attachment
When installing a child restraint, carefully
read and follow the instructions in this
manual and those supplied with the child
restraint.
Top tether anchor
WARNING
∙ Do not allow cargo to contact the top
tether strap when it is attached to the
top tether anchor. Properlysecure the
cargo so it does not contact the top
tether strap. Cargothat is not properly
secured or cargothat contactsthe top
tether strap may damage it during a
collision. A child could be seriously injured or killed in a collision if the top
tether strap is damaged.
∙ Child restraint anchorages are de-
signed to withstand only those loads
imposed by correctly fitted child restraints. Under no circumstances are
they to be used to attach adult seat
belts, or other items or equipment to
the vehicle. Doing so could damage
the child restraint anchorages. The
child restraint will not be properly installed using the damaged anchorages, and a child could be seriously
injured or killed in a collision.
1-34 Safety—Seats, seat belts and supplemental restraint system
Page 63
LRS2553
2nd row bench seat
1
Top tether strap
䊊
2
Anchor point
䊊
Top tether anchor point locations
Anchor points are located in the following
locations:
∙ 2nd row bench on the bottom of the
seatback in the seating positions
shown.
∙ 3rd row bench on the bottom of the
seatback on the passenger side seating position as shown.
LRS2916
3rd row bench seat
If you have any questions when installing a
top tether strap, it is recommended that
you visit a NISSAN dealer for this service.
REAR-FACING CHILD RESTRAINT
INSTALLATION USING LATCH
For additional information,refer toall Warnings and Cautions in the “Child safety” and
“Child restraints” sections of this manual
before installing a child restraint.
Do not use the lower anchors if the combined weight of the child and the child restraint exceeds 65 lbs. (29.5 kg). If the combined weight of the child and the child
restraint is greater than 65 lbs. (29.5kg), use
the vehicle’s seat belt (not the lower anchors) to install the child restraint. Be sure
to follow the child restraint manufacturer’s
instructions for installation.
Follow these steps to install a rear-facing
child restraint in the 2nd row seats using
the LATCH system:
1. Position the child restraint on the seat.
Always follow the child restraint manufacturer’s instructions.
Safety—Seats, seat belts and supplemental restraint system 1-35
Page 64
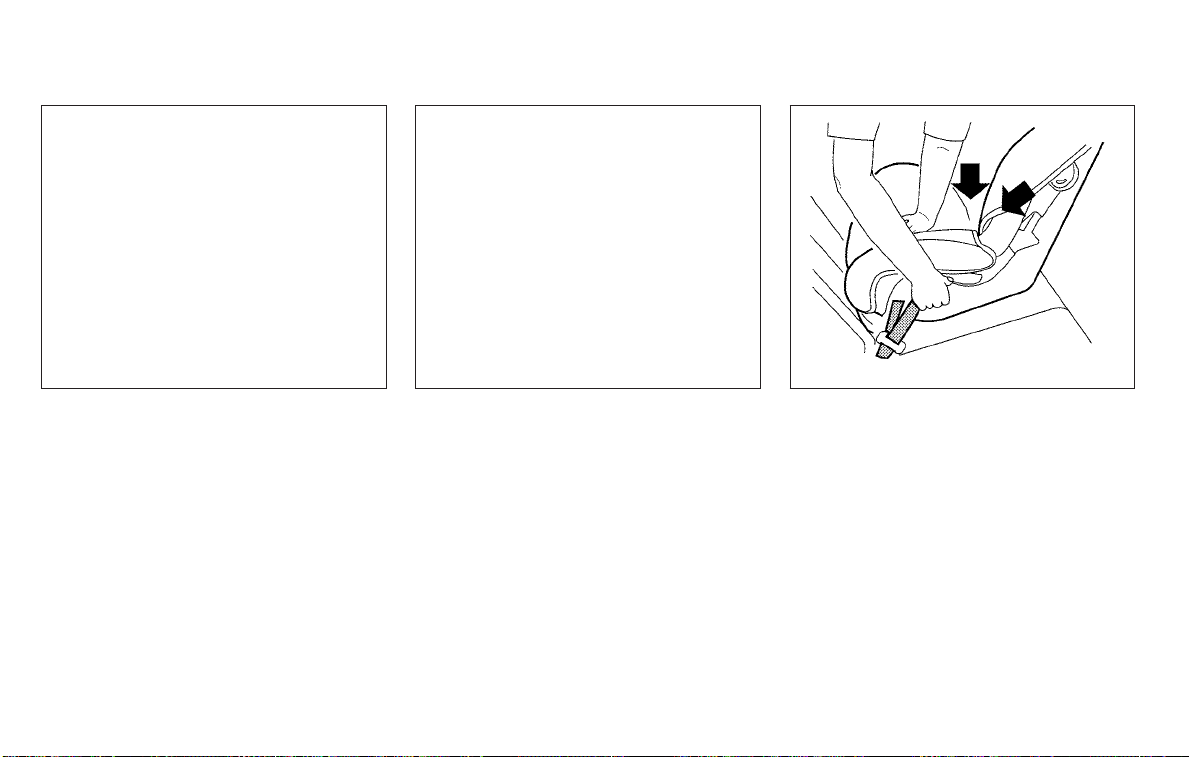
LRS2997
Rear-facing webbing-mounted – step 2
Rear-facing rigid-mounted – step 2
2. Secure the child restraint anchor attachments to the LATCH lower anchors. Check to make sure the LATCH
attachment is properly attached to the
lower anchors.
1-36 Safety—Seats, seat belts and supplemental restraint system
LRS2996
LRS0673
Rear-facing – step 3
3. For child restraints that are equipped
with webbing-mounted attachments,
remove any additional slack from the
anchor attachments. Press downward
and rearward firmly in the center of the
child restraint with your hand to compress the vehicle seat cushion and
seatback while tightening the webbing
of the anchor attachments.
Page 65
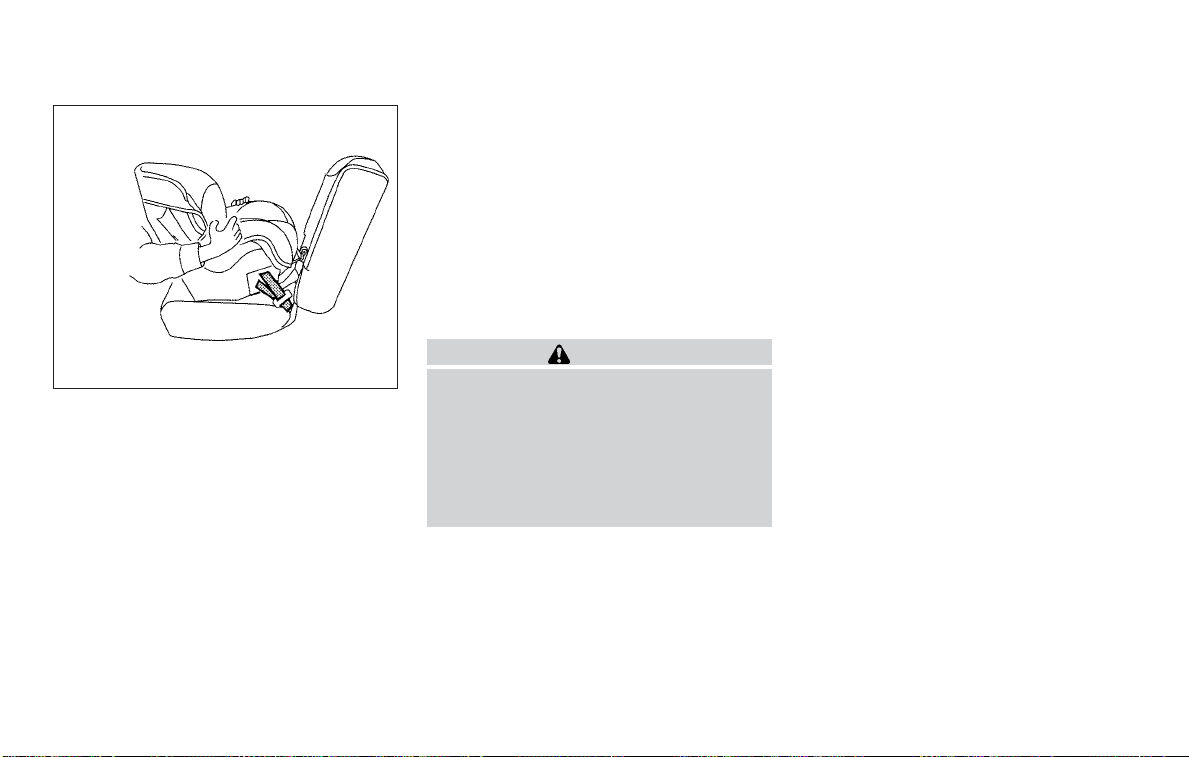
LRS0674
Rear-facing – step 4
4. After attaching the child restraint, test
it before you place the child in it.Push it
from side to side while holdingthe child
restraint near the LATCH attachment
path. The child restraint should not
move more than 1 inch (25 mm), from
side to side. Try to tug it forward and
check to see if the LATCH attachment
holds the restraint in place. If the restraint is not secure, tighten the LATCH
attachment as necessary, or put the
restraint in another seat and test it
again. You may need to try a different
child restraint or try installing by using
the vehicle seat belt (if applicable). Not
all child restraints fit in all types of vehicles.
5. Check to make sure the child restraint
is properly secured prior to each use. If
the child restraint is loose, repeat
steps 1 through 4.
REAR-FACING CHILD RESTRAINT
INSTALLATION USING THE SEAT
BELTS
WARNING
The three-point seat belt with Automatic Locking Retractor (ALR) must be
used when installing a child restraint.
Failureto use the ALR modewill resultin
the child restraint not being properly
secured. The restraint could tip over or
be loose and cause injury to a child in a
sudden stop or collision.
For additional information,refer toall Warnings and Cautions in the “Child safety” and
“Child restraints” sections of this manual
before installing a child restraint.
Do not use the lower anchors if the combined weight of the child and the child restraint exceeds 65 lbs. (29.5 kg). If the combined weight of the child and the child
restraint is greater than 65 lbs. (29.5kg), use
the vehicle’s seat belt (not the lower anchors) to install the child restraint. Be sure
to follow the child restraint manufacturer’s
instructions for installation.
Follow these steps to install a rear-facing
child restraint usingthe vehicleseat beltsin
the rear seats:
Safety—Seats, seat belts and supplemental restraint system 1-37
Page 66
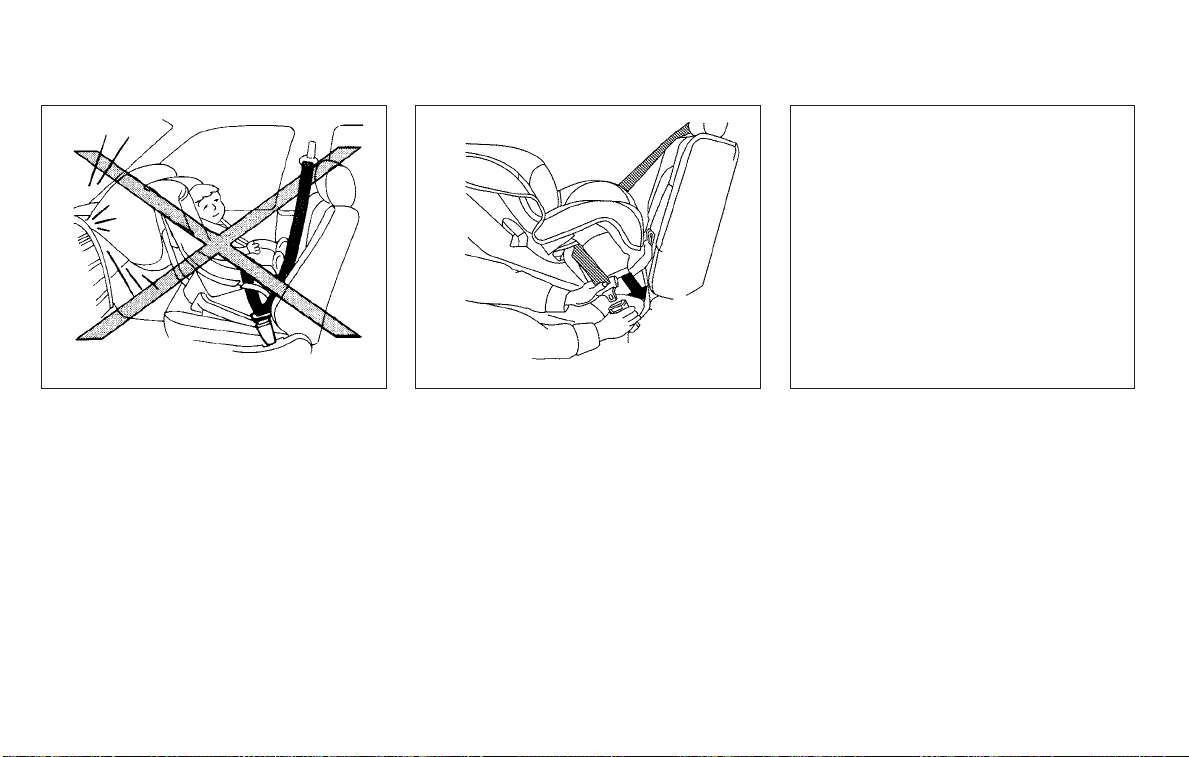
Rear-facing – step 1
1. Child restraints for infants must be
used in the rear-facing direction and
therefore must not be used in the
front seat. Position the child restraint
on the seat. Always follow the child restraint manufacturer’s instructions.
WRS0256
Rear-facing – step 2
2. Route the seat belttongue through the
child restraint and insert it into the
buckle until you hear and feel the latch
engage. Be sure to follow the child restraint manufacturer’s instructions for
belt routing.
1-38 Safety—Seats, seat belts and supplemental restraint system
WRS0761
LRS2395
Rear-facing – step 3
3. Pull the shoulder belt until the belt is
fully extended.At this time,the seatbelt
retractor is in the ALR mode (child restraint mode). It reverts to the ELR
mode when the seat belt is fully retracted.
Page 67
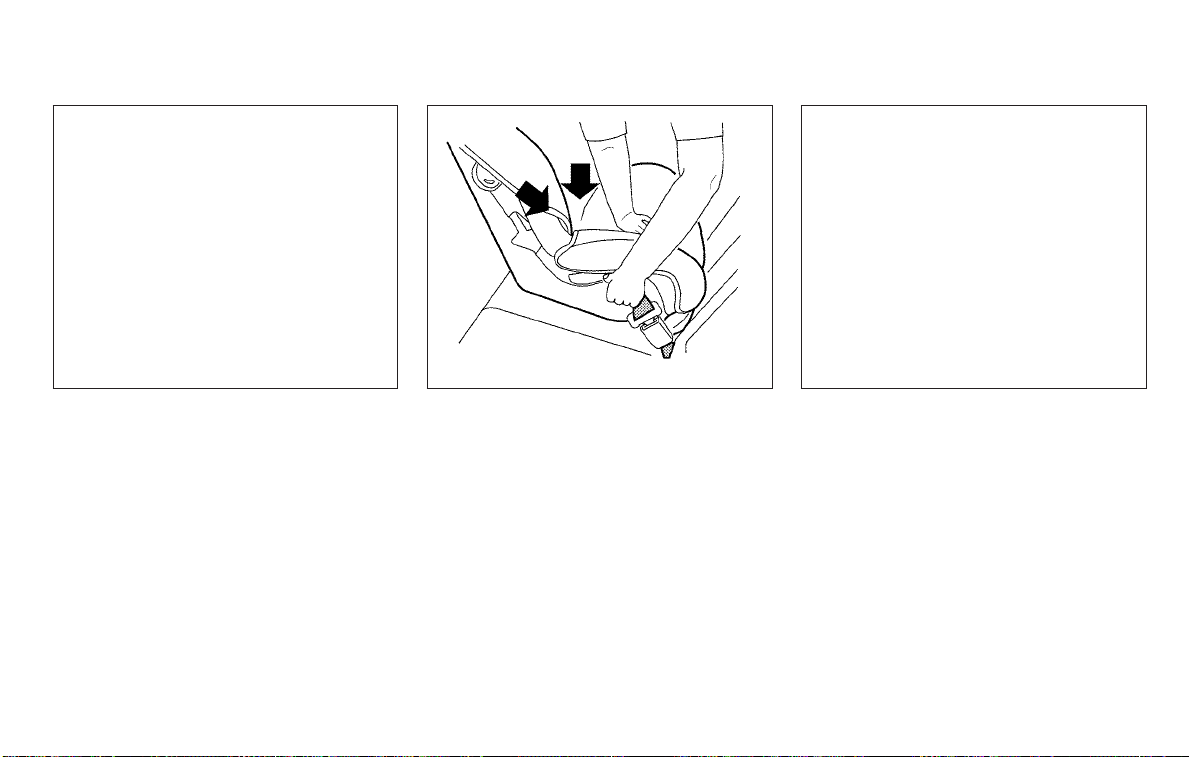
LRS2396
Rear-facing – step 4
4. Allow the seat belt to retract. Pull up on
the shoulder belt to remove any slack
in the belt.
WRS0762
Rear-facing – step 5
5. Remove any additional slack from the
seat belt; press downward and rearward firmly in the center of the child
restraint to compress the vehicle seat
cushion and seatback while pulling up
on the seat belt.
Safety—Seats, seat belts and supplemental restraint system 1-39
LRS2397
Rear-facing – step 6
6. After attaching the child restraint, test
it before you place the child in it. Push it
from side to sidewhile holdingthe child
restraint near the seat belt path. The
child restraint should not move more
than 1 inch (25 mm), from side to side.
Try to tug it forward and check to see if
the belt holds the restraint in place. If
the restraint is not secure, tighten the
seat belt as necessary, or put the restraint in another seat andtest it again.
You may need to try a different child
restraint. Not all child restraints fit in all
types of vehicles.
Page 68

7. Check to make sure that the child restraint is properly secured prior to each
use. If the seat belt is not locked, repeat
steps 3 through 6.
After the child restraint is removed and the
seat belt fully retracted, the ALR mode
(child restraint mode) is canceled.
FORWARD-FACING CHILD
RESTRAINT INSTALLATION USING
LATCH
For additional information,refer toall Warnings and Cautions in the “Child safety” and
“Child restraints” sections of this manual
before installing a child restraint.
Do not use the lower anchors if the combined weight of the child and the child restraint exceeds 65 lbs. (29.5 kg). If the combined weight of the child and the child
restraint is greater than 65 lbs. (29.5kg), use
the vehicle’s seat belt (not the lower anchors) to install the child restraint. Be sure
to follow the child restraint manufacturer’s
instructions for installation.
Follow these steps to install a forwardfacing child restraint in the 2nd row seats
using the LATCH system:
1. Position the child restraint on the seat.
Always follow the child restraint manufacturer’s instructions.
LRS2995
Forward-facing webbing-mounted –
step 2
2. Secure the child restraint anchor attachments to the LATCH lower anchors. Check to make sure the LATCH
attachment is properly attached to the
lower anchors.
If the child restraint is equipped with a
top tether strap, route the top tether
strap and secure the tether strap to
the tether anchor point. For additional
information, refer to “Installing top
tether strap” in this section.
1-40 Safety—Seats, seat belts and supplemental restraint system
Page 69
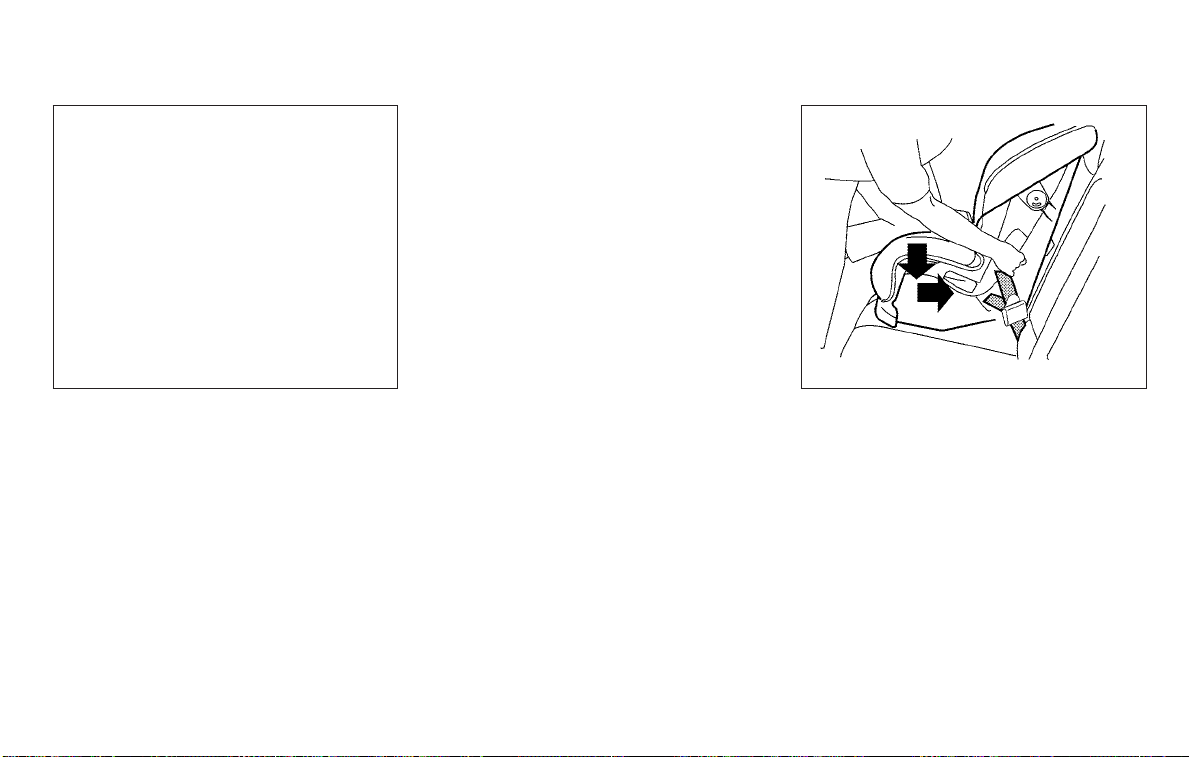
ditional information, refer to “Head
restraints/headrests” in this section.
If the seating position does not have
an adjustable head restraint/headrest
and it is interfering with the proper
child restraint fit, try another seating
position or a different child restraint.
LRS2994
Forward-facing rigid-mounted – step 2
Do not install child restraints that require the use of a top tether strap in
seating positions that do not have a
top tether anchor.
3. The back of the child restraint should
be secured against the vehicle seatback.
If necessary,adjust orremove thehead
restraint/headrest to obtain the correct child restraint fit. If the head
restraint/headrest is removed, store it
in a secure place. Be sure to reinstall
the head restraint/headrest when
the childrestraint is removed.For ad-
LRS0671
Forward-facing – step 4
4. For child restraints that are equipped
with webbing-mounted attachments,
remove any additional slack from the
anchor attachments. Press downward
and rearwardfirmly in the centerof the
child restraint with your knee to compress the vehicle seat cushion and
seatback while tightening the webbing
of the anchor attachments.
5. Tighten the tether strap according to
the manufacturer’s instructions to remove any slack.
Safety—Seats, seat belts and supplemental restraint system 1-41
Page 70
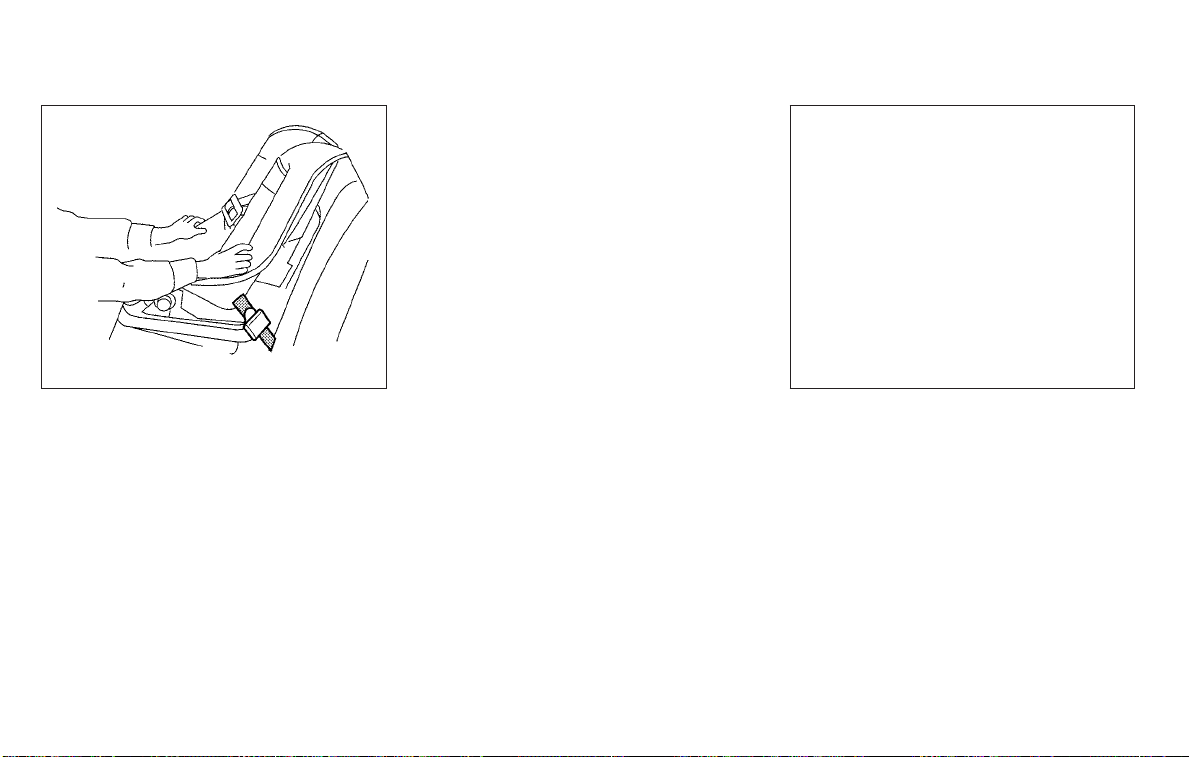
7. Check to make sure the child restraint
is properly secured prior to each use. If
the child restraint is loose, repeat
steps 1 through 6.
WRS0697
Forward-facing – step 6
6. After attaching the child restraint, test
it before you place the child in it. Push it
from side to sidewhile holdingthe child
restraint near the LATCH attachment
path. The child restraint should not
move more than 1 inch (25 mm), from
side to side. Try to tug it forward and
check to see if the LATCH attachment
holds the restraint in place. If the restraint is not secure, tighten the LATCH
attachment as necessary, or put the
restraint in another seat and test it
again. You may need to try a different
child restraint. Not all child restraints fit
in all types of vehicles.
1-42 Safety—Seats, seat belts and supplemental restraint system
LRS2553
2nd row bench seat
Top tether strap
Anchor point
䊊
䊊
1
2
Installing top tether strap
The childrestraint toptether strap must be
used wheninstalling thechild restraint with
the LATCH lower anchor attachments.
First, secure the child restraint with the
LATCH lower anchors (2nd row bench outboard seating positions only).
Page 71
2nd row bench seat
OUTBOARD SEATING POSITIONS
1. Remove the head restraint/headrest
and store it in a secure place. Be sure to
reinstall the head restraint/headrest
when the childrestraint is removed. For
additional information about head
restraint/headrest adjustment, removal and installation, refer to “Head
restraints/headrests” in this section.
1
2. Position the top tether strap
the seatback.
3. Secure the tether strap to the tether
anchor point
4. Tighten the tether strap according to
the manufacturer’s instructions to remove any slack.
If you have any questions when installing a top tether strap, it is recommended
that you visit a NISSAN dealer for this
service.
2
as shown.
䊊
䊊
over
WARNING
Child restraint anchorages are designed to withstand only those loads
imposed by correctly fitted child restraints. Under no circumstances are
they to be used to attach adult seat
belts, or other items or equipment to
the vehicle. Doing so could damage the
child restraint anchorages. The child restraint will not be properly installed using the damaged anchorage, and a
child could be seriously injured or killed
in a collision.
FORWARD-FACING CHILD
RESTRAINT INSTALLATION USING
THE SEAT BELTS
WARNING
The three-point seat belt with Automatic Locking Retractor (ALR) must be
used when installing a child restraint.
Failureto use the ALR modewill resultin
the child restraint not being properly
secured. The restraint could tip over or
be loose and cause injury to a child in a
sudden stop or collision. Also, it can
change the operation of the front passenger air bag. For additional information, refer to “Front passenger air bag
and status light” in this section.
Safety—Seats, seat belts and supplemental restraint system 1-43
Page 72
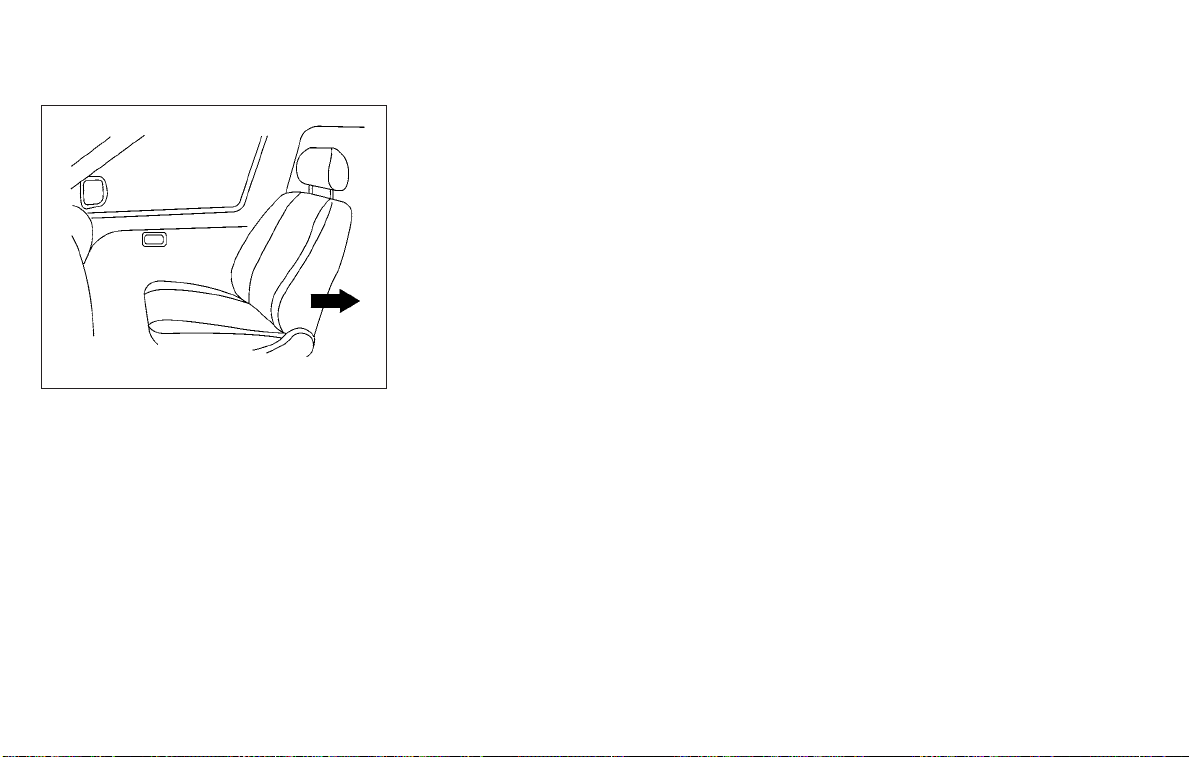
Follow these steps to install a forwardfacing child restraint using the vehicle seat
belt in the rear seats or in the frontpassenger seat:
1. If you must install a child restraint in
the front seat, it should be placed in a
forward-facing direction only. Move
the seat to the rearmost position.
Child restraints for infants must be
used in the rear-facing direction and,
therefore, must not be used in the
front seat.
WRS0699
Forward-facing (front passenger seat) –
step 1
For additional information,refer toall Warnings and Cautions in the “Child safety” and
“Child restraints” sections of this manual
before installing a child restraint.
Do not use the lower anchors if the combined weight of the child and the child restraint exceeds 65 lbs. (29.5 kg). If the combined weight of the child and the child
restraint is greater than 65 lbs. (29.5kg), use
the vehicle’s seat belt (not the lower anchors) to install the child restraint. Be sure
to follow the child restraint manufacturer’s
instructions for installation.
2. Position the child restraint on the seat.
Always follow the child restraint manufacturer’s instructions.
The back of the child restraint should
be secured against the vehicle seatback.
If necessary,adjust orremove thehead
restraint/headrest to obtain the correct child restraint fit. If the head
restraint/headrest is removed, store it
in a secure place. Be sure to reinstall
the head restraint/headrest when
the childrestraint is removed.For ad-
ditional information about head
restraint/headrest adjustment, removal and installation, refer to “Head
restraints/headrests” in this section.
1-44 Safety—Seats, seat belts and supplemental restraint system
If the seating position does not have
an adjustable head restraint/headrest
and it is interfering with the proper
child restraint fit, try another seating
position or a different child restraint.
Page 73
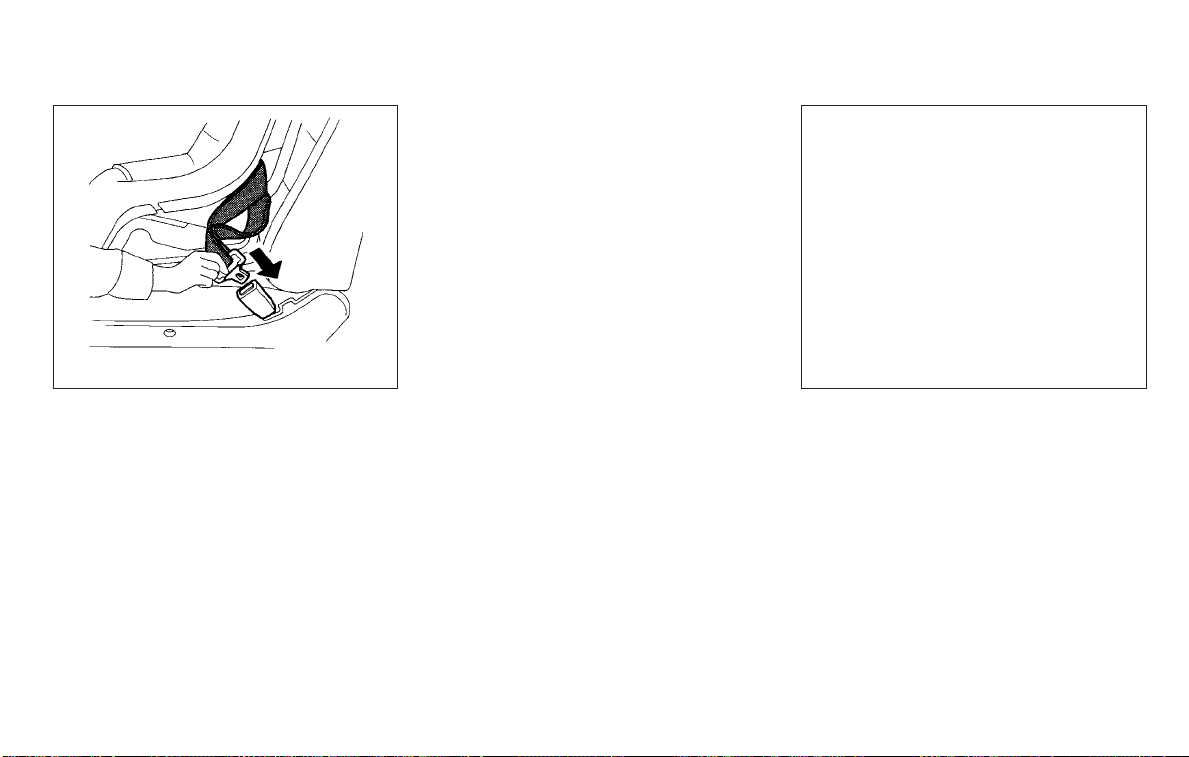
Do not install child restraints that require the use of a top tether strap in
seating positions that do not have a
top tether anchor.
WRS0680
Forward-facing – step 3
3. Route the seat belttongue through the
child restraint and insert it into the
buckle until you hear and feel the latch
engage. Be sure to follow the child restraint manufacturer’s instructions for
belt routing.
If the child restraint is equipped with a
top tether strap, route the top tether
strap and secure the tether strap to
the tether anchor point (2nd row installation only). For additional information, refer to “Installing top tether strap”
in this section.
LRS2394
Forward-facing – step 4
4. Pull the shoulder belt until the belt is
fully extended.At this time, the seat belt
retractor is in the ALR mode (child restraint mode). It reverts to ELR mode
when the seat belt is fully retracted.
Safety—Seats, seat belts and supplemental restraint system 1-45
Page 74
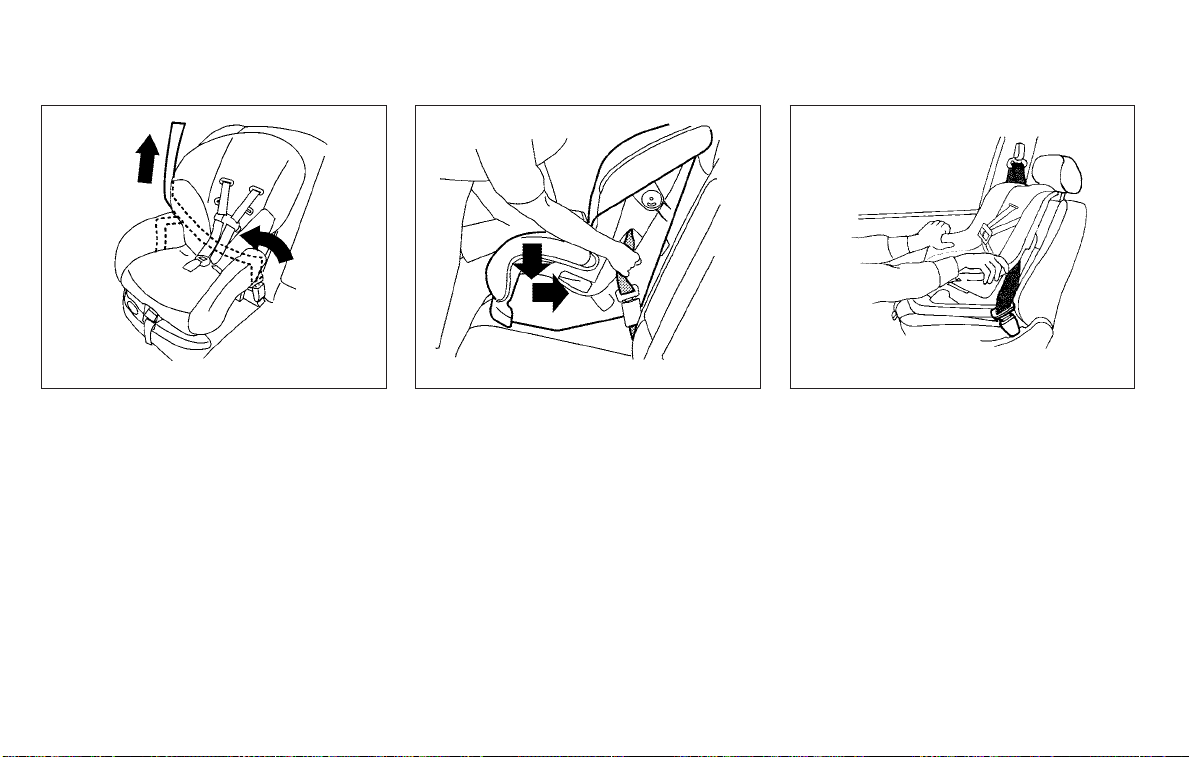
LRS0668
Forward-facing – step 5
5. Allow the seat belt to retract. Pull up on
the shoulder belt to remove any slack
in the belt.
6. Remove any additional slack from the
Forward-facing – step 6
seat belt; press downward and rearward firmly in the center of the child
restraint with your knee to compress
the vehicle seat cushion and seatback
while pulling up on the seat belt.
7. Tighten the tether strap according to
the manufacturer’s instructions to remove any slack.
1-46 Safety—Seats, seat belts and supplemental restraint system
WRS0681
Forward-facing – step 8
WRS0698
8. After attaching the child restraint, test
it before you place the child in it. Push it
from side to side while holding the child
restraint near the seat belt path. The
child restraint should not move more
than 1 inch (25 mm), from side to side.
Try to tug it forward and check to see if
the belt holds the restraint in place. If
the restraint is not secure, tighten the
seat belt as necessary, or put the restraint in another seat and test it again.
You may need to try a different child
restraint. Not all child restraints fit in all
types of vehicles.
Page 75
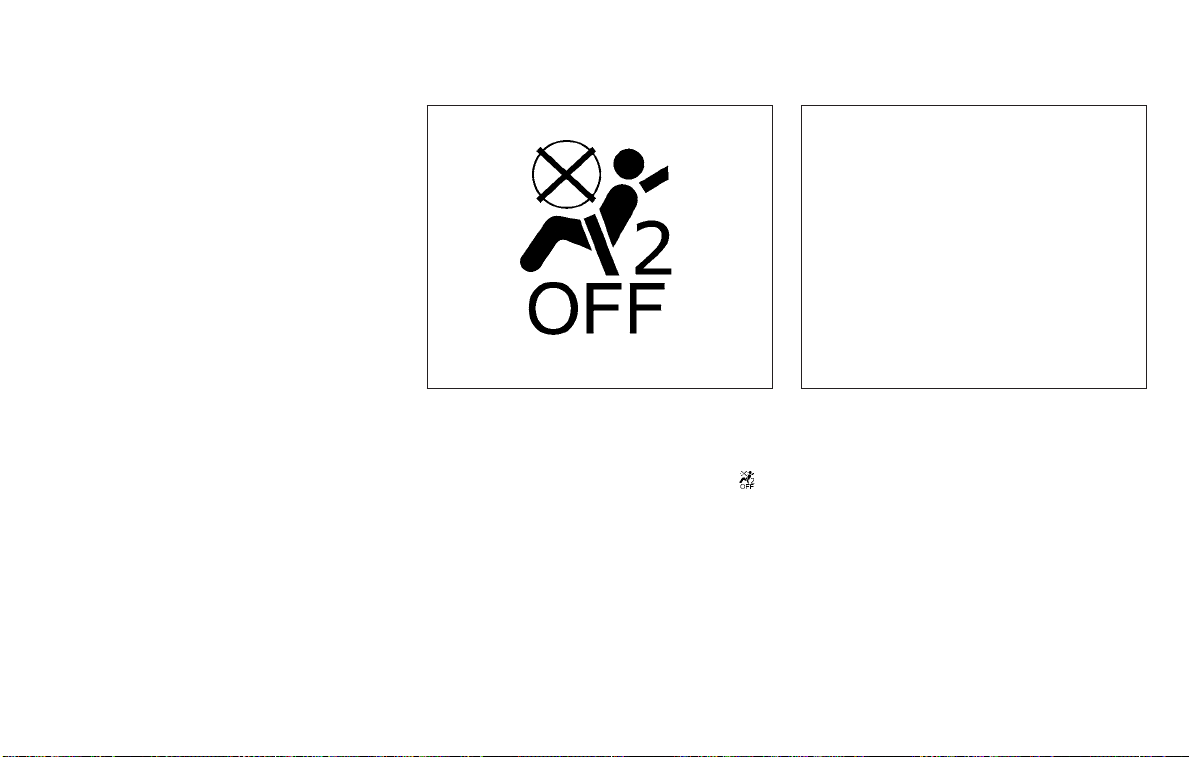
9. Check to make sure the child restraint
is properly secured prior to each use. If
the seat belt is not locked, repeat
steps 4 through 8.
LRS0865
Forward-facing – step 10
10. If the child restraint is installed in the
front passenger seat, place the ignition
switch in the ON position. The front
passenger air bag status light
should illuminate. If this light is not illuminated, refer to “Front passenger air
bag and status light” in this section.
Move the child restraint to another
seating position. Have the system
checked. It is recommended that you
visit a NISSAN dealer for this service.
After the child restraint is removed and the
seat belt is fully retracted, the ALR mode
(child restraint mode) is canceled.
Safety—Seats, seat belts and supplemental restraint system 1-47
LRS2553
2nd row bench seat
Top tether strap
Anchor point
䊊
䊊
1
2
Installing top tether strap
The childrestraint toptether strap must be
used wheninstalling thechild restraint with
seat belts.
First, secure the child restraintwith theseat
belt.
Page 76
2nd row bench seat
OUTBOARD SEATING POSITIONS
1. Remove the head restraint/headrest
and store it in a secure place. Be sure to
reinstall the head restraint/headrest
when the childrestraint is removed. For
additional information about head
restraint/headrest adjustment, removal and installation, refer to “Head
restraints/headrests” in this section.
2. Position the top tether strap
shown.
3. Secure the tether strap to the tether
anchor point
4. Tighten the tether strap according to
the manufacturer’s instructions to remove any slack.
CENTER SEATING POSITION
1. Position the top tether strap
shown.
2. Secure the tether strap to the tether
anchor point
2
as shown.
䊊
2
as shown.
䊊
䊊
䊊
1
1
3. Tighten the tether strap according to
the manufacturer’s instructions to remove any slack. Make sure the head
restraint/headrest does not contact
the top tether strap.
If you have any questions when installing a top tether strap, it is recommended
that you visit a NISSAN dealer for this
service.
WARNING
as
Child restraint anchorages are designed to withstand only those loads
imposed by correctly fitted child restraints. Under no circumstances are
they to be used to attach adult seat
belts, or other items or equipment to
the vehicle. Doing so could damage the
child restraint anchorages. The child restraint will not be properly installed using the damaged anchorage, and a
as
child could be seriously injured or killed
in a collision.
LRS2916
3rd row bench seat
1
Top tether strap
䊊
2
Anchor point
䊊
3rd row bench seat
WARNING
In the 3rd row bench seat, a child restraint with a top tether strap can only
be used on the passenger side seating
position. Do not place inthe driver’s side
seating position and attempt to angle
the tether strap to the passenger side
seating position.
1-48 Safety—Seats, seat belts and supplemental restraint system
Page 77
The passenger side of the 3rd row bench
seat is the seating position that can use a
top tether strap. First, secure the child restraint with the seat belt, as applicable.
1
1. Position the top tether strap
shown.
2. Secure the tether strap to the tether
anchor point
3. Tighten the tether strap according to
the manufacturer’s instructions to remove any slack. Make sure the head
restraint/headrest does not contact
the top tether strap.
If you have any questions when installing a top tether strap, it is recommended
that you visit a NISSAN dealer for this
service.
2
as shown.
䊊
䊊
as
WARNING
Child restraint anchorages are designed to withstand only those loads
imposed by correctly fitted child restraints. Under no circumstances are
they to be used to attach adult seat
belts, or other items or equipment to
the vehicle. Doing so could damage the
child restraint anchorages. The child restraint will not be properly installed using the damaged anchorage, and a
child could be seriously injured or killed
in a collision.
BOOSTER SEATS
For additional information on installing a
booster seat in your vehicle, follow the instructions outlined in this section.
Precautions on booster seats
WARNING
If a booster seat and seat belt are not
used properly, the risk of a child being
injured or killed in a sudden stop or collision greatly increases:
– Make sure the shoulder portion of
the belt is away from the child’s
face and neck and the lap portion
of the belt does not cross the
stomach.
– Make sure the shoulder belt is not
behind the child or under the
child’s arm.
– A booster seat must only be in-
stalled in a seating position that
has a lap/shoulder belt.
Safety—Seats, seat belts and supplemental restraint system 1-49
Page 78
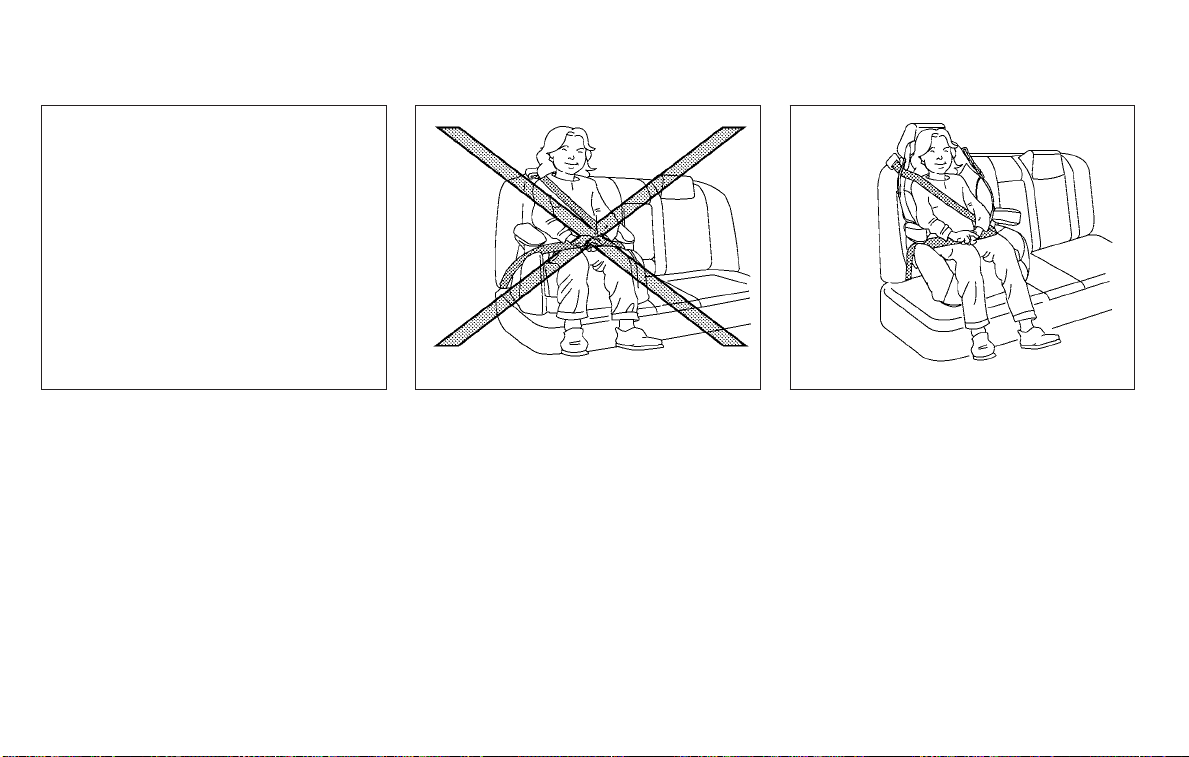
LRS2479 LRS0453 LRS0464
A. Low back booster seat
B. High back booster seat
Booster seats of various sizes are offered
by several manufacturers. When selecting
any booster seat, keep the following points
in mind:
∙ Choose only a booster seat with a label
certifying that it complies with Federal
Motor Vehicle Safety Standard 213 or
Canadian Motor Vehicle Safety Standard 213.
∙ Check the booster seat in your vehicle
to be sure it is compatible with the vehicle’s seat and seat belt system.
1-50 Safety—Seats, seat belts and supplemental restraint system
∙ Make sure the child’s head will be prop-
erly supported by the booster seat or
vehicle seat. The seatback must be at
or above the center of the child’s ears.
For example, if a low back booster seat
is chosen,the vehicle seatback must be
at orabove thecenter ofthe child’sears.
If the seatback is lower than the center
of the child’s ears, a high back booster
seat should be used.
Page 79
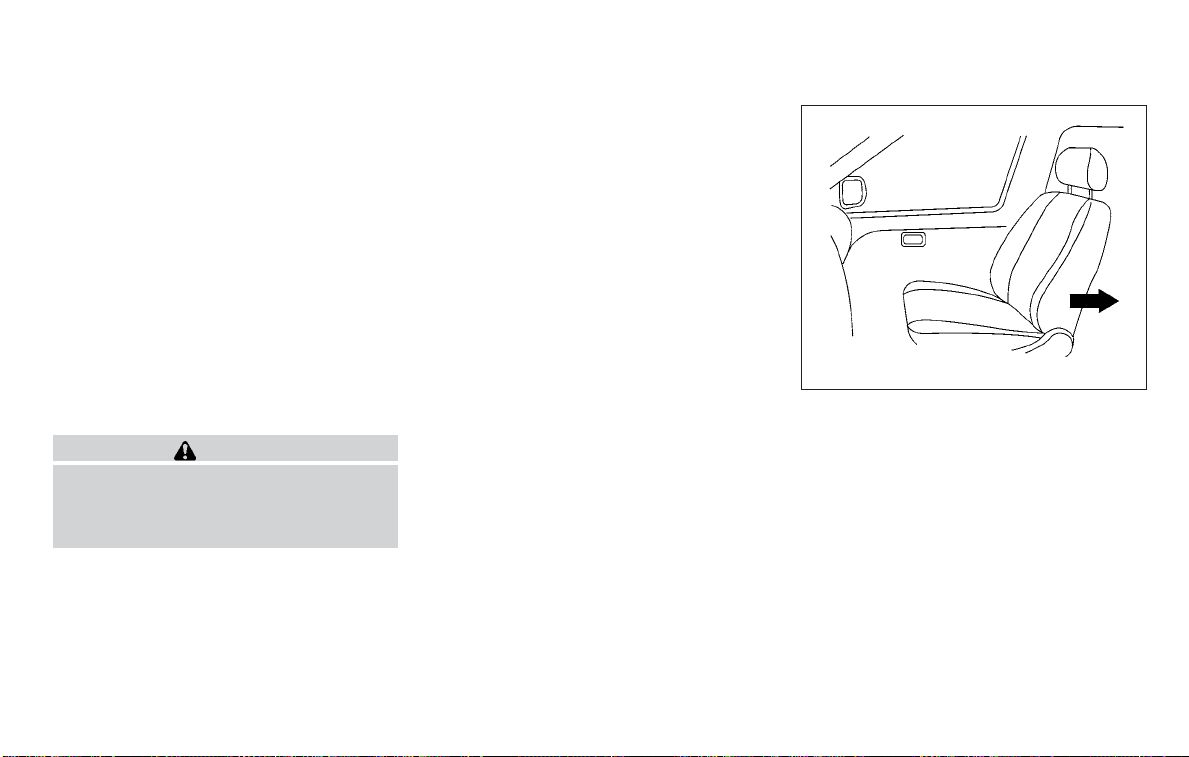
∙ If the booster seat is compatible with
your vehicle, place the child in the
booster seat and check the various adjustments tobe sure thebooster seat is
compatible with the child. Always follow
all recommended procedures.
All U.S. states and Canadian provinces or
territories require that infants and small
children be restrained in an approved
child restraint at all times while the vehicle is being operated.
The instructions in this section apply to
booster seat installation in the rear seats
or the front passenger seat.
Booster seat installation
WARNING
To avoid injury to child, do not use the
lap/shoulder belt in the Automatic
Locking Retractor (ALR) mode when using a booster seat with the seat belts.
For additional information,refer toall Warnings and Cautions in the “Child safety,”
“Child restraints” and “Booster seats” sections ofthis manual before installing a child
restraint.
Follow these steps to install a booster seat
in the 2nd or 3rd rows or in the front passenger seat:
WRS0699
1. If you must install a booster seat in
the front seat, move the seat to the
rearmost position.
2. Position the booster seat on the seat.
Only place it in a front-facing direction.
Always follow the booster seat manufacturer’s instructions.
Safety—Seats, seat belts and supplemental restraint system 1-51
Page 80
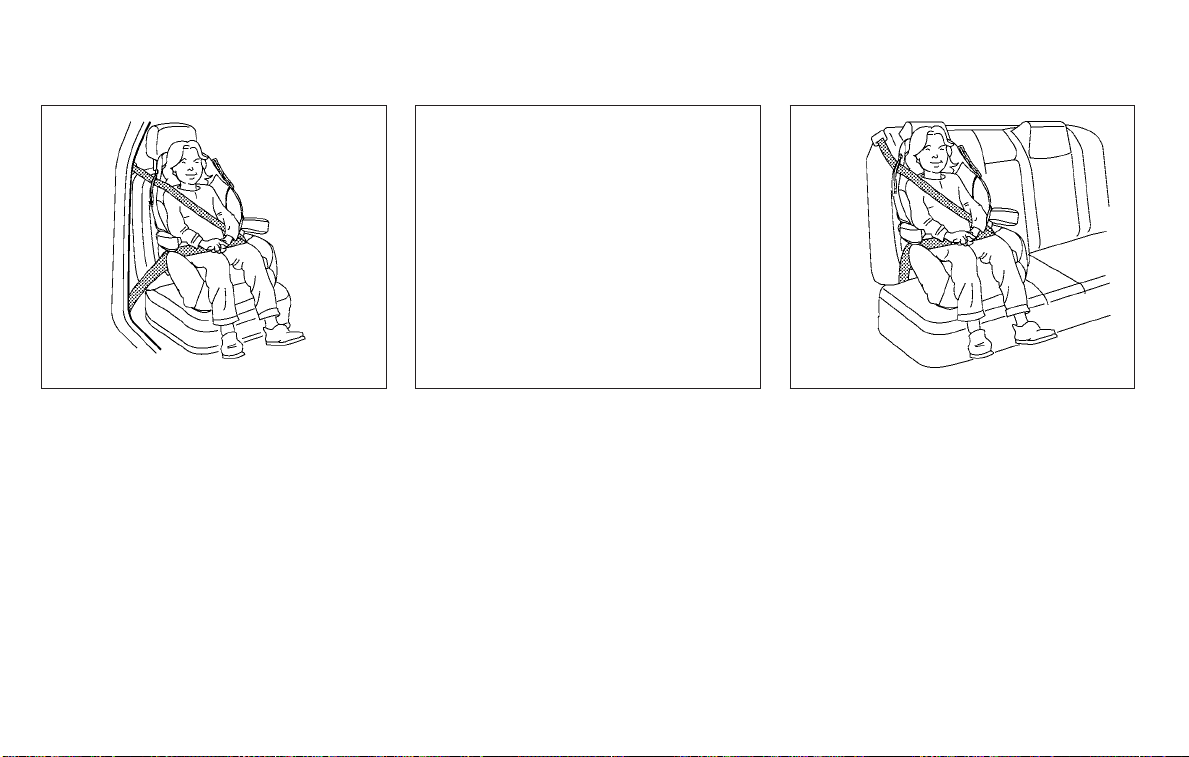
LRS0454
Front passenger position
2nd row center position
1-52 Safety—Seats, seat belts and supplemental restraint system
LRS0451
LRS0452
2nd row outboard position
3. The booster seat should be positioned
on the vehicle seat so that it is stable.
If necessary,adjust orremove thehead
restraint/headrest to obtain the correct booster seat fit. If the head
restraint/headrest is removed, store it
in a secure place. Be sure to reinstall
the head restraint/headrest when
the booster seat is removed. For ad-
ditional information, refer to “Head
restraints/headrests” in this section.
Page 81
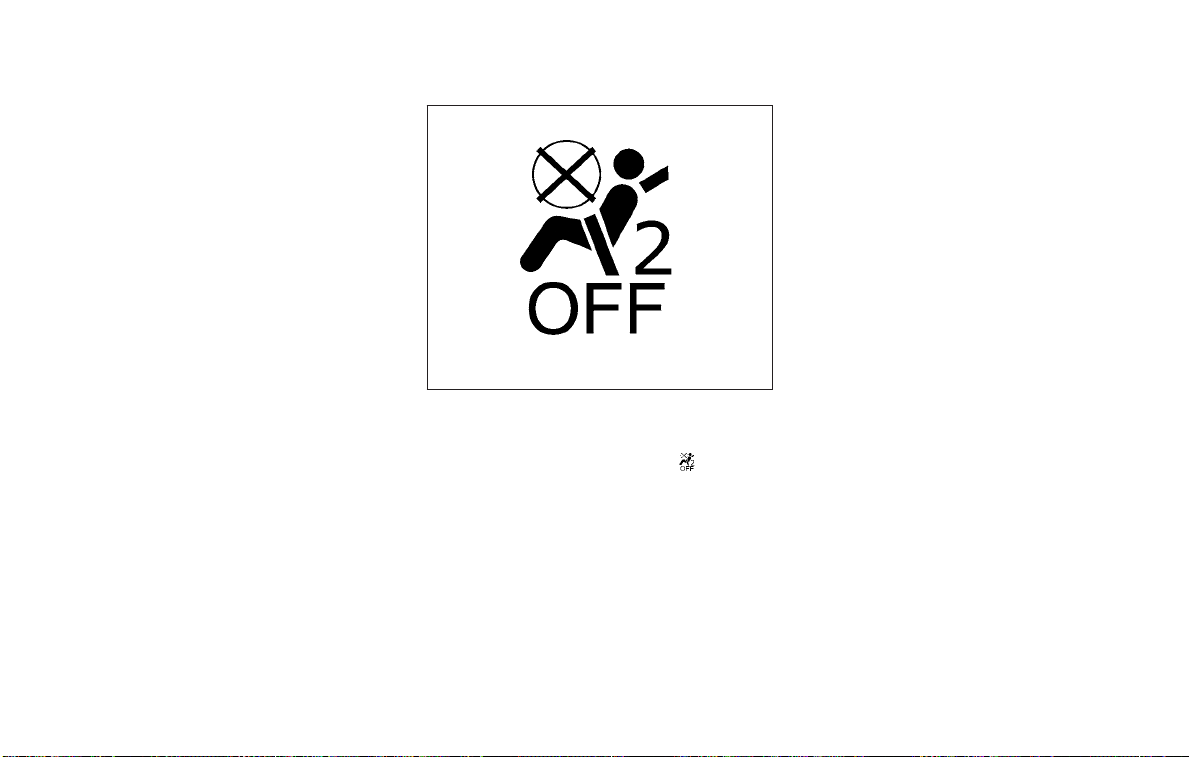
SUPPLEMENTAL RESTRAINT SYSTEM
(SRS)
If the seating position does not have
an adjustable head restraint/headrest
and it is interfering with the proper
booster seat fit, try another seating
position or a different booster seat.
4. Position the lap portion of the seat belt
low and snug on the child’s hips. Be
sure to follow the booster seat manufacturer’s instructions foradjusting the
seat belt routing.
5. Pull the shoulder belt portion of the
seat belt toward the retractor to take
up extra slack. Be sure the shoulder
belt is positioned across the top,
middle portion of the child’s shoulder.
Be sure to follow the booster seat
manufacturer’s instructions for adjusting the seat belt routing.
6. Follow the warnings, cautions and instructions for properly fastening a seat
belt shown in “Three-point type seat
belt with retractor” in this section.
LRS0865
7. If the booster seat is installed in the
front passenger seat, place the ignition
switch inthe ONposition. Thefront pas-
senger air bagstatus light
may not illuminate, depending on the
size of the child and the type of booster
seat being used. For additional information, refer to “Front passenger air
bag and status light” in this section.
may or
Safety—Seats, seat belts and supplemental restraint system 1-53
PRECAUTIONS ON SRS
This SRS section contains important information concerning the following systems:
∙ Driver and front passenger supplemen-
tal front-impact air bag (NISSAN Advanced Air Bag System)
∙ Front seat-mounted side-impact
supplemental air bag
∙ Roof-mounted curtain side-impact and
rollover supplemental air bag
∙ Seat belt with pretensioner(s) (front
seats)
Supplemental front-impact air bag system
The NISSAN Advanced Air Bag System can
help cushion the impact force to the head
and chest of thedriver andfront passenger
in certain frontal collisions.
Front seat-mounted side-impact
supplemental air bag system
This system can help cushion the impact
force to the chest area of the driver and
front passenger in certain side-impact collisions. The side air bags are designed to
inflate on the side where the vehicle is impacted.
Page 82
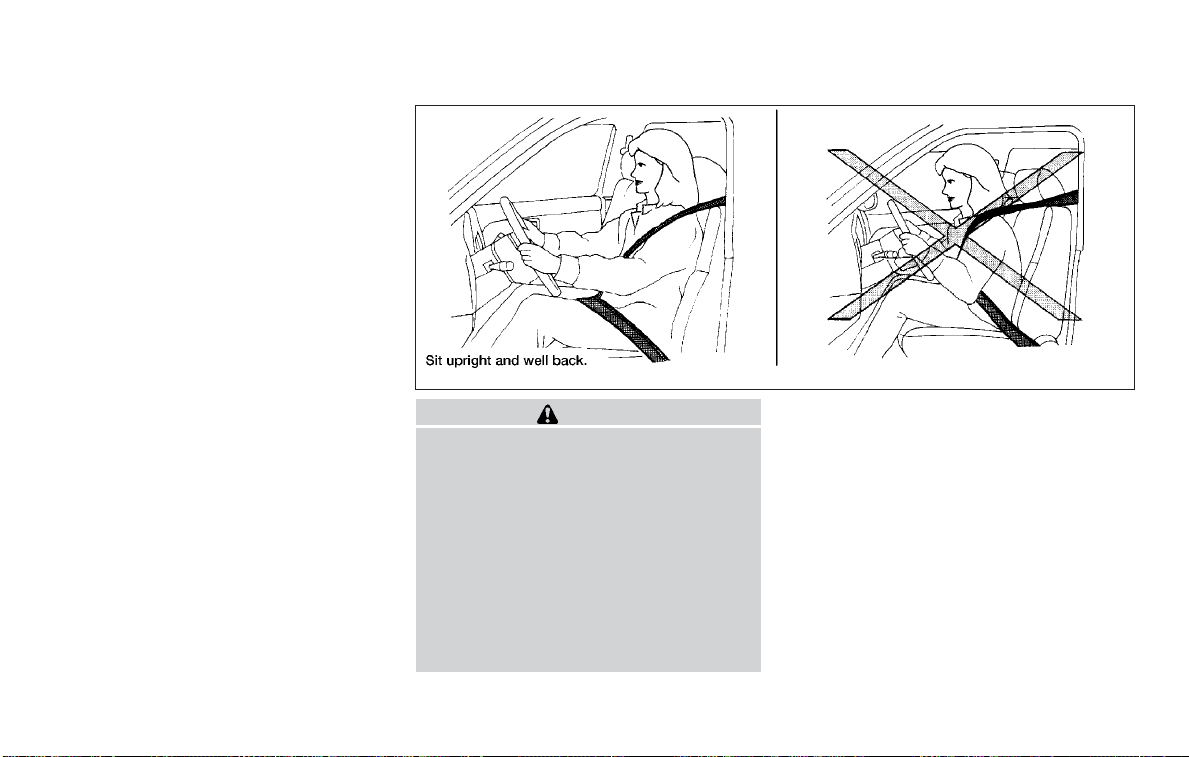
Roof-mounted curtain side-impact and
rollover supplemental air bag system
This system can help cushion the impact
force to the head of occupants in front and
rear outboard seating positions in certain
side-impact collisions. The curtain air bags
are designed to inflate on the side where
the vehicle is impacted. In a rollover, the
curtain air bags are designed to inflate and
remain inflated for a short time.
The SRS is designed to supplement the
crash protection providedby thedriver and
front passenger seat belts and is not a
substitute for them. Seat belts should always be correctly worn and the occupant
seated a suitable distance away from the
steering wheel, instrument panel and door
finishers. For additional information, refer
to “Seat belts” in this section.
The supplemental air bags operate only
when the ignition switch is placed in the
ON position.
After placing the ignition switch in the
ON position, the supplemental air bag
warning light illuminates. The supplemental air bag warning light will turn off
after about 7 seconds if the system is
operational.
WRS0031
WARNING
∙ The front air bags ordinarily will not
inflate in the event of a side impact,
rear impact, rollover, or lower severity
frontal collision. Always wear your
seat belts to help reduce the risk or
severity of injury in various kinds of
accidents
∙ The front passenger air bag will not
inflate if the passenger air bag status
light is lit. For additional information,
refer to “Front passenger air bag and
status light” in this section.
1-54 Safety—Seats, seat belts and supplemental restraint system
Page 83

∙ The seat belts and the front air bags
are most effective when you are sitting well back and upright in the seat.
The front air bags inflate with great
force. Even with the NISSAN Advanced
Air Bag System, if you are unrestrained,leaning forward,sitting sideways orout of position in any way,you
are at greater risk of injury or death in
a crash. You may also receive serious
or fatal injuries from the front air bag
if youare up against itwhen itinflates.
Always sit back against the seatback
and as far away as practical from the
steering wheel or instrument panel.
Always properly use the seat belts.
∙ The driver and front passenger seat
belt buckles are equipped with sensors that detect if the seat belts are
fastened. The NISSAN Advanced Air
Bag Systemmonitors the severityof a
collision and seat belt usage, then inflates the air bags as needed. Failure
to properly wear seat belts can increase the risk or severity of injury in
an accident.
∙ The front passenger seat is equipped
with an occupant classification sensor (weight sensor) that turns the
front passenger air bag OFF under
some conditions. This sensor is only
used in this seat.Failure tobe properly
seated and wearing the seat belt can
increasethe riskor severityof injury in
an accident. For additional information, refer to “Front passenger air bag
and status light” in this section.
∙ Keep hands on the outside of the
steering wheel. Placing them inside
the steering wheel rim could increase
the risk that they areinjured when the
front air bag inflates.
Safety—Seats, seat belts and supplemental restraint system 1-55
Page 84
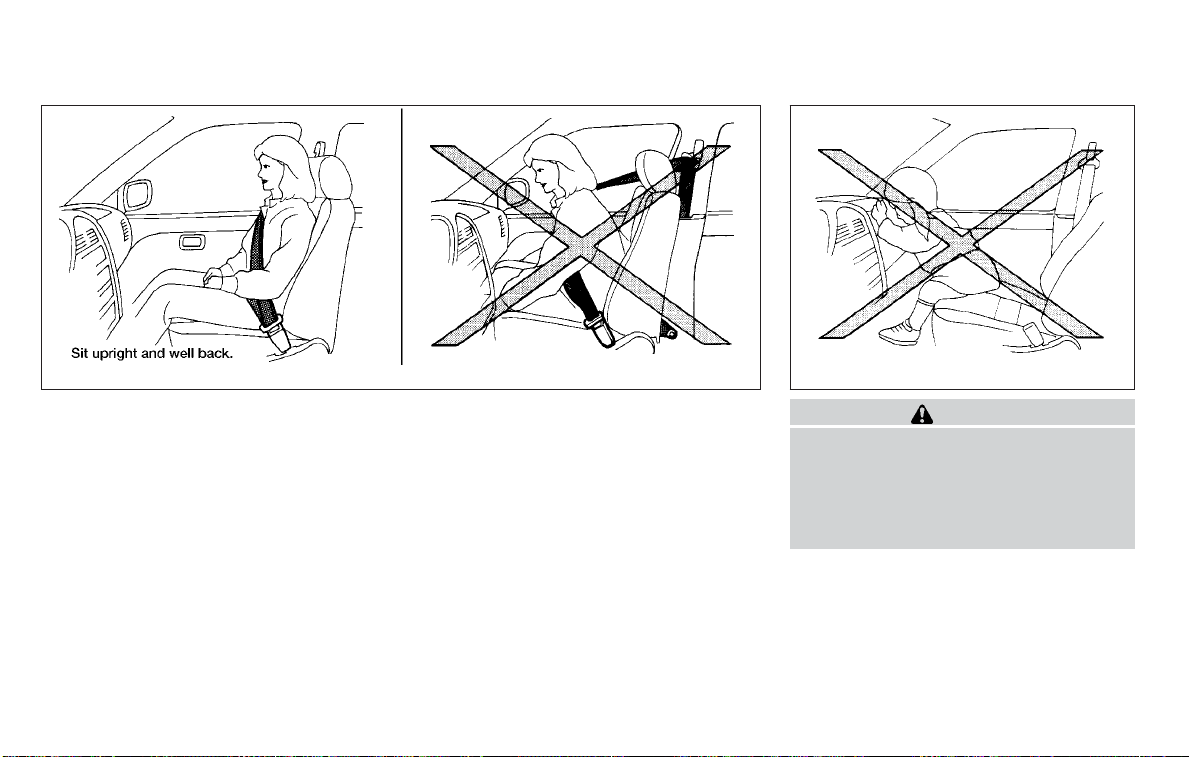
1-56 Safety—Seats, seat belts and supplemental restraint system
ARS1133 ARS1041
WARNING
∙ Never let children ride unrestrained or
extend their hands or face out of the
window. Do not attempt to hold them
in yourlap or arms.Some examples of
dangerous riding positions areshown
in the illustrations.
Page 85
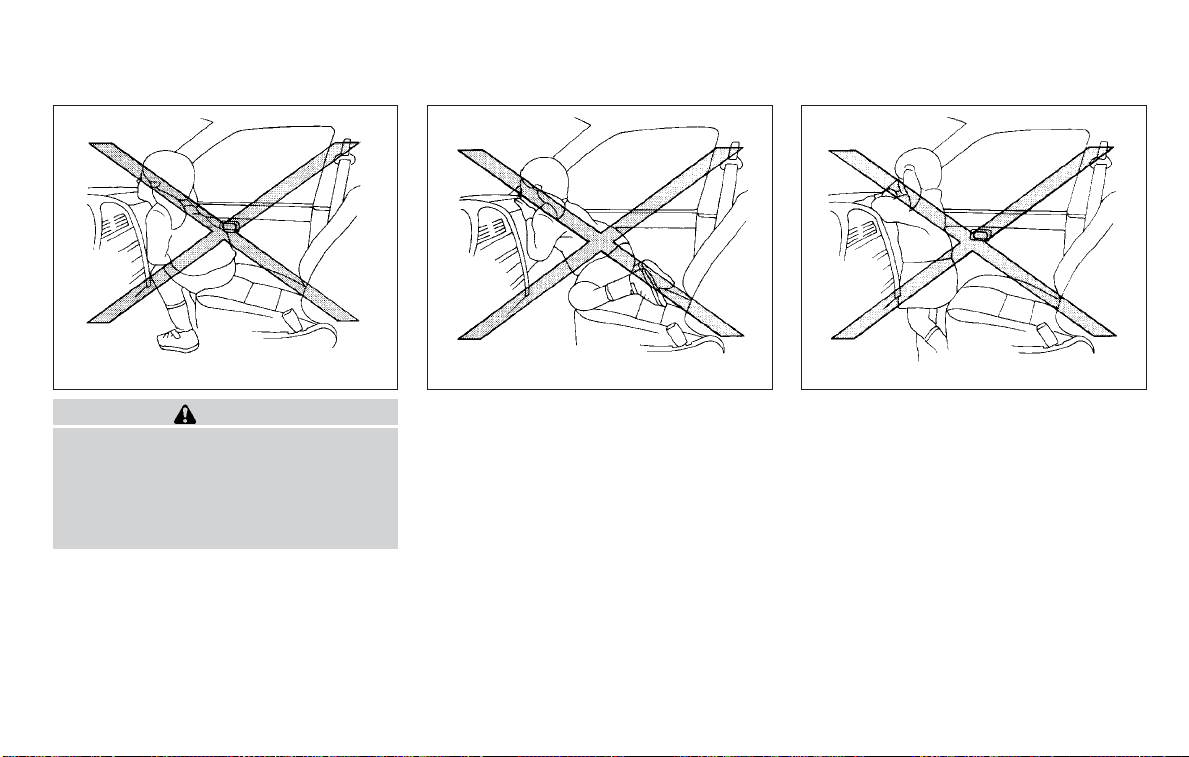
ARS1042 ARS1043 ARS1044
WARNING
∙ Children may be severely injured or
killed when the front air bags, side air
bags or curtain air bags inflate if they
are not properly restrained. Pre-teens
and children should be properly restrained in the rear seat, if possible.
Safety—Seats, seat belts and supplemental restraint system 1-57
Page 86
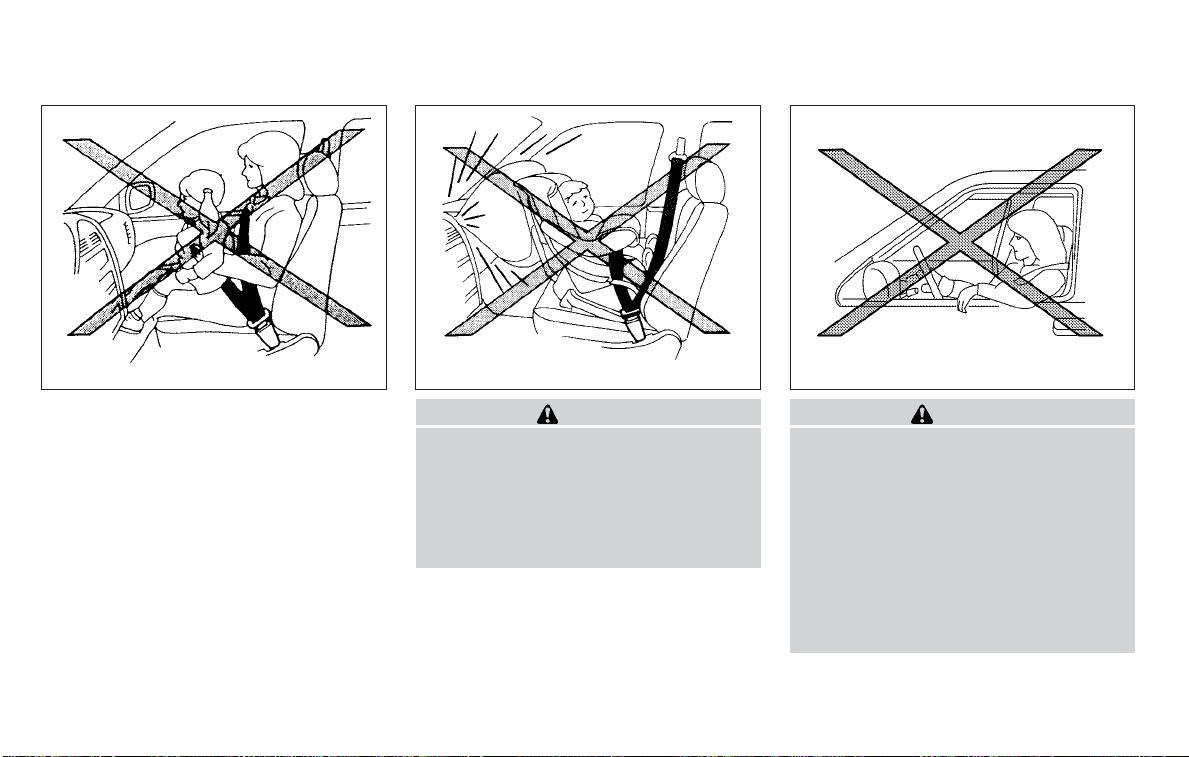
ARS1045 ARS1046 WRS0431
WARNING
∙ Even with the NISSAN Advanced Air
Bag System, never install a rearfacing child restraint in the front seat.
An inflating front air bag could seriously injure or kill your child. For additional information, refer to “Child restraints” in this section.
1-58 Safety—Seats, seat belts and supplemental restraint system
WARNING
Front seat-mounted side-impact
supplemental air bags and roofmounted curtain side-impact and rollover supplemental air bags:
∙ The side air bags and curtain air bags
ordinarily will not inflate in the event
of a frontal impact, rear impact, or
lower severity side collision. Always
wear your seat belts to help reduce
the risk or severity of injury in various
kinds of accidents.
Page 87
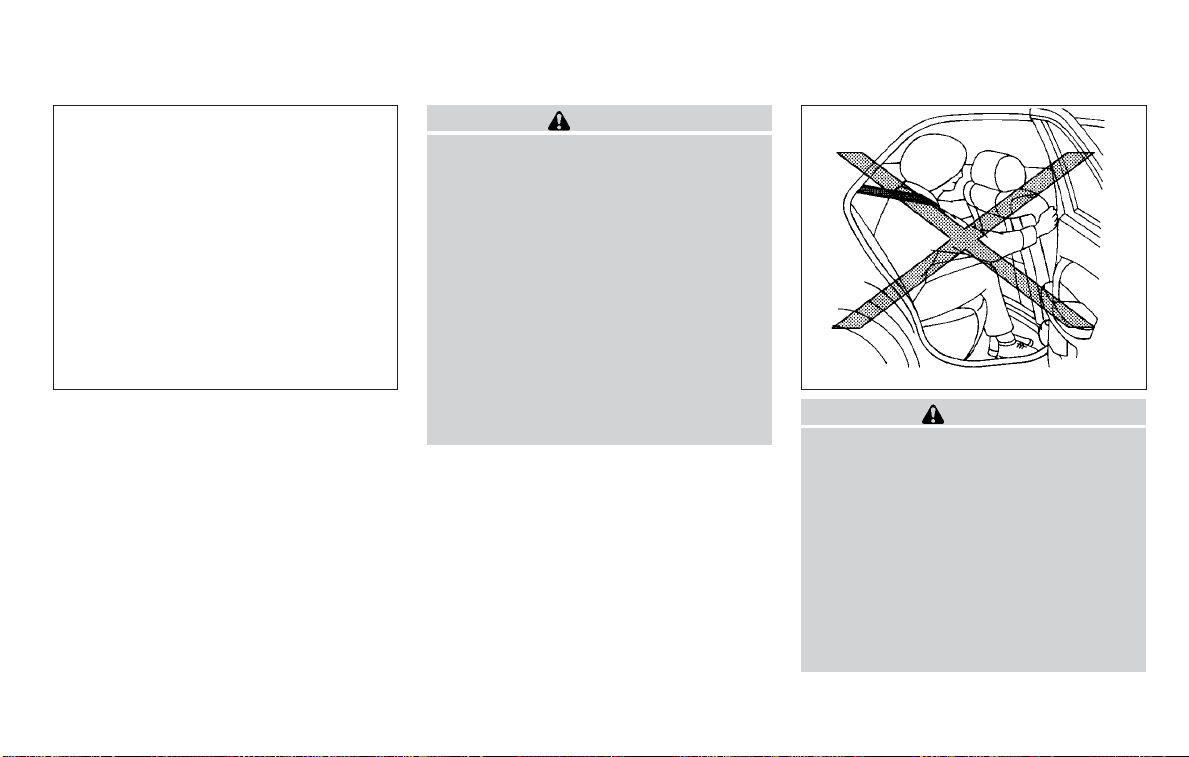
WARNING
∙ The seat belts, the side air bags and
curtain air bags are most effective
when you are sitting well back and
upright in the seat with both feet on
the floor. The side air bag and curtain
air bag inflate with great force.Do not
allow anyone to place their hand, leg
or face near the side air bag on the
side of the seatback of the front seat
or nearthe side roofrails. Do not allow
anyone sitting in the front seats or
rear outboard seats to extend their
LRS3119 WRS0032
hand out of the window or lean
against the door. Some examples of
dangerous riding positions areshown
in the previous illustrations.
WARNING
∙ When sitting in the rear seat, do not
hold onto the seatback of the front
seat. If the side air bag inflates, you
may be seriously injured. Be especially careful with children, who
should always be properly restrained.
Some examples of dangerous riding
positions are shown in the
illustrations.
∙ Do not use seat covers on the front
seatbacks. They may interfere with
side air bag inflation.
Safety—Seats, seat belts and supplemental restraint system 1-59
Page 88
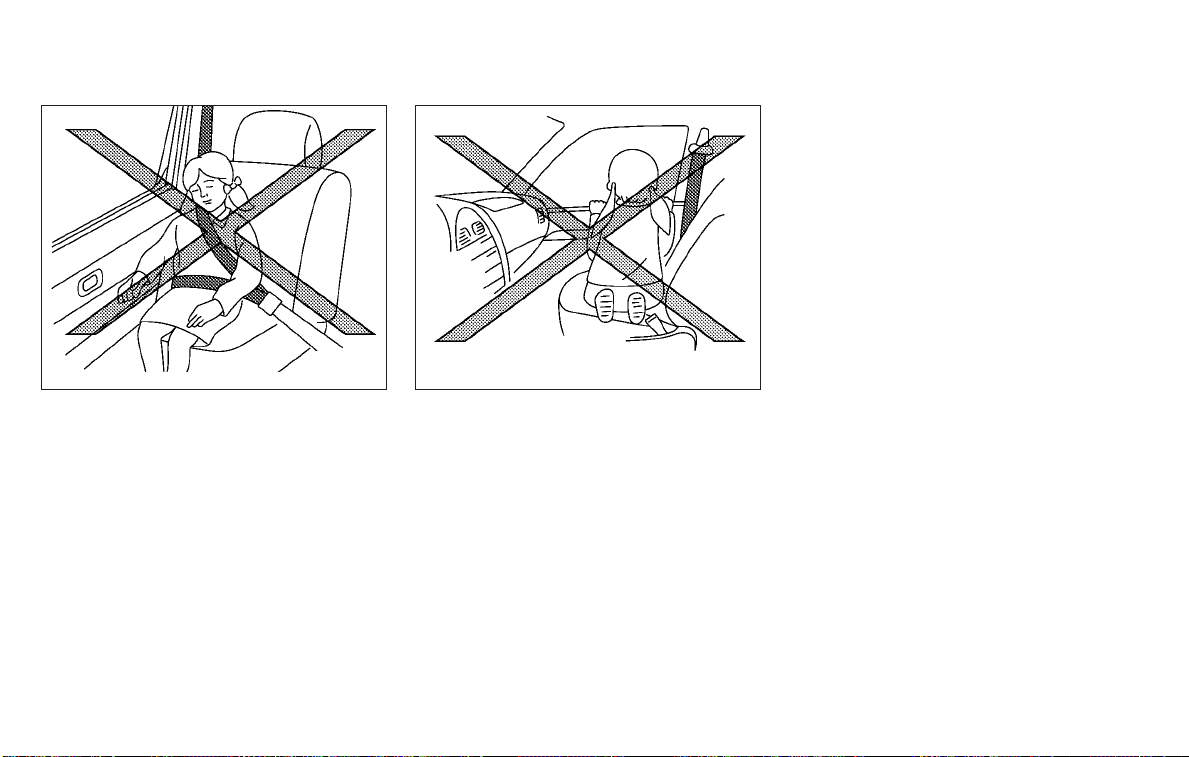
SSS0162 SSS0159
1-60 Safety—Seats, seat belts and supplemental restraint system
Page 89
LRS3059
NISSAN Advanced Air Bag System
(front seats)
1. Supplemental front-impact air bag
modules
2. Air bag Control Unit (ACU)
3. Occupant classification sensor (weight
sensor)
4. Seat belt with pretensioner(s) (front
seats)
5. Front seat-mounted side-impact
supplemental air bag modules
6. Roof-mounted curtain side-impact
and rollover supplemental air bags
7. Roof-mounted curtain side-impact
and rollover supplemental air bag inflators
8. Satellite sensors (driver’s side shown;
passenger side similar)
9. Pressure sensors in door (driver’s side
shown; front passenger side similar)
10. Crash zone sensor
Safety—Seats, seat belts and supplemental restraint system 1-61
Page 90
WARNING
To ensure proper operation of the passenger’s NISSAN Advanced Air Bag System, please observe the following
items.
∙ Do not allow a passenger in the rear
bench seats to push or pull on the
seatback pocket.
∙ Do not place heavy loads heavier than
9.1 lbs. (4 kg) on the seatback, head
restraint/headrest or in the seatback
pocket.
∙ Make sure thatthere is nothing press-
ing against the rear of the seatback,
such as a child restraint installed in
the rear seat or an object stored on
the floor.
∙ Make sure that there is no object
placed under the front passenger
seat.
∙ Make sure that there is no object
placed between the seat cushion and
center console or between the seat
cushion and the door.
∙ If a forward-facing child restraint is
installed in the front passenger seat,
do not position the front passenger
seat so the child restraintcontacts the
instrument panel. If the child restraint
does contact the instrument panel,
the system may determine the seat is
occupied and the passenger air bag
may deploy in a collision. Also the
front passenger air bag status light
may not illuminate. For additional information about installing and using
child restraints, refer to “Child restraints” in this section.
∙ Confirm the operating condition with
the front passenger air bag status
light.
∙ If you notice that the front passenger
air bag status light is not operating as
described in this section, get the occupant classification system checked.
It is recommended that you visit a
NISSAN dealer for this service.
∙ Until you have confirmed with a
dealer thatyour passenger seat occupant classification system is working
properly, position the occupants in
the rear seating positions.
∙ Do not position the front passenger
seat so it contacts the rear seat. If the
front seat does contact the rear seat,
the air bag system may determine a
sensor malfunction has occurred and
the front passenger air bag status
light may illuminate and the supplemental air bag warning light may
flash.
This vehicle is equipped with the NISSAN
Advanced Air Bag Systemfor thedriver and
front passenger seats. This system is designed to meet certification requirements
under U.S. regulations. Itis also permitted in
Canada. However, all of the information,
cautions and warnings in this manual
still apply and must be followed.
The driver supplemental front-impact air
bag is located in the center of the steering
wheel. The front passenger supplemental
front-impact air bag is mounted in the
dashboard above the glove box. The front
air bags are designed to inflate in higher
severity frontal collisions, although they
may inflate if the forces in another type of
collision are similar to those of a higher
severity frontal impact. They may not inflate in certain frontal collisions. Vehicle
1-62 Safety—Seats, seat belts and supplemental restraint system
Page 91

damage (or lack of it) is not always an indication of proper front air bag system operation.
The NISSAN Advanced Air Bag System
monitors information from the crash zone
sensor, the Air bag Control Unit (ACU), seat
belt buckle sensors and occupation classification sensor (weight sensor). Inflator operation is based on the severity of a collision and seat belt usage for the driver. For
the front passenger, the occupant classification sensor is also monitored. Based on
information fromthe sensor,only one front
air bagmay inflatein a crash, dependingon
the crash severity and whether the front
occupants are belted or unbelted. Additionally,the front passenger air bag may be
automatically turned off under some conditions, depending on the weight detected
on the front passenger seat and how the
seat belt is used. If the front passenger air
bag is OFF, the front passenger air bag status light will be illuminated. For additional
information, refer to “Front passenger air
bag and status light” in this section. One
front air bag inflating does not indicate improper performance of the system.
If you have any questions about your air
bag system, it is recommended that you
visit a NISSAN dealer to obtain information
about the system. If you are considering
modification of your vehicle due to a disability, you may also contact NISSAN. Contact information is contained in the front of
this Owner’s Manual.
When a front air bag inflates, a fairly loud
noise may be heard, followed by the release of smoke. This smoke is not harmful
and does not indicate a fire.Care should be
taken to not inhale it, as it may cause irritation and choking. Those with a history of a
breathing condition should get fresh air
promptly.
Front air bags, along with the use of seat
belts, help to cushion the impact force on
the face and chest of the front occupants.
They can help save lives and reduce serious injuries. However, an inflating front air
bag may cause facial abrasions or other
injuries. Front air bags do not provide restraint to the lower body.
Even with NISSAN Advanced Air Bags, seat
belts should be correctly worn and the
driver and front passenger seated upright
as far as practical away from the steering
wheel or instrument panel. The front air
bags inflate quickly in order to help protect
the front occupants. Because of this, the
force of the front air bag inflating can in-
Safety—Seats, seat belts and supplemental restraint system 1-63
crease the risk of injury if the occupant is
too close to, or is against, the front air bag
module during inflation.
The front air bags deflate quickly after a
collision.
The front air bags operate only when the
ignition switch is in the ON position.
After placing the ignition switch in the
ON position, the supplemental air bag
warning light illuminates. The supplemental air bag warning light will turn off
after about 7 seconds if the system is
operational.
Page 92
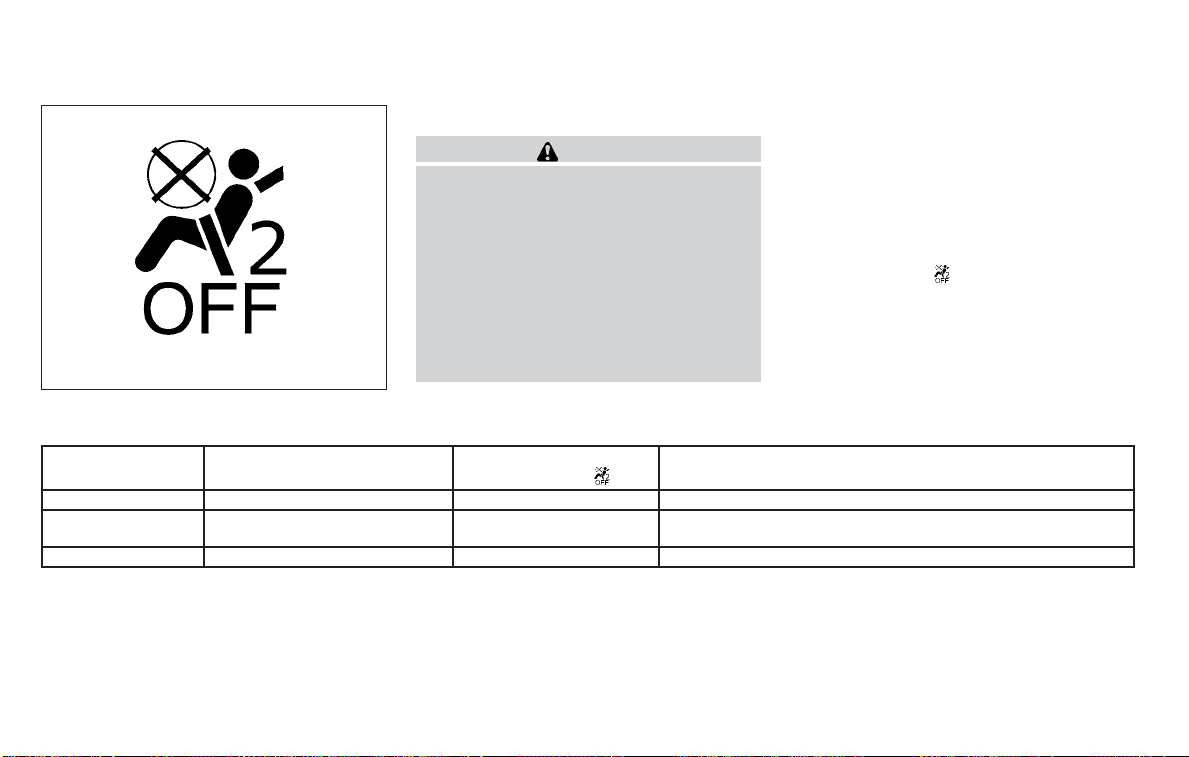
LRS0865
Front passenger air bag and status light
WARNING
The front passenger air bag is designed
to automatically turn OFF under some
conditions. Read this section carefully
to learn how it operates. Proper use of
the seat, seat belt and child restraints is
necessary for most effective protection. Failure to follow all instructions in
this manual concerning the use of
seats, seat belts andchild restraints can
increase the risk or severity of injury in
an accident.
Status light
The front passenger seat is equipped with
an occupant classification sensor (weight
sensor) that turns the front passenger air
bag on or off depending on the weight applied to the front passenger seat. The status of the front passenger air bag (ON or
OFF) is indicated by the front passenger air
bag status light
the instrument panel.
After the ignition switch is placed in the
"ON" position, the front passenger air bag
status light on the instrument panel illuminates for about 7 seconds and then turns
off or remains illuminated depending on
the front passenger seat occupied status.
The light operates as follows:
CONDITION DESCRIPTION
Empty Empty front passenger seat ON (illuminated) INHIBITED
Nobody/Somebody
Adult Adult in the front passenger seat OFF (dark) ACTIVATED
Bag or Child or Child Restraint or
Small Adult in front passenger seat
PASSENGER AIR BAG
STATUS LIGHT (
ON (illuminated) INHIBITED
)
FRONT PASSENGER AIR BAG STATUS
which is located on
In addition to the above, certain objects
placed on the front passenger seat may
also cause the light to operate as described above depending on their weight.
For additional information related to the
normal operation and troubleshooting of
this occupantclassification sensor system,
please refer to “Normal operation” and
“Troubleshooting” in this section.
1-64 Safety—Seats, seat belts and supplemental restraint system
Page 93

Front passenger air bag
The front passenger air bag is designed to
automatically turn OFF when the vehicle is
operated under some conditions as described below in accordancewith U.S.regulations. Ifthe front passenger air bag isOFF,
it willnot inflatein a crash. The driver airbag
and other air bags in your vehicle are not
part of this system.
The purpose of the regulation is to help
reduce the risk of injury or death from an
inflating air bag to certain front passenger
seat occupants,such aschildren, by requiring the air bag to be automatically turned
OFF. Certain sensors are used to meet the
requirements.
The occupant classification sensor in this
vehicle is a weight sensor. It is designed to
detect an occupant and objects on the
seat by weight. For example, if a child is in
the front passenger seat, the NISSAN Advanced Air Bag System is designed to turn
the front passenger air bag OFF in accordance with the regulations. Also, if a child
restraint of the type specified inthe regulations is on the seat, its weight and the
child’s weight can be detected and cause
the air bag to turn OFF.
Frontpassenger seatadult occupantswho
are properlyseated and using the seat belt
as outlined in this manual should not
cause the front passenger air bag to be
automatically turned OFF. For small adults
it may be turned OFF, however if the occupant takes his/her weight off the seat
cushion (for example, by not sitting upright,
by sitting on an edge of the seat, or by
otherwise being out of position), this could
cause the sensor to turn the air bag OFF.
Always be sure to be seated and wearing
the seat belt properly forthe most effective
protection by the seat belt and supplemental air bag.
NISSAN recommends that pre-teens and
children be properly restrained in a rear
seat. NISSAN also recommends that appropriate child restraints and booster
seats be properly installed in a rear seat. If
this isnot possible,the occupant classification sensor is designed to operate as described above to turn the front passenger
air bag OFF for specified child restraints as
required by the regulations. Failing to properly secure child restraints and to use the
ALR mode may allow the restraint to tip or
move in a collision or sudden stop. This can
also result in the passenger air bag inflating in a crash instead of being OFF. For
Safety—Seats, seat belts and supplemental restraint system 1-65
additional information about proper use
and installation, refer to “Child restraints” in
this section.
If the front passenger seat is not occupied,
the frontpassenger air bagis designed not
to inflate in a crash.However,heavy objects
placed on the seat could result in air bag
inflation, because of theobject’s weight detected by the occupant classification sensor. Other conditions could also result in air
bag inflation, such as if a child is standing
on the seat, or if two children are on the
seat, contrary to the instructions in this
manual. Always be sure that you and all
vehicle occupants are seated and restrained properly.
Using the front passenger air bag status
light, you can monitor when the front passenger air bag is automatically turned OFF.
If an adult occupant is in the seat but the
front passenger air bag status light is illuminated (indicating that the air bag is OFF),
it could be that the person is a small adult,
or is not sitting on the seat properly or not
using the seat belt properly.
If a child restraint must be used in the front
seat, the front passenger air bag status
light may or may not be illuminated, depending on the size of the child and the
Page 94

type of child restraint being used. If the air
bag status light is not illuminated (indicating that the air bag might inflate in a crash),
it could be that the child restraint or seat
belt is not being used properly. Make sure
that the child restraint is installed properly,
the seatbelt is usedproperly andthe occupant is positioned properly. If the air bag
status light is still not illuminated, reposition the occupant or child restraint in a rear
seat.
If the front passenger air bag status light
will not illuminate even though you believe
that the child restraint, the seat belts and
the occupant are properly positioned, it is
recommended that you take your vehicle
to a NISSAN dealer. A NISSAN dealer can
check system status by using a special
tool. However, until you have confirmed
with a dealer that your air bag is working
properly, reposition the occupant or child
restraint in a rear seat.
The NISSAN Advanced Air Bag System and
front passenger air bag status light will
take a few seconds to register a change in
the front passenger seatstatus. Thisis normal system operation and does not indicate a malfunction.
If a malfunction occurs in the front passenger air bag system, the supplemental air
bag warning light
ter and gauges area of the instrument
panel, will be illuminated (blinking or
steadily lit). Have the system checked. It is
recommended that you visit a NISSAN
dealer for this service.
Normal operation
In order for the occupant classification
sensor systemto classify the front passenger based on weight, please follow the precautions and steps outlined below:
Precautions
∙ Make sure that there are no objects
weighing over 9.1 lbs. (4 kg) hanging on
the seat or placed in the seatback
pocket.
∙ Make sure that a child restraint or other
object is not pressing against the rear
of the seatback.
∙ Make sure that a rear passenger is not
pushing or pulling on the back of the
front passenger seat.
∙ Make sure that the front passenger
seat or seatback is not forced back
against an object on the seat or floor
behind it.
, located in the me-
1-66 Safety—Seats, seat belts and supplemental restraint system
∙ Make surethat thereis no objectplaced
under the front passenger seat.
Steps
1. Adjust the seatas outlined in the “Seats”
section of this manual. Sit upright, leaning against the seatback, and centered
on theseat cushionwith yourfeet comfortably extended to the floor.
2. Make sure there are no objects on your
lap.
3. Fasten the seat belt as outlined in the
“Seat belts” section of this manual.
Front passenger seat belt buckle status is monitored by the occupant classification system, and is used as an input to determine occupancy status.So,
it is highly recommended thatthe front
passenger fasten their seat belt.
4. Remain in this position for 30 seconds
allowing the system to classify the
front passenger before the vehicle is
put into motion.
5. Ensure proper classification by check-
ing the front passenger air bag status
light.
Page 95

NOTE:
This vehicle’s occupant classification
sensor system generally keeps the classification locked during driving, so it is
important that you confirm that the
front passenger is properly classified
prior to driving. However, the occupant
classification sensor may recalculate the
weight of the occupant under some conditions (both while driving and when
stopped), so front passenger seat occupants should continue to remain seated
as outlined above.
Troubleshooting
If you think the front passenger air bag
status light is incorrect:
1. If the lightis ON with an adultoccupying
the front passenger seat:
∙ Occupant is a small adult — the air bag
light is functioning as intended. The
front passenger air bag is suppressed.
However, if the occupant is not a small
adult, then this may be due to the following
conditions that may be interfering with the
weight sensors:
∙ Occupant is not sitting upright, leaning
against the seatback, and centered on
the seat cushion with his/her feet comfortably extended to the floor.
∙ A childrestraint or other object pressing
against the rear of the seatback.
∙ A rear passenger pushing or pulling on
the back of the front passenger seat.
∙ Forcing the front seat or seatback
against an object on the seat or floor
behind it.
∙ An object placed under the front pas-
senger seat.
∙ An object placed between the seat
cushion andcenter consoleor between
the seat cushion and the door.
If the vehicle is moving, please come to a
stop when it is safe to do so. Check and
correct any of the above conditions. Restart the vehicle and wait 1 minute.
Safety—Seats, seat belts and supplemental restraint system 1-67
NOTE:
A systemcheck will beperformed during
which the front passenger air bag status
light will remain lit for about 7 seconds
initially.
If the light is still ON after this, the person
should be advised not to ride in the front
passenger seat and the vehicle should be
checked as soon as possible. It is recommended that you visit a NISSAN dealer for
this service.
2. If the light is OFF with a small adult,
child or child restraint occupying the
front passenger seat.
This may be due to the following conditions thatmay be interferingwith the
weight sensors:
∙ Small adult or child is notsitting upright,
leaning against the seatback, and centered on the seat cushion with his/her
feet comfortably extended to the floor.
∙ The child restraint is not properly in-
stalled, as outlined in the “Child restraints” section of this manual.
∙ An object weighing over 9.1 lbs. (4 kg)
hanging on the seat or placed in the
seatback pocket.
Page 96
∙ A childrestraint or other object pressing
against the rear of the seatback.
∙ A rear passenger pushing or pulling on
the back of the front passenger seat.
∙ Forcing the front seat or seatback
against an object on the seat or floor
behind it.
∙ An object placed under the front pas-
senger seat.
∙ An object placed between the seat
cushion and center console.
If the vehicle is moving, please come to a
stop when it is safe to do so. Check and
correct any of the above conditions. Restart the vehicle and wait 1 minute.
NOTE:
A systemcheck will beperformed during
which the front passenger air bag status
light will remain lit for about 7 seconds
initially.
If the light is still OFF after this, the small
adult, child or child restraint should be repositioned in the rear seat and the vehicle
should be checked as soonas possible. It is
recommended that you visit a NISSAN
dealer for this service.
3. If the light is OFF with no front passenger and no objects on the front passenger seat, the vehicle should be
checked. It is recommended that you
visit a NISSAN dealer as soon as possible.
Other supplemental front-impact air
bag precautions
WARNING
∙ Do not place any objects on the steer-
ing wheel pad or on the instrument
panel. Also, do not place any objects
between any occupant and the steering wheel or instrument panel. Such
objects may become dangerous projectiles and cause injury if thefront air
bags inflate.
∙ Immediately after inflation, several
front air bag system components will
be hot. Do not touch them; you may
severely burn yourself.
∙ No unauthorized changes should be
made to any components or wiring of
the supplementalair bag system. This
is to prevent accidental inflation of
the supplemental air bag or damage
to the supplemental air bag system.
1-68 Safety—Seats, seat belts and supplemental restraint system
∙ Do not make unauthorized changes
to your vehicle’s electrical system,
suspension system or front end structure. This could affect proper operation of the front air bag system.
∙ Tampering with the front air bag sys-
tem may result in serious personal injury. Tampering includes changes to
the steering wheel and the instrument panel assembly by placing material over the steering wheel pad and
above the instrument panel or by installing additional trim material
around the air bag system.
∙ Removing or modifying the front pas-
senger seatmay affect thefunction of
the air bag system and result in serious personal injury.
Page 97
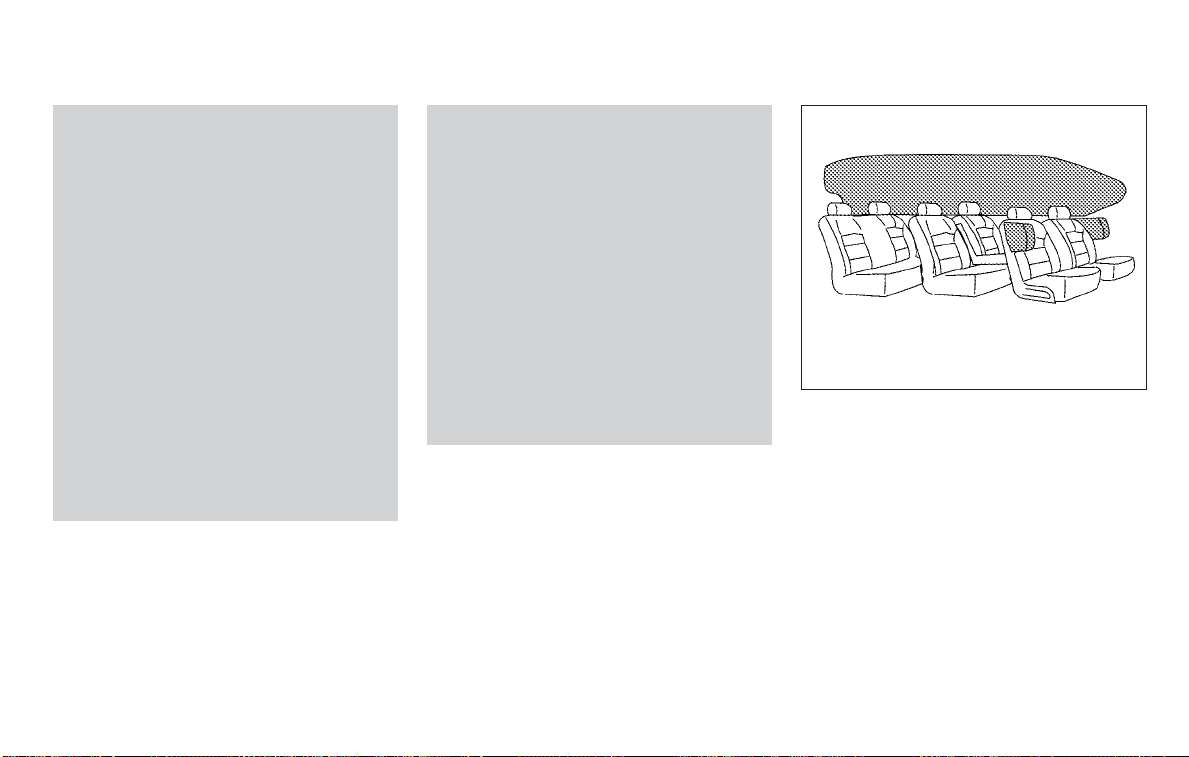
∙ Modifying or tampering with the front
passenger seat may result in serious
personal injury. For example, do not
change the front seats byplacing material onthe seat cushion or by installing additional trim material, such as
seat covers, on the seat that are not
specifically designedto assure proper
air bag operation. Additionally, do not
stow any objects under the front passenger seat or the seat cushion and
seatback. Such objects may interfere
with theproper operation ofthe occupant classification sensor (weight
sensor).
∙ No unauthorized changes should be
made to any components or wiring of
the seat belt system. This may affect
the front air bag system. Tampering
with the seat belt system may result
in serious personal injury.
∙ It is recommended that you visit a
NISSAN dealer for work on andaround
the front air bag. It is also recommended thatyou visita NISSAN dealer
for installation of electrical equipment. The Supplemental Restraint
System (SRS) wiring harnesses*
should not be modified or disconnected. Unauthorized electrical test
equipment and probing devices
should not be used on the air bag
system.
∙ A cracked windshield should be re-
placed immediately by a qualified repair facility. A cracked windshield
could affect the function of the
supplemental air bag system.
*The SRS wiring harness connectors are
yellow and orange for easy identification.
When selling your vehicle, we request that
you inform the buyer about the front air
bag system and guide the buyer to the
appropriate sections in this Owner’s
Manual.
Safety—Seats, seat belts and supplemental restraint system 1-69
WRS0381
Front seat-mounted side-impact
supplemental air bag and
roof-mounted curtain sideimpact and rollover supplemental
air bag systems
The side air bags are located in the outside
of the seatback of the front seats. The curtain air bags are located in the side roof
rails in all three rows. All of the informa-
tion, cautions and warnings in this
manual must be followed. The side air
bags and curtain air bags are designed to
inflate in higher severity side collisions, although they may inflate if the forces in an-
Page 98
other type of collisionare similar to those of
a higher severity impact. They are designed to inflate on the side where the vehicle is impacted. They may not inflate in
certain side collisions.
Curtain airbags arealso designedto inflate
in certain types of rollover collisions or near
rollovers. As a result, certain vehicle movements (for example, during severe offroading) may cause the curtain air bags to
inflate.
Vehicle damage (or lack of it) is not always
an indication of proper side air bag and
curtain air bag operation.
When theside air bagsand curtain air bags
inflate, a fairly loud noise may be heard,
followed by release of smoke.This smoke is
not harmful and does not indicate a fire.
Care should be taken not to inhale it, as it
may cause irritation and choking. Those
with a history of a breathing condition
should get fresh air promptly.
Side air bags, along with the use of seat
belts, help to cushion the impact force on
the chest of the front occupants. Curtain
air bags help tocushion theimpact force to
the head of occupants in the front and rear
outboard seating positions in all rows.They
can help save lives and reduce serious in-
juries. However, an inflating side air bag or
curtain air bag may cause abrasions or
other injuries. Side air bags and curtain air
bags do not provide restraint to the lower
body.
The seat belts should be correctly worn
and the driver and passenger seated upright as far as practical away from the side
air bag. Rear seat passengers should be
seated as far away as practical from the
door finishers and side roof rails. The side
air bags and curtain air bags inflate quickly
in order to help protect the occupants. Because of this, the force of the side air bags
and curtain air bags inflating can increase
the risk of injury if the occupant is too close
to, or is against, theseair bag modules during inflation. The side air bag will deflate
quickly after the collision is over.
The curtain airbag will remaininflated for a
short time.
The side air bags and curtain air bags
operate only when the ignition switch is
placed in the ON position.
After placing the ignition switch in the
ON position, the supplemental air bag
warning light illuminates. The supple-
1-70 Safety—Seats, seat belts and supplemental restraint system
mental air bag warning light will turn off
after about 7 seconds if the system is
operational.
WARNING
∙ Do not place any objects near the
seatback of the front seats. Also, do
not place any objects (an umbrella,
bag, etc.) between the front door finisher and the front seat. Such objects
may become dangerous projectiles
and cause injury if a side air bag
inflates.
∙ Right after inflation, several side air
bag and curtain air bag system components will be hot. Do not touch
them; you may severely burn yourself.
∙ No unauthorized changes should be
made to any components or wiring of
the side air bag and curtain air bag
systems. This is to prevent damage to
or accidental inflation of the side air
bag and curtain air bag systems.
∙ Do not make unauthorized changes
to your vehicle’s electrical system,
suspension system or side panel. This
could affect proper operation of the
curtain air bag systems.
Page 99
∙ Tampering with the side air bag sys-
tem may result in serious personal injury. For example, do not change the
front seats by placing material near
the seatbacks or by installing additional trim material, such as seat covers, around the side air bag.
∙ It is recommended that you visit a
NISSAN dealer for work on andaround
the side air bag and curtain air bag. It
is also recommended that you visit a
NISSAN dealer for installation of electrical equipment. The SRS wiring harnesses* should not bemodified ordisconnected. Unauthorized electrical
test equipment and probing devices
should not be used on the sideair bag
or curtain air bag systems.
*The SRS wiring harness or connectors
are yellow or orange for easy identification.
When selling your vehicle, we request that
you inform the buyer about the side air
bags and curtain air bag system and guide
the buyer to the appropriate sections in
this Owner’s Manual.
Seat belt with pretensioner(s)
(front seats)
WARNING
∙ The pretensioner(s) cannot be reused
after activation. They must be replaced together with the retractor
and buckle as a unit.
∙ If the vehicle becomes involved in a
collision but pretensioner(s) are not
activated, be sure to have the pretensioner system checked and, if necessary,replaced.It is recommended that
you visit a NISSAN dealer for this
service.
∙ No unauthorized changes should be
made to any components or wiring of
the pretensioner system. This is to
prevent damage to or accidental activation ofthe pretensioner(s).Tampering with the pretensioner system may
result in serious personal injury.
∙ It is recommended that you visit a
NISSAN dealer for work on andaround
the pretensionersystem. It is also recommended that you visit a NISSAN
dealer for installation of electrical
equipment. Unauthorized electrical
test equipment and probing devices
should not be used on the pretensioner system.
∙ If you need to dispose of the preten-
sioner(s) or scrap the vehicle, it is recommended that you visit a NISSAN
dealer for this service. Incorrect disposal procedures could cause personal injury.
The pretensioner system may activate
with the supplemental air bag system in
certain types of collisions. Working with the
seat belt retractor, the pretensioner(s) help
tighten the seat belt when the vehicle becomes involved in certain types of collisions, helping to restrain front seat occupants.
The pretensioner(s) are encased within the
seat belt retractor and to the seat belt anchor affixed to the floor of the vehicle.
These seat belts are used thesame way as
conventional seat belts.
Safety—Seats, seat belts and supplemental restraint system 1-71
Page 100
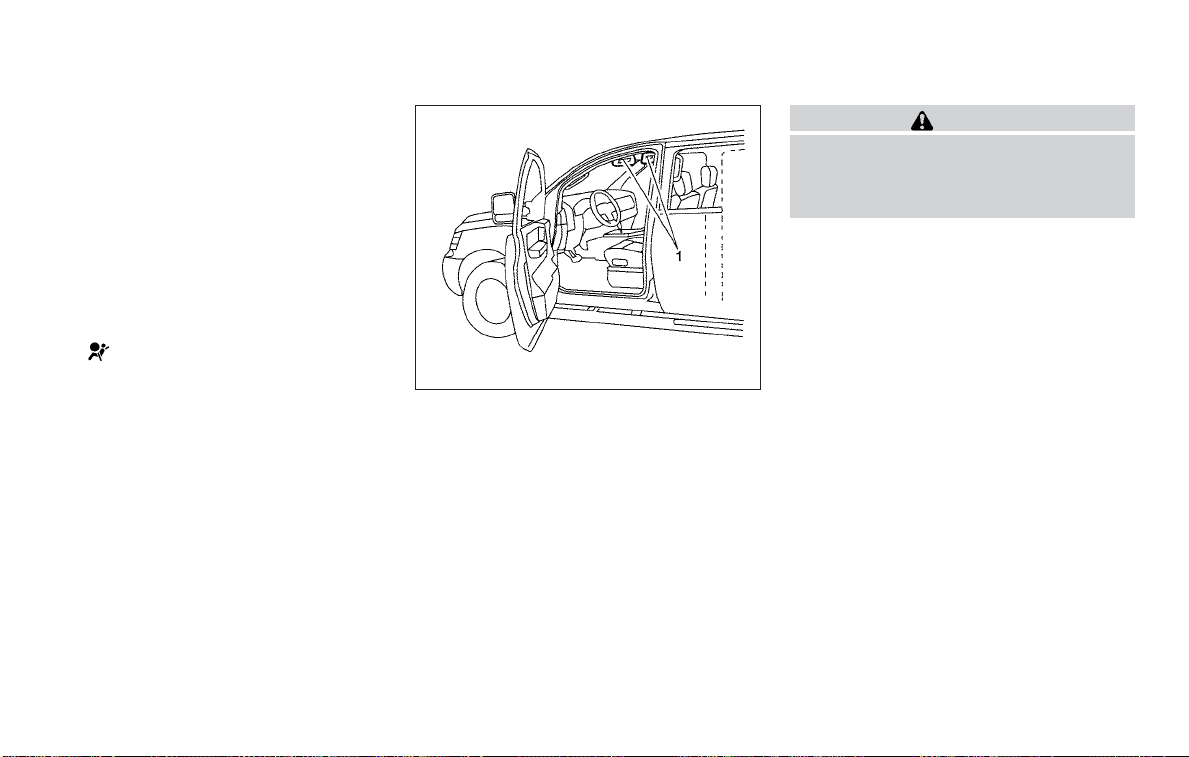
When pretensioner(s)activate, smoke is released and aloud noise may be heard. This
smoke is not harmful and does not indicate a fire. Care should be taken not to
inhale it, as it may cause irritation and
choking. Those with a history of a breathing condition should get fresh air promptly.
After the pretensioner(s’) activation, load
limiters allow the seat belt to release webbing (if necessary) to reduce forces against
the chest.
The supplemental air bag warning
light
in the pretensioner system. For additional
information, refer to "Supplemental air bag
warning light" in this section. If the operation of the supplemental air bag warning
light indicates there is a malfunction, have
the system checked. It is recommended
that you visit a NISSAN dealer for this service.
When selling your vehicle, we request that
you inform the buyer about the pretensioner system and guide the buyer to the
appropriate sections in this Owner’s
Manual.
is used to indicate malfunctions
WARNING
Do not use a rear-facing child restraint
on a seat protected by an air bag in
front of it. If the air bag deploys, it may
cause serious injury or death.
WRS0885
1. SRS Air bag warning labels
The warning labels are located on the
surface of the sun visor.
SUPPLEMENTAL AIR BAG WARNING
LABELS
Warning labels about the supplemental
front-impact air bag system are placed in
the vehicle as shown in the illustration.
1-72 Safety—Seats, seat belts and supplemental restraint system
 Loading...