

Page 1
Operation Guide
Page 2
Features of the card printer PR-C201
Note
Easy Card Loading
Thanks to the Multifunctional Card Case, it is possible to feed cards without
detaching the Card Case. (→ p10)
Strengthened Security
• You can anchor the printer with a cable using the Security Cable Slot. (→ p53)
• It is easy to store cards in the removable Card Case. (→ p53)
Easy Operation
Use of Ink Ribbon/Transfer Film Cassettes makes it easy for anyone to change
ribbons and films. (→ p16)
Easy Setup
The printer comes with a printer driver CD, so if you also have the Ink Ribbon,
Transfer Film, and cards (available separately), you can use the printer
immediately after setup. (→ Easy Setup Guide)
About Symbols
These are warnings indicating the risk of accidents, fire, or electric shock if the printer is
not operated correctly. Be sure to follow these warnings to operate the printer safely.
These cautions indicate the risk of injury or malfunction if the printer is not operated
correctly. Be sure to follow these cautions to operate the printer safely.
These offer important advice you should follow when operating the printer. Be sure to
read this advice to prevent malfunctions or damage to the printer.
These are notes with helpful or additional information about using the printer.
These are references that make the manual easier to use.
• Windows is registered trademarks or trademarks of Microsoft Corporation in the U.S. and / or other countries.
Page 3

Contents
Contents
Operating the Printer Safely .......................................................................................1
Regulations for this product FCC Regulations.............................................................. 3
Part Names and Descriptions.....................................................................................4
Front Side of the Printer................................................................................................ 4
Inside the Top Cover ..................................................................................................... 5
Rear Side of the Printer ................................................................................................ 6
Front Cover ................................................................................................................... 7
Operation Panel............................................................................................................ 8
Basic Card Printing Methods .....................................................................................9
Turning On and Off the Printer...................................................................................... 9
Loading Cards............................................................................................................. 10
Loading Cards into the Card Case.............................................................. 10
Manually Loading Cards One by One ......................................................... 12
Loading Magnetic/IC Cards......................................................................... 13
Printing........................................................................................................................14
Removing Cards ......................................................................................................... 15
Changing the Ink Ribbon and Transfer Film................................................................ 16
Checking Replacement Period, and Preparation ........................................ 16
Changing the Ink Ribbon............................................................................. 17
Transfer Film Replacement .......................................................................... 19
Cleaning Tape Replacement........................................................................ 22
Normal Mode and User Mode ...................................................................................23
Normal Mode and User Mode..................................................................................... 23
Normal Mode ............................................................................................... 23
User Mode ................................................................................................... 24
Switching to User Mode.............................................................................................. 24
Basic User Mode Operations...................................................................................... 25
Moving to the Next Menu (Switching to Menus on the Same Level) ........... 25
Moving to a Sub-menu (Switching to Menus on a Lower Level).................. 25
Returning to the Main Menu (Switching to Menus on a Higher Level) ........ 26
Switching to Normal Mode (Exiting User Mode).......................................... 26
Printer Settings..........................................................................................................27
Counting the Number of Cards that Are Printed ......................................................... 27
Displaying the Total Number of Sides that Are Printed ............................................... 28
Checking the type and remaining quantity of the Ink Ribbon or Transfer Film............ 29
Checking the Program Version and Serial Number .................................................... 30
Turning the Error Alarm On or Off............................................................................... 31
Reduce Printer Power Consumption........................................................................... 32
Adjusting the Print Results.......................................................................................... 33
Adjusting the printing position ..................................................................... 33
Quality printing/Quick printing ..................................................................... 35
Correcting image and text misalignment..................................................... 36
Page 4

Full Color Card Printer
Adjusting the contour level .......................................................................... 37
Adjusting the hue......................................................................................... 38
Setting the Type of Ink Ribbon or Transfer Film to Use............................................... 39
Notification of Time for Ink Ribbon and Transfer Film Replacement........................... 41
Setting the Types of Card to Use ................................................................................ 42
Adjusting the Feed Gate Depending on Card Thickness............................ 42
Optimizing Transfer Conditions.................................................................... 43
Correcting Card Curl ................................................................................................... 45
Switching the Card Ejection Slot................................................................................. 46
Set the Orientation of Magnetic Cards/IC Cards to Load ........................................... 47
Set the Orientation of Cards to Eject .......................................................................... 49
Changing Network Connection Settings ..................................................................... 51
Preventing Theft and Unauthorized Usage................................................................. 53
Preventing Theft of the Printer (Security Cable Slot).................................... 53
How to Store Cards (Removing the Card Case).......................................... 53
Cleaning .....................................................................................................................54
Before Cleaning .......................................................................................................... 54
Cleaning with a Cleaning Card ................................................................................... 54
Cleaning the Cleaning Roller ...................................................................................... 57
Cleaning the Feeding Roller ....................................................................................... 59
Cleaning the Feeding Roller ....................................................................................... 60
Cleaning the Reverse Roller ....................................................................................... 62
Primary Transfer Feeding Roller Cleaning .................................................................. 64
Filter Cleaning............................................................................................................. 66
Troubleshooting.........................................................................................................67
When an Error Message Appears............................................................................... 67
Clearing an Error.......................................................................................... 67
How to Clear an Error................................................................................... 67
When a Card is Jammed... ......................................................................................... 73
If the Ink Ribbon or Transfer Film are Cut ................................................................... 76
When Cards are Not Printed Correctly........................................................................ 78
Other Troubles ............................................................................................................ 80
When These Solutions Don't Work... .......................................................................... 80
Appendix ....................................................................................................................81
Consumables.............................................................................................................. 81
Ink Ribbon/Transfer Film .............................................................................. 81
Cards ........................................................................................................... 82
Cleaning Card.............................................................................................. 82
Cleaning Tape .............................................................................................. 82
Consumables............................................................................................... 82
Updating the Printer's Software .................................................................................. 83
Menu Route Map (User Mode) ................................................................................... 84
Main Specifications..................................................................................................... 86
Opening the Printer Driver Settings Screen................................................................ 87
Opening the Setting Screen (From the Start Menu)..................................... 87
Opening the Setting Screen (From the Application).................................... 87
Changing the Settings or Confirming the Status from the Setting Screen... 87
Page 5
Operating the Printer Safely
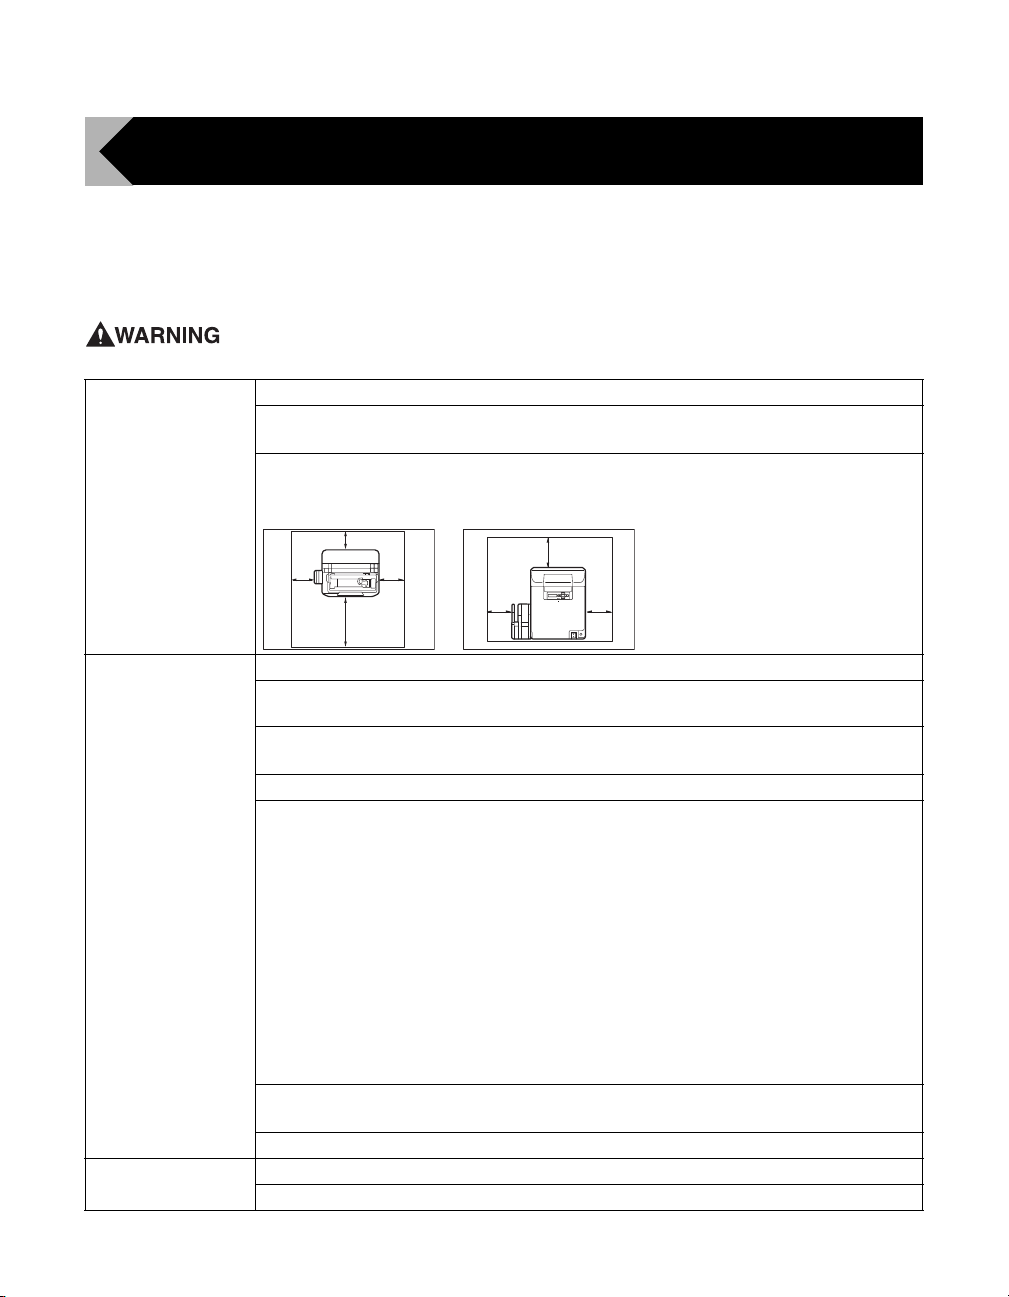
The left illustration indicates
distance values when the Card
Stacker is attached.
Operating the Printer Safely
The following precautions must be observed to assure safe operation of the printer.
Also, do not do anything that is not described in this manual. Doing so may cause an
unexpected accident.
Failure to observe the following items while using the printer may cause fire,
electric shock or other unexpected accident.
Installation location Do not install the printer in a damp or dusty location.
Do not install the printer near flammable or explosive materials or heater, stove or
other device that produces heat.
Place the printer away from walls, as shown in the diagram below, to maintain air
flow. Also, maintain at least 30 cm of open space above the printer.
Blocking the vents may cause the printer to overheat and catch fire.
10cm
30cm
Power supply
15cm
Use a dedicated power cable and do not use an extension cord with multiple outlets.
30cm
15cm
15cm15cm
Be sure to remove any dust from the plug and outlet.
Humidity produces a micro-current on the surface causing overheating or fire.
Do not damage or modify the Power Cable. Also, do not place heavy objects, pull,
or bend excessively.
Do not plug in or unplug the Power Cable if your hands are wet.
Ensure a ground wire is connected.
When connecting the ground wire, note the following cautions.
• Recommended connections for ground wires
Outlet ground terminal
Ground terminals installed as type A, B, or C
A copper rod 65 cm or longer buried in the ground.
• Not permitted for ground wires
Gas piping (risk of fire or explosion.)
Water pipes or taps (water pipes that include plastic piping cannot act as a ground.
However, if a water pipe is configured to act as a ground, then connection of a ground
wire is permitted.)
Telephone line ground wires or lightning conductors (danger of high current flow in the
event of a lightening strike.)
Be sure to turn off the power and unplug the plug from the outlet before moving the
printer.
Pull on the plug, not the cable, when unplugging it from an outlet.
Handling Do not use flammable sprays near the printer.
Do not touch anything inside the printer unless specified in this manual.
1
Page 6
Full Color Card Printer
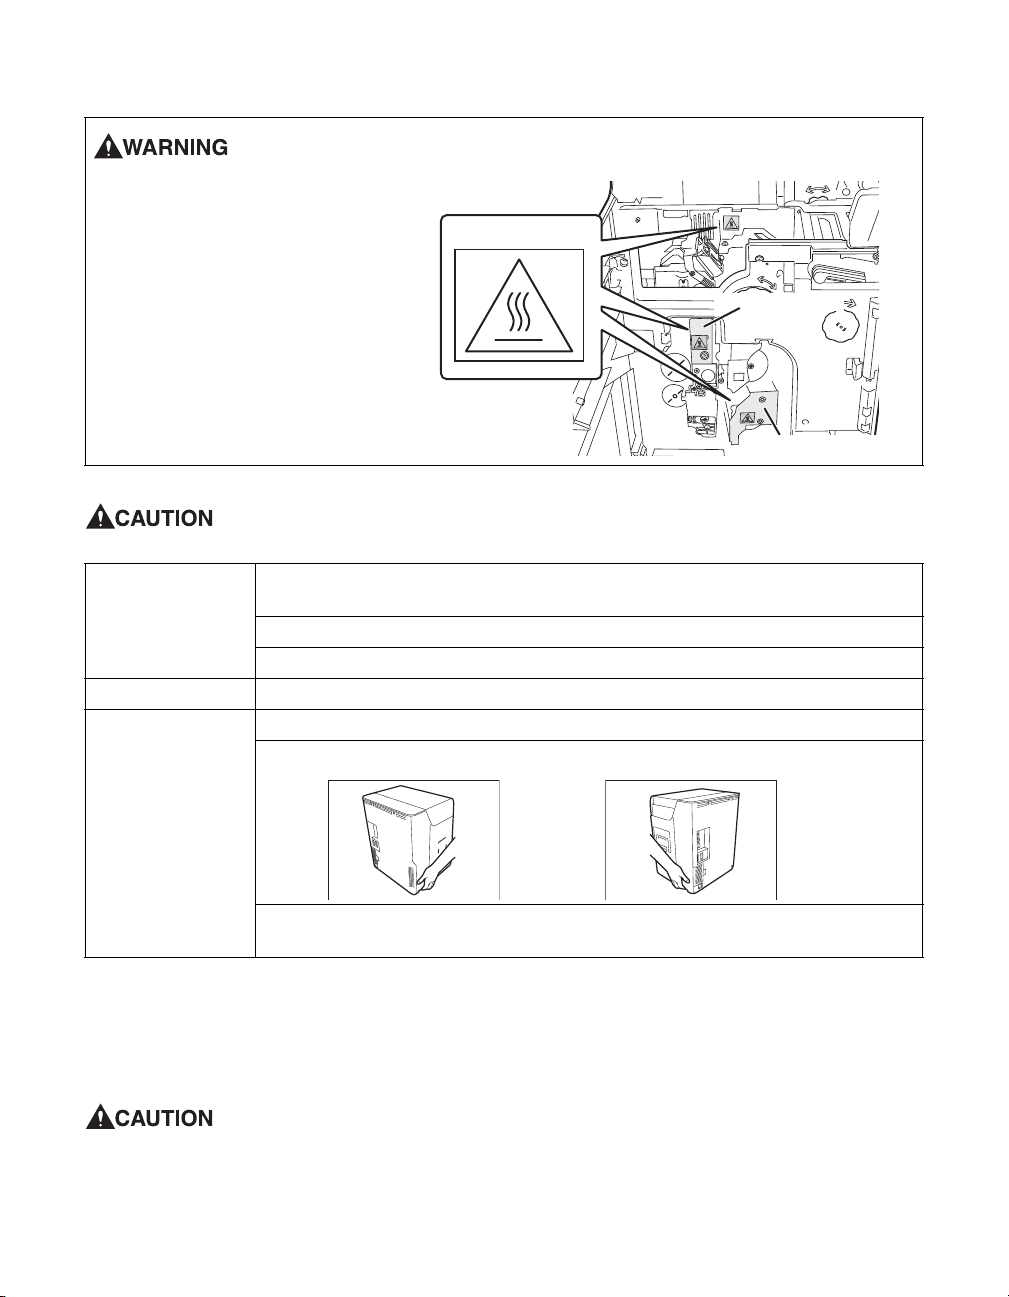
Heat Roller Section
High Temperature
Warning Label
Thermal Head Section
The lower part of the Top Cover, the
printer internal heat roller section,
and the thermal head section get
very hot. Ensure you do not touch
these three locations.
Failure to observe the following items while using the printer may cause injury
or a malfunction.
Installation location Do not install the printer on an unstable table, on a slant, or any place where there
is excessive vibration.
Do not install the printer in a location susceptible to rapid fluctuations in temperature.
Do not install the printer in a location exposed to direct sunlight.
Power supply Do not use an under-rated extension cord.
Handling Do not place heavy items on the printer and do not lean on the printer.
When moving the printer, carry it as shown below.
2
While the printer is operating, do not turn off the power, unplug the power cable, or
look inside the printer.
The cooling fan is always running for cooling the inside of the printer. This is
not a malfunction.
Contact your reseller if there is a current leak.
The printer may cause static, flickering or interrupt reception of televisions
or radios if they are too close to the printer.
Regarding copyrights
Using portraits (photos or images) or copyrighted material (illustrations or
logos) without the permission of their owners is prohibited by law.
Do not use copyrighted images without permission or for illegal activities.
Page 7
Operating the Printer Safely
Note
Under the following conditions images on cards may deteriorate or cards may
warp after printing.
The surface of the card is in contact for an extended period of time with a
vinyl card holder or synthetic leather or other material that contains
plasticizer.
The surface of the card is exposed to direct sunlight for an extended period
of time.
The card is repeatedly rubbed against a hard object.
The faces of two cards are in contact for an extended period of time.
The card is kept for an extended period of time in a very hot location such as
a car parked in the sun.
The card is bent, or used with excessive force.
If a card with a magnetic strip is placed near a magnetic source, the data on the
strip may become corrupted.
Additionally, if the IC card is bent, or used with excessive force, the IC chip may
be damaged.
Regulations for this product FCC Regulations
This device complies with Part 15 of the FCC Rules. Operation is subject to the following two
conditions: (1) This device may not cause harmful interference, and (2) this device must accept
any interference received, including interference that may cause undesired operation.
This equipment has been tested and found to comply with the limits for class B digital
device, pursuant to Part 15 of the FCC Rules. These limits are designed to provide
reasonable protection against harmful interference in a residential installation. This
equipment generates uses and can radiate radio frequency energy and, if not installed and
used in accordance with the instructions, may cause harmful interference to radio
communications. However, there is no guarantee that interference will not occur in a
particular installation. If this equipment does cause harmful interference to radio or
television reception, which can be determined by turning the equipment off and on, the user
is encouraged to try correct the interference by one or more of the following measures:
Reorient or relocate the receiving antenna.
Increase the separation between the equipment and receiver.
Connect the equipment into an outlet on a circuit different from that to which the
receiver is connected.
Consult the dealer or an experienced radio/TV technician for help.
Do not make any changes or modifications to the equipment unless otherwise specified
in the manual.
If such changes or modifications should be made, you could be required to stop
operation of the equipment.
3
Page 8
Full Color Card Printer
Part Names and Descriptions
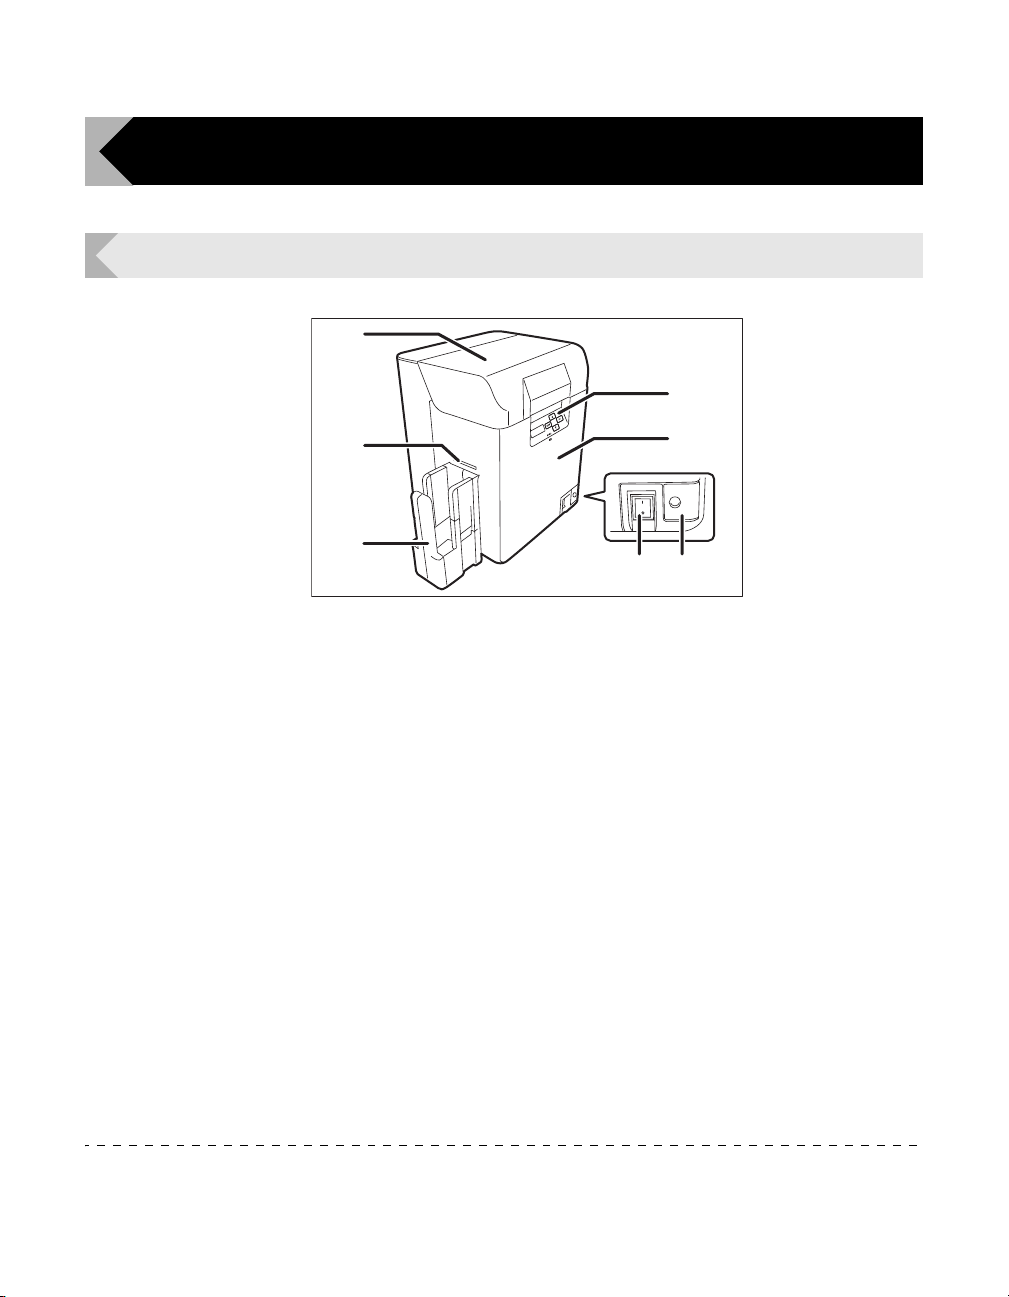
Front Side of the Printer
a
b
g
f
a Top Co v er
Open when loading cards or cleaning the
feeding roller.
b Operation Panel
Includes the keys, the LCD Panel, and LED
indicator for operating the printer.
→See "Operation Panel" on page 8 for detailed
Operation Panel part names and descriptions.
c Front Cover
Open when changing ink ribbons and transfer
film, and when cleaning the Cleaning Roller.
→See "Front Cover" on page 7 for information about
the names of parts inside the cover and their
descriptions.
→See "Changing the Ink Ribbon and Transfer Film" on
page 16 for details about changing the Ink Ribbon
Cartridge.
→See "Cleaning" on page 54 for instructions on
cleaning the Cleaning Roller.
d Open Cover Switch
Front cover opening switch. Press to open the
Front Cover.
c
de
e Power Switch
Turns the power on and off.
→See "Turning On and Off the Printer" on page 9 for
instructions on turning the power on and off.
f Card Stacker
A maximum of 250 cards*1 can be stacked by
attaching the Card Ejection Slot (Left). Without
good reason, there is no need to remove the
Card Stacker.
→See the "Easy Setup Guide" for instructions on
attaching.
g Card Ejection Slot (Left)
Ejects correctly printed cards and cards with
errors. You can select between Card Ejection
Slot (Left) and (Right) for card ejection.
The factory default is set so both correctly
printed cards are output from Card Ejection Slot
(Left).
→See "Switching the Card Ejection Slot" on page 46
for information about switching the card ejection slot.
*1 When using CR-80 cards (size: 3.375" × 2.125" (86 mm × 54 mm), thickness: 0.03" (0.76 mm)).
4
Page 9
Inside the Top Cover
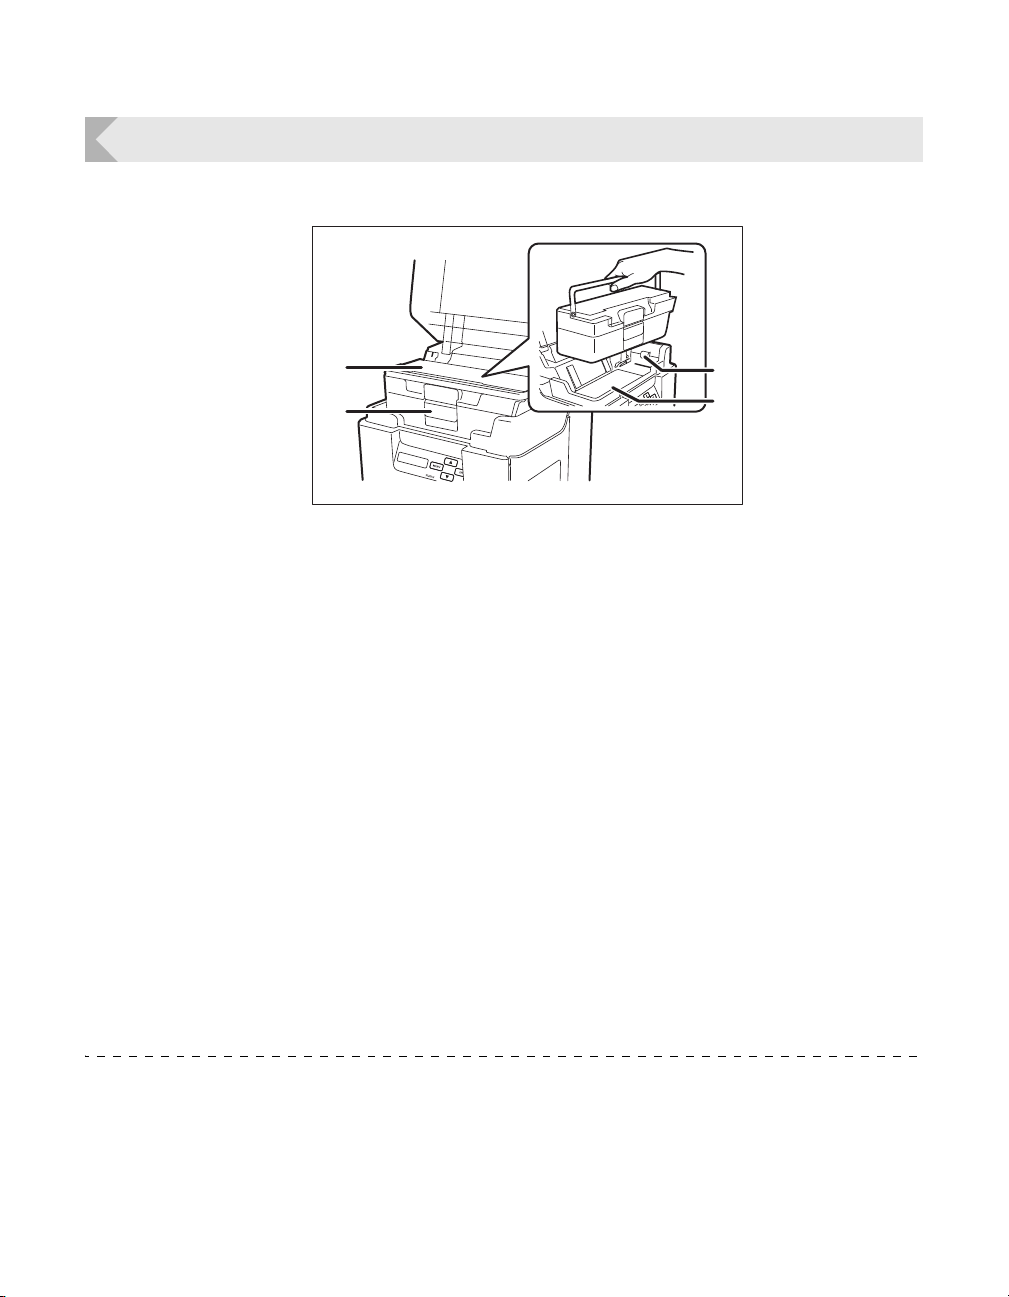
Interior of the Top Cover.
Part Names and Descriptions
a
d
a Card Case
Up to 250*1 cards can be loaded at one time.
You can adjust the gate gap to match the
thickness of the fed cards. The factory default is
set so the gap corresponds to feeding of cards
of 0.76 mm in thickness.
→See "Loading Cards" on page 10 for instructions on
loading cards.
→See "Cards" on page 82 for details about which
cards you can use.
→See "Adjusting the Feed Gate Depending on Card
Thickness" on page 42 for instructions on adjusting
the gate gap.
b Feeding Roller
Pulls loaded cards into the printer.
→See "Cleaning the Feeding Roller" on page 59 for
feeding roller cleaning instructions.
b
c
c Top Cover
Open when cards are jammed or similar.
→See "When a Card is Jammed..." on page 73 for
instructions on how to eject jammed cards.
d Card Case Lock
When loading cards, pull the lock to open the
card case.
→See "Loading Cards" on page 10 for instructions on
loading cards.
*1 When using CR-80 cards (size: 3.375" × 2.125" (86 mm × 54 mm), thickness: 0.03" (0.76 mm)).
5
Page 10
Full Color Card Printer
Rear Side of the Printer
a
g
f
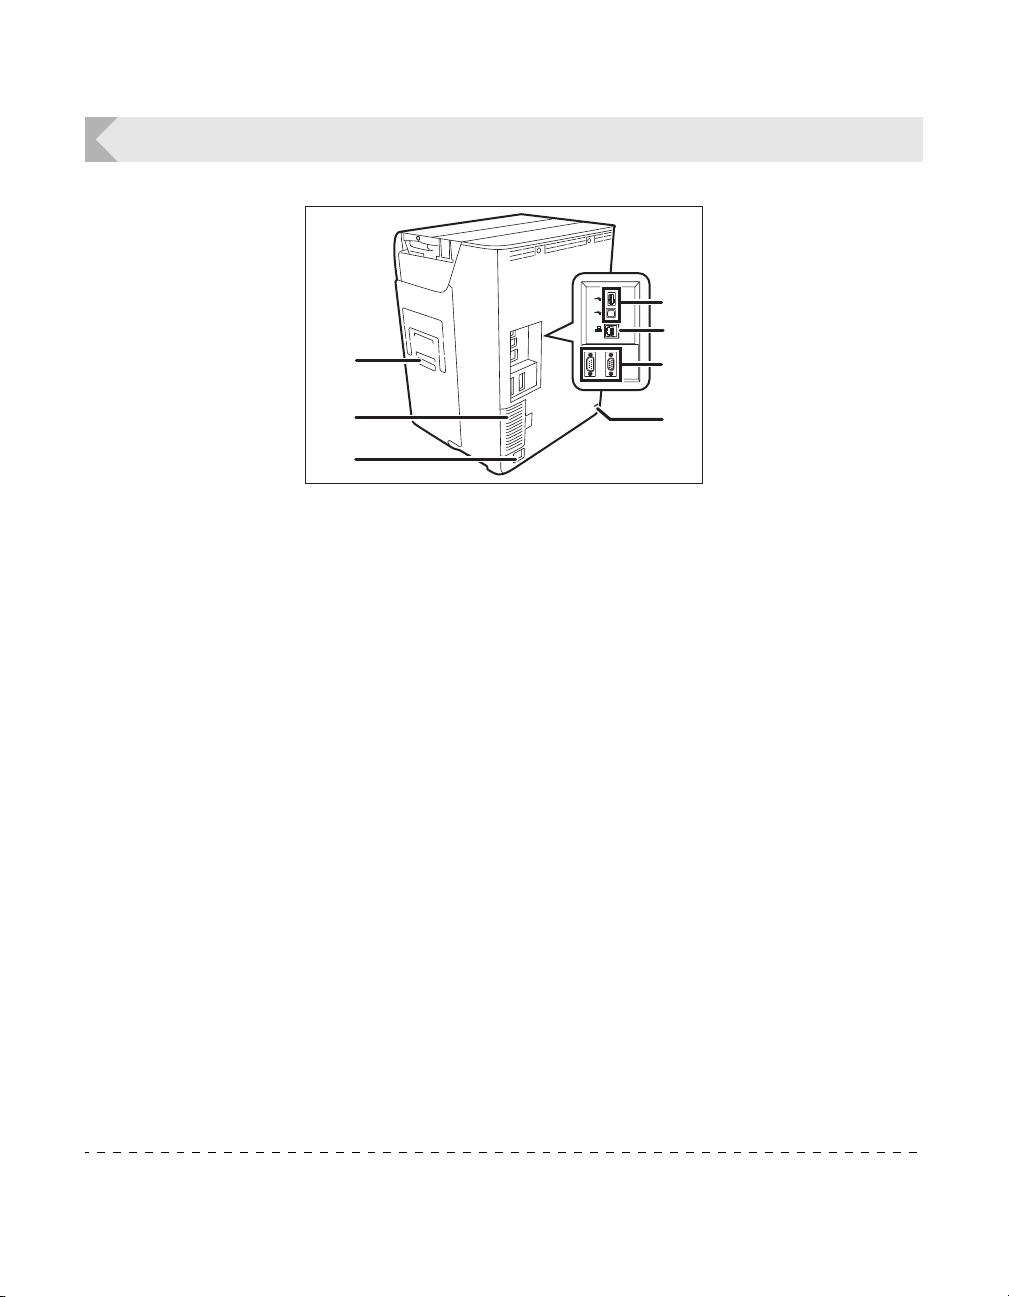
a Card Ejection Slot (Right)
Ejects correctly printed cards and cards with
errors.
Card Ejection Slot (Left) or (Right) can be
selected.
The factory default is set so cards with errors
are output from Card Ejection Slot (Right).
→See "Switching the Card Ejection Slot" on page 46
for information about switching the card ejection slot.
b USB Cable Port
USB (A terminal) ×1 and USB (B terminal) ×1.
Connect the B terminal and the computer using
the provided USB cable. Additionally, connect
the optional enhancement unit using the A
terminal.
→See the "Easy Setup Guide" for instructions on
connecting the cable.
c LAN Cable Port
Connect to the network using the LAN Cable.
→See the "Easy Setup Guide" for instructions on
connecting the cable.
d Port for Enhancing Function
Used for enhancing function
*1
(OPTION)
(PC)
(10/100)
RS-232C(PC) RS-232C(OPTION)
b
c
d
e
e Security Cable Slot
Use the Security Cable Slot to prevent theft of
the printer.
→See "Preventing Theft and Unauthorized Usage" on
page 53 for instructions on using the Security Cable
Slot.
f Power Cable Port
Used to connect the Power Cable.
→See the "Easy Setup Guide" for instructions on
connecting the cable.
g Filter
Filters out airborne dirt and other foreign matter,
preventing this entering the printer. The filter
can be removed for cleaning.
→See "Filter Cleaning" on page 66 for filter cleaning
instructions.
*1 Do not connect other than the specified optional units. Connecting these units could damage them.
6
Page 11
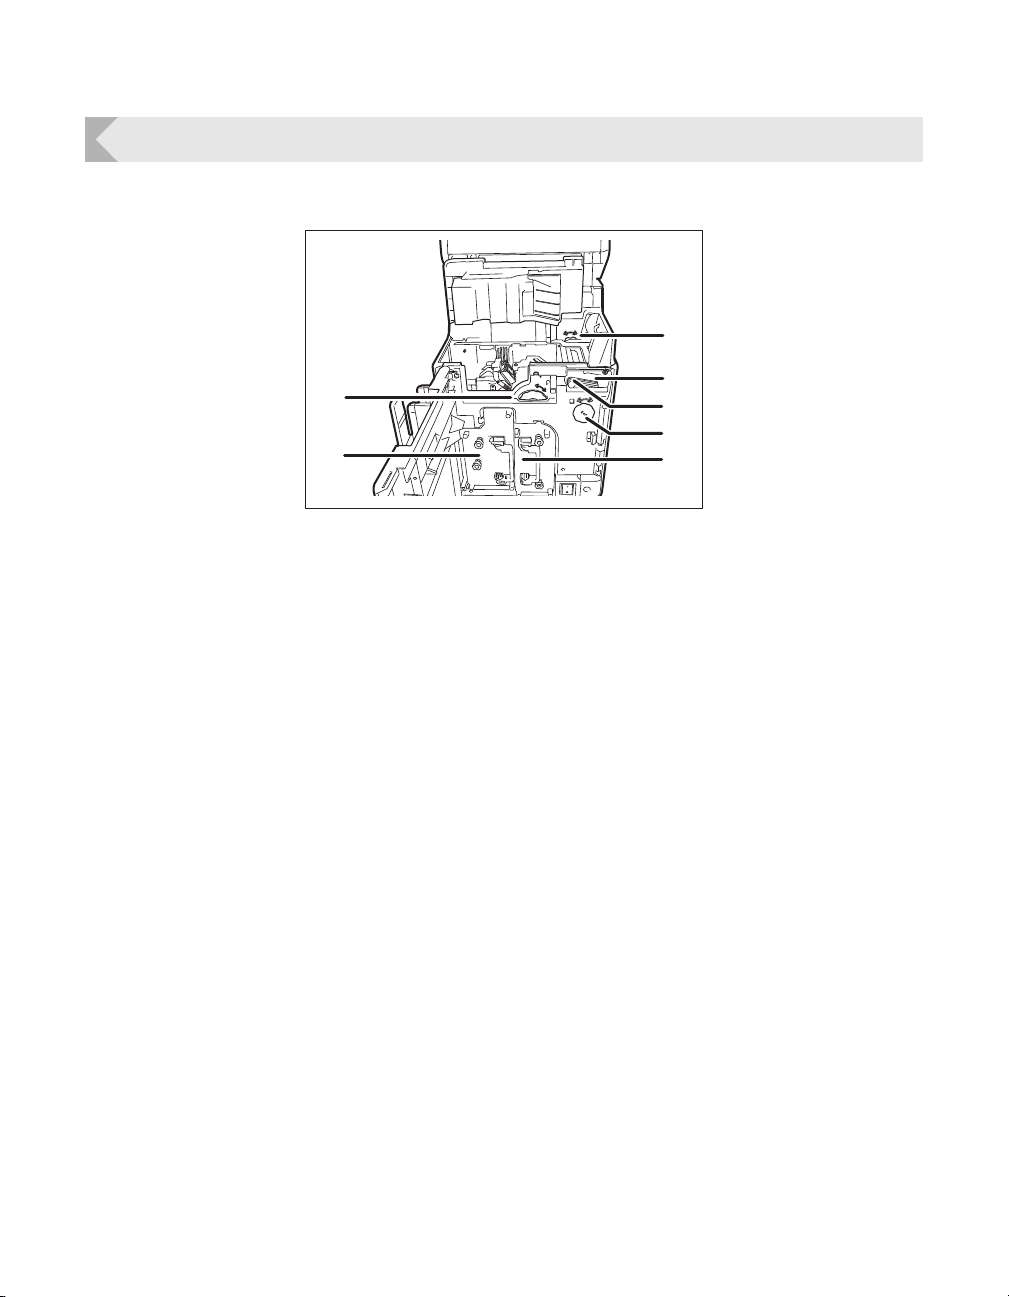
Front Cover
Interior of the Front Cover.
a
g
Part Names and Descriptions
b
c
d
e
f
a Card Feeding Knob
Rotating the dial to the left or right ejects cards
jammed in the secondary transfer section from
the Card Ejection Slot (Left) or (Right).
→See "When a Card is Jammed..." on page 73 for
instructions on how to eject jammed cards.
b Reverse Feeding Knob
Rotating the dial to the left or right ejects cards
jammed in the card feed slot and reverse
section.
→See "When a Card is Jammed..." on page 73 for
instructions on how to eject jammed cards.
c Cleaning Roller
Removes dirt and other foreign matter stuck to
the cards.
→See "Cleaning the Cleaning Roller" on page 57 for
cleaning instructions.
d Cleaning Tape Cassette
Remove when replacing the Cleaning Tape.
→See "Cleaning Tape Replacement" on page 22 for
how to change the Cleaning Tape.
e Reverse Knob
Rotate the knob to the left to change the
direction of the cards in the reverse section.
→See "When a Card is Jammed..." on page 73 for
instructions on how to change the direction of cards in
the reverse section.
f Ink Ribbon Cassette
Ink Ribbon Cassette.
→See "Changing the Ink Ribbon and Transfer Film" on
page 16 for details about changing the Ink Ribbon.
→See "Ink Ribbon/Transfer Film" on page 81 for
details about which Ink Ribbon you can use.
g Transfer Film Cassette
Transfer Film Cassette.
→See "Changing the Ink Ribbon and Transfer Film" on
page 16 for details about changing the Transfer Film.
→See "Ink Ribbon/Transfer Film" on page 81 for
details about which Transfer Film you can use.
7
Page 12
Full Color Card Printer
Note
Ready to Print
a
e
d
b
c
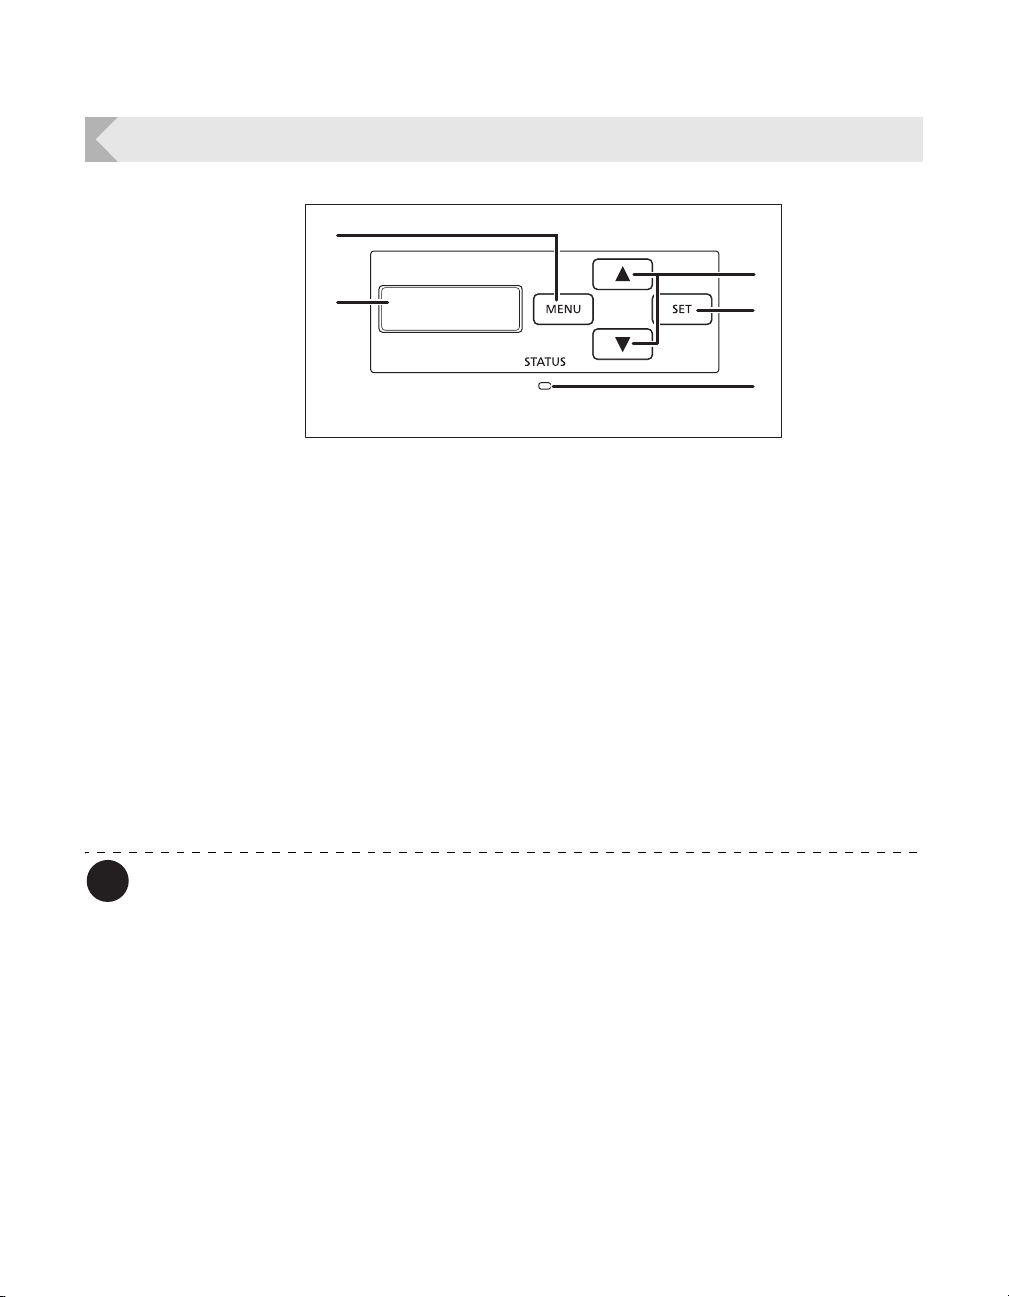
Operation Panel
a MENU Key
Switches between Normal Mode and User
Mode. In User Mode, it is used to go up one
level of the menu.
→See "Normal Mode and User Mode" on page 23 for
details about Normal Mode and User Mode.
b / Keys
In User Mode, used to select menus and
settings values.
c SET Key
Used to clear errors. In User Mode, this opens
the display menu.
→See "Troubleshooting" on page 67 when an error
occurs.
→See "Basic User Mode Operations" on page 25 for
details on changing the User Mode settings.
d LED Indicator
This indicator is lit blue depending on the status
of the printer. Is lit or blinks orange when an
error occurs.
→See "Troubleshooting" on page 67 when an error
occurs.
e LCD Panel
Displays the printer status.
→See "Normal Mode Message List" on page 23 for
details of the display.
You can check the status of the printer by looking at the LED Indicator.
• LED Indicator is lit (blue) ... Ready for printing.
• LED Indicator is blinking (blue, slow) ... Printer is in use.
• LED Indicator is lit (orange) ... Cards or Ink Ribbon have run out.
• LED Indicator is blinking (orange) ... Card jammed, or other error has occurred.
8
Page 13
Basic Card Printing Methods
Note
Ready to Print
Basic Card Printing Methods
This section explains the basic flow of operations, from turning on the power through
printing a card.
Turning On and Off the Printer
Turn on the printer before starting to print.
Before turning on the power, make sure the following preparations are complete:
• The Ink Ribbon Cartridge is loaded
• The Transfer Film is loaded
• The Front Cover is closed
• The Top Cover is closed
• The printer is connected to the computer
• The printer driver is installed
If the preparations above have not been performed, follow the instructions in
the "Easy Setup Guide".
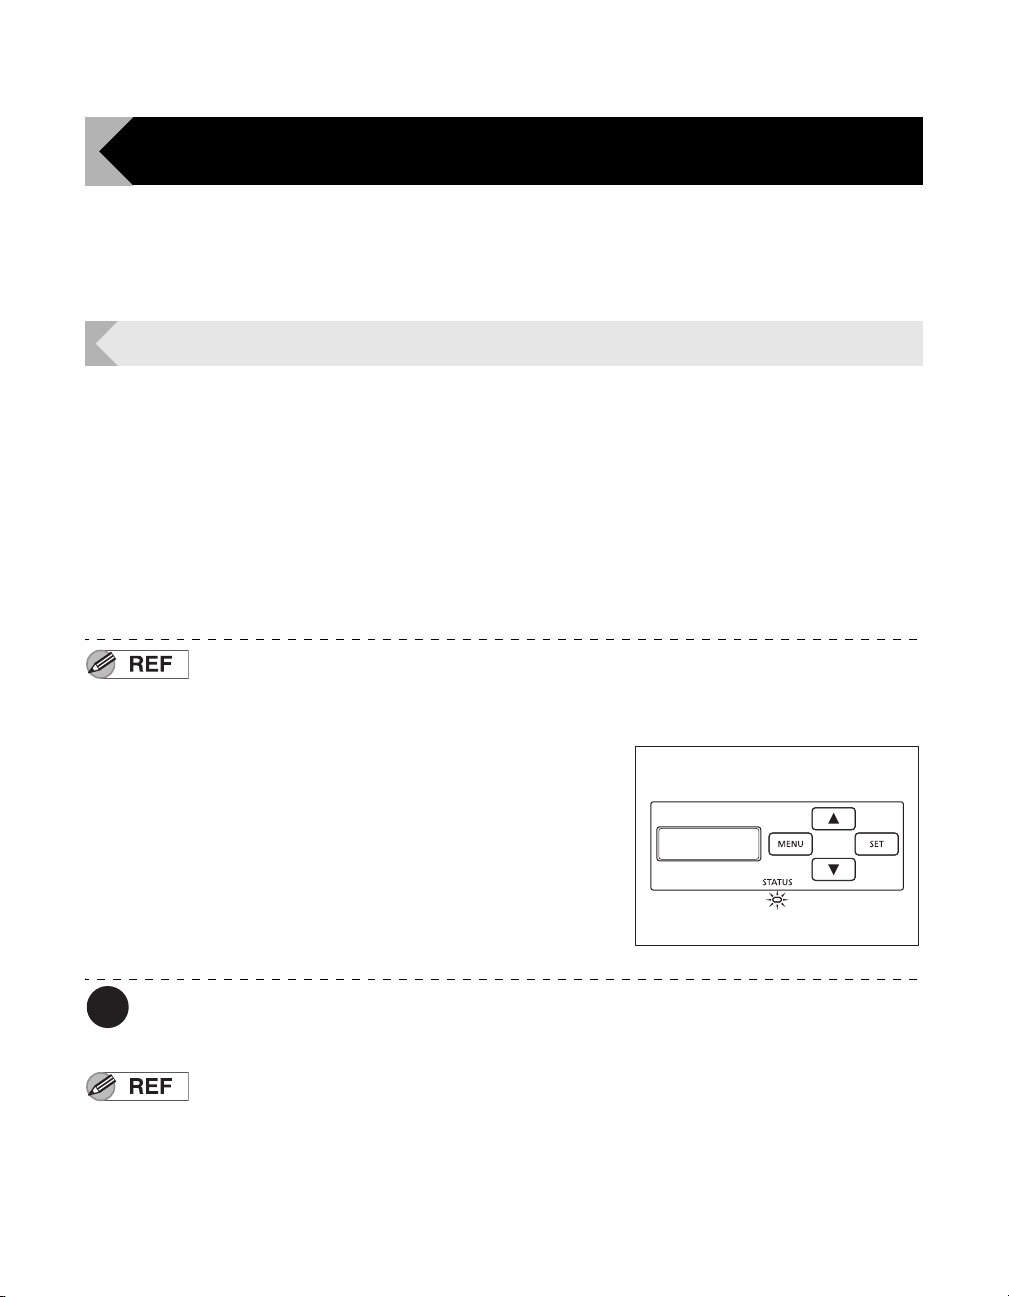
1 Press the Power Switch to turn on the
power.
• Press "–" on the Power Switch behind of the printer for
turning on the power.
• After [Initializing..] appears on the LCD Panel, the
operating indicator turns blue and [Ready to Print]
appears.
• Press "O" on the Power Switch for turning off the
power.
If a card is in the printer when the power is turned on, it is ejected from Card Ejection
Slot (Left) (default setting).
If the LED Indicator turns orange/blinks, refer to "Troubleshooting" on
page 67.
9
Page 14
Full Color Card Printer
Lock Lever
Loading Cards
Cards can be loaded in two ways: using the card retainer, and using the card feeding slot.
The Card Retainer can be loaded with a large quantity of cards, making it useful for mass printing.
Use the Card Feeding Slot to manually load cards when you want to print only 1 particular card
or to print many types of cards.
In this manual, the direction of the card case and of cards is as below.
Right
Rear
Front
Left
Card (Front
Surface)
Use cards recommended by your reseller.
→See "Cards" on page 82 for details about which cards you can use.
Do not use the following cards:
• Cards previously printed with this or any other card printer
• Wet cards
• Cards mixed with glass, metallic or other foreign objects
• Embossed cards
• Cards coated with oil or other foreign matter
• Cracked, chipped, bent or otherwise damaged cards
• Transparent cards
• Abnormally shaped cards
Loading Cards into the Card Case
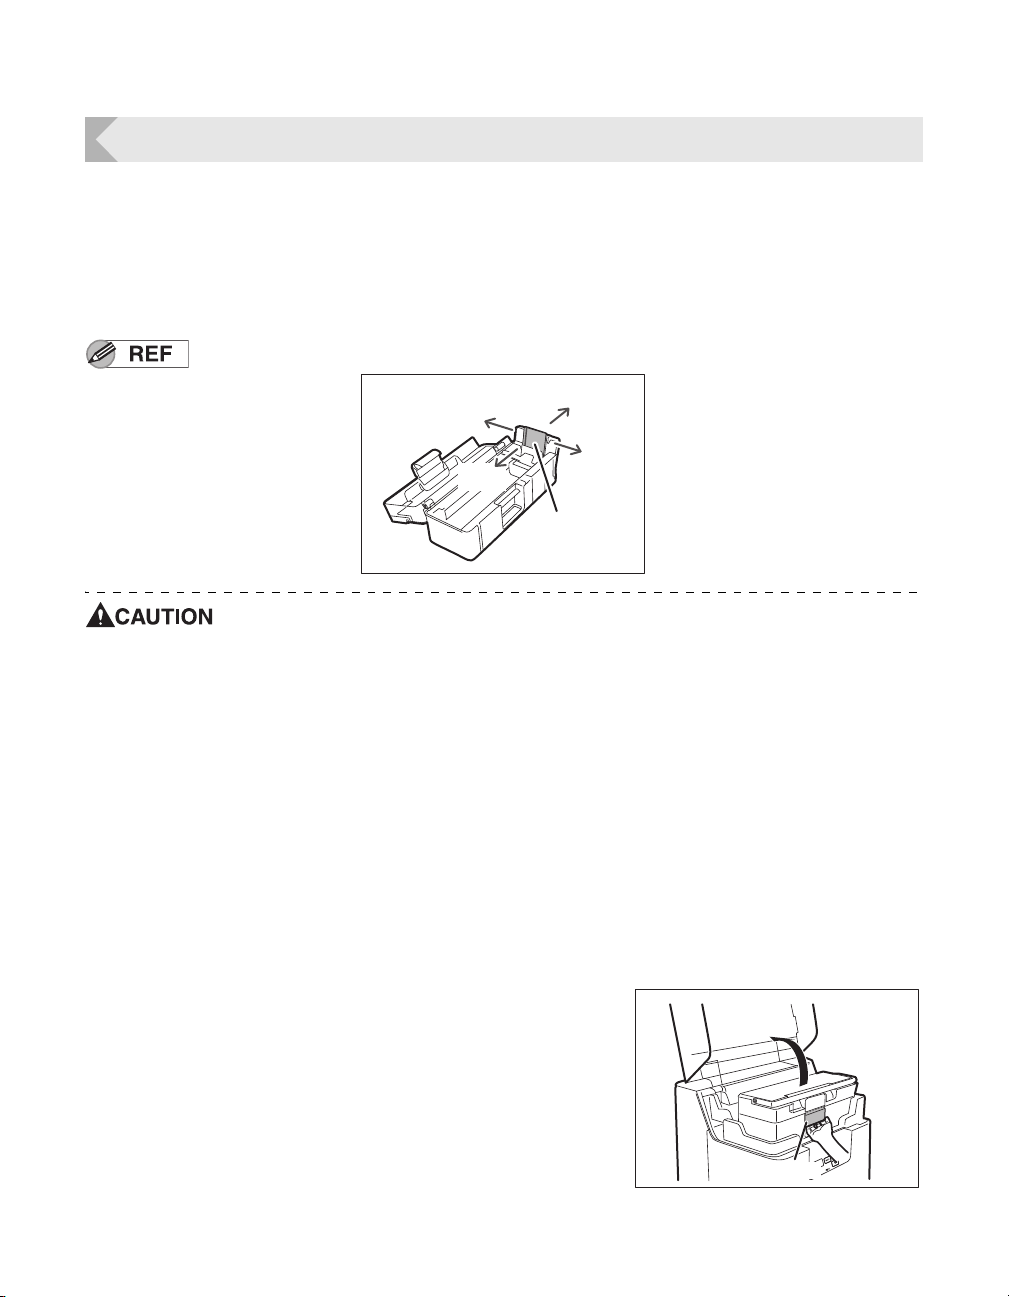
1 Open the Top Cover, and the Card Case
cover.
• Pull the lock lever, and open the Card Case lid.
10
Page 15
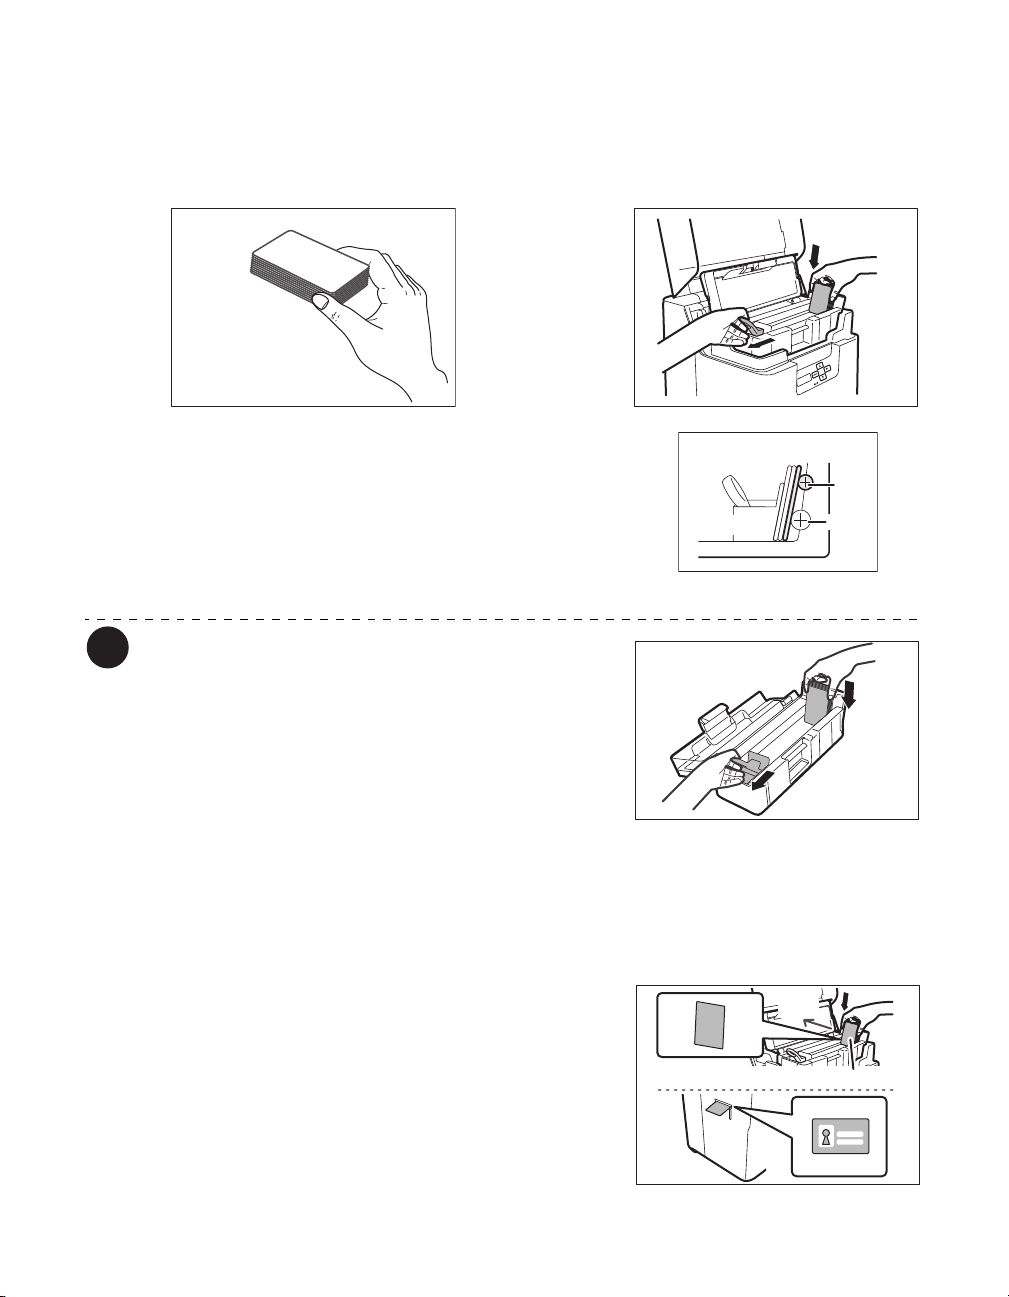
2 Pull the card retainer, and load cards.
Note
Roller
Rubber
Card Case
Card Retainer
To p
Bottom
To p
Bottom
Rear
Card Front Surface (Left Side)
• Hold the card retainer lever with your fingers, and pull it right out.
• Load the card case with the printing side (front surface) to the left.
• When loading the cards, be sure to hold their edges, and never touch the front or rear printing sides.
3 Return the card retainer, and close the
cover.
• When returning the card retainer, be sure not to get
your fingers caught.
• Confirm that the card touches the upper roller of the
feeder.
4 Close the Top Cover.
The Card Case can be removed from the
printer. After loading the cards as in the
diagram at right, return the card retainer to
its original position, close the cover, and
reattach to the printer.
→See "How to Store Cards (Removing the Card
Case)" on page 53 for information on how to remove
the Card Case.
Basic Card Printing Methods
In order to prevent unauthorized printing, we recommend storing loaded Card Cases
separately from the printer.
→See "How to Store Cards (Removing the Card Case)" on page 53 for information on how to store the
Card Case.
Load cards in order starting from the right side of the card case. When printing begins
the right-most card is pulled into the printer.
The printing side of the card (front surface)
is on the left.
When using cards such as pre-printed
cards that have a specified orientation, load
the cards so that after printing, the printed
upper surface is at the rear of the cassette.
If cards are stuck to each other and do not
correctly feed, then lightly flex and separate
the cards before printing.
11
Page 16
Full Color Card Printer
Note
Card
Feeding
Slot
To p
Bottom
To p
Bottom
Re
ar
Card Front Surface (Left Side)
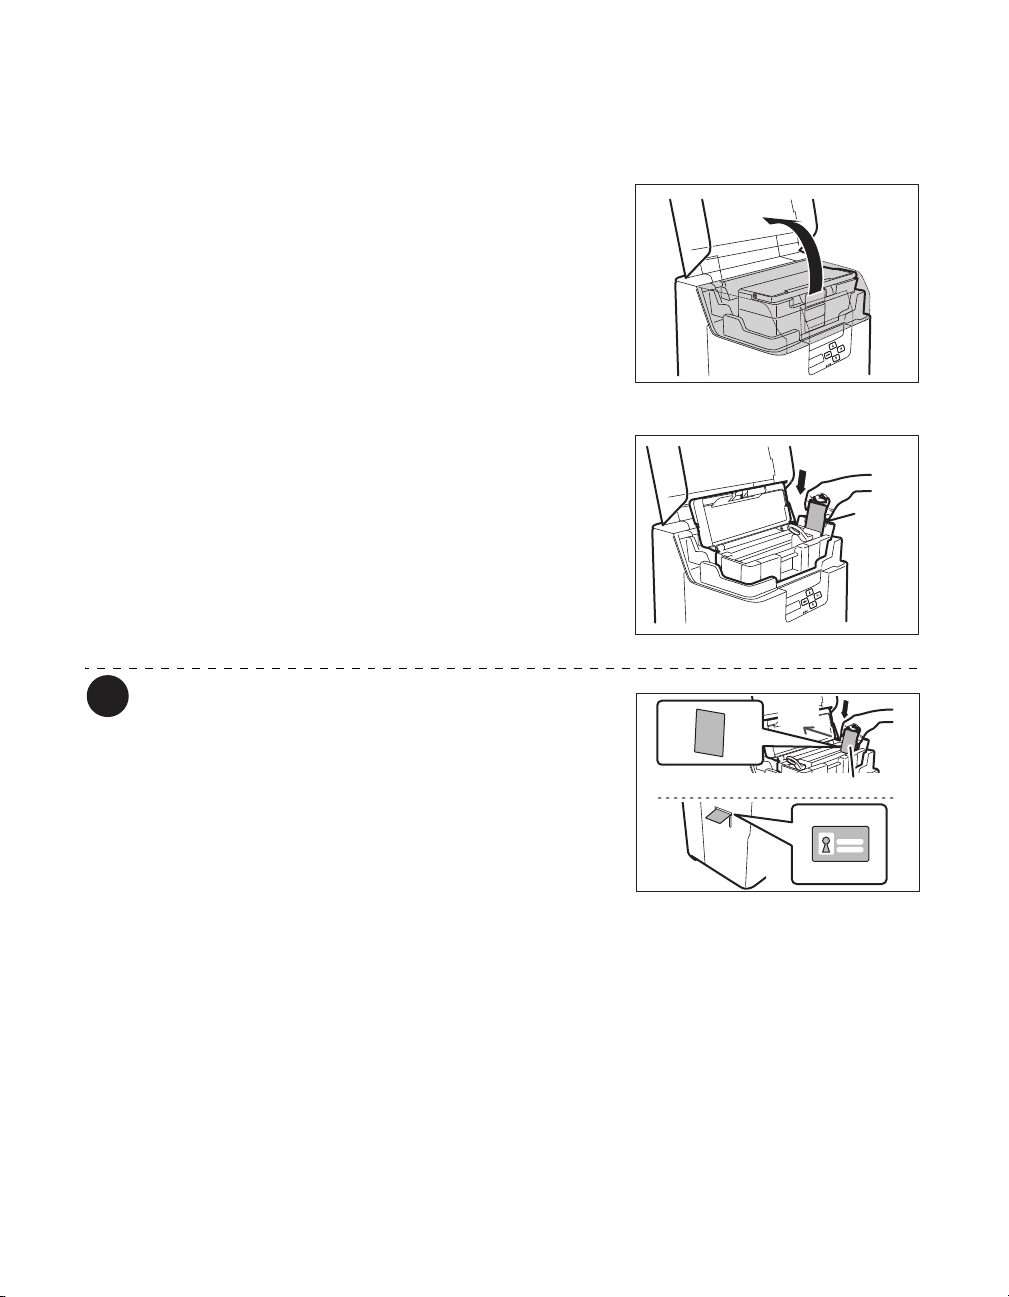
Manually Loading Cards One by One
1 Open the Top Cover.
2 Open the Card Case, and insert cards
into the Card Feeding Slot.
• Pull the lock, and open the Card Case lid.
• Insert cards with the printing side to the left into the
Card Feeding Slot.
• If cards are loaded, remove them from the Card Case.
The printing side of the card (front surface)
12
is the left surface.
When using cards such as pre-printed
cards that have a specified orientation, load
the cards so that after printing, the printed
upper surface is at the rear of the cassette.
Page 17
Basic Card Printing Methods
Note
Front
Surface
Card Case Rear
Card Case Front
Card Case Rear
Card Case Front
Rear
Surface
IC Terminal
Card Case Rear
Card Case Front
Front
Surface
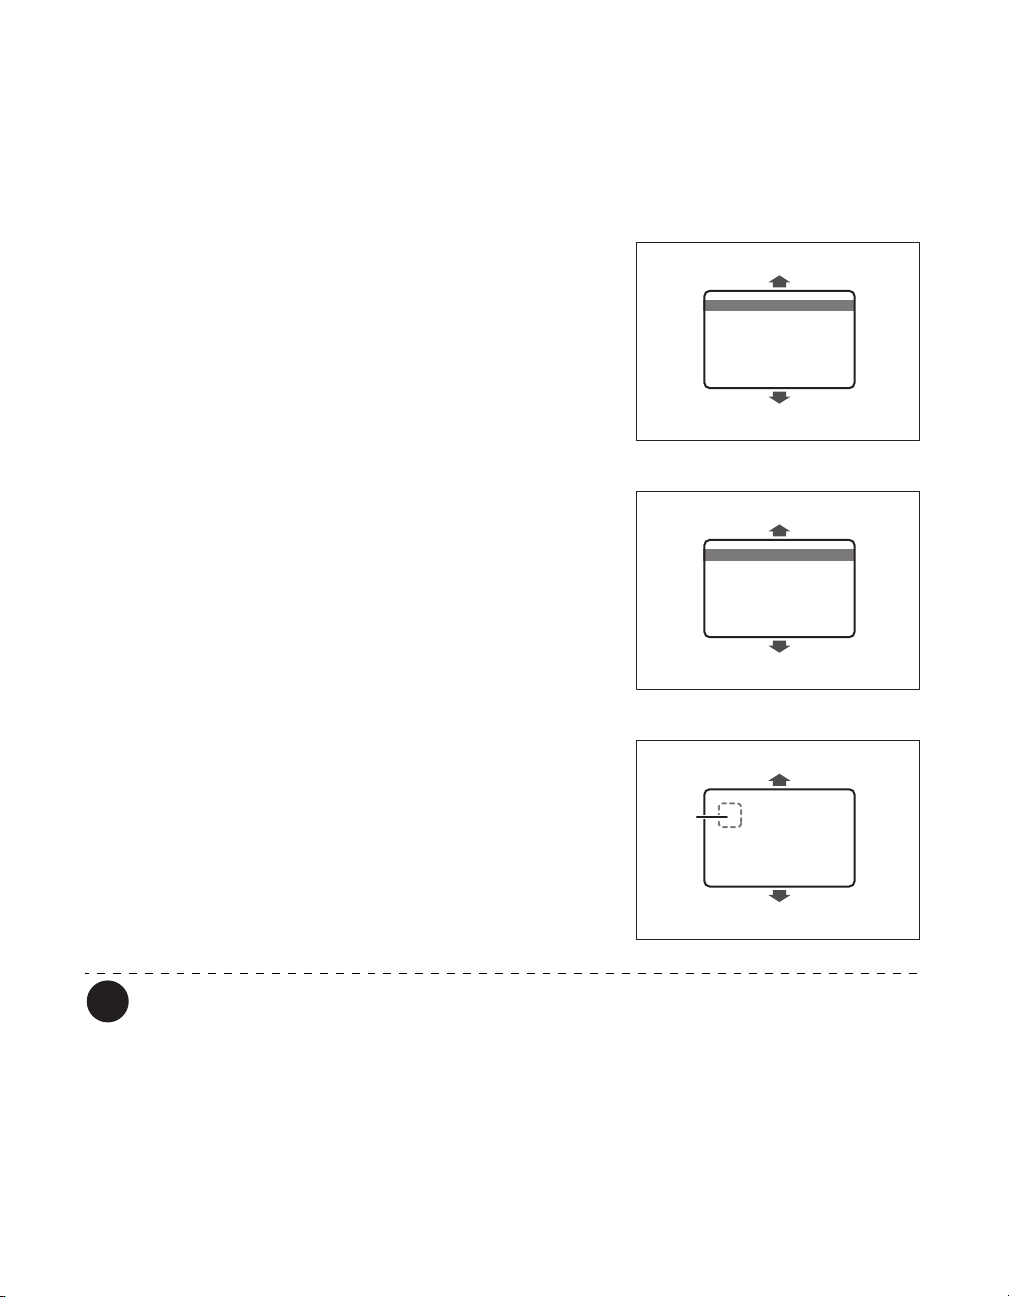
Loading Magnetic/IC Cards
The factory default for magnetic cards/IC cards is to be loaded as below.
→See "Loading Cards into the Card Case" on page 10 for the procedure on loading cards into the Card Case.
If using cards with JIS2 magnetic strips
• Load the JIS2 magnetic strips so that they are at the
left of the Card Case.
• Load the JIS2 magnetic strips so that they are at the
rear of the Card Case.
If using cards with ISO magnetic strips
• Load the ISO magnetic strips so that they are at the
right of the Card Case.
• Load the ISO magnetic strips so that they are at the
rear of the Card Case.
If using cards with IC terminals
• Load the IC terminals so that they are at the left of the
Card Case.
• Load the IC terminals so that they are at the rear of the
Card Case.
Printing on the magnetic strip/IC terminal cannot be guaranteed.
The surface with the JIS2 magnetic strip and the IC terminal is the printing side (front
surface).
In User Mode, [Set Face], you can set the orientation of loaded magnetic cards.
→See "Set the Orientation of Magnetic Cards/IC Cards to Load" on page 47 for information on how to load
magnetic cards.
13
Page 18
Full Color Card Printer
Printing
Command/menu names and the order of the procedure may differ
depending on your application software. For more information on
operations, refer to the instruction manual for your application software.
Also, for more information about printer driver operations, refer to the driver
help files.
The explanations in this manual are based on screens that appear when
using Windows 7.
1 Turn on the printer and load the cards.
• See "Loading Cards" on page 10 for information on
how to load the cards correctly.
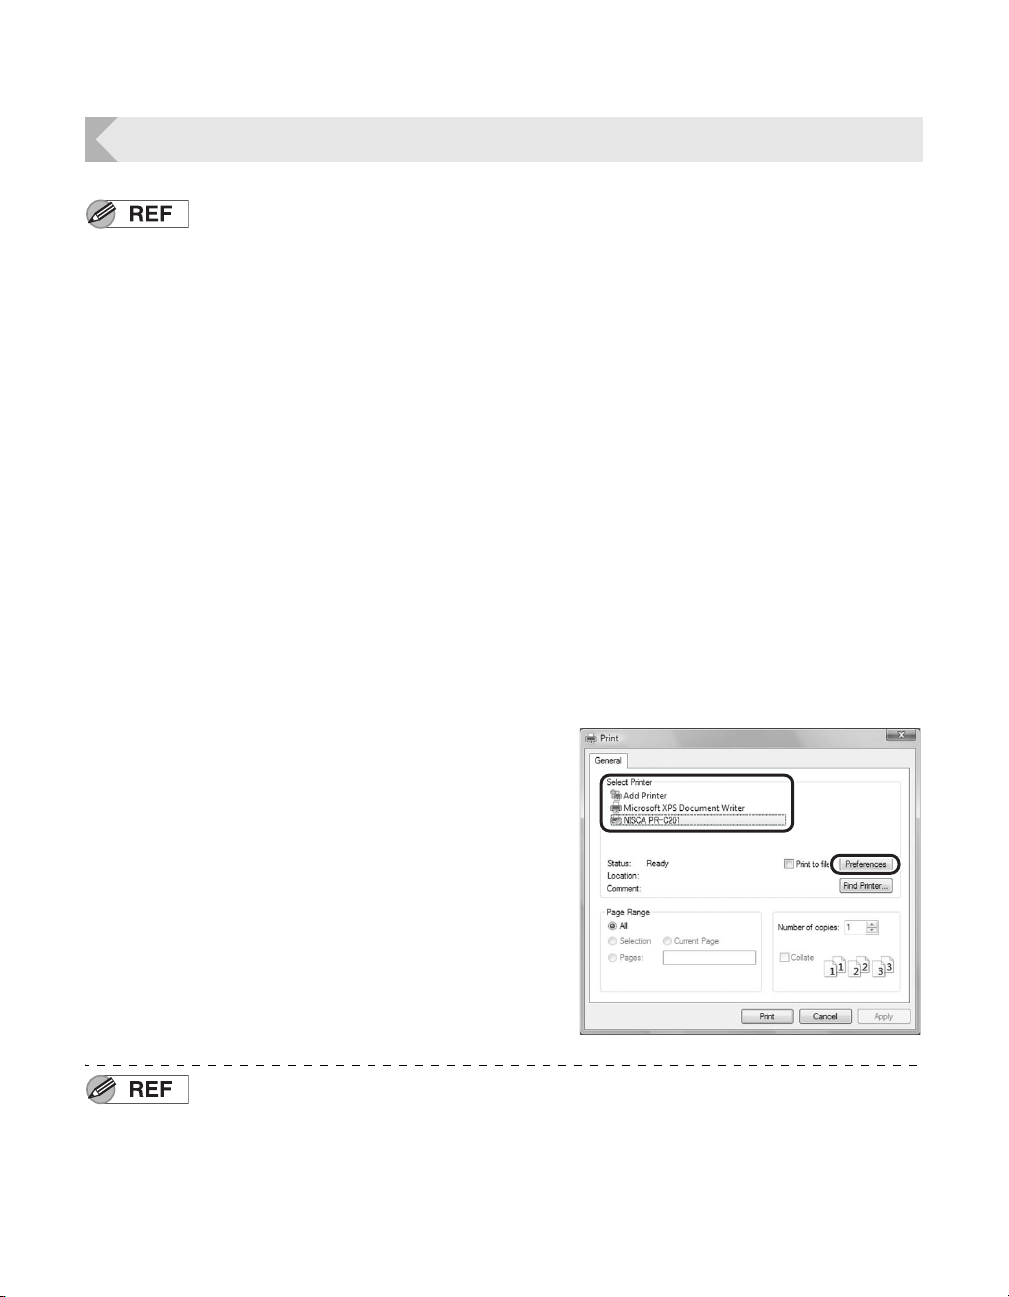
2 Launch your application software to
create a document.
3 From the [File] menu of your
application software, select [Print].
• Open the printer driver settings screen.
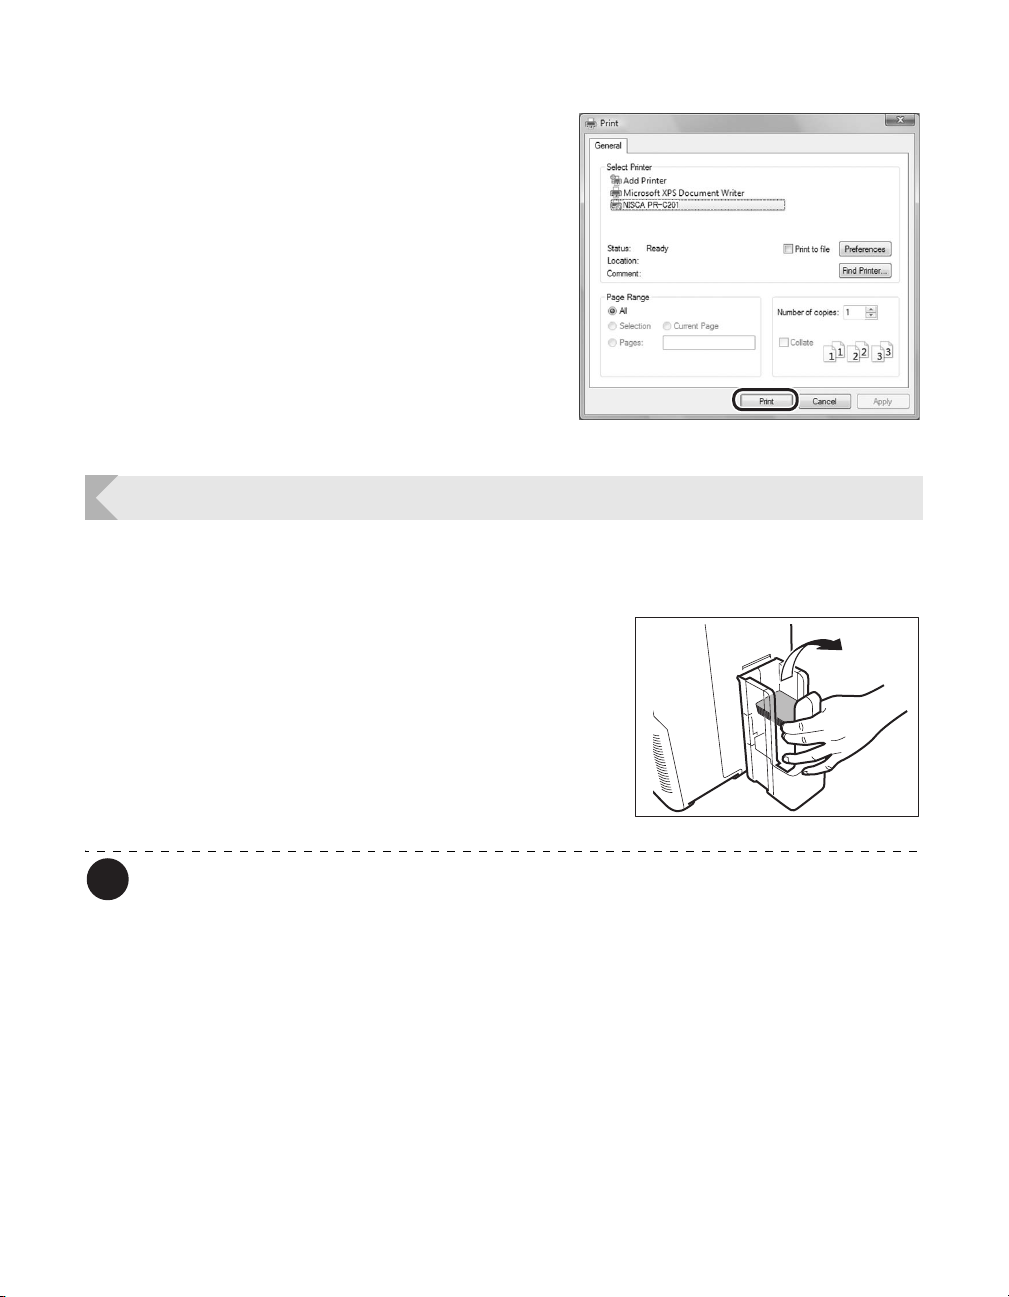
4 Specify various settings for printing if
necessary.
• Select [NISCA PR-C201] if it is not already selected.
• Click [Preferences] (or [Properties]), and set the card
size and the number of cards to be printed.
Click [OK] when setup is complete.
For more information about how to change the settings of the printer driver,
refer to the driver help files.
14
Page 19
Basic Card Printing Methods
Note
5 Click [Print].
• Printing starts.
• Cards are pulled into the printer and the LED Indicator
blinks blue.
[Now Printing] appears on the LCD Panel.
• If the cards are not loaded, [Card Empty] appears on
the LCD Panel.
Removing Cards
The factory default is for printed cards to be ejected from Card Ejection Slot (Left).
1 Removing cards from the Card Stacker.
• You can remove loaded cards from the slit on the side
of the Card Stacker (see diagram at right).
The Card Ejection Slot (Left) Card Stacker has a maximum capacity of approximately
250 cards.
When ejecting cards from the Card Ejection Slot (Left), empty the Card Stacker when
it has approximately 250 cards.
The factory default is set so that correctly printed cards are output from the Card
Ejection Slot (Left), and cards with errors are output from Card Ejection Slot (Right).
→See "Switching the Card Ejection Slot" on page 46 for information about switching the card ejection
location.
→See the "Easy Setup Guide" for instructions on removing the Card Stacker.
The factory default status is to have the front face facing down for single-sided
printing, and facing up for double-sided printing.
→See "Set the Orientation of Cards to Eject" on page 49 for the orientation of cards to eject.
15
Page 20
Full Color Card Printer
Note
Note
Changing the Ink Ribbon and Transfer Film
Change the Ink Ribbon and Transfer Film when these run out.
→See "Ink Ribbon/Transfer Film" on page 81 for details about Ink Ribbon and Transfer Film.
You can check the amount of Ink Ribbon and Transfer Film remaining.
→See "Correcting image and text misalignment" on page 36 for instructions on how to check the amount of
Ink Ribbon and Transfer Film remaining.
Checking Replacement Period, and Preparation
If [Ribbon Empty] or [Film Empty] messages are displayed on the LCD panel, then it is
necessary to replace the Ink Ribbon or Transfer Film.
This section explains how to change the Cleaning Tape together with the Ink Ribbon and
Transfer Film.
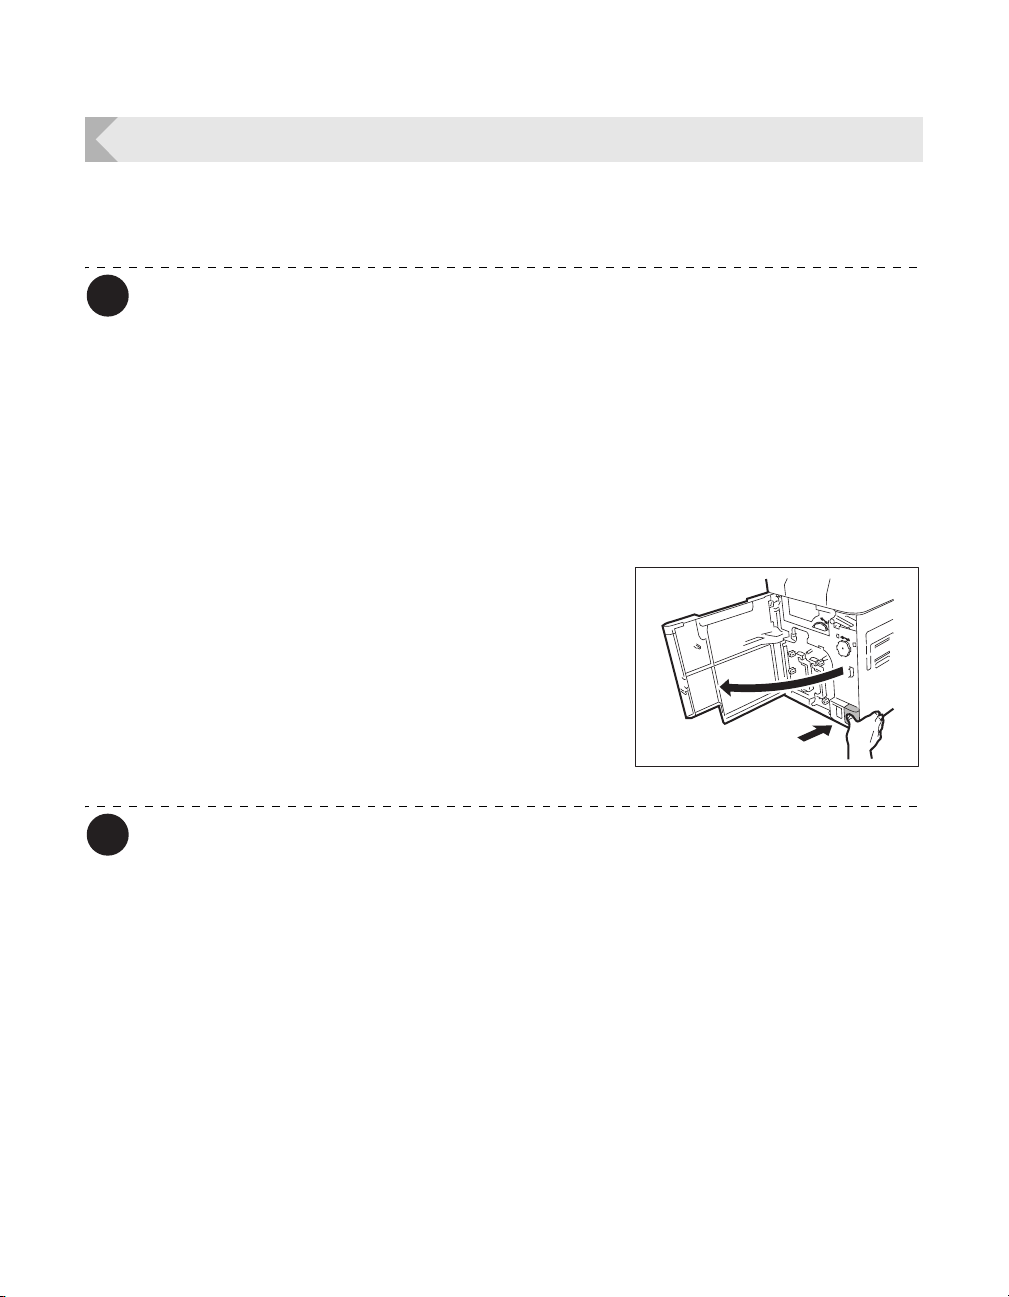
1 Before replacement, open the Front
Cover.
• Press the open cover switch, and pull the Front Cover
out.
→See "Changing the Ink Ribbon" on page 17 when
replacing the Ink Ribbon.
→See "Cleaning Tape Replacement" on page 22
when replacing the Cleaning Tape.
→See "Transfer Film Replacement" on page 19 when
replacing the Transfer Film.
The Ink Ribbon, Transfer Film, and Cleaning Tape can be replaced while the Front
Cover is open.
The number of printable sides with the Ink Ribbon and Transfer Film may decrease
under the following conditions:
→See "Ink Ribbon/Transfer Film" on page 81 for the number of printable sides with Ink Ribbon and Transfer
Film.
• Changing the Ink Ribbon or Transfer Film during use
• When an error occurs during printing
• Performing operations not listed in this manual
Use Ink Ribbon and Transfer Film as soon as possible after purchase.
16
Page 21
Changing the Ink Ribbon
Note
a
b
Winding Side
Feed Side
Use the following procedure when replacing the Ink Ribbon.
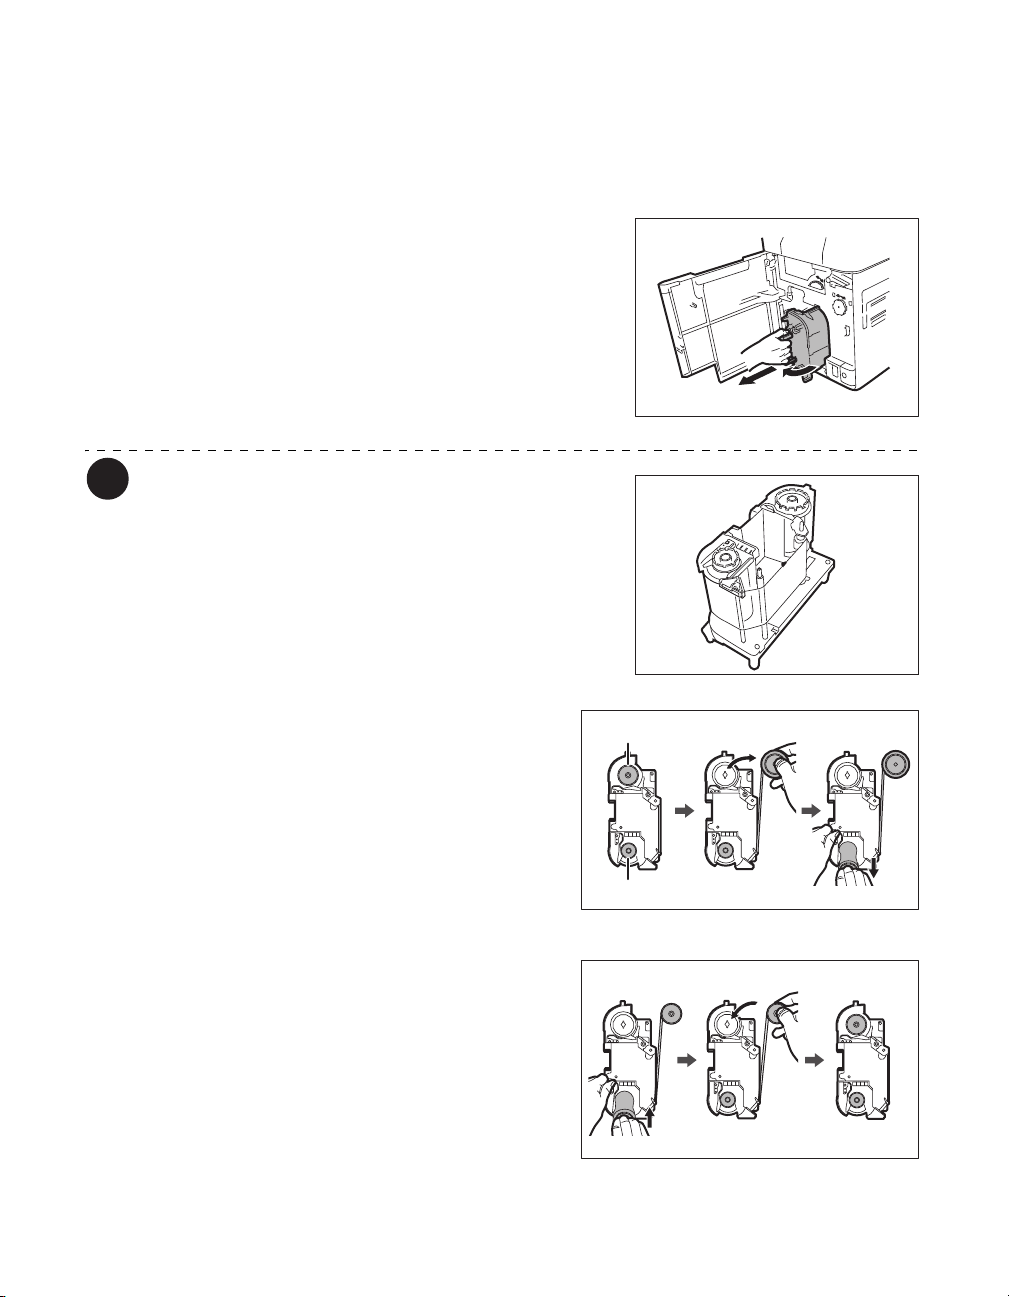
1 Remove the Ink Ribbon Cassette.
• Pull out the handle of the ink ribbon cassette with the
handle turned up.
When placing the Ink Ribbon Cassette
down, prevent contamination adhering by
placing it with the handle on the bottom.
Basic Card Printing Methods
2 Remove the Ink Ribbon from the
Cassette.
• First, remove the spool spindle from the winding side
(black) holder, then remove the spool spindle from the
feed side (magenta) holder.
• When removing the spool spindle, pressing the spool
spindle downwards and tilting it to the side makes it
easy to remove.
3 Load new Ink Ribbon in the Cassette.
• Insert the spool spindle into the feed side (magenta)
holder. As in the diagram at right, unwind and load
onto the shaft. Finally, insert the spool spindle into the
winding side holder.
• When inserting the spool spindle, first inserting the
bottom, then standing the spool spindle makes it easy
to insert.
• When setting the used Ink Ribbon, take up used parts
of the ribbon to the spool spindle for the winding side
(black). Otherwise, images may not be printed on a
card correctly.
17
Page 22
Full Color Card Printer
Note
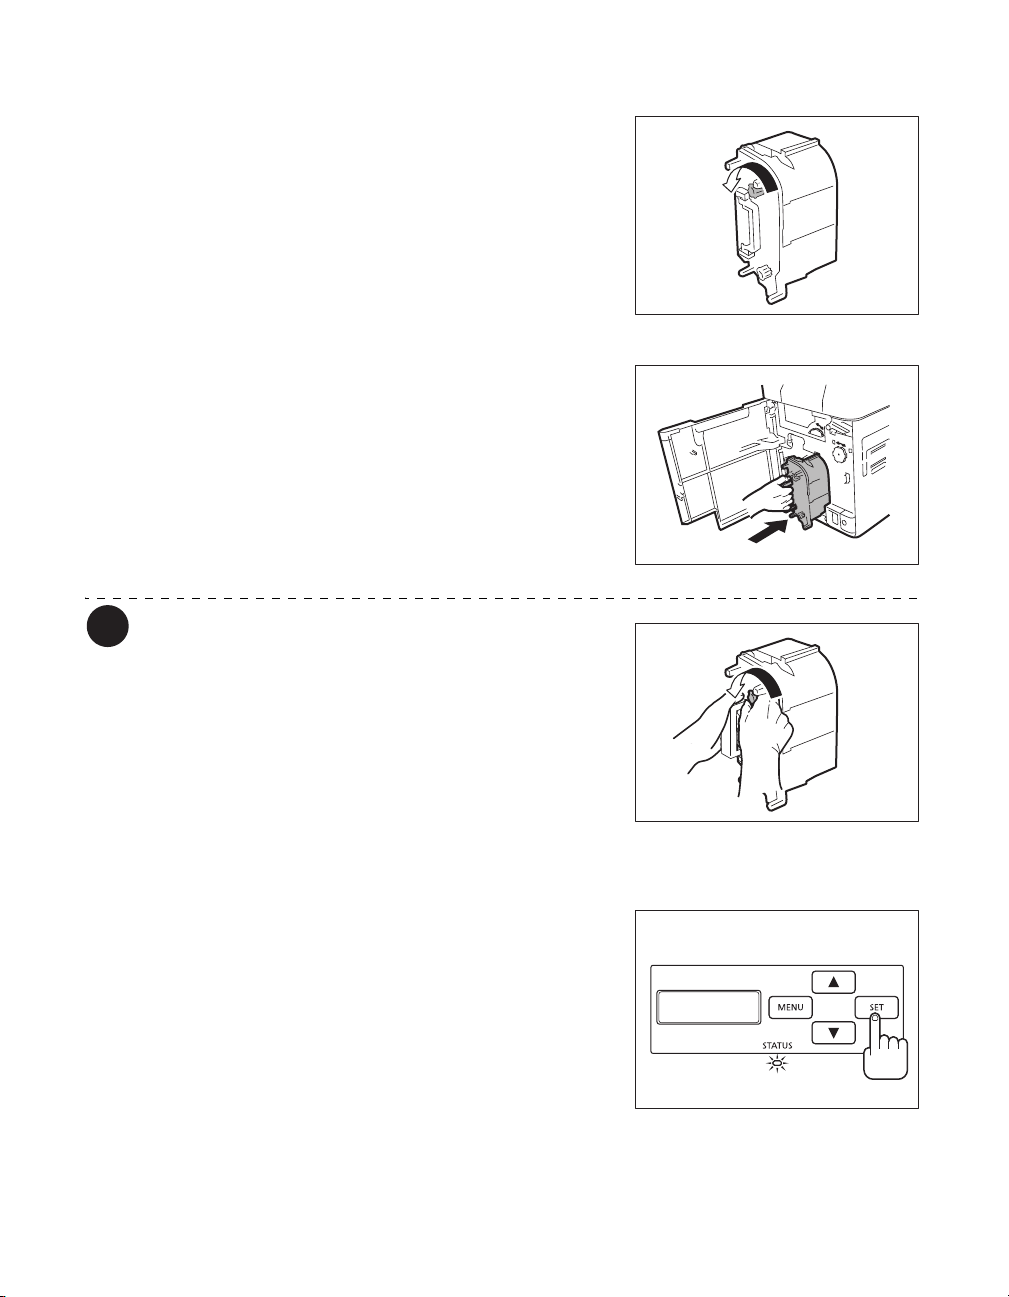
4 Take up the Ink Ribbon slack.
• Turn the knob as in the diagram at right, and take up
the ribbon slack.
• If the slack is not taken up properly, then the Ink
Ribbon may jam.
5 Insert the Ink Ribbon Cassette.
• Insert the Ink Ribbon Cassette until a "click" is heard.
→For replacing Transfer Film or Cleaning Tape, See
"Transfer Film Replacement" on page 19, or "Cleaning
Tape Replacement" on page 22.
When inserting the Ink Ribbon Cassette,
insert while turning the knob in order to
prevent slack.
Slack of Ink Ribbon may lead to print
abnormalities.
6 Close the Front Cover.
7 When [Push SET key] appears on the
screen, press the SET Key.
• Clear an error first if the error message such as [Card
Empty] appears, then press the SET Key.
→See "When an Error Message Appears" on page 67
for clearing error messages.
18
Push SET key
Page 23
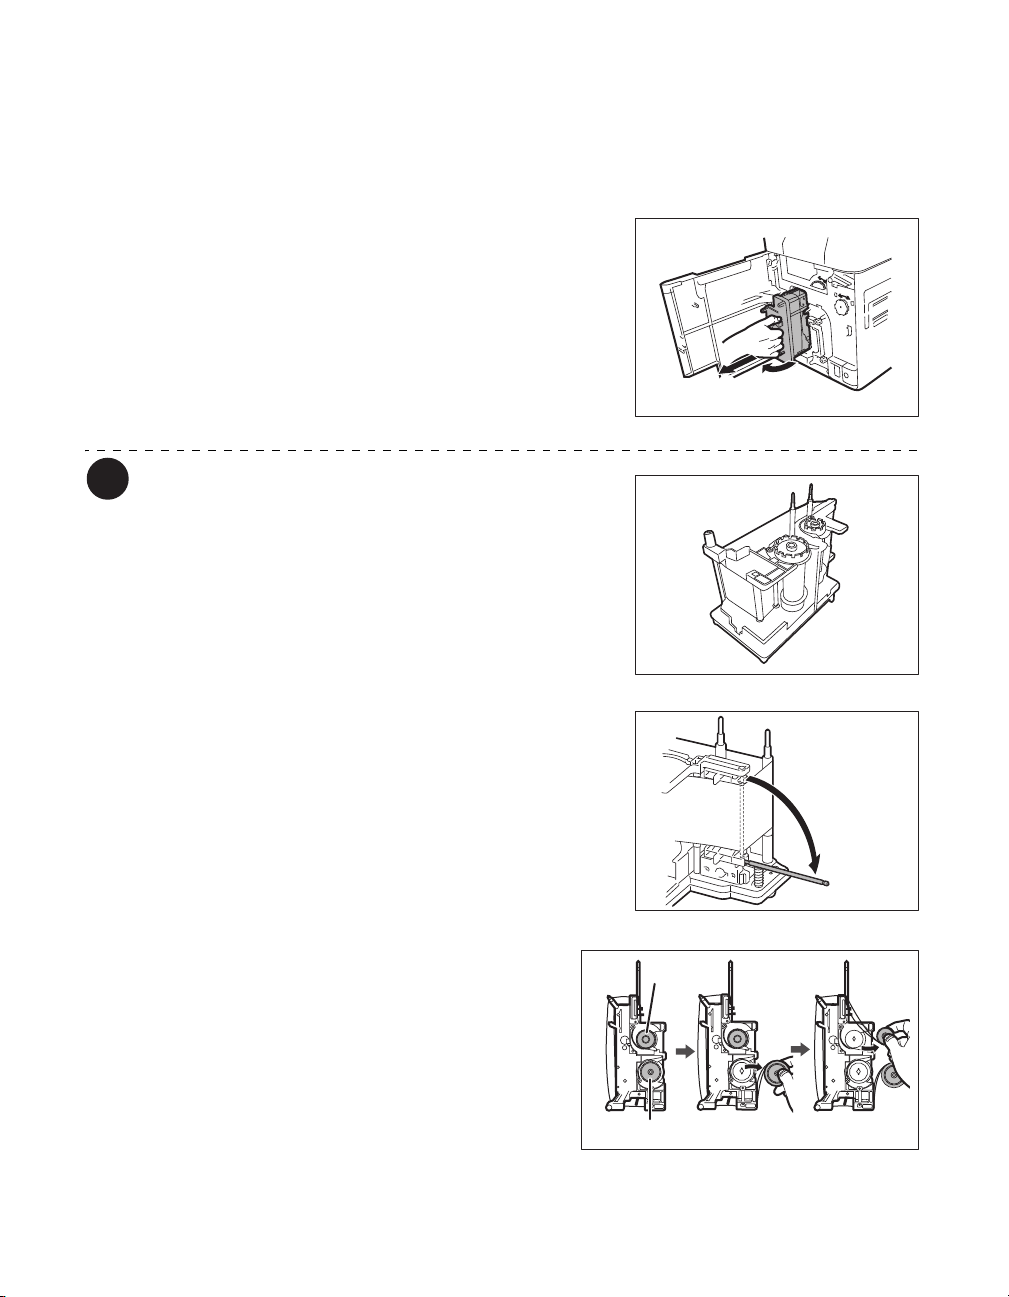
Transfer Film Replacement
Note
a
b
Feed Side
Winding Side
Use the following procedure when replacing the Transfer Film.
1 Remove the Transfer Film Cassette.
• Pull out the handle of the transfer film cassette with the
handle turned up.
When placing the Transfer Film down,
prevent contamination adhering by placing
it with the handle on the bottom.
Basic Card Printing Methods
2 Push down the pin on top of the
Transfer Film Cassette.
3 Remove the Transfer Film from the
Cassette.
• First, remove the spool spindle from the winding side
(black) holder, then remove the spool spindle from the
feed side (white) holder.
• When removing the spool spindle, pressing the spool
spindle downwards and tilting it to the side makes it
easy to remove.
19
Page 24
Full Color Card Printer
Note
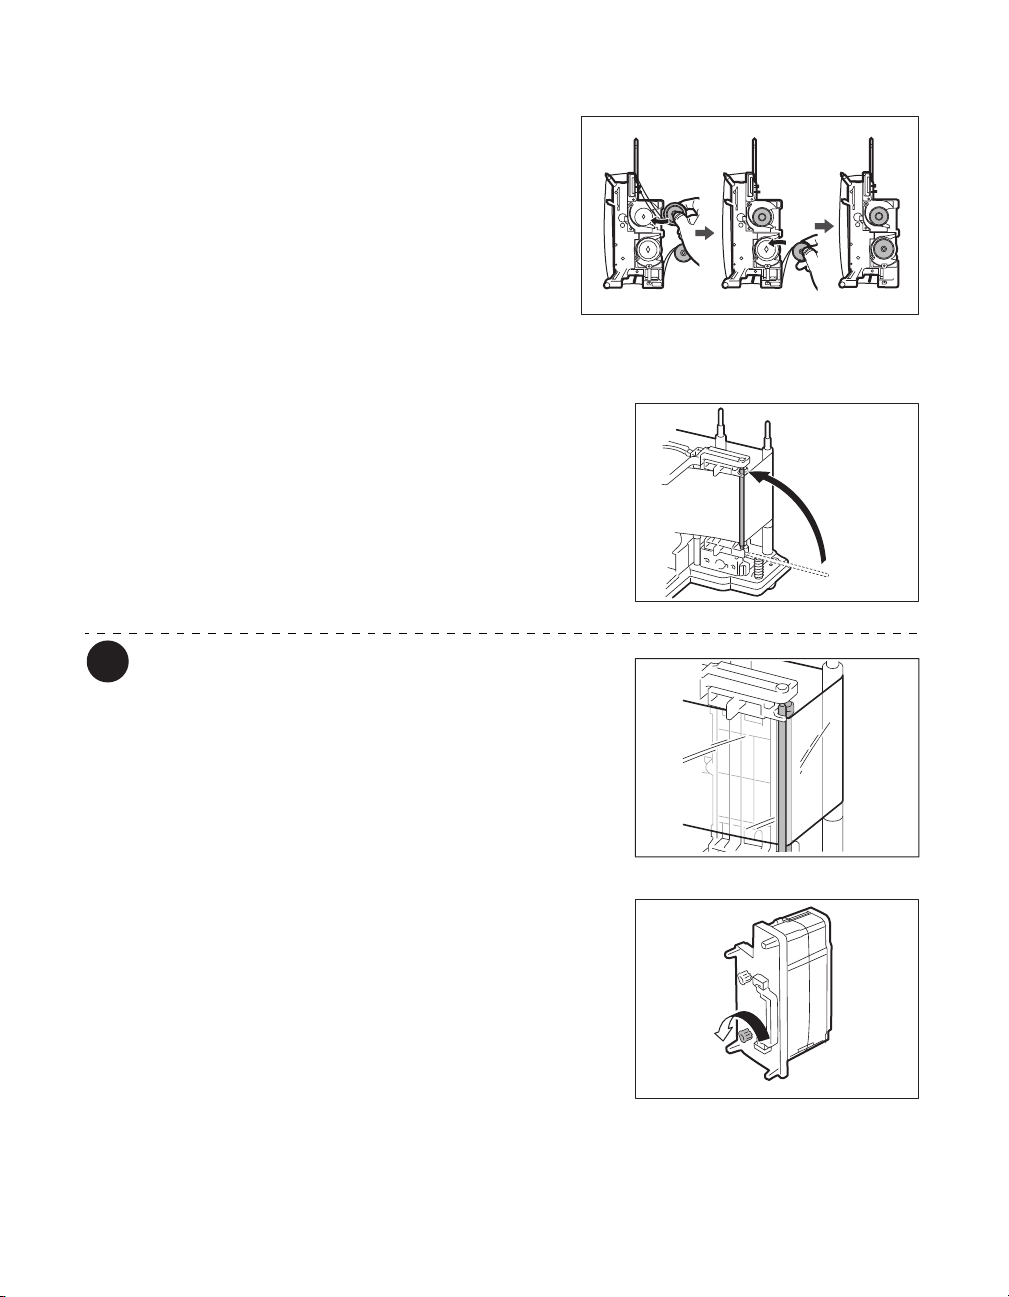
4 Load new Transfer Film in the Cassette.
• Insert the spool spindle into the feed side (white)
holder. As in the diagram at right, unwind and load
onto the shaft. Finally, insert the spool spindle into the
winding side holder.
• When inserting the spool spindle, first inserting the
bottom, then standing the spool spindle makes it easy
to insert.
• When setting the used Transfer Film, take up unused
parts of the film to the spool spindle for the feed side
(white). Otherwise, images may not be transferred to a
card correctly.
5 Attach the pin on top of the Transfer
Film Cassette.
• Tightly fit the tip of the pin into the grooves.
Make sure that the Transfer Film is running
between the two pins on top of the Transfer
Film Cassette.
6 Take up the Transfer Film slack.
• Turn the knob as in the diagram at right, and take up
the film slack.
• If the slack is not taken up properly, then the Transfer
Film may jam.
20
Page 25
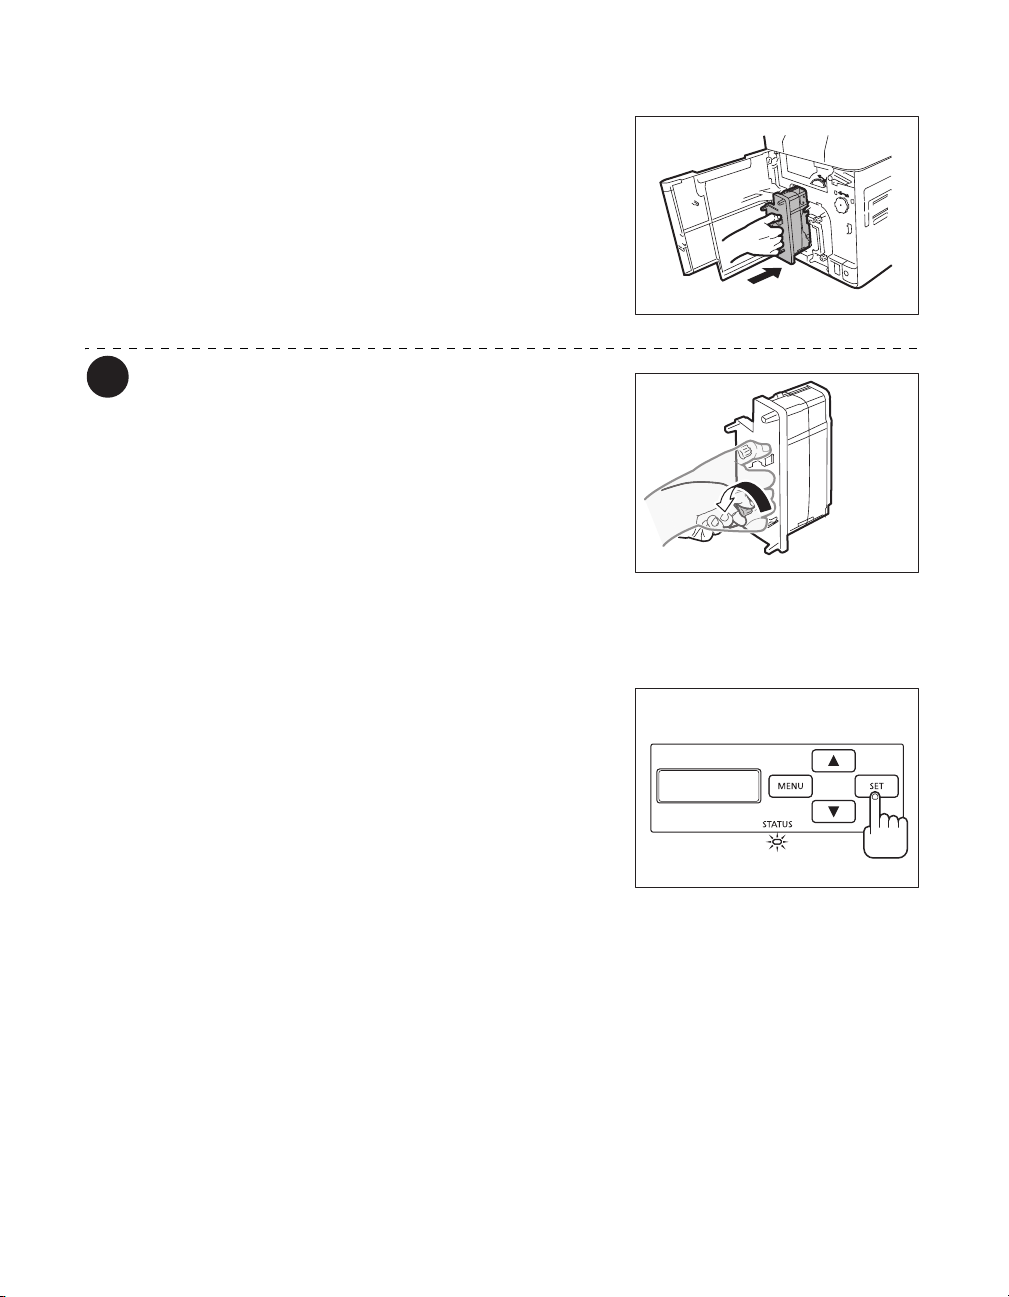
7 Insert the Transfer Film Cassette.
Note
• Insert the Transfer Film Cassette until a "click" is
heard.
→For replacing Cleaning Tape, See "Cleaning Tape
Replacement" on page 22.
When inserting the Transfer Film, insert
while turning the knob in order to prevent
slack.
Slack of Transfer Film may lead to print
abnormalities.
8 Close the Front Cover.
Basic Card Printing Methods
9 When [Push SET key] appears on the
screen, press the SET Key.
• Clear an error first if the error message such as [Card
Empty] appears, then press the SET Key.
→See "When an Error Message Appears" on page 67
for clearing error messages.
Push SET key
21
Page 26
Full Color Card Printer
Note
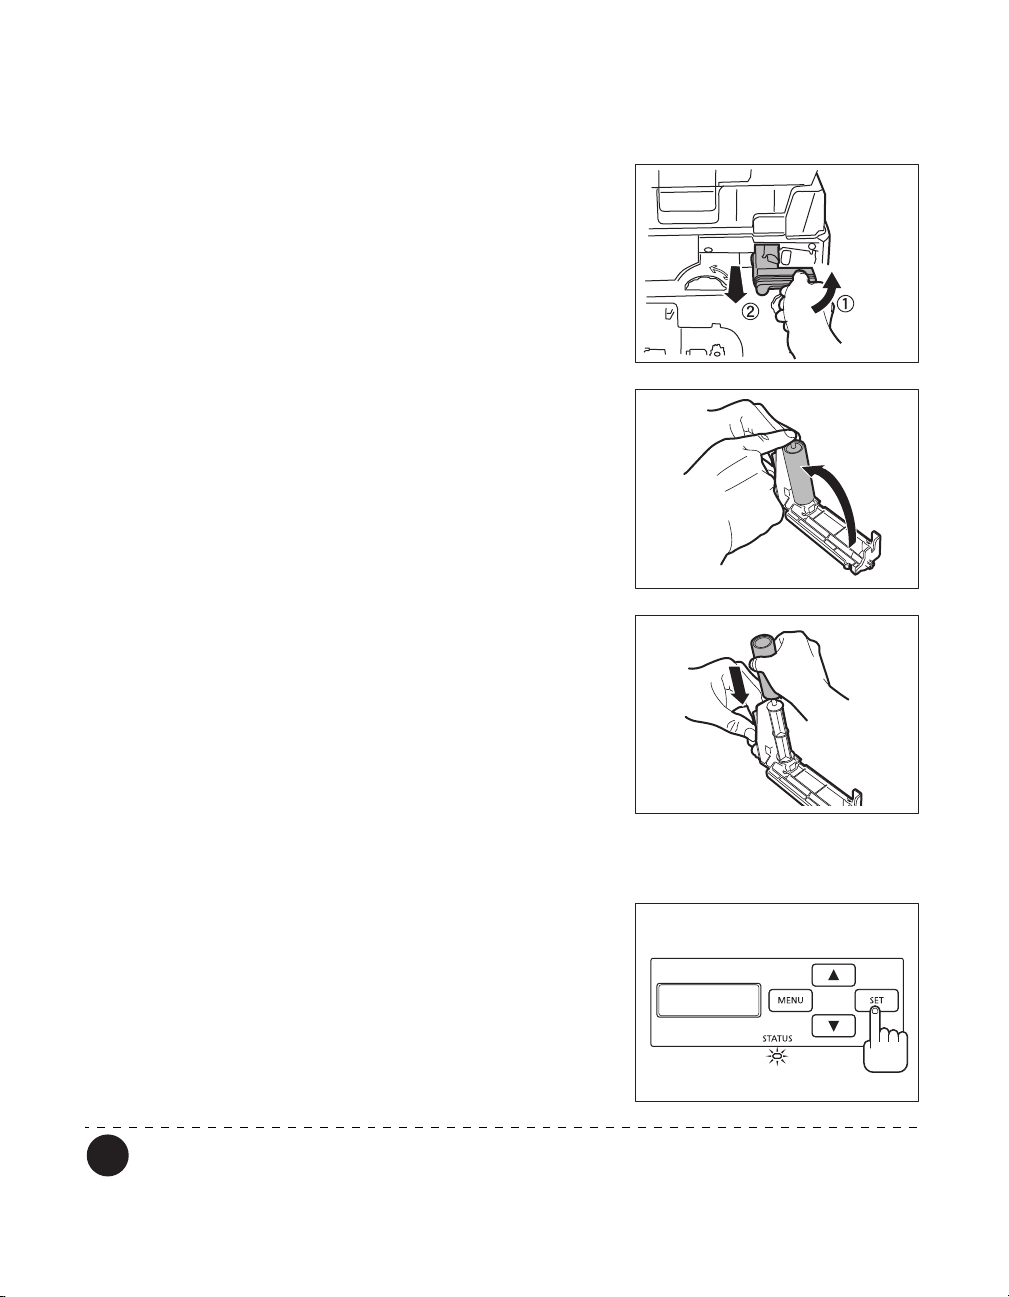
Cleaning Tape Replacement
1 Remove the Cleaning Tape Cassette.
• Hold the Cleaning Tape Cassette handle, lift it, and
pull.
2 Lift up the tape spindle.
• As in the diagram at right, lift the tape spindle by hand.
3 Remove the used Cleaning Tape, insert
the new tape, and return the tape
spindle.
4 Insert the Cleaning Tape Cassette.
• Set the slide of the Cleaning Roller with the rail on the
printer and insert it all the way.
5 Close the Front Cover.
6 When [Push SET key] appears on the
screen, press the SET Key.
• Clear an error first if the error message such as [Card
Empty] appears, then press the SET Key.
→See "When an Error Message Appears" on page 67
for clearing error messages.
A protective tape is attached to the new Cleaning Tape. Use the cleaning tape after
removing the protective tape.
22
Push SET key
Page 27
Normal Mode and User Mode
Ready to Print
Normal Mode and User Mode
You can switch the printer from Normal Mode to User Mode while it is operating.
This section provides an outline of both modes, explains how to change modes and
explains the basic operations of the User Mode.
Normal Mode and User Mode
Normal Mode
Normal Mode is used for printing cards.
When the power is turned on the printer starts in
Normal Mode.
The printer status, such as [Read to Print] and
[Now Printing] appears on the LCD Panel.
Additionally, details of errors, such as [Ribbon
Empty] appear.
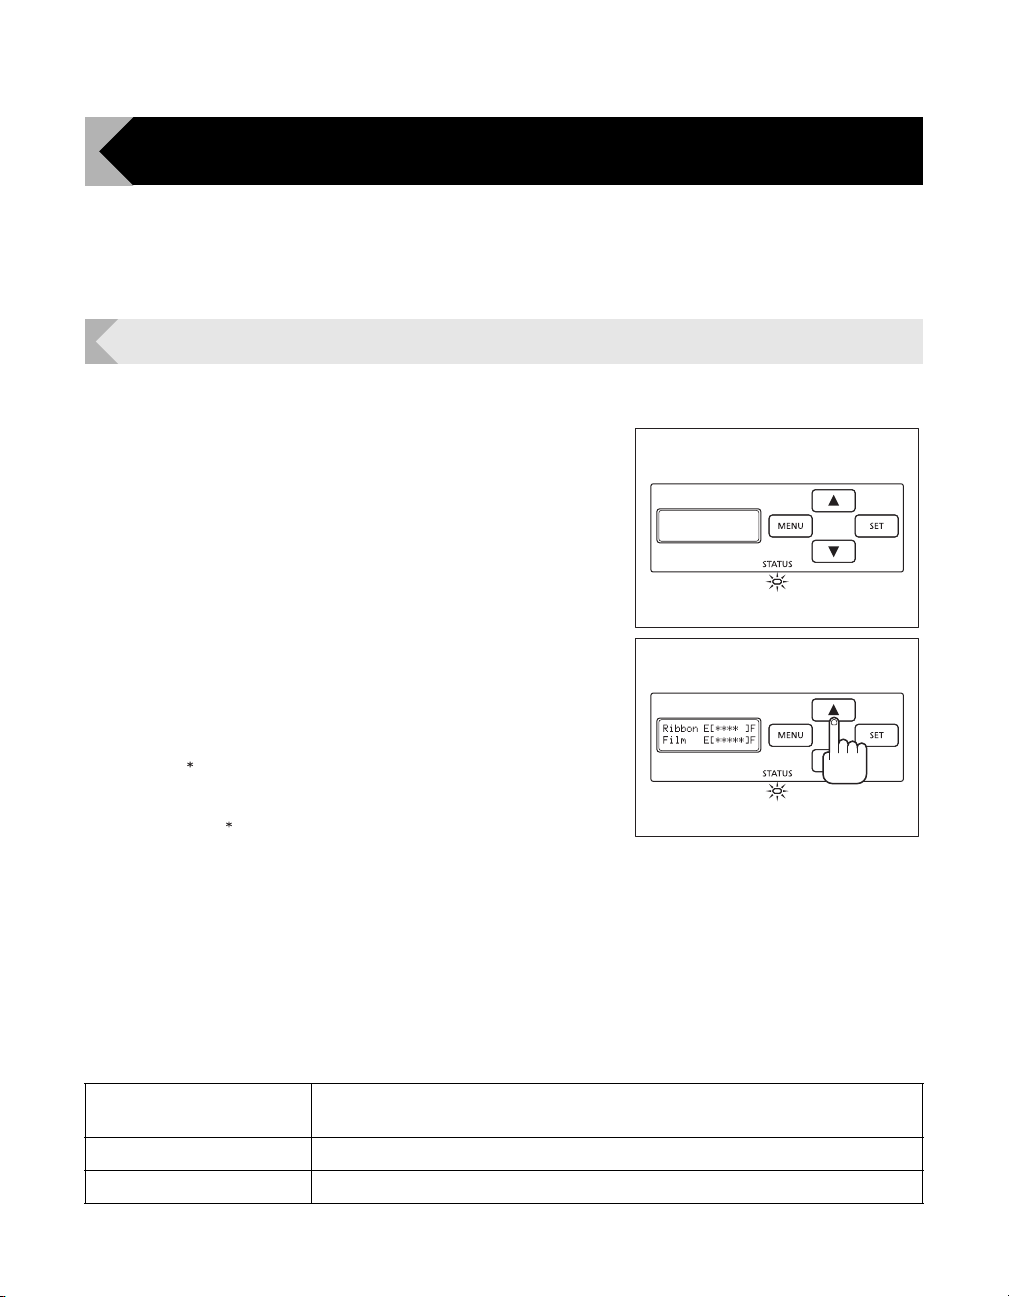
In Normal Mode, while the
can confirm the remaining Ink Ribbon and
Transfer Film (diagram at right).
Releasing the
standard Normal Mode display.
A single " " indicates approximately 20% remaining. When
this is not displayed, then replacement of the Ink Ribbon or
Transfer Film is necessary.
Additionally, if " " is blinking, this indicates that it is nearly time
for replacement.
→See "Changing the Ink Ribbon and Transfer Film" on
page 16 for details about changing the Transfer Film or
Transfer Film.
→See "Correcting image and text misalignment" on page 36
for instructions on how to check the remaining quantities from
User Mode.
→See "Notification of Time for Ink Ribbon and Transfer Film
Replacement" on page 41 for setting replacement times.
Normal Mode Message List
Initializing The printer is initializing. Remaining cards (abnormal card) are ejected from
Ready to Print In standby. This is awaiting a request to print cards.
Now Printing Printing cards.
Key is pressed, you
Key returns the display to the
the card ejection slot.
23
Page 28
Full Color Card Printer
Note
User Mode
User Mode is used to set operations and check
the status of the printer.
Menu names such as [Card Count] and [Ribbon
Type] appear on the LCD Panel.
Switching to User Mode
This section explains how to switch from Normal Mode to User Mode.
→See "Switching to Normal Mode (Exiting User Mode)" on page 26 for how to switch from User Mode to Normal Mode.
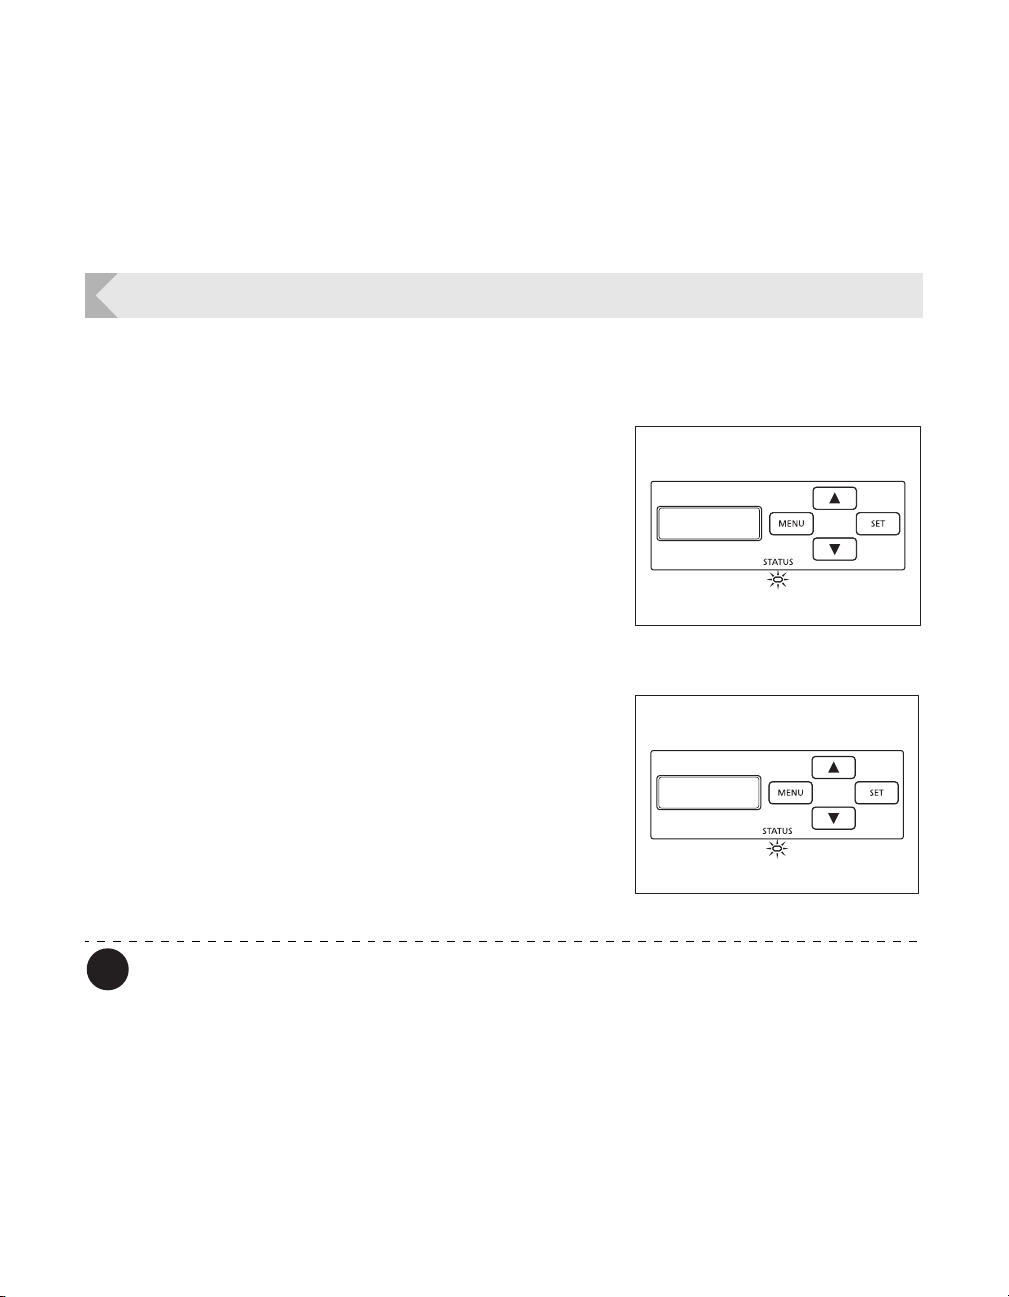
1 Press the Power Switch to turn on the
power.
• When the power starts and the printer turns on in
Normal Mode, and [Ready to Print] appears on the
LCD Panel.
Ready to Print
2 Press the MENU Key.
• The User Mode top menu is displayed on the LCD
Panel.
Printer Info.
SET:>>
You can use the procedure above to enter the User Mode even when a printer error
occurs.
While the top menu is displayed, pressing the MENU Key will display [Exit Menu ?].
Then pressing the SET Key will return to Normal Mode.
24
Page 29
Normal Mode and User Mode
Note
Card Count
0
Card Count
0
Total Count
0
Total Count
0
Ribbon Remainder
YMCK 100%
Basic User Mode Operations
The User Mode has multiple menus in a hierarchical tree organized according to function.
This section explains how to switch menus in the User Mode hierarchy tree and how to switch
from User Mode to Normal Mode.
→See "Menu Route Map (User Mode)" on page 84 for details about the menu tree configuration.
→See "Printer Settings" on page 27 for details on the functions of each menu.
Look at "Menu Route Map (User Mode)" on page 84 while reading this section.
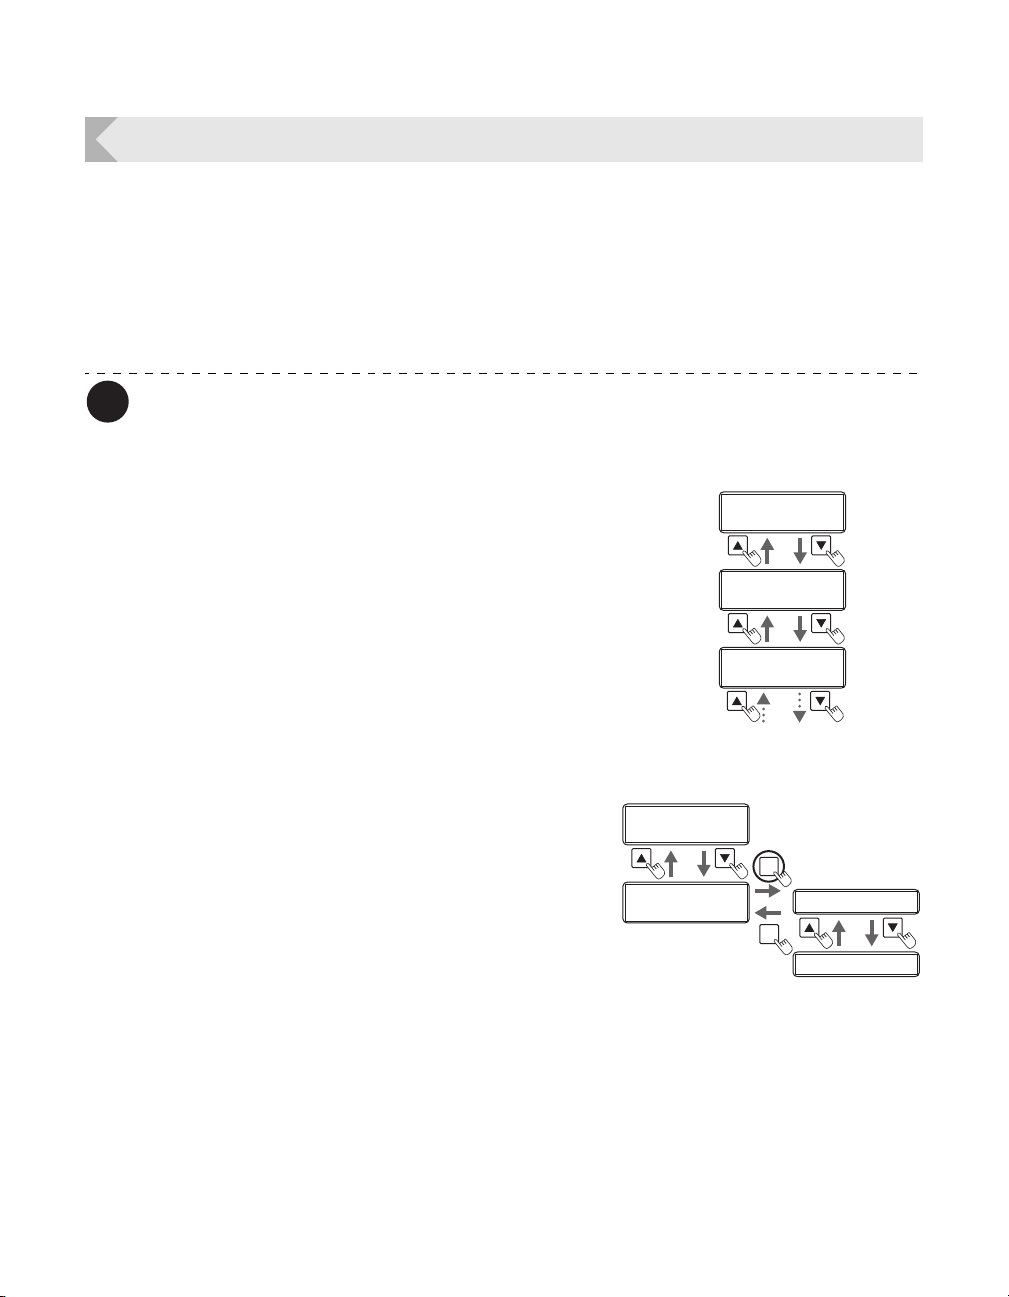
Moving to the Next Menu (Switching to Menus on the Same Level)
You can move to the next menu from any menu in
the User Mode by pressing the Key.
Press the to return to the previous menu.
Moving to a Sub-menu (Switching to Menus on a Lower Level)
You can move to available sub-menus by
pressing the SET Key ([SET:>>] on a menu's
right indicates a sub-menu).
Printer Info.
SET:>>
Version Info.
SET:>>
SET
Base Version
MENU
Main Version
25
Page 30
Full Color Card Printer
Printer Setup
SET:>>
Printer Setup
SET:>>
MENU
MENU
Buzzer
ON
Buzzer
ON
Buzzer
ON
Buzzer
ON
Ready to Print
Ready to Print
MENU
Exit Menu ?
YES
Exit Menu ?
YES
Printer Info.
SET:>>
Printer Info.
SET:>>
SET
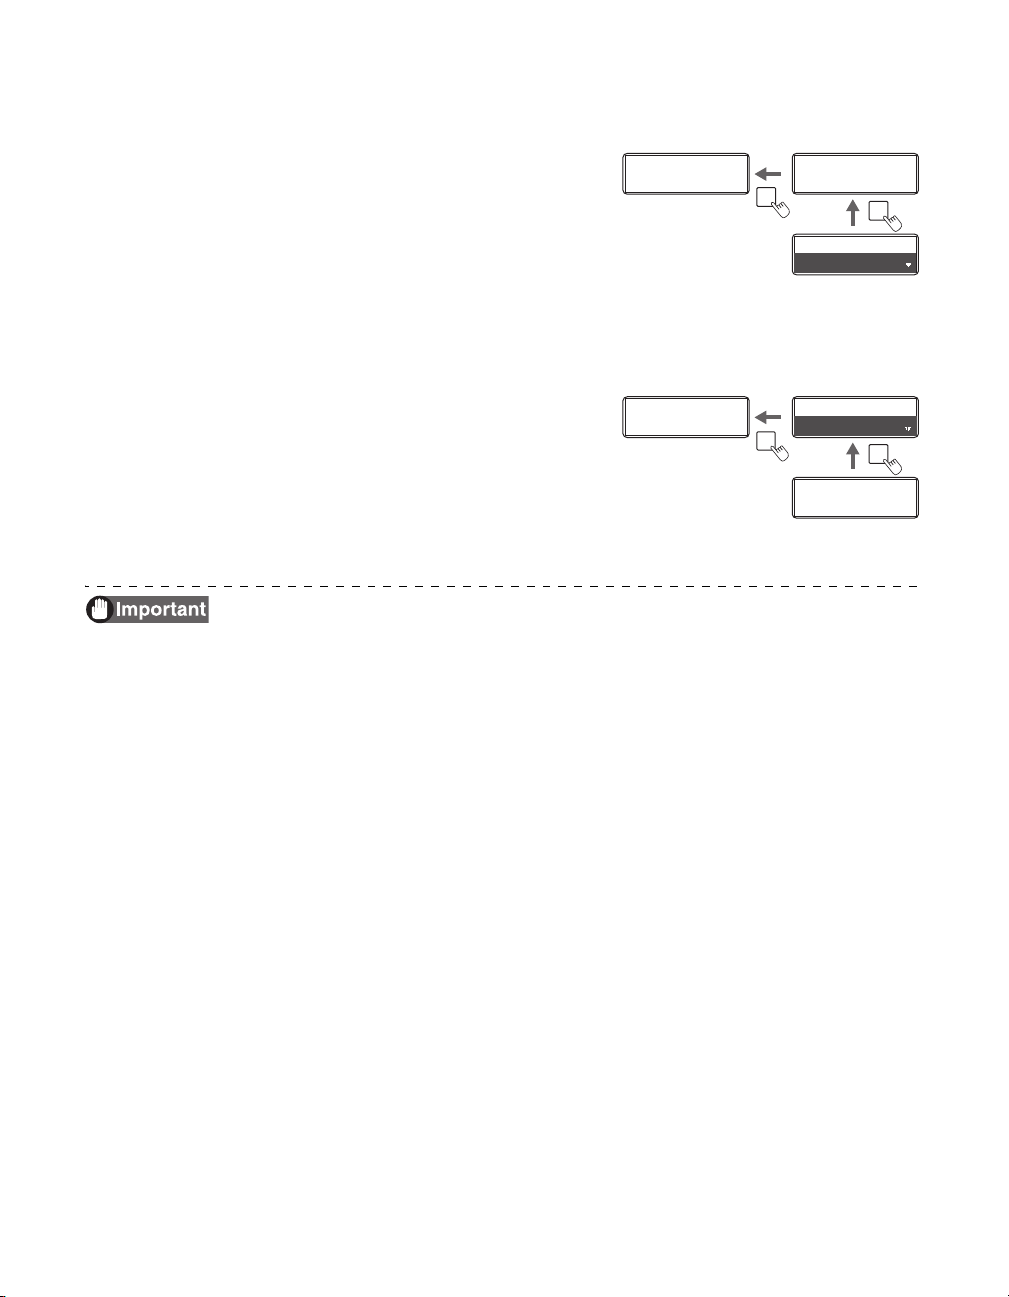
Returning to the Main Menu (Switching to Menus on a Higher Level)
You can return to a higher level by pressing the
MENU Key. You can return to the main menu by
pressing the MENU Key several times.
Switching to Normal Mode (Exiting User Mode)
After pressing the MENU Key several times to
display [Exit Menu ?], you can return to Normal
Mode by pressing the SET Key.
After pressing the Key several times to display
[NO], you can return to User Mode by pressing
the SET Key.
After changing settings values using the / Keys in each menu, press the
SET Key to make the changes.
Either pressing the MENU Key or turning off the power without pressing the
SET Key will mean that changes are not saved in the printer.
(Changed contents are saved when the SET Key is pressed.)
26
Page 31
Printer Settings
Note
Printer Info.
SET:>>
Printer Info.
SET:>>
Card Count Card Count
SET
Card Count
3
Card Count
3
Printer Settings
This section explains how to check the printer's status and change the printer's
settings.
Counting the Number of Cards that Are Printed
You can count the number of cards that are printed.
You can also count the number of cards that have been printed in a specified period of time by
resetting the count with the SET Key.
You can also count the number of cards printed by using the printer driver (→See
"Opening the Printer Driver Settings Screen" on page 87).
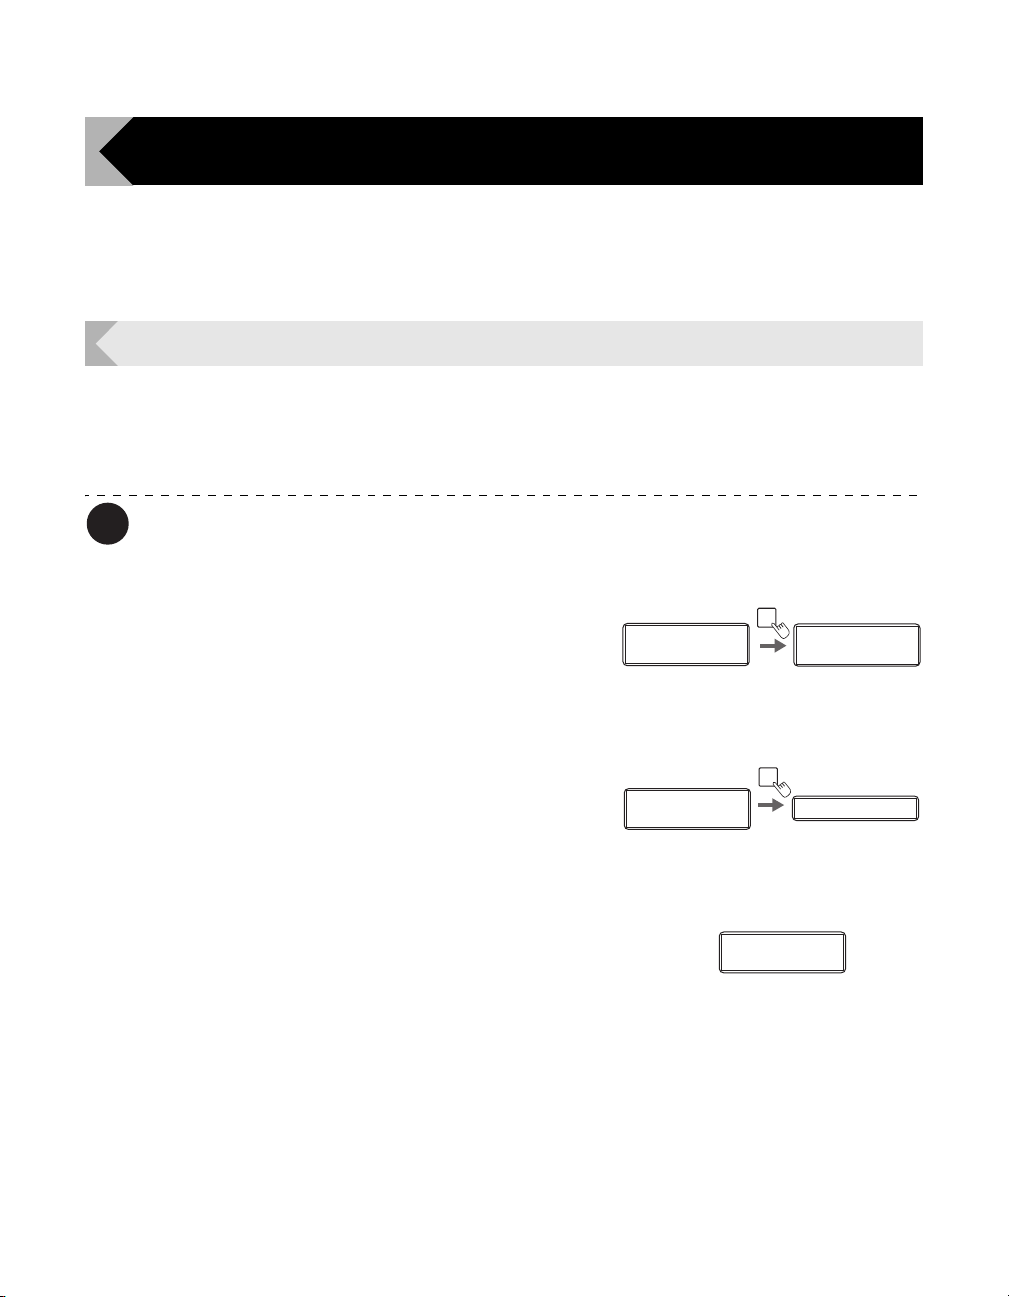
1 Switch from Normal Mode to User
Mode.
→See "Switching to User Mode" on page 24 for details on
how to switch to User Mode.
2 Confirm that [Printer Info.] appears, and
press the SET Key.
3 Confirm the [Card Count] display.
• The number of cards that are printed appears.
To reset the value, proceed to Step 4.
Normal Mode User Mode
Ready to Print
Ready to Print
MENU
Printer Info.
Printer Info.
SET:>>
SET:>>
27
Page 32
Full Color Card Printer
Note
Card Count
3
Card Count
3
Reset ?Reset ?
SET
SET
Reset ?
NO
Reset ?
YES
Card Count
0
Card Count
0
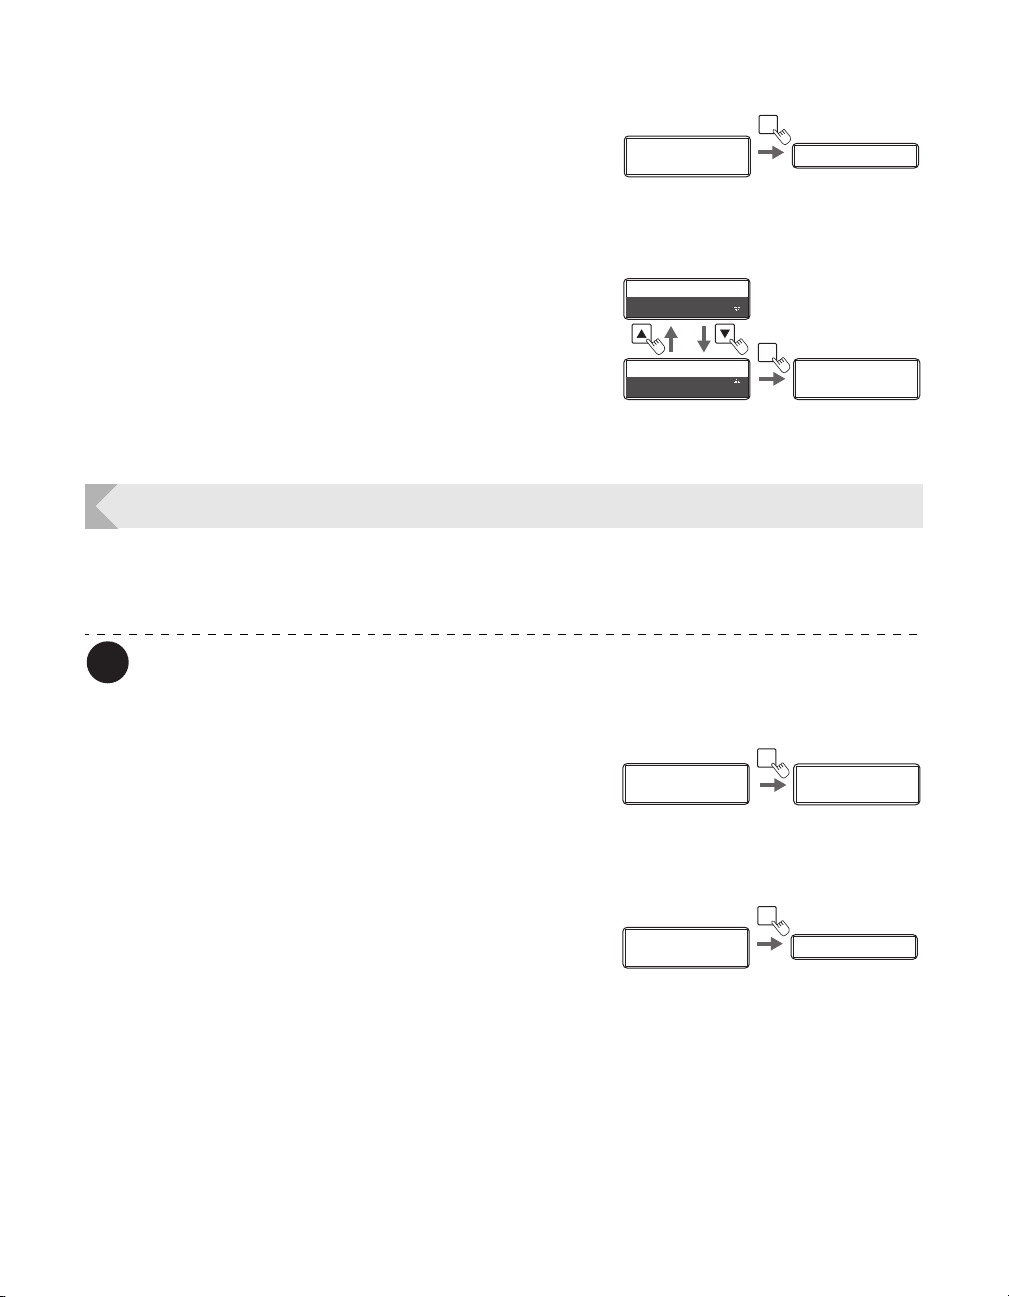
4 Press the SET key.
• The display changes to [Reset ?].
5 Change the setting to [YES] by using
the / Keys then press the SET key.
• The display returns to [Card Count] and the value
becomes [0].
Displaying the Total Number of Sides that Are Printed
You can display the total number of sides (each card has two sides) that are printed. This can
be used as a guideline for doing maintenance.
1 Switch from Normal Mode to User
2 Confirm that [Printer Info.] appears, and
28
You can also display the status on the printer driver (→See "Opening the Printer
Driver Settings Screen" on page 87).
Mode.
→See "Switching to User Mode" on page 24 for details on
how to switch to User Mode.
press the SET Key.
Normal Mode User Mode
Ready to Print
Ready to Print
Printer Info.
Printer Info.
SET:>>
SET:>>
MENU
Printer Info.
Printer Info.
SET:>>
SET:>>
SET
Card Count Card Count
Page 33
Printer Settings
Note
Total Count
30
Total Count
30
Card Count Card Count
Printer Info.
SET:>>
Printer Info.
SET:>>
Card Count Card Count
SET
Card CountCard Count
Ribbon Remainder
100%
Ribbon Remainder
100%
Film Remainder
100%
Film Remainder
100%
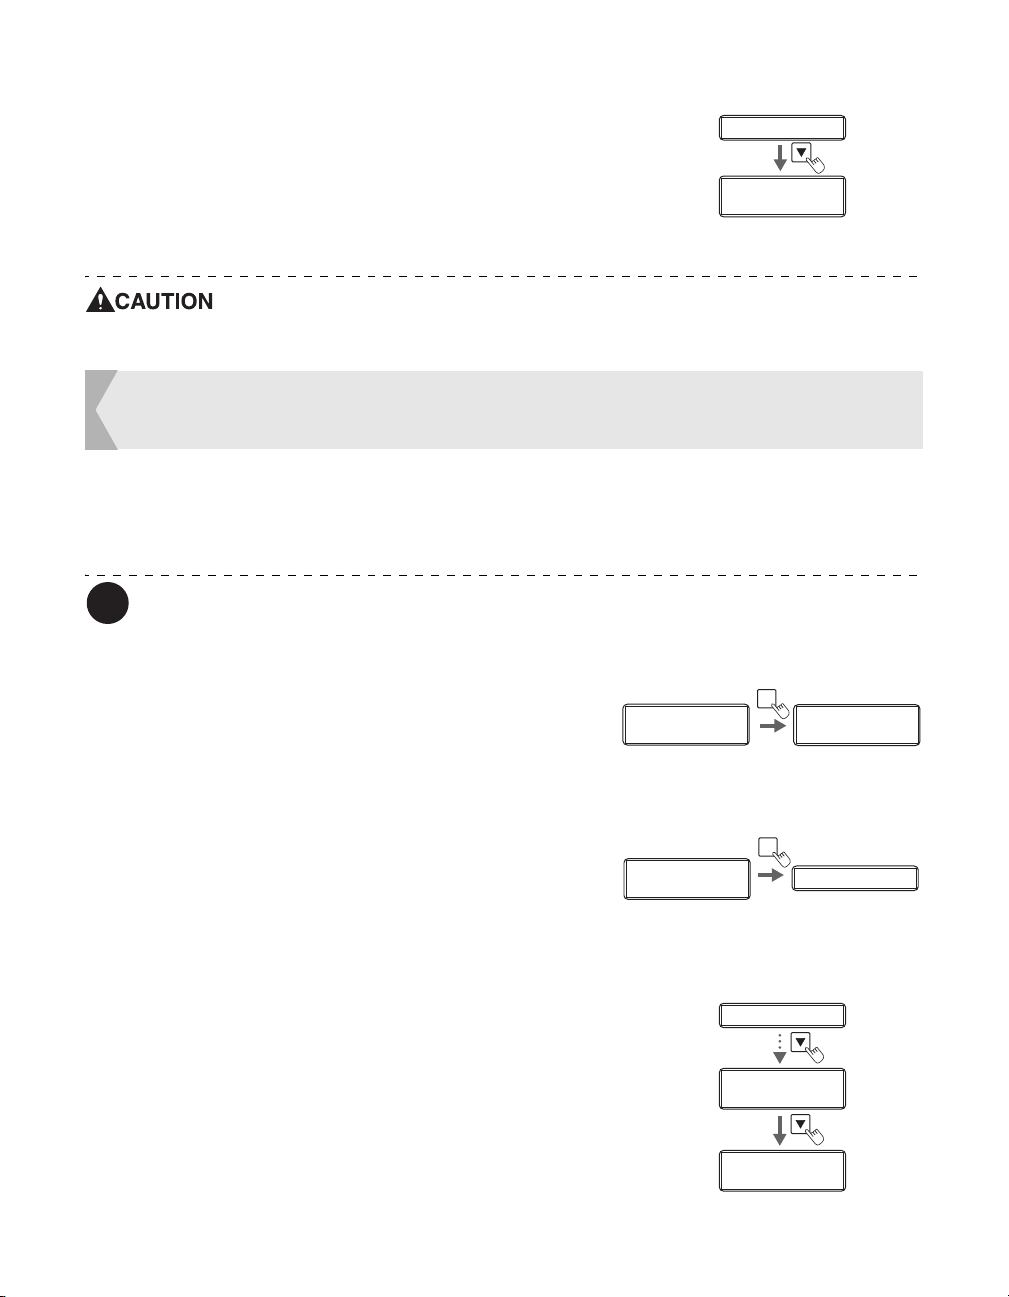
3 Press the Key until [Total Count] is
displayed.
• The total number of sides is displayed.
The count cannot be reset.
Checking the type and remaining quantity of the Ink Ribbon or Transfer Film
You can check the type and remaining quantity of the Ink Ribbon or Transfer Film.
→See "Setting the Type of Ink Ribbon or Transfer Film to Use" on page 39 for details on how to set the Ink Ribbon or
Transfer Film type.
You can also display the status on the printer driver (→See "Opening the Printer
Driver Settings Screen" on page 87).
1 Switch from Normal Mode to User
2 Confirm that [Printer Info.] appears, and
3 Press the Key until [Ribbon
Mode.
→See "Switching to User Mode" on page 24 for details on
how to switch to User Mode.
press the SET Key.
Remainder] or [Film Remainder]
appears.
• [Ribbon Remainder] displays the type and remaining
quantity of the Ink Ribbon as a percentage.
• [Film Remainder] displays the type and remaining
quantity of the Transfer Film as a percentage.
Normal Mode User Mode
Ready to Print
Ready to Print
MENU
Printer Info.
Printer Info.
SET:>>
SET:>>
29
Page 34
Full Color Card Printer
Note
Base Version
*.**
Base Version
*.**
External Box
DISCONNECT
Checking the Program Version and Serial Number
You can check the version of the program and the printer's serial number.
You can also display the status on the printer driver (→See "Opening the Printer
Driver Settings Screen" on page 87).
You can confirm the following information.
• Version of the base program (display is [Base Version])
• Version of the main program (display is [Main Version])
The version of the program that starts when the power is turned on.
You can download a file to update the program.
→See "Updating the Printer's Software" on page 83 for updating instructions.
• Printer's serial number (display is [Serial Number])
• Head serial number (display is [Head Number])
• Magnetic encoder version (display is [Magnetic Encoder])
Magnetic encoder specifications (ISO/JIS2) and version information.
• IC R/W connection status (display is [IC R/W 1], [IC R/W 2])
• External box connection status (display is [External Box])
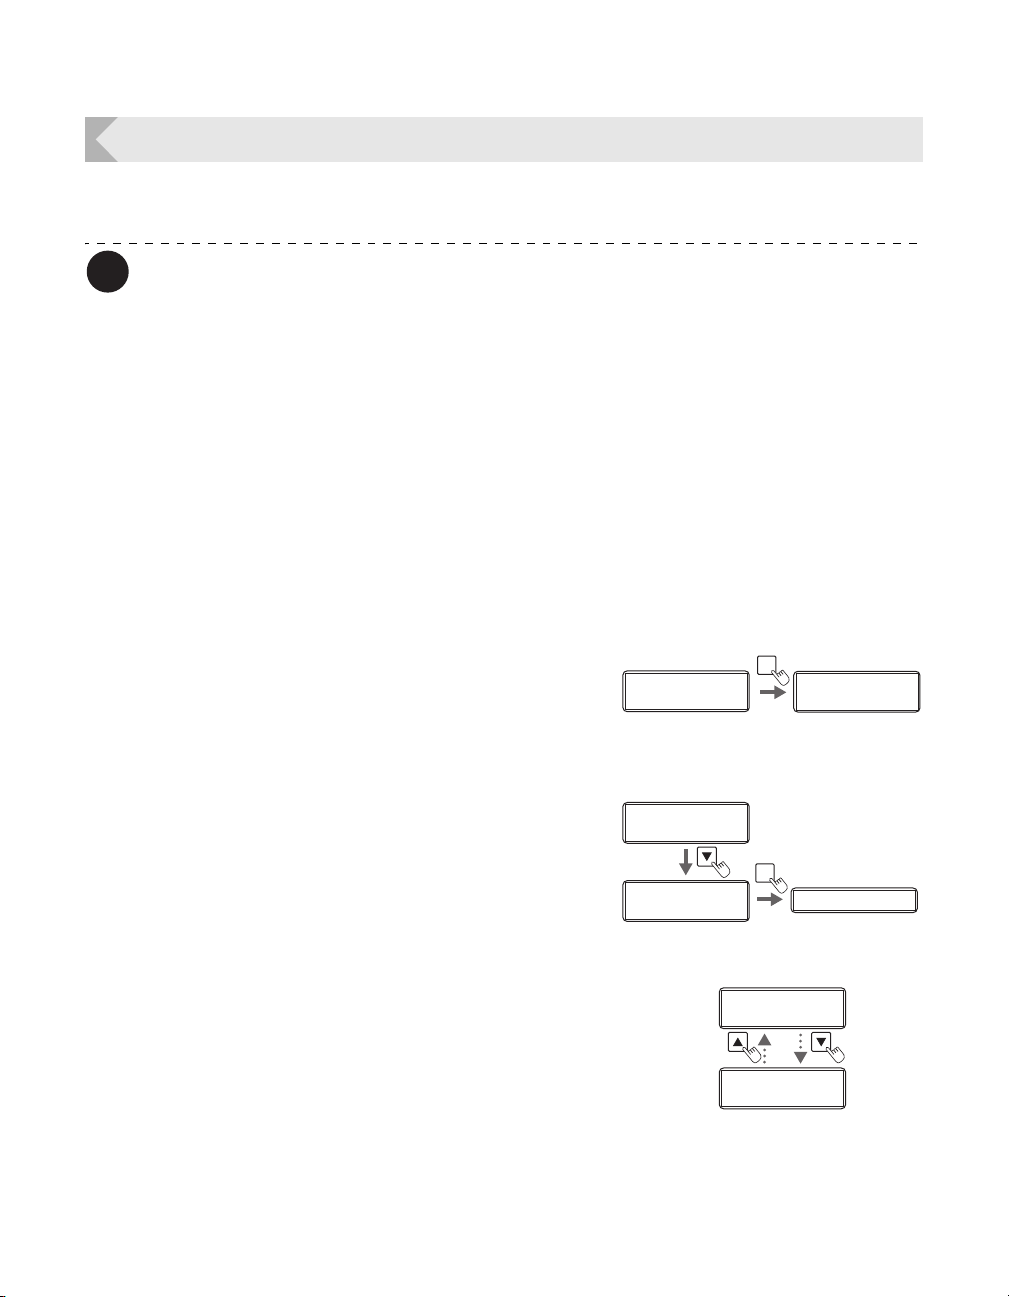
1 Switch from Normal Mode to User
2 Press the Key until [Version Info.] is
3 Press the / Keys to display the
Mode.
→See "Switching to User Mode" on page 24 for details on
how to switch to User Mode.
displayed, then press the SET Key.
information to check.
• The / Keys switch between [Base Version] ⇔
[Main Version] ⇔ [Serial Number] ⇔ [Head Number]
⇔ [Magnetic Encoder] ⇔ [IC R/W 1] ⇔ [IC R/W 2] ⇔
[External Box].
Normal Mode User Mode
Ready to Print
Ready to Print
Printer Info.
Printer Info.
SET:>>
SET:>>
Version Info.
Version Info.
SET:>>
SET:>>
MENU
Printer Info.
Printer Info.
SET:>>
SET:>>
SET
Base Version Base Version
30
Page 35
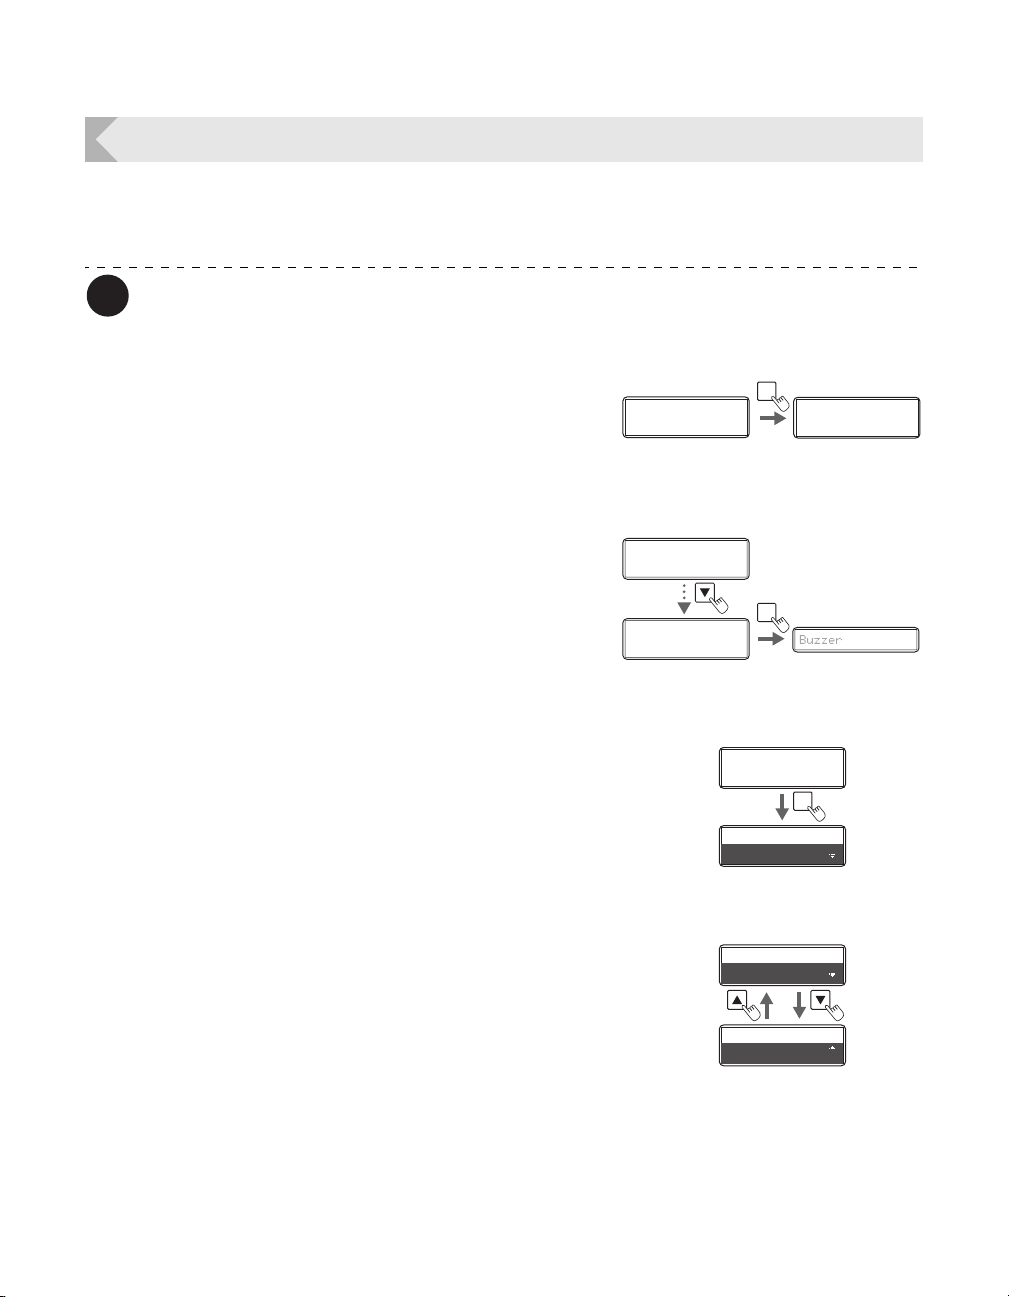
Turning the Error Alarm On or Off
Note
Printer Info.
SET:>>
Printer Info.
SET:>>
Printer Setup
SET:>>
Printer Setup
SET:>>
Buzzer Buzzer
SET
Buzzer
ON
Buzzer
ON
SET
Buzzer
ON
Buzzer
ON
Buzzer
ON
Buzzer
ON
Buzzer
OFF
Buzzer
OFF
The initial setting is for the buzzer to sound when an error occurs.
You can set the buzzer so that it does not sound.
You can also change the settings by using the printer driver (→See "Opening the
Printer Driver Settings Screen" on page 87).
Printer Settings
1 Switch from Normal Mode to User
Mode.
→See "Switching to User Mode" on page 24 for details on
how to switch to User Mode.
2 Press the Key until [Printer Setup] is
displayed, then press the SET Key.
3 Confirm that [Buzzer] appears, and
press the SET Key.
4 Change the settings by using the /
Keys, then press the SET Key.
• Pressing the / Keys switches between [ON] and
[OFF].
• Set it to [ON] to sound the buzzer or [OFF] to turn the
buzzer off.
Normal Mode User Mode
Ready to Print
Ready to Print
MENU
Printer Info.
Printer Info.
SET:>>
SET:>>
31
Page 36
Full Color Card Printer
Note
Printer Info.
SET:>>
Printer Info.
SET:>>
Printer Setup
SET:>>
Printer Setup
SET:>>
Buzzer Buzzer
SET
Power Save Mode
MAIN POWER OFF
Buzzer Buzzer
SET
Power Save Mode
MAIN POWER OFF
Power Save Mode
MAIN POWER OFF
Power Save Mode
KEEP READY
Power Save Mode
HEATER OFF
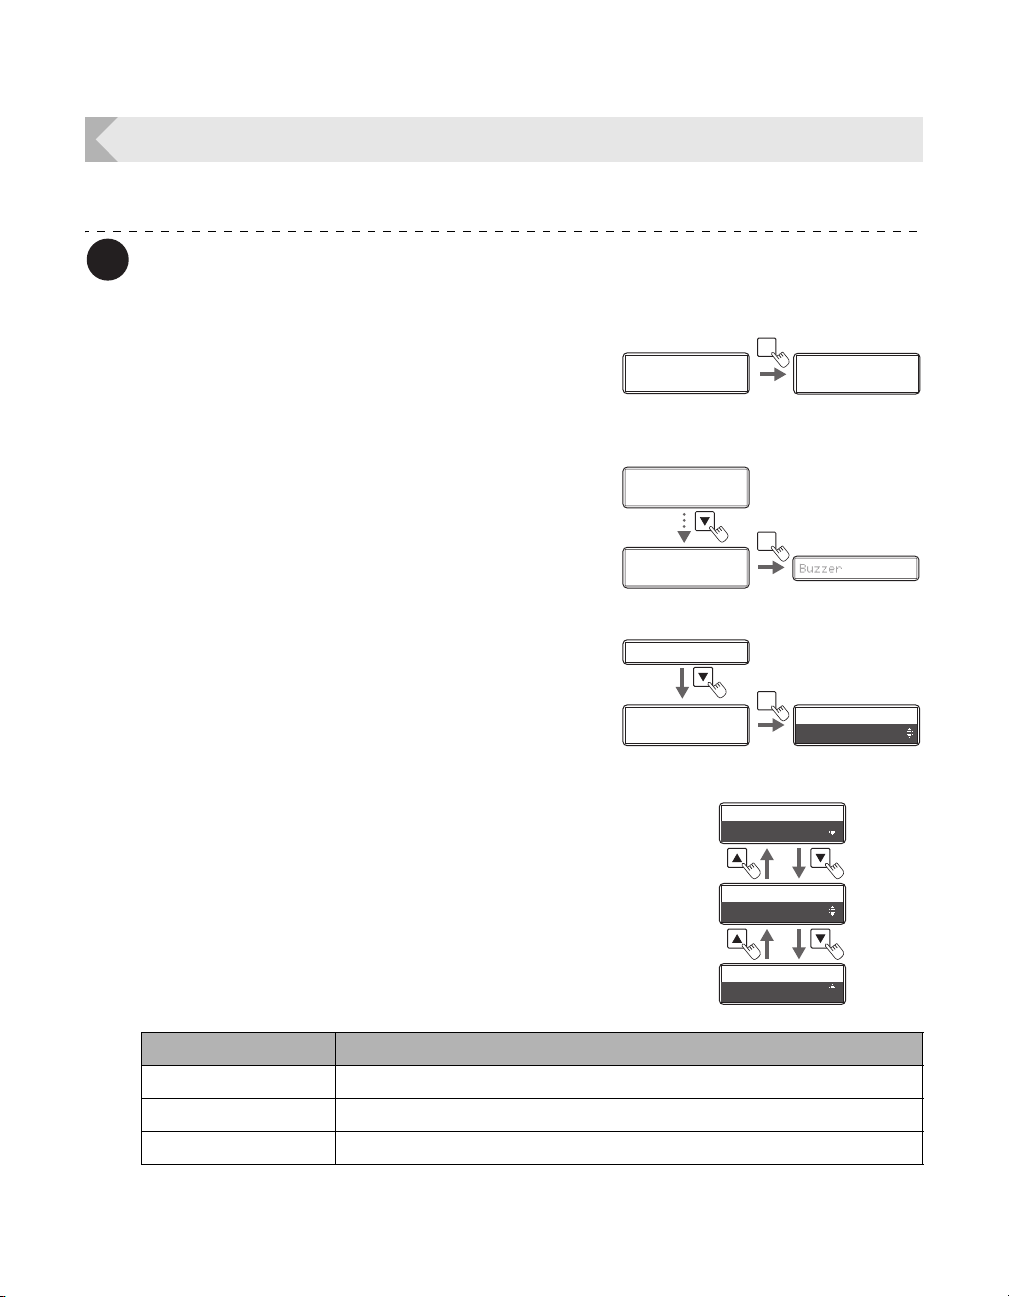
Reduce Printer Power Consumption
Select the power-saving mode for when the printer is not being used.
You can also change the settings by using the printer driver (→ See "Opening the
Printer Driver Settings Screen" on page 87).
1 Switch from Normal Mode to User
Mode.
→See "Switching to User Mode" on page 24 for details on
how to switch to User Mode.
2 Press the Key until [Printer Setup] is
displayed, then press the SET Key.
3 Press the Key until [Power Save
Mode] is displayed, then press the SET
Key.
4 Change the settings by using the /
Keys, then press the SET Key.
• Pressing the / Keys switches between [HEATER
OFF] ⇔ [MAIN POWER OFF] ⇔ [KEEP READY].
• Settings values are as below.
Normal Mode User Mode
Ready to Print
Ready to Print
MENU
Printer Info.
Printer Info.
SET:>>
SET:>>
32
Settings Value Details
HEATER OFF
If the heater is in standby for one hour, the heater will turn off.
MAIN POWER OFF If the heater is in standby for one hour, the printer will turn off.
KEEP READY The printer is always in a ready-to-print state. (power-saving mode off)
Page 37
Printer Settings
Note
Note
The factory default setting is [MAIN POWER OFF].
If the printer is off ([MAIN POWER OFF]), turn it on by pressing the Power Switch to
use it (→See "Turning On and Off the Printer" on page 9).
Adjusting the Print Results
You can adjust the print results by changing the hue and the strength of the edge.
You can also change the settings by using the printer driver (→See "Opening the
Printer Driver Settings Screen" on page 87).
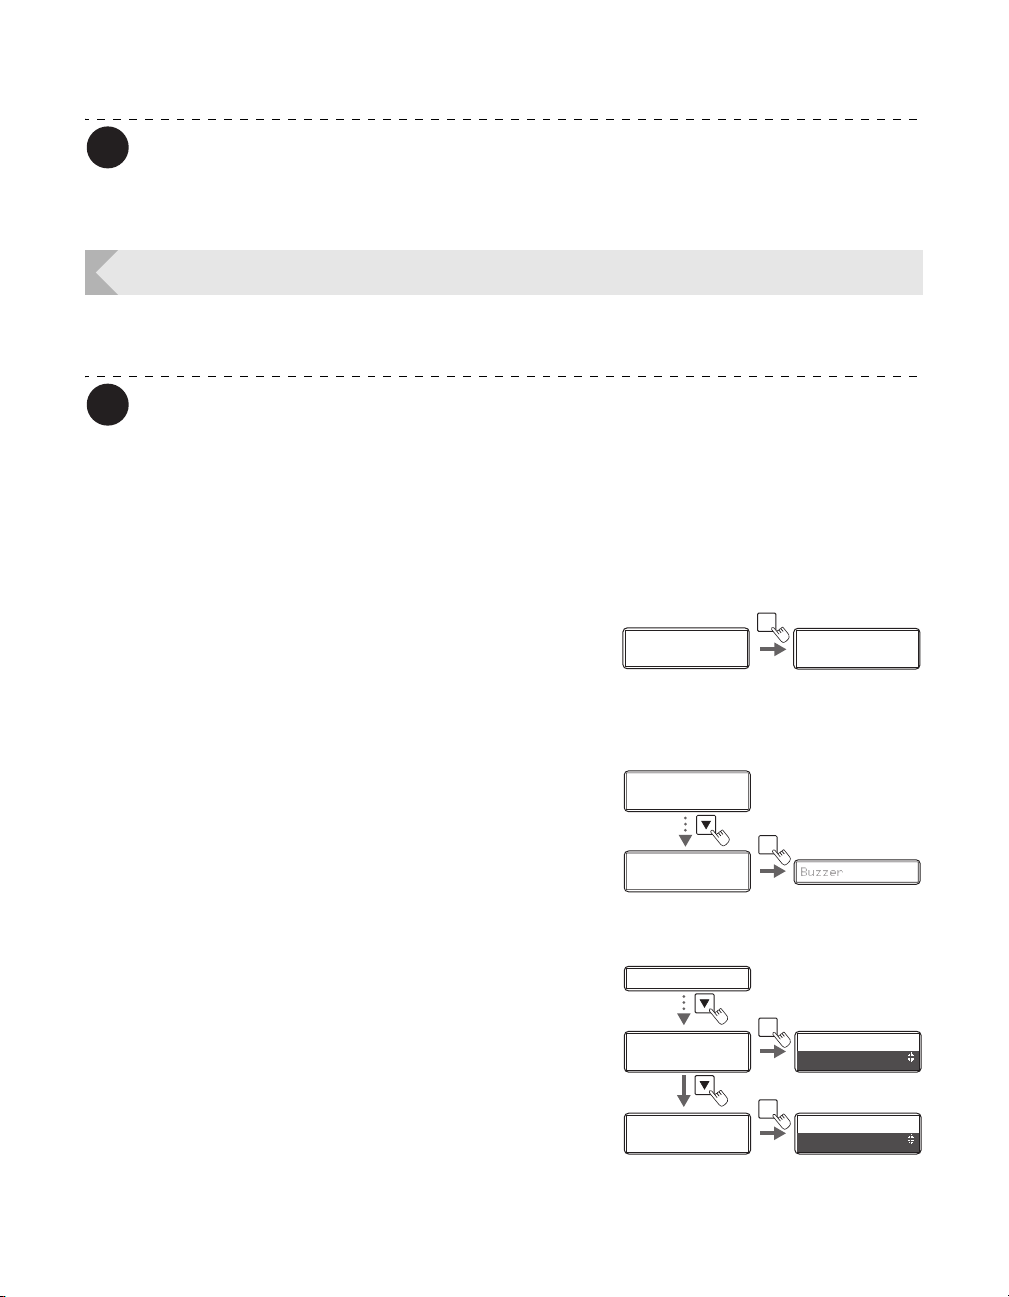
Adjusting the printing position
You can adjust the printing position (vertical/horizontal) of the image and black text that will
be printed on the card.
1 Switch from Normal Mode to User
Mode.
→See "Switching to User Mode" on page 24 for details on
how to switch to User Mode.
2 Press the Key until [Printer Setup] is
displayed, then press the SET Key.
3 Press the Key until [Print Vertical] or
[Print Horizontal] is displayed, then
press the SET key.
• Adjust the vertical printing position using the [Print
Vertical] menu and adjust the horizontal printing
position using [Print Horizontal].
Normal Mode User Mode
Ready to Print
Ready to Print
Printer Info.
Printer Info.
SET:>>
SET:>>
Printer Setup
Printer Setup
SET:>>
SET:>>
Buzzer
Print Vertical
Print Horizontal
Print Horizontal
MENU
Printer Info.
Printer Info.
SET:>>
SET:>>
SET
Buzzer Buzzer
SET
0
0
Print Vertical
SET
Print Horizontal
0
0
33
Page 38
Full Color Card Printer
Note
Print Vertical
0
Print Vertical
Print Vertical
22
-22
--+
+
[Print Vertical]
Printing
Card
[Print Horizontal]
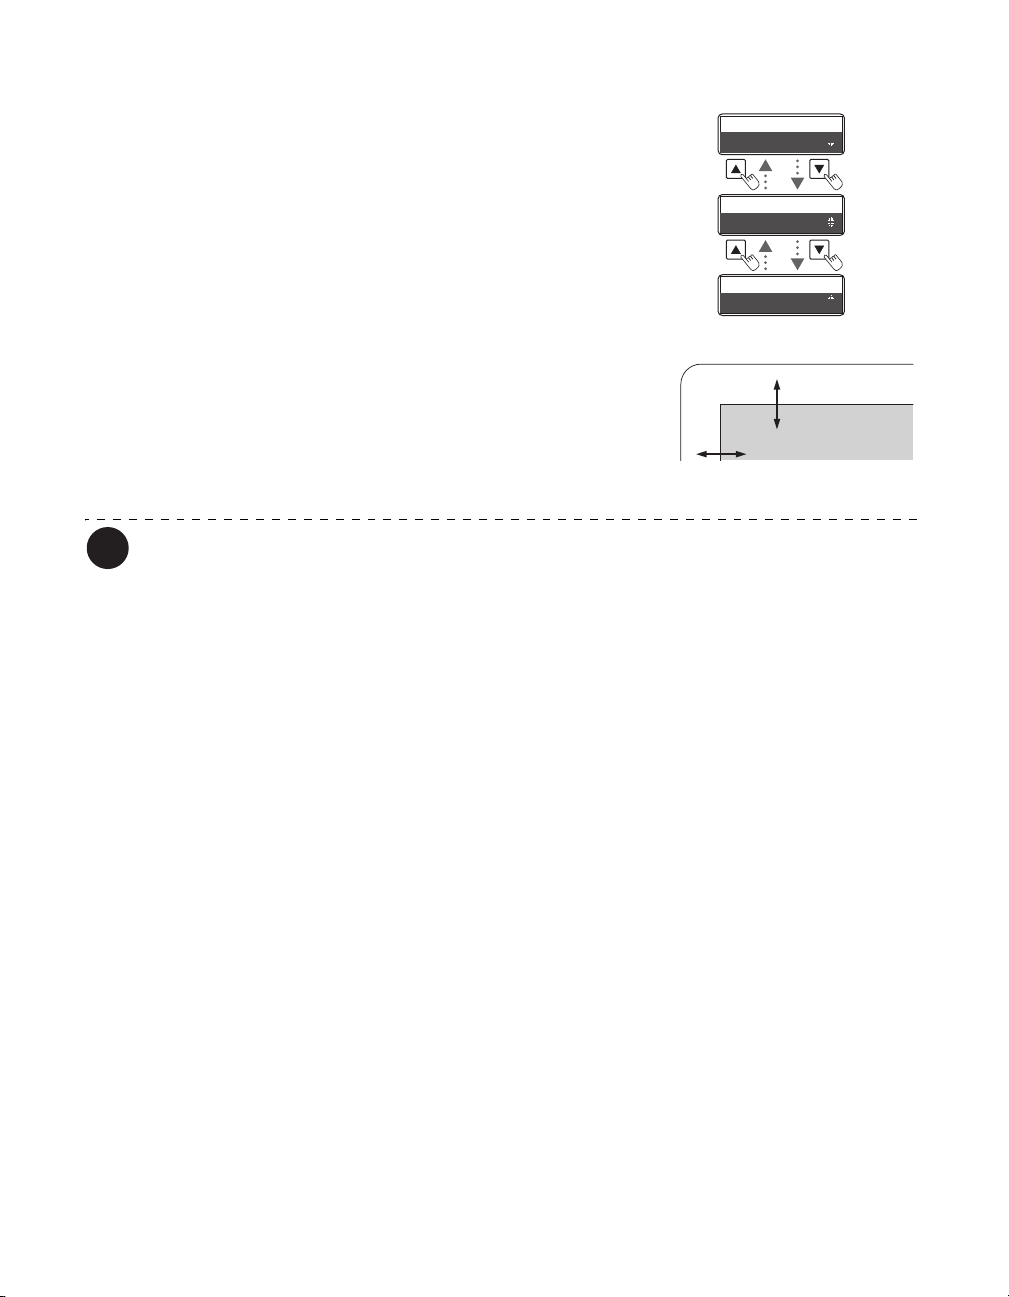
4 Change the settings by using the /
Keys, then press the SET key.
• If you increase the setting value of [Print Vertical] , the
printing position will move downwards. (Setting values
are by increments/decrements of approximately
0.04 mm)
• If you increase the setting value of [Print Horizontal] ,
the printing position will move to the right. (Setting
values are by increments/decrements of
approximately 0.1 mm)
The optimum value is set for each unit as factory default.
34
Page 39
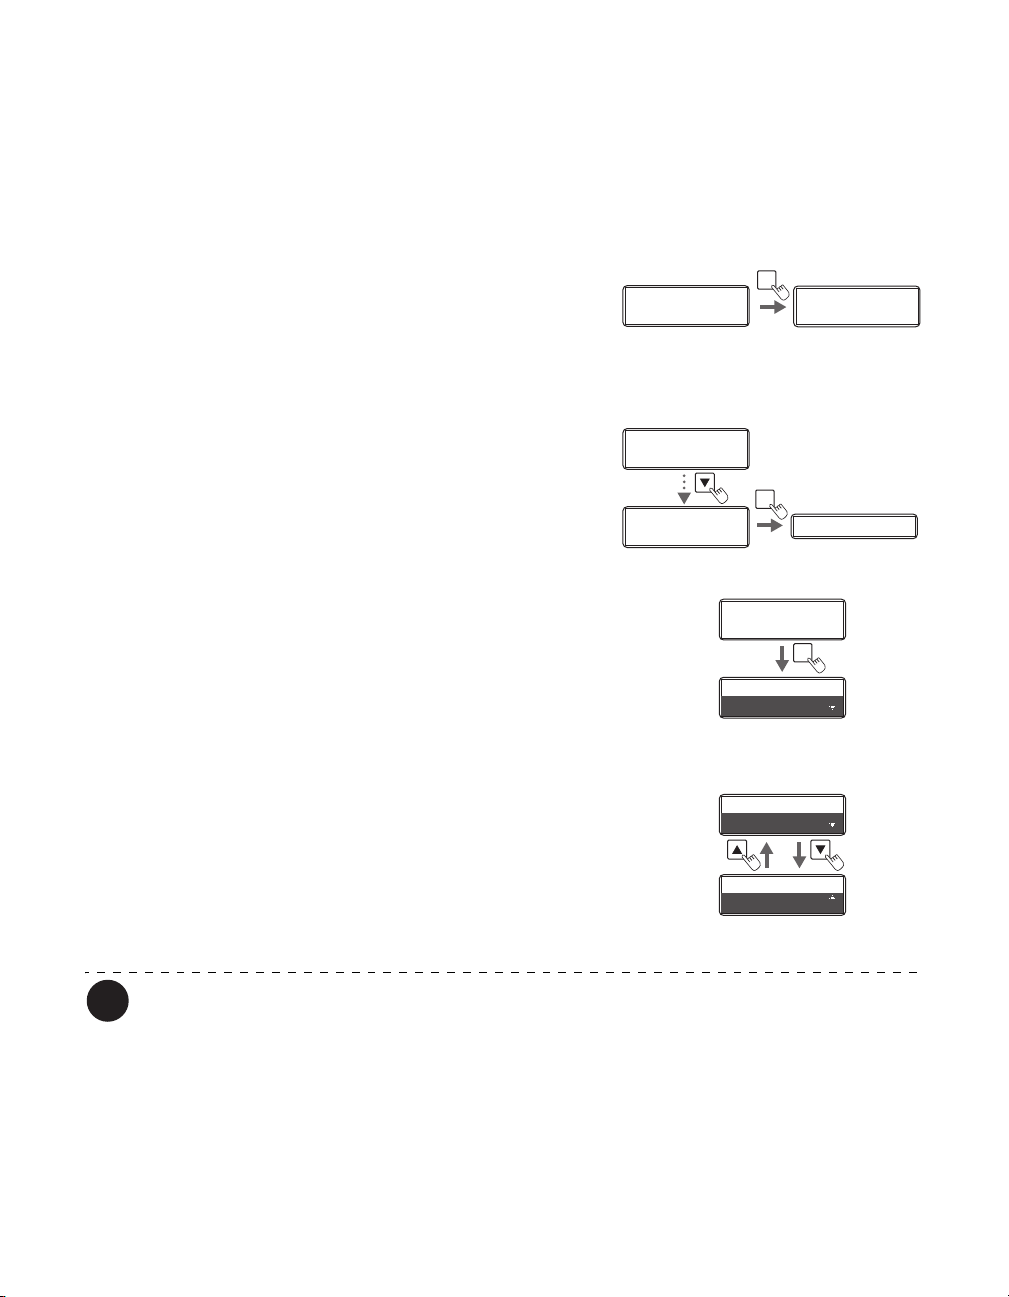
Printer Settings
Note
Print Quality
HIGH SPEED
Print Quality
HIGH SPEED
SET
Print Quality
HIGH SPEED
Print Quality
HIGH SPEED
Print Quality
HIGH SPEED
Print Quality
HIGH QUALITY
Quality printing/Quick printing
You can change the printing speed of color images.
Quick printing is set as a factory default. You can perform quality printing by changing the
settings.
1 Switch from Normal Mode to User
Mode.
→See "Switching to User Mode" on page 24 for details on
how to switch to User Mode.
2 Press the Key until [Image Setup] is
displayed, then press the SET Key.
3 Confirm that [Print Quality] appears,
and press the SET Key.
4 Change the settings by using the /
Keys, then press the SET Key.
• Pressing the / Keys switches between [HIGH
SPEED] and [HIGH QUALITY].
• Set the setting to [HIGH SPEED] for quick printing,
and [HIGH QUALITY] for quality printing.
Normal Mode User Mode
Ready to Print
Ready to Print
Printer Info.
Printer Info.
SET:>>
SET:>>
Image Setup
SET:>>
MENU
Printer Info.
Printer Info.
SET:>>
SET:>>
SET
Print Quality
If the setting is set to [HIGH SPEED] the contrast of the color image will be reduced.
In [Graphics] - [Detailed setting of Black] , we recommend setting the [Printing method
of color data] to [Print in color(CMY) and black(K)].
If you set the print quality to [HIGH QUALITY], we recommend setting the [Printing
method of color data] to [Print in color (CMY) only].
35
Page 40
Full Color Card Printer
Print Quality
Black Correction
SET
Black Correction
0
Black Correction
0
Black Correction
0
Black Correction
Black Correction
20
-20
-+
Color Image
Card
[Black Correction]
Black Text
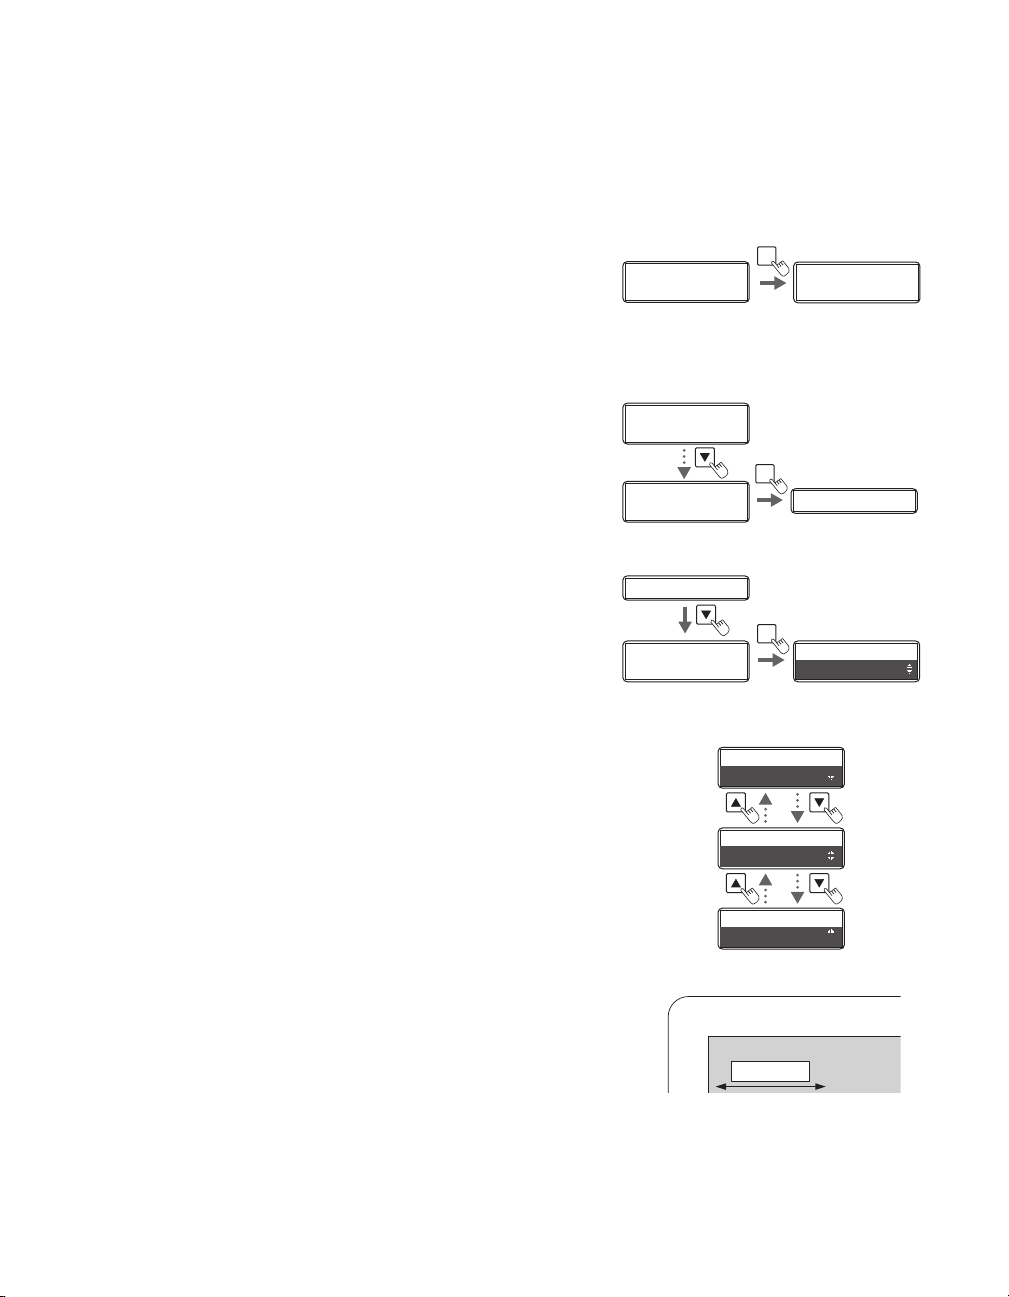
Correcting image and text misalignment
You can correct the misalignment (horizontal) of the color image and black text printing
position.
1 Switch from Normal Mode to User
Mode.
→See "Switching to User Mode" on page 24 for details on
how to switch to User Mode.
2 Press the Key until [Image Setup] is
displayed, then press the SET Key.
3 Press the Key until [Black
Correction] is displayed, then press the
SET Key.
4 Change the settings by using the /
Keys, then press the SET Key.
• If you increase the setting value, the black text will
move towards the right of the color image. (Setting
values are by increments/decrements of
approximately 0.1 mm)
Normal Mode User Mode
Ready to Print
Ready to Print
Printer Info.
Printer Info.
SET:>>
SET:>>
Image Setup
SET:>>
MENU
Printer Info.
Printer Info.
SET:>>
SET:>>
SET
Print Quality
36
Page 41
Adjusting the contour level
Sharpness
0
Sharpness
Sharpness
2
-2
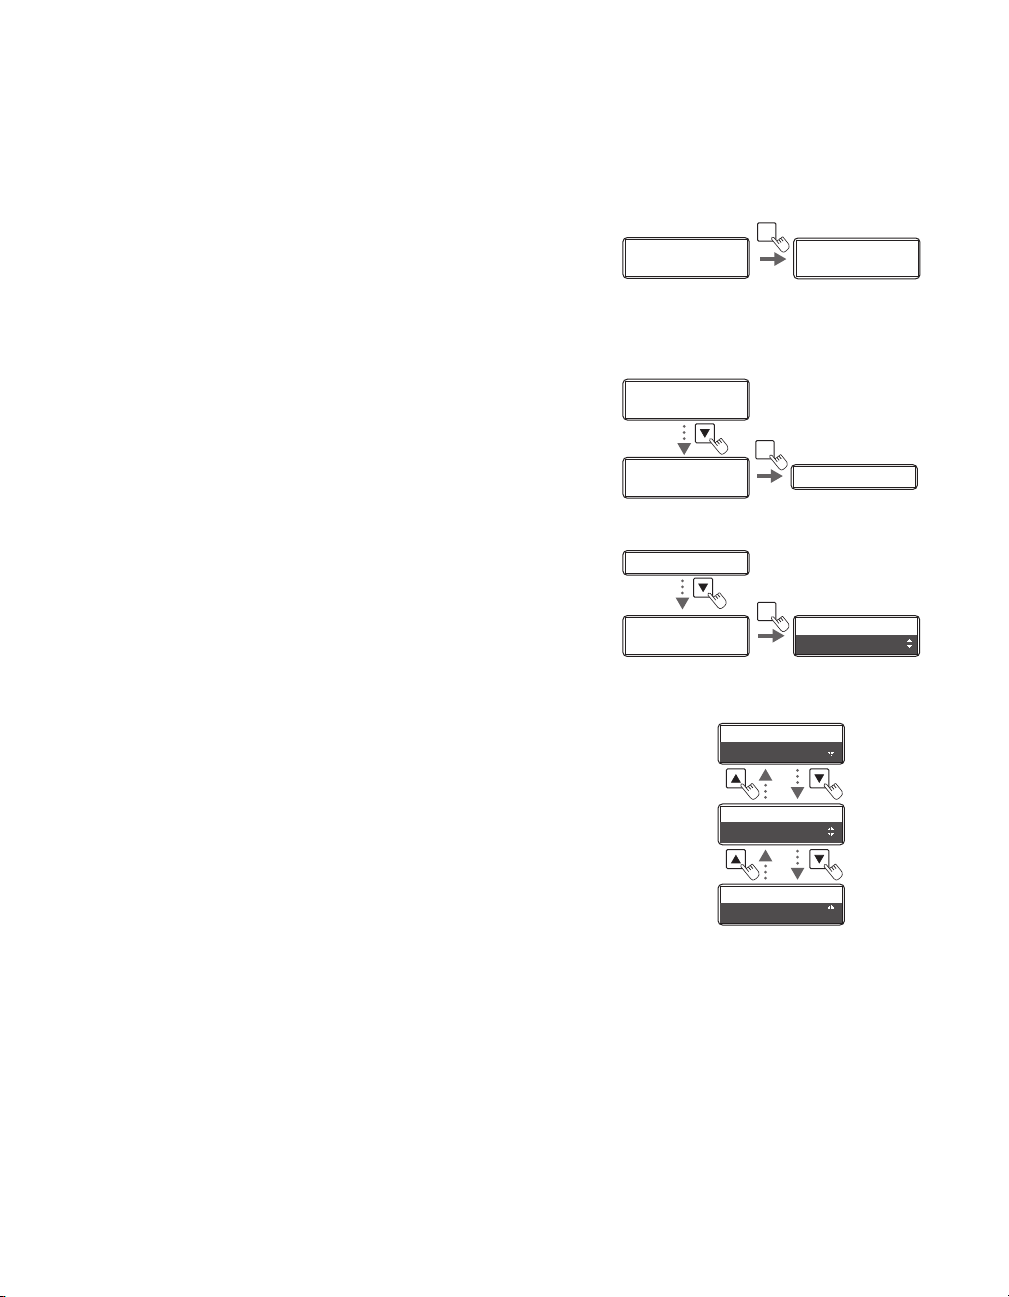
You can adjust the sharpness of edges such as facial contour.
Printer Settings
1 Switch from Normal Mode to User
Mode.
→See "Switching to User Mode" on page 24 for details on
how to switch to User Mode.
2 Press the Key until [Image Setup] is
displayed, then press the SET Key.
3 Press the Key until [Sharpness] is
displayed, then press the SET Key.
4 Change the settings by using the /
Keys, then press the SET Key.
• If you increase the setting value, contours will be more
pronounced. If you increase the setting value too
much, the image quality may appear grainy.
Normal Mode User Mode
Ready to Print
Ready to Print
Printer Info.
Printer Info.
SET:>>
SET:>>
Image Setup
SET:>>
Print Quality
Sharpness
MENU
Printer Info.
Printer Info.
SET:>>
SET:>>
SET
Print Quality
SET
0
Sharpness
0
37
Page 42
Full Color Card Printer
Balance Yellow
0
Balance Yellow
Balance Yellow
3
-3
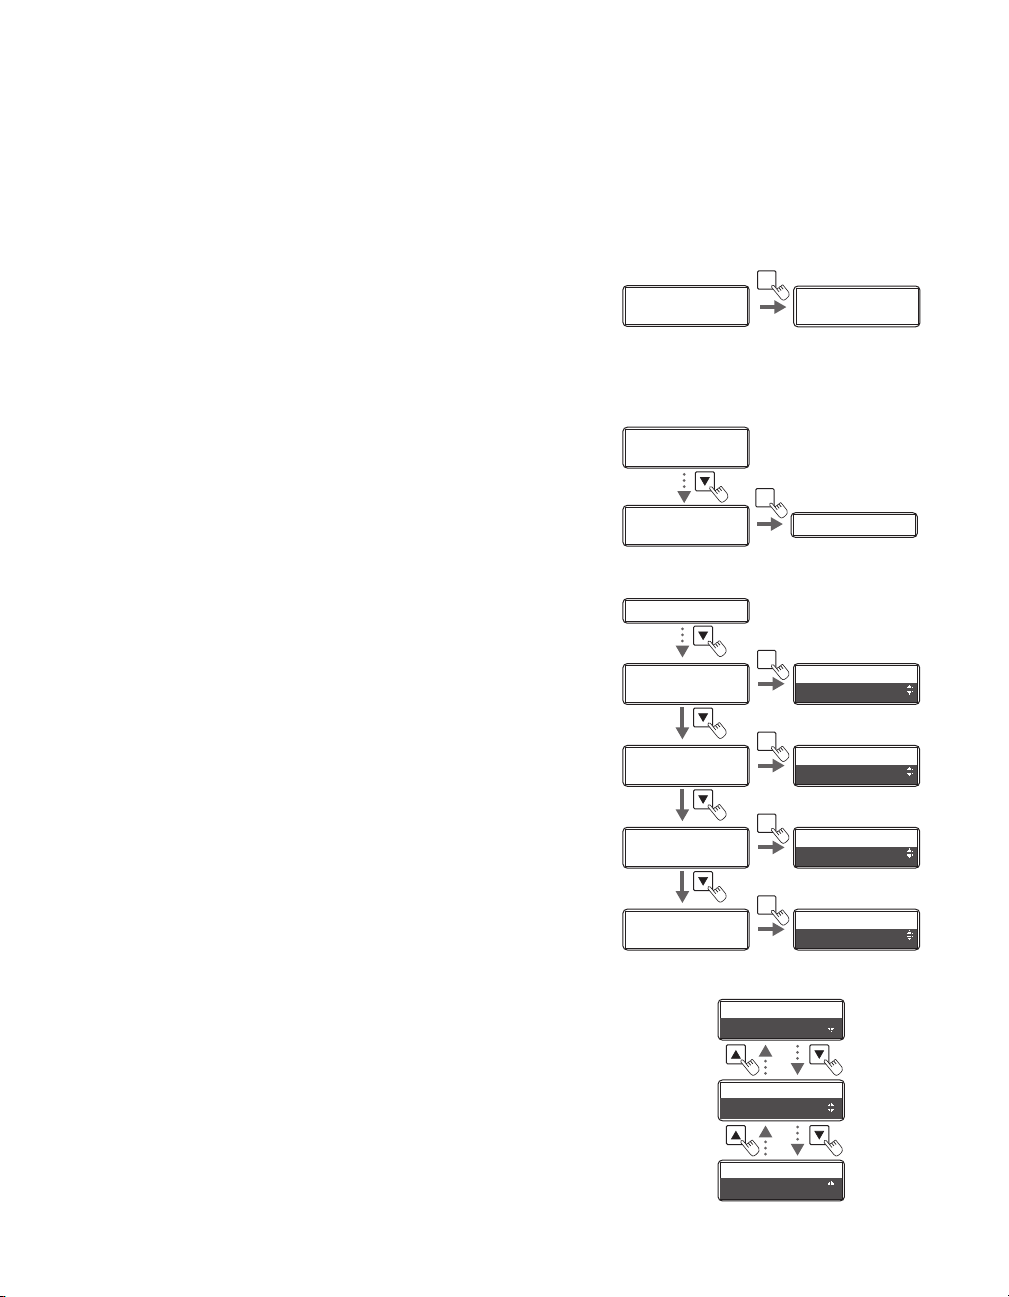
Adjusting the hue
You can adjust the level of each hue (Yellow, Magenta, Cyan, Black). Adjusting the levels
changes the hues of Yellow, Magenta, and Cyan for color images, and the thickness of black
text for Black printing.
1 Switch from Normal Mode to User
Mode.
→See "Switching to User Mode" on page 24 for details on
how to switch to User Mode.
2 Press the Key until [Image Setup] is
displayed, then press the SET Key.
3 Press the Key until [Balance Yellow],
[Balance Magenta], [Balance Cyan], or
[Balance Black] is displayed, then
press the SET key.
Normal Mode User Mode
Ready to Print
Ready to Print
Printer Info.
Printer Info.
SET:>>
SET:>>
Image Setup
SET:>>
Print Quality
Balance Yellow
Balance Magenta
Balance Cyan
MENU
Printer Info.
Printer Info.
SET:>>
SET:>>
SET
Print Quality
SET
0
0
0
Balance Yellow
SET
Balance Magenta
SET
Balance Cyan
0
0
0
4 Change the settings by using the /
38
Keys, then press the SET key.
• If you increase the setting value, the level of the
selected color will increase.
• If you decrease the setting value, the level of the
selected color will decrease.
Balance Black
SET
0
Balance Black
0
Page 43
Printer Settings
Note
Ribbon Type
OOOOO
SET
Ribbon Type
OOOOO
Film Type
OOOOO
SET
Film Type
OOOOO
Setting the Type of Ink Ribbon or Transfer Film to Use
Set the type of Ink Ribbon or Transfer Film to use.
→See "Changing the Ink Ribbon and Transfer Film" on page 16 for details about changing the Ink Ribbon and Transfer
Film.
→See "Ink Ribbon/Transfer Film" on page 81 for details about which Ink Ribbon and Transfer Film you can use.
You can also display the status on the printer driver (→See "Opening the Printer
Driver Settings Screen" on page 87).
1 Switch from Normal Mode to User
Mode.
→See "Switching to User Mode" on page 24 for details on
how to switch to User Mode.
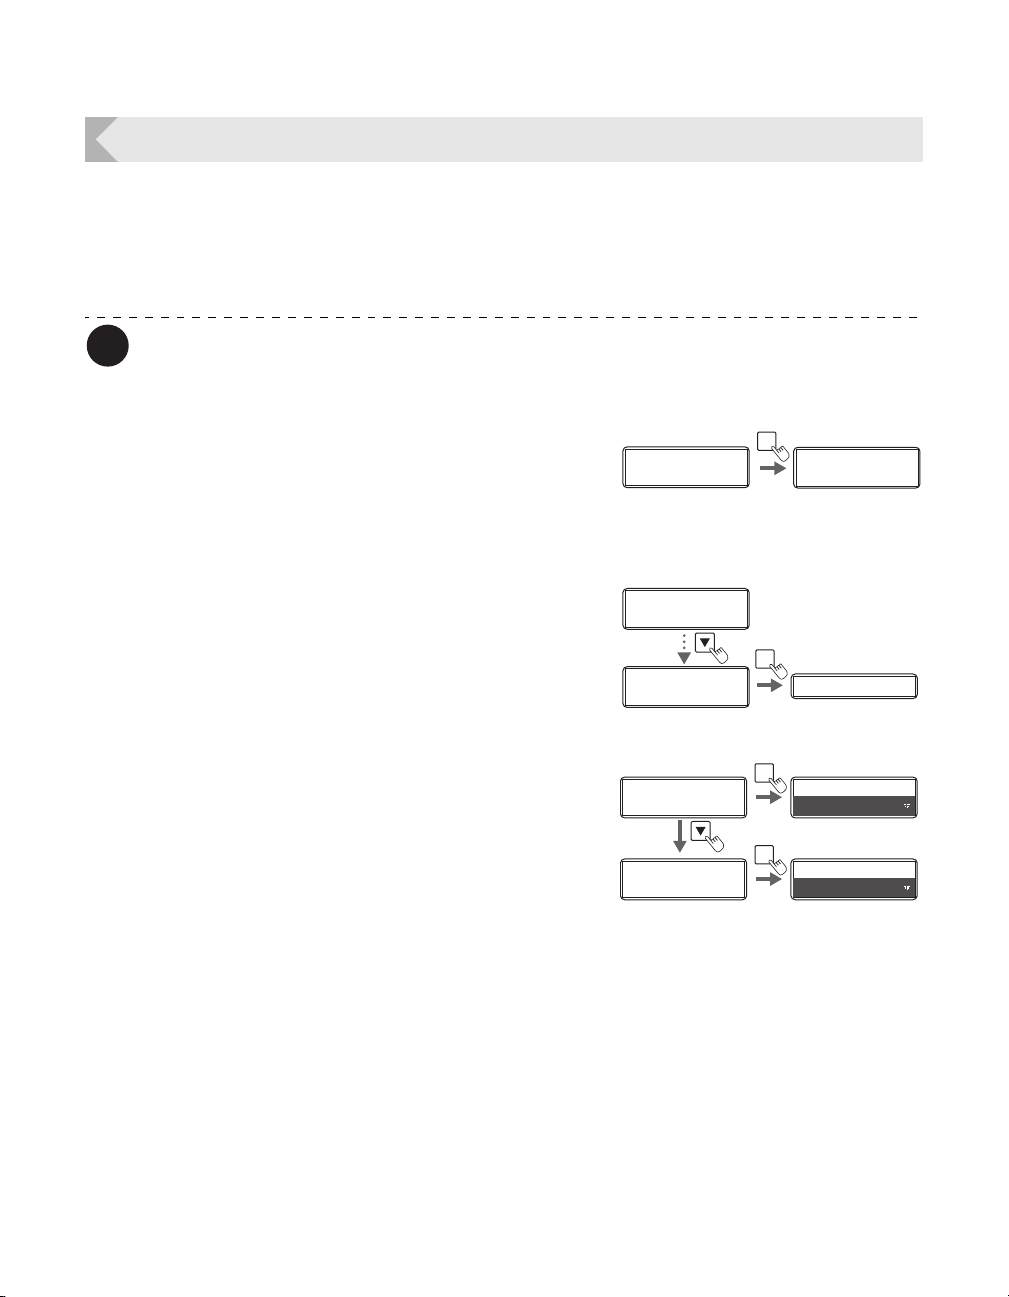
2 Press the Key until [Ribbon Setup] is
displayed, then press the SET Key.
3 Press the Key until [Ribbon Type] or
[Film Type] is displayed, then press the
SET key.
Normal Mode User Mode
Ready to Print
Ready to Print
Printer Info.
SET:>>
Ribbon Setup
SET:>>
MENU
Printer Info.
Printer Info.
SET:>>
SET:>>
SET
Ribbon Type
39
Page 44
Full Color Card Printer
Note
Ribbon Type
OOOOO
Ribbon Type
xxxxx
4 Change the settings by using the /
Keys, then press the SET Key.
If the Ink Ribbon type set in the printer and the [Ribbon Type] setting are different, an
Ink Ribbon error or a transfer problem occurs.
→See "Ribbon Type" and "Ribbon Wind up" in "How to Clear an Error" on page 67.
→See "General Print Problems (In correct Colors, etc.)" in "When Cards are Not Printed Correctly..." on
page 78 about signs of transfer problems.
If the set Transfer Film type and the [Film Type] setting on the printer are different, a
transfer error occurs since the transfer condition is not appropriate.
→See "The card is bent" and "Print flakes off" in "When Cards are Not Printed Correctly..." on page 78
about signs of transfer problems.
40
Page 45
Printer Settings
Note
Ribbon Notice(%)
Ribbon Type
SET
Ribbon Notice(%)
SET
Film Notice(%)
0
0
Film Notice(%)
0
0
Notification of Time for Ink Ribbon and Transfer Film Replacement
If there is little remaining Ink Ribbon or Transfer Film, the LCD Panel will display the remaining
quantity to notify you that it should be replaced soon.
You can also change the settings from the printer driver (→See "Opening the Printer
Driver Settings Screen" on page 87).
The factory default status is not to give this notification.
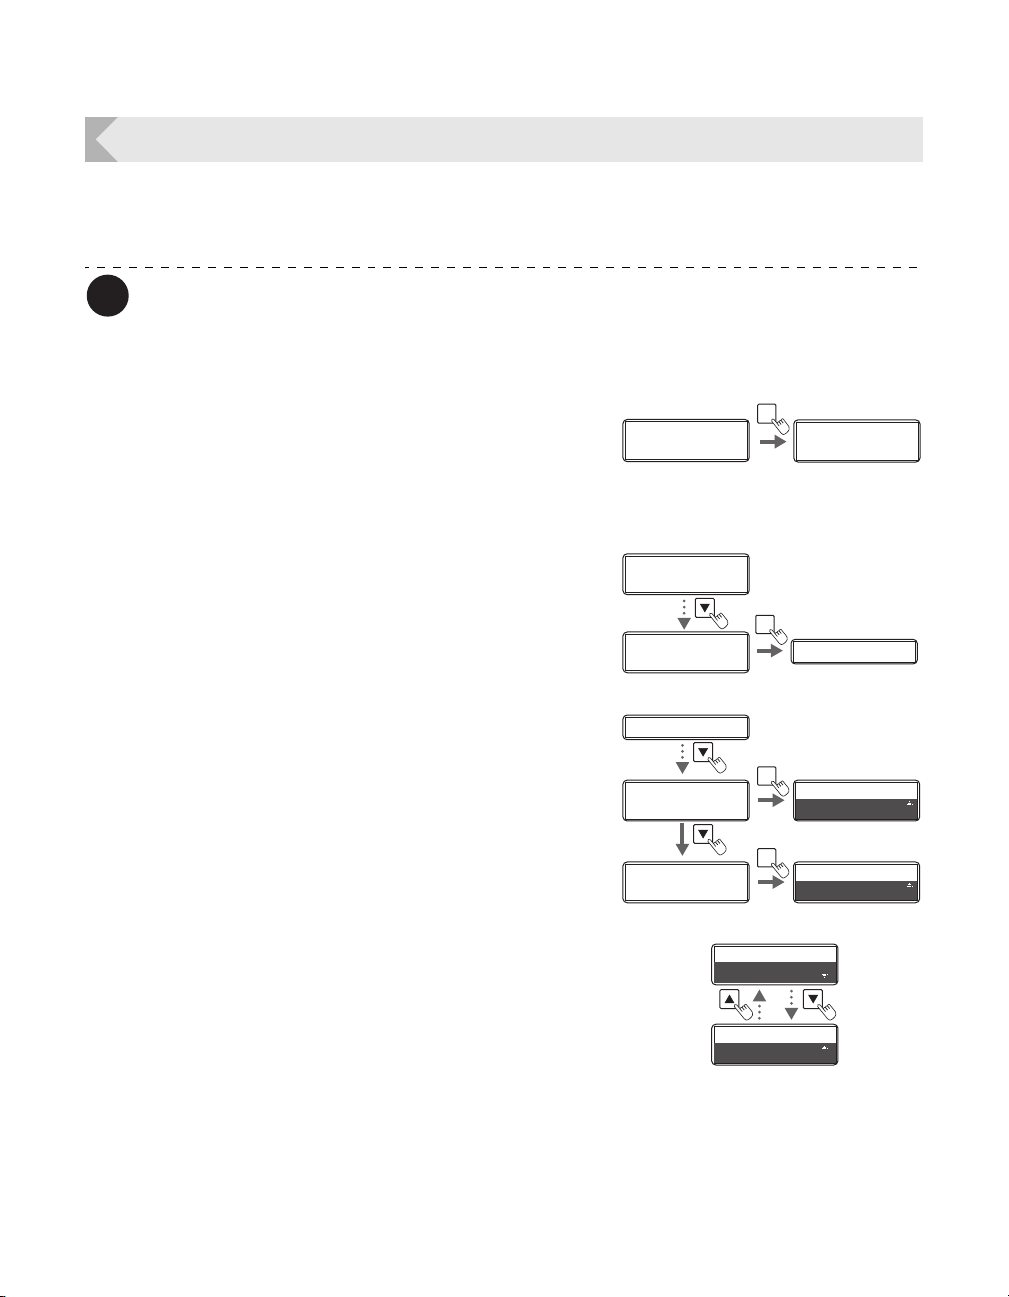
1 Switch from Normal Mode to User
2 Press the Key until [Ribbon Setup] is
3 Press the Key until [Ribbon
4 Change the settings by using the /
Mode.
→See "Switching to User Mode" on page 24 for details on
how to switch to User Mode.
displayed, then press the SET Key.
Notice(%)] or [Film Notice(%)] is
displayed, then press the SET Key.
Keys, then press the SET Key.
• The notification shows the remainder (%) at the time of
notification.
• The remainder can be set to a figure from 0-20%. If
the settings value is set to [0], then there will be no
notification.
• Use the / Keys to change the value, and press the
SET Key to fix the changes.
• If the MENU Key is pressed prior to pressing the SET
Key to fix the changes, then the changes will be
canceled.
Normal Mode User Mode
Ready to Print
Ready to Print
Printer Info.
SET:>>
Ribbon Setup
SET:>>
MENU
Printer Info.
Printer Info.
SET:>>
SET:>>
SET
Ribbon Type
Ribbon Notice(%)
Ribbon Notice(%)
20
0
41
Page 46
Full Color Card Printer
Note
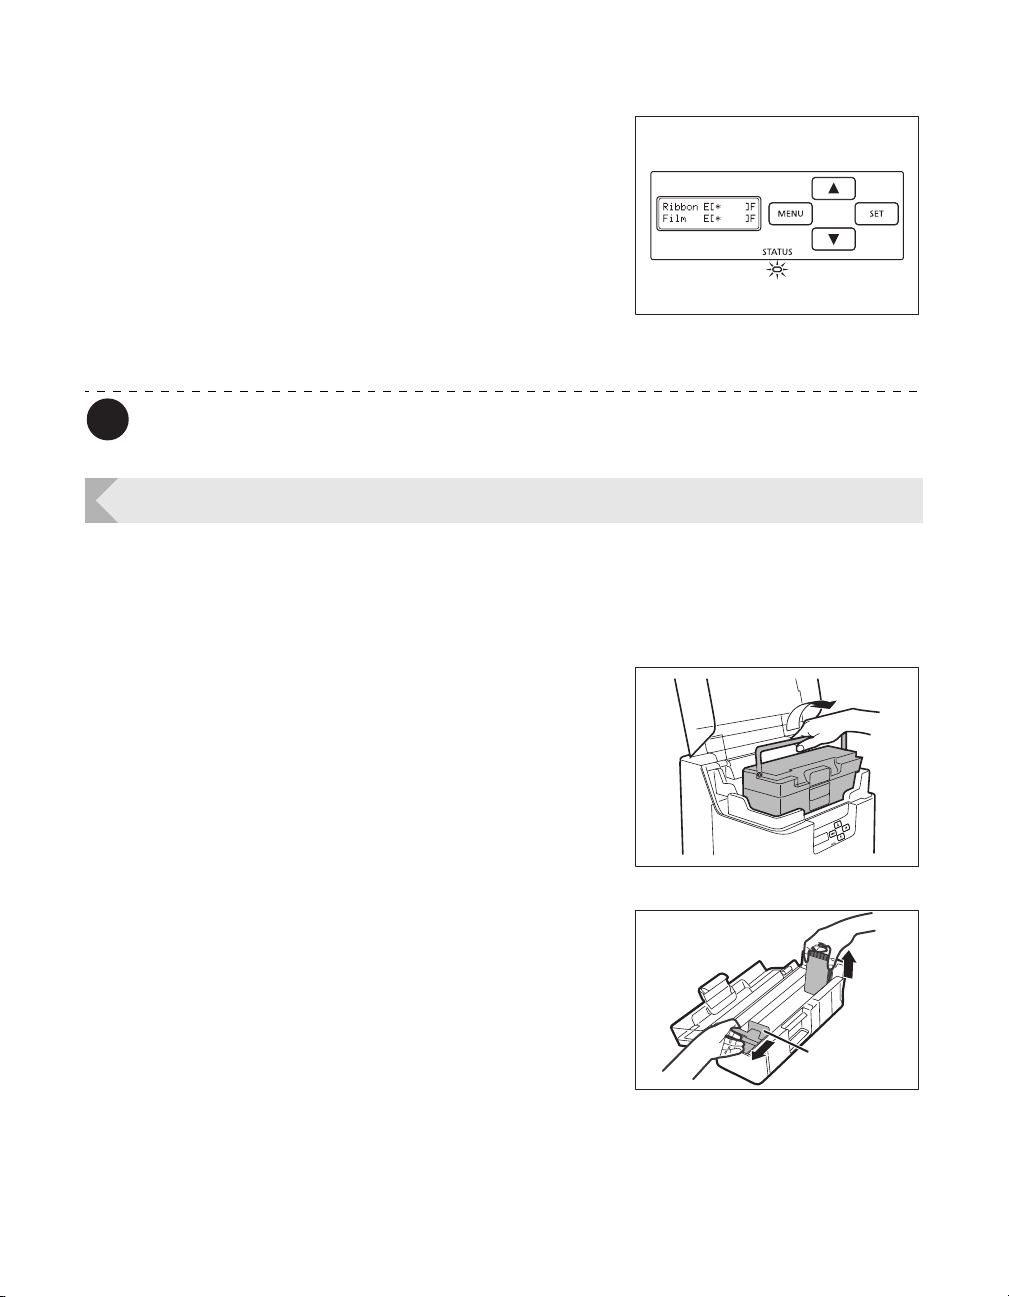
5 As time approaches for replacement of
the Ink Ribbon or Transfer Film, a
remaining quantity notification for
these is displayed.
• In Normal Mode, if the Ink Ribbon and Transfer Film
remaining quantity drops below the settings value (%),
then the remaining quantity notification will appear at a
set frequency (approximately 4 seconds).
→See "Changing the Ink Ribbon and Transfer Film" on
page 16 for details about changing the Ink Ribbon or
Transfer Film.
The factory default setting for [Ribbon Notice(%)] and [Film Notice(%)] is [0].
Setting the Types of Card to Use
Adjusting the Feed Gate Depending on Card Thickness
Adjust the card case and the gate gap to match the fed cards.
1 Open the top cover, and remove the
Card Case.
• Hold the Card Case handle, and remove.
2 Open the Card Case, and remove the
cards from the cassette.
• Pull the lock, and open the Card Case cover.
• Pull the card retainer, and after removing the cards,
return the card retainer to its original position.
• Remove the cards, and close the Card Case cover.
Card Retainer
42
Page 47
Printer Settings
Note
Note
Printer Info.
SET:>>
Printer Info.
SET:>>
Card Setup
SET:>>
Card Setup
SET:>>
Card Type Card Type
SET
Card Type
PVC (0.76mm)
Card Type
PVC (0.76mm)
SET
Card Type
PVC (0.76mm)
Card Type
PVC (0.76mm)
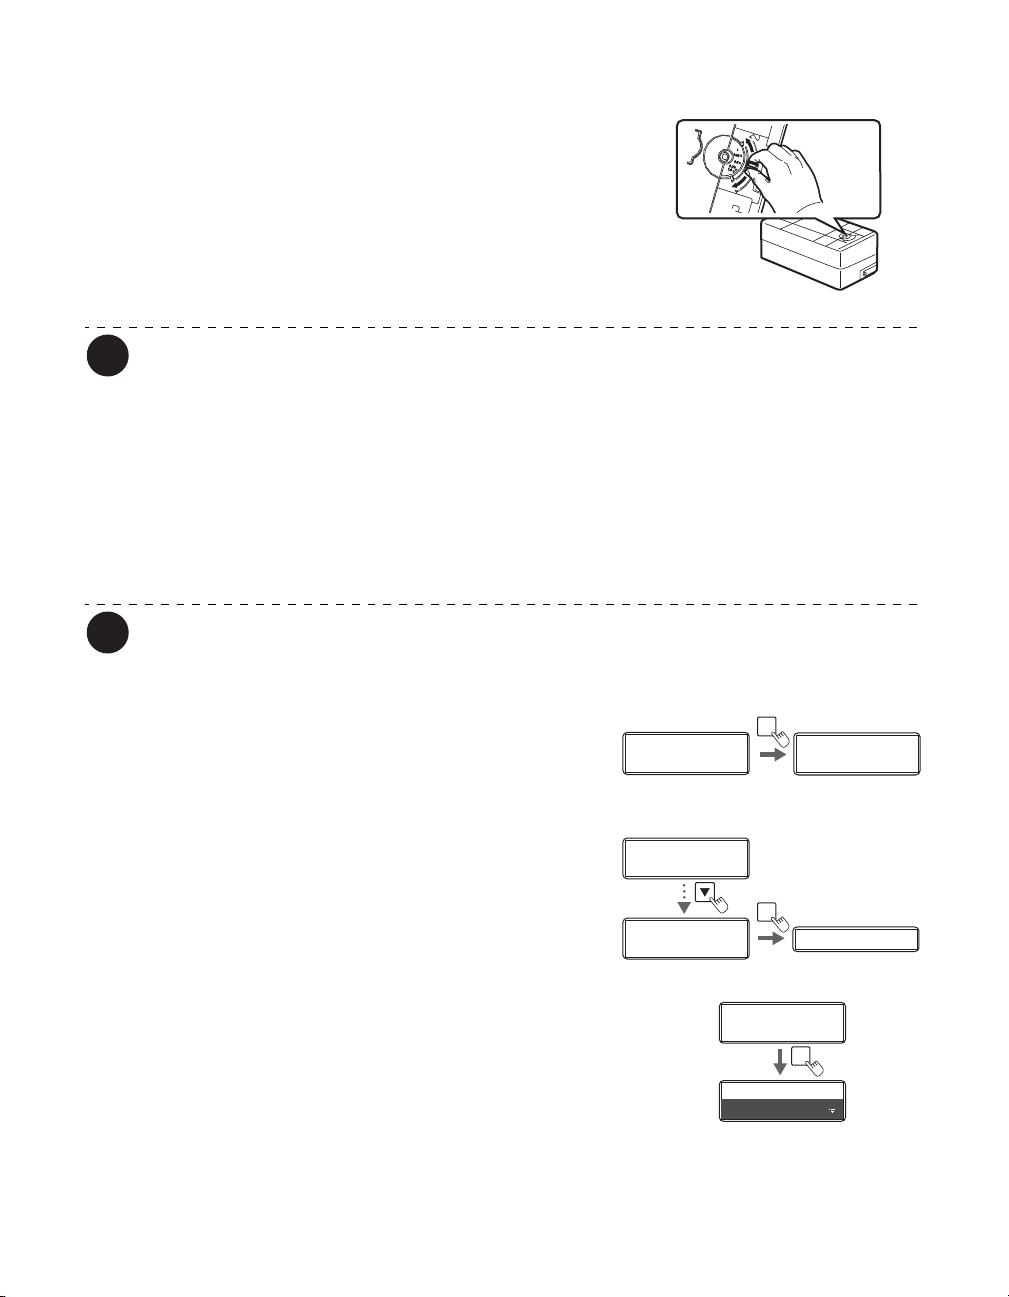
3 Rotate the dial on the lower surface of
the Card Case and adjust the gate gap.
• The figures on the knob indicate the size of the gate
gap.
• If cards do not pass through the gate, turn the knob to
the right.
• If multiple cards pass through the gate, turn the knob
to the left.
The factory default setting for the gate gap is [0.76 mm].
4 Close the Top Cover.
• Face the Card Case outwards, and after returning it to its original location, close the Top Cover.
Optimizing Transfer Conditions
Carry out secondary transfer under optimal conditions for the cards used.
You can also change the settings by using the printer driver (→See "Opening the
Printer Driver Settings Screen" on page 87).
Align
Knob with
Marks
1 Switch from Normal Mode to User
2 Press the Key until [Card Setup] is
3 Confirm that [Card Type] appears, and
Mode.
→See "Switching to User Mode" on page 24 for details on
how to switch to User Mode.
displayed, then press the SET Key.
press the SET Key.
Normal Mode User Mode
Ready to Print
Ready to Print
MENU
Printer Info.
Printer Info.
SET:>>
SET:>>
43
Page 48
Full Color Card Printer
Note
Card Type
PVC (0.76mm)
Card Type
PVC (0.76mm)
Card Type
CARD3 (00/+00)
Card Type
CARD3 (00/+00)
SET
Card Type
CARD1 (20,+00)
Card Type
CARD1 (20,+00)
Card Type
CARD1 (15,+00)
Card Type
CARD1 (15,+00)
Card Type
CARD1 (15,+00)
Card Type
CARD1 ( +00)
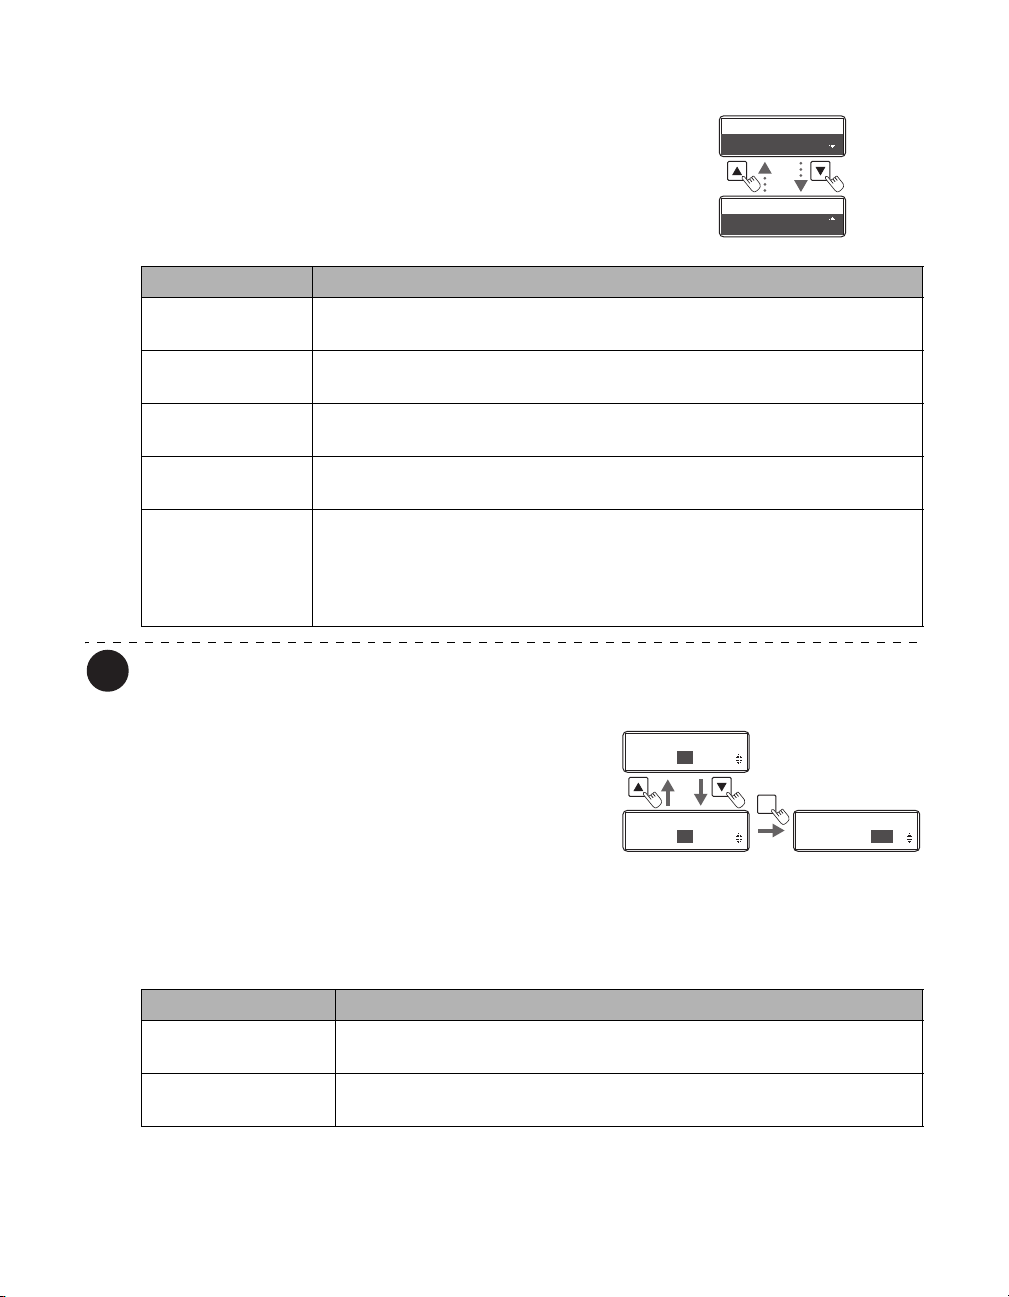
4 Change the settings by using the /
Keys, then press the SET Key.
• Settings values that can be changed are as below.
• If CARD1-3 are selected, then go to Step 5. If other
settings values are selected, then you have finished.
Settings Value Details
PVC (0.76 mm) Carry out secondary transfer using conditions corresponding to 0.76 mm
thickness standard PVC card.
PET (0.76 mm) Carry out secondary transfer using conditions corresponding to 0.76 mm
thickness standard PET card.
PET-G (0.76 mm) Carry out secondary transfer using conditions corresponding to 0.76 mm
thickness standard PET-G card.
Sheet (PET) Carry out secondary transfer using conditions corresponding to a 1.00 mm
card with a PET sheet affixed to a PVC card.
CARD1 (XX,+XX)
CARD2 (XX,+XX)
CARD3 (XX,+XX)
Carry out secondary transfer using conditions set for values set for
CARD 1-3. The left value is the transfer speed, and the right is the transfer
temperature. Selecting either of these settings will then transition to transfer
speed/transfer temperature settings.
→See Step 5
5 (Only if [CARD 1-3] are selected)
44
The factory default setting is [PVC (0.76 mm)].
Use the / Keys and the SET Key to
set the transfer speed/transfer
temperature.
• Use the / Keys to change the value, and press the
SET Key to fix the changes.
• If the MENU Key is pressed prior to pressing the SET
Key to fix the changes, then the changes will be
canceled.
• The left value shows the transfer speed, and the right
the transfer temperature.
Settings Menu Details
Transfer speed
(left value)
Transfer temperature
(right value)
Higher values mean a greater transfer speed, and lower values mean a
lower transfer speed.
Higher values mean a greater temperature, and lower values mean a
lower temperature.
Page 49
Printer Settings
Note
Note
Printer Info.
SET:>>
Printer Info.
SET:>>
Card Setup
SET:>>
Card Setup
SET:>>
Card Type Card Type
SET
Card Type
Decurl Time(s)
SET
Decurl Time(s)
0
0
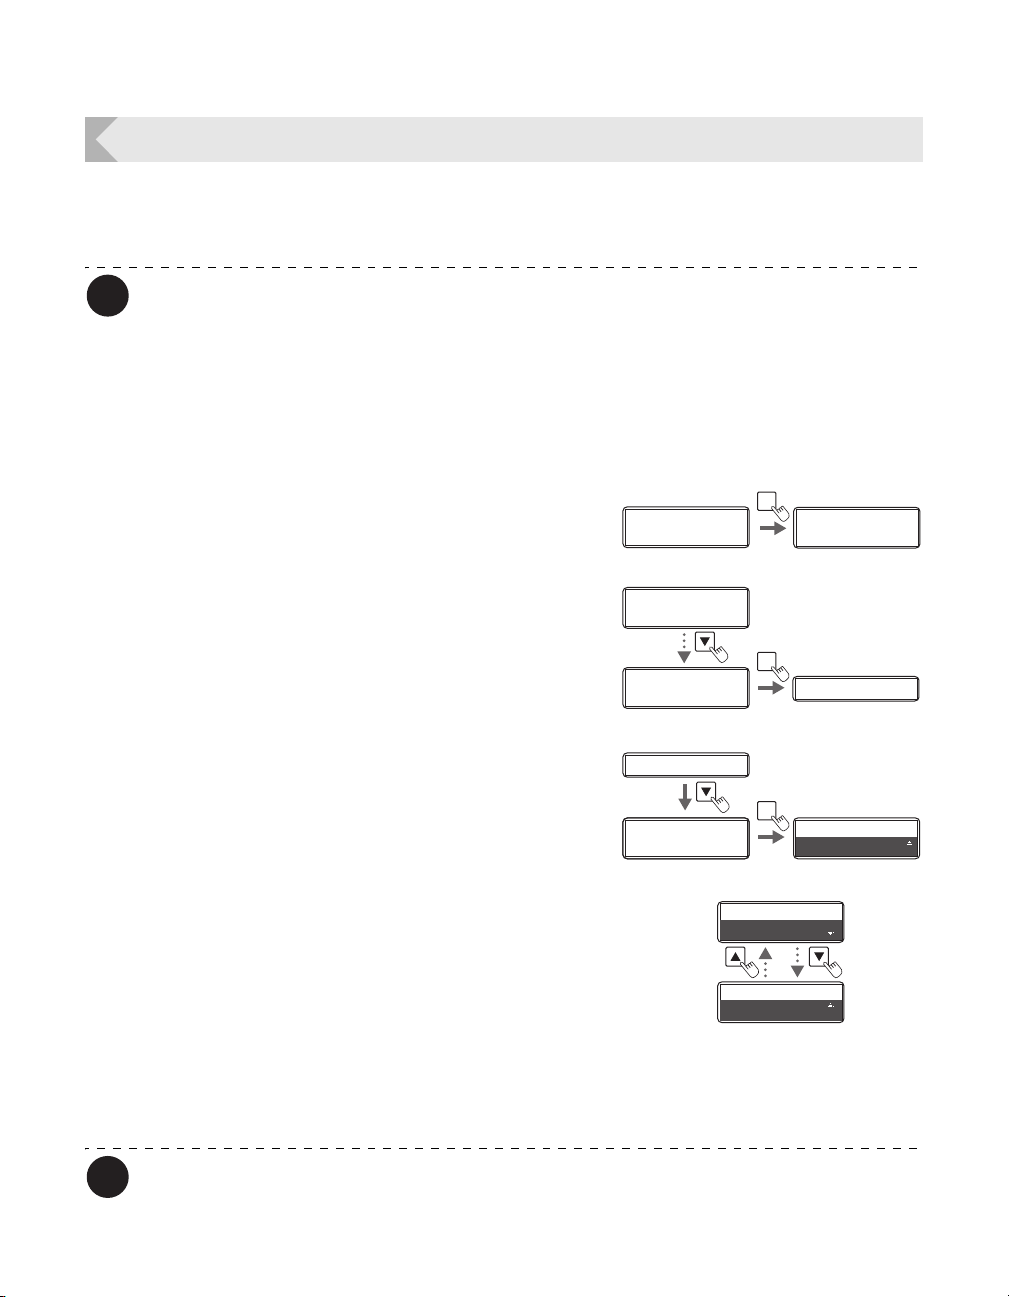
Correcting Card Curl
Depending on the cards you use, even given optimum secondary transfer conditions (speed
and temperature), cards may curl. After secondary transfer, by correcting card curl (decurl), you
can reduce the amount of curl.
You can also change the settings by using the printer driver (→See "Opening the
Printer Driver Settings Screen" on page 87).
The factory default status is not to carry out decurl.
Secondary transfer conditions (speed and temperature) that have not been optimized,
and application of excess heat are major causes of cards curling after printing. Prior
to correction using decurl, adjust the secondary transfer conditions.
→See "Setting the Types of Card to Use" on page 42 for adjustment of secondary transfer conditions.
1
Switch from Normal Mode to User Mode.
→See "Switching to User Mode" on page 24 for details on
how to switch to User Mode.
2 Press the Key until [Card Setup] is
displayed, then press the SET Key.
3 Press the Key until [Decurl Time(s)]
is displayed, then press the SET Key.
• Cards that have had their warp corrected are output.
4 Change the settings by using the /
Keys, then press the SET Key.
• Figures show the duration (seconds) for which decurl
is carried out.
•
You can set the decurl duration from 0-5 seconds. If the
settings value is set to "0", then there will be no decurl.
• Use the / Keys to change the value, and press the
SET Key to fix the changes.
• If the MENU Key is pressed prior to pressing the SET
Key to fix the changes, then the changes will be
canceled.
Normal Mode User Mode
Ready to Print
Ready to Print
MENU
Printer Info.
Printer Info.
SET:>>
SET:>>
Decurl Time(s)
Decurl Time(s)
5
0
The factory default setting is [0].
45
Page 50
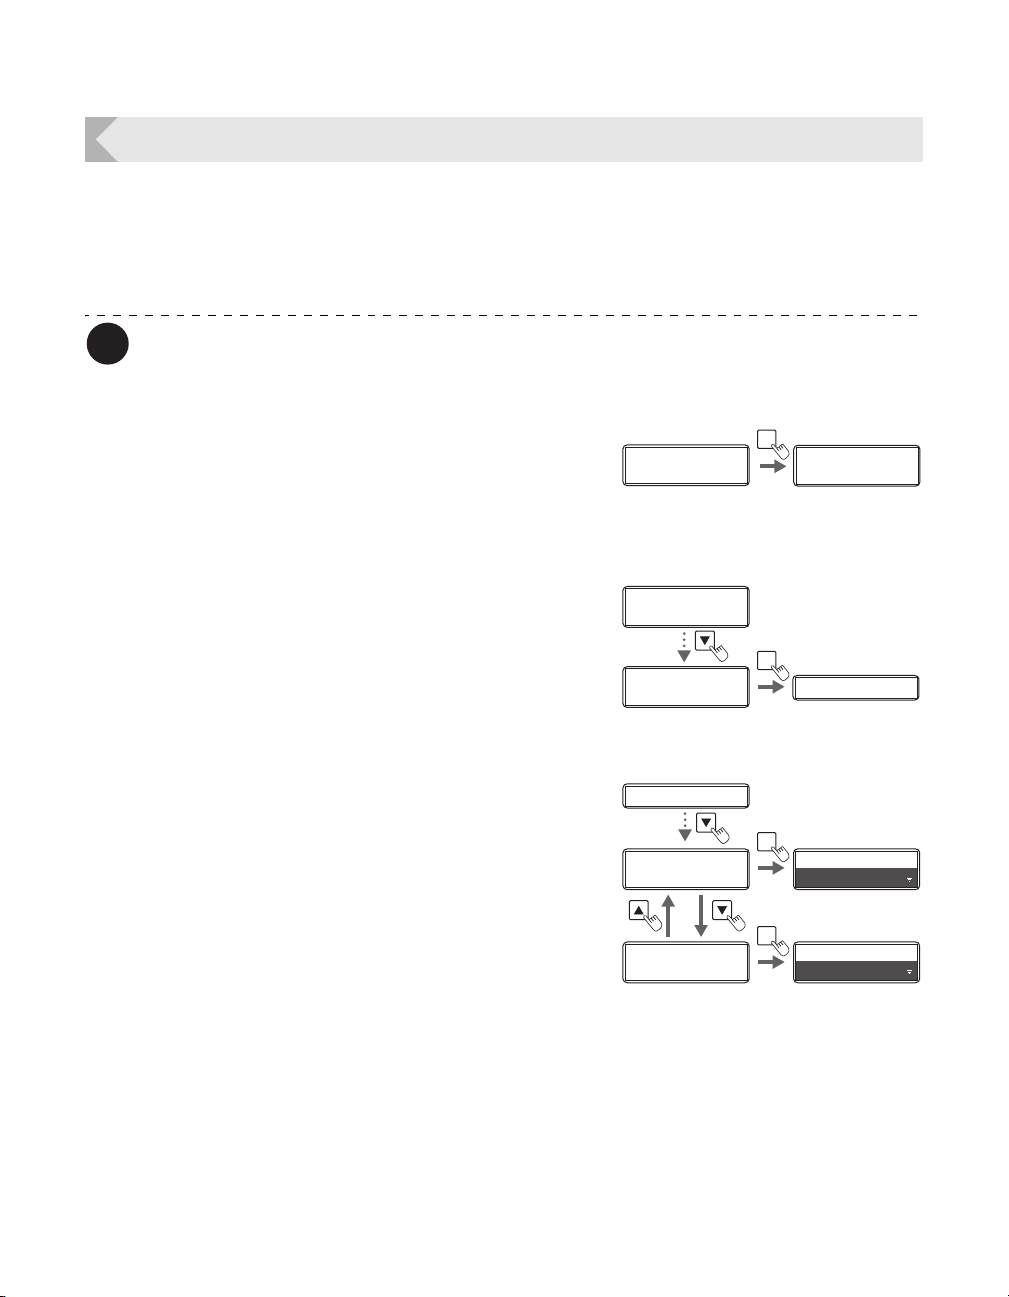
Full Color Card Printer
Note
Printer Info.
SET:>>
Printer Info.
SET:>>
Card Setup
SET:>>
Card Setup
SET:>>
Card Type Card Type
SET
Card Type
Normal Exit
LEFT SIDE
Error Exit
RIGHT SIDE
SET
Normal Exit
LEFT SIDE
SET
Error Exit
RIGHT SIDE
Switching the Card Ejection Slot
You can switch the slot from which printed cards are output to Card Ejection Slot (Left) and
(Right).
The factory default is set so that correctly printed cards are output from the Card Ejection Slot
(Left), and cards with errors are output from Card Ejection Slot (Right).
You can also change the settings by using the printer driver (→See "Opening the
Printer Driver Settings Screen" on page 87).
1 Switch from Normal Mode to User
Mode.
→See "Switching to User Mode" on page 24 for details on
how to switch to User Mode.
2 Press the Key until [Card Setup] is
displayed, then press the SET Key.
3 After using the / Keys to switch
between [Normal Exit]/[Error Exit],
press the SET Key.
• Select where to output correctly printed cards on the
[Normal Exit] menu, and where to output abnormal
cards on the [Error Exit] menu.
Normal Mode User Mode
Ready to Print
Ready to Print
MENU
Printer Info.
Printer Info.
SET:>>
SET:>>
46
Page 51
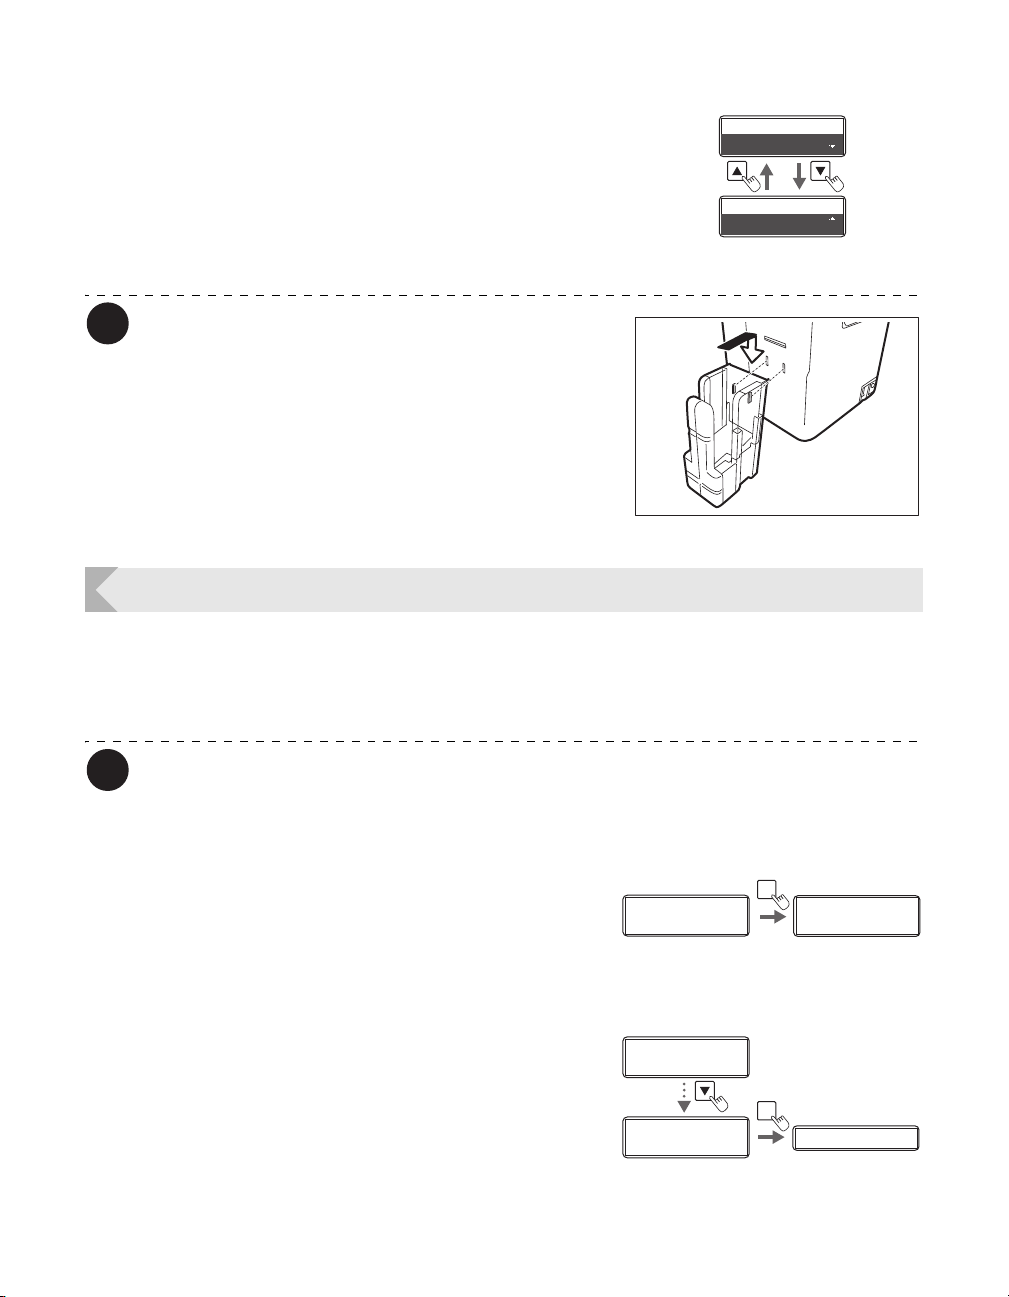
Printer Settings
Note
Note
Normal Exit
LEFT SIDE
Normal Exit
LEFT SIDE
Normal Exit
RIGHT SIDE
Normal Exit
RIGHT SIDE
Printer Info.
SET:>>
Printer Info.
SET:>>
Card Setup
SET:>>
Card Setup
SET:>>
Card Type Card Type
SET
4 Change the settings by using the /
Keys, then press the SET Key.
• Use the / Keys to switch between [LEFT SIDE]/
[RIGHT SIDE].
• Set it to [LEFT SIDE] to output cards from Card
Ejection Slot (Left), or [RIGHT SIDE] to do from Card
Ejection Slot (Right).
The Card Stacker can only be attached to
the Card Ejection Slot (Left).
Note that if the destination for normally
printed cards is set to the Card Ejection
Slot (Right), then output cards cannot be
stacked.
See the "Easy Setup Guide" for instructions
on attaching the Card Stacker.
Set the Orientation of Magnetic Cards/IC Cards to Load
Before loading magnetic card/IC cards, you need to set the Orientation of Magnetic Cards/IC
Cards to Load.
→See "Loading Magnetic/IC Cards" on page 13 for how to set Magnetic Cards/IC Cards.
1 Switch from Normal Mode to User
2 Press the Key until [Card Setup] is
You can also change the settings by using the printer driver (→See "Opening the
Printer Driver Settings Screen" on page 87).
This setting is only available when the optional magnetic encoder unit is attached.
Mode.
→See "Switching to User Mode" on page 24 for details on
how to switch to User Mode.
Normal Mode User Mode
Ready to Print
Ready to Print
MENU
Printer Info.
Printer Info.
SET:>>
SET:>>
displayed, then press the SET Key.
47
Page 52
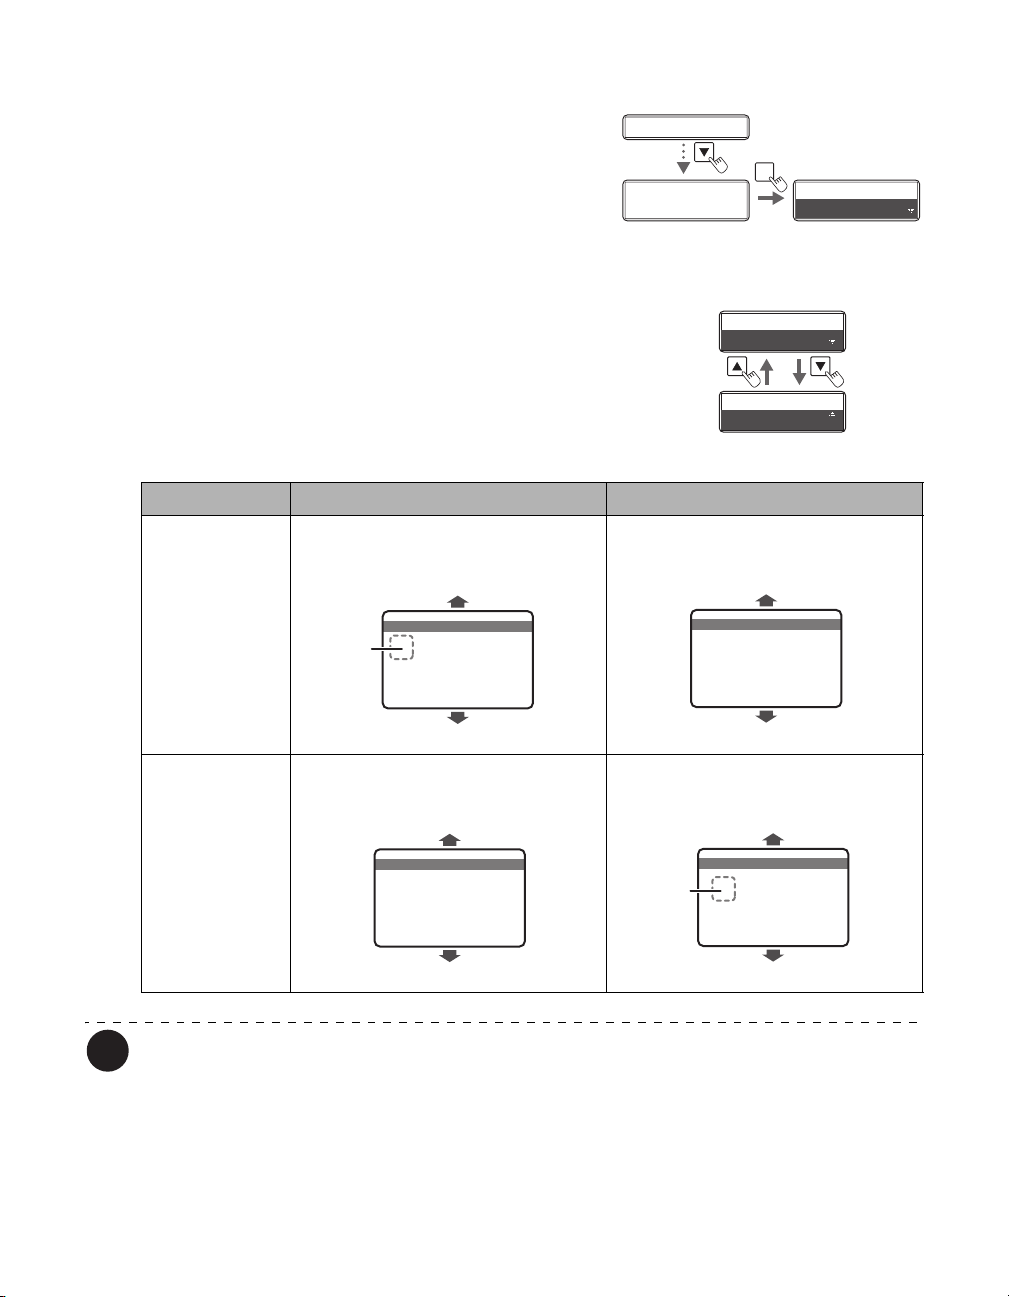
Full Color Card Printer
Note
Set Face
STANDARD
Set Face
STANDARD
Set Face
REVERCE
Set Face
REVERCE
Card Case Rear
Card Case Front
Rear
Surface
Front
Surface
Card Case Rear
Card Case Front
Card Case Rear
Card Case Front
IC Terminal
Rear
Surface
3 Press the Key until [Set Face] is
displayed, then press the SET Key.
4 Change the settings by using the /
Keys, then press the SET Key.
• By combining printing sides of the card (front surface/
rear surface) and magnetic strips/IC cards, settings for
loading can be changed as below.
Settings Value Card front surface (left surface) Card rear surface (right surface)
STANDARD JIS2 magnetic strip/contact IC
terminal
Card Case Rear
IC Terminal
Front
Surface
Card Type
Set Face
STANDARD
ISO magnetic strip
SET
Set Face
STANDARD
REVERSE ISO magnetic strip JIS2 magnetic strip/contact IC
The factory default setting is [STANDARD].
48
Card Case Front
terminal
Page 53
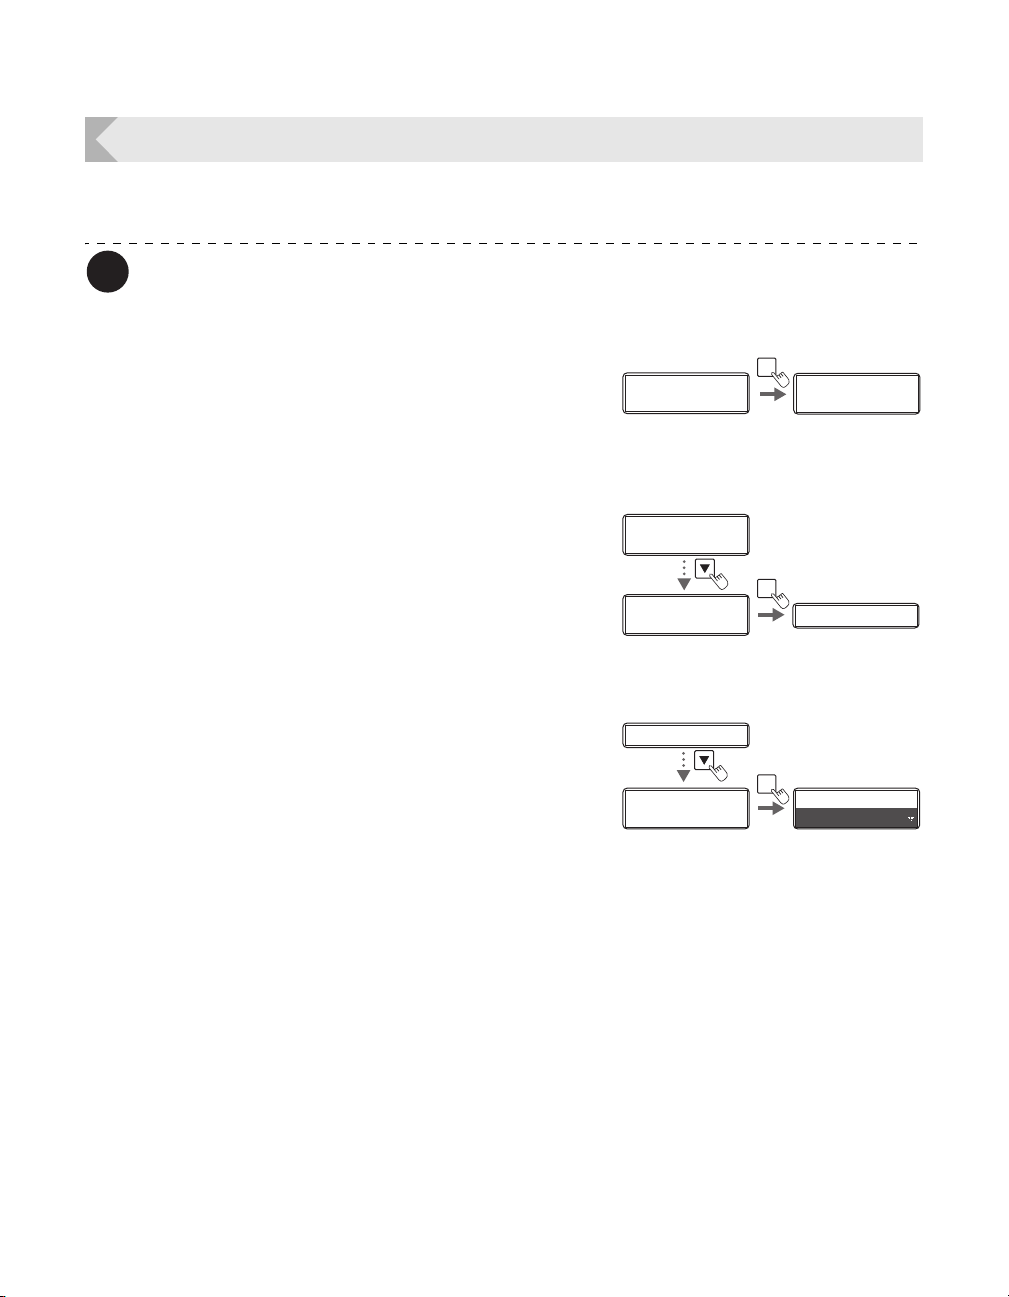
Set the Orientation of Cards to Eject
Note
Printer Info.
SET:>>
Printer Info.
SET:>>
Card Setup
SET:>>
Card Setup
SET:>>
Card Type Card Type
SET
Set the orientation of correctly printed cards.
You can also change the settings by using the printer driver (→See "Opening the
Printer Driver Settings Screen" on page 87).
Printer Settings
1 Switch from Normal Mode to User
Mode.
→See "Switching to User Mode" on page 24 for details on
how to switch to User Mode.
2 Press the Key until [Card Setup] is
displayed, then press the SET Key.
3 Press the Key until [Eject Face] is
displayed, then press the SET Key.
Normal Mode User Mode
Ready to Print
Ready to Print
Card Type Card Type
Eject Face
Eject Face
NOT SPECIFY
NOT SPECIFY
MENU
Printer Info.
Printer Info.
SET:>>
SET:>>
SET
Eject Face
Eject Face
NOT SPECIFY
NOT SPECIFY
49
Page 54
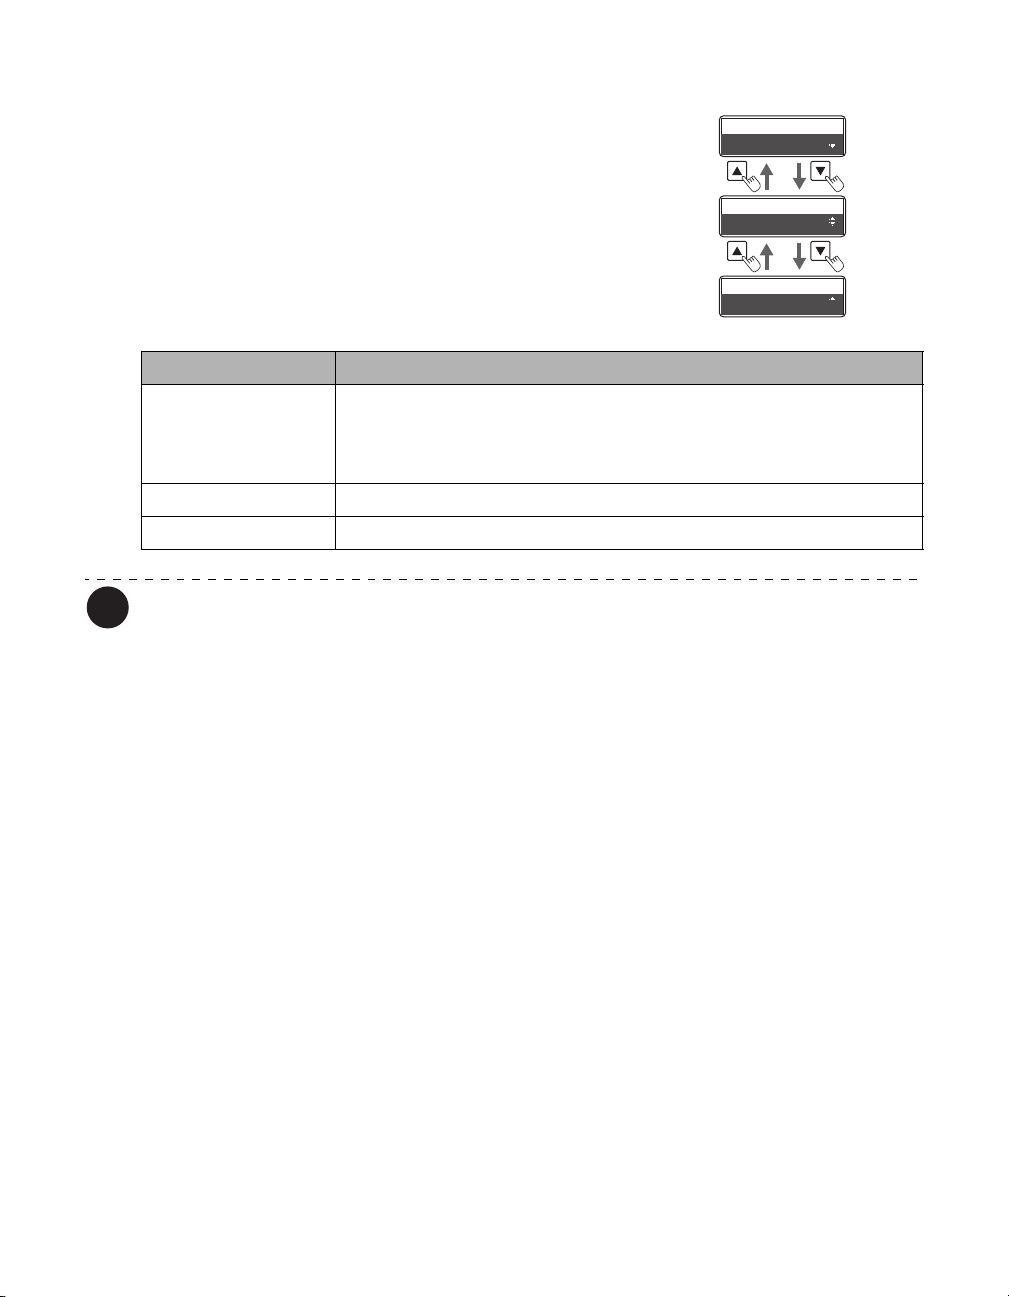
Full Color Card Printer
Note
Eject Face
NOT SPECIFY
Eject Face
NOT SPECIFY
Eject Face
UP
Eject Face
UP
Eject Face
DOWN
Eject Face
DOWN
4 Change the settings by using the /
Keys, then press the SET Key.
• Settings values that can be changed are as below.
Settings Value Details
NOT SPECIFY The rear surface of cards to output cannot be set. Depending on the
details of printing, the orientation that will print the most quickly is
automatically selected. The front face of the card faces down for singlesided printing, and faces up for double-sided printing.
UP The card is output with its front surface upwards.
DOWN The card is output with its front surface downwards.
The factory default setting is [NOT SPECIFY].
50
Page 55
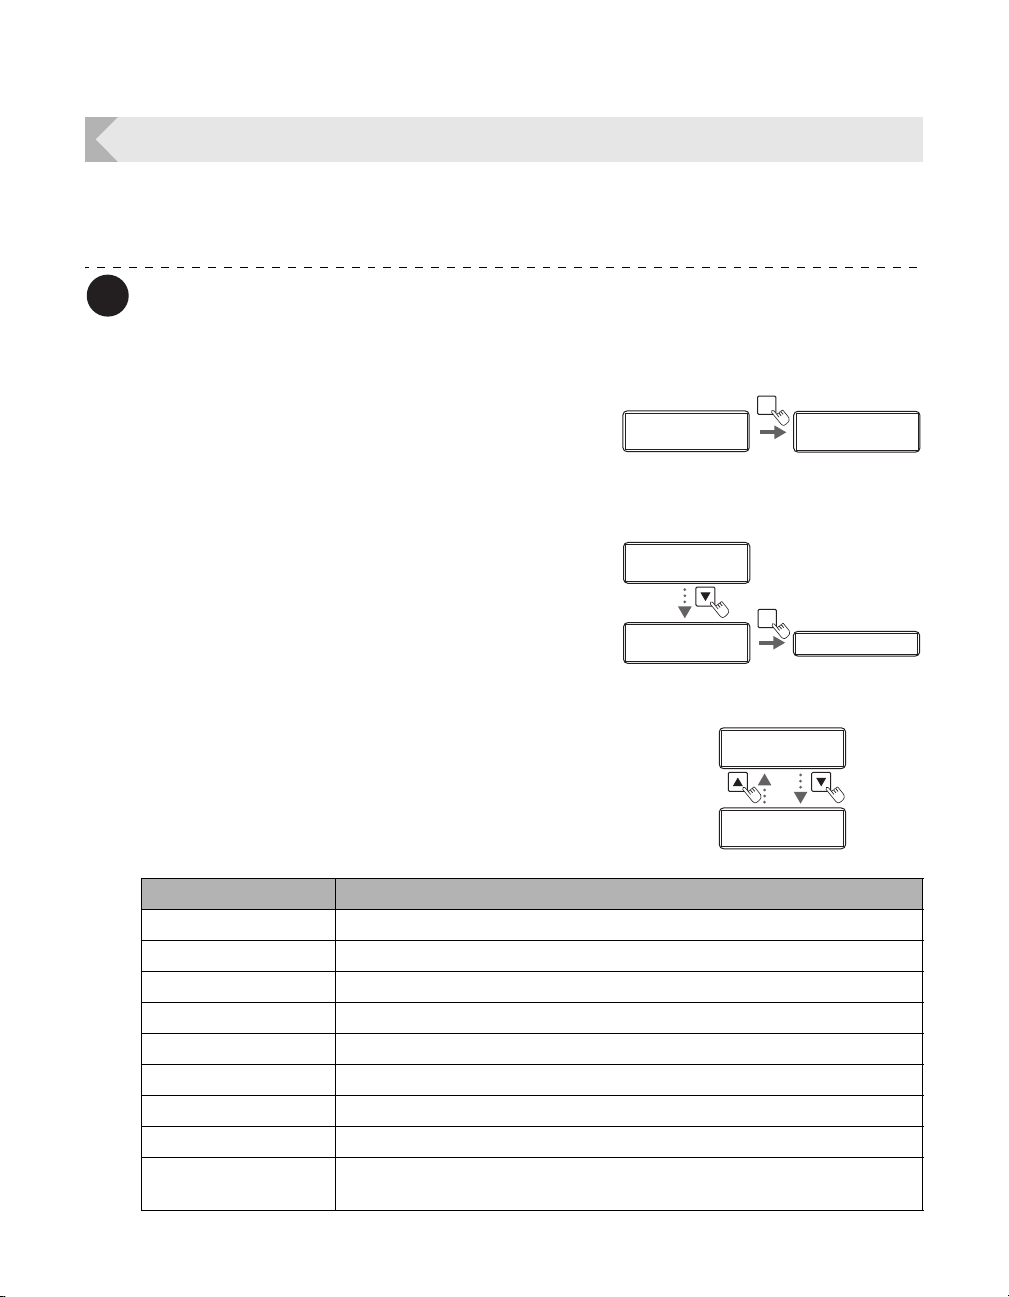
Printer Settings
Note
Printer ID
0
Printer ID
0
Password
OFF
Password
OFF
Changing Network Connection Settings
You can configure Internet communications settings such as the individual printer ID and TCP/
IP-related settings.
You can also change the settings by using the printer driver (→See "2. Print over a
network" in "PrinterDriverManual(E).pdf" on the Printer Driver CD for network
settings).
1 Switch from Normal Mode to User
2 Press the Key until [Interface Setup]
3 Select the setting to change by using
Mode.
→See "Switching to User Mode" on page 24 for details on
how to switch to User Mode.
is displayed, then press the SET Key.
Normal Mode User Mode
Ready to Print
Ready to Print
Printer Info.
Printer Info.
SET:>>
SET:>>
Interface Setup
Interface Setup
SET:>>
SET:>>
MENU
Printer Info.
Printer Info.
SET:>>
SET:>>
SET
Printer ID Printer ID
the / Keys, then press the SET Key.
• Details of items that can be changed in each settings
menu are as below.
Settings Menu Details
Printer ID Set the individual printer ID (0-15).
DHCP Set the DHCP function ON/OFF.
IP Address Set the IP address. (Only when the DHCP function is OFF)
Subnet Mask Set the subnet mask. (Only when the DHCP function is OFF)
Default Gateway Displays the default gateway. (Only when the DHCP function is OFF)
MAC Address Displays the MAC address.
IPsec Set the IPsec function ON/OFF.
Timeout(s) Set the session timeout (seconds).
Password Set the password ON/OFF for setting TCP/IP using the printer driver.
Additionally, if ON, then set the password.
51
Page 56
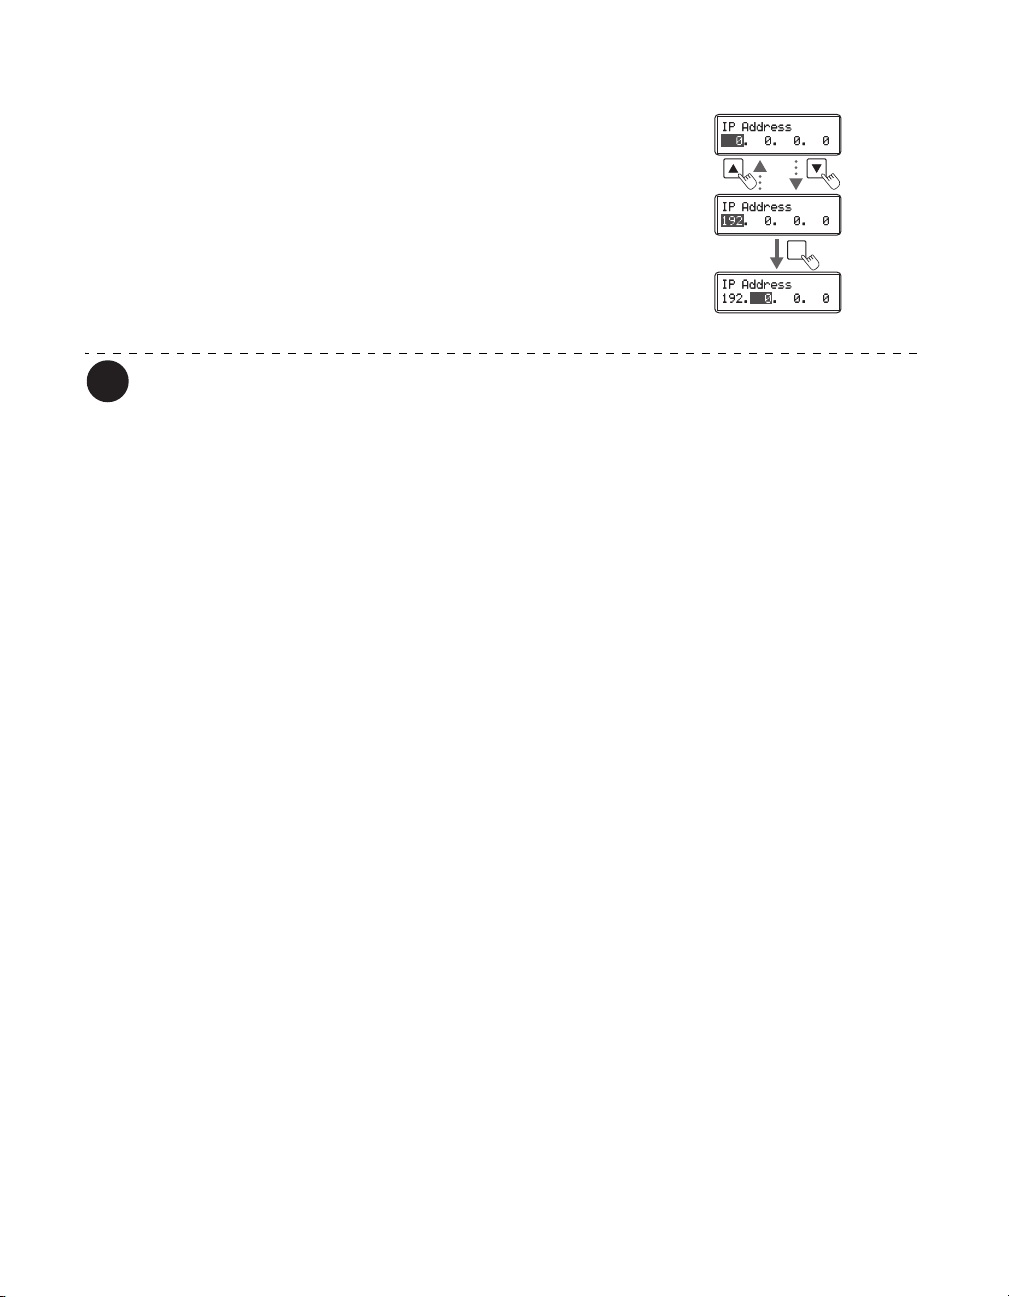
Full Color Card Printer
Note
SET
4 Change the settings by using the /
Keys, then press the SET Key.
• When setting numerical values, change each digit
using the / Keys. Fix changes using the SET Key
then progresses to the next digit.
Pressing the SET Key after the final digit fixes the
changes. If the MENU Key is pressed prior this, then
the changes will be canceled.
The factory default settings are [DHCP], [IPsec] and [Password] set to [OFF].
[Subnet Mask] and [Default Gateway] are set to [0.0.0.0].
[IP Address] is set to [169.254.0.0].
[Printer ID] is set to [8].
[Timeout(s)] is set to [30].
[Interface Setup] settings can also be set when installing the network driver.
Turn the power off and on to enable the settings.
52
Page 57
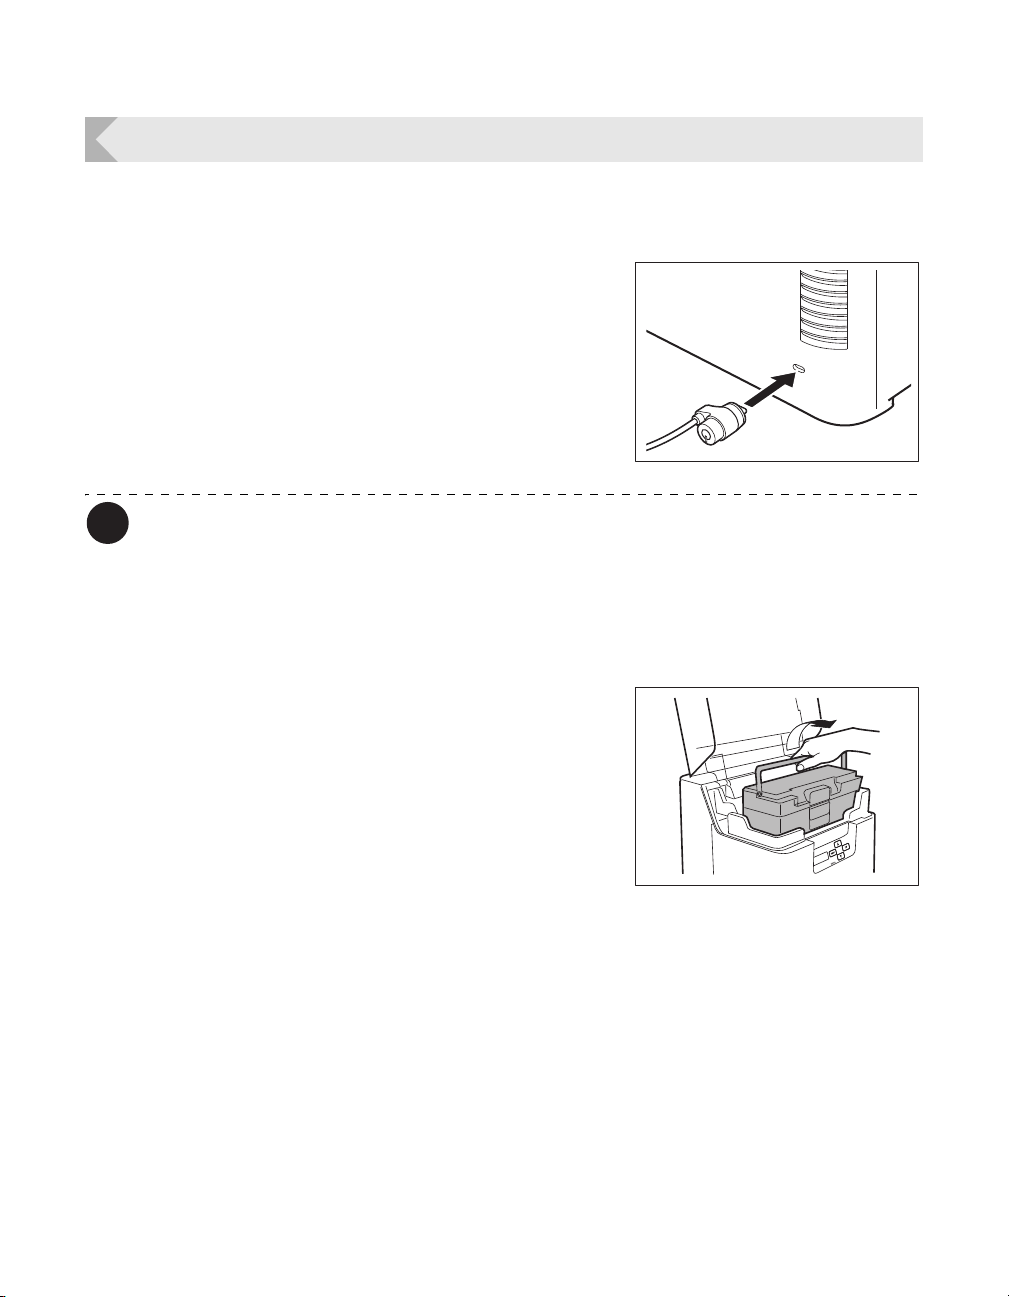
Printer Settings
Note
Preventing Theft and Unauthorized Usage
Preventing Theft of the Printer (Security Cable Slot)
You can prevent theft of the printer by locking it with a wire cable.
Use a wire cable that fits the Security Cable Slot
(0.12" × 0.28" (3.00 mm × 7.00 mm)) to lock up
the printer.
Use a commercial security cable.
How to Store Cards (Removing the Card Case)
You can prevent unauthorized use of the cards by removing the Card Case and locking it in
a safe or other secure location.
1 Open the top cover, and remove the
Card Case.
• Hold the Card Case handle, and remove.
53
Page 58
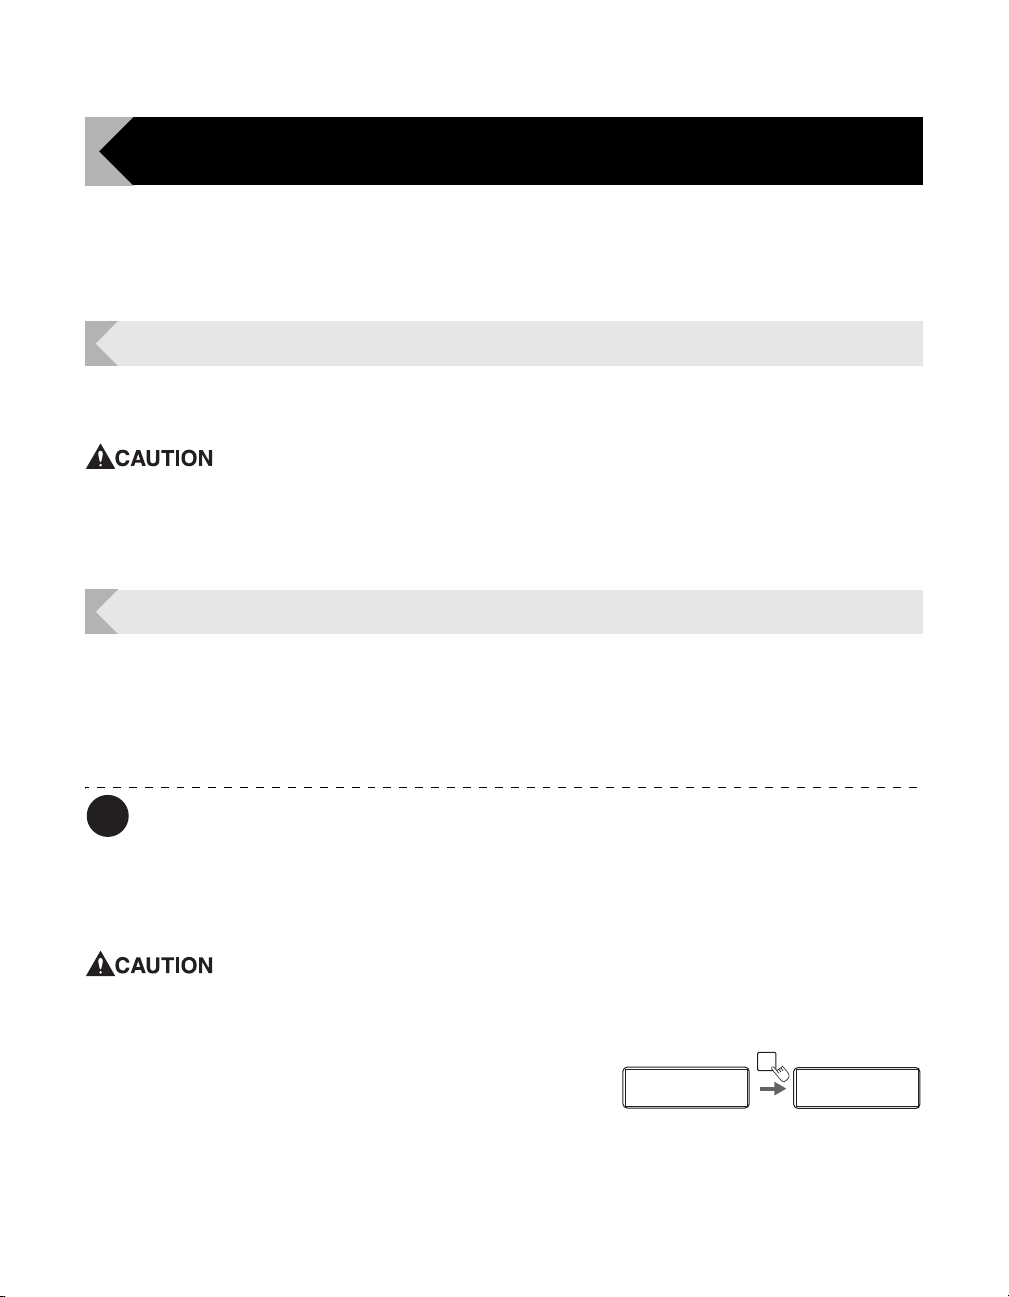
Full Color Card Printer
Note
Cleaning
The rollers need to be cleaned to maintain good print quality.
This section explains which rollers need to be cleaned and how to clean them.
Before Cleaning
Note the following cautions when cleaning the rollers.
Remove any cards that are inside the printer.
After cleaning the rollers, do not use the printer until the rollers get dry (for at
least five minutes).
Do not touch the rollers with your bare hands.
Cleaning with a Cleaning Card
Use the Cleaning Card (provided) to clean the Card Transport Roller if cards do not feed
smoothly.
We recommend cleaning the rollers after printing about 1,000 cards.
→See "Cleaning Card" on page 82 for details about which Cleaning Cards you can use.
The [Card Count] and [Total Count] functions make it easy to keep track of how many
cards are printed.
→See "Counting the Number of Cards that Are Printed" on page 27 for details of the [Card Count] function.
→See "Displaying the Total Number of Sides that Are Printed" on page 28 for details of the [Total Count]
function.
Cleaning Cards can only be used once and cannot be reused. Use a new
Cleaning Card with the adhesive side down every time you clean the rollers.
1 Switch from Normal Mode to User
Mode.
→See "Switching to User Mode" on page 24 for details on
how to switch to User Mode.
Normal Mode User Mode
Ready to Print
Ready to Print
MENU
Printer Info.
Printer Info.
SET:>>
SET:>>
54
Page 59
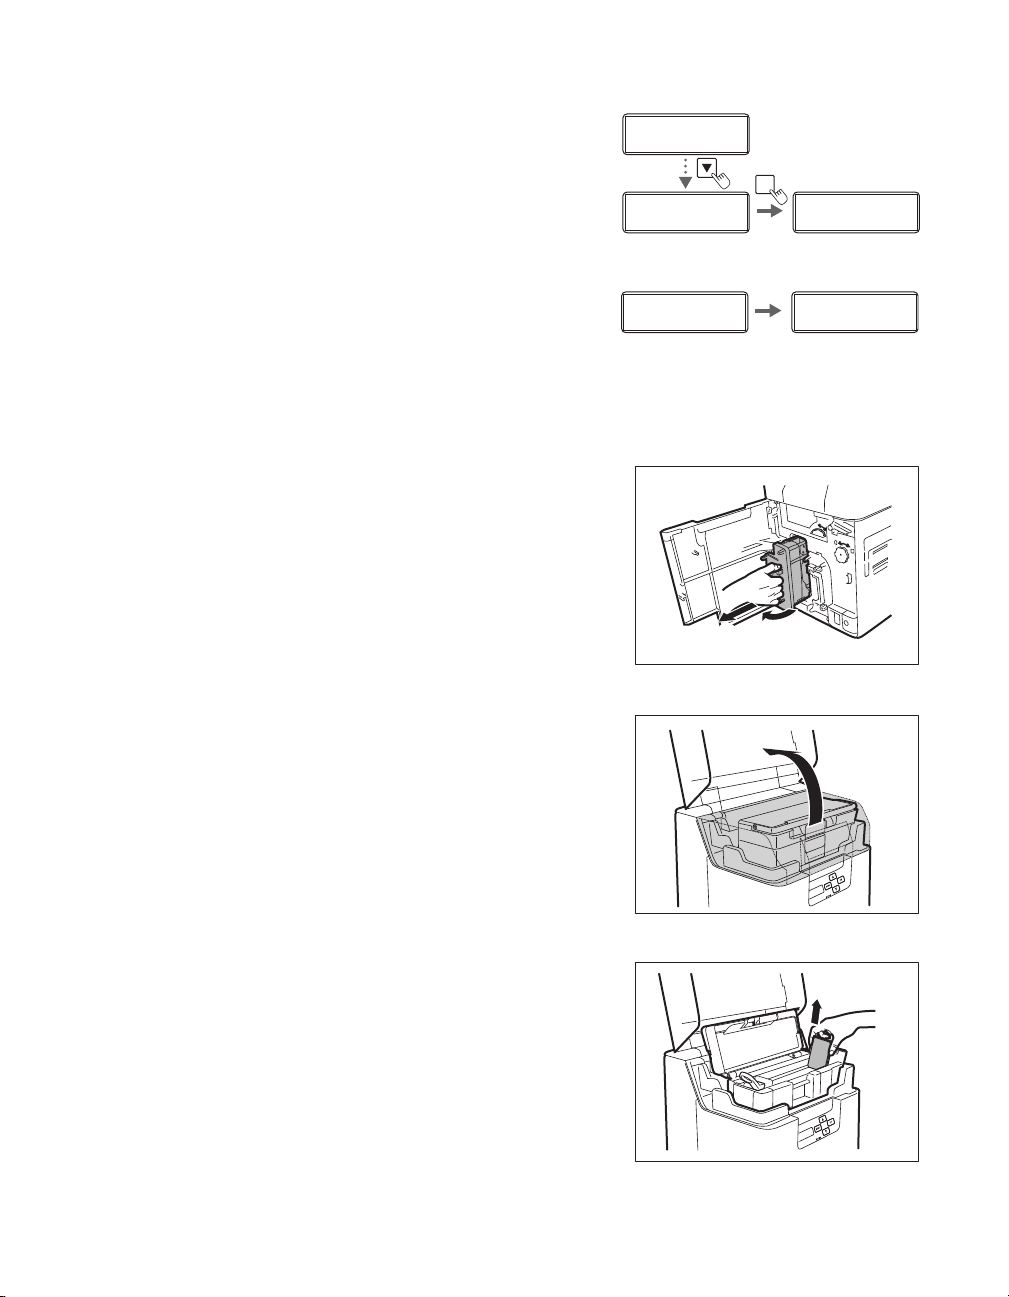
Cleaning
Cleaning
Cool Down 75
Cleaning
Cool Down 70
a
b
2 Press the Key until [Cleaning] is
displayed, then press the SET Key.
3 When [Cool Down ---] is displayed, wait
until the figure drops to 70 or lower.
• This figure indicates the temperature of the heat roller.
• If the heat roller is hot, then it may take 20 minutes for
the temperature to drop to 70 or below.
4 When [Remove Film] is displayed, open
the Front Cover, and remove the
Transfer Film.
→See "Transfer Film Replacement" on page 19 for
details on how to remove the Transfer Film.
• When the Transfer Film has been removed, close the
Front Cover.
Printer Info.
Printer Info.
SET:>>
SET:>>
Cleaning
Cleaning
SET:>>
SET:>>
SET
Cleaning
Cleaning
Remove Cards
Remove Cards
5 When [Remove Cards] is displayed,
open the Top Cover.
6 Open the Card Case, and remove the
cards from the cassette.
• Pull the lock, and open the Card Case lid.
• Pull the card retainer, and after removing the cards,
return the card retainer to its original position.
55
Page 60
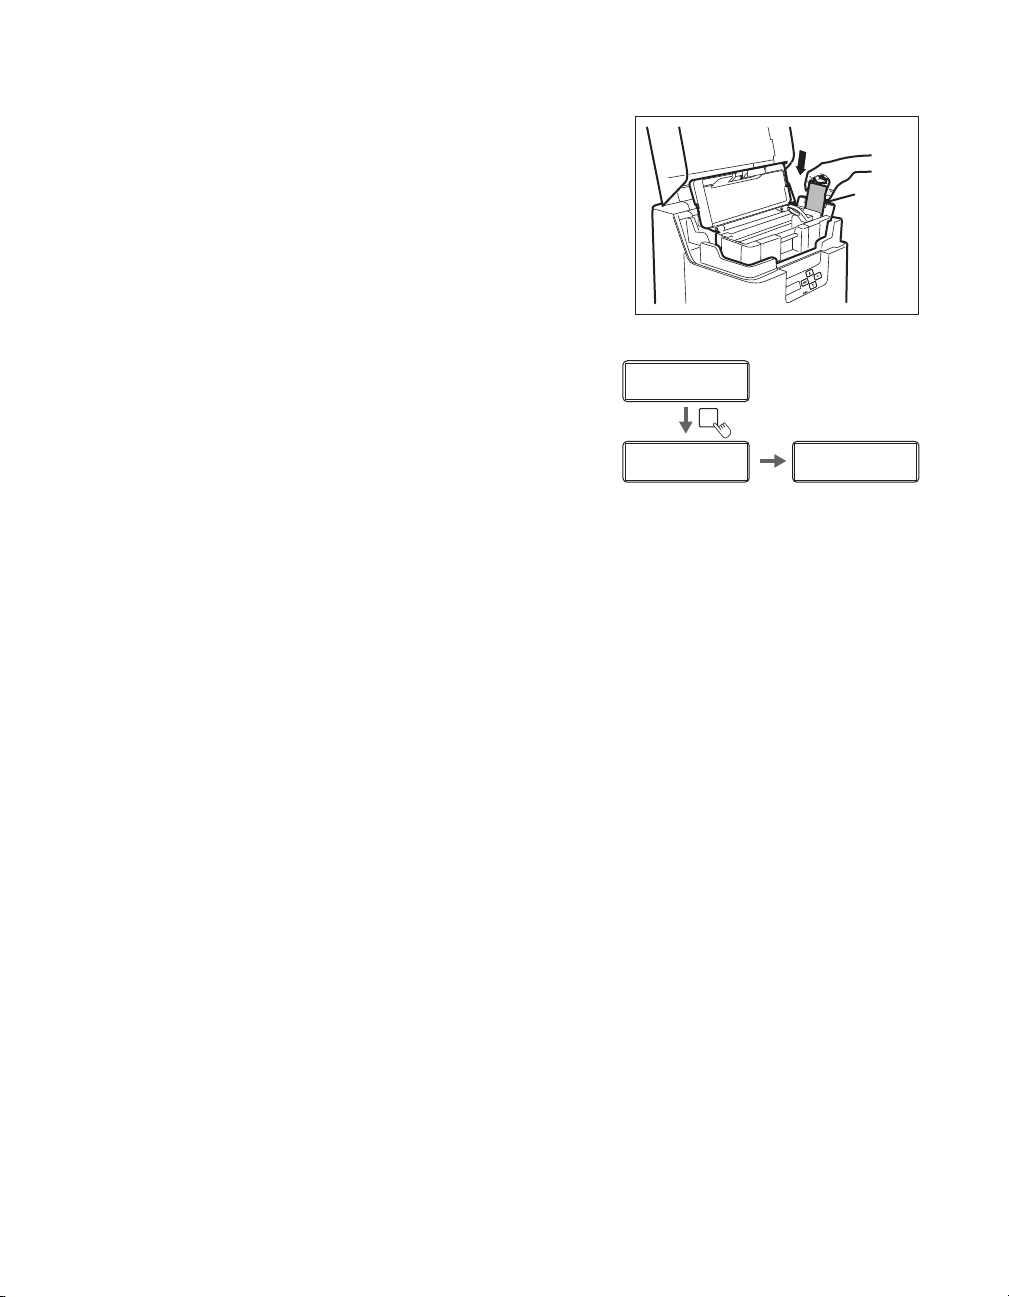
Full Color Card Printer
Card
Feeding
Slot
Cleaning
SET:Start
Cleaning
SET:Start
Cleaning
Now Cleaning
Cleaning
Now Cleaning
Cleaning
Finish
Cleaning
Finish
SET
7 When [Set Cleaning Crd] is displayed,
load the Cleaning Card in the Card
Feeding Slot.
• When the Cleaning Card is loaded, close the Card
Case cover and the Top Cover.
• Align the adhesive side of the Cleaning Card to the
right.
8 When [SET:Start] is displayed, press
the SET Key.
• The Cleaning Card is pulled into the printer and
cleaning starts.
• The Cleaning Card comes out of the Card Ejection
Slot (Left) when cleaning is completed.
• When [Finish] is displayed, cleaning is completed.
56
Page 61
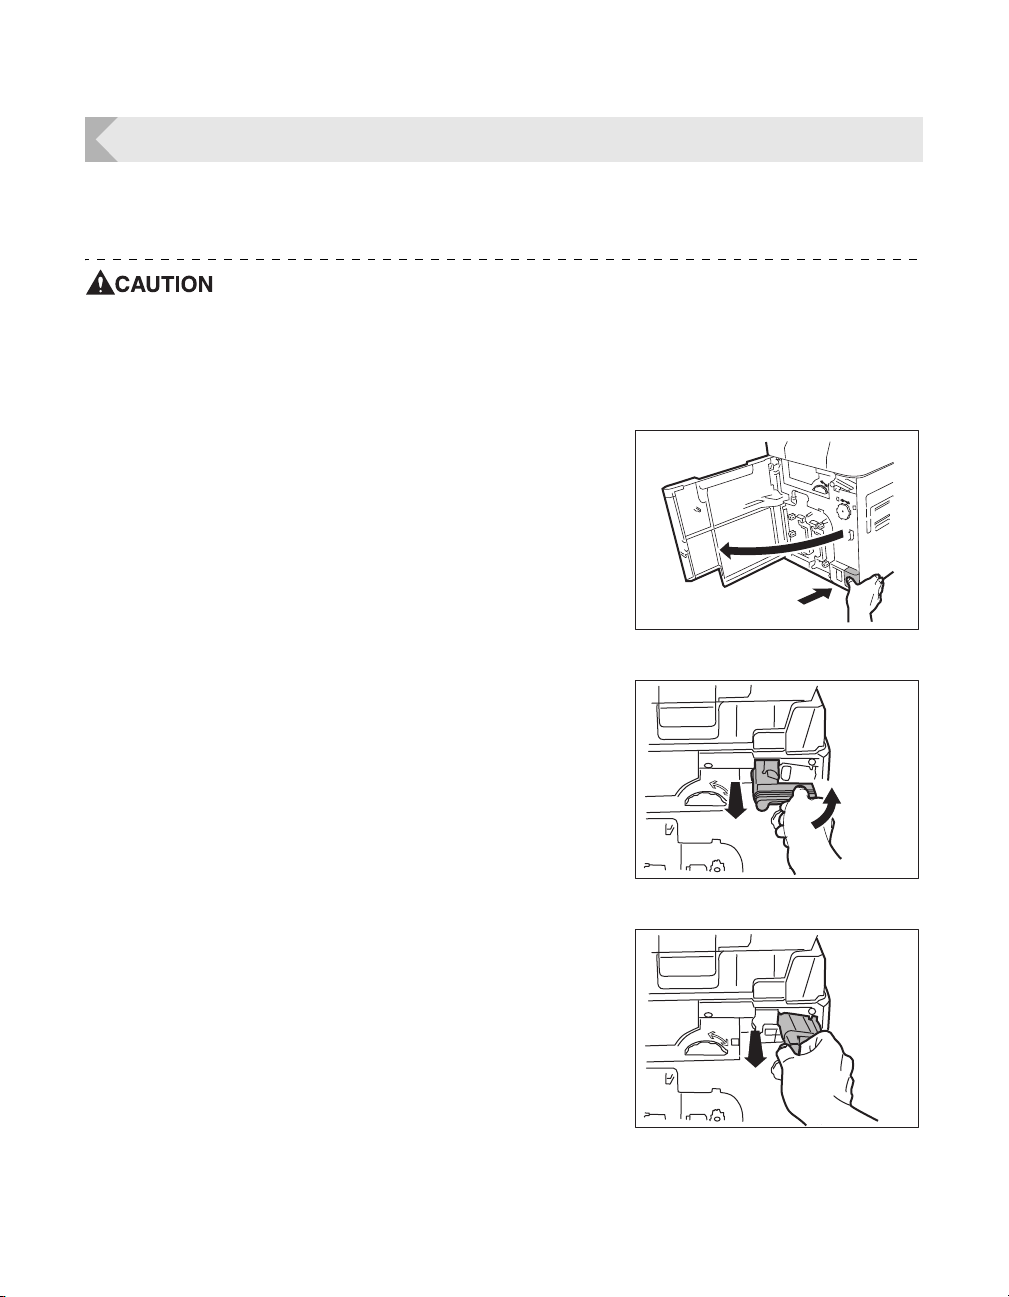
Cleaning
b
a
Cleaning the Cleaning Roller
Clean the Cleaning Roller if cards are printed with missing colors or if there are foreign objects
on them.
Be sure to turn off the printer before cleaning the rollers.
Read the cautions in "Before Cleaning" on page 54.
1 Turn off the power.
2 Open the Front Cover.
• Press the open over switch, and pull the Front Cover
forward.
3 Remove the Cleaning Tape Cassette.
• Hold the Cleaning Tape Cassette handle with your
fingers, raise it slightly, and pull it out.
4 Remove the Cleaning Roller.
• Hold the Cleaning Roller handle on the right of the
Cleaning Tape Cassette, and pull it out.
57
Page 62
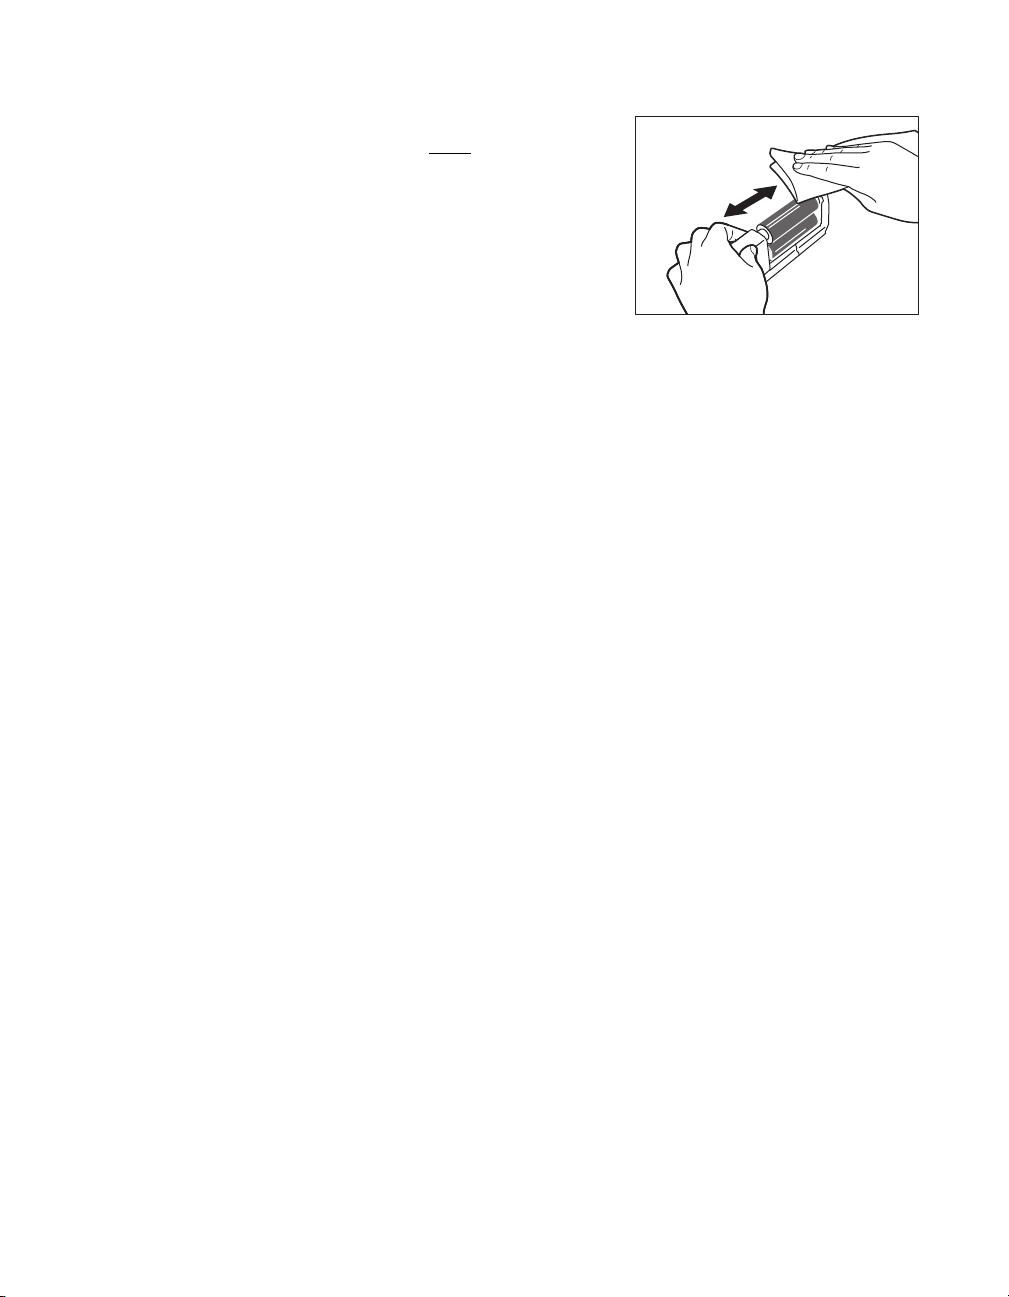
Full Color Card Printer
5 Wipe the roller clean.
• Use a soft cloth fully moistened with water and wrung
out to wipe the roller clean.
6 Load the Cleaning Roller and Cleaning
Tape Cassette in order, and close the
Front Cover.
58
Page 63
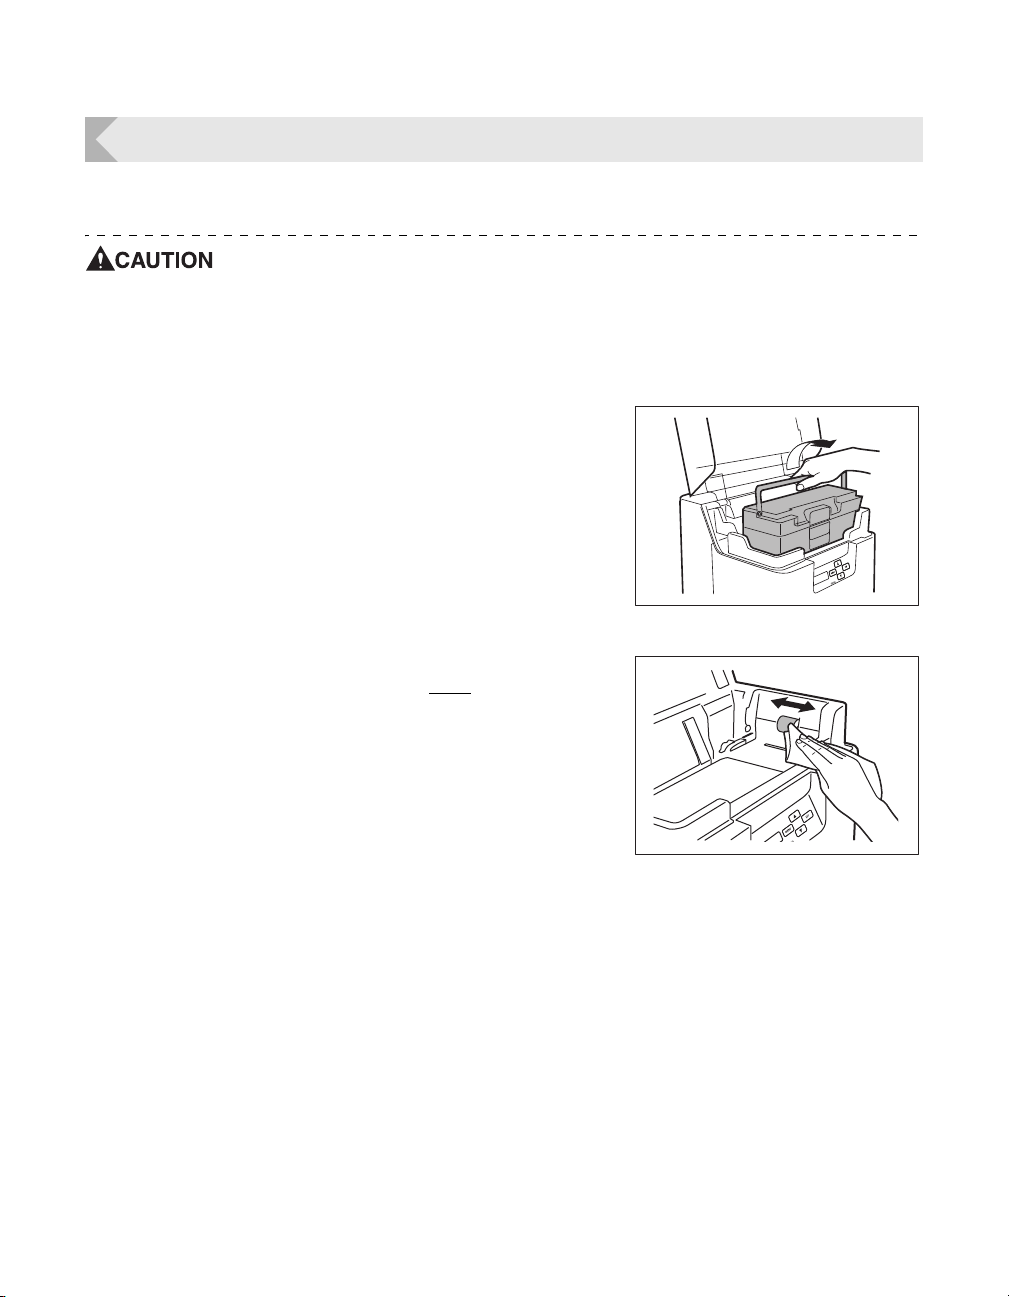
Cleaning
Cleaning the Feeding Roller
Clean the Feeding Roller under the Card Case if cards do not feed smoothly into the printer.
Be sure to turn off the printer before cleaning the rollers.
Read the cautions in "Before Cleaning" on page 54.
1 Turn off the power.
2 Open the top cover, and remove the
Card Case.
• Hold the Card Case handle, and remove.
3 Wipe the roller clean.
• Use a soft cloth fully moistened with water and wrung
out to wipe the roller clean.
• Turn the roller as you wipe it to clean it in the direction
of an arrow.
4 Load the Card Case.
• Return the Card Case to its original position.
5 Close the Top Cover.
59
Page 64
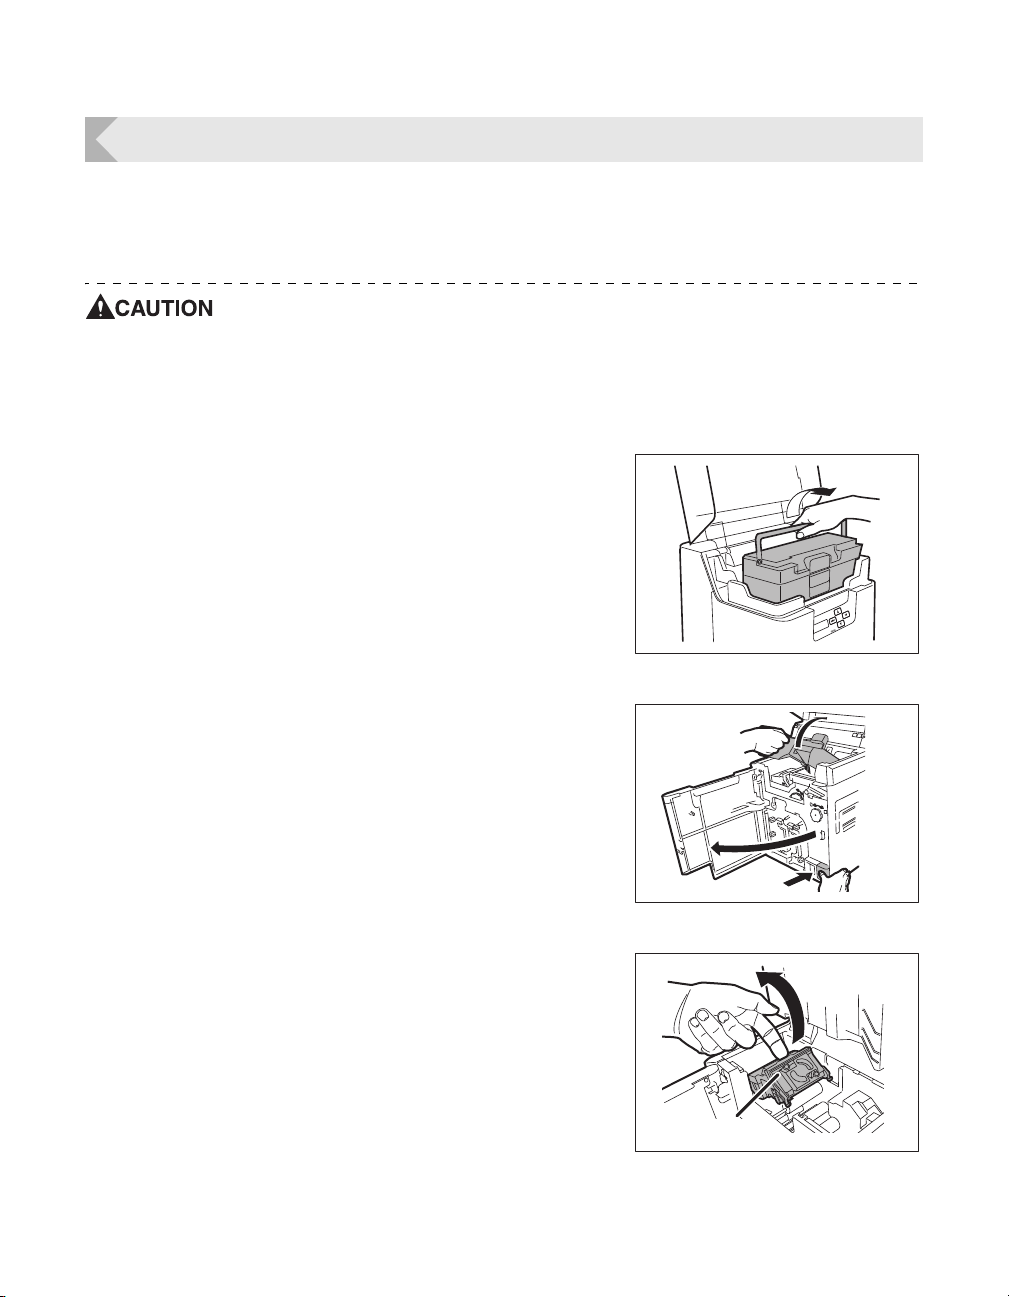
Full Color Card Printer
Decurl Section
Cleaning the Feeding Roller
If the printing location on printed cards is out of adjustment, or there is white space at the edge
of printed areas, then clean the secondary transfer section feeding roller at the bottom of the
top cover.
Be sure to turn off the printer before cleaning the rollers.
Read the cautions in "Before Cleaning" on page 54.
1 Turn off the power.
2 Open the top cover, and remove the
Card Case.
• Hold the Card Case handle, and remove.
3 Open the Front Cover and Top Cover.
• Press the open over switch, and pull the Front Cover
forward.
• Hold the handle of the Top Cover and lift to open.
• If you do not open the Front Cover, then you cannot
open the Top Cover.
4 Lift the decurl section.
• First release the lock on the decurl section as at right
before lifting.
60
Page 65
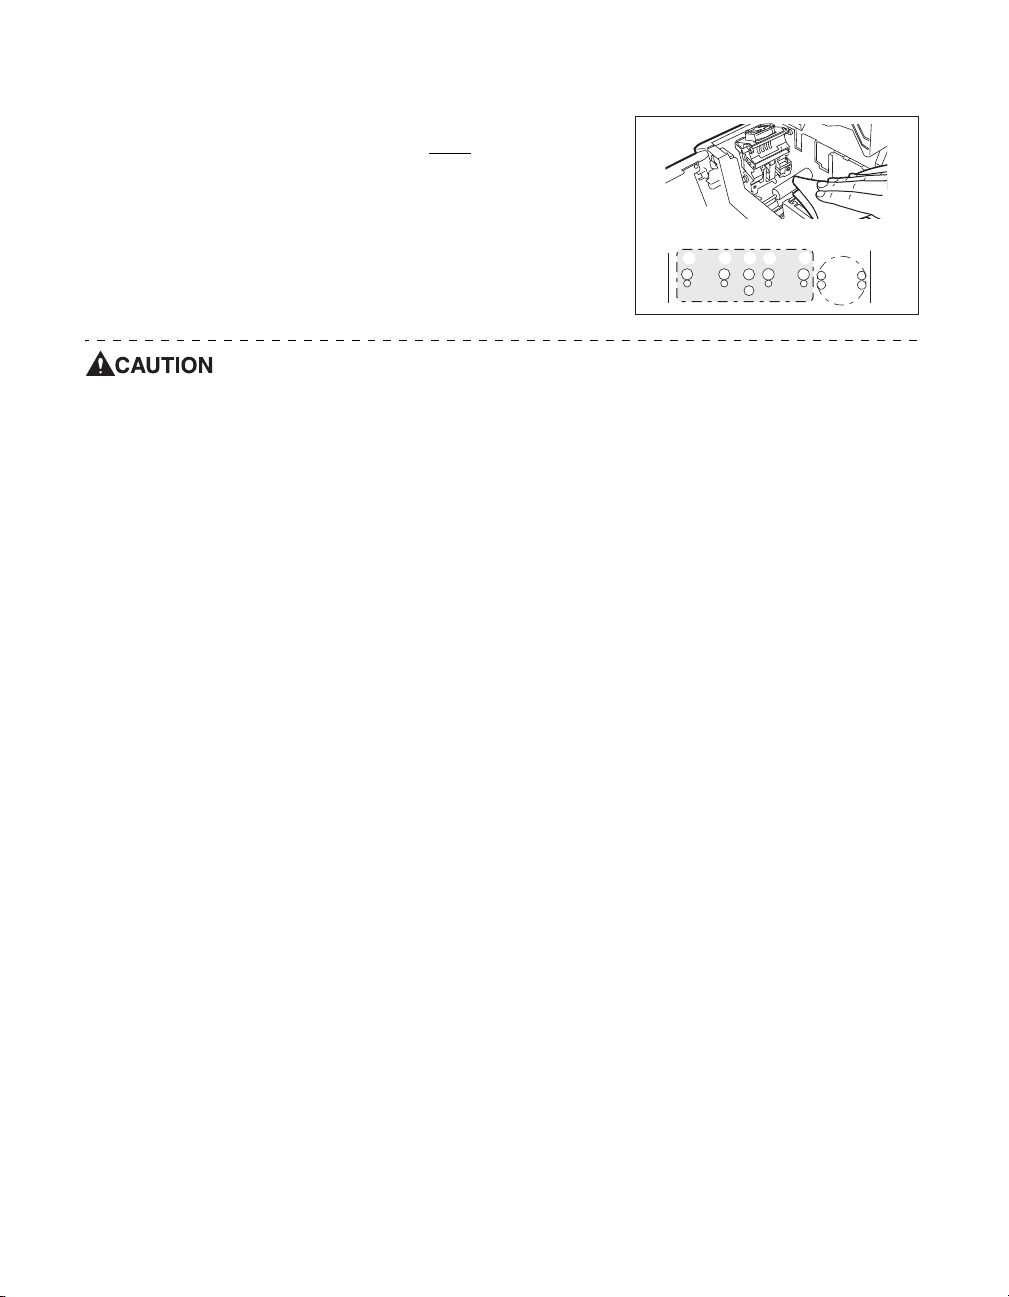
5 Wipe the roller clean.
abcde
Card Feeding Roller
• Use a soft cloth fully moistened with water and wrung
out to wipe the roller clean.
• As you turn the card feeding knob, fully clean the
roller.
• Clean the card feeding roller (5 locations).
It is difficult to reach the bottom part of the decurl section (output side)
rollers, and cleaning can be troublesome. Be careful to not hurt your fingers.
The bottom part of location c in the figure above is the heat roller, and is
therefore hot. Please exercise care when cleaning.
6 Close the Top Cover and Front Cover.
• Before closing the cover, return the Card Case and
decurl section to their original positions.
Cleaning
61
Page 66
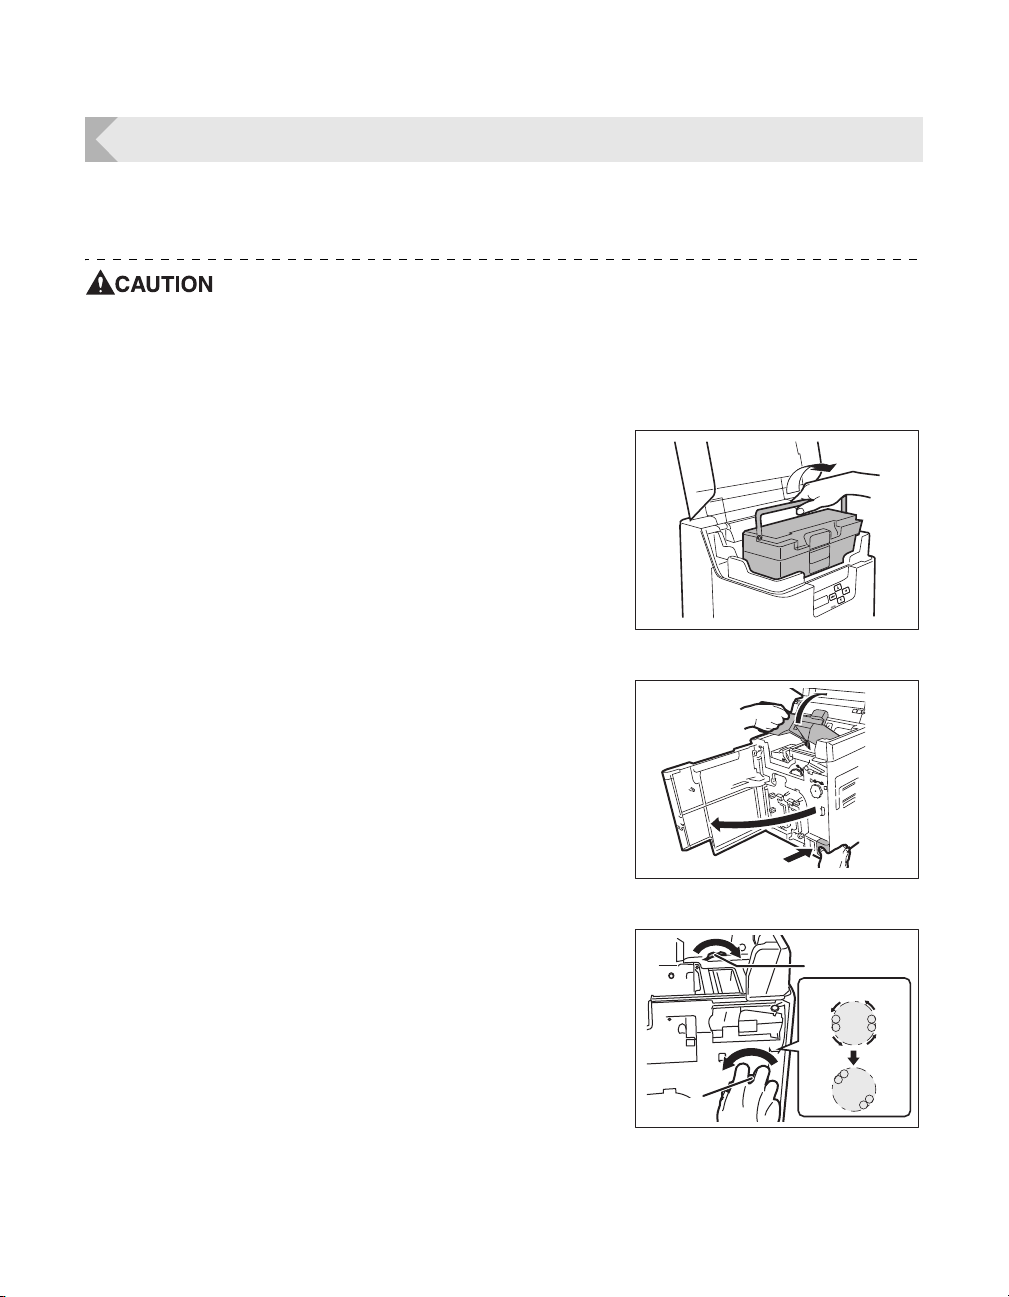
Full Color Card Printer
Reverse
Knob
Reverse Section
Reverse Feeding
Knob
Cleaning the Reverse Roller
If card delivery from the reverse section to the secondary transfer feeding roller is not possible,
then clean the Reverse Roller.
Be sure to turn off the printer before cleaning the rollers.
Read the cautions in "Before Cleaning" on page 54.
1 Turn off the power.
2 Open the top cover, and remove the
Card Case.
• Hold the Card Case handle, and remove.
3 Open the Front Cover and Top Cover.
• Press the open over switch, and pull the Front Cover
forward.
• Hold the handle of the Top Cover and lift to open.
• If you do not open the Front Cover, then you cannot
open the Top Cover.
4 Rotate the reverse knob, and locate the
reverse section roller as in the diagram.
• When checking inside the reverse section, remove the
Cleaning Roller and Cleaning Tape Cassette.
→See "Cleaning Tape Replacement" on page 22 and
"Cleaning the Cleaning Roller" on page 57 for
instructions on removing the Cleaning Roller and
Cleaning Tape Cassette.
62
Page 67
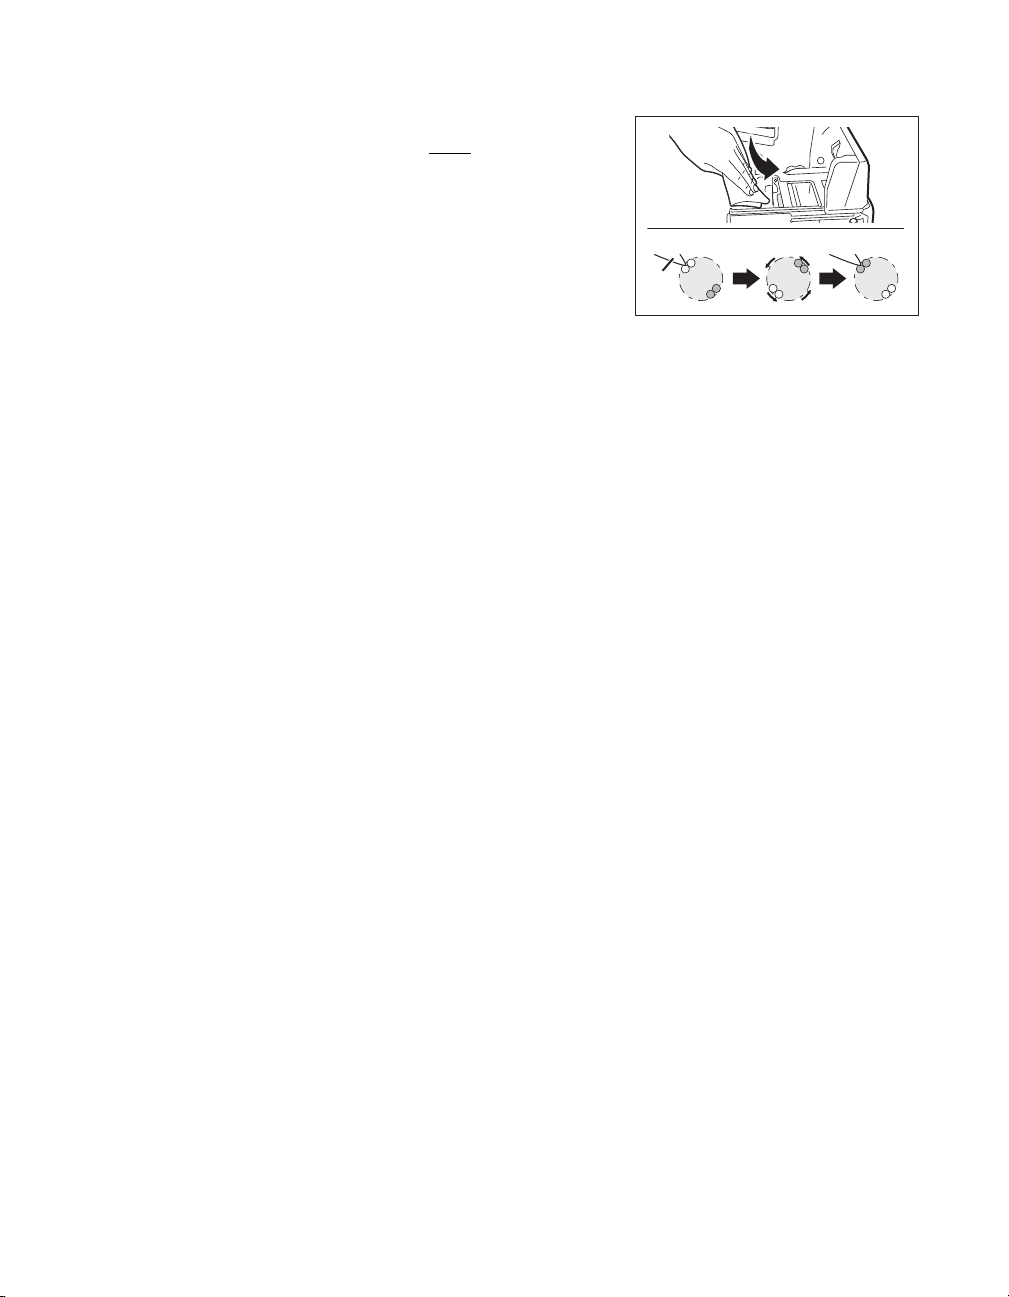
5 Wipe the roller clean.
• Use a soft cloth fully moistened with water and wrung
out to wipe the roller clean.
• Rotate the reverse feeding knob, and fully clean the
roller.
• Turn the reverse knob to rotate the reverse section one
turn, and clean the other side of the Reverse Roller.
6 Close the Top Cover and Front Cover.
• Before closing the cover, return the Card Case, decurl
section, Cleaning Roller, and Cleaning Tape Cassette
to their original positions.
Cleaning
Reverse Roller
Cloth
63
Page 68
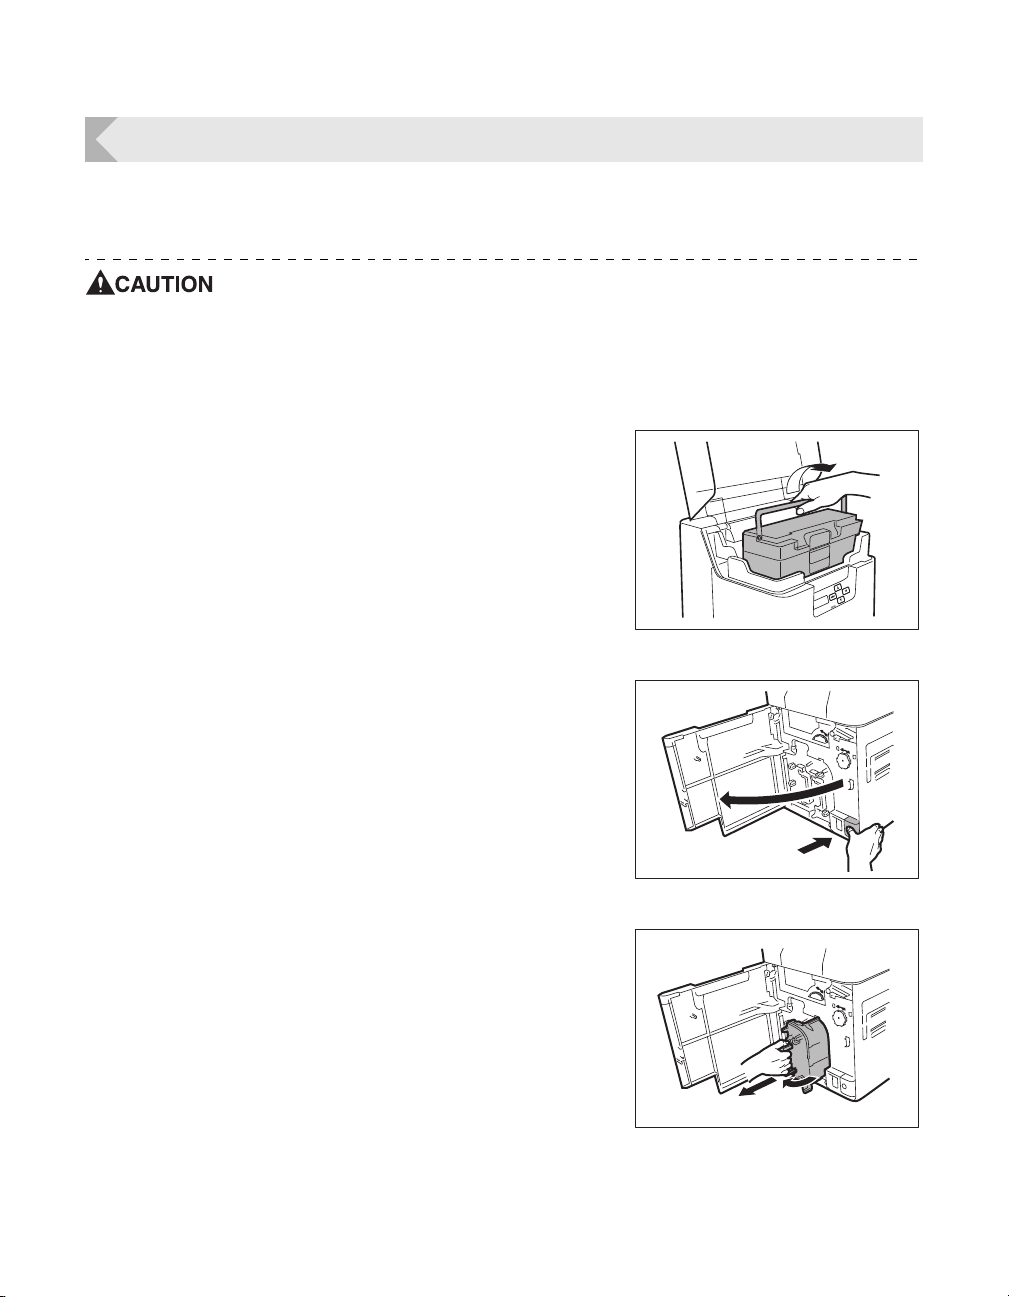
Full Color Card Printer
a
b
Primary Transfer Feeding Roller Cleaning
If a film-related error occurs such as [Film Wind up], or there is color bleed or image distortion,
then clean the primary transfer feeding roller.
Be sure to turn off the printer before cleaning the rollers.
Read the cautions in "Before Cleaning" on page 54.
1 Turn off the power.
2 Open the top cover, and remove the
Card Case.
• Hold the Card Case handle, and remove.
3 Open the Front Cover.
• Press the open over switch, and pull the Front Cover
forward.
4 Remove the Ink Ribbon Cassette and
the Transfer Film.
• See "Changing the Ink Ribbon and Transfer Film" on
page 16 for details on how to remove the Ink Ribbon
Cassette and Transfer Film.
64
Page 69
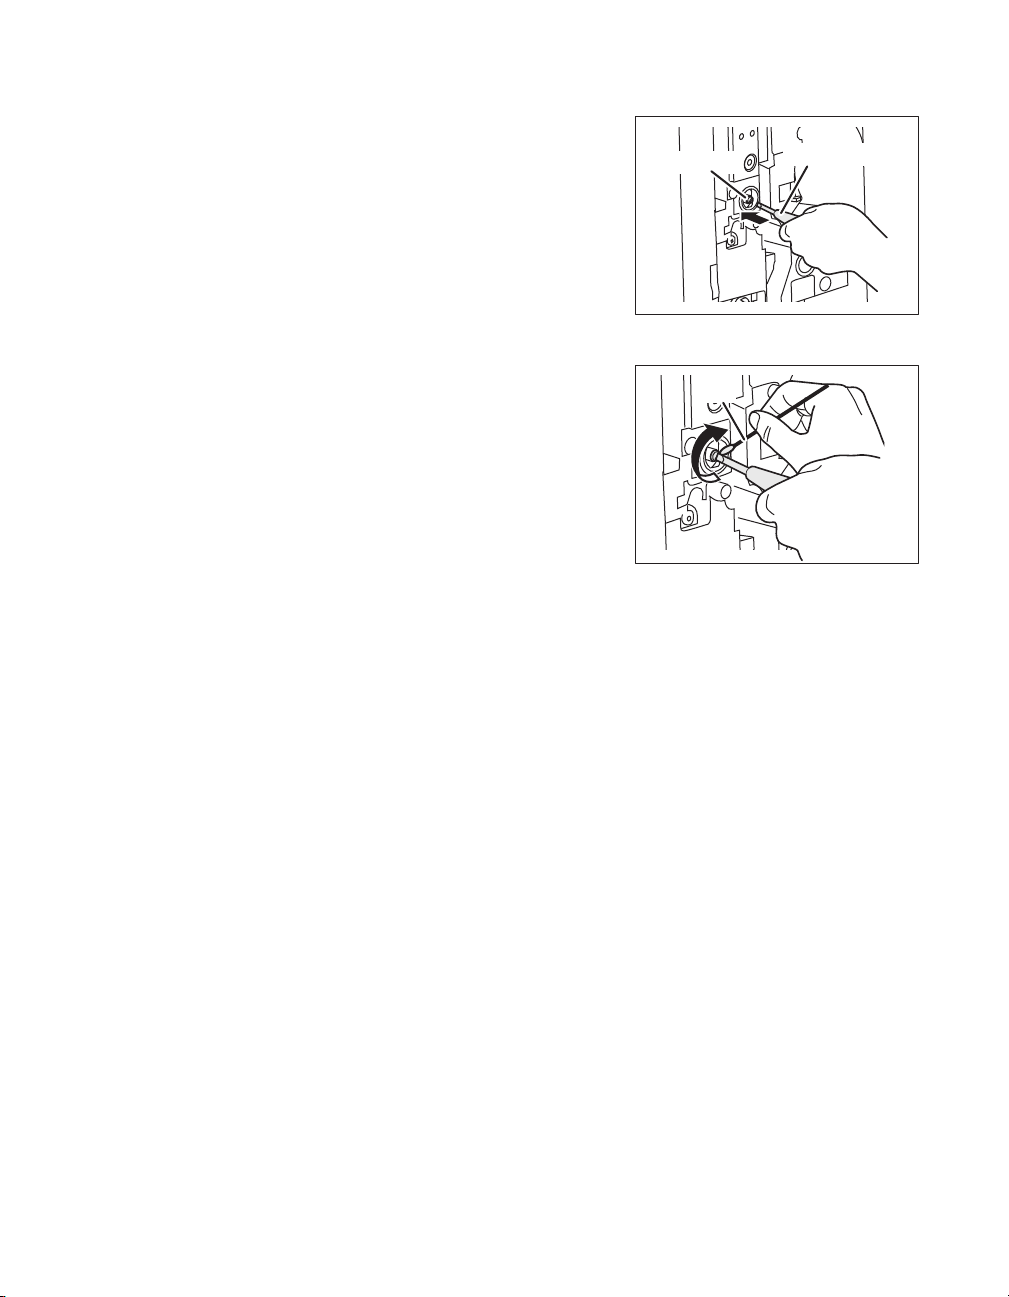
5 Insert a flat screwdriver or coin into the
Flat Screwdriver
Feeding Roller
Cotton
Swa
b
groove on the end of the feeding roller.
• Ensure you have a flat screwdriver or coin that can fit
into the groove on the end of the feeding roller.
6 Wipe the roller clean.
• Turn the screwdriver (or coin), and wipe the feeding
roller using a cotton swab with a long handle fully
moistened with water.
7 Return the Ink Ribbon Cassette and the
Transfer Film Cassette to their original
positions.
→See "Changing the Ink Ribbon and Transfer Film" on
page 16 for details about attaching the Ink Ribbon and
Transfer Film.
Cleaning
8 Close the Front Cover.
65
Page 70
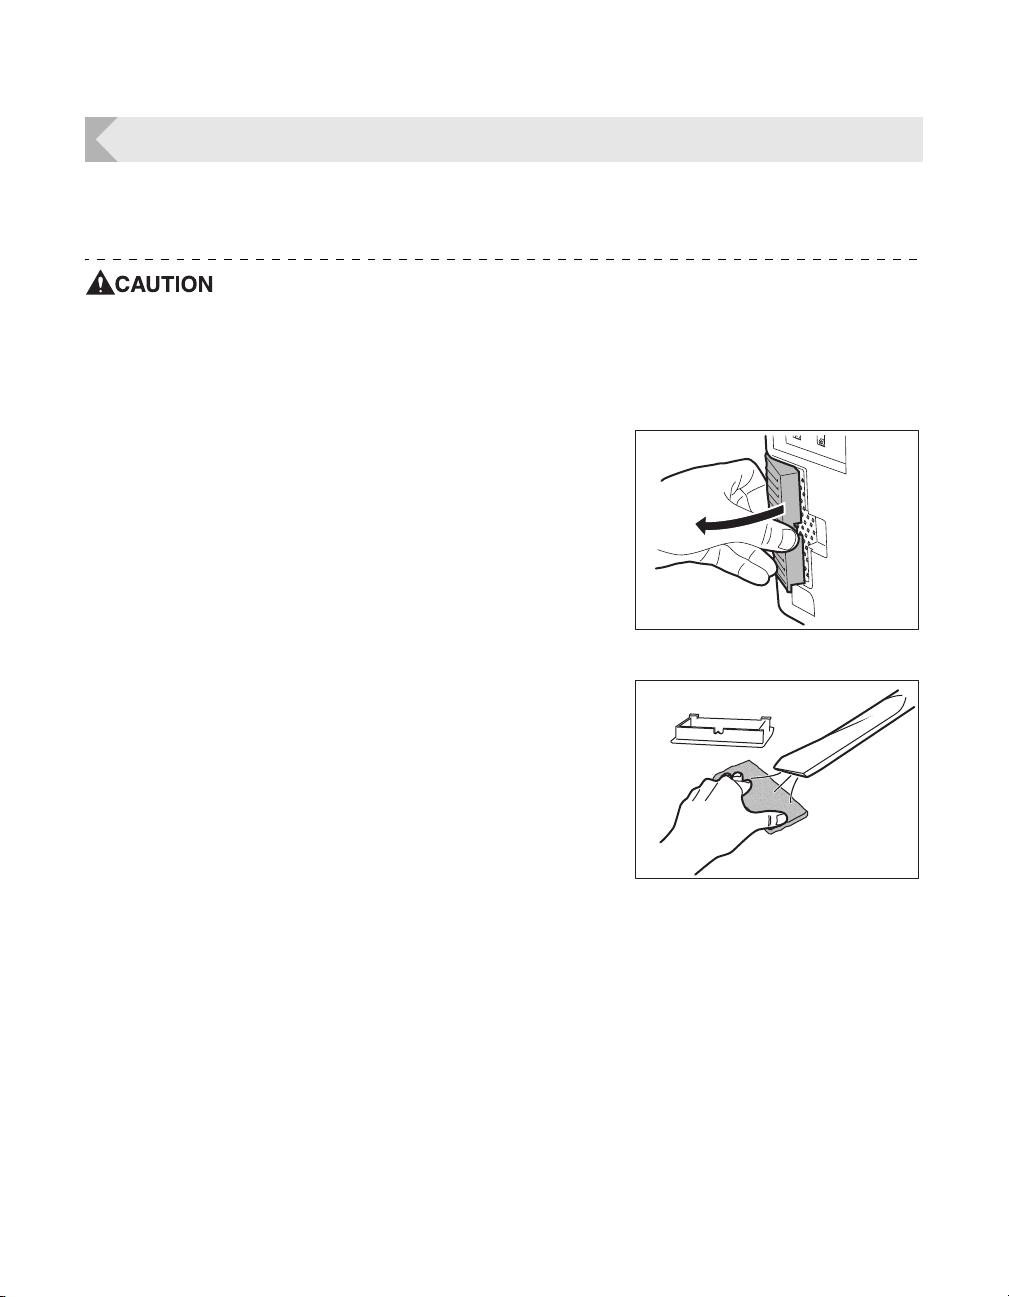
Full Color Card Printer
Filter Cleaning
If the filter becomes clogged, then dirt may enter the printer. It is recommended that the filter be
cleaned monthly.
Be sure to turn off the printer before cleaning the rollers.
Read the cautions in "Before Cleaning" on page 54.
1 Turn off the power.
2 Remove the filter cover on the rear of
the printer.
• Hold the handle with your fingers, and pull.
3 Use a vacuum cleaner or similar to
remove dirt that is adhered to the filter.
• Remove the filter from the filter cover.
• Hold the filter down with your fingers in order that it is
not sucked into the vacuum cleaner.
4 Attach the filter cover to the printer.
• Attach the filter to the filter cover.
66
Page 71
Troubleshooting
Note
Error message
Cause and solution
Cover is Open
Card Empty
Low Temperature
Troubleshooting
This section explains what to do when an error message appears, a card is jammed, or
there is a problem with the printed side of a card.
When an Error Message Appears
The LED Indicator is lit orange or blinks, and a description of the error appears on the LCD
Panel when an error occurs.
Clearing an Error
Follow the instructions below to clear an error.
After clearing an error, pressing the SET Key will initialize the printer, [Ready to Print] will
appear, and the printer will return to normal status.
When two errors occur, only the first error message is displayed.
Pressing the SET Key after clearing the first error displays the next error. Continue to
clear errors until [Ready to Print] appears.
How to Clear an Error
Resolve error messages that appear on the LCD Panel according to the instructions below.
The Front Cover is open.
Make sure the Front Cover is closed.
There are no more cards.
Load cards into the printer.
→See "Loading Cards" on page 10 for instructions on loading cards.
The temperature in which the printer is located is too low.
Ensure the environment temperature is 10°C or higher, and press the
SET Key.
67
Page 72
Full Color Card Printer
Error message
Cause and solution
Ribbon Empty
Ribbon Type
Ribbon Wind up
Film Empty
The Ink Ribbon has been used up.
Replace the Ink Ribbon.
→See "Changing the Ink Ribbon and Transfer Film" on page 16 for
details about changing the Ink Ribbon.
The Ink Ribbon could not be detected correctly.
Reload the Ink Ribbon.
→See "Changing the Ink Ribbon and Transfer Film" on page 16 for details about
changing the Ink Ribbon.
The Ink Ribbon set in the printer and printer settings may be different.
→See "Ink Ribbon/Transfer Film" on page 81 about the supported types of Ink
Ribbon.
→See "Setting the Type of Ink Ribbon or Transfer Film to Use" on page 39 for
details on how to set the Ink Ribbon type.
Ink Ribbons not supported by this printer cannot be used.
→See "Ink Ribbon/Transfer Film" on page 81 for details about supported Ink
Ribbon.
The Ink Ribbon could not be wound correctly.
Reload the Ink Ribbon.
→See "Changing the Ink Ribbon and Transfer Film" on page 16 for details about
changing the Ink Ribbon.
The Ink Ribbon may be cut.
Repair the cut Ink Ribbon.
→See "If the Ink Ribbon or Transfer Film are Cut" on page 76 for instructions on
how to repair a cut Ink Ribbon.
The Ink Ribbon set in the printer and printer settings may be different.
→See "Ink Ribbon/Transfer Film" on page 81 about the supported types of Ink
Ribbon.
→See "Setting the Type of Ink Ribbon or Transfer Film to Use" on page 39 for
details on how to set the Ink Ribbon type.
The Transfer Film has been used up.
Replace the Transfer Film.
→See "Changing the Ink Ribbon and Transfer Film" on page 16 for details about
changing the Transfer Film.
68
Page 73
Troubleshooting
Error message
Cause and solution
Film Type
Film Wind up
Rbn & Film Empty
The Transfer Film could not be detected correctly.
Reload the Transfer Film.
→See "Changing the Ink Ribbon and Transfer Film" on page 16 for details about
changing the Transfer Film.
The Transfer Film set in the printer and printer settings may be
different.
→See "Ink Ribbon/Transfer Film" on page 81 about the supported types of
Transfer Film.
→See "Setting the Type of Ink Ribbon or Transfer Film to Use" on page 39 for
details on how to set the Transfer Film type.
Transfer Film not supported by this printer cannot be used.
→See "Ink Ribbon/Transfer Film" on page 81 for types of supported Transfer
Film.
The Transfer Film could not be wound up.
Reload the Transfer Film.
→See "Changing the Ink Ribbon and Transfer Film" on page 16 for details about
changing the Transfer Film.
The Transfer Film may be cut.
Repair the cut Transfer Film.
→See "If the Ink Ribbon or Transfer Film are Cut" on page 76 for instructions on
how to repair a cut Transfer Film.
The Transfer Film set in the printer and printer settings may be
different.
→See "Ink Ribbon/Transfer Film" on page 81 about the supported types of
Transfer Film.
→See "Setting the Type of Ink Ribbon or Transfer Film to Use" on page 39 for
details on how to set the Transfer Film type.
Both the Ink Ribbon and Transfer Film have been used up.
Replace both the Ink Ribbon and the Transfer Film.
→See "Changing the Ink Ribbon and Transfer Film" on page 16 for details about
changing the Ink Ribbon and Transfer Film.
69
Page 74
Full Color Card Printer
Error message
Cause and solution
Card Jam Feeder
Card Jam F.Turn
Card Jam Print
Card Jam Mg
Card Feed Remove
Card Turn Remove
Card Pr Remove
Card Mg Remove
Cards cannot be fed into printer.
Press the SET Key.
Frequent occurrences of this error may mean the following:
Is the Card Case loaded correctly?
Correctly load the Card Case.
Confirm that the Card Case card retainer is loaded properly.
→See "Loading Cards" on page 10 for instructions on loading cards.
Is the Feeding Roller dirty?
Clean the Feeding Roller located below the Card Case.
→See "Cleaning the Feeding Roller" on page 59 for Feeding Roller cleaning
instructions.
There was a card jam.
Press the SET Key.
An error occurred, and cards cannot be output.
Remove the cards by rotating the Ejection Dial, and press the SET
Key.
→See "When a Card is Jammed..." on page 73 for instructions on how to remove
cards.
70
Frequent card jams could mean the following:
Is the Feeding Roller dirty?
Clean the Feeding Roller.
If the Feeding Roller is excessively dirty, continue cleaning using a
new Cleaning Card.
→See "Cleaning with a Cleaning Card" on page 54 for instructions on cleaning
the Feeding Roller.
There was a card jam.
Remove the cards by rotating the Ejection Dial, and press the SET
Key.
→See "When a Card is Jammed..." on page 73 for instructions on how to remove
cards.
Frequent card jams could mean the following:
Is the Feeding Roller dirty?
Clean the Feeding Roller.
If the Feeding Roller is excessively dirty, continue cleaning using a
new Cleaning Card.
→See "Cleaning with a Cleaning Card" on page 54 for instructions on cleaning
the Feeding Roller.
Page 75
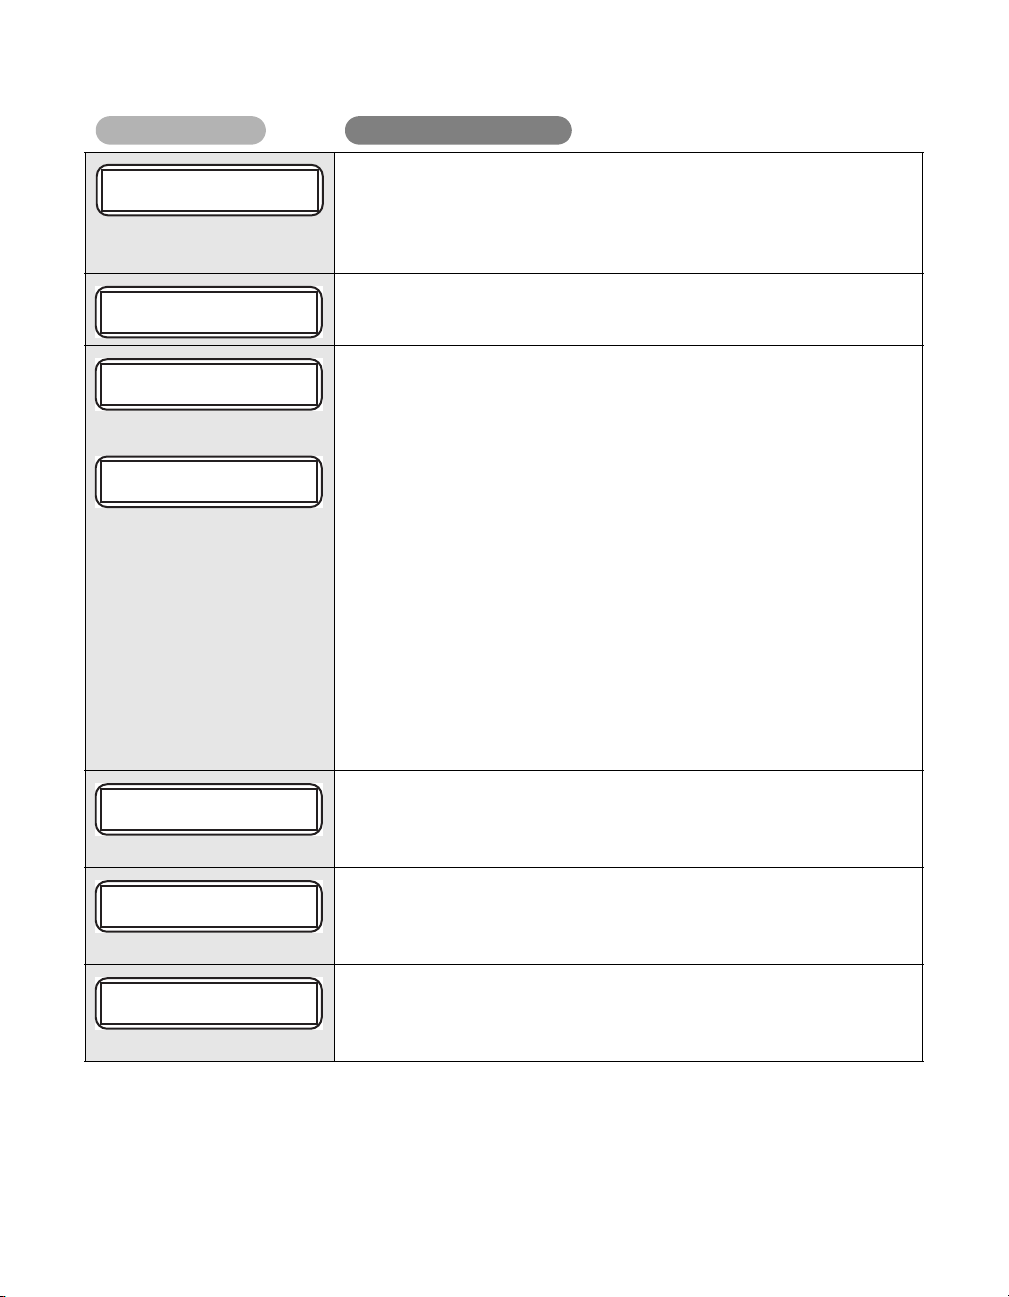
Troubleshooting
Error message
Cause and solution
Service Call
Download Error
Mg Write Error
Mg Read Error
IC1 Access Error
IC2 Access Error
External Box
An error that requires repair may occur.
The cause of the error differs depending on the error code.
Turn off and on the power.
Repairs are necessary if the error reoccurs.
Program version update was interrupted.
Turn off and on the power, then start version update again.
Reading/writing of the magnetic data failed.
Press the SET Key.
Failure when reading/writing the magnetic data may mean the
following:
Is the card set in the correct direction?
Check the loading direction of the cards.
→See "Loading Cards" on page 10 for instructions on loading cards.
Are there any scratches or dirt on the card's magnetic strip?
Use undamaged cards.
Do the magnetic characteristics of the card match the
specifications of the magnetic encoder and the settings of the
magnetic encoder?
Check the specifications of the magnetic encoder.
→See "Checking the Program Version and Serial Number" on page 30 for
instructions on how to check the specifications of the magnetic encoder.
During operation of the IC option 1, data reception by the computer
was interrupted.
Press the SET Key.
→Follow the directions of the application printing cards.
During operation of the IC option 2, data reception by the computer
was interrupted.
Press the SET Key.
→Follow the directions of the application printing cards.
During operation of the external box, data reception by the
computer was interrupted.
Press the SET Key.
→Follow the directions of the application printing cards.
After clearing an error, pressing the SET Key clears the errors, initializes the printer, and
[Ready to Print] will appear.
71
Page 76
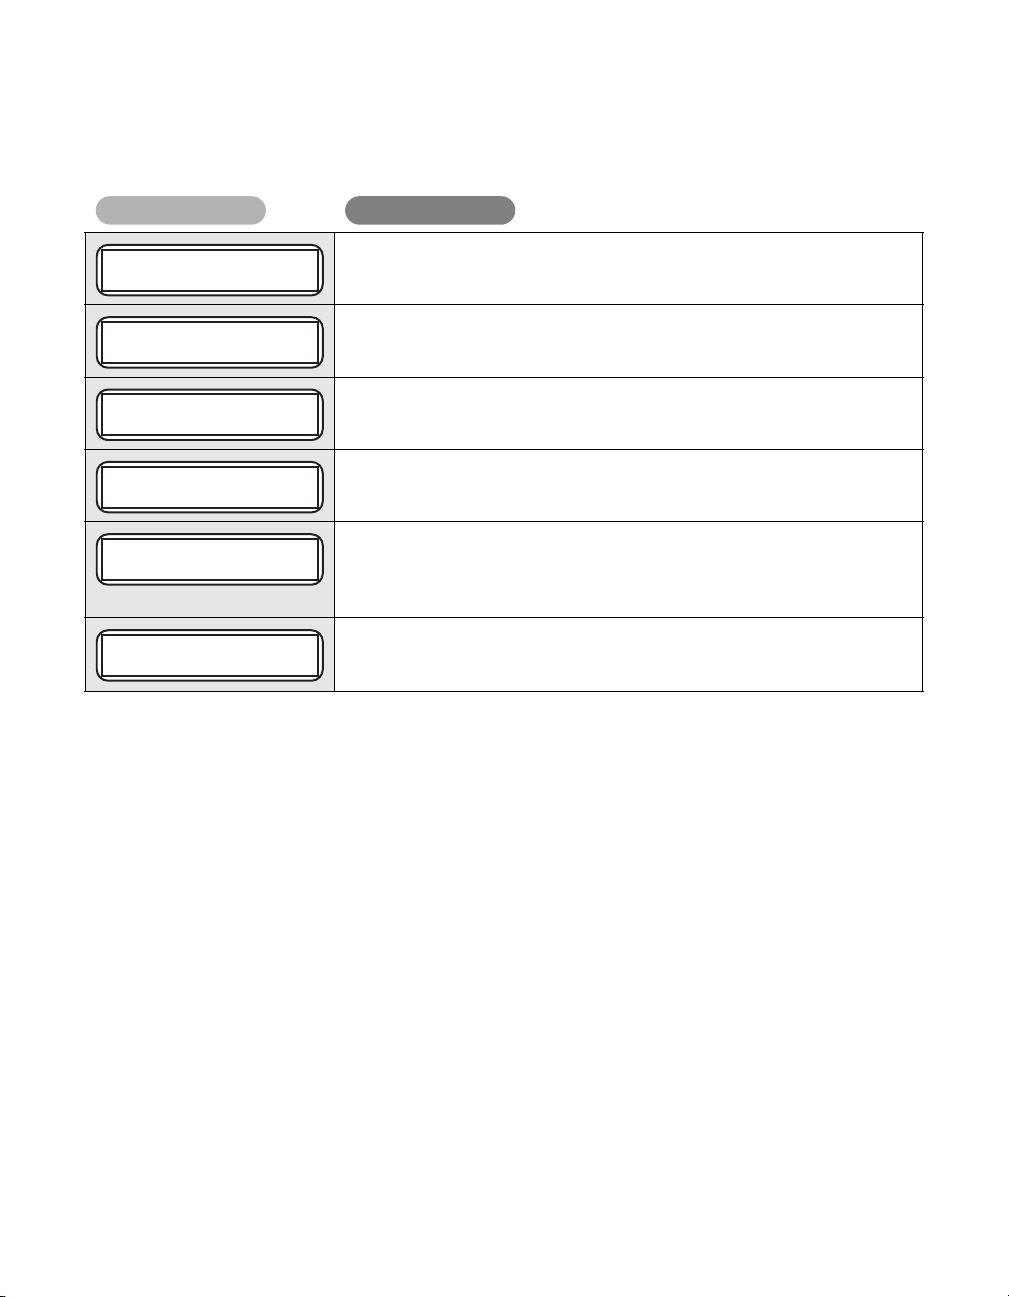
Full Color Card Printer
Message
Solution
Push SET key
Card Empty
Cover is Open
Low Temperature
Check Ribn/Film
Remove Cards
If the following messages appear after pressing the SET key, resolve the problem according
to the instructions below.
Press the SET Key.
Load the card in the Card Case.
Correctly close the cover.
Ensure the environment temperature is 10°C or higher, and press the
SET Key.
Confirm that the Ink Ribbon and Transfer Film are correctly loaded.
If these are used up, then replace the Ink Ribbon or Transfer Film.
→See "Changing the Ink Ribbon and Transfer Film" on page 16 for details about
changing the Ink Ribbon or Transfer Film.
Remove the cards by rotating the Ejection Dial.
→See "When a Card is Jammed..." on page 73 for instructions on how to remove
cards.
72
Page 77
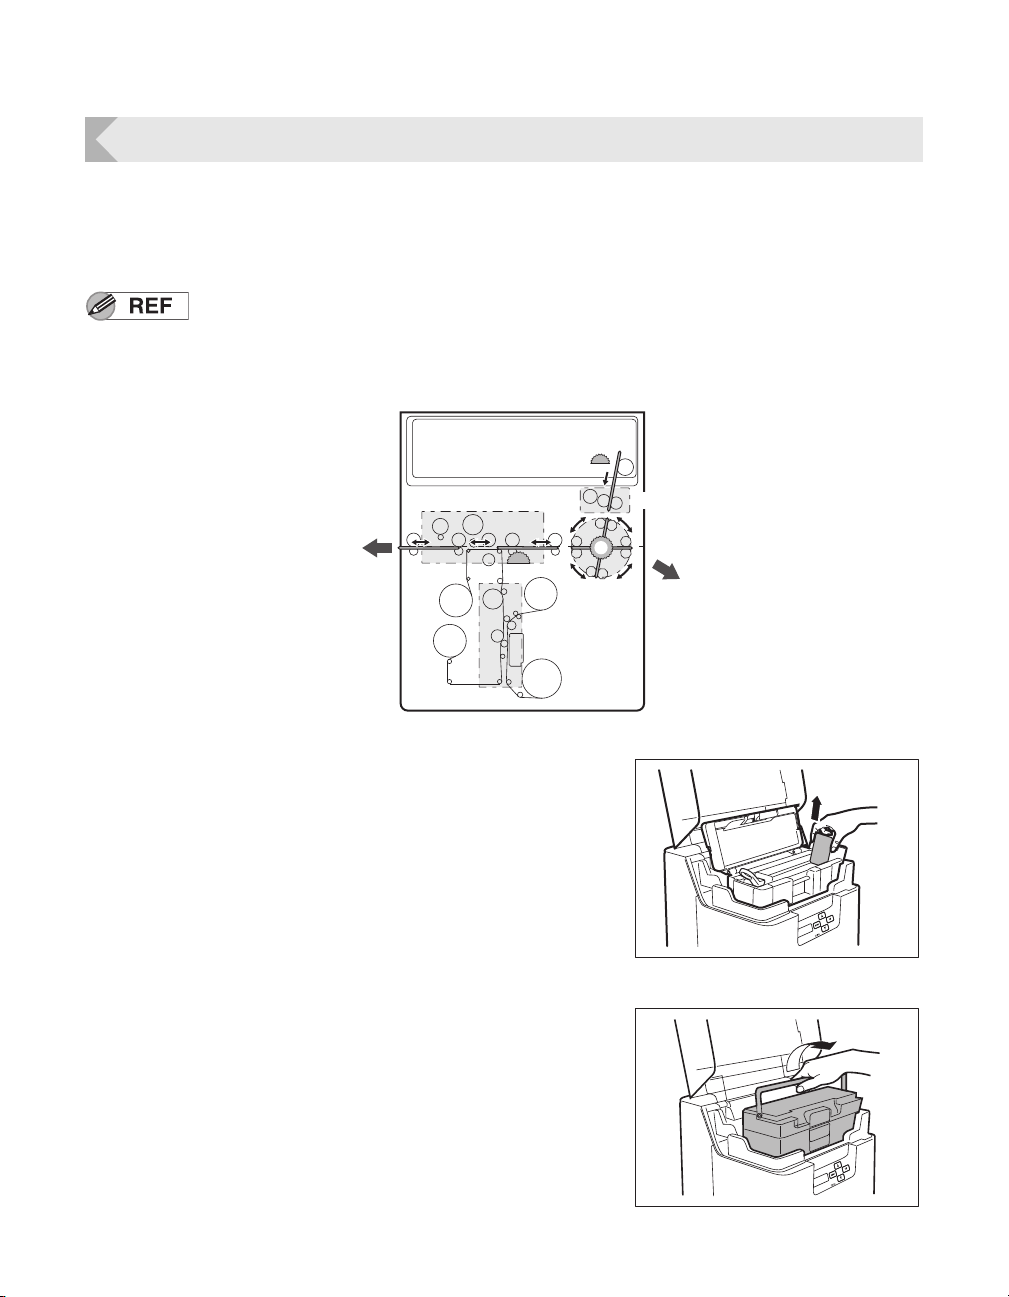
Troubleshooting
a
c
b
a Reverse Feeding Knob
b Reverse Knob
c Feeding Knob
Card Case
Cleaning Section
Card Ejection
Slot (Left)
Card Ejection Slot
(Lower Right)
Reverse
Section
Primary Transfer
Section
Secondary Transfer Section
When a Card is Jammed...
Use the following procedure to remove cards jammed during printing or when the jammed card
is unable to be removed despite the SET Key being pressed. Ejection Dials are at 3 locations
within the printer.
Cards being printed are transported through this printer using the following
path.
If cards are not correctly output, then there may be a jam in any of the
following locations.
1 (If cards are jammed within the Card
2 Remove the Card Case.
Case) Remove cards from the Card
Case.
• If the furthest-right card is partially fed into the
machine, slowly pull it out by hand.
• If the jam is cleared, then go to Step 8.
• Close the Card Case cover, hold the handle, and
remove.
73
Page 78
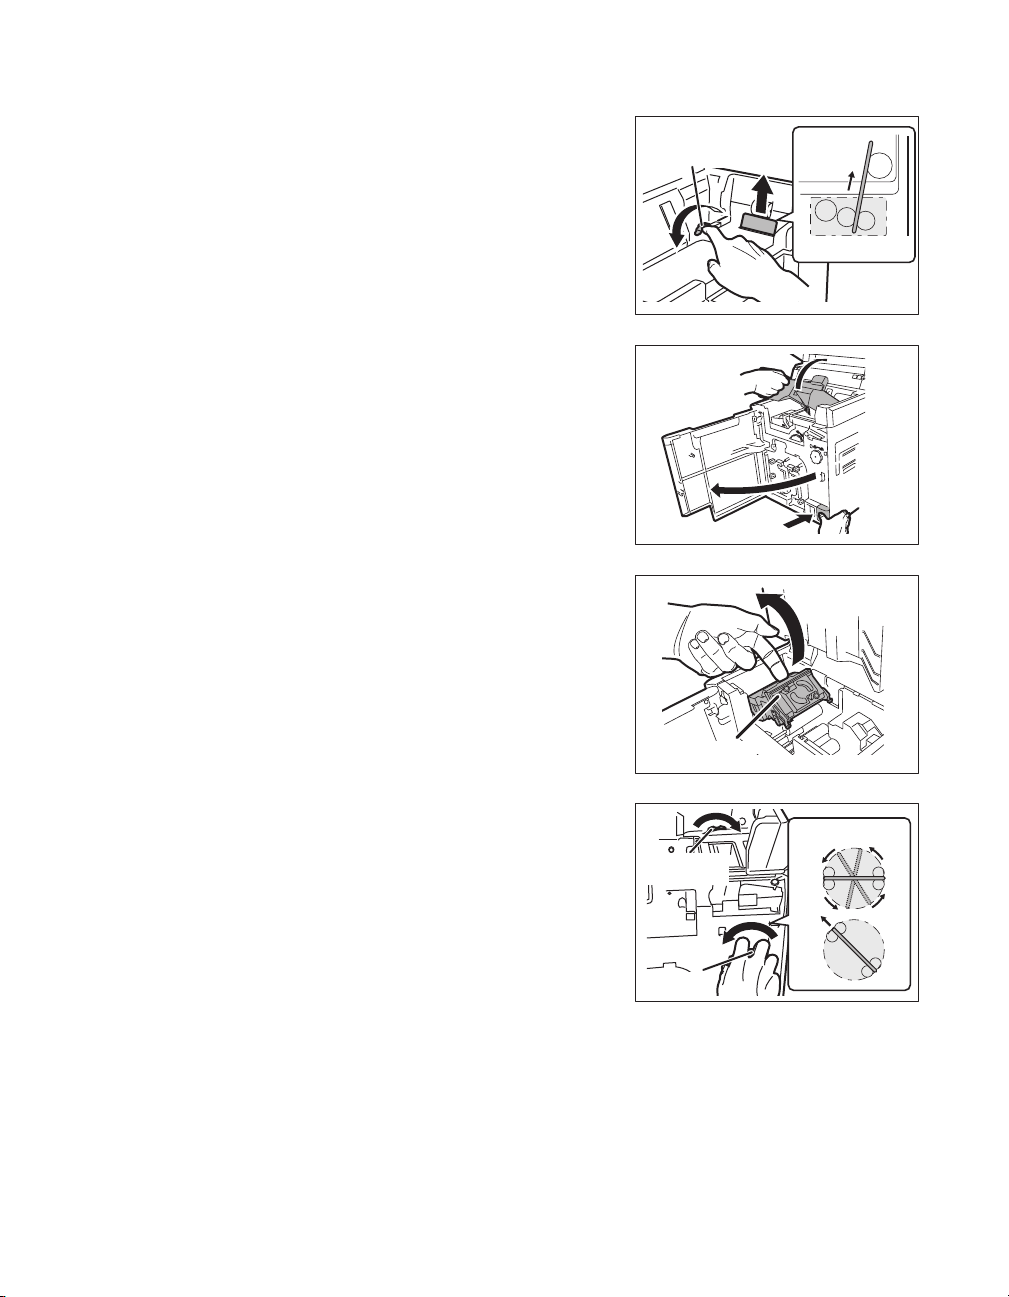
Full Color Card Printer
Reverse Feeding Knob
Cleaning Section
Decurl Section
a
b
Reverse Section
Reverse
Feeding Knob
Reverse
Knob
3 (If cards can be seen in the feed slot)
Rotate the reverse feeding knob.
• Remove cards jammed in the cleaning section from
the feed slot.
• Cards jammed in the reverse section can also be
output.
• If the jam is cleared, then go to Step 8.
4 Open the Front Cover and Top Cover.
• Press the open over switch, and pull the Front Cover
forward.
• Hold the handle of the Top Cover and lift to open.
• If you do not open the Front Cover, then you cannot
open the Top Cover.
5 Confirm the location of jammed cards.
• To confirm the interior of the decurl section, first
release the lock on the decurl section as at right
before lifting.
• When checking inside the reverse section, remove the
Cleaning Roller and Cleaning Tape Cassette.
→See "Cleaning Tape Replacement" on page 22 and
"Cleaning the Cleaning Roller" on page 57 for
instructions on removing the Cleaning Roller and
Cleaning Tape Cassette.
6 (If the card is in the reverse section)
74
a Rotate the reverse knob so that the
cards are parallel, and rotate the
feeding knob left and right.
• If the feeding knob is rotated to the left, then jammed
cards are output from the Card Ejection Slot (Left),
and if this is rotated to the right, then these are output
from Card Ejection Slot (Right).
b Rotate the reverse knob so that the
edge of the cards is at the upper left,
and rotate the reverse feeding knob
so that this outputs as in the figure
at right.
• Jammed cards will be output from the top of the
printer, so remove these by hand.
• If the jam is cleared, then go to Step 8.
Page 79
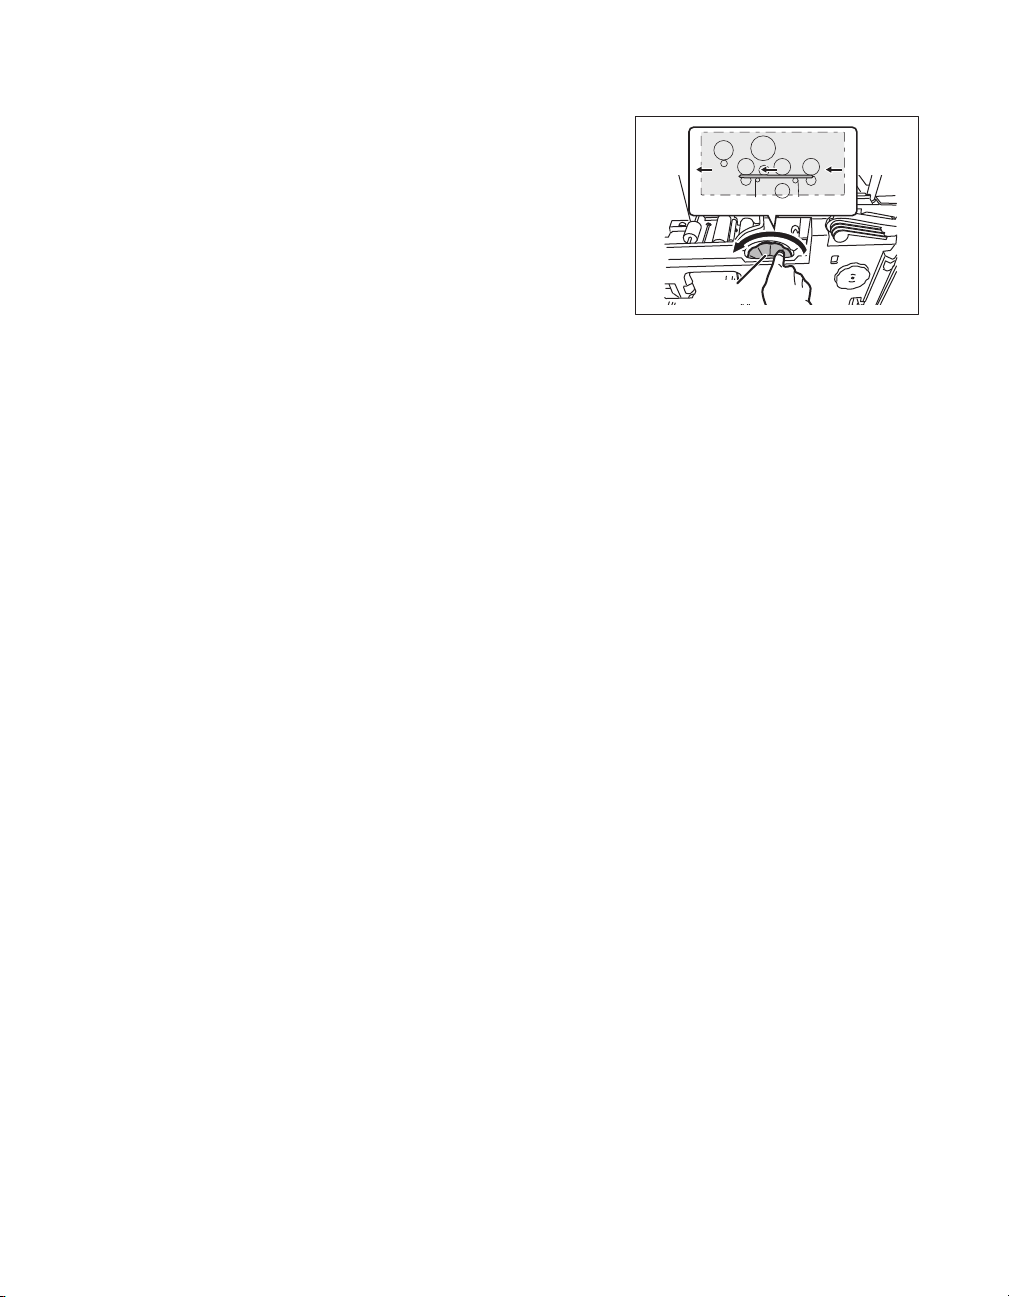
7 (If the card is in other than the reverse
Secondary Transfer Section
Feeding
Knob
section)
Rotate the feeding knob.
• Jammed cards are ejected from Card Ejection Slot
(left).
• If the jam is cleared, then go to Step 8.
8 Close the Top Cover and Front Cover.
• Before closing the cover, return the Card Case, decurl
section, Cleaning Roller, and Cleaning Tape Cassette
to their original positions.
9 Press the SET Key.
• The error message on the LCD Panel disappears, and
the printer returns to Normal Mode.
Troubleshooting
75
Page 80
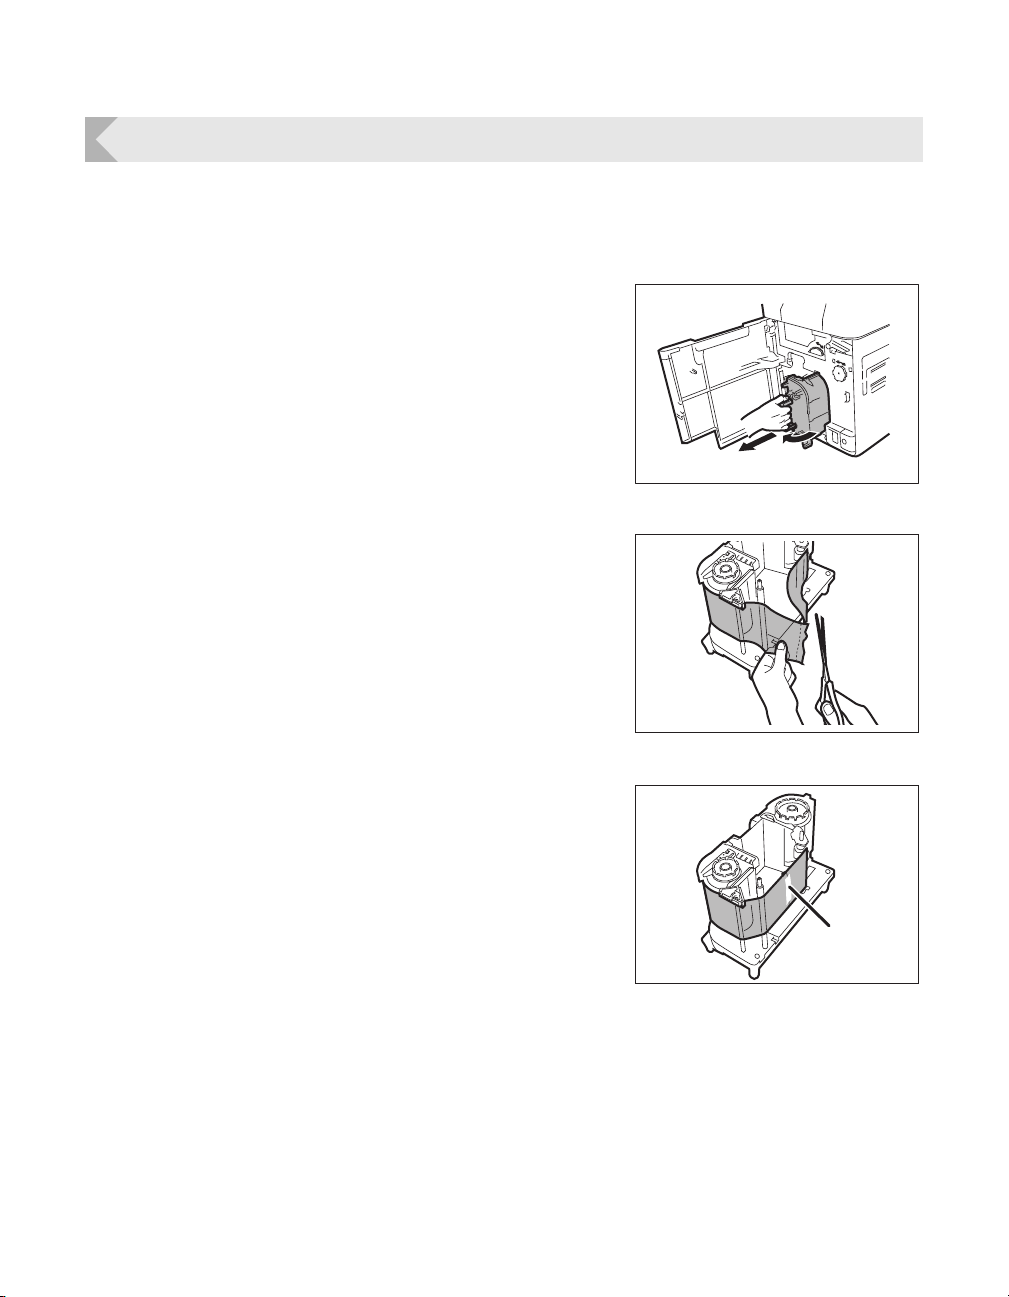
Full Color Card Printer
a
b
Cellophane Tape
If the Ink Ribbon or Transfer Film are Cut
If the Ink Ribbon or Transfer Film are cut for any reason, then repair these using the method
below.
1 Remove the Ink Ribbon Cassette or
Transfer Film Cassette.
→See "Changing the Ink Ribbon and Transfer Film" on
page 16 for details on how to remove the Ink Ribbon
Cassette and Transfer Film Cassette.
2 Carefully trim the cut section with
scissors.
3 Use cellophane tape to join the ribbon
or film.
• Place the cut area in the middle.
• Join the cut surfaces so that they are aligned properly.
• Do not discard the used ink or film on the winding side.
76
Page 81
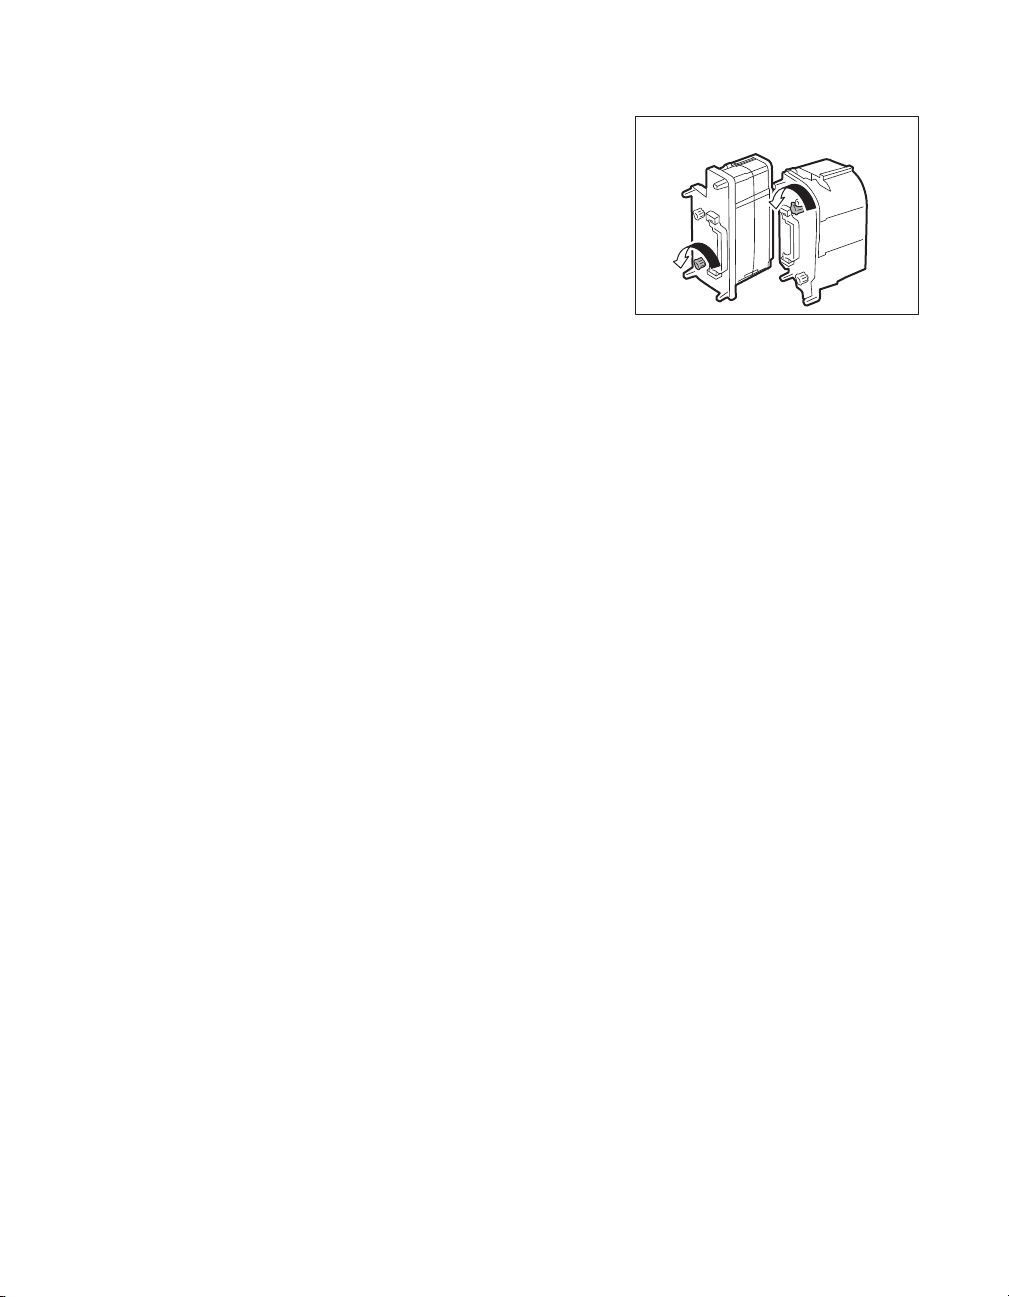
4 Rotate the winding side knob.
Transfer Film
Cassette
Ink Ribbon
Cassette
• Rotate the knob until the joined section of the Ink
Ribbon or Transfer Film is fully inside the winding side
spool spindle.
5 Return the Ink Ribbon Cassette or
Transfer Film Cassette to their original
positions.
→See "Changing the Ink Ribbon and Transfer Film" on
page 16 for details about attaching the Ink Ribbon and
Transfer Film.
6 Close the Front Cover.
7 Press the SET Key.
• The error message on the LCD Panel disappears, and
the printer returns to Normal Mode.
Troubleshooting
77
Page 82
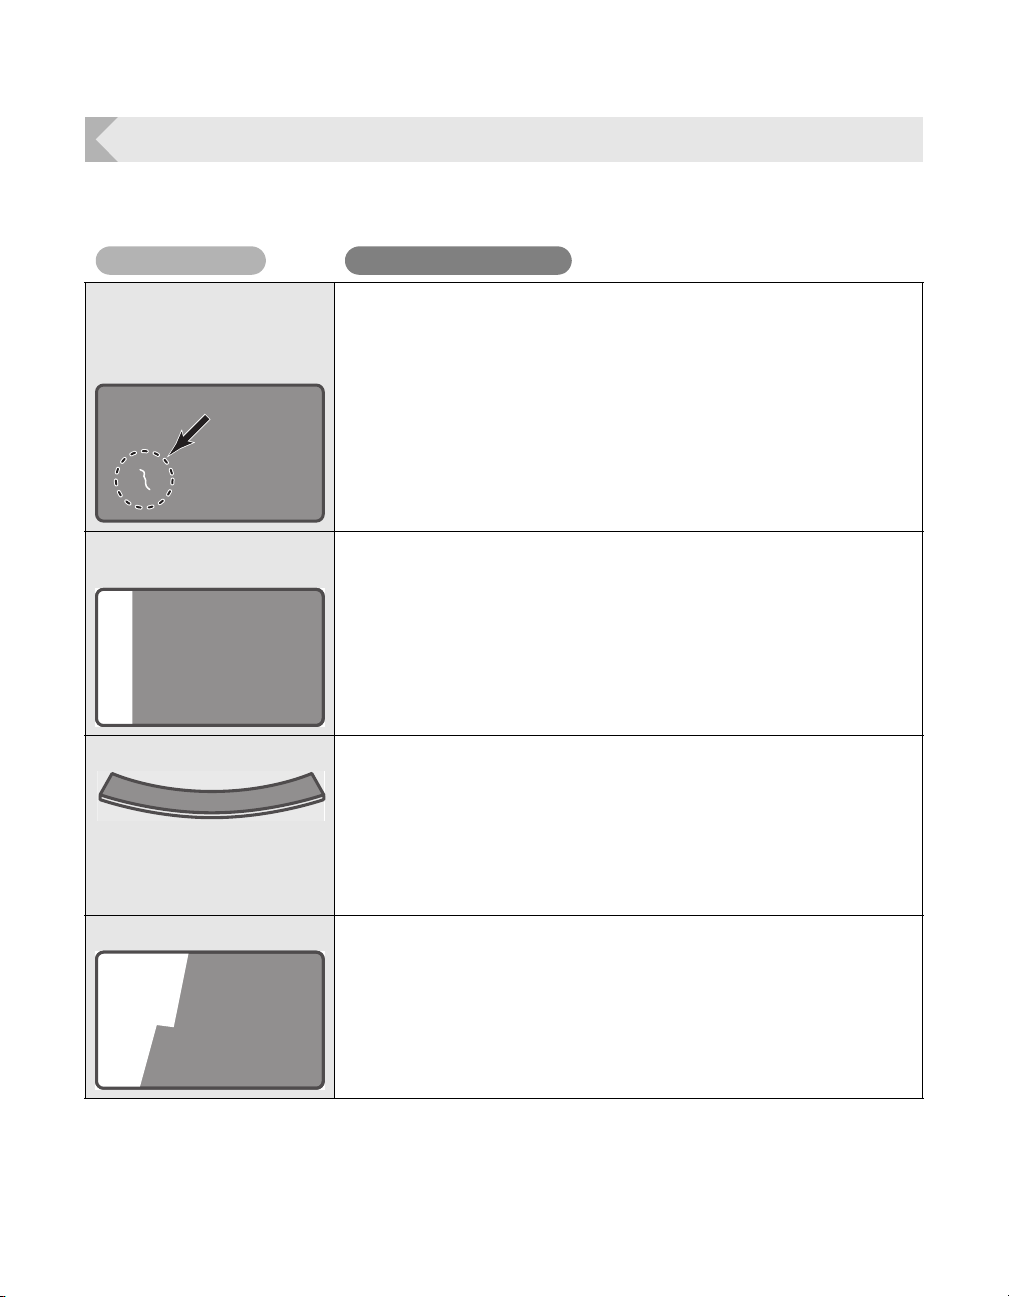
Full Color Card Printer
Problem
Cause and solution
When Cards are Not Printed Correctly...
If missing or incorrect colors are printed on a card or cards are incorrectly printed, resolve the
problem according to the following instructions.
There are missing or
incorrect colors in certain
sections.
Dirt is present.
There is an unprinted area
on the left of the card.
The card is bent. Secondary transfer conditions (speed and temperature) are not
Is there dirt on the card surface?
Do not use dirty cards.
Avoid using the printer in locations with excessive dust or dirt.
Clean the Cleaning Roller.
→See "Cleaning the Cleaning Roller" on page 57 for cleaning instructions.
Use a Cleaning Card to clean the Cleaning Roller.
→See "Cleaning with a Cleaning Card" on page 54 for instructions on how to
clean with a cleaning card.
Is there dirt on the Feeding Roller?
Use a Cleaning Card to clean the Cleaning Roller.
→See "Cleaning with a Cleaning Card" on page 54 for instructions on how to
clean with a cleaning card.
Clean the Feeding Roller.
→See "Cleaning the Feeding Roller" on page 60 for instructions on cleaning the
Feeding Roller.
optimum.
Set secondary transfer conditions in accordance with cards used.
→See "Setting the Types of Card to Use" on page 42 for instructions on setting
secondary transfer conditions.
Print flakes off. Secondary transfer conditions (speed and temperature) are not
78
optimum.
Set secondary transfer conditions in accordance with cards used.
→See "Setting the Types of Card to Use" on page 42 for instructions on setting
secondary transfer conditions.
Page 83
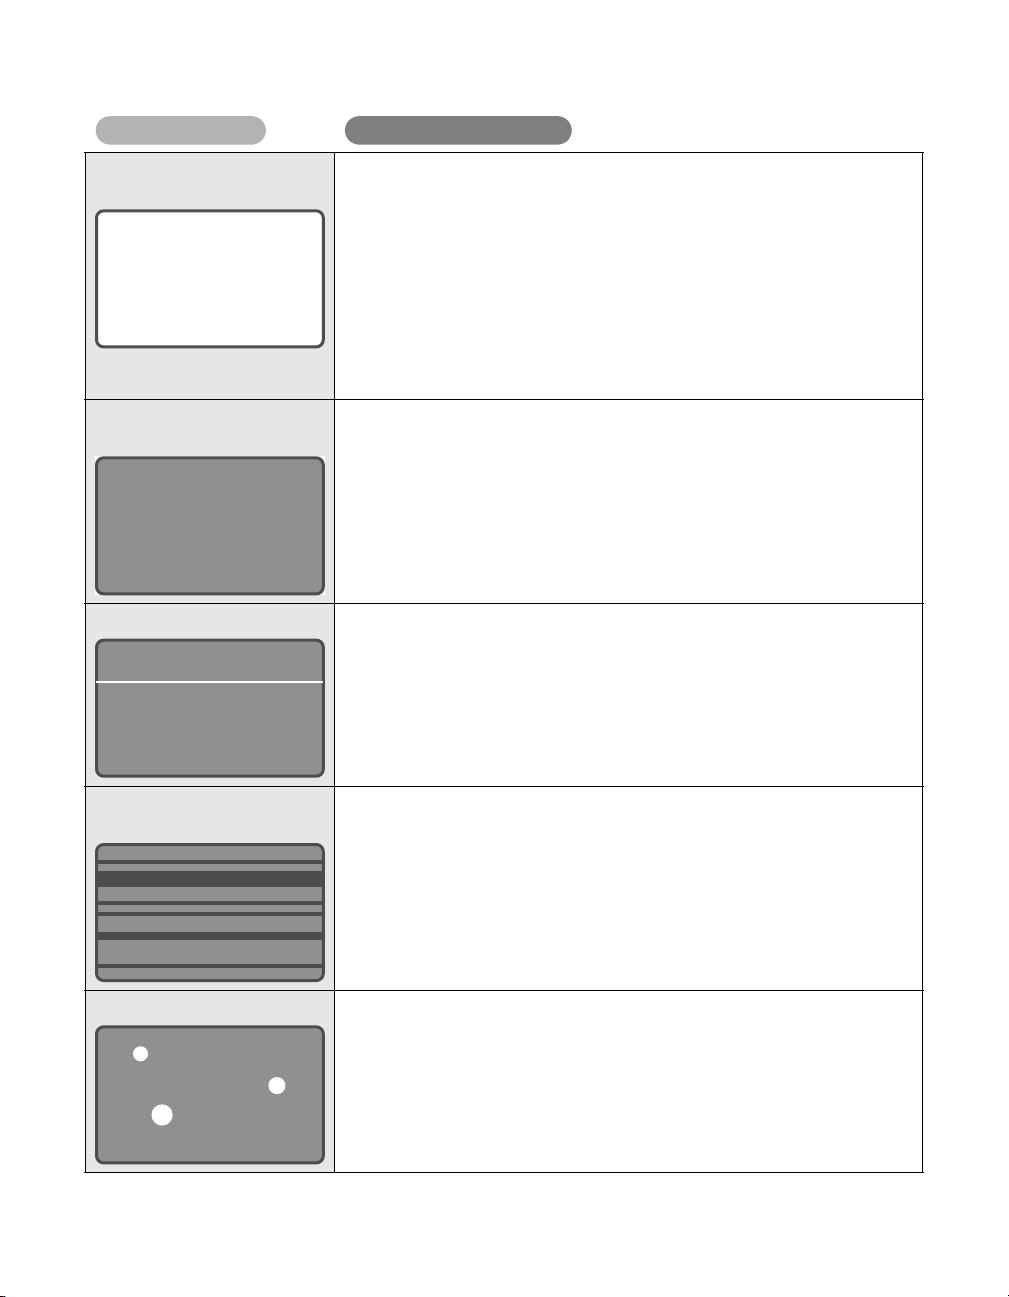
Troubleshooting
Problem
Cause and solution
White cards (unprinted
cards) are output.
Only color image data was received with the Black Ink Ribbon
loaded.
Use the Overcoating Color Ink Ribbon when printing in color.
→See "Changing the Ink Ribbon and Transfer Film" on page 16 for details about
changing the Ink Ribbon.
Secondary transfer conditions (speed and temperature) are not
optimum.
Set secondary transfer conditions in accordance with cards used.
→See "Setting the Types of Card to Use" on page 42 for instructions on setting
secondary transfer conditions.
General Print Problems
(Incorrect Colors, etc.)
The Ink Ribbon type setting is different.
Set the printer according to the type of Ink Ribbon used.
→See "Setting the Type of Ink Ribbon or Transfer Film to Use" on page 39 for
details on how to set the Ink Ribbon type.
Fine lines are not printed. Contact your reseller.
There is a surface
irregularity.
There are partial white areas. Contact your reseller.
Contact your reseller.
79
Page 84
Full Color Card Printer
Note
Problem
Solution
Problem
Cause and solution
Cover is Open
XX-XX
Some or all of the printed
area are cloudy.
Other Troubles
The power cannot be turned
on.
Data cannot be sent to the
printer.
The printer cannot connect to
the network.
Is the Transfer Film running between the two pins on top of the
Transfer Film Cassette?
Make sure that the Transfer Film is correctly loaded.
→See "Transfer Film Replacement" on page 19 on how to install the Transfer
Film.
Is the pin on top of the Transfer Film Cassette attached correctly?
Make sure that the pin on top of the Transfer Film Cassette is attached
correctly.
→See "Transfer Film Replacement" on page 19 on how to attach the pin on top of
the Transfer Film Cassette.
Secondary transfer conditions (speed and temperature) are not
optimum.
Set secondary transfer conditions in accordance with cards used.
→See "Setting the Types of Card to Use" on page 42 for instructions on setting
secondary transfer conditions.
Make sure the power cable is connected.
Make sure the USB cable is connected.
Make sure the network is connected.
Confirm User Mode network settings.
See "Changing Network Connection Settings" on page 51 for how to
confirm network settings.
When These Solutions Don't Work...
Contact your reseller if errors appear which are not included in this manual or when an error
cannot be cleared.
When contacting your reseller, provide them with the content of the message and the
80
error code (XX-XX) that appears on the right side of the LCD Panel.
Page 85
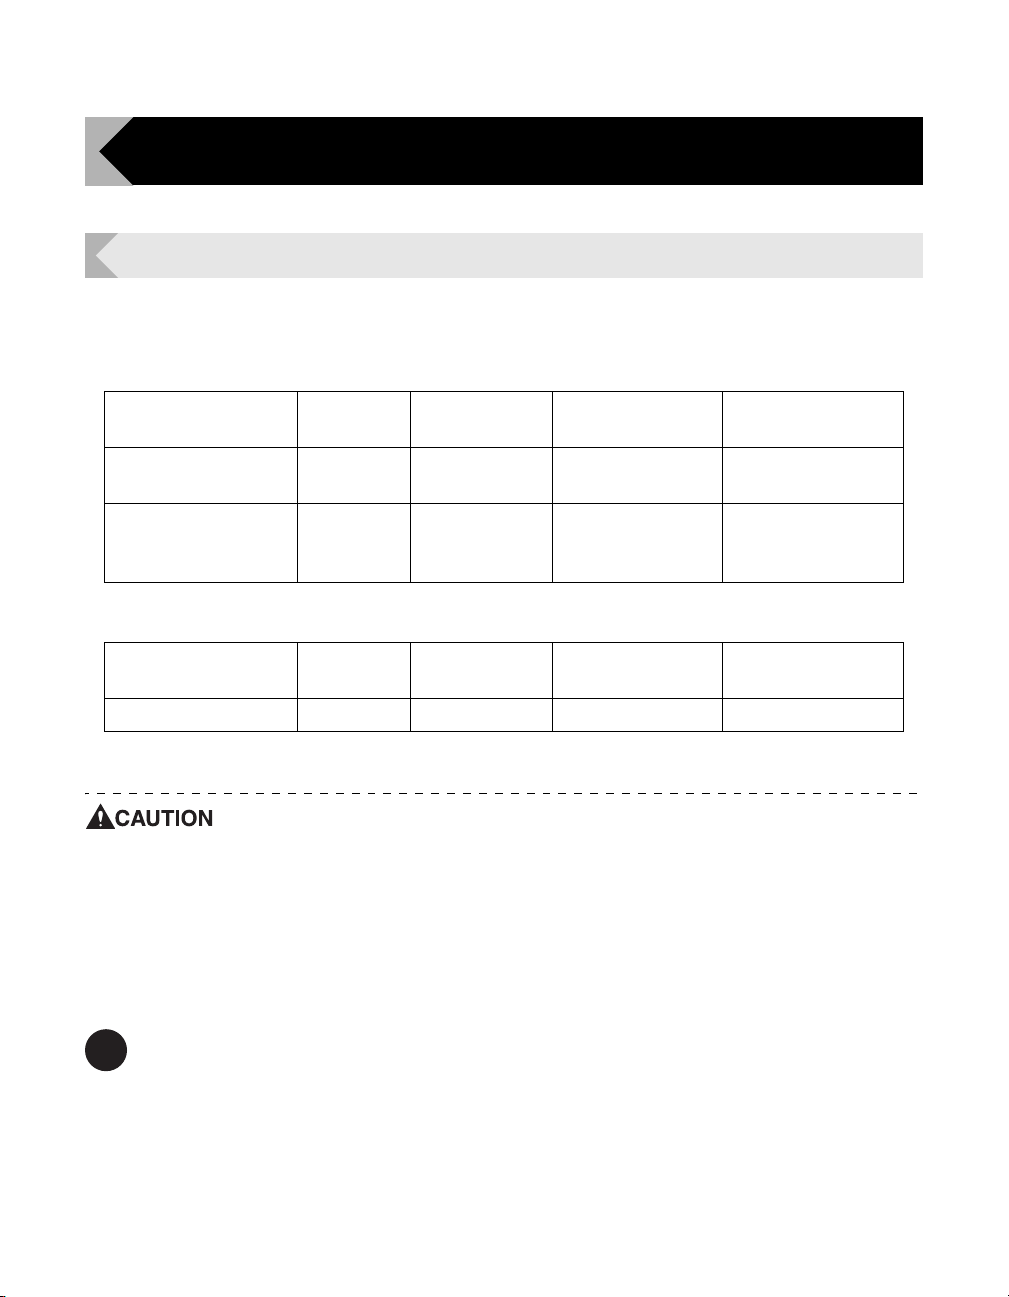
Appendix
Note
Consumables
Ink Ribbon/Transfer Film
The 2 types of Ink Ribbon that can be used in this printer are as follows.
Appendix
Name Type Product no
Retransfer Color Ink
Ribbon
Retransfer Reverse
Overcoating Color Ink
Ribbon
R-YMCK PR5002-R4C 500 screens/spool
R-YMCKK PR5002-R5K 400 screens/spool
Number of
Printable Sides
Remarks
–
–
Transfer Film (transparent type) that can be used with this printer is one type only.
Name Type Product no
Retransfer Film R-InTM1 PR5002-RI1 500 screens/spool With Cleaning Tape
Number of
Printable Sides
Remarks
If using other Ink Ribbon/Transfer Film, please contact your reseller.
Directly touching the Ink Ribbon/Transfer Film may cause uneven print
density.
When changing the Ink Ribbon/Transfer Film, do not subject these to
excessive impacts.
Use of non-genuine parts may lead to reduced print quality, or printer
malfunctions.
We cannot guarantee the quality and reliability of non-genuine products.
Repair of faults caused by the use of non-genuine products shall be
charged, even if the printer is within the warranty period.
The number of printable sides may decrease under the following conditions.
• Changing the Ink Ribbon/Transfer Film during use
• When an error occurs during printing
• Performing operations not listed in this manual
Use Ink Ribbon/Transfer Film as soon as possible after purchase.
When storing Ink Ribbon/Transfer Film, avoid locations that are exposed to direct
sunlight, high temperatures, or with excessive dust or dirt.
81
Page 86
Full Color Card Printer
Cards
Use only cards that conform to the CR-80 standard.
Size: 3.4" × 2.1" (86 mm × 54 mm) Thickness: 0.03"-0.04" (0.76 mm-1.00 mm)
Material: PVC, PET, PET-G
Do not use cards that do not conform to the CR-80 standard. Such cards
may not be printed properly.
Do not use the following cards:
• Cards previously printed with this or any other card printer
• Wet cards
• Cards mixed with glass, metallic or other foreign objects
• Embossed cards
• Cards coated with oil or other foreign matter
• Cracked, chipped, bent or otherwise damaged cards
• Transparent cards
• Abnormally shaped cards
Cleaning Card
Please contact your reseller for cleaning cards.
Cleaning Tape
Please replace Cleaning Tape at the same time as Transfer Film. Cleaning Tape is included
with Transfer Film.
Do not use Cleaning Tape/Cleaning Cards other than those listed above.
Doing so may cause a malfunction.
Consumables
Thermal Heads and Cleaning Rollers that have exceeded the following service lives (usage
period, printed sheets) require replacement.
Product name Service life
Thermal Head Earlier of 1 year or 20,000 images
Cleaning Roller Earlier of 1 year or 40,000 images
The service life depends on the usage environment.
Please contact your reseller for consumables.
82
Page 87

Updating the Printer's Software
Please contact your reseller for upgrades to printer firmware and drivers.
Appendix
83
Page 88
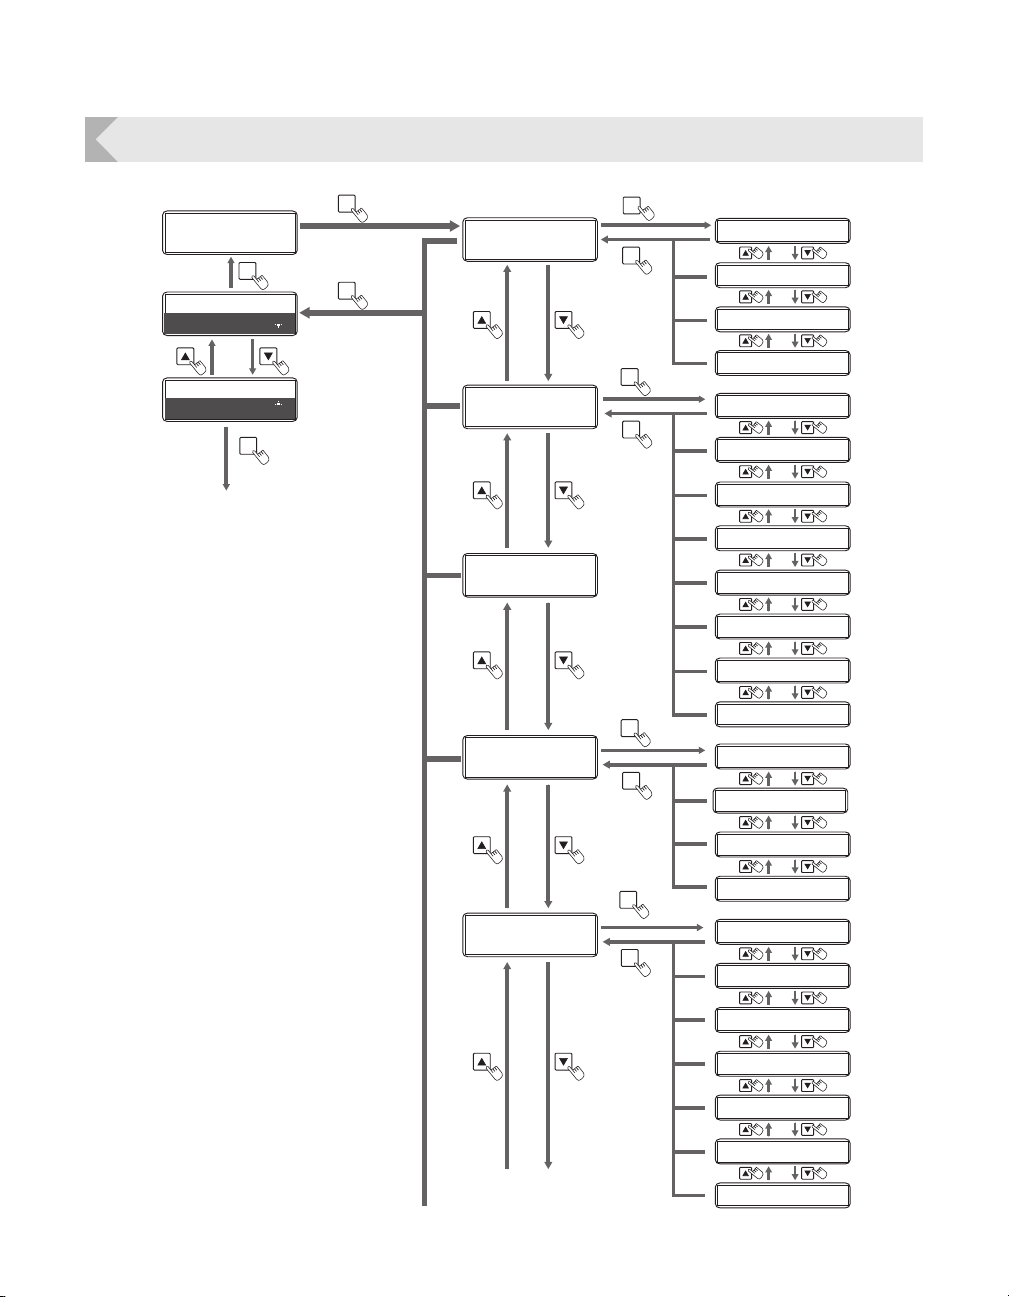
Full Color Card Printer
Exit Menu ?
YES YES
Exit Menu ?
NO NO
Printer Info.
SET:>>
Card Count
Base Version
Main Version
Serial Number
Magnetic Encoder
IC R/W 1
IC R/W 2
External Box
Total Count
Ribbon Remainder
Film Remainder
Version Info.
SET:>>
Printer Setup
SET:>>
Ready to Print
[User Mode]
MENU
MENU
SET
SET
SET
MENU
MENU
SET
Buzzer
Power Save Mode
Print Vertical
Print Horizontal
Head Number
MENU
SET
Image Setup
SET:>>
Print Quality
Sharpness
Balance Yellow
Balance Magenta
Balance Cyan
Balance Black
MENU
SET
Black Correction
Cleaning
SET:>>
Normal Mode
Main Menu
Settings Menu
User Mode
Back to Main Menu
To [Ribbon Setup] Menu
(Next Page)
Menu Route Map (User Mode)
84
Page 89
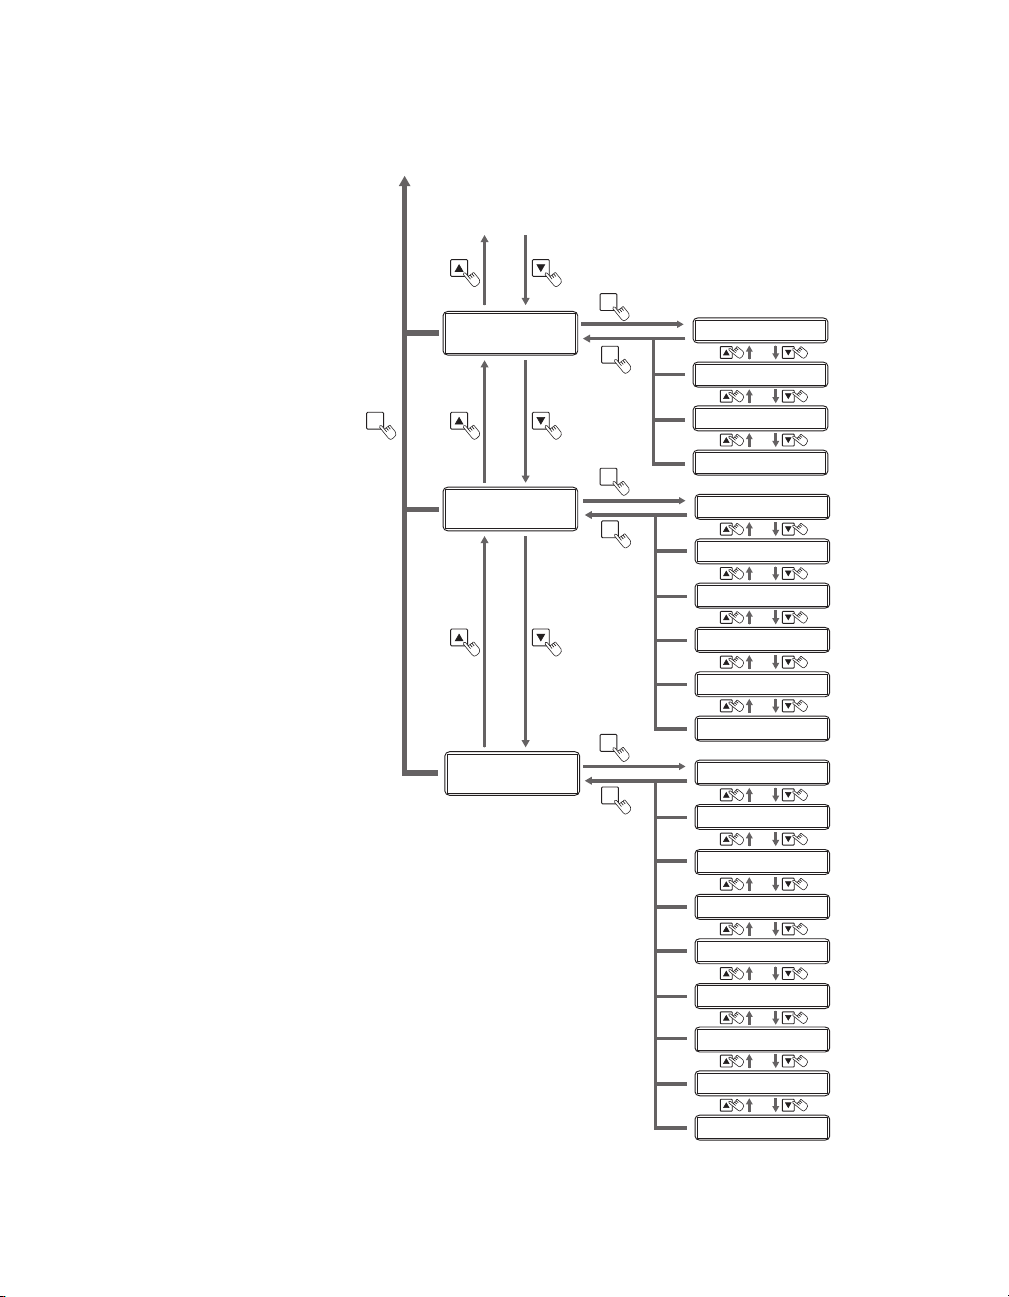
Ribbon Setup
SET:>>
MENU
Card Setup
SET:>>
Film Notice(%)
Film Type
Ribbon Notice(%)
MENU
SET
MENU
SET
MENU
SET
Error Exit
Set Face
Eject Face
Card Type
Decurl Time(s)
Normal Exit
Ribbon Type
Interface Setup
SET:>>
Subnet Mask
Default Gateway
MAC Address
IPsec
Timeout(s)
Printer ID
DHCP
IP Address
Password
User Mode
To Main Menu
Settings Menu
To [Image Setup] Menu
(Previous Page)
Appendix
85
Page 90
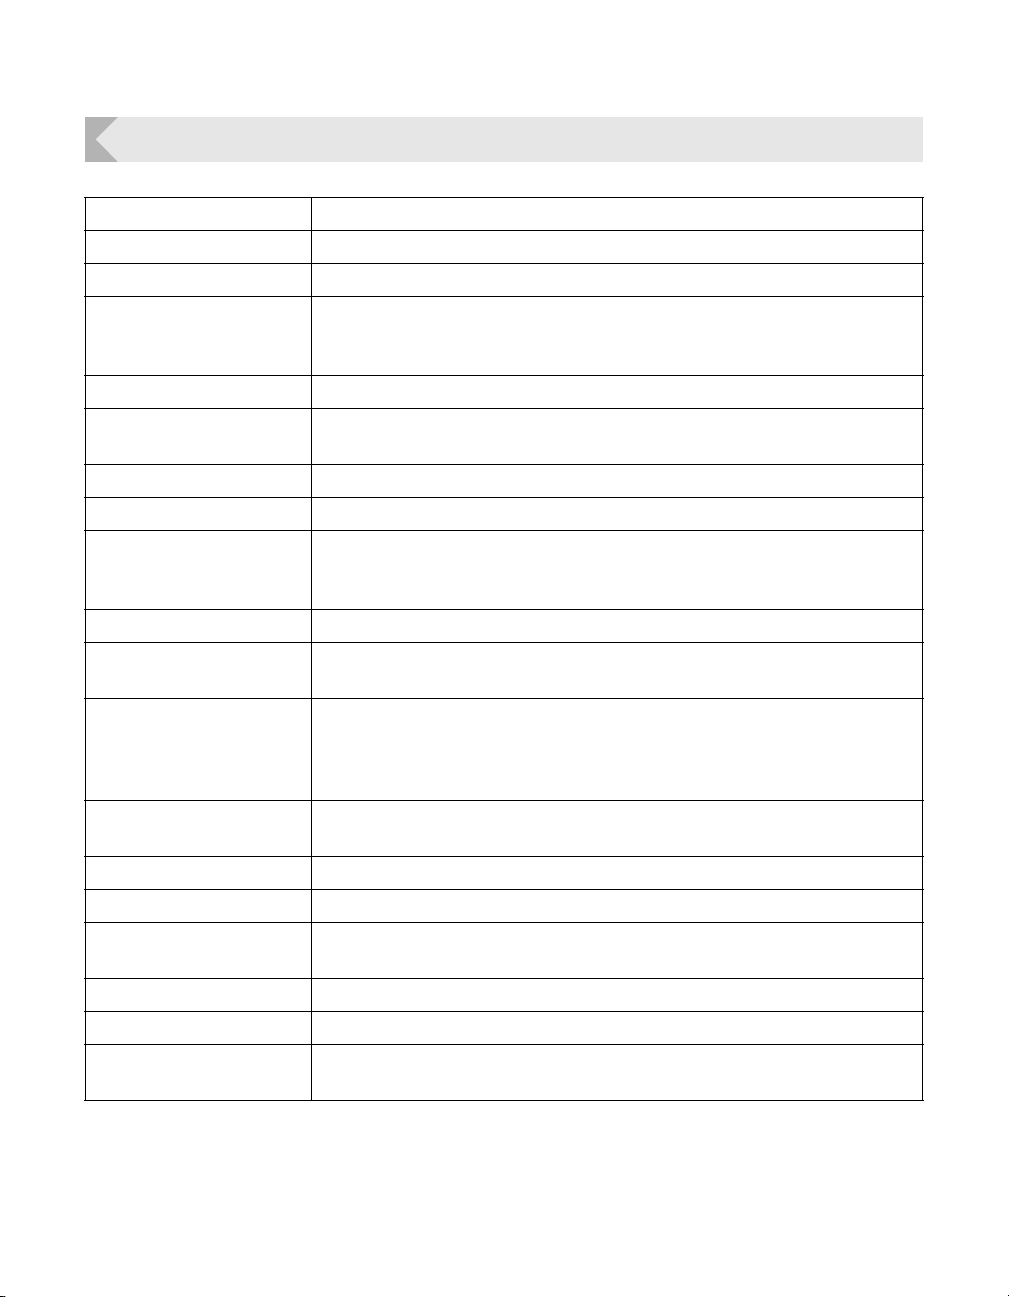
Full Color Card Printer
Main Specifications
PR-C201
Function Double-sided printing (full color)
Print system Indirect transfer system
Print media Material: PVC, PET, PET-G
Thickness: 0.76-1.00 mm
Size: according to CR-80 standards
Print quality 600 dpi
Print tones Input tones: RGB, 256 tones/color, K2 tones
Output tones: YMC 256 tones/color, K2 tones + 256 tones
Print area 3.404" × 2.125" (86.5 mm × 54 mm)
Print time 160 cards/hour using 4 colors single side printing
Ink ribbon R-YMCK Ribbon (Overcoating Colors - 4 colors)
R-YMCKK Ribbon (Front: Overcoating Colors/Reverse: Monochromatic - 5
colors)
Transfer Film R-InTM1 (film)
Card feeding system Automatic feed from the Card Case (250 card auto feed)
Manual feed
Interface USB2.0
Ethernet 100BASE-TX, IEEE802.3u (Operation guaranteed)
USB2.0 × 1 (Port for extended users)
RS-232C × 2 (Port for extended users)
Supported OS Windows XP (32 bit), Windows Vista (32 bit),
Windows 7 (32/64 bit), Windows Server 2008 R2 (64 bit)
Power source AC90/120, 220/240 V, 50/60 Hz
Power consumption Less than 300 W
Operating noise While operating: less than 53 dB
While waiting: less than 45 dB
Dimensions 17.1" (H) × 13.4" (W) × 11.7" (D) (435 mm x 340 mm x 297 mm)
Weight 42.9 lb (19.5 kg)
Operating environment Temperature: 50 to 95°F/10 to 35°C
Humidity: 20 to 80% RH (without condensation)
86
Page 91

Appendix
Opening the Printer Driver Settings Screen
You can change settings or confirm the status of the printer from the printer driver's setting
screen.
Opening the Setting Screen (From the Start Menu)
If you are using Windows Server 2008 R2, open the printer driver's setting screen as
follows.
[Start] → [Control Panel] → [View devices and printers] → [NISCA PR-C201] → [Printing
preferences]
If you are using Windows 7, open the printer driver's setting screen as follows.
[Start] → [Control Panel] → [View devices and printers] → [NISCA PR-C201] → [Printing
preferences]
If you are using Windows Vista, open the printer driver's setting screen as follows.
[Start] → [Control Panel] → [Hardware and Sound] → [Printers] → [NISCA PR-C201] →
[Select printing preferences]
If you are using Windows XP, open the printer driver's setting screen as follows.
[Start] → [Control Panel] → [Printers and Other Hardware] → [Printers and Faxes]
[NISCA PR-C201] → [File] menu → [Printing Preferences]
Opening the Setting Screen (From the Application)
If you want to open the printer driver's setting screen from each application, follow
the procedure below.
[File] → [Print] → Select [NISCA PR-C201] as a printer name → [Preferences] (or
[Properties])
Changing the Settings or Confirming the Status from the Setting
Screen
Follow the procedure below to change the settings or confirm the status after
opening the setting screen.
[Maintenance] tab → [Operation Panel] icon
For more information about how to change the settings of the printer driver,
refer to the driver help files.
If using a network, the printer driver name will be "NISCA PR-C201
Network".
87
Page 92

4Y5-8399-010
 Loading...