

Page 1
This product is a precision electronic device that can be damaged by direct physical impact or contact with dust or other
foreign material. A protective carrying case (sold separately) may help prevent damage to your Nintendo 3DS™ system.
Please carefully read this Operations Manual before setup or use of the Nintendo 3DS system. If, after reading all of the instructions, you still
have questions, please visit our customer service area at support.nintendo.com.
A NOTE ABOUT COMPATIBILITY: The Nintendo 3DS system is only compatible with Nintendo 3DS, Nintendo DSi, and Nintendo DS software.
Nintendo 3DS Game Cards are only compatible with the Nintendo 3DS system. Some accessories may not be compatible with the Nintendo
3DS system.
NOTE: Nintendo Zone is not available in all regions or countries. Please visit www.nintendo.com for more information.
Your system includes:
Nintendo 3DS system
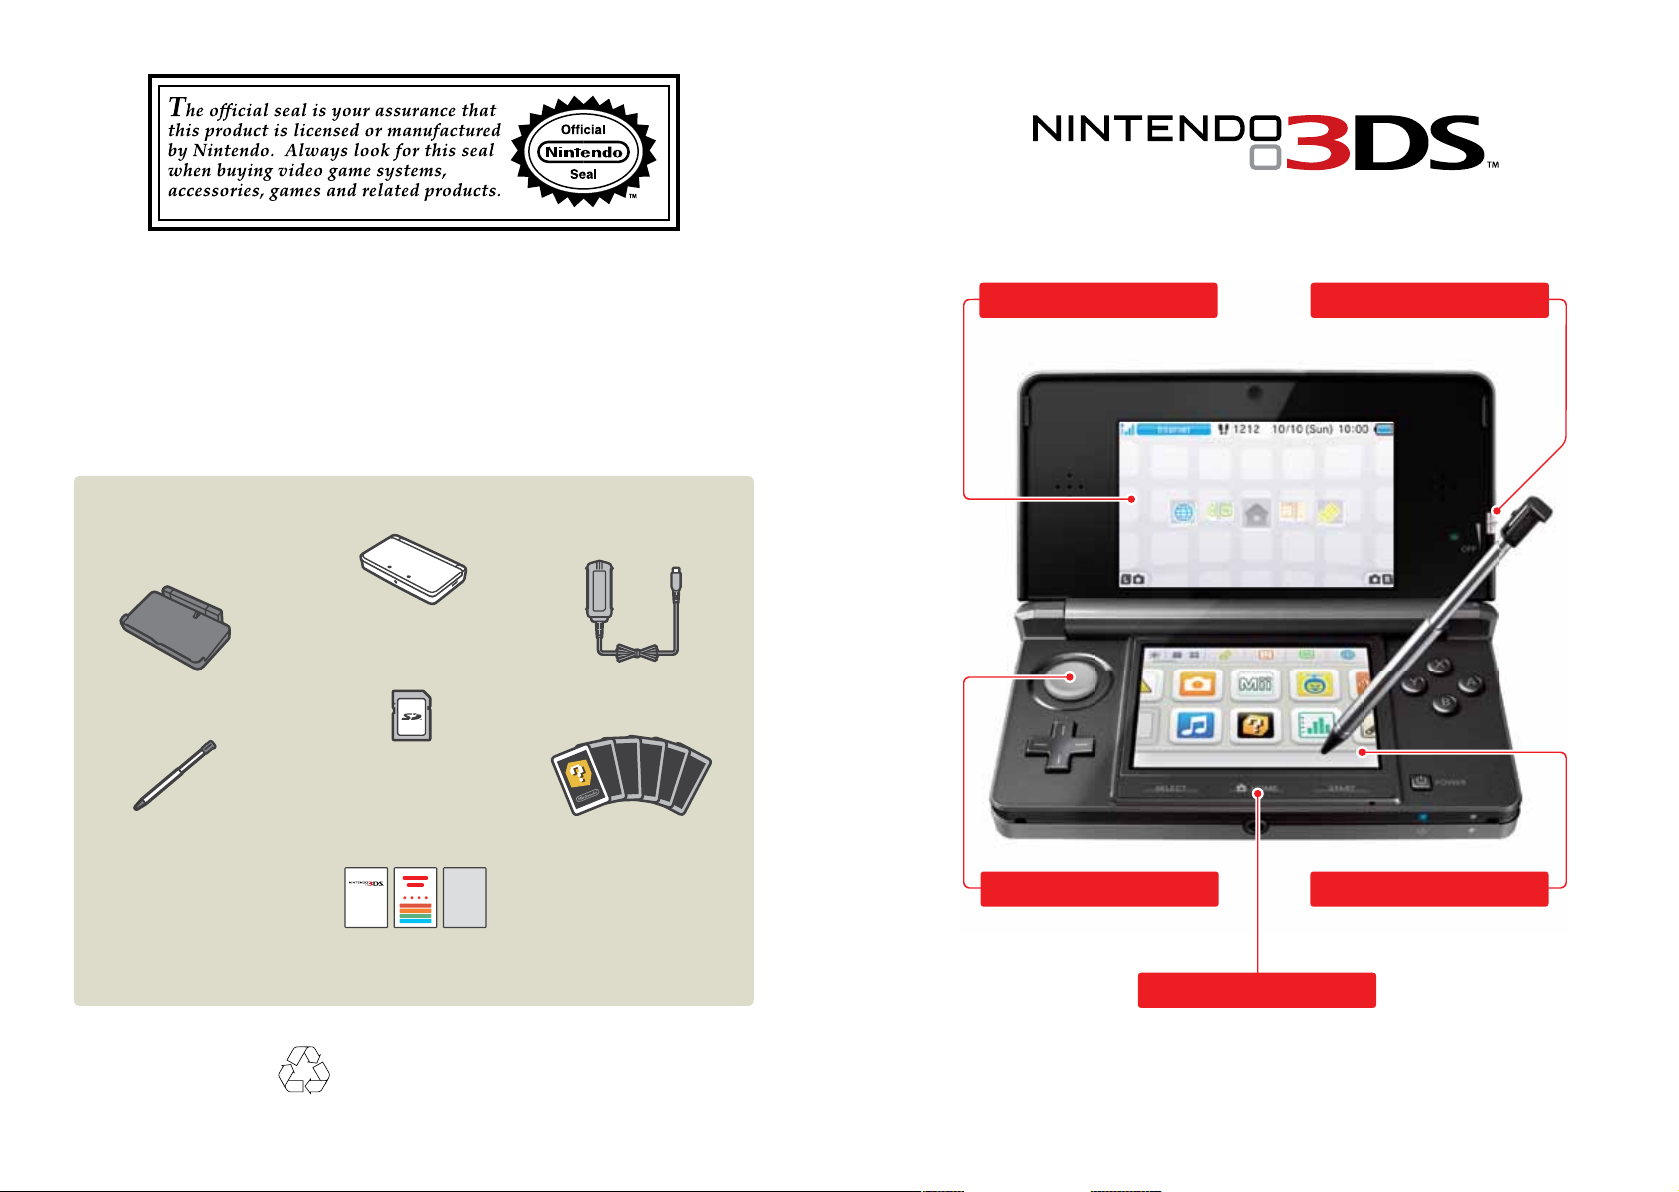
Here is a look at a few of the exciting features of the Nintendo 3DS system!
3D Screen
Can display 3D images (see page 238).
3D Depth Slider
Adjust the depth of 3D images
(see page 239).
Nintendo 3DS charging
cradle
Nintendo 3DS stylus
(inserted into the system’s
stylus holder)
2 GB SD Memory Card
(inserted into the system’s
SD Card slot)
Operations Manual, Quick-start guides,
and other printed enclosures.
Product recycling information:
visit recycle.nintendo.com
Nintendo 3DS AC adapter
AR Cards
Circle Pad
Allows precise 360˚ control for software
that includes this feature (see page 229).
Allows you to access the HOME Menu
Touch Screen
A touch-sensitive display screen controlled
by the stylus (see page 231).
HOME Button
(see page 229).
Page 2
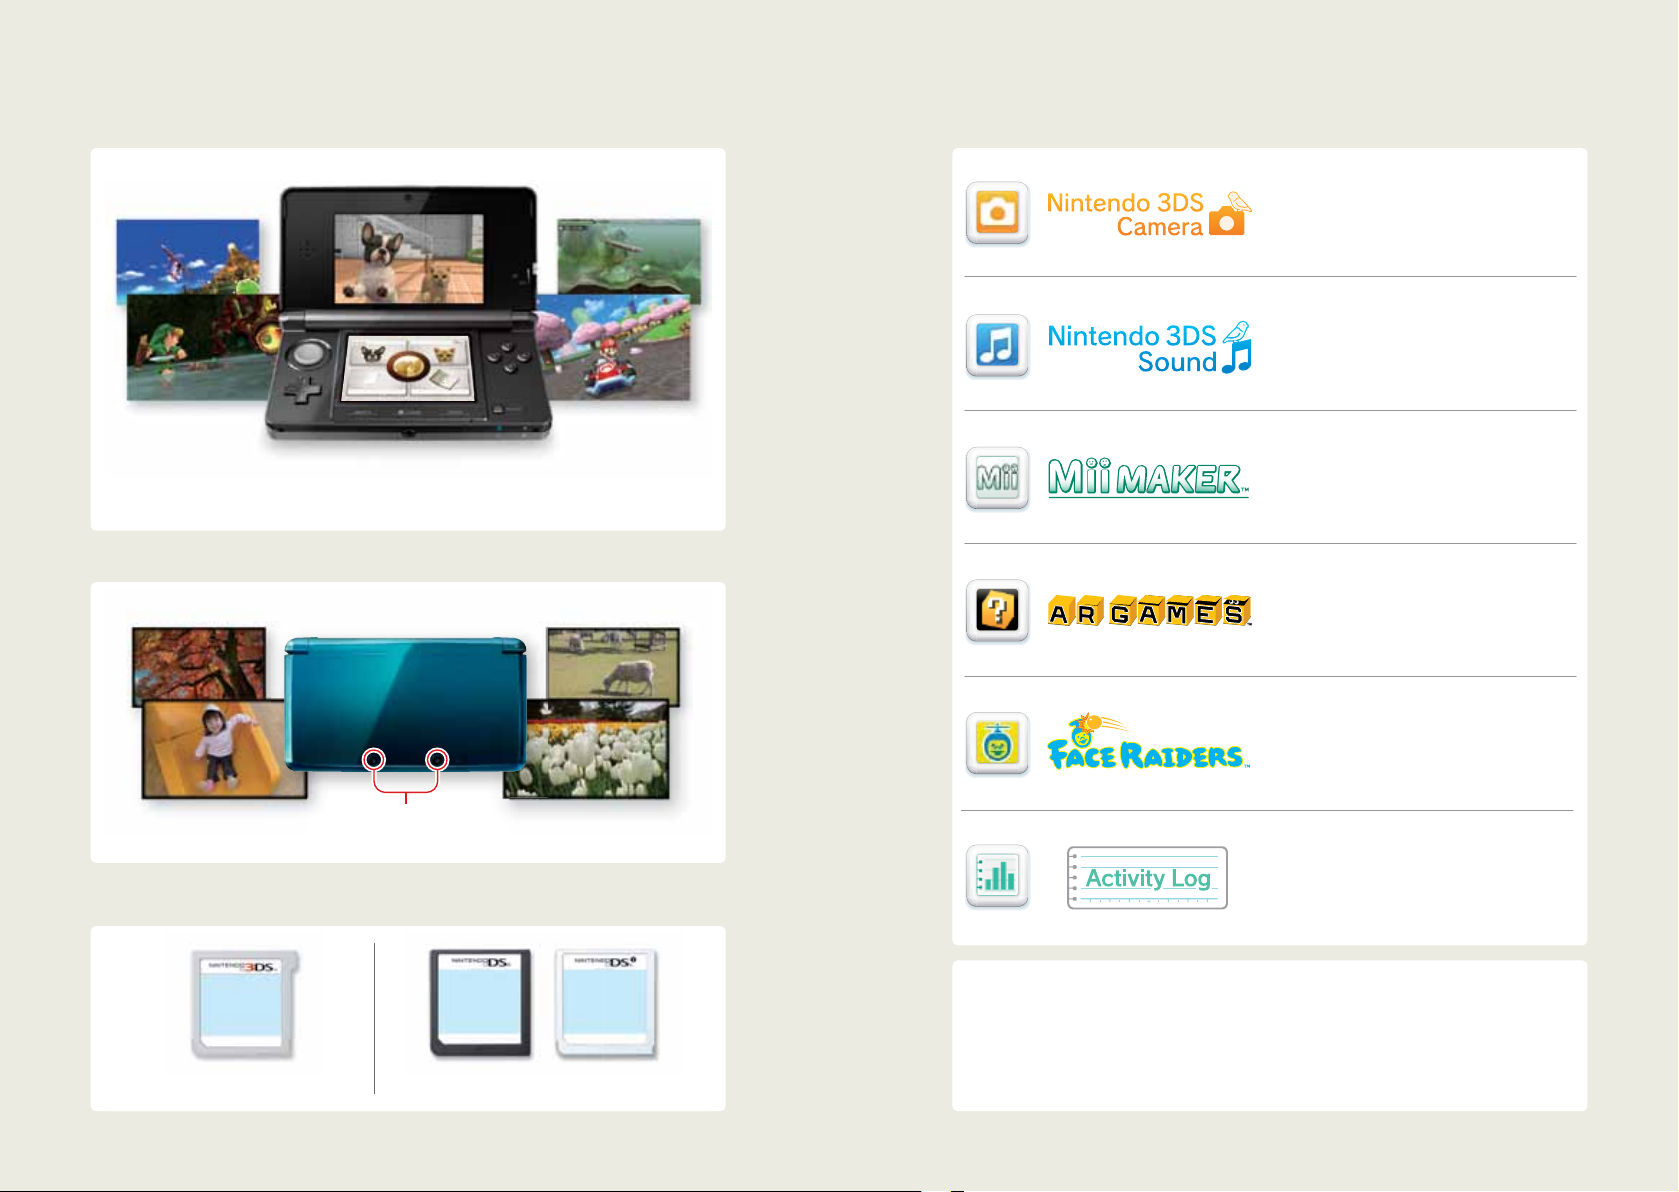
Experience 3D images without the need for special eyewear (page 238). The Nintendo 3DS system includes this built-in software:
Take 3D photos with the built-in cameras
and software.
Listen to music or record sounds.
Create Mii™ characters as alter egos for you
Only specially designed Nintendo 3DS software titles that support 3D image display will appear in 3D. Nintendo DS and Nintendo DSi
software do not support 3D display.
and your family and friends.
Take 3D photos with the outer cameras (page 258).
Play augmented-reality games using the
AR Cards included with your system and the
Nintendo 3DS Camera application.
Play a shooting game where your face and
your friends’ faces become game characters.
Outer cameras
Check your play times for software you are
using or see the amount of steps you have
Play Nintendo 3DS, Nintendo DS, and Nintendo DSi software (page 247).
Nintendo eShop
NOTE: To use this feature, you must connect to the Internet and perform a system update. See page 279 for more information
Nintendo 3DS Game Cards Nintendo DS & Nintendo DSi Game Cards
218 219
on setting up a wireless broadband Internet connection. See page 296 for more information on how to do a system update.
walked while carrying your Nintendo 3DS
with you.
Download various software titles to play on
your Nintendo 3DS system.
Page 3
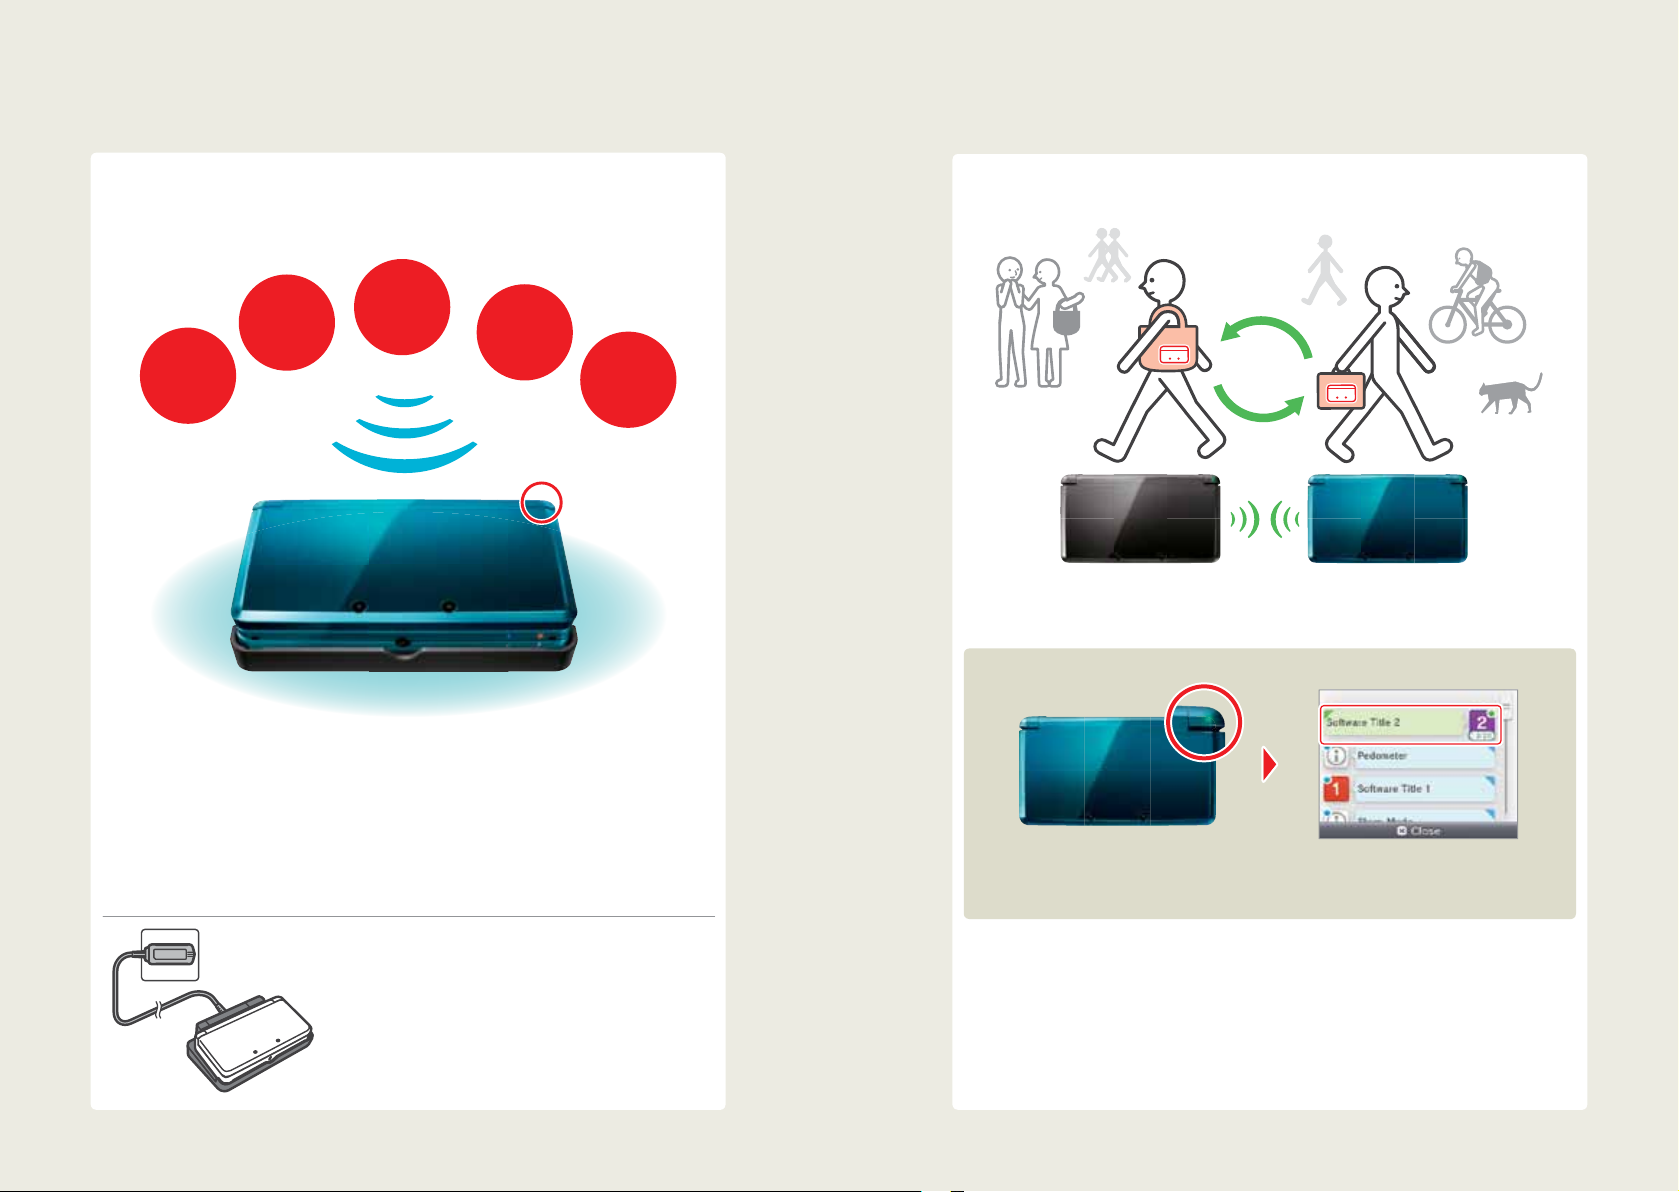
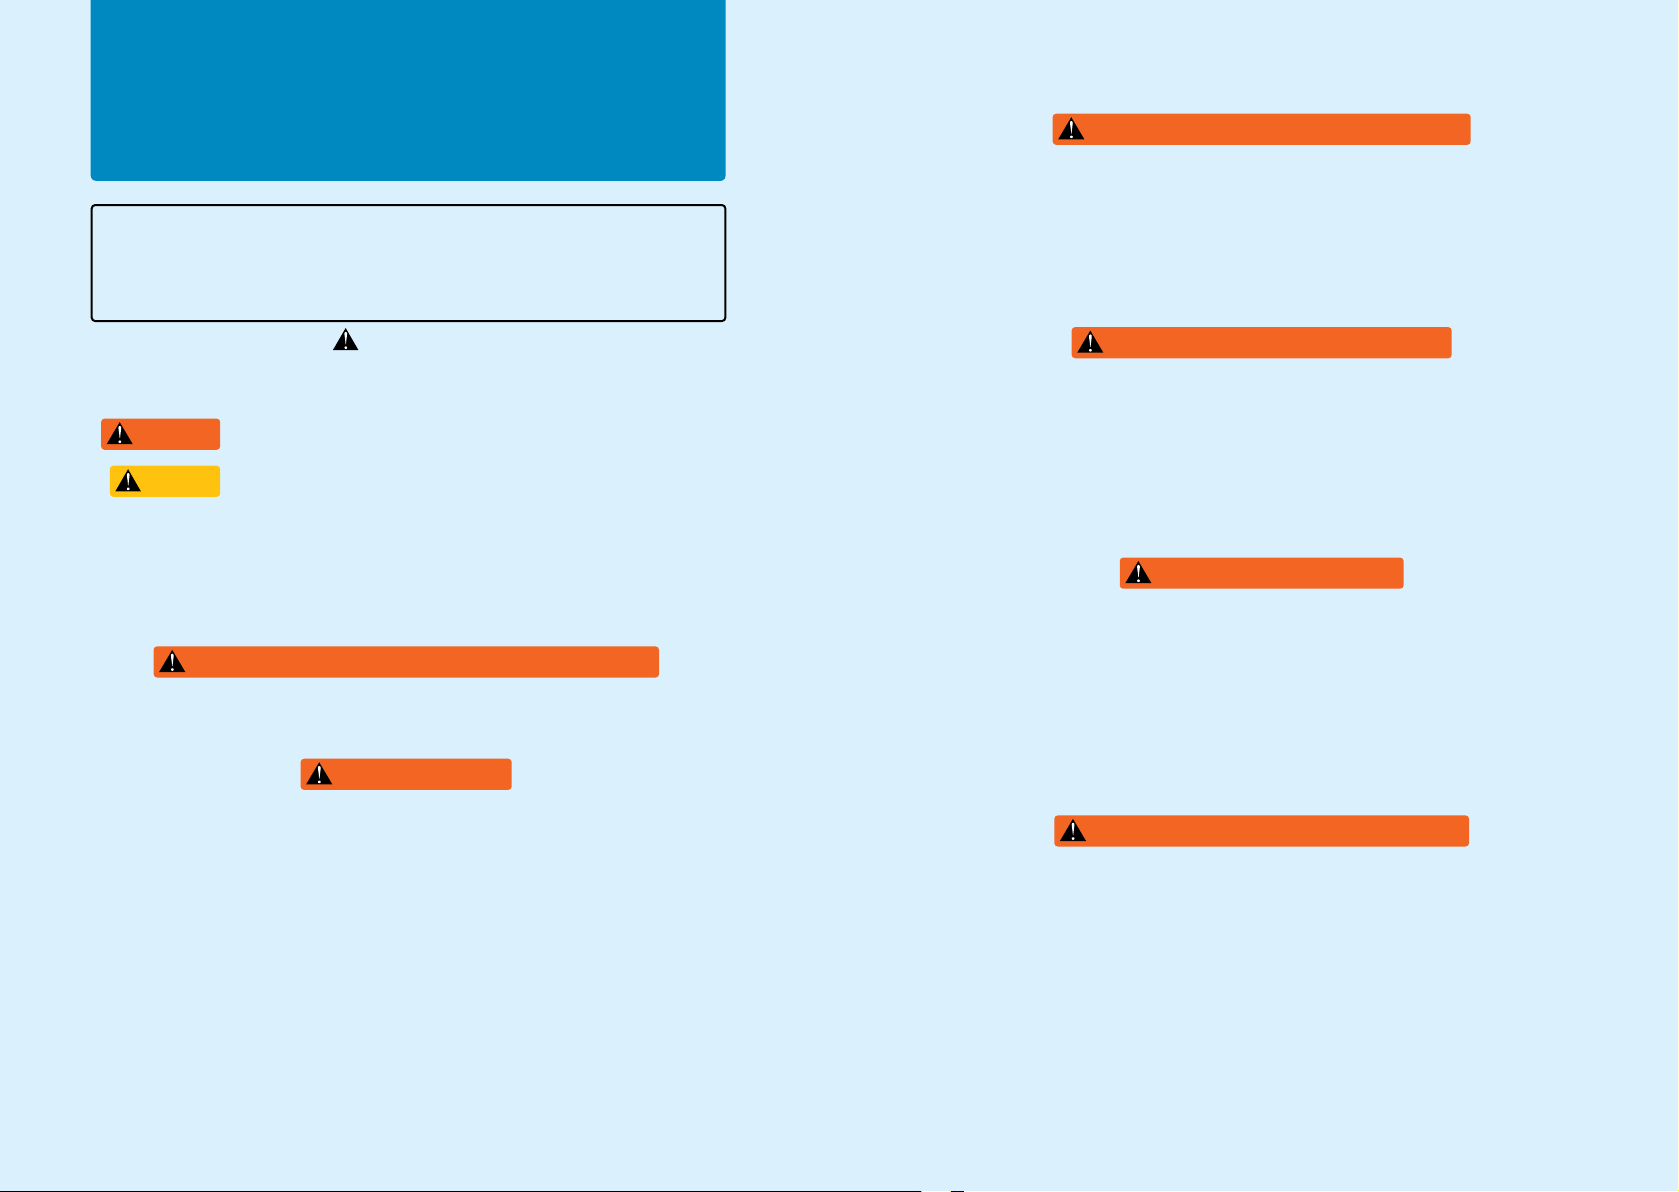
SpotPass™ StreetPass™
The SpotPass feature allows the Nintendo 3DS system to automatically communicate with a nearby
wireless LAN access point, enabling it to connect to the Internet and transmit a variety of data. The
system can also do this while playing a game or in Sleep Mode (power is on, but the system is closed).
3D photos
Notications
Free
software
System
updates
Other
information
The Wireless LED lights up
when wireless communication
is turned on.
The StreetPass feature allows the Nintendo 3DS system to automatically search for and communicate with other Nintendo 3DS systems and to exchange information with them as you walk by.
If you are playing a game, or if the system is in Sleep Mode (turned on but closed) and you pass someone who has
enabled StreetPass for the same software, you will exchange data with them. (If you don’t want to allow data exchange,
you can disable wireless communication.)
If StreetPass is successful...
To connect to a wireless LAN access point, you will need to congure the Internet settings for your Nintendo 3DS system
(see page 279).
• System updates may unlock the ability to receive more types of data via SpotPass, depending on the game you are
playing. It is recommended that you perform system updates to keep your Nintendo 3DS system current with the latest
features (see page 296).
• If you turn wireless communication o with the wireless switch, the system will not be able to use the communication
features.
Keeping your system charged.
Your system includes a charging cradle to make charging easy. When not in
use, you can put the Nintendo 3DS system in Sleep Mode and keep it in the
charging cradle, so it stays fully charged and can still communicate using the
SpotPass feature.
See page 237 for more information on battery endurance.
The Wireless LED illuminates when
wireless communication is activated.
StreetPass settings for Nintendo 3DS software are saved on the system. The data you transmit with StreetPass varies
depending on the software using this feature. Each software program has its own StreetPass settings.
• Up to 12 Nintendo 3DS software titles can use StreetPass simultaneously.
• With Nintendo DS and Nintendo DSi software, you must start the software rst, and then put it in tag mode (the name
for this mode may vary depending on the game you are playing).
• If you turn the power o or disable wireless communication, the system cannot communicate.
• StreetPass does not work if you are connected to the Internet, or are using local communication, depending on the
software you are using (see page 242).
A message will appear on your notication list
(see page 256 for more information on the Notica-
tions application and receiving messges).
220 221
Page 4

Table of Contents
Health and Safety Information
and Usage Guidelines 224
Health and Safety Information 224
Usage Guidelines 226
Basic Operations 228
Nintendo 3DS Components 228
Using the Touch Screen
and Stylus 231
Using the stylus 231
Calibrating the Touch Screen 231
Charging the Battery Pack 232
Battery charging procedure using the
charging cradle 233
Power On/O and
Basic Conguration 234
Sleep Mode and turning your system o 234
Conguring System Settings for the
rst time 234
Using the keyboard 236
Power LED status 237
Battery endurance 237
Viewing and Adjusting
the 3D Image 238
To view the best-quality 3D images 238
Adjusting the depth of the 3D images 239
Using SD Memory Cards 240
Using Software 241
HOME Menu 241
Steps and Play Coins 241
Scrolling, changing the display,
and moving icons 242
Communication modes 242
Software icons 243
Starting a software application 244
Suspending or exiting software 244
Instruction manuals for software
applications 245
Screen brightness and power-saving
mode 245
Taking photos with the Nintendo 3DS
camera 246
Using Game Cards 247
Using Downloaded Software 249
About SD Card capacity 250
Copying les 250
Game Notes 251
Friend List 252
Registering friends 253
Editing your friend card / Viewing
friend cards 254
Friend list settings 255
Notications 256
To receive notications 256
To view notications 257
Nintendo 3DS Camera 258
Nintendo 3DS Camera functions 258
Taking photos 259
Change camera mode 261
Viewing photos 262
Nintendo 3DS Sound 263
Recording and playing with sounds 264
Playing music from an SD Card 265
Mii Maker 266
Create a Mii 266
Main menu 268
Editing or erasing a Mii 269
AR Games 270
AR Cards 270
Playing AR Card games 271
Face Raiders 272
Playing Face Raiders 273
Activity Log 274
Daily Records 274
Software Library 275
Download Play 276
Nintendo eShop 277
Downloadable software 277
System
Conguration 278
System Settings 278
Internet Settings 279
Internet connection requirements 280
Congure your Internet settings 281
Setup using Search for Access Point 282
Setup using Wi-Fi Protected Setup (WPS) 284
Setup using AOSS™ 285
Changing, deleting, or testing
Internet settings 286
Setup using Manual Setup 287
Nintendo DS Connections 288
Other Information 289
If an Error Code is displayed during setup 289
Parental Controls 290
Limiting the use of content or features 290
Conguring Parental Controls 291
Suspending, changing, or removing
restrictions 292
If you forget your PIN or secret question
answer 293
Data Management 294
Managing Nintendo 3DS or
Nintendo DSiWare software data 294
StreetPass Management 295
Reset Blocked-User Settings 295
Other Settings 296
Prole 297
Date & Time 298
Touch Screen 298
3D Screen Check 299
Sound 299
Mic Test 299
Outer Cameras 300
Circle Pad 302
System Transfer 302
Language 303
System Update 303
Format System Memory 304
Consumer
Information 305
Video and Computer Game
Software Rating Information 305
Replacing the Battery Pack 306
Troubleshooting 308
Warranty and Technical
Service 315
Nintendo 3DS System
Privacy Policy 316
Nintendo 3DS Code
of Conduct 320
Specications 321
Legal Notices 323
222 223
Page 5
Health and Safety Information
and Usage Guidelines
Important Safety Information – Read the following warnings before setup or use of the Nintendo 3DS
system. If this product will be used by young children, this manual should be read and explained to them
by an adult. Failing to do so may cause injury. Please carefully review the instruction booklet for the
game you are playing for additional health and safety information.
Throughout this manual, you will see this symbol followed by WARNING or CAUTION, or you may see the term IMPORTANT.
These terms have dierent levels of meaning as outlined below. Please read and understand these terms and the information that
Health and Safety Information
appears after them before using your Nintendo 3DS system:
WARNING
CAUTION
IMPORTANT:
Health and Safety Information
Viewing of 3D images by children 6 and under may cause vision damage.
Use the Parental Control feature to restrict the display of 3D images for children 6 and under. See the Parental Controls section in
this manual for more information.
• Some people (about 1 in 4000) may have seizures or blackouts triggered by light ashes or patterns, and this may occur while
they are watching TV or playing video games, even if they have never had a seizure before.
• Anyone who has had a seizure, loss of awareness, or other symptom linked to an epileptic condition should consult a doctor
before playing a video game.
• Parents should watch their children play video games. Stop playing and consult a doctor if you or your child has any of the
following symptoms:
Convulsions Eye or muscle twitching Loss of awareness
Altered vision Involuntary movements Disorientation
To reduce the likelihood of a seizure when playing video games:
1. Sit or stand as far from the screen as possible.
2. Play video games on the smallest available television screen.
3. Do not play if you are tired or need sleep.
4. Play in a well-lit room.
5. Take a 10 to 15 minute break every hour.
Warns you about incorrect use of the Nintendo 3DS system that could result in serious personal injury.
Cautions you about incorrect use of the Nintendo 3DS system that could result in personal injury or
damage to the Nintendo 3DS system, components, games, or accessories.
Informs you about incorrect use of the Nintendo 3DS system that could result in damage to the
Nintendo 3DS system, components, games, or accessories.
WARNING - 3D FEATURE ONLY FOR CHILDREN 7 AND OVER
WARNING - SEIZURES
WARNING - EYESTRAIN AND MOTION SICKNESS
Playing video games can result in eyestrain after a sustained period of time, and perhaps sooner if using the 3D feature. Playing video
games can also result in motion sickness in some players. Follow these instructions to help avoid eyestrain, dizziness, or nausea:
• Avoid excessive play. It is recommended that parents monitor their children for appropriate play.
• Take a 10 to 15 minute break every hour, or every half hour when using the 3D feature, even if you don’t think you need it.
Each person is dierent, so take more frequent and longer breaks if you feel discomfort.
• If your eyes become tired or sore while playing, or if you feel dizzy or nauseated, stop and rest for several hours before
playing again.
• If you continue to have any of the above symptoms, stop playing and see a doctor.
WARNING - REPETITIVE MOTION INJURIES
Playing video games can make your muscles, joints or skin hurt. Follow these instructions to avoid problems such as tendinitis,
carpal tunnel syndrome or skin irritation:
• Avoid excessive play. Parents should monitor their children for appropriate play.
• Take a 10 to 15 minute break every hour, even if you don’t think you need it.
• When using the stylus, you do not need to grip it tightly or press it hard against the screen. Doing so may cause fatigue or
discomfort.
• If your hands, wrists or arms become tired or sore while playing, or if you feel symptoms such as tingling, numbness, burning
or stiness, stop and rest for several hours before playing again.
• If you continue to have any of the above symptoms or other discomfort during or after play, stop playing and see a doctor.
WARNING - BATTERY LEAKAGE
The Nintendo 3DS system contains a rechargeable lithium ion battery pack. Leakage of ingredients contained within the battery
pack, or the combustion products of the ingredients, can cause personal injury as well as damage to your Nintendo 3DS system.
If battery leakage occurs, avoid contact with skin. If contact occurs, immediately wash thoroughly with soap and water. If liquid
leaking from a battery pack comes into contact with your eyes, immediately ush thoroughly with water and see a doctor.
To avoid battery leakage:
• Do not expose battery to excessive physical shock, vibration, or liquids.
• Do not disassemble, attempt to repair, or deform the battery.
• Do not dispose of battery pack in a re.
• Do not touch the terminals of the battery or cause a short between the terminals with a metal object.
• Do not peel or damage the battery label.
WARNING - RADIO FREQUENCY INTERFERENCE
The Nintendo 3DS system can emit radio waves that can aect the operation of nearby electronics, including cardiac pacemakers.
• Do not operate the Nintendo 3DS system within 9 inches of a pacemaker while using the wireless feature.
• If you have a pacemaker or other implanted medical device, do not use the wireless feature of the Nintendo 3DS system
without rst consulting your doctor or the manufacturer of your medical device.
• Observe and follow all regulations and rules regarding use of wireless devices in locations such as hospitals, airports, and on
board aircraft. Operation in those locations may interfere with or cause malfunctions of equipment, with resulting injuries to
persons or damage to property.
IMPORTANT: The Nintendo 3DS system allows you to disable wireless communication. To turn o all wireless
communication, push the wireless switch to turn the feature o. See page 228 for more information. Make sure the
wireless LED is o.
NOTE: This product does not contain latex.
This product complies with applicable laws barring the use of toxic materials such as lead, mercury, cadmium, hexavalent chromium, PBB, or PBDE in consumer products.
Health and Safety Information
224
225
Page 6

HARDWARE PRECAUTIONS AND MAINTENANCE
Usage Guidelines
IMPORTANT BATTERY GUIDELINES
1. Do not disassemble or try to repair the Nintendo 3DS system, components, or accessories. Doing so voids your warranty.
2. Always turn the Nintendo 3DS power o before loading or removing a Game Card. Insert the Game Card completely until
it clicks into place, without forcing either the Game Card or the Nintendo 3DS system.
3. Do not store the Nintendo 3DS system in a humid place, on the oor, or in any location where it may contact moisture,
Usage Guidelines
dirt, dust, lint, or any other foreign material.
4. Do not drop, hit, or otherwise abuse the Nintendo 3DS system, components, or accessories. Doing so may damage the
LCD screens or other precision components of the Nintendo 3DS system.
5. Make sure all connections to the Nintendo 3DS system are made carefully and inserted into the correct locations only.
Hold plugs straight when inserting them into sockets.
6. When disconnecting any plugs from the Nintendo 3DS system or wall outlet, rst turn the Nintendo 3DS system o. Then
carefully pull by the plug itself rather than by the cord. Do not step on, sharply pull, or bend any wires or cables.
7. Do not expose the Nintendo 3DS system, Game Cards or any of the Nintendo 3DS components or accessories to extreme
heat or cold. The liquid crystal displays (LCD) may become slower or may not work when the temperature is low. The LCD
will deteriorate at a high temperature. Take care not to expose the Nintendo 3DS system to direct sunlight for extended
periods of time.
8. The LCD screens may be damaged by sharp objects or pressure. Take care to protect the displays from scratches or stains.
9. Connect ONLY accessories designed and licensed for use with the Nintendo 3DS system to any external connectors.
10. Do not spill liquids on the Nintendo 3DS system, Game Cards, or other components or accessories. If the Nintendo 3DS
system comes into contact with liquids, wipe clean with a soft, slightly damp cloth (use water only). Remove the battery
cover and battery. If liquid came into contact with the battery, do not reuse it. For further instructions on battery replacement and possible service for your Nintendo 3DS system, please visit our website at support.nintendo.com.
11. Do not rapidly turn the power switch ON and OFF, as this may shorten the life of the battery and cause Game Cards to
lose your stored game information.
12. To avoid dirt or dust from getting into the Nintendo 3DS system, always leave a Game Card loaded (with the power o),
when not in use.
13. When using an AC adapter, make sure you are using the correct model appropriate for your Nintendo 3DS system. Always
unplug the AC adapter from the wall outlet when not in use.
14. Do not use the AC adapter if the cable or plug is damaged.
15. The AC adapter is intended to be correctly oriented in a vertical or oor mounted position.
1. Do not remove the battery pack from the Nintendo 3DS system unless it needs to be replaced.
2. Do not use any battery other than the Nintendo 3DS rechargeable battery pack, Model No. CTR-003. See page 306 for more
information on replacing the battery.
3. When recharging the battery, use ONLY the included AC adapter, Model No. WAP-002(BRA).
4. When disposing of the battery, follow appropriate local guidelines and regulations. For information on battery disposal
contact your local solid waste authority. See page 306 for more information on recycling the battery.
5. If liquid comes into contact with the battery, do not reuse it. For further instructions on battery replacement and possible
service for your Nintendo 3DS system, please visit our website at support.nintendo.com.
IMPORTANT STYLUS AND SCREEN GUIDELINES
1. Use the stylus ONLY on the Touch Screen (lower screen).
2. Use only enough pressure to operate the game. Excessive pressure may damage the Touch Screen.
3. Do not use the stylus if it is broken.
4. Use only a Nintendo licensed stylus on the Touch Screen.
5. Retract and replace the stylus in the stylus holder when not in use.
6. If you use a screen protector on your Nintendo 3DS system, use only a Nintendo licensed screen protector.
CLEANING THE TOUCH SCREEN AND 3D SCREEN
IMPORTANT: If the Touch Screen becomes dirty or contaminated with foreign material, do not continue to use your
Nintendo 3DS system. It may not work properly and can become more damaged. Follow the cleaning procedures
below. If it still does not work after cleaning, visit support.nintendo.com for information on repair services.
If the screens on your Nintendo 3DS system have visible smudges, ngerprints, or other foreign material on them, you can clean
them by using a soft clean cloth, such as a lens or eyeglass cleaning cloth.
1. Slightly dampen the cloth with water ONLY and wipe o the screens to loosen any dirt or foreign material.
2. Using a dry cloth, wipe the screens to dry them and nish the cleaning process. If needed, repeat the process.
GAME CARD PRECAUTIONS AND MAINTENANCE
1. Avoid touching the connectors with your ngers. Do not blow on them or allow them to get wet or dirty. Doing so may
damage the Game Card and/or the Nintendo 3DS system.
2. The Game Card is a high-precision electronic device. Do not store it in places that are very hot or cold. Do not hit, drop, or
otherwise abuse it. Do not attempt to take it apart.
3. Do not clean with benzene, paint thinner, alcohol or any other solvent.
4. Always check the Game Card edge connector for foreign material before inserting the Game Card into the Nintendo 3DS
system.
226 227
Page 7
Basic Operations
Notication LED
Indicates the status of the system.
(blue) You have received a notication; blinks for about ve seconds
(see page 256).
Basic Operations
(green) You have received StreetPass data; blinks for about ve seconds
(see page 256).
(orange) A friend has come online; blinks for about ve seconds (see
page 252).
(red) Battery power is low; blinks continuously when very low
(see page 232).
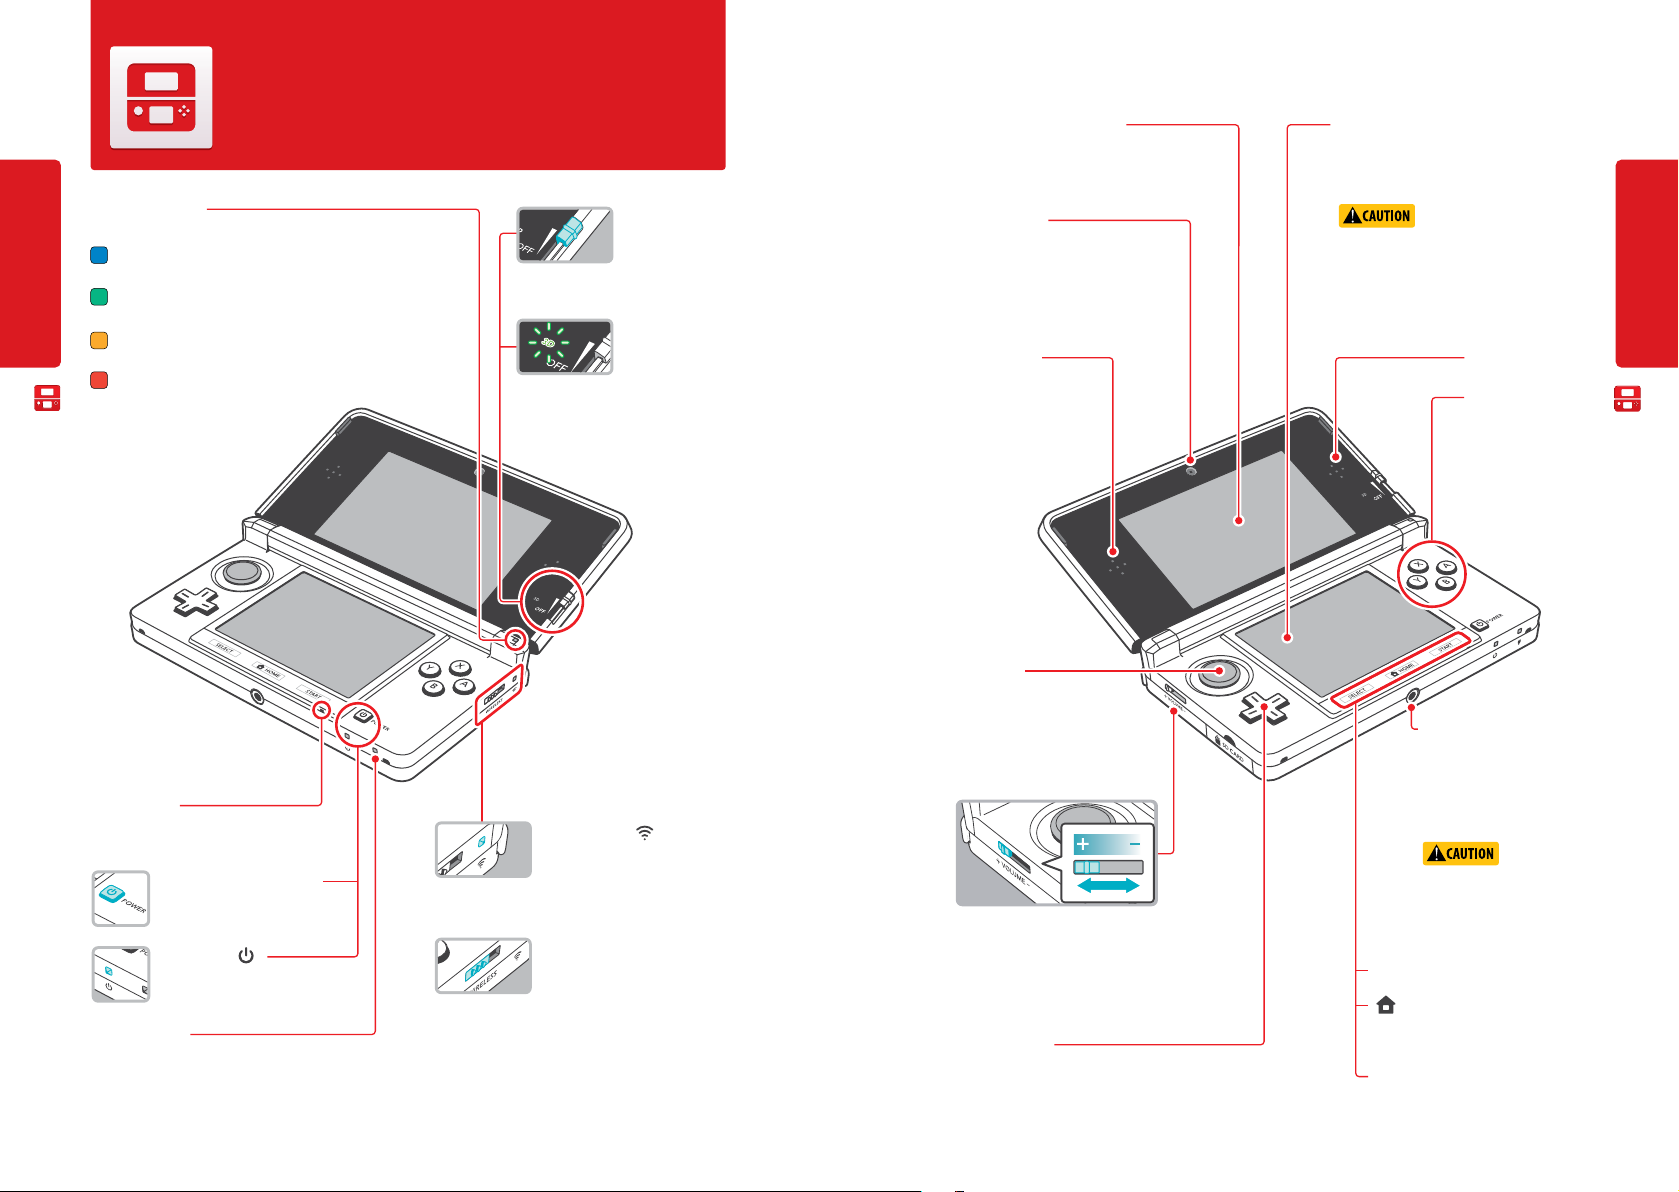
Nintendo 3DS Components
Microphone
Used by games and applications that
include microphone features.
Power Button (POWER)
See page 234.
Power LED ( )
Lights when the power is turned on.
See page 237.
Recharge LED
Lights when the battery is being charged.
See page 232.
Nintendo 3DS Components
communication is turned o, and blinks while data is
being sent or received.
NOTE: For Nintendo DS or Nintendo DSi software, you must
enable wireless communication before starting the game.
However, once enabled, you can turn communications o by
pushing the wireless switch.
3D Depth Slider
Adjusts the depth of
the 3D image from
zero to maximum. See page 238.
3D LED
Lights with a steady
green light when the
image on the upper screen (the 3D screen)
can be displayed in 3D. See page 238.
Wireless LED ( )
Lights when wireless communication is turned on, turns o when
Wireless switch (WIRELESS)
Push this switch to turn wireless
communication on or o.
3D Screen (Upper screen)
Capable of displaying 3D content for games
that include this feature. See page 238.
Inner camera
Used by games or other applications that
include camera features.
NOTE: Avoid getting the camera lens dirty. If
it becomes dirty, wipe gently with a soft cloth,
being careful not to damage the lens.
Left speaker
Circle Pad
For game-play control that supports
this feature. See the instructions for the
game you are playing for specic control
information.
Volume control
Slide to adjust the volume.
NOTE: The camera shutter sound always
plays at a xed volume and is not aected
by the volume control.
+
Control Pad
For game-play control.
Touch Screen (Lower screen)
Touch-sensitive screen. This screen should only be
operated with a Nintendo licensed stylus.
See page 231.
When opening the Nintendo 3DS
system, keep your ngers away from the hinge to
avoid pinching them.
Right speaker
Control buttons
For game-play control.
See the instructions for
the game you are playing for specic control
information.
Audio jack
For connection of stereo
headphones (sold separately).
If headphones are connected,
no sound will play through the
speakers.
When using
headphones, set the volume at a
safe level. Setting the volume too
high may harm your hearing or
damage the headphones.
SELECT
HOME
Displays the HOME Menu during a game.
START
Basic Operations
Nintendo 3DS Components
228
229
Page 8
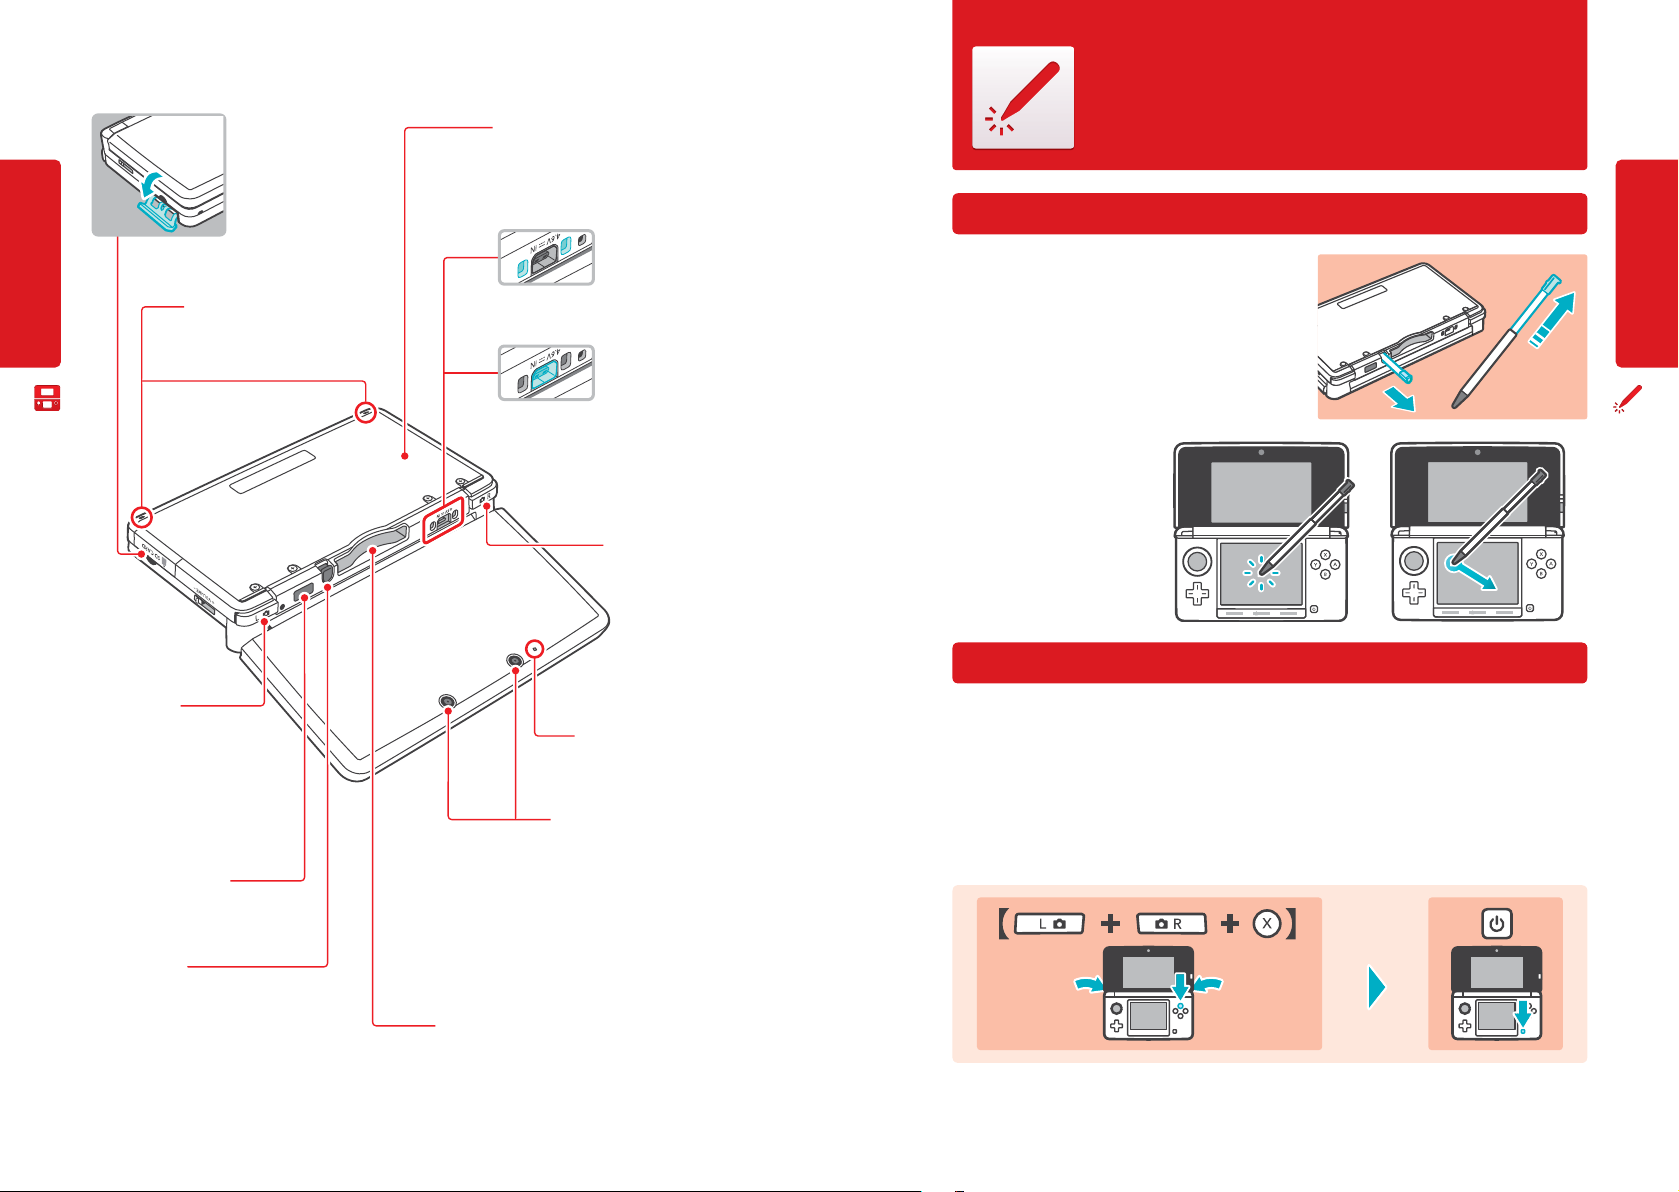
Basic Operations
SD Memory Card slot
For inserting SD or SDHC
memory cards. See page 240.
Wrist strap attachment
For attachment of a licensed wrist
strap (sold separately).
Battery cover
Remove cover to replace the battery.
NOTE: Do not remove the cover unless you
need to replace the battery or check battery
installation.
Cradle connectors
Allows connection to the
Nintendo 3DS charging
cradle (included). See
page 232.
AC adapter
connector
Allows connection of
the Nintendo 3DS AC adapter (included), for
recharging the battery or operation using
household current. See page 232.
R Button
Using the Touch Screen and Stylus
Using the stylus
After removing the stylus from the stylus holder, it can be adjusted to
your desired length. Return it to the retracted length before replacing it
in the stylus holder.
The lower LCD screen, or Touch Screen, is
touch-sensitive. For games that include
this game control feature, operate the
screen by using the included stylus.
Lightly touch or slide the stylus across
the Touch Screen as shown at right.
Basic Operations
Using the Touch Screen and Stylus
Nintendo 3DS Components
L Button
Infrared transceiver
Sends and receives information when
using infrared communication.
Stylus holder
Always replace the stylus into the stylus holder
after use. See page 231.
NOTE: To prevent damage to the Nintendo 3DS
system, do not insert anything other than a Nintendo 3DS licensed stylus into the stylus holder.
230
Camera LED
Lights up when the outer
cameras are in use.
Outer cameras
Used by games or other applications that include camera features.
Two cameras allow you to take 3D
photographs.
NOTE: Avoid getting the camera
lenses dirty. If they become dirty,
wipe gently with a soft cloth, being
careful not to damage the lenses.
Game Card slot
For loading Nintendo 3DS Game Cards. Also compatible
with Nintendo DS and Nintendo DSi Game Cards.
Calibrating the Touch Screen
If the Touch Screen doesn’t seem to be responding properly...
NOTE: If the Touch Screen is not responding properly, rst try removing any screen protectors (sold separately) that
you may have added to your Nintendo 3DS system.
Then you can try calibrating it from within System Settings, accessible from the HOME Menu (see page 296 for more information).
If you are unable to operate the HOME Menu successfully, use the following procedure to switch directly to the Touch Screen
calibration screens. First turn the power o. Then hold down the L Button, R Button, and X Button and turn the system on as
shown below.
While holding,
press
231
Page 9
Charging the Battery Pack
Be sure to charge the battery pack before using it for the rst time or when it has not been used in the
last six months.
WARNING
Basic Operations
IMPORTANT: The Nintendo 3DS AC adapter, Model No. WAP-002(BRA), is for use only with the Nintendo 3DS,
Nintendo DSi, and Nintendo DSi XL portable video game systems. It is not compatible with any other Nintendo
system. Do not use the AC adapter with voltage transformers, dimmer switches, or any other equipment. It is only
for use in a standard AC wall outlet.
Battery information
Do not use the Nintendo 3DS AC adapter or charging cradle during a lightning storm. There
may be a risk of electric shock from lightning.
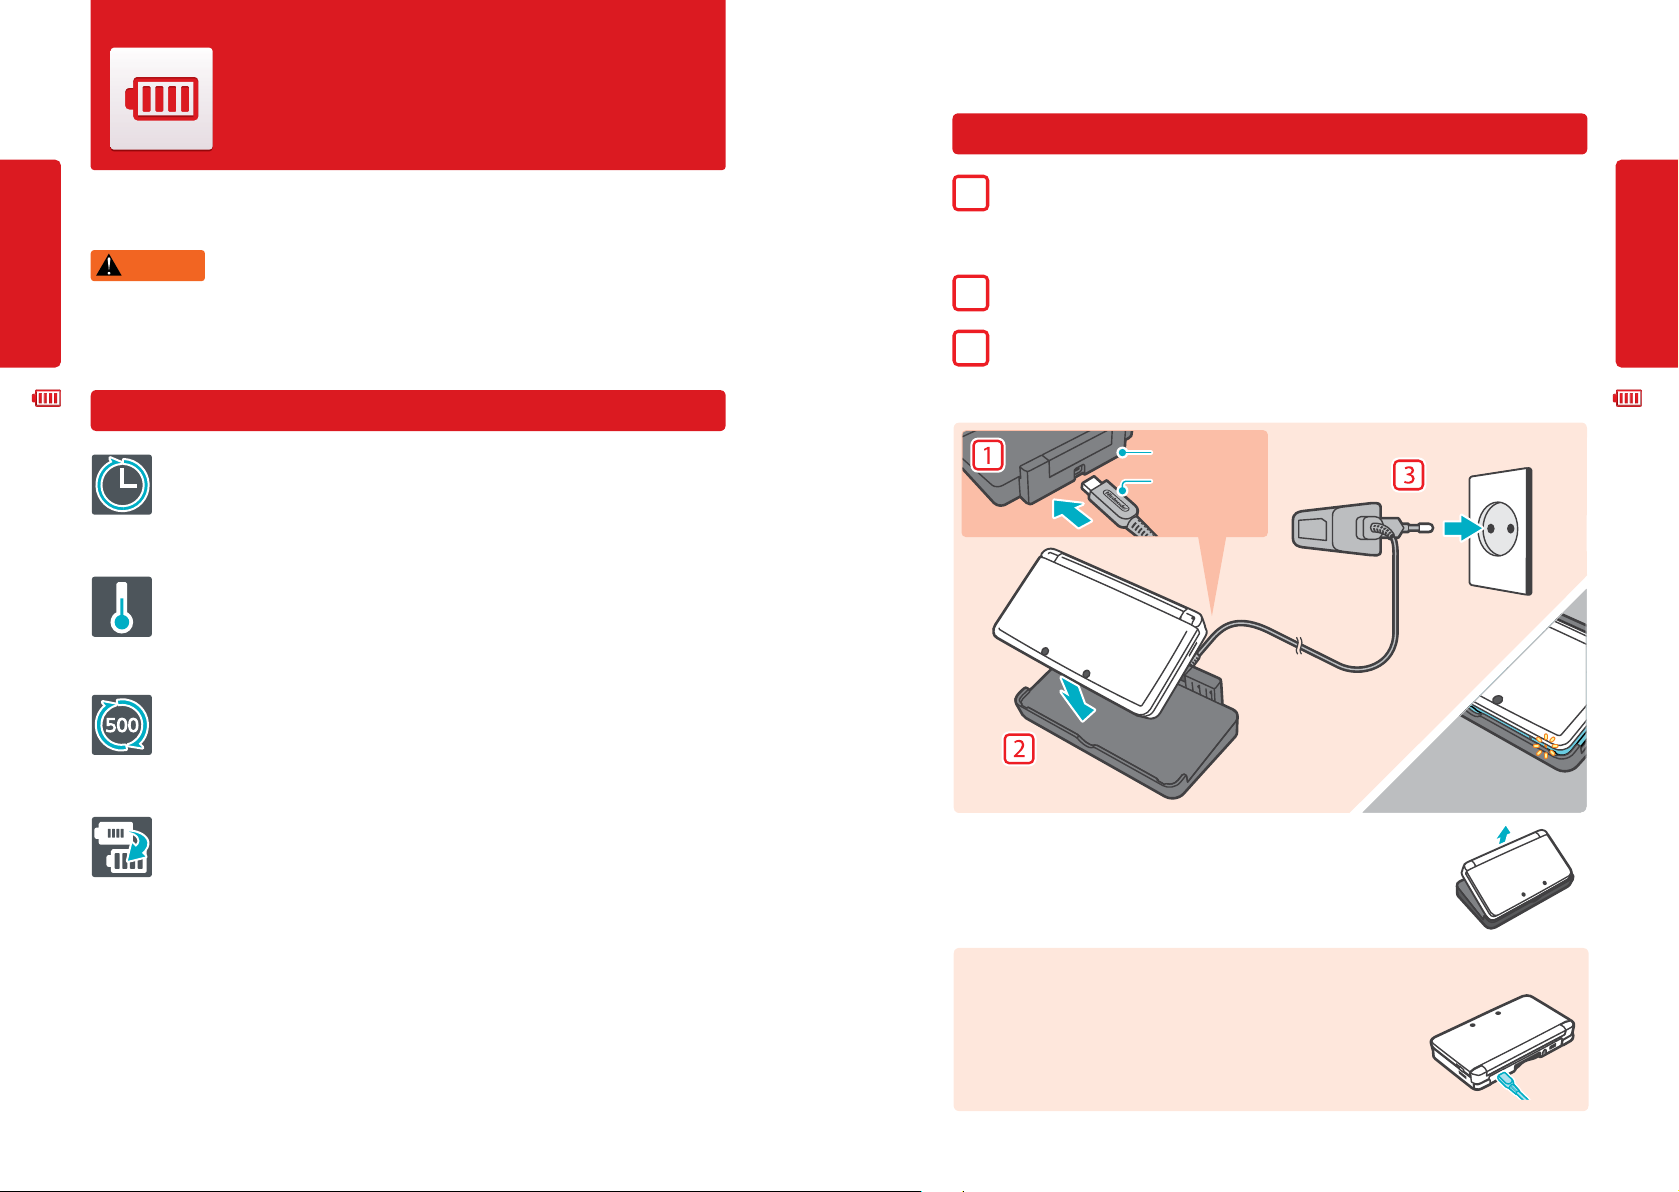
Battery charging procedure using the charging cradle
Insert the DC plug from the AC adapter into the AC adapter connector on the back of the Nintendo 3DS charging cradle.
1
Be sure to insert it straight into the connector.
IMPORTANT: Be sure the DC connector plug is facing in the correct direction before inserting into the
connector to avoid damaging either the plug or connector.
Place the Nintendo 3DS system on top of the charging cradle. It will click into place.
2
Insert the AC adapter into a standard AC wall outlet. The recharge LED will light, indicating the system is charging.
3
When fully charged, the recharge LED will go out.
IMPORTANT: The AC adapter should be correctly oriented in a vertical or oor-mounted position. The cord
should always face downward.
Basic Operations
Charging the Battery Pack
Charging the Battery Pack
Battery recharge time is approximately 3 1/2 hours
It takes about 3 1/2 hours to charge the battery pack with the power o, although this will vary depending on the
remaining charge when you begin to recharge the battery. You can use the system while the battery is charging,
but this will increase the recharging time.
Optimal charging temperature is between 5-35º Celsius (40º and 95º Fahrenheit)
Ambient temperature above or below these temperatures may permanently decrease the life of the battery pack
and adversely aect the ability of the battery to charge.
The battery pack can be recharged approximately 500 times
Battery life will decrease over time. After 500 recharges, battery life may be only 70% of the battery life when new.
If usage time gets very short, replace the battery pack
Battery packs become worn with repeated charge/discharge cycles, and the amount of time they can be used when
fully charged will decrease gradually over time. If you feel the usage time has dropped o noticeably, replace the
battery (see page 306.)
Charging cradle
Logo faces up
Recharge LED
will light up
When charging is complete, remove the AC adapter from the wall outlet and fold the prongs back
into the housing. Remove the Nintendo 3DS from the charging cradle, pulling the back edge out rst.
IMPORTANT: When disconnecting any plugs from the Nintendo 3DS, charging cradle, or
wall outlet, carefully pull by the plug itself rather than by the cord.
Battery charging by connecting directly to the AC adapter...
You can also charge the battery pack by plugging the AC adapter directly into the AC
adapter connector on the back of the Nintendo 3DS system.
NOTE: If you play a game while the system is recharging, the recharge LED may not
always turn o once charging has completed.
232
233
Page 10

Power On/O and Basic Conguration
Press the POWER Button to turn the system on. The Power LED
lights up when the power is on.
The rst time you turn the Nintendo 3DS on, you will
need to select a language and then congure the System
Settings.
Basic Operations
For more information on the Power LED and battery life, see page 237.
Sleep Mode and turning your system o
Putting the system into Sleep Mode
Closing the system while it is turned on will put the system into Sleep Mode. Sleep Mode will reduce power consumption
while still using features such as StreetPass and SpotPass (see page 220 and page 221 for more information on these features).
Depending on the software you are using, closing the system may not place it in
Sleep Mode. (For example, when listening to music with Nintendo 3DS Sound.)
Turning the system o
To turn the system o, either press the POWER button to display the Power menu and
Power On/O and BasiC Ccnguration
tap Power O, or press and hold the POWER button until the power LED turns o.
Power LED will
light up
Press the POWER
Button
Use the keyboard to enter a nickname (or user name). You can enter
3
up to 10 characters.
Remember that other Nintendo 3DS users will see your nickname when
interacting with them, so do not use your real name or otherwise share
any personal information in your nickname.
Set your birthday.
4
Tap the
and move to the next option.
Set the country and state or province where you live.
5
Read the Nintendo 3DS Service User Agreement, and after reading, tap I Accept.
6
To continue without agreeing, tap Later. If you tap Later, you cannot connect to the
Internet until you agree to the Nintendo 3DS Service User Agreement.
arrows to adjust the month and day, then tap OK to conrm
Basic Operations
Power On/O and BasiC Ccnguration
Conguring System Settings for the rst time
First select a language. Then you will need to congure the basic system settings. Using the stylus on the lower screen, follow
the on-screen instructions. If a child will be using the Nintendo 3DS, an adult should assist with these settings.
Conrm that you are holding the system in the best way to view 3D images by
1
following the on-screen instructions. See page 238 for more information on
viewing 3D images.
Set the date and time.
2
Tap the arrows to adjust the
settings, then tap OK to conrm and move to
the next option.
234
Congure the Internet Settings
7
If you connect to the Internet, you can use SpotPass, Nintendo Wi-Fi Connection, and
other features to enjoy more ways of playing and interacting. See page 279 for more
information on setting up an Internet connection. To congure these settings later,
tap Wait Till Later.
Congure the Parental Controls
8
Parental Controls allow you to restrict the use or download of games and some
features by children (such as 3D image display). See page 290 for more information.
If you don’t need to congure these settings, tap Wait Till Later.
You have now completed the basic system conguration. Press the HOME Button to display the
HOME Menu (see page 241) and explore the many features of the Nintendo 3DS.
235
Page 11
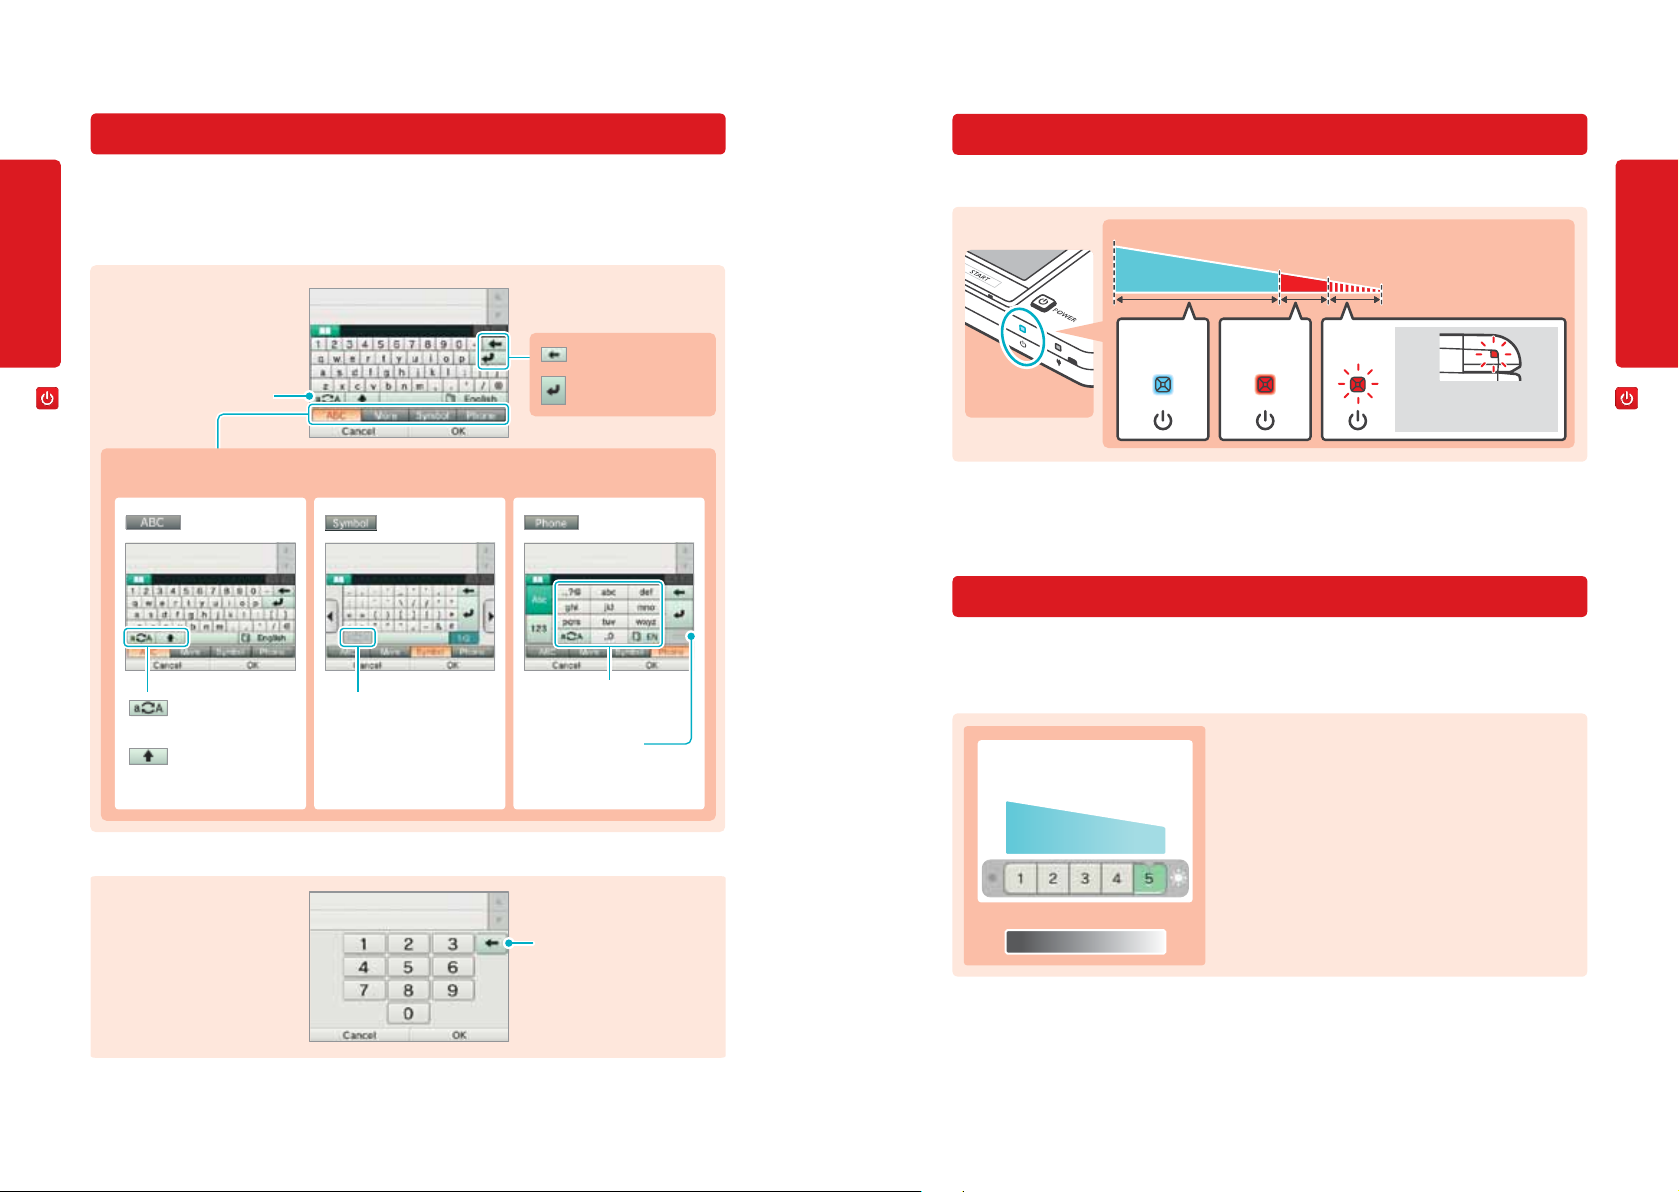
Using the keyboard
Power LED status
A keyboard will display when you are required to enter characters. There are two types of keyboards: a standard alphanumeric
keyboard and a ten-key keyboard.
Alphanumeric keyboard
Basic Operations
Switch the last character
between upper and lower case.
Delete last character
Return
Switch input method
English
Power On/O and BasiC Ccnguration
Switch between upper
and lower case
Uppercase only
Special characters or
symbols
Switch between upper
and lower case
Cell phone-style
Each tap changes which character
you would use from each key
Move to next character
Ten-key keyboard
Delete last character
The power LED lights when the system is on. The color and status of the LED changes depending on the remaining battery charge.
Full charge
Low
Very low
Steady blue
light
NOTE: If you run out of remaining battery life while playing a game, you must replay the game from your last saved
location. If the power LED turns red, save your game and charge the system.
If you put the system into Sleep Mode while the power LED is a steady blue light, the LED will slowly brighten and darken.
Steady red
light
Blinking red
light
The Notication LED also
blinks red
Battery endurance
The battery endurance times are estimates. They will vary depending on factors such as the software being played, the amount
of data received by wireless communication, and the ambient temperature. Using the camera features may also reduce the
battery endurance times shown below.
Battery endurance time
About 5 hours
Screen brightness
About 3
hours
BrightDim
The screen brightness setting aects the battery endurance time. The
factory setting is 5 – for more information on adjusting screen brightness, see page 245.
NOTE: Power-saving mode will increase the battery endurance by
automatically adjusting the screen brightness and color based on what
is being displayed at the time. For more information on power-saving
mode, see page 245.
Basic Operations
Power On/O and BasiC Ccnguration
236
• If you put the system in Sleep Mode when not using it, you can reduce power consumption while still being able to send and
receive information from StreetPass and SpotPass via the wireless communication features. If the system is fully charged and
put into Sleep Mode, the system's battery endurance time in Sleep Mode is roughly 3 days.
• The power LED slowly brightens and darkens while the system is in Sleep Mode. NOTE: Depending on the software you are
using, sometimes closing the system will not cause the system to enter Sleep Mode. In these cases the power LED will remain
steadily lit. (For example, when listening to music with Nintendo 3DS Sound.)
237
Page 12
Viewing and Adjusting the 3D Image
The upper 3D screen allows you to view stereoscopic 3D images. You can adjust the apparent depth of
these images with the 3D depth slider.
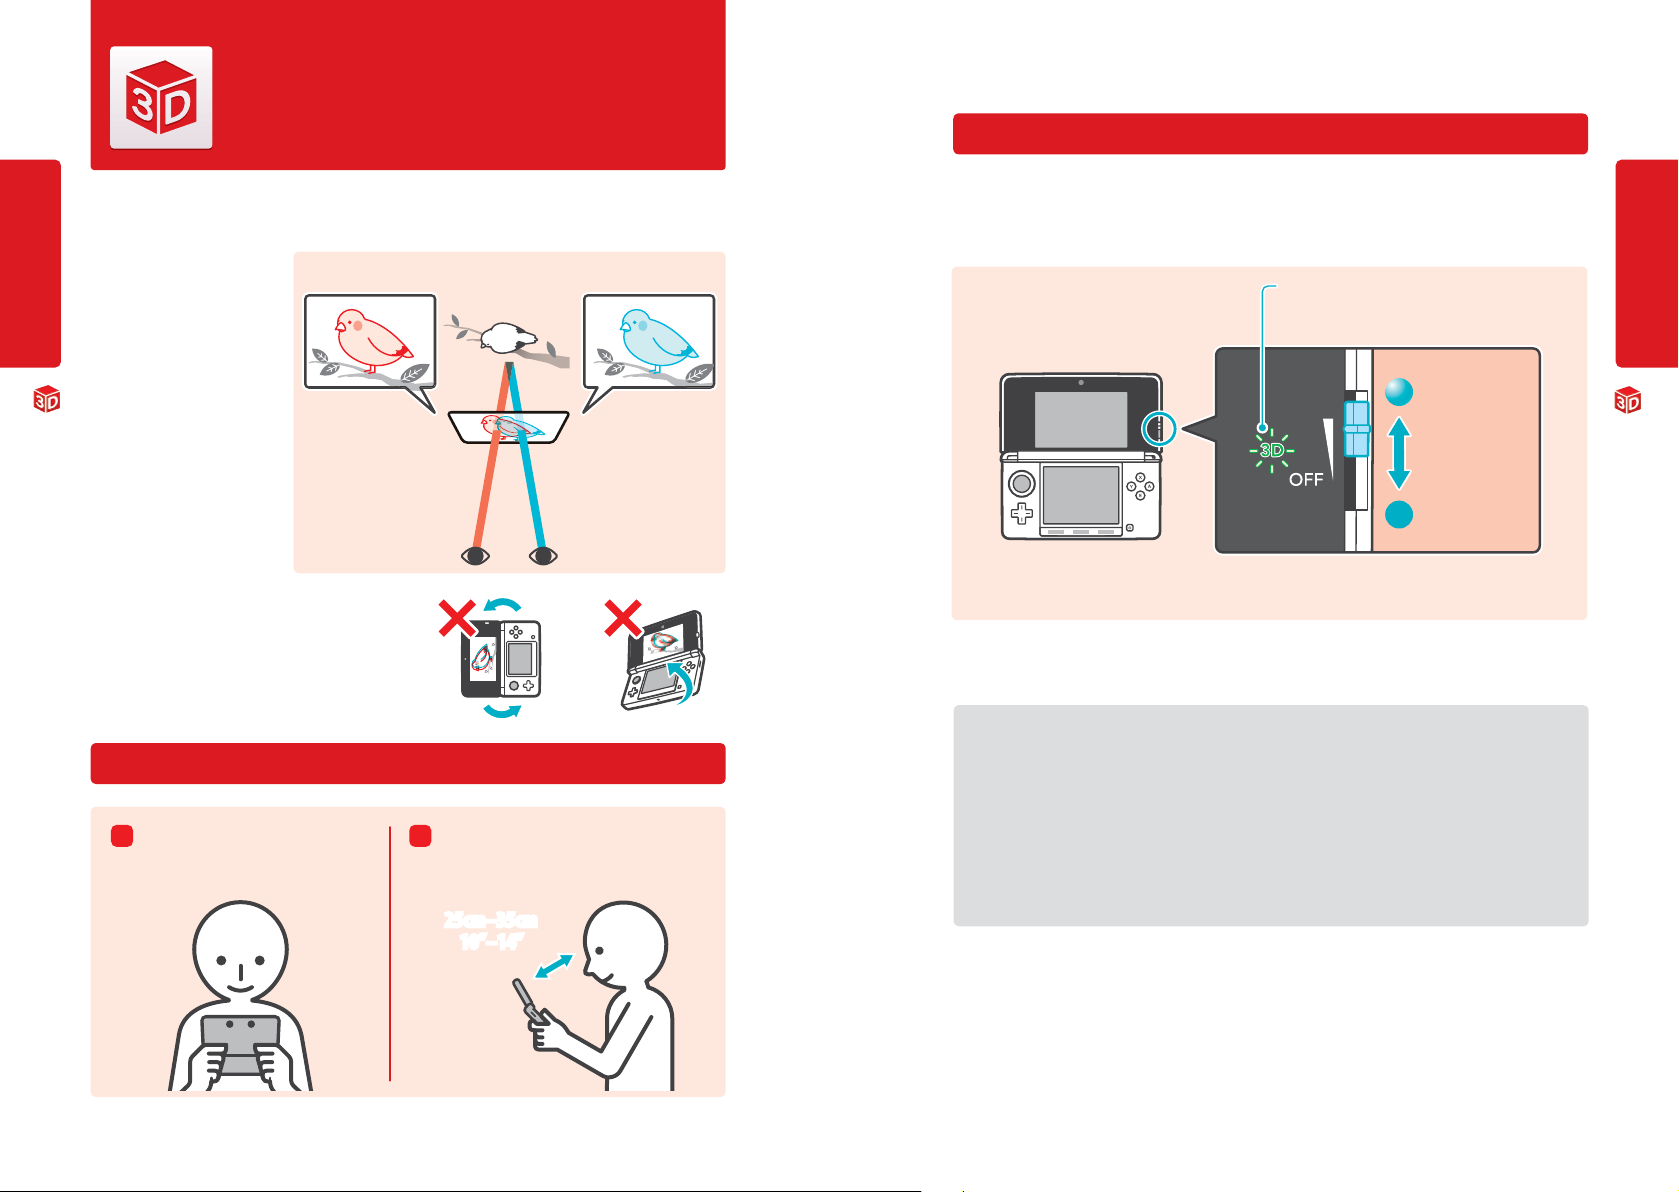
The Nintendo 3DS system uses binocular parallax (the fact that your left and
right eyes are located a short distance
Basic Operations
apart, causing them to see dierent
images) to produce 3D images with a
feeling of depth.
If you view the 3D screen from the
correct distance, it displays an image
for your left eye in such a way that only
your left eye can see it, and an image
for your right eye in such a way that
only your right eye can see it. Binocular
parallax then allows you to see 3D
depth in the image.
Viewing the 3D screen from a diagonal or tilted position, or viewing it
Viewing and Adjusting the 3D Image
with the system held vertically, will not produce a 3D eect. Viewing
it this way could cause you to see double images overlapped or cause
the screen to appear black.
Image for left eye Image for right eye
3D image
Adjusting the depth of the 3D images
You can use the 3D depth slider to adjust the apparent depth when viewing 3D images. If it is dicult to view the image with the
3D slider moved up to the maximum (with the depth set as deep as it will go), try moving the slider to the minimum and then
increasing it in small steps until you nd a level where it is easy for you to view the 3D images. Once your eyes are accustomed to
3D images, you may be able to achieve the best-quality image by moving the 3D slider up.
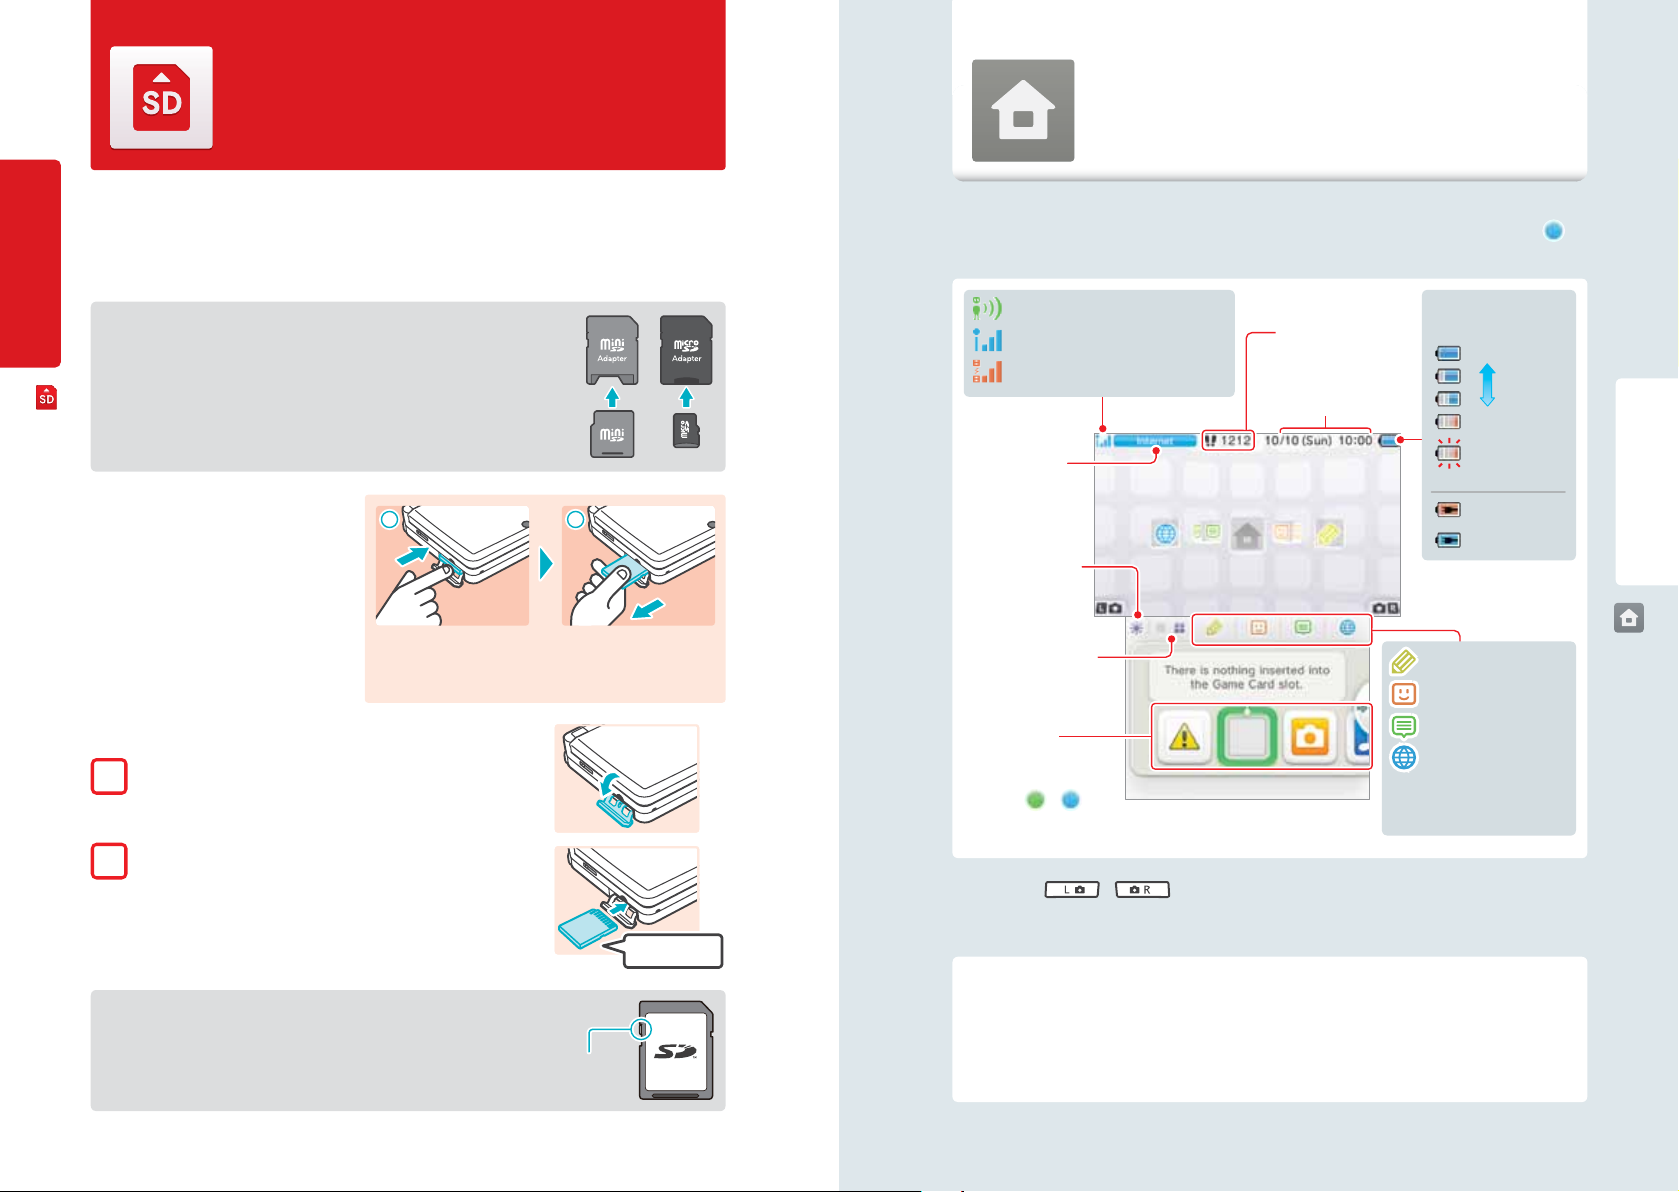
3D depth slider
Move the 3D depth slider down to its lowest position
to switch to 2D (at) display.
• If the 3D LED is not lit, moving the 3D slider toward “3D” will not produce a 3D image.
• Some software switches between 2D and 3D imagery. With this software, moving the 3D slider does not change the 3D eect.
• It may be dicult to see the 3D eect in locations with strong direct light, such as sunlight.
3D LED
Lights up when 3D images are supported by the software
you are using.
Greater depth
3D depth
adjustment
Less depth
Basic Operations
Viewing and Adjusting the 3D Image
To view the best-quality 3D images
1
View the screen from directly in front
238
2
Hold the screen 25–35 centimeters
(10 to 14 inches) from your eyes
Adjust the distance for the easiest viewing of 3D images.
25cm–35cm
10”–14”
A note about viewing 3D images
IMPORTANT: The ability to view 3D images may vary from person to person, depending on physical condition,
content of images, and the environment you are viewing them in. A small percentage of people may not be
able to see 3D images at all. If you see double images or have diculty seeing the 3D eect, turn the 3D
eect o with the 3D depth slider and refrain from using it. The 3D feature can also be turned o with
Parental Controls in System Settings - see page 278 for more information.
Be sure to read the Health and Safety information regarding 3D images at the beginning of this manual (see
page 224).
NOTE: You can use Parental Controls to restrict the display of 3D images (see page 290).
239
Page 13
Using SD Memory Cards
The Nintendo 3DS uses SD Memory Cards up to 2GB in size and SDHC Memory Cards of 4GB
and larger.
HOME Menu
The HOME Menu will display after you turn the system on. From here you can start
Nintendo 3DS software applications.
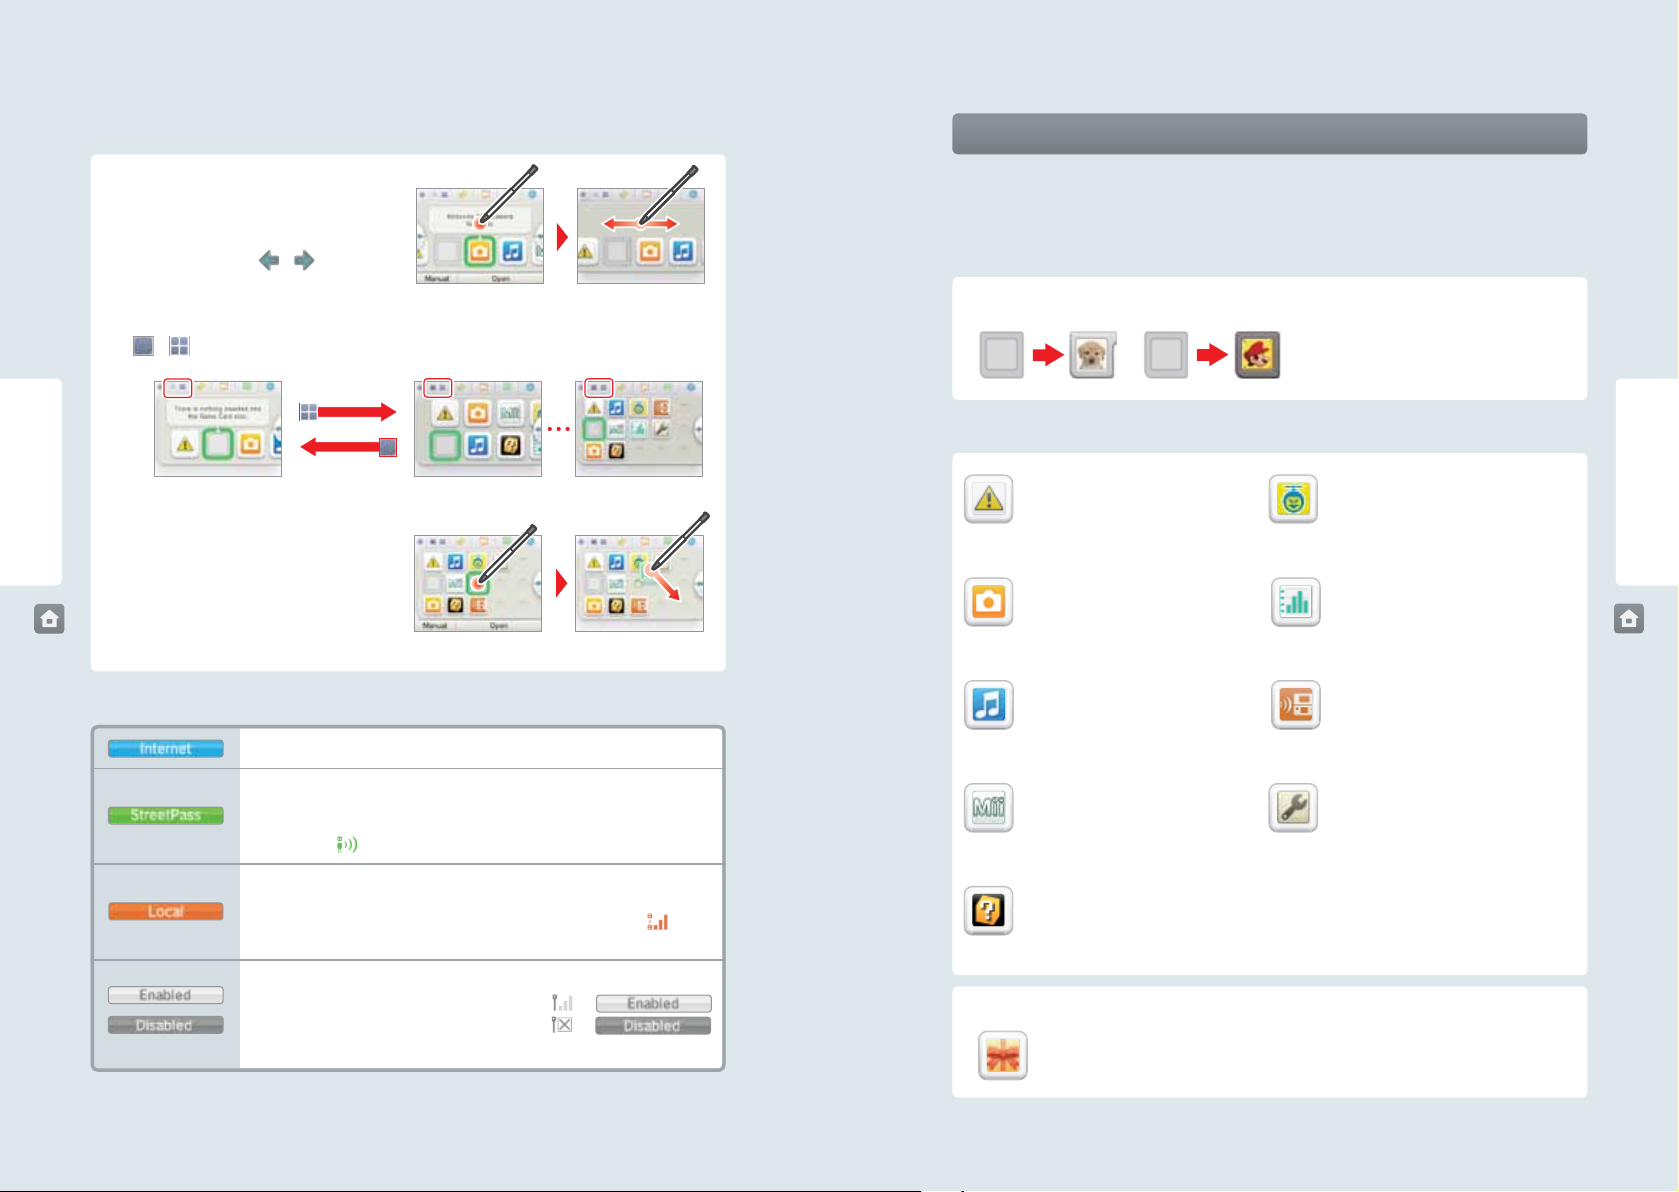
The Nintendo 3DS system comes with an SD Memory Card inserted into the SD Card slot. With SD Memory Cards (SD
Cards), you will be able to save photos you have taken with the system or play music saved to the SD Card. (The data that can be
saved to an SD Card varies depending on the software.)
Software that you have downloaded is saved to the SD Card. NOTE: Downloaded software that has been saved on several cards
cannot be re-saved onto a single card.
Basic Operations
Using miniSD Cards or microSD Cards (sold separately)
These require an SD Card adapter (sold separately).
IMPORTANT: Inserting or removing a miniSD Card or microSD Card while the card
adapter is still inserted in the system could cause the system to be damaged or malfunction, or cause loss of data. Always insert and remove the entire card adapter.
Removing an SD Card
Make sure the power is o.
IMPORTANT: To prevent damage to the system
or the SD Card, do not remove the SD card while
the system is on, unless instructed to do so
by the software you are using. Doing so may
destroy data.
Using SD Memory Cards
1 2
Open the SD Card slot cover and press on the end of the card until it
clicks and partially ejects from the slot. Grasp the SD Card and remove
from the card slot.
Inserting an SD Card
Open the SD Card slot cover.
1
IMPORTANT: Do not pull or twist the slot cover forcefully. Doing so could stretch
or deform it, which could prevent the cover from closing correctly.
Insert the SD Card.
2
Insert the SD Card into the SD Card slot until it clicks into place, making sure the
label side faces down. Close the SD Card slot cover.
SD Card write-protection switch
In the down position, the SD Card write-protection switch will prevent you from saving
or erasing data on the card. In the up position, you can save and erase data on the card.
Write-protection
switch
Label faces down
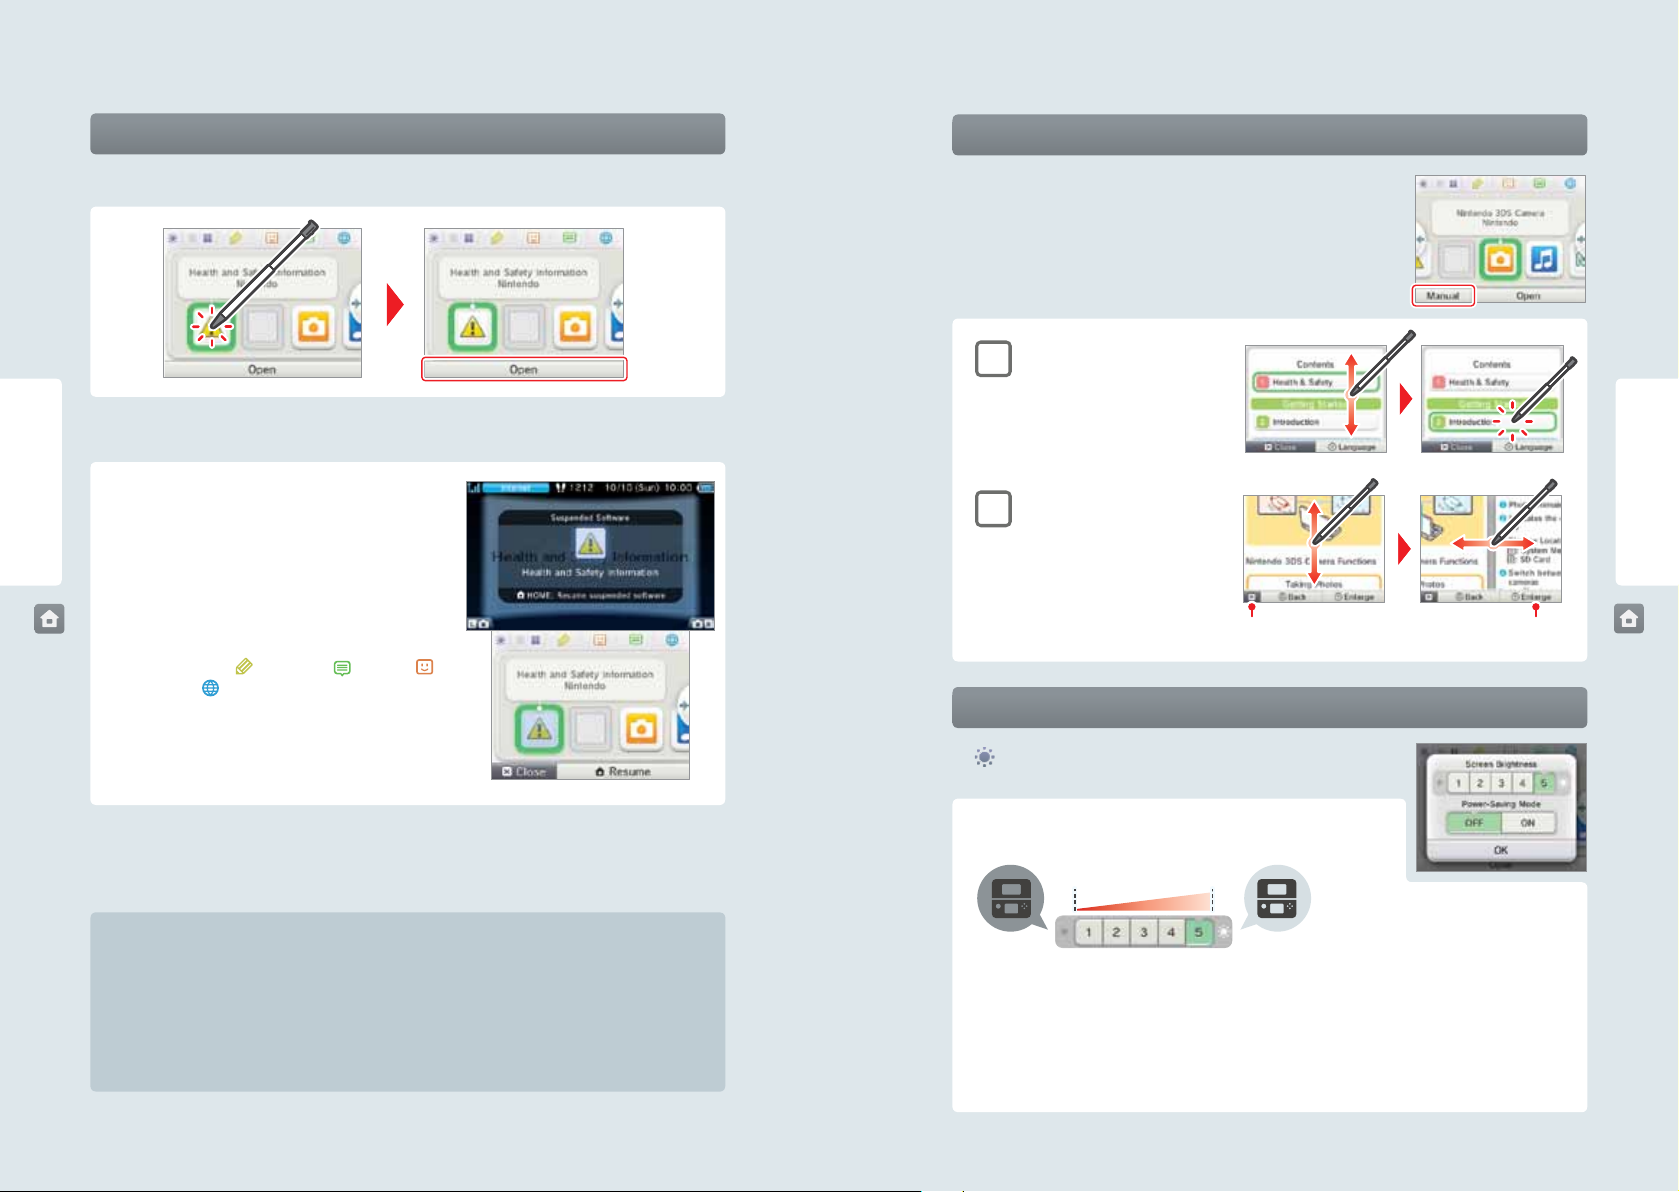
To start a software title, tap its icon on the HOME Menu. On the HOME Menu, you can see several important status indicators
including the time, date, and current day’s step information. Also, if any of your software received new data via SpotPass,
be displayed next to the software icon.
StreetPass icon (see page 242)
Reception signal-strength icon (see page 283)
Reception signal-strength icon (see page 242)
Steps/Play Coins
Battery status
icon
High
Date / Time
Low
Communication
mode
Almost out
(blinking)
Charging (blinking)
Charging complete
Screen brightness/
power-saving mode
Changing the display
Software icons
If there is new data or
notication for any software
application, or
will be displayed next to the
software icon.
NOTE: If you press
or
when the HOME Menu is displayed, you can enter camera mode and take photos.
Game Notes (see page 251)
Friend list (see page 252)
Notications (see page 256)
Internet browser
NOTE: Your Nintendo 3DS system
may require a system update to
use this software (see page 296).
Steps and Play Coins
Each time you take 100 steps with your Nintendo 3DS, you will earn one Play Coin. You can collect up to 10 Play Coins in
one day, up to a maximum of 300 Play Coins. You can then use them in games that support Play Coins.
• Steps are counted when the system is on but closed.
• A maximum of seven days’ worth of steps and play-time data can be recorded while Nintendo DS or Nintendo DSi
software titles are left running. Exit the software once during that time to save your steps.
will
Using Software
HOME Menu
240 241
Page 14
Scrolling, changing the display, and moving icons
Software icons
Scrolling
Tap the Touch Screen and slide the stylus across it to
scroll.
You can also scroll by tapping
Changing the display
Tap or to decrease or increase the number of software icons displayed on the screen.
Moving software icons
Using Software
To move an icon, touch and hold it for a moment. Then
you can slide it to a new location. Slide the icon to a new
location on the HOME Menu and lift the stylus from the
screen to place the icon.
NOTE: If you move one icon over another icon, the icons
will switch places when you lift the stylus from the screen.
Communication modes
.
or
Connected to the Internet (see page 279).
Hold down... ...and slide.
When free software is received via SpotPass, or when software is downloaded through Nintendo eShop, software icons are added
to the HOME Menu. (Up to 300 software titles can be saved to an SD Card.) Shown below is a list of the software icons you may see
on the HOME Menu.
Game Card icons
Nintendo 3DS Game Card Nintendo DS or Nintendo DSi
Game Card
When you insert a Game Card into the Game Card slot,
an icon for the game title will be displayed.
Built-in software icons (Tap the icon to start the software application.)
Health and Safety Information
Review important health and safety information concerning the use of the Nintendo 3DS
system.
Nintendo 3DS Camera
Take 3D photos with the built-in cameras and
software (see page 258).
Nintendo 3DS Sound
Listen to music or record sounds (see page 263).
Face Raiders
Play a game where your face and your friends’
faces become game characters (see page 272).
Activity Log
Check the play times of your software or the
steps you have walked while carrying your
Nintendo 3DS system with you (see page 274).
Download Play
With a single copy of Download Play-compatible
software, you can play multiplayer games with
other Nintendo 3DS system users (see page 276).
Using Software
HOME Menu
Searching for a StreetPass partner. If you congure StreetPass settings for the Nintendo 3DS or
for software that supports this feature, the system can automatically search for other nearby
Nintendo 3DS systems and communicate with them to exchange information (see page 256). A
HOME Menu
StreetPass icon (
Communicating with other Nintendo 3DS systems. Registering nearby people as friends in the
friend list (see page 252) and Download Play (see page 276) requires a local wireless connection for
communication. During local wireless communication, the signal strength icon (
displayed. A stronger signal makes wireless communication easier.
Use the wireless switch to enable wireless communication (see page 228). When wireless communication is enabled but the system is not communicating, and
will be displayed. When wireless communication is disabled, and
will be displayed.
NOTE: You may be using more than one communication mode at a time, but only one mode will be displayed on
your system.
) is displayed when this mode is active.
242
) will be
Mii Maker
Create Mii characters as alter egos for you and
your family and friends (see page 266).
AR Games
Play augmented-reality games using the AR
Cards included with your system and the
Nintendo 3DS Camera application (see page 270).
Other icons
These icons will display when you have new software added to the HOME Menu. Tap the icon to open it.
System Settings
Congure your system’s Internet settings, Parental Controls, and other settings (see page 278).
243
Page 15
Starting a software application
Instruction manuals for software applications
To start a software application, tap the icon on the HOME Menu, then tap Open.
Suspending or exiting software
If you press the HOME Button while playing software, the software
Using Software
will be suspended and the HOME Menu will be displayed. If you tap
Close when at the HOME Menu, you will exit the software.
If you tap Resume when at the HOME Menu, you can resume playing the suspended software.
While software is suspended...
While software is suspended, you can adjust the screen brightness and
access your Game Notes ( ), Notications ( ), friend list ( ),
Internet browser ( ), the camera mode, and instruction manuals.
You can also start other software, but if you do, any suspended soft ware
will be closed.
From the HOME Menu, if you tap the icon for a software application that includes a built-in
instruction manual, a button labeled Manual will be displayed at the bottom of the HOME
Menu. Tap the button to view the instruction manual for the highlighted software.
Viewing a manual
View the table of contents.
1
Scroll through the table of contents by
sliding the stylus up and down the Touch
Screen. Tap the page you want to view.
View the manual pages.
2
Scroll through page contents by sliding
the stylus up and down the Touch S creen.
Switch the page by sliding the stylus left
or right across the screen.
Close the manual
Screen brightness and power-saving mode
Tap on the HOME Menu to access the settings for screen brightness and the
power-saving mode.
Using Software
HOME Menu
Increase or decrease the
text size
• You cannot access the HOME Menu while playing over the Internet. Depending on what software is suspended and what state
that software is in (for example whether it is using the cameras or wireless communication), it may not be possible to access
the Game Notes, friend list, Notications, or Internet browser applications.
HOME Menu
• You cannot access the HOME Menu while playing Nintendo DS or Nintendo DSi software.
Screen brightness
Tap a number to select the screen brightness.
Dim Bright
Save your game before exiting the software.
When you exit the software, any unsaved data will be lost. Remember to save your game before exiting the software.
While software is suspended, do not remove the software or turn the
system o.
While software is suspended, do not remove the Game Card or SD Card or turn the system o. This could result in corrupted
or lost data or other malfunctions.
244 245
NOTE: If you connect the Nintendo 3DS AC adapter, the screen will become brighter when set to level 4 or 5.
Power-saving mode
If you tap power-saving mode ON, screen brightness and color gradation will be automatically adjusted to match the displayed images, and battery consumption will be limited. If you tap power-saving mode OFF, battery life will be shortened
and the screen will maintain the level of brightness that you set. (The default setting is o.)
Page 16
The eect of screen brightness on battery life
Keeping screen brightness at high settings will reduce the duration of a single charge of the battery pack, while keeping
brightness at lower settings can prolong battery life.
IMPORTANT: Setting the screen brighter can greatly increase power consumption and may c ause the power
LED to change to red. If remaining battery power is already low, setting the screen brighter during game
play may cause the system to turn o.
Setting screen brightness and the power-saving mode for Nintendo DS/Nintendo DSi software:
When you play Nintendo DS or Nintendo DSi software, you cannot use the HOME Menu. However, you can press the HOME
Button to suspend the software and congure screen brightness and the power-saving mode using the following controls.
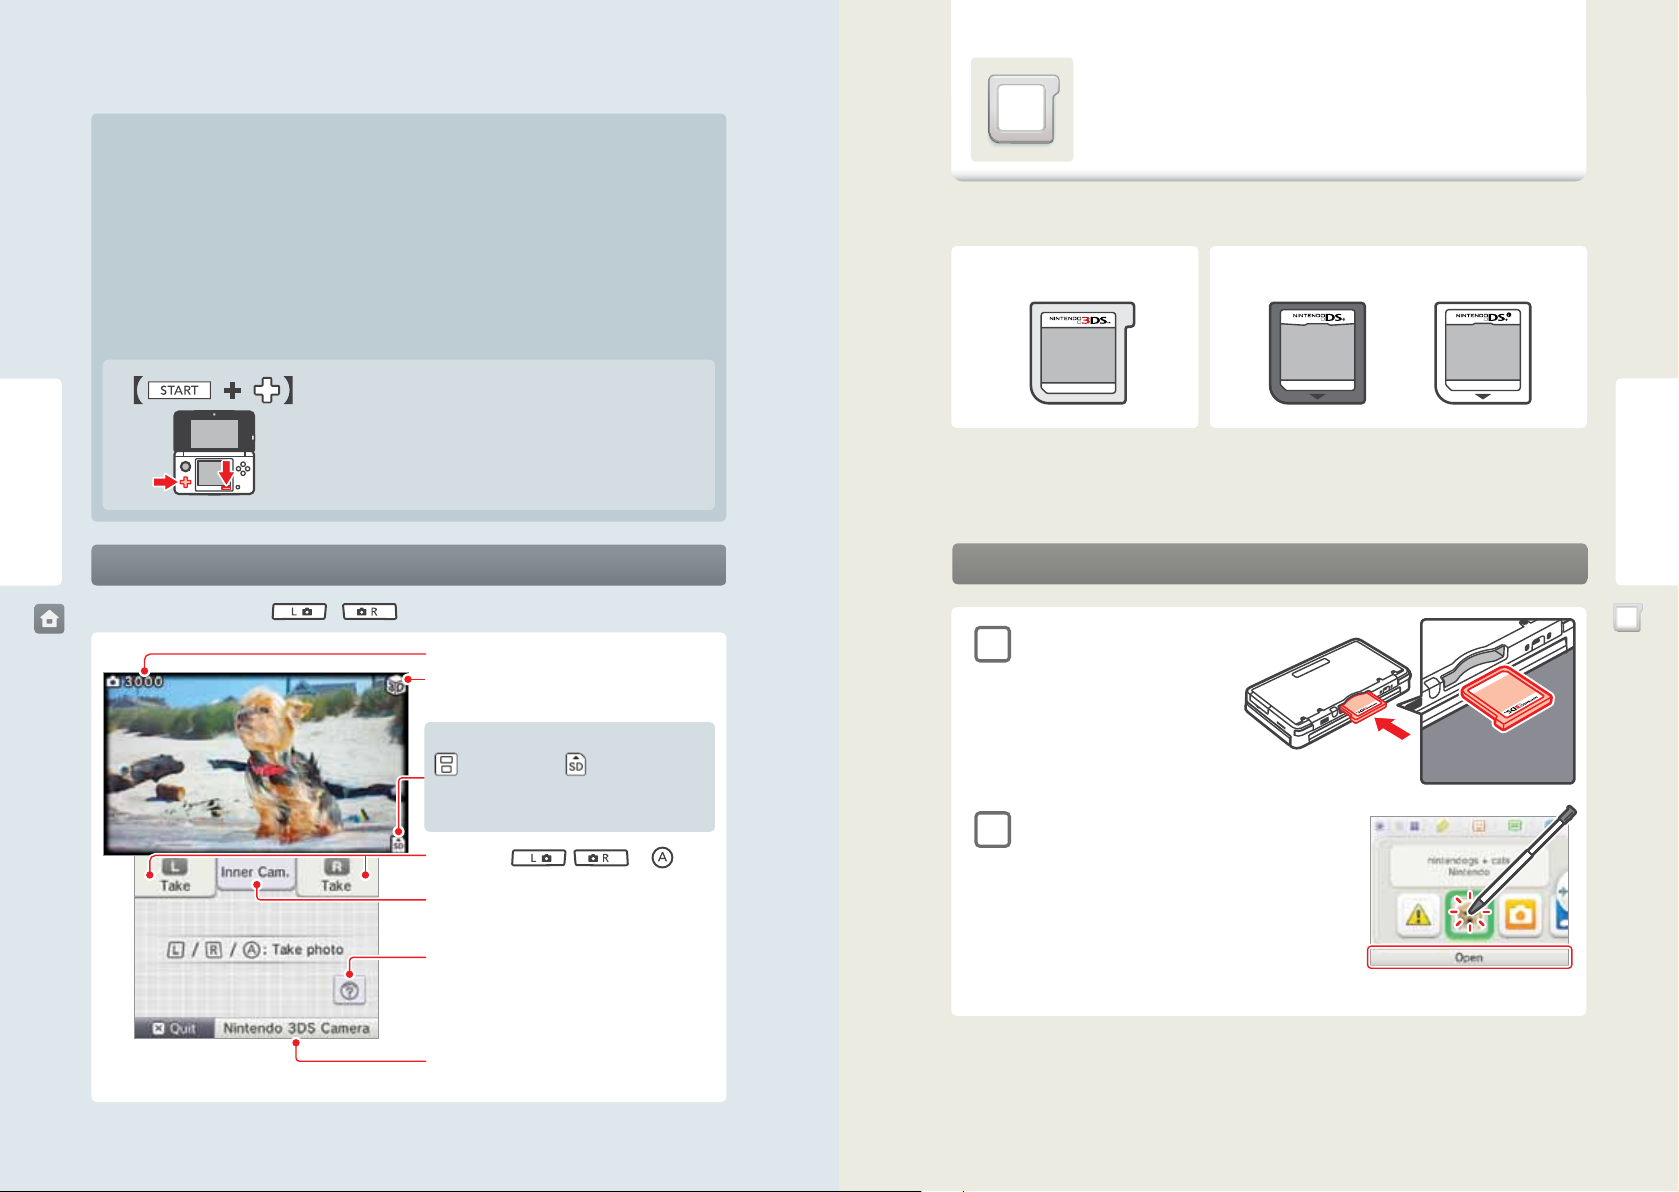
Hold down START and press the +Control Pad as described below.
Press up: Increase brightness one level.
Press down: Decrease brightness one level.
Press left: Turn power-saving mode o.
Press right: Turn power-saving mode on.
Using Software
Using Game Cards
The Nintendo 3DS system can use Nintendo 3DS, Nintendo DSi™, and Nintendo DS™ Game Cards.
Nintendo 3DS
Game Card
• Only Nintendo 3DS software that is designed to support the 3D feature can display images in 3D. Nintendo DS and Nintendo
DSi software do not support 3D image display.
• You cannot access the HOME Menu while playing Nintendo DS/Nintendo DSi software. Likewise, you cannot use SpotPass or
StreetPass features.
Nintendo DS
Game Card
Nintendo DSi
Game Card
Using Software
Taking photos with the Nintendo 3DS Camera
From the HOME Menu, you can press
HOME Menu
or
to switch to camera mode and take photos.
Pictures remaining
3D indicator
This is displayed when the outer cameras are active.
Save-location icon
(System Memory) or (SD Card)
NOTE: You can change the save location under Settings
in Nintendo 3DS Camera.
Take photo:
, ,
or
Switch between the inner and outer camera
You can take 3D photos with the outer cameras.
Merge
Merges two faces from both the inner camera and outer
cameras captured at the same time. (See the built-in
instruction manual for Nintendo 3DS Camera.)
Start the Nintendo 3DS Camera application
(see page 258).
Starting a game
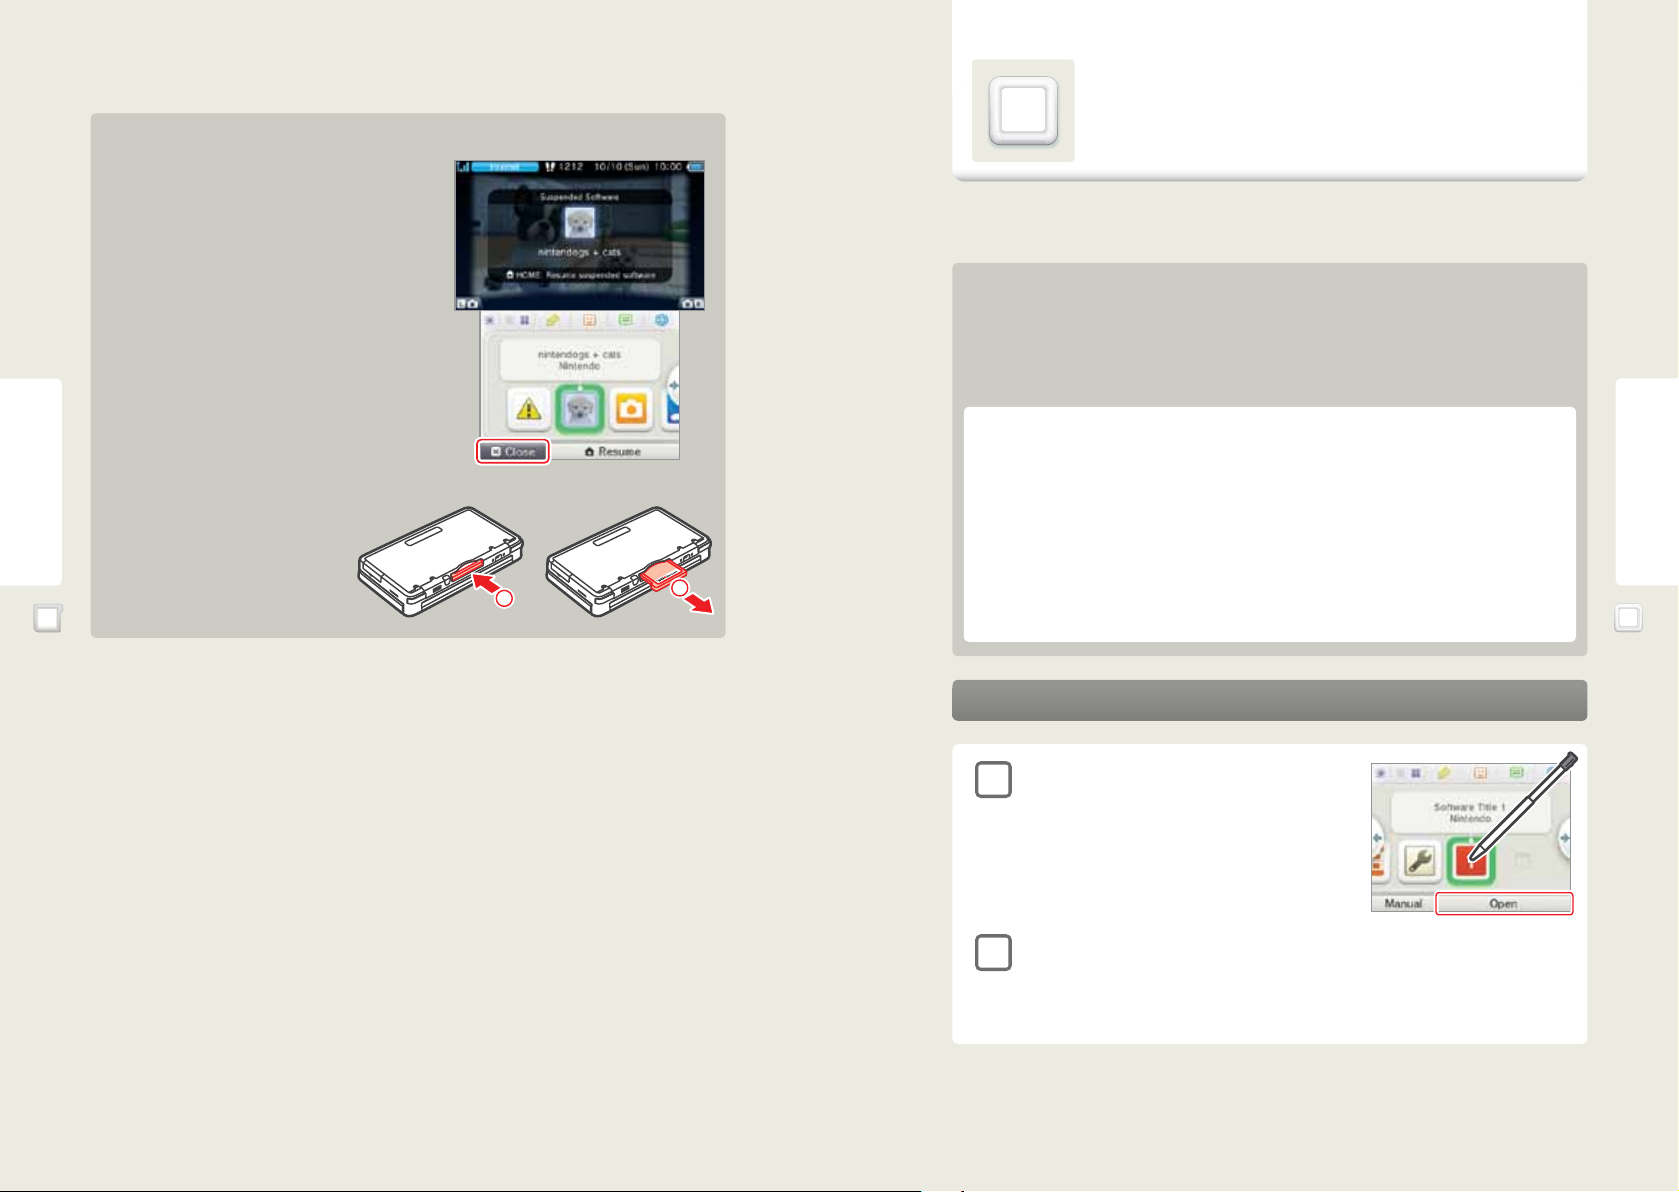
Insert a Game Card into the Game Card slot.
1
If the card seems dicult to insert, remove
it and conrm that it is facing in the right
direction. The label should face towards the
bottom of the Nintendo 3DS.
Turn the power on and when the HOME Menu appears, tap the
2
icon for the Game Card you have inserted, then tap Open.
NOTE: Nintendo DS/Nintendo DSi titles have a lower screen resolution than
Nintendo 3DS software and are stretched to t the Nintendo 3DS screen.
For these titles, hold down START or SELECT while tapping the menu icon to
display the game at their original screen size ratio.
For further instructions on how to operate the game, see the instruction
booklet for the game you are playing.
Using Game Cards
Label faces towards the
bottom of the system.
246 247
Page 17
Exiting or pausing a game
Press HOME to display the HOME Menu. Save the game, then tap
Close on the HOME Menu.
• Tap Resume to resume your paused game.
• When you exit a Nintendo DS or DSi title, rst save your game,
then press HOME and tap OK.
Using Downloaded Software
NOTE: A system update may be required to use this feature. See System Update in
System Settings on page 303 for more information.
NOTE: Software downloaded from Nintendo eShop is licensed to you, not sold. For more information, see the Nintendo 3DS
Service User Agreement by going to Other Information in System Settings (see page 289).
Where can I nd downloadable software?
• You can download Nintendo 3DS software from Nintendo eShop.
NOTE: Wireless broadband Internet access is required for online features. See page 279 for more information on setting up
an Internet connection.
• Free software may be distributed via SpotPass.
Using Software
Removing a Game Card
Only insert or remove Game Cards while the
system is turned o or while the HOME Menu
is displayed. (If software is suspended, exit it
rst before removing the Game Card.)
NOTE: For video and computer game software rating information, see page 305.
Using Game Cards
Downloading and saving software
• To download software, you must have an SD Card in the SD Card slot.
IMPORTANT: Because software can also be distributed via SpotPass, it is recommended that you always have an SD
Card in the SD Card slot.
• You can save up to 300 downloadable software titles on an SD Card. (This number will depend on the data size of the
software title and the capacity of the SD Card you are using.)
• If you save downloadable software and its save data on multiple SD Cards, this data can’t later be combined onto
1
2
one SD Card.
• Downloadable software can only be used on the system where it was downloaded and is not transferrable. You
cannot use the software on another system by inserting the SD Card into another system.
Using Software
Using Downloaded Software
Starting downloaded software
Tap the icon on the HOME Menu.
1
NOTE: Nintendo DSiWare titles have a lower screen resolution
than Nintendo 3DS software and are stretched to t the Nintendo
3DS screen. For these titles, hold down START or SELECT while
tapping the menu icon to display the game at their original screen
size ratio.
Operate the software as you normally would for Game Card software.
2
• For further instructions on how to operate the game, see the instruction manual for the game in question.
• To view a built-in manual, go to the HOME Menu and tap Manual.
• Ending downloaded software works the same way as ending Game Card software.
248 249
Page 18

About SD Card capacity
If you begin to run out of room on an SD Card, rst try deleting undesired photos, sound les, or software using the Data
Management feature in System Settings (see page 294). If you still need more room, you c an purchase a higher-capacity SD Card
and move all of the les onto the new SD Card.
Game Notes
This software allows you to write and draw notes, even during a Nintendo 3DS software
title. You can suspend a game and make a note while viewing the game screen.
Tap in the top bar of the HOME Menu to display a list of your notes.
Use a PC that has an SD Card slot or a commercially available SD Card reader/writer to transfer les.
IMPORTANT: Downloadable software and its save data are saved in the Nintendo 3DS folder. (Photo data
is not included.) Please do not alter, move, or erase les or change the names of the les in the Nintendo
3DS folder.
Using Software
Copying les
Please make sure to copy each of the pertinent folders within the Nintendo 3DS folder.
If you copy software to a new SD Card, play it, and save your progress, the same software on the old SD
Card may become unusable. You cannot use multiple copies of the software.
If you copy software to a new SD Card, use the new SD Card and do not use the original data.
Precautions about copying les
You cannot recombine downloadable software whose folders have been saved to multiple SD Cards. If you copy data
to a new card and then overwrite that data by re-copying it, that data will become unusable.
• You can save up to 16 notes on the system. You can also save the notes you've made as
photo data and view them in Nintendo 3DS Camera software.
• Even while playing Nintendo 3DS software, you can pause the game and make a note.
Press the HOME Button to display the HOME Menu, then tap the Game Notes icon to start
the Game Notes software.
PC
Tap a note on the Game Notes screen and type or draw.
High-capacity SD CardNintendo 3DS folder
1
Using Software
Switch the upper screen
If the game is paused, the display on the
upper screen can be changed.
Display both screens
Game Notes
Display upper screen
Display lower screen
Using Downloaded Software
Pen
If you individually copy the les in the Nintendo 3DS folder,
the Nintendo 3DS system will not recognize them. You must
copy each folder in the Nintendo 3DS folder without altering
the contents.
2
250 251
Eraser
You can draw with three colors of pen or
use the eraser.
When you are done with the note, tap
The active note is saved and you will return to the Game Notes screen.
.
Save the note to an SD Card
Allows you to view it in the
Nintendo 3DS Camera software.
Delete an active note
Page 19

Friend List
Play and communicate with other people registered as your friends via the Internet, no
matter how far away they are.
Tap in the top bar of the HOME Menu to open your friend list.
The rst time you open the friend list, follow the on-screen instructions to create your own
friend card.
From the friend list, you can see if your registered friends are online (whether they are connected to the Internet). Even while playing Nintendo 3DS software, you can pause the game
and view your friend list. Just press the HOME Button to display the HOME Menu and start the
friend list.
NOTE: The friend list feature is available only when using Nintendo 3DS software titles.
Registering friends
To register a friend locally
Tap Local to connect directly to another Nintendo 3DS user nearby and register each
other as friends.
NOTE: You can register a maximum of 100 friends in the friend list.
From among the displayed friend cards, tap the card of a person you want to register as a
friend.
NOTE: If you both tap each others’ cards, you will begin exchanging your friend cards. When
the exchange nishes, you are registered as friends.
Using Software
Using Software
What you will need to do to use the friend list
Create your Personal Mii™ To create your own friend card, you will need to create your Personal Mii in Mii
Maker. See page 266.
Congure your Internet settings To know when your friends are online, you must connect to the Internet.
See page 279.
The friend list screen
Friend List
Register friends
Display friend cards
• Edit your own friend card
• View friend cards of your friends
Friend list settings
• Friend notication settings
• Delete a friend card
To register a friend over the Internet
Tap Internet to connect to another Nintendo 3DS user over the Internet and register
each other as friends.
NOTE: You can check your friend code by looking at your own friend card.
Enter the friend code of the person you want to register.
Enter the name of the person you want to register. If you are not registered as the other person's friend, the registration will be temporary.
(When the temporary friend registers you as a friend, the registration
becomes permanent and the other person's ocial name and Mii are
displayed.)
Friend List
If you are registered as the other
person’s friend, the other person’s
data from the friend card will be
received automatically, and they
will be registered as a friend.
252
253
Page 20

Editing your friend card / Viewing friend cards
Select your friend card from the friend list to edit your details or view friend cards belonging to other people. Your friend card will
identied by a icon.
Editing your friend card
Choose your friend card to edit your
favorite software, message, or other
information.
Using Software
Viewing friend cards
Choose the friend card you would like
to view. Details will be displayed on
the upper screen.
The title of the friend’s favorite
software will be shown, or the
title of the software they are
currently playing.
Display of your friends' online (Internet connection) status
When your friends go online (when they
connect to the Internet), the appearance of
their friend card changes. The software they
are playing is also displayed.
NOTE: For this to happen, they must adjust
their settings to allow their online status
to be visible.
Online Oine
Notication LED
When an oine friend comes online, the
notication LED on your Nintendo 3DS system
blinks orange for ve seconds.
Friend-list settings
Congure your friend notication settings or delete friend cards.
Using Software
Notication LED
blinks
Friend List
Choose your favorite
software from among the
titles you have played.
Remember that other Nintendo 3DS users will see your greeting when interacting with them, so do not use your
Friend List
real name or otherwise share any personal information in your greeting.
NOTE: If the Mii of one of your friends is replaced by a dierent Mii with the name “???”, the creator of your friend’s Mii might have
been added to the blocked-user list.
Enter a short greeting of
up to 16 characters. This
greeting will be visible to
your friends.
254
Choose whether or not to show your
online status and the software you
are playing.
Delete friend cards from the friend list.
Friends are not notied if their
friend cards are deleted.
255
Page 21

Notications
This software allows you to receive notications from Nintendo, from StreetPass, and
from other types of software.
To view notications
Tap in the top bar of the HOME Menu to start Notications and display
a list of your notications.
Even when using Nintendo 3DS software, you can pause the game and view Notications.
Press the HOME Button to display the HOME Menu and tap the Notications icon to start the
Notications software.
Types of notications
SpotPass Notications These contain data or information from Nintendo or from the software you are
using, and will vary depending on the game you are playing.
NOTE: The system cannot receive notications from Nintendo DS or
Nintendo DSi software.
Using Software
StreetPass Notications These contain information received via the StreetPass feature.
To receive notications
Follow these steps to allow your Nintendo 3DS system to receive notications:
• Turn the system on. (The system will also receive notications in Sleep Mode.)
• Turn wireless communication on by pushing the Wireless switch towards the top of the Nintendo
3DS. The Wireless LED will light.
• Congure the Internet connection settings. (Within a Nintendo Zone service area, the system can
receive notications even without its Internet settings congured. Also, the system can receive
StreetPass notications without connecting to the Internet.)
NOTE: Notications sent to you by software may be sent directly without requiring an Internet
connection.
Notications
When you receive a notication...
When you receive a notication, the notication LED on your Nintendo 3DS system will
blink for ve seconds. For StreetPass notications, it blinks green, and for SpotPass, it
blinks blue.
Additionally,
any related software icons in the HOME Menu.
NOTE: If a notication is received when the system is in Sleep Mode, the
notication LED will blink for about ve seconds and then stay lit. It will
turn o when you open the Nintendo 3DS system.
or will be displayed on the Notications icon and
Notication LED blinks
Tap the notication you want to view in your notication list.
Tap and slide the scroll bar
up or down to view your
notication list.
• Unread notications will show for StreetPass notications or for SpotPass notications.
• Up to 12 StreetPass notications and up to 100 other notications can be saved on the system. If you receive more
notications than that, or if the storage limit is exceeded (such as when there are many notications saved with image
attachments), notications are deleted starting with the oldest notications rst. NOTE: Notications sent to you by
software may be sent directly without requiring an Internet connection.
To stop notication delivery
Tap Opt out of all notications for this software inside the message and
follow the on-screen instructions.
NOTE: Notications that do not require an Internet connection, such as those
from software titles, cannot be stopped from the notication list. These are
delivered during game play and can be stopped from within the software.
The method for stopping these notications may vary depending on the
software title.
Stopping StreetPass notications
Tap Opt out of notications for this software and also deactivate StreetPass from StreetPass Management in
the System Settings (see page 294). If you deactivate StreetPass, these notications will no longer reach you.
To resume delivery of notications, adjust the software settings. For details, see the instruction booklet for the game
you are playing.
You cannot stop delivery of notications from Nintendo. (SpotPass notications from Nintendo may
contain important consumer information.)
Using Software
Notications
256
257
Page 22

Nintendo 3DS Camera
Taking photos
Nintendo 3DS Camera can be started from the Nintendo 3DS HOME Menu. This sof tware
allows you to take and view 2D and 3D photos.
For more detailed information, tap
Manual on the HOME Menu.
About 3D photos
When taking 3D photos, both outer cameras will capture
images–one for the left eye and one for the right eye.
When the two images are combined and displayed on the
3D Screen, they appear as a 3D photo. See page 238 for more
Using Software
information about 3D images.
Nintendo 3DS Camera functions
Take Photos
Camera Mode
You can choose dierent
camera settings such as
bright-light camera or
night camera.
Timer
You can use the timer or voice command to automati-
Nintendo 3DS Camera
cally take a photo.
Leveler
The leveler can help you take photos level with the
horizon. A red line will appear that you can use as a
reference.
Image for right eye Image for left eye
View Photos
Grati
You can draw all kinds of
designs on your photos.
Slide Show
You can automatically display photos in a sequence.
Tap
a photo.
NOTE: If you press down on the +Control Pad, you can turn the leveler feature on and o.
or
on the lower screen to take a photo. You can also press ,
Remaining number of photos you can save
3D indicator
This icon will display if you are taking a photo
with the outer cameras.
Save location
Indicates the save location for your photos:
(System Memory) or
Tap to switch between the inner and outer
cameras.
NOTE: The inner camera takes only 2D photos.
Tool lever
Use the stylus to drag the lever handle to select
the following functions:
Settings
Adjust various settings such as
information display and data
management.
View photos
Tap the parakeet to get hints about using
the camera. You can also review hints in
the Settings for Nintendo 3DS Camera,
under Usage Tips.
Change camera mode
Adjust 3D focus
By default, the camera’s 3D autofocus is on.
You can turn it o and manually adjust the 3D
focus if needed.
(SD Card)
,or to take
Using Software
Nintendo 3DS Camera
258
Timer
259
Page 23

How many photos can you save?
The remaining number of photos you can save is displayed on the
upper screen. This is the approximate number of photos you can save
in the current save location (System Memory or an SD Card), but it’s
only an estimate.
Data size can vary depending on the photo, so it’s possible that taking
one photo may reduce the number of remaining photos by two or not
reduce the number at all.
NOTE: A maximum of 3,000 photos can be saved to an SD Card.
About photo data
• When you take photos with the outer cameras, both 3D photo data (saved as MPO format), and left-eye photo data
(saved as JPEG format) are created. When you take a photo with the inner camera, photo data is saved in JPEG format.
• Photo data is saved to the “DCIM” folder on the SD Card.
How far away should your subject be?
Using Software
When taking photos, it’s best to be at least 12 inches away from your subject. If you take a photo of something too close,
the photo may turn out blurry, similar to when you try to look at something too close to your face.
Remaining number of photos you
can save.
Change camera mode
Tap the tool lever icon (
) to display the camera-mode selection screen. Then
icon (
tap the camera mode you would like to use.
), and then tap the camera-mode
Sparkle
Blow into the microphone to add a variety of
visual eects.
Dream
Camera-mode icon Camera modes
Merge
Merge two faces – one from the inner camera
and one from the outer cameras – captured at
the same time.
Pinhole
Using Software
Nintendo 3DS Camera
30cm
(12”)
(12”)
or more
or more
Taking photos of
objects less than 30cm
Nintendo 3DS Camera
(12”) away may result
in blurry photos or
double images.
260
For best results, your
subject should be more
than 30cm (12”) away.
The ideal range for your
subject for the best
3D photos is about 1m
(39”) away from the
camera lens.
Background objects
in the distance can
produce a better 3D
eect.
Take photos that look as if they appeared
from a dream.
Low Light
Take photos in a dark environment, such as
at night.
Normal
Return to Normal mode.
Take a picture that looks like it was taken with a
pinhole camera (darker edges and a lighter center).
Mystery
Apply random lters and eects - you won’t
know what you’ve got until you take the pic ture!
Manual Controls
Adjust the picture settings manually.
261
30cm
1m (39”)1m (39”)
Page 24

Viewing photos
Tap View Photos to see the photos you’ve taken. A series of smaller thumbnail images will be displayed on the Touch S creen.
The red outline in the thumbnail selection indicates which image is displayed on the 3D Screen.
Tap a thumbnail image on the Touch Screen to display it on the 3D Screen.
3D indicator
This icon will display if you are viewing a 3D photo.
Begin slide show.
Nintendo 3DS Sound
The Nintendo 3DS Sound application can be started from the Nintendo 3DS HOME Menu.
This software allows you to play music and sounds saved on an SD Card or recorded with
the microphone on the Nintendo 3DS system. You can also play with and alter your music
or recorded sounds.
For more detailed information, tap
Manual on the HOME Menu.
After starting Nintendo 3DS Sound, you can select from the options below.
Using Software
Using Software
Slide the stylus on the Touch Screen to scroll
through the thumbnail images.
Record sounds or play with
or to change the number of images
Tap
Take Photos –
see page 259.
that are displayed on the Touch Screen.
Access the Settings menu.
About the photo catalog
Photos are arranged by capture date, with older photos to the left.
Nintendo 3DS Camera
If the photo is a le type that cannot be displayed by the system,
If there are many photos in the catalog, it can take some time before all photos are displayed.
will be displayed.
More about photo data
Photos taken with a digital camera or mobile phone may not display. A photo taken with the Nintendo 3DS system may not
display if it has been edited or processed on a PC, moved or deleted on an SD Card, or if the le name has been changed.
Thumbnail images are attached to photos taken with the Nintendo 3DS. If you use a PC or other device to edit photos, in
some cases the thumbnails will not reect these changes. Be aware that if you upload an edited photo to the Internet or
pass it on to a third party, it may be possible to view the unedited thumbnail of the image. When you use the Nintendo 3DS
Camera application to edit a photo taken with the Nintendo 3DS, the thumbnail image will also be edited.
recorded sounds.
Playing music
Music les saved on the SD Card will be displayed.
NOTE: Resume will be displayed if you previously
stopped listening during playback. If you tap
Resume, the music will begin playing from the
point at which it stopped.
Nintendo 3DS Sound settings and
formatting data
• View the results of StreetPass encounters
• Turn StreetPass on/o
You can view the results of StreetPass, such as hit parade and compatibility analysis.
To use StreetPass, rst register a song in your StreetPass favorites and then turn StreetPass on.
If you speak to the parakeet, he may remember the sound when he speaks. He might even call out a few recorded sounds
at his own discretion.
Tap the parakeet on the Touch Screen to make him say a previously recorded sound.
Nintendo 3DS Sound
262 263
Page 25

Recording and playing with sounds
Playing music from an SD Card
You can record a maximum of 10 seconds of sound in one sound le using the microphone. You can save up to 18 sound les in
System Memory and up to 180 sound les on an SD Card.
Tap
to select a le, then tap Record.
1
2
Using Software
3
NOTE: To delete a sound le, select the le icon and tap Erase.
Switching pages
Tap
Nintendo 3DS Sound
Tap
to begin recording.
• Recording will begin automatically if the microphone detects
a sound.
• Tap
to end the recording.
Tap a color for the le icon.
The color you tap will become the color for the icon representing the
recorded data.
Sound les (System Memory) Sound les (SD Card)
to switch between pages of sound les.
or
Moving and copying sound data
To move or copy a sound data le, tap and hold the
data and then slide it to a new location.
• If you slide the sound data le to
copy the le to another page.
• You cannot copy audio data into a location where audio data already exists.
, the page will switch and you can move or
or
Switch between moving and
copying.
Begin by inserting an SD Card that contains music les that are compatible with the Nintendo 3DS. See the section below for
information on compatible music formats.
Select a folder and tap Open.
1
Slide to scroll through music les or folders.
Select a music le and tap Play to begin playback.
2
About compatible music les
The following music formats can be played (copy-protec ted les cannot be played):
AAC les with .m4a, .mp4, and .3gp extensions, or MP3 les with .mp3 extensions
Bit rate of 16kbps - 320kbps and sampling frequency of 32kHz - 48kHz
Saving music to an SD Card
1
Use a PC and appropriate
software to transfer songs into
your PC.
2
Transfer the songs
to an SD Card using the SD
Card slot in your PC or a
commercially available SD
Card reader/writer.
About folders and les on an SD Card
• Only folders with music les saved in them are displayed. The maximum number of folders displayed is 1,000.
• If there are two or more folders with the same name on an SD Card, the music les in those folders will be combined
into one folder.
• The maximum number of music les displayed is 3,000.
• A maximum of 100 music les per folder will be displayed.
• Folders and les with hierarchies deeper than eight levels will not be displayed.
• Folder names are unrelated to hierarchy depth. They are displayed in numeric and alphabetical order.
Using Software
Nintendo 3DS Sound
264
265
Page 26

Mii Maker
Mii Maker can be started from the Nintendo 3DS HOME Menu. This software allows you
to build faces from various parts to create virtual alter egos for yourself, your family
members, and your friends.
Tap the face parts and body type to edit the Mii character.
2
Next/previous page
Create from photo
Take a photo of your face and use the photo to
create your Mii.
For more detailed information, tap
Manual on the HOME Menu.
NOTE: You can also play as your Mii characters in games that support this feature.
Create a Mii
Step 1: Create your own Personal Mii character. After you have created your Mii, you can view it in the Mii Maker main menu and
create more Mii characters.
Using Software
Mii Maker
Tap the creation method you would like to use.
1
If you tap Create from Photo:
You can use a photo of your
face to create your Mii.
Follow the on-screen
instructions to select your
Mii character’s gender, skin
tone, eye color, hair color,
and hairstyle, and then take
the photo using the inner
camera of the Nintendo 3DS.
Select a gender and proceed to step
.
2
Adjust parts:
Change color
Select the part you want to change.
Select the part you want to edit.
When you are nished editing, tap Next.
• Change the Mii viewing angle with the
• If you selected Create from Photo in step
• The types of adjustments you can make (color, number, etc.) will dier from part to part.
Creating a prole
3
or
1
,
buttons or the Circle Pad.
the photo will be displayed next to the Mii on the upper screen.
Favorites
When you make a Mii a Favorite, will be
displayed. Favorite Mii charac ters will have priority in
games that support Mii characters.
You can create up to 10 Mii characters. Your Personal
Mii is indicated by
Favorites.
Share your Mii
Copy permission settings
If you set this option to Don’t Allow, those
who receive the selected Mii will not be able
to copy or edit that Mii.
Sharing a Mii allows it to be sent wirelessly to other
people’s Nintendo 3DS systems, where it may remain
and appear later in other supported games they play.
(The Mii creator's name and birth date are not shared.)
Move up/down
Change spacing
Change angle
Expand/reduce
Expand/reduce up/down
Reset parts
and cannot be removed from
Using Software
Mii Maker
266
NOTE: If your face isn’t recognized, try re-taking the photo (see page 312 for more information on facial
recognition).
Select the face you like and then tap Next.
• When you have nished creating your prole, tap S ave to register the Mii. When you have nished registering your Mii,
you will be returned to the main menu.
• You cannot delete your Personal Mii, but you can edit it.
NOTE: All Mii features and likenesses are the intellectual property of Nintendo and cannot be distributed freely or used for
personal gain.
267
Page 27

Warning about Mii proles
If you send a Mii character to another Nintendo 3DS system, the Mii character’s name and prole will be sent with it.
Therefore, take care not to use oensive words or any personally identiable information in the nickname or prole of
your Mii. Someone who receives your Mii can edit it or send it on to others, and you cannot remotely delete Mii characters
sent to other people using your Nintendo 3DS system.
If you use oensive words in the name or prole, it’s possible they will be displayed as “???” on another person’s Nintendo
3DS system. If this happens, please change the nickname or prole.
About blocking another user
You can set your system to block those who use oensive content in their Mii nickname, prole or appearance. If you choose
to block a Mii whose creator has used an oensive content, all Mii characters from that person will be blocked and other Mii
characters will be displayed instead. Some applications do not allow any content from an blocked player to be displayed.
To access the blocked-user settings, from the Main menu press
the on-screen instructions to make your settings.
Using Software
Main menu
and while holding left on the +Control Pad. Follow
Editing or erasing a Mii
After selecting a Mii character from the Mii list, you can edit, erase, or adjust its Favorite settings.
From the Mii list displayed on the Touch Screen, tap the Mii that you would like to edit or erase.
NOTE: You can change a Mii charac ter’s location in the Mii list by touching and sliding the Mii to a new location.
Mii slots
In the Mii list, there are 10 rooms. Up to 10 Mii characters
can be saved in each slot. To move a Mii to a dierent slot,
touch and slide it on the Mii List.
Using Software
When you start Mii Maker, the main menu appears. Tap an item to select it.
NOTE: You can register a maximum of 100 Mii characters in Mii Maker.
Mii Maker
Create a Mii.
Select a Mii from the Mii list.
Display the instructions for viewing Mii characters.
• Communicate with another Nintendo 3DS system and
send or receive Mii characters.
• Receive Mii characters from the Mii Channel on the
Wii console.
NOTE: You cannot send Mii charac ters to the Mii Channel.
Edit Selected Mii.
Edit the Mii using the same tools you used
when creating it.
If you are working on a Mii that you
received from another system and that Mii
can be copied, you will be asked whether
or not you want to copy it. If you make a
copy of that Mii, you will be able to edit
the copy as well as the original.
Favorites display
Favorite Mii characters will appear with a icon. If you
tap the icon, you can change the Mii character’s status as
a Favorite.
Share display
Shared Mii characters
Mii characters you can copy
Display Mii characters that can be copied.
Creator name display
If the creator of a Mii character has been added to the Mii
character’s prole, you c an tap the Mii character's nickname
and the creator’s name will be displayed.
Erase selected Mii.
Create a Mii QR Code and save the Mii image.
(A QR Code is a two-dimensional code that can be read by
scanners or devices that include cameras.)
268 269
Mii Maker
Page 28

AR Games
You can start AR Games from the HOME Menu. These games use AR Cards that are included
with your Nintendo 3DS system. Using the outer cameras, the system can read the AR
Cards and make magic happen! AR Cards display game stages or characters that can be
recognized by the cameras.
Playing AR Card games
Place the “?” AR Card on a at, well-lit surface and keep it within the view of your system’s outer cameras at the correct distance
and angle, as described below. Follow the directions, and an on-screen menu should appear above the image of the AR Card.
Keep the same distance and angle during
game play.
35cm (14”)
30˚
Aim the cameras at the AR Card.
Using Software
Check your surroundings...
When playing AR Card games, you may have to move
around the area while holding the Nintendo 3DS system.
Make sure you have enough room, and hold the system
rmly with both hands while playing.
AR Cards
Your Nintendo 3DS system includes six AR Cards. You use the “?” AR card to start game play.
AR Games
“?” AR Card
IMPORTANT: If an AR Card becomes damaged or dirty, the cameras may not be able to read it.
If you lose an AR Card, or if it becomes unreadable, you c an download AR Card images from support.nintendo.com/ARcards
and then print the images in color and use them as replacement cards.
Character AR Cards
Use these cards when playing Star Pics (see next page).
NOTE: If you are not playing Star Pics, do not use these cards and the “?” AR
Card together.
Aim the crosshair at the game you would like to play and then press to make your selection.
Archery
Shoot the targets that appear on the screen.
Complete this to unlock Mii Pics and AR Shot. When you complete AR shot,
Menu screen
something more will be unlocked!
Star Pics
If you place a character AR Card in front of the
cameras, the character will appear and you can
take a photo.
Mii Pics
Arrange your Mii in dierent poses and take
photos of your Mii in dierent settings!
AR Shot
Hit the ball and try to move it into the goal.
???
These games are unlocked when you have
cleared AR Shot.
NOTE: Press START to exit the game and return to the menu screen.
If an AR Card isn’t recognized by the cameras, check the following conditions:
• Check the distance and the angle. The cameras can’t recognize the card if the distance is too close.
• Make sure the card is centered on the screen.
• Make sure your game play area is well-lit.
• Make sure a bright light source is not reecting o the surface of the card.
• Make sure the camera lenses are clean.
• Make sure the card is not damaged or dirty.
Using Software
AR Games
270
271
Page 29

FACE RAIDERS
Face Raiders
Playing Face Raiders
You can start Face Raiders from the HOME Menu. Face Raiders puts your face and your
friends’ faces in the game! You will need to take at least one face photo to play (see page 258
for more information on taking photos).
Using Software
Face Raiders
Check your surroundings...
In Face Raiders, you will move around with the Nintendo
3DS system and aim at the targets. Make sure you have
enough room to move around freely, and hold the system
rmly with both hands while playing.
Select Play.
1
Choose an item using the Circle Pad and then press .
Take a photo of a face and begin the game.
2
• When taking a face photo, a guide will be displayed. Line up
the face with the guide on the upper screen. When the face is
recognized, the game will begin. (For tips on facial recognition,
see page 312.)
• If the face is not automatically recognized, you can manually
take the photo by pressing
or
.
Clearing a game and saving photos
When you complete a game, you can save the face photo. The more face photos you save, the more levels you can open up.
Play
Select a previously saved face and begin a game. You can also
take a new face photo and then begin the game.
Face photos taken with Nintendo 3DS Camera may also
randomly appear in the game.
NOTE: If you have a photo that you do not want used in Face
Face Collection
You can view, edit, and delete previously
saved faces.
NOTE: To edit, select a face and then selec t
Face Settings.
• You can press
can view later in the Nintendo 3DS Camera application.
• To end a stage and return to the stage selection screen, rst press START to suspend your game, then select Quit.
• When you reach the maximum number of face photos, you can delete some photos to make room for new face photos.
or
as you progress through the game to save an image of the upper screen, which you
Raiders, you can delete the photo.
Show a Friend!
Choose among serveral short stages designed to quickly
introduce your friends to the game. Take photos of each
other’s faces and begin the game.
Using Software
Face Raiders
272
273
Page 30

Activity Log
Software Library
The Activity Log can be started from the Nintendo 3DS HOME Menu.
This software allows you to keep track of the number of steps you have
taken when you take the Nintendo 3DS with you. It also records your
play time on software titles.
NOTE: Steps are counted when the system is on and closed.
Using Software
Daily Records
Activity Log
Select to view the number of steps you have taken when carrying the
system with you and the number of hours you have played software.
Select to view a list of the software titles you have played, the number of
times you have played them, and your play times for each title.
Tap
or
to change
the time scale that is displayed
between days, weeks, months,
and years.
Tap this option to
display the records for
the day, week, month
or year.
Control dial
Slide the dial left or right to
change the displayed day,
week, month, or year.
Tap a software icon to display information about that software on the upper screen.
Turning pages
To turn pages, slide the stylus to
the left or right, or tap / .
Moving icons
Tap and hold the stylus on an icon, and then you can slide it to a
new position.
Tap, hold,
then slide
Deleting icons
Tap here to delete the selected icon.
• Icons displayed in the Daily Log will not be deleted.
• If you play the same software again after deleting its icon, your
playing times and other information from before deleting its icon
will be retained and added to its displayed gures.
Displaying rankings
Tap here to see various rankings of all the software you have played to date. To change the
ranking being displayed, tap Change Order.
Using Software
Activity Log
Switch between graph display or activity lists.
274
Switch between step count and play time.
Activity lists will display playing times
for each software title.
Scroll the list by tapping
or
on the lower screen.
• The number of steps counted will depend on the conditions under which you use your system and may vary from the actual
number of steps taken. For a more accurate step count, you can carry the system in something connected to your waist, such
as a hip pouch.
• You can record up to 256 dierent software titles. If this number is exceeded, records will be deleted, beginning with the oldest.
• If you play a Nintendo DS or Nintendo DSi software title continuously without exiting it, you can store up to seven days’ worth
of step counts and playing times.
• When the log is full, step counts and playing times are deleted beginning from the oldest rst. For step counts, you can store
up to about 10 years’ wor th of data, depending on how you are using software applications.
275
Page 31

Download Play
Nintendo eShop
With only a single copy of a Download Play-compatible software title, you can play
multiplayer games with other Nintendo 3DS systems, and send and receive demos of some
software titles through local wireless game play. (This feature is not supported through
Internet online play.)
Download Play is compatible with Nintendo DSi XL™, Nintendo DSi™, Nintendo DS™ Lite,
and Nintendo DS™ systems.
Operations on sending system (Host)
Using Software
Steps for host system
Start a Download Play-compatible title
1
from the HOME Menu.
Operations on receiving system (Client)
Steps for client system
Start Download Play from
1
the HOME Menu.
You can connect to Nintendo eShop through the Internet and download Nintendo 3DS
Download Software and Nintendo DSiWare™, as well as classic Virtual Console™ software.
NOTE: A broadband wireless network connection is required to connect to the Internet.
See page 279 for more information on setting up a connection.
A System Update is required to add the Nintendo eShop feature to your system.
(See page 296 for more information on performing a System Update. ) After the update,
a Nintendo eShop icon will be added to your HOME Menu. Tap the icon and then select
Manual from the HOME Menu to read the built-in manal for more information.
Nintendo eShop
Downloadable software
Nintendo 3DS Download Software
Some Nintendo 3DS software is available exclusively through Nintendo eShop.
You can save a maximum of 300 Nintendo 3DS Download Software titles and Virtual Console titles on an SD Card. If there is insufcient space on the SD Card, you may need to create some blocks of free space by deleting data in Data Management (see page 294)
or moving data to a high capacity SDHC Card (see page 250).
Virtual Console
With the Virtual Console service you can download games that were originally released on platforms prior to Nintendo DS, such as
Game Boy™ and Game Boy™ Color.
Using Software
Nintendo eShop
Download Play
Review the instruction booklet for the
2
game title you are playing. Steps may
var y depending on the type of software
you are using.
NOTE: Nintendo DS/Nintendo DSi titles are
stretched to t the Nintendo 3DS screen. To display
the game at the original screen size ratio, hold
down START or SELECT while tapping Start on the
Host system and
276
on the Client system.
Tap
2
Nintendo 3DS software,
or tap
to receive Nintendo DS or
Nintendo DSi software.
3
A list of available titles to
download will appear in
the lower screen. Tap the
title you want to receive.
Review the instruc tion
booklet for the game title
you are playing. Steps may vary depending on the type of
soft ware you are using.
to receive
Nintendo DSiWare
You can also download Nintendo DSiWare from Nintendo eShop. Nintendo DSiWare was originally released for the Nintendo DSi
system. There are many types of software titles available from Nintendo eShop, from games to useful tools and other applications.
You can save a maximum of 40 Nintendo DSiWare titles. If there is insucient space in System Memory, you may need to create
some blocks of free space by deleting data or moving data to an SD Card in Data Management (see page 294).
NOTE: To play Nintendo DSiWare saved on an SD Card, you must rst transfer it into the Nintendo 3DS System Memory.
277
Page 32

Internet SettingsSystem Settings
From System Settings, you can congure various settings for the Nintendo 3DS system, such as Internet Settings and Parental
Controls. You can access System Settings from the HOME Menu.
Internet Settings Congure Internet connection settings (page 281).
Parental Controls Restrict a user’s ability to download games and use certain features, such as the display of
3D images (page 290).
Data Management Manage downloaded software, StreetPass data, and blocked-user settings (page 294).
Other Settings Prole Set your user name and birthday (page 297).
Date & Time Set the date and time (page 298).
Touch Screen Calibrate the Touch Screen (page 298).
3D Screen Check Check the 3D Screen viewing guidelines (page 299).
Sound Change the sound settings (page 299).
System Conguration
Mic Test Conrm that the microphone works properly (page 299).
Outer Cameras Calibrate the outer cameras (page 300).
From Internet Settings, you can congure your Nintendo 3DS system to connect to the Internet. Once you have connec ted to the
Internet and accepted the Nintendo 3DS Service User Agreement, you can use features such as Nintendo eShop, SpotPass, Internet
Browser, and wireless game play over the Internet.
Nintendo eShop
SpotPass
Nintendo eShop
You can download software such as Nintendo 3DS
Download Software and Nintendo DSiWare.
NOTE: Your Nintendo 3DS system may require a system
update to use this software.
Wireless Internet game play
You can receive information or system updates even during game play or while the system is in Sleep Mode.
Internet Browser
System Conguration
Internet Settings
Circle Pad Calibrate the Circle Pad (page 302).
System Transfer Transfer software and Internet settings to another Nintendo 3DS
system (page 302). A system update may be required to use
this feature.
Language Set the system language that text messages appear in (see page 303).
System Update Update the system and built-in software (page 303).
Format System Memory Erase all software, save data, and pictures saved on the system
(page 304).
System Settings
You can wirelessly connect to the Internet to play
specially designed games against people from all over
the world.
NOTE: The ability to play games over the Internet depends on the software title. See the instruction manual
for the software you are using for more information.
You can easily view web pages on the Internet.
NOTE: Your Nintendo 3DS system may require a
system update to use this software.
278 279
Page 33

Internet connection requirements
Congure your Internet settings
To connect your Nintendo 3DS system to the Internet, you will need an Internet connection that supports wireless communication.
(If you haven’t already set up a wireless network, you may also need a computer to congure a wireless access point such as a
wireless router (sold separately).
Internet
Home Internet
environment
(May include a PC)
Broadband
Internet line
System Conguration
Cable modem,
DSL modem or
Wireless
communication
other device
Wireless access point such as a wireless router (sold separately)
• The Nintendo 3DS is compatible with 802.11g and 802.11b. You should use wireless
router that is compatible with these wireless standards.
• For information on nding a router, or on accessing and locating security settings on the
router you have, visit support.nintendo.com/nintendo3DSrouter.
• Setup is easy if your router supports WPS (Wi-Fi Protec ted Setup™) or AOSS. Check the
documentation that came with your router to see if it includes one of these features.
After conguring the devices necessary for connecting to the Internet, tap Internet Settings in the System Settings menu.
Tap Connection Settings.
1
Tap New Connection.
2
NOTE: If you have already created connection settings that were unable to
connect to the Internet, delete these rst before conguring a new one.
Tap Manual Setup.
3
NOTE: See the information at the bottom of this page for information on the
Tutorial option.
Tap the setup method that matches your environment:
4
• Quickest setup method: If you know your access point name, tap Search
for Access Point, see page 282.
• If you know that your access point supports the Wi-Fi Protected Setup (WPS)
method for conguration, tap
• If you know that your access point is compatible with the proprietar y AOSS
standard (found on most routers sold under the Bualo™ brand), tap
(AOSS), see page 285.
• Congure with Nintendo Wi-Fi USB Connector
NOTE: This product is no longer available. If you already own this product and would like more information about using
it for your wireless connection, visit support.nintendo.com.
• Congure with Manual Setup, see page 287.
(WPS), see page 284.
System Conguration
Internet Settings
Internet Settings
280
Choose Tutorial for a guided setup.
In step 3 above, tap Tutorial for help determining the best setup method. Follow the on-screen directions to select the
best Internet connection method. NOTE: If you need additional guidance during setup, tap the helper icon at the bottom
of the screen.
281
Page 34

Setup using Search for Access Point
If you know the name of your wireless network (also known as an access point), and aren’t using WPS or AOSS to congure your
system, follow these steps:
If you are using the guided setup Tutorial and selected No/I don’t know, proceed to step 2.
Tap Search for Access Point.
1
About the
This icon shows whether or not you will need to enter
a key to use that access point.
This icon shows the signal strength of the wireless connection. It is displayed in four stages, and the stronger the
signal, the better reception you will have.
and
icons
The access point requires a key.
The access point does not require a key.
Strong
System Conguration
Tap the name of your wireless network to select it.
2
Enter a password, code, or key if required.
3
This screen will be displayed if your access point has security settings congured. You must enter the security password for the access point for your
Nintendo 3DS system to be able to connect to it. This may also be called an
encryption key or network password on your wireless network setup.
For information on accessing and locating the security settings on
your router, visit support.nintendo.com/nintendo3DSrouter.
Tap OK to save the settings.
4
Tap OK to run a connection test.
5
If the connection test succeeds, setup is complete.
NOTE: If the connection test fails and an error code is displayed, follow the instructions displayed in the error
message, or visit support.nintendo.com and use the Error Code Lookup tool for information on resolving the error.
Weak
Signal reception
Reception signal strength icons
About security settings
The Nintendo 3DS system supports the types of security shown below. The type of security your router uses is usually set
when you install the access point in your network environment. Review the manual for your router for more information
on security settings for your access point.
Security encryption
methods
NOTE: Nintendo DS software only supports WEP security. To connect to the Internet and play Nintendo DS software, please
congure your Nintendo DS Settings and then make sure your access point is set up to use WEP security.
WEP
WPA™-
PSK(TKIP)
WPA2™-
PSK(TKIP)
WPA-
PSK(AES)
WPA2-
PSK(AES)
System Conguration
Internet Settings
Internet Settings
282 283
Page 35

Setup using Wi-Fi Protected Setup (WPS)
Setup using AOSS™
Setup is easy if you use a wireless router that includes the WPS feature. Read the instruction manual for your router for additional information on using the WPS feature.
If you are using the guided setup Tutorial, proceed to step 2.
System Conguration
Tap
1
Tap the connection method that matches your router.
2
On your WPS-compatible router, you will have either one of the following options:
3
to begin WPS conguration.
NOTE: It may take up to two minutes to complete the connection.
Push-Button Connection
Hold down the WPS Button on the access point until the corresponding
light ashes.
WPS Button
OR
PIN Connection
Use the number displayed on the Nintendo 3DS screen to congure your router, then tap Next.
Setup is easy if you use a wireless router that includes the AOSS feature. This is found on many routers sold under the Bualo™
brand name. Read the instruction manual for your router for additional information about using AOSS.
NOTE: If you use AOSS, your access point settings may sometimes change. Computers and other devices connected without
using AOSS sometimes lose the ability to connect to the Internet and may need to be recongured. (If you congure
your settings by using Search for an Access Point, your access point settings will not change.)
If you are using the guided setup Tutorial, proceed to step 2.
Tap to begin AOSS conguration.
1
On your AOSS-compatible router, press the AOSS button.
2
Hold down the AOSS button until the corresponding LED blinks twice.
If the connection fails repeatedly, wait about ve minutes and try again.
When a Settings Complete screen appears on your Nintendo 3DS system, tap OK to run a connection test. If the
3
connection test succeeds, setup is complete.
NOTE: The connection test may fail if you try to connect immediately after nishing setup. Wait one or two minutes before trying
the connection test.
AOSS Button
System Conguration
Internet Settings
When a Settings Complete screen appears on your Nintendo 3DS system, tap OK to run a connection test. If the
4
connection test succeeds, setup is complete.
NOTE: The connection test may fail if you try to connect immediately after nishing setup. Wait one or two minutes before trying
Internet Settings
the connection test.
284 285
Page 36

Changing, deleting, or testing Internet settings
Setup using Manual Setup
You can save up to three wireless conguration settings. Once you have saved a setting, you can change or delete it, or run a
connection test.
IMPORTANT: If you enter incorrect information for the Internet connection settings, you will not be able to connect
to the Internet. You should be familiar with conguring network settings before attempting to manually edit
these settings.
Tap Connection Settings.
1
Tap the desired connection setting.
2
Tap the choice for the action you want to take.
3
• If you tap Delete Settings or Connection Test, follow the on-screen
instructions.
System Conguration
• If you tap Change Settings, proceed to the next step.
Tap the connection setting you want to change, as shown on the next page for Manual
4
Setup.
NOTE: If you used the AOSS or WPS procedures for the setting you are changing, you cannot change the SSID or
security settings.
To enter individual settings yourself,
tap Connection Settings, New
Connection, Manual Setup, and then
Manual Setup again. Tap a panel to edit
a particular setting.
NOTE: If you congure the IP address
manually, you must also congure
the DNS.
SSID
Security IP Address
DNS Proxy Settings MTU Value
The name assigned to the access point. Also called ESS-ID or network name.
SSID:
IP Address: The number used on a network to identify a source/destination for transmitted data.
Subnet Mask: The value in an IP address that shows which network it belongs to.
Gateway: The entrance/exit for a network. In connection point settings, it points to this server’s IP address.
Primary DNS/Secondary DNS: This is a server that can tell you the IP address that corresponds to a computer’s name. In
connection point settings, it points to this server’s IP address.
Proxy: A server used to relay various requests to the Internet.
MTU: This value shows the maximum amount of data that can be sent over the net work at once.
System Conguration
Internet Settings
When you have completed your settings, tap Save and run a connection test.
If the connection test succeeds, setup is complete.
NOTE: If the connection test fails and an error code is displayed, follow the instructions displayed in the error message, or visit
Internet Settings
286 287
support.nintendo.com/errorcode and use the Error Code Lookup tool for information on resolving the error.
Page 37

Nintendo DS Connections
Other Information
If you are using Nintendo DS software that supports game play over the Internet, use these settings.
NOTE: If your access point has security settings congured, they must be set to WEP for the Nintendo DS system to connect to
the Internet.
Tap Nintendo DS Connections.
1
For operations specic to the Nintendo DS system, please refer to the Nintendo Wi-Fi
2
Connection Instruction Booklet included with your Nintendo DS software that
supports game play over the Internet.
System Conguration
Tap this option to agree to or review the Nintendo 3DS Service User Agreement, or to conrm the MAC address for the Nintendo
3DS system. (The MAC address is a unique number assigned to all devices that connect to the Internet.)
If an Error Code is displayed during setup
If the connection test fails and an error code is displayed, follow the instructions displayed in the error message, or visit
support.nintendo.com/errorcode and use the Error Code Lookup tool for information on resolving the error.
If an error message is displayed while you are conguring Nintendo DS settings or while you are playing software for a Nintendo
DS system, please try the following:
If you are conguring Nintendo DS settings or playing Nintendo DS software
It is possible that the Nintendo DS settings are not congured correctly. Please read the
Nintendo Wi-Fi Connection Instruction Booklet included with the Nintendo DS software
you are playing and refer to the displayed error code.
System Conguration
If you are playing Nintendo DSi software
It is possible that the Nintendo 3DS Internet settings are not congured correctly. Please perform a connection test as described on page 286 and follow any
instructions displayed in an error message.
Internet Settings
288 289
Internet Settings
Page 38

Parental Controls
Parental Controls can limit the download and use of certain content on the Nintendo 3DS system. Parental Controls can also limit
the use of certain features of the Nintendo 3DS system such as the display of 3D images.
NOTE: When Parental Controls are enabled, some System Settings, such as Internet Settings, the Outer Cameras adjustment, and
system update cannot be accessed. You will need to enter the PIN to access these features.
IMPORTANT: If a child will be the primary user, a parent or guardian should congure the settings.
Limiting the use of content or features
See the information below for a list of the content or features that can be limited.
Software Rating You can restrict the use of Nintendo 3DS software and Nintendo DSi software based on game
ratings. See page 305 for more information on software rating information.
You cannot restrict the use of Nintendo DS software or software downloaded with DS Download Play.
Internet Browser You can restrict the use of the Internet browser.
Nintendo 3DS When your system has been updated with Nintendo eShop, you can restrict the use of credit
Shopping Services cards, prepaid cards, and online purchasing of content and services through Nintendo 3DS
Shopping Services.
Display of 3D Images You can restrict the display of 3D images. This will make all images display in 2D. The restriction
of the display of 3D images is recommended for users 6 years or younger.
Sharing Images / You can restrict the wireless transmission of photos, images, sounds, animations,
Audio / Video and data and other user created content.
NOTE: This restriction does not work with Nintendo DS software.
System Conguration
Online Interaction You can restrict the exchange of data between users who are not your friends and the ability to
participate in software that can be played via the Internet.
NOTE: This restriction does not work with Nintendo DS software.
StreetPass You can restrict communications with other users via StreetPass.
NOTE: This restriction does not work with Nintendo DS or Nintendo DSi software.
Conguring Parental Controls
From System Settings, tap Parental Controls to begin the setup procedure and then follow the on-screen instructions.
1
Information and directions for the Parental Controls feature will be displayed on the screens. Carefully read and follow
the instructions.
Enter a four-digit PIN.
2
Enter the PIN a second time to conrm your choice.
NOTE: You will need to enter this PIN each time you would like to
suspend or change Parental Controls settings.
Select a secret question and then tap OK.
3
If you forget your PIN, you can answer the secret question to retrieve the
number.
Enter an answer and then tap OK.
4
Use the keyboard to enter an answer and follow the on-screen instructions. (See page 236 for information on using the keyboard.)
Tap Set Restrictions.
5
You can also choose to change your PIN or clear the Parental Controls
settings.
System Conguration
Parental Controls
Friend Registration You can restrict the registration of friends.
DS Download Play You can restrict the use of DS Download Play.
NOTE: A single Nintendo 3DS system can only have one Parental Controls conguration. It is recommended that if you want to
restrict the use of content for multiple users, congure the system with settings to match the restrictions for the youngest user
and share the PIN only with those allowed to view restricted content. Please visit support.nintendo.com for more details.
Parental Controls
290 291
Select a category to set restrictions.
6
Follow the on-screen instructions. You can slide the stylus on the right side
of the screen to see more options.
When you are nished with your selections, tap Done.
Page 39

Suspending, changing, or removing restrictions
Suspending restrictions
You can temporarily remove or change restrictions by selecting the feature and then
entering your PIN.
Tap the feature you want to change.
4
You can also choose to change your PIN or clear the Parental Control
settings.
If you forget your PIN or secret question answer
Changing or removing restrictions
Tap Parental Controls under System Settings.
1
Enter the PIN a second time to conrm your choice.
NOTE: You will need to enter this PIN each time you would like to
suspend or change Parental Controls settings.
Tap Change.
2
System Conguration
Input your PIN and then tap OK.
3
If you forget your PIN, you can answer the secret question to retrieve the
number.
If you forget your PIN or answer to your secret question, please visit support.nintendo.com for assistance.
System Conguration
Parental Controls
Parental Controls
292
293
Page 40

Data Management
Tap Erase or Move.
3
Tap Move to move the DSiWare from System Memory to an SD Card or from an SD Card to System Memory.
You can check, erase, or move downloaded software or StreetPass software, or manage
blocked-user settings. To do so, tap Data Management in System Settings and then
tap the item you want to manage.
Nintendo 3DS Data
Management
DSiWare Data
Management
StreetPass Management
Reset Blocked-User Settings
IMPORTANT: You cannot start DSiWare software from an SD Card. To play a DSiWare application, please move it to System
Memory rst. If the same application already exists in the move location, it will be overwritten. Take care not to
overwrite important save data.
System Conguration
Software
management
Extra data
management
You can check DSiWare software saved on System Memory or an SD Card. You
can also erase DSiWare software or move it between System Memory and an
SD Card. NOTE: A system update may be required to use this feature.
You can check the list of software that includes the StreetPass feature. You can
also turn o StreetPass for each application.
Clear the blocked-user settings. (All data that you have restricted yourself from
receiving will no longer be restricted.)
Check or erase Nintendo 3DS Download Software and
Virtual Console software.
Check or erase extra data for Nintendo 3DS software.
Managing Nintendo 3DS or Nintendo DSiWare software data
• The maximum number of Nintendo DSiWare applications that can be saved to System Memory is 40.
• The maximum number of Nintendo 3DS applications or extra data les that can be saved to an SD Card is 300.
• Nintendo DSiWare software that is moved to an SD Card on another Nintendo 3DS system will no longer be displayed on the
Erase/Move menu screen.
Nintendo DSiWare software cannot be moved in the following circumstances:
• There aren’t enough open blocks in the destination.
• Moving the data would exceed the memory capacity of the destination system or SD Card.
• The SD Card write-protection lock switch has been set to the lock position, disabling write permissions for the SD Card.
StreetPass Management
StreetPass data associated with each application will be displayed in a list.
Select a software icon and then tap Deactivate StreetPass to discontinue the use of StreetPass for that application.
• If you congure StreetPass in software that supports this feature, StreetPass settings will be saved by the Nintendo 3DS system.
You can have up to 12 applications using StreetPass simultaneously. If you already have 12 applications using StreetPass and
want to enable StreetPass for another application, you will rst need to deactivate StreetPass in one of the active applications.
• Each software title can have only one StreetPass setting conguration.
System Conguration
Data Management
Tap the item you would like to manage data for.
1
If you have selected Nintendo 3DS, you will have an additional choice of Software or Extra Data. A list of software
data will be displayed. The number of open blocks in System Memor y and the SD Card will be displayed on the
upper screen.
Tap the item you would like to erase or move.
2
You can tap or
NOTE: You can only select from System Memory or SD Card if you
are managing Nintendo DSiWare data.
Data Management
if you have more than one page of items.
Select from System Memory or SD Card
294
Reset Blocked-User Settings
On the Data Management screen, tap Reset Blocked-User Settings to clear
these settings.
295
Page 41

Other Settings
Tap Other Settings in System Settings to change your user information, calibrate various Nintendo 3DS components, or perform
other system functions.
You can tap
or to switch between pages of options.
Prole
Tap a Prole item to congure it.
NOTE: Nintendo DS Prole will be used if you are playing certain Nintendo DSi or
Nintendo DS software titles. Not all titles use these settings.
User Name Use the keyboard to enter your name.
Remember that other Nintendo 3DS users will
see your user name when interacting with them,
so do not use your real name or other wise share
any personal information in your user name.
Prole Enter prole information, including your name and birthday.
Date & Time Enter a date and time.
Touch Screen Calibrate the Touch Screen.
System Conguration
3D Screen Check Check the 3D Screen viewing guidelines.
Sound Change the sound settings.
Mic Test Conrm that the microphone is working properly.
Outer Cameras Calibrate the outer cameras.
Circle Pad Calibrate the Circle Pad.
System Transfer Transfer software and Internet settings to another Nintendo 3DS system.
NOTE: A system update may be required to use this feature.
Language Select a language that the system will display text in.
System Update Connect to the Internet and check for updates to the system or built-in software.
Format System Memory Erase all added software, save data, pictures, and system settings.
Other Settings
Birthday Enter a date, tapping
settings.
Region Settings Select your country and state or province.
Nintendo DS Prole Message
Enter a shor t message of up to 26 characters.
Remember that other Nintendo 3DS users will
see your message when interacting with them,
so do not use your real name or other wise share
any personal information in your user name.
Color
S elect a color and then tap OK.
or to adjust the
System Conguration
Other Settings
296
297
Page 42

Date & Time
3D Screen Check
Tap the setting you would like to adjust.
1
Tap or
2
time, then tap OK.
Some applications use the date and time, so it is
important to set this correctly.
to adjust the date or
Touch Screen
Use the following procedure if the Touch Screen doesn’t seem to respond properly to the stylus.
Tap with the tip of the stylus.
1
It is important to tap each accurately, in all three locations, to correctly
calibrate the Touch Screen. If you have done so, calibration will be completed and Calibrated will be displayed.
Tap in four places to check calibration.
2
System Conguration
The icon will turn green if you can accurately tap it.
If you cannot accurately tap the icon, tap Repeat to try
the calibration process again.
Green when tapped
If you are having diculty seeing 3D images, slide the 3D depth slider all the way to the top and then follow the on-screen
instructions.
Sound
Tap the setting you would like to use for the system sound, then tap OK.
System Conguration
Mic Test
Speak into the microphone to test its operation. The volume bar in the microphone will change color if it’s working correctly.
Tap Finish when the test is complete.
Other Settings
If you are having diculty selecting with the stylus...
While holding,
press
Turn the power on while holding down the L Button, R Button, and X Button. This will automatically start the Touch Screen
Other Settings
calibration procedure.
298 299
Microphone
Volume Bar
The bars will change color if the
microphone picks up sound.
Page 43

Outer Cameras
If your 3DS system receives an impact or is left in a place where it is exposed to high temperatures, 3D images viewed or taken
by the outer cameras may become misaligned. If you feel like the 3D images are out of alignment, use the following procedure
to calibrate the cameras.
IMPORTANT: If you calibrate to the wrong values, the misalignment could get worse. Please calibrate the outer
cameras only when you think the 3D images they take are out of alignment.
Move the 3D depth slider to its highest
1
position and tap Next.
Tap Automatic Setup.
2
(Tap Return to Default Settings to return the settings to their factory
defaults.)
Tap Next and center the cameras on a subject suitable for
3
automatic calibration.
Center the cameras on a brightly lit outdoors subject that is 20 meters (65 feet) or farther away. Avoid having any nearby
objects in the view. Hold the system as steady as possible, and when all three circles ( ) light up on the upper
screen, the cameras will auto-calibrate.
Manual calibration
You can manually calibrate the vertical alignment of the outer cameras. Please do this if you are not able to use auto-calibration.
Move the 3D depth slider to its highest
1
position and tap Next.
Tap Manual Setup.
2
Tap Next and center the cameras on a subject for manual calibration, then press
3
to take a photo.
• Set the system down on a at surface to avoid blur from shaky hands. Center the subject of the photo in the
screen and photograph it from directly in front.
• Manual calibration is easier if you photograph something with a simple, at shape and a clear outline, like that
shown below.
25cm (10”)
or
System Conguration
System Conguration
20m (65’)
Adjust the image so that the photo subjects displayed in the
If you center on subjects like those below, the cameras cannot calibrate, and the three circles (
up. If this happens, try centering on a dierent object. Depending on the subject, the cameras may not be able to
calibrate. In those cases, calibrate manually, as described on the next page.
Other Settings
300 301
Low-contrast object Close-up object
) will not all light
4
center of the upper screen line up exactly.
• Adjust the vertical alignment. You can also adjust the image to the left
and right, but these horizontal adjustments are not saved.
• If there are other objects in the photo besides the calibration subject,
those objects don’t need to be aligned.
• If you photographed the calibration subject from above or from a slant,
you may not be able to make it align exactly.
Tap Test 3D and follow the on-screen instructions.
5
Other Settings
Page 44

Circle Pad
Language
If the Circle Pad seems to be operating incorrectly, follow these steps to calibrate it.
Make two or three full rotations, then tap Next.
1
If Calibration Failed is displayed, try step 1
again.
Tap Return to Default to return the settings
back to factory default.
Move the Circle Pad in all four directions.
2
Conrm that the color of the triangles changes to
green, then tap OK.
If the color does not change, tap Repeat to try the
calibration procedure again.
If you are having diculty with the input from the Circle Pad...
If you repeatedly use excessive force when moving the Circle Pad, it may begin to incorrectly register input. If it registers
input even when you aren’t using it, and the other control buttons or the Touch Screen don’t seem to operate correctly, try
the following procedure:
System Conguration
While holding,
press
Select the language you would like the system to display text in, then tap OK.
System Update
IMPORTANT: The Nintendo 3DS System specications and the Nintendo 3DS Service are constantly evolving and we may
update or change the Nintendo 3DS System or the Nintendo 3DS Service in whole or in part, without notice to you. Such
updates may be required for you to play new Nintendo 3DS games, enjoy new features, or continue to access the Nintendo 3DS
Service. After the Nintendo 3DS menu is updated, any existing or future unauthorized technical modication of the hardware
or software of your Nintendo 3DS System, or the use of an unauthorized device in connection with your system, will render the
system permanently unplayable. Content deriving from the unauthorized modication of the hardware or software of your
Nintendo 3DS system will be removed. Failure to accept the update may render games and new features unplayable.
The Nintendo 3DS system automatically updates a list to help limit the use of inappropriate words and a list of access points
that can be used for network services oered by Nintendo. No prior notice for these or other minor automatic updates will be
displayed on the screen. For other system updates, a notice will be displayed on the screen, and you will need to select “Accept”
to receive such updates.
NOTE: A broadband wireless network connection is required to connect to the Internet and perform a system update.
See page 279 for more information on setting up a connection.
Tap OK on the System Update screen.
1
IMPORTANT: Be sure the battery is suciently charged before performing a system update to make sure the update is completed correctly.
System Conguration
Other Settings
Turn the power on while holding down the L Button, R Button, and Y Button. This will automatically start the Circle Pad
calibration procedure.
Read the on-screen messages, then tap I Accept.
2
System Transfer
Transfer software and Internet settings to another Nintendo 3DS system.
NOTE: A system update may be required to use this feature.
Other Settings
302 303
Page 45

Format System Memory
IMPORTANT: You should format your Nintendo eShop account rst, then your System Memory, prior to selling or
otherwise transferring your system to any third party. For more information about privacy and the protection of
your personal information, see the Nintendo 3DS System Privacy Policy on page 316.
Format System Memory will erase any data saved in System Memory and return the system to its factory-default state. The system
will keep any updates you have made with the System Update feature.
Tap Format
1
Read the on-screen messages and make sure you want to format your System Memory. IMPORTANT: The following
data cannot be restored if it is erased:
• All save data in System Memory including your friend list, Notications, and step count information
• System Settings data
• Built-in software save data
• All photos in System Memory
• Any other extra data
Tap Format again to erase the data.
2
After formatting the System Memory, when you turn the system on for the
rst time, the initial setup process will begin, as described on page 234.
Video and Computer Game Software Rating
Information
The Entertainment Software Rating Board (ESRB) ratings are designed to provide information about video and computer game
content, so you can make informed purchasing decisions. ESRB ratings have two parts: rating symbols suggest age appropriateness for the game, and content descriptors indicate elements in a game that may have triggered a particular rating and/or may be
of interest or concern.
To take full advantage of the ESRB rating system, it’s important to check both the rating symbol (found on the front of the game
box) and the content descriptor (found on the back of the game box). Go to www.esrb.org for a complete list of these content
descriptors.
The ESRB rating system is designed to provide information about a computer or video game. The ratings are not meant to recommend which games consumers should buy or rent or to serve as the only basis for choosing a product. Rather, individuals should
use the ESRB ratings together with personal tastes and standards when deciding what is best to purchase.
For more information on the ESRB and its video game ratings, go to the ESRB web site at w ww.esrb.org. For Nintendo 3DS packaged games, the Brazilian game rating issued by the Departamento de Justiça, Classicação, Título e Qualicação (DJCTQ) will also
be provided. For more information on the DJCTQ and its video game ratings, please visit www.mj.gov.br/classicacao.
Video and Computer Game Software Rating Information
Titles rated E (Everyone) have content
that may be suitable for ages 6 and
older. Titles in this category may
contain minimal cartoon, fantasy or
mild violence and/or infrequent use of
mild language. This rating is comparable
to the DJCTQ rating of “Livre. “
Titles rated M (Mature) have content
that may be suitable for ages 17 and
older. Titles in this category may con-
tain intense violence, blood and gore,
sexual content and/or strong language.
This rating is comparable to the DJCTQ
rating of “16 anos” and “18 anos.”
System Conguration
Other Settings
Titles rated RP (Rating Pending)
have been submitted to the ESRB and
are awaiting nal rating. (This symbol
appears only in advertising prior to a
game’s release.
Titles rated E10+ (Everyone 10 and
older) have content that may be suit-
able for ages 10 and older. Titles in this
category may contain more cartoon,
fantasy or mild violence, mild language
and/or minimal suggestive themes.
This rating is comparable to the DJCTQ
rating of “10 anos.”
Titles rated EC (Early Childhood) have
content that may be suitable for ages
3 and older. Contains no material that
parents would nd inappropriate.
This rating is comparable to the DJCTQ
rating of “ER.”
Titles rated T (Teen) have content that
may be suitable for ages 13 and older.
Titles in this category may contain
violence, suggestive themes, crude
humor, minimal blood, simulated gam-
bling, and/or infrequent use of strong
language. This rating is comparable
to the DJCTQ rating of “12 anos” and
“14 anos.”
304 305
Consumer Information
Page 46

Replacing the Battery Pack
Battery packs become worn with repeated charge/discharge cycles, and the amount of time they can be used when fully charged
will decrease gradually over time. If you feel the usage time has dropped o noticeably, replace the battery pack.
• Do not use any battery other than the Nintendo 3DS rechargeable battery pack, Model No. CTR-003. For more
information on ordering a new battery please visit support.nintendo.com.
• A parent or guardian should replace the battery pack if a child is using the system.
• Turn the power o and make sure the AC adapter is unplugged from the Nintendo 3DS system.
Loosen the four Phillips-head (+) screws on the battery cover with a screwdriver, and remove the battery cover.
1
IMPORTANT: To avoid damage to the screw or threads, use a screwdriver that is appropriate for the screw (#0).
Remove the battery pack as shown.
2
Replace the battery cover and tighten the four screws,
4
being careful not to overtighten.
IMPORTANT: Always be sure to replace the battery cover
and tighten the screws before resuming use.
PLEASE RECYCLE YOUR USED BATTERIES
When disposing of a rechargeable battery, take care to follow
appropriate local guidelines and regulations.
• Do not disassemble, attempt to repair, or deform the
battery pack.
• Do not dispose of rechargeable batteries in a re.
To nd a collection site near you, contact your local solid waste
authority or, in the United States, visit:
http://www.epa.gov/osw/conserve/materials/battery.htm
For more information or for assistance from Nintendo, visit: http://w ww.nintendo.com/consumer/recycle.jsp
Place tape over the battery contacts
before recycling.
Replacing the Batter y Pack
Replacing the Battery Pack
Wait at least 10 seconds after removing the old battery
3
pack before inserting the new battery pack to make sure the
Power LED resets correctly.
Check to make sure it is oriented correctly, as shown in the
illustration.
Consumer Information
306
Consumer Information
307
Page 47

Troubleshooting
Before seeking assistance, please review the following problems and solutions.You can also visit
support.nintendo.com for assistance and additional troubleshooting and repair options.
NOTE: Please also review any instruction manuals for the games or accessories you may be using.
The system won’t charge or the recharge LED doesn’t light up or stay lit.
• Make sure you are using the correc t AC adapter, Model No. WAP-002(BRA).
• Check your connections, as shown below. Remove the Nintendo 3DS system from the charging cradle and unplug the AC
adapter from both the cradle and the wall outlet. Wait approximately 30 seconds and then reconnect the components, making sure the system clicks into place in the charging cradle. (Review the battery-charging procedure on page 233.)
The system won’t turn on or there is no picture or sound.
• Make sure the battery pack is charged (see page 232).
• Check to see if the power LED lights up when you press the Power Button, as shown below.
Power
LED
• If you are using a Game Card, make sure it is completely inserted into the Game Card slot until it clicks into place.
• The battery pack may be installed incorrectly. Check the installation of the battery pack (see page 306).
• Make sure you are charging the battery pack within an ambient temperature range of 5˚C – 35˚C (41˚F – 95˚F). The battery
pack may not charge properly outside of this range.
• If the recharge LED is blinking or won’t stay lit, visit support.nintendo.com for assistance and additional troubleshooting
and repair options.
Recharge
LED
It takes a long time to charge the battery pack or a battery charge doesn’t last
Troubleshooting
very long.
• Make sure you aren’t exposing the system to or charging the system in temperatures below the ambient temperature range
of 5˚C – 35˚C (41˚F – 95˚F). Cold temperatures can increase the recharge time and decrease the usage time of a charged
battery.
• Over time and after repeated charging, the per formance of the battery will decrease. If you have had the system for a long
time, or if the battery pack appears slightly swollen, try replacing the battery pack.
Consumer Information
The system seems too warm.
• Make sure you are neither exposing the system to or charging the system in temperatures above the ambient temperature
range of 5˚C – 35˚C (41˚F – 95˚F). Do not expose the system to direct sunlight in an enclosed space.
The message “There is nothing inserted into Game Card slot” is displayed on the
HOME Menu, even though a Game Card is inserted in the Game Card slot.
• Make sure the Game Card is completely inserted into the Game Card slot until it clicks into place.
• Check the Game Card connectors and Game Card slot for dirt, dust, or other foreign material.
A Game Card won’t play.
• Make sure the game content is not restricted by Parental Controls. If this is the case, you can either enter a PIN to temporarily
turn o Parental Controls, or you can recongure Parental Controls. See Parental Controls in System Settings for more
information (page 278).
An error message appeared when playing Nintendo DS or Nintendo DSi software:
“An error has occurred. Press and hold the POWER Button to turn the system o. Please refer to the
Operations Manual for details”
• Turn o your system, then on again. Tr y repeating the same action that caused the error message to occur. If the same error
occurs again, please visit support.nintendo.com for assistance and additional troubleshooting and repair options, or call
1-800-255-3700.
Troubleshooting
Consumer Information
308
309
Page 48

The system registers control input when you aren’t operating the controls, or the
controls don’t seem to operate correctly.
• The Circle Pad may need to be calibrated. Use the calibration procedure in System Settings to recalibrate the Circle Pad (see
page 302).
NOTE: You can also go directly to the Circle Pad calibration procedure by following this procedure. First turn the power
o. Then hold down the L Button, R Button, and Y Button and turn the system on as shown below.
While holding,
press
The Touch Screen doesn’t seem to operate or respond correctly to stylus input.
• If you have attached a screen protec tor (sold separately) incorrectly to the Touch Screen, try removing it and using the Touch
Screen again. If it operates correctly, either try reattaching the screen protector, carefully following the instructions included
with it, or avoid using one. (Please use screen protectors ocially licensed by Nintendo.)
There is no sound from the speakers.
• Check to make sure there are no headphones plugged into the system, as the speakers do not operate when headphones are
plugged into the audio jack.
• Try adjusting the volume control to make sure the volume is not turned o, as shown below.
Volume
+ –
There is no sound from the headphones.
• Try adjusting the volume control to make sure the volume is not turned o, as shown above.
• Make sure the headphones are fully inserted all the way in to the audio jack, as shown below.
Troubleshooting
Not aligned correctly Dirt or air bubbles present
The microphone doesn’t seem to work or recognize sounds (including headset
microphones).
• The Touch Screen may need to be recalibrated. Use the calibration procedure in System Settings to recalibrate the Touch
Screen (see page 298).
NOTE: You can also go directly to the Touch Screen calibration procedure by following this procedure. First turn the power
o. Then hold down the L Button, R Button, and X Button and turn the system on as shown below.
Troubleshooting
Consumer Information
While holding,
press
310 311
• Make sure the software you are using includes microphone features.
• Conrm that the microphone is operating correc tly by performing a microphone test in System Settings (see page 296).
• Some voices may be dicult for the system to recognize. Tr y having a dierent person speak the same word or phrase to
verify if this is the problem.
The microphone seems to respond on its own, or there is feedback from the speakers
(including headset microphones).
• The microphone may be responding either to ambient noise in the environment or to noise coming from the speakers. Try to
remove the source of the noise or move to another location. You c an also try lowering the speaker volume, as shown below,
or use headphones.
NOTE: If the speakers are emitting odd
or high-pitched noises, this may be
caused by feedback from the microphone. Lowering the volume should
solve this problem.
Volume
+ –
Consumer Information
Page 49

3D images can’t be seen or are dicult to see.
• Make sure you are not using Nintendo DS or Nintendo DSi software, which do not support 3D image display.
• Check the 3D LED. Not all software includes 3D images, and the 3D LED will light up if 3D images can be viewed.
• Make sure that this feature is not restricted by Parental Controls. If this is the case, you can either enter a PIN to temporarily turn o Parental Controls, or you can recongure Parental Controls. See Parental Controls in System Settings for more
information (page 278).
• Be aware that 3D images can only be displayed on the upper screen.
• Make sure the 3D depth slider is not set all the way to the bottom of its range (in the o position).
• Make sure you are holding the Nintendo 3DS in the proper position to best view 3D images (see page 238).
• If your left and right eyes have dierent visual abilities, this can make 3D images dicult to see. If you use corrective eyewear,
they may help you to see 3D images.
• Avoid conditions where direct sunlight or other strong light is reecting o the screen.
NOTE: The ability to view 3D images varies from individual to individual. In rare cases, some individuals may be unable
to see 3D images or may only be able to see double images. If this is the case, the 3D screen should be set to display 2D
images only by sliding the 3D depth slider all the way to the bottom of its range.
WARNING: The 3D feature is only for children 7 and older.
The cameras don’t recognize my face.
In certain software titles, the cameras are used to recognize facial features. Observe the following guidelines to improve the
recognition process.
I can’t see the 3D eect in images taken with the outer cameras.
• Make sure the image was taken with the outer cameras, not the inner camera.
• Make sure the lenses for the outer cameras are clean and free of dirt or dust. Clean with a soft, dry cloth if necessary.
• Make sure there isn’t a strong light such as direct sunlight shinning on the camera lenses.
IMPORTANT: If your Nintendo 3DS system has been subjected to a physical shock or high temperatures, this could change the
alignment of the outer cameras and aect the 3D image quality. If you think your system may be aected by this, see page 300 for
more information on realigning the cameras.
When I take pictures with the Nintendo 3DS, the colors don’t seem correct.
• Check the camera mode settings for the cameras (see page 261).
• If you adjusted the settings for the cameras, try taking additional photos to see if the problem was correc ted.
The SD Card functions don’t seem to work.
• Check to make sure the SD Card is installed correctly (see page 240).
• Try checking the operation of the SD Card on a PC that has an SD Card reader.
I can’t view photos saved to an SD Card.
• The Nintendo 3DS system can only view photos taken by the Nintendo 3DS Camera software. Photos taken by digital cameras
or cell phones cannot be viewed.
Music les saved on an SD Card won’t play in Nintendo 3DS Sound.
• Check to make sure the les are in a format compatible with Nintendo 3DS Sound. The les must be in the following format:
AAC les with .m4a, .mp4, and .3gp extensions, or MP3 les with .mp3 extensions.
Bit rate of 16kbps - 320kbps and sampling frequency of 32kHz - 48kHz.
NOTE: The Nintendo 3DS cannot play copy-protected music les.
Troubleshooting
Take photos in a well-lit area
Troubleshooting
Consumer Information
• The surrounding environment, the color of your hair and beard, or facial and hair decorations can interfere with facial
recognition.
• In rare cases, dierences in facial features may make the facial recognition process fail.
Move your bangs so the cameras
can recognize your eyebrows
312 313
Face the screen directly
Remove your glasses if you
use them
• Make sure the SD Card is correc tly inserted into the SD Card slot (see page 240).
• Make sure the les are in a format compatible with Nintendo 3DS Sound (see the troubleshooting step above for compatible
le formats).
• The SD Card must not have more than 3000 music les on it.
• The SD Card must not have more than 1000 le folders on it.
• An individual folder must not have more than 100 music les in it. NOTE: If you have more than one folder with the same
name, the music les in each folder will be combined and displayed as one folder.
• An individual folder must not have more than seven subfolders (eight levels including the main folder).
Music les saved on an SD Card won’t display in Nintendo 3DS Sound.
Consumer Information
Page 50

The screen brightness or image colors change, or bright colors appear pale.
• If power-saving mode is on, these may be adjusted automatically to save battery power. For normal appearance, turn the
power-saving mode o (see page 245).
Some pixels on either the upper or lower screen are always dark or lit.
• Due to the characteristics of liquid crystal displays, a small number of pixels may not illuminate, or may always stay lit. This is
normal and not considered a defect unless the number of pixels that don’t function normally increase over time.
Warranty and Technical Service
Gaming do Brasil provides a 3 month legal warranty plus 9 months contracted warranty (total 1 year) from the date of purchase
registered in the product invoice. The shipping costs of the product to technical services as well as the return costs will be borne
by the buyer. This warranty applies only if the purchase invoice and the product serial number, clearly shown on the device,
are presented.
The brightness or color between the upper and lower screens seems dierent.
• The specications of the upper and lower screens are dierent so the appearance of images may be dierent. This is normal
and is not considered a defect.
The Download Play feature doesn’t work.
• Make sure this feature is not restricted by Parental Controls, either with Software Ratings restrictions or with Download Play
restrictions. If this is the case, you can either enter a PIN to temporarily turn o Parental Controls, or you can recongure
Parental Controls. S ee Parental Controls in System Settings for more information (page 278).
The system is not counting step numbers accurately.
• If your system is open, it cannot count steps. Steps are only counted when both the power is on and the system is closed.
• If you carry your Nintendo 3DS system in a bag that is not closely connected to your body, or you dangle it by a strap or case as
you walk, it cannot accurately count your steps. The step numbers will be counted more accurately if you carry your system in
a bag connected to your waist (such as a hip pouch).
• If you play a Nintendo DS or Nintendo DSi software title for long periods of time without exiting, the system can only save up
to seven days of information. Intermittently save your progress and exit the software to accurately count steps when using
this type of software. See page 274 for more information on the step counting feature.
The system suddenly enters Sleep Mode.
Check for and remove the following possible external causes:
• A strong external magnetic force, such as from an audio speaker, can cause the system to go into Sleep Mode.
Troubleshooting
• The Nintendo 3DS system may go into Sleep Mode if it is stacked up with other systems in the Nintendo DS
product line.
Wireless communication doesn’t work or works inconsistently.
AGS Digital Service
Comercial Cine Foto Ltda.
Technical Service
AGS Digital Service
Rua Dona Germaine Burchard, 550
Perdizes, São Paulo – SP
Zip Code: 05002-062
Telephone: (11) 3875-1333, extension 111
E-mail: ags.Service@uol.com.br
Warranty and Technical Service
Consumer Information
• Check the signal strength icon. If it appears as or
wireless access point.
• External causes, such as cell phones, computers, microwaves, or even physical barriers, can interfere with wireless communi-
Consumer Information
cations. Check for these conditions and either remove them or move to a dierent location.
, move closer to your communications partner or to your
I forgot my PIN and answer to the secret question for Parental Controls
• Please review the section on Parental Controls for more information on retrieving this information (see page 293).
314 315
Page 51

Nintendo 3DS System Privacy Policy
Last Updated: November 21, 2010
Nintendo is dedicated to protecting your privacy and handling any personal information we obtain from you with c are and respect. By accepting
the Nintendo 3DS Service User Agreement, you consent to and accept this Nintendo 3DS System Privacy Policy (“Privacy Policy”). This Privacy
Policy describes, among other things, the types of information collected about you by Nintendo when you use the Nintendo 3DS System; how your
information may be used; when it may be disclosed; how you can control the use and disclosure of your information; and how your information
is protected. This Privacy Policy applies only to information collected from your Nintendo 3DS System by Nintendo of America Inc. or its parent
company, Nintendo Co. Ltd. (individually and collectively, “Nintendo”). Information that you may submit to Nintendo through any of its Web sites or
any other Nintendo product or service is subject to the applicable privacy policy posted at support.nintendo.com. This Privacy Policy should be read
in conjunction with the Nintendo 3DS Service User Agreement and Code of Conduct. All capitalized terms not dened in this Privacy Policy will have
the meaning set forth in the Nintendo 3DS Service User Agreement.
CHANGES TO THIS PRIVACY POLICY
We may revise and update this Privacy Policy from time to time. Please review the most recent version of this policy frequently by going to
support.nintendo.com. When we update this Privacy Policy, we will revise the “Last Updated” date above.
INFORMATION COLLECTED
Personally Identiable Information. “Personally Identiable Information” or “PII” is information that identies you as an individual, such as your
full name, address, telephone number, or email address. We only collect PII that you provide to us. If you choose not to provide us with certain PII,
you will be able to continue using your Nintendo 3DS System, except that your use of features or applications that require the disclosure of certain PII
may be limited or unavailable.
We may add to or update the PII you provide on your Nintendo 3DS System with data collected from other sources, including oine sources (e.g.,
consumer service transactions such as repairs, part orders or purchases). If we combine information collected oine with information collected
through the Nintendo 3DS System, the combined PII will be treated in accordance with this Privacy Policy.
Non-Personally Identiable Information. In addition to the PII you provide to us, we may collect Non-Personally Identiable Information from
you. “Non-Personally Identiable Information” or “Non-PII” is information that does not identify you as an individual. This includes information such
as your Mii prole information, age, gender, geographic area, game-play data, online status, Nintendo 3DS System serial number and device ID,
device certicate information, cookies, Friend Codes, wireless access point information, Internet Protocol (“IP”) address, and Media Access Control
(“MAC”) address. We may link your PII with Non-PII or Aggregate Information that we collect from you. Some of the ways in which we collect NonPII are described in more detail below.
• Web Beacons: Certain Nintendo 3DS System online applications may use a common Internet technology called “Web Beacons” which are
small graphic images placed on a Web page, on a Web-based document, or in an email message, designed to collect certain information
and monitor user activity online. We may use Web Beacons to collect information such as IP address, MAC address, the URL of the page the
Nintendo 3DS System Privacy Policy
Consumer Information
Web user comes from, and the time the Web Beacon is activated (such as when you view the Web page, advertisement, or email containing
the Web Beacon). We may use the information collected through Web Beacons, for example, to determine how to improve the Nintendo
3DS System applications by seeing which areas, features, and products are most popular; to personalize the Nintendo 3DS System services
and make recommendations based on downloaded products; and to complete transactions you have requested.
• Cookies: Certain Nintendo 3DS System online applications may use cookies, which are small text les that a Web site places on your
Nintendo 3DS System. These les identify your Nintendo 3DS System and record data about your visit so that when you return to a Web
site, the site recognizes your Nintendo 3DS System and can personalize your visit. Cookies may be linked to your transac tion history, online
game play or other information. We may use information collected by cookies, as well as other tools such as log les and Web Beacons,
for example, to determine how to improve the Nintendo 3DS System applications by seeing which areas, features, and products are most
popular; to personalize the Nintendo 3DS System services; make recommendations based on downloaded products; and to complete
transactions you have requested.
• Nintendo Wireless Communications: Your Nintendo 3DS System is automatically assigned an IP address by your Internet Provider when
you connect to Nintendo via wireless communications. Nintendo receives a log le of your activities that may include, for example, your
IP address, MAC address, cookie information, transaction data, settings and download activity. We may use these log les, for example, to
monitor trac on our Web sites, to facilitate your use of Nintendo 3DS System features and applications, and to troubleshoot technical problems. If you do not want Nintendo to collect this information, you should turn o wireless communications on your Nintendo 3DS System.
Aggregate Information. We also may collect and aggregate certain information about our users’ game play, age, gender, search terms,
clickstreams, and purchases for the purposes of advertising and improving the Nintendo 3DS System features, applications, games, and content.
“Aggregate Information” is Non-PII that is combined with the Non-PII of other users.
HOW INFORMATION IS USED
We may collect PII, Non-PII, and Aggregate Information from you on your Nintendo 3DS System in order to: (i) fulll your requests for products,
services, and information, including to send you commercial and non-commercial messages and to process orders you have placed through your
Nintendo 3DS System; (ii) contact you in connection with games, contests, sweepstakes, sur veys, promotional materials, and product changes; (iii)
facilitate your use of Nintendo 3DS System applications and features, such as StreetPass Communications and communications with other users;
(iv) customize the content, features, and adver tising available through the Nintendo 3DS System, such as your Nintendo 3DS Shop catalog and
other catalogs; (v) set up repair orders and respond to other consumer service inquiries; (vi) provide you back-end services, such as system updates,
system messages, and free games, applications, trials, and content; (vii) analyze the use of the Nintendo 3DS Service, games, and applications
and information about our users for demographic studies, quality assurance and to understand and improve our service oerings; (viii) facilitate
demographic studies and quality assurance; (ix) prevent potentially illegal or oensive activities or to enforce our rights or the rights of our users;
and (x) for any other purposes disclosed to you at the time we collect your information or pursuant to your consent.
DISCLOSURE OF INFORMATION
We may facilitate the disclosure of PII, Non-PII and Aggregate Information when you use the Nintendo 3DS System. For example, information such
as your Mii name, Mii prole information, online status, Mii greeting, and other User Content or game-play information may be displayed to other
users when you use the online features of the Nintendo 3DS System.
• Third Parties. We may share PII, Non-PII, and Aggregate Information with our vendors to help us perform various functions necessary
to operate our business or fulll your requests (for example, completing downloads or purchases, developing and executing marketing
campaigns, etc.). We also may share such information and any User Content you create with third parties. We may share your PII, Non-PII,
and Aggregate Information with third parties to complete your transactions and provide you with advertising and other promotional
materials on your Nintendo 3DS System.
• StreetPass Communications. Certain Nintendo 3DS System features and games allow other Nintendo 3DS System users to automatically
contact and interact with you. The StreetPass Communications feature allows Non-PII and User Content that you have provided or that is
stored on your Nintendo 3DS System to be shared automatically with other Nintendo 3DS users via a wireless connection, the Nintendo
Zone or a StreetPass Communication Point. You understand that you have no expectation of privacy in User Content shared via StreetPass
Communications. When StreetPass Communications are enabled on your Nintendo 3DS system, you may not only receive User Content
from other users but advertising or other promotional materials from Nintendo and third parties. You may disable this feature at any time
through the Nintendo 3DS System settings.
• Friends. In addition, you may add Friends to your Nintendo 3DS Friend list by exchanging friend codes or friend cards. Through the
Nintendo 3DS Friend list and Friend messaging features, certain information that you have provided or that is stored on your Nintendo 3DS
System, such as your Mii name, Mii prole information, Mii greeting, online status, rankings, and other User Content or game-play information, may be shared with your Nintendo 3DS Friends.
• Legal and Business Purposes. We may disclose PII in order to comply with legal process, to respond to claims or inquiries, or to protect
the rights, property or personal safety of Nintendo, our users, or the public. Information about our users, including PII, may be disclosed as
part of any sale or transfer of company assets, if permitted by and done in accordance with applicable laws. We also may disclose your PII
for any other purposes pursuant to your consent.
Please do not to share PII about yourself or otherwise store such information on the Nintendo 3DS System except where necessary
to complete a transaction. You are responsible for any User Content that you share through the Nintendo 3DS System and for ensuring that such information does not contain any PII. Please be aware that other Nintendo 3DS System users may be able to store or
share with third parties information that you provide them through your Nintendo 3DS System.
MARKETING AND ADVERTISING
We may collect and use your PII, Non-PII, or Aggregate Information for marketing purposes, including the delivery of advertising and other
promotional materials to you through the Nintendo 3DS System. For example, we might deliver messages to your Nintendo 3DS System that oer
discounts on Nintendo games or products. You may be able to opt-out of receiving these messages through the Nintendo 3DS System settings or as
otherwise described to you in the marketing message.
Nintendo 3DS System Privacy Policy
Consumer Information
316
317
Page 52

NINTENDO ZONE
We may collect and use your PII and Non-PII to notify you when you are close to a Nintendo Zone. If you choose to access a Nintendo Zone, we may
use your PII and Non-PII, for example, to facilitate your access to applications and content. In addition, third parties may collect PII that you provide
to them and Non-PII through the Nintendo Zone.
LINKING ACCOUNTS
You may link your Nintendo 3DS Shop Account to your Club Nintendo account to receive personalized content and to participate in a variety of activities, promotions and programs. By linking your Club Nintendo account to your Nintendo 3DS Shop Account, you consent to having any PII you enter
on your Club Nintendo account linked to your Nintendo 3DS Shop Account. You may unlink these accounts in the Settings section of the Nintendo
3DS Shop.
THIRD-PARTY WEB BEACONS AND COOKIES
In the event you visit a third party’s Web site through the Internet browser on the Nintendo 3DS System, or you choose to view an ad delivered by a
third party, such as those made available through the Nintendo Zone, those Web sites or ads may also contain tools such as cookies and Web Beacons
which may be accessible to such third party to collect information about your online browsing. These third parties also may use ad networks, ad servers, ad exchanges, or other third parties that may collect information when you view or interact with advertisements or Web sites across the Internet
in an eort to understand your interests and deliver you advertisements tailored to your interests. Nintendo does not have access to the information
these third parties may collect about your interests to deliver relevant advertising to you, and the information practices of these third parties are not
covered by this Privacy Policy. We strongly recommend that you refer to the privacy policies of these third parties to learn more about how they may
collect, use, and disclose your information.
GAMES, APPLICATIONS, ADVERTISING, AND CONTENT PROVIDED BY THIRD PARTIES
You may disclose PII and Non-PII to third parties when you use the Nintendo 3DS System to play third-party games, use third-party applications,
view third-party advertisements, or visit third-party Web sites. We are not responsible for the privacy practices of these third parties, and we recommend that you review their privacy policies before submitting any information.
ATTENTION PARENTS OR LEGAL GUARDIANS: PROTECTING CHILDREN’S PRIVACY
The Nintendo 3DS System is directed to a general audience. We do not knowingly collect or store PII from children under the age of 13. Before
allowing your children to use the Nintendo 3DS System, we strongly recommend that you educate them on the importance of not sharing PII about
themselves with strangers. Children must not include any PII in their Nintendo 3DS System user name, Mii name, Mii prole information, in-game
nicknames or other User Content. Children also must not disclose PII when communicating with other Nintendo 3DS System users or
Nintendo through the Nintendo 3DS System wireless communication features.
We strongly recommend that you supervise your children’s use of the Nintendo 3DS System at all times. You can restrict your children’s use of certain
features of the Nintendo 3DS System by setting up the Nintendo 3DS Parental Controls. For a detailed description of the Nintendo 3DS System
wireless communication features and Parental Controls, please see the Nintendo 3DS System Operations Manual included with your Nintendo 3DS
System. This Operations Manual is also available at support.nintendo.com.
SECURITY
Nintendo 3DS System Privacy Policy
We have established reasonable safeguards to help ensure the security, integrity and privacy of the PII submitted or collected from your Nintendo
3DS System. We also have implemented reasonable security measures to help protect information under our control against loss, misuse or alteration. Nintendo will notify users of a data breach involving unencrypted PII by email or by posting a notice on our Web site. While we strive to safeguard your PII, no data storage system or transmission of data over the Internet or any other public network can be guaranteed to be 100% secure.
Please note that information collected by a Third Party Content Provider may not have the same security protections as information you submit to us,
and we are not responsible for protecting the security of such information.
If you install unauthorized applications or content on your Nintendo 3DS System or make unauthorized modications to the Nintendo 3DS System,
your PII may be compromised. Nintendo is not responsible for any data collection, use or disclosure from any Nintendo 3DS System with unauthorized applications or applications installed.
Consumer Information
OPTING-OUT OF INFORMATION COLLECTION
You may use the Nintendo 3DS System without disclosing PII; however, some features and applications may not be available to you. If you have
provided PII to us, you can opt-out of the collection of such data by turning o wireless communications on your Nintendo 3DS System. You also may
be able to opt-out of some types of information collection through the Nintendo 3DS System settings and Parental Controls.
DISABLING AND REMOVING INFORMATION STORED ON YOUR NINTENDO 3DS SYSTEM
Certain PII about you that you disclose when communicating with third parties or using your Nintendo 3DS System may be stored on your Nintendo
3DS System. For your protection, before selling or otherwise transferring your Nintendo 3DS System, please be sure to remove all stored information
on your Nintendo 3DS System. For instructions on how to remove this information, please see the Internet Setup section of your Nintendo 3DS
System Operations Manual or contact a Nintendo consumer service representative.
If you transfer data to a Nintendo 3DS System using the System Transfer or Nintendo 3DS Transfer Tool features, any PII or Non-PII included in such
data will be transferred as part of this process.
INTERNATIONAL USERS
Any information you provide or that is collected through the Nintendo 3DS System may be stored and processed in the United States or any other
country in which we or our aliated companies, vendors or agents maintain facilities. As such, PII may be accessed by foreign governmental authorities and otherwise in accordance with applicable laws. By using the Nintendo 3DS System, you consent to such storage and processing. We abide by
the safe harbor framework as set forth by the U.S. Department of Commerce regarding the collection, use, and retention of data from the European
Union. However, this Privacy Policy is intended to meet the laws and requirements of the United States and those of Canada and Latin America,
which may not be the same as the laws and regulations of your home country. If you are not located in the United States, Canada or Latin America
please go back to the country selection screen and select an appropriate country so that you will be aware of the policies that apply to you.
CONTACT US WITH YOUR PRIVACY QUESTIONS, COMMENTS OR CONCERNS
If you have any questions, complaints or comments regarding this Privacy Policy, the data collected from you or our practices, please contact the Nintendo 3DS Privacy Policy Administrator via email at privacypolicy@noa.nintendo.com, by phone at 1-888-977-7627, or by regular mail at Nintendo
of America Inc., Attn: Online Privacy Policy Administrator, 4600 150th Avenue NE, Redmond, WA 98052, U.S.A.
Nintendo 3DS System Privacy Policy
Consumer Information
318
319
Page 53

Nintendo 3DS Code of Conduct
Specications
This Nintendo 3DS Code of Conduct outlines the rules that you must follow to participate in the Nintendo 3DS Service. These rules are designed to
keep the Nintendo 3DS Service a friendly and safe environment.
The Nintendo 3DS Code of Conduct may be found at http://support.nintendo.com and may be revised by us at anytime. If you do not have Internet
access, please contact Nintendo Consumer Service by sending a letter to Nintendo of America Inc., Attn: Nintendo 3DS Code of Conduct, 4600 150th
Ave NE, Redmond, WA 98052 USA and they will mail you a current version of the Nintendo 3DS Code of Conduct, free of charge. All capitalized terms
not dened in this Nintendo 3DS Code of Conduct will have the meaning set forth in the Nintendo 3DS Service User Agreement.
1. Your use of the Nintendo 3DS is subject to this Nintendo 3DS Code of Conduct, which prohibits all harmful, illegal or otherwise oensive conduct,
including, but not limited to the following:
• Misrepresenting, impersonating, abusing, stalking, threatening or harassing any person or company, including, but not limited to other
users, Nintendo, and/or its employees, moderators, or sta.
• Doing anything illegal, discriminatory, defamatory, hateful, harassing, abusive, obscene, threatening, physically dangerous or otherwise
objectionable in connection with the Nintendo 3DS System or Nintendo 3DS Service.
• Making, disseminating, sharing or playing unauthorized copies of games, music or images on the Nintendo 3DS System. This activity is
illegal!
• Making new versions of existing Content or Products.
• Trying to modify or gain access to another person’s Nintendo 3DS System or Nintendo 3DS Service without permission or trying to modify or
gain access to any of Nintendo’s computers, hardware or networks used to provide the Nintendo 3DS Service or any feature of the Nintendo
3DS System.
• Cheating in a game, unless such cheats have been deliberately enabled.
• Hosting, intercepting, emulating, reverse engineering or redirec ting the communication protocols used by Nintendo as part of the Nintendo
3DS System or Nintendo 3DS Service, regardless of the method used to do so.
• Engaging in any commercial activity using the Nintendo 3DS System or any other activity that disrupts, diminishes the quality of, interferes
with the performance of, or impairs the functionality of a Nintendo 3DS System, including the Nintendo 3DS Service or networks connected
to the Nintendo 3DS Service.
• Accessing or attempting to access another person’s Nintendo 3DS System, including, but not limited to a person’s Nintendo 3DS Shop Ac-
count without permission or trying to modify, destroy or lose information from, copy or access any third party’s, including, but not limited
to Nintendo’s computers, hardware or networks.
• Uploading, posting, emailing, transmitting or otherwise making available: (a) any content that you do not have a legal right to make
Nintendo 3DS Code of Conduct
Consumer Information
available; (b) any content that infringes any patent, trademark, trade secret, copyright or other intellectual property or proprietary rights of
any party; (c) any unsolicited or unauthorized advertising or promotional materials (e.g. “spam”); (d) information which personally identies you or any third party; (e) content to which you have disguised the origin; or (f) content that is obscene, unlawful or prohibited from
publication in your jurisdiction, including but not limited to publishing news, stories or pictures associated with a third party.
2. Nintendo is not responsible for, and to the fullest extent permitted by law, will not accept liability for, anything you say or anything that happens
on the Nintendo 3DS System and Nintendo 3DS Service or as a result of your use of the Nintendo 3DS System and Nintendo 3DS Service; you
alone are responsible.
3. Virtual Property. Some games or other content may have certain features that may be traded with other Nintendo 3DSusers. For example, a
game might give you the ability to create a character that gathers objects (like a car or gold coins) and has certain characteristics (like a special
ability or appearance). These features are sometimes called “virtual property.” Nintendo (or its licensors) own this virtual propert y, and you may
not sell, trade, assign, license, or otherwise convey virtual property for real money.
4. Nintendo reserves the right to immediately terminate, block or suspend, in whole or in part, your use of the Nintendo 3DS Service or any feature
of the Nintendo 3DS System for, in Nintendo’s sole discretion, any violation of this Nintendo 3DS Code of Conduct. Nintendo reser ves the right
to contact and cooperate with any law enforcement agencies, government ocials or Internet Service Providers, as Nintendo believes in its sole
discretion, is necessary or appropriate to investigate or resolve possible problems or inquiries, or as otherwise required by law.
Nintendo 3DS system
Model name: CTR-001 (BRA)
LCD screens Upper Screen: Widescreen LCD display, enabling 3D view without the need for
(Screen size/pixel count) special glasses. Capable of displaying approximately 16.77 million colors. 3.53-inch
display (76.80 mm horizontal x 46.08 mm vertical) with 800x240 pixel resolution
(400 pixels are allocated for each eye to enable 3D viewing).
Lower Screen: LCD Touch Screen. Capable of displaying approximately 16.77 million
colors. 3.02-inch display (61.44 mm horizontal x 46.08 mm vertical) with 320x240
pixel resolution.
Power source AC adapter (WAP-002 (BRA), Battery pack (CTR-003)
Wireless frequency: 2.4GHz band
Wireless standards: IEEE802.11b/g
Recommended wireless distance: Within 30 m (98’). Depending on surrounding conditions, this
distance may be less.
Camera functions: Lens: Single focus. Capture element: CMOS. Active pixel count: Approx. 300,000
pixels.
Clock features: Maximum daily variance: ± 4 seconds
Speakers: Stereo (with pseudo-surround support)
Input/output: Game Card slot, SD Card slot, AC adapter connector, charging cradle terminal, and
stereo headphone output jack
Sensors: Motion sensor, gyro sensor
Maximum power consumption: Approximately 4.1W (while charging)
Operating environment: Temperature, 5˚C – 35˚C (41˚F – 95˚F) / humidity, 20-80 percent
Dimensions: Height: 74 mm / width: 134 mm / thickness: 21 mm (when closed)
Weight: Approximately 235 g (including battery pack (CTR-003), stylus (CTR-004), and SD
Card)
Charge time Approx. 3 hours and 30 minutes
Battery endurance Please see page 237.
Specications
Consumer Information
320 321
Page 54

Nintendo 3DS battery pack
Model name: CTR-003
Battery type: Lithium-Ion
Power Capacity: 5Wh
Nintendo 3DS charging cradle
Model name: CTR-007
Input/output: DC 4.6V 900mA
Dimensions: Height: 86.5 mm / width: 138.2 mm / thickness: 31.8 mm
Weight: Approximately 87.4 g
Nintendo 3DS AC adapter
Model name: WAP-002 (BRA)
Input: 100V-240 50hz/60hz 7W
Output: DC 4.6V 900mA
Dimensions: Height: 67.5 mm / width: 47.7 mm / thickness: 23.0 mm
Weight: Approximately 80 g
Cord length: Approximately 1.9 m
Compatible products: Nintendo 3DS, Nintendo DSi XL, Nintendo DSi
Specications
Consumer Information
Legal Notices
This product includes RSA BSAFE Cryptographic software from RSA Security Inc. RSA is a registered trademark of RSA Security Inc. BSAFE is a registered trademark of RSA Security Inc. in the United States and/or
other countries. ©2005 RSA Security Inc. All Rights Reserved.
SDHC Logo is a trademark of SD-3C, LLC.
This product uses certain fonts provided by Fontworks Inc.
This product includes speech rate conversion software developed by Toshiba corporation. Copyright ©2008 TOSHIBA CORPORATION
“QR code reader” includes software deliverables of Information System Products Co., Ltd. and Institute of Super Compression Technologies, Inc. QR Code is a registered trademark of DENSO WAVE INCORPORATED
in JAPAN and other countries.
“
“ and AOSS™ are the trademarks of BUFFALO INC.
THIS PRODUCT IS LICENSED UNDER THE MPEG-4 SYSTEMS PATENT PORTFOLIO LICENSE FOR ENCODING IN COMPLIANCE WITH THE MPEG-4 SYSTEMS STANDARD. EXCEPT THAT AN ADDITIONAL LICENSE AND
PAYMENT OF ROYALTIES ARE NECESSARY FOR ENCODING IN CONNECTION WITH (i) DATA STORED OR REPLICATED IN PHYSICAL MEDIA WHICH IS PAID FOR ON A TITLE BY TITLE BASIS AND/OR (ii) DATA WHICH IS PAID
FOR ON A TITLE BY TITLE BASIS AND IS TRANSMITTED TO AN END USER FOR PERMANENT STORAGE AND/OR USE. SUCH ADDITIONAL LICENSE MAY BE OBTAINED FROM MPEG LA, LLC. SEE <HTTP://WWW.MPEGL A.
COM> FOR ADDITIONAL DETAILS.
Ubiquitous TCP/IP+SSL Copyright ©2001-2010 Ubiquitous Corp.
Powered by Devicescape Software. Portions of this products are © 2003-2010 Devicescape Software, Inc. All rights reserved.
Copyright ©2003-2010, Jouni Malinen <j@w1.> and contributors All Rights Reserved.
WPA Supplicant licensed pursuant to BSD License.
Redistribution and use in source and binary forms, with or without modication, are permitted provided that the following conditions are met:
1. Redistributions of source code must retain the above copyright notice, this list of conditions and the following disclaimer.
2. Redistributions in binary form must reproduce the above copyright notice, this list of conditions and the following disclaimer in the documentation and/or other materials provided with the distribution.
3. Neither the name(s) of the above-listed copyright holder(s) nor the names of its contributors may be used to endorse or promote products derived from this software without specic prior written permission.
THIS SOFTWARE IS PROVIDED BY THE COPYRIGHT HOLDERS AND CONTRIBUTORS ”AS IS” AND ANY EXPRESS OR IMPLIED WARRANTIES, INCLUDING, BUT NOT LIMITED TO, THE IMPLIED WARRANTIES OF MERCHANTABILITY AND FITNESS FOR A PARTICULAR PURPOSE ARE DISCLAIMED. IN NO EVENT SHALL THE COPYRIGHT OWNER OR CONTRIBUTORS BE LIABLE FOR ANY DIRECT, INDIRECT, INCIDENTAL, SPECIAL, EXEMPLARY,
OR CONSEQUENTIAL DAMAGES (INCLUDING, BUT NOT LIMITED TO, PROCUREMENT OF SUBSTITUTE GOODS OR SERVICES; LOSS OF USE, DATA, OR PROFITS; OR BUSINESS INTERRUPTION) HOWEVER CAUSED AND
ON ANY THEORY OF LIABILITY, WHETHER IN CONTRACT, STRICT LIABILITY, OR TORT (INCLUDING NEGLIGENCE OR OTHERWISE) ARISING IN ANY WAY OUT OF THE USE OF THIS SOFTWARE, EVEN IF ADVISED OF THE
POSSIBILITY OF SUCH DAMAGE.
This product includes software developed by the OpenSSL Project for use in the OpenSSL Toolkit. (http://www.openssl.org/). Copyright ©1998-2007 The OpenSSL Project. All rights reserved.
Redistribution and use in source and binary forms, with or without modication, are permitted provided that the following conditions are met:
1. Redistributions of source code must retain the above copyright notice, this list of conditions and the following disclaimer.
2. Redistributions in binary form must reproduce the above copyright notice, this list of conditions and the following disclaimer in the documentation and/or other materials provided with the distribution.
3. All advertising materials mentioning features or use of this software must display the following acknowledgment: ”This product includes software developed by the OpenSSL Project for use in the OpenSSL
Toolkit. (http://www.openssl.org/)”
4. The names ”OpenSSL Toolkit” and ”OpenSSL Project” must not be used to endorse or promote products derived from this software without prior written permission. For written permission, please contact
openssl-core@openssl.org.
5. Products derived from this software may not be called ”OpenSSL” nor may ”OpenSSL” appear in their names without prior written permission of the OpenSSL Project.
6. Redistributions of any form whatsoever must retain the following acknowledgment: This product includes software developed by the OpenSSL Project for use in the OpenSSL Toolkit (http://www.openssl.org/)
THIS SOFTWARE IS PROVIDED BY THE OpenSSL PROJECT “AS IS” AND ANY EXPRESS OR IMPLIED WARRANTIES, INCLUDING, BUT NOT LIMITED TO, THE IMPLIED WARRANTIES OF MERCHANTABILITY AND FITNESS FOR A
PARTICULAR PURPOSE ARE DISCLAIMED. IN NO EVENT SHALL THE OpenSSL PROJECT OR ITS CONTRIBUTORS BE LIABLE FOR ANY DIRECT, INDIRECT, INCIDENTAL, SPECIAL, EXEMPLARY, OR CONSEQUENTIAL DAMAGES
(INCLUDING, BUT NOT LIMITED TO, PROCUREMENT OF SUBSTITUTE GOODS OR SERVICES; LOSS OF USE, DATA, OR PROFITS; OR BUSINESS INTERRUPTION) HOWEVER CAUSED AND ON ANY THEORY OF LIABILITY,
WHETHER IN CONTRACT, STRICT LIABILITY, OR TORT (INCLUDING NEGLIGENCE OR OTHERWISE) ARISING IN ANY WAY OUT OF THE USE OF THIS SOFTWARE, EVEN IF ADVISED OF THE POSSIBILITY OF SUCH DAMAGE.
This product includes cryptographic software written by Eric Young. Copyright ©1995-1998 Eric Young (eay@cryptsoft.com). All rights reserved.
This package is an SSL implementation written by Eric Young (eay@cryptsoft.com). The implementation was written so as to conform with Netscapes SSL.
This library is free for commercial and non-commercial use as long as the following conditions are adhered to. The following conditions apply to all code found in this distribution, be it the RC4, RSA, lhash, DES,
etc., code; not just the SSL code. The SSL documentation included with this distribution is covered by the same copyright terms except that the holder is Tim Hudson (tjh@cryptsoft.com).
Copyright remains Eric Young’s, and as such any Copyright notices in the code are not to be removed. If this package is used in a product, Eric Young should be given attribution as the author of the parts of the
library used. This can be in the form of a textual message at program startup or in documentation (online or textual) provided with the package.
Redistribution and use in source and binary forms, with or without modication, are permitted provided that the following conditions are met:
1. Redistributions of source code must retain the copyright notice, this list of conditions and the following disclaimer.
2. Redistributions in binary form must reproduce the above copyright notice, this list of conditions and the following disclaimer in the documentation and/or other materials provided with the distribution.
3. All advertising materials mentioning features or use of this software must display the following acknowledgement: ”This product includes cryptographic software written by Eric Young (eay@cryptsoft.
com)” The word ‘cryptographic’ can be left out if the rouines from the library being used are not cryptographic related :-).
4. If you include any Windows specic code (or a derivative thereof) from the apps directory (application code) you must include an acknowledgement: This product includes software written by Tim Hudson
(tjh@cryptsoft.com).
THIS SOFTWARE IS PROVIDED BY ERIC YOUNG ”AS IS” AND ANY EXPRESS OR IMPLIED WARRANTIES, INCLUDING, BUT NOT LIMITED TO, THE IMPLIED WARRANTIES OF MERCHANTABILITY AND FITNESS FOR A
PARTICULAR PURPOSE ARE DISCLAIMED. IN NO EVENT SHALL THE AUTHOR OR CONTRIBUTORS BE LIABLE FOR ANY DIRECT, INDIRECT, INCIDENTAL, SPECIAL, EXEMPLARY, OR CONSEQUENTIAL DAMAGES (INCLUDING, BUT NOT LIMITED TO, PROCUREMENT OF SUBSTITUTE GOODS OR SERVICES; LOSS OF USE, DATA, OR PROFITS; OR BUSINESS INTERRUPTION) HOWEVER CAUSED AND ON ANY THEORY OF LIABILITY, WHETHER IN
CONTRACT, STRICT LIABILITY, OR TORT (INCLUDING NEGLIGENCE OR OTHERWISE) ARISING IN ANY WAY OUT OF THE USE OF THIS SOFTWARE, EVEN IF ADVISED OF THE POSSIBILITY OF SUCH DAMAGE.
The licence and distribution terms for any publicly available version or derivative of this code cannot be changed. i.e. this code cannot simply be copied and put under another distribution licence [including
the GNU Public Licence.]
This product uses the LC Font by Sharp Corporation. LCFONT, LC Font and the LC logo mark are trademarks of Sharp Corporation.
The Wi-Fi CERTIFIED logo, Wi-Fi Protected Access® (WPA and WPA2), and the Wi-Fi Protected Setup icon are registered trademarks of the Wi-Fi Alliance.
Legal Notices
Consumer Information
322 323
Page 55

324
 Loading...