

Page 1
ninjakitchen.com
TM/MC
CP307
OWNER’S GUIDE
GUIDE D’UTILISATION
MANUAL DEL PROPIETARIO
Page 2
ENGLISH
1
ninjakitchen.com
CONTENTS
THANK YOU
for purchasing the Ninja® Hot & Cold Brewed System™.
Important Safeguards . . . . . . . . . . . . . . . . . . . . . . 2
Parts . . . . . . . . . . . . . . . . . . . . . . . . . . . . . . . . .4
Using the Control Panel. . . . . . . . . . . . . . . . . . . . . .6
Function Buttons. . . . . . . . . . . . . . . . . . . . . . . . . . 6
Operating Buttons . . . . . . . . . . . . . . . . . . . . . . . . . 6
SCA Certification . . . . . . . . . . . . . . . . . . . . . . . . . 7
Before First Use . . . . . . . . . . . . . . . . . . . . . . . . . . 8
Setting the Clock . . . . . . . . . . . . . . . . . . . . . . . . . 8
Priming Your Ninja Hot & Cold Brewed System . . . . . . . . 9
High-Altitude Calibration. . . . . . . . . . . . . . . . . . . . 10
Preparing & Using the Ninja Hot & Cold Brewed System . . 11
How Much do You Get in Your Cup?. . . . . . . . . . . . . . . 11
Coee Measurement Chart . . . . . . . . . . . . . . . . . . . . 11
Tea Measurement Chart . . . . . . . . . . . . . . . . . . . . . 11
Filling the Coee Brew Basket . . . . . . . . . . . . . . . . . . 12
Filling the Tea Brew Basket . . . . . . . . . . . . . . . . . . . . 12
Automatic Drip Stop. . . . . . . . . . . . . . . . . . . . . . . . 13
Brewing . . . . . . . . . . . . . . . . . . . . . . . . . . . . . . . 14
Custom Brews: . . . . . . . . . . . . . . . . . . . . . . . . . . .14
Classic & Rich . . . . . . . . . . . . . . . . . . . . . . . . . . 14
Over Ice & Cold Brew . . . . . . . . . . . . . . . . . . . . . . 15
Signature Brew: . . . . . . . . . . . . . . . . . . . . . . . . . . 16
Specialty . . . . . . . . . . . . . . . . . . . . . . . . . . . . . 16
Setting the Delay Brew . . . . . . . . . . . . . . . . . . . . . . 16
Frothing Milk . . . . . . . . . . . . . . . . . . . . . . . . . . . . 17
Care & Maintenance . . . . . . . . . . . . . . . . . . . . . . . 18
Cleaning After a Brew . . . . . . . . . . . . . . . . . . . . . . . 18
Cleaning Your Water Reservoir . . . . . . . . . . . . . . . . . 18
Cleaning Your Carafe . . . . . . . . . . . . . . . . . . . . . . . 18
Cleaning & Descaling Your Brewing System . . . . . . . . . . 19
Troubleshooting Guide . . . . . . . . . . . . . . . . . . . . . 20
Ordering Replacement Parts / Product Registration. . . . 22
Warranty . . . . . . . . . . . . . . . . . . . . . . . . . . . . . 23
PLEASE READ CAREFULLY AND
KEEP FOR FUTURE REFERENCE.
These instructions are designed
to help you get a complete
understanding of your new
Ninja Hot & Cold Brewed System™.
If you have any questions, please
call our Customer Service line at
1-877-646-5288.
THIS BOOK COVERS MODEL
NUMBER:
CP307
TECHNICAL SPECIFICATIONS
Voltage: 120V~, 60Hz
Power: 1500 Watts
Water Reservoir
Capacity: 50 Ounces
TIP: You can find the model and serial
numbers on the QR code label located on the
back of the unit by the power cord.
RECORD THIS INFORMATION
Model Number: ����������������
Serial Number: �����������������
Date of Purchase: ���������������
(Keep receipt)
Store of Purchase: ��������������
REGISTER YOUR PURCHASE
registeryourninja.com
1-877-646-5288
Scan QR code using mobile device
Page 3

ENGLISH
2 3
1- 877- 6 46 -5 28 8
ninjakitchen.com
IMPORTANT SAFEGUARDS
READ ALL INSTRUCTIONS BEFORE USE • HOUSEHOLD USE ONLY
Read all instructions before using your
NINJA
HOT & COLD BREWED SYSTEM™
When using electrical appliances, basic safety precautions should always
be followed, including the following:
WARNING
To reduce the risk of fire, electric shock,
serious injury, death, or damage when
using this appliance, follow these basic
safety precautions.
General Precautions
1 This appliance can be used by
children aged from 8 years and
above and persons with reduced
physical, sensory or mental
capabilities or lack of experience
and knowledge if they have been
given supervision or instruction
concerning use of the appliance
in a safe way and understand the
hazards involved.
2 To reduce the risk of electric shock ,
this appliance has a polarized plug
(one blade is wider than the other). As
a safety feature, this plug will fit into
a polarized outlet only one way. If the
plug does not fit fully into the outlet,
reverse the plug. If it still does not fit,
contact a qualified electrician.
DO NOT force into outlet or try to
modify to fit.
3 Keep the appliance and its cord
out of reach of children less than 8
years.
4 To eliminate a choking hazard for
young children, remove and discard
the protective cover fitted on the
power plug of this appliance.
5 Children shall not play with the
appliance.
6 To protect against fire, electric shock,
and injury to persons , DO NOT immerse
cord, plugs, or body of machine in water
or other liquid.
7 NEVER carry the appliance by the
power cord or pull it to disconnect
from electrical socket; instead grasp
the plug and pull to disconnect.
8 DO NOT operate any appliance with
a damaged cord or plug, or after the
appliance malfunctions, or has been
dropped or damaged in any manner.
Contact SharkNinja Operating LLC
for service.
9 For household and work top use only.
DO NOT let the power cord hang
over the edge, or touch hot sur faces
such as the stove.
10 NEVER use socket below counter.
11 To avoid risk of fire, electrical shock,
or damage to the unit, DO NOT store
or use unit in an appliance garage or
under a wall cabinet.
12 Unplug from outlet when not in use
and before cleaning.
13 Turn o and allow to cool before
putting on or taking o parts, and
before cleaning the appliance.
Operating Notice
14 The use of an accessory not
recommended by the manufacturer
may create an overflow condition
and scalding hazard, or result in fire,
electric shock, or personal injury.
15 ALWAYS use appliance on a clean, dry,
level surface.
16 DO NOT place on or near a hot gas or
electric burner or in a heated oven.
17 DO NOT use this appliance for anything
other than its intended use.
18 DO NOT use outdoors.
19 DO NOT touch hot surfaces. Use
handles or knobs.
20 To avoid contact with steam and hot
surfaces, DO NOT reach across top of
brewer to froth.
21 ALWAY S place a vessel beneath the
brew basket to receive the brewed
coee or tea.
22 Scalding may occur if brew basket is
opened during a brew or clean cycle.
23 DO NOT remove the vessel while the
appliance is running without the Drip
Stop in the closed position. Return the
vessel quickly and open the Drip Stop
to continue the brew.
24 DO NOT fill water reser voir with
anything other than water, as other
liquids may damage your brewer.
25 DO NOT overfill the water reservoir.
Fill water only to the Max Fill line.
26 DO NOT run the appliance without
water.
27 Exceeding maximum brew basket
capacity may cause over flow. DO NOT
use fine or espresso ground coee.
Thermal Carafe
28 The carafe is designed for use with this
appliance only. DO NOT place carafe on
or near a hot gas or electrical burner, or
in a heated oven.
29 DO NOT place carafe in dishwasher.
30 DO NOT use a cracked or scratched
carafe or a carafe that has a loose or
weakened handle.
31 DO NOT clean carafe with abrasive
cleaners, steel wool pads, or other
abrasive materials.
32 DO NOT place carafe in microwave.
33 DO NOT drink directly from the carafe.
Liquid from the carafe may be very hot.
34 DO NOT use the carafe to store food
when not in use.
35 Ensure the carafe is completely empty
before starting a cleaning or brewing
cycle. Starting a cycle with water,
coee, or tea in the carafe will cause an
overflow.
Care & Maintenance
36 Allow the appliance to cool before
removing any parts and before cleaning.
37 To prevent illness from bacterial growth
in the appliance, follow all cleaning
instructions in the Care & Maintenance
section of this Owner’s Guide.
38 Clean the system on a weekly basis.
39 If the product is not operating
properly, visit ninjakitchen.com or
contact SharkNinja Operating LLC for
examination, repair, or adjustment.
40 Cleaning and user maintenance shall
not be made by children unless they
are older than 8 and supervised.
Cord Statement
41 A short power-supply cord is
provided to reduce the risks resulting
from becoming entangled in or
tripping over a longer cord.
42 DO NOT use extension cords with
this product.
Take care to avoid coming into
contact with a hot surface.
Page 4
4
1- 877- 6 46 -5 28 8
ENGLISH
5
ninjakitchen.com
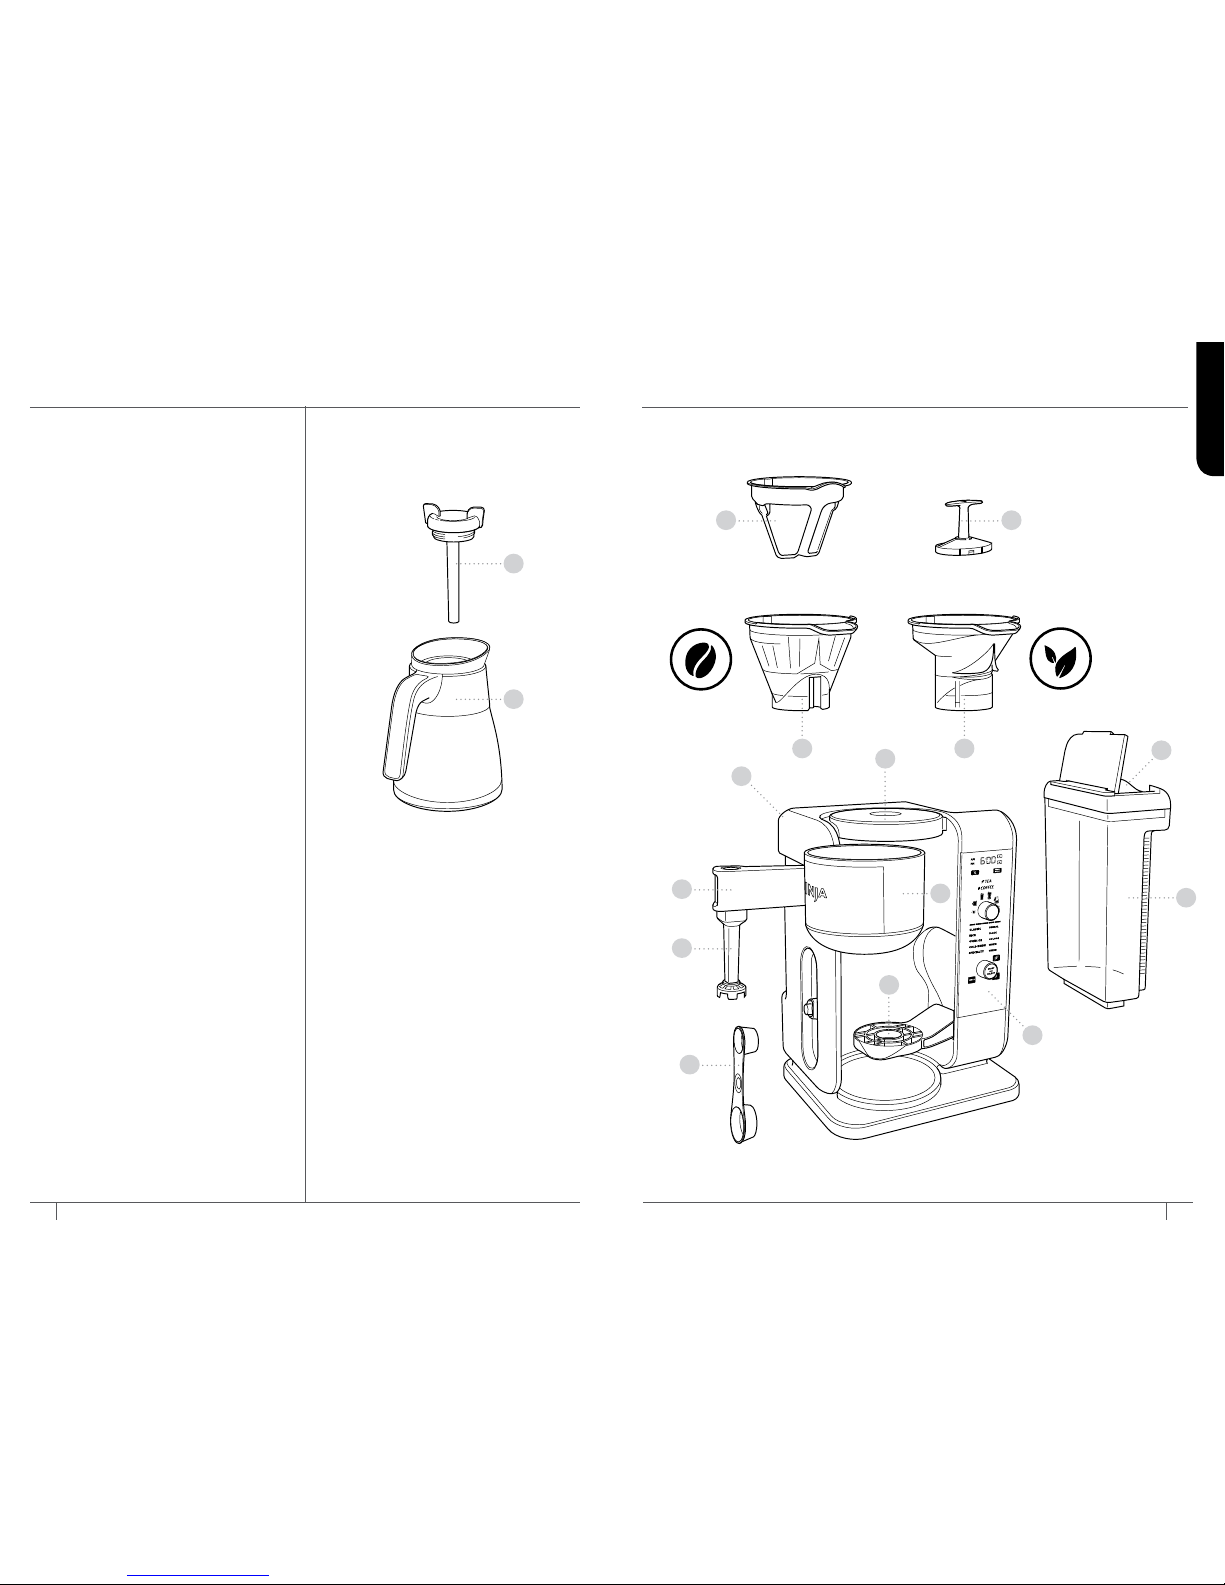
PARTS
A Brewer
(power cord & storage not shown)
B Flip -Top Water Reservoir Lid
C Removable Water Reservoir
D Showerhead
E Control Panel
F Single-Serve Cup Platform
G Swinging Brew Basket
H Removable Tea Filter Holder
I Tea Permanent Filter
J Removable Coee Filter Holder
K Coee Permanent Filter
L Integrated Frother
M Frother Whisk
N Brew-Through Lid
O Stainless Steel C arafe
P Ninja Smart Scoop™
A
B
D
E
F
G
HJ
IK
M
P
L
COFFEE TEA
C
N
O
Page 5
6
1- 877- 6 46 -5 28 8
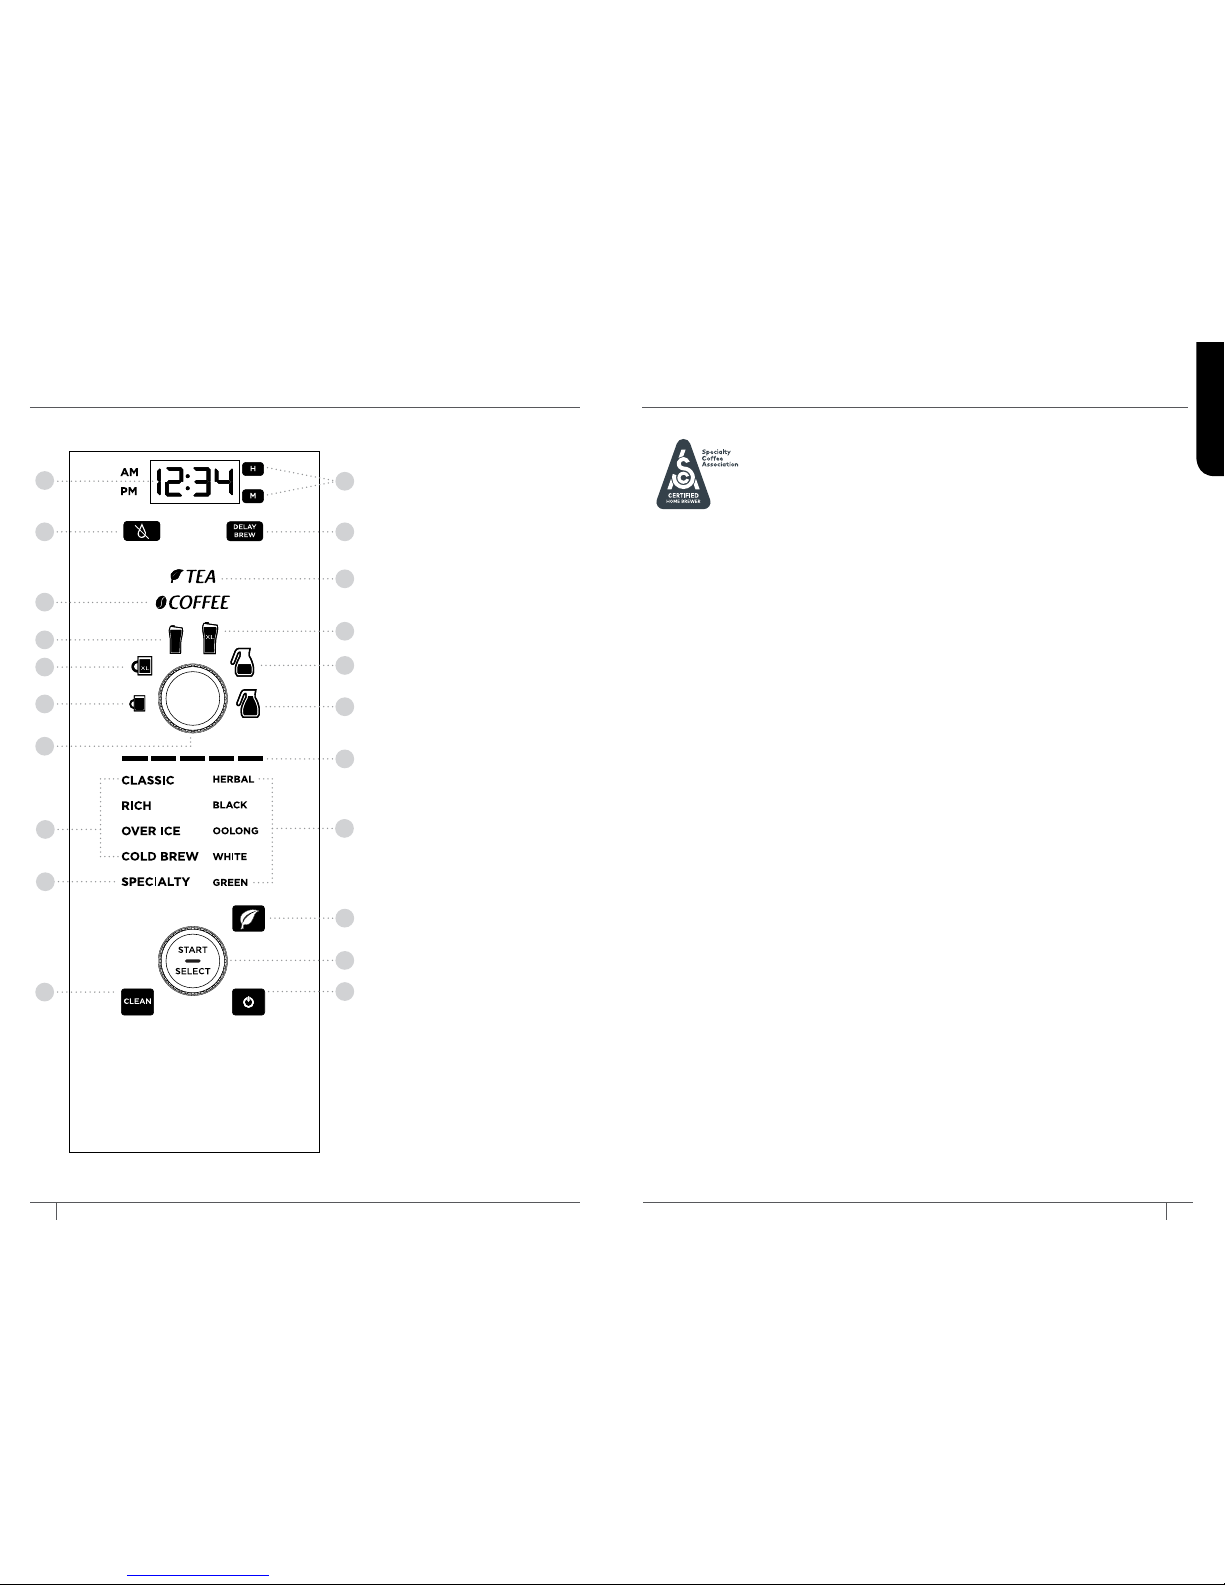
USING THE CONTROL PANEL
1 Programmable
Digital Clock
2 Hour & Minute Buttons
3 Drip Stop Button
4 Delay Brew Button
5 Tea Mode Indicator
6 Coee Mode Indicator
7 Multi-Serve Dial
a Cup
b XL Cup
c Travel Mug
d XL Multi-Serve
e Half Carafe
f Full Carafe
8 Progress Bar
9 Custom Brew Types
Classic Brew
Rich Brew
Over Ice Brew
Cold Brew
10 Ninja® Signature Brew
Specialty Brew
11 Tea Types
Herbal
Black
Oolong
White
Green
12 Tea Button
13 Start/Select Dial
14 Intelligent Clean Cycle
Indicator/Button
15 Power Button
1
3
6
9
10
7a
7b
7c
7
14
4
5
7d
7f
7e
8
12
13
15
2
11
SCA CERTIFICATION
SCA CERTIFIED HOME BREWER
The Specialty Coee Association (SCA) recognizes home brewers
that meet their longstanding rigorous technical requirements.
These requirements are based on decades of industry knowledge
and research by the Coee Brewing Center. All SCA Certified
Home Brewers have met these requirements, which are based
generally on proper water temperature, brewing time, and
ability to brew within the SCA Golden Cup recommendations
If a brewer passes all of the tests in the certification
procedure, as conducted by the SCA, that brewer will be
eligible to be recognized as an exemplary home brewer
and join the short list of SCA Certified Home Brewers.
This coeemaker has been certified by the SCA to meet their
Golden Cup Standard, designed for optimal extraction and
strength. SCA Certification testing was performed using the
Half Carafe and Full Carafe on Classic brew. Testing used
the following ground coee measurements: 55 grams for a
Half Carafe and 77 grams for a Full Carafe. When using the
Ninja Smart Scoop™, this would be 4 heaping big scoops for
a Half Carafe and 6 heaping big scoops for a Full Carafe.
7ninjakitchen.com
ENGLISH
Page 6
ENGLISH
9
ninjakitchen.com
BEFORE FIRST USE
NOTE: If you unplug the brewer or in the event of an extended power loss, you will
need to reset the clock the next time the brewer is plugged in.
NOTE: If the clock stops flashing and does not display the correct time of day,
pressing the hour (H) or minute (M) button at any time will cause the clock to flash
again. You can now reprogram the correct time by following the previous steps.
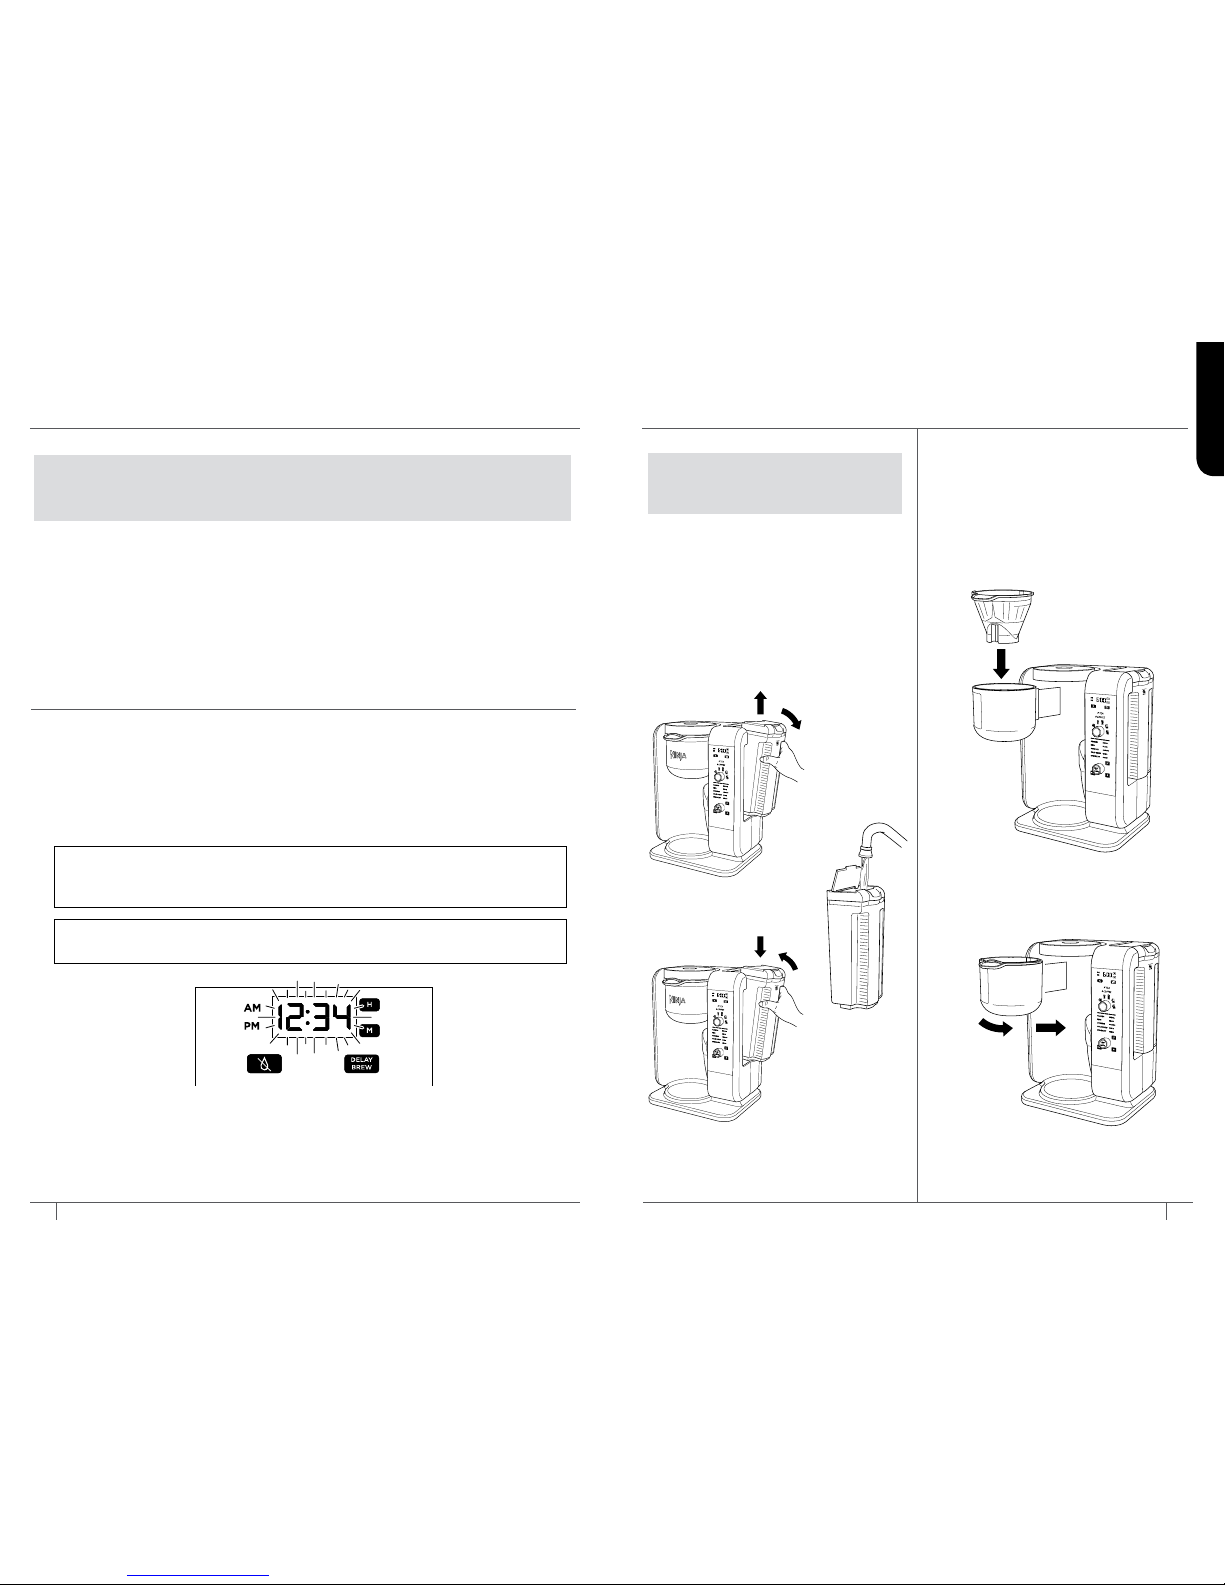
SETTING THE CLOCK
1 Plug the power cord into an electrical outlet. The clock will flash on the control panel
to indicate that the time has not been set (Fig. 1).
2 Press the hour (H) or minute (M) button until you reach the current time.
The AM or PM indicator will illuminate on the left side of the display as you are setting
the time.
3 After 5 seconds, the clock will stop flashing and the clock will be set.
1 Remove all packaging material and stickers from the brewer.
2 Wash the water reservoir, thermal carafe, removable filter holders, and coee and tea
permanent filters in warm, soapy water with a soft cloth.
3 Rinse parts and dry thoroughly.
4 Before first use, prime the system by running two Full Carafe, Classic Brew cycles with
water only. After each cycle is complete, discard the water.
Fig. 1
PRIMING YOUR
NINJA HOT & COLD BREWED SYSTEM™
1 To fill the water reservoir, use the hand
grips to lift it to the right and up o
the brewer (Fig. 2). Flip the reser voir
lid open or remove the entire lid, then
add fresh, filtered water up to, but not
exceeding, the Max Fill line (Fig. 3).
Return the water reservoir to the brewer
(Fig . 4). DO NOT fill water reservoir
with anything other than water, as other
liquids may damage your brewer.
2 Ensure one of the removable filter
holders is nested inside the brew
basket (Fig. 5). Once in place, slide
the brew basket all the way in until you
hear a slight click (Fig. 6).
IMPORTANT:
We recommend fresh, cool, filtered
water. Well water is not recommended.
Fig. 2
Fig. 4
Fig. 6
Fig. 5
Fig. 3
PLEASE KEEP THIS IMPORTANT SAFEGUARD IN MIND
WHEN USING THE APPLIANCE:
IMPORTANT: DO NOT run the appliance without water.
8
1- 877- 6 46 -5 28 8
Page 7
ENGLISH
10 11
1- 877- 6 46 -5 28 8
ninjakitchen.com
COFFEE MEASUREMENT CHART TEA MEASUREMENT CHART
PRIMING YOUR
NINJA HOT & COLD BREWED SYSTEM™ – CONT.
PREPARING & USING
THE NINJA HOT & COLD BREWED SYSTEM™
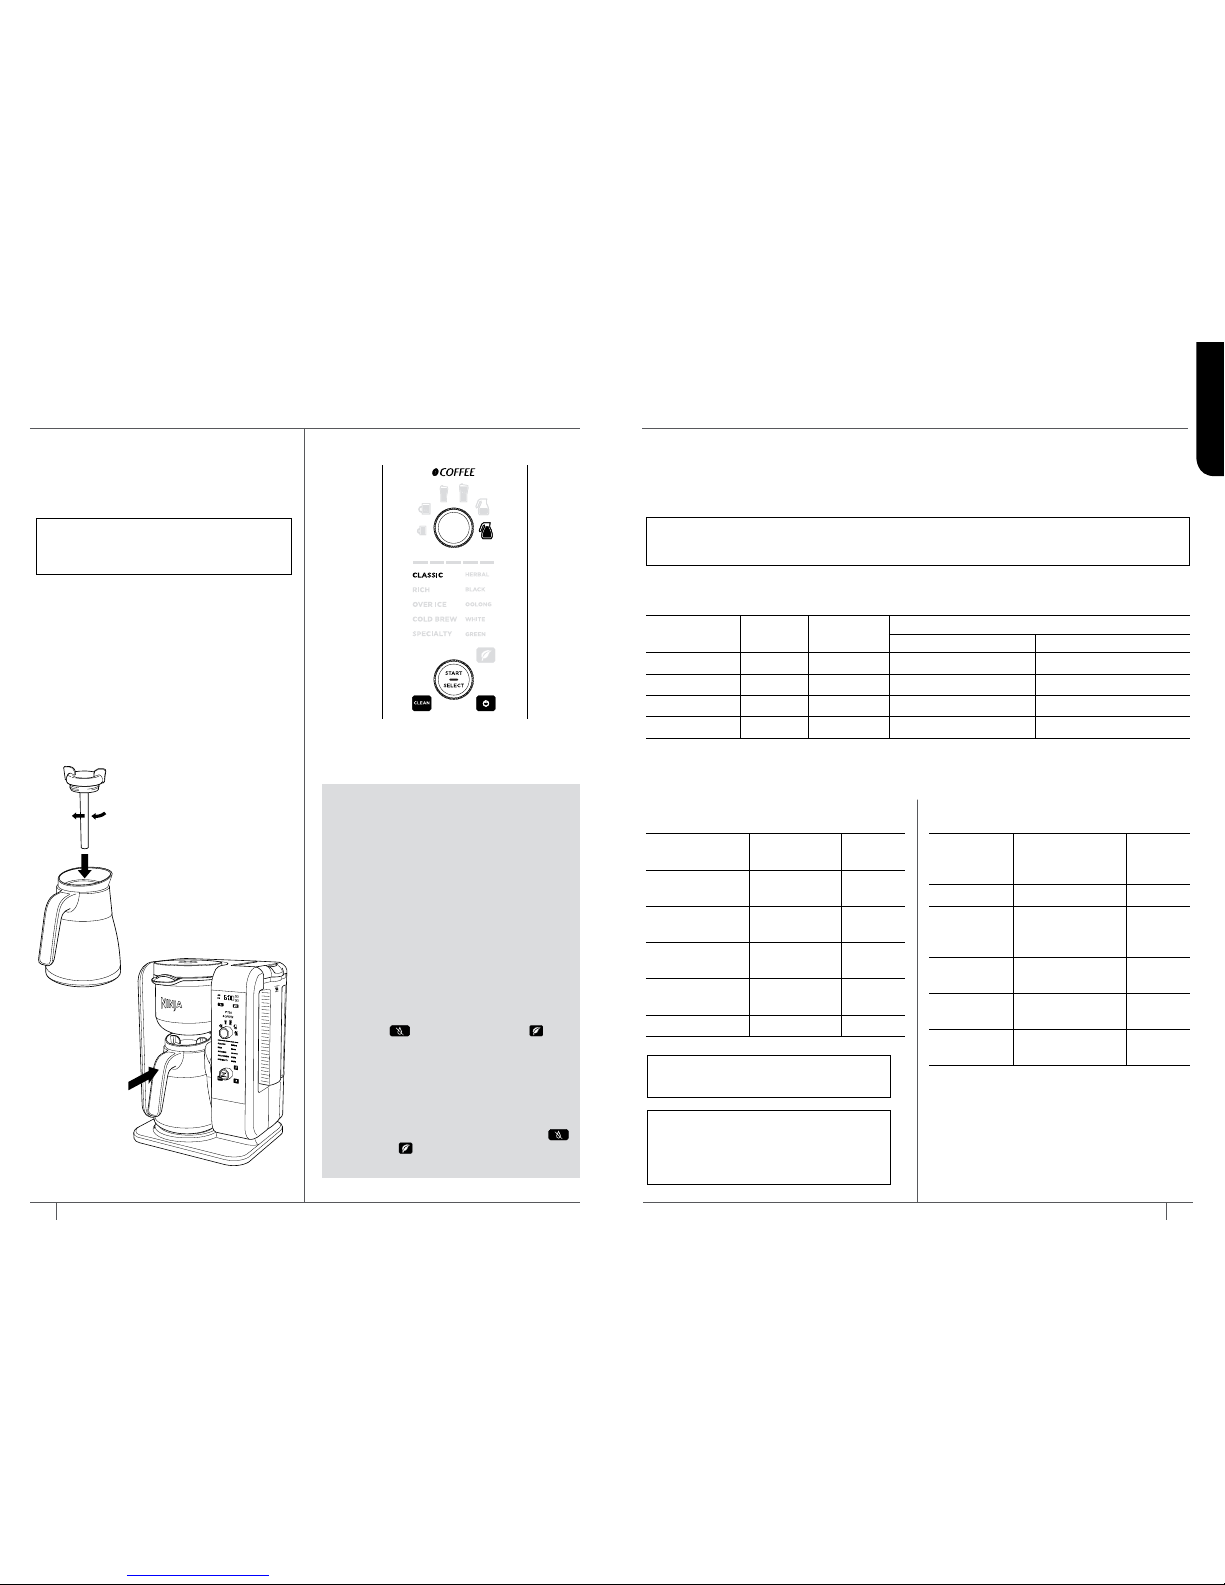
3 Twist the brew-through lid clockwise
onto the carafe to lock into place
(Fig. 7) and center the carafe below
the brew basket (Fig. 8).
NOTE: Do not place any ground
coee or tea in the brew basket
for the first two cycles.
4 Once all parts are securely in place
and the unit is powered on, select
the Full Carafe size and Classic B rew
setting, then press the START/SELECT
dial (Fig. 9).
5 When the cycle is complete, discard
the water in the carafe. Repeat,
beginning with step 1. You are now
ready to use your Ninja Hot & Cold
Brewed System to brew.
HIGH-ALTITUDE CALIBRATION
(OPTIONAL, BUT RECOMMENDED FOR
USERS IN HIGH-ALTITUDE AREAS)
Because water boils at lower
temperatures at higher altitudes,
running a calibration cycle before your
first brew allows the unit to detect the
boiling point of water at your location.
Running a calibration cycle will help
deliver a consistent brew each time.
1 Fill the water reservoir up to, but not
exceeding, the Max Fill line.
2 Place an empty filter holder into the
brew basket, and an empty vessel in
the machine.
3 Press and hold both the Drip Stop
button and the Tea button until
the clock display begins a two-minute
countdown.
4 A calibration cycle will begin. When
complete, the unit will beep and
End will appear on the clock display.
Discard the water in the vessel.
NOTE: Pressing the Drip Stop button
,
Tea button , or Power button will
cancel the calibration cycle.
Fig. 8
Fig. 7
Fig. 9
Size Classic Rich
Over Ice & Cold Brew
coee/te a only filled with ice
Cup 9.5 oz. 8.7 oz. 4.8 oz. 9.5 oz.
XL Cup 11.5 oz. 10.3 oz. 5.8 oz. 11.5 oz.
Travel Mug 14 oz. 13.2 oz. 7.0 oz. 14 oz.
XL Multi-Serve 18 oz. 16 oz. 9.0 oz. 18 oz.
You don’t need to adjust the size for Specialty Brew—it always yields 4 oz. of coee and 6 oz.
of tea.
Serving Size
Ninja
Smart Scoop
™
Table-
spoons
Cup/XL Cup
2–3 small
scoops
2–3 Tbsp.
Travel Mug/
XL Multi-Serve
3–5 small
scoops
3–5 Tbsp.
Half Carafe
3–4 big
scoops
6–8 Tbsp.
Full Carafe
4–6 big
scoops
8–12
Tbsp.
Specialty (4 oz.)
2 big scoops 4 Tbsp.
Serving Size
Ninja
Smart Scoop
™
Loose Leaf Tea
Tea Bag s
Cup/XL Cup 1 small scoop 1 tea bag
Travel Mug/
XL Multi-
Serve
1-2 small scoops
2 tea
bags
Half Carafe 2–3 small scoops
4 tea
bags
Full Carafe 3–4 small scoops
6 tea
bags
Specialty
(6 oz.)
1 big scoop
3 tea
bags
HOW MUCH DO YOU GET IN YOUR CUP?
Each size and brew type produces a dierent amount of coee and tea to optimize
strength and taste.
NOTE:
The coee grounds and tea will absorb some of the water that is brewed,
resulting in slightly less brewed coee or tea than water used.
APPROXIMATE BREW VOLUMES
NOTE: For Cold Brew coee,
add one extra scoop.
NOTE: Exceeding the recommended
medium grind size for whole beans
may cause the brew basket to
overflow.
Page 8

ENGLISH
12 13
1- 877- 6 46 -5 28 8
ninjakitchen.com
PREPARING & USING
THE NINJA HOT & COLD BREWED SYSTEM™ – CONT.
FILLING THE COFFEE
BREW BASKET
For best results, use the coee
measurement chart to determine how
much ground coee to use for each brew
size. The amount of ground coee for each
size will remain the same for any brew type
you select. For example, if you select Cup
and Classic Brew, you will use the same
amount of coee grounds as if you select
Cup and Over Ice Brew. The only exception
is Cold Brew, which requires one extra
scoop of coee, regardless of the size.
1 Open the brew basket by sliding it
out of the brewer (Fig. 1 0). Ensure
you have the COFFEE filter holder in
the machine, denoted by the orange
handle with the coee bean icon.
2 Place the coee permanent filter or a
#4 paper cone filter in the COFFEE filter
holder. If using a paper filter, first ensure
the permanent filter is removed from
the filter holder. Then fold the paper
filter along the seams, open it fully,
and firmly press it into the filter holder
making sure it is fully seated (Fig. 11).
3 Use the Ninja Smart Scoop™
and follow the measurements in
the chart to fill the brew basket
(Fig. 12). These measurements vare
based on level scoops—adjust to your
preferred taste. We suggest using a
medium-sized grind if grinding whole
beans.
4 Slide the brew basket back into the
brewer until it clicks into place.
FILLING THE TEA BREW BASKET
For best results, use the tea measurement
chart to determine how many tea bags or
how much loose leaf tea to use for each
brew size. The amount of tea for each size
will remain the same for any brew type
you select.
1 Open the brew basket by sliding it
out of the brewer (Fig. 1 0). Ensure
you have the TEA filter holder in the
machine, denoted by the green handle
with the tea leaf icon.
2 Place the tea permanent filter in the
TEA filter holder (Fig. 11). When
using tea bags, you may remove the
tea permanent filter if more space is
needed in the brew basket.
3 Use the Ninja Smart Scoop™ and follow
the recommended measurements in the
chart to fill the brew basket, adjusting
to your preferred taste (Fig. 12).
4 Slide the brew basket back into the
brewer until it clicks into place.
Fig. 10
DRIP STOP TIME SETTTING
After a brew is complete, the drip stop will
automatically close. Some types of coee,
such as finely ground or decaf, can take
a little longer to fully drain from the brew
basket. To extend the amount of time the
drip stop remains open after a brew,
follow these instructions:
1 Press and hold the Drip Stop button
(Fig. 13a) until the clock display flashes
either dFLt (default) or the previously
specified time.
2 Press either the hour (H) or minute (M)
button until the desired extension time is
shown: dFLt (default), :15 (+15 seconds),
:30 (+30 seconds), :45 (+45 seconds), :60
(+60 seconds), or OFF (Fig. 13b).
3 Press the Drip Stop button
to set
the new time. Or wait 5 seconds, and the
unit will beep, signifying that the new
extension time has been set.
AUTOMATIC DRIP STOP
The system is equipped with an automatic
drip stop. When the Drip Stop button
is
illuminated, the drip stop is closed and no
coee or tea will flow out of the
brew basket.
When brewing a half or full carafe, press
the Drip Stop button
to pause the brew
cycle and pour a cup. Promptly replace the
carafe and press the Drip Stop button
again to complete the brew (Fig. 13a).
Fig. 12
Fig. 11
or or
COFFEE TEA
Fig. 13a
Fig. 13b
NOTE: When OFF is selected, the drip
stop will remain open after a brew is
complete. You can close the Drip Stop
at any time by pressing the Drip Stop
button again. dFLt (default) is the
machine’s default time setting.
NOTE: If you forget to press the Drip
Stop button
to resume the brew,
the unit will pause the brew, and af ter
30 seconds it will give you a friendly
audible reminder. After 5 minutes, the
brew will be canceled.
Page 9
ENGLISH
14 15
1- 877- 6 46 -5 28 8
ninjakitchen.com
BREWING
CUSTOM BREWS
CLASSIC BREW & RICH BREW
1 After filling the water reservoir, place
either the COFFEE or TEA filter holder
into the brew basket. Add the ground
coee, loose leaf tea, or tea bags
to the filter.
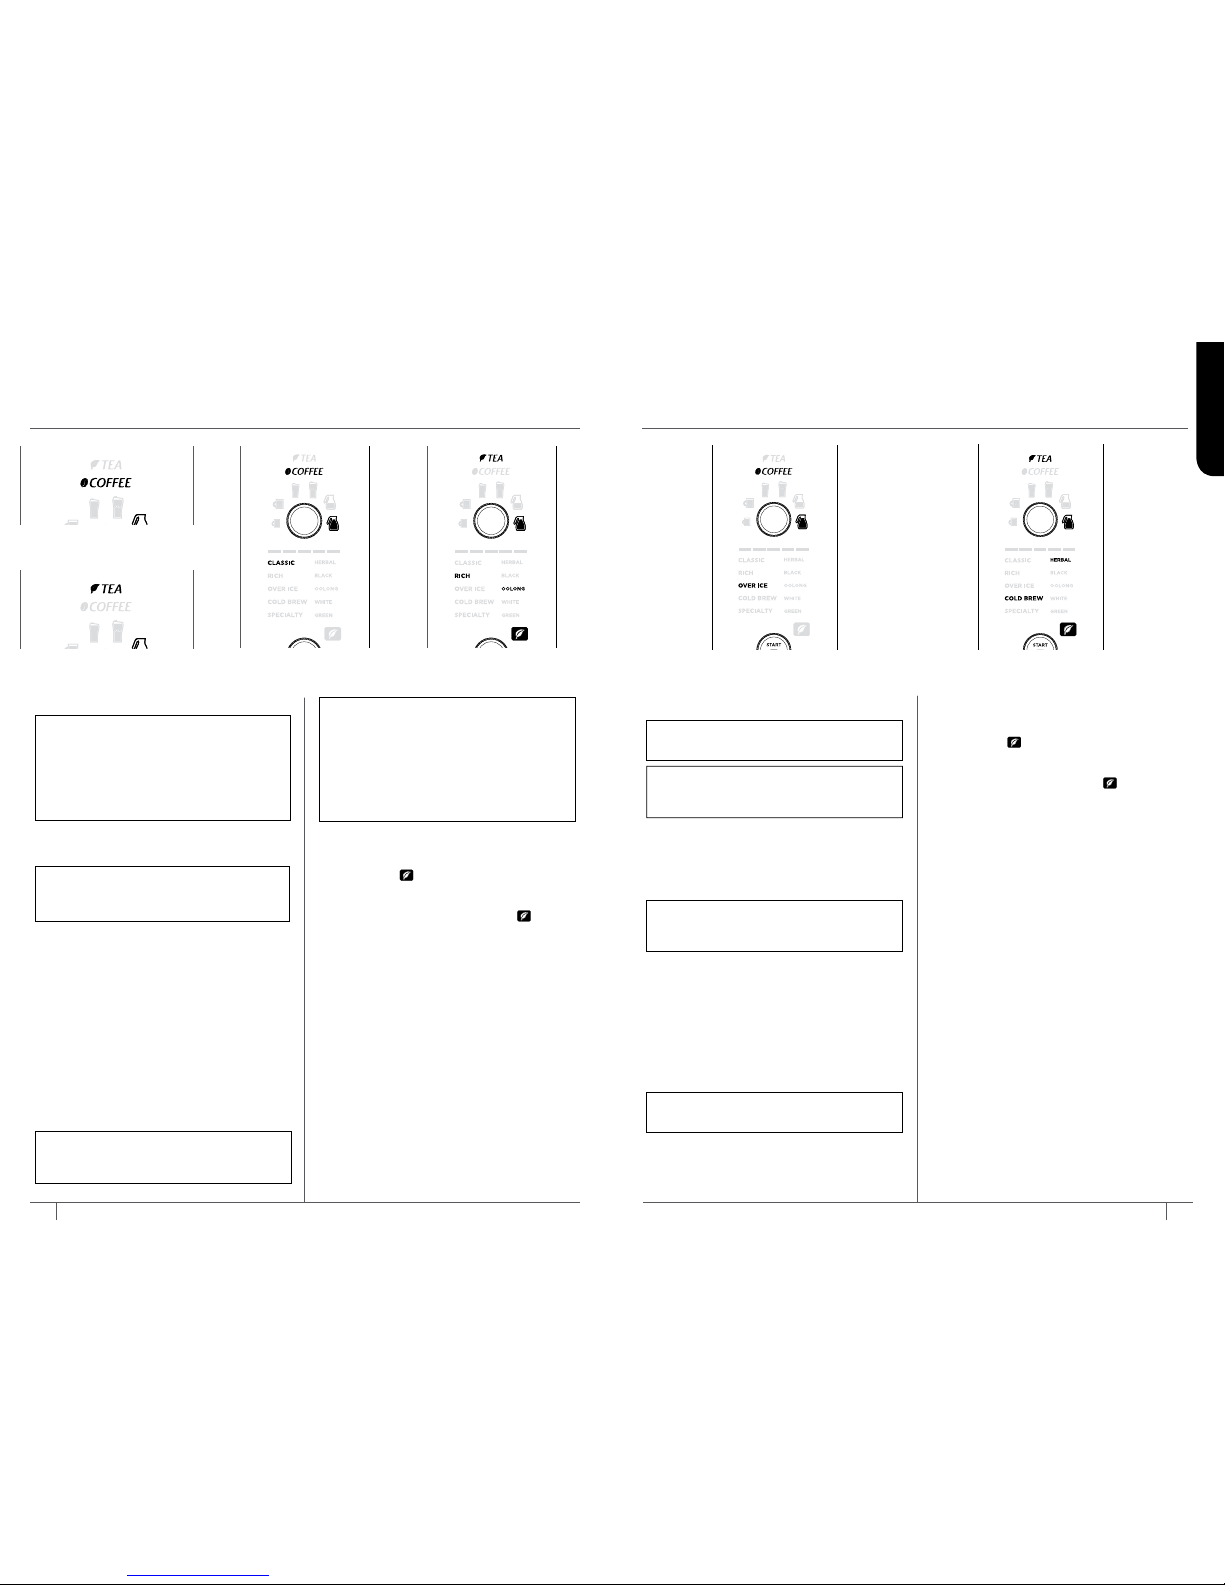
2 Close the brew basket, ensuring it is
securely in place. The control panel will
display either COFFEE (Fig. 14a) or TEA
(Fig. 14b) settings based on the filter
holder that has been inserted.
3 Use the Multi-Serve dial to select the brew
size. Place the empty vessel you would like
to brew into under the brew basket.
4 Turn the START/SELECT dial to choose
either Classic Brew or Rich Brew (Fig.
15a, Fig. 15b). If brewing tea, press the
Tea button
to toggle to the tea menu,
and use the dial to choose your tea type.
To change your brew style while in the
tea menu, press the Tea button again.
5 Press the START/SELECT dial to start the
brew. A progress bar on the control panel
will show the status of the brewing cycle.
To cancel the brew at any time, press the
dial again or press the Power button.
6 The unit will beep and the clock will
display End when the brew
is complete.
NOTE: Some brews have a
pre-infusion cycle with varying times.
The brewing cycle will begin, then
there will be a pause for a shor t
period before resuming. This process
is used to evenly saturate the coee
grounds or tea .
NOTE: If making a single cup, lower
the Single-Serve Cup Platform and set
your vessel in the center of it. Please
ensure you are using at least a 12 oz.
cup for the Cup size, 14 oz. cup for the
XL Cup size, 16 oz. travel mug for the
Travel Mug size, and 20 oz. travel mug
for the XL Multi-Serve size.
NOTE: Rich Brew will use slightly less
water and yield slightly less brewed
coee or tea than Classic Brew.
NOTE: If the brew basket is closed with
no filter holder in place, both COFFEE
and TEA will flash.
Fig. 15bFig. 15aFig. 14b
Fig. 14a
Fig. 16a Fig. 16b
PREPARING & USING
THE NINJA
HOT & COLD BREWED SYSTEM™ – CONT.
4 Turn the START/SELECT dial to choose
either Over Ice Brew or Cold Brew
(Fig. 16a, Fig. 16b). If brewing tea, press the
Tea button to toggle to the tea menu,
and use the dial to choose your tea type.
To change your brew style while in the tea
menu, press the Tea button .
5 Press the START/SELECT dial to start the
brew. A progress bar on the control panel
will show the status of the brewing cycle. To
cancel the brew at any time, press the dial
again or press the Power button.
6 The unit will beep and the clock will display
End when the brew is complete.
OVER ICE BREW & COLD BREW
NOTE: Glassware may be used with
the Cold Brew setting, but not the
Over Ice Brew setting.
1 After filling the water reservoir, insert
either the COFFEE or TEA filter holder
into the brew basket. Add the ground
coee, loose leaf tea, or tea bags to
the filter.
2 Close the brew basket, ensuring it is
securely in place. The control panel will
display either COFFEE (Fig. 14a) or
TEA (Fig. 14b) settings based on the
filter holder that has been inserted.
3 Fill your desired vessel to the top with
ice cubes and place the vessel below the
brew basket. Use the Multi-Serve dial to
select the brew size.
NOTE: For COLD BREW coee ONLY,
add an additional scoop of coee
grounds to the brew basket.
NOTE: Cold Brew takes about
15 minutes for a Full Carafe.
NOTE: DO NOT add ice to the
water reservoir.
Page 10
ENGLISH
16 17
1- 877- 6 46 -5 28 8
ninjakitchen.com
PREPARING & USING
THE NINJA HOT & COLD BREWED SYSTEM™ – CONT.
SIGNATURE BREW
SPECIALTY BREW
1 After filling the water reservoir, insert
either the COFFEE or TEA filter holder
into the brew basket. Add the ground
coee, loose leaf tea, or tea bags to
the filter.
2 Close the brew basket, ensuring it is
securely in place. The control panel will
display either COFFEE (Fig. 14a) or TEA
(Fig. 14b) settings based on the filter
holder that has been inserted.
3 Place the empty vessel you would like to
brew into under the brew basket.
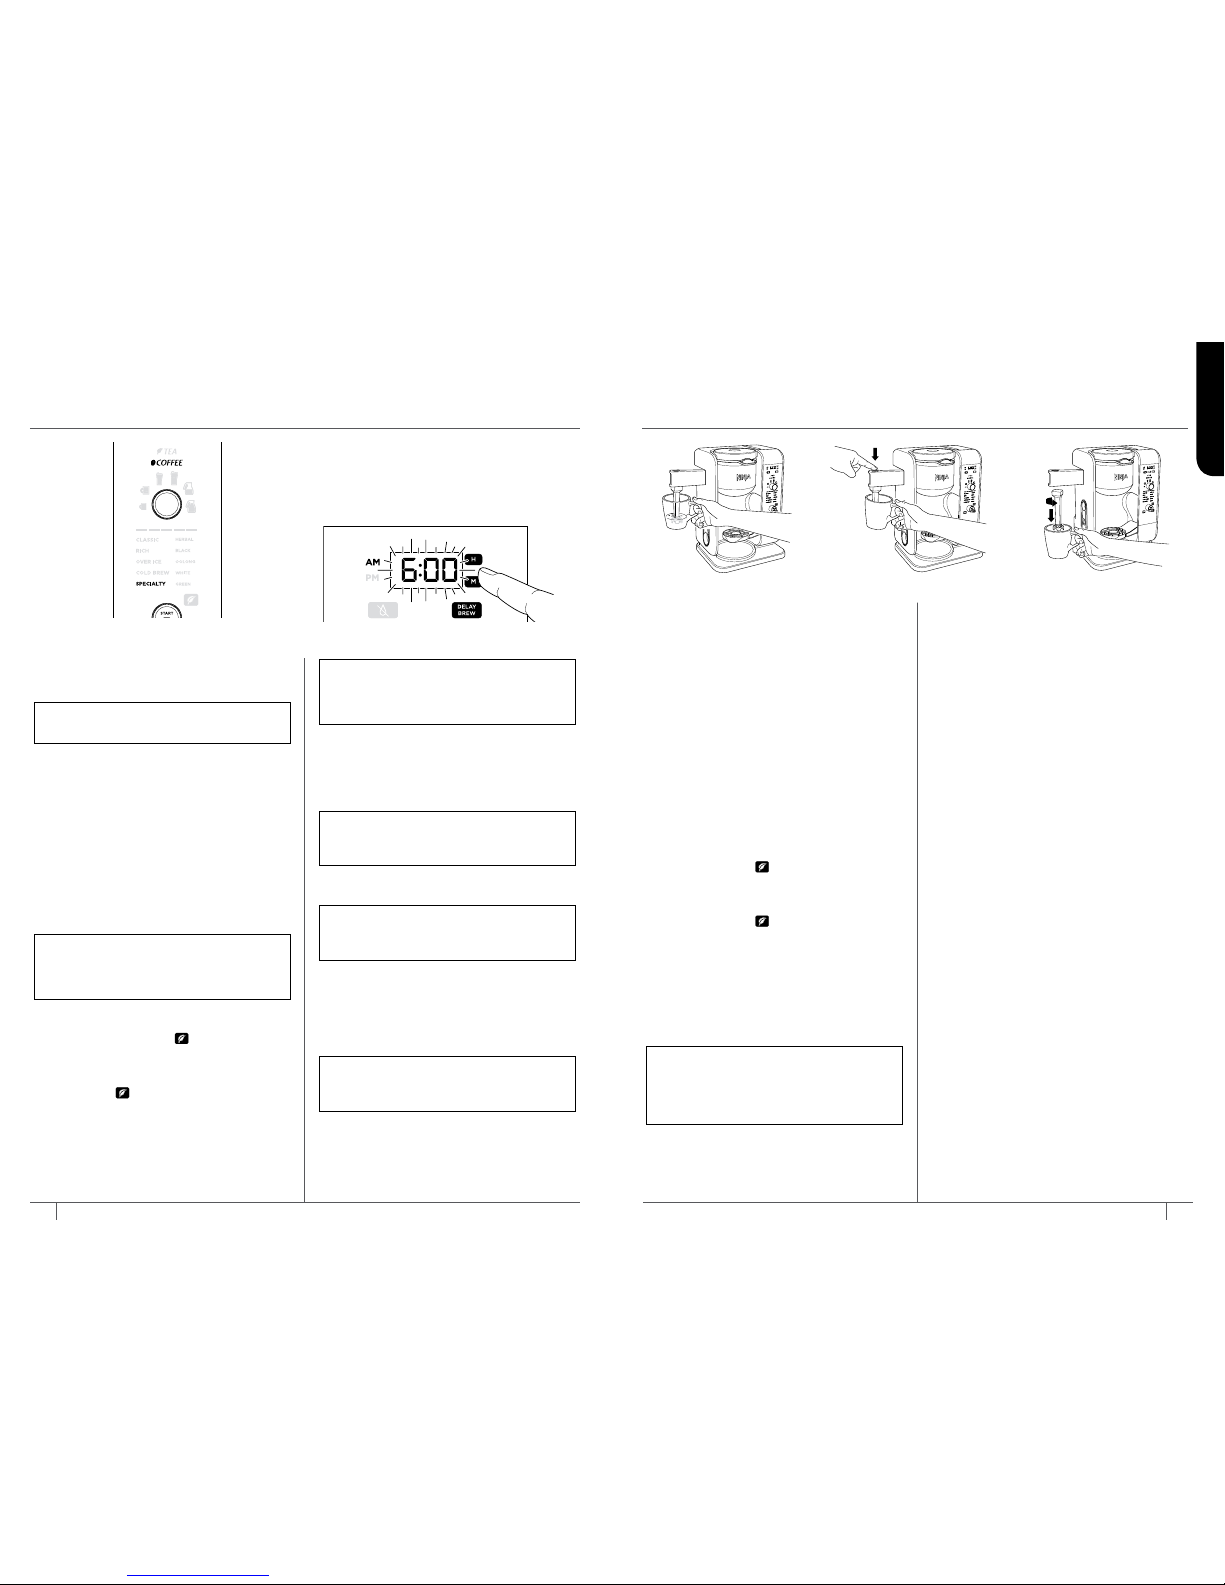
4 Turn the START/SELECT dial to choose
SPECIALTY (Fig. 17). If brewing tea,
press the Tea button
to toggle to the
tea menu, and use the dial to choose
your tea type. To change your brew
style while in the tea menu, press the
Tea button
again.
5 Press the START/SELECT dial to start the
brew. A progress bar on the control panel
will show the status of the brewing cycle.
To cancel the brew at any time, press the
dial again or press the Power button.
3 Press DELAY BREW. DELAY BREW will
illuminate and the clock will begin to flash
“12:00” or the last Delay Brew time that
was set (Fig. 18).
4 While the clock is flashing, press the
hour (H) or minute (M) button to set the
time that you would like the Delay Brew
to begin. The AM or PM indicator will
illuminate on the left side of the display
as you are setting the desired time.
5 Once the proper time has been set,
select the size of the vessel that you
would like to brew into.
6 Turn the START/SELECT dial to choose
your brew style. If brewing tea, press
the Tea button
to toggle to the
tea menu, and use the bottom dial to
choose your tea type. To change your
brew style while in the tea menu, press
the Tea button again.
7 Once the time, brew size, brew style, and
tea type (if applicable) have been set,
allow DELAY BREW to stop flashing, or
press DELAY BREW to activate. When
activated, the unit will beep and DELAY
BREW and your selected options will
remain illuminated. To cancel,
press DELAY BREW again.
6 The unit will beep and the clock
will display End when the brew
is complete.
SETTING THE DELAY BREW
1 Turn the unit on by pressing the
Power button.
2 After filling the water reservoir and
adding ground coee or tea to the
correct filter holder, be sure the
reservoir, brew basket, and filter are
securely in place. Place the appropriatesize vessel under brew basket.
FROTHING MILK
1 Pour milk into cup, until it is about
1
/3
full. (Use more or less milk depending on
your preference.) Microwave for 45 to 60
seconds for hot milk.
2 Move the frother into the ready position
by swinging the arm toward the front.
3 Hold the cup under the frother and
submerge the whisk just below the
surface of the milk. This allows air to
fold into the milk for the frothiest results
(Fig. 19).
4 Press and hold the frothing button for
30 to 45 seconds (Fig. 20).
5 You can easily remove the frother whisk
by twisting it clockwise. To avoid spills,
keep your cup below the whisk and
carry it to your sink or dishwasher for
cleaning (Fig. 21).
NOTE: The brewing cycle will begin,
then pause for a short period before
resuming. This process is used to evenly
saturate the coee grounds or tea.
NOTE: If you attempt to change your
selections while Delay Brew is set, the
unit will beep and DELAY BREW will
flash. To change your selections, cancel
the Delay Brew.
NOTE: Specialty always yields 4 oz. of
coee and 6 oz. of tea.
NOTE: The unit must remain on for the
Delay Brew function to work. DO NOT
power o after setting Delay Brew.
NOTE: If brewing an iced blended
drink, fill the desired vessel with the
amount of ice recommended in the
recipe before brewing.
NOTE: The brew basket must be
securely closed with either the COFFEE
or TEA filter inserted to set Delay Brew.
NOTE: The clock will remain on even if
the unit is turned o. Ensure the unit is
powered on to set Delay Brew.
Fig. 17
Fig. 18
Fig. 19 Fig. 20 Fig. 21
Page 11
18
1- 877- 6 46 -5 28 8
ENGLISH
19
ninjakitchen.com
CARE & MAINTENANCE
CLEANING & DESCALING
YOUR BREWING SYSTEM
The CLEAN button will illuminate when a
cleaning cycle is recommended for your
unit, as calcium scale buildup could be
aecting the flavor of your coee or tea.
To clean and descale your
Ninja
Hot & Cold Brewed System™:
1 Select the Full Carafe size and
set the empty carafe beneath
the brew basket.
2 Use a descaling solution specifically
formulated for coeemaker cleaning
and follow the directions on the package.
Fill the water reservoir up to, but not
exceeding, the Max Fill line (50 oz.).
OR
Fill the water reservoir to the Travel Mug
line (16 oz.) with white vinegar, then fill
the rest of the reservoir with water up to,
but not exceeding, the Max Fill line.
IMPORTANT:
Use only white vinegar.
3 Once the water reservoir is filled with
your cleaning solution and water mixture,
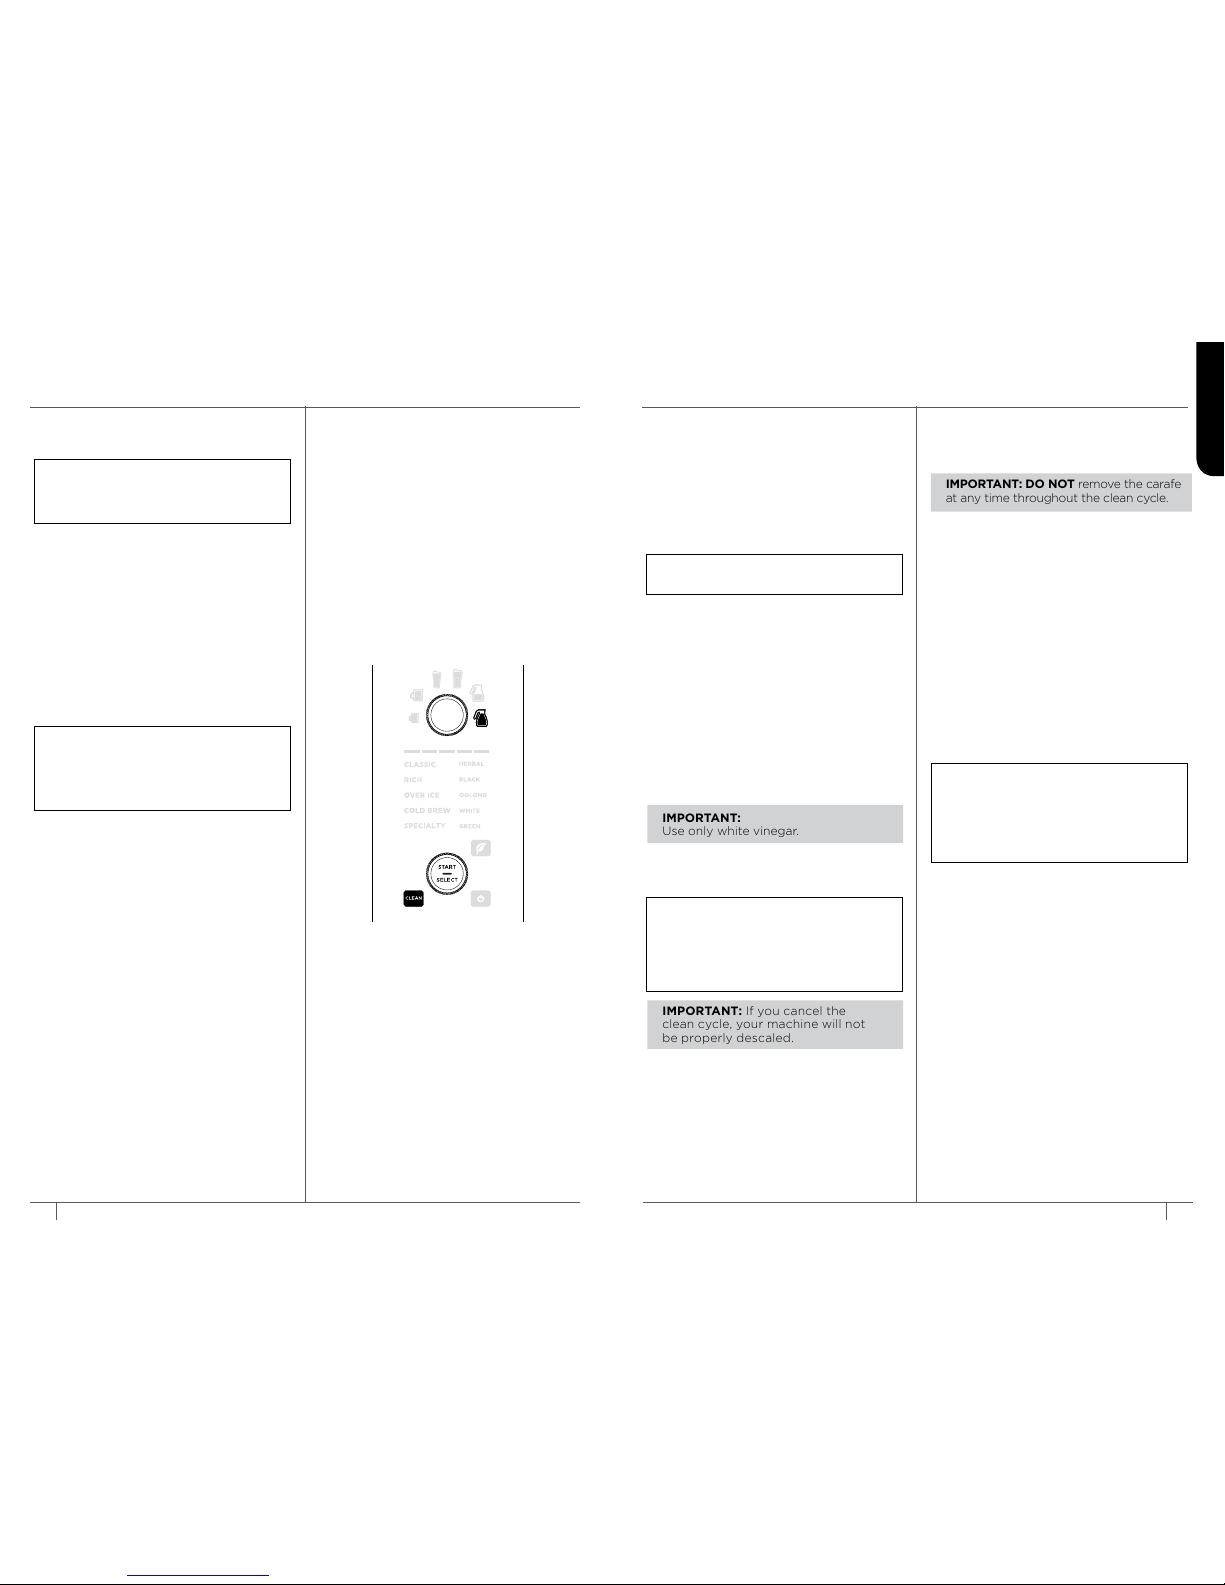
press the CLEAN button (Fig. 22).
IMPORTANT: If you cancel the
clean cycle, your machine will not
be properly descaled.
4 The clock will display and count
down the remaining clean cycle
time, which takes approximately
60 minutes to complete. Your unit will
deliver a small amount of cleaning
solution to distribvute it through the
system. It will then pause, deliver
additional cleaning solution, and continue
for 60 minutes .
The extended pauses allow for maximum
cleaning and descaling.
IMPORTANT: DO NOT remove the carafe
at any time throughout the clean cycle.
5 Upon completion, the brewer will beep,
the clock will display End,
and the CLEAN light will turn o.
6 Empty and thoroughly clean the carafe
and water reservoir with warm, soapy
water to remove any cleaning solution
that could aect the flavor of your
coee or tea.
7 Fill the reservoir with fresh water
up to, but not exceeding, the
Max Fill line and set the empty carafe
beneath the brew basket.
8 Flush the system by running a Full Carafe,
Classic Brew cycle with water only. After
the cycle is complete, discard the water
and thoroughly clean the carafe.
NOTE: The clean cycle takes
approximately 60 minutes.
NOTE: To cancel the clean cycle, press
the Power button or CLEAN button
once. The unit will beep and stop
brewing through the cleaning mixture.
Continue to follow the instructions
starting at Step 6.
NOTE: If the CLEAN light illuminates
again, then calcium buildup is still
present. Repeat the cleaning cycle
instructions from the beginning, and
the CLEAN light will automatically turn
o when your brewer is clean.
Fig. 22
CLEANING AFTER A BREW
1 After the unit has cooled, remove the
filter holder from the brew basket. If using
a paper coee filter, discard it. If using
either the coee or tea permanent filter,
wash it thoroughly with soap and warm
water or place on top rack of dishwasher.
2 Clean the frother whisk after each use.
Hand-wash thoroughly or place on top
rack of dishwasher.
3 Wash the carafe and brew-through lid
with soap and warm water. Use a bottle
brush or a cloth to wash the inside of the
carafe. DO NOT use a wire brush.
The thermal carafe is NOT dishwasher safe.
4 After the brewer has cooled, wipe down
the main unit, showerhead, and water
reservoir shelf with a cloth and warm
water. DO NOT immerse the brewer
in water.
CLEANING YOUR WATER RESERVOIR
Empty the water reservoir and hand-wash or
place in your dishwasher.
CLEANING YOUR CARAFE
We recommend cleaning your carafe with
warm, soapy water.
If you want to clean the carafe more
thoroughly, we recommend using a soft
foam brush. DO NOT use a wire brush.
The thermal carafe is NOT
dishwasher safe.
NOTE: The brew-through lid, coee
and tea permanent filters, removable
filter holders, water reservoir, flip-top
lid, frother whisk, and scoop are
top-rack dishwasher safe.
NOTE: For best results, we
recommend rinsing the reservoir
after brewing and refilling with fresh
water for the next brew.
Page 12

20
1- 877- 6 46 -5 28 8
ENGLISH
21
ninjakitchen.com
There’s sediment in my coee.
•
If using a permanent filter, the sediment at the bottom of the brewed coee may
be due to using finely ground coee.
•
To reduce the amount of sediment in the brewed coee, use a slightly coarser grind
or use a paper filter.
NOTE: We DO NOT recommended using a paper filter in conjunction with
the permanent filter, as clogging and backing up of water and/or coee in
the filter basket can occur.
OVER ICE Brew and COLD BREW are not cold .
• Ensure your cup, travel mug, or carafe is filled all the way to the top with ice cubes
before brewing. Your Ninja Hot & Cold B rewed System™ will brew at elevated
temperatures to lock in the best flavor, then the ice will cool the brewed coee or
tea to the perfect temperature.
Coee or tea is too weak.
• COFFEE: For stronger coee, use the RICH brew setting, try darker roast beans, or
use the permanent filter rather than a paper filter. If you want an even bolder flavor,
you can add more coee grinds to the brew basket. Additional grinds do absorb
liquid, so you will have a more concentrated, smaller cup of coee.
• TEA: For stronger tea, use the RICH brew setting, or add more tea to the brew basket.
Coee or tea is too strong.
• COFFEE: For milder coee, use the CLASSIC brew setting, use lighter roast beans,
or use a paper filter rather than the permanent filter. If you want an even milder
flavor, you can put fewer coee grinds in the brew basket.
• TEA: For milder tea, use the CL ASSIC brew setting, or use less tea in the brew basket.
Brew cycle is too slow.
• Depending on your settings, your brew time will vary from around 4 minutes
to 18 minutes. The progress bar on the control panel will indicate brew status.
Cup or travel mug overflowed.
• Ensure you are using at least a 12 oz. cup for the Cup size, 14 oz. cup for the
XL Cup size, 16 oz. travel mug for the Travel Mug size, and 20 oz. travel mug for the
XL Multi-Serve size.
Brew basket overflowed.
• The bottom of the filter holder may be clogged. This can happen with finely
ground coee or too many coee grinds in the brew basket. Medium-ground coee
is recommended.
NOTE: When using a paper filter, do not use the permanent filter.
There’s water left in my reservoir.
• The water reservoir markings are minimum fill lines that indicate the amount of
water needed for that brew size. However, all brew styles use dierent amounts of
water to create the proper flavor and concentration,
leaving some water to remain.
TROUBLESHOOTING GUIDE
My Ninja Hot & Cold Brewed System is leaking.
• After removing the water reservoir, there may be a small amount of water in the
reservoir valve. This can be easily removed with a dry cloth .
• If the leak is coming from the brew basket, make sure all parts are assembled
correctly and securely. If the leak is coming from the bottom of the brewer, call
Customer Service at 1 -877- 646-5288.
CLEAN light is on .
• Run a clean cycle. If you have recently completed a clean cycle, you may need to run
a second cycle to remove additional mineral buildup that occurs naturally over time.
There’s no Rooibos or Pu’erh tea type setting.
• Use the Herbal tea setting for Rooibos and the Black tea setting for Pu’erh.
CLOCK DISPLAY MESSAGES:
“Add” “Wtr”
• The system does not have enough water in the reservoir to complete your brew. Add
fresh water to the reservoir and then press the START/SELECT dial to resume.
“CLn”
• The system has detected that a clean cycle needs be run immediately to remove
calcium scale buildup in the boiler. See ‘Cleaning & Descaling Your Brewing System’
for instructions.
“Hot” “Wtr”
• The system has detected that hot water has been added to the water reservoir.
Remove the reservoir and empty the hot water. Refill the reservoir with fresh, cool
water and return it to the base of the system. Wait until the display no longer shows
“Hot” “Wtr” before using the system again.
ERROR MESSAGES:
“Er”
• If the clock displays “Er” and then a number (ex. “Er 03”),
contact Customer Service at 1-877-646-5288.
Page 13

PRODUCT REGISTRATION
REPLACEMENT PARTS
To order additional parts and accessories, visit ninjaaccessories.com
or contact Customer Service at 1-877-646-5288.
Please visit registeryourninja.com or call 1-877-646-5288 to register your new
Ninja® product within ten (10) days of purchase. You will be asked to provide
the store name, date of purchase, and model number along with your name
and address.
The registration will enable us to contact you in the unlikely event of a
product safety notification. By registering, you acknowledge you have
read and understood the instructions for use and warnings set forth in the
accompanying instructions.
ONE (1) YEAR
LIMITED WARRANTY
The One (1) Year Limited Warranty applies to purchases made from authorized
retailers of SharkNinja Operating LLC. Warranty coverage applies to the original
owner and to the original product only and is not transferable.
SharkNinja warrants that the unit shall be free from defects in material and
workmanship for a period of one (1) year from the date of purchase when it is used
under normal household conditions and maintained according to the requirements
outlined in the Owner’s Guide, subject to the following conditions and exclusions:
What is covered by this warranty?
1. The original unit and/or non -wearable components deemed defective, in
SharkNinja’s sole discretion, will be repaired or replaced up to one (1) year from
the original purchase date.
2. In the event a replacement unit is issued, the warranty coverage ends six (6)
months following the receipt date of the replacement unit or the remainder of the
existing warranty, whichever is later. SharkNinja reserves the right to replace the
unit with one of equal or greater value.
What is not covered by this warranty?
1. Normal wear and tear of wearable par ts (including filter holder, permanent filter,
frother whisk , carafe and brew-through lid, water reservoir and flip-top lid, and
Ninja Smart Scoop™), which require regular maintenance and/or replacement
to ensure the proper functioning of your unit, are not covered by this warranty.
Replacement parts are available for purchase at ninjaaccessories.com.
2. Any unit that has been tampered with or used for commercial purposes
3. Damage caused by misuse, abuse, negligent handling, failure to perform required
maintenance, or damage due to mishandling in transit.
4. Consequential and incidental damages.
5. Defects caused by repair persons not authorized by SharkNinja. These defects
include damages caused in the process of shipping, altering, or repairing the
SharkNinja product (or any of its parts) when the repair is performed by a repair
person not authorized by SharkNinja .
6. Products purchased, used, or operated outside North America.
How to get service
If your appliance fails to operate properly while in use under normal household
conditions within the warranty period, visit ninjakitchen.com for product care and
maintenance self-help. Our Customer Service Specialists are also available at 1 -877646-5288 to assist with product support and warranty service options, including
the possibility of upgrading to our VIP warranty service options for select product
categories.
SharkNinja will cover the cost for the customer to send in the unit to us for repair or
replacement. A fee of $19.95 (subject to change) will be charged when SharkNinja
ships the repaired or replacement unit.
How to initiate a warranty claim
You must call 1-877-646-5288 to initiate a warranty claim. You will need the receipt as
proof of purchase.A Customer Service Specialist will provide you with return and packing
instruction information.
How state law applies
This warrant y gives you specific legal rights, and you also may have other rights that
vary from state to state. Some states do not permit the exclusion or limitation of
incidental or consequential damages, so the above may not apply to you.
ENGLISH
22 23
1- 877- 6 46 -5 28 8
ninjakitchen.com
Page 14

24 25
1- 877- 6 46 -5 28 8
ninjakitchen.com
FRANÇAIS
TABLE DES MATIÈRES
MERCI
d’avoir acheté le système Ninja Hot & Cold BrewedTM.
Consignes de sécurité importantes . . . . . . . . . . . . . 26
Pièces . . . . . . . . . . . . . . . . . . . . . . . . . . . . . . . 28
Panneau de commande . . . . . . . . . . . . . . . . . . . . 30
Boutons des fonctions . . . . . . . . . . . . . . . . . . . . . .32
Boutons de commande . . . . . . . . . . . . . . . . . . . . . .32
Utilisation du tableau de commande . . . . . . . . . . . . .31
Certification de la SCA . . . . . . . . . . . . . . . . . . . . . 33
Avant la première utilisation. . . . . . . . . . . . . . . . . . 32
Réglage de l’horloge . . . . . . . . . . . . . . . . . . . . . . 32
Préparation de votre
Système Ninja
Hot & Cold Brewed™. . . . . . . . . . . . . . 33
Étalonnage pour la haute altitude . . . . . . . . . . . . . . 36
Préparer et utiliser
le système Ninja Hot & Cold Brewed . . . . . . . . . . . . . 37
Quelle quantité obtenez-vous dans votre tasse?. . . . . . .37
Tableau des mesures de café recommandées . . . . . . . .37
Tableau des mesures de thé recommandées. . . . . . . . .37
Remplissage du panier à infusion de café . . . . . . . . . .38
Remplissage du panier à infusion de thé . . . . . . . . . . .38
Drip stop (soupe d’arrêt) d’écoulement automatique . . . .39
Infusion . . . . . . . . . . . . . . . . . . . . . . . . . . . . . 40
Infusions personnalisées: . . . . . . . . . . . . . . . . . . 40
Classic (classique) et Rich (riche) . . . . . . . . . . . . . 40
Over Ice (sur glace) et cold brew (à froid) . . . . . . . . . 41
Infusion Signature: . . . . . . . . . . . . . . . . . . . . . . .42
Specialy (spécialité). . . . . . . . . . . . . . . . . . . . . .42
Réglage de le Delay Brew (infusion diérée). . . . . . . . .43
Moussage du lait . . . . . . . . . . . . . . . . . . . . . . . . 44
Soins et entretien . . . . . . . . . . . . . . . . . . . . . . . . 45
Nettoyage après une infusion. . . . . . . . . . . . . . . . . . .45
Nettoyage de votre réservoir d’eau . . . . . . . . . . . . . . .45
Nettoyage de votre carafe . . . . . . . . . . . . . . . . . . . .45
Nettoyage et détartrage de votre système d’infusion . . . . .46
Guide de dépannage . . . . . . . . . . . . . . . . . . . . . . 47
Enregistrement du produit . . . . . . . . . . . . . . . . . . 49
Commande de pièces de rechange . . . . . . . . . . . . . . 49
Garantie. . . . . . . . . . . . . . . . . . . . . . . . . . . . . . 48
VEUILLEZ LIRE ATTENTIVEMENT LE
PRÉSENT MODE D’EMPLOI ET
LE CONSERVER À TITRE INFORMATIF.
Ces instructions ont été conçues
pour vous aider à bien comprendre
le fonctionnement de votre nouveau
système Ninja Hot & Cold Brewed
MC
.
Pour toute question,
veuillez communiquer avec notre
service à la clientèle au 1877646-5288.
CE GUIDE PORTE SUR LE NUMÉRO
DE MODÈLE:
CP307
CARACTÉRISTIQUES TECHNIQUES
Tension électrique: 120V~, 60Hz
Puissance: 1500watts
Capacité du
réservoir d’eau: 1,48l (50oz)
CONSEIL: Le numéro de modèle et le
numéro de série apparaissent sur l’étiquette
de code QR qui est située à l’arrière de
l’appareil, à côté du cordon d’alimentation.
CONSIGNEZ LES RENSEIGNEMENTS
CI-DESSOUS
Numéro du modèle: ��������������
Numéro de série: ����������������
Date d’achat: �������������������
(conservez la facture)
Magasin où l’appareil a été acheté:
��������������������������������
ENREGISTREZ VOTRE ACHAT
registeryourninja.com
1-877-646-5288
Numérisez le code QR
avec votre appareil mobile
Page 15

26 27
1- 877- 6 46 -5 28 8
ninjakitchen.com
FRANÇAIS
CONSIGNES DE SÉCURITÉ IMPORTANTES
VEUILLEZ LIRE TOUTES LES INSTRUCTIONS AVANT UTILISATION • POUR USAGE DOMESTIQUE UNIQUEMENT
Lisez toutes les instructions avant d’utiliser votre
SYSTÈME NINJA
HOT & COLD BREWED
MC
Lors de l’utilisation d’appareils électriques, des mesures de sécurité de base
doivent toujours être suivies, y compris les suivantes:
AVERTISSEMENT
Pour réduire le risque d’incendie, de
décharges électriques, de blessures
graves, de décès ou de dommages lors de
l’utilisation de cet appareil, respectez ces
précautions de sécurité élémentaires.
Précautions générales
1 Cet appareil peut être utilisé par les
enfants âgés d’au moins 8ans et les
personnes dont les capacités physiques,
sensorielles ou mentales sont réduites
ou qui manquent d’expérience et de
connaissances seulement s’ils ont été
supervisés ou instruits par rapport à
l’utilisation sécuritaire de l’appareil et s’ils
comprennent les dangers possibles.
2 Afin de réduire le risque de décharges
électriques, cet appareil est muni d’une
fiche d’alimentation polarisée (une
broche étant plus large que l’autre).
Comme précaution, cette fiche s’insère
dans une prise polarisée dans un seul
sens. Si la fiche d’alimentation ne
s’insère pas à fond dans la prise de
courant, inversez alors le sens de la
fiche. Si elle ne s’insère toujours pas,
communiquez avec un électricien
qualifié.
NE FORCEZ PAS pour insérer la fiche
dans la prise et ne tentez pas de la
modifier pour qu’elle puisse entrer dans
celle-ci.
3 Gardez l’appareil et son câble hors de la
portée des enfants de moins de 8ans.
4 Pour éliminer un risque de suocation
pour les jeunes enfants, enlevez
et éliminez de façon sécuritaire le
couvercle protecteur de la fiche
d’alimentation de cet appareil.
5 Les enfants ne doivent pas jouer
avec l’appareil.
6 Afin de protéger contre le feu, les
décharges électriques, et les blessures,
VEUILLEZ NE PAS immerger les câbles,
les prises électriques ou les pièces de
machine dans l’eau ou tout autre liquide.
7 NE SOULEVEZ JAMAIS l’appareil par
le cordon d’alimentation et ne tirez pas
sur ce dernier pour le débrancher; tirez
plutôt sur la fiche.
8 N’UTILISEZ PAS un appareil dont le
cordon ou la fiche sont endommagés,
un appareil qui a subi une défaillance
ou un appareil qui a été échappé ou
endommagé de quelque façon que ce
soit. Communiquez avec SharkNinja
Operating LLC pour la réparation.
9 Pour usage domestique et sur un plan
de travail seulement. NE LAISSEZ PAS
le cordon d’alimentation pendre ni
toucher des surfaces chaudes, comme
celles d’une cuisinière.
10 N’UTILISEZ JAMAIS de prise en
dessous du comptoir.
11 Pour éviter tout risque de feu,
d’électrocution ou de dommage
à l’appareil, N’ENTREPOSEZ PAS
ou N’UTILISEZ PAS l’appareil dans
un meuble de rangement pour
électroménagers ou sous une armoire.
12 Débranchez l’appareil de sa source
d’alimentation entre les utilisations et
avant de le nettoyer.
13 Éteignez l’appareil et laissez-le refroidir
avant d’enlever ou d’installer des pièces
et de le nettoyer.
Avis d’utilisation
14 L’utilisation d’un accessoire n’étant pas
recommandé par le fabricant pourrait
causer un débordement et un danger
d’échaudage ou mener à un incendie, à
une électrocution ou à une blessure.
15 UTILISEZ TOUJOURS l’appareil sur une
surface plane, propre et sèche.
16 NE PLACEZ PAS l’appareil sur un
élément de poêle électrique ou de poêle
au gaz chaud ou à proximité de celui-ci
ni dans un four chaud.
16 Utilisez cet appareil UNIQUEMENT aux
fins pour lesquelles il a été conçu.
17 N’UTILISEZ PAS cet appareil à
l’e xtérieu r.
18 NE TOUCHEZ PAS aux surfaces
chaudes . Utilisez les poignées ou les
boutons.
19 Pour éviter le contact avec la vapeur ou
les surfaces chaudes, NE PAS SE Z PAS
la main au- dessus de la machine pour
utiliser la buse à mousser.
20 PLACEZ TOUJOURS un contenant sous
le panier à infusion pour recevoir le café
ou le thé infusé.
21 L’ouverture du panier à infusion pendant
le cycle d’infusion ou de nettoyage peut
causer un échaudage.
22 NE RETIREZ PAS le contenant pendant
que l’appareil fonctionne et que la
soupape d’arrêt d’écoulement est en
position fermée.
23 Replacez rapidement le contenant et
ouvrez la soupape d’arrêt d’écoulement
pour continuer l’infusion.
24 NE REMPLISSEZ PAS le réservoir d’eau
avec des liquides autres que l’eau, car ils
peuvent endommager votre machine.
25 NE REMPLISSEZ PAS trop le réser voir
d’eau. Ajoutez de l’eau uniquement
jusqu’au niveau de la ligne Max Fill
(remplissage maximal).
26 NE FAITES PAS FONCTIONNER
l’appareil sans eau.
27 Le fait de dépasser la capacité maximale
du panier à infusion peut causer un
débordement. N’UTILISEZ PAS de café
moulu finement ou pour espresso.
Carafe thermique
28 La carafe est conçue pour être utilisée
avec cet appareil seulement. NE
PLACEZ PAS la carafe sur un élément
de poêle électrique ou de poêle au gaz
chaud ou à proximité de celui-ci, ou
dans un four chaud.
29 NE METTEZ PAS la carafe dans le
lave-vaisselle.
30 N’UTILISEZ PAS une carafe fêlée ou
égratignée ni une carafe avec une
poignée lâche ou fragilisée.
31 NE NETTOYEZ PAS la carafe avec
des nettoyants abrasifs , des tampons
de laine d’acier ou tout autre matériel
abrasif.
32 NE METTEZ PAS la carafe au four
micro-ondes.
33 NE BUVEZ PAS directement à la carafe.
Le liquide dans la carafe pourrait être
très chaud.
34 N’UTILISEZ PAS la carafe pour stocker
des aliments lorsqu’elle n’est pas utilisée.
35 Assurez-vous que la carafe est
complètement vide avant de
commencer un cycle de nettoyage ou
d’infusion. Commencer un cycle avec de
l’eau, du café ou du thé dans la carafe
causera un débordement.
Soins et entretien
36 Laissez l’appareil refroidir avant de
retirer toute pièce et avant le nettoyage.
37 Afin d’éviter les maladies liées à la
croissance bactérienne dans l’appareil,
suivez toutes les instructions de
nettoyage figurant dans la section
«Soins et entretien» du présent guide
de l’utilisateur.
38 Nettoyez le système toutes les
semaines.
39 Si le produit ne fonctionne pas
correctement, consultez le site
ninjakitchen.com ou communiquez
avec SharkNinja Operating LLC à
des fins d’examen, de réparation ou
d’ajustement.
40 Les enfants ne peuvent pas nettoyer ni
entretenir l’appareil, à moins qu’ils aient
plus de 8ans et qu’ils soient supervisés.
Avis sur le cordon
41 Un cordon d’alimentation court est
fourni; un cordon plus long augmente
les risques qu’on s’y empêtre ou qu’on
trébuche sur celui-ci.
42 N’UTILISEZ PAS de rallonge avec ce
produit.
Prenez soin d’éviter de toucher
toute surface chaude.
Page 16

28
1- 877- 6 46 -5 28 8
29
ninjakitchen.com
FRANÇAIS
PIÈCES UTILISATION DU TABLEAU DE COMMANDE
A Machine
(cordon d’alimentation et rangement
non illustrés)
B Couvercle à bascule du réservoir d’eau
C Réservoir d’eau amovible
D Douchette
E Tableau de commande
F Plate-forme de service à portion
individuelle
G Panier à infusion pivotant
H Porte-filtre à thé amovible
I Filtre à thé permanent
J Por te-filtre à café amovible
K Filtre à café permanent
L Buse à mousser intégrée
M Fouet à mousser
N Couvercle laissant passer l’infusion
O Carafe en acier inoxydable
P Ninja Smart Scoop™
A
B
D
E
F
G
HJ
IK
M
P
L
CAFÉ THÉ
C
N
O
Page 17

30
1- 877- 6 46 -5 28 8
PANNEAU DE COMMANDE
1 Horloge numérique
programmable
2 Boutons des heures
et des minutes
3 Bouton Drip Stop
(soupape d’arrêt d’écoulement)
4 Bouton Delay Brew
(infusion diérée)
5 Témoin lumineux du mode thé
6 Témoin lumineux du mode café
7 Cadran à services multiples
a Cup (tasse)
b XL Cup (tasse TG)
c Travel Mug
(tasse de voyage)
d XL Multi-Serve
(multiportion TG)
e Half Carafe (demi-carafe)
f Full Carafe (carafe pleine)
8 Barre de progression
9 Types d’infusion personnalisés
Classic (infusion classique)
Rich (infusion riche)
Over Ice (infusion sur glace)
Cold (infusion à froid)
10 Ninja
MD
Signature Brew
(infusion Signature)
Specialty Brew
(infusion de spécialité)
11 Types de thé
Herbal (tisane)
Black (noir)
Oolong (oolong)
White (blanc)
Green (vert)
12 Bouton Tea (thé)
13 Bouton Start/Selection
(démarrer/sélectionner)
14 Bouton/voyant
Intelligent Clean Cycle
(cycle de nettoyage intelligent)
15 Bouton Power (mise en marche)
1
3
6
9
10
7a
7b
7c
7
14
4
5
7d
7f
7e
8
12
13
15
2
11
31ninjakitchen.com
FRANÇAIS
SCA CERTIFICATION
MACHINE À CAFÉ POUR USAGE DOMESTIQUE CERTIFIÉE PAR LA SCA
La Specialty Coee Association (SCA) reconnaît les machines
à café pour usage domestique qui répondent à leurs exigences
techniques rigoureuses de longue date. Ces exigences sont basées
sur des décennies de connaissances de l’industrie et de recherche
réalisée par le Coee Brewing Center. Toutes les machines à café
pour usage domestique certifiées par la SCA répondent à ces
exigences, lesquelles sont généralement basées sur la température
adéquate de l’eau, le temps d’infusion et la capacité d’infuser de
manière à respecter les recommandations de Golden Cup de la SCA.
Si une machine à café passe tous les tests de la procédure
de certification, tels que réalisés par la SCA , elle peut être
reconnue comme une machine à café pour usage domestique
exemplaire et peut figurer sur la liste des machines à
café pour usage domestique certifiées par la SCA .
Cette machine à café a été certifiée par la SCA, car elle répond à
sa norme Golden Cup, conçue pour une extraction et une force
optimales. Les essais de certification de la SCA ont été réalisés en
utilisant une demi-carafe et une pleine carafe, en mode Classic Brew
(infusion classique). Les mesures de café moulu suivantes ont été
utilisées pour les essais: 55g pour une demi- carafe et 77g pour
une pleine carafe. Lors de l’utilisation de la Ninja Smart Scoop
MC
,
cela correspond à 4grandes cuillères combles pour une demicarafe et à 6grandes cuillères combles pour une pleine carafe.
Page 18

33
ninjakitchen.com
FRANÇAIS
AVANT LA PREMIÈRE UTILISATION
REMARQUE: Si vous débranchez la machine à café, ou s’il y a une panne de courant
prolongée, vous devrez régler à nouveau l’horloge lorsque la machine à café sera
rebranchée.
REMARQUE: Si l’horloge cesse de clignoter et n’ache pas l’heure correcte, vous
pouvez à tout moment appuyer sur le bouton H (heure) ou M (minute) pour que
l’horloge se remette à clignoter. Vous pouvez alors programmer à nouveau l’heure
correcte en suivant les étapes ci-dessus.
RÉGLAGE DE L’HORLOGE
1 Branchez le cordon d’alimentation dans une prise électrique. L’horloge sur le panneau
de commande clignotera pour indiquer que l’heure n’a pas été réglée (fig.1).
2 Appuyez sur le bouton H (heure) ou M (minute) jusqu’à ce que vous atteigniez l’heure
actuelle. Le voyant AM ou PM à la gauche de l’achage s’illuminera pendant que vous
réglez l’heure.
3 Après 5secondes, l’horloge cessera de clignoter: elle est alors réglée.
1 Retirez tous les matériaux d’emballage et les autocollants de la machine à café.
2 Lavez le réser voir d’eau, la carafe thermique, les porte-filtres amovibles et
les filtres à café et à thé permanents dans de l’eau tiède savonneuse avec
un chion doux.
3 Rincez les pièces et séchez-les bien.
4 Avant la première utilisation, préparez le système en eectuant deux cycles Full Carafe
(carafe pleine), Classic Brew (infusion classique) avec de l’eau seulement. Après la fin de
chaque cycle, jetez l’eau.
Fig. 1
PRÉPARATION DE VOTRE
SYSTÈME NINJA HOT & COLD BREWED
TM
1 Pour remplir le réservoir d’eau, utilisez
les poignées pour le faire glisser vers
la droite et le soulever de la machine
(fig.2). Ouvrez le couvercle du
réservoir ou enlevez-le complètement,
puis ajoutez de l’eau fraîche et filtrée,
sans dépasser la ligne de remplissage
maximal (fig. 3). Replacez le réservoir
d’eau dans la machine (fi g. 4). NE
REMPLISSEZ PAS le réservoir avec des
liquides autres que l’eau, car ils peuvent
endommager votre machine.
2 Assurez-vous que l’un des porte-filtres
amovibles soit placé dans le panier
à infusion (fig. 5). Une fois en place,
insérez entièrement le panier à infusion
en le faisant glisser jusqu’à ce que vous
entendiez un léger déclic (fig.6).
IMPORTANT:
Nous recommandons d’utiliser de l’eau
filtrée fraîche et froide. L’eau de puits
est déconseillée.
Fig. 4
Fig. 6
Fig. 5
Fig. 3
VEUILLEZ TOUJOURS GARDER CES CONSIGNES IMPORTANTES À L’ESPRIT
LORSQUE VOUS UTILISEZ L’APPAREIL:
IMPORTANT: NE FAITES PAS FONCTION NER l’appareil sans eau.
Fig. 2
32
1- 877- 6 46 -5 28 8
Page 19

34 35
1- 877- 6 46 -5 28 8
ninjakitchen.com
FRANÇAIS
TABLEAU DES MESURES DE CAFÉ TABLEAU DES MESURES DE THÉ
PRÉPARATION DE VOTRE
SYSTÈME NINJA HOT & COLD BREWED
™
PRÉPARER ET UTILISER
LE SYSTÈME NINJA HOT & COLD BREWED
TM
3 Tournez le couvercle laissant passer
l’infusion dans le sens des aiguilles d’une
montre sur la carafe pour le verrouiller
(fig. 7) et centrez la carafe en dessous
du panier à infusion (fig. 8).
REMARQUE: Ne placez pas de café
moulu ou de thé dans le panier à
infusion pour les deux premiers cycles.
4 Une fois que toutes les pièces
sont bien fixées et que l’appareil est
allumé, sélectionnez le format Full
Carafe (carafe pleine) et
le réglage Classic Brew (infusion
classique), puis appuyez sur
le bouton START/SELECT
(démarrer/sélectionner) (fig. 9).
5 Une fois le cycle terminé, jetez l’eau de
la carafe. Répétez en commençant par
l’étape1. Vous êtes maintenant prêt à
utiliser votre système Ninja Hot & Cold
Brewed pour infuser.
Fig. 8
Fig. 7
Fig. 9
Format
Classic
(Classique)
Rich
(Riche)
Over Ice & Cold Brew
(infusion sur glace et à froid)
café/thé seulement
rempli avec de la
glace
Tasse 280ml (9,5oz) 257ml (8,7oz) 142ml (4,8oz) 280ml (9,5oz)
Tasse TG 340ml (11,5oz) 304ml (10,3oz) 171ml (5,8oz) 340ml (11,5oz)
Tasse de voyage 414ml (14oz) 390ml (13,2oz) 207ml (7,0oz) 414ml (14oz)
Multiportion TG 532ml (18oz) 473ml (16oz) 266ml (9,0oz) 532ml (18oz)
Vous n’avez pas besoin d’ajuster la quantité pour le mode Specialty Brew (infusion de spécialité),
car celui-ci produit toujours 118ml (4oz) de café et 177ml(6oz) de thé.
Format
Ninja
Smart Scoop
MC
Cuillerées à
soupe
Tasse/Tasse TG
2 ou 3petites
cuillerées
2 à 3c. à
soupe
Tasse de voyage/
Multiportion TG
3 à 5petites
cuillerées
3 à 5 c. à
soupe
Demi-carafe
3 ou 4grandes
cuillerées
6 à 8c. à
soupe
Carafe pleine
4 à 6grandes
cuillerées
8 à 12c. à
soupe
Spécialité
(118ml [4oz])
2grandes
cuillerées
4c. à
soupe
Format
Ninja
Smart Scoop
MC
Thé en feuilles
Sachets de
thé
Cup/XL Cup
1 petite cuillère
1 sachet
de thé
Travel Mug/
XL Multi-Serve
1 ou 2petites
cuillerées
2 sachets
de thé
Half Carafe
2 ou 3petites
cuillerées
4 sachets
de thé
Full Carafe
3 à 4petites
cuillerées
6 sachets
de thé
Specialty
(6 oz.)
1grande
cuillerée
3 sachets
de thé
QUELLE QUANTITÉ OBTENEZ-VOUS DANS VOTRE TASSE?
Chaque format et chaque type d’infusion produisent une quantité diérente de café et de
thé pour optimiser l’intensité et la saveur.
REMARQUE: Le café moulu et le thé absorberont une partie de l’eau servant à l’infusion: il
y aura un peu moins de café ou de thé que d’eau utilisée.
VOLUMES D’INFUSION APPROXIMATIFS
REMARQUE: Pour le café infusé à froid,
ajoutez une cuillère supplémentaire.
REMARQUE: Ne pas respecter la taille
de mouture moyenne recommandée
pour les grains entiers pourrait causer
le débordement du panier à infusion.
ÉTALONNAGE POUR LA HAUTE
ALTITUDE (FACULTATIF, MAIS
RECOMMANDÉ POUR LES
UTILISATEURS EN HAUTE ALTITUDE)
L’eau bout à une plus basse température
en haute altitude, c’est pourquoi
eectuer un cycle d’étalonnage avant
votre première infusion permettra à
votre appareil de détecter le point
d’ébullition de l’eau selon votre
emplacement. Eectuer un cycle
d’étalonnage permettra de toujours
obtenir une infusion constante.
1. Remplissez le réservoir d’eau jusqu’à la
ligne de remplissage maximal, sans la
dépasser.
2. Placez un porte-filtre vide dans le
panier à infusion et un récipient vide
dans la machine.
3. Appuyez et maintenez enfoncé le
bouton Drip Stop (soupape d’arrêt
d’écoulement) et le bouton Tea
(thé) jusqu’à ce que l’horloge
ache une minuterie de deux minutes.
4. Un cycle d’étalonnage commencera.
L’appareil émettra un bip et l’horloge
achera End (fin). Jetez l’eau dans
le contenant.
REMARQUE: Appuyer sur le
bouton Drip Stop (soupape d’arrêt
d’écoulement)
, le bouton Tea (thé)
ou le bouton Power (mise en marche)
annulera le cycle.
Page 20

36 37
1- 877- 6 46 -5 28 8
ninjakitchen.com
FRANÇAIS
PRÉPARER ET UTILISER LE SYSTÈME
NINJA HOT & COLD BREWED
™
– SUITE
REMPLISSAGE DU PANIER
À INFUSION DE CAFÉ
Pour de meilleurs résultats, servez-vous des
mesures de café recommandées dans le
tableau afin de déterminer quelle quantité
de café moulu vous devriez utiliser pour
chaque format d’infusion. La quantité de café
moulu pour chaque format restera la même
pour n’importe quel type d’infusion que vous
choisissez. Par exemple, si vous sélectionnez
Tasse et Classic Brew (infusion classique), vous
utiliserez la même quantité de café moulu
que si vous sélectionnez Tasse et Infusion sur
glace. La seule exception est pour la fonction
Cold Brew (infusion à froid), qui nécessite une
cuillère supplémentaire de café, quelle que soit
la taille.
1 Ouvrez le panier à infusion en le faisant
glisser hors de la machine (fig. 10). Assurezvous que le porte-filtre à café (avec une
poignée orange et une icône de grain de
café) soit dans la machine.
2 Placez le filtre à café permanent ou un
filtre en papier conique nº4 dans le portefiltre à café amovible. Si vous utilisez un
filtre en papier, assurez-vous d’abord que
le filtre permanent est retiré du portefiltre. Puis, pliez le filtre papier le long
des coutures, ouvrez-le complètement et
enfoncez-le fermement dans le panier à
infusion en vous assurant qu’il est bien en
place (fig. 11).
3 Utilisez la cuillère Ninja Smart Scoop
MC
et suivez les mesures du tableau pour
remplir le panier à infuser (fig. 12). Ces
mesures sont basées sur des cuillerées
rases – ajustez-les selon vos goûts. Nous
suggérons d’utiliser une mouture moyenne
si vous moulez des grains entiers.
4 Remettez le panier à infusion dans la
machine à café en le faisant glisser
jusqu’au déclic.
REMPLISSAGE DU PANIER À INFUSION
DE THÉ
Pour de meilleurs résultats, servez-vous des
mesures recommandées dans le tableau afin
de déterminer combien de sachets de thé
ou la quantité de feuilles de thé vous devriez
utiliser pour chaque format d’infusion. La
quantité de thé pour chaque format restera
la même pour n’importe quel type d’infusion
que vous choisissez.
1 Ouvrez le panier à infusion en le faisant
glisser hors de la machine (fig. 10). Assurezvous que le porte-filtre à THÉ (avec une
poignée verte et une icône de feuille de thé)
soit dans la machine.
2 Placez le filtre à thé permanent dans le
porte-filtre à THÉ (fig. 11). Lorsque vous
utilisez des sachets de thé, vous pouvez
retirer le filtre à thé permanent si vous avez
besoin de plus d’espace dans le panier à
infusion.
3 Utilisez la cuillère Ninja Smart Scoop
MC
et suivez les mesures recommandées du
tableau pour remplir le panier à infuser
en les ajustant pour obtenir votre saveur
désirée (fig. 12).
4 Remettez le panier à infusion dans la
machine à café en le faisant glisser
jusqu’au déclic.
Fig. 10
RÉGLAGE DU TEMPS DE DRIP STOP
(SOUPE D’ARRÊT)
Après l’infusion, l’écoulement s’arrêtera
automatiquement. Certains types de café,
comme le café finement moulu ou décaféiné,
peuvent nécessiter plus de temps pour
s’écouler du panier d’infusion. Pour augmenter
la durée de l’ouverture de la soupape d’arrêt
d’écoulement, suivez ces instructions:
1 Appuyez et maintenez enfoncé le
bouton Drip Stop (soupape d’arrêt
d’écoulement)
(fig. 13a) jusqu’à ce
que l’horloge ache dFLt (défaut) ou
l’heure précédemment réglée.
2 Appuyez sur le bouton heure (H) ou
minute (M) jusqu’à ce que la durée
désirée soit sélectionnée: dFLt (défaut),
:15 (+15 secondes), :30 (+30 secondes),
:45 (+45 secondes), :60 (+60 secondes),
ou OFF (arrêt) (fig. 13b).
3 Appuyez sur le bouton Drip Stop
(soupape d’arrêt d’écoulement)
pour régler une nouvelle durée. Ou alors,
attendez cinq secondes et l’appareil
émettra un bip, ce qui signifie qu’une
nouvelle durée soit réglée.
DRIP STOP (SOUPE D’ARRÊT)
AUTO MATI QUE
Le système est équipé d’un dispositif
automatique d’arrêt d’écoulement. Lorsque
le bouton Drip Stop (soupape d’arrêt
d’écoulement)
est allumé, l’arrêt
d’écoulement est fermé et aucun café
ou thé ne coulera du panier à infusion.
Lorsque vous préparez une carafe pleine ou
à demi remplie, appuyez sur le bouton Drip
Stop (soupape d’arrêt d’écoulement)
pour
mettre le cycle d’infusion en pause et verser
une tasse. Replacez rapidement la carafe et
appuyez sur le bouton Drip Stop (soupape
d’arrêt d’écoulement) une nouvelle fois
pour terminer l’infusion (fig. 13a).
REMARQUE: Lorsque vous sélectionnez
OFF (arrêt), la soupape d’arrêt
d’écoulement restera ouverte après la
fin de l’infusion. Vous pouvez fermer la
soupape d’arrêt d’écoulement à tout
moment en appuyant une nouvelle fois
sur le bouton Drip Stop (soupape d’arrêt
d’écoulement) . dFLt (défaut) est le
réglage par défaut de la machine.
REMARQUE: Si vous oubliez d’appuyer
sur Drip Stop (soupape d’arrêt
d’écoulement) pour reprendre l’infusion
, l’appareil mettra l’infusion en pause
et, après 30secondes, il émettra un
signal sonore servant de rappel amical.
Après 5minutes, l’infusion sera annulée.
ou ou
CAFÉ THÉ
Fig. 12
Fig. 11
Fig. 13a
Fig. 13b
Page 21

38 39
1- 877- 6 46 -5 28 8
ninjakitchen.com
FRANÇAIS
4
Faites tourner le bouton START/SELECT
(démarrer/sélectionner) pour choisir Over
Ice Brew (infusion sur glace) ou Cold Brew
(infusion à froid)(fig. 16a et 16b). Si vous
souhaitez infuser du thé, appuyez sur le
bouton Tea (thé)
pour passer au menu
de thé, et utilisez le bouton pour choisir
votre type de thé. Pour changer votre style
d’infusion dans le menu de thé, appuyez sur
le bouton Tea (thé)
.
5
Appuyez sur le bouton START/SELECT
(démarrer/sélectionner) pour commencer
l’infusion. Une barre de progression sur le
panneau de commande achera l’état du
cycle d’infusion. Pour annuler l’infusion,
appuyez n’importe quand sur le bouton ou
sur le bouton Power (mise en marche).
6
L’appareil émettra un bip et l’horloge
achera End (fin) lorsque l’infusion
est terminée.
INFUSION
I
NFUSIONS PERSONNALISÉES:
CLASSIC BREW (INFUSION CLASSIQUE)
ET RICH BREW (INFUSION RICHE)
1 Après avoir rempli le réservoir d’eau,
insérez le porte-filtre à CAFÉ ou THÉ dans
le panier à infusion. Ajoutez le café moulu,
les feuilles de thé ou les sachets de thé
dans le filtre.
2 Fermez le panier à infusion en vous
assurant qu’il soit solidement en place.
Le panneau de commande achera les
réglages COFFEE (café) (fig. 14a) ou TEA
(thé) (fig. 14b) selon le porte-filtre inséré.
3
Utilisez le cadran à services multiples pour
sélectionner le format de l’infusion. Placez le
contenant vide que vous souhaitez utiliser
sous le panier à infusion.
OVER ICE BREW (INFUSION SUR GLACE)
ET COLD BREW (INFUSION À FROID)
REMARQUE: Un contenant en verre peut
être utilisé en mode Cold Brew (infusion
à froid), mais jamais en mode Over Ice
Brew (infusion sur glace).
1
Après avoir rempli le réservoir d’eau,
insérez le porte-filtre à CAFÉ ou à THÉ
dans le panier à infusion. Ajoutez le café
moulu, les feuilles de thé ou les sachets de
thé dans le filtre.
2
Fermez le panier à infusion en vous
assurant qu’il soit solidement en place.
Le panneau de commande achera les
réglages COFFEE (café) (fig. 14a) ou TEA
(thé) (fig.14b) selon le porte-filtre inséré.
3
Remplissez entièrement le contenant que
vous souhaitez utiliser avec des cubes de
glace et placez-le sous le panier à infusion.
Utilisez le cadran à services multiples pour
sélectionner le format de l’infusion.
4 Faites tourner le bouton START/SELECT
(démarrer/sélectionner) pour choisir
Classic Brew (infusion classique) ou Rich
Brew (infusion riche) (fig. 15a et 15b). Si
vous souhaitez infuser du thé, appuyez
sur le bouton Tea (thé) pour passer
au menu thé, et utilisez le bouton pour
choisir votre type de thé. Pour changer
votre style d’infusion dans le menu thé,
appuyez une nouvelle fois sur le bouton
Tea (thé) .
5 Appuyez sur le bouton START/SELECT
(démarrer/sélectionner) pour commencer
l’infusion. Une barre de progression sur le
panneau de commande achera l’état du
cycle d’infusion. Pour annuler l’infusion,
appuyez n’importe quand sur
le bouton ou sur le bouton Power
(mise en marche).
6 L’appareil émettra un bip et l’horloge
achera End (fin) lorsque l’infusion
est terminée.
REMARQUE: Certaines infusions
comportent un cycle d’infusion préalable
de durée variable. Le cycle d’infusion
commencera, puis se mettra en pause
pendant une courte période avant de
reprendre. Ce processus est utilisé pour
saturer de manière uniforme le café
moulu ou le thé.
REMARQUE: Si vous souhaitez faire
une tasse individuelle, baissez la plateforme de service de tasse individuelle
et placez votre récipient en son centre.
Veuillez vous assurer d’utiliser une
tasse d’au moins 355ml (12oz) pour
le format Tasse, une tasse d’au moins
414ml (14oz) pour le format Tasse
TG, une tasse de voyage d’au moins
473ml (16oz) pour le format Tasse de
voyage et une tasse de voyage d’au
moins 591ml (20oz) pour le format
Multiportions TG.
REMARQUE: Le Rich Brew (infusion
riche) utilisera un peu moins d’eau et
produira un peu moins de café ou de thé
que le Classic Brew (infusion classique).
REMARQUE: SEULEMENT pour le café
COLD BRE W (infusé à froid): ajoutez
une cuillère supplémentaire de café
moulu au panier à infusion.
REMARQUE: Le cycle d’infusion
commencera, puis se mettra en pause
pendant une courte période avant de
reprendre. Ce processus est utilisé pour
saturer de manière uniforme le café
moulu ou le thé.
REMARQUE: L’infusion à froid prend
environ 15minutes pour une carafe pleine.
REMARQUE: Si le panier à infusion est
fermé sans porte-filtre, le témoin lumineux
COFFEE (café) et TEA (thé) clignotera.
Fig. 15bFig. 15aFig. 14b
Fig. 14a
Fig. 16a Fig. 16b
REMARQUE: N ’AJO UTEZ PAS
de glace dans le réservoir d’eau.
PRÉPARER ET UTILISER LE SYSTÈME
NINJA
HOT & COLD BREWEDTM – SUITE
Page 22

40 41
1- 877- 6 46 -5 28 8
ninjakitchen.com
FRANÇAIS
PRÉPARER ET UTILISER LE SYSTÈME
NINJA HOT & COLD BREWED
™
– SUITE
INFUSION SIGNATURE:
SPECIALTY BREW
(INFUSION DE SPÉCIALITÉ)
1 Après avoir rempli le réservoir d’eau,
insérez le porte-filtre à CAFÉ ou à THÉ
dans le panier à infusion. Ajoutez le café
moulu, les feuilles de thé ou les sachets de
thé dans le filtre.
2 Fermez le panier à infusion en vous
assurant qu’il est bien fixé. Le panneau
de commande achera les réglages
COFFEE (café) (fig. 14a) ou TEA (thé)
(fig. 14b) selon le porte-filtre inséré.
3 Placez le contenant vide que vous
souhaitez utiliser sous le panier
à infusion.
4 Tournez le bouton START/SELECT
(démarrer/sélectionner) pour sélectionner
SPECIALTY (spécialité) (fig. 17). Si vous
infusez du thé, appuyez sur le bouton Tea
(thé)
pour passer au menu de thé et
utilisez le bouton pour choisir votre type
de thé. Pour changer le style d’infusion
dans le menu de thé, appuyez une
nouvelle fois sur le bouton Tea (thé) .
5 Appuyez sur le bouton START/SELECT
(démarrer/sélectionner) pour commencer
l’infusion. Une barre de progression sur le
panneau de commande achera l’état du
cycle d’infusion. Pour annuler l’infusion,
appuyez n’importe quand sur le bouton
ou sur le bouton Power (mise en marche).
RÉGLAGE DE LE DELAY BREW (INFUSION
DIFFÉRÉE)
1 Mettez l’appareil en marche en appuyant
sur le bouton Power (mise en marche).
2 Après avoir rempli le réservoir d’eau et
ajouté du café moulu ou du thé au bon
porte-filtre, assurez-vous que le réservoir,
le panier et le filtre sont bien fixés. Placez
un contenant de format approprié sous le
panier à infusion.
3 Appuyez sur DELAY BREW (infusion
diérée). Le bouton DELAY BREW
(infusion diérée) s’illuminera, et l’horloge
commencera à clignoter en indiquant
«12:00» ou la dernière heure d’infusion
diérée réglée (fig. 18).
4 Pendant que l’horloge clignote, appuyez
sur le bouton H (heure) or M (minute)
pour régler l’heure à laquelle vous
souhaitez que le Delay Brew (infusion
diérée) commence. Le voyant AM ou
PM à la gauche de l’achage s’illuminera
pendant que vous réglez l’heure souhaitée.
5 Une fois l’heure correcte réglée,
sélectionnez le format de contenant que
vous souhaitez remplir.
6 L’appareil émettra un bip et l’horloge
achera End (fin) lorsque l’infusion
est terminée.
6 Tournez le bouton START/SELECT
(démarrer/sélectionner) pour choisir
votre style d’infusion. Si vous souhaitez
infuser du thé, appuyez sur le bouton Tea
(thé)
pour passer au menu de thé, et
utilisez le bouton du bas pour choisir votre
type de thé. Pour changer votre style
d’infusion dans le menu de thé, appuyez
une nouvelle fois sur le bouton Tea (thé) .
7 Une fois l’heure, le format de l’infusion,
le type d’infusion et le type de thé (le
cas échéant) sélectionnés, attendez
que le voyant DELAY BREW (infusion
diérée) arrête de clignoter ou appuyez
sur le bouton DELAY BREW (infusion
diérée) pour activer l’infusion diérée.
Lorsqu’activé, l’appareil émettra un bip,
puis DELAY BREW (infusion diérée) et
les options que vous avez sélectionnées
resteront allumées. Pour annuler,
appuyez une nouvelle fois sur DELAY
BREW (infusion diérée).
REMARQUE: Le cycle d’infusion
commencera, puis se mettra en pause
pendant une courte période avant
de reprendre. Ce processus est utilisé
pour saturer de manière uniforme le
café moulu ou le thé.
REMARQUE: Si vous tentez de changer
vos sélections pendant que Delay
Brew (infusion diérée) est activé,
l’appareil émettra un bip et DELAY
BREW (infusion diérée) clignotera.
Pour changer vos sélections, annulez
Delay Brew (infusion diérée).
REMARQUE: La fonction Specialty
(spécialité) produit toujours 118ml
(4oz) de café et 177ml(6oz) de thé
(59ml [2oz] pour le thé vert).
REMARQUE: Si vous préparez une
boisson glacée mélangée, avant
l’infusion, remplissez le contenant que
vous souhaitez utiliser avec la quantité
de glace recommandée par la recette.
REMARQUE: L’appareil doit
demeurer en marche afin de faire
fonctionner l’option d’infusion
diérée. N’ÉTEIGNEZ PAS l’appareil
après avoir activé la fonction Delay
Brew (infusion diérée).
REMARQUE: L’horloge restera
allumée même si l’appareil est hors
fonction. Assurez-vous que l’appareil
est allumé pour régler la fonction
Delay Brew (infusion diérée).
REMARQUE: Le panier d’infusion
doit être bien fermé avec le filtre à
CAFÉ ou à THÉ pour activer Delay
Brew (infusion diérée).
Fig. 18
Fig. 17
Page 23

42 43
1- 877- 6 46 -5 28 8
ninjakitchen.com
FRANÇAIS
SOINS ET ENTRETIEN
MOUSSAGE DU LAIT
1 Remplissez une tasse de lait jusqu’à
1
/3.
(Utilisez plus ou moins de lait selon votre
préférence.) Mettez-la au four microondes pendant 45 à 60secondes pour
obtenir du lait chaud.
2 Placez la buse à mousser en position prête
en faisant pivoter le bras vers l’avant.
3 Tenez la tasse sous la buse à mousser et
immergez le fouet juste sous la surface
du lait. Ainsi, de l’air peut entrer dans le
lait pour créer un maximum de mousse
(fig. 19).
4 Gardez le bouton enfoncé pendant 30 à
45secondes (fig.20).
5 Vous pouvez facilement retirer le
fouet à mousser en le faisant tourner
dans le sens horaire. Afin d’éviter les
déversements, gardez votre tasse sous
le fouet et apportez-le à votre évier
ou à votre lave-vaisselle à des fins de
nettoyage (Fig. 21).
NETTOYAGE APRÈS UNE IN FUSION
1 Retirez le porte-filtre du panier à infuser
après que la machine ait refroidi. Si
vous utilisez un filtre de papier à café, il
sut de le jeter. Si vous utilisez le filtre
permanent à café ou à thé, lavez-le bien
avec du savon et de l’eau chaude ou
mettez-le dans le panier supérieur du
lave-vaisselle.
2 Nettoyez le fouet à mousser après
chaque utilisation. Lavez-le bien à
la main ou met tez-le dans le panier
supérieur du lave-vaisselle.
3 Lavez la carafe et le couvercle laissant
passer l’infusion avec de l’eau tiède
savonneuse. Utilisez une brosse à
bouteille ou un chion pour laver
l’intérieur de la carafe.
La carafe thermique NE VA PAS
au lave-vaisselle.
4 Attendez que l’appareil ait refroidi, puis
nettoyez l’unité principale, la douchette
et le réservoir d’eau avec un chion et
de l’eau chaude. N’IMMERGEZ PAS la
machine dans de l’eau.
NETTOYAGE DE VOTRE
RÉSERVOIR D’EAU
Videz le réservoir d’eau et lavez-le
à la main ou dans le lave-vaisselle.
NETTOYAGE DE VOTRE CAR AFE
Nous recommandons de nettoyer votre
carafe avec de l’eau tiède savonneuse.
Si vous souhaitez laver la carafe plus en
profondeur, nous recommandons d’utiliser
une brosse de mousse souple. N’UTILISEZ
PAS une brosse métallique.
La carafe thermique NE VA PAS
au lave-vaisselle.
REMARQUE: Le couvercle
laissant passer l’infusion, les filtres
permanents à café et thé, les portefiltres amovibles, le réservoir d’eau,
le couvercle rabattable, le fouet à
mousser et la cuillère peuvent être
mis dans le panier supérieur du
lave-vaisselle.
REMARQUE: Pour obtenir les
meilleurs résultats, nous vous
recommandons de rincer le réser voir
après l’infusion et de le remplir d’eau
fraîche pour la prochaine infusion.
Fig. 19
Fig. 20
Fig. 21
PRÉPARER ET UTILISER LE SYSTÈME
NINJA HOT & COLD BREWED™ – SUITE
Fig. 22
Page 24

44
1- 877- 6 46 -5 28 8
45
ninjakitchen.com
FRANÇAIS
Il y a des sédiments dans mon café.
• Si vous utilisez un filtre permanent, les sédiments au fond du café préparé peuvent être
causés par l’utilisation d’un café moulu trop finement.
• Pour réduire la quantité de sédiments dans le café préparé, utilisez une moulure un peu plus
grosse ou utilisez un filtre en papier.
REMARQUE: Nous ne RECOMMANDONS PAS l’utilisation d’un filtre en papier avec le filtre
permanent, car une obstruction ou un refoulement de l’eau ou du café peut se produire dans
le panier à filtre.
L’infusion OVER ICE (sur glace) ou COLD BREW (à froid) n’est pas froide.
• Avant l’infusion, remplissez toujours entièrement votre tasse, votre tasse de voyage ou
votre carafe de cubes de glace. Votre système Ninja Hot & Cold Brewed
TM
infusera à des
températures élevées pour obtenir la meilleure saveur, puis la glace refroidira le café ou le thé
infusé jusqu’à la température parfaite.
La saveur du café ou du thé n’est pas assez forte.
• CAFÉ: Pour un café plus fort, utilisez le réglage RICH Brew (infusion riche) en utilisant des
grains de café à torréfaction foncée et utilisez le filtre permanent plutôt qu’un filtre en papier.
Si vous recherchez une saveur encore plus forte, vous pouvez ajouter davantage de café
moulu au panier à infusion. Le café moulu supplémentaire absorbe le liquide, donc vous
obtiendrez une tasse plus petite et une saveur plus concentrée.
• THÉ: Pour les thés plus forts, utilisez le réglage RICH Brew (infusion riche) ou ajoutez plus
de thé dans le panier à infusion.
Le café ou le thé est trop fort.
• CAFÉ: Pour un café plus doux, utilisez le réglage CLASSIC Brew (infusion classique) en
utilisant des grains à torréfaction légère et un filtre en papier plutôt que le filtre permanent.
Si vous recherchez une saveur encore plus douce, vous pouvez mettre moins de café moulu
dans le panier à infusion.
• THÉ: Pour les thés plus doux, utilisez le réglage CLASSIC Brew (infusion classique) ou
utilisez une plus petite quantité de thé dans le panier à infusion.
Le cycle d’infusion est trop lent.
• Selon vos réglages, le temps de l’infusion peut aller de 4 à 18minutes. La barre de
progression du panneau de commande indique l’état de l’infusion.
Ma tasse ou ma tasse de voyage a débordé.
• Assurez-vous d’utiliser une tasse d’au moins 355ml (12oz) pour le format Cup (tasse), une
tasse d’au moins 414ml (14oz) pour le format XL Cup (tasse TG), une tasse de voyage d’au
moins 473ml (16oz) pour le format Travel Mug (tasse de voyage) et une tasse de voyage
d’au moins 591ml (20oz) pour le format XL Multi-Serve (multiportion TG).
Le panier à infusion a débordé.
• Le dessous du porte-filtre peut se boucher. Cette situation peut être causée par du café
moulu finement ou un excès de café moulu dans le panier à infusion. Il est recommandé
d’utiliser du café à mouture moyenne.
REMARQUE: Lorsque vous utilisez un filtre en papier, n’utilisez pas
le filtre permanent.
Il reste de l’eau dans mon réservoir.
• Les marques du réservoir d’eau représentent les lignes de remplissage minimal qui
indiquent le niveau d’eau requis pour le format de l’infusion sélection. Toutefois, tous les
styles d’infusion utilisent des quantités d’eau diérentes pour fournir une bonne saveur et
concentration, en laissant une certaine quantité d’eau.
SOINS ET ENTRETIEN GUIDE DE DÉPANNAGE
NETTOYAGE ET DÉTARTRAGE DE
VOTRE SYSTÈME D’INFUSION
Le bouton CLEAN (nettoyer)
s’allume lorsqu’un cycle de nettoyage de
votre appareil est suggéré, puisqu’une
accumulation de dépôts de calcium
pourrait nuire à la saveur de votre café
ou de votre thé.
Pour nettoyer et détartrer votre système
Ninja Hot & Cold Brewed
TM
:
1 Sélectionnez le format Carafe pleine et
placez la carafe vide sous le panier à
infusion.
2 Utilisez une solution de détartrage
spécialement conçue pour nettoyer les
cafetières instructions qui se trouvent sur
l’emballage. Remplissez le réservoir d’eau
jusqu’à la ligne de remplissage maximal
(1,48l [50oz]), sans la dépasser.
OU
Versez du vinaigre blanc dans le réservoir
jusqu’à atteindre la ligne de tasse de
voyage (0,47L [16 oz]), puis remplissez le
reste du réservoir d’eau sans dépasser la
ligne de remplissage maximal.
IMPORTANT: Utilisez uniquement du
vinaigre blanc.
3 Une fois que le réservoir d’eau est rempli
du mélange de solution de nettoyage
et d’eau, appuyez sur le bouton CLEAN
(nettoyer) (fig. 22).
IMPORTANT: Si vous annulez le cycle
de nettoyage, la machine ne sera pas
correctement détartrée.
4 L’horloge achera et fera le décompte
du temps restant pour le cycle de
nettoyage, une exécution qui demande
environ 60minutes. Votre appareil
produira une petite quantité de solution
nettoyante pour la distribuer dans le
système. Il se mettra ensuite en pause,
ajoutera une quantité supplémentaire
de solution nettoyante et fonctionnera
ensuite pendant 60minutes. Les pauses
prolongées permettront un nettoyage et
un détartrage maximum.
IMPORTANT: NE RETIREZ PAS la carafe
lorsque le cycle de nettoyage est activé.
5 Lorsque le cycle est terminé, la cafetière
émettra un son, l’horloge achera End
(fin) et le voyant CLEAN (nettoyer)
s’éteindra.
6 Videz et nettoyez soigneusement la
carafe et le réservoir d’eau avec de l’eau
chaude et savonneuse afin d’éliminer
tout résidu de solution de nettoyage qui
pourrait nuire à la saveur de votre café ou
de votre thé.
7 Remplissez le réservoir d’eau fraîche
jusqu’à la ligne de remplissage maximal,
puis mettez la carafe vide sous le panier
à infusion.
8 Vidangez le système en eectuant un
cycle de Classic Brew (infusion classique)
à Carafe pleine, avec de l’eau seulement.
Après la fin du cycle, jetez l’eau et
nettoyez bien la carafe.
REMARQUE: Le cycle de nettoyage
dure environ 60minutes.
REMARQUE: Pour annuler le cycle
de nettoyage, appuyez une fois sur
le bouton d’alimentation ou CLEAN
(nettoyer). L’appareil émettra un bip
et arrêtera l’infusion de la solution
nettoyante. Suivez ensuite les
instructions à partir de l’étape 6.
REMARQUE: Si le voyant CLEAN
(nettoyer) est toujours illuminé,
c’est qu’il y a toujours une présence
d’accumulation de calcium. Suivez à
nouveau les instructions du cycle de
nettoyage depuis le début, puis le
témoin lumineux CLEAN (nettoyer)
s’éteindra lorsque votre machine
sera propre.
Page 25

46
1- 877- 6 46 -5 28 8
47
ninjakitchen.com
FRANÇAIS
PIÈCES DE RECHANGE
ENREGISTREMENT DU PRODUIT
GUIDE DE DÉPANNAGE - SUITE
Pour commander des pièces et des accessoires supplémentaires, veuillez visiter
ninjaaccessories.com ou communiquer avec le Service à la clientèle au 1877646-5288.
Veuillez consulter le site registeryourninja.com ou composer le 1877646-5288 pour
enregistrer votre nouveau produit NinjaTM au plus tard dix (10)jours après l’achat. Le nom
du magasin, la date d’achat, le numéro de modèle ainsi que votre nom et votre adresse
vous seront demandés.
L’enregistrement nous permettra de vous joindre dans le cas peu probable d’un avis de
sécurité touchant le produit. Lorsque vous enregistrez votre produit, vous reconnaissez
avoir lu et compris les instructions et les avertissements présentés dans le guide
d’utilisation inclus.
Mon système Ninja Hot & Cold Brewed fuit.
• Après avoir retiré le réservoir d’eau, il pourrait rester une petite quantité d’eau dans la valve
du réservoir. On peut facilement l’éliminer avec un chion sec.
• Si la fuite provient du panier à infusion, assurez-vous que toutes les pièces sont bien
assemblées et fixées. Si la fuite provient du bas de la machine à café, appelez le service à la
clientèle au 1877646-5288.
Le témoin CLEAN (nettoyage) est allumé.
• Eectuez un cycle de nettoyage. Si vous avez récemment eectué un cycle de nettoyage,
vous pourriez avoir besoin d’un faire un deuxième pour éliminer l’accumulation de minéraux
qui se produit naturellement au fil du temps.
Il n’existe aucun réglage pour le roïbos ou le pu’erh.
• Utilisez le réglage Herbal (tisane) pour le roïbos et le réglage Black (noir) pour le pu-erh.
MESSAGES AFFICHÉS À L’ÉCRAN DE L’HORLOGE:
« Add » « Wtr »
• Le système n’a pas assez d’eau dans le réservoir pour terminer l’infusion. Ajoutez de l’eau
fraîche dans le réservoir, puis appuyez sur le bouton START/SELECT (démarrer/sélectionner)
pour poursuivre.
« CLn »
• Le système a détecté qu’il s’avère nécessaire de procéder à un cycle de nettoyage
immédiatement, afin d’éliminer l’accumulation de dépôts calcaires dans la bouilloire. Consultez
la section « Nettoyage et détartrage de votre système d’infusion » pour lire les instructions.
« Hot » « Wtr »
• Le système a détecté que de l’eau chaude a été ajoutée dans le réservoir d’eau. Retirez le
réservoir et videz l’eau chaude. Remplissez le réservoir à nouveau en ajoutant de l’eau fraîche,
puis replacez celui-ci sur la base du système. Attendez que l’écran d’achage n’indique plus
le message « Hot » «Wtr» avant d’utiliser le système à nouveau.
MESSAGES D’ERREUR:
« Er »
• Si l’écran de l’horloge ache le message « Er », suivi d’un chire (par exemple, «Er 03 »),
communiquez avec le service à la clientèle au : 1-877-646-5288.
Page 26

49
ninjakitchen.com
ESPAÑOL
GARANTIE LIMITÉE
D’UN (1)AN
GRACIAS
por comprar el sistema Ninja Hot & Cold Brewed System™.
LEA ESTAS INSTRUCCIONES
DETENIDAMENTE Y CONSÉRVELAS
PARA REFERENCIA FUTURA.
Estas instrucciones están diseñadas
para ayudarlo a entender por completo
el funcionamiento de su nuevo sistema
Ninja Hot & Cold Brewed System™.
Si tiene alguna pregunta, llame a
nuestra línea de Servicio al Cliente
al 1-877-646-5288.
ESTE MANUAL ABARCA EL NÚMERO
DE MODELO:
CP307
ESPECIFICACIONES TÉCNICAS
Voltaje: 120V~, 60Hz
Energía: 1500 vatios
Capacidad del depósito
de agua: 1,47 litros (50 onzas)
CONSEJO: Encontrará el número
de modelo y de serie en la etiqueta
del código QR, ubicada en la parte
posterior de la unidad, al lado del cable
de alimentación.
GUARDE ESTA INFORMACIÓN
Número de modelo: �������������
Número de serie: ����������������
Fecha de compra: ���������������
(conserve el recibo)
Tienda de compra:
�������������������������������
REGISTRE SU COMPRA
registeryourninja.com
1-877-646-5288
Escanee el código QR
con un dispositivo móvil
48
1- 877- 6 46 -5 28 8
La garantie limitée d’un(1)an s’applique aux achats eectués auprès de détaillants autorisés
de SharkNinja Operating LLC. La garantie s’applique uniquement au premier propriétaire et
au produit original et n’est pas transférable.
SharkNinja garantit ce produit contre toute défectuosité de matériau ou de main-d’œuvre
pour une période d’un(1)an à compter de la date d’achat, dans le cadre d’un usage
domestique normal et si le produit est entretenu conformément aux exigences décrites dans
le guide de l’utilisateur, sujet aux conditions, aux exclusions et aux exceptions ci-dessous.
Qu’est-ce qui est couvert par cette garantie?
1. L’appareil d’origine ou les composants inusables considérés comme défectueux, à la
seule discrétion de SharkNinja, seront réparés ou remplacés jusqu’à un(1)an à compter
de la date d’achat initiale.
2. Dans le cas d’un remplacement de l’appareil, la garantie prendra fin six(6)mois après la
date de réception de l’appareil de remplacement ou pendant le reste de la période de
garantie existante, selon la période la plus longue. SharkNinja se réserve le droit de le
remplacer par un appareil de valeur égale ou supérieure.
Qu’est-ce qui n’est pas couvert par cette garantie?
1. L’usure normale des pièces d’usure (y compris le porte-filtre, le filtre permanent, le fouet
à mousser, la carafe et le couvercle laissant passer l’infusion, le réservoir d’eau et le
couvercle à bascule et la cuillère Ninja Smart Scoop
MC
) qui nécessitent un entretien ou un
remplacement périodique afin d’assurer le bon fonctionnement de votre appareil n’est
pas couverte par la présente garantie. Vous pouvez faire l’achat de pièces de rechange
en visitant le www.ninjakitchen.com.
2. La garantie ne s’applique pas aux appareils utilisés de façon abusive ou à des fins
commerciales.
3. Les dommages causés par une mauvaise utilisation, un abus, une négligence lors de
la manipulation, un manquement à l’entretien nécessaire ou un dommage dû à une
mauvaise manipulation pendant le transport.
4. Les dommages indirects et accessoires.
5. Les défectuosités causées par des réparateurs non autorisés par SharkNinja. Ces
défectuosités incluent les dommages causés lors du processus d’expédition, de
modification ou de réparation du produit SharkNinja (ou de l’une de ses pièces) lorsque
la réparation est eectuée par un réparateur non autorisé par SharkNinja.
6. Les produits achetés, utilisés ou mis en fonction à l’extérieur de l’Amérique du Nord.
Comment obtenir du service
Si votre appareil ne fonctionne pas comme il le devrait lors d’un usage domestique normal
pendant la période de garantie, visitez le ninjakitchen.com pour obtenir de l’information sur
les soins et entretien du produit que vous pouvez eectuer vous-même. Nos spécialistes du
service à la clientèle sont aussi disponibles au 1877646-5288 pour de l’assistance sur les
produits et les options de garantie de service oertes, y compris la possibilité de passer à
nos options de garantie de service VIP pour certaines catégories de produits.
SharkNinja assumera les frais de retour de l’appareil à nos sites par le consommateur en
vue de la réparation ou du remplacement de l’appareil. Un montant de 19,95$ (sujet à
modification) sera facturé lorsque SharkNinja expédiera l’appareil réparé ou remplacé.
Comment présenter une demande de service sous garantie
Veuillez noter que vous devez téléphoner au 1877646-5288 pour soumettre une
réclamation au titre de la garantie. Vous aurez besoin du reçu comme preuve d’achat. Un
spécialiste du service à la clientèle vous fournira les directives d’emballage et de retour.
De quelle manière les lois d’État s’appliquent-elles?
Cette garantie vous accorde des droits spécifiques légaux et vous pouvez aussi bénéficier
d’autres droits qui varient d’une province ou d’un État à l’autre. Certains États américains ou
certaines provinces canadiennes n’acceptent pas l’exclusion ou la limitation de dommages
accessoires ou indirects, ce qui fait que cette disposition peut ne pas s’appliquer à votre cas.
Page 27

51
ninjakitchen.com
ESPAÑOL
ÍNDICE
Certificación SCA . . . . . . . . . . . . . . . . . . . . . . . . . . . . . . . . . 59
Salvaguardas importantes . . . . . . . . . . . . . . . . . . . . . . . . . . . . 52
Piezas . . . . . . . . . . . . . . . . . . . . . . . . . . . . . . . . . . . . . . . . 54
Cómo utilizar el Panel de control . . . . . . . . . . . . . . . . . . . . . . . . 56
Botones de función . . . . . . . . . . . . . . . . . . . . . . . . . . . . . . . . .56
Botones de funcionamiento . . . . . . . . . . . . . . . . . . . . . . . . . . . .56
Antes del primer uso . . . . . . . . . . . . . . . . . . . . . . . . . . . . . . . 57
Configuración del reloj . . . . . . . . . . . . . . . . . . . . . . . . . . . . . . 57
Preparación de su sistema Ninja Hot & Cold Brewed System . . . . . . . . 58
Calibrado a gran altitud . . . . . . . . . . . . . . . . . . . . . . . . . . . . . 59
Preparar y usar el sistema Ninja Hot & Cold Brewed System . . . . . . . . 60
¿Cuánto pondrá en su taza? . . . . . . . . . . . . . . . . . . . . . . . . . . . .60
Gráfico de medida del café . . . . . . . . . . . . . . . . . . . . . . . . . . . . .60
Gráfico de medida del té . . . . . . . . . . . . . . . . . . . . . . . . . . . . . . 60
Llenado de la gaveta del portafiltro con café. . . . . . . . . . . . . . . . . . . 61
Llenado de la gaveta del portafiltro de té . . . . . . . . . . . . . . . . . . . . 61
Detención del goteo automática . . . . . . . . . . . . . . . . . . . . . . . . . . 62
Preparación . . . . . . . . . . . . . . . . . . . . . . . . . . . . . . . . . . . . . . 63
Preparaciones personalizadas: . . . . . . . . . . . . . . . . . . . . . . . . . . .63
Classic (clásica) y Rich (intensa) . . . . . . . . . . . . . . . . . . . . . . . . 63
Over Ice (sobre hielo) y Cold (fría) . . . . . . . . . . . . . . . . . . . . . . .64
Preparación de café de autor: . . . . . . . . . . . . . . . . . . . . . . . . . . .65
Specialty (especial) . . . . . . . . . . . . . . . . . . . . . . . . . . . . . . . 65
Ajuste de la hora de Delay Brew (preparación programada) . . . . . . . . . . .66
Leche con espuma . . . . . . . . . . . . . . . . . . . . . . . . . . . . . . . . . . 67
Cuidado y mantenimiento . . . . . . . . . . . . . . . . . . . . . . . . . . . . 68
Limpieza después de preparar el café. . . . . . . . . . . . . . . . . . . . . . .68
Limpieza del depósito de agua . . . . . . . . . . . . . . . . . . . . . . . . . .68
Limpieza de la jarra . . . . . . . . . . . . . . . . . . . . . . . . . . . . . . . . .68
Limpieza y descalcificación de su sistema
de preparación de café . . . . . . . . . . . . . . . . . . . . . . . . . . . . . . .68
Guía de solución de problemas . . . . . . . . . . . . . . . . . . . . . . . . . 70
Registro del producto / Pedido de piezas de repuesto . . . . . . . . . . . 72
Garantía. . . . . . . . . . . . . . . . . . . . . . . . . . . . . . . . . . . . . . . 73
SCA CERTIFICACIÓN
50
1- 877- 6 46 -5 28 8
CAFETERA DOMÉSTICA CERTIFICADA POR LA SCA
La Specialty Coee Association (SCA) reconoce las cafeteras de
uso doméstico que cumplen con sus rigurosos requisitos técnicos
de larga trayectoria. Estos requisitos se basan en décadas de
conocimiento e investigación de la industria por parte del Coee
Brewing Center (Centro de preparación del café). Todas las cafeteras
domésticas certificadas por la SCA cumplen con estos requisitos,
que por lo general se basan en la temperatura adecuada del agua ,
el tiempo de preparación y la capacidad de realizar la preparación
según las recomendaciones del estándar Golden Cup de la SCA
Si una cafetera pasa todas las pruebas del procedimiento
de certificación, tal como lo realiza la SCA , esa cafetera
cumplirá los requisitos para que se la reconozca como una
cafetera doméstica ejemplar y para ser añadida a la breve
lista de cafeteras domésticas cer tificadas por la SCA.
La SCA certifica que esta cafetera cumple con el estándar
Golden Cup, que se diseñó para una extracción e intensidad
óptimas. La prueba de la certificación de la SCA se llevó a cabo
mediante una preparación Classic (clásica) de media jarra y de
jarra llena. Se utilizaron las siguientes medidas de café molido
en la prueba: 55 gramos para media jarra y 77 gramos para
una jarra llena. Si se utiliza la Ninja Smart Scoop™, esto serían
cuatro medidas grandes colmadas para media jarra de café y
seis medidas grandes colmadas para una jarra llena de café.
Page 28

52 53
1- 877- 6 46 -5 28 8
ninjakitchen.com
ESPAÑOL
SALVAGUARDAS IMPORTANTES
LEA TODAS LAS INSTRUCCIONES ANTES DE USAR • PARA USO DOMÉSTICO ÚNICAMENTE
Lea todas las instrucciones antes de utilizar su NINJA HOT & COLD
BREWED SYSTEM™
Al utilizar aparatos eléctricos, siempre se deben seguir las precauciones de
seguridad básicas, entre las que se incluyen las siguientes:
ADVERTENCIA
Para reducir el riesgo de incendios,
descargas eléctricas, lesiones graves,
muerte o daños al utilizar este aparato, siga
estas precauciones de seguridad básicas.
Precauciones generales
1 Este aparato lo pueden utilizar niños
de ocho años de edad en adelante
y personas con capacidades físicas,
sensoriales o mentales disminuidas,
o que carezcan de la experiencia
y el conocimiento si han recibido
la supervisión o las instrucciones
relacionadas con el uso del aparato
de forma segura y si comprenden los
peligros que implica el uso de este
aparato.
2 Para reducir el riesgo de descarga
eléctrica, este aparato cuenta con
un enchufe polarizado (un terminal
es más ancho que el otro). Como
característica de seguridad, este
enchufe se conecta en un tomacorriente
polarizado solo de una forma. Si el
enchufe no entra por completo en el
tomacorriente, invierta el enchufe. Si
aun así no encaja, comuníquese con un
electricista calificado. NO lo fuerce en
el tomacorriente ni trate de modificarlo
para que encaje.
3 Mantenga este aparato y su cable
fuera del alcance de niños menores de
ocho años.
4 Para evitar casos de ahogo en niños
pequeños, retire y descarte la tapa
protectora que se incluye en el enchufe
de este aparato.
5 Los niños no deben jugar con el aparato.
6 Para protegerse contra incendios,
descargas eléctricas y lesiones
personales, NO sumerja cables,
enchufes ni el cuerpo de la máquina en
agua ni en ningún otro líquido.
7 NUNCA transporte el aparato
tomándolo desde el cable de
alimentación ni le dé un tirón
para desconectarlo del tomacorriente;
en lugar de ello, tome el enchufe y tire
de él para desconectarlo.
8 NO opere ningún aparato cuyo cable
o enchufe estén dañados ni después
de que el aparato haya tenido fallas, se
haya caído o dañado de alguna manera.
Comuníquese con SharkNinja Operating
LLC para realizar la reparación.
9 Solo para uso doméstico y en
encimeras. NO permita que el cable
de alimentación quede colgando
del borde ni que toque superficies
calientes, como la estufa.
10 NUNCA use un enchufe debajo de
la encimera.
11 Para evitar el riesgo de incendio,
descargas eléctricas o daños a la
unidad, NO guarde ni use la unidad en
un cobertizo para aparatos ni debajo de
un gabinete de pared.
12 Cuando no se encuentre en uso y
antes de limpiarla, desenchúfela del
tomacorriente.
13 Apague y deje que se enfríe antes de
ponerle o quitarle piezas, y antes de
limpiar el aparato.
Aviso de funcionamiento
14 El uso de accesorios no recomendados
por el fabricante puede causar
derrames y peligro de quemaduras o
producir incendios, descargas eléctricas
o lesiones personales.
15 SIEMPRE utilice el aparato sobre una
superficie limpia, seca y nivelada.
16 NO coloque el aparato encima ni
cerca de un quemador caliente a gas o
eléctrico o en un horno caliente.
17 NO utilice este aparato para nada que
no sea el uso previsto.
18 NO lo use al aire libre.
19 NO toque superficies calientes. Use los
mangos o las agarraderas.
20 Para evitar el contacto con el vapor y las
superficies calientes, NO pase la mano
por la parte superior de la cafetera para
hacer espuma.
21 SIEMPRE coloque un recipiente debajo
de la gaveta del portafiltro para recibir
el café o té preparado.
22 Pueden ocurrir escaldaduras si se abre
la gaveta del portafiltro durante un ciclo
de preparación o de limpieza.
23 NO retire el recipiente mientras el
aparato esté en funcionamiento sin
que la función Drip Stop (detención
del goteo) esté en posición cerrada.
Vuelva a colocar el recipiente
rápidamente y abra la función Drip
Stop (detención del goteo) para
continuar con la preparación.
24 NO llene el depósito para agua con otro
líquido que no sea agua , ya que otros
líquidos pueden dañar la cafetera.
25 NO llene en exceso del depósito para
agua. Llene con agua solo hasta la línea
Max Fill (llenado máximo).
26 NO haga funcionar el aparato sin
colocar agua.
27 Es posible que se produzcan derrames
si se supera la capacidad máxima de
la gaveta del portafiltro. NO use café
molido fino o para café expreso.
Jarra térmica
28 La jarra está diseñada para utilizarse
con este aparato exclusivamente. NO
coloque la jarra encima ni cerca de un
quemador caliente a gas o eléctrico o
en un horno caliente.
29 NO coloque la jarra en el lavavajillas.
30 NO use una jarra agrietada o rayada ni
una jarra que tenga el mango suelto o
dañado.
31 NO limpie la jarra con limpiadores
abrasivos, almohadillas de acero u otros
materiales abrasivos.
32 NO coloque la jarra en el microondas.
33 NO beba directamente de la jarra .
El líquido de la jarra puede estar
muy caliente .
34 NO utilice la jarra para almacenar
alimentos cuando no esté en uso.
35 Asegúrese de que la jarra esté
completamente vacía antes de
comenzar un ciclo de limpieza o
preparación de café. Comenzar un
ciclo con agua, café o té en la jarra
hará que el líquido se derrame.
Cuidado y mantenimiento
36 Deje enfriar el aparato antes de quitarle
cualquier pieza y limpiarlo.
37 Para prevenir las enfermedades
provenientes del crecimiento
bacteriano en el aparato, siga todas
las instrucciones de limpieza en la
sección Cuidado y mantenimiento de
este Manual del propietario.
38 Limpie el sistema en forma semanal.
39 Si el producto no funciona
correctamente, visite ninjakitchen.com o
comuníquese con SharkNinja Operating
LLC para realizar una revisión, reparar o
ajustar la unidad.
40 Los niños no deben llevar a cabo
la limpieza y el mantenimiento
realizados por el usuario a menos que
sean mayores de ocho años y estén
bajo supervisión.
Declaración sobre el cable
41 Se proporciona un cable de
alimentación eléctrica corto para
reducir el riesgo resultante de
enredarse en un cable largo o
tropezarse con este.
42 NO use cables de extensión con este
producto.
Tenga cuidado de evitar el contacto
con una superficie caliente.
Page 29

54 55
1- 877- 6 46 -5 28 8
ninjakitchen.com
ESPAÑOL
A
B
D
E
F
G
HJ
IK
M
P
L
CAFÉ TÉ
C
N
O
PIEZAS
A Cafetera
(no se muestra el cable de alimentación
ni el almacenamiento)
B Tapa abatible del depósito de agua
C Depósito de agua extraíble
D Cabezal del rociador
E Panel de control
F Plataforma para una única taza
G Gaveta del portafiltro oscilante
H Portafiltro de té extraíble
I Filtro permanente de té
J Portafiltro de café extraíble
K Filtro permanente de café
L Espumador integrado
M Batidora del espumador
N Tapa del filtro de la jarra
O Jarra de acero inoxidable
P Ninja Smart Scoop™
Page 30

CÓMO UTILIZAR EL PANEL DE CONTROL
1 Reloj digital programable
2 Botones hora y minutos
3 Botón Drip Stop
(de detención del goteo)
4 Botón Delay Brew
(de preparación
de café programada)
5 Indicador de modo té
6 Indicador de modo café
7 Indicador de porciones múltiples
a Taza (Cup)
b Taza grande (XL Cup)
c Taza para viaje (Travel Mug)
d Taza grande de varias
porciones (XL Multi-Serve)
e Media jarra (Half)
f Jarra llena (Full)
8 Barra de progreso
9 Tipos habituales de preparación
Classic Brew
(preparación clásica)
Rich Brew
(preparación intensa)
Over Ice Brew
(preparación sobre hielo)
Cold Brew (preparación fría)
10 Ninja
®
Preparación de autor
Specialty Brew
(preparación especial)
11 Tipos de té
Herbal (Herbal)
Black (Negro)
Oolong (Oolong)
White (Blanco)
Green (Verde)
12 Botón Tea (té)
13 Selector de Start/Select
(inicio/selección)
14 Indicador/botón
Intelligent Clean Cycle
(ciclo de limpieza inteligente)
15 Botón Power (encendido)
1
3
6
9
10
7a
7b
7c
7
14
4
5
7d
7f
7e
8
12
13
15
2
11
56
1- 877- 6 46 -5 28 8
ANTES DEL PRIMER USO
NO TA: Si desenchufa la cafetera o en caso de un corte de energía prolongado,
deberá volver a ajustar el reloj la próxima vez que se enchufe la cafetera.
NO TA: Si el reloj deja de titilar y no muestra la hora correcta del día, presionar
el botón H (hora) o M (minuto) en cualquier momento hará que el reloj vuelva
a titilar. Ahora puede volver a programar la hora correcta siguiendo los pasos
previos.
CONFIGURACIÓN DEL RELOJ
1 Enchufe el cable de alimentación a un tomacorriente. El reloj titilará en el panel de
control para indicar que no se ajustó el tiempo (Fig. 1).
2 Presione el botón H (hora) o M (minuto) hasta llegar a la hora actual.
El indicador de AM o PM se iluminará a la izquierda de la pantalla mientras ajuste la
hora.
3 Después de 5 segundos, el reloj dejará de destellar y se ajustará.
1 Retire todos los materiales y adhesivos de embalaje del aparato.
2 Lave el depósito para agua, la jarra térmica y los portafiltros extraíbles, y los filtros
permanentes de café o té con agua tibia con jabón, con un paño suave.
3 Enjuague las piezas y seque minuciosamente.
4 Antes del primer uso, prepare el sistema haciendo funcionar dos ciclos de Full C arafe
(jarra llena) y de Classic Brew (preparación clásica) solo con agua. Luego de terminar
cada ciclo, deseche el agua.
Fig. 1
TENGA EN CUENTA ESTA S IMPORTANTES INDICACIONES AL UTILIZAR EL APARATO:
IMPORTANTE: NO haga funcionar el aparato sin colocar agua.
57ninjakitchen.com
ESPAÑOL
Page 31

58 59
1- 877- 6 46 -5 28 8
ninjakitchen.com
ESPAÑOL
PREPARACIÓN DE SU SISTEMA
NINJA HOT & COLD BREWED SYSTEM
™
1 Para llenar el depósito de agua, use
las empuñaduras para girarlo hacia la
derecha y hacia arriba para retirarlo
del aparato. (Fig. 2). Abra la tapa del
depósito o quite la tapa por completo,
luego agregue agua fresca, de filtrada,
pero no exceda la línea de llenado
Máx (Fig. 3). Devuelva el depósito de
agua a la cafetera (Fig. 4). NO llene el
depósito para agua con otro líquido
que no sea agua, ya que otros líquidos
pueden dañar la cafetera.
2 Asegúrese de que uno de los portafiltros
extraíbles esté colocado dentro de la
gaveta del por tafiltro (Fig. 5). Una vez
que esté en su lugar, deslice la gaveta del
portafiltro completamente hacia adentro
hasta que escuche un suave clic (Fig. 6).
IMPORTANTE:
Recomendamos usar agua dulce
filtrada y fría. Se recomienda
no utilizar agua de pozo.
Fig. 4
Fig. 6
Fig. 5
Fig. 3
Fig. 2
3
Gire la tapa del filtro de la jarra hacia la
derecha en la jarra para que quede fija en
su lugar (Fig . 7) y centre la jarra debajo
de la gaveta del portafiltro (Fig. 8).
NO TA: No coloque café o té
molido en la gaveta del portafiltro
para los primeros dos ciclos.
4
Una vez que todas las partes estén
seguras en su lugar y la unidad esté
encendida, elija el tamaño de jarra llena y
la configuración de preparación clásica,
luego presione el selector START/
SELECT (inicio/selección) (Fig. 9).
5
Cuando haya finalizado el ciclo, deseche
el agua de la jarra. Repita los pasos a
partir del paso 1. Ya está listo para usar
su sistema Ninja Hot & Cold Brewed
System para preparar café o té.
Fig. 8
Fig. 7
CALIBRADO A GRAN ALTITUD
(OPCIONAL, PERO RECOMENDADO
PARA LOS USUARIOS EN ÁREAS DE
GRAN ALTITUD)
Debido a que el agua hierve a una
temperatura más baja a gran altitud,
ejecutar un calibrado antes de la primera
preparación de bebidas permite que la
unidad detecte el punto de ebullición
del agua en su ubicación. Ejecutar un
ciclo de calibrado le ayudará a conseguir
una preparación en condiciones
constantes cada vez.
1 Llene el depósito para agua hasta la
línea Max Fill (de llenado máximo),
sin superarla.
2 Coloque un portafiltro vacío en la
gaveta del portafiltro, y un recipiente
vacío en la máquina.
3 Presione y sostenga tanto el botón
Drip Stop (detención del goteo)
y el botón Tea (té) hasta que la
pantalla del reloj comience una cuenta
regresiva de dos minutos.
4 Comenzará un ciclo de calibrado. Cuando
esté completo, la unidad hará un pitido y
aparecerá el término End (fin) en el reloj.
Deseche el agua en el recipiente.
NOTA: Presione el botón Drip Stop
(detención del goteo)
y el botón Tea
(té)
,
o el botón Power (encendido)
cancelará el ciclo de calibra do.
Fig. 9
Page 32

61
ninjakitchen.com
ESPAÑOL
GRÁFICO DE MEDIDA DE CAFÉ GRÁFICO DE MEDIDA DE TÉ
PREPARACIÓN Y USO DEL
NINJA HOT & COLD BREWED SYSTEM
™
Tamaño Classic (Clásico)
Rich
(Intenso)
Over Ice & Cold Brew
(Preparación sobre hielo y fría)
café/té solamente llenado con hielo
Taza 281 ml (9,5 onzas) 257 ml (8,7 onzas) 142 ml (4,8 onzas) 281 ml (9,5 onzas)
Taza grande 340 ml (11,5 onzas) 305 ml (10,3 onzas) 172 ml (5,8 onzas) 340 ml (11,5 onzas)
Taza de viaje 414 ml (14 onzas) 390 ml (13,2 onzas) 207 ml (7,0 onzas) 414 ml (14 onzas)
Taza grande
de porciones
múltiples
533 ml (18 onzas) 473 ml (16 onzas) 266 ml (9,0 onzas) 533 ml (18 onzas)
No necesita ajustar el tamaño para Specialty Brew (preparación especial); siempre es para una taza
de 118ml (4oz) de café o de 177ml (6oz) de té.
Tamaño de la
porción
Ninja
Smart Scoop™
Cucharadas
Taza /taza grande
2 a 3 cucharadas
pequeñas
2 a 3
cucharadas
Taza de viaje/
taza grande de
porciones múltiple
3 a 5 cucharadas
pequeñas
3 a 5
cucharadas
Media jarra
3 a 4 cucharadas
grandes
6 a 8
cucharadas
Jarra llena
4 a 6 cucharadas
grandes
8 a 12
cucharadas
Especial
(preparación de 118
ml [4 onzas])
2 cucharadas
grandes
4 cuchara-
das
Tamaño de la
porción
Ninja
Smart Scoop
™
Té de hojas sueltas
Saquitos
de té
Taza/taza grande 1 cucharada pequeña
1 saquito
de té
Taza de viaje/
taza grande
de porciones
múltiples
1 o 2 cucharadas
pequeñas
2 saquitos
de té
Media jarra
2 a 3 cucharadas
pequeñas
4 saquitos
de té
Jarra llena
3 a 4 cucharadas
pequeñas
6 saquitos
de té
Especial
(preparación de
177 ml [6 onzas])
1 cucharada grande
3 saquitos
de té
¿CUÁNTO PONDRÁ EN SU TAZA?
Chaque format et chaque type d’infusion produisent une quantité diérente de café et de
thé pour optimiser l’intensité et la saveur.
NO TA: Para la Preparación Fría
de café, agregue una cucharada extra.
NO TA: Exceder el tamaño medio del
molido recomendado con granos
enteros puede provocar que se
derrame la gaveta del portafiltro.
NO TA: El café molido y el té absorberán parte del agua que se utilice, lo que resultará
en una cantidad de café o té preparado un poco menor a la cantidad de agua utilizada.
PREPARACIÓN Y USO DEL SISTEMA
NINJA HOT & COLD BREWED SYSTEM
™
LLENADO DE LA GAVETA DEL
PORTAFILTRO DE CAFÉ
Para obtener resultados óptimos, use
las medidas de café recomendadas en
la tabla para determinar cuánto café
molido se debe usar para cada tamaño
de preparación. La cantidad de café
molido correspondiente a cada tamaño
seguirá siendo la misma para cualquier
tipo de preparación que seleccione. Por
ejemplo, si selecciona taza y preparación
clásica Classic (Clásico), usará la misma
cantidad de café molido que si selecciona
taza y café sobre hielo Over Ice Brew
(Preparación sobre hielo). La única
excepción es la preparación fría, que
requiere una cucharada extra de café,
independientemente del tamaño.
1 Para abrir la gaveta del portafiltro,
deslícela hacia afuera del aparato
(Fig. 10). Asegúrese de tener el
portafiltro de CAFÉ en la máquina, lo
que puede comprobar por la manija
naranja con el ícono del grano de café.
2 Coloque el filtro permanente o un filtro
cónico de papel n.° 4 en el portafiltro
de CAFÉ. Si usa un filtro de papel,
primero asegúrese de haber sacado
el filtro permanente del portafiltro.
Luego, coloque el filtro de papel sobre
la superficie, ábralo bien, presiónelo con
firmeza en el portafiltro y asegúrese de
que esté calzado firmemente (Fig. 11).
3 Use la Ninja Smart Scoop™ y siga las
medidas en el gráfico para llenar la
gaveta del portafiltro (Fig. 12). Estas
medidas se basan en medidas rasas
(ajústelas según sus preferencias de
gusto). Sugerimos utilizar un tamaño
de molido mediano si se muelen
granos enteros.
4 Deslice la gaveta del portafiltro hacia
adentro de la cafetera hasta que se fije
en su lugar y haga clic.
LLENADO DE LA GAVETA DEL
PORTAFILTRO DE TÉ
Para obtener un mejor resultado, use el
gráfico de medidas de té para determinar
cuántos saquitos de té o cuántas hojas
sueltas de té se deben usar para cada
tamaño de preparación. La cantidad de té
correspondiente a cada tamaño seguirá
siendo la misma para cualquier tipo de
preparación que seleccione.
1 Para abrir la gaveta del portafiltro,
deslícela hacia afuera del aparato (Fig.
10). Asegúrese de tener el portafiltro
de TÉ en la máquina, lo que puede
comprobar por la manija verde con el
ícono de la hoja de té.
2 Coloque el filtro de té permanente en
el portafiltro de TÉ (Fig. 11). Cuando
utilice saquitos de té, puede quitar el
filtro permanente de té si se necesita
más espacio en la gaveta del portafiltro.
3 Use la Ninja Smart Scoop™ y siga las
medidas recomendadas en el gráfico
para llenar la gaveta del portafiltro, de
acuerdo con su sabor preferido (Fig. 12).
4 Deslice la gaveta del portafiltro hacia
adentro de la cafetera hasta que se fije
en su lugar y haga clic.
Fig. 10
60
1- 877- 6 46 -5 28 8
VOLÚMENES APROXIMADOS DE LA PREPARACIÓN
Page 33

62
1- 877- 6 46 -5 28 8
CONFIGURACIÓN DEL TIEMPO DE
DETENCIÓN DEL GOTEO
Después de que esté completa una
preparación, se cerrará automáticamente la
detención del goteo. Algunos tipos de café,
como, por ejemplo, el finamente molido o
descafeinado, pueden llevar más tiempo
para drenar por completo de la gaveta del
portafiltro. Para extender el plazo de tiempo
en que botón Drip Stop (detención del
goteo) permanece abierto después de una
preparación, siga las siguientes instrucciones:
1 Presione y mantenga apretado el botón
Drip Stop (detención del goteo)
(Fig. 13a) hasta que en la pantalla del
reloj titile dFLt (default, predeterminado)
o el tiempo previamente especificado.
2 Presione el botón H (hora) o M (minuto)
hasta que se muestre la prórroga de tiempo
que desea: dFLt (default) [predeterminada],
:15 (+15 segundos), :30 (+30 segundos), :
45 (+45 segundos), :60 (+60 segundos),
u OFF (apagado) (Fig. 13b).
3 Presione el botón Drip Stop (detención
del goteo) para configurar el nuevo
plazo de tiempo. O espere 5 segundos, y
la unidad emitirá un pitido, lo que significa
que se ha configurado el plazo nuevo.
DETENCIÓN DEL GOTEO AUTOMÁTICA
El sistema está equipado con una detención
del goteo automática. Cuando el botón Drip
Stop (detención del goteo)
se ilumina,
la detección del goteo está cerrada y no
saldrá café ni té de la gaveta del portafiltro.
Mientras prepara una jarra llena o
media jarra, presione el botón Drip Stop
(detención del goteo)
para pausar el
ciclo de preparación y sírvase una taza.
Vuelva a colocar rápidamente la jarra y
presione el botón Drip Stop (detención del
goteo) nuevamente para completar la
preparación (Fig. 13a).
NOTA: Cuando se elige OFF (apagado),
la detención del goteo continúa abierta
después de que se termine la preparación.
Usted puede cerrar la detención del goteo
en cualquier momento presionando el
botón Drip Stop (detención del goteo)
nuevamente. dFLt (default) es la
configuración de tiempo predeterminada
de la máquina.
NOTA: Si se olvida de presionar el botón
Drip Stop (detención del goteo)
para reanudar la preparación, la unidad
pausará la preparación y, después de 30
segundos, usted escuchará una señal
de recordatorio. Luego de 5 minutos, la
preparación se cancelará.
o o
CAFÉ TÉ
Fig. 13a
Fig. 13b
Fig. 12
Fig. 11
PREPARACIÓN
PREPARACIONES PERSONALIZADAS:
CLASSIC BREW (PREPARACIÓN CLÁSICA)
Y RICH BREW (PREPARACIÓN INTENSA)
1 Después de llenar el depósito de agua,
coloque el portafiltro de CAFÉ o de TÉ
en la gaveta del portafiltro. Agregue el
café molido, las hojas de té o los saquitos
de té al filtro.
2 Cierre la gaveta del portafiltro,
asegurándose de que esté firme en su
lugar. El panel de control mostrará la
configuración COFFEE (café) (Fig. 14a)
o TEA (té) (Fig. 14b) de acuerdo con el
portafiltro que se haya insertado.
3 Use el indicador de porciones múltiples
para seleccionar el tamaño que desea
preparar. Coloque el recipiente vacío en el
que desea servir la preparación debajo de la
gaveta del portafiltro.
4
Gire el selector START/SELECT
(inicio/elección) para elegir la preparación
Classic (clásica) o Rich (intensa) (Fig. 15a,
Fig. 15b). Si prepara té, presione el botón
Tea (té) para cambiar al menú del té, y
use el selector para elegir el tipo de su té.
Para cambiar el estilo de su preparación
mientras se encuentra en el menú de té,
presione el botón Tea (té) nuevamente.
5
Presione el selector START/SELECT (inicio/
selección) para iniciar la preparación.
Una barra de progreso en el panel de
control mostrará el estado del ciclo de la
preparación. Para cancelar la preparación
en cualquier momento, presione el selector
nuevamente u presione el botón Power
(encendido).
6
Se escuchará un pitido y el reloj mostrará
el End (fin) cuando la preparación haya
terminado.
NOTA: Algunas preparaciones tienen
un ciclo de preinfusión de diferente
duración. El ciclo de preparación
comenzará, luego habrá una pausa por
un período corto antes de reanudarse.
Este proceso se utiliza para saturar en
forma pareja el café molido o el té.
NOTA: Si hace una solo taza, baje la
Plataforma de una única taza y coloque
su recipiente en el centro de ella.
Asegúrese de utilizar al menos una taza
de 355 ml (12 onzas) para el tamaño de
taza, una taza de 414 ml (14 onzas) para
el tamaño de taza grande, una taza de
viaje de 473 ml (16 onzas) para el tamaño
de taza para viaje y una taza de viaje de
591 ml (20 onzas) para el tamaño de taza
grande de porciones múltiples.
NOTA: Para una prepararación Rich
(intensa) se utiliza menos agua y se
produce un poco menos de café o té que
para una preparación Classic (clásica)
.
NOTA: Si se cierra la gaveta del portafiltro
sin un portafiltro, titilarán tanto las
palabras COFFEE (café) y TEA (té).
Fig. 15bFig. 15aFig. 14b
Fig. 14a
PREPARACIÓN DE SU SISTEMA
NINJA HOT & COLD BREWED SYSTEM™ – CONT.
63ninjakitchen.com
ESPAÑOL
Page 34

64 65
1- 877- 6 46 -5 28 8
ninjakitchen.com
ESPAÑOL
4
Faites tourner le bouton START/SELECT
(démarrer/sélectionner) pour choisir Over
Ice Brew (infusion sur glace) ou Cold Brew
(infusion à froid)(fig. 16a et 16b). Si vous
souhaitez infuser du thé, appuyez sur le
bouton Tea (thé) pour passer au menu
de thé, et utilisez le bouton pour choisir
votre type de thé. Pour changer votre style
d’infusion dans le menu de thé, appuyez sur
le bouton Tea (thé) .
5
Presione el selector START/SELECT (inicio/
selección) para iniciar la preparación. Una
barra de progreso en el panel de control
mostrará el estado del ciclo de la preparación.
Para cancelar la preparación en cualquier
momento, presione el selector nuevamente u
presione el botón Power (encendido).
6
Se escuchará un pitido y el reloj mostrará
el End (fin) cuando la preparación haya
terminado.
OVER ICE BREW & COLD BREW
(PREPARACIÓN SOB RE HIELO Y FRÍA)
NOTA: Se pueden usar utensilios de
vidrio con la configuración Cold Brew
(preparación fría), pero no con la
configuración Over Ice Brew
(preparación sobre hielo).
1
Después de llenar el depósito de agua,
coloque el portafiltro de COFFEE (café) o
de TEA (TÉ) en la gaveta del portafiltro.
Agregue el café molido, las hojas de té o
los saquitos de té al filtro.
2
Cierre la gaveta del portafiltro,
asegurándose de que esté firme en su
lugar. El panel de control mostrará la
configuración COFFEE (café) (Fig. 14a)
o TEA (té) (Fig. 14b) de acuerdo con el
portafiltro que se haya insertado.
3
Llene su recipiente deseado hasta arriba
con cubos de hielo y coloque el recipiente
debajo de la gaveta del portafiltro. Use
el indicador de porciones múltiples para
seleccionar el tamaño que desea preparar.
NOTA: Para obtener una COLD BREW
(preparación fría) SOLAMENTE, agregue
una cucharada más de café molido en la
gaveta del portafiltro.
NO TA: NO agregue hielo al depósito
para agua.
NOTA: Una preparación fría lleva alrededor
de 15 minutos para una jarra llena.
Fig. 16a Fig. 16b
NOTA: El ciclo de preparación
comenzará, luego habrá una pausa por
un período corto antes de reanudarse.
Este proceso se utiliza para saturar en
forma pareja el café molido o el té.
PREPARACIÓN DE CAFÉ DE AUTOR:
SPECIALTY BREW
(PREPARACIÓN ESPECIAL)
1
Después de llenar el depósito de agua,
coloque el portafiltro de COFFEE (café) o
de TEA (TÉ) en la gaveta del portafiltro.
Agregue el café molido, las hojas de té o
los saquitos de té al filtro.
2
Cierre la gaveta del portafiltro,
asegurándose de que esté fija en su
lugar. El panel de control mostrará la
configuración COFFEE (café) (Fig. 14a)
o TEA (té) (Fig. 14b) de acuerdo con el
portafiltro que se haya insertado.
3
Coloque el recipiente vacío en el que
desea preparar el café debajo de la
gaveta del portafiltro.
4
Gire el selector START/SELECT (inicio/
selección) para elegir SPECIALTY
(especial) (Fig. 17) Si prepara té, presione
el botón Tea (té) para cambiar al menú
de té, y use el selector para elegir su
tipo de té. Para cambiar el estilo de su
preparación mientras se encuentra
en el menú de té, presione el botón Tea
(té) nuevamente.
5
Presione el selector START/SELECT
(inicio/selección) para iniciar la
preparación. Una barra de progreso en
el panel de control mostrará el estado
del ciclo de la preparación. Para cancelar
la preparación en cualquier momento,
presione el selector nuevamente u
presione el botón Power (encendido).
6
Se escuchará un pitido y el reloj mostrará
el End (fin) cuando la preparación haya
terminado
est terminée.
AJUSTE DE LA DELAY BREW
NOTA: El ciclo de preparación
comenzará, luego habrá una pausa por
un período corto antes de reanudarse.
Este proceso se utiliza para saturar en
forma pareja el café molido o el té.
NOTA: Si va a preparar una bebida
licuada con hielo, llene el recipiente
deseado con la cantidad de hielo
recomendada en la receta antes de
preparar el café.
Fig. 17
PREPARACIÓN DE SU SISTEMA
NINJA HOT & COLD BREWED SYSTEM™ – CONT.
NOTA: La preparación de Specialty
(especial) siempre es para una taza de
118ml (4oz) de café y 177ml (6oz) de té.
Page 35

66 67
1- 877- 6 46 -5 28 8
ninjakitchen.com
ESPAÑOL
(PREPARACIÓN PROGRAMADA)
1 Encienda la unidad presionando
el botón Power (encendido).
2 Luego de llenar el depósito para agua
y agregar café molido o té al filtro,
asegúrese de que el depósito, la gaveta
del portafiltro y el filtro estén fijos en
su lugar. Coloque un recipiente de
tamaño apropiado debajo de la gaveta
del portafiltro.
3 Presione el botón DELAY BREW
(preparación programada). El
botón DELAY BREW (preparación
programada) se iluminará y el reloj
comenzará a titilar “12:00” o la última
hora de preparación programada que se
haya configurado (Fig. 18).
4 Mientras el reloj esté titilando, presione
el botón H (horas) o M (minutos) para
configurar la hora en la que desea
que comience la preparación de café
programada. El indicador de AM o PM
se iluminará a la izquierda de la pantalla
cuando esté ajustando la hora deseada.
5 Una vez que haya configurado la hora
correcta, seleccione el tamaño del
recipiente que desea preparar.
6 Gire el selector START/SELECT (inicio/
selección) para elegir el estilo de
preparación. Si prepara té, presione el
botón Tea (té)
para cambiar al menú
del té, y use el selector debajo para
elegir el tipo de su té. Para cambiar el
estilo de su preparación mientras se
encuentra en el menú de té, presione el
botón Tea (té)
nuevamente.
7 Una vez que haya configurado la hora,
el tamaño y el estilo de preparación, y
el tipo de té (si corresponde) deje que
el botón DELAY BREW (preparación
programada) deje de titilar o presione
el botón DELAY BREW (preparación
programada) para activar la función.
Cuando esté activado, la unidad hará
un pitido y la opción DELAY BREW
(preparación programada) y sus
opciones elegidas permanecerán
iluminadas. Para cancelar, oprima DELAY
BREW (preparación programada)
nuevamente.
NOTA: Si intenta cambiar sus
elecciones mientras esté configurada
la preparación programada, la unidad
hará un pitido y DELAY BREW
(preparación programada) brillará.
Para cambiar sus selecciones, cancele
la preparación programada.
NOTA: La unidad deberá permanecer
encendida para que la función Delay
Brew (preparación programada)
funcione. NO apague la máquina
luego de programar la función Delay
Brew (preparación programada).
NOTA: El reloj permanecerá encendido
incluso si se apaga la unidad. Asegúrese
de que la unidad esté encendida antes
de programar la función Delay Brew
(preparación programada).
NOTA: La gaveta del portafiltro debe
estar bien cerrada con el filtro de CAFÉ
o TÉ en ella para configurar la función
Delay Brew (preparación programada).
Fig. 18
Fig. 19
Fig. 20
Fig. 21
PREPARACIÓN DE SU SISTEMA
NINJA HOT & COLD BREWED SYSTEM™ – CONT.
LECHE CON ESPUMA
1 Vierta leche en una taza hasta completar
aproximadamente
1
/3 de su capacidad.
(Use más o menos leche, según su
preferencia). Coloque en el microondas
durante 45 a 60 segundos para calentar la
leche.
2 Para mover el espumador a la posición
para comenzar a funcionar, deslice el
brazo hacia el frente.
3 Mantenga la taza debajo del espumador
y sumerja la batidora justo debajo de la
superficie de la leche. Esto permite que
se incorpore aire en la leche, para poder
lograr el máximo de espuma (Fig. 19).
4 Mantenga presionado el botón del
espumador durante 30 a 45 segundos
(Fig. 20).
5 Puede retirar fácilmente la batidora de
espuma girándola en sentido horario.
Para evitar derrames, mantenga la
batidora dentro de la taza y transpórtela
hasta el lavabo o lavavajillas para
limpiarla (Fig. 21).
Page 36

69
ninjakitchen.com
ESPAÑOL
CUIDADO Y MANTENIMIENTO
LIMPIEZA LUEGO
DE PREPARAR EL CAFÉ
1 Después de que la unidad se haya
enfriado, quite el portafilro de la gaveta
del portafiltro. Si usa un filtro de papel
para café, simplemente deséchelo. Si usa
un filtro permanente para café o té, lávelo
bien con jabón y agua caliente o colóquelo
en el estante superior del lavavajillas.
2 Limpie el espumador después de cada
uso. Lávelo bien a mano o colóquelo en
el estante superior del lavavajillas.
3 Lave la jarra y la tapa del filtro de la jarra
con agua tibia y jabón. Use un cepillo para
botellas o un paño para lavar el interior de
la jarra. NO use un cepillo de alambre.
La jarra térmica NO es apta para
lavavajillas.
4 Después de que el aparato se haya
enfriado, lave la unidad principal, el
cabezal y el estante del depósito de agua
con un paño y agua caliente. NO sumerja
la cafetera en agua.
LIMPIEZA DEL DEPÓSITO DE AGUA
Vacíe el depósito de agua y lávelo a mano
o colóquelo en el lavavajillas.
LIMPIEZA DE LA JARRA
Recomendamos limpiar la jarra con agua
tibia y jabón .
Si desea limpiar la jarra en mayor
profundidad, recomendamos utilizar
un cepillo de espuma suave. NO use un
cepillo de alambre.
La jarra térmica NO es apta para lavavajillas.
NO TA: La tapa del filtro de la jarra,
los filtros permanentes de café o té,
los portafiltros extraíbles, la tapa
abatible, el espumador y la cuchara
pueden lavarse en el estante
superior del lavavajillas.
NOTA: Para obtener mejores
resultados, recomendamos lavar el
depósito después de la preparación y
volverlo a llenar con agua fresca para
la preparación nueva.
Fig. 22
CUIDADO Y MANTENIMIENTO
NETTOYAGE ET DÉTARTRAGE DE
VOTRE SYSTÈME D’INFUSION
El botón CLEAN (limpieza) se encenderá
cuando se recomiende un ciclo de
limpieza para su unidad, ya que la
acumulación de calcio puede afectar el
sabor del café o té.
Para limpiar y descalcificar su sistema
Ninja
Hot & Cold Brewed System™:
1 Seleccione el tamaño de la jarra completa
y coloque la jarra vacía debajo de la
gaveta del portafiltro.
2 Utilice una solución descalcificante
específicamente formulada para limpieza
de cafeteras y siga las instrucciones del
embalaje. Llene el depósito para agua
hasta la línea de llenado máximo,
sin superarla (50 onzas).
O
Llene el depósito de agua con vinagre
blanco hasta la línea taza para viaje (473
ml [16 onzas]); después llene el resto del
depósito con agua hasta la línea llenado
máximo, pero sin sobrepasarla.
IMPORTANTE: Use solamente vinagre
blanco.
3 Cuando el depósito de agua esté lleno
con la mezcla de solución de limpieza
y agua, presione el botón CLEAN
(limpieza) (Fig. 22).
4 El reloj mostrará el conteo regresivo
del ciclo de limpieza restante, que
tarda aproximadamente 60 minutos en
completarse. Su unidad suministrará
una pequeña cantidad de solución de
limpieza para distribuirla por todo el
sistema. Luego hará una pausa, dará
una solución de limpieza adicional y
continuará por 60 minutos. Las pausas
extendidas permiten un máximo de
limpieza y descalcificación.
IMPORTANTE: NO quite la jarra en ningún
momento durante el ciclo de limpieza.
5 Al completarse el ciclo, la cafetera emitirá
un pitido, el reloj mostrar la palabra
End (fin) y se apagará la luz indicadora
CLEAN (limpieza).
6 Vacíe y limpie cuidadosamente la jarra y el
depósito de agua con agua tibia jabonosa
para eliminar todo residuo de solución de
limpieza que pudiera alterar el sabor de su
café o té.
7 Llene el depósito con agua fresca
hasta la línea llenado máximo, pero sin
excederse y coloque la jarra vacía debajo
de la gaveta del portafiltro.
8 Enjuague el sistema haciendo funcionar
un ciclo de jarra llena en Classic
Brew (preparación clásica) solo con
agua. Después de completar el ciclo,
deseche el agua de la jarra y límpiea
completamente.
NOTA: El ciclo de limpieza demora,
aproximadamente, 60 minutos.
NOTA: Para cancelar el ciclo de
limpieza, presione una vez el botón
de encendido o el botón de CLEAN
(limpieza). Se escuchará un pitido y la
unidad dejará de filtrar la solución de
limpieza. Continúe con las instrucciones
a partir del Paso 6.
NOTA: Si la luz CLEAN (limpieza)
se enciende de nuevo, todavía
existe acumulación de calcio.
Repita las instrucciones del ciclo
de limpieza desde el comienzo, y la
luz CLEAN (limpieza) se apagará
automáticamente cuando el
aparato esté limpio.
68
1- 877- 6 46 -5 28 8
IMPORTANTE: Si cancela el ciclo
de limpieza, su máquina no se
descalcificará adecuadamente.
Page 37

Hay sedimento en mi café.
• Si usa un filtro permanente y hay sedimentos en el fondo del café preparado, puede
deberse a que está utilizando un café molido muy fino.
• Para reducir la cantidad de sedimento en el café preparado, use un café molido no tan
fino o use un filtro de papel.
NOTA: Nosotros NO recomendamos usar un filtro de papel junto con un filtro
permanente ya que la gaveta del portafiltro se puede tapar y el agua y/o el café en el
portafiltro se puede desbordar.
La preparación OVER ICE (sobre hielo)
y la COLD BREW (preparación fría) no están frías.
• Asegúrese de que su taza, taza para viaje o jarra estén llenas por completo con cubos
de hielo antes de hacer la preparación. Su sistema Ninja Hot & Cold Brewed System™
trabajará a elevadas temperaturas para obtener el mejor sabor, luego el hielo enfriará el
café o té preparado a la temperatura perfecta.
El café o té es demasiado aguado.
• CAFÉ: Para obtener un café más fuerte, pruebe la configuración de preparación RICH
(intensa) pruebe granos de tueste oscuro o use el filtro permanente en la gaveta del
portafiltro, en vez de usar un filtro de papel. Si quiere un sabor aún más intenso, puede
agregar más café molido a la gaveta del portafiltro. Una mayor cantidad de café molido
absorbe líquido, por lo que obtendrá un una taza de café más pequeña y concentrada.
• TÉ: Para obtener un té más fuerte, use la configuración de preparación
RICH (intensa) o agregue más té en la gaveta del portafiltro.
El café o té es demasiado fuerte.
• CAFÉ: Para obtener un café más suave, use la configuración de preparación CLASSIC
(clásica), use granos de tueste ligero o un filtro de papel en la gaveta del portafiltro, en vez
de usar el filtro permanente. Si quiere un sabor aún más suave, puede poner una menor
cantidad de café molido en la gaveta del portafiltro.
• TÉ: Para obtener té más suave, use la configuración de preparación CLASSIC (clásica)
o use menos té en la gaveta del portafiltro.
El ciclo de preparación es demasiado lento.
• De acuerdo con la configuración, el tiempo de preparación variará entre 4 minutos y 18
minutos. La barra de progreso en su panel de control indicará
el estado de la preparación.
La taza o tazón de viaje se desborda.
• Asegúrese de utilizar al menos una taza de 355 ml (12 onzas) para el tamaño de taza, una
taza de 414 ml (14 onzas) para el tamaño de taza grande, un tazón de viaje de 473 ml (16
onzas) para el tamaño de taza para viaje y un tazón de viaje de 591 ml (20 onzas) para el
tamaño de taza grande de porciones múltiples.
La gaveta del portafiltro se desborda.
• Es posible que el fondo del portafiltro esté obstruido. Esto puede pasar cuando se usa
café molido fino o demasiado café molido en la gaveta del portafiltro. Se recomienda
usar café molido medio.
NOTA: Cuando use filtros de papel, no use el filtro permanente.
Queda agua en mi depósito.
• Las marcas en el depósito de agua son líneas de llenado mínimo que indican la cantidad
de agua que se necesita para ese tamaño de preparación. Sin embargo, todos todos
GUÍA DE SOLUCIÓN DE PROBLEMAS
los tipos de preparación usan diferentes cantidades de agua para crear el sabor y la
concentración correctos, haciendo que quede algo de agua.
Mi sistema Ninja Hot & Cold Brewed System gotea.
• Después de retirar el depósito de agua, puede quedar un poco de agua en la válvula del
depósito. Puede quitarla fácilmente con un paño seco.
• Si el goteo proviene de la gaveta del portafiltro, asegúrese de que todas las piezas estén
armadas firmemente y en forma correcta. Si el goteo proviene de la parte inferior de la
cafetera, comuníquese con el servicio al cliente al 1-877-646-5288.
La luz CLEAN (limpieza) está encendida.
• Ejecute un ciclo de limpieza. Si hace poco completó un ciclo de limpieza, quizás deba
ejecutar un segundo ciclo para eliminar los residuos minerales adicionales que ocurren de
forma natural con el paso del tiempo.
No hay una configuración para el tipo de té Rooibos o Pu’erh.
• Use la configuración de Herbal tea (té de hierbas) para Rooibos y la de Black tea (té
negro) para Pu’erh.
MENSAJES EN LA PANTALLA DEL RELOJ:
“Add” “Wtr”
• El sistema no tiene suficiente agua en el depósito para completar su preparación. Agregue
agua fresca al depósito y luego presione el selector START/SELECT (inicio/selección)
para reanudar.
“CLn”
• El sistema ha detectado que es necesario ejecutar inmediatamente un ciclo de limpieza
para eliminar la acumulación de calcio en el calentador del agua. Consulte ‘Limpieza y
descalcificación de su sistema de preparación de café’ para obtener instrucciones.
“Hot” “Wtr”
• El sistema ha detectado que se ha añadido agua caliente al depósito de agua. Retire el
depósito y vacíe el agua caliente. Rellene el depósito con agua fresca y fría y póngalo
nuevamente en la base del sistema. Espere hasta que la pantalla deje de mostrar “Hot”
“Wtr” antes de volver a utilizar el sistema.
MENSAJES DE ERROR:
“Er”
• Si el reloj muestra “Er” y luego un número (ej. “Er 03”), comuníquese con Servicio al Cliente
al 1-877-646-5288.
70
1- 877- 6 46 -5 28 8
71ninjakitchen.com
ESPAÑOL
Page 38

73
ninjakitchen.com
ESPAÑOL
PIEZAS DE REPUESTO
REGISTRO DEL PRODUCTO
Para solicitar piezas y accesorios adicionales, visite nuestro sitio web ninjaaccessories.com
o comuníquese con nuestro servicio al cliente al 1 -877-646-5288.
Visite registeryourninja.com o llame al 1-877-646-5288 para registrar su nuevo producto Ninja
®
en el término de diez (10) días después de la compra. Se le pedirá que proporcione el nombre
de la tienda, la fecha de compra y el número de modelo junto con su nombre y dirección.
El registro nos permitirá contactarlo en el caso poco probable de que debamos comunicarle
una notificación de seguridad del producto. Al registrar el producto, reconoce haber leído y
comprendido las instrucciones de uso, así como las advertencias incluidas en las
instrucciones adjuntas.
La garantía limitada de un (1) año se aplica a las compras realizadas a los vendedores
minoristas autorizados de SharkNinja Operating LLC. La cobertura de garantía se aplica solo
al propietario y al producto originales, y no puede transferirse.
SharkNinja garantiza que la unidad estará libre de defectos de materiales y de mano de obra
durante un período de un (1) año desde la fecha de compra, siempre y cuando se use en
condiciones domésticas normales y se efectúe su mantenimiento de acuerdo con los requisitos
descritos en este manual del propietario, sujeto a las siguientes condiciones y exclusiones:
¿Qué cubre esta garantía?
1. La unidad original o los componentes que no se gastan que se consideren defectuosos, a
criterio exclusivo de SharkNinja, serán reparados o reemplazados un período máximo de
un (1) año a partir de la fecha de compra original.
2. En el caso de que se entregue una unidad de reemplazo, la cobertura de la garantía
termina seis (6) meses después de la fecha de recepción de la unidad de reemplazo o
cuando termine el plazo restante de la garantía vigente, lo que sea posterior. SharkNinja se
reserva el derecho a reemplazar la unidad con una de igual o mayor valor.
¿Qué no cubre esta garantía?
1. Esta garantía no cubre el desgaste normal de las piezas que se gastan (lo que incluye el
portafiltro, el filtro permanente, la batidora del espumador, la jarra y la tapa del filtro de la
jarra, el depósito de agua, la tapa abatible y la Ninja Smart Scoop™), las cuales requieren
mantenimiento regular o reemplazo para asegurar el funcionamiento adecuado de la
unidad. Se pueden comprar piezas de repuesto en ninjaaccessories.com.
2. Cualquier unidad que haya sido alterada o usada con fines comerciales
3. Daños causados por el uso incorrecto, el abuso, la manipulación negligente, la falta de
mantenimiento necesario, o daños debido al mal trato durante el transporte.
4. Daños emergentes o incidentales.
5. Defectos causados por personas que hacen reparaciones y no estén autorizadas por
SharkNinja. Estos defectos incluyen daños causados en el proceso de envío, modificación
o reparación del producto SharkNinja (o cualquiera de sus piezas) cuando la reparación es
realizada por una persona que no está autorizada por SharkNinja.
6. Productos comprados, usados u operados fuera de Norteamérica.
Cómo solicitar el servicio técnico
Si su aparato no funciona de forma adecuada cuando se usa en condiciones domésticas
normales dentro del período de garantía, visite ninjakitchen.com para obtener instrucciones
de cuidado y mantenimiento del producto que usted mismo pueda llevar a cabo. Nuestros
especialistas de servicio al cliente también están a su disposición si llama al 1-877-646-5288
para asistirlo con todas las opciones de servicio de garantía y soporte del producto, incluida
la posibilidad de mejorar su garantía a nuestras opciones de servicio de garantía VIP para
categorías de productos exclusivos.
SharkNinja cubrirá el costo de envío de la unidad por parte del cliente para ser reparada o
reemplazada. Se cobrará una tarifa de 19,95USD (sujeto a cambios) cuando SharkNinja envíe
la unidad reparada o el reemplazo.
Cómo iniciar un reclamo de garantía
Debe llamar al 1-877-646-5288 para iniciar un reclamo de garantía. Necesitará el recibo como
prueba de compra. Un especialista de servicio al cliente le proporcionará instrucciones para la
devolución y el embalaje.
Cómo se aplica la ley estatal
Esta garantía le otorga derechos legales específicos, y usted también puede tener otros
derechos que varían según el estado. Algunos estados no permiten la exclusión o la limitación
de los daños incidentales o emergentes, por lo que lo anterior puede no aplicarse en su caso.
GARANTÍA LIMITADA
DE UN (1) AÑO
72
1- 877- 6 46 -5 28 8
Page 39

@ninjakitchen
SharkNinja Operating LLC
US: Needham, MA 02494
1-877-646-5288
ninjakitchen.com
Illustrations may dier from actual product. We are constantly striving to improve our products,
therefore the specifications contained herein are subject to change withoutnotice.
For SharkNinja U.S. Patent information, visit sharkninja.com/uspatents.
NINJA is a registered trademark of SharkNinja Operating LLC.
NINJA HOT & COLD BREWED SYSTEM and NINJA SMART SCOOP are trademarks
of SharkNinja Operating LLC.
© 2019 SharkNinja Operating LLC
PRINTED IN CHINA
Les illustrations peuvent diérer du produit réel. Nous tentons constamment d’améliorer nos produits; par
conséquent, les caractéristiques indiquées dans le présent document peuvent être modifiées sans préavis.
Pour obtenir de l’information au sujet des brevets de SharkNinja aux États-Unis, consultez le site
suivant:www.sharkninja.com/USPatents.
NINJA est une marque de commerce déposée de SharkNinja Operating LLC.
SYSTÈME NINJA HOT & COLD BREWED et NINJA SMART SCOOP sont des marques de commerce de
SharkNinja Operating LLC.
© 2019 SharkNinja Operating LLC
IMPRIMÉ EN CHINE
Las ilustraciones pueden diferir del producto real. Nos esforzamos constantemente por mejorar nuestros
productos, por lo que las especificaciones que se incluyen en el presente pueden cambiar sin previo aviso.
Para obtener información sobre las patentes de SharkNinja en los EE.UU., visite sharkninja.com/uspatents.
NINJA es una marca comercial registrada de SharkNinja Operating LLC.
NINJA HOT & COLD BREWED SYSTEM y NINJA SMART SCOOP son marcas comerciales de SharkNinja
Operating LLC.
© 2019 SharkNinja Operating LLC
CP307�IB�EN�FR�SP�MP�180716�Mv3
IMPRESO EN CHINA
VISIT US ONLINE AT:
ninjakitchen.com
Or follow us on any of our social media pages:
VISITEZ-NOUS EN LIGNE:
www.ninjakitchen.com
Ou suivez-nous sur nos pages de réseaux
sociaux:
VISÍTENOS EN LÍNEA EN:
ninjakitchen.com
O síganos en cualquiera de nuestras páginas
de medios sociales:
 Loading...