

Page 1
COFFEE BAR
™
®
/MC
CF080C
OWNER’S GUIDE
MANUEL DU PROPRIÉTAIRE
ninjakitchen.com
1-877-646-5288
Page 2

IMPORTANT SAFEGUARDS
For Household Use Only
READ ALL INSTRUCTIONS BEFORE USING
YOUR NINJA COFFEE BAR
Safety Signal Words
This manual and the safety labels attached to this
appliance utilize signal words that signify safety
hazards with different levels of severity.
Below are the words used and the definitions for
these words:
• WARNING indicates a hazardous situation
which, if not avoided, could result in death or
serious injury.
• CAUTION indicates a hazardous situation
which, if not avoided, could result in minor or
moderate injury.
• NOTICE is used to address practices not
related to physical injury.
The words “WARNING” and “CAUTION” are
preceded by a triangle signifying that these are
safety related.
The terms “IMPORTANT” and “NOTE” are also
used to describe good ideas for better and more
efficient equipment use.
THIS BOOK COVERS MODEL NUMBER:
CF080C
TECHNICAL SPECIFICATIONS
Voltage: 120V~, 60Hz.
Power: 1450 Watts
Water Reservoir
Capacity: 1.25 L
™
.
WARNING:
To reduce the risk of fire, electric shock, serious
injury, death or damage when using this
appliance, follow these basic safety precautions.
General Precautions
1 Do not allow the appliance to be used by
children. Close supervision is necessary
when used near children. This is not a toy.
2 To reduce the risk of electric shock, this
appliance has a polarized plug (one blade is
wider than the other). As a safety feature,
this plug will fit into a polarized outlet only
one way. If the plug does not fit fully into the
outlet, reverse the plug. If it still does not fit,
contact a qualified electrician. Do not force
into outlet or try to modify to fit.
3 To protect against electrical shock, do not
submerge the appliance or allow the power
cord to come into contact with water or any
other liquid.
4 Allow the appliance to cool before taking off
parts and before cleaning.
5 Do not abuse the power cord. Never carry
the appliance by the power cord or yank it
to disconnect from electrical outlet; instead
grasp the plug and pull to disconnect.
6 Do not operate any appliance with a
damaged cord or plug, or after the appliance
malfunctions, has been dropped or damaged
in any manner.
7 Do not let the power cord hang over the edge
of table or counter or touch hot surfaces
such as the stove.
8 Do not remove the brew basket or carafe
while the appliance is brewing. Scalding
may occur if any of these parts are
removed during brewing cycles.
1
1-877-646-5288
Page 3

9 The use of an accessory not recommended
by the manufacturer may result in fire,
electric shock, create an overflow condition
and scalding hazard or personal injury.
10 Do not operate your appliance in an
appliance garage or under a wall cabinet.
When storing in an appliance garage always
unplug the unit from the electrical outlet. Not
doing so could create a risk of fire, especially
if the appliance touches the walls of the
garage or the door touches the unit as it
closes.
Operating Notice
11 Clogging and backing up of water and/or
coffee in the filter basket can occur under
any or a combination of any of the following
conditions: The use of too finely ground
coffee, using two or more paper filters, using
the permanent filter in conjunction with a
paper filter, not cleaning coffee grounds
from the permanent filter, or allowing coffee
grounds to spill over the filter.
12 Always use appliance on a dry, level surface.
13 Do not use this appliance for anything other
than its intended use. Do not use outdoors.
14 Do not touch hot surfaces. Use handles
orknobs.
15 Do not touch warming plate while the brewer
is in use.
Glass Carafe
16 The carafe is designed for use with this
appliance. It must never be used on a range
top.
17 Do not set a hot carafe on a wet or cold
surface.
18 Do not use a cracked or scratched carafe or
a carafe having a loose or weakened handle.
19 Do not clean carafe with abrasive cleansers,
steel wools pads, or other abrasive material.
20 Do not place carafe in microwave.
21 Do not expose carafe to extreme temperature
changes.
22 Do not place on or near a hot gas or electric
burner or in a heated oven.
23 Do not use for carbonated beverages.
24 Do not drink directly from the carafe! Liquid
from the carafe may be very hot!
25 Do not use the carafe to store any other type
of food when not in use.
26 Ensure that the carafe is completely empty
before starting a cleaning or brewing cycle.
Starting a cycle with water or coffee in the
carafe will cause an overflow.
Maintenance
27 Remove the power cord from the electrical
outlet, allow to cool before removing brew
basket, water reservoir, or filters and before
surface cleaning.
28 Clean the glass carafe with a soft brush or
sponge. Do not use a wire brush.
29 To prevent illness from bacterial growth in
the appliance, follow all cleaning instructions
in the “Care & Maintenance” section of this
owner’s guide.
30 If the product is not operating properly
contact SharkNinja Operating LLC at
1-877-646-5288 or ninjakitchen.com for
examination, repair or adjustment.
31 Clean the system on a weekly basis.
Cord Statement
32 A short power-supply cord is provided to
reduce the risks resulting from becoming
entangled in or tripping over a longer cord.
33 Do not use extension cord with this product.
SAVE THESE
INSTRUCTIONS
English
ninjakitchen.com
2
Page 4

CONSIGNES DE SÉCURITÉ IMPORTANTES
Pour usage domestique seulement
LISEZ TOUTES LES INSTRUCTIONS AVANT
D’UTILISER VOTRE APPAREIL NINJA COFFEE
BARMC.
Mentions d’avertissement relatives à la
sécurité
Ce manuel ainsi que les étiquettes de sécurité
apposées sur cet appareil comportent des mentions
d’avertissement indiquant des risques pour la
sécurité assortis de différents degrés de gravité.
Voici les mentions de sécurité et la définition de
celles-ci :
• AVERTISSEMENT indique une situation
dangereuse qui, si elle n’est pas évitée,
pourrait entraîner des blessures graves, voire
mortelles.
• MISE EN GARDE indique une situation
dangereuse qui, si elle n’est pas évitée,
pourrait entraîner des blessures légères ou
modérées.
• AVIS ou REMARQUE indique les pratiques qui
ne sont pas relatives aux blessures corporelles.
Les mentions « AVERTISSEMENT » et « MISE EN
GARDE » sont précédées d’un triangle symbolisant
qu’elles concernent la sécurité.
Les mentions « IMPORTANT » et « REMARQUE »
indiquent également des façons de faire un meilleur
usage de l’appareil et d’en améliorer l’efficacité.
CE MANUEL CONCERNE LE MODÈLE :
CF080C
SPÉCIFICATIONS TECHNIQUES
Tension : 120V~, 60Hz.
Alimentation : 1450 Watts
Capacité du
réservoir d’eau : 1.25 L
AVERTISSEMENT :
Afin de réduire les risques d’incendie, d’électrocution,
de blessures graves ou mortelles et de dommages
matériels lors de l’utilisation de cet appareil, veuillez
respecter ces consignes de sécurité élémentaires.
Précautions générales
1 Ne laissez pas l’appareil être utilisé par des
enfants. Une surveillance attentive est nécessaire
lors de l’utilisation à proximité des enfants. Ceci
n’est pas un jouet.
2 Afin de réduire les risques d’électrocution, cet
appareil a été muni d’une fiche polarisée (une
lame est plus large que l’autre). Par sécurité, cette
fiche ne s’insère que dans un seul sens dans
une prise polarisée. Si la fiche ne s’insère pas
complètement dans la prise de courant, inversez-
la. Si elle ne s’adapte toujours pas, contactez un
électricien qualifié. Ne forcez pas et ne modifiez
pas la fiche pour la brancher dans une prise
murale.
3 Pour éviter les risques d’électrocution, n’immergez
pas l’appareil et assurez-vous que le cordon
d’alimentation n’entre pas en contact avec l’eau ou
un autre liquide.
4 Laissez refroidir l’appareil avant de le démonter et
de le nettoyer.
5 Prenez soin du cordon d’alimentation. Ne
transportez jamais l’appareil en le tenant par
le cordon. Ne débranchez jamais l’appareil de
l’alimentation électrique en tirant sur le cordon.
6 N’utilisez pas l’appareil si sa fiche ou son cordon
est endommagé(e), s’il a fait défaut ou s’il a été
échappé ou endommagé.
7 Ne laissez pas le cordon traîner sur le dessus
d’une table ou d’un comptoir. Ne le laissez pas
entrer en contact avec des surfaces chaudes,
comme la cuisinière.
8 Ne retirez pas le panier-filtre ou la carafe pendant
que l’appareil effectue un cycle d’infusion. Vous
pourriez vous brûler en retirant l’une de ces
pièces pendant les cycles d’infusion.
3
1-877-646-5288
Page 5

9 L’utilisation d’accessoires non recommandés par
le fabricant peut causer un incendie, des brûlures
ou des blessures, entraîner l’électrocution et (ou)
provoquer un débordement.
10 N’utilisez pas l’appareil dans une armoire pour
électroménager ni sous une armoire murale.
Lorsque vous rangez l’appareil dans une armoire
pour électroménager, assurez-vous de toujours
débrancher l’appareil. Le non-respect de
cette consigne présente un risque d’incendie,
particulièrement si l’appareil est en contact avec la
paroi de l’armoire ou si la porte d’armoire fermée
touche l’appareil.
Avis concernant l’utilisation
11 L’obstruction et le refoulement de l’eau et (ou) du
café dans le panier-filtre peut se produire dans
l’une des circonstances suivantes (ou combinaison
de ces circonstances) : l’utilisation de café dont la
mouture est trop fine, l’utilisation de deux filtres
en papier ou plus, l’utilisation du filtre permanent
avec un filtre en papier, l’omission d’éliminer
le marc de café dans le filtre permanent ou le
débordement du marc de café dans le filtre.
12 Utilisez toujours l’appareil sur une surface sèche et
de niveau.
13 N’utilisez l’appareil qu’aux fins pour lesquelles il
est prévu. N’utilisez pas cet appareil à l’extérieur.
14 Ne touchez pas les surfaces chaudes. Utilisez
toujours des poignées.
15 Ne touchez pas la plaque chauffante lorsque
l’appareil est en marche.
Carafe en verre
16 La carafe est conçue pour être utilisée avec cet
appareil. Ne l’utilisez jamais sur le dessus de la
cuisinière.
17 Ne déposez pas une carafe chaude sur une
surface humide ou froide.
18 N’utilisez pas la carafe si elle est fissurée ou
égratignée, ou si sa poignée est lâche ou
desserrée.
19 Ne nettoyez pas la carafe avec des nettoyants
abrasifs, des tampons de laine d’acier ou d’autres
produits abrasifs.
20 Ne mettez pas la carafe dans le four à micro-
ondes.
21 N’exposez pas la carafe à des changements de
température extrêmes.
22 Ne placez pas la carafe sur un brûleur au gaz ou
électrique ou près d’un brûleur, ni dans un four
chaud.
23 Ne versez pas des boissons gazéifiées dans cette
carafe.
24 Ne buvez pas directement à même la carafe! Le
liquide dans la carafe pourrait être très chaud!
25 Ne rangez pas des aliments, quelle qu’en soit la
nature, dans la carafe lorsque celle-ci n’est pas
utilisée.
26 Assurez-vous que la carafe soit complètement
vide avant de démarrer un cycle de nettoyage
ou d’infusion. Si vous démarrez un cycle avec de
l’eau ou du café dans la carafe, ceci mènera à un
débordement.
Entretien
27 Débranchez le cordon d’alimentation, puis laissez
refroidir l’appareil avant d’enlever le panier-filtre,
le réservoir d’eau ou les filtres et avant tout
nettoyage des surfaces.
28 Nettoyez la carafe en verre avec une brosse à
poils souples ou une éponge. N’utilisez pas une
brosse métallique.
29 Afin d’éviter les maladies liées à la croissance
bactérienne dans l’appareil, suivez toutes les
instructions de nettoyage figurant dans la section
« Soins et entretien » du présent manuel du
propriétaire.
30 Si l’appareil ne fonctionne pas correctement,
veuillez contacter SharkNinja Operating LLC en
appelant au 1-877-646-5288 ou en visitant le
site ninjakitchen.com pour vérification, réparation
ou réglage.
31 Nettoyez le système toutes les semaines.
Énoncé concernant le cordon d’alimentation
32 Cet appareil est doté d’un court cordon
d’alimentation afin de réduire les risques de
s’emmêler dans le cordon ou de trébucher.
33 N’utilisez pas de rallonge électrique avec cet
appareil.
VEUILLEZ CONSERVER
CES DIRECTIVES
Français
ninjakitchen.com
4
Page 6

Contents
Thank you for
English
purchasing the
Ninja Coffee
Bar™.
Getting To Know Your Ninja Coffee Bar™ ........................................................................7
Control Panel ..............................................................................................................8
Features Of The Ninja Coffee Bar™ ...............................................................................9
Before First Use . ......................................................................................................10
Setting The Clock & Program “PROG” Delay Brew .......................................................11
Assembly .................................................................................................................12
Preparing For Use .....................................................................................................14
Filling The Water Reservoir ....................................................................................14
How Much Coffee Do You Get In Your Cup...............................................................14
Would You Like A Hotter Coffee ..............................................................................15
Filling The Brew Basket With Coffee .......................................................................15
Drip Stop ..............................................................................................................16
Intelligent Warming Plate .......................................................................................16
Stay Warm Button .................................................................................................16
Brewing Coffee .....................................................................................................17
Classic And Rich ..............................................................................................17
Over Ice............................................................................................................18
Specialty ..........................................................................................................18
Care & Maintenance .................................................................................................19
Cleaning After A Brew ...........................................................................................19
Cleaning Your Carafe ............................................................................................ 19
Cleaning Your Water Reservoir ..............................................................................19
Cleaning & Descaling Your Brewing System ............................................................ 20
Troubleshooting Guide ...............................................................................................21
Replacement Parts ....................................................................................................23
Warranty & Registration .............................................................................................24
5
1-877-646-5288
Page 7

Table des matières
Merci d’avoir
acheté l’appareil
Ninja Coffee
BarMC.
Familiarisez-vous avec votre appareil Ninja Coffee BarMC..............................................25
Panneau de commande .............................................................................................26
Caractéristiques de l’appareil Ninja Coffee BarMC .........................................................27
Avant la première utilisation . .....................................................................................28
Réglage de l’horloge et de l’infusion différée ...............................................................29
Assemblage ..............................................................................................................30
Préparatifs pour l’utilisation .......................................................................................32
Remplissage du réservoir d’eau .............................................................................32
Quelle quantité de café obtenez-vous dans votre tasse? ..........................................32
Désirez-vous obtenir un café plus chaud? ...............................................................33
Remplissage du panier-filtre avec le café moulu......................................................33
Dispositif antigouttes .............................................................................................34
Plaque chauffante intelligente ................................................................................34
Bouton de réchaud « Gardez Chaud » .....................................................................34
Infusion du café ....................................................................................................35
Infusion Classique et Riche ................................................................................35
Infusion Sur Glaçe .............................................................................................36
Infusion de boissons de Spécialité ......................................................................36
Soins et entretien ......................................................................................................37
Nettoyage après l’infusion .....................................................................................37
Nettoyage de votre carafe .....................................................................................37
Nettoyage de votre réservoir d’eau ........................................................................37
Nettoyage et détartrage de votre système d’infusion ...............................................38
Guide de dépannage .................................................................................................39
Pièces de rechange ...................................................................................................41
Garantie et enregistrement ........................................................................................42
Français
ninjakitchen.com
6
Page 8
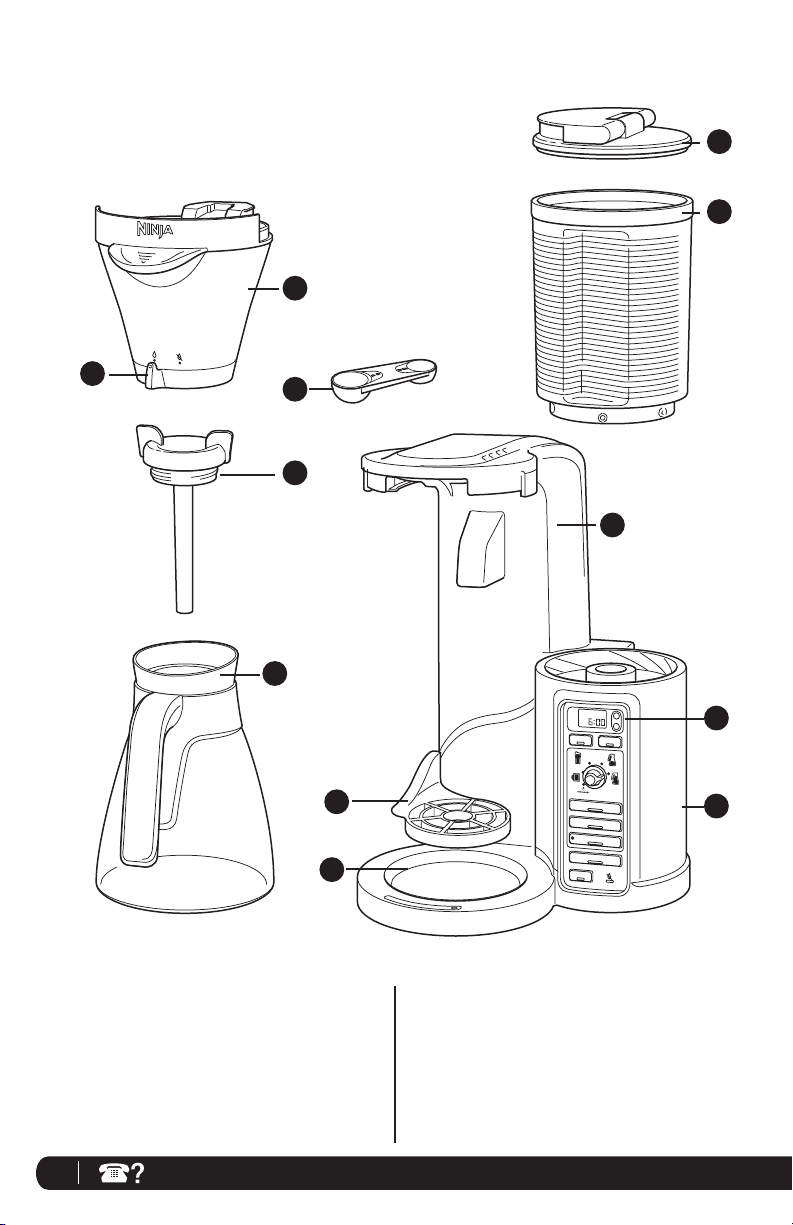
Getting To Know Your Ninja Coffee Bar
e
™
a
b
f
k
g
c
h
AM
H
PM
M
PROG
S
TAY WARM/
GARDEZ CHAUD
BREW/ INFUSION
i
j
CLASSIC/CLAS
RICH/ RICHE
OVE
R ICE / SUR GLACE
SPECIALTY / SPÉCIALITÉ
(CONCENTRATED /
CONCENTRÉ
CLEAN/
NETT
O
YER
SIQUE
E)
d
l
a Flip Top Water Reservoir Lid
b Removable Water Reservoir
c Brewer
d Control Panel
e Removable Brew Basket
f Drip Stop Toggle
7
1-877-646-5288
g Brew-Through Carafe Lid
h Glass Carafe
i Multi-Serve Cup Platform
j Intelligent Warming Plate
k Double Sided Scoop: Carafe Side and Single Serve Side
l Power Cord & Wrap (not shown)
Page 9
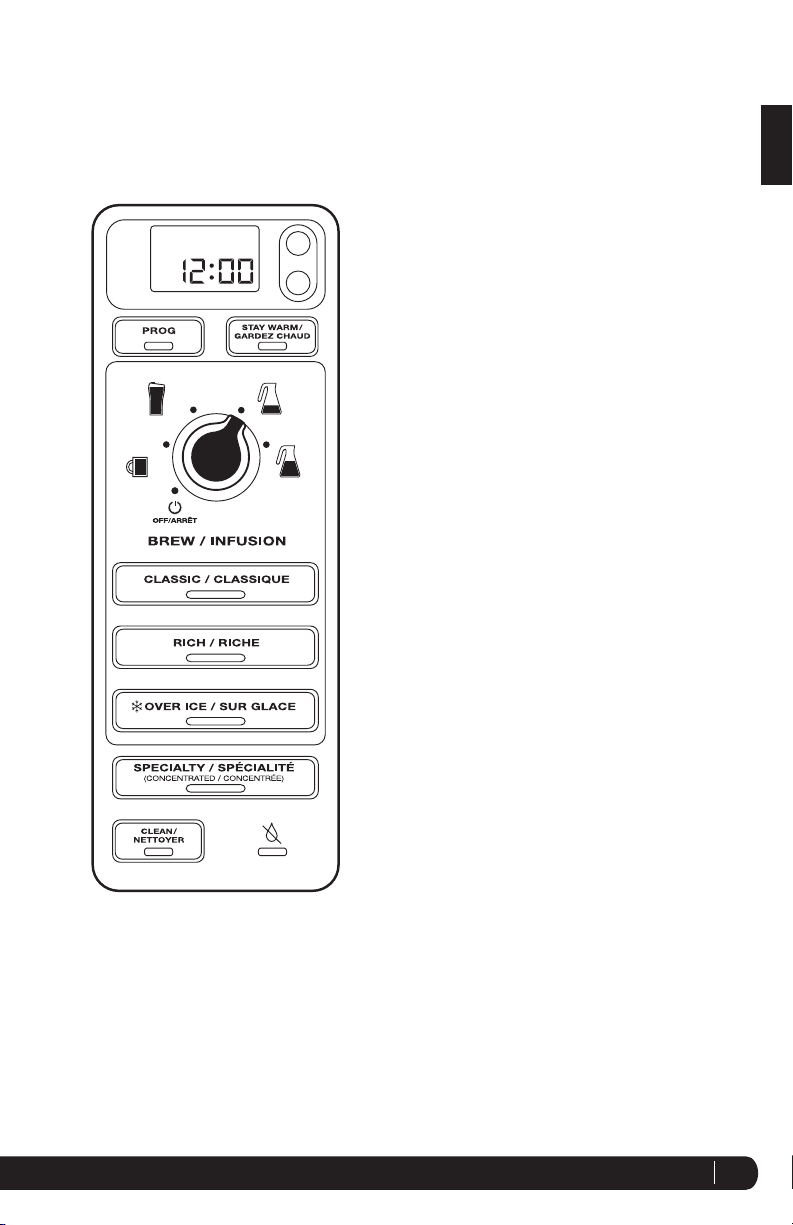
Control Panel
AM
1
PM
3
5b
5a
5e
6a
English
1 Programmable Digital Clock
H
2
M
4
5c
5d
2 Clock Hour and Minute Buttons
3 PROG Button
4 Stay Warm Button
5 Multi-Serve Dial
a Cup
b Travel Mug
c Half Carafe
d Full Carafe
e Off - Turns off all functions except the clock
6 Brew Types
a Classic Button
b Rich Button
c Over Ice Button
d Specialty (Concentrated) Button
7 Intelligent Clean Cycle Indicator/Button
8 Drip Stop Indicator
6b
6c
6d
7 8
ninjakitchen.com
8
Page 10
Features of the Ninja Coffee Bar
™
• Thermal Flavour Extraction™ Technology - Blends Precision Water Delivery with automated controls for Calibrated Temperature,
Pre-infusion, Coffee Saturation, and Flavor Richness. Ninja’s Thermal Flavor Extraction technology can truly unlock the full flavor
potential of your coffee.
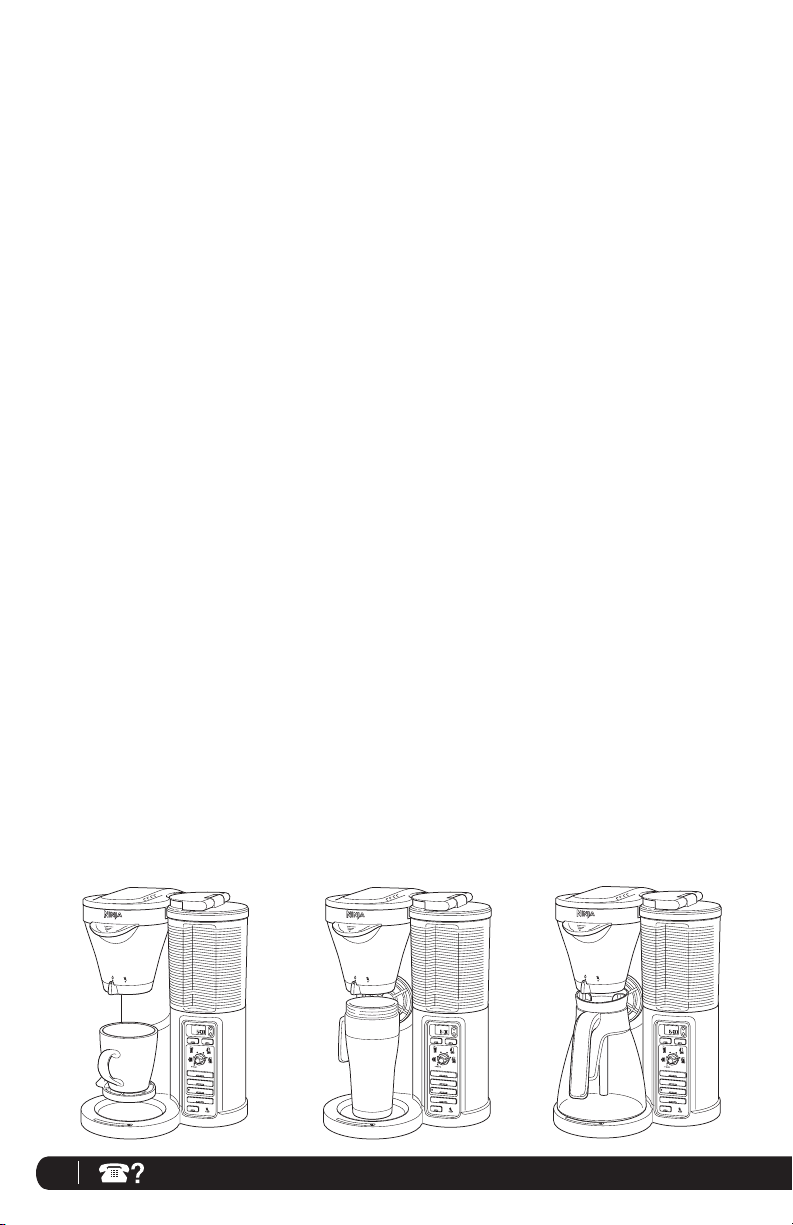
• Multi Serve – Ability to brew directly into your favorite cup, travel mug, or carafe.
• Brew Types – Control the strength and style of your coffee:
a. Classic Brew for smooth, balanced hot coffee.
b. Rich Brew for a richer-than-classic and still smooth coffee with more room for milk and cream.
c. Over Ice Brew for smooth, rich, freshly brewed iced coffee that’s not watered down.
d. Specialty Brew for a strong extract for specialty milk based drinks or blended iced drinks.
• Multi Serve Cup Platform – Pull it down and place your favorite cup on it and brew directly into it.
• Removable Water Reservoir with Easy Access Flip Top Lid – For quick and easy filling.
• Auto-iQ™ – The Ninja Coffee Bar™ knows how much water to use for each size and brew type.
• 1.25 L Glass Carafe
• LED Control Panel with Programmable Digital Clock
• 24-HR Programmable PROG Button – Set it to automatically brew the following morning.
• Drip Stop – Stops the flow of coffee from the brew basket allowing you to pour a cup mid-brew; switch toggle to the closed position to
prevent dripping once the brew cycle is finished.
• Clean Function – It illuminates when your Ninja Coffee Bar™ senses that there is hard water calcium build up in your brewer which can
affect the flavor of your coffee. When it illuminates, follow the cleaning instructions in the Care & Maintenance section or printed on the
back of your brewer.
• Stay Warm Button – Your warming plate will automatically turn on after brewing a carafe and turn off after 2 hours. The Stay Warm
button allows you to manually turn the warming plate off.
• Intelligent Warming Plate – Automatically adjusts the temperature of the warming plate to keep your coffee at the ideal drinking
temperature without burning it.
• Pre-Heat Mode – The Ninja Coffee Bar brewer will be in an idle mode keeping the internal water pre-heated for 72
hours.
• Sleep Mode – After 72 hours the Ninja Coffee Bar will enter sleep mode to conserve energy or turn the Multi-Serve dial
to “OFF” to manually turn off the pre-heat and all other functions.
• Audible Ready Signal – Alerts you that your coffee is ready.
• 2 hour shut off – Automatically turns off the warming plate two hours after you brew coffee.
Brew into a cup, travel mug, or classic carafe or half carafe.
Multi Serve
Classic Carafe or Half CarafeTravel MugCup
AM
H
PM
M
PROG
S
TAY WARM/
GARDEZ CHAUD
BREW/ INFUSION
CLASSIC/CLAS
SIQUE
RICH/ RICHE
OVER ICE / SUR GLACE
SPECIALTY / SPÉCIALITÉ
(CONCENTRATED /
CONCENTRÉ
E)
CLEAN/
NETT
O
YER
9
1-877-646-5288
AM
PM
PROG
BREW/ INFUSION
CLASSIC/CLAS
OVE
SPECIALTY / SPÉCIALITÉ
(CONCENTRATED /
CLEAN/
NETT
O
YER
RICH/ RICHE
R ICE / SUR GLACE
H
M
S
TAY WARM/
GARDEZ CHAUD
SIQUE
CONCENTRÉ
E)
AM
PM
PROG
CLASSIC/CLAS
OVE
SPECIALTY / SPÉCIALITÉ
(CONCENTRATED /
CLEAN/
NETT
H
M
S
TAY WARM/
GARDEZ CHAUD
BREW/ INFUSION
SIQUE
RICH/ RICHE
R ICE / SUR GLACE
CONCENTRÉ
E)
O
YER
Page 11

Before First Use
PLEASE KEEP THESE IMPORTANT
SAFEGUARDS IN MIND WHEN USING THE
APPLIANCE:
CAUTION: APPLIANCE CREATES HOT LIQUID.
HANDLE WITH CARE.
CAUTION: DO NOT remove the vessel while
the appliance is running without the Drip
Stop in the closed position. Return the
vessel quickly and open the Drip Stop to
continue the brew.
CAUTION: Never open the brew basket when
the coffeemaker is in use.
CAUTION: Please ensure that you are using
at least a 350 ml cup for the Cup size and a
475 ml travel mug for the Travel mug size to
prevent overflow and a scalding injury.
IMPORTANT: DO NOT run the appliance
without water.
IMPORTANT: Always place a vessel beneath
the brew basket to receive the brewed
coffee.
IMPORTANT: DO NOT overfill the water
reservoir, fill water only to the Max Fill line.
English
1 Remove all packaging material, stickers and labels from
the brewer.
NOTE: The glass carafe is dishwasher safe. Place on
top rack only.
2 Wash the water reservoir, glass carafe and brew basket
in warm, soapy water with a soft cloth.
3 Rinse and dry thoroughly.
4 Wipe the intelligent warming plate with a damp cloth.
5 Before first use, run two full carafe cycles with water
only and discard water.
ninjakitchen.com
10
Page 12
Setting the Clock & Program “PROG” Delay Brew
AM
PM
Fig. 1
H
M
Fig. 2
AM
PM
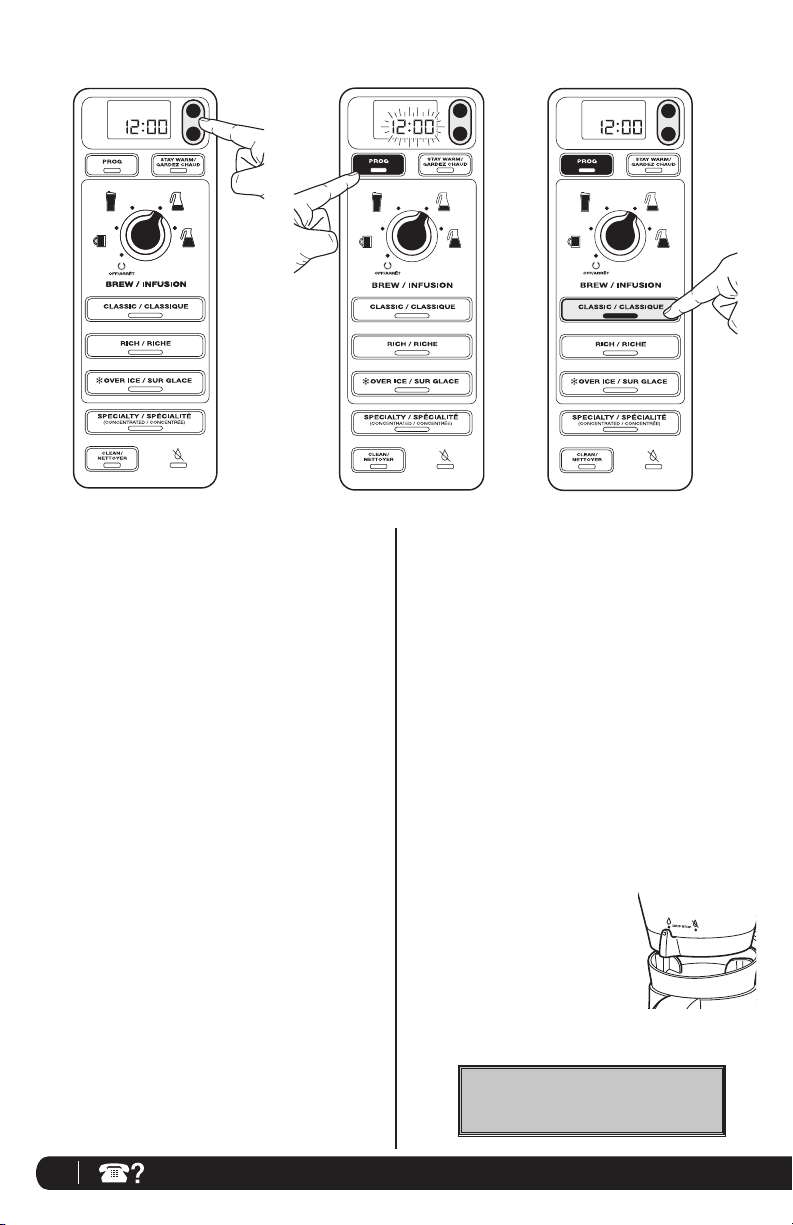
TO SET THE CLOCK
1 Plug the power cord into an electrical outlet. The clock
will flash on the control panel to indicate that the time
has not been set. (Fig. 1)
2 Press the H (hour) or M (minute) button until you reach
the current time. The AM or PM indicator will illuminate
on the left side of the display as you are setting the
time.
3 After 5 seconds the clock will stop flashing and the
clock will be set.
NOTE: If the clock stops flashing and does not display
the correct time of day, pressing the H (hour) or the M
(minute) button at any time will cause the clock to flash
again. You can now re-program the correct time of day
by following the steps above.
NOTE: If you unplug the brewer or in the event of an
extended power loss, you will need to reset the clock
the next time the brewer is plugged in.
TO PROGRAM THE DELAY BREW TIME
NOTE: The Ninja Coffee Bar™ must remain on in order for
the delay brew function to work. Do not power off after
setting Delay Brew.
1 Press the PROG button. The PROG button will illuminate
and the clock will begin to flash “12:00” or the last
delay brew time that was set. (Fig. 2)
2 While the clock is flashing, press the H (hour) or M
(minute) button to set the time that you would like
the delay brew to begin. The AM or PM indicator will
illuminate on the left side of the display as you are
setting the desired time.
11
1-877-646-5288
H
M
AM
PM
H
M
Fig. 3
3 Once the proper time has been set, select the size of
the vessel that you would like to brew.
4
Select the Brew Type that you desire from the 4 flashing
buttons. The selected brew type will be lit.
(Fig. 3)
5 Once the time, brew size, and brew type have been set, allow
the PROG button to flash and lock in or press the PROG
button to activate the Delay Brew time. When the Delay Brew
is activated, the light on the PROG button will illuminate and
an audible signal will play to verify the Delay Brew is set.
6 The Delay Brew time is now set and your Ninja Coffee Bar™
will automatically brew at the time you programmed.
NOTE: To deactivate the Delay Brew cycle, press the PROG
button once more and the light on the PROG button will turn
off. Any change to the selected brew size or starting any other
brew will cancel the programmed Delay Brew time.
7 Place the appropriate-sized vessel
under brew basket for the selected
size.
IMPORTANT: Make sure the
Drip Stop is in the open position.
Go to ninjakitchen.com for more
information and how-to videos.
Page 13
Assembly
AM
PM
PROG
BREW/ INFUSION
CLASSIC/CLA
OVE
SPECIALTY / SPÉCIALITÉ
(CONCENTRATED /
CLEAN/
NETT
RICH/ RICHE
R ICE / SUR GLACE
O
YER
English
AM
H
PM
H
M
S
TAY WARM/
GARDEZ CHAUD
S
SIQUE
CONCENTRÉ
E)
PROG
BREW/ INFUSION
CLASSIC/CLAS
RICH/ RICHE
OVER ICE / SUR GLACE
SPECIALTY / SPÉCIALITÉ
(CONCENTRATED /
CLEAN/
NETT
O
YER
M
S
TAY WARM/
GARDEZ CHAUD
SIQUE
CONCENTRÉ
E)
Fig. 4
Fig. 4a
Fig. 4b
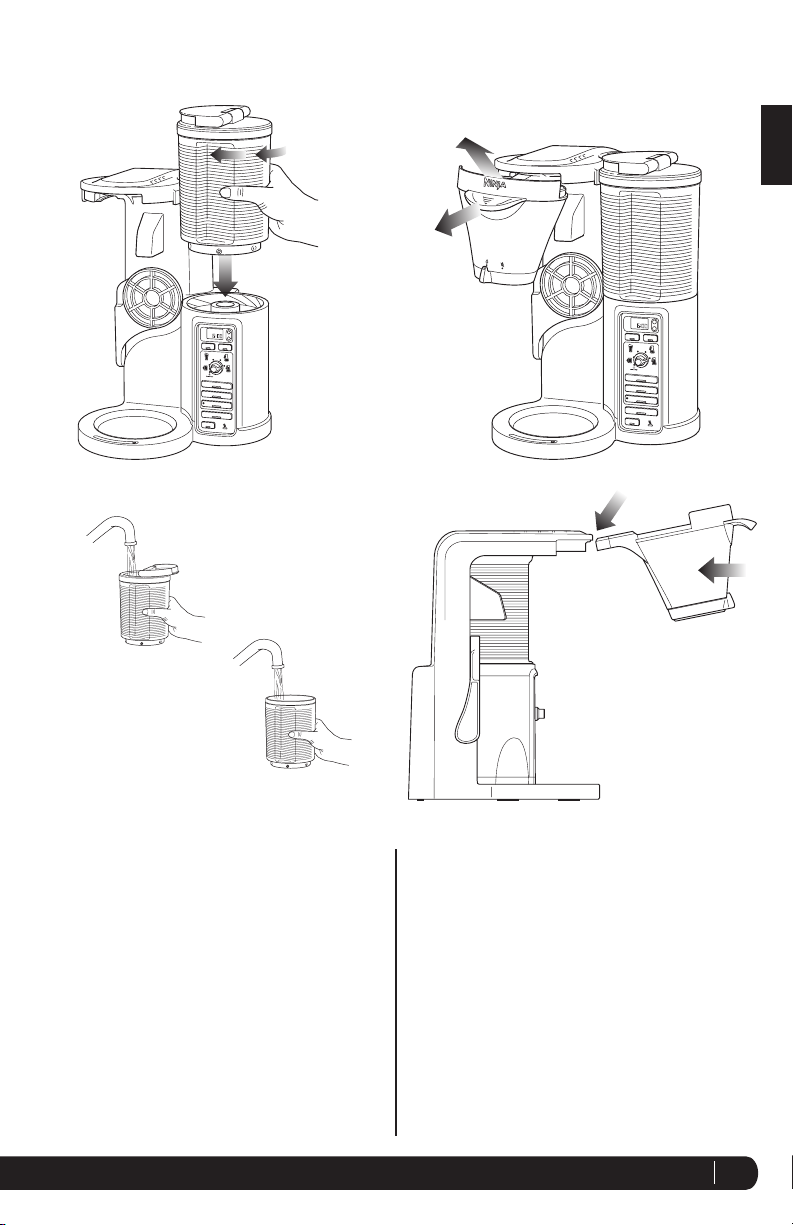
1 Place the brewer on a dry, clean and level surface.
2 Holding the water reservoir by the grip, twist
counterclockwise to remove. (Fig. 4) Either flip
the lid top over (Fig. 4a) or remove lid by twisting
counterclockwise to remove (Fig. 4b). Fill with water
up to, but not exceeding the Max fill line (1.25 L). To
replace the water reservoir, place on top of the base
and twist clockwise until a click indicates it is locked in
place.
Fig. 5
Fig. 6
3 Slide brew basket out and angle up slightly to remove
it from the brewer. (Fig. 5) To reinsert, align the brew
basket with the rails and slide back into the brewer.
(Fig. 6)
4 Once the brew basket is in place, slide all the way into
place until you hear a slight click.
ninjakitchen.com
12
Page 14
Assembly - cont.
Fig. 7
Fig. 8
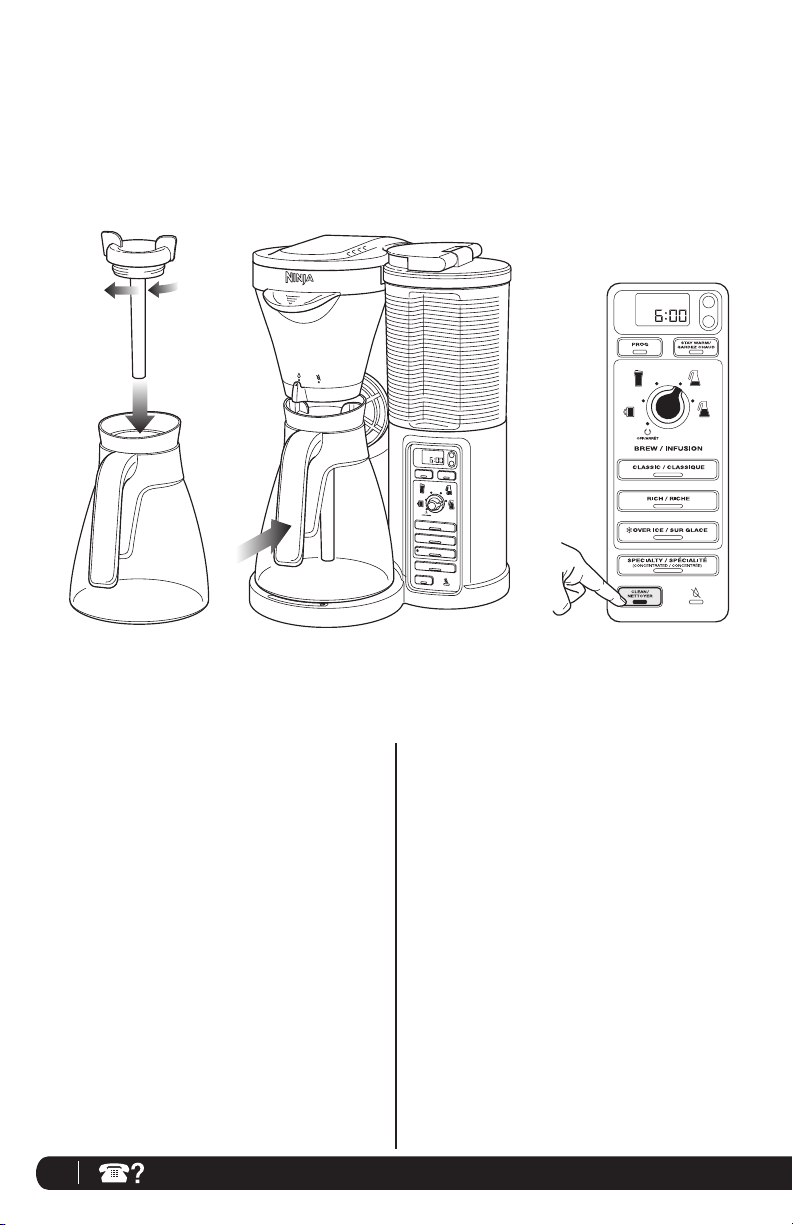
5 Twist the brew-through lid clockwise onto the glass
carafe to lock into place. (Fig.7)
6 Center the carafe below the brew basket. (Fig. 8)
NOTE: Do not use any coffee for the first two brew
cycles in order to clean the brewer.
7 Plug the brewer into an electrical outlet.
H
M
AM
PM
PROG
BREW/ INFUSION
CLASSIC/CLA
RICH/ RICHE
OVE
R ICE / SUR GLACE
SPECIALTY / SPÉCIALITÉ
(CONCENTRATED /
CLEAN/
NETT
O
YER
AM
PM
H
M
S
TAY WARM/
GARDEZ CHAUD
S
SIQUE
CONCENTRÉ
E)
Fig. 9
8 Once all parts are securely in place, press the Clean
button to thoroughly clean the machine before first use.
(Fig. 9)
9 Discard the water in the carafe and repeat, beginning
with step 2, with one more clean cycle of water before
first use.
13
1-877-646-5288
Page 15

Preparing for Use
CAUTION: Only fill water reservoir up to, but not exceeding the Max Fill line with water; we recommend fresh,
cool, filtered water. Do not fill water reservoir with any other liquids such as brewed coffee, carbonated
beverages, etc. as other liquids may damage your brewer.
Fi g. 11a
OR
AM
H
PM
AM
PM
PROG
BREW/ INFUSION
CLASSIC/CLA
OVE
SPECIALTY / SPÉCIALITÉ
(CONCE
CLEAN/
NETT
H
M
S
TAY WARM/
GARDEZ CHAUD
S
SIQUE
RICH/ RICHE
R ICE / SUR GLACE
NTRATE
D /
CONCENTRÉ
E)
O
YER
PROG
BREW/ INFUSION
CLASSIC/CLAS
RICH/ RICHE
OVE
R ICE / SUR GLACE
SPECIALTY / SPÉCIALITÉ
(CONCENTRATED /
CLEAN/
NETT
O
YER
M
S
TAY WARM/
GARDEZ CHAUD
SIQUE
CONCENTRÉ
E)
English
Fig. 10
Fi g. 11b
FILLING THE WATER RESERVOIR
1 For easy filling, remove the water reservoir by slightly
twisting counterclockwise until it is free from the
brewer. (Fig. 10)
2 Either flip the lid top over or remove lid by twisting
counterclockwise to remove. (Fig. 11a, Fig. 11b)
NOTE: The water reservoir and water reservoir lid can
lock in multiple locations.
3 For best results, fill the water reservoir with fresh,
cool, filtered water. Ensure that the water is above the
minimum fill line for the brew size that is selected. Do
not exceed the Max Fill line. The machine’s intelligence
will automatically measure the amount of water needed.
To avoid refilling after each cup, fill to the carafe line.
NOTE: Do not fill past the Max Fill line. If overfilled,
remove the water reservoir from the brewer and empty
to the Max Fill line.
Depending on the size and brew type, you may
have water left in the reservoir.
4 Place the water reservoir back on the brewer and twist
clockwise until you feel the reservoir lock into place.
5 Place the vessel that you would like to brew into
underneath the brew basket-ensure that the vessel is
centered under the brew basket. (Fig. 12)
NOTE: After removing the water reservoir, there may be
a small amount of water in the reservoir valve. This can
be easily removed with a dry cloth.
Fig. 12
HOW MUCH COFFEE DO YOU GET IN YOUR CUP?
Each size and brew type produces a different amount of
coffee to optimize strength, taste, and size.
NOTE: The coffee grounds will absorb some of the water
that is brewed, resulting in slightly less brewed coffee than
water used.
CAUTION: Please ensure that you are using at
least a 350 ml cup for the cup size and a 475 ml
travel mug for the travel mug size.
Approximate Brew Volume
Size/Brew Classic Rich Specialty
Cup
Travel
Mug
Half
Carafe
Full
Carafe
Size/Brew Over Ice
Cup 111 ml 281 ml
Travel
Mug
Half
Carafe
Full
Carafe
281 ml 258 ml 93 ml
414 ml 390 ml 123 ml
620 ml 580 ml 235 ml
1.12 L 1.05 L 298 ml
Coffee Only With Ice
174 ml 414 ml
310 ml 620 ml
468 ml 1.12 L
ninjakitchen.com
14
Page 16

Preparing for Use - cont.
WOULD YOU LIKE A HOTTER COFFEE?
Have you ever wondered why you get paper cups on the go? The type of cup you brew into can drastically influence the
drinking temperature!
CUP TYPE CERAMIC CUP NINJA® CUP PAPER CUP
Cup
Temperature
Drinking
Temperature
Room Temp Pre-warmed with
hot water
Pre-warmed in
microwave with milk
Room Temp Room Temp
Hot Hotter Hotter Hotter Hottest
Why is there a
difference?
A cold ceramic
mug will steal
heat from the
coffee as it warms
itself up.
If the mug is
already warm, it
will not steal as
much heat from
the coffee.
Fi g. 14
AM
H
PM
M
PROG
S
TAY WARM/
Fig. 13
BREW/ INFUSION
CLASSIC/CLAS
OVER ICE / SUR GLACE
SPECIALTY / SPÉCIALITÉ
(CONCENTRATED /
CLEAN/
NETT
O
YER
GARDEZ CHAUD
SIQUE
RICH/ RICHE
CONCENTRÉ
E)
Ninja Scoop
Carafe
FILLING THE BREW BASKET WITH COFFEE
For best results, use the below measurements of ground
coffee for each size brew–the amount of ground coffee for
each size will remain the same for any brew type that you
select. For example, if you select Cup and Classic Brew, you
will use the same amount of coffee grounds as if you select
Cup and Specialty Brew.
CAUTION: The maximum capacity for ground
coffee is 12 rounded tablespoons or 6 Ninja
Carafe Scoops. Exceeding this amount or using
fine ground coffee may cause overflow.
1 Open the brew basket by sliding the brew basket out of
the brewer. (Fig. 13)
NOTE: The brew basket can be removed from the
brewer by lifting the brew basket at a slight upward
angle (similar to a cabinet drawer).
NOTE: Check for any loose grounds that may be left
in the brew basket. Remove and rinse brew basket if
needed.
2 Using a #4 paper cone filter, fold along the seams,
open it fully, and firmly press it into the brew basket
making sure that it is fully seated. (Fig. 14)
Just like your
cold mug, cold
milk lowers the
temperature of
your coffee.
Single
Serve
Fig . 15 a
The Ninja®
double wall cup is
designed to retain
initial coffee temp
better than a
ceramic cup.
Fig . 15
Unlike a ceramic
mug, a thinner
paper cup
does not steal
substantial heat
from the coffee.
AM
H
PM
M
PROG
S
TAY WARM/
GARDEZ CHAUD
BREW/ INFUSION
CLASSIC/CLA
S
SIQUE
RICH/ RICHE
OVE
R ICE / SUR GLACE
SPECIALTY / SPÉCIALITÉ
(CONCENTRATED /
CONCENTRÉ
E)
CLEAN/
NETT
O
YER
3 Use the Ninja Scoop (Fig. 15a) and follow the
measurements below to fill the paper filter. These
measurements are based on level scoops—adjust to
your preferred taste. (Fig. 15 ) We suggest using a
medium grind size if grinding whole beans.
Single
Serve
Ninja® Scoop
(Single Serve Side)
Tablespoon
Cup 2 - 3 scoops 2 - 3 Tbsp.
Travel Mug 3 - 4 scoops 3 - 4 Tbsp.
®
Scoop
Carafe Ninja
(Carafe Side)
Tablespoon
Half Carafe 2 - 3 scoops 5 - 7 Tbsp.
Full Carafe 4 - 6 scoops 8 - 12 Tbsp.
NOTE: Exceeding the recommended medium grind size
for whole beans and 6 Ninja Carafe Scoops may cause
the brew basket to overflow.
4 Slide the brew basket back into the brewer and click in
place.
15
1-877-646-5288
Page 17

CAUTION: HOT WATER. Do not remove the brew basket or vessel while brewing.
CAUTION: STEAM. Do not touch steam vents or the top of the brewer while brewing.
CAUTION: The brew basket is hot after brewing. Always allow the brewer to cool down before cleaning.
AM
H
PM
M
PROG
S
TAY WARM/
GARDEZ CH
AUD
BREW/ INFUSION
CLASSIC/CLAS
SIQUE
RICH/ RICHE
Fig. 16
OVER ICE / SUR GLACE
SPECIALTY / SPÉCIALITÉ
(CONCENTRATED /
CLEAN/
NETT
O
YER
CONCENTRÉ
E)
Fi g. 17
English
DRIP STOP
NOTE: If the Drip Stop is closed before you begin a
brew, the brewer will notify you with 5 beeps. Set the
Drip Stop to the open position and select your brew
concentration level.
CAN’T WAIT FOR THAT FIRST CUP TO BE READY?
When brewing a carafe, close the Drip Stop to pause the
brew cycle and pour a cup. Remember to reopen the Drip
Stop to complete the brew. (Fig. 16)
NOTE: If you forget to open the Drip Stop, the Ninja Coffee
Bar™ will pause the brew, and after 20 seconds it will give
you a friendly audible reminder. After 6 minutes the brew
will be canceled.
CAN’T WAIT FOR THE LAST FEW DROPS?
When the brew cycle is complete, set the Drip Stop to the
closed position to stop dripping from the brew basket.
NOTE: While the Drip Stop is closed the Drip Stop indicator
will light up in the bottom right hand corner of the control
panel.
NOTE: Remember to open the Drip Stop when you’re ready
to brew again. If you forget, your Ninja Coffee Bar™ will give
you a friendly audible reminder.
INTELLIGENT WARMING PLATE
The Intelligent Warming Plate will automatically turn on after
a Classic or Rich on Carafe or Half Carafe. The Intelligent
Warming Plate will adjust the heat it produces in order to
avoid burning the coffee over time.
CAUTION: The HOT SURFACE light will illuminate
when the warming plate is hot. Do not touch the
surface when this light is illuminated.
STAY WARM BUTTON
Press the Stay Warm Button after the brew to turn the
Intelligent Warming Plate off. You can turn the Intelligent
Warming Plate back on within 2 hours of the brew by
pressing the stay warm button again if desired. (Fig. 17 )
If you would like the Warming Plate to stay on longer, you
can program it to stay on up to 4 hours.
1 Turn the Multi-Serve dial to half carafe or full carafe.
2 Press and hold Stay Warm until the clock begins to
flash the current time the warming plate will stay on for.
3 Quickly press the hour or minute (H or M) to increase
the time up to 4 hours.
4 The time will lock in after 5 seconds or you can press
the Stay Warm button.
ninjakitchen.com
16
Page 18

Preparing for Use- cont.
AM
PM
H
M
BREWING COFFEE
NOTE: Each brew has a pre-infusion cycle with
varying times. The brew will begin, stop, and be
quiet for a short period of time before it begins
again. This process is used to evenly saturate your
coffee grounds.
NOTE: For a hotter coffee, rinse the coffee cup, mug or
glass carafe with hot water prior to brewing.
CAUTION: Ensure the carafe is completely
empty before starting a brewing cycle. Starting a
brewing cycle with coffee in the carafe will cause an
overflow.
CLASSIC OR RICH
Classic - For a smooth, balanced flavor.
Rich - For a coffee that is richer than Classic and still
smooth, with more room for milk and cream.
1 After filling the water reservoir and adding ground
coffee to the filter, be sure that the Drip Stop is open
and the reservoir, basket, and filter are securely in
place.
2 Use the multi-serve dial to select the size of coffee
you would like to brew. Place the empty vessel that
you would like to brew into underneath the brew
basket.
NOTE: If making a single cup, lower the multi-serve
cup platform down and center the cup or mug on the
cupplatform. Please ensure that you are using at least
a 350 ml cup for the cup size and a 475 ml travel mug
for the travel mug size.
AM
PM
H
M
Fig. 19Fig . 18
NOTE: Do not remove water reservoir, brew basket, or
vessel while brewing.
3 Press the Classic or the Rich button and the brew will
begin. (Fig. 18, Fig. 19) Press the Classic or Rich
button again or turn the Multi-Serve Size dial to Off to
cancel the brew.
NOTE: The brew will begin, stop, and be quiet for
a short period of time before it begins again. This
process is used to evenly saturate your coffee
grounds.
NOTE: If brewing a half carafe or a full carafe, the
Stay Warm indicator and Intelligent Warming Plate
will automatically turn on. (Fig. 18, Fig. 19) This can
be turned off by pressing the Stay Warm button once
illuminated. The Intelligent Warming Plate will turn off
automatically after 2 hours.
NOTE: Do not remove water reservoir, brew basket, or
vessel while brewing.
4 The Ninja Coffee Bar™ will beep to signal a
completedbrew.
NOTE: Rich brew will use slightly less water and yield
slightly less brewed coffee than Classic.
17
1-877-646-5288
Page 19

OVER ICE
Designed to brew hot coffee over ice to lock in the flavor for
a rich, freshly brewed, smooth iced coffee without becoming
watered down. Be sure your vessel is filled with ice before
brewing.
IMPORTANT NOTICE: DO NOT USE GLASSWARE.
1 After filling the water reservoir, add ground coffee to the
filter (feel free to add more coffee if you like a stronger
taste), be sure that the Drip Stop is open, reservoir,
basket, and filter are securely in place.
2 Use the multi-serve dial to select the size of coffee that
you would like to brew.
3 Before brewing, fill the desired vessel to the top with
ice cubes and place the vessel below the brew basket.
Press Over Ice button and the brew will begin. (Fig. 20)
Press the Over Ice button again or turn the Multi-Serve
Size dial to Off to cancel the brew.
IMPORTANT: Always fill the desired vessel to
the top with ice before placing it below the brew
basket. Do not add ice to the water reservoir.
NOTE: The brew will begin, stop, and be quiet for
a short period of time before it begins again. This
process is used to evenly saturate your coffee
grounds.
NOTE: If making a Carafe of Over Ice brew fill the carafe
with ice and brew without the brew-through lid.
4 The Ninja Coffee Bar™ will beep to signal a completed
brew.
Stir to cool coffee completely.
NOTE: When brewing coffee in the Over Ice brew, the
Intelligent Warming Plate will not turn on.
APPROXIMATE BREW VOLUME
CAUTION: Make sure to use the proper cup size,
not doing so may lead to coffee overflowing the cup.
Size/Brew Over Ice
Coffee Only With Ice
Cup 111 ml 281 ml
Travel
Mug
Half
Carafe
Full
Carafe
174 ml 414 ml
310 ml 620 ml
468 ml 1.12 L
AM
PM
H
M
AM
PM
H
M
Fig . 21Fig. 20
SPECIALTY
The Specialty brew delivers a strong coffee concentrate
perfect for an iced blended coffee drink or milk based
specialty drink. Refer to the recipe book for inspiring
recipes.
1 After filling the water reservoir and adding ground
coffee to the filter, be sure that the Drip Stop is open,
reservoir, basket, and filter are securely in place.
2 Use the multi-serve dial to select the size of coffee that
you would like to brew.
NOTE: If brewing an iced blended drink, fill the desired
vessel with the amount of ice recommended in the
recipe before brewing.
3 Place the vessel that you would like to brew into
underneath the brew basket. Press Specialty brew
and the brew will begin. (Fig. 21) Press the Specialty
button again or turn the Multi-Serve Size dial to Off to
cancel the brew.
NOTE: The brew will begin, stop, and be quiet for
a short period of time before it begins again. This
process is used to evenly saturate your coffee
grounds.
NOTE: If brewing a half carafe or a full carafe, the
Intelligent Warming Plate will not turn on.
4 The Ninja Coffee Bar™ will beep to signal a completed
brew.
Go to ninjakitchen.com for more
information and how-to videos.
English
ninjakitchen.com
18
Page 20

Care & Maintenance
CLEANING AFTER A BREW
CAUTION: Make sure that the brewer is
unplugged from the power source before
cleaning.
CAUTION: Be sure to allow the brewer to cool
before cleaning.
IMPORTANT: Discontinue use if the glass carafe
is scratched or handle is loose or damaged.
NOTE: Do not leave coffee in the glass carafe for
an extended period of time after a brew.
NOTE: Do not leave water in the reservoir unused
for multiple days. Rinse and replace with
freshwater.
1 Before cleaning, close the Drip Stop.
2 After each brew is complete and the coffee grounds
have cooled, carefully remove the permanent filter and
wash. If using the paper filter, simply discard. Remove
brew basket from the brewer, rinse and wash with soap
and warm water.
NOTE: The brew basket is not dishwasher safe.
NOTE: If coffee grounds spilled over into the brew
basket or in the overflow channels, remove and rinse
under water until grounds are removed.
3 Wash the carafe and brew-through lid with soap and
warm water. Use a bottle brush or a cloth to wash the
inside of the carafe.
NOTE: The brew-through lid, glass carafe and water
reservoir are top shelf dishwasher safe.
IMPORTANT: Clean the glass carafe with a soft brush
or sponge. Do not use a wire brush.
4 Wipe machine down with a warm cloth with soap and
water. Let the warming plate cool before cleaning with
a wet cloth and soap and water. Do not immerse the
base in water.
NOTE: For best results, use a bottle brush. This will
allow you to scrub all of the inside with soap and hot
water.
CLEANING YOUR CARAFE
We recommend rinsing your carafe
with warm soapy water, or placing
in the top shelf of your dishwasher.
If you want to clean the carafe more
thoroughly, we recommend using a soft
foam brush such as the one shown.
CLEANING YOUR WATER RESERVOIR
1 Empty the water reservoir.
2 Hand wash with dish soap and rinse or place on the top
rack of your dishwasher.
19
1-877-646-5288
Page 21

Fig. 22
CLEANING & DESCALING YOUR BREWING
SYSTEM
CAUTION: Be sure to allow the brewer to cool
before wiping down any surface for cleaning.
CAUTION: DO NOT immerse the coffeemaker into
water or any other liquid.
The CLEAN button will illuminate when a cleaning cycle
is recommended for your Ninja Coffee Bar™, as calcium
scale buildup could be affecting the flavor of your coffee.
To clean and descale your Ninja Coffee Bar:
NOTE: The clean cycle takes approximately 60 minutes.
1 Select the Full Carafe size and set the empty carafe
beneath the brew basket.
2 Use a descaling solution specifically formulated for
coffeemaker cleaning and follow the directions on
the package. Fill the water reservoir up to, but not
exceeding, the Max Fill line (1.25 L).
OR
Fill the water reservoir to the Travel Mug line (475 ml)
with white vinegar, then fill the rest of the reservoir with
water up to, but not exceeding, the Max Fill line (1.25 L).
IMPORTANT: Use only white vinegar.
3 Once the water reservoir is filled with your cleaning
solution and water mixture, press the CLEAN button.
(Fig. 22)
NOTE: To cancel the clean cycle, turn the multi-serve
dial to the ‘OFF’ position or press the CLEAN button
once. The unit will beep, and stop brewing through
the cleaning mixture. Discard any remaining cleaning
mixture in the reservoir and the carafe, and thoroughly
clean each. Refill the reservoir with fresh water up to,
but not exceeding, the Max Fill line, and set the empty
carafe beneath the brew basket. Run a Full Carafe,
Classic Brew with water only to remove any cleaning
solution that could affect the flavor of your coffee.
AM
H
PM
M
PROG
S
TAY WARM/
GARDEZ CHAUD
BREW/ INFUSION
CLASSIC/CLA
S
SIQUE
RICH/ RICHE
OVER ICE / SUR GLACE
SPECIALTY / SPÉCIALITÉ
(CONCENTRATED /
CONCENTRÉ
E)
CLEAN/
NETT
O
YER
IMPORTANT: If you cancel the clean cycle, your
machine will not be properly descaled, and the CLEAN
indicator light will remain on.
4 The clock will display and countdown the remaining
clean cycle time, as this takes approximately 60 minutes
to complete. Your Ninja Coffee Bar will deliver a small
amount of cleaning solution to distribute it through the
system. It will then pause for a half an hour, deliver
additional cleaning solution, and pause for another half
hour. The extended pauses allow for maximum cleaning
and descaling.
CAUTION: DO NOT remove the carafe at any time
throughout the clean cycle.
5 Upon completion, the brewer will beep, and the CLEAN
light will turn off.
6 Empty and thoroughly clean the carafe and water
reservoir with warm, soapy water to remove any cleaning
solution that could affect the flavor of your coffee.
7 Fill the reservoir with fresh water up to, but not
exceeding, the Max Fill line (1.25 L) and set the empty
carafe beneath the brew basket.
8 Flush the system by running a Full Carafe, Classic
Brew cycle with water only. After the cycle is complete,
discard the water and thoroughly clean the carafe to
remove any cleaning solution that could affect the flavor
of your coffee.
NOTE: If the CLEAN light illuminates again, then calcium
scale buildup is still present. Repeat the steps above and
the CLEAN light will automatically shut off when your
brewer is clean.
Please call Customer Service at 1-877-646-5288 to
purchase descaling solution or if the brewer needs any
servicing.
English
ninjakitchen.com
20
Page 22

Troubleshooting Guide
PROBLEMS POSSIBLE REASONS & SOLUTIONS
Ensure the water reservoir is locked in place and is filled with enough water for the desired
brew.
Check the CLEAN indicator light. If illuminated, run a clean cycle with the appropriate
My Ninja Coffee Bar™
beeped and did not
complete the full brew
that I selected.
descaling solution or a white vinegar mixture. See Care & Maintenance section.
Check the Drip Stop indicator light. If illuminated, ensure the brew basket is fully inserted
into the brewer and open the Drip Stop once the vessel is placed under the brew basket.
If the CLEAN cycle was run and the Ninja Coffee Bar is still not completing the brew OR the
CLEAN light is flashing, you may have hard water and a critical amount of calcium build
up.
If the problem persists please call customer service at 1-877-646-5288.
My CLEAN button is
flashing and beeping.
The clock is flashing cln.
Sediment in my coffee.
Grounds in my coffee.
Brew Basket dripping
after brew.
Paper filter falling
over.
Coffee is not hot
enough.
Over Ice Brew is not
cold.
Weak coffee.
The Ninja Coffee Bar senses that there is a critical amount of calcium or mineral deposits
built up in the internal parts of the brewer. Run a clean cycle using a Descaling solution or
a white vinegar solution. Please see the Care & Maintenance section on page 20.
If there is sediment at the bottom of the brewed coffee, this may be due to finely ground
coffee in a permanent filter.
To reduce the amount of sediment in the brewed coffee use a slightly coarser grind or use
a paper filter.
If there are grounds in your coffee, check to make sure the brew basket did not overflow.
If there are too many grounds in the brew basket, or you are using a fine ground coffee,
the grounds will flow into an overflow channel designed to make sure overflow is captured
in the brew vessel. For best results use medium ground coffee in the recommended
measurements.
Check to see if the Drip Stop toggle is set to the closed, no drip position.
If the Drip Stop is set to the closed, no drip position and the brewer continues to drip, run
a clean cycle or wash the brew basket thoroughly with warm, soapy water.
The Ninja Coffee Bar is designed to take a #4 cone filter. Be sure you are using this size
and shape for best results.
Be sure the paper filter is firmly pressed into the brew basket.
Wet the corners of the filter for best results.
If problem persists, try using a permanent filter.
Your Ninja Coffee Bar System is equipped with a pre-heating function that ensures your
cup of coffee as hot as it possibly can be. After turning your Niinja Coffee Bar on, the preheat notification will illuminate for 3 minutes as it warms up. Once it has warmed up to
temperature the pre-heat notification will turn off indicating it is time to brew.
To brew the hottest possible cup with your Ninja Coffee Bar, keep it plugged in and
powered on at all times to allow the brewing system to remain warm and ready to brew.
The Over Ice brew is designed to brew hot coffee over ice to lock in the flavour for rich,
smooth iced coffee. Make sure your cup, travel mug, or carafe is filled all the way to the
top with ice cubes.
If the coffee tastes weak, try adding more coffee grounds into the brew basket for the next
brew cycle.
If the coffee is still weak after adding more coffee grounds, try Rich Brew to make a
stronger more concentrated cup.
21
1-877-646-5288
Page 23

PROBLEMS POSSIBLE REASONS & SOLUTIONS
Coffee too strong.
Brew will not start.
Brew cycle is too slow.
My cup, travel mug or
carafe overflowed.
Try using a more coarse grind.
If the coffee is still too strong, try using less coffee grounds.
Check to make sure the brewer is plugged in and water is in the water reservoir.
If the drip stop is in the open position, check that the brew basket is pushed all the way
into the brewer.
If you hear 5 beeps, check that the drip stop is in the open position.
NOTE: The brew will begin, stop, and be quiet for a short period of time before it begins
again. This process is used to evenly saturate your coffee grounds.
A carafe brew will take approximately 8 minutes and the single cup will take approximately
4 minutes.
If the brew cycle is taking longer than normal, run the clean cycle with the descaling
solution.
The cup, travel mug or carafe may not have been empty prior to brewing.
The water exceeded the Max Fill line on the water reservoir prior to brewing.
The Ninja Coffee Bar™ is designed to dispense the following amounts on Classic Brew:
Cup 281 ml
Travel Mug 414 ml
Half Carafe 620 ml
Carafe 1.12 L
Please ensure that you are using at least a 350 ml cup for the cup size and a 475 ml
travel mug for the travel mug size.
NOTE: On Rich brew, Over Ice brew, and Specialty brew there will be less volume
dispensed.
English
Brew basket
overflowed.
Water left in my
reservoir.
Does it take coffee
pods?
My Ninja Coffee Bar™ is
leaking.
*K-Cup is a registered trademark of Keurig Green Mountain, Inc. Use of the K-Cup trademark does not imply any affiliation with
or endorsement by Keurig Green Mountain, Inc.
Check the amount of coffee or type of grind used.
Ninja Coffee Bar allows you to fill the reservoir up to but not exceeding the Max Fill line
and Auto-iQ™ One Touch Intelligence will only use the water needed for the brew size and
style selected.
After a brew you may notice left over water in your water reservoir after filling to the
minimum fill line of the size selected. The water reservoir markings are minimum fill lines
that indicate if there is enough water for the proper brew size in the reservoir for any brew
style in that size, but all brew styles use different amounts of water to create the proper
flavour and concentration.
You can brew multiple cups before needing to refill.
This brewer is designed to brew coffee grounds only. Do not insert pods or K-Cups®*.
If the leak is coming from the brew basket, be sure all the parts are fit securely in the
brewer.
If the leak is coming from the bottom of the brewer call customer service at
1-877-646-5288.
ninjakitchen.com
22
Page 24

Troubleshooting Guide - cont.
PROBLEMS POSSIBLE REASONS & SOLUTIONS
Why is the second cup
that I brewed hotter
than the first brew?
How long does pre-heat
take to give me the
hottest cup?
I noticed the carafe
design & lid. What are
the benefits?
Coffee Brew Volume:
What impacts coffee
brew volume?
How does the Ninja
coffee bar keep
coffee at the right
temperature?
Once the Ninja Coffee Bar™ has brewed the first cup, the brewing system is pre-warmed.
This enables any following brews to be slightly hotter. For a hot first cup try pre-warming
your mug.
After turning your Niinja Coffee Bar on, the pre-heat notification will illuminate for 3
minutes as it warms up. Once it has warmed up to temperature the pre-heat notification
will turn off indicating it is time to brew.
To brew the hottest possible cup with your Ninja Coffee Bar, keep it plugged in and
powered on at all times to allow the brewing system to remain warm and ready to brew.
Our unique carafe shape and design has the following benefits:
Easy grip design making it easy to pour coffee without dripping.
Thoroughly mix your coffee from the first drop to the last thanks to the Brew-Through
Carafe Lid.
Optimize coffee temperature.
Allow you to brew both hot and iced coffee.
When you make hot coffee, coffee grounds will absorb some of the water that is brewed
resulting in slightly less brewed coffee than the water used. The more coffee you use,
the more water will be absorbed. Additionally, our wider bottom carafe holds most of the
volume coffee at the base which helps control the temperature more evenly.
Classic Brew:
Full Carafe Half Carafe
The carafe is designed to keep most of the coffee volume in the bottom so it can be held
closer to the Precise Temp Warming plate. This helps maintain the coffee at the ideal
drinking temperature.
Go to ninjakitchen.com for more
information and how-to videos.
Replacement Parts
ORDERING REPLACEMENT PARTS
To order additional parts and attachments, please visit our website: ninjaaccessories.com
or feel free to contact customer service: 1-877-646-5288.
23
1-877-646-5288
Page 25

ONE (1) YEAR LIMITED WARRANTY
SharkNinja Operating LLC warrants this product to be free from material defects and workmanship for a period of
one (1) year from the date of purchase when utilized for normal household use, subject to the following conditions,
exclusions andexceptions.
The liability of SharkNinja Operating LLC is limited solely to the cost of the repair or replacement of the unit at
our option. This Limited Warranty does not cover normal wear of parts and does not apply to any unit that has been
tampered with or used for commercial purposes. This Limited Warranty does not cover damage caused by misuse,
abuse, negligent handling or damage due to faulty packaging or mishandling in transit. This Limited Warranty does
not cover damage or defects caused by or resulting from damages from shipping or repairs, service or alteration
to the product or any of its parts, which have been performed by a repair person not authorized by SharkNinja
OperatingLLC.
If your appliance fails to operate properly while in use under normal household conditions within the warranty period,
return the complete appliance and accessories, freight prepaid. For assistance with warranty service options or
customer support, please call our customer care and product specialists at , call 1 (877) 646-5288 or visit our website
ninjakitchen.com/warranty.
If the appliance is found to be defective in material or workmanship, SharkNinja Operating LLC will repair or replace
it free of charge. Proof of purchase is required and a fee of $19.95 will apply to cover the cost of return freight. *
This Limited Warranty is extended to the original purchaser of the unit and excludes all other legal, implied and/or
conventional warranties. The responsibility of SharkNinja Operating LLC if any, is limited to the specific obligations
expressly assumed by it under the terms of this Limited Warranty. In no event is SharkNinja Operating LLC liable for
incidental or consequential damages to anyone of any nature whatsoever. Some states do not permit the exclusion or
limitation of incidental or consequential damages, so the above may not apply to you.
This Limited Warranty gives you specific legal rights, and you may also have other rights which vary from state to state
or from province to province.
*IMPORTANT: Carefully pack item to avoid damage in shipping. Be sure to include proof of purchase date
and to attach tag to item before packing with your name, complete address and phone number with a
note giving purchase information, model number and what you believe is the problem with the item. We
recommend you insure the package (as damage in shipping is not covered by your Limited Warranty).
Mark the outside of your package “ATTENTION CUSTOMER SERVICE”.
English
Product Registration
Please visit registeryourninja.com or call 1-877-646-5288 to register your new Ninja
days of purchase. You will be asked to provide the store name, date of purchase and model number along with
your name and address.
The registration will enable us to contact you in the unlikely event of a product safety notification. By registering
you acknowledge to have read and understood the instructions for use, and warnings set forth in the
accompanying instructions.
®
product within ten (10)
ninjakitchen.com
24
Page 26

Familiarisez-vous avec votre appareil Ninja Coffee Bar
e
MC
a
b
f
k
g
c
h
AM
H
PM
M
PROG
S
TAY WARM/
GARDEZ CHAUD
BREW/ INFUSION
i
j
CLASSIC/CLAS
RICH/ RICHE
OVE
R ICE / SUR GLACE
SPECIALTY / SPÉCIALITÉ
(CONCENTRATED /
CONCENTRÉ
CLEAN/
NETT
O
YER
SIQUE
E)
d
l
a Couvercle basculant du réservoir d’eau
b Réservoir d’eau amovible
c Appareil d’infusion
d Panneau de commande
e Panier d’infusion amovible
f Dispositif antigouttes à bascule
25
1-877-646-5288
g Couvercle de carafe avec orifice pour l’infusion
h Carafe en verre
i Plateforme à formats multiples pour gobelets
j Plaque chauffante intelligente
k Cuillère à mesurer double : mesure pour la carafe et
mesure de portion individuelle
l Fil d’alimentation et enveloppe (non illustré)
Page 27

Panneau de commande
AM
1
PM
3
5b
5a
5e
6a
1 Horloge numérique programmable
H
2
M
4
5c
5d
2 Bouton des heures et bouton des minutes
3 Bouton « PROG » pour l’infusion différée
4 Bouton de réchaud « Gardez Chaud »
5 Cadran de sélection des formats multiples
a Tasse
b Tasse de voyage
c Demi-carafe
d Carafe entière
e Arrêt - Arrête toutes les fonctions sauf l’horloge
6 Types d’infusion
a Bouton « Classique » pour l’infusion classique
b Bouton « Riche » pour l’infusion corsée
c Bouton « Sur Glace » pour l’infusion sur glaçons
d Bouton « Spécialté (concentrée) » pour l’infusion de
boissons de spécialité
7 Bouton / témoin du cycle de nettoyage intelligent
8 Témoin de l’activation du dispositif antigouttes
Français
6b
6c
6d
7 8
ninjakitchen.com
26
Page 28

Caractéristiques de l’appareil Ninja Coffee Bar
AM
PM
H
M
PROG
CLASSIC/CLAS
SIQUE
RICH/ RICHE
OVER ICE / SUR GLACE
SPECIALTY / SPÉCIALITÉ
(CONCENTRATED /
CONCENTRÉ
E)
S
TAY WARM/
GARDEZ CHAUD
CLEAN/
NETT
O
YER
BREW/ INFUSION
AM
PM
H
M
PROG
CLASSIC/CLAS
SIQUE
RICH/ RICHE
OVE
R ICE / SUR GLACE
SPECIALTY / SPÉCIALITÉ
(CONCENTRATED /
CONCENTRÉ
E)
S
TAY WARM/
GARDEZ CHAUD
CLEAN/
NETT
O
YER
AM
PM
H
M
PROG
CLASSIC/CLAS
SIQUE
RICH/ RICHE
OVER ICE / SUR GLACE
SPECIALTY / SPÉCIALITÉ
(CONCENTRATED /
CONCENTRÉ
E)
S
TAY WARM/
GARDEZ CHAUD
CLEAN/
NETT
O
YER
BREW/ INFUSION
BREW/ INFUSION
MC
• Technologie Thermal Flavour ExtractionMC – cette technologie combine l’apport de la quantité d’eau précise et des
commandes automatisées pour une température, une préinfusion, une saturation du café et une richesse de la saveur calibrés.
La technologie thermique d’extraction de la saveur de NinjaMD vous permet de réellement déguster toute la saveur de votre café.
• Formats multiples – permet d’infuser des boissons qui sont versées directement dans votre tasse favorite, une tasse de
voyage ou la carafe.
• Réglages des types d’infusion – pour régler l’intensité et le type de café infusé:
a. L’infusion classique « Classique » offre un café chaud, au goût velouté et équilibré.
b. L’infusion corsée « Riche » offre un café plus intense que l’infusion classique, mais tout de même velouté; l’infusion plus
courte permet d’ajouter davantage de lait et (ou) de crème.
c. L’infusion sur glaçons « Sur Glace » offre un café glacé intense et velouté, fraîchement infusé, dont la saveur n’est pas
diluée excessivement.
d. L’infusion de boissons de spécialité « Spécialté » offre la décoction puissante des boissons à base de lait et des boissons
glacées de spécialité.
• Plateforme à formats multiples pour gobelets – abaissez la plateforme et déposez-y votre tasse favorite. Ensuite, infusez
une boisson versée directement dans votre tasse.
• Réservoir d’eau amovible avec couvercle basculant facilement accessible – pour un remplissage rapide et facile.
• Auto-iQMC – L’appareil Ninja Coffee BarMC calcule la quantité d’eau requise pour chacun des formats et des types d’infusion.
• Carafe en verre de 1.25 L
• Panneau de commande à DEL avec horloge numérique programmable
• Bouton « PROG » pour l’infusion différée, programmation de 24 h – pour le réglage de l’infusion différée activée
automatiquement le lendemain matin.
• Dispositif antigouttes – ce dispositif interrompt l’écoulement du café du panier-filtre, pour servir le café pendant le cycle
d’infusion; mettez le commutateur à bascule à la position fermée pour éviter l’égouttement après le cycle d’infusion.
• Fonction de nettoyage (« Nettoyer ») – ce témoin s’allume lorsque votre appareil Ninja Coffee BarMC détecte des dépôts
calcaires dans le système d’infusion, ce qui pourrait nuire à la saveur du café. Lorsque ce témoin s’allume, suivez les directives
de nettoyage de la section Soins et entretien de ce manuel ou les instructions derrière votre appareil d’infusion.
• Bouton de réchaud « Gardez Chaud » – La plaque chauffante s’allume automatiquement après l’infusion d’une carafe de
café et s’éteindra après deux heures. Pour éteindre manuelle la plaque chauffante, appuyez sur le bouton de réchaud « Gardez
Chaud ».
• Plaque chauffante intelligente – la plaque chauffante règle automatiquement sa température pour conserver la température
idéale du café sans brûler votre boisson.
• Mode de préchauffage – Le Bar à café Ninja restera en mode de ralenti, et chauffera l’eau à l’intérieur pendant 72 heures.
• Mode de veille – Après 72 heures, le Bar à café Ninja passera au mode de veille pour économiser de l’énergie, ou vous pouvez
mettre le cadran multiservice en position « ARRÊT » pour activer le mode de préchauffage et toutes les autres fonctions.
• Signal sonore indiquant que l’infusion est terminée – ce signal vous informe que votre café est prêt.
• Arrêt automatique après deux heures – la plaque chauffante s’éteint automatiquement deux heures après l’infusion du café.
Infusez des boissons versées directement dans une tasse, une tasse de voyage ou une carafe classique, ou
Formats multiples
infusez le café pour remplir une demi-carafe.
Tasse de voyage Tasse
Carafe classique ou
demi-carafe
AM
H
PM
M
PROG
S
TAY WARM/
GARDEZ CHAUD
BREW/ INFUSION
CLASSIC/CLAS
SIQUE
RICH/ RICHE
OVE
R ICE / SUR GLACE
SPECIALTY / SPÉCIALITÉ
(CONCENTRATED /
CONCENTRÉ
E)
CLEAN/
NETT
O
YER
27
1-877-646-5288
AM
PM
PROG
CLASSIC/CLAS
OVE
SPECIALTY / SPÉCIALITÉ
(CONCENTRATED /
CLEAN/
NETT
H
M
S
TAY WARM/
GARDEZ CHAUD
BREW/ INFUSION
SIQUE
RICH/ RICHE
R ICE / SUR GLACE
CONCENTRÉ
E)
O
YER
AM
PM
PROG
CLASSIC/CLAS
OVER ICE / SUR GLACE
SPECIALTY / SPÉCIALITÉ
(CONCENTRATED /
CLEAN/
NETT
H
M
S
TAY WARM/
GARDEZ CHAUD
BREW/ INFUSION
SIQUE
RICH/ RICHE
CONCENTRÉ
E)
O
YER
Page 29

Avant la première utilisation
VEUILLEZ GARDER À L’ESPRIT CES
DIRECTIVES DE SÉCURITÉ IMPORTANTES
LORSQUE VOUS UTILISEZ L’APPAREIL :
MISE EN GARDE : CET APPAREIL PRÉPARE
DES LIQUIDES CHAUDS. MANIPULEZ-LE AVEC
SOIN.
MISE EN GARDE : Lorsque l’appareil est en
marche, n’enlevez PAS le récipient sans
d’abord mettre le dispositif antigouttes à
la position fermée. Remettez rapidement
le récipient et déplacez le dispositif
antigouttes à la position ouverte pour
continuer l’infusion.
MISE EN GARDE : N’ouvrez jamais le panier-
filtre lorsque la cafetière est en marche.
MISE EN GARDE : Assurez-vous d’utiliser
une tasse d’au moins 350 ml pour le réglage
de Tasse, et une tasse de voyage de 475 ml
pour le réglage de Tasse de Voyage.
IMPORTANT : NE FAITES PAS fonctionner
l’appareil lorsque le réservoir d’eau est vide.
IMPORTANT : Mettez toujours un récipient
sous le panier-filtre pour recueillir le café
infusé.
IMPORTANT : NE PAS remplir le réservoir
excessivement – remplissez d’eau jusqu’à la
ligne de remplissage max. seulement.
Français
1 Retirez tous les composants d’emballage et les
autocollants, ainsi que toutes les étiquettes de
l’apparei.
REMARQUE: La carafe en verre peut être nettoyée au
lave-vaisselle, mais dans le panier supérieur seulement.
2 Avec un linge doux, lavez le réservoir d’eau, la carafe
en verre et le panier-filtre à l’eau savonneuse tiède.
3 Rincez et séchez complètement les pièces.
4 Pour nettoyer la plaque chauffante intelligente,
essuyez-la avec un linge humide.
5 Avant la première utilisation, exécutez deux cycles
d’infusion d’une carafe entière avec de l’eau seulement,
puis jetez l’eau.
ninjakitchen.com
28
Page 30

Réglage de l’horloge et de l’infusion différée
Fig. 1
AM
PM
H
M
Fig. 2
AM
PM
RÉGLAGE DE L’HORLOGE
1 Branchez le cordon d’alimentation dans la prise électrique.
L’horloge du panneau de commande clignotera pour indiquer
que l’heure n’est pas programmée. (Fig. 1)
2 Enfoncez les boutons H (heure) et M (minutes) jusqu’à ce
que l’heure actuelle soit affichée. L’indicateur AM ou PM
(à gauche de l’affichage) s’allumera pendant que vous
programmez l’heure.
3 Après cinq secondes, l’horloge cessera de clignoter et
l’horloge est programmée.
REMARQUE : Si l’horloge cesse de clignoter sans afficher
la bonne heure, il suffit d’enfoncer de nouveau le bouton H
(heure) ou M (minutes) à tout moment pour que l’affichage
clignote. Il est maintenant possible de reprogrammer l’heure
actuelle en suivant les étapes ci-dessus.
REMARQUE: Si l’appareil est débranché et après une
panne de courant prolongée, il faut régler l’horloge lors du
rebranchement de votre Ninja Coffee BarMC.
PROGRAMMATION DE L’HEURE DE L’INFUSION
DIFFÉRÉE
REMARQUE : Le Ninja Coffee Bar doit demeurer en marche afin
de faire fonctionner l’option d’infusion différée. N’arrêtez pas
l’appareil après avoir activé la fonction d’infusion différée.
1 Enfoncez le bouton « PROG » pour l’infusion différée. Le
bouton « PROG » clignotera; l’heure affichée sera « 12:00 »
ou correspondra à l’heure programmée pour la plus récente
infusion différée. (Fig. 2)
2 Lorsque l’heure affichée clignote, enfoncez le bouton
H (heure) ou M (minutes) pour programmer l’heure où
commencera l’infusion différée. L’indicateur AM ou PM
(à gauche de l’affichage) s’allumera pendant que vous
programmez l’heure désirée.
29
1-877-646-5288
H
M
AM
PM
H
M
Fig. 3
3 Une fois l’heure désirée programmée, sélectionnez le format
du récipient qui sera utilisé lors de l’infusion.
4 Sélectionnez le réglage du type d’infusion parmi les quatre
boutons clignotants. Le bouton du type d’infusion sélectionné
s’allumera. (Fig. 3)
5 Lorsque les réglages de l’heure, du format et du type
d’infusion sont programmés, laissez le bouton « PROG »
clignoter avant de s’allumer en continu ou enfoncez le bouton
« PROG » pour activer le mode d’infusion différée. Lorsque la
fonction « PROG » est activée, le témoin du bouton s’allume
et l’appareil émet un signal sonore pour confirmer que cette
fonction est réglée.
6 L’heure de l’infusion différée est programmée et votre appareil
Ninja Coffee BarMC commencera automatiquement l’infusion à
l’heure programmée.
REMARQUE : Pour désactiver le cycle d’infusion différée,
appuyez de nouveau sur le bouton « PROG »; le témoin de ce
bouton s’éteindra. Tout changement apporté au réglage du
format ou le début d’une autre infusion annulera l’infusion
différée programmée.
7 Mettez sous le panier-filtre un récipient
dont le format correspond à vos
réglages.
IMPORTANT : Assurez-vous que le
dispositif antigouttes est à la position
ouverte.
Visitez le site ninjakitchen.com pour obtenir
de plus amples renseignements et pour
visionner des vidéos éducatives.
Page 31

Assemblage
AM
PM
PROG
BREW/ INFUSION
CLASSIC/CLA
RICH/ RICHE
OVE
R ICE / SUR GLACE
SPECIALTY / SPÉCIALITÉ
(CONCENTRATED /
CLEAN/
NETT
O
YER
AM
H
PM
H
M
S
TAY WARM/
GARDEZ CHAUD
S
SIQUE
CONCENTRÉ
E)
PROG
BREW/ INFUSION
CLASSIC/CLAS
RICH/ RICHE
OVER ICE / SUR GLACE
SPECIALTY / SPÉCIALITÉ
(CONCENTRATED /
CLEAN/
NETT
O
YER
M
S
TAY WARM/
GARDEZ CHAUD
SIQUE
CONCENTRÉ
E)
Français
Fig. 4
Fig. 4a
Fig. 4b
1 Placez l’appareil d’infusion sur une surface sèche,
propre et de niveau.
2 Pour retirer le réservoir d’eau, tenez celui-ci par la
prise prévue à cette fin et faites-le tourner dans le sens
contraire des aiguilles d’une montre. (Fig. 4) Faites
basculer le couvercle (Fig. 4a) ou enlevez celui-ci
en le tournant dans le sens contraire des aiguilles
d’une montre. (Fig. 4b) Remplissez le réservoir
jusqu’à la ligne de remplissage pour une carafe
(«MaxFill»,1.25L), sans dépasser cette ligne. Pour
le remettre dans l’appareil, déposez le réservoir sur le
socle, puis faites tourner le réservoir dans le sens des
aiguilles d’une montre jusqu’à ce que vous entendiez un
« clic » indiquant qu’il est verrouillé en place.
Fig. 5
Fig. 6
3 Pour le retirer de l’appareil, faites glisser le panier-filtre
en l’inclinant légèrement vers le haut. (Fig. 5) Pour
le réinsérer, alignez le panier-filtre avec les rails de
guidage et faites-le glisser dans l’appareil. (Fig. 6)
4 Une fois le panier-filtre en place, faites-le glisser
complètement dans l’appareil, jusqu’à ce que vous
entendiez un léger « clic ».
ninjakitchen.com
30
Page 32

Assemblage – suite
Fig. 7
Fig. 8
5 Mettez le couvercle avec orifice pour l’infusion sur
la carafe en verre, puis tournez-le dans le sens des
aiguilles d’une montre afin de le verrouiller. (Fig.7)
6 Mettez la carafe au centre de la plateforme sous le
panier-filtre. (Fig. 8)
REMARQUE : Pour bien nettoyer l’appareil d’infusion,
n’utilisez pas de café lors des deux premiers cycles
d’infusion.
H
M
AM
PM
PROG
BREW/ INFUSION
CLASSIC/CLA
RICH/ RICHE
OVE
R ICE / SUR GLACE
SPECIALTY / SPÉCIALITÉ
(CONCENTRATED /
CLEAN/
NETT
O
YER
AM
PM
H
M
S
TAY WARM/
GARDEZ CHAUD
S
SIQUE
CONCENTRÉ
E)
Fig. 9
7 Branchez l’appareil d’infusion dans une prise électrique.
8 Une fois toutes les pièces solidement fixées, enfoncez
le bouton « Nettoyer » pour nettoyer l’appareil en
profondeur avant la première utilisation. (Fig. 9)
9 Videz la carafe de son eau, puis répétez la procédure
à partir de l’étape 2 afin d’exécuter un autre cycle de
nettoyage complet avec de l’eau avant la première
utilisation.
31
1-877-646-5288
Page 33

Préparatifs pour l’utilisation
MISE EN GARDE : Remplissez le réservoir jusqu’à la ligne de remplissage maximal (« Max Fill »), sans dépasser cette
ligne. Nous recommandons l’utilisation d’eau fraîche, froide et filtrée. Ne remplissez pas le réservoir d’eau avec d’autres
liquides, comme du café infusé, des boissons gazeuses, etc., puisque ces liquides pourraient endommager votre
cafetière.
OU
AM
H
PM
M
PROG
STAY WARM/
GARDEZ CHAUD
SPECIALTY / SPÉCIALITÉ
BREW/ INFUSION
CLASSIC/CLAS
OVER ICE / SUR GLACE
(CONCENTR
CLEAN/
NETT
SIQUE
RICH/ RICHE
ATED /
CONCENTRÉ
E)
O
YER
Fi g. 11a Fig. 11b
Fig. 10 Fig. 12
REMPLISSAGE DU RÉSERVOIR D’EAU
1
Pour remplir facilement le réservoir d’eau, il suffit de le
tourner légèrement dans le sens contraire des aiguilles d’une
montre jusqu’à ce qu’il soit dégagé de l’appareil
2
Faites basculer le couvercle ou enlevez celui-ci en le tournant
dans le sens contraire des aiguilles d’une montre
(Fig. 11a, Fig. 11b)
REMARQUE : L’assemblage du réservoir d’eau et de son
couvercle se verrouille à plusieurs endroits
3
Pour des résultats optimaux, remplissez le réservoir avec
de l’eau fraîche et filtrée. Assurez-vous que le niveau d’eau
soit au-dessus de la ligne de remplissage minimum pour la
quantité de café sélectionnée. Ne pas dépasser la ligne de
remplissage max. Les paramètres intelligents de l’appareil
mesureront automatiquement la quantité d’eau requise. Pour
éviter le remplissage après chaque tasse infusée, remplissez
le réservoir jusqu’à la ligne de remplissage pour une carafe
REMARQUE : Ne pas dépasser la ligne de remplissage max.
Si l’eau débordera, retirez le réservoir de la cafetière et videz-
le jusqu’à la ligne de remplissage max.
Selon le format et le type d’infusion, il est possible
qu’il reste de l’eau dans le réservoir
4
Remettez le réservoir dans son logement sur l’appareil.
Ensuite, tournez le réservoir dans le sens des aiguilles d’une
montre pour le verrouiller en place
5
Mettez sous le panier-filtre le récipient désiré, en vous
.
assurant que celui-ci est bien centré
REMARQUE: La soupape du réservoir pourrait contenir un
peu d’eau après le retrait du réservoir. Il suffit d’essuyer la
soupape avec un chiffon sec pour enlever l’eau
. (Fig. 10)
.
.
.
. (Fig. 12)
.
QUELLE QUANTITÉ DE CAFÉ OBTENEZ-VOUS DANS
VOTRE TASSE?
Chaque format et chaque type d’infusion produisent une quantité
de café différente afin d’optimiser l’intensité, le goût et le format
de votre boisson
.
REMARQUE : Lors de l’infusion, le café moulu absorbe une partie
de l’eau; la quantité de café est ainsi légèrement inférieure à la
quantité d’eau utilisée.
MISE EN GARDE : Assurez-vous d’utiliser une tasse
d’au moins 350 ml pour le réglage de tasse, et une tasse de
voyage de 475 ml pour le réglage de tasse de voyage.
Quantité approximative de l’infusion
Format /
infusion
Tasse
.
Tasse de
voyage
Demicarafe
Carafe
Format /
infusion
Tasse 111 ml 281 ml
Tasse de
voyage
Demicarafe
Carafe
Classique Riche
281 ml 258 ml 93 ml.
414 ml 390 ml 123 ml
620 ml 580 ml 235 ml
1.12 L 1.05 L 298 ml
Café seulement Avec glaçons
174 ml 414 ml
310 ml 620 ml
468 ml 1.12 L
Sur glaçe
AM
H
PM
M
PROG
S
TAY WARM/
GARDEZ CHAUD
BREW/ INFUSION
CLASSIC/CLA
S
SIQUE
RICH/ RICHE
OVER ICE / SUR GLACE
SPECIALTY / SPÉCIALITÉ
(CONCENTRATE
D /
CONCENTRÉ
E)
CLEAN/
NETT
O
YER
Boissons de
spécialité
Français
ninjakitchen.com
32
Page 34

Préparatifs pour l’utilisation – suite
DÉSIREZ-VOUS OBTENIR UN CAFÉ PLUS CHAUD?
Vous êtes-vous déjà demandé pourquoi le café pour emporter est servi dans un gobelet en papier? Le type de récipient contenant votre
boisson infusée peut avoir une influence importante sur la température de dégustation!
TYPE DE RÉCIPIENT TASSE EN CÉRAMIQUE GOBELET
Température du
récipient
Température
ambiante
Préchauffé avec de
l’eau chaude
Préchauffé au four
à micro -ondes avec
du lait
Température de
Chaud Plus chaud Plus chaud Plus chaud Temp. la plus élevée
dégustation
NINJA®GOBELET EN PAPIER
Température
ambiante
Température
ambiante
Pourquoi existe-t-il
une différence?
Une tasse en
céramique froide
se réchauffe en
entraînant une perte
de chaleur du café
Si la tasse est déjà
chaude, elle entraîne
une plus faible perte
de chaleur du café
.
Fi g. 14
AM
H
PM
M
PROG
S
TAY WARM/
Fig. 13
SPECIALTY / SPÉCIALITÉ
CLASSIC/CLAS
OVER ICE / SUR GLACE
(CONCE
CLEAN/
NETT
GARDEZ CHAUD
BREW/ INFUSION
SIQUE
RICH/ RICHE
NTRATED /
CONCENTRÉ
E)
O
YER
Cuillère Ninja
Carafe
REMPLISSAGE DU PANIER-FILTRE AVEC LE CAFÉ
MOULU
Pour des résultats optimaux, utilisez les quantités de café moulu
ci-dessous pour chacun des formats de boisson. La quantité
de café moulu indiquée pour un format donné est la même, peu
importe le réglage de type d’infusion sélectionné. Par exemple,
si vous avez sélectionné les réglages Tasse (« Cup ») et Infusion
classique (« Classic Brew »), vous utiliserez la même quantité de
café moulu que pour les réglages Tasse (« Cup ») et Infusion de
boissons de spécialité (« Specialty Brew »).
MISE EN GARDE : La capacité maximum de café moulu
est 12 c. à soupe débordantes ou 6 cuillérées de carafe
Ninja. Ne dépassez pas cette quantité et n’utilisez
pas du café finement moulu, car cela peut causer un
débordement.
1 Ouvrez le panier-filtre en faisant glisser celui-ci hors de
l’appareil. (Fig. 13)
REMARQUE : Pour retirer le panier-filtre de l’appareil,
soulevez le panier-filtre en l’inclinant légèrement vers le haut
(comme un tiroir de meuble de rangement).
REMARQUE : Examinez le panier-filtre pour vérifier s’il
contient du marc de café. Retirez et rincez le panier-filtre au
besoin.
2 Insérez un cône en papier n° 4 dans le panier d’infusion.
Pliez le cône le long des coutures, ouvrez-le complètement,
et appuyez fermement dans le panier d’infusion pour vous
assurer qu’il soit complètement inséré. (Fig. 14)
33
1-877-646-5288
Tout comme une
tasse froide, le lait
froid diminue la
.
température de votre
café
.
Le gobelet NinjaMD à
double paroi est conçu
pour conserver la
température initiale du
café de manière plus
efficace qu’une tasse en
Contrairement à une
tasse en céramique,
un gobelet en papier
plus mince ne
diminue pas de façon
importante la chaleur
céramique.
Portion individuelle
Fig . 15 a
Fig . 15
3 Utilisez la cuillère Ninja (Fig. 15a) et suivez les directives de
quantité ci-dessous pour remplir le cornet-filtre en papier. Les
quantités suggérées correspondent à des mesures de cuillère
rases; veuillez adapter les quantités en fonction de vos
préférences. (Fig. 15) Si vous souhaitez moudre des grains
de café entiers, nous vous suggérons de choisir une mouture
moyenne.
Portion
individuelle
Tasse
Tasse de voyage
Carafe
Demi-carafe
Carafe
Cuillère Ninja®
(portion individuelle)
Cuillère à table
2 - 3 mesures 2 - 3 c. à table
3 - 4 mesures 3 - 4 c. à table
®
Cuillère Ninja
(mesure pour carafe)
Cuillère à table
2 - 3 mesures 5 - 7 c. à table
4 - 6 mesures 8 - 12 c. à table
REMARQUE : Ne pas utiliser un café à moulure grossière ou
plus de 6 cuillérées de carafe Ninja, car cela peut causer le
débordement du panier d’infusion.
4 Faites glisser le panier-filtre dans l’appareil afin de
l’enclencher.
du café.
AM
PM
SPECIALTY / SPÉCIALITÉ
H
M
PROG
S
TAY WARM/
GARDEZ CHAUD
BREW/ INFUSION
CLASSIC/CLAS
SIQUE
RICH/ RICHE
OVE
R ICE / SUR GLACE
(CONCENTRATED /
CONCENTRÉ
E)
CLEAN/
NETT
O
YER
Page 35

MISE EN GARDE : EAU CHAUDE. Ne retirez pas le panier-filtre ni le récipient pendant le cycle d’infusion.
MISE EN GARDE : VAPEUR. Ne touchez pas les évents à vapeur ni le dessus de l’appareil pendant le cycle
d’infusion.
MISE EN GARDE : Après l’infusion, le panier-filtre est chaud. Il faut toujours laisser l’appareil d’infusion
refroidir complètement avant de le nettoyer.
AM
H
PM
M
PROG
S
TAY WARM/
GARDEZ CH
AUD
BREW/ INFUSION
CLASSIC/CLAS
SIQUE
RICH/ RICHE
Fig. 16
OVER ICE / SUR GLACE
SPECIALTY / SPÉCIALITÉ
(CONCENTRATED /
CLEAN/
NETT
O
YER
CONCENTRÉ
E)
Fi g. 17
Français
DISPOSITIF ANTIGOUTTES
REMARQUE : Si le dispositif antigouttes est fermé lorsque
l’infusion débute, l’appareil vous en avertira en émettant
cinq « bips ». Déplacez le dispositif antigouttes à la position
ouverte et sélectionnez le réglage de l’intensité du café
infusé.
PLAQUE CHAUFFANTE INTELLIGENTE
La plaque chauffante intelligente s’active automatiquement après
l’infusion classique (« Classique ») ou corsée (« Riche ») d’une
carafe ou d’une demi-carafe de café. La plaque chauffante
intelligente règle automatiquement sa température pour éviter de
brûler le café au fil du temps.
VOUS SOUHAITEZ SAVOURER VOTRE CAFÉ AVANT LA
FIN DU CYCLE D’INFUSION?
Pendant le cycle d’infusion d’une carafe, fermez le dispositif
antigouttes pour interrompre le cycle d’infusion afin de verser une
tasse de café. N’oubliez pas de remettre le dispositif antigouttes à la
position ouverte afin de continuer l’infusion. (Fig. 16)
REMARQUE : Si vous oubliez de remettre le dispositif antigouttes à
la position ouverte, l’appareil Ninja Coffee BarMC interrompra le cycle
d’infusion et émettra un rappel sonore amical après 20 secondes.
Après six minutes, l’appareil annulera le cycle d’infusion.
VOUS NE POUVEZ PAS ATTENDRE LES DERNIÈRES
GOUTTES?
Lorsque le cycle d’infusion est terminé, déplacez le dispositif
antigouttes à la position fermée afin d’arrêter l’écoulement du
liquide se trouvant dans le panier-filtre.
REMARQUE : Lorsque le dispositif antigouttes est fermé, le témoin
de ce dispositif s’allume dans le coin inférieur droit du panneau de
commande.
REMARQUE : N’oubliez pas de remettre le dispositif antigouttes
à la position ouverte lorsque vous êtes prêt à continuer l’infusion.
En cas d’oubli, votre appareil Ninja Coffee BarMC émettra un rappel
sonore amical.
lorsque la plaque chauffante est chaude. Ne touchez pas la
surface lorsque le témoin est allumé.
BOUTON DE RÉCHAUD « GARDEZ CHAUD »
Enfoncez le bouton de réchaud « Gardez Chaud » après l’infusion
pour éteindre la plaque chauffante intelligente. Dans les deux
heures suivant l’infusion, il est possible de rallumer la plaque
chauffante intelligente en appuyant de nouveau sur le bouton de
réchaud « Gardez Chaud », si vous le souhaitez. (Fig. 17)
Si vous souhaitez que la plaque de chauffage reste allumée plus
longtemps, vous pouvez la programmer pour qu’elle demeure active
pendant 4 heures.
1 Tournez le cadran multiservice au mode de moitié ou pleine
2 Appuyez et maintenez le bouton « Gardez Chaud » jusqu’à
3 Appuyez rapidement le bouton heure ou minute (H ou M) pour
4 Le délai sera enregistré après 5 secondes, ou vous pouvez
MISE EN GARDE : Le témoin SURFACE CHAUDE s’allume
carafe.
ce que l’horloge commence à clignoter et affiche la durée
d’activation de la plaque de chauffage.
augmenter le délai jusqu’à 4 heures.
appuyer sur le bouton « Gardez Chaud ».
ninjakitchen.com
34
Page 36

Préparatifs pour l’utilisation – suite
INFUSION DU CAFÉ
REMARQUE : Chaque infusion comprend un
cycle préinfusion de durée variable. L’infusion
commence, puis arrête et l’appareil est silencieux
pendant un court laps de temps avant que le cycle
recommence. Ce processus permet de saturer
uniformément le café moulu.
REMARQUE : Pour un café plus chaud, rincez votre tasse, la
tasse de voyage ou la carafe en verre avec de l’eau chaude
avant de commencer l’infusion.
MISE EN GARDE : Assurez-vous que la carafe soit
complètement vide avant de démarrer un cycle de
nettoyage ou d’infusion. Si vous démarrez un cycle
avec de l’eau ou du café dans la carafe, ceci mènera à
un débordement.
INFUSION CLASSIQUE OU RICHE
Infusion Classique - pour un café au goût velouté et
équilibré.
Infusion Riche - pour un café plus intense que
l’infusion classique, mais tout de même velouté;
l’infusion plus courte permet d’ajouter davantage de lait
et (ou) de crème.
1 Après avoir rempli le réservoir d’eau et ajouté le café
moulu dans le filtre, assurez-vous que le dispositif
antigouttes est à la position ouverte et que le réservoir,
le panier et le filtre sont solidement fixés.
2 À l’aide du cadran de sélection des formats multiples,
sélectionnez le format de café que vous souhaitez
infuser. Placez le contenant vide dans lequel vous
souhaitez que le café s’écoule sous le panier d’infusion.
REMARQUE : Si vous infusez une tasse individuelle,
abaissez la plateforme à formats multiples et déposez
votre tasse ou votre gobelet au centre de cette
plateforme. Assurez-vous d’utiliser une tasse d’au moins
350 ml pour le réglage de tasse, et une tasse de voyage
de 475 ml pour le réglage de tasse de voyage.
AM
PM
H
M
AM
PM
H
M
Fig. 19Fig . 18
REMARQUE : Ne retirez pas le réservoir d’eau, le
panier-filtre ou le récipient pendant le cycle d’infusion.
3 Appuyez sur le bouton « Classique » pour
l’infusion classique ou sur le bouton « Riche » pour
l’infusion corsée. Le cycle d’infusion commencera.
(Fig.18,Fig.19) Appuyez de nouveau sur le bouton
« Classique » ou sur le bouton « Riche » ou tournez le
cadran de format multi-service à Arrêt pour annuler
l’infusion.
REMARQUE : L’infusion commence, puis arrête et
l’appareil est silencieux pendant un court laps de temps
avant que le cycle recommence. Ce processus permet
de saturer uniformément le café moulu.
REMARQUE : Lors de l’infusion d’une demi-carafe ou
d’une carafe entière, le témoin de réchaud « Gardez
Chaud » et la plaque chauffante intelligente s’activent
automatiquement. (Fig. 18, Fig. 19) Il est possible
de les éteindre en enfonçant le bouton de réchaud
« Gardez Chaud » allumé. La plaque chauffante
intelligente s’éteint automatiquement deux heures après
l’infusion.
REMARQUE : Ne retirez pas le réservoir d’eau, le
panier-filtre ou le récipient pendant le cycle d’infusion.
4 L’appareil Ninja Coffee BarMC émettra un signal sonore
(« bip ») pour indiquer que le cycle d’infusion est
terminé.
REMARQUE : Lorsqu’il est réglé pour l’infusion Riche,
l’appareil consommera moins d’eau et produira un peu
moins de café que lorsqu’il est réglé pour l’infusion
Classique.
35
1-877-646-5288
Page 37

INFUSION SUR GLAÇE
Ce mode d’infusion est conçu pour préparer sur des glaçons un
café chaud, intense, velouté et fraîchement infusé, dont la saveur
n’est pas diluée. Assurez-vous que le récipient est rempli de
glaçons avant de commencer l’infusion.
MISE EN GARDE : NE PAS utiliser de verrerie.
1 Après le remplissage du réservoir d’eau, ajoutez le café moulu
dans le filtre (n’hésitez pas à augmenter la quantité de café
si vous préférez une saveur plus intense). Assurez-vous que
le dispositif antigouttes est à la position ouverte et que le
réservoir, le panier-filtre et le filtre sont solidement fixés.
2 À l’aide du cadran de sélection des formats multiples,
sélectionnez le format de café que vous souhaitez infuser.
3 Avant de commencer l’infusion, remplissez entièrement le
récipient désiré avec des glaçons, puis mettez le récipient
sous le panier-filtre. Enfoncez le bouton « Sur Glace » pour
commencer l’infusion sur glaçon. (Fig. 20) Appuyez de
nouveau sur le bouton « Sur Glace » ou tournez le cadran de
format multi-service à Arrêt pour annuler l’infusion.
IMPORTANT: Il faut toujours remplir entièrement le
récipient désiré avec des glaçons avant de le mettre
sous le panier-filtre. N’ajoutez pas des glaçons dans le
réservoir d’eau.
REMARQUE : L’infusion commence, puis arrête et l’appareil
est silencieux pendant un court laps de temps avant que
le cycle recommence. Ce processus permet de saturer
uniformément le café moulu.
REMARQUE : Pour préparer une carafe entière de boisson
infusée sur glaçons, remplissez la carafe avec des glaçons et
ne mettez pas le couvercle avec orifice pour l’infusion.
4 L’appareil Ninja Coffee BarMC émettra un signal sonore
(« bip ») pour indiquer que le cycle d’infusion est terminé.
Remuez le café pour le refroidir complètement.
REMARQUE : Lors de l’infusion du café sur glaçons, la
plaque chauffante intelligente ne s’allumera pas.
QUANTITÉ APPROXIMATIVE DE L’INFUSION
MISE EN GARDE : Assurez-vous d’utiliser une tasse de
la taille convenable, sinon celle-ci risque de déborder.
Format /
infusion
Café seulement Avec glaçons
Tasse 111 ml 281 ml
Tasse de
voyage
Demicarafe
Carafe
Sur glaçe
174 ml 414 ml
310 ml 620 ml
468 ml 1.12 L
AM
PM
H
M
AM
PM
H
M
Fig . 21Fig. 20
INFUSION DE BOISSONS DE SPÉCIALITÉ
Ce mode d’infusion permet de préparer un concentré de café
intense idéal pour déguster une boisson mélangée ou à base de
lait de spécialité. Consultez le livre de recette pour découvrir des
recettes inspirantes.
1 Après avoir rempli le réservoir d’eau et ajouté le café moulu
dans le filtre, assurez-vous que le dispositif antigouttes est à
la position ouverte et que le réservoir, le panier et le filtre sont
solidement fixés.
2 À l’aide du cadran de sélection des formats multiples,
sélectionnez le format de café que vous souhaitez infuser.
REMARQUE : Avant d’infuser une boisson mélangée glacée,
remplissez le récipient désiré avec la quantité de glaçons
recommandée dans la recette.
3 Sous le panier-filtre, mettez le récipient dans lequel s’écoulera
la boisson infusée. Enfoncez le bouton « Spécialité » pour
commencer l’infusion de boissons de spécialité. (Fig. 21)
Enfoncez de nouveau le bouton « Spécialité » ou tournez le
cadran de format multi-service à Arrêt pour annuler l’infusion.
REMARQUE : L’infusion commence, puis arrête et
l’appareil est silencieux pendant un court laps de
temps avant que le cycle recommence. Ce processus
permet de saturer uniformément le café moulu.
REMARQUE : Lors de l’infusion d’une demi-carafe ou d’une
carafe entière, la plaque chauffante intelligente ne s’allumera
pas.
4 L’appareil Ninja Coffee BarMC émettra un signal sonore
(« bip ») pour indiquer que le cycle d’infusion est terminé.
Visitez le site ninjakitchen.com pour obtenir
de plus amples renseignements et pour
visionner des vidéos éducatives.
Français
ninjakitchen.com
36
Page 38

Soins et entretien
NETTOYAGE APRÈS L’INFUSION
MISE EN GARDE : Vérifiez que l’appareil est
débranché de la prise électrique avant de le
nettoyer.
MISE EN GARDE : Veillez à laisser refroidir
l’appareil avant de le nettoyer.
IMPORTANT : Cessez d’utiliser si la carafe de verre
est graffignée ou si la poignée est desserrée ou
endommagée.
REMARQUE : Ne laissez pas du café dans la
carafe en verre pour une période prolongée après
l’infusion.
REMARQUE : Ne laissez pas de l’eau dans le
réservoir si l’appareil n’est pas utilisé pendant
plusieurs jours. Rincez le réservoir et remplissezle d’eau fraîche.
1 Avant de nettoyer l’appareil, fermez le dispositif
antigouttes.
2 Après chaque infusion, laissez refroidir le marc de café
et enlevez soigneusement le filtre permanent afin de
le nettoyer. Si vous utilisez un filtre en papier, jetez-le
simplement. Retirez le panier-filtre de l’appareil, puis
rincez le panier et laver à l’eau savonneuse tiède.
REMARQUE : Le panier-filtre n’est pas résistant au
lave-vaisselle.
REMARQUE : Si le marc de café a débordé
du panier-filtre ou dans les gouttières de
débordement, enlevez le panier-filtre et rincez
celui-ci à l’eau courante afin d’éliminer toutes les
particules.
3 Nettoyez la carafe et le couvercle avec orifice pour
l’infusion à l’eau savonneuse tiède. Pour nettoyer
les parois internes de la carafe, utilisez un écouvillon
(brosse cylindrique) ou un linge.
REMARQUE : La carafe en verre, le couvercle avec
orifice pour l’infusion, et le réservoir d’eau peuvent être
lavés dans le panier supérieur du lave-vaisselle.
IMPORTANT : Nettoyez la carafe en verre avec une
brosse à poils souples ou une éponge. N’utilisez pas une
brosse métallique.
4 Nettoyez l’appareil en l’essuyant avec un linge humidifié
avec de l’eau savonneuse tiède. Laissez refroidir la
plaque chauffante avant de la nettoyer avec un linge et
de l’eau savonneuse. N’immergez pas le socle dans
l’eau.
REMARQUE : Pour des résultats optimaux, utilisez un
écouvillon (brosse cylindrique) afin de frotter les parois
internes et de les nettoyer avec de l’eau savonneuse
chaude.
NETTOYAGE DE VOTRE CARAFE
Nous recommandons que vous rinciez
votre carafe avec de l’eau savonneuse
chaude, ou en le plaçant dans le panier
supérieur du lave-vaisselle. Pour un
nettoyage plus profond, nous recommandons
que vous utilisiez une brosse en mousse douce
tel qu’illustré.
NETTOYAGE DE VOTRE RÉSERVOIR D’EAU
1 Videz le réservoir d’eau.
2 Lavez-le à la main à l’aide de savon à vaisselle, puis
rincez-le ou placez-le dans le panier supérieur de votre
lave-vaisselle.
37
1-877-646-5288
Page 39

Fig. 22
AM
H
PM
M
PROG
STAY WARM/
GARD
EZ CHAU
D
BREW/ INFUSION
CLASSIC/CLAS
SIQUE
RICH/ RICHE
OVER ICE / SUR GLACE
SPECIALTY / SPÉCIALITÉ
(CONCENTR
ATED /
CONCENTRÉ
E)
CLEAN/
NETT
O
YER
NETTOYAGE ET DÉTARTRAGE DE VOTRE
SYSTÈME D’INFUSION
MISE EN GARDE: Assurez-vous de laisser la
machine à café refroidir avant d’essuyer toute
surface lors du nettoyage.
MISE EN GARDE: N’IMMERGEZ PAS la machine à
café dans de l’eau ou tout autre liquide.
Le bouton CLEAN (NETTOYER) s’allume lorsqu’il est
conseillé d’effectuer un cycle de nettoyage de votre
Ninja Coffee BarMC, car une accumulation de dépôts de
calcium pourrait nuire à la saveur de votre café.
Pour nettoyer et détartrer votre Ninja Coffee Bar :
REMARQUE: Le cycle de nettoyage dure environ
60minutes.
1 Sélectionnez le format Full Carafe (Carafe pleine) et
placez la carafe vide sous le panier à infusion.
2 Utilisez une solution de détartrage spécialement conçue
pour nettoyer les cafetières et suivez les instructions
qui se trouvent sur l’emballage. Remplissez le réservoir
d’eau jusqu’à la ligne de remplissage maximal (1,25L),
sans la dépasser.
OU
Versez du vinaigre blanc dans le réservoir jusqu’à
atteindre la ligne de tasse de voyage (475 ml), puis
remplissez le reste du réservoir d’eau sans dépasser la
ligne de remplissage maximal (1,25L).
IMPORTANT: Utilisez uniquement du vinaigre
blanc.
3 Une fois que le réservoir d’eau est rempli du mélange
de solution de nettoyage et d’eau, appuyez sur le
bouton NETTOYER (CLEAN). (Fig. 22)
REMARQUE : Pour annuler le cycle de nettoyage,
tournez le cadran de format multi-service à Arrêt pour annuler
ou
appuyez une fois sur le bouton NETTOYER (CLEAN).
L’appareil émettra un bip et arrêtera l’infusion de la
solution nettoyante. Jetez tout restant de la solution
nettoyante qui se trouve dans le réservoir et la carafe,
et nettoyez les deux à fond. Remplissez le réservoir
d’eau fraîche jusqu’à la ligne de remplissage maximal,
puis mettez la carafe vide sous le panier à infusion.
Faites fonctionner la machine pour remplir la carafe en
entier, utilisez l’infusion classique à l’eau seulement
pour retirer toute solution nettoyante qui pourrait
modifier la saveur de votre café.
IMPORTANT : Si vous annulez le cycle de nettoyage,
la machine ne sera pas correctement détartrée, et le
voyant de nettoyage (CLEAN) restera allumé.
4 L’horloge affichera et fera le décompte du temps
restant pour le cycle de nettoyage, une exécution qui
demande environ 60 minutes. Votre machine à café
Ninja Coffee Bar produira une petite quantité de solution
nettoyante pour la distribuer dans le système. Ensuite,
l’appareil sera en pause pendant une demi-heure,
produisant un peu plus de solution nettoyante et
fera une autre pause d’une demi-heure. Les pauses
prolongées permettront un nettoyage et un détartrage
maximum.
MISE EN GARDE: NE retirez PAS la carafe lorsque
le cycle de nettoyage est activé.
5 Lorsque le cycle est terminé, la cafetière émettra un
son et le voyant CLEAN (NET TOYER) s’éteindra.
6 Videz et nettoyez soigneusement la carafe et le
réservoir d’eau avec de l’eau chaude et savonneuse
afin d’éliminer tout résidu de solution de nettoyage qui
pourrait nuire à la saveur de votre café.
7 Remplissez le réservoir d’eau jusqu’à la ligne de
remplissage maximal (1,25L) avec de l’eau potable,
puis mettez la carafe vide sous le panier à infusion.
8 Vidangez le système en effectuant un cycle d’infusion
classique à Carafe pleine, avec de l’eau seulement.
Une fois le cycle terminé, jetez l’eau et nettoyez
soigneusement la carafe afin d’éliminer tout résidu de
solution de nettoyage qui pourrait nuire à la saveur de
votre café.
REMARQUE: Si le voyant CLEAN (NETTOYER)
s’allume de nouveau, c’est qu’il y a toujours présence
d’accumulation de dépôts de calcium. Répétez les
étapes ci-dessus et le voyant CLEAN (NETTOYER)
s’éteindra automatiquement lorsque votre machine à
café sera propre.
Si la machine à café a besoin d’être réparée ou
pour acheter une solution de détartrage, veuillez
communiquer avec le service à la clientèle en
composant le 1877646-5288.
Français
ninjakitchen.com
38
Page 40

Guide de dépannage
PROBLÈMES CAUSES ET SOLUTIONS POSSIBLES
Assurez-vous que le réservoir d’eau est bien verrouillé et contient suffisamment d’eau pour le cycle
d’infusion désiré.
Vérifiez le témoin lumineux de nettoyage « Nettoyer ». Si le témoin est allumé, exécutez un cycle de
Mon appareil Ninja Coffee
BarMC a émis un signal
sonore et n’a pas terminé
le cycle d’infusion
sélectionné.
nettoyage avec la solution de détartrage adéquate ou avec une solution de vinaigre blanc. Consultez
la section Soins et entretien.
Vérifiez le témoin du dispositif antigouttes. Si ce témoin est allumé, assurez-vous que le panier-filtre
est complètement inséré dans l’appareil, puis déplacez le dispositif antigouttes à la position ouverte
une fois le récipient placé sous le panier-filtre.
Si le cycle de NETTOYAGE est terminé et que le Ninja Coffee BarMC n’effectue toujours pas
l’infusion OU si le témoin NETTOYER clignote, il se peut que vous ayez de l’eau dure et une
importante quantité de dépôts calcaires. Enclenchez le cycle de nettoyage supérieur pour un
nettoyage et un détartrage optimaux. Voir la page 38.
Si le problème persiste, veuillez appeler le Service à la clientèle au 1-877-646-5288.
Mon bouton NETTOYER
clignote et émet un
bip. « cln » clignote sur
l’horloge.
Le café infusé contient
des sédiments.
La boisson infusée
contient du marc de
café.
Du liquide s’égoutte
du panier-filtre après
l’infusion.
Le filtre en papier tombe
ou ne reste pas en place.
Le café infusé n’est pas
assez chaud.
Lors de l’infusion sur
glaçons, ma boisson
n’est pas froide.
Le Ninja Coffee BarMC détecte une accumulation importante de dépôts calcaires et de minéraux
dans les pièces internes de l’infuseur. Lancez un cycle de nettoyage en utilisant une solution de
détartrage ou de vinaigre blanc. Veuillez consulter la section Soins et entretien à la page 38.
La présence de sédiments au fond du récipient de café infusé peut être causée par du marc de café
très fin dans le filtre permanent.
Pour réduire la quantité de sédiments dans le café infusé, utilisez un café de mouture légèrement
plus grossière ou utilisez un filtre en papier.
Si la boisson infusée contient du marc de café, vérifiez que le contenu du panier-filtre n’a pas
débordé.
S’il y a trop de café moulu dans le panier d’infusion, ou si vous utilisez du café finement moulu,
le café moulu s’infiltrera dans un canal de débordement conçu pour capter les débordements du
contenant d’infusion. Pour les meilleurs résultats, utilisez un café à moulure moyenne dans les
quantités recommandées.
Vérifiez que le commutateur à bascule du dispositif antigouttes est en position fermée pour
interrompre l’écoulement.
Si le dispositif antigouttes est à la position fermée (aucun écoulement) et que du liquide continue de
s’écouler de l’appareil, exécutez un cycle de nettoyage et lavez le panier-filtre en profondeur avec de
l’eau savonneuse tiède.
L’appareil Ninja Coffee BarMC est conçu pour l’utilisation d’un cornet-filtre n° 4. Pour des résultats
optimaux, assurez-vous d’utiliser un cornet-filtre de ce format.
Assurez-vous que le filtre en papier est enfoncé fermement dans le panier-filtre.
Humidifiez les coins du filtre pour des résultats optimaux.
Si le problème persiste, essayez d’utiliser le filtre permanent.
Votre système Ninja Coffee BarMC comporte une fonction de préchauffage qui permet à votre tasse
de café d’être aussi chaude que possible. Après avoir allumé votre Ninja Coffee BarMC, le mode de
préchauffage s’allumera pendant 3 minutes, le temps de se réchauffer. Lorsque la température
souhaitée est atteinte, le mode de préchauffage s’éteindra, indiquant qu’il est temps d’infuser.
Pour obtenir la tasse de café la plus chaude possible à l’aide de votre Ninja Coffee BarMC, gardez
l’appareil branché et alimenté en tout temps pour permettre au système d’infusion de rester chaud
et prêt à infuser.
Le mode d’infusion sur glaçons est conçu pour préparer sur des glaçons un café chaud, intense
et velouté. Assurez-vous que votre tasse, tasse de voyage ou carafe est entièrement remplie de
glaçons.
39
1-877-646-5288
Page 41

PROBLÈMES CAUSES ET SOLUTIONS POSSIBLES
Si le goût du café est insipide, ajoutez plus de café moulu dans le panier-filtre lors du prochain cycle
Le café est insipide.
d’infusion.
Si la boisson est toujours insipide après l’ajout de café moulu, essayez le mode d’infusion de café
corsé « Rich Brew » afin de préparer un café plus concentré, au goût plus prononcé.
Le café est trop fort.
Le cycle d’infusion du
café ne démarre pas.
Le cycle d’infusion est
trop lent.
Ma tasse, tasse de voyage
ou carafe a débordé.
Le panier d’infusion a
débordé.
Il reste de l’eau dans le
réservoir.
L’appareil est-il
compatible avec les
dosettes de café?
Essayez d’utiliser un café de mouture plus grossière.
Si le café est encore trop fort, essayez d’infuser une plus petite quantité de café moulu.
Vérifiez que l’appareil est branché dans une prise de courant et que le réservoir d’eau n’est pas vide.
Si le dispositif antigouttes est à la position ouverte, vérifiez que le panier-filtre est complètement
inséré dans l’appareil.
Si vous entendez cinq « bips », vérifiez que le dispositif antigouttes est à la position ouverte.
REMARQUE : L’infusion commence, puis arrête et l’appareil est silencieux pendant un court laps
de temps avant que le cycle recommence. Ce processus permet de saturer uniformément le café
moulu.
Il faut prévoir environ huit minutes pour préparer une carafe pleine de café infusé ou quatre minutes
pour infuser une tasse individuelle.
Si le cycle d’infusion est plus long que la normale, exécutez un cycle de nettoyage avec la solution
de détartrage.
La tasse, tasse de voyage ou carafe peut ne pas avoir été vide avant le cycle d’infusion.
Le niveau d’eau dépassait la ligne de remplissage max. sur le réservoir d’eau avant le cycle
d’infusion.
En mode d’infusion classique « Classic Brew », l’appareil Ninja Coffee BarMC est conçu pour préparer
les quantités suivantes:
Tasse 281 ml
Tasse de voyage 414 ml
Demi-carafe 620 ml
Pleine carafe 1.12 L
Assurez-vous d’utiliser une tasse d’au moins 350 ml pour le réglage de tasse, et une tasse de
voyage de 475 ml pour le réglage de tasse de voyage.
REMARQUE : Les modes d’infusion Riche, Sur Glaçe et de boissons de Spécialité, la quantité de
café infusé sera inférieure.
Vérifiez la quantité de café ou le type de café moulu utilisé.
Le bar à café Ninja Coffee Bar
remplissage max, et la technologie à touche unique Auto-iQMC One Touch Intelligence n’utilise que la
quantité minimale nécessaire pour le volume et le style d’infusion sélectionnés.
Après l’infusion, vous remarquerez peut-être un restant d’eau dans le réservoir après l’avoir rempli
jusqu’à la ligne de remplissage minimum pour le volume sélectionné. Les indicateurs du réservoir
d’eau sont les lignes de remplissage minimum qui indiquent qu’il y a suffisamment d’eau pour le
volume et le style d’infusion, mais tous les styles d’infusion requièrent de différentes quantités d’eau
pour créer la saveur et la concentration désirées.
Vous pouvez infuser plusieurs tasses de café avant de remplir le réservoir de nouveau.
Cet appareil est conçu pour infuser le café moulu seulement. N’insérez pas des dosettes ou des
dosettes K-CupMD* dans l’appareil.
MC
vous permet de remplir le réservoir sans dépasser la ligne de
Français
*K-Cup est une marque de commerce déposée Keurig Green Mountain, Inc. L’utilisation de la marque de commerce K-Cup ne
signifie pas une affiliation avec Keurig Green Mountain, Inc. ou une approbation par cette société.
ninjakitchen.com
40
Page 42

Guide de dépannage – suite
PROBLÈMES CAUSES ET SOLUTIONS POSSIBLES
Mon appareil Ninja Coffee
BarMC fuit.
Pourquoi la deuxième
boisson infusée estelle plus chaude que la
première?
Combien de temps
est-ce que le mode de
préchauffage prend pour
obtenir la tasse la plus
chaude?
J’ai remarqué la
conception de la carafe et
le couvercle. Quels en sont
les avantages?
Volume d’infusion de café:
Quels sont les facteurs
qui influencent le volume
de café?
Si la fuite provient du panier-filtre, assurez-vous que toutes les pièces sont bien fixées dans
l’appareil.
Si la fuite se situe au bas de l’appareil, contactez le Service à la clientèle au 1-877-646-5288.
Après avoir infusé la première boisson, l’appareil Ninja Coffee BarMC est préchauffé. Ainsi,
l’appareil infuse ensuite des boissons légèrement plus chaudes. Pour obtenir une boisson infusée
chaude, essayez de préchauffer votre tasse.
Après avoir allumé votre Ninja Coffee BarMC, le mode de préchauffage s’allumera pendant 3
minutes, le temps de se réchauffer. Lorsque la température souhaitée est atteinte, le mode de
préchauffage s’éteindra, indiquant qu’il est temps d’infuser.
Pour obtenir la tasse de café la plus chaude possible à l’aide de votre Ninja Coffee BarMC, gardez
l’appareil branché et alimenté en tout temps pour permettre au système d’infusion de rester chaud
et prêt à infuser.
La forme et la conception uniques de notre carafe vous apportent les avantages suivants:
Conception à prise facile vous permet de verser le café sans égouttements.
Mélange bien votre café dès la première goutte grâce au couvercle de carafe à infusion.
Optimise la température du café
Vous permet d’infuser du café chaud et glacé.
Lorsque vous confectionnez du café chaud, le café moulu absorbe de l’eau, ce qui mène à une
réduction du liquide. Plus vous utilisez de café moulu, plus d’eau sera absorbée. De plus, notre
carafe à base large conserve la majorité du café au fond, ce qui aide à contrôler la température
plus uniformément.
Infusion classique :
Pleine carafe Demi-carafe
Comment le bar à café
Ninja garde-t-il le café à la
bonne température?
La carafe conserve la majorité du café au fond, afin qu’il repose plus près de la plaque de
réchauffement précise. Ceci aide à maintenir le café à la température idéale.
Visitez le site ninjakitchen.com pour obtenir
de plus amples renseignements et pour
visionner des vidéos éducatives.
Pièces de rechange
COMMANDE DE PIÈCES DE RECHANGE
Pour commander des pièces supplémentaires ou de rechange, veuillez visiter notre site : ninjaaccessories.com
ou n’hésitez pas à contacter le Service à la clientèle au numéro suivant : 1-877-646-5288.
41
1-877-646-5288
Page 43

GARANTIE LIMITÉE D’UN AN
SharkNinja Operating LLC garantit ce produit contre toute défectuosité de matériel ou de main-d’œuvre pour une période
d’un (1) an à compter de la date d’achat, dans le cadre d’une utilisation domestique normale, en vertu des conditions,
exclusions et exceptions suivantes.
La responsabilité de SharkNinja Operating LLC ise limite au coût des réparations ou du remplacement de l’appareil, à
sa discrétion. Cette garantie limitée ne couvre pas l’usure normale des pièces et ne s’applique pas aux appareils ayant été
altérés ou utilisés à des fins commerciales. Cette garantie limitée ne couvre pas les dommages causés par une mauvaise
utilisation, l’usage abusif, la négligence lors de la manipulation, un emballage inadéquat ou la mauvaise manipulation en
transit. Cette garantie limitée ne couvre pas les dommages ou défauts causés par ou résultant du transport, des réparations,
ou de l’entretien ni de l’altération du produit ou de ses pièces, effectués par un réparateur non autorisé par SharkNinja
Operating LLC.
Si votre appareil ne fonctionne pas correctement dans des conditions d’utilisation domestique normales, et ce, pendant la
période de garantie, vous pouvez retourner l’appareil et les accessoires avec la preuve et la date d’achat, port payé. Pour
le Service à la clientèle ou pour parler à nos spécialistes de produits, appelez le 1-877-646-5288 ou visitez notre site Web
ninjakitchen.com/warranty.
S’il s’avérait que l’appareil présente une défectuosité matérielle ou de fabrication, SharkNinja Operating LLC le réparera
ou le remplacera sans frais. Vous devez inclure une preuve d’achat et un montant de 19,95 $ pour couvrir les frais
d’expédition de transport de retour.*
Cette garantie limitée s’applique à l’acheteur original de l’appareil et exclut toutes les autres garanties juridiques, implicites
ou conventionnelles. Le cas échéant, la responsabilité de SharkNinja Operating LLC se limite aux obligations spécifiques
expressément énoncées au titre de cette garantie limitée. En aucun cas SharkNinja Operating LLC ne peut être tenue
responsable d’incidents ou de dommages indirects à quiconque et de quelque nature que ce soit. Certains états et certaines
provinces n’autorisent pas l’exclusion ou la limitation de dommages accessoires ou indirects; dans ce cas, cette disposition
ne s’appliquerait pas.
La garantie limitée vous confère des droits juridiques auxquels peuvent s’ajouter d’autres droits qui varient d’un État à
l’autre et d’une province à l’autre.
*IMPORTANT : Emballez soigneusement l’appareil pour éviter tout dommage lors du transport. Avant
d’emballer l’appareil, assurez-vous d’y apposer une étiquette portant vos nom, adresse complète et numéro
de téléphone ainsi qu’une note précisant les détails de l’achat, le modèle et le problème éprouvé par l’appareil.
Nous vous recommandons d’assurer votre colis (puisque les dommages lors du transport ne sont pas couverts
par la garantie limitée). Indiquez sur l’extérieur de votre colis « À L’ATTENTION DE : SERVICE À LA CLIENTÈLE ».
Français
Enregistrement du produit
Veuillez visiter le site Web registeryourninja.com ou composer le 1-877-646-5288 pour enregistrer votre nouveau
produit NinjaMD dans les dix (10) jours suivant l’achat. Vous devrez fournir le nom du magasin, la date d’achat, le
numéro de modèle, ainsi que votre nom et adresse.
L’enregistrement nous permettra de vous contacter dans l’éventualité peu probable d’un avis sur la sécurité du
produit. En enregistrant votre produit, vous reconnaissez avoir lu et compris les instructions d’utilisation et les
consignes de sécurité énoncées dans ce document.
ninjakitchen.com
42
Page 44

VISIT US ONLINE AT/ VISITEZ NOTRE SITE WEB :
ninjakitchen.com
Or follow us on any of our social media pages
Suivez-nous dans les réseaux sociaux
fb.me/ninjacoffeebar
youtube.com/ninjacoffeebar
@ninjacoffeebar
pinterest.com/ninjakitchen
@ninjakitchen
SharkNinja Operating LLC
US: Needham, MA 02494
CAN: Ville St-Laurent, QC H4S 1A7
1-877-646-5288
ninjakitchen.com
Copyright © 2017 SharkNinja Operating LLC
For SharkNinja U.S. Patent information visit sharkninja.com/USPatents.
Pour des renseignements sur les brevets de SharkNinja aux É.-U., veuillez visiter sharkninja.com/USPatents.
Ninja is a registered trademark of SharkNinja Operating LLC.
Auto-iQ, Ninja Coffee Bar and Thermal Flavour Extraction are trademarks of SharkNinja Operating LLC.
Ninja est une marque déposée de Shark Ninja Operating L LC.
Auto-iQ, Ninja Coffee Bar et Thermal Flavour Extraction s ont des marques de commerce de S harkNinja Operating LLC.
Printed in China / Imprimé en Chine
Illustrations may differ from actual product. We are constantly striving to improve our products, therefore the specifications
contained herein are subject to change without notice.
Les illustrations peuvent différées du produit réel. Nous essayons constamment d’améliorer nos produits, donc les clauses
contenues dans ce document peuvent changer sans préavis.
CF080C_69_170510_12
 Loading...