

Page 1
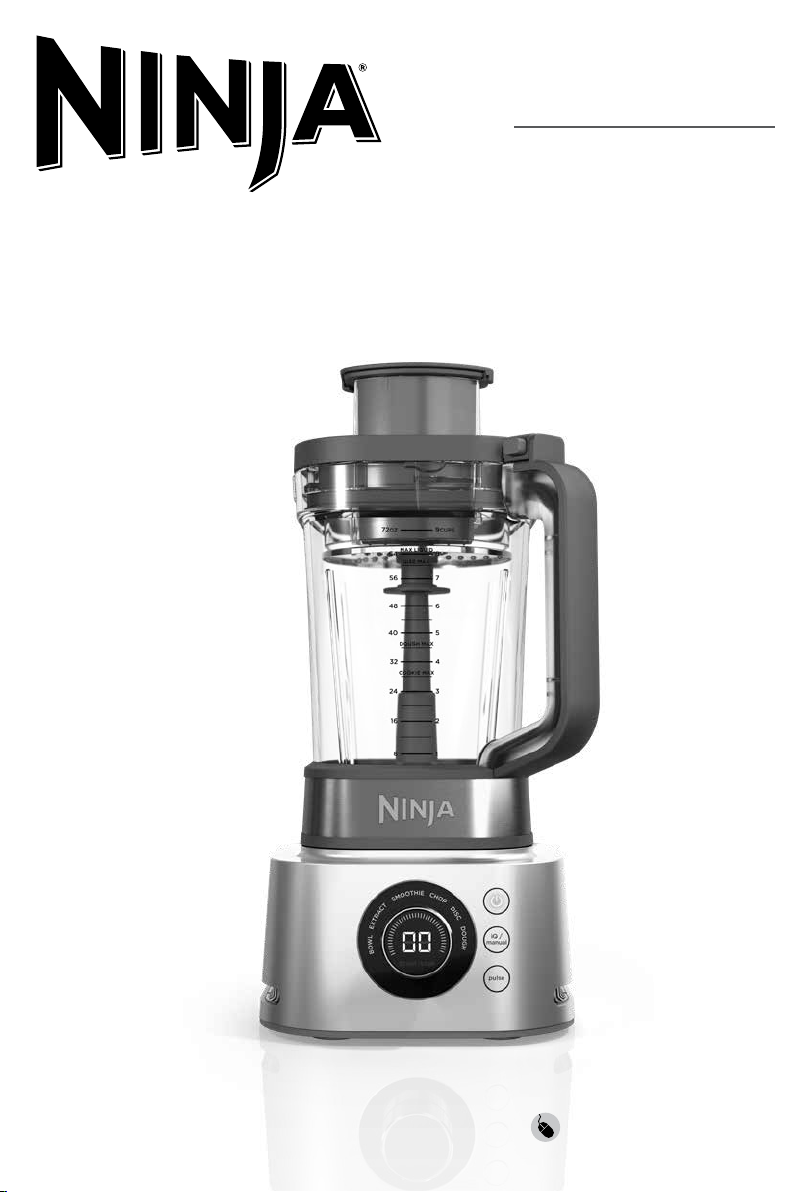
CB402ANZ
OWNER’S GUIDE
FOODI® POWER BLENDER
ULTIMATE SYSTEM
with XL Power Smoothie Bowl, Power Nutri™ Cup*,
and Coee & Spice Grinder
* Extract a drink containing vitamins
and nutrients from fruits and vegetables.
AU ninjakitchen.com.au
NZ ninjakitchen.co.nz
Page 2

THANK YOU
for purchasing the Ninja® Foodi® Power Blender Ultimate System
CONTENTS
REGISTER YOUR PURCHASE
AU ninjakitchen.com.au
NZ ninjakitchen.co.nz
RECORD THIS INFORMATION
Model Number: ����������������������
Serial Number: �����������������������
Date of Purchase: ���������������������
(Keep receipt)
Store of Purchase: ��������������������
TECHNICAL SPECIFICATIONS
Voltage: 220–240V~, 50–60Hz
Power: 1200 Watts
PLEASE READ CAREFULLY AND
KEEP FOR FUTURE REFERENCE.
Important Safety Instructions . . . . . . . . . . . . . . . . . . . . . . . . . . . . . . . . . . 4
Parts . . . . . . . . . . . . . . . . . . . . . . . . . . . . . . . . . . . . . . . . . . . . . . . . . . . . . . . . 8
Before First Use . . . . . . . . . . . . . . . . . . . . . . . . . . . . . . . . . . . . . . . . . . . . . . 9
Getting to Know the Disc Assemblies . . . . . . . . . . . . . . . . . . . . . . . . . . . 9
Using the 2-Part Pusher . . . . . . . . . . . . . . . . . . . . . . . . . . . . . . . . . . . . . . . 9
Using the Control Panel . . . . . . . . . . . . . . . . . . . . . . . . . . . . . . . . . . . . . . 10
Using Variable Speed Control . . . . . . . . . . . . . . . . . . . . . . . . . . . . . . . . . 10
Using the Auto-iQ® Programs . . . . . . . . . . . . . . . . . . . . . . . . . . . . . . . . . .11
Using the Power Blender & Processor Pitcher
& Disc Assemblies . . . . . . . . . . . . . . . . . . . . . . . . . . . . . . . . . . . . . . . . . . . 12
Using the Power Blender & Processor Pitcher
with Flat Lid & Stacked Blade Assembly . . . . . . . . . . . . . . . . . . . . . . . . 14
Using the Power Blender & Processor Pitcher
with Flat Lid & Dough Blade Assembly . . . . . . . . . . . . . . . . . . . . . . . . . 16
Using the XL Smoothie Bowl Maker . . . . . . . . . . . . . . . . . . . . . . . . . . . . 18
Using the Power Nutri™ Cup* . . . . . . . . . . . . . . . . . . . . . . . . . . . . . . . . . .20
Using the Ninja Coee & Spice Grinder . . . . . . . . . . . . . . . . . . . . . . . . . 22
Grinder Charts . . . . . . . . . . . . . . . . . . . . . . . . . . . . . . . . . . . . . . . . . . . . . . 23
2 AU 02 8801 7666 | NZ 0800 112 660
Care & Maintenance . . . . . . . . . . . . . . . . . . . . . . . . . . . . . . . . . . . . . . . . . . 24
Using the Blender For Stuck-On Ingredients . . . . . . . . . . . . . . . . . . . . . . 24
Cleaning . . . . . . . . . . . . . . . . . . . . . . . . . . . . . . . . . . . . . . . . . . . . . . . . . . . . . . .25
Storing . . . . . . . . . . . . . . . . . . . . . . . . . . . . . . . . . . . . . . . . . . . . . . . . . . . . . . . . .25
Resetting the Motor . . . . . . . . . . . . . . . . . . . . . . . . . . . . . . . . . . . . . . . . . . . . .25
Ordering Replacement Parts . . . . . . . . . . . . . . . . . . . . . . . . . . . . . . . . . . . . .25
Troubleshooting Guide . . . . . . . . . . . . . . . . . . . . . . . . . . . . . . . . . . . . . . . 26
Warranty . . . . . . . . . . . . . . . . . . . . . . . . . . . . . . . . . . . . . . . . . . . . . . . . . . . 27
* Extract a drink containing vitamins and nutrients from fruits and vegetables .
3 AU ninjakitchen.com.au | NZ ninjakitchen.co.nz
Page 3
IMPORTANT SAFETY INSTRUCTIONS
PLEASE READ CAREFULLY BEFORE USE • FOR HOUSEHOLD USE ONLY
Read and review instructions for operation and use.
Indicates the presence of a hazard that can cause personal injury,
death or substantial property damage if the warning included with this
symbol is ignored.
For indoor and household use only.
When using electrical appliances, basic safety precautions should always be
followed, including the following:
WARNING
1 Read all instructions prior to using
the appliance and its accessories.
2 Carefully observe and follow all warnings
and instructions. This unit contains
electrical connections and moving parts
that potentially present risk to the user.
3 Take your time and exercise care during
unpacking and appliance setup. This
appliance contains sharp, loose blades
that can cause injury if mishandled.
4 Take inventory of all contents to ensure
you have all parts needed to properly
and safely operate your appliance.
5 Blades are sharp. Care shall be taken
when handling the sharp cutting blades,
emptying the bowl and during cleaning.
6 This product is provided with a Stacked
Blade Assembly. ALWAY S exercise care
when handling blade assemblies.
The blade assemblies are sharp and are
NOT locked in place in their containers.
The blade assemblies are designed to
be removable to facilitate cleaning and
replacement if needed. ONLY grasp
the blade assembly by the top of
the shaft. Failure to use care when
handling the blade assemblies will
result in a risk of laceration.
7 ALWAY S exercise care when handling
the Hybrid Edge™ Blades Assembly.
The blades are sharp. ONLY grasp
the Hybrid Edge Blades Assembly
by the outer perimeter of the blade
assembly base. Failure to use care
when handling the blade assembly
will result in a risk of laceration.
8 Turn the appliance OFF, then unplug
the appliance from the outlet when not in
use, before assembling or disassembling
parts, and before cleaning. To unplug,
grasp the plug by the body and pull
from the outlet. NEVER unplug by
grasping and pulling the flexible cord.
9 Before use, wash all parts that may
contact food. Follow washing instructions
covered in this instruction manual.
10 Before each use, inspect blade
assemblies for damage. If a blade is
bent or damage is suspected, contact
SharkNinja to arrange for replacement.
11 DO NOT use this appliance outdoors.
It is designed for indoor household
use only.
12 DO NOT operate any appliance with
a damaged cord or plug, or after the
appliance malfunctions or is dropped or
damaged in any manner. This appliance
has no user-serviceable parts. If damaged,
contact SharkNinja for servicing.
13 This appliance has important markings
on the plug blade. The entire supply
cord is not suitable for replacement.
If damaged, please contact SharkNinja
for service.
14 Extension cords should NOT be used
with this appliance.
15 To protect against the risk of electric
shock, DO NOT submerge the appliance
or allow the power cord to contact any
form of liquid.
16 DO NOT allow the cord to hang over
the edges of tables or counters.
The cord may become snagged and
pull the appliance o the work surface.
17 DO NOT allow the unit or the cord to
contact hot surfaces, including stoves
and other heating appliances.
18 ALWAYS use the appliance on a dry
and level surface.
19 Children should be supervised to ensure
that they do not play with the appliance.
20 This appliance is NOT intended for use
by persons (including children) with
reduced physical, sensory or mental
capabilities, or lack of experience and
knowledge, unless they have been given
supervision or instruction concerning use
of the appliance by a person responsible
for their safety.
21 ONLY use attachments and accessories
that are provided with the product or are
recommended by SharkNinja. The use of
attachments, including canning jars, not
recommended or sold by SharkNinja may
cause fire, electric shock, or injury.
22 NEVER place a blade assembly on the
motor base without it first being attached
to its corresponding container (pitcher,
cup or bowl) with the lid also in place.
23 Keep hands, hair, and clothing out of the
container when loading and operating.
24 During operation and handling of
the appliance, avoid contact with
moving parts.
25 DO NOT fill containers past the
MAX FILL or MAX LIQUID lines.
26 DO NOT operate the appliance with
an empty container.
27 DO NOT microwave any containers or
accessories provided with the appliance.
28 NEVER leave the appliance unattended
while in use.
29 DO NOT blend hot liquids. Doing so
may result in pressure buildup and steam
exposure that can pose a risk of the user
being burned.
30 DO NOT process dry ingredients without
adding liquid to the single-serve cup,
XL bowl, or Pitcher. They are not
intended for dry blending.
31 DO NOT perform grinding operations.
32 NEVER operate the appliance without
lids and caps in place. DO NOT attempt
to defeat the interlock mechanism.
Ensure the container and lid are
properly installed before operation.
33 Before operation, ensure all utensils
are removed from containers. Failure
to remove utensils can cause containers
to shatter and potentially result in
personal injury and property damage.
34 DO NOT misuse the appliance to avoid
potential injury.
SAVE THESE INSTRUCTIONS
4 AU 02 8801 7666 | NZ 0800 112 660
5 AU ninjakitchen.com.au | NZ ninjakitchen.co.nz
Page 4

IMPORTANT SAFETY INSTRUCTIONS
PLEASE READ CAREFULLY BEFORE USE • FOR HOUSEHOLD USE ONLY
WARNING
35 Keep hands and utensils out of
containers while chopping to reduce the
risk of severe personal injury or damage
to the blender/food chopper. A scraper
may be used ONLY when the blender
or processor is not running.
36 If you find unmixed ingredients sticking
to the sides of the cup, stop the
appliance, remove the blade assembly,
and use a scraper to dislodge ingredients.
37 DO NOT open the pitcher’s pour spout
cap while blender is operating.
38 If you find unmixed ingredients sticking
to the sides of the pitcher, stop the
appliance, remove the lid, and use a
spatula to dislodge ingredients. NEVER
insert your hands into the pitcher, as
you may contact one of the blades and
experience a laceration.
39 DO NOT attempt to remove the
container or lid from the motor base
while the blade assembly is still spinning.
Allow the appliance to come to a
complete stop before removing lids
and containers.
40 If the appliance overheats, a thermal switch
will activate and temporarily disable the
motor. To reset, unplug the appliance
and allow it to cool for approximately 15
minutes before using again.
41 DO NOT expose the containers and
accessories to extreme temperature
changes. They may experience damage.
42 Upon completion of processing, ensure
the blade assembly is removed BEFORE
emptying container’s contents. Remove
the blade assembly by carefully grasping
the top of the shaft and lifting it from
the container. Failure to remove the blade
assembly before emptying the container
results in a risk of laceration.
NOTE: When using the pitcher and
stacked blade assembly, DO NOT
process more than 600g of raw meat,
600g of Parmesan (hard) cheese, or
700g of baking chocolate.
43 If using the pitcher’s pour spout, hold
the cover in place on the container or
ensure lid lock is engaged when pouring
to avoid risk of injury.
44 Remove the Hybrid Edge Blades
Assembly from the single-serve cup or
XL bowl upon completion of blending.
DO NOT store ingredients before or
after blending them in the cup or bowl
with the blade assembly attached.
Some foods may contain active
ingredients or release gases that will
expand if left in a sealed container,
resulting in excessive pressure buildup
that can pose a risk of injury. For
ingredient storage in the cup, use only
Spout Lid or Storage Lid to cover.
45 DO NOT submerge the motor base or
control panel in water or other liquids.
DO NOT spray motor base or control
panel with any liquid.
46 DO NOT attempt to sharpen blades.
47 Turn o the appliance and unplug
the motor base before cleaning.
48 Never feed food by hand. Always use
food pusher.
49 Unit is intended to create a dough ball.
It is NOT intended to continuously
knead. After dough ball forms, additional
kneading should be done by hand
on a work surface. If the unit moves
excessively on the work surface, remove
the dough ball and knead by hand.
50 Always use the grinder on a dry, stable
work surface away from water.
51 DO NOT allow young children to
operate the grinder or use as a toy.
Close supervision is necessary when any
grinder is used by or near children.
52 DO NOT use the grinder for anything
other than its intended use.
53 DO NOT operate the grinder on or near
any hot surfaces (such as gas or electric
burner, or in a heated oven).
54 DO NOT expose the grinder to extreme
temperature changes.
55 DO NOT use the grinder if the parts are
cracked or chipped.
56 DO NOT use the grinder if blades are
bent or damaged.
57 DO NOT attempt to sharpen blades.
58 DO NOT overfill.
59 DO NOT operate the grinder empty.
60 DO NOT operate without the cover
in place.
61 DO NOT try to defeat the interlock
mechanism.
62 DO NOT use outdoors.
SAVE THESE INSTRUCTIONS
6 AU 02 8801 7666 | NZ 0800 112 660
7 AU ninjakitchen.com.au | NZ ninjakitchen.co.nz
Page 5
PARTS
S
H
R
E
D
D
E
R
S
L
I
C
E
R
BEFORE FIRST USE
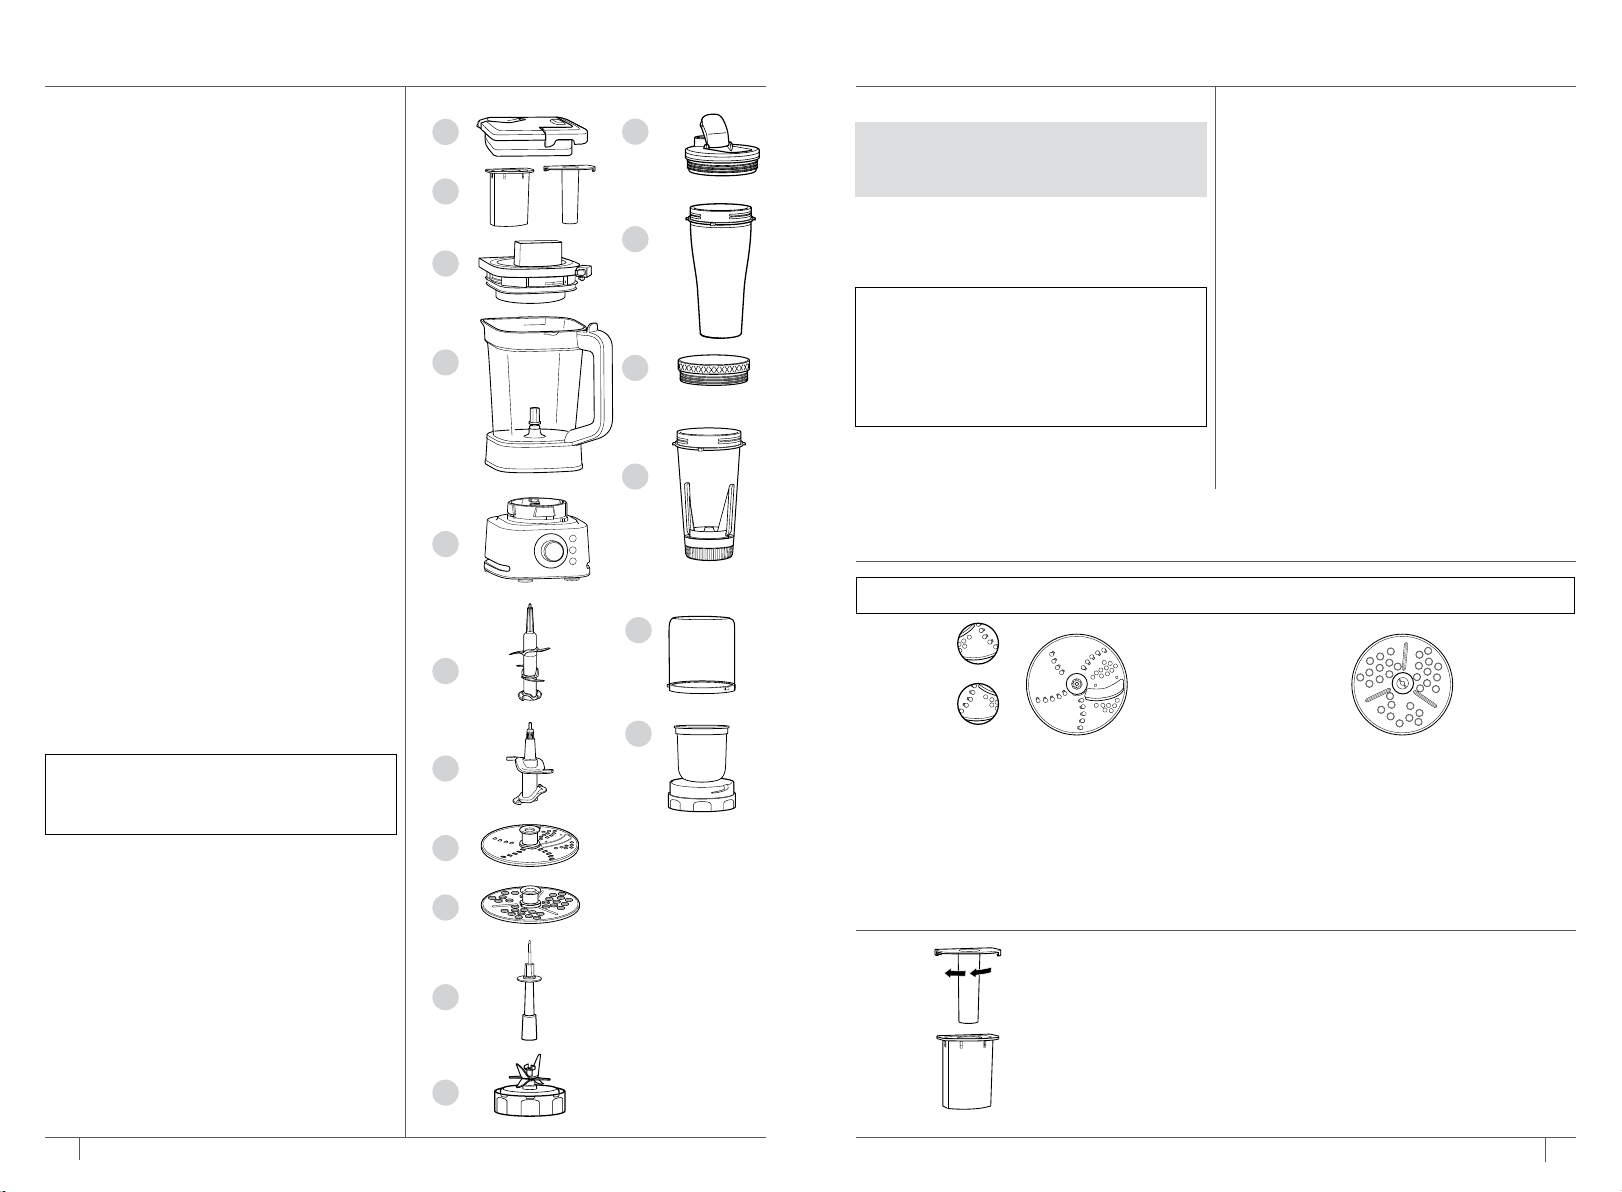
A Pitcher Flat Lid
B 2-Part Pusher
C Pitcher Feed Chute Lid
D 2.1 L* Power Blender & Processor Pitcher
E Motor Base
F Total Crushing® & Chopping Blade
Assembly (Stacked Blade Assembly)
G Dough Blade Assembly
H Reversible Slicing/Shredding Disc
I Grating Disc
(not available with all models)
J Disc Spindle
K Hybrid Edge™ Blades Assembly
L Spout Lid
M 700 ml Power Nutri™ Cup**
N Storage Lid
O 530 ml XL Power Smoothie Bowl
with Built-in Tamper
P Grinder Lid
Q Blade Assembly with Stainless Steel
Grinding Cup
*1.9 L max liquid capacity.
NOTE: The Hybrid Edge Blades
Assembly is not compatible with other
Ninja products.
** Extract a drink containing vitamins and nutrients
from fruits and vegetables.
A
B
C
D
L
IMPORTANT: Review all warnings on
pages 4–7 before proceeding.
1 Remove all packaging materials from the
unit. Exercise care when unpacking blade
assemblies, as the blades are sharp.
2 The stacked blade assembly is NOT
M
To purchase more accessories, visit
AU ninjakitchen.com.au or
NZ ninjakitchen.co.nz.
NOTE: All attachments are BPA free
and dishwasher safe. Ensure blade
assemblies and lids are removed from
N
the containers before placing in the
dishwasher. Exercise care when handling
blade assemblies.
locked in place in the container. Handle
the stacked blade assembly and dough
blade assembly by grasping the top of
the shaft.
3 Handle the Hybrid Edge Blades Assembly
by grasping around the perimeter of the
blade assembly base.
4 Wash containers, lids, discs, and blade
assemblies in warm, soapy, water using a
dishwashing utensil with a handle to avoid
direct contact with the blades. Exercise
care when handling blade assemblies, as
the blades are sharp.
O
E
GETTING TO KNOW THE DISC ASSEMBLIES
5 Thoroughly rinse and air-dry all parts.
NOTE: Install the disc spindle into the pitcher before installing the disc assembly.
P
F
Q
G
The reversible slicing/shredding disc is perfect
for outputs like thinly sliced cucumbers and
H
shredded carrots. Face the side labeled
“slicer” up for slicing and face the side
labeled “shredder” up for shredding.
SHREDDING
SLICING
REVERSIBLE SLICING/
SHREDDING DISC
GRATING DISC
(not available with all models)
The grating disc is ideal for outputs like
grated Parmesan cheese.
8 AU 02 8801 7666 | NZ 0800 112 660
I
USING THE 2-PART PUSHER
Use the 2-part food pusher to help guide the food through the
J
feed chute. The middle piece of the food pusher is removable
to use for narrow ingredients, such as carrots. Rotate the top
clockwise and lift to separate the pieces.
K
9 AU ninjakitchen.com.au | NZ ninjakitchen.co.nz 99
Page 6
USING THE CONTROL PANEL
USING THE AUTO-IQ PROGRAMS
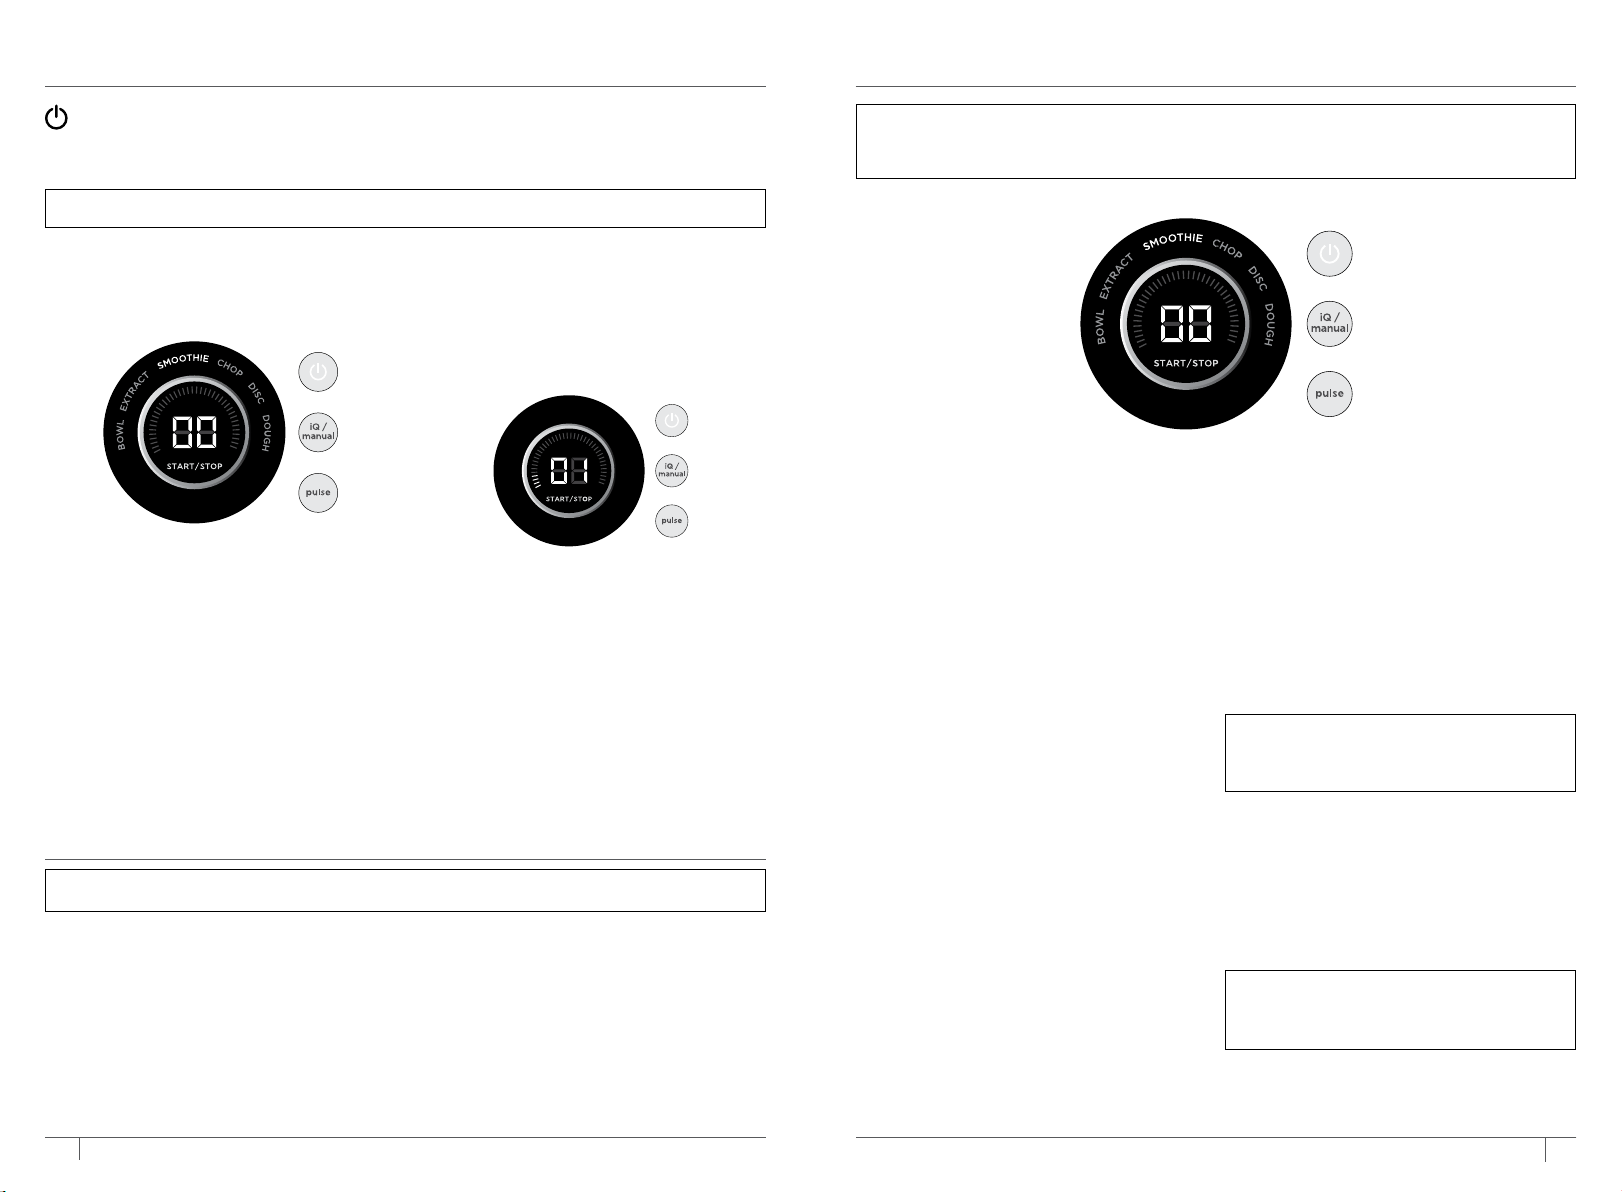
Use the Power button to turn the unit on or o.
SWITCHING BETWEEN AUTO-IQ AND MANUAL MODE:
To toggle between Auto-iQ Mode and Manual Mode, press the IQ/MANUAL button.
NOTE: In Manual Mode, Auto-iQ programs will not illuminate on the control panel.
AUTO-IQ MODE
Unique timed programs customized to
take the guesswork out of making great
drinks and meals.
SELECT AND RUN AN AUTO-IQ PROGRAM
Use the dial to select the desired program,
then press START/STOP to begin. As the
program runs, the timer will count down and
the speedometer will show speed. When
the countdown ends, blending will stop
automatically. To stop blending before the end
of the program, press START/STOP again.
MANUAL MODE
Choose from 10 dierent speeds for total
control of your blending in the pitcher. For
best results, use only speed 1 when using the
dough blade. Only speed 1 is available when
using the feed chute lid and disc assemblies.
Only speed 10 is available when using the
XL bowl and single-serve cup.
SELECT AND RUN A MANUAL PROGRAM
Turn the dial from speed 1 to speed 10. Press
START/STOP to begin continuous blending
up to 60 seconds. Press START/STOP again
to end blending sooner.
PULSE
Oers greater control of pulsing and
blending. Operates only when PULSE is
pressed. Use short presses for short pulses
and long presses for long pulses.
USING VARIABLE SPEED CONTROL
& THE POWER BLENDER & PROCESSOR PITCHER
NOTE: If using the dough blade assembly, only use the flat lid and speed 1.
START SLOW
Always start at a low speed (1–3) to better incorporate ingredients and prevent them from
sticking to the side of the vessel.
DIAL UP THE SPEED
Smoother blends call for higher speeds. Low speeds are great for chopping veggies and
mixing dough, but you’ll need to ramp up for purees and dressings.
HIGH-SPEED BLENDING
Blend until you get your desired consistency. The longer you blend, the better the
breakdown and smoother the outcome will be.
10 AU 02 8801 7666 | NZ 0800 112 660
NOTE: The unit can detect if the pitcher with the flat lid, pitcher with the feed chute lid
or the cup/bowl installed on the motor base. Only the functions available for a particular
container will illuminate on the control panel.
AUTO-IQ PROGRAM FOR
THE PITCHER WITH FLAT LID
SPREAD (not available on all models)
Create anything from spreadable nut butters
to zesty dressing to the perfect hummus.
SMOOTHIE
Combine your favorite fresh or frozen
ingredients, liquids, and powders to create
smoothies and protein shakes.
BOWL
Make thick, spoonable smoothie bowls to
creamy frozen yogurt to refreshing sorbets.
CHOP
Timed pulses and pauses give you
consistent chopping results. Run program
once for a large chop, twice for a small chop
and three times if you prefer to mince.
DOUGH
Use the Dough Blade Assembly to create
dough for pizza, bread, and baked goods.
When using the Dough Blade Assembly, only
use the DOUGH program or speed 1.
AUTO-IQ PROGRAM FOR THE
PITCHER WITH FEED CHUTE LID
DISC
Slice, shred and grate using a variety of
fresh ingredients. When using the disc
assemblies, use the feed chute lid and
only the DISC program or speed 1.
AUTO-IQ PROGRAMS FOR THE
POWER NUTRI CUP* AND XL POWER
SMOOTHIE BOWL
EXTRACT
Ideal for tough, leafy, or fibrous whole fruits
and vegetables, including their skins, seeds,
and stems.
SMOOTHIE
Combine your favorite fresh or frozen
ingredients, liquids, and powders to create
smoothies and protein shakes.
NOTE: For best results when using
the single-serve cup, use the Auto-iQ
Programs EXTRACT & SMOOTHIE.
SPREAD (not available on all models)
Create anything from spreadable nut butters
to zesty dressing to the perfect hummus.
BOWL
Make thick, spoonable single-serve
smoothie bowls to creamy frozen yogurt
to refreshing sorbets.
NOTE: For best results when using
the XL bowl, use the Auto-iQ SPREAD
& BOWL.
* Extract a drink containing vitamins and nutrients
from fruits and vegetables.
11 AU ninjakitchen.com.au | NZ ninjakitchen.co.nz
Page 7
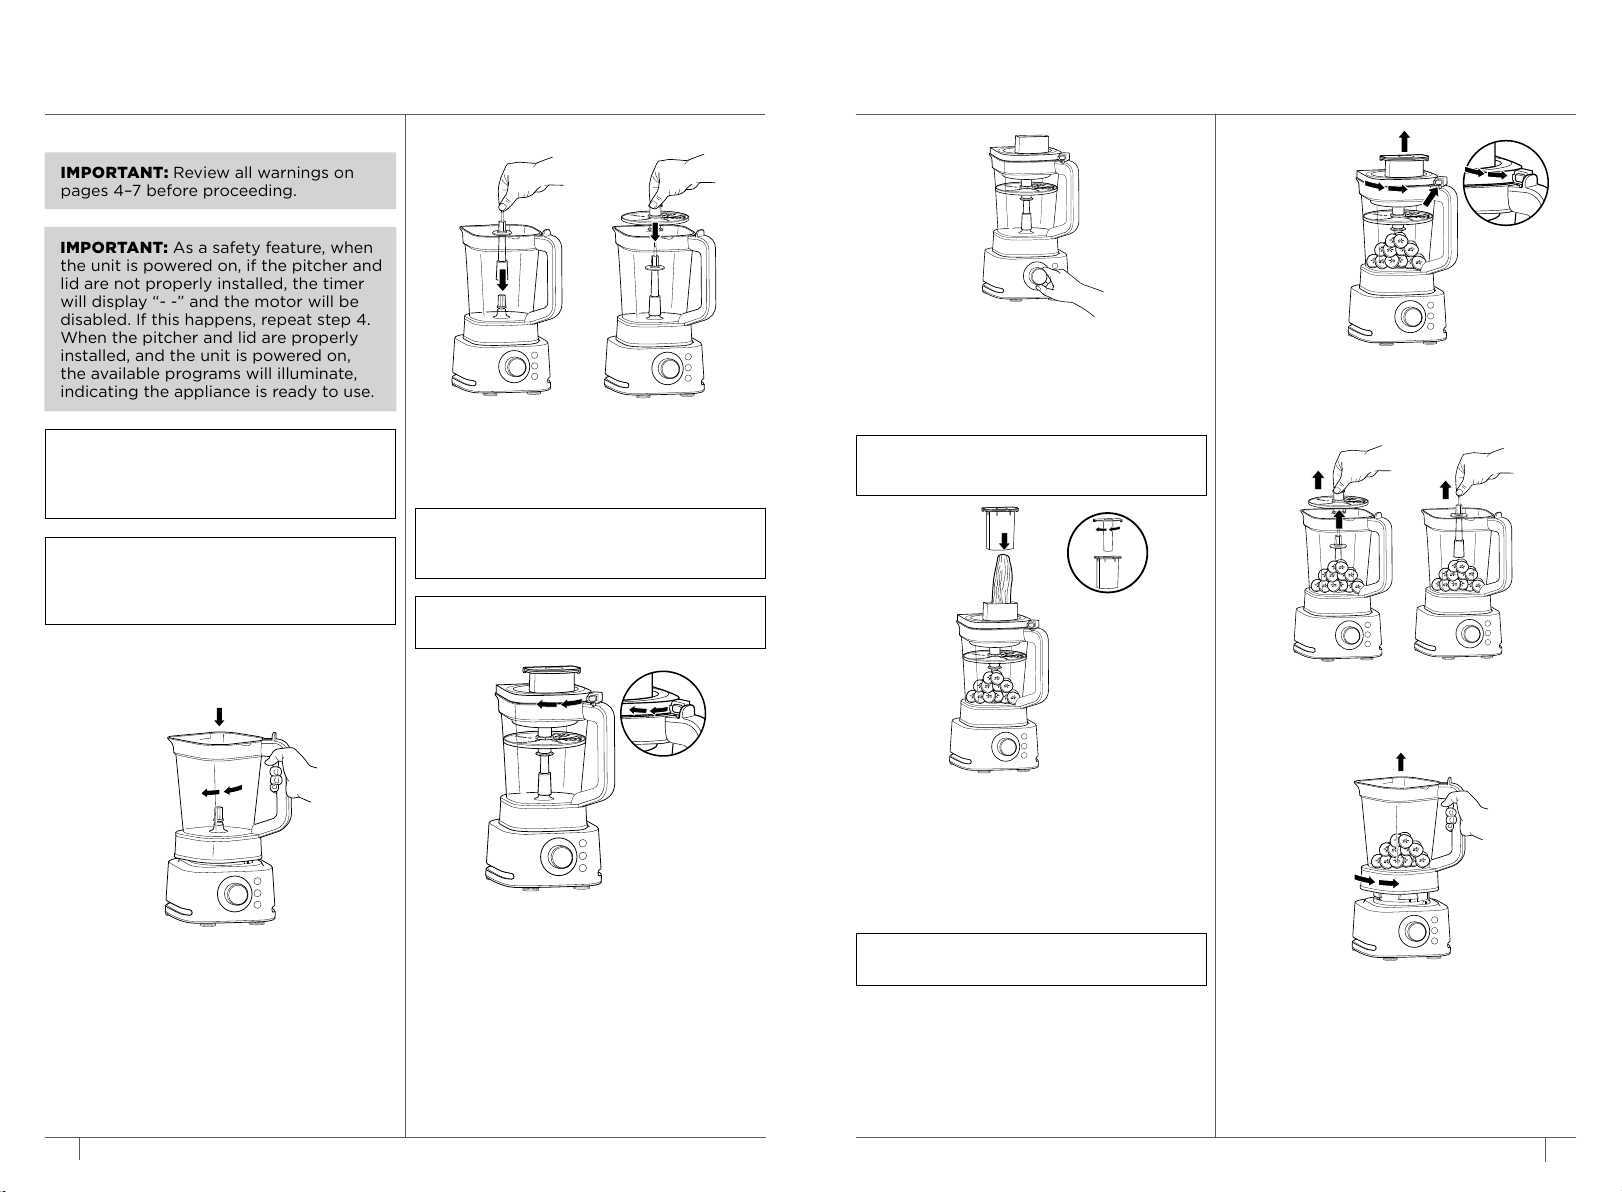
IMPORTANT: As a safety feature, when
the unit is powered on, if the pitcher and
lid are not properly installed, the timer
will display “- -” and the motor will be
disabled. If this happens, repeat step 4.
When the pitcher and lid are properly
installed, and the unit is powered on,
the available programs will illuminate,
indicating the appliance is ready to use.
IMPORTANT: Review all warnings on
pages 4–7 before proceeding.
USING THE POWER BLENDER
& PROCESSOR PITCHER & DISC ASSEMBLIES
3 Place the disc spindle onto the drive
NOTE: The slicing/shredding disc is
reversible. Use the side labeled “Slicer” for
slicing. Carefully flip the disc over to the
side labeled “Shredder” for shredding.
NOTE: The feed chute lid features a
2-part pusher to guide food through the
chute. Rotate the top clockwise and lift
to separate the pieces.
1 Place motor base on a clean, dry, level
surface such as a countertop or table,
then plug in the unit.
gear inside the pitcher. Then, use the
plastic grip to grasp the disc and place it
over the spindle.
NOTE: The slicing/shredding disc is
reversible. Ensure you place the side
you would like to use facing up.
NOTE: Grating disc is not available with
all models.
5a To use the DISC Auto-iQ program, press
STA R T/ STO P.
5b For Manual mode, press IQ/MANUAL.
With speed 1 on the display, press
START/STOP.
NOTE: Only speed 1 is available when using
the feed chute lid and disc assemblies.
2-Part Pusher
8 To remove the lid from the pitcher, press
the release button above the pitcher handle,
and rotate the lid tab counterclockwise out
of the lock position, then lift the entire lid up.
9 Using the plastic grip, carefully lift the
disc out of the pitcher. Then, grasp the
spindle by the top of the shaft and lift it
out of the bowl.
2 Lower the pitcher onto the motor base.
The handle should be aligned slightly
to the right and the pitcher should be
oriented so the LOCK symbols are visible
on the motor base. Rotate the pitcher
clockwise until it clicks into place.
12 AU 02 8801 7666 | NZ 0800 112 660
4 To install the feed chute lid on the
pitcher, place the lid tab to the right of
the handle. Press the lid down until it is
secure. Rotate the tab clockwise until it
clicks into place on the pitcher handle.
Once the lid is locked in place, press the
Power button to turn unit on.
6a Add the prepped ingredients you want
to slice, shred, or grate through the feed
chute on the lid. Use the 2-part food
pusher to help guide the food through the
feed chute. The middle piece of the food
pusher is removable to use for narrow
ingredients. DO NOT process ingredients
past the DISC MAX line on the pitcher.
NOTE: DO NOT force ingredients through
the feed chute.
7a If using the DISC program, this preset
feature will automatically stop at the end
of the program.
7b If using Manual mode, press START/STOP
when processing is complete. Wait for
the unit to come to a complete stop.
10 Remove the pitcher from the motor
base by turning it counterclockwise
and then lifting up.
11 Turn the unit o by pressing the Power
button. Unplug the unit when finished.
Refer to the Care & Maintenance section
for cleaning and storage instructions.
13 AU ninjakitchen.com.au | NZ ninjakitchen.co.nz
Page 8
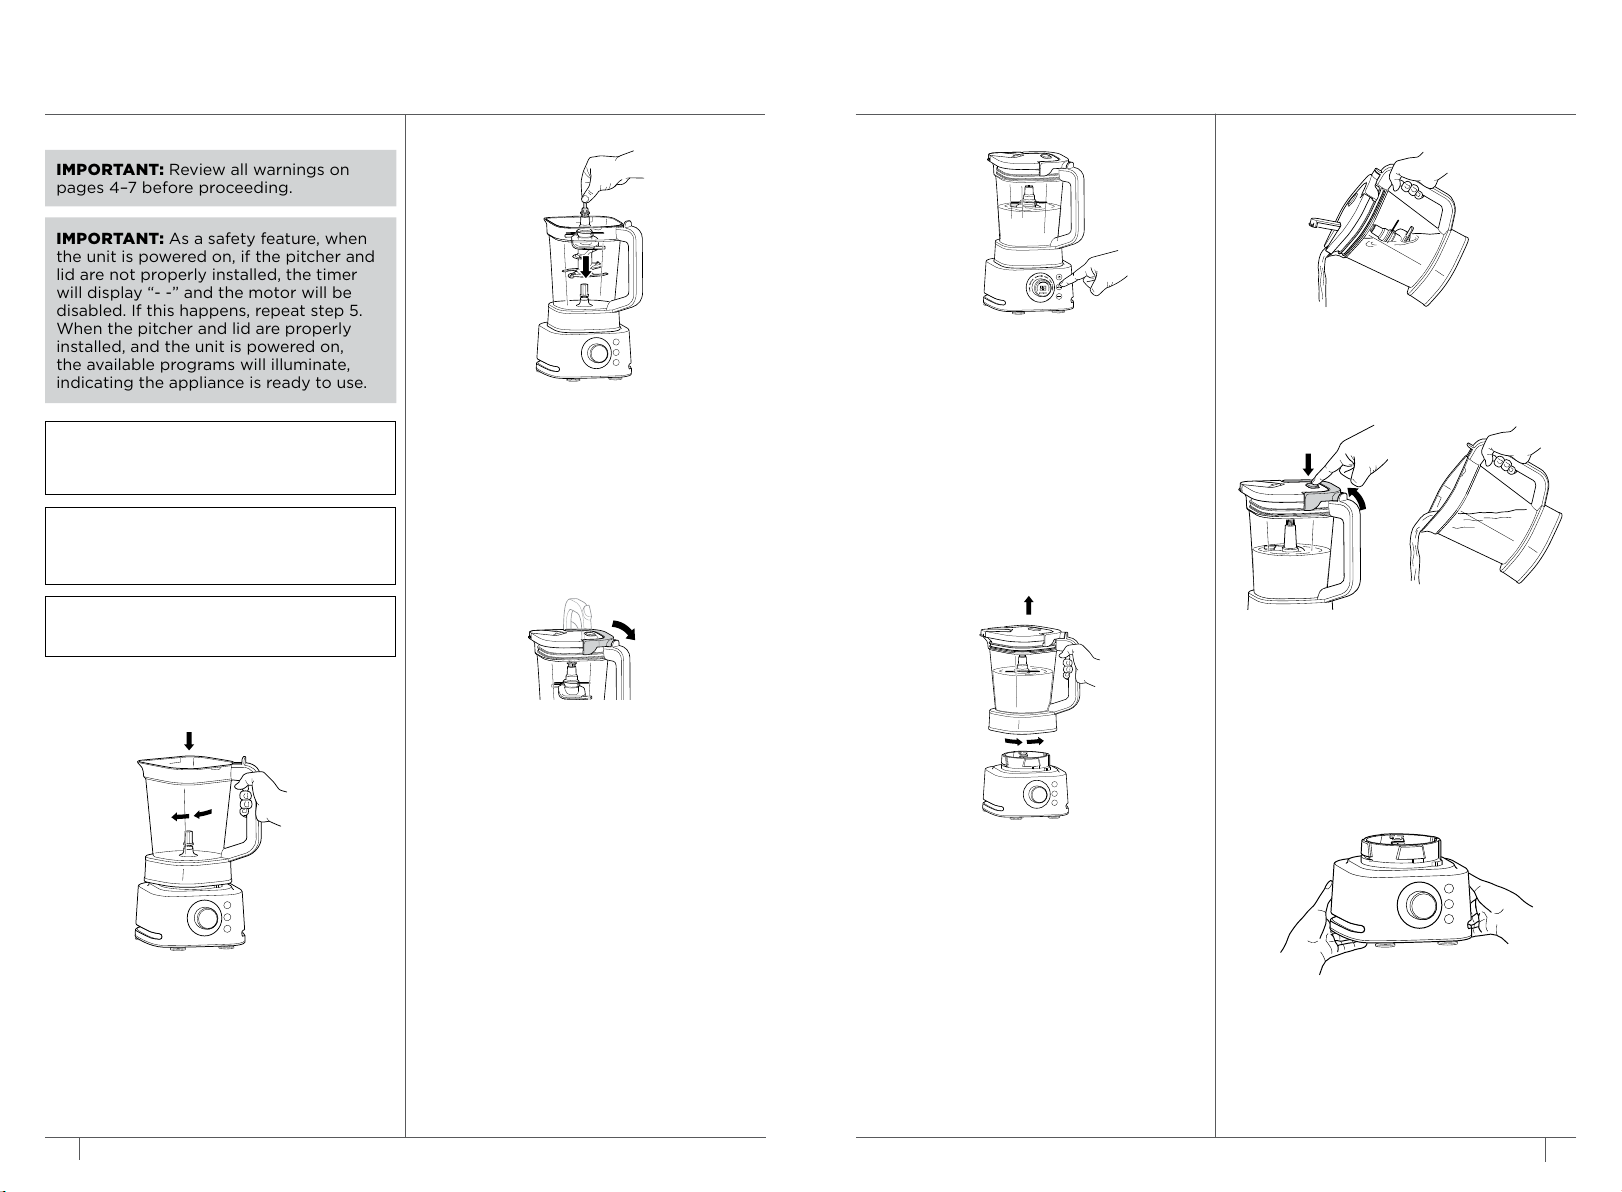
IMPORTANT: Review all warnings on
pages 4–7 before proceeding.
IMPORTANT:
As a safety feature, when
the unit is powered on, if the pitcher and
lid are not properly installed, the timer
will display “- -” and the motor will be
disabled. If this happens, repeat step 5.
When the pitcher and lid are properly
installed, and the unit is powered on,
the available programs will illuminate,
indicating the appliance is ready to use.
USING THE POWER BLENDER & PROCESSOR PITCHER
WITH FLAT LID & STACKED BLADE ASSEMBLY
NOTE: DO NOT add ingredients before
completing installation of the stacked
blade assembly.
NOTE:
If the stacked blade assembly is
not fully seated, you will not be able to
install and lock the lid.
NOTE:
The pitcher lid handle will not fold
down unless it is attached to the pitcher.
1 Plug in motor base and place on a clean,
dry, level surface such as a countertop
or table.
3 Exercising care, grasp the stacked blade
assembly by the top of the shaft and
place it onto the drive gear inside the
pitcher. Note that the blade assembly
will fit loosely onto the drive gear.
4 Add ingredients to the pitcher. DO NOT
add ingredients past the MAX LIQUID
line on the pitcher.
5 Place the flat lid on the pitcher. Press down
on the handle until it clicks into place.
Once the lid is locked in place, press the
Power button to turn unit on. The available
program buttons will illuminate and the
unit will be ready for use.
6a If using an Auto-iQ program, use the dial
to select the program that best suits your
desired output, then press START/STOP.
The preset feature will automatically stop
at the end of the program. To stop the unit
at any time, press START/STOP.
6b For Manual mode, press IQ/MANUAL.
Use the dial to select your desired
speed, ranging from 1 to 10, and press
START/STOP. Once the ingredients have
reached your desired consistency, press
START/STOP, and wait for the unit to
come to a complete stop.
7 Remove the pitcher from the motor base
by turning it counterclockwise and then
lifting up.
8a To pour out thinner mixtures, ensure the
lid is locked in place, then open the pour
spout cap.
8b For thicker mixtures that cannot be
emptied through the pour spout, remove
the lid and stacked blade assembly before
pouring. To remove the lid, press the
RELEASE button and lift the handle. To
remove the blade assembly, carefully grasp
it by the top of the shaft and pull straight
up. The pitcher can then be emptied.
2 Lower the pitcher onto the motor base.
The handle should be aligned slightly
to the right and the pitcher should be
oriented so the LOCK symbols are visible
14 AU 02 8801 7666 | NZ 0800 112 660
on the motor base. Rotate the pitcher
clockwise until it clicks into place.
9 Turn the unit o by pressing the Power
button. Unplug the unit when finished.
Refer to the Care & Maintenance section
for cleaning and storage instructions.
15 AU ninjakitchen.com.au | NZ ninjakitchen.co.nz
Page 9
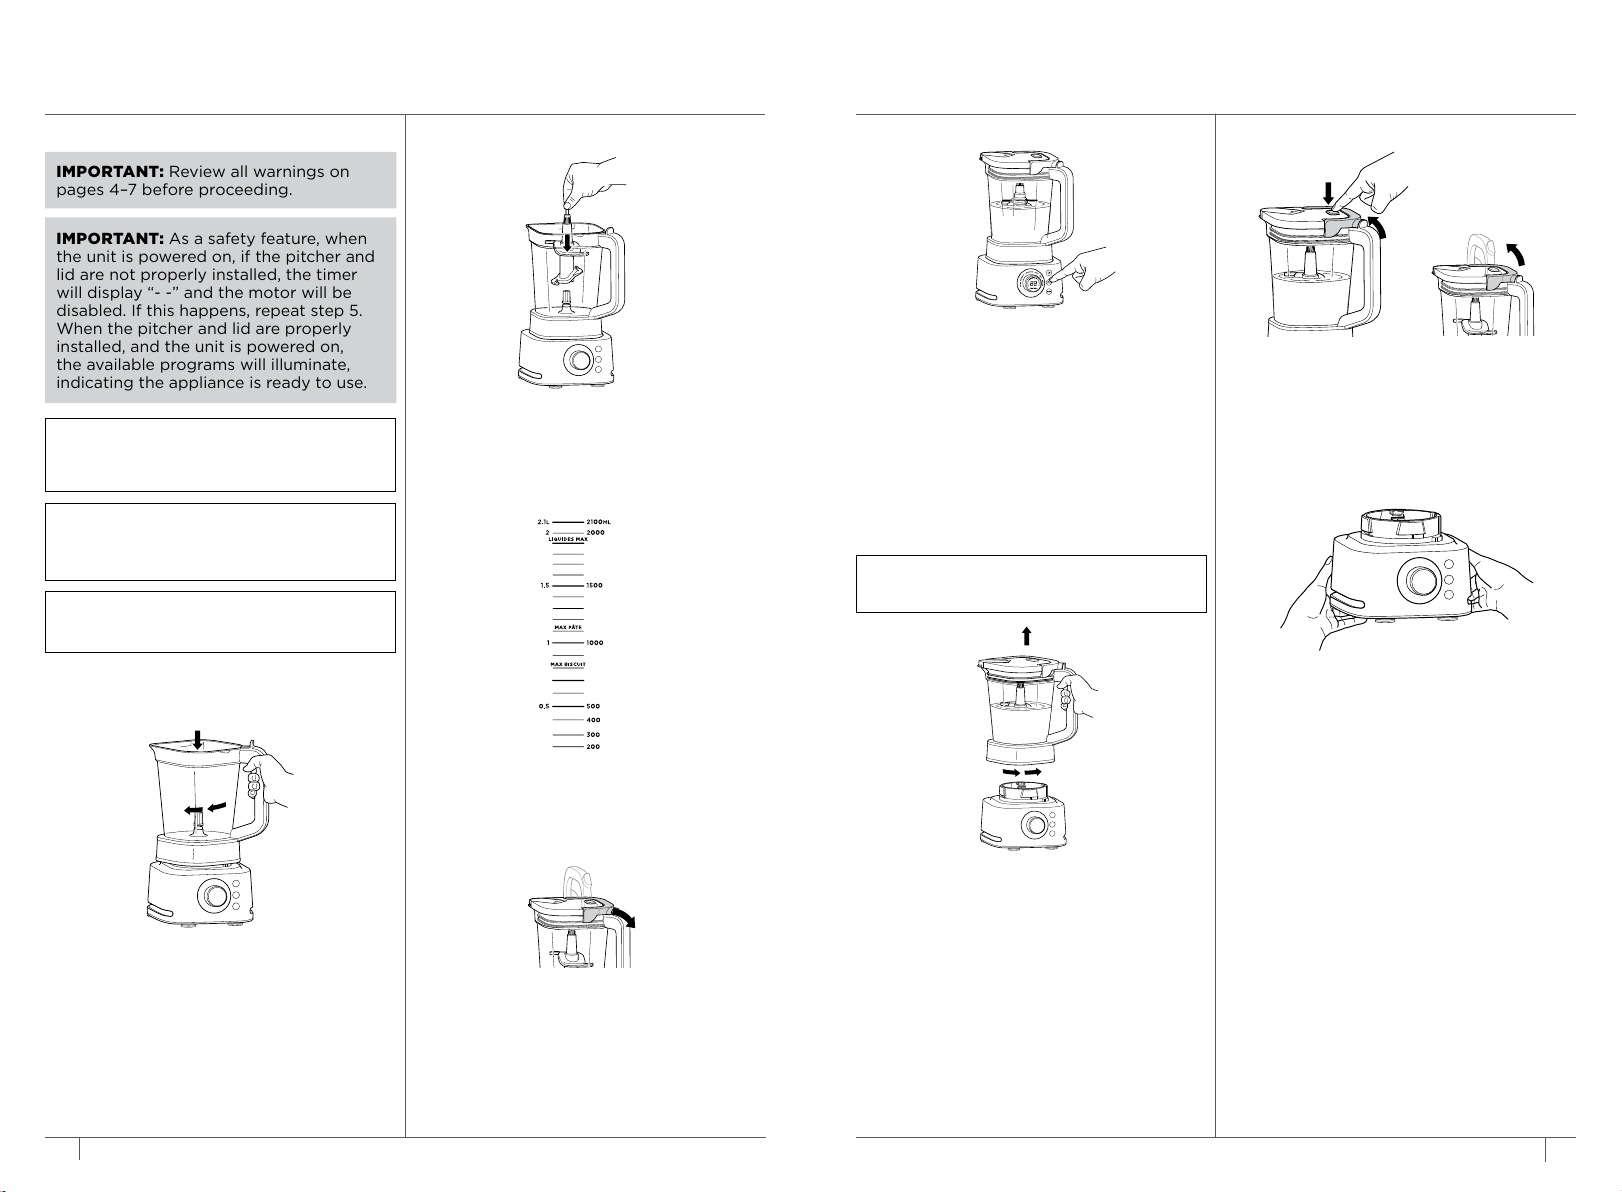
USING THE POWER BLENDER & PROCESSOR PITCHER
IMPORTANT: Review all warnings on
pages 4–7 before proceeding.
IMPORTANT:
As a safety feature, when
the unit is powered on, if the pitcher and
lid are not properly installed, the timer
will display “- -” and the motor will be
disabled. If this happens, repeat step 5.
When the pitcher and lid are properly
installed, and the unit is powered on,
the available programs will illuminate,
indicating the appliance is ready to use.
WITH FLAT LID & DOUGH BLADE ASSEMBLY
3 Exercising care, grasp the dough blade
NOTE: DO NOT add ingredients before
completing installation of the dough
blade assembly.
NOTE:
If the dough blade assembly is
not fully seated, you will not be able to
install and lock the lid.
NOTE:
The pitcher lid handle will not fold
down unless it is attached to the pitcher.
assembly by the top of the shaft and
place it onto the drive gear inside the
pitcher. Note that the blade assembly
will fit loosely onto the drive gear.
6a If using an Auto-iQ® program, use the dial
to select DOUGH, then press START/STOP.
The preset feature will automatically stop
at the end of the program. To stop the unit
at any time, press START/STOP.
6b For Manual mode, press IQ/MANUAL.
Use the dial to select speed 1, then press
START/STOP. Once the ingredients have
reached your desired consistency, press
START/STOP, and wait for the unit to
come to a complete stop.
IMPORTANT:
using the dough blade assembly.
Only use speed 1 when
8 Remove the lid and dough blade
assembly before removing contents. To
remove the lid, press the release button
above the handle, and rotate the lid tab
counterclockwise out of the lock position,
then lift the entire lid up.
1 Plug in motor base and place on a clean,
dry, level surface such as a countertop
or table.
2 Lower the pitcher onto the motor base.
The handle should be aligned slightly
to the right and the pitcher should be
oriented so the LOCK symbols are visible
on the motor base. Rotate the pitcher
16 AU 02 8801 7666 | NZ 0800 112 660
clockwise until it clicks into place.
9 Turn the unit o by pressing the Power
button. Unplug the unit when finished.
Refer to the Care & Maintenance section
for cleaning and storage instructions.
4 Add ingredients to the pitcher. DO NOT
add ingredients past the DOUGH MAX
(MAX PÂTE) or COOKIE MAX (MAX
BISCUIT) line on the pitcher.
7 Remove the pitcher from the motor base
by turning it counterclockwise and then
lifting up.
5 Place the flat lid on the pitcher. Press down
on the handle until it clicks into place.
Once the lid is locked in place, press the
Power button to turn unit on. The available
program buttons will illuminate and the unit
will be ready for use.
17 AU ninjakitchen.com.au | NZ ninjakitchen.co.nz
Page 10
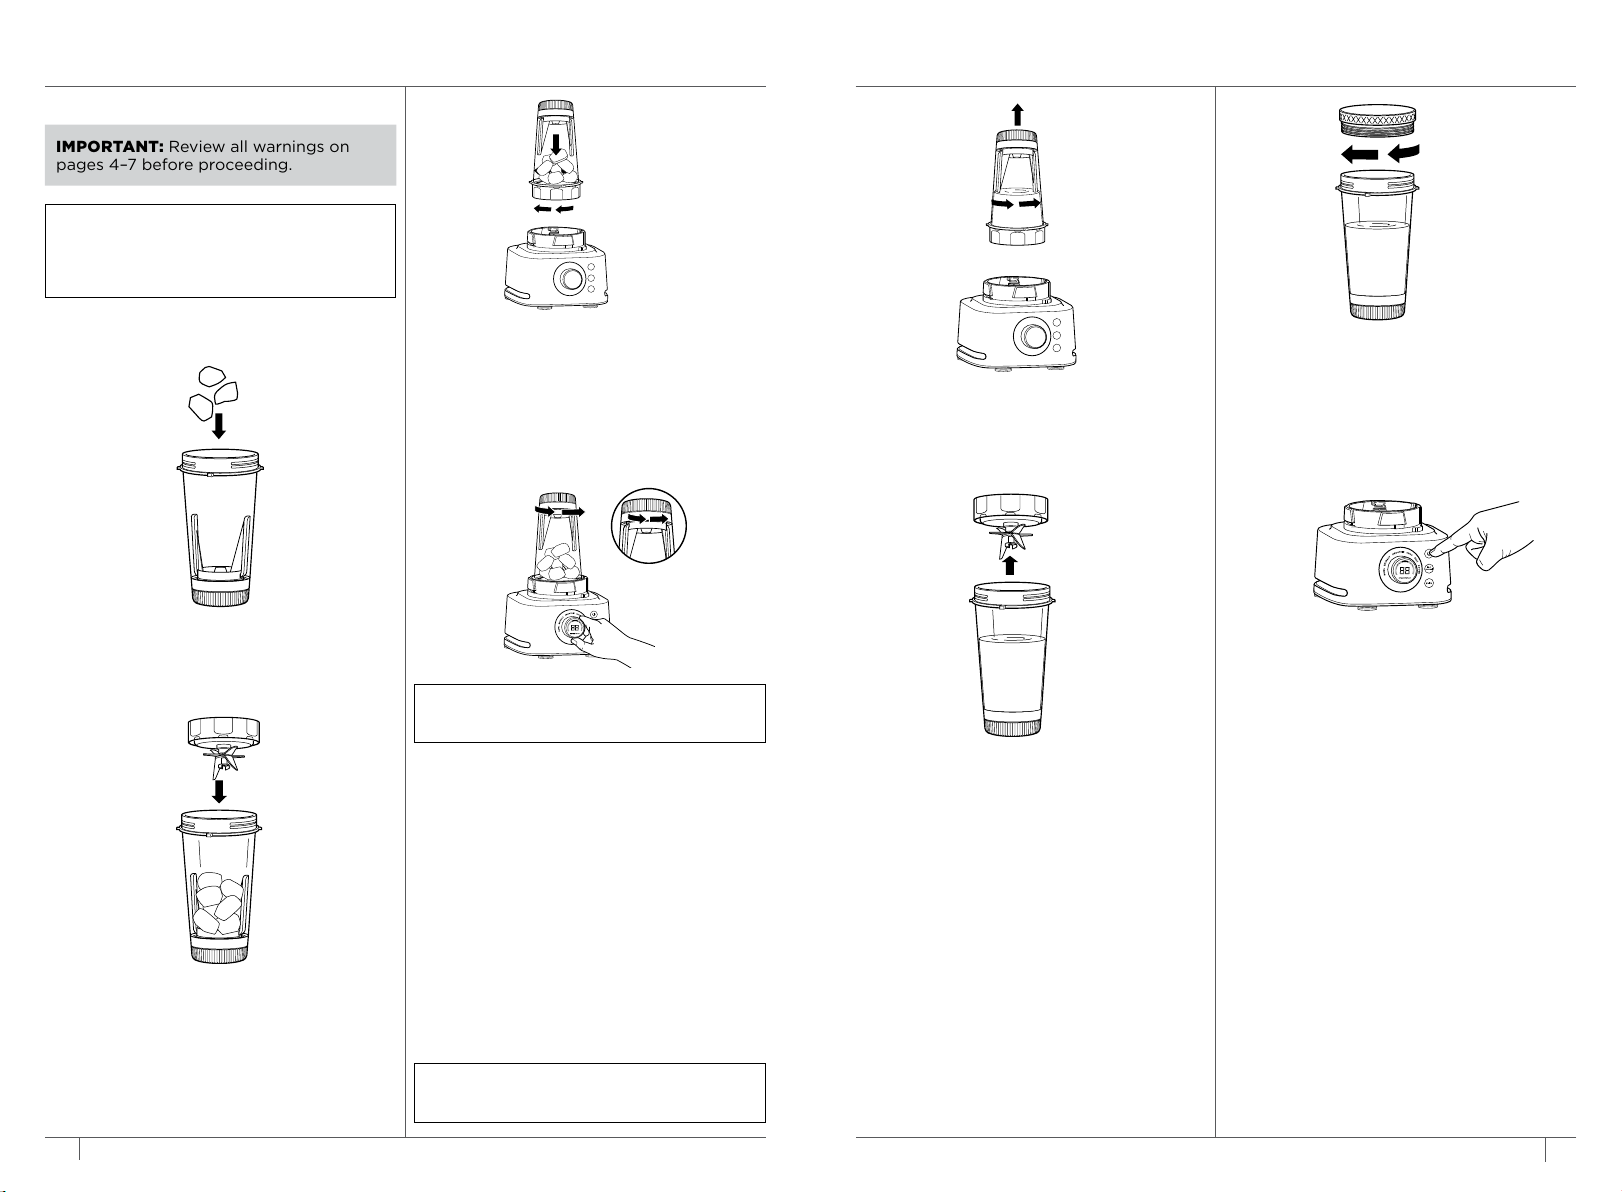
USING THE XL POWER SMOOTHIE BOWL
IMPORTANT: Review all warnings on
pages 4–7 before proceeding.
NOTE: If the unit is plugged in and powered
on, but the XL bowl and blade assembly is
not properly installed, the timer will display
- -” and the motor will be disabled.
1 Plug in motor base and place on a clean,
dry, level surface such as a countertop
or table.
2 Add ingredients to the XL Power
Smoothie Bowl. DO NOT add liquid past
the LIQUID FILL line or ingredients past
the MAX FILL line.
3 Place the Hybrid Edge Blades Assembly
on the top of the smoothie bowl and turn
clockwise to seal.
4 Turn the XL smoothie bowl upside down
and install on motor base by aligning the
tabs on the smoothie bowl with the slots
on the base. Then, rotate smoothie bowl
clockwise until it clicks. Once locked in
place, press the Power button to turn unit
on. The available program buttons will
illuminate and the unit will be ready for use.
NOTE: While processing, twist the built-in
tamper counterclockwise continuously.
5a If using an Auto-iQ program, use the dial
select the program that best suits your
desired output, then press START/STOP.
During the blending process, ensure to
twist the built-in tamper counterclockwise
continuously. The preset feature will
automatically stop at the end of the
program. To stop the unit at any time,
press START/STOP.
5b For Manual mode, press IQ/MANUAL. With
speed 10 on the display, press START/STOP.
During the blending process, twist the built-in
tamper counterclockwise continuously. Once
the ingredients have reached your desired
consistency, press START/STOP and wait for
the unit to come to a complete stop.
6 Remove the XL smoothie bowl
from the motor base by turning it
counterclockwise and then lifting up.
7 Remove the blade assembly by twisting
counterclockwise. DO NOT store blended
contents with the blade assembly
attached. Only use the spout lid or
storage lid to cover. Exercise care when
handling the blade assembly, as the
blades are sharp.
8 To enjoy on the go, place the spout
lid or storage lid onto the smoothie
bowl and twist lid clockwise until
firmly sealed.
9 Turn the unit o by pressing the Power
button. Unplug the unit when finished.
Refer to the Care & Maintenance
section for cleaning and storage
instructions.
18 AU 02 8801 7666 | NZ 0800 112 660
NOTE: Only speed 10 is available when
using the XL smoothie bowl.
19 AU ninjakitchen.com.au | NZ ninjakitchen.co.nz
Page 11

USING THE POWER NUTRI CUP*
IMPORTANT: Review all warnings on
pages 4–7 before proceeding.
NOTE: If the unit is plugged in and powered
on, but the cup and blade assembly is not
properly installed, the timer will display “- -”
and the motor will be disabled.
1 Plug in motor base and place on a clean,
dry, level surface such as a countertop
or table.
4 Turn the cup upside down and install on
the motor base by aligning the tab on
the cup with the slots on the base. Then,
rotate cup clockwise until it clicks. Once
locked in place, press the Power button
to turn unit on. The available program
buttons will illuminate and the unit will
be ready for use.
5b For Manual mode, press IQ/MANUAL.
With speed 10 on the display, press
START/STOP. Once the ingredients have
reached your desired consistency, press
START/STOP and wait for the unit to
come to a complete stop.
NOTE: Only speed 10 is available when
using the single-serve cup.
8 To enjoy on the go, place the spout lid
or storage lid onto the cup and twist lid
clockwise until firmly sealed.
2 Add liquid then ingredients to
the Power Nutri Cup. DO NOT add
ingredients past the MAX LIQUID line.
3 Place the Hybrid Edge™ Blades Assembly
on the top of the cup and turn clockwise
to seal.
20 AU 02 8801 7666 | NZ 0800 112 660
5a If using an Auto-iQ program, use the
dial to select the program that best
suits your desired output, then press
START/STOP. The preset feature will
automatically stop at the end of the
program. To stop the unit at any time,
press START/STOP.
6 Remove the cup from the motor base
by turning it counterclockwise and then
lifting up.
7 Remove the blade assembly by twisting
counterclockwise. DO NOT store blended
contents with the blade assembly
attached. Only use the spout lid or
storage lid to cover. Exercise care when
handling the blade assembly, as the
blades are sharp.
9 Turn the unit o by pressing the Power
button. Unplug the unit when finished.
Refer to the Care & Maintenance section
for cleaning and storage instructions.
* Extract a drink containing vitamins and nutrients
from fruits and vegetables.
21 AU ninjakitchen.com.au | NZ ninjakitchen.co.nz
Page 12
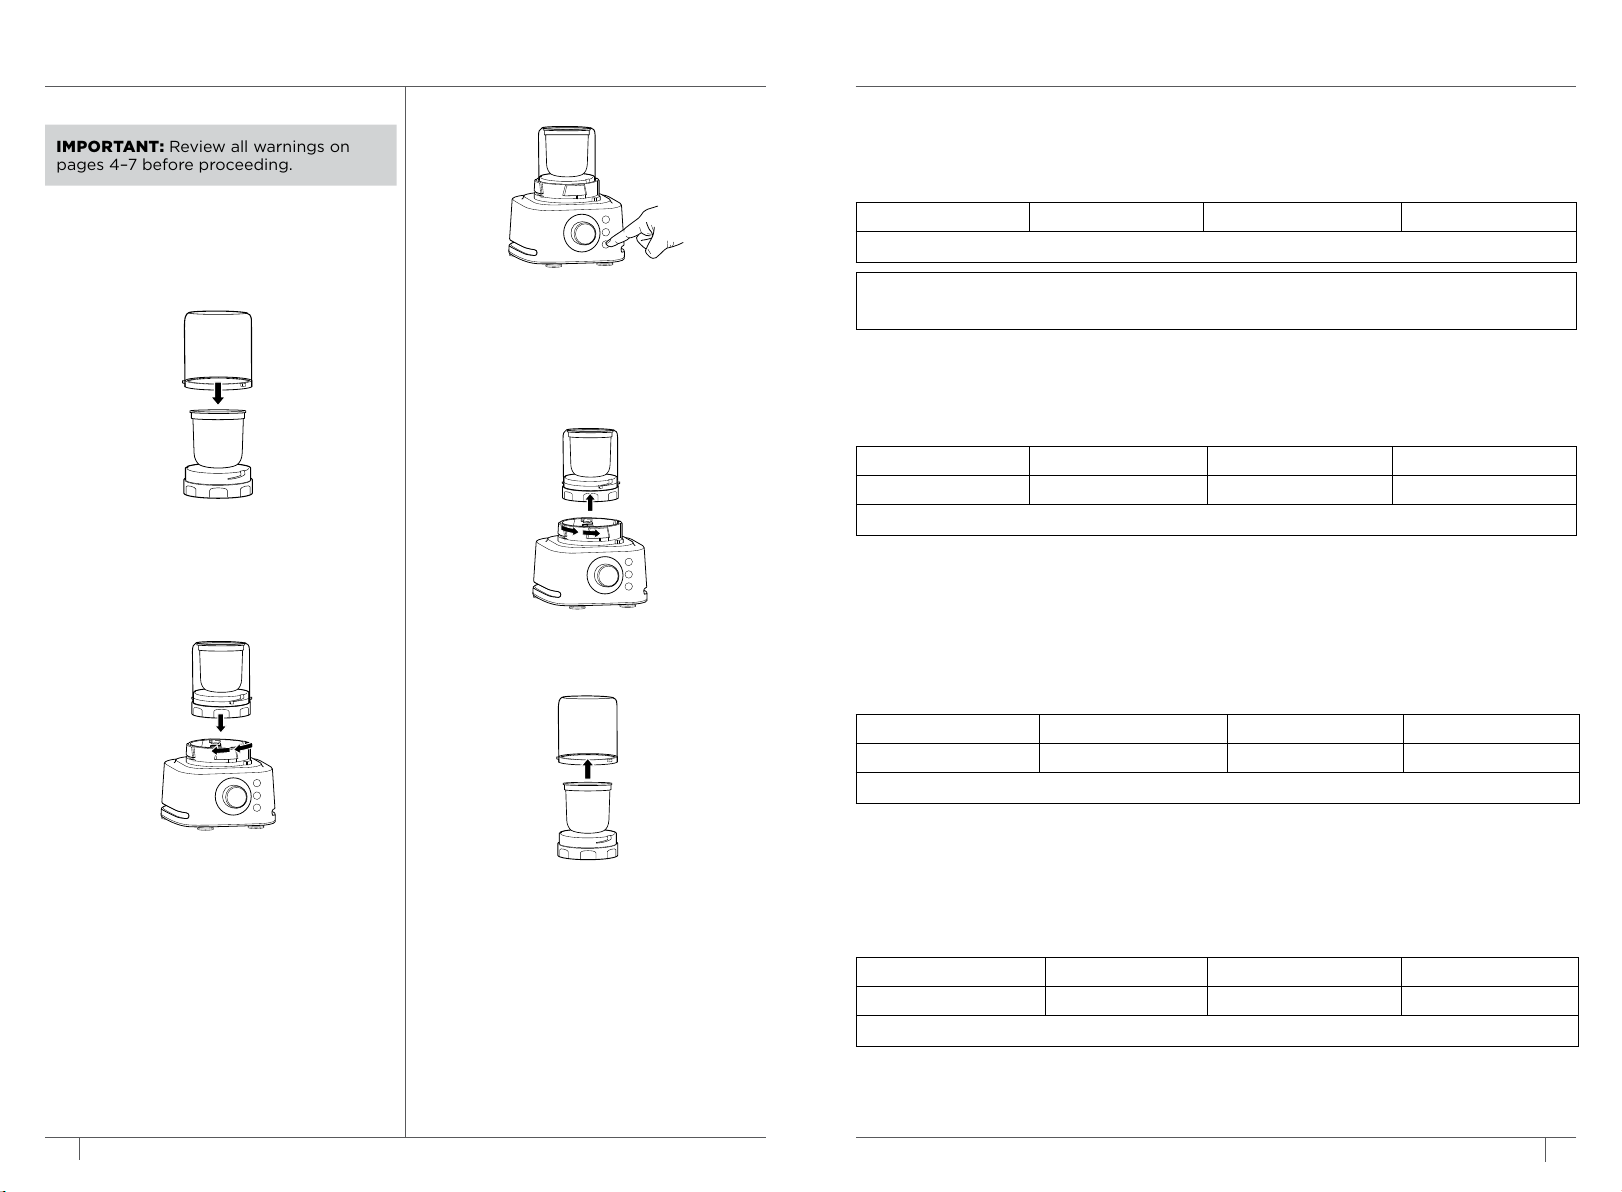
USING THE NINJA COFFEE & SPICE GRINDER
IMPORTANT: Review all warnings on
pages 4–7 before proceeding.
1 Add ingredients to the stainless steel
grinding cup. Use the measurement lines
on the grinding cup for added convenience.
DO NOT exceed 12 tablespoons.
4 Select iQ/Manual. Use the dial to select
your blender model’s highest speed,
then press START/STOP. Blend until
desired consistency is reached. Press
START/STOP again to end the program
and wait for the unit to come to a
complete stop. Or, use PULSE.
2 Place the lid onto the blade assembly
with stainless steel grinding cup so the
tabs on the cup meet the entry point on
the blade assembly. Twist until the lid is
locked in place.
5 Remove the grinder from the motor
base by turning it counterclockwise
then lifting up.
GRINDER CHARTS
GRINDING COFFEE CHART
Use these grind times for your ideal brew.
WHOLE BEANS FRENCH PRESS DRIP COFFEE MAKER ESPRESSO
4–12 tbsp. 15 sec. 20 sec. 25 sec.
Select START/STOP or run on your blender model’s highest speed.
NOTE: For best results, we do not recommend grinding less than 4 tablespoons of
coee beans.
GRINDING SPICES CHART
Make spice blends to flavor your favorite dishes
WHOLE SPICE* COARSE MEDIUM FINE
1–6 tbsp. 10 sec. 15 sec. 25 sec.
7–12 tbsp. 10 sec. 20 sec. 30 sec.
Select START/STOP or run on your blender model’s highest speed.
* Grind times shown are for these four popular spices: black peppercorns, cumin, coriander,
and fennel.
MILLING CHART
Add your freshly ground powders—such as flax meal and chia meal—to smoothies, extracts,
smoothie bowls, and nut butters for more fibre and nutrients.
WHOLE SPICE* COARSE MEDIUM FINE
1–6 tbsp. 20 sec. 30 sec. 40 sec.
7–12 tbsp. 20 sec. 35 sec. 45 sec.
Select START/STOP or run on your blender model’s highest speed.
3 Place the grinder onto the motor base,
aligning the tabs on the grinder with the
slots on the base. Then, rotate clockwise
until it clicks into place. Once locked in
place, the programs will illuminate and
the unit will be ready for use.
22 AU 02 8801 7666 | NZ 0800 112 660
6 Remove the lid and empty contents.
Be sure to store the grinder with the lid
attached to the blade assembly with the
stainless steel cup.
FLAVORED POWDERS CHART
Add your freshly ground flavoring powders—such as strawberry, raspberry, and blueberry—to
smoothies, extracts, smoothie bowls, sorbets, and frozen yogurt to amplify favor and add a
burst of color.
FREEZE DRIED FRUIT** COARSE MEDIUM FINE
1–6 tbsp. 10 sec. 15 sec. 25 sec.
7–12 tbsp. 10 sec. 20 sec. 30 sec.
Select START/STOP or run on your blender model’s highest speed.
** DO NOT grind frozen fruit, only freeze-dried fruits.
23 AU ninjakitchen.com.au | NZ ninjakitchen.co.nz
Page 13
CARE & MAINTENANCE
USING THE BLENDER
FOR STUCK-ON INGREDIENTS
NOTE: For best results, use a dishwasher
to remove stuck-on ingredients.
1 After processing, immediately clean the
container and blade assembly under
warm, soapy water.
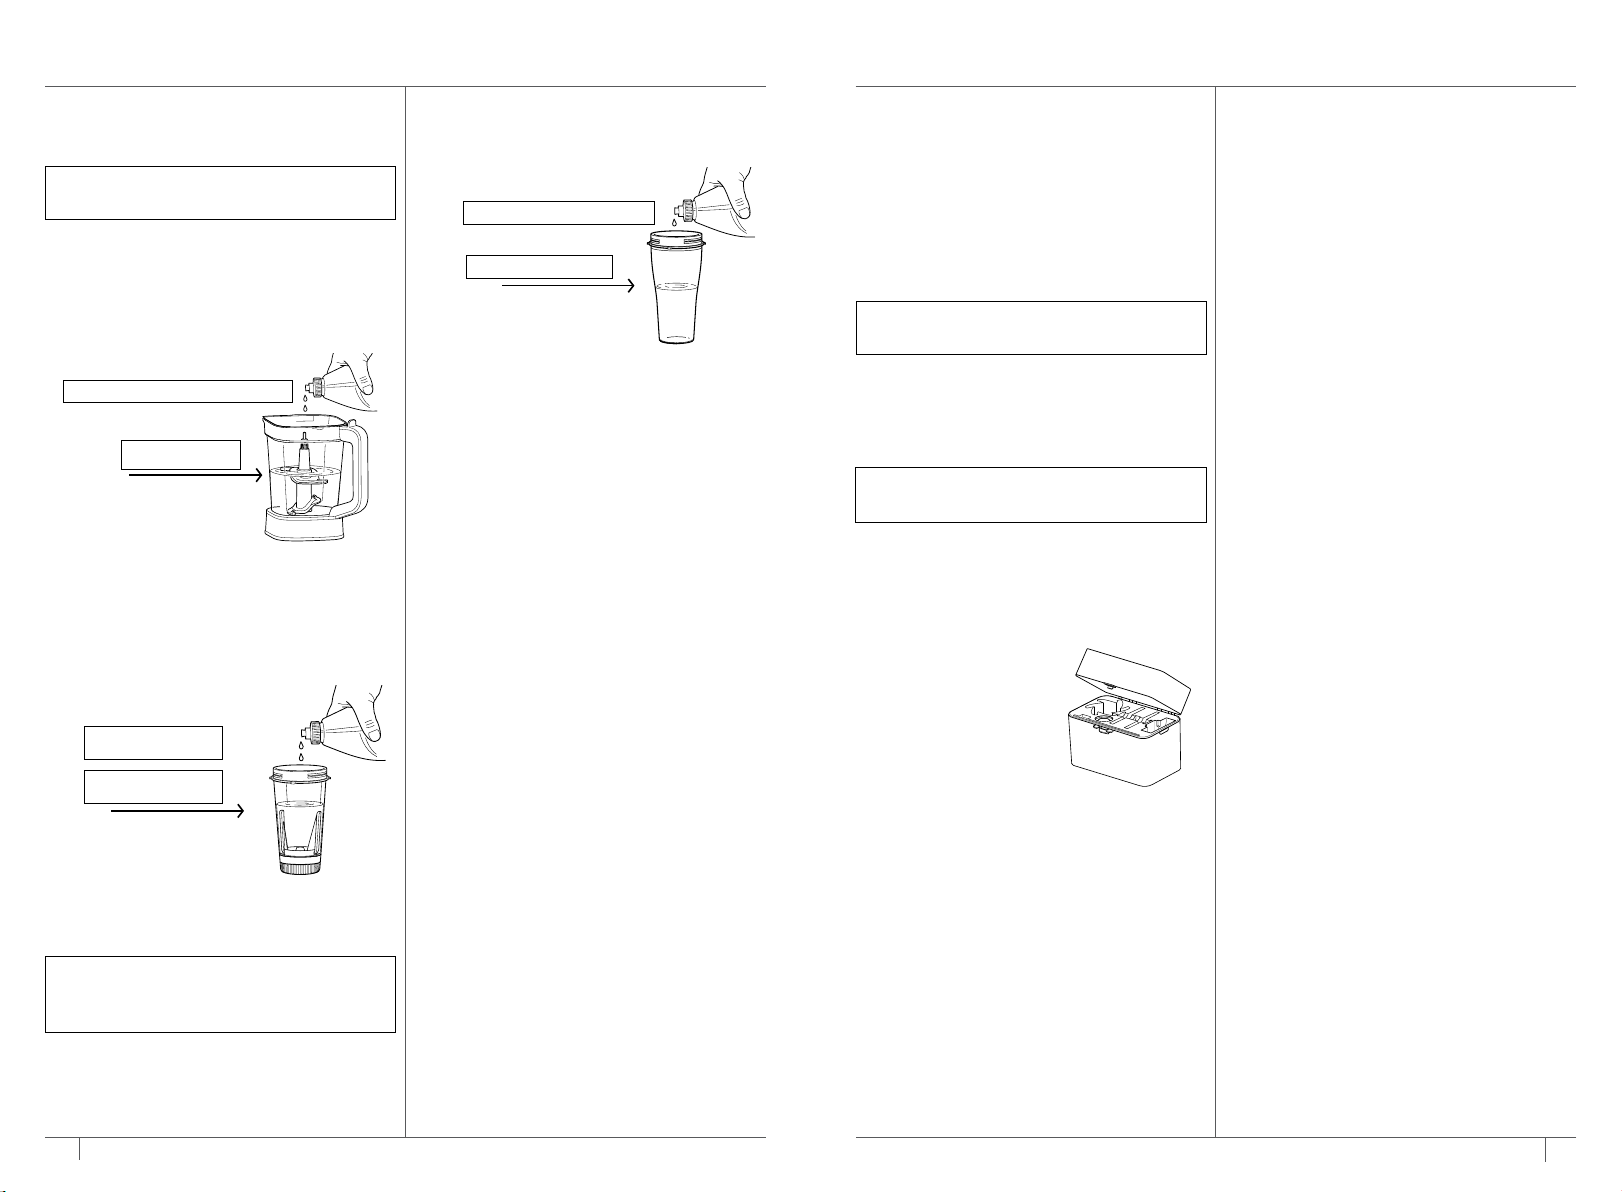
2 Depending on the container, fill with soap
and water according to the following
instructions:
2.1 L Pitcher & Flat Lid:
1 OR 2 SMALL DROPS OF DISH SOAP
FILL WATER TO
DOUGH MAX LINE
With the dough or stacked blade
assembly installed, fill with warm water
up to DOUGH MAX line and add 1 or 2
small drops dish soap. Secure flat lid, and
ensure the pour spout is securely closed.
XL Power Smoothie Bowl:
1 OR 2 SMALL DROPS
OF DISH SOAP
FILL WATER TO TOP
OF BUILT-IN TAMPER
Fill with warm water up to top of built-in
tamper and add 1 or 2 small drops dish
soap. Install blade assembly.
NOTE: If using the XL smoothie bowl,
twist the built-in tamper counterclockwise
continuously while cleaning.
Single-Serve Cup:
1 SMALL DROP OF DISH SOAP
FILL WATER HALFWAY
Fill halfway with warm water and
add 1 small drop dish soap. Install
blade assembly.
3 Install the container on the motor base.
Select BOWL, then press START/STOP.
4 Once program is complete, thoroughly
rinse container and blade assembly
under warm, soapy water.
CLEANING
Hand-Washing
Wash containers, lids, discs, and blade
assemblies in warm, soapy water. Use a
dishwashing utensil with a handle to avoid
direct contact with the blades. Exercise care
when handling the blade assembly as the
blades are sharp. Thoroughly rinse and air-dry
all parts.
NOTE: The built-in tamper in the
XL smoothie bowl is not removable.
Dishwasher
Containers, lids, discs and blade assemblies
are dishwasher safe. Ensure the blade
assembly and lid are removed from the
container before placing in the dishwasher.
NOTE: For best results, use a dishwasher
to remove stuck-on ingredients.
Motor Base
Unplug the motor base before cleaning.
Wipe motor base with a clean, damp cloth.
DO NOT use abrasive cloths, pads, or
brushes to clean the base.
STORING
To purchase a storage
case to house most
attachments that come
with this unit, visit
AU ninjakitchen.com.au or
NZ ninjakitchen.co.nz.
Store the Hybrid Edge
Blades Assembly with the single-serve cup and
the storage lid with the XL smoothie bowl.
For cord storage, wrap cord with hook-andloop fastener near the back of the motor
base. DO NOT wrap the cord around the
bottom of the base for storage.
DO NOT store blended or unblended
ingredients in the cup or XL smoothie bowl
with the blade assembly attached.
DO NOT stack items on top of the
containers. Store any remaining attachments
alongside the unit or in a cabinet where they
will not be damaged or create a hazard.
RESETTING THE MOTOR
This unit features a unique safety system
that prevents damage to the motor and
drive system should you inadvertently
overload it. If the unit is overloaded, the
motor will be temporarily disabled. Should
this occur, follow the reset procedure below.
1 Unplug the unit from the electrical outlet.
2 Allow the unit to cool for approximately
15 minutes.
3 Remove the container’s lid and blade
assembly. Empty the container and ensure
no ingredients are jamming the blade
assembly.
IMPORTANT: Ensure that maximum
capacities are not exceeded. This is the most
typical cause of appliance overload.
ORDERING REPLACEMENT PARTS
To order additional parts and attachments,
visit AU ninjakitchen.com.au or
NZ ninjakitchen.co.nz
24 AU 02 8801 7666 | NZ 0800 112 660
25 AU ninjakitchen.com.au | NZ ninjakitchen.co.nz
Page 14

TROUBLESHOOTING GUIDE
WARNING: To reduce the risk of shock and unintended operation,
turn power o and unplug unit before troubleshooting.
Display reads “- -”.
• If the display reads “- -”, install a container and the available program buttons will
illuminate, indicating the unit is ready for use. Ensure the lid is fully engaged and the
container has been rotated clockwise and clicked to lock into place.
• If vessel is properly installed and the display reads ‘- -’, ensure the interior of the base
area is clean of any debris.
Display reads “E1”.
• If the display reads “E1”, unplug the unit from the electrical outlet and allow it to cool for
15 minutes. Remove the blade assembly and empty the contents to ensure no ingredients
are jamming the blade assembly.
Display reads “E2”.
• If the display reads “E2” unplug the unit from the electrical outlet and allow it to cool for
5 minutes. Remove the blade assembly and empty the contents to ensure no ingredients
are jamming the blade assembly. If output is too thick and ingredients are not processing
properly, add more liquid.
Blade speed sometimes changes when blending thinner ingredients.
• When using speed 9 or 10 with the pitcher, you may notice a change in the blade speed
when blending thinner ingredients. This is due to the smart technology in the blender
and is part of the unit’s normal operation.
Unit doesn’t mix well; ingredients get stuck.
• Using the Auto-iQ programs is the easiest way to achieve great results. The pulses and
pauses allow the ingredients to settle toward the blade assembly. If ingredients are
routinely getting stuck, adding some liquid will usually help.
• When filling the cup, start with fresh fruit or veggies, then leafy greens or herbs. Next add
liquids or yogurt, then seeds, powders, or nut butters. Finally, add ice or frozen ingredients.
• If using the XL smoothie bowl, during the blending process twist the built-in tamper
counterclockwise continuously to circulate ingredients.
Unit moves on counter while blending.
• Make sure the surface and feet of the unit are clean and dry.
Preset program will not work.
• The unit can detect which container is on the motor base. You may be trying to use a program
that is not designed for the container or lid you have installed. The programs will light up,
indicating which programs are available for each container.
Food is not evenly chopped.
• For best results when chopping, cut pieces of ingredients in a uniform size and don’t overfill
the Pitcher. Refer to the Quick Start Guide or Inspiration Guide for food prep instructions.
Can’t remove the built-in tamper from the XL smoothie bowl.
• The built-in tamper in the XL smoothie bowl is not removable. For cleaning instructions,
refer to the Care & Maintenance section.
All ten speed ranges are not available when using the XL smoothie bowl,
the single-serve cup, or the feed chute lid and disc assemblies.
• Only speed 10 is available when using the XL smoothie bowl or single-serve cup, and only
speed 1 is available when using feed chute lid and disc assemblies.
• All 10 speed ranges are available when using the pitcher and stacked blade assembly.
IMPORTANT: Only use speed 1 when using the dough blade assembly.
Cannot install feed chute lid onto pitcher.
• Thoroughly wash the handle of the pitcher with soap and water where the lid connects to
the pitcher.
• Check to ensure the desired disc is fully seated on the disc spindle.
Ingredients are unevenly sliced.
• For best results when using the reversible slicing/shredding disc, trim ingredients to
a uniform size so they fit better through the feed chute. Do not cut ingredients smaller
than the feed chute height. DO NOT attempt to force ingredients through the feed chute.
ONE (1) YEAR LIMITED REPLACEMENT WARRANTY
The warranty commences on the date of purchase and expires at the end of the 1 year period. In
the unlikely event of a defect due to faulty materials or workmanship within the guarantee period
we will replace the defective/faulty part with a new product, free of charge, or if the unit is deemed
defective/faulty we replace the unit with an equivalent or upgraded model, at our discretion.
For warranty claims, you will need to submit a proof of purchase in the form of a valid receipt
that displays date and place of purchase.
Replacement items will be covered by the limited warranty for the balance of the warranty
period from the date of the original purchase. Please note:
Your warranty is subject to the following conditions:
• DO NOT operate the appliance with a damaged plug or cord, or if the unit has been
dropped, damaged or dropped in water.
• To avoid the risk of electric shock, do not disassemble or attempt to repair the appliance
on your own. If the supply cord is damaged, it must be replaced by a qualified electrician
to avoid a hazard. Incorrect re-assembly or repair can cause a risk of electric shock or
injury to persons when the appliance is used.
• The item has not been misused, abused, neglected, altered, modified or repaired by anyone.
• The item has been subjected to fair wear and tear.
• The item has not been used for trade, professional or hire purposes.
• The item has not sustained damage through foreign objects, substances or accident
• Accidental damage
• Damage as a result of use not in accordance with the rating plate
• Use of parts and accessories that are not genuine Ninja components
Customer costs within warranty
• The customer is responsible for any inwards freight charge to return a product for warranty
if requested, and outward freight charge for warranty parts and or replacement unit.
Who is covered?
• This warranty applies only to the original purchaser, who bought the product from an
authorised retailer and may not be transferred. Proof of purchase is required.
What is not covered?
• Accessories supplied with the item.
• Components that are subject to natural wear and tear caused by normal use in accordance
with operating instructions.
• Unauthorised/improper maintenance/handling or overload is excluded from this warranty.
26 AU 02 8801 7666 | NZ 0800 112 660
27 AU ninjakitchen.com.au | NZ ninjakitchen.co.nz
Page 15

Mann&Noble Pty Ltd
Building D, 33 Quarry Road
Erskine Park NSW, Au stralia, 2759
AU 02 8801 76 66 | NZ 0800 112 660
AU ninjakitchen.com.au | NZ ninjakitchen.co.nz
Illustrations may dier from a ctual product. We are co nstantly striving to improve our produc ts, therefore
the specifications contained he rein are subject to chan ge withoutnotice.
AUTO-IQ, FO ODI , NINJA, and TOTAL CRUSHING are registered trademarks of SharkNinja Operating LLC.
HYBRID EDGE and POWER N UTRI are trad emarks of SharkNinja Operating LLC.
© 2022 SharkNinja O perating LLC
CB402ANZ�IB�MP�Mv8�220520
 Loading...