

Page 1
Cleaning
Please make sure to read the enclosed Ninja® Owner’s Guide prior to using your unit.
CUP PITCHER & LID OVERFLOW RESERVOIR
Make sure water
flows through
the vacuum
channel of
the pitcher.
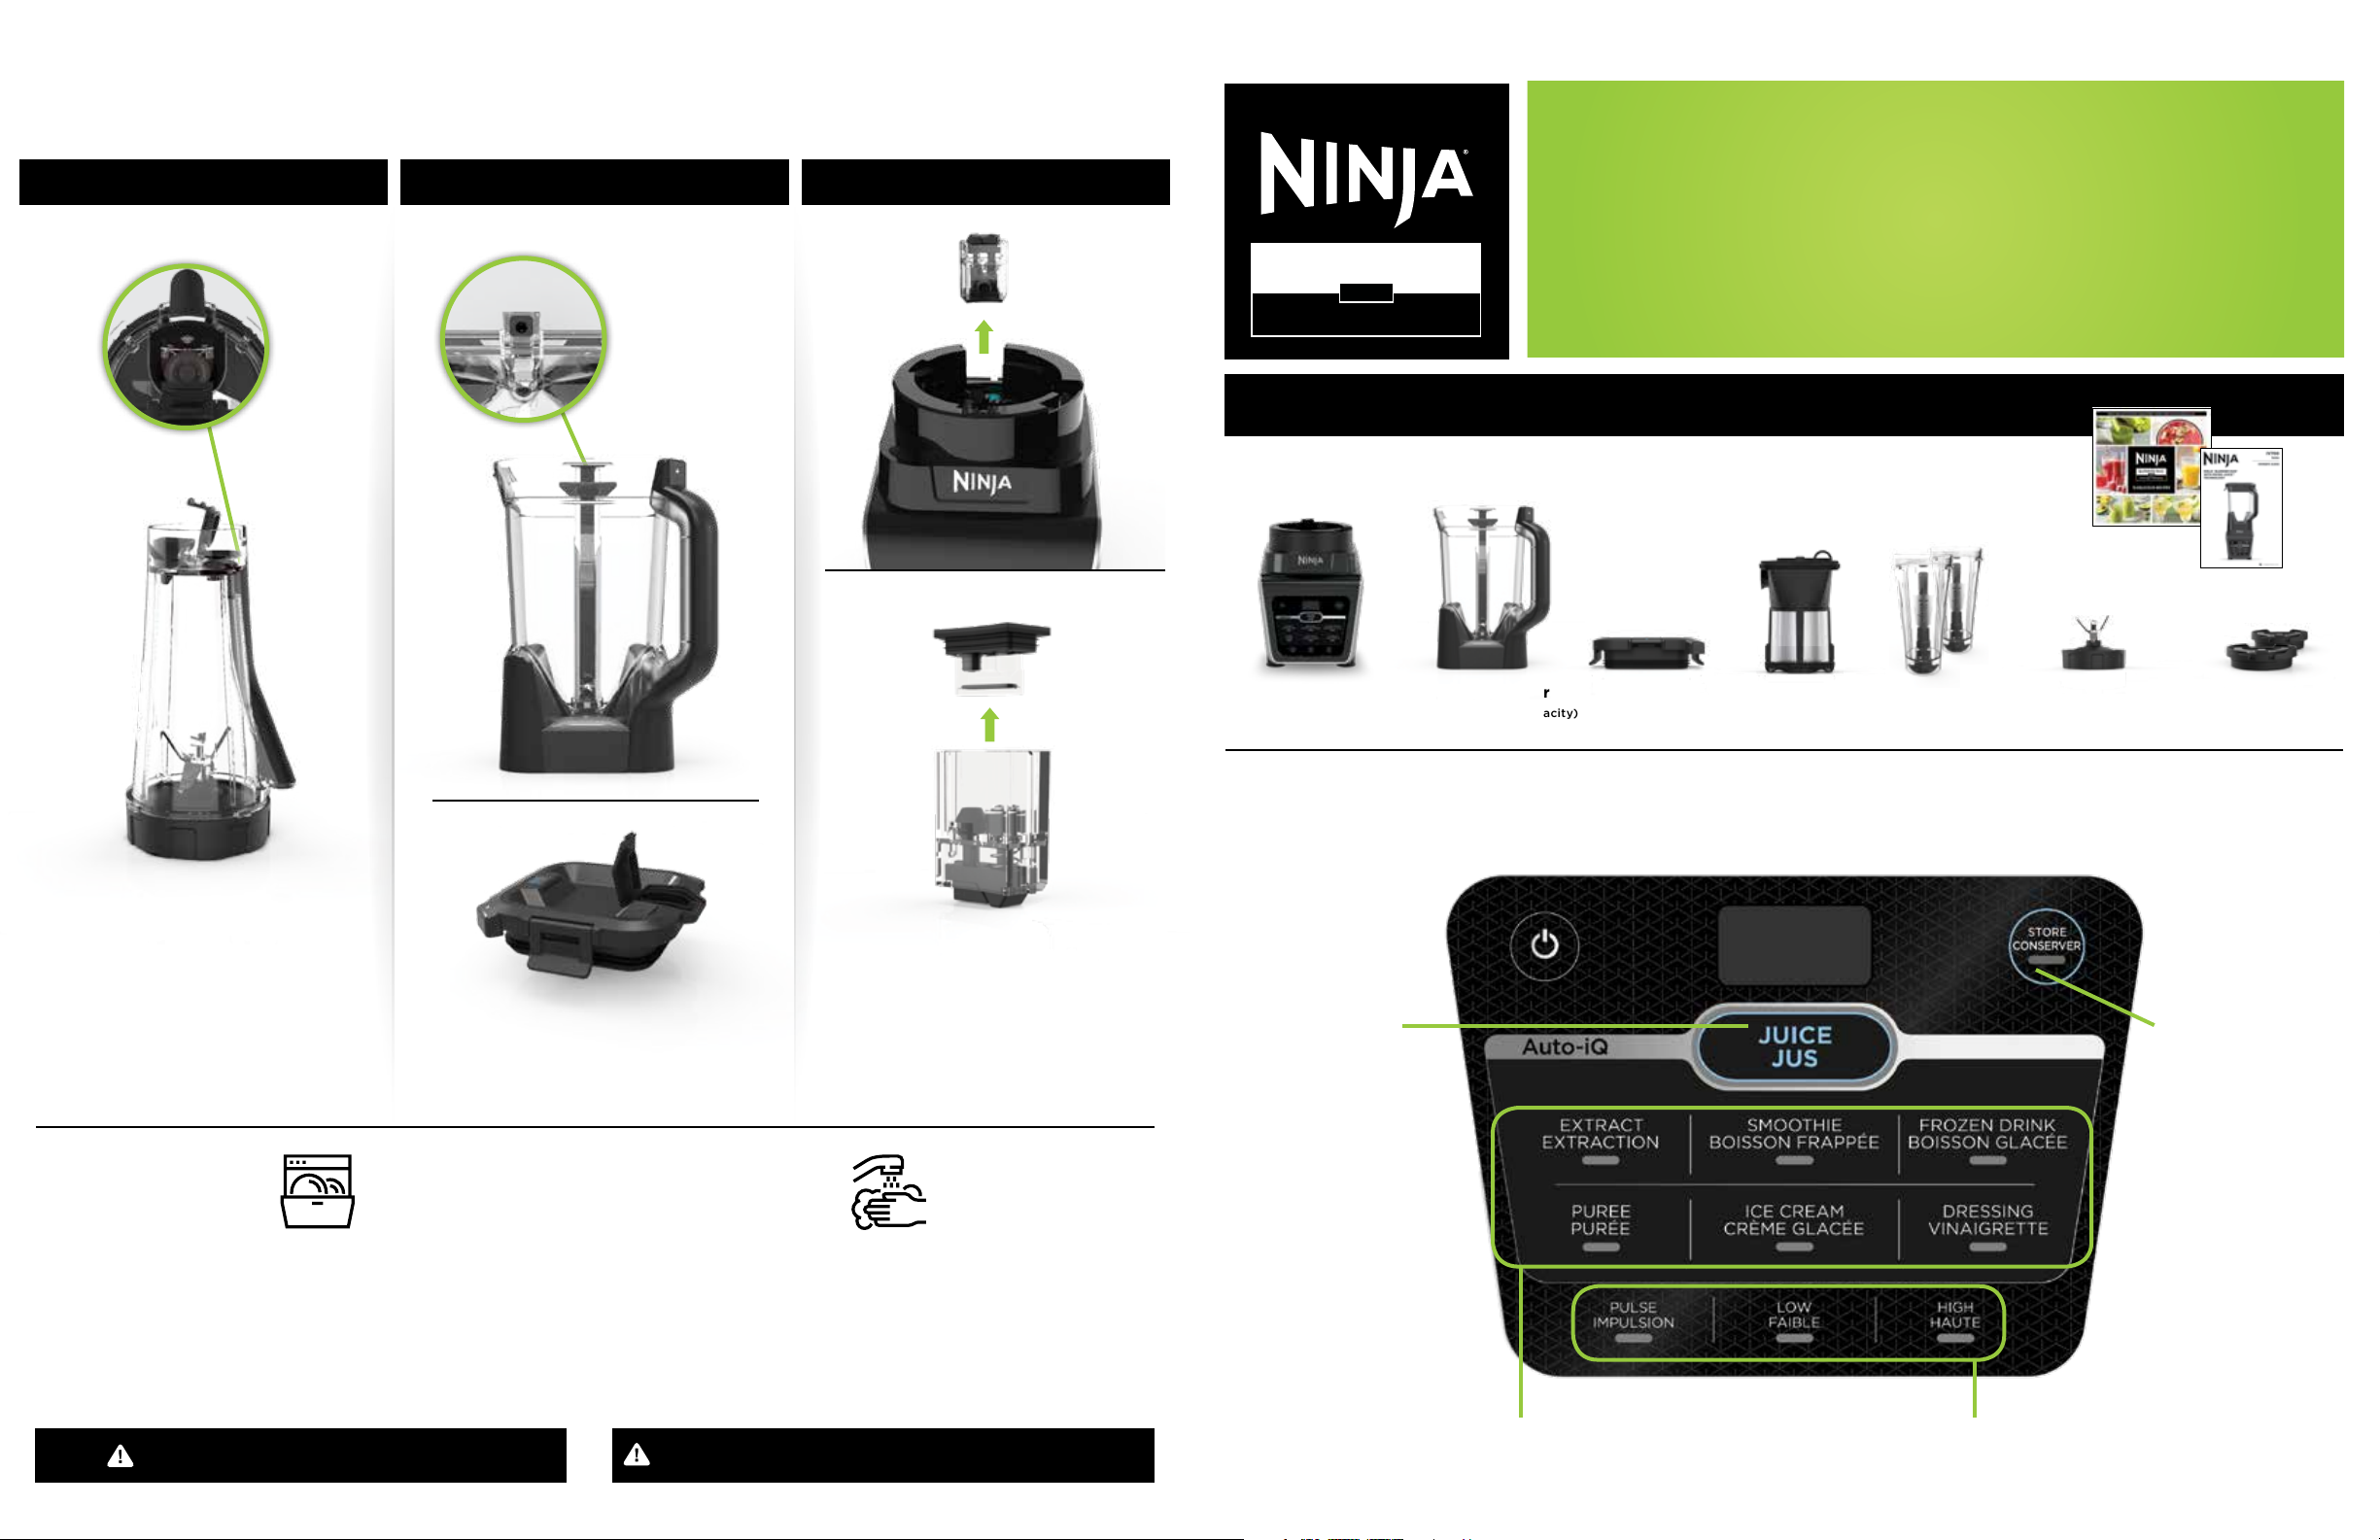
BLENDER DUO®
WITH
Micro-JuiceTM Technology
WHAT’S IN THE BOX
Motor Base 2 100 ml Pitcher
(1 90 0 ml max li quid capaci ty)
Pitcher Lid Micro-JuiceTM
LET’S GET
STARTED
Recipe Book
Owner’s
Guide
Pro Extractor Blades®
Assembly
(2) Sealed
Spout Lids
Filter
(2) 591 ml
Single-Serve
Blending Cups
Keep the channel cover
on the cup open so
water can flow through
the vacuum channel.
DISHWASHER
The containers, lids, Micro-JuiceTM Filter, and
blade assemblies are all dishwasher safe.
The lids and blade assemblies are top-rack
dishwasher safe. Ensure the blade assemblies
are removed from the containers before
placing in the dishwasher.
Keep the channel cover on the
lid open so water can flow
through the vacuum valve.
Hand-wash the containers, lids, Micro-Juice Filter, and
blade assemblies in warm, soapy water. When washing
the blade assemblies, use a dishwashing utensil with
a handle to avoid direct hand contact with blades.
Handle blade assemblies with care to avoid contact
with sharp edges. Rinse and air-dry thoroughly.
If cleaning is necessary, remove
overflow reservoir from the base.
Separate bottom cover from
reservoir and rinse both parts
under running water.
NOTE: Make sure the overflow
reservoir is completely dry
before reinstalling.
HAND-WASHING
JUICE
Make light and
refreshing juice in
the pitcher. The unit
will remove air then
automatically switch
to the program.
Using the Unit
DRINKSAVER
Press the DrinkSaver
button after blending
to remove air and
keep drinks fresh
up to 48 hours.
WARNING: Always unplug the base before cleaning.
© 2019 Shark Ni nja Operating LLC.
WARNING: Handle the blade assemblies with care when washing, as the
blades are sharp. Contact with the blades’ edges can result in laceration.
IV701C_QSG_ EN_MP_Mv3
AUTO-IQ PROGRAMS
7 chef-designed automatic preset
programs do the work for you.
MANUAL SETTINGS
Take control and customize your blended
creations with 3 manual speeds.
Page 2
Assembly & Use
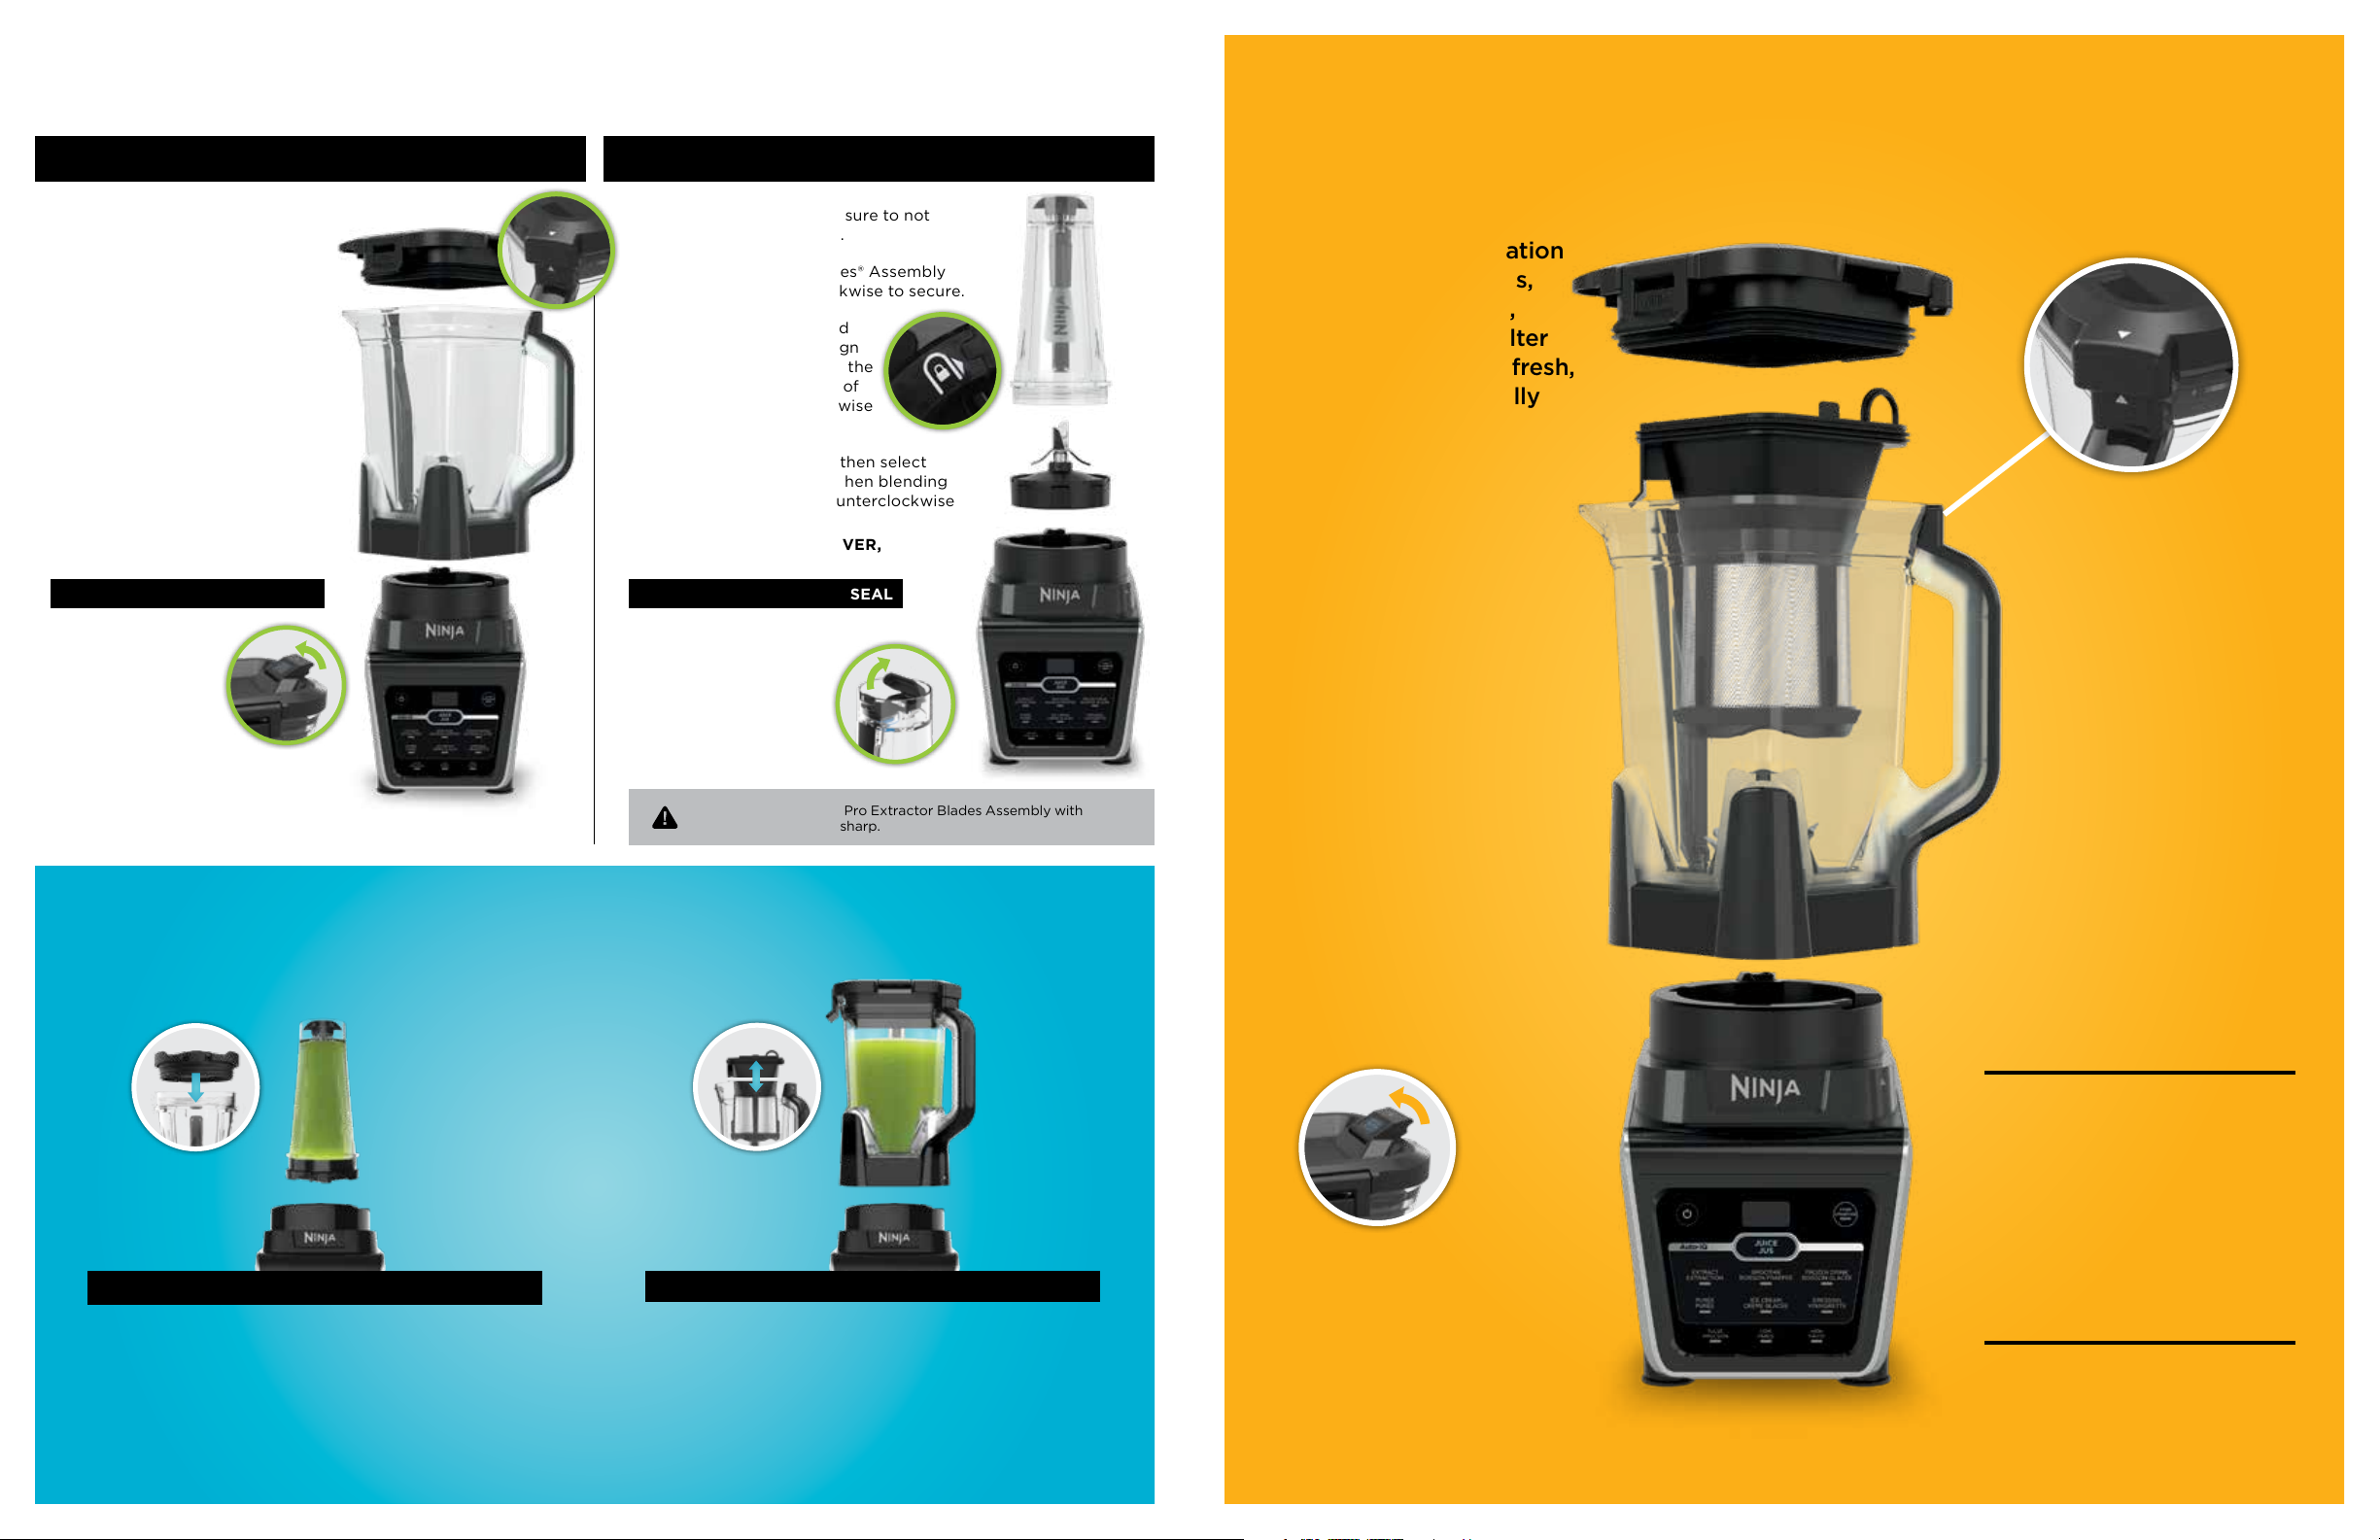
USING THE PITCHER
Juice Making
USING THE CUP
1 Add ingredients, making sure
to not exceed MAX LIQUID line.
2 Place lid on pitcher, aligning
triangles on lid and pitcher
handle. Then snap tabs down
to lock lid in place.
3 Place pitcher on base and turn
clockwise to align triangles on
pitcher and base.
4 Press the power button, then
select your desired program.
When blending is complete,
turn pitcher counterclockwise
and lift to remove.
If making juice or storing with
DRINKSAVER, refer to step 5.
RELEASING THE VACUUM SEAL
5 Pull up on the
vacuum release
tab on the lid.
Once the vacuum
seal is released,
you’ll be able to
remove the lid.
1 Add ingredients, making sure to not
exceed MAX LIQUID line.
2 Place Pro Extractor Blades® Assembly
on the cup and turn clockwise to secure.
3 Flip cup upside down and
lower it onto the base. Align
the vacuum channel with the
lock symbol on the back of
the base. Turn cup clockwise
to lock in place.
4 Press the power button, then select
your desired program. When blending
is complete, turn cup counterclockwise
and lift to remove.
If storing with DRINKSAVER,
refer to step 5.
RELEASING THE VACUUM SEAL
5 With blade assembly
flat on the counter,
pull up on the vacuum
release tab. Once
the vacuum seal is
released, you’ll be
able to remove the
blade assembly.
Our unique combination
of high-speed blades,
vacuum air removal,
and Micro-JuiceTM Filter
allows you to make fresh,
great-tasting, virtually
pulp-free juice.
1 Insert Micro-Juice Filter
in pitcher, aligning triangle
on filter with pour spout
of pitcher.
2 Open filter lid. Add ingredients
in the order recommended in
the Recipe Book. Then close
the filter lid.
3 Place lid on pitcher, aligning
triangles on lid and pitcher
handle. Then snap tabs down
to lock lid in place.
Two ways to store with
DRINKSAVER
ON-THE-GO CONVENIENCE
1 After blending in the cup, remove the blade assembly.
2 Twist the spout lid onto the cup, attach cup to base,
then press DRINKSAVER. The unit will remove air
for approximately 15 seconds until the vacuum
seal is achieved.
3 Place vacuum-sealed drink in the refrigerator, then
release the seal when you’re ready to enjoy that
just-made taste.
WARNING: Handle the Pro Extractor Blades Assembly with
care, as the blades are sharp.
TM
BATC H B LEND I N G
1 After blending in the pitcher, remove the lid, and pour
out a glass.
2 Lock the lid back on the pitcher, attach pitcher to
base, then press DRINKSAVER. The unit will remove
air for approximately 30 seconds until the vacuum seal
is achieved.
3 Place vacuum-sealed pitcher in refrigerator and release
the seal when you’re ready to enjoy another serving.
4 Place pitcher on base and turn
clockwise to align triangles on
pitcher and base.
5 Turn the unit on. Press JUICE.
First the unit will remove air
for approximately 30 seconds,
then automatically switch to
the blending program.
6 When blending is complete,
turn pitcher clockwise and
lift to remove from base.
7 Release vacuum seal by
pulling up on the vacuum
release tab on the lid.
8 Remove pitcher lid. With
the filter still in place, pour
juice into serving glasses.
PRO TIPS
• Loading order matters. See
Recipe Book for more details.
• Peel citrus fruits completely.
• Cut all ingredients into 25 mm pieces.
• Use only 1/2 cup total of any highly
fibrous or seeded ingredients.
 Loading...