

Page 1
Ultima™ System
BL820UK
OWNER’S GUIDE
®
Page 2

IMPOR
TANT SAFETY INSTRUCTIONS
For Household Use Only
WHEN USING ELECTRICAL APPLIANCES,
BASIC SAFETY PRECAUTIONS SHOULD
ALWAYS BE FOLLOWED, INCLUDING THE
FOLLOWING:
READ ALL INSTRUCTIONS BEFORE USING
YOUR NINJA ULTIMA™ SYSTEM.
IMPORTANT:
This appliance is not intended for use by
persons with reduced physical, sensory or
mental capabilities, or lack of experience
and knowledge, unless they have
been given supervision or instruction
concerning use of the appliance by a
person responsible for their safety.
Children shall not use or play with this
appliance. Close supervision is necessary
to keep appliance out of reach of
children during use.
WARNING:
The blades are not affixed to the
unit. They are removable and very
sharp. Handle with care!
CAUTION: ln order to avoid a hazard
due to inadvertent resetting of the
thermal cut-out, this appliance must
not be supplied through an external
switching device, such as a timer, or
connected to a circuit that is regularly
switched on and off by the utility.
WARNING:
TO REDUCE THE RISK OF FIRE, ELECTRIC
SHOCK OR INJURY:
1. To protect against electrical shock, do
not submerge the appliance or allow the
power cord to come into contact with
water or any other liquid.
2. DO NOT allow young children to
operate the appliance or use as a toy.
Close supervision is necessary when any
appliance is used near children.
3. Never leave an appliance unattended
when in use.
4. Turn the appliance off and remove the
power cord from the electrical outlet
when not in use, before assembling or
disassembling parts, accessing parts that
move while in use and before cleaning.
To unplug, grasp the plug and pull from
the electrical outlet. Never pull from the
power cord.
5. DO NOT abuse the power cord. Never
carry the appliance by the power cord
or yank it to disconnect from electrical
outlet; instead, grasp the plug and pull to
disconnect.
6. DO NOT use with damaged cord or plug.
7. DO NOT USE if the appliance is not
working, has been dropped, dropped
into water, damaged or left outdoors.
8. NO SERVICEABLE PARTS. Incorrect
re-assembly or repair can cause a risk of
electrical shock or injury to persons when
the appliance is used. Contact Customer
Service.
9. DO NOT let the power cord hang over
the edge of table or counter or touch hot
surfaces such as the stove.
10. Always use the appliance on a dry, level
surface.
1
Page 3

11. Keep hands, hair, clothing, as well as
utensils out of container while processing
or blending to reduce the risk of severe
injury to persons or damage to the
appliance. A scraper may be used but
only when the appliance is not running.
CAUTION: The blades are not affixed
12.
to the unit. They are removeable and
extremely sharp. When handling the
top blades or the chopping blades,
do not hold the blades but rather
always hold by the shaft. Blades are
sharp. Handle carefully!
13. Avoid contact with moving parts.
14. DO NOT attempt to sharpen blades.
15. DO NOT use the appliance if either set of
blades are bent or damaged.
16. To reduce the risk of injury, never
assemble the top blades in the pitcher or
the chopping blade in the bowl without
the pitcher or the bowl properly attached
to the motor base.
17. DO NOT operate this appliance on or
near any hot surfaces (such as gas or
electric burner or in a heated oven).
18. The use of attachments or accessories
including canning jars, not recommended
by the manufacturer may result in fire,
electric shock or personal injury.
19. DO NOT remove any container from
the motor base while the appliance is in
operation. Always unplug the unit when
not in use.
20. To reduce the risk of injury, NEVER
operate the appliance without the lid in
place; DO NOT try to defeat or bypass
the interlock mechanism. When using
the removable blades, make sure they are
properly installed before operating the
appliance.
21. CAUTION: DO NOT BLEND HOT LIQUIDS.
22. Extreme caution must be used when
moving an appliance containing hot food,
water or other liquids.
23. DO NOT expose containers to extreme
temperature changes.
24. CAUTION: DO NOT process hot foods
or hot liquids. Allow hot ingredients to
cool before processing.
25. DO NOT overfill. DO NOT exceed max fill
line.
26. DO NOT operate the appliance empty.
27. To reduce the risk of burns, always allow
the appliance to cool before taking off
parts and before cleaning.
28. Max ON time is 30 seconds under
1500W load. If the appliance overheats,
a thermal switch will become activated
and shut off the motor. To reset, unplug
the appliance and let it cool down for
approximately 15 minutes before using
again.
29. In the event that the unit overloads, the
control panel lights will flash and the unit
will shut down. Unplug the unit and wait
15 minutes to reset.
30. The maximum rating is based on without
the top blades inserted into the pitcher.
This drives the greatest power. Other
recommended attachments may draw
significantly less power or current.
31. To avoid injury, never attempt to place
the single serve blade assembly onto the
motor base without first assembling the
blade assembly to the single serve cup.
32. DO NOT push food into the food chute
with your fingers. Always use the food
pusher provided.
33. THIS PRODUCT IS INTENDED FOR
HOUSEHOLD USE ONLY. Do not use
this appliance for anything other than its
intended use. Do not use outdoors.
WARNING: Extension cords are
not recommended for use with this product.
SAVE THESE
INSTRUCTIONS
2
Page 4

This applaince complies with the WEEE-Directive 2002/96/EC on the disposal of electrical and electronic
equipment (WEEE).
This appliance complies with the European directives for electromagnetic compatibility (EMC) 2004/108/EC and
its revisions, as well as Low Voltage Directive (LVD) 2006/95/EC and its revisions.
This marking indicates that this product should not be disposed with other household wastes
throughout the EU. To prevent possible harm to the environment or human health fom uncontrolled
waste disposal, recycle it responsibly to promote the sustainable reuse of material sources. To return
your used device, please use the return and collection systems or contact the retailer where this product
was purchased. They can take this product for environmental safe recycling.
Guarantee: This product is unconditionally guaranteed for one year against all defects of workmanship
and materials. This guarantee does not affect your statutory rights. If this product proves unsatisfactory
please contact our customer service department on freephone 0800 862 0453.
THIS BOOK COVERS MODEL NUMBERS:
BL820UK 30
TECHNICAL SPECIFICATIONS
Voltage: 220-240V~, 50/60Hz.
Power: 1500 Watts
Max ON time is 30 seconds under 1500W load
Pitcher Capacity: 2.1 Litres
Max. liquid 1.8 Litres
Single Serve Capacity: 470 ml
Bowl Capacity: 1.8 Litres
Euro-Pro, Ninja, Ultima and Ninja Ultima are trademarks of
Euro-Pro Operating LLC.
3
Page 5
Contents
Thank you for
purchasing the
Ninja Ultima
™
System.
Getting to Know Your Ninja Ultima™ System ...........................................5
™
Using the Ninja Ultima
Assembly and Use for the Pitcher ...........................................................8
System ............................................................ 7
Assembly and Use for the Single Serve Cup .. ......................................... 10
Assembly and Use for the Bowl .............................................................. 11
Using the Chopping Blade Assembly .................................................12
Using the Dough Blade ...................................................................... 12
Using the Discs .................................................................................13
Pitcher Speed Settings & Uses ................................................................14
Food Processor Speed Settings & Uses ................................................... 14
Tips ........................................................................................................15
Care & Maintenance ............................................................................... 16
Troubleshooting Guide ............................................................................17
/
4
Page 6
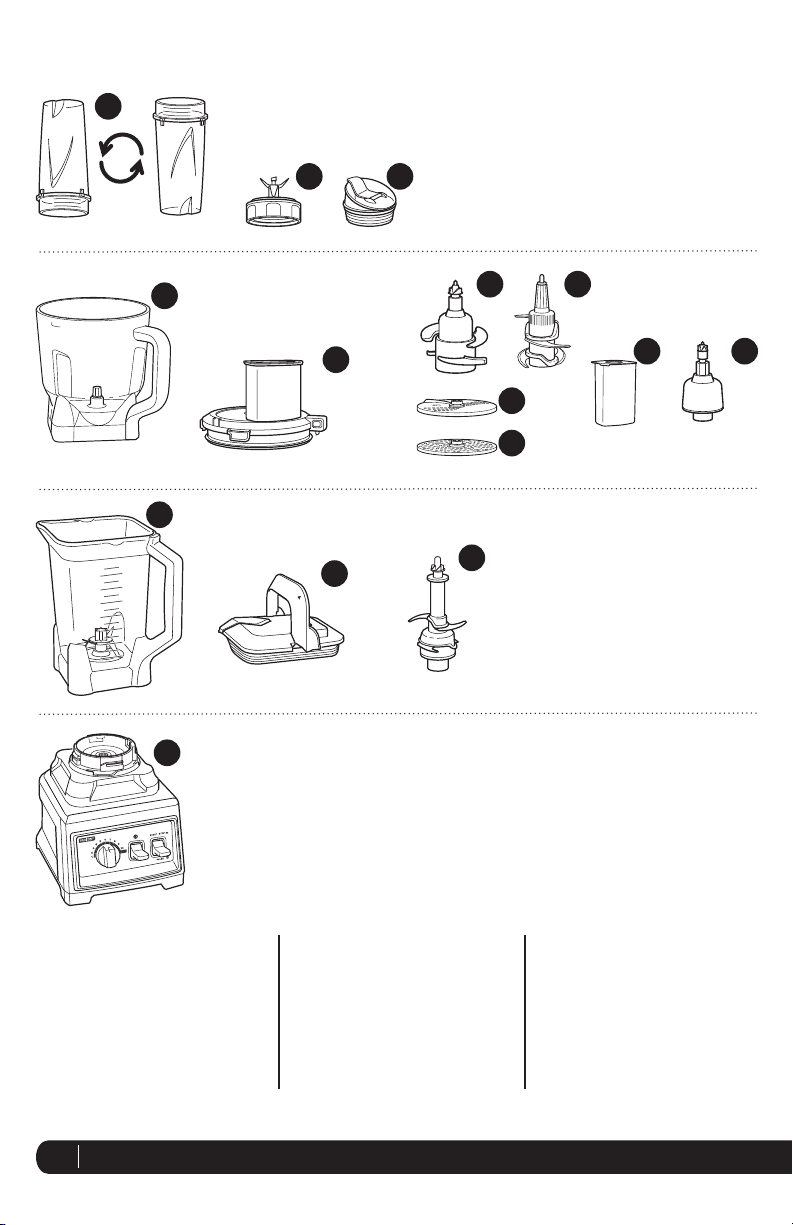
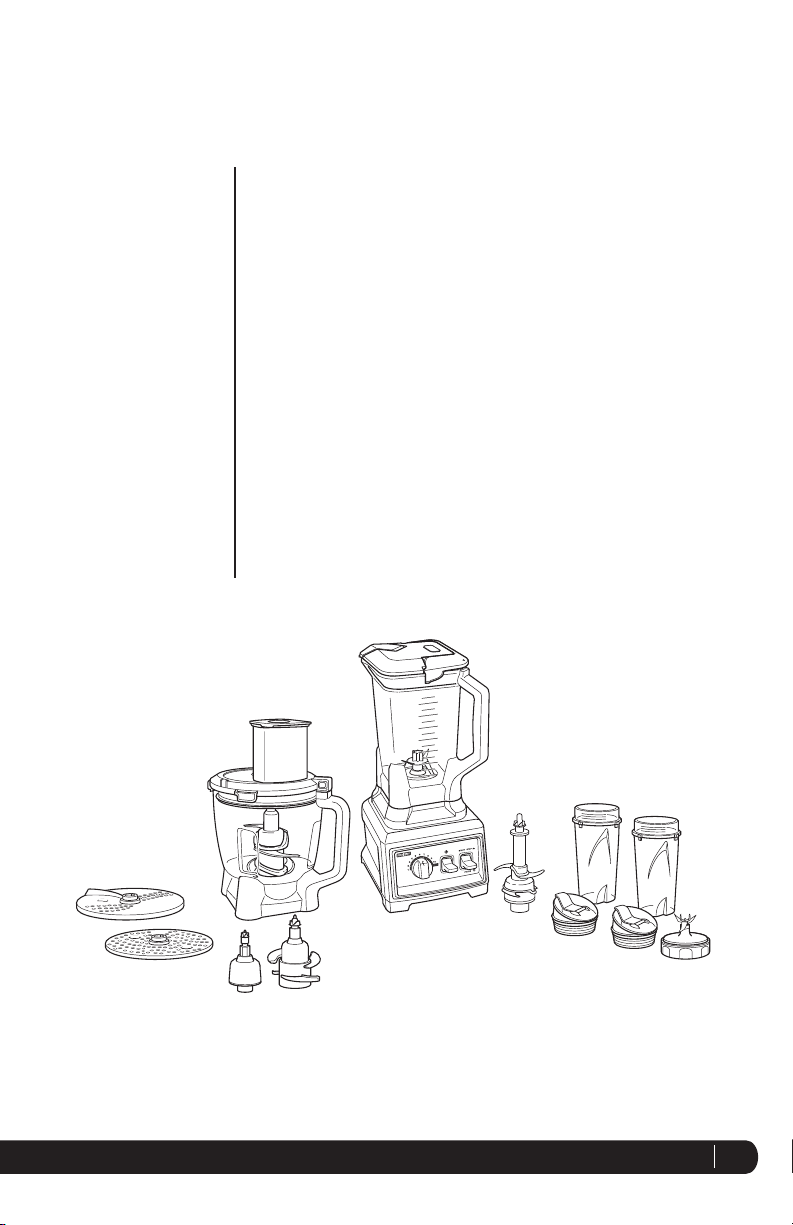
Getting To Know Your Ninja Ultima™ System
a
b
d
e
c
f
g
j k
h
i
l
m
n
o
/
a Single Serve Drink Cup (x2)
b Single Serve Blade
c Sip & Seal™ To-Go Lids (x2)
d Bowl
e Feed Chute Lid (bowl)
f Dough Blade (bowl)
g Chopping Blade (bowl)
h Reversible Slicer/Shredder Disc
i Grating Disc
j Food Pusher
k Disc Gear Shaft
NOTE: Attachments are not interchangeable.
5
l Pitcher
m Lid with Locking Handle
(pitcher)
n Top Blades (Removable)
(pitcher)
o Motor Base
Page 7

The Ninja Ultima™ System features a dual blade system and 3 peak horsepower motor for culinary
precision at home. For best results, be sure to carefully read all the instructions contained in the
manual before using this appliance.
/
FEATURES:
®
• Ninja
Dual Stage Technology
• Extra Large Pitcher, Single Serve Drink Cups and Large Bowl - BPA Free
• Drip-Free Pour Spout
• Sip & Seal™ To-Go Lids
• Easy to Clean Control Panel
• Dough Blade
• Sturdy, Non-Slip Base
• Hidden Drain Holes - prevent water build up from dishwasher
• Dual-blade system
• Lid featuring Smart Lid technology for easy release
6
Page 8

Using the Ninja Ultima™ System
PLEASE KEEP THESE IMPORTANT
SAFEGUARDS IN MIND WHEN USING
THE APPLIANCE:
IMPORTANT: DO NOT push food into
the food chute with your fingers. Always
use the food pusher provided.
CAUTION: Avoid contact with moving
parts. Keep fingers out of the food chute
opening.
IMPORTANT: When using the top blades,
always add the ingredients into the
blender AFTER inserting the top blades.
CAUTION: Blades are sharp! Use extreme
caution when handling the top blades.
Always hold them by the shaft.
IMPORTANT: DO NOT attempt to
operate the appliance without the lid on.
IMPORTANT: Never run the appliance
empty.
CAUTION: DO NOT process food or
liquids that are hot. Allow hot ingredients
to cool before processing.
WARNING: Secure the appliance while in
use by pressing down on the lid with one
hand.
CAUTION: Never remove any container
or try to remove the lid from the pitcher
while the appliance is still running.
WARNING: Never leave the appliance
unattended while in use.
BEFORE FIRST USE
1 Remove all packaging material and labels from the
appliance.
2 Wash the lids, pitcher, bowl, discs, single serve cups
and blades in warm, soapy water with a soft cloth.
Use caution when washing the removable
top blades, chopping blades and discs as the
blades are very sharp. Rinse and dry thoroughly.
OR
3 All accessories are dishwasher safe except the
motor base. When using the dishwasher, place
the pitcher, bowl and single serve cup in the
dishwasher. Place the lids and attachments on
the top rack. Use caution when washing the
removable top blades, chopping blades and
discs as the blades are very sharp. Always hold
the top blades and chopping blades from the shaft.
4 Wipe the motor base clean with a damp cloth. Do
not submerge the motor base in water or any other
liquid.
7
Page 9

Assembly and Use for the Pitcher
/
Assembly
/
Fig. 1
/
Fig. 3a
Fig. 3bFig. 2
IMPORTANT: Make sure that the motor base is
plugged in for use.
1 Place the motor base on a clean, dry, level surface
such as a counter or table top.
2 Align and lower the pitcher onto the motor base.
(Fig. 1) Handle should be aligned slightly to the
right of the “LOCK” symbol on the motor base.
3 Rotate the pitcher clockwise as far as it will go to
lock in place. (Fig. 2)
NOTE: The pitcher can be placed on the motor base
two ways; the handle can be on the front right
corner or the front left corner. (Fig. 3a, Fig. 3b)
4 Holding the top blades by the top of the shaft,
place it onto the bottom blades inside the pitcher.
Ensure that the top blades are seated properly
by standing the top blades upright in the pitcher.
Do not operate the unit if the top blades are not
upright at any time. (Fig. 4)
NOTE: The top blades will fit loosely on the bottom
blades but will be secured once the lid is in place.
/
Fig. 4
/
Fig. 5
TIP: When pureeing, use only the bottom blades
for best results.
NOTE: The bottom blades are not removable.
5 When using the top blades, ensure blades are
properly in place prior to adding ingredients. Add
the ingredients to the pitcher, making sure that
they do not exceed the 2.1 L mark on the pitcher.
NOTE: When blending any kind of liquids, such as
mixtures of any drinks or smoothies, do not exceed
the “MAX LIQUID” mark on the pitcher.
NOTE: If you need to add additional ingredients
while the appliance is processing, do not remove
the lid. Turn the appliance off, open the pour spout
cap and add any additional ingredients, close cap
when complete.
6 Holding the lid by the handle in the upright
position, place it on top of the pitcher aligning the
arrow (
) located on the lid with the arrow ( )
located on the pitcher’s handle. (Fig. 5) Press the
handle down until you hear a click.
8
Page 10

Assembly and Use for the Pitcher - cont.
WARNING: Never leave the appliance unattended while in use.
USE
/
Fig. 6 Fig. 8
7 Plug the motor base in for use.
8 Turn the Variable Speed Dial to speed 1. (Fig. 6)
The power indicator light (
To start the blender, press the “Power” toggle up,
then press the “Start/Stop/Pulse” toggle up to start
processing. Slowly increase to desired speed.
NOTE: As a safety feature, the power
indicator light (
) will flash and the motor
will not work if the pitcher and lid are not
installed correctly.
NOTE: If you need to Pulse ingredients press down
on the toggle in short intervals.
9 When you have reached your desired consistency,
reduce speed slowly and turn the unit off by
pushing up on the Start/Stop/Pulse toggle. (Fig. 7)
10 Use the convenient pour spout when serving
smoothies, juices and other beverages you have
created! Push the pour spout back as far as it
will go before pouring. For thicker consistencies,
remove the lid and the top blades carefully (by the
shaft), then empty the contents from the pitcher.
11 To remove the lid, press the release button on the
lid, pull the lid handle up to a 90° angle and lift
the lid off. Holding the pitcher with one hand while
Fig. 7
) will now turn on.
REMOVAL
/
CAUTION: Never insert your hands in the pitcher
12 Make sure that the unit is unplugged when not in
TIPS:
• Use low speed settings (1-3) when blending
• Use medium speed settings (4-6) when
• Use high speed settings (7-10) when creating
• For softer ingredients, the bottom fixed blades
as the blades are sharp. Always use a spatula to
dislodge food that has stuck to the sides of the
pitcher. Unplug the unit before attempting to
dislodge anything.
use.
drinks and other blended items.
frozen blending, ice crushing or grinding dry
ingredients.
purees such as sauces, dips and restaurant
quality glazes. Top blades are needed to power
through tough ingredients like ice, solid fruits
and vegetables. If silky smooth results are
desired, push down on the power toggle to turn
off the power, carefully remove the top blades,
replace the lid and continue processing.
are enough to fully process in one step.
removing the lid with the other will provide the
best leverage. Turn the pitcher counter clockwise
and then lift off the base. Do not pour out
ingredients without first carefully removing the top
blades. (Fig. 8)
/
9
Page 11

Assembly and Use for the Single Serve Cup
ASSEMBLY PULSE REMOVAL
/
Fig. 9 Fig. 10
For best results, use short “PULSES”... Practise makes perfect!!
Fi g. 11 Fig. 12 Fig. 13
IMPORTANT: Make sure that the motor base
is plugged in for use.
1 Place the motor base on a clean, dry, level
surface such as a counter or table top.
2 Add ingredients to the single serve cup.
NOTE: Do not overfill! Do not exceed “Max
Fill” mark on the cup.
3 Place the single serve blade onto the cup and
screw it on tightly until you have a good seal.
(Fig. 9)
4 Turn the single serve cup upside down and
place it onto the motor base, aligning the tabs
on the cup with the motor base. (Fig. 10)
Turn clockwise until the cup locks in place,
the unit is ready for use. (Fig. 11)
5 The single serve cup only operates at one
speed regardless of which number is chosen
on the dial. Press down on the “Start/Stop/
Pulse” toggle in short intervals until you have
reached your desired consistency. (Fig . 11)
/
/
6 When you have reached your desired
consistency, turn the single serve cup counterclockwise (Fig. 12) and pull straight up to
remove. (Fig. 13)
7 Turn the cup upright and remove the single
serve blade by twisting the blade assembly
counter clockwise.
8 Place the Sip & Seal
™
To-Go drinking lid onto
the single serve drink cup, screw on to seal
and enjoy!
9 Make sure that the motor base is unplugged
when not in use.
/
10
Page 12

Assembly and Use for the Bowl
WARNING: Never leave the appliance unattended while in use.
ASSEMBLY
/
Fig . 14
/
Fig. 15
IMPORTANT: Make sure that the motor base is
plugged in for use.
1 Place the motor base on a clean, dry, level surface
such as a counter or table top.
2 Align and lower the Bowl onto the motor base.
(Fig. 14) Handle should be aligned slightly to the
right of the “LOCK” symbol on the motor base.
3 Rotate the bowl clockwise as far as it will go to
lock in place. (Fig. 15)
4 The bowl can be placed on the motor base two
ways; the handle can be on the front right corner or
the front left corner. (Fig. 16a, Fig. 16b)
5 Holding the desired blade by the top of the shaft,
place it onto the drive gear inside the bowl. Ensure
that the attachment is seated properly and is
standing upright. (Fig. 17)
NOTE: The blade will fit loosely on the star-shaped
post.
6 Add the ingredients to the bowl, making sure that
they do not exceed the highest measured marking
line on the side of the bowl.
/
Fig . 16a
/
Fig . 16b
Fig. 17
Fig. 18
7 Holding the lid from the feed chute, place it on top
of the bowl and turn clockwise aligning the arrow
( ) located on the lid with the arrow ( ) located
on the bowl’s handle. (Fig. 18)
8 Plug the power cord into the electrical outlet and
press up on the power toggle (
) to turn the power
“On”.
NOTE: The bowl is not intended for blending
drinks. Do not exceed the “Max Fill” mark on
the bowl.
NOTE: To add liquids during
processing, remove the food
pusher from the feed chute to
drizzle in liquids. Do not remove
the lid while in use.
TIP: Turn the unit down to the
lowest setting before adding
additional liquids.
11
Page 13

USE
REMOVAL
USE
/
Fig . 19
Dough &
ocessing
r
P
Fig. 20 Fig. 21
USING THE CHOPPING BLADE ASSEMBLY
1 Holding the Chopping Blade Assembly by the shaft,
place it onto the star-shaped post inside the bowl.
Ensure that the attachment fits on the star-shaped
post and that it is standing straight.
2 Add the ingredients and secure the bowl lid onto
the bowl. (Fig. 19)
3 Plug the power cord into the electrical outlet and
press the power toggle up (
) to turn the power
“On”.
4 Select the speed that best suits your needs. Pulse
ingredients for even chopping by pressing down
on the “Start/Stop/Pulse” toggle in short intervals.
Press up on the “Start/Stop/Pulse” toggle to run
the unit continuously.
NOTE: When making dips or sauces, set the
variable speed on a low setting (1-3) and press the
“Start/Stop/Pulse” toggle up.
NOTE: Please refer to “Speed Settings & Uses”
chart for suggested uses and speeds.
5 When you have reached your desired consistency,
stop the appliance by pressing the “Start/Stop/
Pulse” toggle up and wait for the blade to stop
turning.
6 Press the power toggle (
) down to turn the power
off.
7 To remove the lid, press the release button on the
lid, pull the lid handle up to a 90° angle and lift the
lid off. Hold the bowl with one hand and lift the
lid with the other for best leverage. Turn the bowl
counter clockwise and then lift off the base.
(Fig. 20, Fig. 21)
CAUTION: Use care when handling the removable
Chopping Blade Assembly. Blades are sharp, handle
with caution. Always handle by the shaft.
/
/
Fig. 22
USING THE DOUGH BLADE
1 Place the motor base on a clean, dry, level surface
such as a counter or table top. (Fig. 22)
2 Secure the bowl onto the motor base.
3 Holding the dough blade by the shaft, place it onto
the star-shaped post inside the bowl. Ensure that
the attachment fits on the star-shaped post and
that it is standing straight.
4 Add the ingredients and secure the bowl lid onto
the bowl.
NOTE: For best results add dry ingredients first and
then add wet ingredients.
5 Plug the power cord into the electrical outlet and
press up on the power toggle (
) to turn the power
“On”.
6 IMPORTANT: Use only the “DOUGH/DISC” setting
when mixing dough or using either disc. Press up
on the Start/Stop/Pulse Toggle to start the unit.
7 When finished making dough, press up on the
Start/Stop/Pulse Toggle to stop the unit. Remove
the bowl from the motor base. (Fig. 20, Fig. 21)
8 Press the power toggle (
) down to turn off the
unit.
NOTE: As a safety feature, the power light
will flash when the power toggle (
) is pushed
upwards if the lid or bowl are not installed
correctly. When the lid and bowl are installed
properly and the toggle (
) is pushed up, the
power light will become solid, indicating the
unit is ready for use.
12
Page 14

Assembly and Use for the Bowl - cont.
/
Fig. 23
USING THE DISCS
IMPORTANT: Use only the “DOUGH/DISC” setting
when mixing dough or using either disc.
IMPORTANT: Use ONLY the Feed Chute Lid when
using the discs.
1 Place the motor base on a clean, dry, level surface
such as a counter or table top. (Fig. 23)
2 Secure the bowl onto the motor base.
3 Place the disc gear shaft inside the bowl.
4 Use the finger holes to grasp the selected disc and
place it over the gear shaft.
5 Place the feed chute lid on the bowl and turn
clockwise to lock in place. (Fig. 23)
6 Plug the power cord into the electrical outlet and
press up on the power toggle (
) to turn the power
“On”.
7 Turn the variable speed dial to 10 (Dough & Discs).
8 Press the Start/Stop/Pulse toggle up to have the
discs start spinning.
9 Add the food that you want to slice, shred or grate
through the feed chute on the lid. (Fig. 23)
10 The food pusher has two parts. Use the assembled
food pusher to push the food through the feed
chute. (Fig. 23) If the food to be sliced is of a small
diameter, use the small feed chute by twisting the
food pusher and removing the inner tube. Feed the
food to be sliced through the smaller chute.
TIP: Twist the inner tube of the food pusher counter
clockwise and pull to remove it from the food
pusher.
11 When finished, press the Start/Stop toggle up to
stop the discs and then press the power toggle
down to turn the appliance off. Remove the lid.
Using the finger holes, carefully lift the disc out of
the bowl.
13
Page 15

Pitcher Speed Settings & Uses
Function Type of Food Suggested Blade(s) Speed Settings
Juices / Smoothies
Ice Crushing /
Frozen Blending
Pureeing
Emulsifying
Chopping
Mixing
Grinding Meat Top blades & bottom blades Pulse
Nut Butters
Milling
Flours
Fruits
Vegetables
Ice
Frozen fruit
Ice cream
Smooth soups
Milkshakes
Nut milks
Salad dressings
Sauces
Salsa
Vegetables
Nuts
Batters
Dips
Sunflower butter
Peanut butter
Almond butter
Rice
Quinoa
Chick peas
Top blades & bottom blades Pulse then 5 - 10
Top blades & bottom blades Pulse then 5 - 10
Top blades & bottom blades*
Bottom blades only*
Bottom blades only 1 - 5
Top blades & bottom blades Pulse
Bottom blades only 1 - 3
Top blades & bottom blades 1 - 8
Top blades & bottom blades 5 - 8
1 - 10
Food Processor Speed Settings & Uses
Function Type of Food Suggested Blade(s) Speed Settings
Chopping
Mixing
Dough Mixing
Grating
Slicing/Shredding Vegetables
Vegetables, Nuts,
Herbs
Dips, Sauces,
Quick breads
Cakes
Pizza dough,
Pasta dough,
Cookie dough
Cheese
Chocolate
Chopping blade Pulse
Chopping blade 1-10
Dough blade Dough/Discs
Add disc gear shaft
and grating disc
Add disc gear shaft
and slicing/shredding disc
Dough/Discs
Dough/discs
14
Page 16

*TIPS:
• Top blades are needed to power through tough ingredients like ice, solid fruits and
vegetables. If silky smooth results are desired, push the power toggle down to turn off the
unit. Carefully remove the top blades by lifting from the shaft, replace the lid and press the
power toggle up to continue processing with only the bottom blades.
• For softer ingredients, the bottom fixed blades are enough to fully process in one step.
• Use the single serve cup for great results when making individual portions of smoothies or
other drinks.
• The single serve cup is also great for chopping and creating salad dressings!
• The single serve cup only operates at one speed regardless of which number is chosen
on the dial. Press down on the “Start/Stop/Pulse” toggle in short intervals until you have
reached your desired consistency.
• Always use the Dough/Discs setting on the dial when mixing dough or using either disc.
• When chopping, pulse for the perfect chop.
• When using the chopping blade, start the Variable Speed Dial at a low speed and gradually
increase to desired speed.
15
Page 17

Care & Maintenance
HOW TO CLEAN
CAUTION: Make sure that the motor base is
unplugged from the power source before inserting
or removing any attachment and before cleaning.
CAUTION: DO NOT immerse the motor base into
water or any other liquid.
1 Separate/remove all parts from each other.
2 Clean the motor base with a damp cloth and wipe
dry.
3 Place the pitcher, bowl and single serve cup in the
dishwasher. Place the lids and attachments on
the top rack. Use caution when handling the
blade assemblies as the blades are very sharp.
Always hold the top blades and chopping
blade by the shaft.
NOTE: You may also wash the containers by
filling ¾ of the container with warm water and a
drop of dish washing detergent, placing the lid or
single serve blade assembly on and pressing the
pulse button a few times. Once clean, remove the
container from the motor base. Rinse the pitcher,
bowl, single serve cup and lids under running
water. Allow all the parts to dry before storing.
HOW TO STORE
1 Store the Ninja Ultima
™
System upright with the
pitcher on the motor base, top blades inside the
pitcher and lid on the pitcher. Store the Chopping
blade in the 1.8 L bowl with the lid on the bowl.
Store the discs and dough blade in a secure
location.
RESETTING THE MOTOR THERMOSTAT
The Ninja Ultima
™
System features a unique safety
system which prevents damage to the unit’s
motor and drive system should you inadvertently
overload your appliance. If the appliance is being
overloaded, the motor will stop. To reset the
appliance, follow the resetting procedure below:
1 Unplug the appliance from the electrical outlet.
2 If using the top blades or the chopping blades,
carefully remove them by the shaft, ensuring that
no food is jamming the top or bottom cutting
blades.
CAUTION: The blades are extremely sharp - handle
with care! Always hold the top blades and
chopping blades by the shaft.
3 Allow the appliance to cool for approximately 15
minutes.
4 Re-install the container onto the base, carefully
re-insert the top blades (if using) and
re-plug the appliance into the electrical outlet.
NOTE: Ensure that the blades are seated properly
by standing the blades upright in the jar. If the
blades are not seated properly on the star-shaped
post, carefully check the underside of the top blade
assembly to ensure there’s no food in the way.
Rinse if necessary. Do not operate if the top blades
are not upright at any time.
5 Proceed to use the appliance as before, making
sure not to exceed the recommended maximum
capacities.
16
Page 18

Troubleshooting Guide
PROBLEMS POSSIBLE REASONS & SOLUTIONS
Motor doesn’t start or
attachment doesn’t rotate.
Make sure the pitcher, bowl or single serve cup is securely placed on motor
base.
Make sure the lid is securely on pitcher in the correct position (align
arrows).
The appliance is turned “Off”. Turn the Variable Speed Dial to the desired
speed setting, press up on the power toggle and press the Start toggle
switch up to turn “On”.
Check that the plug is securely inserted into the electrical outlet.
Check the fuse or circuit breaker.
The unit has overloaded. The appliance will stop and the power indicator
light will flash. Unplug and wait approximately 15 minutes before using
again.
The unit has overheated. Unplug and wait approximately 15 minutes
before using again.
Food is unevenly chopped.
Food is chopped too fine or
is too watery.
Food collects on lid or on
the sides of the container.
You cannot achieve snow
from solid ice.
Variable speed won’t work
on my single serve cup.
The unit won’t stop blinking
although everything seems
to be assembled properly.
You are chopping too much food at one time. Use short pulses for best
results.
The food has been over processed. Use short pulses for best results.
The mixture is too thick. Add more liquid. Start at a low speed and slowly
increase to high for best results.
Do not use ice that has been sitting out or has started to melt. Use ice
straight from the freezer. Pulse for best results.
The single serve cup only operates at one speed regardless of which number
is chosen on the dial. Press down on the “Start/Stop/Pulse” toggle in short
intervals until you have reached your desired consistency.
Unit is overfilled. Reduce amount being processed and restart.
17
Page 19

18
Page 20

Freephone 0800 862 0453
© 2014 Euro-Pro Operating LLC
Euro-Pro, Ninja, Sip & Seal, Ultima and Ninja
Ultima are trademarks of Euro-Pro Operating LLC.
Printed in China
Illustrations may differ from actual product.
BL820UK.30.E.140219.1
Ninja Customer Services
PO Box 298
Mirfield
WF14 9BA
www.ninjakitchen.eu
 Loading...