

Page 1

DELTABOOSTER
User Manual
7309021 (02.2008)
1
Page 2

2
DELTABOOSTER
manual
Contents
1 Product description .......................................................4
1.1 Model survey and main functions ......................................................................... 6
1.2 Selection of system .............................................................................................. 8
1.3 Technical data ......................................................................................................9
1.3.0 Switchboard .......................................................................................... 10
1.3.1 Water tank ............................................................................................10
1.3.2 C3K pumps ........................................................................................... 10
1.3.3 Dimensions, weight and total performance for systems ....................... 11
1.4 Location: surroundings -frost, safety and service margins ................................. 12
1.5 Installation requirements for water connection ................................................... 13
1.6 Installation requirements for mains power connection ....................................... 14
1.7 Pipe system ........................................................................................................ 15
1.7.1 Location of pipe lines/general instructions ............................................15
1.7.2 Types of pipes, standards ..................................................................... 15
1.7.3 Fittings, standards ................................................................................16
1.7.4 Dimensioning of pipe systems, pressure drop graph ............................ 21
1.7.5 Examples .............................................................................................. 23
1.7.6 Mounting requirements and hints .........................................................26
1.8 Outlet points and accessories ............................................................................ 29
1.9 Spray lance system ............................................................................................ 31
2 Instructions for assembly ...................................................32
2.1 Location of the DELTABOOSTER ...................................................................... 32
2.2 Mounting base and tip over safety device .......................................................... 33
2.3 Connection of inlet water .................................................................................... 34
2.3.1 Control of filter in water tank ................................................................. 34
2.4 Connection of power between the DELTABOOSTER and the supply network
(Settings on the plant, see section 3.5) .............................................................. 35
2.5 Starting up / running in ....................................................................................... 36
2.5.1 Oil control.............................................................................................. 36
2.5.2 Start ...................................................................................................... 36
2.5.3 Venting of pumps ..................................................................................36
2.5.4 Venting of pipe system ..........................................................................37
2.5.5 Adjustment of line pressure .................................................................. 37
Page 3

3
DELTABOOSTER
manual
3 How to use the DELTABOOSTER ...................................... 38
3.1 Safety .............................................................................................................. 38
3.2 Model survey ...................................................................................................... 39
3.3 Functional diagram ............................................................................................. 40
3.4 Instrument panel ................................................................................................41
3.4.1 Main / emergency switch ...................................................................... 41
3.4.2 Control switch / starting switch and stopping switch .............................41
3.4.3 Control panel ........................................................................................42
3.5 Setting and reading of DELTABOOSTER ........................................................... 43
3.5.1 Setting of water temperature ................................................................44
3.5.2 Connection and disconnection of C3K pumps ......................................45
3.5.3 Reading of hour meters ........................................................................ 46
3.6 Starting up / operation ........................................................................................ 47
3.7 Multipressure spray lance system ...................................................................... 49
3.8 Operation after starting up - outlet points and equipment .................................. 50
3.8.1 High-pressure cock with Multipressure spray lance, Outlet point A ...... 50
3.8.2 Outlet point with foam injector and foam lance, Outlet point B ............. 51
3.8.3 Outlet point with detergent trolley and foam lance, Outlet point D ........ 52
3.8.4 General guidelines for the dosage of detergents ..................................52
3.9 Maintenance ....................................................................................................... 53
3.9.1 Service intervals / oil change ................................................................ 53
3.9.2 Water filter ............................................................................................53
3.9.3 Couplings ..............................................................................................53
3.10 Trouble-shooting and correction ......................................................................... 54
NOTE
Users are urgently requested to study section
“3.1 Safety” before operating the system.
Only instructed staff should operate the
system.
Page 4

4
1. Product Description
Layout of system
The DELTABOOSTER is a flexible pump station capable of supplying several simultaneous
users with pressurized cold / hot water through a pipeline. The DELTABOOSTER has been
pre-adjusted for a certain line pressure which is also the maximum working pressure.
For the DELTABOOSTER a system of nine different spray lances has been developed. From
a diagram the user can choose the lance giving the exact pressure and water volume required
for his cleaning job.
As standard the DELTABOOSTER system is available with capacities from 2 - 6 users and
pre-adjusted at a line pressure of 160 bar (other pressures are available according to wishes
of the customer).
A plant with a capacity for 3 users can be upgraded to 4, 5, or 6 users at any time, and more
DELTABOOSTER plants can be connected up on the same pipeline.
With the DELTABOOSTER users no longer have to bother about the pros and cons of high
or low pressure. From now on all choices are united in one system, and the solution with the
optimal effect on the job to be done may always be found.
In more technical terms the plant operates in the following way:
Water from a COLD and a HOT connecting valve is mixed in a water tank of the type A airgap.
From here water of the required temperature is drawn into the high pressure pumps of the
DELTABOOSTER which pressurize the water and supply it to a pipeline.
When one or more outlet points are being used, the number of pumps required to maintain the
pressure will automatically start up.
When the cleaning stops successively, one of the excess pumps will cease operation each 15
sec. If all cleaning is stopped then controls will ensure that the requisite pressure for re-starting
is maintained. If a leakage is caused to the pipe system then the pump station will be totally
switched off after some 2 minutes. In the case of an internal hose leakage in the system, faulty
water supplies, excess temperature of inlet water, excess motor temperature or excess power
consumption the system will be switched off.
When starting and stopping the individual pumps, controls will ensure an even distribution of
operation time on the pumps by switching between all the pumps in the system.
Page 5
5
Page 6
6
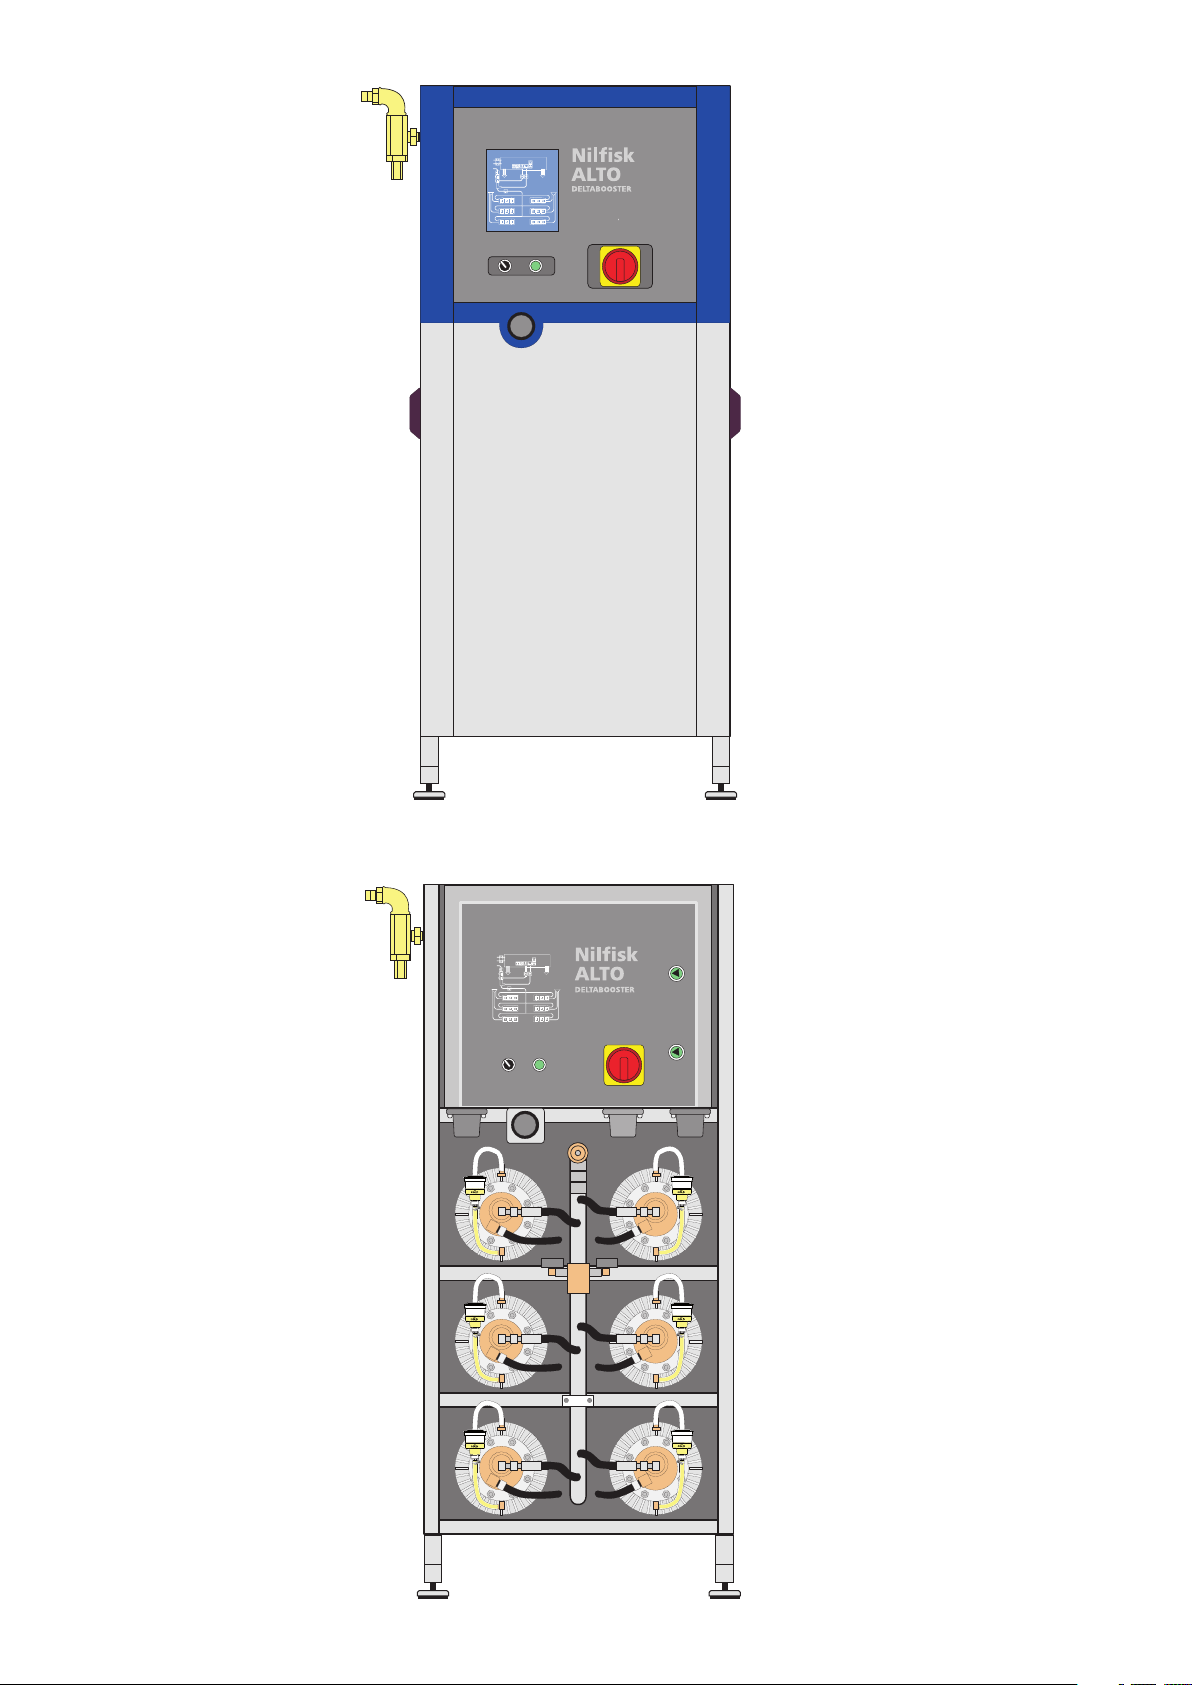
1.1 Model survey and main functions
The DELTABOOSTER comprises 4 different modules:
1. A switchboard
2. A water tank
3. KEW Technology C3K pumps
4. Cabinet / frame
The DELTABOOSTER is made of stainless materials through and through.
DELTABOOSTER switchboard
The switchboard comprises:
- main (emergency) switch, to which the supply cable is connected
- control switch 24V AC
- push-button switch for starting up
- maximum current breaker (short circuit and overload) for each pump
- contactors for connection of 3 or 6 pumps.
The switchboard also incorporates an electronic control that monitors the operation of the
system; i.e. a) selection at any time of required pump capacity; b) even distribution of load on
individual pumps; c) mixing of desired temperature of water drawn from a cold water and a
hot water supply and d) the indication of status/fault on a control panel.
It also incorporates hour meters to show hours of operation of each individual pump.
The switchboard has been prepared for
connection of 6-pumps: (4, 5, and 6 pump plants)
or for connection of 3-pumps: (2 and 3 pump plants)
The switchboard which on delivery controls 3 pumps may later be expanded to control
6-pumps.
The DELTABOOSTER is available for the following voltages:
3 x 230V 50 and 60 Hz + earth (PE)
3 x 346-400V, 50 and 60 Hz + earth (PE)
3 x 415-440V, 50 and 60 Hz + earth (PE)
Page 7
7
Water tank
The water tank of the DELTABOOSTER has been constructed in accordance with BS 6281
part 1 (type A air gap). As standard the water tank is mounted for water connection in the left
side (seen from in front) but the water tank is also available with prepared water connection in
the right side.
The water tank of the DELTABOOSTER incorporates the following:
- two solenoid valves for water inlet, cold and hot water respectively
- various control valves
- temperature sensor and level switches in the float tank
- overflow
- connection of up to 6 pumps
- filters in in-lets
C3K pumps
The C3K pumps are designed for the very demanding environments in which they are used. Their
durability has been achieved by the use of ceramic pistons *) and valves of stainless steel.
Each of the pumps are connected by individual non-return valves to a central manifold. Thus it
is ensured that a defective pump will not cause a malfunction or an unintentional by-pass situation.
*) The C in the pump designation C3K stands for "Ceramic".
Page 8

8
1.2 Selection of system
The great degree of flexibility, an important characteristic of the DELTABOOSTER, means that
each individual customer may select the system which suits his cleaning needs.
The following solutions are offered:
NUMBER OF PUMPS
Choose from 2 to 6 pumps depending on the capacity required at the same time. In other words,
the number of pumps should be decided on the basis of the number of places that are to use
the system at one and the same time.
LINE PRESSURE
The line pressure is the maximum working pressure for the individual user and is of importance
to the dimensioning of the pipeline, of course.
As a standard the system is adjusted to a line pressure of either 120 bar or 160 bar, but it may
be adjusted to a line pressure within the area 90 to 160 bar. This adjustment should only be
done by a specialized Nilfisk-ALTO customer engineer.
SELECTION OF SPRAY LANCE
For each of the line pressures (120 and 160 bar) there are nine different spray lances developed
especially for the DELTABOOSTER. Each of the nine spray lances represents a combination
of pressure and water volume. Users may therefore always select the job-right combination of
pressure and water volume.
Page 9
9
1.3 Technical data
3
4
11
9
8
5
2
10
1
7
6
DELTABOOSTER
xxx xxx - xxx xxx/xx/200x
xxxx
P bar/MPa xxx/xxx
Pmax bar/MPa xxx/xx
Q l/min xx
Tin max °C xx
I nom. Amp xx
XXX-XXXV/Xph/XXHz/XX kW IP X5
107330xxx
Made in Denmark
Identification of model
The model identification appears from the identification plate on the cabinet.
The model plate provides the following data:
1. Model
2. Nilfisk-ALTO No.
3. Nozzle
4. Pump pressure
5. Max. pressure
6. Water volume
7. Max. temperature of inlet water
8. Voltage / frequency / nominal input
9. Power consumption
10. Approval
11. Serial number / Production week and year
Page 10

10
1.3.0 Control system
Classifica-
Country Model Electric Data Power Max. tion of
absorption capacity tightness
B,E,I, DELTABOOSTER-3P 230V 3~+ EARTH, 50Hz 6,7-20,4kW 3x6,7kW IP55
N 20,6-63 A
DELTABOOSTER-6P 230V 3~+ EARTH, 50Hz 6,7-40,5kW 6x6,7kW IP55
20,6-125 A
DK,S,N, DELTABOOSTER-3P 400V 3~+ EARTH, 50Hz 6,7-20,4kW 3x6,7kW IP55
SF,D,B, 12-36,7 A
NL,A,E,
CH,I,GR
DELTABOOSTER-6P 400V 3~+ EARTH, 50Hz 6,7-40,5kW 6x6,7kW IP55
12-72,7 A
GB,AUS, DELTABOOSTER-3P 415-440V 3~+ EARTH, 6,7-20,4kW 3x6,7kW IP55
SGP,U, 50/60Hz
USA,SKB 10,7-32,7 A
DELTABOOSTER-6P 415-440V 3~+ EARTH, 6,7-40,5kW 6x6,7kW IP55
50/60Hz
10,7-64,8 A
1.3.1 Water tank
Tank capacity l 80
Water inlet C + H 1"
Fittings stainless steel
Control current max. V 24V AC
1.3.2 C3K pump
Cleaning power kW 4.4
Water volume l/min 17
Electric motor, power consumption kW 6.7
Current consumption 3x400V/230V A 12/20,6
Classification of tightness - IP45
Ceramic pistons, stainless steel valves, and closed oil system with special gaskets in pumps.
Page 11
11
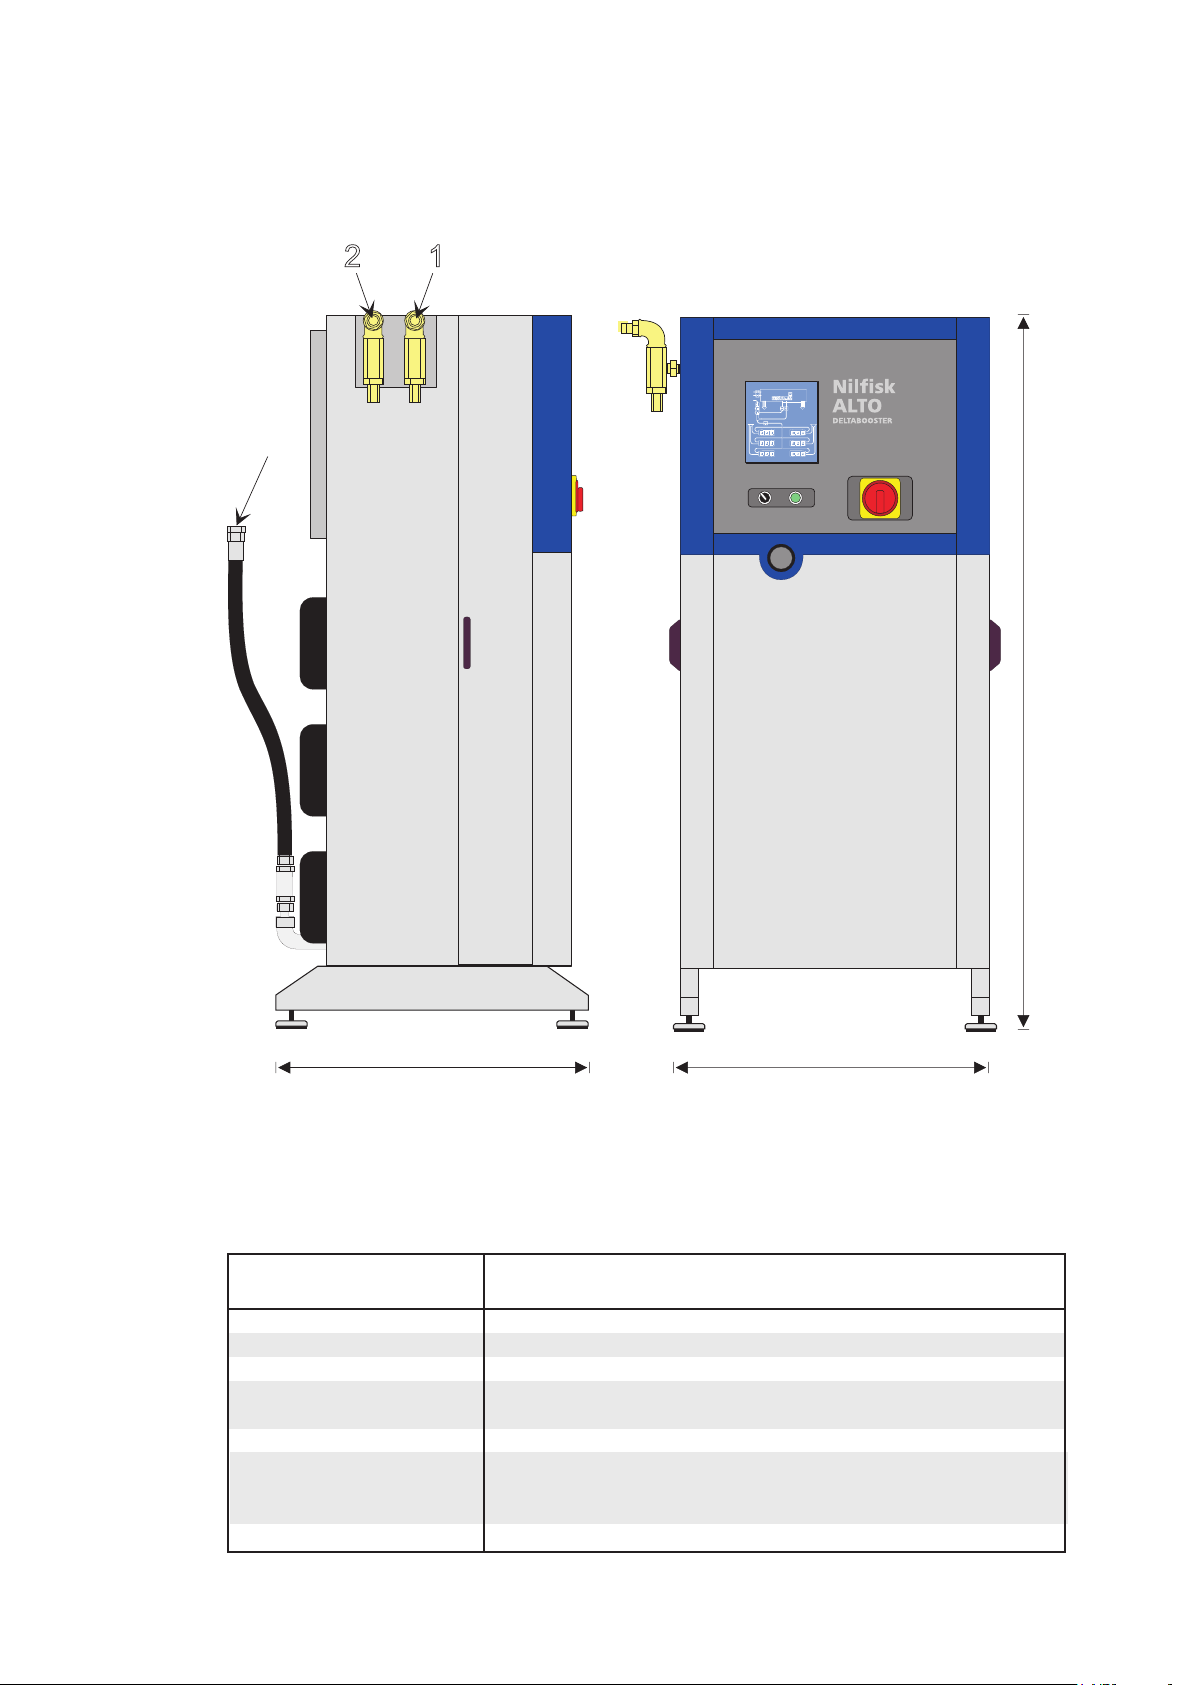
1.3.3 Dimensions, weight and total performance per system
c
ab
3
2
1
1 - water inlet for hot water
2 - water inlet for cold water
3 - water outlet, ∅22 mm
No. of pumps 2 3 4 5 6
Model 44C3 44C3 44C3 44C3 44C3
Cleaning power kW 8,8 13,2 17,6 22,0 26,4
Pressure bar 160 160 160 160 160
Water volume l/min 34 51 68 85 102
41,22) /61,82) /82,42) /1032) /123,6
Current cons. A 21,41) 32,11) 42,81) 53,51) 64,2
/24
3)
/36
3)
/48
3)
/60
3)
Dimensions:
A mm 780 780 780 780 780
B mm 790 790 790 790 790
C mm 1800 1800 1800 1800 1800
Weight 4) kg 250 300 350 400 450
/72
1)
3)
2)
1
) 415-440V, 3~, 50/60Hz
4
) Ready for service
2
) 230V, 3~, 50Hz
3
) 400V, 3~, 50Hz
Page 12
12
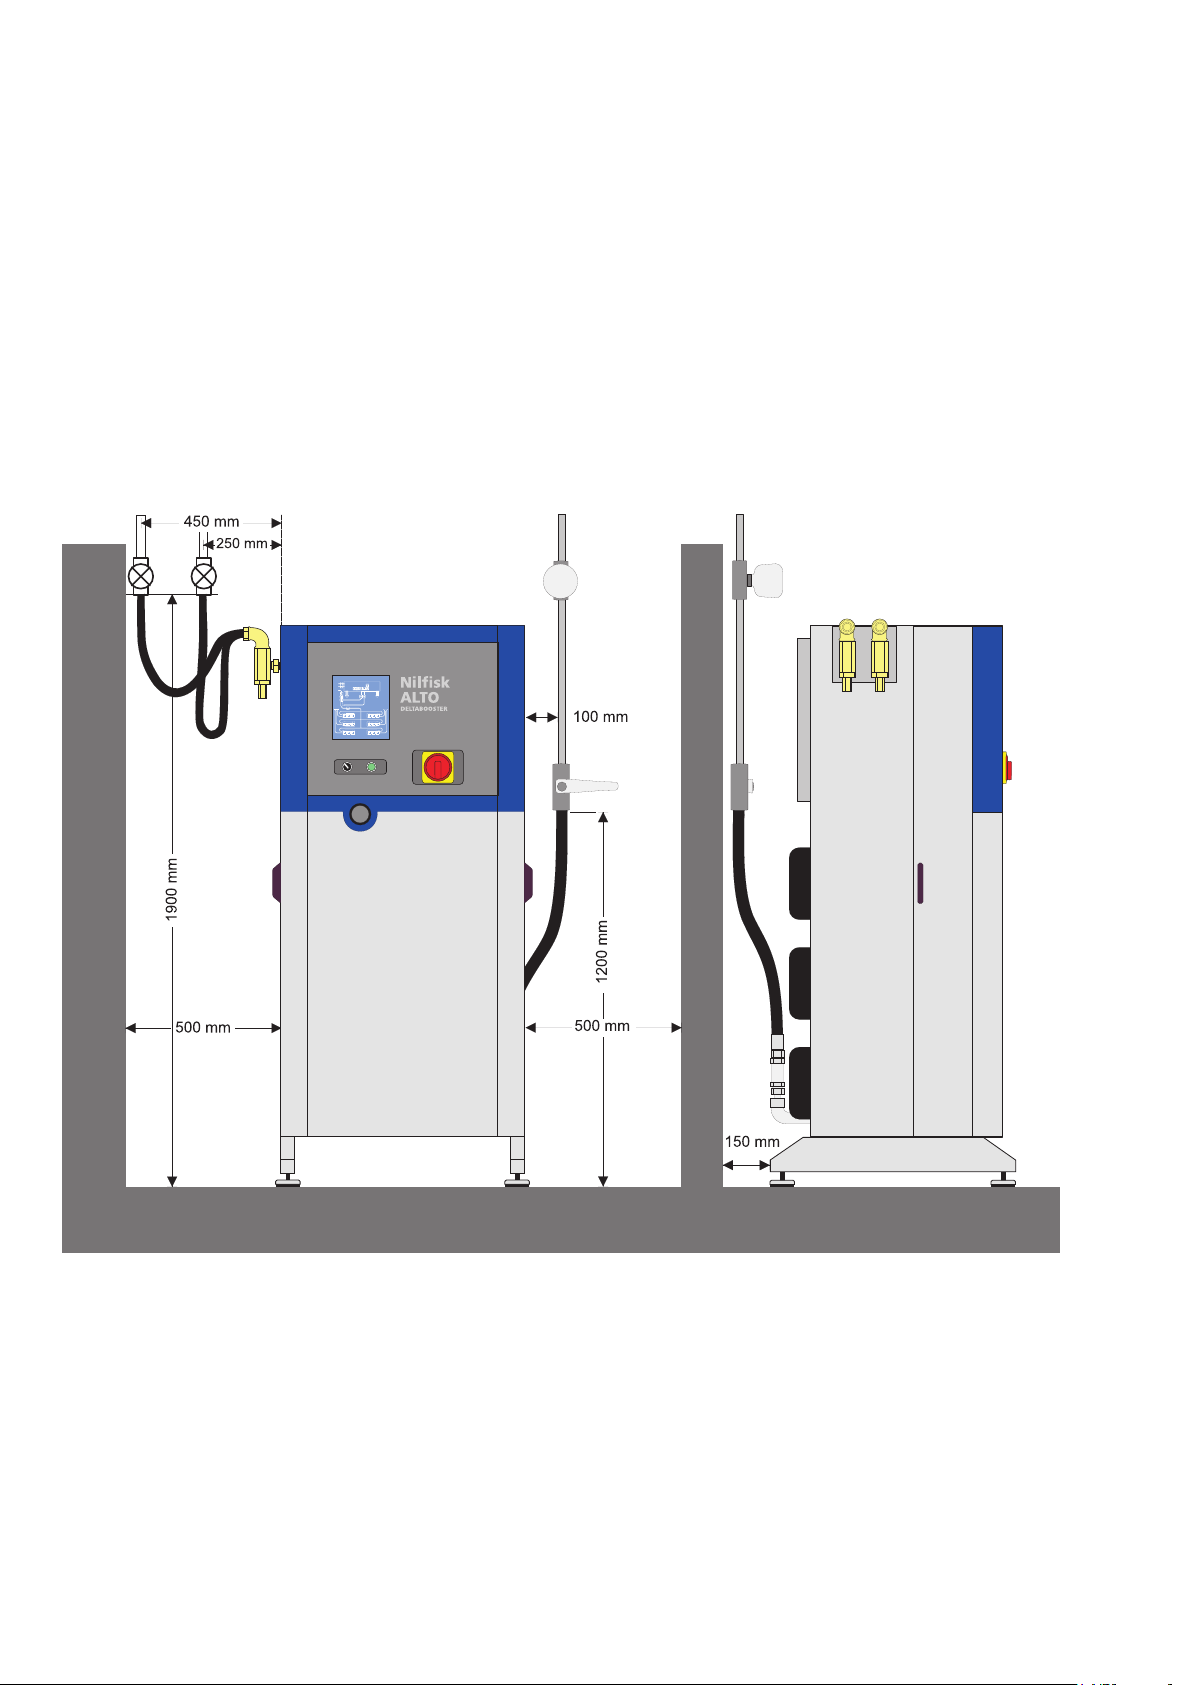
1.4 Location of the DELTABOOSTER
The DELTABOOSTER is fitted with vibration absorbing rubber supports, so it may be placed
straight on an even surface (see section 2.2).
The plant must be placed in frost-free premises where the maximum temperature does not
exceed 40°C.
LOCATION SKETCH
(dimensions in millimetres)
Page 13
13
1.5 Installation requirements for water connection
Capacity diagram
0
50
100
150
200
250
300
350
0,3 0,4 0,5 0,6 0,7 0,8 0,9 1 1,5
Differential pressure of solenoid valve measured in bar
Liter/Min
EVSI 18 (Cold)
EVSI 20 (Hot)
Parallel
Max capacity ( 6-pumps)
Max capacity ( 3-pumps)
The water tank is fitted with two water inlets, one for cold water (BLUE marking) and one for hot
water (RED marking). This allows the operator to control the temperature of the water being used.
If no temperature control is desired both water inlets may be attached to the cold pipeline.
At least 1 cold water inlet should always be connected and the hot inlet water should never
exceed 80°C.
Each pipeline should be capable of supplying the system with at least the water volume that
answers to the capacity of the system ( no. of pumps - l/min, cf. 1.3.3) and at min. 2 bar. The
water pressure must not exceed 10 bar. If water is being drawn from the lines at other points,
the line capacity should be equally bigger.
In order to achieve optimal temperature control the shut-off valves on both the hot and the cold
pipeline should be adjusted so that the water volume of each line comes as close to the required
water volume as possible.
Water should be connected at the inlet sockets with two 1" flexible hose connections (included
in the MK-Mountig Kit). The two water inlet hoses are 1 m long and fitted with a 1" external taper
pipe thread. Shut-off valves should be fitted right next to the connections on the supply lines, but
no extra non-return valve is required as the system is fitted with an airgap type water tank.
If the water holds running sand or other impurities external filters should be fitted in addition to
the internal filters.
The high-pressure connection to the pipe system should be by means of the 3/4" high-pressure
hose supplied with the system. The hose is fitted with an Ø22 plain branch for connecting to
cutting ring hose connection.
Page 14
14
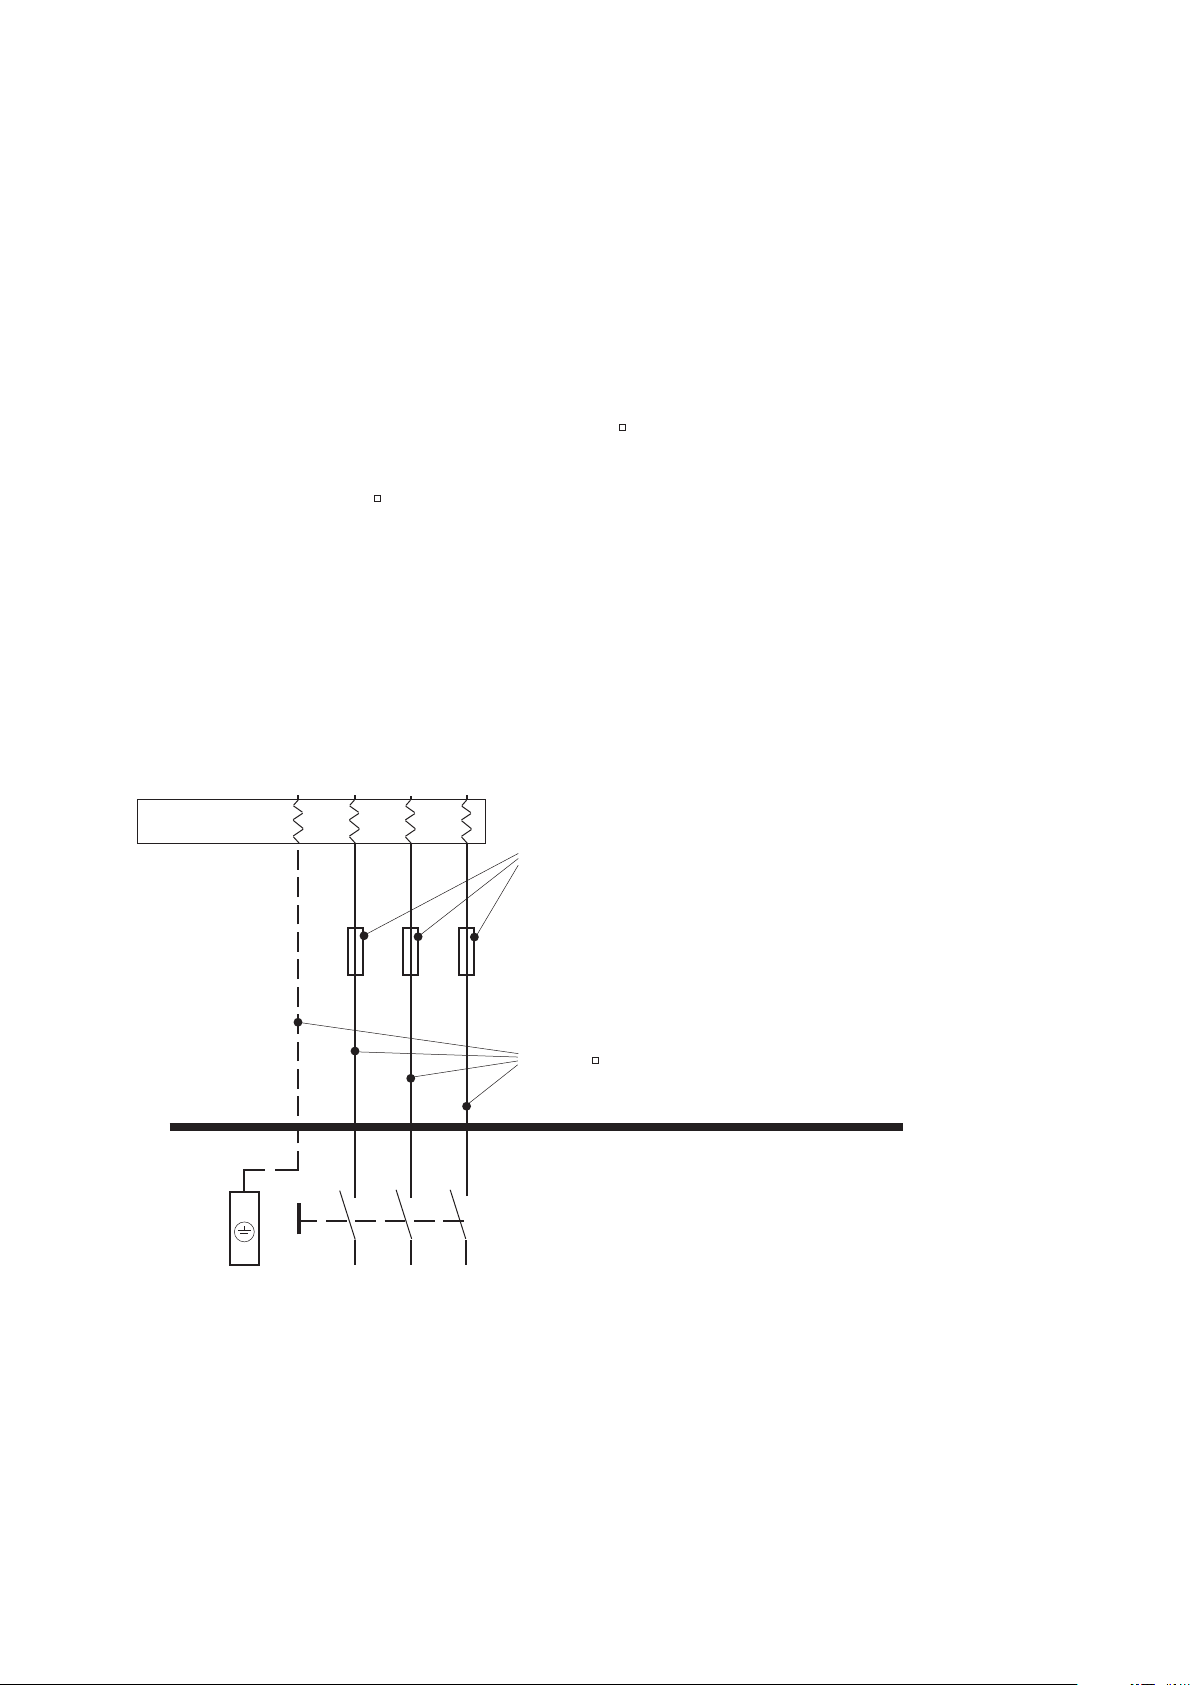
1.6 Installation requirements for mains power connection
The power system of the DELTABOOSTER is designed in conformity with the common Euro-
pean standard:
EN 60204-1 (October 1992): Electrical equipment of machines, Part 1: General requirements.
Power should be connected through a flexible rubber cable holding copper conductors for 3 phases
and earth (PE). The minimum dimensions of the cable are determined by the power consumption
of the current system (cf. data sheet), but common to all systems is the following:
Max pre-fuse: 125 A
Max core section of cable: 35 mm
In consideration of a future extension of the plant we recommend you to use a cable with a min.
core section of cable of 25 mm.
Earth wire protection is required and the connection of the DELTABOOSTER to the mains power
supply MUST be carried out by an authorized electrician in conformity with local regulations.
To ensure maximum protection of persons, the installation should be protected by a Residual
Current Device (RCD).
Ground fault
circuit interrupter
PE
L1
SUPPLY NETWORK
L2 L3PE
max 125 A
max 35
DELTABOOSTER control system
Page 15

15
1.7 Pipe system
1.7.1 Location of pipelines/general instructions
- The pump station and outlet points should be placed so that the lines become as short as
possible.
- The line should be arranged with as few bends as possible.
- Sometimes it may pay to split the line close to the pump station so the lengths conducting
large volumes of water become as short as possible. A centre location of the pump station
in relation to the outlet points would also lead to smaller pipe dimensions.
- Pipe lines should be placed on walls of tile or concrete, otherwise great care should be taken
(reinforcement plates etc.)
- Pipe lines should be placed so that damage is prevented (collision, frost, extreme attacks of
corrosion, etc.)
- Pipe lines should be fitted in a visual location everywhere or so that they may easily be
inspected. Lines should not be incorporated in walls or floors. When leading through walls
be careful not to enclosed. (Special lead-in bushes are available)
- The outlet points should be placed as close to the operation point as possible and so that a
hose length preferably of 20 m is used.
1.7.2 Types of pipes - standards
Seamless pipes of precision steel are used for the pipe system according to DIN 2391/C of St.
35.4 material quality, normalized, bright annealed and electro galvanized
or welded steel pipes, stainless, calibrated and glowed according to DIN 2463 - 1.401 d3-- (DIN
17457 cl. 1).
Alternatively, seamless pipes of precision steel in dimensions according to DIN 2391 and stainless
material quality e.g. Werkstoff no. 1.4301, 1.4436 or 1.4571. Comparable qualities to Swedish
standards are SIS 2333 or SIS 2343.
Pipe dimensions:
The following sizes are used with electro galvanized precision steel pipes:
- ∅15x2
- ∅22x2.5
- ∅30x4
The following sizes are used with stainless precision steel pipes:
- ∅15x1.5
- ∅22x2
- ∅30x3
In connection with branches close to the pump station it should be possible to avoid the ∅30
dimension for most 44C3 systems. For 160 bar systems fittings with a permissible working pressure of min. ND 160 bar are to be used.
Please note that the pipe dimension ∅30 according to DIN 2353 is used together with a stronger
type of fitting (S-series) and pipe systems with this dimension therefore become more expensive
than e.g. an ∅22 line - particularly in multi-pump systems.
Page 16
16
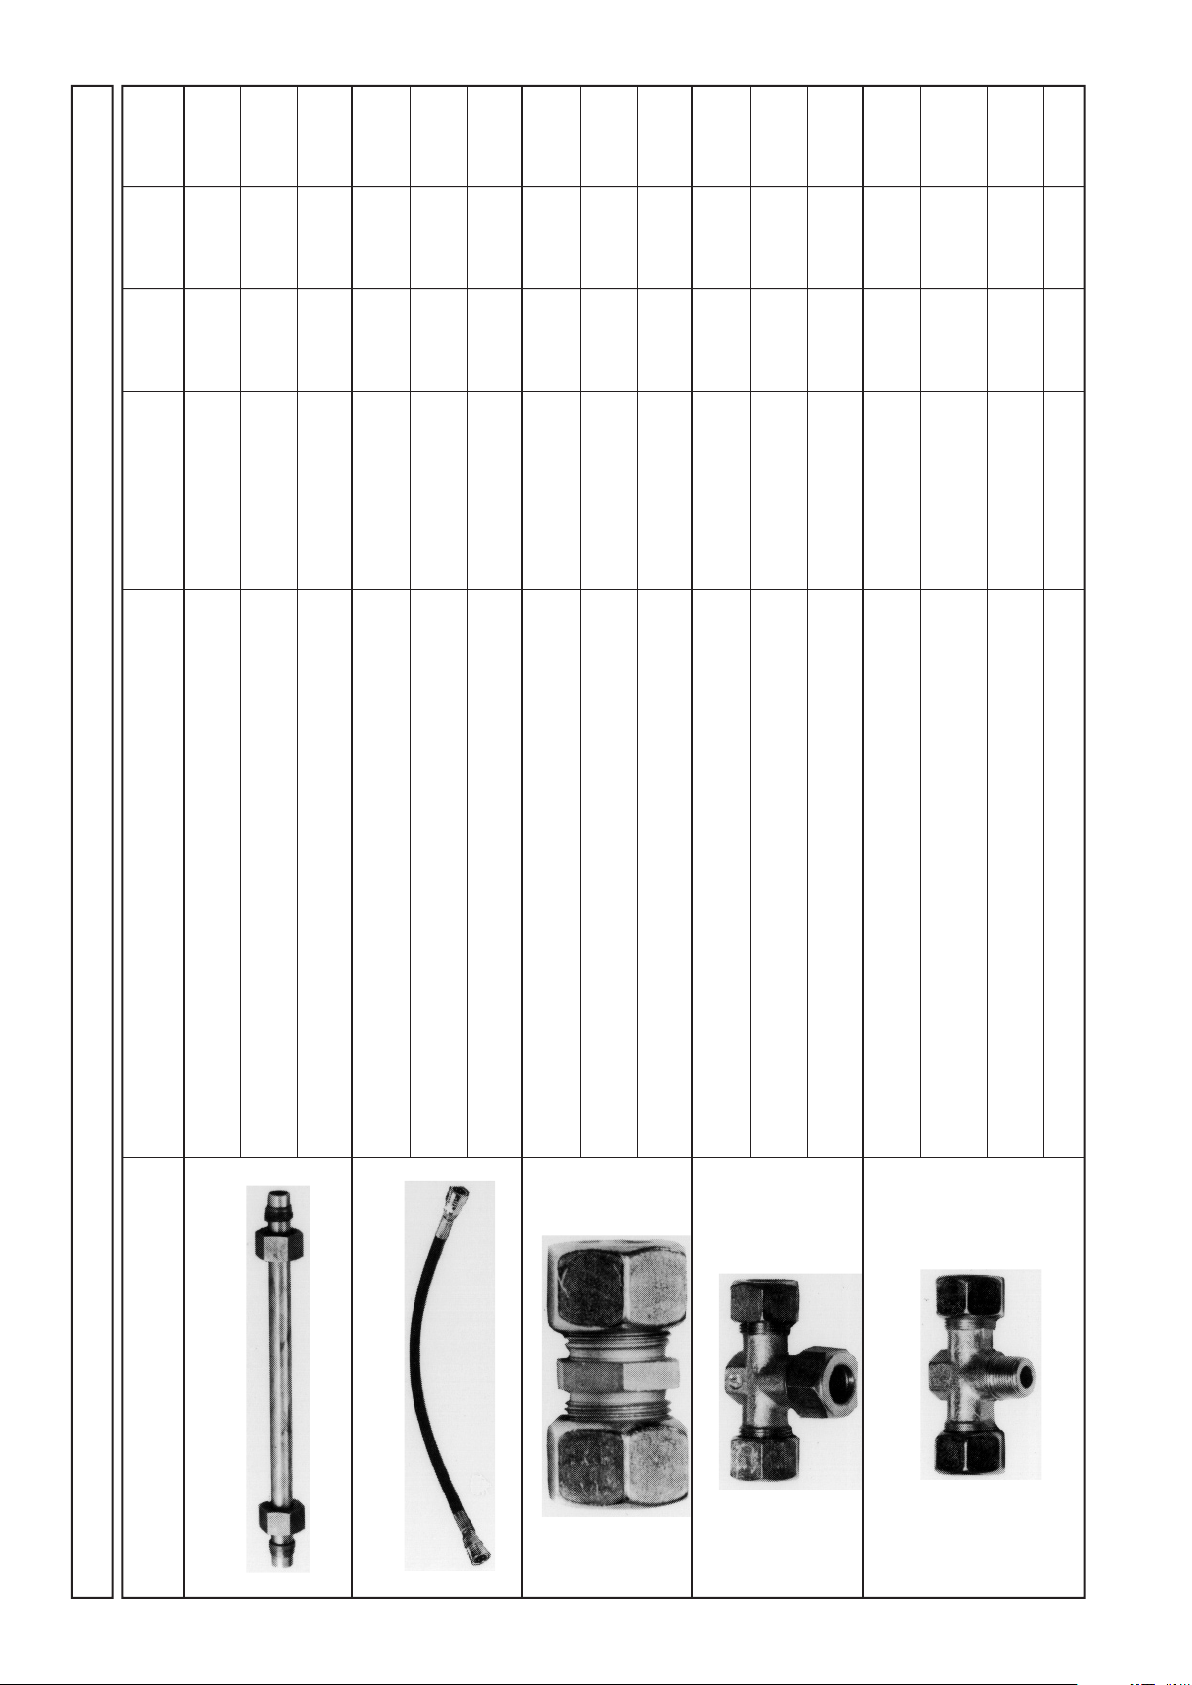
1.7.3 Fittings, standards - 1
X X
X X X
X *
BETEGNELSE BEZEICHNUNG
DESCRIPTION DESIGNATION DIMENSION G R Cu
Rør Rohr G Ø15 x 2 mm
Pipe Tuyau R Ø15 x 1,5 mm
Rør Rohr G Ø22 x 2,5 mm
3/4” X X
Pipe Tuyau R Ø22 x 2,0 mm
Rør Rohr G Ø30 x 4,0 mm
Pipe Tuyau R Ø30 x 3,0 mm
Tilslutningsslange Anschlußschlauch
Connecting hose Tuyau de raccordement
Ø15 X X
Rørsamler Verschraubung
Pipe coupling Raccord
Ø22 X X *
Rørsamler Verschraubung
Pipe coupling Raccord
Ø30 X *
Rørsamler Verschraubung
Pipe coupling Raccord
Ø15 x Ø15 x Ø15 X X *
Ø22 x Ø22 x Ø22 X X
Ø30 x Ø30 x Ø30 X *
Ø15 x 3/8RG x Ø15 X
T-stykke T-Stück
T-Connection Raccord en Té
T-stykke T-Stück
T-Connection Raccord en Té
T-stykke T-Stück
T-Connection Raccord en Té
T-Stykke T-Stück
T-Connection Raccord en Té
Rørledningskomponenter - Piping Components - Rohrleitungskomponenten - Elements De Tuyauterie
*) Lagerføres ikke Not in stock (Ask for Nicht vorrätig (Fragen Sie bitte N’est pas en stock (Le délai de
(leveringstid oplyses ) time of delivery) nach Lieferzeit) livraison peut étre communique)
Page 17

17
1.7.3 Fittings, standards - 2
Ø15 x Ø15 X X *
Ø22 x Ø22 X X
Ø30 x Ø30 X *
Ø15 X X
Ø22 X X
Ø15 x 3/8” RG X
Ø22 x Ø15 X
Ø15 X X
Ø22 X X
Ø30 X X
BETEGNELSE BEZEICHNUNG
DESCRIPTION DESIGNATION DIMENSION G R Cu
Rørledningskomponenter - Piping Components - Rohrleitungskomponenten - Elements De Tuyauterie
Vinkel Winkel
Elbow Coude
Vinkel Winkel
Elbow Coude
Vinkel Winkel
Elbow Coude
Stilbar L-forskruning Verschraubung
Adj. Elbow coupl. Raccord reg.
Stilbar L-forskruning Verschraubung
Adj. Elbow coupl. Raccord reg.
Vinkel Winkel
Elbow Coude
Vinkel Winkel
Elbow Coude
Vægbeslag f. rørholder Wandbeschlag
Bracket f. pipe hangs Fixation mural
Vægbeslag f. rørholder Wandbeschlag
Bracket f. pipe hangs Fixation murale
Vægbeslag f. rørholder Wandbeschlag
Bracket f. pipe hangs Fixation murale
*) Lagerføres ikke Not in stock (Ask for Nicht vorrätig (Fragen Sie bitte N’est pas en stock (Le délai de
(leveringstid oplyses ) time of delivery) nach Lieferzeit) livraison peut étre communique)
Page 18

18
1.7.3 Fittings, standards - 3
Ø30 x Ø30 X X
Ø15 X
Ø15 X X
Ø22 X X
Ø30 X X
Ø15 X X
Ø22 X X
Ø30 X X
Ø22 x Ø15 x Ø22 X X
BETEGNELSE BEZEICHNUNG
DESCRIPTION DESIGNATION DIMENSION G R Cu
T-stykke T-Stück
T-Connection Raccord en Té
T-Stykke T-Stück
T-Connection Raccord en Té
Justerbar T-forskruning T-Verschraubung
Ø22 x Ø15 X X
Ø30 x Ø15 X X
Ø30 x Ø22 X X
T-coupling adj. Raccord en Té reg.
Ligereducering Ubergangsrohr
Straight coupling Reduction droite
Ligereducering Ubergangsrohr
Straight coupling Reduction droite
Ligereducering Ubergangsrohr
Straight coupling Reduction droite
Skærering Schniedring
Cutting ring Anneau
Skærering Schniedring
Cutting ring Anneau
Skærering Schniedring
Cutting ring Anneau
Omløber Überwurfmutter
Union nut Ecrou
Omløber Überwurfmutter
Union cut Ecrou
Omløber Überwurfmutter
Union nut Ecrou
Rørledningskomponenter - Piping Components - Rohrleitungskomponenten - Elements De Tuyauterie
*) Lagerføres ikke Not in stock (Ask for Nicht vorrätig (Fragen Sie bitte N’est pas en stock (Le délai de
(leveringstid oplyses ) time of delivery) nach Lieferzeit) livraison peut étre communique
Page 19

19
1.7.3 Fittings, standards - 4
Ø15 X X
Ø22 X X
Ø30 X X
½” Ø15/Ø22 X X
3/4” Ø22/Ø30 X X
3/8RG Ø17 mm X X
3/8RG X X
Ø15 X
Ø22 X
Ø30 X
BETEGNELSE BEZEICHNUNG
DESCRIPTION DESIGNATION DIMENSION G R Cu
Rørledningskomponenter - Piping Components - Rohrleitungskomponenten - Elements De Tuyauterie
Rørhol der Rohrhalterung
Pipe holder Support tuyau
Rørhol der Rohrhalterung
Pipe holder Support tuyau
Rørholder Rohrhalterung
Pipe holder Support tuyau
Slange f. temp. kompens. Schlauch - Tempkomp.
Hose temp. compensated Tuyau temp. compenser
Slange f. temp. kompens. Schlauch - Tempkomp.
Hose temp. compensated Tuyau temp. compenser
Tætningsskive Dichtungsscheibe
Tightening washer Rondelle d’etancheite
Stiknippel Schnellkupplungsnip.
Quick coupling Raccord rapide male
Murgennemføring Durchführung
Lead-in bush Réalisable
Murgennemføring Durchführung
Lead-in bush Réalisable
Murgennemføring Durchführung
Lead-in bush Réalisable
*) Lagerføres ikke Not in stock (Ask for Nicht vorrätig (Fragen Sie bitte N’est pas en stock (Le délai de
(leveringstid oplyses ) time of delivery) nach Lieferzeit) livraison peut étre communique)
Page 20

20
1.7.3 Fittings, standards - 5
Ø15 X
Ø22 X
Ø30 X
3/8RG X X
Ø22 X X
Ø30 X X
BETEGNELSE BEZEICHNUNG
DESCRIPTION DESIGNATION DIMENSION G R Cu
Roset f. murgennemføring Röllchenplat. f. Durch
Pipe enclose Enkysté de tuyau
Roset f. murgennemføring Röllchenplat. f. Durch
Pipe enclose Enkysté de tuyau
Roset f. murgennemføring Röllchenplat. f. Durch
Pipe enclose Enkysté de tuyau
2 mm X
Støttebeslag f. tappested Stützenbeschlag
Supportingfitting f. tap Support
Ø15 x 3/8RG X X
Brystnippel Doppelnippel
Hexagon nipple Raccord
Hydroballhane Hochdruck Kugelhahn
High pressure ball valve Robinet haute press.
Hydroballhane Hochdruck Kugelhahn
High pressure ball valve Robinet haute press.
Hydroballhane Hochdruck Kugelhahn
High pressure ball valve Robinet haute press.
Rustfri-syrefast Rustfrei
R
Corrosion proof Inoxydable
Kobber Kupfer
Cu
Copper Cuivre
El-galvaniseret Galv.
G
Galv. Galv.
Rørledningskomponenter - Piping Components - Rohrleitungskomponenten - Elements De Tuyauterie
*) Lagerføres ikke Not in stock (Ask for Nicht vorrätig (Fragen Sie bitte N’est pas en stock (Le délai de
(leveringstid oplyses ) time of delivery) nach Lieferzeit) livraison peut étre communique)
Page 21

21
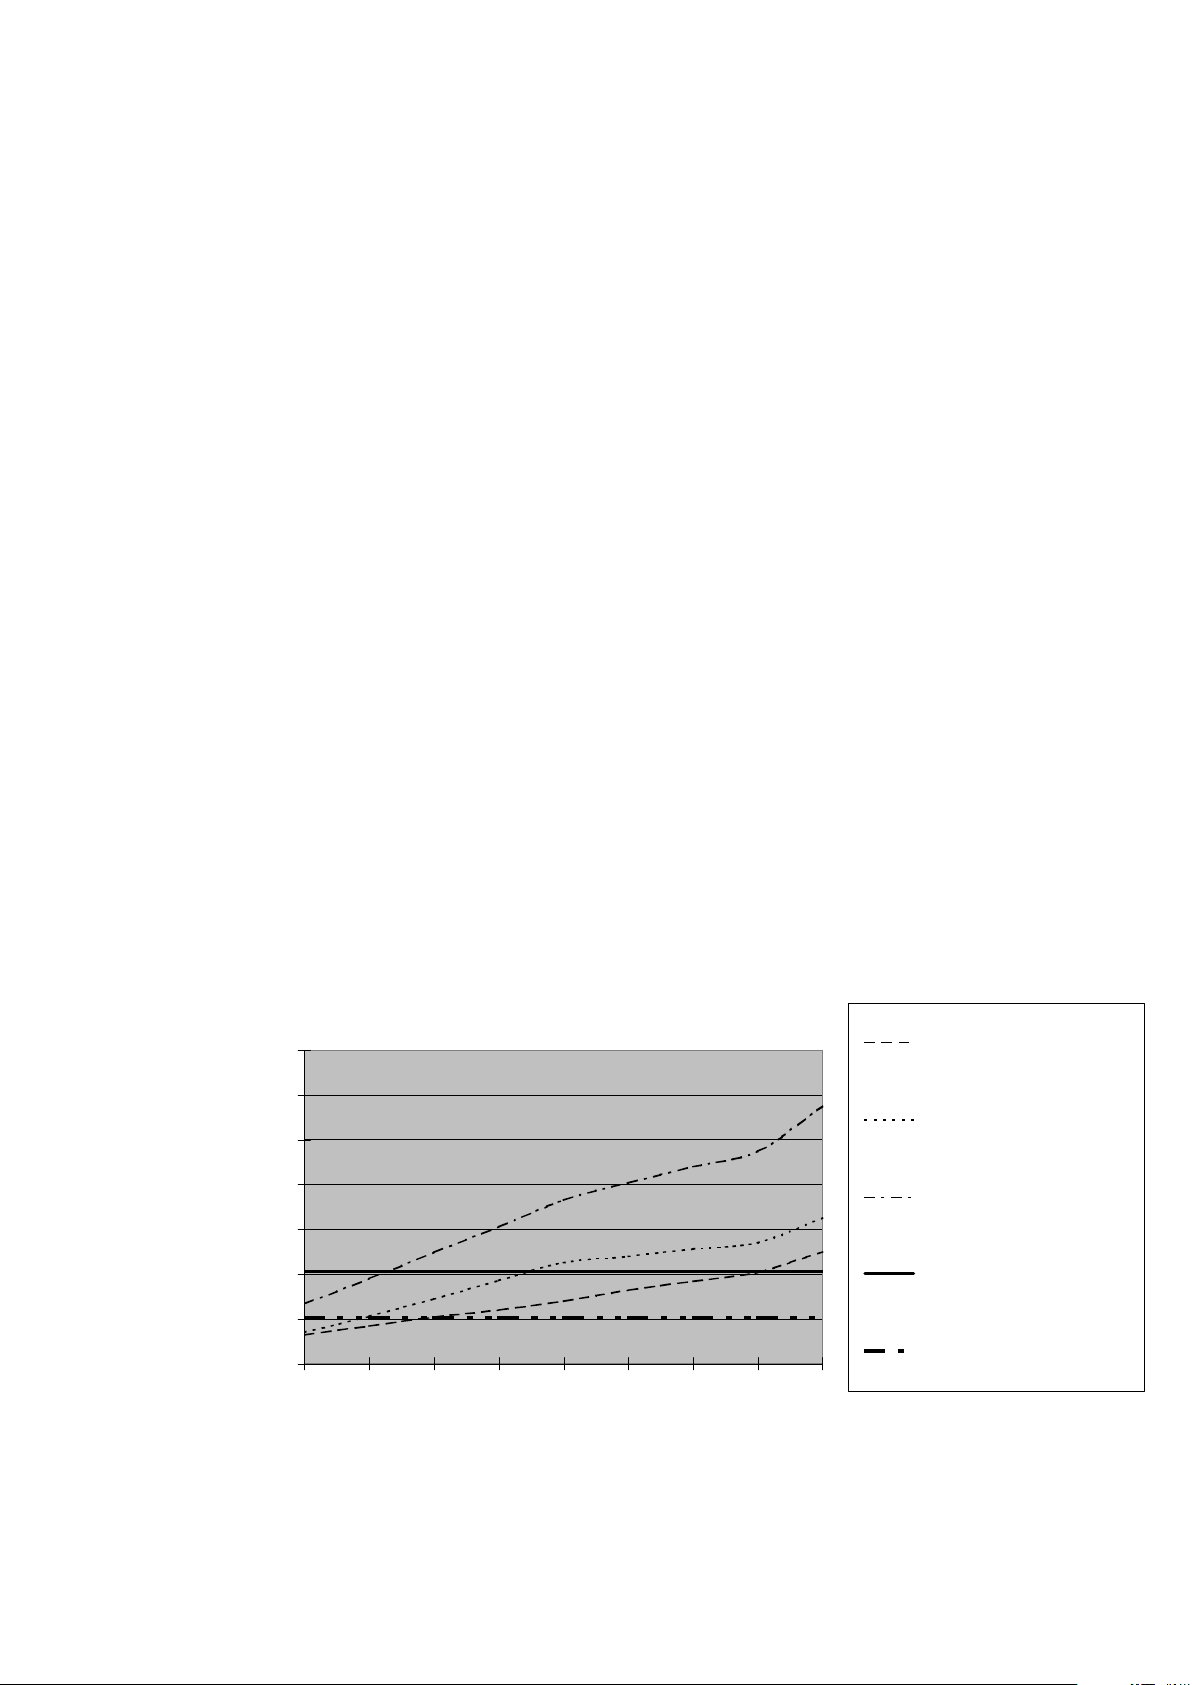
1.7.4 Dimensioning of pipe systems
The below diagram shows the current pressure drop graphs meant for the dimensioning
of pipe systems used in connection with the DELTABOOSTER plant.
The diagram illustrates two vertical divisions for
II) electro galvanized steel pipes 15x2 mm - 22x2.5 mm - 30x4 mm
I) stainless steel pipes 15x1.5 mm - 22x2 mm - 30x3 mm
The pressure drop per metre of pipe at a given water volume may be read from the following pressure drop graph.
Water volume [l/min]
When dimensioning the system be careful that the maximum pressure drop at the remotest
outlet point does not exceed 15 bar at full load.
The pressure drop in elbows and branches is of minor importance in relation to the pressure
drop in the pipes.
Page 22

22
Page 23

23
1.7.5 Examples
The following examples have been worked out on the basis of stainless steel pipes and a 160
bar system, and the dimension requirements are max.15 bar pressure drop from the machine
to the outlet points.
Example 1
50 m
40 m
70 m
M
abc
Two different conditions may be used when
dimensioning the pipe system:
A. Based upon a fixed type of spray lance (capacity l/min)
B. Based upon max. capacity, i.e. all spray lances may be used anywhere
A:
If standard lances (17 l/min) are selected for outlet points a, b and c the maximum load on line
b-c = 17 l/min.
PRESSURE
According to the diagram the use of a 50 m ∅15 mm DROP
pipe will result in a pressure drop of: 2.3 bar
In the diagram you follow the 50 m division vertically
upwards to the curve symbolizing 17 l/min through an
∅15 mm pipe. From here proceed horizontally and a
pressure drop of 2.3 bar is had.
Maximum load on pipe line a-b = 35 l/min.
Use of 40 m Ø15 mm pipe will result in a pressure drop of: 7.4 bar
Maximum load on pipe line M-a = 51 l/min.
Use of 70 m Ø22 mm pipe will result in a pressure drop of: 3.3 bar
Total pressure drop 13.0 bar
The aggregate pressure drop on the three lines is less than 15 bar and the dimension requirements have therefore
been met.
Page 24

24
B:
If, on the other hand, a green spray lance is selected = 33 l/min + a standard spray lance = 17
l/min the maximum load on the line b-c = 33 l/min.
PRESSURE
DROP
Use of 50 m ∅15 mm pipe will result in a pressure drop of: 9.3 bar
Maximum load on line a-b = 50 l/min.
Use of 40 m ∅22 mm pipe will result in a pressure drop of: 2.0 bar
Maximum load on line M-a = 50 l/min.
Use of 70 m ∅22 mm pipe will result in a pressure drop of: 3.2 bar
Total pressure drop 14.5 bar
The aggregate pressure drop on the three lines is less than 15 bar and the dimension require-
ments have therefore been met.
Example 2
60 m
c1
20
c
30 m 30 m 10 m10 m
20
c2
20
b
20
b1
b2
a1
20
a
M
20
a2
80 m
Branched system
Selection of spray lance: 2 green spray lances each of 33 l/min
2 blue spray lances each of 17 l/min
PRESSURE
Maximum load in each branch is 33 l/min DROP
Use of∅15 mm pipe on e.g. the a-a2 line
(20m) will result in a pressure drop of: 4.0 bar
Maximum load on line b-c = 66 l/min
Use of 30 m ∅22 mm pipe will result in a pressure drop of: 2.5 bar
Maximum load on line a-b + M-a = 101 l/min
Use of 40 m ∅22 mm pipe will result in a pressure drop of: 7.5 bar
Total pressure drop 14.0 bar
The aggregate pressure drop on the three lines is less than 15 bar and the dimension require-
ments have therefore been met.
Page 25

25
Example 3
60 m
20 m
c1
30 m
40 m
b1
20 m
a1
30 m
15 m
20 m
c2
30 m
b2 a2
20 m 40 m
80 m
Ring system
Selection of spray lance: 2 green spray lances each of 33 l/min
2 blue spray lances each of 17 l/min
20 m
M
If the maximum load is distributed evenly and symmetrically the
maximum load on line b1 - c1 = 33 l/min.
If ∅15 mm pipe is selected 35 m pipes will result PRESSURE DROP
in a pressure drop of: 6 bar
Maximum load on line M-a1 + a1-b1 = 50 l/min.
If 90 m ∅22 mm pipe is used the resulting pressure drop will be: 4 bar
Total pressure drop 10 bar
This means that ∅22 mm pipe is to be used from the pumps to outlet points b1 and b2 and
∅15 mm for the rest.
The examples show different ways of installing the pipe system. What to prefer in each individual
case highly depends on the building where it is to be located and special requirements, if any.
Due regard should be paid to the fact that big pipe dimensions and units are considerably more
expensive, and the financial costs of each solution should therefore always be compared to
one another.
Page 26

26
1.7.6 Mounting requirements and hints
Temperature compensation
When hot water (max. 75°C) is used in the system due regard should be paid to thermal expansion of the pipes when mounting the system. When raising the temperature from10°C to 75°C
the system will expand some 0.7 mm/m. In order to allow for this expansion long straight lines
should be fitted with compensators in the form of U-bends or hose connections. The pipe system
should not be fixed too close to any corners and close to Tee connectors at outlet points.
U-bends/hose connections
At a max. temperature on the system of 75°C a compensator should be fitted at 20 m intervals
if there are no elbows on the line. If the pipe may expand at one end compensators may be left
out if the pipe is not fixed at the Tee connectors at the same time. Compensation for ∅15 and
∅22 should be in the form of hose connections or as U-bends on the pipe. Use hose connections for ∅30.
COMPENSATION
Pipe Hose no. Hose no. stainless L (mm) L min (mm) R min (mm)
∅15 6300453 6301191 350 450 40
∅22 6300453/6300454* 6301191/6202161* 350/480 550 55
∅30 6300454 6202161 480
* If the pipe line carries more than the water volume from 3 pumps 6300454 respectively 6202161
hoses should be fitted.
Page 27

27
FIXATION AT CORNERS AND TEE CONNECTORS
Standard distance between pipe brackets is some 2 m.
MOUNTING OF PIPE LINES/GENERAL INSTRUCTIONS
- Shorten the pipes by sawing off and take off burrs.
- When bending the pipe bending radii should not be smaller than those stated in the chart
under “U-bends/hose connections” and the bending should always be completed in a bending tool with rolling matrixes in order to prevent deformation of the pipe.
- Union nut and cutting ring should be greased with oil and the cutting ring should be pre-fitted
to the pipe in the screw joint or the annealed pre-mounting socket before fitting the pipe.
- Place the pipe brackets at a maximum interval of 2 m.
- Use ∅6 hexagon-headed screw with expansion joint for wall or concrete walls when
mounting wall fittings, alternatively use a knock-type anchor for concrete walls, e.g. HILTI
type HPS 8/30.
- In systems meant for hot water, care should be taken to place the pipe brackets on a straight
line in order to prevent the lengthwise expansion of the pipe.
Page 28

28
Mounting in Connection Socket
1. Saw the pipe rectangularly through and take off
burrs.
2.
It will be most easy
for you to saw the
pipe rectangularly
through by means
of the pipe sawing
mechanism shown.
NAME:BAV 6/42
(for pipes of 6-42 mm
OD).
NOTE: Do not use pipe cutter!
The pipe will be cut over slantingly
and there will be burrs inside as
well as outside the pipe end.
3.
Lubricate thread as well as cutting- and key ring with oil (not
grease). Now push the pipe nut
and the ring over the pipe end as
shown on the drawing.
If the cutting- and key ring cannot or can only just be pushed
over the end of the pipe, do not
entlarge it, but file the pipe end.
6. Pipes of a large outer diameter and all
connections in free pipings are mounted
in a vice of practical reasons while you
are fastening the connection socket. The
screw spanner must have a length approximately 15 times as long as the width
of it. (Lengthen it by means of a pipe, if
necessary). Proceed according to point
4.
When using series connection sockets, be
aware that the pipe ends go into
the same inner conus as the one
in which the mounting in the vice
was carried out. The final tightening
will be simplified by loosening the
compression nut a little, so that the
wearing surfaces may be supplied
with a little oil.
7.
After the final feeding, loosen
compression nut and check
that there is an apparent belt
before the cutting. If not - wring
the cutting- and key ring a little
extra.
4. At first screw up the
compression nut by
hand until it has got
contact with the cutting- and key ring.
Then press the pipe
wholly up to the inner
conus and give the
compression nut a
turn of app. 3/4.
A marking thread on
the compression nut
will make it easier for
you to observe the
turns prescribed.
5. (NOTE: The pipe must nut turn at the same
time).
The cutting- and key ring will get hold of the
pipe, and now it is unnecessary to press the pipe
further. For the final feed, give the compression
nut another turn of approximately 3/4. By doing
so, the ring will cut into the pipe and reveal an
apparent belt.
Apparent belt
8. It does not matter if the cutting- and key
ring can be turned on the pipe end.
9. REMOUNTING
After each loosening of the connection, the
tightening of the compression nut may be
done without any lengthening with a pipe
and without any violent effort.
10.
The straight pipe end,
which goes into the
screwed connection, must
have a length of at least
2 lengths of the compression nut (H).
If the pipings are longer
or more weighted, you
will have to mount a pipe
fitting.
Page 29

29
1.8 Outlet points and accessories
Outlet point A is a high-pressure cock meant for permanent mounting. The high-pressure cock
should be fitted straight on the pipe line by means of an ∅15 mm cutting ring connection.
If a DELTABOOSTER spray lance is wanted the quick-coupling for the high- pressure hose
should be fitted straight on to outlet point A.
If equipment for the application of detergents is wanted a foam injector should be fitted between
outlet point A and the quick-coupling on the high-pressure hose.
When using the detergent trolley the high-pressure hose may be fitted straight on to the outlet
point A.
OUTLET STATION
A High-pressure cock
To be used for connection of detergent trolley,
single foam injector or single DELTABOOSTER
spray lance.
B Foam injector
To be fitted on high-pressure cock. To be used in
conjunction with foam lance when detergents and
disinfectants are to be applied.
Dosage from 1-5%.
C Wall rack
Used in conjunction with outlet station A and detach
able foam injector.
Capacity to take lance, two 25 l cans and 10 m
high-pressure hose.
D Detergent trolley
May be connected to high-pressure cock.
Capacity to take high-pressure cock with
detachable foam injector (A+B+C) and floor washer.
Page 30

30
ACCESSORIES
Detachable foam injector,
to be used in conjunction with outlet station A.
Pressure-relieved spray handle
with 10 m hose.
Hose coil
with 20 m hose
Single spray lance for DELTABOOSTER plant
described in section 1.9
Foam lance
To be used in conjunction with detachable
foam injector and detergent trolley.
Page 31

31
1.9 Multipressure spray lance system
Spray lances with colour coding are used as standard equipment. The colour code indicates the
water volume and pressure supplied by the specific lance.
The different water volumes and pressures depend on the high-pressure nozzle, pre-nozzle
and spray lance fitted.
The spray lances for 120 and 160 bar respectively differ in that the spray lances for 120 bar
are fitted with a GREY nozzle protection, whereas the spray lances for 160 bar are fitted with
a BLACK nozzle protection.
Multipressure spray lances are available in 3 different lengths: 50 mm - 570 mm - 930 mm.
160 bar (black nozzle protection)
No. Colour High- Pre- C3K pumps Reactive power*) No. of
pressure nozzle Pressure Water vol. N kp pumps
nozzle diameter bar l/min in oper.
1 White 1515 ∅1.56 27 17 19 2.0 1
2 Black 1530 ∅2.27 27 35 41 4.2 2
3 Brown 1511 ∅1.73 50 17 26 2.6 1
4 Green 1520 ∅2.35 53 33 56 5.7 2
5 Blue 1508 ∅1.80 80 17 35 3.6 1
6 Red 1513 ∅2.27 80 27 57 5.8 1.5
7 Orange 15075 ∅2.08 107 17 38 3.9 1
8 Yellow 1511 ∅2.50 107 26 60 6.2 1.5
9 Steel 1506 none 152 17 46 4.7 1
120 bar (grey nozzle protection)
No. Colour High- Pre- C3K pumps Reactive power*) No. of
pressure nozzle Pressure Water vol. N kp pumps
nozzle diameter bar l/min in oper.
1 White 15165 ∅1.68 20 17 18 1.8 1
2 Black 1531 ∅2.32 20 32 33 3.4 2
3 Brown 1511 ∅1.73 40 16 23 2.3 1
4 Green 1522 ∅2.43 40 32 48 4.9 2
5 Blue 1509 ∅1.88 60 16 28 2.8 1
6 Red 1515 ∅2.43 60 26 45 4.6 1.5
7 Orange 1508 ∅2.15 80 17 35 3.6 1
8 Yellow 1513 ∅2.74 80 27 56 5.7 1.5
9 Steel 15075 none 114 17 40 4.1 1
*) As the reactive power describes an angle together with the spray lance the pistol handle is
also affected by a torque power.
Alternative lances should only be mounted under the guidance of Nilfisk-ALTO staff.
Page 32

32
2. Instructions for assembly of
DELTABOOSTER
2.1 Location of the DELTABOOSTER
The DELTABOOSTER is fitted with vibration absorbing rubber supports, so it may be placed
straight on an even surface.
The plant must be placed in frost-free premises where the maximum temperature does not
exceed 40°C.
LOCATION SKETCH
(dimensions in millimetres)
Page 33

33
2.2 Mounting base
If the base is uneven height adjustments may be made by adjusting the counter nut (1) on the
machine foot (2) as shown on Fig. 1.
It is important that the plant is adjusted to horizontal position. Otherwise it may be a problem
opening the cabinet door.
Fig. 1
2
1
It is advisable to fix the module frame of the system to both the bulkhead and bottom when mounting the system in ships.
The tip over safety devices (3) (which are available as an accessory) should be placed diagonally
on the plant and mounted between the machine feet and the floor stands as shown on Fig. 2.
Fasten the fittings securely to the floor with 4 pcs. ∅8 mm hexagon-headed screws complete
with expansion bushes or with 4 anchors of the impact type.
Fig. 2
3
Page 34

34
2.3 Connection of inlet water
The water tank is provided with two 1" water inlets:
Inlet 1 for cold water (BLUE marking)
Inlet 2 for hot water (RED marking)
Fig. 3
1
2
Water is connected at the inlet sockets of the system by means of two 1" flexible hose connectors.
Shut-off cocks should be mounted right next to the sockets on the supply lines.
If the water contains running sand or other impurities external filters should be mounted in addition to the internal filters.
2.3.1 Control of filter in water tank
Check that the filter in the water tank has been correctly mounted.
Fig. 4
filter
Page 35

35
2.4 Mains power connection between the DELTABOOSTER
and the supply network (cf. Fig. 5)
All measurements and connections described below should be carried
out by authorized specialists !
1) The DELTABOOSTER should be connected to a three-phase mains supply at the rated
voltage, cf. the model plate. Max. 125 Amp pre-fuses.
2) The connection should be established through a flexible rubber cable with 3 phase cores
and one earth conductor to be led through the sealing connection (2) and into the bottom of
the switchboard through the open angle flange (3). The angle flange is opened by loosening
two nuts. The cable should be connected direct at the main switch S1 and the main earth
terminal (4). When the cable has been properly mounted in the main switch S1, the angle
flange should be closed around the sealing connection (2) and the cable placed in the two
cable reliefs (1).
The cable should be rated to the existing current consumption which has been stamped on
the DELTABOOSTER model plate. It is advisable to apply a cable with a conductor cross
section of minimum 25 in preparation for a later expansion.
3) It is also advisable to take additional precautionary measures to protect the user by installing
a Residual Current Device (RCD) / Ground fault circuit interruptor (GFCI) in the DELTA-
BOOSTER supply line.
4) Finally, check that fuses F1 - F2 and F3 (cf. wiring diagram) have been mounted in the retainers and that the overload cut-out Q1-Q? has been connected and set correctly (cf. C3K
model plate).
5) With an appropriate measuring equipment the connection of earth cables from the outlet of
the fixed installation to a metallic part on the high pressure outlet of the machine should be
checked. The phase conductors of the supply cable should be subjected to a high voltage
test with the main switch in off position.
At Nilfisk-ALTO the DELTABOOSTER has been tested on the above-mentioned items as a
separate machine.
6) The door to the switchboard should be closed and locked. The system is now ready for running in and function testing.
Fig. 5
2. Sealing connection
1. Cable reliefs
4. Main earth terminal
3. Angle flange
Page 36

36
2.5 Starting up/running in
Prior to starting up the customer engineer should be fully confident with sections 3.4 - 3.6 of
the Operation Manual describing the instrument panel, settings and starting up/operation.
If any faults appear during the starting up and running in, sect. 3.10 on trouble-shooting may
help you.
2.5.1 Oil control
Check the oil level in the oil glas (cf. Fig. 6).
If the oil level gets too low, the machine will automatically shut down. will light up.
In the case of repeated low oil level (oil waste) please contact a Nilfisk-ALTO service
technician.
Fig. 6
2.5.2 Start
Turn the main switch to position - I -.
Turn the operation switch to position - I -.
The water tank will now be filled up. Press the starting switch when the system has been made
ready for venting of the pumps.
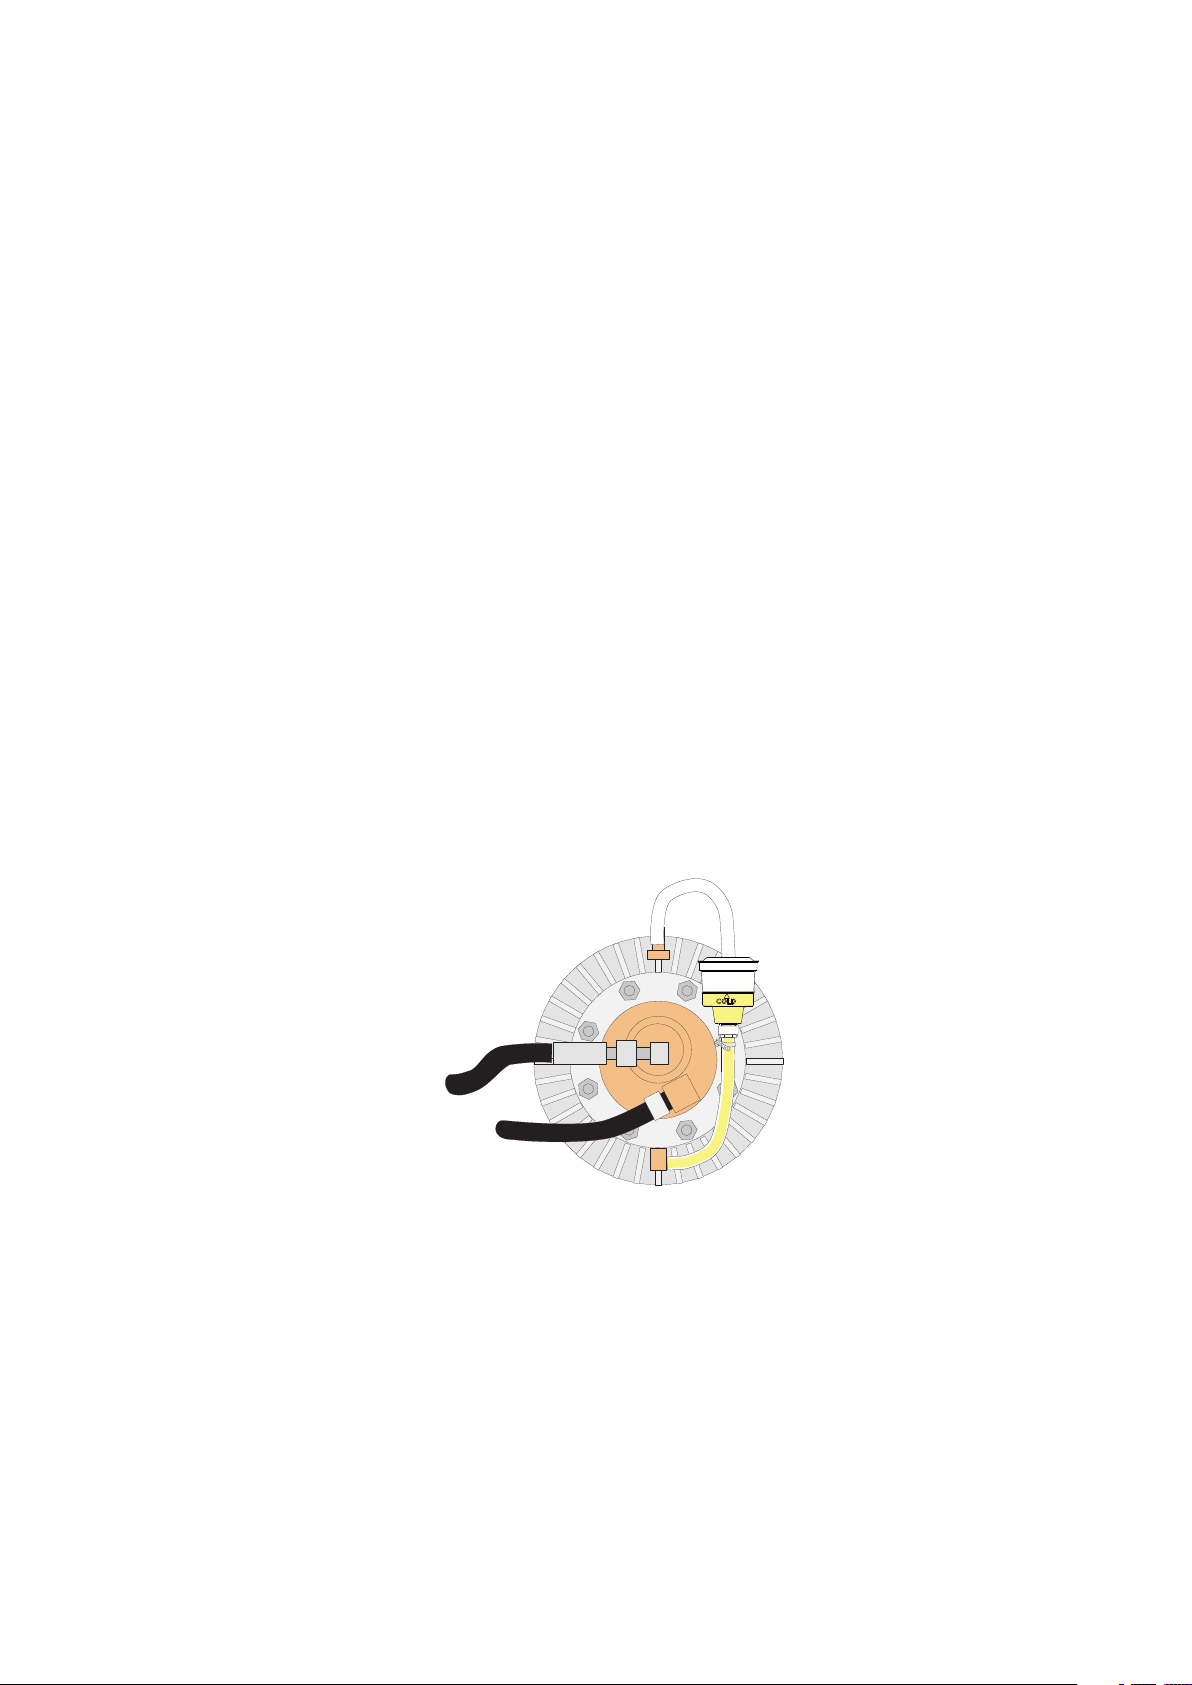
2.5.3 Venting of pumps
Venting should be carried out on each pump individually (cf. sect. 3.5.2) as power is only connected to the water tank module and the relevant pump during the venting process.
The pump should be vented in the following way:
1. Make sure that only the pump to be vented is switched on (cf. Fig. 3.5.2).
2. Open the cabinet.
3. Loosen the venting screw of the pump (cf. Fig. 7).
4. Fit a hose to the end of the venting screw and lead it to waste (jar or the like).
5. Start the pump and let it run until all the air has been removed.
6. Tighten the venting screw.
7. Repeat the procedure until all pumps of the DELTABOOSTER have been vented.
Fig. 7
Venting screw
Page 37

37
2.5.4 Venting of pipe system
When each pump has been vented the system is started up, and all high- pressure cocks on
the pipeline are opened one at a time until all air has been removed. Begin with the remotest
high pressure cock.
Please note that the cock should be closed for a short time before opening it again. The latter is
done in order to prevent the leakage stop from being activated when venting long pipelines.
2.5.5 Adjustment of line pressure
Adjustment of line pressure should only be carried out by an
authorized Nilfisk-ALTO service technician.
As a standard the DELTABOOSTER is adjusted to a line pressure of 160 bar, but it may be
adjusted to any line pressure within the area 90 to 160 bar.
It will always be expedient to choose a line pressure corresponding to the highest working pressure / nozzle pressure which you know will be required for your cleaning jobs.
A Nilfisk-ALTO service technician can adjust the high pressure switch (1) and the overflow valve
(2) to the required line pressure. The pressure can be read from the pressure gauge (3).
Fig. 8
2
3
1
Page 38

38
3 How to use the DELTABOOSTER
Users are urgently requested to study these instructions before operating the DELTABOOSTER.
The individual user is personally responsible for handling and using the cleaning system properly and
safely. It is therefore urgent that all users are instructed in detail of how to use the system and they should
all have a copy of Appendix A on “Operation and Safety Instructions”.
3.1 Safety
Your Nilfisk-ALTO DELTABOOSTER is designed and made in accordance with the latest rules on safety
at work. In order to prevent injuries to yourself and other persons, the following regulations should always
be observed when operating the plant.
1. WARNING! Never direct the water jet towards people, pets, electric wiring, or
the DELTABOOSTER.
2. WARNING! Never try to clean clothes or footwear on yourself or other per-
sons.
3. We recommend you to wear ear defenders, goggles and protective clothing during operation.
4. Never work barefoot or with sandals.
5. Operator and anyone in immediate vicinity of the site of cleaning should take action to
protect himself from being struck by debris dislodged during operation.
6. Spray handle and lance are affected by a thrust during operation - therefore always hold
the spray handle and lance firmly with both hands.
7. Only activate the trigger by hand. Never tie it up or fix it in any other way.
8. At intervals during operation, the machine should be stopped and the spray handle secured against
inadvertent use by turning safety knob to position O.
9. WARNING! High pressure hoses, nozzles and connections are important for safety when operating
the plant. Only use the high pressure hoses, nozzles and connections prescribed by Nilfisk-ALTO.
1 0. Avoid damage to the high pressure hose such as running over by a car, squeezing, pulling, knot-
ting/kinking etc. and keep it away from oil and sharp or hot objects, as such may cause the hose to
burst.
11. Never use the water for other purposes than cleaning. Detergents etc. may have been added.
12. Never detach the high pressure hose from an outlet point until the high pressure cock at the outlet
has been properly closed and the high pressure hose relieved of pressure.
13. Only let instructed personnel operate the plant.
14. Never let children operate the plant. Denmark: Persons under the age of 18 must not operate the
plant if the working pressure exceeds 70 bar.
1 5. When using detergents the instructions should always be strictly observed.
16. Persons under the influence of alcohol, drugs and medicine should not operate the machine.
17. Don’t use the machine if important parts of the equipment are damaged - i.e. safety devices, high
pressure hoses, pipeline, spray handle.
Save these instructions for later
The high-pressure pumps of a DELTABOOSTER are fitted with a safety valve each.
The safety valve has been set and sealed from the works.
DO NOT INTERFERE WITH THIS SETTING!
The motors in a DELTABOOSTER are protected against overload as thermal circuit breakers have been
incorporated in the stator windings, and the motor is guarded.
If the motor is subjected to an overload the thermal switches will cut off the system so it stops. After such
a stop the DELTABOOSTER can be restarted without interfering in the electrical system as the failing
motor will automatically be disconnected. After cooling or re-connection of the motor protection, the previously disconnected motor can be taken into operation again when re-starting the plant as described in
section 3.4.2.
The motor protection disconnects the system if the motor consumes too much power.
Frost protection
The system should be installed in frost-free premises. Pipelines and outlet stations should also be in a
frost-free location. When outlet stations are situated outdoors remember to provide for the cutting off and
draining of that part of the line which is exposed to frost.
If the temperature of the inlet water is above 80°C or below 2°C the plant will be disconnected.
Page 39

39
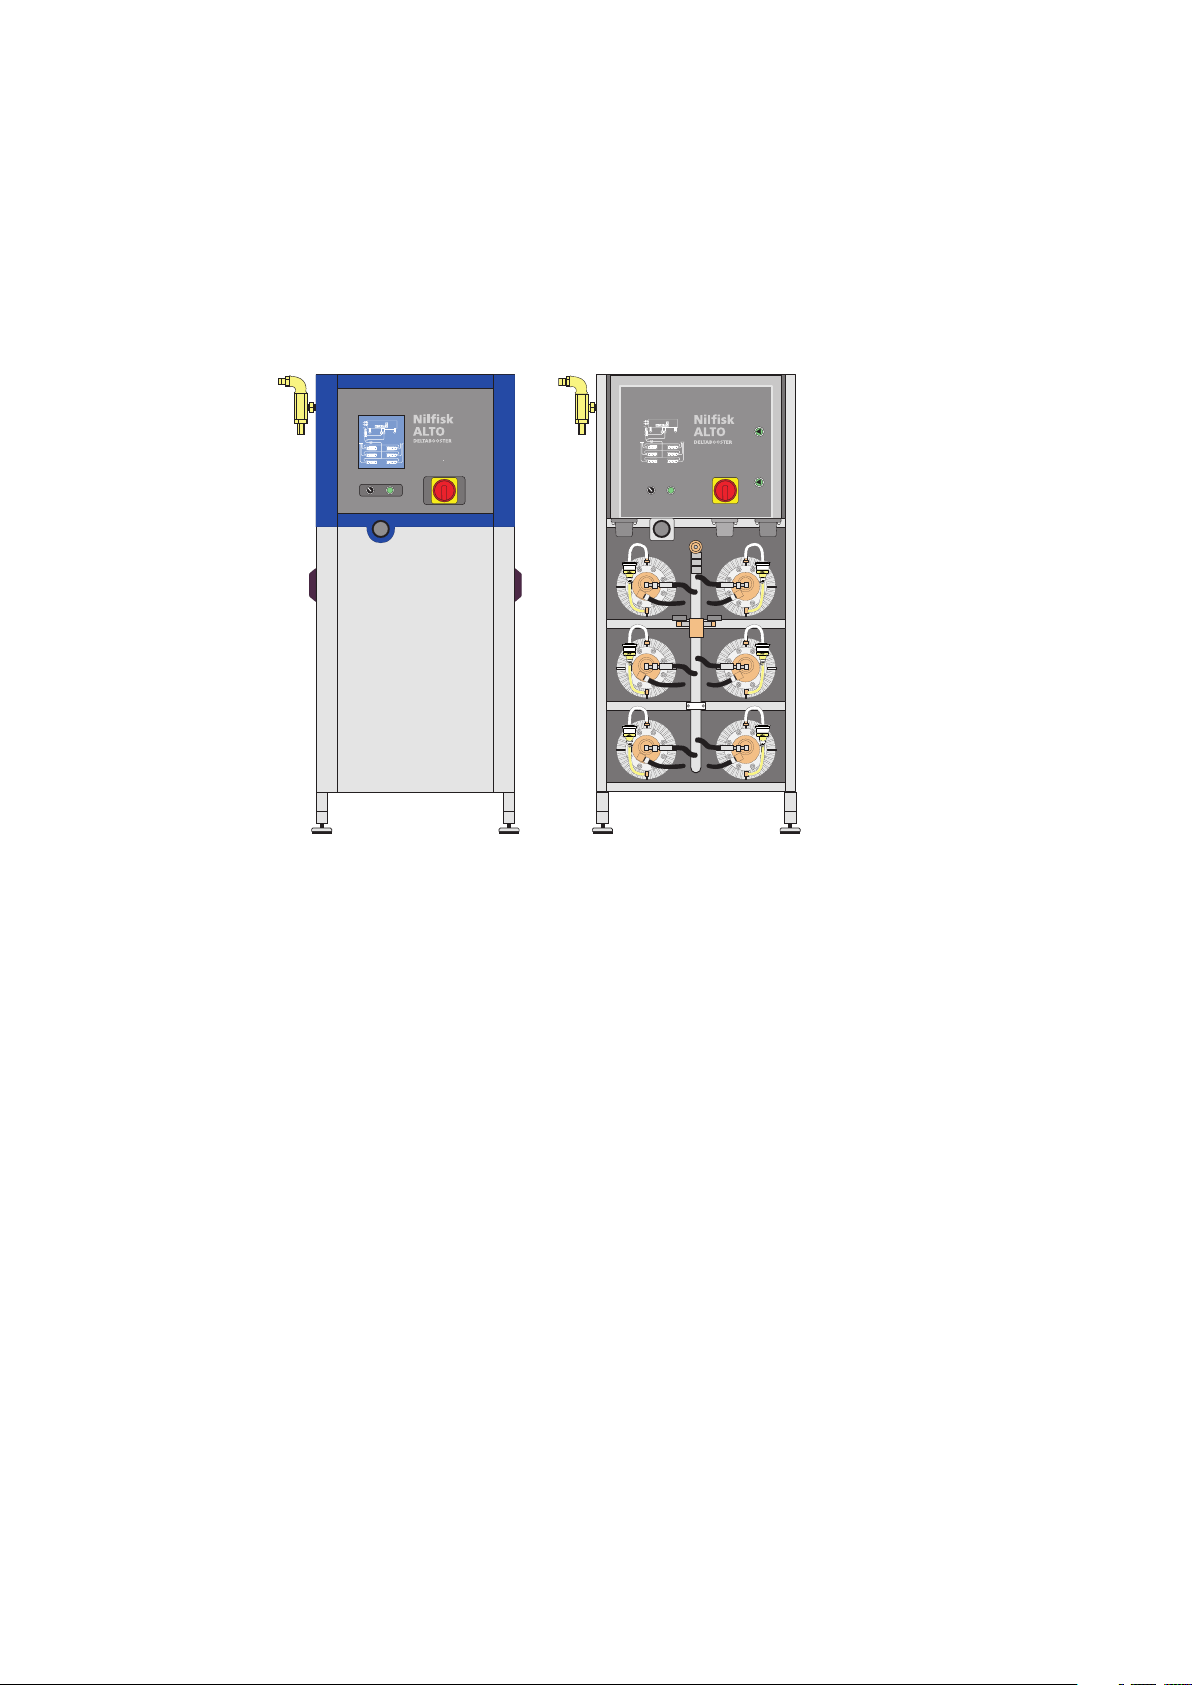
3.2 Model survey
1
5
4
3
10
9
15
2
7
6
8
1. Switchboard
2. Main switch
3. Operation switch
4. Starting button
5. Switchboard
6. Water tank
7. Motor pump units
8. Water connection
9. Oil control
10. Pressure gauge
11. Outlet socket
12. Machine feet with vibration absorber
13. Identification plate
14. Water filters
15. Lock
16. Handle / lock for cabinet door
14
13
11
16
12
Page 40

40
3.3 Functional diagram
1
2
3
4
5
6
21
20
22
12
14
17
15
13
10
11
18
25
16
15
19
7
8
9
26
1. Water filter
2. Water tank
3. Overflow pipe
4. Level sensor (lack of water)
5. - - (start inlet of water)
6. - - (stop inlet of water)
7. Relief valve
8. Flow switch (flow back to tank)
9. Excess-pressure valve (overflow valve)
10. Pressure switch (low pressure)
11. Pressure switch (high pressure)
12. Solenoid relief valve
13. Pressure gauge
14. Difuse filter, return
15. Non-return valve
16. Accumulator
17. Motor pump unit
18. High pressure hose, machine outlet
19. Temperature sensor
20. Drain cock for cleaning of water filter
21. Water inlet for hot water
22. Water inlet for cold water
23. Solenoid valve, hot water
24. Solenoid valve, cold water
25. Pipeline, high pressure
26. Oil glas with level sensor
Page 41

41
3.4 Instrument panel
4
2
3
1
5
The instrument panel is situated on the switchboard of the DELTABOOSTER.
1. Main / emergency switch (circuit breaker)
2. Operation switch - stopping switch
3. Starting switch
4. Switchboard
5. Locks for the door of the switchboard
3.4.1 Main / emergency switch
The main switch (1) connects the DELTABOOSTER to the supply network when the switch is
turned from pos. 0 to pos. I. At pos. 0 there is no connection between the DELTABOOSTER and
the supply network and the capacity of the switch is sufficient to use it as an emergency device.
The main switch may be locked in 0 position by means of an ordinary padlock. The switch should
always be locked during service checks of the system.
PLEASE NOTE: The switchboard can only be opened by means of a key and only when the
main switch (1) is in pos. 0.
3.4.2 Control switch / starting switch and stopping switch
The control switch (2) supplies 24VAC control voltage to the DELTABOOSTER when turned to
position I (provided the main switch is in pos. I).
The plant is started up by pressing the starting switch (3).
The plant will now be in operation / stand-by mode until the operation switch is turned back to
pos. 0.
Stop of plants in operation should always be effected on the operation switch and thus only use
the main / emergency switch for power cut off and emergencies.
Page 42

42
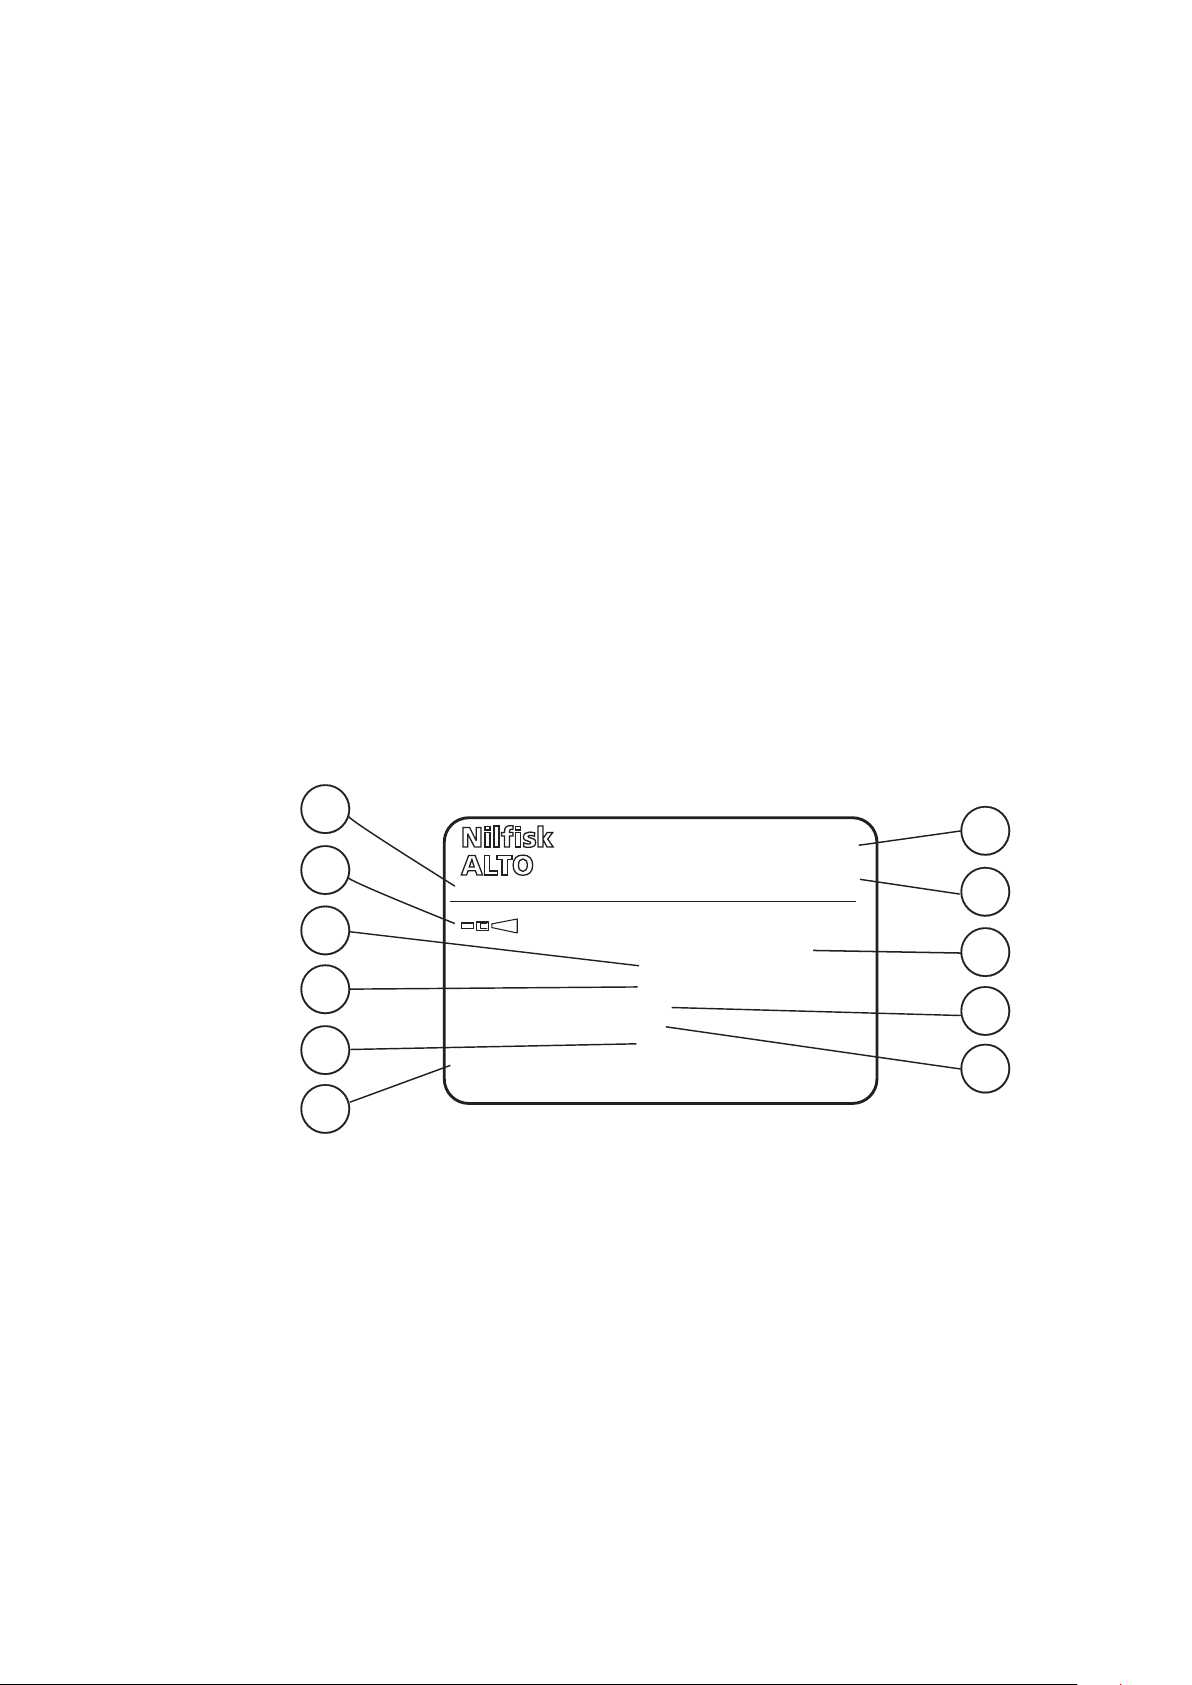
3.4.3 The control panel
The control panel (5) is based upon a schematic drawing of the system where a number of
control lamps will show the status of the system and possible faults.
The control lamps have been divided into three categories:
Green indicating a coupled unit (valve, C3K)
Yellow indicating an activated sensor (pressure switch, flow, level)
Red indicating a serious fault (leakage, over heating, etc.)
In normal conditions only the green and the yellow control lamps will glow.
If a serious fault arises the relevant red control lamp will start flashing and at the same time the
system will stop operating completely. Status from the other lamps is retained so the condition
at the moment of the fault is visible.
If a red control lamp flashes the system can usually not be re-started until the fault has been
corrected unless a motor pump unit is disengaged because of a too high temperature or a too
high power consumption. The plant can be restarted by following the procedure described in
section 3.4.2 as the steering will disconnect the defective motor. Thus the actual control lamp
will glow contantly (cf. the section on “3.10 Trouble-shooting and correction”).
The meaning of the control panel and the individual control lamps appears from Fig. 2 below.
YELLOW: Temperature adjustment
connected
Glows if the regulation is
temporarily disconnected
because of an insufficient
water supply.
GREEN: Cold inlet
GREEN: Hot inlet
Fig. 2
RED: Flashes at illegal sensor combination [water inlet will stop]
RED: Flashes at a water temperature in tank above 80°C [system will stop]
RED: Flashes at lack of water
YELLOW: Glows when high water level has been achieved
[water inlet will stop]
YELLOW: Glows when low water level has been achieved
[water inlet will start]
YELLOW: Glows when water is recirculated
GREEN: Glows when relief valve is closed [normal operat.]
YELLOW: Glows at normal working pressure [high pressure]
YELLOW: Glows when line pressure exceeds 25 bar.
RED: *) Flashes if the temp. in motor no. 1 is excessive or the oil level low [system will stop]
*) Glows constantly when starting the plant with a defective motor pump unit
RED: *) Flashes if the current cons. on pump no. 1 is excessive [system will stop]
GREEN: Glows when pump no. 1 is in operation
RED: Flashes in case of leakage on internal high pressure hose [system will stop]
RED: Flashes in case of leakage on external pipe line [system will stop]
Page 43

43
3.5 Setting and reading of DELTABOOSTER
In the DELTABOOSTER the user will only need to make the following settings and readings:
1. Setting of water temperature
2. Setting of number of C3K pumps in operation
3. Reading of hour meters
In all three cases the switchboard (Fig. 3) will have to be opened by means of the enclosed
special key.
Prior to opening the door the main switch should be turned to pos. 0.
Fig. 3
2 3
1
ON
1
2
3
4
5
6
7
8
Page 44

44
3.5.1 Setting of water temperature
The knob for adjusting the water temperature is placed on the steering A1 in the switchboard
and may either be put in the OFF position (click function - vertically) or set on the desired
mixing temperature. The yellow diode below the control knob indicates the starting point of the
temperature adjustment.
OFF
In this position the system will allow the parallel inlet of water from the two water connections
into the water tank. This is an advatage if the pressure of the inlet water is low and you can do
without the function of temperature regulation.
No adjustment of temperature is provided for, but the water temperature at the two connections
may be selected freely (lower than 75°C).
The yellow indicator symbol
on the control panel (section 3.6, Fig. 5, symbol 4) is not lit.
ON 50°C
In this position water from the two connections will be mixed to the desired mixing temperature
(e.g. 50°C).
The yellow indicator symbol
constantly as an indication that the temperature adjustment has been activated.
The indicator lamp may start to flash while the system is in operation. This means that the temperature adjustment has been cancelled by the controls. This will happen if the water supply
from either the cold or the hot connection is so sparse (closed tap, low water pressure) that the
system is about to enter to a fault situation: “Lack of water”.
Both connections will then be opened in parallel until a high water level has been achieved. The
attempt at mixing to the desired temperature will then be repeated.
on the control panel (section 3.6, Fig. 5, symbol 4) will glow
The indicator lamp will continue to flash even though the water supply returns to OK and the
temperature adjustment is repeated.
Please note: The flashing can only be removed by restarting the system.
Page 45

45
3.5.2 Connection and disconnection of C3K pumps
1
2
3
6
5
4
The desired configuration of the DELTABOOSTER will determine this setting.
As the system may have 2 to 6 C3K pumps connected, each module location has a specific
figure connected to it.:
The current configuration is set on the 8-poled transformer (cf. Fig. 3); below is a setting for a
configuration of 4 C3Kpumps:
ON
1
2
3
4
5
6
7
8
C3K NO.1 ON
C3K NO.2 ON
C3K NO.3 OFF
C3K NO.4 ON
C3K NO.5 ON
C3K NO.6 OFF
Meant for connection of more DELTA-
}
BOOSTER plants
Both should be ON for the operation
of a single plant
Page 46

46
3.5.3 Reading of hour meters
On the hour meters you can read for how many hours each of the motor pump units has been
running. Reading as follows:
Motor pump unit 1
Hours 1/100 hours
Example: 4 hours + 50/100 hour = 4½ hours
Page 47

47
3.6 Starting up/running in (cf. Fig. 4)
3
2
4
1
Once the desired settings have been made the cover of the switchboard should be closed and
both locks activated.
Make sure the water supply has been connected.
Turn the main switch (1) to position I.
Turn the control switch (2), to position I and keep an eye on the control panel (3) to make sure
that water is drawn in and the relief valve closed.
(Are there any red indicator lamps flashing on the control panel? cf. sect. "3.10 Trouble-shoot-
ing and corrections")
Press the starting switch (4) and 1 pump will then start running if the line pressure is on working
pressure or even higher. If the pressure is lower, 2 pumps will start and an additional pump will
start every other second until a working pressure has been achieved.
Fig. 4
The system is now in operation and water may be drawn off under high pressure at the individual
outlets. If consumption exceeds the capacity of the pumps connected a pump will immediately
be started up and an additional pump will follow every other second until capacity meets consumption.
If consumption drops at the outlets so that the pump capacity becomes excessive, one pump
will stop every 15 seconds, until capacity meets consumption.
The controls determine a rotation between the individual C3K pumps so that all units -time-wiseare subjected to the same load.
If consumption at the outlets is cut off completely all pumps will stop 1 every 15 seconds. The
system will then be on STAND BY with a working pressure on the line and one or more pumps
will start operating again as soon as the pressure in the line drops below 25 bar or if the outlets
are re-activated.
Page 48

48
The operation of the system may be controlled on the control panel.
(cf. sect. 3.4.4, Fig. 2)
From the above figure it appears which pumps and water supplies have been connected at the
moment (green), and the status of the pressure, water flow and water level (yellow).
Below is an example of the indications on the control panel in a given situation.
Fig. 5
1 The water level in the water tank is low - water is being
2 filled from the cold connection and
3 from the hot connection.
4 Temperature adjustment is active (set. 50°C)
5 Pumps no. 1, 3, 4 and 5 have been connected
6 Consumption is lower than the capacity from the
connected number of pumps. Water is therefore being
recirculated (the first connected pump will stop after 15 sec.)
7 The line pressure is on working pressure, H (= high pressure)
and consequently also >25 bar, L (= low pressure)
Page 49

49
3.7 Multipressure spray lance system
For each line pressure of 120 and 160 bar a kit of nine different spray lances is available, which
have been especially developed for the Multipressure spray lance system. Each of the nine spray
lances represents a combination of pressure and water volume. Users may therefore always
select the job-right combination of pressure and water volume.
The spray lances for 120 and 160 bar respectively differ in that the spray lances for 120 bar
are fitted with a GREY nozzle protection, and the spray lances for 160 bar are fitted with a
BLACK nozzle protection.
The nine spray lances are marked with each their colour and on the spray lance chart on the
DELTABOOSTER pressure, water volume and number of pumps may be read for the nine types
of spray lance.
The different water volumes and pressures depend on which high-pressure nozzle and which
pre-nozzle the spray lance is fitted with.
For further details on reactive power and nozzle sizes please refer to the Product Description
in sect. 1.9.
Alternative nozzles or spray lances should only be fitted in consultation with your Nilfisk-ALTO
specialists.
Page 50

50
3.8 Operation after starting up - outlet points and equipment
3.8.1 High pressure cock with Multipressure spray lance, Outlet point A
1. Open/close handle on high-pressure cock
2. Quick-coupling
3. Trigger on spray handle
4. Safety lock
5. Quick-coupling for spray lance
6. Multipressure spray lance
Operation after starting up
1. Carefully connect the high-pressure hose to the quick-coupling of the high-pressure cock
(2). Any impurities should be removed prior to coupling.
2. Fit the spray lance (6) in the quick-coupling of the spray pistol (5).
3. Slowly turn the handle of the high-pressure cock (1) to open position and start your cleaning
work.
4. After use close the high pressure cock by turning the handle (1) to closed position, relieve
the hose of its pressure by opening the pistol until the hose is void of pressure.
Page 51

51
3.8.2 Outlet point with foam injector and foam lance, Outlet point B
1. Open/close handle on high-pressure cock
2. Quick-coupling
3. Trigger on spray handle
4. Safety lock
5. Quick-coupling for spray lance
7. Foam lance
10. Dosage scale
11. Dosage valve
12. Detergent containers
13. Wall rack for detergent containers
Operation after starting up
1. Carefully connect the high-pressure hose to the quick-coupling of high-pressure cock (2).
Any impurities should be removed prior to coupling.
2. Fit the spray lance (6) in the quick-coupling of the spray pistol (5).
3. Slowly turn the handle of the high-pressure cock (1) to open position and start your cleaning
work.
Admixture of detergents
1. Set the dosage valve on the foam injector to a concentration of 1-5%.
When adjusting the dosage valve please note that maximum admixture of detergent is 5%
when the dosage valve is fully opened.
(Percentages apply to detergents and disinfectants in aqueous solutions. These values will
be modified if other viscosity rates are used).
2. Apply the desired detergent or disinfectant by means of the foam lance (7).
3. Fit the DELTABOOSTER spray lance (6) (low pressure) in the quick-coupling (5) of the spray
pistol and after-rinse.
4. If the injector is only used at long intervals make sure to rinse it in clean water every time it
has been used. This may be done by putting the suction hose of the injector in a container
with clean water and letting the injector suck clean water for 1 to 2 minutes with a fully opened
dosage valve.
After use
1. Close the high-pressure cock by turning the handle (1) to closed position and relieving the
hose of its pressure by activating the spray handle until the hose is void of pressure.
Please refer to section "3.8.4 General guidelines for the dosage of detergents".
Page 52

52
3.8.3 Outlet point with detergent trolley and foam lance, Outlet point D
1. Open/close handle on high-pressure cock
2. Quick-coupling
3. Trigger on spray handle
4. Safety lock
5. Quick-coupling for spray lance
7. Foam lance
10. Dosage scale
11. Dosage valve
12. Detergent containers
Outlet point with detergent trolley should be operated in the same way as outlet point A with
foam injector - cf. section 3.8.2.
3.8.4 General guidelines for the dosage of detergents
The Nilfisk-ALTO detergent equipment may be used for all disinfectants and detergents suitable
for use in high-pressure cleaning according to Nilfisk-ALTO instructions. (The pH value should
lie between 4 and 14). Acids and lyes should not be used undiluted.
The supplier’s instructions and guidelines should be followed very closely, this also applies to
rules on protective garments and drainage.
Detergents which have not specifically been specified for use in high- pressure cleaning should
only be used after prior permission from Nilfisk-ALTO and possibly the supplier.
By using Nilfisk-ALTO detergents users are sure to have machinery, accessories and detergents which are compatible and which are a pre- requisite for optimal solutions to the cleaning
tasks.
Nilfisk-ALTO can offer a wide range of effective substances for professional cleaning and disinfection. The products are composed of substances which unite effectiveness with environmental
considerations.
Page 53

53
3.9 Maintenance
The DELTABOOSTER is designed to ensure a minimum of maintenance. The following points
should however, be observed in order to secure trouble-free operation.
3.9.1 Service intervals/oil change
"Frequency of system servicing is dependent upon several factors including water temperature and
water quality. We, therefore, recommend that you contact your local service agent for advice."
Change the oil in the pump at each service interval. The pump is supplied with zinc-free hydraulic
oil - “KEW Pump Oil 100”. When replenishing use this or an oil specified to
ISO NO. 100
Viscosity index (VI) min 130
Congelation point lower than -30°C
URGENT: PROTECT NATURE
Waste oil and oil sludge should be removed or destroyed in accordance with local rules and
regulations.
3.9.2 Water filter
There are two filters on the water inlets in order to prevent impurities from entering the high-pressure pumps and thus causing damage. The filters should be cleaned regularly. The frequency
depends on the purity of the inlet water, but daily cleaning would often be required.
Cleaning is accomplished by leaving both inlets open and opening the outlet cocks on filters
(14). The inlet water will then flush away impurities from the filters.
3.9.3 Couplings
In order to prevent leakages and destruction of quick-couplings on hoses, spray handle, outlet
points and spray lances it is urgent to clean them regularly and grease with a little oil or fat.
Page 54

3.10 Trouble-shooting and possible correction
Problem Possible cause Correction
System will not start or stops in
mid-operation
(no indication of fault)
1
) Mains power supply cut off
2
) Fuses have blown
3
) Control voltage fuses in DELTA
BOOSTER have blown
Connect mains power supply
Check that fuses correspond to power consumption (model plate). Renew fuses
Call customer engineer
System does not start or stops in
mid-operation with the following
fault indication:
C3K
C3K
Water tank
Water tank
Pipeline / internal hoses
Sensors
Any of the below faults ia fatal and
should be corrected
Motor guard on motor 2 cut out:
1
) No phase
2
) Pump - motor blocked
3
) Short-circuit in motor
Thermal cut-out sensor in motor 3 cut out
1
) Air intake obstructed
2
) Oil deficiency
Water level in water tank too low
Temperature in water tank too high
(>80°C)
Temperature in water tank too low (<2°C)
Leakage: external or internal
Combination of sensor values illegal.
I.e. if the high pressure switch is ON and
the low pressure switch is OFF.
When fault has been corrected restart
system - check that the fault indication has
disappeared
*) Call customer engineer
(C3K pump no. 2 can be withdrawn on the
steering - see section 3.5 - upon which the
operation can be resumed)
*) Allow the motor to cool
Check the air intake and clean, if necessary
Refill with oil.
Check that the shut-off’s on the water inlets
are open and clean the inlet filters, if necessary. Check that the water supply meets
the requirements stated in sect. 1.5
Allow the water to cool, empty the watertank, if necessary. Check that the cold
water connection is open and, if not, that
the temp. on the hot connection does not
exceed 75°C.
Empty the water tank, and make sure that
the temperature of the water inlets are
above 2°C.
In case of external leakage: disengage
any open spray handles, if relevant - repair
leakage.
In case of internal leakage: repair leakage
Call customer engineer
One or more pumps will not stop
after end of operation
Pump restarts at short intervals
High-pressure cock at outlet point does
not close
Flow sensor return defective
The system cannot keep up pressure
Check that all high-pressure cocks at outlet
points have been closed
Call customer engineer
Check that all high-pressure cocks at outlet
points have been closed
Working pressure too low
The high-pressure cock at outlet point
not completely closed
Double spray lance used at outlet point
without injector
Excessive water consumption
Check that all high-pressure cocks at outlet
points have been closed.
Shift to single spray lance at this outlet
point.
Check whether the water consumption of
the spray lances used exceeds the capacity
of the system - shift to other spray lances, if
necessary
No working pressure
Irregular working pressure
(machine vibrates)
High-pressure cock at one outlet point is
left open
Air in pump
Inlet water too hot
Shut off the high-pressure cock at outlet
points not in use
Vent the system, cf. sect. 2.5.3
Allow water to cool and check that inlet
temperature does not exceed 80°C
Water volume at outlet point too
small
Blockage of filter for inlet water
Nozzle blocked
Clean the filter, cf. sect. 3.9.2
Clean the nozzle
*) In both cases the plant will stop and the related control lamp will flash. When restarting the plant, the pump will
AUTOMATICALLY cut out, and the operation can be resumed - the control lamp will now be constantly alight.
If other faults occur than those enlisted, please contact your nearest Nilfisk-ALTO service centre.
54
Page 55

http://www.nilfisk-alto.com
HEAD QUARTER
DENMARK
Nilfisk-Advance Group
Sognevej 25
DK-2605 Brøndby
Tel.: +45 4323 8100
Fax: +45 4343 7700
E-mail: mail@nilfisk-advance.dk
SALES COMPANIES
AUSTRALIA
Nilfisk-ALTO
48 Egerton St.
P.O. Box 6046
Silverwater, N.S.W. 2128
Tel.: +61 2 8748 5966
Fax: +61 2 8748 5960
AUSTRIA
Nilfisk-Advance GmbH
Nilfisk-ALTO
Metzgerstrasse 68
5101 Bergheim/Salzburg
Tel.: +43 662 456 400-0
Fax: +43 662 456 400-34
E-mail: info@nilfisk-alto.at
www.nilfisk-alto.at
BELGIUM
Nilfisk-ALTO
Division of Nilfisk-Advance n.v-s.a.
Internationalelaan 55 (Gebouw C3/C4)
1070 Brussel
Tel.: +32 02 467 60 40
Fax: +32 02 466 61 50
E-mail: info.be-@nilfisk-alto.com
CANADA
Clarke Canada
Part of the Nilfisk-Advance Group
4080 B Sladeview Crescent, Unit 1
Mississauga, Ontario L5L 5Y5
Tel.: +1 905 569 0266
Fax: +1 905 569 8586
CHINA
Nilfisk-Advance (Shenzhen) Ltd.
Blok 3, Unit 130 1001 Honghua Road
Int. Commercial & Trade Center
Fuitian Free Trade Zone
518038 Shenzhen
Tel.: +86 755 8359 7937
Fax: +86 755 8359 1063
CZECH REPUBLIC
ALTO Ceská Republika s.r.o.
Zateckých 9
14000 Praha 4
Tel.: +420 24 14 08 419
Fax: +420 24 14 08 439
E-mail: info@alto-cz.com
DENMARK
Nilfisk-ALTO
Division of Nilfisk-Advance A/S
Industrivej 1
9560 Hadsund
Tel.: +45 7218 2100
Fax: +45 7218 2105
E-mail: salg@nilfisk-alto.dk
E-mail: service@nilfisk-alto.dk
www.nilfisk-alto.dk
Nilfisk-ALTO Food division
Division of Nilfisk-Advance A/S
Blytækkervej 2
9000 Aalborg
Tel.: +45 7218 2100
Fax: +45 7218 2099
E-mail: scanio.technology@nilfisk-alto.dk
FINLAND
Nilfisk-Advance Oy Ab
Piispantilankuja 4
02240 Espoo
Tel.: +358 207 890 600
Fax: +358 207 890 601
E-mail: jukka.lehtonen@nilfisk-alto.com
www.nilfisk-advance.fi
FRANCE
Nilfisk-ALTO
ALTO France SAS
Aéroparc 1
19 rue Icare
67960 Entzheim
Tel.: +33 3 88 28 84 00
Fax: +33 3 88 30 05 00
E-mail: info@nilfisk-alto.fr
www.nilfisk-alto.com
GERMANY
Nilfisk-ALTO
Division of Nilfisk-Advance AG
Guido-Oberdorfer-Strasse 10
89287 Bellenberg
Tel.: +49 0180 5 37 37 37
Fax: +49 0180 5 37 37 38
E-mail: info@nilfisk-alto.de
www.nilfisk-alto.de
GREECE
Nilfisk-Advance SA
8, Thoukididou str.
164 52 Argiroupolis
Tel.: +30 210 96 33443
Fax: +30 210 96 52187
E-mail: nilfisk-advance@clean.gr
HOLLAND
Nilfisk-ALTO
Division of Nilfisk-Advance BV
Camerastraat 9
3322 BB Almere
Tel.: +31 36 546 07 60
Fax: +31 36 546 07 61
E-mail: info@nilfisk-alto.nl
www.nilfisk-alto.nl
HONG KONG
Nilfisk-Advance Ltd.
2001 HK Worsted Mills Ind’l Bldg.
31-39 Wo Tong Tsui St.
Kwai Chung
Tel.: +852 2427 5951
Fax: +852 2487 5828
HUNGARY
Nilfisk-Advance Kereskedelmi Kft.
II. Rákóczi Ferenc út 10
2310 Szigetszentmiklos-Lakihegy
Tel: +36 2447 5550
Fax: +36 2447 5551
E-mail: info@nilfisk-advance.hu
www.nilfisk-advance.hu
ITALY
Nilfisk-ALTO
Divisione di Nilfisk-Advance A/S
Località Novella Terza
26862 Guardamiglio (LO)
E-mail: d.puglia@nilfisk-advance.it
JAPAN
Nilfisk-Advance Inc.
247 Nippa-cho, Kouhoku-ku
Yokohama, 223-0057
Tel.: +8145 548 2571
Fax: +8145 548 2541
MALAYSIA
Nillfisk-Advance Sdn Bhd
Sd 14, Jalan KIP 11
Taman Perindustrian KIP
Sri Damansara
52200 Kuala Lumpur
Tel.: +60 3 603 6275 3120
Fax: +60 3 603 6274 6318
NORWAY
Nilfisk-Advance AS
Bjørnerudveien 24
1266 Oslo
Tel.: +47 22 75 17 70
Fax: +47 22 75 17 71
E-mail: info@nilfisk-alto.no
www.nilfisk-alto.no
POLAND
Nilfisk-Advance Sp. Z.O.O.
05-800 Pruszków
ul. 3-go MAJA 8
Tel.: +48 22 738 37 50
Fax: +48 22 738 37 51
E-mail: info@nilfisk-alto.pl
www.nilfisk-alto.pl
PORTUGAL
Nilfisk-ALTO
Division of Nilfisk-Advance Lda.
Sintra Business Park
Zona Industrial Da Abrunheira
Edificio 1, 1° A
P2710-089 Sintra
Tel.: +35 808 200 537
Fax: +35 121 911 2679
E-mail: mkt@nilfisk-advance.es
RUSSIA
Nilfisk-Advance LLC
Vyatskaya str. 27, bld. 7
127015 Moskow
Tel.: +7 495 783 96 02
Fax: +7 495 783 96 03
E-mail: info@nilfisk-advance.ru
SINGAPORE
Nilfisk-Advance Pte. Ltd.
Nilfisk-ALTO Division
40 Loyang Drive
Singapore 508961
Tel.: +65 6 759 9100
Fax: +65 6 759 9133
E-mail: sales@nilfisk-advance.com.sg
SPAIN
Nilfisk-ALTO
Division of Nilfisk-Advance S.A.
Torre D’Ara
Paseo del Rengle, 5 Pl. 10
08302 Mataró
Tel.: +3 4 902 200 201
Fax: +34 93 757 8020
E-mail: mkt@nilfisk-advance.es
SWEDEN
ALTO Sverige AB
Member of Nilfisk-Advance Group
Aminogatan 18, Box 4029
431 04 Mölndal
Tel.: +46 31 706 73 00
Fax: +46 31 706 @nilfisk-alto.se
www.nilfisk-alto.se
TAIWAN
Nilfisk-Advance Taiwan Branch
No. 5, Wan Fang Road
Taipei
Tel.: +886 227 002 268
Fax: +886 227 840 843
THAILAND
Nilfisk-Advance Co. Ltd.
89 Soi Chokechai-Ruammitr
Viphavadee-Rangsit Road
Layao, Jatuchak, Bangkok 10900
Tel.: +66 2 275 5630
Fax: +66 2 691 4079
TURKEY
Nilfisk-Advance Profesional Temizlik
Ekipmanlari Tic. A/S.
Necla Cad. NI.: 48
Yenisahra / Kadiköy
Istanbul
Tel.: +90 216 470 08 - 60
Fax: +90 216 470 08 - 63
www. nilfisk-advance.com
UNITED KINGDOM
Nilfisk-ALTO
Division of Nilfisk-Advance Ltd.
Bowerbank Way
Gilwilly Industrial Estate, Penrith
Cumbria CA11 9BQ
Tel.: +44 1 768 86 89 95
Fax: +44 1 768 86 47 13
E-mail: sales@nilfisk-alto.co.uk
www.nilfisk-alto.co.uk
USA
Nilfisk-Advance Inc.
14600 21st Avenue North
Plymouth, MN 55447-3408
Tel.: +1 763 745 3500
Fax: +1 763 745 3718
E-mail: info@nilfisk-advance-us.com
www.advance-us.com
VIETNAM
Nilfisk-Advance Representative Office
No. 46 Doc Ngu Str.
Ba Dinh Dist.
Hanoi
Tel.: +84 4 761 5642
Fax: +84 4 761 5643
E-mail: nilfisk@vnn.vn
Page 56

7309021 (02.2008)
 Loading...