

Page 1
ATTIX 550-01
ATTIX 550-11 MOBIL
ATTIX 550-21
ATTIX 590-21
ATTIX 12 GALLON
ATTIX 12 GALLON RDF
ATTIX EC 12 GALLON AS/E
Bedienungsanleitung .......................................................................... 3
Operating Instructions ...................................................................... 14
Notice d'utilisation ............................................................................25
Gebruiksaanwijzing ...........................................................................36
Istruzioni sull’uso .............................................................................. 47
Driftsinstruks ..................................................................................... 58
Bruksanvisning .................................................................................69
Driftsvejledning ................................................................................. 80
Käyttöohje .......................................................................................... 91
Navodilo za uporabo ......................................................................102
Uputstvo za rad ............................................................................... 113
Prevádzkový návod .........................................................................124
Provozní návod ................................................................................135
Instrukcja obsługi ............................................................................ 146
Kezelési utasítás ............................................................................. 157
Instrucciones de manejo ................................................................ 168
Instruções de operação ..................................................................179
Οδηγίες λειτουργίας........................................................................ 190
Ýþletme kýlavuzu .............................................................................. 201
Руководство по эксплуатации ..............................................................212
302001420 - 2004-02-13
Page 2
ATTIX 550-01/550-11 MOBIL/550-21/590-21
ATTIX 12 GALLON / ATTIX 12 GALLON RDF
ATTIX EC 12 GALLON AS/E
Page 3

ATTIX 550-01/550-11 MOBIL/550-21/590-21
ATTIX 12 GALLON / ATTIX 12 GALLON RDF
ATTIX EC 12 GALLON AS/E
Contents
Symbols used to mark
instructions
1 Important safety
instructions
...........................................................................................15
...........................................................................................15
2 Description
3 Before startingy
4 Operation
5 Applications and
techniques
6 After fi nishing work
7 Maintenance
8 Troubleshooting
9 Further information
2.1 Purpose ..............................................................................17
2.2 Operating elements ............................................................17
3.1 Assembling the vacuum cleaner ........................................17
4.1 Connections .......................................................................18
4.1.1 Connecting the suction hose ..............................................18
4.1.2 Electrical connection ..........................................................18
4.1.3 Connecting power tools1) ..................................................18
4.2 Switching on the vacuum cleaner.......................................18
4.2.1 Switch position "I" ...............................................................18
4.2.2 Switch position "auto"1) ......................................................18
4.2.3 Suction power control1) ......................................................19
5.1 Techniques .........................................................................19
5.1.1 Picking up dry sub stances..................................................19
5.1.2 Picking up liquids................................................................19
6.1 Switching the vacuum cleaner off and storage ...................20
7.1 Maintenance plan ...............................................................20
7.2 Maintenance work ..............................................................21
7.2.1 Emptying the dirt tank.........................................................21
7.2.2 Replacing the fi lter bag.......................................................21
7.2.3 Replacing the fi lter element ................................................21
...........................................................................................22
9.1 Recycling the vacuum cleaner ...........................................23
9.2 Guarantee ..........................................................................23
9.3 Tests and approvals ...........................................................24
9.4 Technical data ....................................................................24
9.5 Accessories ........................................................................24
9.6 EC declaration of conformity ..............................................24
1)
14
Option depending on model
Page 4
Symbols used to mark instructions
Safety instructions marked with
this symbol must be observed
to prevent danger to persons.
This symbol is used to mark
safety instructions that must be
observed to prevent damage
to the vacuum cleaner and its
performance.
,
This indicates tips and instructions to simplify work and to
ensure safe operation.
1 Important safety instructions
ATTIX 550-01/550-11 MOBIL/550-21/590-21
ATTIX 12 GALLON / ATTIX 12 GALLON RDF
ATTIX EC 12 GALLON AS/E
For your own safety
Before using the vacuum cleaner, always read the operating
instructions and keep them
readily available.
Only allow the vacuum cleaner
to be used by persons who
have been trained in its use
and who have been explicitly
authorized to use it.
General
The use of the vacuum cleaner is subject to valid national
regulations.
1)
Option depending on model
The vacuum cleaner is suitable
for commercial use, e.g. in hotels, schools, hospitals, factories, shops, offi ces and rental
businesses.
Besides the operating instructions and the binding accident
prevention regulations valid in
the country of use, observe recognized regulations for safety
and proper use.
Do not use any unsafe work
techniques.
Hazardous dust
This vacuum cleaner is not suitable for removing hazardous
dust.
Risk of fi re and explosion
The following materials should
not be sucked into the vacuum
cleaner:
– hot materials (burning ciga-
rettes, hot ashes, etc.)
– fl ammable, explosive, ag-
gressive liquids (e.g. petrol,
solvents, acids, alkalis, etc.)
– fl ammable, explosive dusts
(e.g. magnesium or aluminium dust, etc.)
15
Page 5
ATTIX 550-01/550-11 MOBIL/550-21/590-21
ATTIX 12 GALLON / ATTIX 12 GALLON RDF
ATTIX EC 12 GALLON AS/E
Appliance socket
Use the socket on the vacuum
cleaner for the purpose defi ned
in the operating instructions
only.
Before plugging an appliance
into the appliance socket:
1. Switch off the vacuum cleaner
2. Switch off the appliance to
be connected.
CAUTION!
Follow the operating instructions and safety instructions for
appliances connected to the
appliance socket.
Transport
After sucking up water, do not
tilt the cleaner or transport it in
a horizontal position.
Before starting the vacuum
cleaner
Before starting the vacuum
cleaner, check that it is in
proper condition. Plugs and
couplings in power cords must
at least have splash protection.
Regularly check whether the
power cord is damaged or
shows signs of aging.
Before using the cleaner, ensure that the cover and power
cord are intact. (There is risk of
electrocution if they are damaged.)
CAUTION!
Before sucking in liquids, remove the fi lter bag and check the
performance of the fl oater (see
section 7.2.3).
If foam appears, stop
work immediately and empty
the tank.
Maintenance and repair
CAUTION!
Always pull out the mains
plug before cleaning and servicing the vacuum clea -ner.
Only carry out maintenance
work described in the operating
instructions.
CAUTION!
Use original Alto accessories
and parts only. The use of
other parts can adversely affect
safety.
CAUTION!
Do not make technical modifi cations to the vacuum cleaner.
They could endanger your
safety.
For further maintenance or repair work and the replacement
of a faulty power cord please
contact the Alto service department or an authorized Alto
workshop.
Electrical connections
by the manufacturer or higher
quality ones (see section 9.4
"Technical data").
It is recommended that the
vacuum cleaner is connected
via a residual current circuit
breaker. This device stops the
supply of electricity if the leakage current to earth exceeds 30
mA for 30 ms or it has an earth
tester circuit.
When using an extension cord,
check the minimum cross-sections of the cable:
Cable length Cross section
m mm
2
up to 20 1.5
20 to 50 2.5
Arrange the electrical parts
(sockets, plugs and couplings)
and lay down the extension
cord so that protection class is
maintained.
CAUTION!
Never spray water on to the
upper section of the vacuum
cleaner: danger for persons,
risk of short-circuiting.
Observe the latest edition of the
IEC regulations.
Never use the vacuum cleaner
if the fi lter element is damaged.
During use
Do not damage the power cord
(e.g. by moving over it or pulling
or squeezing it).
Disconnect the power cord by
pulling the plug only (do not pull
or tug the power cord).
16
Check the rated voltage of the
vacuum cleaner before connecting it to the mains supply
system. Ensure that the voltage
shown on the rating plate corresponds to the voltage of the
local mains power supply.
If you are using an extension
cord, use only those specifi ed
1)
Option depending on model
Page 6

2 Description
ATTIX 550-01/550-11 MOBIL/550-21/590-21
ATTIX 12 GALLON / ATTIX 12 GALLON RDF
ATTIX EC 12 GALLON AS/E
2.1 Purpose When used properly, the indu-
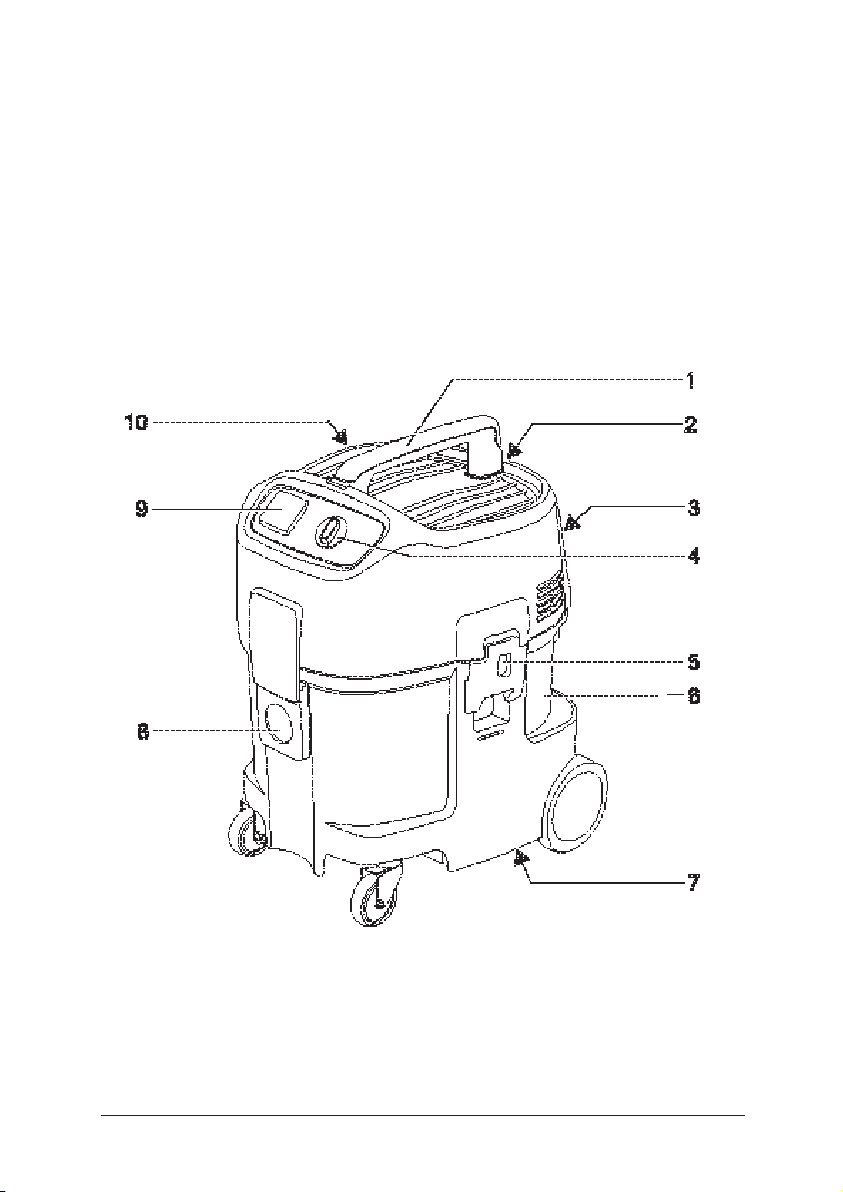
2.2 Operating elements See fold-out page at front of
strial vacuum cleaners described in these instructions are
these operating instructions.
1 Handle
2 Suction tube fastener
3 Mounting for accessories
4 Appliance switch with suc-
tion power control
1)
3 Before starting
3.1 Assembling the
vacuum cleaner
1
suitable for sucking up dry, nonfl ammable dusts and li quids.
5 Retaining clamp
6 Dirt tank
7 Grip to empty tank
8 Inlet fi tting
9 Appliance socket
10 Cable hook
1. The mains plug should not
yet be inserted into a socket.
2. Open the retaining clamps
(1) and remove upper section of the cleaner.
3. Take the accessories1) out of
the dirt tank and the pakkaging.
4. Place a fi lter bag into the
tank as described in the
instructions (printed on the
fi lter bag).
IMPORTANT!
Press the fi lter bag connection
fi rmly on to the inlet fi tting.
5. Fit the upper section of the
cleaner (do not damage
the fi lter bag) and close the
retaining clamps.
NOTE!
Ensure that the retaining
clamps fi t properly.
1)
1)
Option depending on model
17
Page 7

ATTIX 550-01/550-11 MOBIL/550-21/590-21
ATTIX 12 GALLON / ATTIX 12 GALLON RDF
ATTIX EC 12 GALLON AS/E
4 Operation
4.1 Connections
4.1.1 Connecting the suction
hose
4.1.2 Electrical connection The operating voltage shown
on the rating plate must correspond to the voltage of the
mains power supply.
4.1.3 Connecting power
tools1)
To comply with regulations, only
approved dust producing tools
should be connected.
The maximum power consumption of the connected power tool
is stated in section 9.4 "Technical data".
4.2 Switching on the
vacuum cleaner
4.2.1 Switch position "I"
4.2.2 Switch position "auto"
1)
1. Connect the suction hose.
1. Ensure that the cleaner is
switched off.
2. Insert the power cord into a
properly installed and fused
socket with earthing contact.
1. Ensure that the power tool
is switched off.
2. Connect the power tool to
the appliance socket1) on the
control panel.
1. Turn the switch to position
"I".
The vacuum cleaner motor
starts.
1. Turn the switch to position
"auto"1).
The vacuum cleaner motor
starts when the connected
power tool is switched on.
CAUTION!
Before switching the switch
to position "auto", ensure
that the power tool connected to the appliance socket is
switched off.
18
2. When the power tool is
switched off, the vacuum
cleaner continues to run for
a short moment so that any
dust in the suction hose is
conveyed to the fi lter bag.
1)
Option depending on model
Page 8

4.2.3 Suction power control
1)
The motor speed and the suction power can be varied with
the suction power control
allows precise adaptation of
the suction power for different
cleaning tasks.
5 Applications and techniques
ATTIX 550-01/550-11 MOBIL/550-21/590-21
ATTIX 12 GALLON / ATTIX 12 GALLON RDF
ATTIX EC 12 GALLON AS/E
1)
. This
5.1 Techniques If used correctly, additional accessories, suction nozzles and
suction hoses can enhance the
cleaning action and reduce the
cleaning effort.
Effective cleaning is achieved if
you follow just a few guidelines
5.1.1 Picking up dry sub -
stances
CAUTION!
Do not pick up fl ammable
substances.
Before picking up dry substances, always ensure that a
fi lter bag is inserted in the tank
(see section 9.5 "Accessories"
for order number). Disposal of
the picked up material is then
simple and hygienic.
After picking up liquids, the fi lter
5.1.2 Picking up liquids
CAUTION!
Do not pick up fl ammable
liquids.
Always remove the fi lter bag
and check the fl oater before
picking up liquids (see section 7.2.3 "Replacing the fi lter
element").
The use of a separate fi lter ele-
ment or fi lter screen is recom-
mended.
in combination with your own
practical experience in special
fi elds.
Here are some basic tips.
element is wet. A damp fi lter
element clogs more quickly
when dry substances are
picked up. For this reason the
fi lter element should be washed
and dried or replaced by a dry
element before dry substances
are picked up.
If foam appears, stop work immediately and empty the tank.
To reduce the amount of foam,
use foam killer Alto Foam Stop
(see section 9.5 "Accessories"
for order number).
1)
Option depending on model
19
Page 9

ATTIX 550-01/550-11 MOBIL/550-21/590-21
ATTIX 12 GALLON / ATTIX 12 GALLON RDF
ATTIX EC 12 GALLON AS/E
6 After fi nishing work
6.1 Switching the vacuum
cleaner off and storage
7 Maintenance
7.1 Maintenance plan
7.2.1 Emptying the dirt tank
7.2.2 Replacing the fi lter bag
7.2.3 Replacing the fi lter element
7.2.4 Check suction hose and
accessories for clogging, clean if necessary
1. Switch off the vacuum cleaner and pull the mains plug
out of the socket.
2. Wind up the power cord and
hang it on the handle.
3. Empty the tank and clean
the vacuum cleaner.
4. After picking up liquids:
Store the upper section of
the cleaner separately so
that the fi lter element can
dry.
5. Store the cleaner in a dry
room where it is protected
from unauthorized use.
After work As required
y
y
y
y
1)
20
Option depending on model
Page 10

7.2 Maintenance work
7.2.1 Emptying the dirt tank
ATTIX 550-01/550-11 MOBIL/550-21/590-21
ATTIX 12 GALLON / ATTIX 12 GALLON RDF
ATTIX EC 12 GALLON AS/E
Empty the dirt tank when vacuuming without a fi lter bag.
1. Remove the upper section
of the cleaner from the dirt
tank.
2. Hold the dirt tank at the grip
underneath the tank and tip
out the dirt.
3. Dispose of the dirt in accordance with legal regulations.
4. Clean the rim of the tank before fi tting the upper section
of cleaner.
Before reinserting the suction
hose:
5. Clean the inlet fi tting and
hose collar.
7.2.2 Replacing the fi lter bag
7.2.3 Replacing the fi lter
element
1. Remove the upper section
of cleaner from the dirt tank.
2. Carefully remove the fi lter
bag connection from the
inlet fi tting.
3. Close the fi lter bag connec-
tion with the slide.
4. Dispose of the fi lter bag in
accordance with legal regulations.
5. Place a new fi lter bag into
the clean tank as described
in the instructions (printed
on the fi lter bag).
IMPORTANT!
Press the fi lter bag connection
fi rmly on to the inlet fi tting.
3
2
1. Remove the upper section of
the cleaner from the dirt tank
and deposit with the fi lter
element facing upwards. Do
not place the upper section
1
of the cleaner on the guard
(1).
2. Turn the fi lter holder anticlo-
ckwise (2) and remove it (3).
3. Carefully remove the fi lter
element.
4. Clean the fi lter seal (4).
1)
Option depending on model
21
Page 11

ATTIX 550-01/550-11 MOBIL/550-21/590-21
ATTIX 12 GALLON / ATTIX 12 GALLON RDF
ATTIX EC 12 GALLON AS/E
5
8 Troubleshooting
Check it for damage and
replace if necessary.
5. Check antistatic clamp (5)
for damage and have it
replaced by Alto Service if
necessary.
6. Check the fl oater (6) for
4
proper operation: When
you turn the fi lter holder, the
fl oater should move back
and forth easily.
7. Fit a new fi lter element.
8. Fit the fi lter holder and turn it
clockwise to secure it.
9. Dispose of the used fi lter
element in accordance with
legal regulations.
6
CAUTION!
Never use the vacuum cleaner without a fi lter.
Fault
Cause
‡ Motor does not start > Fuse in mains plug has
blown.
> Overload protection switch
has tripped.
> Self-acting carbon brush is
1)
worn
matic mode
1)
not connected properly.
> Power tool is defective or
> The power rating of the elec-
trical tool is too low.
• Check that the power tool
22
Remedy
• Reset the fuse.
• Switch off the vacuum cleaner and allow it to cool for
approx. 5 minutes. If it can
not be started again, contact
the Alto service department.
• Have carbon brushes
changed by Alto Service.
‡ Motor does not run in auto-
works or that the plug is
inserted correctly.
• Note that minimum power
rating is P>40W
1)
Option depending on model
Page 12

Fault
Cause
ATTIX 550-01/550-11 MOBIL/550-21/590-21
ATTIX 12 GALLON / ATTIX 12 GALLON RDF
Remedy
ATTIX EC 12 GALLON AS/E
‡ Reduced suction power > Suction power selected with
‡ No suction power during wet
cleaning
‡ Voltage fl uctuations > Impedance of power supply
suction power control
low.
> Clogged suction hose/noz-
zle.
> Seal/tank rim between the
upper section of the cleaner
and the dirt tank is dirty/defective.
> Filter bag is full.
> Filter element is clogged.
> Tank is full (fl oater closes
the suction opening).
is too high.
1)
is to
9 Further information
· Set suction power in ac-
cordance with section 4.2.3.
"Suction power control".
· Clean suction hose/nozzle.
· Clean/replace seal.
· See section 7.2.2 "Replac-
ing the fi lter bag".
· See section 4.3 "Cleaning
the fi lter element" and 7.2.3
"Replacing the fi lter ele-
ment".
· Switch off the cleaner.
Empty the tank.
· Use a suitable extension
cord (see section 9.4 "Technical data").
· Connect the cleaner to
another socket closer to
the fuse box. Voltage fl uc-
tuations over 7 % should
not occur if the impedance
at the transfer point is
≤ 0.15 Ω.
9.1 Recycling the vacuum
cleaner
9.2 Guarantee Our general conditions of busi-
1)
Option depending on model
Make the old cleaner unusable
immediately.
1. Unplug the cleaner and
cut the power cord.
The cleaner contains valuable
materials that should be recycled. Therefore, make use of
your local waste disposal site.
Contact your local authorities or
your nearest dealer for further
information.
ness are applicable with regard
to the guarantee.
Subject to change as a result of
technical advances.
23
Page 13

ATTIX 550-01/550-11 MOBIL/550-21/590-21
ATTIX 12 GALLON / ATTIX 12 GALLON RDF
ATTIX EC 12 GALLON AS/E
9.3 Tests and approvals Electrical tests must be per-
formed in accordance with the
at regular intervals and after
repairs or modifi cations.
provisions of safety regulations
(VBG4) and to DIN VDE 0701
Part 1 and Part 3. In accordance with DIN VDE 0702
9.4 Technical data
EU CH, DK GB 230/240V GB 110V
12 GALLON 12 GALLON RDF
ATTIX EC 12 GALLON AS/E
Voltage Volt
Spannung Volt 230 230 230/240 110 120 120
Mains frequency Hz
Netzfrequenz Hz 50/60 50/60 50/60 50/60 60 60
Power consumption Watt
Leistungsaufnahme Watt 1200 1200 1200 1200 1000 840
Connected load for
Anschlusswert für
appliance socket1) Watt
Gerätesteckdose1) Watt 2400 1100 1800 560 - 600
Gesamtanschluss-
Total connected load/fuse Watt/A
leistung/Absicherung Watt/A 3600/16 2300/10 3000/13 1760/16 1000/15 1440/15
ATTIX 550-01 ATTIX ATTIX 12 GALLON RDF
ATTIX 550-11 MOBIL 12 GALLON
ATTIX 550-21
ATTIX 590-21
Volume fl ow (air) max. l/min.
Volumenstrom (Luft) max. l/min. 3600 3600 3600
Vacuum max. Pa
Unterdruck max. Pa 23000 23000 23000
Measuring surface
sound pressure
level measured at
a distance of 1 m,
ISO 3744 dB(A)
Schalldruckpegel dB(A) 60 60 60
Operating noise dB(A)
Arbeitsgeräusch dB(A) 57 57 57
Power cord length m
Netzanschlussleitung Länge m 7,5 / 10,0(GB) 7,5 7,5
Power cord type
Netzanschlussleitung Typ H05RR-F 3 x 0,75 SJTW-A SJTW-A
AWG 18/3 AWG 14/3
Protection class
Schutzklasse I I I
Type of protection
Schutzart
(splash water protected)
(spritzwassergeschützt) IP X4 IP X4 IP X4
Radio interference
suppression level
Funkentstörgrad EN 50014-1 EN 50014-1 EN 50014-1
Tank volume l
Behältervolumen l 45 45 45
Width mm
Breite mm 476 476 476
Depth mm
Tiefe mm 506 506 506
Height mm
Höhe mm 655 655 655
Weight kg
Gewicht kg 14 14 14
these tests must be performed
The vacuum cleaner has been
approved in accordance with
IEC/EN 60335-2-69.
ATTIX ATTIX
ATTIX EC 12 GALLON AS/E
9.5 Accessories
Name Order No.
Filter bags (pack of 5) 302 000 527
Filter element 302 000 490
Alto Foam STOP (6 x 1l) 8469
24
EU Declaration of Conformity
ALTO Deutschland GmbH
Guido-Oberdorfer-Straße 2-8
D-89287 Bellenberg
Product:
Type:
Description:
The design of the appliance corresponds to the following pertinent
regulations:
Applied harmonized standards:
Applied national standards and
technical specifi cations:
Dipl.-Ing. Wolfgang Nieuwkamp
Tests and approvals
Vacuum for wet and dry operation
ATTIX 550-01/550-11 MOBIL/550-21/590-21
ATTIX 12 GALLON / ATTIX 12 GALLON RDF
ATTIX EC 12 GALLON AS/E
110/230-240 V~, 50/60 Hz
EC Machine Directive 98/37/EG
EC Low-voltage Directive 73/23/EG
EC EMV Directive 89/336/EG
EN 292-1, EN 292-2
EN 60335-1
EN 60335-2-69
EN 55014-1, EN 55014-2, EN 61000-3-2
DIN EN 60335-1
DIN EN 60335-2-69
Bellenberg, 13.02.2004
1)
Option depending on model
Page 14

http://www.nilfi sk-alto.com
HEAD QUARTER
DENMARK
Nilfi sk-Advance Group
Sognevej 25
DK-2605 Brøndby
Tel.: +45 4323 8100
Fax: +45 4343 7700
E-mail: mail@nilfi sk-advance.dk
SALES COMPANIES
AUSTRALIA
Nilfi sk-ALTO
48 Egerton St.
P.O. Box 6046
Silverwater, N.S.W. 2128
Tel.: +61 2 8748 5966
Fax: +61 2 8748 5960
AUSTRIA
Nilfi sk-Advance GmbH
Nilfi sk-ALTO
Metzgerstrasse 68
5101 Bergheim/Salzburg
Tel.: +43 662 456 400-0
Fax: +43 662 456 400-34
E-mail: info@nilfi sk-alto.at
www.nilfi sk-alto.at
BELGIUM
Nilfi sk-ALTO
Division of Nilfi sk-Advance n.v-s.a.
Internationalelaan 55 (Gebouw C3/C4)
1070 Brussel
Tel.: +32 02 467 60 40
Fax: +32 02 466 61 50
E-mail: info.be-@nilfi sk-alto.com
CANADA
Clarke Canada
Part of the Nilfi sk-Advance Group
4080 B Sladeview Crescent, Unit 1
Mississauga, Ontario L5L 5Y5
Tel.: +1 905 569 0266
Fax: +1 905 569 8586
CHINA
Nilfi sk-Advance (Shenzhen) Ltd.
Blok 3, Unit 130 1001 Honghua Road
Int. Commercial & Trade Center
Fuitian Free Trade Zone
518038 Shenzhen
Tel.: +86 755 8359 7937
Fax: +86 755 8359 1063
CZECH REPUBLIC
ALTO Ceská Republika s.r.o.
Zateckých 9
14000 Praha 4
Tel.: +420 24 14 08 419
Fax: +420 24 14 08 439
E-mail: info@alto-cz.com
DENMARK
Nilfi sk-ALTO
Division of Nilfi sk-Advance A/S
Industrivej 1
9560 Hadsund
Tel.: +45 7218 2100
Fax: +45 7218 2105
E-mail: salg@nilfi sk-alto.dk
E-mail: service@nilfi sk-alto.dk
www.nilfi sk-alto.dk
Nilfi sk-ALTO Food division
Division of Nilfi sk-Advance A/S
Blytækkervej 2
9000 Aalborg
Tel.: +45 7218 2100
Fax: +45 7218 2099
E-mail: scanio.technology@nilfi sk-alto.dk
FINLAND
Nilfi sk-Advance Oy Ab
Piispantilankuja 4
02240 Espoo
Tel.: +358 207 890 600
Fax: +358 207 890 601
E-mail: jukka.lehtonen@nilfi sk-alto.com
www.nilfi sk-advance.fi
FRANCE
Nilfi sk-ALTO
ALTO France SAS
Aéroparc 1
19 rue Icare
67960 Entzheim
Tel.: +33 3 88 28 84 00
Fax: +33 3 88 30 05 00
E-mail: info@nilfi sk-alto.fr
www.nilfi sk-alto.com
GERMANY
Nilfi sk-ALTO
Division of Nilfi sk-Advance AG
Guido-Oberdorfer-Strasse 10
89287 Bellenberg
Tel.: +49 0180 5 37 37 37
Fax: +49 0180 5 37 37 38
E-mail: info@nilfi sk-alto.de
www.nilfi sk-alto.de
GREECE
Nilfi sk-Advance SA
8, Thoukididou str.
164 52 Argiroupolis
Tel.: +30 210 96 33443
Fax: +30 210 96 52187
E-mail: nilfi sk-advance@clean.gr
HOLLAND
Nilfi sk-ALTO
Division of Nilfi sk-Advance BV
Camerastraat 9
3322 BB Almere
Tel.: +31 36 546 07 60
Fax: +31 36 546 07 61
E-mail: info@nilfi sk-alto.nl
www.nilfi sk-alto.nl
HONG KONG
Nilfi sk-Advance Ltd.
2001 HK Worsted Mills Ind’l Bldg.
31-39 Wo Tong Tsui St.
Kwai Chung
Tel.: +852 2427 5951
Fax: +852 2487 5828
HUNGARY
Nilfi sk-Advance Kereskedelmi Kft.
II. Rákóczi Ferenc út 10
2310 Szigetszentmiklos-Lakihegy
Tel: +36 2447 5550
Fax: +36 2447 5551
E-mail: info@nilfi sk-advance.hu
www.nilfi sk-advance.hu
ITALY
Nilfi sk-ALTO
Divisione di Nilfi sk-Advance A/S
Località Novella Terza
26862 Guardamiglio (LO)
E-mail: d.puglia@nilfi sk-advance.it
JAPAN
Nilfi sk-Advance Inc.
247 Nippa-cho, Kouhoku-ku
Yokohama, 223-0057
Tel.: +8145 548 2571
Fax: +8145 548 2541
MALAYSIA
Nillfi sk-Advance Sdn Bhd
Sd 14, Jalan KIP 11
Taman Perindustrian KIP
Sri Damansara
52200 Kuala Lumpur
Tel.: +60 3 603 6275 3120
Fax: +60 3 603 6274 6318
NORWAY
Nilfi sk-Advance AS
Bjørnerudveien 24
1266 Oslo
Tel.: +47 22 75 17 70
Fax: +47 22 75 17 71
E-mail: info@nilfi sk-alto.no
www.nilfi sk-alto.no
POLAND
Nilfi sk-Advance Sp. Z.O.O.
05-800 Pruszków
ul. 3-go MAJA 8
Tel.: +48 22 738 37 50
Fax: +48 22 738 37 51
E-mail: info@nilfi sk-alto.pl
www.nilfi sk-alto.pl
PORTUGAL
Nilfi sk-ALTO
Division of Nilfi sk-Advance Lda.
Sintra Business Park
Zona Industrial Da Abrunheira
Edifi cio 1, 1° A
P2710-089 Sintra
Tel.: +35 808 200 537
Fax: +35 121 911 2679
E-mail: mkt@nilfi sk-advance.es
RUSSIA
Nilfi sk-Advance LLC
Vyatskaya str. 27, bld. 7
127015 Moskow
Tel.: +7 495 783 96 02
Fax: +7 495 783 96 03
E-mail: info@nilfi sk-advance.ru
SINGAPORE
Nilfi sk-Advance Pte. Ltd.
Nilfi sk-ALTO Division
40 Loyang Drive
Singapore 508961
Tel.: +65 6 759 9100
Fax: +65 6 759 9133
E-mail: sales@nilfi sk-advance.com.sg
SPAIN
Nilfi sk-ALTO
Division of Nilfi sk-Advance S.A.
Torre D’Ara
Paseo del Rengle, 5 Pl. 10
08302 Mataró
Tel.: +3 4 902 200 201
Fax: +34 93 757 8020
E-mail: mkt@nilfi sk-advance.es
SWEDEN
ALTO Sverige AB
Member of Nilfi sk-Advance Group
Aminogatan 18, Box 4029
431 04 Mölndal
Tel.: +46 31 706 73 00
Fax: +46 31 706 @nilfi sk-alto.se
www.nilfi sk-alto.se
TAIWAN
Nilfi sk-Advance Taiwan Branch
No. 5, Wan Fang Road
Taipei
Tel.: +886 227 002 268
Fax: +886 227 840 843
THAILAND
Nilfi sk-Advance Co. Ltd.
89 Soi Chokechai-Ruammitr
Viphavadee-Rangsit Road
Layao, Jatuchak, Bangkok 10900
Tel.: +66 2 275 5630
Fax: +66 2 691 4079
TURKEY
Nilfi sk-Advance Profesional Temizlik
Ekipmanlari Tic. A/S.
Necla Cad. NI.: 48
Yenisahra / Kadiköy
Istanbul
Tel.: +90 216 470 08 - 60
Fax: +90 216 470 08 - 63
www. nilfi sk-advance.com
UNITED KINGDOM
Nilfi sk-ALTO
Division of Nilfi sk-Advance Ltd.
Bowerbank Way
Gilwilly Industrial Estate, Penrith
Cumbria CA11 9BQ
Tel.: +44 1 768 86 89 95
Fax: +44 1 768 86 47 13
E-mail: sales@nilfi sk-alto.co.uk
www.nilfi sk-alto.co.uk
USA
Nilfi sk-Advance Inc.
14600 21st Avenue North
Plymouth, MN 55447-3408
Tel.: +1 763 745 3500
Fax: +1 763 745 3718
E-mail: info@nilfi sk-advance-us.com
www.advance-us.com
VIETNAM
Nilfi sk-Advance Representative Offi ce
No. 46 Doc Ngu Str.
Ba Dinh Dist.
Hanoi
Tel.: +84 4 761 5642
Fax: +84 4 761 5643
E-mail: nilfi sk@vnn.vn
 Loading...