

Page 1
I n s t a l l a t i o n G u i d e
IW650FX ■ IW770FX
P r o f e s s i o n a l Q u a l i t y , I n - W a l l ,
S u r r o u n d E f f e c t s L o u d s p e a k e r s
Page 2

CONGRATULATIONS!
Thank you for choosing a superior StageFront Home Theater Solutions™ In-Wall FX
loudspeaker from Niles. With proper installation and operation, you should enjoy
years of trouble-free use.
Niles manufactures the industry’s most complete line of custom installation
components and accessories for audio/video systems. To see the complete Niles
product assortment, visit us on the Internet at: www.nilesaudio.com
TABLE OF CONTENTS
Introduction 1
Features and Benefits 2
Installation Considerations 3
Finishing the Installation 8
Operation 12
Specifications 13
Limited Warranty 16
Warranty Registration Card 17
Page 3
INTRODUCTION
StageFront Home Theater Solutions loudspeakers are expressly designed
for superior sonic quality in home theater applications. Each model employs
advanced technology components that extract the subtle nuances in recorded
music or the thunderous action sound in a movie. Models ending in “FX” are
intended primarily for special effect placement. Models ending in “LCR” are
designed for front channel left/center/right placement or wherever a monopole
design is required. StageFront models are the perfect choice wherever quality of
sound is the most important consideration.
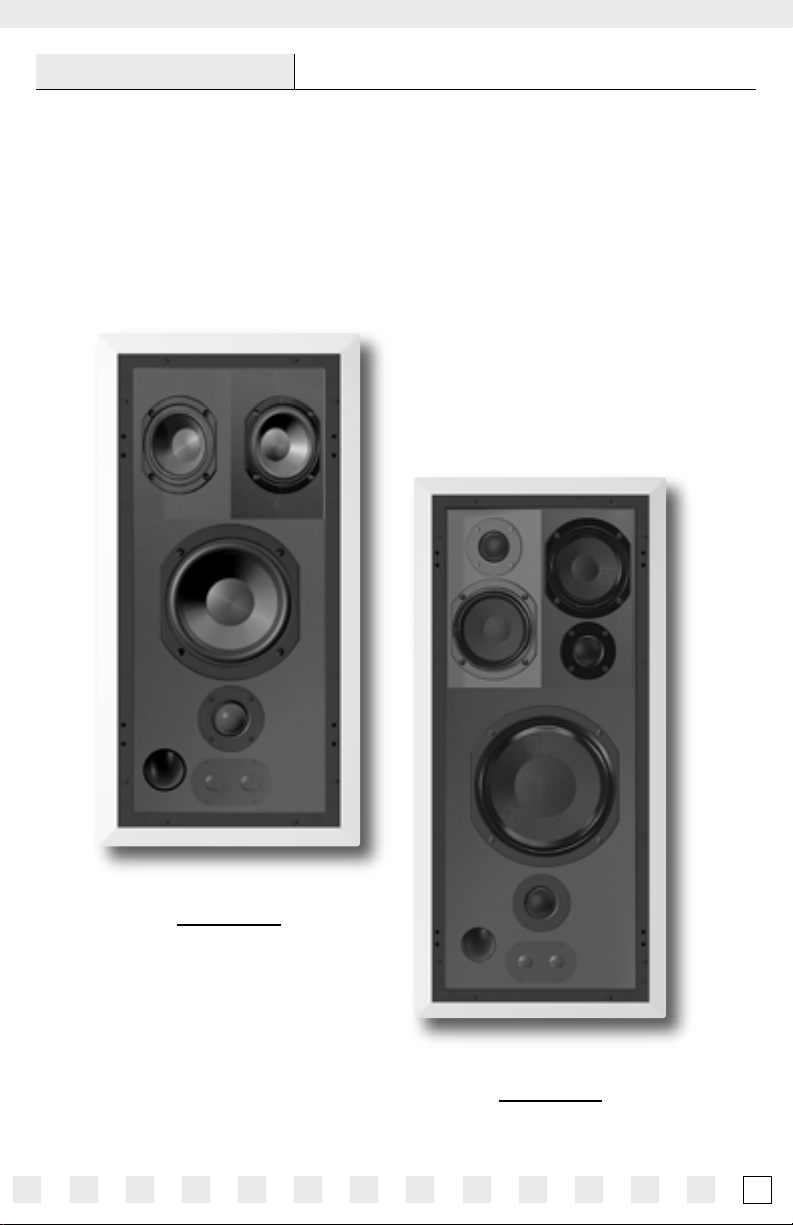
IW650FX
Stock Number
FG01331
IW770FX
Stock Number
FG01328
1
Page 4

FEATURES AND BENEFITS
TCC™ (TALC, CARBON, CERAMIC-FILLED) WOOFER*
*IW650FX only
Extremely rigid to reduce breakup, lower distortion and provide enhanced bass
response
DUAL SIDE-FIRING TCC™ (TALC, CARBON, CERAMIC-FILLED) SURROUND
EFFECT DRIVERS*
*IW650FX only
Provide diffuse sound fields for optimum surround effects
INTERLACED CARBON-FIBER WOOFER WITH BUTYL RUBBER SURROUND*
*IW770FX only
Provide increased sound pressure levels and sustained high-power output
DUAL SIDE-FIRING CARBON-FIBER MIDRANGES WITH DUAL TETERON™
DOME TWEETERS*
*IW770FX only
Enable sustained high power playback and diffuse sound fields for optimum
surround effects
FORWARD-FIRING FLUID-COOLED TETERON™ DOME TWEETER
Delivers ultra-wide dispersion and silky-smooth response
12V CONTROLLED DIPOLE/BIPOLE RELAY
Accommodates automated DVD-Audio or Dolby® surround sound effects
FRONT-MOUNTED DIPOLE/BIPOLE SWITCH AND EFFECTS LEVEL CONTROL
Enables fine-tuning after installation
CROSS-BRACED PORTED CABINETS WITH INTEGRATED FRAME DESIGN
Fits standard 2x4 construction and is easily retrofitted
EPOXY-COATED MICROPERF™ MAGNETIC GRILLE
Provides an elegant yet unobtrusive appearance
DOLBY DIGITAL® READY
StageFront Home Theater Solutions loudspeakers are expressly designed
for superior sonic quality in home theater applications. All models exceed the
specifications set forth by Dolby Laboratories for the accurate reproduction of Dolby
Digital-Encoded Sources
2
Page 5
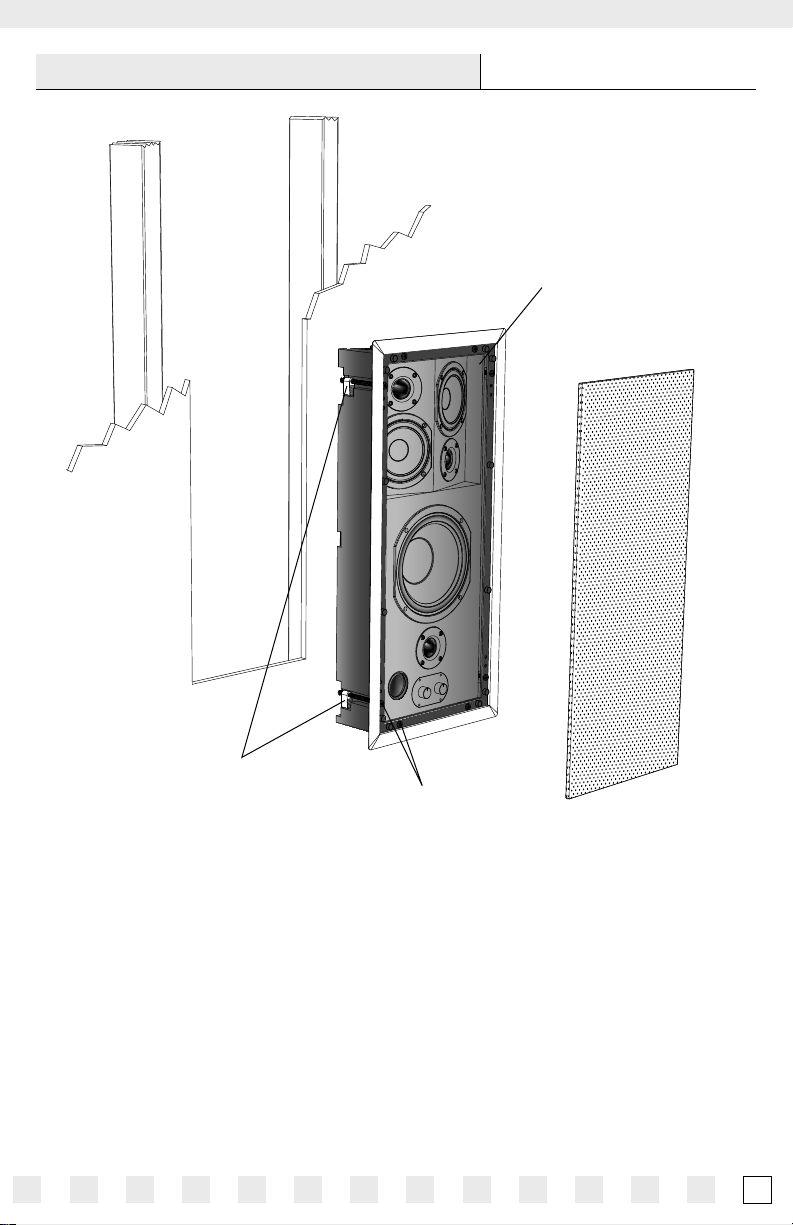
INSTALLATION CONSIDERATIONS
Loudspeaker Baffle
Dogs swivel 90°
Mounting Screws
Figure 1. Mounting an IW770FX vertically into a wall.
(CONTINUED ON NEXT PAGE)
Grille
3
Page 6

INSTALLATION CONSIDERATIONS
(CONTINUED)
TOOLS AND PRECAUTIONS
We recommend using the following tools to install an In-Wall StageFront
loudspeaker:
■ Electric drill with 1/4- and 1/2-inch drill bits, and a 1-inch flat drill bit (for drilling
through studs)
■ Keyhole or drywall saw
■ Stiff wire, fish tape, or glow rods (for routing cables)
■ Phillips screwdriver set
■ Cable ties
■ Pencil
■ Level
■ Rubber gloves and protective eyewear
Before starting the installation, please observe the following precautions:
■ Turn off all system power before making any connections
■ Always wear protective eyewear when using tools
■ Make sure hands are clean before installation
■ Wear gloves when working with fiberglass insulation
RECOMMENDED AMPLIFIER POWER
For satisfactory performance, we recommend using a surround amplifier with a
power rating of 15 to 125 watts. Most loudspeakers are not damaged by large
amplifiers, but rather by small amplifiers. If your system is playing loud music,
a small amplifier will run out of power very quickly and can create damaging
“clipping” distortions. A more powerful amplifier will play at the same volume
without distorting. See OPERATION on page 12 for more information about amplifier
clipping distortion.
LOUDSPEAKER WIRE
Use 2-conductor loudspeaker wire when connecting loudspeakers to your
receiver or amplifier. For most applications, we recommend using 16-gauge wire.
For wiring runs longer than 80 feet, we recommend 14-gauge wire. The springloaded terminals will accommodate up to 12-gauge wire directly. Larger sizes can
be accommodated via pin connectors. When running wire inside walls or ceilings,
use special jacketed cable (CL-2 or CL-3) to protect the wire and to meet local
4
Page 7

electrical and fire codes. In some areas, conduit is also required. For a trouble-free
installation, low-voltage wire such as loudspeaker wire must be run in accordance
with the National Electrical Code and any applicable provisions of the local building
code. If you are unsure of the correct installation techniques, wire jacket, or type of
conduit to use, consult a professional audio/video installer, building contractor, or
the local building and inspection department.
TECH TIP
Wire size is expressed by its AWG (American
Wire Gauge) number – the lower the number,
the larger the wire. For example, 12 AWG is
physically larger than 14 AWG.
LOUDSPEAKER PLACEMENT
NOTE: THE STAGEFRONT FX LOUDSPEAKERS ARE DESIGNED FOR USE IN EFFECT CHANNEL
APPLICATIONS. FOR FRONT LEFT, CENTER OR RIGHT-CHANNEL NEEDS, WE RECOMMEND USING
STAGEFRONT LCR LOUDSPEAKERS.
PLACING THE STAGEFRONT FX AS THE SIDE LEFT AND RIGHT LOUDSPEAKERS
In home theater, the goal is to reproduce the experience of a great movie theater in
your home. The biggest difference between the two venues is the use of a rear- or
surround-loudspeaker array in a commercial theater. Here, it is not uncommon
to see 20 or 30 loudspeakers placed around theater walls. This huge array of
loudspeakers assures the audience will feel completely surrounded by the ambient
soundtrack of the movie.
Filmmakers carefully use the “surround” soundtrack to envelope viewers in the
sound environment on screen. They will place background music, rain sounds,
traffic noise, etc. on the “surround” soundtrack to create desired effects. However,
in a home with a single pair of front loudspeakers, this surround effect will be lost,
and jungle sounds may actually sound like they are emanating “from the middle of
your head,” just like headphones!
Each StageFront FX loudspeaker is equipped with a BIPOLE/DIPOLE front switch
as well as a 12 volt trigger jack on the rear of the enclosure. This jack will switch
the StageFront FX loudspeaker from the front switch setting to its opposite
position (such as from a setting of Dipole to Bipole) for as long as voltage is
applied to this connection. Tip is positive. Use a source that will supply 12 volts
DC 200 mA minimum for this trigger. These controls optimize the surround effects
for either side or rear placement as well as various surround modes. (see SETTING
THE BIPOLE/DIPOLE MODE on page 11). Here are some recommended loudspeaker
placement tips:
(CONTINUED ON NEXT PAGE)
5
Page 8

INSTALLATION CONSIDERATIONS
■ Place the surround loudspeakers on a rear wall directly behind the listening position.
(CONTINUED)
If possible, try placing the loudspeakers nearer to the corners, as shown in
Figure 2 and 3. Set each BIPOLE/DIPOLE switch to DIPOLE for reflected sound.
Moreover, the adjoining walls will act as powerful reflectors to create even
more reflections.
■ If you place the surround loudspeakers farther away from the listener, the surround
sound will dissipate, requiring even more power from the surround-sound channels.
If your sound system uses a small (less than 50 watts per channel) surround
amplifier for the rear loudspeakers, be sure to place the loudspeakers within 5 to 8
feet of the listening location.
■ If you are using a larger (more than 50 watts per channel) surround amplifier, you
can mount the loudspeakers 10 to 15 feet away from the listening location and still
achieve reasonably high volume levels. In large or unusually-shaped rooms, this
might be the only way to achieve a good effect.
Right
Left
Left
Figure 2. Loudspeakers are placed near
back corner walls of a home theater room.
Figure 3. Loudspeakers are placed
near back corner walls of a home theater
room with an L-shaped sofa.
■ If your home theater system is capable of reproducing Dolby Surround EX
consider using a second pair of StageFront FX loudspeakers (on the side walls)
for an additional rear surround effect, as shown in Figure 4. Ideally, the side
loudspeakers should be placed in-line with the listening position with the
BIPOLE/DIPOLE controls set to DIPOLE. For a more focused surround effect, set the
BIPOLE/DIPOLE controls to BIPOLE.
®
Right
6
Page 9

■ If you like listening to music in surround modes (which emulate concert hall
acoustics), consider using more than two surround loudspeakers to provide an
extraordinary effect. With StageFront loudspeakers, it is easy to add another pair
without affecting the decor of the room.
If the StageFront FX loudspeaker is being installed in existing construction, please
use the included cardboard template to mark your installation location. Check for
proper clearance within studs or any other obstructions before cutting the speaker
opening. If you are unsure of the correct installation techniques, please consult your
authorized Niles Audio dealer.
NOTE: FOR THIS APPLICATION, YOU WILL NEED TO USE A MORE POWERFUL AMPLIFIER THAN
THE ONE BUILT INTO A TYPICAL SURROUND-SOUND RECEIVER OR AMPLIFIER. NILES MAKES
A NUMBER OF SYSTEMS INTEGRATION AMPLIFIERS WITH PROPRIETARY FEATURES THAT
MAKE THEM UNIQUELY SUITED TO ENHANCE YOUR EXISTING SURROUND-SOUND SYSTEM.
CONSULT YOUR LOCAL NILES DEALER FOR MORE INFORMATION.
Right
Rear
Right
Rear
Left
Left
Figure 4. Two pairs of loudspeakers
reproduce Dolby Surround EX® surround
sound in a home theater room.
THE BOUNDARY EFFECT
Placing a loudspeaker in a corner can powerfully affect the way a listener perceives
bass response. Known as the boundary effect, placing loudspeakers close to
a wall/ceiling boundary or near a corner-wall boundary will emphasize certain
bass frequencies, while canceling others. This effect can make the loudspeaker
sound excessively boomy and inaccurate to some listeners, while to others it
just seems like more bass sound. As a good rule-of-thumb, if you like listening
to your current pair of loudspeakers with the bass turned up, you’ll enjoy corner
placement. However, if you listen with the tone controls at neutral, try keeping the
loudspeakers at least 2 or 3 feet from the boundaries of the room.
(CONTINUED ON NEXT PAGE)
7
Page 10

FINISHING THE INSTALLATION
CONNECTING & INSTALLING THE LOUDSPEAKER
1. Please be sure to install the correct loudspeaker in the correct room position. Look
on the rear label for “Right” or “Left” designation. Install in the appropriate position
as viewed from the listening position facing the video display.
Right
Rear
Right
Optional
Placement
Figure 5. Two pairs of loudspeakers
reproduce Dolby Surround EX® surround
sound in a home theater room.
Rear
Left
Left
Optional
Placement
2. Remove the magnetic grille starting at a corner and gently pulling the grille
outwards as you work around the edges.
3. At each loudspeaker, route the loudspeaker and optional trigger wire through the
provided channel to the input connectors, then separate the loudspeaker wire so
that at least 2 inches of each conductor are free. Strip away 1/4 inch of insulation
from each loudspeaker wire. If you wish to use the 12 volt triggered Dipole/Bipole
automated feature, please insert 1/8” (3.5mm) plug above speaker inputs. Refer
back to page 5 for details.
4. On each set of loudspeaker connectors, press down the spring-loaded connector,
insert the appropriate conductor, and then release the connector, as shown in
Figure 5. Gently tug on the loudspeaker wire to make sure it is held in place.
If not, repeat this procedure until it is.
NOTE: OBSERVE CORRECT POLARITY: POSITIVE (+) GOES TO THE RED POST AND NEGATIVE
(–) GOES TO THE BLACK POST. IF YOU ARE UNSURE OF WIRE POLARITY, SEE THE SECTION,
CHECKING LOUDSPEAKER PHASE ON PAGE 9.
5. Connect the other end of each loudspeaker wire to the receiver (or amplifier) in the
same way.
6. Check that loudspeaker is level and then tighten the eight large screws using a #2
Phillips bit. This should pull the frame and mounting dog together (sandwiching the
drywall) so that the frame is absolutely flush with the wall surface. There should be
no gaps between the wall and the frame.
8
Page 11

7. Remove cardboard paint mask / template from the box and keep for future
potential use.
8. Turn on the home theater receiver and calibrate all loudspeakers in the system
according to the receiver manufacturer’s instructions.
IMPORTANT: DO NOT OVER TIGHTEN THE SCREWS! OVER TIGHTENING THEM MAY MAKE
THE GRILLE DIFFICULT TO INSTALL.
Figure 6. Connecting a loudspeaker
wire to the terminals.
Rear View
Front View
Figure 7. Installing unit into a wall.
(CONTINUED ON NEXT PAGE)
9
Page 12

PAINTING THE GRILLE AND FRAME
Each StageFront FX and LCR frame and grille may be painted without the need for
primer. For best results, use a spray gun or airless sprayer, thin the paint to prevent
clogging of the grille holes, and apply several light coats instead of one heavy one.
1. Install loudspeaker into wall.
2. Carefully peel adhesive-covering strips off of paint mask and align over magnets on
loudspeaker baffle. Gently press into place.
3. Paint the frame of the loudspeaker.
4. Paint the grille separately from the loudspeaker frame.
5. Reinstall grille after paint dries on all surfaces and the paint mask has been removed.
CHECKING LOUDSPEAKER PHASE
Loudspeaker wire has two conductors. On both your loudspeaker and amplifier, one
conductor is attached to the negative (–) terminals, while the other is attached to
the positive (+) terminals. Usually, the wire is marked for your convenience, but the
marking can be done in the following different ways:
■ Stripe on one wire
■ Ribbed area you can feel on one conductor
■ Different colors of metal wire on each conductor
■ Fabric strand or string wound into one of the conductors
Of course, there are some wires that appear completely identical. So be careful, or
you might make a connection mistake. If you do, one loudspeaker will be playing
“out-of-phase” with the other loudspeaker. A pair of out-of-phase loudspeakers
works against each other, and the sound of the two playing together will be lacking
in bass and sound “phasey.” If you suspect the sound is not right, and you cannot
see any markings on the wire, try this simple test:
1. Stand halfway between the loudspeakers.
2. Play some music with the amplifier or radio set to Mono.
3. Listen to the richness of the bass and the loudness of the sound.
4. Turn off the amplifier and reverse the connections on one amplifier channel only.
5. Repeat the listening test with the same volume control setting. When the sound has a
richer bass and is slightly louder, the loudspeakers are working together or
“in-phase.”
10
Page 13

SETTING THE BIPOLE/DIPOLE MODE
Each StageFront FX loudspeaker features a BIPOLE/DIPOLE switch located on the
front, as shown in Figure 8. Set the BIPOLE/DIPOLE switch on each StageFront
FX loudspeaker according to the loudspeaker’s side or rear placement, as shown in
Figure 8. Here are some tips on usage:
■ Use the DIPOLE setting on rear loudspeakers when listening to movies and classical
music. The sound will be less focused as it is reflected along the room’s boundaries.
This is the best choice, since most films are mixed using non-localized surround
effects, and classical music is usually recorded in a favorable acoustic environment.
■ Use the BIPOLE setting on rear loudspeakers when listening to discrete multi-
channel recordings that equally emphasize front and surround sounds.
■ For multiple sets of StageFront FX loudspeakers, use the DIPOLE setting on the side
loudspeakers (aimed at the listening position) for a more DIFFUSE surround effect.
For the rear loudspeakers, use the BIPOLE setting to focus the sound.
■ With the 1/8” (3.5 mm) trigger input for Bipole/Dipole mode switching, an IR macro
can be used to control the loudspeaker mode. You can program this as part of your
source selection. This is an easy way to have Dipole envelopment for Movie sources
and Bipole performance for Music sources. (refer to page 5 for details)
ACOUSTIC FINE TUNING
Each StageFront In-Wall FX loudspeaker features a Diffuse Sound Level control
located on the front for acoustic fine-tuning after installation, as shown in
Figure 8. Adjust this control as follows:
■ The Diffuse Sound Level control adjusts the level between the side-firing (diffuse)
and front-firing drivers. Increase the level with this control for more ambiance. A
decrease with this control will yield a more direct sound.
Figure 8. The In-Wall FX models
feature BIPOLE/DIPOLE and Diffusion
Level controls.
INSTALLING THE GRILLE
Starting at one corner, carefully align the magnetic grille into the frame and slowly
allow the magnets to attach. Work around the grille edge, ensuring that the grille
stays within the frame. When properly installed, the edges of the grille will be flush
in appearance with the frame.
11
Page 14

OPERATION
LISTENING AT HIGHER VOLUMES
Achieving a reasonable volume of sound in a large room requires more amplifier
power than it does in a small room. It is possible to turn the volume up so high
that the amplifier runs out of power. This creates “clipping” distortion, which will
make treble sound very harsh and unmusical. When you hear harsh-sounding
treble from any good loudspeaker, turn the volume down immediately! Those
harsh sounds are masking much more powerful ultra-high-frequency sound
spikes, which will quickly damage any fine loudspeaker. You are much less likely
to damage a loudspeaker driven by a large amplifier because it will be very loud
before any clipping distortion is produced.
CLEANING
Clean the StageFront Home Theater Solutions loudspeaker with a dampened soft
cloth or paper towel. If the loudspeaker is mounted high up on a wall or ceiling,
use a broom to gently brush it off.
12
Page 15

SPECIFICATIONS
IW650FX
Recommended Amplifier Power
15 to 125 watts per channel
Nominal Impedance
6 ohm nominal; 3.2 ohm minimum
Frequency Response
80Hz to 20kHz, +/- 3 dB
Sensitivity
88 dB with 2.83 V pink noise input measured at
1 meter on axis
Frame Dimensions
21-1/2" x 11"
Hole Cut-Out Dimensions
19-7/8" x 9-3/8"
Depth From Front of Wall 3-7/8"
Wiring Requirements
We recommend using 16-gauge loudspeaker
wire for runs up to 80 feet and 14-gauge
loudspeaker wire for runs up to 200 feet.
The connectors will accommodate up to
12-gauge wire.
IW770FX
Recommended Amplifier Power
15 to 125 watts per channel
Nominal Impedance
6 ohm nominal; 3.2 ohm minimum
Frequency Response
70Hz to 20kHz, +/- 3 dB
Sensitivity
90 dB with 2.83 V pink noise input measured at
1 meter on axis
Frame Dimensions
25-3/4" x 12"
Hole Cut-Out Dimensions
24-1/4" x 10-1/2"
Depth From Front of Wall 3-7/8"
Wiring Requirements
We recommend using 16-gauge loudspeaker
wire for runs up to 80 feet and 14-gauge
loudspeaker wire for runs up to 200 feet.
The connectors will accommodate up to
12-gauge wire.
13
Page 16

NOTES
14
Page 17

NOTES
15
Page 18

LIMITED WARRANTY
NILES AUDIO CORPORATION (“NILES”) WARRANTS ITS PASSIVE LOUDSPEAKER PRODUCTS (THOSE NOT REQUIRING
AC OR BATTERY POWER) TO THE ORIGINAL PURCHASER TO BE FREE OF MANUFACTURING DEFECTS IN MATERIAL
AND WORKMANSHIP FOR A PERIOD OF FIVE YEARS FROM DATE OF PURCHASE.
THIS WARR ANTY IS SUBJECT TO THE FOLLOWING ADDITIONAL CONDITIONS AND LIMITATIONS. THE WARRANTY
IS VOID AND INAPPLICABLE IF NILES DEEMS THAT THE PRODUCT HAS BEEN USED OR H ANDLED OTHER THAN IN
ACCORDANCE WITH THE INSTRUCTIONS PROVIDED BY THE MANUFACTURER, INCLUDING BUT NOT LIMITED TO
DAMAGE CAUSED BY ACCIDENT, MISHANDLING, IMPROPER INSTALLATION, ABUSE, NEGLIGENCE, OR NORMAL
WEAR AND TE AR, OR ANY DEFECT CAUSED BY REPAIR TO THE PRODUCT BY ANYONE OTHER THAN NILES OR AN
AUTHORIZED NILES DEA LER.
TO OBTAIN WARRAN TY SERVICE, TAKE THE UNIT TO THE NEAREST AU THORIZED NILES DEALER, WHO WILL TEST
THE PRODUCT AND IF NECESSARY, FORWARD IT TO NILES FOR SERVICE. IF THERE ARE NO AUTHORIZED NILES
DEA LERS IN YOUR ARE A, YOU MUST WRITE TO NILES AND INCLUDE YOUR NAME, MODEL AND SERIAL NUMBER OF
YOUR UNIT, ALONG WITH A BRIEF DESCRIPTION OF THE PROBLEM. A FACTORY RETURN AUTHORIZATION NUMBER
WILL BE SENT TO YOU. DO NOT RETURN ANY UNIT WITHOUT FIRST RECEIVING WRITTEN AUTHORIZATION AND
SHIPPING INSTRUCTIONS FROM NILES.
IF THE ABOVE CONDITIONS ARE MET, THE PURCHASER’S SOLE REMEDY SHALL BE TO RETURN THE PRODUCT TO
NILES, IN WHICH CASE NILES WILL REPAIR OR REPLACE, AT ITS SOLE OPTION, THE DEFECTIVE PRODUCT WITHOUT
CHARGE FOR PARTS OR LABOR. NILES WILL RETURN A UNIT REPAIRED OR REPLACED UNDER WARRANTY BY
SHIPPING SAME BY ITS USUAL SHIPPING METHOD FROM THE FACTORY (ONLY) AT ITS EXPENSE WITHIN THE UNITED
STATES OF AMERICA. THERE ARE NO OTHER WARRANTIES, INCLUDING WITHOUT LIMITATION, EITHER EXPRESS
OR IMPLIED WARRANTIES OF MERCHANTABILITY OR FITNESS FOR A PARTICUL AR PURPOSE, WITH RESPECT TO
THE PRODUCT.
REPAIR OR REPLACEMENT AS PROVIDED UNDER THIS WARR ANTY IS THE EXCLUSIVE REMEDY OF THE CONSUMER/
PURCHASER. NILES SHALL NOT BE RESPONSIBLE FOR ANY INCIDENTAL OR CONSEQUENTIAL DAMAGES EXCEPT
TO THE E XTENT PROVIDED (OR PROHIBITED) BY APPLICABLE LAW.
SOME STATES DO NOT ALLOW THE EXCLUSION OR LIMITATION OF INCIDENTAL OR CONSEQUENTIAL DAMAGES, SO
THE A BOVE LIMITATION MAY NOT APPLY TO YOU. THIS WARRANTY GIVES YOU SPECIFIC LEGAL RIGHTS, AND YOU
MAY ALSO HAVE OTHER RIGHTS WHICH VA RY FROM STATE TO STATE.
FOR THE NAME OF YOUR NEAREST AUTHORIZED NILES DEALER CONTACT:
NILES AUDIO CORPORATION, P.O. BOX 160818, MIAMI, FLORIDA 33116-0818.
Please fill in your product information and retain for your records.
Model_____________________ Serial No._________________ Purchase Date________
16
Page 19

WARRANTY REGISTRATION CARD
Model Purchased _________________________________________________________
Serial Number ___________________________________________________________
Date Purchased (month/day/year) _____________________________________________
Dealer Name and Location __________________________________________________
______________________________________________________________________
❍
Dr.
❍
Miss
❍
Mr.
❍
Mrs.
❍
Ms.
Name__________________________________________________________________
Address________________________________________________________________
______________________________________________________________________
City_______________________________________State________________Zip ______
Telephone ( )_______________________email _______________________________
Please take a moment to fill out our warranty registration card. The information helps us to get to
know you better and develop the products you want
Age:
❍
Under 25
❍
25-34
❍
35-44
❍
45-54
❍
55 & over
Income:
❍
Under $44,999
❍
$45,000-$59,999
❍
$60,000-$74,999
❍
$75,000-$99,999
❍
$99,999-$150,000
❍
$150,000-$99,999
❍
$99,999-$200,000
❍
Over $200,000
Occupation:
❍
Arts/Entertainment
❍
Business Owner
❍
Engineer
❍
Finance/Accounting
❍
General Office
❍
Management
DETACH HERE AND RETURN TO: NILES AUDIO CORPORATION WARRANTY REGISTRATION DEPT. P.O. BOX 160818 MIAMI, FLORIDA 33116-0818
❍
Professional
❍
Sales/Marketing
❍
Student
❍
Tradesperson
Musical tastes:
(Please check
all that apply)
❍
Alternative
❍
Classical
❍
Country
❍
Jazz
❍
New Age
❍
Popular
❍
R&B
❍
Rock
❍
Other _____________
How did you hear
about Niles?
❍
Architect/Developer
❍
Custom Installer
❍
Direct Mail
❍
Friend/Family
❍
In-Store Display
❍
Interior Designer
❍
Magazine Ad
❍
Mail-Order Catalog
❍
Newspaper Ad
❍
Product Brochure
❍
Product Review
❍
Retail Salesperson
❍
Internets
❍
Other
What magazines
do you read?
1. ________________
2. ________________
3. ________________
Who will install
the product?
❍
Custom Installer
❍
Electrician
❍
Friend
❍
Myself
Which factor(s) influenced
the purchase of your Niles
product? (Please check
all that apply)
❍
Ease of Use
❍
Price/Value
❍
Product Features
❍
Quality/Durability
❍
Reputation
❍
Style/Appearance
❍
Warranty
Do you . . . ?
❍
Own a House. If yes,
how many square feet?
❍
Own a Town House/
Condominium/Co-op
❍
Rent an Apartment
❍
Rent a House
Are you interested in
receiving literature on
other Niles products?
❍
Yes
Are there products/
capabilities that you would
like to see introduced?
❍
No
17
Page 20

NILE S AUDIO CORPORATION
12331 SW 130 Street, Miami, FL 33186 1-800-BUY-HIFI – www.nilesaudio.com
©2006 Niles Audio Corporation. All Rights Reserved. Niles and the Niles logo are registered trademarks of Niles Audio
Corporation. Stagefront Home Theater Solutions is a trademark of Niles Audio Corporation.
All other trademarks are the property of their respective owners. DS00543A
 Loading...