

Professional
Setting Guide
— For Still Photography —
En

Table of Contents
Landscapes 5
Basic Settings for Landscape Photography ................... 6
• Focus: Choose “Single AF” and “Single-Point AF”! ............ 7
• VR: Choose “Normal” for Hand-Held Photography! ..............7
• Silent Photography: Choose “On”! ..............................................9
• Low-Light AF: Choose “On”! .........................................................9
• Exposure Delay Mode: Choose “1s”! ........................................10
• Monitor Mode: Choose “Monitor Only”!...............................10
Custom Controls for Landscape Photography ............ 11
• qPreview ......................................................................................11
• tAuto Bracketing ......................................................................11
• KSelect Center Focus Point ...................................................12
• bFraming Grid Display ..............................................................12
• Shooting Mode> pZoom On/Off ...........................................12
• Playback Mode> pZoom On/Off ............................................12
Portraits 13
Basic Settings for Portrait Photography .......................14
• Set Picture Control: Choose “Portrait”! ..................................14
• Focus Mode: Choose “Continuous AF” (AF -C)! ....................14
• AF-Area Mode: Choose “Auto-Area AF”! ..............................15
• Vibration Reduction: Choose “Normal”!.................................16
• Monitor Mode: Choose “Prioritize Viewnder”! ...............16
2

Custom Controls for Portrait Photography .................. 17
• KPlayback .....................................................................................17
• KSelect Center Focus Point ...................................................17
• yActive D -Lighting .....................................................................18
• Shooting Mode> pZoom On/Off ...........................................18
• Playback Mode> pZoom On/Off ............................................18
Sports 19
Basic Settings for Sports Photography ......................... 20
• Focus Mode: Choose “Continuous AF” (AF -C)! ....................20
• AF-Area Mode: Choose “Dynamic-Area AF”!......................21
• Vibration Reduction: Choose “Sport”! .....................................21
• Monitor Mode: Choose “Prioritize Viewnder”! ...............22
Custom Controls for Sports Photography ....................23
• KPlayback .....................................................................................23
• gProtect ......................................................................................23
• KSelect Center Focus Point ...................................................24
• zFocus Mode/AF-Area Mode ...............................................24
• Shooting Mode> pZoom On/Off ...........................................24
• Playback Mode> pZoom On/Off ............................................24
Split-Second Shots ............................................................ 25
“Continuous H” Versus “Continuous H (Extended)” ....28
• The Shooting Display ....................................................................29
• Frame Advance Rate .....................................................................30
AE with Constant Shutter Speed and Aperture ..........31
3

Table of Contents
Tips and Tricks 33
Recalling Saved Settings via the Mode Dial................. 34
Using the Viewnder Without Fatigue .......................... 35
Flicker Reduction .............................................................. 36
Subject-Tracking AF .......................................................... 38
Assigning Focus and Release to Separate Controls .... 40
Animal Face/Eye-Detection AF ....................................... 41
• Basic Settings for Animal Portraits ............................................41
Protecting and Rating Pictures ......................................44
• Protecting Pictures ........................................................................44
• Rating Pictures ...............................................................................46
4
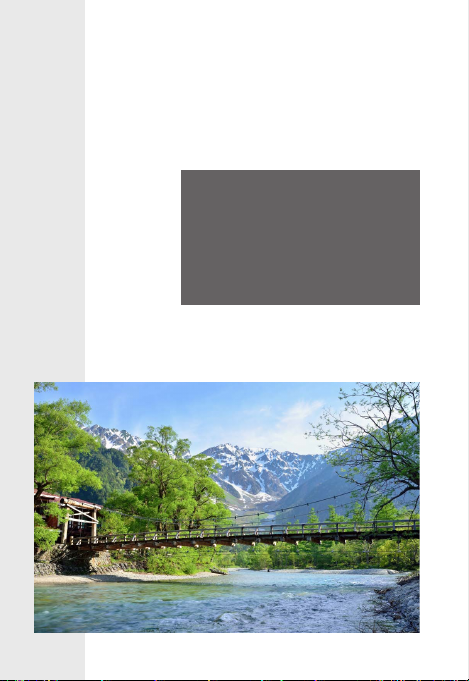
Landscapes
Learn basic techniques and helpful features for capturing landscapes more vividly and with
greater ease.
5

Basic Settings for Landscape Photography
The following are the recommended settings for photographing landscapes:
Photo shooting menu
Focus mode Single AF
AF-area mode Single-point AF
Diraction compensation On
Vibration reduction • Hand-held photography: Normal
• Tripod photography: O
Silent photography On
Custom Settings menu
a7 AF ac tivation Shutter/AF-ON
a11 Low-light AF On
d4 Exposure delay mode 1s
2
Other settings
Release mode Single frame
Monitor mode Monitor only
1. Settings for lenses with on-board vibration reduction vary with
the lens (
page 8).
2. We recommend that, where available, an optional remote
control be used in place of Exposure delay mode.
1
6
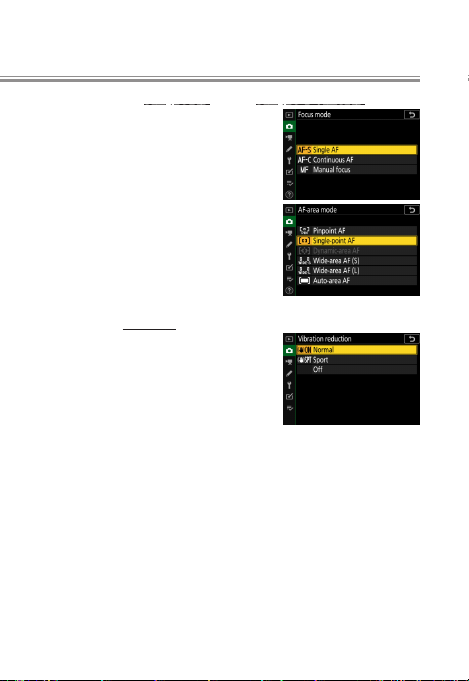
Focus: Choose “Single AF” and “Single-Point AF”!
l
l
Choose Single AF (AF‑S) for Focus
mode and select Single-point AF
for AF-area mode. This is the standard combination of settings for
landscapes and other static subjects: focus will lock once you have
chosen a focus point and pressed
the shutter-release button halfway.
VR: Choose “Normal” for Hand-Held Photography!
Choose a vibration reduction option
according to whether the camera
is mounted on a tripod. Normal,
which oers a comparatively high
level of vibration reduction, is recommended for hand-held shots of static subjects. Note
that if you are using an F mount lens with a vibration reduction switch, the Vibration reduction item in the camera menus will be grayed out and unavailable, and vibration reduction options will instead have to be selected
using the switch.
7

Tripod Photography
The recommended settings for tripod photography vary
with the lens:
• Z mount lenses: Choose Normal for lenses with on-board vi-
bration reduction, O for other lenses.
• F mount lenses: If you are using one of the lenses listed be-
low, slide the lens vibration reduction switch to “NORMAL”.
Users of other lenses should consult the lens manual.
‣ AF-P DX NIKKOR 10–20 mm f/4.5–5.6G VR
‣ AF-P DX NIKKOR 18–55 mm f/3.5–5.6G VR
‣ AF-P DX NIKKOR 70–300 mm f/4.5–6.3G ED VR
‣ AF-P NIKKOR 70–300 mm f/4.5–5.6E ED VR
‣ AF-S DX NIKKOR 16–80 mm f/2.8–4E ED VR
‣ AF-S NIKKOR 24–70 mm f/2.8E ED VR
‣ AF-S NIKKOR 70–200 mm f/2.8E FL ED VR
‣ AF-S NIKKOR 120–300 mm f/2.8E FL ED SR VR
‣ AF-S NIKKOR 180–400 mm f/4E TC1.4 FL ED VR
‣ AF-S NIKKOR 200–500 mm f/5.6E ED VR
‣ AF-S NIKKOR 500 mm f/4E FL ED VR
‣ AF-S NIKKOR 500 mm f/5.6E PF ED VR
‣ AF-S NIKKOR 600 mm f/4E FL ED VR
8

Basic Settings for Landscape Photography
l
l
Silent Photography: Choose “On”!
Choosing On for Silent photography in the photo shooting menu en-
ables the electronic shutter, helping
prevent blur caused by vibrations
from the mechanical shutter.
Silent Photography
Select O for Silent photography:
• during ash photography,
• when using long-exposure noise reduction or icker reduction, or
• if you notice distortion in photos of moving subjects.
In these cases, we recommend that you select Auto for Custom Setting d5 (Shutter type). The camera will automatically
switch between the front-curtain and electronic front-curtain
shutters according to shutter speed, helping prevent blur
caused by camera motion.
Low-Light AF: Choose “
When photographing sunsets, night
scenes, and other dimly-lit subjects
with AF‑S selected for focus mode,
choose On for Custom Setting a11
(Low-light AF) to help the camera
focus.
On”!
9

Basic Settings for Landscape Photography
l
l
Exposure Delay Mode: Choose “1s”!
Custom Setting d4 (Exposure delay
mode) is used to delay release of the
shutter for a set time after the shutter-release button is pressed. A delay of a second or more helps reduce
blur caused by the camera moving when you press the
shutter-release button. z appears in the display when
an option other than O is selected.
Monitor Mode: Choose “Monitor Only”!
To prevent the monitor turning o
should you accidentally trigger the
eye sensor with your face or hands
while composing photographs, use
the monitor mode button to select
“monitor only” mode.
“Prioritize Viewnder”
When “prioritize viewnder” is selected for monitor mode, the
camera behaves much like a traditional digital SLR: in photo mode, putting your eye to the viewnder turns it on and
displays the view through the lens, but the shooting display
does not appear in the monitor when you take your eye away.
Menus and pictures can still be displayed in the monitor using the G and K buttons. “Prioritize viewnder” mode is
recommended for current or former users of digital SLR cameras who prefer to frame hand-held shots in the viewnder.
10

Custom Controls for Landscape Photography
l
l
The following custom control settings are recommended
for landscape photography:
Fn1 button
w
Fn2 button
y
AF‑ON button
V
Center of sub-selector
8
Movie-record button
z
J
Roles can be assigned to the J
button via Custom Setting f3 (OK
button) and to other controls via
Custom Setting f2 (Custom control
assignment).
Preview
q
Hold the selected control to preview color, exposure, and
depth of eld while shooting landscapes.
t
Auto Bracketing
Bracketing settings can be adjusted by holding the selected control and rotating the command dials. The bracketing type can be chosen using Auto bracketing> Auto bracketing set in the photo shooting menu.
button
Shooting mode
Playback mode
Preview
q
t
Auto bracketing
AF-ON
A
K
Select center focus point
Framing grid display
b
Zoom on/o; zoom ratio 1:1 (100%)
p
Zoom on/o; zoom ratio 1:1 (100%)
p
11

Custom Controls for Landscape Photography
lll
l
K
Select Center Focus Point
If you typically use the sub-selector for focus-point selection, assigning this role to the center of the control lets you
use it to quickly choose the center focus point.
Framing Grid Display
b
Use the selected control to quickly view the framing grid
for landscape shots that keep verticals vertical and horizontals horizontal.
Shooting Mode> pZoom On/O
Use the J button to quickly zoom the display in on the
area around the current focus point and check focus before
shooting. You’ll nd this particularly useful for improved
focus when using manual focus in situations in which the
camera has diculty focusing using autofocus. To choose
the zoom ratio, select Custom Setting f3 (OK button)>
Shooting mode, highlight Zoom on/o, and press 2.
Playback Mode> pZoom On/O
Use the J button to quickly zoom in on the active focus
point during playback and check whether your photos are
in focus. To choose the zoom ratio, select Custom Setting
f3 (OK button)> Playback mode, highlight Zoom on/o,
and press 2.
12

Portraits
Learn basic techniques and helpful features that free you to concentrate on your subject during
portrait photography.
13
l
l
Basic Settings for Portrait Photography
The following settings are recommended for portrait photography:
Photo shooting menu
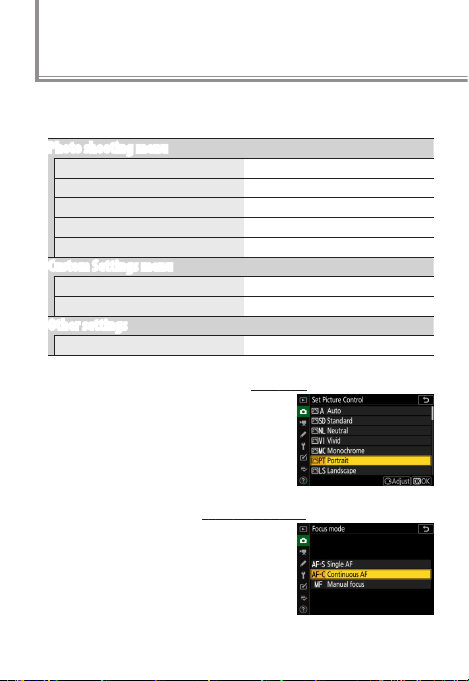
Set Picture Control Portrait
Focus mode Continuous AF
AF-area mode Auto-area AF
Vibration reduction Normal
Silent photography O
Custom Settings menu
a4 Auto-area AF face/eye detection Face and eye detection on
d5 Shutter type Auto
Other settings
Monitor mode Prioritize viewfinder
Set Picture Control: Choose “
Choose this option for portraits in
which your subject’s complexion
looks smooth and natural.
Focus Mode: Choose “Continuous AF” (AF -C)!
Choose AF ‑C for shots of mobile subjects. The camera adjusts focus continuously while the shutter-release
button is pressed halfway or the
AF‑ON button is pressed.
Portrait”!
14

AF-Area Mode: Choose “Auto-Area AF”!
l
In auto-area AF, the camera scans all
focus points in the frame and chooses the focus point automatically. If
Face and eye detection on is selected for Custom Setting a4 (Auto-area
AF face/eye detection) and the camera detects a portrait
subject, it will automatically position the focus point (indicated by an amber border) over the subject’s face, or if
the eyes are detected, over one or the other of their eyes,
letting you concentrate on composition and your subject’s
expression even when your subject is in motion. Note that
eye detection is available only from camera “C” rmware
version 2.00.
When Lighting Is Poor
When photographing dimly-lit subjects with AF‑S selected for focus
mode, choose On for Custom Setting
a11 (Low-light AF) to help the camera focus.
15
 Loading...