


DIGITAL CAMERA
Reference Manual
En
• Read this manual thoroughly before using the camera.
• To ensure proper use of the camera, be sure to read
“For Your Safety” (page xxxv).
• After reading this manual, keep it in a readily accessible
place for future reference.
When Your First Photo Can’t Wait
64
GB
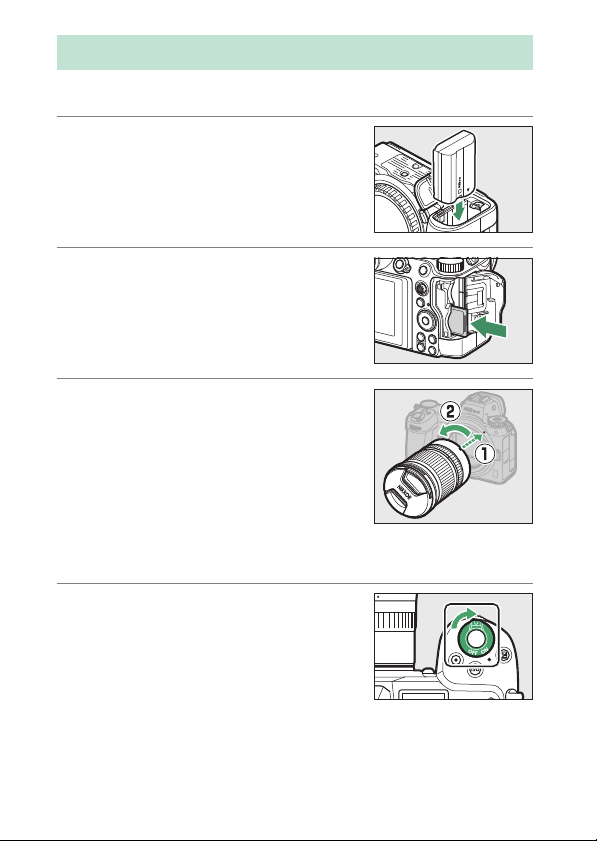
Getting Ready
❚❚
1
Insert the battery (043).
For information on charging the
battery, see “Charging the Battery”
(038).
2
Insert a memory card (045).
3
Attach a lens (050).
•
Align the white dot on the lens with
the white dot on the camera body
(q) and rotate the lens in the
w
direction shown (
•
A strap can be attached to the
camera. For more information, see
“Attaching the Strap” (037).
4
Turn the camera on and then
choose a language and set the
clock (052).
).
Z 7II Model Name: N1932
Z 6II Model Name: N1929
When Your First Photo Can’t Wait
ii
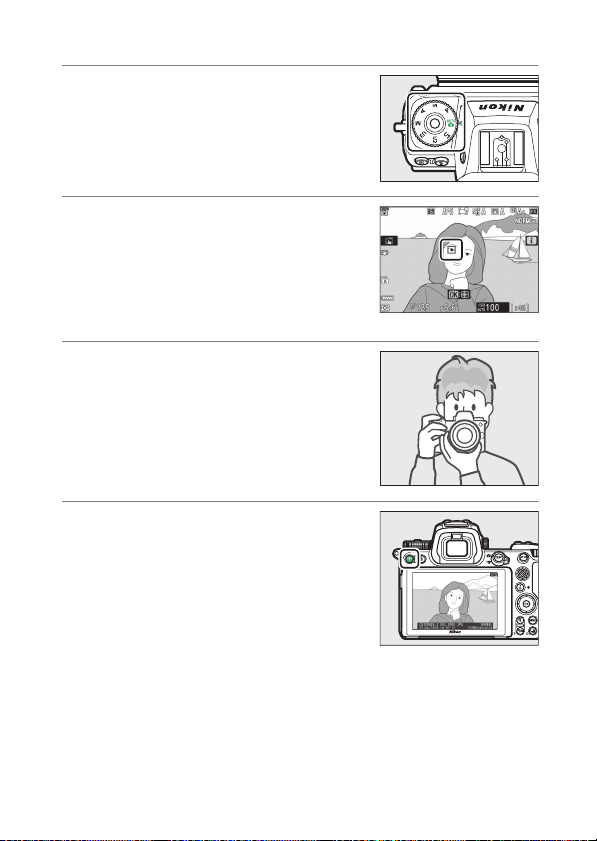
Take (056) and View (069) Pictures
❚❚
1
Rotate the mode dial to b.
2
To focus, press the shutterrelease button halfway (i.e,
lightly press the shutterrelease button, stopping when
it is pressed halfway).
3
Without lifting your finger
from the shutter-release
button, press the button the
rest of the way down to take
the picture.
4
View the picture.
When Your First Photo Can’t Wait
iii
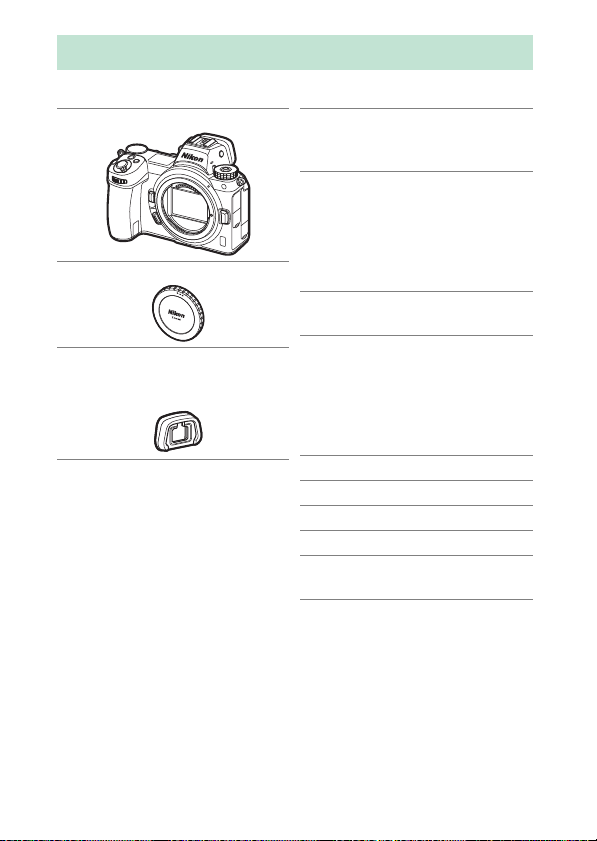
Package Contents
Be sure all items listed here were included with your camera.
Camera
❏
BF-N1 body cap
❏
DK-29 rubber eyecup
❏
(comes attached to
camera,
•
Memory cards are sold separately.
0
704)
EN-EL15c rechargeable
❏
Li-ion battery with terminal
cover
MH-25a battery charger
❏
(comes with either an AC
wall adapter or power
cable of a type and shape
that varies with the country
or region of sale)
HDMI/USB cable clip
❏
(
708)
0
EH-7P charging AC adapter
❏
(Z 7II only; supplied with a
plug adapter attached in
countries or regions where
required; shape depends
on country of sale—
AN-DC19 strap (037)
❏
Warranty
❏
User’s Manual
❏
UC-E24 USB cable (0599)
❏
BS-1 accessory shoe cover
❏
(0709)
0
40)
iv
Package Contents

The Nikon Download Center
D
Visit the Nikon download center to download firmware updates, ViewNX-i
and other Nikon software, and manuals for Nikon products including
cameras, NIKKOR lenses, and flash units.
https://downloadcenter.nikonimglib.com/
Package Contents
v

About This Manual
Symbols
❚❚
The following symbols and conventions are employed in this
manual. Use them to help locate the information you need.
This icon marks notes, information that should be read before
D
using this product.
This icon marks tips, additional information you may find
A
helpful when using this product.
This icon marks references to other sections in this manual.
0
Conventions
❚❚
•
This manual is for use with both the Z 7II and Z 6II. The
illustrations show the Z 6II.
•
This camera uses CFexpress (Type B), XQD, SD, SDHC, and
SDXC memory cards. Memory cards of all types are referred to
throughout this manual as “memory cards”. Where it is
necessary to distinguish between the different types, the
terms “CFexpress memory card”, “XQD memory card”, and “SD
memory card” may be used.
•
Throughout this manual, battery chargers are referred to as
“battery chargers” or “chargers”.
•
Throughout this manual, the display in camera monitor and
viewfinder during shooting is referred to as the “shooting
display”; in most cases, the illustrations show the monitor.
•
Throughout this manual, smartphones and tablets are referred
to as “smart devices”.
•
Throughout this manual, the term “default settings” is used to
refer to the settings in effect at shipment. The explanations in
this manual assume that default settings are used.
vi
About This Manual

For Your Safety
A
“For Your Safety” contains important safety instructions. Be sure to read
them before using the camera. For more information, see “For Your
Safety” (
0
xxxv).
About This Manual
vii

Table of Contents
When Your First Photo Can’t Wait ..................................................... ii
Package Contents................................................................................... iv
About This Manual ................................................................................. vi
Menu List ............................................................................................ xxviii
For Your Safety .................................................................................. xxxv
Notices........................................................................................................ xl
Getting to Know the Camera 1
Parts of the Camera................................................................................. 1
Camera Body ...................................................................... 1
The Control Panel ............................................................. 6
The Monitor ........................................................................ 7
The Viewfinder................................................................ 10
Camera Controls ................................................................................... 13
Viewfinder ........................................................................ 13
(Monitor Mode) Button ................................ 14
The
M
The Mode Dial................................................................. 15
The Command Dials...................................................... 16
The
The E (Exposure Compensation) Button.............. 18
Touch Controls ............................................................... 19
The DISP Button ............................................................. 25
The
The Sub-Selector............................................................ 27
The AF-ON Button ......................................................... 28
The
The i Button (the i Menu)......................................... 33
The Fn1 and Fn2 Buttons............................................ 35
Button .............................................................. 16
S
and W (Q) Buttons .......................................... 27
X
Button.............................................................. 28
G
viii
Table of Contents

First Steps 37
Attaching the Strap.............................................................................. 37
Charging the Battery ........................................................................... 38
The Battery Charger...................................................... 38
Charging AC Adapters ................................................. 40
Inserting the Battery............................................................................ 43
Removing the Battery .................................................. 43
Battery Level.................................................................... 44
Inserting Memory Cards..................................................................... 45
Removing Memory Cards ........................................... 46
Number of Exposures Remaining ............................ 47
Attaching a Lens ................................................................................... 50
Detaching Lenses........................................................... 51
Choose a Language and Set the Clock ......................................... 52
Basic Photography and Playback 56
Taking Photographs (b Mode) ....................................................... 56
Shooting Movies (b Mode) .............................................................. 63
Taking Photos in Movie Mode................................... 67
Playback ................................................................................................... 69
Viewing Photos............................................................... 69
Viewing Movies .............................................................. 70
Deleting Unwanted Pictures...................................... 72
Basic Settings 74
Focus ......................................................................................................... 74
Focus Mode...................................................................... 74
AF-Area Mode ................................................................. 77
The Touch Shutter......................................................... 88
Manual Focus .................................................................. 91
Table of Contents
ix

White Balance......................................................................................... 94
Adjusting White Balance ............................................. 94
Silent Photography............................................................................ 100
Rating Pictures .................................................................................... 102
Protecting Pictures from Deletion ............................................... 104
Shooting Controls 106
The Mode Dial ..................................................................................... 106
Using the Mode Dial................................................... 106
P (Programmed Auto)................................................ 107
S (Shutter-Priority Auto)............................................ 108
A (Aperture-Priority Auto)........................................ 108
M (Manual)..................................................................... 109
U1, U2, and U3 (User Settings Modes) ................. 115
The
The
The c/E (Release Mode/Self-Timer) Button .......................... 125
The Sub-Selector ................................................................................ 133
Button................................................................................... 118
S
Adjusting ISO Sensitivity........................................... 118
Auto ISO Sensitivity Control .................................... 120
(Exposure Compensation) Button .................................. 122
E
Adjusting Exposure Compensation...................... 122
Choosing a Release Mode ........................................ 125
The Self-Timer............................................................... 131
Focus-Point Selection ................................................ 133
Exposure Lock............................................................... 133
Focus Lock ..................................................................... 133
Locking Focus and Exposure................................... 134
x
Table of Contents

The i Menu 136
The i Menu........................................................................................... 136
Still Images............................................................................................ 138
Set Picture Control ...................................................... 139
White Balance ............................................................... 145
Image Quality................................................................ 152
Image Size ...................................................................... 154
Flash Mode..................................................................... 156
Metering.......................................................................... 157
Wi-Fi Connection ......................................................... 158
View Memory Card Info............................................. 159
Release Mode ................................................................ 160
Vibration Reduction.................................................... 161
AF-Area Mode ............................................................... 163
Focus Mode.................................................................... 164
Movies..................................................................................................... 165
Set Picture Control ...................................................... 167
White Balance ............................................................... 167
Frame Size and Rate/Image Quality...................... 168
Microphone Sensitivity.............................................. 174
Choose Image Area..................................................... 175
Metering.......................................................................... 177
Wi-Fi Connection ......................................................... 177
Destination..................................................................... 177
Electronic VR.................................................................. 178
Vibration Reduction.................................................... 179
AF-Area Mode ............................................................... 179
Focus Mode.................................................................... 179
Table of Contents
xi

Playback 180
Viewing Pictures ................................................................................. 180
Full-Frame Playback ................................................... 180
Thumbnail Playback................................................... 181
Photo Information ............................................................................. 183
File Information............................................................ 184
Exposure Data............................................................... 185
Highlight Display......................................................... 185
RGB Histogram ............................................................. 186
Shooting Data............................................................... 188
Location Data................................................................ 191
Overview......................................................................... 191
Button (Playback Mode)...................................................... 193
The
i
Photos.............................................................................. 193
Movies ............................................................................. 196
Movies (Playback Paused)........................................ 196
Playback Zoom.................................................................................... 204
Using Playback Zoom ................................................ 204
Deleting Pictures ................................................................................ 206
Using the Delete Button ........................................... 206
Deleting Multiple Pictures ....................................... 208
xii
Table of Contents

Menu Guide 212
Defaults .................................................................................................. 212
Playback Menu Defaults............................................ 212
Photo Shooting Menu Defaults.............................. 213
Movie Shooting Menu Defaults.............................. 217
Custom Settings Menu Defaults............................. 219
Setup Menu Defaults.................................................. 226
The Playback Menu: Managing Images................................ 232
D
Delete ...............................................................................................233
Playback Folder.............................................................................234
Playback Display Options..........................................................234
Dual-Format Recording PB Slot ..............................................235
Image Review ................................................................................235
After Delete ....................................................................................236
After Burst, Show..........................................................................237
Rotate Tall .......................................................................................237
Copy Image(s)................................................................................238
Copying Pictures.......................................................... 238
Slide Show ......................................................................................245
Viewing Slide Shows................................................... 246
Rating ...............................................................................................247
The Photo Shooting Menu: Shooting Options.................. 248
C
Reset Photo Shooting Menu....................................................249
Storage Folder............................................................................... 250
Renaming Folders........................................................ 250
Select Folder by Number .......................................... 252
Select Folder from List ............................................... 254
Table of Contents
xiii

File Naming.................................................................................... 256
Primary Slot Selection................................................................ 257
Secondary Slot Function........................................................... 258
Deleting Copies............................................................ 259
Choose Image Area..................................................................... 260
Image Quality................................................................................ 260
Image Size ...................................................................................... 261
NEF (RAW) Recording................................................................. 264
NEF (RAW) Compression........................................... 264
NEF (RAW) Bit Depth .................................................. 265
ISO Sensitivity Settings.............................................................. 265
White Balance ...............................................................................267
The White Balance Menu: Fine-Tuning ............... 267
The White Balance Menu: Choosing a Color
Temperature............................................................. 270
Preset Manual: Copying White Balance from a
Photograph............................................................... 272
Set Picture Control ...................................................................... 275
Modifying Picture Controls from the Menus..... 275
Manage Picture Control ............................................................278
Creating Custom Picture Controls ........................ 278
Color Space.................................................................................... 282
Active D-Lighting......................................................................... 283
Long Exposure NR ....................................................................... 285
High ISO NR ................................................................................... 286
Vignette Control .......................................................................... 287
Diffraction Compensation........................................................ 288
Auto Distortion Control............................................................. 288
xiv
Table of Contents

Flicker Reduction Shooting ......................................................289
Metering..........................................................................................290
Flash Control.................................................................................. 291
Flash Control Mode..................................................... 292
Wireless Flash Options............................................... 293
Remote Flash Control................................................. 294
Radio Remote Flash Info............................................ 294
Flash Mode ..................................................................................... 295
Flash Compensation ...................................................................295
Focus Mode....................................................................................295
AF-Area Mode................................................................................296
Vibration Reduction ....................................................................296
Auto Bracketing............................................................................297
Exposure and Flash Bracketing............................... 298
White Balance Bracketing......................................... 303
ADL Bracketing ............................................................. 306
Multiple Exposure........................................................................309
Creating a Multiple Exposure .................................. 312
HDR (High Dynamic Range) .....................................................319
Taking HDR Photographs ......................................... 321
Interval Timer Shooting.............................................................326
Interval-Timer Photography .................................... 329
Time-Lapse Movie........................................................................ 340
Recording Time-Lapse Movies................................ 342
Focus Shift Shooting...................................................................352
Focus Shift Photography........................................... 354
Silent Photography .....................................................................362
Table of Contents
xv

The Movie Shooting Menu: Movie Shooting Options..... 363
1
Reset Movie Shooting Menu ...................................................364
File Naming.................................................................................... 364
Destination .................................................................................... 364
Choose Image Area..................................................................... 365
Frame Size/Frame Rate.............................................................. 365
Movie Quality................................................................................ 365
Movie File Type ............................................................................ 365
ISO Sensitivity Settings.............................................................. 366
White Balance ...............................................................................367
Set Picture Control ...................................................................... 367
Manage Picture Control ............................................................367
Active D-Lighting......................................................................... 368
High ISO NR ................................................................................... 368
Vignette Control .......................................................................... 369
Diffraction Compensation........................................................ 369
Auto Distortion Control............................................................. 369
Flicker Reduction ......................................................................... 370
Metering ......................................................................................... 371
Focus Mode ................................................................................... 371
AF-Area Mode ............................................................................... 371
Vibration Reduction.................................................................... 371
Electronic VR.................................................................................. 372
Microphone Sensitivity.............................................................. 372
Attenuator...................................................................................... 373
Frequency Response ..................................................................373
Wind Noise Reduction ...............................................................374
Headphone Volume ................................................................... 374
Timecode........................................................................................ 375
xvi
Table of Contents

Custom Settings: Fine-Tuning Camera Settings................ 377
A
Reset Custom Settings ...............................................................381
a: Autofocus .................................................................................. 381
a1: AF-C Priority Selection .................................................381
a2: AF-S Priority Selection..................................................382
a3: Focus Tracking with Lock-On....................................382
a4: Focus Points Used .........................................................383
a5: Store Points by Orientation .......................................384
a6: AF Activation...................................................................386
Out-of-Focus Release ................................................. 386
a7: Limit AF-Area Mode Selection ..................................387
a8: Focus Point Wrap-Around..........................................387
a9: Focus Point Options .....................................................388
Manual Focus Mode.................................................... 388
Dynamic-Area AF Assist............................................. 388
a10: Low-Light AF.................................................................389
a11: Built-in AF-Assist Illuminator...................................390
a12: Manual Focus Ring in AF Mode..............................391
b: Metering/Exposure................................................................ 392
b1: EV Steps for Exposure Cntrl ....................................... 392
b2: Easy Exposure Compensation ..................................392
b3: Center-Weighted Area ................................................393
b4: Fine-Tune Optimal Exposure ....................................393
Table of Contents
xvii

c: Timers/AE Lock........................................................................ 394
c1: Shutter-Release Button AE-L..................................... 394
c2: Self-Timer ......................................................................... 394
c3: Power Off Delay .............................................................395
d: Shooting/Display ................................................................... 396
d1: CL Mode Shooting Speed.......................................... 396
d2: Max. Continuous Release........................................... 396
d3: Sync. Release Mode Options .................................... 397
d4: Exposure Delay Mode ................................................. 397
d5: Shutter Type ................................................................... 398
d6: Extended Shutter Speeds (M)................................... 399
d7: Limit Selectable Image Area..................................... 399
d8: File Number Sequence ............................................... 400
d9: Apply Settings to Live View ...................................... 402
d10: Framing Grid Display ................................................402
d11: Focus Peaking.............................................................. 403
Peaking Level................................................................ 403
Peaking Highlight Color............................................ 403
d12: View All in Continuous Mode ................................ 403
e: Bracketing/Flash..................................................................... 404
e1: Flash Sync Speed........................................................... 404
e2: Flash Shutter Speed .....................................................406
e3: Exposure Comp. for Flash ..........................................406
e4: Auto
e5: Modeling Flash............................................................... 407
e6: Auto Bracketing (Mode M)......................................... 408
e7: Bracketing Order ...........................................................409
ISO Sensitivity Control.................................. 407
c
xviii
Table of Contents

f: Controls....................................................................................... 410
f1: Customize
View Memory Card Info............................................. 411
Split-Screen Display Zoom ....................................... 412
Bluetooth Connection................................................ 413
MB-N11 Info................................................................... 413
f2: Custom Controls .............................................................414
f3: OK Button..........................................................................427
Shooting Mode............................................................. 427
Playback Mode.............................................................. 428
f4: Shutter Spd & Aperture Lock......................................429
f5: Customize Command Dials ........................................430
Reverse Rotation .......................................................... 430
Change Main/Sub........................................................ 431
Menus and Playback................................................... 432
Sub-Dial Frame Advance........................................... 433
f6: Release Button to Use Dial ..........................................434
f7: Reverse Indicators ..........................................................436
f8: Reverse Ring for Focus..................................................436
f9: Assign MB-N11 Buttons................................................437
Same as Camera AF-ON Button.............................. 439
Same as Camera Multi Selector .............................. 439
Menu.......................................................410
i
Table of Contents
xix

g: Movie.......................................................................................... 440
g1: Customize
g2: Custom Controls ...........................................................441
g3: OK Button ........................................................................448
g4: AF Speed.......................................................................... 449
g5: AF Tracking Sensitivity................................................ 449
g6: Highlight Display ..........................................................450
Display Pattern ............................................................. 450
Highlight Display Threshold.................................... 450
g7: Assign MB-N11 Buttons.............................................. 451
Same as Camera AF-ON Button.............................. 452
The Setup Menu: Camera Setup ............................................... 453
B
Format Memory Card................................................................. 455
Save User Settings....................................................................... 455
Reset User Settings ..................................................................... 455
Language........................................................................................ 456
Time Zone and Date................................................................... 456
Monitor Brightness ..................................................................... 457
Monitor Color Balance ............................................................... 458
Viewfinder Brightness................................................................ 459
Viewfinder Color Balance.......................................................... 460
Control Panel Brightness .......................................................... 460
Limit Monitor Mode Selection ................................................ 461
Information Display ....................................................................461
AF Fine-Tuning Options ............................................................ 462
Creating and Saving Fine-Tuning Values ........... 464
Choosing a Default Fine-Tuning Value................ 465
Menu .....................................................440
i
xx
Table of Contents

Non-CPU Lens Data.....................................................................466
Save Focus Position..................................................................... 466
Clean Image Sensor.....................................................................467
Image Dust Off Ref Photo .........................................................468
Acquiring Image Dust Off Reference Data ......... 468
Pixel Mapping................................................................................471
Image Comment ..........................................................................473
Input Comment............................................................ 473
Attach Comment.......................................................... 473
Copyright Information ...............................................................474
Artist/Copyright ........................................................... 474
Attach Copyright Information................................. 474
Beep Options.................................................................................476
Beep On/Off................................................................... 476
Volume ............................................................................ 477
Pitch.................................................................................. 477
Touch Controls.............................................................................. 477
Enable/Disable Touch Controls .............................. 477
Full-Frame Playback Flicks........................................ 477
HDMI.................................................................................................478
Location Data ................................................................................478
Wireless Remote (WR) Options ...............................................479
LED Lamp........................................................................ 479
Link Mode....................................................................... 480
Assign Remote (WR) Fn Button...............................................482
Airplane Mode...............................................................................482
Table of Contents
xxi

Connect to Smart Device.......................................................... 483
Pairing (Bluetooth)...................................................... 483
Select to Send (Bluetooth) ....................................... 484
Wi-Fi Connection......................................................... 484
Send While Off.............................................................. 485
Location Data (Smart Device) ................................. 485
Connect to PC ...............................................................................486
Wi-Fi Connection......................................................... 486
Network Settings......................................................... 486
Options............................................................................ 488
MAC Address................................................................. 489
Wireless Transmitter (WT-7)..................................................... 490
Wireless Transmitter................................................... 490
Conformity Marking ................................................................... 490
Battery Info .................................................................................... 491
USB Power Delivery .................................................................... 492
Energy Saving (Photo Mode)................................................... 494
Slot Empty Release Lock ........................................................... 495
Save/Load Menu Settings......................................................... 496
Save Menu Settings.................................................... 500
Load Menu Settings ................................................... 500
Reset All Settings .........................................................................501
Firmware Version......................................................................... 501
The Retouch Menu: Creating Retouched Copies.............. 502
N
Creating Retouched Copies..................................... 503
NEF (RAW) Processing: Converting NEF (RAW) to
JPEG ............................................................................................. 506
Trim................................................................................................... 511
xxii
Table of Contents

Resize................................................................................................ 512
Resizing Multiple Images.......................................... 512
D-Lighting.......................................................................................517
Red-Eye Correction...................................................................... 518
Straighten .......................................................................................519
Distortion Control........................................................................520
Perspective Control.....................................................................521
Monochrome.................................................................................522
Image Overlay ...............................................................................523
Add.................................................................................... 523
Lighten and Darken .................................................... 528
Trim Movie...................................................................................... 532
My Menu/m Recent Settings.................................................... 533
O
My Menu: Creating a Custom Menu................ 533
O
Recent Settings: Accessing
m
Recently-Used Settings ......................................... 538
Establishing Wireless Connections to Computers
or Smart Devices 539
Camera and Network System Chart............................................. 539
Connecting to Computers via Wi-Fi............................................. 541
What Wi-Fi Can Do for You....................................... 541
The Wireless Transmitter Utility.............................. 541
Infrastructure and Access-Point Modes............... 542
Connecting in Access-Point Mode ........................ 544
Connecting in Infrastructure Mode....................... 550
Uploading Pictures...................................................... 559
Disconnecting and Reconnecting ......................... 563
Table of Contents
xxiii

Connecting to Smart Devices ........................................................ 565
The SnapBridge App .................................................. 565
What SnapBridge Can Do for You ......................... 566
Wireless Connections................................................. 567
Connecting via Wi-Fi (Wi-Fi Mode) ....................... 568
Connecting via Bluetooth ........................................ 577
Connecting to Networks Using the WT-7.................................. 594
The WT-7......................................................................... 594
What the WT-7 Can Do for You .............................. 595
Connecting Using the WT-7 .................................... 597
Troubleshooting................................................................................. 598
Cabled Connections to Computers and HDMI
Devices 599
Connecting to Computers Via USB.............................................. 599
Installing ViewNX-i...................................................... 600
Copying Pictures to a Computer Using
ViewNX-i..................................................................... 601
Connecting to HDMI Devices......................................................... 604
TVs..................................................................................... 605
Recorders........................................................................ 606
On-Camera Flash Photography 611
“On-Camera” Versus “Remote”...................................................... 611
Camera-Mounted Flash Units ................................. 611
Remote Flash Photography..................................... 612
Using an On-Camera Flash ............................................................. 613
Flash Control Mode ........................................................................... 616
Flash Modes ......................................................................................... 619
xxiv
Table of Contents

Flash Compensation.......................................................................... 622
FV Lock ................................................................................................... 623
Flash Info for On-Camera Units ..................................................... 626
Flash Control Mode Displays ................................... 626
Remote Flash Photography 629
What Is Remote Flash Photography?........................................... 629
Using Remote Flash Units......................................... 630
Radio AWL ............................................................................................. 631
Establishing a Wireless Connection ...................... 631
Remote Flash Photography ..................................... 636
Adding a Shoe-Mounted Flash Unit...................... 644
Optical AWL .......................................................................................... 645
Using Optical AWL with the SB-5000 or
SB-500.......................................................................... 646
Optical/Radio AWL............................................................................. 656
Flash Info for Remote Units............................................................. 657
Flash Control Mode Displays ................................... 657
Troubleshooting 660
Before Contacting Customer Support ........................................ 660
Problems and Solutions ................................................................... 662
Battery/Display ............................................................. 662
Shooting.......................................................................... 663
Playback .......................................................................... 669
Bluetooth and Wi-Fi (Wireless Networks)............ 671
Miscellaneous................................................................ 672
Table of Contents
xxv

Alerts and Error Messages............................................................... 673
Alerts................................................................................ 673
Error Messages ............................................................. 676
Technical Notes 680
Compatible Lenses and Accessories ........................................... 680
The Camera Display and Control Panel...................................... 681
The Monitor................................................................... 681
The Viewfinder ............................................................. 688
The Control Panel........................................................ 692
Compatible Flash Units.................................................................... 693
The Nikon Creative Lighting System (CLS)......... 693
Other Compatible Accessories...................................................... 701
Optional MB-N11 Power Battery Packs ............... 710
Attaching a Power Connector and
AC Adapter................................................................ 733
Software................................................................................................. 735
Caring for the Camera ...................................................................... 737
Storage............................................................................ 737
Cleaning.......................................................................... 738
Image Sensor Cleaning ............................................. 739
Manual Cleaning.......................................................... 741
Caring for the Camera and Battery: Cautions .......................... 743
Camera Care.................................................................. 743
Battery Care................................................................... 747
Using the Charger ....................................................... 750
Using the Charging AC Adapter............................. 750
xxvi
Table of Contents

Specifications....................................................................................... 751
Nikon Z 7II/Z 6II Digital Camera.............................. 751
Approved Memory Cards................................................................. 770
Portable Chargers (Power Banks) ................................................. 771
Memory Card Capacity ..................................................................... 773
Battery Endurance.............................................................................. 777
AF-Assist Illumination ....................................................................... 780
Trademarks and Licenses................................................................. 781
Notices.................................................................................................... 785
Bluetooth and Wi-Fi (Wireless LAN) ............................................. 788
Kit Lens Manual 794
NIKKOR Z 24–70mm f/4 S Lens Manual...................................... 794
Using the Lens .............................................................. 794
Precautions for Use ..................................................... 799
Lens Care......................................................................... 800
Accessories..................................................................... 801
Specifications ................................................................ 802
Index 803
Table of Contents
xxvii

Menu List
The camera offers the following menus. For a more complete
description of individual menu items, refer to the “Menu Guide”
chapter in the Online Manual.
PLAYBACK MENU
Delete
Playback folder
Playback display options
Dual-format recording PB slot
Image review
After delete
After burst, show
Rotate tall
Copy image(s)
Slide show
Rating
PHOTO SHOOTING MENU
Reset photo shooting menu
Storage folder
File naming
Primary slot selection
Secondary slot function
Choose image area
Image quality
Image size
NEF (RAW) recording
ISO sensitivity settings
White balance
Set Picture Control
Manage Picture Control
Color space
Active D-Lighting
Long exposure NR
High ISO NR
Vignette control
xxviii
Menu List

PHOTO SHOOTING MENU MOVIE SHOOTING MENU
Diffraction compensation
Auto distortion control
Flicker reduction shooting
Metering
Flash control
Flash mode
Flash compensation
Focus mode
AF-area mode
Vibration reduction
Auto bracketing
Multiple exposure
HDR (high dynamic range)
Interval timer shooting
Time-lapse movie
Focus shift shooting
Silent photography
Reset movie shooting menu
File naming
Destination
Choose image area
Frame size/frame rate
Movie quality
Movie file type
ISO sensitivity settings
White balance
Set Picture Control
Manage Picture Control
Active D-Lighting
High ISO NR
Vignette control
Diffraction compensation
Auto distortion control
Flicker reduction
Menu List
xxix

MOVIE SHOOTING MENU CUSTOM SETTING MENU
Metering
Focus mode
AF-area mode
Vibration reduction
Electronic VR
Microphone sensitivity
Attenuator
Frequency response
Wind noise reduction
Headphone volume
Timecode
Reset custom settings
a Autofocus
a1 AF-C priority selection
a2 AF-S priority selection
a3 Focus tracking with lock-on
a4 Focus points used
a5 Store points by orientation
a6 AF activation
Limit AF-area mode
a7
selection
a8 Focus point wrap-around
a9 Focus point options
a10 Low-light AF
Built-in AF-assist
a11
illuminator
Manual focus ring in AF
a12
mode
xxx
Menu List

CUSTOM SETTING MENU
b Metering/exposure
b1 EV steps for exposure cntrl
Easy exposure
b2
compensation
b3 Center-weighted area
Fine-tune optimal
b4
exposure
c Timers/AE lock
Shutter-release button
c1
AE-L
c2 Self-timer
c3 Power off delay
CUSTOM SETTING MENU
d Shooting/display
d1 CL mode shooting speed
d2 Max. continuous release
d3 Sync. release mode options
d4 Exposure delay mode
d5 Shutter type
Extended shutter speeds
d6
(M)
d7 Limit selectable image area
d8 File number sequence
d9 Apply settings to live view
d10 Framing grid display
d11 Focus peaking
View all in continuous
d12
mode
Menu List
xxxi

CUSTOM SETTING MENU
e Bracketing/flash
e1 Flash sync speed
e2 Flash shutter speed
e3 Exposure comp. for flash
Auto
ISO sensitivity
e4
e5 Modeling flash
e6 Auto bracketing (mode M)
e7 Bracketing order
c
control
CUSTOM SETTING MENU
f Controls
f1 Customize
f2 Custom controls
f3 OK button
f4 Shutter spd & aperture lock
f5 Customize command dials
f6 Release button to use dial
f7 Reverse indicators
f8 Reverse ring for focus
f9 Assign MB-N11 buttons
g Movie
g1 Customize
g2 Custom controls
g3 OK button
g4 AF speed
g5 AF tracking sensitivity
g6 Highlight display
g7 Assign MB-N11 buttons
i
i
menu
menu
xxxii
Menu List

SETUP MENU
Format memory card
Save user settings
Reset user settings
Language
Time zone and date
Monitor brightness
Monitor color balance
Viewfinder brightness
Viewfinder color balance
Control panel brightness
Limit monitor mode selection
Information display
AF fine-tuning options
Non-CPU lens data
Save focus position
Clean image sensor
Image Dust Off ref photo
Pixel mapping
Image comment
Copyright information
SETUP MENU
Beep options
Touch controls
HDMI
Location data
Wireless remote (WR) options
Assign remote (WR) Fn button
Airplane mode
Connect to smart device
Connect to PC
Wireless transmitter (WT-7)
Conformity marking
Battery info
USB power delivery
Energy saving (photo mode)
Slot empty release lock
Save/load menu settings
Reset all settings
Firmware version
Menu List
xxxiii

RETOUCH MENU
NEF (RAW) processing
Trim
Resize
D-Lighting
Red-eye correction
Straighten
Distortion control
Perspective control
Monochrome
Image overlay
Trim movie
MY MENU
Add items
Remove items
Rank items
Choose tab
xxxiv
Menu List

For Your Safety
To prevent damage to property or injury to yourself or to others, read “For
Your Safety” in its entirety before using this product.
Keep these safety instructions where all those who use this product will
read them.
DANGER: Failure to observe the precautions marked with this icon
A
carries a high risk of death or severe injury.
WARNING: Failure to observe the precautions marked with this icon
A
could result in death or severe injury.
CAUTION: Failure to observe the precautions marked with this icon
A
could result in injury or property damage.
WARNING
A
Do not use while walking or operating a vehicle.
Failure to observe this precaution could result in accidents or other
injury.
Do not disassemble or modify this product. Do not touch internal
parts that become exposed as the result of a fall or other accident.
Failure to observe these precautions could result in electric shock or
other injury.
Should you notice any abnormalities such as the product producing
smoke, heat, or unusual odors, immediately disconnect the battery
or power source.
Continued operation could result in fire, burns or other injury.
Keep dry. Do not handle with wet hands. Do not handle the plug
with wet hands.
Failure to observe these precautions could result in fire or electric shock.
For Your Safety
xxxv

Do not let your skin remain in prolonged contact with this product
while it is on or plugged in.
Failure to observe this precaution could result in low-temperature burns.
Do not use this product in the presence of flammable dust or gas
such as propane, gasoline or aerosols.
Failure to observe this precaution could result in explosion or fire.
Do not directly view the sun or other bright light source through the
lens.
Failure to observe this precaution could result in visual impairment.
Do not aim the flash or AF-assist illuminator at the operator of a
motor vehicle.
Failure to observe this precaution could result in accidents.
Keep this product out of reach of children.
Failure to observe this precaution could result in injury or product
malfunction. In addition, note that small parts constitute a choking
hazard. Should a child swallow any part of this product, seek immediate
medical attention.
Do not entangle, wrap or twist the straps around your neck.
Failure to observe this precaution could result in accidents.
Do not use batteries, chargers, or AC adapters not specifically
designated for use with this product. When using batteries,
chargers, and AC adapters designated for use with this product, do
not:
•
Damage, modify, forcibly tug or bend the cords or cables, place
them under heavy objects, or expose them to heat or flame.
•
Use travel converters or adapters designed to convert from one
voltage to another or with DC-to-AC inverters.
Failure to observe these precautions could result in fire or electric shock.
xxxvi
For Your Safety

Do not handle the plug when charging the product or using the AC
adapter during thunderstorms.
Failure to observe this precaution could result in electric shock.
Do not handle with bare hands in locations exposed to extremely
high or low temperatures.
Failure to observe this precaution could result in burns, or frostbite.
CAUTION
A
Do not leave the lens pointed at the sun or other strong light
sources.
Light focused by the lens could cause fire or damage to product’s
internal parts. When shooting backlit subjects, keep the sun well out of
the frame. Sunlight focused into the camera when the sun is close to the
frame could cause fire.
Turn this product off when its use is prohibited. Disable wireless
features when the use of wireless equipment is prohibited.
The radio-frequency emissions produced by this product could interfere
with equipment onboard aircraft or in hospitals or other medical
facilities.
Remove the battery and disconnect the AC adapter if this product
will not be used for an extended period.
Failure to observe this precaution could result in fire or product
malfunction.
Do not fire the flash in contact with or in close proximity to the skin
or objects.
Failure to observe this precaution could result in burns or fire.
For Your Safety
xxxvii

Do not leave the product where it will be exposed to extremely high
temperatures, for an extended period such as in an enclosed
automobile or in direct sunlight.
Failure to observe this precaution could result in fire or product
malfunction.
Do not look directly at the AF-assist illuminator.
Failure to observe this precaution could have adverse effects on vision.
Do not transport cameras or lenses with tripods or similar
accessories attached.
Failure to observe this precaution could result in injury or product
malfunction.
Do not touch the memory card when a high-temperature
warning is displayed in the monitor or viewfinder.
The memory card will be hot, potentially causing burns or
causing the card to be dropped and damaged when
removed.
DANGER (Batteries)
A
Do not mishandle batteries.
Failure to observe the following precautions could result in the batteries
leaking, overheating, rupturing, or catching fire:
•
Use only rechargeable batteries approved for use in this product.
•
Do not expose batteries to flame or excessive heat.
•
Do not disassemble.
•
Do not short-circuit the terminals by touching them to necklaces,
hairpins, or other metal objects.
•
Do not expose batteries or the products in which they are inserted to
powerful physical shocks.
•
Do not step on batteries, pierce them with nails, or strike them with
hammers.
Charge only as indicated.
Failure to observe this precaution could result in the batteries leaking,
overheating, rupturing, or catching fire.
xxxviii
For Your Safety

If battery liquid comes into contact with the eyes, rinse with plenty
of clean water and seek immediate medical attention.
Delaying action could result in eye injuries.
Follow the instructions of airline personnel.
Batteries left unattended at high altitudes in an unpressurized
environment may leak, overheat, rupture, or catch fire.
WARNING (Batteries)
A
Keep batteries out of reach of children.
Should a child swallow a battery, seek immediate medical attention.
Keep batteries out of reach of household pets and other animals.
The batteries could leak, overheat, rupture, or catch fire if bitten,
chewed, or otherwise damaged by animals.
Do not immerse batteries in water or expose to rain.
Failure to observe this precaution could result in fire or product
malfunction. Immediately dry the product with a towel or similar object
should it become wet.
Discontinue use immediately should you notice any changes in the
batteries, such as discoloration or deformation. Cease charging
EN-EL15c rechargeable batteries if they do not charge in the
specified period of time.
Failure to observe these precautions could result in the batteries leaking,
overheating, rupturing, or catching fire.
When batteries are no longer needed, insulate the terminals with
tape.
Overheating, rupture, or fire may result should metal objects come into
contact with the terminals.
If battery liquid comes into contact with a person's skin or clothing,
immediately rinse the affected area with plenty of clean water.
Failure to observe this precaution could result in skin irritation.
For Your Safety
xxxix

Notices
•
No part of the manuals included with this product may be reproduced,
transmitted, transcribed, stored in a retrieval system, or translated into
any language in any form, by any means, without Nikon’s prior written
permission.
•
Nikon reserves the right to change the appearance and specifications of
the hardware and software described in these manuals at any time and
without prior notice.
•
Nikon will not be held liable for any damages resulting from the use of
this product.
•
While every effort has been made to ensure that the information in
these manuals is accurate and complete, we would appreciate it were
you to bring any errors or omissions to the attention of the Nikon
representative in your area (address provided separately).
●
Notice Concerning Prohibition of Copying or Reproduction
Note that simply being in possession of material that has been digitally
copied or reproduced by means of a scanner, digital camera, or other
device may be punishable by law.
•
Items prohibited by law from being copied or reproduced
Do not copy or reproduce paper money, coins, securities, government
bonds, or local government bonds, even if such copies or reproductions
are stamped “Sample”.
The copying or reproduction of paper money, coins, or securities which
are circulated in a foreign country is prohibited.
Unless the prior permission of the government has been obtained, the
copying or reproduction of unused postage stamps or post cards issued
by the government is prohibited.
The copying or reproduction of stamps issued by the government and
of certified documents stipulated by law is prohibited.
Notices
xl

•
Cautions on certain copies and reproductions
The government has issued cautions on copies or reproductions of
securities issued by private companies (shares, bills, checks, gift
certificates, etc.), commuter passes, or coupon tickets, except when a
minimum of necessary copies are to be provided for business use by a
company. Also, do not copy or reproduce passports issued by the
government, licenses issued by public agencies and private groups, ID
cards, and tickets, such as passes and meal coupons.
•
Comply with copyright notices
Under copyright law, photographs or recordings of copyrighted works
made with the camera cannot be used without the permission of the
copyright holder. Exceptions apply to personal use, but note that even
personal use may be restricted in the case of photographs or recordings
of exhibits or live performances.
●
Use Only Nikon Brand Electronic Accessories
Nikon cameras are designed to the highest standards and include
complex electronic circuitry. Only Nikon brand electronic accessories
(including lenses, chargers, batteries, AC adapters, and flash accessories)
certified by Nikon specifically for use with this Nikon digital camera are
engineered and proven to operate within the operational and safety
requirements of this electronic circuitry.
The use of non-Nikon electronic accessories could damage
the camera and may void your Nikon warranty. The use of
third-party rechargeable Li-ion batteries not bearing the
Nikon holographic seal shown at right could interfere with normal
operation of the camera or result in the batteries overheating, igniting,
rupturing, or leaking.
For more information about Nikon brand accessories, contact a local
authorized Nikon dealer.
Notices
xli

Before Taking Important Pictures
D
Before taking pictures on important occasions (such as at weddings or
before taking the camera on a trip), take a test shot to ensure that the
camera is functioning normally. Nikon will not be held liable for damages
or lost profits that may result from product malfunction.
Life-Long Learning
D
As part of Nikon’s “Life-Long Learning” commitment to ongoing product
support and education, continually-updated information is available
on-line at the following sites:
•
For users in the U.S.A.: https://www.nikonusa.com/
•
For users in Europe: https://www.europe-nikon.com/support/
•
For users in Asia, Oceania, the Middle East, and Africa:
https://www.nikon-asia.com/
Visit these sites to keep up-to-date with the latest product information,
tips, answers to frequently-asked questions (FAQs), and general advice on
digital imaging and photography. Additional information may be
available from the Nikon representative in your area. See the following
URL for contact information: https://imaging.nikon.com/
xlii
Notices

Getting to Know the Camera
Parts of the Camera
Camera Body
5
21
Mode dial (015, 106)
1
Mode dial lock release (015,
2
106)
Stereo microphone (063)
3
Movie-record button (063)
4
Power switch (052, 56)
5
Shutter-release button (056)
6
button (018, 122)
E
7
3
4
1491312
button (016, 118)
S
8
Eyelet for camera strap (037)
9
(focal plane mark; 093)
E
10
Main command dial (016)
11
Speaker (071)
12
Control panel (06, 692)
13
Accessory shoe (for optional
14
flash unit;
613, 693)
0
6
7
8
9
10
11
Parts of the Camera
1

123
13
6
4
5
9
8
10
11
7
12
Image sensor (0739)
1
button (014, 461)
M
2
AF-assist illuminator (060,
3
390)
Red-eye reduction lamp
156, 619)
(
0
Self-timer lamp (
Cover for accessory terminal
4
and USB and HDMI connectors
Cover for headphone and
5
microphone connectors
131)
0
Lens mounting mark (050)
6
Headphone connector
7
374)
(
0
Charge lamp (040)
8
USB connector (0492, 599)
9
HDMI connector (0604)
10
Accessory terminal
11
Connector for external
12
microphone (
Body cap (050)
13
706)
0
2
Parts of the Camera

14 13 1112
7
6
5
8
9
10
20
15
19
17
18
16
2134
Diopter adjustment control
1
(
13)
0
DISP button (025)
2
Photo/movie selector (056,
3
63)
AF-ON button (028)
4
Sub-selector (027, 133)
5
button (033, 136)
i
6
Memory card slot cover (045)
7
Memory card access lamp
8
(
61, 65)
0
button (029)
J
9
Multi selector (029)
10
G
11
c (E
12
W (Q
13
204)
X
14
Monitor (019, 88)
15
O
16
K
17
Rubber eyecup (0704)
18
Viewfinder (013)
19
Eye sensor (013)
20
button (028, 212)
) button (0125, 131)
) button (027, 32, 181,
button (027, 91, 181, 204)
button (072, 206)
button (069, 180)
Parts of the Camera
3

6
7
9
8
3
5
4
10
1
2
Lens mount (050, 93)
1
Lens release button (051)
2
CPU contacts
3
Tripod socket
4
Power connector cover
5
(
733)
0
Battery-chamber cover
6
Battery-chamber cover latch
7
Fn2 button (035, 74)
8
Fn1 button (035, 94)
9
Sub-command dial (016)
10
Parts of the Camera
4

Do Not Touch the Image Sensor
D
Under no circumstances should you exert pressure on the image sensor,
poke it with cleaning tools, or subject it to powerful air currents from a
blower. These actions could scratch or otherwise damage the sensor. For
information on cleaning the image sensor, see “Image Sensor Cleaning”
(0739).
Notes on the Monitor
D
The angle of the monitor can be adjusted.
Product Serial Number
D
The serial number for this product can be
found by opening the monitor.
Parts of the Camera
5

The Control Panel
The control panel lights when the camera is on. At default
settings, the following indicators are displayed. For a full list of
the indicators that appear in the control panel, see “The Camera
Display and Control Panel” (
7
65
Shutter speed (0108, 109)
1
Aperture (0108, 109)
2
Battery indicator (044)
3
“k” (appears when memory
4
remains for over 1000
exposures; 047)
681) in “Technical Notes”.
0
12
3
4
Number of exposures
5
remaining (
Release mode (0125)
6
ISO sensitivity (0118)
7
0
47, 773)
6
Parts of the Camera

The Monitor
At default settings, the following indicators appear in the
monitor. For a full list of indicators, see “The Camera Display and
Control Panel” (0681) in “Technical Notes”.
Photo Mode
❚❚
2
43 5 6 7 8 9 10
1
11
12
AF-area brackets (077)
1
Shooting mode (0106)
2
Focus point (077)
3
Release mode (0125)
4
Focus mode (074)
5
AF-area mode (077)
6
Active D-Lighting (0283)
7
Picture Control (0139, 275)
8
White balance (094, 145, 267)
9
Image area (0260)
10
Image size (0154)
11
Image quality (0152)
12
Parts of the Camera
7

4
3
12
57
6
10 9
8
14
15
13
11
2
1
icon (0136)
i
1
Exposure indicator
2
Exposure (
Exposure compensation
(0122)
“k” (appears when memory
3
remains for over 1000
exposures; 047)
Number of exposures
4
remaining (
ISO sensitivity (0118)
5
ISO sensitivity indicator
6
(
118)
0
Auto ISO sensitivity indicator
(0120)
0
0
110)
47, 773)
Aperture (0108, 109)
7
Shutter speed (0108, 109)
8
Subject-tracking AF (086)
9
Metering (0157)
10
Battery indicator (044)
11
Shutter type (0398)
12
“Clock not set” indicator
13
(
55)
0
Vibration reduction indicator
14
(
161)
0
Touch shooting (088)
15
8
Parts of the Camera

Movie Mode
❚❚
9
8
7
Recording indicator (063)
1
“No movie” indicator (
Destination (0177)
2
Frame size and rate/image
3
quality (
Image area (0175)
4
Time remaining (063)
5
168)
0
1 3 42
65)
0
5
6
Release mode (still
6
photography;
Sound level (0174)
7
Microphone sensitivity
8
(
174)
0
Frequency response (0373)
9
130)
0
Parts of the Camera
9

The Viewfinder
At default settings, the following indicators appear in the
viewfinder. For a full list of indicators, see “The Camera Display
and Control Panel” (0681) in “Technical Notes”.
Photo Mode
❚❚
2 4 5 6789101 3 1211
10
Battery indicator (044)
1
“Clock not set” indicator
2
55)
(
0
Vibration reduction indicator
3
161)
(
0
Release mode (0125)
4
Focus mode (074)
5
Parts of the Camera
AF-area mode (077)
6
Active D-Lighting (0283)
7
Picture Control (0139, 275)
8
White balance (094, 145, 267)
9
Image quality (0152)
10
Image size (0154)
11
Image area (0260)
12

3 25 4910 7 68 1
12
13
11
“k” (appears when memory
1
remains for over 1000
exposures; 047)
Number of exposures
2
remaining (
ISO sensitivity (0118)
3
ISO sensitivity indicator
4
118)
(
0
Auto ISO sensitivity indicator
(0120)
0
47, 773)
Exposure indicator
5
Exposure (
Exposure compensation
122)
(
0
Aperture (0108, 109)
6
Shutter speed (0108, 109)
7
Shutter type (0398)
8
Shooting mode (0106)
9
Metering (0157)
10
Subject-tracking AF (086)
11
Focus point (077)
12
AF-area brackets (077)
13
110)
0
Parts of the Camera
11

Movie Mode
❚❚
9
8
Recording indicator (063)
1
“No movie” indicator (
Frame size and rate/image
2
quality (
Image area (0175)
3
Destination (0177)
4
168)
0
1
7
5
65)
0
6
7
8
9
2
3
5
6
Release mode (still
photography;
Time remaining (063)
Frequency response (0373)
Microphone sensitivity
174)
(
0
Sound level (0174)
4
130)
0
12
Parts of the Camera

Camera Controls
Viewfinder
•
Placing your eye to the viewfinder
activates the eye sensor, switching the
display from the monitor to the
viewfinder. Note that the eye sensor
will also respond to other objects, such
as your fingers.
•
The viewfinder can be used for menus and playback if desired.
The Diopter Adjustment Control
D
•
The viewfinder can be focused by lifting and
rotating the diopter adjustment control.
•
Be careful not to put your fingers or
fingernails in your eye.
•
After adjusting diopter, push the diopter
adjustment control back into its original
position.
Extended Use
A
When using the viewfinder for extended periods, you can select [Off] for
Custom Setting d9 [Apply settings to live view] to ensure that
viewfinder brightness and hue are adjusted for ease of viewing.
Camera Controls
13

The M (Monitor Mode) Button
Press the M button to cycle between
viewfinder and monitor displays.
Press the
[Automatic display switch]: The camera automatically
switches between the viewfinder and monitor displays
based on information from the eye sensor.
[Viewfinder only]: The monitor remains blank. The
viewfinder is used for shooting, menus, and playback.
[Monitor only]: The monitor is used for shooting, menus,
and playback. The viewfinder display will remain blank
even if you put your eye to the viewfinder.
[Prioritize viewfinder]: The camera functions in a manner
similar to existing digital SLR cameras.
•
During photo mode, placing your eye to the viewfinder
turns the viewfinder on; the monitor remains off after
you take your eye away.
•
During movie mode or playback or while menus are displayed, the
camera automatically switches between the viewfinder and the
monitor based on information from the eye sensor.
button to cycle through the displays as follows.
M
14
Camera Controls

Tilting the Monitor
A
Putting your eye to the camera when the monitor is tilted will not trigger
the viewfinder if both the following conditions are met:
•
[Automatic display switch] or [Prioritize viewfinder] is selected for
monitor mode, and
•
a menu, picture, or other display currently appears in the monitor.
Monitor Mode
A
You can limit the choice of monitor modes available using the [Limit
monitor mode selection] item in the setup menu.
The Mode Dial
Press the mode dial lock
release and rotate the mode
dial to choose a shooting
mode.
Mode Description
Auto
b
Programmed
P
auto
Shutter-
S
priority auto
Aperture-
A
priority auto
MManual You control both shutter speed and aperture.
U1
User settings
U2
modes
U3
A simple, “point-and-shoot” mode that leaves
the camera in charge of settings (
The camera sets shutter speed and aperture for
optimal exposure.
You choose the shutter speed; the camera
selects the aperture for best results.
You choose the aperture; the camera selects the
shutter speed for best results.
Assign frequently-used settings to these
positions for quick recall.
0
56, 63).
Camera Controls
15

The Command Dials
Rotate the command dials to choose
settings for shutter speed, aperture, or
the functions assigned to other camera
controls.
The S Button
Adjust the camera’s sensitivity to light
(ISO sensitivity) in accord with lighting
conditions.
Photo Mode
❚❚
ISO sensitivity can be adjusted by holding the S button and
rotating the main command dial.
•
In modes P, S, A, and M, you can hold the S button and
rotate the sub-command dial to choose from “ISO AUTO”
(auto ISO sensitivity control enabled) or “ISO” (auto ISO
sensitivity control disabled).
•
In b mode, “ISO AUTO” (auto ISO sensitivity control enabled)
is selected by default. Hold the
main command dial to cycle between “ISO AUTO” and “ISO”
(auto ISO sensitivity control disabled).
button and rotate the
S
16
Camera Controls

Movie Mode
❚❚
ISO sensitivity can be adjusted by holding the S button and
rotating the main command dial. ISO sensitivity for movie
recording can be adjusted in mode M only.
•
The value selected for [ISO sensitivity settings] > [ISO
sensitivity (mode M)] applies when [Off] is selected for [ISO
sensitivity settings] > [Auto ISO control (mode M)].
•
You can choose between “ISO AUTO” (auto ISO sensitivity
control enabled) and “ISO” (auto ISO sensitivity control
disabled) by holding the S button and rotating the subcommand dial.
Camera Controls
17

The E (Exposure Compensation) Button
Alter exposure from the value suggested by the camera.
Exposure compensation can be used to make pictures brighter
or darker.
−1 EV No exposure
•
Exposure compensation can be
adjusted by holding the
rotating either command dial.
•
Higher values make the subject
brighter, lower values darker.
Camera Controls
18
compensation
button and
E
+1 EV

Touch Controls
The touch-sensitive monitor offers a
variety of controls that can be operated
by touching the display with your
fingers. During viewfinder photography,
touch controls are disabled and cannot
be used for focus or the like.
Focusing and Releasing the Shutter
❚❚
•
Touch the monitor to focus on the
selected point (touch AF).
•
In photo mode, the shutter will be
released when you lift your finger from
the display (touch shutter).
•
Touch shutter/AF settings can be
adjusted by tapping the
88).
(
0
Adjusting Settings
❚❚
•
Tap highlighted settings in the display.
•
You can then choose the desired
option by tapping icons or sliders.
W
icon
Camera Controls
19

•
Tap Z or press J to select the chosen
option and return to the previous
display.
Playback
❚❚
•
Flick left or right to view other pictures
during full-frame playback.
•
In full-frame playback, touching the bottom of the display
brings up a frame-advance bar. Slide your finger left or right
over the bar to scroll rapidly to other pictures.
•
To zoom in on a picture displayed
during full-frame playback, use a
stretch gesture or give the display two
quick taps. You can adjust the zoom
ratio using stretch gestures to zoom in
and pinch gestures to zoom out.
20
Camera Controls

•
Use slide gestures to view other parts of the image during
zoom.
•
Giving the display two quick taps while zoom is in effect
cancels zoom.
•
To “zoom out” to a thumbnail view, use
a pinch gesture during full-frame
playback. Use pinch and stretch to
choose the number of images
displayed from 4, 9, and 72 frames.
Viewing Movies
❚❚
•
Movies are indicated by a 1 icon; to
start playback, tap the on-screen guide.
•
Tap the display to pause. Tap again to
resume.
•
Tap Z to exit to full-frame playback.
Camera Controls
21

The i Menu
❚❚
•
Tap the i icon to display the i menu
during shooting (
•
Tap items to view and change options.
Text Entry
❚❚
•
When a keyboard is displayed, you can enter text by tapping
33, 136).
0
the keys.
1
2
Keyboard area
2
Keyboard selection
3
Text display area
1
3
•
To position the cursor, tap e or f or tap directly in the text
display area.
•
To cycle through the upper- and lower-case and symbol
keyboards, tap the keyboard selection button.
22
Camera Controls

Navigating the Menus
❚❚
•
Slide up or down to scroll.
•
Tap a menu icon to choose a menu.
•
Tap menu items to display options.
You can then choose the desired
option by tapping icons or sliders.
•
To exit without changing settings, tap
.
Z
Camera Controls
23

The Touch Screen
D
•
The touch screen responds to static electricity. It may not respond when
touched with fingernails or gloved hands.
•
Do not touch the screen with sharp objects.
•
Do not use excessive force.
•
The screen may not respond when covered with third-party protective
films.
•
The screen may not respond when touched simultaneously in multiple
locations.
Enabling or Disabling Touch Controls
A
Touch controls can be enabled or disabled using the [Touch controls]
item in the setup menu.
24
Camera Controls

The DISP Button
Use the DISP button to cycle through
the following displays:
Photo Mode
❚❚
123
654
Indicators on
1
Simplified display
2
Histogram
3
1 Displayed when [On] is selected for Custom Setting d9 [Apply
settings to live view].
2 Not displayed if [On] is selected for [Overlay shooting] during
multiple exposure photography.
1, 2
Virtual horizon
4
Information display (0681)
5
Flash info (0626, 657)
6
Camera Controls
3
25

3 Displayed when an optional SB-5000, SB-500, SB-400, or SB-300 flash
unit is mounted on the accessory shoe or a WR-R10 wireless remote
controller commands a flash unit via radio flash control.
The Viewfinder
A
The DISP button can also be used to choose the information displayed in
the viewfinder. Note, however, that the information display and flash info
do not appear in the viewfinder.
Hiding the Information Display
A
The information display can be hidden by pressing the control to which
[Live view info display off] has been assigned using Custom Setting f2
[Custom controls]. Press the control again to reactivate the display.
Movie Mode
❚❚
12
43
26
Indicators on
1
Simplified display
2
Histogram
3
Virtual horizon
4
Camera Controls

The X and W (Q) Buttons
Zoom the display in the monitor in or
out during shooting or playback.
Shooting
❚❚
Press X to zoom in on the view through the lens during
shooting. Press
out.
Playback
❚❚
Press X to zoom in on pictures during full-frame playback. Press
to increase the zoom ratio, W (Q) to zoom out. Pressing
X
) when the picture is displayed full frame “zooms out” to
W(Q
the thumbnail list.
to increase the zoom ratio, W (Q) to zoom
X
The Sub-Selector
Press the sub-selector up, down, left, or
right to select the focus point. Press and
hold the center of the selector to lock
focus and exposure (
0
133).
Camera Controls
27

The AF-ON Button
The AF-ON button can be used for focus
in autofocus mode.
The
G
Button
Press the G button to view the menus.
[PLAYBACK MENU]
D
1
2
3
4
5
6
7
8
* You can choose the menu displayed. The default is [MY MENU].
1
232)
(
0
[PHOTO SHOOTING
C
2
9
MENU] (
1
3
(
0
A
4
(
0
[SETUP MENU] (0453)
B
5
N
6
O
7
m
(
0
The d Help icon (032)
8
Current settings
9
248)
0
[MOVIE SHOOTING MENU]
363)
[CUSTOM SETTING MENU]
377)
[RETOUCH MENU] (0502)
[MY MENU]/
[RECENT SETTINGS]*
533)
28
Camera Controls

Using the Menus
❚❚
You can navigate the menus using the multi selector and J
button.
Move cursor up
1
Select highlighted item
2
Display sub-menu, select
3
highlighted item, or move
cursor right
Move cursor down
4
Cancel and return to previous
5
menu, or move cursor left
1
Highlight the icon for the current menu.
Press 4 to place the cursor in the menu-selection area.
2
Select a menu.
Press 1 or 3 to select the desired menu.
Camera Controls
29

3
Position the cursor in the selected menu.
Press 2 to position the cursor in the selected menu.
4
Highlight a menu item.
Press 1 or 3 to highlight a menu item.
5
Display options.
Press 2 to display options for the selected menu item.
30
Camera Controls

6
Highlight an option.
Press 1 or 3 to highlight an option.
7
Select the highlighted option.
•
Press J to select the highlighted
option.
•
To exit without making a selection,
press the
•
To exit the menus and return to shooting mode, press the
shutter-release button halfway.
G
button.
Camera Controls
31

Grayed-Out Items
D
Some items and menu options may be unavailable depending on the
mode and camera status. Unavailable items are displayed in gray.
The d (Help) Icon
A
•
Where available, a description of the currently-selected item can be
viewed by pressing the
•
Press 1 or 3 to scroll.
•
Press W (Q) again to return to the menus.
Touch Controls
A
You can also navigate the menus using touch controls (019).
W (Q
) button.
32
Camera Controls

The i Button (the i Menu)
For quick access to frequently-used settings, press the i button
or tap the
•
Different menus are displayed during
photo mode and movie mode.
•
Options can be viewed by tapping
items in the display or by highlighting
items and pressing
then be made using the multi selector.
•
Items for which the camera displays an
on-screen guide can be adjusted by
highlighting them in the i menu and
rotating a command dial. In some
cases, adjustments can be made using
both the main and sub-command dials.
The Playback i Menu
A
Pressing the i button during playback displays
a context-sensitive
playback options.
icon to view the i menu.
i
; selections can
J
menu of frequently-used
i
Camera Controls
33

Customizing the i Menu
❚❚
The items displayed in the photo-mode i menu can be chosen
using Custom Setting f1 or g1 [Customize
1
Highlight Custom Setting f1 or
g1 [Customize
press
See “The G Button” (028) for
information on using the menus.
2
Highlight the position you
J
.
want to change and press
A list of the items available for the
selected position will be displayed.
3
Highlight the desired item and
press
•
•
4
Press the G button.
Changes will be saved and the Custom Settings menu will be
displayed.
.
J
The item will be assigned to the
selected position and the options
shown in Step 2 will be displayed.
Repeat Steps 2 and 3 as desired.
menu] and
i
J
.
menu].
i
34
Camera Controls

The Fn1 and Fn2 Buttons
Use the Fn1 or Fn2 button for quick
access to selected settings.
•
By default, the Fn1 button is assigned
white balance (
button focus- and AF-area–mode
selection (074).
•
The assigned setting can be adjusted by holding the Fn1 or
Fn2 button and rotating the command dials. In some cases,
adjustments can be made using both the main and subcommand dials.
Choosing Roles for the Fn1 and Fn2 Buttons
❚❚
The roles played by the Fn1 and Fn2 buttons can be selected
using Custom Setting f2 or g2 [Custom controls] > [Fn1
button] and [Fn2 button].
1
Highlight Custom Setting f2 or
g2 [Custom controls] and press
.
J
See “The G Button” (028) for
information on using the menus.
2
Highlight the option for the
desired button and press
A list of the items available for the
selected button will be displayed.
94) and the Fn2
0
J
.
Camera Controls
35

3
Highlight the desired item and
press
•
•
4
Press the G button.
Changes will be saved and the Custom Settings menu will be
displayed.
.
J
The item will be assigned to the
selected button and the options
shown in Step 2 will be displayed.
Repeat Steps 2 and 3 to assign a role to the remaining
button.
36
Camera Controls

First Steps
Attaching the Strap
To attach a strap (whether the supplied strap or one that has
been purchased separately):
Attaching the Strap
37

Charging the Battery
Charge the supplied EN-EL15c battery before use.
The Battery and Charger
D
Read and follow the warnings and cautions in “For Your Safety” (0xxxv)
and “Caring for the Camera and Battery: Cautions” (
The Battery Charger
Depending on the country or region, the charger comes with
either an AC wall adapter or a power cable.
•
AC wall adapter: After inserting the AC wall adapter into the
q
charger AC inlet (
w
(
) and rotate the adapter 90 ° to fix it in place (e).
), slide the AC wall adapter latch as shown
743).
0
38
Charging the Battery

•
Power cable: After connecting the power cable with the plug
in the orientation shown, insert the battery and plug the cable
in.
•
An exhausted battery will fully charge in about 2 hours and
35 minutes.
Battery charging (flashes) Charging complete (steady)
If the CHARGE Lamp Flashes Rapidly
D
If the CHARGE lamp flashes rapidly (8 times a second):
•
A battery charging error has occurred: Unplug the charger and
remove and reinsert the battery.
•
The ambient temperature is too hot or too cold: Use the battery
charger at temperatures within the designated temperature range (0–
40 °C/+32–104 °F).
If the problem persists, unplug the charger and end charging. Bring the
battery and charger to a Nikon-authorized service representative.
Charging the Battery
39

Charging AC Adapters
When a battery is inserted in the camera, an EH-7P charging AC
adapter (available separately for the Z 6II, supplied with the
Z 7II) can be used to charge the battery or power the camera.
•
EN-EL15a or EN-EL15 batteries cannot be charged using a
charging AC adapter. Use an MH-25a battery charger instead.
•
If [Enable] is selected for [USB power delivery] in the setup
menu, the charging AC adapter can be used to power the
camera. The batteries will not charge while the camera is
powered by an outside source. For more information, see
“‘Power Delivery’ Versus ‘Charging’” (0493).
1
Insert the EN-EL15c into the
camera (
0
43).
40
Charging the Battery

2
After confirming that the camera is off, connect
q
the charging AC adapter (
) and plug the adapter
in.
Keep the plug straight during insertion and removal.
Charging
•
The battery charges while the camera is off.
•
The camera charge lamp (w) lights amber while charging is
in progress. The lamp turns off when charging is complete.
•
An exhausted battery will fully charge in about 2 hours and
45 minutes.
Power Delivery
The camera will draw power from the adapter while on.
Charging the Battery
41

3
Unplug the charging AC adapter when charging is
complete or when it is no longer needed to power
the camera.
The Charging AC Adapter
D
If the battery cannot be charged using the charging AC adapter, for
example because the battery is not compatible or the temperature of the
camera is elevated, the charge lamp will flash rapidly for about
30 seconds and then turn off. If the charge lamp is off and you did not
observe the battery charging, turn the camera on and check the battery
level.
Computer USB Power Delivery and Battery Charging
A
•
Computers will supply current to power the camera or charge the
battery only when connected via a UC-E25 USB cable (available
separately). The supplied USB cable cannot be used for this purpose.
•
Depending on the model and product specifications, some computers
will not supply current to power the camera or charge the battery.
42
Charging the Battery

Inserting the Battery
•
Turn the camera off before inserting or removing the battery.
•
Using the battery to keep the orange battery latch pressed to
one side, slide the battery into the battery chamber until the
latch locks it in place.
Removing the Battery
To remove the battery, turn the camera
off and open the battery-chamber cover.
Press the battery latch in the direction
shown by the arrow to release the
battery and then remove the battery by
hand.
Inserting the Battery
43

Battery Level
•
The battery level is shown in the shooting display and control
panel while the camera is on.
Monitor Viewfinder Control panel
•
The battery level display changes as the battery level
diminishes, from
battery level falls to
battery or ready a spare battery.
•
If the message [Shutter release disabled. Recharge battery.]
is displayed, charge or exchange the battery.
through K, J, I, and H. When the
L
, suspend shooting and charge the
H
44
Inserting the Battery

Inserting Memory Cards
128
GB
64
GB
The camera is equipped with two
memory card slots: a slot that takes one
CFexpress or XQD memory card (
another that takes one SD memory card
w
), for a total of two cards, one of each
(
type.
•
Turn the camera off before inserting or removing memory
cards.
•
Holding the memory card in the orientation shown, slide it
straight into the slot until it clicks into place.
- CFexpress and XQD memory cards:
- SD memory cards:
q
) and
Inserting Memory Cards
45

Removing Memory Cards
16
GB
After confirming that the memory card
access lamp is off, turn the camera off,
open the memory card slot cover, and
press the card in to eject it (
can then be removed by hand (
q
). The card
w
).
Inserting Memory Cards
46

Number of Exposures Remaining
•
When the camera is on, the shooting display and control panel
show the number of photographs that can be taken at current
settings.
•
When memory cards are inserted in both slots and the default
option—[Overflow]—is selected for [Secondary slot
function], the camera will record pictures first to the card in
the slot chosen using [Primary slot selection] (the primary
slot), switching to the card in the remaining slot (the
secondary slot) when the card in the primary slot is full.
•
If two memory cards are inserted, the camera will show the
number of additional photographs that can be recorded to
the card in the primary slot. When the card in the primary slot
is full, the display will show the number of exposures
remaining on the card in the secondary slot.
•
Values over 1000 are rounded down to the nearest hundred.
For example, values between 1500 and 1599 are shown as
1.5 k.
Monitor Viewfinder Control panel
Inserting Memory Cards
47

Memory Cards
D
•
Memory cards may be hot after use. Observe due caution when
removing memory cards from the camera.
•
Do not perform the following operations during formatting or while
data are being recorded, deleted, or copied to a computer or other
device. Failure to observe these precautions could result in loss of data
or in damage to the camera or card.
- Do not remove or insert memory cards
- Do not turn the camera off
- Do not remove the battery
- Do not disconnect AC adapters
•
Do not touch the card terminals with your fingers or metal objects.
•
Do not use excessive force when handling memory cards. Failure to
observe this precaution could damage the card.
•
Do not bend or drop memory cards or subject them to strong physical
shocks.
•
Do not expose memory cards to water, heat, or direct sunlight.
•
Do not format memory cards in a computer.
Memory Card High-Temperature Warning
D
As indicated on the inside of the memory card
slot cover, memory cards inserted in the
camera may become hot. Do not attempt to
remove memory cards if a high-temperature
warning appears in the shooting display;
instead, wait for the camera to cool and the
warning to clear from the display.
Inserting Memory Cards
48

No Memory Card Inserted
D
If no memory card is inserted, a “no memory card” indicator will appear in
the shooting display and [–E–] will appear in both the control panel and
the shooting display.
The Write Protect Switch
A
•
SD memory cards are equipped
with a write-protect switch. Sliding
the switch to the “lock” position
write-protects the card, protecting
the data it contains.
•
A “–––” indicator and a [Card] warning appear in the shooting display
when a write-protected card is inserted.
•
If you attempt to release the shutter while a write-protected card is
inserted, a warning will be displayed and no picture will be recorded.
Unlock the memory card before attempting to take or delete pictures.
Inserting Memory Cards
49

Attaching a Lens
•
The camera can be used with Z mount lenses. The lens
generally used in this manual for illustrative purposes is a
NIKKOR Z 24–70mm f/4 S.
•
Be careful to prevent dust entering the camera.
•
Confirm that the camera is off before attaching the lens.
q, w
- Remove the camera body cap (
- Align the mounting marks on the camera (
Do not touch the image sensor or lens contacts.
) and rear lens cap (e, r).
t
) and lens (y).
50
Attaching a Lens

u
- Rotate the lens as shown until it clicks into place (
•
Remove the front lens cap before taking pictures.
F Mount Lenses
D
•
Be sure to attach the FTZ mount adapter (available separately) before
using F mount lenses.
•
Attempting to attach F mount lenses directly to the camera could
damage the lens or image sensor.
).
Detaching Lenses
•
After turning the camera off, press and
hold the lens release button (
turning the lens in the direction shown
(w).
•
After removing the lens, replace the
lens caps and camera body cap.
q
) while
Attaching a Lens
51

Choose a Language and Set the Clock
The language option in the setup menu is automatically
highlighted the first time menus are displayed. Choose a
language and set the camera clock.
1
Turn the camera on.
2
Highlight [Language] in the
setup menu and press
•
The [Language] item is
automatically highlighted in the
setup menu the first time the G
button is pressed after purchase.
•
For information on using the
menus, see “Using the Menus”
(029).
2
.
Choose a Language and Set the Clock
52

3
Select a language.
Press 1 or 3 to highlight the desired language and press J
(the languages available vary with the country or region in
which the camera was originally purchased).
4
Highlight [Time zone and date]
and press
5
Choose a time zone.
•
Select [Time zone] in the [Time
zone and date] display.
•
Highlight a time zone in the [Time
zone] display and press
•
The display shows a time zone map listing the selected
cities in the chosen zone and the difference between the
time in the chosen zone and UTC.
2
.
.
J
Choose a Language and Set the Clock
53

6
Turn daylight saving time on or
off.
•
Select [Daylight saving time] in
the [Time zone and date] display.
•
Highlight [On] (daylight saving time
on) or [Off] (daylight saving time off) and press
•
Selecting [On] advances the clock one hour; to undo the
effect, select [Off].
7
Set the clock.
•
Select [Date and time] in the [Time
zone and date] display.
•
Press J after using the multi
selector to set the clock to the date
and time in the selected time zone (note that the camera
uses a 24-hour clock).
8
Choose a date format.
•
Select [Date format] in the [Time
zone and date] display.
•
Highlight the desired date (year,
month, and day) display order and
press J.
.
J
Choose a Language and Set the Clock
54

9
Exit the menus.
Lightly press the shutter-release
button halfway to exit to shooting
mode.
The t Icon
D
A flashing t icon in the shooting display indicates that the camera clock
has been reset. The date and time recorded with new photographs will
not be correct; use the [Time zone and date] > [Date and time] option in
the setup menu to set the clock to the correct time and date. The camera
clock is powered by an independent clock battery. The clock battery
charges when the main battery is inserted in the camera. It takes about 2
days to charge. Once charged, it will power the clock for about a month.
SnapBridge
A
Use the SnapBridge app to synchronize the camera clock with the clock
on a smartphone or tablet (smart device). See SnapBridge online help for
details.
Choose a Language and Set the Clock
55

Basic Photography and Playback
Taking Photographs (b Mode)
Select b (auto) mode for simple “point-and-shoot”
photography.
Lenses with Retractable Barrels
D
Lenses with retractable barrels must be
extended before use. Rotate the lens zoom ring
as shown until the lens clicks into the extended
position.
1
Turn the camera on.
The monitor and control panel will
light.
56
Taking Photographs (
b
Mode)

2
Select photo mode by
rotating the photo/
movie selector to
3
Pressing the mode
dial lock release on
top of the camera,
rotate the mode dial
to b.
C
.
Taking Photographs (
b
Mode)
57

4
Ready the camera.
Holding the handgrip in your right hand and cradling the
camera body or lens with your left, bring your elbows in
against the sides of your chest.
•
Framing photos in the viewfinder:
58
Landscape (wide)
orientation
•
Framing photos in the monitor:
Landscape (wide)
orientation
Taking Photographs (
b
Mode)
Portrait (tall) orientation
Portrait (tall) orientation
 Loading...