

Page 1
Professional
Technical Guide
— N-Log Recording —
En
Page 2

Table of Contents
N ‑Log: A Primer ................................................................... 3
• Why Use N‑Log? ............................................................................... 4
Filming N‑Log Footage ...................................................... 6
• Using Camera Controls .................................................................10
• View Assist .......................................................................................11
• Ensuring Consistent Exposure ....................................................12
2
Page 3

N ‑Log: A Primer
The term “N‑Log” is an amalgam of “N”, for “Nikon”, and “log”,
short for “logarithmic function”. The logarithmic function
in question is that used in digitizing light levels based on
the density characteristics of negative lm to render expo‑
sure dierences much as humans perceive them. This is
known as a “log curve”.
The process of lming movies using a log curve is referred
to as “logarithmic” or “log‑format” recording. Log format
recording preserves highlights and shadows in scenes in
which they would otherwise be lost and is intended for
footage that will be processed post‑production, when
color grading can be used to produce high‑quality video
with a wide color gamut that takes advantage of the large
amount of tone information available for an expanded dy‑
namic range and smooth color gradients.
Nikon’s unique N‑Log format was developed to take full
advantage of sensor dynamic range. It oers excellent bal‑
ance between highlights and shadows and is optimized
for 10‑bit movie recording.
3
Page 4

Why Use N-Log?
l
Shooting in N‑Log format preserves details in highlights
and shadows and expands the range of eects available
through color grading.
Preserving Details in Highlights and ShadowsPreserving Details in Highlights and Shadows
N‑Log preserves highlights and shadows in high‑contrast
shots, such as those that mix indoor and outdoor lighting.
Footage shot without N‑Log shows
loss of detail in highlights.
N‑Log produces colors with less ap‑
parent contrast but more variation.
Highlights, shadows, and color
variation preserved.
4
Non–
N‑Log
N‑Log
N‑Log
+ color
grading
Page 5
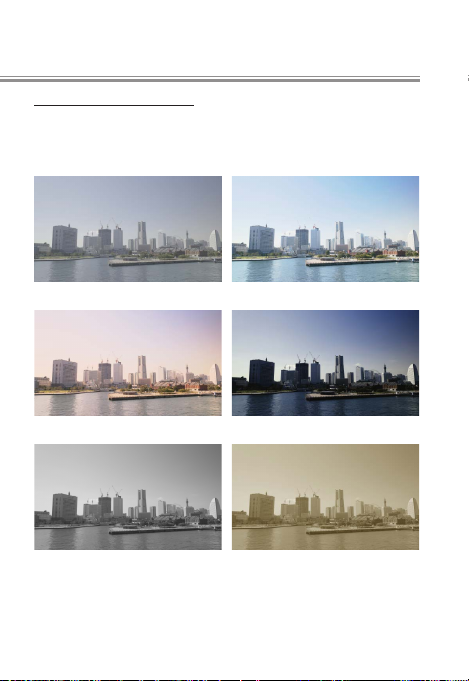
Improved Color GradingImproved Color Grading
Third‑party movie‑editing software that supports color
grading can be used to process the same footage in a va‑
riety of dierent ways, as is shown in the examples below.
No color grading
5
Page 6

Filming N‑Log Footage
To record N‑Log footage, connect the camera to a digital
recorder that supports 10‑bit video. Use a Type C HDMI
cable (available from third‑party suppliers) and be sure
the camera is o before connecting or disconnecting the
cable.
Choose cable with connector for
external device
To lm N‑Log footage:
Select 10 bit for Output data depth.
1
N‑Log footage can only be
recorded at a bit depth of
10 bits. In the setup menu,
select 10 bit for HDMI >
Advanced > Output data
depth.
6
Digital recorder
Page 7

Enable N‑Log recording.
2
Return to HDMI > Ad‑
vanced in the setup menu
and select N‑Log for N‑Log/
HDR(HLG) output options.
Note that N‑Log footage is
recorded only to the exter‑
nal device, not to the cam‑
era memory card.
Congure the recorder for HDMI input.
3
For details, see the documentation supplied with the
device.
Start lming.
4
If On is selected for HDMI> Advanced> External re‑
cording control in the camera setup menu, you can
start and stop recording using the camera movie‑re‑
cord button (page page 1010). Contrast can be enhanced for
display on the camera during recording (view assist;
page page 1111).
When the camera standby timer expires, the monitor
will turn o and HDMI output will end. Choose No
limit or a time longer than the anticipated recording
time for Custom Setting c3 (Power o delay)> Stand‑
by timer.
7
Page 8

N‑Log Recording
While N‑Log recording is in eect, Picture Controls cannot be
used, ISO sensitivity cannot be set lower than ISO 800 or to
values of from Hi 0.3 to Hi 2, Active D‑Lighting and high ISO
noise reduction turn o automatically, and photographs will
not be taken when the shutter‑release button is pressed all
the way down. The camera may also have trouble focusing;
this is not a malfunction. The subject will be displayed in the
monitor, not the viewnder, regardless of the display mode
selected, and icker or noise may be visible in the display.
Note that because HDMI output is not available when the
camera is connected to devices running SnapBridge or
Camera Control Pro 2, these applications cannot be used for
N‑Log recording.
8
Page 9

Filming N-Log Footage
Frame Size/Frame Rate
Note the following when choosing a frame size and frame
rate for N‑Log recording:
Frame size/frame rateFrame size/frame rate NotesNotes
3840× 2160 60p
(Z7II only)
3840× 2160 50p
(Z7II only)
3840× 2160 30p
3840× 2160 25p
3840× 2160 24p
1920× 1080 120p
1920× 1080 100p
1920× 1080 60p
1920× 1080 50p
1920× 1080 30p
1920× 1080 25p
1920× 1080 24p
1920× 1080 slow-motion N‑Log recording not available.
N‑Log recording not available.
• Icons and characters in the monitor dis‑
play at low resolution, but this has no
effect on the footage actually recorded.
• The angle of view is reduced to about
90% (Z6II only; on the Z7II, the angle
of view is reduced only when the DX
image area is selected).
N‑Log recording not available.
No restrictions apply.
9
Page 10

Using Camera Controls
l
If On is selected for HDMI> Ad‑
vanced > External recording
control in the camera setup
menu, you can start and stop
recording using the camera
movie‑record button (for fur‑
ther information, contact the
manufacturer). The camera displays A in movie live
view and B during movie recording. During recording,
check the recorder and recorder display to ensure that foot‑
age is being saved to the device.
10
Page 11

Filming N-Log Footage
l
View Assist
Although it increases the range
of tones recorded, at default
settings N‑Log reduces the ap‑
parent contrast between colors
when the footage is viewed in
the camera monitor. If desired,
the display of colors in the
camera monitor can be simplied to enhance contrast for
ease of viewing by selecting On for HDMI> Advanced>
View assist in the camera setup menu.
View assist on View assist o (default)
View Assist
View assist applies to the display in the camera monitor only
and has no eect on the footage output to the external re‑
corder.
11
Page 12

Filming N-Log Footage
l
Ensuring Consistent Exposure
If your recorder features a
waveform display, you can
lm an 18% gray color chart
and adjust exposure for a
video signal level (IRE) of
35%, equivalent to a 10‑bit
code value of around 372.
12
100
80
60
40
20
0
Page 13

N‑Log Specications
N‑Log specications are available from the following web‑
site:
https://downloadcenter.nikonimglib.com/en/products/558/Z_7II.htmlhttps://downloadcenter.nikonimglib.com/en/products/558/Z_7II.html
13
Page 14

© 2020 Nikon Corporation
 Loading...