

Nikon XF Quick Start Manual
XF SERIES TOTAL STATION
XF SERIES TOTAL STATION
QUICK START GUIDE
Safety information
The Nikon XF Series Total Station is a CLASS 2 LASER PRODUCT in accordance with: IEC608251:2014:“Safety of Laser Products”.
Precautions: To counteract hazards, it is essential for all users to pay careful attention to the safety
precautions and control measures specified in the standard IEC60825-1:2014. For further information
please refer to the Nikon XF User Guide.
Note – This product complies with IEC 60825-1:2014 and IEC 60825-1:2007 and 21 CFR 1040.10 and
1040.11 except for deviations pursuant to Laser Notice no. 50, dated June 24, 2007.
C Warning: Only qualified and trained persons should be assigned to install, adjust and operate the laser
equipment.
C Warning: Precautions should be taken to ensure that persons do not look directly, with or without an
optical instrument, into the beam.
C Warning: Laser beam path should be located well above or below eye level wherever practicable.
Table 1.1 Specifications for laser emission
Laser pointer Class 2
Wave length
Output power
Distance meter Class 1
Wave length
Output power
Pulse width
Laser plummet Class 2
Wave length
Output power
Table 1.2 Conforming standards
630-680 nm
CW Po ≤ 1 mW
850-890 nm
Pulse Po ≤ 22 W
< 5 ns
635 nm
CW Po < 1.0 mW
QUICK START GUIDE
E.U. IEC60825-1:2014
Laser Pointer: Class 2
Distance Meter: Class 1
Laser plummet: Class 2
USA FDA21CFR Part 1040 Sec.1040.10 and 1040.11
(except for deviations pursuant to Laser Notice No.50, dated June 24, 2007)
For further details regarding the features and operations of this instrument, and to access the latest
information including instruction manuals and application software please refer to
www.spectraprecision.com.
© 2017, Trimble Inc. All rights reserved. Trimble is a trademark of
Trimble Inc. registered in the United States Patent and Trademark Office
and other countries. Nikon is a registered trademark of Nikon. All other
trademarks are the property of their respective owners.
This is the September 2017 release version 1.00 of the Nikon XF Series Total
Station Quick Start Guide, P/N 114465-01. It applies to the Nikon XF total
station.
Spectra Precision
10368 Westmoor Dr.
Westminster, CO, 80021
USA
www.spectraprecision.com
Version: 1.00
September 2017
Part Number: 114465-01
*114465-01*
1
2
3
4
5
6
7
8
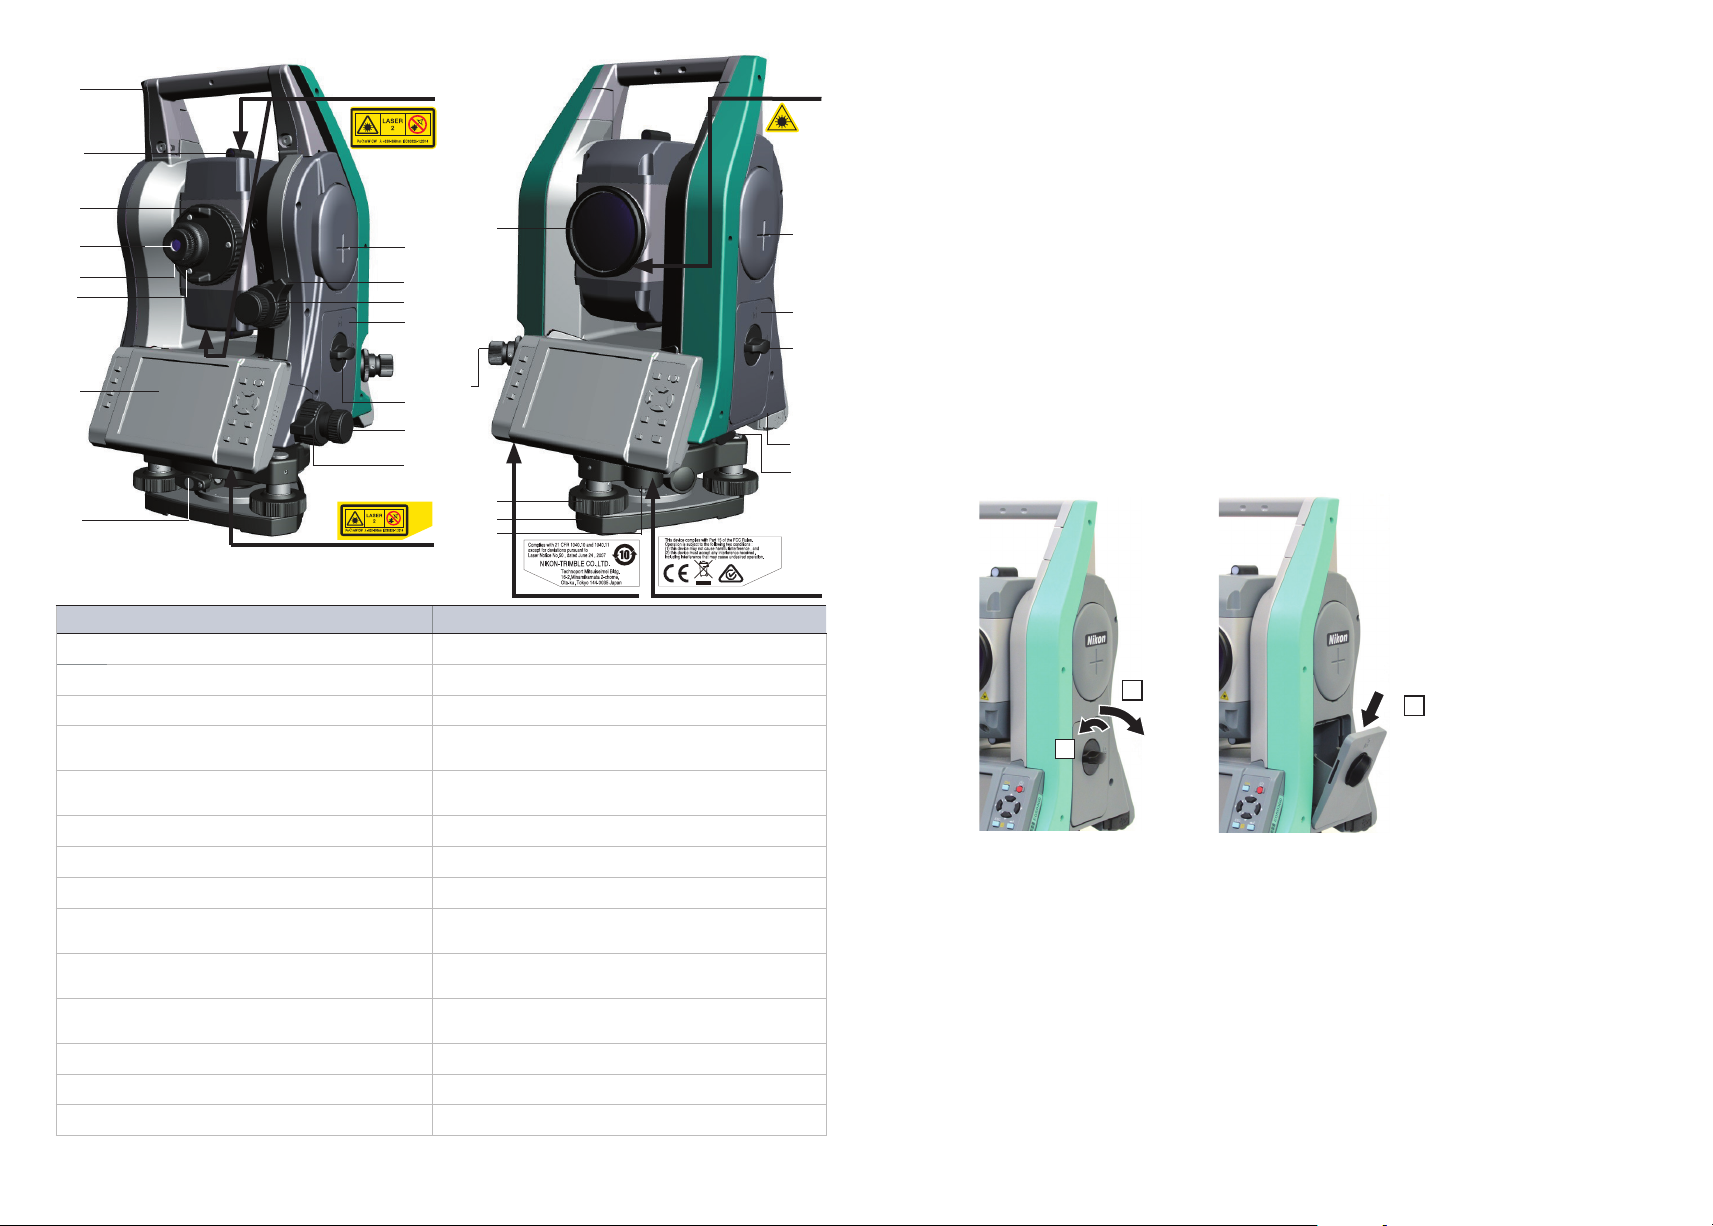
Item Description Item Description
1 Carrying handle 15 Vertical clamp
2 Optical sight (Finder) 16 Horizontal axis indication mark
3 Telescope focusing ring 17 Laser Safety label. Attached to the telescope.
4 Telescope eyepiece 18 Objective. LASER LIGHT IS EMITTED FROM THIS
5 Diopter ring 19 Optical or optional laser plummet. (This picture
6 Reticle plate cover 20 Leveling screw
7 Face-1 display / keyboard 21 Tribrach
8 Tribrach clamp knob 22 Circular level
9 Laser Safety label. Attached underside when
the instrument is laser plummet model.
10 Horizontal clamp 24 FCC label. Attached to the underside of the
11 Horizontal tangent screw 25 Data output / external power / input connector.
12 Battery box release knob 26 USB ports (x2)
13 Battery box 27 Laser Safety label. Attached to the telescope.
14 Vertical tangent screw
17
18
16
15
14
13
19
12
11
10
9
20
21
22
23
PA RT.
shows the optical plummet.)
23 CFR label. Attached to the underside of the
keyboard.
keyboard.
CAUTION: Input voltage shall be 4.5-5.2 V DC
24
16
13
12
26
25
27
Standard components
• Instrument main body
• Battery pack (x 2)
• Battery charger
• AC adapter
• Adjustment pin, Allen wrench
• Objective lens cap
• Rain/dust cover
• Carrying case
• Shoulder strap (x 2)
• USB cable
Charging the battery pack
C Warning: Before charging or connecting the battery, please refer to the battery safety information in the
Nikon XF Series Total Station Instruction Manual.
The battery pack is supplied partly charged. Before using the battery for the first time, charge the battery
completely using the supplied battery charger.
Inserting the battery pack
Before inserting the battery pack, clear any dust or other foreign particles from the battery contacts.
2
1
1. Turn the battery box release knob counterclockwise and open the battery box cover.
2. Put the battery pack into the battery box. Insert the battery pack with the connectors bottom first, facing
inside.
3. Close the battery box cover and turn the knob clockwise until the secure click sound is heard.
3
C CAUTION: If the battery box cover is not closed, this could adversely affect the watertightness of the
instrument.
2
3
 Loading...