

Page 1

Nikon View 4 Reference Manual
For Version 4.1.1
Overview (pp. 2–3)
Getting Started (pp. 4–12)
Tutorial (pp. 13–32)
Preferences (pp. 33–42)
Appendices (pp. 43–51)
Page 2

Overview
About This Manual
Reading This Manual
This manual describes how to work with the images stored on your camera's
memory card. It is divided into the following four main chapters:
Welcome to Nikon View 4! Using Nikon View 4, you can connect your
Nikon digital camera to a computer or insert the camera memory card in
a card reader or PC card slot and browse photographs or save them to
disk. Images can be transferred directly from the camera to the computer
via an IEEE 1394 or USB connection, or you can insert the camera memory
card in a card reader or PC card slot and copy images to disk. The photographs to be viewed or copied to disk can be chosen from a list of thumbnail images (note that Nikon View 4 can not be used to browse images after
they have been transferred to disk; to browse images on disk, use
FotoStation Easy or the full version of Cumulus 5.0 or similar software).
Nikon View 4 version 4.1.1 can be used with the following Nikon digital
cameras: D1, D1X, D1 H and COOLPIX995/775. For information on using
these cameras, see the documentation provided with the devices.
Please read all instructions in this manual thoroughly to ensure that you get
the most from Nikon View 4 and your Nikon digital camera.
Trademark Information
Microsoft and Windows are registered trademarks of Microsoft Corporation in the
United States of America and other countries. IBM is a registered trademark of
International Business Machines. Adobe and Adobe Photoshop are trademarks or
registered trademarks of Adobe Systems, Inc. Pentium, and Celeron are trademarks
of Intel Corporation. Macintosh, Mac OS, and QuickTime are trademarks of Apple
Computer, Inc. Cumulus is a registered trademark of Canto Software , Fotostation
Easy and Fotostation are registered trademarks of Fotoware A/S. All other trade
names mentioned in this manual or other documentation provided with your Nikon
product are trademarks or registered trademarks of their respective holders.
• Getting Started
Read this chapter for information on the type of system required to use
Nikon View and for complete installation instructions.
• Tutorial
The tutorial provides all the information needed to browse the images
on the camera memory card and copy them to disk.
• Preferences
This chapter describes the options available in the Nikon View Preferences dialog.
• Appendices
Included in the appendices are instructions for uninstalling and reinstalling Nikon View, together with a visual index to the program's principle windows, menus, and dialogs.
This reference manual has been written for users of both the
COOLPIX series and D1 series of cameras. We ask for your
understanding that certain parts of this manual may not apply
to your camera.
Overview
2
Page 3
To make it easier to find the information you need, the following symbols
and conventions are used:
This icon marks cautions, information that you should read before
use to prevent damage to your Nikon product.
This icon marks notes, information that you should read before using Nikon View.
Background Knowledge
This manual assumes familiarity with operations common to the Macintosh
and Windows operating systems. If you are in doubt about the meaning of
any of the terms used here, refer to the documentation provided with your
operating system.
This icon marks tips, information that you may find helpful when
using Nikon View.
This icon indicates that more information is available elsewhere in
this manual or in other documentation.
This symbol indicates that the cross-reference marked with the
icon is to the Nikon View 4 Reference Manual (this manual).
Blue text indicates a link to another part of this manual or to the
World-Wide Web. Click the text to follow the link.
Illustrations
This manual is for use with both the Windows and Macintosh versions of
Nikon View. While the majority of the illustrations are taken from the
Windows version of the product (Windows Millennium Edition), save where
otherwise noted the operations described apply to both the Macintosh
and Windows versions.
Printing This Manual
If desired, portions of this manual can be printed for ease of reference using
the Print… command in the Adobe Acrobat Reader File menu.
Life-Long Learning
As part of Nikon’s “Life-Long Learning” commitment to ongoing product
support and education, continually-updated information is available on-line
at the following web-sites:
• For users in the United States of America: http://www.nikonusa.com/
• For users in Europe: http://www.nikon-euro.com/
•
For users in Asia, Oceania, the Middle East, and Africa:
Visit these sites to keep up-to-date with the latest product information and
general advice on digital imaging and photography. For more information,
please contact your nearest Nikon representative.
http://www.nikon-asia.com/
Overview
http://www.nikon-image.com/eng/
3
Page 4

Getting Started
Installing Nikon View 4
Before You Begin (pp. 5–6)
Installation (p. 7)
Starting Nikon View 4 (pp. 8–12)
About This Chapter
This chapter takes you step-by-step through the process of installing Nikon View 4 and supporting software.
Pg. For more information on:
49 Reinstalling Nikon View 4
4
Page 5
Before You Begin
Windows
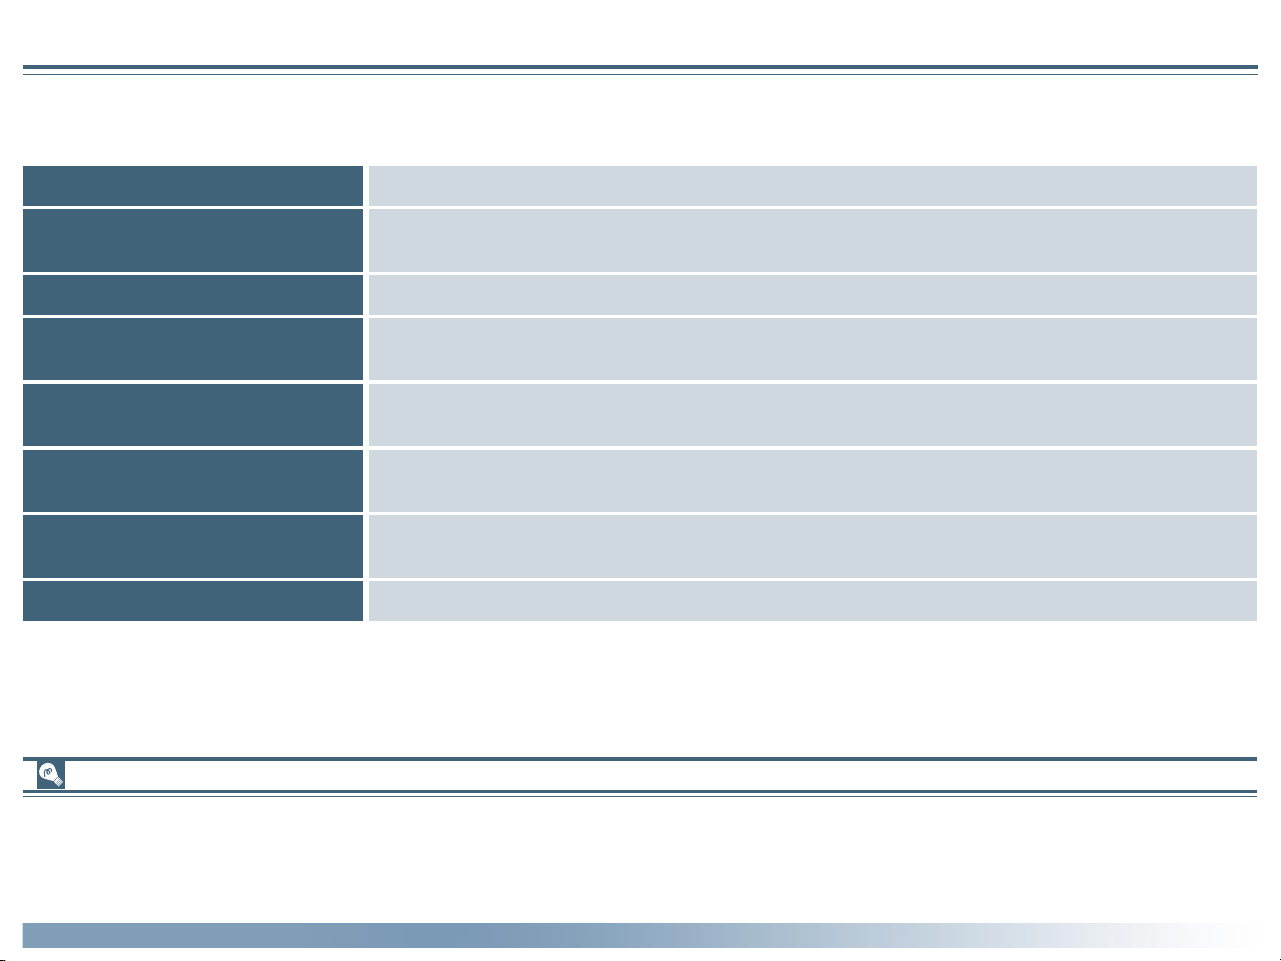
Before installing Nikon View 4, make sure that your computer system satisfies the following requirements:
System Requirements
CPU
OS
Memory (RAM)
Hard disk space
MMX Pentium or better
Windows 98
Windows 2000 Professional
1,2
/ Windows 98 Second Edition (SE)1, Windows Millennium Edition (Me)1,
1
32 MB (64 MB or more recommended)
15 MB required for installation, with an additional amount equivalent to twice the capacity of the camera
memory card required when Nikon View 4 is running
Video resolution
640 × 480 pixels with 16-bit color (High Color) (800 × 600 pixels or greater with 24-bit color [True Color]
recommended)
IEEE 1394 interface
(D1series cameras)
USB
(COOLPIX995/775)
Miscellaneous
Only boards compliant with Open Host Controller Interface (OHCI) are supported
Only built-in USB ports supported
3
CD-ROM drive required for installation
1 Only pre-installed versions supported.
2 Windows 98 does not support IEEE 1394 connection of D1 series cameras.
3 The camera may not function as expected when connected to IEEE 1394 or USB hubs.
4 Please see the web page address below for support information concerning compatible boards.
3,4
Software updates
For the latest information and updates, visit the following web-sites:
• For users in the United States of America: http://www.nikonusa.com/
• For users in Europe: http://www.nikon-euro.com/
• For users in Asia, Oceania, the Middle East, and Africa: http://www.nikon-asia.com/
Getting Started: Before You Begin
5
Page 6

Macintosh
Before installing Nikon View 4, make sure that your computer system satisfies the following requirements:
Model
OS
Memory (RAM)
Hard disk space
iMac1, iMacDV1, Power Mac G3 (Blue & White) 1, Power Mac G4 or later1, iBook1, Power Book G3 or later
Mac OS 8.62, Mac OS 9.0, Mac OS 9.1
32 MB (64 MB or more recommended)
15 MB required for installation, with an additional amount equivalent to twice the capacity of the camera
memory card required when Nikon View 4 is running
Video resolution
640 × 480 pixels with 16-bit color (thousands of colors) (800 × 600 pixels or greater with 24-bit color
[millions of colors] recommended)
Firewire interface
(D1 series cameras)
USB
(COOLPIX995/775)
Miscellaneous
Only built-in Firewire ports supported
Only built-in USB ports supported
CD-ROM drive required for installation
3
3
1 Built-in Firewire (IEEE 1394) or USB interface required.
2 Users of Mac OS 8.6 will need to upgrade to version 1.3.5 of the Apple Computer USB driver, and version 2.3.3 of the Apple Firewire driver.
3 The camera may not function as expected when connected to IEEE 1394 or USB hubs.
Software updates
1
For the latest information and updates, visit the following web-sites:
• For users in the United States of America: http://www.nikonusa.com/
• For users in Europe: http://www.nikon-euro.com/
• For users in Asia, Oceania, the Middle East, and Africa: http://www.nikon-asia.com/
Getting Started: Before You Begin
6
Page 7
Installation
Installing Nikon View 4 and Supporting Software
Windows / Macintosh
If you have already completed installation, click here for information on starting Nikon View 4.
The procedure for installing Nikon View 4 varies according to your operating system, make of camera, and the image database software you are using. Click
the links below for complete installation instructions. After reading these instructions, you will be returned to the present manual.
FotoStation
Camera Operating system
Windows Millennium Edition (Me)
COOLPIX995
COOLPIX775
Other image database software (such as Cumulus)
Camera Operating system
COOLPIX995
COOLPIX775
Getting Started: Installation
Windows 98 / 98 Second Edition (SE)
Windows 2000 Professional
Mac OS
Windows Millennium Edition (Me)
Windows 98 / 98 Second Edition (SE)
Windows 2000 Professional
Mac OS
7
Page 8
Starting Nikon View 4
Before connecting your camera to a computer
Starting Nikon View 4
Once installation is complete, Nikon View 4 will start whenever your Nikon
digital camera is turned on and connected to the computer, or when the
camera memory card is inserted in a card slot or in a CompactFlash card
reader connected to the computer. Note that for the program to start on
insertion of a memory card, the memory card must be from one of the
following cameras: COOLPIX995, 775, 900s, 900, 950, 700, 800, 990, 880, or
a camera in the D1 series. The program will not start on insertion of
memory cards from cameras other than those listed above. Note too that
only one camera can be connected to the computer at a time.
If you would prefer that Nikon View 4 not start automatically, select Dis-
able auto start in the Auto Start tab of the Preferences dialog ( 34).
(Windows only)
When the camera is first connected to a computer, the computer must
“register” the camera. If you have been using a D1 camera with Nikon View
DX or Nikon Capture, you will need to update the device drivers for the
D1 before you can use Nikon View 4.
For more information about device registration or updating the device
drivers for the D1, click here .
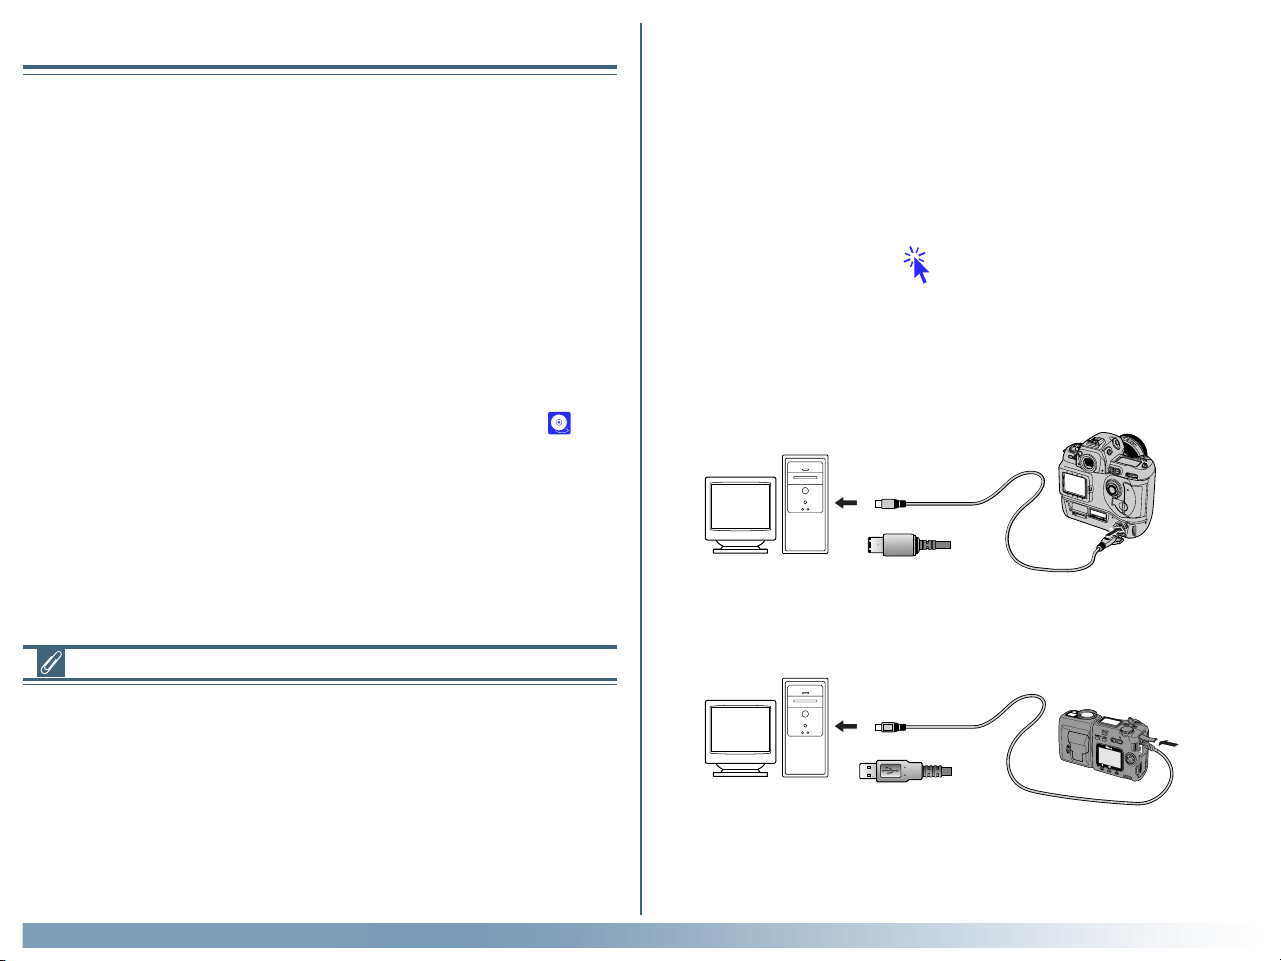
Connecting the Camera to a Computer
Turn the camera on and connect it to the computer. For more information
on connecting your camera and on the cables required, see the documentation provided with your camera.
D1/D1X/D1H (IEEE 1394/Firewire interface)
Auto Start
Nikon View 4 will confirm that a camera is connected or a memory card
inserted in a card reader or card slot and start automatically when:
• A supported camera is connected while on and with a memory card in
place
• A supported camera with a memory card in place is connected and
then turned on
• A memory card from a Nikon digital camera supported under Nikon
View 4 is inserted in a CompactFlash card reader or card slot
Getting Started: Starting Nikon View 4
COOLPIX995/775 (USB interface)
8
Page 9
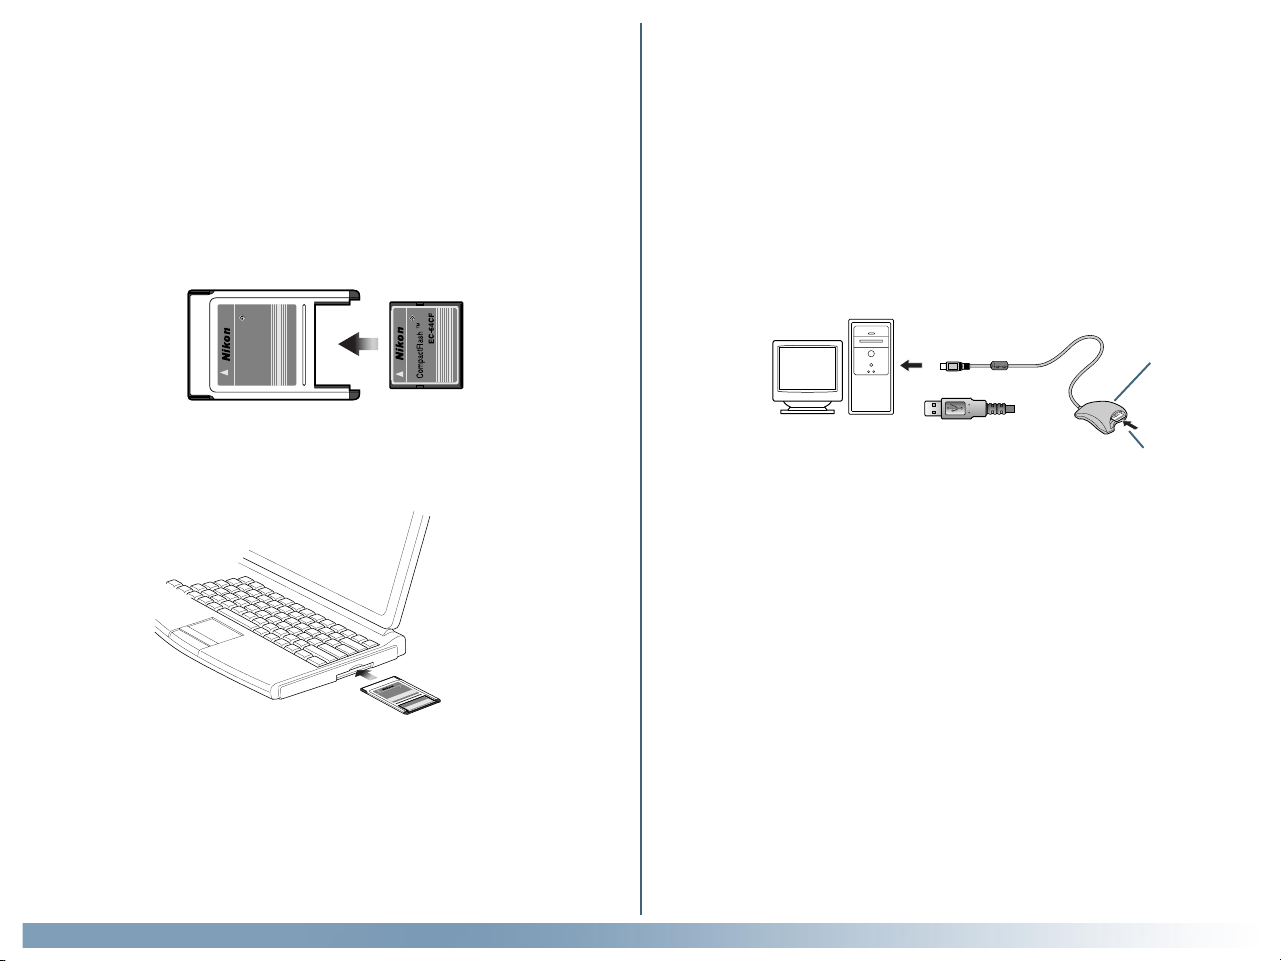
Using a Card Slot
PC Card Adapter
When inserted in a PC-card adapter (available separately), the camera
memory card functions as a Type II PCMCIA ATA card, allowing images to
be read from the card.
Inserting a Memory Card
After removing the memory card from the camera, insert it in the adapter
as shown below.
TM
TM
Card
EC-AD1
CompactFlash
PC Card Adapter
Using a Card Reader
Images on the memory card can also be viewed using a card reader.
Inserting a Memory Card
After removing the memory card from the camera, insert it in the card
reader and connect the reader to the computer. For information on connecting the card reader, see the documentation provided with the device.
Card reader
Insert the adapter in a computer that supports ATA-RAM memory cards
and is equipped with a PCMCIA Type II-compatible card slot.
1
M
T
D
d
A
r
-
a
C
C
E
h
s
a
l
F
t
c
a
p
m
R
o
C
E
T
P
M
T
A
F
d
r
C
D
a
4
C
6
A
-
h
s
C
a
l
F
E
t
c
a
p
m
o
C
For more information, see the documentation for your computer. Depending on your operating environment, it may be necessary to install drivers, register the card with the system, or adjust settings to configure the
computer to read CompactFlash memory cards. For details, see the documentation provided with your computer or operating system.
Getting Started: Starting Nikon View 4
Card reader (USB interface)
CompactFlash
memory card
9
Page 10

The Camera or Memory Card Drive or Volume
Connecting the Camera and Inserting Memory Cards
When a COOLPIX995/775 digital camera is connected or a memory card
inserted in a card reader or card slot:
Unexpected Termination
Nikon View 4 (version 4.1.1) will terminate and a warning will appear if any
of the operations listed below are performed while Nikon View 4 is in use.
Click OK to close the warning and exit Nikon View 4.
Windows
The computer will show the camera or memory card as a new drive in the
My Computer window. Opening the drive will reveal the folder “DCIM,”
which holds further folders (“100NIKON” or other folders with names
assigned by the user or automatically by the camera) containing images
taken with the camera. Note that when first connecting a camera to the
computer, the camera must be registered as a device with Windows.
Macintosh
The camera or memory card will appear on the desktop as an untitled volume.
Opening this volume will reveal the folder “DCIM,” which holds further folders
(“100NIKON” or other folders with names assigned by the user or automatically by the camera) containing images taken with the camera. (Note that
memory cards formatted on a D1 series camera will appear on the desktop
not as an untitled volume, but as a folder labeled “NIKON D1X”.)
Disconnecting the Camera and Removing Memory Cards
Before disconnecting or turning a COOLPIX995/775 digital camera off or
removing a memory card from a card reader or card slot:
Windows
Click the “Unplug or Eject Hardware” icon in the taskbar and remove the
camera or memory card from the system.
• If you turn the camera off while
data transfer is in progress, or
disconnect the cable connecting the camera and computer,
the warning shown at right will
be displayed.
• If you remove the memory card
from the card slot or card
reader while data transfer is in
progress, the warning shown at
right will be displayed.
• If you reformat the memory
card while Nikon View 4 is in
use, the warning shown at
right will be displayed.
To avoid unexpected termination, we recommend that you exit Nikon View
4 either by selecting Exit from the File menu or by clicking the Exit
button in the Transfer window ( 15). Make sure that data transfer is
complete before exiting Nikon View 4.
Macintosh
Drag the untitled volume corresponding to the camera or memory card into
the Trash.(Note that memory cards formatted on a D1 series camera will
appear not as an untitled volume, but as a folder labeled “NIKON D1X”.)
Getting Started: Starting Nikon View 4
.
10
Page 11
Restarting Nikon View 4
Nikon View 4 can be restarted automatically or manually.
Automatic Restart
1. If you have turned the camera off, disconnected the interface
cable, or removed the memory card from the card reader or
card slot, you can restart the program by:
• reconnecting the camera
• turning the camera on
• re-inserting the memory card
Manual Restart
When Nikon View 4 is started manually the Thumbnail List window will be
displayed if Nikon View 4 can detect the same memory card that was in the
camera, card reader, or card slot when the program last was shut down.
(Note that detection will only occur if the card is in the same camera, card
reader or card slot as on the previous occasion.) If the same card that was
present when Nikon View 4 was last shut down can not be detected, (i.e. is
not present or has been moved to another device), a message will be displayed and the Thumbnail List will appear with no thumbnails showing. The
only operations that can be performed are adjustments to Preferences.
2. If you exited Nikon View 4 while the camera and computer
were connected, you can restart the program by:
• turning the camera off and then on again
• removing and then re-inserting the memory card
• disconnecting and then reconnecting the camera
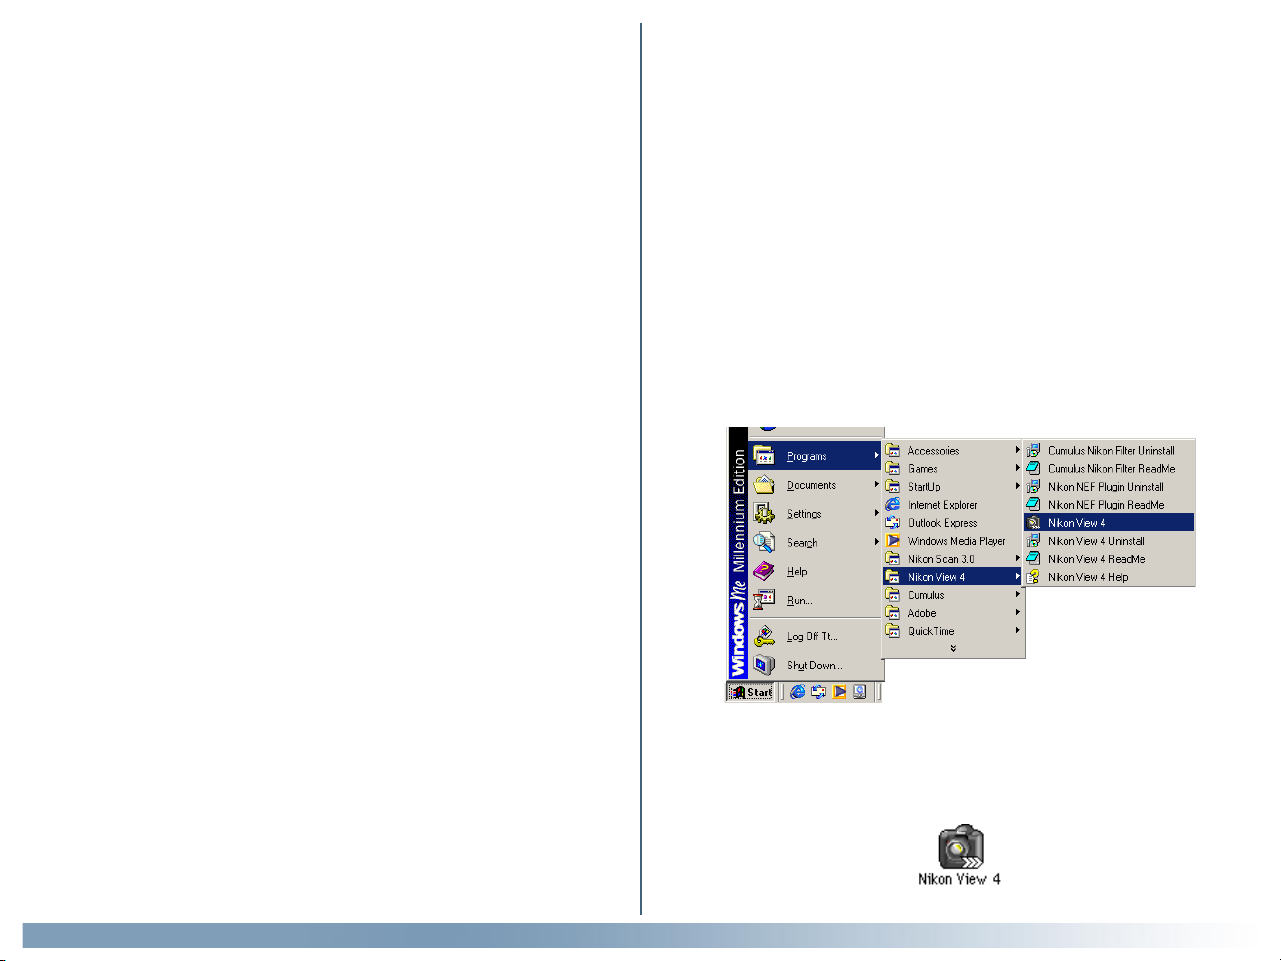
Windows
To start Nikon View 4 manually, select Programs > Nikon View 4 >
Nikon View 4 from the Windows Start menu.
Macintosh
To start Nikon View 4 manually, double click the Nikon View 4 icon, which
may be found in the folder Nikon Software : Nikon View 4.
Getting Started: Starting Nikon View 4
11
Page 12
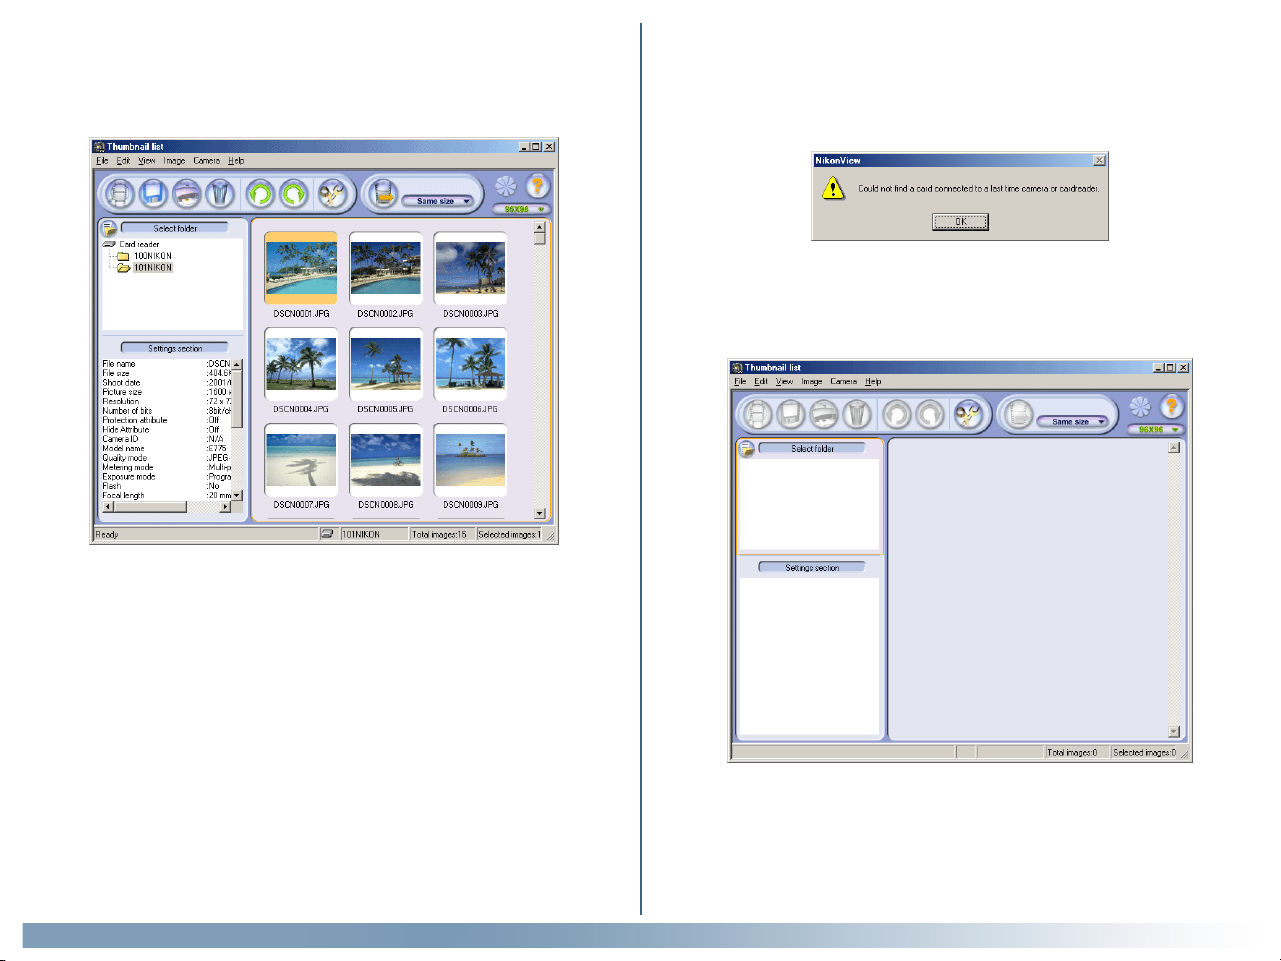
If Nikon View 4 can detect the memory card that was in the camera, card
reader, or card slot when the program was shut down, the Thumbnail List
window will be displayed when Nikon View 4 is started manually.
If the card that was present when Nikon View 4 was shut down can not be
detected when the program is started manually, the following warning will
be displayed. (Note that detection will not occur if the card is not in the
same camera, card reader or card slot as on the previous occasion.)
Click OK to close the error message. The Thumbnail List window will
open, but no thumbnails will be displayed. Only the options in the Preferences dialog can be adjusted; no other operations can be performed.
Getting Started: Starting Nikon View 4
12
Page 13

Tutorial
Transferring Images to the Computer
The Image Transfer Window (pp. 15–18)
The Thumbnail List Window (pp. 19–32)
About This Chapter
This chapter describes how to transfer images to the computer from the camera, card reader, or card slot, and outlines the operations that can be
performed in the Image Transfer and Thumbnail List windows.
13
Page 14
When the camera is connected to the computer and turned on, or a memory
card from the camera inserted in a card reader or card slot, Nikon View 4
will start automatically and the Image Transfer or Thumbnail List window
will appear. You can choose which window appears at start-up in the Auto
Start tab of the Preferences dialog ( 34). Images can be transferred to
the computer from either window.
The Image Transfer window provides a convenient tool for transferring all
images, or all images of a specified type, to the computer in a single operation. The Thumbnail List window gives you the opportunity to view images
before transfer and select the images that will be copied to your computer.
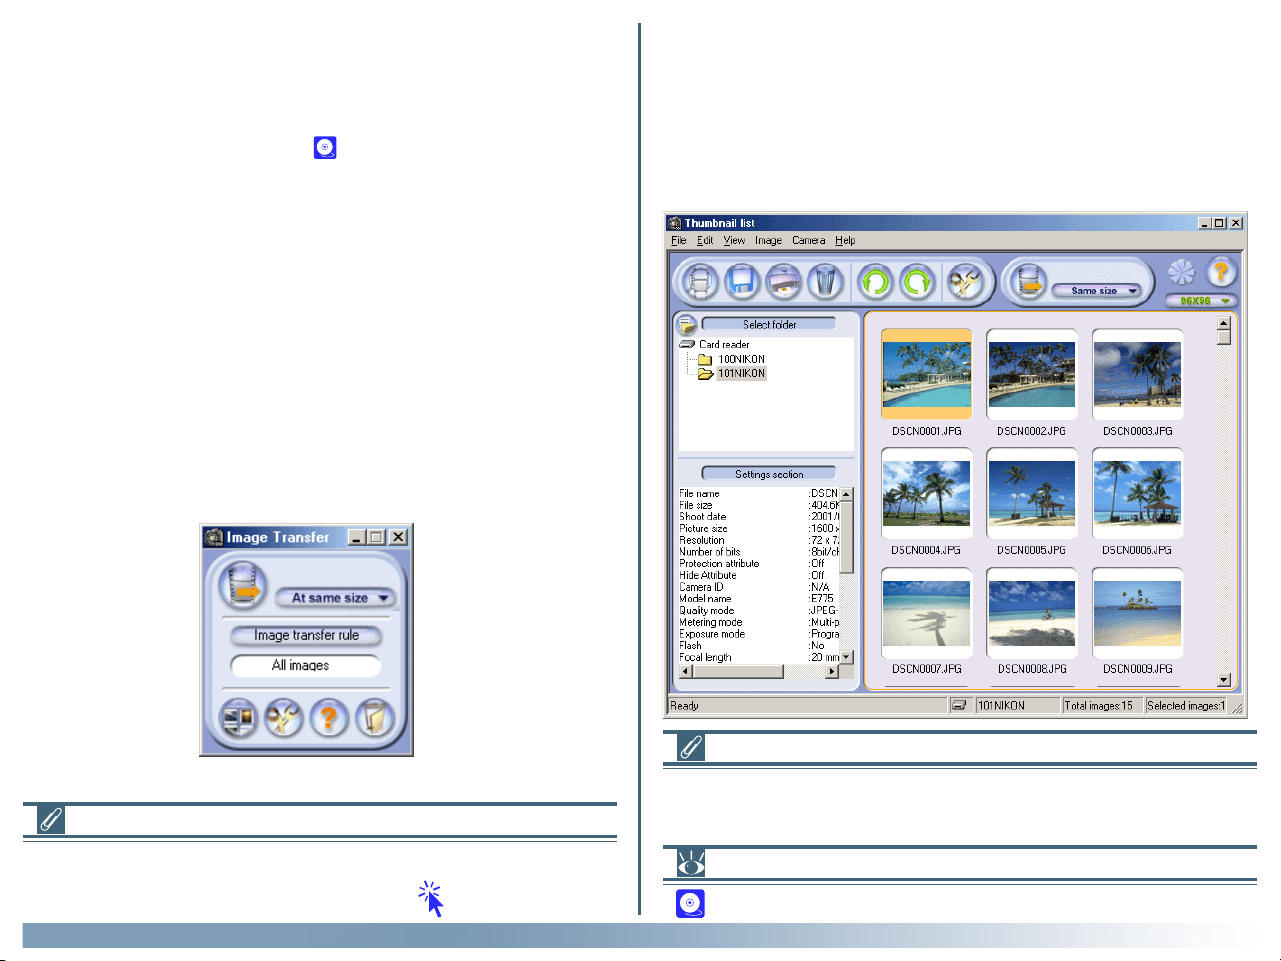
The Image Transfer Window
The Image Transfer window provides a simple tool for transferring images
to the computer from a memory card inserted in a camera, card reader, or
PC card slot. It also allows access to the Thumbnail List, Preferences, and
Help windows.
The Thumbnail List Window
The Thumbnail List window can be used to browse images or view photo
information. This window can be used to view as small thumbnail previews
the images on the memory card inserted in the camera, card reader, or
card slot and select the images to be transferred to the computer, or to
preview selected images at full size.
Using the Transfer Button (COOLPIX775)
Users of the COOLPIX775 can also transfer or upload images using the
TRANSFER button on the camera itself. Click here for more information.
Tutorial
Viewing Images on the Hard Disk
The Thumbnail list window can not be used to preview images that have
already been transferred to the hard disk.
Pg. For more information on:
34 Preferences: Auto Start
14
Page 15
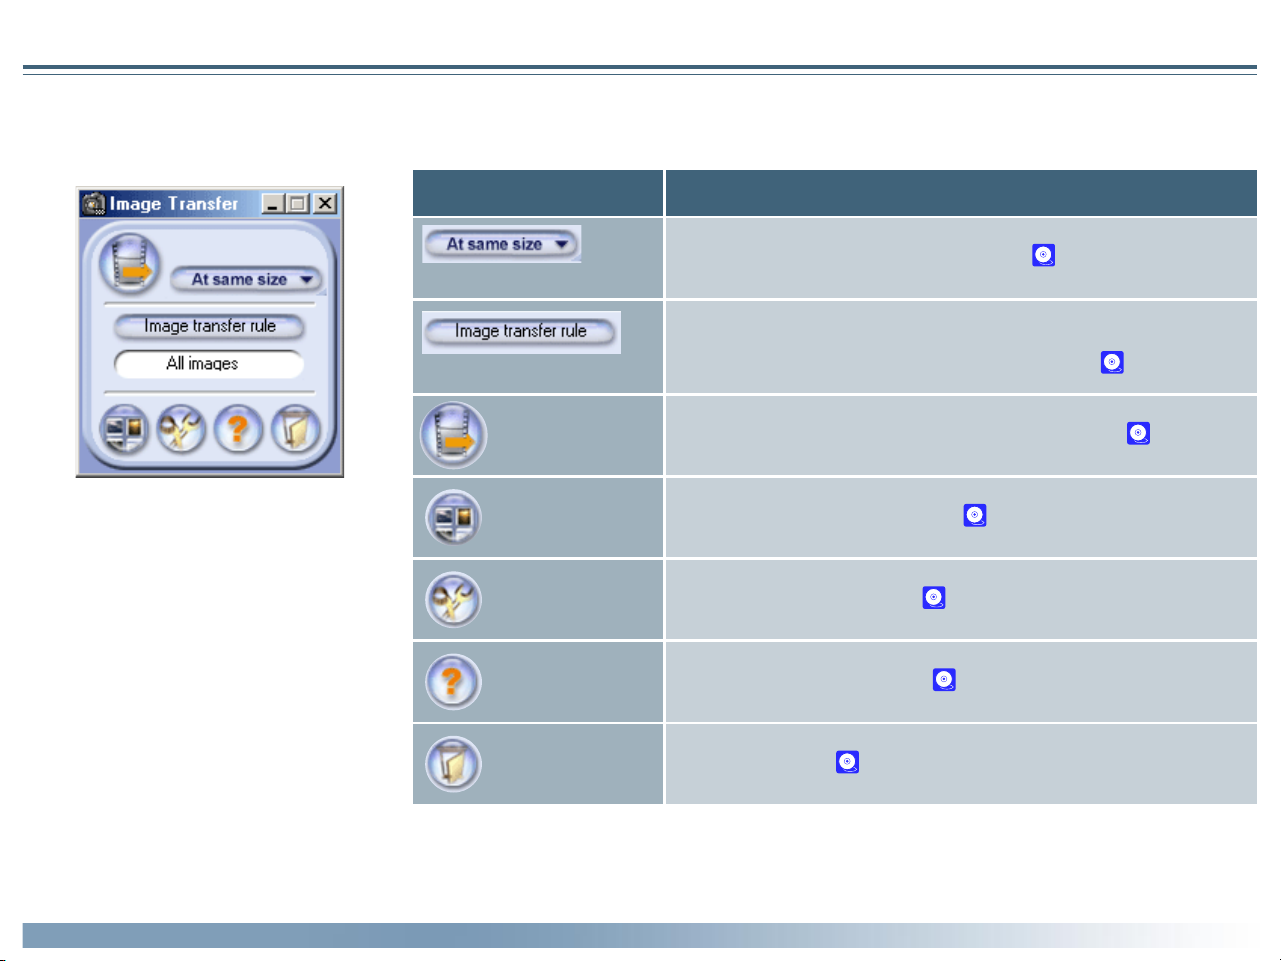
The Image Transfer Window
The following controls are available in the Image Transfer window (shown below):
Button Function
Transfer size
Image transfer rule
Using the Image Transfer Window
Specify the size of the image after transfer. ( 18)
Choose the type of image that will be transferred. The type of image
selected appears in the text box below the button. ( 17)
The Macintosh version of Nikon View 4 has a
menu bar that duplicates the functions of the
tool buttons (the Windows version does not
have a menu bar). Most operations can be performed using the tool buttons and, in the case
of the Macintosh version, the menus in the menu
bar. In the case of operations that can be performed by means both of menus and tool buttons, the explanation in this manual gives priority to the tool buttons.
Tutorial: The Image Transfer Window
Transfer
Thumbnail list
Preferences
Help
Exit
Transfer images of the selected type to the computer. ( 18)
Open the Thumbnail List window. ( 21)
Open the Preferences dialog. ( 34)
Display help for Nikon View 4. ( 32)
Exit Nikon View 4. ( 10)
15
Page 16
Transferring Images Using the Image Transfer Window
Image Database Applications
This section describes how to use the Image Transfer window to transfer
images to your computer from a memory card inserted in a camera, card
reader, or card slot.
Step 1—Choose a destination
In this step, you will choose the destination folder for the images that will be
transferred from the memory card. Users who intend to transfer images to
the default destination can proceed to Step 3 (unless you have selected a
new default, the default destination is the Images folder in the folder to
which you installed Nikon View 4). To change the destination, choose a new
folder from the Transfer tab of the Preferences dialog ( 35).
Step 2—Choose an image database
If you will not be using image database software, proceed to Step 3.
Confirm that an image database application has been selected in the Data-
base tab of the Preferences dialog ( 40).
The following applications are supported under Nikon View 4:
Windows
• Cumulus 5 (Canto Software): images registered in catalog
• FotoStation Easy (FotoWare): images can be found no matter
where they are located on your
hard disk
• PC-Archive (Nikon): images registered in folder
Macintosh
• Cumulus 5 (Canto Software): images registered in catalog
• FotoStation Easy (FotoWare): images can be found no matter
where they are located on your
hard disk
• iViewMediaPro (iView Multimedia): images registered in catalog
Uploading Images to Nikon FotoShare
If your computer is connected to the internet, and you choose FotoStation
as your image database application, images that have been transferred to
the computer can be uploaded to Fotoshare, Nikon’s on-line photo album
service. If you want to upload images to FotoShare, click here after
choosing FotoStation Easy as the image database application in Step 2.
After reading Uploading Images to Nikon FotoShare (pages 17B-20B) you
will be linked back to page 19 of this manual.
Sub-folders
When images are transferred to the computer, a sub-folder is created within
the selected folder and all images transferred to the sub-folder. The sub-folder
is named according to the current date and time (YYYYMMDD-HHMMSS).
Tutorial: The Image Transfer Window
FotoStation Easy
The FotoStation Easy ‘Coolpix’ folder is preset to browse to the default folder
to where Nikon View 4 transfers images. If you change the folder in Nikon View
4 you may have to quit Nikon View 4 and FotoStation and then relaunch both
programs for FotoStation to find the new transfer destination folder.
Pg. For more information on:
35 Preferences: Transfer
40 Preferences: Database
16
Page 17

Step 3—Choose the images to be transferred
In this step, you will choose the images to be transferred. This allows you
to select only a specific type of image, for example protected images, for
transfer. Click the Image transfer rule button in the Transfer Image
window.
After selecting an image type, click OK to return to the Transfer Image
window. The selected image type will be indicated by an icon in the text
box below the Image transfer rule button.
Image transfer rule
button
The dialog shown below will be displayed, where you can select the type of
image to be transferred.
Check Save setting until next change is made to save the selected
type as the default setting for subsequent sessions of Nikon View 4. If this
box is not checked, the default setting will be Ignore mark and protect
attribute, and all images will be transferred.
DescriptionSelection Icon
All Images
(Ignore mark and
protect attribute)
Transfer Marked
images only
Transfer Unmarked
images only
Transfer images with
Protect attribute
Transfer images without Protect attribute
All images will be transferred. This is default setting at installation.
Only marked images will
be transferred.
Only unmarked images will
be transferred.
Only protected images will
be transferred.
Only unprotected images
will be transferred.
All images
Marked Images
Some cameras do not allow images to be marked for transfer. Note that
the COOLPIX 995/775 does allow you to mark images for transfer. For
more information, see the documentation provided with your camera.
Tutorial: The Image Transfer Window
17
Page 18

Step 4—Choose an image size
Choose a size suited to the task at hand from the Transfer size menu.
Transfer size menu
If you choose At same size, image size will not change during transfer. At
other settings, all images larger than the selected size will be converted to the
new size during transfer. Images smaller than the selected size are transferred at their original size. All photo information apart from the “image size”
field will be unaffected by the conversion. Converted images are saved using
JPEG compression at a ratio equivalent to a camera setting of NORMAL.
The following options are available
DescriptionOption
Step 5—Transfer the images
To transfer images of the selected type, click the “Transfer” button.
“Transfer” button
A progress indicator will be displayed while the images are being transferred. A thumbnail preview of the image currently being transferred will
also be displayed. When multiple images are transferred, the Transferring…
window will include a progress meter showing the number of images copied to disk and the number of images remaining.
At same size
1024 × 768
640 × 480
320 × 240
Images will be saved at their original dimensions.
Images will be converted to XGA (suitable for display on most computer monitors).
Images will be converted to VGA (suitable for Web
distribution).
Images will be converted to QVGA size (suitable
for distribution by e-mail).
Aspect Ratio
If the original image does not have an aspect ratio of 4 : 3 (note that photographs taken with the D1, D1X or D1H have an aspect ratio of 3 : 2), the
vertical dimension will be adjusted to match the horizontal dimension without changing the original aspect ratio.
Tutorial: The Image Transfer Window
No other operations can be performed while the Transferring… window is
displayed.
Transferring Images
The original image remains on the memory card.
18
Page 19

The Thumbnail list Window
Using the Thumbnail list Window
The Thumbnail list window includes a menu bar, toolbar, a folder tree area and camera settings section, and a thumbnail list area.
Menu bar
Toolbar
Contains buttons for the operations
that can be performed in the Thumbnail list window.
Folder tree area
Shows the folders on the memory
card inserted in the camera, card
slot, or card reader ( 23).
Camera settings section
Displays photo information for the
selected image ( 27).
Contains File, Edit, View, Image,
Camera, and Help menus ( 44).
The Macintosh version also contains
a Window menu.
Thumbnail list area
Shows thumbnail previews of the images in the path indicated in the folder
tree .
Status bar
Gives the current folder name, the number of images in the folder, and the
number of images selected in the thumbnail list area.
The majority of operations in the Thumbnail list window are performed using the menu bar and tool buttons. In the case of operations that can be
performed by means both of menus and tool buttons, the explanation in this manual gives priority to the tool buttons.
Tutorial: The Thumbnail list Window
19
Page 20

The Thumbnail list window contains the following buttons:
Button FunctionButton Function
Opens the selected image(s) in the
Open
Save copy
Print Print the selected images. ( 26)
Delete
90° CCW
90° CW
built-in viewer or an external application. ( 29)
Save a copy of each of the selected
images. ( 26)
Delete the selected images ( 28) or
folders. ( 31)
Rotate the selected image ninety degrees to the left. ( 27)
Rotate the selected image ninety degrees to the right. ( 27)
Transfer
Transfer size
Progress
indicator
Help Open help for Nikon View 4. ( 32)
Thumbnail size
Toggle view
Transfer the selected images to the
computer. ( 18)
Specify the size of the image after
transfer. ( 18)
This display is active when an operation
is in progress. ( 32)
Choose the size at which thumbnails
will be displayed. ( 24)
View or hide the folder tree area and/
or camera settings section. ( 23)
Preferences Open the Preferences dialog. ( 34)
Tutorial: The Thumbnail list Window
20
Page 21

Transferring Images Using the Thumbnail list window
Using the Thumbnail list window, you can select images to be transferred to
the computer from the memory card inserted in the camera, card slot, or
card reader.
The following explanation assumes that you have completed steps 1–2 of
“Transferring Images Using the Image Transfer Window.” See “Tutorial: Transferring Images Using the Image Transfer Window” steps 1–2 ( 16).
Step 1—Open the Thumbnail list window
When the camera is connected to the computer and turned on, or a memory
card from the camera inserted in a card reader or card slot, Nikon View 4
will start automatically and the Transfer Images or Thumbnail list window
will appear. You can choose which window appears at start-up in the Auto
start tab of the Preferences dialog ( 34). Images can be transferred to
the computer from either window.
If the Transfer Images window is displayed, you can open the Thumbnail list
window by clicking the “Thumbnail list” button.
Step 2—Choose a folder
The folders on the memory card are
shown in the folder tree area. Click the
folder containing the desired images;
thumbnail previews of the images in the
folder, including hidden images, will be displayed in the thumbnail list area.
“Thumbnail list” button
Pg. For more information on:
34 Preferences: Auto start
Tutorial: The Thumbnail list Window
The Thumbnail list
If the memory card contains only one folder with images, the Thumbnail list
will automatically open with that folder selected and thumbnails of the
images in the folder displayed. Where there is more than one folder, the
images in the first folder will be previewed automatically.
21
Page 22

Step 3—Select images
Select the images that you wish to transfer to the computer. Selected
images are highlighted with a yellow border.
Selected image
To select multiple images, press the Ctrl (Windows) or Command
(Macintosh) key while clicking each image in turn. A group of images can be
selected by dragging the mouse. Press the shift key while clicking two
images to select the images and all images between them.
Step 4—Transfer the images
To transfer the selected images to the computer, click the “Transfer” button.
“Transfer” button
A progress window will be displayed as described above under Step 5 of
“Transferring Images Using the Image Transfer Window” ( 18).
Tutorial: The Thumbnail list Window
22
Page 23

Working with Thumbnails
This section describes the operations that can be performed on thumbnails.
Choosing a Folder
The folders on the memory card are shown in the folder tree area. Click
the folder containing the desired images; thumbnails of the images in the
folder will be displayed in the thumbnail list area.
“Toggle view”
button
By clicking the “Toggle view” button in the folder tree area, you can display
or hide the folder tree area and camera settings section. The display will
cycle through views as follows: both folder tree area and camera settings
section displayed → folder tree area displayed, camera settings section hid-
den → folder tree area hidden, camera settings section displayed → both
folder tree area and camera settings section hidden → both folder tree
area and camera settings section displayed.
Selecting Thumbnails
Thumbnail previews of the images in the selected folder are shown in the
thumbnail list area. To select multiple images, press the Ctrl (Windows) or
Command (Macintosh) key while clicking each image in turn. A group of
images can be selected by dragging the mouse. Press the shift key while
clicking two images to select the images and all images between them.
Selected image
If only one folder is present on the memory card and you do not need to
view photo information, you can hide both the folder tree and camera
settings section to increase the size of the thumbnail list area and the number of thumbnails visible.
Tutorial: The Thumbnail list Window
Selecting Multiple Images
The commands in the Select sub-menu of the Edit menu can be used to
select all images of a specified type (marked or unmarked, protected or
unprotected).
23
Page 24

Specifying Thumbnail Size
The pull-down menu at the right side of the Thumbnail
list window can be used to specify the dimensions of
the thumbnails displayed in the thumbnail list area.
When a new size is chosen, any images that were selected or rotated before the change will still be selected or rotated at the new size.
Examples of the thumbnail list at different thumbnail sizes are shown below.
The following five sizes are available:
• 64 × 64 pixels
• 96 × 96 pixels
• 128 × 128 pixels
• 192 × 192 pixels
• 256 × 256 pixels
The default size at installation is 96 × 96. At sizes of 96 × 96 and 64 × 64, no
file-status icons are displayed. At a size of 64 × 64, the file type extension is
not displayed.
64 × 64 (file name only—no extension or file-status icon displayed)
96 × 96 (file name and extension only—no file-status icon displayed)
Tutorial: The Thumbnail list Window
128 × 128 or more (file name, extension, and file-status icon displayed)
24
Page 25

File Status
Hidden and protect status can be assigned to or removed from images
using the Attribute sub-menu, which may be found in the Image menu.
The Macintosh version of Nikon View 4 can be used to change the protect
status of images, but not their hidden status.
Hide sub-menu Protect sub-menu
When a thumbnail size of 128 × 128 or more is selected, icons indicating
marked and protected status appear to the left of the file name. A movie
icon appears in the case of movie files. No icon appears in the case of
hidden images. Hidden image status can be confirmed in the settings section of the Thumbnail List window (Windows only).
Printing the Thumbnail list and Saving It to Disk
To print the currently selected thumbnails, choose Print Thumbnail list
from the File menu. The file name and date and time of recording will be
printed below each thumbnail. Any rotations will be reflected when the
thumbnail is printed. If desired, this output can be saved to disk as a JPEG
file by selecting Copy thumbnail list to file from the File menu. The file
will automatically be assigned the name Sheet+(page number).JPG.
Displaying the Image Transfer Window
In Nikon View 4 version 4.1.1, the Image Transfer window can be opened
from the Thumbnail list window by selecting Display Small Transfer Win-
dow from the View menu.
Click here
Protect icon
DescriptionIcon
Marked file
Protected file
Movie file
Tutorial: The Thumbnail list Window
File name
25
Page 26

Working with Images
This section describes the operations that can be performed on images.
Transferring Images to the Computer
In the thumbnail list area, select the image or images you wish to transfer.
Copies of the images will be transferred to the computer when the “Transfer” button is clicked. Transfer does not affect the originals on the memory
card inserted in the camera, card slot, or card reader.
“Transfer” button
A progress window will be displayed as described above under Step 5 of
“Transferring Images Using the Image Transfer Window” ( 18). Depending on user settings, any rotations and size changes may apply when the
images are transferred, and transferred images may be catalogued using the
selected image database software.
Saving Images
After selecting the image or images you wish to save from the thumbnail
list, click the “Save copy” button. A dialog will appear where you can navigate to the volume (disk) and folder to which you wish to save copies of
the images. The original image will remain on the memory card inserted in
the camera, card slot, or card reader.
“Save copy” button
Select the folder to which you wish
to save the copies and click OK.
Copies of the selected images will
be saved in the selected folder.
In the Macintosh version, select the
desired folder and click Save.
Printing Images
In the thumbnail list area, select the image or images you wish to print.
Click the “Print” button to print the images at their original size.
“Print” button
Tutorial: The Thumbnail list window
The copies created by this operation are identical to the original images on
the memory card, and do not reflect rotations or size changes made in the
Thumbnail list window. Captions and keywords are not included, and the
images will not be catalogued or registered in a database as they are saved.
In the Macintosh version of Nikon View 4, a thumbnail icon will be created
for display in the Finder.
Copying Images to Disk by Drag and Drop
Images can also be copied to disk by dragging and dropping the selected
thumbnails onto the desktop or another folder.
26
Page 27

Rotating Images
Select the image or images you want to rotate from the thumbnail list and
click the “90° CCW” or “90° CW” button.
“90° CCW” button
“90° CW” button
Any rotations will be reflected in the thumbnail images.
Viewing Photo Information
When a single thumbnail is selected,
photo information will be displayed
in the camera settings section.
Photo information is not displayed
when no thumbnail is highlighted or
when multiple thumbnails are selected.
The camera settings section can be
displayed or hidden using the “Toggle
view” button. The information in the
camera settings section can be selected and copied to the clipboard.
The information displayed includes the following items. If no information is
available for a given setting, “N/A” will be displayed.
Image rotated
counter-clockwise
Rotations do not apply to the original images on the memory card inserted in the camera , card slot, or card reader, but will be visible in images
opened in the still-image viewer. The image will also be rotated when
transferred to the computer. Movie files and their associated thumbnails
can not be rotated.
Image rotated
clockwise
Pg. For more information on:
29 Viewing Still Images
Tutorial: The Thumbnail list window
• File name
• File size
• Date and time
• Image size
• Resolution
• Number of bits
• Protection
• Hide attribute (Windows only)
• Camera ID
• Model name
• Quality mode
• Metering mode
• Exposure mode
• Flash
• Focal length
• Shutter speed
• Aperture
• Exposure compensation
• White Balance
• Lens
• Flash sync mode
• Exposure difference
• Flexible program
• Sensitivity (ISO equivalency)
• Image sharpening
• Image type
• Color Mode
• Hue adjustment
• Saturation Control
• Tone compensation
• Latitude (GPS)
• Longitude (GPS)
• Altitude (GPS)
27
Page 28

Deleting Images
After selecting the image or images you want to delete in the thumbnail list
area, click the “Delete” button.
“Delete” button
If the selection does not include any protected images, the following dialog
will be displayed. Click OK to delete the selected images.
If the selection includes protected images, the following dialog will be displayed. Click OK to delete all selected images, including those that are
protected.
Tutorial: The Thumbnail list window
Deleted Images
Images selected for deletion are permanently erased from the memory card
inserted in the camera, card slot, or card reader, and can not be recovered.
28
Page 29

Viewing Images
Viewing Still Images
Double-click any of the highlighted images to open each of the selected
images in a separate window. The folder and file name will be displayed in
the title bar, separated by a backslash (Windows) or colon (Macintosh).
The following buttons are located at the bottom left corner of the window:
“90° CCW,” “90° CW,” “Zoom out,” and “Zoom in.” The status bar shows
the width and height of the image in pixels, the current zoom ratio, and the
amount of rotation currently applied to the image.
Scrolling Images
Areas of the image that do not fit in the window can be viewed by dragging
the image with the hand cursor ( ) or by scrolling the image with the
scroll bars at the bottom and right side of the window.
Rotating Images
Images can be rotated ninety degrees at a time in either direction using the
rotate buttons at the bottom left corner of the window.
Zooming the Image in or Out
Use the zoom in and zoom out buttons to zoom the image in or out. If you
press the ALT (Windows) or option (Macintosh) key while the cursor is
over the image window, the cursor will change to the zoom-out cursor
( ). Click anywhere in the window while the zoom-out cursor is displayed to zoom out. To zoom in, press the Ctrl (Windows) or command
(Macintosh) key while the cursor is over the image window (the zoom-in
cursor ( ) will be displayed) and click anywhere on the image. The minimum zoom ratio is 1 : 8, the maximum ratio 8 : 1.
Selecting a Still-Image Viewer
The application used to view still images can be selected from the Viewer
tab in the Preferences dialog.
Tutorial: The Thumbnail list window
“Zoom in” button
“Zoom out” button
“90° CW” button
“90° CCW” button
Pg. For more information on:
42 Preferences: Viewer
29
Page 30

Viewing Movies
Movies can be played back by clicking the associated thumbnail.
Windows
Movies can be played back using any application that supports Quick Time
movie files with the “.MOV” extension, such as the Quick Time Player included on the Nikon View 4 CD. For details, see the documentation provided with the movie player application.
Macintosh
In the Macintosh version of Nikon View 4, movies can be played back using
the built-in player or in any external application that supports Quick Time
movies. At installation, the default external application is the Quick Time
Player. For details, see the documentation provided with the movie player
application.
Choosing a Movie Player
The application used for playing movies can be selected using the Viewer
tab of the Preferences dialog.
Pg. For more information on:
42 Preferences: Viewer
Tutorial: The Thumbnail list window
Choosing a Movie Player
The application used for playing movies can be selected using the Viewer
tab of the Preferences dialog.
Pg. For more information on:
42 Preferences: Viewer
30
Page 31

Other Operations
This section describes the other operations that can be performed in the
Thumbnail list window.
Deleting Folders
To delete a folder and all images it contains, select the folder in the folder
tree area and click the “Delete” button.
Formatting Memory Cards
Memory cards inserted in a card reader or card slot, or in a COOLPIX995/
775 connected via USB, can be formatted by selecting the card reader icon
in the folder tree area and choosing Format card from the Camera
menu. Depending on your operating system, one of the following dialogs
will appear. Click Start (Windows) or OK (Macintosh) to format the
memory card. The procedure for formatting memory cards inserted in
cameras in the D1 series is the same as that when formatting cards from
the camera.
Macintosh
Windows
“Delete” button
If the folder contains no protected images, the following dialog will be displayed. Click OK to delete the selected folder.
If the folder contains protected images, the following dialog will be displayed.
Clicking OK deletes the folder and all images it contains (including protected images).
Formatting Memory Cards
Formatting memory card permanently deletes all data they contain. Note
that clicking OK in the dialog that is displayed when formatting is complete
will exit Nikon View 4.
Tutorial: The Thumbnail list window
Deleted Folders
Once deleted, folders and their contents can not be recovered.
31
Page 32

Task Confirmation
When a task is in progress, the segments of the progress indicator light up
in sequence. Do not perform any other operations until the current task is
complete.
Progress indicator
Viewing Help
For information on using Nikon View 4, click the “Help” button. The help
file will be displayed.
“Help” button
The help file can be viewed using basic Windows or Macintosh operations.
For details, refer to the documentation provided with your operating system.
Tutorial: The Thumbnail list window
32
Page 33

Preferences
Fine-Tuning Nikon View 4
The Preferences Dialog (p. 34)
The Auto Start Tab (p. 34)
The Transfer Tab (pp. 35–39)
The Database Tab (p. 40)
The File Information Tab (p. 41)
The Viewer Tab (p. 42)
About This Chapter
This chapter describes the options available in the Nikon View 4 Preferences dialog.
33
Page 34

The Preferences Dialog
The Auto start Tab
Adjusting Preferences
The Preferences dialog can be opened by clicking the “Preferences” button
in the Transfer Images and Thumbnail List windows.
“Preferences” button
The Preferences dialog contains the following five tabs: Auto Start, Transfer,
Database, File information and Viewer. Changes to settings take effect not
as they are made, but only when the OK button at the bottom of the
Preferences window is clicked. Clicking Cancel closes the Preferences
dialog and returns settings to the values in effect when the dialog was
opened.
Start-up Options for Nikon View 4
The Auto start tab is where you specify the window that will open when Nikon
View 4 starts automatically. You can also turn the auto start option on and off.
The Auto Start tab contains the following options:
Option Description
Transfer tool
(small window)
Contact sheet view
(large window)
The Image Transfer Image window will open when
Nikon View 4 starts automatically. This is the default option at installation.
The Thumbnail List window will open when Nikon
View 4 starts automatically.
Preferences: The Preferences Dialog
Disable auto
start
Nikon View 4 does not start automatically. To enable auto start after selecting this option, start Nikon
View 4 manually and adjust settings in the Preferences dialog.
34
Page 35

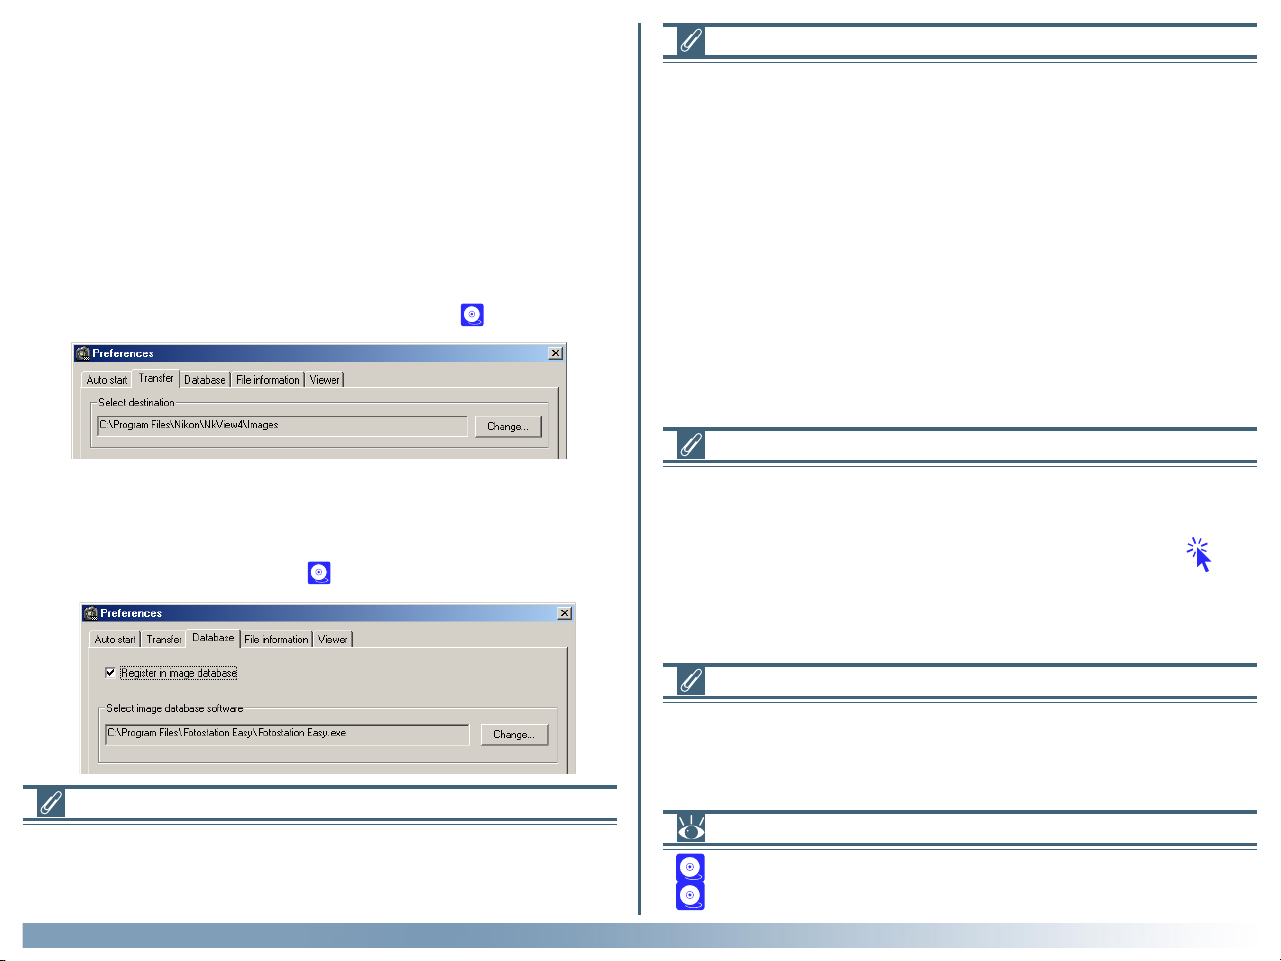
The Transfer Tab
Specifying a Destination and File Names for Transferred Images
The Transfer tab is where you specify the destination and file names for images transferred to the computer. There are a few differences between Transfer
tabs for the Windows and Macintosh versions of Nikon View 4.
Windows Macintosh
Preferences: The Transfer Tab
35
Page 36

Select Destination
This area of the Transfer tab is used to specify the destination folder for
images transferred to the computer.
If the image database software selected in the Database tab uses a registration folder, rather than a catalogue or index to track images, the Change…
button will be grayed out and unavailable. The default destination at installation is the Images folder in the folder to which Nikon View 4 has been
installed. If the destination folder does not exist when the Preferences
dialog is opened, the destination will automatically be changed to the Im-
ages folder and the following warning will be displayed.
File Naming
This area of the Transfer tab is where you specify how files will be named
when transferred to the computer. You can opt to use either the file name
assigned automatically by the camera when the image was taken (Keep
original file name) or a name automatically generated by the computer
as images are transferred to disk (Create new file name). If Create
new file name is selected, you can specify how file names will be assigned
using the options in the File name creation rule section.
Preferences: The Transfer Tab
36
Page 37

File Name Creation Rules
File names created automatically by the computer consist of a prefix or
suffix (optional), content, and file numbers assigned automatically in ascending order. An extension is assigned automatically according to the file
type.
File names
File names generated by Nikon View 4 take the form shown below. File
names may include either a prefix or a suffix, but not both (you can also opt
to use neither a prefix nor a suffix). Note also that an underscore is added
before the file number.
(prefix +) content + _ + file number + (suffix + ) extension
File name creation options
Prefix/Suffix
You can choose one of Use prefix, Use suffix, and Neither. If Use
prefix or Use suffix is selected, you can enter a prefix or suffix of up to
eight characters in the text box. The prefix is added to the beginning of the
file name (before the content), the suffix at the end (before the extension).
Contents
You can select one of None, Use folder name, Use original file name,
and Date and time of creation. If Use original file name is selected,
the Sequential numbering option will be grayed out and unavailable.
Sequential numbering
You can enter a starting number of up to 999999 for sequential file numbering. The specified number will be assigned to the first file transferred to
the computer after the setting is made, after which the file number will be
incremented by one for each file transferred. File numbering will automatically return to zero after 999999 has been reached. File numbering also
returns to zero whenever the Reset button is clicked.
Sample
The sample reflects the results of the selected file-naming options. The example below shows the sample that will be generated when NIKON is selected as the prefix and Date and time of creation chosen for the content.
Prefix Content Sequential numbering
Extensions
Depending on the file type, one of the following extensions will be assigned:
File type Extension File type Extension
JPEG .JPG
NEF
(RAW data)
.NEF
Preferences: The Transfer Tab
TIFF .TIF
Quick Time
movie
.MOV
File-Naming Conventions
The maximum length for file names varies with the operating system. If the
file name exceeds the limit for your operating system, characters will be
trimmed from the right end of the prefix or suffix.
37
Page 38

Windows
Macintosh
The following options are available only in the Windows version of Nikon
View 4.
Save hidden image
If this box is checked (the default setting at installation), hidden images will
be saved together with other images when files are transferred to the computer using the transfer window. If the box is not checked, hidden images
will not be transferred to the computer when files are transferred to the
computer using the Image Transfer window. The Save hidden image
option has no effect on transfer and save operations performed in the
Thumbnail List window; all images, including hidden images, selected in the
Thumbnail list window will be transferred whether or not the Save hid-
den image box is checked.
Display thumbnail during transfer
When this box is checked (the default setting at installation), a thumbnail
preview of each of the images transferred will be displayed while the file is
copied to the computer.
The following options are available only in the Macintosh version of Nikon
View 4.
Create thumbnail
When this box is checked (the default setting at installation), a thumbnail
icon is generated for each image as it is transferred. This icon will be shown
when Icon is selected in the Finder View menu.
Display thumbnail during transfer
When this box is checked (the default setting at installation), a thumbnail
preview of each of the images transferred will be displayed while the file is
copied to the computer.
Pg. For more information on:
17 Image transfer rule
Preferences: The Transfer Tab
File Icons
If Create thumbnail is not checked, image files will automatically be as-
signed a file icon for the application associated with other files of the same
type. If no application is associated with files of the appropriate type, the
file will have an empty icon.
38
Page 39

Macintosh
The following options are available only in the Macintosh version of Nikon
View 4.
During installation, Nikon View 4 will search for existing applications and
automatically associate the above file types with the following defaults:
Still images (JPEG/TIFF)
Select a helper application for each file format
The buttons in this area are used to select the applications associated with
files transferred to the computer. The selected applications will start when
files are double-clicked in the Finder after transfer. Separate options are
available for still images (JPEG and TIFF files), NEF image (RAW data), and
movies. Click the Change… button to choose the associated application.
Photoshop present
at installation?
Ye s Photoshop
No
Default viewer selected at installation
Quick Time Picture Viewer
NEF images (RAW data)
Application present at installation
Photoshop
Present
Present
Not Present
Not Present
Nikon Capture
Present
Not Present
Present
Not Present
Movie
Quick Time Player
Default viewer selected
at installation
Nikon Capture
Photoshop
Nikon Capture
Nikon Capture
Preferences: The Transfer Tab
39
Page 40

The Database Tab
Choosing an Image Database Application
The Database tab contains options for choosing an image database application and the catalog file or registration folder used to catalog images as
they are transferred. When the Register in image database box is
checked, you can select an image database application by clicking the
Change… button next to the Select image database software textbox.
Select image database software
If the selected image database application catalogs images in a file, you will
be prompted to select the catalog file used. If it instead catalogs images in
a folder, you will be prompted to select a registration folder. Be sure that
the application selected is supported under Nikon View 4 ( 16).
Select catalog file
This option is available if the selected image database application creates a
catalog file containing image information supplied by Nikon View 4 as the
images are transferred to the computer (Cumulus 5.0 and iView MediaPro
1.0 are examples of this type of database application). To specify the file
used to catalog transferred images, click the Change… button. To create
a new catalog file containing no image data, click New….
Select registration folder
This option is available if the selected application creates an image database
by copying images to a folder (PC-Archive is an example of this type of
database application). To select the folder used, click the Change… button.
Preferences: The Database Tab
Registration Folders
If a registration folder is selected, the Select destination text box in the
Transfer tab of the Preferences dialog will show the folder selected. The
destination folder can not be changed from the Transfer tab.
40
Page 41

The File Information Tab
Including Information with Transferred Images
Copy camera settings to caption
When this box is checked (the default setting at installation), photo information is included in the photo caption. Photo information will only be
added to the database if this box is checked.
When Copy camera settings to Caption field is checked, photo information for still images is copied to the caption. The caption can be viewed
in the file information or file properties windows of applications such as
Photoshop (version 5.0 or later). Captions can also be viewed with image
database software.
Keywords
You can specify up to ten keywords of up to thirty-one characters in length
to be included with the files transferred to the computer. Enter a keyword
in the text box after checking the box to its left.
Keywords are added to the file information when the image is transferred,
and are visible in the file information or file properties windows of applications such as Photoshop (version 5.0 or later). Keywords can also be viewed
with image database software.
A caption is not created in the case of movie files.
Preferences: The File Information Tab
Keywords are not included with movie files.
41
Page 42

The Viewer Tab
Options for the Thumbnail List Window
Create large thumbnails from image data
When this box is checked, a large thumbnail preview will be generated
when data for such a thumbnail does not exist in the original file. Note that
this will increase the amount of time needed to display thumbnails. The
default for this option is off.
Select still image viewer
You can choose the viewer for still images from the viewer included with
Nikon View 4 (Nikon View) or a third-party application such as Adobe
Photoshop (Other program). When Other program is selected, the
application used to view still images can be chosen by clicking the Change…
button. The default option at installation is Nikon View.
Select movie player
The options in this section are used to select the player for viewing movies.
When data for a large thumbnail exists in the original image file, standard
size thumbnails will be generated from the large thumbnail, irrespective of
the above setting.
Large Thumbnails
Large thumbnails for high-resolution thumbnail display are included in still
images taken with the D1X, D1H, or COOLPIX995. Large thumbnails are
not included in images taken with the D1 or COOLPIX775.
Preferences: The Viewer Tab
Windows
Click the Change… button next to the Choose program text box to
choose the application used to play movie files.
Macintosh
You can choose a movie player from the player included with Nikon View 4
(Built-in player) or a third-party application (External application).
When External application is selected, the application used to play movies
can be chosen by clicking the Change… button. The default option at
installation is Built-in player.
42
Page 43

Appendices
Nikon View 4 Visual Index (pp. 44–47)
Troubleshooting (p. 48)
Reinstall (pp. 49–51)
About This Section
The appendices provide:
• A clickable index to Nikon View 4’s menus
• A guide to what to do when Nikon View 4 does not function as expected
• Instructions on reinstalling Nikon View 4
43
Page 44

Appendix A
The following pages provide a visual index to the Nikon View 4 menus.
The Transfer Images Window Menu Bar (Macintosh Only)
About Nikon View 4…
Display version information for Nikon
View 4.
Preferences…
Transfer
Transfer images from the memory card
to the computer.
Quit
Quit Nikon View 4.
The other commands in this menu are
grayed out and unavailable when the
Image Transfer window is active.
Open the Preferences dialog.
The other commands in this menu are
grayed out and unavailable when the
Image Transfer window is active. They
can be used in the Preferences and
other dialogs to cut, copy, paste, clear,
and select text, and to undo cut, paste,
and clear commands.
Nikon View 4 Visual Index
Help Center
Displays the help menu.
Show Balloons
Displays “Balloon Help”.
Nikon View 4 Help
Open the Nikon View 4 help file.
Appendix A: Nikon View 4 Visual Index
44
Page 45

The Thumbnail List Window Menu Bar (Windows)
Copy
Copy to the clipboard text selected
Open…
Open the selected image(s).
Transfer
Transfer the selected image(s) to the
computer.
Save copy of image
Save a copy of the selected image(s)
to disk.
Copy thumbnail list to file
Output the thumbnail list to disk as a
JPEG file.
Print Thumbnail List
Print the thumbnail list.
Print Image
Print the selected image(s).
Exit
Exit Nikon View 4.
in the camera settings section or in a
text box.
Select
Select all marked or unmarked, protected or unprotected images.
Select All
Select all thumbnails.
Preferences…
Open the Preferences dialog.
View Image Folder(s)
When this item is checked, the folder
tree area will be displayed.
View Shooting Data
When this item is checked, the camera settings section will be displayed.
Display Small Transfer Window
Closes the Thumbnail list window and
opens the Image Transfer window.
Rotate
Rotate the selected image(s) ninety degrees clockwise or counter-clockwise.
Attribute
Change the protected or hidden status of the selected image(s).
Delete
Delete the selected image(s) or folder.
Format card
Format the memory card inserted in
the camera, card slot, or card reader.
Help Topics
Display Nikon View 4 help topics.
About Nikon View 4…
Display version information for Nikon
View 4.
Appendix A: Nikon View 4 Visual Index
45
Page 46

The Thumbnail List Window Menu Bar (Macintosh)
Print Setup…
Display the print setup dialog for the
About Nikon View 4…
Display version information for Nikon
View 4.
Open
Open the selected image(s).
Close
Close the active image window.
Transfer
Transfer the selected image(s) to the
computer.
printer selected in the Chooser.
Copy thumbnail list to file
Output the thumbnail list to disk as a
JPEG file.
Print Thumbnail List…
Print the thumbnail list.
Print…
Print the selected image(s).
Quit
Quit Nikon View 4.
Undo/Cut/Copy/Paste/Clear
These commands are only active during text entry in dialogs such as the
Preferences dialog, when they allow
you to use keyboard shortcuts to cut,
copy, paste, and clear text and undo
cut, copy, paste, and clear commands.
Select
Select all marked or unmarked, protected or unprotected images.
Select All
Select all thumbnails.
Preferences…
Open the Preferences dialog.
View Image Folder(s)
When this item is checked, the folder
tree area will be displayed.
View Shooting Data
When this item is checked, the camera settings section will be displayed.
Zoom In/Zoom Out
Zoom images displayed in the built-in
viewer in or out.
Display Small Transfer Window
Closes the Thumbnail List window and
opens the Image Transfer window.
Save copy of image
Save a copy of the selected image(s)
to disk.
Appendix A: Nikon View 4 Visual Index
46
Page 47

The Thumbnail List Window Menu Bar (Macintosh—continued)
Format card…
Format the memory card inserted in
Rotate
Rotate the selected image(s) ninety
degrees clockwise or counter-clockwise.
Protect
Change the protected status of the
selected image(s).
the camera, card slot, or card reader.
Cascade
Arrange the Thumbnail List window
and image windows so that they overlap.
Thumbnail list
Activate the Thumbnail List window
and bring it to the front.
Help Center
Display Mac OS help.
Show/Hide Balloons
Turn Balloon Help on and off.
Nikon View 4 Help
Open the Nikon View 4 help file.
Delete…
Delete the selected image(s) or folder.
Appendix A: Nikon View 4 Visual Index
Open files
The files open in the built-in viewer
are listed at the end of the menu.
47
Page 48

Appendix B
Should you encounter any problems using Nikon View 4, check the list below before contacting your retailer or Nikon representative.
Possible CauseProblem
Troubleshooting
9
8
8
34
9
23
8
42• No movie player is selected in the Viewer tab of the Preferences dialog.
Nikon View 4 does not start auto-
matically when a camera or card
reader is connected.
The thumbnail list is not displayed.
Movies can not be played back
(Windows only)
• A memory card is not inserted in the camera or card reader.
• The images on the memory card were taken with a make of camera not supported under
Nikon View 4.
• The camera is not properly installed
• Disable auto start is selected in the Auto start tab of the Preferences dialog.
• No memory card is inserted in the camera, card slot, or card reader
• No camera or card reader is selected in the folder tree.
• The card does not contain images taken with a Nikon digital camera.
Life-Long Learning
As part of Nikon’s “Life-Long Learning” commitment to ongoing product support and education, continually-updated information is available on-line at the
following web-sites:
• For users in the United States of America: http://www.nikonusa.com/
• For users in Europe: http://www.nikon-euro.com/
•
For users in Asia, Oceania, the Middle East, and Africa:
http://www.nikon-asia.com/
Visit these sites to keep up-to-date with the latest product information and general advice on digital imaging and photography. For more information, please
contact your nearest Nikon representative.
http://www.nikon-image.com/eng/
Appendix B: Troubleshooting
48
Page 49

Appendix C
Reinstall
When Nikon View 4 does not function as expected (see Appendix B, “Troubleshooting”), it may indicate that you need to reinstall the program. This
appendix describes how to uninstall and reinstall Nikon View on both the Macintosh and Windows platforms.
Reinstalling Nikon View 4
Before reinstalling Nikon View 4, you will need to uninstall the program.
Windows
Step 1—Uninstall Nikon View 4
From the Start menu, select Programs > Nikon View 4 > Nikon View 4
Uninstall.
Click here to proceed to the next step.
Windows 2000 Professional
Macintosh
Step 1—Start the installer
After inserting the Nikon View 4 CD into the CD-ROM drive, click Install
Nikon View 4 in the Basic Software tab of the Welcome dialog. The li-
cense agreement and ReadMe windows will be displayed; click Accept and
Continue… to proceed to the installer dialog shown in Step 2.
Log on as the Administrator when uninstalling Nikon View 4.
Appendix C: Reinstall
Click here to proceed to the next step.
49
Page 50

Windows
Step 2—Confirmation
When the message, “Do you want to completely remove the selected ap-
plication and all of its components?” appears, click OK to begin the pro-
cess of uninstalling Nikon View 4.
Step 3—Shared components
If any of the components used by Nikon View 4 are also used by another
program, a confirmation dialog will be displayed. Follow the instructions in
the dialog to remove the component or leave it untouched.
Macintosh
Step 2—Select the uninstall option
To start the process of uninstalling Nikon View 4, select Uninstall from
the pop-up menu in the top left corner of the installer dialog and then click
the Uninstall button at the bottom right corner of the dialog.
Step 3—Exit other applications
The dialog shown below will be displayed. Click Continue to automati-
cally quit all other applications and continue the process of uninstalling
Nikon View 4.
Click here to proceed to the next step.
Appendix C: Reinstall
Click here to proceed to the next step.
50
Page 51

Windows
Step 4—Restart your computer
The dialog shown below will be displayed when the process of uninstalling
Nikon View 4 is complete. Confirm that Yes, I want to restart my com-
puter now is selected and click Finish to restart your computer.
Step 5—Reinstall Nikon View 4
Reinstall Nikon View 4 as described in “Getting Started: Installation”( 7).
Macintosh
Step 4—Exit the uninstaller
Once the process of uninstalling Nikon View 4 is complete, the following
message will be displayed. Click OK to exit the uninstaller.
Step 5—Restart your computer
Please restart your computer.
Step 6—Reinstall Nikon View 4
Reinstall Nikon View 4 as described in “Getting Started: Installation”( 7).
Pg. For more information on:
7 Installing Nikon View 4
Appendix C: Reinstall
Pg. For more information on:
7 Installing Nikon View 4
51
 Loading...