


Contents
Overview
Getting Started—Browsing Images
Browsing the Images in Your Camera
Browsing Compact Flash-Memory Cards
Browsing Images on Disk
Displaying Image Files as a List
Browsing Images in the Windows Explorer
Working with Images
Companion Software for
COOLPIX Digital Cameras
Nikon View Ver.2
for Windows
Reference Manual
Selecting Thumbnails
Viewing Images
Rotating Thumbnails
Deleting Images
Printing Images
Refreshing Thumbnails and Folders
Viewing Image Information
Copying Images to Disk
Opening Images in Another Application
Inserting Images into Documents
Preference
Changing Port and Rate Settings
Nikon View Reference
The Menu Bar
The Tool Bar
The Right-Button Menus
- 1 -

Overview
Welcome to Nikon View Ver.2 for Windows (below, Nikon View),
a companion program for the COOLPIX 700, COOLPIX 900
Series, and the COOLPIX 950 (below, “COOLPIX digital
cameras”). The Nikon View camera driver and browser allows
rapid, easy access to camera image files when the camera is
connected to a computer. With Nikon View, the camera functions as one of your computer’s drives, making it possible to
apply standard Windows operations to the image files in the
camera’s memory. Once you have installed Nikon View and
mastered its simple operations, you’ll be able to distribute your
digital photographs by disk or electronic mail, or include them in
your home page and other documents you create for business
or personal use.
Nikon View’s principal features are listed below.
• a camera driver for the COOLPIX digital cameras, which
allows you to connect your camera to a computer and
access its memory in much the same way as you would an
ordinary disk drive
• support of OLE 2.0 Drag-and-Drop, making it easy to copy
images to disk, open them in other applications, or insert
them in documents
• simple operation featuring one-touch tool-bars and menus
• images can be opened in any application that supports JPEG
or TIFF for retouching or to be saved in another format,
allowing you to use images as wallpaper for your desktop or
distribute them by electronic mail
• if you have a compact flash-memory reader or a PCMCIA
card slot and card adapter, the digital camera’s compact
flash-memory cards can be browsed even when not inserted
in the camera
• a browser function that makes it possible to preview at a
glance all the images stored in your camera’s memory, and to
select items for editing, deletion, or transfer to disk
Overview
- 2 -

This manual will guide you, step-by-step, through the process of
using Nikon View with your digital camera. For details on Nikon
View installation and system requirements, refer to the ”Quick
Start Guide.”
The Manual Layout
The contents of each chapter are outlined below.
With Different Operating Systems
The illustrations and explanations in this manual are for Windows 98. Display and operation may differ under Windows NT
4.0, Windows 95, or when Active Desktop is used with Windows 95. Refer to the manuals provided with your operating
system.
Overview
Describes Nikon View’s features and outlines the contents of
this manual.
Getting Started—Browsing Images
Introduces basic techniques for browsing images with Nikon
View.
Working with Images
Details the process of viewing images, opening them in other
applications, and saving them to disk.
Preference
Discusses port and data transfer rate settings adjustment.
Nikon View Reference
A handy reference guide to Nikon View’s menu bar and tool
bar.
On Symbols in This Manual
The ✔ symbols in this manual signify the need for caution when
using the product. These indications are placed in sections that
should be read before operation to prevent damage to the
product.
Working Knowledge
This manual assumes a basic understanding of common Windows operations. If you are in doubt about the meaning of
terms used here, refer to your Windows manual.
Overview
- 3 -
Getting Started—Browsing Images
Once you have installed the Nikon View software as described
in “Quick Start Guide,” Nikon View allows you to use the
camera’s memory in much the same way that you would use
any other drive. This chapter describes how to browse the
images in the camera’s memory, compact flash-memory cards,
and your computer disk.
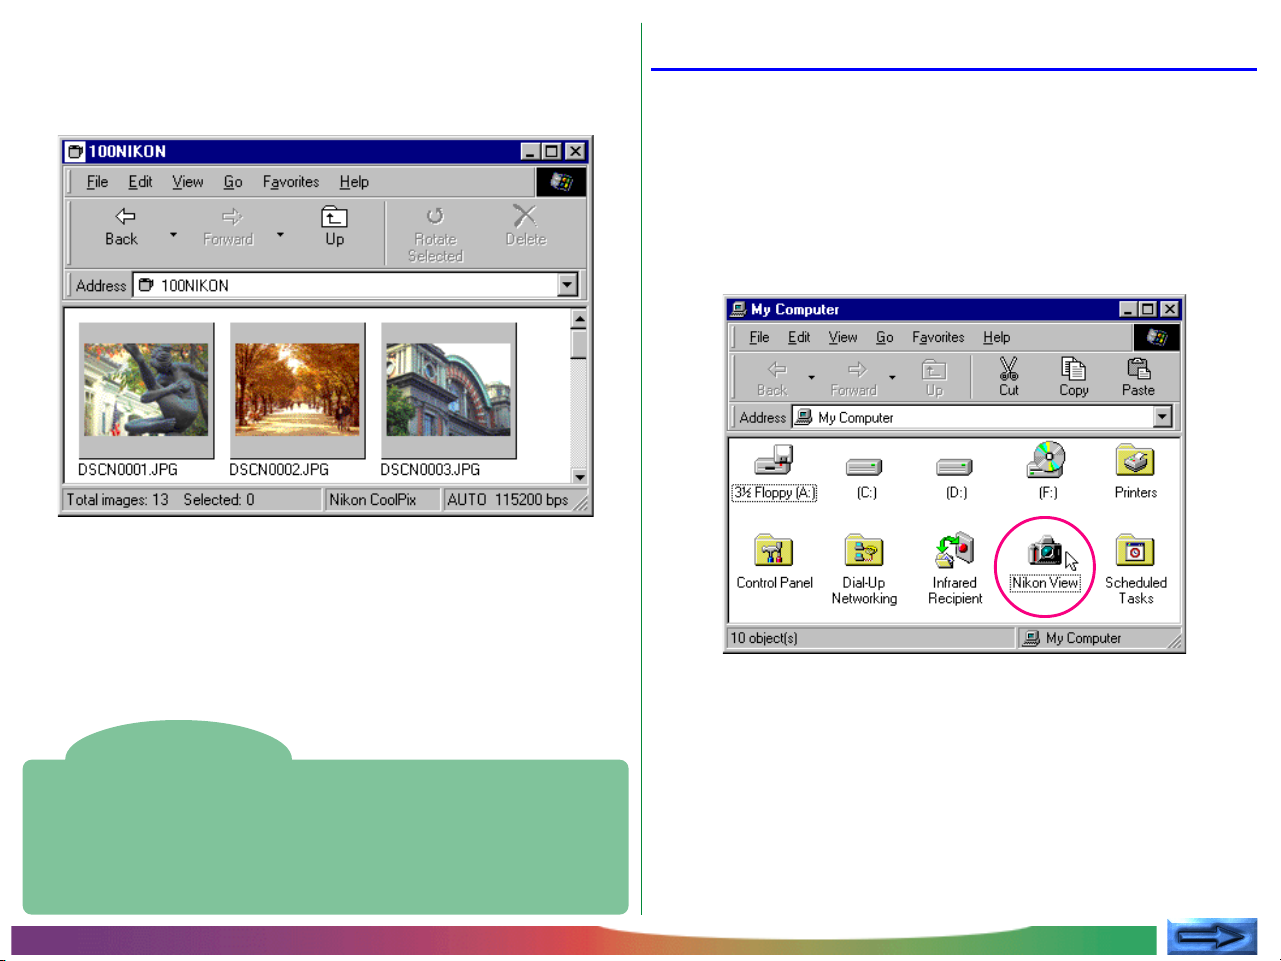
Browsing the Images in Your Camera
You can use Nikon View to browse the images stored in your
camera and display them as thumbnails.
Follow these steps to view images stored in your digital
camera’s memory.
1 Connect the camera to your computer as described in the
documentation provided with your camera.
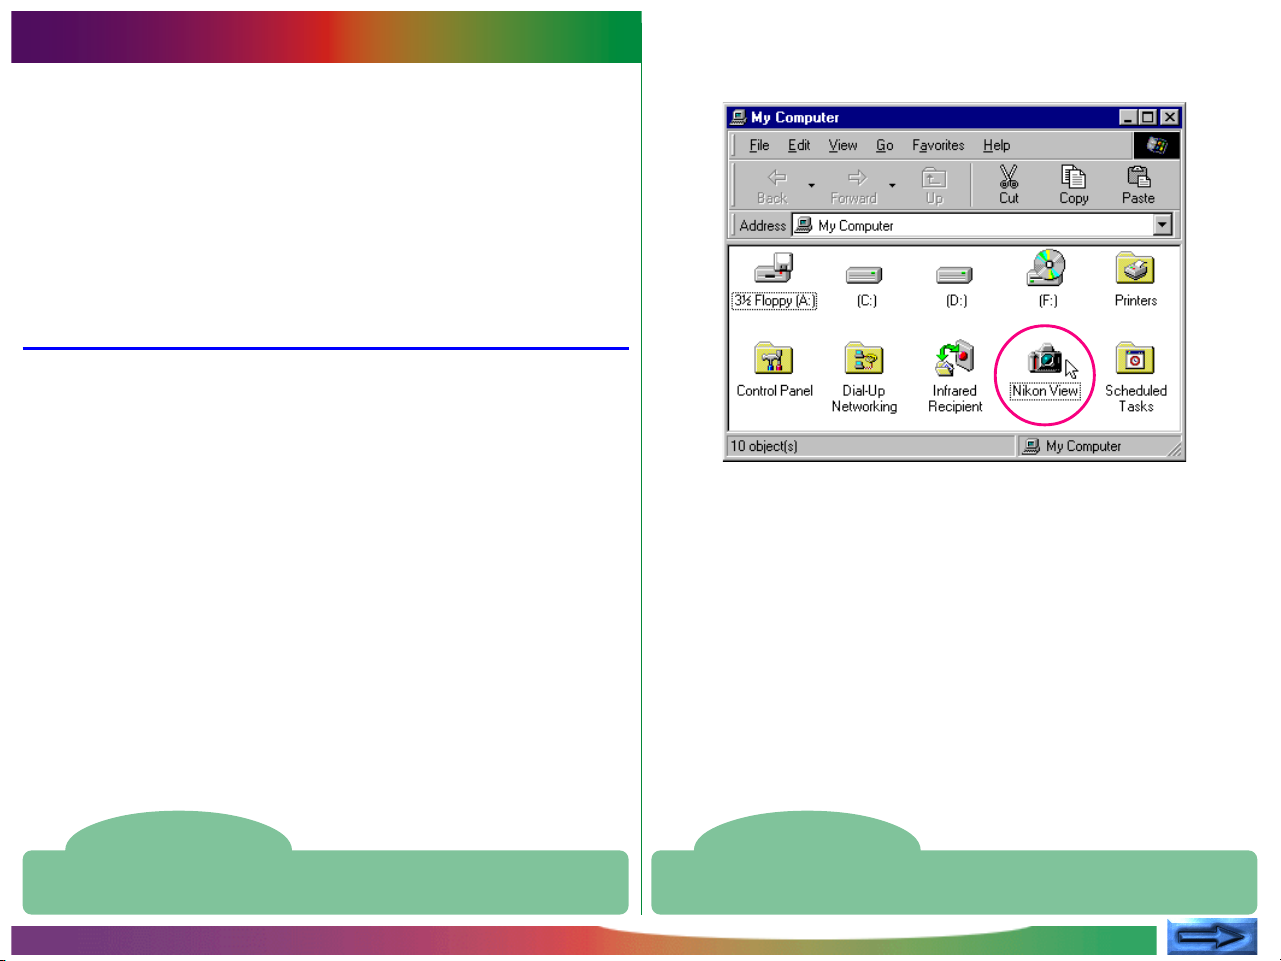
2 After turning on your computer, double-click the Nikon
View icon in the My Computer window.
The Nikon View window will open.
Tips
Nikon View supports one camera, attached to a serial (COM 1–4) port. It
does not support multiple connected cameras or port-extension boards.
Browsing Images: Browsing Images in Your Camera
Tips
The camera will not function as a network drive. Consequently, the Nikon
View icon will not be visible to other computers.
- 4 -
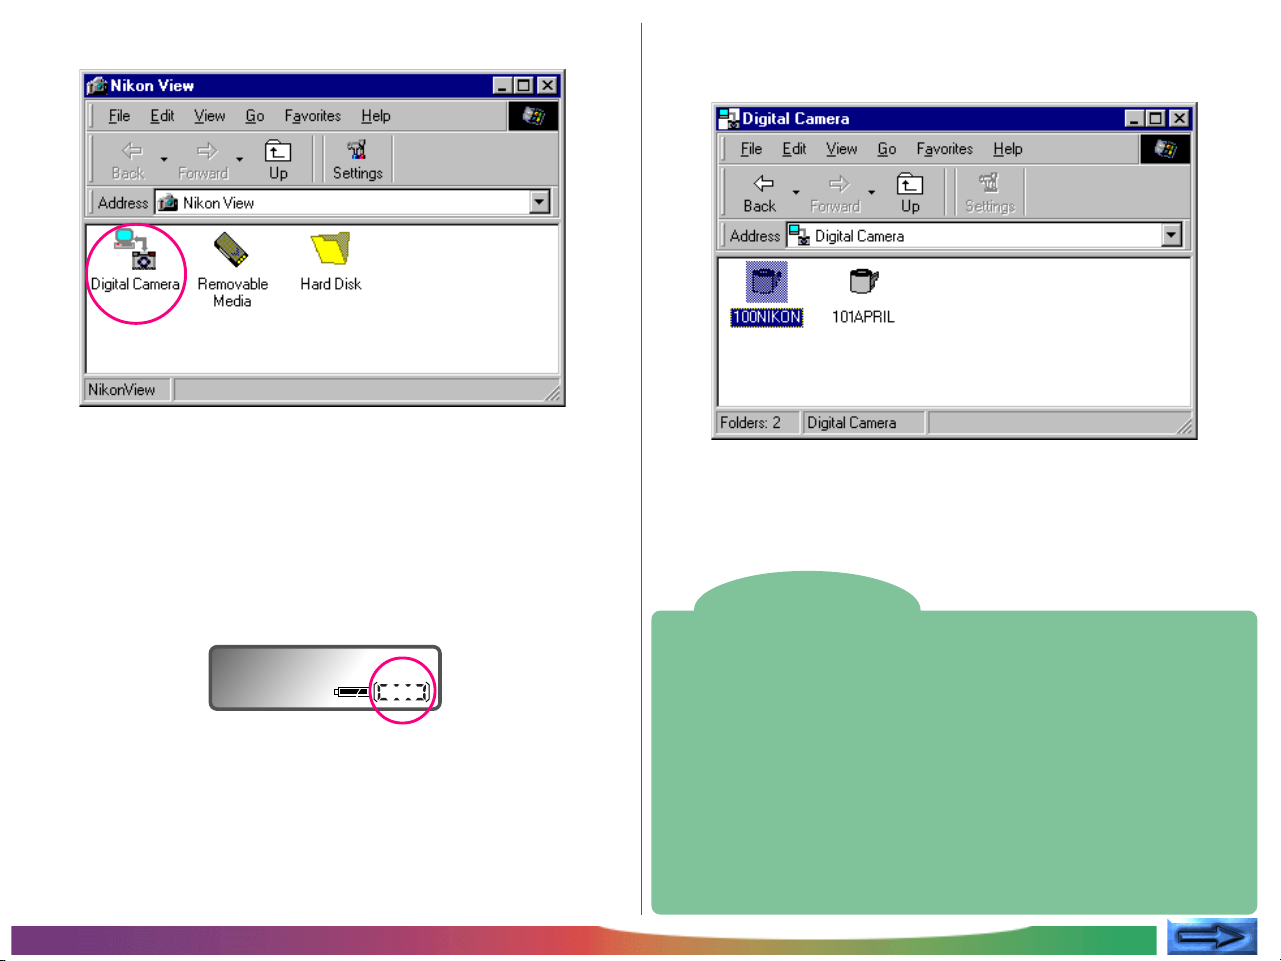
3 Double-click the Digital Camera icon.
✔Caution: The data-transfer icon in the camera’s control
panel is displayed while the computer communicates with the
camera. The data-transfer icon is displayed for up to sixty seconds
after transfer of data is complete. Do not disconnect the camera
while the icon is displayed. (The data transfer icon varies according to your camera model.)
The data-transfer icon
(COOLPIX 950)
Folders saved in the camera’s memory are represented by a
roll film icon.
Folder Names
When displayed in Nikon View, folders created with the camera are prefixed
by a three digit folder number. Thus the default folder, which when viewed
from the camera menus has the name “NIKON,” is displayed in Nikon View
as “100NIKON.” Each folder can hold up to 999 images. If this number is
exceeded, the camera will create a new folder with the same name but a
different prefix (e.g., “101NIKON”). When viewed on a computer, folders
with the same name but a different prefix appear as separate folders. When
viewed from the camera menus, however, folders with the same name appear to be the same folder, although the full folder name with prefix appears in the photo information display in playback mode.
Browsing Images: Browsing Images in Your Camera
- 5 -
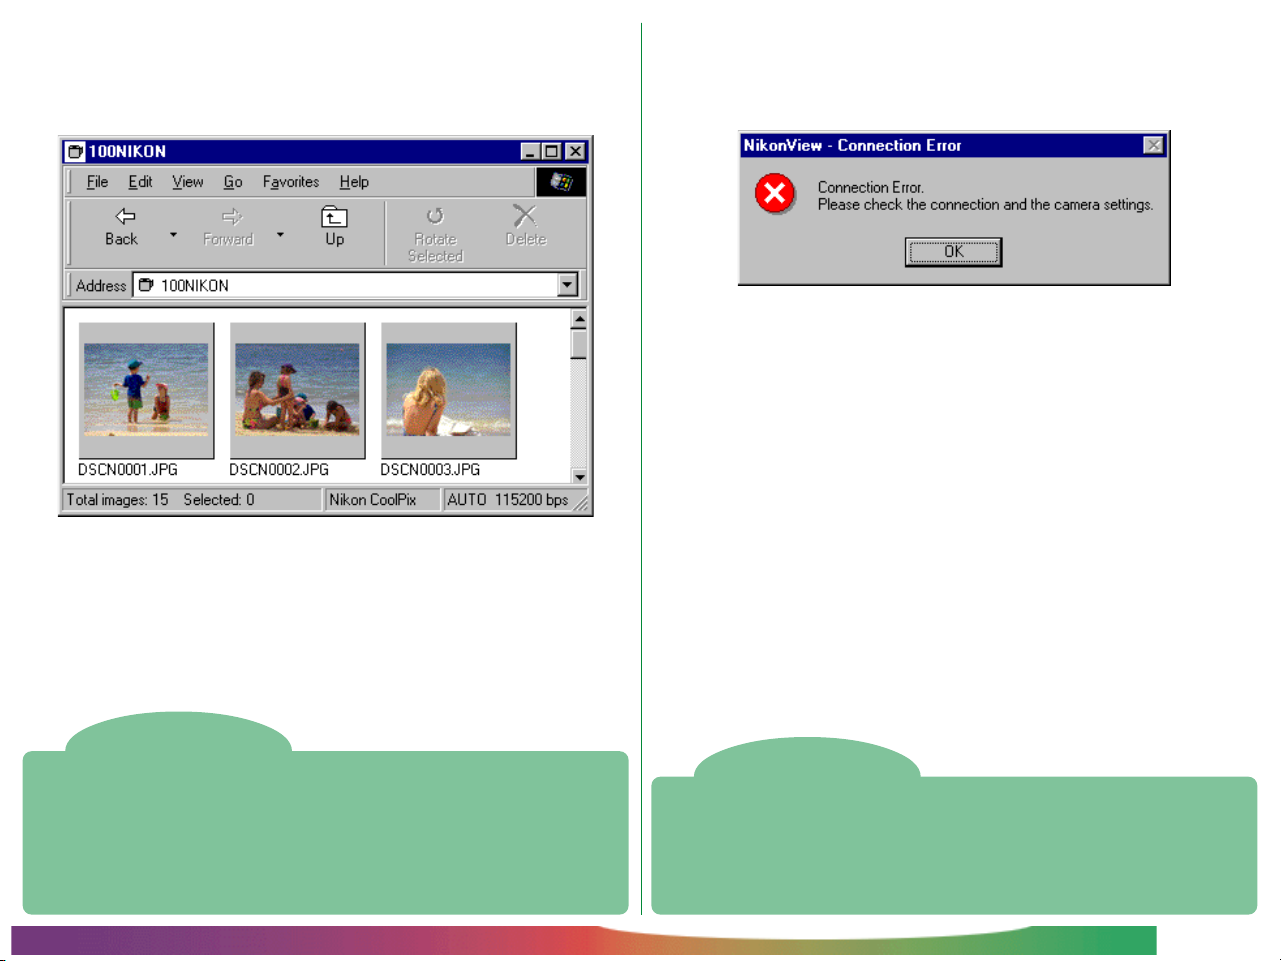
4 Double-click the folder icon.
The images in the selected folder will appear as thumbnail
images.
You can then view each thumbnail at full resolution, and
print, delete, or copy it. See the following chapter for details.
Connection error
If the computer is unable to establish connection with the
camera, the following dialog box will appear.
After clicking OK to close the dialog box, check that the cam-
era and computer are connected and that the camera’s selector
dial is not set to OFF. If the data transfer icon does not appear
in the camera’s control panel, check whether the serial cable is
properly connected and that the batteries are properly inserted,
and are not dead. If you are using the AC adapter, be sure that
it is properly connected. This connection error dialog box will
also appear if you specified the wrong port during installation.
Choose a new port as described in “Changing Port and Rate
Settings.”
Tips
The camera’s memory is treated as write-protected when browsing in Nikon
View. Files cannot be copied from other folders to the browsing window,
nor can files be saved to the camera after editing in another application.
The file names displayed in the browsing window cannot be changed. Should
you wish to change a file name, do so after copying the image to disk.
Browsing Images: Browsing Images in Your Camera
Tips
The dafault data-transfer rate is 115,200 bps. This setting may be too high
for some i486 machines. If you experience communications problems,
choose the lower data-transfer rate until you find one that works as described in “Changing Port and Rate Settings.”
- 6 -
Browsing Compact Flash-Memory Cards
If your computer has a Type II PCMCIA card drive, you can
read compact flash-memory cards using a flash-memory adapter
(available separately from Nikon), or by using a compact flash
card-reader. If a card containing images taken with a COOLPIX
digital camera is inserted in either device, you can browse its
contents by using Nikon View.
Follow these steps to view images stored on a flash-memory
card.
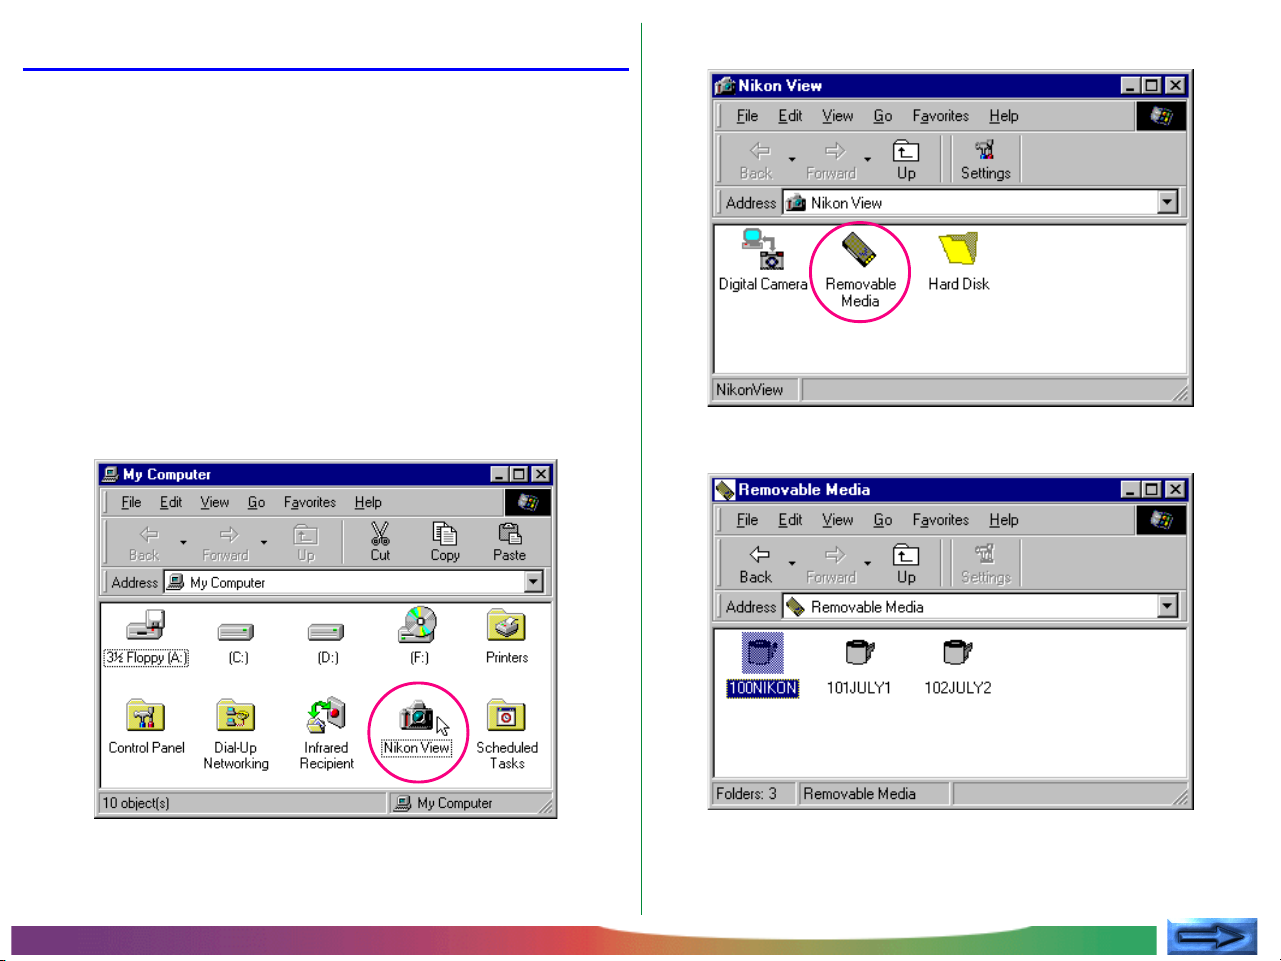
1 Double-click the Nikon View icon in the My Computer
window.
2 Double-click the Removable Media icon.
Folders in the card are represented by a roll film icon.
The Nikon View window will open.
Browsing Images: Browsing Compact Flash-Memory Cards
- 7 -
3 Double-click the folder icon.
The images in the selected folder will appear as thumbnail
images.
You can then view each thumbnail at full-resolution, and
print, delete, or copy it. See the following chapter for details.
Browsing Images on Disk
Nikon View can be used to browse images on disk even when
the camera is not connected.
Follow these steps to view images on disk.
1 Double-click the Nikon View icon in the My Computer
window.
Tips
Nikon View automatically detects the drive containing the flash-memory card.
When more than two drives are mounted (PC Card slot or a compact
flash-memory card reader), NIkon View selects one of them that contains a
flash memory card. To change the drive, select Hard Disk in the Nikon View
window, and use the Select Folder command to select the desired drive.
Browsing Images: Browsing Compact Flash-Memory Cards
The Nikon View window will open.
- 8 -

2 Double-click the Hard Disk icon.
You can browse images that you have previously browsed.
The images will appear as thumbnail images.
As there are no previously browsed images when you initially install Nikon View, the Browse for Folder dialog box will
appear when you click the Hard Disk icon.
Select the folder that you want to browse, and click OK.
The images in the selected folder will appear.
You can then view each thumbnail at full-resolution, and
print, delete, or copy it. See the following chapter for details.
Browsing Images: Browsing Images on Disk
- 9 -
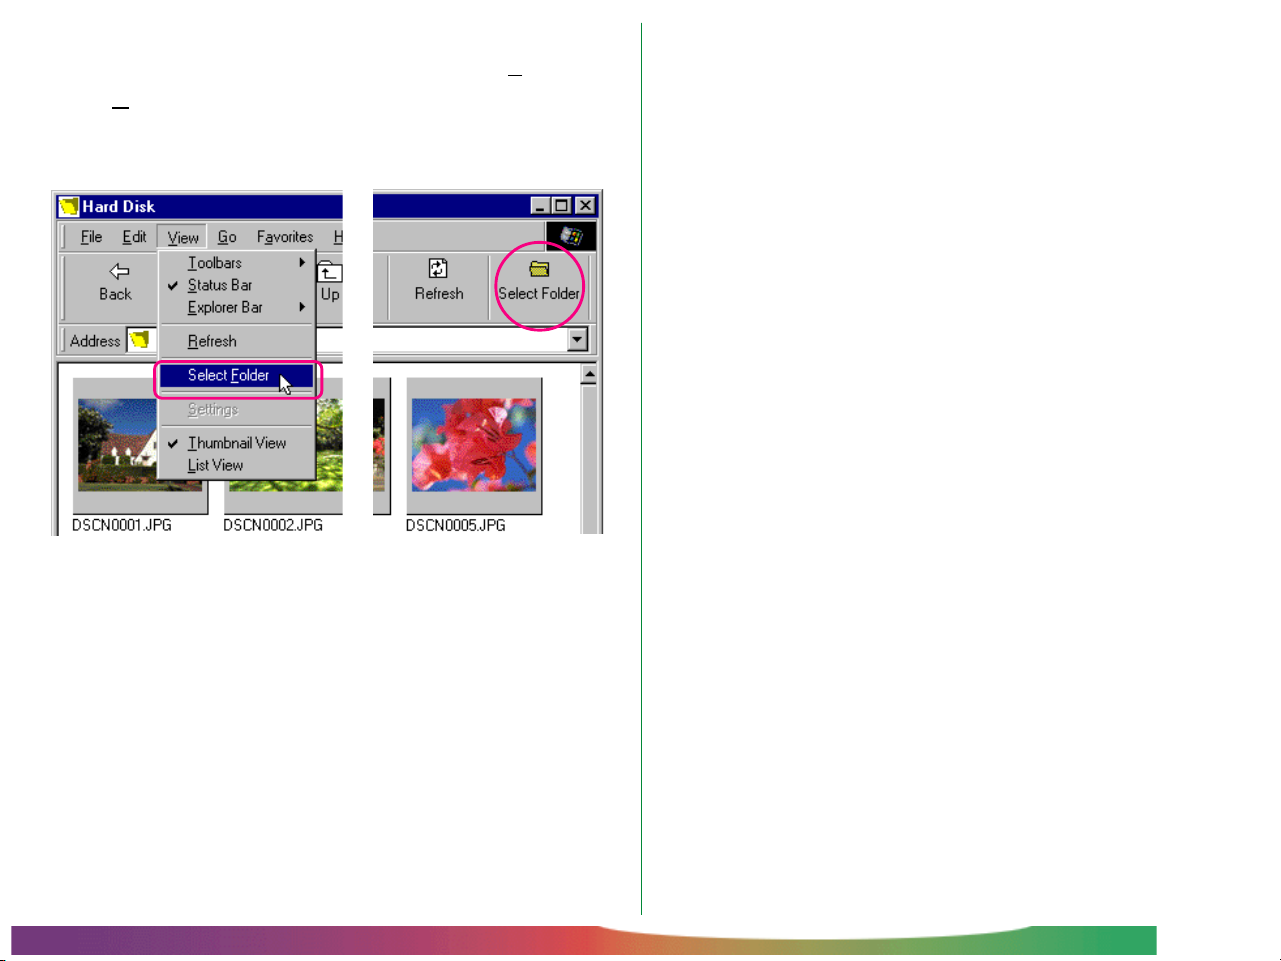
Browsing images in another folder…
To browse images in another folder, select Select Folder
from the View menu, or click the Select Folder button in the
tool bar. If the button is hidden, enlarge the window to bring it
into view.
When the Browse for Folder dialog box appears, select the
folder that you want to browse.
Short-cut: Click the right mouse button in an empty area of the
window and choose Select Folder from the right-button menu.
Browsing Images: Browsing Images on Disk
- 10 -

Displaying Image Files as a List
To view information on the image’s date of recording, a list-style
display is available by selecting List View from the View menu
or by clicking the List View button in the tool bar. If the button
is hidden, enlarge the window to bring it into view.
Short-cut: Click the right mouse button in an empty area of the
window and choose List View from the right-button menu.
The list-style display is shown below.
To view the images as thumbnail previews again, select
Thumbnail View from the View menu or click the Thumb-
nail View button.
Tips
Depending on the resolution of your display, the right-edge tool buttons
may not be visible, even when you maximize the image to fill the screen. In
that case, open the Toolbars submenu on the View Menu, and then clear
Text Labels to change to small tool buttons without text labels.
Browsing Images: Displaying Image Files as a List
Short-cut: Click the right mouse button in an empty area of the
window and choose Thumbnail View from the right-button
menu.
- 11 -
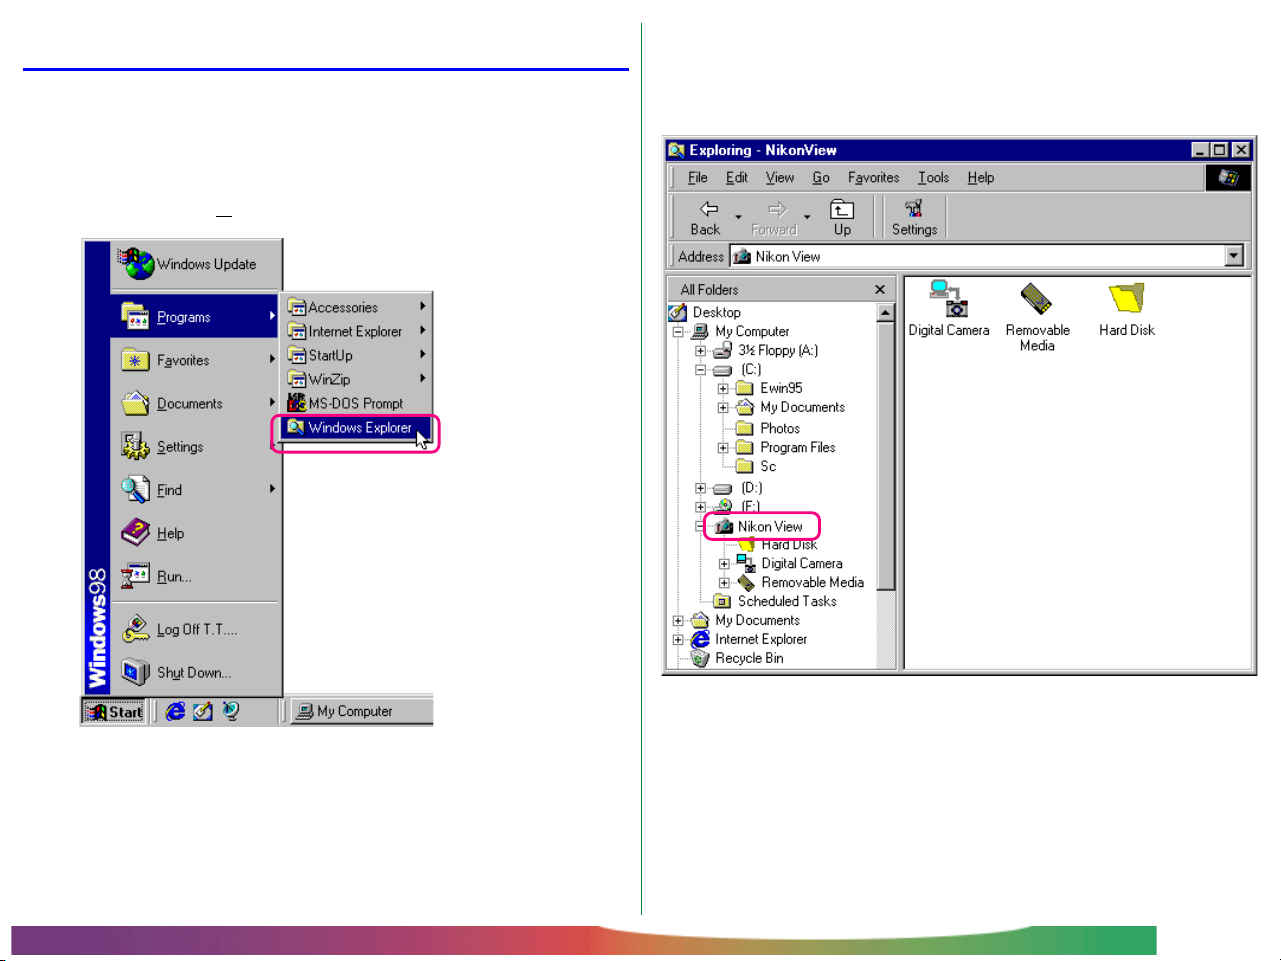
Browsing Images in the Windows Explorer
With Nikon View installed, you can also browse images saved in
the camera using Windows Explorer.
Click the Start button in the taskbar and select Windows
Explorer from the Programs sub-menu.
Select “Nikon View,” from Explorer’s “My Computer” folder list
to display the “Digital Camera,” “Removable Media,” and “Hard
Disk” icons.
Browsing Images: Browsing Images in the Windows Explorer
You can use these commands to browse the images in the
camera’s memory, compact flash-memory cards, and your
computer disk. Operating procedures are the same as those
for browsing in My Computer. See the preceding chapter for
details.
- 12 -
Working with Images
In browsing with Nikon View, you can use the same standard
operations that you would with other files on Windows. This
chapter describes how to preview images, copy them to disk,
and open them for editing in other applications.
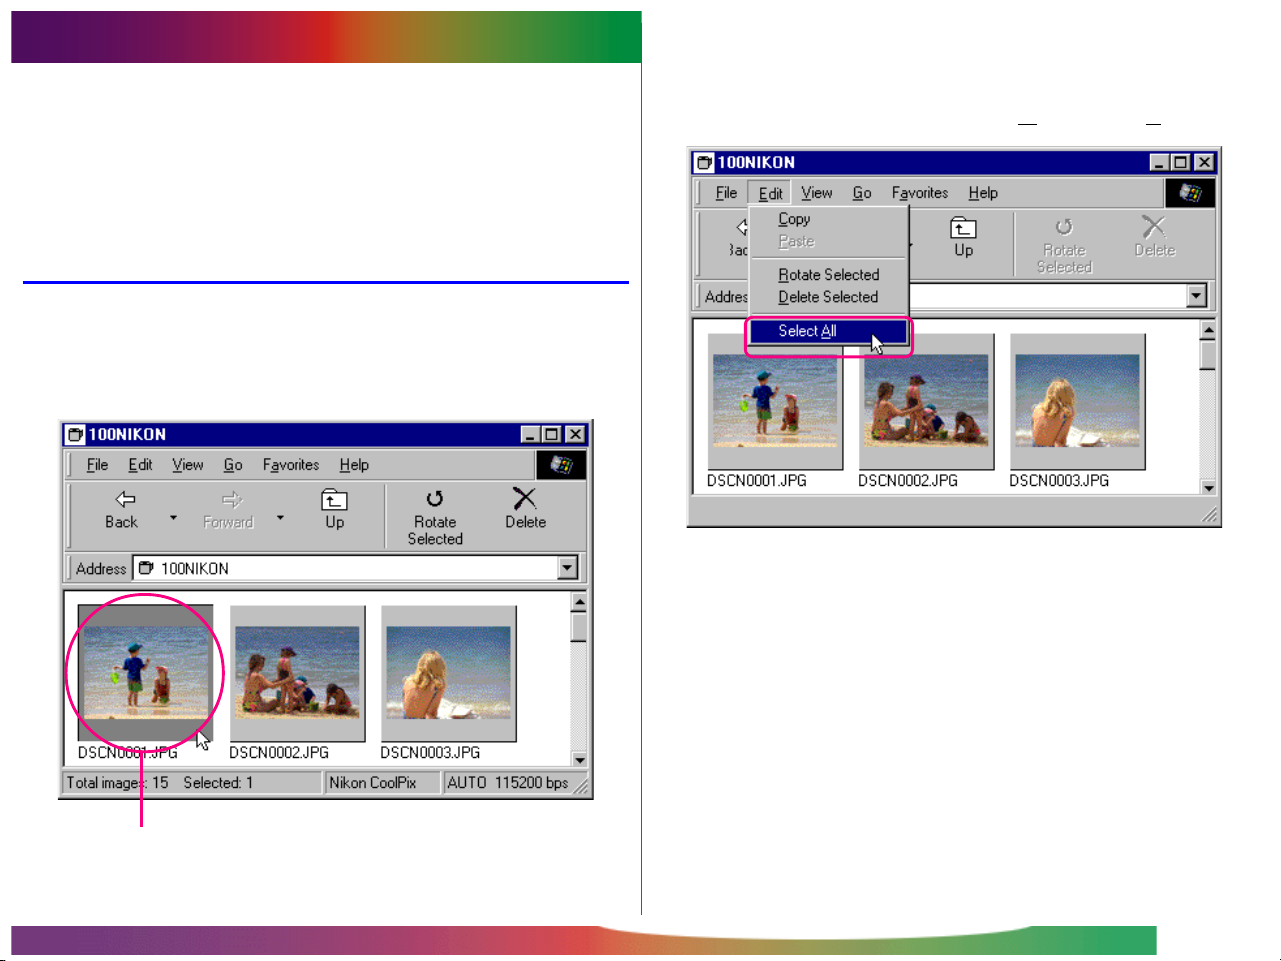
Selecting Thumbnails
To copy, print, or delete an image, select the desired thumbnail
by clicking it once. Selected thumbnails are indicated by a dark
gray border.
To select multiple thumbnails, hold down the Ctrl key on the
keyboard while clicking each image in turn.
To select all thumbnails, select Select All from the Edit menu.
Short-cut: Press A on the keyboard while holding down the
Ctrl key, or click the right mouse button in an empty area of the
window and choose Select All from the right-button menu.
Selected thumbnail
Working with Images: Selecting Thumbnails
- 13 -

Viewing Images
Images can be viewed at full resolution in image windows.
Images in image windows can be rotated and zoomed in or out
using the controls on the image window tool bar. Any number
of image windows may be open at one time.
Opening images in image windows
Double-click the thumbnail you wish to view.
While image data are being copied to the image window, the
following indicator is displayed. Click Cancel to abort the
operation.
Once transfer is complete, the image is opened in an image
window.
Short-cut: Select the thumbnail with the right mouse button
and choose Preview from the right-button menu.
Working with Images: Viewing Images
- 14 -

Rotating images and zooming images in and out
Images in the image window can be rotated or zoomed in or
out using the buttons in the image window tool bar.
Rotate The image view is rotated ninety degrees to
the left each time this button is clicked
Zoom In Click to zoom the image view in
Zoom Out Click to zoom the image view out
Note: Rotation and zoom operations performed in the image
window are not reflected in the thumbnail images in the browsing
window.
Scrolling and resizing the image window
When the entire image does not fit in the image window, you
can view the hidden portion by dragging the scroll sliders at the
right and bottom of the window, or by clicking the scroll bars or
arrow buttons. Alternatively, you can enlarge the window itself
by dragging the window’s borders.
Scroll slider
Working with Images: Viewing Images
Scroll bar
Arrow
button
To close an image window, click the close button ( ) at the
right end of the title bar.
- 15 -

Rotating Thumbnails
Selected thumbnails in the browsing window can be rotated
ninety degrees to the right by selecting Rotate Selected from
the Edit menu or clicking the Rotate Selected button in the
tool bar.
Rotating the selected thumbnail.
Note: Rotations applied to thumbnails in the browsing window
have no effect on the images in the camera, or on copies of the
image that have already been saved to disk. Rotations are saved if
the image is copied to disk after having been rotated.
Short-cut: Select the thumbnail with the right mouse button
and choose Rotate from the right-button menu.
Working with Images: Rotating Thumbnails
- 16 -

Deleting Images
Images can be deleted from the camera’s memory when no
longer needed. Note that images can not be recovered from
the Recycle Bin after deletion; be sure to back up any images
you would like to keep.
Caution: Images that have been protected using the camera’s
protect option can be deleted.
Short-cut: Delete selected thumbnails by pressing the del key
on the keyboard, or click thumbnails with the right mouse button
and choose Delete from the right-button menu.
A confirmation dialog box will appear.
Follow these steps to delete selected images.
1 Select the images you wish to delete and choose Delete
Selected from the Edit menu, or click the Delete button
in the tool bar.
2 Click Yes to delete the selected images.
Click No to return to the browsing window without deleting
the images.
Working with Images: Deleting Images
- 17 -

Printing Images
Nikon View allows you to print selected images or all the images
in the browsing window.
Follow these steps to print selected images.
1 Select the images you wish to print and then select Print…
from the File menu, or click the Print button in the tool bar.
The Print dialog box will appear.
2 After making changes to printer settings, click OK to print
the selected images.
Print dialog box options:
Short-cut: Select the thumbnail with the right mouse button
and choose Print… from the right-button menu.
Working with Images: Printing Images
Printer
Name
Gives the name of the active printer. Click the arrow key to
the right of the listed printer to bring up a list of the printer
drivers currently installed on your system, allowing you to
select a different printer. The type, location, and current
status of the selected printer are listed beneath this item.
- 18 -

Properties
Click this button to bring up the Properties dialog box for
the selected printer; here you can change paper size and
graphics settings. The specific contents of the Properties
dialog box depend on the printer selected.
Print range
All
With this command, all the images displayed in the browsing
window are printed.
Selection
With this command, only the images currently selected in
the browsing window are printed.
Number of images per page
Single image per page
With this command, each image is printed on a separate
sheet.
Two images per page
With this command, two images are printed on each sheet.
OK
Prints the image at the specified settings, and returns you to
the the browsing window.
Cancel
Returns you to the the browsing window without printing
the image.
Four images per page
Select this command to print four images per sheet.
Contact Sheet
This command prints selected images as thumbnails.
Working with Images: Printing Images
- 19 -
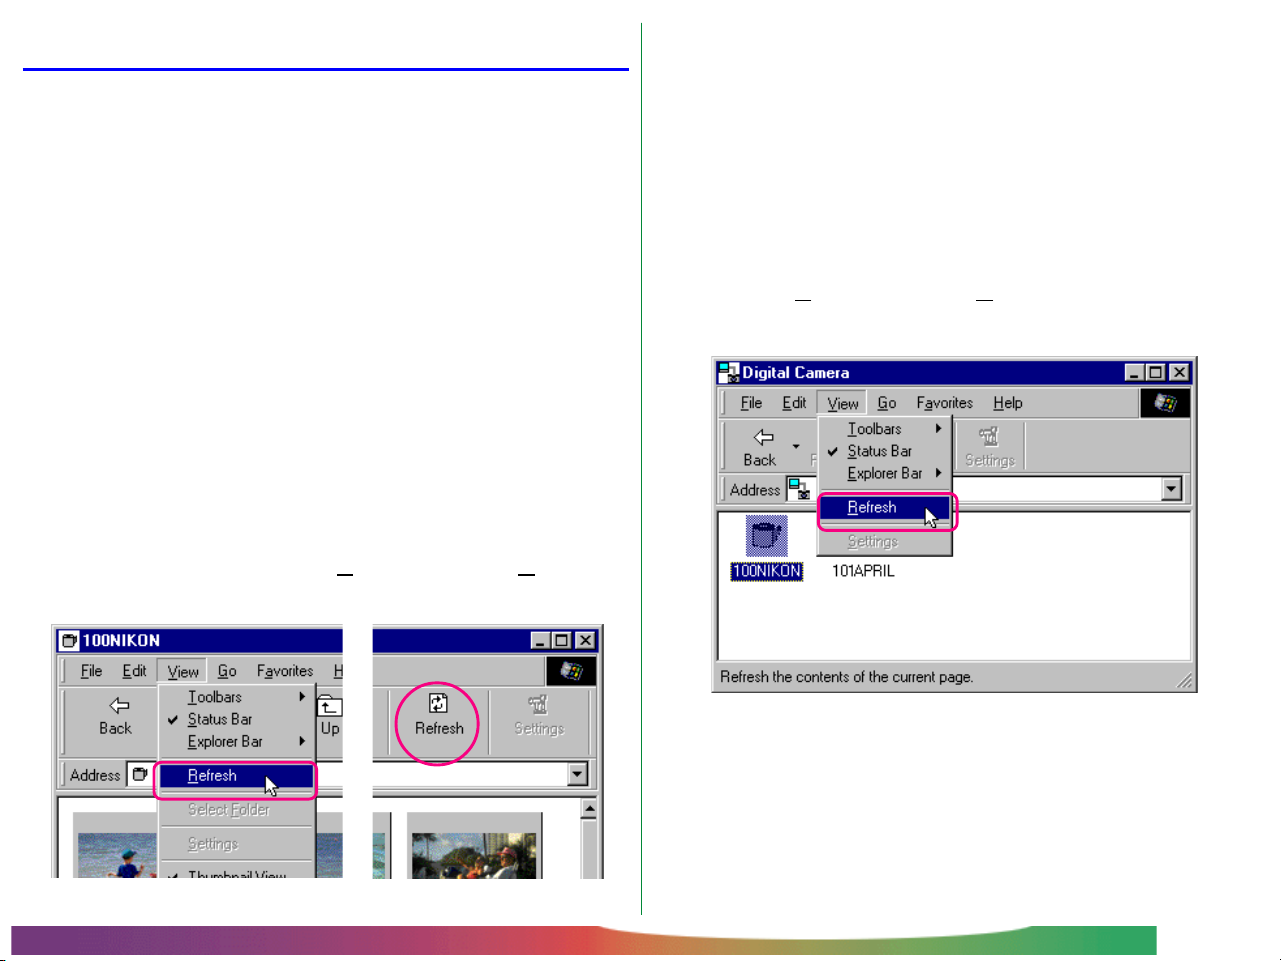
Refreshing Thumbnails and Folders
Short-cut: Click the right mouse button in an empty area of the
window and choose Refresh from the right-button menu.
The digital camera can be disconnected while your computer is
on and later reconnected to the computer. If you have taken
new photographs, or deleted or changed the hide/protect
status of existing photographs while the camera was disconnected, you will need to update the thumbnails in the browsing
window. You may also need to update thumbnails if you have
replaced a memory card while browsing images on the camera’s
flash-memory card, using a compact-flash card-reader or card
drive; or if you have copied files to or deleted files from the
active folder while browsing images on disk.
✔Caution: Do not disconnect the camera while the data-
transfer icon is displayed. (The data transfer icon varies according
to your camera model.)
To update the thumbnails, select Refresh from the View
menu or click the Refresh button in the tool bar.
The images in the selected medium (the camera if “Digital
Camera” is selected, a compact flash-memory card if “Removable Media” is selected, or a specified folder on a disk if “Hard
Disk” is selected) will be read, and thumbnail previews displayed
in the window.
You can select Refresh from the View menu, while the
folders are displayed.
Working with Images: Refreshing Thumbnails and Folders
- 20 -

Viewing Image Information
Information on selected images can be viewed. After selecting
the thumbnails, select Properties from the File menu or click
the Properties button in the tool bar.
Short-cut: Select a thumbnail with the right mouse button and
choose Properties from the right-button menu.
The Properties dialog box is displayed. The Properties dialog
box contains two panels, General and Photo. You can switch
between panels by clicking the tabs at the top of the dialog box.
The General panel gives the file name, file size, capture date,
and dimensions of the selected image. “Protected” and “Hidden” attributes set in the camera’s playback mode can be
changed using the Attribute check boxes. The Photo panel
contains information on camera settings such as image quality
and metering at the time the photograph was taken.
Click OK to accept any changes to image attributes and close
the Properties dialog box. Click Cancel to close the dialog
box without changing attributes.
Working with Images: Viewing Image Information
- 21 -

Copying Images to Disk
Images that you are browsing can be copied to disk by using a
drag-and-drop or copy-and-paste operation. Before copying
images to disk, locate or create a destination folder.
Copying images using a drag-and-drop operation
Select the images you wish to copy by clicking their thumbnails
(to select multiple images, hold down the Ctrl key on the
keyboard while clicking each image), then drag the images to
the destination folder and release the mouse button.
Tips
All images taken with the camera are assigned file names beginning with
“DSCN0001.JPG (or TIF).” Likewise, all image files saved in folders in the
camera’s memory are assigned file names beginning with “DSCN0001.JPG
(or TIF).” Thus, to prevent overwriting when copying an image to disk,
change the filename when you copy an image, or create a new copy folder
for each camera folder.
Working with Images: Copying Images to Disk
The progress indicator will be displayed while images are copied
to disk. Click Cancel to abort the operation.
Once all images have been copied to disk, the progress indicator will disappear.
- 22 -
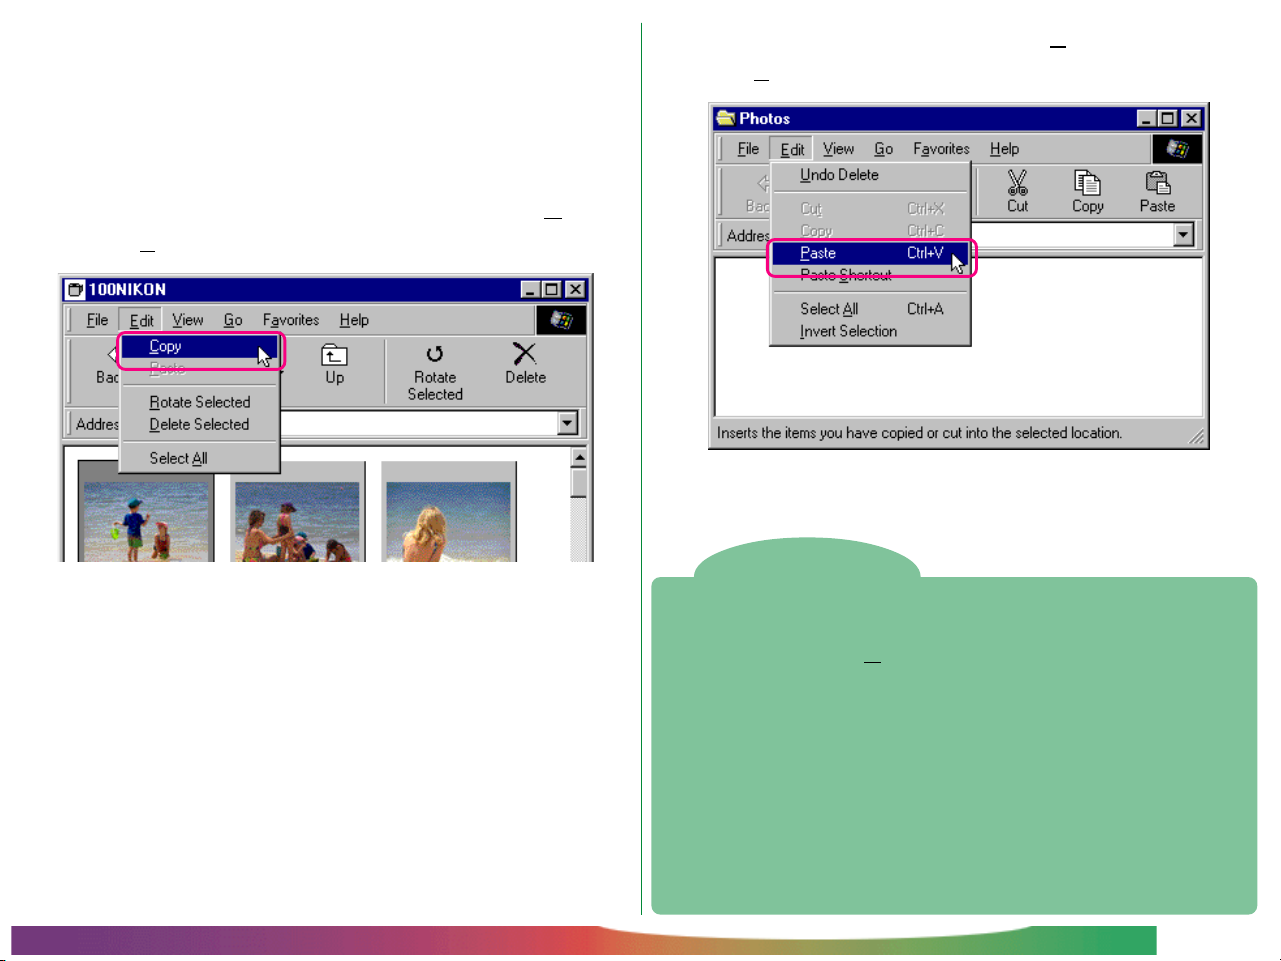
Copying images using a copy-and-paste operation
Follow these steps to copy images to disk using a copy-andpaste operation.
1 Select the images you wish to copy by clicking their thumb-
nails (to select multiple images, hold down the Ctrl key on
the keyboard while clicking each image), then select Copy
from the Edit menu.
2 Open the destination folder and select Paste from the
folder’s Edit menu.
The selected images will be copied to the destination folder.
Tips
Short-cut: Press C while holding down the Ctrl key on the
keyboard, or click a thumbnail with the right mouse button and
choose Copy from the right-button menu.
The progress indicator will be displayed while images are
copied to the clipboard. Click Cancel to abort the opera-
tion.
Once all images have been copied, the progress indicator will
disappear.
Working with Images: Copying Images to Disk
When copying a thumbnail to disk, if an image with the same filename has
previously been copied, you will be asked whether you wish to replace the
existing file. If you select No, a temporary file containing the image data is
created in the Windows temporary folder (path “(Windows folder)\Temp\
Camexp\Transfer”). Then, when you copy files with redundant names to
disk, they are saved under names created by adding a number in brackets
([1], [2], [3], […]) to the filename. This prevents users from accidentally
overwriting image files on the computer. If you use this operation repeatedly, however, you will fill the temporary file. To clear disk space, you may
wish to delete the contents of this temporary folder periodically—the “Windows folder” is the folder to which Windows has been installed.
- 23 -

Opening Images in Another Application
You can open the thumbnails that you browse in any application that support JPEG (“.JPG”) or TIFF (“.TIF”) files. Images can
be opened directly from the application or by a drag-and-drop
operation.
Opening image files by drag-and-drop
Images that have been selected in the browsing window can be
opened in another application by dragging the thumbnails over
an open application window and releasing the mouse button.
The images will be opened in the application.
Use the Save As… command to save the images in the appropriate folder.
Working with Images: Opening Images in Another Application
Tips
After opening images taken with the camera in another application, a temporary file containing the image data is created in the Windows temporary
folder (path “(Windows folder)\Temp\ Camexp\Transfer”). As repeated
use of this operation will fill the temporary file, you may wish to delete the
contents periodically to clear disk space. If you save the open image using
the Save command, it is saved in the temporary folder. Use the Save As…
command to save the image in the appropriate folder—the “Windows
folder” is the folder to which Windows has been installed.
- 24 -

Opening image files from other applications
Follow these steps to open images using the applications’ open
dialog.
1 You can open images in another application by selecting
Open… or Open File… from the application’s File
menu.
2 In the application’s Open dialog box, select “NikonView”
from the drives listed under “My Computer” and click
Open.
3 Double-click the icon of the medium where the desired
image is saved.
If you chose “Digital Camera,” or “Removable Media,” more
folders from memory are displayed. “Hard Disk” displays a
Select Folder dialog box.
The “Digital Camera,” “Removable Media,” and “Hard Disk”
icons are displayed.
Working with Images: Opening Images in Another Application
- 25 -

4 Select a folder.
Thumbnail previews of the images in the selected folder will
be displayed (to change the list display, right-click in an
empty area by the thumbnails, and select List View from
the menu).
Note: The dialog box shown above is the standard Windows
Open dialog box for 32-bit applications. The contents of the dialog
box may vary depending on the application.
Inserting Images into Documents
Nikon View supports OLE 2.0, which allows you to insert images
taken with the COOLPIX digital cameras into documents
created by any OLE 2.0 application that supports the JPEG
(“.JPG”) or TIFF (“.TIF”) image format. Images can be inserted
in documents directly using drag-and-drop, or cut-and-paste
operations; or they can be embedded using the insert object
command.
Inserting images by a drag-and-drop operation
Drag the image you wish to insert over an open document
window in another application.
5 Select the thumbnail you wish to open and click Open.
The selected image will be opened in a window within the
application.
Use the Save As… command to save the images in the
appropriate folder.
Working with Images: Opening Images in Another Application
- 26 -

If the application supports OLE 2.0, the image will be inserted in
the document as shown below.
Inserting images using a copy-and-paste operation
In the browsing window, select the image you wish to insert
and select Copy from the Edit menu.
Next, open the destination application and display the document window into which you wish to insert the image. Paste
the image into the document by positioning the cursor, and
selecting Paste from the application’s Edit menu.
Working with Images: Inserting Images into Documents
- 27 -
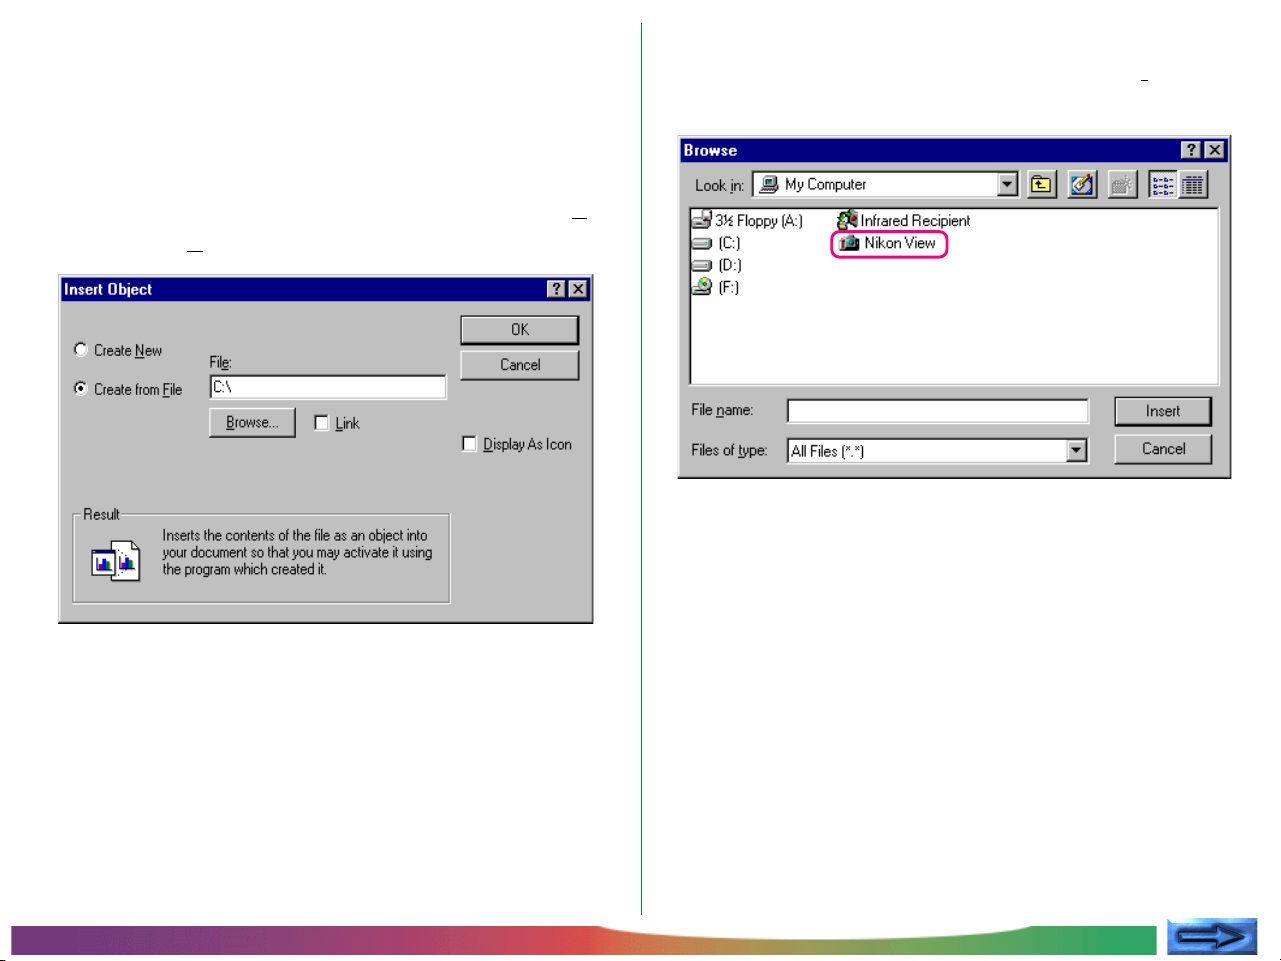
Inserting images using the insert object command
In applications that support OLE 2.0, images can be inserted in
documents using the application’s “insert object” command.
Follow these steps to insert images using the “insert object”
command.
1 In the Insert Object dialog box, choose Create from File,
and then click Browse….
2 In the Browse dialog box, select “Nikon View” from the
drives listed under “My Computer” in the Look in pop-up
menu, and then click Insert.
The “Digital Camera,” “Removable Media,” and “Hard Disk”
icons are displayed.
Working with Images: Inserting Images into Documents
- 28 -

3 Double-click the icon of the medium where the desired
image is saved.
If you chose “Digital Camera,” or “Removable Media,” more
folders from memory are displayed. “Hard Disk” displays a
Select Folder dialog box.
4 Select a folder.
Thumbnail previews of the images in the selected folder will
be displayed (to change the list display, right-click in an
empty area by the thumbnails, and select List View from
the menu).
5 Select the image you wish to insert and click the Insert
button to return to the Insert Object dialog. Click OK to
insert the selected image in the document.
Working with Images: Inserting Images into Documents
- 29 -

Preference
This chapter covers connection port and data transfer rate
settings adjustment.
Changing Port and Rate Settings
The port used to connect to the camera and the data transfer
rate (port speed) card can be changed after installation.
Follow these steps to change settings.
1 In the Nikon View window, select Settings… from the
View menu, or click the Settings button in the tool bar.
The following Digital Camera Settings dialog box will be
displayed.
2 Make the desired settings changes and click OK.
Digital Camera Settings dialog box options:
Camera
The name of the camera currently connected is displayed.
The only option available is “Nikon CoolPix.”
Remote Connection
Type
The only available port type is “Serial.”
Preference: Changing Port and Rate Settings
- 30 -

Port
Click the arrow button to the right of this text box to display
a list of supported ports. Select the port to which the
camera is connected from among “AUTO,”“COM1,”
“COM2,” “COM3,” and “COM4.” If you choose “AUTO,”
the computer automatically detects the port to which the
camera is connected.
Note: If you consistently connect your camera to just one
port, select the appropriate port number, rather than AUTO,
to speed processing.
Speed
Clicking the arrow button to the right of this field displays a
list of supported speeds (data-transfer rates).
OK
Accepts any changes to port settings and closes the Digital
Camera Settings dialog box.
Cancel
Closes the Digital Camera Settings dialog box without changing port settings.
Preference: Changing Port and Rate Settings
- 31 -

Nikon View Reference
This chapter provides a brief reference guide to Nikon View’s
menu bar and tool bar. Refer to this guide when you want to
know the meaning of a command or button.
The Menu Bar
When you browse images in Nikon View, Nikon View commands
are added to the standard Windows menu commands. The
commands available in each menu are outlined below.
Menu bar
The File Menu
These commands may only
be used in the browsing
window.
Print…
Allows you to print the currently selected image to a
printer that you specify. You can also choose this command by clicking the Print button in the tool bar.
Properties
Displays the properties for the selected image in the
Properties dialog box. You can also choose this command by clicking the Properties button in the tool bar.
Work Offline
Allows you to perform work while you are offline.
Nikon View Reference: The Menu Bar
Close
Closes the Nikon View window, terminating your Nikon
View session. You can also quit the program by clicking
the close button ( ) at the right end of the title bar.
- 32 -

The Edit Menu
The View Menu
The Edit menu may only be used in the browsing window.
Copy
Copies the selected image to the clipboard. The image
can be pasted into another folder or application using the
paste command.
Paste
This command is unavailable.
Rotate Selected
Rotates selected images ninety degrees, counter-clockwise. You can also choose this command by clicking the
Rotate Selected button in the tool bar.
Delete Selected
The selected image is deleted from the medium currently
being browsed. You can also choose this command by
clicking the Delete button in the tool bar.
Commands available in the View menu vary depending on
the active window.
The Nikon View windowbrowsing window
This command may only be used
in the Hard Disk window.
Toolbar
Choose this command to determine the type of tool bar
that will be displayed.
Status Bar
Choose this command to display the status bar at the
bottom of the Nikon View window.
Explorer Bar
Choose this command to determine the type of Explorer
bar that will be displayed.
Select All
Selects all the images for copying, printing, or deletion.
Nikon View Reference: The Menu Bar
- 33 -

Refresh
Updates the images in the window. You can also choose
this command by clicking the Refresh button in the tool
bar, or select it from the View menu, while the folders
are displayed.
Select Folder
Displays the Browse for Folder dialog box, allowing you
to select the folder containing the images you want to
browse. You can also choose this command by clicking
the Select Folder button in the tool bar. This command
may only be used when browsing images in the Hard Disk
window.
Settings…
Displays the Digital Camera Settings dialog box, where
you can make changes to port settings. You can also
choose this command by clicking the Settings button in
the tool bar. This command may only be used in the
Nikon View window.
The Go Menu
A standard Windows menu command. Refer to your Windows manual for details.
The Favorites Menu
A standard Windows menu command. Refer to your Windows manual for details.
The Help Menu
About Windows 98
Displays Windows 98 version information.
About NikonView
Opens the “About NikonView” dialog, which gives copyright information for the program.
Thumbnail View
Displays the images as thumbnails. You can also choose
this command by clicking the Thumbnail View button in
the tool bar.
List View
Displays the images as a simple list, without thumbnails.
You can also choose this command by clicking the List
View button in the tool bar.
Nikon View Reference: The Menu Bar
- 34 -

The Tool Bar
The buttons in the tool bar allow you to manage images in the browsing window and perform various operations.
Tool bar
Tips
Enlarge the window in order to view all of the command buttons in the
tool bar. When you locate the cursor on the window frame, it changes into
a bidirectionall arrow. Drag this arrow to enlarge the window.
Nikon View Reference: The Tool Bar
Tips
Depending on the resolution of your display, the right-edge tool buttons
may not be visible, even when you maximize the image to fill the screen. In
that case, open the Toolbars submenu on the View Menu, and then clear
Text Labels to change to small tool buttons without text labels. (To view
the buttons’ label, place the mouse pointer on the button, and wait for a
few seconds. A label will pop up.)
- 35 -

The commands accessible from the tool bar are outlined below.
Button Function
Button Function
Returns to the previous window.
Proceeds to the next window.
Opens the folder one level up in the file
heirarchy (in the case of the “Nikon
View” folder, the “My Computer”
folder).
Rotates the selected images 90º to the
left.
Deletes the selected images. Clicking
this button brings up the Confirm Image
Delete dialog box, allowing you to
permanently remove the selected
images from the open media.
Updates the images in the window.
Displays the Browse for Folder dialog
box, allowing you to select the folder
containing the images you want to
browse. This command may only be
used when browsing images in the
Hard Disk window.
Displays the Digital Camera Settings
dialog box, where you can change port
settings. This command may be used in
the Nikon View window.
Displays the Properties dialog for the
selected image.
Displays the images as thumbnails.
Brings up the Print dialog box, allowing
you to print selected images to a
printer of your choice.
Nikon View Reference: The Tool Bar
Displays the images as a simple list,
without thumbnails.
- 36 -

The Right-Button Menus
You can use right-button menu commands to perform various
operations such as Preview, Copy, List View, and so on.
Click a thumbnail with the right mouse button to select the
image and display a menu of command short-cuts.
Clicking the right mouse button in an empty part of the window
displays the menu shown below.
Tips
Similarly, you can use right-button menus with the open dialog for images
opened in other applications, and with the Browse dialog when you insert
images. (Only, however, in the standard Windows dialog box for a 32-bit
application.)
Nikon View Reference: The Right-Button Menus
Note: You can use the Select Folder command when brows-
ing images in the Hard Disk window.
These menus allow quick access to the commands in the menu
and tool bar.
- 37 -
 Loading...