

Page 1
Nikon Film Scanner
En
Fr
Es
(
En/Fr/Es
)
Manuel de I'utilisateur
Manual del Usuario
User's Manual
Page 2
Nikon Film Scanner
User's Manual
Before You
Begin
En
Setup
Basic Scanning
Nikon Scan
Optional
Holders
Technical Notes
Page 3

Trademark Information
Apple, the Apple logo, Macintosh, and Mac OS are registered trademarks of Apple Computer, Inc. Finder is a trademark of Apple Computer,
Inc. Microsoft and Windows are registered trademarks of Microsoft Corporation. Pentium is a trademark of Intel Corporation. Digital ICE4
AdvancedTM is Digital ICETM, Digital ROCTM, Digital GEMTM and Digital DEETM. Digital ICE4 AdvancedTM are technologies developed by Applied
Science Fiction. Radius, ColorMatch, and PressView are registered trademarks of miro displays, inc. Adobe and Acrobat are registered trademarks of Adobe Systems Inc. All other trade names mentioned in this manual or the other documentation provided with your Nikon product
are trademarks or registered trademarks of their respective holders.
Product Documentation
Product Documentation
The documentation for this product includes the manuals listed below. Be sure to read all
instructions thoroughly.
Quick Start Guide
User’s Manual (this manual)
The Quick Start Guide provides a quick introduction to installing the
Nikon Scan driver software for the scanner, inserting fi lm, and making a simple scan.
This User’s Manual provides detailed instructions for installing and
using a SUPER COOLSCAN 9000 ED fi lm scanner.
Nikon Scan Reference Manual /
Easy Scanning Guide
(on CD)
The Nikon Scan Reference Manual provides complete information
on Nikon Scan, the software used to scan images into the computer. This manual is stored on the reference CD in pdf format, and
can be viewed using Adobe Acrobat Reader 4.0 or later. If necessary, Windows users can install Adobe Acrobat using the installer
provided on the reference CD. For more information on installing
Adobe Acrobat Reader and viewing the reference manual, see the
Quick Start Guide.
The Easy Scanning Guide uses animation to explain such basic scan-
ning tasks as setting image size and resolution. See the Quick Start
Guide for viewing instructions.
Nikon View Reference Manual
(on CD)
The Nikon View Reference Manual provides complete information
on using the supplied Nikon View software to view and organize
images. This manual is stored on the reference CD in pdf format.
Page 4
i
Do not touch exposed parts
Should the product break open as the result of a fall or other accident, do not touch the exposed parts.
Unplug the power cable and take the product to an authorized Nikon service representative for inspection.
Do not disassemble or modify
• The interior of the device contains areas of high voltage. Removing the casing could result in fi re or
electric shock. Contact an authorized Nikon service representative for inspection or repair.
• Do not modify. Modifi cation could result in fi re or electric shock.
For Your Safety
For Your Safety
To prevent damage to this Nikon product or injury to yourself or to others, read the following
safety precautions in their entirety before using this equipment. Keep these safety instructions where all those who use the product will read them.
The consequences that could result from failure to observe the precautions listed in this section are indicated by the following symbols:
This icon marks warnings, information that should be read before using this Nikon product to
prevent serious injury or death.
This icon marks cautions, information that should be read before using this Nikon product to
prevent damage to the equipment or injury to yourself or to others.
WARNINGS
Unplug in the event of malfunction
• Should the equipment start to smoke or produce an unusual noise or smell, turn the device off immediately and unplug the power cable. Continued use could result in fi re or electric shock. Wait for the
equipment to stop smoking and then contact an authorized Nikon service representative for information on replacement or repair. DO NOT attempt repairs yourself, as this would be extremely dangerous.
• In the event of damage to the equipment, turn the device off at once and unplug the power cable,
then contact an authorized Nikon service representative for information on replacement or repair.
Continued use could result in fi re or electric shock.
Do not use in the presence of fl ammable gas or dust
Failure to observe this precaution could result in explosion or fi re.
Keep clear of foreign objects
Do not place vases, fl owerpots, cups, cosmetics, vessels containing chemicals or water, or small metal
articles on the device. Should water or another foreign object enter the equipment, unplug the power
cable and contact an authorized Nikon service representative. Continued use could result in fi re, electric
shock, or malfunction.
Keep out of reach of children
Particular care should be taken to prevent infants from putting small parts into their mouths. Should a
child swallow any part of the equipment, contact a physician immediately.
Use an appropriate power supply
The power supply must be 50/60 Hz and 100–240 V AC. The power cable must comply with the safety
standards of the country of use, have SVT insulation or better, and be more than AWG18 in thickness.
At voltages over AC 125 V At voltages of AC 125 V or less
Use a plug rated for 250 V, 15 A (NEMA 6- P 15) Use a plug rated for 125 V, 10 A
Page 5
ii
Do not handle with wet hands
Failure to observe this precaution could result in electric shock.
Handling the power cable and plug
• Do not damage, modify, or forcibly tug or bend the power cable, place it under heavy objects, or
expose it to heat or fl ame. Should the insulation be damaged and wires become exposed, contact an
authorized Nikon service representative for information on replacement or repair. Failure to observe
these precautions could result in fi re or electric shock.
• Do not handle the plug with wet hands. Failure to observe this precaution could cause electric shock.
• Dust on or near the metal parts of the plug should be removed with a dry cloth. Continued use could
result in fi re.
• Do not handle the power cable or go near the equipment during thunderstorms. Failure to observe this
precaution could result in electric shock.
CD-ROMs
The CD-ROMs on which the software and manuals are distributed should not be played back on audio
CD equipment. Playing CD-ROMs on an audio CD player could cause hearing loss or damage the equipment.
CAUTIONS
Ground the equipment
• The outlet into which the power cable is plugged must be grounded. Failure to ground the power
supply could result in electric shock.
• Do not ground the outlet to a gas or water pipe or a dedicated telephone system earth connector.
Failure to observe this precaution could result in fi re or electric shock.
Handling the power cable and plug
• Do not place the power cable in the vicinity of a stove or heater. The insulation could melt, resulting in
fi re or electric shock.
• Unplug the cable by pulling on the plug, never on the cable itself. Failure to observe this precaution
could damage the cable, resulting in fi re or electric shock.
• Do not plug the power cable into an extension cord or multi-outlet adapter, as this could cause fi re or
malfunction.
Unplug when not in use
Turn off and unplug the device if it will not be used for an extended period. Failure to observe this
precaution could result in fi re.
Do not insert fi ngers in equipment
Do not insert your fi ngers in the device save where indicated otherwise. Failure to observe this precaution could result in injury.
Unplug before cleaning
Turn off and unplug the device before cleaning. Failure to observe this precaution could result in injury.
Do not place heavy objects on the device
The objects or device could overbalance or fall, causing injury.
Do not place on unstable or sloping surfaces
The device could fall, resulting in injury or damage. Should glass parts inside the device break as the
result of a fall or other accident, care should be taken to avoid injury caused by broken glass.
Install only as directed
Failure to install the device as directed in this manual could block the vents, causing overheating and
possibly fi re.
Page 6
iii
• No part of the manuals included with this pro duct
may be reproduced, transmitted, transcribed,
stored in a retrieval system, or translated into any
language in any form, by any means, without
Nikon’s prior written permission.
• Nikon reserves the right to change the specifi cations
of the hardware and software described in these
manuals at any time and without prior notice.
• Nikon will not be held liable for any damages
resulting from the use of this product.
• While every effort has been made to ensure that
the information in these manuals is accurate
and complete, we would appreciate having any
errors or omissions brought to the attention of
the Nikon representative in your area (address
provided separately).
Notices
Notices
Notice for customers in the State of California
WARNING: Handling the cord on this product will expose you to lead, a chemical known to the State of
California to cause birth defects or other reproductive harm. Wash hands after handling.
Nikon Inc.,
1300 Walt Whitman Road, Melville, New York
11747-3064, U.S.A.
Tel.: 631-547-4200
Notice for customers in Canada
CAUTION
This class B digital apparatus meets all requirements of the Canadian Interference Causing Equipment Regulations.
ATTENTION
Cet appareil numérique de la classe B respecte
toutes les exigences du Règlement sur le matériel
brouilleur du Canada.
LS-9000 ED
Notice for customers in the U.S.A.
Federal Communications Commission (FCC) Radio Frequency Interference Statement
This equipment has been tested and found to
comply with the limits for a Class B digital device,
pursuant to Part 15 of the FCC rules. These limits
are designed to provide reasonable protection
against harmful interference in a residential installation. This equipment generates, uses, and can
radiate radio frequency energy and, if not installed
and used in accordance with the instructions, may
cause harmful interference to radio communications. However, there is no guarantee that interference will not occur in a particular installation. If
this equipment does cause harmful interference to
radio or television reception, which can be determined by turning the equipment off and on, the
user is encouraged to try to correct the interference
by one or more of the following measures:
• Reorient or relocate the receiving antenna.
• Increase the separation between the equipment
and receiver.
• Connect the equipment into an outlet on a circuit
different from that to which the receiver is connected.
• Consult the dealer or an experienced radio/
television technician for help.
CAUTIONS
Modifi cations
The FCC requires the user to be notifi ed that any
changes or modifi cations made to this device that
are not expressly approved by Nikon Corporation
may void the user’s authority to operate the equipment.
Interface Cables
Use the interface cables sold or provided by Nikon
for your equipment. Using other interface cables
may exceed the limits of Class B Part 15 of the
FCC rules.
Page 7

iv
Notice Concerning Prohibition of Copying or Reproduction
Note that simply being in possession of material that has been digitally copied or reproduced by means of a
scanner, digital camera or other device may be punishable by law.
• Items prohibited by law from being copied or
reproduced
Do not copy or reproduce paper money, coins, securities, government bonds, or local government
bonds, even if such copies or reproductions are
stamped “Sample.”
The copying or reproduction of paper money,
coins, or securities which are circulated in a foreign country is prohibited.
Unless the prior permission of the government
has been obtained, the copying or reproduction
of unused postage stamps or post cards issued by
the government is prohibited.
The copying or reproduction of stamps issued
by the government and of certifi ed documents
stipulated by law is prohibited.
• Cautions on certain copies and reproductions
The government has issued cautions on copies
or reproductions of securities issued by private
companies (shares, bills, checks, gift certifi cates,
etc.), commuter passes, or coupon tickets, except
when a minimum of necessary copies are to be
provided for business use by a company. Also,
do not copy or reproduce passports issued by the
government, licenses issued by public agencies
and private groups, ID cards, and tickets, such as
passes and meal coupons.
• Comply with copyright notices
The copying or reproduction of copyrighted
creative works such as books, music, paintings,
woodcut prints, maps, drawings, movies, and
photographs is governed by national and international copyright laws. Do not use this product for
the purpose of making illegal copies or to infringe
copyright laws.
Page 8

v
Table of Contents
Table of Contents
For Your Safety............................................................................................................................... i
WARNINGS.................................................................................................................................... i
CAUTIONS ..................................................................................................................................... ii
Notices ............................................................................................................................................ iii
Before You Begin ............................................................................................................................ 1
Introduction ................................................................................................................................... 2
Principal Features ........................................................................................................................... 2
Parts of the Scanner....................................................................................................................... 3
Precautions for Use........................................................................................................................ 5
Setup................................................................................................................................................ 7
Setup and Scanning Guide ............................................................................................................ 8
Installing Nikon Scan ..................................................................................................................... 10
Windows ....................................................................................................................................... 10
Macintosh...................................................................................................................................... 15
Installing the Scanner .................................................................................................................... 20
Step 1 — Choose a Location............................................................................................................ 20
Step 2 — Connect the Power Cable................................................................................................. 21
Step 3 — Connect the IEEE 1394 Cable ........................................................................................... 22
Basic Scanning................................................................................................................................. 23
Step 1 — Turn the Scanner On........................................................................................................ 24
Step 2 — Place Film in the Holder .................................................................................................. 25
Step 3 — Open the Scan Window .................................................................................................. 30
Step 4 — Insert the Holder.............................................................................................................. 32
Step 5 — Choose a Film Type and Color Model............................................................................. 33
Step 6 — Preview ............................................................................................................................. 35
Step 7 — Select a Crop .................................................................................................................... 37
Step 8 — Scan and Save .................................................................................................................. 39
Step 9 — Eject and Exit ................................................................................................................... 41
Nikon Scan....................................................................................................................................... 43
The Scan Window .......................................................................................................................... 44
The Control Area ........................................................................................................................... 45
The Information Panel.................................................................................................................... 46
The Preview and Scan Buttons........................................................................................................ 46
The Thumbnail Drawer Tab............................................................................................................. 47
The Preview Area ........................................................................................................................... 47
The Progress Window .................................................................................................................... 47
The Tool Chest................................................................................................................................ 48
Optional Holders............................................................................................................................. 51
FH-869M Holder for Medium-Format Slides ................................................................................ 53
Inserting Slides............................................................................................................................... 53
Removing Slides............................................................................................................................. 53
FH-869G Glass-Covered Holder for Medium-Format Film ........................................................... 54
Inserting Film ................................................................................................................................. 54
Removing Film ............................................................................................................................... 55
Page 9

vi
FH-869GR Rotating Holder for Medium-Format Film.................................................................. 56
Inserting Film ................................................................................................................................. 56
Removing Film ............................................................................................................................... 57
FH-816 Holder for 16-mm Film...................................................................................................... 58
Inserting Film ................................................................................................................................. 58
Removing Film ............................................................................................................................... 59
FH-8G1 Medical Holder ................................................................................................................. 60
Inserting Slides............................................................................................................................... 60
Removing Slides............................................................................................................................. 60
Technical Notes................................................................................................................................ 61
Maintenance .................................................................................................................................. 62
Troubleshooting............................................................................................................................. 63
Installing the IEEE 1394 (Firewire) Interface Board ..................................................................... 64
Updating the IEEE 1394 Drivers (Windows 98 SE Only)................................................................... 65
Installing the IEEE 1394 (Firewire) Interface Board........................................................................... 66
Installing the Device Drivers (Windows Only) .................................................................................. 66
Uninstalling Nikon Scan ................................................................................................................ 70
Windows ....................................................................................................................................... 70
Macintosh...................................................................................................................................... 71
Custom Install (Macintosh Only) ................................................................................................... 73
Checking Device Registration (Windows Only)............................................................................ 74
Specifi cations ................................................................................................................................. 76
SUPER COOLSCAN 9000 ED (LS-9000 ED)...................................................................................... 76
Supplied Film Holders..................................................................................................................... 77
Optional Film Holders..................................................................................................................... 78
Index ............................................................................................................................................... 79
Page 10
1
Introduction ............................................................ 2
Parts of the Scanner ............................................... 3
Precautions for Use................................................. 5
Before You Begin
This chapter describes the conventions used in this
manual, the names of scanner parts, and precautions
for use.
Page 11
2
Introduction
Introduction
Thank you for your purchase of a Nikon SUPER COOLSCAN 9000 ED fi lm scanner. Read this
manual thoroughly before use, and keep it handy when using the product.
To make it easier to fi nd the information you need, the following symbols and conventions
are used:
Illustrations
The majority of illustrations showing the scanner interface are taken from Windows XP Professional.
Where operations in the two operating systems differ, illustrations from Mac OS X are also used.
Terminology
In this manual, the SUPER COOLSCAN 9000 ED is sometimes referred to as the 9000 ED. Windows XP
Home Edition and Windows XP Professional are jointly referred to as Windows XP, Windows Millennium
Edition as Windows Me, and Windows 98 Second Edition as Windows 98 SE.
Life -Long Learning
As part of Nikon’s “Life- Long Learning” commitment to ongoing prod uct sup port and ed u ca tion, con tin u al ly-updated information is avail able on-line at the following sites:
• For users in the U.S.A.: http://www.nikonusa.com/
• For users in Europe: http://www.europe -nikon.com/support
• For users in Asia, Oceania, the Middle East, and Africa: http://www.nikon- asia.com/
Visit these sites to keep up-to- date with the latest product in for ma tion, tips, an swers to fre quent ly-asked
ques tions (FAQs), and gen er al advice on digital imaging and pho tog ra phy. Ad di tion al information may
be available from the Nikon rep re sen ta tive in your area. See the URL below for contact in for ma tion:
http://nikonimaging.com/
This icon marks cautions, information that
should be read before using the scanner to
prevent damage to the device.
This icon marks tips, additional information
that may be helpful when using the scanner.
This icon marks notes, information that
should be read before using the scanner.
This icon indicates that more information is
available elsewhere in this manual or in the
other documentation provided.
Principal Features
• The Scan Image Enhancer automatically adjusts hue to produce images with clear contrast
• Digital ICE detects, analyzes, and automatically compensates for scratches and dust
• Digital ROC digitally restores for faded colors in old fi lm
• Digital GEM automatically corrects for fi lm grain, smoothing pictures taken with high-speed
fi lm
• Digital DEE reveals details in shadows of backlit and underexposed shots and increases con-
trast in “washed- out” areas of highlights to produce natural-looking exposure
Page 12
3
Parts of the Scanner
Parts of the Scanner
Front View
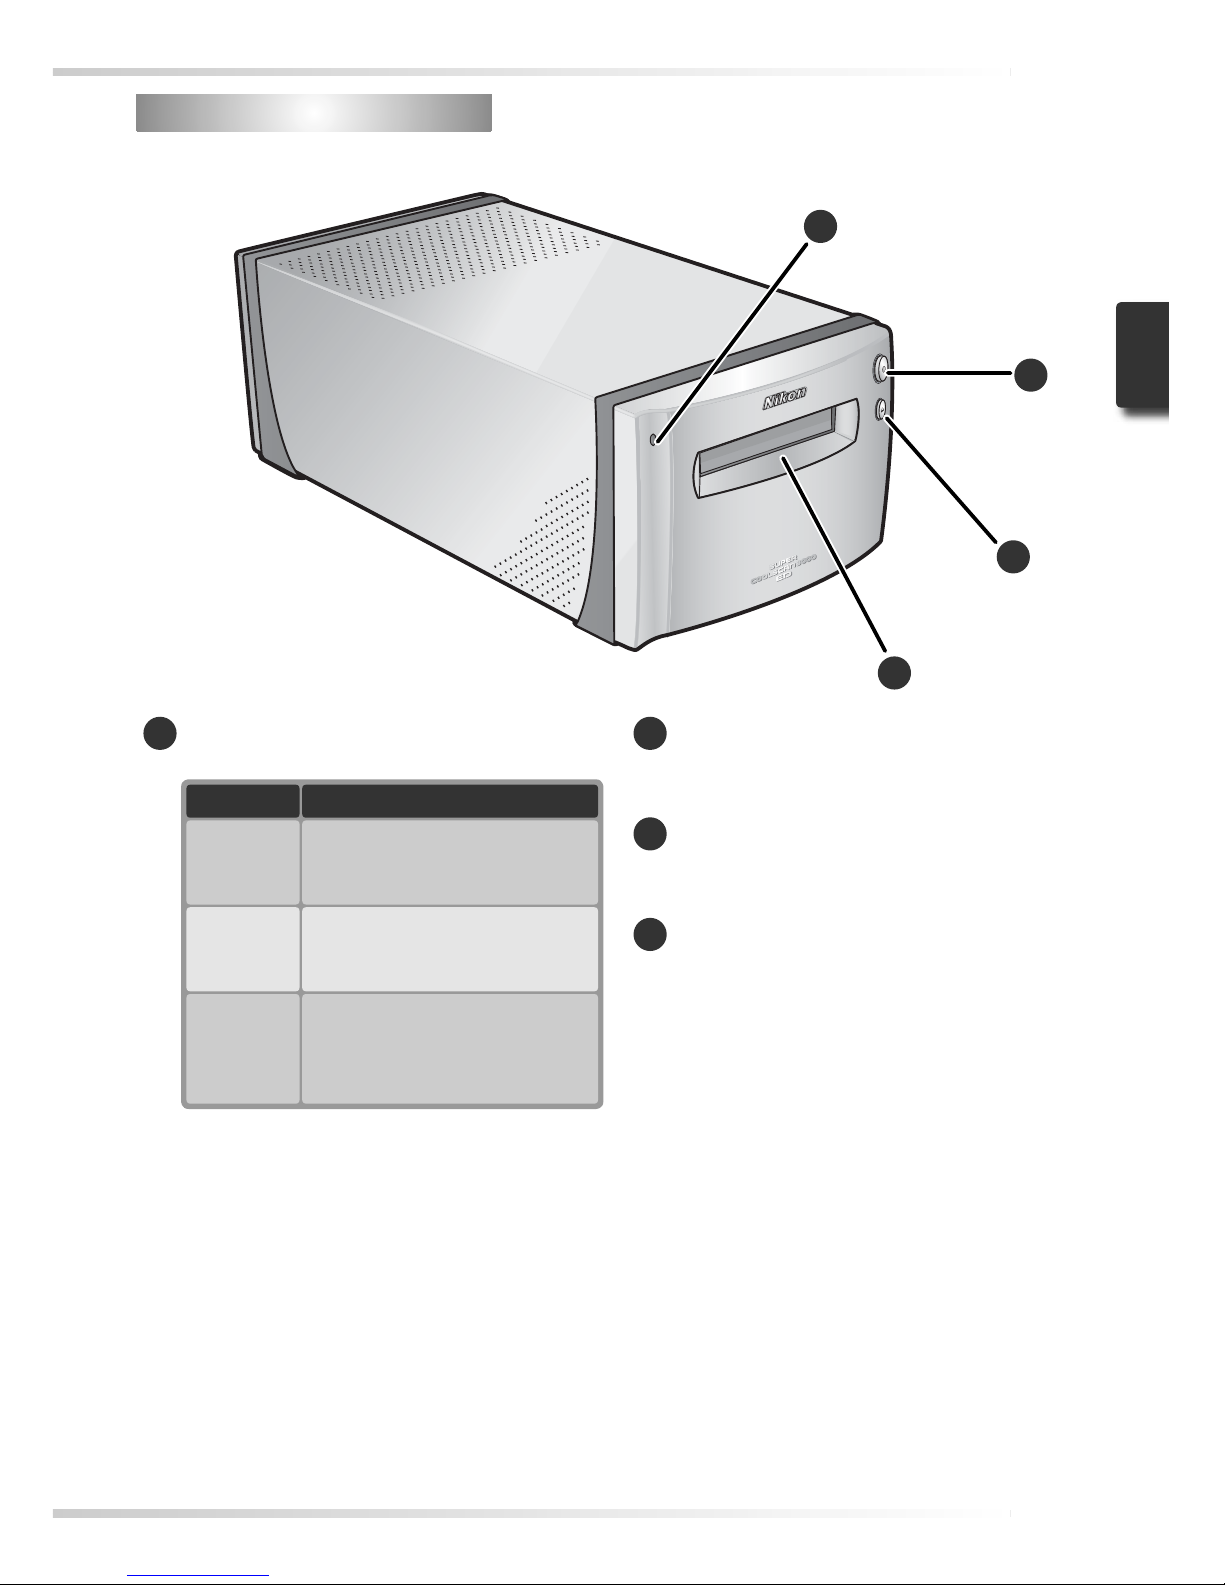
1
Status LED
Scanner status is indicated as follows:
Status LED Scanner status
On
No operations in progress. Film
holders can be inserted or removed.
Blinks
(about
1.5 × /s )
Scanner busy. Do not turn
scanner off or insert or remove
fi lm holders.
Flickers
(about
5 ×/ s)
Hardware or communications
error. Turn scanner off, wait
for at least 5 s, and turn scan ner on again.
2
Power switch
Pressing this switch turns the scanner on
and off.
3
Eject button
Pressing this button ejects fi lm holders
from the scanner.
4
Holder slot
Holders for various types of fi lm can be
inserted in this slot. A fl ap prevents the
accumulation of dust inside the scanner
when the device is not in use.
2
3
4
1
Page 13
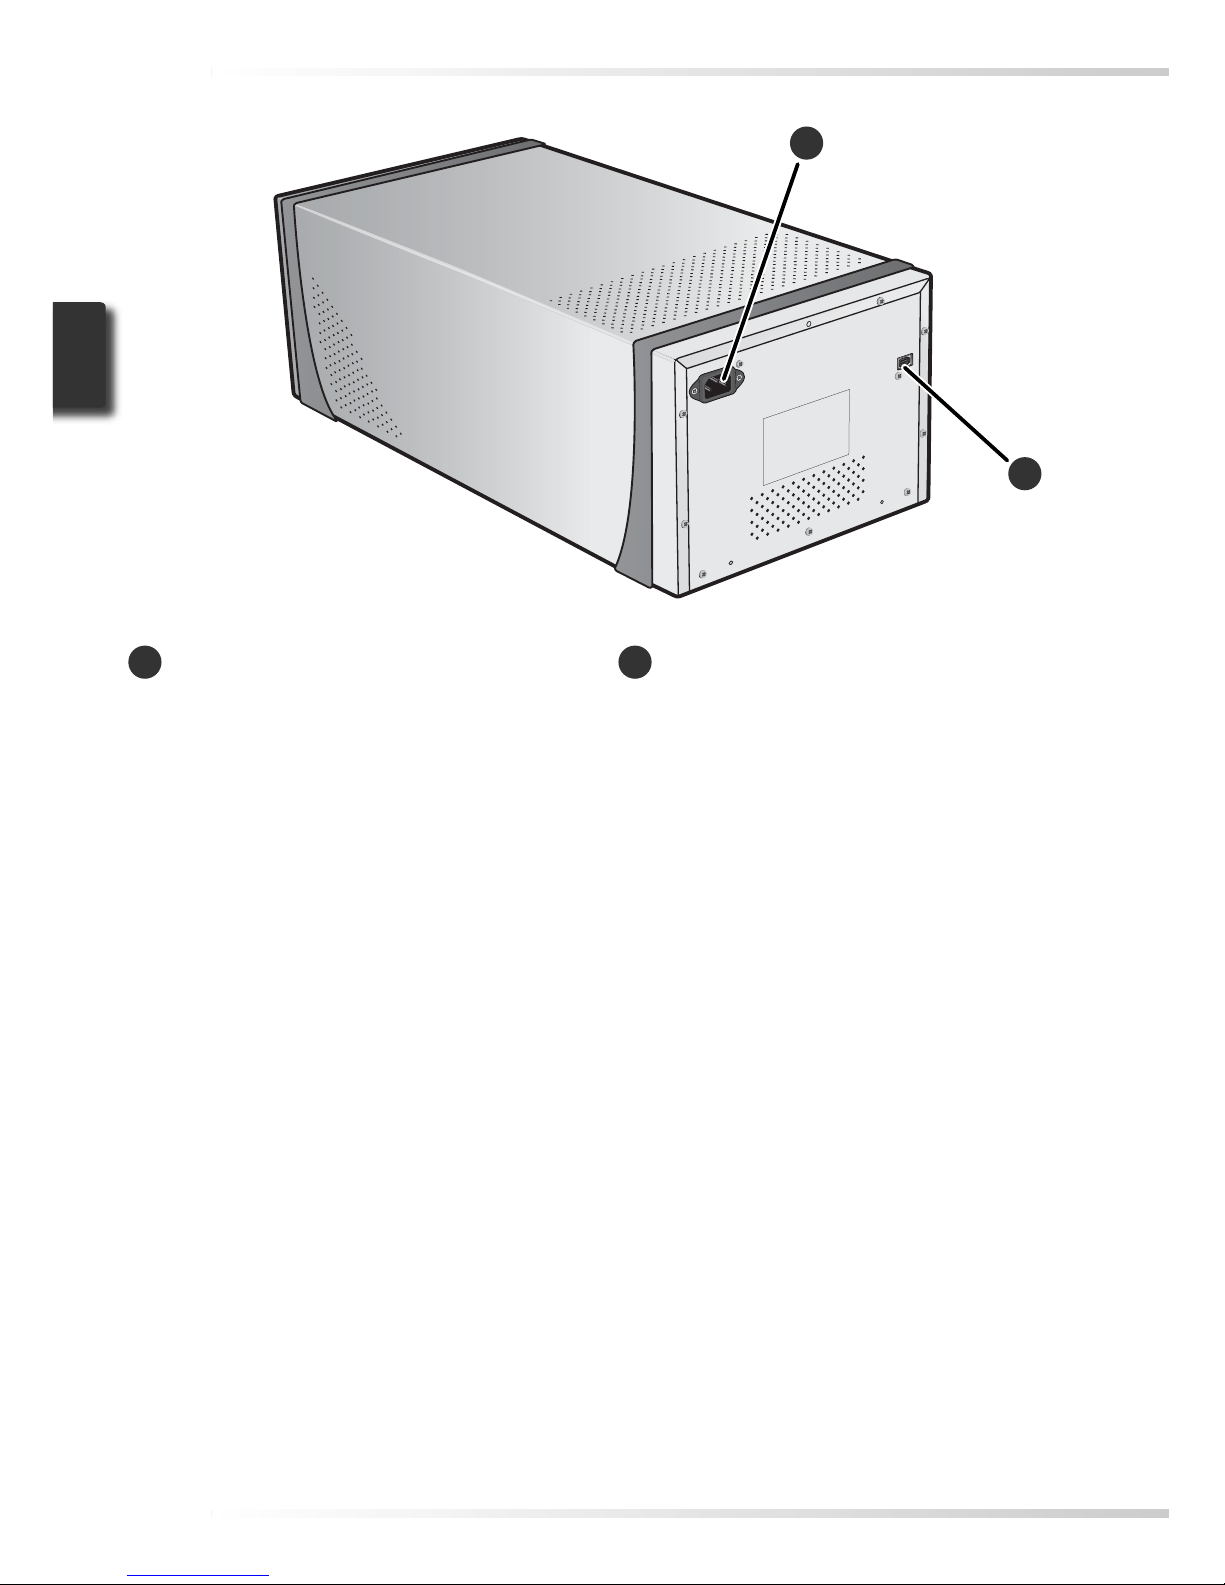
4
Rear View
5
AC connector
The female end of the AC power cable
plugs into this connector.
6
IEEE 1394 (Firewire) connector
The IEEE 1394 interface cable connects
here.
6
5
Page 14
5
Precautions for Use
Precautions for Use
Observe the following precautions to ensure that the scanner always produces the best possible results.
Check the status LED
• Do not turn the scanner off or insert or remove fi lm holders while the status LED is blinking.
• Do not use other IEEE 1394 (Firewire) devices or turn them on or off while the status LED is blinking.
• Do not connect or disconnect USB or IEEE 1394 (Firewire) cables while the status LED is blinking.
• Do not operate camera control software for digital cameras connected via USB while the status LED is
blinking.
Connecting the scanner
• Connect the scanner directly to the computer. The scanner may not function as expected when connected to an IEEE 1394 hub or adapter.
• The scanner may not function as expected when used together with other IEEE 1394 devices. Should
the scanner not function as expected, use the scanner with all other IEEE 1394 devices disconnected.
• Do not connect two or more scanners to the computer simultaneously.
Protecting fi lm
• Before scanning fi lm, remove dirt and dust with a blower. This will not only keep the fi lm free of
scratches but will also help prevent scanning errors and malfunctions.
• Remove fi ngerprints with a soft, dry cloth, being careful not to scratch the fi lm.
• Remove fi lm from the holder after scanning. Storing fi lm in the holder could damage the fi lm.
• The fi lm base and emulsion will deteriorate if exposed to high temperatures or humidity. Be sure temperature and humidity are within the limits given below.
• Sudden changes in temperature and humidity, even when within the limits stated below, can cause
condensation on the fi lm. Check before use to ensure that no condensation is present. If condensation has occurred, leave the fi lm out until it dries. Condensation can damage the fi lm during insertion.
• The operating environment for the scanner is as follows:
Temperature: +10 – +35 °C (+50 – +95 °F)
Humidity: 20 – 60%
When the scanner is not in use
Remove the fi lm holder and turn the scanner off when not in use.
Page 15

6
Page 16
7
Setup and Scanning Guide ..................................... 8
Installing Nikon Scan .............................................10
Installing the Scanner........................................... 20
Setup
This chapter contains all the information needed to set
up the scanner for use, including installing Nikon Scan
and connecting the scanner to a computer.
Page 17
8
Install software ( 10–19)
Imaging application (e.g., Adobe
Photoshop)
C
D
-
R
O
M
C
D
-
R
O
M
C
D
-
R
O
M
C
D
-
R
O
M
C
D
-
R
O
M
Nikon
View
C
D
-
R
O
M
C
D
-
R
O
M
C
D
-
R
O
M
C
D
-
R
O
M
C
D
-
R
O
M
Nikon
Scan 4
Computer
Setup and Scanning Guide
Setup and Scanning Guide
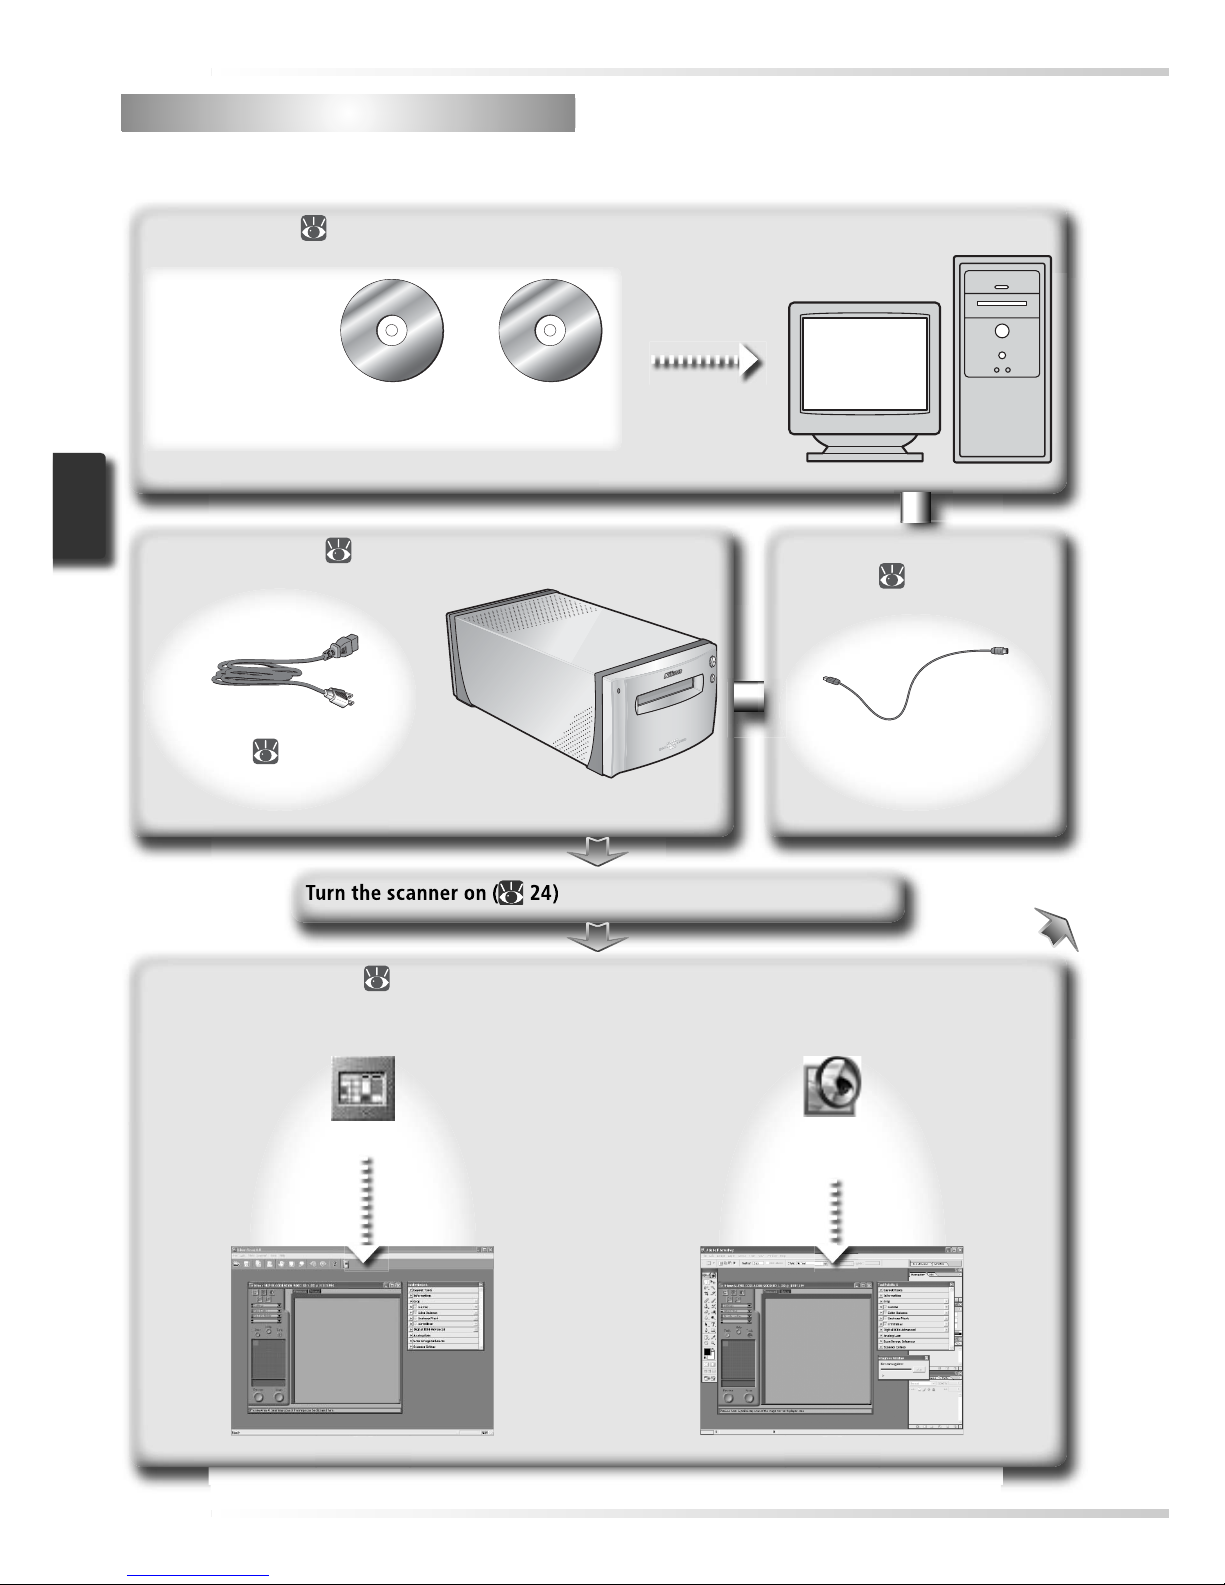
This fi gure outlines the steps involved in installing the scanner and making a scan. Refer to
the page numbers listed for more information.
Set up the scanner ( 20–22)
Connect the power cable
(
21)
SUPER COOLSCAN 9000 ED
Connect the scanner to the
computer (
22)
Connect the IEEE 1394
(Firewire) cable
Open the scan window ( 30–31)
Nikon Scan can function as a “stand -alone” application to scan, process, and save images, or it can
be used to scan images directly into an imaging application such as Adobe Photoshop.
Nikon Scan
Imaging application (e.g.,
Adobe Photoshop)
Page 18
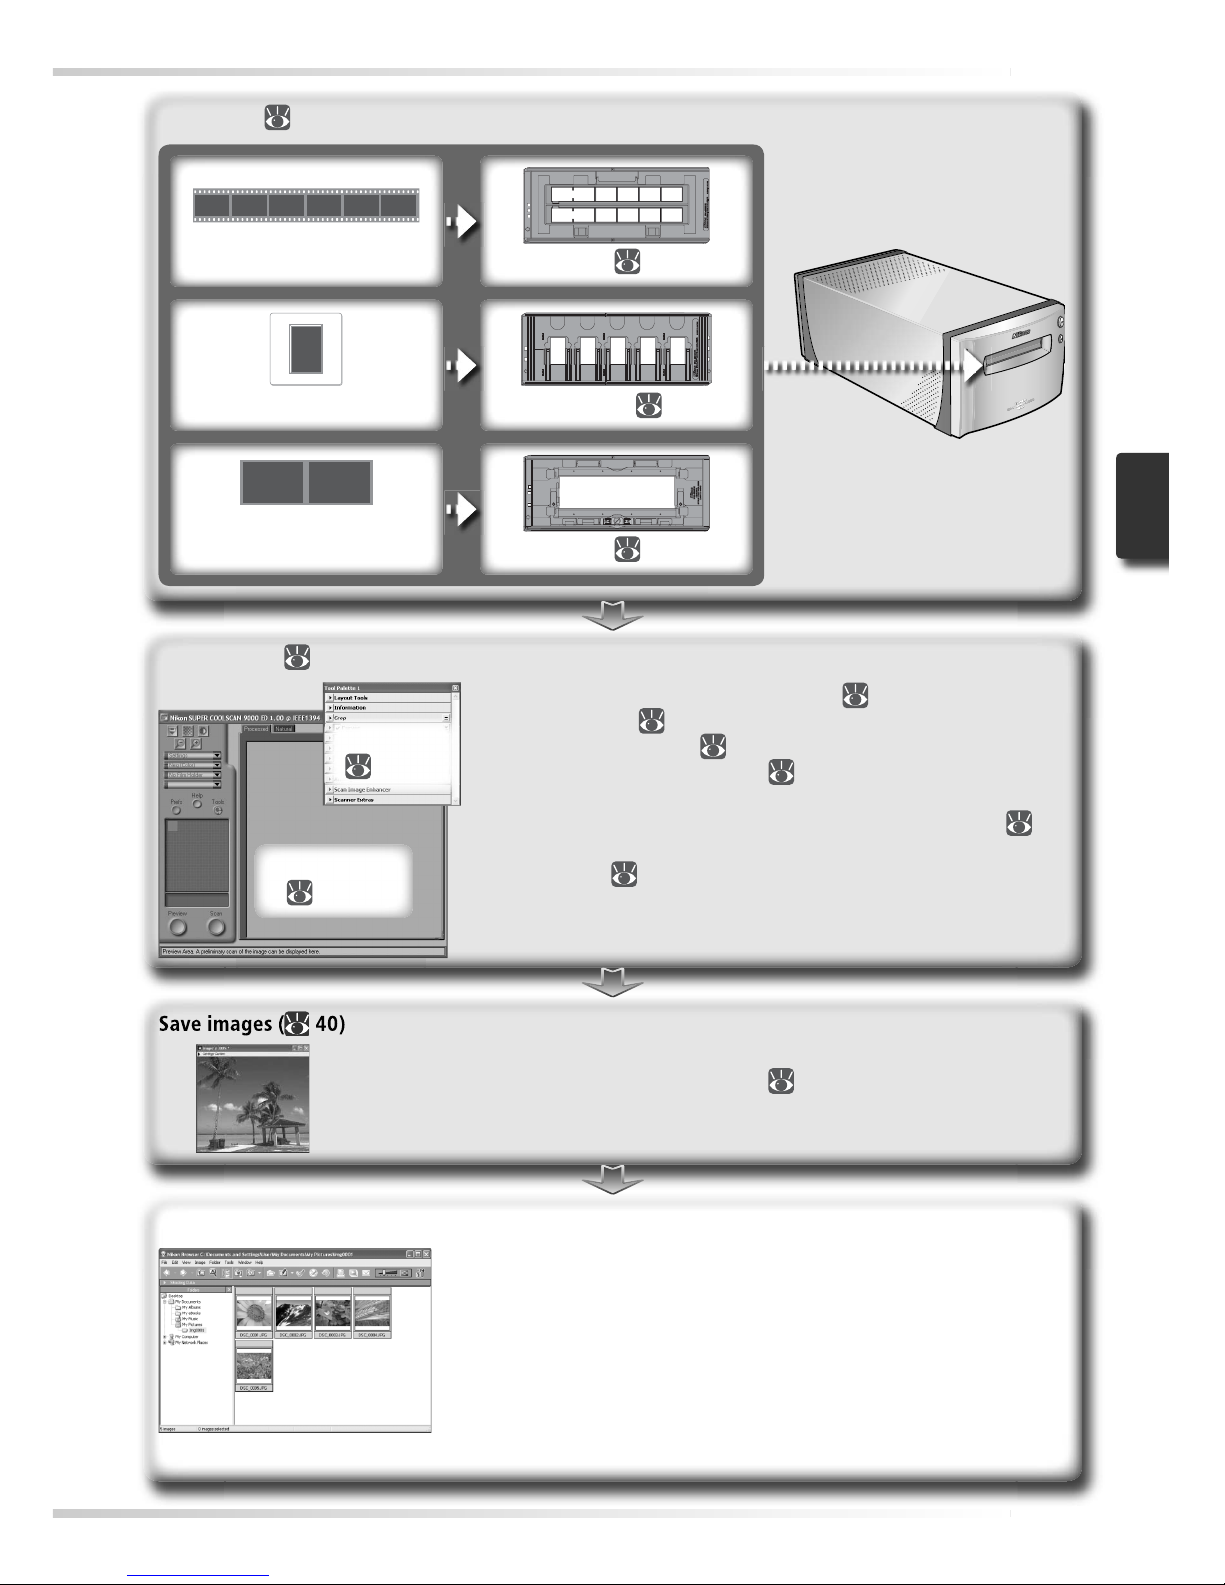
9
Insert fi lm ( 32)
FH-835S ( 26–27)35-mm fi lm
FH-835M ( 28)35-mm slides
FH-869S ( 28–29)
Medium format fi lm
Electron microscope fi lm
Organize images
Images that have been saved to disk can be viewed and organized in Nikon View. See the Nikon View Reference Manual
(on CD) for more information.
After scanning, images are opened in images windows in the host application, where they can be printed or saved ( 40).
Scan images ( 33–39)
• Specify the fi lm type and color model ( 34)
• Preview images (
35–36)
• Flip and rotate images ( 36)
• Select the area to be scanned ( 37–38)
• Enhance images using the tools in the Tool Chest, including
Scan Image Enhancer, Digital ICE4 Advanced, and curves ( 38,
48–50)
• Scan images ( 39)
Scan window
(
44–47)
Tool Chest
( 48–50)
Page 19
10
Installing Nikon Scan
Installing Nikon Scan
Nikon Scan software (provided) is required to control the scanner. The installation instructions
that follow are divided into Windows and Macintosh sections.
Windows
Turn the computer on and wait for Windows to start up. Before continuing with installation,
make sure that:
• The scanner is NOT connected
• No other applications (including anti-virus software) are running
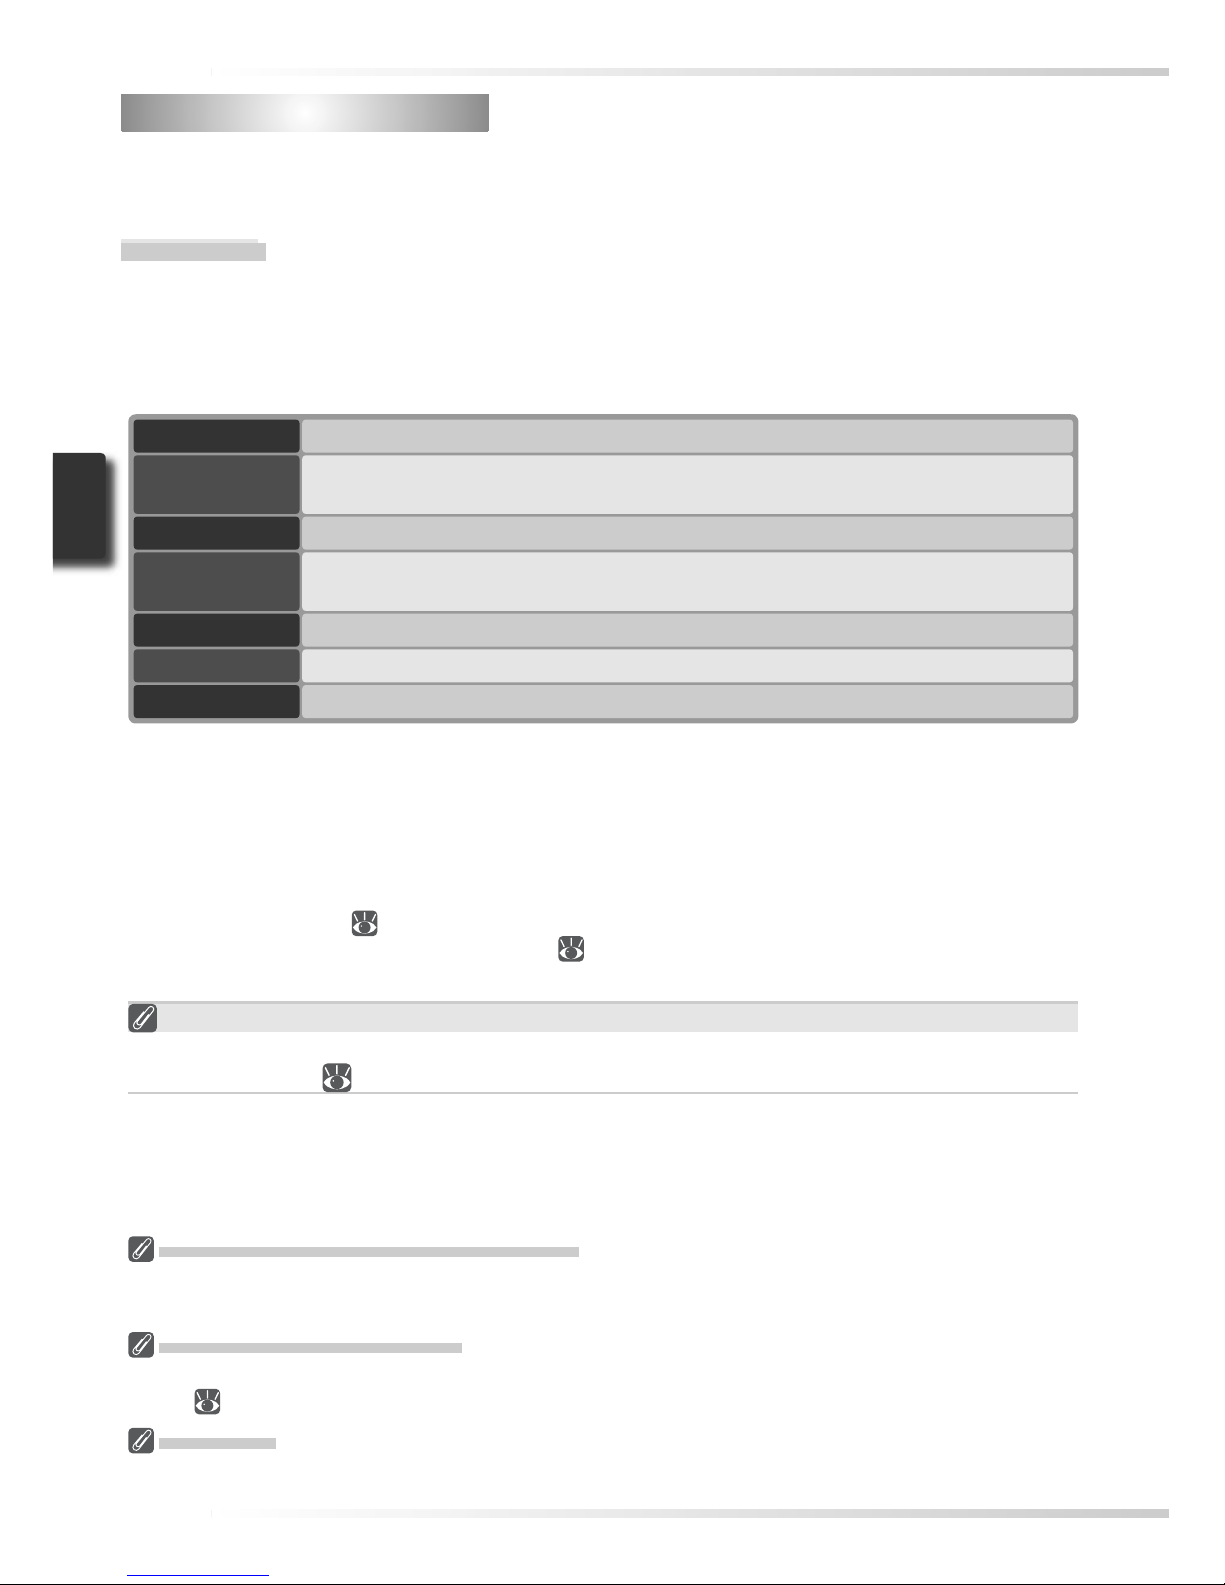
• The computer satisfi es the following system requirements:
CPU 300 MHz Pentium or better
OS
Preinstalled versions of Windows XP, Windows 2000 Professional, Windows Me,
Windows 98 SE
RAM
*
128 MB or more (512 MB or more recommended)
Hard-disk
space
†
A minimum of 40 MB required for installation (200 MB or more recommended), with
an additional 200 MB of free disk space available while Nikon Scan is running
Video resolution 800 × 600 pixels or more with 16-bit color (High Color) or more
IEEE 1394
‡
Only OHCI-compliant boards supported
Miscellaneous CD -ROM drive required for installation
* More memory may be required depending on fi lm type, scan size, resolution, bit depth, the number of
scans performed in each session, the adapter used, and on whether Digital ROC, Digital GEM or Digital
DEE is used. A system with more than the minimum amount of memory is recommended.
† More free disk space may be required depending on the fi lm type and number of frames. Nikon recom-
mends having as much free disk space as possible when running Nikon Scan.
‡ If the computer is not already equipped with an IEEE 1394 (Firewire) interface, install an approved
OHCI-compliant IEEE 1394 interface board or card (for a list of approved boards or cards, see the Nikon
web site for your area; 2). The IEEE 1394 interface board provided with the scanner can be installed
in desktop computers with an empty PCI slot ( 64 ). N ote that the supplied board can not be installed
in laptop computers or low- profi le PCI slots.
Windows 98 SE
Before installing Nikon Scan on a computer running Windows 98 SE, be sure to update the
IEEE 1394 drivers (
65).
Windows XP/Windows 2000 Professional
When installing or uninstalling Nikon Scan under the above operating systems, log in as the “Computer
administrator” (Windows XP) or “Administrator” (Windows 2000 Professional).
Earlier Versions of Nikon Scan
Before installing Nikon Scan 4, uninstall any earlier versions of Nikon Scan. See “Uninstalling Nikon
Scan” (
70).
Nikon View
For information on installing and using Nikon View, see the Nikon View Reference Manual (on CD).
Page 20
11
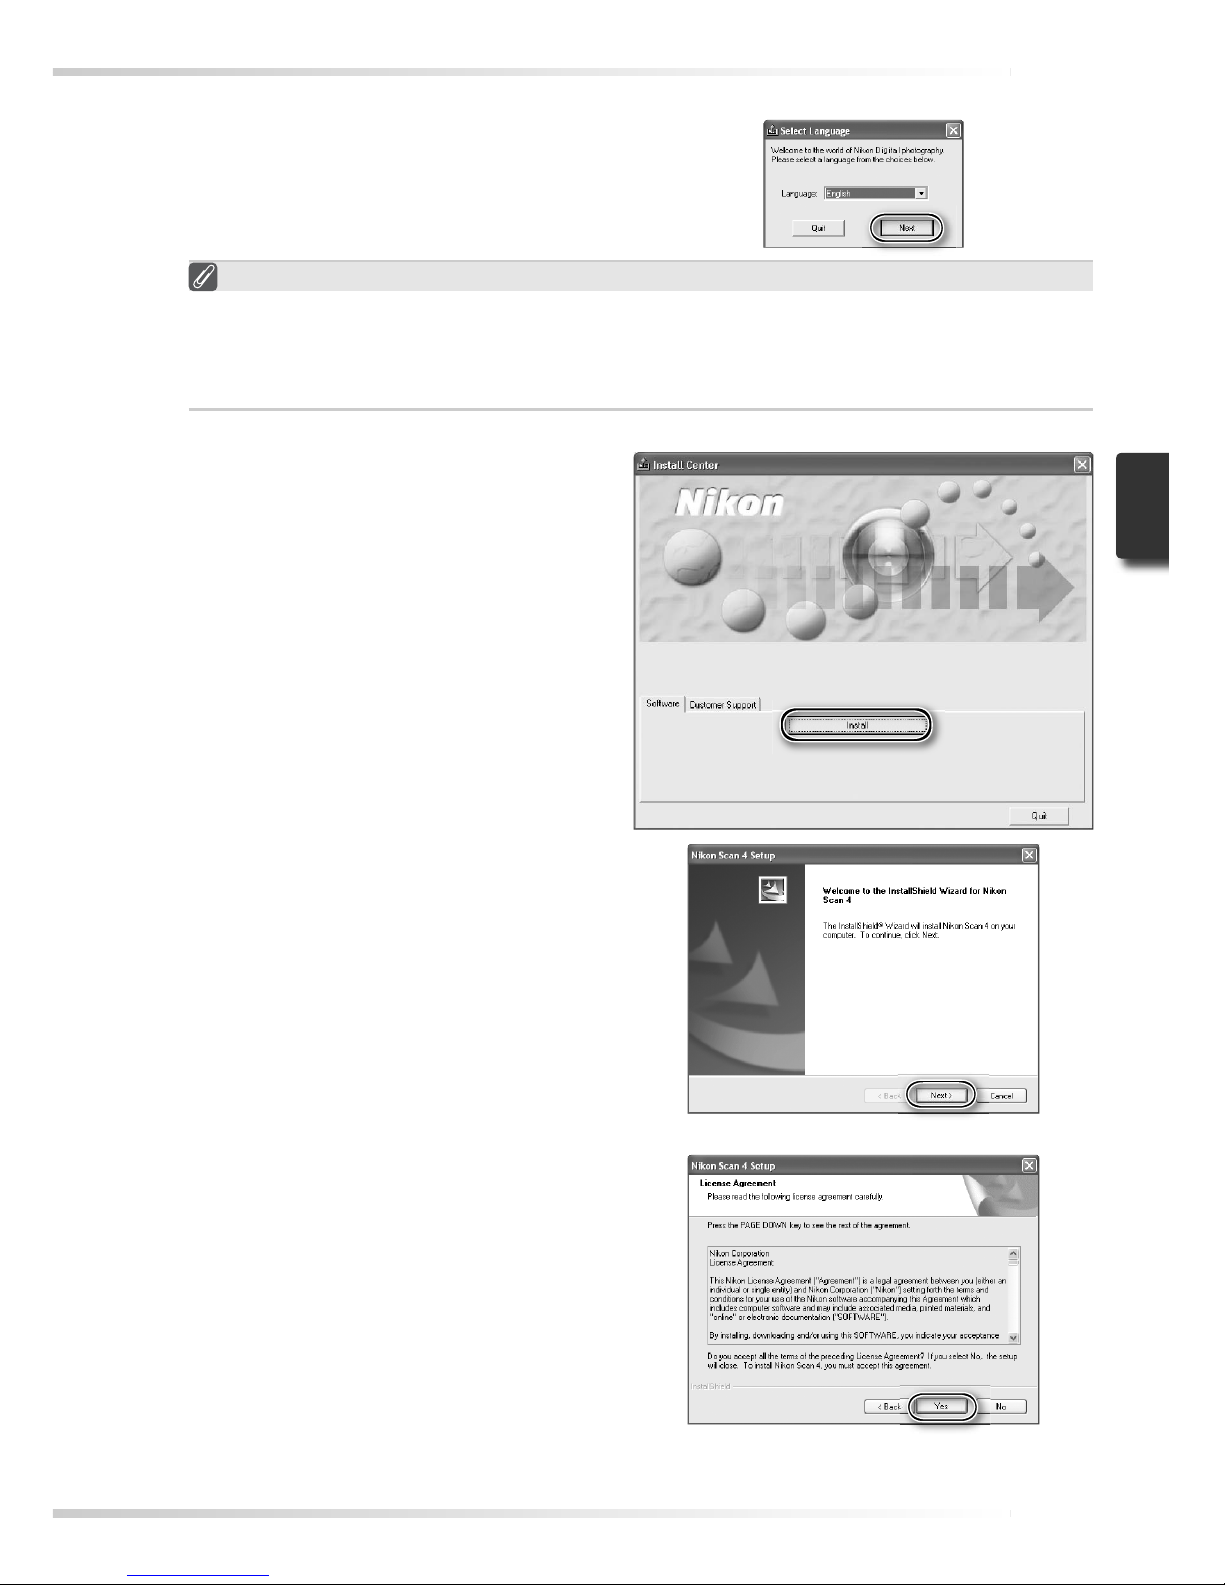
1
Insert the Nikon Scan CD into the CD-ROM drive
A language-selection dialog will be
displayed. Select a language and click
Next.
If the Language Selection Dialog Is Not Displayed
If the language selection dialog does not appear after the Nikon Scan CD is inserted:
1. Double-click the My Computer icon on the desktop.
2. Right click the CD-ROM drive containing the Nikon Scan CD.
3. Choose AutoRun from the menu that appears.
2
Click Install
The “Install Center” dialog will be displayed. Open the “Software” panel and
click Install.
3
Click Next
4
Read the license agreement
Click Yes to accept the agreement and
continue installation.
Page 21
12
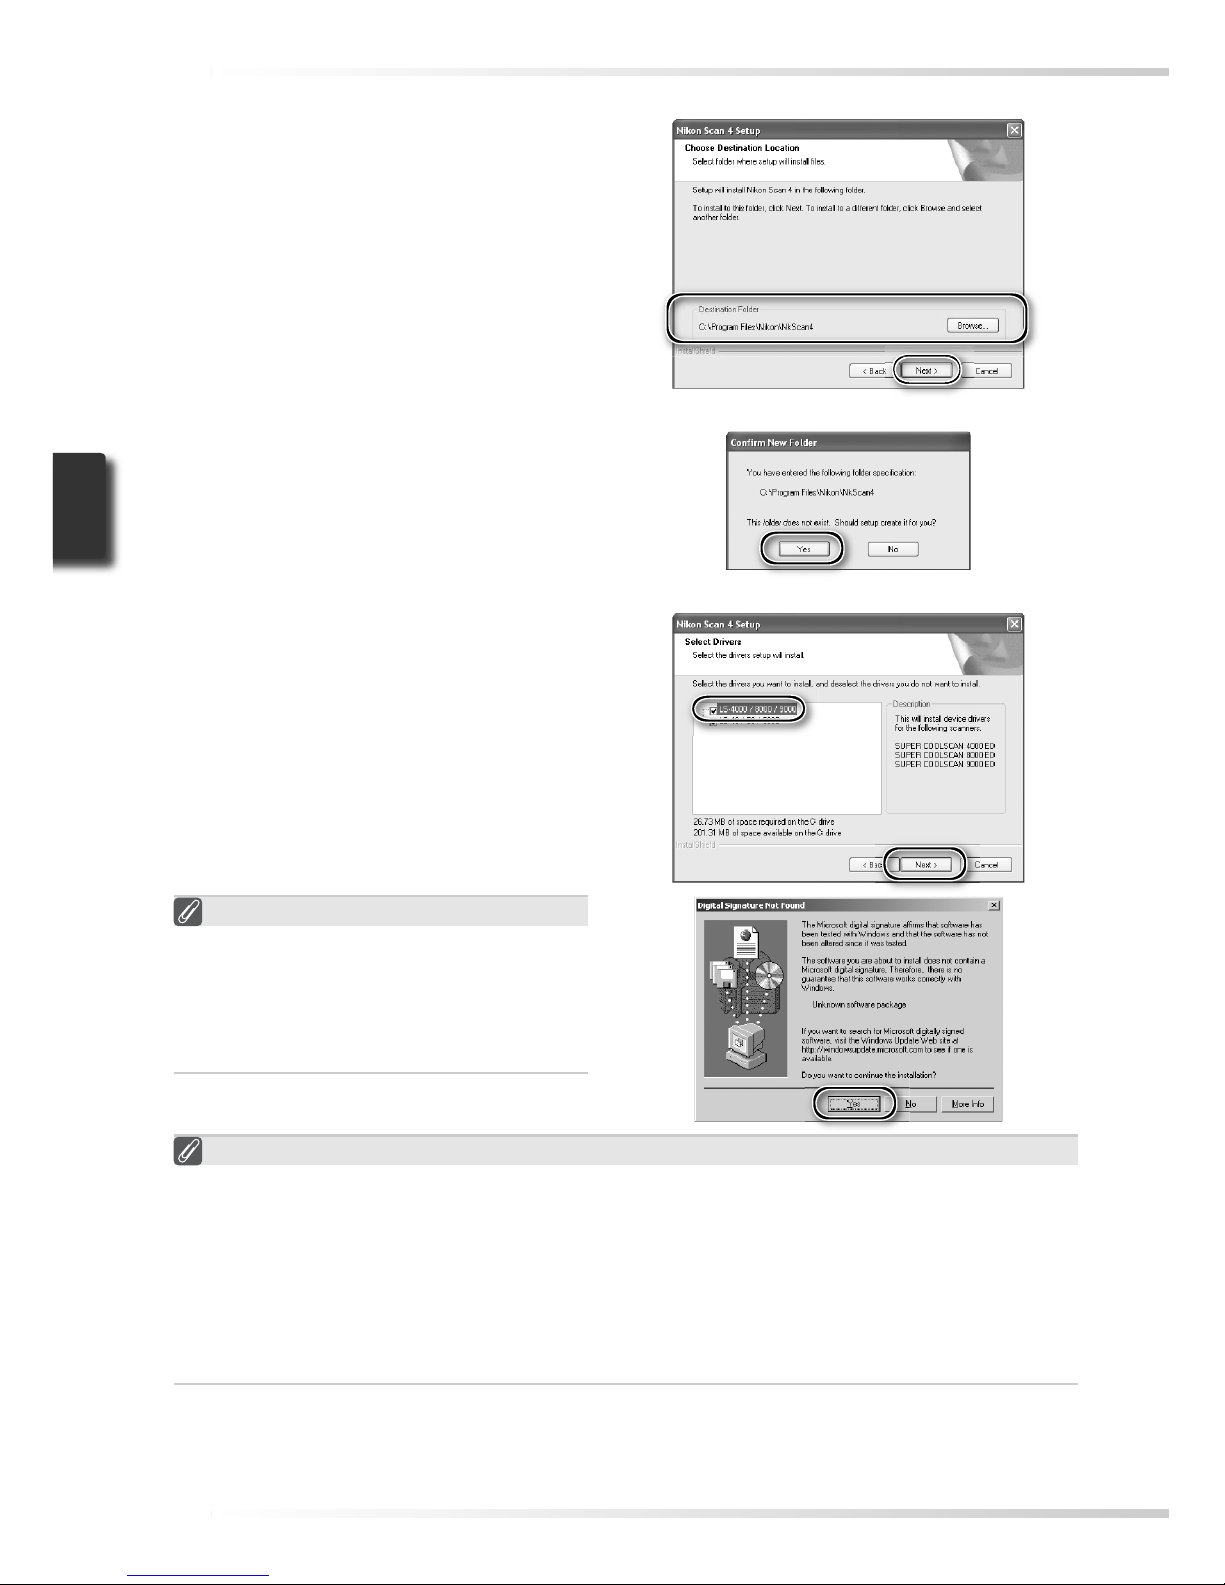
7
Select the scanner drivers
Select LS-4000/8000/9000 and click
Next.
Device Registration
Windows 2000 Professional
A “Digital Signature Not Found” dialog will also be displayed the fi rst time the scanner is
connected and turned on following installation of Nikon Scan. Click Yes to register the
scanner with the system.
Windows XP, Windows Me, Windows 98 SE
Once Nikon Scan has been installed, the scanner will automatically be registered with the
system the fi rst time the scanner is connected and turned on.
6
Click Yes
Click Yes to create the destination
folder.
Windows 2000 Professional
A “Digital Signature Not Found” dialog
will be displayed twice; click Yes each
time (if the LS-40/50/5000 scanner
drivers were not selected, this dialog will
be displayed only once).
5
Choose a destination folder
The default install location for Nikon
Scan is displayed under “Destination
Folder.” To choose a different location,
click Browse… and navigate to the desired folder. Click Next to install Nikon
Scan to the selected folder.
Page 22
13
8
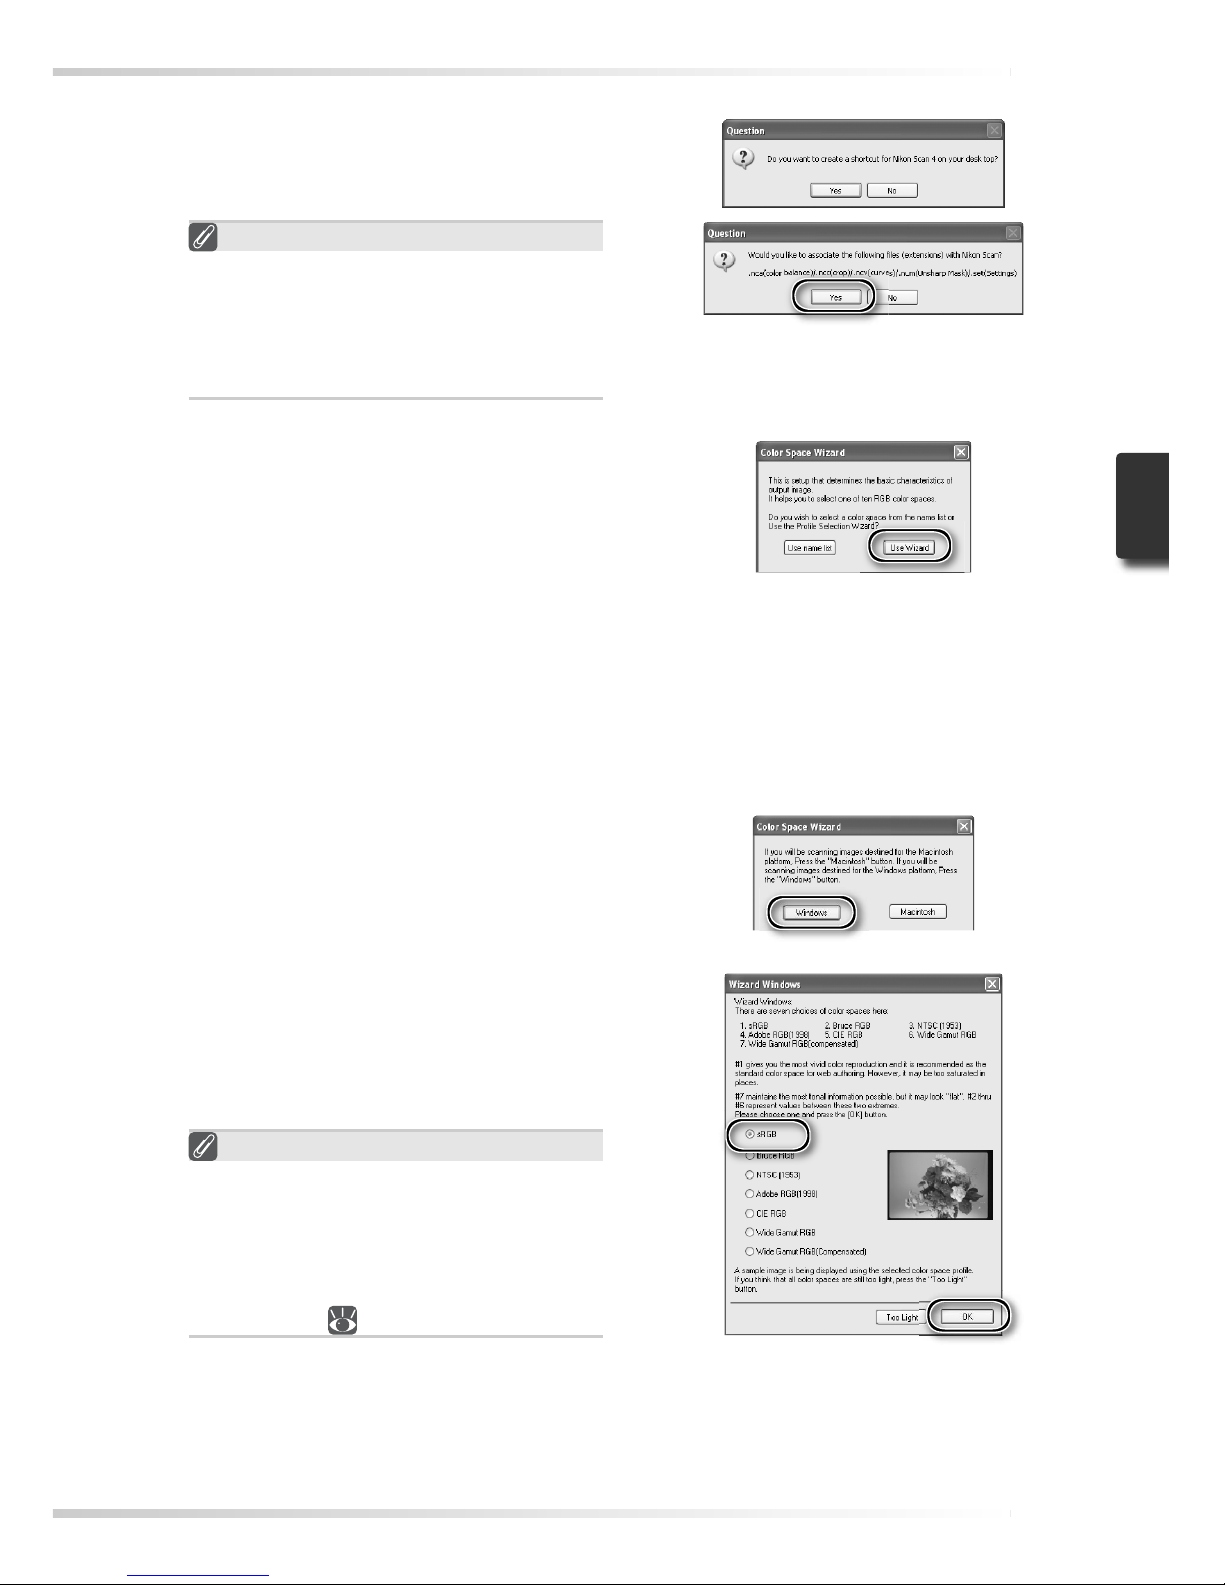
Create a shortcut (optional)
Click Yes to create a shortcut to Nikon
Scan on the desktop. Click No to proceed without creating a shortcut.
Settings File Extensions
If other Nikon imaging software is installed, the dialog shown at right will be
displayed. Click Yes to associate Nikon
Scan with settings fi le extensions such as
“.n ca” and “.ncv ”.
9
Click Use Wizard (recommended)
Click Use Wizard to choose an RGB
color-space profi le with the help of the
Color Space Wizard (recommended).
The selected color-space profi le can
be changed in the Nikon Scan “Preferences” dialog after installation.
Note that choosing the correct color-space profi le is very important if the scanner is used
in a professional setting, for example as part of a production workfl ow. For more information on choosing an RGB color-space profi le, see the Nikon Scan Reference Manual
(on CD). Your national Nikon offi ce may also be able to provide or recommend color
management training resources.
10
Click Windows
Clicking Use Wizard in the opening
dialog of the Color Space Wizard displays a platform selection dialog. Click
Windows.
11
Select sRGB
In the Windows Color Space Wizard, select sRGB (recommended) and click OK.
For more information on color-space
profi les, see the Nikon Scan Reference
Manual.
Windows 98 SE
If the computer displays a message stating that an IEEE 1394 update is required,
click OK to continue with installation.
Once installation is complete and the
computer has restarted, update the IEEE
1394 drivers ( 65).
Page 23
14
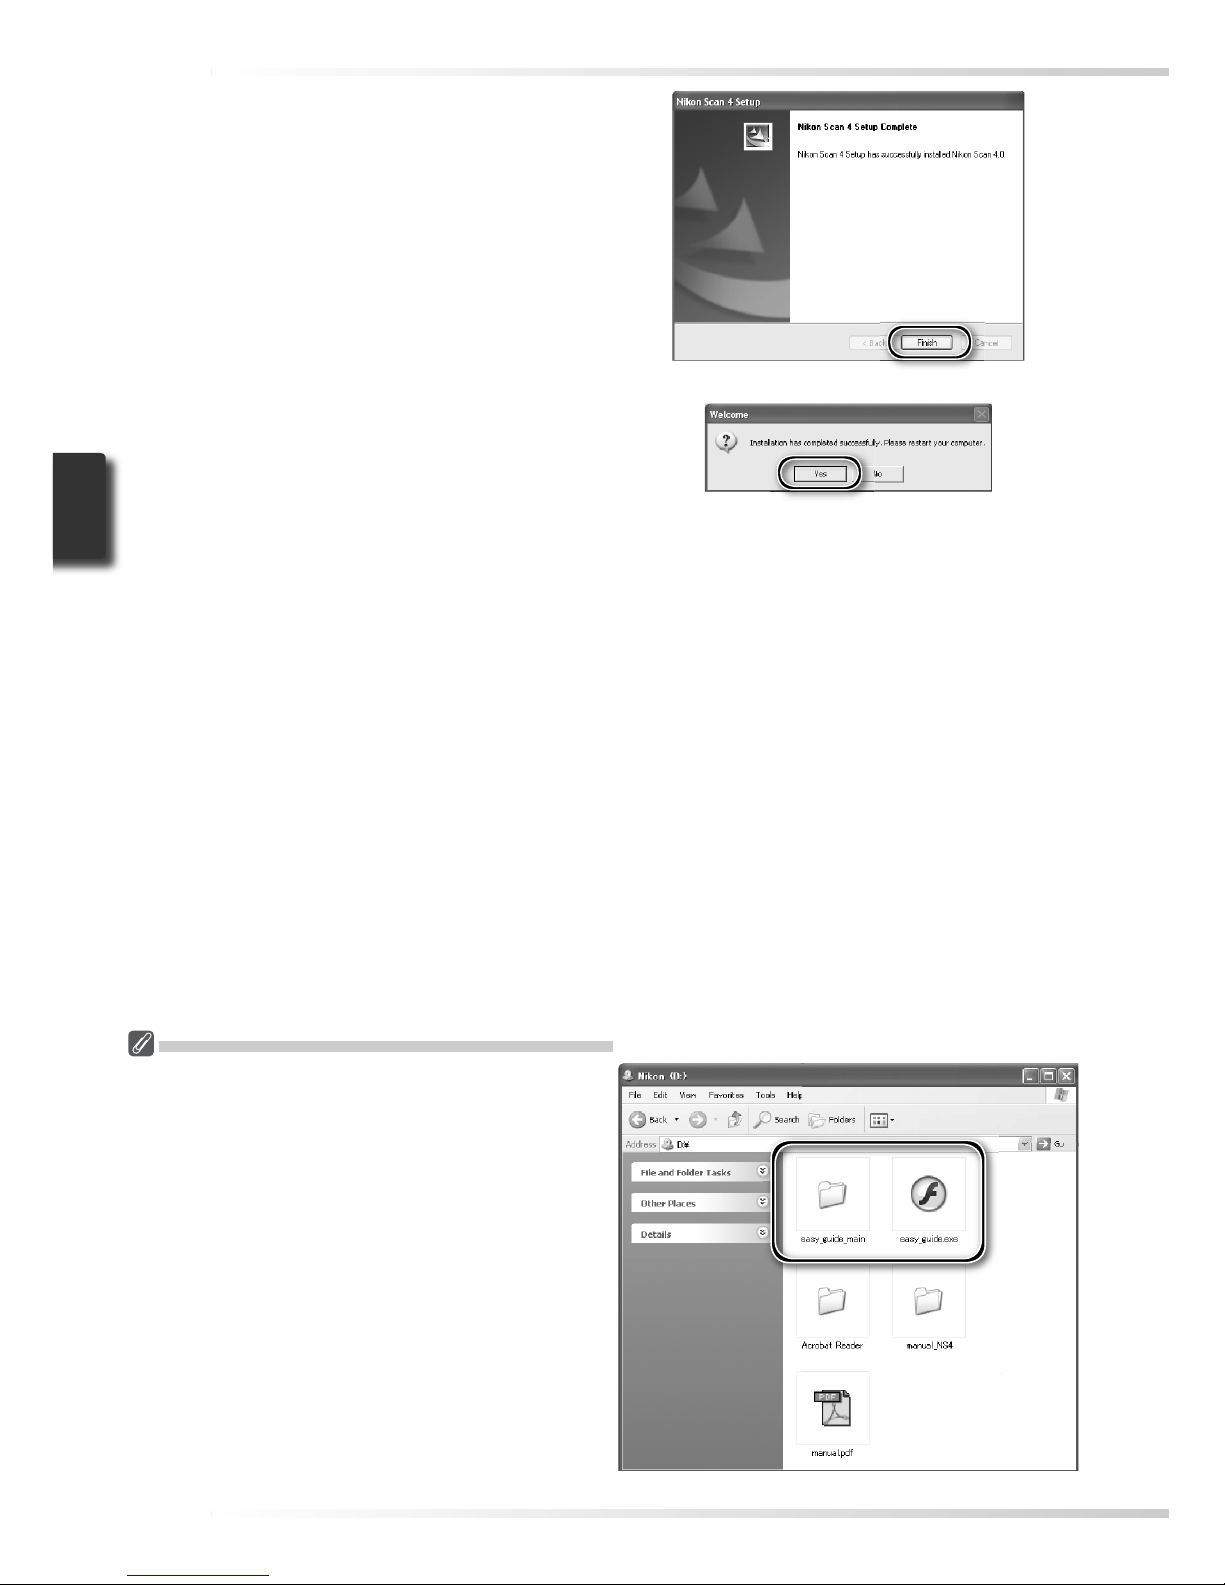
Viewing the Easy Scanning Guide (Windows)
Insert the Nikon Scan 4 Reference Manual/Easy
Scanning Guide CD and double-click the easy_
guide.exe icon. The Macromedia Flash Player
will start and a language selection screen will be
displayed; click the appropriate link to view the
guide in the desired language. The Easy Scanning
Guide can also be copied to the computer hard
disk for ease of reference (total size: approximately
200 MB). Copy the “easy_guide_main” folder and
easy_guide.exe to the desktop.
12
Click Finish
13
Restart the computer
Click Yes to restart the computer. Once
the computer has restarted, take a few
minutes to view the ReadMe fi le, which
may contain important information that
could not be included in this manual.
Page 24
15
Macintosh
Turn the computer on and wait for it to start up. Before continuing with installation, make
sure that:
• The scanner is
NOT connected
• No other applications (including anti-virus software) are running
• The computer satisfi es the following system requirements:
CPU Power PC G3 or later (G4 or later recommended)
OS
*
Mac OS 9 (9.1 or later), Mac OS X (10.1.5 or later)
RAM
†
• Mac OS 9: 64 MB or more (256 MB or more recommended)
• Mac OS X: 128 MB or more (512 MB or more recommended)
Hard-disk
space
‡
A minimum of 70 MB required for installation (200 MB or more recommended), with
an additional 200 MB (Mac OS 9) or 550 MB (Mac OS X) of free disk space available
while Nikon Scan is running
Video resolution 800 × 600 pixels or more with 16-bit color (thousands of colors) or more
Firewire Only built-in Firewire ports supported
Miscellaneous CD -ROM drive required for installation
* For the latest information on supported versions of Mac OS, see the Nikon web site listed in this
manual(
2).
† More memory may be required depending on fi lm type, scan size, resolution, bit depth, the number of
scans performed in each session, the adapter used, and on whether Digital ROC, Digital GEM or Digital
DEE is used. A system with more than the minimum amount of memory is recommended.
‡ More free disk space may be required depending on the fi lm type and number of frames. Nikon recom-
mends having as much free disk space as possible when running Nikon Scan.
Mac OS X
Administrator privileges are required to install and uninstall Nikon Scan under Mac OS X.
Mac OS 9
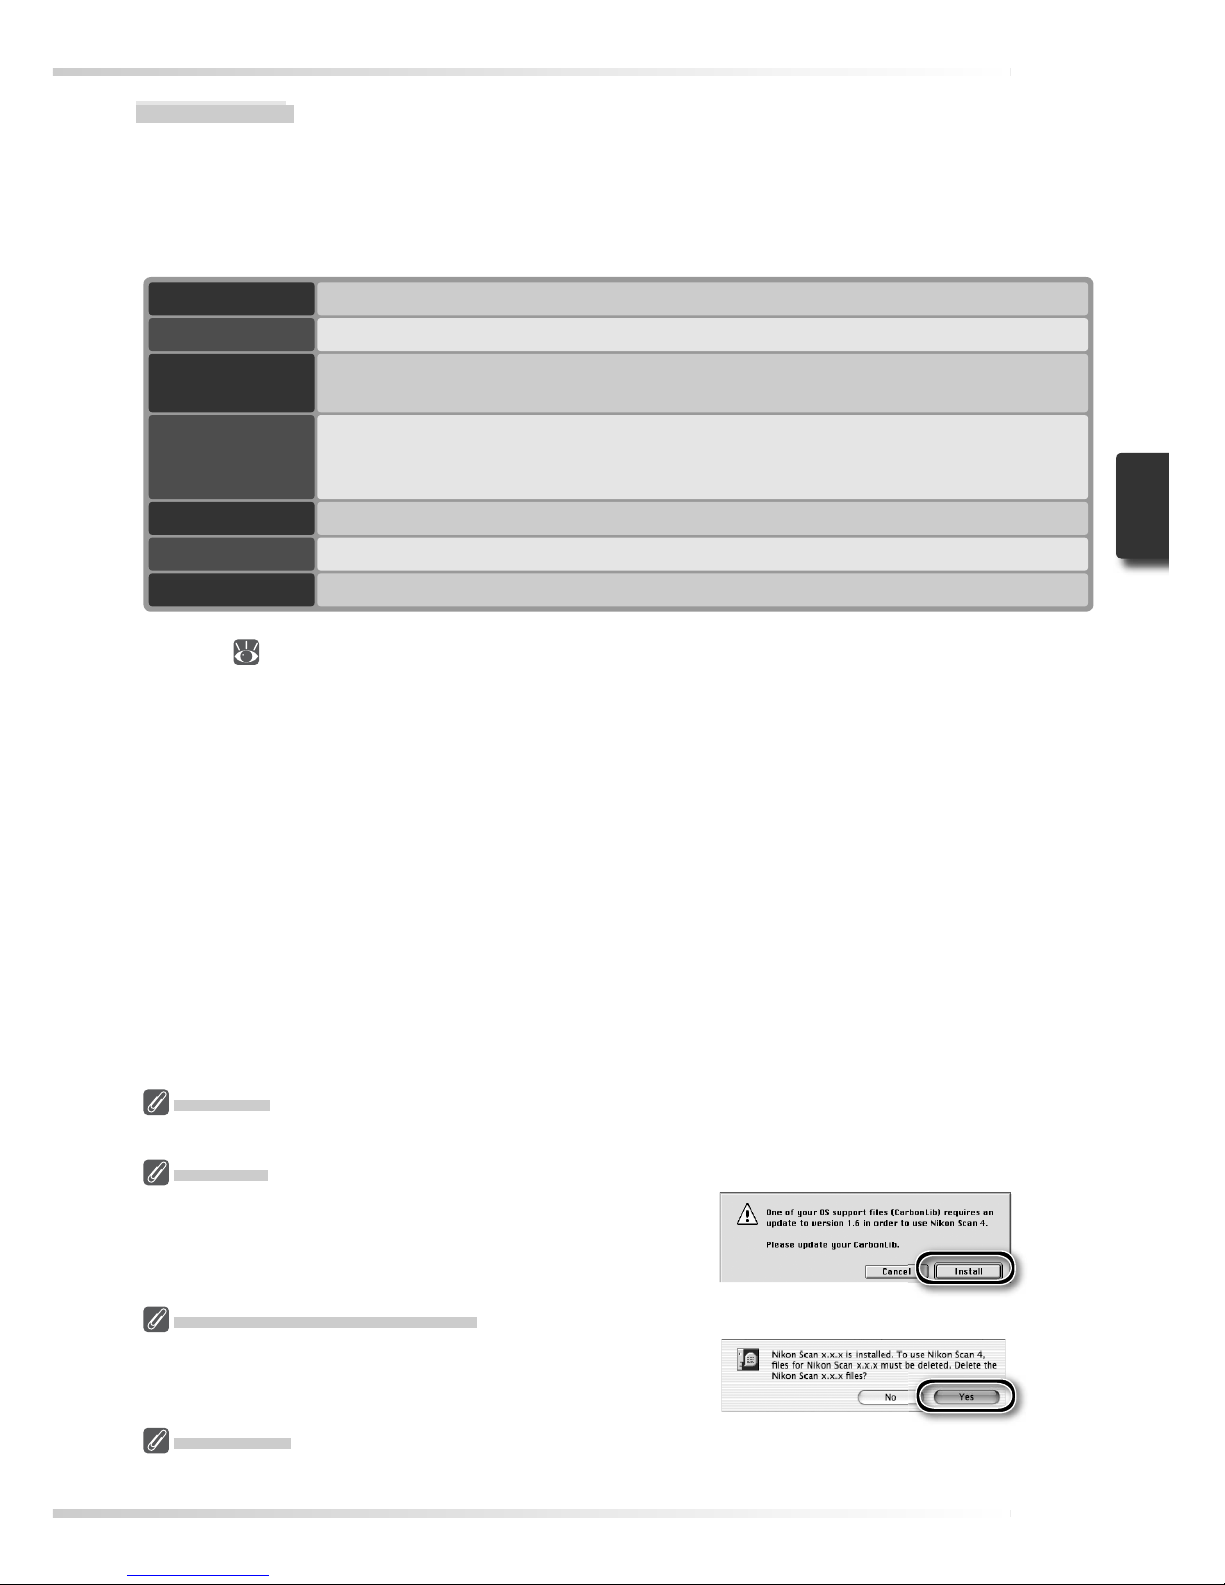
CarbonLib 1.6 or later is required to install Nikon
Scan. If the installer detects an earlier version of
CarbonLib, a message will be displayed. Click In-
stall to upgrade to a new version of CarbonLib.
Earlier Versions of Nikon Scan
If the installer detects an earlier version of Nikon
Scan, the dialog shown at right will be displayed.
Click Ye s to upgrade to Nikon Scan 4.
Nikon View
For information on installing and using Nikon View, see the Nikon View Reference Manual (on CD).
Page 25
16
1
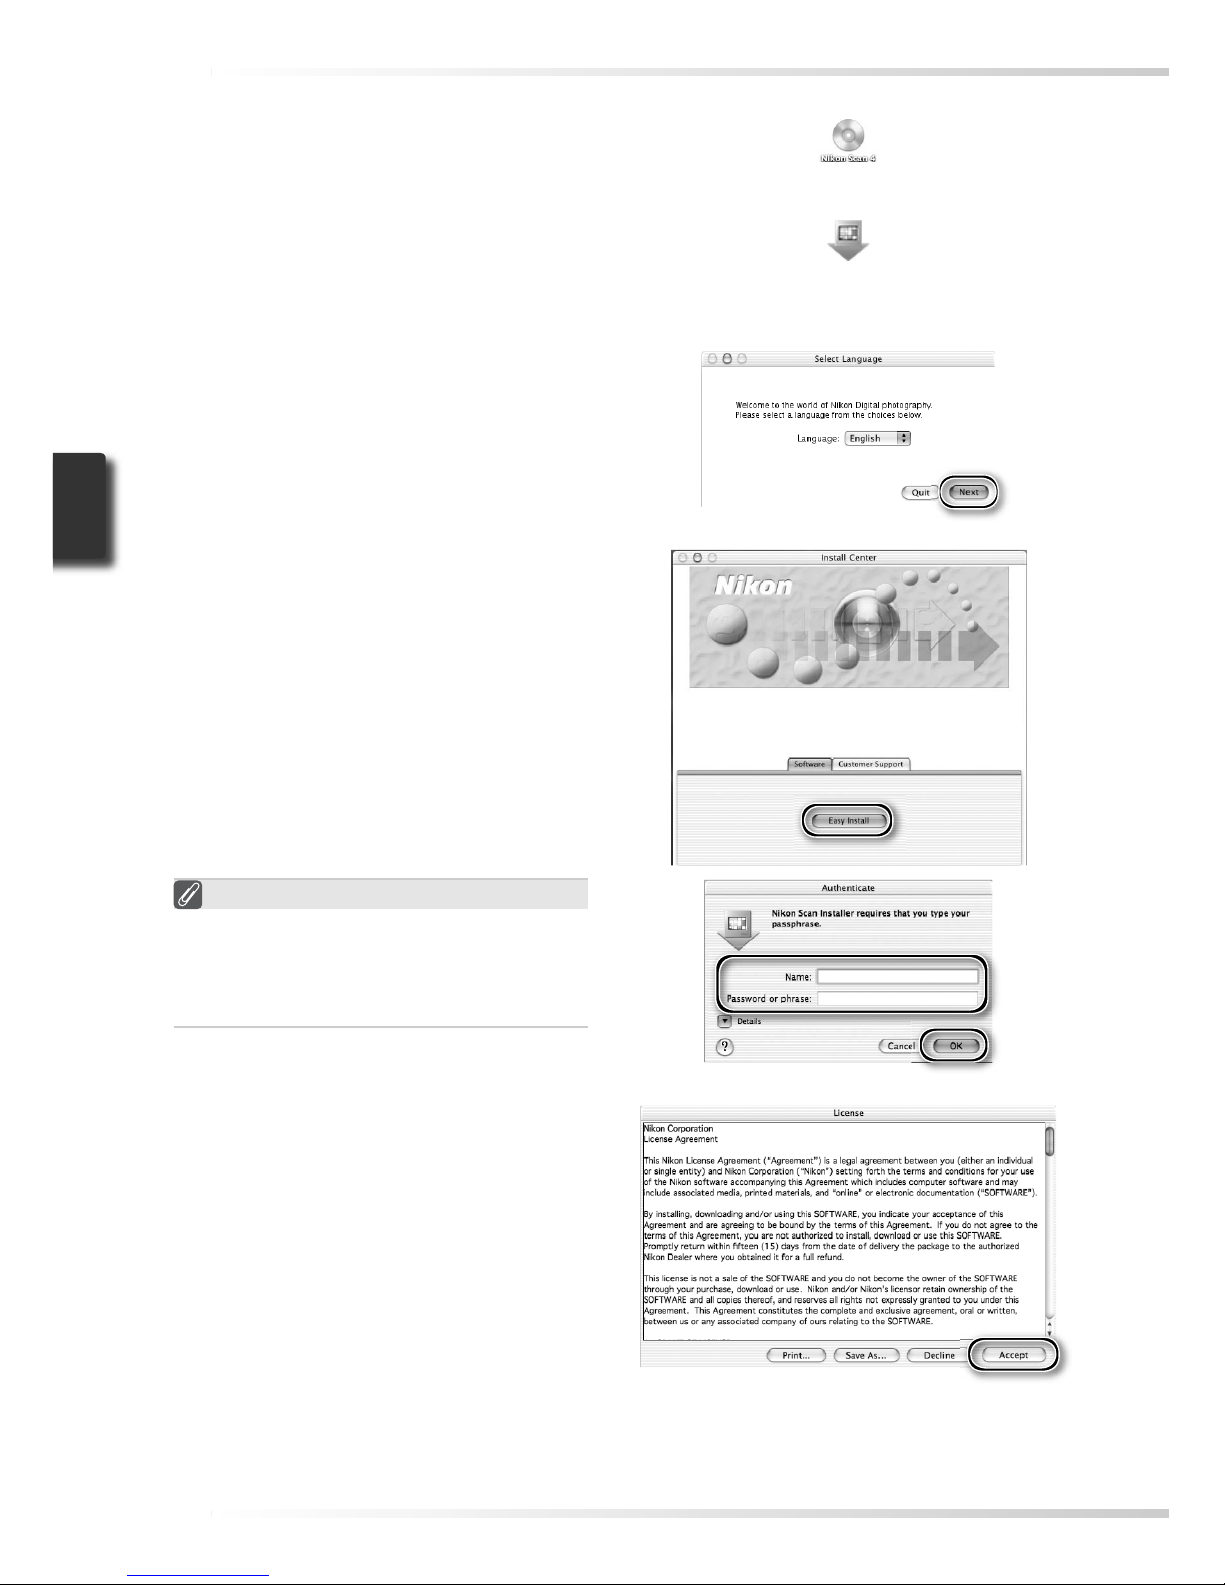
Insert the Nikon Scan CD into the CD-ROM drive
A Nikon Scan 4 CD icon will appear on
the desktop. Double- click the icon to
open the “Nikon Scan 4” window.
2
Double-click the Welcome icon in
the “Nikon Scan 4” window
“Authenticat e” (Mac OS X Only)
Clicking Easy Install in the software
panel displays the “Authenticate” dialog
shown at right. Enter the administrator
name and password and click OK.
5
Read the license agreement
Click Accept to accept the agreement
and continue installation.
3
Choose a language
A language-selection dialog will be
displayed. Select a language and click
Next.
4
Click Easy Install
The “Install Center” dialog will be displayed. Open the “Software” panel and
click Easy Install.
Page 26
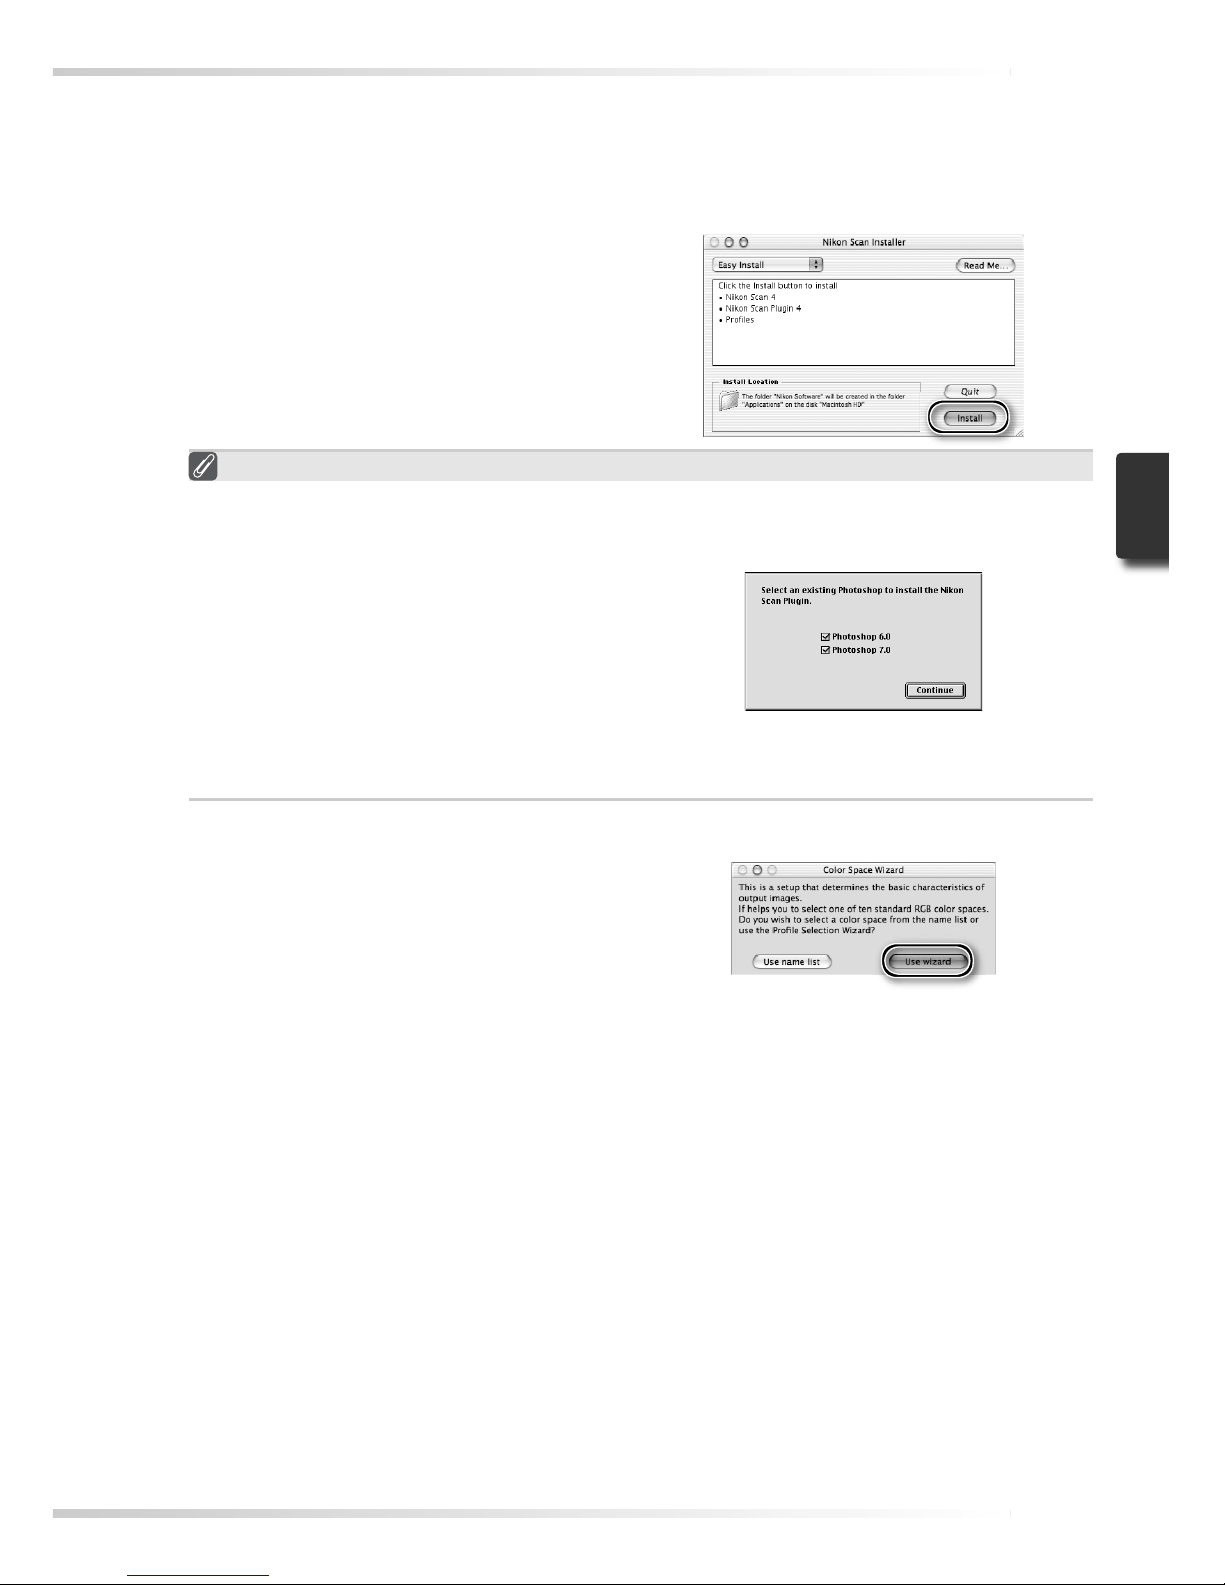
17
8
Click Use wizard (recommended)
Click Use wizard to choose an RGB
color-space profi le with the help of the
Color Space Wizard (recommended).
The selected color-space profi le can
be changed in the Nikon Scan “Preferences” dialog after installation.
6
View the “ReadMe” fi le
Take a few moments to read this fi le, which may contain important information that
could not be included in this manual. Click Continue… to continue with installation.
7
Click Install
Click Install to begin installation.
Selecting a Plug-ins Folder (Mac OS 9)
If a copy of the Nikon Scan plug-in is
installed in the plug-ins folders for supported versions of Adobe Photoshop,
Photoshop can be used to acquire images directly from the scanner. If more
than one copy of Photoshop is installed
on the computer, a list will be displayed.
Select the copies of Photoshop that will
be used to acquire images and click Con-
tinue to copy the Nikon Scan plug-in to
the appropriate plug-ins folders.
Note that choosing the correct color-space profi le is very important if the scanner is used
in a professional setting, for example as part of a production workfl ow. For more information on choosing an RGB color-space profi le, see the Nikon Scan Reference Manual
(on CD). Your national Nikon offi ce may also be able to provide or recommend color
management training resources.
Page 27
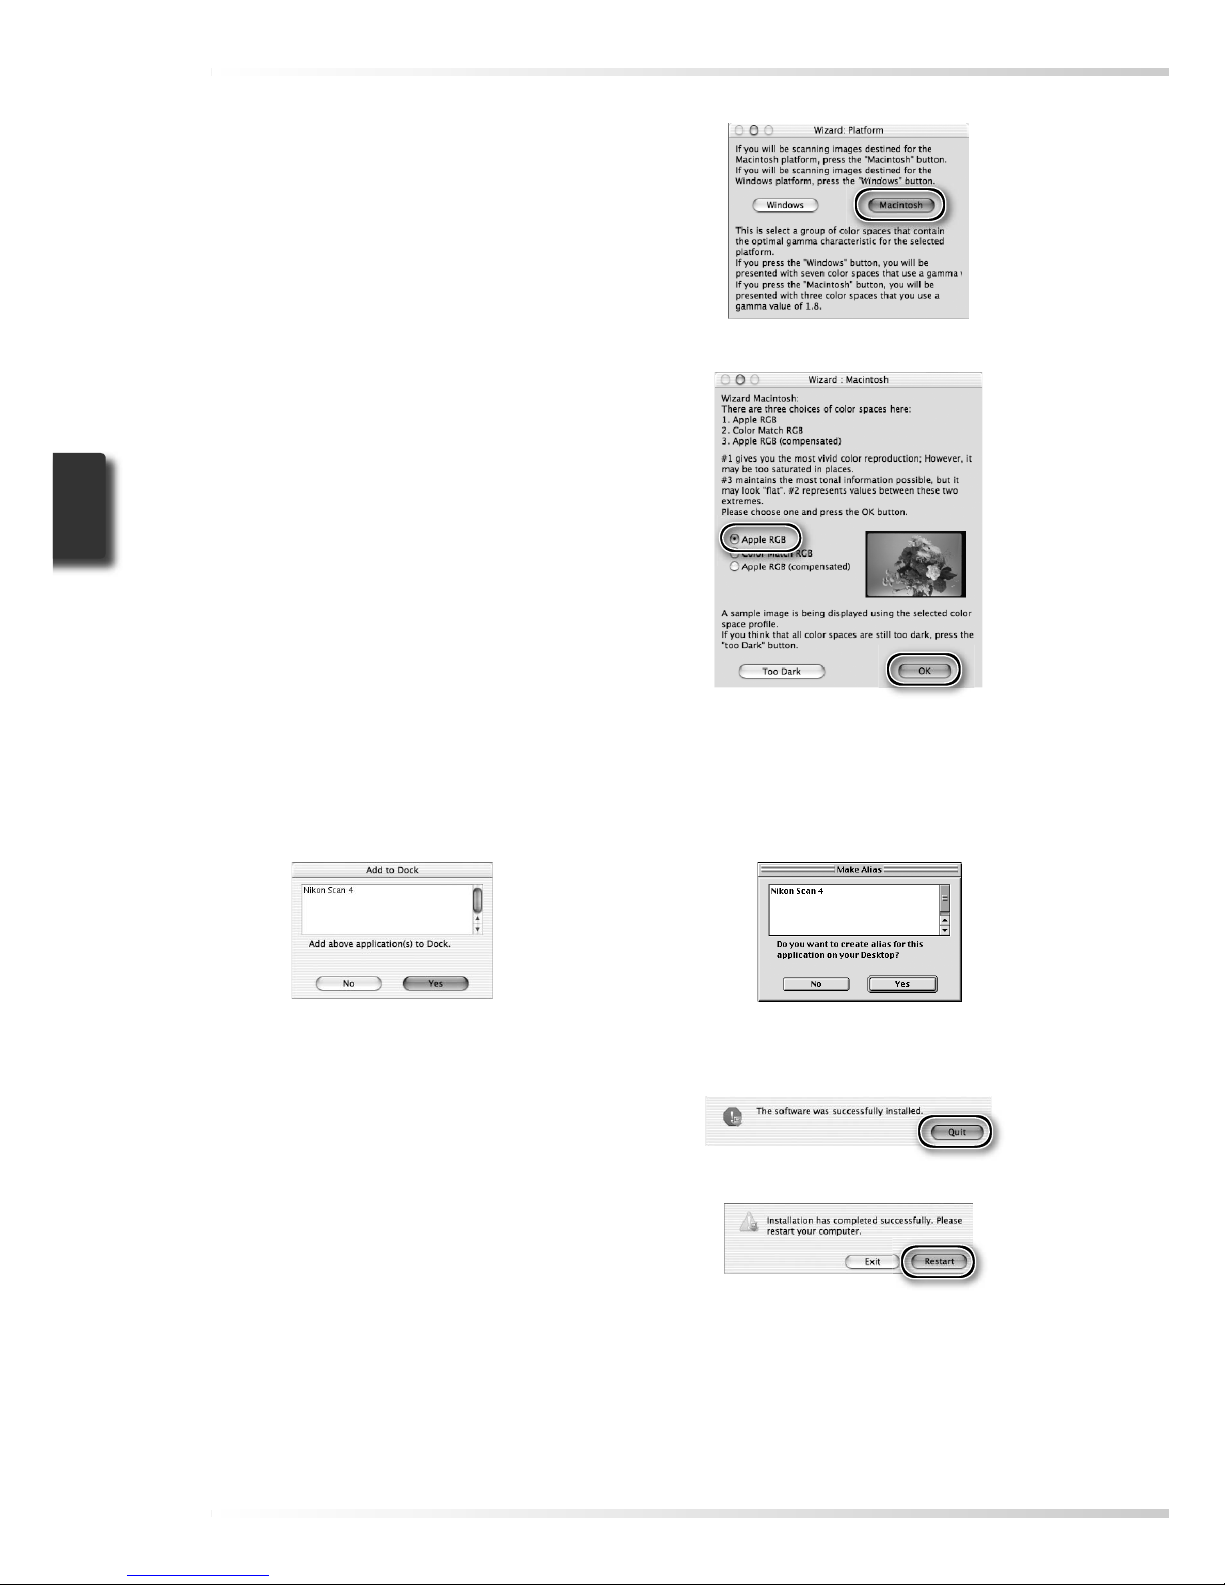
18
10
Select Apple RGB
In the Windows Color Space Wizard,
select Apple RGB (recommended) and
click OK. For more information on
color-space profi les, see the Nikon Scan
Reference Manual.
9
Click Macintosh
Clicking Use wizard in the opening
dialog of the Color Space Wizard displays a platform selection dialog. Click
Macintosh.
11
Add Nikon Scan to the Dock (Mac OS X) or create an alias (Mac OS 9)
Click Yes to add Nikon Scan to the Dock (Mac OS X) or to create an alias for Nikon Scan
on the desktop (Mac OS 9). Click No to proceed without adding Nikon Scan to the Dock
or creating an alias.
Mac OS X Mac OS 9
12
Click Quit
Click Quit to exit the installer.
13
Restart the computer
Click Restart to restart the computer.
This completes installation of Nikon
Scan.
Page 28
19
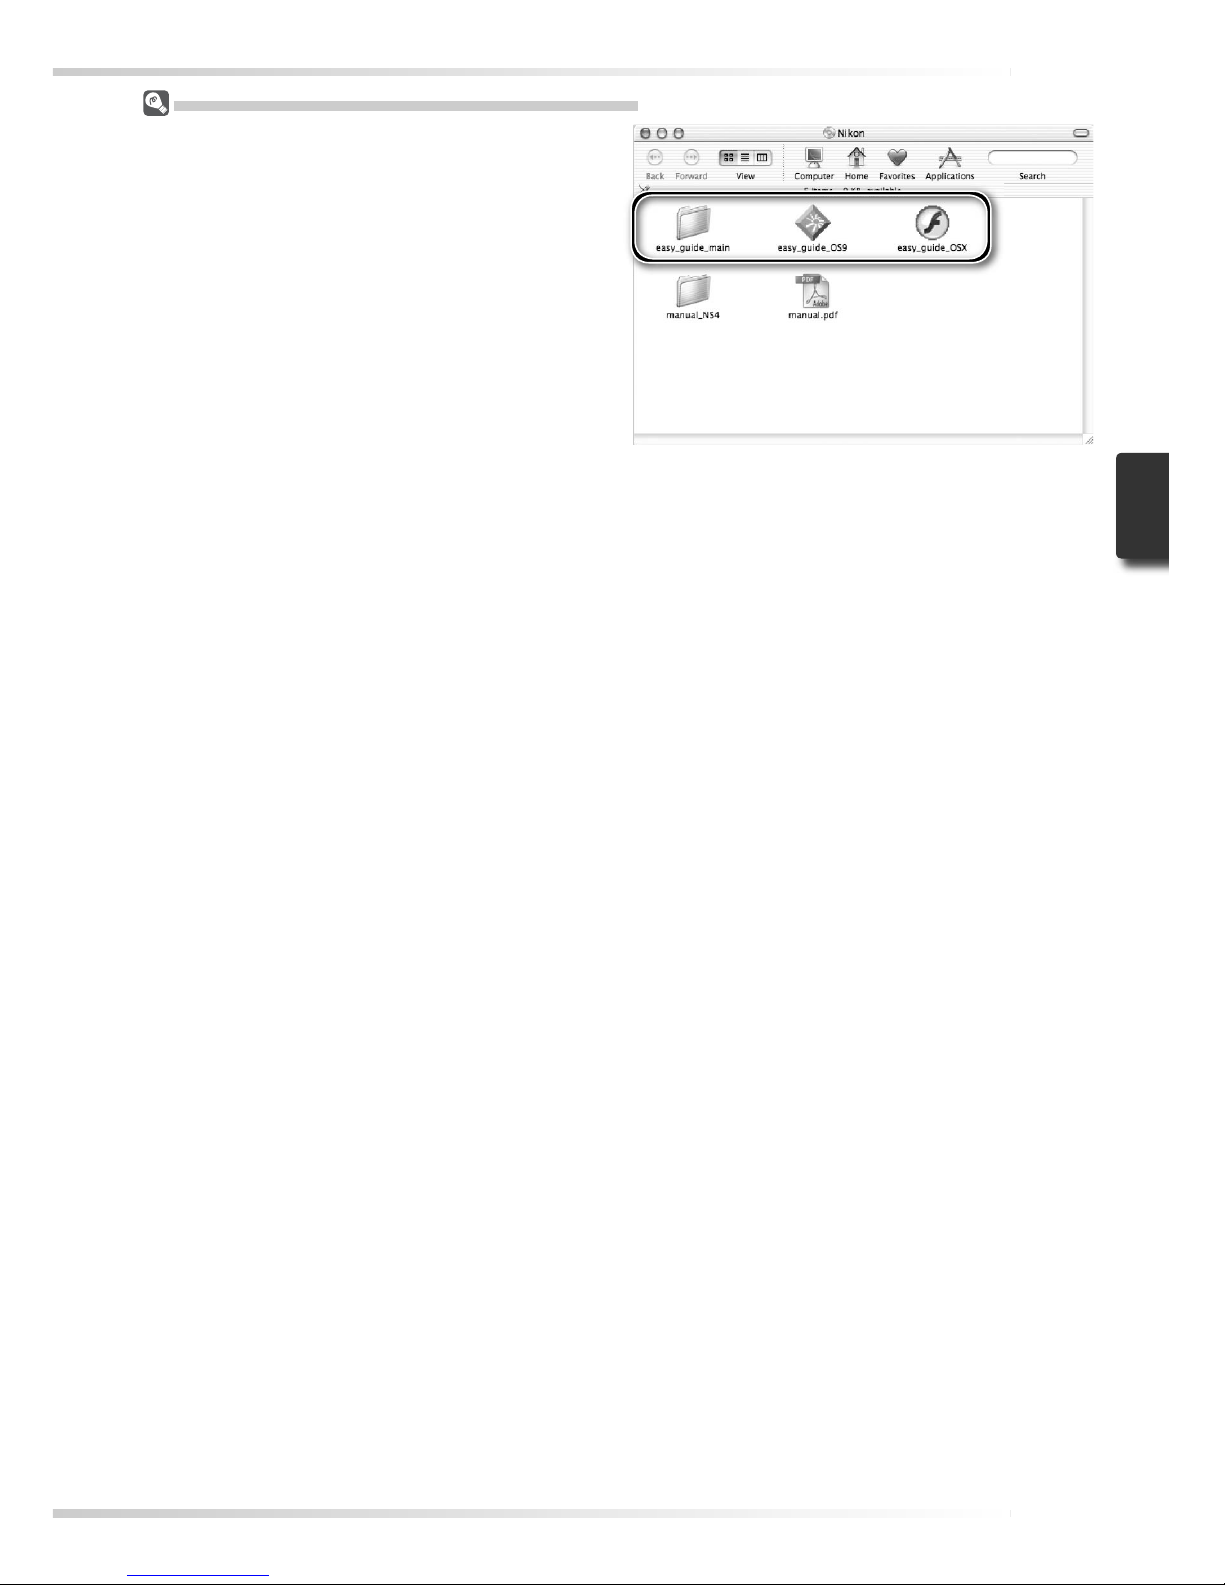
Viewing the Easy Scanning Guide (Macintosh)
Insert the Nikon Scan 4 Reference Manual/Easy
Scanning Guide CD and double-click the easy_
guide_OSX icon (Mac OS X) or easy_guide_OS9
icon (Mac OS 9). The Macromedia Flash Player
will start and a language selection screen will be
displayed; click the appropriate link to view the
guide in the desired language. The Easy Scanning
Guide can also be copied to the computer hard
disk for ease of reference (total size: approximately
200 MB). Copy the “easy_guide_main” folder and
easy_guide_OSX (Mac OS X) or easy_guide_
OS9 (Mac OS 9) to the desktop.
Users of Mac OS X should ensure that the start-up
disk is named using only letters and numbers (the
default name for the start-up drive is "Macintosh
HD"). The guide may not start if the volume name
contains punctuation or other non-alphanumeric
characters.
Page 29
20
Installing the Scanner
Installing the Scanner
Step 1 — Choose a Lo cation
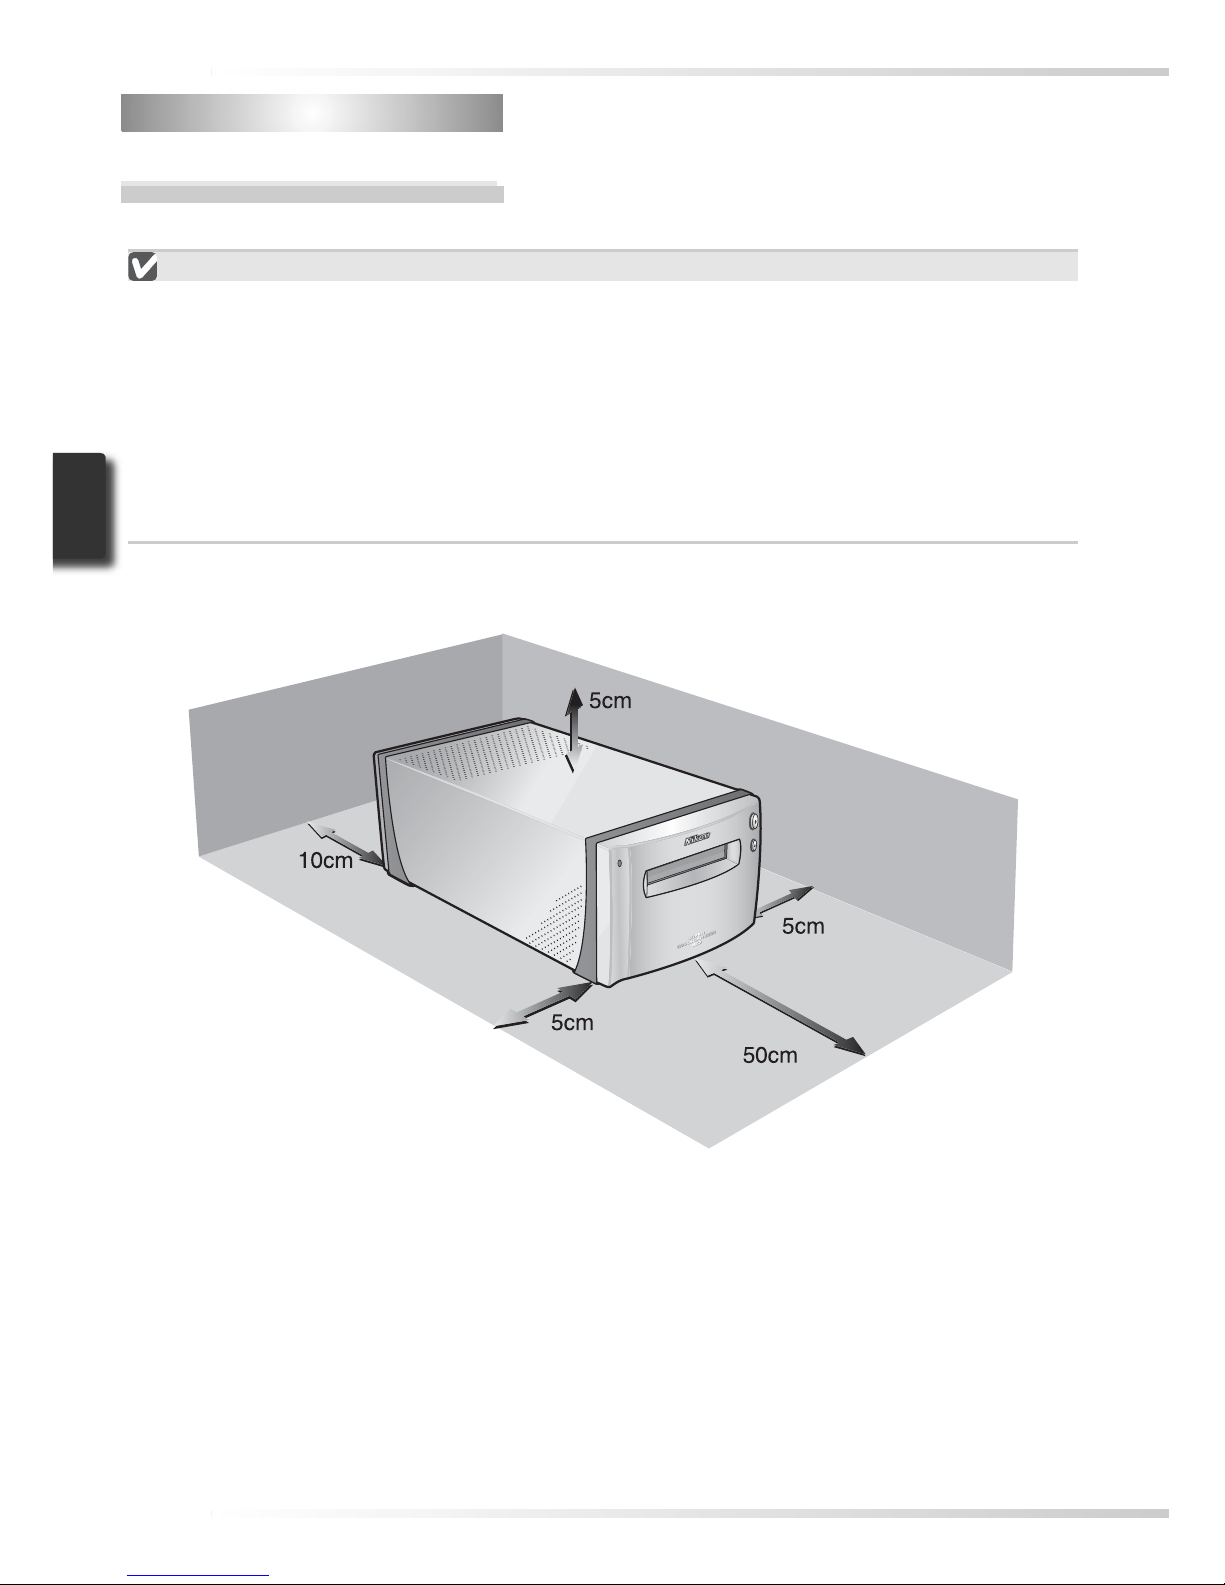
Choose a fl at, stable location close to the computer.
Installing the Scanner
Do NOT install the scanner where other objects would block its vents or where it would be
exposed to:
• direct or refl ected sunlight
• condensation or rapid temperature changes
• electromagnetic interference from other electronic devices
• temperatures over 35 °C (95 °F) or below 10 °C (50 °F)
• excessive dust
• water vapor from a humidifi er or similar device
• smoke
Leave at least 5 cm (2˝) clear above and on either side of the scanner, 10 cm (4˝) behind, and
50 cm (20˝ ) in front.
Page 30
21
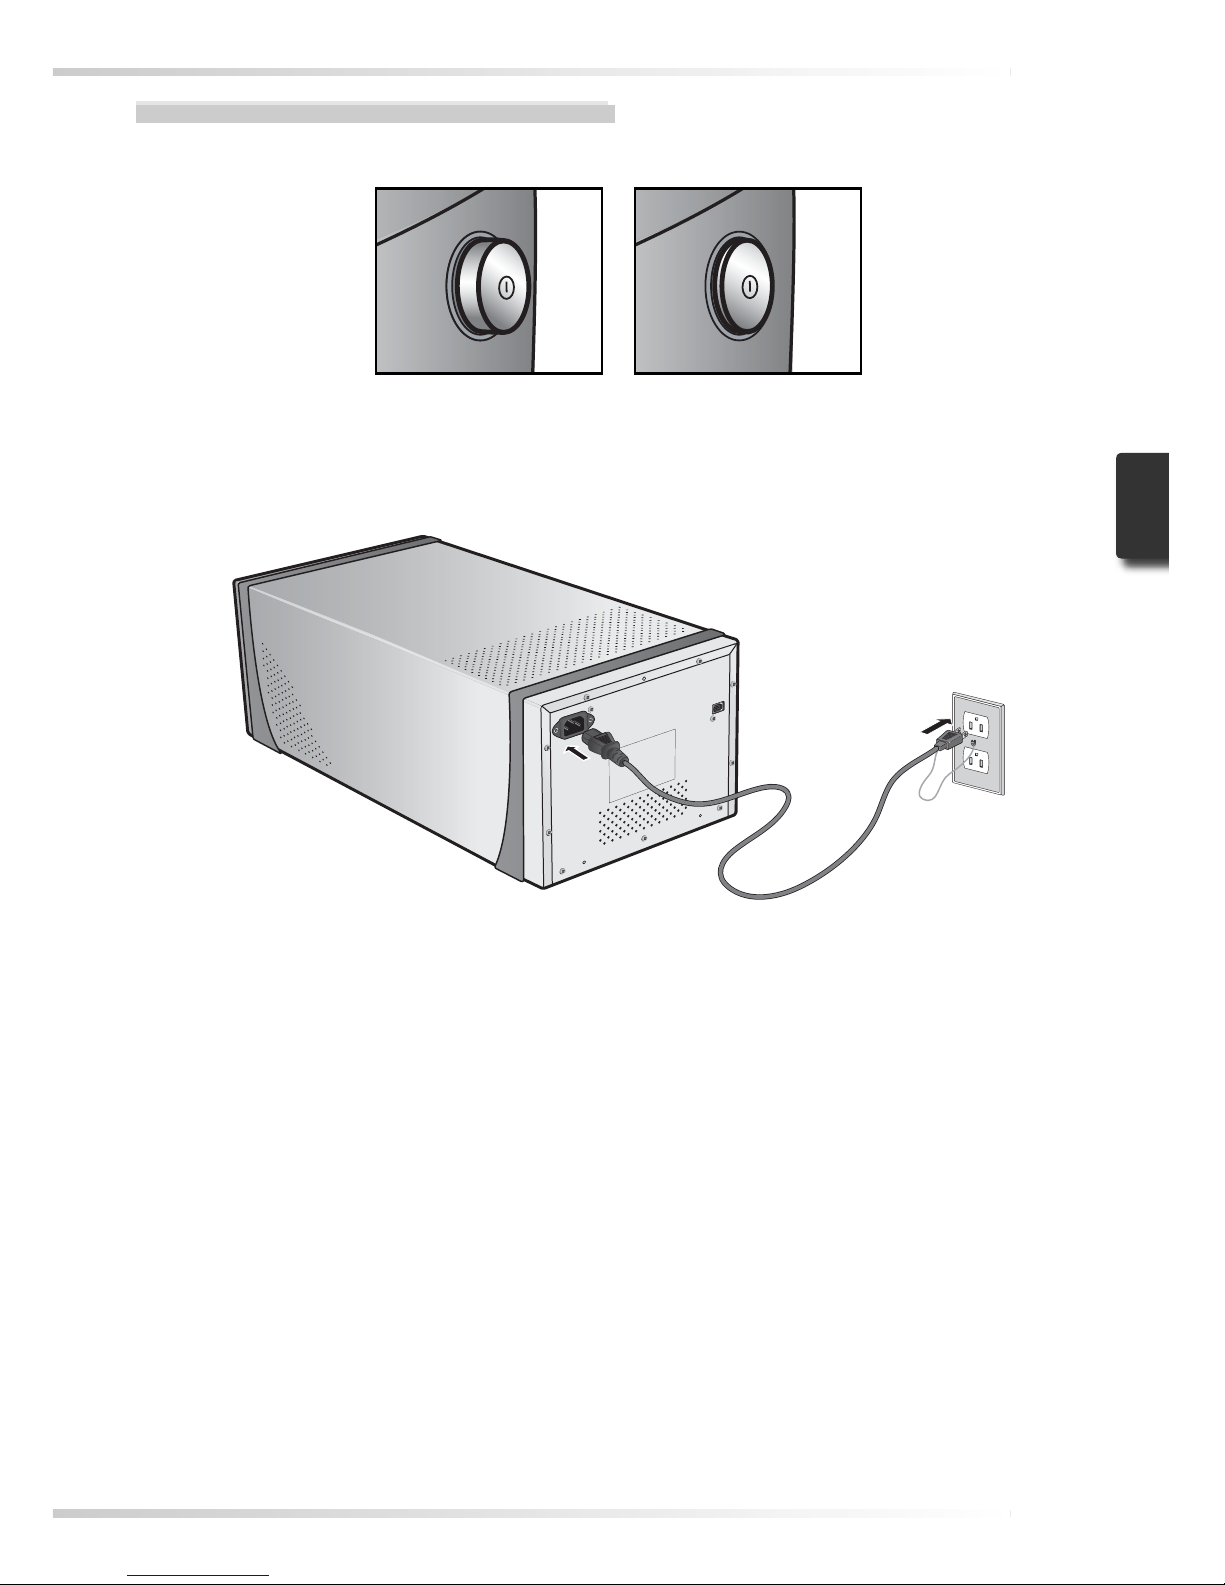
Step 2 — Connect the Power Cable
1
Make sure the power switch is in the “off” position
On position
2
Connect the power cable
Connect the power cable as shown and plug the scanner into a general-purpose household outlet.
Shape of plug varies
with country or region
of purchase
Off position
Page 31
22
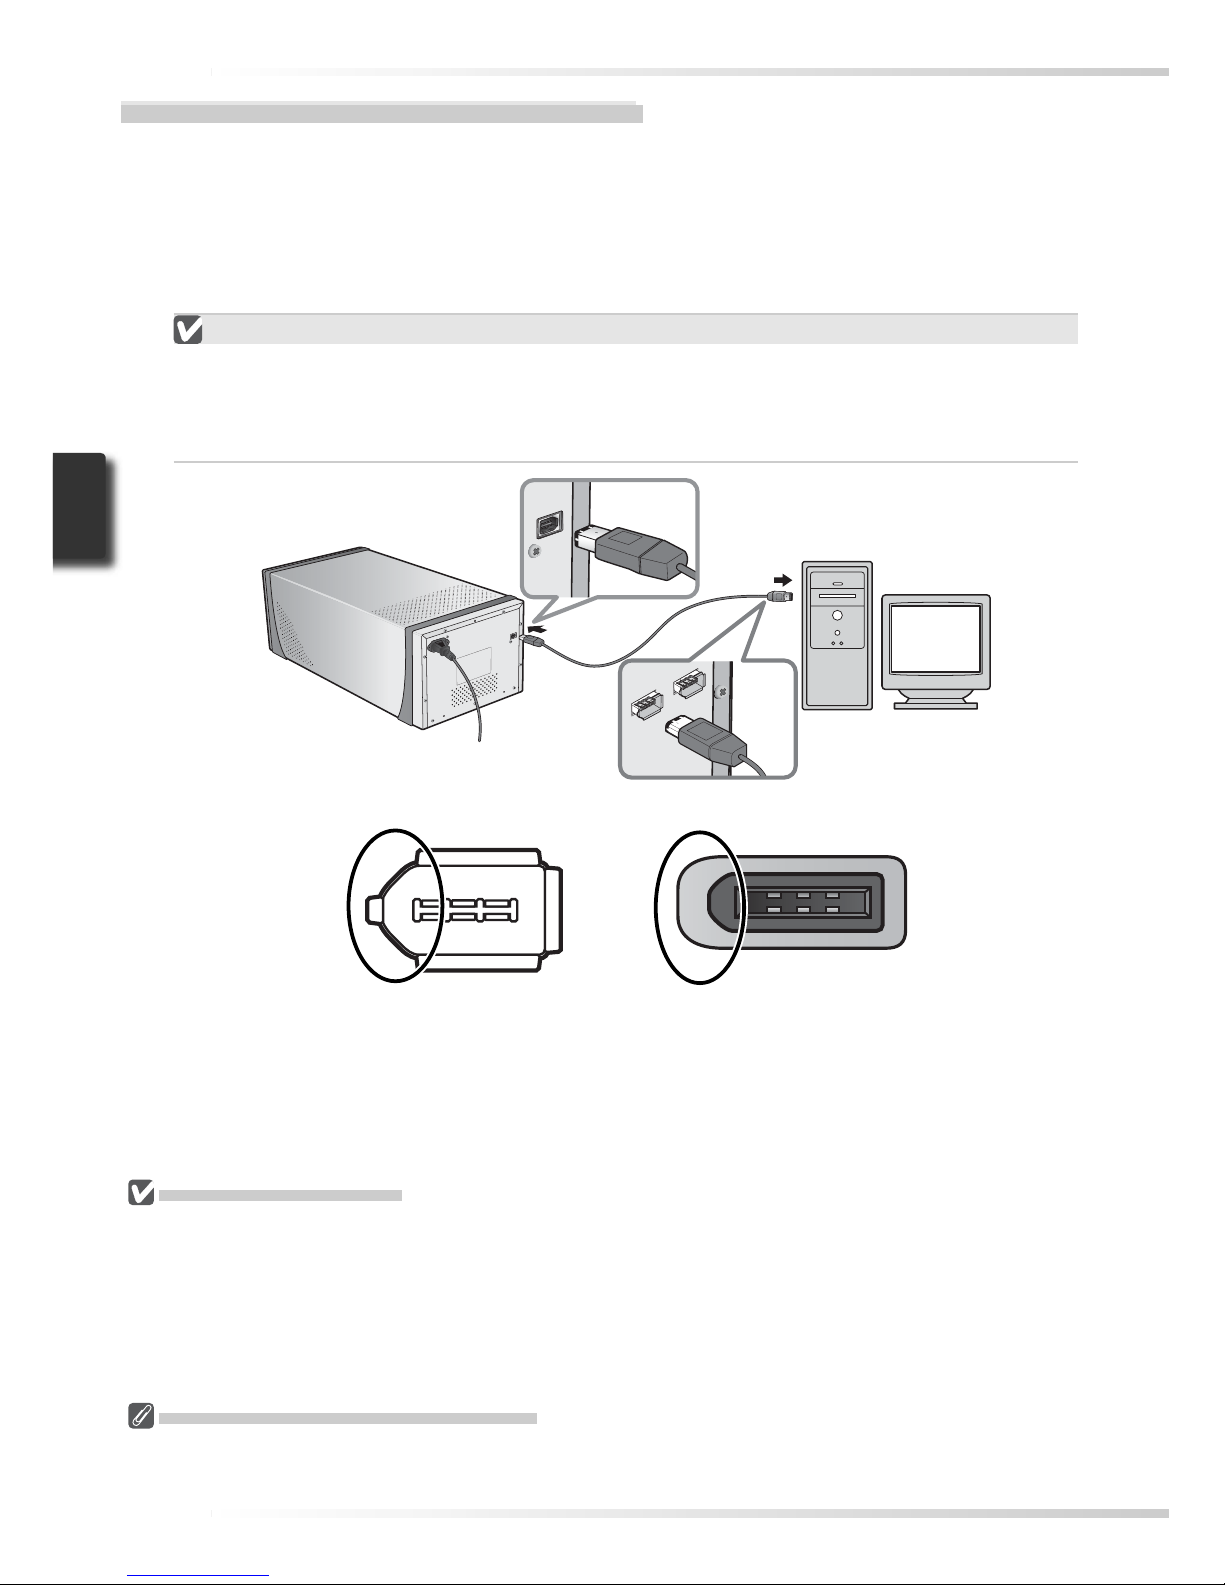
Step 3 — Connect the IEEE 1394 Cable
1
Make sure that the scanner is off
2
Connect the IEEE 1394 cable
Connect the supplied IEEE 1394 cable as shown below. Connect the scanner directly to
the computer; do not connect the cable via an IEEE 1394 hub or adapter.
Connecting the IEEE 1394 Cable
Connect the cable as shown. When connecting the cable to the computer, use a six-pin
IEEE 1394 (Firewire) terminal like that shown in the cross-section below. Attempting to
insert the connectors in another orientation or using the wrong connector could not only
damage the connector, but also the scanner or computer.
Connecting the Scanner
• Do not connect or disconnect IEEE 1394 cables while Nikon Scan is starting or after it has started.
• The scanner may not function as expected when used with other IEEE 1394 devices. Should the scan ner not function as expected, use the scanner with all other IEEE 1394 devices disconnected. Do not
connect two or more scanners to the computer simultaneously.
• Do not connect or disconnect USB or IEEE 1394 interface cables or operate camera control software for
digital cameras connected via USB while the scanner status LED is blinking.
• After disconnecting the cable, wait a few seconds before connecting it again.
Computers with Four-Pin Connectors
The supplied IEEE 1394 cable can not be connected to computers with a four- pin DV connector. Use a
cable with one six-pin and one four-pin connector or a six-to -four pin adapter.
Align rounded edge of connector (circled above at
right) with matching curve on scanner or computer IEEE
139 4 ( Firewire) terminal (above at left).
Six-Pin IEEE 1394 (Firewire) Terminal and Connector (Cross Section)
Page 32
23
Step 1 — Turn the Scanner On .............................. 24
Step 2 — Place Film in the Holder ......................... 25
Step 3 — Open the Scan Window ......................... 30
Step 4 — Ins er t the Hol der .................................... 32
Step 5 — Choose a Film Type and Color Model ... 33
Step 6 — Previe w.................................................... 35
Step 7 — Select a Crop ........................................... 37
Step 8 — Scan and Save ......................................... 39
Step 9 — Eject and Exit ...........................................41
Basic Scanning
This chapter details the steps involved in making a
simple scan.
Page 33
24
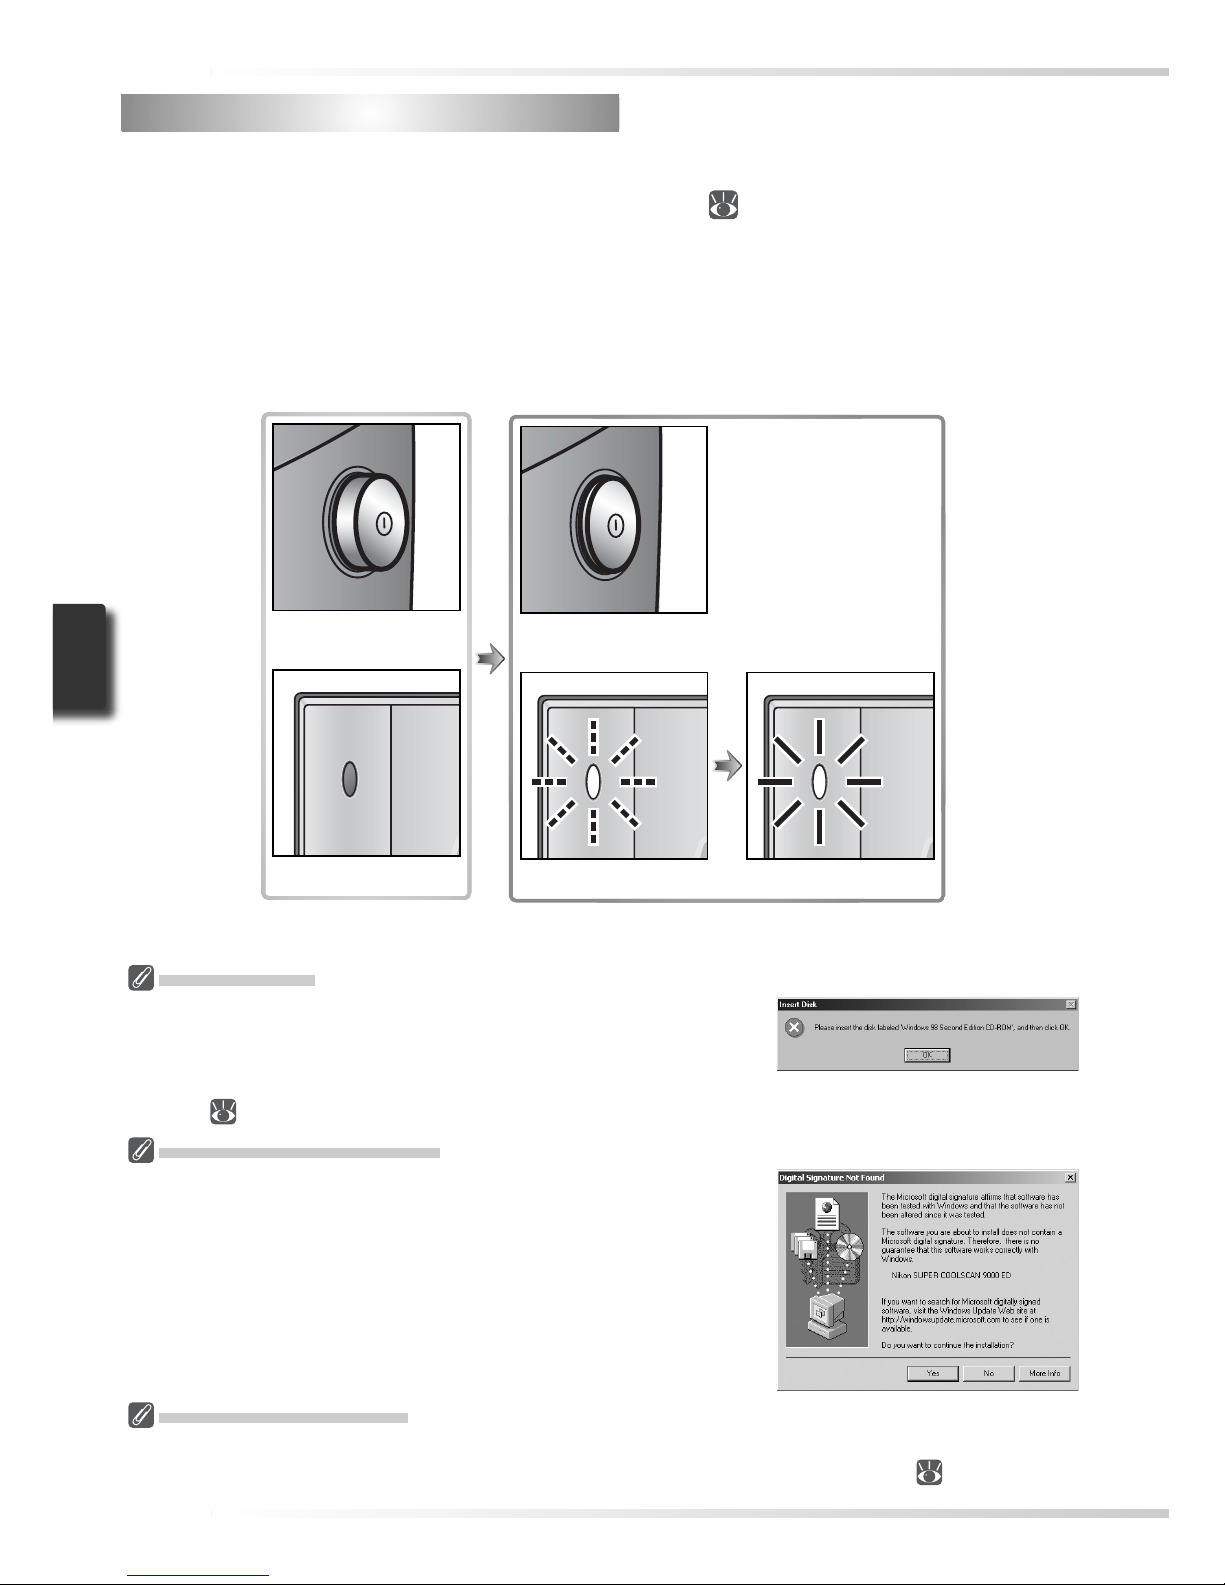
Windows 98 SE
If the dialog shown at right appears the fi rst time the scanner is
connected and turned on, the IEEE 1394 driver update has not been
completed. Update the IEEE 1394 drivers as described in “Updating the IEEE 1394 Drivers (Windows 98 SE Only): The ‘Insert Disk’
Dialog” (
65).
Windows 2000 Professional
A “Digital Signature Not Found” dialog will be displayed the fi rst
time the scanner is connected and turned on following installation
of Nikon Scan. Click Yes to register the scanner with Windows.
Step 1 — Turn the Scanner On
Step 1 — Turn the Scanner On
Before turning on the scanner for the fi rst time, make sure that Nikon Scan is installed on the
computer and that the power and IEEE 1394 cables are connected. For information on installing Nikon Scan and connecting the cables, see “Setup” (
7).
1
Turn the computer on
Turn the computer on and wait for the operating system to start up.
2
Turn the scanner on
The status LED will blink for about two minutes while the scanner initializes. The status
LED will stop blinking when initialization is complete.
Scanner off
Status LED off
Scanner on
Status LED blinks Status LED on
If the Status LED Flickers
If the status LED fl ashes quickly (about fi ve times a second), turn the scanner off, wait at least fi ve seconds, and turn the scanner on again. If the problem persists, see “Troubleshooting” (
63).
Page 34
25
Step 2 — Place Film in the Holder
Step 2 — Place Film in the Holder
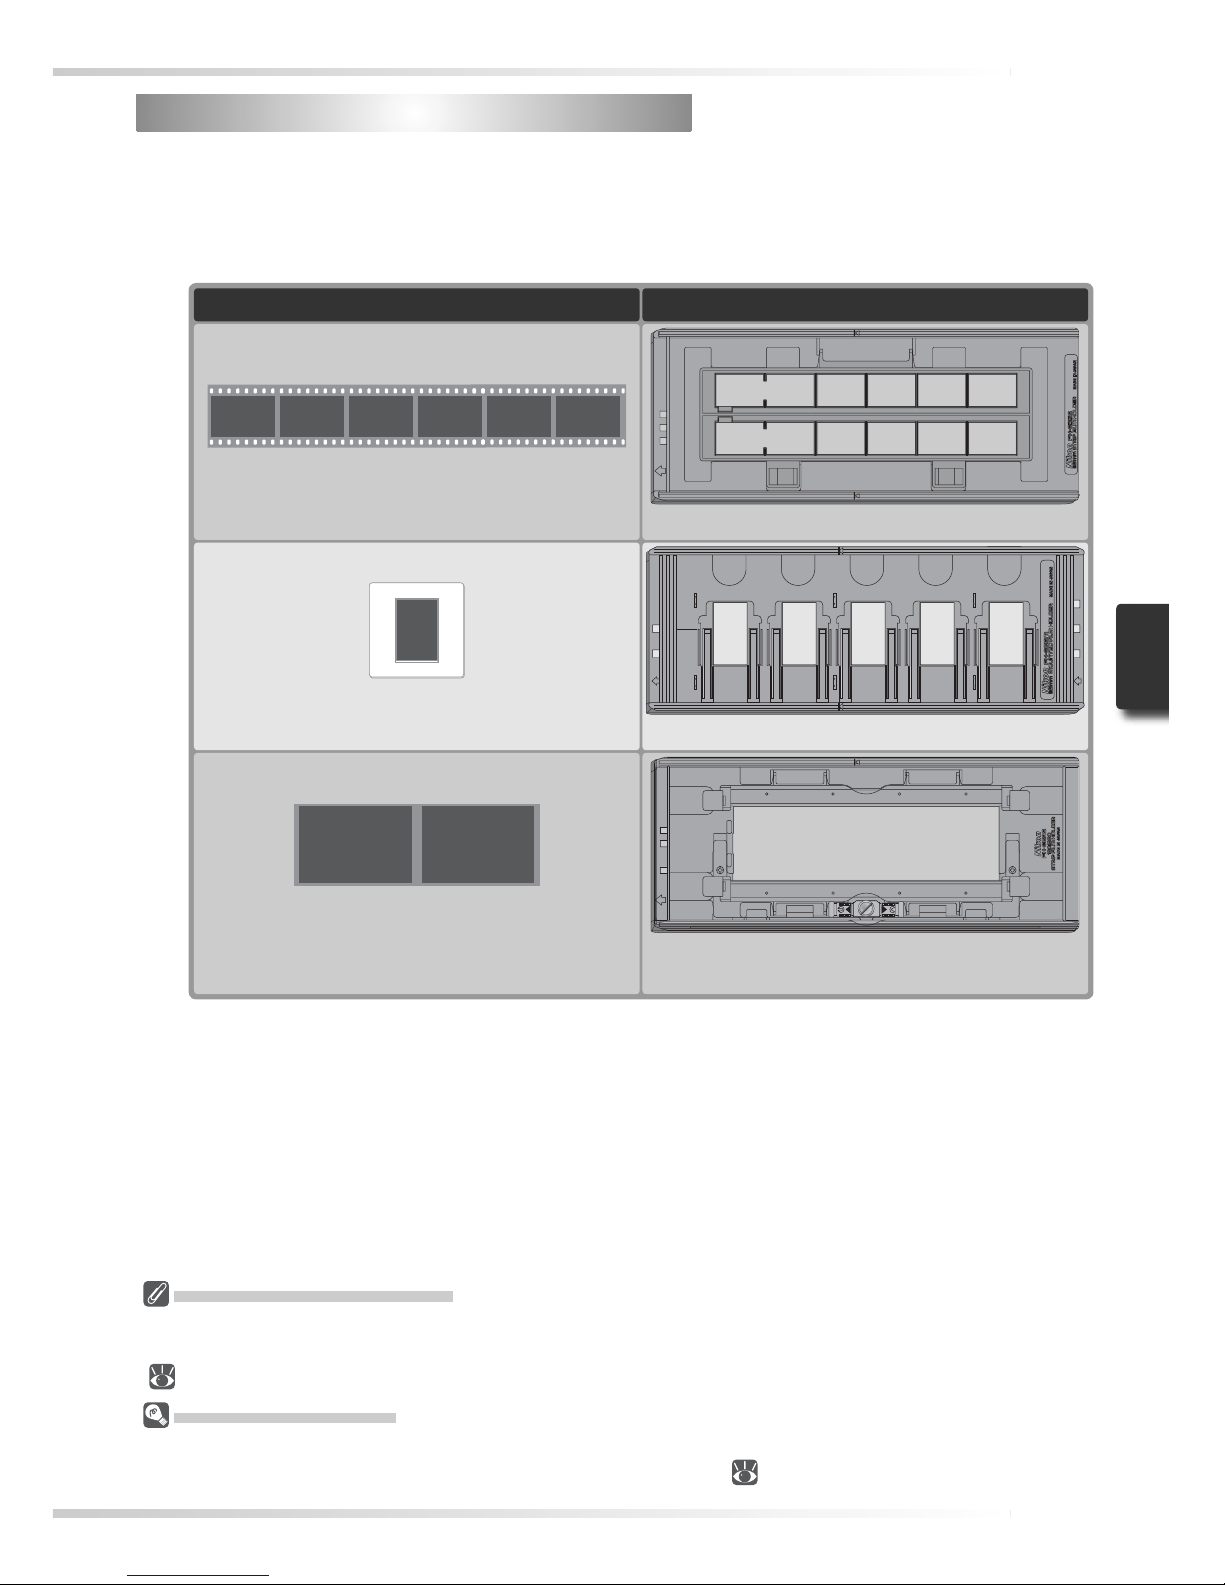
The fi lm holders provided with the scanner can be used to scan 35-mm fi lm, 35-mm slides,
medium-format fi lm, and 59 × 82 mm electron microscope fi lm.
1
Choose a holder
Choose a holder appropriate to the type of fi lm.
Caring for Holders and Film
Keep holders and fi lm free of dust. If necessary, remove dust from holders and fi lm with a blower before
scanning. Dust on the fi lm or holder could damage the fi lm or affect the quality of the scanned image
(
5).
Optional Film Holders
Optional fi lm holders are available for 16- mm and panorama fi lm, medium-format slides, and glass mi croscope slides. For more information, see “Optional Holders” (
51) .
Film Film holder
35-mm fi lm (in strips of up to six frames) FH-835S
35-mm slides
Medium format (120/220, 2¼ or Brownie) fi lm
or 59 × 82 mm ele ctron microsco pe fi lm
FH-835M
FH-869S
Page 35
26
2
Place fi lm in the holder
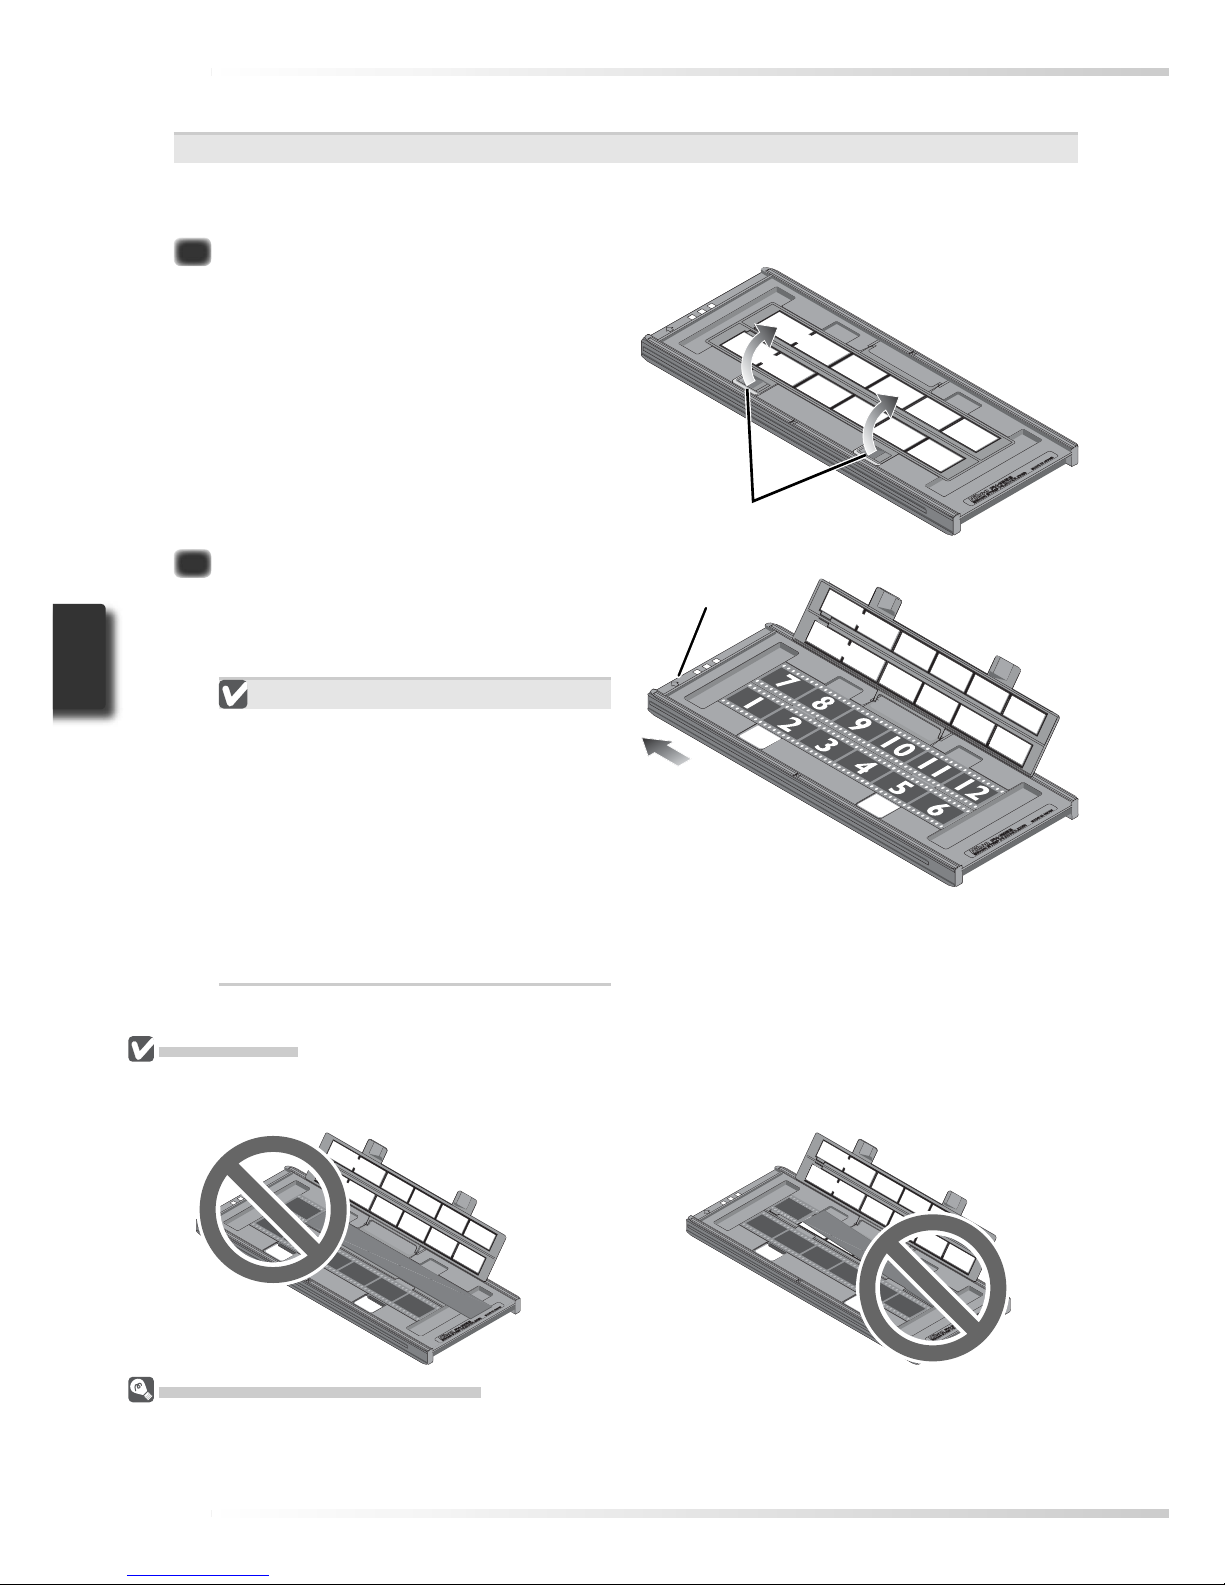
FH-835S Holder for 35-mm Film
The FH-835S can be used with one or two strips of 35-mm fi lm. Each strip can be up to
six frames long.
2.1
Open the holder
Insert your fi ngers through the holes
in the bottom half of the holder and
undo the latches, then open the
holder.
Latches
2.2
Insert fi lm
Place fi lm in the holder with the refl ective fi lm base up and the matte emulsion
surface down.
Inserting Film
Align the fi rst frame in each strip with
an aperture at the left end of the holder. Leaving the apertures at the left
end of the holder uncovered or covering them with a masking sheet could
cause scanning errors or interfere with
accurate color reproduction.
Use only one type of fi lm; do not mix
negatives with positive fi lm.
Inserting Film
Do not place fi lm or masking sheets so that they protrude from the holder or overlap the fi lm guides.
Failure to observe this precaution could cause the holder to jam in the scanner.
“Film Base”/”Emulsion Surface”
When fi lm is examined under bright light, the image on the emulsion surface will be in slight relief, with
bumps and hollows where the image has been developed. The opposite surface (the fi lm base) will be
refl ective and smooth. Insert fi lm with the base up.
Direction of
insertion
Thumbnails
displayed in
order shown
Arrow
Page 36
27
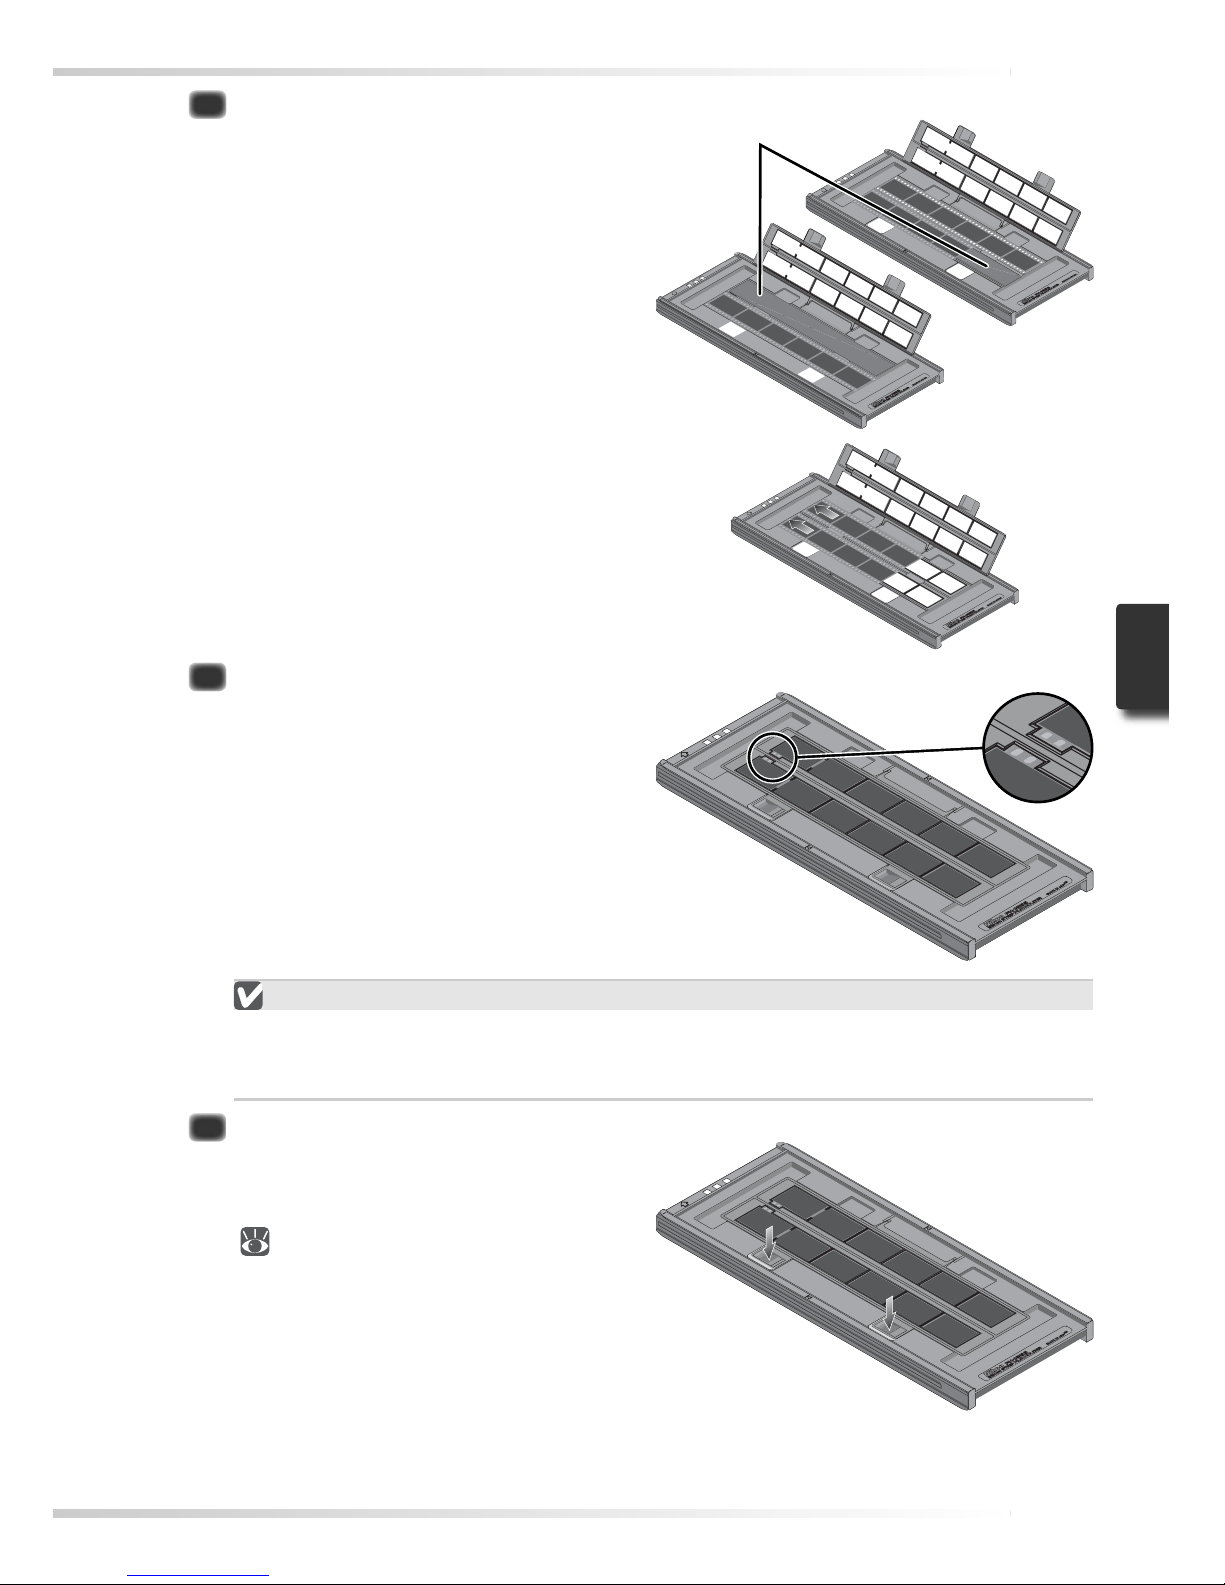
2.3
Insert masking sheets
When scanning a single strip or strips
of different lengths, place the fi lm at
the left end of the holder and cover
any open apertures with the supplied
masking sheets, cutting the sheet to the
appropriate length if necessary. When
scanning a single strip, place the fi lm in
the bottom row and the masking sheet
in the top row.
Masking sheet
When scanning two strips of equal
length, place the fi lm at the left end
of each row. Masking sheets are not
required.
2.4
Position the fi lm
Close the holder without latching it,
and check that the fi lm is correctly
aligned. If necessary, insert a pen
or other pointed object into the perforations and slide the fi lm until the
frames are aligned with the apertures.
The perforations can be accessed
through the cutouts at the left end of
the holder.
Positioning Film
Care should be taken to avoid damaging the perforations when positioning the fi lm.
Do not attempt to position the fi lm while the holder is latched. Failure to observe
this precaution could damage the fi lm.
2.5
Latch the holder
Press the holder closed until the
latches click into place. Proceed to
“Step 3 — Open the Scan Window”
(
30).
Cutouts
Page 37
28
2.2
Insert fi lm
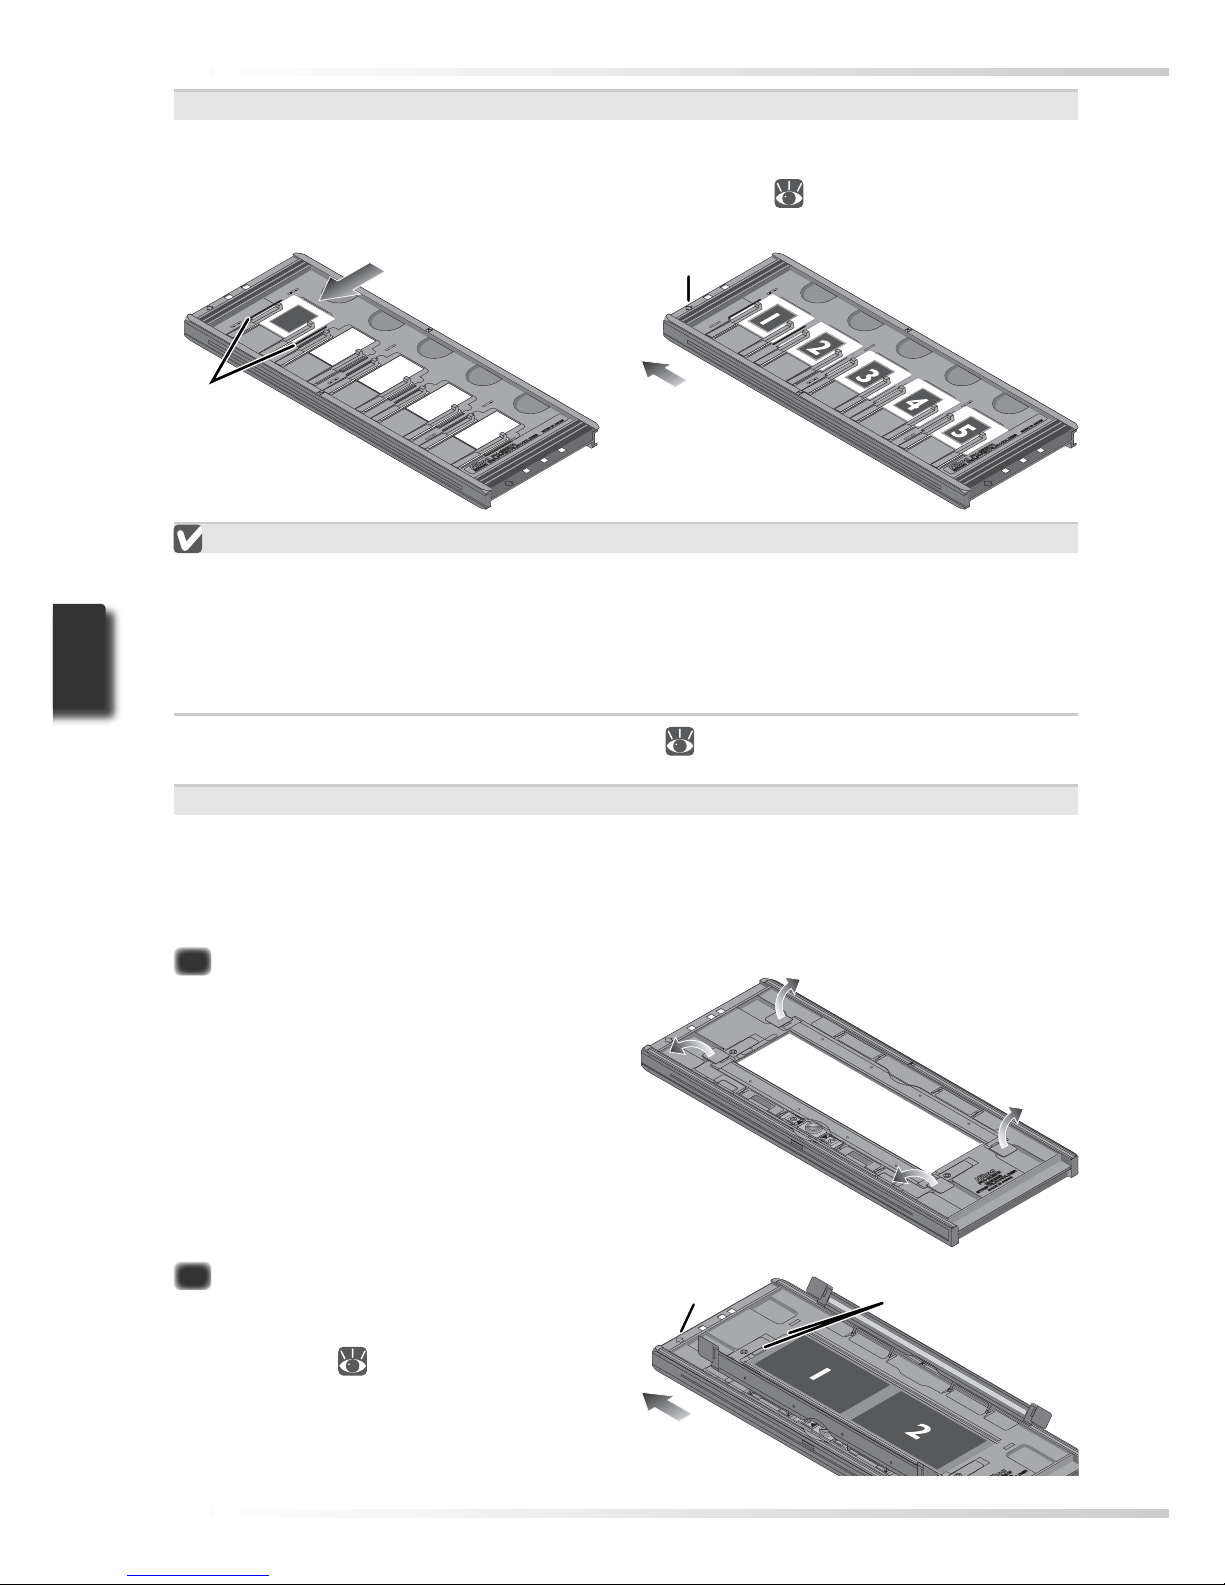
Place fi lm in the holder with the refl ective fi lm base up (matte emulsion surface down; 26) and with the end of
the fi lm against the stops.
FH-835M Holder for 35-mm Slides
The FH-835M can be used to scan up to fi ve 35-mm slides with mounts 1.0–3.2 mm
thick. Slide the mounts into place between the guides, short side fi rst and with the
refl ective fi lm base up (the matte emulsion surface down; 26). Stop when the slides
contact the base of the clips.
Inserting Slides
Insert slides between the guides. Forcing the slides onto the guides could damage the
slides or clips and prevent the scanner from focusing correctly. To minimize resistance,
try inserting slides at a slight angle.
Be sure a slide is inserted in the fi rst slot. Leaving the aperture at the left end of the holder uncovered could cause scanning errors or interfere with accurate color reproduction.
Proceed to “Step 3 — Open the Scan Window” ( 30).
Direction of
insertion
Thumbnails
displayed in
order shown
Guides
2.1
Open the holder
Undo the latches and open the
holder.
FH-869S Holder for Medium- Format Film
The FH-869S can be used to scan medium-format
(120/220, 2¼ or Brownie) fi lm and
59 × 82 mm e lectron-microscope fi lm. The length of the fi lm strip that can be inserted in
the holder depends on the type of fi lm:
• 6 × 4.5: 1– 4 frames • 6 × 6: 1–3 frames • 6 × 7 – 6 × 9: 1–2 frames
Stops
Direction
of insertion
Thumbnails
displayed in
order shown
Arrow
Arrow
Page 38
29
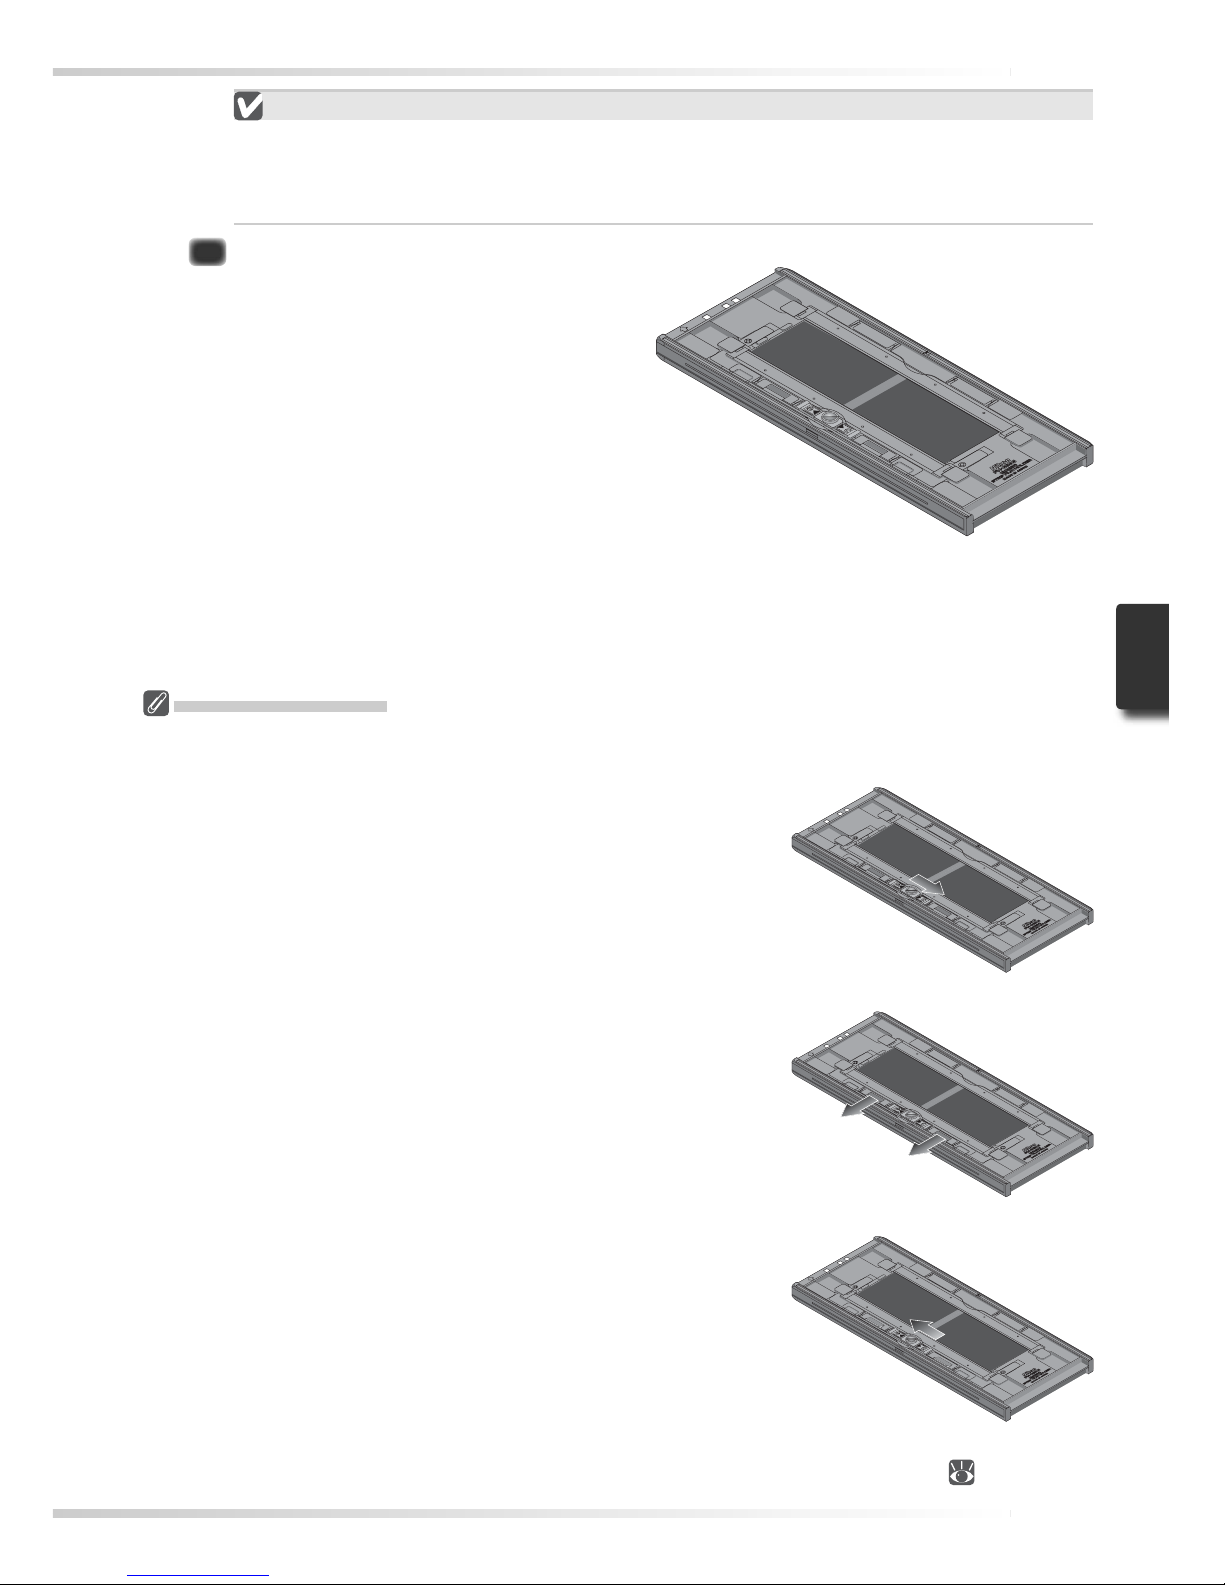
2 Flatten the fi lm
Place your fi ngers on the grips and slide them gently outwards.
Do not use force. To prevent the fi lm from sliding out of position,
press the holder cover lightly before sliding the grips.
3 Latch the movable base
Slide the latch in the direction shown.
Scanning Curled Film
Curl of 10 mm or less can be removed as follows:
1 Unlatch the movable base
Slide the latch in the direction shown.
Inserting Film
Use only one type of fi lm; do not place negatives in the holder with positive fi lm.
Be sure the end of the fi lm is fl ush with the stops. A gap between fi lm and stop
could interfere with accurate color reproduction.
2.3
Close the holder
Close the holder, pressing the covers
down until they latch.
Film with a curl of more than 10 mm can not be scanned in the FH-869S. Use the optional FH- 869G
glass-covered fi lm holder or the optional FH-869GR glass- covered rotating fi lm holder ( 54, 56).
Page 39
30
Step 3 — Open the Scan Window
Step 3 — Open the Scan Window
The scanner is controlled from the Nikon Scan scan window.
1
Choose the application in which pictures will be displayed
After scanning, pictures can be displayed either in Nikon Scan or in a third-party application such as Adobe Photoshop. The application in which pictures will be displayed after
scanning is referred to as the “host application.”
Application
Nikon Scan
Platform
Windows
Description
Nikon Scan used as a “stand-alone” application to scan, process,
print, and save images.
Macintosh
Third-party
application
Windows
Nikon Scan used as a TWAIN source to control the scanner from a
third-party application (application must support TWAIN). Images are
scanned using Nikon Scan and processed, printed, and saved in the
third-party application.
Macintosh
Nikon Scan plug-in used to control the scanner from a third-party
application (application must support Adobe Photoshop 5.0 acquire
plug- ins, and a copy of the Nikon Scan plug- in must be installed in the
application’s plug-ins folder). Images are scanned using Nikon Scan
and processed, printed, and saved in the third- party application.
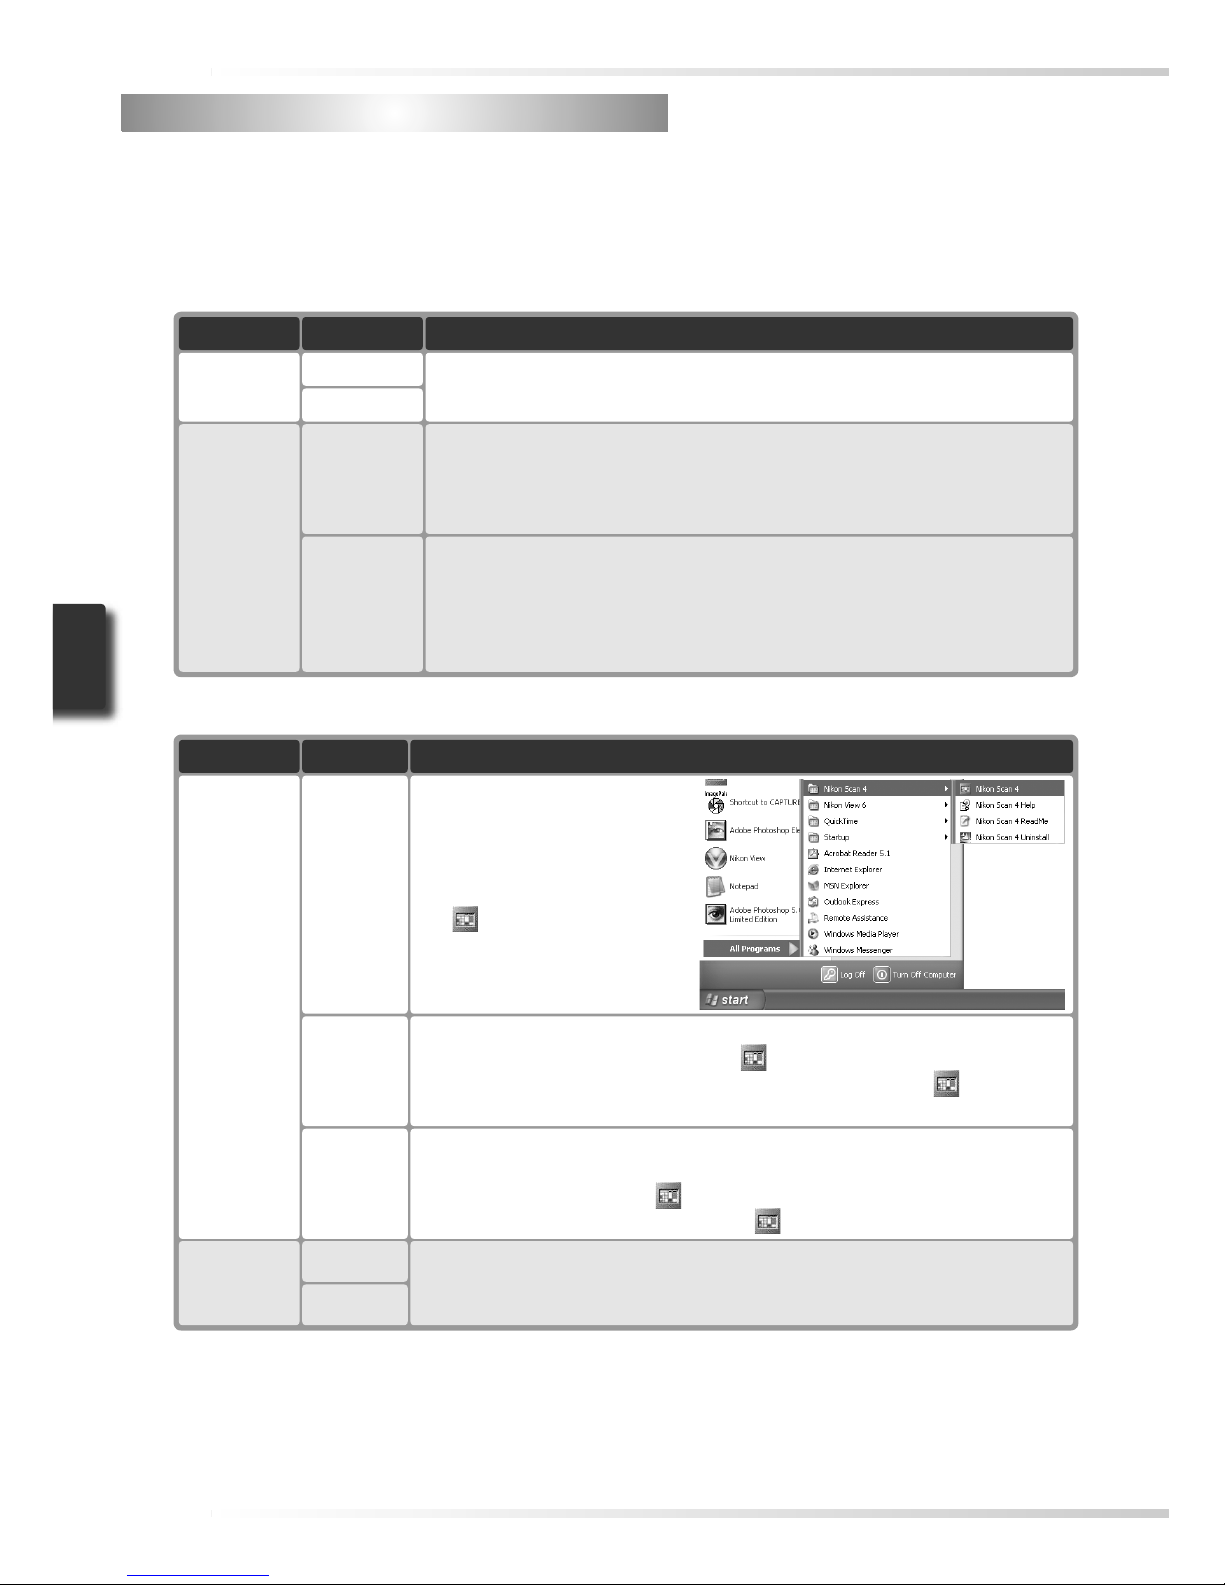
2
Open the scan window
Application
Nikon Scan
used as
“stand-
alone”
application
Platform
Windows
Description
Click the Start button and select Nikon Scan 4 from the
programs list. (If a shortcut
was created during installation, you can also double-click
the icon on the desktop.)
Third-party
application
Windows
Select Nikon Scan from the application’s list of “Acquire” or “Import”
sources. For more information, see the documentation provided with
the application.
Macintosh
Macintosh
(Mac OS X)
Open the Applications : Nikon Software : Nikon Scan 4 folder on the
start-up disk and double-click the
icon. (If Nikon Scan was added
to the Dock during installation, you can also click the icon in the
Dock.)
Macintosh
(Mac OS 9)
Open the Nikon Software : Nikon Scan 4 folder in the folder selected at
installation (the default folder is the Applications folder on the start-up
disk) and double-click the icon. (If an alias was created during installation, you can also double -click the icon on the desktop.)
Page 40
31
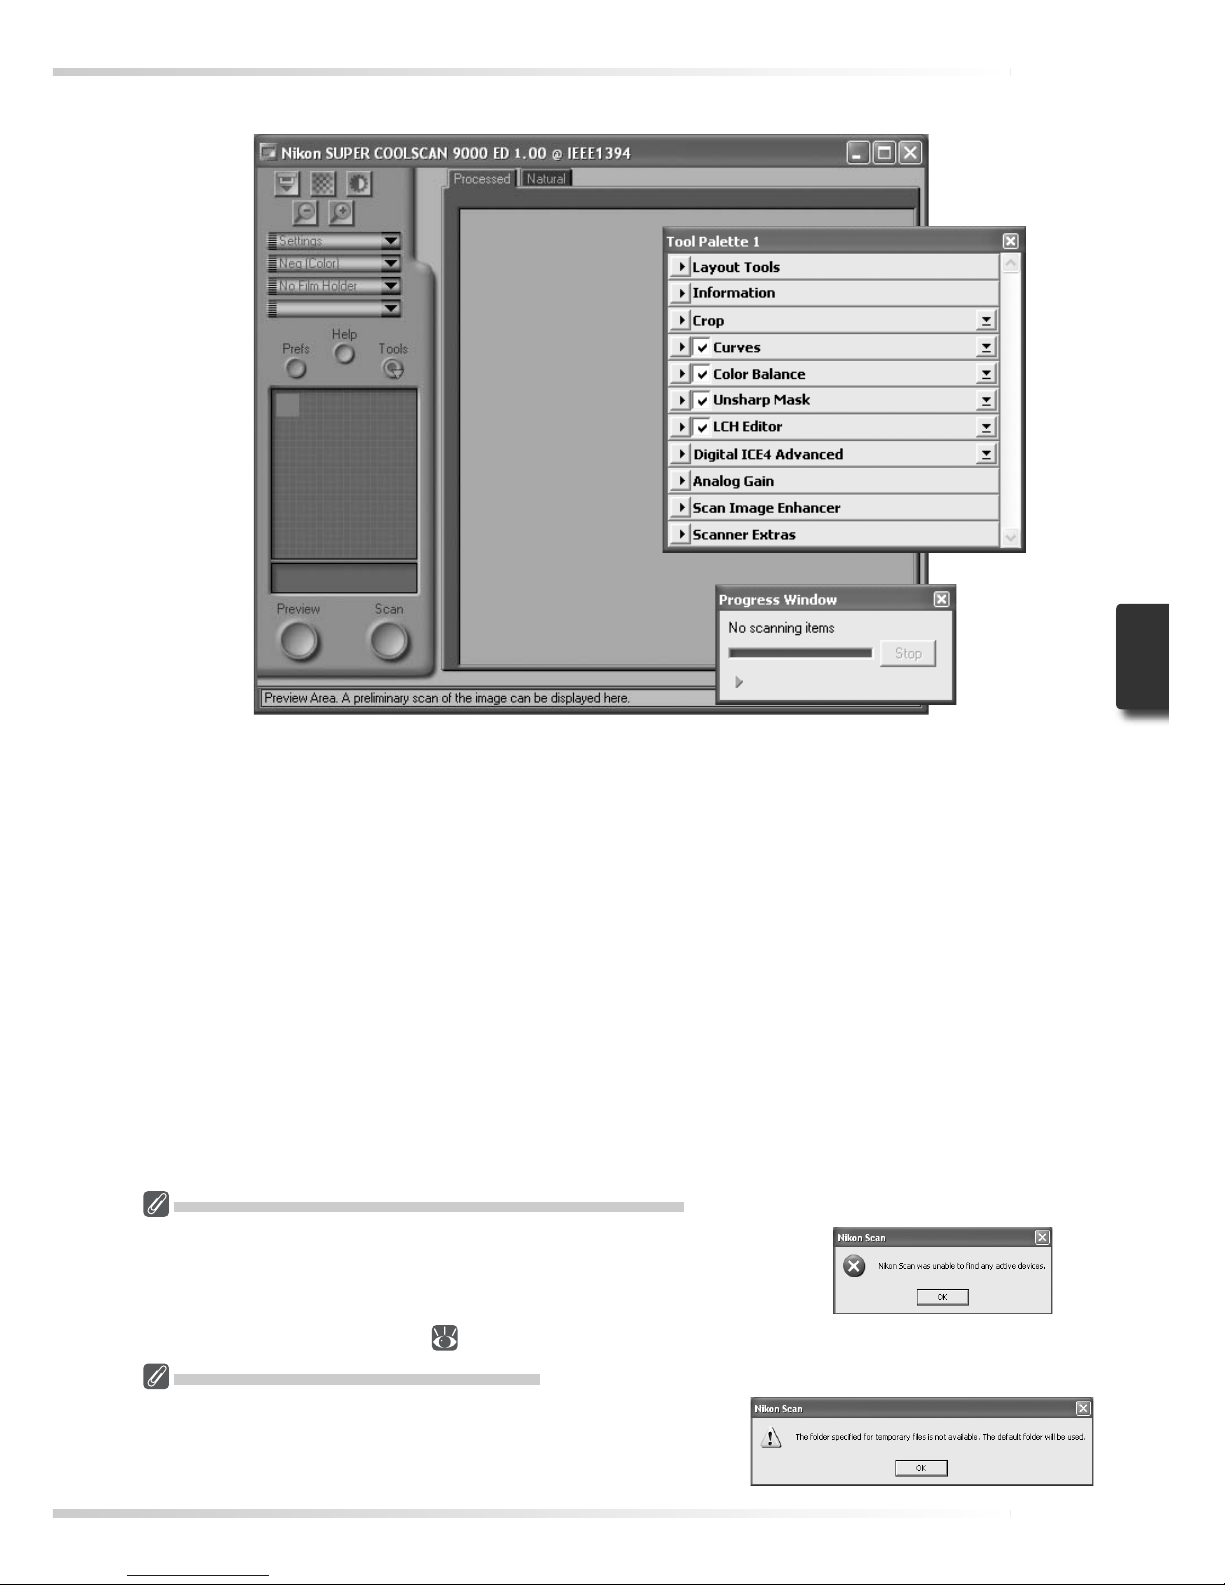
The scan window will open.
“Nikon Scan Is Unable to Find Any Active Devices”
If the message shown at right is displayed when the scan window
opens, check that the scanner is connected and turned on and that
the status LED is not fl ashing. If the scanner is connected to a Windows computer, check that the scanner has been registered with
the Windows Device Manager (
74).
Temporary Storage (Windows Only)
If the message shown at right is displayed, click OK.
Page 41
32
Step 4 — Insert the Holder
Step 4 — Inser t the Holder
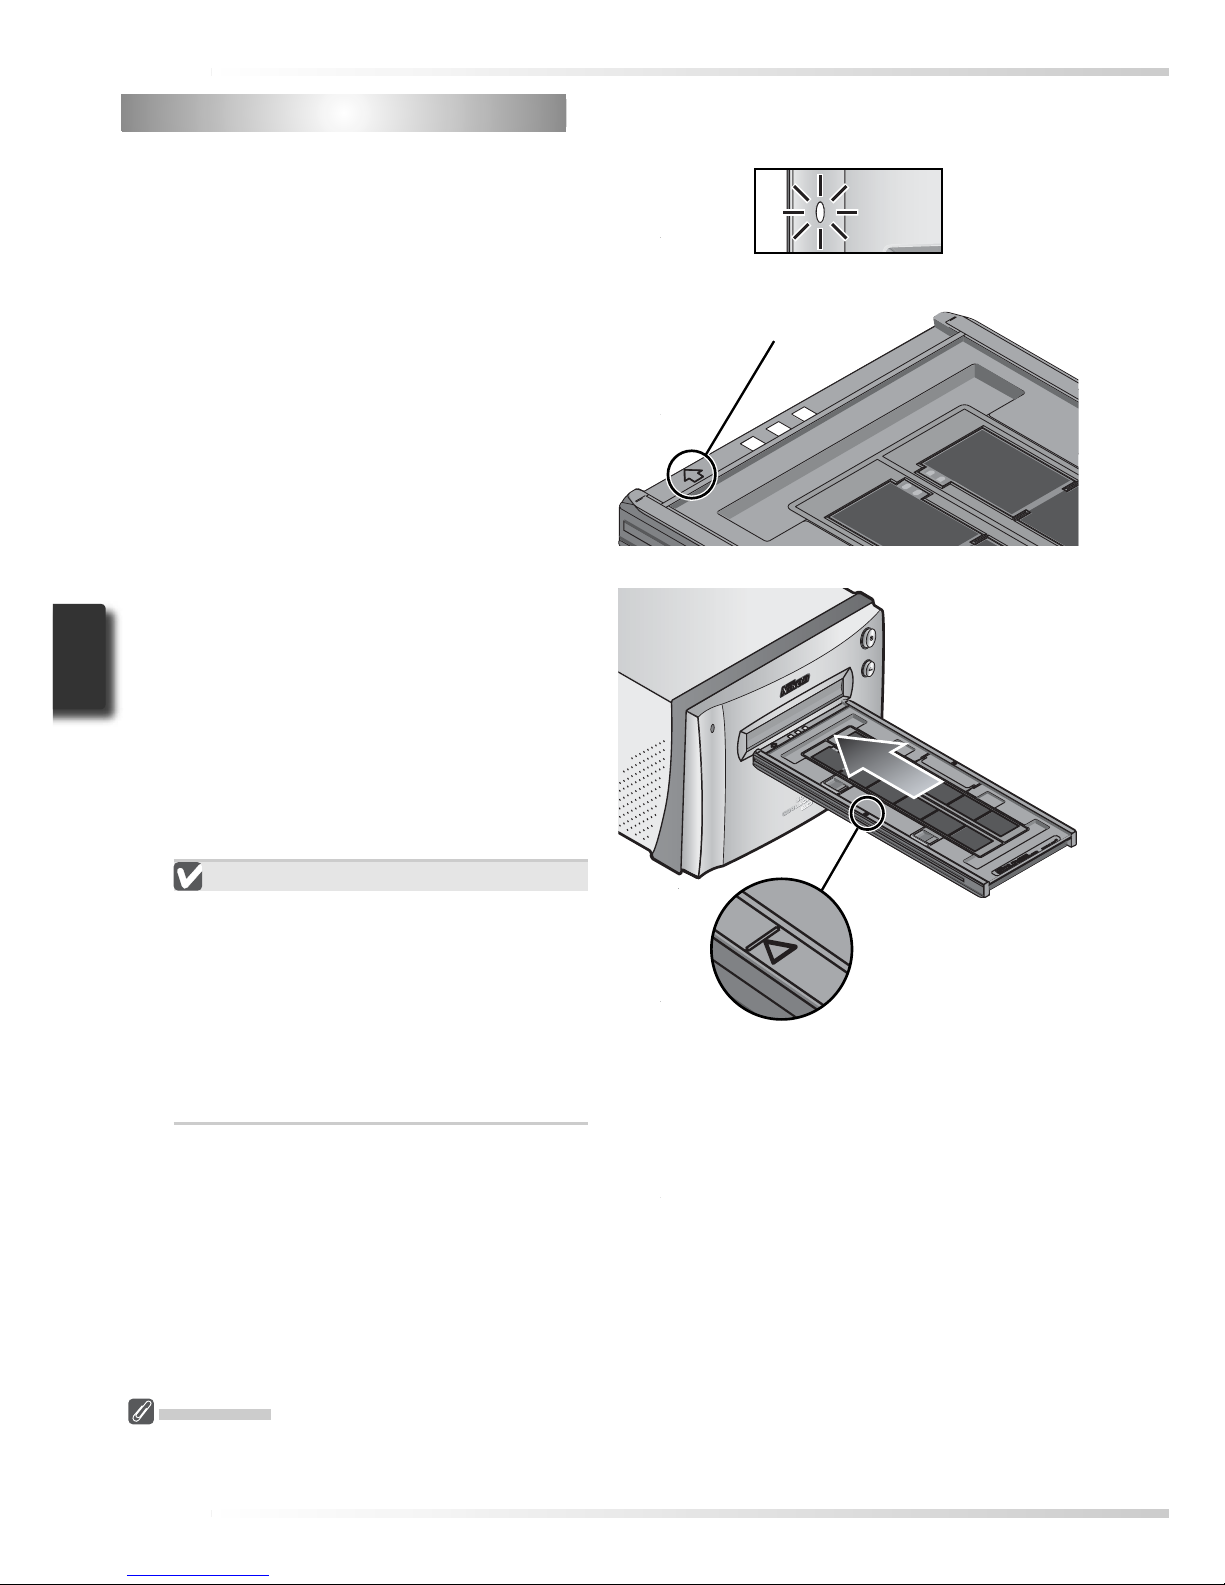
1
Check the status LED
Make sure that the status LED is glowing
steadily. Do not insert fi lm holders while
the status LED is blinking.
2
Find the arrow on the front of the holder
The front each holder is marked with
an embossed arrow showing the direction of insertion. When the holder is
inserted, the side with the arrow should
face up with the arrow pointing toward
the scanner.
Calibration
The scanner is automatically calibrated at regular intervals if left on with no holder in place. Calibration
will end when a holder is inserted.
Arrow
3
Insert the holder
Keeping the holder straight, slide the it
into the holder slot with the arrow up
and facing toward the scanner. Once
the holder has been inserted as far as the
insertion guides, the automatic loading
mechanism will activate. Remove your
hands from the holder when loading
starts. When loading stops, the holder
is in scanning position.
Inserting Holders
If the loading mechanism is does not activate, remove the holder and try again.
Do not use force. Once loading has
begun, do not interfere with the loading mechanism. Attempting to remove
the holder during loading or otherwise
interfering with the mechanism could
cause scanning errors.
Insertion guide
Page 42
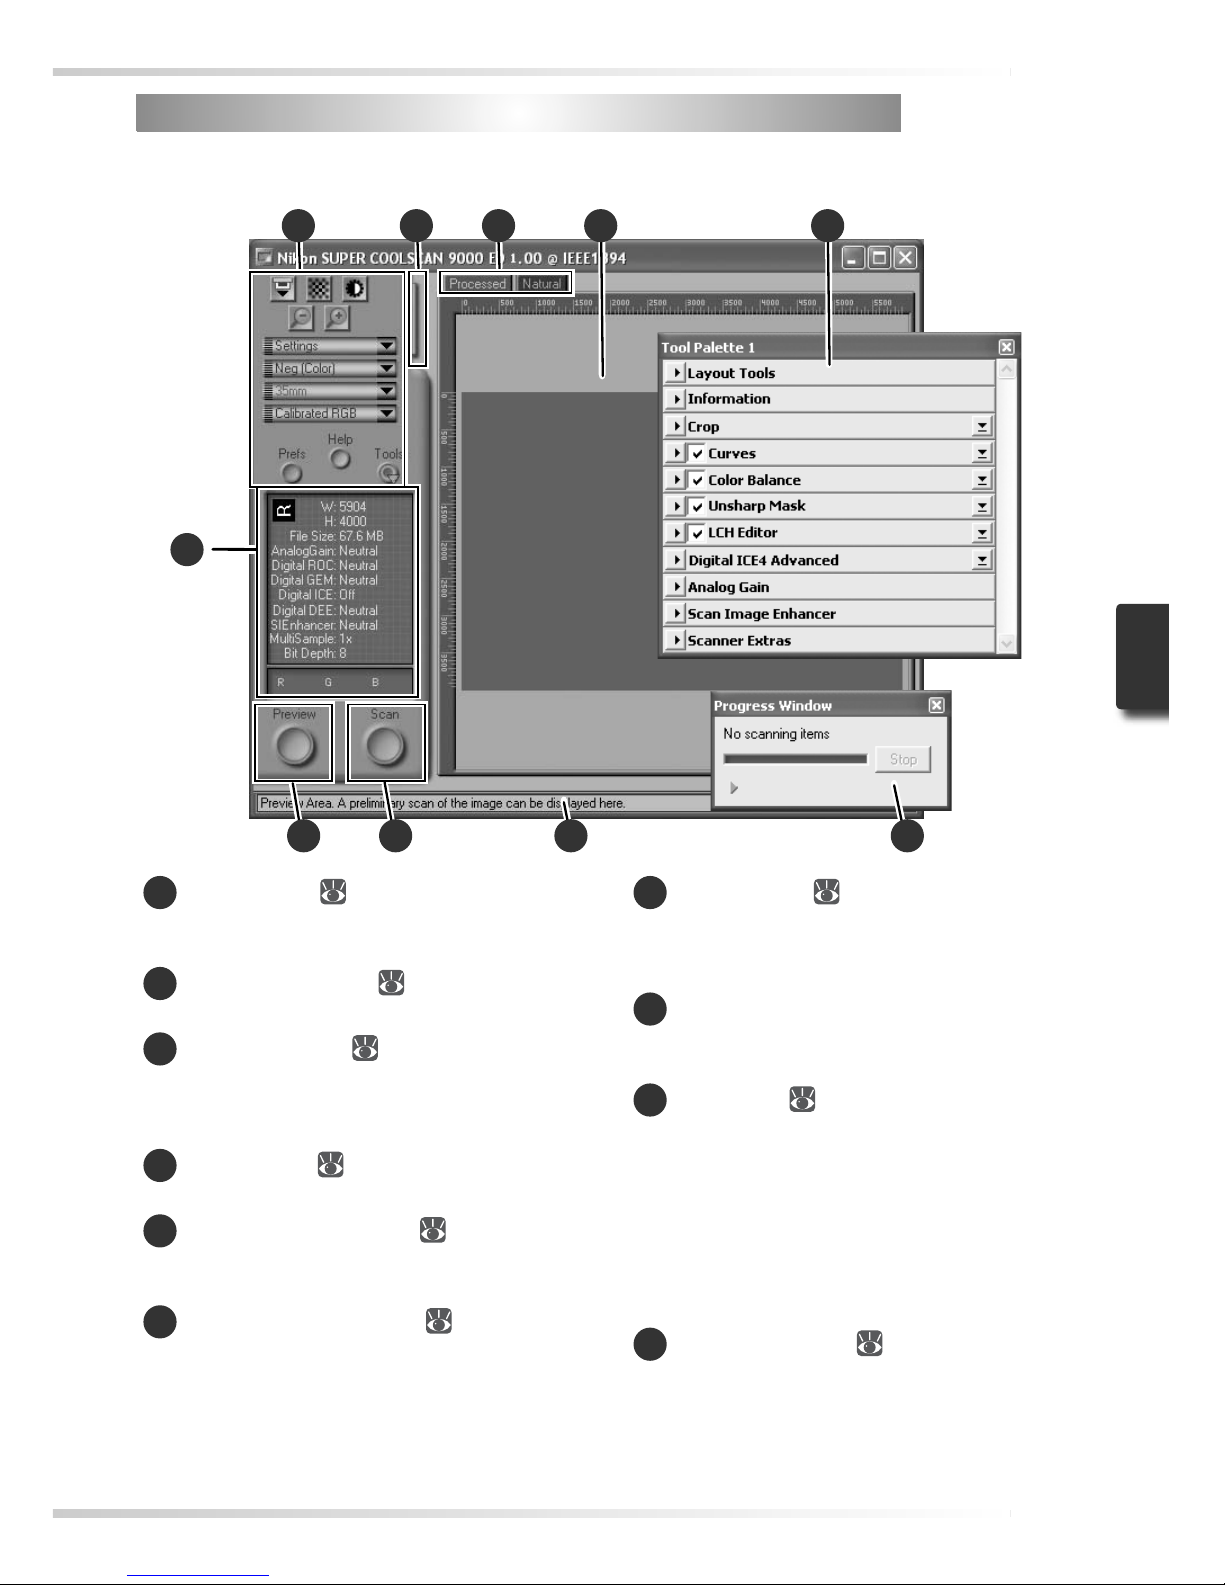
33
1
Control area (
45)
Contains frequently used scanning and preview controls.
2
Information panel (
46)
Lists information on current settings.
3
Preview button (
46)
Click to view selected frames in the preview
area, where they can be enhanced using the
tools in the Tool Chest.
4
Scan button (
46)
Click to scan the selected frames.
5
Thumbnail drawer tab (
47)
Click to select frames to be previewed or
scanned.
6
Processed/Natural tabs (
47)
The “Processed” panel shows how the image
would appear if scanned at current settings,
the “Natural” panel the unmodifi ed image.
Comparing these two views can help determine whether changes to settings are having
the desired effect.
7
Preview area (
47)
Provides a preview of the image prior to scanning. Any modifi cations to settings are visible
in the “Processed” panel.
8
Interactive help
Displays a brief tip about the control under
the cursor.
9
Tool Ches t (
48)
Contains tools for changing the orientation
of the image and selecting the portion to be
scanned, choosing the dimensions and resolution of the scanned image, enhancing color,
contrast, and sharpness, processing images to
remove the effects of scratches, dust, fading,
fi lm grain, and underexposure, and controlling
scanner settings.
10
Progress window (
47)
Shows the status of current tasks and lists
operations that have been or are about to be
performed.
Step 5 — Choose a Film Type and Color Model
Step 5 — Choose a Film Type and Color Model
The steps that follow involve the controls in the Nikon Scan scan window. The names and
functions of the controls in the scan window are described below.
1
2
3 4
5 7 9
10
6
8
Page 43
34
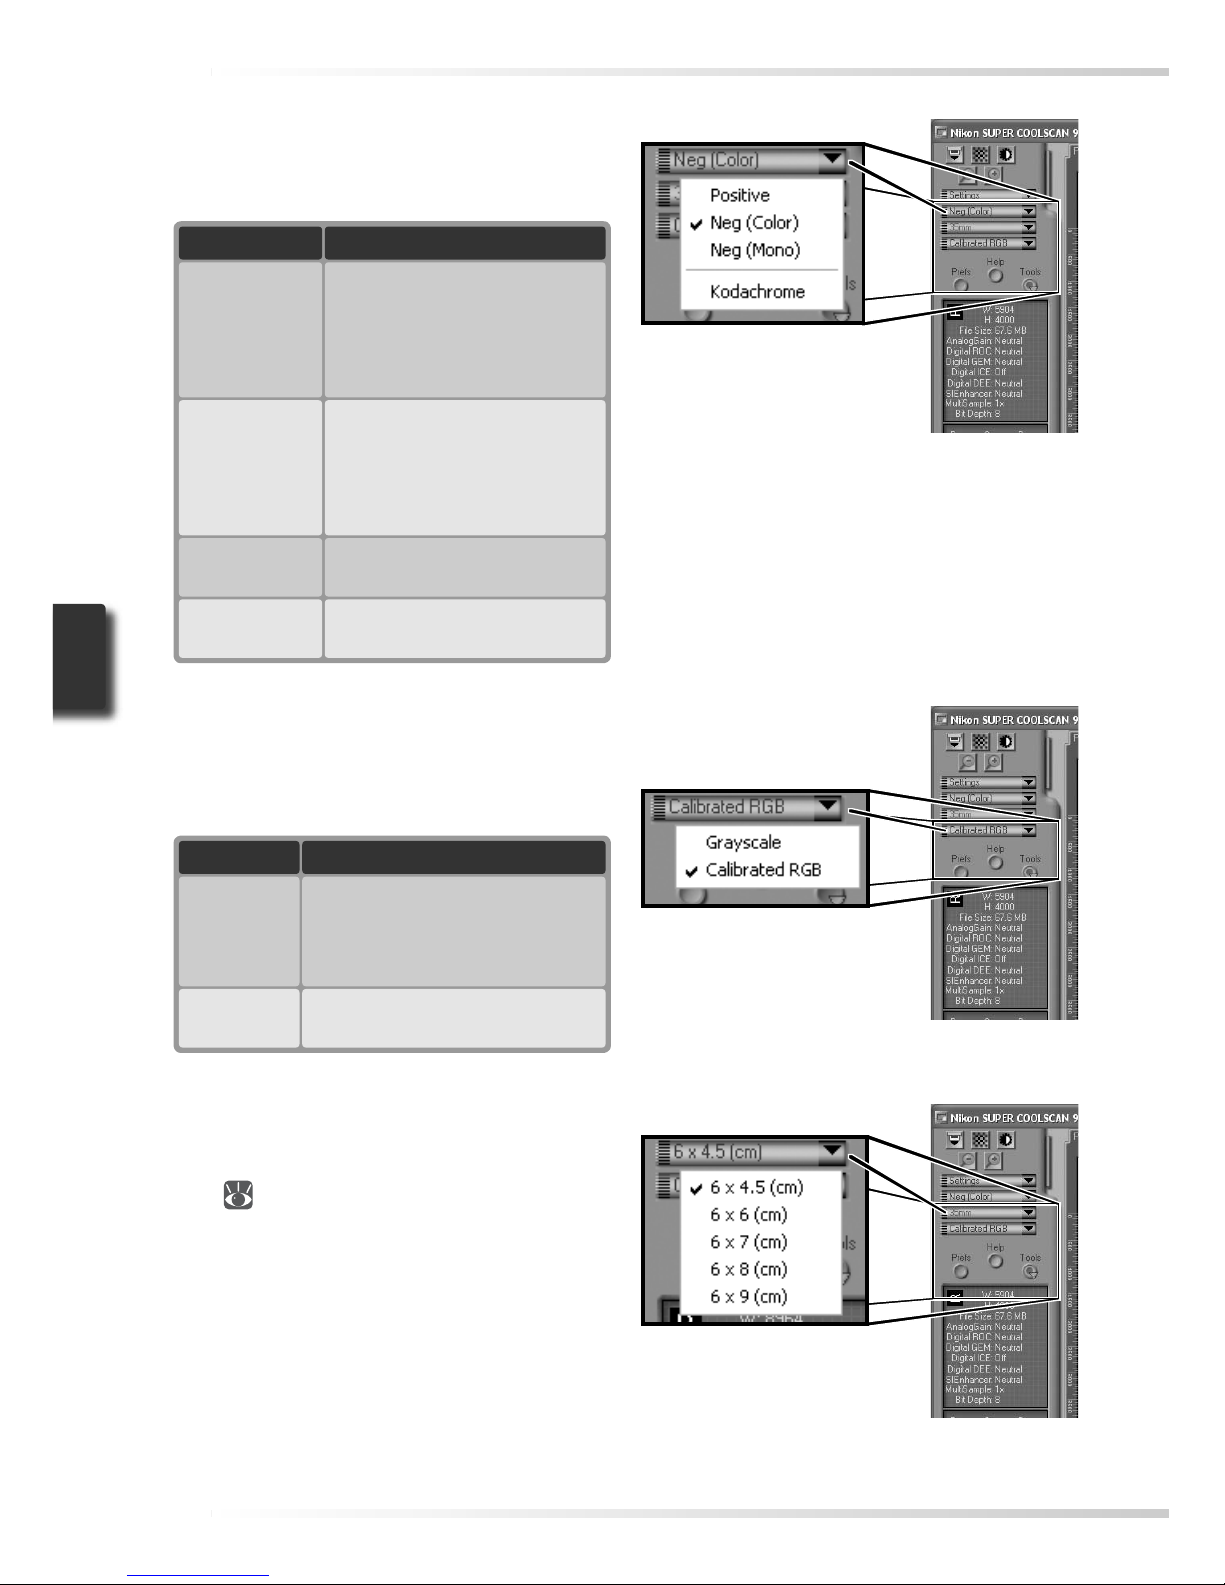
1
Choose the fi lm type
Click the fi lm-type menu in the scan window control area and choose a fi lm type
that matches the fi lm being scanned.
Option
Positive
Use with
Use with most makes of positive slides and reversal fi lm.
These fi lms have a black base,
and the image in each frame
appears in its actual colors.
Neg (Color)
Use with color negatives. Color negatives can be identifi ed
by their orange -tinted base
and by the fact that the colors
in the images are reversed.
Neg (Mono)
Use with black-and -white
negatives.
Kodachrome
Use with Kodachrome positives.
2
Choose a color model
Click the color-model menu in the scan
window control area and choose a color
model according to how the image will
be used.
Option
Grayscale
Description
Image scanned as grayscale
data. Use when scanning images that will be printed or viewed
in black-and-white.
Calibrated
RGB
Image scanned as RGB data.
Use to scan images in color.
3
Select the frame size (medium-format fi lm only)
When scanning medium-format (120/220
or Brownie) fi lm in the FH-869S, click the
frame-size menu and select the fi lm frame
size ( 28).
Film type menu
Frame- size menu
Color model menu
Page 44
35
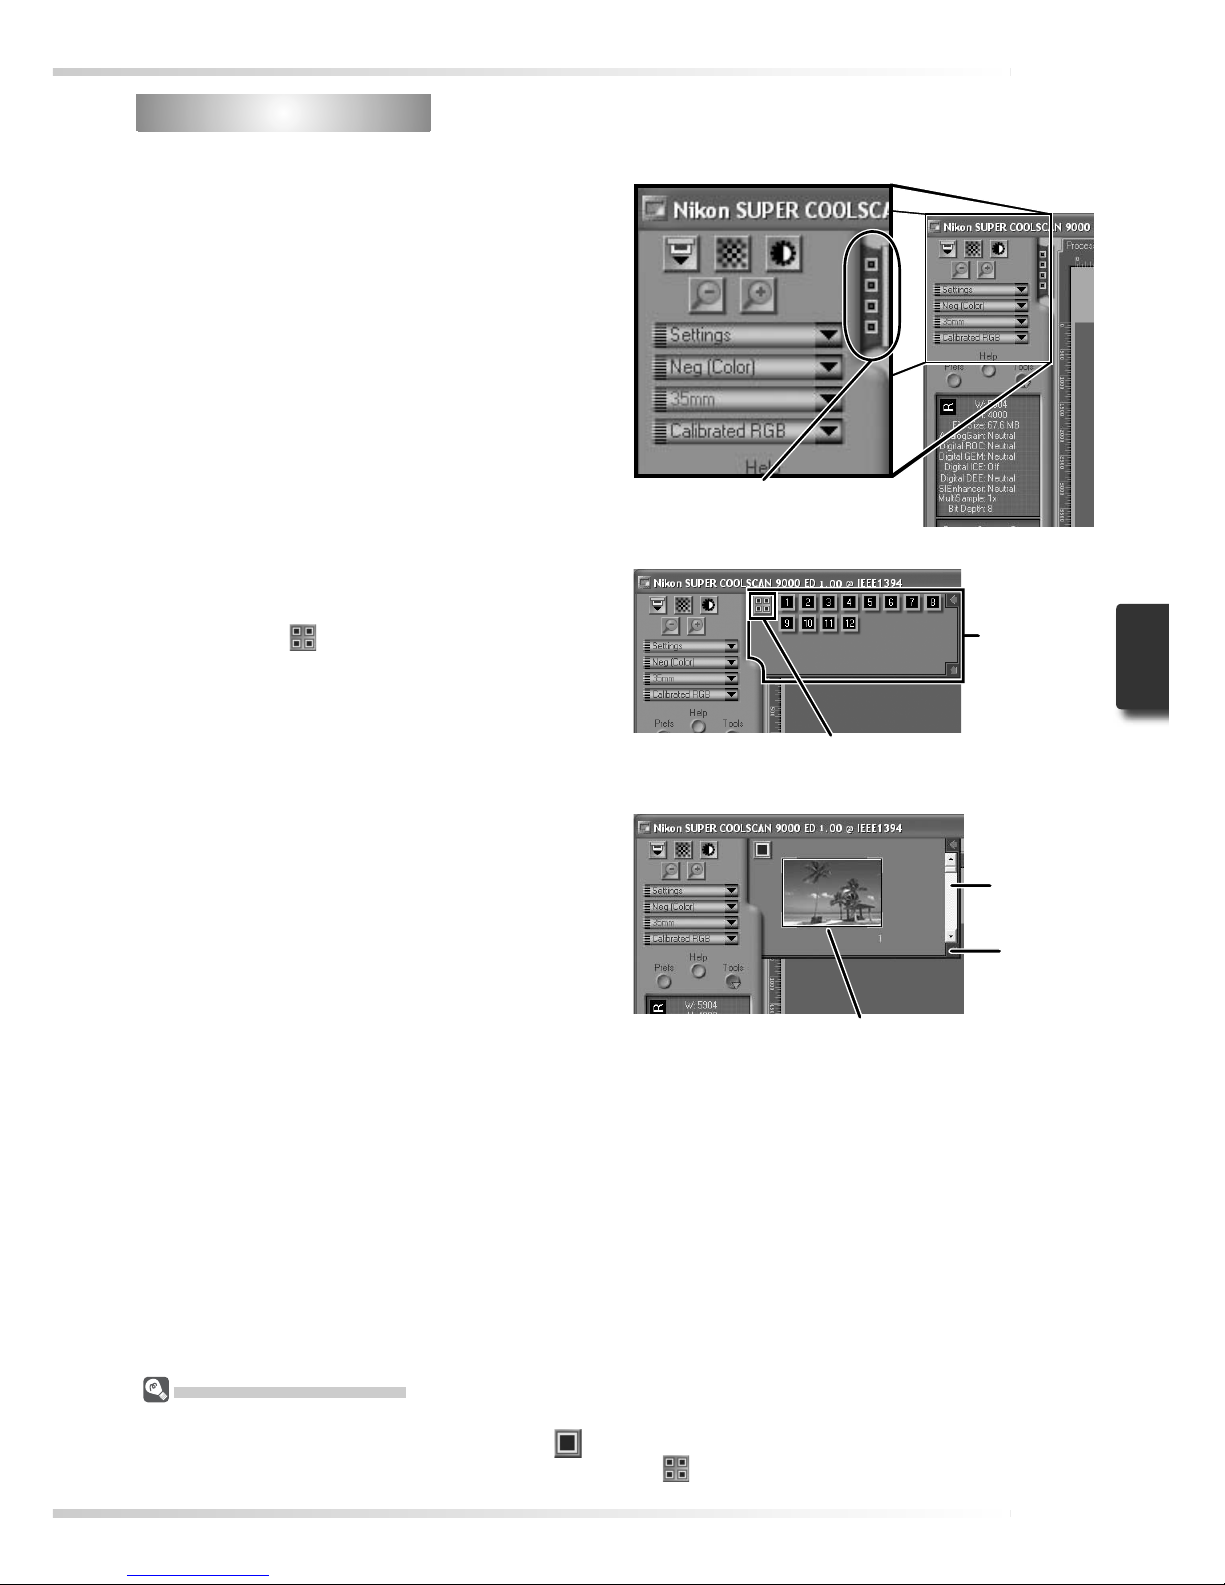
Step 6 — Preview
Step 6 — Preview
1
Open the thumbnail drawer
Click the thumbnail drawer tab.
Thumbnail drawer tab
2
Display thumbnails
To view the frames in the thumbnail
drawer as small “thumbnail” previews,
click the button. The scanner will
scan the fi lm to generate thumbnails and
display them in the thumbnail drawer.
Click here to display/hide thumbnails
Thumbnail
drawer
3
Select frames
Select the frame to be scanned by clicking the associated thumbnail or frame
number (selected frames are indicated
by a green border). To selec t multiple
frames, hold down the Ctrl (Windows)
or command (Macintosh) key while clicking each frame in turn, or hold down
the shift key and click to select two
images and all frames between them.
To view frames not currently visible in
the thumbnail drawer, use the scroll bar
or enlarge the drawer by dragging the
handle at its lower right corner.
Selected frame
Scroll bar
Handle
The Thumbnail Display
If the wrong fi lm type or frame size is chosen when thumbnails are generated, the thumbnail display will
not refl ect the contents of the fi lm. Click the
button in the thumbnail drawer to hide thumbnails, and
then select the correct fi lm type or frame size. Click the button to view the new thumbnails.
Page 45
36
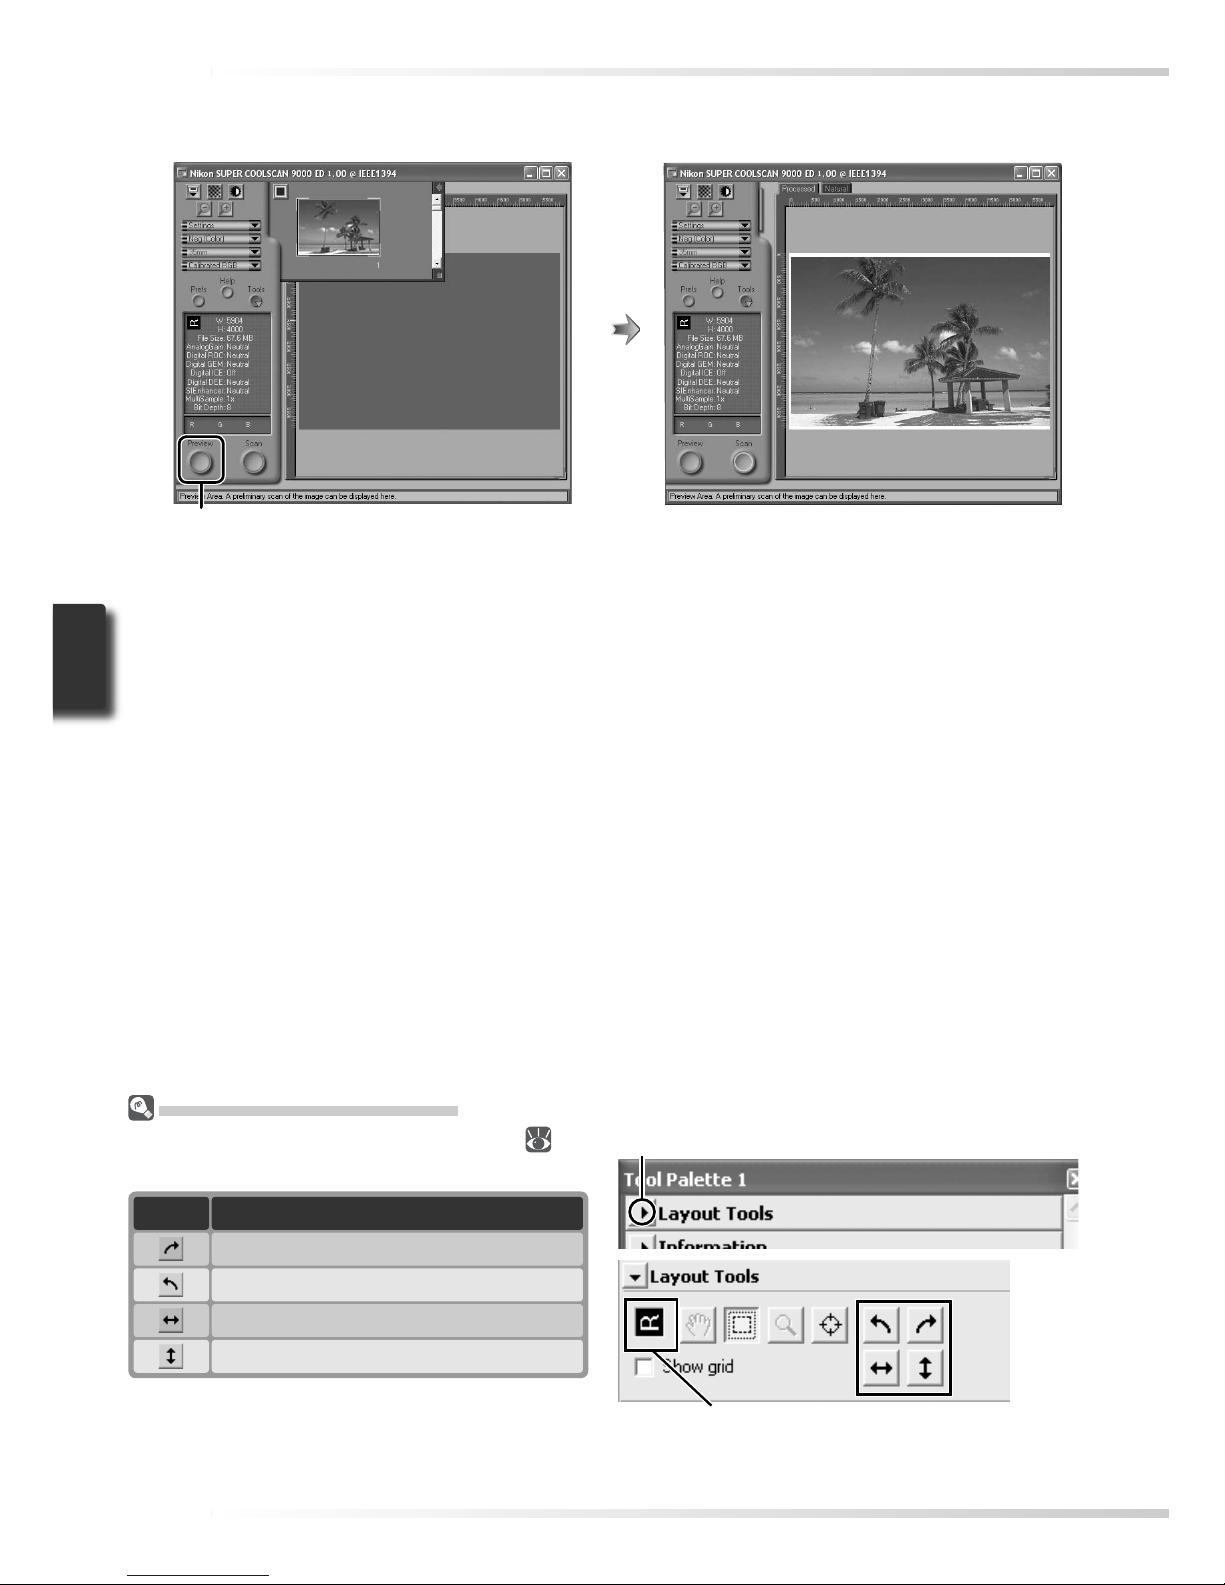
4
Click the Preview button
A preview will be displayed in the preview area.
Preview button
Rotating and Flipping Images
The Layout Tools palette in the Tool Chest (
48)
contains buttons for rotating and fl ipping images.
Button
Rotate image 90 ° clockwise
Flip image horizontally
Flip image vertically
Rotate image 90 ° counter-clockwise
Function
If multiple frames are selected, additional frames can be previewed by clicking the
thumbnails in the thumbnail drawer.
Orientation of letter “R” refl ects any fl ips
or rotations that have been performed. “R”
turns red when image is fl ipped.
Click to display Layout Tools palette
Page 46
37
2
Select the Crop Tool
Step 7 — Select a Crop
Step 7 — Select a Crop
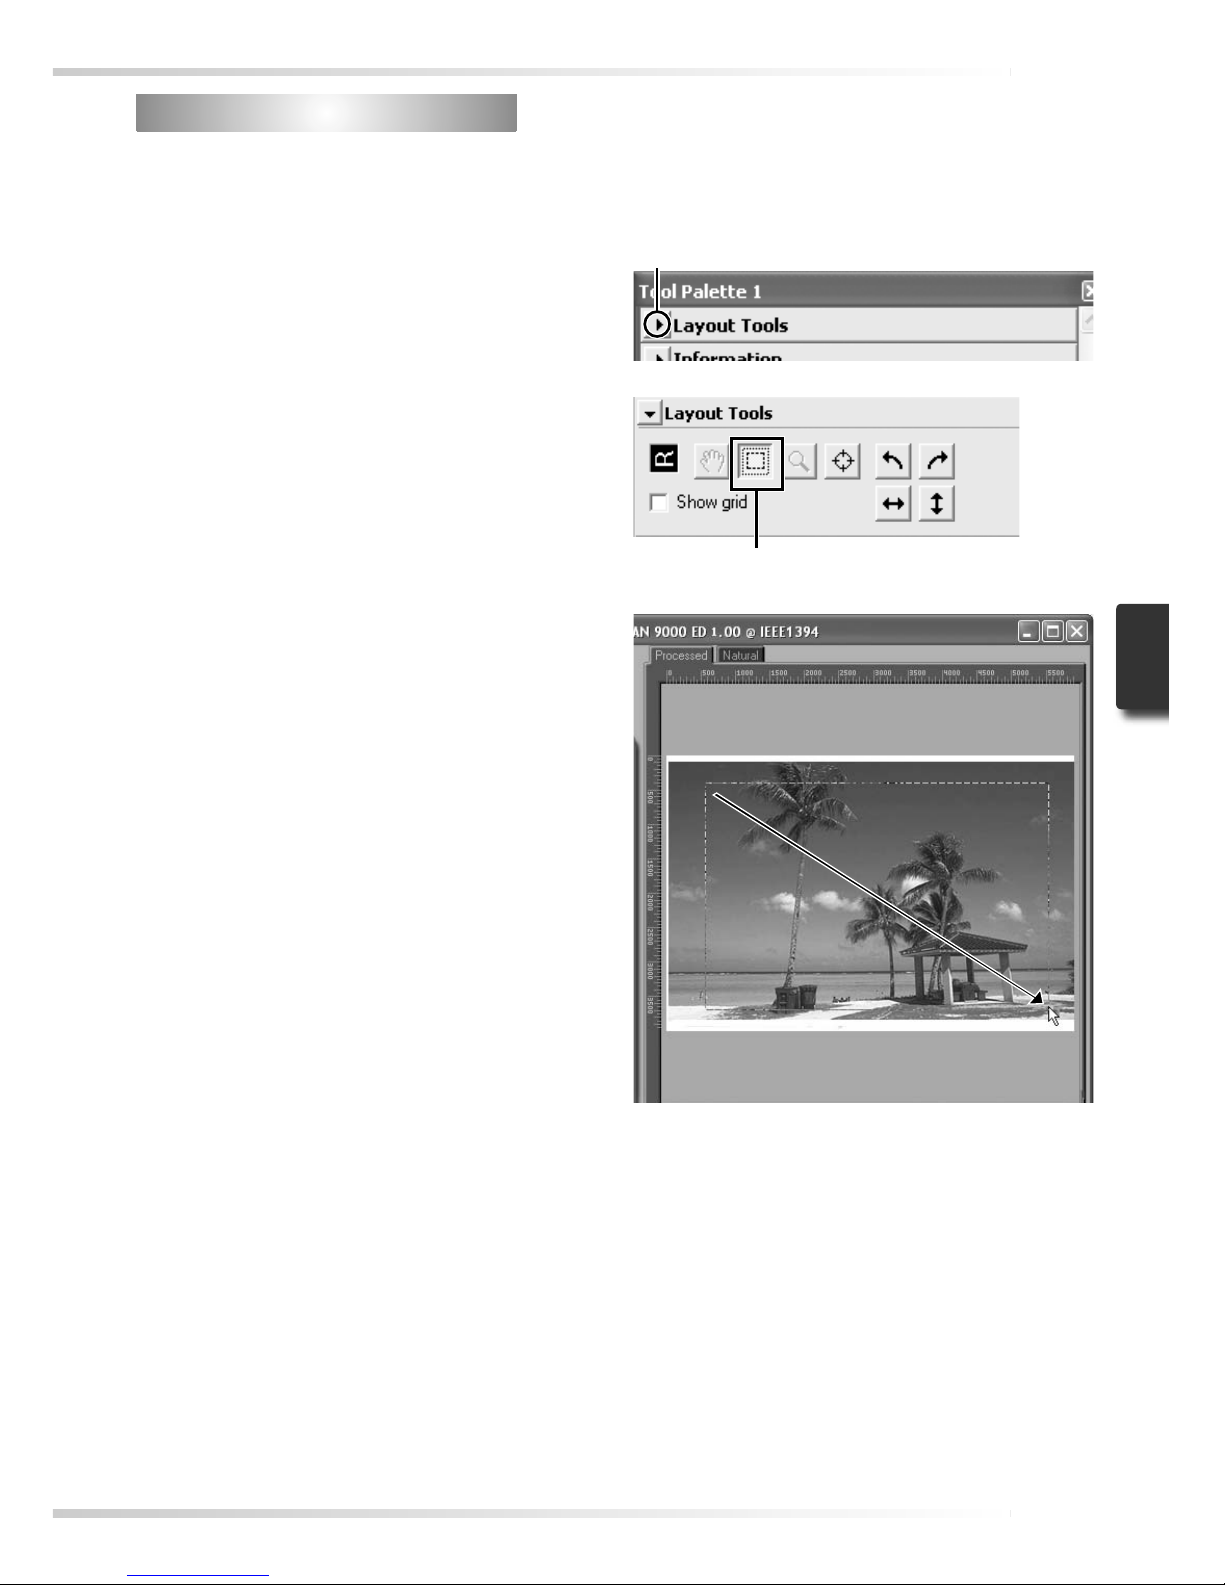
To scan only part of an image into the host application, use the Crop Tool in the Layout Tools
palette to select the desired area. This selection is referred to as a “crop.”
1
Open the Layout Tools palette
Click the triangle next to “Layout Tools”
in the Tool Chest (if the Tool Chest is not
already open, click the Tools button in
the scan window and select Tool Pal -
ette 1 from the menu that appears).
Crop Tool
Click to display Layout Tools palette
3
Select a crop
To select a crop, drag the mouse over the
image in the preview area. The borders
of the crop are indicated by a dotted line.
The size of the crop can be changed by
dragging its borders. To change the po sition of the crop, place the cursor inside
the selected area and drag it to a new
location.
Repeat this step for the other images
selected in the thumbnail drawer. To
display images in the preview area, open
the thumbnail drawer and click the selected thumbnails.
Page 47
38
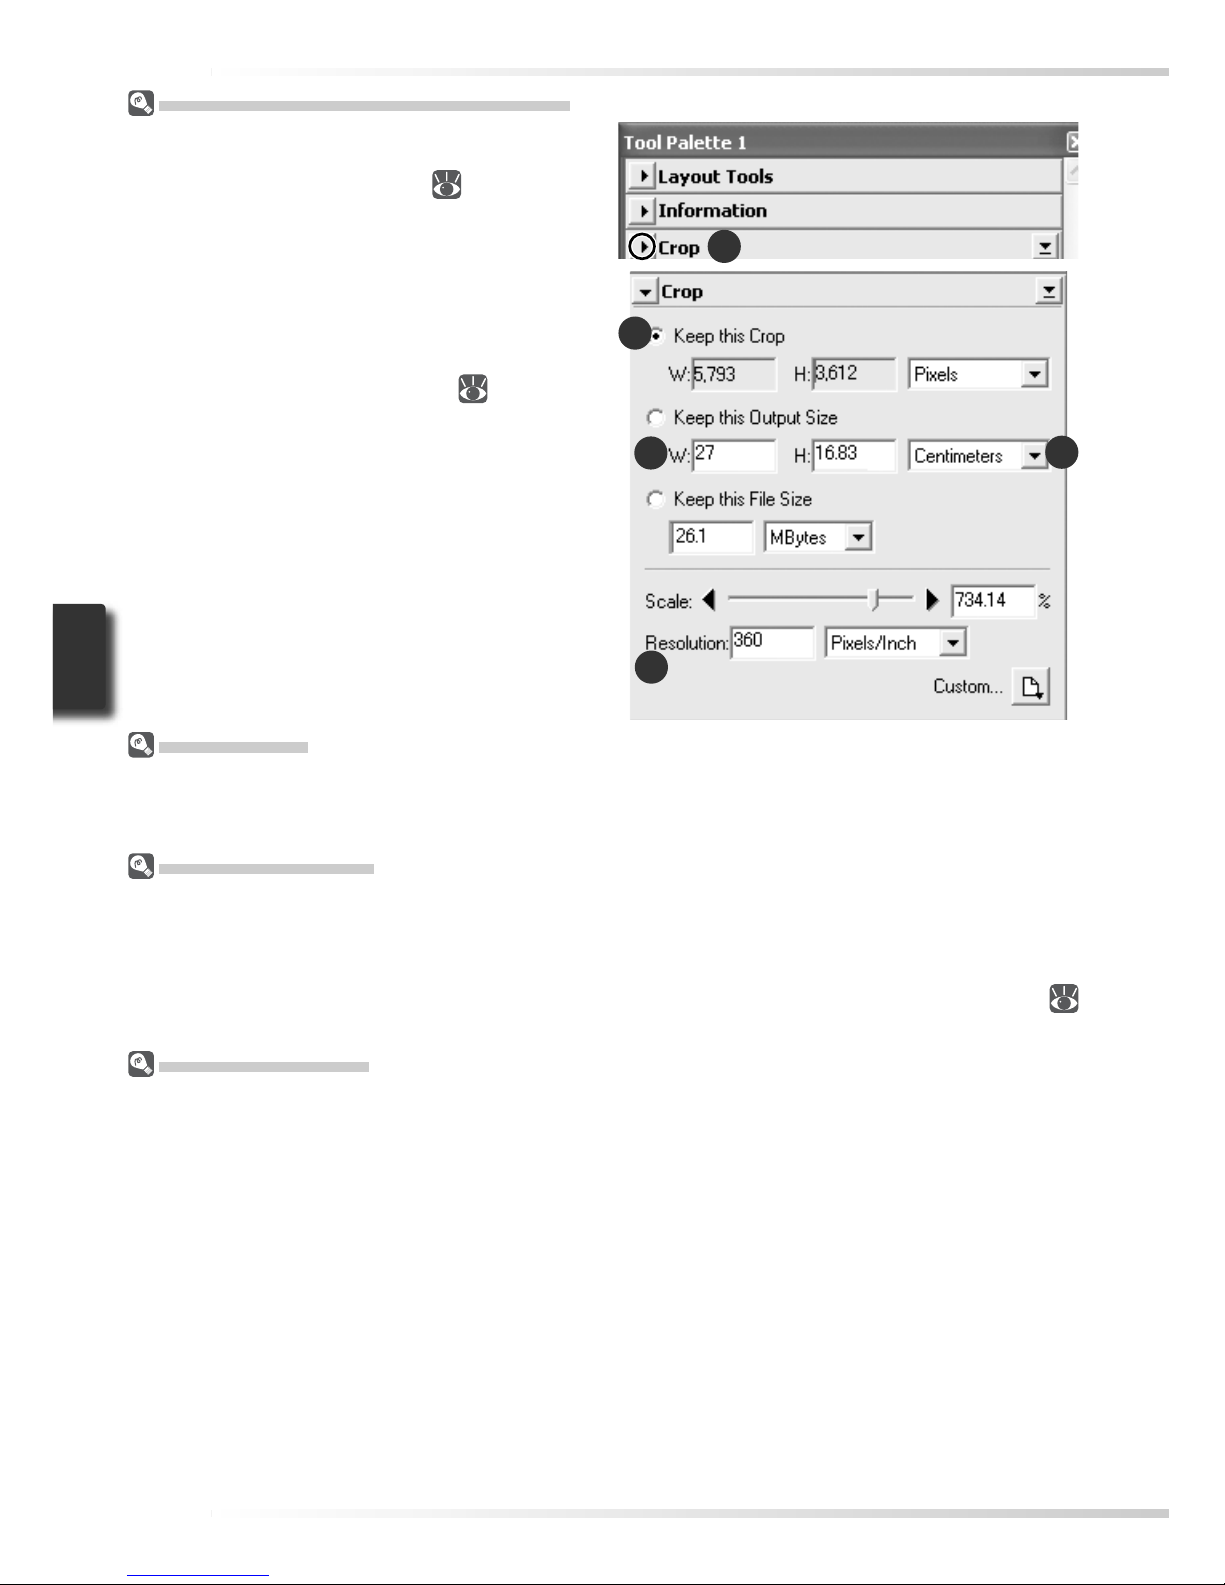
Choosing an Output Size and Resolution
The “Crop” palette in the Tool Chest is used to
specify the size and resolution of the crop when
opened in the host application (
30). For example, to scan an image so that it can be printed
within the margins of A4 (21.0 × 29.7 cm) or lettersized (11˝ ×8.5˝ ) paper on a typical inkjet printer:
1 Click the triangle next to “Crop” in the Tool
Chest to open the “Crop” palette.
2 Choose Keep this Crop and use the mouse to
select a crop in the preview area (
37).
3 Choose Centimeters or Inches from the out-
put units menu.
4 Enter a value for Height or Width that will fi t on
A4 paper (remember to leave a margin of least
2 cm/0.79˝). The other value will automatically
be adjusted to maintain the current crop; if the
result is still too large, enter a value that will fi t
on A4 paper.
5 Enter an output resolution of 360 pixels per
inch.
Scan Bit Depth
The scan bit depth determines the maximum number of colors in the image after scanning. A choice of
sixteen and eight bits is available in the “Scanner Extras” palette. For more information, see the Nikon
Scan Reference Manual (on CD).
Scan Image Enhancer
The image enhancement tools in the Tool Chest can be used to enhance images before they are scanned.
For example, the Scan Image Enhancer automatically adjusts brightness, contrast, and hue to produce an
image that can be printed or used “as is,” without further alteration (note that this will increase scanning
times and may not have the desired effect on dark images). For information on the Scan Image Enhancer
and the other image adjustment options and scan settings available in Nikon Scan, see “Nikon Scan” (
43) or the Nikon Scan Reference Manual (on CD).
Easy Scanning Guide
The Easy Scanning Guide gives examples of how to adjust “Crop” palette settings in a variety of situations.
1
2
4
3
5
Page 48
39
Step 8 — Scan and Save
Step 8 — Scan and Save
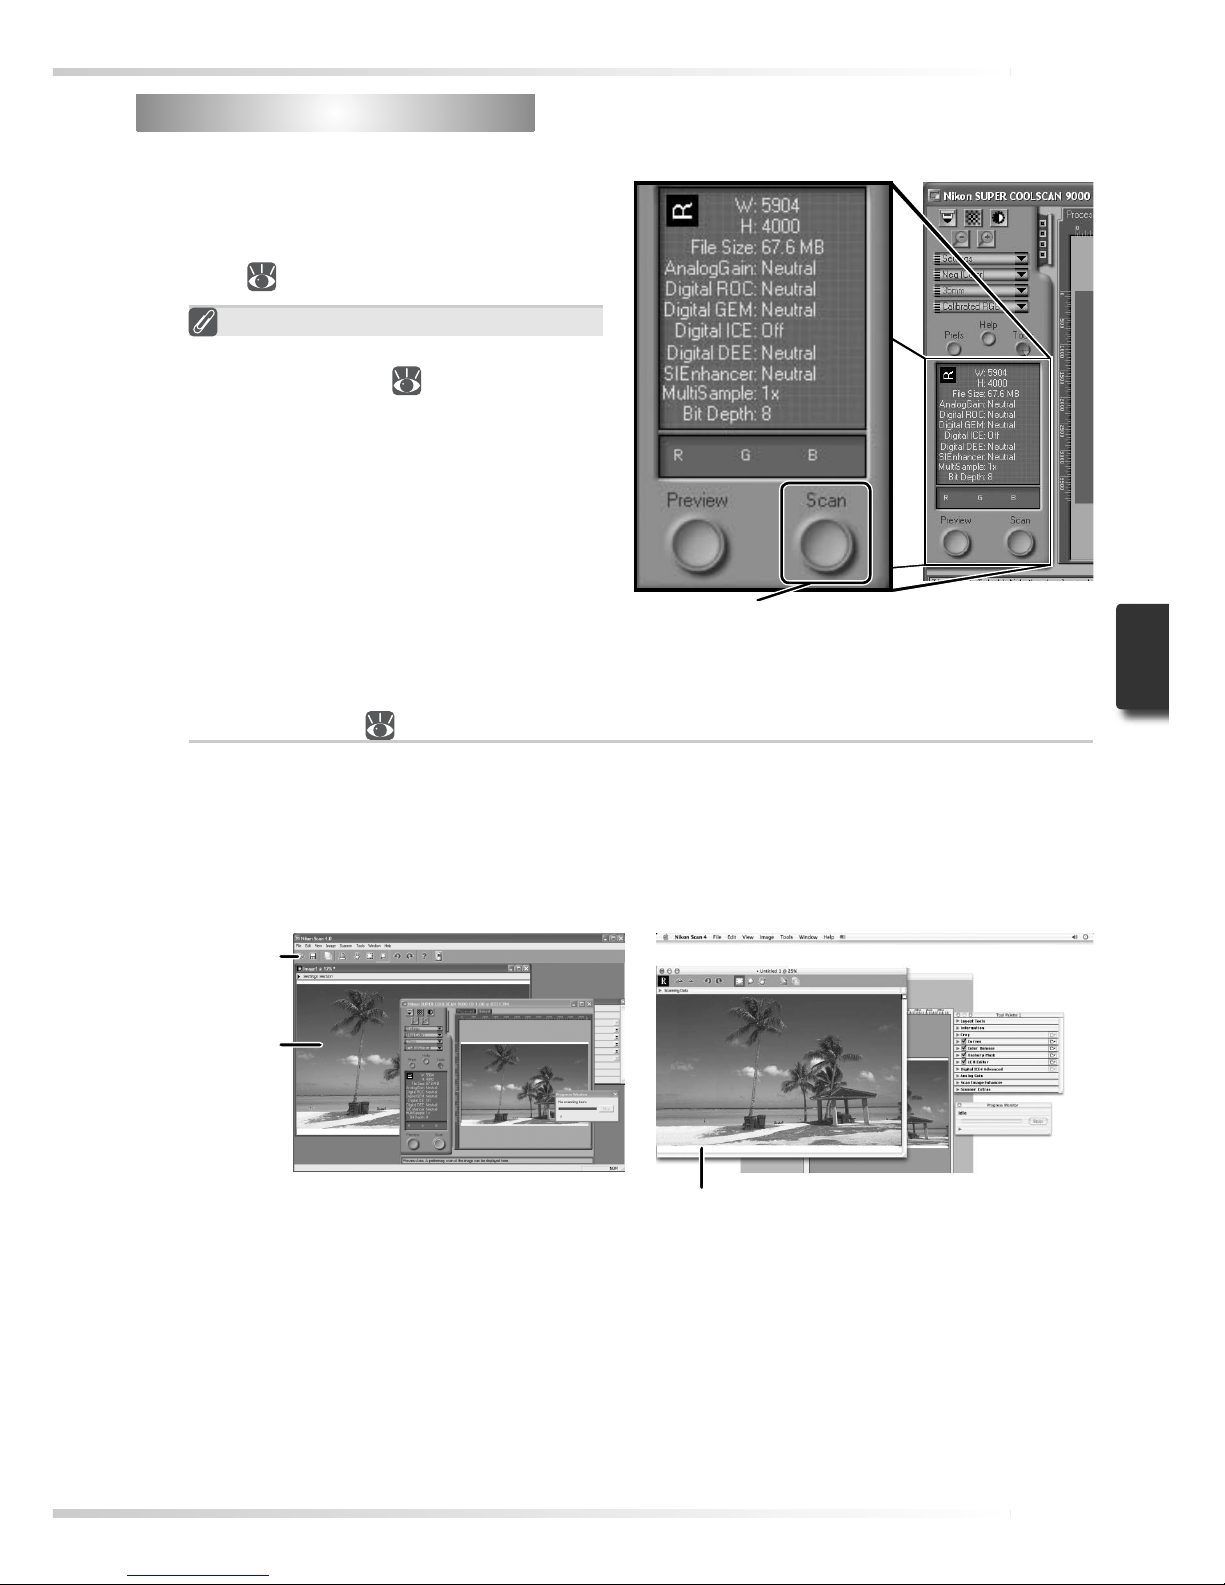
1
Click the Scan button
Click the Scan button to begin scanning
the crop selected in the preview area.
Progress is shown in the progress window (
47).
Batch Scans
If multiple frames are selected in the
thumbnail drawer (
35), clicking the
Scan button will display a dialog of
batch scan options. Click OK to save the
scanned images to disk. If Nikon Scan is
being used as a “stand-alone” application, the “File Saving Options” dialog
will be displayed; choose a location and
fi le format and click OK to begin scanning. Instead of being opened in image
windows, the images will be saved in
the location chosen in the “File Saving
Options” dialog. Proceed to Step 9,
“Eject and Exit” (
41).
Toolbar
Windows
Image
window
Macintosh
Image window
Scan button
When scanning is complete, images will be opened in image windows in the host application (single scans only). Note that the scan window may remain open “on top” of
the host application window; to view the images, it may be necessary to move the scan
window.
Page 49
40
2
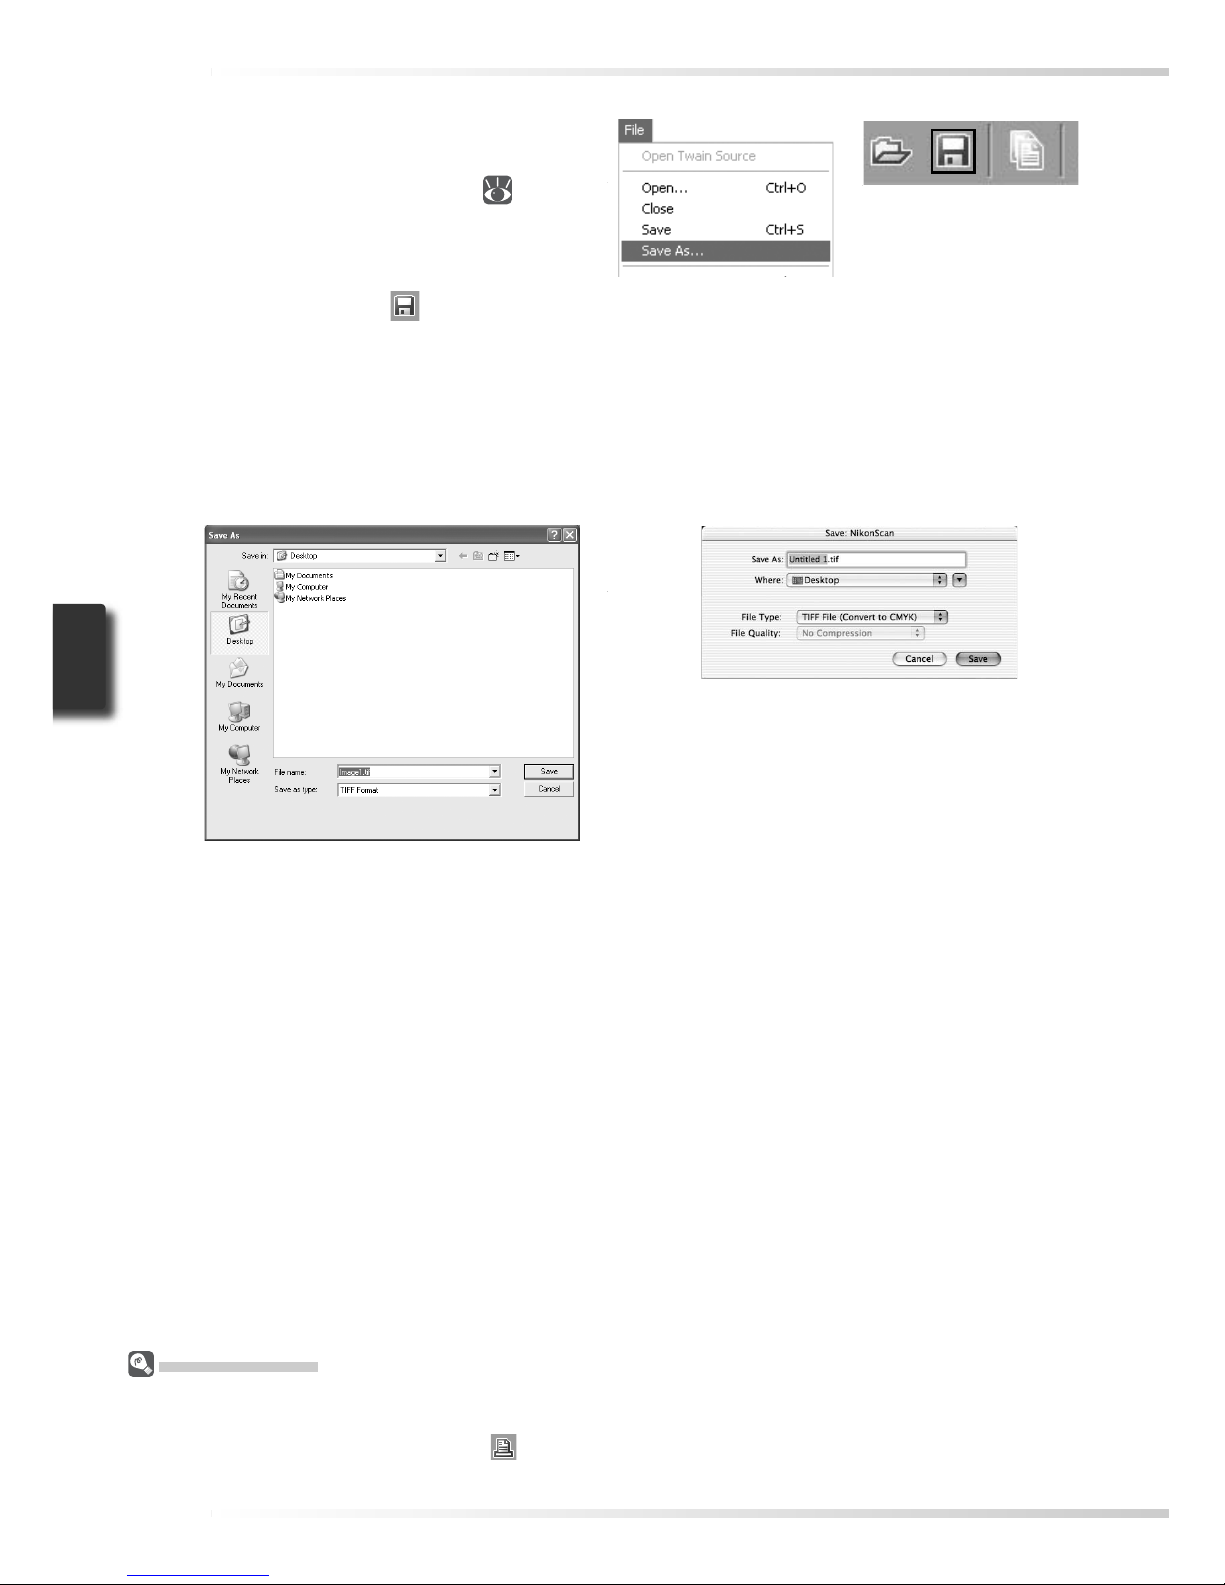
Select the save command
To save the image in the active window,
select Save or Save As… from the File
menu in the host application ( 30). If
Nikon Scan is being used as a “standalone” application under Windows, the
image in the active window can also be
saved by clicking the
(“Save”) button
in the toolbar.
3
Save the image
After navigating to the desired location, enter a name for the image and choose a fi le
format. Click the Save button to save the image to disk. Repeat steps 2 and 3 until all
images have been saved.
Printing Images
Images can be printed by selecting the print command from the File menu in the host application. If
Nikon Scan is being used as a “stand-alone” application under Windows, the image in the active window can also be printed by clicking the
button in the toolbar. See the Nikon Scan Reference Manual
for more information.
Typical “Save As” dialogs
Macintosh
Windows
Page 50
41
Step 9 — Eject and Exit
Step 9 — Eject and Exit
1
Eject the holder
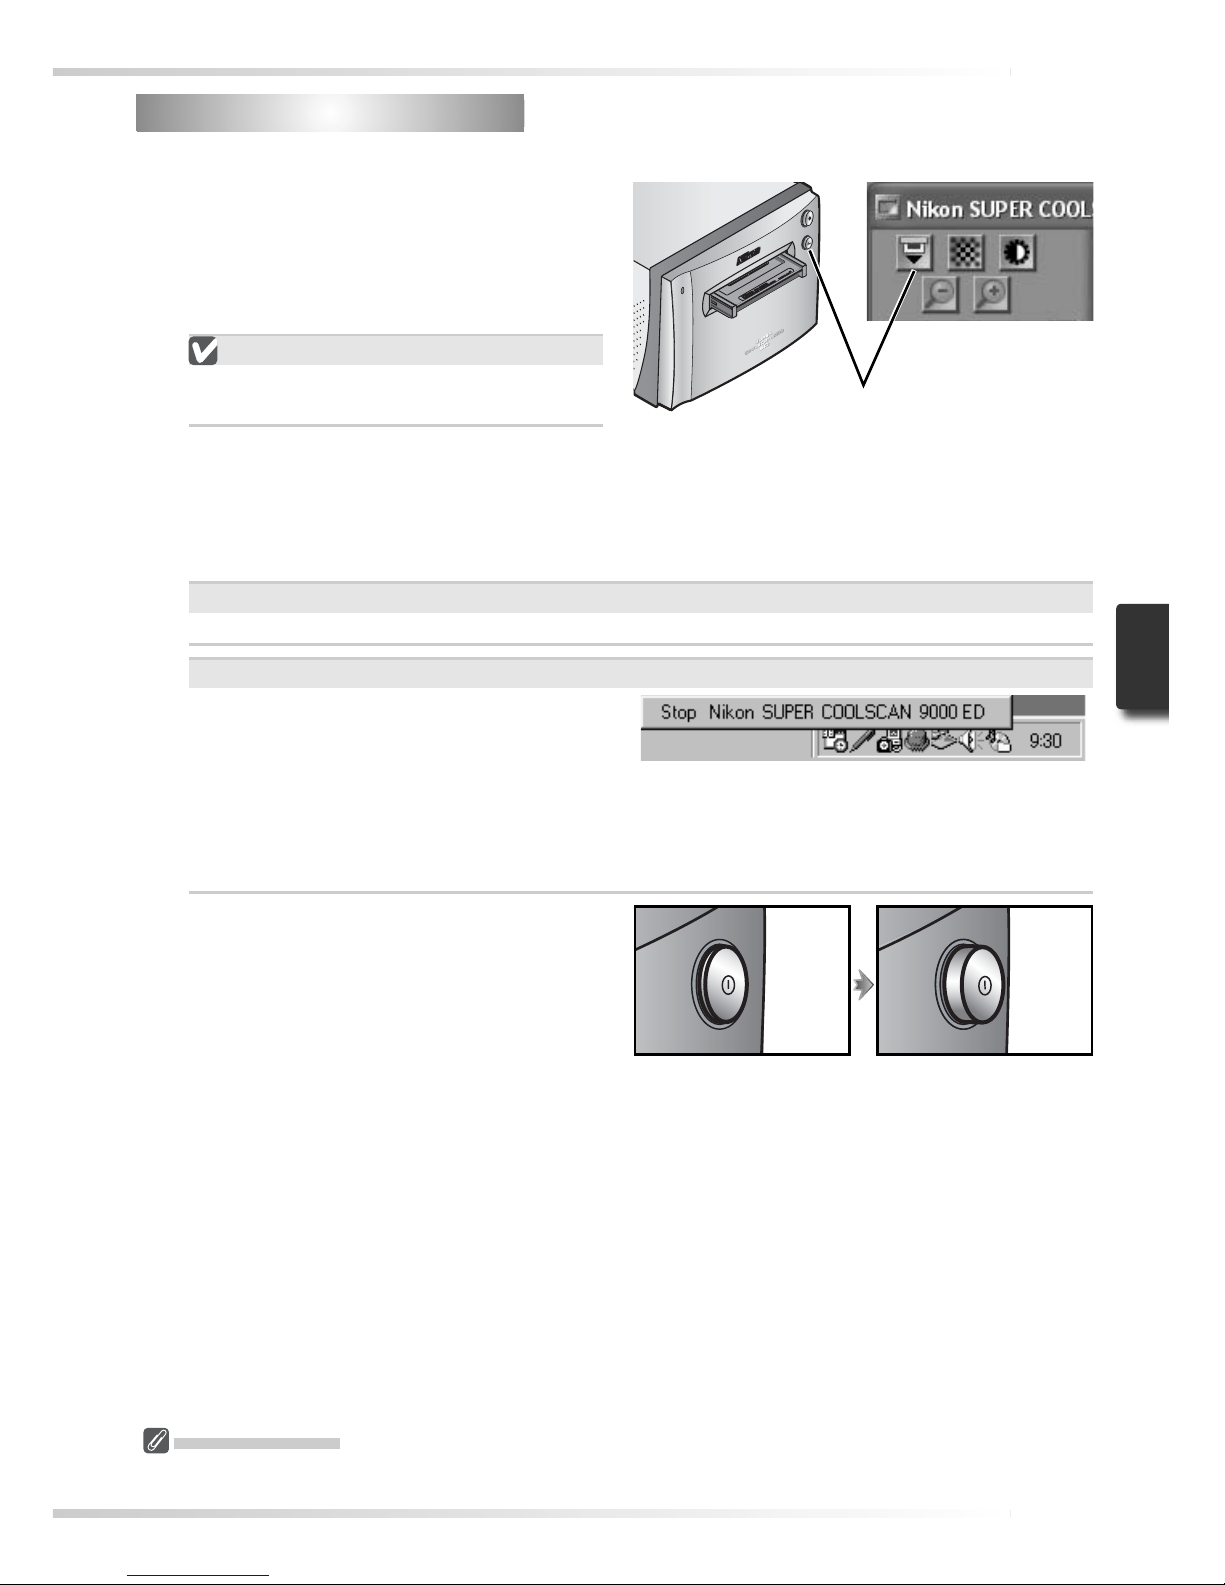
Press the eject button on the front of the
scanner or click the eject button in the
control area of the scan window. Ejection is complete when the status LED has
stopped blinking.
Removing Holders
Wait until ejection is complete before
removing the holder by hand.
2
Exit the host application
Select Exit (Windows) or Quit (Mac OS 9) from the File menu. In Mac OS X, open the
application menu and choose the “Quit” option for the host application.
3
Remove the scanner from the system (Windows Me/Windows 98 SE only)
Windows Me
Shut down the computer and turn the power off.
Windows 98 SE
Click the “Unplug or Eject Hardware”
icon in the task bar and select Stop
Nikon SUPER COOLSCAN 9000 ED
from the menu that appears. A message
will be displayed stating that the scanner
can be safely removed from the system;
click OK.
4
Turn the scanner off
Ejecting Holders
The holder will be ejected automatically if the scanner is turned off and then on again.
Scanner offScanner on
Eject button
Page 51
42
5
Remove the fi lm
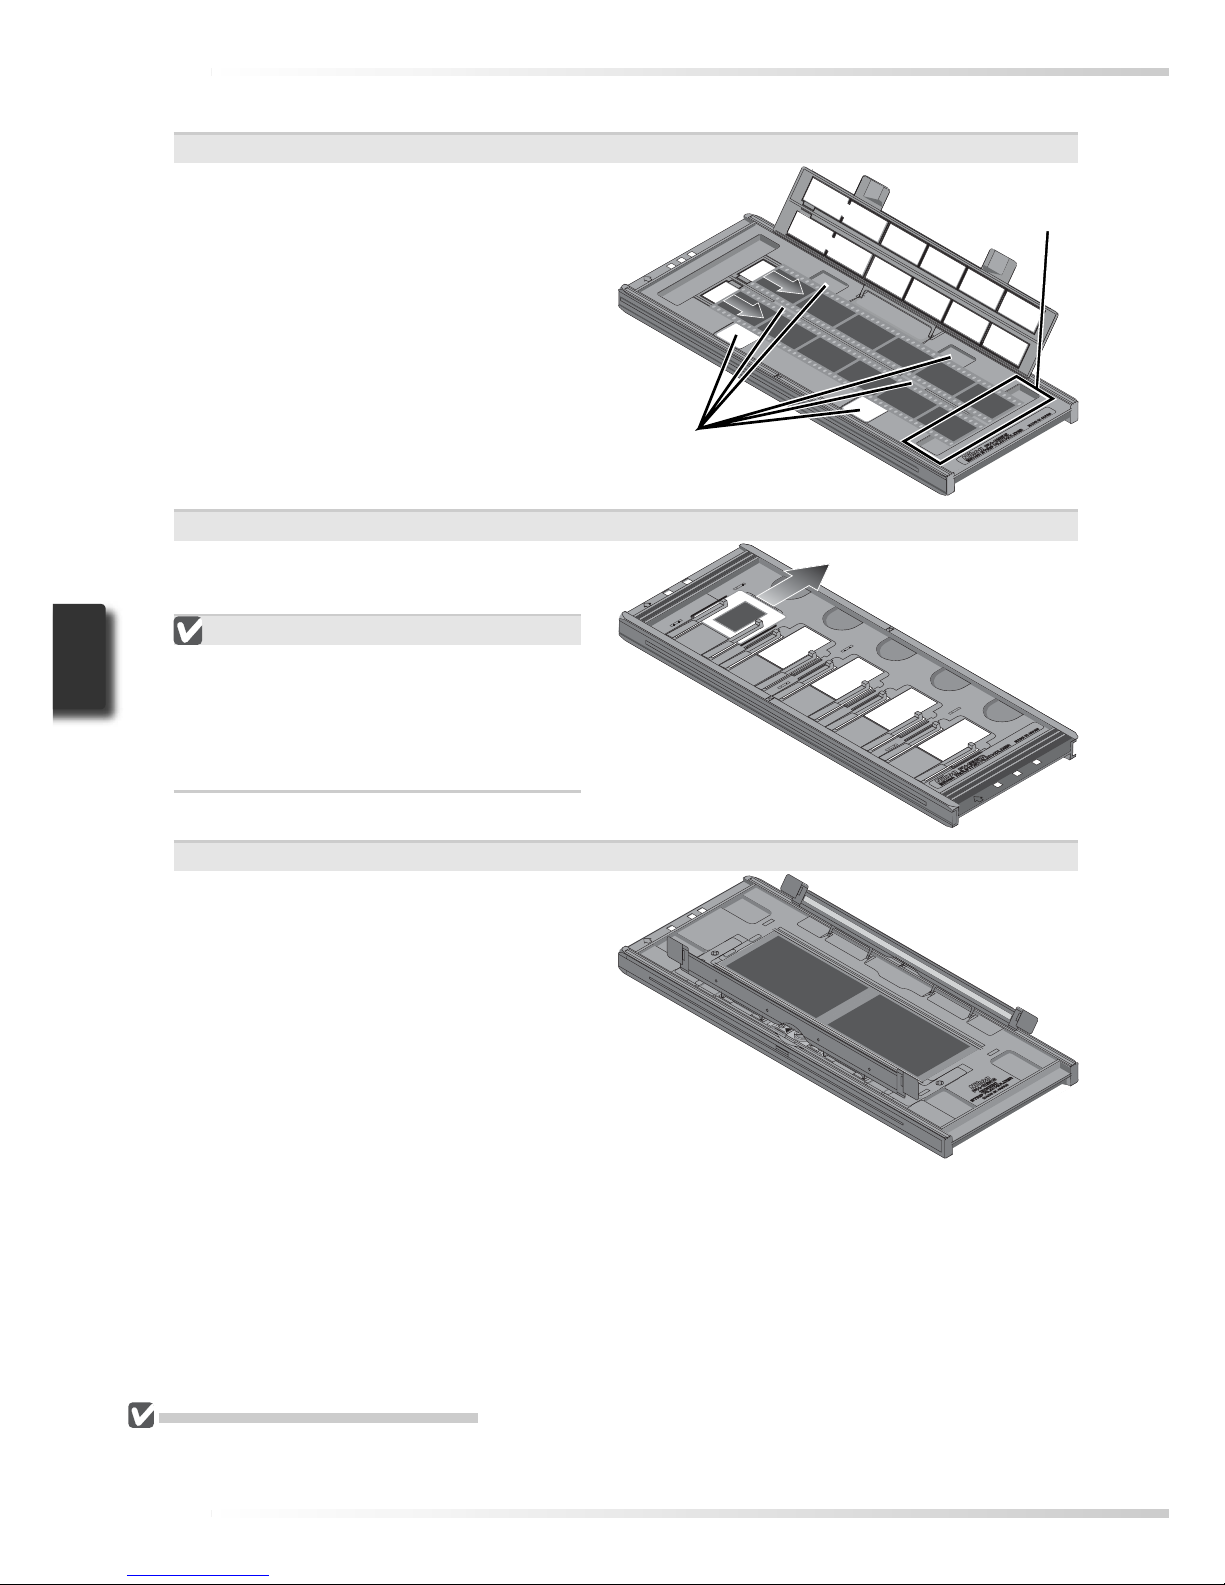
FH-835S Holder for 35-mm Film
Insert your fi ngers into the holes in the
lower portion of the holder and undo
the latches. Open the holder and use
the cutouts to pick the fi lm up by its
edges. If the edges of the fi lm are not
accessible, tilt the holder to slide the fi lm
to the hollows at either end of the lower
holder.
Cutouts
Hollow
FH-835M Holder for 35-mm Slides
Slide the mounts out from under the
clips that hold them in place.
Do Not Use Force
Do not use force when removing slides.
Failure to observe this precaution could
damage the clips holding the slides in
place. Do not lift the slides up until fully
removed from the clips.
FH-869S Holder for Brownie Film
Open the cover and pick the fi lm up by
the edge at the rear of the holder.
Do Not Store Film in the Holder
Leaving slides in the FH- 835M for extended periods could damage the clips holding the slides in place.
Film left in the FH-869S for extended periods could develop permanent indentations.
Page 52

43
The Scan Window ................................................. 44
The Tool Chest....................................................... 48
Nikon Scan
This chapter provides a brief overview of the Nikon Scan
software that controls the scanner. For more information, see the Nikon Scan Reference Manual (on CD).
Page 53
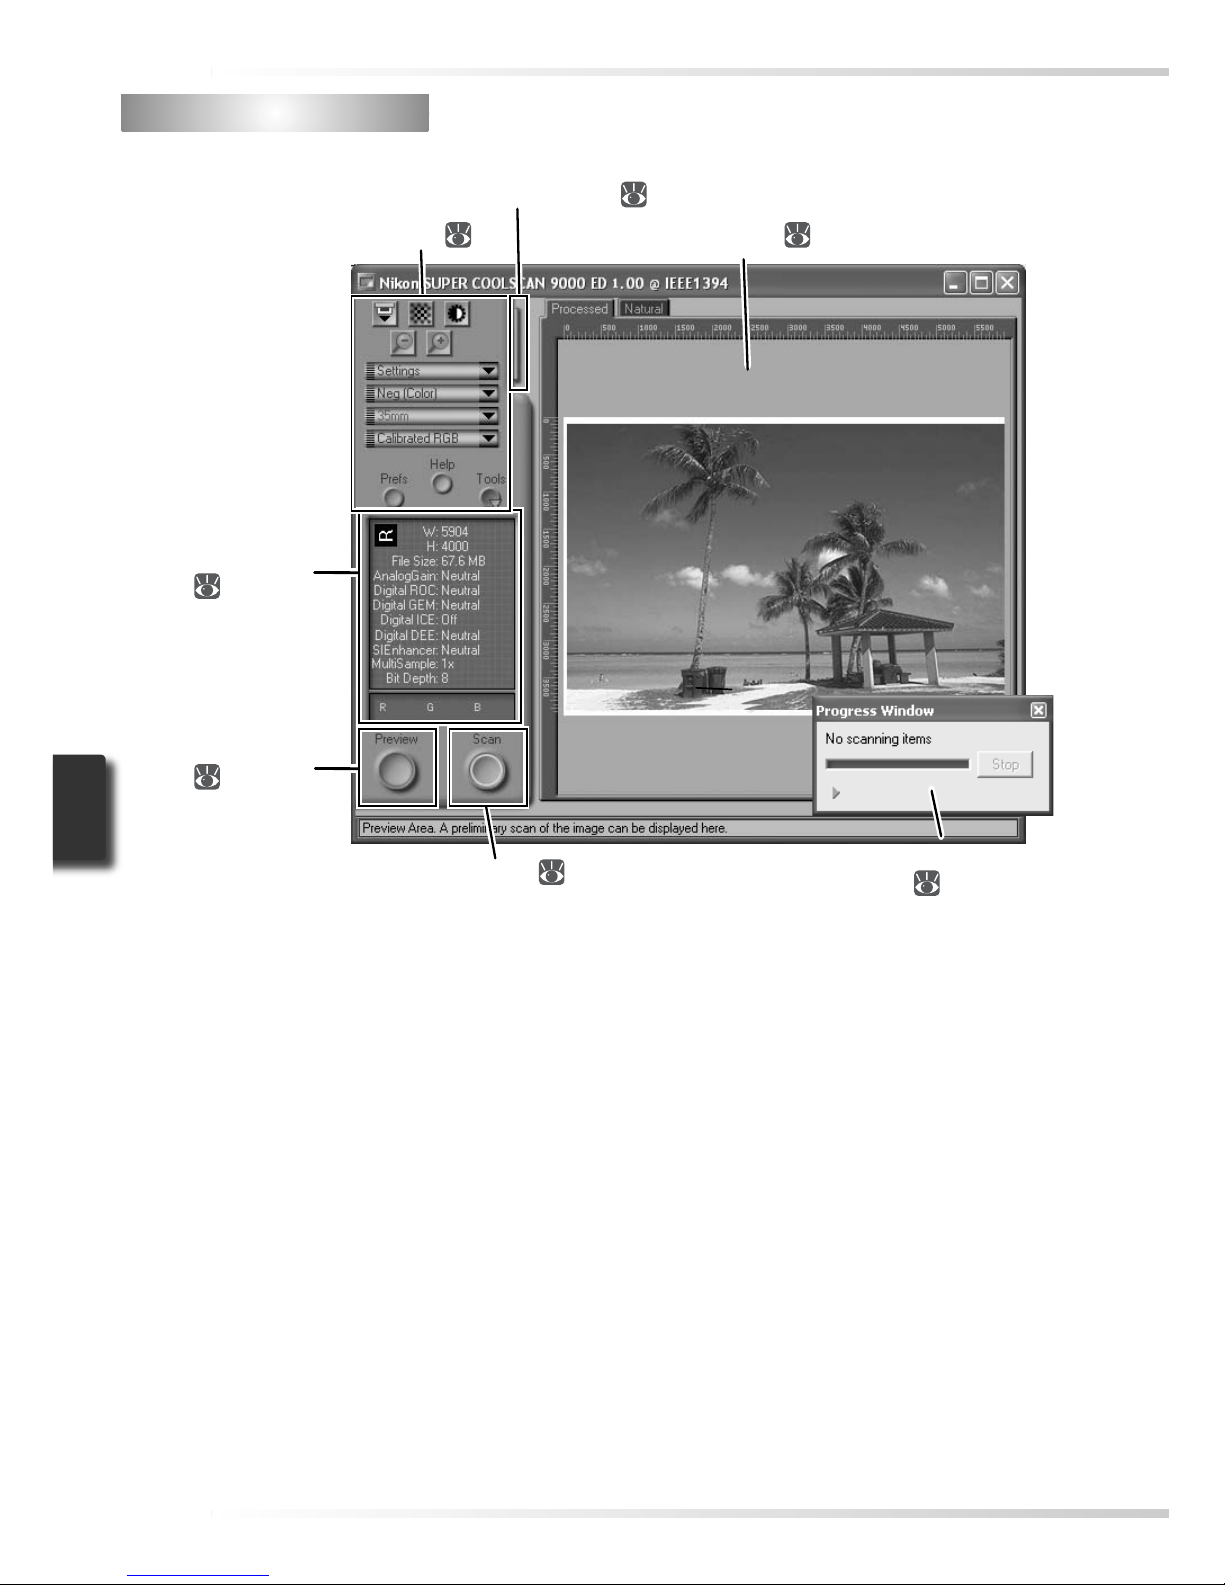
44
The Scan Window
The Scan Window
The parts of the scan window are identifi ed below.
Control area ( 45)
Progress window
(
47)
Preview area (
47)
Thumbnail drawer tab ( 47)
Scan button (
46)
Preview button
(
46)
Information panel
( 46)
Page 54
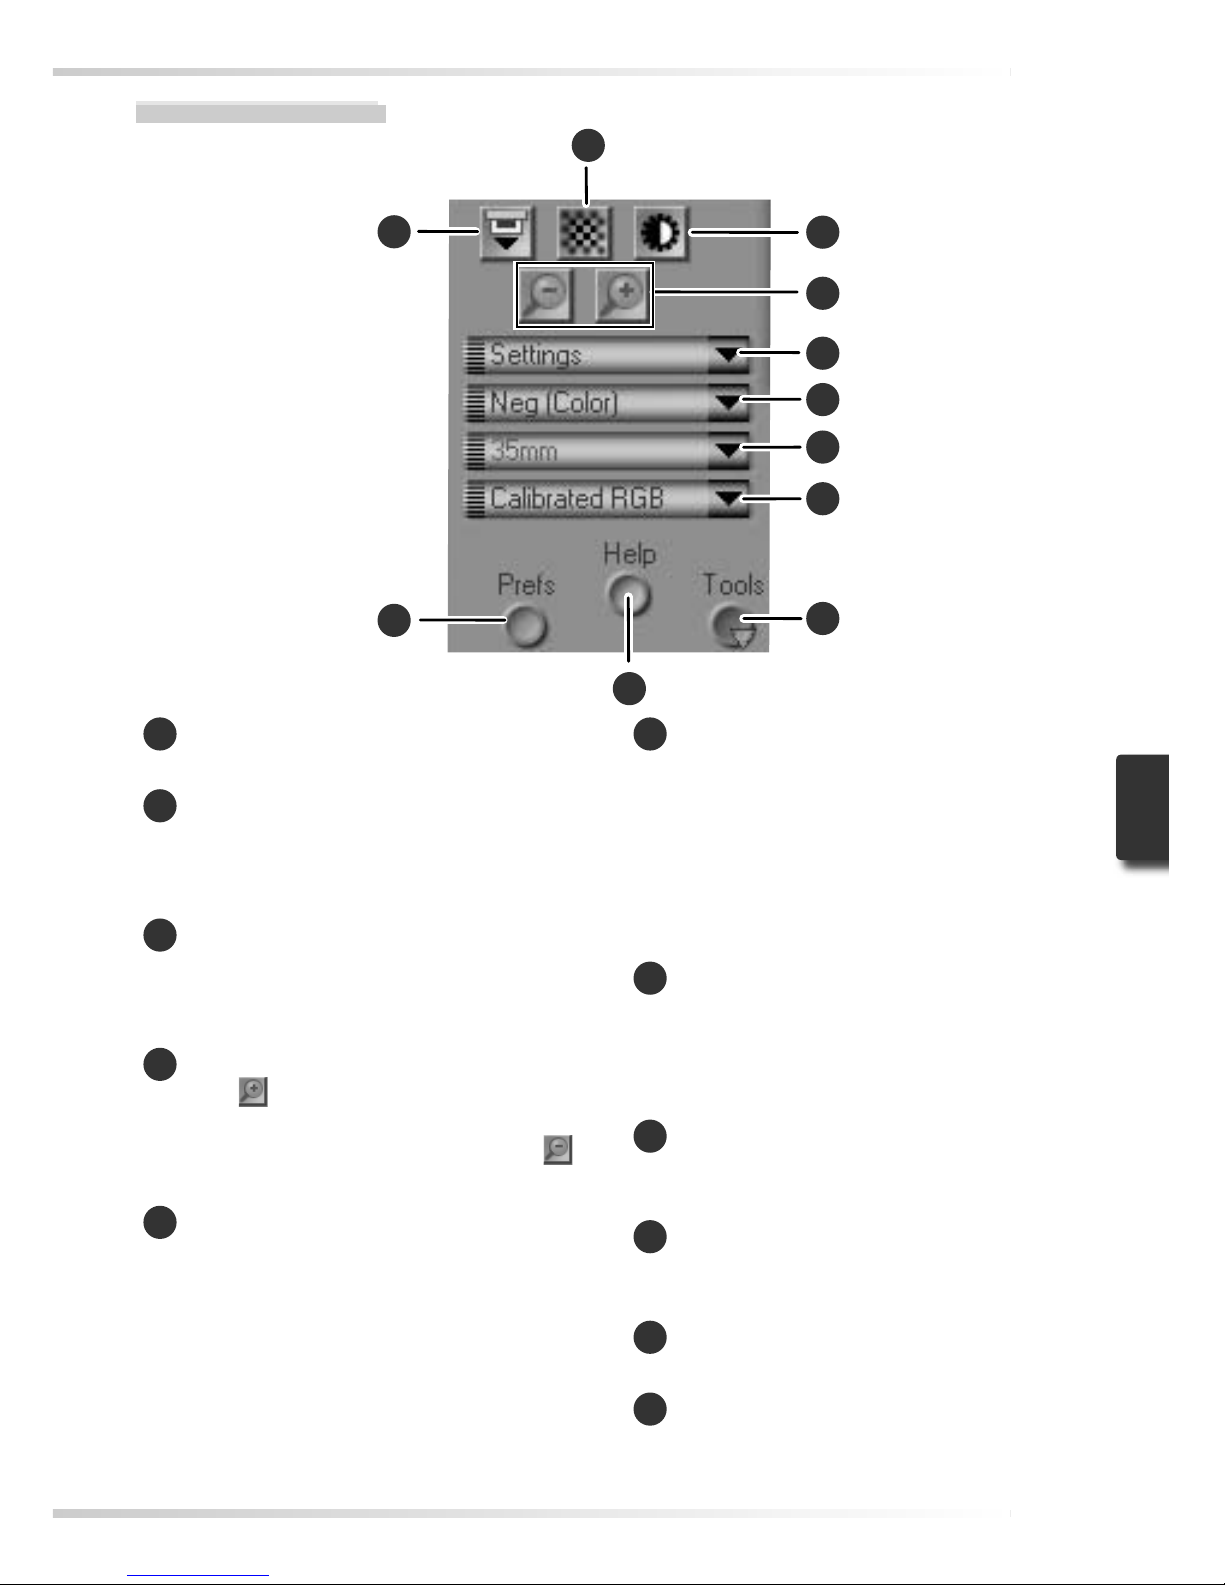
45
1
Eject button
Ejects the holder from the scanner.
2
Autofocus button
Click to focus the scanner. Control-click
(Windows) or option- click (Macintosh) to
select a new focus point.
3
Autoexposure button
When this button is clicked, the scanner
analyzes the current image and adjusts
exposure for optimal results.
4
Zoom buttons
Click
to zoom in for a closer look at
the portion of the image currently selected in the preview area. Click
to
zoom out.
5
Settings menu
Save and load settings or reset settings to
default values.
6
Film type menu
Choose an option that matches the type
of fi lm being scanned: Positive for positive or reversal fi lm, Neg (Color) for color
negatives, or Neg (Mono) for blackand-white negatives. A separate Koda-
chrome option is available for scanning
Kodachrome positives.
7
Frame size menu
Choose the frame size when scanning
medium-format (120/220 or Brownie)
fi lm in the FH- 869S, or optional FH-869G
or FH-869GR fi lm holders.
8
Color model menu
Choose a color model according to how
the image will be processed or used.
9
Tools button
Click to open the Tool Chest or progress
window.
10
Help button
Click to open Nikon Scan help.
11
Prefs button
Click to open the “Preferences” dialog.
The Control Area
9
7
6
5
4
3
2
1
11
8
10
Page 55
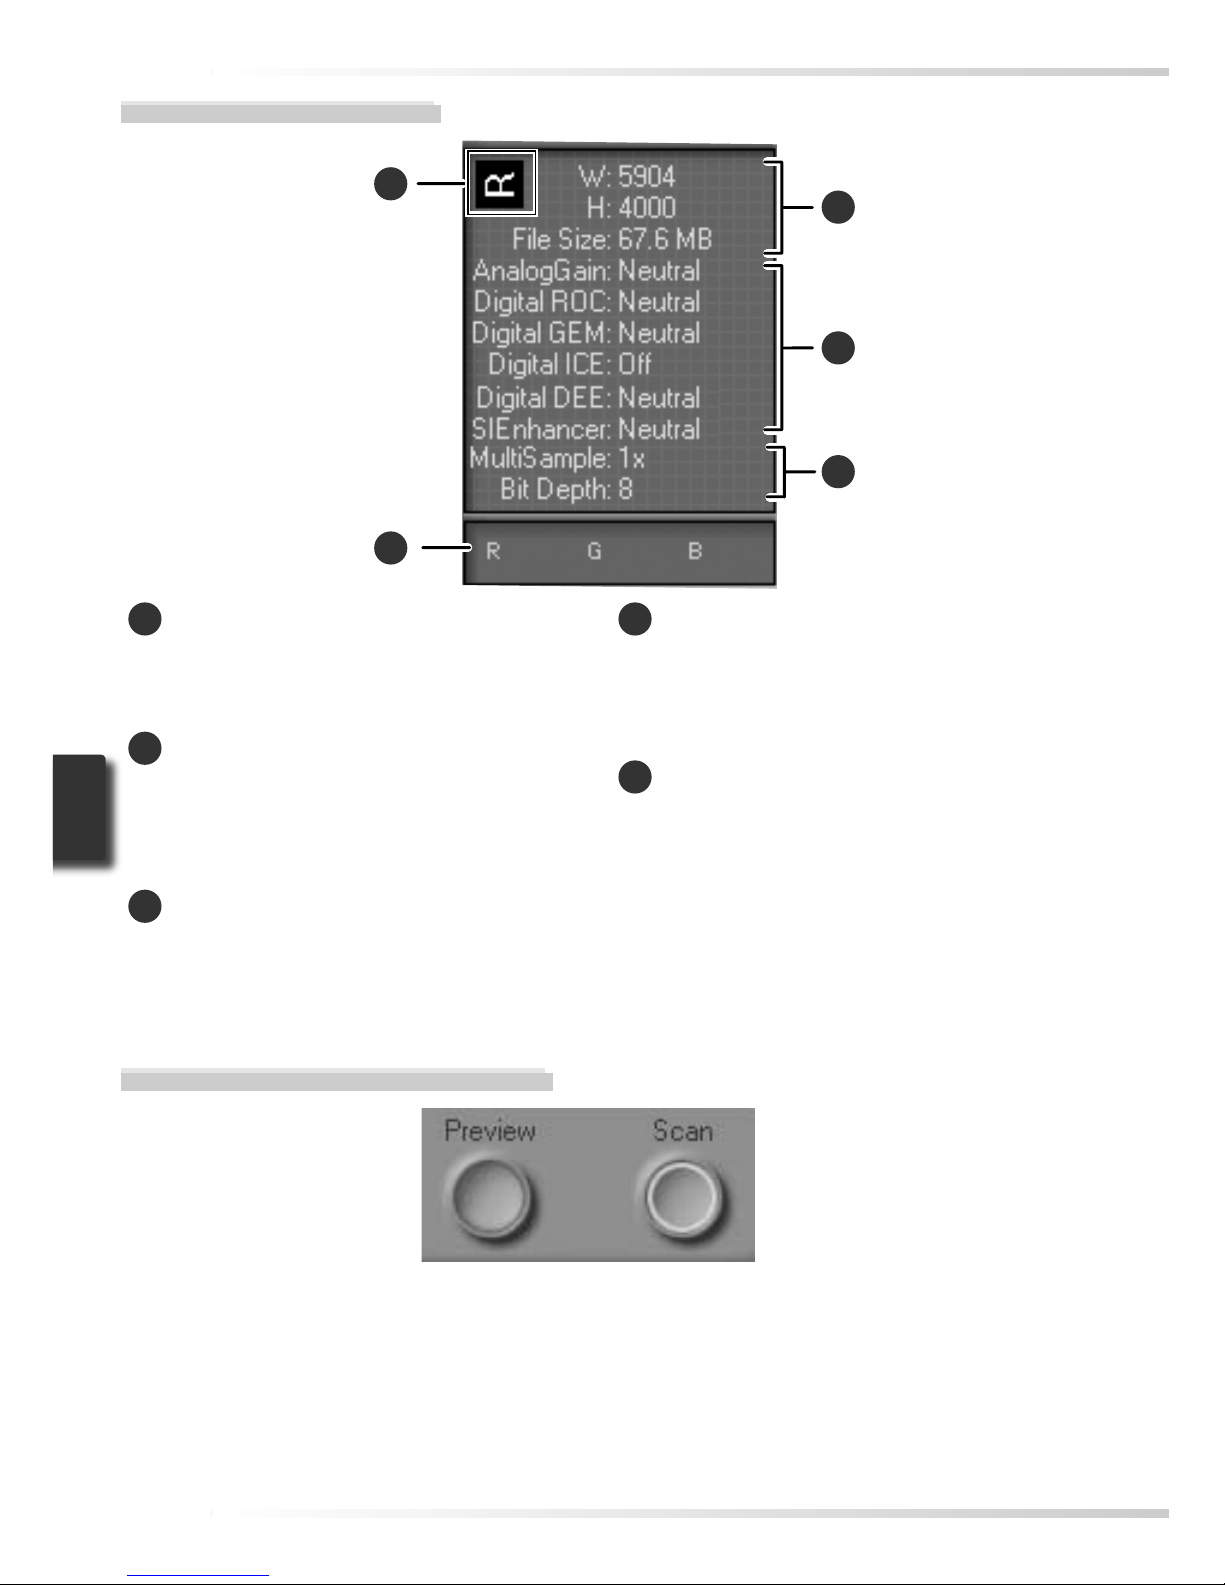
46
The Information Panel
1
Orientation
Shows the orientation of the image in the
preview area, refl ecting any fl ips or rotations that have been performed.
2
Dimensions/fi le size
Lists the width and height of the current
selection (in pixels) and the size of the fi le
that would be produced if the selection
were scanned at current settings.
3
Image enhancement
Shows the current status of Digital ICE
4
Advanced and analog gain. Note that
using Digital ICE
4
Advanced can increase
scanning times.
4
Scanner extras
Lists the current bit depth (which determines the maximum number of colors
available) and shows whether multisample scanning is in effect.
5
Color values
Lists the color values for the pixel under
the cursor. The values for the Natural
panel are listed in the top row, the values
for the Processed panel in the bottom
row.
4
3
2
5
1
The Preview and Scan Buttons
Preview button
Click to preview the image to be scanned (if
multiple frames are selected in the thumbnail
drawer, a preview will be performed for each
frame). Be sure to click this button after
changing the fi lm type or choosing a new
value for analog gain.
Scan button
Scans the images and opens them in the host
application (if multiple frames are selected
in the thumbnail drawer, a scan will be performed for each frame and the resulting images will be opened in separate windows).
Page 56
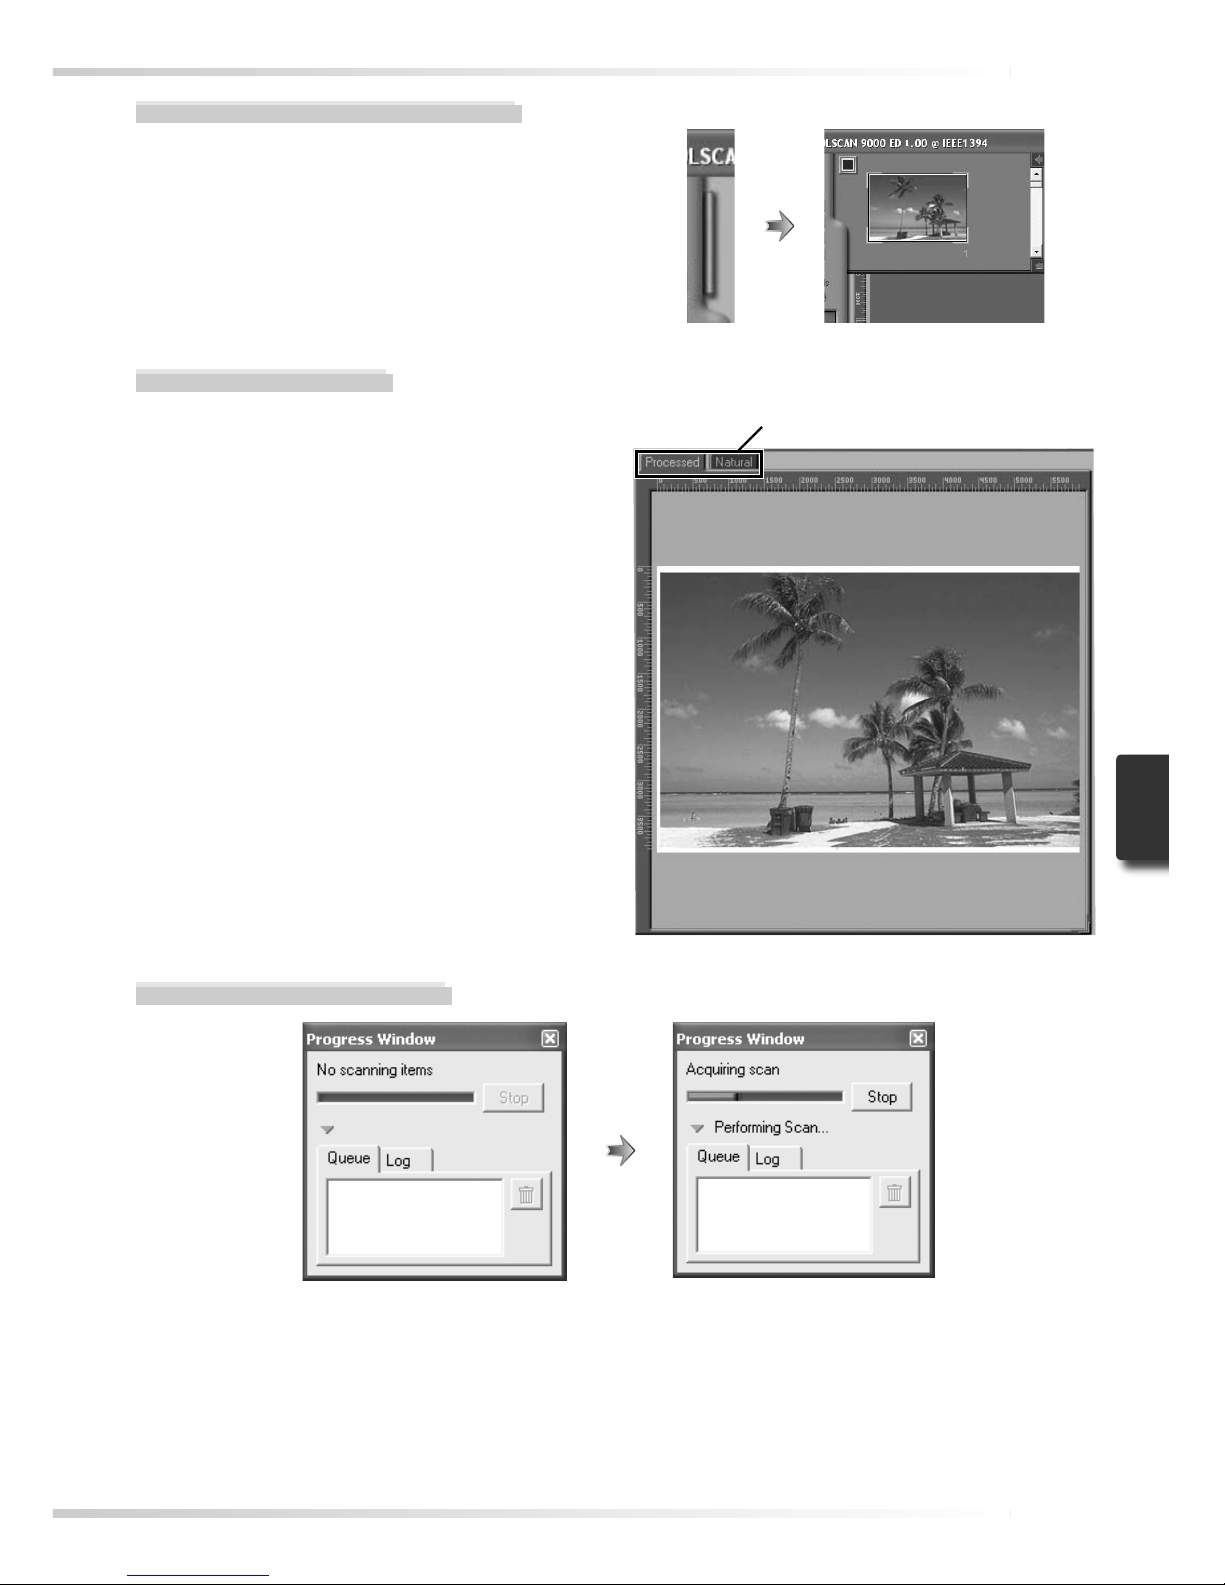
47
The Thumbnail Drawer Tab
Click this tab to open the thumbnail drawer.
If multiple frames are selected, the selected
images can be scanned in a single batch. This
is called a “batch scan.”
The Progress Window
The progress of preview and scan operations is shown in this window. The current task (acquiring thumbnails, preview, or scanning) is shown at the top of the window. Tasks that have
yet to be performed are listed in the “Queue” panel, completed tasks in the “Log” panel. To
stop the current task, click Stop.
The Preview Area
Selected frames are previewed in this area.
Click the “Natural” and “Processed” tabs
for a quick “before-and-after” comparison
showing the effect of changes to settings in
the Tool Chest. The “Natural” panel shows
the image before processing, the “Processed” panel the image as it would appear
when scanned at current settings.
Natural/Processed tabs
Page 57
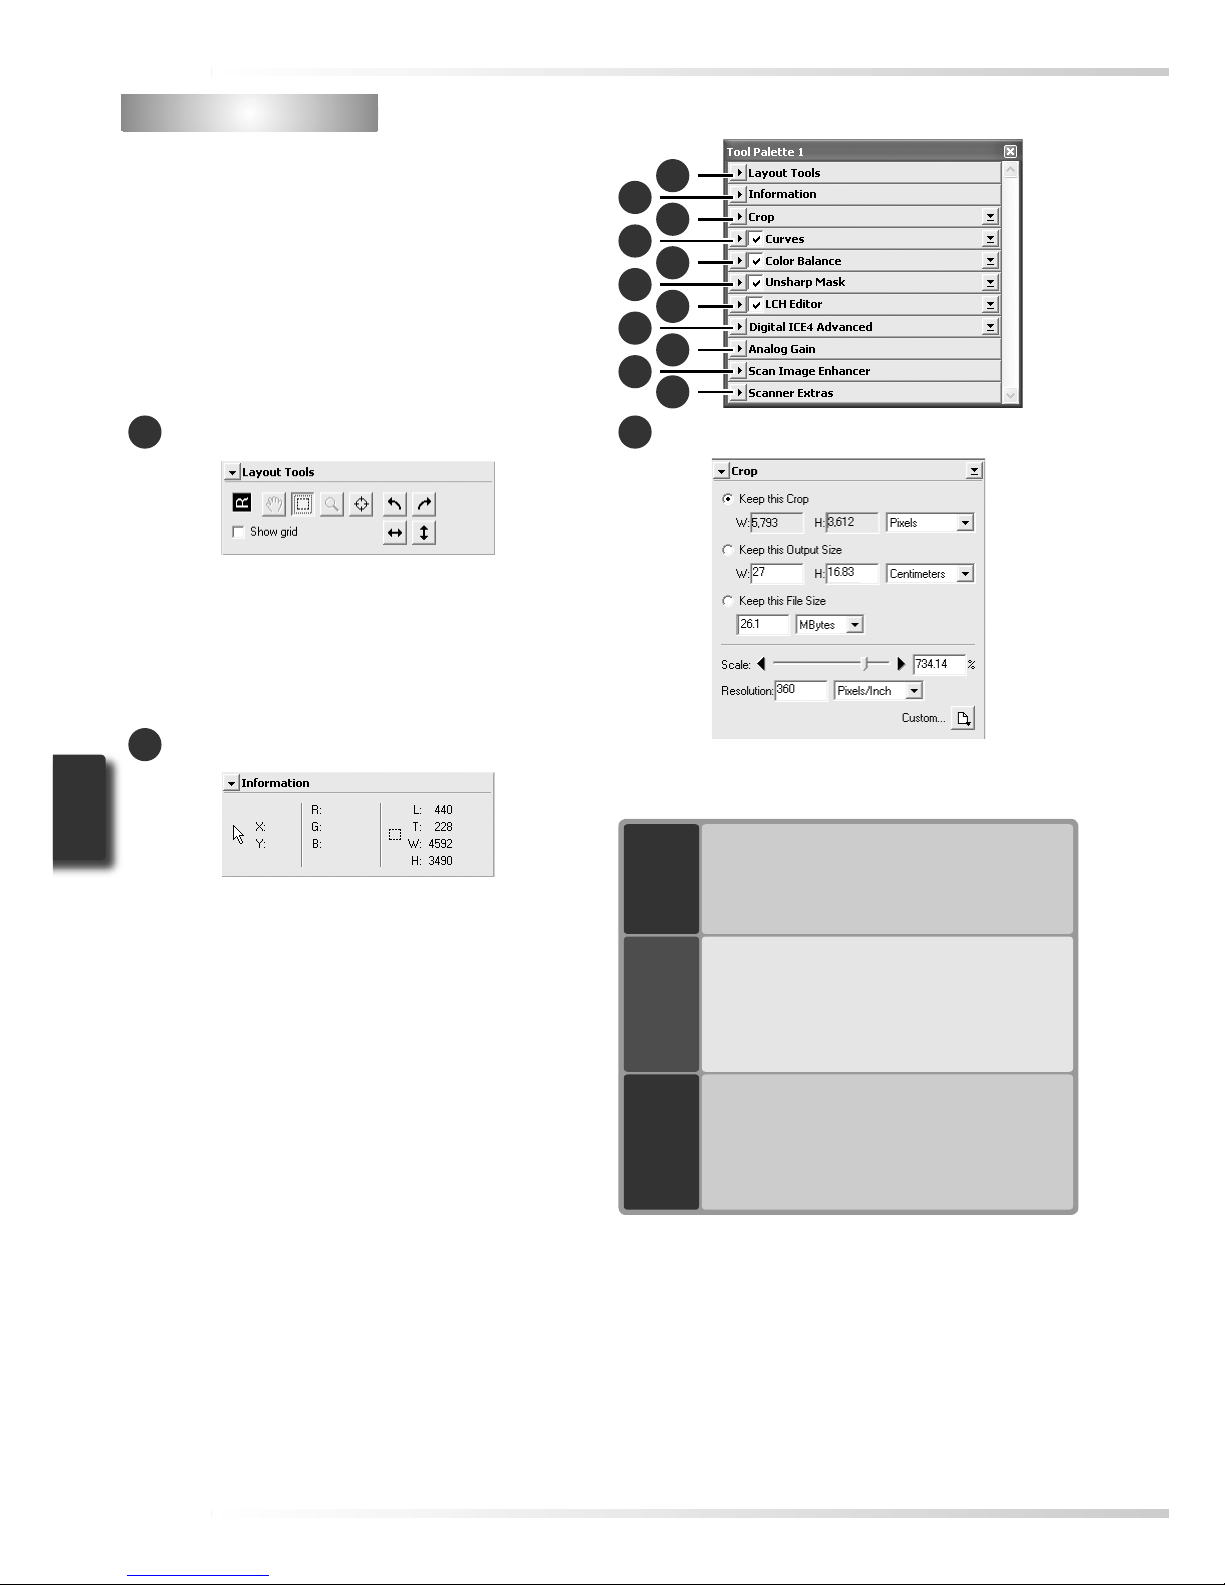
48
The Tool Chest
The Tool Chest
To display or hide the Tool Chest, click the
Tools button in the control area of the scan
window. For more information, see the
Nikon Scan Reference Manual (on CD).
Select the portion of the image that will be
scanned, choose a focus point, or rotate and
fl ip images. Use the Zoom and Grab tools
to navigate images that have been opened in
Nikon Scan after scanning.
2
Information
1
Layout tools
View the width and height of the current
selection and the coordinates of its top left
corner. The color value display shows the
color of the pixel under the cursor before and
after processing.
3
Crop
Specify the size and resolution of the image
that will result when the fi lm is scanned.
Keep
this
Crop
User selects exact area to be scanned,
then selects output size and resolution
according to how image will be used.
Best choice in most situations.
Keep
this
Output
Size
User selects general area to be scanned,
then enters exact output size in output
size area. Choose this option when image must fi t in space of known dimen sions.
Keep
this
File
Size
User selects general area to be scanned,
then enters exact fi le size for fi nal image
in fi le size area. Choose when fi le size is
paramount, for example when scanning
images for electronic distribution.
Enter the desired Height and/or Width in the
text boxes. If Keep this Crop is selected,
the remaining dimension will automatically
be adjusted to maintain the current crop.
If Keep this File Size is selected, the remaining dimension and the resolution will
automatically be adjusted to maintain the
selected fi le size, and the crop in the preview
area will be adjusted accordingly.
9
10
7
8
5
6
3
4
1
2
11
Page 58
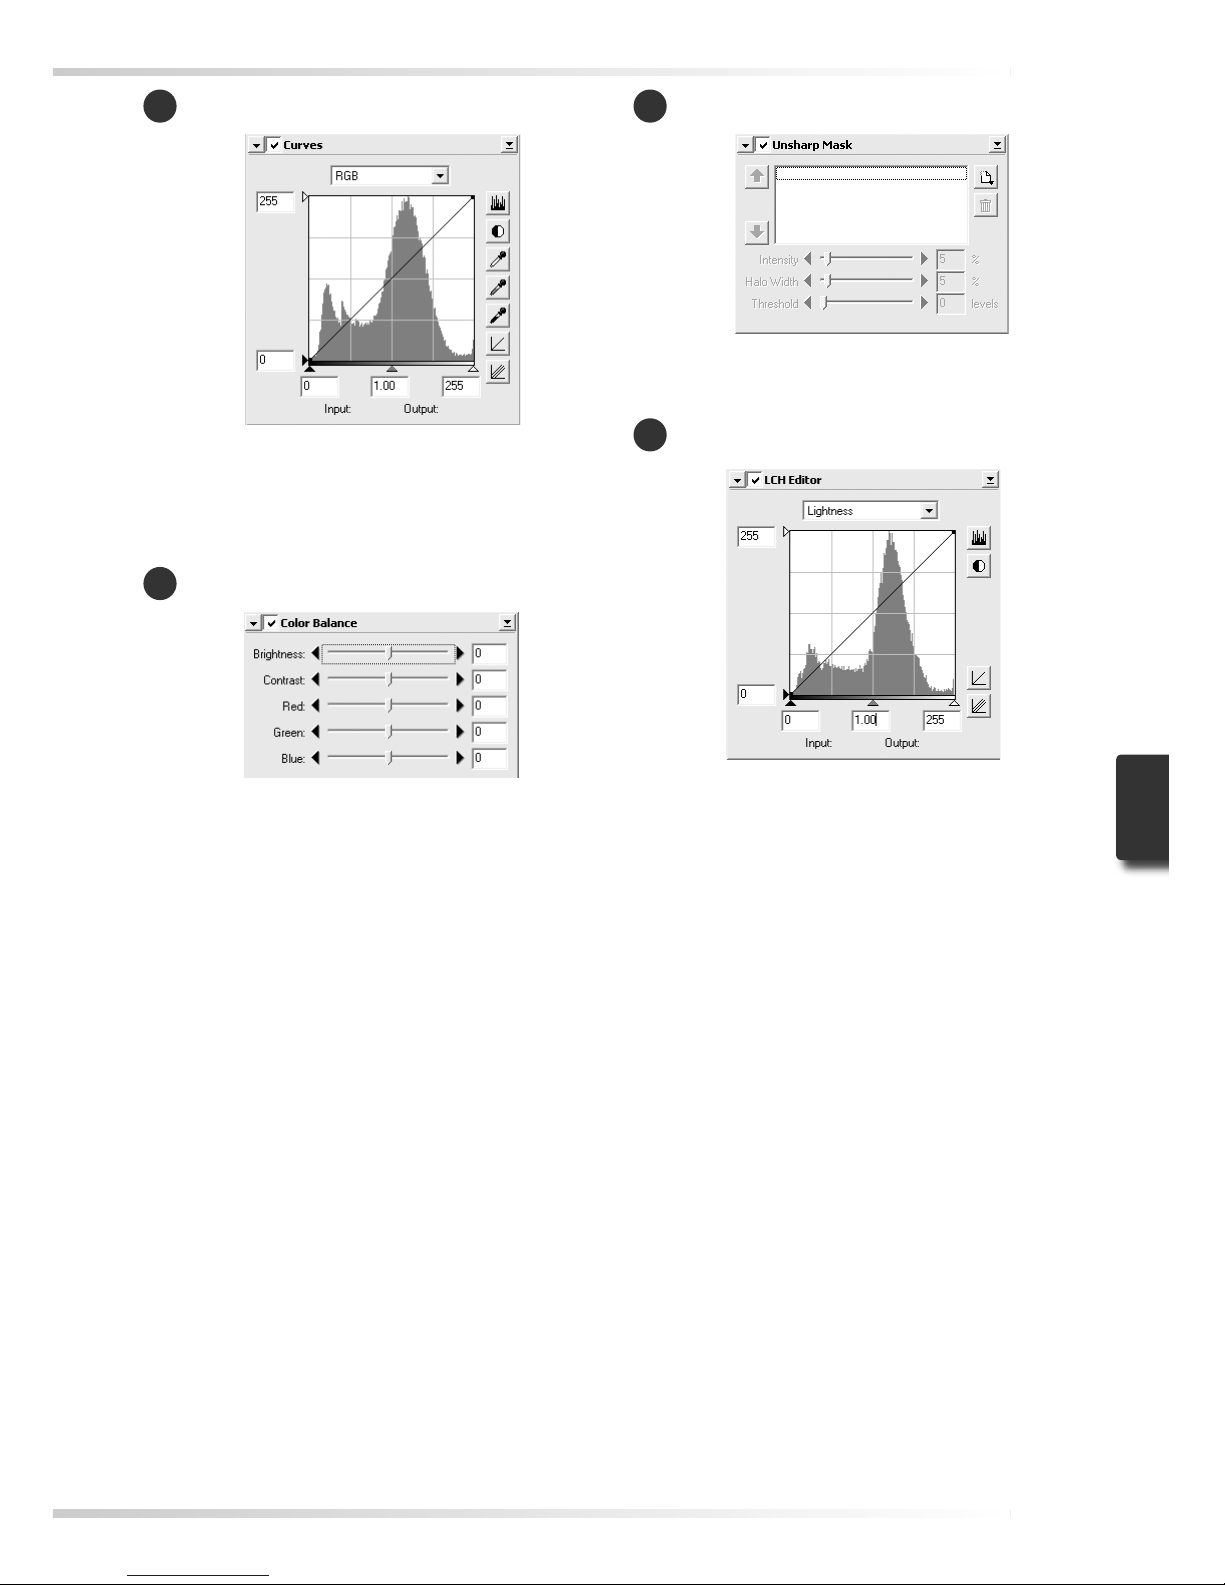
49
Make adjustments to brightness, contrast,
and color targeted to specifi c portions of
the tone range (for example, this tool can be
used to increase brightness in shadows).
5
Color Balance
4
Curves
Adjust overall brightness, contrast, and color
balance.
6
Unsharp Mask
Sharpen images by making colors more distinct.
7
LCH Editor
Make adjustments to brightness and contrast
targeted to specifi c portions of the tone
range, or use the hue and chroma editors for
precise control of color.
Page 59
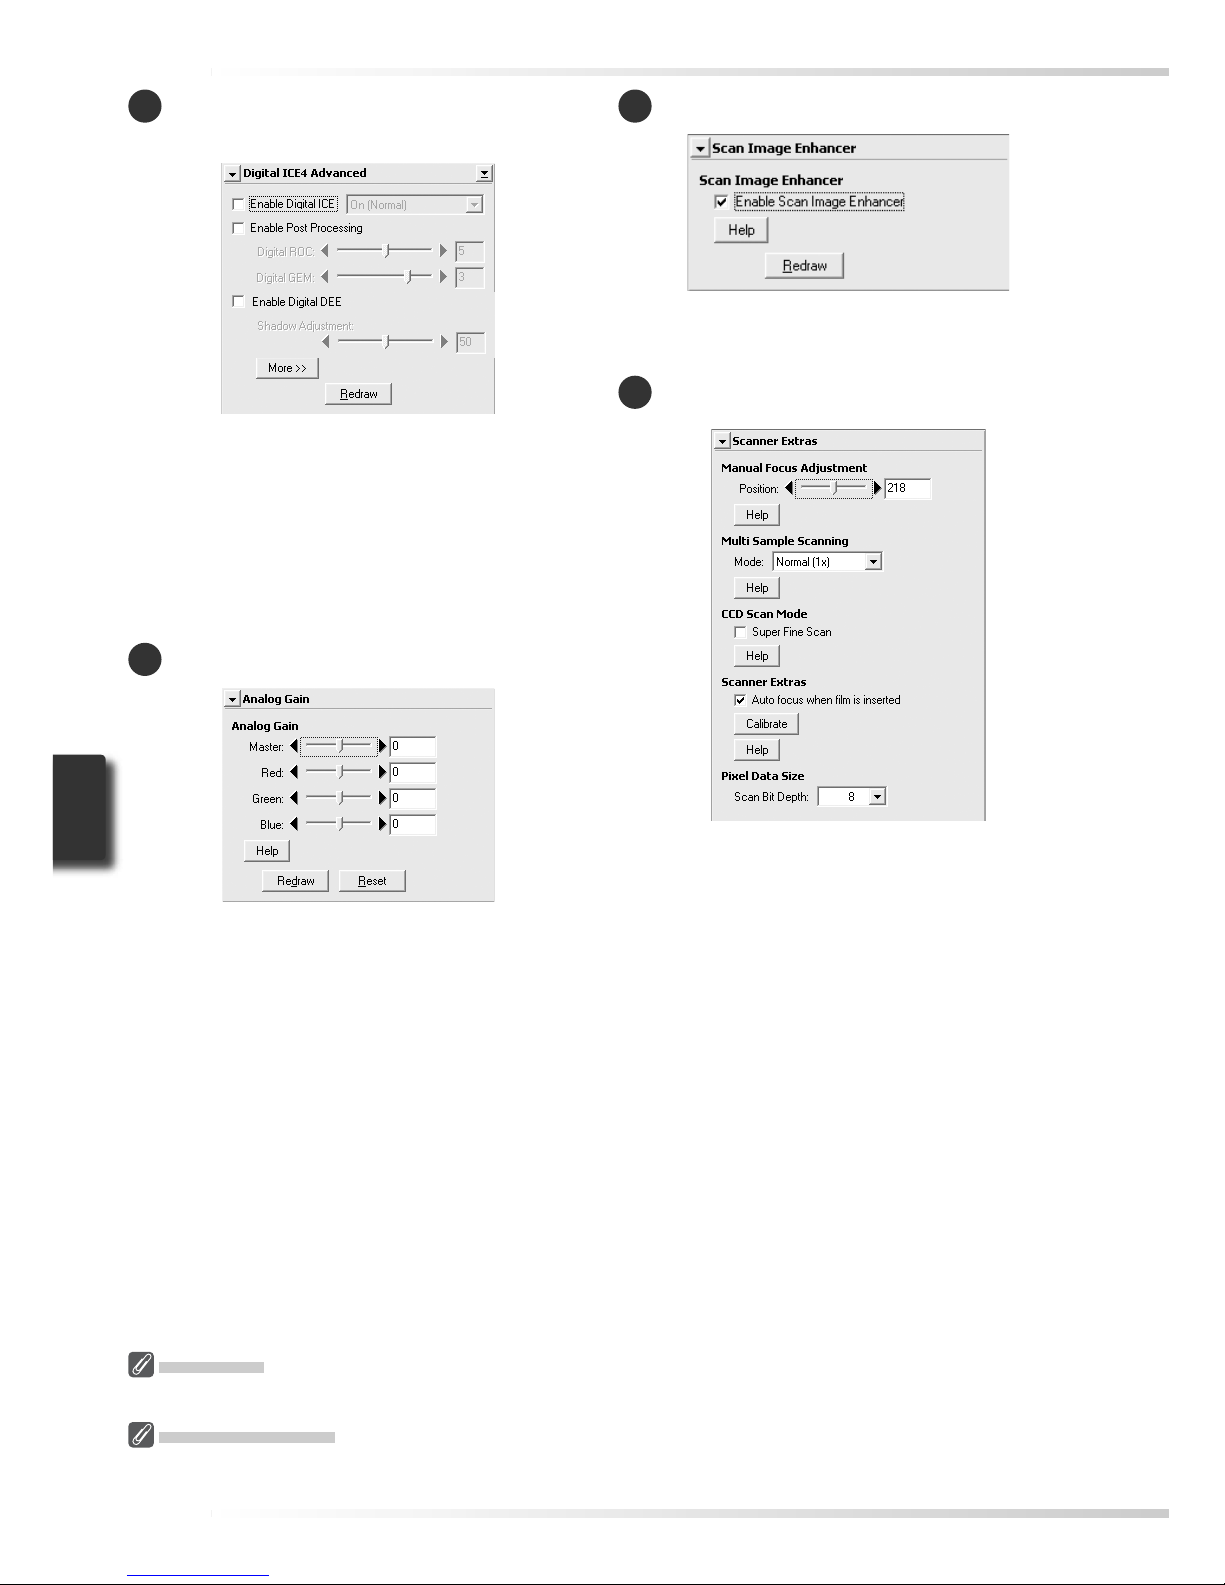
50
10
Scan Image Enhancer
Perform automatic brightness, color, and
contrast adjustment.
11
Scanner Extras
Control features specifi c to the type of scanner currently connected.
• Multi Sample Scanning
Use this feature to reduce noise.
• Scan Bit Depth
Choose a bit depth of sixteen or eight bits.
8
Digital ICE4 Advanced (Digital ICE
quad Advanced)
Digital ICE
Digital ICE will not produce the desired results with monochrome fi lm (unless developed in color).
Kodachrome Film
When scanning Kodachrome fi lm in the 9000 ED, select Kodachrome in the fi lm type menu.
Four tools are available:
• Digital ICE: mitigate the effects of dust and
scratches
• Digital ROC: restore faded colors
• Digital GEM: reduce the effects of fi lm grain
•
Digital DEE: increase detail in under- or overexposed areas of the frame
9
Analog Gain
Adjust exposure values for each of the colored elements in the scanner’s light source.
Page 60

51
FH-869M Holder for Medium- Format Slides............................. 53
FH-869G Glass-Covered Holder for Medium -Format Film....... 54
FH-869GR Rotating Holder for Medium- Format Film .............. 56
FH-816 Holder for 16-mm Film................................................... 58
FH-8G1 Medical Holder............................................................... 60
Optional Holders
This chapter describes the optional fi lm holders available for the SUPER COOLSCAN 9000 ED.
Page 61
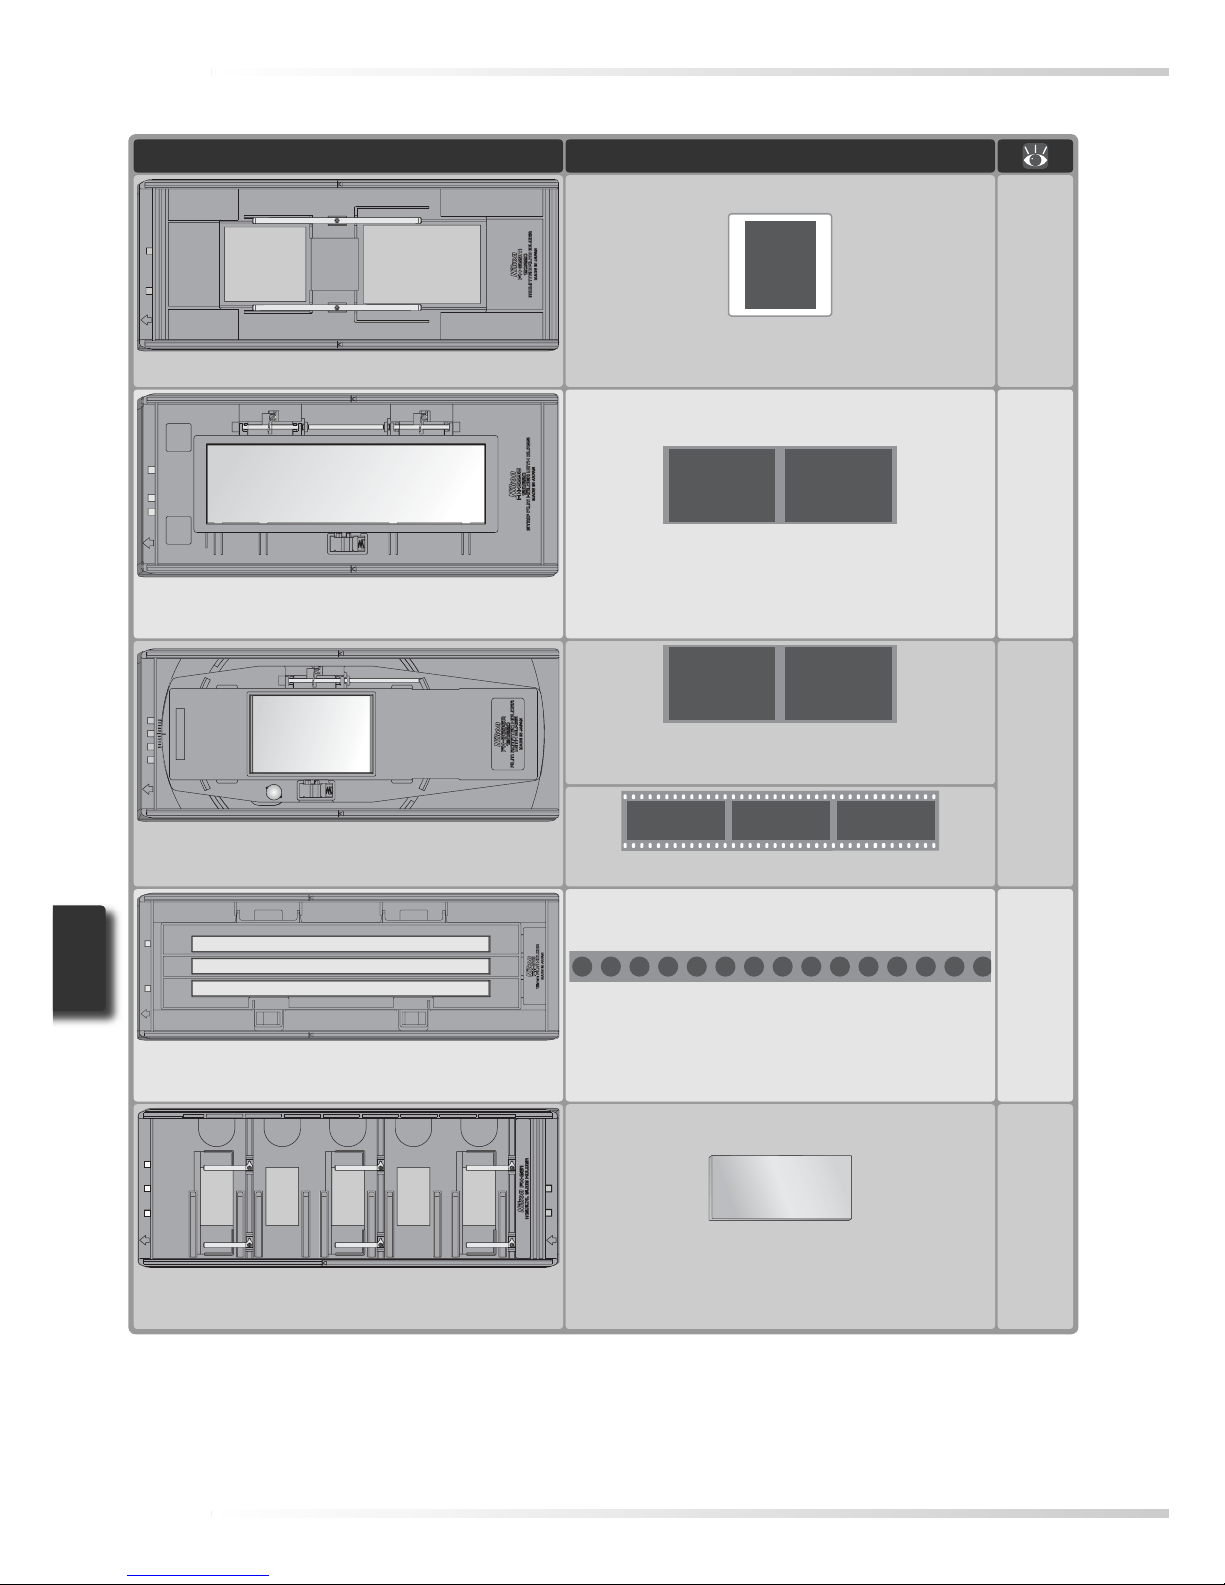
52
The following optional fi lm holders are available for the SUPER COOLSCAN 9000 ED:
Film holder Film
53
FH-869M 120/220 M
OUNTED FILM HOLDER 6 × 4.5, 6 × 6, 6 × 7, and 6 × 9 sli des
54–55
FH-869G 120/220 S
TRIP FILM HOLDER WITH GLASS
Medium-format (120/220, 2¼ or Brownie) fi lm
and 59 × 82 mm fi lm for electron microscopes
56–57
FH-869GR
ROTATING 120/220 FILM HOLDER WITH GLASS
Medium-format (120/220, 2¼ or Brownie) fi lm
and 59 × 82 mm fi lm for electron microscopes
Panorama fi lm
58–59
FH-816 16 -
MM FILM HOLDER
One to three strips of 16-mm fi lm up to
twenty frames in length
60
FH-8G1 M
EDICAL SLIDE HOLDER Glass microscope slides (26 × 72 mm) of pre-
pared tissue samples
Page 62
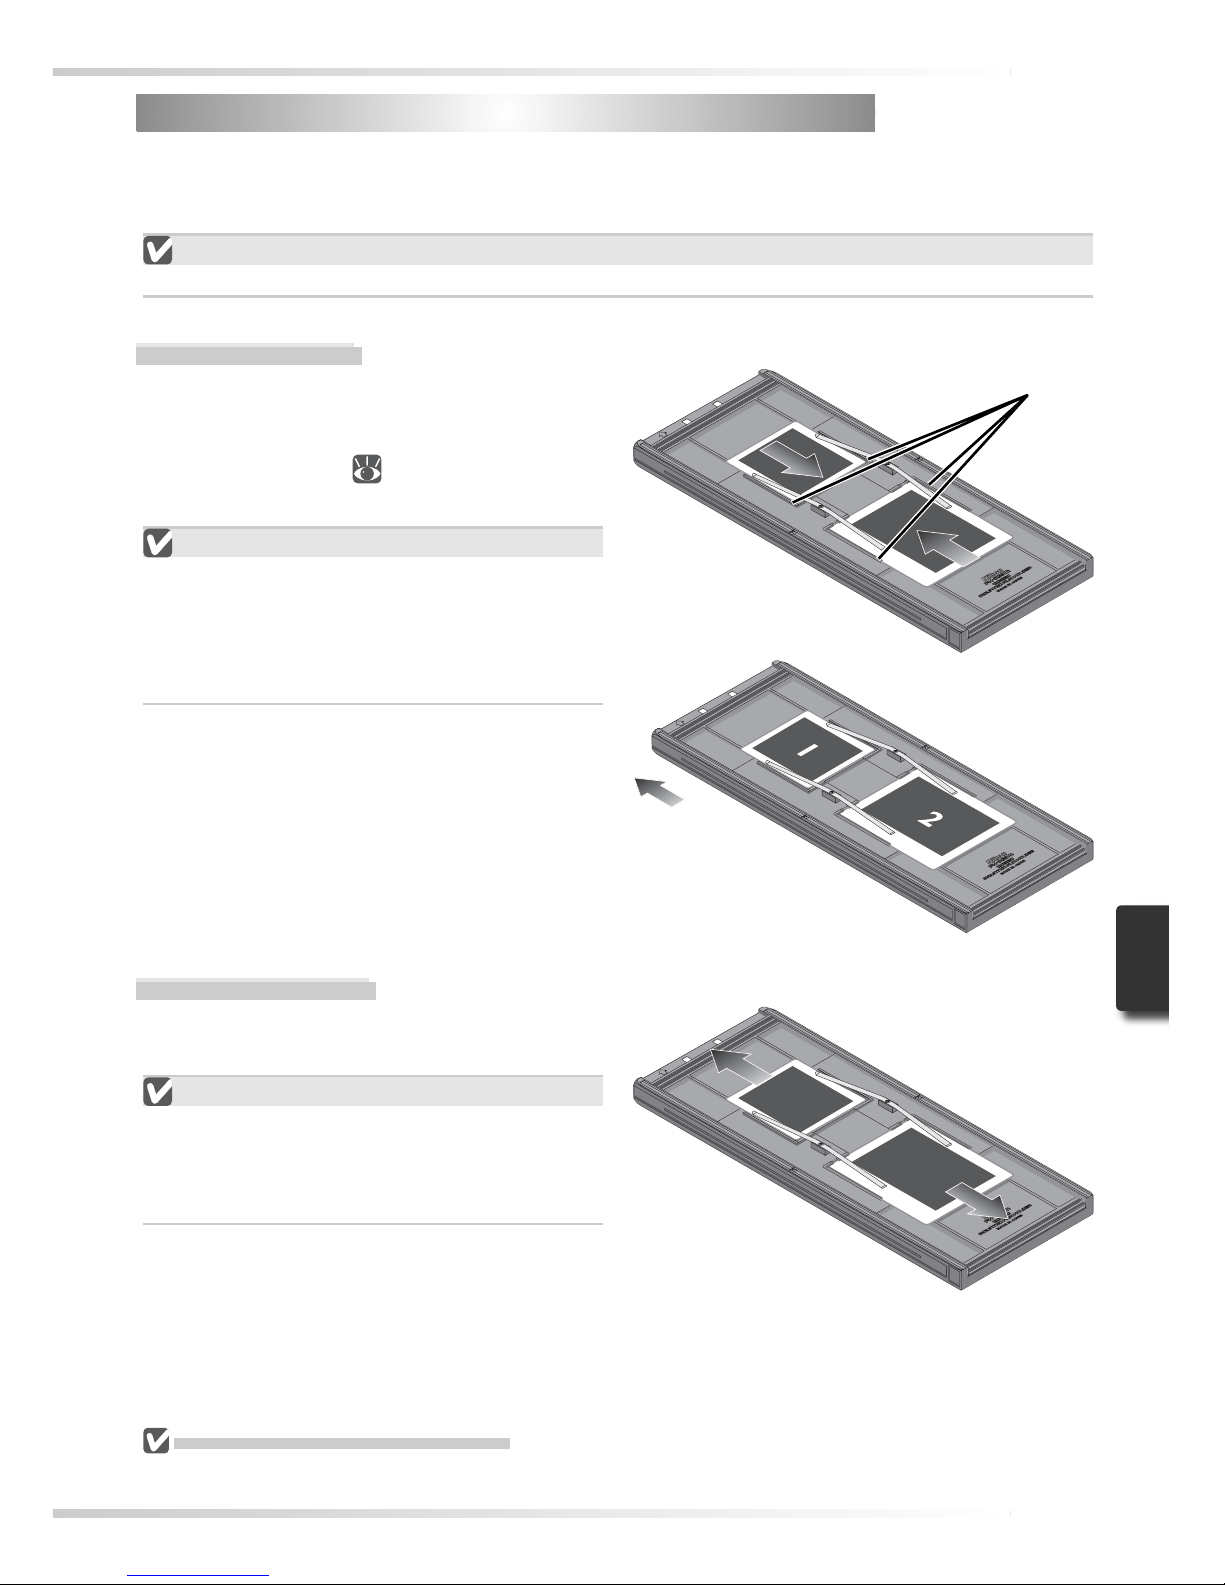
53
Removing Slides
Slide the mounts out from under the clips
that hold them in place.
Do Not Use Force
Do not use force when removing slides. Failure to observe this precaution could damage
the clips. Do not lift the slides up until fully
removed from the clips.
FH-869M Holder for Medium-Format Slides
FH-869M Holder for Medium-Format Slides
The FH-869M is used with medium-format (120/220, 2¼ or Brownie) slides with mounts
1.0 – 3. 2 mm th ic k. It is equipped with two apertures: a smaller aperture for 6 × 4.5 or 6 × 6
slides and a larger aperture for 6 × 7, 6 × 8, and 6 × 9 slides.
Do Not Mix Positive and Negative Film
Do not place mounted negatives in the holder with positive slides.
Inserting Slides
Insert the slides between the guides. The
slides should be oriented to match the apertures in the holder and the refl ective fi lm
base should be up (
26). Stop when the
slide contacts the base of the clips.
Inserting Slides
Insert slides between the guides. Forcing
the slides onto the guides could damage the
slides or clips and prevent the scanner from
focusing correctly. To minimize resistance,
try inserting slides at a slight angle.
Do Not Store Slides in the Holder
Leaving slides in the holder for extended periods could damage the clips holding the slides in place.
Guides
Direction of
insertion
Thumbnails
displayed in
order shown
Page 63
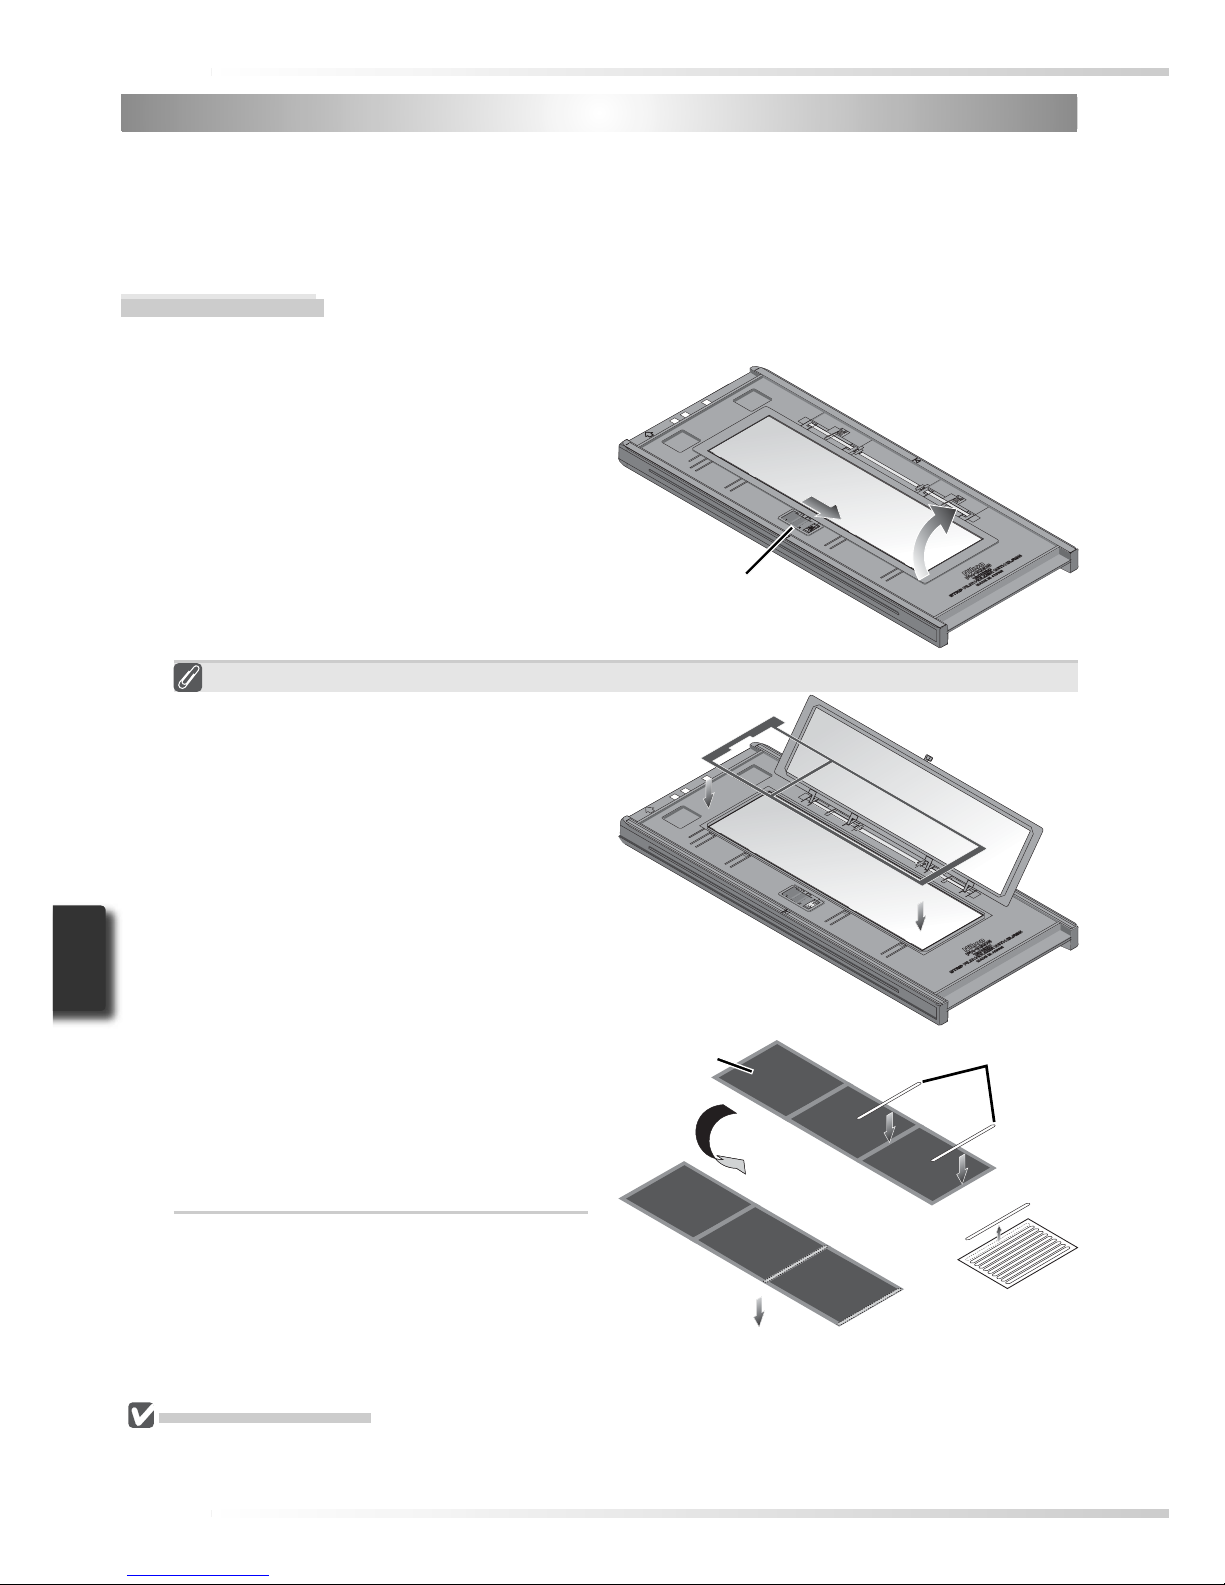
54
Inserting Film
1
Open the holder
Slide the latch in the direction shown
and open the holder.
FH-869G Glass-Covered Holder for Medium-Format Film
FH-869G Glass-Covered Holder for Medium-Format Film
The FH-869G is used to scan medium-format fi lm (120/220, 2¼ or Brownie) and 59 × 82 mm
electron-microscope fi lm. The length of the fi lm strip that can be scanned depends on the
type of fi lm:
• 6 × 4.5: 1– 4 frames • 6 × 6: 1–3 frames • 6 × 7 – 6 × 9: 1–2 frames
Newton’s Rings
If the fi lm is folded or twisted, Newton’s
rings (a radial interference pattern) may
appear when the fi lm is scanned. This
can be prevented by placing a masking
sheet in the holder as shown at right.
The aperture at the front of the masking
sheet should match the fi lm frame size.
Place stickers between frames on the
emulsion surface of the fi lm (no sticker is
required between the fi rst two frames).
The stickers can then be used to fasten
the fi lm to the masking sheet. Stickers
can be reused.
Latch
StickersEmulsion
surface
Keep the Glass Clean
The inner surface of the glass cover been treated to prevent interference. Avoid leaving fi ngerprints or
other stains on the glass.
Place side
with stickers
down
Page 64
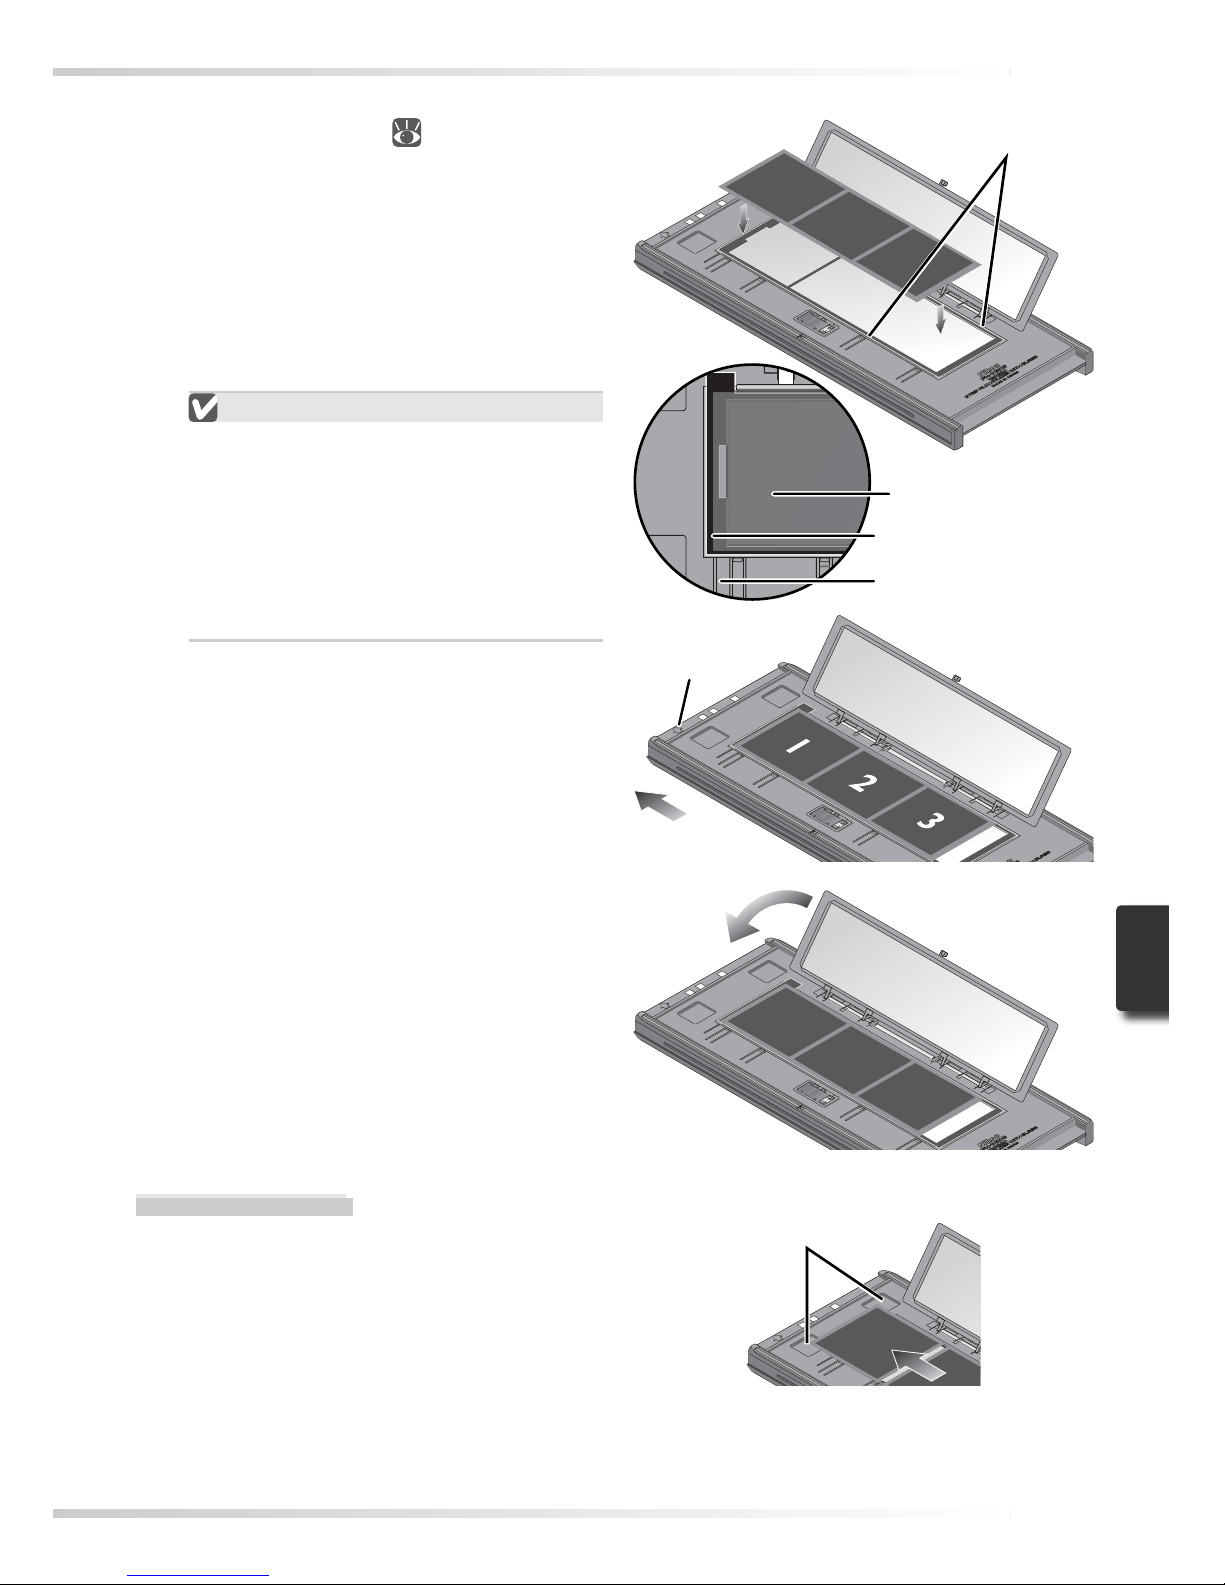
55
2
Insert fi lm
Place fi lm base up ( 26) between the
guides with the left end of the fi lm at
the fi lm line. If a masking sheet is used,
the start of the fi rst exposure should
be aligned with the inner edge of the
masking sheet. Additional fi lm strips
can be placed in the holder as space
permits; place the fi lm end-to- end, with
no gaps.
Inserting Film
Use only one type of fi lm; do not place
negatives in the holder with positive
fi lm.
Be sure to align the end of the fi lm with
the fi lm line on the holder. A gap at the
leading edge of the fi lm could interfere
with accurate color reproduction.
3
Snap the holder closed
Guides
Masking sheet
First frame
Removing Film
Tilt the holder to slide the fi lm over the depressions at the front of the holder and pick
the fi lm up by its edges.
Depressions
Film line
Arrow
Direction
of insertion
Thumbnails
displayed in
order shown
Page 65
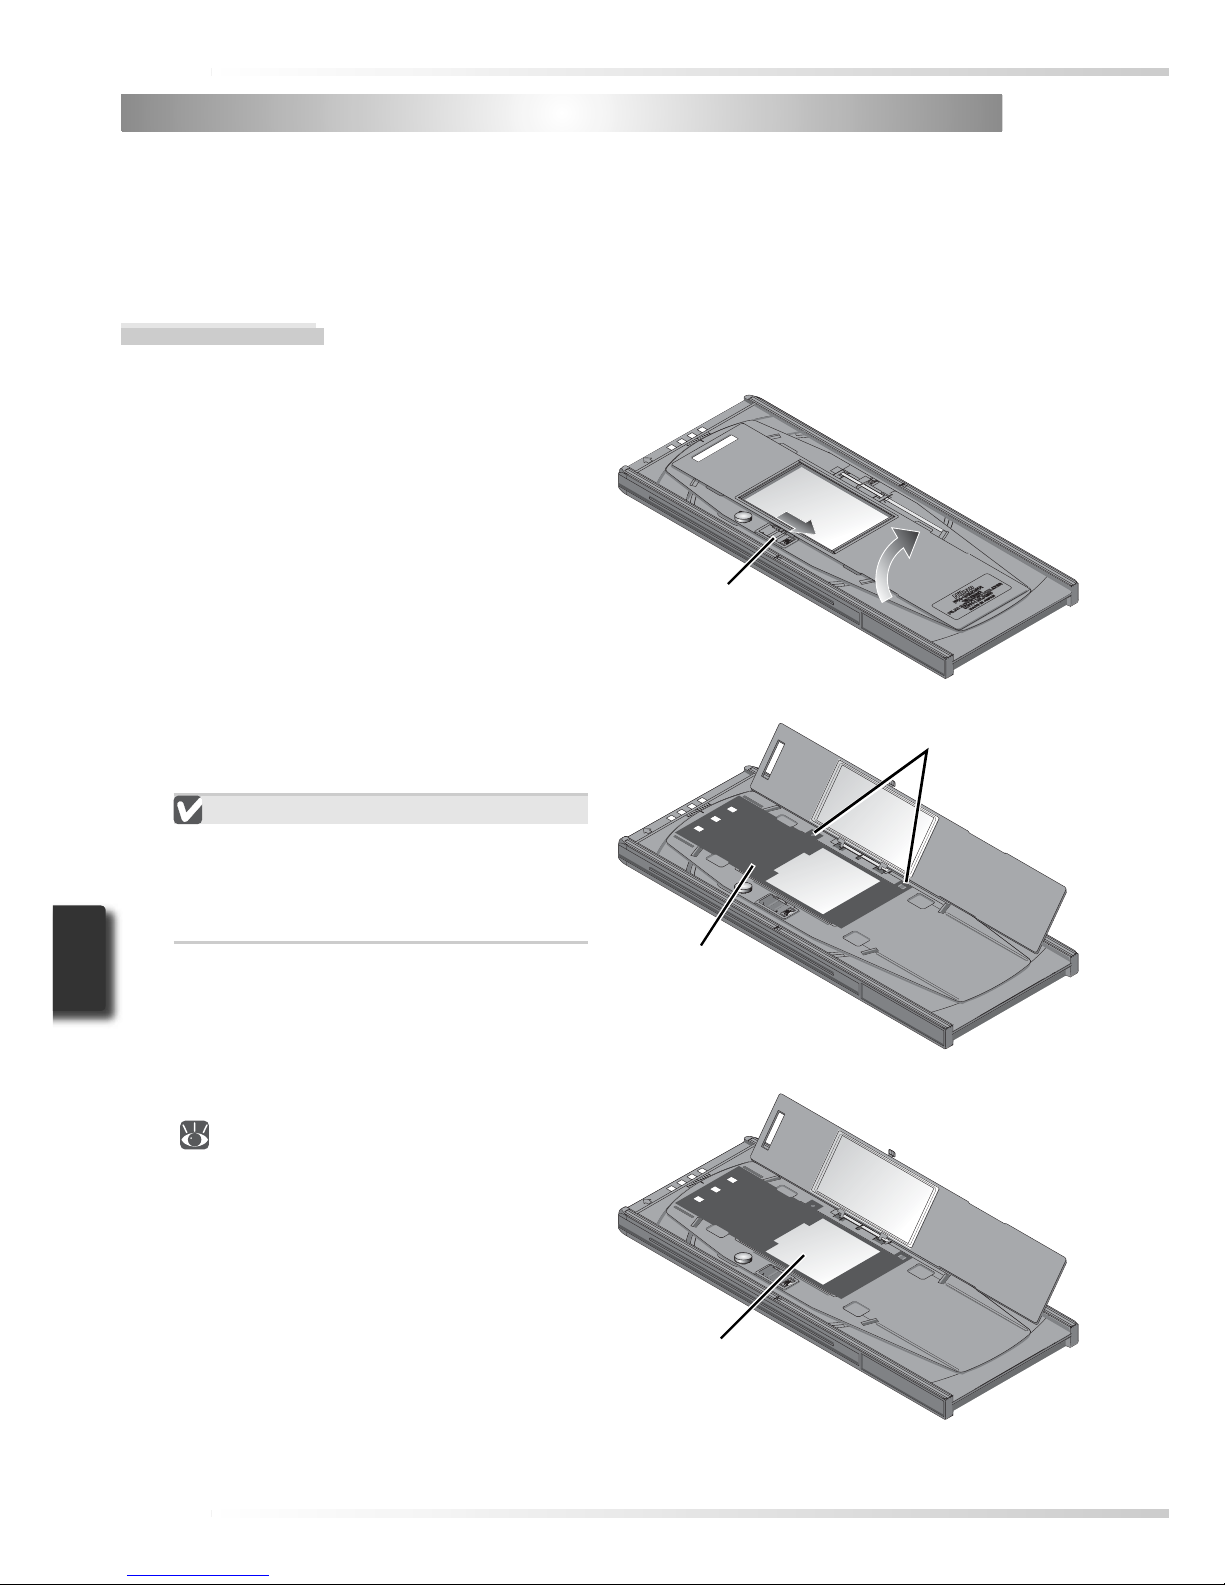
56
Inserting Film
1
Open the holder
Slide the latch in the direction shown
and open the holder.
FH-869GR Rotating Holder for Medium-Format Film
FH-869GR Rotating Holder for Medium-Format Film
The FH-869GR is used to scan medium-format fi lm (120/220, 2¼ or Brownie), 59 × 82 mm
electron-microscope fi lm, or 24 × 65 mm panorama fi lm. The angle of the holder can be
adjusted by ±5% to compensate for camera angle. When scanning medium format fi lm, the
length of the strip that can be inserted depends on the type of fi lm:
• 6 × 4.5: 1– 4 frames • 6 × 6: 1–3 frames • 6 × 7 – 6 × 9: 1–2 frames
2
Insert a masking sheet
Align the masking sheet with the guide
pins in the holder.
Use an Appropriate Mask
The mask aperture must match the fi lm
frame size. Gaps between the mask and
the fi lm could interfere with accurate
color reproduction.
3
Insert fi lm
Place fi lm on the masking sheet base up
( 26). Align the frame to be scanned
with the aperture in the masking sheet.
Latch
Aperture
Masking sheet
Guide pins
Page 66
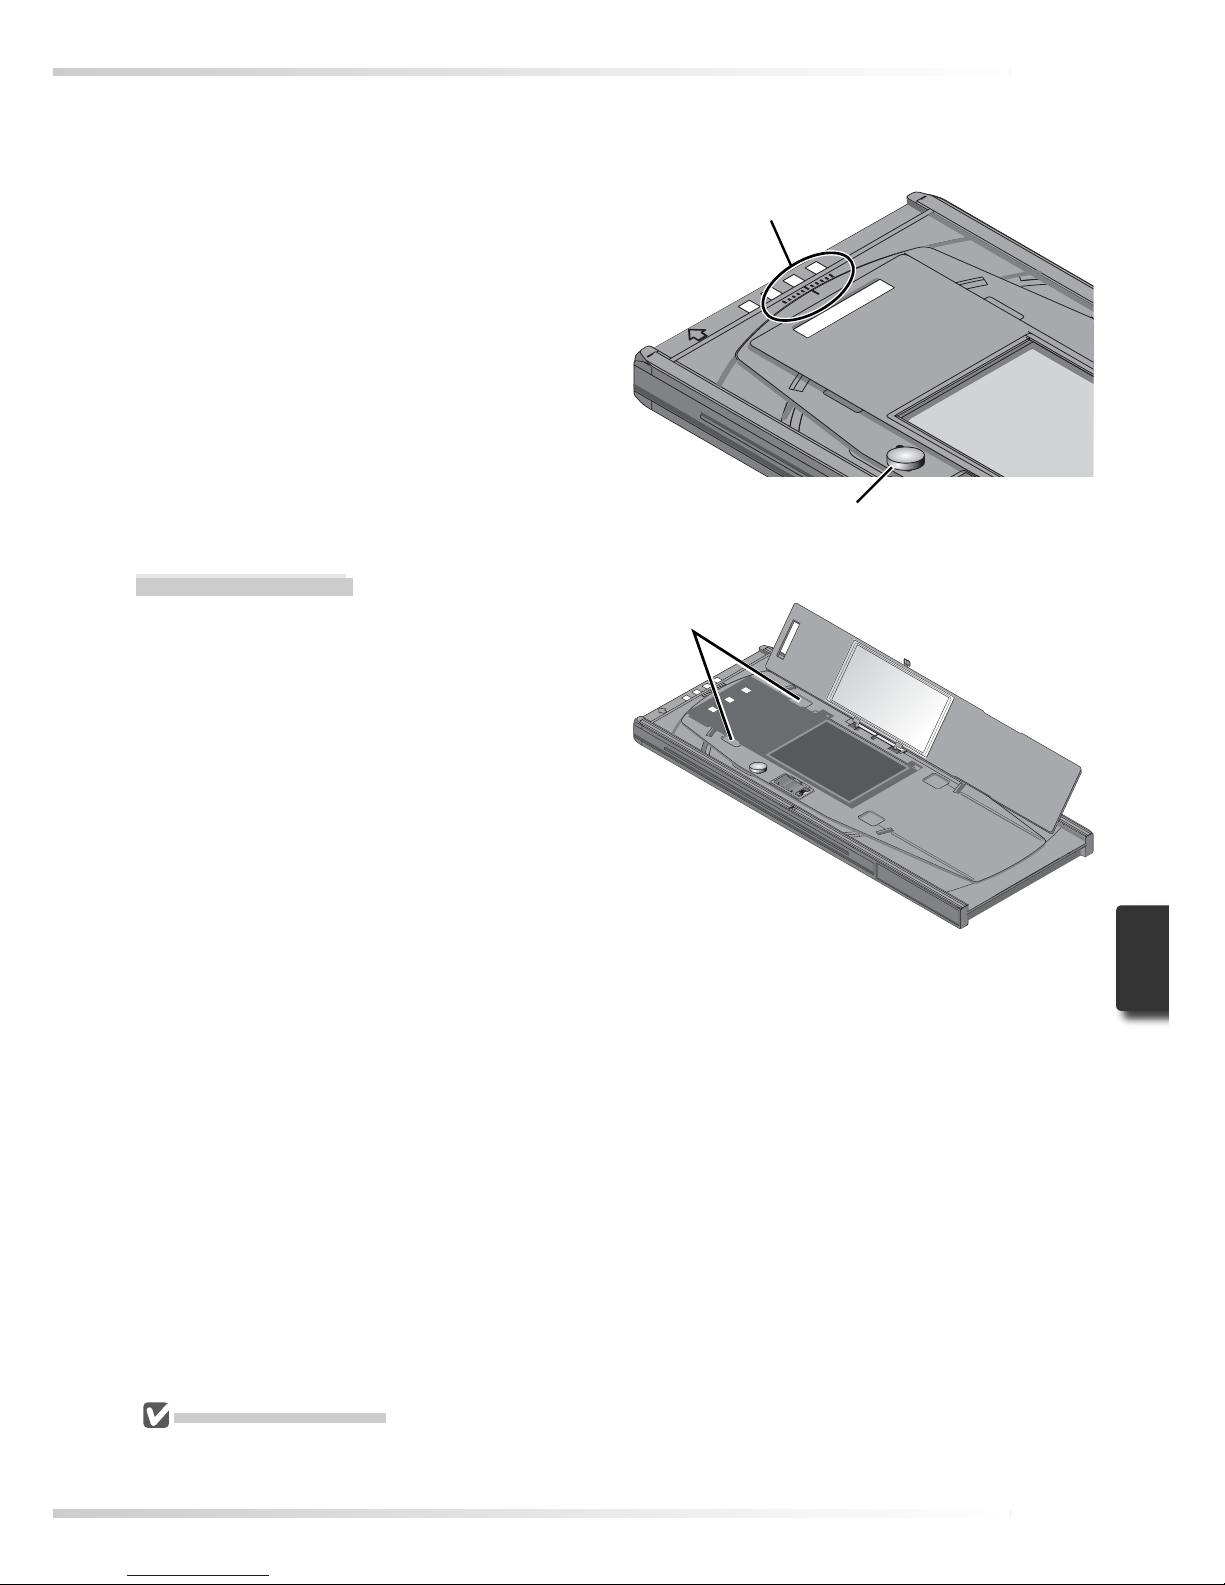
57
4
Snap the holder closed
5
Adjust the fi lm angle
Loosen the locking screw by rotating it
counter- clockwise. Adjust the angle, using the marks on the front of the holder
as a guide (each mark is equivalent to
1 °), and then tighten the locking screw.
Removing Film
Insert your fi ngers in the depressions and
pick the fi lm up by its edges.
Angle indicator
Locking screw
Depressions
Keep the Glass Clean
The inner surface of the glass cover been treated to prevent interference. Avoid leaving fi ngerprints or
other stains on the glass.
Page 67
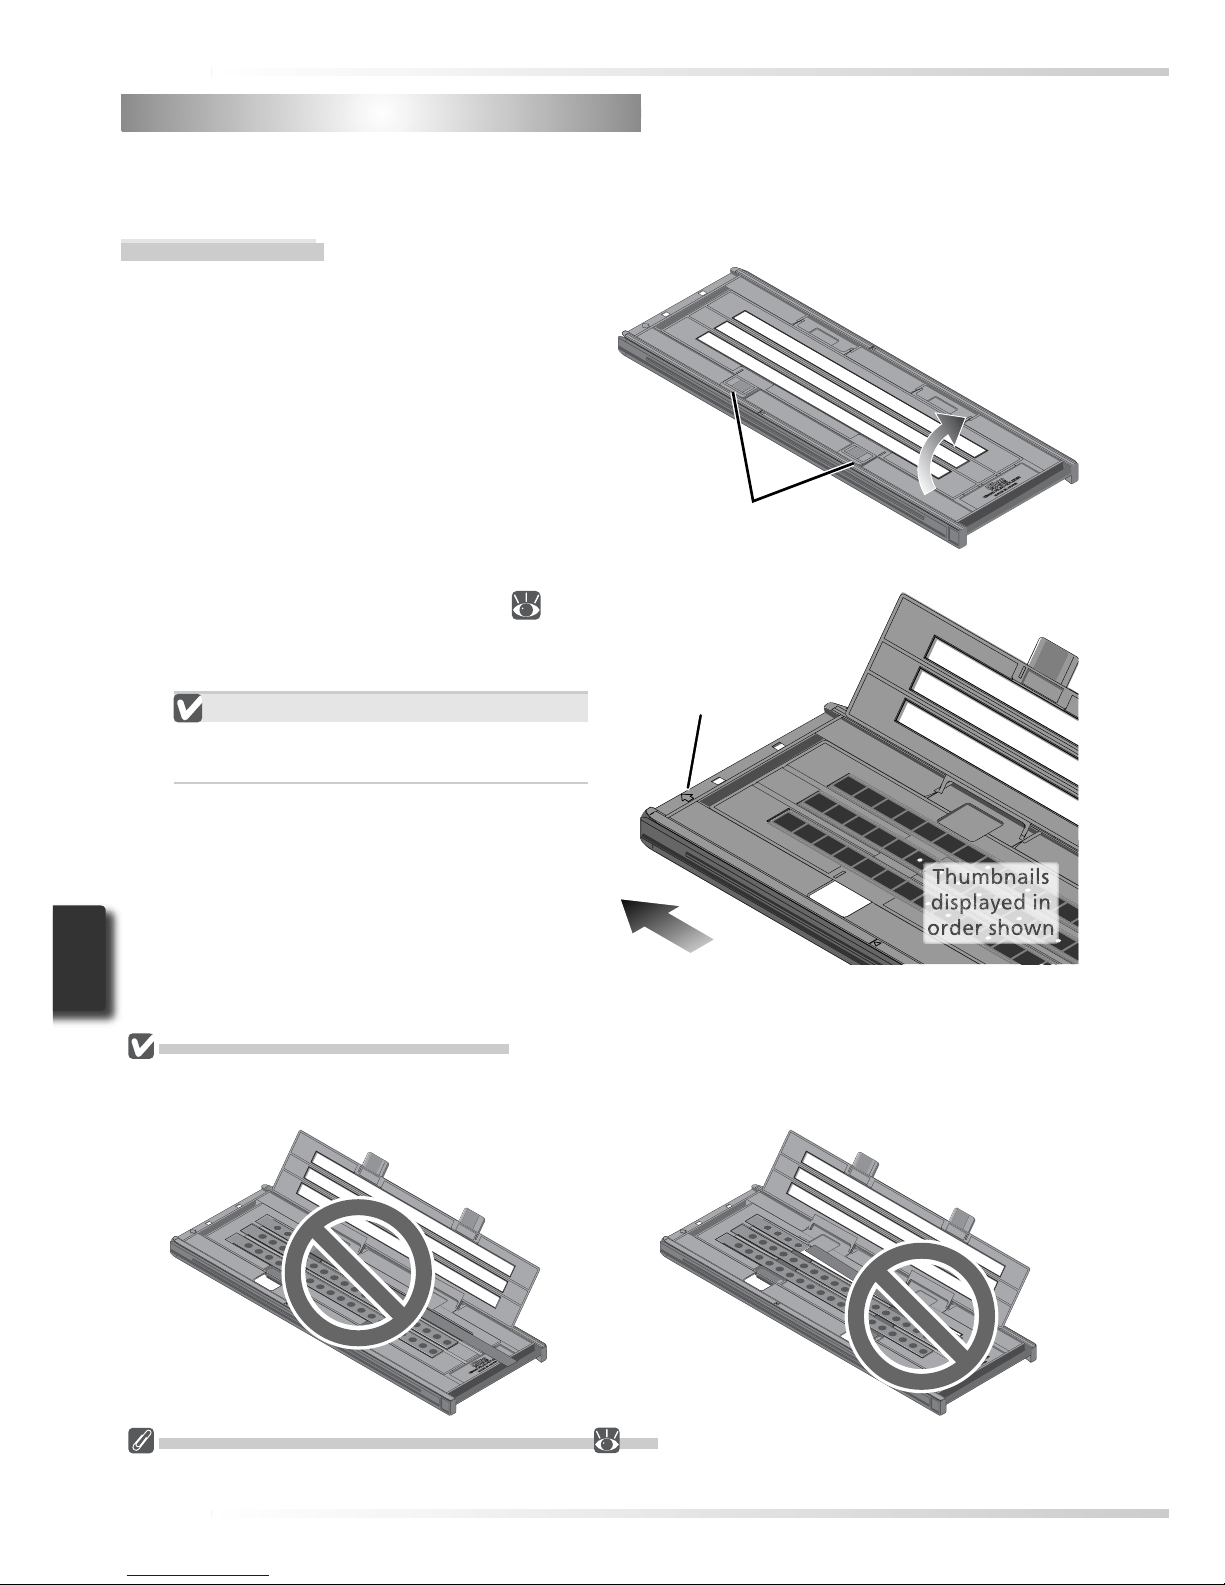
58
2
Insert fi lm
Place fi lm in the holder base up ( 26).
Align the fi rst frame in each strip with an
aperture at the left end of the holder.
Use Only One Type of Film
Do not place negatives in the holder with
positive fi lm.
41
42 43 44
45
•
•
•
•
21
22
23
24 25
•
1
2
3
4
5
•
•
•
FH-816 Holder for 16-mm Film
FH-816 Holder for 16-mm Film
The FH-816 is used to scan up to three strips of 16 -mm fi lm. Each strip can be from one to
twenty frames in length.
Inserting Film
1
Open the holder
Insert your fi ngers through the holes in
the bottom half of the holder and undo
the latches, then open the holder.
Latches
Inserting Film and Masking Sheets
Do not place fi lm or masking sheets so that they protrude from the holder or overlap the fi lm guides.
Failure to observe this precaution may cause the holder to jam in the scanner.
Digital ROC, Digital GEM, and Digital DEE ( 50)
These functions can not be used with 16-mm fi lm.
Direction of
insertion
Arrow
Page 68
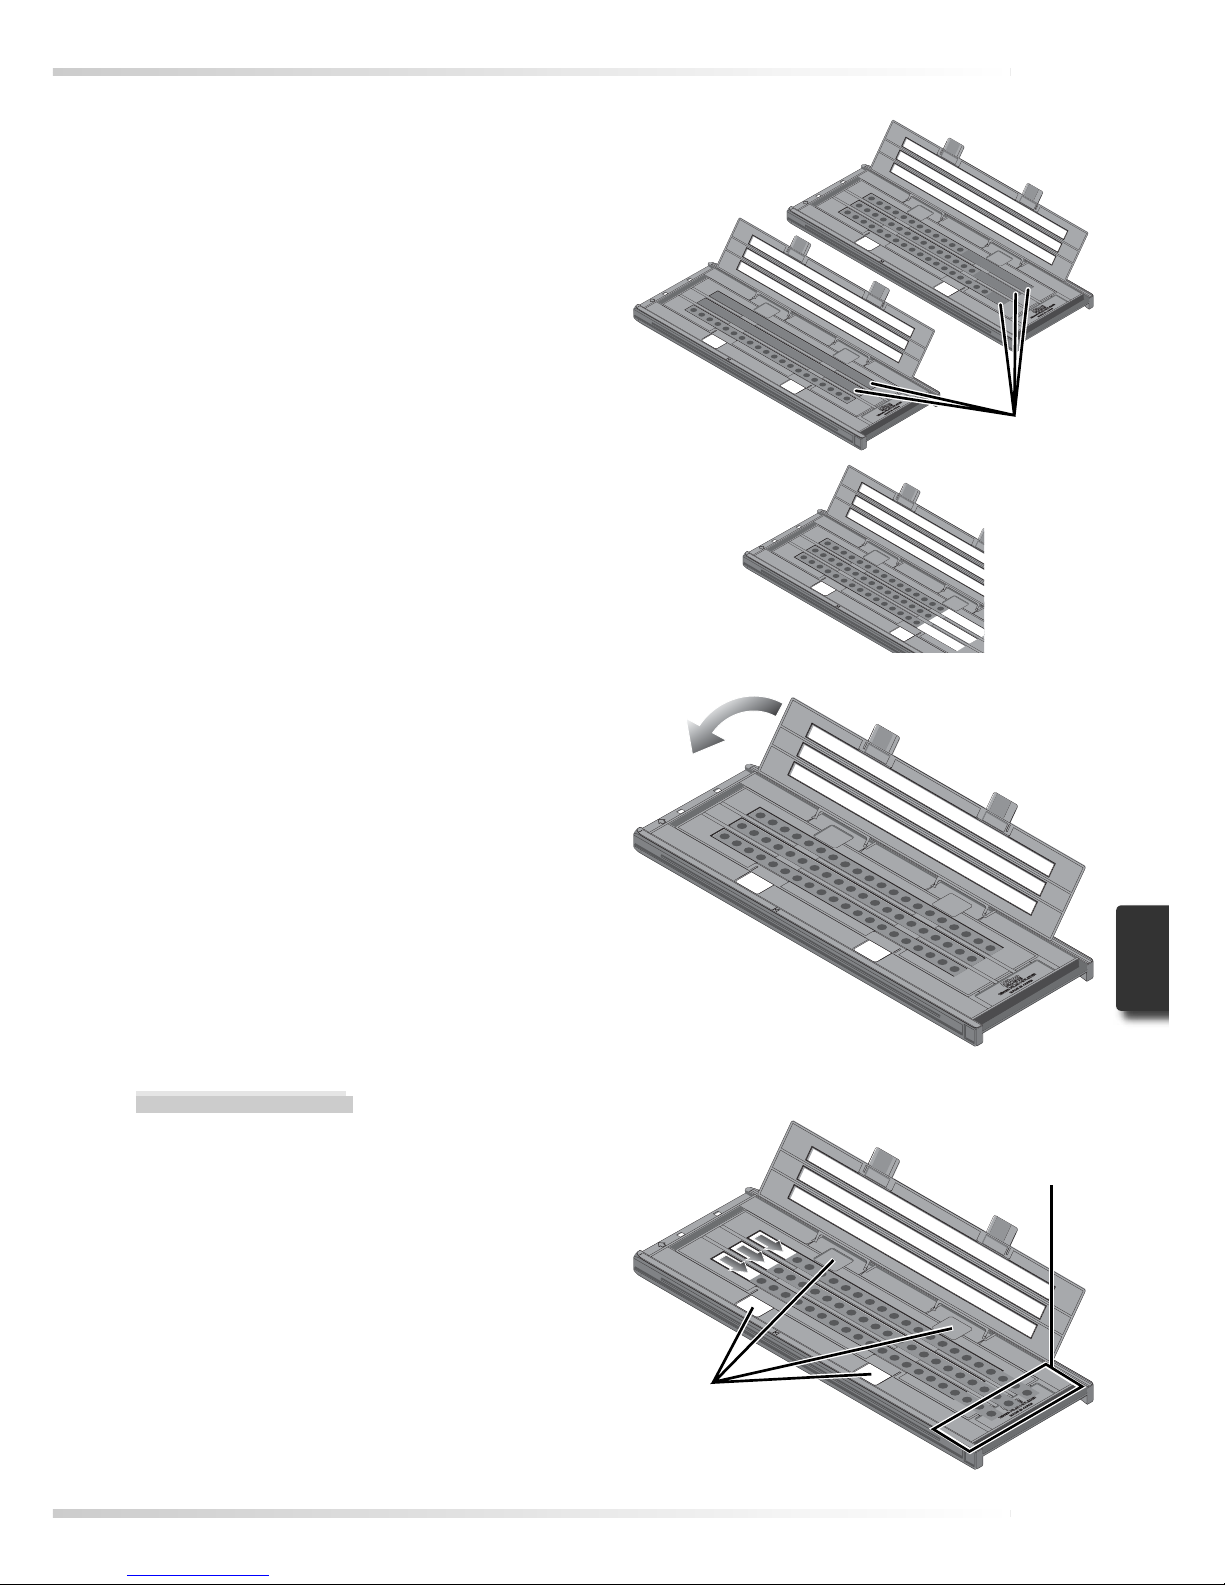
59
3
Insert masking sheets
When scanning one or two strips or
strips of different lengths, place the fi lm
at the left end of the holder and cover
any open apertures with the supplied
masking sheets, cutting the sheet to the
appropriate length if necessary. When
scanning one or two strips, place the
fi lm in the bottom rows and the masking
sheets in the top rows.
When scanning three strips of equal
length, place the fi lm at the left end
of the holder. Masking sheets are not
required.
4
Latch the holder
Press the holder closed until the latches
click into place.
Removing Film
Insert your fi ngers into the holes in the lower
portion of the holder and undo the latches.
Open the holder and use the cutouts to pick
the fi lm up by its edges. If the edges of the
fi lm are not accessible, tilt the holder to slide
the fi lm to the hollow at the end of the lower
holder.
Cutouts
Hollow
Masking sheets
Page 69
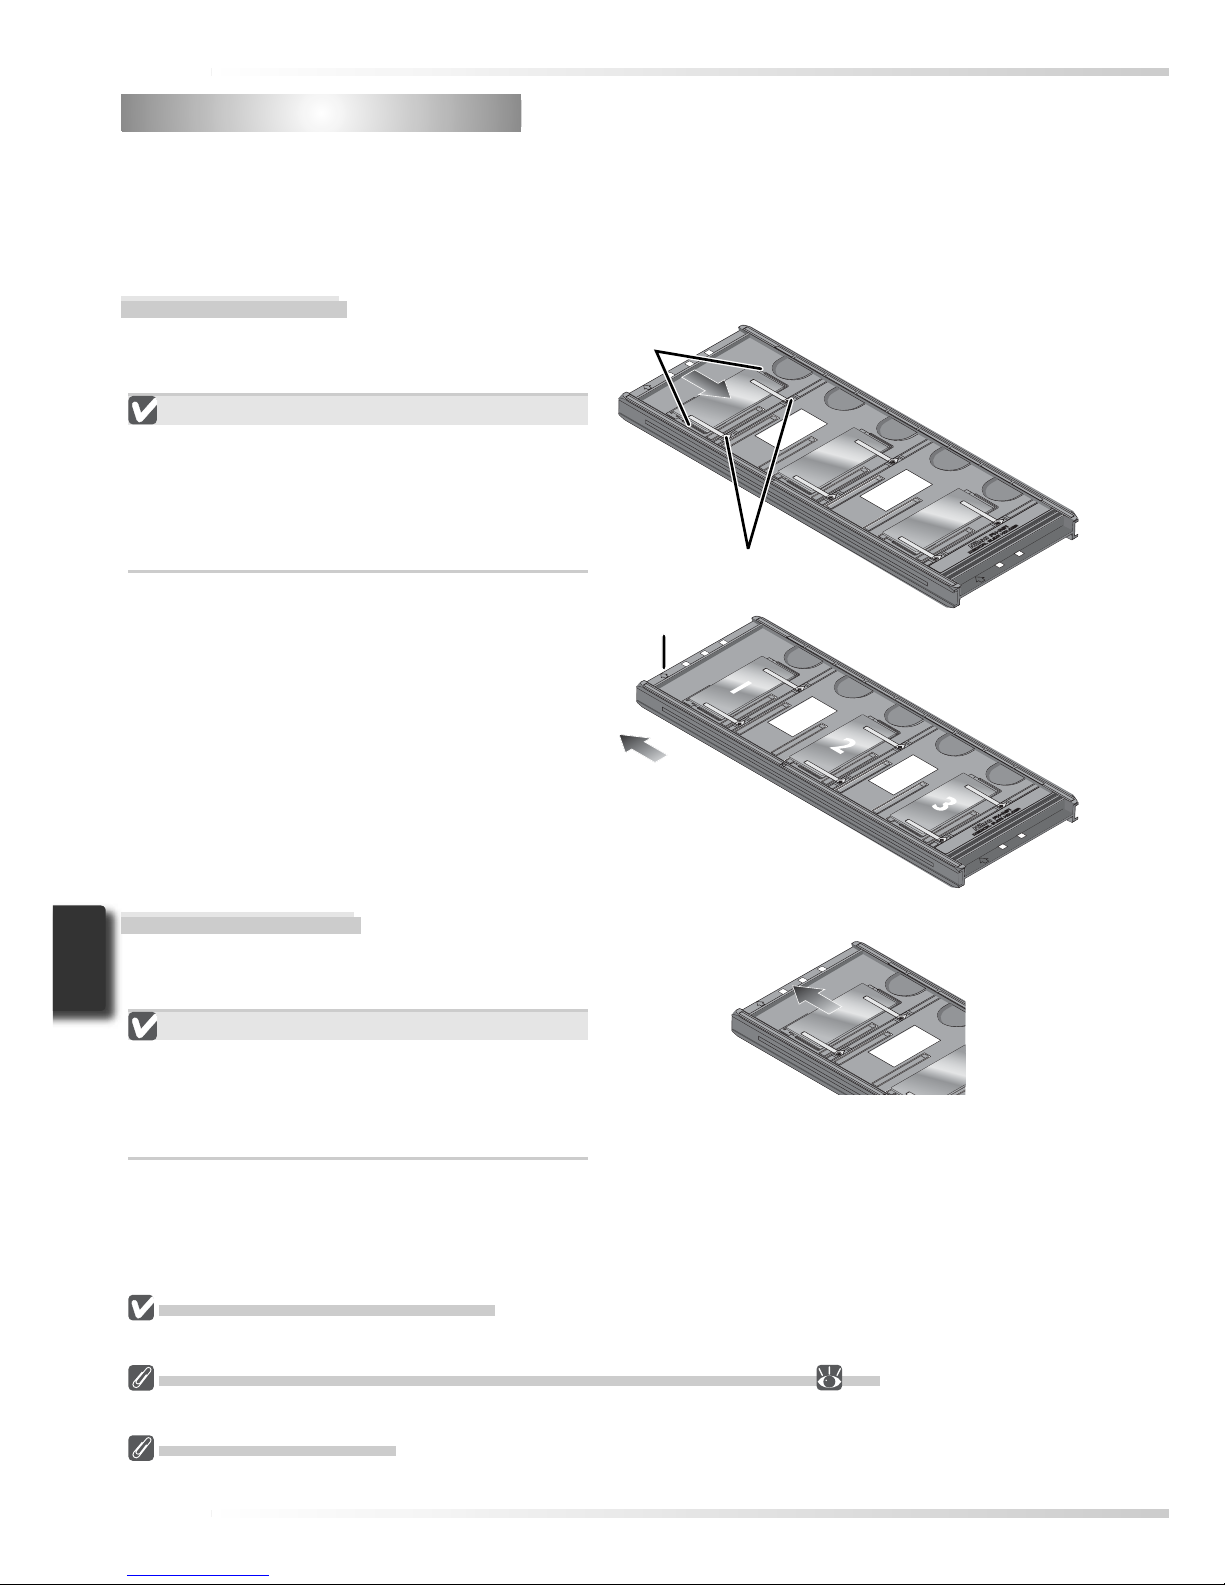
60
FH-8G1 Medical Holder
FH-8G1 Medical Holder
The FH-8G1 can be used to scan up to three glass microscope slides of prepared tissue
samples. Slides must be 26 × 76 mm with a base 0.8–1.5 mm thick, a cover no more than
25 mm wide, 60 mm long, and 0.18 mm thick, and a total thickness of no more than 2 mm,
including adhesive.
Inserting Slides
Insert the slides cover up. Stop when the
slide contacts the base of the clips.
Inserting Slides
Insert slides between the guides. Forcing
the slides onto the guides could damage the
slides or clips and prevent the scanner from
focusing correctly. To minimize resistance,
try inserting slides at a slight angle.
Do Not Store Slides in the Holder
Leaving slides in the holder for extended periods could damage the clips holding the slides in place.
Do Not Use Digital ICE, Digital ROC, Digital GEM, or Digital DEE ( 50)
Noise may appear in images scanned with Digital ICE, Digital ROC, Digital GEM, or Digital DEE.
Scanning 35-mm Slides
The FH-8G1 can also be used to scan 35 -mm slides. Do not mix 35-mm slides with microscope slides.
Guides
Removing Slides
Slide the samples out from under the clips
that hold them in place.
Do Not Use Force
Do not use force when removing slides. Failure to observe this precaution could damage
the clips. Do not lift the slides up until fully
removed from the clips.
Direction
of insertion
Thumbnails
displayed in
order shown
Clips
Arrow
Page 70

61
Maintenance .....................................................................62
Troubleshooting................................................................63
Installing the IEEE 1394 (Firewire) Interface Board........64
Uninstalling Nikon Scan ...................................................70
Custom Install (Macintosh Only) .....................................73
Checking Device Registration (Windows Only).............. 74
Specifi cations ....................................................................76
Technical Notes
This chapter lists scanner specifi cations and provides
information on maintenance, troubleshooting, and installing the supplied IEEE 1394 interface board.
Page 71
62
Maintenance
Maintenance
Storage
When the scanner is not in use, eject the fi lm holder and turn the scanner off. If the device
will not be used for a prolonged period, unplug the scanner and store it in a well-ventilated
area where the temperature is between –10 °C (14 °F) and +50 °C (+122 °F) and the humidity
less than 60%. Do not store the scanner or holders where they would be subject to sudden
temperature changes or condensation.
Cleaning
Turn the scanner off, unplug the power cable, and place the scanner on a fl at, stable surface
where it will not be damaged in a fall. Use a blower or a soft dry cloth to remove dust, a soft
cloth lightly dampened with neutral detergent or liquid soap to remove tougher stains. Do
not use alcohol or other volatile chemicals.
Transport
Before transporting the scanner:
1 Turn the scanner on and eject any fi lm holders.
2 Press and hold the eject button until the status LED stops blinking (about three seconds).
The scan mechanism will lock.
3 Turn the scanner off and disconnect the power and interface cables.
4 Repackage the scanner in the original packing materials (if the original packing materials
are unavailable, use materials at least as shock resistant as the originals).
Transpor ting the Scanner
Nikon scanners are only certifi ed for use in the region or country of sale. Transport or use
outside the region or country of sale is at the risk and responsibility of the user.
Servicing
Nikon scanners are precision devices. We recommend that the scanner and holders be taken to an authorized Nikon service representative once every one to two years for inspection, and once every three
to fi ve years for servicing (fees are charged for these services). Frequent inspection and servicing are
particularly recommended in the case of scanners used in commercial applications.
Page 72
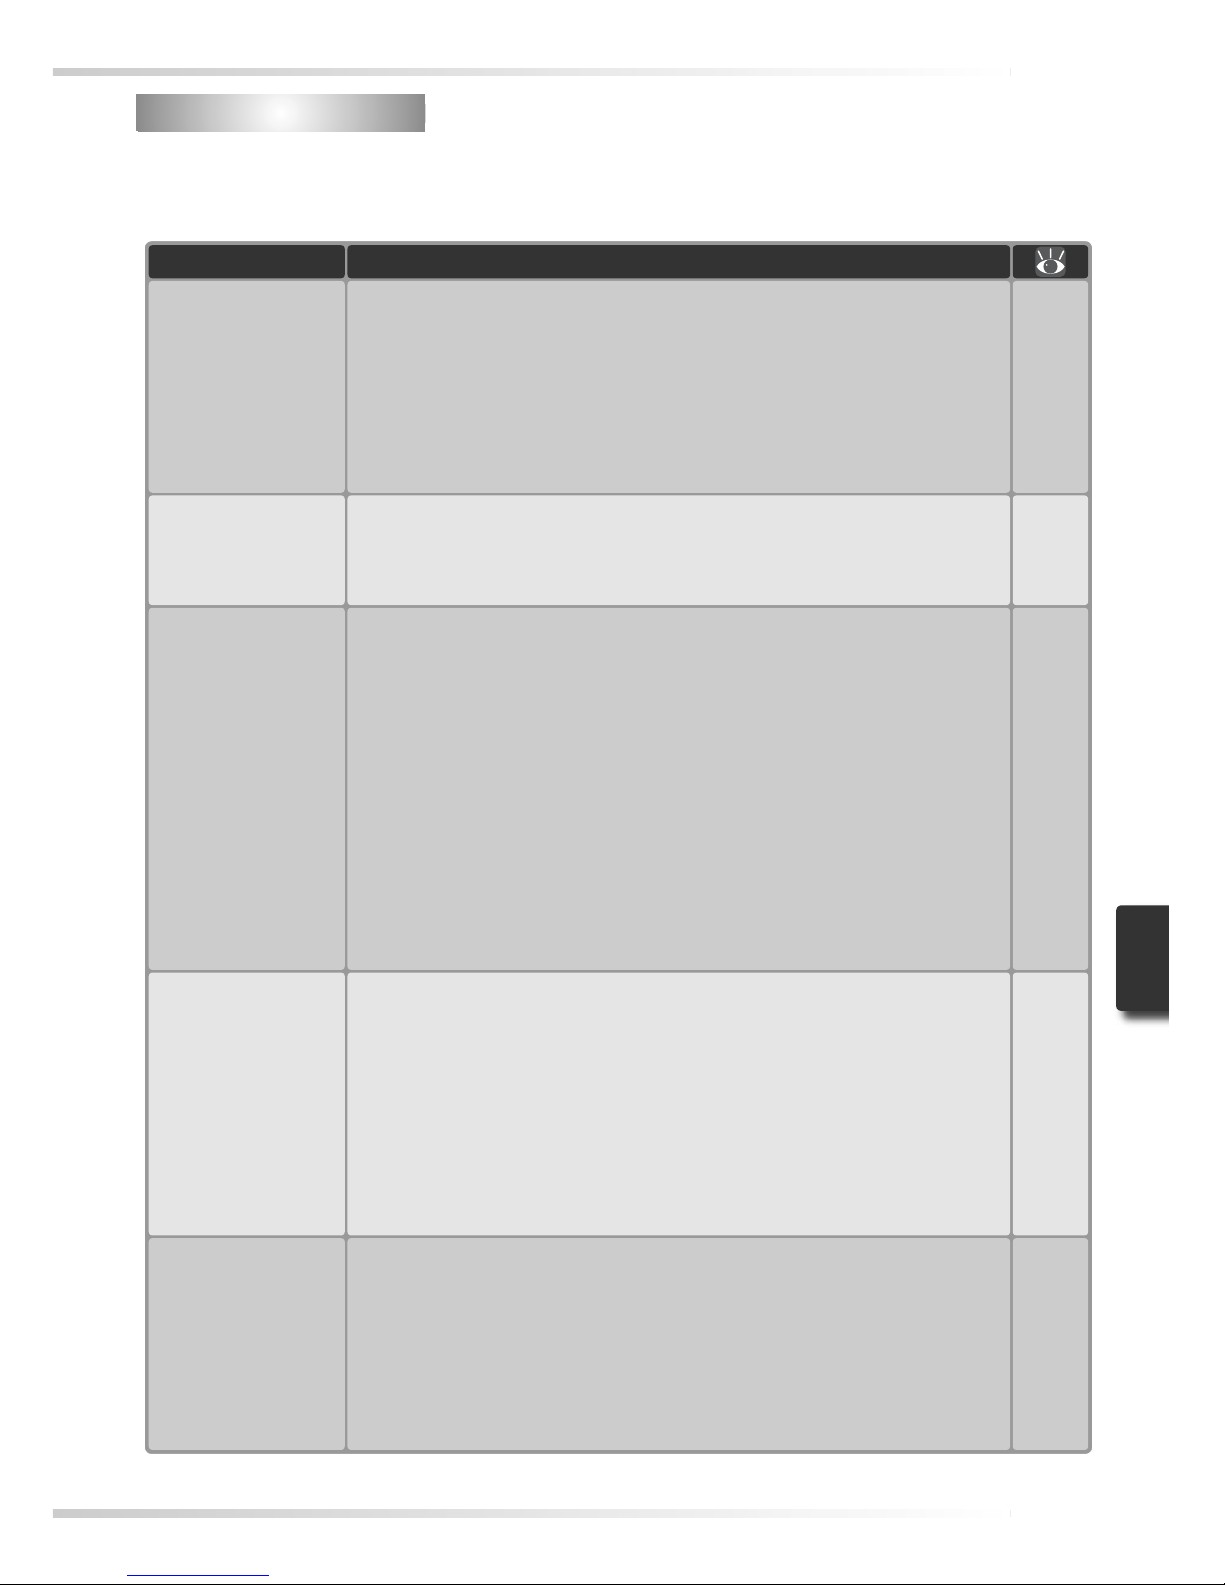
63
Troubleshooting
Troubleshooting
If the scanner fails to function as expected, check the problems described below before consulting the original retailer or Nikon service representative. For more information on solving
the problems listed here, refer to the page numbers in the rightmost column.
Problem Possible cause
Scanner will not
turn on (status LED
does not light)
• Scanner is off
Turn the scanner on
• Power cable is not properly connected
Return the power switch to the off position and reconnect the power
cable.
• Outlet is not receiving power
Plug another device into the outlet to determine whether the outlet is
working properly.
24
21
—
Status LED fl ickers
(scanner not con-
nected to computer,
or computer off)
• Scanner hardware malfunction
Turn the scanner off and disconnect it from the computer. Wait fi ve
seconds and turn the scanner on again. If the problem persists, con tact a Nikon service representative.
—
Status LED fl ickers
(scanner connected
to computer)
• Scanner hardware malfunction or communications error
Turn the scanner and computer off and disconnect the scanner. Wait
fi ve seconds and turn the scanner on again. If the status LED fl ickers
when the scanner is turned on, a scanner hardware malfunction has
occurred. Contact the original retailer or a Nikon service representative. If the status LED blinks and then glows steadily, turn the scanner
off and reconnect it to the computer. After waiting fi ve seconds, turn
the scanner on and restart the computer. If the status LED fl ickers
when the computer is restarted, try the following:
• Disconnect all other devices using the same interface as the scanner
• Reinstall Nikon scan
• Update the IEEE 1394 device drivers (Windows only)
• Update the scanner device drivers (Windows only)
22, 41
5, 22
10–19
70–72
65–69
74–75
Computer does not
recognize scanner
• Scanner is off
Turn the scanner on.
• Scanner turned on with holder inserted
After removing the holder, turn the scanner off and then on again.
• Interface cable not correctly connected
Turn the scanner off and reconnect the cable.
• Computer does not meet minimum system requirements
Use a system that meets the requirements.
24
24, 41
22, 41
10, 15
Poor quality scans
• Film is not properly inserted in holder
Eject the holder and reinsert the fi lm.
• Scanner or holder moved during scanning
Do not use the scanner in locations subject to shock or vibration. Failure to observe this precaution could result in scanner malfunction.
• Scan window settings require adjustment
Adjust settings or use factory defaults. For more information, see the
Nikon Scan Reference Manual.
• Glass in optional glass-covered holder is dirty
Use a blower to remove dust, a soft cloth to remove other stains.
25–29,
41
20
33–38
—
Page 73
64
Problem Possible cause
Computer does not
recognize scanner
(continued)
• Other IEEE 1394 devices are connected and turned on
Disconnect the other devices. If the scanner is connected via a hub,
adapter, or extension cable, disconnect the scanner and reconnect it
directly to the computer. If this does not solve the problem, uninstall all software that uses the IEEE 1394 interface and reinstall Nikon
Scan.
• Interface board is not compatible
At the time of writing, operation has been confi rmed only with the
interface board provided with the scanner. Operation is not guaranteed with other boards or with built-in IEEE 1394 ports. Install the
supplied interface board (desktop computers) or consult a Nikon service representative for information on approved IEEE 1394 interface
boards or cards.
• Interface board is not correctly installed
Check the documentation provided with interface board or card.
• Scanner device driver is missing or corrupted (Windows only)
Check that the device driver is correctly installed.
• Nikon Scan is not correctly installed
Uninstall and reinstall Nikon Scan. For more information, see the
Nikon Scan Reference Manual.
• IEEE 1394 drivers require updating (Windows 98 SE only)
Update the IEEE 1394 drivers.
5, 22
10, 15,
64–69
64–69
74–75
10–18,
70–72
65
Installing the IEEE 1394 (Firewire) Interface Board
Installing the IEEE 1394 (Firewire) Interface Board
Users whose computer is not equipped with a compatible IEEE 1394 interface must install
the supplied IEEE 1394 (Firewire) interface board (Macintosh users should note that beige G3
computers are not equipped with a built-in Firewire interface). To install the board, follow
the steps below.
Operating system Installation
Windows XP
Windows 2000 Professional
Windows Me
1 Install the interface board. The board device drivers will be
installed automatically when the computer is turned on.
2 Confi rm that the board is correctly registered in the Windows
Device Manager.
66
66–67
Windows 98 SE
1 Update the IEEE 1394 drivers.
2 Install the interface board.
3 Install the drivers for the interface board.
65
66
68–69
Mac OS Install the interface board. 66
Computers Without an Empty Full-Sized PCI Slot
The supplied IEEE 1394 board can only be installed in a full-sized PCI slot. It can not be installed in laptop
computers or in computers with a low-profi le PCI slot. For information on other approved boards and
PCMCIA cards, see the Nikon web site for your area (
2).
Page 74
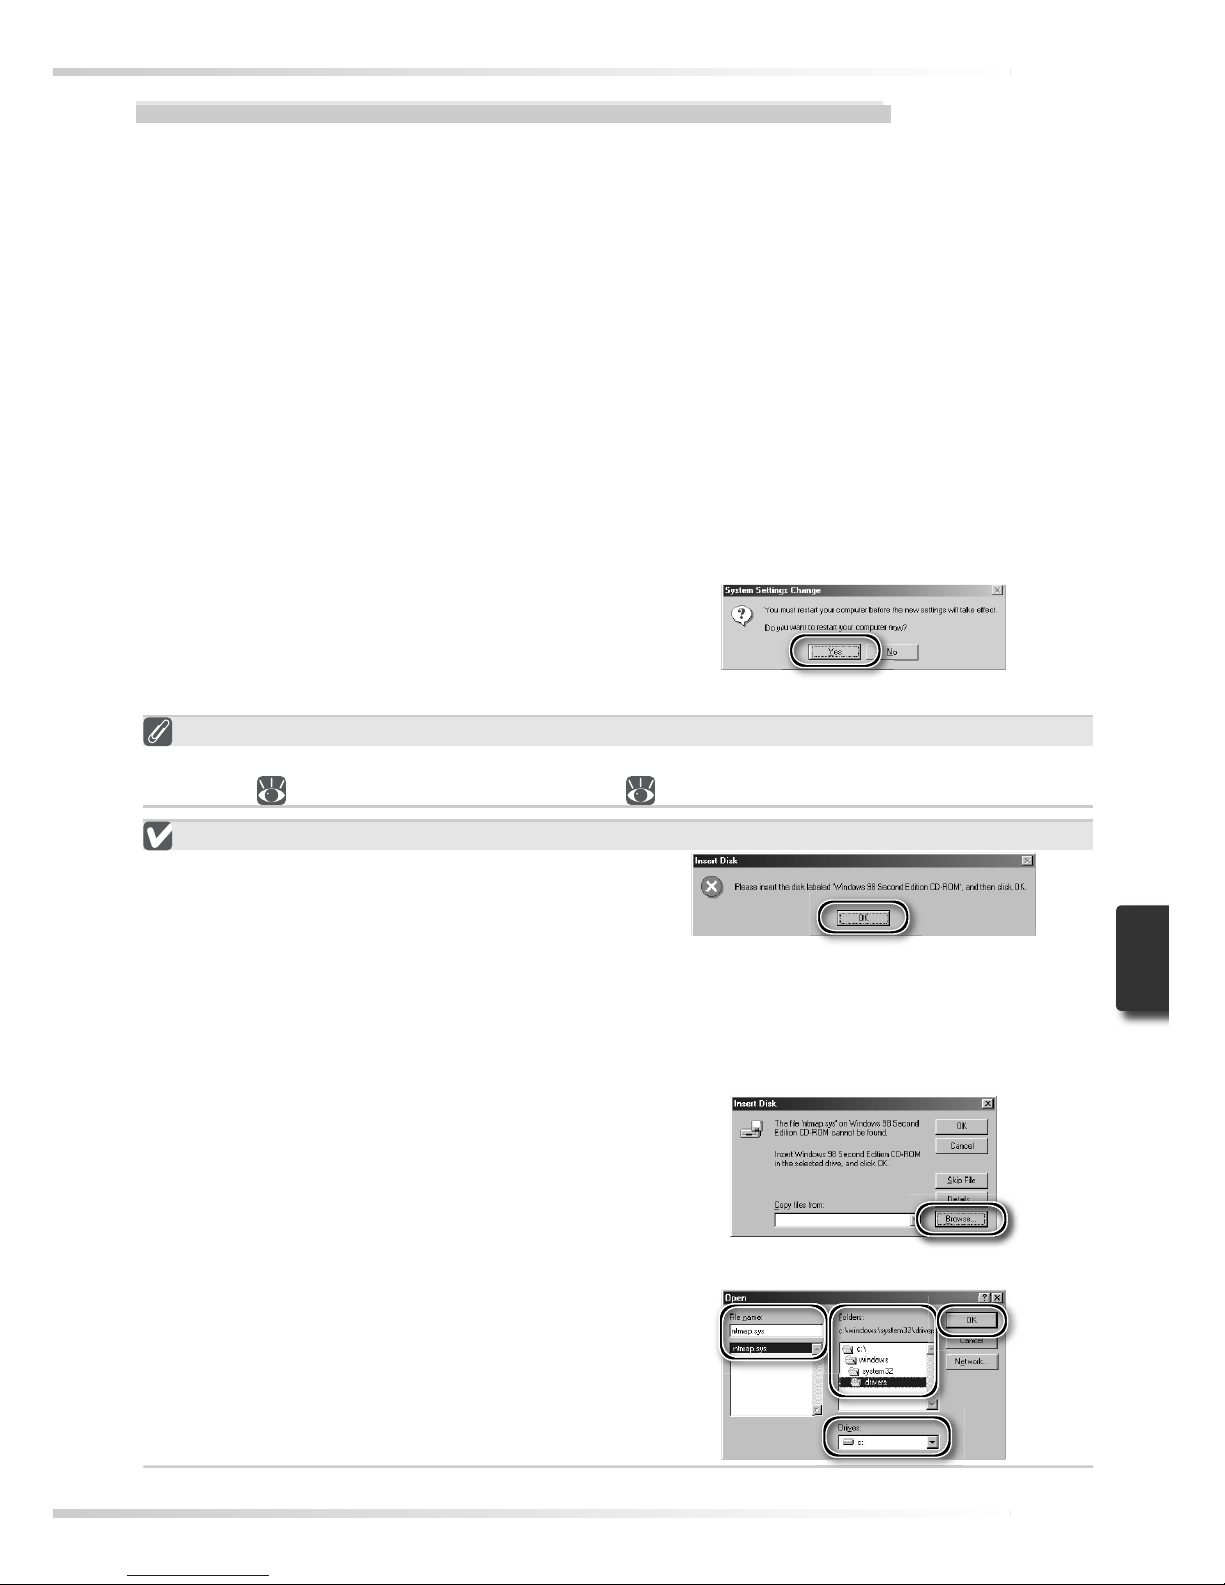
65
Updating the IEEE 1394 Drivers (Windows 98 SE Only)
Users of Windows 98 SE must update the IEEE 1394 drivers provided with Windows before
they can use the scanner. This update is required regardless of whether an IEEE 1394 interface
is already installed or the user is installing an IEEE 1394 interface for the fi rst time.
1
Insert the Nikon Scan CD
Holding down the shift key to prevent the installer from start ing automatically, insert the
Nikon Scan CD into the CD -ROM drive. If the language selection dialog is displayed, click
Quit.
2
Open the Nikon Scan CD in Windows Explorer
Double-click the My Computer icon. Click the icon for the Nikon Scan CD with the right
mouse button and select Explore from the menu that appears.
3
Run the updater
Open the Microsoft folder and double- click 242975USA8 or 242975USA8.EXE. Follow
the on-screen instructions to complete the update.
4
Restart the computer
When the dialog shown at right is displayed, remove the Nikon Scan CD from
the CD-ROM drive and then click Yes to
restart the computer.
Installing the IEEE 1394 Interface Board
Once the computer has restarted, users of the supplied IEEE 1394 interface board can install
the board ( 66) and interface device drivers ( 68–69).
The “Insert Disk” Dialog
If an “Insert Disk” dialog is displayed the fi rst
time the scanner is connected and turned on,
the IEEE 1394 driver update has not been
completed successfully. Do NOT insert the
Windows 98 Second Edition CD. Make
sure the CD-ROM drive is empty and click
OK, then update the drivers as follows:
1
Click Browse…
The dialog shown at right will be displayed. Click Browse….
2
Locate “ntmap.sys”
Select drive “c:” from the Drives menu.
In the “Folders” list, double- click fi rst on
“windows,” then “system32,” and fi nally “drivers.” Co nfi rm that “ntmap.sys” is
selected in the list of fi les and click OK.
Page 75
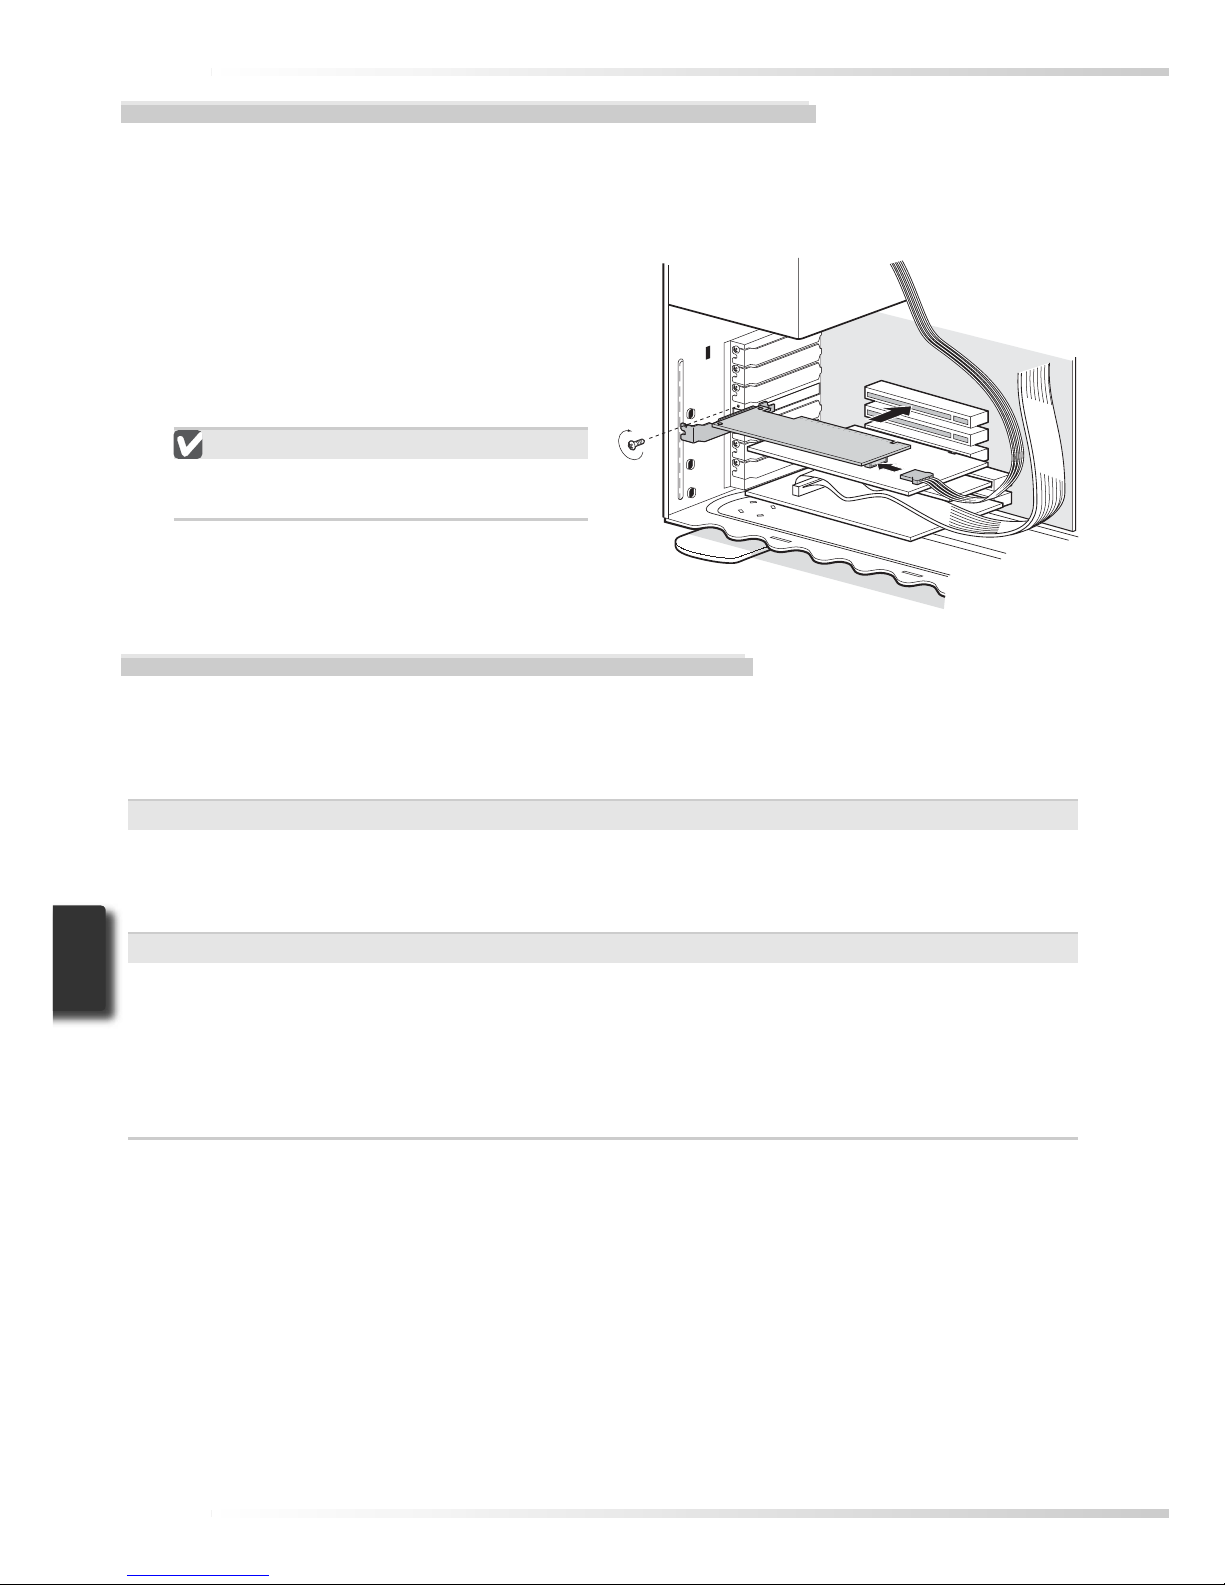
66
Installing the IEEE 1394 (Firewire) Interface Board
1
Turn th e computer off
Turn the computer off and disconnect all cables.
2
Insert the IEEE 1394 (Firewire) interface board
Insert the supplied IEEE 1394 (Firewire)
board as shown. For information on the
location of the PCI slots and on installing PCI boards, see the documentation
provided with the computer and the IEEE
1394 ( Firewire) interface board.
Installing the Interface Board
Do not use force. Excessive force could
damage the computer or board.
Installing the Device Drivers (Windows Only)
After installing the IEEE 1394 (Firewire) interface board, reconnect the cables and turn the
computer on.
Windows XP, Windows 2000 Professional, Windows Me
Windows XP, Windows 2000 Professional
The fi rst time the computer is powered on with the board installed under Windows XP or
Windows 2000 Professional, Windows will automatically install the necessary drivers. Confi rm that the drivers have been correctly installed as described on the opposite page.
Windows Me
The fi rst time the computer is powered on with the board installed, the “Add New Hardware
Wizard” will be displayed. Select Automatic search for a better driver (Recommended)
and click Next to install the drivers for the IEEE 1394 interface board. When installation is
complete, Windows Me will display message stating that the computer must be restarted before changes to system settings can take effect. Click Yes to restart the computer. Proceed
to the next step once the computer restarts.
Page 76
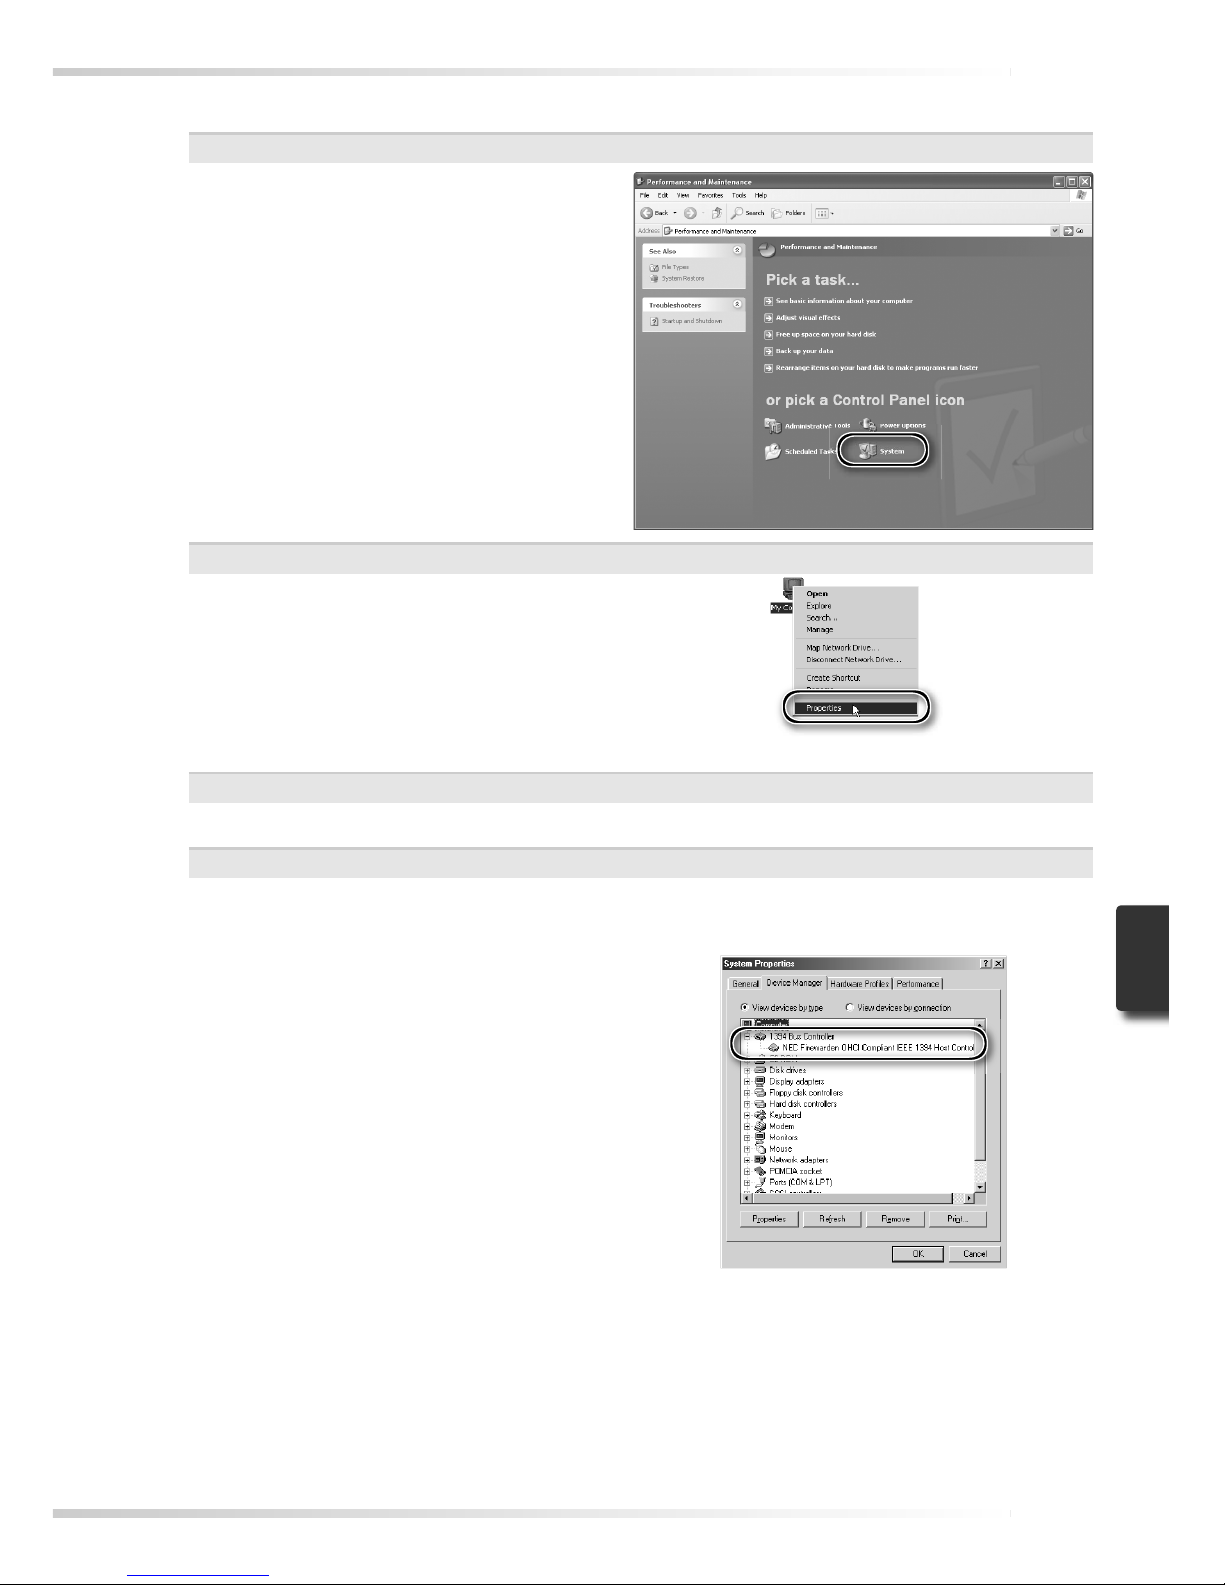
67
Windows 2000 Professional, Windows Me
Click the My Computer icon with the
right mouse button and select Proper-
ties from the menu that appears.
1
Display the “System Properties” dialog
Windows XP
Select Control Panel from the Start
menu, open Performance and Main-
tenance, and click System.
2
Open the Device Manager
Windows XP, Windows 2000 Professional
Open the “Hardware” panel and click the Device Manager button.
Windows Me
Click the “Device Manager” tab.
3
Check the IEEE 1394 host controller
Confi rm that “NEC Firewarden OHCI
Compliant IEEE 1394 Host Controller”
is listed under “IEEE 1394 Bus host controllers” (Windows XP, Windows 2000
Professional) or “1394 Bus Controller”
(Windows Me).
Page 77
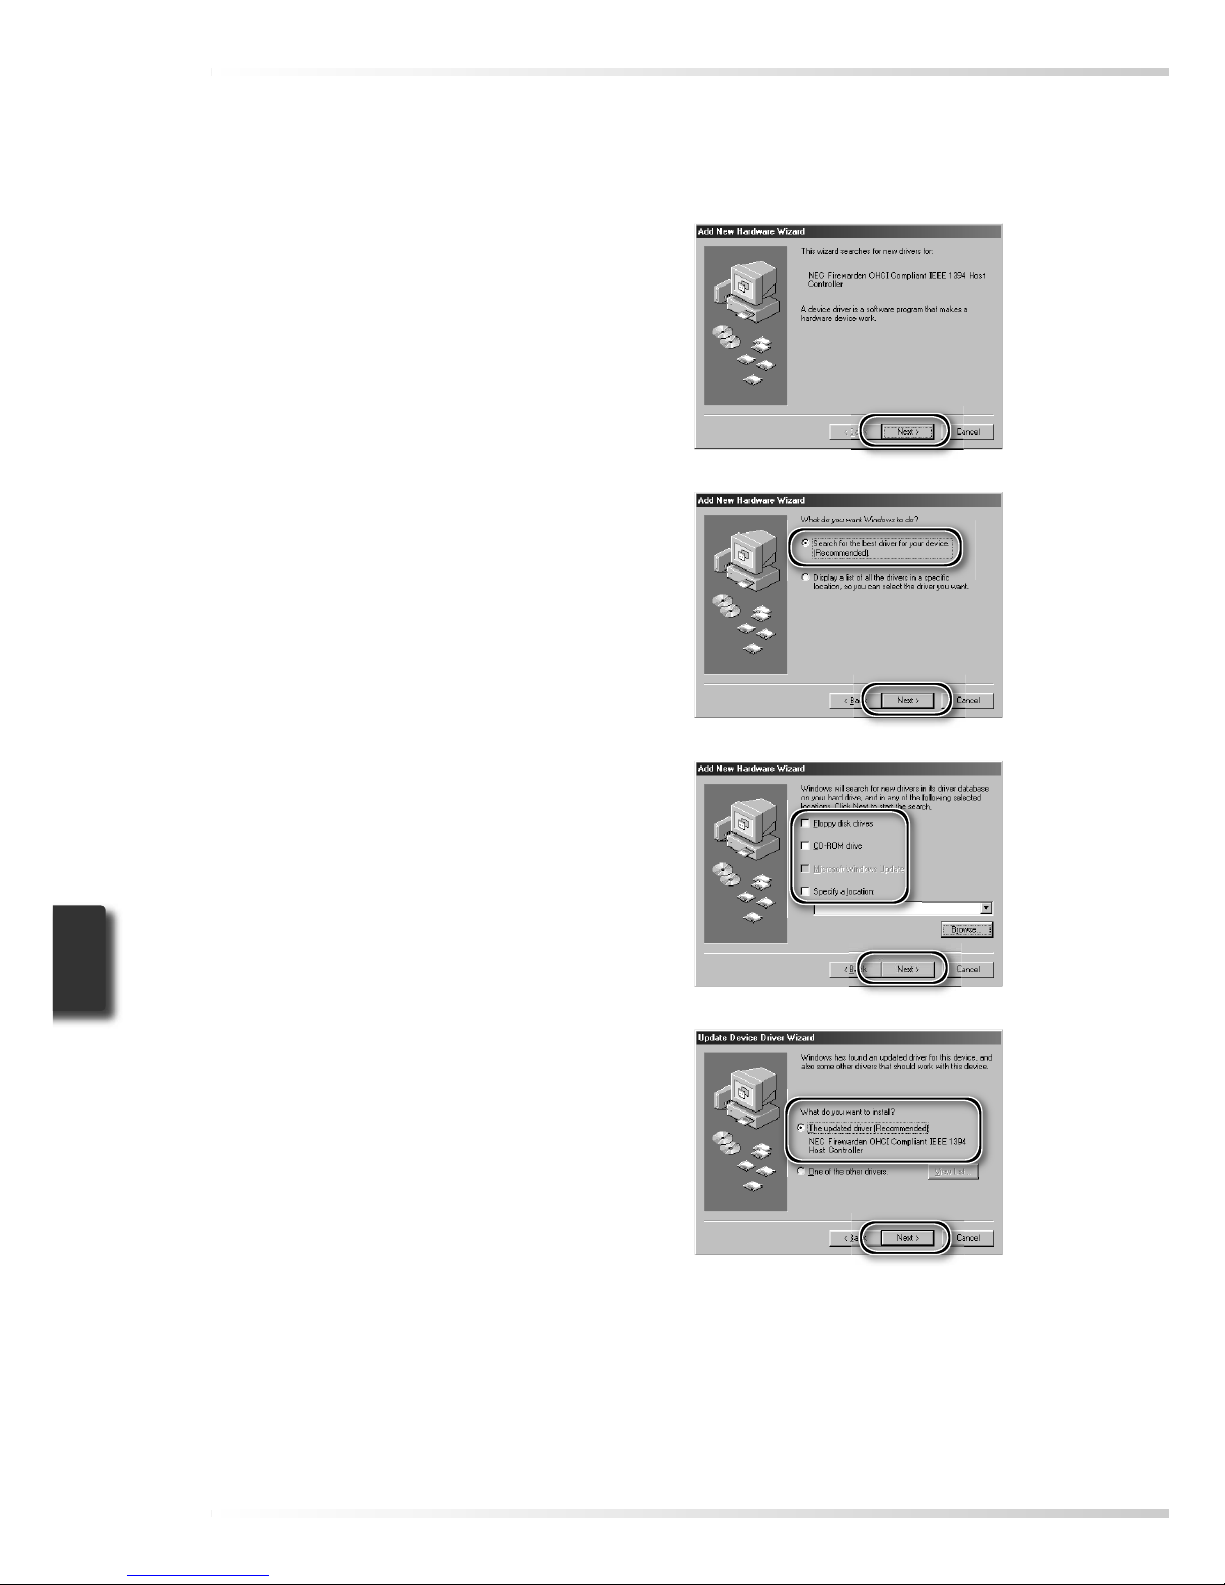
68
Windows 98 SE
The fi rst time the computer is powered on with the board installed, the “Add New Hardware”
wizard will be displayed.
1
Click Next
Click Next to start the “Add New Hardware” wizard.
4
Choose the recommended driver
Select The updated driver (Recommended)/NEC Firewarden OHCI
Compliant IEEE 1394 Host Controller
and click Next.
2
Select the search option
Select the search option and click Next.
3
Deselect all search location options
After confi rming that none of the search
location options are selected, click
Next.
Page 78
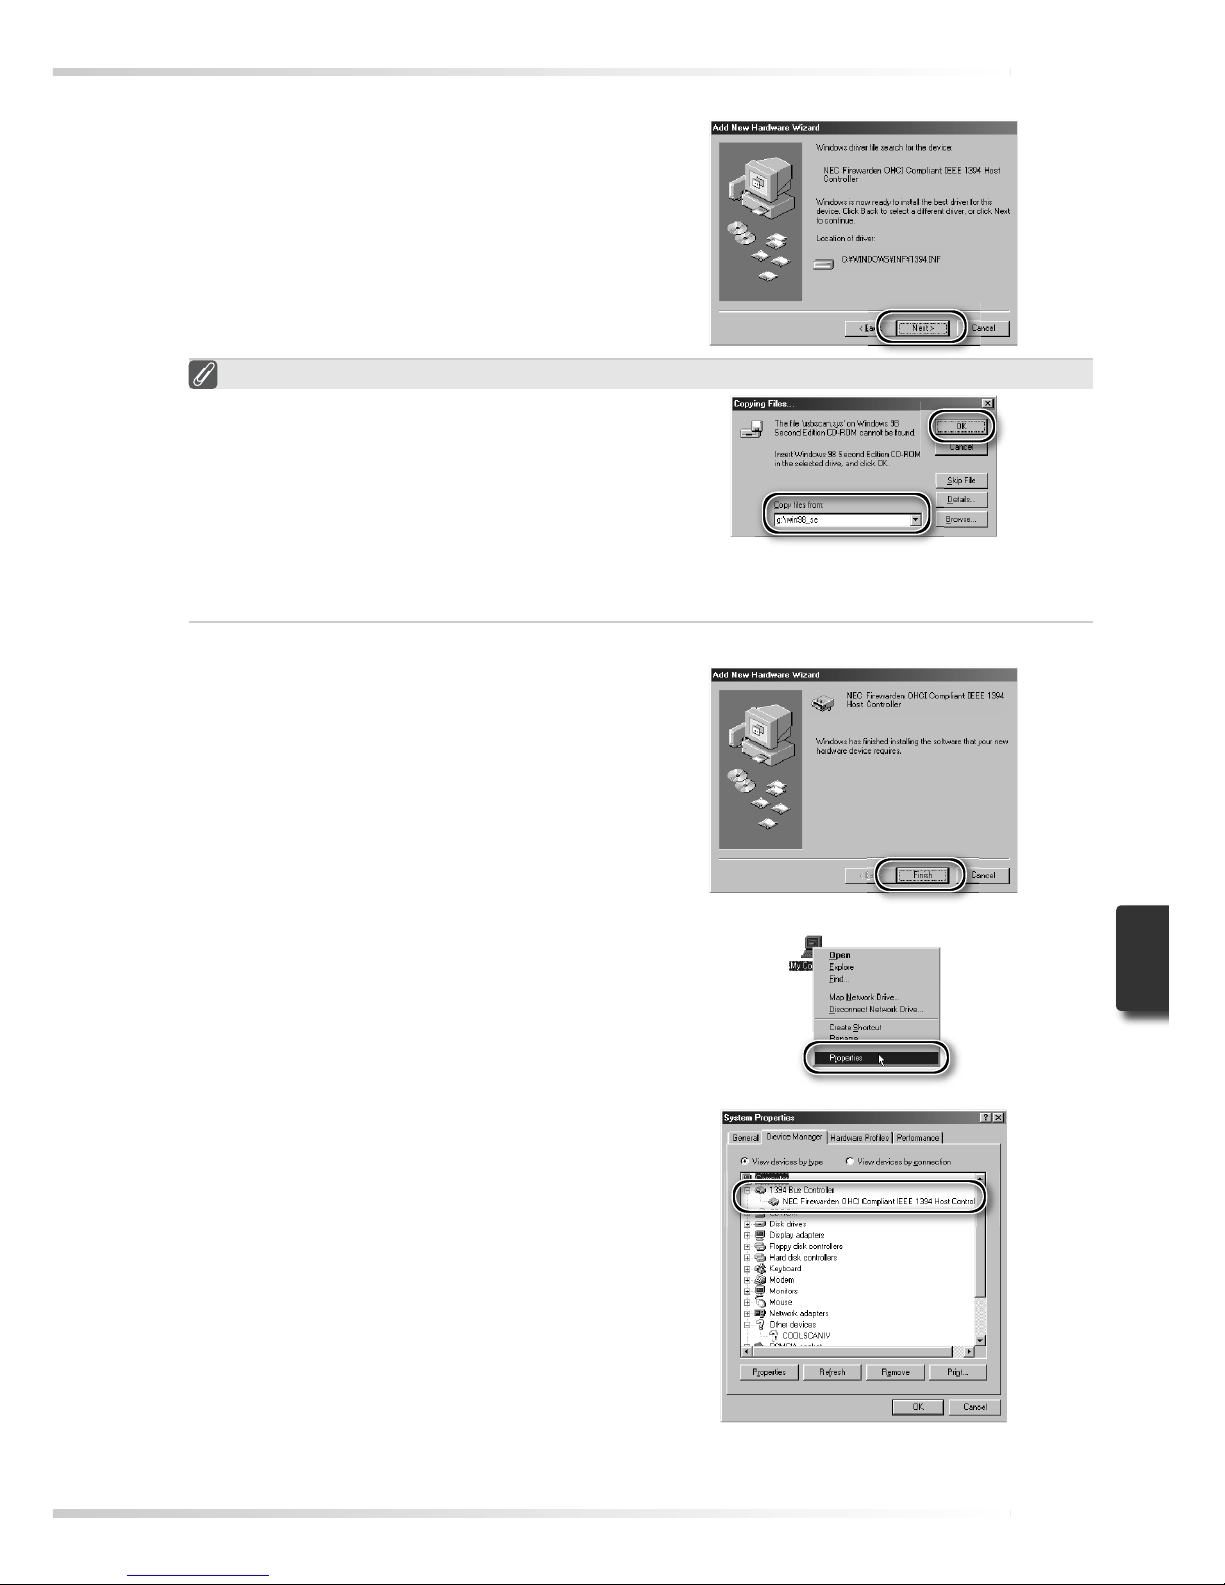
69
5
Click Next
The dialog shown at right will be displayed. Click Next.
The “Insert Disk” Dialog
If the “Insert Disk” dialog is displayed,
insert the Windows 98 Second Edition
CD and click OK. If Windows displays a
message stating that a fi le could not be
found, enter the drive letter of the CDROM drive followed by “\win98_se”
(e.g., “d:\win98_se”) in the Copy fi les
from text box and click OK.
6
Click Finish
The dialog shown at right will be displayed. Click Finish.
7
Open the “System Properties” dialog
After the computer restarts, click the My
Computer icon with the right mouse
button and select Properties from the
menu that appears.
8
Check the IEEE 1394 host controller
Click the Device Manager tab and confi rm that “NEC Firewarden OHCI Compliant IEEE 1394 Host Controller” is listed
under “1394 Bus Controller.”
Page 79
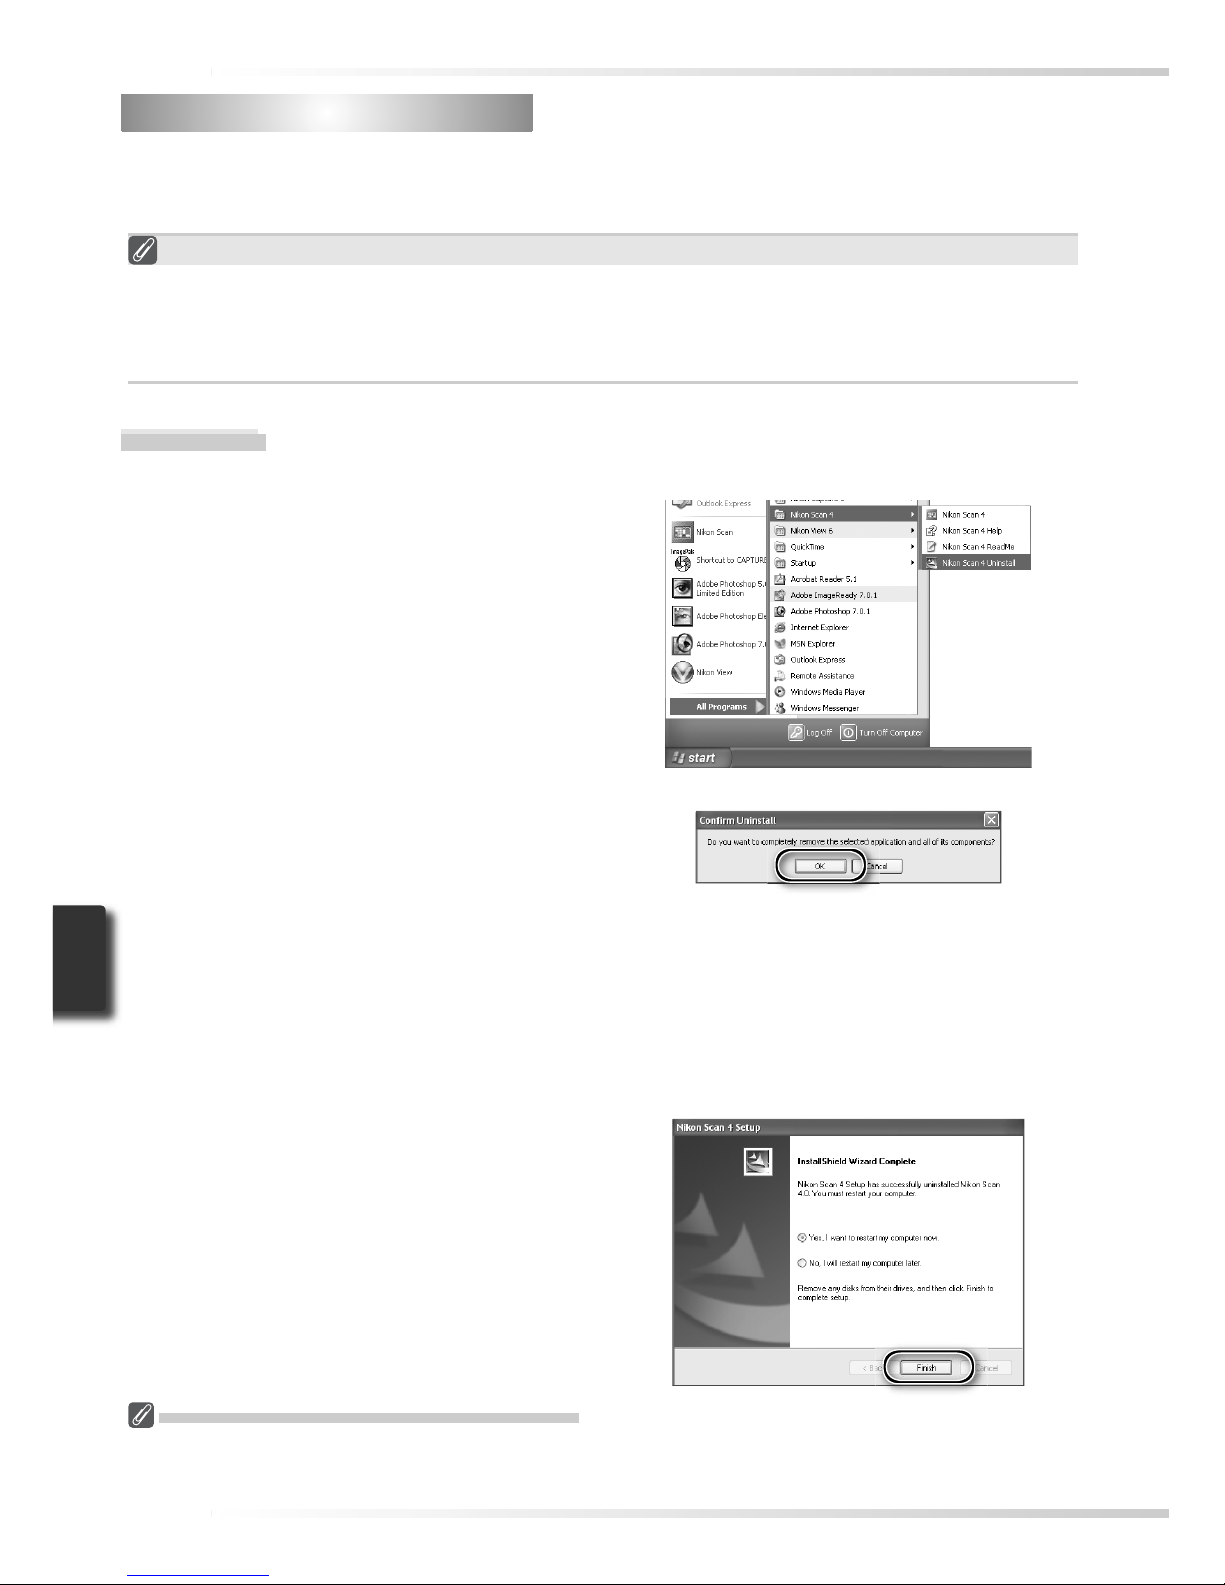
70
Uninstalling Nikon Scan
Uninstalling Nikon Scan
Before Nikon Scan can be reinstalled or a new version installed, the existing version must be
removed from the computer (uninstalled). The instructions that follow are divided into Windows and Macintosh sections.
Export Settings
Before uninstalling Nikon Scan, export frequently-used scan window settings to a location
outside the Nikon Scan application folder. These settings can then be loaded into the scan
window once Nikon Scan has been reinstalled. For more information, see the Nikon Scan
Reference Manual (on CD).
Windows
1
Select Nikon Scan 4 Uninstall
Click the Start button and select Nikon
Scan 4 > Nikon Scan 4 Uninstall from
the program list.
2
Begin the uninstall
The dialog shown at right will be displayed. Click OK to begin removing
Nikon Scan and all of its components.
If uninstaller encounters read-only fi les
or components shared by another application, a confi rmation dialog will be
displayed. Read the information displayed carefully before deciding what to
do with the affected components.
3
Click Finish
Click Finish to exit the uninstaller.
Windows XP/Windows 2000 Professional
When installing or uninstalling Nikon Scan under the above operating systems, log in as the “Computer
administrator” (Windows XP) or “Administrator” (Windows 2000 Professional).
Page 80
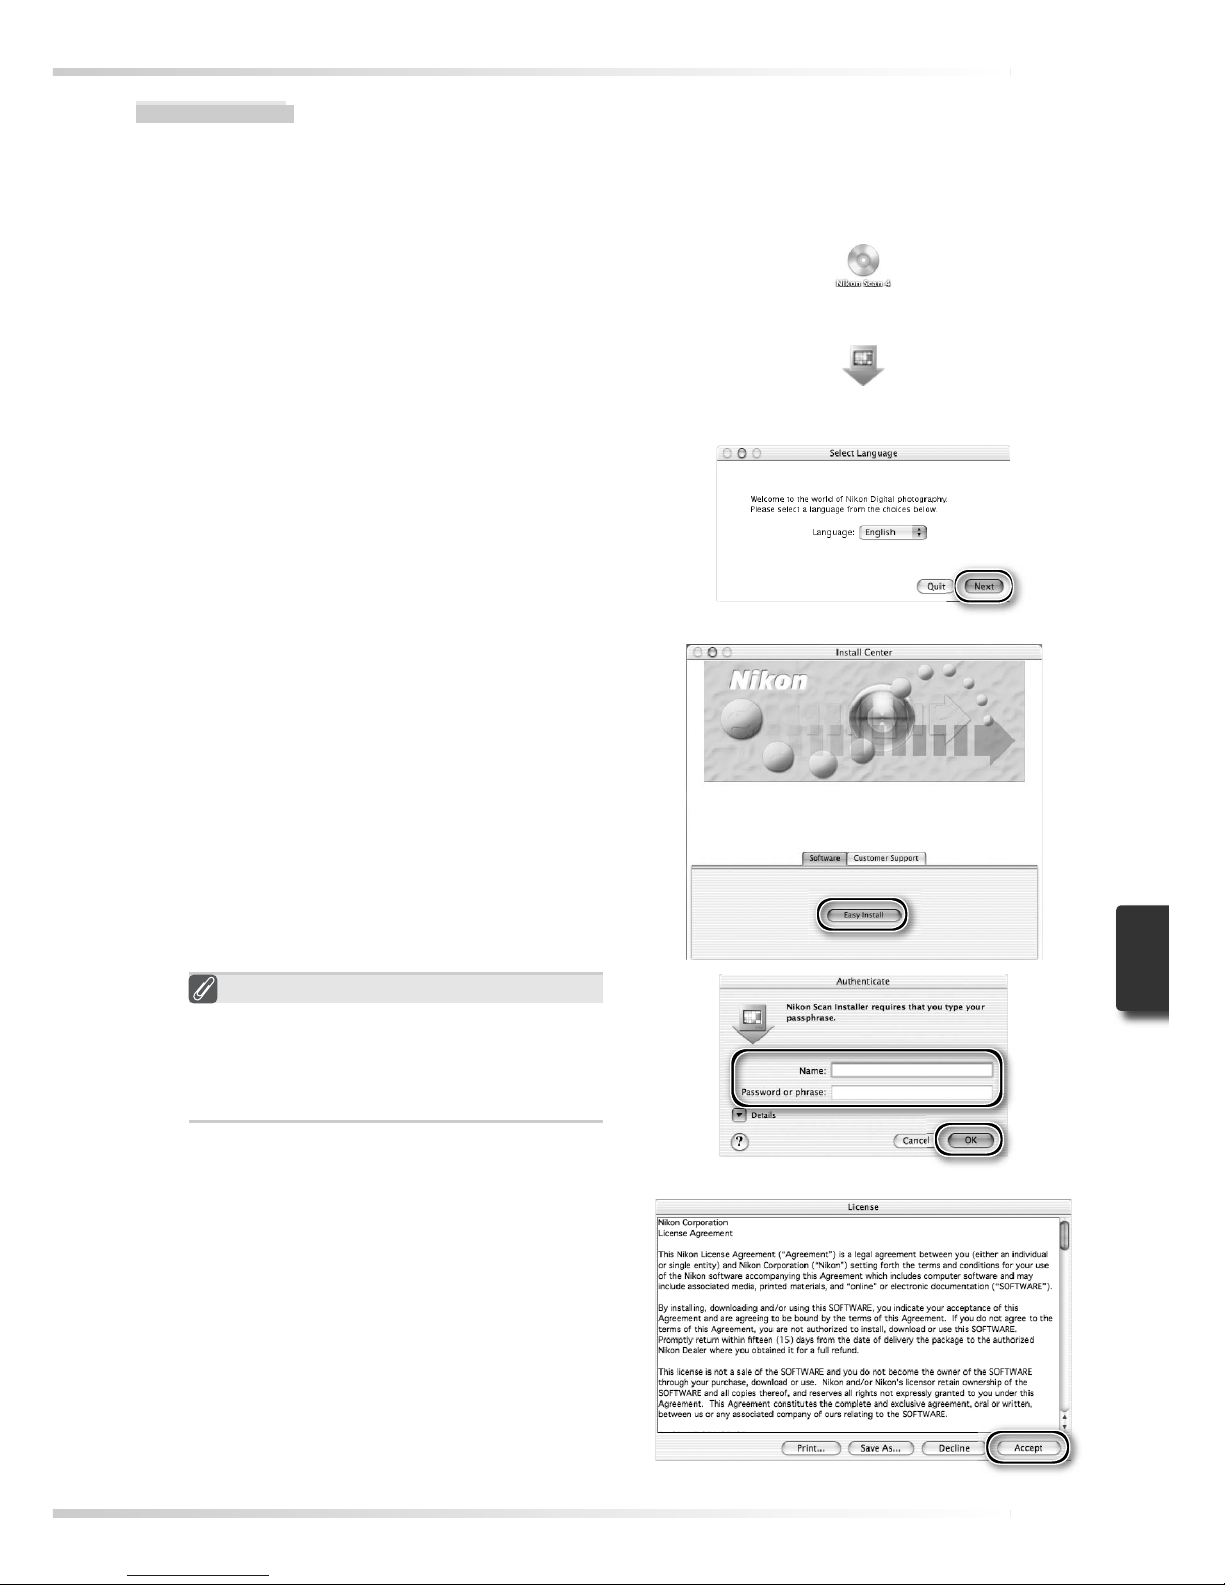
71
“Authenticat e” (Mac OS X Only)
Clicking Easy Install in the software
panel displays the “Authenticate” dialog
shown at right. Enter the administrator
name and password and click OK.
6
Click Accept
The license agreement will be displayed.
Click Accept.
5
Start the installer
The “Install Center” dialog will be displayed. Open the “Software” panel and
click Easy Install.
Macintosh
1
Quit all applications
2
Insert the Nikon Scan CD into the CD -ROM drive
A Nikon Scan 4 CD icon will appear on
the desktop. Double- click the icon to
open the “Nikon Scan 4” window.
3
Double- click the Welcome icon in
the “Nikon Scan 4” window
4
Choose a language
A language-selection dialog will be
displayed. Select a language and click
Next.
Page 81
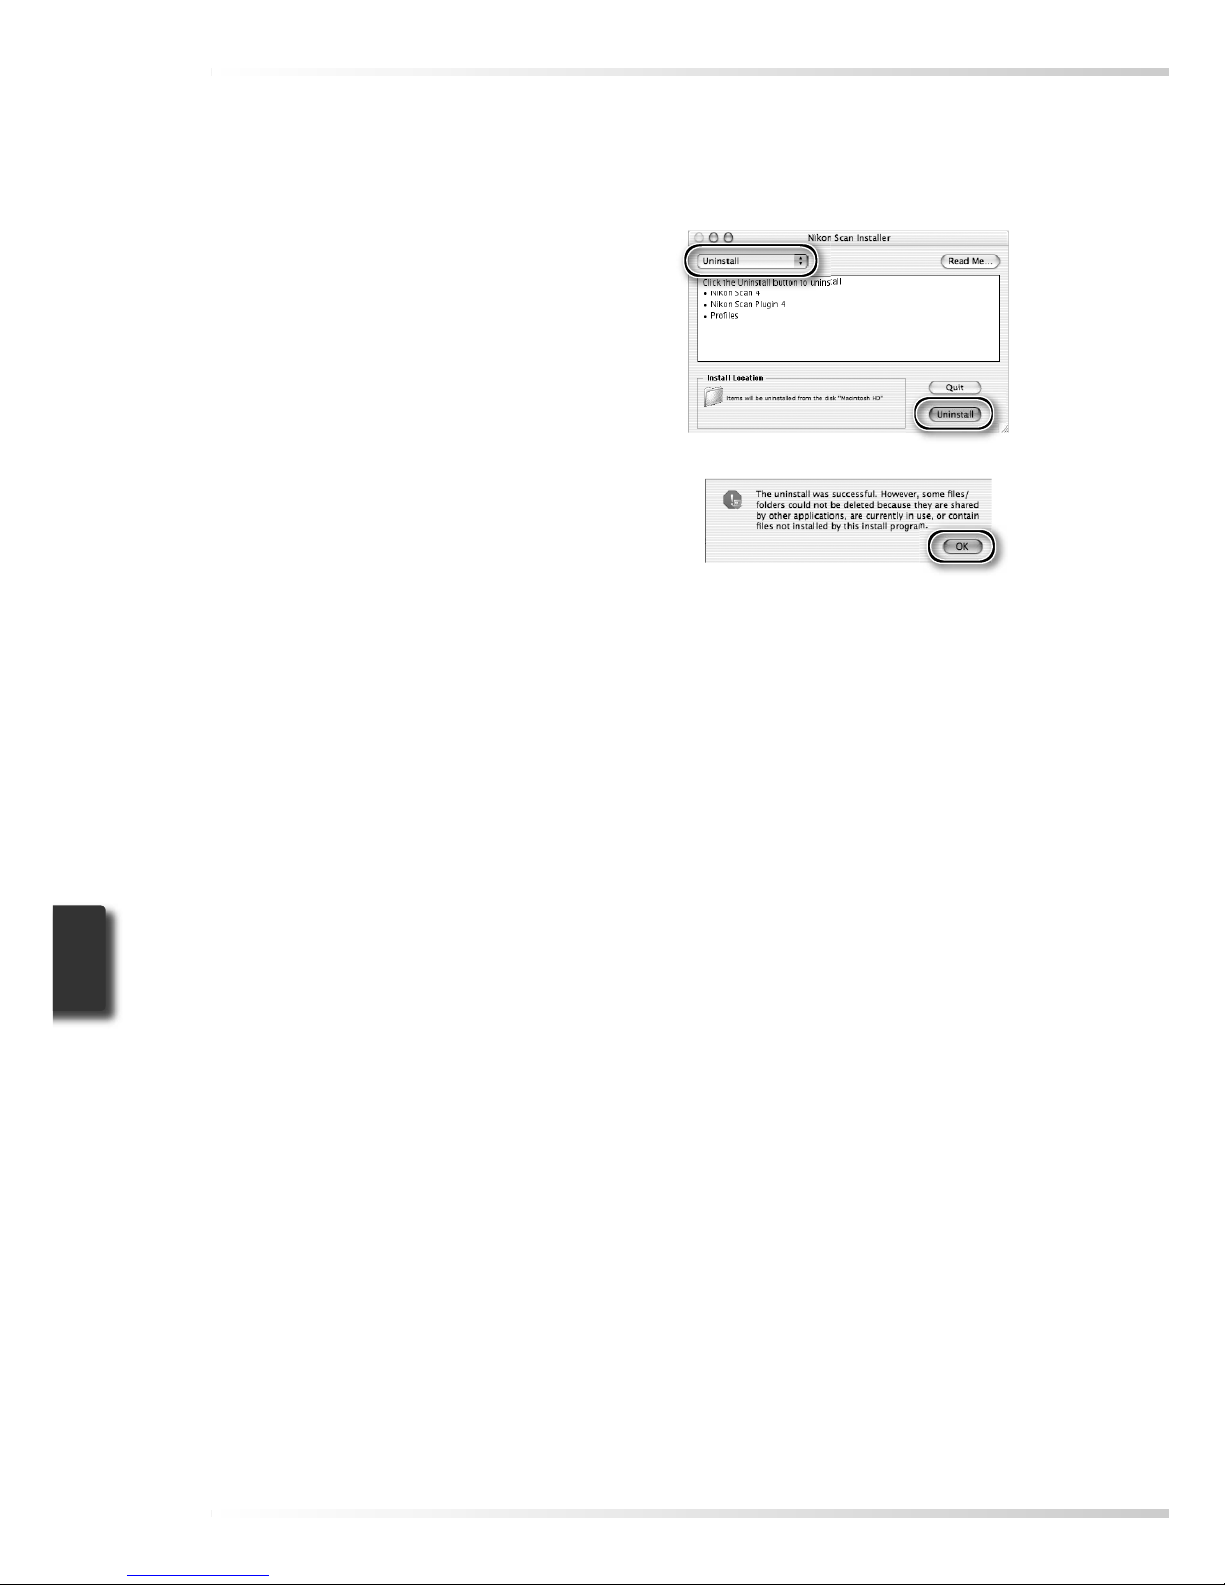
72
7
Click Continue…
The ReadMe fi le will be displayed. Click Continue… to display the “Nikon Scan Installer”
dialog.
8
Select Uninstall
Select Uninstall from the menu at the
top left corner of the installer dialog and
click the Uninstall button to remove
Nikon Scan and its components from the
computer.
9
Click OK
A confi rmation dialog will be displayed
when removal is complete. Click OK.
Page 82
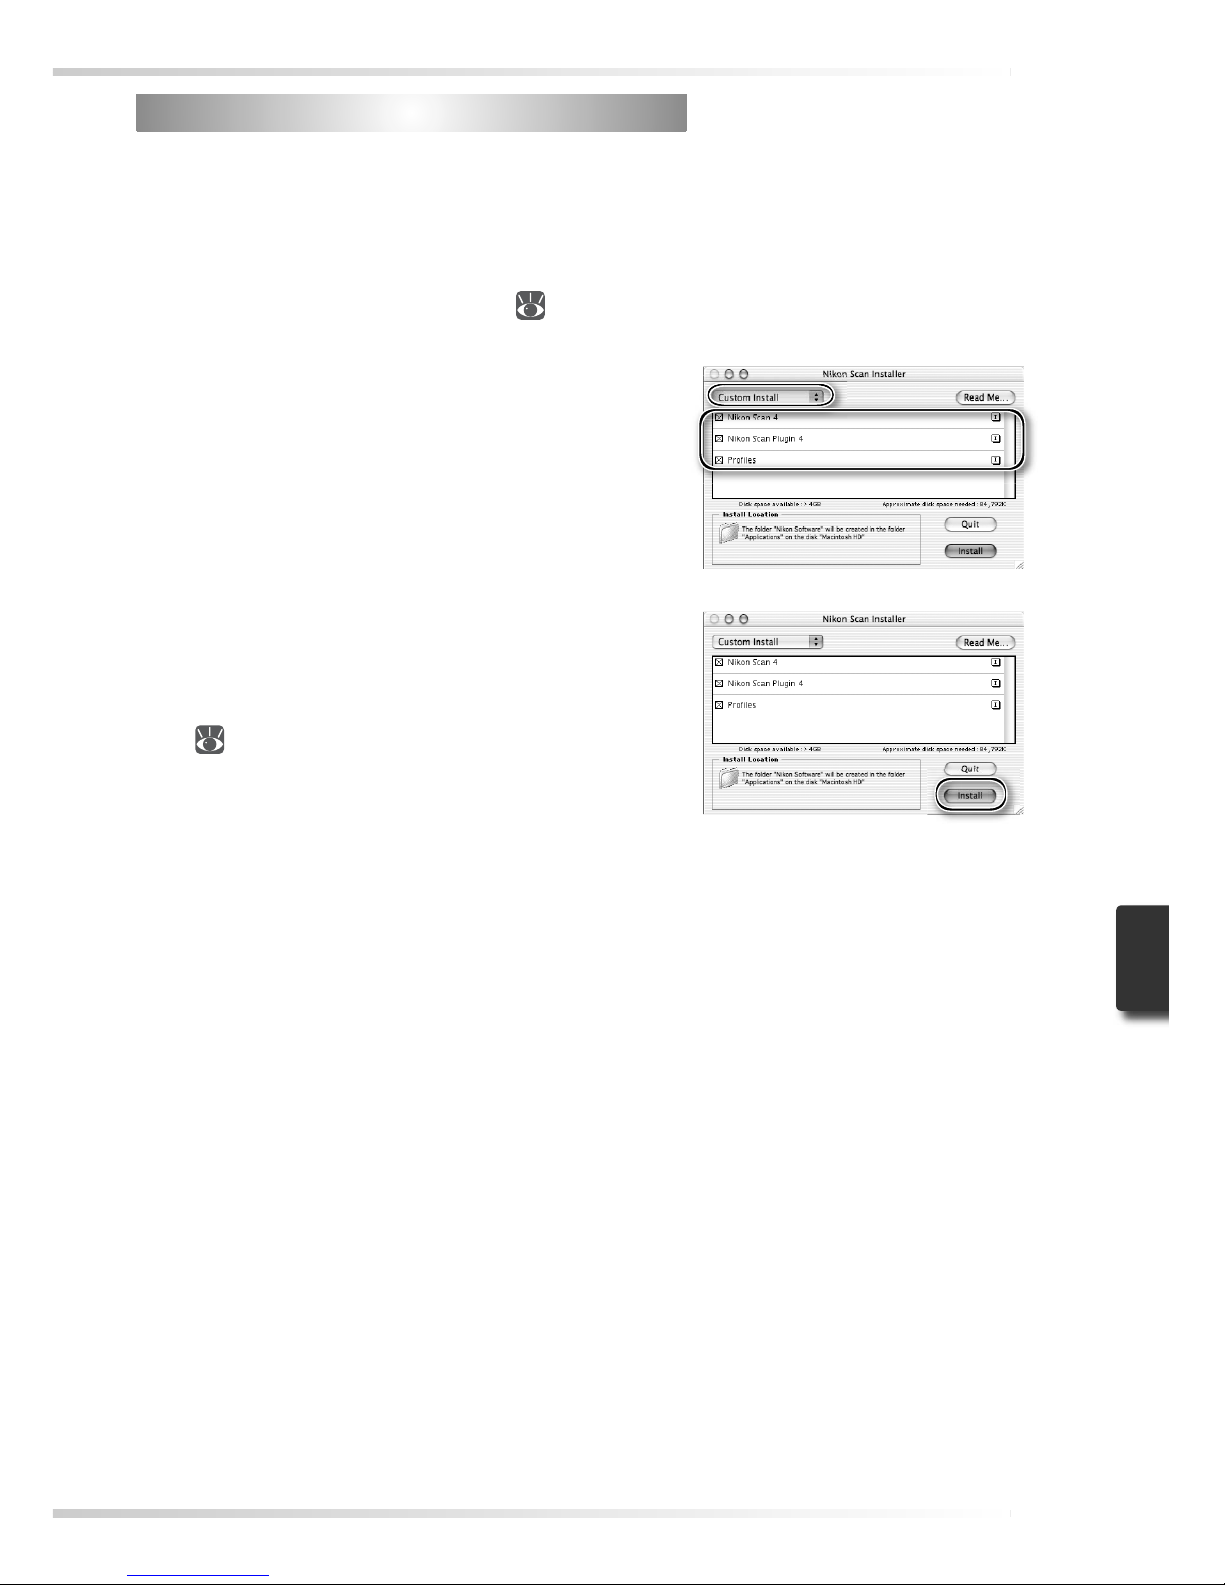
73
Custom Install (Macintosh Only)
Custom Install (Macintosh Only)
The Macintosh version of Nikon Scan offers a custom install option that can be used to install
selected program components as described below.
1
Display the “Nikon Scan Installer” dialog
After quitting any applications that may be running, insert the Nikon Scan CD in the CDROM drive and display the “Nikon Scan Installer” dialog as described in steps 2–7 of the
“Uninstall: Macintosh” section (
71–72).
2
Select Custom Install
Select Custom Install from the menu at
the top left corner of the installer dialog
and select or deselect components for
installation by clicking the boxes to their
left.
3
Click Install
Click Install to begin installation of
the selected components. Complete
installation as described in steps 8–13
of “Installing Nikon Scan: Macintosh”
(
17–18 ).
Page 83
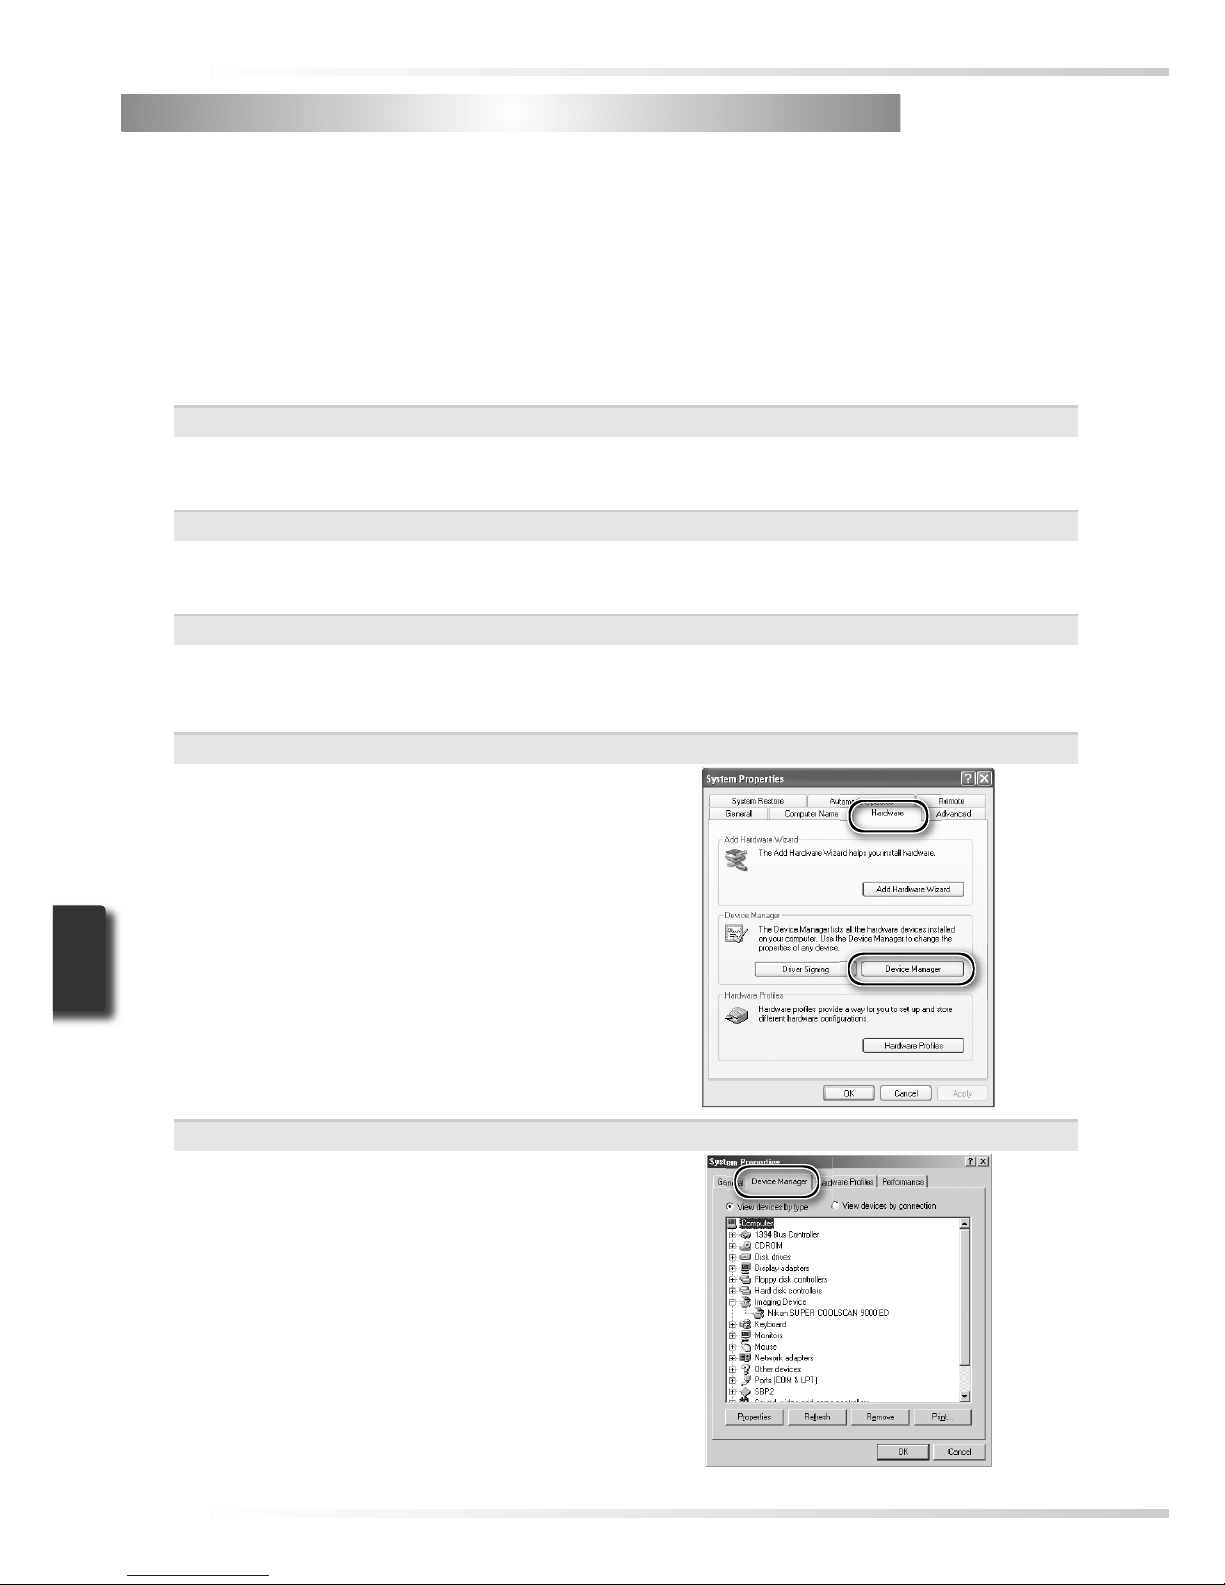
74
Checking Device Registration (Windows Only)
Checking Device Registration (Windows Only)
The fi rst time the scanner is connected and turned on following installation of Nikon Scan,
Windows will “register” the scanner with the Device Manager. If the computer fails to detect
the scanner or the scanner does not function as expected when Nikon Scan is running, the
computer may not have correctly registered the scanner. Check that the device drivers are
correctly installed.
1
Make sure the scanner is connected and turned on
2
Display the “System Properties” dialog
Windows XP
Select Control Panel from the Start menu, open Performance and Maintenance, and
click System.
Windows 2000 Professional
Select Settings > Control Panel from the Start menu and double-click the System
icon.
Windows Me, Windows 98 SE
Select Control Panel from the Start menu and double-click the System icon.
3
Open the Device Manager
Windows XP, Windows 2000 Professional
Open the “Hardware” panel and click
the Device Manager button.
Windows Me, Windows 98 SE
Click the “Device Manager” tab.
Page 84
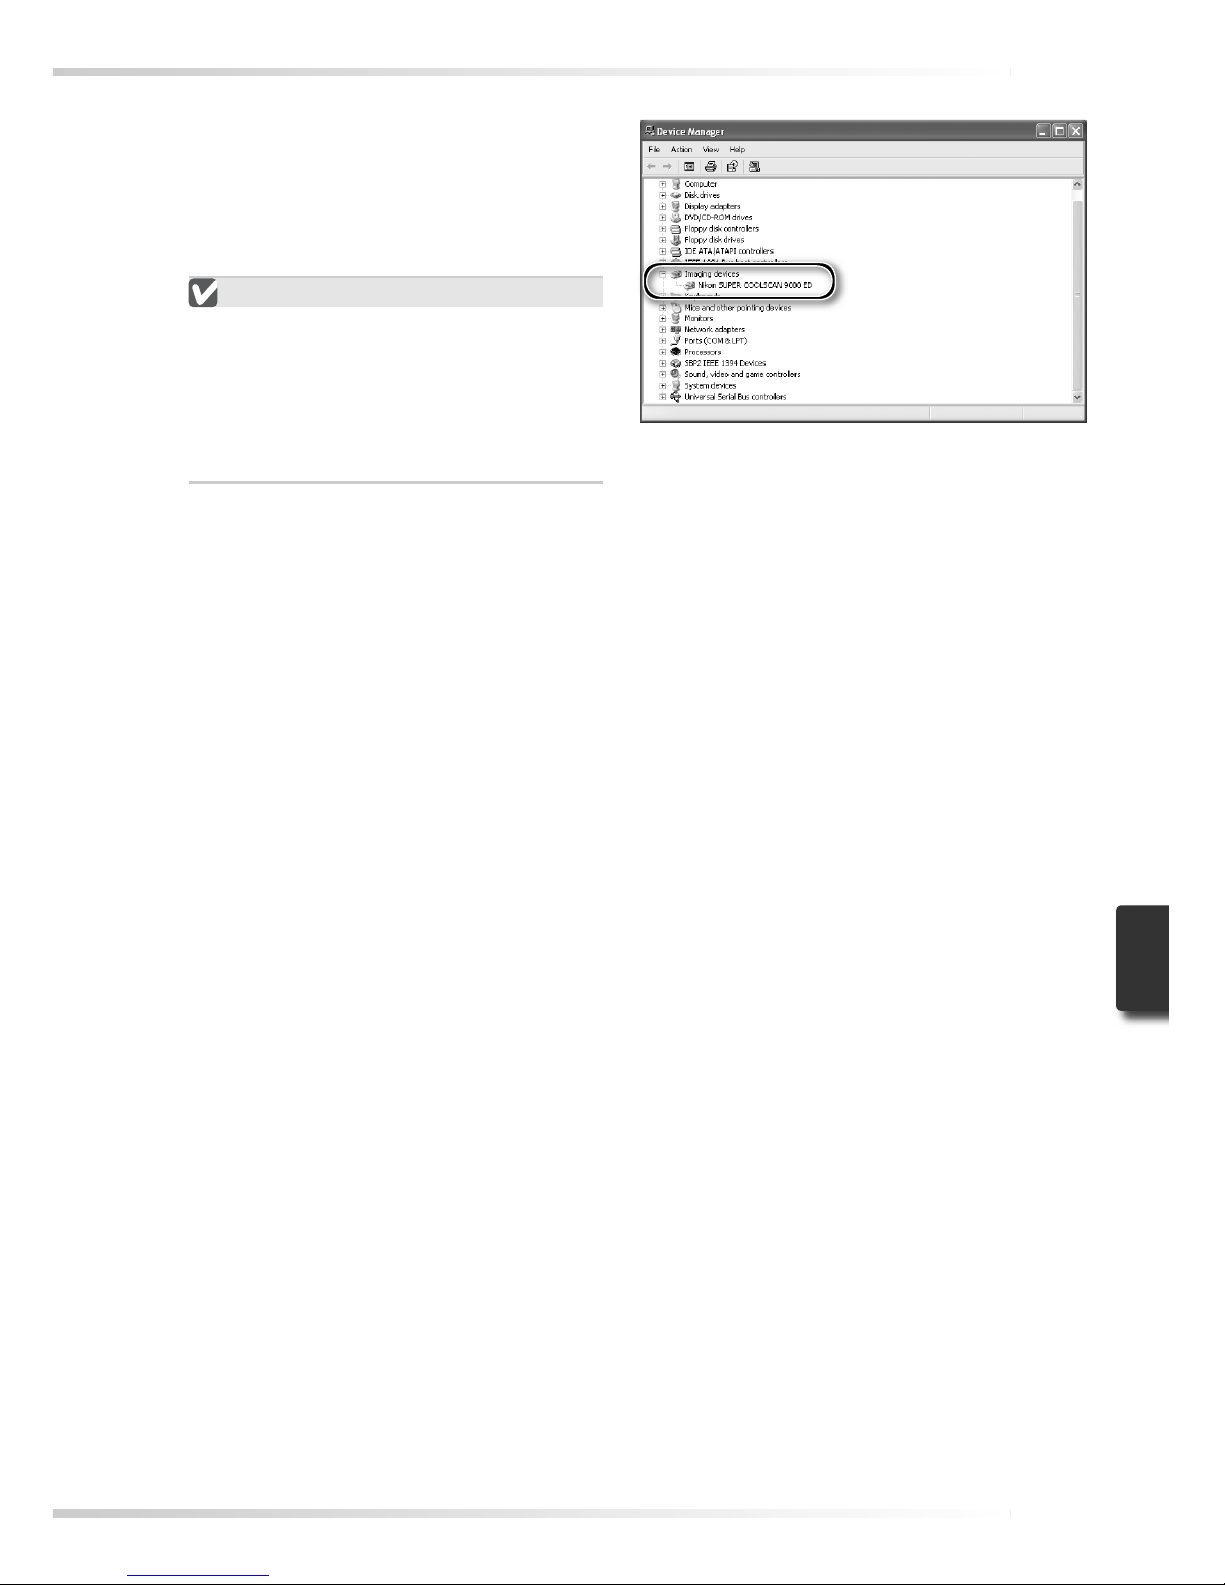
75
4
Check that the scanner is listed as an imaging device
Click the “+” next to “Imaging devices”
(Windows XP, Windows 2000 Professional) or “Imaging Device” (Windows
Me, Windows 98 SE) and confi rm that
the scanner is listed.
If the Scanner Is Not Listed
If the scanner is not listed or appears
next to a “!”, “?”, or “×”, the drivers
have not been correctly installed. Disconnect the scanner and uninstall Nikon
Scan, then reinstall Nikon Scan and reconnect the scanner.
Page 85
76
Specifi cations
Specifi cations
SUPER COOLSCAN 9000 ED (LS-9000 ED)
Media Negatives and positives, in color and monochrome
35-mm fi lm 1–2 strips of 1–6 frames. Up to 3 frames of 24 × 4 8 mm or 24 × 65 mm p an-
orama fi lm can be scanned with optional FH- 869GR fi lm holder.
35-mm slides 1–5 slides with mounts 1.0–3.2 mm thick.
Medium-format fi lm 1–4 frames (6 × 4.5), 1–3 frames (6 × 6), or 1–2 frames (6 × 7, 6 × 8, or 6 × 9).
Medium-format slides Slides with mounts 1.0–3.2 mm thick can be scanned with optional FH-869M
fi lm holder.
Scanning system Fixed optical, movable media, parallel single -pass scanning system
Light source Red, Green, Blue, and Infrared (RGBIr) LEDs; slit light source with rod and
disperser
Image sensor 10,000 pixel three-line monochrome linear CCD image sensor
Color separation Performed by RGB LEDs
Optical resolution Up to 4000 pixels per inch
Analog-to-digital (A/D)
conversion
16 bits per color
Output Full color or greyscale at 8 or 16 bits per channel
Focus Auto and manual
Interface IEEE 1394
Power supply AC 100–240 V, 50 /60 Hz
Operating environment +10 – +35 °C (+50–+95 °F) at a humidity of 20–60%
Size and weight 249 × 498.5 × 202 mm /9.8 ˝ × 19.6˝ × 8.0 ˝ (W × H × D) , 9 kg/19.8 lb (app rox.)
16- mm fi lm 1–3 strips of 1–20 frames can be scanned with optional FH- 816 fi lm holder.
Glass microscope
slides
1–3 prepared glass microscope slides (26 × 76 mm, 0.8–1.5 mm thi ck) can be
scanned with optional FH-8G1 fi lm holder.
FH-
835S
FH-
835M
FH-869S, FH-869G
Aperture (mm)
Scan range (pixels) 4000
×
5904
5905
×
4032
8964
×
6696
25.4
×
37.5
37.5
×
25.6
56.9
×
42.5
Aperture/scan range
6 × 4.5
8964
×
8964
56.9
×
56.9
6 × 6
8964
×
11016
56.9
×
70.0
6 × 7
8964
×
1220 4
56.9
×
77.5
6 × 8
8964
×
13176
56.9
×
83.7
6 × 9
8964
×
13176
56.9
×
83.7
5.9×8.2
2362
×
3384
15.0
×
21.48
FH-
816
7248
×
3780
46.02
×
24.0
FH-
8G1
Power consumption 27 W o r less; 14 W or less in standby mode
Page 86
77
* Times for positive fi lm scanned at input resolution of 4000 dpi (2000 dpi when FH-869S is used with Digital DEE) and bit depth of 16
bits (CMS on) using Nikon Scan 4 on Pentium 4 3.06 GHz FSB 533 MHz computer with 1 GB RAM, Windows XP Professional, IEEE 1394
interface, and 1024 × 768 display.
† Input resolution set to 2000 dpi
Scanning time
(Time to display image
when Preview button is
clicked, or when Scan
button is clicked following preview. Times
do not include autofo cus or holder positioning.)*
With FH-835M 35 -mm slide mount holder
With FH-869S 120/220 fi lm holder
Supplied Film Holders
FH-835S 35-MM STRIP FILM HOLDER
Size and weight 130 × 320 × 17 mm /5.1˝ × 12.6˝ × 0.7˝ ( W × H × D), 20 0 g/ 7.1 oz. (approx. )
Film
1–2 strips of 35-mm fi lm, each with 1–6 frames
FH-835M 35-MM MOUNTED FILM HOLDER
Film 1–5 35 -mm slides with mounts 1.0–3.2 mm thick and 49.0–50.8 mm wide
Size and weight 130 × 345 × 17 mm/5.1˝ × 13.6˝ × 0.7 ˝ (W × H × D) , 180 g/ 6.3 oz. (ap prox.)
FH-869S 120/220 STRIP FILM HOLDER
Size and weight 130 × 320 × 17 mm /5.1˝ × 12.6˝ × 0.7˝ ( W × H × D), 29 0 g/10.2 oz. (a pprox.)
6 × 4.5
6 × 6
6 × 7, 6 × 8, 6 × 9 1–2 frames
1–3 frames
1–4 frames
Film Medium-format (120/220) fi lm, 5.9 × 8. 2 cm electro n microscope fi lm
DEE Preview Scan
40 s
52 s
41 s
57 s
1 min 27 s
1 min 31 s
13 s
28 s
12 s
14 s
14 s
26 s
Off
Off
Off
Off
Off
On
GEM
Off
Off
Off
Off
Off
On
Scan Image
Enhancer ROC
Off
On
Off
Off
Off
Off
Off
On
Off
Off
Off
Off
ICE
Off
Off
On
Off
Off
Off
2 min 33 s33 sOnOnOnOn On
DEE Preview Scan
3 min 05 s
8 min 55 s
3 min 14 s
7 min 05 s
2 min 20 s
11 m i n 4 0 s
38 s
1 min 26 s
38 s
40 s
38 s
1 min 26 s
Off
Off
Off
Off
Off
On
†
GEM
Off
Off
Off
Off
Off
On
Scan Image
Enhancer ROC
Off
On
Off
Off
Off
Off
Off
On
Off
Off
Off
Off
ICE
Off
Off
On
Off
Off
Off
16 m in 0 0 s2 min 24 sOffOnOnOn On
Page 87
78
Optional Film Holders
FH-869M 120/220 MOUNTED FILM HOLDER
Size and weight 130 × 320 × 17 mm /5.1˝ × 12.6˝ × 0.7˝ ( W × H × D), 170 g/ 6.0 oz. (approx .)
Film One 6 × 4.5 or 6 × 6 slid e and one 6 × 7, 6 × 8, or 6 × 9 s lide
FH-8G1 MEDICAL HOLDER
Size and weight 130 × 345 × 17 mm/5.1˝ × 13.6˝ × 0.7 ˝ (W × H × D) , 190 g/ 6.7 oz. (approx. )
Slide
Slide cover
Total thickness No more than 2 mm, including adhesive
25 × 60 mm with thickness of 0.18 mm or less
26 × 76 mm , 0.8–1.5 mm thick
Media 1–3 prepared glass microscope slides
FH-869G 120/220 STRIP FILM HOLDER WITH GLASS
Size and weight 130 × 300 × 17 mm/ 5.1˝ × 11.8˝ × 0.7˝ ( W × H × D), 3 00 g/10.6 oz. ( approx.)
6 × 4.5
6 × 6
6 × 7, 6 × 8, 6 × 9 1–2 frames
1–3 frames
1–4 frames
Film
Medium-format (120/220) fi lm, 5.9 × 8. 2 cm electro n microscope fi lm
FH-869GR ROTATING 120/220 STRIP FILM HOLDER WITH GLASS
Angle adjustment ±5 °
6 × 4.5
6 × 6
6 × 7, 6 × 8, 6 × 9 1–2 frames
1–3 frames
1–4 frames
Film
Medium-format (120/220) fi lm, 5.9 × 8. 2 cm ele ctron microsco pe fi lm, 35 mm panorama fi lm with frame size of 24 × 48 mm or 24 × 65 mm
Size and weight 130 × 320 × 17 mm /5.1˝ × 12.6˝ × 0.7˝ ( W × H × D), 330 g /11.6 oz. (approx. )
FH-816 16 -MM STRIP FILM HOLDER
Film 1–3 strips of 16 - mm fi lm, each with 1–20 frames
Size and weight 130 × 375 × 17 mm /5.1˝ × 14.8˝ × 0.7 ˝ (W × H × D) , 250 g/ 8.8 oz. ( approx.)
Page 88

79
Index
Index
Symbols
2¼˝, see Film, medium format
16 - mm, see Film, 16-mm
35-mm, see Film, 35-mm
120 /220, see Film, medium format
A
Acquire plug-in, 17, 30
Adobe Photoshop, 8, 17, 30
Analog gain, 50
Aperture, 76
Autoexposure, 45
Autofocus, 45
B
Bit depth, 38, 50
Brownie, see Film, medium format
C
Calibrated RGB, 34
Calibration, 32
Color balance, 49
Color model menu, 34, 45. See also
Calibrated RGB; Grayscale.
Color-space profi le, 13, 17–18
Color values, 46, 48
Control area, 33, 44, 45
Crop, 37–38, 48
Curves, 49
D
Device drivers, 12, 74–75
Digital DEE, 2, 50, 58, 60
Digital GEM, 2, 50, 58, 60
Digital ICE, 2, 50, 60
Digital ICE
4
Advanced, 9, 50
Digital ROC, 2, 50, 58, 60
E
Eject button, 41
Nikon Scan, 41, 45
scanner, 3, 41
Ejecting fi lm, see Film, ejecting
Electron microscope fi lm, see Film,
electron microscope
F
File size, 48
Film, 5, 9, 25–29, 42, 52–60
16 - mm, 58–59
35-mm, 9, 26–27
slides, 9, 28, 60
base, 26
caring for, 5, 25
color, 34
curl, 29
ejecting, 41
electron microscope, 9, 25, 28,
52, 54, 56
emulsion surface, 26
inserting, 26–29, 53–60
Kodachrome, 34, 50
medium format, 9, 25, 28–29,
52, 54–56
slides, 52, 53
monochrome, 34
negative, 26, 29, 34, 53, 55, 58
panorama, 52, 56
positive, 26, 29, 34, 53, 55, 58
removing, 42, 53, 55, 57, 59, 60
Film holders, 9, 25–29, 51– 60, 77–78
ejecting, 41
FH- 816, 52, 58–59, 76, 78
FH- 835M, 9, 25, 28, 76, 77
FH-835S, 9, 25, 26–27, 76, 77
FH-869G, 29, 52, 54–55, 76, 78
FH- 869GR, 29, 52, 56–57, 78
FH- 869M, 52, 53, 78
FH-869S, 9, 25, 28–29, 76, 77
FH- 8G1, 52, 60, 76, 78
inserting, 32
Film type menu, 34
Firewire, see IEEE 1394
Flipping images, 9, 36, 46, 48
Frame size menu, 34
G
Grayscale, 34
H
Help button, 45
Holder slot, 3, 32
I
IEEE 1394, 5, 10, 15, 22, 64–69
cable, 4, 5, 8, 22
driver update (Windows 98 SE),
10, 13, 24, 65
interface board, 10, 64–69
interface drivers, 66–69
Imaging applications, 8, 30
Image windows, 9, 39
Information palette, 48
Information panel, 33, 44, 46
Install, see Nikon Scan, installing
K
Kodachrome, see Film, Kodachrome
L
Layout Tools, 36, 48
LCH Editor, 49
M
Mac OS, 2, 15–19, 30, 41, 64, 71–73
Maintenance, 62
Medium format, see Film, medium
format
Multi-sample scanning, 50
N
Natural, 33, 47
Nikon Scan, 8–9, 10–18, 30–31,
33–41, 43–50, 63, 64, 70–73.
See also Scan window
installing, 10–18
custom install, 73
plug- in, 17, 30
starting, 30–31
uninstalling, 70–72
Nikon View, 8–9, 10, 15
O
Orientation, 36, 46
Output size, 38, 48
P
Panorama fi lm, see Film, panorama
Power switch, 3, 21, 24, 41
Power cable, 4, 21, 63
connecting, 21
Preferences, 45
Prefs button, 45
Preview area, 36–38
Preview button, 33, 36, 44, 46
Previewing images, 9, 35–36
Printing images, 9, 40
Processed, 33, 47
Progress window, 33, 39, 44, 47
R
Resolution, 38, 48
Rotating images, 36, ,46 ,48
S
Saving images, 39, 40
Scan button, 33, 39, 44, 46
Scan Image Enhancer, 2, 38, 50
Scan window, 8–9, 30–31, 33–39,
44–47
Scanner extras, 50
Settings menu, 45
Status LED, 3, 5, 24, 32, 41, 63
T
Thumbnail, 35
drawer, 35, 47
drawer tab, 33, 35, 44, 47
Tool Chest, 9, 33, 36, 37–38, 45,
48–50
Tool palettes, 48–50
Too ls button, 37, 45
Transp or t, 62
TWAIN, 30
U
Uninstall, see Nikon Scan, uninstall-
ing
Unsharp Mask, 49
USB, 5, 22
W
Windows, 10–14, 30, 41, 63,
64–69, 70, 74–75
98 SE, 2, 10, 12, 13, 24, 41, 64,
65, 68–69
2000 Professional, 10, 12, 24, 64,
66–67, 70, 74–75
Me, 2, 12, 41, 64, 66–67, 74–75
XP, 2, 10, 12, 64, 66–67, 70,
74–75
Z
Zoom buttons, 45
Page 89
Nikon Film Scanner
Avant de
commencer
Fr
Confi guration
Bases de la
numérisation
Nikon Scan
Porte-fi lms
optionnels
Remarques
techniques
Manuel de l’utilisateur
Page 90

Trademark Information
Apple, le logo Apple, Macintosh, et Mac OS sont des marques déposées d’Apple Computer, Inc. Finder est une marque commerciale d’Apple
Computer, Inc. Microsoft et Windows sont des marques déposées de Microsoft Corporation. Pentium est une marque d’Intel Corporation. Digital ICE4 AdvancedTM englobe Digital ICETM, Digital ROCTM, Digital GEMTM et Digital DEETM, technologies développées par Applied Science Fiction.
Radius, ColorMatch, et PressView sont des marques déposées de miro displays, inc. Adobe et Acrobat sont des marques déposées d’Adobe
Systems Inc. Tous les autres noms mentionnés dans ce manuel ou dans les autres documentations fournies avec votre matériel Nikon sont des
marques commerciales ou des marques déposées de leurs détenteurs respectifs
Documentation relative au produit
Documentation relative au produit
La documentation relative à ce produit comprend les manuels mentionnés ci-dessous. Assurez-vous d'en avoir lu attentivement les instructions.
Guide de démarrage rapide
Manuel de l’utilisateur (ce guide)
Ce document décrit brièvement comment installer le logiciel Nikon
Scan qui permet de piloter votre scanner, comment insérer le fi lm et
effectuer une numérisation simple.
Le présent manuel fournit de manière détaillée les instructions d’installation et d’utilisation des scanners de fi lm
SUPER COOLSCAN 9000 ED.
Manuel de référence de Nikon
Scan/Guide de numérisation
(sur CD)
Ce manuel fournit les instructions complètes de Nikon Scan, logi ciel permettant de numériser les images. Il est disponible sur le CD
de référence en format pdf et peut être visualisé à l'aide d’Adobe
Acrobat Reader 4.0 ou version ultérieure. Cependant, si les utilisa teurs Windows ne possèdent pas Adobe Acrobat Reader, ils peuvent l'installer à l’aide du programme d’installation disponible sur le
CD de référence. Pour de plus amples informations sur l’installation
d’Adobe Acrobat Reader et sur la visualisation du manuel de référence, consultez le Guide de démarrage rapide.
Le Guide de numérisation comporte des animations destinées à
expliquer les notions fondamentales de la numérisation, comme la
confi guration de la taille d’image et de la résolution. Consultez le
Guide de démarrage rapide pour lire les instructions.
Manuel de référence de Nikon
View (sur CD)
Ce manuel fournit les instructions complètes d’utilisation du logiciel
fourni Nikon View qui permet de visionner et de gérer les images.
Ce manuel est enregistré sur le CD de référence en format pdf.
Page 91
Nouchez pas les parties exposées
En cas d'ouverture du produit suite à une chute de ce dernier ou à une autre circonstance, ne touchez pas les parties
exposées. Débranchez le câble d'alimentation du scanner et confi ez le produit à un centre de services agréé Nikon pour
le faire contrôler.
Ne démontez pas ou ne modifi ez pas le scanner
•
L'intérieur de votre scanner comporte des zones de haute tension. Le retrait
de l’armature du scanner peut provoquer un incendie ou vous exposer à une décharge électrique. Contactez votre
revendeur ou votre représentant Nikon pour un contrôle ou une réparation.
• Ne modifi ez pas le scanner. Cela pourrait provoquer un incendie ou vous exposer à une décharge électrique.
Mesures de sécurité
Mesures de sécurité
Afi n d'éviter d'endommager votre matériel Nikon, de vous blesser vous ou d'autres personnes,
veuillez lire attentivement toutes les mesures de précaution relatives à cet appareil avant de procé der à son utilisation. Conservez ces instructions dans un lieu accessible à toutes les personnes qui
ont l’intention d’utiliser ce produit.
Les conséquences résultant du non-respect de ces mesures de précautions sont indiquées dans
cette section par les symboles suivants :
Cette icône indique les avertissements ou les informations devant être lus attentivement avant d'utiliser ce
produit Nikon, afi n d'éviter un accident éventuel pouvant entraîner des blessures graves ou mortelles.
Cette icône indique les précautions à prendre ou les informations devant être lues avant d'utiliser ce produit Nikon,
et ce afi n d'éviter d'endommager ce matériel, de vous blesser ou éviter que d'autres personnes ne se blessent.
AVERTISSEMENTS
Débranchez le scanner si vous constatez une anomalie
• Si vous constatez un bruit anormal, une odeur, ou de la fumée provenant du scanner, éteignez-le immédiatement
et débranchez le câble d'alimentation. Une utilisation prolongée dans ces conditions pourrait provoquer un incendie
ou vous exposer à une décharge électrique. Attendez que la fumée disparaisse puis faites appel à votre représentant
Nikon pour en savoir plus sur le remplacement ou la réparation de l’appareil. NE TENTEZ PAS DE RÉPARER L'APPAREIL
VOUS-MÊME : cela pourrait s’avérer extrêmement dangereux.
• En cas de détérioration de l'appareil, éteignez-le immédiatement et débranchez le câble d'alimentation, puis contactez
votre représentant Nikon pour en savoir plus sur le remplacement ou la réparation de l’appareil. Une utilisation prolongée de l'appareil dans ces conditions pourrait provoquer un incendie ou vous exposer à une décharge électrique.
N'utilisez pas le produit en la présence de gaz infl ammables ou de poussière
Le non-respect de cette consigne pourrait provoquer une explosion ou un incendie.
Ne laissez pas des corps étrangers s’infi ltrer dans le scanner
Ne posez pas de vases, de pots de fl eurs, de tasses, de produits cosmétiques, de récipients contenant des produits chimiques ou de l'eau, ni de petits objets métalliques sur le scanner. Dans le cas où des corps étrangers ou de l'eau s’infi ltreraient
dans le scanner, débranchez le câble d'alimentation et contactez votre représentant Nikon. Une utilisation prolongée dans
de telles conditions pourrait entraîner un incendie, une décharge électrique ou un mauvais fonctionnement de l'appareil.
Ne laissez pas de petits objets à la portée des enfants
Faites très attention à ce que les enfants ne mettent pas à la bouche les petites pièces du scanner. Dans le cas où un
enfant avalerait l’un de ces éléments, faites appel immédiatement à un médecin.
Utilisez une alimentation électrique appropriée
Utilisez une alimentation secteur de 50/60 Hz et une tension de 100 V-240V. Le cordon d'alimentation doit être conforme aux normes de sécurité en vigueur dans le pays où il est utilisé. Son isolation doit être de type SVT ou mieux, et
son épaisseur doit dépasser 18 AWG.
À des tensions supérieures à 125V À des tensions de 125V ou moins
Utilisez une prise dont la tension est de 250V,
15A (NEMA 6P-15)
Utilisez une prise dont la tension est de 125V, 10A
i
Page 92
ii
Ne manipulez pas l'appareil avec les mains mouillées
Vous risquez sinon de vous exposer à une décharge électrique.
Manipulation du câble d'alimentation et des prises
• N'endommagez pas, ne modifi ez pas, ne tentez pas de tirer ou de plier le câble d'alimentation. Ne le placez pas non
plus sous des objets lourds, ne l’exposez pas à la chaleur ou à des fl ammes. Si l’isolation est endommagée et que les
fi ls électriques sont visibles, contactez un représentant Nikon pour en savoir plus sur le remplacement ou la réparation du câble. Le non-respect de ces consignes risque de provoquer un incendie ou de vous exposer à une décharge
électrique.
• Ne manipulez pas la prise avec les mains mouillées. Ceci pourrait vous exposer à une décharge électrique.
• Si vous constatez la présence de poussière sur ou près des parties métalliques de la prise, enlevez-la avec un chiffon
sec. Une utilisation prolongée dans de telles conditions pourrait provoquer un incendie.
• Ne manipulez pas le câble d’alimentation ou ne vous approchez pas du scanner pendant les orages. Le non-respect
de cette consigne pourrait vous exposer à une décharge électrique.
CD-ROM
Les CD-ROM contenant le logiciel et les manuels ne doivent pas être insérés dans un lecteur de CD audio. La lecture de
CD-ROM sur un équipement audio peut entraîner une perte d’audition ou endommager l’équipement.
AVERTISSEMENTS
Connectez le scanner à une prise de terre
• La prise de courant utilisée pour le branchement du câble d'alimentation doit être une prise de terre. Si ce n'est pas
le cas, vous vous exposez à une décharge électrique.
• Ne mettez pas à la masse la prise de courant où elle serait en contact avec un tuyau de gaz ou une conduite d'eau
ou encore un système de branchement téléphonique. Cela pourrait provoquer un incendie ou vous exposer à une
décharge électrique.
Manipulation du câble d'alimentation et des prises
• Ne placez pas le câble à proximité d'une cuisinière, d’un poêle ou d'un chauffage car ceci pourrait faire fondre l'isolation, provoquant ainsi un incendie ou une décharge électrique.
•
Débranchez le câble d'alimentation en tirant sur la prise, et non sur le câble lui-même. Vous risquez sinon d'endomma-
ger le câble et de provoquer un incendie ou de vous exposer à une décharge électrique.
• Ne branchez pas le câble d'alimentation sur une rallonge ou une rallonge avec connecteur multiple, car cela pourrait
provoquer un incendie ou un mauvais fonctionnement.
Débranchez l'équipement lorsque vous ne l’utilisez pas
Eteignez et débranchez le scanner lorsque ne vous ne l'utilisez pas pendant une période prolongée. Le non-respect de
cette consigne pourrait provoquer un incendie.
Ne mettez pas les doigts dans l'appareil
A moins qu'il n'en soit indiqué autrement, ne mettez pas les doigts dans l'appareil. Vous risquez sinon de vous blesser.
Débranchez l'appareil avant de procéder à son nettoyage
Par mesure de précaution, éteignez et débranchez le scanner lorsque vous procédez à son nettoyage. Vous risquez
sinon de vous blesser.
Ne placez pas des objets lourds sur l'appareil
Les objets ou le matériel pourraient basculer ou tomber, provoquant éventuellement des blessures.
Placez l'appareil sur une surface stable
Sinon, le scanner risque de tomber et par conséquent de s’endommager ou de vous blesser. En cas de rupture d’éléments en verre du scanner, suite à la chute de l’appareil ou à tout autre incident, faites attention de ne pas vous
blesser.
N'installez le scanner que selon les instructions de ce manuel
Vous risquez sinon de bloquer les orifi ces de ventilation du scanner, provoquant ainsi une surchauffe et éventuellement
un incendie.
Page 93
iii
• Les manuels fournis avec votre appareil photo ne
peuvent être reproduits, transmis, transcrits, stockés sur un serveur ou traduits quelle que soit la
langue, en tout ou en partie, et quels qu’en soient
les moyens, sans accord écrit préalable de Nikon.
• Nikon se réserve le droit de modifi er à tout moment et sans avis préalable les caractéristiques du
matériel et du logiciel décrites dans ces manuels.
• Nikon ne peut être tenu responsable des dommages provenant de l’utilisation de ce matériel.
• Nous avons apporté le plus grand soin à la rédaction de ces manuels pour qu’ils soient précis et
complets. Si, cependant, vous veniez à remarquer
des erreurs ou des omissions, nous vous serions
reconnaissants de les signaler à votre représentant
Nikon (adresse fournie séparément).
Avertissements
Avertissements
Nikon Inc.,
1300 Walt Whitman Road, Melville, New York
11747-3064, U.S.A.
Tel.: 631-547-4200
A l’attention des utilisateurs canadiens
CAUTION
This class B digital apparatus meets all requirements of the Canadian Interference Causing Equipment Regulations.
ATTENTION
Cet appareil numérique de la classe B respecte
toutes les exigences du Règlement sur le matériel
brouilleur du Canada.
LS-9000 ED
A l’attention des utilisateurs aux Etats-Unis
Déclaration de la FCC (Federal Communications Commission) pour la protection contre les parasites
Cet équipement a été testé et trouvé conforme
aux limites défi nies pour les appareils numériques
de classe B selon la partie 15 de la réglementation FCC. Ces limites assurent une protection
raisonnable contre les interférences dangereuses
lorsque l'équipement est utilisé en environnement
résidentiel. Cet équipement génère, utilise et peut
irradier des radiofréquences qui peuvent, en cas
d'une installation et d'une utilisation contraire aux
instructions, provoquer des interférences néfastes
aux communications radio. Cependant, il n'existe
aucune garantie qu'une interférence ne se produira
pas dans une installation particulière. Si ce matériel
provoque effectivement des interférences préjudiciables à la réception radio ou télévisée, ce que l’on
peut déterminer en allumant et en éteignant le matériel, l'utilisateur est vivement encouragé à essayer
de corriger ces interférences en ayant recours à une
ou plusieurs des mesures suivantes:
• Réorientez ou repositionnez l'antenne de réception.
• Augmentez la distance séparant l'équipement du
récepteur.
• Branchez le scanner à une prise reliée à un circuit
différent de celui où est connecté le récepteur.
• Consultez le revendeur ou un technicien radio/
télévision spécialisé.
ATTENTION
Modifi cations
Le FCC demande qu’il soit notifi é à l'utilisateur que
tout changement ou modifi cation sur cet appareil
qui n'aurait pas été expressément approuvé par
Nikon Corporation peut annuler tout droit à l'utilisateur d'utiliser l'équipement.
Câbles d’interface
Utilisez les câbles d’interface vendus ou fournis par
Nikon pour votre matériel. L'utilisation d'autres
câbles peut faire dépasser les limites de la Classe B
Partie 15 du règlement FCC.
Page 94

iv
Avertissement concernant l’interdiction de copie ou de reproduction
Il est à noter que le simple fait d’être en possession de matériel copié ou reproduit numériquement au
moyen d’un scanner, d’un appareil photo numérique ou d’un autre dispositif est répréhensible.
• Articles légalement interdits de copie ou de
reproduction
Ne copiez pas, ni ne reproduisez des billets de
banque, des pièces, des titres, des bons d’Etat,
même si de telles copies ou reproductions sont
estampillées « Exemple ».
La copie ou la reproduction de billets de banque,
de pièces ou de titres circulant à l’étranger est
interdite.
Sauf autorisation exceptionnelle de l'Etat, la copie
ou la reproduction de timbres et de cartes postales non compostés émis par l’Etat sont interdites.
La copie ou la reproduction de timbres émis par
l’Etat et des documents certifi és, stipulés par la
loi est interdite.
• Attention à certaines copies et reproductions
L'état a émis des avertissements sur les copies ou
les reproductions de titres émis par des sociétés
privées (actions, factures, chèques, chèque-cadeau, etc.), les coupons ou titres de transport, à
l’exception du minimum de copies nécessaires à
fournir pour les besoins de l’entreprise. De même,
ne copiez pas, ni ne reproduisez des passeports
émis par l’Etat, des permis émis par des organismes publics et des groupes privés, des cartes
d’identité et des tickets comme des passes ou des
tickets restaurant.
• Conformez-vous aux avis de droit de reproduction
La copie ou la reproduction de travaux créatifs
soumis à un droit de reproduction comme les
livres, la musique, les peintures, les impressions
sur bois, les cartes, les dessins, les fi lms et les
photographies est régie par des lois nationales
et internationales de copyright. L’utilisation de ce
produit à des fi ns de reproduction illégale, ainsi
que toute infraction aux lois de copyright sont
interdites.
Page 95

v
Table des matières
Table des matières
Mesures de sécurité ....................................................................................................................... i
AVERTISSEMENTS .......................................................................................................................... i
Avertissements ............................................................................................................................... iii
Avant de commencer...................................................................................................................... 1
Introduction ................................................................................................................................... 2
Caractéristiques principales ............................................................................................................ 2
Descriptif du scanner ..................................................................................................................... 3
Précautions à observer .................................................................................................................. 5
Confi guration .................................................................................................................................. 7
Guide de confi guration et de numérisation ................................................................................ 8
Installation de Nikon Scan............................................................................................................. 10
Windows ....................................................................................................................................... 10
Macintosh...................................................................................................................................... 15
Installation du scanner .................................................................................................................. 20
Etape 1 — Choisir un emplacement pour le scanner ........................................................................ 20
Etape 2 — Connecter le câble d’alimentation .................................................................................. 21
Etape 3 —Brancher le câble IEEE 1394 ............................................................................................ 22
Bases de la numérisation................................................................................................................ 23
Etape 1 — Mettre le scanner sous tension..................................................................................... 24
Etape 2 — Insérer le fi lm dans le porte-fi lm .................................................................................. 25
Etape 3 — Ouvrir la fenêtre de numérisation ............................................................................... 30
Etape 4 — Insérer le porte-fi lm ..................................................................................................... 32
Etape 5 — Choisir un type de fi lm et un mode couleur ................................................................ 33
Etape 6 — Créer un aperçu (prévisualiser)..................................................................................... 35
Etape 7 — Effectuer un recadrage ................................................................................................. 37
Etape 8 — Numériser et enregistrer............................................................................................... 39
Etape 9 — Ejecter et quitter ........................................................................................................... 41
Nikon Scan....................................................................................................................................... 43
Fenêtre de numérisation ............................................................................................................... 44
Zone de contrôle............................................................................................................................ 45
Zone d’informations....................................................................................................................... 46
Boutons Aperçu et Numériser......................................................................................................... 46
Onglet du menu Vignette .............................................................................................................. 47
Zone d’aperçu................................................................................................................................ 47
Fenêtre de progression................................................................................................................... 47
Palette d’outils ............................................................................................................................... 48
Porte-fi lms optionnels .................................................................................................................... 51
Porte-diapositive moyen-format FH-869M................................................................................... 53
Insertion des diapositives................................................................................................................ 53
Retrait des diapositives................................................................................................................... 53
Porte-fi lm moyen format + presseur verre FH-869G.................................................................... 54
Insertion du fi lm............................................................................................................................. 54
Retrait du fi lm ................................................................................................................................ 55
Porte-fi lm rotatif moyen format + presseur verre FH-869GR...................................................... 56
Insertion du fi lm............................................................................................................................. 56
Retrait du fi lm ................................................................................................................................ 57
Page 96

vi
Porte-fi lm 16 mm FH-816 .............................................................................................................. 58
Insertion du fi lm............................................................................................................................. 58
Retrait du fi lm ................................................................................................................................ 59
Porte-lame pour microscope FH-8G1............................................................................................ 60
Insertion des lames ........................................................................................................................ 60
Retrait des lames............................................................................................................................ 60
Remarques techniques ................................................................................................................... 61
Maintenance .................................................................................................................................. 62
Dépannage..................................................................................................................................... 63
Installation de la carte d’interface IEEE 1394 (Firewire).............................................................. 64
Mise à jour des pilotes IEEE 1394 (Windows 98 SE uniquement)..................................................... 65
Installation de la carte d’interface IEEE 1394 (Firewire)................................................................... 66
Installation des pilotes du périphérique (Windows uniquement) ..................................................... 66
Désinstallation de Nikon Scan....................................................................................................... 70
Windows ....................................................................................................................................... 70
Macintosh...................................................................................................................................... 71
Installation personnalisée (Macintosh uniquement) ................................................................... 73
Vérifi cation de l’enregistrement du périphérique (Windows uniquement) .............................. 74
Caractéristiques.............................................................................................................................. 76
SUPER COOLSCAN 9000 ED (LS-9000 ED)...................................................................................... 76
Porte-fi lms fournis.......................................................................................................................... 77
Porte-fi lms optionnels .................................................................................................................... 78
Index ............................................................................................................................................... 79
Page 97
1
Introduction ............................................................ 2
Descriptif du scanner.............................................. 3
Précautions à observer ........................................... 5
Avant de commencer
Ce chapitre décrit les conventions utilisées dans ce manuel, les noms des différents composants du scanner et
les précautions d’emploi.
Page 98
2
Introduction
Introduction
Merci d'avoir fait l'acquisition du scanner de fi lm Nikon SUPER COOLSCAN 9000 ED. Lisez attentivement ce manuel avant d'utiliser votre matériel et gardez-le toujours à portée de main.
Pour mieux mettre en évidence les informations dont vous pouvez avoir besoin, nous avons
utilisé dans ce manuel les symboles et conventions suivants :
Illustrations
La plupart des illustrations de l’interface du scanner sont extraites de Windows XP Professionnel. Lorsque
les deux systèmes d’exploitation Windows et Macintosh n’opèrent pas de la même façon, les illustrations
sont également extraites de Mac OS X.
Terminologie
Dans ce manuel, le SUPER COOLSCAN 9000 ED est parfois appelé 9000 ED. Windows XP Edition familiale et Windows XP Professionnel sont réunis sous le nom de Windows XP ; Windows Millénium Edition
est appelé Windows Me et Windows 98 Deuxième Edition est appelé Windows 98 SE.
Formation permanente
Dans le cadre de l’engagement de Nikon pour la “Formation permanente” sur ses produits au niveau
technique et éducatif, des informations continuellement mises à jour sont disponibles en ligne sur les
sites suivants :
• Etats-Unis.: http://www.nikonusa.com/
• Europe: http://www.europe-nikon.com/support
• Asie, Océanie, Moyen- Orient et Afrique: http://www.nikon-asia.com/
Vous trouverez sur ces sites des informations relatives aux derniers produits, des astuces, des réponses
aux questions les plus fréquemment posées (FAQ) ainsi que des conseils d’ordre général sur l’imagerie et
la photographie numériques. Pour tout renseignement complémentaire, contactez le représentant Nikon
de votre pays. Consultez le site suivant pour obtenir les coordonnées de votre fi liale:
http://nikonimaging.com/
Cette icône signale les mesures de précaution dont
vous devez avoir connaissance avant d'utiliser votre
scanner pour ne pas risquer de l'endommager.
Cette icône signale des astuces, informations
supplémentaires qui peuvent s'avérer utiles
lors de l'utilisation de votre scanner.
Cette icône signale les notes à lire avant d'utiliser votre scanner.
Cette icône signale que de plus amples informations sont disponibles dans une autre partie de ce
manuel ou dans le Guide de démarrage rapide.
Caractéristiques principales
• La technologie Scan Image Enhancer ajuste automatiquement les teintes pour restituer
des images parfaitement contrastées.
• La technologie Digital ICE détecte, analyse et élimine automatiquement les rayures et les
poussières.
• La technologie Digital ROC restitue numériquement les couleurs altérées des anciens négatifs.
• La technologie Digital GEM permet la gestion automatique du grain, améliorant considéra -
blement les images prises avec des fi lms à sensibilité élevée.
• La technologie Digital DEE fait ressortir les détails dans les ombres des vues sous- exposées
ou prises en contre-jour. Elle permet également d’augmenter le contraste dans les zones
“décolorées” ( hautes lumières) afi n de créer une exposition à l’aspect naturel.
Page 99
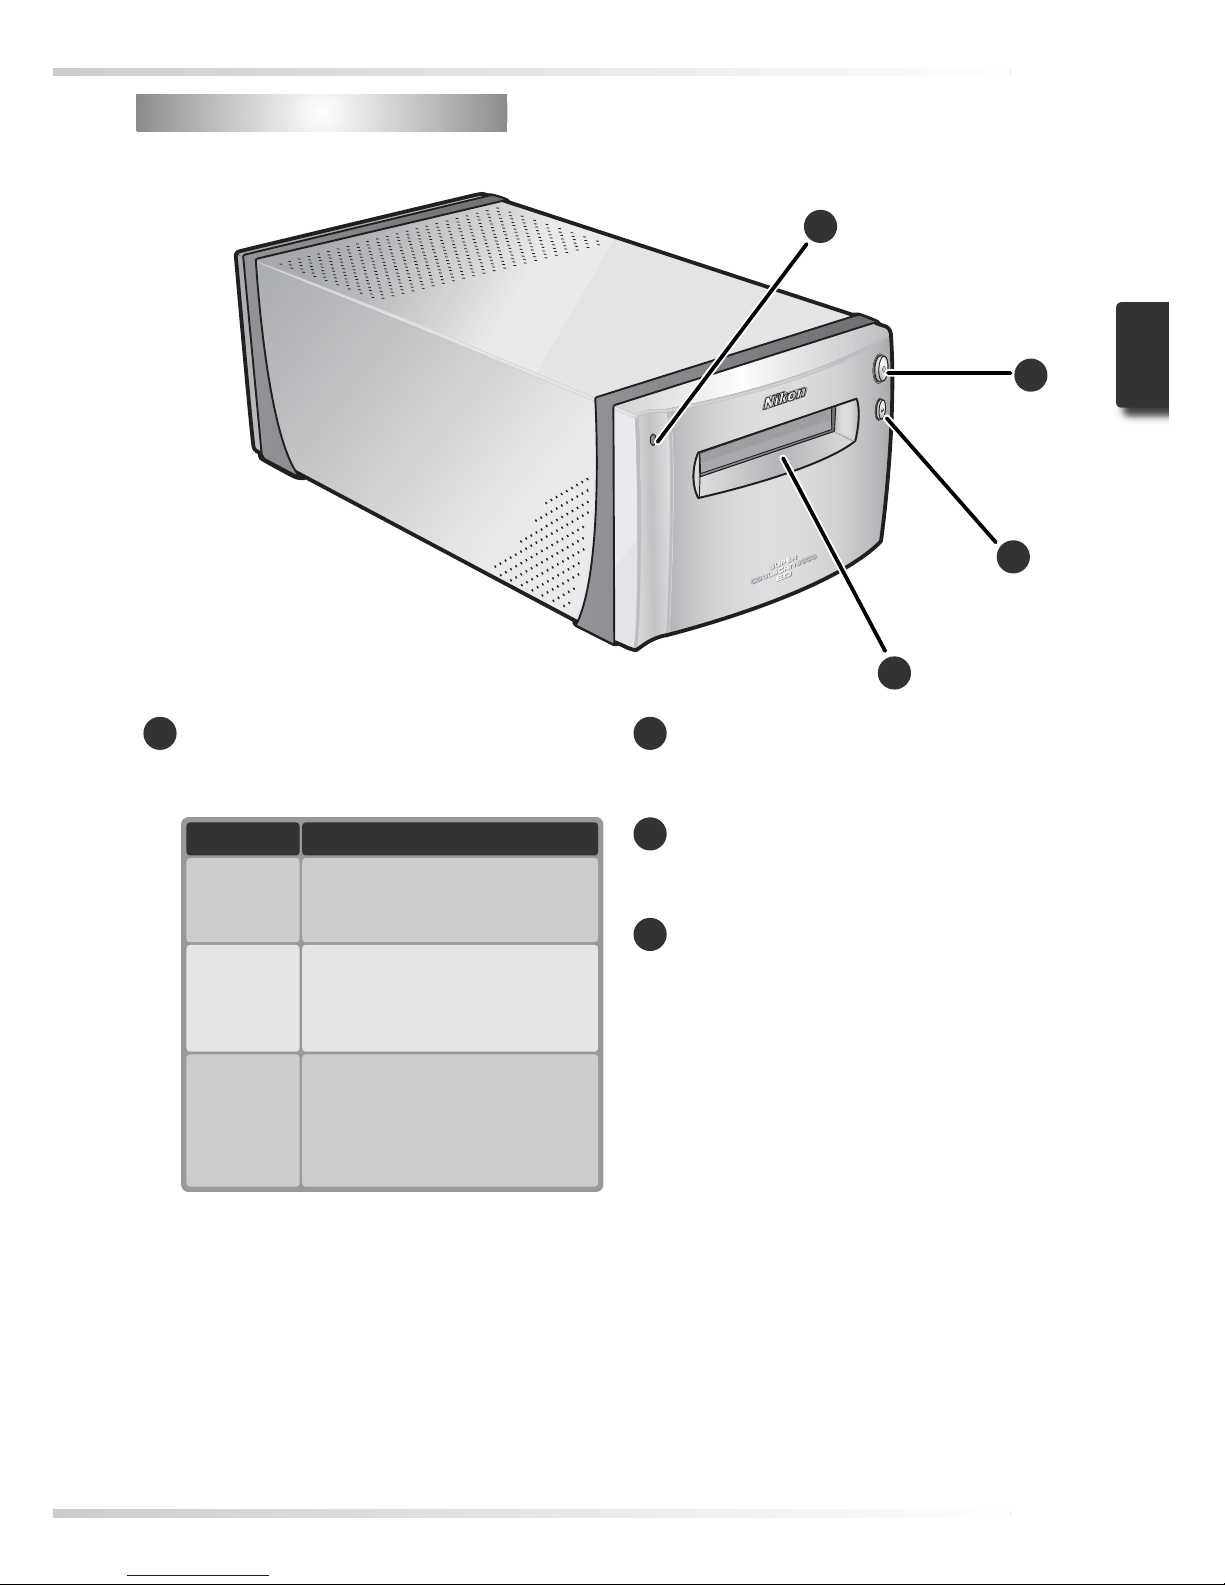
3
Descriptif du scanner
Descriptif du scanner
Vue avant
1
Témoin DEL
L’é ta t d u s ca nn er es t indiqué de la manière
suivante:
Tém o in D EL
Etat du scanner
Allumé
Aucune opération n’est en
cours. Vous pouvez insérer ou
retirer des fi lms et adaptateurs.
Clignote
(environ
1,5x / s )
Le scanner est en cours de
fonctionnement. Ne l’éteignez
pas, n’insérez pas ni ne retirez
de fi lm ou d’adaptateur.
Clignote
rapidement
(environ
5x/ s)
Erreur matériel ou erreur de
communication. Eteignez le
scanner, patientez au moins
5s avant de le remettre sous
tension.
2
Commutateur marche-arrêt
Appuyez sur celui-ci pour allumer ou
éteindre le scanner.
3
Bouton d’éjection
Appuyez sur ce bouton pour éjecter les
porte-fi lms du scanner.
4
Fente pour porte-fi lm
Insérez les porte-fi lms destinés à divers
types de fi lm dans la fente prévue à
cet effet. Un couvercle empêche que la
poussière ne s’accumule à l’intérieur du
scanner lorsque celui- ci n’est pas utilisé.
2
3
4
1
Page 100
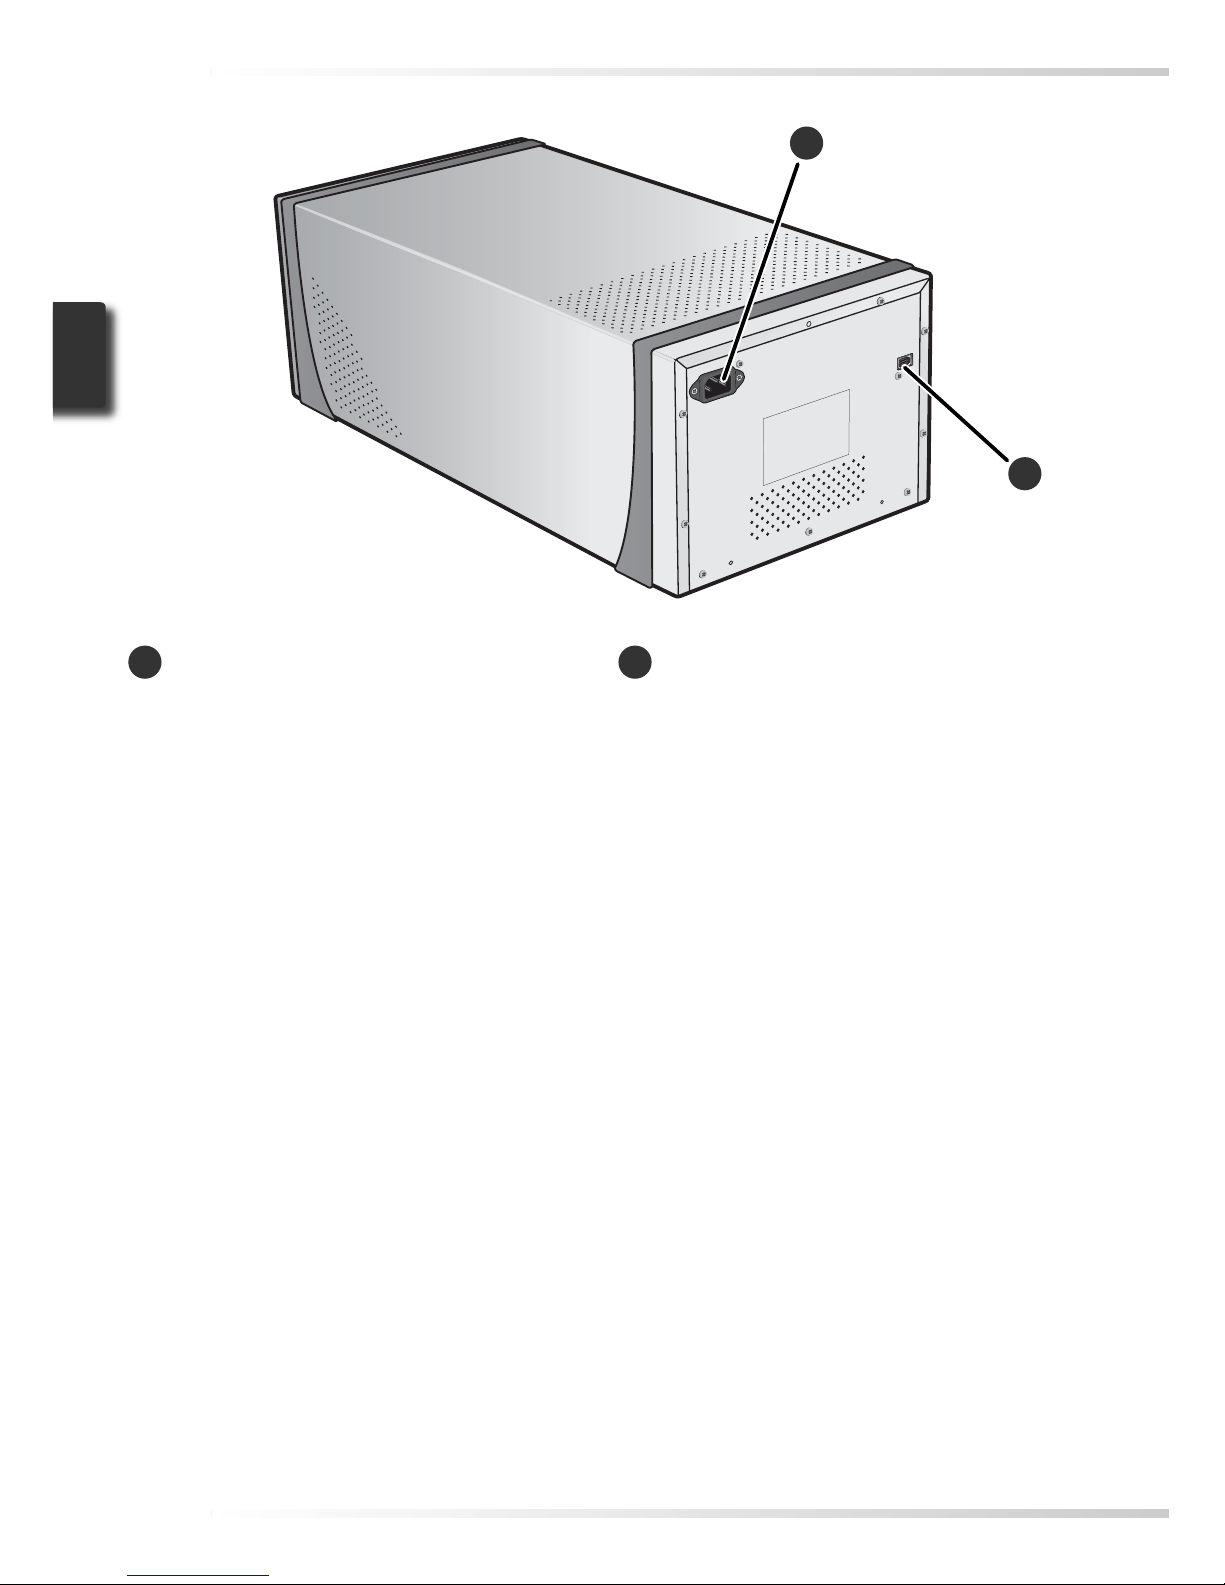
4
Vue arrière
5
Connecteur secteur
C’est ici que vous devez insérer l’extrémité
femelle du câble d’alimentation secteur.
6
Connecteur IEEE 1394 (Firewire)
Branchez le câble d’interface IEEE 1394 à
cet emplacement.
6
5
 Loading...