

Page 1
Page 2

Trademark Information
• Microsoft, Windows and Windows Vista are either registered trademarks or
trademarks of Microsoft Corporation in the United States and/or other countries.
• Macintosh, Mac OS, and QuickTime are trademarks of Apple Inc.
• Adobe and Acrobat are registered trademarks of Adobe Systems Inc.
• The SD logo is a trademark of the SD Card Association.
• PictBridge is a trademark.
• D-Lighting technology is provided by P Apical Limited.
• All other trade names mentioned in this manual or the other documentation
provided with your Nikon product are trademarks or registered trademarks of their
respective holders.
Page 3
Introduction
First Steps
A Basic Photography and Playback: Auto Mode
B High-sensitivity Shooting Mode
C Shooting Suited for the Scene
c More on Playback
D Movies
Connecting to Televisions, Computers and Printers
d Shooting, Playback and Setup Menus
Technical Notes
i
Page 4
For Your Safety
To prevent damage to your Nikon product or injury to yourself or to others, read
the following safety precautions in their entirety before using this equipment.
Keep these safety instructions where all those who use the product will read them.
The consequences that could result from failure to observe the precautions listed
in this section are indicated by the following symbol:
This icon marks warnings, information that should be read before using this Nikon
product, to prevent possible injury.
WARNINGS
Turn off in the event of
malfunction
Should you notice smoke or an
unusual smell coming from the
camera or AC adapter, unplug the AC
adapter and remove the battery
immediately, taking care to avoid
burns. Continued operation could
result in injury. After removing or
disconnecting the power source, take
the equipment to a Nikon-authorized
service representative for inspection.
Do not disassemble
Touching the internal parts of the
camera or AC adapter could result in
injury. Repairs should be performed
only by qualified technicians. Should
the camera or AC adapter break open
as the result of a fall or other accident,
take the product to a Nikon-authorized
service representative for inspection,
after unplugging the product and/or
removing the battery.
ii
Do not use the camera or AC
adapter in the presence of
flammable gas
Do not use electronic equipment in
the presence of flammable gas, as this
could result in explosion or fire.
Handle the camera strap with
care
Never place the strap around the neck
of an infant or child.
Keep out of reach of children
Particular care should be taken to
prevent infants from putting the
battery or other small parts into their
mouths.
Page 5

For Your Safety
Observe caution when
handling the battery
The battery may leak or explode if
improperly handled. Observe the
following precautions when handling
the battery for use in this product:
• Before replacing the battery, turn
the product off. If you are using the
AC adapter, be sure it is unplugged.
• Only use a Rechargeable Li-ion
Battery EN-EL10 (supplied). Charge
the battery by inserting it in a
Battery Charger MH-63 (supplied).
• When inserting the battery, do not
attempt to insert it upside down or
backwards.
• Do not short or disassemble the
battery or attempt to remove or
break the battery insulation or
casing.
• Do not expose the battery to flame
or to excessive heat.
• Do not immerse in or expose to
water.
• Return the battery to the battery
case for transportation. Do not
transport or store with metal objects
such as necklaces or hairpins.
• The battery is prone to leakage
when fully discharged. To avoid
damage to the product, be sure to
remove the battery when no charge
remains.
• Discontinue use immediately should
you notice any change in the
battery, such as discoloration or
deformation.
• If liquid from the damaged battery
comes in contact with clothing or
skin, rinse immediately with plenty
of water.
Observe the following
precautions when handling
the battery charger
• Keep dry. Failure to observe this
precaution could result in fire or
electric shock.
• Dust on or near the metal parts of
the plug should be removed with a
dry cloth. Continued use could
result in fire.
• Do not handle the power cable or
go near the battery charger during
lightning storms. Failure to observe
this precaution could result in
electric shock.
• Do not damage, modify, forcibly tug
or bend the power cable, place it
under heavy objects, or expose it to
heat or flames. Should the insulation
be damaged and the wires become
exposed, take it to a Nikonauthorized service representative for
inspection. Failure to observe these
precautions could result in fire or
electric shock.
• Do not handle the plug or battery
charger with wet hands. Failure to
observe this precaution could result
in electric shock.
• Do not use with travel converters or
adapters designed to convert from
one voltage to another or with DCto-AC inverters. Failure to observe
this precaution could damage the
product or result in overheating or
fire.
iii
Page 6
For Your Safety
Use appropriate cables
When connecting cables to the input
and output jacks, use only the cables
provided or sold by Nikon for the
purpose, to maintain compliance with
product regulations.
Handle moving parts with
care
Be careful that your fingers or other
objects are not pinched by the lens
cover or other moving parts.
CD-ROMs
The CD-ROMs supplied with this
device should not be played back on
audio CD equipment. Playing CDROMs on an audio CD player could
cause hearing loss or damage the
equipment.
Observe caution when using
the flash
Using the flash close to your subject’s
eyes could cause temporary visual
impairment. Particular care should be
observed if photographing infants,
when the flash should be no less than
one meter (39 in.) from the subject.
Do not operate the flash with
the flash window touching a
person or object
Failure to observe this precaution
could result in burns or fire.
Avoid contact with liquid
crystal
Should the monitor break, care should
be taken to avoid injury caused by
broken glass and to prevent liquid
crystal from the monitor touching the
skin or entering the eyes or mouth.
iv
Page 7

Notices
Notice for Customers in the U.S.A.
Federal Communications
Commission (FCC) Radio
Frequency Interference Statement
This equipment has been tested and
found to comply with the limits for a
Class B digital device, pursuant to Part
15 of the FCC rules. These limits are
designed to provide reasonable
protection against harmful
interference in a residential installation.
This equipment generates, uses, and
can radiate radio frequency energy
and, if not installed and used in
accordance with the instructions, may
cause harmful interference to radio
communications. However, there is no
guarantee that interference will not
occur in a particular installation. If this
equipment does cause harmful
interference to radio or television
reception, which can be determined
by turning the equipment off and on,
the user is encouraged to try to correct
the interference by one or more of the
following measures:
• Reorient or relocate the receiving
antenna.
• Increase the separation between the
equipment and receiver.
• Connect the equipment into an
outlet on a circuit different from that
to which the receiver is connected.
• Consult the dealer or an
experienced radio/television
technician for help.
CAUTIONS
Modifications
The FCC requires the user to be
notified that any changes or
modifications made to this device that
are not expressly approved by Nikon
Corporation may void the user’s
authority to operate the equipment.
Interface Cables
Use the interface cables sold or
provided by Nikon for your equipment.
Using other interface cables may
exceed the limits of Class B Part 15 of
the FCC rules.
Notice for customers in the State of
California
WARNING
Handling the cord on this product will
expose you to lead, a chemical known
to the State of California to cause birth
defects or other reproductive harm.
Wash hands after handling.
Nikon Inc.,
1300 Walt Whitman Road
Melville, New York 11747-3064
USA
Tel: 631-547-4200
v
Page 8
Notices
Notice for customers in Canada
CAUTION
This Class B digital apparatus complies
with Canadian ICES-003.
ATTENTION
Cet appareil numérique de la classe B
est conforme à la norme NMB-003 du
Canada.
Symbol for Separate Collection in
European Countries
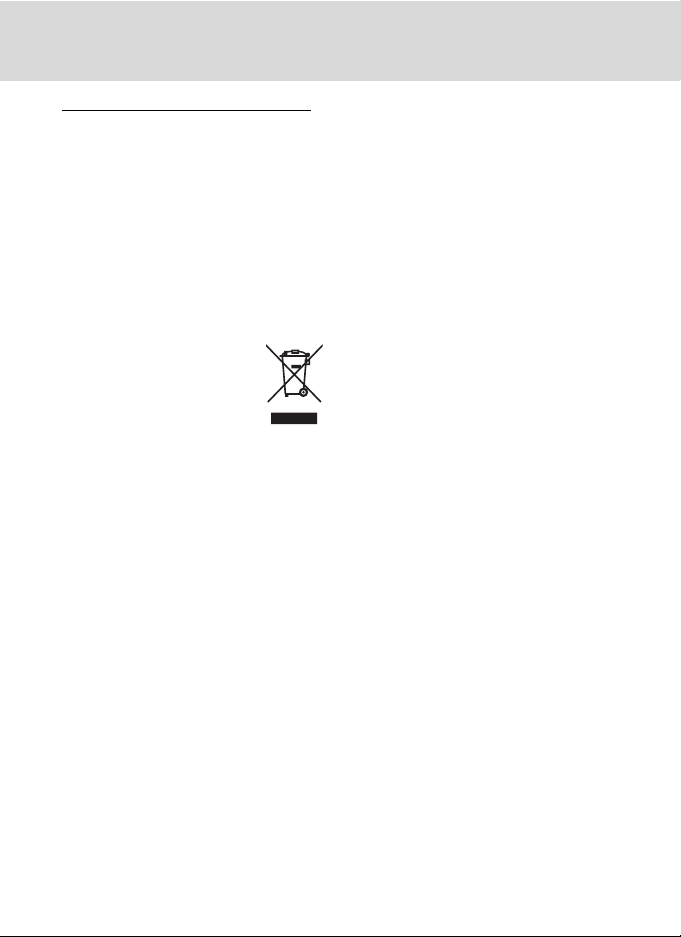
This symbol indicates that
this product is to be
collected separately.
The following apply only to
users in European countries:
This product is designated for separate
collection at an appropriate collection
point. Do not dispose of as household
waste.
For more information, contact the
retailer or the local authorities in
charge of waste management.
vi
Page 9

Table of Contents
For Your Safety........................................................................................................................................ ii
WARNINGS..................................................................................................................................................................ii
Notices ....................................................................................................................................................... v
Introduction ...........................................................................................................................................1
About This Manual ................................................................................................................................1
Information and Precautions............................................................................................................. 2
Parts of the Camera ...............................................................................................................................4
The Camera Body ...................................................................................................................................................4
The Monitor................................................................................................................................................................6
Basic Operations..................................................................................................................................... 8
The c (Shooting/Playback) Button...........................................................................................................8
The e (Mode) Button ..................................................................................................................................8
The Multi Selector...................................................................................................................................................9
The d Button....................................................................................................................................................10
Help Displays..........................................................................................................................................................11
Attaching the Camera Strap .........................................................................................................................11
First Steps............................................................................................................................................. 12
Charging the Battery ..........................................................................................................................12
Inserting the Battery ...........................................................................................................................14
Removing the Battery .......................................................................................................................................15
Turning On and Off the Camera.................................................................................................................15
Setting Display Language, Date and Time .................................................................................16
Inserting Memory Cards ....................................................................................................................18
Removing Memory Cards...............................................................................................................................19
A Basic Photography and Playback: Auto Mode .................................................................20
Step 1 Turn the Camera On and Select A (Auto) Mode .......................................................20
Indicators Displayed in A (Auto) Mode...............................................................................................21
Step 2 Frame a Picture .......................................................................................................................22
Using the Zoom....................................................................................................................................................22
Step 3 Focus and Shoot .....................................................................................................................24
Step 4 Viewing and Deleting Pictures ..........................................................................................26
Viewing Pictures (Playback Mode)............................................................................................................26
Deleting Pictures..................................................................................................................................................26
Using the Flash......................................................................................................................................28
Setting the Flash Mode....................................................................................................................................28
Taking Pictures with the Self-timer ...............................................................................................30
Macro Mode...........................................................................................................................................31
Exposure Compensation...................................................................................................................32
vii
Page 10

Table of Contents
B High-sensitivity Shooting Mode ............................................................................................ 33
Shooting in the High-sensitivity Shooting Mode.....................................................................33
C Shooting Suited for the Scene................................................................................................ 34
Shooting in the Scene Mode ...........................................................................................................34
Setting the Scene Mode..................................................................................................................................34
Features .....................................................................................................................................................................35
Taking Pictures for a Panorama ..................................................................................................................40
c More on Playback....................................................................................................................... 43
Viewing Multiple Pictures: Thumbnail Playback ......................................................................43
Taking a Closer Look: Playback Zoom ..........................................................................................44
Editing Pictures.....................................................................................................................................45
Enhancing Brightness and Contrast: D-Lighting..............................................................................46
Compensating Blurred Images After Shooting: Electronic VR.................................................47
Creating a Cropped Copy: Crop.................................................................................................................48
g Resizing Pictures: Small Picture...........................................................................................................49
Viewing Pictures by Date ..................................................................................................................50
Selecting a Date in Calendar Mode..........................................................................................................50
Selecting a Date in List by Date Mode...................................................................................................51
Using Calendar Mode and List by Date Mode ..................................................................................52
Calendar and List by Date Menus..............................................................................................................53
D Movies ............................................................................................................................................. 54
Recording Movies ................................................................................................................................54
The Movie Menu...................................................................................................................................55
Selecting Movie Options.................................................................................................................................55
w Electronic VR ...................................................................................................................................................56
Time-Lapse Movies.............................................................................................................................................57
Movie Playback .....................................................................................................................................59
Deleting Movie Files...........................................................................................................................................59
viii
Page 11

Table of Contents
Connecting to Televisions, Computers and Printers............................................................ 60
Connecting to a TV ..............................................................................................................................60
Connecting to a Computer...............................................................................................................61
Before Connecting the Camera..................................................................................................................61
Transferring Pictures from a Camera to a Computer ....................................................................62
Connecting to a Printer......................................................................................................................65
Connecting the Camera and Printer........................................................................................................66
Printing Pictures One at a Time..................................................................................................................67
Printing Multiple Pictures ...............................................................................................................................68
Creating a DPOF Print Order: Print Set .........................................................................................71
d Shooting, Playback and Setup Menus ............................................................................. 73
Shooting Options: The Shooting Menu .......................................................................................73
Displaying the Shooting Menu and High-sensitivity Menu ......................................................74
A Image Mode ....................................................................................................................................................75
B White Balance.................................................................................................................................................77
C Continuous ......................................................................................................................................................79
E ISO Sensitivity..................................................................................................................................................81
F Color Options .................................................................................................................................................81
G AF Area Mode.................................................................................................................................................82
Face Priority.............................................................................................................................................................84
Restrictions on Camera Settings ................................................................................................................85
Playback Options: The Playback Menu ........................................................................................86
Displaying the Playback Menu....................................................................................................................86
b Slide Show........................................................................................................................................................88
c Delete ...................................................................................................................................................................89
d Protect ..............................................................................................................................................................89
f Rotate image ..................................................................................................................................................89
h Copy .....................................................................................................................................................................90
Basic Camera Setup: The Setup Menu..........................................................................................91
Displaying the Setup Menu...........................................................................................................................92
a Menus .................................................................................................................................................................92
c Welcome Screen...........................................................................................................................................93
d Date.......................................................................................................................................................................94
e Monitor Settings ..........................................................................................................................................97
f Date Imprint.....................................................................................................................................................98
w Electronic VR ................................................................................................................................................100
u Digital Zoom ................................................................................................................................................101
i Sound Settings ...........................................................................................................................................102
k Auto Off ..........................................................................................................................................................102
l Format Memory/m Format Card ...................................................................................................103
ix
Page 12

Table of Contents
n Language ........................................................................................................................................................104
o Video Mode ..................................................................................................................................................104
p Reset All...........................................................................................................................................................105
r Firmware Version .....................................................................................................................................107
Technical Notes................................................................................................................................108
Optional Accessories ....................................................................................................................... 108
Approved Memory Cards ............................................................................................................................108
Image File and Folder Names ....................................................................................................... 109
Caring for the Camera ..................................................................................................................... 110
Cleaning .................................................................................................................................................................112
Storage....................................................................................................................................................................112
Error Messages ...................................................................................................................................113
Troubleshooting................................................................................................................................ 117
Specifications ..................................................................................................................................... 122
Supported Standards ...................................................................................................................... 125
Index...................................................................................................................................................... 126
x
Page 13
Introduction
About This Manual
Thank you for your purchase of a Nikon COOLPIX S202 digital camera. This manual
was written to help you enjoy taking pictures with your Nikon digital camera. Read
this manual thoroughly before use, and keep it where all those who use the
product will read it.
Symbols and Conventions
To make it easier to find the information you need, the following symbols and
conventions are used:
This icon marks cautions,
information that should be read
B
before use, to prevent damage to
the camera.
This icon marks notes, information
that should be read before using
C
the camera.
Notations
• A Secure Digital (SD) memory card is referred to as a “memory card.”
• The setting at the time of purchase is referred to as the “default setting.”
• The names of menu items displayed in the camera monitor, and the names of
buttons or messages displayed in the computer monitor are indicated in bold
(ex. Yes).
Screen Samples
In this manual, images are sometimes omitted from monitor display samples so
that monitor indicators can be more clearly shown.
Illustrations and Screen Display
Illustrations and text displays shown in this manual may differ from actual display.
This icon marks tips, additional
information that may be helpful
D
when using the camera.
This icon indicates that more
information is available elsewhere
A
in this manual or in the Quick Start
Guide.
Introduction
C Memory Cards
Pictures taken with this camera can be stored in the camera’s internal memory or on removable
memory cards. If a memory card is inserted, all new pictures will be stored on the memory card and
delete, playback and format operations will apply only to the pictures on the memory card. The
memory card must be removed before the internal memory can be formatted or used to store,
delete or view pictures.
1
Page 14
Information and Precautions
Life-Long Learning
As part of Nikon’s “Life-Long Learning” commitment to ongoing product support and education,
continually updated information is available online at the following sites:
Introduction
• For users in the U.S.A.: http://www.nikonusa.com/
• For users in Europe and Africa: http://www.europe-nikon.com/support/
• For users in Asia, Oceania, and the Middle East: http://www.nikon-asia.com/
Visit these sites to keep up-to-date with the latest product information, tips, answers to frequently
asked questions (FAQs), and general advice on digital imaging and photography. Additional
information may be available from the Nikon representative in your area. See the URL below for
contact information:
http://imaging.nikon.com/
Use Only Nikon Brand Electronic Accessories
Nikon COOLPIX cameras are designed to the highest standards and include complex electronic
circuitry. Only Nikon brand electronic accessories (including battery chargers, batteries and AC
adapters) certified by Nikon specifically for use with this Nikon digital camera are engineered and
proven to operate within the operational and safety requirements of this electronic circuitry.
THE USE OF NON-NIKON ELECTRONIC ACCESSORIES COULD DAMAGE THE CAMERA AND MAY
VOID YOUR
For more information about Nikon brand accessories, contact a local authorized Nikon dealer.
NIKON WARRANTY.
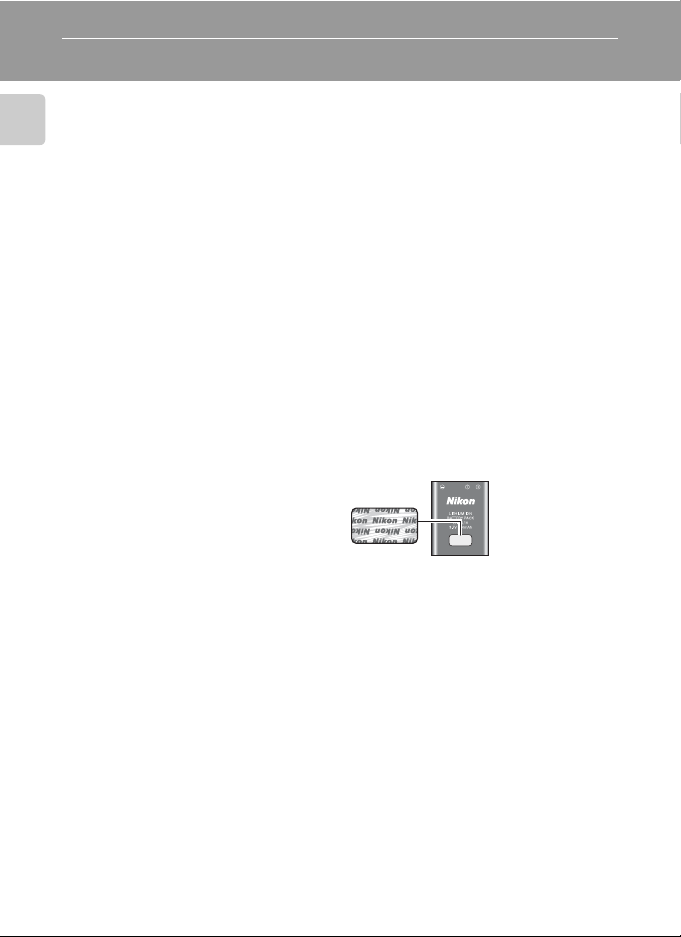
Holographic seal: Identifies this
device as an authentic Nikon product.
Rechargeable Li-ion
Battery EN-EL10
Before Taking Important Pictures
Before taking pictures on important occasions (such as at weddings or before taking the camera on
a trip), take a test shot to ensure that the camera is functioning normall y. Nikon will not be held liable
for damages or lost profits that may result from product malfunction.
About the Manuals
• No part of the manuals included with this product may be reproduced, transmitted, transcribed,
stored in a retrieval system, or translated into any language in any form, by any means, without
Nikon’s prior written permission.
• Nikon reserves the right to change the specifications of the hardware and software described in
these manuals at any time and without prior notice.
• Nikon will not be held liable for any damages resulting from the use of this product.
• While every effort was made to ensure that the information in these manuals is accurate and
complete, we would appreciate it were you to bring any errors or omissions to the attent ion of the
Nikon representative in your area (address provided separately).
2
Page 15

Information and Precautions
Notice Concerning Prohibition of Copying or Reproduction
Note that simply being in possession of material that was digitally copied or reproduced by means
of a scanner, digital camera or other device may be punishable by law.
• Items prohibited by law from being copied or reproduced
Do not copy or reproduce paper money, coins, securities, government bonds or local gove rnment
bonds, even if such copies or reproductions are stamped “Sample.” The copying or reproduction
of paper money, coins, or securities which are circulated in a foreign country is prohibited. Unless
the prior permission of the government was obtained, the copying or reproduction of unused
postage stamps or post cards issued by the government is prohibited. The copying or
reproduction of stamps issued by the government and of ce rtified documents stipulate d by law is
prohibited.
• Cautions on certain copies and reproductions
The government has issued cautions on copies or reproductions of securities issued by private
companies (shares, bills, checks, gift certificates, etc.), commuter passes or coupon tickets, except
when a minimum of necessary copies are to be provided for business use by a company. Also, do
not copy or reproduce passports issued by the government, licenses issued by public agencies
and private groups, ID cards and tickets, such as passes and meal coupons.
• Comply with copyright notices
The copying or reproduction of copyrighted creative works such as books, music, paintings,
woodcut prints, maps, drawings, movies and photographs is governed by national and
international copyright laws. Do not use this product for the purpose of making illegal copies or to
infringe copyright laws.
Disposing of Data Storage Devices
Please note that deleting images or formatting data storage devices such as memory cards or builtin camera memory does not completely erase the original image data. Deleted files can sometimes
be recovered from discarded storage devices using commercially available software, potentially
resulting in the malicious use of personal image data. Ensuring the privacy of such data is the user’s
responsibility.
Before discarding a data storage device or transferring ownership to another person, erase all data
using commercial deletion software, or format the device and then completely refill it with images
containing no private information (for e xample, pictures of empty sky). Be sure to also replace any
pictures selected for the welcome screen ( A93). Care should b e taken to avoid injury or damage to
property when physically destroying data storage devices.
Introduction
3
Page 16
Parts of the Camera
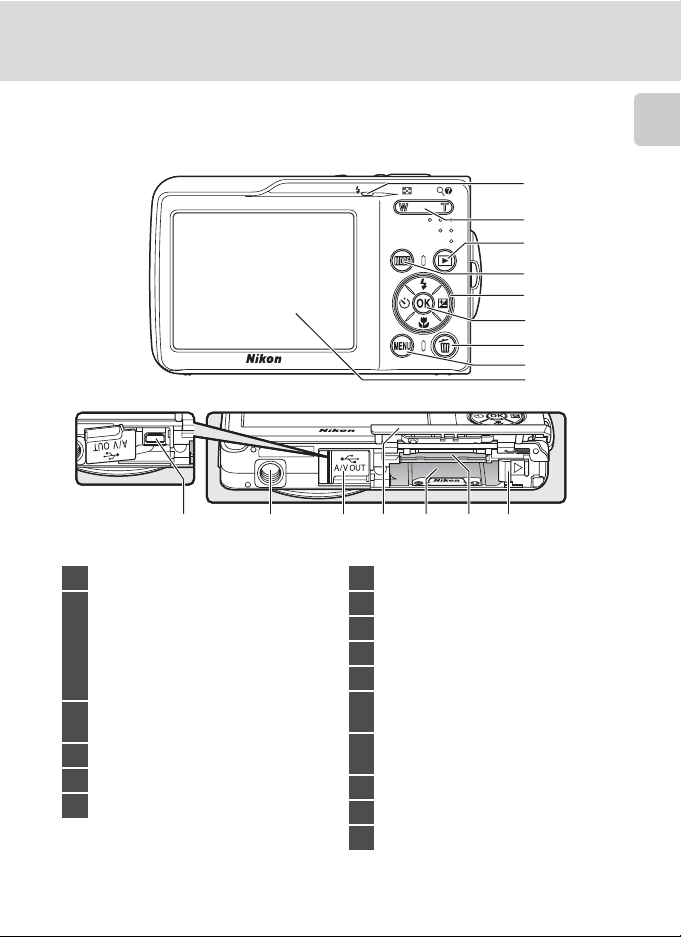
The Camera Body
2
Introduction
1
7
3
4
5
Lens cover closed
6
8
9
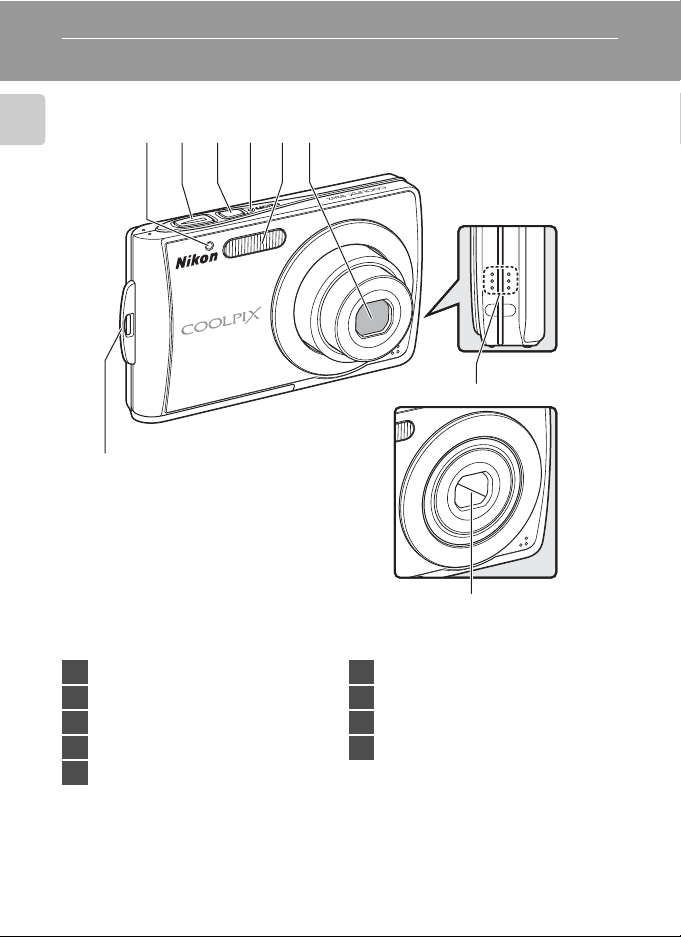
1 Self-timer lamp...............................................30
2 Shutter-release button..............................24
3 Power switch...................................................20
4 Power-on lamp ...................................20, 102
5 Built-in flash......................................................28
4
6 Lens .........................................................112, 122
7 Eyelet for camera strap..............................11
8 Speaker.............................................................102
9 Lens cover ......................................................110
Page 17
Opening the pin cover
10
11
12
13
14
Parts of the Camera
1
2
3
4
5
6
7
8
9
16
15
Introduction
1 Flash lamp.........................................................29
Zoom buttons ................................................22
f : wide .......................................................22
g : tele..........................................................22
2
h : thumbnail playback.....................43
i : playback zoom................................44
j : help ........................................................11
c (shooting/playback) button
3
.............................................................................8, 26
4 e (mode) button ....................................8
5 Multi selector......................................................9
6 k (apply selection) button ......................9
7 l (delete) button.........................26, 27, 59
8 d button ......................10, 34, 55, 74, 86
9 Monitor..................................................................6
10 Cable connector............................60, 62, 66
11 Tripod socket
Pin/power connector cover
12
.......................................................60, 62, 66, 108
Battery-chamber/
13
memory card slot cover....................14, 18
14 Battery-chamber............................................14
15 Memory card slot..........................................18
16 Battery latch .............................................14, 15
5
Page 18
Parts of the Camera
F3.1
1/60
1
600
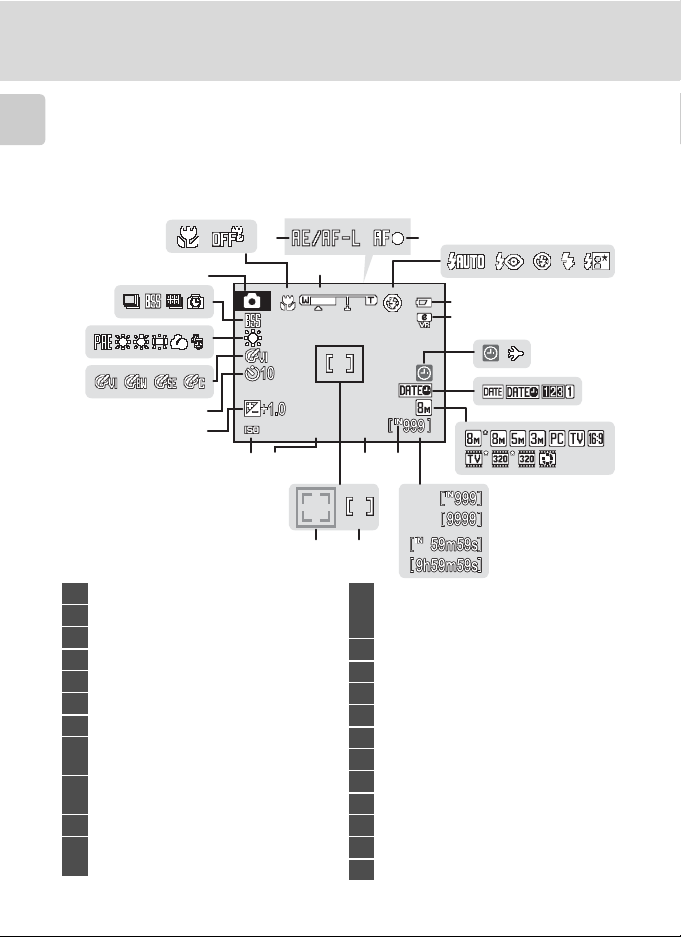
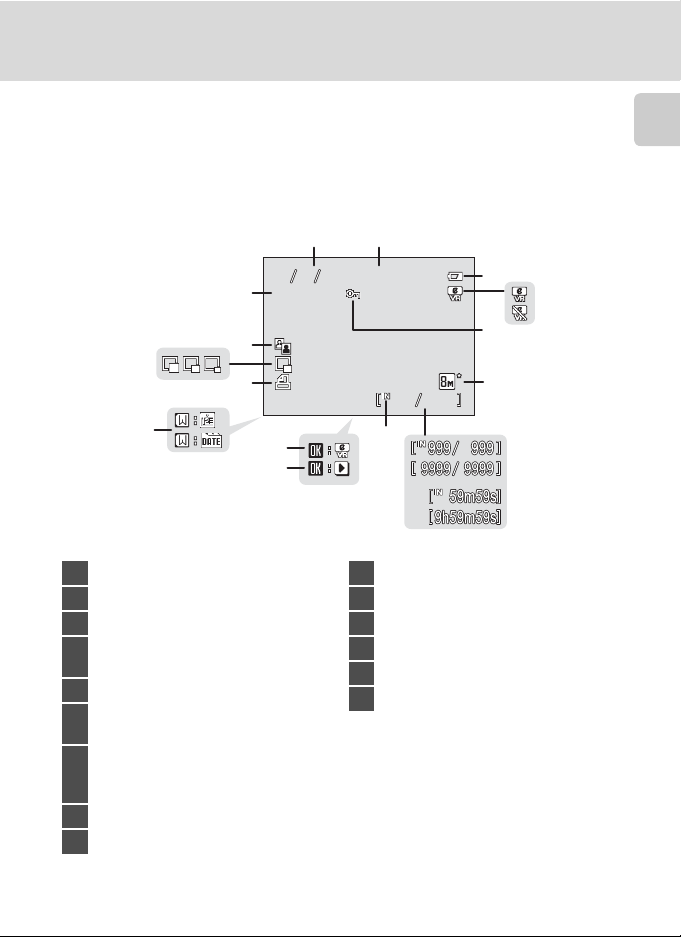
The Monitor
The following indicators may appear in the monitor during shooting and playback
(actual display varies with current camera settings).
Introduction
The indicators that appear in the monitor during shooting and playback disappear
after a few seconds (A 97).
Shooting
22
23
2
1
45
3
7
8
9
6
21
20
19
600
1600
18 17
1/60
F3.1
F3.11/60
1314
12
a
1516
1 Shooting mode* ....................20, 33, 34, 54
2 Macro mode....................................................31
3 Zoom indicator...................................... 22, 31
4 Exposure/focus lock ...................................41
5 Focus indicator ..............................................24
6 Flash mode.......................................................28
7 Battery level indicator................................ 20
Electronic vibration reduction icon
8
..............................................................................100
“Date not set” indicator ......................... 113
9
Time zone indicator....................................94
10 Date imprint ....................................................98
Image mode....................................................75
11
Movie options ................................................55
*
Differs according to the current shooting mode. Refer to the sections on each mode for details.
6
a Number of exposures remaining
12
(still pictures)...............................................20
b Movie length...............................................54
13 Internal memory indicator......................21
14 Aperture .............................................................24
15 Focus area.................................................24, 82
16 Focus area (Face Priority).................24, 82
17 Shutter speed .................................................24
18 ISO sensitivity..........................................29, 81
19 Exposure compensation value ............32
20 Self-timer indicator......................................30
21 Color options ..................................................81
22 White balance mode..................................77
23 Continuous shooting mode ..................79
b
10
11
Page 19
Playback
999
999
9999.JPG
12:00
2008
13
11
15
14
12
12
151505052008
15 05 2008
9999.JPG
9999.JPG
9
10
12:00
12:00
8
999
Parts of the Camera
3
5
6
999
999999
7
Introduction
4
a
b
a
b
1 Date of recording.........................................16
2 Time of recording.........................................16
3 Battery level indicator................................ 20
a Compensated image.............................47
4
b Electronic VR not available.............. 100
5 Protect icon......................................................89
6
7
8 Internal memory indicator......................26
9 Electronic VR guide .....................................47
*
The icons displayed differ depending on the settings configured during shooting.
Image mode....................................................75
Movie options ................................................55
a Current frame number/
total number of frames*......................26
b Movie length
*
.............................................59
10 Movie playback indicator ........................59
11 Calendar/List by Date guide.......... 50, 51
12 Print set icon....................................................71
13 Small picture....................................................49
14 D-Lighting icon..............................................46
15 Filename .........................................................109
7
Page 20
Basic Operations
The c (Shooting/Playback) Button
Introduction
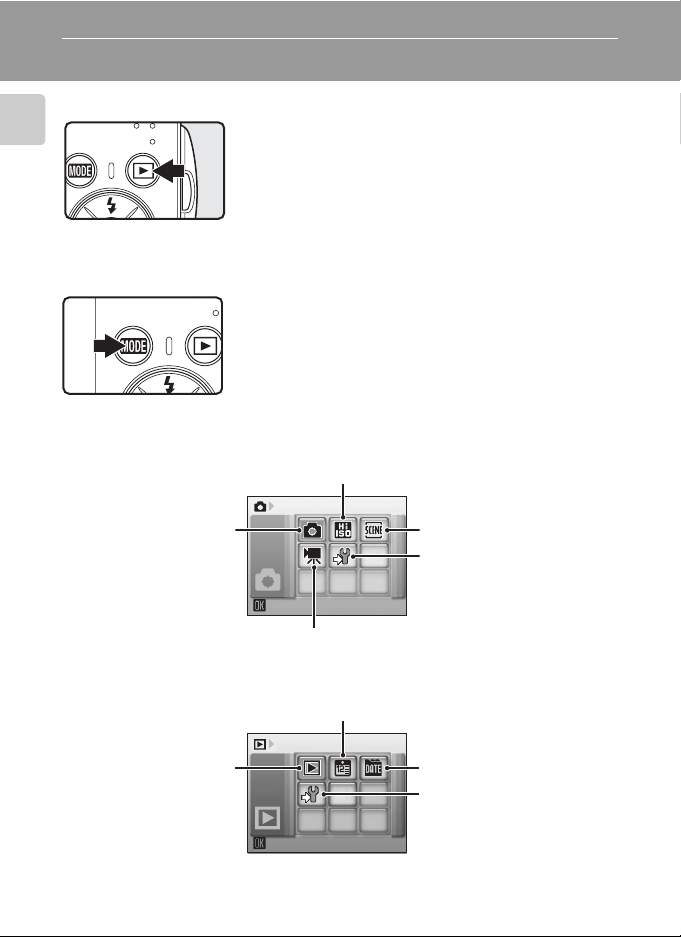
The e (Mode) Button
Shooting-mode Selection Menu
Auto mode (A 20) Scene mode (A 34)
Press c once in shooting mode to enter playback
mode; press again to switch back to shooting mode.
Pressing the shutter-release button in playback mode
(A 26) will also activate shooting mode.
If the camera is turned off, hold down c to turn the
camera on in playback mode (A 26).
Press e during shooting to display the shootingmode selection menu, or during playback to display the
playback-mode selection menu. Use the multi selector
(A 9) to choose the desired mode.
• Press c to switch between the mode-selection
menus for shooting mode and playback mode.
High-sensitivity shooting mode (A 33)
Movie mode (A 54)
Shooting
Setup mode (A 91)
Playback-mode Selection Menu
Playback mode (A 26)
8
Calendar mode (A 50)
Play
List by date mode (A 51)
Setup mode (A 91)
Page 21
Basic Operations
15/05/2008 15:30
0004.JPG
44
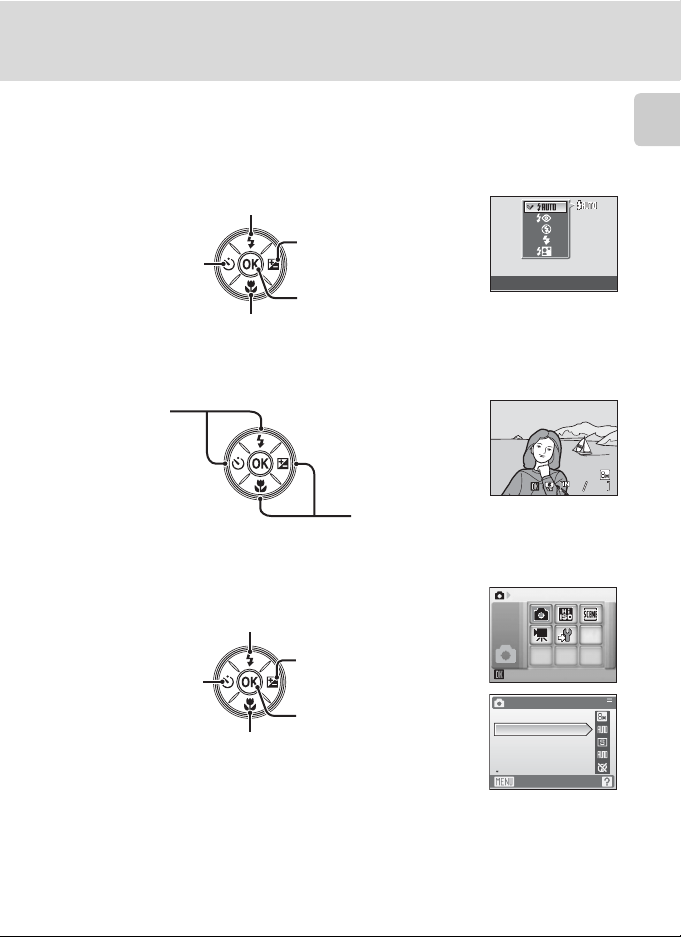
The Multi Selector
This section describes standard uses of the multi selector to select modes, select
menu options and to apply selection.
For Shooting
Display m (flash mode) (A 28) menu or move cursor up.
Display o
Display n (self-timer)
(A 30) menu.
Display p (macro mode) (A 31) menu or move cursor down.
For Playback
Select previous
picture.
For the Menu Screen
Move cursor up.
Move corsor left
or return to
previous screen.
Move cursor down.
(exposure compensation)
(A 32) menu.
Apply selection.
Select next picture.
Move corsor right or go
to next screen (apply
selection).
Apply selection (go to
next screen).
Flash mode
15/05/2008 15:30
15/05/2008 15:30
0004.JPG
0004.JPG
Shooting menu
Image mode
White balance
Continuous
ISO sensitivity
Color options
Exit
Shooting
Introduction
44
C Note on the Multi Selector
In the manual, the button indicating up, down, left and right of the multi selector is shown as H, I,
J and K.
9
Page 22
Basic Operations
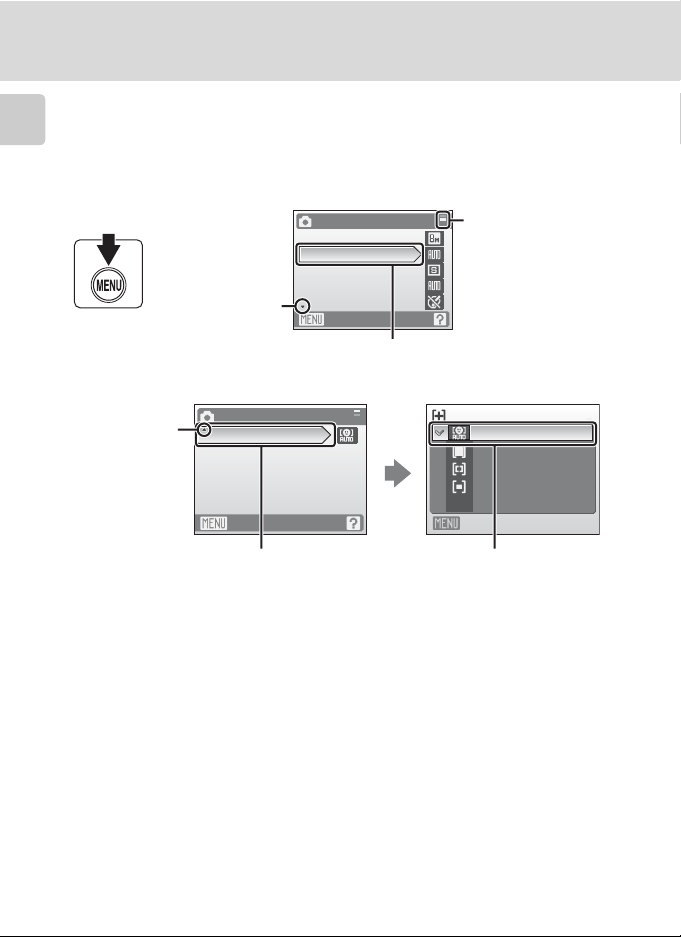
The d Button
Press d to display the menu for the selected mode. Use the multi selector to
navigate the menus (A 9).
Introduction
Press d again to exit the menu.
Displayed when
there are more
previous menu
items.
Image mode
White balance
Continuous
ISO sensitivity
Displayed when
Color options
there are one or
more menu items
to follow.
Shooting menu
AF area mode
Exit
Press the multi selector K or
k to proceed to the next set
of options.
Shooting menu
Exit
The selected option.
Displayed when the
menu contains two or
more pages.
AF area mode
Face priority
Auto
Manual
Center
Exit
Press the multi selector K
or k to apply selection.
10
Page 23
Basic Operations
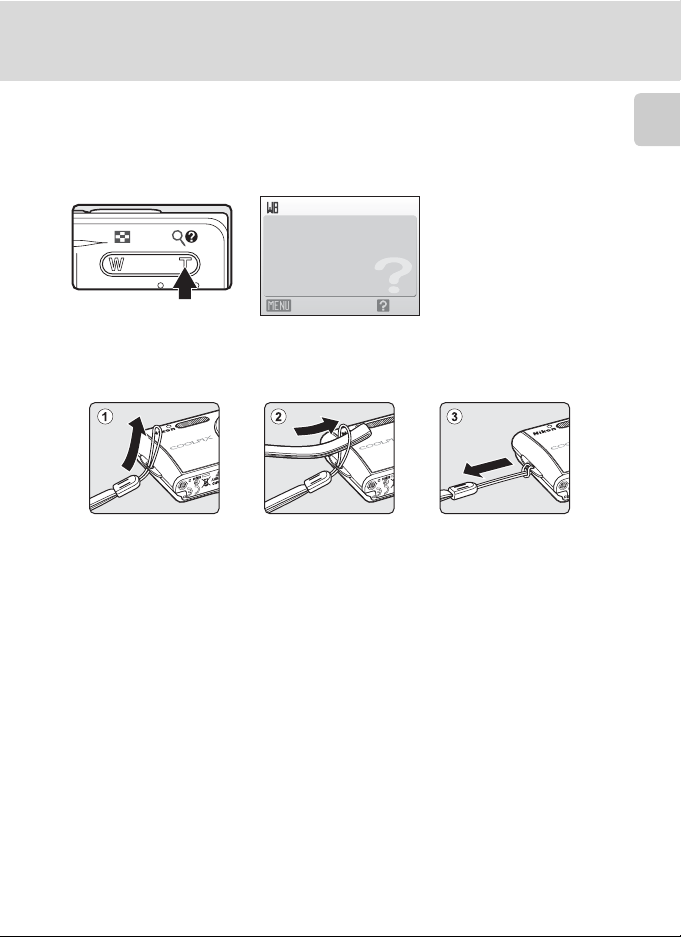
Help Displays
Press g (j) when M is displayed at the lower right of the menu screen to view a
description of the currently selected menu option.
To return to the original menu, press g (j) again.
White balance
For accurate color reproduction,
choose a setting that matches
the light source.
Exit Back
Attaching the Camera Strap
Introduction
11
Page 24
First Steps
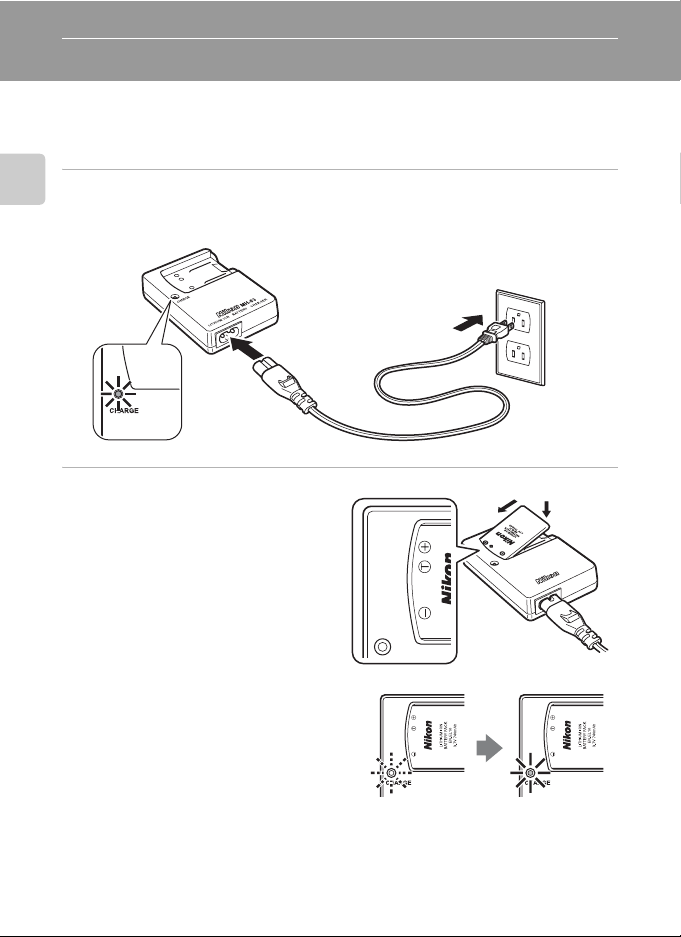
Charging the Battery
The camera uses a Rechargeable Li-ion Battery EN-EL10 (supplied).
Charge the battery with the Battery Charger MH-63 (supplied) before first use or
when the battery is running low.
1 Connect the power cable.
First Steps
Connect the power cable to the battery charger 1 and insert the wall plug into a power
outlet 2. The CHARGE lamp will light to show that the charger is on 3.
2
3
1
2 Charge the battery.
Insert the battery at an angle as
shown 1, and set it in the battery
charger 2.
CHARGE lamp starts blinking when
battery is inserted 3. Charging is
complete when lamp stops blinking 4.
About 100 minutes are required to
charge a fully depleted battery.
12
3
1
C
4
2
E
G
R
A
H
R
3
E
G
-6
R
H
A
H
M
C
Y
R
E
T
T
A
B
N
O
I
M
U
I
H
T
I
L
Page 25
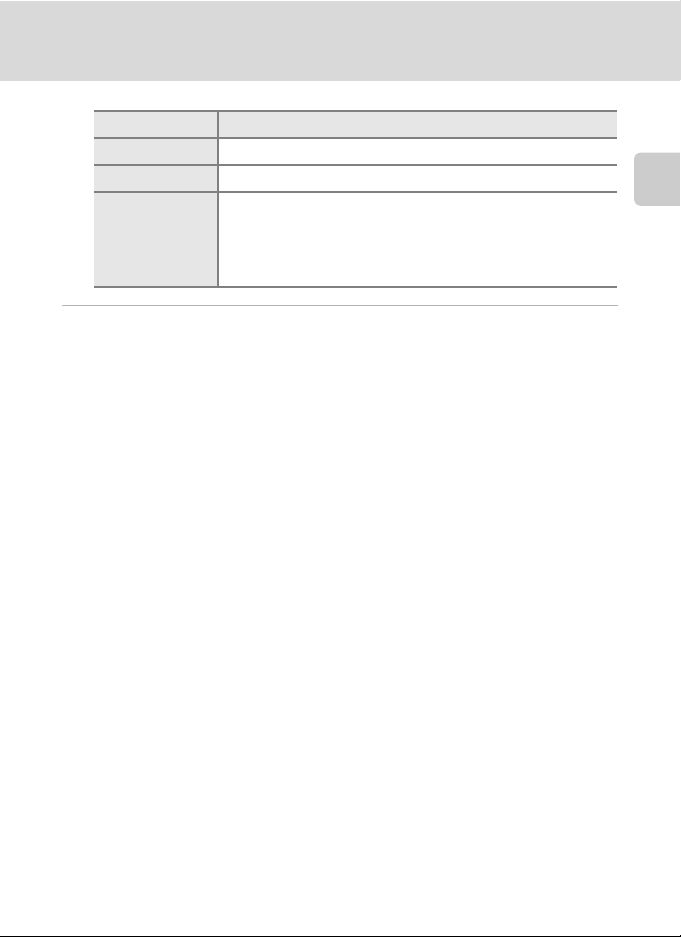
Charging the Battery
CHARGE lamp Description
Blinks Battery charging.
On Battery fully charged.
Battery error. If ambient temperature is not 5 to 35 °C (41 to
Flickers
95 °F), wait until temperature is in this range before charging.
Otherwise unplug charger and remove battery immediately and
take both devices to retailer or Nikon-authorized service
representative.
3 Unplug the charger.
Remove the battery and unplug the charger.
B Note on the Battery Charger
Be sure to read and follow the warnings for the battery charger on pages iii and iv before using the
battery charger.
The supplied battery charger is for use only with a Rechargeable Li-ion Battery EN-EL10. Do not use
with incompatible batteries.
First Steps
B Notes on the Battery
• Be sure to read and follow the warnings for the battery on page iii and the section, “The Battery”
(A 111), before using the battery.
• If the battery will not be used for an extended period, recharge it at least once every six months
and run it flat before returning it to storage.
C Note on AC power supply
To power the camera continuously for extended periods, use an AC Adapter EH-62D (available
separately from Nikon). Do not, under any circumstances, use another make or model of AC adapter.
Failure to observe this precaution could result in overheating or in damage to the camera.
13
Page 26
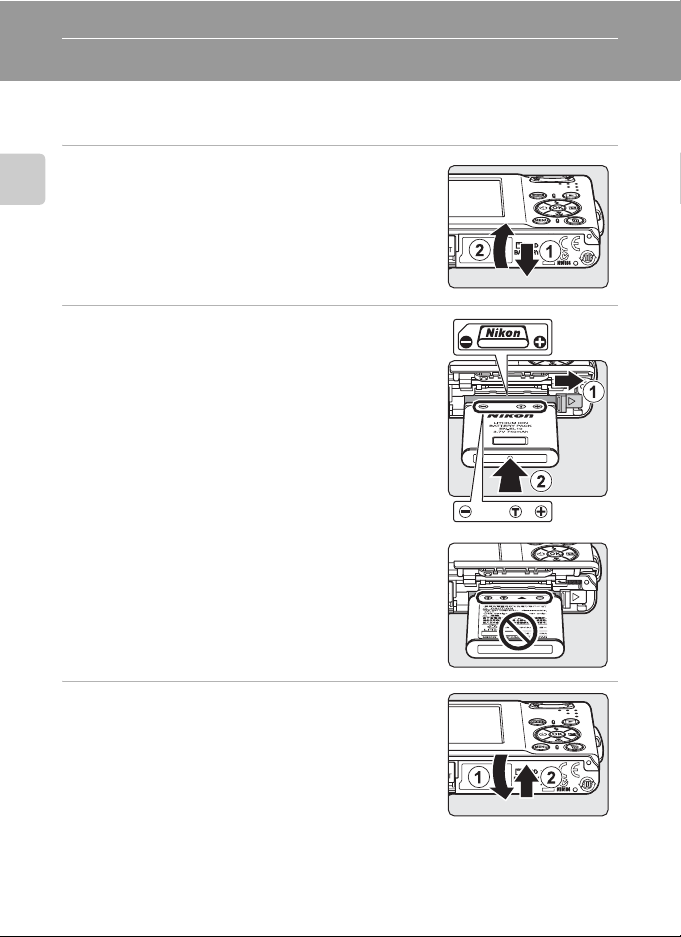
Inserting the Battery
Insert a Rechargeable Li-ion Battery EN-EL10 (supplied) that has been fully
charged, using the Battery Charger MH-63 (supplied), into your camera.
1 Open the battery-chamber/memory card slot
cover.
First Steps
2 Insert the battery.
Confirm that the positive (+) and negative (–) terminals
are oriented correctly as described on the label at the
entrance of the battery chamber, and insert the battery.
Use the side of the battery to push aside the orange
battery latch in the direction of the arrow 1, and fully
insert the battery 2.
The battery is fully inserted when the latch clicks back
into place.
B Inserting the Battery
Inserting the battery upside down or backwards could
damage the camera. Be sure to check the battery is in the correct
orientation.
3 Close the battery-chamber/memory card slot
cover.
14
Page 27
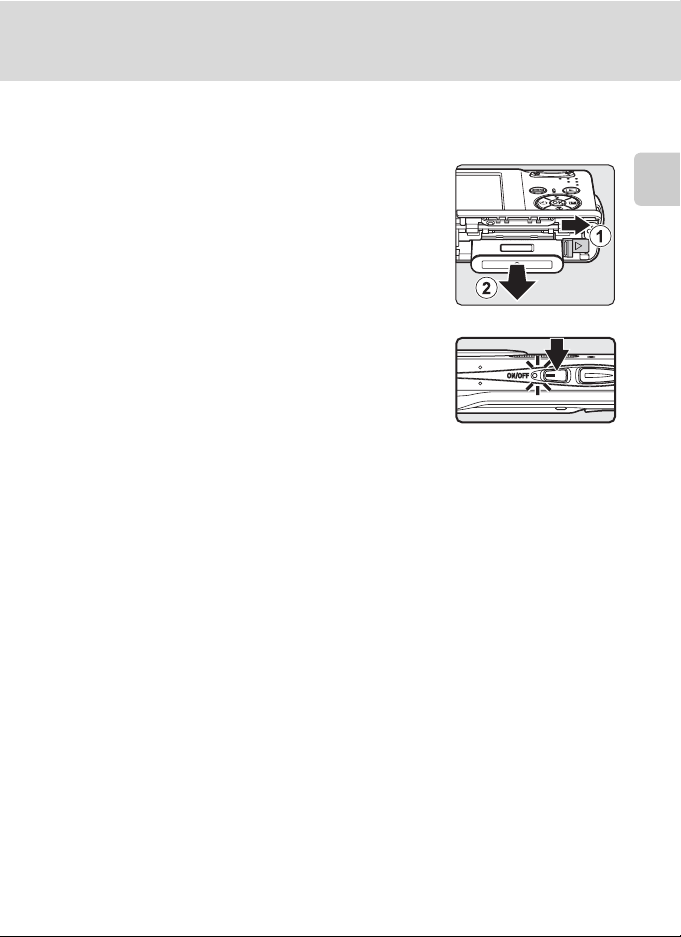
Removing the Battery
Turn the camera off before removing the battery.
To eject the battery, open the battery-chamber/
memory card slot cover and slide the battery latch in
the direction shown
removed by hand
1. The battery can then be
2.
• Note that the battery may become hot during use;
observe due caution when removing the battery.
Turning On and Off the Camera
To turn on the camera, press the power switch. The
power-on lamp (green) will light and the monitor will
turn on.
To turn off the camera, press the power switch again.
• If the camera is turned off, hold down c to turn the
camera on in playback mode.
Inserting the Battery
First Steps
D Auto Power-Off (Standby Mode)
The monitor will dim to reduce the drain on the battery if no operations are performed for about five
seconds. The monitor will brighten when camera controls are used. At default settings, the monitor
will turn off altogether if no operations are performed for about a minute during shooting and
playback. The camera will turn off automatically if no operations are performed for another three
minutes (A 102).
15
Page 28
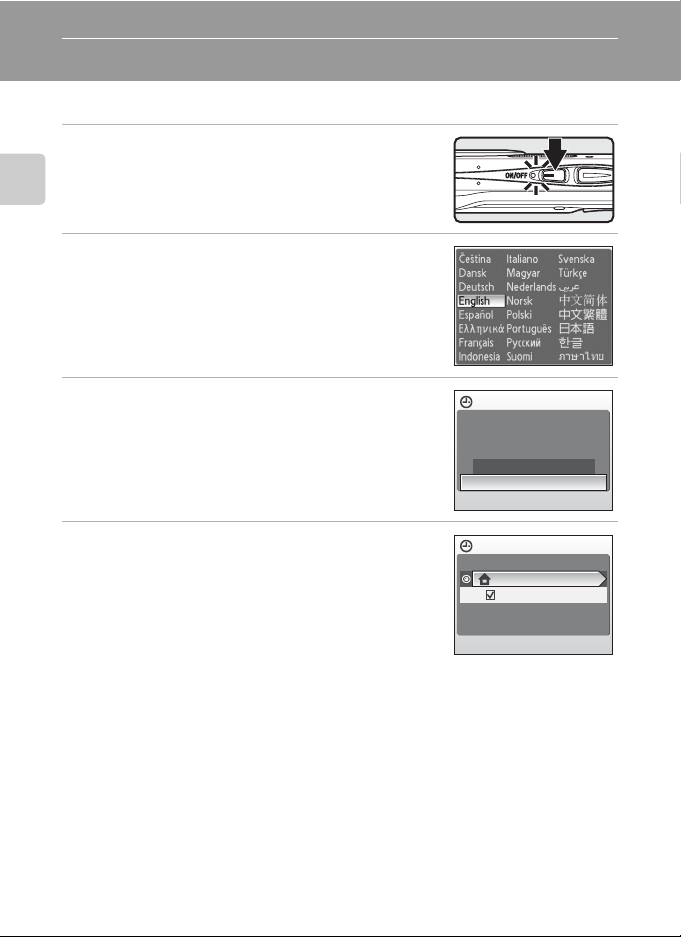
Setting Display Language, Date and Time
A language-selection dialog is displayed the first time the camera is turned on.
1 Press the power switch to turn on the camera.
The power-on lamp will light and the monitor will turn
on.
First Steps
2 Use the multi selector to choose the desired
language and press k.
For information on using the multi selector, see “The Multi
Selector” (A 9).
3 Choose Yes and press k.
If No is selected, the date and time will not be set.
4 Press k.
The home time zone menu is displayed.
D Daylight Saving Time
If daylight saving time is in effect, turn on Daylight saving in the Time zone menu and set
the date.
1 Before pressing k in step 4, press the multi selector I to choose Daylight saving.
2 Press k to enable daylight saving time (w). Pressing k toggles the daylight saving time
option on and off.
3 Press the multi selector H, and then press k to proceed to step 5.
16
Date
Set time and date?
No
Ye s
Time zone
London,Casablanca
Daylight saving
Page 29
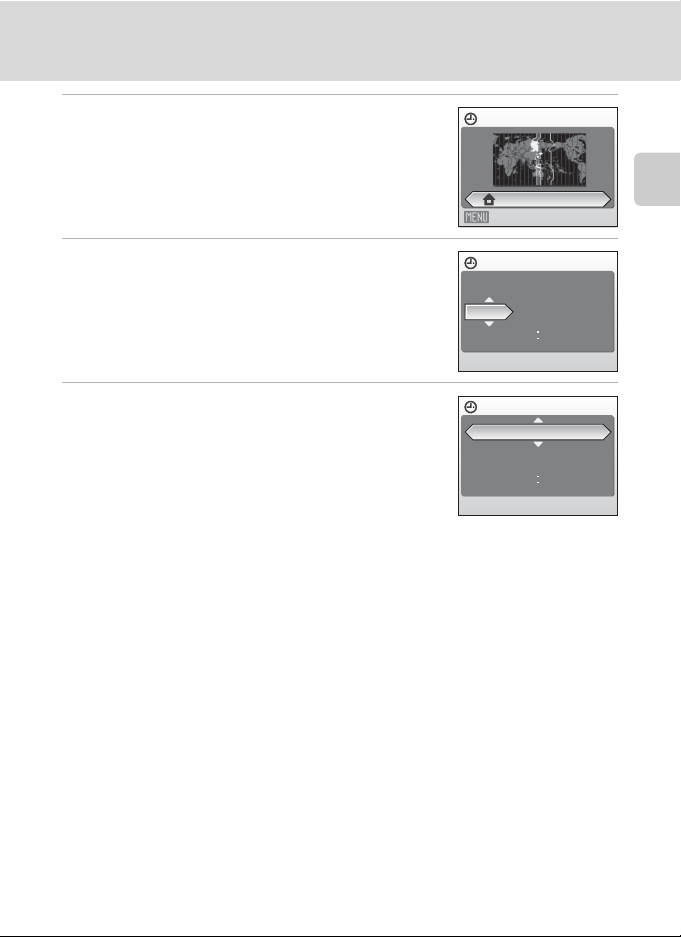
Setting Display Language, Date and Time
5 Select your home time zone (A 96) and press
k.
The Date menu is displayed.
6 Edit the date.
• Press H or I to edit the highlighted item.
• Press K to move the cursor in the following order.
D ->M ->Y ->Hour ->Minute ->D M Y
• Press J to return to the previous cursor.
7 Choose the order in which the day, month and
year are displayed and press k or press K.
The settings are applied and monitor display returns to
shooting mode.
Home time zone
London,Casablanca
Back
Date
DMY
01
Date
DMY
15
200801
0000
200811
1015
First Steps
D Changing the date and time
To change the current date and time, go into Date (A 94) in the setup menu (A 91), choose Date
and follow the instructions above, starting from step 6.
To change the time zone and daylight saving settings, go into Date in the setup menu, choose
Time zone, and change the settings (A 91, 94).
17
Page 30
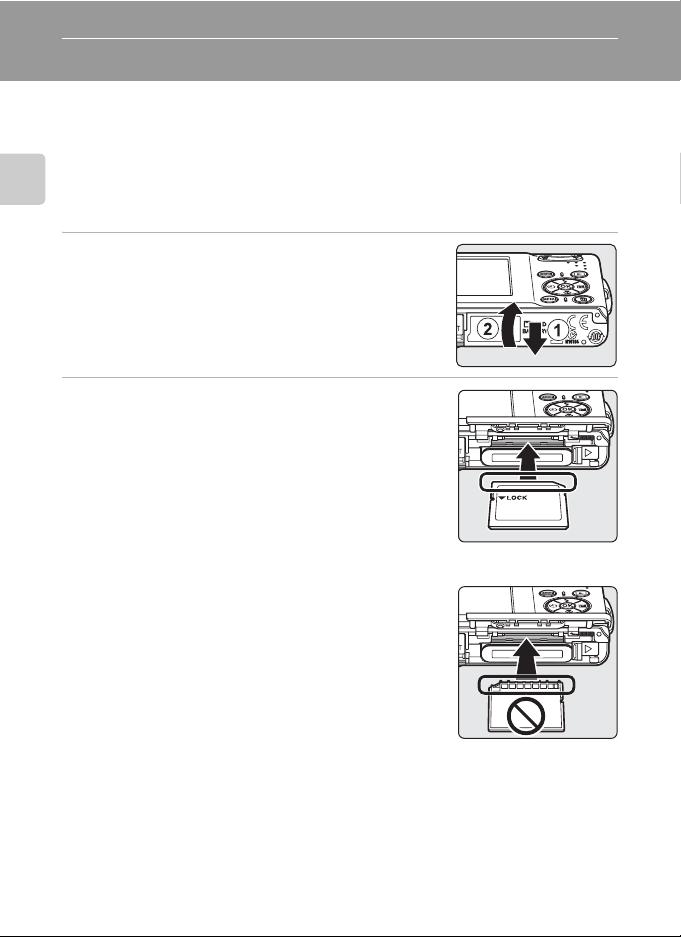
Inserting Memory Cards
Pictures are stored in the camera’s internal memory (approximately 52 MB) or on
removable Secure Digital (SD) memory cards (available separately) (A 108).
If a memory card is inserted in the camera, pictures are automatically stored on the
memory card and pictures recorded to the memory card can be played back,
deleted or transferred. Remove the memory card to store pictures in the internal
memory, or play back, delete or transfer pictures from the internal memory.
First Steps
1 Turn the camera off and open the battery-
chamber/memory card slot cover.
If the power-on lamp is lit, press the power switch to turn
off the camera.
Make sure that the camera is off (power-on lamp is off)
before inserting or removing the memory card.
2 Insert the memory card.
Slide the memory card in correctly until it clicks into
place.
Close the battery-chamber/memory card slot cover.
B Inserting Memory Cards
Inserting the memory card upside down or backwards
could damage the camera or the memory card. Make
sure that the memory card is correctly oriented.
18
Page 31
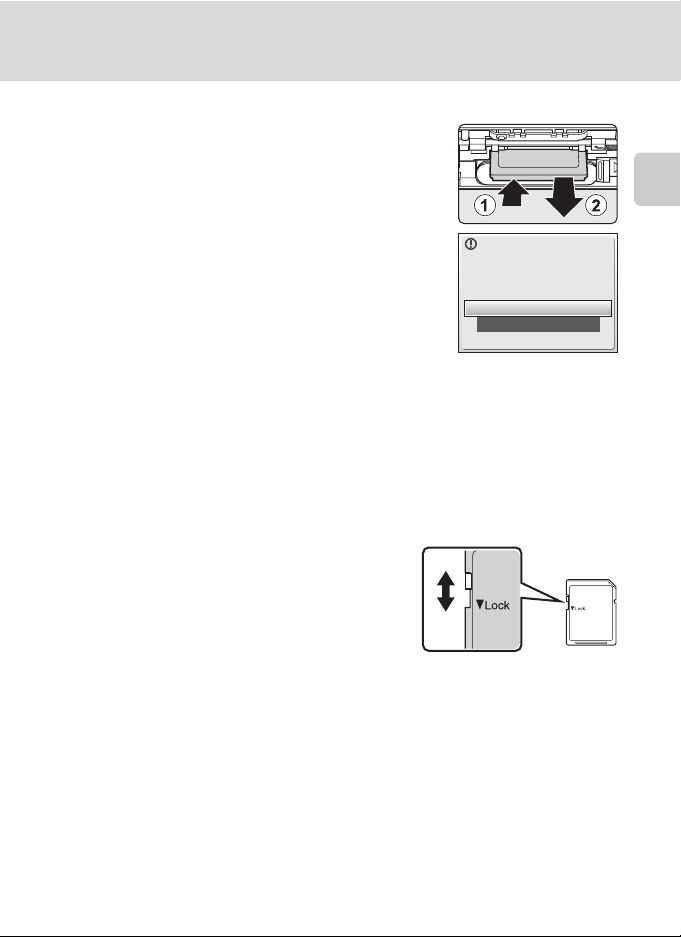
Removing Memory Cards
Before removing memory cards, turn the camera off
and confirm that the power-on lamp is off. Open the
battery-chamber/memory card slot cover and press the
card in 1 to partially eject the card 2. The card can
then be removed by hand.
Inserting Memory Cards
First Steps
B Formatting Memory Cards
If the message at right is displayed, the memory card must be
formatted before use (A 103). Note that formatting permanently
deletes all pictures and o ther data on the memory card. Be sure
to make copies of any pictures you wish to keep before formatting
the memory card.
Use the multi selector to choose Yes and press k. The
confirmation dialog will be displayed. To start formatting, choose
Format and press k.
• Do not turn the camera off or o pen the battery-chamber /memory card slot cover until
formatting is complete.
• The first time you insert the memory cards used in other devices into the COOLPIX S202, be sure to
format them using this camera (A 103).
Card is not formatted.
Format card?
No
Ye s
B The Write Protect Switch
SD memory cards are equipped with a write protect switch.
Pictures cannot be recorded or deleted and the memory card
cannot be formatted when this switch is in the “lock” position.
Unlock by sliding the switch to the “write” position.
Write protect switch
B Memory Cards
• Use only Secure Digital memory cards.
• Do not perform the following during formatting, while data
is being written to or deleted from the memory card, or during data transfer to a computer. Failure
to observe this precaution could result in the loss of data or in damage to the camera or memory
card:
- Take out the battery or memory card
-Turn off the camera
- Disconnect the AC adapter
• Do not format the memory card using a computer.
• Do not disassemble or modify.
• Do not drop, bend, or expose to water or strong physical shocks.
• Do not touch the metal terminals with your fingers or metal objects.
• Do not affix labels or stickers to the memory card.
• Do not leave in direct sunlight, closed vehicles or areas exposed to high temperatures.
• Do not expose to humidity, dust, or to corrosive gases.
19
Page 32
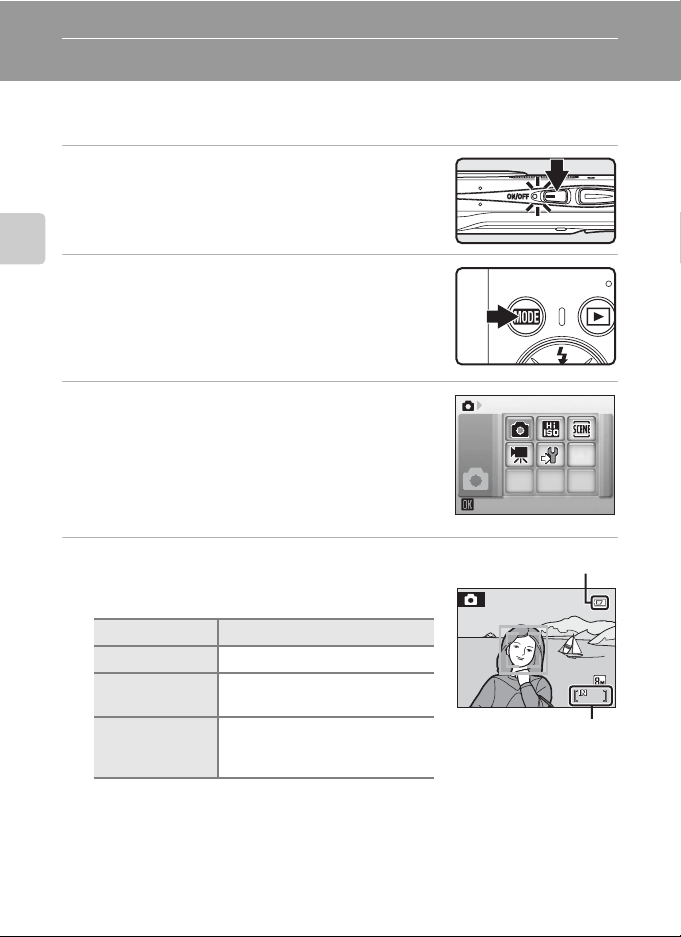
Basic Photography and Playback: Auto Mode
Step 1 Turn the Camera On and Select A (Auto) Mode
This section describes how to take pictures in A (auto) mode, an automatic,
“point-and-shoot” mode recommended for first-time users of digital cameras.
1 Press the power switch to turn on the camera.
The power-on lamp will light up, the lens will open and
the monitor will turn on.
Proceed to step 4 when A is displayed.
Basic Photography and Playback: Auto Mode
2 Press e.
3 Use the multi selector to choose A and press
k.
The camera enters A (auto) mode.
4 Check the battery level and number of
exposures remaining.
Battery Level
Monitor Description
NO INDICATOR Battery fully charged.
B
N
Battery
exhausted.
Number of Exposures Remaining
The number of pictures that can be stored depends on the capacity of the memory or
memory card and image mode setting
20
Battery low; prepare to charge or
replace the battery.
Cannot take pictures. Recharge or
replace with a fully charged
battery.
(A 75).
Shooting
Battery level indicator
262626
Number of exposures
remaining
Page 33
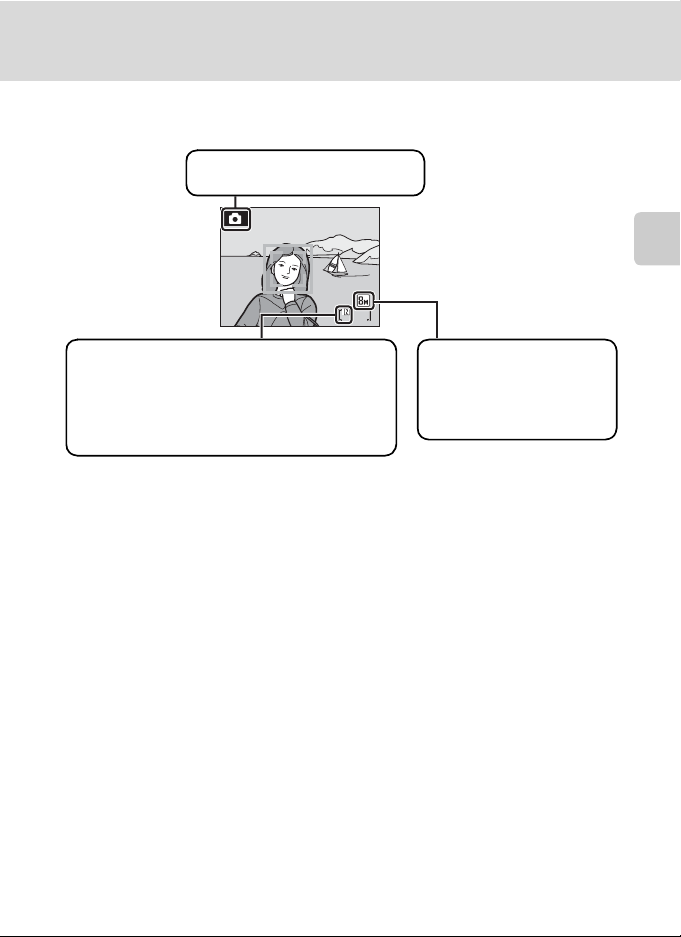
Step 1 Turn the Camera On and Select A (Auto) Mode
Indicators Displayed in A (Auto) Mode
Shooting mode
A displayed in A (auto) mode.
262626
Basic Photography and Playback: Auto Mode
Internal memory indicator
Indicates that images will be stored on the
camera’s internal memory (approximately 52 MB).
When a memory card is inserted in the camera,
C does not appear and images will be stored on
the memory card.
Image mode
Display image size and
quality set in the image mode
menu. The default setting is
y Normal (3264).
• The indicators that appear in the monitor during shooting and playback
disappear after a few seconds (A 97).
D Available Functions in A (Auto) Mode
In A (auto) mode, macro mode (A 31) and exposure compensation (A 32) can be applied and
pictures can be taken using the flash mode (A 28) and self-timer (A 30). Pressing d in A (auto)
mode displays the shooting menu. This menu allows you to specify the image mode (A 75), white
balance setting (A 77), and to apply continuous shooting (A 79), ISO sensitivity (A 81), color
options (A 81) and AF area (A 82), to suit shooting conditions or your own preferences.
D Electronic vibration Reduction
When the flash mode (A 28) is set to W (off) or Y (slow sync) while Electronic VR is set to Auto
in the setup menu (A 106), the R icon may appear in the monitor. The appearance of R indicates
shooting conditions in which the effects of camera shake can be pronounced. In these situations,
the camera reduces the effects of camera shake in pictures before recording them. Even if pictures
are taken with Electronic VR set to Off (default setting), blurring in pictures resulting from camera
shake can be compensated during playback for pictures marked with S (A 47).
21
Page 34
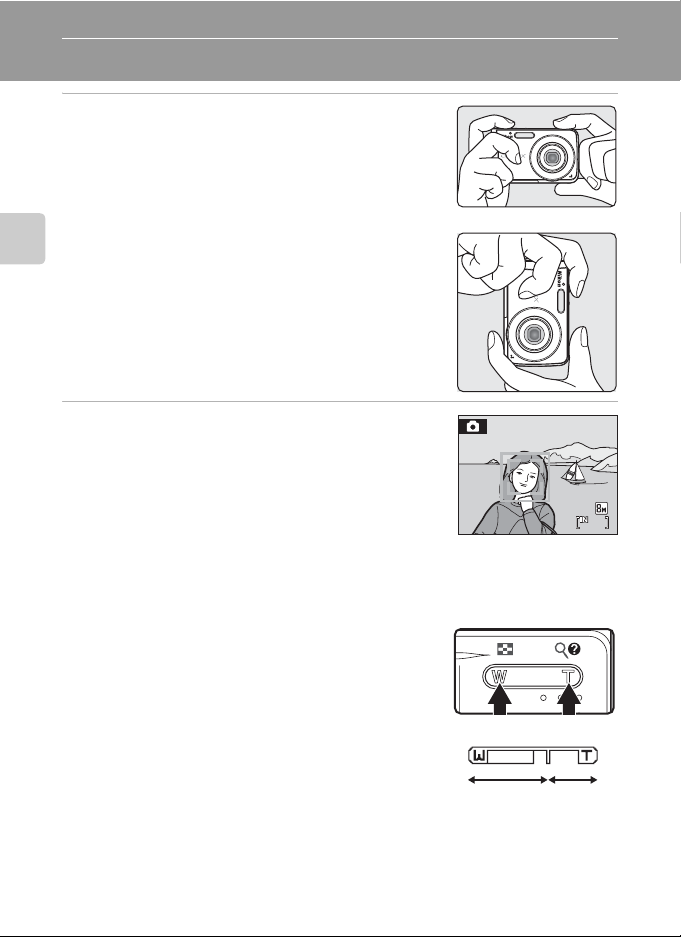
Step 2 Frame a Picture
1 Ready the camera.
Hold the camera steadily in both hands, keeping your
fingers and other objects away from the lens, flash and
speaker.
Place the flash upwards when shooting images in “tall”
(portrait) orientation.
Basic Photography and Playback: Auto Mode
2 Frame the picture.
When the camera recognizes a face (front view), that face
will be framed by a yellow double border (by default). If
more than one face is recognized, the face nearest to the
camera will be framed by a double border and the rest by
a single border.
AF area will not appear when shooting non-human subjects or when no faces are recognized.
Using the Zoom
Use the zoom buttons to activate optical zoom.
Press f (h) to zoom out, increasing the area visible
in the frame, or g (i) to zoom in so that the subject fills
a larger area of the frame.
A zoom indicator is displayed at the top of the monitor
when the zoom buttons are pressed.
Zoom out
262626
Zoom in
22
Optical
zoom
Digital
zoom
Page 35
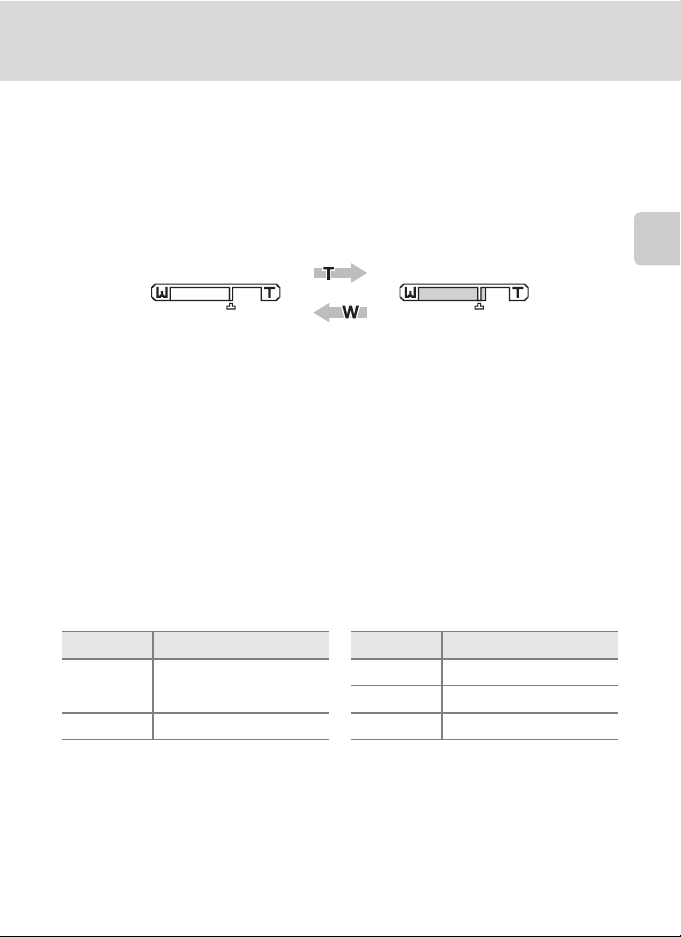
Step 2 Frame a Picture
Digital Zoom and Image Quality
When the camera is zoomed in to the maximum optical zoom magnification,
holding down g (i) triggers digital zoom. With digital zoom, you can magnify a
subject up to 4× the maximum magnification of optical zoom (3×) for a total of up
to 12× magnification.
Focus will be on the center of the screen (without active focus area display) when
digital zoom is in effect.
Basic Photography and Playback: Auto Mode
Optical zoom
(up to 3×).
Digital zoom is
in effect.
Unlike optical zoom, digital zoom uses a digital imaging process known as
interpolation to magnify images, resulting in slight deterioration of picture quality.
The V icon appears under the zoom indicator at the top of the monitor to mark
the maximum zoom ratio possible before deterioration from digital zoom occurs.
When the zoom ratio exceeds V towards the telephoto side, the zoom indicator
will turn yellow and picture quality will begin to deteriorate.
C Maximum zoom ratio without interpolation
The position of V under the zoom indicator moves closer to the telephoto side as the image size
selected for image mode (A 75) gets smaller. Deterioration from digital zoom will not occur until
the zoom ratio reaches the following levels for each mode.
When the zoom ratio reaches the following levels, zoom operations pause temporarily. If you
continue to press g (i) and increase the zoom after this point, the images will start to get grainier.
Image Mode Zoom rate Image Mode Zoom rate
S, R, P
Digital zoom can be turned off (A 101).
3×
(maximum optical zoom)
L 3.6× (1.2 digital zoom)
M
4.2× (1.4 digital zoom)
N 9× (3 digital zoom)
12× (4 digital zoom)
O
23
Page 36
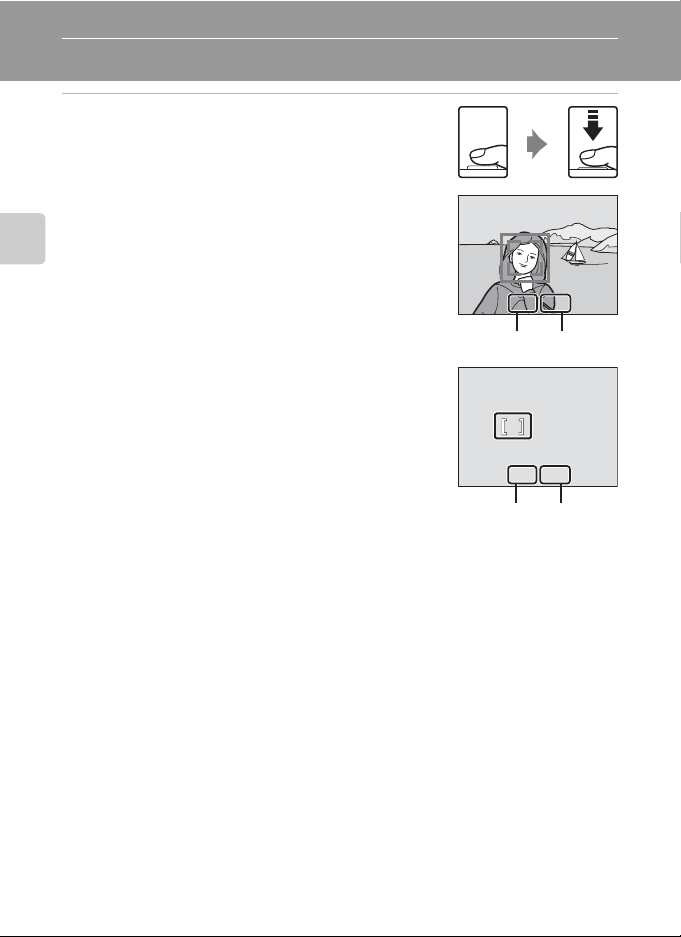
Step 3 Focus and Shoot
F3.1
1/60
F3.1
1/60
1 Press the shutter-release button halfway.
When people’s faces (front view) are recognized:
Camera will focus on the face surrounded by the doubleborder active focus area. When the subject is in focus, the
Basic Photography and Playback: Auto Mode
double border glows green.
When shooting non-human subjects or when no faces
are recognized:
Camera automatically selects the focus area (one of nine)
containing the subject closest to the camera. When the
subject is in focus, the active focus area glows green.
When digital zoom is in effect and the camera is focused on the center of the screen, the
focus indicator (A 6) glows green. The active focus area is not displayed.
When you press the shutter-release button halfway, the shutter speed and aperture
values also appear.
Focus and exposure remain locked while the shutter-release button is pressed halfway.
While the shutter-release button is pressed halfway, the double border for face
recognition may blink, or the focus area or focus indicator may blink red. All of these
cases indicate that the camera is not focused. Change the composition and try pressing
the shutter-release button halfway again.
See “AF Area Mode” (A 82) or “Face Priority” (A 84) for more information about Face
Priority.
F3.1
F3.11/60
1/60
Shutter speed Aperture
F3.1
F3.11/60
1/60
Shutter speed Aperture
24
Page 37
Step 3 Focus and Shoot
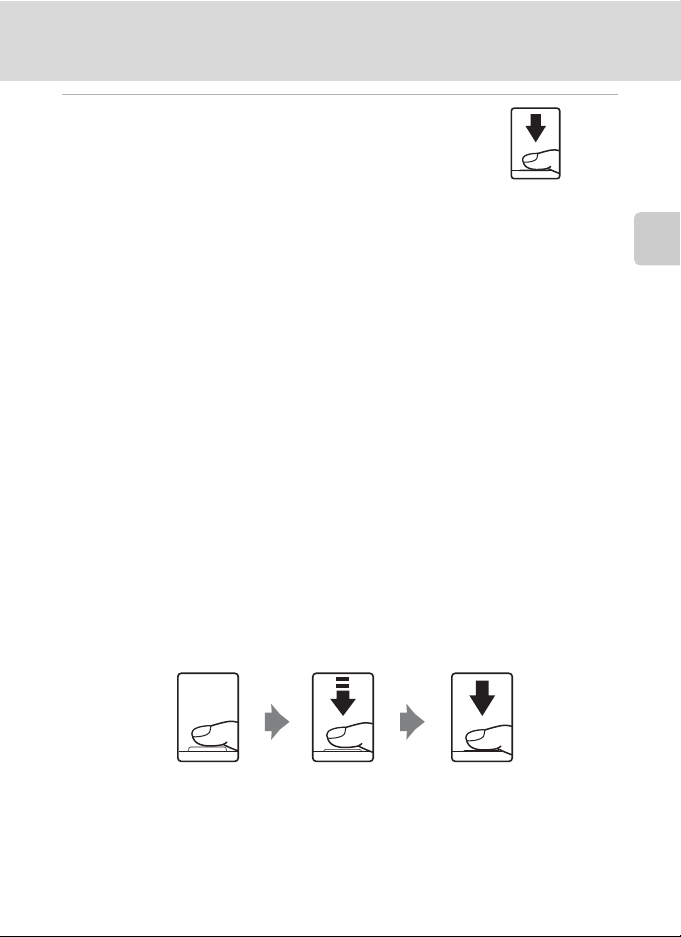
2 Press the shutter-release button the rest of
the way down.
The picture will be recorded to the memory card or
internal memory.
C During Recording
While images are being recorded, the O (wait) icon will be displayed and the indicator for the
number of exposures or movie length remaining will blink. Do not turn the camera off, open the
battery-chamber/memory card slot cover, or remove or disconnect the power source while these
icons are displayed. Cutting power or removing the memory card in these circumstances could
result in loss of data or in damage to the camera or card.
C Autofocus
Autofocus may not perform as expected in the following situations. In some rare cases, the subject
may not be in focus despite the fact that the active focus area and the focus indicator glow green:
• Subject is very dark
• Objects of sharply differing brightness are included in the scene (e.g. the sun is behind the subject
and is in deep shadow)
• No contrast between the subject and surroundings (e.g. when the subject is standing in front of a
white wall, wearing a white shirt)
• Several objects are at different distances from the camera (e.g. the subject is inside a cage)
• Subject is moving rapidly
In the situations noted above, try pressing the shutter-release button halfway to refocus several times, or
focus on another subject and use focus lock (
between the camera and the subject with which focus was locked is the same as that for the actual subject.
D Shutter-release Button
The camera features a two-stage shutter-release button. To set focus and exposure, press the
shutter-release button halfway, stopping when you feel resistance. Focus and exposure lock while
the shutter-release button is held in this position. To release the shutter and take a picture, press the
shutter-release button the rest of the way down. Do not use force wh en pressing the shutter-release
button, as this may result in camera shake and blurred pictures.
A
83). When using focus lock, be sure that the distance
Basic Photography and Playback: Auto Mode
Press the shutter-release
button halfway to set
focus and exposure.
Press the shutter-release
button the rest of the way
down to take picture.
D Flash
If the subject is poorly lit, the AF-assist illuminator may light by pressing the shutter-release button
halfway, or the flash may fire by pressing the shutter-release button all the way down (A 28).
25
Page 38
Step 4 Viewing and Deleting Pictures
15/05/2008 15:30
0004.JPG
44
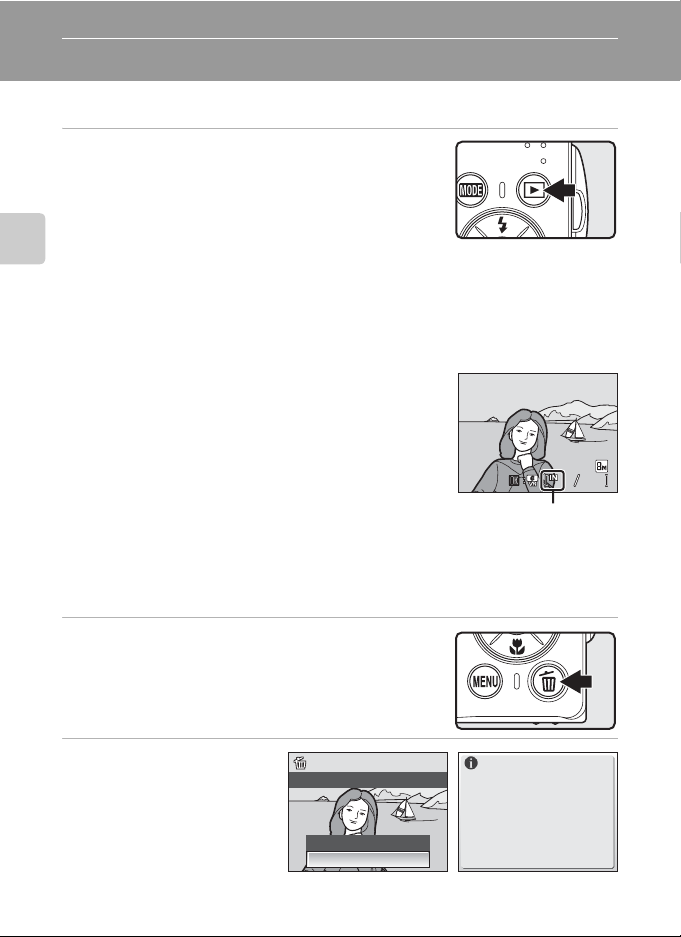
Viewing Pictures (Playback Mode)
Press c.
The last picture taken will be displayed in full-frame playback
mode.
Press the multi selector H, I, J or K to view additional
pictures.
Pictures may be displayed briefly at low resolution while being
Basic Photography and Playback: Auto Mode
read from the memory card or internal memory.
Press c or the shutter-release button to switch to shooting
mode.
When playing back pictures stored on the camera
memory, C appears. When a memory card is inserted in the
camera, C does not appear and images stored on the
memory card are played back.
Deleting Pictures
1 Press l to delete the picture currently
displayed in the monitor.
2 Use the multi selector
to select Yes and press
26
k.
To exit without deleting the
picture, choose No and press
k.
’s internal
Erase 1 image?
No
Ye s
15/05/2008 15:30
15/05/2008 15:30
0004.JPG
0004.JPG
Internal memory
indicator
Done
44
Page 39
Step 4 Viewing and Deleting Pictures
C Playback Mode
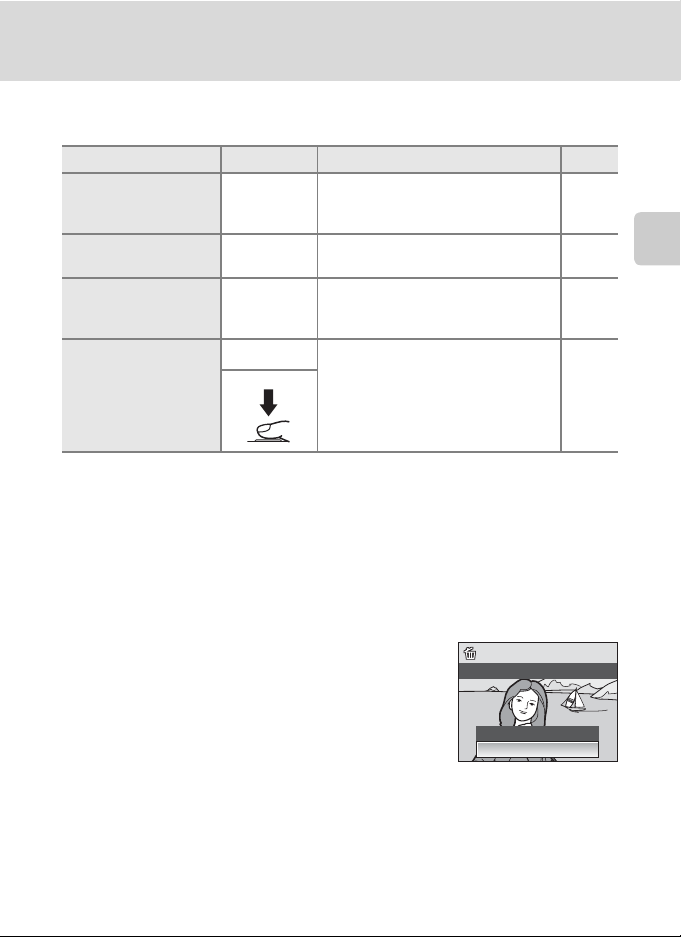
The following options are available in full-frame playback mode.
Option Use Description A
Playback zoom g (i)
View thumbnails f (h)
Electronic VR
k
c
Switch to shooting
mode
Press g (i) to enlarge the picture up
to 10×.
k to return to full-frame playback.
Press
Press f (h) to display 4, 9 or 16
picture thumbnails.
If the picture displayed in the monitor
is marked with S, press
compensate blurring (A 47).
Press c or the shutter-release button
to switch to the shooting mode
selected in the shooting-mode
selection menu.
k to
44
43
47
26
C Power on by pressing c
If the c button is pressed continuously while the power is OFF, the power will be switched ON
and playback mode will be started up.
C Viewing Pictures
• Pictures stored in the internal memory can only be viewed if no memory card is inserted.
• Pictures taken in Face Priority, while in full-frame playback, will be rotated (if necessary) and
displayed.
Basic Photography and Playback: Auto Mode
C Deleting the Last Picture Taken
In shooting mode, press l to delete the last picture taken. When
the confirmation dialog shown at right is displayed, use the multi
selector to choose Yes and press k.
To exit without deleting the picture, choose No and press k.
Erase 1 image?
No
Ye s
27
Page 40
Using the Flash
The flash has a range of 0.6-4.0 m (2.0-13.1 ft.) when the camera is zoomed out all
the way. With maximum optical zoom applied, the range is 0.6-2.1 m (2.0-6.9 ft.)
(when ISO sensitivity is set to Auto). The following flash modes are available.
U Auto (default setting for A (auto) mode)
Flash fires automatically when lighting is poor.
V Auto with red-eye reduction
Reduces “red-eye” in portraits (A 29).
Basic Photography and Playback: Auto Mode
W Off
Flash will not fire even when lighting is poor.
X Fill flash
Flash fires when a picture is taken. Use to “fill-in” (illuminate) shadows and backlit
subjects.
Y Slow sync
U (auto) is combined with slow shutter speed.
Flash illuminates main subject; slow shutter speeds are used to capture
background at night or under dim light.
Setting the Flash Mode
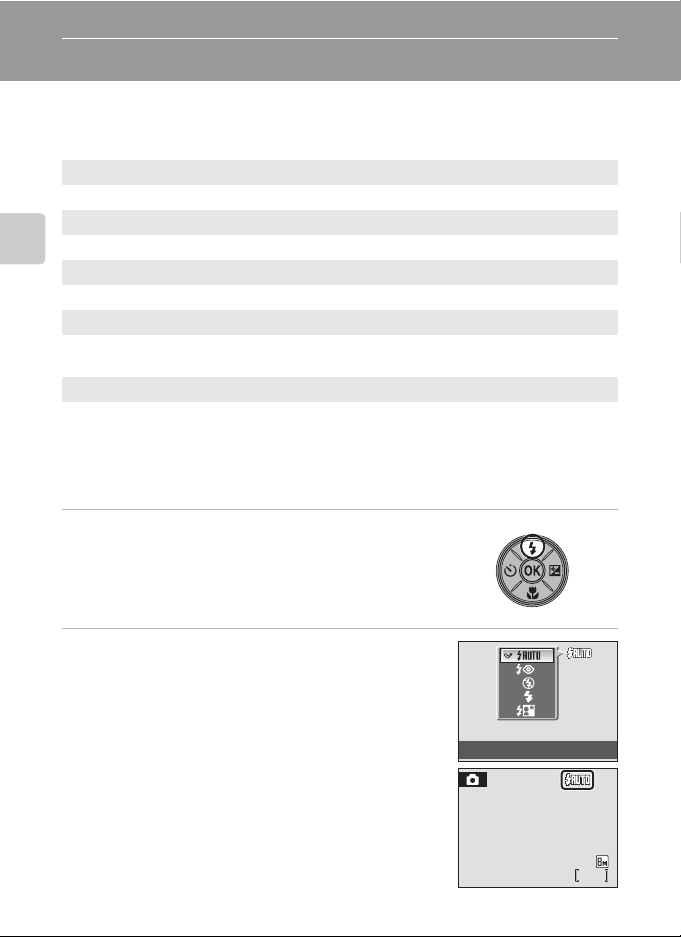
1 Press m (flash mode).
The flash menu is displayed.
2 Use the multi selector to choose the desired
flash mode and press k.
The icon for the selected flash mode is displayed at the
top of the monitor.
When U (auto) is applied, D will disappear after
few seconds regardless of the Photo info option (A 97).
If a setting is not applied by pressing k within a few
seconds, the selection will be cancelled.
28
Flash mode
262626
Page 41
Using the Flash
B The W (Off) Indicator
Note the following when lighting is poor and the flash is Off (W):
• Place the camera on a flat, level surface or use a tripod (recommended).
• The E is displayed when the camer a automatically increases sensitivity to minimize blur caused
by slow shutter speed. Pictures taken when E is displayed may be slightly mottled.
B Note on Using the Flash
When using the flash at a wide-angle zoom position, reflections from dust particles in the air may
appear as bright spots in pictures. To reduce these reflections, set the flash to W (Off) or zoom in on
the subject.
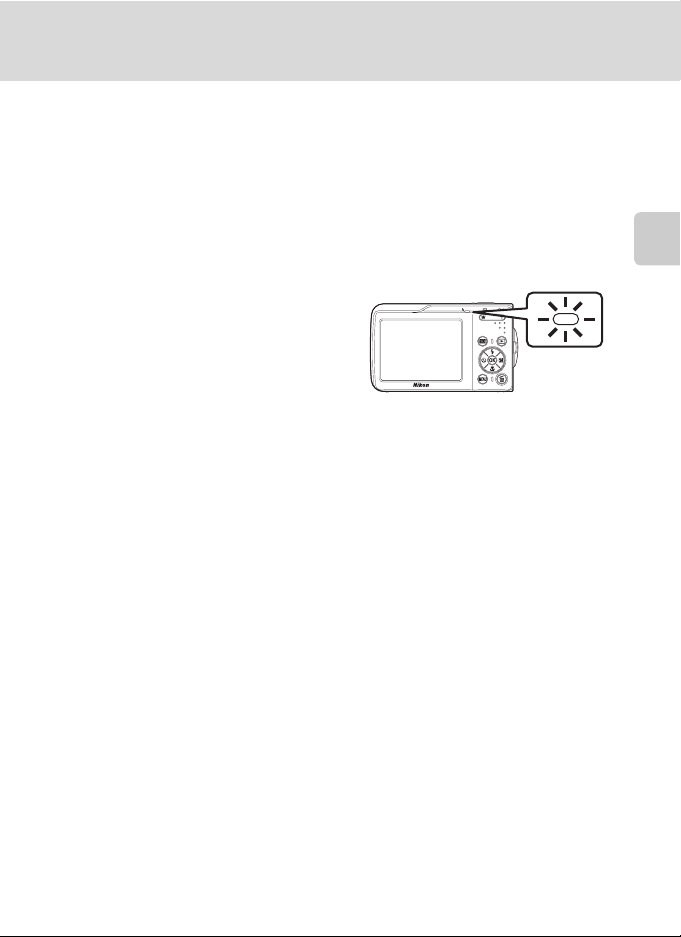
C The Flash Lamp
The flash lamp indicates flash status when the
shutter-release button is pressed halfway.
• On: Flash will fire when picture is taken.
• Blinks: Flash charging. Wait a few seconds and
try again.
• Off: Flash will not fire when picture is taken.
If remaining battery level is low, the monitor will
turn off and the flash lamp will blink until the flash has finished charging.
C The Flash Mode Setting
The default setting is U (auto) (except for some modes in scene mode).
When flash mode is applied in a scene mode, the setting is only enabled until another shooting
mode is selected or the camera is turned off. Switching to another shooting mode or turning the
camera off enables the default flash setting for all modes.
C Red-eye Reduction
The COOLPIX S202 is equipped with an advanced red-eye reduction system. Pre-flashes are fired
several times at low intensity before the main flash, to reduce “red-eye.” If the camera detects “redeye” after a picture is taken, N ikon’s own In-Camera Red Eye Fix processes the ima ge as it is recorded.
Therefore, there is a slight delay before the shutter-re lease button operates normally to take another
picture. Note the following when using red-eye reduction:
• Not recommended when shutter-release timing is essential.
• Red-eye reduction may not always produce the desired results.
• In some rare cases, other portions of pictures may be affected.
• Use flash modes other than auto with red-eye reduction in above cases.
Basic Photography and Playback: Auto Mode
29
Page 42
Taking Pictures with the Self-timer
F3.1
1/60
F3.1
1/60
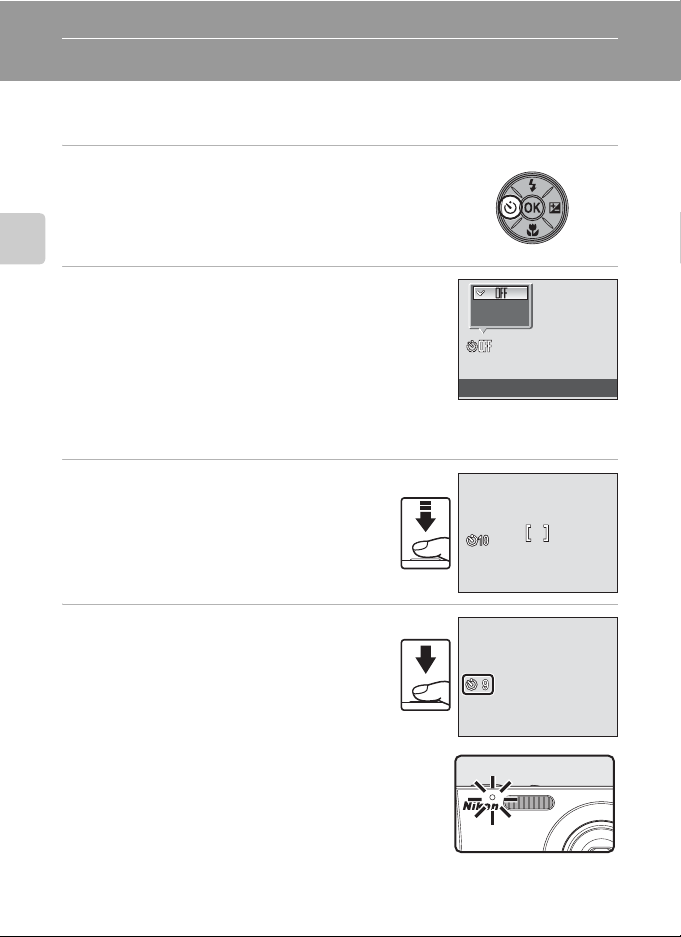
The camera is equipped with a ten-second and two-second timer for self-portraits.
When using the self-timer, use of a tripod is recommended.
1 Press n (self-timer).
The self-timer menu is displayed.
Basic Photography and Playback: Auto Mode
2 Use the multi selector to choose 10 s or 2 s
and press k.
10 s (ten seconds): Suited for important occasions
(such as weddings)
2 s (two seconds): Suited for preventing camera shake
The mode selected for self-timer is displayed.
If a setting is not applied by pressing k within a few seconds, the selection will be
cancelled.
10s
2s
Self-timer
3 Frame the picture and press the
shutter-release button halfway.
Focus and exposure will be set.
1/60
4 Press the shutter-release button the
rest of the way down.
The self-timer starts, and the number of
seconds remaining before the shutter is
released is displayed in the monitor. The selftimer lamp blinks while the timer is counting
down. About one second before the shutter is
released, the lamp remains lit and stops
blinking.
To stop the timer before a picture is taken, press
the shutter-release button again.
1/60
F3.1
F3.11/60
F3.1
F3.11/60
30
Page 43
Macro Mode
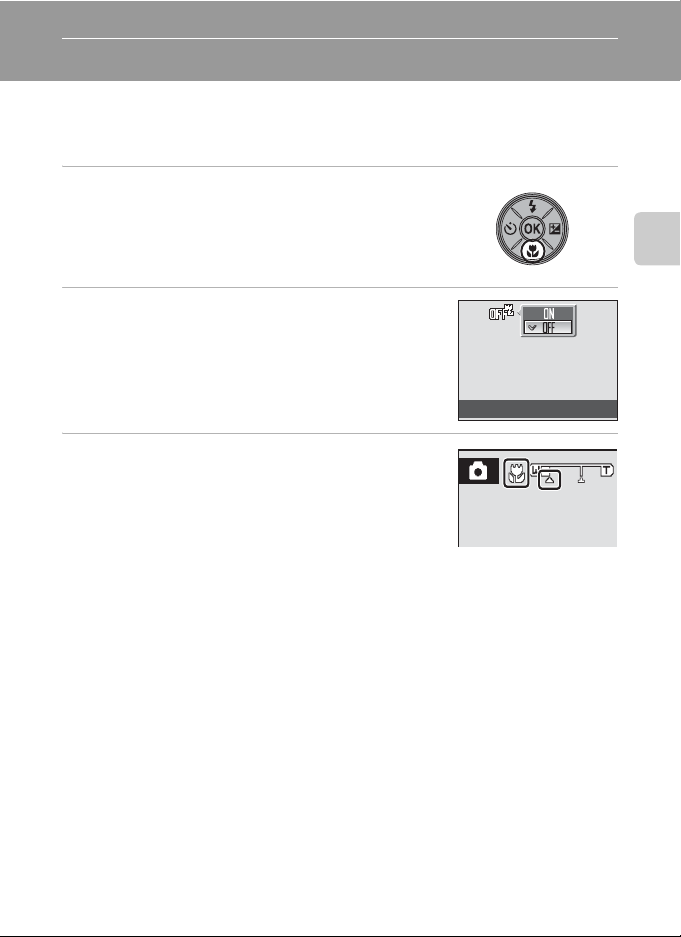
Macro mode is used for taking pictures of objects as close as 10 cm (4 in.). Note
that the flash may be unable to light entire subject at distances of less than 60 cm
(2 ft.).
1 Press p (macro mode).
The macro menu is displayed.
2 Use the multi selector to choose ON and press
k.
The macro mode icon (F) is displayed.
The monitor will return to the normal display for the
current mode if the setting is not applied by pressing k
within a few seconds.
Macro mode
3 Press g (i) or f (h) to frame the picture.
The camera can focus at a distance of 10 cm (4 in.) at the
zoom position at which F and the zoom indicator glow
green (the zoom indicator is positioned before K).
Basic Photography and Playback: Auto Mode
C Macro Mode
In macro mode, the camera focuses continuously until the shutter-release button is pressed halfway
to lock focus.
C The Macro Mode Setting
When macro mode is applied in a scene mode, the setting is only enabled until another shooting
mode is selected or the camera is turned off. Switching to another shooting mode or turning the
camera off enables the default macro setting for all modes.
31
Page 44
Exposure Compensation
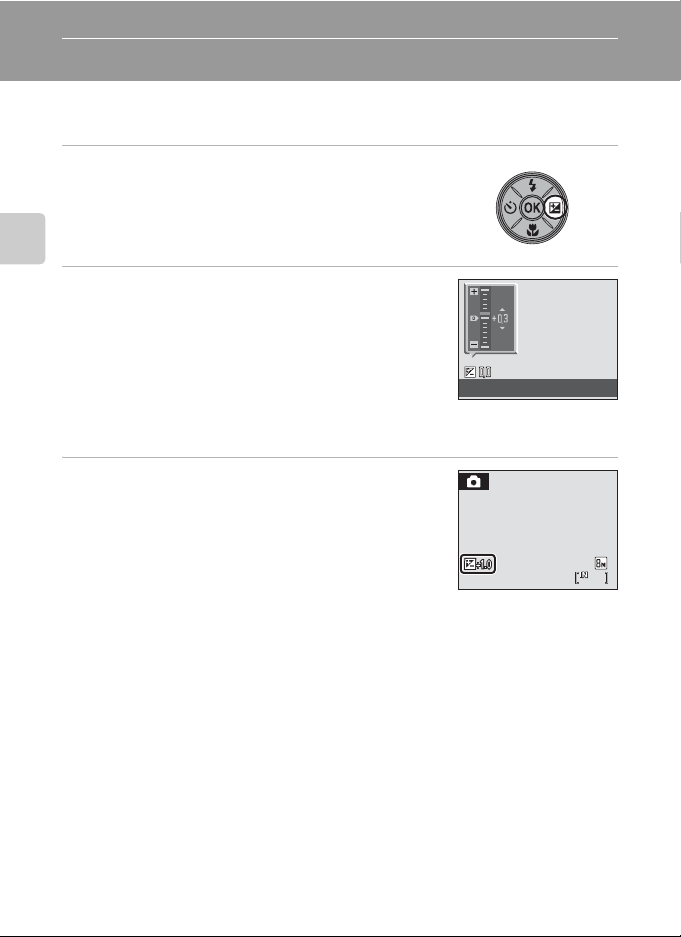
Exposure compensation is used to alter exposure from the value suggested by the
camera to make pictures brighter or darker.
1 Press the multi selector o (exposure
compensation).
The exposure compensation guide is displayed.
Basic Photography and Playback: Auto Mode
2 Use the multi selector to adjust exposure.
• When the picture is too dark: adjust the exposure
compensation to “+” side.
• When the picture is too bright: adjust the exposure
compensation to “–” side.
• Exposure compensation can be set to values between
–2.0 and +2.0 EV.
• If a setting is not applied by pressing k within a few
seconds, the selection will be cancelled.
Exposure compensation
3 The setting is applied.
• The H icon is displayed in the monitor.
262626
C Exposure Compensation Value
When exposure compensation is adjusted in a scene mode, the setting is only enabled until another
shooting mode is selected or the camera is turned off. Switching to another shooting mode or
turning the camera off returns exposure compensation to 0.0.
D Using Exposure Compensation
The camera tends to lower exposure when the frame is dominated by brightly lit objects and to
increase exposure when the frame is mostly dark. Positive compensation may therefore be required
to capture the brilliancy of very bright objects that fill the frame (for example, sunlit expanses of
water, sand, or snow) or when the background is much brighter than the main subject. Negative
compensation may be called for when large areas of the frame contain very dark objects (for
example, a swath of dark green leaves) or when the background is much darker than the main
subject.
32
Page 45
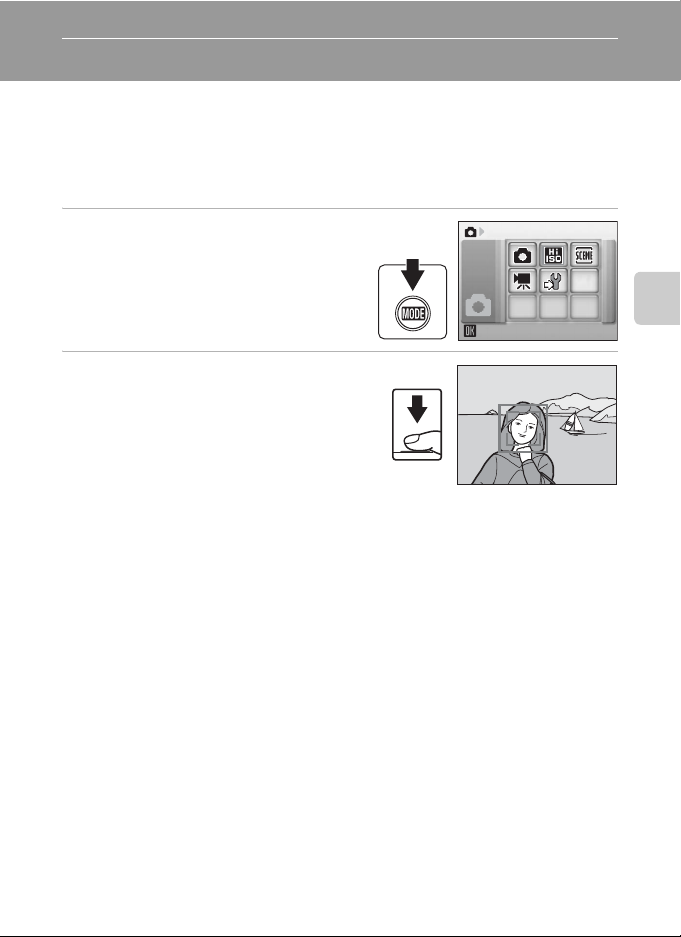
High-sensitivity Shooting Mode
F3.1
1/60
Shooting in the High-sensitivity Shooting Mode
In high-sensitivity shooting mode, sensitivity is increased when shooting under
low lighting, to reduce blurring caused by camera shake or subject movement,
allowing you to capture the atmosphere of the scene. ISO sensitivity will be
automatically increased to a maximum of 1600, depending upon the brightness of
the subject.
1 Enter high-sensitivity shooting
mode by pressing e in
High sensitivity
shooting mode, selecting B (use
the multi selector), and then
pressing k.
2 Frame the subject and shoot.
When people’s faces (front view) are
recognized the camera will focus on the face
surrounded by a double AF area.
When shooting non-human subjects or when
no faces are recognized the camera
automatically selects the focus area (one of
nine) containing the subject closest to the camera.
See “AF Area Mode“ (A 82) or “Face Priority” (A 84) for more information about Face
Priority.
B Notes on High-sensitivity Shooting Mode
• This mode reduces effects of camera shake even for shooting under low lighting; however, when
shooting without the flash, use of a tripod is recommended.
• Pictures taken in this mode may become somewhat grainy.
• Focus may not be precisely fixed in extremely dark places.
D Options that can be used in High-sensitivity Shooting
Settings can be changed for Flash mode (A 28), Self-timer (A 30), Macro mode (A 31) and
Exposure Compensation (A32).
Pressing the d button in high-sensitivity shooting mode allows you to change the settings for all
options in shooting menu (except ISO Sensitivity) (A 73).
1/60
F3.1
F3.11/60
High-sensitivity Shooting Mode
33
Page 46
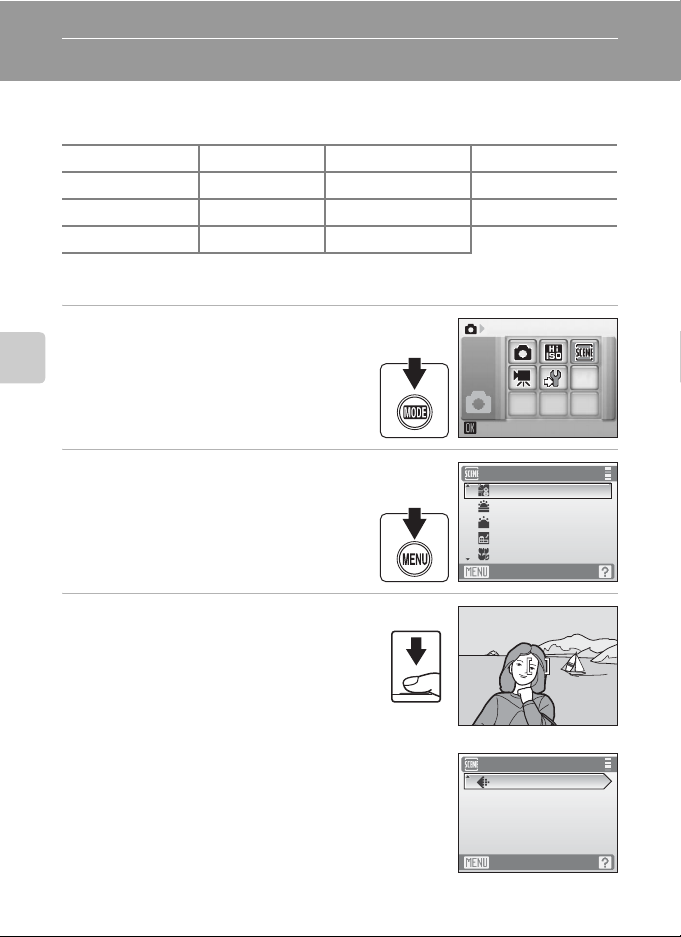
Shooting Suited for the Scene
F3.1
1/60
Shooting in the Scene Mode
Camera settings are automatically optimized for the selected subject type. The
following scene modes are available.
b Portrait f Party/indoor j Night landscape n Copy
c Landscape g Beach/snow k Close-up o Backlight
d Sports h Sunset l Museum p Panorama assist
e Night portrait i Dusk/dawn m Fireworks show
Setting the Scene Mode
1 Enter scene mode by pressing e
in shooting mode, selecting C (use
the multi selector), and then
Shooting Suited for the Scene
pressing k.
2 Press d to display the scene
menu screen, choose the desired
scene and press k.
3 Frame the subject and shoot.
D Image Mode
A Image mode (A 75) can be set in the Scene menu. Changes
made to these settings apply to all shooting modes (except for
movie menu).
Scene menu
Beach/snow
Sunset
Dusk/dawnd
Night landscape
Close-up
Exit
F3.1
F3.11/60
1/60
Scene menu
Image mode
Exit
Scene
34
Page 47
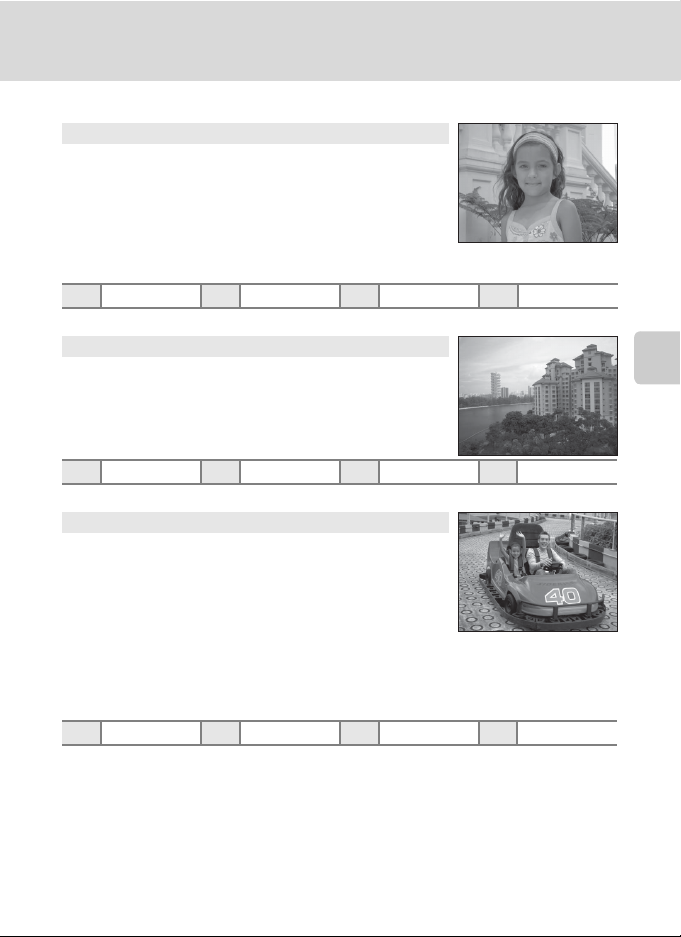
Shooting in the Scene Mode
Features
b Portrait
Use this mode for portraits in which the main subject stands out
clearly. Portrait subjects exhibit smooth, natural-looking skin tones.
•
Focus will be set on people’s faces if it recognizes people’s faces
(front view). See “Face Priority” (
• If more than one face is recognized, focus will be on the face
nearest to the camera.
•
If no faces are recognized, focus will be on the center of the screen.
• Digital zoom is not available.
m V* n Off* p Off o 0.0*
* Other settings can be selected.
c Landscape
Use this mode for vivid landscapes and cityscapes.
• Camera focuses at infinity. The focus area or focus indicator
(A 6) always glows green when the shutter-release button
is pressed halfway. Note, however, that objects in the
foreground may not always be in focus.
m W n Off* p Off o 0.0*
* Other settings can be selected.
d Sports
Use this mode for dynamic action shots that freeze the action
in a single shot and record motion in a series of pictures.
•
The camera will continuously focus on different objects until
you press the shutter-release button halfway to lock focus.
• While shutter-releas e button is held down, pictures are take n
at a rate of about 1.2 frames per second (fps) when image
mode is set to R Normal (3264). This rate is maintained for
up to 4 pictures.
• The maximum frame rate with continuous shooting may
vary depending upon the current image mode setting and
the memory card used.
m W n Off p Off o 0.0*
* Other settings can be selected.
A
84) for more information.
C Icons Used for Descriptions
The following icons are used for descriptions in this section: m, flash mode (A28); n, self-timer (A30);
p
, macro mode (A31); o, exposure compensation (A32).
C Scene Mode Settings
Adjustments to the flash mode setting, self-timer setting, macro mode setting, and exposure
compensation value are cancelled and these settings return to their default scene values whenever
another shooting mode is selected or the camera is turned off.
Shooting Suited for the Scene
35
Page 48
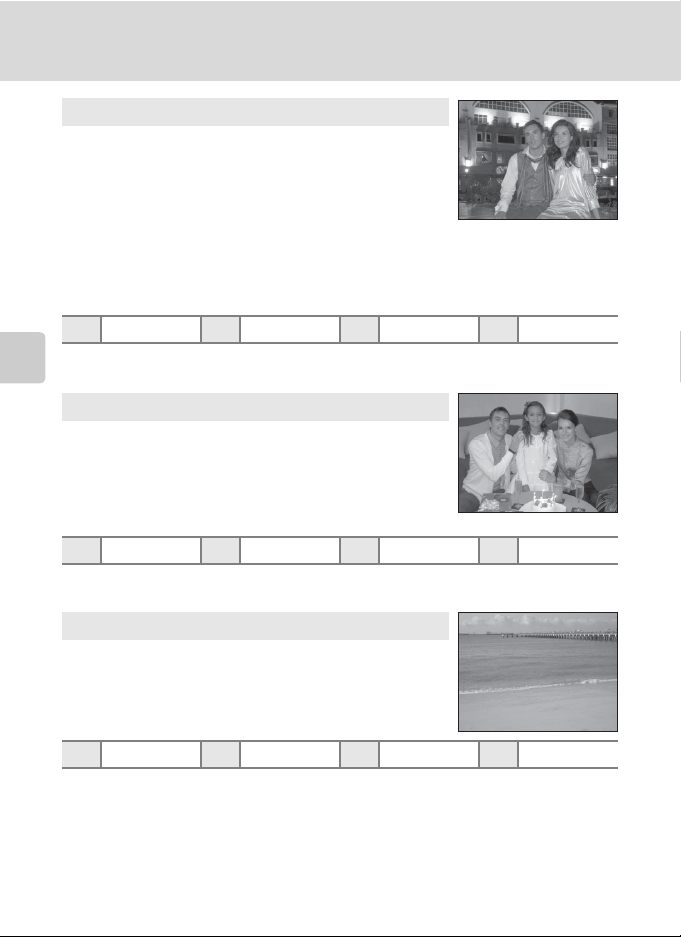
Shooting in the Scene Mode
e Night portrait OQ
Use this mode to achieve a natural balance between the main
subject and background lighting in portraits taken at night.
• Focus will be set on people’s faces if it recognizes people’s
faces (front view). See “Face Priority” (A 84) for more
information.
• If more than one face is recognized, focus will be on the face
nearest to the camera.
• If no faces are recognized, focus will be on the center of the
screen.
• Digital zoom is not available.
m V
1
Fill flash with slow sync and red-eye reduction.
2
Other settings can be selected.
Shooting Suited for the Scene
1
n Off
2
p Off o 0.0
f Party/indoor
Captures the effects of candlelight and other indoor
background lighting.
• Camera focuses on subject in center of frame.
• As pictures are easily affected by camera shake, hold the
camera steadily. Use of a tripod is recommended for dark
locations.
m V
1
Slow sync with red-eye reduction. Other settings can be selected.
2
Other settings can be selected.
1
n Off
2
p Off o 0.0
g Beach/snow
Captures the brightness of such subjects as snowfields,
beaches, or sunlit expanses of water.
• Camera focuses on subject in center of frame.
2
2
m U* n Off* p Off o 0.0*
* Other settings can be selected.
O: For those scene modes with O, use of a tripod is recommended.
Q: For those scene modes with Q, noise reduction is carried out automatically so th e time taken to
save an image will be longer than usual.
36
Page 49
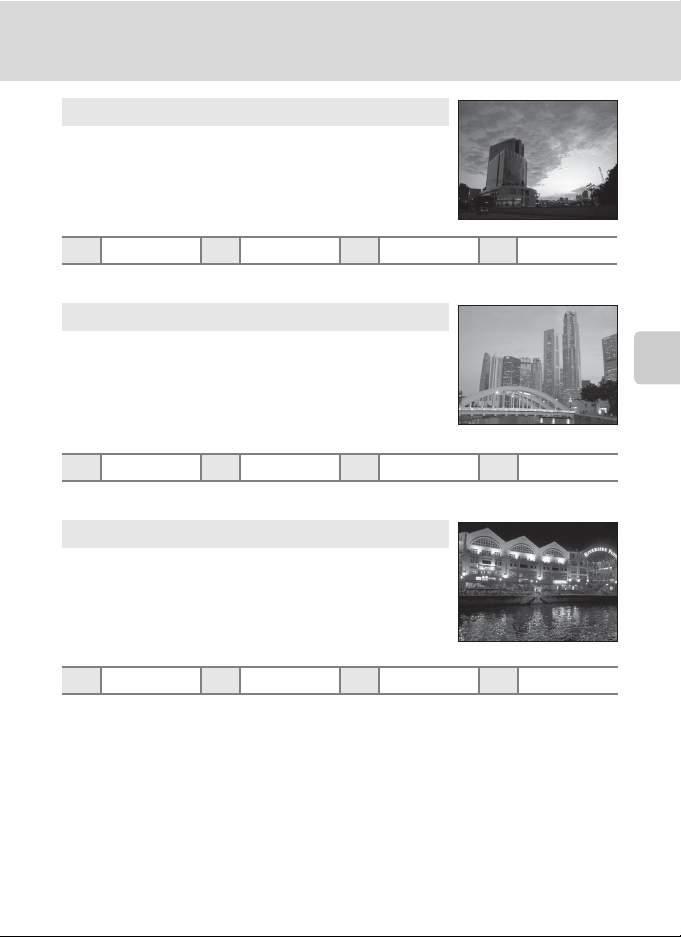
Shooting in the Scene Mode
h Sunset O
Preserves the deep hues seen in sunsets and sunrises.
• Camera focuses at the center of the screen.
m W* n Off* p Off o 0.0*
* Other settings can be selected.
i Dusk/dawn OQ
Preserves the colors seen in the weak natural light before
sunrise or after sunset.
• Camera focuses at infinity. The focus area or focus indicator
(A 6) always glows green when the shutter-release button
is pressed halfway. Note, however, that objects in the
foreground may not always be in focus.
m W n Off* p Off o 0.0*
* Other settings can be selected.
j Night landscape OQ
Slow shutter speeds are used to produce stunning night
landscapes.
• Camera focuses at infinity. The focus area or focus indicator
(A 6) always glows green when the shutter-release button
is pressed halfway. Note, however, that objects in the
foreground may not always be in focus.
Shooting Suited for the Scene
m W n Off* p Off o 0.0*
* Other settings can be selected.
O: For those scene modes with O, use of a tripod is recommended.
Q: For those scene modes with Q, noise reduction is carried out automatically so th e time taken to
save an image will be longer than usual.
37
Page 50
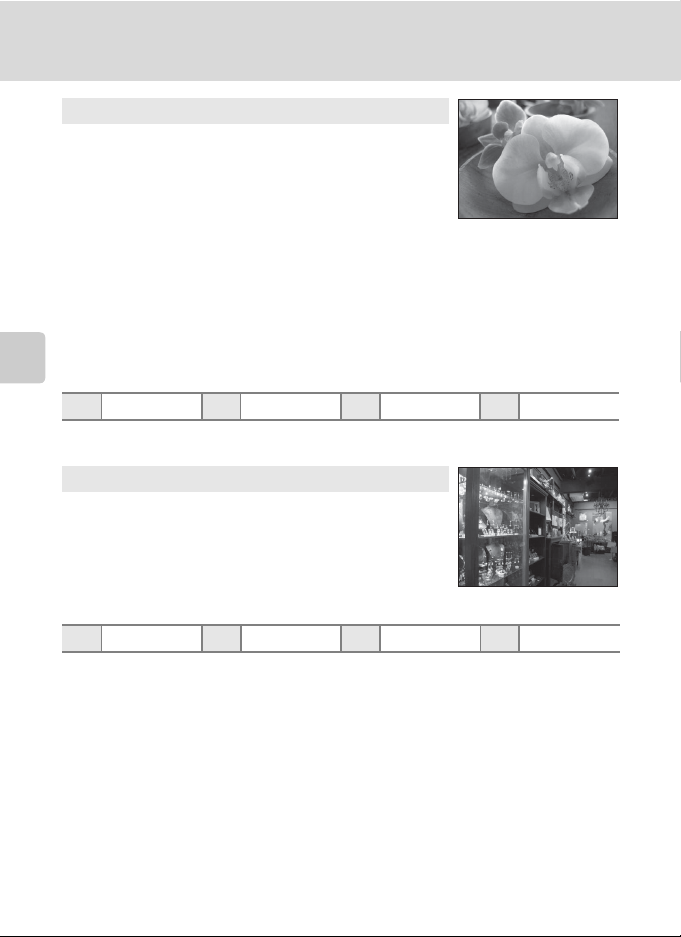
Shooting in the Scene Mode
k Close-up
Photograph flowers, insects and other small objects at close
range.
•
Macro mode (A31) will be changed to ON and the zoom will
automatically move to the closest possible shooting position.
•
The camera can focus at a distance of 10 cm (4 in.) at the zoom
position at which
zoom indicator is positioned before
F
and the zoom indicator glow green (the
K
).
The closest possible shooting position may vary according to
the zoom position.
• AF area mode is set to Manual (A 82). When k is pressed,
camera focuses on subject in active focus area.
The camera will continuously focus on different objects until
•
you press the shutter-release button halfway to lock focus.
•
As pictures are easily affected by camera shake, hold the camera
steadily.
Shooting Suited for the Scene
m U* n Off* p On o 0.0*
* Other settings can be selected. Note that the flash may be unable to light entire subject at
distances of less than 60 cm (2 ft.).
.
l Museum
Use indoors where flash photography is prohibited (for
example, in museums and art galleries) or in other settings in
which you do not want to use the flash.
• Camera focuses on subject in center of frame.
• BSS (best shot selector) can be used to shoot (A79).
• As pictures are easily affected by camera shake, hold the
camera steadily.
m W n Off* p Off* o 0.0*
* Other settings can be selected.
38
Page 51
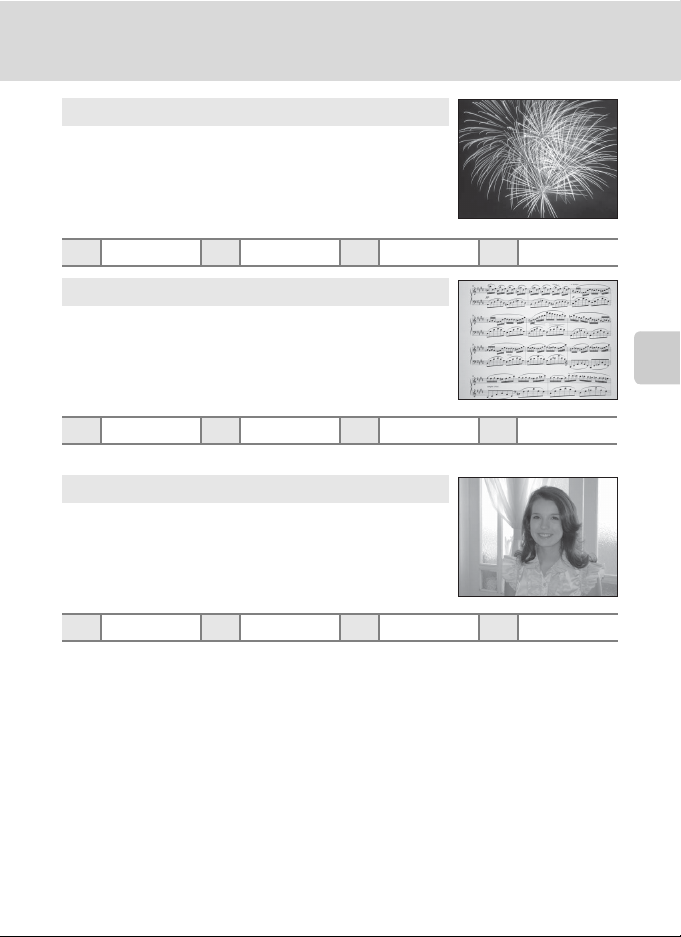
Shooting in the Scene Mode
m Fireworks show O
Slow shutter speeds are used to capture the expanding burst
of light from a firework.
• Camera focuses at infinity. The focus area (A 6) always
glows green when the shutter-release button is pressed
halfway. Note, however, that objects in the foreground may
not always be in focus.
m W n Off p Off o 0.0
n Copy
Provides clear pictures of text or drawings on a white board or
in print.
• Camera focuses on subject in center of frame.
• Use macro mode (A 31) to focus at short ranges.
• Colored text and drawings may not show up well.
m W* n Off* p Off* o 0.0*
* Other settings can be selected.
o Backlight
Use when light is coming from behind your subject, throwing
features or details into shadow. The flash fires automatically to
“fill in” (illuminate) shadows.
• Camera focuses on subject in center of frame.
mmn Off* p Off o 0.0*
* Other settings can be selected.
Shooting Suited for the Scene
O: For those scene modes with O, use of a tripod is recommended.
39
Page 52
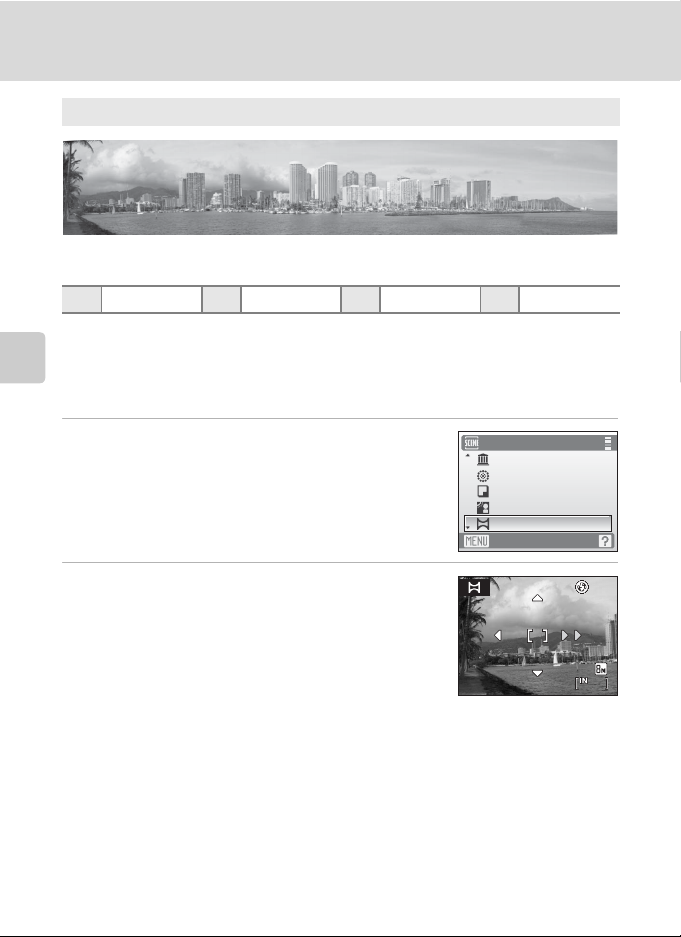
Shooting in the Scene Mode
p Panorama assist
Use when taking a series of pictures that will later be joined to form a single panorama using
the supplied Panorama Maker software.
m W* n Off* p Off* o 0.0*
* Other settings can be selected.
Taking Pictures for a Panorama
The camera focuses on the subject in the center of the frame. Use a tripod for best
Shooting Suited for the Scene
results.
1 Use the multi selector to choose p
Panorama assist in the scene menu and
press k
Panorama direction icons (I) are displayed to show the
direction in which pictures will be joined.
(A 34).
2 Use the multi selector to choose the direction
and press k.
Select how pictures will be joined together in the
completed panorama; right (I), left (J), up (K) or down
(L).
Yellow direction icons (I I) appear for the selected
direction. When you press k, the selected direction is set,
and a white direction icon (I) appears for that direction.
Apply flash mode (A 28), self-timer (A 30), macro mode (A 31) and exposure
compensation (A 32) settings with this step, if necessary.
Press k to reselect the direction.
40
Scene menu
Museum
Fireworks show
Copy
Backlight
Panorama assist
Exit
262626
Page 53
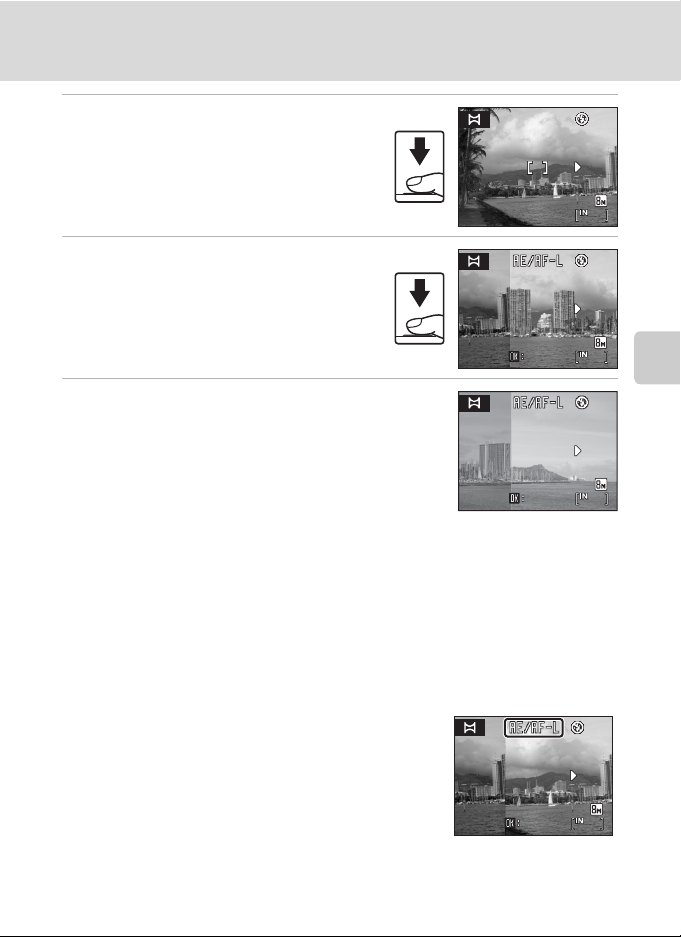
Shooting in the Scene Mode
Exi t
Exi t
Exi t
3 Shoot the first picture.
The picture taken will be displayed in 1/3 of
the monitor.
262626
4 Shoot the second picture.
Compose the next picture so that it overlaps
the first picture.
Repeat until you have taken the necessary
number of pictures to complete the scene.
Exit
Exit
252525
5 Press k when shooting is completed.
The camera returns to step 2.
Exit
Exit
B Panorama Assist
Flash mode (A 28), self-timer (A 30), macro mode (A 31) and exposure compensation (A 32)
settings cannot be adjusted after the first picture is taken. Pictures cannot be deleted, nor can zoom
or image-mode setting (A 75) be adjusted until the series is finalized.
The panorama series is terminated if the camera enters standby mode with the auto off function
(A 102) during shooting. Setting the time allowed to elapse before the auto off function is enabled
to a longer setting is recommended.
222222
Shooting Suited for the Scene
D Exposure Lock
R is displayed to indicate that exposure, white balance, and
focus have been locked at the values set with the first shot. All
pictures taken in a panorama series have the same exposure, whitebalance, and focus settings.
Exit
Exit
252525
41
Page 54
Shooting in the Scene Mode
D Panorama Maker
Install Panorama Maker from the supplied Software Suite CD. Transfer pictures to a computer (A 61)
and use Panorama Maker (A 64) to join them in a single panorama.
D More Information
See “Image File and Folder Names” (A 109) for more information.
Shooting Suited for the Scene
42
Page 55
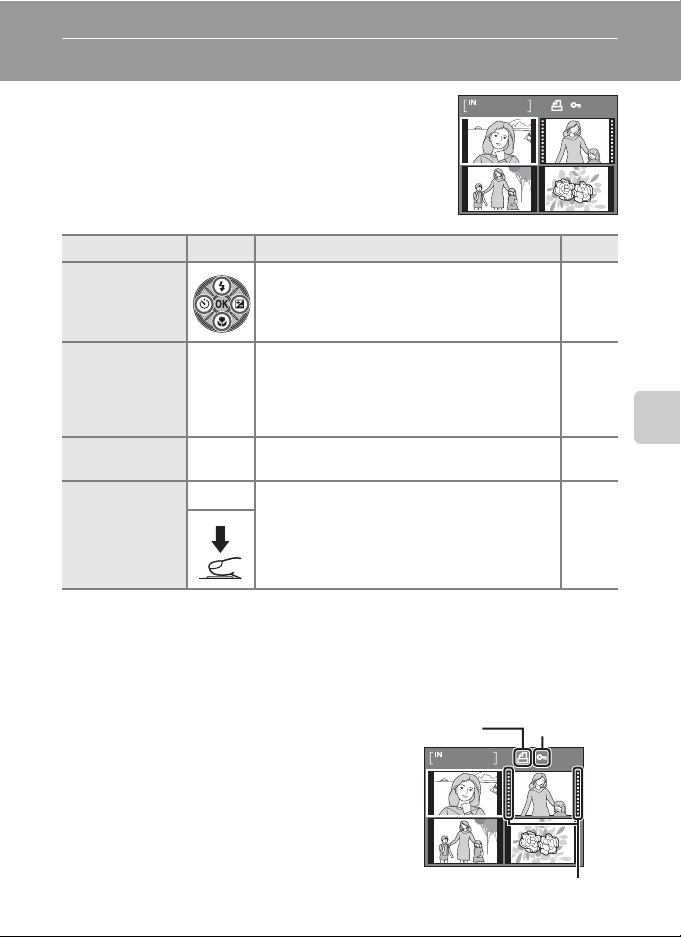
More on Playback
Viewing Multiple Pictures: Thumbnail Playback
Press f (h) in full-frame playback mode (A 26) to
display pictures in “contact sheets” of thumbnail
1/ 10
images. The following operations can be performed
while thumbnails are displayed.
To Use Description A
Choose pictures Use the multi selector to choose pictures. 9
Change number
of pictures
displayed
Cancel thumbnail
playback
f (h)
When f (h) is pressed, display picture
thumbnails in the following order:
g (i)
k
4 ➝ 9 ➝ 16
When g (i) is pressed, the number of
thumbnails changes reversely.
Press k.26
c
Switch to
shooting mode
Press c or the shutter-release button to return
to the last shooting mode selected.
–
More on Playback
26
C Thumbnail Playback Mode Display
When pictures for which Print set (A 71) and
Protect (A 89) settings have been configured
are selected, the icons in the illustration to the
right appear.
Movies are displayed as film frames.
Print set icon Protect icon
1/ 10
Film frames
43
Page 56
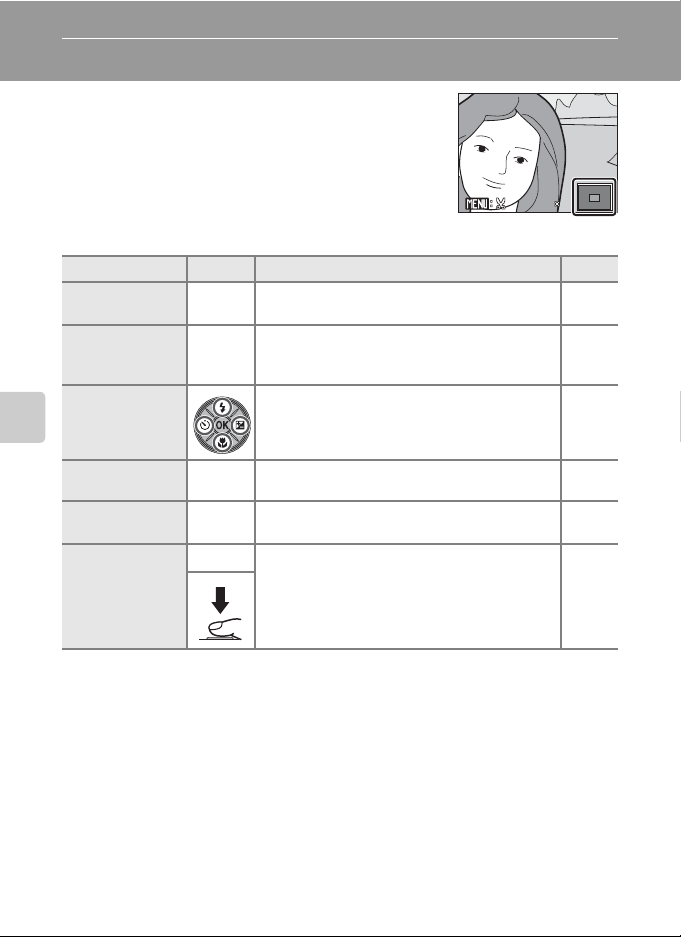
Taking a Closer Look: Playback Zoom
3.0
Pressing g (i) during full-frame playback mode (A 26)
zooms the current picture in 3×, with the center of the
picture displayed in the monitor.
The guide at lower right shows which portion of the
picture is enlarged.
The following operations can be performed while
pictures are zoomed in.
To Use Description A
Zoom in g (i)
Zoom out f (h)
Zoom increases each time g (i) is pressed, to a
maximum of 10×.
Zoom decreases each time f (h) is pressed.
When the magnification ratio reaches 1×, the
display returns to full-frame playback mode.
3.
3.0
–
–
View other areas
of picture
More on Playback
Switch to fullframe playback
Crop picture
Press the multi selector H, I, J or K to move the
display area to other areas of the picture.
k
Press k.26
Press d to crop current picture to contain only
d
the portion visible in the monitor.
c
Switch to
shooting mode
Press c or the shutter-release button to return
to the last shooting mode selected.
Pictures Taken in Face Priority
When g (i) is pressed during full-frame playback mode for pictures taken in Face
priority (A 84), the picture will be enlarged using the face (which was focused on
during shooting time) as the centralized point.
If several faces are recognized, the picture will be enlarged using the face (which
was focused on during shooting time) as the centralized point, and pressing the
multi selector H, I, J, or K will enable you to switch between the people’s
faces.
You can change the zoom ratio by pressing g (i) or f (h).
44
9
48
26
Page 57
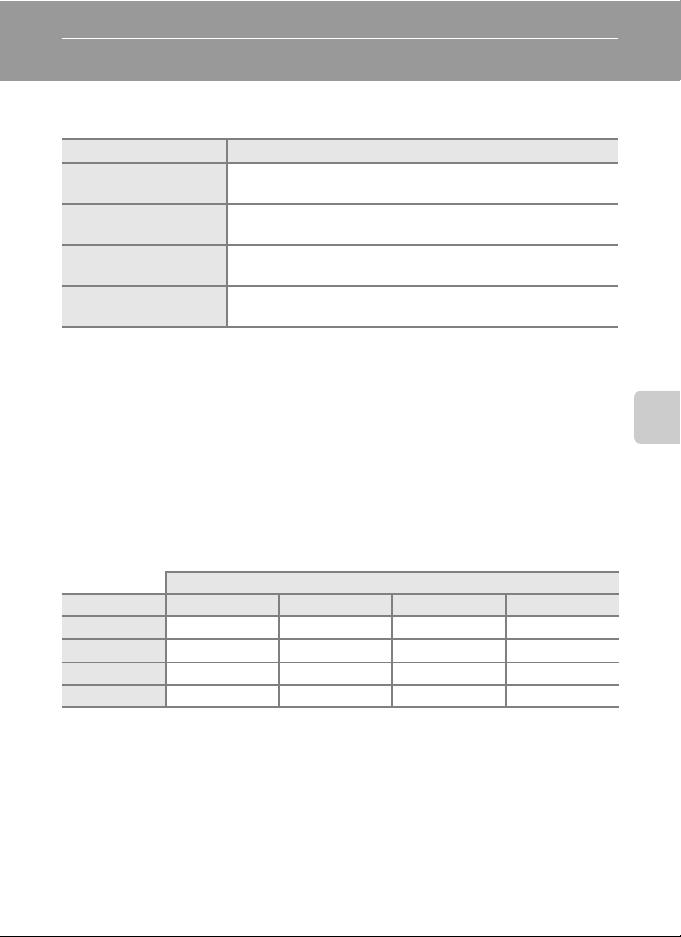
Editing Pictures
Use the COOLPIX S202 to edit pictures in-camera and store them as separate files
(A 109). The editing features described below are available.
Editing function Description
D-Lighting (A 46)
Electronic VR (A 47)
Crop (A 48)
Small picture (A 49)
C Picture Editing
• Pictures taken at an Image mode setting of 16:9 (1920) (A 75) can not be edited (except
electronic vibration reduction).
• The COOLPIX S202 editing functions are not available for pictures taken with non-COOLPIX S202
digital cameras.
• If a copy created using the COOLPIX S202 is viewed on a different digital camera, the picture may
not be displayed or may not be transferred to a computer.
• Editing functions are not available when there is not enough free space in the internal memory or
on the memory card.
C Restrictions on Picture Editing (✔: available, –: not available)
1st editing D-Lighting Electronic VR Crop Small picture
D-Lighting ––
Electronic VR
Crop ––––
Small picture ––––
• Pictures cannot be edited twice with the same editing function.
• The D-Lighting or Electronic VR should be done first while the restricted use of combination exists.
• Electronic VR cannot be applied to pictures on which advanced red-eye reduction was applied.
Create a copy of the current picture with enhanced brightness
and contrast, brightening dark portions of the picture.
Compensate for blurring caused by camera shake, and create a
sharper copy of the picture.
Enlarge the image or refine the composition and create a copy
containing only the portion visible in the monitor.
Create a small copy of pictures suitable for use on web pages or
as e-mail attachments.
2nd editing
✔✔
✔
–
✔✔
More on Playback
D Original Pictures and Edited
• Copies created with editing functions are not deleted if the original pictures are deleted. The
original pictures are not deleted if copies created with editing functions are deleted.
• Edited copies are stored with the same recording date and time as the original.
• Print set (A 71) and Protect (A 89) settings configured for original pictures are not reflected in
their edited copies.
45
Page 58
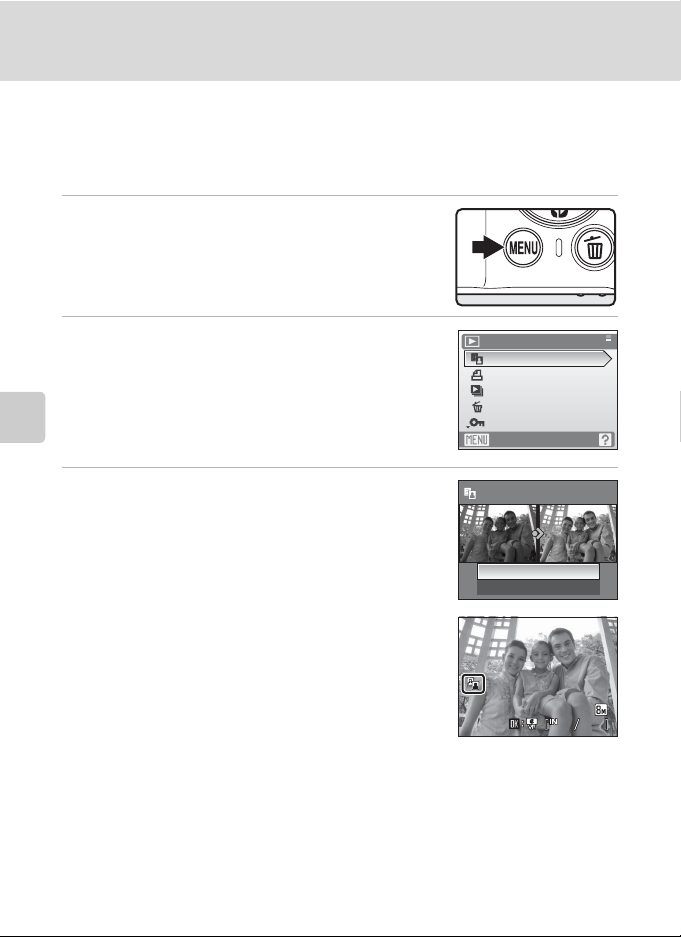
Editing Pictures
15/05/2008 15:30
0004.JPG
44
Enhancing Brightness and Contrast: D-Lighting
D-Lighting can be used to create copies with enhanced brightness and contrast,
brightening dark portions of a picture. Enhanced copies are stored as separate
files.
1 Select the desired picture from full-frame
(A 26) or thumbnail (A 43) playback mode
and press d.
The playback menu will be shown.
2 Choose D-Lighting with the multi selector
and press k.
The original version will be shown on the left and the
edited version will be shown on the right.
More on Playback
3 Choose OK and press k.
A new copy with enhanced brightness and contrast is
created.
To cancel D-Lighting, choose Cancel and press k.
D-Lighting copies can be recognized by the c icon
displayed during playback.
D More Information
See, “Image File and Folder Names” (A 109) for more information.
46
Playback menu
D-Lighting
Print set
Slide show
Delete
Protect
Exit
D-Lighting
OK
Cancel
15/05/2008 15:30
15/05/2008 15:30
0004.JPG
0004.JPG
44
Page 59
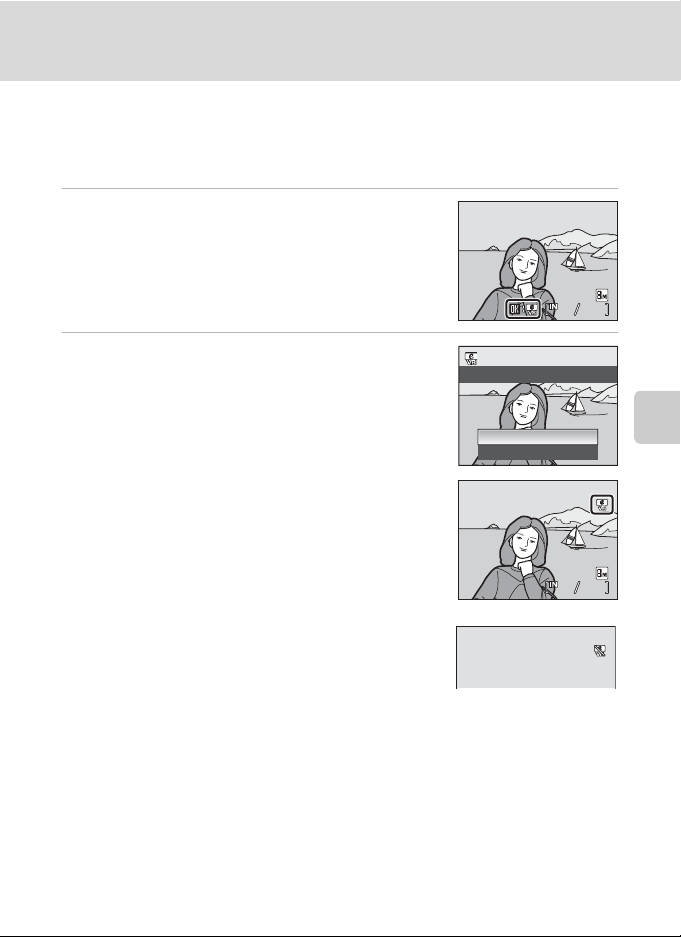
Editing Pictures
15/05/2008 15:30
0004.JPG
44
Red uc e blu r?
15/05/2008 15:30
0004.JPG
44
0003.JPG
15/05/2008 15:30
Compensating Blurred Images After Shooting: Electronic VR
Blurring in pictures shot without electronic VR enabled, and marked with S (electronic VR guide)
in full-frame playback mode, can be compensated with electronic VR after shooting. When electronic
VR is applied to pictures after they are shot, compensated copies are stored as separate files.
1 Select the desired picture from playback
mode (A 26) and press k.
Blurring compensation can only be applied to pictures
marked with S.
15/05/2008 15:30
15/05/2008 15:30
0004.JPG
0004.JPG
2 Use the multi selector to choose OK and press
k.
Compensated image is created.
To cancel vibration reduction, choose Cancel and press
k.
For compensated images, the R icon is displayed in the
monitor during playback.
B Note on Electronic VR
In addition to the restrictions described in “Restrictions on Picture
A
Editing” (
•
•
• Pictures with Date imprint (A 98).
• Pictures taken with other cameras.
• Pictures with minor blur, or pictures that are badly blurred.
• Pictures taken with slow or very fast sh utter speeds.
• Pictures with sensitivity of ISO 800 or above (A 81).
• Pictures that an R icon or Q icon is displayed (A 100).
D More Information
See “Electronic VR (The Setup Menu)“ (A 100) or “Image File and Folder Names” (A 109) for more
information.
45), electronic VR cannot be used for the following pictures:
Pictures on which advanced red-eye reduction was applied (A29).
Pictures taken with
Continuous, BSS
(Best Shot Selector),
Multi-shot 16
15/05/2008 15:30
15/05/2008 15:30
0004.JPG
0004.JPG
15/05/2008 15:30
15/05/2008 15:30
0003.JPG
0003.JPG
, or
Intvl timer shooting (A
Reduce blur?
Reduce blur?
OK
Cancel
44
More on Playback
44
79).
47
Page 60
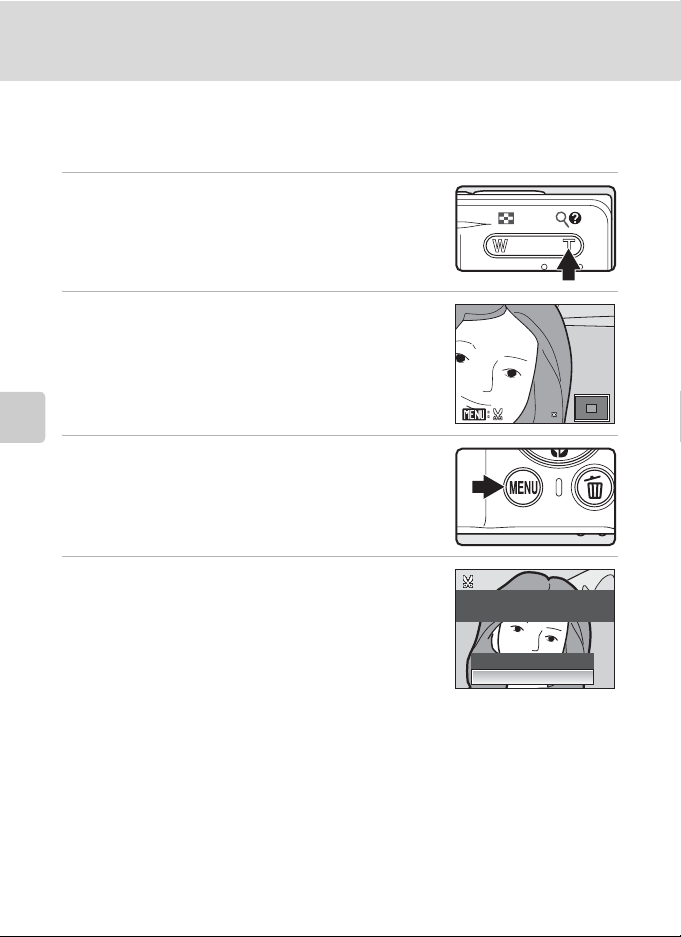
Editing Pictures
4.0
Creating a Cropped Copy: Crop
This function is only available when u is displayed in the monitor with
playback zoom (A 44) enabled. Cropped copies are stored as separate files.
1 Press g (i) in full-frame playback mode to
zoom in on the image.
2 Refine copy composition.
Press g (i) or f (h) to adjust the zoom ratio.
Press the multi selector H, I, J or K to scroll the picture
until only the portion you want to copy is visible in the
monitor.
More on Playback
3 Press d.
4 Use the multi selector to choose Yes and
press k.
A new picture, containing only the portion visible in the
monitor, is created.
Save this image as
displayed?
No
Ye s
4.
4.0
Depending on the size of the original picture and the zoom ratio in effect at the time the copy was
created, the camera will automatically select one of the following image-mode settings for cropped
copies (unit: pixels).
•y 3,264 × 2,448 •e
•j 1,024 × 768•k
When the image-mode setting for a cropped copy is 320
appear around the picture during playback, and the m or n small picture icons will appear on the
left side of the monitor.
2,592 × 1,944•g
640 × 480
•l 320 × 240
2,048 × 1,536•h
•m 160 × 120
×240 or 160×120, a gray frame will
1,600 × 1,200•i
1,280 × 960
D More Information
See “Image File and Folder Names” (A 109) for more information.
48
Page 61
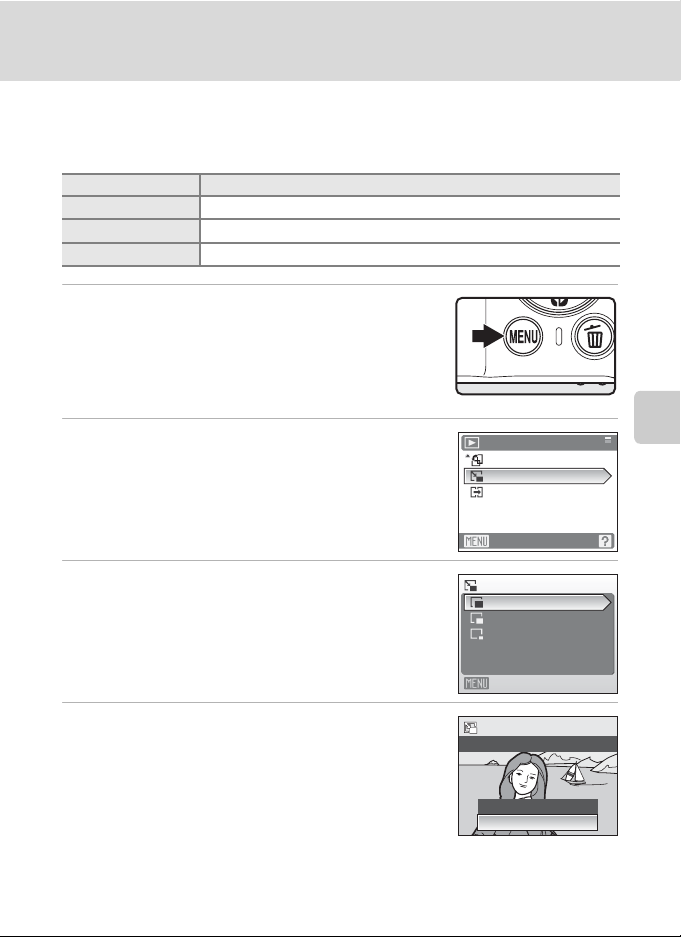
Editing Pictures
g Resizing Pictures: Small Picture
Cre ate a sma ll copy o f the cur rent p icture. Small copies are stored as JPEG files with
a compression ratio of 1:16. The following sizes are available.
Option Description
l 640×480
m 320×240
n 160×120
Suited to television playback.
Suited to display on web pages.
Suitable for e-mail attachments.
1 Select the desired picture from full-frame
(A 26) or thumbnail (A 43) playback mode
and press d.
The playback menu is displayed.
2 Use the multi selector to choose Small pic.
and press k.
3 Choose the desired copy size and press k.
4 Choose Yes and press k.
A new, smaller copy is created.
The copy is displayed with a gray frame.
D More Information
See “Image File and Folder Names” (A 109) for more information.
Playback menu
Rotate image
Small pic.
Copy
Exit
Small pic.
640× 480
320× 240
160× 120
Exit
Create small picture file?
No
Ye s
More on Playback
49
Page 62
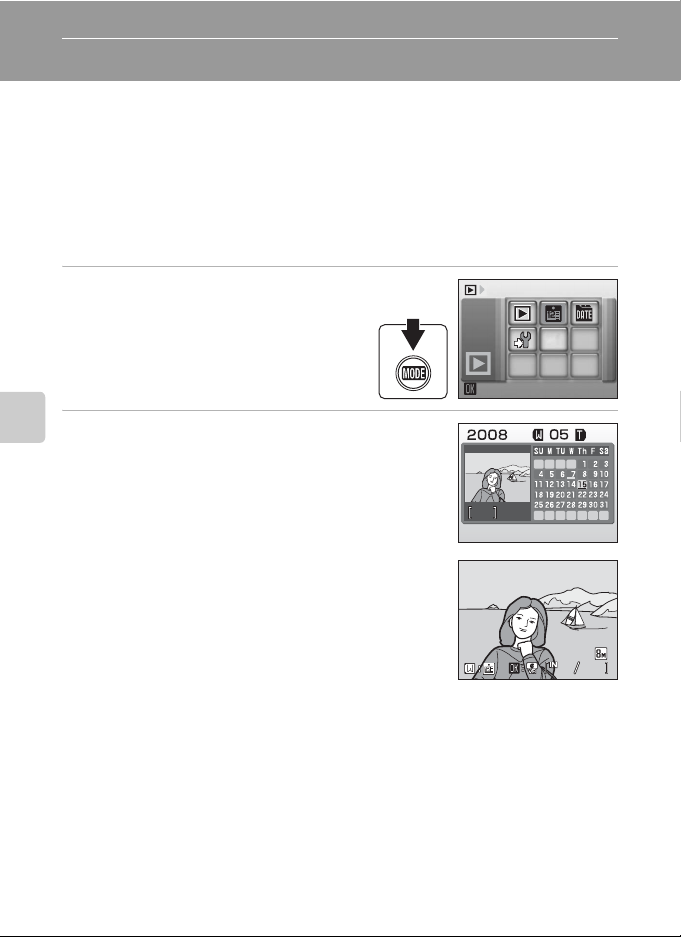
Viewing Pictures by Date
3
15/05/2008 15:30
0004.JPG
31
In calendar mode or list by date mode, pictures taken on a specified date can be
displayed. In full-frame playback mode, just as with playback mode, picture display
can be enlarged, pictures can be edited, and movies can be played back. When
d is pressed, the calendar menu or the list by date menu is displayed, and all
pictures taken on a specified date can be selected for deletion, printing, protection
and transfer.
Selecting a Date in Calendar Mode
1 Enter calendar mode by pressing
e in playback mode, selecting
B (use the multi selector), and then
pressing k.
2 Choose the desired date and press k.
More on Playback
Dates for which pictures exist are underlined in yellow.
Press f (h) to view the previous month, or press g (i)
to view the following month.
The first picture for that date will be displayed full-frame.
Press f (h) in full-frame playback mode to return to
calendar mode.
Calendar
3
15/05/2008 15:30
15/05/2008 15:30
0004.JPG
0004.JPG
31
50
Page 63
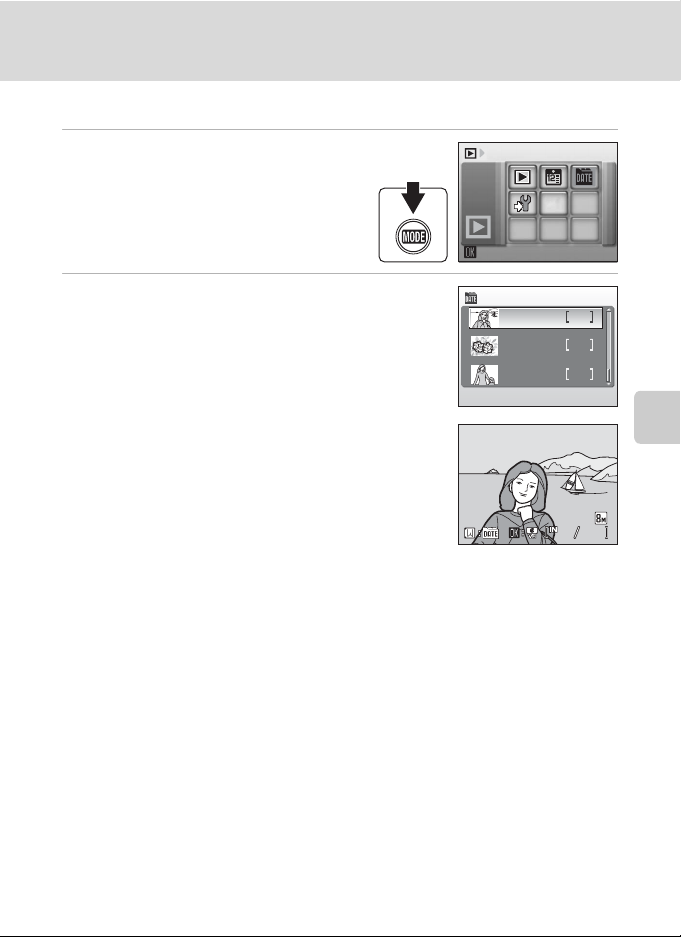
Selecting a Date in List by Date Mode
15/05/2008 15:30
0004.JPG
31
Viewing Pictures by Date
1 Enter list by date mode by pressing
e in playback mode, selecting
C (use the multi selector), and then
pressing k.
Dates for which pictures exist will be listed.
2 Choose the desired date and press k.
Camera lists up to 29 dates. If pictures exist for more than
29 dates, all pictures recorded earlier than most recent 29
dates will be listed together as Others.
The first picture for that date will be displayed full-frame.
Press f (h) in full-frame playback mode to return to
the date list.
List by date
List by date
15/05/2008
10/05/2008
Others
15/05/2008 15:30
15/05/2008 15:30
0004.JPG
0004.JPG
3
2
56
More on Playback
31
51
Page 64
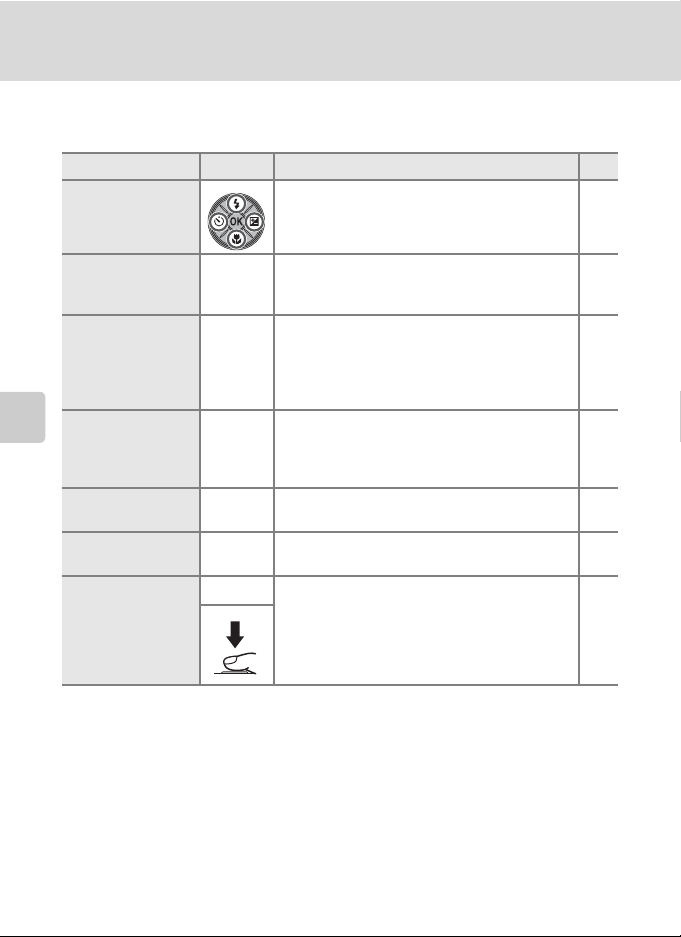
Viewing Pictures by Date
Using Calendar Mode and List by Date Mode
The following operations are possible from the date selection screen.
To Use Description A
Select date Use the multi selector to select a date. 9
Select month
(calendar mode
only)
Switch to full-frame
playback
More on Playback
Delete picture
View calendar or list
by date menu
View playbackmode menu
f (h)
g (i)
k
l
d
e
Press f (h) to view the previous month, or
press g (i) to view the following month.
Press k to display the first picture taken on the
selected date.
Press f (h) in full-frame playback to return to
the calendar or list by date mode selected before
viewing in full-frame playback.
Press l after selecting a date, and a confirmation
dialog will be displayed. Choose Yes and press
k to delete all pictures taken on the selected
date.
Press d to display the calendar or list by date
menu.
Press e to display the playback-mode
selection menu.
c
Switch to shooting
mode
Press c or the shutter-release button to return
to the last shooting mode selected.
B Notes on Calendar Mode and List by Date Mode
• Up to 9,000 pictures can be displayed in calendar mode or in list by date mode. If more pictures
exist, “*” is displayed next to the number.
• Pictures taken with no date stamp are not listed in these modes.
52
–
26
26
53
8
26
Page 65

Viewing Pictures by Date
Calendar and List by Date Menus
Press d in either mode to display the following menus for only the pictures
taken on the specified date.
D-Lighting* A 46
Print set A 71
Slide show A 88
Delete A 89
Protect A 89
Rotate image* A 89
Small pic.* A 49
* During full-frame playback only
When d is pressed in the date selection screen (A 50, 51), options can be
applied to all pictures taken on the same date, or all pictures taken on the same
date can be deleted. To apply options to individual pictures, or to select individual
pictures for deletion, display a picture full-frame and press d.
More on Playback
B Print Set
When print marking already exists for pictures taken on dates other than that specified, a
confirmation dialog Save print marking for other da tes? will be displayed. Select Yes to add the
new print to the existing marking. Select No to remove the existing print and leave only the new
marking.
53
Page 66
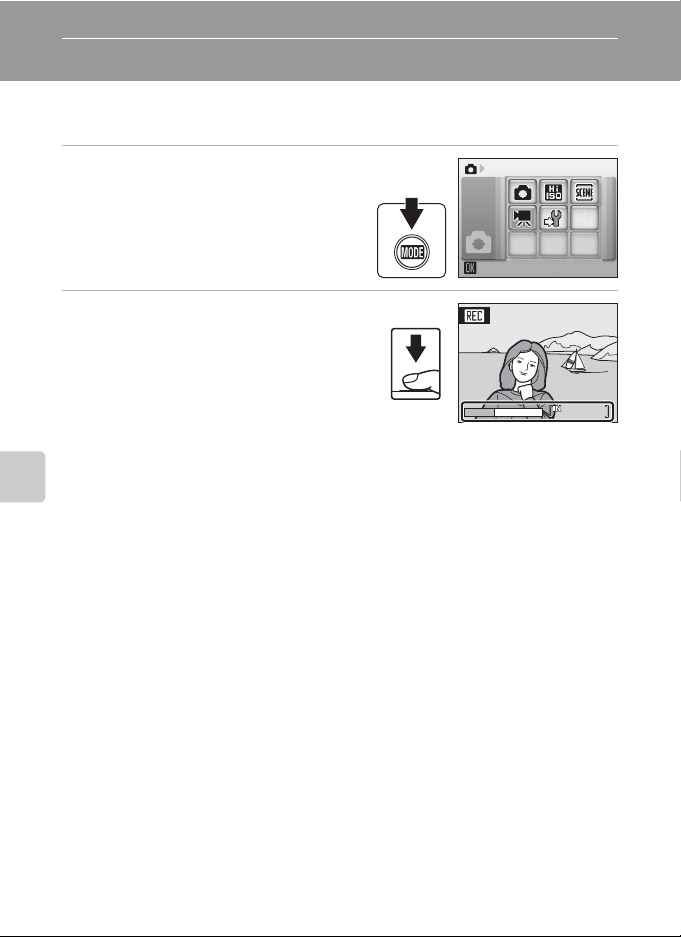
Movies
47s
Recording Movies
To shoot movies, select shooting mode and follow the steps below. Movies are
recorded without sound.
1 Enter movie mode by pressing e
in shooting mode, selecting D (use
the multi selector), and then
pressing k.
Exposure count display shows maximum
total length of movie that can be recorded.
2 Press the shutter-release button all
the way down to start recording.
Camera focuses on subject in center of
frame.
A progress bar at the bottom of the monitor
shows the amount of recording time
remaining.
To end recording, press the shutter-release
button all the way down a second time.
Movies
B Recording Movies
• Flash mode (A 28) and exposure compensation (A 32) can only be used for time-lapse (A 57)
movies. Macro mode (A 31) is available in all modes. Self-timer (A 30) cannot be used.
• Flash mode, macro mode, and exposure compensation settings cannot be applied or changed
while movies are being recorded. Apply or change settings as necessary before movie recording
begins.
• Optical zoom cannot be applied while movies are recorded. Digital zoom cannot be used just
before recording a movie, but up to 2× digital zoom can be applied while movies are recorded
(except for time lapse movies).
• With the exception of Time-lapse movieP mode, the angle of view (field of view) when
shooting movies is smaller than when shooting still pictures.
Movie
47s
47s
D Changing Movie Settings
Movie options or Electronic VR can be changed (A 55).
54
Page 67
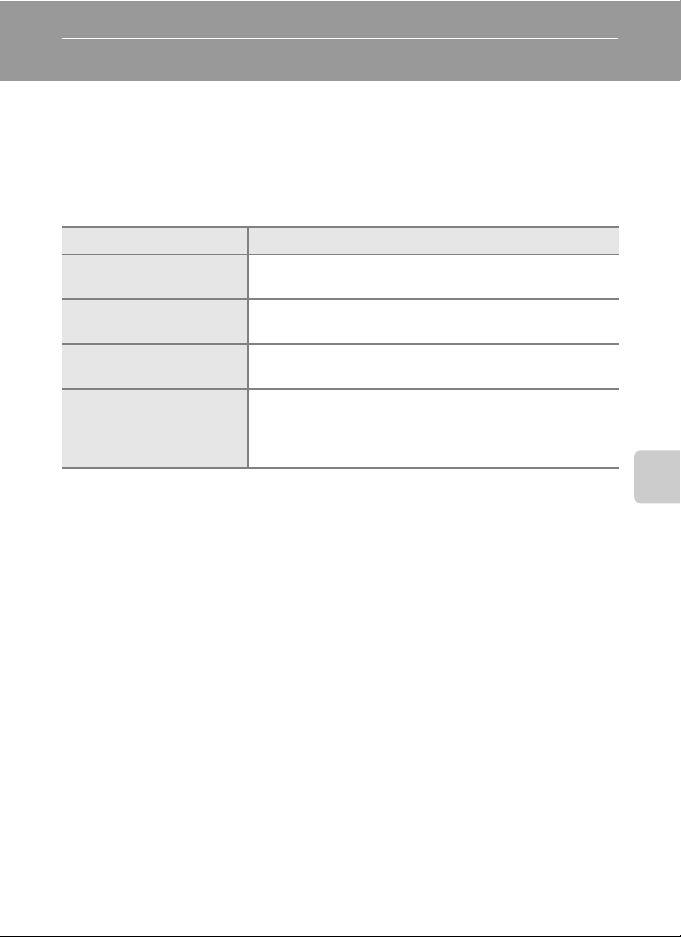
The Movie Menu
Movie options and Electronic VR (A 56) settings can be changed from the
movie menu. Press d in movie mode to display the movie menu and use the
multi selector to modify and apply settings.
Selecting Movie Options
The movie menu offers the options shown below.
Option Image size and frame rate
J TV movie 640P
(default setting)
L Small size 320P
S Small size 320
N Time-lapse movieP
Image size: 640 × 480 pixels
Frame rate: 30 frames per second
Image size: 320 × 240 pixels
Frame rate: 30 frames per second
Image size: 320 × 240 pixels
Frame rate: 15 frames per second
The camera automatically takes pictures at intervals and
joins them into a silent movie.
Image size: 640 × 480 pixels
Frame rate: 30 frames per second
Movies
55
Page 68
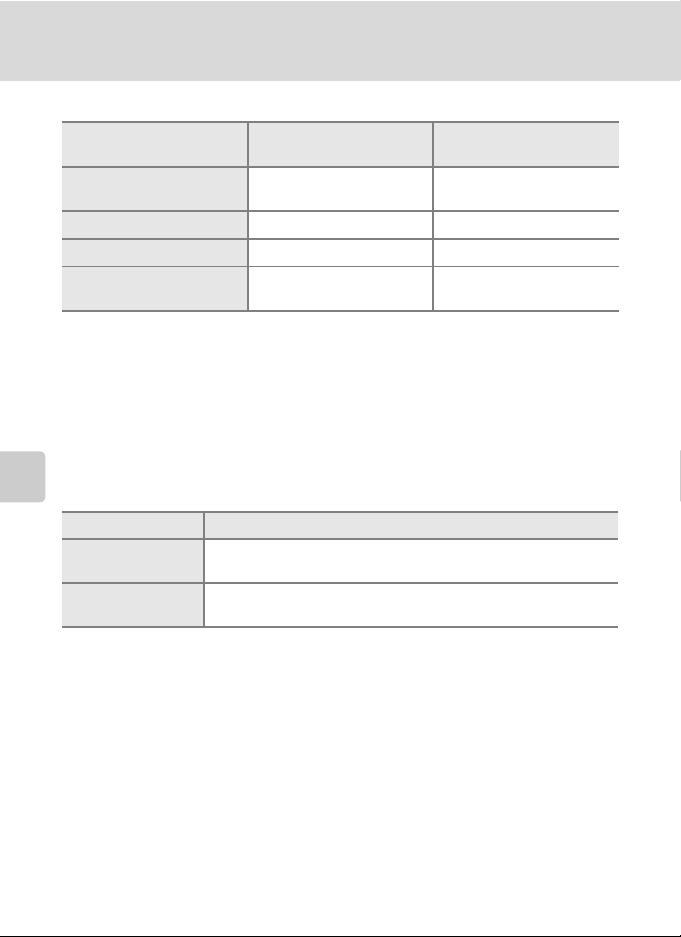
The Movie Menu
C Movie Options and Maximum Movie Length and Frames
Option
J TV movie 640P
(default setting)
L Small size 320P 1 min 34 s 7 min 20 s
S Small size 320 3 min 4 s 14 min 30 s
N Time-lapse movieP
(A 57)
* Movies can be as long as free space in the internal memory or on the memory card allows.
All figures are approximate. Maximum movie length or frames varies with make of memory
card. The maximum file size for a single movie is 2 GB. Therefore, the 2 GB maximum movie
length will be displayed even when memory cards with greater capacities are used.
Internal memory
(approx. 52 MB)
47 s 3 min 40 s
555 frames 1,800 frames per movie
Memory card
(256 MB)
D More Information
See “Image File and Folder Names” (A 109) for more information.
w Electronic VR
Choose whether to use electronic VR (vibration reduction) when shooting movies.
Movies
Option Description
x On
k Off
(default setting)
Reduce the effects of camera shake in all movie modes except
Time-lapse movieP.
Disable electronic VR.
An indicator appears in the monitor when electronic VR is enabled (A 6). (There is
no indicator for when the setting is Off.)
56
Page 69
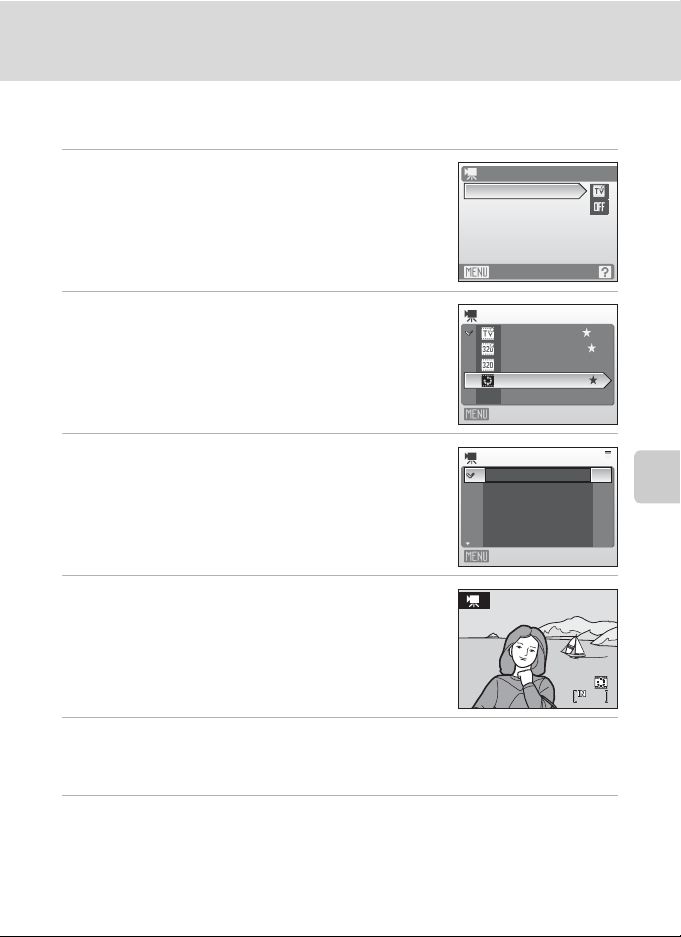
Time-Lapse Movies
555
Record flowers opening or butterflies emerging from cocoons.
The Movie Menu
1 Use the multi selector to choose Movie
options from the movie menu and press k.
2 Choose Time-lapse movieP and press k.
3 Choose the interval between shots and press
k.
Choose from intervals between 30 seconds and
60 minutes.
Movie
Movie options
Electronic VR
Exit
Movie options
TV movie 640
Small size 320
Small size 320
Time-lapse movie
Exit
Set interval time
30 s
1 m
5 m
10 m
30 m
Exit
4 Press d.
The camera returns to shooting mode.
555
555
5 Press the shutter-release button all the way down to start recording.
Monitor turns off and power-on lamp blinks between shots.
Monitor reactivates automatically for the next shot.
6 Press the shutter-release button all the way down a second time to
end recording.
Recording will automatically stop if the internal memory or memory card becomes full,
or when 1,800 frames have been recorded. A 1,800-frame movie has a playback time of
60 seconds.
Movies
57
Page 70
The Movie Menu
B Time-Lapse Movie
• Flash mode (A 28), macro mode (A 31), and exposure compensation (A 32) cannot be adjusted
after the first picture is taken. Apply the appropriate settings before shooting begins.
• To prevent the camera from turning off unexpectedl y during recording, use a fully charged battery
or the AC Adapter EH-62D (sold separately).
Movies
58
Page 71
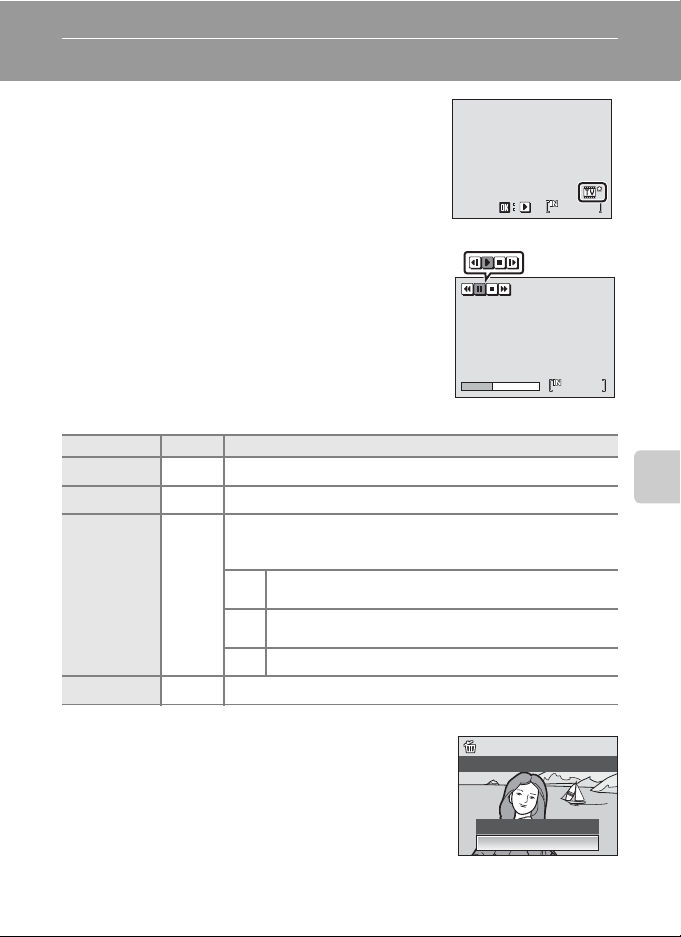
Movie Playback
0010.AVI
15/05/2008 15:30
10s
In full-frame playback mode (A 26), movies are
recognized by the Movie options icon (A 55). To play
15/05/2008 15:30
15/05/2008 15:30
0010.AVI
0010.AVI
a movie, display it in full-frame playback mode and
press k.
Playback controls appear at the top of the monitor.
Press the multi selector J or K to choose a control,
Pausing
then press k to perform the selected operation. The
following operations are available.
During playback
To Press Description
Rewind K Rewind movie. Playback resumes when k is released.
Advance L Advance movie. Playback resumes when k is released.
Pause playback.
The following operations can be performed while playback is
paused.
Rewind movie by one frame. Rewind continues while k
M
Pause
End Q End playback and return to full-frame playback.
O
is pressed.
Advance movie by one frame. Advance continues while
N
k is pressed.
Resume playback.
P
10s
10s
4s4s4s
Movies
Deleting Movie Files
Press l when playing a movie, or when displayed in fullframe playback mode (A 26), or when selected in
thumbnail (A 43) playback mode. A confirmation dialog
is displayed. Choose Yes and press k to delete the
movie, or choose No and press k to return to the
normal playback display without deleting the movie.
Erase 1 image?
No
Ye s
59
Page 72
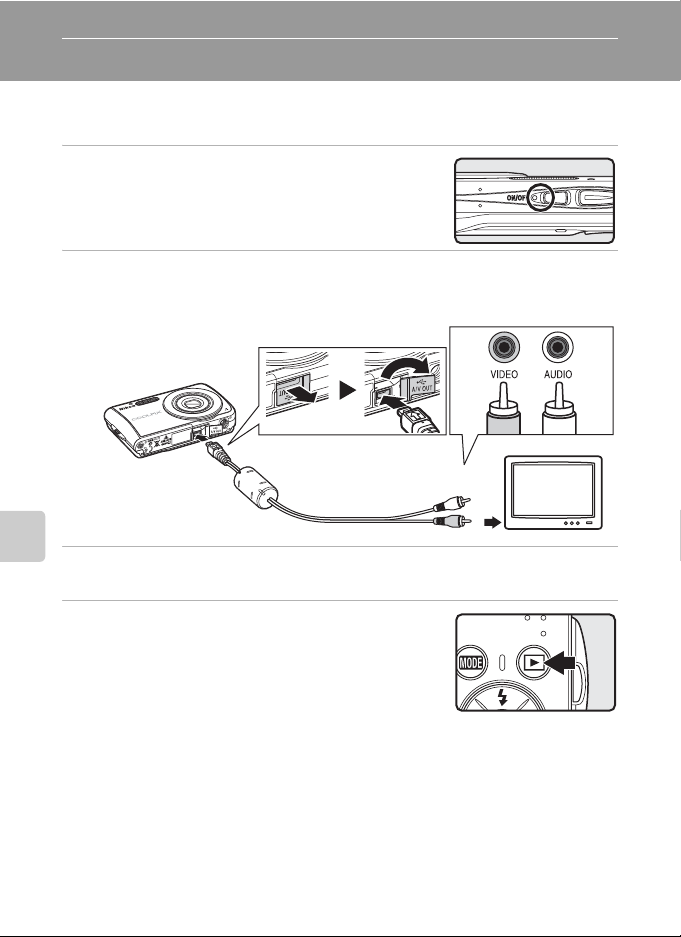
Connecting to Televisions, Computers and Printers
Connecting to a TV
Connect the camera to a television using the Audio/Video Cable EG-CP14
(available separately from Nikon) to play back pictures on the television.
1 Turn off the camera.
Connecting to Televisions, Computers and Printers
2 Connect the camera to the TV using the AV cable.
Connect the yellow plug to the video-in jack on the TV, and the white plug to the audioin jack.
3 Tune the television to the video channel.
See the documentation provided with your television for details.
4 Hold down c to turn on the camera.
The camera enters playback mode, and the pictures
taken will be displayed on the television.
While connected to the TV, the camera monitor will
remain off.
WhiteYellow
B Connecting an AV Cable
When connecting the AV cable, be sure that the camera connector is oriented correctly. Do not use
force when connecting the AV cable to the camera. When disconnecting the AV cable, do not pull
the connector at an angle.
B Video Mode
Be sure that the camera’s video mode setting conforms to the standard used by your television. The
video mode setting is an option set in the setup menu (A 91) > Video mode (A 104).
60
Page 73

Connecting to a Computer
Use the supplied USB cable to connect the camera to a computer, and copy
(transfer) pictures to a computer with the supplied Nikon Transfer software.
Before Connecting the Camera
Install the Software
Before connecting the camera to a computer, software, including Nikon Transfer
and Panorama Maker for creating panorama images, must be installed from the
supplied Software Suite CD. For more information on installing the software, refer
to the Quick Start Guide.
Operating Systems Compatible with COOLPIX S202
Windows
Preinstalled versions of Windows Vista (32-bit Home Basic/Home Premium/
Business/Enterprise/Ultimate editions), Windows XP Service Pack 2 (Home Edition/
Professional)
If your computer is running Windows 2000 Professional, use a card reader or
similar device to transfer pictures stored on the memory card to the computer
(A 63).
Macintosh
Mac OS X (version 10.3.9, 10.4.11)
Refer to the Nikon website for the latest information on operating system
compatibility.
Connecting to Televisions, Computers and Printers
B Note on Power Source
When connecting the camera to a computer or printer, use a fully charged battery to prevent the
camera from turning off unexpectedly.
If the AC adapter EH-62D that is sold separately is used, COOLPIX S202 can be charged using the
home electrical outlet. Do not use any other AC adapters as it will cause the camera to heat up or
malfunction.
61
Page 74
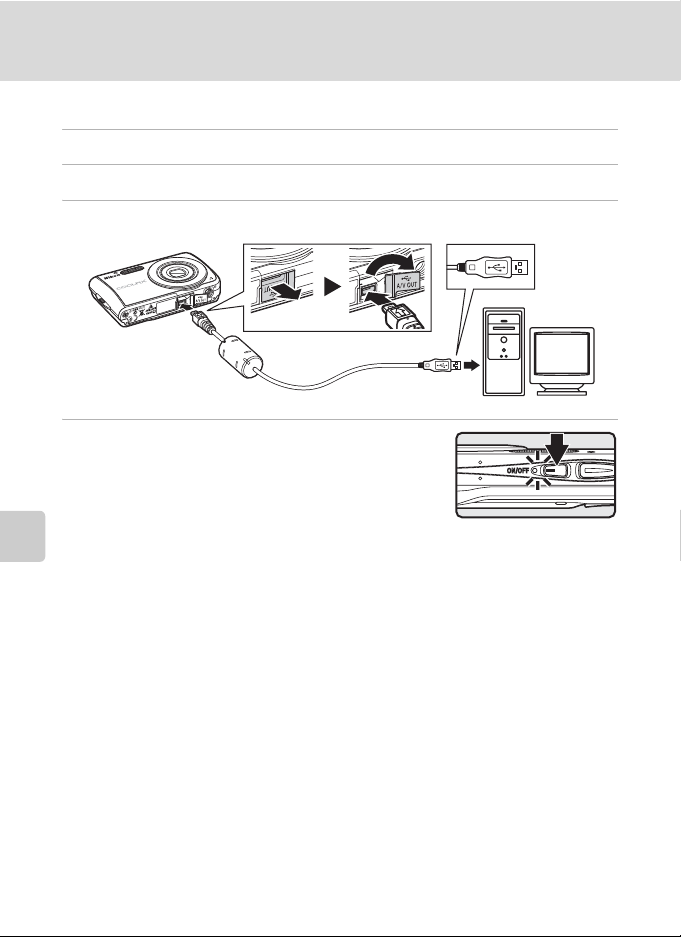
Connecting to a Computer
Transferring Pictures from a Camera to a Computer
1 Start the computer to which Nikon Transfer was installed.
2 Turn off the camera.
Connecting to Televisions, Computers and Printers
3 Connect the camera to the computer using the supplied USB cable.
4 Turn on the camera.
The power-on lamp will light up.
Windows Vista
When the AutoPlay dialog is displayed, select Copy
pictures to a folder on my computer using Nikon
Transfer.
To bypass this dialog in the future, check Always do this for this device. Nikon
Transfer will start.
Windows XP
When the action selection dialog is displayed, select Nikon Transfer Copy pictures to
a folder on my computer and click OK.
To bypass this dialog in the future, check Always use this program for this action..
Nikon Transfer will start.
Mac OS X
Nikon Transfer will start automatically if Yes was selected in the Auto-Launch setting
dialog when Nikon Transfer was first installed.
B Connecting the USB Cable
When connecting the USB cable, be sure that the connectors are oriented correctly.
Do not use force when connecting the USB cable. When disconnecting the USB cable, do not pull
the connector at an angle.
Connection may not be recognized when the camera is connected to a computer via a USB hub.
62
Page 75
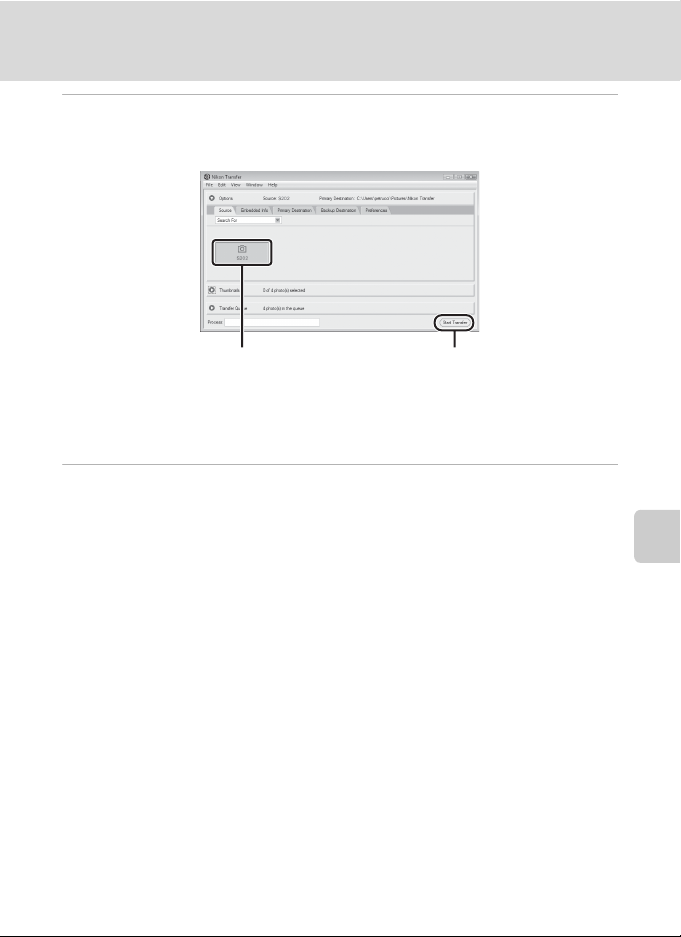
Connecting to a Computer
5 Transfer pictures when Nikon Transfer has finished loading.
Click Start Transfer in Nikon Transfer. At the default setting, all pictures are transferred
to the computer.
Start Transfer buttonSource device
At the Nikon Transfer default setting, the folder to which the pictures were transferred
opens automatically when transfer ends.
For more information on using Nikon Transfer, refer to help information contained in
Nikon Transfer.
6 Disconnect the camera when transfer is complete.
Turn the camera off and disconnect the USB cable.
For Users of Windows 2000 Professional
Use a card reader or similar device to transfer the pictures stored on the memory
card to the computer. If the memory card has a capacity greater than 2 GB, or is
SDHC-compliant, the intended device must support these features of the memory
card.
• At the Nikon Transfer default settings, Nikon Transfer will start automatically
when a memory card is inserted into the card reader or similar device. See step 5
above to transfer pictures.
• Do not connect the camera to the computer. If the camera is connected to the
computer, the Found New Hardware Wizard dialog will be displayed. Select
Cancel, close the dialog, and disconnect the camera from the computer.
•
To transfer pictures stored in the camera’s internal memory to the computer, the
pictures must first be copied to a memory card using the camera (
A
86, 90).
Connecting to Televisions, Computers and Printers
63
Page 76
Connecting to a Computer
D Using Standard OS Operations to Open Camera Files
Navigate to the folder on the computer’s hard disk to which pictures were saved and open a picture
in the viewer supplied with your operating system.
D Panorama Creation with Panorama Maker
• Use a series of pictures taken using the Panorama assist option in scene mode (A 40) to create
Connecting to Televisions, Computers and Printers
a single panorama photo with Panorama Maker.
• Panorama Maker can be installed to a computer using the supplied Software Suite CD. After
installation is complete, follow the procedure described below to start Panorama Maker.
Windows
Open All Programs (Programs under Windows 2000) from the Start menu > ArcSoft
Panorama Maker 4 > Panorama Maker 4.
Macintosh
Open Applications by selecting Applications from the Go menu, and double-click the
Panorama Maker 4 icon.
• For more information on using Panorama Maker, refer to the on-screen instructions and help
information contained in Panorama Maker.
D Image File Names and Folder Names
See “Image File and Folder Names” (A 109) for more information.
64
Page 77
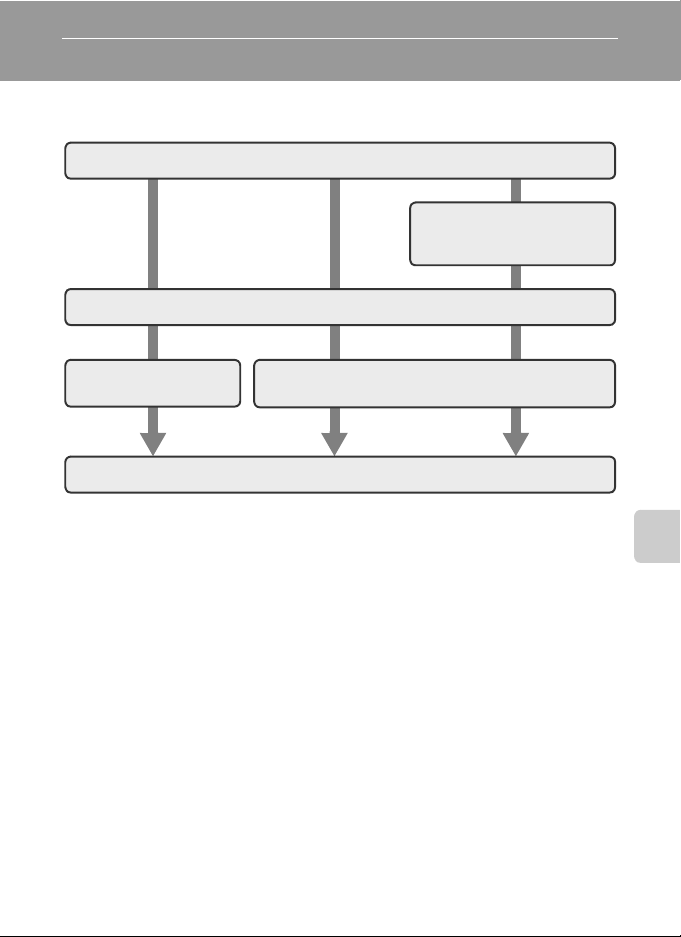
Connecting to a Printer
Users of PictBridge-compatible (A 125) printers can connect the camera directly
to the printer and print pictures without using a computer.
Take pictures
Select pictures for printing
using Print set option (A 71)
Connect to printer (A66)
Connecting to Televisions, Computers and Printers
Print pictures one at a
time (A 67)
Turn camera off and disconnect USB cable
Print multiple pictures (A 68)
B Note on Power Source
When connecting the camera to a computer or printer, use a fully charged battery to prevent the
camera from turning off unexpectedly.
If the AC adapter EH-62D that is sold separately is used, COOLPIX S202 can be charged using the
home electrical outlet. Do not use any other AC adapters as it will cause the camera to heat up or
malfunction.
D Printing Pictures
In addition to printing pictures transferred to a computer from your personal printer and printing
over a direct camera-to-printer connection, the following options are also available for printing
pictures:
• Insert a memory card into a DPOF-compatible printer’s card slot
• Take a memory card to a digital photo lab
For printing using these methods, specify the pictures and the number of prints each using your
camera’s Print set menu (A 71).
65
Page 78
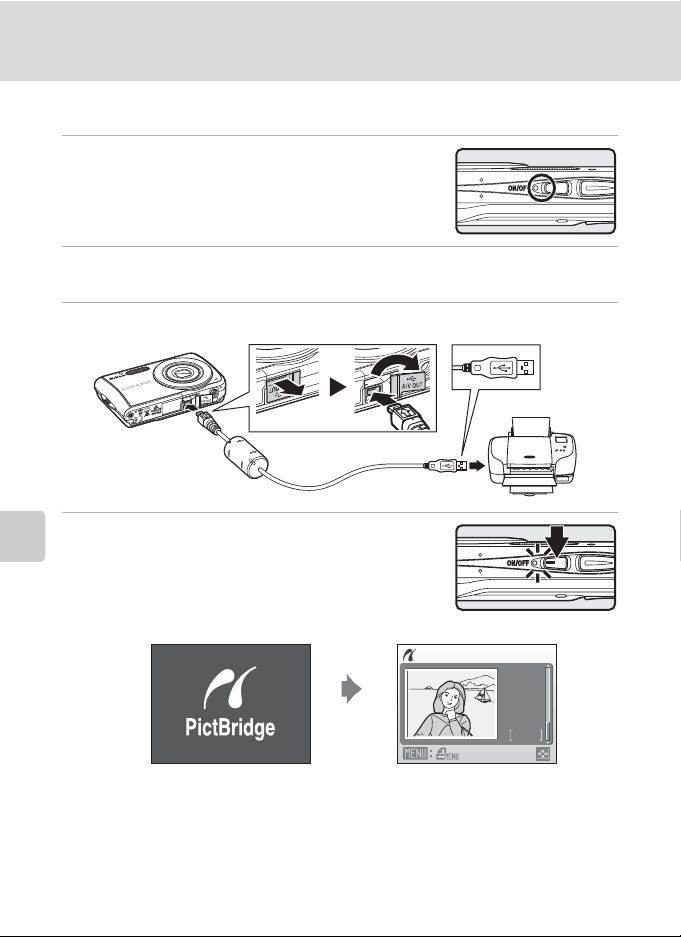
Connecting to a Printer
Connecting the Camera and Printer
1 Turn off the camera.
Connecting to Televisions, Computers and Printers
2 Turn on the printer.
Check printer settings.
3 Connect the camera to the printer using the supplied USB cable.
4 Turn on the camera.
When connected correctly, the PictBridge startup screen
1 will be displayed in the camera monitor. Then the
print selection screen will be displayed 2.
12
Print selection
15/05
2008
No. 4
4
B Connecting the USB Cable
When connecting the USB cable, be sure that the connectors are orient ed correctly. Do not use force
when connecting the USB cable. When disconnecting the USB cab le, do not pull the connector at an
angle.
66
Page 79
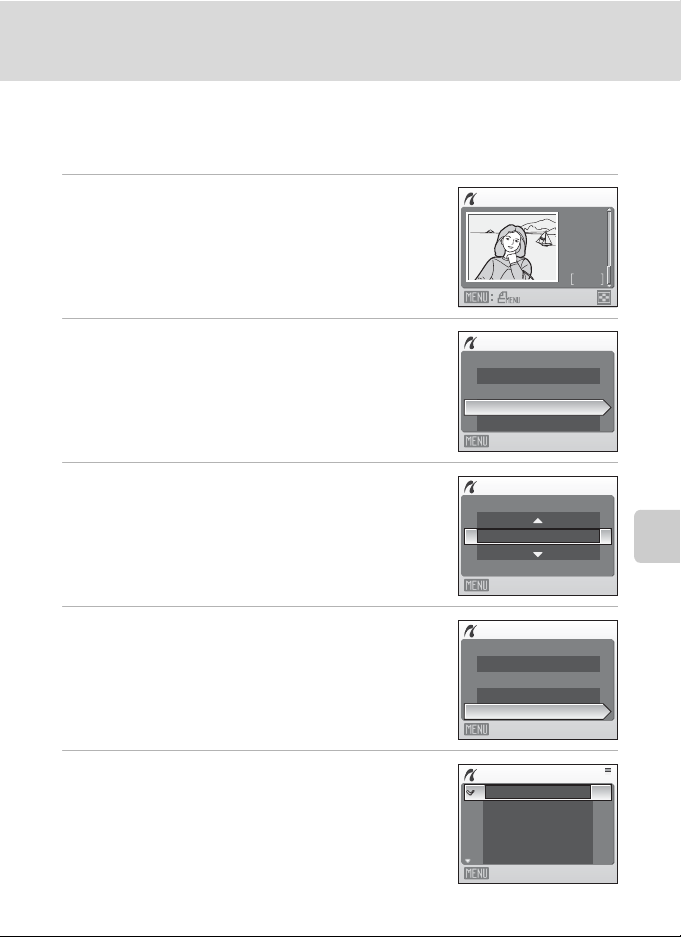
Connecting to a Printer
Printing Pictures One at a Time
After connecting the camera to the printer correctly (A 66), print pictures by
following the procedure below.
1 Use the multi selector to choose the desired
picture and press k.
Press f (h) to display 12 thumbnails, and g (i) to
switch back to full-frame playback.
2 Choose Copies and press k.
3 Choose the number of copies (up to nine) and
press k.
4 Choose Paper size and press k.
5 Choose the desired Paper size and press k.
To specify paper size using printer settings, choose
Default in the paper size menu.
Print selection
PictBridge
Start print
Copies
Paper size
Exit
Copies
4
Exit
PictBridge
Start print
Copies
Paper size
Exit
Paper size
Default
3.5 × 5 in.
5 × 7 in.
100 × 150 mm
4 × 6 in.
Exit
15/05
2008
No. 4
Connecting to Televisions, Computers and Printers
4
67
Page 80
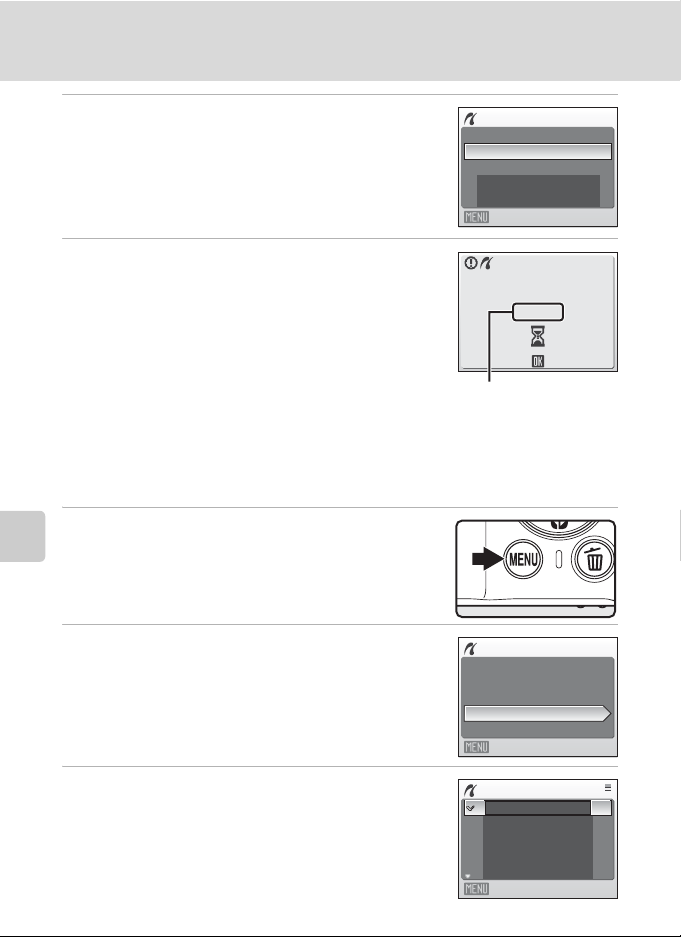
Connecting to a Printer
6 Choose Start print and press k.
Connecting to Televisions, Computers and Printers
PictBridge
Exit
7 Printing starts.
Monitor display returns to that shown in step 1 when
printing is complete.
To cancel before all copies have been printed, press k.
Current print/
total number of prints
Printing Multiple Pictures
After connecting the camera to the printer correctly (A 66), print pictures by
following the procedure below.
1 When the print selection screen is displayed,
press d.
The print menu is displayed.
2 Use the multi selector to choose Paper size
and press k.
Print menu
Print selection
Print all images
DPOF printing
Paper size
Exit
Start print
Copies
Paper size
Printing
002/004
Cancel
3 Choose the desired Paper size and press k.
To specify paper size using printer settings, choose
Default in the paper size menu.
68
Paper size
Default
3.5 × 5 in.
5 × 7 in.
100 × 150 mm
4 × 6 in.
Exit
Page 81
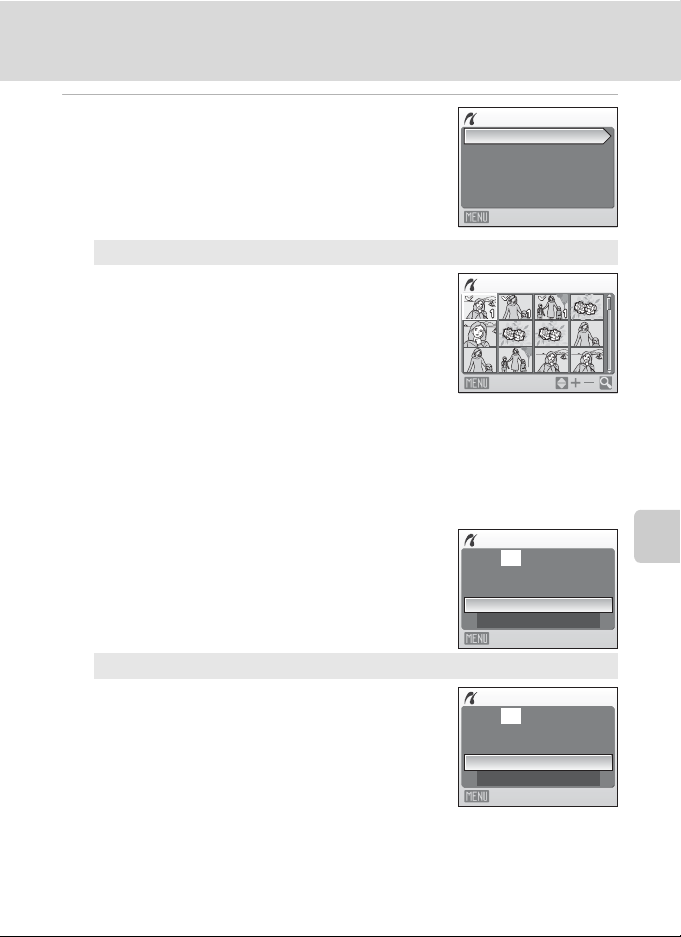
Connecting to a Printer
4 Choose Print selection, Print all images or
DPOF printing and press k.
Print selection
Choose the pictures and number of copies (up to
nine) of each.
Press the multi selector J or K to select pictures,
and press H or I to set the number of copies
for each.
Pictures selected for printing can be recognized
by the check mark (y) and the numeral
indicating the number of copies to be printed. A
check mark is not displayed with pictures for
which no copies have been specified and these
pictures will not be printed.
Press g (i) to switch to full-frame playback.
Press f (h) to switch back to thumbnail
display.
Press k when setting is complete.
The menu shown at right will be displayed.
To print, choose Start print and press k.
Choose Cancel and press k to return to the
print menu.
Print all images
All pictures stored in the internal memory, or on
the memory card, are printed one at a time.
The menu shown at right will be displayed.
To print, choose Start print and press k.
Choose Cancel and press k to return to the
print menu.
Print menu
Print selection
Print all images
DPOF printing
Paper size
Exit
Print selection 10
Back
Print selection
010 prints
Start print
Cancel
Exit
Print all images
012 prints
Start print
Cancel
Exit
Connecting to Televisions, Computers and Printers
69
Page 82
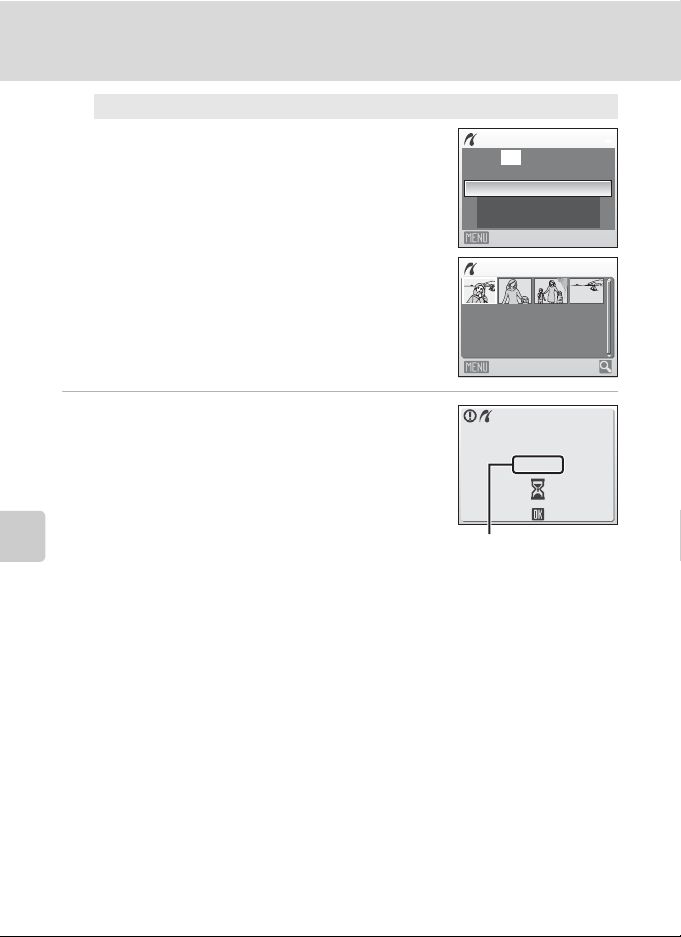
Connecting to a Printer
DPOF printing
Connecting to Televisions, Computers and Printers
5 Printing starts.
Monitor display returns to the print menu (step 2) when
printing is complete.
To cancel before all copies have been printed, press k.
Print pictures for which a print order was created
in Print set (A 71).
• The menu shown at right will be displayed.
• To print, choose Start print and press k.
• Choose Cancel and press k to return to the
print menu.
• To view the current print order, choose View
images and press k. To print pictures, press
k again.
DPOF printing
010 prints
Start print
View images
Cancel
Exit
View images
Back
Printing
002/010
Cancel
Current print/
total number of prints
10
B Paper Size
The camera supports the following paper sizes: Default (the default paper size for the current
printer), 3.5×5 in., 5×7 in., 100×150 mm, 4×6 in., 8×10 in., Letter, A3, and A4. Only sizes
supported by the current printer will be displayed. To specify paper size using printer settings,
choose Default in the paper size menu.
70
Page 83
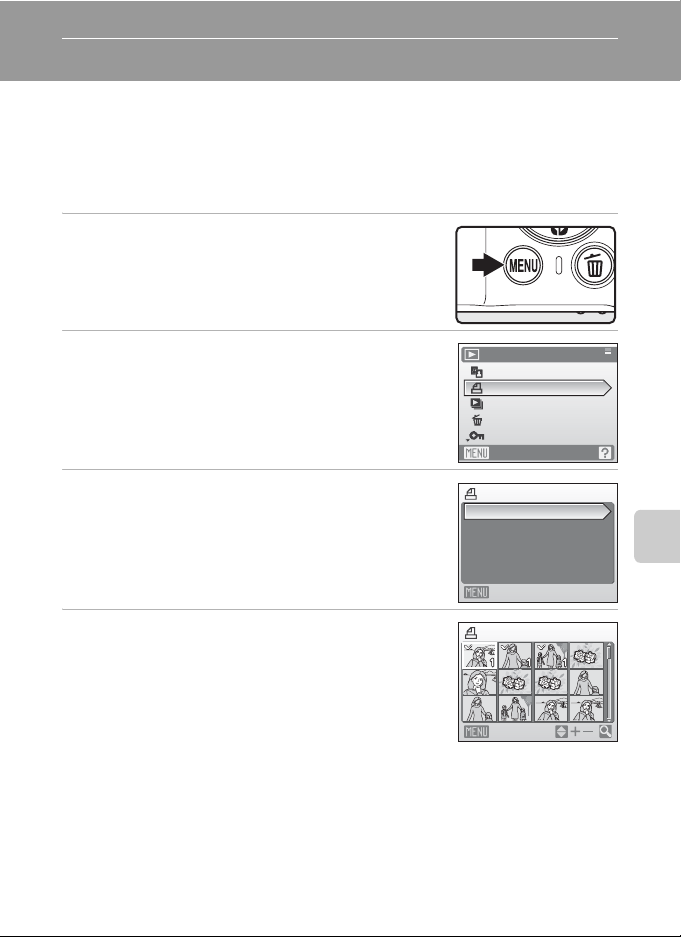
Creating a DPOF Print Order: Print Set
The
Print set
option in the playback menu is used to create digital “print orders” for printing on
DPOF-compatible devices (A125).
When the camera is connected to a PictBridge-compatible printer, pictures can be printed from
the printer according to the DPOF print order you have created for pictures on the memory card.
If the memory card is removed from the camera, you can create the DPOF print order for pictures
in the internal memory and print pictures according to the DPOF print order.
1 Press d in playback mode.
The playback menu is displayed.
Connecting to Televisions, Computers and Printers
2 Use the multi selector to choose Print set and
press k.
The print set menu is displayed.
3 Choose Select images and press k.
4 Choose the pictures and number of copies (up
to nine) of each.
Press the multi selector J or K to select pictures, and
press H or I to set the number of copies for each.
Pictures selected for printing can be recognized by the check
y
) icon and the numeral indicating the number of
mark (
copies to be printed. A check mark is not displayed with pictures
for which no copies have been specified and these pictures will not be printed.
g (i
) to switch to full-frame playback.
Press
f (h
Press
Press
) to switch back to thumbnail display.
k
when setting is complete.
Playback menu
D-Lighting
Print set
Slide show
Delete
Protect
Exit
Print set
Select images
Delete print set
Exit
Print selection
Back
71
Page 84
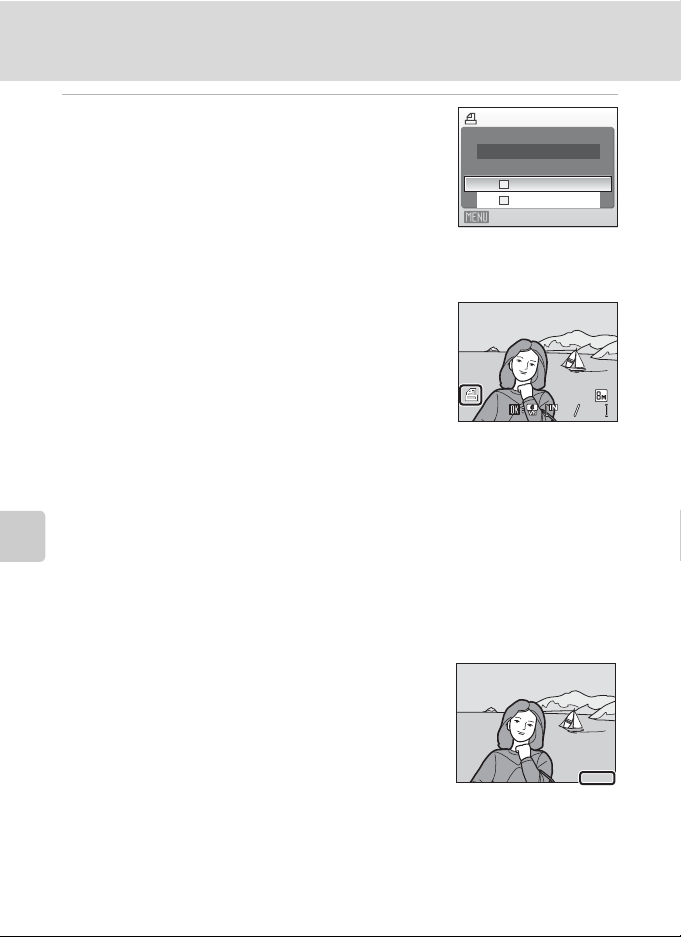
Creating a DPOF Print Order: Print Set
0004.JPG
44
15/05/2008 15:30
15. 05.2 008
5 Choose whether or not to also print shooting
date and photo information.
Print set
Choose Date and press k to print the date of recording
on all pictures in the print order.
Connecting to Televisions, Computers and Printers
Choose Info and press k to print shutter speed and
aperture information on all pictures in the print order.
Exit
Choose Done and press k to complete the print order
and exit.
Pictures selected for printing are recognized by the w
icon displayed with playback.
15/05/2008 15:30
15/05/2008 15:30
0004.JPG
0004.JPG
B Note on Printing the Date and Photo Information
Date and Info settings configured in the print set menu can be printed from DPOF-compatible
printers (A 125) that support the printing of dates and photo information.
• When DPOF printing (A 70) is used while the camera is connected to the printer via the
supplied USB cable, photo information (Info) cannot be printed.
• Date and Info settings are reset each time the print set menu is displayed, so be careful.
C Deleting All Print Orders
Choose Delete print set in step 3 and press k. Print orders for all pictures will be deleted.
C Note on the Print Set Date Option
The date and time printed on pictures with DPOF printing when
Date in the Print set menu is enabled, are those recorded with the
picture when it was taken. Date and time printed using this option
are not affected when the camera’s date and time setting are
changed from the setup menu after pictures are recorded.
Done
Date
Info
44
D Date Imprint
When you use Date imprint in the setup menu (A 98), the date is imprinted directly onto pictures
and recorded. When the date is imprinted on a picture, this date can be printed regardless of
whether the printer supports date printing.
If you apply Print set date settings on a picture on which the date is already imprinted, only the
information set for Date imprint will be printed.
72
15.05.2008
15.05.2008
Page 85

Shooting, Playback and Setup Menus
Shooting Options: The Shooting Menu
The shooting menu and high-sensitivity menu contain the following options.
A Image mode
Choose image size and quality.
B White balance
Match white balance to the light source.
C Continuous
Change settings for Continuous or BSS (best shot selector).
E ISO sensitivity
Control camera’s sensitivity to light.
F Color options
Apply color effects to pictures as they are recorded.
G AF area mode A 82
Choose where the camera focuses.
1
Image mode can change the settings for menus of other shooting modes (except movie
menu).
2
See the information on restrictions that may apply to these settings (A 85).
3
This setting cannot be set in the high-sensitivity menu.
1
2
2
3
2
A 75
A 77
A 79
A 81
A 81
Shooting, Playback and Setup Menus
73
Page 86
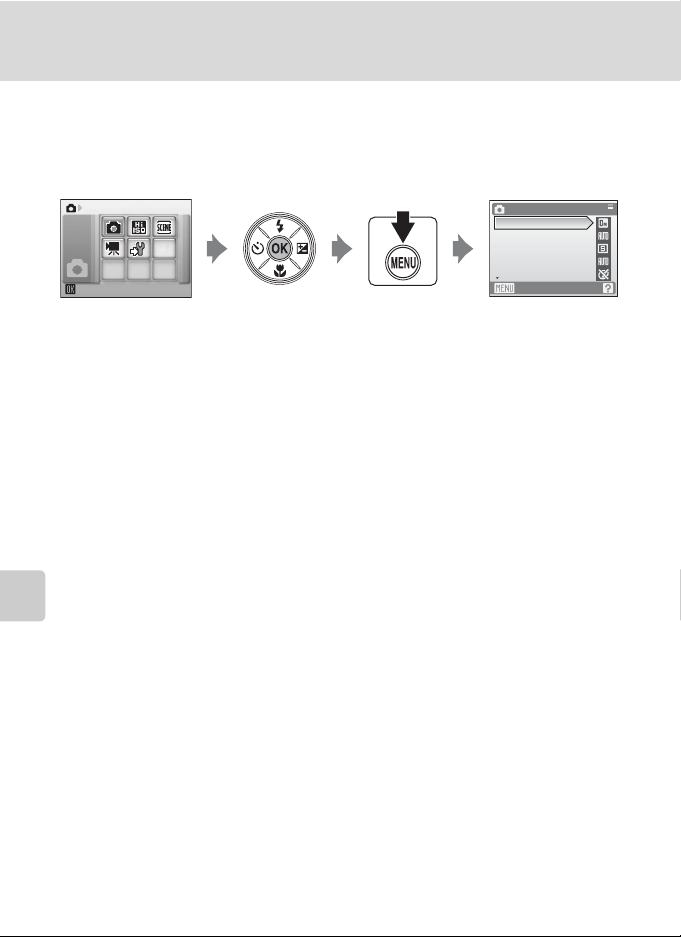
Shooting Options: The Shooting Menu
Displaying the Shooting Menu and High-sensitivity Menu
Enter A (auto) or high-sensitivity shooting mode by pressing e in shooting
mode, selecting A (auto) or B (high-sensitivity), and then pressing k. Press d
to display the shooting menu or high-sensitivity menu.
Shooting
• Use the multi selector to choose and apply settings (A 9).
Shooting, Playback and Setup Menus
• To exit the shooting or high-sensitivity menu, press d.
Shooting menu
Image mode
White balance
Continuous
ISO sensitivity
Color options
Exit
74
Page 87
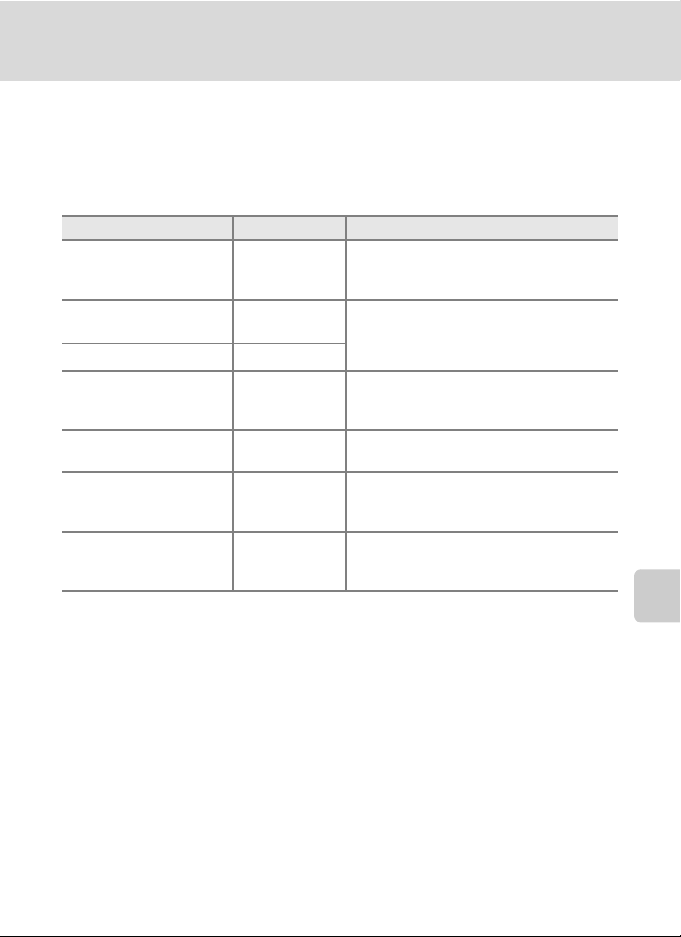
Shooting Options: The Shooting Menu
A Image Mode
Pictures taken with a digital camera are recorded as image files. The size of the
files, and with it the number of images that can be recorded, depends on the size
and quality of the images. Before shooting, choose an image mode according to
how you plan to use the picture.
Option Size (pixels) Description
Highest quality, suitable for enlargements
S High (3264P) 3,264 × 2,448
Normal (3264)
R
(default setting)
L Normal (2592) 2,592 × 1,944
M Normal (2048) 2,048 × 1,536
N PC screen (1024) 1,024 × 768
O TV screen (640) 640 × 480
P 16:9 (1920) 1,920 × 1,080
3,264 × 2,448
The icon for the current setting is displayed in the monitor in shooting and
playback modes (A 6, 7).
or high-quality prints. The compression
ratio is approximately 1:4.
Best choice in most situations. The
compression ratio is approximately 1:8.
Smaller size allows more pictures to be
stored. The compression ratio is
approximately 1:8.
Suited to display on a computer monitor.
The compression ratio is approximately 1:8.
Suited to full-screen display on a television,
or distribution by e-mail or the web. The
compression ratio is approximately 1:8.
Pictures with an aspect ratio of 16:9 can be
taken. The compression ratio is
approximately 1:8.
Shooting, Playback and Setup Menus
D Image Mode
Changes made to these settings apply to all shooting modes (except movie menu).
75
Page 88
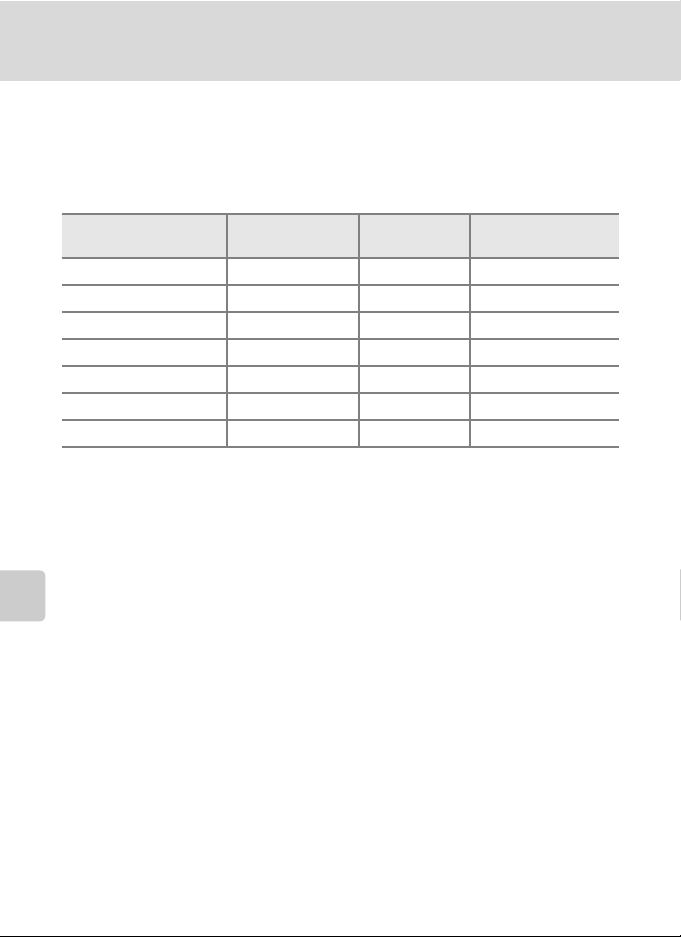
Shooting Options: The Shooting Menu
C Number of Exposures Remaining
The following table lists the approximate number of pictures that can be stored in internal memory
and on a 256 MB memory card. Note that the number of pictures that can be stored will differ
depending on the composition of the picture (due to JPEG compression). In addition, this number
may differ depending on the make of memory card, even if the capacity for the memory card is the
same.
Setting
Internal memory
(approx. 52 MB)
Memory card1
(256 MB)
Print size (printed at
300 dpi; cm/in.)
S High (3264P) 13 60 28 × 21/11 × 8.3
R Normal (3264) 25 120 28 × 21/11 × 8.3
L Normal (2592) 40 185 22 × 16.5/8.7 × 6.5
Shooting, Playback and Setup Menus
M Normal (2048) 62 295 17 × 13/6.7 × 5.1
N PC screen (1024) 196 925 9 × 7/3.5 × 2.8
O TV screen (640) 416 1965 5 × 4/2 × 1.6
P 16:9 (1920) 92 435 16 × 9/6.3 × 3.5
1
If the number of exposures remaining is 10,000 or more, the number of exposures
remaining display shows “9999.”
2
Print sizes are calculated by dividing the number of pixels by printer resolution (dpi) and
multiplying by 2.54 cm (1 in.). However, at the same image size, pictures printed at higher
resolutions will print smaller than the size indicated, and those printed at lower resolutions
will print larger than the size indicated.
2
76
Page 89

Shooting Options: The Shooting Menu
B White Balance
The color of light reflected from an object varies with the color of the light source.
The human brain is able to adapt to changes in the color of the light source, with
the result that white objects appear white whether seen in the shade, direct
sunlight, or under incandescent lighting. Digital cameras can mimic this
adjustment by processing images according to the color of the light source. This is
known as “white balance.” For natural coloration, choose a white balance setting
that matches the light source before shooting. Although the default setting, Auto,
can be used under most types of lighting, you can apply the white balance setting
suited to a particular light source to achieve more accurate results.
a Auto (default setting)
White balance automatically adjusted to suit lighting conditions. Best choice in
most situations.
b Preset manual
Neutral-colored object used as reference to set white balance under unusual
lighting conditions. Please refer to “Preset Manual” for more information(A 78).
c Daylight
White balance adjusted for direct sunlight.
d Incandescent
Use under incandescent lighting.
e Fluorescent
Use under most types of fluorescent lighting.
f Cloudy
Use when taking pictures under overcast skies.
g Flash
Use with the flash mode.
The effects of the selected option can be previewed in the monitor. At settings
other than Auto, the icon for the current setting is displayed in the monitor (A 6).
Shooting, Playback and Setup Menus
B Flash Mode
At white-balance settings other than Auto or Flash, turn the flash off (W) (A 28).
77
Page 90
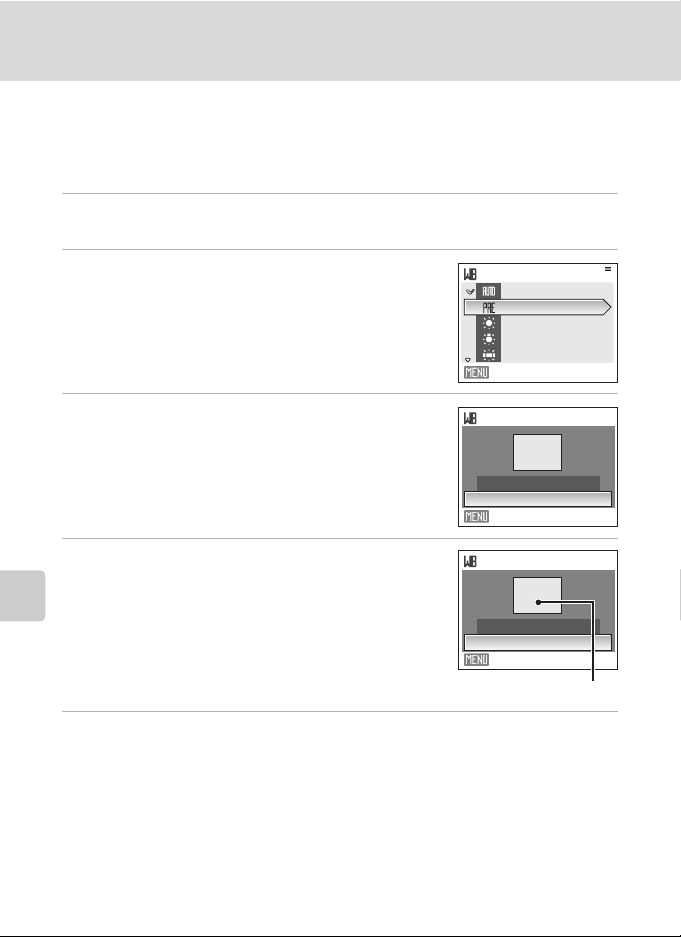
Shooting Options: The Shooting Menu
Auto
Daylight
Incandescent
Fluorescent
Preset Manual
Preset manual is used with mixed lighting or to compensate for light sources with
a strong color cast (for example, to make pictures taken under a lamp with a red
shade look as though they had been taken under white light).
1 Place a white or gray reference object under the lighting that will be
used during shooting.
2 Use the multi selector to choose b Preset
manual in the White balance menu, and
press k.
Shooting, Playback and Setup Menus
The camera zooms in.
3 Choose Measure.
To apply the most recently measured value for preset
manual, choose Cancel and press k.
4 Frame the reference object.
White balance
Auto
Auto
Preset manual
Daylight
Daylight
Incandescent
Incandescent
Fluorescent
Fluorescent
Exit
Preset manual
Cancel
Measure
Exit
Preset manual
Cancel
Measure
Exit
Reference object frame
5 Press k.
The shutter is released and the new white-balance value is set.
No pictures are recorded.
B Note on Preset Manual
Regardless of the flash mode selected, the flash will not fire when k is pressed in step 5. Therefore,
the camera cannot measure a value for preset manual for when the flash is used.
78
Page 91
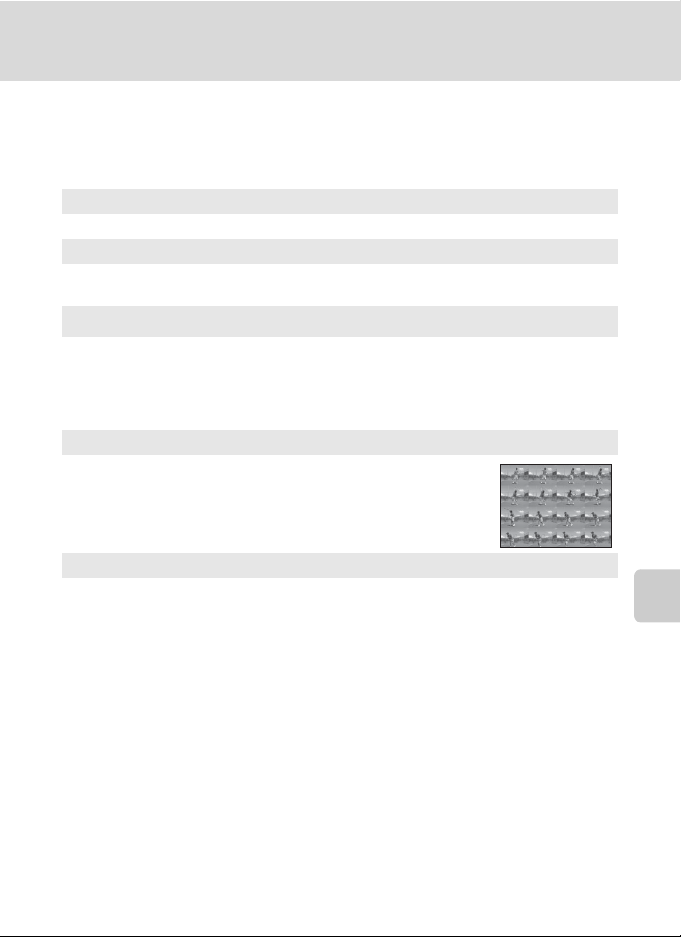
Shooting Options: The Shooting Menu
C Continuous
Change settings to Continuous or BSS (best shot selector). Flash will be switched
off for Continuous, BSS or Multi-shot 16, and focus, exposure and white balance
are fixed at the values for the first picture in each series.
U Single (default setting)
One shot is taken each time shutter-release button is pressed.
V Continuous
While the shutter-release button is held down, up to 4 pictures are taken at a rate of
about 1.2 frames per second (fps) when Image mode is set to R Normal (3264).
BSS (Best Shot Selector)
D
The “best shot selector” is recommended when shooting with the flash off or the
camera zoomed in, or in other situations in which inadvertent motion can result in
blurred pictures. When BSS is on, the camera takes up to ten pictures while the
shutter-release button is held down. The sharpest picture in the series is
automatically selected and saved.
W Multi-shot 16
Each time shutter-release button is pressed, camera takes 16
shots at about 1.6 frames per second and arranges them in a
single picture with Image mode setting L Normal (2592).
X Intvl timer shooting
Camera takes pictures (up to 1,800 frames) automatically at specified interval
(A 80).
At settings other than Single, the indicator for the current setting is displayed in
the monitor (A 6).
Shooting, Playback and Setup Menus
B Notes on Continuous Shooting
• The maximum frame rate with continuous shooting may vary, depending upon the current image
mode setting and the memory card used.
• Digital zoom cannot be used in Multi-shot 16.
B Note on BSS
BSS may not produce the desired results if the subject moves or the composition changes while the
shutter-release button is pressed all the way down.
79
Page 92
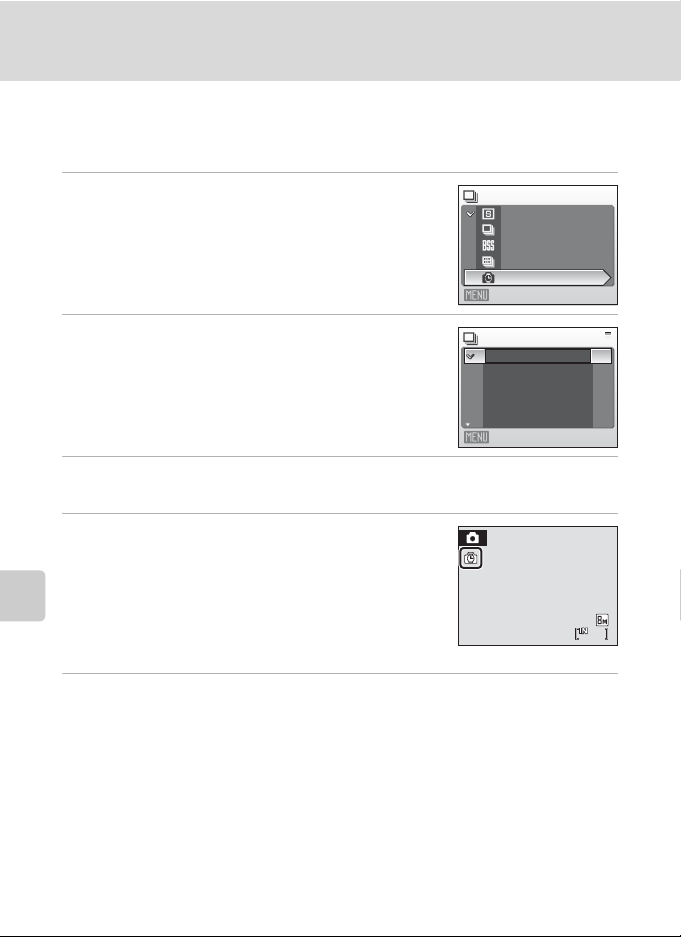
Shooting Options: The Shooting Menu
Interval Timer Photography
Pictures are taken automatically at specified intervals. Choose from intervals
between 30 seconds and 60 minutes.
1 Use the multi selector to choose Intvl timer
shooting in the Continuous menu, and press
k.
2 Choose interval between shots and press k.
Shooting, Playback and Setup Menus
Continuous
Single
Continuous
BSS
Multi-shot 16
Intvl timer shooting
Exit
Set interval time
Exit
3 Press d.
The camera returns to shooting mode.
4 Press the shutter-release button all the way
down to take the first picture and initiate
interval timer shooting.
Monitor turns off and power-on lamp blinks between
shots.
The monitor turns on automatically right before the next
shot is taken.
5 Press the shutter-release button all the way down a second time to
end recording.
Recording will end automatically if the internal memory or memory card becomes full,
or when 1,800 pictures have been taken.
30 s
1 m
5 m
10 m
30 m
262626
C Power Source
To prevent the camera from turning off unexpectedly during recording, use a fully charged battery
or the AC Adapter EH-62D (sold separately).
D More Information
See “Image File and Folder Names” (A 109) for more information.
80
Page 93
Shooting Options: The Shooting Menu
E ISO Sensitivity
Sensitivity is a measure of how quickly the camera reacts to light. The higher the
sensitivity, the less light needed to make an exposure. Although a high ISO rating
is suited for taking pictures of subjects in action or in poor lighting, high sensitivity
is often associated with “noise” - randomly spaced, brightly colored pixels
concentrated in dark parts of the image.
Auto (default setting)
Sensitivity is ISO 64 under normal conditions; when lighting is poor and the flash is
off, the camera compensates by raising sensitivity to a maximum of ISO 800.
64,100, 200, 400, 800, 1600, 2000
Sensitivity will be locked at the specified value.
At the settings other than Auto, the current setting is displayed in the monitor
(A 6). If Auto is selected and the sensitivity is raised above ISO 64, the E icon
will be displayed (A 29).
F Color Options
Make colors more vivid or record pictures in monochrome.
n Standard color (default setting)
Use for pictures exhibiting natural color.
o Vivid color
Use to achieve a vivid, “photoprint” effect.
p Black-and-white
Record pictures in black-and-white.
q Sepia
Record pictures in sepia tones.
r Cyanotype
Record pictures in cyan-blue monochrome.
Shooting, Playback and Setup Menus
The effects of the selected option can be previewed in the monitor. At settings
other than Standard color, the icon for the current setting is displayed in the
monitor (A 6).
81
Page 94
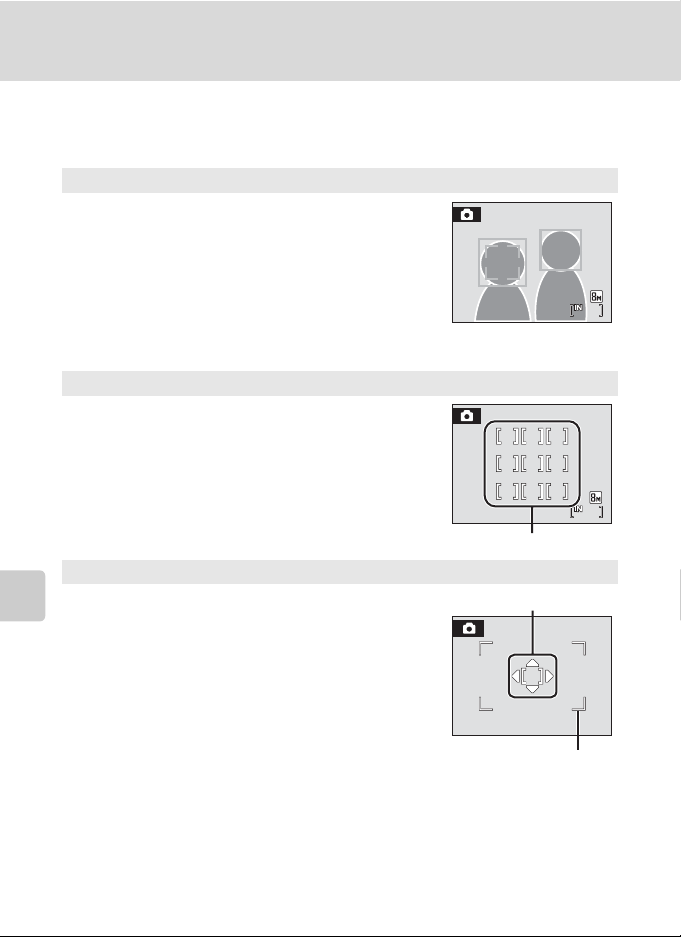
Shooting Options: The Shooting Menu
G AF Area Mode
Use this option to determine where the camera focuses. When digital zoom is in
effect, focus will be on the center of the screen regardless of the settings used.
z Face priority (default setting)
When the camera recognizes a face (front view), the
camera will focus on that face. See “Face Priority”
(A 84) for more information. If more than one face is
recognized, focus will be on the face closest to the
camera.
When shooting non-human subjects or when no
faces are recognized, AF area mode will switch to
Shooting, Playback and Setup Menus
Auto, and the camera will automatically select the
focus area (one of nine) containing the subject
closest to the camera.
w Auto
Camera automatically selects the focus area (one of
nine) containing the subject closest to the camera.
Press the shutter-release button halfway to activate
the focus area. When the shutter-release button is
pressed halfway, the focus area selected by the
camera will be displayed in the monitor.
x Manual
This option is suited to situations in which the
intended subject is relatively still and not positioned
in the center of the frame.
Press the multi selector H, I, J or K to select from
99 focus areas in the frame. Pictures can be taken
while focus-area selection screen is displayed.
To end focus-area selection and adjust the flash,
macro, self-timer and exposure compensation
settings, press k. To return to the focus-area
selection screen, press k again.
Available AF areas
AF area
Selectable area
262626
262626
82
Page 95
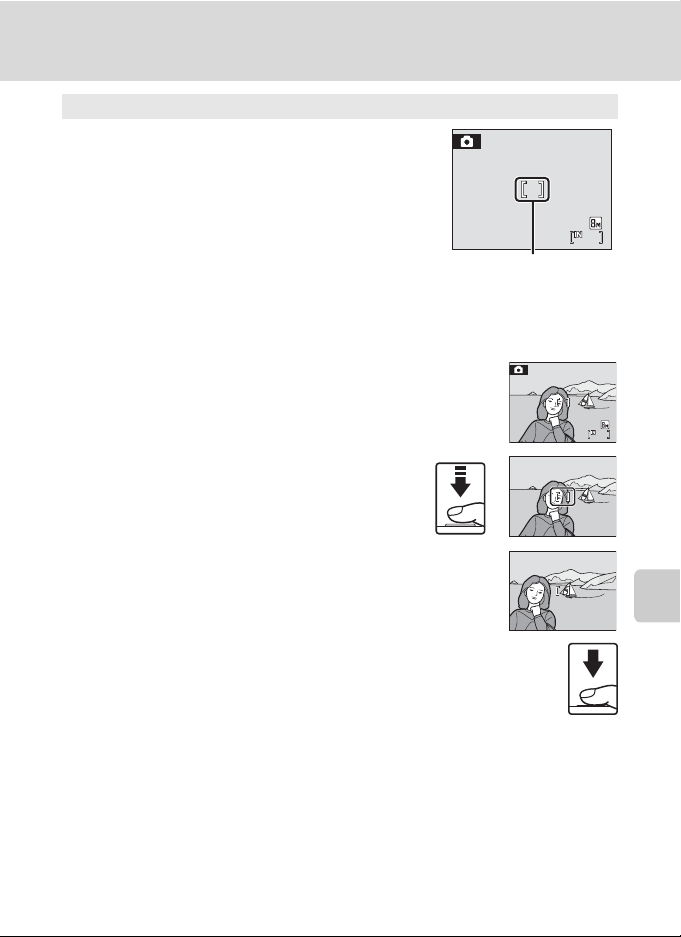
Shooting Options: The Shooting Menu
F3.1
1/60
F3.1
1/60
y Center
Camera focuses on subject in center of frame.
Center focus area is used.
AF area
D Focus Lock
To focus on off-center subjects when Center is selected for AF area mode, use focus lock as
described b elow.
1 Position the subject in the center of the frame.
2 Press the shutter-release button halfway.
• Confirm that the focus area is green.
1/60
3 Continue holding down the shutter-release button halfway
and recompose the picture.
• Be sure that the distance between the camera and the
subject does not change.
4 Press the shutter-release button the rest of the wa y down to
shoot.
1/60
F3.1
F3.11/60
F3.1
F3.11/60
262626
Shooting, Playback and Setup Menus
262626
D More Information
See “Autofocus” (A 25) for more information.
83
Page 96
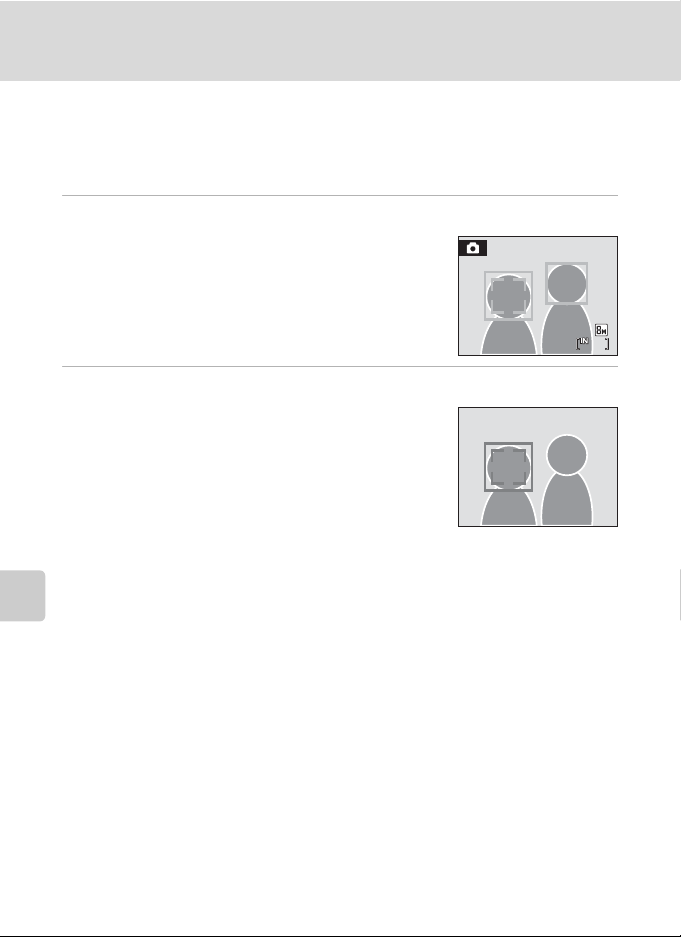
Shooting Options: The Shooting Menu
F3.1
1/60
Face Priority
Face Priority will take effect when AF area mode is set to Face priority, or when
Scene mode is set to Portrait or Night portrait. The camera will automatically
recognize human faces that are facing the camera and set focus on the faces.
1 Frame a picture.
When the camera recognizes a face (front view), that face
will be framed by a yellow double border.
If more than one face is recognized, the face nearest to
the camera will be framed by the double border and the
rest by a single border. Up to 12 people’s faces can be
Shooting, Playback and Setup Menus
recognized.
2 Press the shutter-release button halfway.
Focus will be on the face framed by the double border.
The double border will glow green once focus has been
locked.
When the camera is unable to focus, the double border
will blink. Press the shutter-release button halfway and try
focusing again.
Press the shutter-release button the rest of the way down
to take the picture.
B Notes about Face-Priority
• In Face priority, if the shutter-release button is pressed halfway when no faces are recognized, AF
area mode will be set to Auto.
• In the Portrait and Night portrait settings of scene mode, if the shutter-release button is
pressed halfway when no faces are recognized, focus will be set on the center of the screen.
• The camera may be unable to detect faces in the following situations:
- When faces are partially hidden by sunglasses or other obstructions
- When faces take up too much or too little of the frame
- When the subject is not looking directly at the camera
• The camera’s ability to detect faces depends on a variety of factors, including whether or not the
subject is facing the camera.
• In some rare cases, the subject may not be in focus despite the fact that the double border glows
green (A 25). Should this occur, switch to AF area mode (manual or center), refocus on another
subject positioned at the same distance from the camera as the actual portrait subject, and use
focus lock (A 83).
• Pictures taken in Face Priority, while in full-frame playback, will be rotated (if necessary) and
displayed.
84
1/60
F3.1
F3.11/60
262626
Page 97

Shooting Options: The Shooting Menu
Restrictions on Camera Settings
Restrictions apply to the following settings in A (auto) mode.
Flash mode
Flash turns off at Continuous settings of Continuous, BSS or Multi-shot 16.
Applied setting is restored when Single or Intvl timer shooting is selected.
Self-timer
If self-timer is on, only one shot will be taken when shutter is released, regardless of
settings chosen for Continuous.
Applied Continuous settings are restored when picture is taken or self-timer is
turned off.
Continuous
If Continuous setting is set to Multi-shot 16, Image mode will be set to L
Normal (2592).
If Continuous mode is restored to any setting other than Multi-shot 16 the
settings for Image mode will also be restored.
White balance
White balance is automatically set to Auto and cannot be adjusted when Blackand-white, Sepia or Cyanotype is selected for Color options.
Applied white balance setting is restored when Standard color or Vivid color is
selected.
Shooting, Playback and Setup Menus
85
Page 98
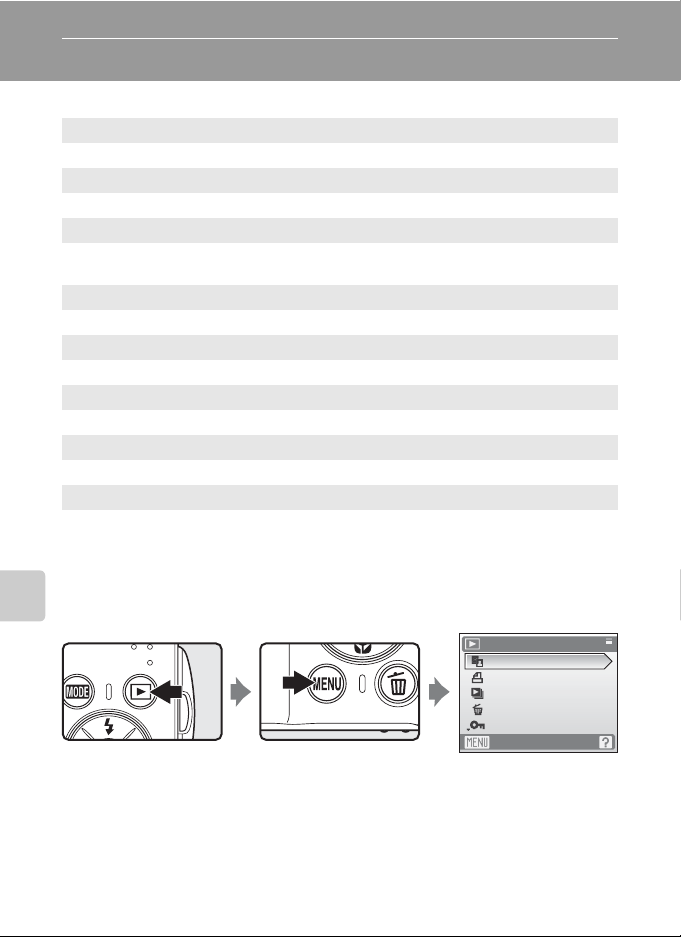
Playback Options: The Playback Menu
The playback menu contains the following options.
I D-Lighting A 46
Enhances brightness and contrast in dark portions of pictures.
a Print set A 71
Select pictures to print and the number of copies for each.
b Slide show A 88
View pictures stored in the internal memory or on a memory card in an
automatic slide show.
c Delete A 89
Shooting, Playback and Setup Menus
Delete all or selected pictures.
d Protect A 89
Protect selected pictures from accidental deletion.
f Rotate image A 89
Change the orientation of pictures.
g Small pic. A 49
Create a small copy of the current picture.
h Copy A 90
Copy files between memory card and internal memory.
Displaying the Playback Menu
Display the playback menu by pressing c and pressing d.
• Use the multi selector to choose and apply settings (A 9).
• To exit the playback menu, press d.
86
Playback menu
D-Lighting
Print set
Slide show
Delete
Protect
Exit
Page 99
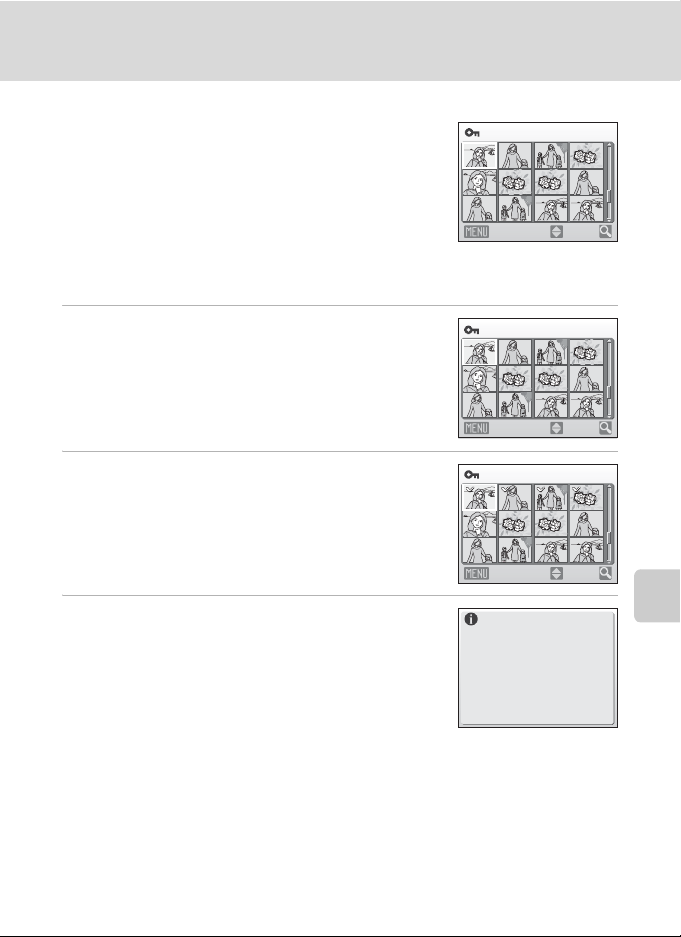
Playback Options: The Playback Menu
Selecting Multiple Pictures
The screen shown at right will be displayed in the
menus (shown below) when choosing pictures.
Playback menu: Print set (A 71), Delete (A 89),
Protect (A 89), Rotate image (A 89),
Copy (A 90)
Setup menu: Welcome screen (A 93)
Follow the procedure described below to choose the
pictures.
Protect
Back
ON/OFF
1 Press the multi selector J or K to choose the
desired picture.
Only one picture can be selected for Rotate image and
Welcome screen. Proceed to step 3.
Press g (i) to switch to full-frame playback.
Press f (h) to switch back to thumbnail display.
2 Press H or I to select ON or OFF (or the
number of copies).
When ON is selected, a check mark (y) is displayed in the
top left corner of the current picture. Repeat steps 1 and 2
to select additional pictures.
3 Press k.
The setting is enabled.
Protect
Back
Protect
Back
Shooting, Playback and Setup Menus
ON/OFF
ON/OFF
Done
87
Page 100
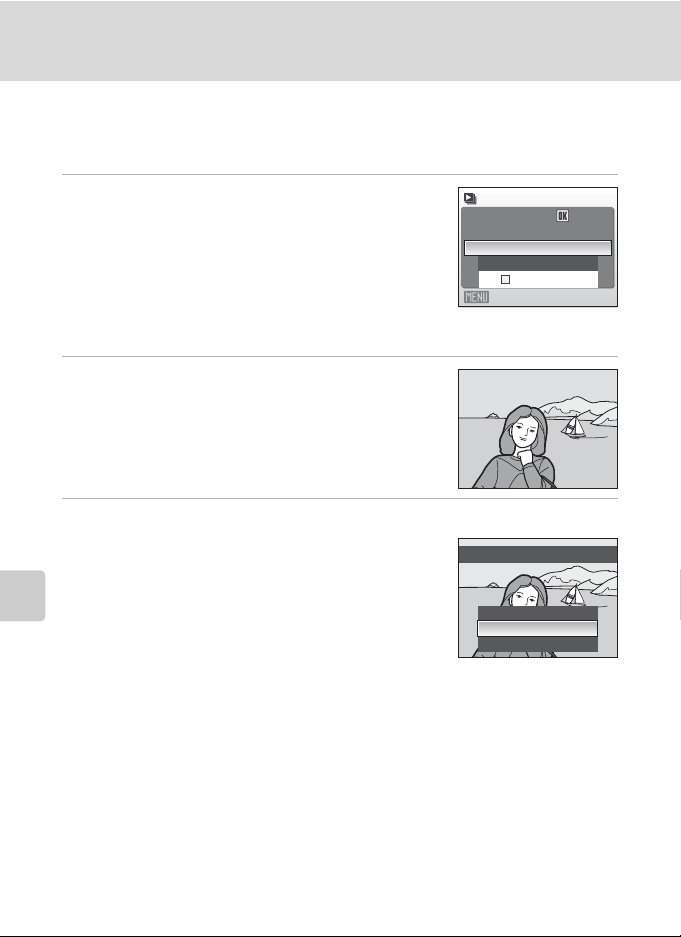
Playback Options: The Playback Menu
b Slide Show
Play back pictures, stored in the internal memory or on a memory card, one by one
in an automated “slide show.”
1 Use the multi selector to choose Start and
press k.
To change the interval between pictures, choose Frame
intvl, select the desired interval time, and press k
before choosing Start.
To repeat the slide show automatically, enable Loop and
press k before choosing Start. The check mark (w) will
Shooting, Playback and Setup Menus
be added to the loop option when enabled.
2 The slide show begins.
While the slide show is in progress, the following
operations can be performed:
Press the multi selector J or K to switch pictures. Hold
down either button to rewind or fast forward.
Press k to pause the slide show.
3 Choose End or Restart.
When the slide show ends or is paused, choose End and
press k to return to the playback menu, or choose
Restart to play the slide show again.
Slide show
Pause:
Frame intvl
Loop
Exit
Pause
Restart
Frame intvl
Start
End
B Notes on Slide Show
• Only the first frame of movies (A 59) included in slide shows is displayed.
• Even if Loop is selected, the maximum playback duration for a slide show is 30 minutes (A 102).
88
 Loading...