


Nikon RAIII 65 WP, RAIII 82 WP, RAIII 82A WP, RAIII 65A WP Instruction Manual
SPOTTING SCOPE RAIII 65 WP /
PROSTAFF WATERPROOF 65mm [Straight-Body Type]
SPOTTING SCOPE RAIII 65A WP/
PROSTAFF WATERPROOF 65mm [Angled-Body Type]
SPOTTING SCOPE RAIII 82 WP
PROSTAFF WATERPROOF 82mm [Straight-Body Type]
SPOTTING SCOPE RAIII 82A WP
PROSTAFF WATERPROOF 82mm [Angled-Body Type]
Printed in Japan (175K)66-1Y/1E
• Specifications and design are subject to change without
notice.
• No reproduction in any form of this manual, in whole or in
part (except for brief quotation in critical articles or
reviews), may be made without written authorization from
NIKON VISION CO., LTD.
•Änderungen der Konstruktion und der technischen Daten
bleiben vorbehalten.
• Alle Rechte, auch die des auszugsweisen Nachdrucks
(mit Ausnahme kurzer Zitate in technischen
Besprechungen), ohne schriftliche Genehmigung durch
NIKON VISION CO., LTD. bleiben ausdrücklich
vorbehalten.
• Les spécifications et la conception sont sujettes à
modification sans préavis.
• Aucune reproduction totale ou partielle, sous quelle que
forme que ce soit, (à l'exception de brèves citations dans
des magazines) ne peut être faite sans autorisation écrite
de NIKON VISION CO., LTD.
• Las especificaciones y el diseño están sujetos a cambios
sin previo aviso.
• Se prohibe la reproducción de este manual en cualquier
forma, ya sea en su totalidad o en parte (excepto citas
breves en artículos críticos o revisiones), sin la
autorización escrita de NIKON VISION CO., LTD.
• Design e dati caratteristici sono soggetti a variazioni
senza preavviso.
• Senza autorizzazione scritta di NIKON VISION CO., LTD,
non è possibile riprodurre in nessun modo, in tutto o in
parte, il presente manuale (salvo brevi citazioni in
recensioni o articoli critici).
NIKON VISION CO., LTD.
Customer Service Department
3-25, Futaba 1-chome, Shinagawa-ku, Tokyo 142-0043, Japan
Tel: +81-3-3788-7699 Fax: +81-3-3788-7698
CAUTIONS BEFORE USE
Thank you for purchasing the Nikon product.
Please observe the following guidelines strictly so you can use the equipment properly and avoid potentially
hazardous problems. Before using this product, read thoroughly the “SAFETY PRECAUTIONS” and
instructions on correct usage accompanying the product. Keep this manual within reach for easy reference.
w
WARNING
This indication alerts you to the fact that any improper use ignoring the contents described herein can result
in potential death or serious injury.
w
CAUTION
This indication alerts you to the fact that any improper use ignoring the contents described herein can result
in potential injury or material loss.
SAFETY AND OPERATION PRECAUTIONS
wWarning
Never look at the sun directly using the Spotting Scope.
wCautions
• Avoid rain, water splashes, sand and mud.
• Do not operate focusing ring if exposed to water or rain.
• Do not disassemble the Spotting Scope.
• Do not swing the Spotting Scope by its strap. You could hit someone and cause injury.
• Take care not to pinch your finger when sliding the lens hood back.
• Do not leave the Spotting Scope in a car on a hot or sunny day, or near heat generating equipment.
• When the Spotting Scope is exposed to sudden temperature changes, water condensation may occur on lens
surfaces.
• Do not use alcohol for cleaning the main body.
• Do not leave the polyethylene bag used for packaging within the reach of small children.
• When carrying the Spotting Scope, store it in the soft case and close the fastener completely.
CARE AND MAINTENANCE
Lens surfaces
• Fingerprints, dust and dirt on the lens may distort viewing.
• To remove fingerprints or dirt, gently wipe the lens surfaces with a soft, clean cotton cloth or a high-quality
oil-free lens tissue. Use a small quantity of pure alcohol (not denatured) to wipe stubborn smudges. Do not
use velvet cloth or ordinary tissue, as it may scratch the lens surface.
• Remove dust with a soft oil-free brush.
Main body
• Remove dust from the focusing ring with a soft brush.
• Clean the body surface with a soft, clean cloth and a neutral cleansing agent. Then wipe with a dry cloth. Do
not use benzene, thinner, or other organic agents because they may cause discoloration or rubber
degeneration.
Heat and humidity
• Water condensation or mold may occur on lens surfaces because of high humidity. Therefore, store the
spotting scope in a cool, dry place. After use on a rainy day or at night, thoroughly dry it at room temperature,
then store it in a cool, dry place.
• Do not leave the spotting scope inside a car on a hot or sunny day, or near heat-generating equipment. This
may damage or negatively affect performance.
VORSICHTSMASSNAHMEN VOR GEBRAUCH
Vielen Dank für das Vertrauen in Nikon, das Sie uns mit dem Kauf dieses Produkts erwiesen haben.
Bitte befolgen Sie die nachstehenden Richtlinien genau, damit stets eine sachgemäße Handhabung
gewährleistet ist und potentielle Gefährdungen vermieden werden. Vor dem Gebrauch des Produkts machen
Sie sich bitte gründlich mit den “VORSICHTS-MASSNAHMEN” und den Anweisungen zur korrekten
Handhabung vertraut. Bewahren Sie diese Anleitung griffbereit auf, damit sie stets zum Nachschlagen zur
Hand ist.
w
VORSICHT
Hinweis, bei dessen Nichtbeachtung die Gefahr schwerer Verletzungen bzw. Lebensgefahr droht.
w
ACHTUNG
Hinweis, bei dessen Nichtbeachtung die Gefahr von Personen- oder
Sachschäden droht.
VORSICHTSMASSNAHMEN BEI GEBRAUCH
wVorsicht
Keinesfalls durch das Beobachtungsfernrohr direkt in die Sonne blicken.
wAchtung
• Schützen Sie das Beobachtungsfernrohr vor Regen, Wasserspritzern, Sand und.
• Verstellen Sie nicht den Fokussierring, wenn dieser Wasser oder Regen ausgesetzt ist.
• Versuchen Sie niemals, das Beobachtungsfernrohr zu öffnen, zu zerlegen oder auseinanderzubauen.
• Schwenken Sie das Beobachtungsfernrohr nicht an seinem Riemen. Sie könnten jemanden verletzen.
• Achten Sie darauf, beim Zurückschieben der Gegenlichtblende nicht Ihre Finger einzuklemmen.
• Belassen Sie das Beobachtungsfernrohr nicht in einem in der Sonne geparkten Fahrzeug oder in der Nähe von
Heizungen und Warmluftauslässen.
• Bei plötzlichen Temperaturänderungen kann sich Kondensat an den Linsenoberflächen bilden.
• Zum Reinigen des Gehäuses unter keinen Umständen scharfe Lösungsmittel oder Alkohol verwenden.
• Halten Sie den Kunststoffbeutel, in den das Beobachtungsfernrohr verpackt war, von Kleinkindern fern.
• Verstauen Sie das Beobachtungsfernrohr zum Tragen in seiner weichen vollständig geschlossenen
Schutztasche.
PFLEGE UND WARTUNG
Linsenoberflächen
• Fingerabdrücke, Staub und Schmutz auf den Linsen beeinträchtigen das Beobachten.
• Wenn nun Unreinheiten wie eben Fingerabdrücke und Schmutz von den Linsenoberflächen entfernt weden
sollen, so ist dies am besten behutsam mit einem weichen, nicht fusselnden Tuch oder aber silikonfreiem
Linsenreinigungspapier (in Fotogeschäften erhältlich), das vorsichtig in etwas reinen Alkohol getaucht worden
ist, zu tun.
• Staub kann Kratzer verursachen, entfernen Sie ihn daher mit einem Blasebalg oder einem weichen, fettfreien Pinsel.
Gehäuse
• Wischen Sie Staub vom Fokussierring gründlich mit einem Pinsel weg.
• Ein weiches Tuch mit neutralem Reinigungsmittel tränken und gut auswringen. Dann Schmutz vom Gehäuse
abwischen und mit einem trockenen Tuch trockenwischen. Nicht Alkohol, Äther etc. oder organische
Lösungsmittel zum Entfernen von Schmutz verwenden, da Verfärbung und Beschädigung der Gummiteile
verursac ht werden kann.
Hitze und Feuchtigkeit
• Seien Sie besonders vorsichtig, wenn das Beobachtungsfernrohr in Gegenden mit hoher Luftfeuchtigkeit zum
Einsatz kommt. Auch Tau und Regen sind gefährlich, da sich durch Nässe generell auf den Linsen eine
Schimmelbildung oder Trübung einstellen kann. Nach Gebrauch bei feuchten Wetterbedingungen müssen
daher Nässe und Schmutz sowohl vom Gehäuse selber als auch von den Linsen vollständig entfernt werden.
Danach ist das Beobachtungsfernrohr in einem gut belüfteten Raum zu lagern, um der Schimmelbildung
vorzubeugen.
PRECAUTIONS AVANT UTILISATION
Nous vous remercions d'avoir porté votre choix sur ce produit Nikon.
Veuillez respecter strictement les directives suivantes pour pouvoir. utiliser correctement cet appareil et
éviter tout danger potentiel.Avant d’utiliser ce produit, lisez attentivement les “REGLES DE SECURITE” et les
instructions sur l’usage correct accompagnant le produit.Conservez ce manuel à portée de la main pour
pouvoir vous y référer à tout moment.
w
AVERTISSEMENT
Cet indication vous avertit du fait qu’une utilisation incorrecte ne respectant pas les indications de cette
brochure peut se traduire par une mort potentielle ou des blessures graves.
w
PRECAUTION
Cette indication vous avertit qu’une utilisation incorrecte ne respectant pas les indications de cette brochure
peut se traduire par des blessures potentielles ou des pertes matérielles.
REGLES DE SECURITE
wAvertissement
Ne regardez jamais directement le soleil avec le "Spotting Scope".
wPrécautions
• Protégez le "Spotting Scope" contre la pluie, les éclaboussures d’eau, le sable et la boue.
• N’agissez pas sur la bague de mise au point si elle est exposée à l’eau ou à la pluie.
• Ne démontez pas le "Spotting Scope".
• Ne vous amusez pas à balancer le "Spotting Scope." Il pourrait heurter quelqu’un et provoquer des blessures.
• Prenez garde de ne pas vous coincer le doigt en ramenant le bouchon d’objectif en place.
• Ne laissez pas votre "Spotting Scope" dans une voiture par temps chaud o ensoleillé.
• Quand le “Spotting Scope” est soumis à des changements de température soudains, de la condensation peut
apparaître à la surface des lentilles.
• N’utilisez pas d’alcool pour nettoyer le boîtier.
• Ne laissez pas le sac en polyéthylène utilisé pour l’emballage à portée des petits enfants.
• Portez le “Spotting Scope” placé dans son étui souple et fermez la fermeture à glissière.
ENTRETIEN ET MAINTENANCE
Surface des lentilles
• Toutes traces de doigts, de poussière et de saleté sur les lentilles gênent la vue.
• Pour enlever les traces de doigts ou la saleté, frottez doucement la surface des lentilles avec de la gaze ou du
papier de nettoyage d’objectif (papier sans silicone vendu dans les magasins de photo ordinaires), mouillé
d’un peu d’alcool pur.
• La poussière peut provoquer des rayures ou de la corrosion. Elle doit donc être enlevée avec un brosse douce
sans huile.
Boîtier principal
• Enlevez soigneusement la poussière de la bague de mise au point avec une brosse.
• Humecter un chiffon doux avec un agent de mettoyage neutre et bien nettoyer le corps puis essuyer de
nouveau avec un chiffon sec. Ne pas utiliser d’alcool, éther ou autre nettoyant organique pour nettoyer le
coprs car cela risqe d’abîmer la couleur et/ou le caoutchouc.
Chaleur et humidité
• Prenez un soin tout particulier du Spotting Scope en cas d’humidité élevée, car de la moisissure ou un
assombrissement à la surface des lentilles risquent d’apparaître. Après une utilisation par temps pluvieux ou
la nuit, essuyez soigneusement la saleté et la poussière sur le boîtier et sur l’objectif, et rangez-le dans un
endroit bien ventilé pour éviter la formation de moisissures.
PRECAUCIONES ANTES DEL USO
Le agradecemos por su compra de este producto de Nikon.
Cumpla estrictamente las siguientes guías para utilizar el equipo correctamente y evitar problemas
potencialmente graves. Antes de utilizar este producto por primera vez lea todas las “PRECAUCIONES PARA
SU SEGURIDAD” y las instrucciones sobre el uso correcto que vienen con el producto.
Guarde este manual en un lugar a mano para su consulta inmediata.
w
ADVERTENCIA
Esta indicación le avisa que un uso incorrecto que no tenga en cuenta estas instrucciones puede provocar la
muerte o heridas graves.
w
PRECAUCION
Esta indicación le avisa que un uso incorrecto que no tenga en cuenta estas instrucciones puede provocar
heridas o pérdidas materiales.
PRECAUCIONES PARA SU SEGURIDAD Y FUNCIONAMIENTO
wAdvertencia
No mire directamente al sol con el "Monocular de goma."
wPrecauciones
• Evite la lluvia, salpicaduras, arena y barro.
• No mueva el anillo de enfoque si ha estado expuesto al agua o la lluvia.
• No desarme el "Monocular de goma."
•No bambolee el "Monocular de goma" desde la correa. Podría golpear a alguien y lastimarlo.
• Tenga cuidado de no pellizcarse su dedo cuando desliza la visera parasol hacia atrás.
• No deje el "Monocular de goma" en un coche estacionado en un día caliente o soleado o cerca de la
calefacción.
•Si el medidor de enfoque ha sido expuesto a cambios bruscos de temperatura, es posible que se forme
condensación de agua en la superficie de la lente.
• No utilice alcohol para limpiar el cuerpo.
• No deje la bolsa de polietileno en la que vinieron originalmente el Monocular de goma al alcance de los niños.
• Cuando transporte el Monocular de goma, guárdelo en el estuche blando y ciérrelo hasta el final.
CUIDADO Y MANTENIMIENTO
Superficies de las lentes
• Las huellas dactilares, el polvo, y la suciedad impedirán la visión.
• Par eliminar las huellas dactilares o la suciedad, frote las superficies de las lentes con una gasa o un papel
para limpieza de lentes (papel sin silicio que podrá adquirir en cualquier tienda de cámaras) humedecido en
un poco de alcohol puro.
• El polvo puede causar rayaduras o corrosión. Por lo tanto, elimínelo con un cepillo suave exento de aceite.
Cuerpo principal
• Limpie a fondo el polvo del anillo de enfoque con un cepillo.
• Humedezca un paño suave con un líquido limpiador neutro, escúrralo, limpie el cuerpo del aparato, y frótelo
con un paño seco. No emplee alcohol, éter, etc., ni limpiadores orgánicos para limpiar el cuerpo del aparato
ya que podría descolorarlo y/o dañar las partes de caucho.
Calor y humedad
•Tenga especial cuidado cuando emplee el Monocular de goma en ambientes de gran humedad. Después de
emplearlo en tiempo lluvioso o por la noche, limpie la suciedad y el polvo del cuerpo y las lentes porque
podría formarse moho o enturbiarse las superficies de las lentes. Para evitar la formación de moho, limpie
completamente la suciedad y el polvo del cuerpo principal y las lentes y guárdelo en un lugar bien ventilado.
Instruction Manual / Bedienungsanleitung / Manuel d’utilisation /
Manual de instrucciones / Manuale di istruzioni
E G
S I
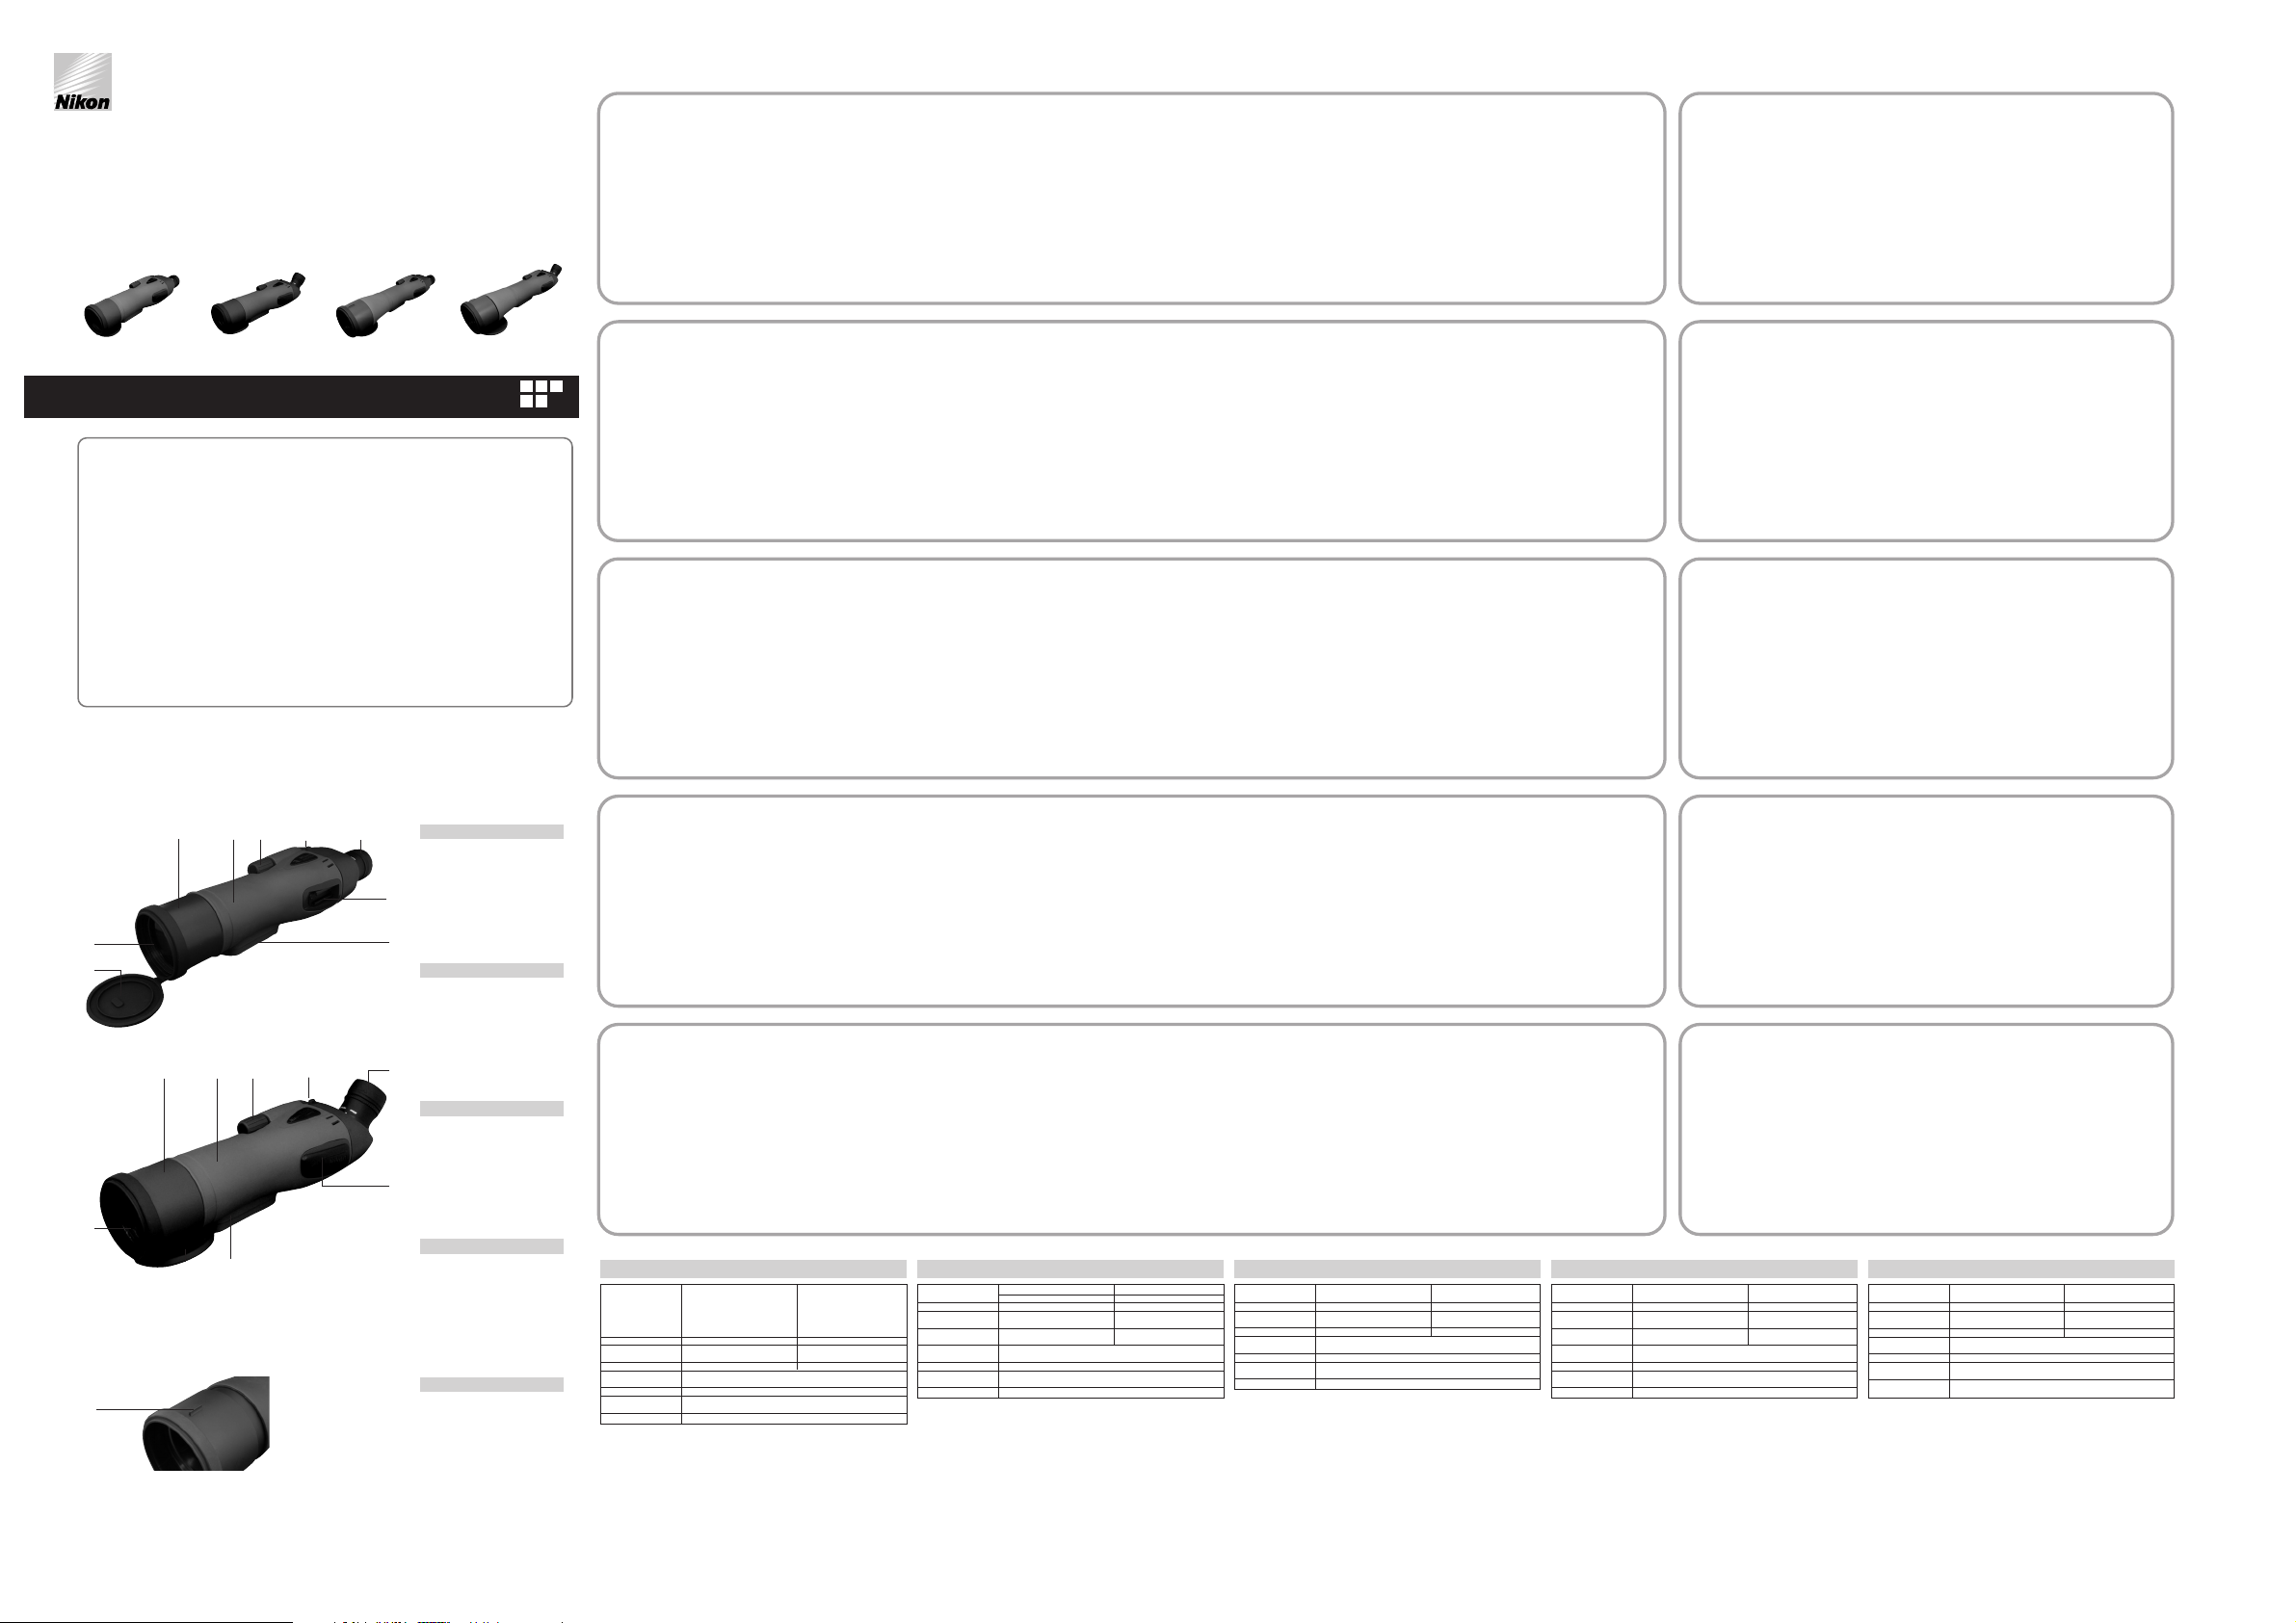
[Straight-Body Type/Mit geradem Einblick/
Type boîtier droit/Tipo cuerpo recto/
Tipo a corpo diritto]
[Angled-Body Type/
Mit schrägem Einblick/
Type boîtier coudé/
Tipo cuerpo en ángulo/
Tipo a corpo angolato]
!p
7
4
6
2
3
8
42 3
1. Objective lens
2. Lens hood
3. Body
4. Focusing knob
5. Eyepiece lens (optional accessory)
6. Tripod mount
7. Objective lens cap
8. Accessory shoe
9. Accessory shoe cover
10. Sight
NOMENCLATURE
1. Objektiv
2. Gegenlichtblende
3. Gehäuse
4. Fokussierknopf
5. Okular (Sonderzubehör)
6. Stativanschluß mit 1/4” Gewinde
7. Objektivlinsenkappe
8. Aufsteckschuh
9. Aufsteckschuhabdeckung
10. Visier
NOMENKLATUR
1. Objectif
2. Bouchon d’objectif
3. Boîtier
4. Bouton de mise au point
5. Oculaire (accessoire optionnel)
6. Socle de fixation
7. Capuchon d’objectif
8. Sabot porte-accessoire
9.Protection du sabot porte accessoire
10. Viseur
1. Objetivo
2. Visera parasol
3. Cuerpo
4. Perilla de enfoque
5. Ocular (accesorio opcional)
6. Montura para trípode
7. Tapa del objetivo
8. Zapata para accesorio
9.Tapa de zapata para accesorio
10. Mira
NOMENCLATURA
1. Lente dell'obiettivo
2. Paraluce
3. Corpo
4. Anello di messa fuoco
5. Lente dell'oculare (accessorio opzionale)
6. Innesto per il cavalletto
7. Copriobiettivo
8. Slitta portaccessori
9. Copertura della slitta portaccessori
10. Mirino
NOMENCLATURA
NOMENCLATURE
F
Waterproof models (Main body):
All models shown are waterproof, and will suffer no damage to the optical system if submerged or dropped in water to a maximum depth of 2 meters for up
to 5 minutes.
These products offer the following advantages:
• Can be used in conditions of high humidity, dust and rain without risk of damage.
• Nitrogen-filled design makes them resistant to condensation and mold.
Observe the following when using these products:
• As the unit does not have a perfectly sealed structure, it should not be operated nor held in running water.
• Any moisture should be wiped off before adjusting movable parts (focusing knob, eyepiece, etc.) of these products to prevent damage and for safety
reasons.
Water resistant models (Eyepiece lens, Target Sight):
In normal use, there will be no water penetration. (As tested by water equivalent to more than 1mm per minute, falling from a height of more than 200mm for
a duration of 10 minutes.)
Drops of water and other types of moisture will not damage the Spotting Scope, but be sure to observe the following during use:
1. The unit is neither waterproof nor airtight, so it should not be held under running water or used in rainy conditions.
2. Movable parts (focusing knob, eyepiece, etc.) of the Spotting Scope should not be adjusted in wet conditions. If you notice moisture has accumulated on
the product’s surface, gently wipe it off immediately.
To keep your binoculars in excellent condition, Nikon Vision recommends regular servicing by an authorized dealer.
Wasserdichte Modelle (Gehäuse):
Alle gezeigten Ferngläser sind wasserdicht und lassen sich bis zu einer Tiefe von maximal 2 Metern bis zu 5 Minuten lang im Wasser einsetzen, ohne dass
die Optik beschädigt wird.
Diese Modelle bieten die folgenden Vorteile:
• Einsatz unter hoher Luftfeuchtigkeit, Staub und Regen ohne Beschädigungsrisiko.
• Stickstofffüllung verhindert Kondensation und Schimmelbildung.
Bei Einsatz von dieser Modelle zu beachten:
• Da das Produkt nicht hermetisch abgedichtet ist, darf es unter fließendem Wasser weder betrieben noch gehalten werden.
• Zur Verhinderung von Schäden und aus Sicherheitsgründen dürfen die beweglichen Teile (z. B. Fokussierring und Okular) von dieser Modelle erst dann
betätigt werden, wenn etwaige Feuchtigkeit abgewischt ist.
Wasserfeste Modelle (Okular, Visier):
Unter normalen Einsatzbedingungen besteht keine Gefahr, dass Wasser eindringt. (Getestet bei Wassereinfall von mehr als 1 mm pro Minute aus einer Höhe
von über 200 mm über einen Zeitraum von 10 Minuten.)
Wasserspritzer und andere Feuchtigkeit stellen keine Beschädigungsgefahr für das Beobachtungsfernrohr dar. Beachten Sie bitte dennoch die
folgenden Punkte:
1. Das Beobachtungsfernrohr ist weder wasser- noch luftdicht. Halten Sie es deshalb nicht unter fließendes Wasser und schützen Sie es vor Regen.
2. Die beweglichen Teile (Fokussierring, Okular usw.) des Beobachtungsfernrohr dürfen bei Nässe nicht betätigt werden. Wischen Sie Feuchtigkeit von der
Gehäuseoberfläche unverzüglich mit einem trockenen Tuch ab.
Damit Sie viele Jahre ungetrübte Freude an Ihrem Fernglas haben, empfiehlt Nikon Vision die regelmäßige Wartung durch einen autorisierten Fachhändler.
Modèles étanches (Boîtier):
Les jumelles indiquées sont étanches, et ne subiront pas de dégâts si elles sont submergées ou laissées tomber dans l’eau jusqu’à une profondeur maximale
de 2 mètres jusqu’à 5 minutes.
Ces produits ofrent les avantages suivants:
• Elles sont utilisables sous forte humidité, poussière et pluie sans risques de dommages.
• La conception à injection d’azote les rend résistantes à la condensation et aux moisissures.
Observez les règles suivantes à l'emploi de ces produits:
• Comme l’appareil n’a pas une structure parfaitement étanche, il ne doit pas être tenu dans l’eau courante.
• Toute humidité doit être essuyé eavant d’ajuster les parties mobiles (bouton de mise au point, oculaire, etc.) de ces produits pour éviter tout dégât et pour
des raisons de sécurité.
Modèles résistant à l'eau (Oculaire, Viseur):
En fonctionnement normal, il n'y aura pas de pénétration d'eau. (d'après les tests avec de l'eau équivalente à plus de 1 mm par minute, tombant d'un
hauteur de plus de 200 mm pendant 10 minutes.)
Les gouttes d'eau et d'autres types d'humidité n'endommageront pas les "Spotting Scope", mais les règles suivantes devront être respectées pendant
le fonctionnement:
1. Ces jumelles ne sont étanches ni à l'eau ni à l'air, aussi elles ne doivent pas être maintenues sous l'eau courante ou utilisées par temps pluvieux.
2. Les pièces mobiles (bouton de mise au point, oculaire etc.) des "Spotting Scope" ne doivent pas être réglées en environnement humide. Si vous notez de
l'humidité accumulée à la surface du produit, essuyez-la doucement immédiatement.
Pour maintenir vos jumelles en excellent état, Nikon Vision recommande un entretien régulier par un revendeur agréé.
Modelos a prueba de agua (Cuerpo principa):l
Todos los modelos mostrados son a prueba de agua y su sistema óptico no sufrirá daños si se sumergen o se dejan caer en el agua hasta una profundidad
máxima de 2 metros durante un tiempo máximo de 5 minutos.
Estos productos odrecen las sigjienesventajas:
• Pueden utilizarse en condiciones de alta humedad, polvo y lluvia sin peligro de dañarse.
• El diseño lleno de nitrógeno los hace resistentes a la condensación y al moho.
Observe lo siguiente cuando utilice estos producos:
• Como la unidad no tiene una estructura perfectamente sellada, no debe manipularse ni colocarse bajo el agua que sale del grifo.
• Para evitar daños, y por razones de seguridad, antes de ajustar las piezas móviles (perilla de enfoque, ocular, etc.) de estos products, debe eliminarse
toda la humedad.
Modelos resistentes al agua (Ocular, Mira):
Con un uso normal, no entrará agua. (Se hicieron pruebas en agua equivalente a más de 1 mm por minuto. con caída de una altura de más de 200 mm
durante 10 minutos.)
Las gotas de agua y otros tipos de humedad no dañarán el "Monocular de goma" pero debe tenerse en cuenta lo siguiente durante el uso:
1. La unidad no es a prueba de agua o hermética al aire y no debe dejarse bajo el agua que sale del grifo o utilizarse cuando está lloviendo.
2. Las piezas móviles (perilla de enfoque, ocular, etc.) del "Monocular de goma" no debe ajustarse en condiciones húmedas. Si advierte que se ha
acumulado humedad en la superficie del producto, limpie inmediatamente.
Para mantener sus binoculares en excelentes condiciones, Nikon Vision recomienda un servicio regular en un distribuidor autorizado.
Note circai i modelli impermeabili (Corpo principale):
Tutti i modelli mostrati sono impermeabili, quindi possono essere usati fino a una profondità massima di 2 metri per un massimo di 5 minuti senza che il
sistema ottico si danneggi.
Questi prodotti offrono i seguenti vantaggi:
• Possono essere usati in condizioni di molta umidità, polvere e pioggia senza alcun rischio di danneggiamento.
• Il design a riempimentodi azoto li rende resistenti a condensazione e muffa.
Nell’ utilizzare questi prodotti, osservare quanto segue:
• Poiché l’unità non ha una struttura perfettamente sigillata, non deve essere utilizzata né mantenuta sotto l’acqua corrente.
• Prima di regolare le parti mobili (manopola di messa a fuoco, oculare, ecc.) di questi prodotti, per evitare guasti e ai fini della sicurezza, é necessario
rimuovere qualsiasi traccia di umidità.
Modelli impermeabili (Lente dell'oculare, Mirino puntatore):
Nell’uso normale, non ci sarà penetrazione d’acqua. (Come da prove equivalenti a più di 1mm di acqua al minuto, in caduta da un’altezza di oltre 200mm per
una durata di 10 minuti.)
Gocce d’acqua e altri tipi di umidità non danneggeranno il Spotting Scope, tuttavia durante l’uso vanno osservate le cose seguenti:
1. L’unità non è impermeabile né a tenuta stagna e pertanto non dovrà essere lasciata sotto acqua scrosciante né usata sotto la pioggia.
2. Le parti mobili (manopola di messa a fuoco, oculare, ecc.) del Spotting Scope non devono essere regolate in condizioni d’umidità. Se si notassero effetti
d’umidità sulla superficie del prodotto, strofinare gentilmente, subito.
Per conservare il binocolo in condizioni ottimali, Nikon Vision consiglia una periodica revisione da parte di un rivenditore autorizzato.
PRECAUZIONI PRIMA DELL'USO
Grazie di aver acquistato questo prodotto Nikon.
Per poter utilizzare questo apparecchio nel modo corretto ed evitare problemi potenzialmente pericolosi,
attenersi rigorosamente alle seguenti indicazioni. Prima di utilizzare questo prodotto, leggere attentamente
le "PRECAUZIONI PER LA SICUREZZA" e le istruzioni relative ad un impiego corretto fornite unitamente al
prodotto. Conservare il presente manuale a portata di mano per potervi fare riferimento agevolmente.
w
AVVERTENZA
Questa indicazione richiama l'attenzione dell'utente sul fatto che l'eventuale uso errato derivato
dall'ignoranza del contenuto del presente documento può causare la morte o lesioni gravi.
w
ATTENZIONE
Questa indicazione richiama l'attenzione dell'utente sul fatto che l'eventuale uso errato derivato
dall'ignoranza del contenuto del presente documento può causare lesioni o danni materiali.
PRECAUZIONI PER LA SICUREZZA E IL FUNZIONAMENTO
wAvvertenza
Non guardare mai il sole direttamente servendosi del dispositivo Spotting Scope.
wPrecauzioni
• Evitare l'esposizione a pioggia, spruzzi d'acqua, sabbia e fango.
• In caso di esposizione all'acqua o alla pioggia, non azionare l'anello di messa a fuoco.
• Non smontare il dispositivo Spotting Scope.
• Non fare oscillare il dispositivo Spotting Scope tenendolo per la cinghietta. Si potrebbe colpire qualcuno e
provocare ferite.
• Fare attenzione a non farsi intrappolare le dita quando si fa scivolare all'indietro il paraluce.
• Non lasciare il dispositivo Spotting Scope all'interno di un'auto in giornate calde o di sole o presso
apparecchiature che producono calore.
• Quando il dispositivo Spotting Scope viene esposto a brusche variazioni di temperatura, sulla superficie delle
lenti può depositarsi della condensa di vapore di acqua.
• Non utilizzare alcool per la pulizia del corpo principale.
• Non lasciare il sacchetto di polietilene usato per l'imballaggio a portata di mano dei bambini.
• Per il trasporto, riporre il dispositivo Spotting Scope nella custodia morbida e chiudere completamente la
fascetta
CURA E MANUTENZIONE
Superficie delle lenti
• Le impronte dei polpastrelli, la polvere e lo sporco presenti sulle lenti possono ostacolare la visualizzazione.
• Per rimuovere le impronte dei polpastrelli o lo sporco, strofinarle con estrema delicatezza servendosi di un
panno di cotone morbido e pulito o di carta velina per la pulizia delle lenti di buona qualità ed esente da olio.
Per rimuovere eventuali macchie resistenti, utilizzare una piccola quantità di alcool puro (non denaturato). Non
utilizzare velluto o altri tessuti normali, poiché possono graffiare la superficie delle lenti.
• Rimuovere la polvere con un pennello morbido, esente da olio.
Corpo principale
• Per rimuovere la polvere dall'anello di messa a fuoco, servirsi di un pennello morbido.
• Pulire la superficie del corpo principale servendosi di un panno morbido e pulito e di un prodotto di pulizia
neutro. Eseguire la pulizia con un panno asciutto. Non utilizzare benzina, diluenti o altri agenti organici poiché
essi possono causare decolorazioni o il deterioramento della gomma.
Caldo e umidità
• Livelli elevati di umidità possono provocare la formazione di condensa o muffe sulla superficie delle lenti.
Conservare pertanto il dispositivo Spotting Scope in un luogo fresco e asciutto. Dopo l'uso in giornate piovose
o di notte, lasciare asciugare completamente il dispositivo a temperatura ambiente prima di riporlo in un luogo
fresco e asciutto.
• Non lasciare il dispositivo Spotting Scope all'interno di un'auto in giornate calde o di sole o presso
apparecchiature che producono calore. Ciò può danneggiarlo o influire negativamente su di esso.
5
!p
5
6
7
1
Spotting Scope — for RAIII 82
WP/RAIII 82A WP bodies only/ — nur
für Gehäuse RAIII 82 WP/RAIII 82A
WP/ — uniquement pour les boîtiers
RAIII 82 WP/RAIII 82A WP/ —
solamente para cuerpos RAIII 82
WP/RAIII 82A WP/ — solo per i
dispositivi RAIII 82 WP/RAIII 82A WP
RAIII 65 WP Straight RAIII 65A WP Angled RAIII 82 WP Straight
RAIII 82A WP Angled
9
1
!p
(With lens cap attached to retaining hook.)
(Mit Objektivlinsenkappe am Sicherungshaken)
(avec capuchon d'objectif fixé au crochet de retenue)
(Con la tapa del objetivo instalada en el gancho de sujeción)
(Con copriobiettivo fissato al gancio di fermo)
ITEMS SUPPLIED
(Identification marking)
IM LIEFERUMFANG
(Kennzeichnung)
Nikon Spotting Scope RA III 65 WP Nikon Spotting Scope RA III 82 WP
Nikon Spotting Scope RA III 65A WP Nikon Spotting Scope RA III 82A WP
Gehäuse x 1 UY VA
Objektivlinsenkappe
OBA OBB
(angebracht) x 1
Unverlierbares Etui CAX CAY
(angebracht) x 1
Gehäusefassungskappe
EBF
(angebracht) x 1
Gurt (liegt bei) x 1 SAT
Aufsteckschuhabdeckung
PAA
(angebracht) x 1
Visier (liegt bei) x 1 TGS-1
ELEMENTS FOURNIS
(Marque d'identification)
Nikon Spotting Scope RA III 65 WP Nikon Spotting Scope RA III 82 WP
Nikon Spotting Scope RA III 65A WP Nikon Spotting Scope RA III 82A WP
Boîtier x 1 UY VA
Capuchon d’objectif
OBA OBB
(fixé) x 1
Boîtier permanent (fixé) x 1 CAX CAY
Capuchon de support du
EBF
boîtier (fixé) x 1
Courroie (fourni) x 1 SAT
Protection du sabot porte
PAA
accessoire (fixée) x 1
Viseur (fourni) x 1 TGS-1
ACCESORIOS SUMNISTRADOS
(Marca de identificación)
Nikon Spotting Scope RA III 65 WP Nikon Spotting Scope RA III 82 WP
Nikon Spotting Scope RA III 65A WP Nikon Spotting Scope RA III 82A WP
Cuerpo principal x 1 UY VA
Tapa del objetivo
OBA OBB
(acoplada) x 1
Funda protectora CAX CAY
(acoplada) x 1
Tapa de montura del
EBF
cuerpo (acoplada) x 1
Corre (incluida) x 1 SAT
Tapa de zapata para
PAA
accesorio (acoplada) x 1
Mira (incluida) x 1 TGS-1
ELEMENTI IN DOTAZIONE
(Contrassegno per individuazione)
Nikon Spotting Scope RA III 65 WP Nikon Spotting Scope RA III 82 WP
Nikon Spotting Scope RA III 65A WP Nikon Spotting Scope RA III 82A WP
Corpo principale x 1 UY VA
Copriobiettivo
OBA OBB
(fissato) x 1
Fodero rigido (fissato) x 1 CAX CAY
Copertura del corpo
EBF
principale (fissato) x 1
Cinghia (incluso) x 1 SAT
Copertura della slitta
PAA
portaccessori (fissata) x 1
Mirino puntatore TGS-1
(incluso) x 1
Nikon Spotting Scope RA III 65 WP/ Nikon Spotting Scope RA III 82 WP
ProStaff Waterproof 65mm Straight- ProStaff Waterproof 82mm StraightBody Type/ Body Type/
Nikon Spotting Scope RA III 65A WP/ Nikon Spotting Scope RA III 82A WP/
ProStaff Waterproof 65mm Team ProStaff Waterproof 82mm Team
REALTREE Angled-Body Type REALTREE Angled-Body Type
Main Body x 1 UY VA
Objective lens cap
OBA OBB
(attached) x 1
Stay-on case (attached) x 1 CAX CAY
Body Mount cap
EBF
(attached) x 1
Strap (enclosed) x 1 SAT
Accessory shoe cover
PAA
(attached) x 1
Target Sight (enclosed) x 1 TGS-1
Magnification 20x (25x) 20x LE (25x LE) 30x W (38x W) 16-48x zoom
(20-60x zoom)
Real field of view 2.5° (2.0°) 2.0° (1.6°) 2.2° (1.8°) 2.4°[16x]
(1.8° [20x])
Apparent field of view 50.0° (50.0°) 40.0° (40.0°) 66.0°(66.0°) 38.4° [16x]
(38.4° [20x])
Exit pupil 3.3mm/0.13 in. 3.3mm/0.13 in. 2.2mm/0.09 in.
4.1mm/0.16 in. [16x]
(3mm/0.13 in.) (3mm/0.13 in.) (2.2mm/0.09 in.)
(4.1mm/0.16 in. [20x])
Brightness 10.9 (10.9) 10.9 (10.9) 4.8 (4.8) 16.8 [16x]
(16.8 [20x])
Field of view at 44m/131 yds 35m/105 yds 38m/115 yds
42m/126 yds [16x]
1,000m (Approx.) (35m/105 yds) (28m/84 yds) (31m/94 yds)
(33m/99 yds [20x])
Weight 130g/4.6 oz. 170g/6.0 oz. 180g/6.3 oz. 185g/6.5 oz.
1
Mounting a tripod (regular type
for camera)
• The Spotting Scope is designed to be
used with a tripod. Align the screw of the
tripod with the tripod mount of the
Spotting Scope, and firmly tighten the
screw. Choose a solid tripod of medium
size or larger, that can stand the weight
of the Spotting Scope and wind pressure,
as well as being vibration-free.
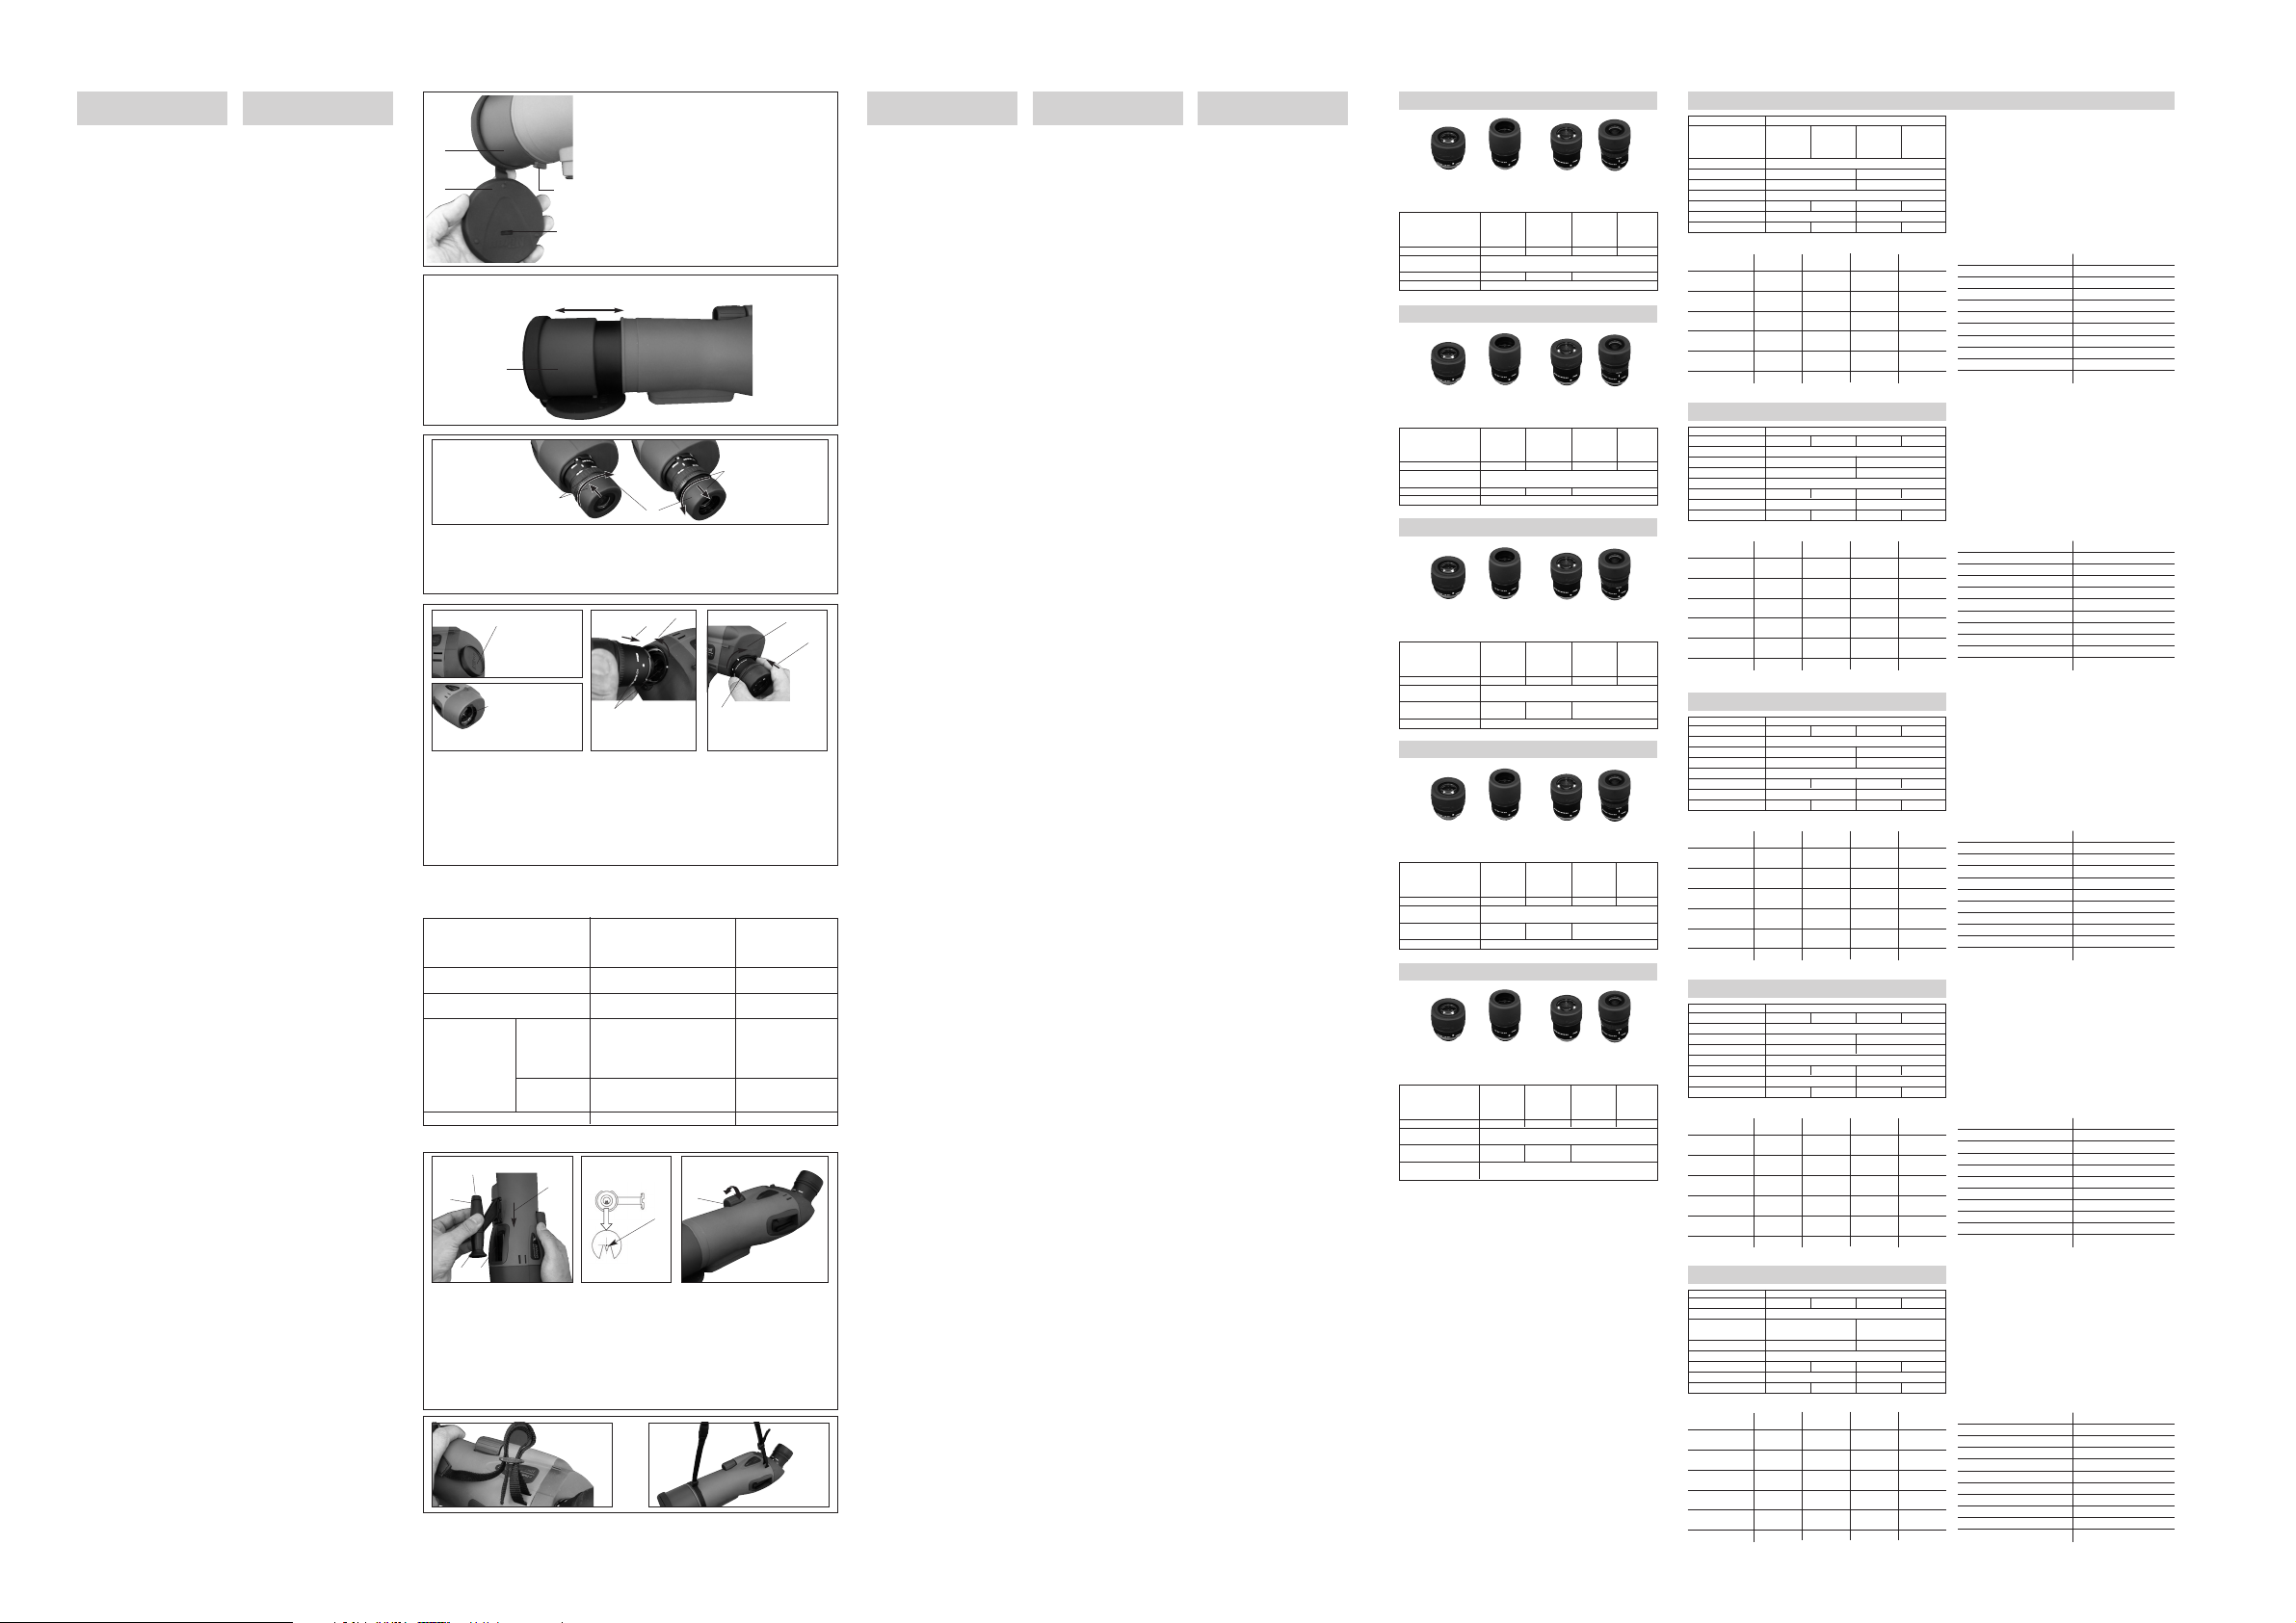
2
Objective lens cap
(Fig. 1)
• Remove the objective lens cap from the
objective lens hood. Then, attach the cap
to the cap-retaining hook on the hood.
3
Lens hood
• Securely attach the objective lens cap to
the cap-retaining tab, then slide the lens
hood outward until it stops. (Fig. 2)
•To retract the lens hood, slide the lens
hood in toward the body until it stops.
After the lens hood has been fully
retracted, re-attach the objective lens
cap to the front of hood.
4
Eyepiece cup
• The 20x/25x, 20xLE/25xLE, 30xw/38xw
and 16-48x zoom/20-60x zoom
eyepiece lenses are all equipped with a
turn-slide type rubber eyecup. Eyeglass
wearers should always turn the rubber
eyecup inward to look through the
Spotting Scope. (Fig. 3)
5
Attaching eyepiece lens
(Fig. 4 and 5)
• After removing the lens mount cap,
which protects the lens mount, attach the
eyepiece lens to the main body via the
bayonet mount.
6
Attaching and using the
20x/25x, 20xLE/25xLE,
30xw/38xw and 16-48x
zoom/20-60x zoom lenses.
•To attach the eyepiece lens, align the index
marks on the lens and the main body. Next,
insert the lens into the lens mount and turn
counterclockwise until you hear it “click.”
(Fig. 6)
•To remove the eyepiece lens, turn the lens
clockwise while pushing the release button
on the main body with your index finger.
(Fig. 7)
• The 20x/25x, 20xLE/25xLE, 30xw/38xw and
16-48x zoom/20-60x zoom lenses are
specially designed for Spotting Scope III.
They cannot be used with the Fieldscope
series or Spotting Scopes I & II.
7
Target Sight
•To attach the Target Sight, first remove the
accessory shoe cover toward the objective
lens. Next, slide the Target Sight into the
accessory shoe. No adjustment is
necessary. (Fig. 9)
•To use the Target Sight, align the reticle and
objective through the Target Sight. (Fig. 10)
After aligning, you can locate your target
object somewhere in the field of view.
•You can also use the sight on the top of
body (65 and 82) and the lens hood (82
only) to aim at your target object.
8
Focusing
• To focus, rotate the focusing tab. Rotating
the tab to the right brings distant objects
into focus; rotating the tab to the left brings
near objects into focus. (Fig. 11)
9
Strap
• Attach strap as shown in Figs. 12 and 13.
1
Lens hood
2
Objective lens cap
3
Cap-retaining tab
4
Hole for tab
1
Gegenlichtblende
2
Objektiv-linsenkappe
3
Sicherungshaken für
Objektivlinsenkappe
4
Schlitz für Klaue
1
Bouchon d’objectif
2
Capuchon d’objectif
3
Crochet de retenue
de capuchon
4
Orifice pour l’ergot
1
Parasol
2
Tapas de objetivo
3
Gancho de sujeción
de la tapa
4
Orificio para pestaña
1
Paraluce
2
Copriobiettivo
3
Fermo del
copriobiettivo
4
Foro per linguetta
1
Anbringen des Beobachtungsfernrohr auf einem Stativ.
(Jedes handels-übliche
Kamerastativ ist benutzbar)
•
Das
Beobachtungsfernrohr
sollte stets in
Kombination mit einem Stativ verwendet
werden. Richten Sie die Stativschraube auf
das Stativgewinde des
Beobachtungs-
fernrohr
aus und schrauben Sie sie dann
fest in das Gewinde ein. Nehmen Sie ein
stabiles, erschütterungsfrei stehendes
Stativ mittleren oder größeren Formats,
das das Gewicht des
Beobachtungs-
fernrohr
problemlos trägt und auch dem
Wind trotzt.
2
Objektivlinsenkappe
(Abb. 1)
•
Entfernen Sie die Objektivlinsenkappe vom
Objektiv und sichern Sie die Kappe am
Sicherungshaken der Gegenlichtblende.
3
Gegenlichtblende
•
Sichern Sie zunächst die
Objektivlinsenkappe an der
Sicherungsklaue und ziehen Sie dann die
Gegenlichtblende bis zum Anschlag
heraus. (
Abb.
2)
•
Zum Wiedereinziehen der
Gegenlichtblende schieben Sie sie bis zum
Anschlag zurück. Setzen Sie anschließend
erneut die Objektivlinsenkappe vorne an
der Gegenlichtblende auf.
4
Okularkappen
• Die Okulare 20x/25x, 20xLE/25xLE,
30xw/38xw und 16-48x Zoom/20-60x
Zoom sind alle mit dreh- und
verschiebbaren Gummiaugenmuscheln
ausgestattet. Wenn Sie mit aufgesetzter
Brille durch das Beobachtungsfernrohr
schauen, drehen Sie die
Gummiaugenmuschel nach innen.
(Abb. 3)
5
Montage der Okulare
(Abb. 4 und 5)
• Nach dem Entfernen des Objektivdeckels,
der die Objektivfassung schützt, die
Okularlinse über die Bajonettfassung am
Gehäuse anbringen.
6
Anbringen und Gebrauch der
Objektive 20x/25x,
20xLE/25xLE, 30xw/38xw und
16-48x Zoom/20-60x Zoom
• Zum Anbringen der Okularlinse fluchten Sie
die Markierungen an der Linse und am
Gehäuse. Danach setzen Sie die Linse in die
Fassung ein und drehen Sie diese entgegen
dem Uhrzeigersinn, bis sie hörbar einrastet.
(Abb. 6)
•Zum Entfernen der Okularlinse drehen Sie
sie im Uhrzeigersinn und drücken dabei mit
dem Zeigefinger auf die Freigabetaste am
Gehäuse. (Abb. 7)
• Die Objektive 20x/25x, 20xLE/25xLE,
30xw/38xw und 16-48x Zoom/20-60x
Zoom wurden speziell für
Beobachtungsfernrohr III entwickelt. Sie
können nicht bei der Fieldscope-Serie oder
Beobachtungsfernrohr I und II verwendet
werden.
7
Visier
• Zum Anbringen des Visiers zunächst die
Abdeckung des Aufsteckschuhs zur
Objektivlinse hin abnehmen. Danach das
Visier auf den Aufsteckschuh aufschieben.
Keine Einstellung erforderlich. (Abb. 9)
• Zur Nutzung des Visiers fluchten Sie
Fadenkreuz und Objektiv durch das Visier.
(Abb. 10) Nach dem Fluchten können Sie
das Beobachtungsobjekt irgendwo im
Blickfeld lokalisieren.
• Sie können auch mit dem Visier oben am
Gehäuse das Beobachtungsobjekt anvisieren
(nur bei Gehäuse von RAIII 82 WP/RA III
82A).
8
Scharfeinstellung
• Mit dem Fokussierknopf wird die Schärfe
eingestellt. Die Rechtsdrehung des Knopfs
bewirkt das Scharfstellen entfernter Objekte,
während durch Linksdrehung des Knopfs
näher liegende Objekte scharfgestellt werden
(Abb. 11).
9
Gurt
• Bringen Sie den Gurt gemäß Abb. 12 und
13 an.
OPERATION BEDIENUNG
1
4
3
2
1
Montage sur un pied (de type
photographique)
• Le Spotting Scope est prévu pour être
monté sur un pied. Alignez la vis du pied
avec le socle de fixation du Spotting
Scope et serrez la vis à fond. Choisissez
un pied photographique solide de
moyenne ou grande taille, qui puisse
supporter le poids du Spotting Scope et
la pression du vent, et qui soit antivibration.
2
Capuchon d'objectif
(Fig. 1)
• Retirez le capuchon d’objectif du
bouchon d’objectif. Puis, conservez le
capuchon à disposition en l’accrochant
au crochet de retenue de capuchon sur
le bouchon d’objectif.
3
Bouchon d’objectif
• Fixez bien le capuchon d’objectif sur
l’ergot de maintien du capuchon, puis
glissez le bouchon d’objectif vers
l’extérieur jusqu’à l’arrêt. (Fig. 2)
•
Pour remettre le bouchon d’objectif en
place, glissez-le vers l’intérieur jusqu’à
l’arrêt. Fixez de nouveau le capuchon
d’objectif à l’avant de la protection
d’objectif après sa rétraction complète.
4
Œilleton avec le caoutchouc
replié
• Les oculaires 20x/25x, 20xLE/25xLE,
30xw/38xw et 16-48x zoom/20-60x
zoom sont tous équipés d’un oeilleton en
caoutchouc à tourner-glisser. Une
personne portant des lunettes peut ainsi
regarder dans le Spotting Scope en
tournant vers l’intérieur l’oeilleton en
caoutchouc. (Fig. 3)
5
Mise en place de l'oculaire
(Fig. 4 et 5)
• Après avoir enlevé le capuchon du
support d’oculaire qui protège le support
de l’oculaire, fixez l’oculaire sur le boîtier
sur la monture à baïonnette.
6
Mise en place et utilisation de
l’oculaire 20x/25x,
20xLE/25xLE, 30xw/38xw et
16-48x zoom/20-60x zoom
• Pour monter l’oculaire, alignez les symboles
de l’oculaire et du boîtier. Ensuite,
introduisez l’oculaire dans son support et
tournez dans le sens inverse des aiguilles
d’une montre jusqu’à ce que vous entendiez
un déclic. (Fig. 6)
• Pour retirer l’oculaire, tournez-le dans le
sens des aiguilles d’une montre tout en
poussant le bouton de libération du boîtier
avec l’index. (Fig. 7)
• Les oculaires 20x/25x, 20xLE/25xLE,
30xw/38xw et 16-48x zoom/20-60x zoom
sont spécialement conçus pour le Spotting
Scope III. Ils ne peuvent être utilisés ni sur
les séries Fieldscope, ni sur les Spotting
Scope I & II.
7
Viseur
•Pour monter le viseur, retirez d’abord le
couvercle du sabot porte accessoire vers
l’objectif. Ensuite, glissez le viseur dans le
sabot porte accessoire. Aucun réglage n’est
nécessaire. (Fig. 9)
•Pour utiliser le viseur, alignez le réticule et
l’objectif à travers le viseur. (Fig. 10) Une
fois l’alignement effectué, vous pouvez
localiser votre cible quelque part dans le
champ de vision.
•Vous pouvez aussi utiliser le viseur situé au
sommet du boîtier pour viser votre objectif.
(uniquement pour les boîtiers RAIII 82
WP/RA III 82A WP )
8
Mise au point
•Tournez le bouton de mise au point pour
faire la mise au point. Tournez-le vers la
droite pour faire la mise au point sur des
objets lointains et vers la gauche pour des
objets proches. (Fig. 11)
9
Courroie
• Fixez la courroie comme indiqué Fig.12 et
13.
1
Montaje sobre un trípode (de
tipo normal para cámaras)
•
El
Monocular de goma
ha sido diseñado
para emplearse con un trípode. Alinee el
tornillo del trípode con la rosca de la
montura para trípode del
Monocular de
goma
y apriete firmemente dicho tornillo.
Elija un trípode recio de tamaño medio o
grande para que pueda resistir el peso del
Monocular de goma
y la presión del
viento, y para evitar vibraciones.
2
Tapa del objetivo
(Fig. 1)
•Quite la tapa del objetivo del parasol.
Luego, mantenga la tapa sujetándola al
gancho de sujeción de la tapa en la
visera parasol
3
Visera parasol
• Ajuste bien la tapa del objetivo a la
pestaña de retención de la tapa, luego
deslice la visera parasol hacia afuera
hasta que se detenga. (Fig. 2)
•Para plegar la visera parasol, deslícela
hacia el cuerpo hasta que se detenga.
Después que la visera parasol ha sido
plegada totalmente, vuelva a acoplar la
tapa del objetivo al frente del parasol.
4
Borde de caucho del ocular
plegado
• Los oculares de 20x/25x, 20xLE/25xLE,
30xw/38xw y 16-48x zoom/20-60x zoom
disponen todos de un borde de caucho
tipo girar y deslizar. Cuando observe a
través del Monocular de goma con gafas
siempre doble hacia adentro el borde de
caucho del ocular. (Fig. 3)
5
Instalación en el ocular
(Fig. 4 y 5)
•Después de quitar la tapa de la montura
del ocular que protege la montura del
ocular, monte el ocular al cuerpo principal
mediante el montaje de bayoneta.
6
Instalación y empleo de los
oculares 20x/25x,
20xLE/25xLE, 30xw/38xw y 1648x zoom/20-60x zoom
•Para instalar el ocular, alinee las marcas de
referencia en el ocular y en el cuerpo
principal. Luego, inserte el ocular en la
montura para ocular y gire en sentido
antihorario hasta que escuche un “clic.”
(Fig. 6)
•Para retirar el ocular, gire el ocular en
sentido horario a la vez que con su dedo
índice presiona el botón de liberación en el
cuerpo principal. (Fig. 7)
• Los oculares 20x/25x, 20xLE/25xLE,
30xw/38xw y 16-48x zoom/20-60x zoom
han sido diseñados especialmente para el
Monocular de goma III. No podrán
emplearse con la serie Catalejo ni con los
Monoculares de goma I y II.
7
Mira
•Para instalar la mira, primero extraiga la tapa
de la zapata para accesorio hacia el objetivo.
Luego, deslice la mira en la zapata para
accesorio. No se requiere ajuste. (Fig. 9)
• Para utilizar la mira, alinee el retículo y el
objetivo a través de la mira. (Fig. 10)
Después de alinear, puede encontrar su
sujeto en alguna parte del campo de visión.
• También puede utilizar la mira en la parte
superior del cuerpo para apuntar a su
sujeto. (Solamente cuerpos RAIII 82 WP/RA
III 82A WP)
8
Enfoque
• Para enfocar, gire la perilla de enfoque. Al
girarla hacia la derecha se enfocarán objetos
distantes, y al hacerlo hacia la izquierda se
enfocarán los cercanos. (Fig. 11)
9
Correa
•Instale la correa como se muestra en las
Figs. 12 y 13.
FONCTIONEMENT OPERACION
1
Montaggio di un cavalletto (di
tipo normale per fotocamere)
•
Il dispositivo Spotting Scope è progettato
per l'uso con il cavalletto. Allineare la vite
di quest'ultimo con l'innesto per il
cavalletto presente nel dispositivo Spotting
Scope, quindi serrarla a fondo. Scegliere
un cavalletto solido di dimensioni mediograndi, in grado di sostenere il peso del
dispositivo Spotting Scope e di resistere
alla forza del vento, oltre che esente da
vibrazioni.
2
Copriobiettivo
(Fig. 1)
•Rimuovere il copriobiettivo dal paraluce
dell'obiettivo. Quindi, fissare il
copriobiettivo al fermo relativo, situato sul
paraluce.
3
Paraluce
•Fissare saldamente il copriobiettivo alla
linguetta relativa, quindi fare scorrere il
paraluce verso l’esterno fino all’arresto.
(Fig. 2)
•Per ritirare il paraluce, farlo scorrere
verso il corpo dell’unità fino al suo
arresto. Quando il paraluce è
completamente ritratto, fissare
nuovamente il copriobiettivo davanti ad
esso.
4
Paraocchio dell'oculare
• Le lenti 20x/25x, 20xLE/25xLE,
30xw/38xw e 16-48x zoom/20-60x
zoom dell’oculare sono tutte dotate di un
paraocchio di gomma di tipo estraibile.
Per guardare attraverso il dispositivo
Spotting Scope, coloro che portano gli
occhiali devono sempre ruotare verso
l’interno il paraocchio di gomma. (Fig. 3)
5
Fissaggio della lente
dell'oculare
(Fig. 4 e 5)
• Dopo aver rimosso il coperchio di
fissaggio lente che protegge l’attacco
della lente, montare la lente dell’oculare al
corpo principale tramite l’attacco a
baionetta.
6
Fissaggio e uso degli obiettivi
20x/25x, 20xLE/25xLE,
30xw/38xw e 16-48x zoom/2060x zoom
• Per fissare la lente dell’oculare, allineare il
contrassegno presente sulla lente al
contrassegno presente sul corpo principale.
Quindi, inserire la lente nell’attacco
dell’obiettivo e ruotare in senso antiorario
fino allo scatto. (Fig. 6)
• Per rimuovere la lente dell’oculare, ruotare
la lente in senso orario premendo il pulsante
di rilascio sul corpo principale con il dito
indice. (Fig. 7)
• Le lenti 20x/25x, 20xLE/25xLE, 30xw/38xw
e 16-48x zoom/20-60x zoom sono state
progettate in modo speciale per il dispositivo
Spotting Scope III. Esse non possono essere
utilizzate con i dispositivi della serie
Fieldscope o con i dispositivi Spotting
Scopes I e II.
7
Mirino puntatore
• Per fissare il mirino puntatore rimuovere
prima il coperchio della slitta portaccessori
in direzione della lente dell’obiettivo. Quindi,
far scorrere il mirino nella slitta
portaccessori. Non è necessario effettuare
nessuna regolazione. (Fig. 9)
• Per utilizzare il mirino puntatore, allineare il
reticolo e l’obiettivo attraverso il mirino. (Fig.
10) Dopo aver effettuato l’allineamento, è
possibile individuare l’obiettivo all’interno del
campo visivo.
•È inoltre possibile utilizzare il mirino situato
sulla parte superiore del corpo principale per
puntare l’obiettivo. (Solo per i dispositivi RAIII
82 WP/RA III 82A WP)
8
Messa a fuoco
• Per effettuare la messa a fuoco, ruotare la
manopola di messa a fuoco. Ruotando la
manopola verso destra, si mettono a fuoco
gli oggetti distanti, mentre ruotandola verso
sinistra si mettono a fuoco gli oggetti vicini.
(Fig. 11)
9
Cinghia
•Fissare la cinghia come mostrato nelle figure
12 e 13.
FUNZIONAMENTO
Fig. 1/
Abb. 1
Fig. 2/
Abb. 2
Inward/ Nach innen/ Vers/
l’intérieur/ Hacia adentro/ Interno
Outward/ Nach außen/ Vers
l’extérieur/ Hacia afuera/ Esterno
Lens hood
Gegenlichtblende
Bouchon d’objectif
Parasol
Paraluce
2
WATERPROOF (At 2m for 5 min.) WATER RESISTANT
WASSERDICHT (bei 2 m für 5 Min.) WASSERFEST
ETANCHE (A 2m pendant 5 min.) RESISTANTE A L’EAU
A PRUEBA DE AGUA (a 2m durante 5 min.) RESISTENTE AL AGUA
IMPERMEABILE (a 2m per 5 min.) RESISTENTE ALL’ACQUA
Main body/ Gehäuse/ Boîtier/ Cuerpo principal/
R
—
Corpo principale
Eyepiece lens/ Okularlinse/ Oculaire/ Ocular/
XX
Lente dell’oculare
Main body with eyepiece lens/ Main body/ Gehäuse/
R
—
Gehäuse mit Okularlinse/ Boîtier/ Cuerpo
Boîtier avec oculaire/ principal/ Corpo
Cuero principal con ocular/ principale
Corpo principale con lente
dell’oculare
Eyepiece lens/ Okular/ —
R
Oculaire/ Bloque de
ocular/ Blocco oculare
Target Sight/ Visier/ Viseur/ Mira/ Mirino puntatore —
R
Fig. 8: Structure Abb. 8: Struktur Fig. 8: Structure Fig. 8: Estructura Fig. 8: Struttura
1
Turn-slide eyepiece
cup
2
Screwed in
3
Screwed out
1
Dreh- und
verschiebbare
Gummiaugenmuschel
2
Eingeschraubt
3
Herausgeschraubt
1
Œilleton à tournerglisser
2
Vissé
3
Dévissé
1
Borde de caucho del
ocular tipo girar y
deslizar
2
Enroscado
3
Desenroscado
1
Paraocchio
dell’oculare di tipo
estraibile
2
Avvitato
3
Svitato
Fig. 3/ Abb. 3
1
1
Target Sight
2
Objective lens
3
Eyepiece cup
4
Accessory shoe for
Target Sight
5
Assembly direction
6
Aligning point
7
Distant
8
Near
9
Focusing knob
1
Visier
2
Objektiv
3
Okularkappe
4
Aufsteckschuh für
Visier
5
Einbaurichtung
6
Fluchtungspunkt
7
Ferne
8
Nähe
9
Fokussierknopf
1
Viseur
2
Objectif
3
Œilleton
4
Sabot porte accessoire
pour viseur
5
Sens de montage
6
Point d’alignement
7
Lointain
8
Proche
9
Bouton de mise au
point
1
Mira
2
Objetivo
3
Borde de caucho del
ocular
4
Zapata para
accesorio para mira
5
Dirección del montaje
6
Punto de alineación
7
Distante
8
Cercano
9
Perilla de enfoque
1
Mirino puntatore
2
Lente dell'obiettivo
3
Paraocchio dell’oculare
4
Slitta portaccessori
per mirino puntatore
5
Direzione di
montaggio
6
Punto di allineamento
7
Distante
8
Vicino
9
Anello di messa fuoco
1
9
3
4
5
2
6
7
8
Fig. 11/ Abb. 11
Fig. 9/
Abb. 9
Fig. 10/
Abb. 10
OPTIONAL ACCESSORIES
Model Spotting Scope
RAIII 65 WP/ RAIII 65 A WP/ RAIII 82 WP/ RAIII 82 A WP/
ProStaff WP 65 ProStaff WP 65 ProStaff WP 82 ProStaff WP 82
Straight-Body Angled-Body Straight-Body Angled-Body
type type type type
Type Porro prism
Objective lens diameter 65mm 82mm
Focusing range Approx. 4m/13.1 ft. to infinity Approx. 6.1m/20.0 ft. to infinity
Height 102mm/4.0 in.
Length
293mm/11.5 in. 304mm/12.0 in . 380mm/15.0 in. 391mm/15.4 in.
Width 105mm/4.1 in. 114mm/4.5 in.
Weight 900g/31.7 oz. 920g/32.5 oz. 1,200g/42.3 oz. 1,220g/43.0 oz.
SPECIFICATIONS
( ): With Spotting Scope 82/82A
Eyepiece Lenses Specifications
Modell Beobachtungsfernrohr
RAIII 65 WP RAIII 65A WP RAIII 82 WP RAIII 82A WP
Prismentyp Porro-prism
Objektivdurchmesser 65mm 82mm
Fokussierbereich ca. 4m—unendlich ca. 6,1m—unendlich
Höhe 102mm
Länge 293mm 304mm 380mm 391mm
Breite 105mm 114mm
Gewicht 900g 920g 1.200g 1.220g
TECHNISCHE DATEN
SONDERZUBEHÖR
Technische Daten von allen Okularen
ACCESSOIRES OPTIONNELS
Modèle Spotting Scope
RAIII 65 WP RAIII 65A WP RAIII 82 WP RAIII 82A WP
Type Prisme de Porro
Diamètre de l’objectif 65mm 82mm
Plage de mise au point Environ 4m à l’infini Environ 6,1m à l’infini
Hauteur 102mm
Longueur 293mm 304mm 380mm 391mm
Largeur 105mm 114mm
Poids 900g 920g 1.200g 1.220g
SPECIFICATIONS
Spécifications de chaque oculaire
ACCESORIOS OPCIONALES
Modelo Monocular de goma
RAIII 65 WP RAIII 65A WP RAIII 82 WP RAIII 82A WP
Tipo Prisma de Porro
Diámetro del objetivo 65mm 82mm
Alcance de enfoque Aprox, 4m/13,1 ft. à infinito Aprox, 6,1m/20,0 ft. à infinito
Altura 102mm/4,0 in.
Longitud
293mm/11,5 in. 304mm/12,0 in. 380mm/15,0 in. 391mm/15,4 in.
Anchura 105mm/4,1 in. 114mm/4,5 in.
Peso 900g/31,7 oz. 920g/32,5 oz. 1.200g/42,3 oz. 1.220g/43,0 oz.
ESPECIFICACIONES
Especificaciones de cada ocular
ACCESSORI OPZIONALI
Modello Spotting Scope
RAIII 65 WP RAIII 65A WP RAIII 82 WP RAIII 82A WP
Tipo Prisma Porro
Diametro della lente 65mm 82mm
dell'obiettivo
Gamma di messa a fuoco Da circa 4 m a infinito Da circa 6,1m a infinito
Altezza 102mm
Lunghezza 293mm 304mm 380mm 391mm
Larghezza 105mm 114mm
Peso 900g 920g 1.200g 1.220g
DATI TECNICI
Dati tecnici delle lenti dell'oculare
For eyeglass wearers/ Für
Brillenträger/ Pour les porteurs
de lunettes/ Para quienes usan
gafas/ Per coloro che portano
occhiali
1
Push
2
Turn
counterclockwise
3
Push release button
with index finger
4
Turn clockwise
1
Drücken
2
Entgegen dem
Uhrzeigersinn drehen
3
Freigabetaste mit
dem Zeigefinger
drücken
4
Im Uhrzeigersinn
drehen
1
Poussez
2
Tournez dans le sens
contraire des aiguilles
d’une montre
3
Poussez le bouton de
libération avec l’index
4
Tournez dans le sens
des aiguilles d’une
montre
1
Empuje
2
Gire en sentido
antihorario
3
Presione el botón de
liberación con el
dedo índice
4
Gire en sentido
horario
1
Premere
2
Ruotare in senso
antiorario
3
Premere il pulsante
di rilascio con il dito
indice
4
Ruotare in senso
orario
Fig. 5/ Abb. 5
Fig. 6/ Abb. 6
Fig. 7/ Abb. 7
1
4
Index mark/
Vergrößerungsindex/ Repère
d’index/ Marca de referencia/
Contrassegno di indice
Fig. 12/
Abb. 12
Fig. 13/
Abb. 13
20x/25x 20x Long Eyerelief/
25x Long Eyerelief
30x W/
38x W
16-48x Zoom/
20-60x Zoom
Target Sight Specifications
Magnification 1x
Real field of view 9.5°
Apparent field of view 9.5°
Exit pupil 3mm
Brightness 9.0
Eye relief 43.1mm/1.7 in.
Field of view at 1,000m (Approx.) 166m/499 yds
Height 55mm/2.2 in.
Length 98mm/3.9 in.
Width 19mm/0.7 in.
Weight 23g/0.8 oz.
Fig. 4/ Abb.4
3
Lens mount cap/
Objektivdeckel/ Bouchon
du support d’oculaire/
Tapa de montaje del
objetivo/ Coperchio di
fissaggio lente
For those who don't wear
eyelgasses/ Für NichtBrillenträger/ Pour les
personnes ne portant pas
de lunettes/ Para quienes
no usan gafas/ Per coloro
che non portano occhiali
Lens mount (bayonet)/
Objektivfassung (Bajonett)/
Support d’oculaire (baïonnette)/
Montura del ocular (bayoneta)/
Attacco lente (baionetta)
2
3
Release button/ Freigabetaste/
Bouton de libération/ Botón de
liberación/ Pulsante di rilascio
20x/25x 20x Long 30x W/38x W 16-48x
Eyerelief/ Zoom/
25x Long 20-60x
Eyerelief Zoom
Eyepiece lens x 1 VF VE VG VC
Eyepiece mount cap
EBL
(attached) x 1
Eyepiece cap (attached) x 1 EBG EBK EBG
Soft case (enclosed) CBR
20x/25x 20x Long Eyerelief/
25x Long Eyerelief
30x W/
38x W
16-48x Zoom/
20-60x Zoom
20x/25x 20x Long 30x W/ 16-48x
Eyerelief/ Zoom/
25x Long 20-60x
Eyerelief Zoom
Okular x 1 VF VE VG VC
Okularfassungskappe
EBL
(angebracht) x 1
Eyepiece cap (angebracht) x 1
EBG EBK EBG
Etui (liegt bei) x 1 CBR
20x/25x 20x Long Eyerelief/
25x Long Eyerelief
30x W/
38x W
16-48x Zoom/
20-60x Zoom
20x/25x 20x Long 30x W/ 16-48x
Eyerelief/ Zoom/
25x Long 20-60x
Eyerelief Zoom
Oculaire x 1 VF VE VG VC
Capuchon du support le
EBL
l’œilleton (fixé) x 1
Capuchon de l’œilleton
EBG EBK EBG
(fixé) x 1
Sacoche souple (fournie) x1
CBR
20x/25x 20x Long Eyerelief/
25x Long Eyerelief
30x W/
38x W
16-48x Zoom/
20-60x Zoom
20x/25x 20x Long 30x W/ 16-48x
Eyerelief/ Zoom/
25x Long 20-60x
Eyerelief Zoom
Ocular x 1 VF VE VG VC
Tapa de montura de
EB
ocular (acoplada) x 1
Tapa del ocular
EBG EBK EBG
(acoplada) x 1
Funda (incluida) x 1 CBR
20x/25x 20x Long Eyerelief/
25x Long Eyerelief
30x W/
38x W
16-48x Zoom/
20-60x Zoom
20x/25x 20x Long 30x W/ 16-48x
Eyerelief/ Zoom/
25x Long 20-60x
Eyerelief Zoom
Lente dell'oculare x 1 VF VE VG VC
Coperchio di fissaggio
EB
dell’oculare (fissato) x 1
Paraocchio dell’oculare
EBG EBK EBG
(fissato)
Custodia morbida
CBR
(inclusa)
x 1
Technische Daten für Visier
Vergrößerung 1x
Sehfeld objektiv 9,5°
Sehfeld subjektiv 9,5°
Austrittspupille 3mm
Lichtstärke 9,0
Eye relief 43,1mm
Sehfeld auf 1.000m 166m
Höhe 55mm
Länge 98mm
Breite 19mm
Gewicht 23 g
Spécifications du viseur
Grossissement 1x
Champ optique arrière 9,5°
Champ optique apparent 9,5°
Pupille de sortie 3mm
Luminosité 9,0
Eye relief 43,1mm
Champ optique à 1.000m (env.) 166m
Hauteur 55mm
Longueur 98mm
Largeur 19mm
Poids 23g
Especificaciones de la mira
Aumento 1x
Campo de visión real 9,5°
Campo de visión aparente 9,5°
Pupille de sortie 3mm
Luminosidad 9,0
Eye relief 43,1mm/1,7 in.
Campo de visión a 1.000m (Aprox.) 166m/499 yds
Altura 55mm/2,2 in.
Longitud 98mm/3,9 in.
Anchura 19mm/0,7 in.
Peso 23g/0,8 oz.
Dati tecniche del mirino puntatore
Ingrandimento 1x
Campo visivo reale 9,5°
Campo de visión aparente 9,5°
Pupilla di uscita 3mm
Luminosità 9,0
Eye relief 43,1mm
Campo visivo a 1.000 mm (approssimativo) 166m
Altezza 55mm
Lunghezza 98mm
Larghezza 19mm
Peso 23g
Vergrößerung 20x (25x) 20x LE (25x LE) 30x W (38x W) 16-48x zoom
(20-60x zoom)
Sehfeld objektiv 2,5° (2,0°) 2,0° (1,6°) 2,2° (1,8°) 2,4° [16x]
(1,8° [20x])
Sehfeld subjektiv 50,0° (50,0°) 40,0° (40,0°) 66,0° (66,0°) 38,4° [16x]
(38,4° [20x])
Austrittspupille 3,3mm (3mm) 3,3mm (3mm) 2,2mm (2,2mm) 4,1mm [16x]
(4,1mm [20x])
Lichtstärke 10,9 (10,9) 10,9 (10,9) 4,8 (4,8) 16,8 [16x]
(16,8 [20x])
Sehfeld auf 1,000m 44m (35m) 35m (28m) 38m (31m) 42m [16x]
(33m [20x])
Gewicht 130g 170g 180g 185g
( ): Mit Beobachtungsfernrohr 82/82A
Grossissement 20x (25x) 20x LE (25x LE) 30x W (38x W) 16-48x zoom
(20-60x zoom)
Champ optique arrière 2,5° (2,0°) 2,0° (1,6°) 2,2° (1,8°) 2,4° [16x]
(1,8° [20x])
Champ optique 50,0° (50,0°) 40,0° (40,0°) 66,0° (66,0°) 38,4° [16x]
apparent (38,4° [20x])
Pupille de sortie 3,3mm (3mm) 3,3mm (3mm) 2,2mm (2,2mm) 4,1mm [16x]
(4,1mm [20x])
Luminosité 10,9 (10,9) 10,9 (10,9) 4,8 (4,8) 16,8 [16x]
(16,8 [20x])
Champ optique à 44m (35m) 35m (28m) 38m (31m) 42m [16x]
1,000m (env,) (33m [20x])
Poids 130g 170g 180g 185g
( ): Avec Spotting Scope 82/82A
Aumento 20x (25x) 20x LE (25x LE) 30x W (38x W) 16-48x zoom
(20-60x zoom)
Campo de visión real 2,5°(2,0°) 2,0° (1,6°) 2,2° (1,8°) 2,4° [16x]
(1,8° [20x])
Campo de visión 50,0° (50,0°) 40,0° (40,0°) 66,0°(66,0°) 38,4°[16x]
aparente (38,4° [20x])
Pupille de sortie 3,3mm/0,13 in. 3,3mm/0,13 in. 2,2mm/0,09 in.
4,1mm/0,16 in. [16x]
(3mm/0,13 in.) (3mm/0,13 in.) (2,2mm/0,09 in.)
(4,1mm/0,16 in. [20x])
Luminosidad 10,9 (10,9) 10,9 (10,9) 4,8 (4,8) 16,8 [16x]
(16,8 [20x])
Campo de visión a 44m/131 yds 35m/105 yds 38m/115 yds
42m/126 yds [16x]
1,000m (Aprox,) (35m/105 yds) (28m/84 yds) (31m/94 yds)
(33m/99 yds [20x])
Peso 130g/4,6 oz. 170g/6,0 oz. 180g/6,3 oz. 185g/6,5 oz.
( ): Con Monocular de goma 82/82A
Ingrandimento 20x (25x) 20x LE (25x LE) 30x W (38x W) 16-48x zoom
(20-60x zoom)
Campo visivo 2,5° (2,0°) 2,0° (1,6°) 2,2° (1,8°) 2,4° [16x]
reale (1,8° [20x])
Campo de visión 50,0° (50,0°) 40,0° (40,0°) 66,0°(66,0°) 38,4°[16x]
aparente (38,4° [20x])
Pupilla di uscita 3,3mm (3mm) 3,3mm (3mm) 2,2mm (2,2mm) 4,1mm [16x]
(4,1mm [20x])
Luminosità 10,9 (10,9) 10,9 (10,9) 4,8 (4,8) 16,8 [16x]
(16,8 [20x])
Campo visivo a 1,000 mm
44m (35m) 35m (28m) 38m (31m) 42m [16x]
(approssimativo) (33m [20x])
Peso 130g 170g 180g 185g
( ): Con il dispositivo Spotting Scope 82/82A
Item supplied (Identification marking)
Contrassegno per individuazione
Kennzeichnung
Marque d’identification
Marca de identificación