

Nikon LS-3510AF Owner Manual


Software Reference for Scanners


Nikon Software License Agreement
NOTICE TO USER
1.License
A Use the Nikon Device Driver Software only on a single Apple or IBM computer. You must obtain a
B Make one copy of the Nikon Device Driver Software in machine-readable form solely for back-up
C Transfer the Nikon Device Driver Software and all rights under this license to another party together with
D Configure the Nikon Device Driver Software for your own use by adding or removing fonts, desk
You should carefully read the Nikon License Agreement and Disclaimer of Warranty contained
herein before opening this package or breaking any seals.
INDICATE YOUR ACCEPTANCE OF THIS AGREEMENT AND ARE AGREEING TO BECOME
BOUND BY THE TERMS OF THIS AGREEMENT. . If you do not agree to the terms of this
agreement, do not open the package or break any seals. Promptly return within fifteen (15) days
from the date of delivery the unopened package to the authorized Nikon Dealer where you obtained
it for a full fee refund.
In consideration of the payment of the license fee, Nikon grants to you a non-exclusive license
to use the enclosed computer program and documentation ("Nikon Device Driver Software") only
under the terms stated in this agreement. This license is not a sale of the Nikon Device Driver
Software and you do not become owner of it. Nikon retains ownership of Nikon Device Driver
Software and all copies of it, and reserves all rights not expressly granted to you under this
agreement. You only own the disk on which the Nikon Device Driver Software is recorded. This
agreement constitutes the complete and exclusive agreement between you and Nikon and takes the
place of any prior agreement, oral or written, between us relating to the Nikon Device Driver
Software.
This license allows you to:
supplementary license from Nikon before using the Nikon Device Driver Software in connection with
systems, multiple central processing units, computer networks, or emulations on a main frame or
mini computer.
purposes. The Nikon Device Driver Software is protected by United States copyright law. You must
reproduce on each copy the Nikon copyright notice and any other proprietary legends that were on
the original copy.
a copy of this Agreement provided you give Nikon written notice of the transfer and the other party
reads and agrees to accept the terms and conditions of the agreement.
accessories, and/or device drivers.
BY OPENING THIS PACKAGE, YOU
2.Restrictions
3.Term
Except as otherwise stated in this Agreement, you may not distribute copies of the Nikon Device
Driver Software to others or electronically transfer the Nikon Device Driver Software from one
computer to another over a network. The Nikon Device Driver Software contains trade secrets, and
in order to protect them, you may not decompile, reverse engineer, disassemble, or otherwise
reduce the Nikon Device Driver Software to a human perceivable form. YOU MAY NOT MODIFY,
ADAPT, TRANSLATE, RENT, LEASE, LOAN, RESELL FOR PROFIT, DISTRIBUTE, NETWORK,
OR CREATE DERIVATIVE WORKS BASED UPON THE NIKON DEVICE DRIVER SOFTWARE
OR ANY PART THEREOF.
This license is effective until terminated. This license will terminate automatically without notice
from Nikon if you fail to comply with any provisions of this license. Upon termination you must
destroy the Nikon Device Driver Software and all copies thereof. You may terminate this license at
any time by destroying the Nikon Device Driver Software and all copies thereof.
Software Reference for Scanners

4.Foreign Export
5.Limited Warranty and Limitations of Warranty and Liability
You agree and certify that neither the Nikon Device Driver Software nor any direct product thereof is
being or will be shipped, transferred, or re-exported, directly or indirectly, into any country prohibited
by the United States Export Administration Act and the regulations thereunder or will be used for
any purpose prohibited by the same.
A Nikon warrants that the disk on which the Nikon Device Driver Software is recorded is free from
B This warranty extends to the original licensee only and is not assignable or transferable. This
C Except for the limited warranty for the disk on which the Nikon Device Driver Software is recorded
defects in material and workmanship under normal use and conditions for a period of ninety (90)
days from date of delivery to the original licensee as evidenced by the original fee receipt. During
this period, if there is any defect in material or workmanship to the disk, return it to the Nikon
authorized dealer from whom you obtained it, together with your original fee receipt and it will be
repaired or replaced free of charge. If you ship the Nikon Device Driver Software to your Nikon
authorized dealer, you must pay all postage, shipping, transportation, insurance and delivery costs.
warranty does not apply to any disk which has been subject to misuse, abuse, negligence or
accident. Any repaired or replaced disk shall be warranted for the remainder of the original limited
warranty or thirty (30) days, whichever is longer. All warranties implied by law on the disk, including
but not limited to merchantability or fitness for a particular purpose, are limited to the duration of the
above warranty. Nikon's entire liability and your exclusive remedy hereunder is limited solely to
repair or replacement of the disk on which the Device Driver Software is recorded, or, at Nikon's
option, a refund of the license fee.
as set forth above, Nikon makes no warranties, either expressed or implied. The Nikon Device
Driver Software is sold "as is" without any warranty of any kind and Nikon, its employees,
distributors, dealers and agents specifically disclaim any warranty of any kind, either expressed or
implied, including but not limited to any implied warranty of merchantability or fitness for a particular
purpose. In no event does Nikon, its employees, distributors, dealers, or agents warrant the
performance of or the results you may obtain from the Nikon Device Driver Software, or that the
Nikon Device Driver Software will meet your requirements, or that the operation of the Nikon Device
Driver Software will be uninterrupted and error-free. If the Nikon Device Driver Software is
defective, you assume all costs of repair or servicing. In no event shall Nikon, its employees,
distributors, dealers or agents be liable to you for any direct, indirect, consequential or incidental
damages, losses or expenses of any kind, including but not limited to the loss of profits, business
information or business interruption, arising out of or resulting from the Nikon Device Driver
Software, however caused, even if Nikon has been advised of the possibility of such damages,
losses or expenses.
6.General.
D EXCEPT AS OTHERWISE PROVIDED IN THIS AGREEMENT, NIKON SHALL HAVE NO
LIABILITY OR RESPONSIBILITY OF ANY KIND (INCLUDING LIABILITY FOR NEGLIGENCE) TO
YOU OR ANY OTHER PERSON OR ENTITY WITH RESPECT TO ANY LIABILITY, LOSS OR
DAMAGE CAUSED OR ALLEGED TO HAVE BEEN CAUSED, DIRECTLY OR INDIRECTLY BY
THE NIKON DEVICE DRIVER SOFTWARE SOLD, LICENSED OR FURNISHED BY NIKON
UNDER THIS AGREEMENT. NOTWITHSTANDING THE ABOVE LIMITATION, NIKON'S
LIABILITY ON ANY CLAIM OF ANY KIND (INCLUDING NEGLIGENCE) FROM THE DELIVERY,
LICENSE, OR USE OF THE NIKON DEVICE DRIVER SOFTWARE FURNISHED UNDER THIS
AGREEMENT SHALL IN NO CASE EXCEED THE FEE YOU PAID FOR THE NIKON DEVICE
DRIVER SOFTWARE.
SOME STATES DO NOT ALLOW (A) LIMITATIONS ON HOW LONG AN IMPLIED
WARRANTY LASTS OR (B) THE EXCLUSION OR LIMITATIONS OF INCIDENTAL OR
CONSEQUENTIAL DAMAGES SO THE ABOVE LIMITATIONS OR EXCLUSIONS MAY NOT
APPLY TO YOU. NIKON'S WARRANTY GIVES YOU SPECIFIC LEGAL RIGHTS AND YOU MAY
ALSO HAVE OTHER RIGHTS WHICH VARY FROM STATE TO STATE.
This agreement is governed and shall be construed in accordance with the laws of the State of New
York. If any provision of this Agreement shall be determined to be invalid for any reason, the
remaining provisions shall not be invalidated and shall remain in full force and effect.
Software Reference for Scanners

Software Reference for Scanners

Table of Contents 4-4
Acknowledgments
Nikon Inc. acknowledges with gratitude the contributions of the Planning and Design Sections, and the Electronic Imaging
Department Software Engineering Section. These manuals were written, designed and produced by the Electronic Imaging
Department Development & Marketing Group in collaboration with the Technical Support Section and the 4th Designing Section
of Nikon Corporation. Nikon would also like to thank all those who helped test the LS-3510AF and its software.
This manual may not, in whole or in part, be copied, photocopied, reproduced, translated, or converted to any electronic or
machine readable form without prior written consent of Nikon Inc.
Apple Disclaimer
The following disclaimer is required by Apple Computer, Inc. It applies only to Apple software. All other software is covered by
Nikon's limited warranty
“APPLE COMPUTER, INC. (“APPLE”) MAKES NO WARRANTIES, EXPRESS OR IMPLIED, INCLUDING WITHOUT LIMITATION THE IMPLIED WARRANTIES OF
MERCHANTABILITY AND FITNESS FOR A PARTICULAR PURPOSE, REGARDING THE APPLE SOFTWARE. APPLE DOES NOT WARRANT, GUARANTEE OR MAKE ANY
REPRESENTATIONS REGARDING THE USE OR THE RESULTS OF THE USE OF THE APPLE SOFTWARE IN TERMS OF ITS CORRECTNESS, ACCURACY, RELIABILITY,
CURRENTNESS OR OTHERWISE. THE ENTIRE RISK AS TO THE RESULTS AND PERFORMANCE OF THE APPLE SOFTWARE IS ASSUMED BY YOU. THE EXCLUSION OF
IMPLIED WARRANTIES IS NOT PERMITTED BY SOME STATES. THE ABOVE EXCLUSION MAY NOT APPLY TO YOU.”
“IN NO EVENT WILL APPLE, ITS DIRECTORS, OFFICERS, EMPLOYEES OR AGENTS BE LIABLE TO YOU FOR ANY CONSEQUENTIAL, INCIDENTAL OR INDIRECT
DAMAGES (INCLUDING DAMAGES FOR LOSS OF BUSINESS PROFITS, BUSINESS INTERRUPTION, LOSS OF BUSINESS INFORMATION, AND THE LIKE) ARISING OUT OF
THE USE OR INABILITY TO USE THE APPLE SOFTWARE EVEN IF APPLE HAS BEEN ADVISED OF THE POSSIBILITY OF SUCH DAMAGES. BECAUSE SOME STATES DO
NOT ALLOW THE EXCLUSION OR LIMITATION OF LIABILITY FOR CONSEQUENTIAL OR INCIDENTAL DAMAGES, THE ABOVE LIMITATIONS MAY NOT APPLY TO YOU.
APPLE’S LIABILITY TO YOU FOR ACTUAL DAMAGES FROM ANY CAUSE WHATSOEVER, AND REGARDLESS OF THE FORM OF THE ACTION (WHETHER IN CONTRACT,
TORT (INCLUDING NEGLIGENCE), PRODUCT LIABILITY OR OTHERWISE,) WILL BE LIMITED TO $50.”
Trademark Information
NB Handler CDEV, NB-GPIB, GPIB-AT, MC-GPIB are Copyright National Instruments, Inc.
Windows is a registered trademark of Microsoft Corporation
Nikon Inc.
Electronic Imaging Department
1300 Walt Whitman Road,
Melville, NY 11747
516-547-4355
Nikon, LS-3500, LS3510AF
© 1991, Nikon Inc. All right reserved.
Printed in the United States of America
are trademarks of Nikon Corp.
Software Reference for Scanners

4-5 Table of Contents
Table of Contents
Read This First ....................................................................................................... i
About This Manual....................................................... i
The Package Contents .................................................. i
User Registration.......................................................... i
Minimum Macintosh System Requirements ................ i
Minimum PC System Requirements ............................ ii
Before You Begin......................................................... ii
Software Installation............................................................................................... 1-1
Installing the Plugin Modules on the Macintosh.............................................. 1-1
Configuring and Testing the GPIB................................................................... 1-2
Installing the Plugin Modules under Windows 3.1 .......................................... 2-1
Interface Hardware for PC Compatibles .......................................................... 2-3
GPIB (General Purpose Interface Bus) ........................ 2-3
SCSI (Small Computer Systems Interface).................. 2-3
Getting Started on the Macintosh........................................................................... 3-1
Launching the Application ............................................................................... 3-1
Software Reference for Scanners

Table of Contents 4-6
Scanning a Preview Image............................................................................... 3-2
Final Scan......................................................................................................... 3-3
Conclusion ....................................................................................................... 3-4
Getting Started on the IBM.................................................................................... 4-1
Launching the Application............................................................................... 4-1
Scanning a Preview Image............................................................................... 4-2
Final Scan......................................................................................................... 4-3
Conclusion ....................................................................................................... 4-4
Using the Macintosh Scanner Plugin..................................................................... 5-1
The Main Dialog .............................................................................................. 5-1
Controls and Indicators .................................................................................... 5-2
Status Line.................................................................... 5-2
Film Type..................................................................... 5-2
Orientation ................................................................... 5-4
Portrait/Landscape ....................................................... 5-4
Vertical/Horizontal Flip ............................................... 5-4
Densitometer ................................................................ 5-4
Sizing and Resolution .................................................. 5-5
Scan Pitch..................................................................... 5-6
Software Reference for Scanners

4-7 Table of Contents
Scanning Speed ............................................................ 5-10
Grayscale/Color Preview.............................................. 5-11
Interface Buttons .......................................................... 5-11
Digital and Analog Controls......................................... 5-11
Digital Mode................................................................. 5-12
Analog Mode................................................................ 5-12
Auto Exposure/Auto Mode .......................................... 5-13
The Settings Buttons .................................................... 5-14
Toolkit .......................................................................... 5-14
Calibrating the Lamp.................................................... 5-17
Using the Windows 3.1 Scanner Plugin................................................................. 6-1
The Main Dialog .............................................................................................. 6-1
Controls and Indicators .................................................................................... 6-1
Interface........................................................................ 6-1
Scanner Tools............................................................... 6-3
Calibration.................................................................... 6-4
Scan Size and Resolution ............................................. 6-4
Scan Pitch..................................................................... 6-5
Sizing and Resolution................................................... 6-5
Software Reference for Scanners

Table of Contents 4-8
Scanning Speed............................................................ 6-7
Color Adjustment Controls .......................................... 6-7
Film Types ................................................................... 6-10
Autoexposure ............................................................... 6-11
Autofocus..................................................................... 6-11
Manual Focus............................................................... 6-11
Densitometer Readout.................................................. 6-12
Previewing ................................................................... 6-12
Defaults ........................................................................ 6-13
Status Indicator ............................................................ 6-13
Scanning for Reproduction .................................................................................... 7-1
Gamma............................................................................................................. 7-1
Color Balancing ............................................................................................... 7-1
Color Reproduction Background Information ................................................. 7-2
Glossary of Computer Imaging Terms................................................................... 8-1
Software Reference for Scanners

Software Reference for Scanners


Read This First i
Read This First
About This Manual
This reference and disk set contains material for either Apple Macintosh
computers or PC compatibles running MS Windows. Where possible, we have
tried to make both versions of software as similar as possible in feature set and
interface design. There may be occasions, because of operating system
dissimilarities, where the two versions may not match exactly. The explanations
in the respective platform sections may also differ for that reason.
Commands that are taken from the user interface are shown using Helvetica
type. Cautions and Notes are printed in boldfaced type with a triangular marker
in the margin.
The Package Contents
Listed below are the components of the Nikon Software Reference for
Scanners package.
• Nikon Software Reference for Scanners
• Nikon Device Drivers Disks for Macintosh and Windows 3.0
• Nikon User Registration
If any of the above are missing, please contact your Nikon Electronic
Imaging Dealer immediately.
User Registration
If you would like to receive the latest information and updates from Nikon,
please fill in the User Registration and mail it today!
Minimum Macintosh Scanning System Requirements
• Macintosh System 6.0.5 or later
• 32-Bit Quickdraw
• 4MB RAM (8MB recommended)
• 80MB Hard Disk (300MB recommended)
• National Instruments NB-GPIB card with cable when using the
GPIB interface
Software Reference for Scanners

ii Read This First
• SCSI II cable adapter when using the LS-3510AF SCSI interface
• 8-bit display (24-bit true-color display highly recommended)
Minimum PC and Compatibles Scanning System Requirements
• Windows 3.0 or later
• 4MB RAM (8MB recommended)
• 80MB Hard Disk (300MB recommended)
• National Instruments GPIB -AT (for ISA bus) or MC-GPIB (for
Microchannel bus) card with cable when using the GPIB interface
• SCSI II cable adapter when using the SCSI interface
• Super VGA display (24-bit true-color display highly recommended)
Before You Begin
Before you begin setting up, make a backup copy of your master diskettes!
Put away the masters in a safe place and work with the backup copies to install the
Nikon Drivers.
Please begin by following the Software Installation procedures for your
particular platform.
The Getting Started section of this manual will get you up and running in the
shortest possible time. This is a condensed instruction manual that will lead you
through the basic steps of scanner setup, configuration, and finally, scanning of the
enclosed sample slide. Don’t worry if you don’t fully understand some of the
terminology and concepts we are introducing here. The idea is to setup quickly and
familiarize yourself with the controls by performing a routine scan.
You will probably require one hour to perform any hardware installation, test
it, and go through a trial run. In this time you will gain a working knowledge of
the scanning system. Before you begin, make sure that you have the minimum
system requirements for a functional scanning system.
In particular, if you are using your scanner with a GPIB interface, you must
have a GPIB interface card installed in your computer, or have one ready to install.
For a thorough explanation of scanner controls, color imaging techniques and
color separation guidelines, we strongly recommend reading the User's Guide
sections of this manual.
For detailed information on the scanning hardware and a full discussion of
programming your own scanner control interface, refer to the Technical and
Programmer's References available from Nikon. Now, let’s begin....
Software Reference for Scanners
Software Installation - Macintosh 1-1
Software Installation
Installing the Plugin Modules on the Macintosh
If you have not already done so, install Photoshop following Adobe's
installation procedure. If you are using ColorStudio, then follow the installation
routine specified by Letraset.
After you have installed and tested your image processing application, you
are ready to install the Nikon Plugin modules. If you are using Photoshop v 2.0,
they should be placed in the Photoshop Plugins folder within the Adobe Photoshop
application folder. If you are using ColorStudio or another image processing
application that uses Photoshop Plugins, install the module in the location
specified for plugins by the manufacturer of the software package.
>Note This plugin works with Photoshop 1.0 or later, or ColorStudio 1.5 or later.
You must update older versions with the new ones before you use this
software
Start your Macintosh and determine if you are running System 6.0.5 or a later
version. If you are unfamiliar with how to do this, please refer to the Macintosh
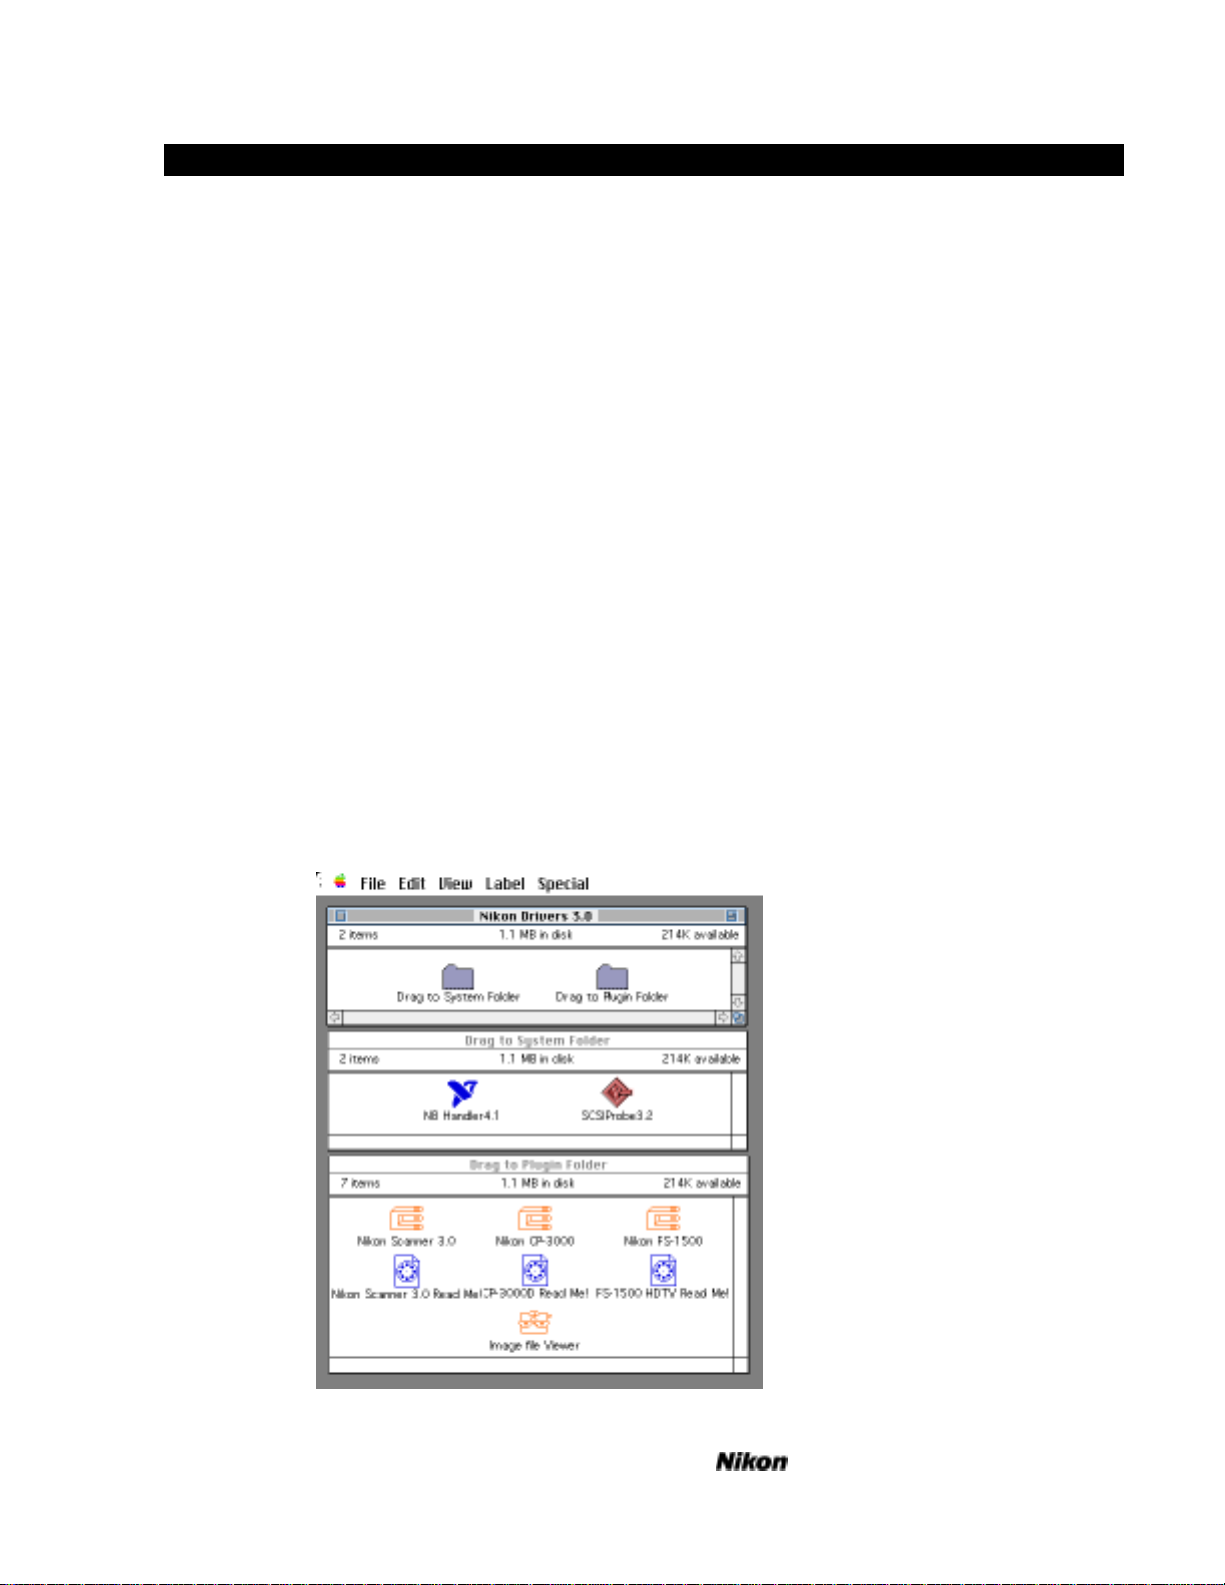
Owner’s Guide. Insert your backup Nikon Drivers disk into the drive. The disk
icon will appear on your desktop and three windows containing folders will appear
in a vertical column on the left side of your screen, as shown below.
Fig. 1 Desktop
Software Reference for Scanners

1-2 Software Installation - Macintosh
If you are using a GPIB interface, select the NB Handler Init in the folder
labeled Drag to System Folder and drag it onto the System Folder on your hard
disk. It will be copied into the Control Panels folder if you are using System 7.
>Caution If you already have a file called NB-Handler INIT installed in your system
folder, move it to another folder before you copy the new file in.
Next, drag the Nikon Drivers disk icon onto your hard disk icon and follow
the prompts. Double click on your hard disk icon to reveal its contents. Now
double click on the Nikon Drivers folder to display the NB Handler Init, the
plugin modules, and the ReadMe documents.
If you are using the built-in SCSI interface on the Macintosh, connect the
DB25 to SCSI II cable adapter to the rear panel connector on the Mac and then to
the Mini 50 pin connector on the Nikon scanner. If this is the only unit on the
SCSI bus, connect a terminator to the second plug on the scanner. Restart your
Macintosh and go on to Using the Plugin Scanning Module.
Configuring and Testing the GPIB
If you are using an NB-GPIB interface card, the NB Handler Init must be in
your startup (boot) disk’s System Folder in order for the plugins to work properly.
Using System 7, it should be in the Control Panels folder.
In order for the NB-GPIB interface to communicate properly with the Nikon
Plugins, the NB Handler control panel should be configured to your device address
settings. In particular, it is necessary that the GPIB finds a device called LS-
3510AF, which is the LS-3510AF Film Scanner (or in the case of the LS-3500
scanner, LS3500), when the plugin looks for it. Similarly, if you are using a CP3000 printer, then the name CP-3000 must be used by the NB Handler to indicate
the device. If your NB Handler does not have your scanner or printer address
configured properly, the GPIB may not communicate with the device connected.
If you have an old version of the handler in your system folder, remove it
temporarily and replace it with the new version from the Nikon Drivers disk. This
is a preconfigured file for the Nikon LS-3500, LS-3510AF, CP-3000D and FS1500 devices. Using this Init will get you running in the least amount of time and
you can reconfigure for other devices later on. If you are using the preconfigured
NB Handler, confirm its correct installation by restarting your machine and
opening your NB Handler control panel from your Control Panels under the Apple
Menu.
Software Reference for Scanners
Software Installation - Macintosh 1-3
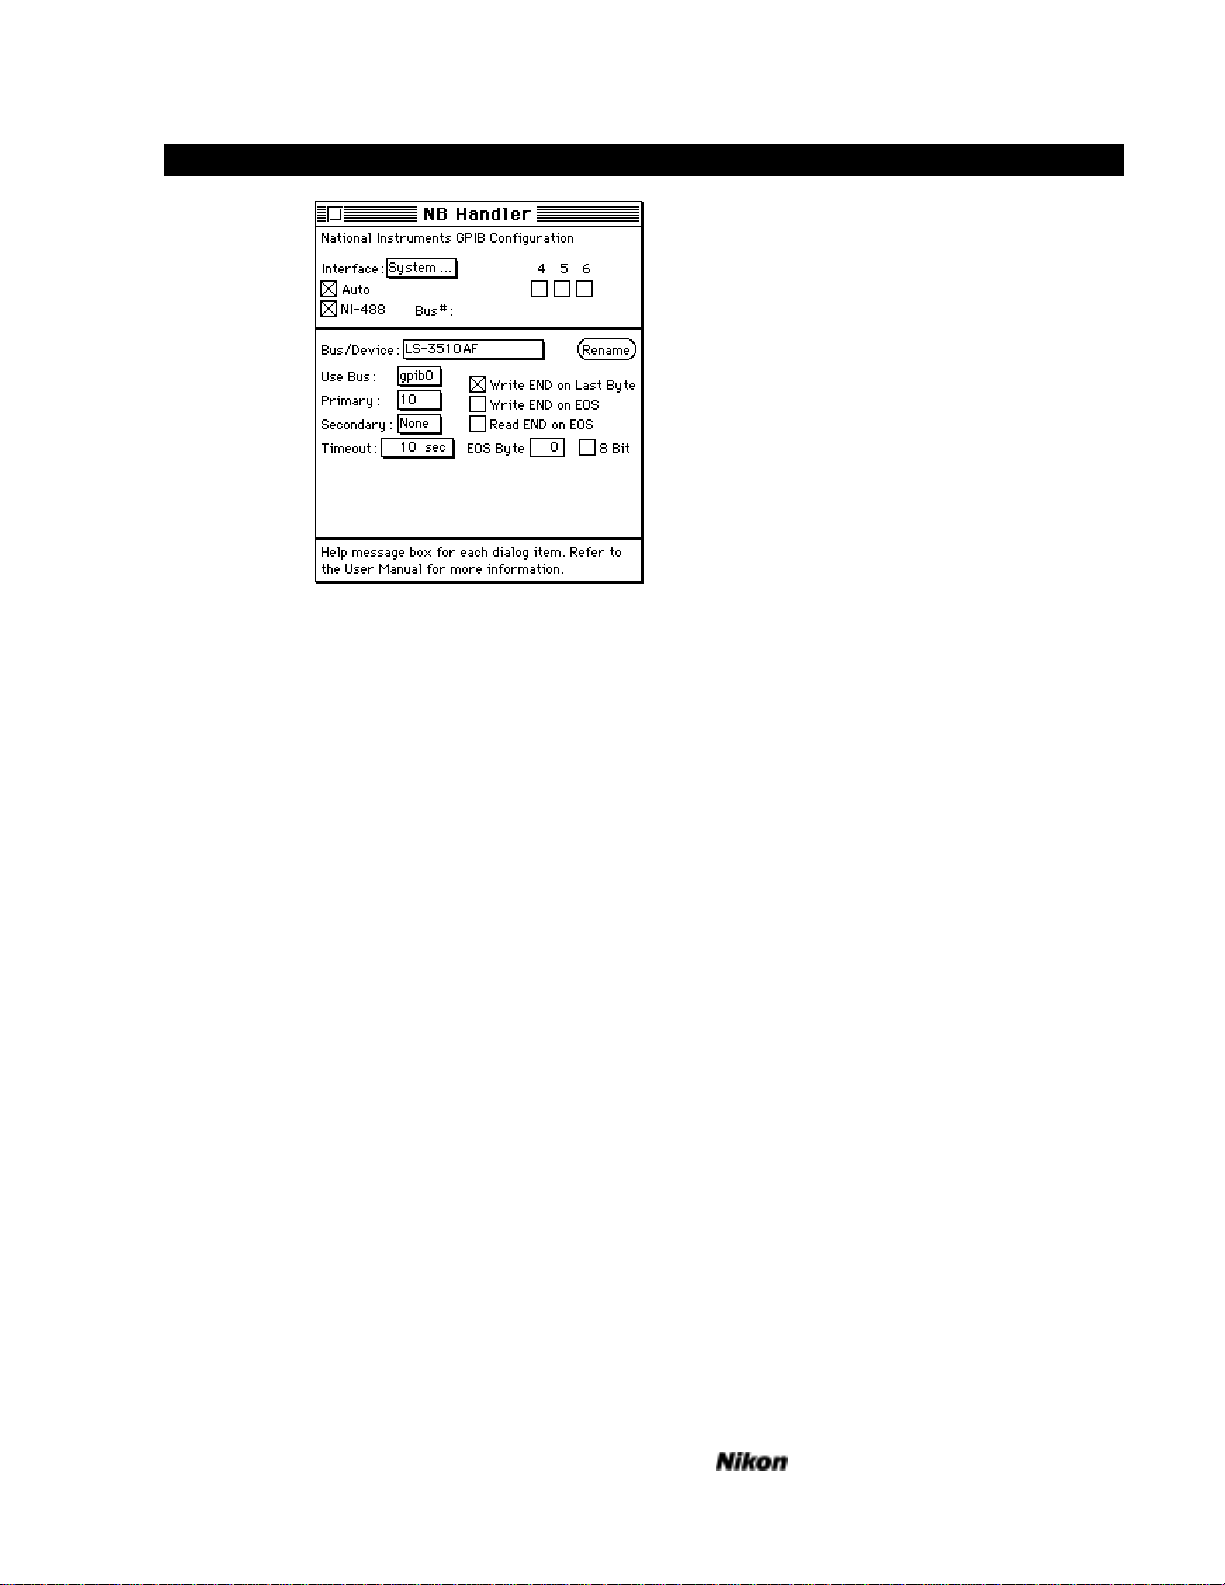
Fig. 2 NB Handler control panel
Check to see that the addresses are correctly entered and conform to the
factory default settings of the device DIP switches. If so, proceed to the next
section, Using The Macintosh Plugin Scanning Module.
If you wish to change the configuration, use the rename button to change any
devx setting to the appropriate name of the device. Set the address in the text-edit
box labeled Primary. It is not necessary to restart your machine for the changes to
take effect. Simply close the Control Panel and go on to Getting Started.
>Note If you have an older NB Handler Init installed it may not be of the control
panel type and will not show up in your Control Panels folder. If so, you can
use the IBCONF utility usually supplied with your National Instruments NBGPIB board to add the Nikon configuration to your old Init, or you can
modify the new one with the control panel shown above to include your other
devices, such as film recorders and other scanners.
Software Reference for Scanners

Software Installation - IBM 2-1
Installing the Plugin Modules under Windows 3.1
If you have not already done so, install PhotoStyler following Aldus’
installation procedure. If you are using another application, then follow the
installation routine specified by the manufacturer.
After you have installed and tested your image processing application, you
are ready to install the Nikon Plugin modules. If you are using PhotoStyler they
should be placed in the PhotoStyler directory.
>Note This plugin works with PhotoStyler 1.0 or later
Launch Windows. If you are unfamiliar with how to do this, please refer to
the Microsoft Windows Owners Guide.
Insert your backup Nikon Installer Disk in your floppy drive - drive A: for
example.
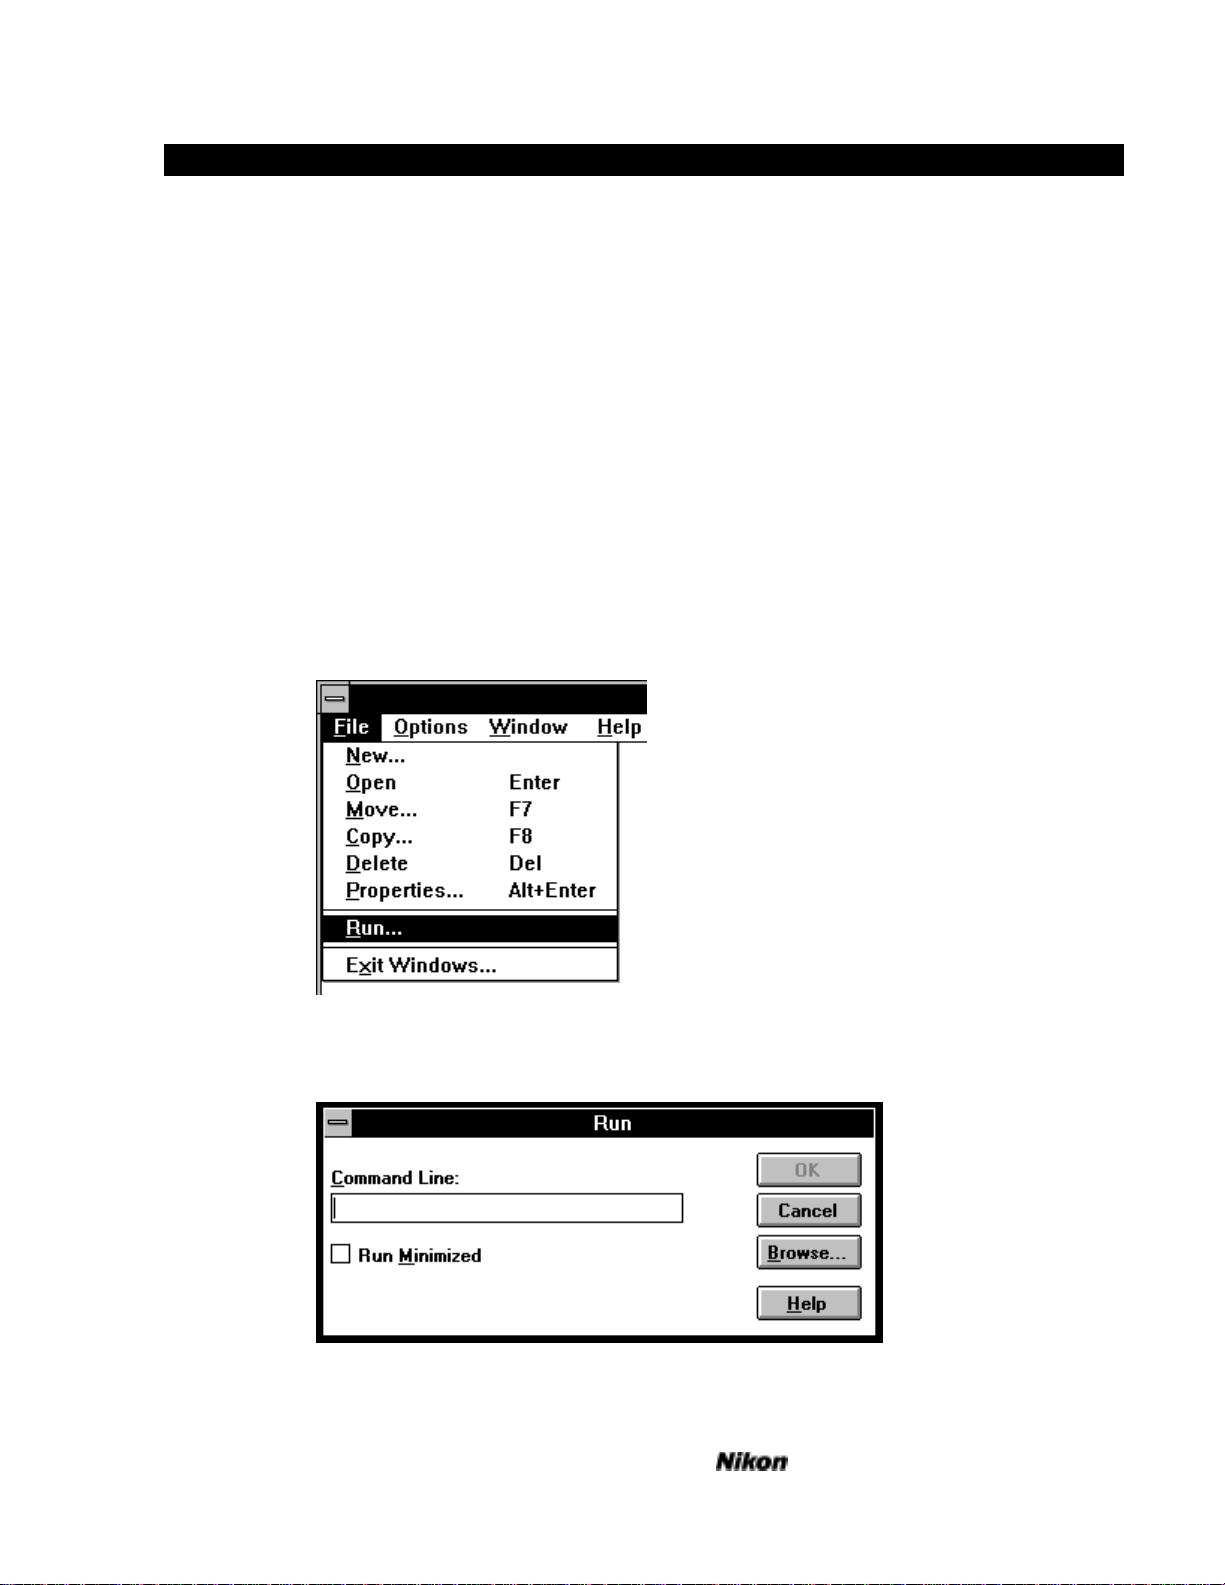
Fig. 3.The Program Manager File Menu
Select Run... from the File menu in the Program Manager.
Fig. 4 The Run... Dialog
Software Reference for Scanners
2-2 Software Installation - IBM
Type A:PSSETUP and press enter. Press any key or click the mouse to skip
the startup screen.
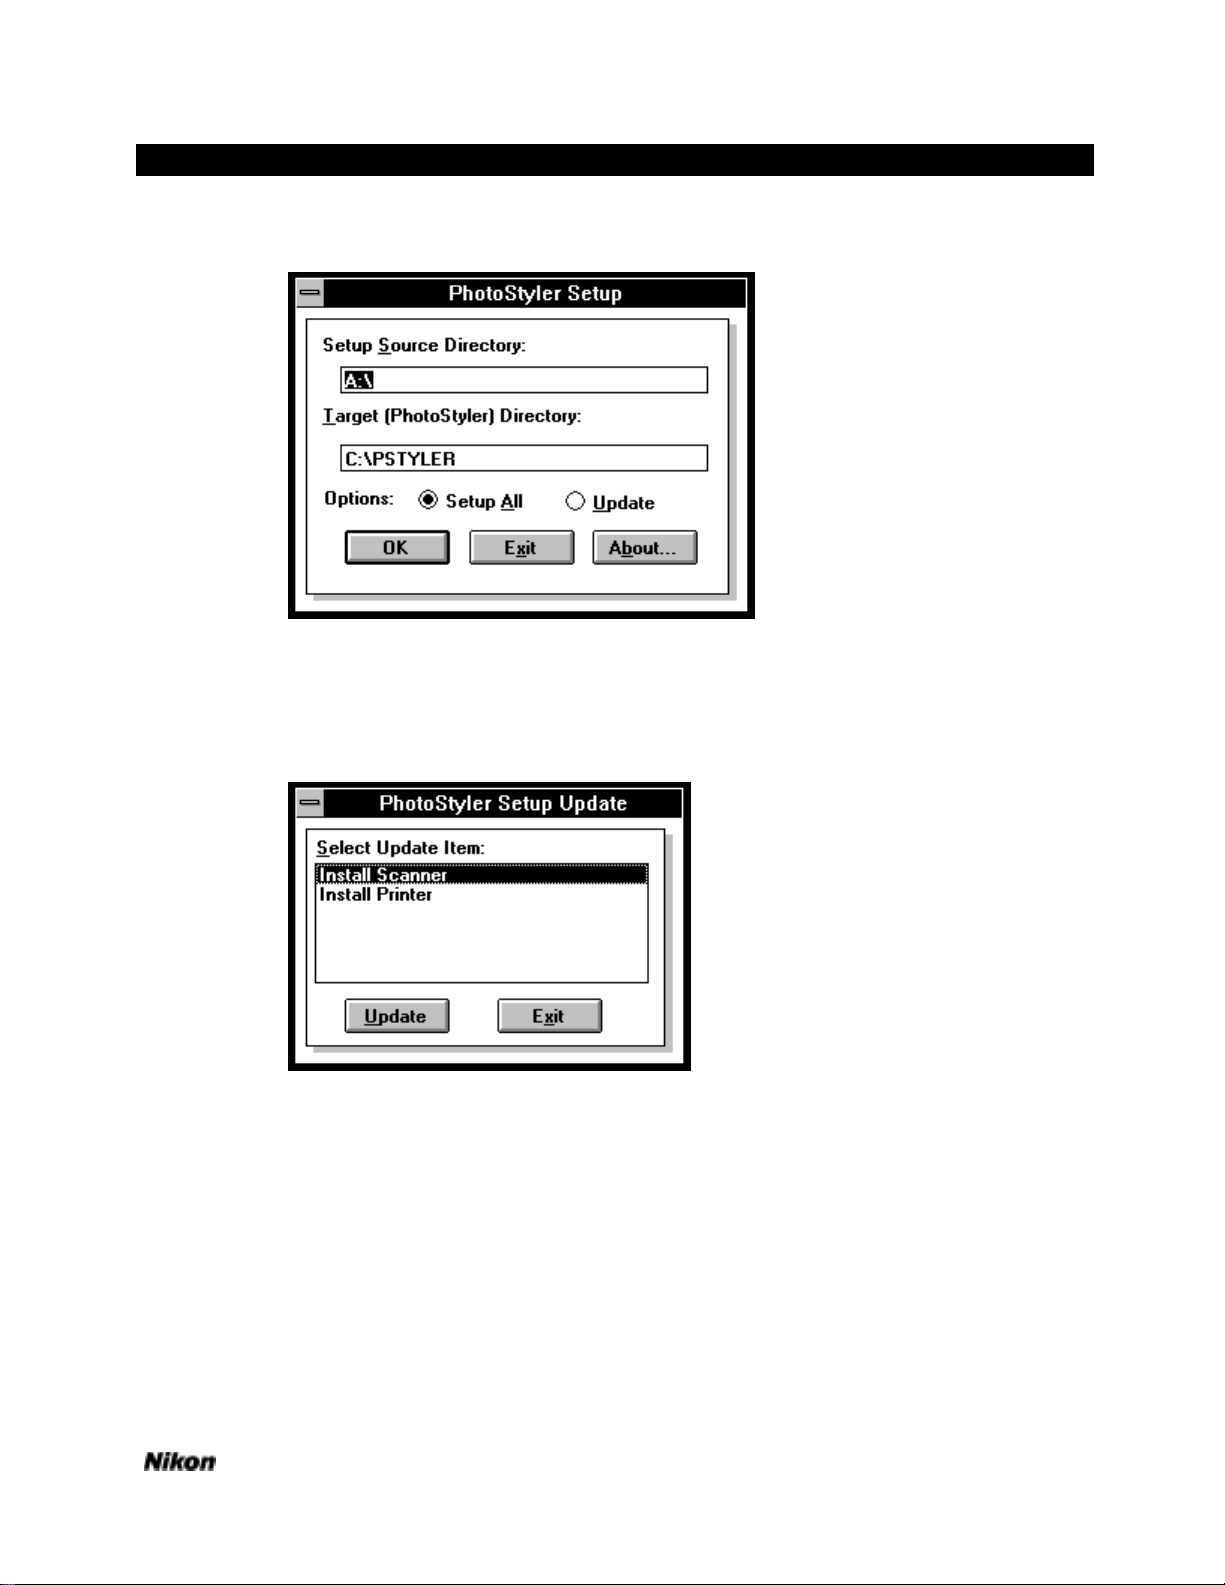
Fig. 5 PhotoStyler Directories
Enter your source and target directories. To install only the Scanner Plugin or
the Nikon CP-3000 printer export, check the Update box before pressing the OK
button. Choosing Setup All will install all the plugins on the disk.
Fig 6 Installing the scanner
If you are updating the scanner, choose the Install Scanner selection.
Software Reference for Scanners
Software Installation - IBM 2-3
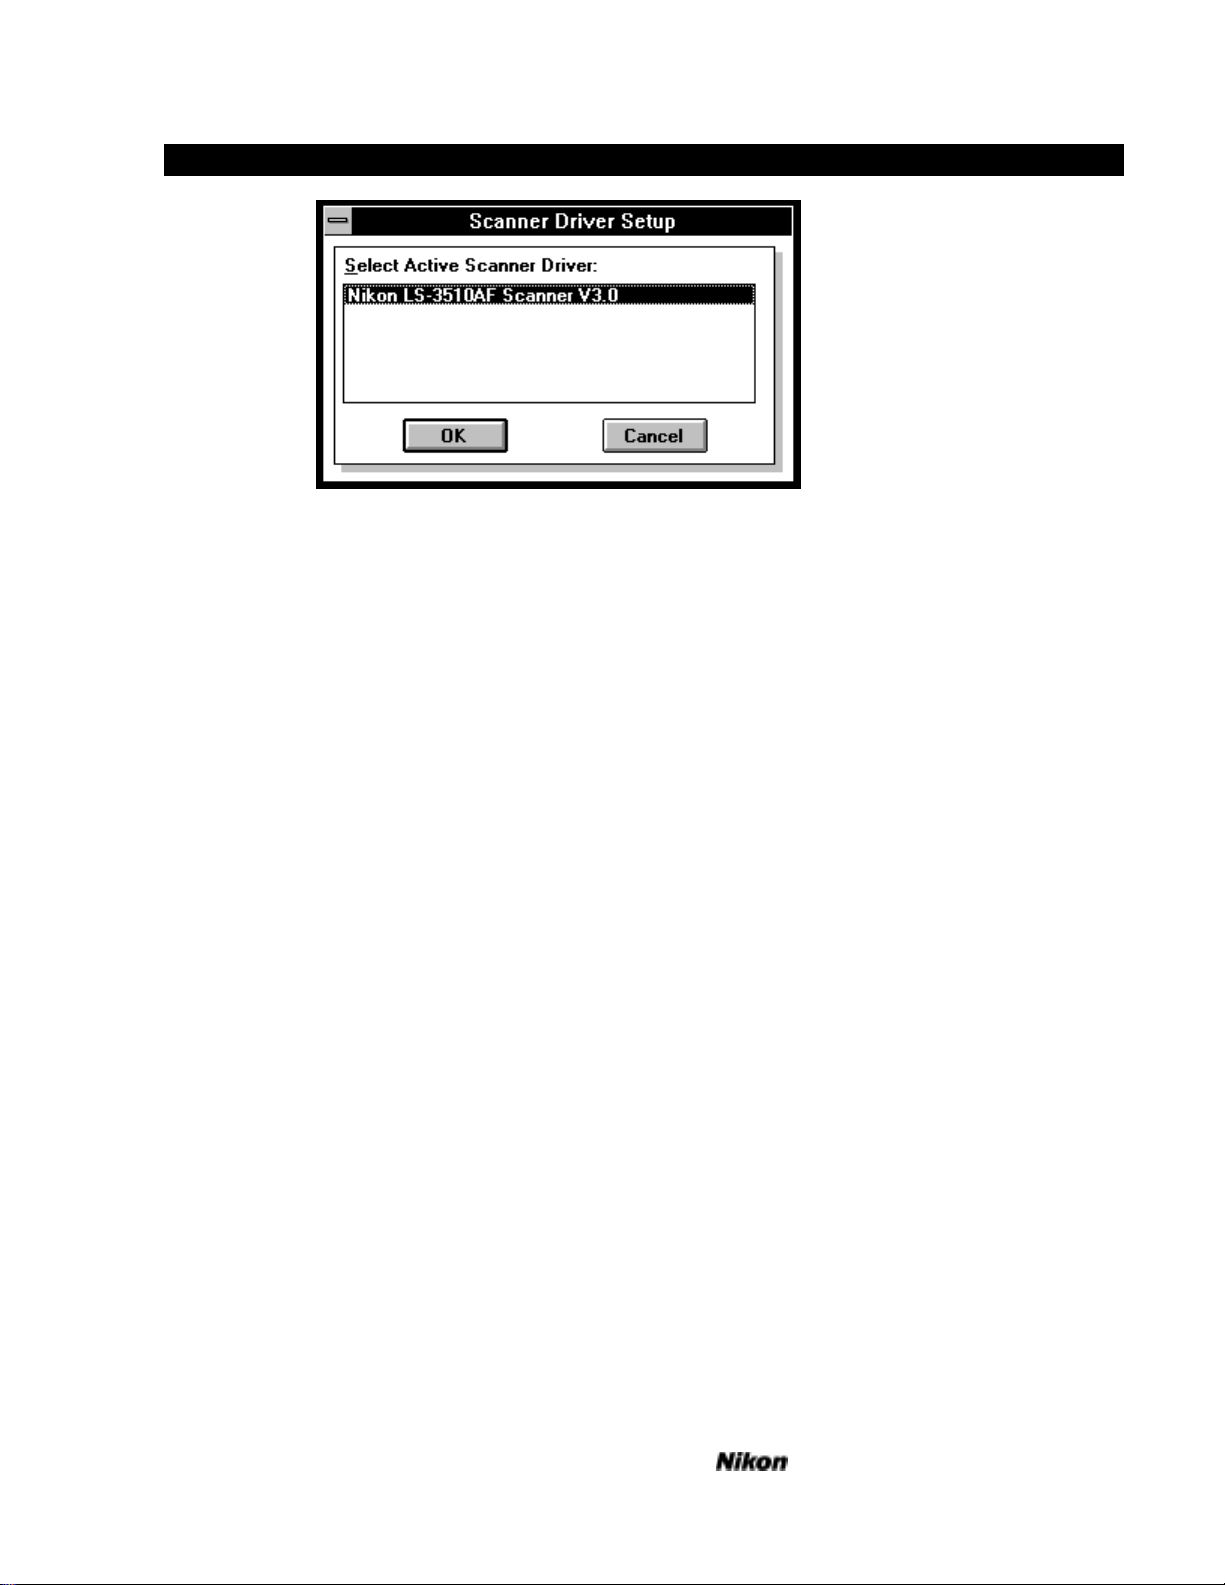
Fig. 7 Selecting the active scanner for PhotoStyler
You must choose which scanner driver to make active in PhotoStyler. Since
only one driver is available, click OK.
Your drivers are now installed and you can proceed on to the Getting Started
section for the Windows plugins.
Interface Hardware for PC Compatibles
For complete information on installation of GPIB hardware consult your GPIB
installation manual which comes with your GPIB board.
As with any interface board installation, ensure that there are no address,
interrupt or DMA channel conflicts between any boards installed in your
computer.
GPIB (General Purpose Interface Bus)
Currently, only the National Instruments AT-GPIB and MC-GPIB boards are
supported. When installing the software drivers for these boards, be sure to select
the installation for Windows. National Instruments can be reached at
1-800-IEEE-488 (1-800-433-3488).
SCSI (Small Computer Systems Interface)
Any SCSI board with ASPI (Advanced SCSI Programming Interface) drivers
should work, but only the T128 and T228 from Trantor and the AHA-1520, AHA1522, AHA-1540B, AHA-1542B, AHA-1640 and AHA-1642 from Adaptec have
been verified. Trantor can be reached at 1-510-770-1400 and Adaptec can be
reached at 1-800-869-8883. The ASPI drivers may not be included with the
standard software bundle and may have to be specifically requested.
Software Reference for Scanners


Getting Started On The Macintosh 3-1
Getting Started on the Macintosh
Launching the Application
Launch Photoshop or ColorStudio by double clicking the appropriate icon.
Pull down the File menu to reach the Acquire... menu item and select Nikon
Scanner... from the hierarchical menu. The main scanning dialog will appear as
below and the Device: and Address: lines should indicate that there is a scanner
connected. If the dialog appears as below, you are ready to start scanning and can
proceed to Scanning a Preview Image.
Fig. 8 Main Scanning Dialog
If the message in the upper left-hand corner reads “Nikon LS-3510AF Ver
1.xx” on either a SCSI or GPIB interface, you are ready to make a preview or
scan. If not, the plugin has not found the scanner and you will need to check your
SCSI or GPIB cabling, confirm tight connections and proper termination. For
SCSI installations with other external devices, place the scanner at the end of the
chain with the standard supplied terminator for your machine. If you are unsure
what GPIB or SCSI address to use, consult the Setup Guide included with your
scanner.
Software Reference for Scanners
3-2 Getting Started
Scanning a Preview Image
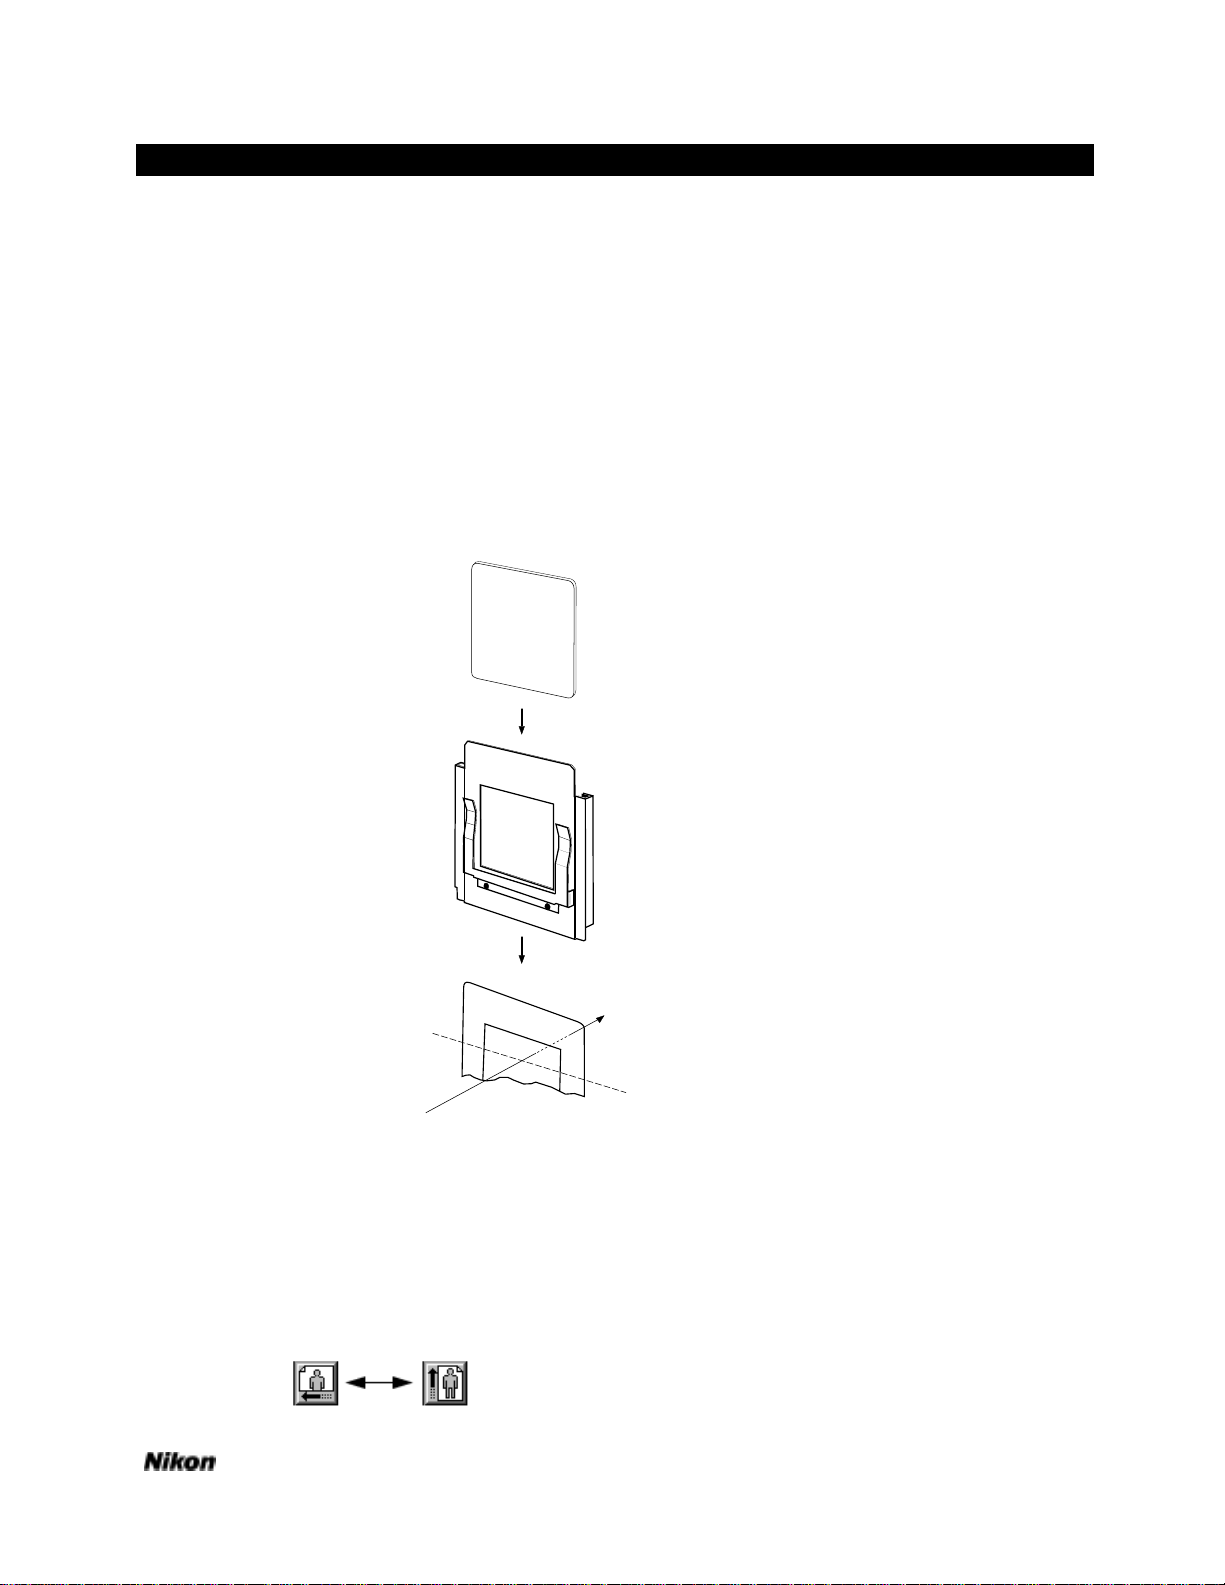
Take out the sample slide included in the disk holder. You will be using the
Standard Slide Holder for this scan. Hold the mount as in the diagram in Fig. 9
below. Insert the slide so that the emulsion side of the film faces the front of the
scanner. When viewing the slide orient the picture so the text is readable. The
emulsion side is the surface furthest away from you. Since the LS-3510AF is an
autofocus scanner, it will not make much difference which way you place the
emulsion (other than image orientation, right-reading or backwards), although
sharpest results will be achieved when the emulsion faces the front of the scanner
because the imaging lens will not be reading the film through the film base, which
may reduce definition, depending on the film type.
Sample
35mm film
in slide mount
Standard Holder
Scanning Stage
Light source
Fig. 9 Loading the Scanner
Insert the Slide Holder into the scanner so that the slide mount is closest to
the lamp. Close the dustproof cover so that the outside light does not affect the
scan.
The sample slide is a portrait (or a vertical image) but we will leave the
default scanning orientation in the horizontal or landscape position.
Fig. 10 Orientation
Software Reference for Scanners

Getting Started On The Macintosh 3-3
The quickest way to capture this image is to click the Preview button.
Fig. 11 Previewing an Image
In order to scan the slide under optimal conditions, the LS-3510AF will first
perform an autoexposure and autofocus sequence to determine information about
the nature of the image in the holder.
You should see the green Busy LED light up on the scanner and a message
appear in a small dialog. The message should read Performing an
autoexposure... This status line will keep you informed about the scanner’s
progress.
When the green Busy LED on the LS-3510AF goes out, you have completed
the Autoexposure cycle and the scanner will automatically focus on the slide
displaying the message, Performing autofocus... After this, the Busy LED will
immediately light up again and the scanner will begin the preview cycle as it reads
the picture directly to your monitor display, field by field. We can now see the
image appearing on the video screen in the scan window in the sequence red,
green, then blue screens.
>Note You will not be able to see the high-quality color available from the scanner
unless you have a 24-bit display card installed in your system. Using an 8-bit
card will display a dithered image.
Final Scan
The next step will be to perform the main scan at a higher resolution. Crop
the preview image by placing the cursor at any corner of the preview, and dragging
to enclose the area of interest in a rectangle as in Fig. 12 below.
Fig. 12 Cropping the Preview Image
Software Reference for Scanners
 Loading...