

Page 1
READ
Nikon LS-2000 35mm Film Scanner
THIS FIRST!
Fast Track Guide
Getting Started
About Film
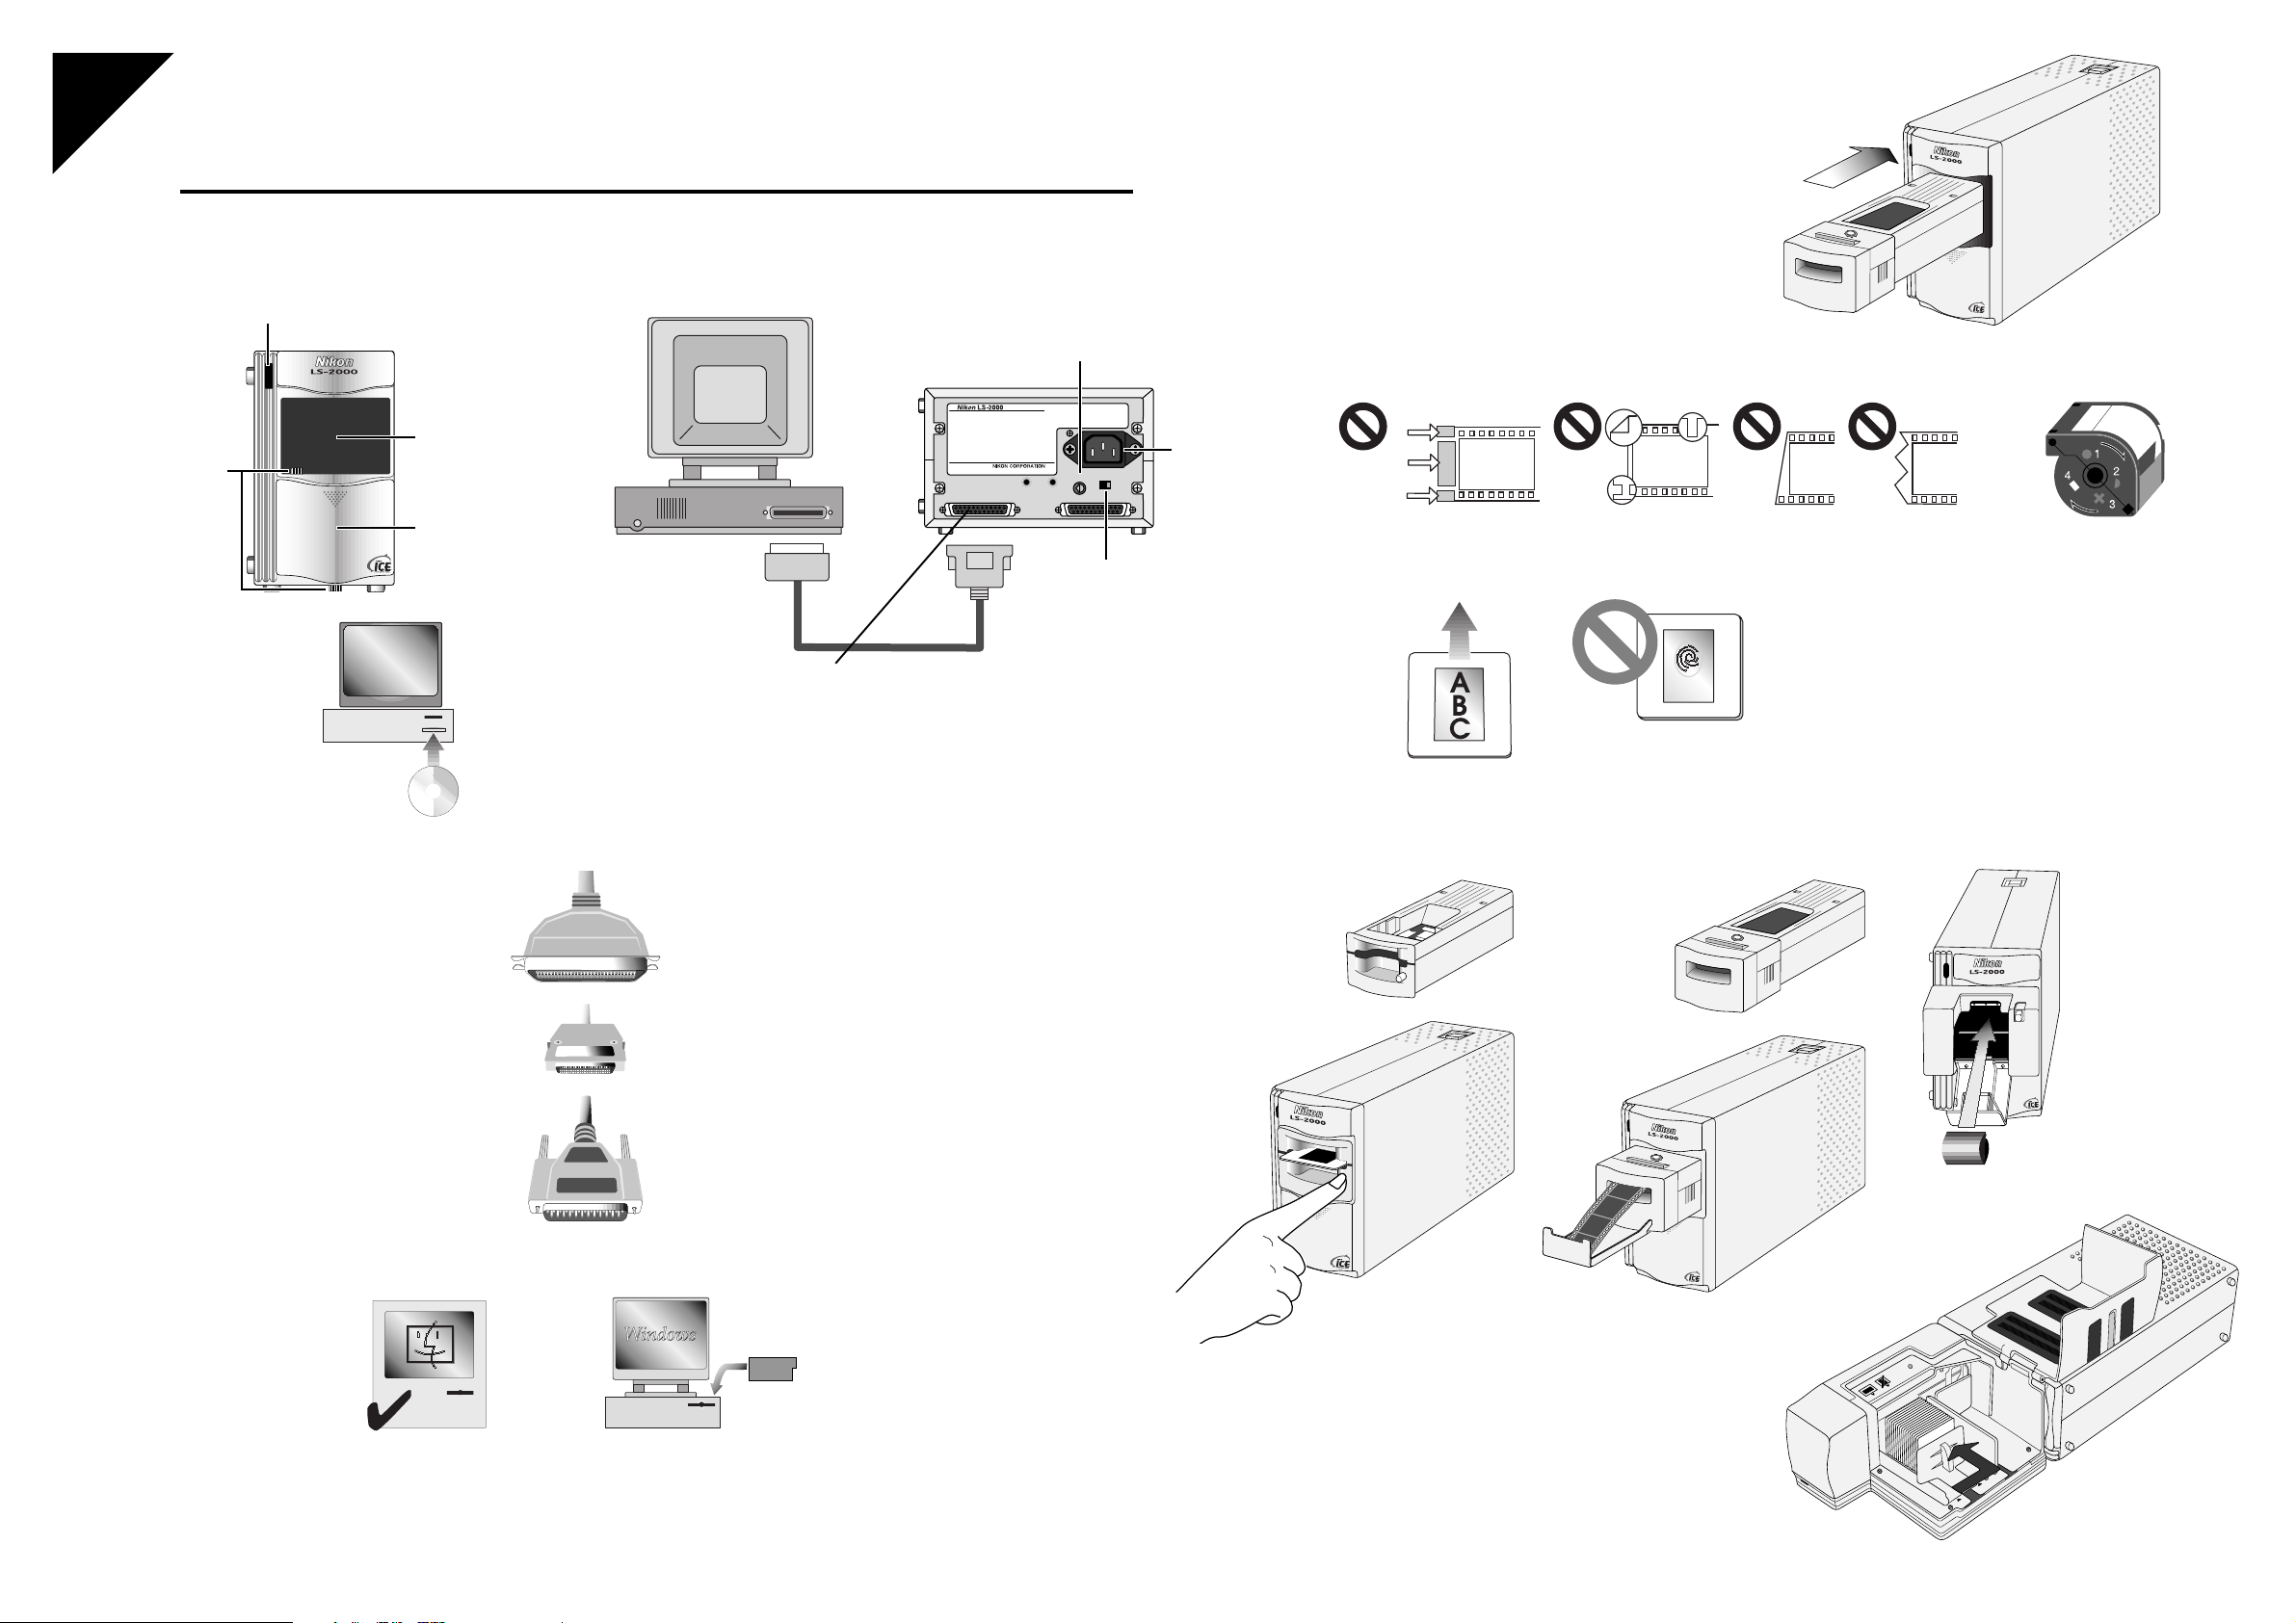
Your Nikon scanner will accept 35mm film in strips or as individual
mounts. An adapter for scanning IX240 film is available separately.
A multiple slide feeder is also available for up to fifty mounted
slides. In total, there are four adapters available for your Nikon
scanner. Film adapters are inserted into the scanner as shown. The
film adapter can be changed while the scanner is on (hot swap).
This LED blinks when the scanner is initializing and
during a scan. It glows steadily when the scanner is
ready. If it flashes rapidly, something is wrong.
There are two locking
screws to secure the
mechanism during
transport. Remove them
before use and put them
Don’t put anything in this
hole except an approved
Nikon film adapter.
in the holes provided on
the rear of the scanner so
that you will have them if
you need to transport your
scanner at a later time.
This cover slides
down. Nikon film
adapters go in the hole.
Your scanner needs software to make
it work. It may be supplied with
Nikon’s own software, Nikon Scan.
Nikon Scan is available for free
download from Nikon’s Technical
Support web-site at
http://www.nikon-euro.com/support
SCSI
Your scanner uses a standard called SCSI to connect to your
computer. Mac OS computers have SCSI built in. Nearly all
Windows computers require an expansion card which provides the
SCSI interface. In order to ensure maximum reliability, Nikon
scanners are tested and approved for use with Adaptec SCSI cards
and require ASPI 32-bit software for Windows NT 4.0 (a list of
approved adapters is provided separately).
A SCSI connection is a high-speed data link and is vulnerable to
disturbance. You must use high-quality cables that are as short as
possible. The ends of the SCSI chain must be terminated. Your
Nikon scanner has a switch to set termination if it is the last device in
your SCSI chain. The other end will probably be your SCSI adapter
card, or a hard-disk or CD-ROM drive inside your computer. If you
have a SCSI hard disk in your computer, you may need to remove
termination from the SCSI card as it will be in the middle of the
chain when you connect your scanner.
Nikon software will
run under Mac OS®,
Windows® 95 or
Windows NT™.
This is where your scanner
connects to your computer by
a SCSI interface. Use either
connector.
A Centronics 50-pin SCSI-1
connector
A half-pitch SCSI-2 connector, found
on modern high-speed SCSI adapters
and your scanner
A DB 25-pin SCSI connector,
found on Mac OS computers
Each SCSI device has a unique number.
Your computer is probably “0” or “7.”
CD-ROM drives are often “3.” This dial
must be set to a number that is not being
used by other equipment.
100–240V~
0.3–0.2A
50/60 Hz
Connect the power
MADE IN JAPAN100098
SCSI NB
4
5
3
6
2
7
1
SCSI SCSI
0
TERMINATOR
OFF ON
cable here
Set this switch to ON
if one of the SCSI
connectors is left free.
Use the other connector if you
have other SCSI devices in your
system.
Your Nikon scanner comes with adapters for mounted slides and strip film. Additional
adapters are available for IX240 film and consecutive scanning of slide mounts.
Insert slides
Press button
Slides go in face up, with
the short side of the
aperture facing the scanner
MA-20 adapter for
35mm slide mounts
by hand.
to eject.
Your film is valuable! Please observe the following precautions when handling film
Adhesive tape must be
removed
Perforations must
not be torn
Strip film must be flat and the
ends should be cut straight across
Take out film before switching the scanner off. Remove all
film before switching the scanner on.
Wait until the green light glows steadily before inserting or
removing adapters or film.
Film should be free of
dust and fingerprints
SA-20 35mm
strip-film
adapter
IX240 film must be
developed and exposed
IA-20 adapter for
IX240 film
Press eject button to
open cover. Insert film
as shown.
6ME 50000
Mac OS computer
(built-in SCSI)
Windows computer (requires SCSI adapter)
SCSI adapters must be configured for your
system. See the information provided with
your SCSI adapter
Film will be fed into the adapter automatically
when inserted a short distance
LS-2000 with SF-200
slide feeder adapter
Page 2
Nikon Scan
Fast Track Guide
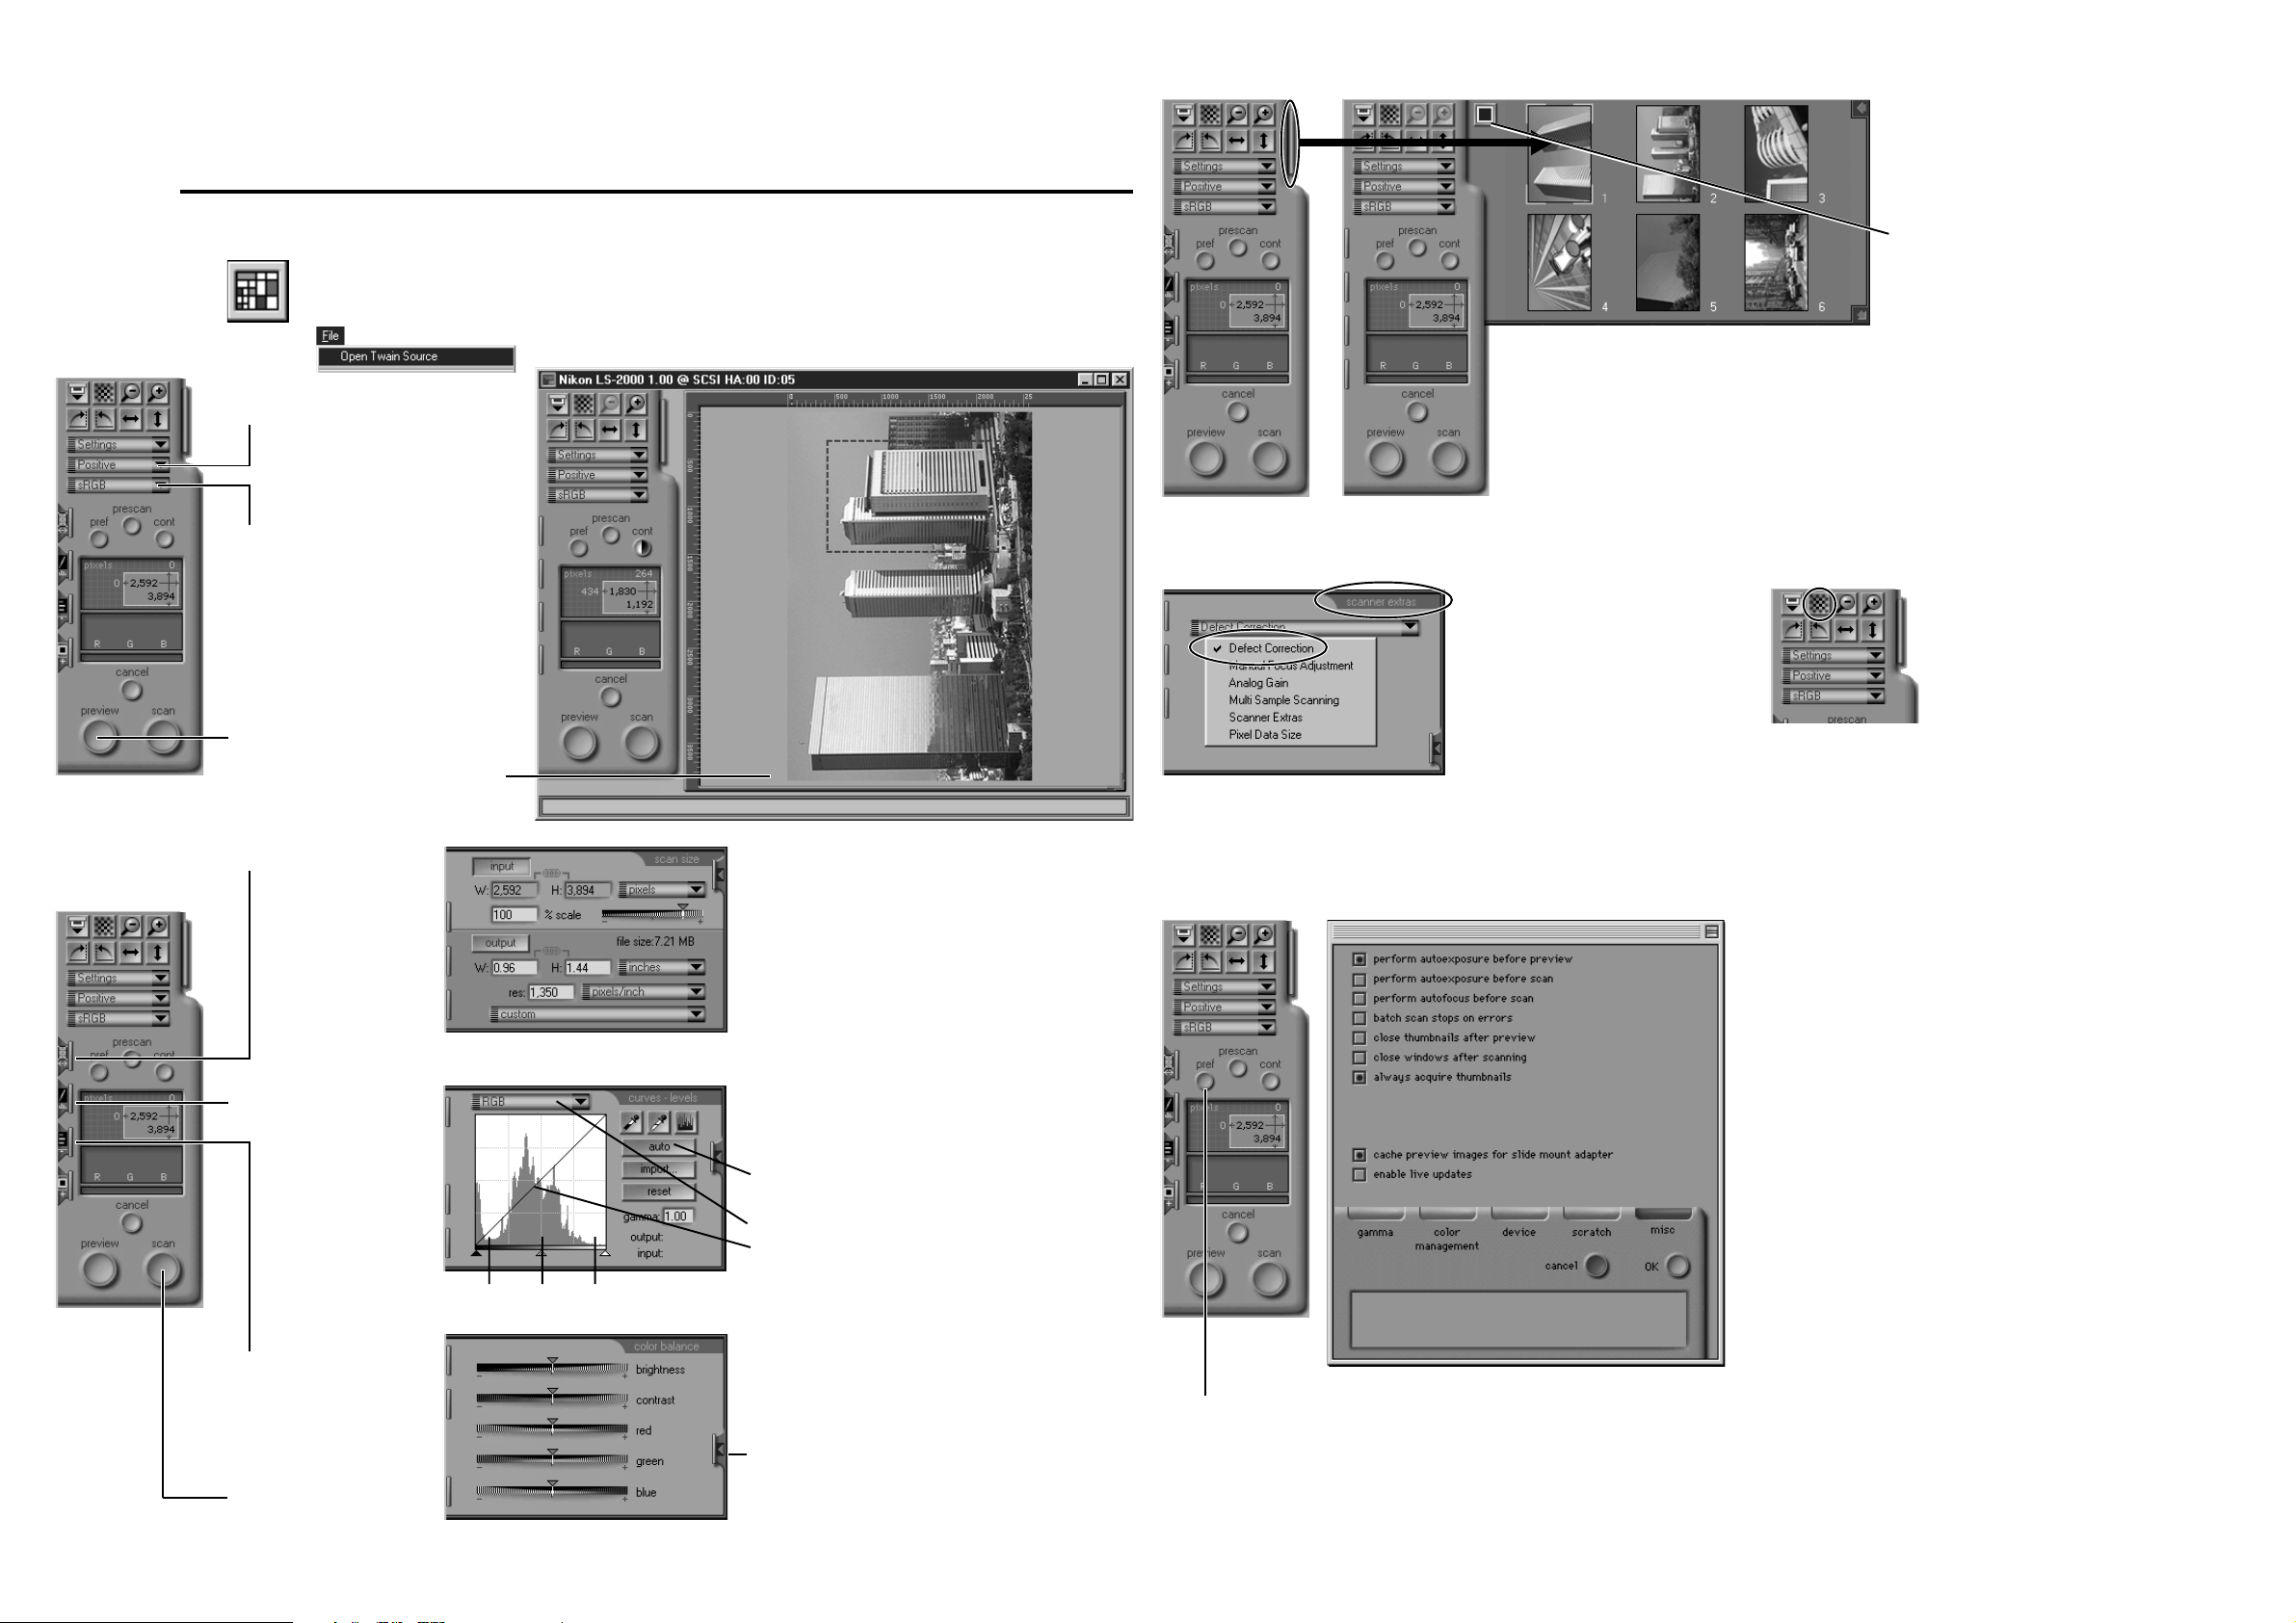
Starting Nikon Scan
Click the Nikon Scan icon
1. Select film type
2. Select color space
(start with sRGB)
Choose Open Twain Source from the File menu
(Windows) or select the scanner from the Devices
submenu of the Nikon Scan menu (Macintosh)
Don’t want to use the Nikon Scan applet?
You can launch the Nikon Scan driver from Photoshop™ or from a TWAIN-
compliant PC application (see below, at right).
Multiple Images
Cleaning Images
When scanning with the IX240 or film-strip adapters,
thumbnail images can be scanned before you commit
yourself to a full preview scan.
Click the drawer-tab and the thumbnail drawer
appears. To save time, images can be displayed by
frame number only. Click here to toggle between
thumbnail and frame-number display.
Double-click any thumbnail or frame number to
display the image in the preview window.
Auto Focus
3. Preview slide
4. Preview image appears in scan window
5. Select the scan-size drawer
6. Select the curves-andlevels drawer
Shadows Midtones Highlights
7. Select the color-balance
drawer
8. Make your scan!
The scan-size drawer
Use this drawer to control the size and resolution of the
scanned image. To scan to a g iven output size, click the
output lock button, specify a size (W and H) and output
resolution, and drag the mouse over the preview image to
define the area to be scanned. For archive and general use,
click the input lock button and adjust the slider to alter the
scale. File size and resolution can be read in the output field.
(Hint: enter a new value for resolution if the desired file
size cannot be obtained using the slider.) Drag the mouse
over the preview image to define the area to be scanned.
The curves-and-levels drawer
This drawer sets the overall tone range (lightest point to
darkest point) and controls color balance within the specified
range.
1. Set the darkest and brightest points automatically.
2. Check color balance and contrast in the preview image.
3. Select an individual color, or all colors at once.
4. Click on the line and drag to adjust details of highlights,
midtones, and shadows.
The color-balance drawer
This drawer is used to change the overall appearance of the
scanned image. The sliders control the brightness, contrast,
and general color balance of the image. Experiment with the
controls to obtain a pleasing result.
Putting drawers away
All drawers are closed by clicking this button.
Use the Defect Correction control
to remove surface scratches, dust,
and other film defects.
Preferences
These settings allow you to change the way the scanner operates. You may need to alter
them to suit your particular scanning requirements.
The Preferences dialog is accessed from the scan window. Click here to open the
Preferences dialog. Refer to the reference manuals for your platform for more details.
The auto-focus control is located
at the top of the control panel.
Nikon Scan 2.0—Technical Information
Nikon Scan 2.0 consists of a mini-application (“applet”) and a driver. The
driver for Windows is a TWAIN source, the driver for the Macintosh an
Adobe® Photoshop™ plug-in.
During the pre-scan and scanning phases of operation, the driver controls all
scanner functions, including color balance, scan size, and focus. After
scanning, the driver quits, leaving the image as an image file in a window in
the host application. It is therefore not necessary to save the file using a
scanning application and open it in a graphics application; the image is
delivered directly to the host.
If you prefer not to use the Nikon Scan mini-application to launch the driver,
you can launch the driver from any TWAIN-compliant application (under
Windows) or from applications that support Photoshop-compatible plug-ins
(Macintosh).
Windows Users
The term TWAIN applies to a program which can be run within another host
application to control an imaging device. TWAIN programs are called
“TWAIN sources.” The host application is able to choose an installed TWAIN
source as a means of connecting to a particular scanner, digital camera, or
other TWAIN-controlled device.
If Nikon Scan is your only TWAIN source, it will automatically be available to
your TWAIN-compliant imaging applications. If you have more than one
TWAIN source, before launching the TWAIN driver (usually through the
menu sequence File:Acquire (or Import):TWAIN) you will have to select it
as the default TWAIN source, usually through the File or Preferences menu
of the host application.
Mac OS Users
A Photoshop plug-in is a software program used by Photoshop or compatible
applications to extend the functionality of the original application. In the case
of imaging devices, this means allowing the application to communicate with
a scanner and acquire images. In order for the Nikon Scan Photoshop plug-in
to appear in the menu File:Acquire:Nikon Scan, the Nikon Scan plug-in
must be located in the correct folder on your computer. It should be copied to
the Import/Export folder in the Plugins folder of the host application.
 Loading...