

Page 1
Nikon
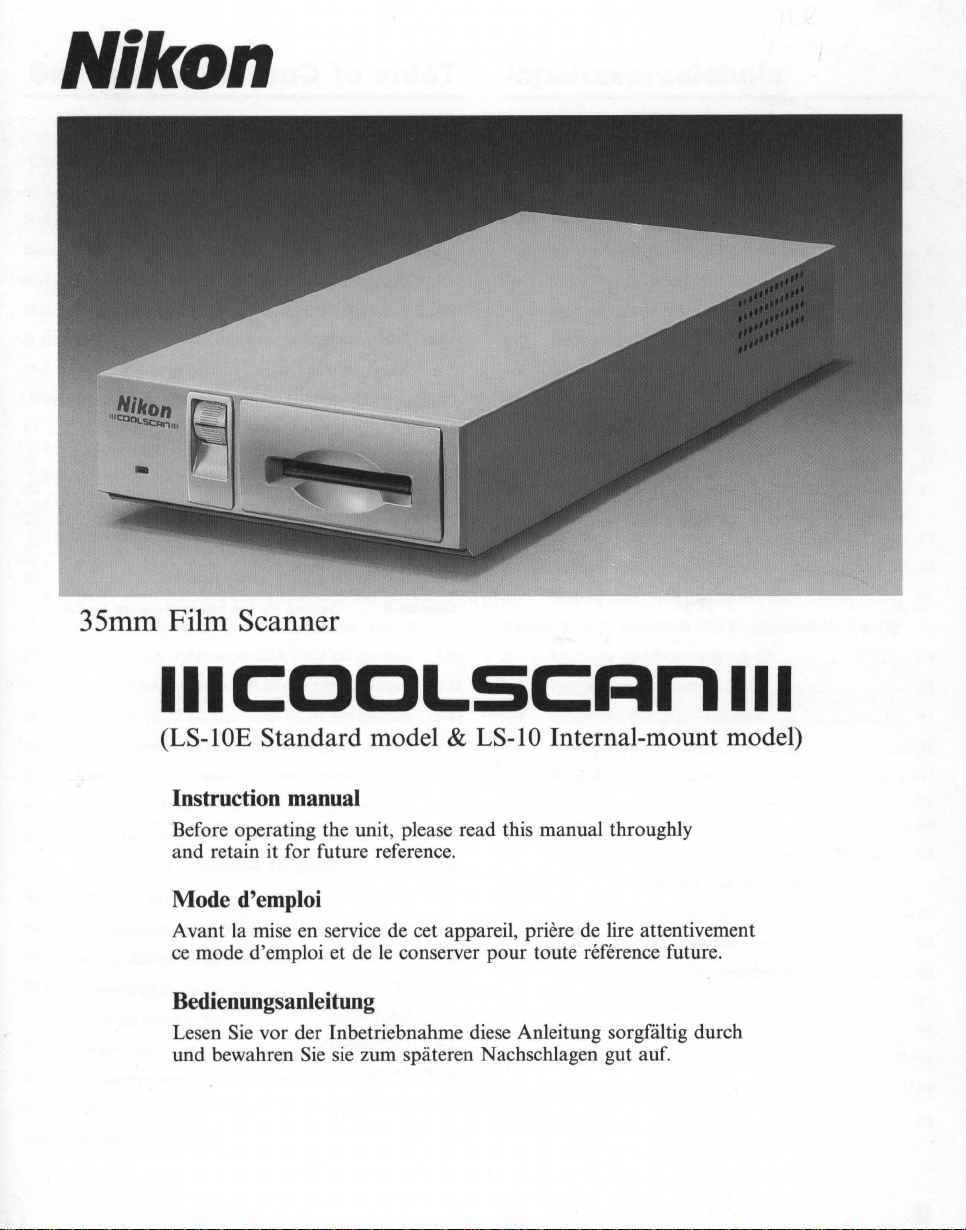
35mm Film Scanner
IllCOOLSCRn
(LS-IOE
Instruction
Before operating the unit, please read this manual throughly
and retain it for future reference.
Mode
Avant la mise en service de cet appareil, priere
ce
mode d'emploi et de
Bedienungsanleitung
Lesen
und bewahren
Standard model &
manual
d'emploi
Ie
conserver pour toute reference future.
Sie
vor der Inbetriebnahme diese Anleitung sorgfiiltig durch
Sie
sie
zum spiiteren Nachschlagen gut
LS-lO
Internal-mount model)
de
lire attentivement
auf
III
.
Page 2
Table
Chapter 1 Getting Started
1-1 Unpacking .....................................
1-2 Checking the Parts
1-3 Components of Internal-mount Model (LS1-4 Components of Standard Model (LS-10E)
1-5 Software Backups ......................................
1-6
1-7 Notes on Use ........................................................ 8
Chapter 2
2-1
2-2 Setting the SCSI
2-3
2-4 Connecting to the
2-5 Setting Up the SCSI Chain ................................. 24
2-6 Setting Up a SCSI Chain with
Chapter 3 Setting
3-1 Setting Up the LS-10 Scanner
3-2 Installing the LS3-3 Setting the SCSI
3-4
3-5 SCSI Cables Used with Internal Scanners ........ 46
3-6 Connecting to the
3-7
Chapter 4 Using the Scanner
4-1
4-2 Operation to Use a
4-3 Operation to Use a Strip Film
4-4 Focus .......................................... ............ .............
4-5
4-6
4-7 TERM.
Specifications ................................................................
of
Content
......
List ........
Minimum
Setting Up the LS-10E
Terminating
Terminating
Setting Up a SCSI Chain with the LS-10
Knowledge
Calibration
LEO
System .................................................. 6
Setting the Standard Model (LS-10E)
10
.............................................
the SCSI Chain ..............................
Computer
Up
(LS-10)
the SCSI Cha in ..............................
of
........................................................... 74
Indicator ......................................................
PWR Switch .............................................
the Internal-mount Model
10
Scanner ..............................
10
............................................. 40
Computer
Films
..........................................
Slide
....................... ......... 4
Scanner
..........................
SCSi .................
the
LS-10E .........
..
.....................
SCSi ..................... 48
Film ...........................
Holder
...........
.... ..
10)
..
......... 6
..
......... 6
....
..... 28
................
. 4
.... 4
14
16
20
22
26
30
46
50
..
52
54
62
70
76
76
78
2
Page 3

Sommaire
Inhaltsverzeichnis
Chapitre 1
1-1
Oeballage .................
1-2 Verification du contenu .
1-3 Pieces du
1-4 Pieces du modele standard (LS-10E) .................. 7
1-5 Copies
1-6 Configuration
1-7 Notes d'utilisation ..............................................
Chapitre 2
2-1
Preparation du
Selection d'iO SCSI
2-2
Terminaison de la chaine SCSI
2-3
2-4 Connexion SCSI a I'unite centrale . . . . . . . . . . . . . . . . . . . . .
2-5 Etablissement de la chaine SCSI
2-6 Integration du LS-10E a la chaine SCSI ......... ...
Chapitre 3 Montage
3-1
Preparation du
3-2 Installation du scanner LS-
3-3 Selection d'iO SCSi ................................. ...........
3-4 Terminaison de la chaine SCSi ................
3-5 Cables SCSI utilises avec des scanners
internes ...............................................................
3-6 Raccordement au port
centrale .
3-7 Integration du LS-
Chapitre 4
4-1
Connaissance des films .................................
4-2 Numerisation de diapositives ....
4-3 Numerisation de film en bande .........................
4-4
Mise
4-5
Calibrage
4-6 Oiode-temoin ..........................
4-7 Interrupteur TERM.
Caracteristiques ......................
Mise en route
............................................. 5
..
..................................... 5
modele
de
sauvegarde
Raccordement
(LS-10E)
interne (LS-10) .......................
du logiciel ....................... 7
minimum
scanner
........................................ 7
du
modele standard
LS-10E
.............. .. .. ............. .........
.........................
. . . . . . . . . . . . . . . . . . . . . . . . .
..
du
modele Interne (LS-10)
scanner
..
........................
Utilisation
au point ......
.............................................................
LS-10 ...........................
10
............................
SCSI
de I'unite
............
....
10
a la chaine SCSi ...........
du
scanner
....
...
.............................................
............................. 77
PWR ..............................
.......
.................... ...........
.. ..
...... ...
...........
...
......
....................
...
....
....
.............
...
....
..
. 9
15
17
21
23
25
27
29
31
41
47
47
49
51
53
55
63
71
75
.. 77
79
Kapitel1 Vorbereltungen
1-1
Auspacken ...........................................
der
1-2 Prufen
1-3 Teile des Einbaumodells (LS-10) .........
5
1-4 Teile des Standard-Modells (LS-10E) ................
1-5 Sicherungskopien
1-6 Gerate-Mindestanforderungen .....
1-7
Allgemeine Hinweise ........................................... 9
Kapitel2
2-1
Aufstellen des externen Scanners LS-10E
2-2
Einstellen
2-3 AbschluB
2-4 AnschluB an die SCSI-Schnittstelle
des Computers .......... ........ ...........
2-5 Aufbau
2-6 Aufbau
Kapitel3
Montage des Scanners LS-10 ....................
3-1
Einbau des Scanners LS-10 ........
3-2
Einstellen
3-3
AbschlieBen
3-4
SCSI-Kabel des Einbau-Scanners .....................
3-5
AnschluB an die SCSI-Schnittstelle des
3-6
Computers .
Aufbau
3-7
Kapitel4
4-1 Grundsatzliches zum Film ..........................
4-2 Verwendung von Umkehrfilm .............................
4-3 Verwendung des Filmstreifenhalters .................
4-4 Scharfeinstellung ................................................
4-5 Kalibrierung ..............................................
4-6
LEO-Anzeige .....................................
4-7 AbschluBstromschalter (TERM.
Technische Daten .........................................
Teileliste ............................ ................. 5
der
Software ........................... 7
AnschluB des Standard-Modells (LS-10E)
der
SCSI-Adresse ............................
der
SCSI-Kette ......... ..........
der
SCSI-Kette ...................... .................
einer
SCSI-Kette
AnschluB des Einbaumodells (LS-10)
der
SCSI-Adresse ................... .........
der
SCSI-Ketle .
.................................................
einer
SCSI-Kette
Bedienung des Scanners
mit
dem LS-10E ....
....
..........................
mit
dem LS-10
PWR)
...
.............. 5
..
.............. 5
.....
................... 7
...
.....
...
........
...
...
......... ............
.....
...
...
.......................
......... 49
....
....
...
....
...
....
.............. 77
...............
....
.............
..
7
15
..
17
21
..
23
25
27
..
29
31
..
41
47
47
51
53
55
63
71
75
77
79
3
Page 4

~
lhliID[lil
U
®1f
11
I
Getting Started
1-1
Unpacking
Care should be exercised when unpacking the
Follow the
installation
1.
2. Check
3.
instructions
procedure
Remove all packaging
and the interface kit.
for
sales
want
damage
shipping
to
you notice any
Nikon
Save all
you
.
while
damage
office
where
and packaging
ship
the
below
before
beginning
materials
unpacking the
, notify the
scanner
from
you purchased the
materials
in the future .
dealer
the
scanner
scanner
or
scanner
the
. If
the
scanner
in case
1-2 Checking the Parts List
Each
scanner
includes
documentation and
scanning
LS-10E packaging
insure
package,
all
of
the
film
. Check the
that you have unpacked
whether
necessary
cabling
components
against
the
to get you to started
internal
hardware, software
following
all
or
in the LS-101
parts
contents.
external ,
list
,
to
1-3 Components of Internal-mount
Model (LS-10)
The internal
items:
1.
Scanner LS-10
2. Strip
3.
SCSI 50-pin
4.
DC
5.
Internal
6. Utility
User's
7.
film
power
software
manual
scanner
holder
flat
cable
cable
mounting
for
package contains the
FH-1
IS-1
IW-1
kit IP-1
MS-Windows
following
.
.
4
Page 5
Mise
1-1
Oeballage
en
route
Vorbereitungen
1-1
Auspacken
Deballez Ie
Respectez les consignes suivantes avant de proceder
I'installation.
1. Enlevez Ie materiau d'
accessoires.
2. Verifiez qu'aucun
constatez un dommage,
revendeur
achete Ie
3. Conservez I'emballage d'
vous
1-2 Verification
L'emballage
Ie materiel , Ie logiciel, la documentation et Ie cablage
necessaires
contenu de
pieces ci-dessous
ete deballees.
1-3 Pieces
scanner
auriez a expedier
pour
I'emballage
et ses accessoires avec precaution .
emballage
element
ou a I'agent Nikon chez qui vous avez
scanner
signalez
.
origine, pour
Ie
du
du scanner interne ou externe contient tout
la
numerisat
du LS-10/LS-
pour
vous
assurer
du
modele interne
du
scanner
n'est
endommage. Si vous
-Ie a votre
scanner
Ie cas
ulterieurement.
contenu
ion des
films
10E
sur
qu 'elles ont to utes
. Pointez
la liste des
et
OU
des
(LS-10)
L'
emballage
suivantes:
1. Scanner LS-
2.
Porte-film
3. Cable en nappe
4. Cable d'alimentation IW-1
5. Necessaire
6. Logiciel
7. Mode d'emploi
du
scanner
10
FH-1
50
de
montage interne
pour
MS-Windows
interne contient les pieces
broches SCSI
IS-1
IP-1
Das Auspacken des Scanners sollte mit groBer Sorgfalt
a
erfolgen. Foigen Sie hierzu den nachstehend
beschriebenen Schritten.
1. Entfernen Sie samtliches Verpackungsmaterial yom
Scanner und
2. Priifen Sie den Scanner beim Auspacken auf
Beschadigungen. Sollten Sie Schaden feststellen,
setzen Sie sich bitte unverziiglich mit Ihrem Nikon
Handler in Verbindung.
3.
Bewahren Sie das Verpackungsmaterial fUr den Fall
einer
1-2
PrOfen
Jedes Scanner-Modell wird
Ie
des Gerates erforderlichen Hardware, Software,
Dokumentation und Verkabelung
Sie sich durch einen Vergleich
Teileliste,
LS-10E
ausgepackt haben.
der
Schnittstelle.
zukiinftigen Versendung des Gerats auf.
der Teileliste
mit
samtiicher
geliefert
daB
Sie samtliche Teile des LS-10 bzw.
mit
zum Betrieb
. Vergewissern
der
nachstehenden
1-3 Teile des Einbaumodells
(LS-10)
Die Verpackung des Einbaumodells des Scanners
enthiilt
die
folgenden Teile:
1. Scanner LS-10
2. Filmstreifenhalter
3. SCSI-Kabel (Flachkabel
Steckverbindern)
4. Gleichspannungskabel
5. Einbausatz IP-1
6. Dienstprogramm
7. Benutzerhandbuch
FH-1
IS-1
IW-1
fiir
MS-Windows
mit zwei 50poligen
5
Page 6
1-4 Components
(LS-10E)
of
Standard Model
The external
items:
1. Scanner LS-10E
2. Strip
3.
SCSI
4. SCSI
5.
AC
6. Plug-in
7. Utility
8.
User's
scanner
film
holder
cable
terminator
power
software
software
manual
package contains the
FH-1
SS-lO
ST-1
cable
PW-2
for
Photoshop
for
MS-Windows
1-5 Software Backups
As with any software, it is
backup
of
the
a safe place.
installing
software
Always
the Nikon
disk
work
software
wise
to make a
and store the
with
the backup copies when
.
1-6 Minimum System
As an absolute
system must have the
1. 386
or
2. 1 Megabyte of
3.
Super
4.
Windows 3.0
5. SCSI Bus
recommended
The
least
4 to 8 megabytes of
color
graphic
As an absolute
system must have the
1.
Most
of
monitor
Powerbook,
2. Apple Macintosh system 6.07
3. 32-bit Quick
4. 4 MB RAM
5. Hard
Color
6.
8-bit
video
7. Adobe Photoshop
minimum
486 Processor
VGA
graphic
or
or
card
adapter
minimum,
of Macintosh models
resolution
II
Draw
(8
disk
(300
display & video
color
reproduction (Full
card
are
, an IBM PC-type
following
memory
card
later
installed
slot
for
computer
memory
.
the Macintosh-type
following
is
, Centris and
MB
is recommended)
MB
is recommended)
card
recommended)
version 1.07
components
the SCSI card included
system
components:
(More
required
Quadra
or
capable
color
following
complete
master
disk
computer
:
should
with a 16- to 32-bit
.), such as
later
or
have at
computer
than 640 x 480 dots
series
.
of
more
display
later
than
& 24-bit
in
6
Page 7
1-4 Pieces
(LS-10E)
du
modele standard
1-4 Teile des Standard-Modells
(LS-10E)
L'emballage
suivantes
1.
Scanner LS-10E
2.
Porte-film
3.
Cable SCSI
4. Bouchon
5.
Cable
Logiciel
6.
Logiciel
7.
8.
Mode d'emploi
du
:
FH-1
de
secteur
additionel
pour
scanner
SS-lO
terminaison
standard contient
PW-2
pour
MS-Windows
SCSI
ST-1
Photoshop
1-5 Copies de sauvegarde
logiciel
Comme
de
de
Travaillez
installez
pour
sauvegarde
ranger
la
disquette d'origine
toujours
Ie
logiciel
tout
logiciel
complete
, il est avise de faire une
de la disquette du
les
dans
copies
lorsque
avec
Nikon.
un
endroit
1-6 Configuration minimum
Pour les
minimum
1.
2. 1
3. Carte
4.
5. Bus SCSI ou fente
II
configuration
dotee
Pour les
minimum
1. La
2.
3. Quick Draw
4. 4
5.
6. Affichage
7. Adobe Photoshop
ordinateurs
est la suivante :
Processeur
Mo
Windows 3.0 ou
est
recommande d'utiliser
d'une
plupart
superieure
moniteur)
et
Quadra
Ordinateur
Mo
Disque
reproduction
"full
recommandes)
386 ou 486
de
memoire
graphique
disposant
carte
graphique
ordinateurs
est
la suivante:
des
a 640 x 480 points
tels
que
Apple
32
de
memoire
dur
(300 Mo recommandes)
couleur
color
couleur
" et une carte
de
type IBM
vive
super
ulterieur
pour
de
Macintosh, la
modeles
les
Macintosh au 6.
bits
vive
et
carte
de plus de 8 bits (un affichage
version 1.07
PC,
la configuration
VGA
installe
la carte SCSI installee
en
pratique
4 a 8 Mo de
couleur
Macintosh (une
series
(8
Mo
video capables
video
une
memoire
de 16 a
configuration
est
requise
Powerbook, II, Centris
07
ou
recommandes)
de 24 bits
ou
ulterieure
les
pieces
du
logiciel
sOr.
vous
vive,
32
bits.
resolution
pour
ulterieur
d'une
sont
copie
et
Ie
Die Verpackung
die
folgenden Teile :
1. Scanner LS-10E
Filmstreifenhalter
2.
3. SCSI-Kabel
4. SCSI-AbschluBwiderstand
5.
Netzkabel PW-2
6. Plug-in-Software
7.
Dienstprogramm
8. Benutzerhandbuch
des
externen Scanner-Modells enthi:ilt
FH-1
SS-lO
fur
fur MS-Windows
ST-1
Photoshop
1-5 Sicherungskopien der Software
Wie bei
einen kompletten Satz Sicherungskopien herzustellen
und
Benutzen Sie
ausschlieBlich
jeder
die
Originale
Software
zur
die
empfiehlt
an einem sicheren
Installation
Sicherungskopien.
es sich auch hier,
Ort
der
aufzubewahren.
Nikon Software
1-6 Gerate-Mindestanforderungen
Der
IBM-kompatible
Mindestanforderungen
1.
Prozessor 386
2. 1 Megabyte
3. Super-VGA-Grafikkarte
4.
Windows 3.0
5. SCSI-Bus
Karte.
Das empfohlene Computersystem sollte mindestens 4
bis 8
MByte
Colorgrafik-Adapter
Der
Macintosh-Computer muB folgende
Mindestanforderungen
1. Die meisten
des
erforderlich),
Powerbook,
2. Apple Macintosh -System ab Version 6.
3.
32-Bit Quick
4. 4 MB
5.
Festplatte (300 MB
6.
Farbdisplay und Grafikkarte,
Farbwiedergabe
(Vollfarben-Display und 24-Bit-Grafikkarte sind
empfehlenswert)
7.
Adobe Photoshop ab Version 1.
Speicher
Monitors
RAM
PC
muB folgende
erfUllen :
oder
486
Speicher
oder
spi:iter
oder
Kartenschlitz fUr
haben.
Macintosh-Modelle
von
wie
II
, Centris und Quadra
Draw
(8
MB
von
installiert
und einen 16- bis 32-Bit-
erfullen:
mehr
als 640 x 480 Punkten ist
z.B.
die
ist
empfehlenswert)
ist
empfehlenswert)
mehr
die
beigefUgte SCSI-
(eine Bildaufl6sung
Modelle
die
als 8
der
fUr
eine
Bit
tauglich sind
07
Serien
07
7
Page 8
1-7 Notes
on
Use
Power source
1.
Always
use the
50-60
Use the
source, and if you use
• the plug must be rated
(NEMA6P-15) .
• the insulation of the cord must be
type, and be a
approved
which it is used.
2. Once the
on until at
3. Don
't
unplug the unit
4.
Don't hold the cord
5. The
6. Don
7. Don't
• Be
• Don't use a
• Don't force the
• When
• Don't
• Don
power
with
other
ground
loop, which can cause
electrical
't
unplug the
carry
sure
a
slide
some
slide
out of the
unmount
touch the internal components because
materials
shock,
to use the
perpendicular
mount is not flat on its surface, you
roughness when
.
scanner
moving
the
disassemble
't
put the
, metals,
damage
power
source
Hz.
power
cord
subject
suitable
under
safety
power
source
least 5 minutes
while
itself
source
instruments
noise,
slide
strip
must be
may
result.
peripherals
the main unit
unit
in a
orientation
mount
more
mounting
slide-mount
if
it
does not move
the scanning stage, don't touch
film
holder
the main unit. It is
things
inside
water
and
misoperation
of
to the voltage of
over
AC125 V:
for
AC250 V
cord
of
regulations
is
etc
at
is turned off, do not turn it
have passed.
the
power
when
unplugging
grounded
indispensable, or
electrical
while
while
the
horizontal
will
cause
than 3
or
or
strip
.
the unit.
.,
will
cause
.
100
- 240 V,
power
15
A
more
than SVT
least
AWG18 and
of the nations in
is on.
the unit.
. A jOint
the
power
orientation
misoperation
mm
unmounting
film
smoothly
dangerous
Flammable
ground
else
shocks and
power
is on.
thick. If
may
feel
holder
into
.
or
of
high-voltage .
fire, electrical
a
is on.
only
.
the
the
or
to
;
8
In
emergency
If you find
smells
unit
or
to the
something
smoke,
dealer
unusual, such as
turn
off the
from whom you purchased it.
power
abnormal
switch
, and take the
noise,
Page 9
1-7 Notes d'utilisation
1-7 Allgemeine Hinweise
Alimentation
1. Utilisez
volts, 50 a 60 Hz.
Utilisez un cordon
d'
• la
(NEMA6P-15).
• I'isolation du cordon
SVT, et la section des conducteurs
egale
pays d'utilisation.
Si vous
125 V:
• la
2. Si vous coupez I'
retablissez
3. Ne
Ie
4.
Ne pas
par
5.
II
connexion
relies
fonctionnement
d'induction
6. Ne
7.
Ne pas
tension
• Le
Si on Ie place
anomalies
• Ne pas
d'
epaisseur
diapositive
parfois
retrait
• Si I'on ressent une
i
ntroduire
• Ne pas
• Ne pas
presente
• Ne pas i
I'
unite
etc
des
En
Si
vous
fumee, coupez
scanner a votre
toujours
alimentation, et
125 V:
prise
doit
un secteur
si cette tension est
etre
aux
a AWG18, et Ie
utilisez
prise
debranchez
scanner
Ie cordon.
est
necessaire
entre
jamais
scanner
utiliser
une resistance
de
toucher
demonter
ntroduire
centrale
.,
peuvent
dommages
cas d'urgence
trouvez
une tension
do it etre aux
alimentation
pas avant cinq
pas Ie cordon d'
est sous tension.
brancher
deplacer
.
.
ne repose pas a plat, I'on
la
ou
un
et
de
de
terre
eux est
; sinon, cela peut
generatrice
debrancher
I'unite
doit
reposer
verticalement
de
montures
superieure
diapositive
telle
retirer
Ie porte-film pendant la
I'unite
danger
de
. Des objets inflammables, metaux, eau,
provoquer
et des
quelque
I'alimentation
revendeur.
secteur
normes
doit
cordon
normes
debrancher
relier
concentree
indispensable
de
un
centrale
sur
a 3 mm. Si la monture de la
lors
de
.
resistance, ne pas
la
diapositive
centrale
mortel.
corps
etrangers
un
incendie
anomalies
chose
compris
approprie
etre
egale
minutes
Ie
scanner
parasites
peripherique
une surface horizontale.
, ceci se
de
I'introduction
d'anormal, bruit, odeur
et faites
entre
100
a la tension
superieure
250 V 15 A
superieure
d'un type
ou
AC125 V
du
scanner
alimentation
la
par
former
lorsqu '
diapositives
ou Ie porte-film.
. La haute tension
, une electrocution ,
.
au type
superieure
agree
inferieure
10
A.
, ne la
.
prise
en la
a la
tous les
pour
un bon
une boucle
.
sous tension.
elle
traduira
ressentira
ou du
forcer
numer
a I'
interieur
parvenir
terre
appareils
est sous
par
isation .
Ie
et
ou
dans Ie
a
lorsque
tenant
. La
des
240
a
pour
de
,
Spannungsquelle
1.
Das von Nikon
einschliigigen
Sicherheit. Wenn Sie ein
verwenden , achten Sie auf das Vorhandensein des
VDE- bzw. TOV-Priifzeichens. Die
und
15 A diirfen
2.
Nach dem Ausschalten des Geriites miissen
mindestens
Geriit
erneut
3. Der Netzstecker
gezogen werden .
4. Fassen Sie das Netzkabel zum Trennen
Verbindung
direkt
am Kabel!
5. Der NetzanschluB muB unbedingt
Erdung
unerliiBlich , da sonst eine Erdschleife entsteht,
zu
elektrischen Schliigen und Rauschen fiihren kann.
6. Die Verbindung zu Peripheriegeraten
ausgeschaltetem
7. Das
• Das
• Die
• Bei Einlegen
• Wah rend des Scannens
•
• Das
In
Schalten Sie das
Geriiuschunverziiglich
Kundendienst.
Geriit
transportiert
Geriit
werden . Bei
Betriebsablauf
maximal
3 mm. Falls
flach
ist
, kann
Dias manchmal nicht ganz reibungslos ablaufen.
Filmstreifenhalters
vermeiden
weder
beriihrt
Jeder
Eingr
Hochspannung
Geriiteinnere
Beriihrung
Materialien
Geriiteschiiden
einem Notfall
, Geruchs-
mitgelieferte
Bestimmungen
nicht unterschritten werden!
fiinf
Minuten verstreichen,
eingeschaltet
darf
grundsiitzlich
ist
beim Betrieb
Gerat
darf
nur
in ausgeschaltetem Zustand
werden.
darf
nur
in
vertikaler
zuliissige
die
oder
.
iff in das
kommen. Metall, Wasser und
konnen Feuer, elektrische
ab und
horizontaler
nicht
gewiihrleistet.
Oberfliiche
das
Einsch ieben
Entnehmen des Dias
ist
jede
noch entnommen werden.
Geriit
droht
Lebensgefahr!
darf
oder
Betriebsstorungen verursachen.
Geriit
im Faile
oder
verstiindigen
Netzkabel entspricht den
iiber
anderes
Priifwerte
wird
.
nur bei ausgeschaltetem
nur
am Stecker,
mit
unterbrochen werden.
Aufstellung ist ein
Dicke von Diariihmchen betragt
des
Gewaltanwendung zu
darf
ist
nicht
Rauchentwicklung
geerdet
anderen Geraten
Stellung betrieben
Diariihmchens
oder
der
Filmstreifenhalter
zu unterlassen . Durch
mit
Fremdkorpern in
ungewohnlicher
Sie den Nikon
die
elektrische
Netzkabel
bevor
der
darf
fehlerfreier
Auswerfen des
oder
brennbare
Schliige
250
das
Geriit
niemals
sein
. Die
die
nur
bei
nicht
,
V
9
Page 10

Safety regulation
Hinweis:
Dieses Gerat entspricht
Sicherheitsnorm EN60950, hat
und
erflillt
die
Sekundarstrahlung. Dieses Gerat sollte
Ausrlistung eingebaut werden,
(TOV,
f-Marke usw.) entspricht.
Norm-Vfg 243/1991 Klasse B fUr unnotige
der
europaischen
die
die
GS-Marke erhalten
nur
denselben Normen
in
For regular use
Avoid using and storing the scanner in locations
are
:
* extremely hot
*
near
heat sources
* exposed to moisture
* exposed to hard vibration.
Avoid hard physical shocks to the main unit.
Note
on
When transporting the main unit, always use
packaging materials in which the main
when you purchased it. The focus dial must be turned
downward to the end before packing . If you have lost the
packaging materials, use materials designed to protect
precision instruments from vibration and physical
shocks . Be especially careful when using
service.
or
cold . (from +10 to +35*
or
in
direct
or
dust.
transportation
sunlight.
unit
C)
air
the
was
or
that
packed
courier
10
Taking this product out
The use of this product may violate local
restrictions in some countries. If this is the case , we can
not
bear
from the use of this product. Note that, in
countries, this product can be made to conform with
regulations through an internal adjustment. Therefore,
before taking this product out of the country ,
with
any responsibility for any
your
service representative.
of
country
violations
laws
some
consult
and
resulting
Page 11
Reglementations de securite
Hinweis
Dieses Gerat entspricht
Sicherheitsnorm EN60950, hat die GS-Marke erhalten
und erfUlit die Norm-Vfg 243/1991 Klasse B fUr unnotige
Sekundarstrahlung. Dieses
Ausrustung eingebaut werden,
(TOV,
:
f-Marke usw.) entspricht.
der
europaischen
Gerat
sollte
nur
die
denselben Normen
in
Conditions d'utilisation normales
Evitez d'
conditions ci-dessous:
• froid ou
• pres d'une source de chaleur, ou sous la
• dans des endroits excessivement poussiereux ou
• dans des conditions
Manipulez
chocs.
utiliser
de
+10 a +35' ).
solaire
directe.
humides
et de stocker Ie scanner dans les
chaleur
extremes (temperature recommandee
lumiere
de
fortes vibrations.
Ie
scanner avec precautions, et evitez les
Remarques sur Ie transport
Si
vous devez
materiaux d'
lesquels Ie
point
au
I'emballage
d'emballage
identiques, qui
vibrations. Soignez
les expeditions par
Utilisation de ce produit
L'utilisation
reglementation et aux restrictions locales
pays. Dans
etre engagee pour toute infraction resultant
I'utilisation de ce produit. Notez, toutefois , que, dans
certains pays, il est possible de rendre ce produit
conforme
Avant d'utiliser
donc
a votre agent de service apres-vente.
expedier
emballage
scanner
doit
etre positionnee a fond vers Ie bas avant
. Si vous ne disposez plus des materiaux
d'origine,
amortissent
de
ce produit peut
un
tel cas, notre responsabilite ne
Ie
scanner
et
Ie conditionnement avec
vous a ete livre. La molette de mise
procurez vous des materiaux
particulierement I'emballage
Air
ou Poste.
, utilisez les
les chocs
it
contrevenir
et
absorbent les
pour
I'etranger
a la
de
certains
saurait
de
a la reglementation par un reglage interne.
ce produit a
I'etranger
, adressez-vous
Sicherheitsbestimmung
Hinweis:
Dieses Gerat entspricht
Sicherheitsnorm EN60950, hat die GS-Marke erhalten
und erfUlit
Sekundarstrahlung. Dieses Gerat sollte
Ausrustung eingebaut werden, die denselben Normen
(TOV
1m
Vermeiden Sie die Benutzung bzw. Aufbewahrung des
Scanners unter den nachfolgend aufgefUhrten
Bedingungen.
•
An
bis +35 ·
•
In
Sonnenlicht.
• Bei
• Bei starken Schwingungen.
Schutzen Sie das Gerat vor Schlagen.
die
Norm-Vfg 243/1991 Klasse B fUr unnotige
, f-Marke usw.) entspricht.
Normalbetrieb
sehr
heiBen
C).
der
Nahe von Hitzequellen
sehr
hoher Feuchtigkeit oder starkem Staub.
der
europaischen
nur
oder
kalten Orten (auBerhalb von +10
oder
im direkten
in
Transporthinweise
Versenden
Originalverpackung. Die Feinfokussierung
Einpacken ganz nach unten gedreht werden . Sollte
Originalverpackung nicht
auf besonders widerstandsfahige Verpackung zu achten,
wie
besonders
Spediteur.
Benutzung dieses Produktes
Sie das Gerat ausschlieBlich in
mehr
zur Verfugung stehen, ist
sie fUr Prazisionsgerate geeignet ist. Dies
fUr
den Versand auf dem Luftwege oder per
seiner
muB
im
vor dem
die
gilt
Ausland
Der Betrieb dieses Produktes kann in einigen Landern
gegen die ortlichen Gesetze und Bestimmungen
verstoBen . So lite dies
keinerlei Haftung fur etwaige VerstoBe, die auf den
Betrieb dieses Produktes zuruckzufuhren sind . Wir
weisen darauf hin,
Einstellung an diesem Produkt notwendig sein kann, urn
es den geltenden Bestimmungen anzupassen. Wenden
Sie sich
dieses Produkt ins Ausland mitnehmen.
daher
der
Fall sein, so ubernehmen
daB
fur
einige Lander eine interne
an
Ihre Kundendienststelle, bevor Sie
wir
11
Page 12

Note on installation
1. Turn off the
LS-10
turn off the switch on the computer .)
2. Turn off the
(printer
3. Move the key to the unlock position if the computer
has a key-lock mechanism.
4. Unplug all the cables, including the
5.
Remove the cover of computer as described in the
manual.
6. Remove the
manual.
Warnlngl
Electro.taUc discharge
you touch the scanner'. connector pin
touch the pin
power
is not provided with a
, display) connected to the computer.
switches
power
switches
cover
of the bay as described in the
for
the equipment. (The
power
switch. Always
for
all the devices
power
will damage the scanner If
•.
•.
Do not
cords.
12
Page 13
Remarques sur I'installation
1. Mettez
2. Mettez tous les
3. Mettez Ie cas
4.
5. Deposez Ie capot de I'unite centrale selon les
6. Deposez Ie capot du
Attentlonl
Une decharge d'61ectrlclt6 statlque peut gravement
endommager les circuits du scanner. Ne touchez
Jamals les broches
I'interrupteur
(Le LS-10 ne dispose pas d'un
toujours I'alimentation de I'unite centrale .)
peripMriques
centrale
centrale
Deconnectez to us les cables
y
instructions de son mode
du mode d'emploi.
compris
sur
Arret.
sur
deverrouillage.
Ie cable secteur.
des
peripheriques
interrupteurs
(imprimante
ecMant
du
, ecran) relies a I'unite
la cle de securite de I'unite
relies
d'emploi.
logement
connecteur du scanner.
interrupteur
sur
de tous les
a I'unite centrale ,
selon les instructions
Arret.
: coupez
Installationshinweise
1. Schalten Sie die Hauptschalter
(Der LS-10 besitzt keinen eigenen Hauptschalter.
Schalten Sie das Gerat stets
des Computers aus .)
2. Schalten Sie auch samtliche an den Computer
angeschlossenen Peripheriegerate aus (Drucker,
Monitor
3. Sofern
werden kann,
4. Trennen Sie den Computer von
und entfernen Sie
Kabel.
5.
Entfernen Sie das Computergehause
Computer-Handbuch beschrieben .
6.
Entfernen Sie die Abdeckung des Laufwerkschachts
wie
Achtungl
Vermelden Sle
Elne elektrostatlsche Entladung kann das
beschldlgenl
usw.).
der
Computer
im Computer-Handbuch beschrieben.
Jede
muB
er
aile
Beriihrung
mit
geoffnet werden.
von auBen eingesteckten
der
mit
dem Hauptschalter
Schlussel
der
der
Steckerkontaktel
Gerate aus.
verr
iegelt
Netzspannung
wie
im
Gerlt
13
Page 14
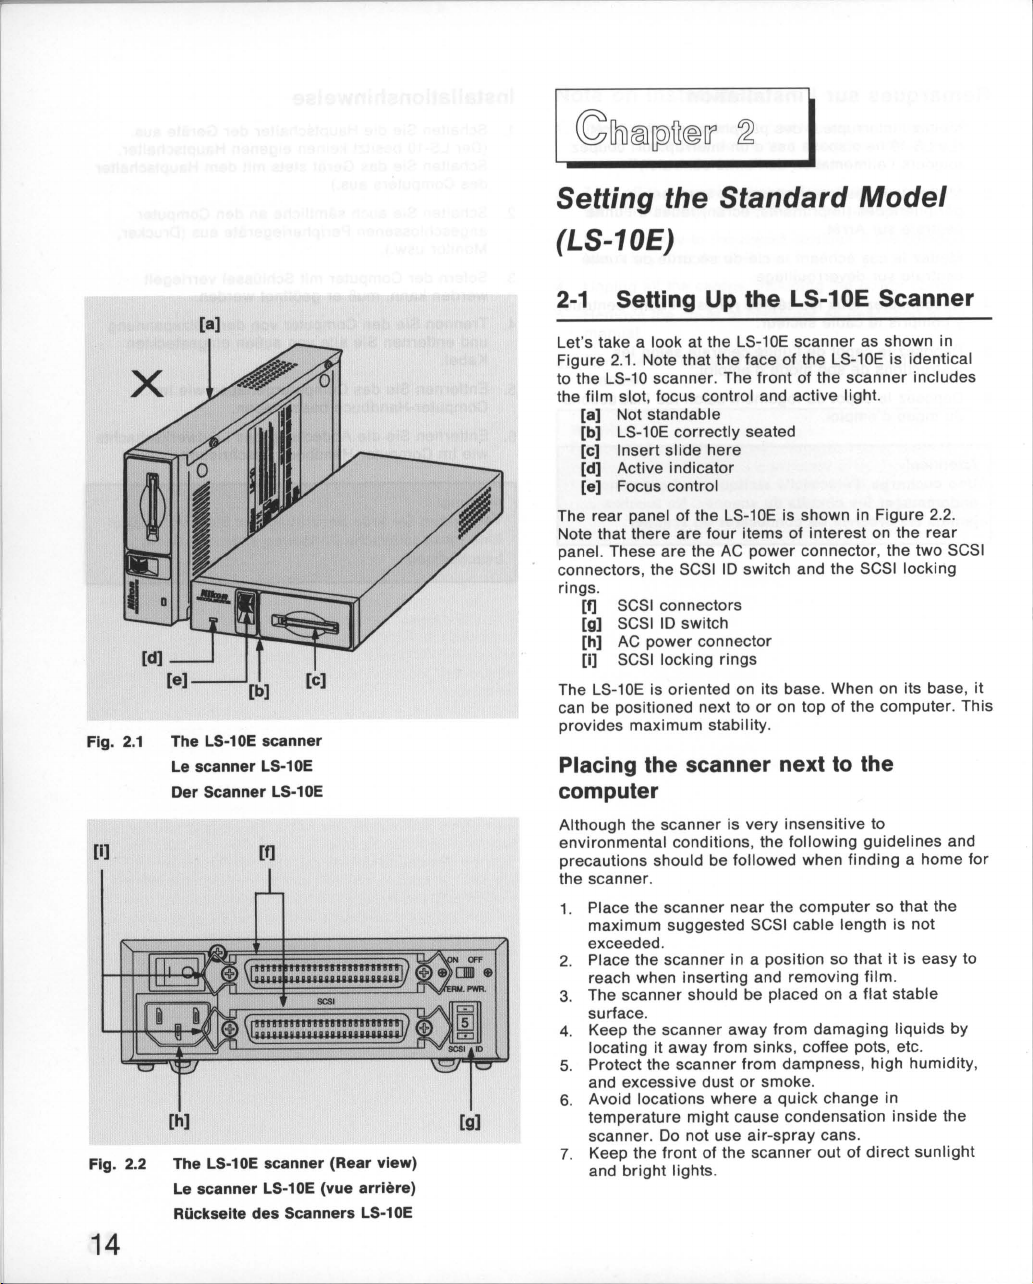
~1li®[pJfi®1l'
~
I
[8]
Fig.
2.1
The LS·10E scanner
Le scanner LS·10E
Der Scanner LS·10E
[I]
[h)
Fig. 2.2 The LS·10E scanner (Rear view)
Le scanner LS·10E (vue arriere)
Riickselte des Scanners LS·10E
[f]
[g)
Setting the Standard
Model
(LS-10E)
2-1
Setting Up the LS-10E Scanner
Let's take a look
2.1
Figure
to the LS-10 scanner. The front of the
the film
The rear panel of the LS-10E is shown in Figure 2.2.
Note that there
panel. These are the
connectors, the SCSI
rings.
The LS-10E is oriented on its base . When on its base,
can be positioned next to
provides maximum stability .
slot
[a] Not stand able
[b]
LS-10E
[c] Insert
[d] Active indicator
[e] Focus control
[f]
SCSI connectors
[g]
SCSI
[h]
AC
SCSI
[I]
Placing the scanner next
computer
Although the scanner is very insensitive to
environmental conditions, the
precautions should be followed when finding a home
the scanner.
1. Place the scanner
maximum suggested SCSI cable length is not
exceeded.
2. Place the
reach when inserting and removing
3. The scanner should be placed on a flat stable
surface.
4. Keep the scanner
locating it away from sinks, coffee pots, etc.
5. Protect the
and excessive dust
6. Avoid locations
temperature might cause condensation inside the
scanner.
7. Keep the
and
bright
at
. Note that the face of the LS-10E is identical
power
the LS-10E scanner as shown in
, focus control and active light.
correctly seated
slide
here
are
four items of
AC
power
10
switch and the SCSI locking
10
switch
connector
locking rings
or
on top of the
near
the
scanner
Do
front
in a position so that it is easy to
away
from
scanner
lights.
from dampness ,
or
smoke.
where
a quick change in
not use
air-spray
of the scanner out of
scanner
interest
connector, the
to
the
following
computer
guidelines
film
damaging
high
cans.
direct
includes
on the
rear
two
computer
so that the
.
liquids
humidity,
sunlight
SCSI
. This
and
by
it
for
14
Page 15
I
Raccordement
du
modele
standard (LS-10E)
2-1
La version du
2.1. Notez que la face avant des versions LS-10E
LS-10 est
scanner
d'activite, et la molette de mise au point.
La figure
trouvent la
connecteurs SCSI, Ie selecteur d'
verrouillage
Le
Preparation
scanner
str
ictement identique. La face avant du
regroupe Ie
[a] Ne pas
[b] LS-10E
[c] Inserez
[d] Voyant d'activite
[e] Molette
[f] Connecteurs SCSI
[g] Selecteur d'
[h] Prise
[I] Clips de verrouillage
scanner
peut alors etre place a
Ceci procure une
utiliser
correctement
la
diapositive
de
2.2
montre
prise
de
.
de
raccordement au secteur
LS-10E
stabilite
Emplacement du scanner pres de
I'unite centrale
Bien que Ie
fortement recommande de respecter autant que possible
les indications su ivantes lorsqu 'il a ete decide de son
emplacement.
1. Placez Ie scanne r pres de I'unite centrale , sans
depasser la
2. Placez
Ie retrait des diapositives et du porte-film soient
facile.
3. Le scanner
reguliere
4. Veillez
projections de liquide. Eloignez-Ie des
cafetieres, etc.
5. Evitez I'humidite , I'eau, la poussiere excessive
fumee.
6. Evitez les endroits presentant un risque
condensation. N'utilisez
notamment en bombes,
7.
Evitez que les rayons
violent
scanner
longueur
Ie
scanner a un
doit
.
a ce que
, ne tombent
du
scanner LS-10E
LS-10E est representee figure
logement
en position verticale
mise au
la face
raccordement au secteur, les deux
IO
SCSI
doit
so it
reposer
Ie
du
film
, Ie voyant
en
place
ici
point
arriere
du LS-10E: s'y
IO
SCSI et les clips de
etre utilise a I'horizontale .
proximite
tres
scanner ne
directement
de ou
maximale
bien protege, iI est
de
cable SCSI recommandee.
endroit
sur
jama
pour
solaires
sur
.
tel que I'insertion
une surface plane et
soit
pas expose a des
is d'
air
com
Ie depoussierer.
, ou un
sur
la face avant.
et
I'ordinateur.
eviers
,
de
prime
eclairage
II
,
et
et
la
AnschluB des Standard-
Modells (LS-10E)
2-1
Aufstellen des externen
Scanners LS-10E
Schauen
externen Scanner LS-10E an. Die Vorderseite dieses
Gerats ist mit
An
Feinfokussierung und
Die ROckseite des LS-10E ist in 2.2 abgebildet. Sie
enthalt vi
die beiden SCSI-Steckverbinder, den SCSIAdressenschalter und
Oer externe Scanner (LS-10E) muB horizontal aufgestellt
werden. Somit kann
stehen , so daB maximale Stabilitat gewahrleistet ist.
Aufstellung des Scanners neben dem
Computer
Wenngleich
den Umgebungsverhaltnissen ist, sollten bei
des Aufstellungsorts folgende Kriterien in Betracht
gezogen werden.
1. Stellen Sie den Scanner so nah am Computer auf,
2. Stellen Sie den Scanner so auf ,
3. Stellen Sie den Scanner auf
4. Stellen Sie den Scanner auBer Reichweite von
5. SchOtzen Sie den Scanner vor Nasse, Feuchtigkeit,
6. Vermeiden Sie Aufstellungsorte,
7. SchOtzen Sie die Vorderseite des Scanners
wir
uns zunachst den in Abb . 2.1 dargestellten
jener
der
Vorderseite befinden sich
[a] Nicht hochkant stellen
[b] LS-10E in korrekter Lage
[c] Schlitz zum Einlegen des Oias
[d] Kontrollampe
[e] Feinfokussierung
er
Elemente: den AnschluB
[f] SCSI-Steckverbinder
[g] SCSI-Adressenschalter
[h] NetzanschluB
[I] SCSI-Klemmen
daB
die
Kabels nicht Oberschritten wird .
und Entnehmen des Films leicht zu erreichen ist.
Flache auf.
schiidlichen FIOssigkeiten auf, d.h. keinesfalls in
Nahe von AusgOssen, Kaffeemaschinen usw.
Staub und Rauch.
Temperaturschwankungen
fUhren k6nnten. Verwenden Sie keine SprOhdosen.
vorgeschriebene
Kondenswasserbildung innerhalb des Scanners
direktem Sonnenlicht und starken Kunstlichtquellen.
des Einbaumodells LS-10 identisch.
die
die
er
neben oder auf dem Computer
der
Scanner recht unempfindlich gegenOber
der
Kontrollampe.
SCSI-Klemmen.
Maximallange
Filmschlitz,
fOr
daB
einer
ebenen , stabilen
an
zur
den Netzstecker,
der
des SCSI-
er
zum Einlegen
denen plotzliche
die
Wahl
vor
der
15
Page 16
Connecting
The
scanner
grounding
outlet. Intended to be a safety feature, the
connector should not be removed . Use of a
protected
scanner
computer
Always
when
1. The
2.
3. The
4. The case of the
5. The case is opened.
6.
would
remove
anyone
power
Any
liquids
scanner
You think the
requires
AC
power
plug. This plug
power
.
cord
source
ideally
the
power
of
the
cord
or
are
spilled
is exposed to
scanner
scanner
repair
.
following
power
be turned on and off with the
plug becomes
to
the scanner
is a standard
will
fit
only a grounded
is
highly
recommended
cord from the AC
occurs
:
damaged
into the
is not functioning
excessive
has
become
scanner
three-wire
moisture
damaged
AC
grounding
transient
. The
source
.
.
.
.
properly
and
2-2 Setting the SCSI
Up to
eight
each identified by SCSI
have a value between 0 and 7.
regulations
Typically, the
number
through 7.
A
minimum
this case, one is designated as the
other
configurations of
than one
typical configuration is one
targets. The LS-10/LS-10E
the case we show
computer.
The SCSI
the SCSI peripherals. The
the factory is
devices can
regarding
computer
0,
while
of
two
is the target. It is
initiator
10
is
typically
10
the use
the SCSI
devices
initiators
can be
below
#5.
share
a SCSI
10
numbers
There
of
controller
possible
set
these numbers.
peripherals
must
sit
to have
and
targets
present
there
on a SCSI bus. The
initiator
scanner
is
by a switch on the
default
10
device
. Thus , a SCSI
would be SCSI
on any SCSI bus. In
initiator
and one
is
only
SCSI
. These
are
no
implicit
would be 1
while
many
on a bus .
or
always
a target. In
one
initiator
10
number
More
more
rear
10
10
the
set
of
are
can
the
of
at
16
Page 17

Raccordement
Le cordon d'alimentation
cordon type
doit
etre utilise
mesure de securite, la connexion
doit
jamais
d'un
recommandee. Idealement, Ie
so us tension
Toujours commencer
d'alimentation
1.
Le cordon est
2. Le scanner a
3. Le scanner presente des traces d'
4. Le boWer du
5. Le boWer du
6. Le
et
pour
etre
filtre
secteur
et
scanner
necessite une reparation.
2-2 Selection
Huit dispositifs SCSI peuvent etre relies simultanement
a un SCSI.
qui peut
regie absolue dans I'affectation des ID SCSI. On attribue
generalement
centrale, les
SCSI.
Un
raccordes
dispositifs est qualifie de
est possible de raccorder a un bus SCSI
dispositifs maltres en
dispositifs esclaves. La configuration la plus frequente
est
dispositifs esclaves . Le scanner LS-10/LS-10E est
toujours
seulement
a
L'ID SCSI se choisit
commutateur
L'
ID
lis
prendre
ID
minimum
toutefois un
SCSI par defaut est
de deux dispositifs SCSI
a
un
un
esclave. Dans Ie cas indique ci-dessous,
un maitre
au
secteur
trifilaire
raccordement aux
sur
des prises raccordees a la
interrompue
supprimant
hors tension avec
par
du secteur dans les cas suivants:
rec;:u
scanner
scanner
ne
deconnecter Ie cordon
abime
ou la
du liquide accidentellement.
est
est
semble
d'ID
sont identifies
les valeurs de 0 a
1'10
SCSI 0 au contr61eur de I'unite
1 a 7 etant destinees aux peripheriques
bus SCSI. Dans ce cas, un des
dispositif
situe a
maitre
meme
maitre
de
generalement
I'arriere
ID
du scanner est un
prises
de terre.
de
ou
endommage.
ouvert
pas fonctionner correctement
mise a la
supprimee
les
transitoires
scanner
I'ordinateur
prise
est endommagee .
humidite
.
. L'utilisation
est
devrait
etre mis
.
.
terre
terre
SCSI
par
un numero , I'ID SCSI,
7.
II
n'y a pas de
doivent
, et I'
autre
temps que
raccorde a plusieurs
I'unite centrale.
etre
d'esclave.
plusieurs
plusieurs
a I'aide d'un
des
peripMriques
5.
SCSI.
II
. Par
ne
II
iI
NetzanschluB des Scanners
Das Netzkabel des Scanners ist
Erdungsstecker versehen,
Steckdosen paBt.
SicherheitsmaBnahme han de It, sollte diese keinesfalls
umgangen werden. Die Verwendung
SpannungsstoBe abgesicherten Spannungsquelle
dringend
zusammen mit dem Computer ein- und ausgeschaltet
werden.
Ziehen Sie den Netzstecker des Scanners in den
folgenden Fallen:
1.
2. Wenn
3.
4. Wenn das Gehause des Scanners schad haft
5. Wenn das Gehause geoffnet werden soil.
6. Wenn
empfohlen.
Wenn das Netzkabel oder
ist.
Beruhrung gekommen ist.
Wenn
ausgesetzt ist.
geworden ist.
scheint und instandgesetzt werden muB.
2-2 Einstellen
Bis
zu
acht Gerate konnen sich eine SCSI-Schnittstelle
teilen. Jedes Gerat
zwischen 0 und 7 liegen kann. Fur
dieser
Zahlen gibt es keine festen Vorschriften.
Normalerwe
im Computer reserviert, wah rend die SCSI-
Peripheriegerate die Nummern 1 bis 7 erhalten.
Mindestens zwei Gerate mussen sich auf jedem SCSIBus befinden . Dann
Nebengerat. Viele verschiedene Konfigurationen von
y
Haupt- und Nebengeraten sind auf einem Bus moglich .
Auch
mehr
SCSI-Bus befinden. Bei
handelt es sich urn ein Hauptgerat und ein oder
mehrere
Nebengerat.
Hauptgerat.
Die SCSI-Adresse wird im allgemeinen
Schalter an
eingestellt.
Adresse eingestellt.
Nebengerate. Der LS-10/LS-10E ist
Da
es sich bei
1m
Idealfall sollte
der
Scanner
der
Scanner ubermaBiger Feuchtigkeit
der
Scanner nicht einwandfrei zu funktionieren
mit
der
erhalt
ise ist die
als ein Hauptgerat kann sich auf einem
In
der
1m
Nummer
gilt
eines als Haupt-, das andere als
der
unserem gezeigten Fall gibt es
Ruckseite
Werk wird
mit
der
einer
einem dreipoligen
nur
in geerdete
der
Erdung urn eine
einer
der
Netzstecker schad haft
Flussigkeit in
SCSI-Adresse
dabei eine SCSI-Adresse, die
der
die
die
Verwendung
0 fUr den SCSI-Controller
typischen Konfiguration
SCSI-Peripheriegerate
Nummer 5 als SCSI-
der
mit
gegen
Scanner
immer
nur
einem
wird
ein
ein
17
Page 18
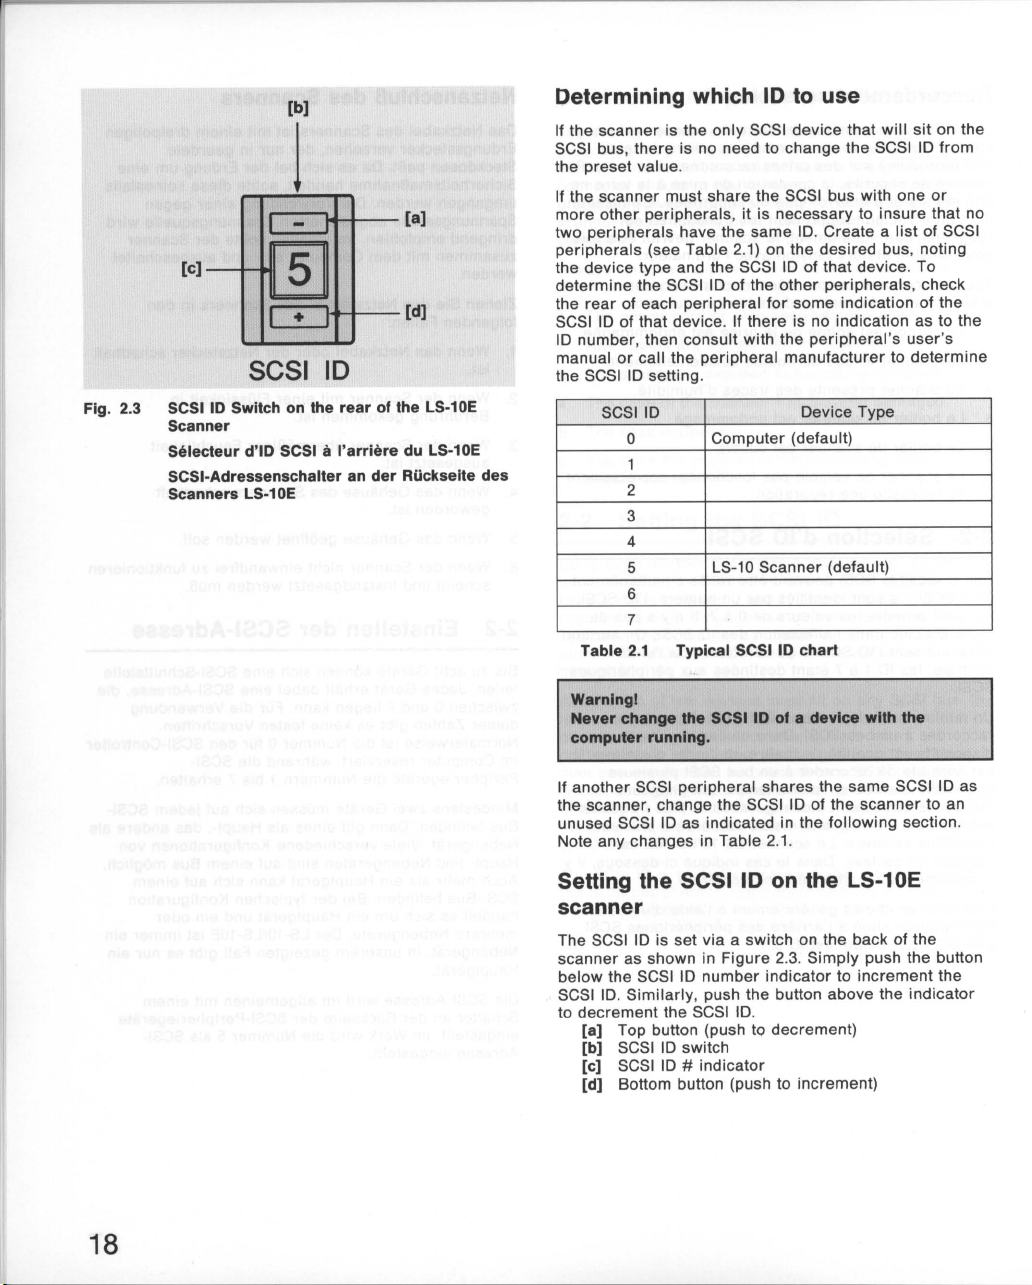
Fig.
[C]-~HI
SCSI
2.3
SCSI ID Switch on the
Scanner
Selecteur d'iO SCSI
SCSI-Adressenschalter an
Scanners
LS-1
[b)
J
I~_::-"W-
.+--
5
r
••
1+-
.+--
10
rear
of the LS-10E
Ii
I'arriere
DE
der
[a]
[d)
du LS-10E
Riickseite des
Determining
If
the scanner is the
SCSI bus , there is no need to change the SCSI
the preset value .
If the scanner must share the SCSI bus with one
more
other
two
peripherals
peripherals
the device type and the SCSI
determine
the
rear
SCSI
10
manual
the SCSI 10 setting.
of each peripheral for some indication of the
10 of that device . If there is no indication as to the
number
or
SCSI
o
2
3
4
5 LS-10 Scanner (default)
6
7
Table
2.1
which
peripherals
have the same 10. Create a
(see Table 2.
the SCSI 10 of the
, then consult with the
call the peripheral manufacturer to
10 Device Type
Typical SCSI
10
to
use
only
SCSI device
, it is necessary to insure that no
1)
on the desired bus, noting
10
other
Computer (default)
10
that
of
that
device. To
peripherals
peripheral's
chart
will
list
user
determine
sit
on the
10 from
or
of SCSI
, check
's
18
Warnlngl
Never
change the SCSI 10
computer
If another SCSI peripheral shares the
the scanner, change the SCSI
unused SCSI
Note any changes in Table 2.1.
running.
10 as indicated in the
Setting the SCSI 10 on
of a device
10 of the
following
the
with
the
same
SCSI 10 as
scanner
section.
LS-10E
scanner
The SCSI 10 is set via a switch on the back of the
scanner as shown in Fi
below the SCSI
SCSI
10
.
to decrement the SCSI 10.
Similarly
[a]
Top button (push to decrement)
[b]
SCSI 10 switch
[c]
SCSI 10 # indicator
[d]
Bottom button (push to increment)
gure
10
number
, push the button above the
2.3. Simply push the button
indicator to increment the
indicator
to an
Page 19
Determination de
Si Ie scanner est
SCSI, il est inutile de
Si Ie scanner
d'autres
peripMriques
deux
Etablissez une liste de vos peripheriques sous la forme
du
tableau 2.1.
L'
IO
SCSI peut etre relevee
plupart
d'indication de numero d'IO, consultez
respectives ou contactez Ie fabricant ou distributeur.
ID SCSI Equipement
doit
peripMriques
des peripheriques. Si vous ne trouvez pas
0 Unite centrale (par defaut)
1
2
3
4
1'10
Ie
seul
peripherique
modifier
cohabiter
, il est necessaire de
ne reC(oivent pas la
cette
sur
Ie bus SCSI avec
sur
la face
connecte au bus
10
prereglee
verifier
meme
10
arriere
de
leurs
notices
.
que
SCSI.
la
5 Scanner LS-10 (par defaut)
6
7
Tableau
AUentlonl
Ne Jamals modUler
pendant Ie foncllonnement de
Si
un autre
scanner
une
suivantes. Notez ces modifications dans
, modifiez 1'
10
SCSI
2.1
Tableau
1'10
peripMrique
10
libre
comme
10
SCSI
SCSI d'un perlph'rlque
I'unlt.
centrale.
SCSI a la meme
SCSI du
scanner
indique dans les sections
10
pour
Ie
SCSI que
lui
attribuer
tableau 2.1.
Ermittlung der einzustellenden Adresse
Wenn
der
SCSI-Bus ist, besteht keine Veranlassung , die
eingestellte SCSI-Adresse zu iindern.
MuB sich
Peripheriegeriiten den SCSI-Bus teilen,
sichergestellt werden, daB
doppelt vergeben sind. Machen Sie deshalb eine
Aufstellung
2.1) auf dem betreffenden Bus,
Geriitetypen und SCSI-Adressen zu entnehmen sind.
die
festzustellen , uberprufen Sie die Ruckseite jedes
Peripheriegeriites auf das Vorhandensein
Adressenanzeige.
schlagen Sie bitte im Handbuch des betreffenden
Peripheriegeriits
Geriitehersteller
Ie
Achtungl
Andern Sle die Elnstellung der SCSI-Adre
kelne.falls bel laulendem Computerl
Scanner das einzige SCSI-Geriit auf dem
der
Scanner
der
SCSI-Adresse
SCSI-Adresse Geriitetyp
0
1
2
3
4
5
6
7
Tabelle
2.1
mit
einem
oder
mehreren
die
Adressennummern nicht
SCSI-Pheripheriegeriite (siehe Tabelle
anderer
1st
eine Adresse nicht bekannt,
nach oder konsultieren Sie den
.
Computer (Vorgabe)
Scanner LS-10 (Vorgabe)
Aufstellung der SCSI-Adressen
der
die entsprechenden
Peripheriegeriite
muB
einer
••
Urn
SCSI-
e
Selection d'ID SCSI sur Ie Scanner
LS-10E
L'
IO
SCSI est
la face
Appuyer
de
numero d'iO
dessus
[a] Bouton
[b) Commutateur d'
[c) Indicateur de
[d) Bouton
determinee
arriere
du scanner,
sur
Ie bouton situe au dessous
pour
SCSI
decrementer
superieur
inferieur
par
comme
pour
incrementer
.
(appuyer
iO
SCSI
numero
(appuyer
un commutateur situe
indique
pour
d'iO SCSI
pour
figure
de
I'indicateur
et
sur
celui du
decrementer)
incrementer)
2.3.
sur
Sollte ein anderes SCSI-Peripheriegeriit dieselbe
Adresse haben wie
Einstellung
nachstehend beschrieben. Notieren Sie jede Anderung
in Tabelle 2.1.
der
der
SCSI-Adresse des Scanners
Scanner, so
iindern
Sie
wie
die
Einstellung der SCSI-Adresse am
externen Scanner (LS-10E)
Die SCSI-Adresse wird
einen Schalter an
eingestellt.
Sie die Taste unter
Einstellung
Anzeige.
[a] Obere Taste (Einstellung
[b) SCSI-Adressenschalter
[c) SCSI-Adressenanzeige
[d) Untere Taste (Einstellung
Zur
einer
wie
der
Einstellung
der
niedrigeren die Taste uber
in Abb. 2.3 dargestellt uber
Ruckseite des externen Scanners
einer
Adressenanzeige,
h6heren Zahl drucken
einer
niedrigeren Zahl)
einer
h6heren Zahl)
zur
der
19
Page 20
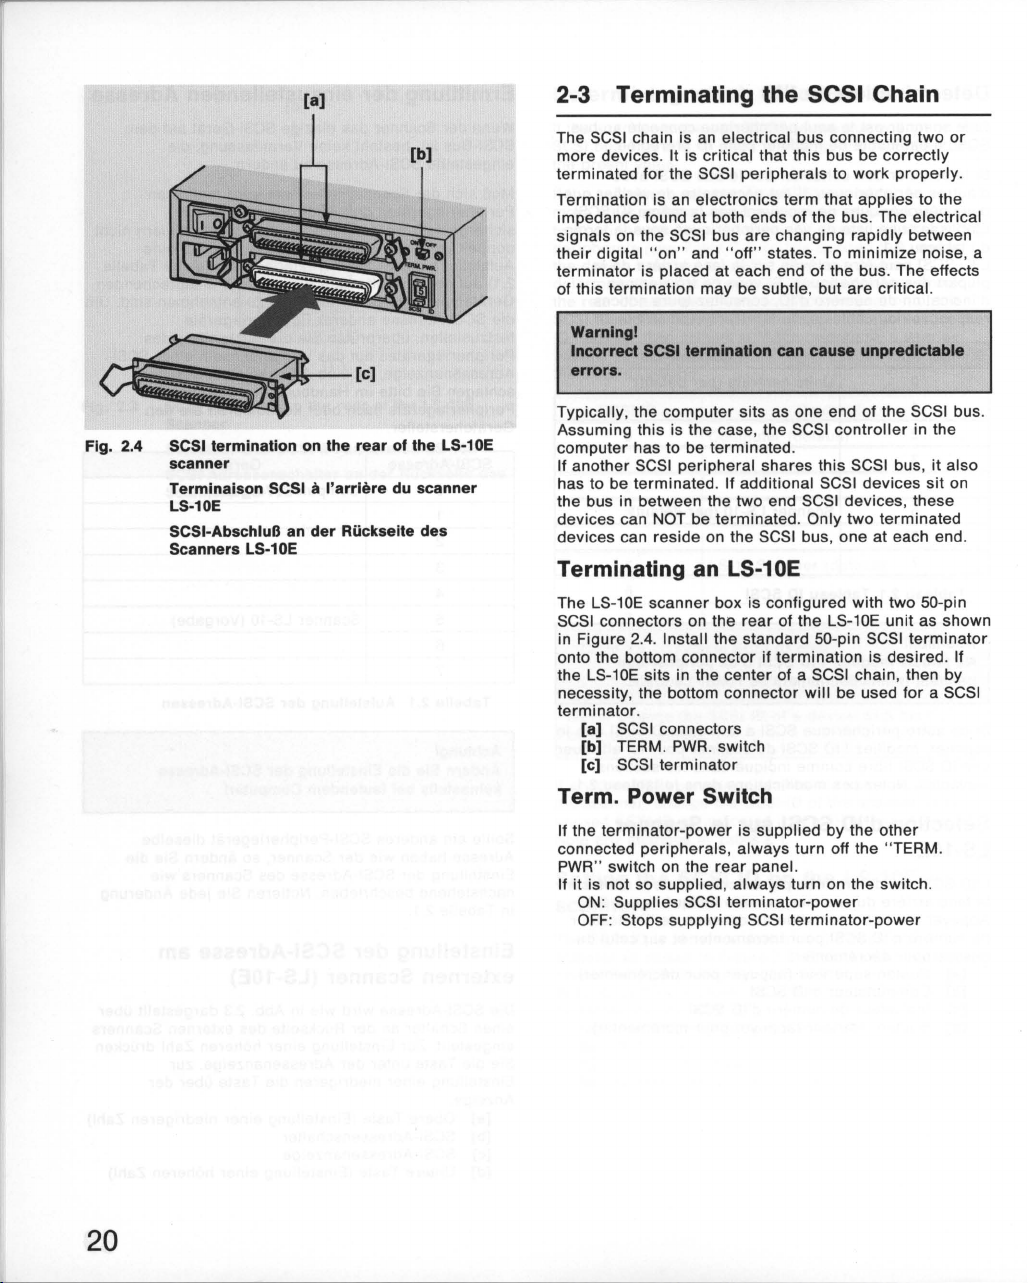
[a]
2-3 Terminating the SCSI Chain
Fig. 2.4 SCSI termination
scanner
Terminaison SCSI iI I'arriere
LS-10E
SCSI-AbschluB an der Ruckseite des
Scanners LS-10E
[b)
on
the rear of the LS-10E
du
scanner
The SCSI chain is an electrical bus connecting
more devices. It is critical that this bus be
terminated for the SCSI
Termination is an electronics term
impedance found
signals
on
their
terminator
of this termination may be subtle, but are critical.
Warnlngl
Incorrect SCSI termination can cause unpredictable
errors.
Typically, the computer sits as one end of the SCSI bus.
Assuming this is the case, the SCSI
computer has to be terminated .
If another SCSI peripheral shares this SCSI bus, it also
has to be terminated. If additional SCSI devices sit on
the bus in between the two end SCSI devices, these
devices can NOT be terminated. Only two terminated
devices can reside on the SCSI bus, one
the SCSI bus
digital "on " and " off" states. To
is placed
Terminating
The LS-10E scanner box is configured with two 50-pin
SCSI connectors on the
in Figure 2.4. Install the standard 50-pin SCSI
onto the bottom connector if
the LS-10E sits in the center of a SCSI chain, then by
necessity, the bottom connector
terminator
.
[a] SCSI connectors
[b] TERM.
[c]
SCSI
PWR.
terminator
peripherals
at
both ends of the bus. The electrical
are
at
each end of the bus. The effects
an
LS-10E
rear
switch
to
work
that
changing
of the LS-10E
termination
rapidly
minimize
controller
will
be used for a SCSI
correctly
properly.
applies
between
at
each end.
unit
terminator
is desired.
two
or
to the
noise, a
in the
as shown
If
Term. Power Switch
If the
terminator-power
connected
PWR
If
it
ON
OFF: Stops supplying SCSI
peripherals
" switch on the
is not so supplied , always turn on the switch.
: Supplies SCSI
is supplied by the
, always turn off the " TERM.
rear
panel.
terminator-power
terminator-power
other
20
Page 21

2-3 Terminaison de la chaine SCSI
La chaine SCSI est un bus
peripheriques
puissent
terminaison
"Terminaison
s'applique
signaux
Les
rapidement
reduire
a chaque
terminaison
AHentlonl
Une termlnalson SCSI Incorrecte peul provoquer des
erreurs Imprevlslbles.
Typiquement,
extremites
centrale
Si un autre
do
it
lui aussi
peripheriques
entre
deux
PEUVENT PAS
Autrement
munies
ou plus . Pour que les
fonctionner
soit
correctement
" est un
a I'impedance
electriques
entre
Ie
extremite
est
de
les
bruit
au
minimum,
sont
essentiels.
I'unite
du bus SCSI. Le contr61eur SCSI dans I'unite
alors
muni d'une
peripherique
recevoir
SCSI addition nels
peripheriques
recevoir
dit, seules
terminaisons.
Terminaison d'un LS-10E
Le
boitier
connecteurs SCSI
la
standard a 50
terminaison
d'une
terminaison
du scanner LS-10E com porte a
figure
2.4. Installez Ie bouchon
chaine de
[8] Connecteurs SCSI
[b]
Interrupteur
de
broches
est necessaire . Si Ie
dispositifs
sera
utilise
[c] Bouchon de
Interrupteur Term. Power
Si I'alimentation de la
autres
peripheriques
PWR" situe
elle
Si
placez-Ie
ON
OFF: Coupe I'alimentation de
sur
n'est pas
sur ON.
: Fournit
Ie panneau
fournie
I'alimentation
electrique
correctement, il est essentiel
terme
d'electronique
des
deux
sur
Ie bus SCSI passent
niveaux "
du bus . Les effets
centrale
50
Term.
terminaison
, placez
une
se
SCSI partage ce bus SCSI , iI
sa
terminaison
, ces
de
terminaison
deux
extremites
broches, comme
sur
Ie
connecteur
SCSI, Ie bouchon de
sur
Ie
PWR
terminaison
I'interrupteur
arriere
par
les
de
reliant
peripheriques
effectuee.
extremites
haut
" et
"bas
terminaison
de
cette
trouve a I'une
terminaison.
. Si
trouvent
.
du bus SCSI
de
terminaison
scanner
dispositif.
est
fournie
sur
OFF.
peripheriques,
des
inferieur
se
peripheriques
dernier
SCSI
autres
terminaison
terminaison
deux
qui
".
est placee
sur
NE
I'arriere
Ie represente
fait partie
"TERM.
SCSI.
SCSI.
SCSI
que
du bus .
Pour
des
Ie bus
sont
deux
si une
par
les
2-3 AbschluB der SCSI-Kelle
Bei
der
elektrischen Bus zwischen zwei
Dieser
la
sein,
arbeiten k6nnen.
Bei
Fachausdruck,
Enden eines Busses bezieht. Die elektrischen Signale
auf
dem
auf ein
Enden abgeschlossen. Der Effekt eines solchen
Abschlusses mag
Normalerweise
Ende
SCSISollte ein
Bus teilen, muB auch
Befinden sich
zwischen den beiden vorgenannten SCSI-Geraten,
k6nnen
k6nnen sich
eine
AbschluB eines LS-10E
An
2.4
SCSI-Kette, ist
SCSI-Leitungsbrucke besetzt.
SCSI-Kette handelt es sich um einen
Bus muB auf jeden Fall entsprechend
damit
die
SCSI-Peripheriegerate einwandfrei
"AbschluB"
dem
digitalen
Minimum
Achlungl
Falscher SCSI-AbschluB kann unvorhersehbare
Fehler verursachenl
des
Controller
diese
an
jedem
der
Ruckseite des LS-10E befinden sich -
dargestellt
Bringen
AbschluBwiderstand gegebenenfalls im unteren
AnschluB an. Befindet sich
[8] SCSI-Stecker
[b] AbschluBstromschalter (TERM.
handelt es sich um einen elektronischen
der
sich auf den Widerstand an beiden
SCSI-Bus wechseln in
EIN- und AUS-Zustand . Um
zu
verringern, wird
gering
befindet sich
SCSI-Busses. Sofern
im Computer
weiteres
Sie den normalen 50poligen SCSI-
SCSI-Peripheriegerat diesen SCSI-
dieses
weitere
NICHT
nur
SCSI-Gerate auf dem Bus
terminiert
zwei AbschluBschaltungen befinden,
Ende.
- zwei 50polige SCSI-Steckverbinder.
der
untere AnschluB zwangslaufig
oder
mehreren
schneller
der
sein,
er
ist
jedoch wichtig.
der
Computer an einem
dies
der
terminiert
abgeschlossen werden.
werden. Am SCSI-Bus
der
LS-10E in
[c] SCSI-AbschluBwiderstand
AbschluBstromschalter
Falls
der
angeschlossenen
Sie den AbschluBstromschalter (TERM .
Ruckseite des Gerates grundsatzlich auf OFF (AUS).
Wird
Schalter stets auf
AbschluBstrom
der
Strom nicht so
ON
(EIN): SCSI-AbschluBstrom
OFF (AUS): SCSI-AbschluBstrom wird nicht
durch
geliefert
die
, stellen Sie den
Peripheriegerate
ON
(EIN).
anderen
geliefert
wird
Geraten .
terminiert
Foige zwischen
das
Rauschen
Bus an beiden
Fall ist, muB
werden.
wie
in Abb.
der
Mitte
mit
PWR)
wird
PWR)
geliefert
, stellen
an
der
geliefert
der
so
der
der
21
Page 22
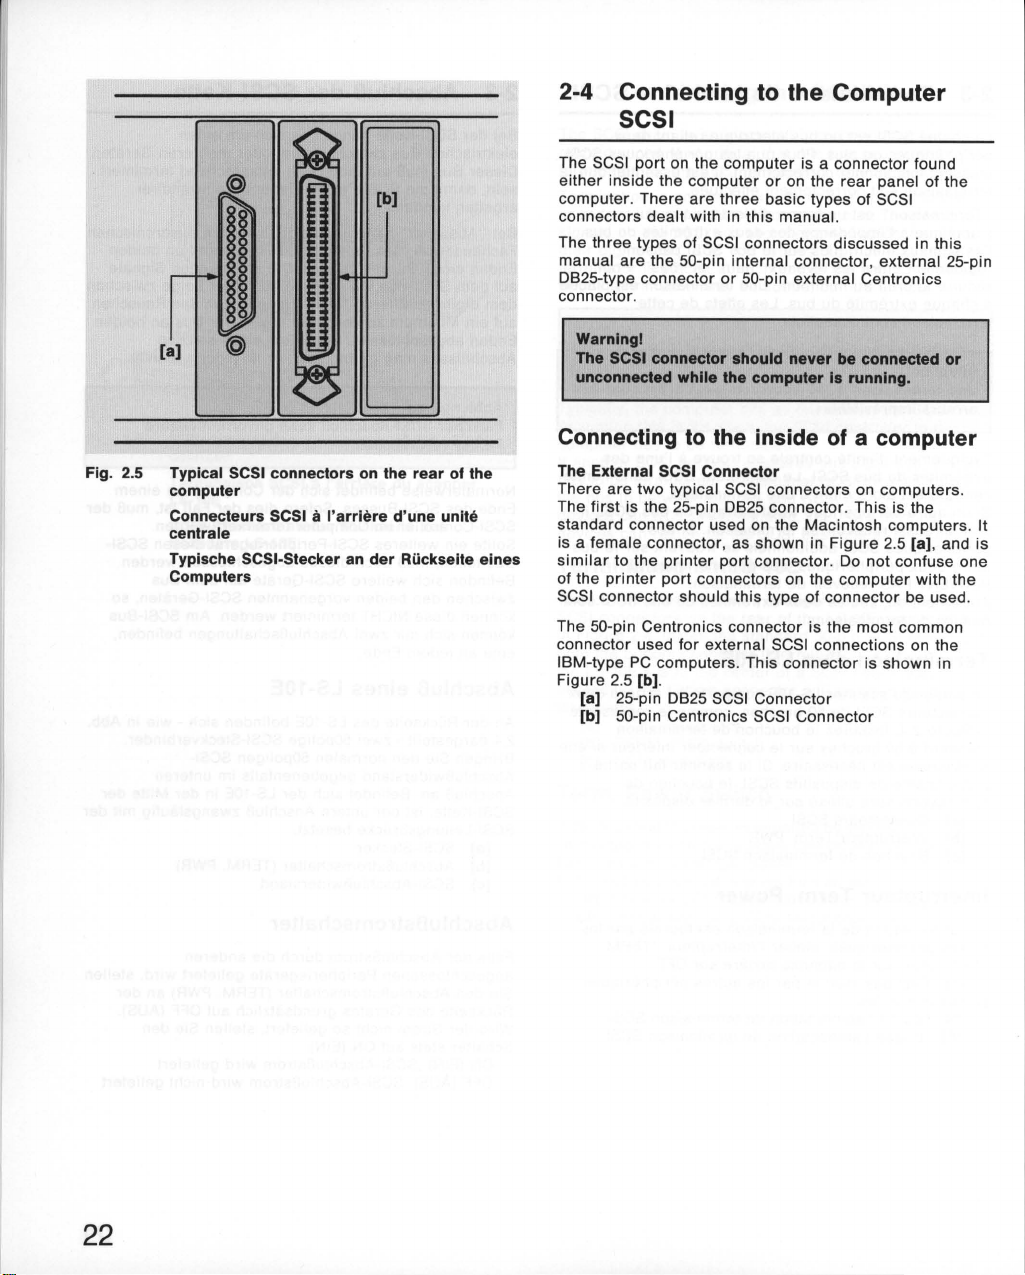
2-4 Connecting
SCSI
to
the
Computer
[a]
Fig. 2.5 Typical SCSI
computer
Connecteurs SCSI
centrale
Typlsche SCSI-Stecker an
Computers
connectors
Ii
I'arriere
on the
d'une
der
rear
of
unite
Riickseite
the
elnes
The SCSI
either
computer. There
connectors
The
manual
OB2S-type
connector.
Connecting to
The External SCSI
There
The
standard
is a female
similar
of the
SCSI connector should this type
The
connector used
IBM-type
Figure
port
on the
inside the
dealt
three
types of SCSI connectors discussed in this
are
the
connector
Warnlngl
The SCSI
unconnected
first
SO-pin
[a]
[b] SO-pin Centronics SCSI
connector
are
two
is the 2S-pin
connector
connector
to the
printer
Centronics connector is the most
PC
computers. This
2.S
[b].
2S-pin
computer
computer
are
with in
SO-pin
while
Connector
typical SCSI connectors on
printer
port
connectors on the
for
OB2S
or
three basic types of SCSI
this
internal
or
SO-pin
should
the
computer
the
inside
OB2S
used on the Macintosh computers. It
, as shown in
port
connector. 00
external SCSI connections on the
SCSI
Connector
on the
manual.
connector
connector
is a connector found
rear
panel of the
connector
external Centronics
never
, external 2S-pin
be
connected
Is
running.
of a computer
computers
. This is the
Figure
2.S
[a]
not confuse one
computer
of
connector
Connector
with the
be used.
common
is shown in
or
.
, and is
22
Page 23

2-4 Connexion SCSI a I'unite
centrale
Le
port
SCSI
I'
interieur
Ce manuel traite de trois types de connecteurs SCSI.
Trois types differents
interessent
broches en ligne (internes) ,
broches Centronics (externes) .
Attentlonl
Ne
branchez et ne debranchez jamals un connecteur
SCSI pendant Ie lonctlonnement de I'unlte centrale.
Connexion
de I'ordinateur est un connecteur situe
ou
sur
Ie panneau
pour
Ie raccordement du scanner :
it
I'interieur
arriere
de
I'unite centrale.
de
connecteurs SCSI nous
25
broches OB-
de
I'unite
25
50
et
50
centrale
Connecteur SCSI externe
Les unites centrales peuvent etre munies
de connecteurs SCSI. Le
OB25
it
25
Macintosh. C'est un connecteur
represente la
port
confondre avec les ports d'
centrale.
Le connecteur Centronics
connecteur
connexions SCSI externes
IBM
broches qui est
d'imprimante.
PC.
[a] connecteur
[b] connecteur
figure
Ie
plus communement
Ce
connecteur est represente
premier
2.5
[a]
II
faut donc
25
broches OB-25
50
broches Centronics SCSI
est Ie connecteur
Ie
connecteur standard des
femelle
similaire
veiller
impr
imante
it
50
broches est Ie
sur
les ordinateurs de type
tel que Ie
au
connecteur du
it ne pas Ie
de
utilise
it
de
deux types
I'unite
pour
les
la
figure 2.5 [b].
2-4 AnschluB an die SCSI-
Schnittstelle des Computers
it
Oer SCSI-Anschlu'B des Computers befindet sich
entweder im Inneren
diesem Handbuch werden drei Grundtypen von
Steckverbindern behandelt.
Bei den drei in diesem Handbuch besprochenen
Steckverbindern handelt es sich um den 50poligen
Innensteckverbinder, den 25poligen
AuBensteckverbinder
Centronics-AuBensteckverbinder.
Achtungl
Schneeen Sle den SCSI-Steckverblnder nle bel
laufendem Computer ani
AnschluB
Der auBere SCSI-Steckverbinder
Es
gibt zwei typische SCSI-Steckverbinder an
Computern. Oer erste ist
Steckverbinder. Oies ist
Macintosh-Computern.
Abb. 2.5
Verwechseln Sie keinesfalls einen
Oruckeranschlusse des Computers mit dem SCSISteckverbinder!
Oer 50polige Centronics-Steckverbinder ist
gebrauchlichste Steckverbinder
Anschlusse an IBM-kompatiblen PCs. Er ist in Abb . 2.5
[b] dargestellt.
[a]). die dem OruckeranschluB ahnelt.
[a] 25poliger SCSI-Steckverbinder
[b] 50poliger SCSI-Steckverbinder von Centronics
im
oder
an dessen Ruckseite.
0825
und den 50poligen
Innern
des
Computers
der
25polige OB25-
der
Standard-Steckverbi
Es
ist eine Steckerbuchse (siehe
der
fUr
auBere SCSI-
0825
der
In
SCSI
SCSI
nder
-
-
an
23
Page 24
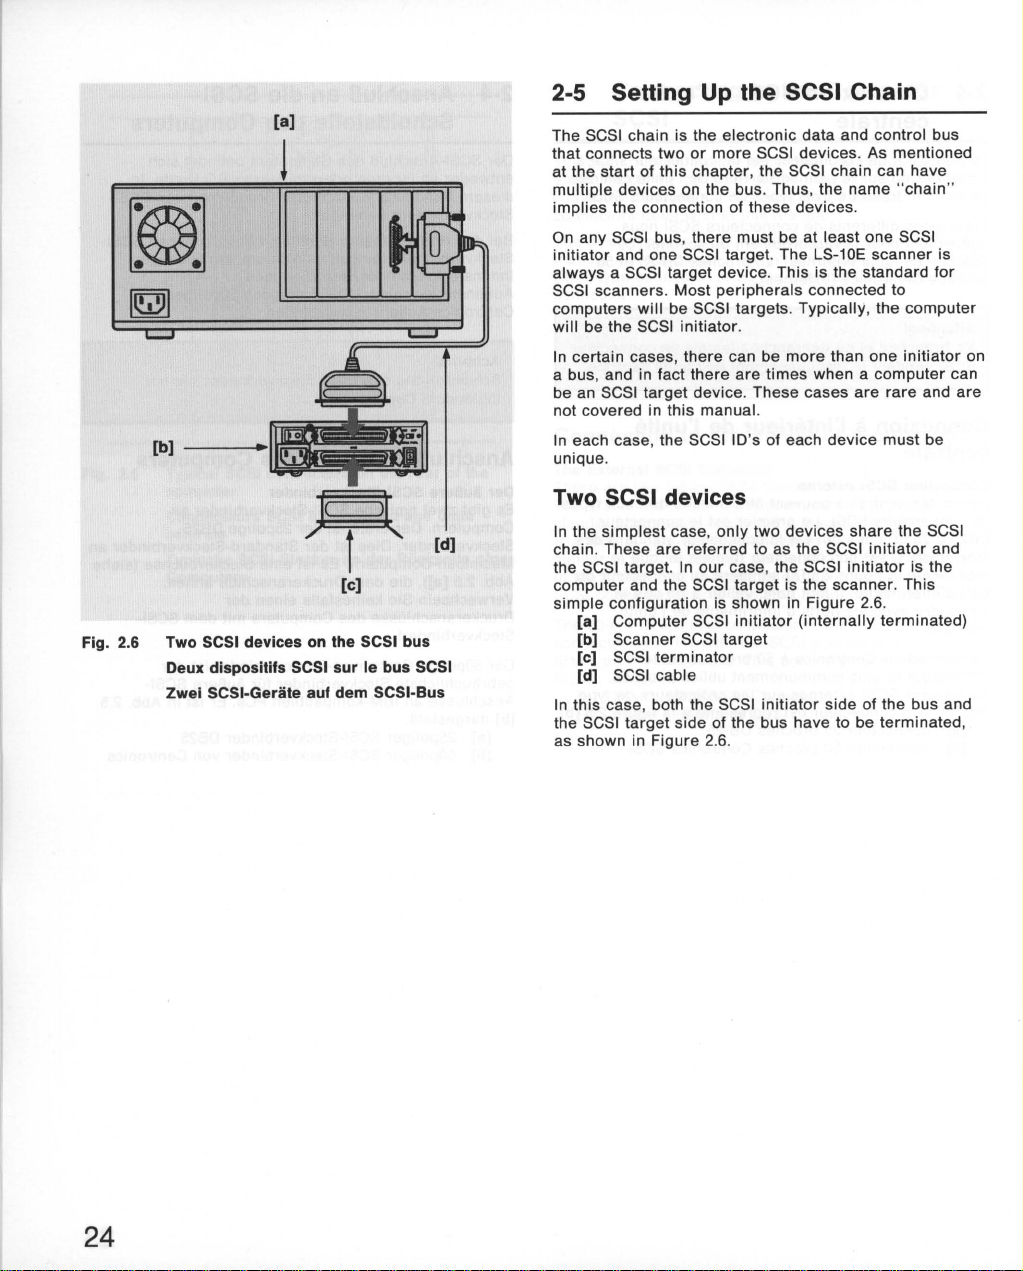
[a]
[b)
---llii.im
2-5 SeHing Up the SCSI Chain
The SCSI chain is the
that connects
at
the
multiple
implies
On any SCSI bus,
initiator
always
SCSI
scanners. Most
computers
will
be the SCSI
In certain cases ,
a bus , and in fact
be an SCSI
not covered in
In each case , the SCSI ID's of each
unique.
two
start
of this chapter, the SCSI chain can have
devices on the bus. Thus, the
the connection of these
and one SCSI target. The LS-10E
a SCSI
will
target
electronic
or
more
SCSI
there
must be at
target
device
. This is the standard
peripherals
be SCSI
this
targets. Typically
initiator
.
there
can be
there
are
device. These cases
manual.
times
data and control bus
devices
. As mentioned
name
devices
least
connected to
more
than one
when a
device
"chain"
.
one SCSI
scanner
, the
computer
are
rare
must
computer
initiator
for
and
be
is
on
can
are
Fig. 2.6
Ic::::JI
./
f
'"
[d)
[e)
Two SCSI devices
Deux dlspositifs SCSI sur Ie bus SCSI
Zwel SCSI·Geriite auf dem SCSI·Bus
on
the SCSI bus
Two SCSI devices
In the
simplest
chain. These
the SCSI target. In
computer
simple
[a]
[b] Scanner SCSI
[c] SCSI
[d] SCSI cable
In this case , both the SCSI
the SCSI
as shown in Figure 2.6.
case,
are
and the SCSI
configuration is shown in
Computer
terminator
target
only
referred to as the SCSI
our
case,
target
SCSI
initiator
target
side
of the
two
devices
the
is the scanner. This
initiator
bus
share
side
initiator
initiator
2.6.
of
SCSI
Figure
(internally
have to be terminated,
the SCSI
and
is the
terminated)
the
bus
and
24
Page 25
2-5 Etablissement de la chaine
SCSI
La chaine SCSI est un bus de donnees electroniques
de commande
Comme il a ete indique au debut du chapitre, la chaine
SCSI peut
terme "chaine"
Sur
un bus SCSI,
et
un esclave SCSI. Le
esclave SCSI. C'est la
plupart
La
sont des esclaves SCSI. L'unite centrale est
generalement
Dans certains cas, il peut
un bus ; parfois, I'unite centrale peut etre un esclave
SCSI. Ces cas
present manuel.
Dans tous les cas, la regie
I'attribution
Deux dispositifs SCSI
Dans Ie cas
SCSI constituent la chaine. lis sont designes comme
maitre et esclave. Dans Ie cas
maitre
Ie
simple
2.6.
[8] Unite centrale
[b] Scanner Esclave SCSI
[c] Terminaison SCSI (bouchon)
[d] Cable SCSI
Dans ce cas, les deux extremites du bus SCSI doivent
recevoir
2.6.
reliant
deux
peripMriques
comporter
des
plusieurs
designe la liaison
iI
doit y avoir
scanner
norme
peripMriques
Ie
maitre
sont
rares et ne sont pas traites dans
dispositifs
de
au moins un maitre SCSI
LS-10E est toujours un
pour
les scanners SCSI.
relies a I'unite centrale
SCSI.
y
avoir
plusieurs
a respecter absolument est
a chaque
Ie
et
Ie
d'interfacer deux dispositifs est
interieure)
une terminaison, comme indique
dispositif
plus
simple, seulement
scanner
, I'esclave. Cette fa«on tres
Maitre
d'une
traite
I'unite centrale est
SCSI (terminaison
SCSI ou plus .
sur
ces peripheriques.
10
Ie bus. Le
maitres
SCSI unique.
deux dispositifs
montree
sur
figure
la
figure
sur
Ie
et
2-5 Aufbau der SCSI-KeHe
Bei
der
elektronischen Daten- und Steuerbus,
mehr
dieses Kapitels erwahnt, kiinnen sich innerhalb
SCSI-Kette
bezieht sich
Verbindung
Auf jedem SCSI-Bus
Hauptgerat und ein SCSI-Nebengerat befinden. Der
Scanner LS-10E ist stets das SCSI-Nebengerat. Dies ist
normal
Computer angeschlossenen Peripheriegeraten handelt
es sich urn SCSI-Nebengerate.
Computer das SCSI-Hauptgerat.
In
auf einem Bus befinden, und es kann auch vorkommen,
daB ein Computer zum SCSI-Nebengerat wird. Dies ist
jedoch
eingegangen
In
einmal vergeben sein.
Zwei SCSI-Gerate
1m
SCSI-Kette. Diese gelten als SCSI-Hauptgerat und SCSINebengerat.
der
Diese einfache Anordnung ist in Abb . 2.6 dargestellt.
In
SCSI-Hauptgerats als auch auf
Nebengerats
dargestellt.
SCSI-Kette handelt es sich urn den
SCSI-Gerate verbindet. Wie bereits zu Beginn
mehrere
dieser
fOr
SCSI-Scanner. Bei den meisten an einen
manchen Fallen kann sich
nur
selten
jedem
Fall
einfachsten Fall befinden sich
Computer und das SCSI-Nebengerat
[8] Computer, SCSI-Hauptgerat (intern
abgeschlossen)
[b] Scanner, SCSI-Nebengerat
Gerate auf dem Bus befinden. Somit
die
Bezeichnung
Gerate.
muB
der
wird
darf
In
Fall, so daB
.
die SCSI-Adresse jedes Gerats nur
unserem Fall ist das SCSI-Hauptgerat
"Kette
sich mindestens ein SCSI-
mehr
der
zwei oder
" auf
die
1m
Normalfall ist
als ein Hauptgerat
hier
nicht darauf
nur
zwei Gerate in
der
[c] SCSI-AbschluB
[d] SCSI-Kabel
diesem
Fall
muB
terminiert
der
Bus sowohl auf
jener
werden. Dies ist in Abb. 2.6
der
des SCSI-
der
der
der
Scanner.
Seite des
25
Page 26
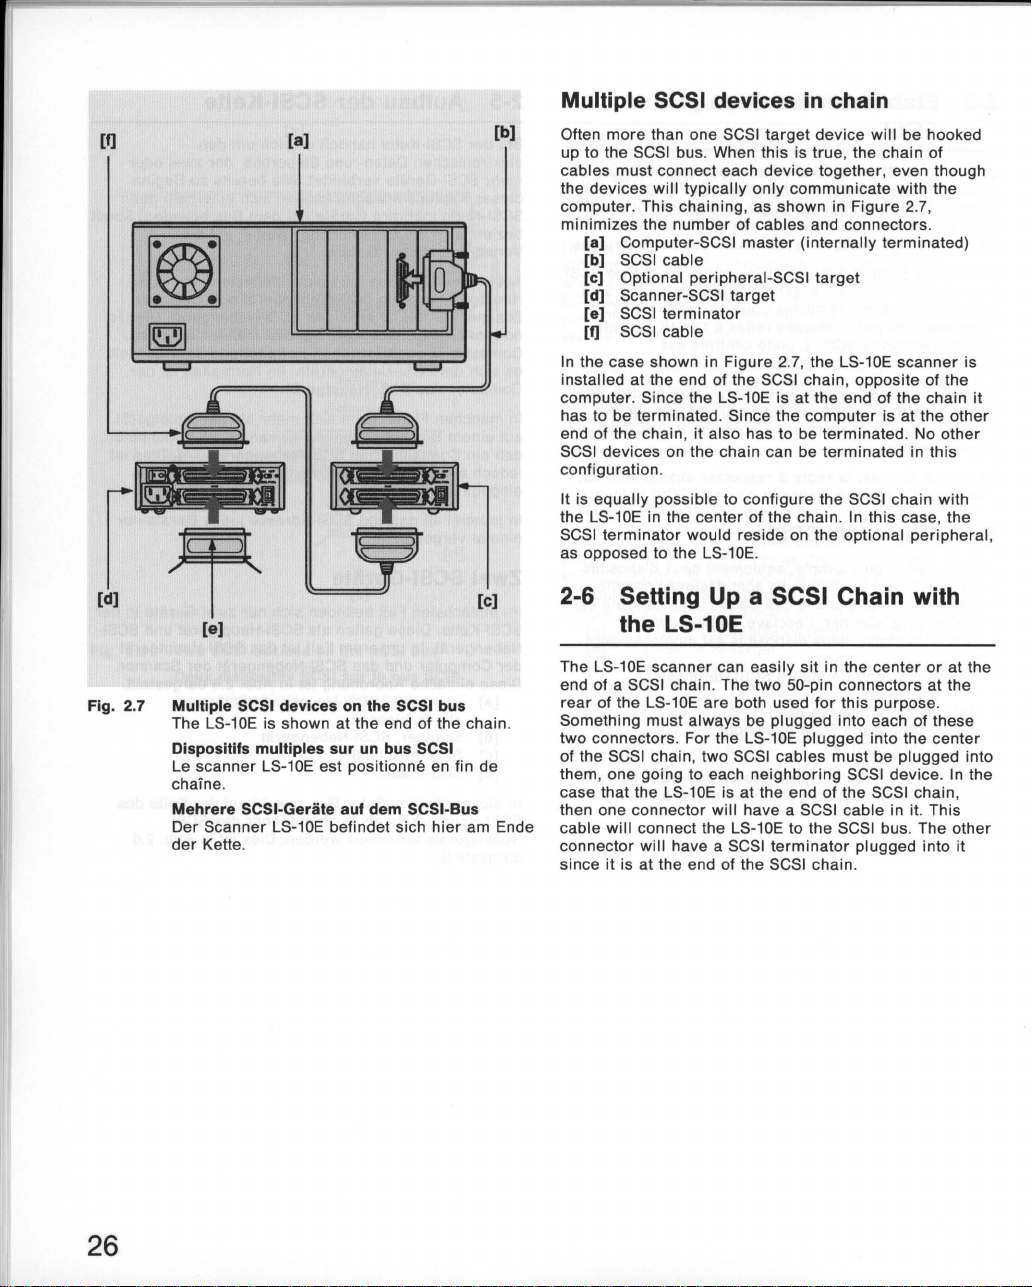
[I]
[e)
[a]
[b)
Multiple SCSI devices
Often
more
up to the SCSI bus. When this is true, the chain of
cables must connect each device together, even though
the devices
computer. This chaining, as shown in Figure 2.7,
minimizes the
[a]
[b] SCSI cable
[c] Optional peripheral-SCSI
[d] Scanner-SCSI
[e] SCSI
[f] SCSI cable
In
the case shown in Figure 2.7, the LS-10E scanner is
installed at the end of the SCSI chain, opposite of the
computer. Since the LS-10E is at the end of the chain it
has to be terminated. Since the
end of the chain, it also has to be terminated . No
SCSI
configuration.
It is equally possible to configure the SCSI chain with
the LS-10E in the center of the chain.
SCSI
as opposed to the LS-10E.
than one SCSI
will
typically only communicate with the
number
Computer-SCSI master (internally terminated)
terminator
devices on the chain can be terminated in this
terminator
of cables and connectors.
target
would reside on the optional peripheral,
target
in
chain
device
target
computer
In
will
be hooked
is at the
this case, the
other
other
2-6 SeHing Up a SCSI Chain with
the LS-10E
Fig. 2.7
Multiple SCSI devices
The LS-10E is shown
Dispositifs multiples sur
Le scanner LS-10E est positionne
chaine.
Mehrere SCSI-Gerate auf dem SCSI-Bus
Der Scanner LS-10E befindet sich
der
Kette.
on
the SCSI
at
the end of the chain.
un
bus
bus
SCSI
en
hier
fin de
am Ende
The LS-10E scanner can easily sit in the
end of a SCSI chain . The two 50-pin connectors
rear
of the LS-10E are both used
Something must always be plugged into each of these
two connectors. For the LS-10E plugged into the
of the SCSI chain , two SCSI cables must be plugged into
them , one going to each neighboring SCSI device.
case that the LS-10E is at the end of the SCSI chain ,
then one connector
cable
will
connector
since
connect the LS-10E to the SCSI bus. The other
will
it
is at the end of the SCSI chain .
will
have a SCSI
have a SCSI
terminator
center
for
this purpose.
cable
plugged into it
or
at
the
center
in it. This
at the
In
the
26
Page 27

Chaine SCSI
Souvent, plus d'un
bus SCSI. Dans ce cas, les dispostifs
aux autres
nombre
la
communique
de cables
figure
2.7. Chacun de ces
[a] Unite
i
nterieure
[b] Cable SCSI
[c] Autre
[d] Scanner Esclave SCSI
[e]
Terminaison
[f] Cable SCSI
Dans Ie cas de
installe
centrale. II
terminaison, comme
centrale
recevoir
dispositif
II
en
terminaison
lieu du LS-10E.
en bout
etant
un bouchon
de cette chaine n'a it
est
bien
sur
milieu
de chaine. Dans ce cas , Ie bouchon de
2-6 Integration
it
dispositif
par
des
et
uniquement
centrale
peripMrique
la
figure
de
doit
dans ce cas
it
I'autre
possible
sera
connecte it un
dispositifs multiples
esclave SCSI
cordons
chaine
uniques
de connecteurs,
dispositifs
avec I'
Maitre
SCSI (bouchon)
nous I'avons vu plus haut. L'unite
bout de la chaine,
de
terminaison
de
unite
SCSI
Esclave SCSI
2.7, Ie
scanner
SCSI,
it
recevoir
recevoir
positionner
autre
du
LS-10E
terminaison
I'oppose de I'unite
chaine SCSI
Le
scanner
bout
au
dos
doit
deux
chaine
branches
allant
chaine, I'un des connecteurs re90it Ie
relie
de
terminaison
chaine
LS-10E peut
de la chaine SCSI. Les connecteurs
du LS-10E
toujours y avoir
connecteurs. Si Ie LS-10E est au
SCSI, les
it
ces connecteurs , chacun de ces cables
au SCSI voisin.
Ie LS10E au bus SCSI.
SCSI.
puisqu'il
sont
quelque
deux
etre
positionne
tous
deux
destines
chose de branche it ces
cables SCSI
Si
Ie LS-10E est en bout
se
trouve
doivent
L'autre
it
sera
sont
, ce qui
comme
, cependant ,
centrale.
un bouchon de
. Aucun
Ie
peripherique
milieu
cable
re90it un bouchon
I'extremite
relie
relies
les uns
minimise
Ie
montre
LS-10E est
doit
egalement
autre
de
terminaison
scanner
it
la
au
milieu
it
50
broches
it
cette fin.
de la
etre
de
SCSI qui
de la
LS-10E
au
ou en
au
Ie
Mehrere SCSI-Gerate
Oft
wird
mehr
angeschlossen.
samtliche
Gerate
kommunizieren
dargestellt. Sie
Stecker auf ein
als ein SCSI-Nebengerat an den SCSI-Bus
1st
Gerate
normalerweise
dies
miteinander
nur
. Diese Verkettung ist in Abb. 2.7
verringert
Minimum
in
der Kette
der
Fall, muB
verbinden, wenngleich
mit
die
Anzahl
.
die
dem Computer
der
Kabelkette
die
Kabel und
[a] Computer, SCSI-Hauptgerat (intern
abgeschlossen)
[b] SCSI-Kabel
[c]
Optionales
Scanner, SCSI-Nebengerat
[d]
SCSI-AbschluB
[e]
SCSI-Kabel
[f]
In
dem
in Abb. 2.7 gezeigten Fall befindet sich
Scanner LS-10E am Ende
dem Computer . Nachdem
bildet
, muB
das andere Ende
.
ebenfalls
kann kein
werden .
Es
sich
Fall
LS-10E befinden, sondern am optionalen
Peripheriegerat.
terminiert
weiteres
ist
auch moglich ,
der
Scanner LS-10E in
wiirde
Peripheriegerat
der
SCSI-Kette,
der
er
abgeschlossen werden . Da
der
SCSI-Kette
werden. In
SCSI-Gerat in
die
sich
der
SCSI-AbschluBwiderstand nicht am
Scanner LS-10E das Ende
dieser
SCSI-Kette
der
Mitte befindet. In diesem
, SCSI-Nebengerat
der
gegeniiber
der
darstellt
Konfiguration
der
Kette
so
Computer
, muB
er
terminiert
aufzubauen, daB
2-6 Aufbau einer SCSI-KeHe mit
dem LS-10E
II
Der Scanner LS-10E kann sich ohne
Mitte
oder
beiden 50poligen
LS-10E dienen
stets etwas angeschlossen sein . Befindet sich
LS-10E in
Kabel angeschlossen sein, von denen
benachbarten SCSI-Geraten geht. Befindet sich
LS-10E am Ende
einen
Kabel
anderen Steckverbinder muB sich ein SCSIAbschluBwiderstand befinden, nachdem es sich hierbei
um das Ende
am Ende
der
der
Steckverbinder angeschlossen sein. Dieses
verbindet
einer
Steckverbinder
beide
Mitte
der
den LS-10E
der
SCSI-Kette handelt.
SCSI-Kette befinden. Die
zu
diesem
der
SCSI-Kette, miissen zwei SCSI-
SCSI-Kette, muB ein SCSI-Kabel an
mit
weiteres
an
der
Zweck. An
dem SCSI-Bus.
Riickseite des
beide
je
eines
in
der
zu
der
1m
der
muB
den
27
Page 28

~
lhl
iID
[lilfr®
IT'
~
I
.,lto"
~
......
CJ
~
I
~
[b] [c]
Fig.
3.1
The LS-10 scanner front view
du
Face avant
Vorderansicht des Scanners LS-10
I
II
d:::::IIJIIIIIIIl"O:::::::::::::::::::::::::d1
LS-10
[a]
~
~-~
[I]
Setting
Model
The LS-10
instructions will lead you through this
3-1
Let's take a look
shown in Figure 3.1. Note that
I
identical to the LS-10E scanner. The
includes the
indicator.
[a]
[b] Active
[c] Focus control
Up
(LS-10)
scanner
SeHing
film
Insert
slide
indicator
the Internal-mount
is
easy
to install. The
Up
the LS-10 Scanner
at
the LS-10
slot
. the focus
here
internal-mount
the
control
following
process
face of the LS-10 is
front
.
scanner
of the
and the active
as
scanner
Rear panel
The
rear
I
that there
These
configuration DIP switch block.
The default DIP switch
3.
10
scanner is set
termination
the
connector is unused when connecting the LS-10
the computer.
panel of the LS-10 is
are
three items
are
the
DC
power
[d] SCSI connector
[e] Configuration DIP
[I] Power connector
1.
The meaning of the SCSI
DIP switch is discussed in
rear
at
the factory to SCSI 10
OFF. Note the
view
of the LS-10 as
shown
in
Figure
of
interest
connector. SCSI connector and
switch
configuration
connector
on the
is shown in Table
termination
this
chapter
on the
shown
in
Figure
3.2. Note
rear
and the SCSI
. The LS-10
#5
and to
right
3.2. [I]
inside
panel.
side
of
[e]
Fig. 3.2 The LS-10 scanner rear view
Face arriere
Riickselte des Scanners LS-10
du
[d]
LS-10
28
DIP
Switch
1
2
3
4 open
Table
3.1
Default Usage
closed SCSI
open
closed
SCSI
Factory set default DIP switch
configuration
10 bit 0 = 1
10
SCSI
10
SCSI
10
Termination
bit
bit
1 = 0
2 = 1
= OFF
Page 29

I
I
Montage du
modele
interne
(L8-10)
Le scanner LSdoivent vous
centrale.
3-1
La
figure
est en tous points identique au scanner LS-10E, avec
logement
d'activite.
[a] Inserez la diapositive ici
[b] Voyant
[c] Molette de mise au point
Panneau arriere
La face
trouve Ie connecteur
Ie connecteur SCSI et les interrupteurs
configuration.
[d] Connecteur SCSI
[e]
['1
La configuration par defaut des
indiquee au tableau 3.
I'interrupteur
chapitre. Le Scanner LS-10 a ete regie en usine
SCSI = 5 et
connecteur du cote
represente
utilise lorsque
ordinateur
I'
Inter-
rupteur Defaut
DIP
1
2
3
4 ouvert
Tableau 3.1 Configuration par defaut
10
est facile a
aider a realiser
installer
son integration dans I'unite
. Ces instructions
Preparation du scanner LS-10
3.1
montre que la face avant du scanner LS-10
film, la molette de mise
d'activite
arriere
du LS-10 est
d'alimentation
Interrupteurs DIP
Connecteur
sur
.
d'alimentation
DIP
sur
ouvert
1.
pour
1'10
la
terminaison
droit
la
figure
Ie
LS-10 est monte a
ferme
ferme
La
de
3.2
au
point,
et
Ie
voyant
illustree
terminaison
SCSI sont expliques dans ce
la
[f]
figure 3.2.
en
courant
DIP
interrupteurs
desactivee. Notez
vue
arriere
. Ce connecteur n'est pas
I'interieur
Utilisation
10
SCSI bit 0 = 1
10
SCSI bit 1 = 0
10
SCSI bit 2 = 1
Terminaison
de
DIP est
SCSI et
du LS-10
10
On
continu,
sur
Ie
de
SCSI
= desactivee
regh~e
de I'interrupteur DIP
en usine
y
1'10
AnschluB des Einbaumodel/s
(L8-10)
Das Einbaumodell LS-10 ist leicht anzuschlieBen. Dieser
AnschluB ist im folgenden beschrieben.
3-1 Montage des Scanners LS-10
Abb. 3.1 zeigt
LS-10,
Ie
identisch ist. Auf
Feinfokussierung und
[a] Schlitz zum Einlegen des Dias
[b] Kontrollampe
[c] Feinfokussierung
Riickseite
Abb.
3.2
befinden sich
Steckverbinder und die DIP-Schalter.
[d] SCSI-Steckverbinder
[e] DIP-Schalter
['1
Tabelle
Einstellung. Die Bedeutung des SCSI-Abschlusses und
der
SCSI-Adressen-DIP-Schalter wird in diesem Kapitel
erliiutert. Die werkseitige Einstellung des Scanners
LS-10 ist wie folgt: SCSI-Adresse
AdreBabschluB
Abb.
3.2
der
Seite
bleibt unbenutzt, wenn
Computers angeschlossen wird.
DIP-
Schalter
1 geschlossen SCSI-AdreBbit 0
2 offen SCSI-AdreBbit 1
3
4 offen
Tabelle 3.1 Werkseitig vorgegebene DIP-Schalter-
die
die
zeigt
GleichstromanschluB
3.1
['1
ROckansicht des LS-10. Dieser Steckverbinder
Frontplatte des Einbau-Scanners
mit
jenem des externen Scanners LS-10E
ihr
befinden sich
die
Kontrollampe.
die
ROckseite des LS-10.
der
GleichstromanschluB,
zeigt die vorgegebene DIP-Schalter-
= OFF (AUS). Beachten Sie den in
gezeigten Steckverbinder auf
der
Vorgabe Verwendung
geschlossen
Elnstellung
der
Filmschlitz,
An
dieser
der
=
5,
SCSI-
der
LS-10 im Inneren des
SCSI-AdreBbit 2
SCSI-AdreBabschluB
= OFF
(A
SCSI-
linken
US)
die
der
= 1
= 0
= 1
29
Page 30

[c) [8] [b)
[d)
]1
''Y
Both sides of the LS-10
3.3. Note the set of
set of holes on each
the
rails
as shown in this
[a] Mounting
[b] Guide rail
are
two
holes
identical as shown in Figure
tapped holes on each side. One
side
of the
figure
scanner
.
will
be used
for
[c] Locking tab
[d] Top panel
[e] LS-10
[f] Tapped holes
Jl
front
panel
3-2 Installing the LS-10 Scanner
o
o
[e)
[I]
Fig. 3.3 The LS-10 scanner side view
Vue latera Ie
du
LS-10 et rail guide de montage
Seltenansicht des Scanners LS-10 mit
Fiihrungsschlenen
with
ralls
Installing the
guide
to the
inserted into the
slots. Connections to the back
computer
Due to the
is not
scanner
the
networks
scanner
connector is
when the
internal-mount
rails
provided with the
two
sides
of
the
drive
power
and the SCSI flat
tight
possible
space
to connect the cables to the
is installed . The SCSI
are
easier
is mounted in
typically
scanner
is
scanner
scanner
scanner
bay using the
constraints
to connect to the
drive
easiest to connect to the
partially
. The
of
the
bay. The
pushed into the
Installing the guide rails
Each
computer
for
mounting
most cases, a pair of
sides of the scanner to
in
Figure
scanner in place.
can have its own
devices
3.3. These
rails
into the
rails
special
are
are
into the internal
guide
slide
guide
The computer drive bays
In
order
for
computer, the
1. An
2. A standard
3. A card
a scanner to be mounted internal to the
computer
externally
slot
power
available
must
have the
accessible 5 1/4"
supply
connector
on the
motherboard
is
very
must be
scanner
computer
scanner
cable
.
inside
the
cable
and
scanner
computer
requirements
drive
screwed
drive
also
used to lock the
following
half-height
easy
. The
screwed
must
be
drive
include
computer, it
scanner
terminating
before the
power
scanner
drive
bay.
bays.
In
to the
bay as
shown
:
bay
bay
the
after
30
Page 31

Les deux cotes du LS-10
represente la
taraudes
montage des
[a] Orifices
[b) Rail
[c) Butee de
[d) Panneau
[e) Face avant du LS-10
[f]
Orifices
figure
de
de
guide
taraudes
3.3. Notez les
chaque cote . Ces
rails
comme
montage
verrouillage
superieur
sont
identiques
paires
orif
ices
Ie represente la
comme
d'orifices
servent
figure
au
Ie
.
Beide Seiten des LS-10 sind identisch und in Abb. 3.3
dargestellt. Auf
Gewindelochern
Befestigung
[a]
Montagelocher
[b) FOhrungsschiene
[c) Sicherungsblech
[d) Deckplatte
[e) Frontplatte
[f] Gewindebohrungen
jeder
Seite befinden sich zwei Paare von
. Eines
der
dieser
abgebildeten Schienen.
des
LS-10
Paare
pro
Seite
dient
zur
3-2 Installation
L'installation interne du LS-10 est
guides fournis
scanner. II
de I'unite
raccordements
scanner
nappe SCSI.
L'espace
n'est pas
lorsque
connecter Ie
avant
de
fac ile de
I'unite
centrale
partiellement
doivent
suffira
centrale, dote
electriques
se
resument a I'alimentation
interieur
possible
celui-ci est instal1l3.
cable
monter
Ie
brancher
au
introduit dans Ie logement.
du
scanner LS-10
tres
etre fixes de chaque cote du
alors
de Ie
glisser
de
glissieres
simple
dans Ie
a cette fin. Les
a effectuer a
et
de
I'unite
de conne c
SCSI et les bouchons de
scanner
Ie
scanner
centrale
ter
II
dans
connecteur d'alimentation
lorsque
etant
les cables au scanner
est
plus
facile de
Ie logement.
celui-ci est
I'arriere
au cordon en
Montage des rails guides
Chaque unite
age
mont
temps, une
scanner, comme
comme
aussi au
centrale
encastre
paire
un ti
roir
blocage
a ses
de
de
rails
sur
dans Ie logement. Ces
du
scanner
specificites
peripheriques.
est fixee de chaque cote du
la
figure
La
3.3, et Ie
en place.
en
plupart
scanner
rails
Le logement de I'unite centrale
Pour
pouvoir
centrale
1. un
I'ex
2. un
3. un
mere
integrer
, celle-ci
emplacement
terieur
connecteur d'alimentation
emplacement
un
doit
etre dotee de :
5 1/4
pour
scanner
",
demi-hauteur
carte
LS-10 a une unite
, accessible de
standard
disponible
. Les
rails
logement
du
reduit
, il
terminaison
II
est plus
de
matiere
du
glisse
servent
sur
la carte
de
3-2 Einbau des Scanners LS-10
Der Einbau des Scanners
Scanner gelieferten FOhrungsschienen werden auf
beiden Seiten
wird
Ober
Laufwerkschacht
ROckseite des Scanners werden das Spannungskabel
vom Computer und
Auf Grund
Computers
Einbau in den
leichter, das SCSI-Kabel und
vor
dem Einbau des Scanners in den Laufwerkschacht
anzuschlieBen. Der Spannungsstecker des Computers
laBt sich
anschlieBen, wenn
Laufwerkschacht eingefOhrt ist.
des
die
entsprechenden FOhrungsschlitze in den
des
der
raumlichen Enge
ist
es nicht moglich,
Computer
meist
am leichtesten an den Scanner
Montage der Fiihrungsschienen
Die Montage von Geraten im Laufwerkschacht kann in
den verschiedenen Computern unterschiedlich
sein . In den meisten Fallen kann
Abb.
3.3
gezeigt
FOhrungsschienen in den Laufwerkschacht geschoben
werden . Diese FOhrungsschienen dienen auch
Fixierung des Scanners im Computer.
auf zwei angeschraubten
Die Computer-Laufwerkschachte
Damit
der
kann , muB
verfOgen:
1.
2.
3. Kartenschlitz auf
Scanner in einen Computer
dieser
Ober folgende Voraussetzungen
Von auBen
5 1/4"-Laufwerkschacht
Normaler
zuganglicher, halbhoher
Stromversorgungsstecker
ist
sehr
einfach. Die
Scanners geschraubt. Der Scanner
Computers eingesetzt.
das
SCSI-Flachkabel angeschlossen.
innerhalb
die
anzuschlieBen.
dieser
zum Teil in den
der
Grundplatine
Kabel nach
die
AbschluBwiderstande
der
Scanner
eingebaut
mit
An
des
Vielmehr
gelost
wie
zur
dem
die
der
dem
ist
in
werden
es
31
Page 32

[b)
[e)
[c)
Fig. 3.4 A typical computer drive bay slot
(The drive bay as seen from the front)
Emplacement typique 5
de I'avant
Eln typlscher Computer·Schachteinschub
(Vorderansicht des Laufwerkschachts)
[d) [I]
1/4"
demi hauteur,
[a]
The
scanner
as shown in Figure 3.4. Since you
into the
this
drive
externally
computer
the
supply
have an
SCSI interface board.
will
slide
scanner
connector
, the
bay. In
accessible. The
using the standard
. The
available
computer
other
single
into a 5
words
, the
scanner
computer
short
[a] Rai I slots
[b) Rail stop
[c) Rail stop (open)
[d) Drive
[e) Insert LS-10
screws
slot
here
[I] Rail stop (closed)
computer
The
screwed into the tapped
height
be loosened to
freely
so
the
guide
scanner
drive
bay
has one
drive
slot
as shown in
allow
they do not block the
rails
. These
is installed to lock the scanner in place.
holes
them
Figure
to
either
will
be repositioned
The scanner side mounting holes
Two sets of vertical holes
the
vu
scanner
mounting holes. One
with
where
positioned in the
the bottom
rails
at
the bottom of the
scanner
slots.
, see if the scanner
. These
the
computer
drive
set
of mounting
are
are
set
provided on the
called the top and bottom rail
must be chosen in accordance
allows
bay.
Most
holes
scanner
will
1/4"
half-height
will
be
must
computer
motherboard
connector
or
on the
drive
the
computers
be used. Position
slide
inserting
have a cutout
drive
bay
will
be
powered
drive
slot
two
metal stops
sides
of
3.4. These
be
removed
bay receptacles
after
scanner
and,
while
into the bay rail
drive
for
must be
power
needs to
for
the
each half-
should
or
the
sides
to be
require
holding
bay
film
from
hung
for
of
that
the
the
32
Page 33

Le
scanner
hauteur
introduire
etre
accessible
Ie
connecteur
mere
libre
[a] Rainures
[b] Vis de
se
glisse
comme
dotee d'une fente
de
pour y inserer
sur
Ie
de
I'unite
la
film
dans
I'exterieur
standard d'alimentation
centrale
une carte d'interface SCSI.
taquet
[c] Taquet (ouvert)
[d]
Emplacement
[e]
Inserer
['1
Le
logement
taquets
cotes de chaque fente
3.4. Devissez les vis et
pendre
librement.
passer
les taquets en place
Ah~sages
Deux
series d'alesages
cote du
so it en position haute,
la
serie
scanner
centrales
basse. Montez les
presentez
entre facilement.
Ie LS-10 ici
Taquet (ferme)
de I'unite
metalliques
librement
visses
de
sorte
Apres
pour
lateraux
scanner
de
dans I'unite centrale. La
LS-10.
trous
qui
permet
requierent
Ie LS-10 face au
un montage
rails guides
dans Ie
logement
figure
3.4.
Ie
scanner
pour
ce
logement
. Le
scanner
doit
disposer
centrale
dans les
comme
soit
Ie represente la
retirez
les taquets ou laissez-Ies
que les
avoir
pose Ie
bloquer
du
scanner
filetes
sont
II
servent a fixer
en position basse . Choisissez
de
en position basse, et
logement
51/4
Comme
, I'unite
sera
interne
d'un
comporte
orifices
rails guides
scanner
Ie
scanner
pratiques
monter
correctement
plupart
des
rails
pour
vous devez
centrale
qui
alimente
emplacement
un ou deux
sur
les
rails
des
en position
verifier
",
demi-
do it
devra
etre
par
. La carte
les
figure
puissent
, remettez
.
de chaque
guides,
unites
qu'iI y
Ie
wird
Der Scanner
5 1/4"-Laufwerkschacht geschoben. Nachdem Film in
den Scanner
uber
eine Aussparung fUr diesen Laufwerkschacht
verfUgen.
von au Ben
einen
versorgt. Auf
Steckschlitz fUr
Mit
normalen
[a]
Schienenschlitze
[b] Schienenanschlagsschrauben
gemiiB Abb . 3.4 in den halbhohen
eingefuhrt
anderen Worten,
zugiinglich
der
die
werden muB, muB
der
sein. Der Scanner
Stecker vom Computer
Grundplatine
SCSI-Schnittstellenkarte befinden.
Laufwerkschacht muB
muB
wird
mit
sich ein
der
Computer
uber
Spannung
freier
[c] Schienenanschlag (offen)
[d] Laufwerkeinschub
[e]
LS-10
hier
['1
Schienenanschlag (geschlossen)
Wie Abb . 3.4
Metallanschliige
Laufwerkeinschubs. Diese mussen gelockert werden, so
sie
daB
konnen, daB
nicht blockieren . Nach
werden
zuruckversetzt.
entweder
sie
einschieben
zeigt
, befinden sich ein
in Gewindelochern an
entfernt
sie
die
Aufnahme
wieder
der
in ihren
oder
zwei
der
Seite
oder
so weggeklappt werden
der
Montage des Scanners
Fuhrungsschienen
ursprunglichen
Zustand
jedes
Seitliche Montagelocher des Scanners
An den Seiten des Scanners befinden sich
von Lochern. Diese werden als
Montagelocher
nachdem, wie sich
liiBt, mussen zwei
gewiihlt
die
unteren Locher.
unteren Lochern an und probieren Sie, ob sich
Scanner
liiBt.
fUr
die
Fuhrungsschienen bezeichnet. Je
der
Scanner im Computer
in
dieser
Bringen
die
Schlitze
werden . Bei den meisten Computern sind
damit
Locher
Sie
des
obere
zur
die
Schachtes einfUhren
je
zwei Siitze
und untere
Befestigung
Schienen in den
anbringen
dies
der
33
Page 34

The guide rails mounting holes
The
guide
rails
end. The tapered end is mounted
scanner. This
drive
bay slot. The non-tapered end mounts to the
of the
scanner
locked into position once the
Certain holes on the
direction
of the
rails
set
of horizontal holes that can be used to position the
rails
forward
have a tapered end and a non-tapered
facilitates the
. This flat end
permits
or
backward
rails
precise
. This
with respect to the
at
the
scanner
allows
scanner
are
elongated in the vertical
adjustment
scanner
with
respect to the
rear
's
entry
the
scanner
is installed.
of the position
. The
into the
of the
rails
front
to be
have a
scanner
.
Attaching the guide rails
There
are
take several
are
The face of the
peripherals
computer
drive
drive
front
The process
computer
patience. It is often easiest to
while
bay. Choose the position that looks best. Then
rails
push the
scanner
installation . If not, move the
scanner
several
found on the
. In addition , the
bay
without
bay. It
panel
drive
holding
into the
scanner
, tighten the screws and continue on
and
different
tries
before the
scanner
scanner
in the
drive
touching any
should
sit
aligns
of
the scanner and
side
try
so that the
with the face of the
properly
bay can take
of the
into the bay . If
again until
styles of
and
has to
bays as
scanner
aligning
scanner
it
to
the scanner
computers
best
combination
rails
for
optimal
fit
flush with
well
as the face of
must
other
devices
cutout
scanner
the
several
rails
scanner
attempt
eyeball
fits.
the
rails
in
front
loosely
it
fits ,
remove
with respect to the
. It
may
of
holes
mounting
other
into the
or
computer
.
into the
and
holes
of
the
screw
the
with
the
the
some
drive
the
slide
in the
best
and attempt to
Sliding the scanner into the drive bay
Before the
that the DIP switch block is
it
may
DIP switch block.
Never
have a snug fit, yet it should not be
excessive force when pushing in the
not
check the
path of the scanner.
scanner
be necessary to change the
force
slide
in
easily, reposition
drive
is inserted into the
the
scanner
bay
to see
into the
set
the
what
correctly
configuration
drive
bay
necessary
scanner
guide
might
be
drive
. In
rare
. It should
rails
blocking
bay, insure
cases,
of the
to
apply
. If it does
or
visually
the
.
the
34
Page 35

Ahftsages
Les
rails
extremite
a
I'arriere
scanner
I'avant du scanner. Elle
en place apres son installation. Certains trous
rails sont allonges verticalement. Ceci permet de
la position des
rails
comportent
peuvent etre utilises
arriere
des rails guides
guides ont une extremite en biseau et une
normale
dans Ie logement. L'
sur
du
scanner
Ie
scanner
. Cette
pour
rails
avec precision
une
serie
pour
.
extremite
permet
de
leur
doit
faciliter la penetration du
extremite
de bloquer
trous horizontaux qui
positionnement avant ou
etre position nee
normale
Ie
sur
Ie
scanner. Les
scanner
va a
sur
les
regler
Fixation des rails guides sur Ie scanner
Les
rails
II
tentatives
trous
etre en affleurement avec les autres peripheriques dans
les baies et avec I'avant
glisser
peripheriques
que la decoupe du panneau avant de
affleurement avec I'avant du
Un
demander
II
I'on presente Ie
logement. Choisissez la position qui
Vissez ensuite les rails
serrer
logement.
et
les
se montent differemment selon les ordinateurs.
peut donc etre necessaire d'effectuer
est partois plus facile de
poursuivez
pour
sur
dans Ie
bon
alignement
et
rails
trouver
Ie
scanner
logement
ni Ie logement. Son montage
plusieurs
scanner
essayez de pousser Ie
S'il
est bien adapte, retirez-Ie,
I'installation. S'il
sur
Ie
scanner
la
meilleure
et
les
rails
de I'ordinateur
sans
du
scanner
tentatives et une certaine patience.
trouver
et les ra ils a I'avant du
sur
Ie cote du scanner sans
et essayez a nouveau .
combinaison de
. L'avant du
toucher
scanner
dans Ie logement peut
est
. Le scanner
ni les autres
I'ordinateur
.
les trous a
parait
scanner
mal adapte, deplacez
plusieurs
scanner
doit
utiliser
la
meilleure
dans Ie
serrez
doit
doit
etre tel
soit
les vis
Introduction du scanner dans Ie
logement
Avant d'
vous que les interrupteurs
positionnes. Dans
de
Ne forcez
logement. Le scanner doit etre bien ajuste
devez pouvoir
scanner
guides ou cherchez
introduire
changer
ne
Ie
scanner
de
configuration des interrupteurs
jamais
glisse
rares cas, il peut etre necessaire
pour
I'introduire
pas facilement , repositionnez les rails
visuellement
dans Ie logement, assurez-
DIP
sont correctement
introduire
Ie scanner dans Ie
sans trop pousser. Si Ie
ce qui fait obstacle .
et
DIP
.
vous
Montagelocher fur die
Fuhrungsschienen
Die Fuhrungsschienen haben ein konisch zulaufendes
und ein gerades Ende. Das konische Ende
der
Ruckseite des Scanners befinden. Dies erleichtert
das EinfUhren des Scanners in den Fuhrungsschlitz des
Laufwerkschachts. Das gerade Ende befindet sich im
vorderen Teil des Scanners.
Verriegelung des Scanners nach
der
Montagelocher in den Fuhrungsschienen sind
vertikalen Langslochern versehen, die eine Justierung
der
Schienen gestatten. Daruber hinaus gestatten
horizontale
Schienen auf dem Scanner.
Uingslocher
Es
gestattet die
der
Montage. Einige
die
horizontale Ausrichtung
Anbringung der Fuhrungsschienen am
Scanner
Wegen
der
unterschiedlichen Computer-Konstruktionen
konnen
Scanner gefunden ist. Die Frontplatte des Scanners muB
bundig
en
Vorderseite des Computers abschlieBen. Daruber hinaus
dart
Laufwerkschacht keines
si
Seine Frontplatte muB
Aussparung des Computers sitzen.
Die Einpassung des Scanners in den Computer
.
einige Versuche und ein wenig Geduld. Oft ist es am
einfachsten,
AugenmaB zu ermitteln, wah rend
Schienen vor den Laufwerkschacht gehalten werden.
Dann schraubt man
Seiten des Scanners und versucht, den Scanner in den
Schacht
heraus, zieht
Montage fort. Andernfalls verschiebt man die Schienen
auf dem Scanner und beginnt erneut
Einpassung.
mehrere
Kombination von Montagelochern
mit
der
Scanner beim Einschieben in den
zu
Einsetzen des Scanners
Versuche notig werden , bis die beste
den anderen Peripheriegeraten und
der
sauber
die
bestgeeigneten Montagelocher nach
die
Schienen
schieben. PaBt er, zieht man ihn noch einmal
die
Schrauben fest und fahrt
an
Schienen und
anderen Gerate beruhren .
in
der
entsprechenden
der
Scanner und die
nur
leicht auf die
mit
in
den
Laufwerkschacht
Vor dem Einschieben des Scanners in den
Laufwerkschacht
Leitungsbrucken
entsprechen .
die
Konfiguration des Bruckenblocks zu andern.
Vermeiden Sie beim Einsetzen des Scanners in den
Laufwerkschacht
sollte kein Spiel haben, jedoch beim Einschieben keinen
zu groBen Kraftaufwand ertordern. Bei zu groBem
Widerstand
einmal ab oder pruft den Laufwerkschacht visuell, um
festzustellen , was den Scanner blockiert.
vergewissert
an
der
In
seltenen Fallen kann es notwendig sein,
jede
Gewaltanwendung! Der Scanner
nimmt
man die Fuhrungsschienen noch
man sich ,
Ruckseite den Erfordernissen
mit
der
daB
muB
die
sich
mit
der
ertordert
der
an
der
35
Page 36

[a] [b)
Procedure
physically
Please read through this chapter
installation of the
3.1 provides step-by-step
installing
the LS-10 internal-
scanner
.
instructions
mount
before
for
scanner.
the actual
[c]
Fig. 3.5 SCSI connection
Connexlon SCSI
SCSI-Stecker
an
on
the
du
lS-10
lS-10
lS-10
Procedure
3.1
__________
Installing the internal-mount scanner
into the drive bay
Step
1 Connect the SCSI
Connect one end of the
50
-pin SCSI connector on the
in
Figure
with Pin 1
The connectors on both the
are
connector to
scanner
with a
red
scanner
careful to have the
parallel
force. This
Step
LS-10
Terminating
information .
Step
On one
locking
block the access to the
the
metal tab does not block access to the
be necessary to
because they
3.5. Insure that Pin 1 of the
of
[a] LS-10
[b] SCSI connector
(c] SCSI
protected with a
str
Warnlngl
Make sure
mates with Pin 1
rails
the
rear
flat
mount
connector and the
triangle
, and the
ipe on it. Do not force the
. It should
to the connector on the
will
reduce the risk
Pin
2 Terminating the SCSI
needs the SCSI
the SCSI chain" in
3
loosen
or
both
screws
. These may be positioned so that they
will
slide
will
flat
scanner
side
cable
(SCSI
protruding
properly
wire
snap
connector
1 marked on the scanner connector
of
the flat cable connector.
termination
the lock down screws
sides
of the
openings
in. Loosen these
remove
be repositioned in Step 6
cable
to the
50-pin SCSI
rear
of the LS-
.
cable
showing
scanner
. Note that Pin 1 on the
cable
associated with Pin 1 has a
into place with a
drive
these tabs . Keep them
and on the
tab to
connector
cable
on the
cable
scanner
of
bending
. Refer to "3-4
this
chapter
bay
in the
screws
cable
cable
is
force
the
is
connector
bit
pos itioned
before
any
opening
drive
so that the
openings
below
lS-10
10
keying)
of
for
to the
as shown
aligned
cable
marked
into the
force
applying
pins
more
are
bay
where
. It
handy
.
_
. Be
.
may
36
Page 37

La
procedure
LS-10 dans
Veuillez
commencer
Procedure
Installation
3.1
I'unite
lire
attentivement
I'installat
3.1
du
detaille
pas a pas I'installation du
centrale
ion du
.
ce
chapitre
scanner
_________
scanner dans Ie
.
avant
de
logement de I'unite centrale
Etape 1 Connexlon du cable SCSI au LS-10
Connectez une
50
broches au
I'
arriere
vous que la broche 1 du
broche 1 du
[a] Face
[b] Connecteur SCSI
[c] Cable en nappe SCSI
connecteurs
Les
par
un
ergot
que
Notez
et
du cable
leur
qui
pour
pas
scanner
pression.
parallele
Vous
eviterez
Attentlonl
A
••
urez-vou. que la broche 1 marqu'e
coincide avec la broche 1
nappe.
Etape 2 Termlnalson
Le LS-
10
de plus
Terminaison
Etape 3 Desserrez les vis de malntlen
L'un ou les deux cotes du
taquets
positionnees
niveau
des
taquet ne bloque pas I'acces. Retirez les taquets si
necessaire. Gardez-Ies
devrez
les
extremite
connecteur
du LS-10 ,
scanner
arriere
du
saillant
les
broches
sont
est
. Le
amples
de
reperees
associe
introduire
connecteur
Veillez
au
doit
a ce
connecteur
ainsi de
faire I'objet
precisions, reportez
de la
blocage
pour
rails. Desserrez
remettre
du
cable
50
comme
sur
cable
.
LS-10
scanner
qui
assure
N' 1 des connecteurs du
par
com porte un
Ie
connecteur
doit s'engager
que
Ie
du
tordre
du
d'une
chaine
SCSI" dans ce chapi
logement
. Les vis
bloquer
I'acces du
en nappe SCSI a
broches
la
figure
est
en regard de la
(reperage
et
du
cable
un bon engagement.
un
triangle,
filet
de
connecteur
scanner
du
avant
des
broches
connecteur
SCSI
terminaison
-vous a "3-4
de
ces vis
com
ces taquets peuvent etre
de
a portee de main
en place a I'etape
qui se
trouve
3.5.
Assurez
du
cable
sont
proteges
et
que
rouge
. Ne forcez
cable
dans Ie
avec une
du cable
de I'
.
du
scanner
du
SCSI. Pour
portent
logement
sorte que Ie
car
vous
8.
scanner
legere
enfoncer
cAble
tre
des
au
a
-
SCSI)
Ie fil
so
it
..
.
_
Die einzelnen Arbeitsschritte
Scanners LS-10 sind unter Verfahren
beschrieben.
Bitte lesen Sie dieses Kapitel
Installation des Scanners durch.
Verfahren
3.1
__________
Einbau des Scanners
zur
Montage des Einbau-
3.1
ausfOhrlich
vor
der
eigentiichen
in
den
Laufwerkschacht
SchriH 1 AnschluB des SCSI-Kabels an den LS-10
Schl ieBen Sie ein Ende des 50poligen SCSI-Fachkabels
an den 50poligen SCSI-Steckverbi
des
LS-10 an,
Sie sich, daB sich Stift 1
Stift 1 des Scanners befindet.
[a] ROckseite des LS-10
[b] SCSI-Steckverbinder
wie
in Abb. 3.5 dargestellt.
des
[c] SCSI-Flachkabel (SCSI-Kabel angeschlossen)
Die
Steckverbinder
durch einen Vorsprung geschOtzt ,
sicherstellt. Beachten Sie das Dreieck
von Stift 1 auf dem Scanner-Steckverbinder und dem
Kabelstecker
Stift 1. Wenden Sie beim Ansetzen des Kabelsteckers an
den Scanner keine
.
Kraft einrasten. Beachten Sie , daB sich
parallel
muB,
Gefahr
zum
bevor
, daB sich Stifte verbiegen .
am Scanner und am Kabel sind
sowie
den roten Streifen auf
Gewalt
Steckverbinder
Sie Druck ausOben. Dies
Achtungl
Vergewl
••
ern Sle .Ich,
daS
Steckverblnder gekennzelchnete
Stlft 1 de.
Stecker.
am
Flachkabel
SchriH 2 SCSI-AbschluB
Der LS-10 ben6tigt einen SCSI-AbschluB . Weitere
Informationen hierzu entnehmen Sie bitte dem Abschnitt
"3-4 AbschlieBen
der
SCSI-Kette" in diesem Kapitel.
SchriH 3 Losen der Klemmschrauben
Auf
einer
oder
Laufwerkschachts befinden sich Klemmschrauben . Diese
k6nnen
Laufwerkschacht versperren, durch
eingefOhrt werden. L6sen Sie deshalb
die
bis
nicht
mehr
Plattchen zu entfernen. Heben Sie sie jedoch auf,
sie
in Schritt 8
beiden Seiten
unter
Umstanden die Offnungen im
Metallplattchen den Zugang zu den Offnungen
versperren. Es
wieder
angebracht werden!
nder
an
Kabels in
an. Er
des
der
der
einwandfreien Sitz
zur
sollte
mit
der
Scanners befinden
verringert
der auf dem Scanner-
Stlft 1 In
1st.
der
Offnung des
die die
die
kann
erforderlich
der
ROckseite
Vergewissern
Stellung von
Markierung
dem
Kabel
geringer
Kabelstecker
die
Kontakt
Schienen
Schrauben,
werden,
weil
mH
die
_
fOr
37
Page 38

~14----[a]
Step
4 Feed the computer
Feed the
Figure 3.6, through the
as
cords with each
Step
computer
it
will
extend out through the
Computer
[a]
on
[b] V-Adapter
four
power
power
12 V DC
power
wire
cable)
power
connector)
drive
connector (Typical
5 Slide the LS-10 part way Into the
power
drive
connector
connector
, as shown in
inside
bay
. Connect
connector
4-pin
connector
bay from the
or
5 V
DC
connector (Optional V-type
drive bay
Thread the unconnected end of the 50-pin SCSI
through the
of
the
the
drive
rails
that the
power
computer
bay
are
properly
rear
connector.
drive
bay
and pull
while
. The
of the
sliding
scanner
positioned. Push the
scanner
it
through into the
the
scanner
should
slide
aligns
with
rear-first
in
easily
scanner
the
computer
.
as
cable
inside
into
if the
in
so
far
the
Fig. 3.6 Computer power supply connector
Connecteurs d'alimentation d'unite centrales
Stromversorgungsstecker des Computers
Warnlngl
boHom
of
The top or
the scanner should not touch
anything when sliding Into the computer. Damage
can occur
the scanner or
to
other devices If the
to
scanner scrapes during Installation.
Step
6 Connect the power connector
Connect the 4-pin
the 4-pin
connectors
is beveled.
are
possible
thereby
damage
Make
power
properly
to
creating
can
sure
Note: An optional V-adapter
are
not any
computer
power
connector
are
keyed so that one
Be
careful to
aligned. Under
force
a backward connection.
occur
that the connection is correct.
.
connector
of
insure
the connector in
to the
scanner
available
of the
the scanner. Note that both
side
of
that the beveled edges
certain
circumstances,
at
an
should
may
be
power
necessary
connectors in the
computer
the connector
improper
Extreme
this happen.
Warnlngl
to
Never aHempt
connect power
the computer power
on.
to
the scanner
if
there
to
it
angle
with
is
38
Page 39

Etape 4 Passage du cordon d'allmentatlon
Comme
connecteur d'alimentation
logement
maximum
connecteur
Etape 5 Insertion
Faites
50
de
en
facilement
scanner
Ie
Ie represente la
depuis I'interieur
du logement.
[a] Connecteur d'
[b] Cordon de
broches a
I'unite
premier
connecteur d'alimentation
12 V CC
(Connecteur type
alimentation
d'
passer I'extremite
travers
centrale
dans Ie logement. Le
si
les
de
rails
sorte
figure
a 4 broches a
et faites-Ie
Branchez
ou 5 V CC.
alimentation
sur
derivation
tout en
que
Ie cable a
en Y (Connecteur
de type Y en option)
partie
lie
non
Ie
sont
sa
branchee
logement
glissant
bien positionnes . Pousser Ie
face
arriere
de
3.6, faites
passer
travers
depasser
les cables a chaque
de I'
unite
centrale
quatre
du LS-10
du
tirez
so
centrale
cable
-Ia a
du
coulisse
it en
I'interieur
scanner
ligne
et
I'arriere
scanner
I'unite
fils)
.
Attentlonl
Les facea auperleurea et Interleurea du scanner ne
dolvent rlen toucher en gllaaant dana I'unlte
ou
centrale. Le scanner
peuvent aublr dea dommagea
Ii
enfonee
force dana Ie logement.
lea autrea perlpherlquea
al
Ie scanner eat
Etape 6 Connection d'allmentatlon
Enfichez Ie
sur
deux connecteurs
Veillez
On
risque
connecteur
mauvaise
importants
que
Remarque:
Attentlonl
Ne tentez Jamala de raccorder I'allmentatlon au
scanner loraque I'ordlnateur eat aoua tenalon.
connecteur d'alimentation a quatre
la
prise
d'alimentation
a ce
, dans certaines
connexion. Ceci peut
la
connexion est correcte.
comportent
que
les bords en biseau
avec un
dommages
Un
adaptateur en Y, en option , peut
necessaire
d'
alimentation
centrale.
du
circonstances, d'enfoncer
angle incorrect
pour
Ie
s'il n'y a plus de connecteurs
disponibles
scanner
un biseau
et
alors
scanner
. Notez
soient
de faire ainsi une
entrainer
dans I'unite
broches
que
sur
un cote .
bien alignes.
. Assurez-vous
de tres
etre
Ie
Ie
au
SCSI a
avec
les
Ie
SchriH 4 Zufiihren
der
Spannungsversorgung yom
Computer
Fuhren Sie den
Computers
wie
moglich durch den Laufwerkschacht. Verbinden Sie
die
Kabel
Gleichspannungsstecker.
[a]
Stromversorgungsstecker
(Normaler
[b]
Stromversorgungsstecker
(Zubehorstecker
vierpoligen
wie
in Abb. 3.6
mit
einem 12-Volt-
Stecker
Spannungsstecker des
dargestelit
oder
mit
mit
T-Adapter)
von innen so
5-Volt-
des Computers
vierpoligem
mit
T-Adapter
weit
Kabel)
SchriH 5 LS-10 tellwelse In den Laufwerkschacht
Fuhren Sie das
poligen SCSI-Kabels durch den Laufwerkschacht und
ziehen Sie es in den Computer hinein , wah rend Sie den
Scanner
Laufwerkschacht schieben. Der Scanner solite sich
leicht
richtig sitzen. SchlieBlich
weit
Stromversorgungsstecker
Achtungl
Belm Elnschleben
oben und unten nlcht schlelfen. Andernfalla
Beachldlgung dea Scannera oder anderer
m6gllch.
schieben
mit
seiner
einfiihren
hinein, bis
nicht
angeschlossene Ende des 50-
Ruckseite voran in den
lassen, sofern
seine
Ruckseite
In
die
driicken
des
Fiihrungsschienen
Sie den Scanner so
mit
dem
Computers abschlieBt.
den Computer dart der Scanner
1st
elne
Gerlte
SchriH 6 AnschlleBen des Stromversorgungs-
Verbinden Sie den
des Computers
einer
Ausrichtung
moglich, die
ineinanderzudrucken , so daB sich eine Fehlverbindung
ergibt. Diese kann zu
Scanners fUhren!
die
Stecker einwandfrei sitzen.
Hinweis: Wenn auf seiten des Computers nicht
steckers
vierpoligen
mit
Seite konisch zu. Achten Sie auf prazise
geniigend
Verfugung stehen, kann ein als
lieferbarer
jenem
der
Stecker. Unter Umstanden
Stecker in einem falschen Winkel
schwerer
Vergewissern
Stromversorgungsstecker
T-Adapter
Stromversorgungsstecker
am Scanner. Beide laufen auf
ist
Beschadigung des
Sie sich deshalb, daB
erforderlich
Zubehor
werden.
es
zur
Achtungl
Oer Computer
muB
belm
AnachluB
dea Scannera an
die Spannungaveraorgung grundaltzllch
auageschaHet selnl
39
Page 40

Step 7 Slide the scanner Into the computer
Once the
scanner
should gently pull the SCSI
tension on the
in. Never tug on the
while
power
the rest of the way into the
pushing in the
connection is
cable
while
cable
scanner
cable
the
nor
made, carefully
computer
to
provide a slight
scanner
allow
.
the
is
cable
slide
. One hand
being
to fold
pushed
Step 8 Screw down the rail stops
Once the
reposition
above. The tabs
guide
scanner
or
reinsert
rails, thereby
should
is pushed into the
the lock tabs mentioned in Step 3
slide
locking the
in
front
scanner
computer
of
the
in place .
End
of
,
scanner
Procedure 3.1
the
3-3 Setting the SCSI
Up to
eight
each identified by SCSI 10 numbers. Thus, a SCSI 10 can
have a value between 0 and
regulations
Typically
number
through
A
minimum
this case, one is designated as the
other
configurations of initiators and
than one
typical
targets. The LS-10/LS-10E
the case
computer.
The SCSI
the SCSI
the factory is
devices
, the
0,
while
7.
is the target. It is
initiator
configuration
we
10 is
peripherals
can
share
regarding
computer· controller
of
show
10
the use of these numbers.
the SCSI
two
devices
possible
can be
present
is one
below
there
typically
set by a switch on the
. The
#5
.
10
a SCSI
7.
There
would be SCSI 10
peripherals
must
sit
on any SCSI bus. In
initiator
to have many
targets
on a SCSI bus . The
initiator
scanner
default
is
only
SCSI 10
and one
is
device
. These
are
no
implicit
would be 1
while
on a bus .
or
always
a target. In
one
initiator
number
More
more
rear
are
the
of the
of
set at
40
Page 41

Etape
7
Introduisez Ie scanner dans I'unite
centrale
Apres
avoir
soin Ie
enfoncez
d'une main . Ne
qu'il ne se plie pas lorsque vous enfoncez Ie scanner.
Etape
Une fois Ie
en revissant ou repositionnant les taquets deposes ou
deserres
I'avant des rails guides du scanner
scanner en place.
branche I'alimentation, introduisez avec
scanner
au fond du logement. Lorsque vous
Ie
scanner, tendez
tirez
jamais
legerement
sur
Ie cable
Ie
et
8 Revissez les taquets
scanner
a sa position definitive , bloquez-Ie
a I'etape 3. Les taquets doivent
et
bloquer ainsi Ie
Fin
de
la procedure
ciible
veillez
glisser
SCSI
a ce
a
3-3 Selection d'ID SCSI
SchriH
7 Einschieben des Scanners
Computer
Nach dem AnschluB
Sie den Scanner vorsichtig den Rest des Wegs in den
Computer. Dabei sollte eine Hand vorsichtig am SCSIKabel ziehen und dieses straff halten. Vermeiden Sie
jedoch jeglichen kraftigen Zug an diesem Kabel!
Andererseits
Scanners nicht geknickt werden.
3.1
SchriH
Nach
Sie
Metallplattchen
Fuhrungsschienen des Scanners zu liegen kommen, so
daB
8 Anbringen der Schienenanschlage
der
Plazierung des Scanners im Computer bringen
die
in Schritt 3 gelockerten oder abgenommenen
der
Scanner
der
Spannungsversorgung schieben
dart
das Kabel beim Einschieben des
wieder an. Diese mussen vor
damit
fixiert
wird
in
.
Ende
des Verfahrens 3.1.
den
die
Huit dispositifs SCSI peuvent etre relies simultanement
a un bus SCSI. lis sont identifies par un numero, I'ID
SCSI, qui peut
de
regie
attribue
I'unite centrale, les
peripheriques SCSI.
Un
minimum
raccordes
dispositifs est
est possible
dispositifs
dispositifs esclaves. La configuration la plus frequente
est toutefois un
plusieurs
est toujours un esclave. Dans Ie cas indique ci-dessous,
il y a
seulement
ID
SCSI est
L'
commutateur
numero d'iD SCSI
prendre
absolue
generalement
de
a un bus SCSI. Dans ce cas, un des
qualifie
de
maitres
dispositifs esclaves. Le
generalement
a
I'arriere
les valeurs de 0 a 7.
pour
I'attribution
I'ID SCSI 0 au
ID
1 a 7 etant destinees aux
deux dispositifs SCSI
de maitre,
raccorder
en
meme
dispositif
un
maitre
par
defaut
des
et
a un bus SCSI plusieurs
temps que
maitre
raccorde a un ou
scanner
de I'unite centrale.
determinee par Ie
peripMriques
est
ID
II
de
ces numeros.
controleur
doivent
I'autre d'esclave .
5.
n'y
de
etre
plusieurs
LS-10/LS-10E
SCSI. Le
a pas
On
II
3-3 Einstellen der SCSI-Adresse
Bis
zu
acht Gerate konnen sich eine SCSI-Schnittstelle
teilen. Dabei wird jedes einzelne durch eine SCSI-
Adresse identifiziert. Diese kann somit zwischen 0 und 7
Es
gibt
liegen.
dieser
Nummern.
Controller die SCSI-Adresse
Peripheriegerate
Auf einem SCSI-Bus mussen sich mindestens zwei
Gerate befinden. In diesem Fall wird eines als Haupt-,
das andere als Nebengerat bezeichnet. Auf einem Bus
sind viele verschiedene Konfigurationen von Haupt- und
Nebengeraten moglich. Auch
kann sich auf einem SCSI-Bus befinden. Typisch ist eine
Konfiguration aus einem Haupt- und einem oder
mehreren Nebengeraten. Der LS-10/LS-10E ist
ein Nebengerat.
ein Hauptgerat.
Die SCSI-Adresse wird im allgemeinen an
der
SCSI-Peripheriegerate eingestellt. Der Scanner ist
werksseitig auf
keine festen Vorschriften
1m
allgemeinen haben
0,
die
Nummer 1 bis 7.
In
unserem gezeigten Fall gibt es
die
SCSI-Adresse 5 eingestellt.
die
mehr
fur
die
Vergabe
der
SCSI-
als ein Hauptgerat
Computer-
immer
der
Ruckseite
nur
41
Page 42
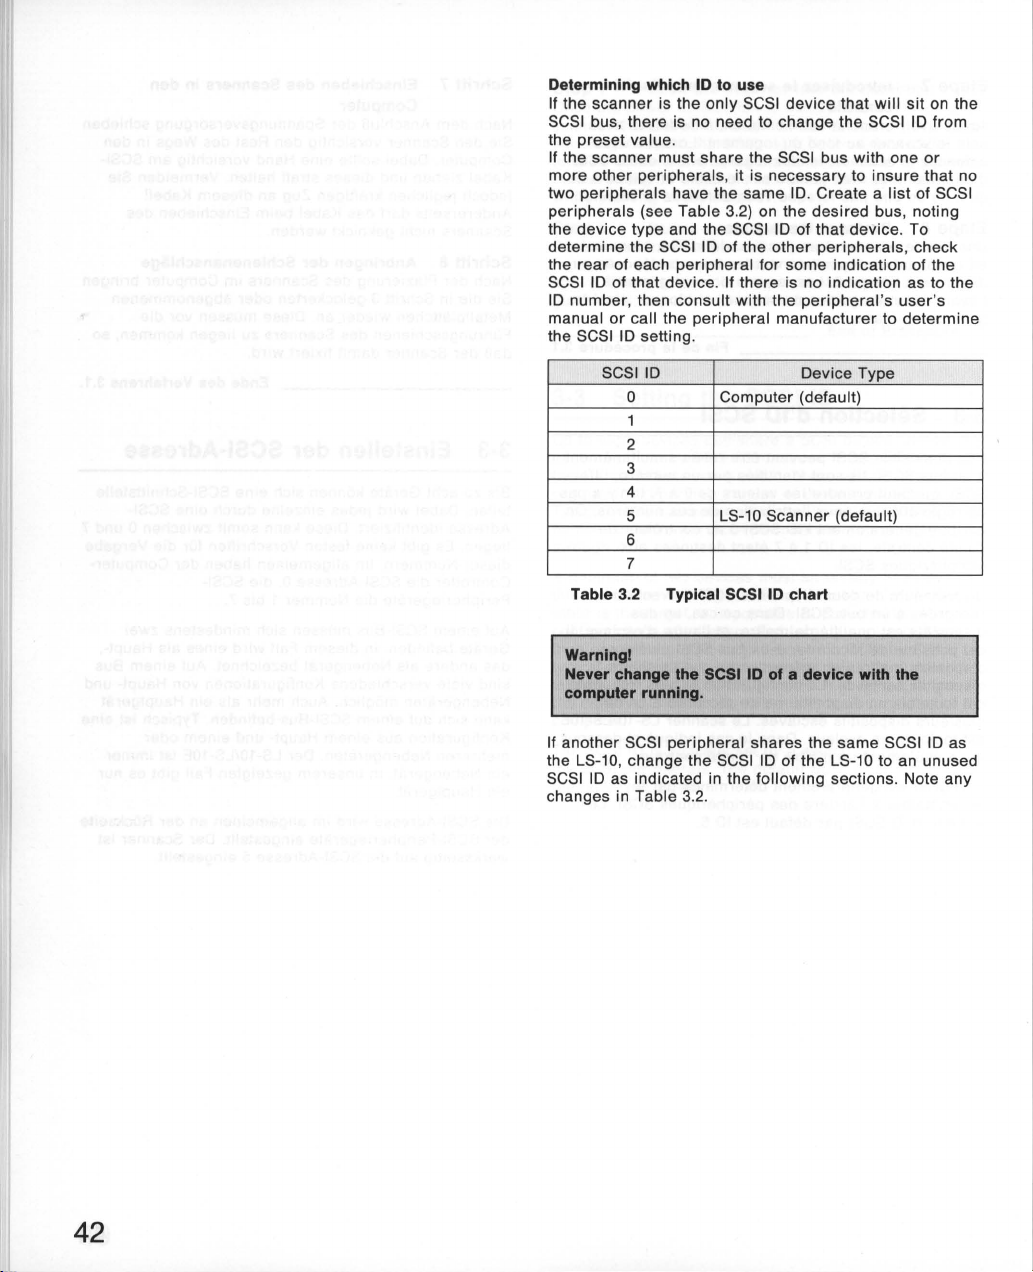
Determining which ID
If
the
scanner
SCSI bus ,
the preset
If the
more
two
peripherals
the
determine
the
SCSI
10
manual
the SCSI 10 setting.
there
value
scanner
other
peripherals
device
type and the SCSI 10 of that
the SCSI 10 of the
rear
of each
10
of
or
SCSI
that
, then
call the
0
1
2
number
peripherals
(see Table 3.2) on the
10 Device Type
to
is the
is no need to change the SCSI 10
.
must
have the
peripheral
device
consult
use
only
SCSI
device
that
share
the SCSI bus with one
, it is
necessary
same
10
other
for
. If there is no indication as to the
peripheral
Computer
some
with the
manufacturer
to
. Create a
desired
device
peripherals
indication
peripheral
(default)
insure
3
4
LS-10
5
Scanner
(default)
6
7
Table 3.2 Typical SCSI
Warnlngl
Never change the SCSI ID of a device with the
computer running.
ID
chart
will
sit
on the
from
or
that no
list
of SCSI
bus, noting
. To
, check
of the
's
user
's
to
determine
42
If
another
the LS-10, change the SCSI
SCSI
changes in Table 3.2.
SCSI peripheral
10 as indicated in the
shares
10 of
following
the
same
the
SCSI 10 as
LS-10 to an unused
sections. Note any
Page 43

Determination de
Si
Ie
scanner
SCSI, il est
Si
Ie
scanner
d'
autres
deux
Etablissez une liste
du tableau 3.
arriere
d'
contactez
peripheriques
peripheriques
de
indication d'IO, consultez
10
SCSI
1'10
est
Ie seul
inutile
doit
2.
L'IO SCSI peut
la
plupart
leur
fabricant
0 Unite
1
peripherique
de
modifier
cohabiter
, il est
ne rec;:oivent pas la
de
vos
des
peripheriques
ou
cette
sur
Ie bus SCSI avec
necessaire
peripheriques
etre
leurs
distributeur.
centrale
2
3
4
5 Scanner LS-10
6
7
Tableau 3.2 Tableau
Attention!
Ne Jamals modifier
pendant
Si un
LS-10,
10
suivantes. Notez ces modifications
autre
modifiez 1'10
SCSI
libre
Ie
fonctlonnement
peripherique
comme
10
SCSI type
1'10
SCSI d'un perlpherlque
de
I'ordlnateur
SCSI a la
SCSI du LS-10
il est
indique
connecte au bus
10
prereglee.
de
verifier
meme
sous la
relevee
notices respectives ou
Equipement
meme
pour
dans les sections
dans
sur
. S'iI
(par
defaut)
(par
defaut)
10
lui
attribuer
Ie tableau 3.2.
que
10
SCSI.
forme
la face
n'y
a pas
SCSI que Ie
une
ErmlHlung der elnzustellenden Adresse
Wenn
der
SCSI-Bus ist, besteht keine Veranlassung,
eingestellte SCSI-Adresse zu iindern.
MuB sich
Peripheriegeriiten
sichergestellt
doppelt
Aufstellung
2)
3.
Geriitetypen und SCSI-Adressen zu entnehmen sind . Um
die
festzustellen, uberprufen Sie
Peripheriegeriites
Adressenanzeige.
schlagen Sie bitte im Handbuch
Peripheriegeriits
Geriitehersteller
Scanner das
der
Scanner
werden, daB
vergeben sind. Machen Sie
der
auf dem betreffenden Bus,
SCSI-Adresse
SCSI-Adresse
0 Computer (Vorgabe)
1
einzige
mit
in den SCSI-Bus teilen, muB
SCSI-Pheripheriegeriite (siehe Tabelle
anderer
auf das Vorhandensein
1st
eine
nach
oder
.
SCSI-Geriit auf dem
einem
oder
die
Adressennummern
der
Peripheriegeriite
die
Ruckseite
Adresse
des
konsultieren Sie den
Geriitetyp
die
mehreren
deshalb
die
entsprechenden
jedes
einer
nicht
bekannt,
betreffenden
nicht
eine
SCSI-
2
3
4
5
Scanner LS-10 (Vorgabe)
6
7
Tabelle 3.2 Aufstellung der SCSI-Adressen
Achtung!
Andern Sle die Elnstellung
kelneafalla bel laufendem Computer!
der
SCSI-Adreaae
Sollte ein anderes SCSI-Peripheriegeriit
Adresse haben
Adresse
wie
nachstehend beschrieben. Notieren Sie jede
Anderung in Tabelle 3.
des
wie
LS-10 in
der
LS-10, so
eine
2.
iindern
unbenutzte SCSI-Adresse um,
dieselbe
Sie
die
SCSI-
SCSI-
43
Page 44

[a]
OPEN
o
[b)
2 3
Setting the SCSI
10
on
the
Internal
Scanner
The SCSI
of the
most cases, these DIP switches
If it is
the position
shown in Figure 3.7. Use the Table 3.3.
Switch values . When changing the position
switches
It is not recommended to use a pencil
these
differentiate the " on" versus " off" position .
ID
is set by a
internal-mount
[a]
Typically
[b) Factory
necessary
of
, use a pointed
will
color
set
of DIP
scanner
reserved
default
for
to change the
the DIP
switches
instrument
the switch and make it
as shown in
will
for
computer
LS-10
default
to the
switches
not be changed.
SCSI ID,
proper
for
to
toggle
or
pen, since
hard
on the back
Figure
3.7. In
change
SCSI
proper
of
ID
DIP
the
the switch .
to
as
Fig. 3.7 SCSI
LS-10 Scanner
Position
a
I'arriere
Einstellungen
Schalter
LS-10
10
DIP switch settings
des
interrupteurs
du scanner LS-10
der
an
SCSI-Adressen-DIP-
der
Riickselte
of
DIP
des
the
rear
pour
1'10
Scanners
of the
SCSI
SCSIID
0 open open
2 open closed
3
DIP #1 DIP
closed
closed
open open
closed open
#2
4 open open closed
5 (ID) closed
open closed
6 open closed closed
7
Table 3.3 SCSI
closed closed closed
10
DIP
switch
SCSI
10
5 (10)
values.
indicates
factory default.
DIP
open
open
#3
44
Page 45
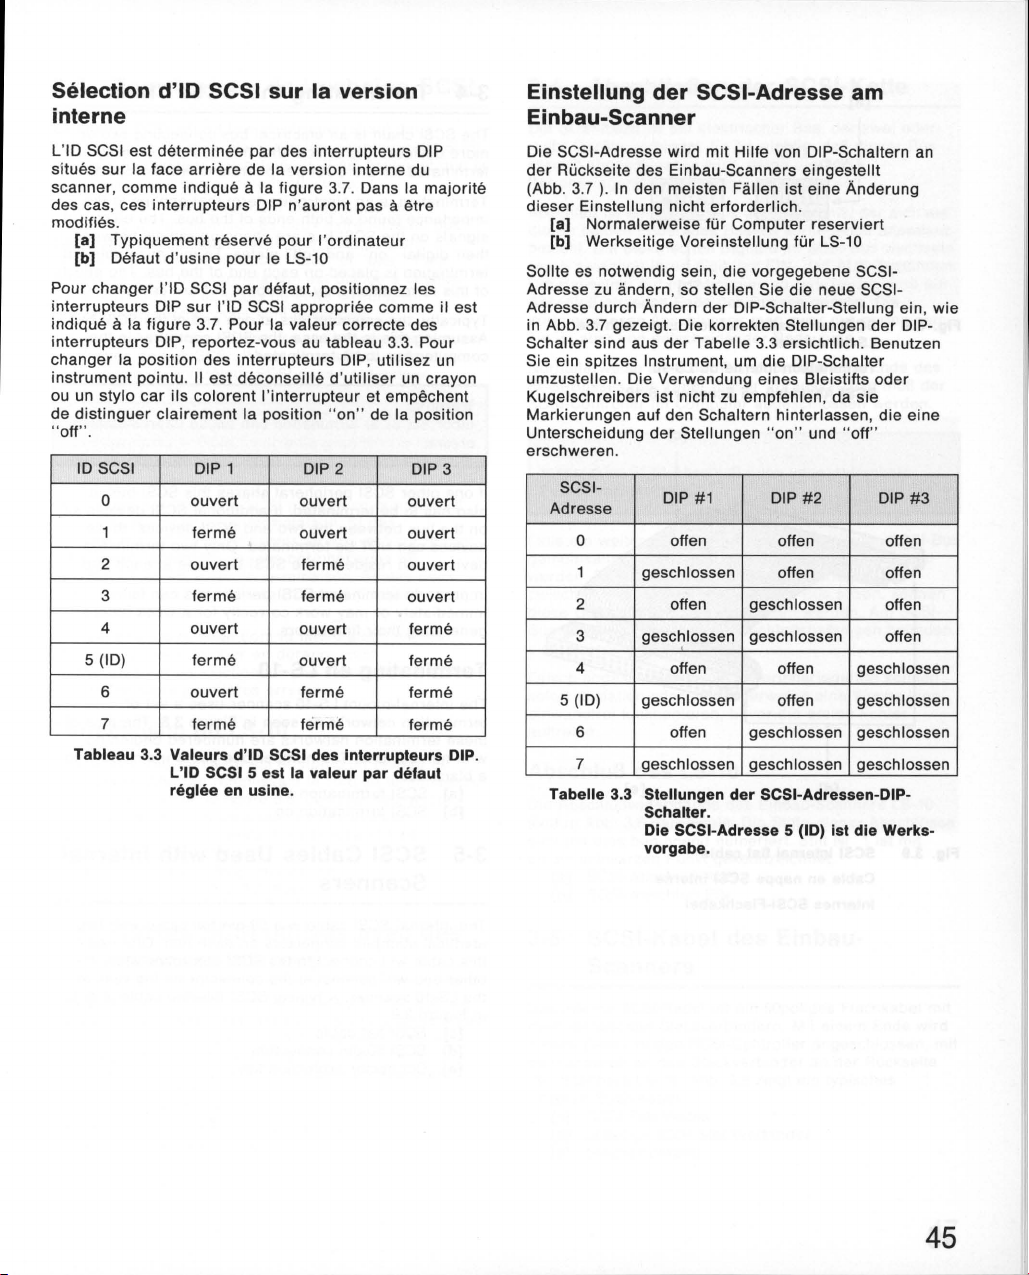
Selection d'ID SCSI sur la version
interne
L'
ID
SCSI est
situes
scanner,
des cas , ces
modifies.
[a]
[b] Defaut d'usine
Pour
changer
in
terrupteurs
indique
interrupteurs
changer la position des interrupteurs DIP, utifisez un
instrument
ou
un stylo
de
distinguer
lI
off
".
ID
5 (ID)
Tableau 3.3 Valeurs d'ID SCSI des Interrupteurs DIP.
determinee
sur
la face
comme
Typiquement
a
la
SCSI DIP 1
0
1
2
3
4
arriere
indique a
interrupteurs
I'ID SCSI par defaut, positionnez les
DIP
sur
figure 3.7.
DIP, reportez-vous au tableau 3.3. Pour
pointu.
car
ils
clairement
6
7
L'ID SCSI 5 est la valeur par defaut
reglee en uslne.
par des interrupteurs DIP
de la version interne du
la
figure
DIP n'auront pas a etre
reserve
pour
Ie LS-
I'ID SCSI appropriee comme il est
Pour la
II
est
deconseille
colorent I'interrupteur
la position
ouvert ouvert
ferme
ouvert
ferme
ouvert
ferme
ouvert
ferme
3.7. Dans la
pour
I'ordinateur
10
valeur
d'utiliser
"on"
DIP
ouvert ouvert
ferme
ferme
ouvert ferme
ouvert ferme
ferme
ferme ferme
correcte des
un crayon
et empechent
de la position
2
ouvert
ouvert
ouvert
ferme
majorite
DIP
Einstellung der SCSI-Adresse am
Einbau-Scanner
Die SCSI-Adresse wird
der
Riickseite des Einbau-Scanners eingestellt
(Abb. 3.7 ).
dieser
[a]
In
den meisten Fallen ist eine Anderung
Einstellung nicht erforderlich.
Normalerweise
[b) Werkseitige Voreinstellung
Sollte es notwendig sein ,
Adresse zu andern, so stellen Sie die neue SCSIAdresse durch Andern
in Abb . 3.7 gezeigt. Die korrekten Stellungen
Schalter sind aus
Sie ein spitzes Instrument, um
umzustellen. Die Verwendung eines Bleistifts
Kugelschreibers ist nicht zu empfehlen, da sie
Markierungen auf den Schaltern hinterlassen , die eine
Unterscheidung
3
erschweren.
SCSI-
Adresse
0
1
2 offen
3
geschlossen offen offen
gesc~lossen
4
5 (ID) geschlossen
6
7 geschlossen geschlossen geschlossen
Tabelle 3.3 Stellungen der SCSI-Adressen-DIP-
Schalter.
vorgabe.
mit
Hilfe von DIP-Schaltern
fur Computer reserviert
die
der
der
Tabelle 3.3 ersichtlich. Benutzen
der
Stellungen "
DIP #1
offen offen offen
offen offen
offen geschlossen
Die SCSI-Adresse 5 (10)
fUr
LS-10
vorgegebene SCSI-
DIP-Schalter-Stellung ein,
die
DIP-Schalter
on"
und
"off"
DIP
#2
geschlossen offen
geschlossen offen
geschlossen
offen
geschlossen
geschlossen
1st
die Werks-
der
oder
DIP
an
wie
DIP-
#3
45
Page 46
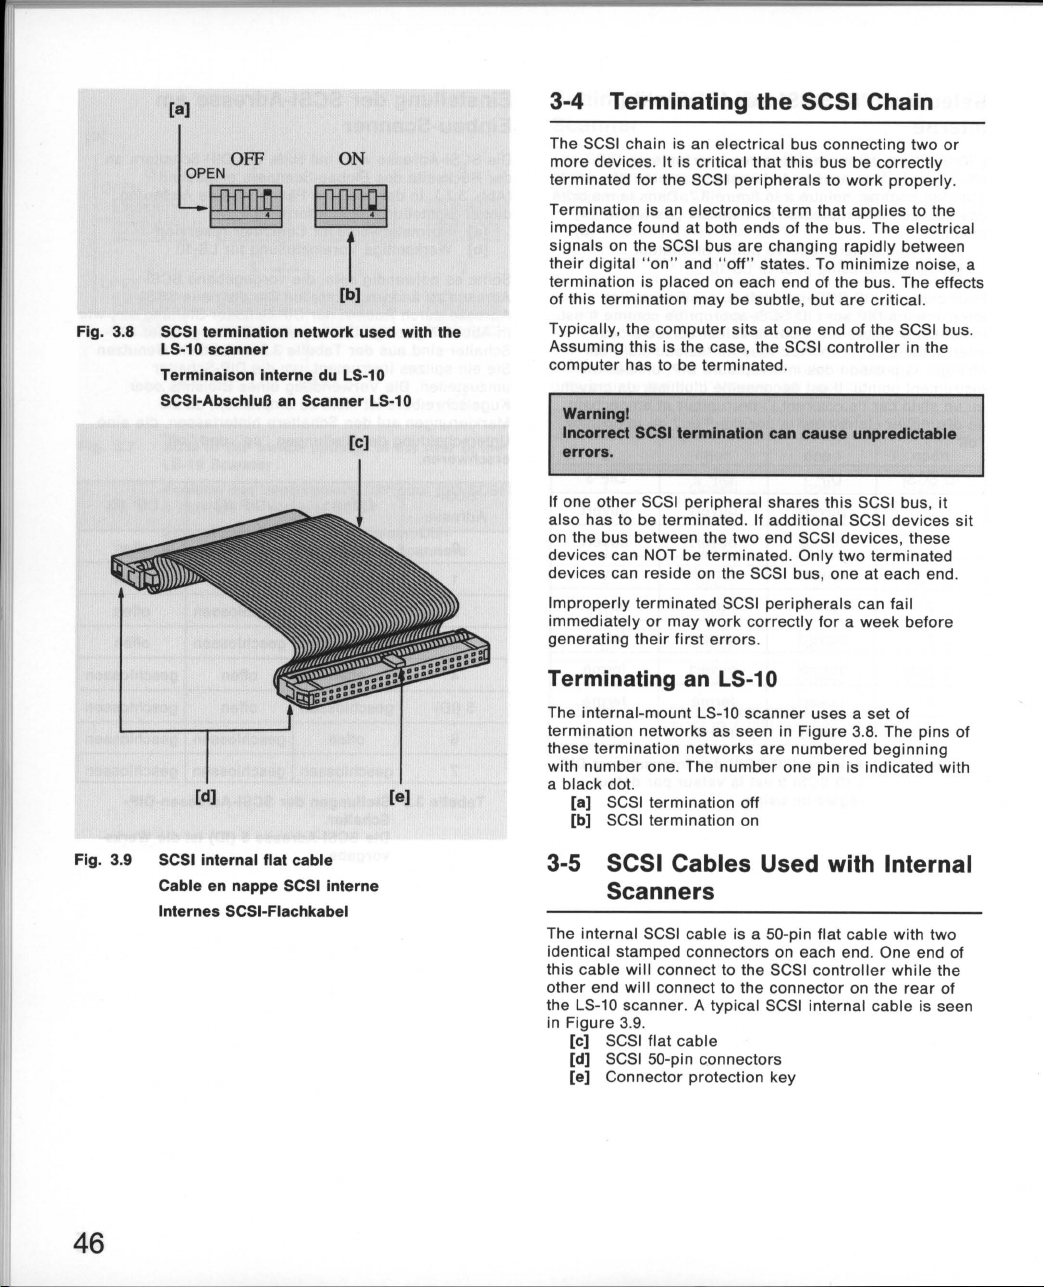
[a]
3-4
Terminating
the SCSI Chain
t~~
Fig. 3.8 SCSI
LS-10
Terminaison
SCSI-AbschluB an Scanner LS-10
termination
scanner
[d)
network
interne
f
[b)
used with the
du LS-10
[c)
[e)
The SCSI chain is an electrical bus connecting
more
devices
. It is
critical
that
this
terminated
Termination
impedance found at both ends of the bus. The electrical
signals
their
termination
of this
Typically, the
Assuming
computer
Warnlngl
Incorrect
error
If one
also
on the bus between the
devices can NOT be
devices can
Improperly
immediately
generating
Terminating
The
termination
these
with
a black dot.
[a]
[b)
for
the SCSI
is an
on the SCSI bus
digital
"on" and
is placed on each end of the bus. The effects
termination
computer
this is the case, the SCSI
has to be
SCSI
•.
other
SCSI
has to be terminated. If
reside
terminated
or
may
their
peripherals
electronics
are
"off"
may be subtle, but
sits at one end of the SCSI bus .
terminated
termination
peripheral
two
terminated
on the SCSI bus, one
SCSI
work
errors
correctly
.
first
an LS-10
internal-mount
term
ination networks
number
SCSI
SCSI
LS-10
networks as seen in Figure 3.8. The pins of
one. The
termination
termination
scanner
are
number
off
on
bus be
to
work
term
that
applies
changing
states. To
can
shares
additional
end SCSI devices, these
peripherals
one pin is indicated with
rapidly
minimize
are
controller
.
cau.e
this SCSI bus, it
SCSI
. Only
two
for a week
uses a set of
numbered
two
correctly
properly
to the
between
nOise, a
critical.
in the
unpredictable
devices
terminated
at
each end .
can fail
before
beginning
or
.
sit
Fig. 3.9 SCSI internal
Cable en nappe SCSI interne
Internes SCSI-Flachkabel
46
flat
cable
3-5 SCSI Cables Used
with
Internal
Scanners
The internal SCSI cable is a 50-pin
identical stamped connectors on each end . One end of
this cable
other
the LS-10
in
will
end
Figure
[c) SCSI flat
[d)
[e)
connect to the SCSI
will
connect to the
scanner
3.9.
SCSI 50-pin connectors
Connector protection key
. A typical SCSI internal
cable
flat
controller
connector
cable
on the
cable
with
while
rear
is seen
two
the
of
Page 47

3-4 Terminaison de la chaine SCSI
3-4 AbschlieBen der SCSI-Ketle
La chaine SCSI est un bus
peripheriques
puissent
terminaison
"
Terminaison"
applique a I'impedance
s'
signaux
Les
rapidement
reduire
extremite
peuvent etre
Typiquement, I'ordinateur
extremites
terminaison
Attentlonl
Une termlnalson SCSI Incorrecte peut causer des
erreurs Imprevlslbles.
Si un
autre
doit
lui aussi
peripheriques
entre
deux
PEUVENT PAS
terminaisons
extremite
Des
peripheriques
effectuee peuvent
immediatement
manifester
ou plus. Pour
fonctionner
so
it
correctement
est
un
electriques
entre
Ie bruit, une
du bus . Les effets de cette
bus SCSI.
les
subtils, mais
du bus SCSI.
du
controleur
peripherique
recevoir
SCSI addition nels se
peripMriques
recevoir
doivent
SCSI dont
tomber
ou
leurs
fonctionner
premieres
Terminaison du
Le
scanner
resistances internes
comme
bouchons de
commen9ant
indiquee
[a]
[b]
interne
indique
Terminaison
Terminaison
sur
terminaisons
par
par
un
Ie
point
electrique
que
correctement
terme d'electronique
sur
niveaux "haut" et
terminaison
II
SCSI
sa
, ces
de
donc
les
, il est essentiel
effectuee.
des
deux
extremites
Ie bus SCSI passent
est placee a chaque
sont
essentiels
se
trouve a I'une
faut
alors
SCSI
dans I'ordinateur.
partage
terminaison.
terminaison
se
en
erreurs
trouvent
peripMriques
trouver
la
terminaison
derangement
une
semaine
.
LS-10
LS-10 est
remplissant
Ie
numero
SCSI desactivee
SCSI activee
equipe
Ie
figure
sont
noir.
role
3.8. Les broches de ces
numerotees
1.
La
broche
reliant
peripMriques
terminaison
effectuer la
deux
qui
. du bus.
" bas
".
.
des
ce bus SCSI, il
Si
des
sur
NE
. Seules
a chaque
est mal
avant de
d'un reseau de
de
terminaison,
en
n01 est
Pour
Ie bus
deux
SCSI
que
Die SCSI-Kette ist ein
mehr
Geriite
la
korrekt
Peripheriegeriite
AbschluB
die
an beiden Enden des Busses
bezieht. Die elektrischen
rasch zwischen ihren
Um Rauschen auf ein
AbschluB an
Wirkung
sie i
st
Normalerweise
SCSI-Busses
SCSI-Controller im Computer abgeschlossen werden .
Achtungl
Inkorrekter SCSI-AbschluB kann unberechenbare
Fehler verursachen.
Falls ein
gemeinsam
werden. Falls zusiitzliche SCSI-Peripheriegeriite
zwischen zwei Endgeriiten auf dem Bus sitzen, k6nnen
diese
Bus k6nnen sich
eine an
Falsch
sofort
einwandfrei funktionieren,
auftreten.
verbindet.
abgeschlossen wird, dam it
ist
ein Begriff aus
jedes
dieses
aber
von entscheidender Bedeutung.
dar
weiteres
benutzt, muB es ebenfalls abgeschlossen
Geriite
NICHT abgeschlossen werden . Am SCSI-
jedem
abgeschlossene
ausfallen
AbschluB des
Die AbschluBwiderstiinde
sind in Abb. 3.8 dargestellt. Die Stifte
sind
mit
einem schwarzen Punkt gekennzeichnet.
eins beginnend numeriert. Stift Nr . 1
[a] SCSI-AbschluB AUS
[b) SCSI-AbschluB
elektrischer
Es
einwandfrei funktionieren.
Signale
digitalen
Minimum
Ende des Busses gesetzt. Die
Abschlusses mag
stellt
der
. Unter
nur
Ende.
oder
Computer
dieser
SCSI-Peripheriegeriit diesen SCSI-Bus
zwei AbschluBshaltungen befinden,
SCSI-Peripheriegeriite k6nnen
m6glicherweise
bevor
Bus,
ist
wichtig, daB
die
SCSI-
der
Elektronik,
vorliegende
im SCSI-Bus wechseln
EIN- und AUS-Zustiinden.
zu reduzieren,
zwar
das
Voraussetzung muB
eine Woche lang
die
ersten Fehler
LS-10
des
Einbau-Scanners LS-10
dieser
EIN
der
nur
eine
zwei
dieser
der
gering
oder
Bus
sich auf
Impedanz
wird
ein
sein,
Ende des
der
Abschliisse
ist
mit
3-5 Cables SCSI utilises avec des
scanners internes
Le
cable
interne
nappe
a 50
extremites. Un
SCSI et
scanner
represente
I'autre
LS-10. Un
SCSI se presente sous la
broches
figure
, avec deux connecteurs
connecteur
, au
connecteur
modele
3.9.
[c] Cable SCSI en nappe
[d] Connecteurs
[e] Ergot
de
detrompage
sertis
sera
asujetti au
situe a
de ce cable en nappe est
50
broches
forme
controleur
I'arriere
sertis
du
d'une
a ses
3-5 SCSI-Kabel des Einbau-
Scanners
Das interne SCSI-Kabel ist ein 50poliges Flachkabel
zwei identischen Steckverbindern.
dieses
Kabel an den SCSI-Controller angeschlossen,
dem
anderen an den Steckverbinder an
des Scanners LS-10. Abb. 3.9
internes SCSI-Kabel.
[c] SCSI-Flachkabel
[d] 50polige SCSI-Steckverbinder
[e] Steckerfiihrung
Mit
zeigt
ein typisches
einem Ende
der
Riickseite
mit
wird
mit
47
Page 48

3-6 Connecting
SCSI
to
the Computer
Fig. 3.10 The 50-pin SCSI connector Inside the
computer
Le
connecteur
I'unite centrale
Der 50pollge SCSI-Stecker
Computers
50
broches
it
I'lnterleur de
1m
Innern des
The SCSI
ther
ei
computer. There
connectors
The
manual
25-pin
connector.
Warnlngl
The SCSI connector should never
unconnected while the computer Is running.
Connecting
The SCSI connector inside the
flat
of the pin 1 and the key.
pin
have keys
clearly
have mechanical levers to assi
removing
Care must be exercised when
these 50-pin connectors. These connectors
fragile
connectors.
1. Never force the connector in and out.
2. Make
3. Do not remove a
This connector is si
the
port
on the
inside the
dealt
three
types of SCSI connectors discussed in this
are
the 50-pin internal connector, standard
0825
type
connector as shown in Figure 3.10. Note the position
flat
connectors used. They
while
marked
connectors.
[a] To
remove
out
[b] SCSI connector
[c] Ci
[d] SCSI flat cable
gently
rcuit
. Follow the rules
sure
before
inserting
pulling
the connector out by
small
screwdriver
little at a
LS-10
time
scanner
computer
computer
are
three
with in this manual.
connector
to
the inside
others do not. Some
while
others
connector: Pry
with small
card
that the
connectors
.
connector
to
.
milar
as shown in
is a connector found
or
on the
rear
basic types
or 50-pin external Centronics
computer
There
are a wide
are
will
not; and
st
in
flat
screw
inserting
below
when
from the socket by
the
pry
each
to the connector on the back of
Figure
panel
of
SCSI
be
connected or
of
a computer
will be a 50-pin
may
inserting
cable
driver
and
dealing
are
aligned
cable
the sides
3.9.
variety
yet
have Pin 1
some
connector
are
. Instead
similar
flat
of
some
and
removing
with these
properly
out
of
the
of 50-
may
rather
use
, a
may
a
48
Page 49

3-6 Raccordement au port SCSI de
I'unite centrale
Le
port
SCSI de I'
I'
interieur
Ce manuel traite
Les trois types
manuel sont Ie connecteur interne
connecteur standard DB25
externe Centronics
AUentlonl
Le connecteur SCSI ne dolt lamals
debranche pendant
I'ordlnateur.
ou
ordinateur
sur
Ie panneau
de
trois
de
connecteurs SCSI traites dans ce
a
est un connecteur situe a
arriere
types de connecteurs SCSI.
a
50
broches.
Ie
fonctlonnement de
de I'unite centrale.
a
50
25
broches, Ie
broches et Ie connecteur
Itre
branche ou
3-6 AnschluB an die SCSI-
Schnittstelle des Computers
Die SCSI-Schnittstelle des Computers befindet sich
entweder innerhalb des Computers
Ruckseite. Dieses Handbuch behandelt drei Grundtypen
von SCSI-Steckverbindern.
Bei den drei
handelt es sich um den internen 50poligen
Steckverbinder, den externen 25poligen Steckverbinder
yom Typ DB25 und den externen CentronicsSteckverbinder
Achtungl
Der SchnlHateUenanachluB darf grundsitzllch nlcht
bel laufendem Computer erfolgenl
hier
beschriebenen SCSI-Steckverbindern
mit
50
Polen .
oder
an dessen
Connexion a I'interieur de I'unite
centrale
Le connecteur SCSI a
un connecteur
fi
gure 3.10
detrompeur. II
broches
munis
pas de reperes evidents de la broche N° 1, d'autres
offrent des leviers pour en
I'extraction.
L'enfichage
pour
connecteurs sont fragiles. Respectez les regles
suivantes lorsque vous les manipulez:
1. Ne
2. Veillez
3. Ne
Ce connecteur est
scanner LS-10
. Notez la position
pour
cable en nappe : il sont
de
detrompeurs
[8] Pour
[b] Connecteur SCSI
[c]
[d] cable SCSI en nappe
cable en nappe doivent etre faits avec soin. Ces
dessus
traction
tournevis
I'autre,
retirer
levier
sur
un petit tournevis
Circuit
et
jamais
forcer
a
aligner
jamais
extraire
sur
pour
pour
I'interieur
50
broches en nappe,
y a une grande variete de connecteurs
, d'autres non ; certains n'offrent
Ie connecteur: Faites
Ie connecteur de cable en nappe avec
Imprime
I'extration des connecteurs
de
de
la broche N° 1, et
faciliter
a
lame
plate.
I'unite centrale
comme
I'insertion
similaires
legerement
50
sur
, certains
et
broches
la
a I'extraction ou a I'insertion
les connecteurs avant de
Ie
la nappe
finir
comme
connecteur en exen;;ant une
de
soulever
similaire
fil. Utilisez plutot un petit
alternativement un cote puis
par
liberer
a celui utilise au dos du
Ie montre la
Ie connecteur.
figure
presser
3.9.
sera
Ie
50
AnschluB im Innern des Computers
Beim SCSI-Steckverbinder innerhalb des Computers
handelt es sich um einen in Abb. 3.
poligen Flachsteckverbinder. Beachten Sie die Lage von
Stilt 1 sowie
Formen von 50poligen Flachsteckverbindern. Sie sind
aile
ahnlich, jedoch haben einige Fuhrungen, andere
wiederum nicht. Bei einigen ist Stilt 1 deutlich
gekennzeichnet, bei anderen nicht. Wieder andere
haben Hebel zum leichteren Ansetzen und Abnehmen.
[8] Zum Abnehmen des Steckverbinders:
[b] SCSI-Steckverbi
der
Fuhrung.
Flachsteckverbinder vorsichtig mit kleinem,
flachen Schraubendreher herausheben
Es
nder
[c] Steckkarte
[d] SCSI-Flachkabel
Beim Einsetzen und Abnehmen
Steckverbinder ist Vorsicht am Platze. Die
Steckverbi
deshalb
1. Wenden Sie niemals Gewalt an.
2. Achten Sie
3. Ziehen Sie grundsatzlich nicht am Kabel, sondern
Dieser Steckverbinder ist dem in Abb . 3.9 gezeigten
Steckverbinder
ahnl ich .
nder
sind
sehr
die
folgenden Regeln:
Ausrichtung.
heben Sie den Steckverbinder
vorsichtig
vor
mit
an
empfindlich. Beachten Sie
dem Ansetzen auf genaue
einem Schraubendreher heraus .
der
Ruckseite des Scanners LS-10
10
dargestellten 50-
gibt viele verschiedene
dieser
50poligen
an
den Seiten
49
Page 50

[8]
[b)
3-7 SeHing Up a SCSI Chain with
the LS-10
Fig.
[g) [e)
3.11
The internal-mount SCSI
Le
bus
interne SCSI
Der Interne SCSI-Bus
bus
[h)
The LS-10
connector
other
chain, then the connector of the 50-pin
the
Typically, the
internal SCSI bus. If this is the case , the 50-pin
provided
In
some
not be the
When this occurs . the SCSI
A special
of the
ends
shown in
scanner
. When the
device
scanner
[a]
Computer
[b]
Computer
[c] Computer SCSI
[d] SCSI
[e] LS-10 SCSI
[I] LS-10
[g] LS-10 SCSI
will
cases, as shown in
only
cable
cable
of
the cable will be
Figure 3.12
[h] SCSI
[I] SCSI 50-pin connectors
Ul
Connector protection key
is equipped with one SCSI 50-pin
scanner
on the chain,
. This case is shown in Figure 3.11.
SCSI
internal SCSI
cable
scanner
scanner
work
.
peripheral
with a
as well as a
flat
cable (optional)
or
controller
connector
connector
termination
will be the
Figure 3.11
on the internal SCSI bus.
cable
connector
connector
required
.
is connected as the
as
the
last
device
cable
termination
switch
only
provided
stamped
stamped on both
. This
set
peripheral
. the LS-10
will
in the
special
only
on the
will
end
on the
cable
not work.
center
cable
at
will
is
[i)
Fig. 3.12 The special cable (not provided) required
connect
chain
Le cable special (non fourni) necessalre pour
connecter Ie LS-10
SCSI
Das zum
SCSI-KeHe beniitigte Spezialkabel gehiirt
nlcht zum Lleferumfang
the
LS-10
AnschluB
In
the center
au
milieu d'une chaine
des LS-10
[j]
of
a SCSI
In
der MIHe der
50
to
Page 51

3-7 Integration
du
LS-10 a la chaine
SCSI
Le
scanner
broches. Quand Ie
connecte de la chaine ou qu 'il est Ie
peripherique
branche au scanner comme
[a] Contr61eur SCSI
[b] Terminaison interne de I'unite centrale
[c] Connecteur SCSI
[d] CAble SCSI
[e] Connecteur SCSI du LS-10
[f] Scanner LS-10
[g]
Le scanner est tres souvent Ie seul
bus SCSI interne. Le cable a
alors.
Dans certains cas,
devra
Dans ces cas, Ie cable SCSI fourni ne suffit pas.
faudra
connecteur
connecteurs
represente figure 3.
[h] Cable SCSI
[I] Connecteurs SCSI
[J] Ergot
LS-10 est equipe d'un connecteur SCSI a
scanner
, Ie connecteur du cable a
Interrupteur
partager
alors
comme
Ie bus SCSI avec d'autres peripheriques.
vous
procurer
intermediaire
de
de
de
terminaison
sur
serti
est Ie seul
sur
I'unite centrale
I'unite
50
la
un
dible
sur
peripherique
dernier
50
la
figure
centrale
SCSI du LS-10
peripherique
broches fourni suffit
figure 3.11, Ie LS-1
special avec un
la nappe
a chaque bout. Ce type de cable est
12
.
en
nappe (option)
50
de
detrompage
broches sertis
broches se
3.11
.
et
des
sur
II
3-7 Aufbau einer SCSI-KeHe mit
dem LS-10
50
Ie
0
Der Scanner LS-10 ist
Steckverbinder versehen. Wenn
andere GeriH in
Kette (Abb. 3.
poligen Kabels am Scanner. Diesen Fall zeigt Abb.
[a] SCSI-Controller des Computers
[b] Interner SCSI-AbschluB des Computers
11)
mit
einem 50poligen SCSI-
der
der
Kette oder das letzte Gerat
ist, endet
der
Scanner das einzige
Steckverbinder des 50-
der
3.11
[c] SCSI-Stecker des Computers
[d] SCSI-Kabel
[e] SCSI-Steckverbinder des LS-10
[f] Scanner LS-10
[g] SCSI-AbschluBschalter des LS-10
1m
allgemeinen wird
Peripheriegerat auf dem internen SCSI-Bus sein.
der
Fall, eignet sich das mitglieferte, 50polige Kabel.
In
manchen Fallen (wie in Abb. 3.
das einzige Peripheriegerat auf dem internen SCSI-Bus.
Dann ist das mitgelieferte SCSI-Kabel nicht geeignet.
diesem Fall wird ein Spezialkabel benotigt, das auBer
Steckverbindern
weiteren aufgepreBten Steckverbinder besitzt. Dieses
Spezialkabel zeigt Abb. 3.
[h] SCSI-Flachkabel (Zubehor)
[I] 50polige SCSI-Steckverbinder
[J] Steckerfuhrung
der
Scanner das einzige
an
beiden Enden in
12
.
11)
ist
der
der
Mitte einen
1st
dies
LS-10 nicht
In
.
51
Page 52

~lliltID[pJfr®~
~
I
t-I"
--50
Fig. 4.18
mrn---+t"1
[a]--t4~~~~
Fig. 4.1b
[b) [c)
Fig.
4.1
'----------'
35
mm film mounting
Film
35
mm
Kleinblldfilm
1
50mrn
J
Using the Scanner
4-1
Knowledge
There
are
two
positive
film
, the
printed
the
image
and
dark
is associated with
associated with
either
the
Flg.4.1a
[a] Film
Fig.4.1b
[b] Unexposed portion of
[c] Image portion of
Both sides of the
called the
emulsion
shown in Figure 4.2.
having the
[d] Scanner
[e] Non-
[I] Emulsion
basic
and the
viewed
image
to
is
color
areas
appearing
slide
positive
Film in a typical
Film in an uncut
emulsion
side
should face
emulsion
emulsion
other
image
appear
film
side
of
Films
formats
reversed with
print
or
side
In
facing
for
negative. When
appears
. When looking at negative film,
film
film. The
negative
are
. For
many
side
of
35
as you would expect the
light.
Typically
, and
scanner
film
slide
strip
film
film
not
the
optimum
the
bottom
cases, the advantage of
down
of
film
film
mm
looking
light
areas
positive
formats
mount
same
. One
scanning
of
may
be
film
, one being
at positive
looking
, negative
film
is
can handle
.
side
, the
the
scanner
minimal.
dark
film
is
, as
.lJ.to"
-.
/17/
t
[f]
Fig. 4.2 Inserting the film with the emulsion side
52
the film facing the bottom
Insertion
vers Ie bas
Die Schichtseite des Films sonte im Scanner
nach unten zeigen
du
film avec I'emulslon orientee
[eJ
of
the scanner
of
Page 53

Utilisation
4-1
Connaissance des films
II
Y a
principalement
films positifs ,
observees, et
film
positif
papier, et
scanner
positifs
Fig.4.1a
[a] Film
Flg.4.1b
[b] Partie non-exposee
[c] Surface
Les deux cOtes
d'eux est Ie cOte
numerisation
toujours
figure
I'
emuision
[d]
[e]
[f]
qui
rendent
les
films
est
associe
Ie
film
est
que
etre
4.2. Dans
Scanner
COte
COte
negatif, a
prevu
pour
negatifs.
Film monte sous cache,
Film en bande
impression
des
emulsion
possible
dirige
de
tournee
vers Ie bas peut etre
support
emulsion
du
scanner
deux
families
directement
negatifs,
aux procedes
celui
tirer
nee
films
ne sont pas identiques. L'un
. Pour
, Ie cOte
vers
Ie bas,
nombreux
de
films
les
qui
les inversent. Le
de
des
parti aussi bien
diapositives.
diapositive
obtenir
emulsion
comme
cas,
I'avantage d'avoir
35 mm. Les
valeurs
tirage
des
la
meilleure
du
film
indique
minime
sur
doit
sur
.
Le
films
la
Bedienung des Scanners
4-1
Grundsatzliches zum Film
Es
gibt
zwei Typen von Kleinbildfilm: Umkehrfilm
(positiv) und Negativfilm . Umkehrfilm
seiner
normalen
Lichtern und Schatten. Negativfilm
zur
Herstellung von Aufsichtsbildern , Umkehrfilm
Diapositive. Der Scanner
beider
Filmtypen.
Abb. 4.1a
[a] Film
Abb.4.1b Unzerschniltener Filmstreifen
[b] Perforationsrand
[c]
Bildformat
Die beiden Seiten eines Films sind nicht identisch . Auf
einer
Seite befindet sich
Diese
wird
Ergebnisse sollte sich
befinden (Abb. 4.
nach unten gerichteten Schichtseite jedoch
[d] Scanner
Form, Negativfilm
eignet
In
einem typischen Diarahmchen
die
als Schichtseite bezeichnet.
2). In
lichtempfindliche
diese
Seite im Scanner unten
vielen Fallen
[e] Schichttragerseite des
[f] Sch ichtseite
sich
Films
zeigt
mit
verkehrten
dient
normalerweise
zur
Verarbeitung
FOr
ist
der
das Bild in
ergibt
Schicht.
beste
Vorteil
der
nur
minimal.
53
Page 54

[b)
[a]
Slide and film mounts
Both
positive
35
mm
thickness and material. Typical 35
either
film
holders
The
film
mount as shown in
adjusting. Thus,
mount, the
positioned at the
focusing
slides
.
[a]
[b] Mounted
[c] Film
[d] Emulsion
and negative
frame
. These
plastic
that
is assumed to be at the
center
may
Slide
or
glass. The
are
regardless
of the
center
be
required
mount
35
side
frames
50
mm
Figure
film
of
mm
film
of
for
film
film
can be mounted into a
can
scanner
wide
4.3. The
of
the thickness of the
will
the focal field. Additional
extremely
vary
widely
mm
can accommodate
by 3 mm thick.
center
scanner
be
automatically
in
film
mounts
of the
is self-
high-resolution
are
slide
slide
Fig. 4.3 The film position with respect
'kG,.
-a;.
'kG,.
-a;.
the
slide frame
Positlonnement
la monture,
Lage des Films
Diariihmchens
au
du
film dans I'epaisseur de
centre
im
Verhiiltnls zur MiHe des
x
to
the
Flg.4
center
.4a
4-2 Operation
of
Film mounted in a
scanner
into a
in the
sure
the outward edge of the
the
slide into the
bumps into the face of the
Since the
inserted in any
the
the scanning process .
in a
disk
front
that the
scanner
slide
frame
Fig. 4.4a Film entered into the
Fig
. 4.4b Film entered into the
slide
similar
drive
of
. This is
slide
fashion as a 3.5"
. The
slide
the
scanner
slide
is pushed into the
easily
scanner
first (will scan
first (will cause
This operation
with one's
frame
is
orientation. However
when inserted in the
to
Use a Slide Film
frame
is inserted into the
disk
frame
is pushed into the
. When
insert
slide
is flush with the face of
accomplished
thumb
scanner
typically
square
entire
clipping)
is
incorrect.
.
scanner
film)
scanner
is inserted
ing a
scanner
by pushing the
until the
, it could be
, the orientation of
computer
slide
such that
thumb
will affect
narrow
wide
side
slot
, make
side
Fig
. 4.4 Inserting the narrow side
scanner
Insertion d'une diapositive par Ie petit cote
Orientierung des Dias beim Einlegen
54 Scanner
Flg.4.4b
of
the film into the
in
den
Page 55
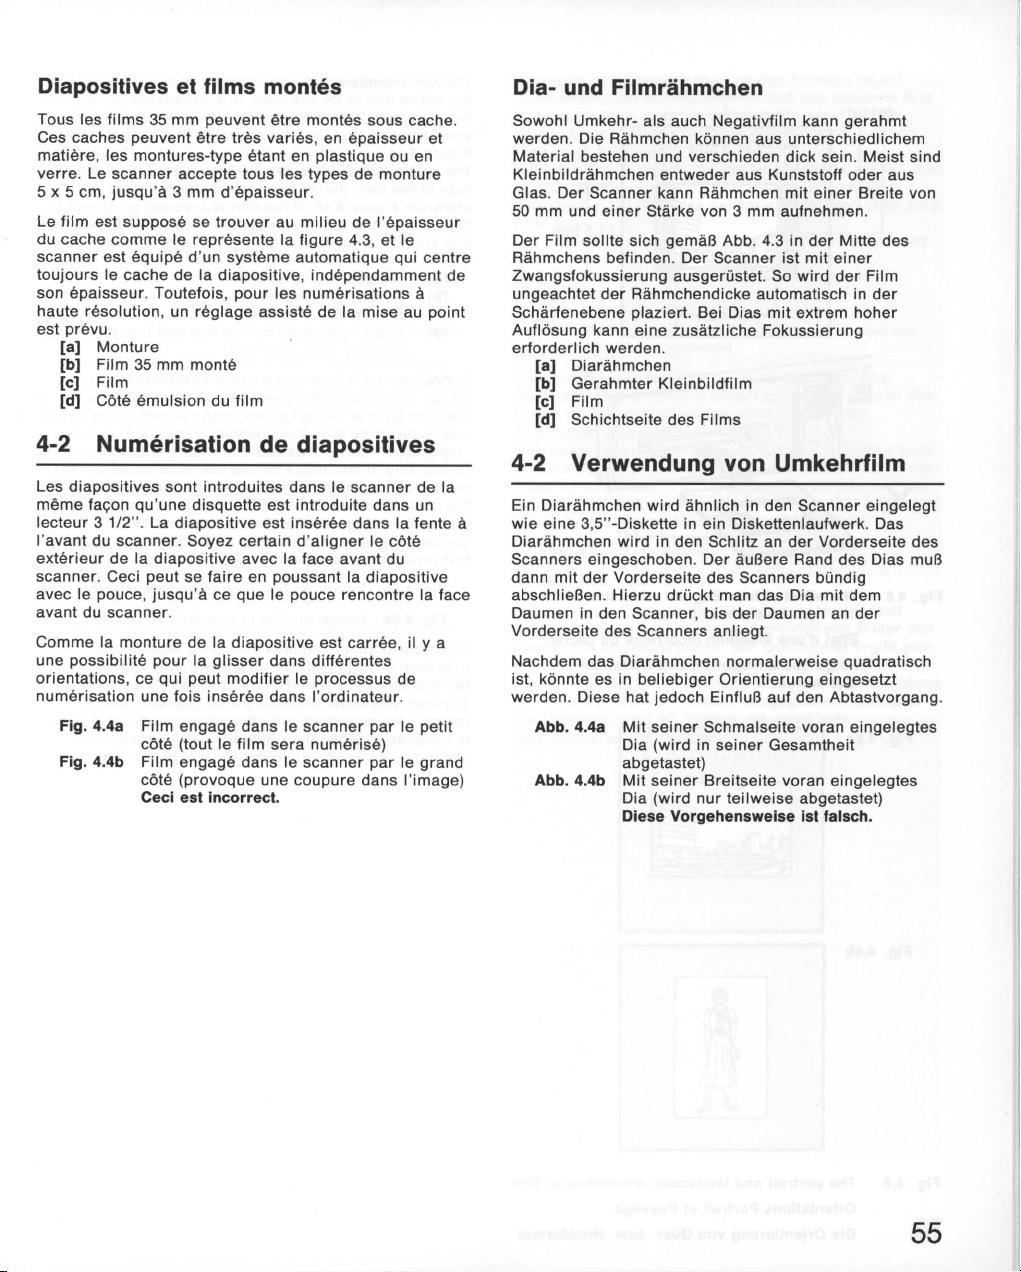
Diapositives et films montes
Tous
les
films
3S
mm
Ces caches
matiere, les
verre
S x
Scm, jusqu
Le film est suppose
du cache
scanner
toujours
son
haute
est prevu.
[a]
[b] Film
peuvent
. Le
scanner
comme
est
equipe
Ie cache de la
epaisseur
resolution
Monture
montures-type
'a 3
. Toutefois,
, un
3S
mm
peuvent
etre
accepte tous les types de
mm d'epaisseur
se
Ie represente
d'un
reglage
monte
etre montes sous cache.
tres
var
ies , en
etant
trouver
au
la
systeme
diapositive, independamment
pour
les
assiste de la mise au
epaisseur
en plastique ou en
.
milieu
figure
automatique
numerisations
monture
de
!'epaisseur
4.3,
et
Ie
qui
a
centre
[c] Film
[d] Cote
emulsion
du
film
4-2 Numerisation de diapositives
Les
diapositives
meme
fayon qu'une disquette est
lecteur
3 1/2
I'avant du
exterieur
scanner
avec Ie pouce,
avant du
Comme
une
orientations
numerisation
. Ceci peut se
la
possibilite
Fig. 4.4a Film
Fig. 4.4b Film
sont
introduites dans Ie
".
La
diapositive
scanner
de
scanner
. Soyez
la
diapositive
jusqu
'a ce
.
monture
, ce qui peut
de
pour
la
une fois
engage
cote (tout Ie
engage
cote (provoque une coupure dans !'image)
Cecl est incorrect.
est
certain d'aligner
avec la face avant du
faire
en poussant la
que
Ie pouce rencontre la face
la
diapositive
glisser
dans differentes
modifier
inseree
dans I'
dans Ie
film
sera
dans Ie
scanner
introduite
inseree
Ie processus de
scanner
numerise)
scanner
dans un
dans la fente a
Ie cote
diapositive
est
carree
ordinateur
par
par
de la
, il y a
.
Ie
petit
Ie grand
et
de
point
Dia- und Filmrahmchen
Sowohl Umkehr- als auch Negativfilm kann
werden
. Die Rahmchen k6nnen aus
Material
Kleinbildrahmchen
Glas. Der Scanner kann Rahmchen
SO
Der
Rahmchens befinden.
Zwangsfokussierung
ungeachtet
Schiirfenebene plaziert. Bei Dias
Aufl6sung kann eine
erforderlich
bestehen und verschieden
mm
und
Film
sollte
[a] Diarahmchen
[b]
Gerahmter
entweder
einer
Starke von 3
sich gemaB Abb . 4.3 in
der
werden.
ausgerustet. So
Rahmchendicke automatisch in
zusiitzliche
Kleinbildfilm
Der
Scanner
aus Kunststoff
mm
aufnehmen.
ist
mit
Fokussierung
[c] Film
[d] Schichtseite des Fi
4-2 Verwendung
Ein Diarahmchen
wie
eine
Diarahmchen
Scanners eingeschoben.
dann
abschlieBen. Hierzu
Daumen in den Scanner, bis
Vorderseite
Nachdem das Diariihmchen
ist, k6nnte es in
werden. Diese hat jedoch EinfluB auf den Abtastvorgang.
3,S"-Diskette in ein Diskettenlaufwerk. Das
mit
der
Abb. 4.4a
Abb. 4.4b
wird
wird
Vorderseite des Scanners bundig
des Scanners anliegt.
beliebiger
Mit
seiner
Dia (wird in
abgetastet)
Mit
seiner
Dia (wird
Diese Vorgehenswelse
lms
von
Umkehrfilm
iihnlich
in den Schlitz an
druckt
in den Scanner
Der
auBere Rand des Dias muB
man das Dia
der
Daumen an
normalerweise
Orientierung eingesetzt
Schmalseite voran eingelegtes
seiner
Gesamtheit
Breitseite
nur
voran eingelegtes
teilweise
gerahmt
unterschiedlichem
dick
sein.
Meist
aus
Breite
des
Film
der
eingelegt
dem
der
sind
von
mit
oder
einer
der
Mitte
mit
einer
wird
der
extrem hoher
der
Vorderseite
mit
quadratisch
abgetastet)
1st
falsch.
des
55
Page 56

x
Fig. 4.5 The effect of
Fig. 4.6a
film
into the
Effet
d'une
des
Folge
Querformat
Einlegens
[a)
I
22.5mm
l-24mm~
inserting
scanner
insertion
the
wide
incorrecte
eines
Blldes
side
of
du cache
im
the
The
film
the
the
side,
Figure 4.4a.
The
side
shown in Figure 4.4b. If the
Figure 4.4b, the resulting scan
film surface. Known as
4.5.
Portrait
for
oriented so that the top of the
wide
" landscape" and is
Conversely, if the
the top of the
the
illustrated in Figure 4.6b. This is identical to the
terminology
text
Since the scanner
side
top
scanned
image
is completed. Since the rotation is
absolutely no
mounted in the
entire
film
slide
entering
entire
of the
[a]
[b]
[c]
[d]
the non-
side
film
processing
Fig. 4.6a Image on
Fig. 4.6b Image on
first, only
correct
. This is corrected by the
to be scanned, it is
with the
first
film
surface can NOT be scanned if the
film
, the
Clipped region of
Scanned
Mounted 35
Clipping
scanner
or
landscape is the
square
of the
image
, the orientation is called "
used in
or
portrait
format. Landscape oriented
sideways, producing
image
narrow
into the
36
mm
clipping
region
mm
caused by
wide
side
film
format. If the
film
, the
illustrated
image
corresponds
preparing
printing.
film
film
requires
slides
degradation
slide
frame
is NOT
side
of
film
orientation
on the
necessary
of
the
scanner
film
. This is shown in
side
is inserted
film
is inserted as shown in
will
not
, this is shown in Figure
film
film
inserted into the
first
frequent
image
in Fi
gure
film
to the
portrait
an 8,5 x
is in a landscape orientation
is in a
portrait
film
to be inserted
are
actually scanned in a
a 90
degree
software
90
occurs.
square
film
terminology
image
corresponds
is called
is oriented so that
to insert
, the
24
first
cover
the
on the
4.6a.
narrow
" and is
11
inch page
orientation
slides
rotated
after the scan
degrees
mm
wide
as
entire
used
to the
side
narrow
will be
,
. For
film
of
for
is
Fig. 4.6b
Fig. 4.6 The
Orientations
56 Ole
~
~
portrait
Orlentierung
and landscape
Portrait
orientation
et Paysage
von Quer- bzw.
of
film
Hochformat
Page 57

Le
film a I'interieur
necessaire de
di
aposit
ive en
(24 mm) en avant
La totalite du
couverte
film
comme
partie
presente
si Ie cache
en avant
sur
la
non-numerisee.
figure
[a] Surface du
[b] Surface
[c] Film de
[d] Numerisation
orientat
"
Portrait
pour
de I'i
corresponde
d'orientation paysage,
A
du
comme
la
options d'
format
Le
les
avant, seules les
immediatement
films
analyses, et restitues dans Ie bon sens
rotation
qualite de I'image.
" ou " Paysage " est une
les
images
mage
est
I'inverse
meme
, si Ie
petit
cote de I'
Ie
montre
que
impressions
A4
par
Fig. 4.6a Image
Fig. 4.6b Image
scanner
films
en bande
en
paysage
logicielle
exigeant
du cache
respecter
presentant
(voir
format
24 x
est
(voir figure
figure
4.4b, il en
4.5.
film
numerisee
35
mm a I'interieur
ion
incorrecte
rectangulaires
orientee
au cote Ie plus
sommet
image
la
figure
celie
utilisee
exemple
orientee
orientee
que les caches de
soient
images
dans Ie bon sens. Les
seront
de
90
etant
Ie
sens
Ie petit cote de I'
figure
4.4a).
36
mm
presente avec Ie grand cote du
4.4b). Si Ie
Ge
vignetage
non-numerisee
partielle
comme
d'un
.
du cache a
de
telle
large
Ie
de I'i
mage
, on
parle
4.6b.
lorsque
document
paysage
portrait
inseres
portrait
toutefois
degres, qui n'altere
rectangulaire
d'introduction de la
NE
PEUT PAS
film
resultera
indesirable
du cache
causee
terminologie
. Si la
sorte
de
montre
se
d'orientation
GeUe
I'on choi
avec Ie petit cote en
seront
correctement
, il est
image
etre
est
insere
une surface en
est
par
une
I'introduct
partie
superieure
qu'
elle
I'image
la
figure
trouve
terminologie
sit
de bureautique , au
diapositives
rendues
diapositives
grace
pas la
utilisee
, on
parle
Ie long
portait
les
a une
ion.
4.6a.
est
, et
et les
Entgegen dem Diarahmchen ist das Filmbild NIGHT
quadratisch .
abgetastet
(24
mm) voran in den Scanner eingeschoben werden.
Dies
Wird das Dia hingegen
im
Querformat -eingelegt
Abtastung nicht
Abb. 4.4b.
Die Abbildung 4.5
Bild.
[a]
[b]
[c]
[d] Ein im
Orientierung
Die
Querformat
Bildes
Querformat. Diese Situation
Befindet sich
voran im Scanner, sprechen
Situation
auch bei
fUr Textverarbeitung
Abb. 4.6a Querformat
Abb. 4.6b Hochformat
Nachdem
erfordert
vornherein
auf Grund
versetztes Bild. Diese Drehung wird nach
mit Hilfe
die
Drehung exakt 90· betragt. ist
Qualitatsverlust verbunden .
Um
sicherzustellen. daB das gesamte Bild
wird
, muB
die
Schmalseite des Formats
zeigt
Abb. 4.4a.
Von Abtastung nicht erfaBter Bereich
Abtastbereich
Gerahmtes Kleinbild
teilweise
bezeichnet. Befindet sich
im Scanner voran, so sprechen
das
zeigt
Abb. 4.6b. Dieselben
der
Aufbereitung
der
Scanner das Einlegen im Hochformat
, lassen sich
korrekt
der
notwendigen Drehung ein um 90·
der
Software
mit
seiner
Breitseite
iiber
zeigt
Querformat
abgetastet.
eines Bildes
Bild hingegen
(Abb. 4.4b),
das gesamte Bildformat. Dies
ein auf diese Weise gekapptes
eingelegtes Bild
wird
als Hoch-
zeigt
Abb. 4.6a.
mit
seiner
wir
von Hochformat. Diese
einer
oder
Ausdruck verwendet.
nur
so aufgenommene
scannen. Bei
wieder
Ausdriicke
Seite im DIN-A4-Format
Querformat
ausgeglichen. Nachdem
damit
voran -
erfolgt
die
wird
oder
die
Breitseite des
wir
von
Schmalseite
Bilder
ergibt
der
kein
werden
Abtastung
also
zeigt
nur
von
sich
57
Page 58

[8]
'kG.
[b)
Portrait orientation
If
the
film
is in a
portrait
emulsion
film faces
slide
into the
side
of
towards
into the
[a]
[b] Front panel
scanner
scanner
Image
first. This is shown in Figure 4.7.
on
[c] Film entered into the
where
the
orientation
[d] Resultant
correctly
If the bottom of the
scan will be upside-down. This can be corrected by the
software
operation is fast and causes
degradation.
after
the scan with a vertical flip.
orientation, determine
the
film
and
the bottom of
with the top of the
film
is in a
film
slot
image
on the
image
on
monitor
image
is entered
absolutely
insure
the
portrait
scanner
film
that
scanner
orientation
narrow
is in a
is oriented
first
no image
the
this
side
of the
. Insert the
image
entering
side
first
portrait
, the resultant
This
Fig. 4.7
58
Inserting film that
portrait orientation into the scanner
Insertion
Elnlegen elnes Hochformatblldes
Scanner
du
is
in a
film en mode portrait
In
den
Page 59

Orientation portrait
Si
I'image
emulsion
en bas . Inserez
premier.
Si Ie
premier
peut-etre
la
numerisation
aucune
est en mode portrait,
du
film
Voir
[a]
[b]
[c] Le
[d] L'
film
figure
Image
Logement
film
superieure
image
ment
orientee
est
introduit
, Ie
resultat
corrige a I'aide
degradation
et
assurez-vous
la
diapositive
4.7
en
mode
du
film
est
introduit
de
resultante
.
avec Ie bas de I'
sera
. Cette
operation
de I'image.
I'image
un affichage tete en bas. Ceci
determinez
que
avec Ie
portrait
face avant
par
son cote
en
premier.
sur
Ie
moniteur
de fonctions
est
Ie cote
ce cote est face
haut
de
I'image
etroit
, partie
est
correcte-
image
en
logicielles, apras
rapide,
et
ne cause
Hochformat
Bei
einer
Schichtseite und legen das Bild
Seite unten befindet. Legen Sie das Bild
en
voraus ein (Abb. 4.
Wird das Bild kopfstehend eingelegt,
Abtastung
anschlieBend
geht schnell und
Hochformataufnahme
7)
[a] Hochformat
.
[b] Filmschlitz an Vorderseite
[c] Einlegen
[d] Korrekte
Monitor
einer
Orientierung
gleichfalls
mit
der
bewirkt
kopfstehend . Das Bild kann jedoch
Software aufgerichtet werden. Dies
ermitteln
so
Hochformataufnahme
des
keinerlei Qualitatsverlust.
Sie
mit
erfolgt
die
dem Kopf
die
ein , daB sich
Bildes auf dem
diese
59
Page 60

'kon
~
[a]
Landscape
If the
film
emulsion
film
faces the bottom of the
the
scanner
scanner
in
Figure
[a]
[b) Film entered into the
[e) Resultant
If the top
the
scanner
This can be corrected by the
with a vertical flip .
absolutely
orientation
is in a landscape
side
of the
film
with the top of the
at the
right
on
the
image
resultant
image
side
film
image
image
is entered fac ing the left
This
degradation
4.8.
Image
where
orientation
correctly
of
the
, the
no
and insure that this
of
is in a landscape orientation
on the
on
scan
operation
orientation, determine
scanner. Insert
image
the
scanner
scanner
film
monitor
software
is oriented
will
be upside-down.
is fast and causes
.
side
the
entering
. This is shown
narrow
is in a landscape
after
slide
into the
side
side
the scan
the
of
first
the
into
of
[b]
------t"..,
Fig. 4.8 Inserting
orientation
Insertion du
Einlegen
Scanner
film
that
is
into the
film
einer
in
scanner
en
mode
Querformataufnahme
[e]
a landscape
paysage
in
den
Positioning
There
are
slide
by ejecting the
the
effect is a
This
software
software, image
software
Ejecting
The
command
no manual eject
times
so
minor
scanner
while
minor
minor
rotation can
using a rotate tool.
correction
slides
scanner
ejects the
as
discussed in the
slides
wheri a
rotations can occur. This is accomplished
slide
angle shift.
degradation
for
user
and
gently
holding
also
approach.
slide
the
scanner
wants to fine position the
pushing
the
other
be accomplished by the
However, depending
can
through a
driver
.
on one
side
stationary
occur
using the
software
manual. There is
side
on the
of
. The
60
Page 61

Orientation paysage
Si
I'orientation
reperez
Orientez
sujet
soit
figure
4.8.
[a]
[b] Le
[c]
Si la partie
gauche
resultat
corrige
numerisation
aucune
de
Ie cote
ensuite Ie
du cote
Image
etant
L'image
correctement
au
sera
a I'
degradation
I'image
emulsion
film
droit
en
mode
film
est
introduit
en
mode
resultante
superieure
moment
aide
de
une
image
de
fonctions
. Gette operation est
de I'image.
est en
mode
et
dirigez-Ie
pour
que la partie
du
scanner, comme
Pays
age
par
paysage
sur
orientee.
de
I'image
I'insertion dans Ie
tete en bas. Geci peut-etre
logicielles,
vers Ie bas.
son cote
Ie
moniteur
est
orientee
rapide, et
paysage,
etroit, I'image
scanner
apres
Positionnement des dipositives
Pour
certaines
positionnement
grace
a une petite rotation. Dans ce cas , activez
I'ejection
alternativement
deplacement d'angle
Gette petite rotation peut
depuis
Toutefois, selon les
I'i
mage
correction
electrique
Ie
logiciel
peut
se
par
images
, on peut
tres
rigoureux
et
guidez
sur
ses angles. L'eftet est un
.
en
utilisant
logiciels
produire
Ie logiciel.
souhaiter
de I'
la
egalement
I'outil
, une
lorsqu 'on
et
image a numerise
diapositive
etre
commandee
de
rotation .
degradation
utilise
I'approche de
Ejection des diapositives
Le
scanner
depuis
du pilote.
scanner.
Ie
logiciel
ejecte la
II
n'y a pas
diapositive
comme
d'ejection
par
une
il a ete indique dans Ie manuel
manuelle
commande
pour
superieure
Ie
montre
est
cote
, Ie
la
ne cause
obtenir
en poussant
leger
de
Ie
un
Querformat
Bei
einer
la
Schichtseite und drehen
Sie
du
das
befindet. Sehen Sie dazu
Querformataufnahme ermitteln Sie
Bild
50
ein , daB sich
diese
nach unten. Dann legen
die
Oberkante rechts
die
Abbildung 4.8.
die
[a] Querformataufnahme
[b]
Orientierung
Einlegen
[c] Korrekte
Monitor
Wird
die
ihre
kopfstehend . Das Bild kann jedoch anschlieBend
Software aufgerichtet werden . Dies geht schnell und
bewirkt
Querformataufnahme so
Oberkante links befindet,
keinerlei
einer
Querformataufnahme beim
Orientierung
Qualitatsverlust.
des Bildes auf dem
erfolgt
eingelegt
die
, daB sich
Abtastung
mit
der
Feinjustierung von Dias
Gelegentiich
einer
indem man das Dia
r
seitiichen Druck etwas verkantet einfuhrt.
Stellung im Scanner beibehalten.
derartige,
Eine
Software
verwendeter
ist
eine
leichten Drehung erwunscht. Dies
moglich
Software
Feinjustierung von Dias in Form
auswirft
leichte Drehung ist jedoch auch
. Dabei kann sich jedoch
und dann unter leichtem
eine
QualitatseinbuBe ergeben .
ist
moglich,
Es
je
wird
mit
nach
diese
der
Auswerfen des Dias
Der Scanner
(siehe Treiber-Anleitung).
moglich
wirft
das Dia auf einen Software-Befehl aus
.
Manuelles
Auswerfen ist nicht
61
Page 62

4-3 Operation
Holder
to
Use a Strip Film
[c)
Fig. 4.9 The closed strip film holder
Le
porte-film en bande
Der geschlossene Filmstrelfenhalter
[d)
Negative processed
to six frames
mount this film before scanning. The scanner can
accommodate
strip
film
4.9.
holder
[a] Front of
[b) Top of strip film
[c] Back of
The
front
designed to fit easily into the
to
The back of the
It extends out the
operations.
Insert the
heading into the scanner up to the
Always
button.
When closed, as shown in Figure 4.9, the
holder
course, the back end of the
scanner
in the
strip
A typical
film
of the strip film
inserting a slide
holder
eject the
fits into the scanner
during
strip
will
film
holder
example
extends out the back of the
[d] Front of
[e] Film
[I] Back of stri p fi I m
film
per
film
. The strip
strip
strip
strip
is typically cut into
strip. It is not necessary to
strips up to
film
film
.
film
front
from the
six
frames long
film
holder
holder
holder
holder
holder
is the tapered end. It
scanner
holder
is
of the scanner
narrow
wider
side
TIT
holder
by using the software function
just
as a
holder
the scanning operation . Any excess
always extend out the' back end of the
.
is shown in Figure 4.10. Note
strip
film
strip
holder
with six frames
holder
extends out
strip
strips
cut
is shown in
film
slot, similar
than the front.
during
scanning
with
arrow
mark
strip
slide
would. Of
film
holder
using
.
film
of
of
and
Figure
the
that
.
four
the
is
film
the
[e)
Fig. 4.10 The strip film holder with film inserted
The
strip
film
holder
scanning.
Le porte-film avec une bande de 6 vues
La bande est position nee
numerisation
Der Fllmstreifenhalter mit elngelegtem Film
Der Streifenhalter
Scannen bereit.
is loaded and ready
correcte
.
ist
gel aden und zum
pour
une
62
for
Page 63

4-3 Numerisation de film en bande
Le
film
negat
if
sortant
du
temps
decoupe
necessaire
numeriser
recevoir
Ie porte-f
[a] Avant du porte-film
[b] Dessus du porte-film
[c]
Arriere
avant
du porte-film
L'
s'
adapter
s'
introduit
L'arrh3re du
de passe
Introduisez
fleche
dirigee
TIT
. Ejectez
bouton de fonction du logiciel.
Lorsqu
'il est
film s'engage
diapositive
pendant la
depasse
Un
exemple
film
depasse a I'arriere
[d]
Avant
en ban
de
modifier
ces
films
des
bandes
ilm
. Le porte-film est
du porte-film
facilement
comme
porte-film
de I'avant
Ie porte-film depuis Ie cote
vers Ie
toujours
ferme,
dans Ie
. L'
arriere
numerisation.
du
porte-film, notamment
type
est
laboratoire
des
de
ce
conditionnement
sur
Ie
scanner
ayant
jusqu
est
en biseau.
dans la fente du
une
diapositive
est plus
du
scanner
scanner
Ie porte-film en
comme
sur
scanner
du porte-film
II
est
donne a
du porte-film.
[e] Film en bande ( 6 vues)
[I]
Arriere
la
est la
4 a 6 vues.
. Le
scanner
'a 6 vues si I'on
decrit
figure 4.9.
II
est
conc;;u
scanner
.
large
que
la
etroit
'a
la
figure
la
meme
depasse
que
a I'
arriere
I'avant.
numerisation
marque
utilisant
4.9, Ie porte-
durant
jusqu
la
de
normal
figure 4.10
plupart
n'est pas
pour
peut
utilise
pour
et
II
avec la
Ie
qu'une
du
scanner
film
.
du
II
fac;;on
Ie
. Notez que Ie
4-3 Verwendung des
Filmstreifenhalters
Negativfilm
Aufnahmen
nicht zerschnitten und
Scanner
Filmstreifen
Filmstreifenhalter
[a]
[b] Oberseite
[c] Ruckseite des Filmstreifenhalters
der
An
Filmstreifenhalters
.
erleichtern
Hinten
Teil
Schieben Sie den
vorne
der
Pfeil auf den Scanner zeigt. Verwenden Sie stets
Software-Funktionstaste zum Auswerfen des
Filmstreifenhalters
Geschlossen - wie in Abb. 4.9
Filmstreifenhalter
Naturlich
auBerhalb des Scanners. Die anderen
Streifen ragen hinten aus dem Streifenhalter heraus .
Abb. 4.
der
Film hinten aus
[d]
[e] Filmstreifen
[I] Ruckseite des
liegt
meist
vor
. Diese Streifen mussen zum Abtasten
nimmt
mit
seinem
mit
bis zu sechs
Vorderseite
Vorderseite
ist
der
bleibt
bis
zur
bleibt
10
zeigt
Vorderseite
zeigt
des
des
sind
.
beim Scannen auBerhalb
abgeschragt, um das Einschieben zu
Filmstreifenhalter
Halter
Markierung
.
ebenso in den Scanner
der
hintere Teil bei
ein typisches Beispiel. Beachten Sie, daB
dem
des Filmstreifenhalters
mit
in Streifen
die
Abb. 4.9.
Filmstreifenhalters
Filmstreifenhalters
die
mit
Streifenhalter herausragt.
sechs
Filmstreifenhalters
zu vier
Bilder
gerahmt
Filmstreifenhalter
Bildern
Ecken des
breiter
der
schmalen Seite nach
TIT
in den Scanner, wobei
dargestellt
Bildern
auf. Den
als vorn.
des
der
Abtastung
Bilder
bis sechs
werden.
auch
Scanners.
- paBt
der
wie
ein Dia.
auf dem
Der
Dieser
die
63
Page 64

When open , as shown in Figure 4.11,
into the
that
one
scan
repositioned in the
strip
it
aligns
frame
more
[a]
Top of the
[b]
Bottom of the
film
holder
with the
of the
strip
than one
. Position the
window
film
frame
strip
strip
film
strip
in the
can be scanned at a
, the
film
film
holder
holder
film
holder
film
desired
film
holder. Only
must be
.
can be
frame
placed
so
time. To
Fig.
4.11
[b)
The open
Le porte-film
Der geoffnete
strip
film
holder
ouvert
Filmstrelfenhalter
Positioning the film
There is one
Figure 4.11.
in
be
visible
necessary
window when positioning the
strips
Film
the depth restrictions of the scanner . No film can extend
out the
the
strip
reside
It is
therefore
scanner
the
window
As with
be face down in the
be face
window
The
to the scanner
to
are
front
film
in
front
so no
slides
down
film
align
the
typically
of
the
strip
holder, no
of the
necessary to position the film in the
more
in the
strip
, the
emulsion
when inserted in the scanner .
in
the holder
on the
strip
that resides in this
for
desired
limited
film
more
desired
than two frames
film
strip
film
scanning. Therefore, it is
frame
film
in the
to six frames because of
holder. Due to the length of
than
frame
holder
.
side
film
of the
holder
holder
of
film
holder
two
frames can
.
are
strip
so that it
as shown
window
with this
to the
film
.
front
will
will
of
should
also
64
Page 65

Quand Ie porte-film est
il suffit
de
placer
et
de
positionner
seule image
numeriser
dans Ie porte-
la bande decoupee dans Ie porte-film ,.
I'image
sera
numerisee
plus d'une vue, il faut
film
.
[a] Dessus du porte-
[b] Dessous du porte-film
ouvert, comme
choisie
dans
a chaque
repositionner
film
sur
la
figure 4.11
la
fenetre. Une
operat
ion. Pour
Ie
film
Bei geeffnetem Fi
,
eingelegt
Fenster des Streifenhalters liegen.
ein Bild des Streifens abgetastet werden.
mehrere Bilder
verschoben werden .
[a] Oberteil des
[b] Unterteil des
lmstreifenhalter
werden. Das abzutastende Bild muB dabei im
muB
der
Filmstreifen im
Filmstreifenhalters
Filmstreifenhalters
(Abb. 4.
Es
kann
11)
jeweils
Zur
Halter
kann Film
nur
Abtastung
Positionnement du film dans Ie portefilm
II
Y a une fenetre
voir
figure 4.11
sera
numerise
positionner
Les fi
lms
par
de passer
deux
desiree, compte
Lorsque I'on
donc
images
De la
emulsion
ainsi
Ie scanner.
Compte tenu
possible
normal.
en bande
la
profondeur
vers
images
necessaire
a
meme
du
dirige
de
destinee a I'analyse
. Le film positionne
par
Ie
preci
peut
inserre
I'avant
falton
film
vers
des
numeriser
scanner. II
sement
sont
du
scanner
I'avant du porte-film .
etre
positionne
tenu de la
la bande dans Ie
de ne pas
de
la fenetre
que
pour
doit
etre
Ie bas a I'
ces contraintes, il n'
les
dans
est
Ie
document
generalement
longueur
positionner
les
dirige
insertion
images
donc
. Aucune bande ne
Un
devant I'image
sur
Ie porte-film.
diapositives
vers Ie bas.
du porte-
dans
sur
Ie porte-film ,
cette fenetre
necessaire
sur
la fenetre.
limites a six
maximum
de la bande .
scanner
est
, il est
plus de deux
, la cote
II
sera
film
pas
toujours
leur
sens
doit
de
dans
de
vues
Einlegen des Films in den Streifenhalter
Der
Filmstreifenhalter
Das
hier
Damit
Streifens
Fi
Scanners Oblicherweise auf sechs
An
nicht
Filmstreifenhalters
der
Deshalb muB
werden, daB sich
Fenster befinden.
Wie bei gerahmten Dias,
Schichtseite von
Unterseite befinden,
dieser
sichtbare
ist
es notwendig, das abzutastende Bild
mit
diesem
lmstre
ifen werden wegen
der
Vorderseite
herausragen
abzutastenden Aufnahme befinden .
der
Lage ertolgen kann.
enthiilt
Bild
wird
Fenster
des
Halters
. Auf Grund
kennen sich
Film so im
nicht
mehr
Filmstre
sollte
ifen im Streifenhalter auf
damit
ein Fenster (Abb. 4.11).
im Scanner abgetastet.
zur
Deckung
der
begrenzten Tiefe des
dart
der
Liinge
maximal
Streifenhalter
als
zwei
sich auch
die
Abtastung im Scanner in
Bilder
der
Bilder
Filmstreifen
zu
bringen.
zugeschnitten.
des
zwei
plaziert
vor
die
des
Bilder
seinem
der
vor
65
Page 66

[a]
[d]
[e]
[f]
+-
Front side I Avant I Vorderselte
~
iI4
.3
116
fl
116
fl
112
iI4
t:l
' 1
112
Based on these two
to scan the
backwards
correct
the
frame
or
image
operation is a
causes no
Several
holder
image
examples
are
shown
[a] Frame 1
(scanned
constraints, it
right-side-up. If
upside-down,
software
after scanning. Since the
90
or
180
degree
degradation
of positioning
flip
.
film
in Figure 4.12.
correctly)
is not
always
the
frame
can be used to
, it is
very
in the
strip
possible
is scanned
resultant
fast and
film
[b] Frame 2
(scanned correctly)
[c]
Frame
3
(scanned correctly)
[d]
Frame
4
(scanned upside down)
[e] Frame 5
(scanned upside down)
[1]
Frame
6
(scanned upside down)
Care should be taken not to touch the
the
film
when
desirable
to use
photo processing
loading
The
window
in the
than the typical
so that the
Minor
holder
rotations
the
film
handling
or
camera
str
ip
35
mm
window
or
translations
film
film
frame
properly
holder
stores
. Position the
can be accomplished by opening the
.1
realigning
the
strip
film
.
into the
gloves
.
is
brackets the
of the
frame
holder
available
slightly
des
film
in the
holder
portion
of
. It may be
at most
smaller
ired
frame
frame
holder
and
.
Fig. 4.12 Positioning film
Posltionnement d'une
film
Elnlegen des Films
66
In
the strip film holder
ban
de
dans Ie porte-
in
den Filmstrelfenhalter
Page 67

Si
I'image
comme
ou un
des
sans aucune incidence
Plusieurs
bande sont
[a]
[b]
est
dans un
retournement
angles
de 90 ou 180
exemples
illustres
Image
(numerisee
Image
(numerisee
numerisee
miroir,
logiciel. Ces
de
figure
1
normalement)
2
normalement)
[c] Image 3
(numerisee
[d]
Image
(numerisee
[e]
Image
(numerisee
[f]
Image
(numerisee
Les plus
ne pas
de
La fenetre d'
plus petite qu'une
Positionnez la bande
bien la partie du
les
retouches de
Ie porte-film
grandes
toucher
laboratoire
diapositives, des
normalement)
4
tete en bas)
5
tete en bas)
6
tete en bas)
precautions
la surface de
est
recommande
analyse
image
sujet
positionnement
et
realignant
tete en bas, ou
on peut
sur
positionnement
dans Ie porte-film
de
qui vous interesse.
alignements
degres
la
qualite
4.12.
doivent
I'image
typique
sorte
que
sont
la bande .
pratiquer
operations
sont
. Le
.
24 x
la fenetre
mineurs
possibles en
inversee
une rotation
tres
rapides
de
I'image
d'un
etre
prises
port
est
36 mm.
Comme
ou
portant
sur
, et
.
film
en
pour
de gants
legerement
encadre
avec
des
ouvrant
Auf Grund
moglich,
das
kann
Software erfolgen . Da es sich dabei um eine Drehung
von
nur
Bildqualitiit.
Abb . 4.12
den
dieser
die
Bild
seitenverkehrt
die
Aufrichtung nach dem Scannen
jeweils
schnell, sondern auch ohne EinfluB auf
zeigt
Filmstreifenhalter
[a] Bild
(Abtastung aufrechtstehend)
[b] Bild
(Abtastung aufrechtstehend)
Erfordernisse ist es nicht in
Bilder
aufrechtstehend abzutasten. Wird
oder
kopfstehend abgetastet,
90'
oder
180' handelt,
verschiedene Moglichkeiten , den Film in
Nr
Nr
einzulegen.
. 1
. 2
ist
der
jedem
mit
der
Vorgang nicht
die
[c] Bild Nr. 3
(Abtastung aufrechtstehend)
[d] Bild
[e] Bild Nr. 5
[f] Bild
Beim Einlegen
darauf
beruhrt
entsprechender
Fotozubehorhandel
Das Fenster des
das
Kleinbildformat. Legen Sie den Film
daB
das
der
Bilder
und leichte Verkantung des Streifens moglich.
Nr
. 4
(Abtastung kopfstehend)
(Abtastung kopfstehend)
Nr
. 6
(Abtastung kopfstehend)
des
geachtet werden , daB
wird
Bild
im
Films in den Streifenhalter
. Gegebenenfalls
Handschuhe,
erhiiltlich
Filmstreifenhalters
gut
zentriert
Streifenhalter
ist. Eine geringfOgige Drehung
ist
der
Bildbereich nicht
empfiehlt
wie
sind.
durch Offnen
sich
sie im
ist etwas
sollte
das
kleiner
deshalb
des
Tragen
so
Halters
Fall
als
ein ,
67
Page 68

[a]
Fig. 4.13 Aligning the strip film holder with the
scanner's film slot
Allgnement
scanner
Ausrichten des Fllmstrelfenhalters auf den
Fllmschlltz des Scanners
du
porte-film sur Ie logement
du
Loading the holder into the scanner
The strip film
holding the back end of the strip film
the
front
film holder should be pushed in gently until the first stop
is felt.
It is best to align the
so the holder is in the same place as the film
scanner and the holder goes straight into the scanner.
This is no different than pushing a disk into a disk
or
a video tape into a video tape player . This is
illustrated in Figure 4.13.
[a] Scanner
[b] Strip film
When ready to scan, the strip film
the
front
[c] Scanner
[d] Strip film
holder
is inserted into the scanner by
end into the film
holder
of the scanner as shown in Figure 4.14.
holder
slot
strip
film holder before inserting it
holder
of the scanner . The
holder
and pushing
slot
extends out of
strip
on the
drive
Ejecting the holder
The strip film
ejected.
The software eject command accomplishes this task.
Unlike a
film
holder
working status since it always extends out the front of
the scanner.
holder
is ejected the same way a
slide
, it is possible to
by hand when the
simply
scanner
slide
remove the
is not in a
is
strip
[d)
Fig. 4.14 The strip film holder ready for scanning
Le
porte-film pret pour une numerlsation
In
Fllmstreifenhalter
Abtastposltlon
68
Page 69

Insertion du porte-film dans Ie scanner
Le porte-film
I'arriere,
du
scanner
Avant d'
I'
aligner
directement
pour
une disquette ou une cassette
4.13
[a]
[b] Porte-fi I m
Correctement positionne
porte-film depasse du scanner, comme Ie montre la
figure
[e] Scanner
[d) Porte-film
est
et en Ie
introduire
sur
Scanner
4.14.
insere dans Ie
glissant
jusqu'a une butee.
Ie
la fente du scanner
Ie scanner. Procedez
scanner
par
I'avant dans Ie logement
porte-film, il est
pour
pour qu'U
comme
une
numer
en
Ie
conseille
penetre
vous Ie faites
video. Voir
isation, Ie
tenant
de
la
figure
par
Ejection du porte-film
L'ejection du porte-film s'effectue
que
pour
une
La commande d'ejection depuis Ie logiciel effectue cette
tache. Toutefois ,
possible de
scanner
I'avant du
diapositive
contrairement
retirer
n'est pas en service
scanner
isolee.
Ie porte-film a la main lorsque Ie
.
de
la
meme
maniere
aux diapositives, il est
car
il depasse toujours a
Einlegen des Streifenhalters
in
den
Scanner
Zum Einlegen des Filmstreifenhalters in den Scanner
faBt man das hintere Ende des Halters und schiebt
mit
diesen
Scanners. Der Streifenhalter sollte vorsichtig bis zum
ersten Anschlag eingefOhrt werden.
Es
empfiehlt sich , den Filmstreifenhalter vor dem
Einschieben in den Scanner auf dessen Filmschlitz
auszurichten. Dieser Vorgang ist identisch
Einlegen
einer
erliiutert
[a] Scanner
[b] Filmstreifenhalter
Wenn
Filmstreifenhalter wie in Abb. 4.14 dargestellt aus dem
Scanner.
seinem Vorderteil in den Filmschlitz des
mit
einer
Videokassette in einen Videorecorder. Abb . 4.
der
Diskette in ein Diskettenlaufwerk oder
den Vorgang.
Scanner bereit
zur
Abtastung ist, ragt
dem
der
13
[e] Scanner
[d] Filmstreifenhalter
Auswerfen des Streifenhalters
Der Filmstreifenhalter
ausgeworfen
Software-8efehl.
Filmstreifenhalter im Ruhezustand des Scanners auch
einfach von Hand entnommen werden,
dem Scanner herausragt.
wie
wird
in
der
ein Diapositiv , niimlich mittels
1m
Gegensatz
gleichen Weise
zu
einem Dia kann
da
er
der
stets aus
69
Page 70

4-4 Focus
There may be
focus control in
performance. Focus control becomes
when a high resolution scan is taken. High resolution
typically
Focus is affected by the position of the
to the optics in the scanner. The most common
parameter
thickness of the
utilizes
mechanism
of the focal region
slide
mount.
It should be noted that the focus control of the
cannot be used to
some
software
to help
following
The
Thickness
There is a
today. The thickness of these mounts affects
film
will
consequently
self-
adjusting
automatically
region
times
when it is
order
to
ranges from Pitch=1 to Pitch=2 scans.
that can cause focus
film
a self-adjusting focus
automatically
sharpen
wide
be positioned within the
regardless
mount. Fortunately, the
regardless
sharpen
processing
unfocused
is a
list
of
of
the slide mount
variety
within
the
focus
mechanism
centers the
of the thickness of the sl ide mount.
necessary
achieve
things
of
scanner
maximum
problems
mechanism
centers
film
the
of the thickness of the
unfocused
techniques that can be used
film
.
that can affect focus .
slide
mounts
slide
. This
. This mechanism
in the
to
more significant
film
is the
. This
film
in the
film
. These
popularly
mount
scanner
center
adjust
the
scanning
with respect
scanner
center
scanner
are
used
where
and
utilizes a
of the focal
The film type
Many
film
types
are
thickness , dyes and
how
affect
consequently affects the focus.
light
used today. The
emulsions
passes
through
film
used on the
the
film
and
material,
film
can
film
the
70
Page 71

f
4-4 Mise au point
Dans certains cas, il
au point
possible. La mise au point est avantageuse dans tous
les cas
pour
La mise au
dans
peut affecter
I'epaisseur
resoudre ce
de mise au
automatiquement Ie film dans Ie plan de nettete de
I'objectif
En
rendre nette une
n'
d'
permettent de
tous cas
que I'on a affaire
Parmi les raisons qui peuvent
numerisation par defaut
pour
de
numerisation a haute resolution, typiquement
des valeurs
point
Ie
systeme optique du scanner. Le parametre qui
Ie
de
probleme
point
quelle
aucun cas,
aurait
pas ete soignee . Les
image
offrent
de
donner
Epaisseur
Des types
utilises. L'
dans la monture et,
scanner utilise un mecanisme
automatique. Ce mecanisme centre automatiquement Ie
film au
I'epaisseur
de
epaisseur
milieu
du cache.
Type de film
II
existe une
des caracteristiques extremement
epaisseur du support, nature et
sensibles, presence ou non de
etc. Ces caracteristiques peuvent affecter la
lumiere
la
mise au point.
grande
traverse
est
beneficier
plus souvent la mise au point est
la
que so it
Ie
pour
restaurer
necessaire d'effectuer la mise
de
la plus haute resolution
de
pas
de
est affectee par la position du film
monture
automatique. Ce
systeme de mise au
prise
I'impression en
1 a 2.
des diapositives . Pour
, Ie scanner utilise un mecanisme
I'epaisseur
de vue dont la mise au point
la plupart des fonctions qui
partieliement
mecanisme
de la monture .
logiciels
premiere
point
de retouche
la nettete, ou en
a un document net.
alterer
de
mise au point:
du
cache
caches
tres
divers
du cache affecte la position du film
par
suite, dans Ie scanner. Le
de la region de nettete
variete de films 35mm, presentant
Ie document,
la qualite
sont actuellement
de
mise au point
quelle
diverses
ordre
dorsale
et
: nature
des couches
anti-abrasion ,
consequemment la
centre
ne peut
lecture
d'une
que so it
fa<;:on
et
dont
4-4 Scharfeinstellung
In
manchen Fallen mag es notwendig sein,
Erzielung eines optimalen Ergebnisses
nachzufokussieren. Dies wird um so wichtiger,
die Scanning-Auflosung. Hohe AlJflosungen bewegen
sich Oblicherweise zwischen Scan Pitch
Die Fokussierung wird durch die Lage des Films im
Verhaltnis
Ursache
Diariihmchens. Allerdings positioniert
Film ungeachtet
automatisch in
Es
Scanner mangelnde Bildschiirfe
ausgleichen kann.
Bildbearbeitungsverfahren, bei denen die Bildscharfe
Ober
Nachstehend eine Besprechung
EinfluB auf
zur
Scanner-Optik beeinfluBt. Die haufigste
fOr
Fokussierprobleme ist die Dicke des
der
Dicke des Diarahmchens bereits
der
dOrfte
klar
die
Software verbessert werden kann.
die
Schiirfenebene.
sein , daB eine Nachfokussierung im
1m
Gegensatz dazu gibt es
Bildschiirfe haben.
der
der
Dicke des Diarahmchens
Eine groBe Zahl verschiedener Diarahmchen ist auf dem
Markt. Die Dicke
veranwortlich, wo sich
Riihmchens und dam it im Scanner befindet.
erfolgt die Fokussierung automatisch. Dabei
Film ungeachtet
Scharfenebene gebracht.
dieser
Riihmchen ist dafOr
der
Film innerhalb des
der
Dicke des Riihmchens in die
Der Filmtyp
Viele verschiedene Filmtypen sind heute auf dem Markt.
Der Schichttriiger,
Emulsionsstoffe des Films bestimmen, wie das Licht das
Material passiert. Somit beeinflussen sie auch die
Bildschiirfe.
die
Schichtdicke, die Farb- und
zur
je
1 und 2.
der
Scanner den
Vorlagen nicht
Faktoren, die
1m
Scanner
wird
hoher
der
71
Page 72

Fig. 4.15a
[a]
The mount type
Plastic, cardboard and glass mounts are
to frame film. Typically, the plastic and cardboard
mounts center the film in
light
passes through the
through the film. When the
there is a thin piece of glass sandwiching the film as
shown in Figure 4.
Flg.4.15a
[a] Mounted
[b] Film
Flg.4.1Sb Glass Slide Mount
[c] Sandwiched
[d] Film
[e] Glass
In
the case of a glass mount, light must pass through
the air, film and both sides of the glass . This
manual focus control.
Cardboard
35
an
open window. Thus, the
air
on both sides of the
film
is mounted in glass,
15
.
or
mm
35
plastic
film (air-film-air)
mm film (air-glass-film-glass-air)
slide
commonly
film
mount
will
require
used
and
Fig. 4.15b
~~l~ft
[d) [e]
Fig. 4.15 Slide mounts
Montures de diaposltives
Dlariihmchen
~~
1.5mm
3mm
The film location
In
rare cases, the
of the mount. Due to the
mechanism mentioned above, focus control
necessary to accommodate these mount variations .
film
in
a mount
will
not be mounted in the
self
adjusting centering
will
center
be
Emulsion side of the film
The two surfaces of the film
is called the emulsion
film is shown in Figure 4.2.
maximum focus, the emulsion
down when put into the scanner.
are
side
not the same. One
. The emulsion side of the
In
order
to achieve
side
needs to be face
side
72
Page 73

Type de monture
Des
montures
couramment
montures
I'interieur
des
deux
monte
sous
Ie
film
Flg.4.15a
[a] Film 35mm monte
[b] Film
Fig. 4.15b
en
plastique
utilisees
en plastique et en carton
de
la
cotes du
verre
com
me
pour
fenetre . La
film
, de
minces
a la
figure
Monture
Monture
[c] Film 35mm en
(Air-Verre-Film-Verre-Air)
[d] Film
[e]
Verre
Dans Ie cas de
lumiere
les
deux
indispensable
Position
Dans de rares cas, Ie
I'epaisseur
tenu du systeme
automatiquement
mise au point.
diapositives
doit
traverser
cotes du
verre
.
du
film dans la monture
de la monture. Dans de tels cas, compte
film n'e
mentionne
Ie film, il
Cote "emulsion"
Les deux
des cotes est Ie cote
est represente a la
maximale,
Ie bas
surfaces
lors
Ie cote
de
I'insertion
d'un
emulsion
figure
emulsion
, en carton
encadrer
lumiere
et Ie
film. Lorsque
lames
4.15.
en
plastique
(Air-Film-Air)
sous
verre
sandwich
montees
successivement
. La
mise
st pas
precedemment
sera
du
film
film
ne sont pas identiques . L'
. Le cote
4.2. Pour
doit
dans Ie scanner.
et
Ie film. Les
centrent
traverse
de
verre
ou carton
sous
I'air, Ie
au
point
centre
necessaire
emulsion
obtenir
toujours
en
verre
Ie
film
ainsi I'
Ie
film
intercalent
verre, la
film
manuelle
dans
, qui centre
de
faire
la nettete
etre
dirige
sont
est
, et
du
a
air
est
la
film
vers
un
Die Art des Rahmchens
Aligemein
Kunststoff, Pappe
Papprahmchen
geht
Films. Bei Glasdias hingegen
von dunnen Glasplatten gehalten (Abb. 4.15).
1m
durch Luft, Film und Glas auf beiden Seiten. Dies
erfordert
ublich sind heute Diarahmchen aus
oder
Glas. Bei Kunststoff- und
liegt
der
der
Strahlengang durch Luft zu beiden Seiten des
Fig.4.15a
[a]
[b] Film
Diarahmchen aus Pappe
Gerahmter
Film frei im Bildfenster.
wird
der
Kleinbildfilm
(Luft-Film-Luft)
Film beidseitig
oder
Fig. 4.15b Glasrahmchen
[c]
Kleinbildfilm
(Luft-Glas-Film-Glas-Luft)
[d) Film
zwischen Glasplatten
[e] Glas
Faile eines
Glasrahmchens
manuelle Fokussierung.
fi.ihrt
der
Strahlengang
Kunststoff
Die Lage des Films im Rahmchen
In seltenen Fallen
Mitte
des
Zwangsfokussierung
Fokussierung.
Rahmchens befinden. Die vorgenannte
wird
erfordert
sich
der
in diesen Fallen
Film nicht genau in
manuelle
Die Schichtseite des Films
Die beiden Seiten
eine Seite des Films bezeichnet man
Die in Abb . 4.2 gezeigte Schichtseite muB
bester Scharfe im Scanner unten liegen.
des
Films sind
nicht
identisch. Die
mit
Schichtseite.
zur
Erzielung
Somit
der
73
Page 74
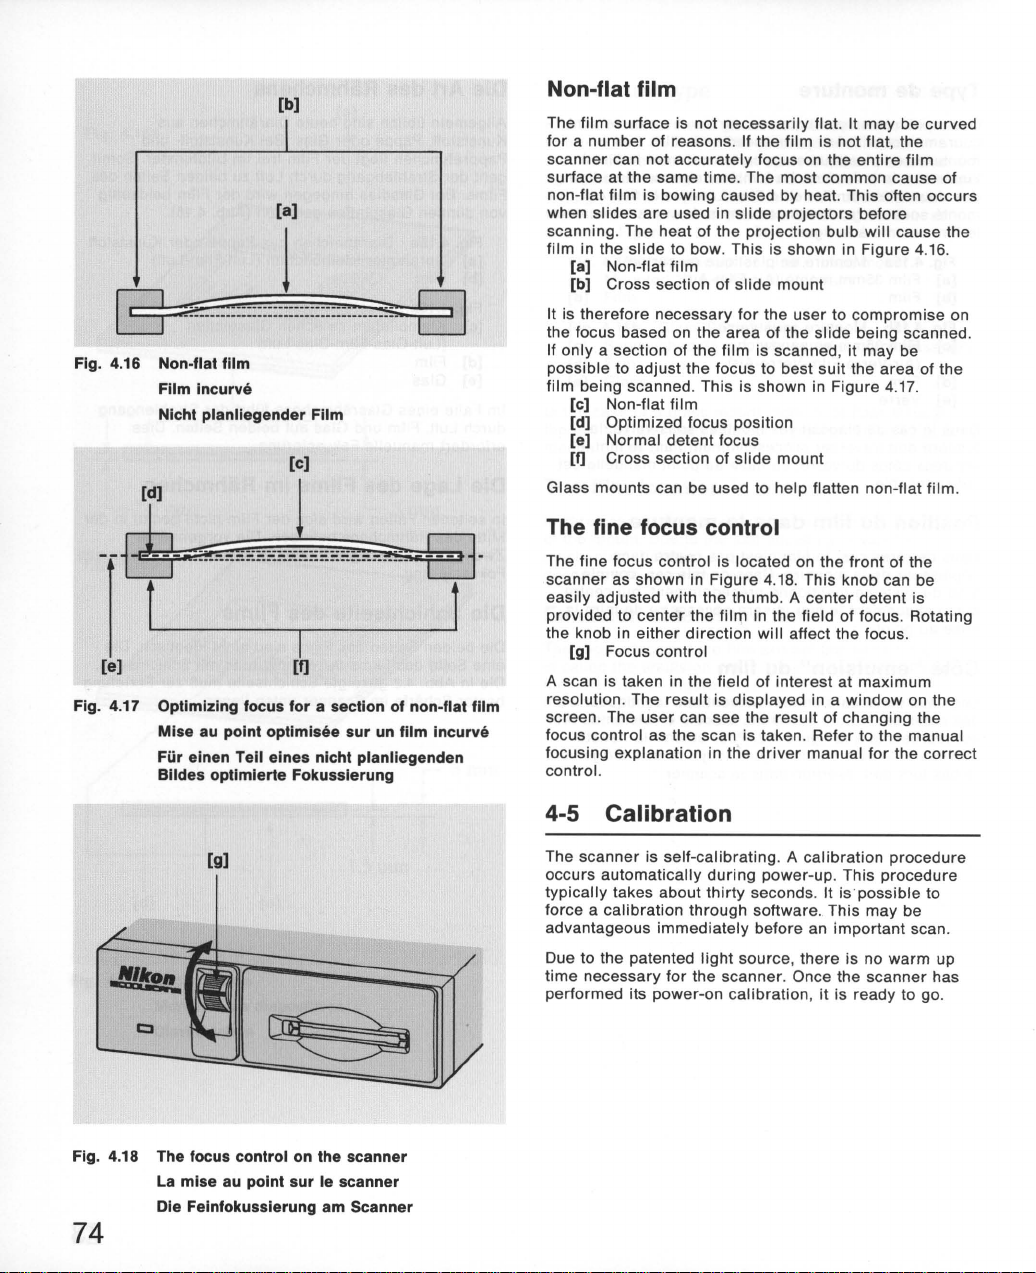
~
Fig. 4.16 Non-flat
Film Incurve
Nlcht
__
mm_muuum
..
=---------------------_
film
planliegender
[d]
~
-,-
1·---""-~~~~-~""""'------
_______
[e)
Fig. 4.17 Optimizing focus
Mise
Fur
einen Tell
Blldes
au pOint
optlmlsee
elnes
optlmlerte
[b)
[a]
j
..
_----=---
Film
[c)
J
m
_____
I
[ij
for
a section
sur
nlcht
Fokusslerung
~
~
I
of
non-flat
un
film
Incurve
planllegenden
film
Non-flat film
The
film
for a number
scanner
surface
non-flat
when
scanning. The
film
It is
the focus based on the
If
possible
film
Glass mounts can be used to
surface is not
of reasons . If the
can not
at
the
same time
film
is bowing caused by heat. This often
slides
are
in the
[a]
[b) Cross section of
therefore
only
being scanned. This is shown in Figure 4.17.
[c) Non-flat
[d) Optimized focus position
[e)
[f]
heat
slide
Non-flat
necessary
a section of the
to
adjust
Normal
Cross
sect
The fine focus
The fine focus control is located on the
scanner
easily
provided to
the knob in
A scan is taken in the field of
resolution. The
screen . The
focus control as the scan is taken . Refer to the manual
focusing explanation in the
control.
as shown in
adjusted with the thumb. A
center
either
[g) Focus control
user
necessarily
accurately
used in
to bow. This is shown in Figure 4.16.
film
film
detent focus
. The most common cause
slide
of the projection bulb will cause
slide
for
area
film
the focus to best suit the
ion of
slide
flat. It
may
film
projectors
mount
the
user
of the
mount
help
is not
to
slide
flatten non-
focus on the
is scanned , it may be
be
flat
, the
entire
film
before
compromise
being scanned.
area
flat
of
control
front
Figure 4.18. This
the
film
direction
result
is
displayed
can see the
center
in the field of focus. Rotating
will
affect the focus.
interest
in a
result
of
driver
manual
of the
knob can be
detent is
at
maximum
window
changing
for
on the
the
the
correct
curved
of
occurs
the
on
the
film
.
[g)
Fig. 4.18 The focus
La
mise
Die Feinfokusslerung
74
control
au pOint
on the
sur
Ie
am
scanner
scanner
Scanner
4-5
The
occurs
typically
force a
advantageous
Due to the patented
time
performed
Calibration
scanner
necessary
is self-
automatically
takes about
calibration
immediately
its
power-on
for
calibrating
dur
ing
thirty
through
light
source, there
the
scanner
calibration
. A
calibrat
ion
power-up. This
seconds. It is· possible to
software
before
. This
an
. Once the
, it is ready to go .
procedure
procedure
may
important
is no
warm
scanner
be
scan .
up
has
Page 75

Film incurve
La surface du
peut etre incurvee
film n'est
Ie
ressentir de defauts locaux de mise au point. La raison
la plus frequente de
ou bombes, est
diapositive. Sous I'effet de la
deforme
par
la
[a]
[b] Coupe de la monture
II
est
donc necessa ire d'
mise au point, qui rendra
partie
est
illustree
[c] Film incurve
[d] Mise au point optimisee
[e]
[1]
Des montures sous
aplanir
film
n'est
pas necessairement plane. Elle
pour
pas
leur
, parfois de
figure 4.
de
16.
Film incurve
I'image
par
Position
Coupe de la monture
un film incurve.
un grand
plat, la
qualite de la numerisation va se
travailler
utilisation dans un projecteur de
facton
arriver
qui vous interesse . Cette optimisation
la figure 4.17
de
centrage
verre
nombre
avec des films incurves ,
chaleur
irremediable
a un
de
facton
normale
peuvent etre utilisees pour
de raisons. Si
, Ie film .se
. Ceci est
compromis
statisfaisante la
illustre
sur
la
Mise au point micrometrique
La molette de mise au point
I'avant du
Cette molette peut etre facilement tournee avec Ie
pouce. Elle com porte une detente centrale permettant de
centrer
tournez la molette dans un sens ou dans I'autre, ceci
affecte la nettete.
Une numerisation est effectuee dans Ie champ vous
interessant avec la resolution
affiche dans une fenetre
voir
point pendant qu 'il effectue la numerisation . Pour Ie
reglage
au point
scanner
Ie
film dans Ie champ de nettete. Lorsque vous
[g] Molette de mise au point
Ie resultat du reglage
correct
manuelle
comme
, reportez-vous a I'explication
dans Ie manuel du pilote.
micrometrique
Ie
represente la figure 4.18.
maximale
sur
I'ecran. L'
de
la molette de mise au
se trouve a
. Le resultat est
utilisateur
sur
peut
la mise
Mangelhafte Filmplanlage
Aus
einer
Bildfenster zu wunschen ubriglassen. Dann jedoch kann
nicht das gesamte Bild scharf wiedergegeben werden.
Am hiiufigsten wandert
Dies tritt oft dann ein, wenn das Dia vor dem Scannen
mit
Projektionslampe erzeugte Hitze fUhrt in diesem Fall
Durchbiegung des Films. Abb. 4.
Deshalb kann es notwendig werden, auf eine
vermittelnde Ebene zu fokussieren. Wird nur ein Teil des
Bildes abgetastet, findet eine solche vermittelnde
Fokussierung die besten Voraussetzungen. Die Situation
wird
Glasriihmchen verbessern die Filmplanlage.
Reihe von Grunden kann die Filmplanlage im
der
Film durch
einem Projektor
[a]
Mangelnde Filmplanlage
[b] Querschnitt des Diariihmchens
von Abb. 4.
[c) Nicht planliegender Film
[d] Vermittelnde Fokussierung
[e]
Normale Schiirfenebene
[1]
Querschnitt des Diariihmchens
projiziert
17
verdeutlicht.
wurde. Die von
16
zeigt
Erwiirmung
aus.
der
zur
diesen Effekt.
Die Feinfokussierung
Der Drehknopf
der
Vorderseite des Scanners,
Dieser Knopf liiBt sich leicht
seiner
mittleren Raststellung wird
Schiirfenebene zentriert. Die Schiirfe kann durch Drehen
des Knopfes in beide Richtungen beeinfluBt werden.
[g] Feinfokussierung
In
dem interessierenden Bereich wird eine Abtastung
mit
maxi
wird in einem Fenster auf dem
der
daB
Informationen
bitte der Erliiuterung
der
Geriitetreiber-Anleitung.
fUr
die
Feinfokussierung befindet sich an
maier
Auflosung vorgenommen. Das Ergebnis
Effekt
der
Fokuskorrektur sichtbar wird.
zur
korrekten Bedienung entnehmen Sie
der
wie
in Abb. 4.
mit
dem Daumen drehen.
der
Film in
Monitor
manuel len Scharfeinstellung in
dargestellt, so
18
gezeigt.
der
In
4-5 Kalibrierung
4-5 Calibrage
Le
scanner
procedure est automatique lors
Cette procedure demande
de
secondes.
depuis Ie logiciel. Ceci peut etre interessant juste avant
un numerisation importante .
La technologie brevetee de source
temps de prechauffage du
la mise so us tension , Ie
est dote
II
est
d'une
fonction d'auto-
de
generalement
possible d'effectuer un
scanner
scanner
la mise sous tension.
de
lumiere
. Apres
est
pret
calibrage
une trentaine
calibrage
Ie
. La
annule Ie
calibrage
a etre utilise.
Der Scanner ist selbstkalibrierend . Die Kalibrierung
erfolgt automatisch nach dem Einschalten und dauert
ublicherweise etwa dreiBig Sekunden. Eine Kalibrierung
kann auch uber die Software erzwungen werden. Dies
kann sich unmittelbar
Abtastvorgang empfehlen.
Auf Grund
Scanner keine Anlaufzeit. Er ist unmittelbar nach
Selbstkalibrierung einsatzbereit.
der
vor
einem besonders wichtigen
patentierten Lichtquelle benotigt
a
der
der
75
Page 76

4-6
LED
Indicator
II'llo"
-
~[
[8]
Fig. 4.19 LED Indicator (green)
Diode-temoin (verte)
LED-Anzeige (griin)
The LED
illustrated
The LED indicates the
Light-on: Lights when
Blinking
Blinking
* The LED
4-7 TERM.
Selects
power
See chapter 2. 2-3
TERM.
LS-10.
indicator
in Fig. 4.19.
[a] LED
malfunction.
indicator
: Blinks
whether
from the
PWR
slowly
(BUSY)
fast: Blinks fast when an
sometimes
or
scanner
Switch is needless in internal-
situates on the
PWR
not to
for
front
panel as
following
power
when
blinks
3 states .
is suppl ied. (READY)
scanning
irregularly. but
and initializing.
error
occurs. (ERROR)
this is not a
Switch
supply
outlet.
the SCSI
standard model LS-10E.
terminator-
mount
model
76
Page 77

4-6 Diode-temoin
4-6 LED-Anzeige
La
diode-temoin
Ie
montre
[a] Diode-temoin
diode-temoin
Cette
etats suivants :
Allumee: S'
Clignotement: Clignote
Clignotement
* Le
clignotement
irregulier
est
situe
sur
la
figure 4.19
fournit
allume
a la
numerisation
(OCCUPE)
rapide
: Clignote
un etat d'
de
. Ceci n'est pas anormal.
la
Ie panneau avant,
des indications dans les
mise
sous tension.
lentement
et
de
rapidement
erreur
diode-temoin
lors de la
I'initialisation.
pour
. (ERREUR)
est
parfois
4-7 Interrupteur TERM. PWR
Cet
interrupteur
I'alimentation du bouchon de
prise du scanner.
Voir Chapitre 2, 2-3
L'interrupteur TERM.
interne LS-10.
permet
pour
PWR
d'etablir
et de
terminaison
Ie
modele
est inutile a Ie
couper
SCSI
standard LS-10E.
modele
comme
trois
(PR~T)
signaler
depuis
Die LEO-Anzeige befindet sich an
Abb. 4-19).
[a] LEO-Anzeige
uber
die
Die LED verfugt
Anzeigen des
Aufleuchten: Beim Einschalten
Langsames Blinken : Beim Abtasten und
Schnelles Blinken : Bei Fehlerzustand . (FEHLER)
* Die LED
jedoch keine St6rung .
jeweiligen
(BEREIT)
blinkt
manchmal unregelmaBig. Dies bedeutet
folgenden
Betriebszustands:
(BETRIEB)
der
drei
der
Stromversorgung
4-7 AbschluBstromschalter
(TERM. PWR)
Mit
diesem
la
AbschluBstrom vom Scanner-Ausgang
oder
Bezuglich des externen
2-3.
Der AbschluBstromschalter ist im Einbaumodell LS-10
nicht
Schalter
nicht.
notwendig .
wahlen Sie , ob de r SCSI-
Modells
LS-10E siehe Kapitel
Vorderseite (siehe
Methoden zum
.
Initialisieren
geliefert
.
wird
2,
77
Page 78

Specifications
1. Reading system/Optics
Film type
35
mm
film
(colour
or
negative)
Reading resolution
2,592 x 3,888 pixels
Effective resol ution
2,393 x 3,648 pixels (with
Reading
Effective
Light
Colour
Film
Imaging
Gradation
area
24
.3 x 36.5
area
22
.5 x 34.3
source
RGB 3-colour LED
separation
3-filter selectable LED
holder
No
holder
optics
High-resolution optics (Autofocus, Manual focus)
256
mm
mm
holder
needed
for
strip
gradations
monochrome, positive
strip
(with
strip
film
for
mounted
sli
des
each
for
R, G and B
film
holder)
slides, strip
or
holder)
film
78
2.
Scanning/Signal processing
Image scanning (single pass)
Main
scanning:
2,592-
Sub-scanning:
Moving
Scanning
Scanning density
AID conversion
time
Pre-scan:
Approx. 30
Actual scan:
depends on the kind of interface ,
setting and
(Approx.
1,000 x 1,
2,700 dpi
Pixel size: 9.4
Pixel density: 106
8 bits
element
film
140
OOO
CCD line
stage
sec.
film
density
sec.
-pixel
Jim
square
pixels/mm
driven
for
3-colour
range
sensor
by step
with standard film)
on
within
film
motor
resolution
a
Page 79

Caracteristiques
Technische
Daten
1. Systeme de lecture/optique
Type de
Resolution de
Resolution effective
Surface de lecture
Surface effective
Source d'
Separation des
Porte-film
Optique d'imagerie
Gradation
2.
Numerisation d'
Temps de
Densite de
Conversion
film
Film de 35
ou negatif)
2
592
393
2
24,3 x
22
,5 x 34,3
eclairage
Diode
(rouge,
Diode
3 filtres
Inutile
pour les bandes de
Optique de haute resolution
automatique,
256
(bleu)
mm
(couleur ou
lecture
x 3 888 pixels
x 3 648 pixels (avec porte-film)
36
,5
mm
mm
(avec porte-film)
electroluminescente
vert
, bleu)
couleurs
electroluminescente
pour
les
diapositives
mise
au
gradations
pour
monochrome,
trois
selectionnable
diapositives
montees;
(mise
point
manuelle)
R (rouge) , G (vert) et B
couleurs
Numerisation/traitement de signal
image
(par
Numerisation
Capteur
Numerisation
Platine porte-film
pas a pas.
numerisation
Pre-numerisation: 30
Numerisation
Depend du type d'interface, du
resolution et de la densite de
(140 sec .
plage
standard)
2700
Taille
Densite de pixels: 106
8 bits
de
de
numerisation
dpi
de
pixel :
analogique/numerique
passe unique)
principal
auxiliaire
effective:
environ
1 000 x 1 000
:
ligne
CCD a 2
mobile
:
sec. environ
pour 3 couleurs
Carre
de
:
pixels/mm
592
entraTnee
pixels
9,4
J.lm
elements
reglage
film
avec un
sur
necessaire
au
point
par
dans une
film
positif
RGB
a
moteur
de
film
1. Lesesystem/Optik
Filmsorte
35-mm-Film (Farbe
oder
negativ)
Leseauflosung
Effektive Auflosung
Lesefeld
Effektives Feld
Lichtquelle
Farbentrennung
Filmhalter
Abbildungs
Gradation
2.
Bildabtastung (in einem Durchlauf)
Abtastzeit
Abtastdichte
Analog-Digital-Umsetzung
592
x 3.
2.
2.393 x 3.
24,3 x 36,5
22,5 x 34,3
RGB 3-Farben-LED
LED
FOr
Filmstreifenhalter
Hochauflosende Optik (automatische ,
Scharfeinstellung)
Je
888
648
mm
mm
mit 3 wiihlbaren
gerahmte
-Optik
256
Abstufungen
Abtastung/Signalverarbeitung
Hauptabtastung:
CCD-Zeilensensor
Abtastvorschub:
Verschiebung
Schrittmotorantrieb
Vorabtastung: ca.
Eigentliche Abtastung:
abhiingig
Auflosungseinstellung und
(ca. 140 s
eines Bereiches von 1.000 x 1.000 Pixel
Normalfilm)
2.700 dpi (Punkte/Zoll)
PixelgroBe: 9,4
Pixeldichte:
8 Bits
oder
schwarzweiB, positiv
Pixel
Pixel (mit Filmstreifenhalter)
(mit Filmstreifenhalter)
Farbfiltern
Dias
wird
kein Halter benotigt,
fOr
Diapositiv-Filmstreifen
fOr
R, G und B
mit 2.592
der
FilmbOhne mittels
30
s
von
der
Art
der
Schnittstelle,
fOr
Dreifarben-Abtastung innerhalb
2
J.lm
106
Pixellmm
auf Film
Elementen
der
Eilmdichte
manuelle
der
mit
79
Page 80

3.
Data transmission
Panel indicators
READY, BUSY and ERROR states indicated
LED
Control method
Host
computer
line
interface
Interface
SCSI (ANSI X3.131-1986 standard)
Image
transfer
Via sequential R, G, B screens
Maximum
4.
Power
Environmental
Dimensions and
transfer
Approx. 1MB/sec
Others
requirements
Standard model : AC100 V/0.14 A Internal-mount model: DC5 V. 0.5 A, DC12
Temperature: 10'C-40
Humidity
Standard model :
148(W) x 320(0) x 47(H)
Internal-mount
148(W) x 208(0) x 42(H) mm ,
issues commands from
rate
. with SCSI
50/60 Hz
' C
: 20% -85% (with no condensation)
weight
model :
240
mm, approx
approx
by
command
V/0.
13
A
V.
0.7 A
. 1,900g
. 1,
OOOg
80
• Macintosh is a
Computer, Inc.
PC
is a registered
•
Machines Corp .
• Photoshop is a registered
Systems Inc.
• Windows is a
registered
trademark
trademark
trademark
trademark
of
Microsoft
of
Apple
of International Business
of Adobe
Corp.
Page 81

3.
Transmission de donnees
Temoins
Methode
Interface
Transfert d'image
Vitesse de
4.
Alimentation
Conditions
Dimensions
• Macintosh
•
• Photoshop est une
• Windows est une
du panneau
PR~T
Etats
diodes
de
L'
ordinateur
depuis
SCSI
Par
sequentiels
1 M octets/sec.
,
electroluminescentes
commande
I'interface
(norme
des
ecrans
transfert
Divers
requise
Modele
Modele
Temperature: 10- 40 ·C
Humidite
Modele
Modele
Computer
PC
est une
Machines Corp .
Inc.
standard: 100 V
interne
ambiantes
: 20 - 85 % (sans condensation)
et
poids
standard:
interne: 148 (I) x 208 (p) x
est
une
, Inc.
marque
OCCUPE et ERREUR
central
emet
de
ligne
ANSI X3.131-1986)
R (rouge) , G (vert), B (bleu)
maxi
environ
CA/0,14 A - 240 V/0 ,
50/60 Hz
: 5 V CC, 0,5 A,
148
(I)
1 900 9 environ
1 000 9 environ
marque
marque
marque
deposee
deposee
deposee
de International Business
deposee
des
commandes
de
commande
avec SCSI
12 V CC
x 320 (p) x
d'Apple
d'Adobe Systems
de
indiques
13
0,7 A
47
h (mm),
42
(h) mm,
Microsoft
.
A
par
Corp.
3.
Dateniibertragung
Fronttafel-Anzeigen
Anzeige
FEHLER durch LED
Steuerung
Der
Befehlszeilen-Schnittstelle aus.
Schnittstelle
SCSI (ANSI-Norm
BildObertragung
Ober sequentielle RGB-Bildschirme
Maximale
ca. 1
4.
Sonstiges
Stromversorgung
Standard-Modell:
Einbau-Modell : 5 V
Betriebsbedingungen
Temperatur: 10 -40
Luftfeuchtigkeit:
Abmessungen und
Standard-Modell :
Einbau-Modell:
• Macintosh i
Apple Computer, Inc.
•
PC
ist
International Business Machines Corp.
• Photoshop
Adobe Systems Inc.
• Windows ist ein eingetragenes Warenzeichen von
Microsoft
der
Zustande BEREIT, BETRIEB und
Verarbeitungsrechner
X3
Obertragungsgeschwindigkeit
MB/s
mit
SCSI
100
Wechselstrom , 50/60 Hz
Gleichstrom
20 -85
Gewicht
148
ca. 1.900 9
148
ca. 1.000 9
st
ein eingetragenes Warenzeichen von
ein
eingetragenes
ist
ein
eingetragenes
Corp.
gibt
.131-1986)
V/O, 14
A - 240
Gleichstrom
Warenzeichen von
, 0,7 A
·C
% (keine Kondensation)
(B) x
320
(B) x 208
Warenzeichen von
Befehle von
V/O, 13
, 0,5 A;
12
(T)
x 47
(T) x 42
(H)
V
(H)
mm ,
der
A
mm,
81
Page 82

Nikon Corporation
Electronic Image Engineering Division
Fuji Bldg.,
Chiyoda-ku, Tokyo,
2-3
, Marunouchi 3-chome,
100
, Japan
 Loading...