


Nikon
INSIRUCIIONS
Advanced Test Equipment Rentals
www.atecorp.com 800-404-ATEC (2832)
®
E
s
t
a
b
l
i
s
h
e
d
1
9
8
1
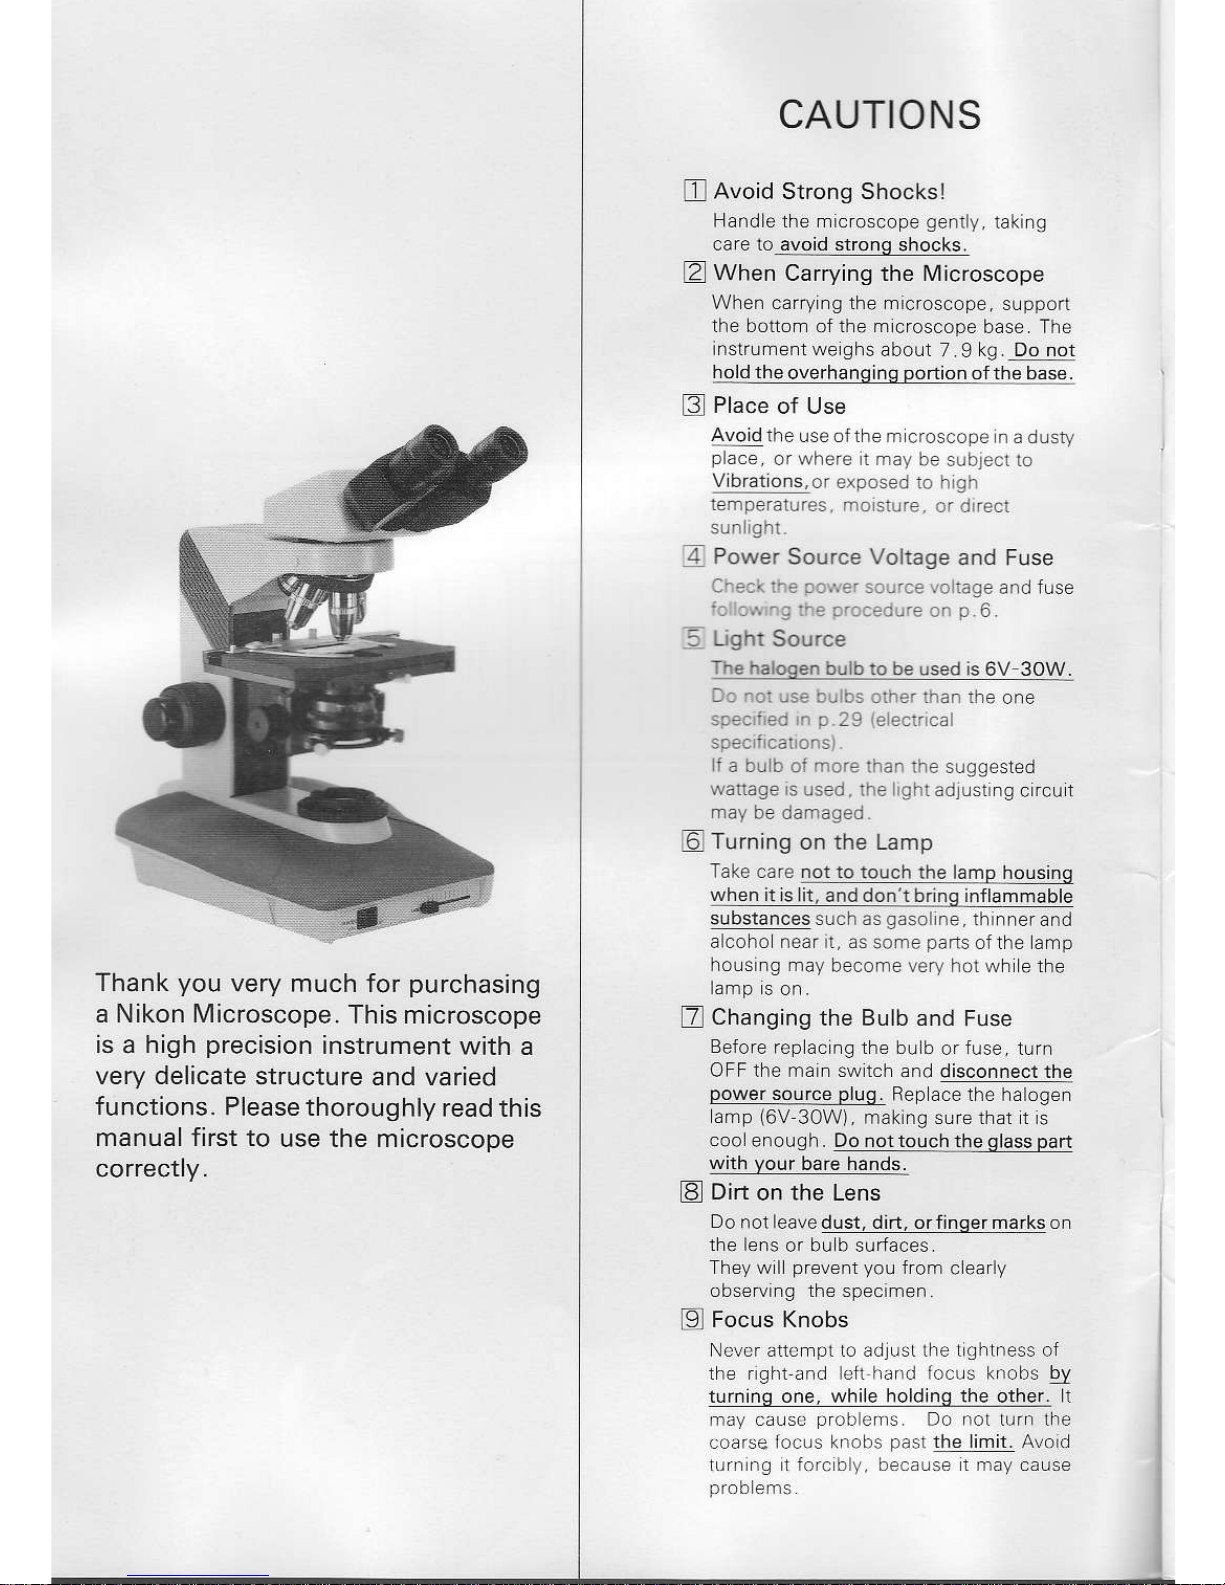
Thank
you
very
much for
purchasing
a Nikon lMicroscope.
This microscope
is a high
precision
instrument
with a
very delicate structure
and varied
functions. Please
thoroughly
read this
manual first to
use the microscope
correctly.
CAUTIONS
I
Avoid
Strong Shocksl
ll
afd e the microscope
genrly,
tsking
care 10 avoid strons
shocks
E
When
Carrying the Microscope
When carryng th€ microscope.
s!pporl
the bouom of th-c m
croscope base The
nsrr!ment we
ghs
.bout 7 9 kg Do not
ltsl!l!9!!9rl4sl!s
fthebcse-
E
Place
of Use
Avo d the
lse oftlr€ m
cros.opc n a d!sry
prace,
or wferc l mar ne
slolecl lo
V brat ontor
clposed ro l.
gr
lemper.r!rcs mn
sir.e,
.r o
r.c:
4
Power
Source
Voltage
and Fuse
a'...
-'...
...,..,'..
. :age.nd
fuse
-:
:..
-t
:-i. -..),'....
Q
n
a
Lrght
Source
The ha gqen
b! bro be
used
is
6V 30
I r
_:'
..:. ... .: r:re. :.an rlr-.
one
:.:.'..
".
:i ..ci..a
f
a b! b oi
T..:
i.a. .e
slqgested
wattage s Lrsed,lfe
!f:
adlusting c rcu t
ma!
oe oamageo
6
Turning
on the Lamp
Tske cafe not to touch
the lamp nousing
when it s it,
and don'1br qg inflammable
s!bstances such as
gas.
n-.. thinner
and
lrlcoho
n€ar n. .s some
pa.ts
ofthe amp
hols ng may
b€conre lery hoL wh e the
Z
Changing
the Bulb and Fuse
Before rep
ac .9 the bLr b
or
luse.
tufi
OFF the ma n sw tclr and
disconnect the
power
source
plua.
Rep ac€ the halogei
amp
16V
30W). maklng s!fe tlrat t
s
coo
enough. Do noltouch the
qlass part
with
Vour
bare hands.
B
Dirt
on the Lens
wattage s Lrsed,ll'e
!f:
adlusting c rcu t
Do noi leave
dust. dirt. orf in
the lens
or bu b surfaces
They w I
prevent
you
from
c early
obsetuiig th€ specim€n
-91
Focus Knobs
N.!cr att. npr ro !dlust the t.Jht.ess ot
th€ rght !nd €ti
fr!fd ro.!s
k.oi,s
!Y
turnino one, whiie
holdinar
the other. r
nr! ca!s.
pfoliems
D!
.ot
tLrr. the
idrse
locls kr
..ib: p.st
the imit A!. d
trrr. ng t i.r. h
!,
be..!:e t na,r' cause
CARE AND MAINTENANCE
A
Cleaning the
Lenses
To
cleaf the ens slrfaces. remove
dlst
Lrsing
a soft brush or
gauze
Only when
removing
finger marks
or
grease.
use a
solt colton coth, ens tissle,
ofgauze
ghty
moistened with
pure
alcohol
lmethy
a cohol or
ethyl alcoho
)
IESL
sE4lra!|i
s!i9!lry9! 9i
"91
Lr only xylene. Do
nol use xylen€ for
cleai n9 the su.face
of lhe entrance lens
of
the eyepiece
lLrbe or the
pr
sm sLrface
of
the Ult.a
Wide Eyepiece Tube UW"
Observe
suffic ent caut on n handl ng
a cohol and xylene
lthey
.re n
fammable).
andtheON OFF of rh€
powef
source switch.
Z
Cleaning
the Painted Surfaces
Avoid the use of anv orqanic
solvent
(for
examp €, thinn€r.
-"ther. a coho
)lor
cear ng the
pa
nted
sl|faces.rd
plastc
parts
of the nstr!m-.nl
W€ reconrmend
yo!
!s€ tlre
si cof cloth.
g
Never Attempt to Dismantlel
Never
attempt to dismantle the
instrument
beca!se
you
may mpa r the
@
When
Not in Use
When not in Lrse.
covef the instrument
wlfrthe
accessory v ny cover. and qlel9
it in a
place
free from moisture
and
funqus. t is espec aly recommended
that the objectves
and eyep eces be kept
ii an ai.t
ght
conta ner containing
El
renoorc
Lnecttncl
To mainlain
the b€st
pe.formance
of the
instftrmeni.
we r€commend
that the
instr!m€nl
be
pefodlca
lychecked
(For
deta s of th s check, contact
your
au-
thorized Nikon distr butor.
)
*Ple.se nole .rs
pe. you.
N kon warcntv,
''Any
defects or damage dircctly or indi
rectly caused by the use of unauthorized
replacement
parts
and,/or
performed
by
unautho
zed
personnel"
wil vod the
CONIENTS
r.Nol\,lENCLATURE
.. .. ..
.....
3
TT.ASSEMBLY..
...... . ... ..5
rn.
N4lcRoscopy
...-........
12
V.MANIPULATION
OF EACH
ELEtvtENT
. .. ..... .. .. .. ..... .
16
1) Use offocusins device.
. . .. .16
2) Optica
path
change over in the
tr nocular eyep ece tulre
3) D
opter
adlustmenr
. .. .... .
4) nterpupillary d stance
1f
18
adjustment
. . . ,. . ,. ,. . ,. ,.
J8
5)
Center ng the
condenser ens
T 9
6) Useoffeddiaphragm
...
20
7)
Use of condenser apenure
daphrasm...
.......20
8) Use of fiters
-----.-.--21
9) O immersion manipLr
alon..
..23
V
,TROU BLESHOOTIN G
."',..,.24
ELECTRICAL
SPECIFICATIONS. 29
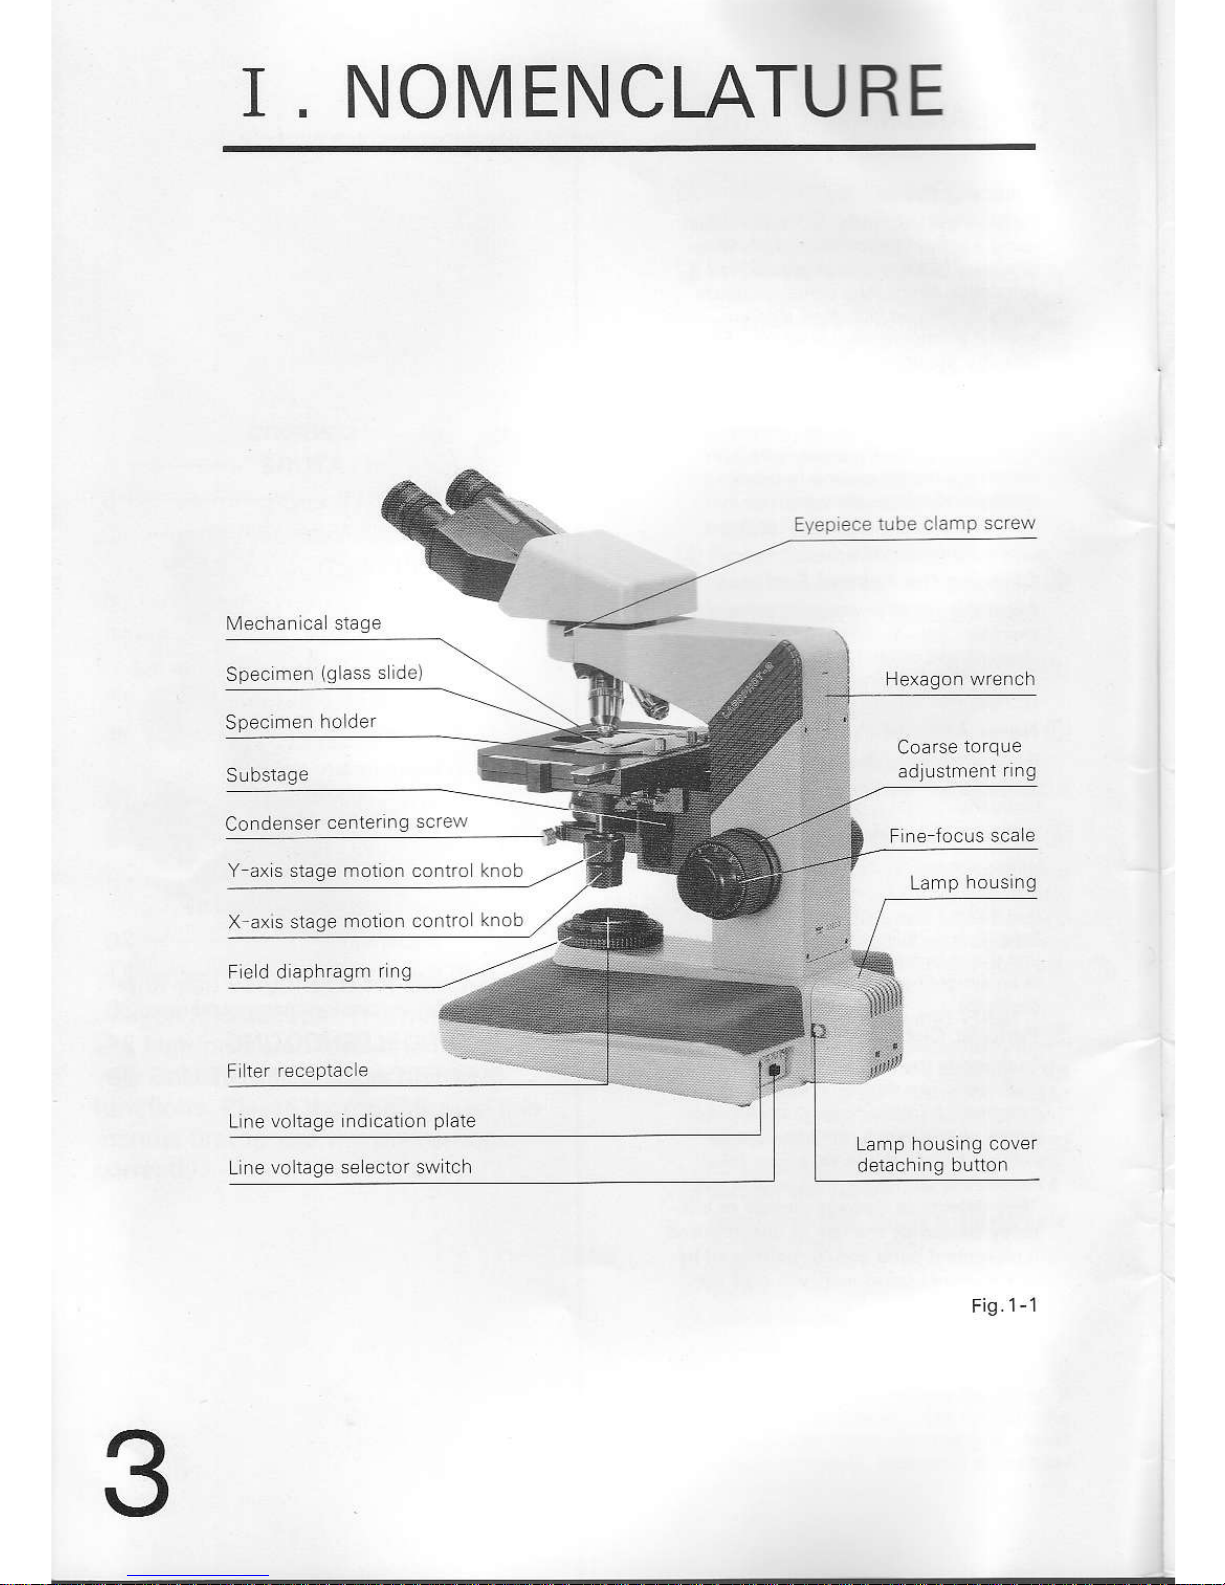
I
NOM ENCLATU
RE
Specm€n
(glass
s rdel
S!bstage
Condenser
centerlng
screw
Y ax s slage molion contro
X axls stale
mot on coniro
Fed diaphragir
rng
LrnF
io tage .d cadln p dre
LrnF
!oltaqe se cLtor sw
1.h
Eyep ece
1!be clamp
screw
Lamp housing covef
\
Frg.
r- |
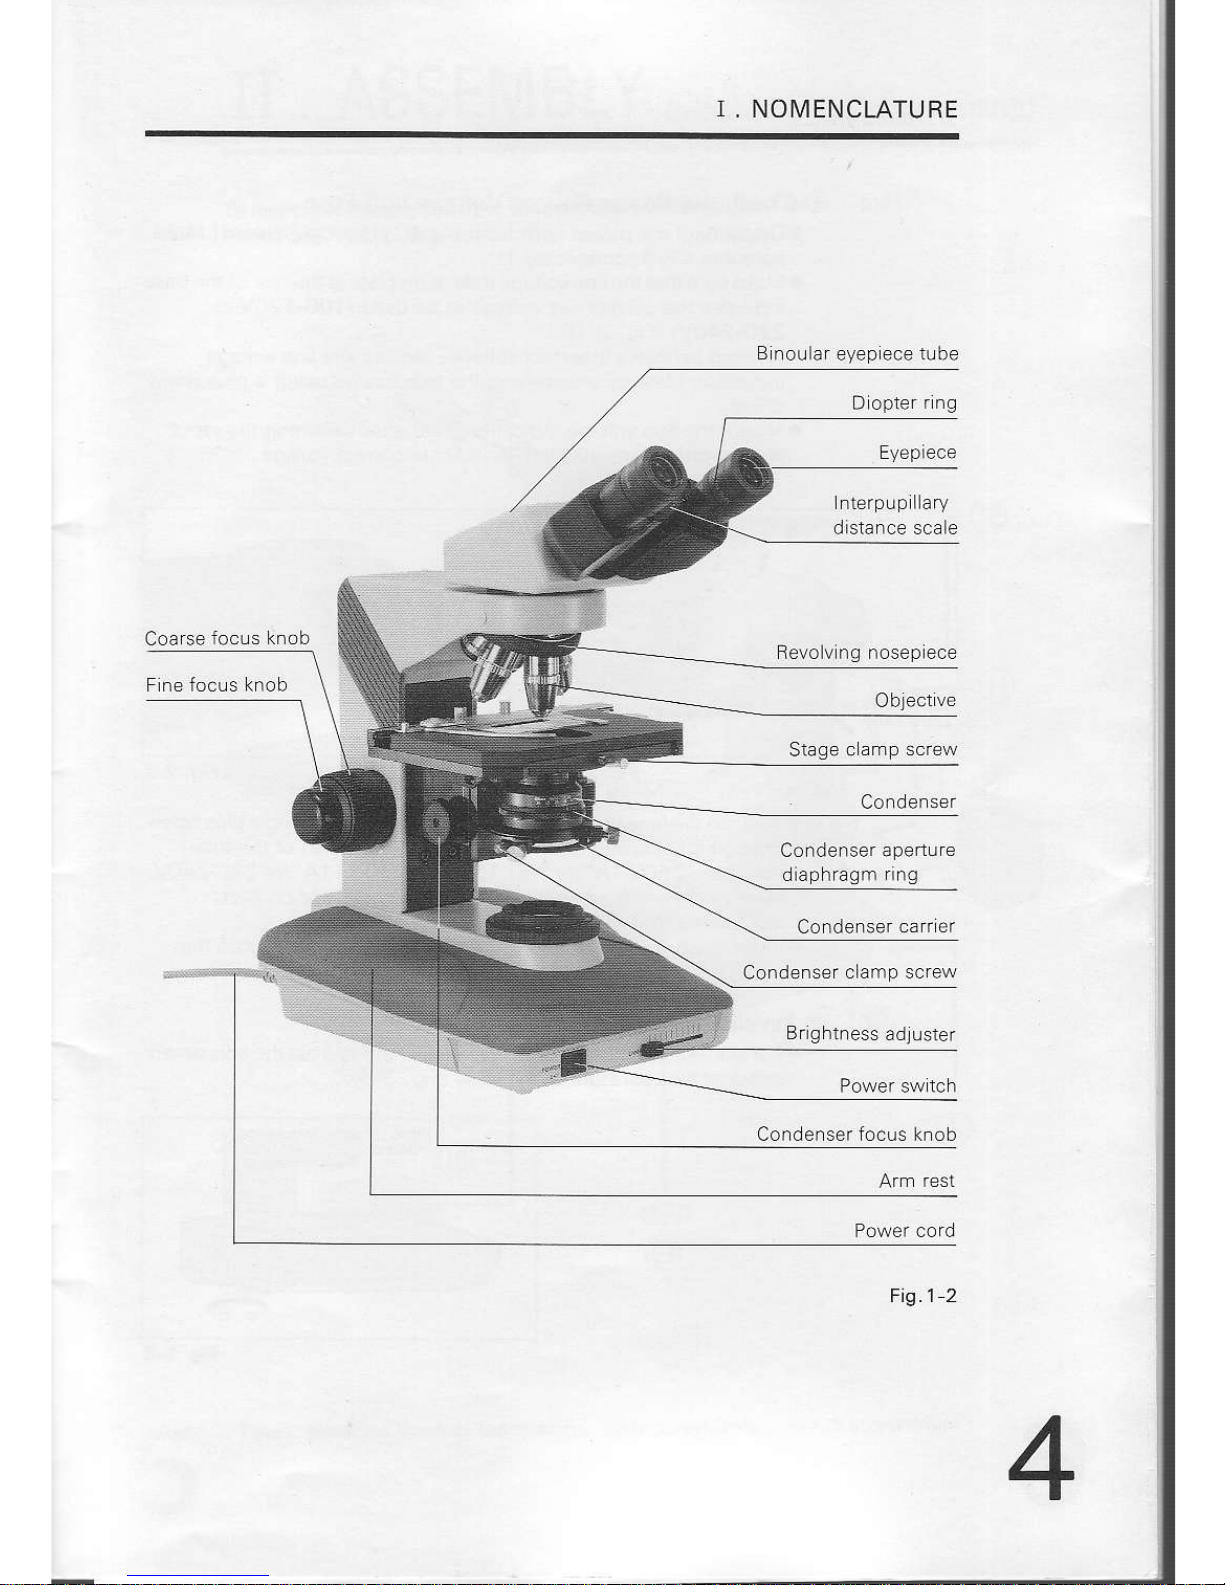
NOI\4ENCLATURE
B
noular eyep ec€
tube
D opter
r ng
Revolv ng nosep ece
dlaphragm
ring
Condenser
c amp screw
Cofdenser focus knob
Fig.l 2
il.
ASSEM
B
LY
r'o""r,ns
and dismantrins)
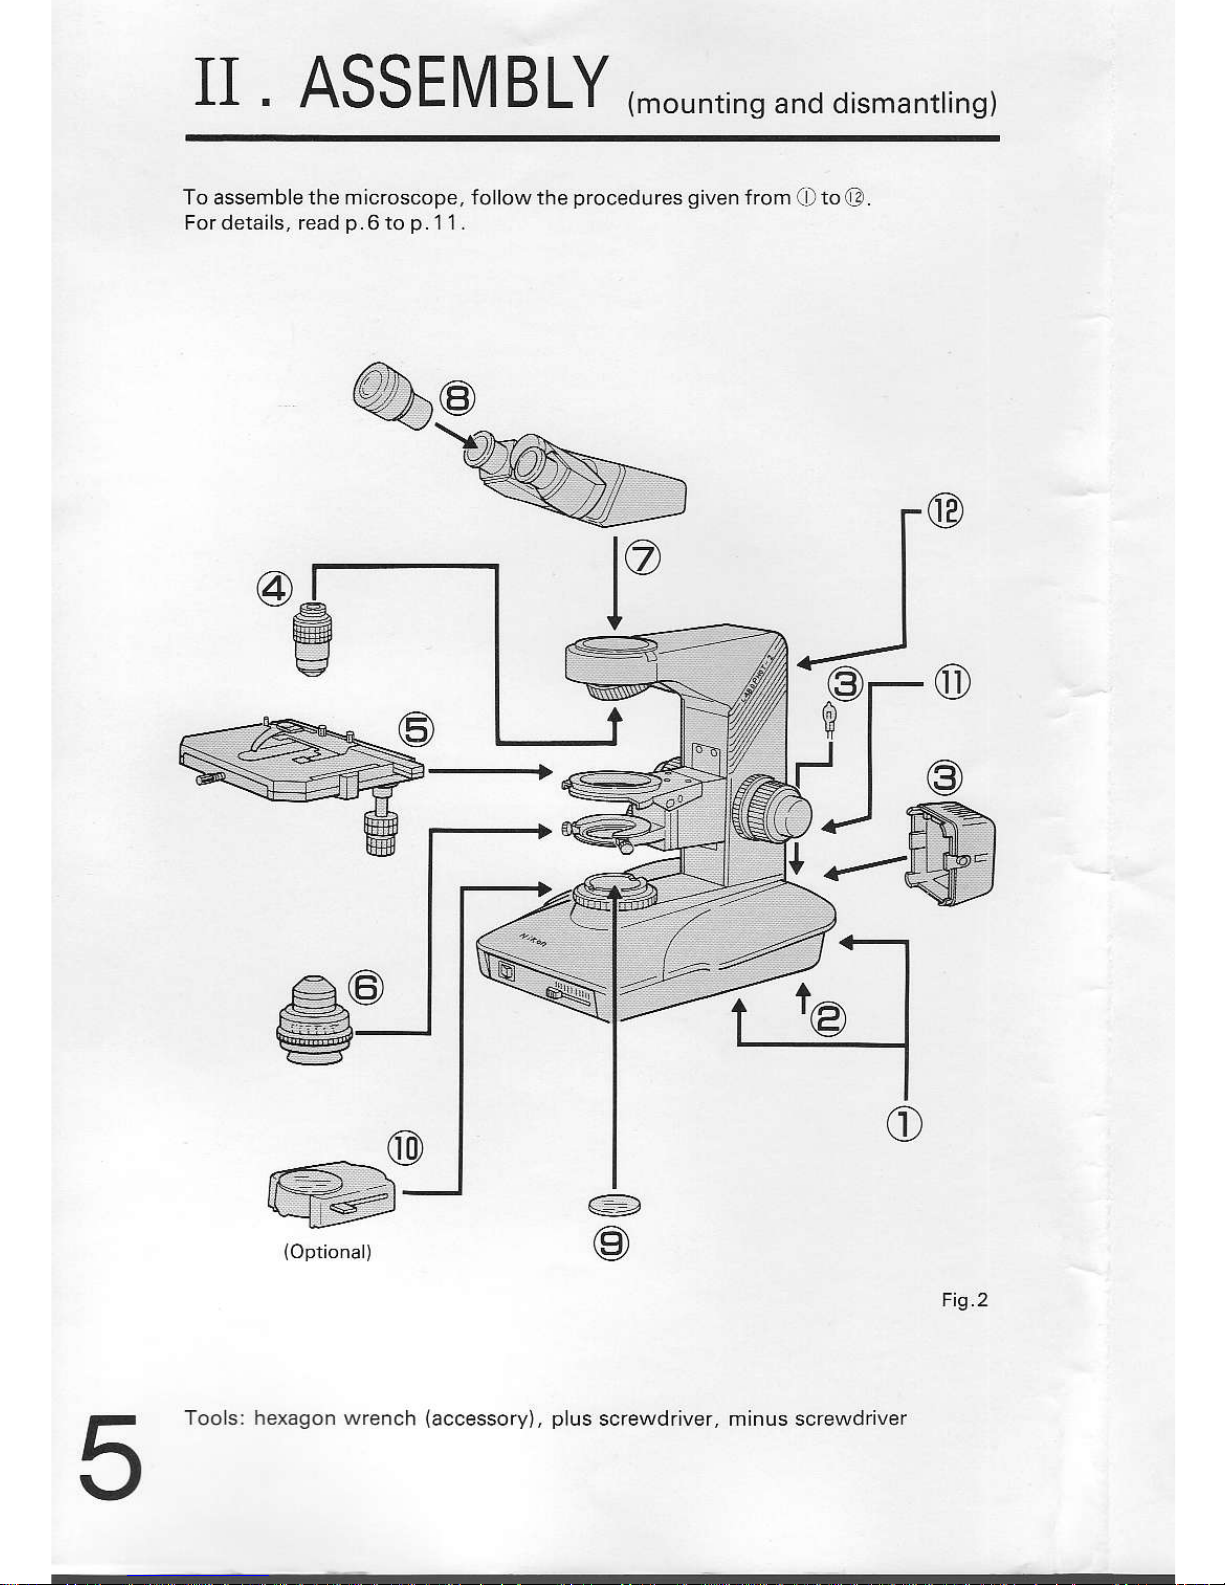
To assemblethe microscope, follow the
procedures given
from
Oto(?
Fordelails, read
p.6
to
p.
1'1.
1u
r@
@
@
Tools: hexagon wrench
(accessory),
plus
screwdriver, minus screwdriver
Fig.2
N.ASSEI\4BLY
O
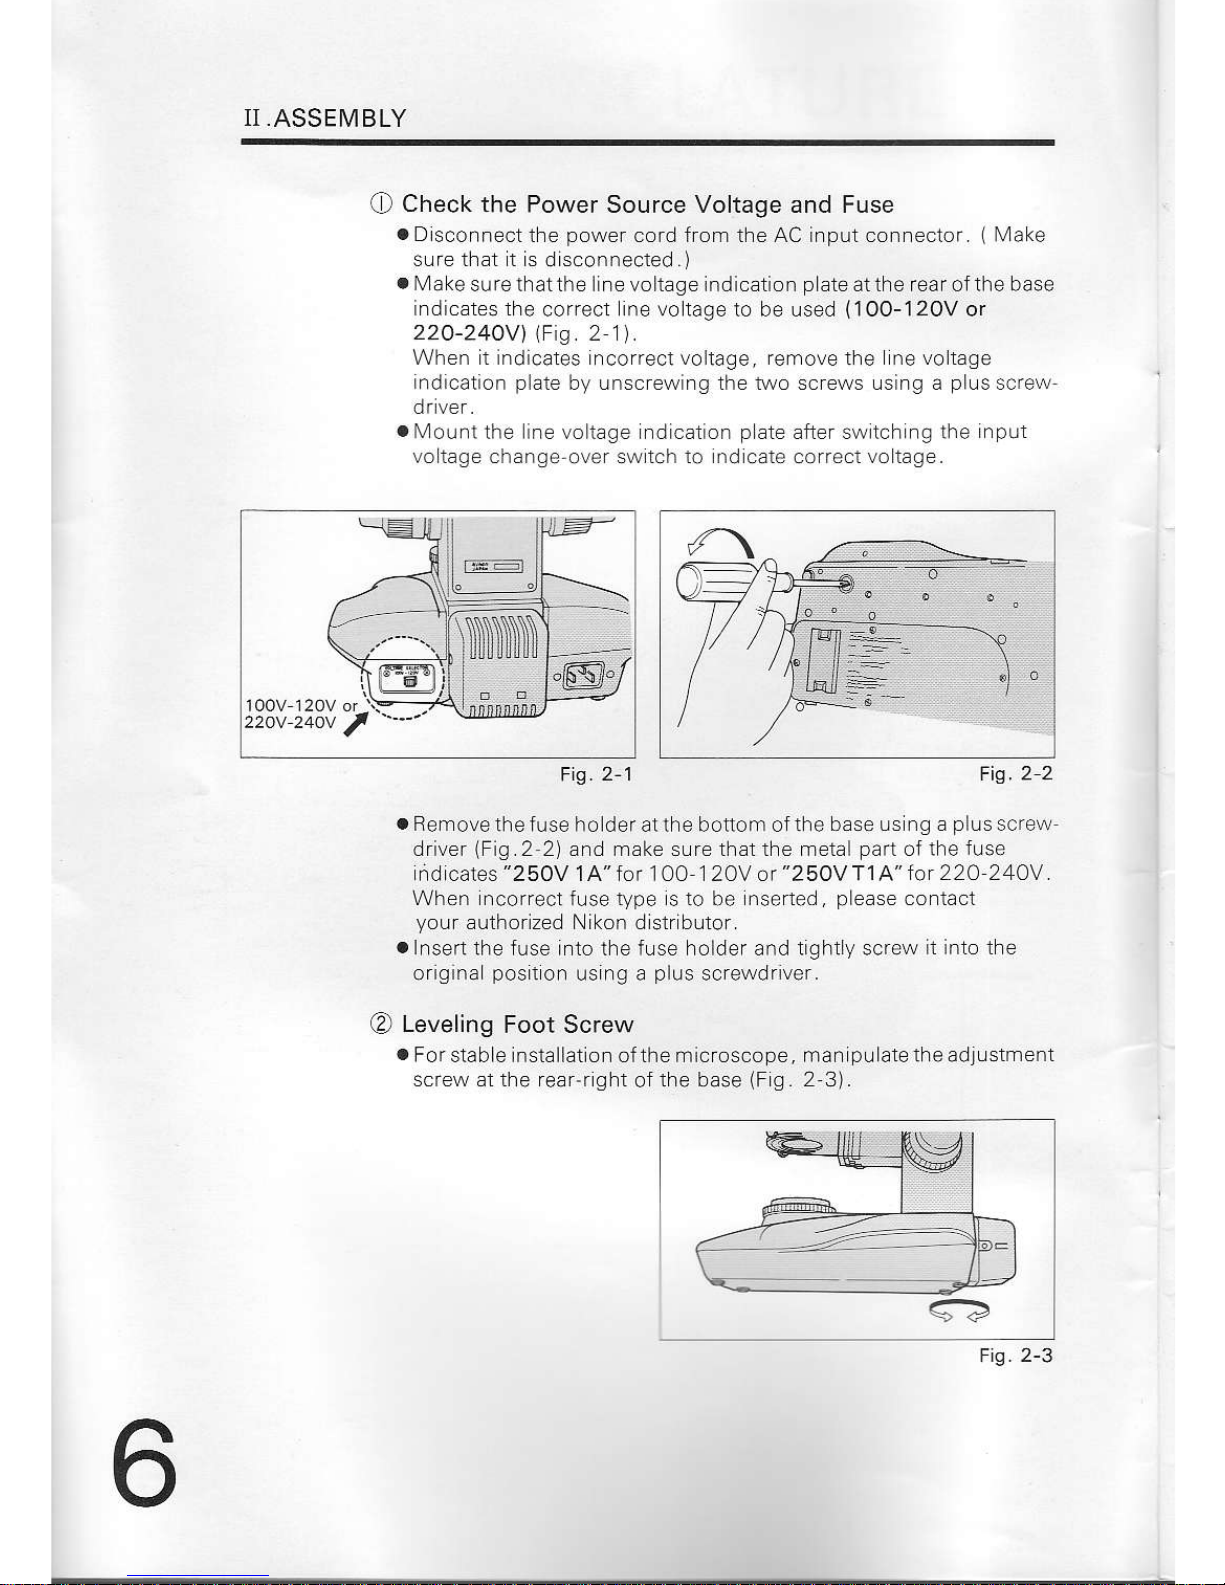
Check the
Power Source Voltage and Fuse
o
Dlsconnect
the
power
cord from the AC input connector.
(Make
sure that t rs
disconnected.)
.
Make
sure thatthe line voltage indication
plate
atthe rear ofthe base
indicates the
correct
ine vo
tage to be used
(1OO-120V
or
22O-24OV)
\Fis.21).
When t indicates Lncorrecl voliage, rerriove the ne voltage
indication plate
by unscrewing the two screws using a
plus
screw
driver.
.
Mount
the ine voltage ndication p ate after swltch ng lhe
input
vo tage change
over
sw tch to lndlcate correct vo tage.
a
Remove
the fuse holder at the boitom ofthe
base us ng a
plus
screw
driver
(Fig.2
2) and nrake sure that the metal
part
of the
fuse
nd cales
"250V
1 A' for 1 0O 1 20V or
"250V
T1
A'
tot 224 244V.
When ncorreci fuse type s to
be
nserted,
please
contact
your
aulhorized Nikon disir bulor.
.Insert
ihe fuse into the fuse holder and iightly screw
it into the
origina
positon
using a
plus
screwdriver.
O
Leveling
Foot Screw
.
Forstable installation of the microscope, man
pulatetheadjustment
screw at lhe rear-righi
ofthe base
(F
g.
2 3).
F
g.
2-1 Fis.2
2
Fig. 2-3
N.ASSEMBLY
a3)
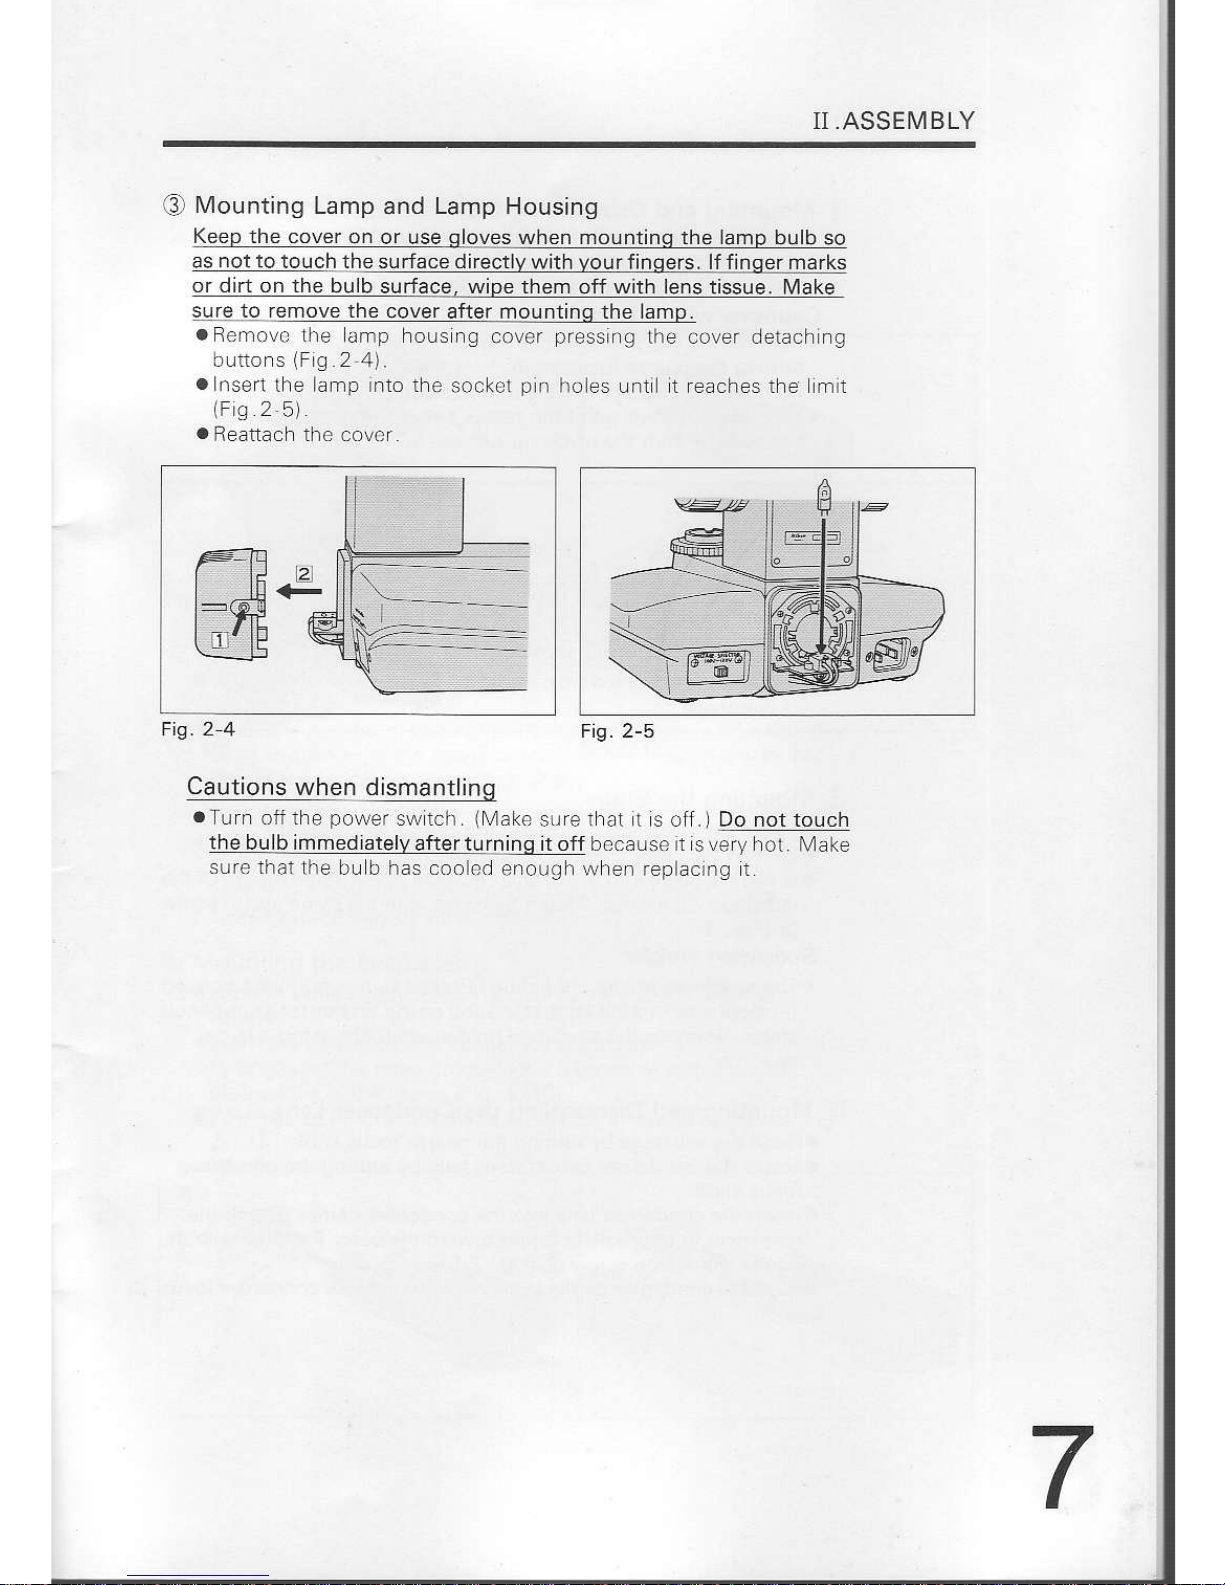
Mounting
Lamp and Lamp Housing
Keep the cover on
or use
qloves
when mountinq the amp bulb
so
as
not
to touch th9
!!r[q!g dilcq!]yt{llluyelrillgels-Lf i.rc9l!]4!!
or dirt on the bulb
surface, wipe them off with lens tissue.
J\4ake
5!l€
te remove the
cover after mountinq the lam
.F-.movc
lhe
amp hoLrsng coler
pressIg
the cover derachfg
buttons(Fg 241
a
nsen
the arnp into the
sockel
p
I ho
es
Llrt
t feaches the rntt
(Fs
2
5)
.
Reattach thc covcr
Fig 24
Cautions
when dismantling
.Tuff
olithe
power
sr,!tclr
lMak-osLrreirai
i soff.) Donottouch
thebulbimmediatelvafterturninqitoif
becausen
sveryhot. Make
sure thar
lhe bu b has coolod
enouil i \ryhen feplacrng t
tr-ts
_^4
[fr
t
II,ASSEIVIBLY
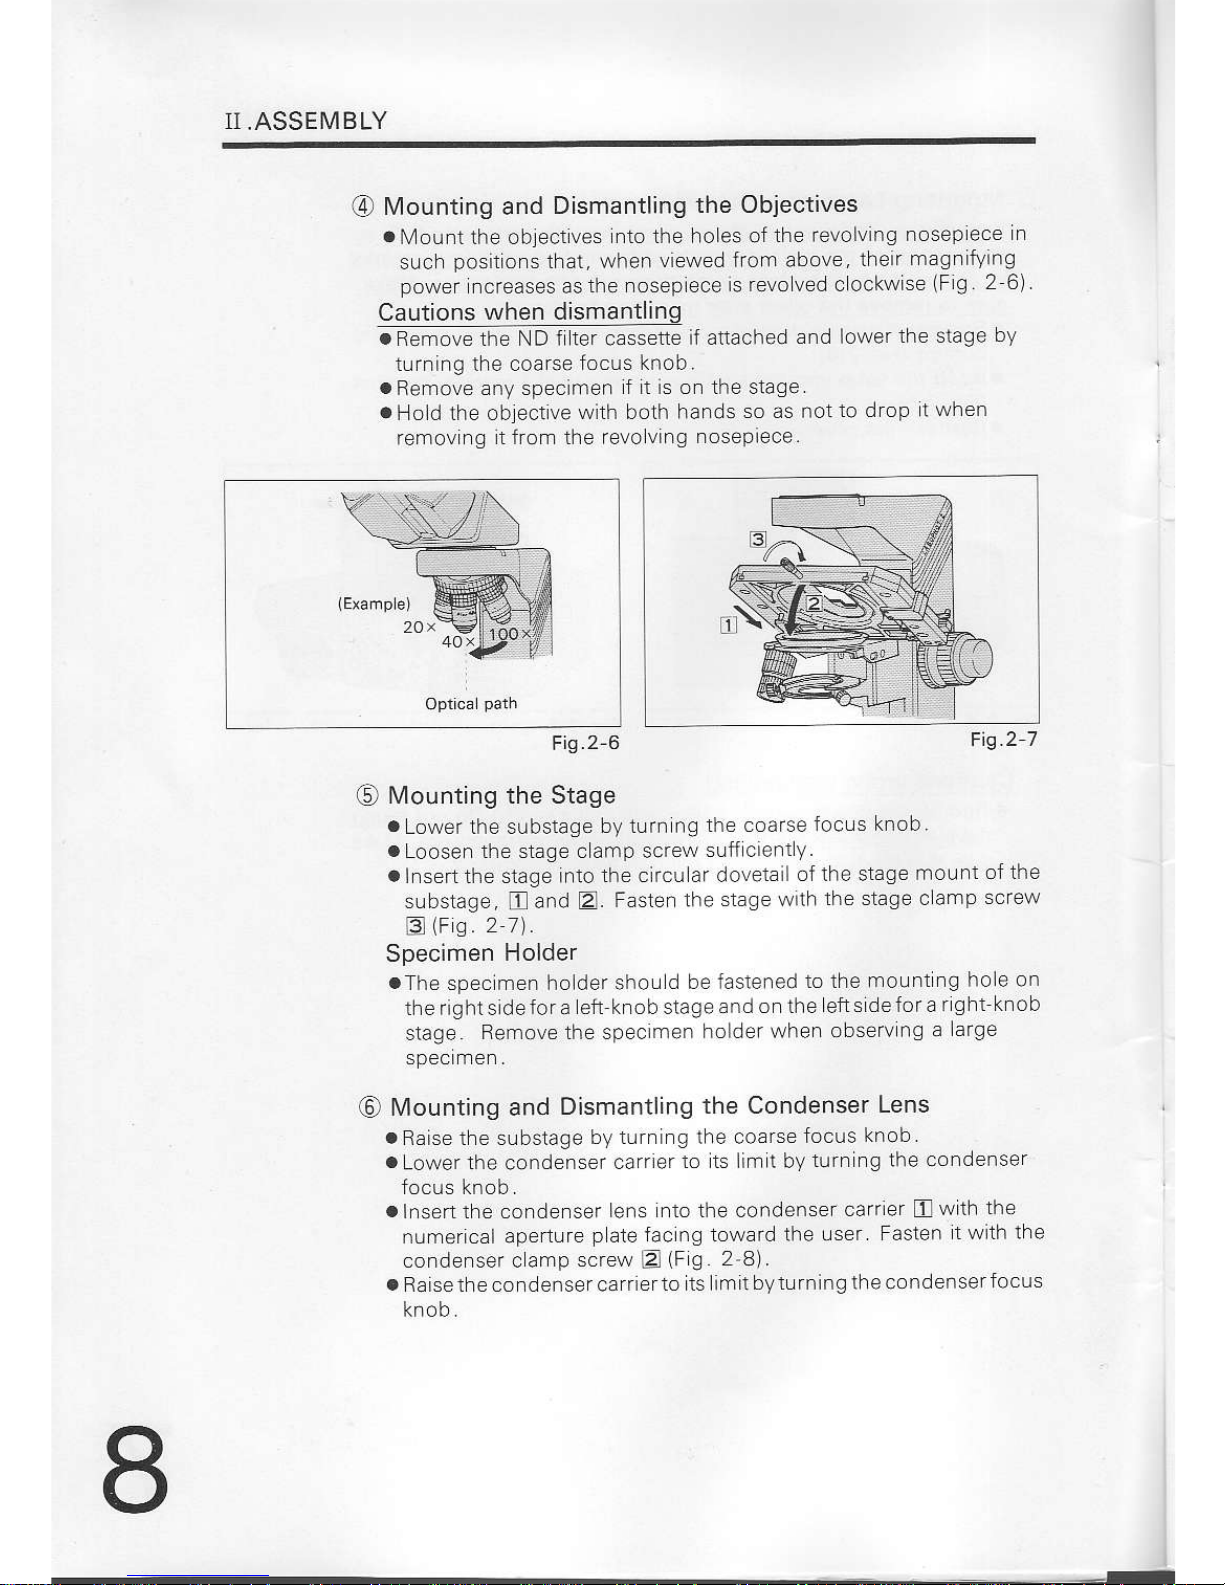
G)
lVounting and
Dismantling
the Objectives
al'4ountthe
oblectves
ntothe hoes
olthe revolvlng
nosepece
n
such
posil
ons that, when
viewed from above,
their
magn fving
power
ncreases as
the noseplece
is revo ved c ockwise
(Flg
2 6)
Cautions
when dismantling
.
Remove the ND f ler cassette
ii altached
and lower
the stage
by
turfing the coafse
tocus knob.
aRemove
any specimen
f t is on the stage
.
Ho d lhe oblective
with both hands
so as not
1c) drop 1
when
remov ng lt from the revo
ving nosepiece.
Ftg27
Fig.2
6
O
l\/lounting the Stage
a
Lower lhe sLrbstage
by tLrrn ng
the coarse
focus knob
a
Loosen the stage c amp screw
suff cient
y.
a
Insert the stage
Lnto the c rcu ar dovelall
of lhe stage
rnount
ol the
substage,
ll
and
E.
Fasten
the stage wrlh
the stage c amp
screw
3(Fs.2
7).
Specimen
Holder
aThe
spec men ho der shoLr
d be lasiened
to the
mo!nt ng no e on
therightsldefora
eft knobslageandonthe
eflsdeforarght
knob
stage
8e'nove the speclmen
holderwhen
observng
a arge
@
lVlounting and
Dismantling
the Condenser
Lens
.
Raise the substage
by tLrn ng lhe coarse
focus
knob
a
Lower the
condenser
carrler
11] ts lim t by
turn ng the
condenser
.lnsertthe
condenser ens
nto the condenser
carrler
Ewth
the
numer cal
aperture p ate
fac ng toward the
user Fasten
t wlth lrre
condenser c amp
screw
2
(F
g
2-8).
.
RaLsethecondensercarrierto
ts
im tbyturning ihecondensef
focus

N,ASSEI\1BLY
Cautions
when Dismantling
.q-
oeLe\Df r" ene tdd" neo
.
Lowef the condenser
carr er to Ls imil by turn n! the
fccLrs knob.
Removethe condenser lens byre
easing
the
Fis.2I
Fis. 2 I
_
Vounling
the Brnocu ar Evepiece Tube
o
Lo.sef ihe er'cp ..e tube
c nrrp scfevr s|rll creni ! usrfg the
h.ria!of lref.h
lSee,?
l
.
nsert rhe c f.! ar doietir
of t re tf n.rc! if efep ece tlrbc f10 thc
c r.Lr af doveia ci th. .ry-!p c.e
Lrbe ro!fl
Fasi,.
I i
{,th
the
ey-ap ece l|rbe c anrp scrc\\
iF
!r
2 9)
Caution when
clamping
.
Do fot ho d th.
p
asi c
p.ft
ofthe hexa!.rna
,.,/fench,,vhEn
l
giricn
fq
Lhe elep ece tubc . a.np
:.rew
Ho
a Lhe lte n ol the
\\refch f ovefl
alhtefed,
opt c:
path
.hang.i ov.r of the
eyep ece tLrb. ma\r be
na iLrfrci oned
I
l\.4ounting
the Eyepiece
.
Use ihe sam. mngn I
cat of eyep eces lof both rhc I
ghi
afd
.
nsert tirc cy-ap
eces fto ihe s ee!.s oi the b llo.iLrlar ey-ap e.-. Lub-.
A'
pr.nrtrsrolls
ol the sleeve
1F
g
2 10)
o\'Vhcn
Lrsrng
eyegrard rLrbbefs, nsertth.m nt.lhe
eyep eces
(F q
2 11).
-<(d::
/#l}lrm--
I /
-<?):.
-
\./
|
rq,
/
1l--J'--r--
,/
i.--,-=-,.r,!4