

Page 1
Laser Rangefinder / Laser-Entfernungsmesser / Télémètre laser /
Telémetro láser / Telemetro laser / Лазерный дальномер /
Laseravstandsmåler / Laseravståndsmätare / Laser-etäisyysmittari
/Laserafstandsmeter / Laserafstandsmåler / Telemetru cu laser /
Dalmierz laserowy / Lézeres távmérő / Laserový dálkoměr
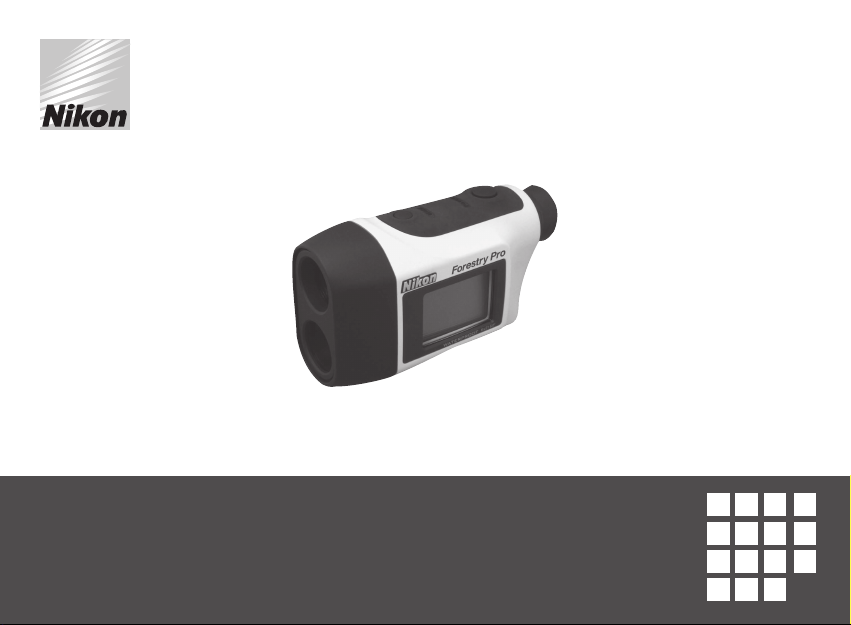
Forestry Pro
Instruction manual / Bedienungsanleitung/ Manuel d’utilisation /
Manual de instrucciones / Manuale di istruzioni / Руководство по
продукции / Instruksjonsmanual / Bruksanvisning / Käyttöohje /
Gebruiksaanwijzing / Brugsvejledning / Manual de instrucţiuni /
Instrukcją obsługi / Kezelési útmutató / Návod k použití
En De Fr Es
SeRu NoIt
Nl DkFi Ro
Pl Hu Cz
Page 2

English ......................... p. 4-33
Deutsch...................... s. 34-63
Français .....................p. 64-93
Español ....................p. 94-123
Italiano ..................p. 124-153
Русский ............. cтр. 154-183
Norsk ..................... s. 184-213
Svenska ................. s. 214-243
Suomi ..................... s. 244-273
Nederlands ............p. 274-303
Dansk ..................... s. 304-333
Română .................p. 334-363
Polski ..................... s. 364-393
Magyar..................394-423. o.
Česky...................... s. 424-453
22
Page 3

3
Page 4

En
De
Fr
Es
It
Ru
No
Se
Fi
Nl
Dk
Ro
Pl
Hu
Cz
Cautions before use ....................................................... 5-7
Key features ....................................................................... 8-9
Nomenclature/Composition ......................................... 10
Changing batteries ........................................................... 11
Internal display ............................................................. 12-13
Operational Summary ............................................... 14-16
Specifications ................................................................ 17-18
External display ............................................................ 19-21
Operation and internal display ............................... 22-28
Others ..................................................................................... 29
Troubleshooting/Repair ............................................ 30-31
English
CONTENTS
How to use the Rangefinder case ................................. 32
4
Page 5

Cautions before use
Thank you for purchasing the Nikon Laser Forestry Pro.
This high-spec laser rangefinder features a new angle measurement function in addition to the
existing linear distance measurement function for enhanced enjoyment of sports and other outdoor
applications. (The Nikon Laser Forestry Pro is also able to measure the horizontal distance to a target
and its height.)
Please observe the following guidelines strictly so you can use the equipment properly and
avoid potentially hazardous problems. Before using this product, read thoroughly the “SAFETY
PRECAUTIONS” and instructions on correct usage accompanying the product.
Use of controls or adjustments or performance of procedures other than those specified herein
may result in hazardous radiation exposure.
Keep this manual within reach for easy reference.
• Specifications and design are subject to change without notice.
• No reproduction in any form of this manual, in whole or in part (except for brief quotation in critical
articles or reviews), may be made without written authorization from NIKON VISION CO., LTD.
En
De
Fr
Es
It
Ru
No
Se
Fi
Nl
Dk
Ro
Pl
Hu
Cz
5
Page 6

Cautions before use
En
Please observe the following
guidelines strictly so you can use
De
the equipment properly and avoid
Fr
potentially hazardous problems.
Es
Before using this product, read
It
thoroughly the “SAFETY AND
OPERATION PRECAUTIONS” and
Ru
instructions on correct usage
No
accompanying the product. Keep
Se
this manual within reach for easy
reference.
Fi
Nl
WARNING
Dk
This indication alerts you to the fact
Ro
that any improper use ignoring the
contents described herein can result in
Pl
potential death or serious injury.
Hu
CAUTION
Cz
This indication alerts you to the fact
that any improper use ignoring the
contents described herein can result in
potential injury or material loss.
SAFETY AND OPERATION
PRECAUTIONS
Warning
• Never look directly at the laser beam
or directly at the sun when using the
Nikon Laser Forestry Pro.
• Do not depress the POWER button
while looking into the optics from the
6
objective side.
• Do not aim at the eye.
• Do not operate the unit with other
additional optical elements, such as
lenses or binoculars. Using an optical
instrument together with the Nikon
Laser Forestry Pro increases the danger
of damaging the eyes.
• Do not disassemble the Nikon Laser
Forestry Pro. The emitting laser may
be harmful to your health. A product
that has been disassembled is not
guaranteed by the manufacturer.
• When the Nikon Laser Forestry Pro’s
body cover is damaged, or if it emits
a strange sound due to dropping or
for some other cause, immediately
remove the battery and stop using.
Cautions
• When not using the Nikon Laser
Forestry Pro, do not push the POWER
button.
• Do not leave the Nikon Laser Forestry
Pro within the reach of small children.
• Rain, water, sand and mud should be
removed from the rangefinder body
surface as soon as possible, using a
soft, clean, dry cloth.
• Although the Nikon Laser Forestry Pro
is waterproof, it is not designed for use
underwater.
• Do not swing the Nikon Laser Forestry
Pro by its strap. It may hit someone
and cause injury.
• Do not leave the Nikon Laser Forestry
Pro in an unstable place, as it may
fall and cause injury, or damage the
equipment.
• Do not look through the Nikon Laser
Forestry Pro while walking. You may
walk into something and get hurt.
• Do not leave the Nikon
Pro
in a car on a hot or sunny day, or
Laser Forestry
near heat-generating equipment. This
may damage or negatively affect it.
• Do not leave the Nikon
Pro
in direct sunlight. Ultraviolet rays
Laser Forestry
and excessive heat may negatively
affect or even damage the unit.
• When the Nikon Laser Forestry Pro
is exposed to sudden changes in
temperature, water condensation may
occur on lens surfaces. Do not use the
product until the condensation has
evaporated.
• Do not use alcohol for cleaning the
main body.
• Do not leave the polyethylene bag
used for packaging within the reach of
small children.
• Be careful that small children do not
inadvertently swallow the eyecup.
If it does happen, consult a doctor
Page 7
immediately.
EU 電池指令表記
WEEE
WEEE
• If you use the rubber eyecup for a
long period of time, you may suffer
skin inflammation. If you develop
any symptoms, consult a doctor
immediately.
• When carrying the Nikon Laser
Forestry Pro, store it in the soft case.
• If your Nikon Laser Forestry Pro
should fail to operate correctly,
discontinue use immediately and
consult the Troubleshooting Table.
If you are unable to fix the problem,
contact your local dealer for
instructions on where to send it for
repair.
CARE AND MAINTENANCE
Lenses
• When removing dust on the lens
surface, use a soft oil-free brush.
• When removing stains or smudges
like fingerprints from the lens
surface, wipe the lenses very gently
with a soft clean cotton cloth or
quality oil-free lens tissue.
Use a small quantity of pure alcohol
(not denatured) to wipe stubborn
smudges. Do not use velvet cloth or
ordinary tissue, as it may scratch the
lens surface. Once the cloth has
been used for cleaning the body, it
should not be used again for the lens
surface.
Main body
• Clean the body surface with a soft,
clean cloth and a dry cloth. Do not
use benzene, thinner, or other organic
agents because they may cause
discolouration or rubber
degeneration.
Storage
• Water condensation or mold may
occur on the lens surface because of
high humidity. Therefore, store the
Nikon
Laser Forestry Pro
in a cool, dry
place.
After use on a rainy day or at night,
thoroughly dry it at room
temperature, then store in a cool, dry
place.
NOTES ON LITHIUM BATTERY
If handled incorrectly, batteries may
rupture and leak, corroding equipment
and staining clothing. Be sure to
observe the following:
• Install batteries with the + and – poles
positioned correctly.
• Batteries should be removed when
exhausted or during extended
periods of non-use.
• Always use the same type of battery.
• If battery fluid contacts eyes or skin,
rinse well with water. If swallowed,
consult a doctor immediately.
• Do not short-circuit battery chamber
terminals.
• Do not carry batteries together with
keys or coins in a pocket or bag. This
may overheat and short-circuit
batteries.
• Do not put batteries in fire or water.
Never disassemble batteries.
• Do not charge batteries.
• Do not subject stored batteries to
extremes in temperature.
• Do not subject batteries to strong
vibrations or shock.
En
De
Fr
Es
It
Ru
No
Se
Fi
Nl
Dk
Ro
Pl
Hu
Cz
7
Page 8

Key Features
En
• Linear distance measurement range: 10-500 meters/11-550
De
yards/33-999 feet.
Fr
• Angle measurement range: ±89°
• Distance measurement display step:
Es
[Internal Display]:
It
(Linear Distance)
Ru
0.5 meter/yard, 1 foot
(measurement distance is less than 100 meters/yards
No
/feet)
Se
1.0 meter/yard, 1 foot
(measurement distance is 100 meters/yards/feet
Fi
or further)
Nl
(Horizontal Distance/Height)
0.2 meter/yard, 0.5 foot
Dk
(measurement distance is less than 100 meters/yards
Ro
/feet)
Pl
1.0 meter/yard, 1 foot
(measurement distance is 100 meters/yards/feet
Hu
or further)
Cz
(Angle)
0.1° (-10° — 10°)
1.0° ( ≦ -10°, 10° ≦ )
[External Display]:
(Linear distance) 0.5 meter/yard, 1 foot
(Horizontal Distance/Height) 0.2 meter/yard, 0.5 foot
(Angle) 0.1°
8
• Easy-to-aim 6x optical observation system
• Quantifies the horizontal distance to the target and its height in
relation to the rangefinder's level by measuring linear distance
and angle.
• Measure the vertical separation (height between two points) -
vertical separation mode and 3-point measurement mode are
available
• The results are displayed on both an internal and an
external LCD panel. The external LCD panel shows all results
simultaneously.
• Target Priority Switch System allows you to easily match the
measuring situation.
• Waterproof design (NOT designed for underwater usage)
• Invisible/Eyesafe EN/IEC Class 1M Laser
• 30-second results display
• Compact, lightweight, ergonomic design
• Automatic shut-off (after approx. 30 sec. unattended)
• Default to “Last Use” settings
• Approx. 20-second continuous measuring function
The Nikon Laser Forestry Pro emits invisible, eyesafe, infrared
energy pulses that reflect off the selected target back to its
optical receiver. Sophisticated precision charge circuitry is used
to instantaneously calculate distances, by measuring the time it
takes for each pulse to travel from the rangefinder to the target
and back. Laser reflectivity and measurement results may vary
according to climatic and environmental conditions, the colour,
surface finish, size, shape and other characteristics of the target.
Page 9

The following factors ensure better range and accuracy:
• Night time use
• Cloudy weather
• Bright-coloured targets
• Targets with highly reflective surfaces
• Targets with shiny exteriors
• Large-size targets
• Shooting targets facing at 90 degrees
Measurement may result in inaccuracy or failure in the following cases:
• Slender or small target
• Target has diffusing reflective surface
• Target does not reflect the laser beam to the rangefinder (glass, a mirror, etc.)
• Black target
• Target has varing depths
• In snow, rain or fog
• Target measured through glass
• Reflective surface measured from diagonal direction
• Moving target
• Obstacle moving in front of the target
• When targeting the surface of water
En
De
Fr
Es
It
Ru
No
Se
Fi
Nl
Dk
Ro
Pl
Hu
Cz
9
Page 10
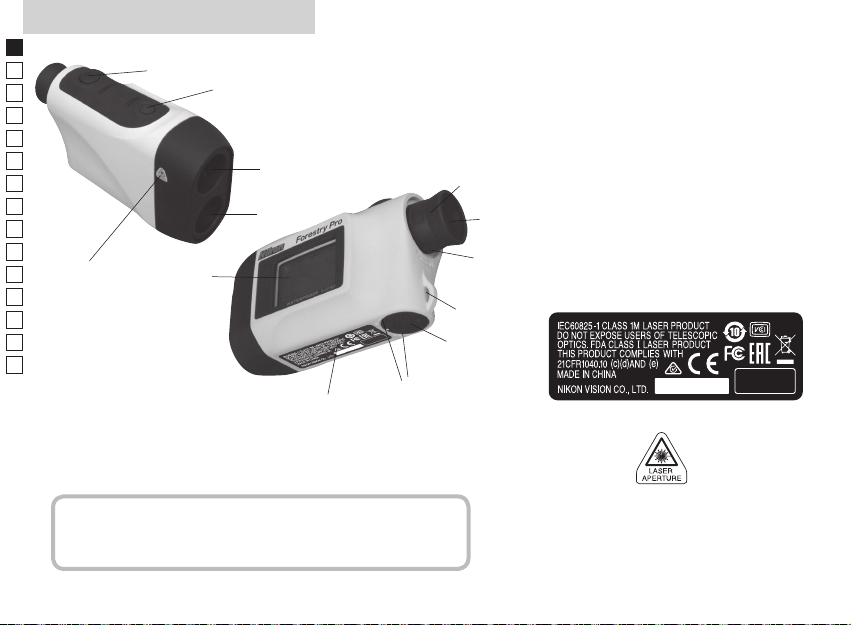
Nomenclature/Composition
En
De
Fr
Es
It
Ru
No
Se
Fi
Nl
Dk
Ro
Pl
Hu
Cz
!e
Body .............................................. x1
Soft case (CCN) ...........................x1
10
5
4
3
Composition
1
2
!w
Neckstrap ....................................x1
Lithium battery (CR2) .............. x1
1Monocular objective lens/
Laser emission aperture
2Laser detector aperture
3External LCD
4MODE button
5POWER button
6
66x monocular eyepiece
7Eyecup/dioptre adjustment ring
7
8
8Dioptre index
9Strap eyelet
!pBattery chamber cover
!qBattery chamber cover “Open/Close”
indication
9
!wProduct number/explanatory label
!p
!q
!e Laser warning label
Page 11

Changing Batteries
•
Type of battery: 3V CR2 lithium battery
•
Battery condition indicators
: Battery has enough power for use.
: Battery is getting low.
flashing: Battery is low and battery should be replaced.
disappears: Battery is exhausted and should be replaced.
flashing in the LCD indicates that the battery should be replaced.
1 Open the battery chamber cover
Using the ball of the thumb or a coin in the recessed part of the battery chamber cover, rotate the cover following the Open/
Close arrow indicator. It may not open easily due to its rubber packing for water resistance.
2 Replace the old battery with a new one
Install new battery with the [+] and [-] correctly positioned following the “Battery installation” indication seal in the battery
chamber. (Insert battery positioning the [+] pole towards the inside of the chamber.) [The Laser Forestry Pro will not operate
if the battery is installed incorrectly.]
3 Close the battery chamber cover
Align the Open/Close indicator with the white dot and insert the battery chamber cover. Using the ball of the thumb or a
coin, turn the cover in the opposite direction to the arrow indicator. It may not close easily due to the rubber packing for
water resistance, but continue to turn it all the way until it stops. Confirm that the cover is securely closed.
•
Battery life
Continuous operation: Approx. 13,000 times (at 20°C)
Target focusing, measurement, and automatic power off are included in a single cycle. This figure may differ according to
temperature, and other factors such as target shape, colour, etc.
* The Nikon Laser Forestry Pro come with a 3V CR2 lithium battery. However, due to natural electric discharge, the life of the battery will likely be
shorter than that noted above.
* Replace battery if the N ikon Laser Forestry Pro is ever submerged in water or if water enters in the battery chamber.
En
De
Fr
Es
It
Ru
No
Se
Fi
Nl
Dk
Ro
Pl
Hu
Cz
11
Page 12
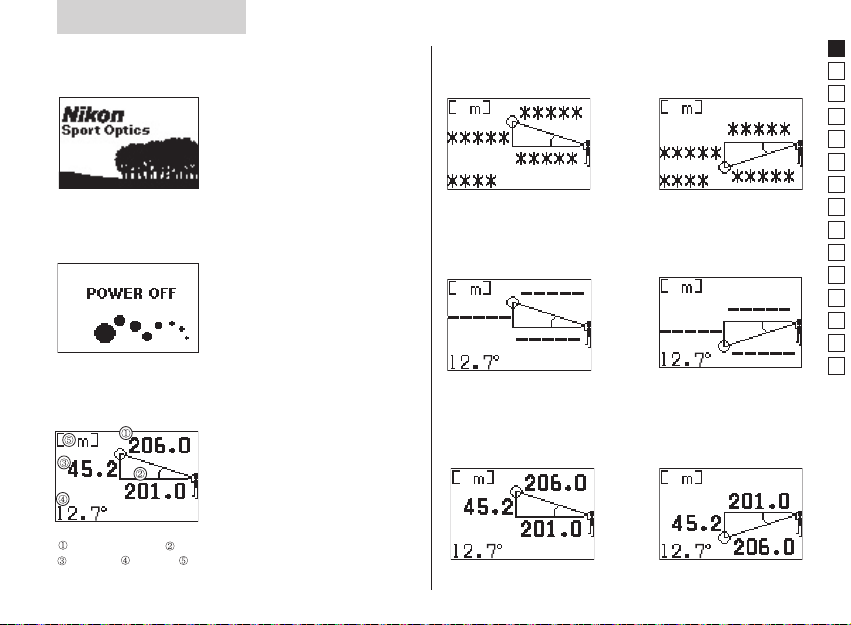
Internal display
En
1. 『 』- Target aiming/Laser irradiate system
De
『
Fr
『
Es
Warning: Do not look into the objective lenses when this mark is shown.
It
2. 『
Ru
Digitally indicates measured distance in meters/yards/feet and angles in degrees. Also indicates
No
Se
<Examples of measurement results>
Fi
(Distance)
Nl
Display of results: ( ≧ 100m/yards/feet) e.g. 234 meters = 『
Display of results: ( < 100m/yards/feet) e.g. 76.5 yards = 『
Dk
Display of results: ( < 100m/yards/feet) e.g. 82 feet =
Ro
(Angle)
Pl
Display of results: ( ≦ -10˚and ≧ 10˚) e.g. 36˚ =『 』
Hu
e.g. -29˚ =『
Cz
Display of results: (-10˚< and < 10˚) e.g. 3.5˚ =『
e.g. -7.0˚=『
『
『
3. 『
『
4. 『 』- Indicates battery condition. (See "Changing Batteries")
12
』- Aim at the target. Position the target at the center of the reticle.
- Appears while the laser is being used for a measurement. (Remains present during single
』
measurement. Blinks during continuous measurements.)
』- Distance/measurement status display
measuring status such as “Measurement in progress”, “Measurement unsuccessful” or “Unable to
measure.”
』
』
『 』
』
』
』
』- Now measuring
』- Failure to measure or unable to measure distance
』
Display Units
』Indicates distance being measured in meters.
『
』Indicates distance being measured in yards.
[No unit displayed] Indicates distance is measured in feet.
Page 13

5. 『 』Display Modes
(See “External display, and Operation and Internal display” for operations and display examples.)
Linear distance mode
『
』 Calculates linear distance to your target and displays the results.
Horizontal distance mode
『
』 Calculates horizontal distance to your target by measuring the linear distance and angle, and displays the results.
Height mode
『
』 Measures your target's height from the horizontal level, and displays the results.
Vertical separation (height between two points) mode
『
between the two points.)
』 Uses the linear distance and angle data of two points to calculate and display the vertical separation (height
Three-point measurement (height between two points) mode
『
to calculate and display the vertical separation (height between 2nd and 3rd points).
Use the horizontal distance data to the target (1st point) and angle data of two points (2nd and 3rd points)
』
Angle mode
『
6. 『
』 Measures the angle of your target from the horizontal level and displays the results.
』 Target Priority mode
First Target Priority mode
『
』 Indicates when First Target Priority mode is set.
Distant Target Priority mode
『
』 Indicates when Distant Target Priority mode is set.
Note: When Angle measuring mode is set (during [Ang] symbol display), Target Priority mode is not displayed and illuminated [1st]
or [Dst] symbols turn off.
Although the LCD was produced using the most advanced technology, it is impossible to eliminate dust completely. When using this
product, the LCD is magnified by high magnification of the eyepiece lens and dust may appear as a defect. It will not, however, affect
measurement accuracy.
En
De
Fr
Es
It
Ru
No
Se
Fi
Nl
Dk
Ro
Pl
Hu
Cz
13
Page 14
Operational Summary
En
Caution—use of controls or adjustments or
performance of procedures other than those
De
specified herein may result in hazardous radiation
Fr
exposure
Es
1. Install a battery in the battery chamber. (See "Changing
Batteries")
It
2. Rubber eyepiece cup
Ru
Eyeglass wearer: Collapse the eyepiece cups.
No
Non-eyeglass wearer: Do not collapse the eyepiece cups.
3. Diopter adjustment
Se
Adjust diopter to obtain a clear image in the LCD.
Fi
First, rotate the diopter adjustment ring counterclockwise
until it comes to a complete stop. Next, turn on the power
Nl
to activate the LCD when you look through the Nikon Laser
Dk
Forestry Pro. Rotate the diopter adjustment ring clockwise
until the display comes into focus.
Ro
If the diopter is not adjusted to correspond to your
Pl
eyesight, you may not be able to clearly focus your subject.
Hu
4. Measuring
Note: See the chapter "External and Internal display" for external
Cz
LCD panel.
Note: Depressing and holding down the POWER button causes
all symbols to be displayed in the internal LCD panel. After
you remove your finger from the POWER button, the lastused setting is displayed. (If you briefly press the POWER
button then remove your finger, the LCD panel may
display the last-used setting without displaying all of the
symbols. This is not a malfunction or other problem.)
Before measuring, be sure to confirm settings, such as unit,
measurement/display mode and priority mode.
◎: See the relevant mode section in this manual for setting.
14
LCD is illuminated
Align the reticle
with the target
Cannot measure
Measure again
Fail to measure
appears
Indication
remains
illuminated for
30 sec.
Power off: LCD indications disappear
POWER
◎
Set your desired modes
☆
For continuous distance
and angle measurement
POWER
or
30 seconds pass without operation *
(up to 20 seconds), keep
button depressed.
Successfully
measured
MODE
※
Results are converted
to the mode set and
displayed.
Page 15
※ See the the chapter "External and Internal display" for details
regarding the operations and results display of the various
modes.“
* Power turns off 30 seconds after the last operation.
☆【Continuous measurement mode】
Keeping the POWER button depressed allows you to
perform continuous measurement for 20 seconds.
Blinks while performing measurements.
When measuring a pin at a golf course, for example, use First
Target Priority and Continuous measurement mode for easy
measurement. With no objects between you and the pin, the
smallest number is the distance to your targeted pin.
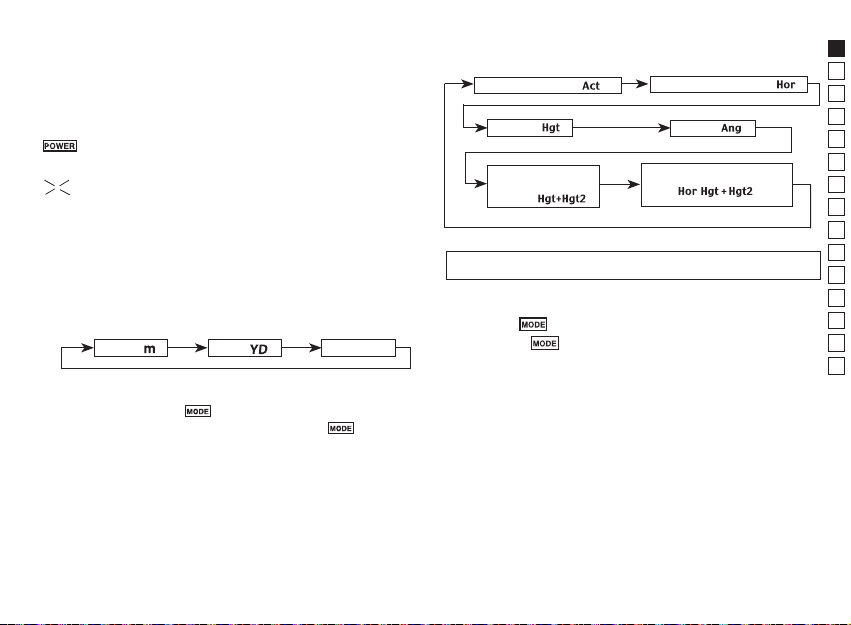
5. Selecting display unit (Factory default setting is feet.)
Meter [ ]
Yard
[ ]
Feet
[
]
1. Confirm the LCD panel is on.
2. Press and hold the
3. When display unit has switched, release the
button for approx. two seconds.
button.
4. Repeat steps 2 and 3 until your desired mode is displayed.
5. When you have completed setting, results will be converted
and displayed in the your selected measurement unit.
6. Switching measurement/display modes (Factory default
setting is linear distance measurement mode)
Linear Distance [ ]
Height [ ]
Vertical Separation
(height between 2
[ ]
points )
By pressing the MODE button, modes will change in the order
indicated above.
Horizontal Distance [ ]
Angle [ ]
Three-point measurement
[ ]
1. Confirm the LCD panel is on.
2. Press
3. Release
button within 0.5 seconds.
button to switch the mode.
4. Repeat steps 2 and 3 until your desire mode is displayed.
5. Switching the mode after measurement converts the
results to the new mode.
6. After the mode is set, measurements are performed in the
new mode.
En
De
Fr
Es
It
Ru
No
Se
Fi
Nl
Dk
Ro
Pl
Hu
Cz
15
Page 16
Operational Summary
En
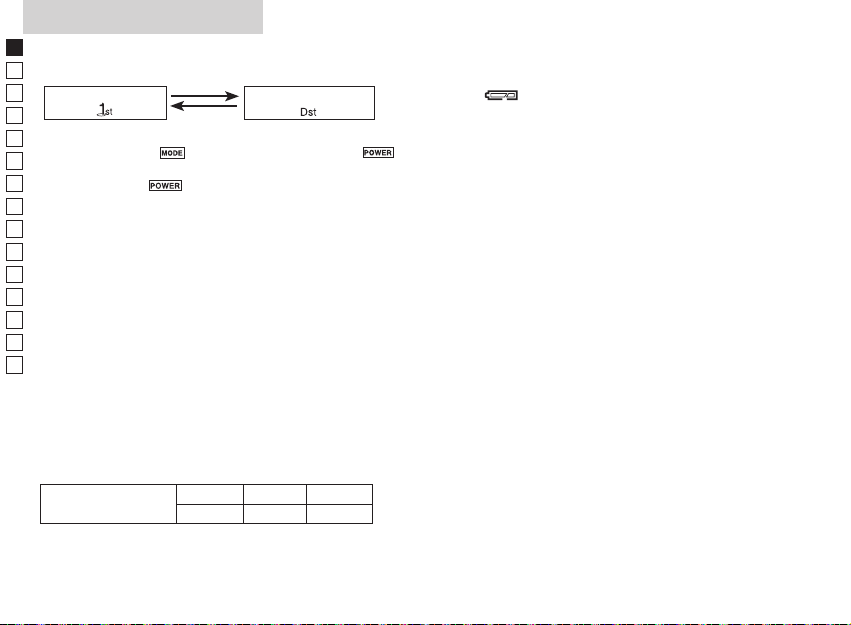
7. Switching Target priority modes (Factory default setting is
De
Distant Target Priority mode.)
Fr
First Target Priority
Es
1. LCD panel should be on.
It
2. Press and hold
Ru
No
Se
3. Continue to press and hold both buttons (more than 2
Fi
Nl
Dk
Ro
4. Release buttons.
Pl
Hu
Cz
[Deciding which Target Priority to use]
When obtaining different results from a single measuring
operation, the Nikon Laser Forestry Pro will display the distance
to the farthest target on the LCD panel when using Distant Target
Priority mode, while First Target Priority mode will show the range
to the nearest target.
]
[
button within 0.5 second.
Note)If the
second, the display unit (m/yd/ft) will be switched.
seconds) until First Target Priority mode and Distant Target
Priority mode are switched.
Note: If buttons are not pressed in the correct order,
switching will not take place.
Note: If switching fails to take place, repeat 2.
Note: Because Target Priority mode is not displayed
while Angle mode is set, switching is made but
visual confirmation is impossible. Switch to another
measuring mode for confirmation.
button, then depress and hold
button is not pressed within 0.5
ex.) When measuring a tree standing in front of a house;
Distance to Target
"115m" (distance to the tree) will be displayed in First Target
Priority mode, and "128m" (distance to the house) in Distant
Target Priority mode. First Target Priority mode, for example, has
applications for golf, while Distant Target Priority is useful when
115m 123m 128m
16
Distant Target Priority
]
[
Tree Fence House
hunting in heavily wooded areas.
8. Low battery indication
Flashing
battery should be replaced. (See "Changing Battery")
indicates that the battery power is low and
Page 17
Specifications
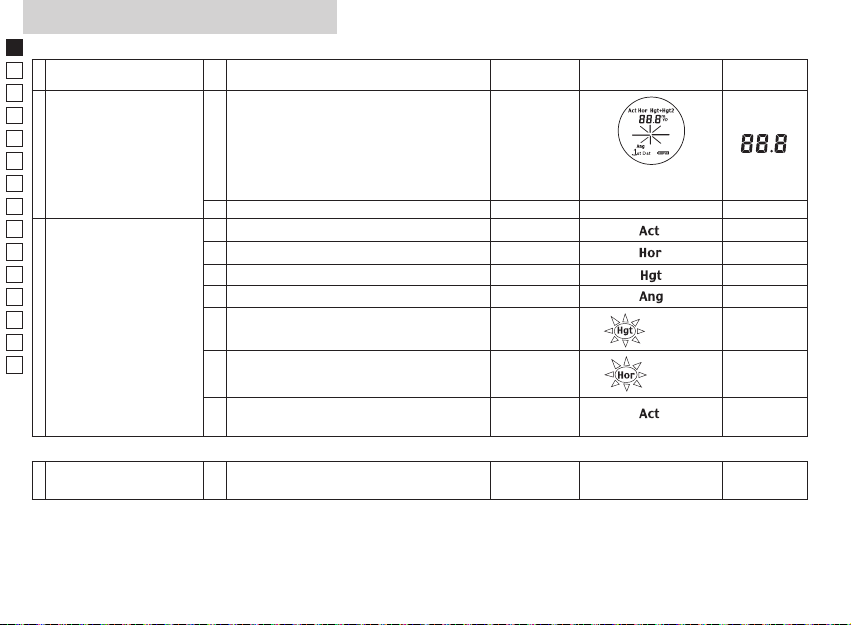
Measuring system
Measuring mode display Linear distance : Act
Measuring distance/ angle range
Distanceangle
Display
steps
System First Target Priority/Distant Target Priority switching system
Optical system
Type Roof-prism monocular
Magnification (x) 6
Effective diameter of objective lens
(mm)
Angular field of view (real) (˚) 6.0
Eye relief (mm) 18.2
Exit pupil (mm) ø3.5
Dioptre adjustment ±4m
Horizontal distance : Hor
Height : Hgt
Angle : Ang
Vertical separation (height between two points ): Hgt + Hgt2
Three-point measurement : Hor + Hgt + Hgt2
Distance: 10-500 meters/11-550 yards/33-999 feet
(999 feet: 304.5 meters/333 yards)
Act
(Linear distance)
Internal
Hor
(Horizontal distance)
Hgt
(Height)
Ang (Angle) 0.1° ( < 10°), 1.0°( ≧ 10°)
External
Linear distance
Horizontal dist.
Height
Angle
Angle: ± 89°
0.5m/yd., 1.0 ft. ( < 100m/yd./ft.)
1.0m/yd., 1.0 ft. ( ≧ 100m/yd./ft.)
0.2m/yd., 0.5 ft. ( < 100m/yd./ft.)
1.0m/yd., 1.0 ft. ( ≧ 100m/yd./ft.)
0.2m/yd., 0.5 ft. ( < 100m/yd./ft.)
1.0m/yd., 1.0 ft. ( ≧ 100m/yd./ft.)
0.5m/yd., 1.0 ft.
0.2m/yd., 0.5 ft.
0.2m/yd., 0.5 ft.
0.1°
ø21
-1
En
De
Fr
Es
It
Ru
No
Se
Fi
Nl
Dk
Ro
Pl
Hu
Cz
17
Page 18

Specifications
En
De
Fr
Es
It
Ru
No
Se
Fi
Nl
Dk
Ro
Pl
Hu
Cz
18
Others
Operating temperature (˚C) -10 — +50
Power source CR2 lithium battery x 1 (DC 3V)
Auto power shutoff function equipped (after approx. 30 seconds)
Dimensions (L x H x W) (mm) 130x69x45
Weight (g) Approx. 210 (without battery)
Structure Body: Waterproof
Laser classication IEC60825-1: Class 1M/Laser Product
(maximum depth of 1 meter for up to 10 minutes)*
(Battery chamber: Water resistant**)
FDA/21 CFR Part 1040.10:Class I Laser Product
EMC FCC Part15 SubPartB class B, EU:EMC directive, AS/NZS, VCCI classB, CU TR 020
Environment RoHS, WEEE
Laser
Wavelength (nm) 870
Pulse duration (ns) 14
Output (W) 15
Beam divergence (mrad) Vertical: 2.5, Horizontal: 0.025
Operating humidity (%RH) 80 (without dew condensation)
* Waterproof models
The Nikon Laser Forestry Pro is waterproof, and will suffer no damage to the optical system if submerged or dropped in water to a
maximum depth of 1 meter for up to 10 minutes.
The Nikon Laser Forestry Pro offers the following advantages:
• Can be used in conditions of high humidity, dust and rain without risk of damage.
• Nitrogen-filled design makes it resistant to condensation and mold.
Observe the following when using the Nikon Laser Forestry Pro.
• The unit should not be operated nor held in running water.
• Any moisture should be wiped off before adjusting movable parts (eyepiece, etc.) of the Nikon Laser Forestry Pro to prevent
damage and for safety reasons.
To keep your Nikon Laser Forestry Pro in excellent condition, Nikon Vision recommends regular servicing by an authorized dealer.
** The battery chamber is water resistant, not waterproof. Water may enter the device if the Nikon Laser Forestry Pro is submerged in
water. If water enters the battery chamber, wipe out any moisture and allow time for the chamber to dry.
Page 19
External display
[Power On]
After the power is turned on, the
internal and external LCDs are
illuminated until either the POWER or
MODE button is pressed.
[Power off notice]
If 30 seconds pass without
operation, the power turns off.
Approx. one second before power
turns off, this screen is displayed.
1 Point Measurement
[Results]
Linear distance Horizontal distance
Height Angle Unit
After measurement, all data “linear
distance, horizontal distance, height
and angle” are displayed. Units can be
shown in meters, yards or feet. Angles
are indicated by °(degree).
[ m ] : meter
[ YD ] : yards
[ ft ] : feet
[While measuring]
When the target is upward
When the target is downward
[Measurement unsuccessful or unable to measure]
When the target is upward
When the target is downward
With negative values,
the “– (minus)” symbol is not shown.
[Measurement complete]
When the target is upward
When the target is downward
En
De
Fr
Es
It
Ru
No
Se
Fi
Nl
Dk
Ro
Pl
Hu
Cz
19
Page 20
External display
En
Vertical separation (height between two points) mode
De
[Results]
Fr
Es
It
Ru
No
Se
Linear distance (1st point)
Linear distance (2nd point)
Fi
Vertical separation (height between two points)
Nl
Angle of two points
Unit
Dk
Ro
[Measuring 1st point]
Pl
Hu
Cz
After measuring two points, "Linear
distance to two points" and "Vertical
separation (height) and angle
between two points" are displayed.
Units can be shown in meters, yards
or feet. Angles are indicated by
°(degree).
[Failed to measure 1st point]
[Measuring 2nd point]
Although the point is located
downward, display shows the
upward position.
[Failure to measure 2nd point]
Angle measurements never fail.
[Display of results for vertical separation (height between two
points) and 2nd point]
[Results of 1st point]
20
Angle measurements never fail.
Vertical separation
(height between two points)
After displaying vertical
separation (height between
two points), pressing MODE
button displays the result of
the 2nd point.
Page 21

Three-point measurement (height between two points) mode
[Results]
After measuring horizontal distance
and two angles and its height,
"vertical separation (height) and
angle between two points" are
displayed. Units can be shown in
meters, yards or feet. Angles are
indicated by °(degree).
Vertical separation (height between two points)
Angle of two points
Unit
[Measuring 1st point]
[Failed to measure 1st point]
[Results of 1st point]
Displays the horizontal distance.
[Measuring 2nd point]
When measuring 2nd and 3rd points, please note that angles
should be between –75˚ and +75˚ from the horizontal level.
If measurement fails, the angle is beyond ±75˚.
[Measuring 3rd point]
When measuring 2nd and 3rd points, please note that angles
should be between –75˚ and +75˚ from the horizontal level.
If measurement fails, the angle is beyond ±75˚.
[Results of 2nd point]
[Results of 3rd point]
En
De
Fr
Es
It
Ru
No
Se
Fi
Nl
Dk
Ro
Pl
Hu
Cz
21
Page 22
Operation and internal display
En
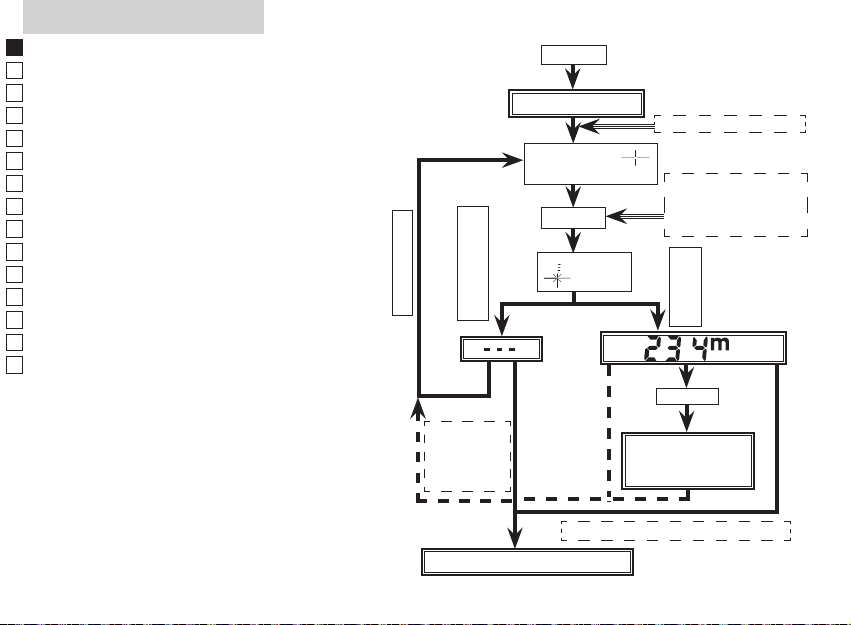
【1 • 2】 Power On/Off and mode settings
De
Fr
Es
It
Ru
No
Se
Fi
Nl
Dk
Ro
Pl
Hu
Cz
Operation/Results Work Button Display
1
2
Power On
Measurement standby
Selecting and setting modes
(1) Linear distance 【3】
(2) Horizontal distance 【4】
(3) Height (from horizontal)【5】
(4) Angle (from horizontal)【6】 MODE
(5)
(6)
Initial screen
Measurement standby Last Use mode symbol
Vertical separation
(height between two points)【7】
Three-point measurement 【8】
(height between two points)
POWER
MODE
MODE
MODE
MODE
All symbols
(while pressing)
blinks
blinks
Display
examples
n/a
n/a
n/a
n/a
n/a
n/a
9 Power off
22
Return to 2-(1) Linear distance, then repeat.
See the relevant section in this manual for each mode setting and display.
Regardless of process, after 30 seconds since your
last operation, power turns off.
30 seconds
without
operation
n/a
Page 23
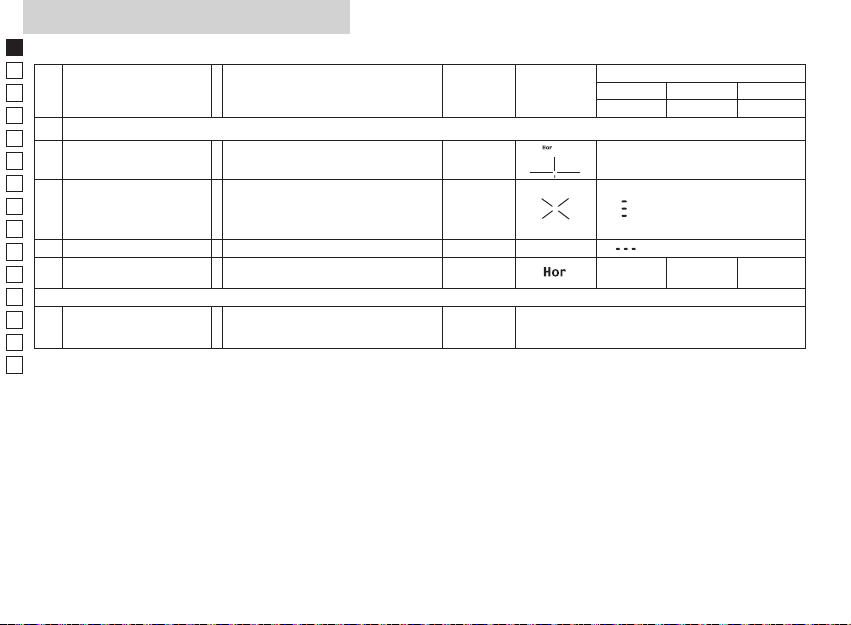
【3】 Linear distance mode
Operation/Results Wor k Button Display
3 Measurement with Linear distance mode
Seeking your target
3-1
(Align the reticle with target)
3-2
3-3 Failure to measure Repeat step 3-1.
3-4 Measurement OK
Measurement
(Laser irradiate symbol is
displayed.)
9 Power off
continuous measurement is possible for
Regardless of process, after 30 seconds
since your last operation, power turns off.
Linear distance
With the POWER button depressed,
up to 20 seconds.
(When done, 3-3 display appears.)
Linear distance
Follow by 3-1.
POWER
30 seconds
without
operation
Display examples
meter yards feet
Elevation (˚) Depression (˚)
206 225
En
De
Fr
Es
It
Ru
No
Se
Fi
Nl
Dk
Ro
Pl
Hu
Cz
23
Page 24
Operation and internal display
En
【4】 Horizontal distance mode
De
Fr
Es
It
Ru
No
Se
Fi
Nl
Dk
Ro
Pl
Hu
Cz
24
Operation/Results Wor k Button Display
4 Measurement with Horizontal distance mode
Seeking your target
4-1
(Align the reticle with target)
4-2
4-3 Failure to measure Repeat step 4-1.
4-4 Measurement OK
Measurement
(Laser irradiate symbol is
displayed.)
9 Power off
Horizontal distance
With the POWER button depressed,
continuous measurement is possible for
up to 20 seconds.
(When done, 4-3 display appears.)
Horizontal distance
Regardless of process, after 30 seconds
since your last operation, power turns off.
Follow by 4-1.
POWER
30 seconds
without
operation
Display examples
meter yards feet
Elevation (˚) Depression (˚)
201 220 660
Page 25
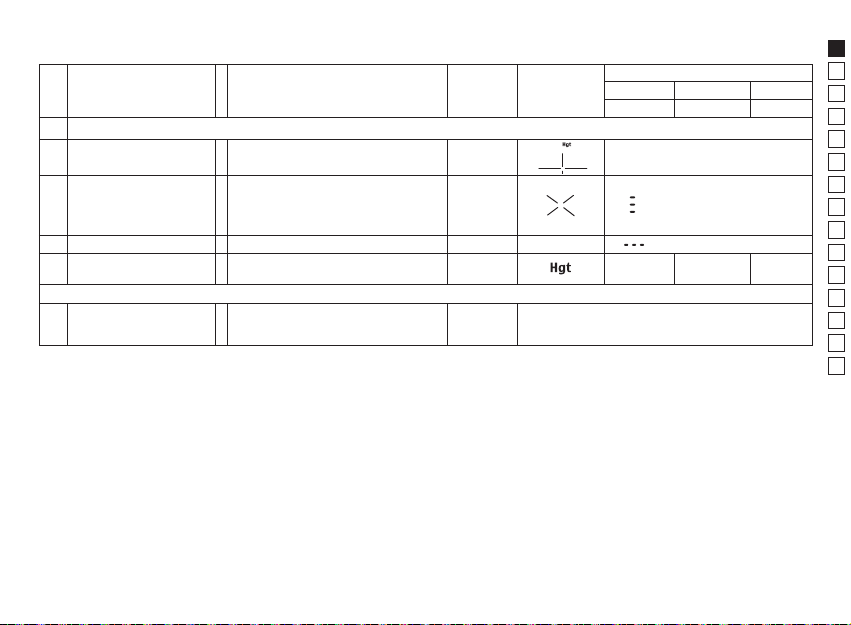
【5】 Height mode
Operation/Results Wor k Button Display
5 Measurement with Height mode
Seeking your target
5-1
(Align the reticle with target)
5-2
5-3 Failure to measure Repeat step 5-1.
5-4 Measurement OK
Measurement
(Laser irradiate symbol is
displayed.)
9 Power off
Height (from horizontal)
With the POWER button depressed,
continuous measurement is possible for
up to 20 seconds.
(When done, 5-3 display appears.)
Height (from horizontal)
Follow by 5-1.
Regardless of process, after 30 seconds
since your last operation, power turns off.
POWER
30 seconds
without
operation
Display examples
meter yards feet
Elevation (˚) Depression (˚)
45.2 49.4 148
En
De
Fr
Es
It
Ru
No
Se
Fi
Nl
Dk
Ro
Pl
Hu
Cz
25
Page 26
Operation and internal display
En
【6】 Angle mode
De
Fr
Es
It
Ru
No
Se
Fi
Nl
Dk
Ro
Pl
Hu
Cz
26
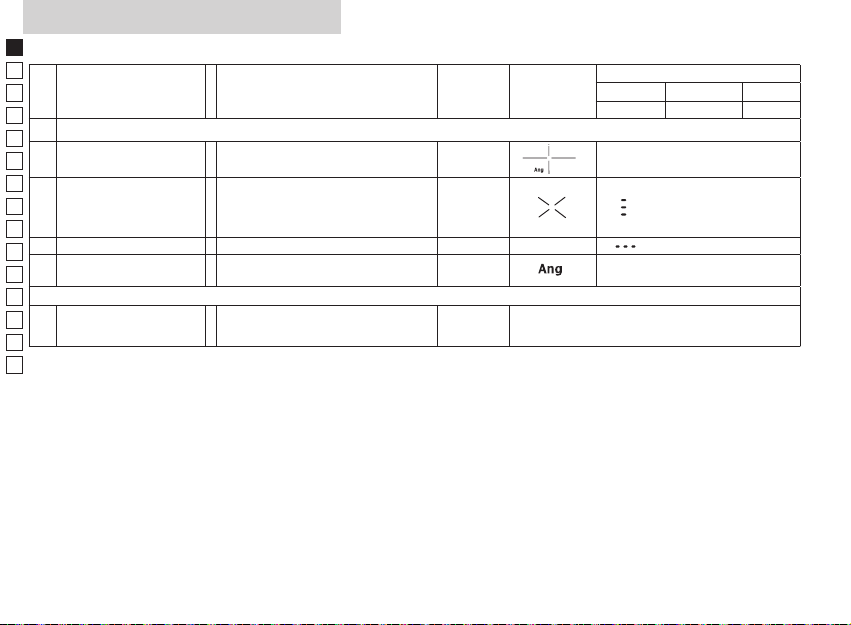
Operation/Results Wor k Button Display
6 Measurement with Angle mode
Seeking your target
6-1
(Align the reticle with target)
6-2
6-3 Failure to measure Repeat step 6-1.
6-4 Measurement OK
Measurement
(Laser irradiate symbol is
displayed.)
9 Power off
Angle (from horizontal)
With the POWER button depressed,
continuous measurement is possible for
up to 20 seconds.
(When done, 6-3 display appears.)
Angle (from horizontal)
Follow by or 6-1.
Regardless of process, after 30 seconds
since your last operation, power turns off.
POWER
30 seconds
without
operation
Display examples
meter yards feet
Elevation (˚) Depression (˚)
13
Page 27
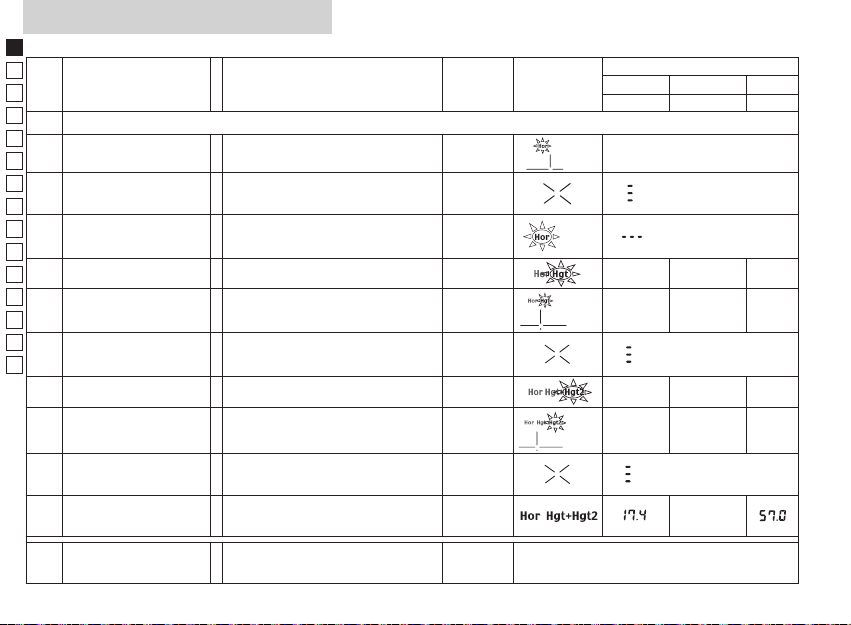
【7】 Vertical separation (height between two points) mode
Operation/Results Wor k Button Display
7 Measurement with Vertical separation (height between two points) mode
Seeking your target
7-1
(Align the reticle with target)
7-2
Measurement
(Laser irradiate symbol is
displayed.)
7-3 Failure to measure
7-4 Measurement OK Height of 1st target (from Horizontal)
Aiming (2nd target)
7-5
(Align the reticle with
target)
7-6
Measurement
(Laser irradiate symbol is
displayed)
7-7 Failure to measure
7-8 Measurement OK
9 Power off
Vertical separation
(height between two points) (1st target)
Repeat 7-1, 7-2, 7-3 until measurement is
Vertical separation (height between two
(Result shown is the height of the 1st target)
Repeat 7-5,7-6 and 7-7 until measurement
Regardless of process, after 30 seconds
since your last operation, power turns off.
Follow by 7-1
complete.
points) (2nd target)
Follow by 7-5
is complete
Vertical separation
(height between two points)
After 2 seconds, move to7-1
POWER
POWER
30 seconds
without
operation
meter yards feet
Elevation (˚) Depression (˚)
blinks
blinks
15.2 16.6 50.0
blinks
15.2 16.6 50.0
blinks
blinks
21.4 23.4
Display examples
En
De
Fr
Es
It
Ru
No
Se
Fi
Nl
Dk
Ro
Pl
Hu
Cz
27
Page 28
Operation and internal display
En
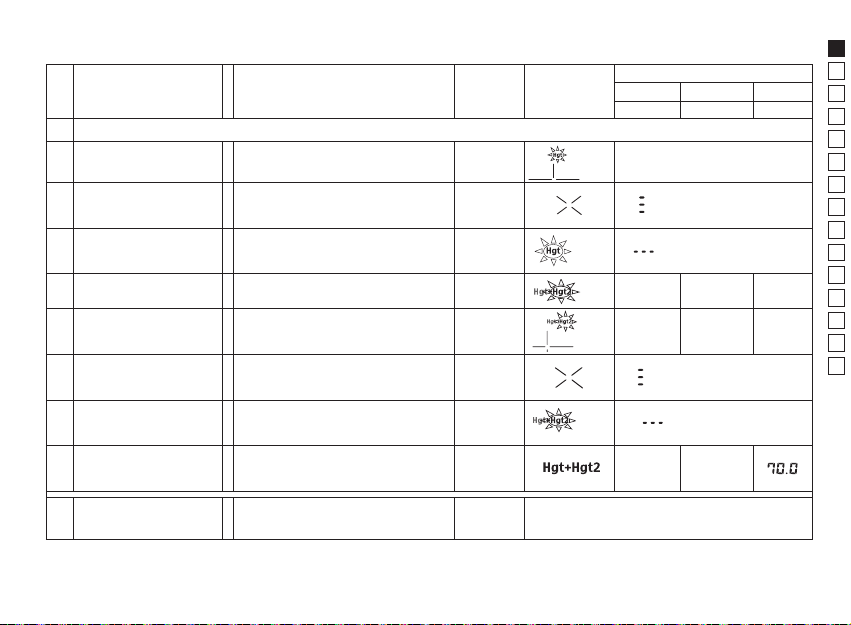
【8】 Three-point measurement (height between two points) mode
De
Fr
Es
It
Ru
No
Se
Fi
Nl
Dk
Ro
Pl
Hu
Cz
28
Operation/Results Wor k Button Display
8 Measurement with Three-point measurement (height between two points) mode
Seeking your target
8-1
(Align the reticle with target)
8-2
8-3 Failure to measure
8-4 Measurement OK
8-5
8-6
8-7 Measurement OK
8-8
8-9
8-10 Measurement OK
9 Power off
Measurement
(Laser irradiate symbol is
displayed.)
Aiming (2nd target)
(Align the reticle with
target)
Measurement
(Laser irradiate symbol is
displayed)
Aiming (3rd target)
(Align the reticle with
target)
Measurement
(Laser irradiate symbol is
displayed)
Horizontal distance (1st target)
Repeat 8-1, 8-2, 8-3 until measurement is
(height from horizontal level to 2nd point).
(height from horizontal level to 2nd point).
(height between 2nd target and 3rd target)
(height between 2nd target and 3rd target)
Regardless of process, after 30 seconds since
Follow by 8-1
complete.
Horizontal distance
Followed by 8-5.
Vertical separation
Vertical separation
Vertical separation
Vertical separation
After 2 seconds, follow by 8-1
your last operation, power turns off.
POWER
POWER
POWER
30 seconds
without
operation
meter yards feet
Elevation (˚) Depression (˚)
blinks
blinks
24.4 26.8 80.5
24.4 26.8 80.5
blinks
3.4 3.8 11.0
blinks
3.4 3.8 11.0
Display examples
19.0
Page 29

Others
This device complies with Part 15 of the FCC Rules. Operation is subject to the following two conditions:
(1) This device may not cause harmful interference, and
(2) this device must accept any interference received, including interference that may cause undesired operation.
This equipment has been tested and found to comply with the limits for a Class B digital device, pursuant to Part
15 of the FCC Rules and to EU EMC directive. These limits are designed to provide reasonable protection against
harmful interference in a residential installation. This equipment generates, uses and can radiate radio frequency
energy and, if not installed and used in accordance with the instructions, may cause harmful interference to radio
communications. However, there is no guarantee that interference will not occur in a particular installation. If this
equipment does cause harmful interference to radio or television reception, which can be determined by turning
the equipment off and on, the user is encouraged to try to correct the interference by one or more of the following
measures:
•Reorient or relocate the receiving antenna.
•Increase the separation between the equipment and receiver.
•Consult the dealer or an experienced radio/TV technician for help.
This Class B digital apparatus meets all requirements of the Canadian Interference-Causing Equipment Regulations.
The Forestry Pro is a simplified laser rangefinder. Results obtained should not be used for official records.
En
De
Fr
Es
It
Ru
No
Se
Fi
Nl
Dk
Ro
Pl
Hu
Cz
29
Page 30

Troubleshooting/Repair
En
De
Fr
Es
It
Ru
No
Se
Fi
Nl
Dk
Ro
Pl
Hu
Cz
30
If your Nikon Laser Forestry Pro should require repair, please contact your local dealer for details regarding
where to send it. Before doing so, you are advised to consult the Troubleshooting Table below.
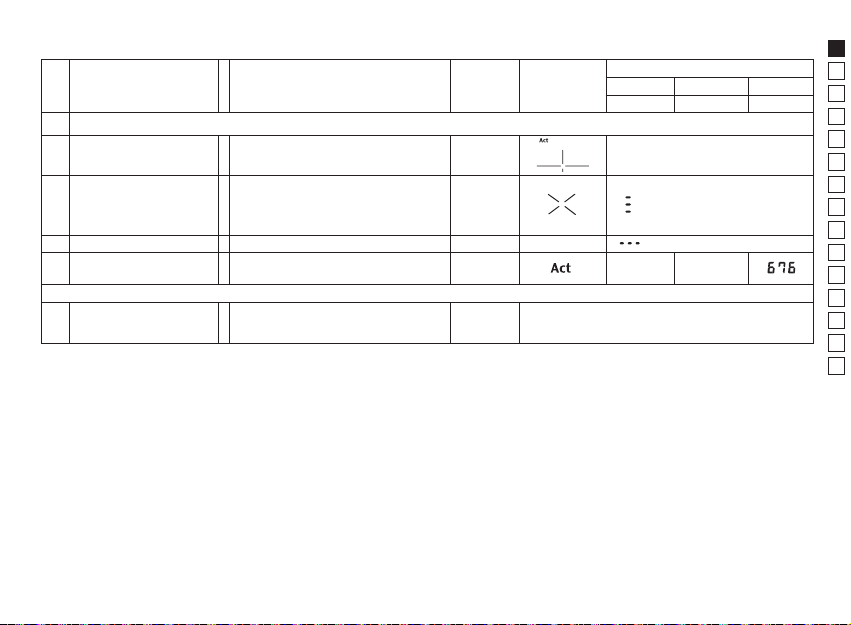
Symptom Check Points
Unit does not turn
on — LCD fails to
illuminate
Target range cannot
be obtained
[- - -] (“Cannot
measure”) appears
Closer target cannot
be measured
Target beyond a
certain distance
cannot be measured
• Depress POWER button.
• Check and replace batteries if necessary.
• Be sure that nothing, such as your hand or finger, is
blocking the laser emission aperture and laser detector.
• Be sure that the laser emission aperture and laser detector
are clean. Clean them if necessary.
• Be sure that the target shape and condition is appropriate
to reflect the laser beam.
• Replace battery.
• Be sure to hold the unit steady while depressing the
POWER button.
• Be sure the target is within measuring range (10-500m/11550 yards/33-999 feet)
• Be sure that nothing, such as leaves or grass, is between
the Nikon Laser Forestry Pro and the target.
• Be sure that nothing, such as leaves or grass, is between
the Nikon Laser Forestry Pro and the target.
Page 31

Symptom Check Points
Measurement result is
unstable
Incorrect result is
displayed
If problems persist after consulting the Troubleshooting Table, please contact your local dealer to check/repair the Nikon
Laser Forestry Pro. Never let anyone than the official representative of the product manufacturer check or repair the Nikon
Laser Forestry Pro. Failure to follow this instruction could result in injury, or damage to the product.
• Replace battery.
• Be sure that the target shape and condition is appropriate
to reflect the laser beam.
• Be sure to hold the unit steady while depressing the
POWER button.
• Be sure that nothing, such as leaves or grass, is between
the Nikon Laser Forestry Pro and the target.
• Replace battery.
• Be sure that the target shape and condition is appropriate
to reflect the laser beam.
• Be sure that nothing, such as leaves or grass, is between
the Nikon Laser Forestry Pro and the target.
En
De
Fr
Es
It
Ru
No
Se
Fi
Nl
Dk
Ro
Pl
Hu
Cz
31
Page 32

How to use the Rangefinder case
En
De
Fr
Es
It
Ru
No
Se
Fi
Nl
Dk
Ro
Pl
Hu
Cz
32
Regular case
Upper flap
Lower flap
Case with belt loop
Belt
Upper flap
Lower flap
1) Open the lower flap and divide into its
two parts. ①
②
①
2) Attach the tip of the upper flap to the
lower flap. ②
3) Secure the upper flap by clipping
together the two parts of the lower
flap. ③
③
Page 33

En
De
Fr
Es
It
Ru
No
Se
Fi
Nl
Dk
Ro
Pl
Hu
Cz
33
Page 34

En
De
Fr
Es
It
Ru
No
Se
Fi
Nl
Dk
Ro
Pl
Hu
Cz
Vorsichtshinweise vor der Anwendung ............................ 35-37
Hauptmerkmale ....................................................................... 38-39
Begriffsbestimmung/Zusammensetzung ............................. 40
Wechseln der Batterie ................................................................... 41
Interne Anzeige ......................................................................... 42-43
Übersicht über den Betrieb .................................................. 44-46
Technische Daten ..................................................................... 47-48
Externe Anzeige ........................................................................ 49-51
Betrieb und interne Anzeige ................................................ 52-58
Andere ................................................................................................. 59
Fehlersuche/Reparatur ........................................................... 60-61
So verwenden Sie die
Deutsch
INHALT
Entfernungsmesser-Tasche .......................................................... 62
34
Page 35

Vorsichtshinweise vor der Anwendung
Wir danken Ihnen für den Erwerb des Nikon Laser Forestry Pro.
Dieser Laser-Entfernungsmesser mit hochgenauen technischen Daten verfügt, zusätzlich zur
vorhandenen Luftlinienmessfunktion, über eine neue Winkelmessfunktion für ein gesteigertes
Sporterlebnis und anderer Anwendungen im Freien. (Das Nikon Laser Forestry Pro ist ebenfalls in der
Lage, die Horizontalentfernung zum Ziel und dessen Höhe zu messen.)
Bitte beachten Sie sorgfältig die folgenden Richtlinien, damit Sie das Gerät ordnungsgemäß
verwenden und mögliche Gefahrenquellen vermeiden können. Lesen Sie bitte vor Anwendung dieses
Produktes sorgfältig die „SICHERHEITSMAßNAHMEN“ und die Anweisungen für eine ordnungsgemäße
Anwendung, die diesem Produkt beigelegt sind.
Die Verwendung von Einstellelementen oder Justagen oder die Ausführung von anderen als den
hierin angegebenen Verfahren können zu einer gefährlichen Strahlenbelastung führen.
Verwaren Sie dieses Handbuch immer zur einfachen Referenz, und halten Sie es in Reichweite.
• Spezifikationen und Design können ohne Vorankündigung geändert werden.
• Eine Reproduktion dieses Handbuches in jeder möglichen Form, ganz oder teilweise (außer in
kurzen Artikeln zu Produktbesprechungen oder in Zusammenfassungen), dürfen nicht ohne die
schriftliche Einverständniserklärung von NIKON VISION Co., Ltd. erfolgen.
En
De
Fr
Es
It
Ru
No
Se
Fi
Nl
Dk
Ro
Pl
Hu
Cz
35
Page 36

Vorsichtshinweise vor der Anwendung
Bitte beachten Sie sorgfältig die folgen-
En
den Richtlinien, damit Sie das Gerät ord-
De
nungsgemäß verwenden und mögliche
Gefahrenquellen vermeiden können.
Fr
Lesen Sie bitte vor Anwendung dieses
Es
Produktes sorgfältig die „SICHERHEITSUND BETRIEBSHINWEISE“ sowie die
It
Anweisungen für eine ordnungsgemäße
Ru
Anwendung, die diesem Produkt beigelegt sind. Verwaren Sie dieses Handbuch
No
immer zur einfachen Referenz, und hal-
Se
ten Sie es in Reichweite.
Fi
WARNUNG
Nl
Dieses Symbol weist Sie auf den Umstand
hin, dass eine den im Folgenden beschriebe-
Dk
nen Inhalt außer Acht lassende Anwendung
Ro
zu einem möglichen Tod oder zu schwerwiegende Verletzungen führen kann.
Pl
VORSICHT
Hu
Dieses Symbol weist Sie auf den Umstand
Cz
hin, dass eine den im Folgenden beschriebenen Inhalt außer Acht lassende Anwendung
zu einer möglichen Verletzungen oder zu
einer Sachbeschädigung führen kann.
SICHERHEITS- UND
BETRIEBSHINWEISE
Warnung
• Sehen Sie bei der Anwendung des Nikon
Laser Forestry Pro nie direkt in den
Laserstrahl oder direkt in die Sonne.
• Drücken Sie nicht die POWER-Taste,
wenn Sie von der Objektivseite in die
Optik schauen.
36
• Richten Sie es nicht auf ein Auge.
• Betreiben Sie das Gerät nicht mit anderen zusätzlichen optischen Elementen,
wie Objektiven oder Feldstechern. Eine
Verwendung des Nikon Laser Forestry Pro
zusammen mit einem optischen Gerät
erhöht die Gefahr einer Verletzung der
Augen.
• Zerlegen Sie das Nikon Laser Forestry Pro
nicht. Der ausstrahlende Laser kann Ihre
Gesundheit gefährden. Ein einmal zerlegtes Produkt unterliegt nicht mehr der
Herstellergarantie.
• Ist die Gehäuseabdeckung des Nikon
Laser Forestry Pro beschädigt oder gibt
das Gerät nach einem Fall oder aus einem
anderen Grund einen fremdartigen Ton
ab, so entnehmen Sie bitte sofort die
Batterie und verwenden es nicht mehr.
Vorsichtsmaßnahmen
• Drücken Sie nicht die POWER-Taste, wenn
Sie das Nikon Laser Forestry Pro nicht
verwenden.
• Lassen Sie das Nikon Laser Forestry Pro
nicht innerhalb der Reichweite kleiner
Kinder.
• Regen, Wasser, Sand und Schmutz
sollten von der Oberfläche des
Entfernungsmessers mittels eines
weichen, sauberen, trockenen Tuches so
bald als möglich entfernt werden.
• Obwohl das Nikon Laser Forestry Pro
wasserfest ist, ist es nicht für eine
Anwendung unter Wasser bestimmt.
• Schwenken Sie das Nikon Laser Forestry
Pro nicht an seinem Trageriemen. Es
könnte jemand treffen und Verletzungen
verursachen.
• Lassen Sie das Nikon Laser Forestry Pro
nicht an einem instabilen Platz, da es
fallen und Verletzung verursachen oder zu
Sachbeschädigungen führen könnte.
• Schauen Sie nicht während des Gehens
durch das Nikon Laser Forestry Pro. Sie
könnten in einen Gegenstand laufen und
sich verletzten.
• Lassen Sie das Nikon Laser Forestry Pro
nicht an einem heißen oder sonnigen Tag
in einem Auto, oder bringen Sie es nicht
in die Nähe wärmeabstrahlender Geräte.
Hierdurch könnte es beschädigt oder
negativ beeinflusst werden.
• Lassen Sie das Nikon Laser Forestry Pro
nicht in direktem Tageslicht. Ultraviolette
Strahlen und übermäßige Hitze könnten
die Messeinheit negativ beeinflussen
oder sogar beschädigen.
• Wasserkondensation auf
Objektivoberflächen kann auftreten, wenn
das Nikon Laser Forestry Pro plötzlichen
Temperaturänderungen ausgesetzt wird.
Verwenden Sie das Produkt nicht, bis die
Kondensation verdunstet ist.
• Benutzen Sie keinen Alkohol zur
Reinigung des Äußeren.
• Lassen Sie nicht den zur Verpackung
verwendeten Polyäthylenbeutel innerhalb
der Reichweite kleiner Kinder.
• Geben Sie acht, dass kleine Kinder nicht
unbeabsichtigt die Augenmuschel
verschlucken. Konsultieren Sie in diesem Fall
sofort einen Arzt.
• Ein Kontakt für eine längere Zeitspanne mit
Page 37

der Gummi-Augenmuschel könnte zu einer
EU 電池指令表記
WEEE
WEEE
Hautentzündung führen. Konsultieren Sie
sofort einen Arzt, falls sich irgendwelche
Symptome entwickeln.
• Stecken Sie das Nikon Laser Forestry Pro
beim Tragen in die Soft-Tragetasche.
• Sollte Ihr N ikon Laser Forestry Pro nicht mehr
ordnungsgemäß funktionieren, so stellen Sie
die Anwendung sofort ein, und konsultieren
Sie die Störungssuchtabelle. Sollten Sie nicht
imstande sein, das Problem zu beheben, so
kontaktieren Sie Ihren lokalen Händler für
Hinweise für eine Reparatureinsendung.
PFLEGE UND WARTUNG
Objektive
• Benutzen Sie eine weiche ölfreie Bürste
zum Entfernen von Staub auf der
Objektivoberfläche.
• Verwenden Sie zum Entfernen von Flecken
oder Schmierstellen, wie Fingerabdrücke,
von der Objektivoberfläche ein weiches
sauberes ölfreies BaumwollObjektivreinigungstuch, mit dem Sie die
Objektive leicht abwischen.
Verwenden Sie eine kleine Menge reinen
Alkohols (nicht denaturiert), um
widerspenstige Schmierstellen zu
entfernen. Verwenden Sie kein Samttuch
oder gewöhnliches Gewebe, da dieses die
Objektivoberfläche zerkratzen könnte.
Sobald ein Tuch zum Säubern des
Gehäuses benutzt wurde, sollte es nicht
zum Reinigen der Objektivoberflächen
verwendet werden.
Hauptkörper
• Reinigen Sie die Körperoberfläche mit
einem weichen, sauberen und trockenen
Tuch. Verwenden Sie kein Benzol,
Verdünner oder andere organische
Mittel, da diese zu einer Verfärbung oder
zu einer Beschädigung des Gummis
führen können.
Lagerung
• Auf der Objektivoberfläche kann,
bedingt durch eine hohe Feuchtigkeit,
eine Wasserkondensation oder
Schimmelbildung auftreten. Lagern Sie
daher das Nikon Laser Forestry Pro an
einem kühlen, trocknen Platz.
Trocknen Sie es daher nach einem
Einsatz an einem regnerischen Tag oder
einer regnerischen Nacht vollständig bei
Zimmertemperatur, und lagern Sie es
anschließend an einem kühlen,
trockenen Platz.
ANMERKUNGEN ZU LITHIUMBATTERIEN
Werden diese falsch gehandhabt, können
Batterien aufbrechen und lecken, wodurch
Ausrüstung und Bekleidung korrodieren
können. Stellen Sie sicher, das Folgende zu
beachten:
• Installieren Sie die Batterien mit richtig
positionierten Plus- und Minuspolen.
• Batterien sollten entnommen werden,
wenn diese leer sind oder das Gerät für
einen längeren Zeitraum nicht
verwendet wird.
• Verwenden Sie immer die gleiche Art
von Batterien.
• Kommt Batterieflüssigkeit mit den
Augen oder mit der Haut in Kontakt, so
spülen Sie diese gut mit Wasser.
Konsultieren Sie sofort einen Arzt, falls
die Flüssigkeit verschluckt wird.
• Schließen Sie keine Anschlüsse im
Batteriefach kurz.
• Tragen Sie keine Batterien zusammen
mit Schlüsseln oder Münzen in einer
Tasche oder in einem Beutel. Hierdurch
können die Batterien kurzgeschlossen
werden und sich überhitzen.
• Legen Sie keine Batterien ins Feuer oder
ins Wasser. Zerlegen Sie nie Batterien.
• Laden Sie Batterien nicht auf.
• Unterwerfen Sie gelagerte Batterien
keinen Temperaturextremen.
• Unterwerfen Sie Batterien keinen starken Erschütterungen oder Schlägen.
En
De
Fr
Es
It
Ru
No
Se
Fi
Nl
Dk
Ro
Pl
Hu
Cz
37
Page 38

Hauptmerkmale
En
• Linearer Entfernungsmessbereich: 10 - 500 m/11 - 550 Yards/
De
33-999 Fuß
Fr
• Winkelmessbereich: ± 89°
• Entfernungsmess-Anzeigeschritt:
Es
[Interne Anzeige]:
It
(Luftlinie)
Ru
No
Se
Fi
Nl
Dk
Ro
Pl
Hu
Cz
0,5 m/Yard, 1 Fuß
(Messentfernung ist geringer als 100 Meter/Yards/Fuß)
1,0 m/Yard, 1 Fuß
(Messentfernung beträgt 100 Meter/Yards/Fuß oder
mehr)
(Horizontalentfernung/Höhe)
0,2 m/Yard, 0,5 Fuß
(Messentfernung ist geringer als 100 Meter/Yards/Fuß)
1,0 m/Yard, 1 Fuß
(Messentfernung beträgt 100 Meter/Yards/Fuß oder
mehr)
(Winkel)
0,1° (-10° — 10°)
1,0° ( ≦ -10°, 10° ≦ )
Externe Anzeige]
(Luftlinie)
(Horizontalentfernung/Höhe)
(Winkel)
38
0,5 Meter/Yard, 1 Fuß
0,2 Meter/Yard, 0,5 Fuß
0,1°
• Einfach anzuvisierendes optisches 6x-Beobachtungssystem
• Bestimmt die Horizontalentfernung zum Ziel und dessen Höhe
in Bezug auf die Stufe des Entfernungsmessers durch das
Messen der Luftlinie und des Winkels.
• Messung des Vertikalabstands (Höhe zwischen zwei Punkten) modus Vertikalabstand und Modus 3-Punktmessung stehen
zur Verfügung
• Die Ergebnisse werden auf einem internen und externen
LC-Display angezeigt. Das externe LC-Display zeigt alle
Ergebnisse gleichzeitig an.
• Das Zielprioritäts-Umschaltsystem ermöglicht Ihnen die
einfache Anpassung an die Messsituation.
• Wasserfestes Design (NICHT für die Verwendung unter Wasser
konzipiert)
• Unsichtbarer/augensicherer Laser der EN/IEC-Kategorie 1M
• 30-Sekunden-Anzeige der Ergebnisse
• Kompaktes, leichtes, ergonomisches Design
• Abschaltautomatik (nach ca. 30 unbeaufsichtigten Sekunden)
• Rückstellung auf die Einstellungen „Letzte Anwendung“
• Fortlaufende ca. 20-Sekunden-Messfunktion
Das Nikon Laser Forestry Pro strahlt unsichtbare, augensichere,
Infrarotenergieimpulse aus, die vom gewählten Ziel zurück
zu dem optischen Empfänger reflektiert werden. Hoch
entwickelte Präzisionsladeschaltungen werden verwendet, um
Entfernungen durch Messung der von jedem Impuls benötigten
Zeit zum Zurücklegen der Strecke vom Entfernungsmesser
zum Ziel und zurück blitzschnell zu berechnen. LaserstrahlReflexionsvermögen und Messergebnisse können,
entsprechend den klimatischen und Umweltbedingungen, der
Farbe, Oberflächenbeschaffenheit, Größe, Form und anderen
Eigenschaften des Ziels, schwanken.
Page 39

Die folgenden Faktoren stellen einen besseren Bereich und eine hohe Genauigkeit sicher:
• Nachtzeitanwendung
• Bewölktes Wetter
• Hellfarbige Ziele
• Ziele mit hochgradig reflektierenden Oberflächen
• Ziele mit glänzendem Äußeren
• Große Ziele
• Erfassung von Zielen im 90-Grad-Winkel
Messungen können in folgenden Fällen Ungenauigkeiten oder Störungen aufweisen:
• Schlanke oder kleine Ziele
• Das Ziel hat eine zerstreuende reflektierende Oberfläche
• Ziel reflektiert keinen Laserstrahl an den Entfernungsmesser (Glas, ein Spiegel usw.)
• Schwarze Ziele
• Ziel hat sich ändernde Tiefen
• Im Schnee, Regen oder Nebel
• Durch Glas gemessene Ziele
• Reflektierende Oberfläche, aus diagonaler Richtung gemessen
• Bewegliche Ziele
• Hindernisse, die sich vor dem Ziel bewegen
• Beim Anvisieren der Oberfläche von Wasser
En
De
Fr
Es
It
Ru
No
Se
Fi
Nl
Dk
Ro
Pl
Hu
Cz
39
Page 40

Begriffsbestimmung/Zusammensetzung
En
De
Fr
Es
It
Ru
No
Se
Fi
Nl
Dk
Ro
Pl
Hu
Cz
!e
Körper ........................................... x1
Soft-Tragetasche (CCN)............x1
40
5
4
3
Zusammensetzung
1
2
!w
!q
Trageriemen ...............................x1
Lithiumbatterie (CR2) ..............x1
1Monokulare Objektivlinse/
Laser-Emissionsblendenöffnung
2Laser-Detektorblendenöffnung
3Externes LC-Display
4MODE-Taste
5POWER-Taste
6
6Okular des Monokulars 6x
7Augenmuschel/Dioptrineinstellring
8Dioptrinindex
9Brückenöse
7
!pBatteriefachabdeckung
!qBatteriefachabdeckung „Offen/
8
Geschlossen”-Anzeige
!wProduktnummer/Beschreibender
9
Aufkleber
!p
!e Laser-Warnschild
Page 41

Wechseln der Batterie
•
Art der Batterie: 3V CR2 Lithiumbatterie
•
Batteriezustandsanzeigen
blinkend : Batterieladung ist niedrig, und die Batterie sollte ersetzt werden.
verschwindet : Batterie ist erschöpft und muss ersetzt werden.
im LC-Display blinkend : Zeigt an, dass die Batterie ersetzt werden sollte.
1 Öffnen Sie die Batteriefachabdeckung
Verwenden Sie die Daumenfläche oder eine Münze für die Nut in der Batteriefachabdeckung, und drehen Sie
die Abdeckung in die durch Pfeile gekennzeichnete Offen- bzw. Geschlossen-Stellung. Dies kann aufgrund der
Gummidichtung für die Wasserdichtigkeit möglicherweise schwergängig sein.
2 Ersetzen Sie die alte Batterie durch eine neue
Installieren Sie die neue Batterie mit richtiger [+]- und [-]-Position, entsprechend der
Dichtung im Batteriefach. (Setzen Sie die Batterie ein, wobei der [+]-Pol in das Innere des Faches zeigt.) [Das Nikon Laser
Forestry Pro funktioniert nicht, wenn die Batterie falsch herum installiert ist.]
3 Schließen Sie die Batteriefachabdeckung
Richten Sie die Offen/Geschlossen-Anzeige auf den weißen Punkt aus, und setzen Sie die Batteriefachabdeckung ein.
Drehen Sie die Abdeckung mit der Fläche des Daumens oder mittels einer Münze in die der Pfeilanzeige entgegengesetzte
Richtung. Dies kann aufgrund der Gummidichtung zur Wasserdichtigkeit möglicherweise schwergängig sein. Drehen Sie
diese aber weiter, bis die Abdeckung sich nicht mehr weiter dreht. Stellen Sie sicher, dass die Abdeckung dicht geschlossen
ist.
•
Batterielebensdauer
Dauerbetrieb: Ca. 13.000 mal (bei 20 °C)
Die Zielfokussierung, das Messen und das automatische Ausschalten sind in einem einzelnen Zyklus enthalten. Dieser Wert
kann, entsprechend der Temperatur und anderer Faktoren wie Zielform, -farbe, usw. schwanken.
* Das Nikon Laser Forestry Pro wird mit einer 3V CR2 Lithiumbatterie geliefert. Bedingt durch die natürliche elektrische Entladung ist die
Lebensdauer der Batterie wahrscheinlich kürzer als die oben angegebene.
* Ersetzen Sie die Batterie, wenn das Nikon Laser Forestry Pro jemals in Wasser eingetaucht wird oder wenn Wasser in das Batteriefach eindringt.
: Batterie besitzt genügend Ladung für den Betrieb.
: Batterieladung ist niedrig.
„
Batterieinstallations “-Anzeige der
En
De
Fr
Es
It
Ru
No
Se
Fi
Nl
Dk
Ro
Pl
Hu
Cz
41
Page 42

Interne Anzeige
En
1.
『 』
De
『
Fr
『
Es
It
2.
『 』
Ru
Zeigt die gemessene Entfernung digital in Metern/Yards/Fuß und den Winkeln in Grad an. Zeigt
No
ebenfalls den Messzustand wie „Measurement in progress“ (Messvorgang) und „Measurement
unsuccessful“ (Messung erfolglos) oder „Unable to measure“ (Messung unmöglich) an.
Se
<Bespiele von Messergebnissen>
Fi
(Entfernung)
Nl
Anzeige von Ergebnissen: ( ≧ 100 m/Yards/Fuß) z.B. 234 Meter =
Dk
Anzeige von Ergebnissen: ( < 100 m/Yards/Fuß) z.B. 76,5 Yards =
Anzeige von Ergebnissen: ( < 100 m/Yards/Fuß) z.B. 82 Fuß =
Ro
(Winkel)
Pl
Anzeige von Ergebnissen: ( ≦ -10˚und ≧ 10˚) z.B. 36˚ =
Hu
Cz
Anzeige von Ergebnissen: ( -10˚ <und<10˚) z.B. 3,5˚ =
『
』
『
3.
『 』
『
『
[Keine Maßeinheit angezeigt] Zeigt die in Fuß gemessene Entfernung an.
4.
『 』
42
Zielfokussierung/Laserstrahlsystem
-
Visieren Sie das Ziel an. Positionieren Sie das Ziel in die Mitte des Fadenkreuzes.
』
-
Wird angezeigt, während der Laser zur Messung verwendet wird. (Bleibt während
-
』
der einzelnen Messung aktiv. Blinkt während der kontinuierlichen Messung.)
Warnung: Blicken Sie nicht in das Objektiv, wenn diese Markierung angezeigt wird.
Entfernungs-/Messzustandsanzeige
-
『
『
『 』
『
z.B. -29˚ =
『
『
-
z.B. -7,0˚ =
Messung aktiv
-
Messung fehlgeschlagen oder nicht imstande, Entfernung zu messen
』
Anzeigenmaßeinheiten
Zeigt die in Metern gemessene Entfernung an.
』
Zeigt die in Yards gemessene Entfernung an.
』
-
Zeigt den Batteriezustand an. (Sehen Sie „Wechseln der Batterie“)
『
』
』
』
』
』
』
Page 43

5.
『 』 Anzeigemodi
(Sehen Sie „Externe Anzeige“ und „Betrieb und interne Anzeige“ für Bedienungs- und Anzeigenbeispiele.)
Modus Luftlinie
『
Berechnet die Luftlinie zu Ihrem Ziel und zeigt die Ergebnisse an.
』
Modus Horizontalentfernung
『
Berechnet die Luftlinie zu Ihrem Ziel durch Messung der Luftlinie und des Winkels und zeigt die
』
Ergebnisse an.
Modus Höhe
『
Misst die Höhe Ihres Ziels von der Horizontalen und zeigt die Ergebnisse an.
』
Modus Vertikalabstand (Höhe zwischen zwei Punkten)
Verwendet die Luftlinie und die Winkelangaben von zwei Punkten, um den Vertikalabstand
『
』
(Höhe zwischen den zwei Punkten) zu berechnen und anzuzeigen.
Modus 3-Punkt-Messung (Höhe zwischen zwei Punkten)
『
Mit den Daten der horizontalen Entfernung zum Ziel (1. Punkt) und den Winkeldaten von zwei Punkten
』
(2. und 3. Punkte) können Sie den Vertikalabstand (Höhe zwischen den 2. und 3. Punkten) berechnen und
anzeigen.
Modus Winkel
Misst den Winkel Ihres Ziels von der Horizontalen und zeigt die Ergebnisse an.
』
6.
『 』
『
Prioritätsmodus Ziel
Prioritätsmodus 1. Ziel
』
『
Zeigt an, wenn der Prioritätsmodus 1. Ziel eingestellt ist.
Prioritätsmodus Entferntes Ziel
『
』
Zeigt an, wenn der Prioritätsmodus Entferntes Ziel eingestellt ist.
Hinweis: Ist der Winkel-Messmodus eingestellt (während der Anzeige des Symbols [Ang]), wird der Prioritätsmodus Ziel nicht
angezeigt, und das erleuchtete [1st] oder [Dst]-Symbol wird ausgeschaltet.
Obwohl das LC-Display mittels der höchstentwickelten Technologie hergestellt wurde, ist es unmöglich, das Eindringen
von Staub vollständig zu verhindern. Bei Einsatz dieses Produktes wird das LC-Display durch die hohe Vergrößerung des
Okularobjektivs vergrößert und Staub kann als Defekt erscheinen. Hierdurch wird jedoch nicht die Messgenauigkeit beeinflusst.
En
De
Fr
Es
It
Ru
No
Se
Fi
Nl
Dk
Ro
Pl
Hu
Cz
43
Page 44

Übersicht über den Betrieb
En
Vorsicht — Die Verwendung von Einstellelementen
oder Justagen oder die Ausführung von anderen
De
als den hierin angegebenen Verfahren können zu
einer gefährlichen Strahlenbelastung führen.
Fr
1. Installieren Sie eine Batterie im Batteriefach. (Sehen Sie
Es
„Wechseln der Batterie“)
It
2. Gummiokularkappe
Brillenträger: Klappen Sie die Gummiokularkappen ein.
Ru
Personen ohne Brille: Klappen Sie die Gummiokularkappen
No
nicht ein.
Se
3. Dioptrineinstellung
Stellen Sie den Dioptrinwert ein, um ein klares Bild auf dem
Fi
LC-Display zu erhalten.
Drehen Sie den Dioptrineinstellring zuerst bis zum
Nl
vollständigen Anschlag links herum. Schalten Sie als
Dk
nächstes die Spannung ein, um das LC-Display zu
aktivieren, wenn Sie durch das Nikon Laser Forestry Pro
Ro
blicken. Drehen Sie den Dioptrineinstellring nach rechts,
Pl
bis die Anzeige scharf wird.
Wird der Dioptrinwert nicht entsprechend Ihrem
Hu
Sehvermögen eingestellt, sind Sie nicht in der Lage, Ihr Ziel
klar zu fokussieren.
Cz
4. Messung
Hinweis: Sehen Sie den Abschnitt „Externe und interne Anzeige“
Hinweis: Durch das Drücken und Halten der POWER-Taste
Prüfen Sie vor der Messung Einstellungen wie Maßeinheit,
◎: Sehen Sie das entsprechende Modus-Kapitel in diesem
44
für das externe LC-Display.
werden alle Symbole auf dem internen LC-Display
angezeigt. Nach der Freigabe der POWER-Taste durch
Ihren Finger wird die zuletzt verwendete Einstellung
angezeigt. (Wenn Sie die POWER-Taste nur kurz mit
dem Finger betätigen, zeigt das LC-Display nur die
zuletzt verwendete Einstellung an, ohne alle Symbole
anzuzeigen. Dieses ist keine Störung oder kein anderes
Problem.)
Mess-/Anzeigemodus und Prioritätsmodus.
Handbuch für die Einstellung.
POWER
LC-Display leuchtet
Richten Sie das
Fadenkreuz
das Ziel aus
Kann nicht messen
Neue Messung
fehlgeschlagen
Messung
Anzeige
verbleibt für
30 Sek.
beleuchtet
Ausschalten: LCD-Anzeige wird ausgeblendet
POWER
wird
angezeigt
oder
30 Sekunden vergehen ohne Bedienvorgang *
◎
Stellen Sie Ihre
gewünschten Modi ein
☆
auf
Halten Sie die Taste für
eine kontinuierliche
Entfernungs- und
Winkelmessung (bis zu
20 Sekunden) gedrückt.
erfolgreich
Messung
MODE
※
Ergebnisse werden
in den eingestellten
Modus konvertiert
und angezeigt.
Page 45

※ Sehen Sie den Abschnitt „Externe und interne Anzeige“
bezüglich der Betriebs- und Ergebnisanzeigen der
verschiedenen Modi.
*Die Spannung stellt sich 30 Sekunden nach dem letzten
Bedienvorgang ab.
☆【Messmodus Kontinuierlich】
Durch das Drücken der POWER-Taste können Sie eine
kontinuierliche Messung für 20 Sekunden durchführen.
Blinkt beim Messvorgang.
Verwenden Sie bei der Messung einer Stange auf einem
Golfplatz, z.B., die 1. Ziel-Priorität und den Messmodus
Kontinuierlich für eine einfache Messung. Ohne Objekte
zwischen Ihnen und der Stange entspricht der kleinste Wert der
Entfernung zu Ihrer Zielstange.
5. Wahl der Anzeigemaßeinheit (die werkmäßige
Vorgabeeinstellung ist Fuß.)
Meter [ ]
Yard
[ ]
Fuß
[
]
1. Stellen Sie sicher, dass das LC-Display eingeschaltet ist.
2. Betätigen und halten Sie die
Sekunden.
3. Geben Sie die
-Taste nach der Umschaltung frei.
-Taste für ca. zwei
4. Wiederholen Sie die Schritte 2 und 3, bis der gewünschte
Modus angezeigt wird.
5. Nach dem Einstellen werden die Ergebnisse in die von
Ihren ausgewählte Maßeinheit konvertiert und angezeigt.
6. Umschaltung der Mess- und Anzeigemodi (die werkmäßige
Vorgabeeinstellung ist der Messmodus Luftlinie)
Luftlinie [ ]
Höhe [ ]
Vertikalabstand
(Höhe zwischen zwei
Punkten)[ ]
Durch das Drücken der MODE-Taste werden die Modi in der
vorstehenden Reihenfolge angezeigt.
Horizontalentfernung [ ]
Winkel [ ]
3-Punkt-Messung
[
]
1. Stellen Sie sicher, dass das LC-Display eingeschaltet ist.
2. Drücken Sie die
3. Geben Sie zum Umschalten des Modus die
4. Wiederholen Sie die Schritte 2 und 3, bis der gewünschte
Modus angezeigt wird.
5. Das Umschalten des Modus nach der Messung konvertiert
die Ergebnisse in den neuen Modus.
6. Nachdem Einstellen des Modus werden Messungen im
neuen Modus durchgeführt.
-Taste innerhalb von 0,5 Sekunden.
-Taste frei.
En
De
Fr
Es
It
Ru
No
Se
Fi
Nl
Dk
Ro
Pl
Hu
Cz
45
Page 46

Übersicht über den Betrieb
En
7. Umschaltung der Prioritätsmodi Ziel (die werkmäßige
Vorgabeeinstellung ist Prioritätsmodus Entferntes Ziel.)
De
Fr
Es
It
Ru
No
Se
Fi
Nl
Dk
Ro
Pl
Hu
Cz
Priorität 1. Ziel
]
[
Priorität Entferntes Ziel
]
[
1. Das LC-Display sollte eingeschaltet sein.
2. Drücken und halten Sie die
Sie anschließend die -Taste innerhalb von 0,5 Sekunden.
Hinweis: Wird die
3. Drücken und halten Sie beide Tasten (für mehr als 2
Sekunden) weiterhin, bis der Prioritätsmodus 1. Ziel und
der Prioritätsmodus Entferntes Ziel umgeschaltet werden.
Hinweis: Es findet keine Umschaltung statt, wenn die
Hinweis: Wiederholen Sie Schritt 2, falls keine
von 0,5 Sekunden gedrückt, werden die
Anzeigemaßeinheiten (m/Yard/Fuß) umgeschaltet.
Tasten nicht in richtiger Reihenfolge gedrückt
werden.
Umschaltung stattfindet.
-Taste. Drücken und halten
-Taste nicht innerhalb
4. Geben Sie die Tasten frei.
Hinweis: Da der Prioritätsmodus Ziel bei eingestelltem
Modus Winkel nicht angezeigt wird, erfolgt eine
Umschaltung, aber eine Sichtbestätigung ist
unmöglich. Schalten Sie zur Bestätigung in einen
anderen Messmodus.
[Entscheidung für die zu verwendende Zielpriorität]
Werden verschiedene Ergebnisse von einem einzelnen
Messvorgang erzielt, zeigt das Nikon Laser Forestry Pro die
Entfernung zum entferntesten Ziel auf dem LC-Display an, wenn
der Prioritätsmodus Entferntes Ziel verwendet wird, während der
Prioritätsmodus 1. Ziel die Entfernung zum naheliegendsten Ziel
zeigt.
46
z. B.: Beim Messen eines vor einem Haus stehenden Baums:
Entfernung zum Ziel
„115m“ (Entfernung zum Baum) werden im Prioritätsmodus
1. Ziel und „128m“ (Entfernung zum Haus) im Prioritätsmodus
Entferntes Ziel angezeigt. Der Prioritätsmodus 1. Ziel wird z.B.
beim Golf verwendet, während der Prioritätsmodus Entferntes
Ziel bei der Jagd in dichtbewaldeten Bereichen nützlich ist.
Baum Zaun Haus
115 m 123 m 128 m
8. Batterie niedrig-Anzeige
Blinkend
und die Batterie ersetzt werden sollte. (Sehen Sie „Wechseln der
zeigt an, dass die Batterieladung niedrig ist
Batterie“)
Page 47

Technische Daten
Messsystem
Messmodusanzeige
Gemessene Entfernung/Winkelbereich
Entfernungswinkel
Anzeigenschritte
System Prioritäts-Umschaltsystem 1. Ziel/Entferntes Ziel
Optisches System
Typ Dachprismen-Monokular
Vergrößerung (x) 6
Effektiver Durchmesser der Objektivlinse (mm) ø21
Sichtwinkel (wahr) (°) 6,0
Auge-Okular-Abstand (mm) 18,2
Austrittspupille (mm) ø3,5
Dioptrineinstellung ±4 m
Luftlinie : Act
Horizontalentfernung : Hor
Höhe : Hgt
Winkel : Ang
Vertikalabstand (Höhe zwischen zwei Punkten): Hgt + Hgt2
3-Punkt-Messung : Hor + Hgt + Hgt2
Entfernung : 10 - 500 m/11 - 550 Yards/33 - 999 Fuß
Winkel : ± 89°
Act
(Luftlinie)
Hor
Intern
(Horizontalentfernung)
Hgt (Höhe)
(999 Fuß: 304,5 Meter/333 Yards)
0,5 Meter/Yard, 1,0 Fuß ( < 100 Meter/Yards/Fuß)
1,0 Meter/Yard, 1,0 Fuß ( ≧ 100 Meter/Yards/Fuß)
0,2 Meter/Yard, 0,5 Fuß ( < 100 Meter/Yards/Fuß)
1,0 Meter/Yard, 1,0 Fuß ( ≧ 100 Meter/Yards/Fuß)
0,2 Meter/Yard, 0,5 Fuß ( < 100 Meter/Yards/Fuß)
1,0 Meter/Yard, 1,0 Fuß ( ≧ 100 Meter/Yards/Fuß)
Ang (Winkel) 0,1° ( < 10°), 1,0°( ≧ 10°)
Luftlinie 0,5 Meter/Yard, 1,0 Fuß
Extern
Horizontalentfernung 0,2 Meter/Yard, 0,5 Fuß
Höhe 0,2 Meter/Yard, 0,5 Fuß
Winkel 0,1°
-1
En
De
Fr
Es
It
Ru
No
Se
Fi
Nl
Dk
Ro
Pl
Hu
Cz
47
Page 48

Technische Daten
En
Andere
Betriebstemperatur (˚C) -10 bis +50
De
Spannungsquelle
Fr
Es
Maße (L x H x B) (mm) 130 × 69 × 45
Gewicht (g) Ca. 210 (ohne Batterie)
It
Ru
Struktur
No
Laserklassifizierung
Se
EMV FCC Part15 UnterteilungB kategorie B, EU:EMC-Richtlinie, AS/NZS, VCCI KategorieB, CU TR 020
Fi
Umgebung RoHS, WEEE
Nl
Laser
Dk
Wellenlänge (nm) 870
Impulsdauer (ns) 14
Ro
Ausgabe (W) 15
Pl
Lichtstrahlabweichung (mrad) Vertikal: 2.5, horizontal: 0.025
Hu
Betriebsfeuchtigkeit (% rel. Feuchtigkeit) 80 (ohne Taukondensation)
Cz
* Wasserfeste Modelle
Das Nikon Laser Forestry Pro ist wasserfest und erleidet keinen Schaden am optischen System, wenn es für bis zu 10 Minuten in max.
1 Meter tiefes Wasser getaucht wird oder fällt.
Das Nikon Laser Forestry Pro bietet die folgenden Vor teile:
• Kann bei hoher Feuchtigkeit, Staub und Regen ohne Gefahr eines Schadens verwendet werden.
• Stickstoff-gefülltes Design lässt es beständig gegen Kondensation und Schimmelbildung werden.
Beachten Sie das Folgende, wenn Sie das Nikon Laser Forestry Pro verwenden.
• Das Gerät sollte nicht in fließendem Wasser verwendet noch in dieses gehalten werden.
• Zur Verhinderung von Schäden und aus Sicherheitsgründen sollte vor der Justage der beweglichen Teile (Okular, usw.) des Nikon
Lasers Forestry Pro jede mögliche Feuchtigkeit abgewischt werden.
Um Ihr Nikon Laser Forestry Pro in ausgezeichnetem Zustand zu halten, empfiehlt Nikon Vision eine regelmäßige Wartung durch
einen autorisierten Händler.
** Das Batteriefach ist wasserfest, nicht wasserdicht. Wasser kann in die Einheit eindringen, wenn das Nikon Laser Forestry Pro in
Wasser getaucht wird. Wischen Sie nach dem Eindringen von Wasser das Batteriefach sorgfältig aus, und lassen Sie ausreichend Zeit,
damit dieses vollständig trocknen kann.
48
1x Lithiumbatterie CR2, 3 V DC
Selbstabschaltung (nach ca. 30 Sekunden)
Körper: Wasserfest (max. Tiefe von 1 m für bis zu 10 Minuten)*
(Batteriefach: Wasserfest**)
IEC60825-1: Kategorie 1M /Laser-Produkt
FDA/21 CFR Teil 1040.10: Laser-Produkt der Kategorie 1
Page 49

Externe Anzeige
[Einschalten]
[Ausschalthinweis]
1-Punkt-Messung
[Ergebnisse]
Luftlinie Horizontalentfernung
Höhe Winkel Einheit
Nach dem Einschalten der Spannung
leuchten die LCDs Internal und
External, bis entweder die POWERoder die MODE-Taste betätigt wird.
Die Spannung wird abgeschaltet,
wenn 30 Sekunden ohne
Bedienvorgang verstreichen. Ca.
eine Sekunde vor dem Abschalten
der Spannung wird diese Anzeige
angezeigt.
Nach der Messung werden die Daten
für „Luftlinie, Horizontalentfernung,
Höhe und Winkel“ angezeigt. Einheiten
können in Metern, Yards oder Fuß
angezeigt werden. Winkel werden
durch ° (Grad) angezeigt.
[ m ] : Meter
[ YD ] : Yards
[ ft ] : Fuß
[Während der Messung]
Wenn das Ziel aufwärts liegt Wenn das Ziel abwärts liegt
[Messung erfolglos oder Messung unmöglich]
Wenn das Ziel aufwärts liegt
Wenn das Ziel abwärts liegt
Mit negativen Werten,
„-(Minus)“-Symbol wird nicht
gezeigt.
[Messung abgeschlossen]
Wenn das Ziel aufwärts liegt
Wenn das Ziel abwärts liegt
En
De
Fr
Es
It
Ru
No
Se
Fi
Nl
Dk
Ro
Pl
Hu
Cz
49
Page 50

Externe Anzeige
En
Modus Vertikalabstand (Höhe zwischen zwei Punkten)
De
[Ergebnisse]
Fr
Es
It
Ru
No
Luftlinie (1. Punkt)
Se
Luftlinie (2. Punkt)
Fi
Modus Vertikalabstand (Höhe zwischen zwei Punkten)
Winkel von zwei Punkten
Nl
Einheit
Dk
Ro
[Messung des 1. Punktes] [Messung des 1. Punktes
Pl
Hu
Cz
Nach dem Messen von zwei Punkten
werden „Luftlinie zu zwei Punkten“ und
„Vertikalabstand (Höhe) und Winkel
zwischen zwei Punkten“ angezeigt.
Einheiten können in Metern, Yards oder
Fuß angezeigt werden. Winkel werden
durch ° (Grad) angezeigt.
fehlgeschlagen]
[Messung des 2. Punktes] [Messung des 2. Punktes
fehlgeschlagen]
Obwohl der Punkt abwärts
lokalisiert ist, zeigt die Anzeige
die Aufwärtsposition an.
Winkelmessungen schlagen
niemals fehl.
[Anzeige der Ergebnisse für Vertikalabstand (Höhe zwischen
zwei Punkten) und 2. Punkt]
[Ergebnisse des 1. Punktes]
50
Winkelmessungen schlagen
niemals fehl.
Modus Vertikalabstand
(Höhe zwischen zwei Punkten)
Nach der Anzeige des
Vertikalabstands (Höhe
zwischen zwei Punkten)
wird durch das Betätigen der
MODUS-Taste das Ergebnis des
2. Punktes angezeigt.
Page 51

Modus 3-Punkt-Messung (Höhe zwischen zwei Punkten)
[Ergebnisse]
Nach der Messung der
Horizontalentfernung und zwei
Winkeln und ihrer Höhe wird
„Vertikalabstand (Höhe) und Winkel
zwischen zwei Punkten” angezeigt.
Einheiten können in Metern, Yards
oder Fuß angezeigt werden. Winkel
werden durch º (Grad) angezeigt.
Vertikalabstand (Höhe zwischen zwei Punkten)
Winkel von zwei Punkten
Einheit
[Messung des 1. Punktes] [Messung des 1. Punktes
fehlgeschlagen]
[Messung des 2. Punktes]
[Ergebnisse des 2. Punktes]
Beachten Sie bitte beim Messen der 2. und 3. Punkte, dass die
Winkel zwischen –75˚ und +75˚ von der Horizontalebene aus
sein müssen. Sollte die Messung fehlschlagen, ist der Winkel
größer als ±75˚.
[Messung des 3. Punktes]
[Ergebnisse des 3. Punktes]
En
De
Fr
Es
It
Ru
No
Se
Fi
Nl
Dk
Ro
Pl
Hu
Cz
[Ergebnisse des 1. Punktes]
Anzeige der Horizontalentfernung.
Beachten Sie bitte beim Messen der 2. und 3. Punkte, dass die
Winkel zwischen –75˚ und +75˚ von der Horizontalebene aus
sein müssen. Sollte die Messung fehlschlagen, ist der Winkel
größer als ±75˚.
51
Page 52

Betrieb und interne Anzeige
En
【1 • 2】 Ein-/Ausschalten und Moduseinstellungen
De
Bedienvorgang/Ergebnisse Tätigkeit Taste Anzeige Anzeigenbeispiele
Fr
Es
1 Einschalten
It
Ru
No
Se
Fi
Nl
Dk
Ro
Pl
Hu
Cz
Messungsbereitschaft
2 Modi auswählen und
einstellen
Anfangsanzeige
Messbereitschaft
(1) Luftlinie【3】
(2) Hor izontalentfernung【4】 MODE
(3) Höhe (von der Horizontalen)【5】 MODE
(4) Winkel (von der Horizontalen)【6】 MODE
(5)
Vertikalabstand
(Höhe zwischen zwei Punkten)【7】
POWER
MODE
Alle Symbole
(während des Drückens)
Letztes Anwendungs-
modussymbol
blinkt
n. v.
n. v.
n. v.
n. v.
n. v.
9 Ausschalten
52
(6)
Sehen Sie das entsprechende Kapitel in diesem Handbuch für jede Moduseinstellung und -anzeige.
3-Punkt-Messung【8】
(Höhe zwischen zwei Punkten)
Kehren Sie zu 2-(1) Luftlinie zurück,
wiederholen Sie dann den Bedienvorgang.
Unabhängig vom Vorgang wird 30 Sek. nach
Ihrem letzten Bedienvorgang die Spannung
abgeschaltet.
MODE
30 Sek. ohne
Bedienvorgang
blinkt
n. v.
n. v.
Page 53

【3】 Modus Luftlinie
Bedienvorgang/Ergebnisse Tätigkeit Taste Anzeige
3 Messung mit M odus Luftlinie
3-1
3-2
3-3 Messung fehlgeschlagen Wiederholen Sie Schritt 3-1.
3-4 Messung OK
9 Ausschalten
Suchen des Ziels
(Fluchten von Fadenkreuz und Ziel)
Messung
(Laserstrahl-Symbol wird
angezeigt.)
Luftlinie
Bei gedrückter POWER-Taste ist eine
kontinuierliche Messung für bis zu 20
Sekunden möglich.
(Anschließend erscheint Anzeige
Unabhängig vom Vorgang wird 30
Sek. nach Ihrem letzten Bedienvor-
gang die Spannung abgeschaltet.
3-3.)
Luftlinie
Folgen Sie 3-1.
30 Sek. ohne
Bedienvorgang
POWER
Anzeigenbeispiele
Meter Yards Fu ß
Erhöhung (º) Absenkung (º)
206 225
En
De
Fr
Es
It
Ru
No
Se
Fi
Nl
Dk
Ro
Pl
Hu
Cz
53
Page 54

Betrieb und interne Anzeige
En
【4】 Modus Horizontalentfernung
De
Fr
Es
It
Ru
No
Se
Fi
Nl
Dk
Ro
Pl
Hu
Cz
54
Bedienvorgang/Ergebnisse Tätigkeit Taste Anzeige
4
Messung mit Modus Horizontalentfernung
4-1
4-2 Messung
4-3
4-4
9 Ausschalten
Suchen des Ziels
(Fluchten von Fadenkreuz und Ziel)
(Laserstrahl-Symbol wird angezeigt.)
Messung fehlgeschlagen Wiederholen Sie Schritt 4-1.
Messung OK
Horizontalentfernung
Bei gedrückter POWER-Taste ist eine
kontinuierliche Messung für bis zu
20 Sekunden möglich.
(Nach Abschluss erscheint Anz. 4-3.)
Horizontalentfernung
Folgen Sie 4-1.
Unabhängig vom Vorgang wird 30
Sek. nach Ihrem letzten Bedienvor-
gang die Spannung abgeschaltet.
POWER
30 Sek. ohne
Bedien-
vorgang
Anzeigenbeispiele
Meter Yards Fuß
Erhöhung (º) Absenkung (º)
201 220 660
Page 55

【5】 Modus Höhe
Bedienvorgang/Ergebnisse Tätigkeit Taste Anzeige
5 Messung mit M odus Höhe
5-1
5-2
5-3 Messung fehlgeschlagen Wiederholen Sie Schritt 5-1.
5-4 Messung OK
9
Suchen des Ziels
(Fluchten von Fadenkreuz und Ziel)
Messung
(Laserstrahl-Symbol wird
angezeigt.)
Ausschalten
Höhe (von der Horizontalen)
Bei gedrückter POWER-Taste ist eine
kontinuierliche Messung für bis zu 20
Sekunden möglich.
(Nach Abschluss erscheint Anz. 5-3.)
Höhe (von der Horizontalen)
Folgen Sie 5-1.
Unabhängig vom Vorgang wird 30 Sek.
nach Ihrem letzten Bedienvorgang die
Spannung abgeschaltet.
POWER
30 Sek. ohne
Bedienvorgang
Anzeigenbeispiele
Meter Yards Fu ß
Erhöhung (º) Absenkung (º)
45.2
49.4 148
En
De
Fr
Es
It
Ru
No
Se
Fi
Nl
Dk
Ro
Pl
Hu
Cz
55
Page 56

Betrieb und interne Anzeige
En
【6】 Modus Winkel
De
Fr
Es
It
Ru
No
Se
Fi
Nl
Dk
Ro
Pl
Hu
Cz
Bedienvorgang/Ergebnisse Tätigkeit Taste Anzeige
6 Messung mit dem Modus Winkel
6-1
6-2
6-3 Messung fehlgeschlagen Wiederholen Sie Schritt 6-1.
6-4 Messung OK
Suchen des Ziels
(Fluchten von Fadenkreuz und
9 Ausschalten
Ziel)
Messung
(Laserstrahl-Symbol wird
angezeigt.)
Winkel (von der Horizontalen)
Bei gedrückter POWER-Taste ist eine
kontinuierliche Messung für bis zu 20
Sekunden möglich.
(Nach Abschluss erscheint Anzeige
Winkel (von der Horizontalen)
Unabhängig vom Vorgang wird 30 Sek.
nach Ihrem letzten Bedienvorgang die
6-3.)
Folgen Sie 6-1.
Spannung abgeschaltet.
56
POWER
30 Sek. ohne
Bedienvorgang
Anzeigenbeispiele
Meter Yards Fuß
Erhöhung (º) Absenkung (º)
13
Page 57

【7】Modus Vertikalabstand (Höhe zwischen zwei Punkten)
Bedienvorgang/Ergebnisse Tätigkeit Taste Anzeige
7 M essung mit dem Modus Vertikalabstand (Höhe zwischen zwei Punkten)
7-1
7-2
7-3 Messung fehlgeschlagen
7-4 Messung OK Höhe des 1. Ziels (von der Horizontalen)
7-5
7-6
Suchen des Ziels
(Fluchten von Fadenkreuz und Ziel)
(Laserstrahl-Symbol wird angezeigt)
(Fluchten von Fadenkreuz und Ziel)
Messung (Laserstrahl-Symbol wird
Messung
Anvisieren (2. Ziel)
Messung
angezeigt)
7-7 Messung fehlgeschlagen
7-8 Messung OK
9 Ausschalten
Vertikalabstand
(Höhe zwischen zwei Punkten) (1. Ziel)
Folgen Sie 7-1
Wiederholen Sie 7-1, 7-2, 7-3, bis die
Messung abgeschlossen ist.
Vertikalabstand
(Höhe zwischen zwei Punkten) (2. Ziel)
(Das Ergebnis wird in Höhe des 1. Ziels
Wiederholen Sie 7-5,7-6 und 7-7, bis die
Gehen Sie nach 2 Sekunden zu 7-1
Unabhängig vom Vorgang wird 30 Sek.
nach Ihrem letzten Bedienvorgang die
gezeigt.)
Folgen Sie 7-5
Messung abgeschlossen ist
Vertikalabstand
(Höhe zwischen zwei Punkten)
Spannung abgeschaltet.
POWER
POWER
30 Sek. ohne
dienvorgang
En
Anzeigenbeispiele
Meter Yards Fuß
Erhöhung (°) Absenkung (°)
blinkt
blinkt
15.2 16.6 50.0
blinkt
15.2 16.6 50.0
blinkt
blinkt
De
Fr
Es
It
Ru
No
Se
Fi
Nl
Dk
Ro
Pl
Hu
Cz
21.4 23.4
57
Page 58

Betrieb und interne Anzeige
【8】 Modus 3-Punkt-Messung (Höhe zwischen zwei Punkten)
En
De
Fr
Es
It
Ru
No
Se
Fi
Nl
Dk
Ro
Pl
Hu
Cz
Bedienvorgang/Ergebnisse Tätigkeit Taste Anzeige
8 Messung mit dem Modus 3-Punkt-Messung (Höhe z wischen zwei Punkten)
8-1
8-2
8-3 Messung fehlgeschlagen
8-4 Messung OK
8-5
8-6
8-7 Messung OK
8-8
8-9
8-10 Messung OK
Suchen des Ziels
(Fluchten von Fadenkreuz und Ziel)
Messung (Laserstrahl-Symbol wird
angezeigt)
Anvisieren (2. Ziel) (Fluchten von
Fadenkreuz und Ziel)
Messung (Laserstrahl-Symbol wird
angezeigt)
Anvisieren (3. Ziel) (Fluchten von
Fadenkreuz und Ziel)
Messung (Laserstrahl-Symbol wird
angezeigt)
9 Ausschalten
Horizontalentfernung (1. Ziel)
Folgen Sie 8-1
Wiederholen Sie 8-1, 8-2, 8-3, bis die
Messung abgeschlossen ist.
Horizontalentfernung
Folgen Sie 8-5
(Höhe von der Horizontalebene bis zum 2.
(Höhe von der Horizontalebene bis zum 2.
Bedienvorgang die Spannung abgeschaltet.
Vertikalabstand
Punkt).
Vertikalabstand
Punkt).
Vertikalabstand
(Höhe zwischen dem 2. und 3. Ziel)
Vertikalabstand
(Höhe zwischen dem 2. und 3. Ziel)
Gehen Sie nach 2 Sekunden zu 8-1
Unabhängig vom Vorgang wird
30 Sekunden nach Ihrem letzten
58
POWER
POWER
POWER
30 Sek. ohne
Bedien-
vorgang
Meter Yards Fu ß
Erhöhung (°) Absenkung (°)
blinkt
blinkt
24.4 26.8 80.5
24.4 26.8 80.5
blinkt
3.4 3.8 11.0
blinkt
3.4 3.8 11.0
Anzeigenbeispiele
19.0
Page 59

Andere
Dieses Gerät stimmt mit Teil 15 der FCC-Richtlinien überein. Der Betrieb hängt von den folgenden zwei Bedingungen
ab:
(1) Dieses Gerät darf keine schädlichen Störung verursachen, und
(2) Dieses Gerät muss jede mögliche empfangene Störung annehmen, einschließlich Störung, die einen
unerwünschten Betrieb verursachen kann.
Dieses Gerät wurde geprüft und als mit den Grenzen für eine digitale Einheit der Kategorie B, gemäß Teil 15 der
FCC-Richtlinien und der EU-EMC-Richtlinie übereinzustimmend befunden. Diese Grenzen sind konzipiert, dass
diese einen angemessenen Schutz gegen eine schädliche Störung in einer Wohninstallation bieten. Dieses Gerät
generiert, verwendet und kann Hochfrequenzenergie ausstrahlen und, wenn nicht in Übereinstimmung mit den
Anweisungen installiert und verwendet, schädliche Störung des Funkverkehrs verursachen. Es gibt jedoch keine
Garantie, dass Störungen nicht in einer bestimmten Installation auftreten. Verursacht dieses Gerät Störungen beim
Rundfunk- oder Fernsehempfang, die durch das Ein- und Ausschalten des Gerätes festgestellt werden können,
wird der Benutzer angeregt zu versuchen, die Störung durch eine oder mehrere der folgenden Maßnahmen zu
beheben:
• Richten Sie die Empfangsantenne neu aus oder stellen Sie diese an einem anderen Ort auf.
• Erhöhen Sie den Abstand zwischen dem Gerät und dem Empfänger.
• Fragen Sie einen Händler oder einen erfahrenen Radio/TV-Techniker um Hilfe.
Dieses digitale Gerät der Kategorie B entspricht allen Anforderungen der kanadischen Richtlinien für Störungsverursachende Geräte.
Der Forestry Pro ist ein vereinfachter Laser-Entfernungsmesser. Die damit erzielen Ergebnisse sollten nicht in
offiziellen Dokumenten verwendet werden.
En
De
Fr
Es
It
Ru
No
Se
Fi
Nl
Dk
Ro
Pl
Hu
Cz
59
Page 60

Fehlersuche/Reparatur
En
Treten Sie bitte mit Ihrem lokalen Händler bezüglich Einzelheiten für den Versand in Verbindung, wenn Ihr Nikon Laser Forestry
De
Pro eine Reparatur erfordert. Jedoch sollten Sie zuvor die folgende Störungssuchtabelle konsultieren.
Fr
Es
It
Ru
No
Se
Fi
Nl
Dk
Ro
Pl
Hu
Cz
Gerät lässt sich nicht einschalten —
LC-Display leuchtet nicht
Zielbereich kann nicht erhalten werden • Stellen Sie sicher, dass nichts, wie Ihre Hand oder Finger, die Laser-
Symptom Korrektur
• Drücken Sie die POWER-Taste.
• Überprüfen und ersetzen Sie die Batterie, falls erforderlich.
Emissionsblendenöffnung und den Laser-Detektor blockiert.
• Stellen Sie sicher, dass die Laser-Emissionsblendenöffnung und der
Laser-Detektor sauber sind. Reinigen Sie diese, falls erforderlich.
• Stellen Sie sicher, dass die Zielform und der Zustand für die Reflektion
des Laserstrahls geeignet sind.
• Ersetzen Sie die Batterie.
[- - -] (“Kann nicht messen”) wird
angezeigt
• Stellen Sie sicher, dass Sie das Gerät beim Drücken der POWER-Taste
ruhig halten.
• Stellen Sie sicher, dass sich das Ziel innerhalb des Messbereichs
befindet
(10 - 500 m/11 - 550 Yards/33-999 Fuß)
Näheres Ziel kann nicht gemessen
werden
Ziel über eine bestimmte Entfernung
hinaus kann nicht gemessen werden
• Stellen Sie sicher, dass sich nichts, wie Blätter oder Gras, zwischen
dem Nikon Laser Forestry Pro und dem Ziel befindet.
• Stellen Sie sicher, dass sich nichts, wie Blätter oder Gras, zwischen
dem Nikon Laser Forestry Pro und dem Ziel befindet.
60
Page 61

Symptom Korrektur
Messergebnis ist instabil • Ersetzen Sie die Batterie.
Falsches Ergebnis wird angezeigt • Ersetzen Sie die Batterie.
Sollten die Probleme nach der Konsultierung der Störungssuchtabelle weiter bestehen, so kontaktieren Sie bitte Ihren
lokalen Händler zwecks einer Überprüfung/Reparatur des
als den offiziellen Repräsentant des Produktherstellers das
Nichtbefolgung dieser Anweisung könnte Verletzungen oder Schäden am Produkt verursachen.
• Stellen Sie sicher, dass die Zielform und der Zustand für die Reflektion des
Laserstrahls geeignet sind.
• Stellen Sie sicher, dass Sie das Gerät beim Drücken der POWER-Taste ruhig
halten.
• Stellen Sie sicher, dass sich nichts, wie Blätter oder Gras, zwischen dem
Nikon Laser Forestry Pro und dem Ziel befindet.
• Stellen Sie sicher, dass die Zielform und der Zustand für die Reflektion des
Laserstrahls geeignet sind.
• Stellen Sie sicher, dass sich nichts, wie Blätter oder Gras, zwischen dem
Nikon Laser Forestry Pro und dem Ziel befindet.
Nikon Laser Forestry Pro. Lassen Sie nie jemanden anderen
Nikon Laser Forestry Pro überprüfen oder reparieren. Eine
En
De
Fr
Es
It
Ru
No
Se
Fi
Nl
Dk
Ro
Pl
Hu
Cz
61
Page 62

So verwenden Sie die Entfernungsmesser-Tasche
En
De
Fr
Es
It
Ru
No
Se
Fi
Nl
Untere Lasche
Dk
Ro
Pl
Hu
Cz
62
Standardtasche
Obere Lasche
②
①
Tasche mit Gürtelschlaufe
Gürtel
Obere Lasche
Untere Lasche
1) Öffnen Sie die untere Lasche und teilen
Sie diese in ihre zwei Teile. ①
2) Befestigen Sie die Spitze der oberen
Lasche an der unteren Lasche. ②
3) Sichern Sie die obere Lasche, indem
Sie die zwei Teile der unteren Lasche
zusammendrücken. ③
③
Page 63

En
De
Fr
Es
It
Ru
No
Se
Fi
Nl
Dk
Ro
Pl
Hu
Cz
63
Page 64

En
De
Fr
Es
It
Ru
No
Se
Fi
Nl
Dk
Ro
Pl
Hu
Cz
Précautions avant utilisation ................................. 65-67
Caractéristiques principales ................................... 68-69
Nomenclature/composition .......................................... 70
Remplacement des piles ................................................. 71
Écran interne ................................................................. 72-73
Mode d'emploi ............................................................. 74-76
Caractéristiques ........................................................... 77-78
Écran externe ................................................................ 79-81
Utilisation et affichage interne ............................... 82-88
Autres...................................................................................... 89
Guide de dépistage des pannes/réparations .... 90-91
Français
SOMMAIRE
Comment utiliser l’étui du télémètre .......................... 92
64
Page 65

Précautions avant utilisation
Merci d’avoir choisi le Nikon Laser Forestry Pro.
Ce télémètre laser hautes performances est doté d'une nouvelle fonction de mesure d'angle en plus de
la fonction existante de mesure de la distance linéaire, pour une pratique encore plus agréable des
sports et activités en extérieur. (Le Nikon Laser Forestry Pro peut aussi mesurer la distance horizontale
à une cible ainsi que sa hauteur).
Respectez à la lettre les instructions suivantes pour une utilisation adéquate de votre matériel et pour
éviter tout risque d'accidents. Avant d’utiliser l'appareil, lisez attentivement les "PRÉCAUTIONS DE
SÉCURITÉ" et le mode d’emploi qui accompagnent l'appareil.
L'emploi de commandes, réglages ou de procédures autres que ceux spécifiés dans ce manuel peut
entraîner une exposition à des rayonnements dangereux.
Conservez ces instructions à portée de la main pour référence.
• Les spécifications et la conception sont sujettes à modification sans préavis.
• Aucune reproduction totale ou partielle de ce mode d'emploi, sous quelque forme que ce soit, (à
l'exception de brèves citations dans des revues ou magazines) ne peut être faite sans autorisation
écrite de NIKON VISION CO., LTD.
En
De
Fr
Es
It
Ru
No
Se
Fi
Nl
Dk
Ro
Pl
Hu
Cz
65
Page 66

Précautions avant utilisation
Respectez à la lettre les
En
instructions suivantes pour une
De
utilisation adéquate de votre
Fr
matériel et pour éviter tout risque
d'accident. Avant d’utiliser
Es
l'appareil, lisez attentivement les
It
"PRÉCAUTIONS DE SÉCURITÉ ET
D’EMPLOI" et le mode d’emploi
Ru
qui accompagnent l'appareil.
No
Conservez ces instructions à
Se
portée de main pour référence.
Fi
ATTENTION
Ce symbole avertit qu'une utilisation
Nl
incorrecte qui ignore les points
Dk
mentionnés peut se traduire par la mort
Ro
ou de graves blessures.
Pl
PRÉCAUTION
Ce symbole avertit qu'une utilisation
Hu
incorrecte qui ignore les points
Cz
mentionnés peut se traduire par de
sérieuses blessures ou des dégâts
matériels.
PRÉCAUTIONS DE SÉCURITÉ ET
D’EMPLOI
Attention
• Ne regardez pas directement le faisceau
laser ni le soleil quand vous utilisez le
Nikon Laser Forestry Pro.
• N'appuyez pas sur le bouton POWER
lorsque vous regardez l'optique à partir
du côté objectif.
• Ne visez pas les yeux.
66
• N'utilisez pas l'appareil en même temps
que d'autres instruments d'optique
tels que des lentilles ou des jumelles.
L'utilisation d'un instrument d'optique en
même temps que le Nikon Laser Forestry
Pro augmente les risques de blessures
oculaires.
• Ne démontez pas le Nikon Laser Forestry
Pro. Le laser émetteur pourrait être
nocif pour votre santé. Un appareil qui
a été démonté n'est plus garanti par le
fabricant.
• Si le couvercle du boîtier du Nikon Laser
Forestry Pro est endommagé, ou s'il émet
un bruit étrange en raison d'une chute ou
d'une autre cause, retirez immédiatement
la pile et cessez d'utiliser l'appareil.
Précautions
• Si vous n'utilisez pas le Nikon Laser
Forestry Pro, n'appuyez pas sur le bouton
POWER.
• Ne laissez pas le Nikon Laser Forestry Pro
à portée des jeunes enfants.
• La pluie, l'eau, le sable et la boue doivent
être retirés de la surface du boîtier du
télémètre dès que possible au moyen
d'un chiffon doux, propre et sec.
• Bien que le Nikon Laser Forestry Pro soit
étanche, il n'est pas conçu pour être
utilisé sous l'eau.
• Ne balancez pas le Nikon Laser Forestry
Pro par sa courroie. Il pourrait heurter et
blesser quelqu'un.
• Ne conservez pas le Nikon Laser Forestry
Pro sur une surface instable, car il pourrait
tomber, s'endommager ou provoquer des
blessures.
• N'utilisez pas le Nikon Laser Forestry Pro
en marchant. Vous pourriez trébucher sur
quelque chose et vous blesser.
• Ne laissez pas le Nikon Laser Forestry Pro
dans une voiture par temps chaud ou
ensoleillé, ou près d’un appareil
produisant de la chaleur. Cela pourrait
l'endommager ou affecter son
fonctionnement.
• Ne conservez pas le Nikon Laser Forestry
Pro à la lumière directe du soleil. Les
rayons UV et la chaleur excessive
peuvent affecter son fonctionnement,
voire l'endommager.
• En cas de changement de température
brutal, de l’eau peut se condenser sur
la surface des lentilles du Nikon Laser
Forestry Pro. N'utilisez pas l'appareil tant
que la condensation n'a pas disparu.
• N'utilisez pas d'alcool pour nettoyer le
boîtier.
• Ne laissez pas le sac en polyéthylène
utilisé pour l’emballage à des enfants.
• Faites attention à ce que les enfants en
bas âge n'avalent pas par inadvertance
l'œilleton. Consultez immédiatement un
médecin si cela se produisait.
• Si vous utilisez l'oeilleton en
caoutchouc pendant longtemps, il
peut provoquer une irritation cutanée.
En cas d’inflammation, consultez
immédiatement un médecin.
Page 67

• Lorsque vous transportez le Nikon
EU 電池指令表記
WEEE
WEEE
Laser Forestry Pro, veillez à le ranger
dans sa housse.
• Si le Nikon Laser Forestry Pro ne
fonctionne pas correctement, cessez
de l'utiliser et consultez le tableau
de dépistage des pannes. Si vous ne
pouvez pas résoudre le problème,
consultez le revendeur qui vous dira où
envoyer l'appareil pour réparation.
SOINS ET ENTRETIEN
Objectif
• Servez-vous d’un pinceau doux non gras
pour dépoussiérer la surface des lentilles.
• Pour éliminer les taches ou saletés
comme les traces de doigts de la
surface des lentilles, essuyez
doucement avec un chiffon doux et
propre ou du papier pour lentilles non
gras de bonne qualité.
Un peu d’alcool pur (non dénaturé)
peut être utilisé pour éliminer les
taches tenaces. L’emploi de velours ou
d’un mouchoir en papier n’est pas
recommandé, parce qu’ils pourraient
rayer la surface des lentilles. Un chiffon
utilisé pour nettoyer le boîtier ne doit
pas être réutilisé sur la surface des
lentilles.
Boîtier principal
• Nettoyez la surface du boîtier au
moyen d'un chiffon doux, propre et
sec. N'utilisez ni benzène, ni diluant, ni
agent organique qui peuvent décolorer
ou endommager le caoutchouc.
Stockage
• De la condensation ou des moisissures
peuvent se former sur la surface des
lentilles en cas de forte humidité. Pour
cette raison, rangez le Nikon Laser
Forestry Pro dans un endroit frais et sec.
Après utilisation un jour de pluie ou
pendant la nuit, laissez le sécher
entièrement à température ambiante
avant de le ranger dans un endroit frais
et sec.
NOTES SUR LES PILES AU LITHIUM
Si elles ne sont pas convenablement
manipulées, elles peuvent se rompre et
fuir, provoquant la corrosion de l'appareil
et des taches sur les vêtements. Veillez à
respecter ce qui suit:
• Installez les piles de manière que les
pôles + et - soient correctement
positionnés.
• Les piles doivent être retirées quand
elles sont usagées et suite à toute
longue période de non-utilisation.
• Utilisez toujours le même type de piles.
• En cas de contact de l'électrolyte avec les
yeux ou de la peau, rincez
abondamment à l'eau. En cas
d'ingestion, consultez immédiatement
un médecin.
• Ne court-circuitez pas les bornes des
piles.
• Ne transportez pas les piles dans le
même sac ou la même poche que des
clés ou des pièces de monnaie. Cela
peut provoquer une surchauffe des
piles ou leur court-circuit.
• Ne jetez pas les piles dans un feu ni
dans l'eau. Ne démontez pas les piles.
• Ne chargez pas les piles.
• N'exposez pas les piles à des
températures extrêmes.
• N'exposez pas les piles à des vibrations
ou des chocs importants.
En
De
Fr
Es
It
Ru
No
Se
Fi
Nl
Dk
Ro
Pl
Hu
Cz
67
Page 68

Caractéristiques principales
En
• Plage de mesure de la distance linéaire: 10-500 mètres/11-550
De
yards/33-999 pieds
Fr
• Plage de mesure de l'angle: ± 89°
• Etapes d'affichage de la mesure de distance:
Es
[Écran interne]:
It
(Distance linéaire)
Ru
No
Se
Fi
Nl
Dk
Ro
Pl
Hu
Cz
0,5 mètre/yard, 1 pied
(La mesure de la distance est inférieure à 100 mètres/
yards)
1,0 mètre/yard, 1 pied
(La mesure de la distance est égale ou supérieure à
100 mètres/yards/pieds)
(Distance horizontale/Hauteur)
0,2 mètre/yard, 0,5 pied
(La mesure de la distance est inférieure à 100 mètres/
yards/pieds)
1,0 mètre/yard, 1 pied
(La mesure de la distance est égale ou supérieure à
100 mètres/yards/pieds)
(Angle)
0,1° (-10° — 10°)
1,0° ( ≦ -10°, 10° ≦ )
[Écran externe]
(Distance linéaire)
(Distance horizontale/ Hauteur)
(Angle)
68
0,5 mètre/yard, 1 pied
0,2 mètre/yard, 0,5 pied
0,1°
• Système de mesure optique 6x à visée simple.
• Quantifie la distance horizontale à la cible et sa hauteur en
relation avec le niveau du télémètre en mesurant la distance
linéaire et l'angle.
• Mesure l'écart vertical (la hauteur entre deux points) les modes mesure de l'écart vertical et des 3 points sont
disponibles.
• Les résultats s’affichent à la fois sur un écran LCD interne et
un écran LCD externe. L’écran LCD externe affiche tous les
résultats simultanément.
• Le système de bascule de priorité de cible vous permet
d'accorder facilement la situation de mesure.
• Conception étanche (N'EST PAS conçu pour un usage sous
l'eau).
• Laser EN/IEC de Classe 1M, invisible et sans danger pour les
yeux.
• Affichage du résultat dans les 30 secondes.
• Conception compacte, légère et ergonomique.
• Arrêt automatique (après environ 30 secondes de nonutilisation).
• Réglage par défaut sur « Dernière utilisation ».
• Fonction de mesure continue pendant 20 secondes environ.
Le Nikon Laser Forestry Pro émet des impulsions invisibles
sans danger pour les yeux, qui sont renvoyées de la cible
visée vers son récepteur optique. Des circuits de charge précis
sophistiqués sont utilisés pour calculer instantanément la
distance, en mesurant le temps requis pour chaque impulsion
pour aller du télémètre à la cible et retour. La réflectivité
du laser et les résultats des mesures peuvent dépendre des
conditions météorologiques, ainsi que de la couleur, de l'aspect
de surface, de la taille, de la forme ou d'autres caractéristiques
de la cible.
Page 69

Les facteurs suivants assurent une meilleure portée et précision:
• Utilisation de nuit
• Temps couvert
• Cibles très colorées
• Cibles à surface très réfléchissante
• Cibles à surface brillante
• Cibles de grande taille
• Cibles visées à 90 degrés
Les mesures prises dans les cas suivants peuvent s'avérer imprécises ou erronées:
• Cible mince ou de petite taille
• Cibles à surface réfléchissante diffuse
• Cible qui ne réfléchit pas le rayon laser au télémètre (verre, miroir, etc.)
• Cible noire
• Cible de profondeur variable
• En cas de neige, de pluie ou de brouillard
• Cible visée à travers un verre
• La surface réfléchissante est visée de biais
• Cible mobile
• Un obstacle se déplace devant la cible
• Cible visée sur une surface d'eau
En
De
Fr
Es
It
Ru
No
Se
Fi
Nl
Dk
Ro
Pl
Hu
Cz
69
Page 70

Nomenclature/composition
En
De
Fr
Es
It
Ru
No
Se
Fi
Nl
Dk
Ro
Pl
Hu
Cz
!e
Corps .............................................x1
Housse souple (CCN) ................x1
70
5
4
3
1
2
!w
Composition
Courroie .......................................x1
Pile au lithium (CR2) ................x1
1Objectif monoculaire/
ouverture de l'émetteur laser
2Ouverture du détecteur laser
3Écran LCD extérieur
4Bouton MODE
5Bouton POWER
6
6Oculaire monoculaire 6x
7Œilleton/bague de réglage dioptrique
8Index dioptrique
7
9Œillet pour sangle
8
!pCouvercle du logement des piles
!qIndication "Ouvert/Fermé" pour le
couvercle du logement des piles
9
!wRéférence de l'appareil/étiquette
signalétique
!p
!q
!e Étiquette d'avertissement relatif au
laser
Page 71

Remplacement des piles
•
Type de pile: Pile 3V CR2 au lithium
•
Indicateur d'état de la pile
clignotant : Charge faible, remplacez la pile.
éteint : Charge épuisée, remplacez immédiatement la pile.
clignote sur l'écran LCD : Pour signaler que la pile doit être remplacée.
1 Ouvrez le couvercle du logement de la pile
À l’aide de la partie charnue du pouce ou d’une pièce de monnaie dans la partie encastrée du couvercle du logement
des piles, faites tourner le couvercle dans le sens de la flèche Ouvert/Fermé. Il peut ne pas s’ouvrir facilement à cause
du joint de caoutchouc prévu pour l'étanchéité à l'eau.
2 Remplacez la pile usagée par une pile neuve
Installez la pile neuve en respectant la polarité [+] et [-] de l'indication « Battery installation » gravée dans le logement
de la pile. (Introduisez la pile en dirigeant le pôle [+] vers l'intérieur du logement). [Le Nikon Laser Forestry Pro ne
fonctionne pas si la pile n'est pas installée correctement].
3 Fermez le couvercle du logement de la pile
Alignez le repère Ouvert/Fermé et le point blanc et introduisez le couvercle du logement de la pile. À l’aide de la
partie charnue du pouce ou d’une pièce de monnaie, tournez le couvercle dans la direction inverse de la flèche. Il est
possible qu’il ne se ferme pas facilement à cause du joint de caoutchouc prévu pour l’étanchéité à l’eau, ne cessez pas
de tourner jusqu'à l'arrêt du couvercle. Vérifiez que le couvercle est bien fermé.
•
Durée de vie de la pile
Fonctionnement continu: Environ 13.000 fois (à 20°C)
La mise au point de la cible, la mesure et la coupure automatique sont incluses en un seul cycle. Cette valeur peut
varier selon la température et d'autres facteurs tels que forme, couleur, etc. de la cible.
* Le Nikon Laser Forestry Pro est livré avec une pile 3V CR2 au lithium. Toutefois, à cause de la décharge naturelle, la durée de vie de la pile
sera probablement plus courte que la valeur ci-dessus.
* Remplacez la pile si jamais le Nikon Laser Forestry Pro est immergé ou si de l'eau pénètre dans le logement de la pile.
: Charge suffisante pour le fonctionnement.
: Charge faible.
En
De
Fr
Es
It
Ru
No
Se
Fi
Nl
Dk
Ro
Pl
Hu
Cz
71
Page 72

Écran interne
En
1.
『 』
De
『
Fr
『
Es
It
2.
『 』
Ru
Indique sous forme numérique la distance mesurée en mètres/yards/pieds et les angles en
No
degrés. Indique aussi l'état de la mesure tel que « Measurement in progress » (mesure en
cours), « Measurement unsuccessful » (échec de la mesure) ou « Unable to measure » (mesure
Se
impossible).
Fi
Nl
<Exemples de résultats de mesure>
(Distance)
Dk
Affichage des résultats : ( ≧ 100 m/yards/pieds) par ex. 234 mètres =
Ro
Affichage des résultats : ( < 100 m/yards/pieds)
Pl
Affichage des résultats : ( < 100 m/yards/pieds)
Hu
(Angle)
Affichage des résultats : ( ≦ -10˚et ≧ 10˚) par ex. 36˚
Cz
Affichage des résultats : (-10˚ <et <10˚) par ex. 3,5˚
『
『
3.
『 』
4.
『 』
72
Visée de la cible/système de rayonnement laser
-
Visez la cible. Positionnez la cible au centre du réticule.
』
-
S'affiche lorsque le laser est utilisé pour une mesure. (Reste affiché pendant une
』
-
mesure unique. Clignote lors de mesures en continu).
Attention: ne regardez pas dans l'objectif lorsque ce symbole est affiché.
Affichage de l'état distance/mesure
-
76,5 yards
par ex.
82 pieds
par ex.
par ex. -29˚
par ex. -7,0˚
-
Mesure en cours
』
-
Échec de la mesure ou mesure de distance impossible
』
Unités d'affichage
Indique, en mètres, la distance en cours de mesure.
』
『
『
Indique, en yards, la distance en cours de mesure.
』
[Aucune unité affichée] indique, en pieds, la distance en cours de mesure.
-
Indique l'état de la pile. (Reportez-vous à la section «Remplacement des piles».)
『
『
=
『 』
=
= 『
= 『
『
=
= 『
』
』
』
』
』
』
Page 73

5.
『 』 Modes affichés
(Pour l'utilisation et les exemples, reportez-vous à « Écran externe et Utilisation et affichage interne ».)
Mode Distance linéaire
Calcule la distance linéaire à la cible et affiche le résultat.
』
『
Mode Distance horizontale
『
résultat.
Calcule la distance horizontale de la cible en mesurant la distance linéaire et l'angle et affiche le
』
Mode Hauteur
『
Mesure la hauteur de la cible par rapport à l'horizontale et affiche le résultat.
』
Mode Écart vertical (hauteur entre deux points)
『
Utilise les données de la distance linéaire et de l'angle de deux points pour calculer et afficher
』
l'écart vertical (hauteur entre deux points.)
Mode mesure de trois points (hauteur entre deux points)
『
Utilisez les données de distance horizontale jusque la cible (1er point) et les données d'angle de
』
deux point (2e et 3e points) pour calculer et afficher l'écart vertical (hauteur entre le 2e et le 3e
points).
Mode Angle
Mesure l'angle de la cible par rapport à l'horizontale et affiche le résultat.
』
『
6.
『 』
Mode Priorité à la cible
Mode Priorité à la première cible
『
Indique que le mode Priorité à la cible proche est adopté.
』
Mode Priorité à la cible distante
Indique que le mode Priorité à la cible distante est adopté.
』
Remarque: si le mode de mesure d'angle est adopté (le symbole [Ang] est alors affiché), le mode Priorité à la cible n'est
pas affiché et les symboles [1st] ou [Dst] s'éteignent.
Bien que l'écran LCD ait été fabriqué grâce à la technologie la plus avancée, il est impossible d'ôter toute la poussière.
Lorsque vous utilisez cet appareil, l'écran LCD est agrandi par le fort grossissement de l'oculaire et la poussière peut
apparaître comme un défaut. La précision de la mesure n'en est pas diminuée pour autant.
『
En
De
Fr
Es
It
Ru
No
Se
Fi
Nl
Dk
Ro
Pl
Hu
Cz
73
Page 74

Mode d'emploi
En
Attention: l'emploi de commandes, réglages ou
de procédures autres que ceux spécifiés dans ce
De
mode d'emploi peut entraîner une exposition à
Fr
des rayonnements dangereux
Es
1. Installez une pile dans le logement prévu à cet effet.
(Reportez-vous à « Remplacement des piles »)
It
2. Œilleton en caoutchouc
Ru
Porteurs de lunettes : démontez les œilletons.
Non porteurs de lunettes : ne démontez pas les œilletons.
No
3. Correction dioptrique
Se
Réglez la correction dioptrique pour obtenir une image nette
sur l'écran LCD.
Fi
Tournez d'abord la bague de réglage dioptrique dans le sens
Nl
inverse des aiguilles d'une montre jusqu'à ce qu'elle soit
totalement en butée. Ensuite, mettez l'appareil sous tension
Dk
pour activer l'écran LCD quand vous regardez dans le Nikon
Ro
Laser Forestry Pro. Tournez la bague de réglage dioptrique
dans le sens des aiguilles d'une montre jusqu'à ce que
Pl
l'affichage soit net.
Si la correction dioptrique ne correspond pas à votre vue, vous
Hu
aurez des difficultés à effectuer la mise au point sur le sujet.
Cz
4. Mesure
Remarque : pour l'affichage extérieur LCD, reportez-vous à
Remarque : Une pression continue sur le bouton POWER
Avant de procéder à une mesure, vérifiez les réglages tels les
modes d'unités, de mesure/affichage et de priorité.
◎: pour les réglages, reportez-vous à la section
74
« Affichages extérieur et intérieur ».
provoque l'affichage de tous les symboles sur
l'écran LCD. Quand vous relâchez la pression sur le
bouton POWER, le dernier réglage utilisé s'affiche.
(Si vous appuyez brièvement sur le bouton POWER
puis relâchez la pression, l'écran LCD peut afficher
le dernier réglage utilisé sans afficher tous les
symboles. Il ne s'agit pas d'un dysfonctionnement
ni d'un problème).
correspondante de ce mode d'emploi.
POWER
L'écran LCD s'éclaire
Alignez le réticule
sur la cible
Mesurez à nouveau
Échec de la mesure
Mesure impossible
L'indication
demeure
visible pendant
30 secondes.
Arrêt: les indications figurant sur l'écran LCD s'éteignent.
POWER
s'affiche
ou
※
Les résultats sont
convertis dans le mode
choisi, puis affichés.
30 secondes s'écoulent sans utilisation *
◎
Choisissez les modes
désirés
☆
Lors de la mesure en
continu de la distance
ou de l'angle (jusqu'à 20
secondes), maintenez la
pression sur le bouton.
Mesure
réussie
MODE
Page 75

※ Reportez-vous à la section « Affichages externe et interne »
pour de plus amples détails sur les modes opératoires et les
résultats selon les modes de fonctionnement.
*L'alimentation de l'appareil se coupe automatiquement 30
secondes après la dernière action.
☆【Mode de mesure en continu】
En maintenant la pression d'un doigt sur le bouton
POWER, vous provoquez une mesure continue
pendant 20 secondes.
Clignote lors des mesures.
Lors de la mesure de la distance d'un drapeau sur un terrain
de golf, par exemple, utilisez les modes de mesure Priorité à la
cible proche et Mesure en continu pour vous faciliter la tâche.
Lorsqu'il ne se trouve aucun objet entre vous et le drapeau, la
plus petite valeur est la distance au drapeau que vous visez.
5. Sélection de l'unité d'affichage (le réglage par défaut est le
pied).
Mètre [ ]
Yard
[ ]
Pied
[
]
1. Assurez-vous que l'écran LCD est éclairé.
2. Maintenez la pression d'un doigt sur le bouton
pendant environ 2 secondes.
3. Lorsque la nouvelle unité d'affichage est adoptée, relâchez la
pression sur le bouton
.
4. Répétez les opérations 2 et 3 jusqu'à ce que le mode que
vous souhaitez adopter s'affiche.
5. Après adoption d'une unité d'affichage, les résultats sont
convertis et affichés dans l'unité choisie.
6. Passage entre les modes mesure et affichage (le réglage par
défaut est le mode de mesure de distance linéaire)
Distance linéaire [ ]
Hauteur [ ]
Écart vertical
(hauteur entre les deux
points)[ ]
En appuyant sur le bouton MODE, les modes changent dans
l'ordre affiché ci-dessus.
Distance horizontale [ ]
Angle [ ]
Mesure des trois points
[ ]
1. Assurez-vous que l'écran LCD est éclairé.
2. Appuyez sur le bouton
3. Relâchez le bouton
4. Répétez les opérations 2 et 3 jusqu'à ce que le mode que
vous souhaitez adopter s'affiche.
5. Changer de mode après la mesure convertit les résultats
dans le nouveau mode.
6. Après avoir choisi un mode, les mesures sont effectuées
dans le mode adopté.
dans la demi-seconde qui suit.
pour changer de mode.
En
De
Fr
Es
It
Ru
No
Se
Fi
Nl
Dk
Ro
Pl
Hu
Cz
75
Page 76

Mode d'emploi
En
7. Passage entre les modes Priorité à la cible (le réglage par
défaut est le mode Priorité à la cible distante).
De
Priorité à la cible proche
Fr
Es
It
Ru
No
Se
Fi
Nl
Dk
Ro
Pl
Hu
Cz
[ ]
1. L'écran LCD doit être éclairé.
2. Maintenez la pression d'un doigt sur le bouton
appuyez sur le bouton dans la demi-seconde qui
suit et maintenez la pression.
Remarque: si vous n'appuyez pas sur le bouton
3. Maintenez toujours la pression sur ces deux boutons
(plus de 2 secondes) jusqu'à ce que le mode Priorité à la
cible proche soit remplacé par le mode Priorité à la cible
distante ou inversement.
Remarque: si vous n'appuyez pas sur les boutons dans
Remarque: si le passage d'un mode à l'autre échoue,
dans la demi-seconde qui suit, l'unité
d'affichage (m/yd/pieds) est modifiée.
l'ordre prescrit, le changement de mode n'a pas
lieu.
répétez à partir de 2.
4. Relâchez les boutons.
Remarque: comme le mode Priorité à la cible n'est pas
affiché lorsque le mode Angle est adopté,
le basculement se fait mais la confirmation
visuelle est impossible. Adoptez un autre
mode de mesure pour savoir ce qu'il en est.
[Décider quelle cible doit être prioritaire]
Lors de l'obtention de différents résultats à partir d'une seule
opération de mesure, le Nikon Laser Forestry Pro affiche la
distance à la cible la plus éloignée sur l'écran LCD si vous utilisez
le mode Priorité à la cible distante, tandis que le mode Priorité à
la cible proche affiche la distance à la cible la plus proche.
76
Priorité à la cible distante
[ ]
Par ex.: Lors de la mesure d'un arbre placé devant une maison :
Distance à la cible
"115 m" (distance de l'arbre) s'affiche en mode Priorité à la cible
proche et "128 m" (distance de la maison) en mode Priorité à la
cible distante. Le mode Priorité à la cible proche est utile pour le
puis
golf tandis que le mode Priorité à la cible distante convient à la
chasse en forêt touffue.
8. Indication de charge faible
clignotant indique que la charge restante de la pile est
faible et qu'elle doit être remplacée. (Reportez-vous à la section
Arbre Clôture Maison
115 m 123 m 128 m
« Remplacement des piles »).
Page 77

Caractéristiques
Système de mesure
Affichage du mode de mesure
Plage de mesure de la distance/ angle
Distance Angle
Étapes d'affichage
Système Sélection de priorité cible proche/distante
Système optique
Type Monoculaire à prisme en toit
Grossissement (x) 6
Diamètre effectif de l’objectif (mm) ø21
Champ angulaire de vision (réel) (°) 6,0
Dégagement oculaire (mm) 18,2
Pupille de sortie (mm) ø3,5
Réglage dioptrique ±4 m
Distance linéaire : Act
Distance horizontale : Hor
Hauteur : Hgt
Angle : Ang
Écart ver tical (distance verticale entre deux points) : Hgt + Hgt2
Mesure des trois point : Hor + Hgt + Hgt2
Distance :
10-500 mètres/11-550 yards/33-999 pieds
(999 pieds : 304,5 mètres/333 yards)
Angle : ± 89°
Act
(Distance linéaire)
Interne
Hor
(Distance horizontale)
Hgt (Hauteur)
0,5 mètre/yard, 1,0 pied ( < 100 mètres/yards/pieds)
1,0 mètre/yard, 1,0 pied ( ≧ 100 mètres/yards/pieds)
0,2 mètre/yard, 0,5 pied ( < 100 mètres/yards/pieds)
1,0 mètre/yard 1,0 pied ( ≧ 100 mètres/yards/pieds)
0,2 mètre/yard 0,5 pied ( < 100 mètres/yards/pieds)
1,0 mètre/yard 1,0 pied ( ≧ 100 mètres/yards/pieds)
Ang (Angle) 0,1° ( < 10°), 1,0°( ≧ 10°)
Distance linéaire 0,5 mètre/yard, 1 pied
Externe
Distance horizontale 0,2 mètre/yard, 0,5 pied
Hauteur 0,2 mètre/yard, 0,5 pied
Angle 0,1°
-1
En
De
Fr
Es
It
Ru
No
Se
Fi
Nl
Dk
Ro
Pl
Hu
Cz
77
Page 78

Caractéristiques
En
Autres
Température de fonctionnement (˚C) -10 — +50
De
Source d'alimentation
Fr
Dimensions (L x H x P) (mm) 130 × 69 × 45
Es
Poids (g) Environ 210 (sans la pile)
It
Structure
Ru
No
Classification laser
Se
EMC FCC Chapitre15 Sous-PartieB classe B, directive EU:EMC, AS/NZS, VCCI classeB, CU TR 020
Fi
Environnement RoHS, WEEE
Nl
Laser
Dk
Longueur d'onde (nm) 870
Durée d'une impulsion (ns) 14
Ro
Puissance de sortie (W) 15
Pl
Divergence du faisceau (mrad) Verticale: 2.5, horizontale: 0.025
Hu
Humidité ambiante de fonctionnement (%HR) 80 (sans condensation)
Cz
* Modèles étanches
Le Nikon Laser Forestry Pro est étanche et ne subira pas de dégâts s'il est immergé ou tombe dans l'eau jusqu'à une profondeur
maximale de 1 mètre et s'il n'y demeure pas plus de 10 minutes.
Le Nikon Laser Forestry Pro offre les avantages suivants:
• Utilisable en présence de forte humidité, de poussière et de pluie sans risques de dommages.
• Rempli d'azote, ce qui le rend résistant à la condensation et aux moisissures.
Observez les consignes suivantes lors de l'utilisation d'un Nikon Laser Forestry Pro.
• Le dispositif ne doit pas être utilisé ni maintenu sous l'eau courante.
• Toute humidité doit être supprimée avant de régler les pièces mobiles (oculaire, etc.) du Nikon Laser Forestry Pro pour éviter de
l'endommager et pour des raisons de sécurité.
Pour conserver le Nikon Laser Forestry Pro en excellent état, Nikon Vision conseille un entretien régulier par un revendeur agréé.
** Le logement de la pile est protégé de l'eau mais il n'est pas étanche. De l'eau peut pénétrer dans l'appareil si le Nikon Laser
Forestry Pro est immergé. En ce cas, essuyez soigneusement le logement de la pile et attendez qu'il soit parfaitement sec.
78
1 pile CR2 au lithium, 3V CC
Coupure automatique de l'alimentation (environ 30 secondes)
Boîtier: étanche (peut être immergé dans un mètre d'eau pendant 10 minutes)*
(Logement de la pile : étanche à l'eau**)
IEC60825-1 : Classe 1M / Produit laser
FDA/21 CFR Partie 1040.10 : Produit laser de classe 1
Page 79

Écran externe
[Mise sous tension]
Après mise sous tension, les diodes
internes et externes s'éclairent
jusqu'à ce que le bouton POWER ou
MODE soit actionné.
[Indication de la mise hors tension prochaine]
Après 30 secondes sans action,
l'appareil se met hors tension.
Environ une seconde avant la mise
hors tension, l'indication ci-contre
apparaît.
1 Mesure d'un point
[Résultats]
Distance linéaire Distance horizontale
Hauteur Angle Unité
Après la mesure, les données
de "distance linéaire, distance
horizontale, hauteur et angle"
s'affichent. L'unité peut être le mètre,
le yard ou le pied. L'unité d'angle est le
degré (°).
[ m ] : mètre
[ YD ] : yard
[ ft ] : pied
[Pendant la mesure]
Si la cible est au-dessus de
l'horizon
Si la cible est au-dessous de
l'horizon
[Échec de la mesure ou mesure impossible]
Si la cible est au-dessus de
l'horizon
[Mesure terminée]
Si la cible est au-dessus de
l'horizon
Si la cible est au-dessous de
l'horizon
Le signe "- (moins)"
n'accompagne pas les valeurs
négatives.
Si la cible est au-dessous de
l'horizon
En
De
Fr
Es
It
Ru
No
Se
Fi
Nl
Dk
Ro
Pl
Hu
Cz
79
Page 80

Écran externe
En
Mode Écart vertical (hauteur entre deux points)
De
[Résultats]
Fr
Es
It
Ru
No
Distance linéaire (au 1er point)
Se
Distance linéaire (au 2e point)
Fi
Écart vertical (hauteur entre les deux points)
Angle entre les deux points
Nl
Unité
Dk
Ro
[Mesure du 1er point]
Pl
Hu
Cz
Après la mesure de deux points,
la «Distance linéaire entre ces
points» et «l'Écart vertical (hauteur)
entre ces points et l'Angle entre ces
points», sont affichés. L'unité peut
être le mètre, le yard ou le pied.
L'unité d'angle est le degré (°).
[Échec de la mesure du 1er point]
[Mesure du 2e point]
Bien que le point soit
au-dessous, il est affiché
sur l'écran comme étant
au-dessus.
[Échec de la mesure du 2e point]
Les mesures d'angle
n'échouent jamais.
[Affichage du résultat d'écart vertical (hauteur entre deux
points) et du 2e point]
[Résultat pour le 1er point]
80
Les mesures d'angle
n'échouent jamais.
Écart vertical
(hauteur entre les deux
points)
Après l'affichage de l'écart
vertical (hauteur entre deux
points), une pression sur
le bouton MODE affiche le
résultat pour le 2e point.
Page 81

Mode mesure de trois points (hauteur entre deux points)
[Résultats]
Écart vertical (hauteur entre les deux points)
Angle des deux points
Unité
[Mesure du 1er point]
Une fois les mesures de la
distance horizontale, des deux
angles et de la hauteur prises, les
valeurs «écart vertical (hauteur)
et angle entre deux points» sont
affichées. L'unité peut être le
mètre, le yard ou le pied. L'unité
d'angle est le degré (°).
[Échec de la mesure du 1er point]
[Mesure du 2e point]
[Résultats pour le 2e point]
Lorsque vous mesurez les 2e et 3e points, prenez garde que
les angles se situent entre –75˚ et +75° à partir du niveau
horizontal. Si vous ne parvenez pas à prendre la mesure, c’est
que l’angle est supérieur ±75°.
[Mesure du 3e point]
[Résultat pour le 3e point]
En
De
Fr
Es
It
Ru
No
Se
Fi
Nl
Dk
Ro
Pl
Hu
Cz
[Résultat pour le 1er point]
Affiche la distance horizontale.
Lorsque vous mesurez les 2e et 3e points, prenez garde que
les angles se situent entre –75˚ et +75° à partir du niveau
horizontal. Si vous ne parvenez pas à prendre la mesure, c’est
que l’angle est supérieur ±75°.
81
Page 82

Utilisation et affichage interne
En
【1 • 2】 Mise sous/hors tension et paramètres des modes
De
Fr
Es
It
Ru
No
Se
Fi
Nl
Dk
Ro
Pl
Hu
Cz
Utilisation/résultats
1 Mise sous tension
Attente de mesure
2 Sélection et configuration
des modes
9 Mise hors tension
82
Affichage initial
Attente de mesure
(1) Distance linéaire 【3】
(2) Distance horizontale 【4】
(3) Hauteur (par rapport à l'hor izontale)【5】
(4) Angle (par rapport à l'horizontale)【6】 MODE
(5)
(6)
Revenez à 2-(1) Distance linéaire, puis répétez.
Reportez-vous à la section correspondante de ce mode d'emploi qui traite de chaque mode et affichage.
Quelle que soit la situation, 30 sec. après la dernière
action, l'appareil se met hors tension.
Écart vertical
(hauteur entre deux points)【7】
Mesure de trois points 【8】
(hauteur entre deux points)
Tâche
Bouton
POWER
MODE
MODE
MODE
MODE
30 sec.
s'écoulent sans
utilisation
Affichage
Tous les symboles (tandis
qu'une pression est exercée)
Symbole du dernier mode
utilisé
clignote
clignote
Exemples
d'affichage
Sans objet
Sans objet
Sans objet
Sans objet
Sans objet
Sans objet
Sans objet
Page 83

【3】 Mode Distance linéaire
Utilisation/résultats Tâche Bouton Affichage
3 Mesure en mode Distance linéaire
Recherche de la cible
3-1
(alignez le réticule sur la
cible)
Mesure
(le symbole de
3-2
rayonnement laser
s'affiche.)
3-3 Échec de la mesure Répétez l'opération 3-1.
3-4 Mesure satisfaisante
9 Mise hors tension
Distance linéaire
Si vous appuyez sur le bouton POWER,
la mesure en continu est possible
pendant 20 secondes.
(Après la mesure, les indications de 3-3
Quelle que soit la situation, 30 sec. après
la dernière action, l'appareil se met hors
apparaissent.)
Distance linéaire
Suivie par 3-1.
tension.
POWER
30 sec.
s'écoulent sans
utilisation
Exemples d'affichage
mètre yard pied
Angle pos. (º) Angle nég. (º)
206 225
En
De
Fr
Es
It
Ru
No
Se
Fi
Nl
Dk
Ro
Pl
Hu
Cz
83
Page 84

Utilisation et affichage interne
En
【4】Mode Distance Horizontale
De
Fr
Es
It
Ru
No
Se
Fi
Nl
Dk
Ro
Pl
Hu
Cz
Utilisation/résultats Tâche Bouton Affichage
4 Mesure en mode Distance Horizontale
Recherche de la cible
4-1
(alignez le réticule sur la cible)
4-2
4-3 Échec de la mesure Répétez l'opération 4-1.
4-4 Mesure satisfaisante
9 M ise hors tension
Mesure
(le symbole de rayonnement
laser s'affiche).
Distance Horizontale
Si vous appuyez sur le bouton POWER,
la mesure en continu est possible
pendant 20 secondes.
(Après la mesure, les indications de 4-3
Quelle que soit la situation, 30 sec. après
la dernière action, l'appareil se met hors
apparaissent).
Distance Horizontale
Suivie par 4-1.
tension.
84
POWER
30 sec.
s'écoulent sans
utilisation
Exemples d'affichage
mètre yard pied
Angle pos. (º) Angle nég. (º)
201 220 660
Page 85

【5】Mode Hauteur
Utilisation/résultats Tâche Bouton Affichage
5 Mesure en Mode Hauteur
Recherche de la cible
5-1
(alignez le réticule sur la
cible)
Mesure
(le symbole de
5-2
rayonnement laser
s'affiche.)
5-3 Échec de la mesure Répétez l'opération 5-1.
5-4 Mesure satisfaisante
9 Mise hors tension
Hauteur (par rapport à l'horizontale)
Si vous appuyez sur le bouton POWER,
la mesure en continu est possible
pendant 20 secondes.
(Après la mesure, les indications de 5-3
apparaissent.)
Hauteur (par rapport à l'horizontale)
Suivie par 5-1.
Quelle que soit la situation, 30 sec.
après la dernière action, l'appareil se
met hors tension.
POWER
30 sec. s'écoulent
sans utilisation
Exemples d'affichage
mètre yard pied
Angle pos. (º) Angle nég. (º)
45.2 49.4 148
En
De
Fr
Es
It
Ru
No
Se
Fi
Nl
Dk
Ro
Pl
Hu
Cz
85
Page 86

Utilisation et affichage interne
En
【6】Mode Angle
De
Fr
Es
It
Ru
No
Se
Fi
Nl
Dk
Ro
Pl
Hu
Cz
86
Utilisation/résultats Tâche Bouton Affichage
6 Prise de mesure avec le Mode Angle
Recherche de la cible
6-1
(alignez le réticule sur la
cible)
6-2
6-3 Échec de la mesure Répétez l'opération 6-1.
6-4 Mesure satisfaisante
9 Mise hors tension
Mesure
(le symbole de rayonnement
laser s'affiche).
Angle (par rapport à l'horizontale)
Si vous appuyez sur le bouton POWER,
la mesure en continu est possible
pendant 20 secondes.
(Après la mesure, les indications de 6-3
apparaissent).
Angle (par rapport à l'horizontale)
Suivie par 6-1.
Quelle que soit la situation, 30 sec.
après la dernière action, l'appareil se
met hors tension.
POWER
30 sec. s'écoulent
sans utilisation
Exemples d'affichage
mètre yard pied
Angle pos. (º) Angle nég. (º)
13
Page 87

【7】 Mode Écart vertical (hauteur entre deux points)
Utilisation/résultats Tâche Bouton Affichage
7 Mode prise de mesure avec Écart vertical (hauteur entre deux points)
7-1
7-2
Visez la cible
(alignez le réticule sur la cible)
(le symbole de rayonnement laser
Mesure
s'affiche)
7-3 Échec de la mesure
7-4 Mesure satisfaisante
7-5
7-6
Visée (2e cible)
(alignez le réticule sur la cible).
(le symbole de rayonnement laser
Mesure
s'affiche).
7-7 Échec de la mesure
7-8 Mesure satisfaisante
9 Mise hors tension
(hauteur entre deux points) (1e cible)
Répétez 7-1, 7-2 et 7-3 jusqu'à ce que la
(hauteur entre deux points) (2e cible)
(Le résultat indiqué est la hauteur de la 1e
Répétez 7-5, 7-6 et 7-7 jusqu'à ce que la
Écart vertical
Suivie de 7-1
mesure soit achevée.
Hauteur de la 1re cible
(par rapport à l'horizontale)
Écart vertical
cible).
Suivie de 7-5
mesure soit achevée
Écart vertical
(hauteur entre deux points)
Après 2 secondes, passez à 7-1
Quelle que soit la situation, 30 sec.
après la dernière action, l'appareil se
met hors tension.
Exemples d'affichage
mètre yard pied
Angle pos. (°) Angle nég. (°)
clignote
POWER
clignote
clignote
clignote
15.2 16.6 50.0
15.2 16.6 50.0
POWER
clignote
21.4 23.4
30 sec.
s'écoulent
sans
utilisation
En
De
Fr
Es
It
Ru
No
Se
Fi
Nl
Dk
Ro
Pl
Hu
Cz
87
Page 88

Utilisation et affichage interne
En
【8】 Mode mesure de trois points (hauteur entre deux points)
De
Fr
Es
It
Ru
No
Se
Fi
Nl
Dk
Ro
Pl
Hu
Cz
Utilisation / résultats Tâche Bouton Affichage
8 Mode prise de mesure avec mesure de trois points (hauteur entre deux points)
Visez la cible
8-1
Mesure (le symbole de
8-2
rayonnement laser s'affiche)
8-3 Échec de la mesure
8-4 Mesure satisfaisante
Visez la cible (2e cible)
8-5
(alignez le réticule sur la
Mesure (le symbole de
8-6
rayonnement laser s'affiche)
8-7 Mesure satisfaisante
Visez la cible (3e cible)
8-8
(alignez le réticule sur la
Mesure (le symbole de
8-9
rayonnement laser s'affiche)
8-10 M esure satisfaisante
9 Mise hors tension
(alignez le
réticule sur la cible)
cible)
cible)
Distance horizontale (1e cible)
Répétez 8-1, 8-2 et 8-3 jusqu'à ce que la
Suivie de 8-1
mesure soit achevée.
Distance horizontale
Suivie de 8-5.
Écart vertical
(hauteur par rapport à l'horizon au
niveau de 2e point)
Écart vertical
(hauteur par rapport à l'horizon au
niveau de 2e point)
Écart vertical
(hauteur entre la 2e et la 3e cibles)
Écart vertical
(hauteur entre la 2e et la 3e cibles)
Après 2 secondes, suivies par 8-1
Quelle que soit la situation, 30 secondes
après la dernière action, l'appareil se met
hors tension.
88
POWER
POWER
POWER
30 sec.
s'écoulent
sans
utilisation
Angle pos. (°) Angle nég. (°)
clignote
clignote
clignote
clignote
Exemples d'achage
mètre yards pied
24.4 26.8 80.5
24.4 26.8 80.5
3.4 3.8 11.0
3.4 3.8 11.0
19.0
Page 89

Autres
Cet appareil est conforme à la Partie 15 des Règles FCC. L'exploitation de cet appareil est soumise aux conditions
suivantes:
(1) Cet appareil ne peut pas provoquer des brouillages nuisibles et
(2) cet appareil doit s'accommoder des brouillages auxquels il est soumis, y compris les brouillages qui peuvent
provoquer des anomalies de fonctionnement.
Après essais, les caractéristiques de cet appareil ont été jugées comme entrant dans les limites des dispositifs
numériques de la classe B, telles que décrites à la Partie 15 des Règles FCC et de la directive EMC de l'UE. Ces limites
ont été fixées dans le dessein d'apporter une protection raisonnable contre les brouillages des appareils domestiques.
Cet appareil produit, utilise et peut émettre des fréquences radioélectriques. S'il n'est pas installé conformément aux
instructions, ces ondes peuvent perturber les radiocommunications. Toutefois, même en cas d'installation conforme
aux instructions, il peut arriver qu'un brouillage se produise en raison des conditions particulières d'installation. Si cet
appareil perturbe la réception des émissions de radio ou de télévision, ce dont on peut s'assurer en le mettant sous
tension puis hors tension, l'utilisateur est invité à prendre les mesures correctives suivantes:
• Modifier l'orientation de l'antenne de réception ou changer son emplacement.
• Augmenter la distance séparant l'appareil du récepteur de radio ou de télévision.
• Consulter le distributeur ou un technicien de radio/télévision expérimenté.
Cet appareil numérique de la classe B est conforme à la norme canadienne relative aux équipements susceptibles de
provoquer des brouillages.
La gamme Forestry Pro est une gamme de télémètre laser simplifiée. Les résultats obtenus ne doivent pas figurer
dans les registres officiels.
En
De
Fr
Es
It
Ru
No
Se
Fi
Nl
Dk
Ro
Pl
Hu
Cz
89
Page 90

Guide de dépistage des pannes/réparations
En
Si le Nikon Laser Forestry Pro doit être réparé, consultez le revendeur local. Toutefois, avant toute chose, prenez connaissance
De
du tableau de dépistage des pannes qui suit.
Fr
Es
It
Ru
No
Se
Fi
Nl
Dk
Ro
Pl
Hu
Cz
L'appareil ne se met pas sous tension
- l'écran LCD ne s'éclaire pas.
La distance à la cible ne peut pas
être obtenue.
L'indication [- - -] ("Mesure
impossible") apparaît.
Symptôme Points à vérifier
• Appuyez sur le bouton POWER.
• Vérifiez la pile et, le cas échéant, remplacez-la.
• Veillez à ce qu'aucun obstacle (votre main ou un doigt) n'empêche la
propagation du faisceau laser ni la réception par le détecteur.
• Assurez-vous que la fenêtre d'émission laser et le détecteur sont propres. Le
cas échéant, nettoyez-les.
• Assurez-vous que la forme et l'état de la cible permettent la réflexion du
laser.
• Remplacez la pile.
• Veillez à ce que l'appareil soit stable lorsque vous appuyez sur le bouton
POWER.
• Assurez-vous que la cible est dans les limites de portée de l'appareil (10 -
500 m/11 - 550 yards/33-999 pieds).
Les distances les plus proches ne
peuvent pas être mesurées .
Les cibles placées au-delà d'une
certaine distance ne peuvent pas
être mesurées.
90
• Veillez à ce qu'aucun obstacle (feuilles, herbes, etc.) ne soit placé entre le
Nikon Laser Forestry Pro et la cible.
• Veillez à ce qu'aucun obstacle (feuilles, herbes, etc.) ne soit placé entre le
Nikon Laser Forestry Pro et la cible.
Page 91

Symptôme Points à vérifier
Les résultats des mesures sont
variables.
Le résultat affiché est incorrect. • Remplacez la pile.
Si le problème persiste après avoir consulté le tableau de dépistage des pannes, prenez contact avec
le revendeur pour qu'il vérifie ou répare le
représentant agréé du fabricant, le soin de vérifier ou de réparer le
cette consigne, vous vous exposez à des blessures ou à une défaillance de l'appareil.
• Remplacez la pile.
• Assurez-vous que la forme et l'état de la cible permettent la réflexion du
laser.
• Veillez à ce que l'appareil soit stable tandis que vous appuyez sur le
bouton POWER.
• Veillez à ce qu'aucun obstacle (feuilles, herbes, etc.) ne soit placé entre le
Nikon Laser Forestry Pro et la cible.
• Assurez-vous que la forme et l'état de la cible permettent la réflexion du
laser.
• Veillez à ce qu'aucun obstacle (feuilles, herbes, etc.) ne soit placé entre le
Nikon Laser Forestry Pro et la cible.
Nikon Laser Forestry Pro. Ne confiez à personne d'autre qu'un
Nikon Laser Forestry Pro. Faute de respecter
En
De
Fr
Es
It
Ru
No
Se
Fi
Nl
Dk
Ro
Pl
Hu
Cz
91
Page 92

Comment utiliser l’étui du télémètre
En
De
Fr
Es
Rabat supérieur
It
Ru
No
Se
Fi
Nl
Rabat inférieur
Dk
Ro
Pl
Hu
Cz
92
Étui ordinaire
Étui avec boucle de ceinture
Ceinture
Rabat supérieur
Rabat inférieur
1) Ouvrez le rabat inférieur et divisez-le
en deux parties. ①
②
①
2) Fixez l’extrémité du rabat supérieur
sur le rabat inférieur. ②
3) Fermez le rabat supérieur en reliant
l’attache des deux parties du rabat
inférieur. ③
③
Page 93

En
De
Fr
Es
It
Ru
No
Se
Fi
Nl
Dk
Ro
Pl
Hu
Cz
93
Page 94

En
De
Fr
Es
It
Ru
No
Se
Fi
Nl
Dk
Ro
Pl
Hu
Cz
Precauciones antes del uso .................................... 95-97
Características clave .................................................. 98-99
Nomenclatura/Componentes .................................... 100
Cambio de baterías ........................................................ 101
Pantalla interna ....................................................... 102-103
Resumen operativo ............................................... 104-106
Especificaciones ...................................................... 107-108
Pantalla externa ...................................................... 109-111
Operación y pantalla interna.............................. 112-118
Otros .................................................................................... 119
Solución de problemas/Reparación ................ 120-121
Español
CONTENIDO
Utilización de la funda del telémetro ....................... 122
94
Page 95

Precauciones antes del uso
Gracias por adquirir el Nikon Laser Forestry Pro.
Este telémetro láser de gama alta ofrece una nueva función de medición de ángulos además de la ya
conocida función de medición de distancias para un mayor disfrute de los deportes y otras
aplicaciones de exteriores (el Nikon Laser Forestry Pro también puede medir la distancia horizontal a
un sujeto y su altura).
Respete estrictamente las orientaciones siguientes para utilizar correctamente el equipo y
evitar accidentes que podrían ser peligrosos. Antes de utilizar el producto lea atentamente las
"PRECAUCIONES DE SEGURIDAD" y las instrucciones de uso correcto que acompañan al producto.
La utilización de controles, ajustes o procedimientos de utilización distintos de los aquí indicados
puede provocar una exposición a radiaciones peligrosas.
Tenga a mano este manual para consultarlo cuando lo precise.
• Las especificaciones y el diseño pueden cambiar sin aviso previo.
• Queda prohibida la reproducción total o parcial (excepto para citas breves en artículos o
revisiones de evaluación) de este manual en cualquier forma sin la autorización previa por escrito
de NIKON VISION CO., LTD.
En
De
Fr
Es
It
Ru
No
Se
Fi
Nl
Dk
Ro
Pl
Hu
Cz
95
Page 96

Precauciones antes del uso
Respete estrictamente las
En
orientaciones siguientes para utilizar
De
correctamente el equipo y evitar
Fr
accidentes que podrían ser peligrosos.
Antes de utilizar el producto lea
Es
atentamente las "PRECAUCIONES DE
It
SEGURIDAD Y FUNCIONAMIENTO" y las
instrucciones de uso correcto que
Ru
acompañan al producto. Tenga a mano
No
este manual para consultarlo cuando lo
Se
precise.
Fi
ADVERTENCIA
Esta indicación le advierte que cualquier
Nl
utilización inadecuada que ignore el
Dk
contenido aquí incluido puede provocar
Ro
la muerte o lesiones graves.
Pl
PRECAUCIÓN
Esta indicación le advierte que cualquier
Hu
utilización inadecuada que ignore el
Cz
contenido aquí incluido puede provocar
lesiones o pérdidas materiales.
PRECAUCIONES DE SEGURIDAD
Y FUNCIONAMIENTO
Advertencia
• Nunca mire directamente al haz láser
ni al sol cuando utilice el Nikon Laser
Forestry Pro.
• No pulse el botón POWER mientras mira
la óptica desde el lado del objetivo.
• No apunte al ojo.
• No utilice la unidad junto con otros
elementos ópticos adicionales, como
96
lentes o binoculares. La utilización de un
elemento óptico junto con el Nikon Laser
Forestry Pro aumenta el riesgo de dañar
los ojos.
• No desmonte el Nikon Laser Forestry
Pro. El láser emitido podría ser nocivo
para su salud. Un producto que haya
sido desmontado pierde la garantía del
fabricante.
• Si la cubierta del cuerpo del Nikon
Laser Forestry Pro está dañada o si
emite un ruido raro después de una
caída o por cualquier otra causa, retire
inmediatamente la batería y deje de
usarlo.
Precauciones
• Si no utiliza el Nikon Laser Forestry Pro,
no pulse el botón POWER.
• No deje el Nikon Laser Forestry Pro, al
alcance de niños pequeños.
• Lluvia, agua, arena y barro deben
eliminarse de la superficie del telémetro
lo antes posible, utilizando un paño
suave, limpio y seco.
• Aunque el Nikon Laser Forestry Pro es
impermeable, no está diseñado para
utilizarlo bajo el agua.
• No haga balancear el Nikon Laser
Forestry Pro con las correas. Podría
golpear a alguien y herirle.
• No deje el Nikon Laser Forestry Pro en
un lugar inestable ya que podría caer y
provocar lesiones, o dañar el equipo.
• No mire a través del Nikon Laser Forestry
Pro mientras anda. Podría tropezar o
caerse y resultar herido.
• No deje el Nikon Laser Forestry Pro en
un coche en días cálidos o soleados, ni
cerca de equipos generadores de calor.
Podría dañarlo o afectarle
negativamente.
• No deje el Nikon Laser Forestry Pro bajo
la luz solar directa. Los rayos ultravioleta
y el exceso de calor podrían afectar
negativamente a la unidad e incluso
dañarla.
• Si se expone el Nikon Laser Forestry Pro
a cambios de temperatura repentinos,
puede condensarse agua en las
superficies de las lentes. No utilice el
producto hasta que se haya evaporado la
condensación.
• No utilice alcohol para limpiar el cuerpo
principal.
• No deje la bolsa de polietileno del
embalaje al alcance de niños pequeños.
• Tenga cuidado con los niños pequeños
para que no se traguen accidentalmente
la ojera. Si se da el caso, consulte a un
médico inmediatamente.
• Si utiliza las ojeras de goma durante
mucho tiempo puede notar una
inflamación de la piel. Si presenta algún
síntoma, consulte inmediatamente a un
médico.
• Cuando transporte el Nikon Laser
Forestry Pro, guárdelo en el estuche
flexible.
Page 97

• Si su Nikon Laser Forestry Pro no
EU 電池指令表記
WEEE
WEEE
funciona correctamente, deje de
utilizarlo inmediatamente y consulte la
Tabla de solución de problemas. Si no
consigue resolver el problema, póngase
en contacto con su distribuidor local
quien le indicará dónde enviarlo para su
reparación.
CUIDADO Y MANTENIMIENTO
Objetivos
Para eliminar el polvo de la superficie de
•
las lentes, utilice un cepillo blando sin
aceite.
• Al eliminar manchas o residuos como
marcas de dedos de la superficie de los
objetivos, límpielos muy suavemente
con un paño de algodón suave y limpio
o con un paño de limpieza de lentes de
calidad sin aceite.
Utilice una pequeña cantidad de alcohol
puro (no desnaturalizado) para limpiar
las manchas resistentes. No utilice paños
de terciopelo ni telas normales, pues
podrían rayar la superficie de los
objetivos. Si se ha utilizado un paño para
limpiar el cuerpo no debe usarse para la
superficie del objetivo.
Cuerpo principal
• Limpie la superficie del cuerpo con un
paño suave, limpio y seco. No utilice
benceno, disolvente ni otros agentes
orgánicos ya que podrían decolorar el
cuerpo o deteriorar las gomas.
Almacenamiento
• En caso de humedad elevada puede
aparecer condensación de agua o
moho sobre la superficie de los
objetivos. Por tanto, guarde el Nikon
Laser Forestry Pro en un lugar fresco y
seco.
Después de usarlo en un día lluvioso o
por la noche, séquelo a temperatura
ambiente y guárdelo en un lugar fresco
y seco.
NOTAS SOBRE LA BATERÍA DE
LITIO
Si se manejan incorrectamente, las
baterías pueden romperse y tener fugas,
corroyendo los equipos y manchando la
ropa. Asegúrese de respetar lo siguiente:
• Monte las baterías con los polos + y colocados correctamente.
• Cuando las baterías están agotadas, o
en períodos prolongados de no
utilización, deben retirarse.
• Utilice siempre el mismo tipo de
baterías.
• Si el fluido de la batería entra en
contacto con los ojos o la piel
enjuáguelos abundantemente con
agua. Si se tragan, consulte a un
médico inmediatamente.
• No cortocircuite los terminales de la
cámara de la batería.
• No lleve baterías junto con llaves o
monedas en un bolsillo o bolsa. Podría
sobrecalentar y cortocircuitar las
baterías.
• No tire las baterías al fuego ni al agua.
Nunca desmonte las baterías.
• No cargue las baterías.
• No someta las baterías guardadas a
temperaturas extremas.
• No someta las baterías guardadas a
grandes vibraciones ni golpes.
En
De
Fr
Es
It
Ru
No
Se
Fi
Nl
Dk
Ro
Pl
Hu
Cz
97
Page 98

Características clave
En
• Gama de distancias de medición lineal: 10-500 metros/11-550
De
yardas/33-999 pies
Fr
• Gama de medición de ángulos: ± 89°
Es
• Pasos de visualización de la medición de distancias:
[Pantalla interna]:
It
(Distancia lineal)
Ru
No
Se
Fi
Nl
Dk
Ro
Pl
Hu
Cz
0,5 metros/yardas, 1 pie
(distancia de medición menor de 100 metros/yardas/
pies)
1,0 metro/yarda, 1 pie
(distancia de medición de 100 metros/yardas/pies o
más)
(Distancia horizontal/Altura)
0,2 metros/yardas, 0,5 pies
(distancia de medición menor de 100 metros/yardas/
pies)
1,0 metro/yarda, 1 pie
(distancia de medición de 100 metros/yardas/pies o
más)
(Ángulo)
0,1° (-10° — 10°)
1,0° ( ≦ -10°, 10° ≦ )
[Visor externo]
(Distancia lineal)
(Distancia horizontal/Altura)
(Ángulo)
98
0,5 metros/yardas, 1 pie
0,2 metros/yardas, 0,5 pies
0,1°
• Sistema de observación óptica de 6x fácil de apuntar
• Cuantifica la distancia horizontal al sujeto y su altura con
respecto al nivel del telémetro mediante la medición de la
distancia lineal y el ángulo.
• Mida la separación vertical (altura entre dos puntos) - dispone
de los modos de separación vertical y de medición en tres
puntos.
• Los resultados se muestran en as pantallas LCD interna y
externa. El panel LCD externo muestra todos los resultados
simultáneamente.
• El "sistema de conmutación de prioridad al sujeto" le permite
adecuarse con facilidad a la situación de medición.
• Diseño impermeable (NO diseñado para utilización bajo el
agua)
• Láser invisible/seguro para la vista de clase 1M según EN/IEC
• Visualización de resultados durante 30 segundos
• Diseño compacto, ligero y ergonómico
• Apagado automático (después de aprox. 30 segundos sin
tocarlo)
• Predeterminación a los "Ultimos ajustes usados"
• Función de medición continua de aproximadamente 20
segundos
El Nikon Laser Forestry Pro emite impulsos de energía
infrarroja invisible y segura para los ojos que se refleja
en el sujeto seleccionado y vuelve a su receptor óptico.
Sus complejos circuitos de carga de precisión calculan
instantáneamente las distancias midiendo el tiempo que
tarda cada impulso en ir desde el telémetro al sujeto y volver.
La reflectividad láser y los resultados de medición pueden
variar en función de las condiciones climáticas y ambientales,
el color, acabado superficial, tamaño, forma y otras
características del sujeto.
Page 99

Los factores siguientes aseguran mejores alcance y precisión:
• Utilización nocturna
• Tiempo nuboso
• Sujetos de colores brillantes
• Sujetos con superficies muy reflectantes
• Sujetos con exteriores lustrosos
• Sujetos de gran tamaño
• Apuntar a sujetos orientados a 90 grados
La medición puede resultar imprecisa o fallar en los casos siguientes:
• Sujeto delgado o pequeño
• Sujeto con una superficie reflectante difusora
• Sujeto que no refleja el haz láser hacia el telémetro (vidrio, un espejo, etc.)
• Sujeto negro
• Sujeto con distintas profundidades
• Nieve, lluvia o niebla
• Sujeto medido a través de vidrio
• Superficie reflectora medida en dirección diagonal
• Sujeto en movimiento
• Obstáculo en movimiento delante del sujeto
• Apuntar a la superficie del agua
En
De
Fr
Es
It
Ru
No
Se
Fi
Nl
Dk
Ro
Pl
Hu
Cz
99
Page 100

Nomenclatura/Componentes
En
De
Fr
Es
It
Ru
No
Se
Fi
Nl
Dk
Ro
Pl
Hu
Cz
!e
Cuerpo ............................. x1
Caja de transporte
flexible (CCN).................. x1
100
5
4
1
2
3
Componentes
Correa de cuello ........... x1
Batería de litio (CR2) ... x1
1Lente del objetivo monocular/
Abertura para emisión láser
2Abertura del detector láser
3LCD externo
4Botón MODE
POWER
5Botón
6
6Ocular monocular de 6x
7Ojera/Anillo de ajuste de dioptrías
8Índice de dioptrías
7
9Ojal para correa
!pTapa del compartimento de la batería
8
!qIndicación "Abierta/Cerrada" de la tapa
del compartimento de la batería
9
!wEtiqueta de número de producto/
explicatoria
!p
!q
!w
!e Etiqueta de advertencia sobre el láser
 Loading...