

Page 1
(E)
INSTRUCTION MANUAL
E
Page 2

Getting Started
Thank you for purchasing this Nikon FM3A camera. Please read this instruction manual
carefully for complete details on getting the most from your Nikon FM3A.
Your new Nikon FM3A features a Manual Exposure mode for total control of exposure, as
well as a semi-automatic Aperture-Priority Exposure mode. Aperture Priority mode lets
you adjust the aperture for the desired depth of field while the shutter speed is automatically adjusted accordingly. The FM3A incorporates a special hybrid shutter mechanism
that offers the advantages of a mechanical focal plane shutter for use during manual
operation, as well as an electronically controlled focal plane shutter for use during Aperture-Priority Auto Exposure operation. Even when the FM3A's battery power is fully exhausted, all shutter speeds remain functional in Manual Exposure mode.
The FM3A features a maximum shutter speed of 1/4000 sec., a flash sync speed of 1/250,
multiple exposure control, interchangeable focusing screens, and the ability to use the
MD-12 Motor Drive for high speed sequence photography. The Nikon FM3A's flash system
offers TTL control in both Manual Exposure mode and Aperture-Priority Auto Exposure
mode, and includes a flash compensation button that provides a natural looking flash
result.
We hope you enjoy using your new Nikon FM3A camera, and would like to thank you for
choosing Nikon.
Symbols used in this manual
Tips
Indicates items in boxes that contain important matters to be noticed first.
Indicates items to be checked, such as requirements and restrictions.
Indicates pages for reference.
...
Indicates supplementary descriptions.
2
Page 3
Notice
Take trial shots
Take a few test shots before shooting important events like weddings or graduations.
Have Nikon spot-check your camera regularly
Nikon recommends that you have your camera serviced by an authorized dealer or
service center at least once every two years.
Using your camera correctly
The Nikon FM3A’s performance has been optimized for use with Nikon brand accessories. Accessories made by other manufacturers may not meet Nikon’s criteria for
specifications, and nonconforming accessories could damage the FM3A’s compo-
nents. Nikon cannot guarantee the FM3A’s performance when it is used with other than
Nikon brand accessories.
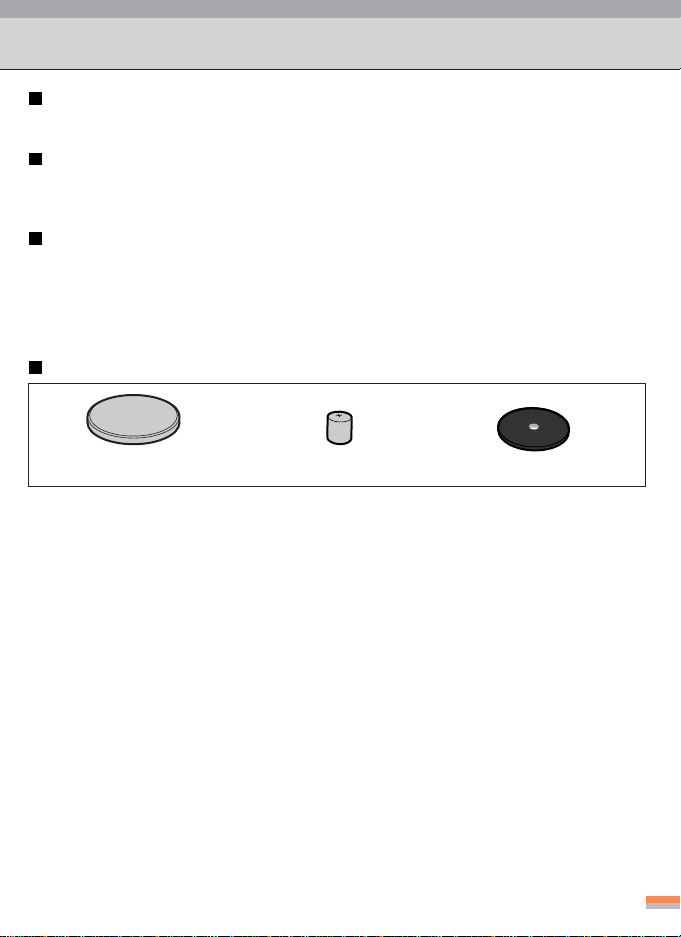
Supplied accessories
Body cap (white) Battery (CR-1/3N)
...
When using a tripod with a lens of such large diameter that the lens touches the tripod, insert
the tripod mat between the camera and tripod.
Tripod mat
3
Page 4

Contents
Prior to Use
1
Getting Started -----------------------------------------------------------------------2
Symbols used in this manual -----------------------------------------------------2
Notice ----------------------------------------------------------------------------------- 3
Camera Parts (Body, Viewfinder indications) --------------------------------- 6
Basic Operations for Shooting--------------------------------------- 9
2
Installing Batteries ----------------------------------------------------------------- 10
Checking the Battery Power ---------------------------------------------------- 11
Attaching/Detaching a Lens----------------------------------------------------- 12
Loading Film ------------------------------------------------------------------------ 13
Setting the Film Speed (DX-Coded Film)------------------------------------ 15
Holding the Camera (How to press the shutter-release button) ------- 16
Focusing ----------------------------------------------------------------------------- 17
Shooting------------------------------------------------------------------------------ 18
Aperture-Priority Auto Exposure Mode -------------------------------- 18
Manual Exposure Mode --------------------------------------------------- 20
Rewinding the Film ---------------------------------------------------------------- 22
4
Page 5

Controls in Detail ------------------------------------------------------- 23
3
Shutter-Speed Dial ---------------------------------------------------------------- 24
Film-Advance Lever --------------------------------------------------------------- 25
Manual Film-Speed Setting ----------------------------------------------------- 26
Exposure-Compensation Indicator -------------------------------------------- 27
Frame Counter --------------------------------------------------------------------- 29
Depth of Field Preview Lever --------------------------------------------------- 29
Film-Plane Indicator--------------------------------------------------------------- 30
Accessory Shoe and Sync-Cord Terminal----------------------------------- 30
Steps of Advanced Photography---------------------------------- 31
4
Flash Photography ---------------------------------------------------------------- 32
AE-Lock Photograph y ------------------------------------------------------------ 36
Self-Timer Photography---------------------------------------------------------- 37
Multiple-Exposure Photography------------------------------------------------ 38
Additional Information ------------------------------------------------ 39
5
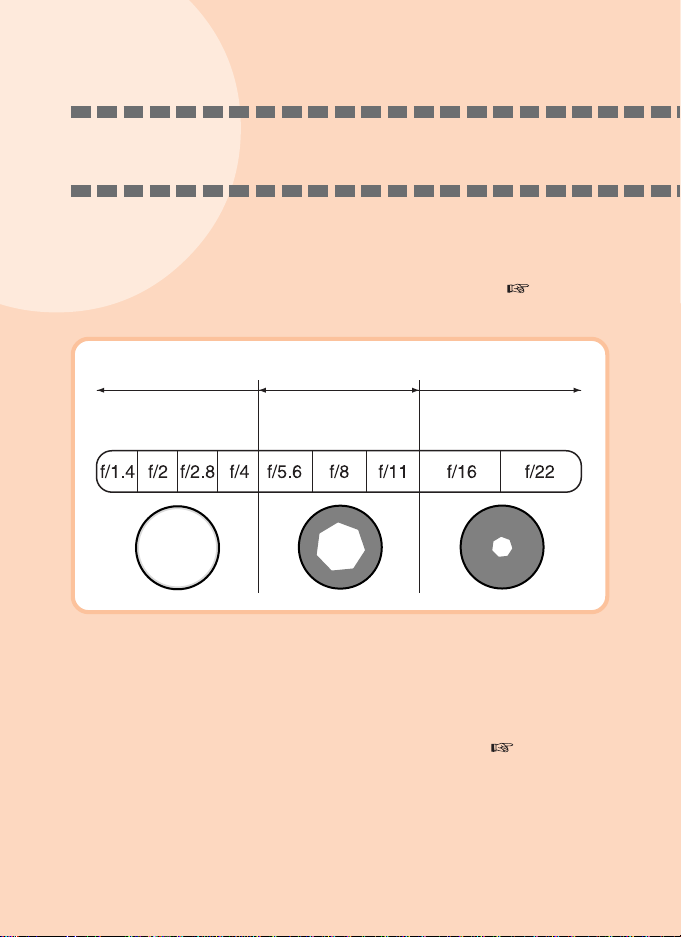
Shutter Speed and Aperture Setting ------------------------------------------ 40
Depth of Field----------------------------------------------------------------------- 41
Light-Metering Methods ---------------------------------------------------------- 41
Lens Compatibility ----------------------------------------------------------------- 42
Optional Accessories ------------------------------------------------------------- 44
Changing the Focusing Screen ------------------------------------------------ 46
Tips on Handling the Camera and Batteries -------------------------------- 48
Glossary------------------------------------------------------------------------------ 50
Specifications ----------------------------------------------------------------------- 54
5
Page 6
N
i
k
o
n
K
O
R
4
5
m
m
1
Camera Parts
Body
Meter-coupling lever
Lens mounting index
TTL flash-compensation
button p.33
Lens-release button
p.12
Sync-cord terminal
p.30
Neckstrap
eyelet
Film-rewind
crank
p.22
Film-rewind knob
p.13
Film-plane
indicator
Film-speed index
p.26
Aperture index window
Depth of field preview lever
p.29
Self-timer lever p.37
4
5
R
O
K
K
I
N
m
m
1
:
2
.
8
P
N
n
i
k
o
Shutter-release button
p.16
Frame counter
p.29
Multiple-exposure
lever p.38
Film-advance lever p.25
Auto-lock release button
p.24
Shutter-speed dial p.24
Shutter-speed indication
Shutter-speed index
Speedlight sync contact
Accessory shoe p.30
Exposure-compensation
lock release button p.28
Exposure-compensation indicator p.27
Exposure-compensation index
Exposure-compensation mark
Film-speed setting ring
6
Page 7
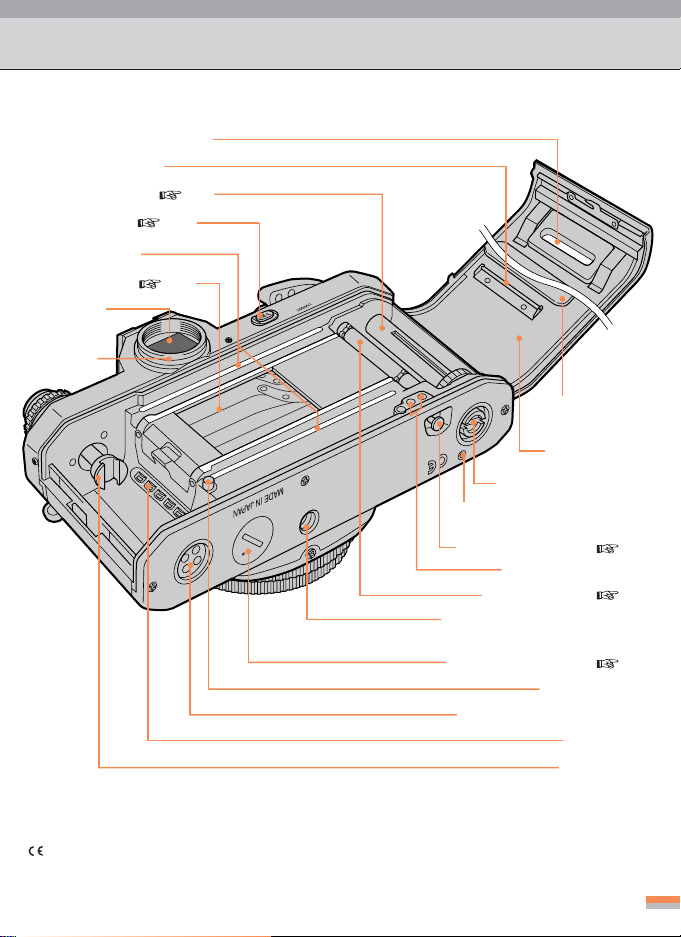
Film confirmation window
Film anti-curl roller
Film-takeup spool p.13
AE-lock button p.36
Film guide rails
Shutter curtains p.13
Viewfinder
Eyepiece
Film-pressure
plate
Camera back
Motor-drive coupling
Motor-drive shutter coupling
Film-rewind button p.22
Data Back contacts
Film sprockets p.13
Socket for tripod/motor drive
Battery chamber lid p.10
Film guide pin
Motor-drive sync contacts
DX contact
Rewind fork
About CE marking
CE stands for Conformité Européenne. This marking guarantees that the product meets all applicable EC regulations.
7
Page 8
Camera Parts (Continued)
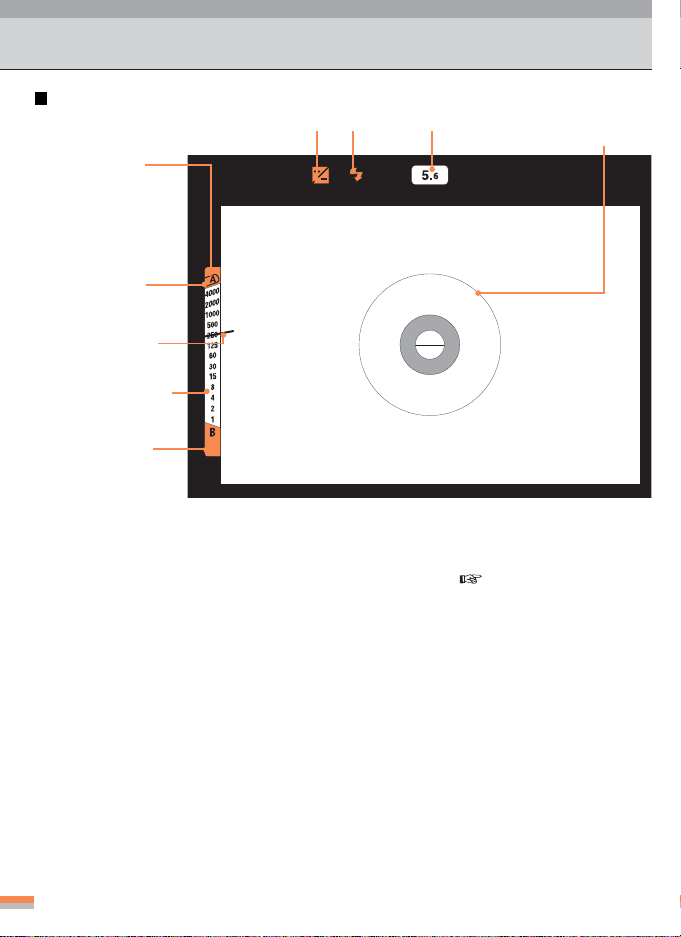
Viewfinder indications
77
7Exposure compensa-
77
tion indicator (red)
11
1Overexposure
11
alert zone (red)
22
2Shutter-speed
22
indicator
(blue)
33
3Exposure-meter
33
indicator (black)
Shutter speed display
44
4Underexposure
44
alert zone (red)
11
44
1
4 Overexposure/underexposure alert zone
11
44
This is the alert zone, which indicates that the
shutter speed is out of range and will result in
over/under exposure. Change the aperture setting and/or shutter speed so that the exposure
meter indicator does not fall into this zone.
22
2 Shutter-speed indicator
22
Moves synchronously as you turn the shutterspeed dial. For example, if you set the shutter-speed dial to “A,” the shutter-speed indicator points to “A.” In Manual mode, it points
to the selected shutter speed.
33
3 Exposure-meter indicator
33
With a light press of the shutter-release button, power is supplied to the exposure meter
and the indicator (needle) swings according
to the brightness of the subject and the aperture setting, and indicates the correct shutter
speed. When the shutter-speed dial is on “B,”
8
55
66
6Ready
66
light (red)
55
5 Aperture indication
55
66
6 Ready light (
66
77
7 Exposure-compensation indicator
77
88
8 12mm-diameter reference circle
88
Note: The background of the shutter speed display in the viewfinder is shown white in this manual
to clearly show the shutter speeds and indicators, but it is actually transparent and you can
see the picture.
5Aperture
55
indication
the needle will not move.
The current lens aperture setting is indicated.
Lights if you perform exposure compensation.
(Remember to return the exposure compensation dial to “0” after shooting.)
The exposure meter of this camera employs a
center-weighted metering system. You can obtain proper exposure by metering the light with
the main portion of your subject located within
the center 12mm-diameter circle in the viewfinder.
88
812mm-diameter
88
p. 32)
reference circle
Page 9
Basic Operations for Shooting
• In aper ture-pr ior ity auto exposure shooting, select the aper-
ture setting appropriate to your desired result. ( p.18)
Full aperture settings Intermediate aperture
For an out-of-focus
background or
foreground
settings
For a distant view that
requires precedence of
definition
Narrow aperture
settings
For sharp focus of both
foreground and
background
• In manual e xposure shooting, you can freeze a moving sub-
ject by using a high shutter speed, or you can accentuate
the flow of water by using a low shutter speed.
With skillful use of shutter speed and aperture, you can obtain the desired effect in your photographs. ( p.20)
Page 10
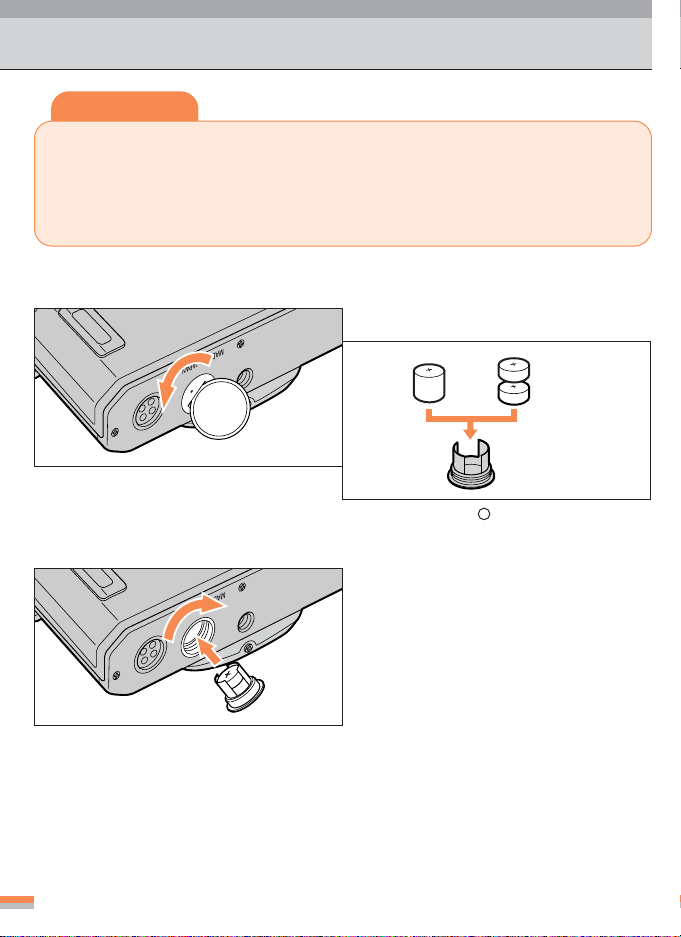
Installing Batteries
Tips
Three types of batteries can be used with this camera.
1) One 3V lithium battery (CR-1/3N type)
2) Two 1.55V silver-oxide batteries (SR44 type)
3) Two 1.5V alkaline batteries (LR44 type)
...
Use new batteries of the same type when you use two batteries.
1
Remove the battery chamber lid.
2
Install the battery (batteries).
...
Use a coin or equivalent to unscrew the lid
counterclockwise.
Return the battery chamber lid to
3
its closed position.
10
One 3V
lithium
battery
...
Make sure that the + pole faces upward.
or
Two silver-oxide
alkaline batteries
or
Page 11
Checking the Battery Power
Check the battery power after installing a new battery (or new batteries) before starting
shootings.
Pull out the film-advance lever
and lightly press the shutterrelease button
1
...
Pressing the shutter-release button lightly and
stopping it halfway is called a “Light press.”
The power is turned on and the exposure meter
is activated when you pull the film-advance lever out to the standoff position and lightly press
the shutter-release button.
• When the shutter-speed dial is set to the “B” position, the exposure meter is not
activated. Be sure to set the dial to another position.
• If the exposure-meter needle stops moving while the camera is being used, set the
shutter-speed dial to the “B” position first and then change to another position.
Make sure that the exposure-meter needle is moving.
• If you load non-DX-coded film with the film-speed index set to , or if no film is
loaded, the exposure-compensation indicator and the ready light blink alternately as a
warning. ( p.15)
22
2 .
22
11
1
11
Check that the exposure-meter
2
needle moves in the viewfinder.
...
When battery power is sufficient, the indicator keeps moving for approx. 16 sec. after
you take your finger off the shutter-release
button.
Reference for battery replacement
1) Replace the battery (or batteries) at the earliest opportunity if the exposure-meter
needle moves only when you hold the shutter-release button pressed and then falls
down at once when you release it.
2) Replace the battery (or batteries) immediately if the shutter curtains do not open
and the mirror stays at the upper position disabling film advance or if there is no
change in the viewfinder indications when you press the shutter-release button with
the shutter-speed dial set to the “A” position.
...
In this case, set the dial to a position other than the “A” position to restore the
original state.
11
Page 12
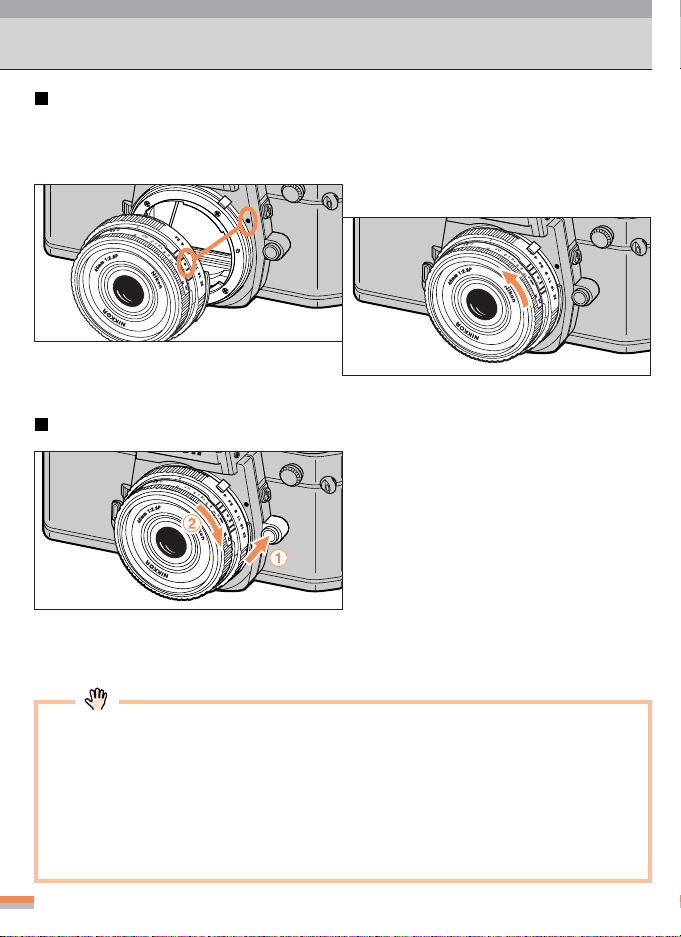
Attaching/Detaching a Lens
1
1
.
2
2
.
2
Attaching a lens
Align the mounting index on the
lens with the mounting index of
1
the camera body.
Detaching the lens
...
Press and hold the lens-release button 1 and
twist the lens clockwise 2, (as shown by the
arrow) to detach.
Insert and twist the lens counter-
2
clockwise (as shown b y the arrow).
...
Twist the lens slowly until it clicks into place.
• Use an Ai-type lens with this camera. There are some non-Ai-type lenses that can
be used with this camera. See page 42 for lens compatibility.
•Avoid direct sunlight when attaching/detaching a lens.
• When attaching a lens, take care not to press the lens release button.
• When you leave the camer a unattended without a lens attached, be sure to attach
the supplied body cap (page 3), or the optional body cap BF-1A. (The BF-1 body
cap for previous models can also be attached.)
12
Page 13
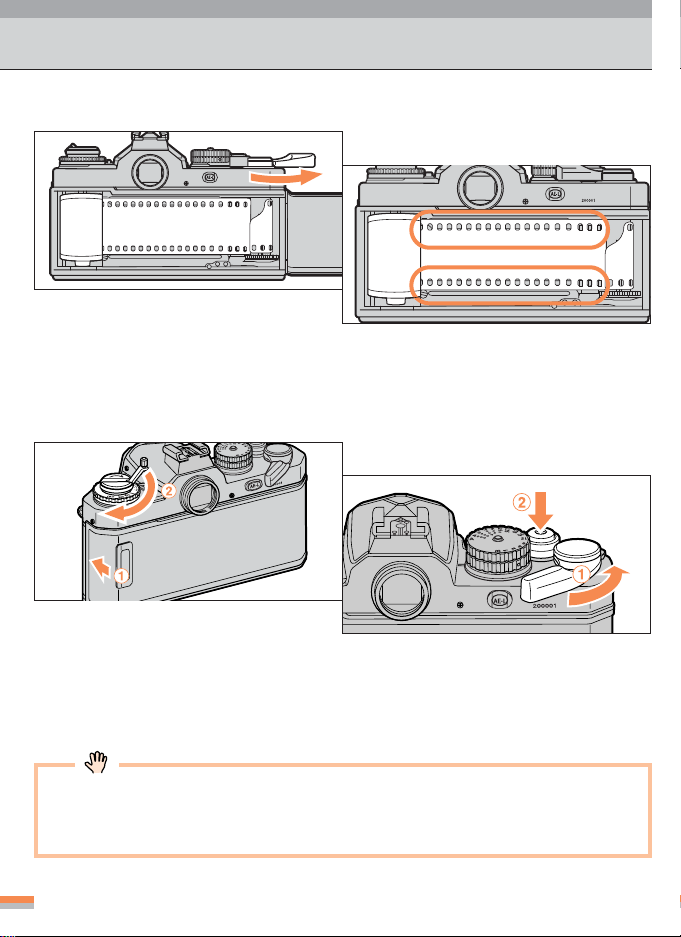
Loading Film
200001
Tips
When you use DX-coded film, the camera automatically detects the film speed and
makes the appropriate setting.
Open the camera back.
1
...
When you lift the film-rewind knob, the camera back will open.
Insert the film leader into one of
3
the slots of the film-takeup spool.
200001
Insert a roll of film
2
the rewind knob
Fit the film sprocket holes of the
film onto the spool’s sprockets.
4
11
1 and push
11
22
2 back down.
22
...
Slowly rotate the film-takeup spool inward with
your thumb, making sure the latch is in the
slot such that the film sprocket holes of the
film are meshed with the sprockets.
Caution when loading/unloading film
The shutter curtains are very thin. When loading/unloading film, be careful not to touch the shutter curtains with your fingers or the film leader.
13
Page 14
Loading Film (Continued)
Advance the film on the film-
5
takeup spool.
200001
...
To advance the film on the film-takeup spool,
pull out the film-advance lever to the standoff
position and wind it slowly.
Close the camera back and take
up the film slack.
7
...
1 Slowly close the door of the camera back
until it snaps shut into the camera body.
...
2 Pull out the film-rewind crank and rotate it
in the direction of the arrow until it stops to
take up the slack inside the film cartridge.
Check the position of the film.
6
...
Make sure that the film sprocket holes are perfectly meshed with the film sprockets and that
the film is correctly set between the film guide
rails.
8
Make a few blank exposures.
...
Wind the film-advance lever 1 and press the
shutter-release button 2 until the frame
counter indicates frame 1.
...
Adjust the shutter-speed dial to a high speed
other than “A.”
• If the film-rewind knob fails to rotate when you wind the film-advance lever , reload
the film cartridge.
• Repeat making blank exposures until the frame counter indicates frame 1.
14
Page 15
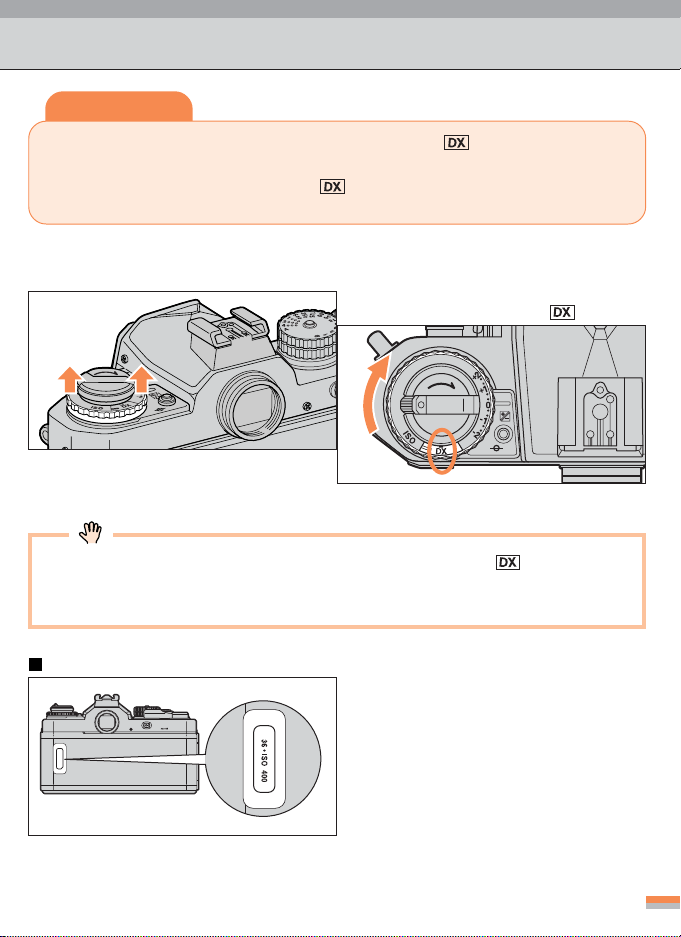
Setting the Film Speed (DX-Coded Film)
Tips
When using DX-coded film, set the film-speed index to . When using non-DXcoded film, set the film speed manually. See page 26.
...
When the film-speed index is set to , the film speed is automatically set (ISO
25 to 5000).
Pull up the film-speed setting
ring.
1
Set the film speed to .
2
...
Turn the ring in the direction of the arrow.
If you load non-DX-coded film with the film-speed index set to , or if no film is
loaded, the exposure-compensation indicator and the ready light blink alternately as
a warning.
Film confirmation window
•You can check the film type, the number
of frames, and the ISO film speed in the
film confirmation window.
15
Page 16
Holding the Camera (How to press the shutter-release button)
How to hold the camera
Grip the camera in your right hand and look through the viewfinder. Keep your left elbow
propped against your body to keep the camera steady.
To hold horizontally To hold vertically
How to press the shutter-release button
The shutter-release button of this camera has a 2-step mechanism.
...
Pull out the film-advance lever to the standoff position and press the shutter-release
button lightly stopping about halfway. This operation is called a “Light press.” The
shutter is released when you press the shutter-release button completely down from
the lightly-press position.
...
With a “Light press,” the exposure meter turns on, and the meter-on timer is activated.
The timer on duration is for approx. 16 seconds from the time you remove your finger
from the lightly-pressed shutter-release button, and it is also on for approx. 16 seconds after the shutter is released.
Press lightly Slowly press
•Moving the camera while pressing the shutter-release button may cause “camera
shake” and result in a blurred photograph. Choose a high shutter speed of faster
than 1/(focal-length-of-lens) second for handheld shooting. Use a tripod and the
AR-3 cable release to eliminate camera shake.
• Do not press the shutter-release button abruptly or sharply. Do a “Light press” with
the bulb of your index finger, then squeeze to press the button slowly to the end to
release the shutter. Pressing abruptly may cause camera shake.
• When the shutter-speed dial is set to “B,” the exposure meter is not activated.
16
down
Page 17

Focusing
Focusing ring
0
0
0
4
0
0
0
2
0
0
0
1
0
0
5
0
5
2
25
1
60
0
3
15
8
4
2
1
B
Microprism
collar
Split-image
rangefinder
Matte field
Look through the viewfinder and put the subject in focus by rotating the focusing ring of
the lens.
Tips
•To focus using the split-image rangefinder, turn the focusing ring of the lens until the
upper and lower images coincide perfectly to form a single unbroken image .
Example: In focus Example: Out of focus
•To focus using the microprism grid or matte, turn the focusing ring so that the fuzzy
image becomes sharp.
• Get your main subject in focus.
...
If you want to photograph a flower, focus on a stamen or pistil, and for an animal
or person, focus on the eyes.
17
Page 18

Shooting: Aperture-Priority A uto Exposure Mode
Tips
• The aperture setting lets you adjust the exposure and control the depth of field.
...
If the subject of your picture extends into the distance and/or you want the entire
subject to be sharp, choose a narrow aperture setting. If you want an out-offocus background and/or foreground, select a wide aperture i. e. f/2.8. If your
subject has little or no depth of field, such as flat wall, choose an intermediate
aperture setting.
• In Aperture-Priority Auto Exposure mode, you can make the aperture setting as
desired, and the camera controls the shutter speed automatically.
1
Set the shutter-speed dial to “A.”
2
Pull out the film-advance lever.
...
In the “A” (Auto) position, the shutter-speed
dial is locked.
3
Make your lens aperture setting.
18
4
Compose your picture and focus.
...
Place the main subject inside the 12mm-diameter circle in the center of the screen.
Page 19

Lightly press the shutter-release
5
button.
...
Check the shutter speed, observing the exposure-meter indication in the viewfinder.
Slowly depress the shutterrelease button all the way.
6
...
If the exposure meter indication is between
1/60 and 1/4000 second, squeeze to press
the shutter-release button all the way.
Tips
• If the exposure-meter needle points in the 1 to 1/(focal-length of the lens) second
range:
...
Camera shake may occur because the shutter speed is low. Use a tripod or
flash.
• If the exposure-meter needle points to the upper alert zone:
...
Make a narrower aperture setting. If the indication is still in the alert zone, use an
ND filter.
• If the exposure-meter needle points to the lower alert zone:
...
Select a wider aperture setting. If the indication is still in the alert zone, use flash
photography.
Example: Aperture of f/2.8 Example: Aperture of f/16
19
Page 20

Shooting: Manual Exposure Mode
Tips
• In this mode, you can manually select both the shutter speed and the aperture
setting as desired.
• By changing the combination of shutter speed and aperture setting, you can change
the photo effect without changing the exposure.
•You can create various effects , lik e controlling the depth of field by v arying the aperture setting or freezing the motion of a fast-moving subject with high shutter speed.
• When the battery power is completely exhausted or diminished in a cold place, all
the electronic displays are disabled, but major mechanical systems, such as the
shutter and aperture control, remain functional, enabling you to continue shooting.
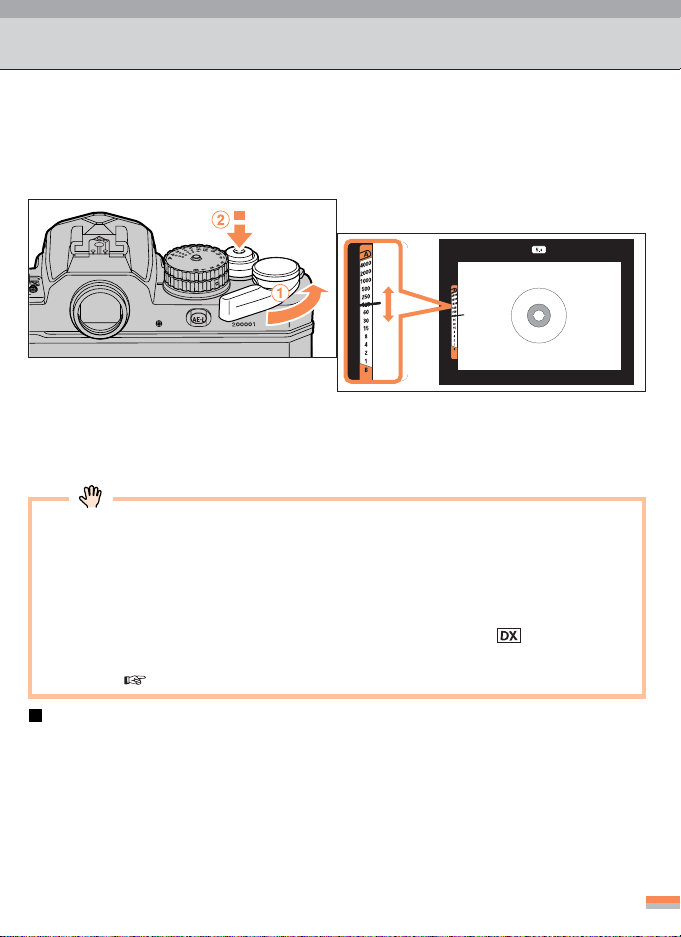
Set the shutter-speed dial to a
1
position other than “A.”
2
Pull out the film-advance lever.
...
To change the dial setting from “A,” rotate the
dial while holding the auto-lock release button pressed.
3
Compose your picture and focus.
...
Place the main subject inside the 12mm-diameter circle in the center of the screen.
20
Lightly press the shutter-release
4
button.
Page 21

4000
2000
1
0
0
0
500
250
125
60
30
15
8
A
Align the shutter-speed indicator
5
and the exposure-meter indicator .
A
4000
2000
1000
0
0
5
0
5
2
125
0
6
30
15
8
4
2
1
B
...
To align the two indicators, adjust the shutter
Slowly press the shutter-release
button all the way.
6
-speed dial and/or the aperture setting.
Tips
• It is possible to perform exposure compensation by intentionally mismatching the
shutter-speed indicator and the exposure-meter indicator.
This will cause underexposure. This will cause overexposure.
Shutter-speed indicator
Exposure-meter indicator
• Reference for shutter speed selection:
...
If you want to freeze the motion of a fast-moving subject, choose a shutter speed
over 1/500.
...
If you want to create a motion effect by blurring the subject, choose a shutter
speed under 1/60.
...
If you want to accentuate the flow of the water, choose a shutter speed of under 1/15.
...
If you want to shoot fireworks or tracks of lights at night, choose B.
Exposure-meter indicator
Shutter-speed indicator
Example: Shutter speed of 1/15 with
aperture of f/16
Example: Shutter speed of 1/500 with
aperture of f/2.8
21
Page 22

Rewinding the Film
When the end of the roll of film is reached, the film-advance lever will not advance further.
Rewind the film.
Return the film-advance lever to
1
its folded position.
2
Press the film-rewind button.
...
Just press the button once. You don’t have to
hold it pressed.
3
Rewind the film.
...
Pull out the film-rewind crank and turn it in
the direction of the arrow.
...
As you approach the end of film rewind, you
will feel a slight resistance in the crank. Continue turning and stop when resistance to the
crank is released and feels lighter.
Open the camera back and
remove the film cartridge.
4
200001
...
Pull up the film-rewind knob to open the camera back, and take out the film cartridge.
Do NOT open the camera back until you are sure rewinding is complete.
22
Page 23

Controls in Detail
To use the camera skillfully, you need to understand
its functions and features.
Shutter-Speed Dial............................................................. p . 24
Film-Advance Lever ........................................................... p. 25
Manual Film-Speed Setting................................................ p. 26
Exposure-Compensation Indicator..................................... p. 27
Frame Counter ................................................................... p. 29
Depth of Field Preview Lever ............................................. p. 29
Film-Plane Indicator ........................................................... p. 30
Accessory Shoe and Sync-Cord Terminal ......................... p. 30
Page 24

Shutter-Speed Dial
• Depending on the conditions and your
intention of shooting, align the shutterspeed index to the figures or marks on
the shutter-speed dial. You may choose
from among the following shooting
modes:
A (Aperture-Priority Auto Exposure mode)
Once you make the aperture setting, the camera automatically selects the appropriate shutter speed (stepless control). This is the simplest shooting mode with this camera. ( p.18)
Tips
Locking and releasing the shutter-speed dial:
Once you set the shutter-speed dial to “A,” the dial is locked to prevent inadvertent changes.
...
To move the dial to another position, rotate the dial while holding down the
auto-lock release button at the center of the dial.
1 to 1/4000 second (Manual mode)
In Manual mode, you can set both the shutter speed and aperture manually to create
various creative photographic effects. ( p.20)
B (Bulb mode)
In this mode, the shutter stays open as long as the shutter-release button is depressed. Use
this function when shooting scenes that require extended exposure (e.g., night time stars,
etc.). For very long exposures, use a tripod, and instead of holding the shutter-release button
down with your finger, you can lock the shutter release open by using the AR-3 cable release
(sold separately), to take steady, long-exposure shots without worrying about “camera shake.”
•You cannot use intermediate positions between shutter-speed dial clicks.
• In B (Bulb) mode, the shutter operation is performed mechanically (not electronically). However, a v ery small amount of battery power may be drained. Theref ore ,
we recommend you remove the battery to sav e the battery power when you plan to
take many pictures using B mode.
24
Page 25

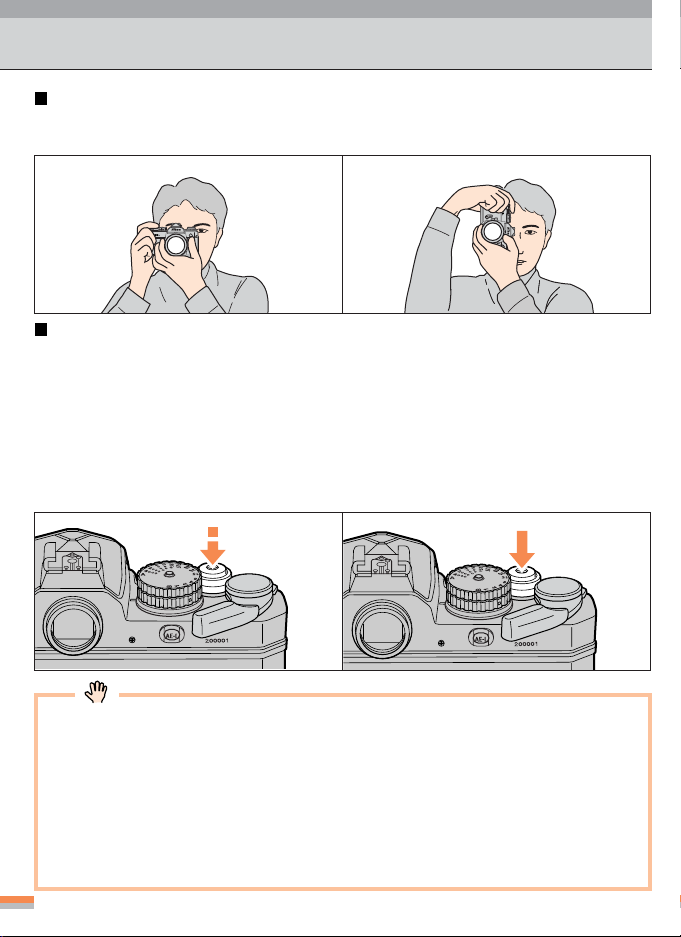
Film-Advance Lever
• The film-advance lever also pro vides a lock
function for the shutter-release button.
(re
3
0
a
se
˚
n
g
r
ve
le
)
Tips
Power on/off:
...
When you pull the film-advance lever to the standoff position and lightly press
the shutter-release button, the exposure-meter turns on and the exposure indication appears in the viewfinder.
...
When you are not using the camera, keep the film-advance lever set to its
home position to prevent the shutter from being inadvertently released.
...
To advance the film, pull the film-advance lever out to the standoff position, then wind the lever
until it stops. This operation advances the film by a single frame, and enables the next shutter
release.
...
The lever stops advancing when the film roll reaches the end. In this case, rewind the film. Do
not forcibly advance the lever further or you might damage the film or the camera.
angle)
135˚(winding
Standoff position
In rare cases the film-advance lever meets strong resistance. If so, the film may
have been advanced unevenly. Do not advance it forcibly. Rewind the film.
25
Page 26

Manual Film-Speed Setting
Tips
Set the film speed manually in the following cases:
1) When using non-DX-coded film.
2) To intentionally change the light sensitivity of DX-coded film in order to obtain
special effects when developing.
...
The film speed can be set manually in the range of ISO 12 to 6400.
Setting the film speed
• Pull and rotate the film-speed setting
ring and set it to the film speed of the
film in use.
200
50
100
Details on readings of the film-speed index
• The corresponding film speeds for the
dots between numbers on the film
speed index are indicated in the illustration.
26
Page 27

Exposure-Compensation Indicator
If there is an extreme difference in brightness between the main subject and the
background (e.g., a person surrounded by heavy shadows), it may be difficult to get the
correct exposure. In this case, or when you want to achieve a certain effect, exposure
compensation is recommended.
Example: Before compensation
Example: After compensation
(compensated toward the + side)
...
Without exposure compensation,
the face is underexposed.
...
With exposure compensation, you
get sufficient brightness on the
face.
Tips
•A highly reflective or whitish (bright) subject may cause underexposure. In this case,
adjust exposure compensation toward the + side. Lik ewise, when shooting a dark subject with little reflection that might cause overexposure, compensate to ward the – side.
...
If it is hard to decide on the level of compensation, it is best to take the same
shot several times with different exposures.
• When exposure compensation is active, the exposure-compensation indicator
appears at the top of the viewfinder.
Exposure-compensation indicator
• Remember to return the exposure-compensation indicator to the “0” after shooting.
27
Page 28

Exposure-Compensation Indicator (Continued)
Exposure compensation using the exposure-compensation indicator
It is possible to adjust ±2 EV in units of 1/3 EV.
While holding down the exposure-compensation lock release
11
button
1, rotate the film-speed
1
When you set the film speed to ISO 12, compensation to the + side is disabled (the setting
ring may rotate, b ut the speed remains at ISO 12). When the film speed is set to ISO 6400,
compensation to the – side is disabled. (The setting ring will not rotate further.)
11
setting ring
22
2.
22
Set the compensation index to
2
the desired compensation value.
...
Confirm the ring is firmly set down and locked
in a clicked position.
28
Page 29

N
O
R
m
7
.
7
0
Frame Counter
When opening/closing
S
the camera back
Second blank exposure
First shot
20th shot
...
The frame counter has indications of S, 1, 2, 4, 6, etc., up to 36 in even numbers. Frames of odd
numbers are indicated by dots between the even numbers.
...
The counter stops at 36. However, film will be advanced up to the actual end of the film roll.
...
Even if there is no film in the camera, the frame counter is operative and advances by a single
frame every time you wind the advance lever.
...
The frame counter is automatically reset to “S” when the camera back is opened.
Depth of Field Preview Lever
• When you press the depth of field preview lever to ward the camera body , the
lens is stopped down to the specified
o
k
i
n
N
aperture setting, enabling you to check
the depth of field through the viewfinder.
P
8
.
2
:
1
...
When checking the depth of field with an Ai-type lens attached to the camera, press the depth
of field preview lever fully. Release the lever before you shoot.
...
When you press the lever, the image in the viewfinder is darkened according to the specified
m
I
K
K
lens aperture.
29
Page 30

N
I
K
K
O
R
4
5
m
m
1
:
2
.
8
P
N
i
k
o
n
Film-Plane Indicator
• The mark shown on the upper
panel of the camera indicates the position of the film plane inside the camera.
...
This film-plane indicator can be used as the measurement standard when you must know the
actual camera-to-subject distance (e.g. in close-up photography).
...
The exact distance from the lens-mounting flange to the film plane is 46.5mm.
Accessory Shoe and Sync-Cord Terminal
Accessory Shoe
•A Nikon cordless-type speedlight can
only be connected by attaching it to
the accessory shoe.
• This accessory shoe is equipped with
a safety lock mechanism (a lock hole)
Sync-Cord T erminal
k
i
o
n
N
to prevent slippage.
• This camera has a sync-cord terminal
(with a screw to prevent slippage). To
use a sync-cord, connect it to this synccord terminal (“X” contact only available as sync contact).
30
P
Page 31

Steps of Advanced Photography
With the convenient features of Auto Exposure
mode, you can obtain great results with easy shooting. However, we hope you will also learn more advanced photographic techniques to take full advantage of the wonderful capabilities of your Nikon
FM3A camera.
Flash Photography ............................................................. p. 32
AE-Lock Photography ........................................................ p. 36
Self-Timer Photography ..................................................... p. 37
Multiple-Exposure Photography ......................................... p. 38
Page 32

Flash Photography
Flash photography is not only useful when shooting in a dark place. Even in daylight
shooting, it is sometimes useful to use the flash for supplementary lighting to increase
the shooting range, such as when the subject is too dark because of rear lighting or a
bright background.
Applicable speedlight and shooting situation
Speedlight model
SB-80DX, SB-30, SB-28/28DX,
SB-27, SB-26, SB-25, SB-24
SB-50DX, SB-29/29s, SB-23, SB-21B
S, SB-20, SB-16B,
SB-22/22
SB-15
SB-11, SB-14, SB-140
yes yes yes
yes
yes yes yes
yes yes yes
Non-TTL (external) auto flash
no
Manual flashTTL flash
yes
*1 TTL Auto Flash is possible with TTL Remote Cord SC-23.
*2 When you shoot in “A” or “M” mode on the speedlight:
• use the SU-2 in combination with the SC-13 to connect the SB-11 or SB-14.
• use the SU-3 in combination with the SC-13 to connect the SB-140.
• use the AS-15 in combination with the SC-11 or SC-15 to connect the SB-140.
If the speedlight flash battery power is low or exhausted, the ready light on the speedlight flash turns on earlier than that in the viewfinder. In this case , replace the speedlight flash batteries with new ones.
Ready Light flash status
The ready light is built into the viewfinder and enables you to check the status of the
speedlight while looking through the viewfinder.
Lit: The ready light turns on when the speedlight is fully
charged and ready to flash.
...
The ready light does not light in Bulb mode or if the camera’s
Valid shooting modes
battery power is fully exhausted.
3 seconds as a warning if underexposure is likely with
the full-flash output of the speedlight. In this case, shoot
again after checking the focus distance, aperture setting, range of flash shooting distance, etc.
...
The ready light will also blink as a warning if the shutter speed
is set between 1/500 and 1/4000 second. Select a shutter
speed below 1/250 second.
32
A
00
40
2000
1000
500
250
5
2
1
0
6
0
3
5
1
8
4
2
1
B
Blink: After taking a picture, the ready light blinks for approx.
Connection
method
Cordless
Cordless
Cordless
*1, *2
Page 33

TTL flash
With the TTL flash system, the camera measures the flash of a speedlight reflected from
the subject to obtain the proper level of flash illumination.
TTL flash-exposure compensation
Example: Before compensation
In flash photography when the main subject is far away or near the edge of the viewfinder
frame, overexposure may occur, as the reflected light may be insufficient. This may cause
excessive flash illumination. Flash photography with a bright background may also give
unnatural results.
k
i
o
n
N
Example: After compensation
In such a situation, shooting with the TTL
flash-compensation button held pressed
can automatically reduce the level of flash
illumination for more natural and better exposure results.
When the TTL flash-compensation button
is used, the illumination of the speedlight
is automatically compensated (reduced)
by 1 EV to the – side.
• There is no indication regarding the flash-exposure compensation when you press
the TTL flash-compensation button.
• If exposure compensation is made by the camera, the level of flash illumination is
controlled by adding this compensation level.
• The flash-exposure compensation function of the speedlight is disabled in TTL
mode.
33
Page 34

Flash Photography (Continued)
Procedure for TTL flash photography
Tips
• Applicable film speeds for TTL auto flash are ISO 12 to ISO 1000.
• The flash-sync speed is 1/250 second or lower. In Aperture-Priority Auto Exposure
mode, the speed is automatically set to 1/250 second.
...
When you use a Medical lens, set it to 1/125 second or lower.
The following example shows the Nikon SB-27 Speedlight attached to the camera. For
details, refer to the manual for your speedlight.
Set the exposure mode.
1
...
Set to A. Or, set to a shutter speed of 1 to 1/
250 second.
Confirm that the mark lights in
3
the viewfinder.
Set the mode switch of the
2
speedlight to AUTO.
(Example: with SB-27)
4
Compose your picture and focus.
A
4000
2000
1000
500
250
5
2
1
0
6
0
3
5
1
8
4
2
1
B
...
Lightly press the shutter-release button and
check the ready light.
34
Page 35

Make sure the subject is within
the range of flash-shooting
5
distance, then shoot.
(Example: with SB-27)
...
Press the F button to obtain the same value
as the aperture setting on the lens.
...
Lightly press the shutter release button and
check that the ready light is lit, then shoot.
Tips
<ISO 100>
• Equation to obtain the camera-to-subject distance:
D (distance to subject)= GN (guide number)/f (aperture)
• Equation to obtain the aperture:
f (aperture) = GN (guide number)/D (distance to subject)
If the ready light blinks for appro x. 3 sec. immediately after firing the flash, check the
camera-to-subject distance, aperture setting, and range of flash-shooting distance,
and shoot again.
Flash attachments from other manufacturers
• NEVER use a flash attachment from another manufacturer . The full perf ormance of
this camera can only be obtained with Nikon brand accessories. Other brands ma y
apply a voltage of ISO 24V or higher to the camera’s “X” contacts, or otherwise
short-circuit the accessory-shoe contacts, resulting in damage to the circuits in the
camera.
• Before using the Speedlight, make sure that the Speedlight flash flashes when the
shutter is released.
35
Page 36

AE-Lock Photography
Tips
• AE-lock photography is possible in Aperture-Pr iority Auto Exposure mode. You
cannot use it in Manual Exposure mode.
• Since the composition of a shot can be changed with the EV temporarily stored in
memory, AE-lock photography of a subject of normal (intermediate) brightness
proves to be highly effective when back lighting is present that makes it difficult to
specify the exposure, or when subjects of high and low reflectance are intermingled
in the viewfinder.
Locate the subject in the center of
1
the viewfinder and focus.
3
Press the AE-lock button.
Lightly press the shutter-release
2
button.
Compose your shot, and shoot with
4
the AE-lock button held pressed.
• Apply the auto exposure lock when the exposure meter is active.
• The exposure-meter indicator in the viewfinder is fixed in AE-Lock mode.
36
Page 37

Self-Timer Photography
Tips
The self-timer is useful when you want to include yourself in a group shot or to
prevent camera shake.
...
The maximum count-down time of the self-timer is approx. 10 seconds.
Pull the self-timer lever in the
1
direction of the arrow.
k
i
o
n
N
P
8
.
2
:
1
m
m
5
4
N
I
K
K
O
R
•You can cancel self-timer operation after you set it. To cancel, pull the lever back
toward the lens completely until it stops before you press the shutter-release button. (If you pull the self-timer lever back when it is already in operation, the shutter
is released the moment the lever reaches its original position.)
• When you shoot without looking through the viewfinder in Aperture-Priority Auto
Exposure mode, cover the eyepiece to prevent interference from stray light when
you press the shutter-release button.
Check the focus and exposure,
2
then shoot.
...
The shutter is released with a delay of approx.
10 seconds.
...
The countdown time of the self-timer can be
set from 4 to 10 seconds, according to how
far you cock the self-timer lever.
37
Page 38

Multiple-Exposure Photography
Tips
• Exposing a single frame more than once to overlap multiple images is called multiple-exposure photography.
• If images are to be overlapped in the background, exposure compensation is required, depending on the number of exposures in multiple-exposure photography .
(When images do not overlap, no compensation is necessary.)
Number of exposures
Standard compensation value
...
As the film does not advance, the frame counter does not count up.
Frames may shift slightly in some cases of multiple-exposure photography. In
particular, film advance may be slightly unstable at the beginning and end of a
roll, so multiple-exposure photograph y using the first or last frame of a film roll is
not recommended.
2
– 1.0 EV3– 1.5 EV4– 2.0 EV
• Do not advance film for multiple-exposure photography, wind the film-advance lever
tiple-exposure lev er
22
2 while holding the mul-
22
11
1 toward you.
11
8 or 9
– 3.0 EV
38
Page 39

Additional Information
Keeping this information in mind may help you avoid
problems.
In particular, do not forget to read “Tips on Han-
dling the Camera and Batteries” on page 48.
Page 40

Shutter Speed and Aperture Setting
The shutter-speed setting specifies the length of time the film will be exposed by opening
and closing of the shutter curtains, while the aperture setting determines the amount of
light that passes through the lens. The combined value of these settings is called EV
(Exposure Value).
For example: using ISO100 film with a shutter speed of one second and an aperture setting of f/1.0, the EV is defined as 0 (EV 0). This value increases by one each time the
aperture is stopped down or the shutter speed is increased by one unit.
The shutter speed and the aperture value converted from the EV are displayed in the
viewfinder of the camera. The same EV can result from various possible combinations of
shutter speed and aperture setting. For example, as shown in the EV table below, when
the correct exposure is obtained with a shutter speed of 1/125 second and an aperture
setting of f/11 (EV14), you can obtain the same amount of light also at 1/60 second and f/
16 or at 1/250 second and f/8, for the correct exposure. Understanding these combinations, you can change only the effect on the picture by changing the combination of shutter speed and aperture setting without changing the exposure value.
Tips
Priority should be given to shutter speed when movement is more important, and
to the aperture setting when depth of field is more important.
Exposure Values
Aperture setting (f)
Shutter speed (sec)
40
when using ISO100 film
Page 41

Depth of Field
When you focus on your subject, you will find that not only is the subject itself in focus
but objects in a certain distance range both in front of and behind the subject appear
reasonably sharp. This in-focus zone is known as “depth of field.”
Control of depth of field enables selective blurring of the background elements of a
picture or letting the major subject stand out.
By pressing the depth of field preview lever, you can check how the background image
will appear in the photograph.
Tips
• The depth of field changes depending on three factors; aperture, focal length of the
lens, and shooting distance as follows.
1)The wider the aperture opening, the shallower the depth of field, and the
narrower the aperture opening, the deeper the depth of field.
2)The longer the focal length (such as with a telephoto lens), the shallower the
depth of field, and the shorter the focal length (as with a wideangle lens), the
deeper the depth of field.
3)The closer the subject is to the lens, the shallower the depth of field, and the
farther away the subject is from the lens, the deeper the depth of field.
• Controlling the depth of field gives your picture its own character.
Light-Metering Methods
Full-aperture metering
With a built-in sensor, this camera employs TTL full-aperture metering to determine the
exposure by measuring the brightness of subjects through the lens. With an Ai-type lens
attached, full-aperture metering is performed, and you can set the exposure while maintaining full brightness in the viewfinder.
Stop-down metering
This method is used when the meter coupling lever does not operate in synchronization
with the lens aperture.
With this method, after making the aperture setting for actual shooting, the light is measured when a Non-Ai-type lens or close-up ring is used.
41
Page 42

Lens Compatibility
Any of the following lenses can be used with this camera.
Exposure mode
Lens
CPU lens
•D-type AF
•Non-D-type AF
•Ai-P
•PC Micro 85mm f/2.8D
Non CPU lens
•Ai-S
•Ai / Ai-modified
•Series E
Medical 120mm f/4
Reflex lenses yes yes
PC lenses
PB-6 Bellows Focusing
Attachment
IX lenses
G-type lenses
Aperture-priority
auto
1
yes*
yes yes
no
3
yes*
5
yes*
no no
Manual Remarks
1
yes*
2
yes*
4
yes*
yes Stop-down metering
Stop-down metering
Stop-down metering
*1: When using the PC Micro 85mm f/2.8D, only manual exposure can be used. Note,
however, that the exposure-meter indication will not be correct if you shift and/or tilt
the camera or if you have an aperture setting other than full aperture. In addition, the
TTL flash and the flash compensation will not work.
*2: Only manual exposure is enabled and is usable with shutter speeds under 1/125 second.
*3: In aperture-priority auto exposure, first preset the aperture on the lens, then shift
and/or tilt the camera.
*4: In manual exposure, first preset the aperture on the lens, then measure the light to
determine the exposure before shifting and/or tilting the camera.
*5: First make the aperture setting for the bellows focusing attachment, then measure
the light and shoot.
42
Page 43

Note that the following lenses and accessories cannot be attached to this camera. (If you
try to forcibly attach them, the camera and/or lens may be damaged.)
• Non-Ai-type lenses
• TC-16A Teleconverter
• Lenses used with the AU-1 Focusing Unit (400mm f/4.5, 600mm f/5.6, 800mm f/8,
and 1200mm f/11)
• Fisheye lenses (6mm f/5.6, 8mm f/8 and OP 10mm f/5.6)
• Old-type 21mm f/4
• K2 ring
• ED 180-600mm f/8 (Product No. 174041-174180)
• ED 360-1200mm f/11 (Product No. 174031-174127)
• 200-600mm f/9.5 (Product No. 280001-300490)
• 80mm f/2.8, 200mm f/3.5, and TC-16 Teleconverter for F3AF
• PC 28mm f/4 (Product No. 180900 or smaller)
• PC 35mm f/2.8 (Product No. 851001-906200)
• Old-type PC 35mm f/3.5
• Old-type Reflex 1000mm f/6.3
• Reflex 1000mm f/11 (No. 142361-143000)
• Reflex 2000mm f/11 (No. 200111-200310)
Tips
How to distinguish Ai-type lenses from non-Ai-type lenses
Ai-type lens Non-Ai-type lens
Meter coupling
guide
An Ai-type lens has a meter-coupling guide, but a non-Ai-type lens does not.
43
Page 44

Optional Accessories
Lenses
45mm f/2.8P Lens
•Top quality and unique design with metallic silver or black appearance is an ideal combination with the FM3A camera.
• Lightweight and superthin lens of 17mm (0.7 in.) total length, optimum as a regular-use lens.
• The minimum shooting distance is as close as 45cm (17.7 in.).
• While being a manual-only lens, it can provide all exposure modes
with the built-in CPU, enabling use with an auto-focus camera.
A wide variety of lenses --14mm to 1000mm; wideangle, telephoto,
zoom, Micro or DC (Defocus image Control) -- is available for the FM3A.
MD-12 Motor Drive
With the MD-12 motor drive attached to the bottom of the camera body, automatic film
advance and continuous shooting at a maximum rate of approx. 3.2 frames per second
are enabled.
This proves very convenient when shooting fast-moving subjects.
SB-27 Speedlight
•A compact, lightweight flash attachment that enables TTL light metering, external
automatic light metering, and manual flash firing.
• The mounting position of the light-emission block can be changed to horizontal at the
right, and vertical, or horizontal at the left, so that you can easily control the shadow of
the subject.
• The built-in reflective plate enables you to bounce flash upward or to the left.
• The catch-light effect (to reflect part of flash on eyes) and the diffuser (to soften the
flash) allow additional effects for close-up photography.
• The SB-80DX, SB-50DX, SB-30, SB-29s, SB-28, SB-23, and SB-22S are also available.
MF-16 Data Back
• By attaching the MF-16 to this camera, you can superimpose any of the following:
year/month/day, day/hour/minute, or the frame number.
• The alarm function can be set to sound a buzzer at a specified time.
• The MF-16 also operates in synchronization with the MD-12 motor drive when attached.
Camera Case
• The CF-27S, CF-28S, and CF-29S semi-soft cases are available.
• The CF-27S case accommodates the camera with a mounted lens of 50mm f/1.4 or
smaller. The CF-28S case accommodates the camera with a mounted lens between
50mm f/1.2 and 135mm f/2.8.
• When the MD-12 motor drive is attached to the camera, use the CF-29S.
In addition, the CF-28A front cover for a 35-70mm zoom lens is available.
44
Page 45

Filters
• Nikon filters are divided into three types: screw-on, drop-in and rear-interchange. With
the FM3A, the filter factor need not be considered except with the R60 filter. Compensate exposure +1 EV when using the R60.
• For a filter to protect the lens, use of an L37C or NC filter is recommended.
• Moiré may occur when shooting a subject against bright light or if a bright light source
is in the frame. In this case, remove the filter before shooting.
Neck straps
The leather AN-1 (black), the mesh-type AN-4Y (yellow) and AN-4B (black), and the wide
AN-6Y (yellow) and AN-6W (wine red) are available.
Others
AR-3 Cable release
A screw-in type cable release is available so that you can eliminate camera shake caused
by pressing the shutter-release button. This also enables you to lock the shutter-release
button in Bulb mode without holding the button pressed with your finger.
DK-3 Eyepiece attachment
When attached to the camera’s eyepiece, this makes the field of vision in the viewfinder
clearer, and may reduce eye strain. The DK-3 is made of rubber.
Eyepiece correction lens (for dioptry adjustment)
For nearsighted or farsighted photographers. This eyepiece can be easily attached just
by screwing it onto the camera’s eyepiece. Nine models (–5, –4, –3, –2, 0, +0.5, +1, +2,
or +3) are available. It is recommended to try them before purchasing, as proper dioptry
greatly differs among individuals.
DB-2 Anti-cold battery pack
When you keep the DB-2 external power supply for the camera body in your pocket,
power is steadily supplied even when the ambient temperature is low. (AA-type NiCd,
NiMH and Lithium batteries cannot be used for this battery pack. When the DB-2 battery
pack is mounted to the camera, tripod cannot be used.)
DG-2 Eyepiece Magnifier
When attached to the viewfinder eyepiece, this accessory enlarges the image at the
center of the viewfinder to assure precise focusing in close-up photography, duplication
work and telephotography.
DR-4 Right-Angle Viewing Attachment
Screws onto the viewfinder eyepiece to provide a viewfinder image at a 90° angle to the
camera’s optical axis, An Adapter Ring DK-13 (optional) is required.
45
Page 46

Changing the Focusing Screen
Tips
• Different types of focusing screens can be used with this camera. The K3-type
Clear Matte screen IIa comes with the camera as a standard accessory.
•Two types of screen are available f or replacement as options: B3 type and E3 type.
Select the one that matches your particular requirements.
Pull the focusing screen release
11
latch
1 towards you using the
1
...
The focusing screen comes down.
...
The special tweezers are supplied with a focusing screen for replacement.
3
11
special tweezers
Place the replacement screen on
the screen holder.
22
2.
22
Grip the screen by pinching the
2
tab of the screen and remove it.
Push the front edge of the holder
4
upward to secure the screen.
...
Be sure to place the screen in the right position on the holder.
46
...
Push up on the holder until it snaps into place.
Page 47

Tips
How to distinguish the applicable types.
K3 type, B3 type, E3 type K2 type, B2 type, E2 type
Type
K3
B3
E3
...
K2, B2 and E2 types for the FE2 or New FM2 can be used with this camera without exposure
compensation. K3, B3, and E3 type for this camera can be used with an FE2 or New FM2 camera,
no compensation is required.
Name/style
Split-image rangefinder/
microprism system
Matte system
Etched system with horizontal
and vertical lines
Suitable for general photography. It has a microprism
collar around the central split-image rangefinder spot.
With a PC lenses or lenses having a maximum aperture
less than f/4.5, the split-image rangefinder or microprism
collar is dim. In this case, focus on the surrounding matte
area.
Works well for general photography, close-up photography, and duplication work. Especially useful for
people who prefer to focus on the matte focusing spot
at the center of the screen, or when it is inconvenient to
use the split-image rangefinder for focusing, as is the
case with telephoto lenses.
Extremely useful in pictorial composition. It consists of
a B3-type matte field with etched horizontal and vertical lines. Also useful with PC lenses.
(for New FM2 and FE2)
Features
47
Page 48

Tips on Handling the Camera and Batteries
Camera Care
Do NOT use thinner, benzene or other or-
WARNING
• Cleaning the camera
First lightly blow off dirt and dust with a blower, then gently wipe the body with a clean
soft cloth. After using the camera near sea water, wipe the body with a soft cloth slightly
moistened with tap water to remove salt, then lightly wipe it with a dry cloth.
• Cleaning the mirror and lens
The mirror and lens are very sensitive. Clean them only by lightly blowing off dust with a
blower.
If the lens is smeared, such as with fingerprints, gently wipe it with a clean, soft cloth
moistened with commercially available lens cleaner.
• Do NOT subject the camera or lens to strong shock.
Be careful not to drop the camera and lens or hit them against a hard surface.
Such strong shock may damage the camera or badly affect the precisely adjusted parts.
• Do NOT touch the shutter curtains.
The shutter curtains are made of a very thin material. NEVER hold, push, or strongly
blow with a blower. Such actions can crack, deform, or damage the curtains.
• Avoid locations where strong radio waves or strong electromagnetic fields are generated.
The camera may not operate correctly in a location where a strong radio wave or strong
electromagnetic field is generated, such as near a television tower.
• Store the camera in a cool, dry, well-ventilated place.
To eliminate mold and damage, store the camera in a dry place with sufficient ventilation.
•Do NOT leave the camera in a place exposed to chemicals such as camphor or
naphthalene, near equipment generating a strong magnetic emission, or in an
excesively hot place, such as inside a car or in front of a heater.
• Avoid extreme temperature changes.
Extreme temperature changes can cause condensation outside and inside the camera.
When taking the camera to very hot place from a cold place or vice versa, place it inside
an airtight container such as a plastic bag and leave it inside awhile to expose the
camera gradually to the temperature change.
ganic solvents to clean the camera.
They may damage the camera, cause it to catch fire,
or harm your health.
48
Page 49

• Remove the battery (batteries) and store the camera with a desiccant.
If you do not intend to use the camera for a long time, store it after removing the battery
(batteries) to protect the camera from battery leakage.
•When storing the camera, it is recommended to store it with a desiccant in a plastic
bag. Note, however, that storing the leather camera cases in plastic bags may cause
the leather to deteriorate. Keep the batteries in a cool, dry place.
•A desiccant will lose its effect after absorbing a certain amount of moisture. Occasionally replace it with new one.
•Leaving the camera unused for a long period of time will allow mold to grow and result
in malfunction. To prevent this, insert a battery (batteries) once a month and release
the shutter a few times.
Handling the Batteries
Keep batteries out of the reach of children.
WARNING
• Use the following battery (batteries):
1 One 3V lithium battery (CR-1/3N type)
2 Two 1.55V silver-oxide batteries (SR44 type)
3 Two 1.5V alkaline batteries (LR44 type)
•Before important photographic occasions, check and replace the battery (batteries)
well before exhaustion, or have spare batteries handy.
• Turn the power to the camera off when replacing battery (batteries).
When changing the battery (batteries), fold the film-advance lever and insert the new
battery (new batteries) with the + and – ends positioned correctly.
•The supplied battery is for checking the operation of the camera at the time of purchase. It may have a shorter life than a new one.
•Stains on the battery poles may cause lack of contact. Wipe the batteries with a dry
cloth before inserting.
• Use a fresh battery (batteries) when using the camera in very cold temperature.
The camera may not operate with exhausted batteries.
It is recommended to carry spare batteries, and keep them warm for alternate use.
•The number of film rolls that can be shot decreases in very cold temperatures.
However, battery power may recover when the temperature returns to normal.
• Do NOT throw batteries into a fire.
Do NOT throw batteries into a fire, short-circuit, disassemble, heat or charge batteries.
If a battery is swallowed, immediately contact a physician.
49
Page 50

Glossary
AE lock
A
A function to temporarily store the exposure setting determined by the camera in memory.
After measuring the light on a specific portion of the subject (face, etc.) or another
object, you can change the angle as desired, maintaining the exposure setting (AE
lock is activated with the AE button). When the subject is back lit, first direct the camera
to a dark area or fill the frame with the subject for AE lock, then return the camera to the
desired angle and framing to shoot.
Aperture-priority auto exposure
An automatic mechanism to obtain the proper exposure by automatically controlling
the shutter speed depending on the aperture specified by the operator. This mechanism provides flexible photographing, such as focusing on the foreground subject and
having an out-of-focus background with a wide aperture opening, or to keep the overall
picture in clear focus with a small aperture opening.
Blank exposure
B
With a camera with manual film winding, initial film advancing is required by repeatedly
releasing the shutter and winding the film until the film counter indicates the first frame.
Cable release
C
A shutter release device designed to eliminate vibration caused by slight movement of
the camera from pressing the shutter button with the camera on a tripod.
Center-weighted metering
Light is measured with priority given to the center of the image, gradually decreasing
the metering level towards the edges.
Correct exposure
The exposure setting for the film that best reproduces the lighting condition of the
subject, from its highlights to shadowed portions. Or, the setting that can best provide
an image that matches the intention of the photographer. While the best combination of
shutter speed and aperture value for the sensitivity of film in use may normally provide
the correct exposure, this may not be true for the specific result you are looking for.
50
DX code
D
The bar code on a cartridge of 35mm film. The bar code contains information on the
type of film, sensitivity, and number of frames. A camera that can read DX code is
automatically adjusted by reading the information.
Page 51

EV
E
EV stands for Exposure Value, which indicates the exposure settings, For example:
using ISO 100 film with a shutter speed of one second and an aperture setting of f/1.0,
the EV is defined as 0 (EV 0). This value increases by one each time the aperture is
stopped down or the shutter speed is increased by one unit. The aperture and shutter
speed are indicated in the built-in exposure meter of the camera as values converted
from the EV.
Exposure
Exposing the film to light with a combination of the aperture and shutter speed settings.
The aperture is used to adjust the amount of light that reaches the film, and the shutter
speed is used to adjust the length of time the film is exposed, thus providing the correct
exposure.
Exposure compensation
To change the standard exposure determined by an exposure-meter. By intentionally
changing the exposure setting, you may obtain a desired effect. Increasing the exposure is called positive compensation, and decreasing it is called negative compensation. Exposure compensation may be effective when the luminance, reflection, position, or size of the subject may cause an exposure error.
Flash-exposure compensation
F
The light-control system that automatically controls the illumination level of the flash
according to the ambient brightness is called flash exposure. Flash-exposure compensation is a function to increase/decrease this automatic-level-control range.
Flash-shooting distance range
The range in which the proper exposure can be obtained in flash photography. The
higher the film sensitivity, the wider the range, and vice versa. The wider the lens aperture, the wider the range, and vice versa. Pictures must be taken within the flash shooting distance range.
Full aperture
The minimum aperture value (smallest f-number) for a lens is “full aperture.” With the
full aperture opening, the depth of field is shallow, and images are defocused more in
the background while widening the shootable range for the amount of light.
51
Page 52

Glossary (Continued)
F
Full-aperture metering
One of the light-metering systems of a camera with a built-in TTL exposure meter. After
you make the aperture setting, the camera determines the correct shutter speed by measuring the light with full aperture. As the aperture is kept fully open, the view in the viewfinder is bright, enabling easy focusing. The lens will then be stopped down to your
aperture setting when you release the shutter. On the contrary, metering the light with the
actual aperture setting for shooting is called “stop-down metering.” This may darken the
view in the viewfinder making focusing difficult. With some special lenses or certain accessories (such as a bellows attachment), only stop-down metering is available.
G
Guide number
Used as a standard value to numerically show the illumination level (ISO 100, m, 20°C
/ 68°F) of flash. The value is indicated in units of GN (ISO 100, m). An aperture setting
value for the correct exposure can be obtained by the following equation.
Aperture value (f) = Guide number (GN) / Shooting distance (meters).
I
ISO film speed
A unit to indicate the film sensitivity, defined by the ISO (International Organization for
Standardization).
M
Manual exposure
Shooting is performed by manually setting the shutter speed and aperture value based
on the light level measured by an external or built-in exposure meter. With manual
exposure, shooting can be performed independent from changes in conditions. You
may want to make a solemn image by setting the exposure to a low level, or add a
cheerful atmosphere by setting it to a high level.
Mechanical shutter
A shutter system that mechanically controls the shutter speed. Its advantage is that no
power is required, permitting you to shoot even when the battery power is exhausted.
This may be especially effective for photographing with long-time exposure or at low
temperatures at which batteries would have to be warmed.
52
Multiple-exposure photography
To expose a single frame more than once.
N
ND filter
ND stands for Neutral Density. ND filters can flatly decrease the light level without
masking out any specific wavelength (color).
O
Overexposure
A state in which the total exposure is too great when compared with standard exposure.
Page 53

TTL
T
An abbreviation of “Through the Lens,” which represents a system to determine the
brightness of the subject by metering the light through the lens with the built-in exposure meter of the camera.
TTL flash
A function to obtain the correct exposure for the main subject by firing the flash
regardless of the ambient light. By measuring the amount of the flash light reflected
from the subject, the camera stops light emission when the correct illumination level is
reached. This may possibly cause an imbalance in brightness between the main subject and the background.
Underexposure
U
A state in which the total exposure is insufficient when compared with standard exposure.
53
Page 54

Specifications
Type of camera
35mm single-lens reflex with electronically and
mechanically controlled focal-plane shutter
Applicable film
35mm film in a cartridge
Frame size
24 × 36mm
Lens mount
Nikon F mount
Shutter
Vertical-travel, metal focal-plane shutter
Shutter-speed settings
A (aperture-priority auto): 8 to 1/4000 sec., electronic stepless control (indications are 1 to 1/4000)
Manual: Bulb, 1 to 1/4000 sec., mechanical control
Viewfinder
Eye-level pentaprism
Eyepoint
14mm (at –1.0 m
-
1
)
Focusing screen
K3 type (splitprism-image microprism type, Clear
Matte Screen
optional
Viewfinder frame coverage
Approx. 93% (objective screen)
II
a) standard, B3 type and E3 type
Viewfinder magnification
0.83× with 50mm lens set to infinity
Viewfinder information
Shutter speed, exposure meter indication, shutter indication, direct aperture value, exposure
compensation mark, ready light
Reflex mirror
Quick-return type
Exposure meter sync
Ai type (automatic compensation at full-aperture
f-stop)
Metering system
TTL center-weighted, full-aperture exposure metering system, approx. 60% of the meter’s sensitivity concentrated on a 12mm diameter circle
Metering range
EV1 to EV20 at ISO100 (with a 50mm f/1.4 lens)
54
Film-sensitivity settings
DX system or manual. DX: ISO 25 to 5000 Manual:
ISO 12 to 6400
Exposure compensation
Exposure compensated to ±2 EV in units of 1/3 EV
(compensation to the + side not possible with ISO
12, and that to the – side not possible with ISO 6400)
Auto exposure lock
Enabled by pressing the AE lock button
Film advance
Lever provided, 30-degree standoff angle and 135degree winding angle, automatic film advance enabled with MD-12 Motor Drive (sold separately)
Frame counter
Additive type (S, 1 to 36), automatic reset
Film rewinding
Film rewind button and crank
Self-timer
Mechanical controlled, countdown time of approx.
4 to 10 seconds, cancellation possible
Depth of field preview
Can stop down lens aperture by pressing the
depth of field lever
Multiple exposure
Activated with multiple exposure lever
Sync contact
X-contact only; synchronized with the flash at a
low speed of under 1/250 sec.
Flash control
TTL flash: Enabled by using SB-28, SB-27,
TTL flash
compensation: Compensation to –1 EV activated
Film speed synchronization in TTL flash:
Sync terminal
Equipped with sync terminal (ISO 519), locking
screw type
etc. in combination
with the TTL flash compensation
button on the camera
ISO 12 to 1000
Accessory shoe
Hot-shoe contact (ISO 518, sync contact, readylight contact, monitor contact, stop-signal contact
for TTL flash) with a lock hole to prevent accidental
dropping
Page 55

Ready light
Lights when the flash is fully charged with SB-28,
SB-27, etc.; blinks for full-output warning or shutter-speed settings from 1/500 to 1/4000 sec.
Camera back
Detachable hinged back; MF-16 Data Back can
be attached in place.
Camera-back opening
Achieved with the film-rewind lever
Power source
One 3V lithium battery (CR-1/3N type), two 1.55V
silver-oxide batteries (SR44 type), or two 1.5V alkaline batteries (LR44 type)
Meter-on timer
To turn the camera on when the shutter-release
button is pressed lightly, turning it off 16 seconds
after your finger leaves the button. With the MD12 Motor Drive, the camera is turned on when the
shutter release button of the MD-12 is pressed
lightly, and it turns off approx. 66 seconds after
your finger leaves the button.
Battery power check
Displayed for 16 seconds with the meter-on timer.
The exposure meter does not work if the batteries are exhausted.
Number of film rolls that can be shot
When repeating the procedure of holding the shutter-release button in the lightly-pressed position for
10 seconds, pressing it all the way, and waiting
until the meter-on timer counts up to the end, with
36-frame film rolls, a shutter speed of 1/250 second in Aperture-Priority Auto mode:
Power
Temperature
At normal
temperature
(20˚C)
At low
temperature
(–10˚C)
One 3V
lithium
battery
approx. 100
rolls
approx. 50
rolls
Two 1.55V
silver-oxide
batteries
approx. 100
approx. 50
rolls
rolls
Two 1.5V
alkaline
batteries
approx. 45
rolls
approx. 10
rolls
Optional exclusive or common accessories
MD-12 Motor Drive
SB-27 Speedlight and equivalents
MF-16 Data Back
CF-27S / CF-28S / CF-29S Camera Case
AR-3 Cable release
etc.
Tripod socket
1/4 (ISO 1222)
Dimensions (W × H × D)
Approx. 142.5 × 90 × 58mm / 5.6 × 3.5 × 2.3 in.
(camera body only)
Weight
Approx. 570g / 20.1 oz. (camera body only, including battery)
• All specifications are calculated assuming fresh batteries are used at normal
temperature (20˚C / 68˚F).
• Specifications and design are subject to
change without notice.
55
Page 56

No reproduction in any form of this manual, in
whole or in part (except for brief quotation in critical
articles or reviews), may be made without written
authorization from NIKON CORPORATION.
NIKON CORPORATION
FUJI BLDG., 2-3, MARUNOUCHI 3-CHOME,
CHIYODA-KU, TOKYO 100-8331, JAPAN
Printed in Japan Y3A00500401 (S954) 11
 Loading...