

Jp
Jp
En
De
Fr
Es
It
Ru

3

Jp
En
De
Fr
Es
It
Ru
日本語
はじめに・安全上のご注意 ................................ 4-6
使用上のご注意 ....................................................... 6
EDG フィールドスコープ/仕様 ...................... 8-9
接眼レンズ/仕様 ......................................... 10-11
各部の名称 .......................................................12-13
目次
接眼レンズの取り付け・取り外し .......................14
ピント合わせ/フードの出し入れ .........................14
鏡筒回転 ..................................................................15
付属品 ......................................................................15
接眼レンズの使用状況 .................................. 16-17
システムチャート ................................................ 18
EMA-1 .................................................................. 19
FSA-L2 ...........................................................20-23
• 仕様・外観などは改善のため予告なしに変更する場合があります。
• 本「使用説明書」に掲載されている文章・イラスト等の無断転載を禁じます。
アフターサービスについて
お買い上げいただきましたフィールドスコープを、安心してご愛用いただきますよう、次のとおり修理、アフターサービスを行っております。
• 本製品の補修用性能部品は、製造打ち切り後も 8 年間を目安に保有しております。
したがいまして、修理可能期間は部品保有期間内とさせていただきます。なお、ご使用いただいております製品が修理可能期間内であるかどうかに
つきましては、当社 CS センター、あるいはニコンのサービス機関へお問い合わせください。
付記
水没、火災、落下等による故障または破損で全損と認められる場合は、修理が不可能となります。なお、この故障または破損の程度の判定は当社 CS
センター、あるいはニコンのサービス機関におまかせください。
消耗品について
• 目当て等の消耗品につきましては、ご購入店、または当社 CS センター、あるいはニコンのサービス機関にお問い合わせください。
4
はじめに・安全上のご注意
このたびは、ニコンフィールドスコープを
お買い上げいただきまして、まことにあり
がとうございます。
安全にお使いいただくために─必ずお守り
ください
○ 製品をご使用の前に、この使用説明書の
「安全上・使用上のご注意」をよくお読
みのうえ、正しくお使いください。
○ お読みになった後は、製品のそばなど、
いつも手元に置いてご利用ください。
この使用説明書には、あなたや他の人への
危害や財産への損害を未然に防ぎ、この製
品を安全にお使いいただけるために、守っ
ていただきたい事項を示しています。内容
をよく理解してから、製品をご使用くださ
い。
警告
この表示を無視して、誤った取り扱いをす
ると、人が死亡または重傷を負う可能性が
想定される内容を示しています。
注意
この表示を無視して誤った取り扱いをする
と、人が傷害を負う可能性が想定される内
容および物的損害の発生が想定される内容
を示しています。
Jp
En
De
Fr
Es
It
Ru
5

Jp
En
De
Fr
Es
It
Ru
安全・使用上のご注意
警告!
太陽を、絶対に直接見ないでください!
注意!
・ この製品は防水仕様になっていますが、
雨・水滴・砂や泥が掛からないように
してください。
・ この製品が雨に濡れたときはピント合
わせリングを回さないでください。
・ この製品を分解しないでください。
・ ストラップを持って振り回さないでく
ださい。人に当たり、けがの原因とな
ることがあります。
・ この製品を不安定な場所に置かないで
ください。倒れたり、落ちたりしてけ
がの原因となることがあります。
・ この製品を歩行中に使用しないでくだ
さい。衝突や転倒により、けがの原因
となることがあります。
・ 炎天下の自動車の中や、ヒーターなど
高温の発熱体の前にこの製品を放置し
ないでください。
・ 寒い戸外から温かい室内に入ったとき
など、急激な温度変化によって、一時
的にレンズ面が曇ることがあります。
6
・ 本体の清掃のときに、アルコールなどの
有機溶剤を使用しないでください。
・ この製品の包装に使用されているポリ袋
などを、小さなお子さまの手の届くとこ
ろに置かないでください。
・ キャップ、目当てゴムなど、お子さまが
誤って飲むことがないようにしてくださ
い。万一、飲みこんだ場合は、直ちに医
師に相談してください。
・ この製品の長時間使用を繰り返します
と、ゴム製の目当てにより、皮膚に炎症
を起こすことがあります。もし、疑わし
い症状が現れましたら、直ちに医師に相
談してください。

使用上のご注意
保守・手入れ
レンズ
・ レンズ面上のほこりは、柔らかい、油気
のないハケで払うようにして取り除いて
ください。
・ レンズ面上の指紋や汚れは、メガネ拭き
専用の布(市販品)で拭き取るか、ガー
ゼまたは専用のクリーニングペーパー
(カメラ店などで市販されているシリコ
ンが含まれていないもの)に少量の無水
アルコールを含ませて、軽く拭き取って
ください。身近な布やビロード、なめし
革などでから拭きしますと、レンズ面に
キズを付けることがあります。また、一
度本体の清掃に使用した布は、レンズ面
の清掃に使用しないでください。
ED レンズの清掃に際して
・ フィールドスコープの対物レンズを清掃
するときは、エアゾールタイプのダスト
クリーナーの使用はご遠慮ください。液
化ガスの急冷作用によりレンズ割れを起
こすことがあります。もし使用される場
合は、缶を立ててレンズ面より 30cm
以上離し、気化した液化ガスが一点に集
中しないように動かしながら、十分に注
意して清掃してください。
本体
・ ピント合わせリングの回転部分に入った
砂・ゴミは、ハケでよく払ってください。
・ 本体のお手入れは、ブロア*でゴミやホ
コリを軽く吹き払ったあと、柔らかい清
潔な布で軽く拭いてください。ベンジン
やシンナーなどの有機溶剤や、有機溶剤
を含むクリーナーなどを汚れ落としに使
わないでください。
* ブロア:ノズルから空気をいきおいよ
く吹き出すことができるゴム製の清掃
道具
保管
・ 湿気の多いところでの保管・使用は、レ
ンズ面にカビや水滴による曇りが生じや
すくなります。風通しのよい、乾燥した
場所に保管してください。とくに、雨の
日などに使用されたときは、室内で充分
に乾かしてから保管してください。
・ 炎天下の自動車の中やヒーターなど高温
の発熱体のそばに、この製品を放置しな
いでください。製品の変形、故障の原因
となります。
防水型について
この製品は2mの水深に 10 分間水没させ
ても内部光学系に異常がなく、観察に支障
のない防水設計になっています。
1. 雨風の当たる場所や、湿気の多い場所な
どの悪条件下で使用しても、内部機能を
損ねることがない。
2. 乾燥窒素の充填により、曇りやカビが生
じにくい。
などの特徴がありますが、次の点にご注意
の上、ご使用ください。
1. 密閉構造ではありませんので、水中での
使用や強い水流で洗うことはおこなわな
いでください。
2. 本体可動部に水滴が付いたときは操作す
ることをやめ、水滴を拭き取るようにし
てください。
なお、防水性能を保持するために、定期的
に点検を受けられることをおすすめしま
す。
7
Jp
En
De
Fr
Es
It
Ru
Jp
En
De
Fr
Es
It
Ru
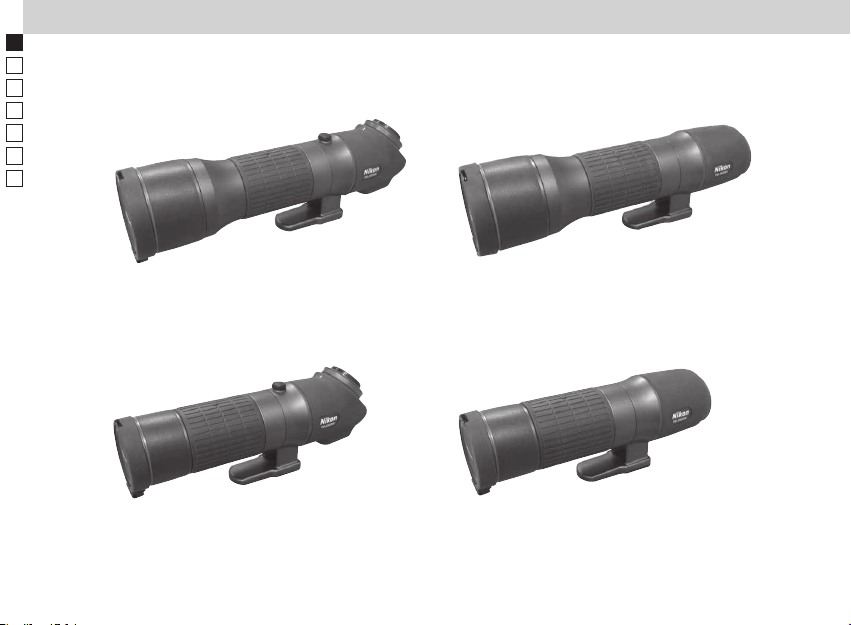
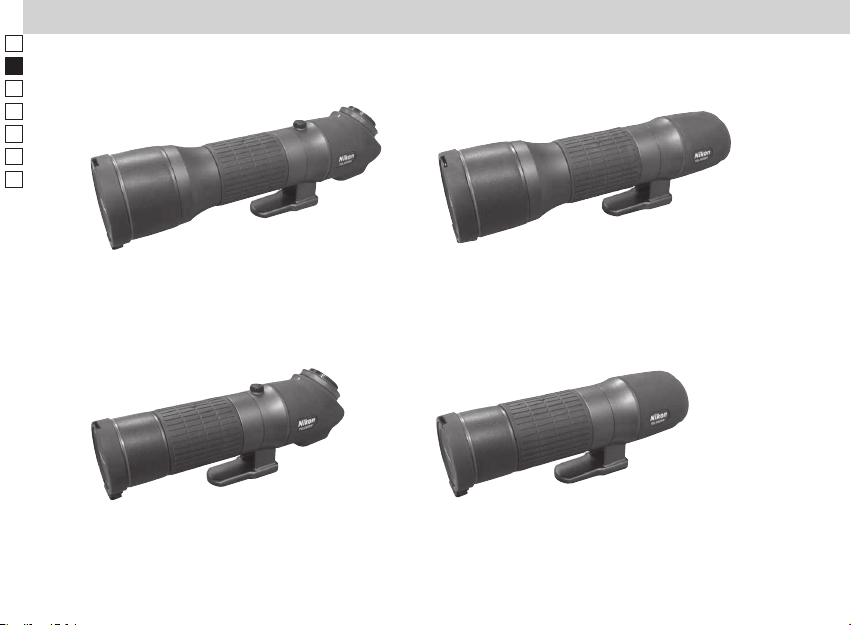
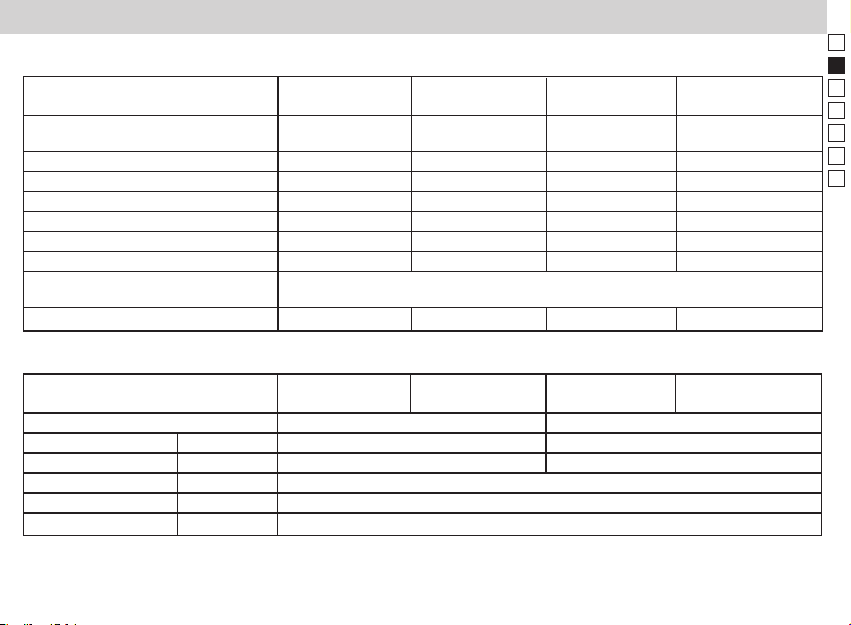
EDG フィールドスコープ 仕様
EDG フィールドスコープ 85-A EDG フィールドスコープ 85
EDG フィールドスコープ 65EDG フィールドスコープ 65-A
8
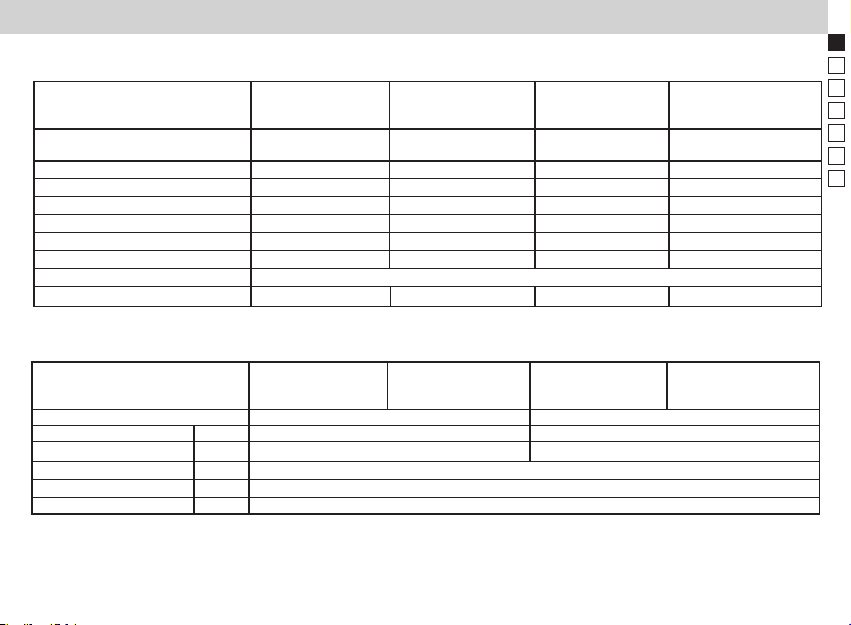
機種 EDG EDG EDG EDG
フィールドスコープ フィールドスコープ フィールドスコープ フィールドスコープ
65-A 65 85-A 85
形式 傾斜 直視 傾斜 直視
プリズム式 プリズム式 プリズム式 プリズム式
対物レンズ有効径 65mm 65mm 85mm 85mm
最短合焦距離 3.3m 3.3m 5m 5m
質量(本体のみ) 1,620g 1,560g 2,030g 2,030g
全長(本体のみ) 332mm 313mm 398mm 379mm
全高(本体のみ) 131mm 120mm 131mm 127mm
全幅(本体のみ) 88mm 88mm 102mm 102mm
構造 防水(水深 2m x 10 分)+ 窒素置換(接眼レンズとの間は、防滴)
鏡筒回転(三脚座に対して) *回転 固定 *回転 固定
*0˚、± 45˚、± 90˚、± 135˚の位置でクリック感があり、クランプつまみで固定できます。
識別マーク一覧 EDG EDG EDG EDG
フィールドスコープ フィールドスコープ フィールドスコープ フィールドスコープ
65-A 65 85-A 85
本体 VV VU
ステイオンケース CCM CCL
対物キャップ 組込 OBM OBL
マウントキャップ 組込 LF-1
ケースストラップ SBB
マウント飾りリング 組込 PAV
9
Jp
En
De
Fr
Es
It
Ru
Jp
En
De
Fr
Es
It
Ru
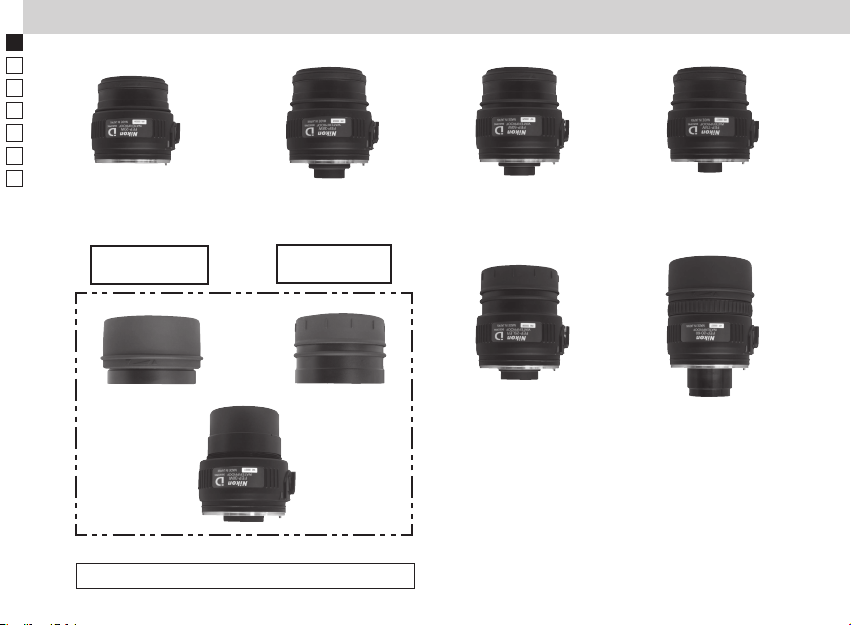
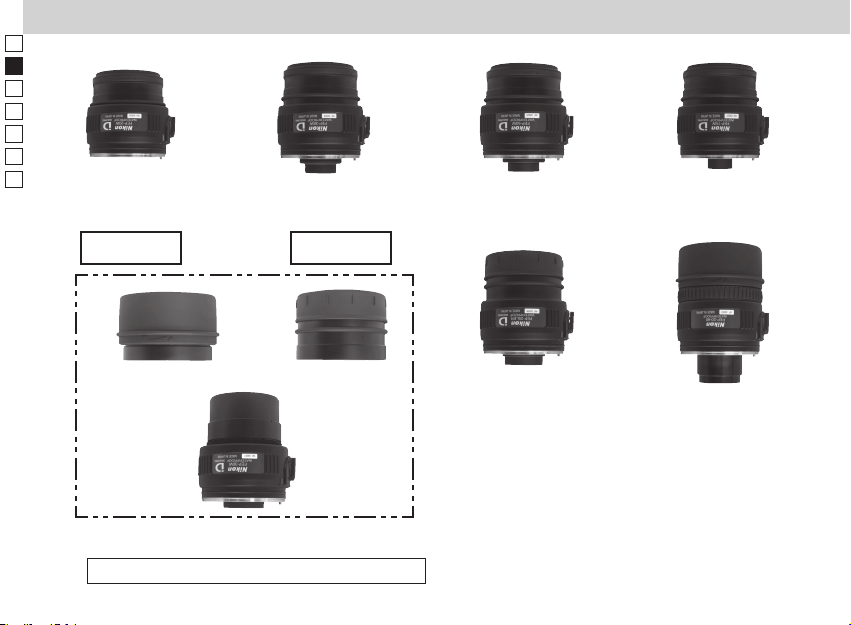
接眼レンズ / 仕様一覧
FEP-20W FEP-38W FEP-50W FEP-75W
TS リング
アタッチメント
DS リング
アタッチメント
FEP-30W
どちらかのリングアタッチメントをねじ込んで使用
10
FEP-25LER FEP-20-60
種類 FEP-20W FEP-25LER FEP-30W FEP-38W FEP-50W FEP-75W FEP-20-60
倍率 20x 25x 30x 38x 50x 75x 20-60x
16x 20x 24x 30x 40x 60x 16-48x
実視界 3.3˚ 2.4˚ 2.4˚ 1.9˚ 1.4˚ 1.0˚ **2.2˚-1.1˚
4.1˚ 3.0˚ 3.0˚ 2.4˚ 1.8˚ 1.2˚ **2.8˚-1.4
* 見掛け視界 60˚ 55.3˚ 64.3˚ 64.3˚ 64.3˚ 64.3˚ **42˚-60˚
60˚ 55.3˚ 64.3˚ 64.3˚ 64.3˚ 64.3˚ **42˚-60
1,000m/yds での視野
115-58 ft.
147-73 ft.
射出瞳径 4.3mm 3.4mm 2.8mm 2.2mm 1.7mm 1.1mm **4.3-1.4mm
4.1mm 3.3mm 2.7mm 2.2mm 1.6mm 1.1mm **4.1-1.4mm
明るさ 18.5 11.6 7.8 4.8 2.9 1.2 **18.5-2.0
16.8 10.9 7.3 4.8 2.6 1.2 **16.8-2.0
アイレリーフ 20.1mm 32.3mm 25.4mm 17.9mm 17.8mm 17.0mm
58m/173 ft. 42m/126 ft 42m/126 ft. 33m/99 ft. 24m/73 ft. 17m/52 ft.
72m/215 ft. 52m/157 ft. 52m/157 ft. 42m/126 ft. 31m/94 ft. 21m/63 ft.
20.1mm 32.3mm 25.4mm 17.9mm 17.8mm 17.0mm
全長 59mm 77mm
最外径 63mm 63mm 63mm 63mm 63mm 63mm 63mm
質量 240g 320g ***390g 230g 230g 230g 330g
構造 防水(水深 2mx10 分 )+ 窒素置換(本体との間は防滴)
81mm: ターンスライド
79mm: DS
74mm 71mm 71mm 99mm
**38-19m/
**49-24m/
**18.4-16.5mm
**18.4-16.5mm
上段: 85 口径装着時、下段 : 65 口径装着時 ** 低倍時 - 高倍時
*
関係式 [tan ω’= Γ x tan ω ] で算出した値。 見掛け視界 : 2 ω’、 倍率:Γ、実視界 : 2 ω *** ターンスライドの時
識別マーク一覧
TS リング DS リング
本体
— —
マウントキャップ(対物) 組込 ECF
ゴムキャップ(接眼) 組込 ECG ECL ECG ECG ECL
目当てゴム 組込 ACM ABY ACN ABY ACM ACN
ケース 同梱 CCK
FEP-20W FEP-25LER
WA WB
WD
*FEP-30W
FEP-38W FEP-50W FEP-75W FEP-20-60
WE WF WG WC
* 工場出荷時、ターンスライド (TS) リングが組込まれ、DS リングセット(リング + ゴムキャップ + 目当てゴム)は同梱されています。
11
Jp
En
De
Fr
˚
Es
˚
It
Ru
Jp
En
De
Fr
Es
It
Ru
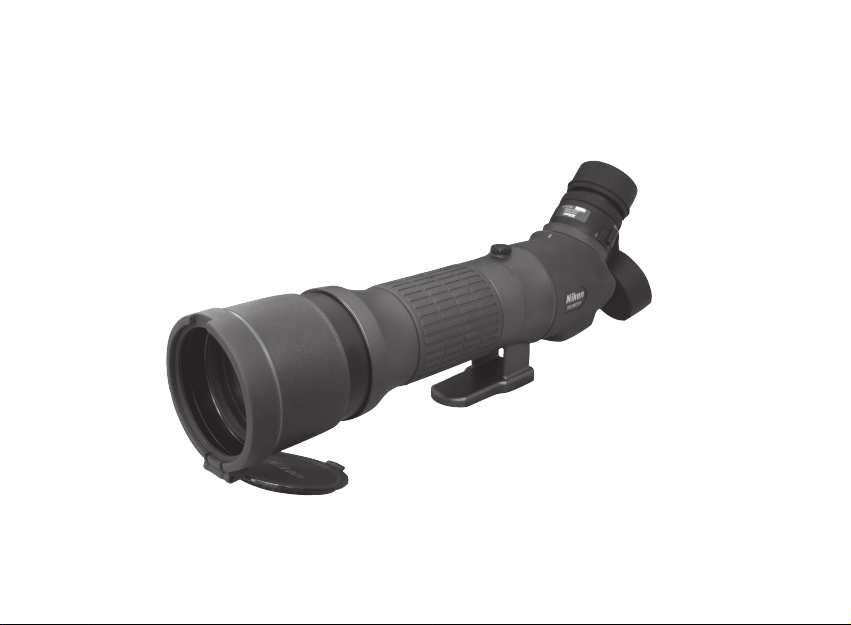
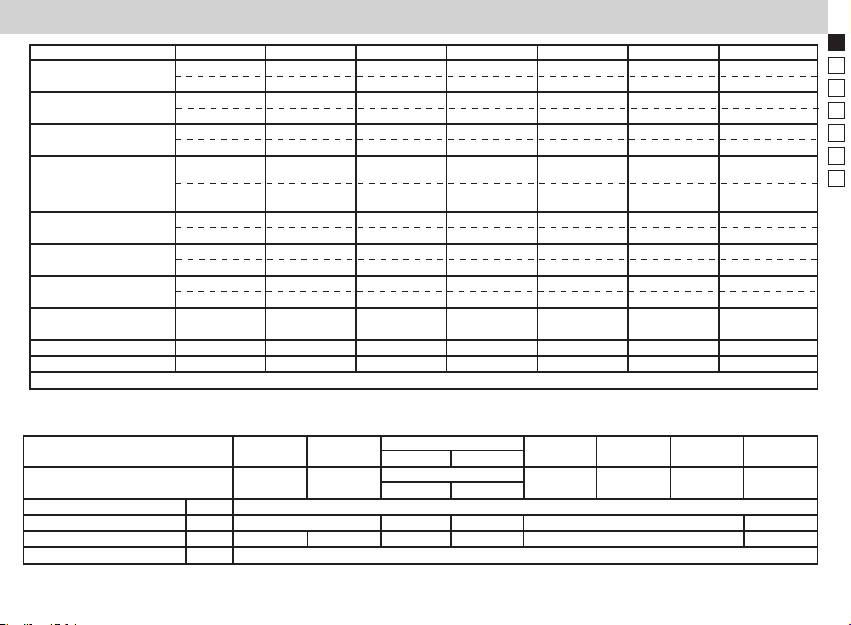
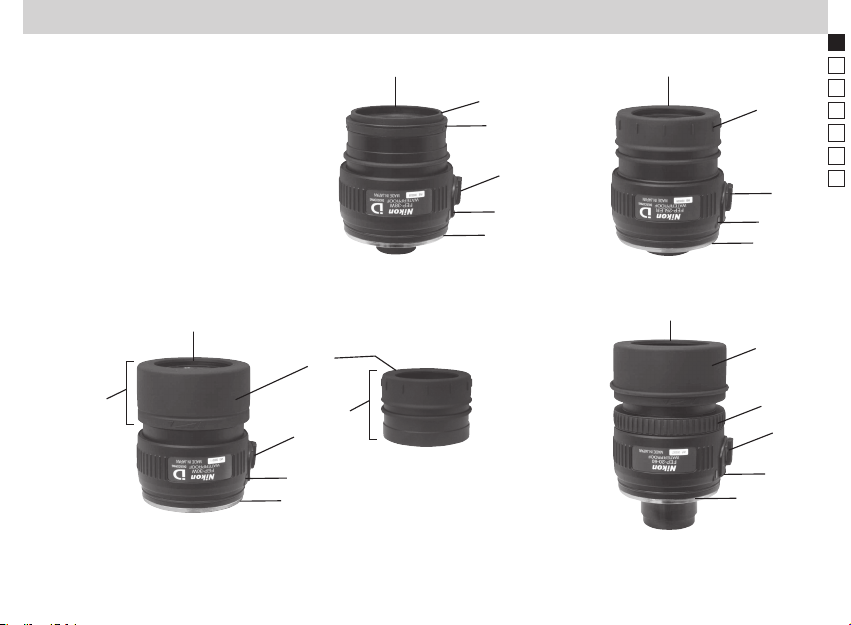
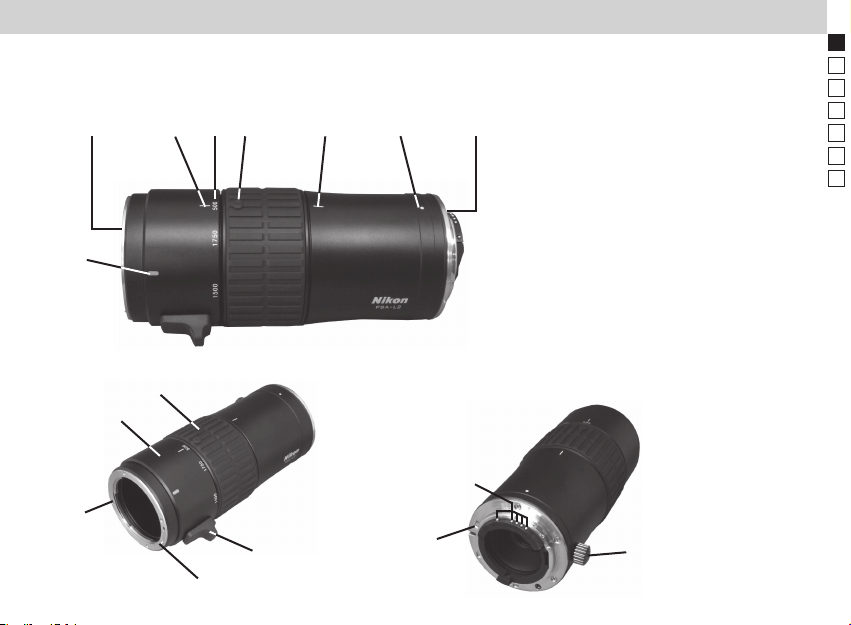
各部名称(傾斜・直視)
① 対物レンズ
② 対物キャップ
③ フード ( スライド式)
④ ピント合わせリング
⑤ 接眼レンズ(別売)
⑥ 接眼キャップ
⑦ 接眼着脱指標
⑧ 三脚取付け座
⑨ クランプつまみ
⑩ 三脚ねじ穴(1/4")( 3カ所)
⑪ ビデオピン穴 (4 ヶ所 )
⑫ マウント飾りリング
(傾斜)
①
⑦
⑨
③
④
⑤
⑫
⑥
⑧
②
(直視)
④
⑩
③
⑦
⑤
⑫
⑥
①
⑪
⑧
②
12
各部名称(接眼レンズ)
① 接眼レンズ
② 目当てゴム
③ 目当て繰り出しリング
④ ズームリング
⑤ 接眼着脱レバー
⑥ 接眼着脱指標
⑦ 接眼マウント
⑧ TS リングアタッチメント
⑨ DS リングアタッチメント
①
①
FEP-20W, 38W,
50W, 75W
②
Jp
①
②
②
③
⑤
⑥
⑦
⑥
⑦
En
De
Fr
Es
It
Ru
⑤
FEP-25LER
①
②
⑧
TS リングアタッチメント付
⑤
⑥
⑦
FEP-30W
⑨
DS リング
アタッチメント
④
⑤
⑥
⑦
FEP-20-60
13
Jp
En
De
Fr
Es
It
Ru
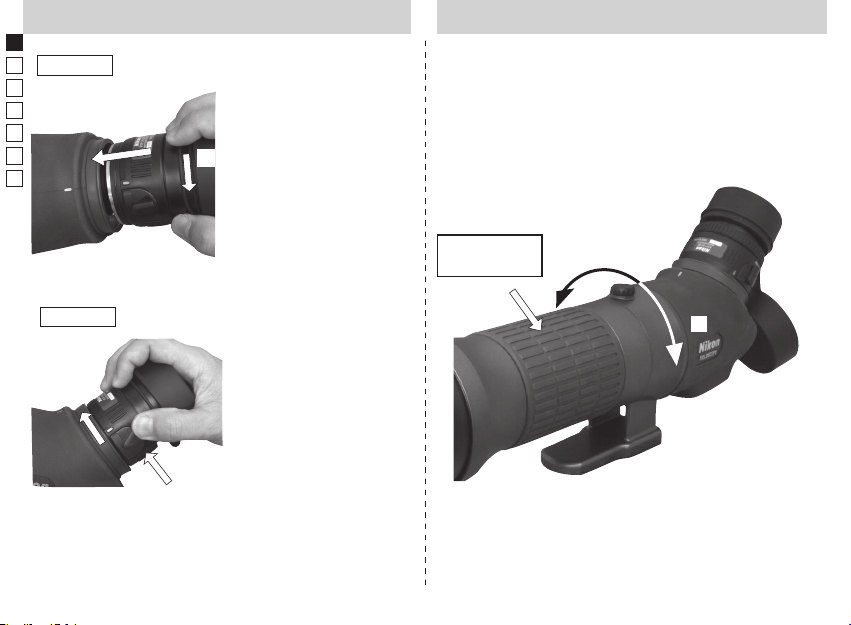
取り付け
接眼レンズの取付け・取り外し
本体と接眼の接眼着脱
指標に合わせて、
①レンズをはめ込み、
①
押し込みながら、
②反時計回りにロック
②
音がするまで回します。
注)押し込みが不十分
なときは、回りません。
ピント合わせ/フードの出し入れ
ピント合わせ
・ピント合わせリングで行ないます。
時計回り①に回すと、遠くの目標にピントが合いま
す。
反時計回り②に回すと、近くの目標にピントが合い
ます。
ピント合わせ
リング
①
取り外し
②
14
②
接眼レンズ着脱レバーを
①矢印の方向に押した状
態で、接眼レンズを
②時計回りに回して外し
ます。
①
フードの出し入れ
・フードの伸縮は、対物レンズキャップを開けた状態
で行なってください。閉めた状態では、フード内の
空気圧により、動きが抑制されます。
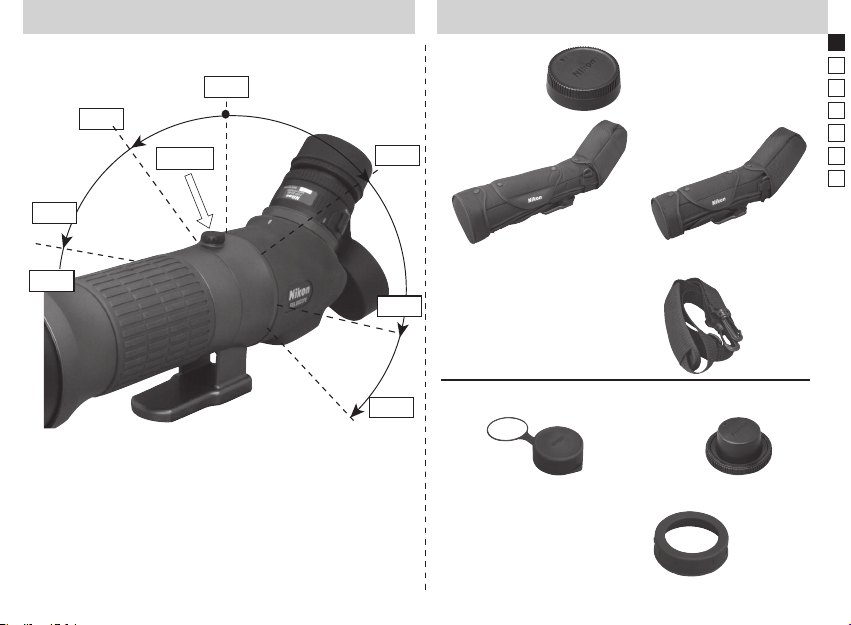
本体鏡筒の回転(傾斜タイプのみ)
0˚
45˚
Clamp
45˚
90˚
135˚
90˚
135˚
・クランプつまみを反時計回りに緩めると、スコープ
本体鏡筒を回転することが出来ます。
・0˚、± 45˚、± 90˚、± 135˚の位置でクリックに
より止まります。
・クランプつまみをねじ込むことにより、その角度で
固定できます。
付属品
(本体)
マウントキャップ
SOC-8
(85/85-A 用)
(65/65-A 用)
ステイオンケース(標準品設定の場合)
ケースストラップ
(標準品設定の場合)
(全接眼レンズ共通)
接眼キャップ
保護用目当てゴム
(FEP-30W, FEP-25LER 用)
SOC-7
マウントキャップ
Jp
En
De
Fr
Es
It
Ru
15
Jp
En
De
Fr
Es
It
Ru
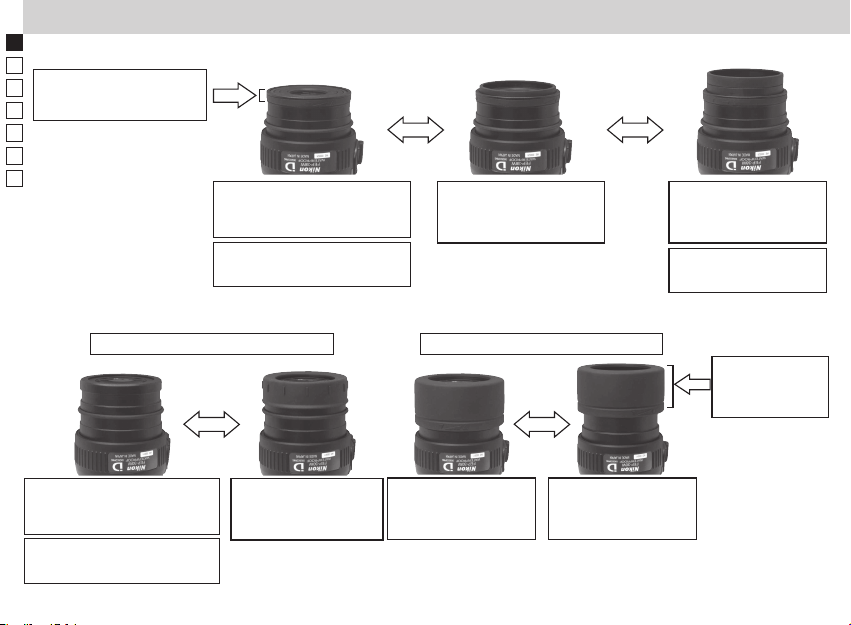
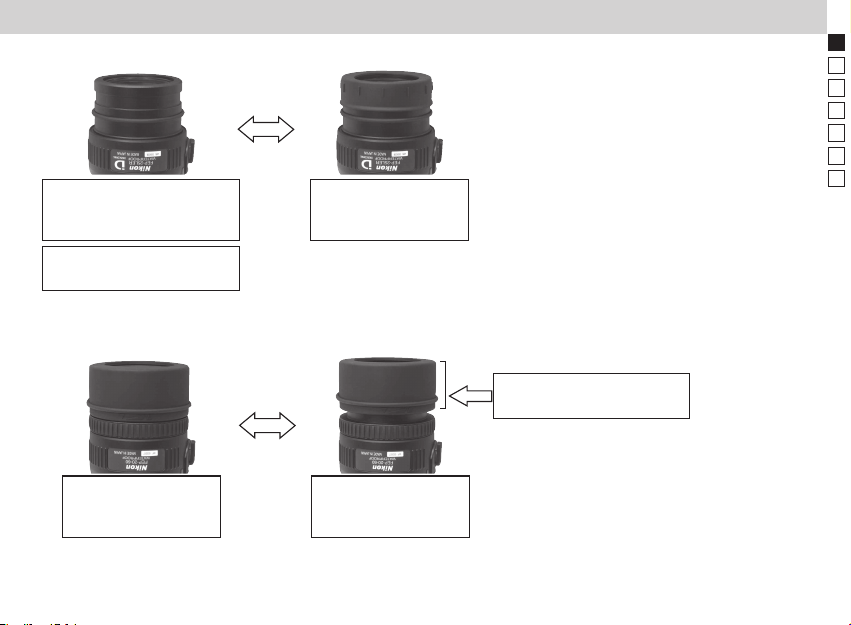
各接眼レンズの使用状態
FEP-20W, -38W, -50W, -75W 共通(目当てゴム部の繰り出しで設定します。)
目当て繰り出しリング
を回転して設定します
デジスコ撮影時
目当てゴム部を
収納した状態
眼鏡装用者観察時
目当てゴム部が
約5mm ほど出た状態
デジタルカメラブラケット
が取り付けられます
FEP-30W(ねじ込み式のリングアタッチメントを交換して、接眼部仕様を変更します。)
DS リングアタッチメント使用時
TS リングアタッチメント使用時
裸眼観察時
目当てゴム部が
更に突出した状態
突出量は接眼により
異なります
目当てゴム部を
回転して
設定します
デジスコ撮影時
保護用目当てゴムを
取り外した状態
デジタルカメラブラケット
が取り付けられます
16
目視観察時
保護用目当てゴムを
被せた状態
眼鏡装用者観察時
目当てゴム部を
収納した状態
裸眼観察時
目当てゴム部を
繰り出した状態
FEP-25LER(着脱式目当てゴム仕様です。)
デジスコ撮影時
保護用目当てゴムを
取り外した状態
目視観察時
保護用目当てゴムを
被せた状態
デジタルカメラブラケット
が取り付けられます
FEP-20-60(ターンスライド仕様の目当てです。)
( デジタルカメラブラケットには取付けられません。)
Jp
En
De
Fr
Es
It
Ru
目当てゴム部を回転して
設定します
眼鏡装用者観察時
目当てゴム部を
収納した状態
裸眼観察時
目当てゴム部を
繰り出した状態
17
Jp
En
De
Fr
Es
It
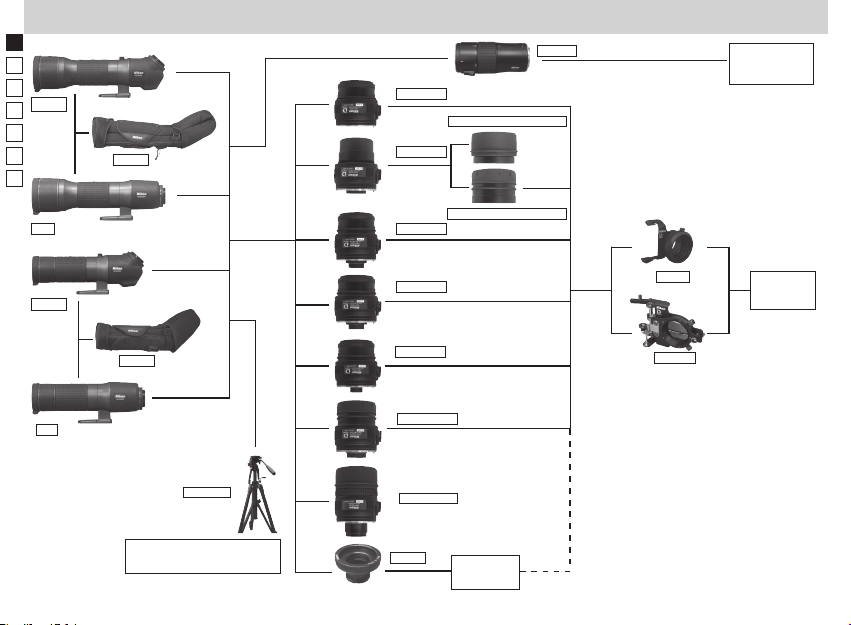
システムチャート
85-A
SOC-8
FEP-20W
FEP-30W
FSA-L2
TS リングアタッチメント
Nikon
デジタル一眼レフ
カメラ
Ru
85
65-A
65
DS リングアタッチメント
FEP-38W
SOC-7
FT-5000
目視観察・COOLPIX 撮影用
(D-SLR 撮影用には、より堅牢な
三脚の使用をお勧めします。)
FEP-50W
FEP-75W
FEP-25LER
FEP-20-60
EMA-1
フィールド
接眼レンズ
(ねじ込み式)
FSB-6
FSB-U1
Nikon
COOLPIX
18
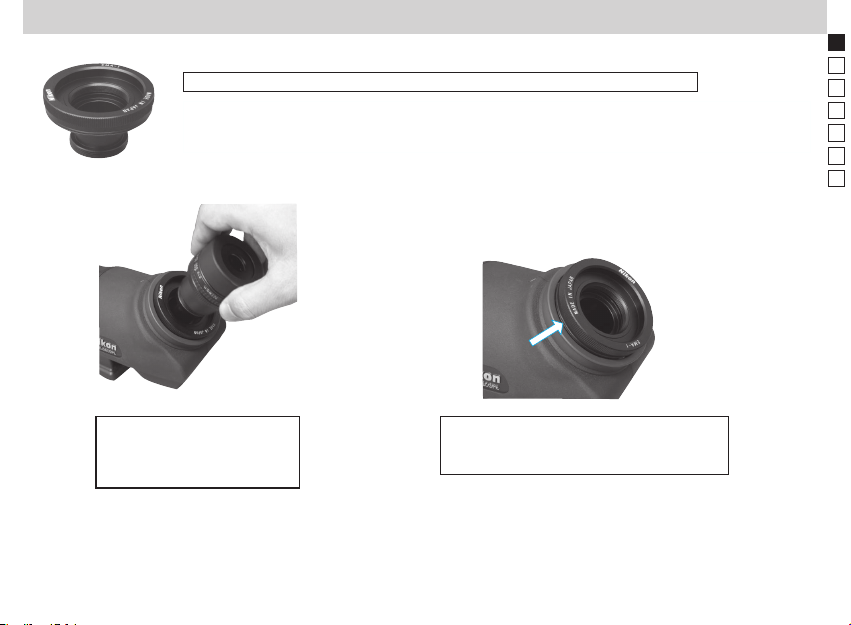
EMA-1(別売品)
フィールドスコープ接眼レンズ(ねじ込み式)を利用して観察出来ます。
注) O リング使用による抵抗がありますので、最後まで十分にねじ込んでください。
ねじ込みが不完全なときは、気密を保持する事は出来ません。ご注意下さい。
Jp
En
De
Fr
Es
It
Ru
適切な取り付け例とフィー
ルドスコープ接眼レンズの
取り付け
不十分な取り付け例
(ねじ込み不足:O リングが見えている)
19
Jp
En
De
Fr
Es
It
Ru
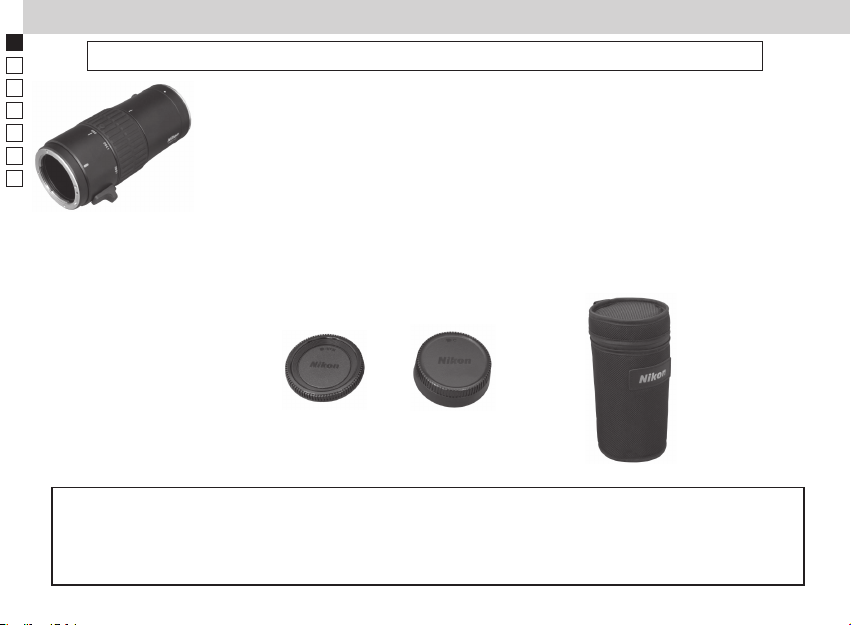
フィールドスコープ デジタル一眼レフカメラアタッチメントFSA-L2(別売品)
デジタル一眼レフカメラによる、写真撮影が行えます。ズーム機能を利用して超望遠撮影も可能になります。
仕様
EDG フィールドスコープ専用のズーム仕様の D-SLR カメラアタッチメントです。
ズーム比 : 3.5x
合成焦点距離 /f 値 : 500mm f/5.9 〜 1,750mm f/21
(EDG フィールドスコープ 85/85-A、35mm 換算)
400mm f/6.2 〜 1,400mm f/22
(EDG フィールドスコープ 65/65-A、35mm 換算)
・DX フォーマットデジタル一眼レフカメラ使用時、合成焦点距離は
1.5 倍になります。
全長 : 150mm
質量 : 435g ( キャップを除く)
付属品 : 両側マウントキャップ (BF-1A/LF-1)
収納ケース (CCY)
スコープ側
BF-1A
マウントキャップ
フィールドスコープ デジタル一眼レフカメラアタッチメント FSA-L2 は、EDG フィールドスコープのアクセサリーとして
㈱ニコンビジョンが販売するものであり撮影を含めたお問い合わせは下記へお願い申し上げます。
株式会社ニコンビジョン
〒 142-0043 東京都品川区二葉 1-3-25 ニコン二葉ビル
営業部 (03-3788-7691) CS センター (03-3788-7699)
カメラ側
LF-1
ケース
20
各部名称
⑫ ⑬⑦ ⑤⑧
⑨ ⑩
④
⑥
①
⑫
③
②
⑬
① 本体
② 着脱スライドレバー
③ 着脱ロックピン
④ 着脱指標
⑤ カメラ着脱指標
⑥ ズームリング
⑦ 焦点距離表示 (85 口径用 :35mm 換算)
⑧ 焦点距離指標
⑨ カメラ位置指標(基準)
⑩ カメラ位置指標(水平)
⑪ クランプねじ
⑫ スコープ側マウント
⑬ カメラ側マウント
⑭ 信号接点ピン
⑭
⑪
Jp
En
De
Fr
Es
It
Ru
21
Jp
En
De
Fr
Es
Ru
It
着脱
装着
着脱マークをあわせて、FSA-L2 を差し込みます。
1
2
FSA-L2 を矢印の方向に「カチッ」というまで回します。
3
カメラ着脱指標を参考に、カメラを取り付けます。
4
クランプねじを緩め、2箇所のカメラ位置指標を一直線にしてクランプね
じを締め付けると、カメラの位置が水平になります。
取り外し
レンズ着脱ボタンを押して、カメラを外します。
1
着脱レバーを矢印の方向にスライドし、保持します。
2
3
本体を矢印方向に回して、FSA-L2 を外します。
装着完了図
3
4
2
1
2
3
1
22

撮影
適用カメラ: D3 シリーズ、D2 シリーズ、D5000、D700、D300、D100、D90、D80、D70 シリーズ、D60、
D50、D40 シリーズ(2009.05 現在)
・FX フォーマットカメラでは、500mm 〜 750mm の範囲でけられが生じます。
撮影モード: A(絞り優先オート)モードあるいは、M(マニュアル)モード
・銀塩フィルムカメラでの絞り優先オート撮影での適正露出の検証は行っておりません。
露出: 中央部重点測光
・マルチパターン測光、スポット測光は使用できません。
・撮影時にファインダーから離れるときは、アイピースキャップなどにより遮光してください。
・カメラ用交換レンズとは光学特性が異なるため、露出レベルはご使用のカメラによって異なることがあり
ます。
必要に応じて、露出補正のうえご使用をお願い致します。特に、ズームの短焦点領域では、露出補正が必
要になる場合があります。
・f 値と合成焦点距離は実際にはズームにて変化をしますが、カメラ本体の f 値・焦点距離表示は「13」
と「800」にそれぞれ固定となります。
フォーカス: フィールドスコープ本体のピント合わせリングによるマニュアル操作です。
・「オートフォーカス」「フォーカスエイド」の機能は使用できません。
・望遠側に設定すると、f 値の変化のため、ファインダー像が暗くなります。
暗い目標の場合、ピント合わせが難しくなります。ご注意ください。
ズーム: ズームリングで行います。時計回りの回転で望遠側に、反時計回りの回転で広角側に設定できます。
レリーズ: 撮影時はレリーズで生じる振動を軽減する次の方法で、撮影してください。
露出ディレーモード、リモートコード、セルフタイマー、リモコン、ルミコントロールセットなど。
・撮影に使用する三脚は、ゆれが少ないしっかりした製品を使用してください。
三脚への固定 : 重量がありますので、前後バランスに注意してください。
・フィールドスコープ本体の三脚取り付け座の三カ所の三脚ねじ穴をねじ穴を利用して、バランスを取って
ください。
Jp
En
De
Fr
Es
It
Ru
23
English
Jp
En
De
Fr
Es
It
Ru
Index
Precautions
.........................................................
25-26
Operation precautions ....................................... 26-27
EDG Fieldscopes/Specifications ...................... 28-29
Eyepieces/Specifications ................................... 30-31
Nomenclature ........................................................ 32-33
Mounting and removing eyepiece lens ............. 34
Focusing/Sliding sunshade...................................... 34
Rotating the body ....................................................... 35
Accessories ................................................................... 35
Suitability of eyepieces ...................................... 36-37
System chart ................................................................. 38
EMA-1 ............................................................................. 39
FSA-L2 ....................................................................... 40-43
• Specifications and design are subject to change without notice.
• No reproduction in any form of this manual, in whole or in part
(except for brief quotation in critical articles or reviews), may be
made without written authorization from NIKON VISION CO., LTD.
24
Precautions
CAUTIONS BEFORE USE
Thank you for purchasing a Nikon
Fieldscope.
Please observe the following
guidelines strictly so you can use
the equipment properly and
avoid potentially hazardous
problems. Before using this
product, read thoroughly the
“SAFETY PRECAUTIONS,”
"OPERATION PRECAUTIONS" and
instructions on correct usage
accompanying the product. Keep
this manual within reach for easy
reference.
WARNING
This indication alerts you to the
fact that any improper use
ignoring the contents described
herein can result in potential
death or serious injury.
CAUTION
This indication alerts you to the
fact that any improper use
ignoring the contents described
herein can result in potential
injury or material loss.
Jp
En
De
Fr
Es
It
Ru
25

Jp
En
De
Fr
Es
It
Ru
Safety and Operation Precautions
WARNING!
Never look at the sun directly
through the Fieldscope.
CAUTION!
• This product is waterproof,
however, avoid rain, water
splashes, sand and mud.
• Do not operate focusing ring if
exposed to water or rain.
• Do not disassemble the
Fieldscope.
• Do not swing the Fieldscope
by its strap. It may hit someone
and cause injury.
• Do not leave the Fieldscope in
an unstable place. It may fall
and cause injury.
• Do not look through the
Fieldscope while walking. You
may walk into something and
get hurt.
• Do not leave the Fieldscope
in a car on a hot or sunny
day, or near heat-generating
equipment.
26
• If the Fieldscope is exposed to
sudden temperature changes,
water condensation may occur
on lens surfaces.
• Do not use alcohol for cleaning
the main body.
• Do not leave the polyethylene
bag used for packaging within
the reach of small children.
• Be careful that small children
do not inadvertently swallow
the cap or eyecup. If it does
happen, consult a doctor
immediately.
• If using the rubber eyecup
for a long period of time,
some people may suffer skin
inflammation. If any symptoms
occur, consult a doctor
immediately.
Operation Precautions
CARE AND MAINTENANCE
Lenses
• When removing dust on the
lens surface, use a soft oil-free
brush.
• When removing stains or
smudges like fingerprints from
the lens surface, wipe the
lenses very gently with a soft
clean cotton cloth or quality
oil-free lens tissue.
Use a small quantity of pure
alcohol (not denatured) to
wipe stubborn smudges. Do
not use velvet cloth or ordinary
tissue, as it may scratch the
lens surface. Once the cloth has
been used for cleaning the
body, it should not be used
again for the lens surface.

Cleaning ED lens
• Do not use an aerosol-type lens
cleaner for cleaning the
Fieldscope's objective lens. The
quick freezing effect of
liquefied gas may break the
lens.
Main body
• Remove dust from the focusing
ring with a soft brush.
• Clean the body surface with a
soft, clean cloth and a dry
cloth. Do not use benzene,
thinner, or other organic
agents because they may
cause discoloration or rubber
degeneration.
Storage
• Water condensation or mold
may occur on the lens surface
because of high humidity.
Therefore, store the Fieldscope
in a cool, dry place.
After use on a rainy day or at
night, thoroughly dry it at
room temperature, then store
in a cool, dry place.
• Do not leave the Fieldscope in
a car on a hot or sunny day, or
near heat-generating
equipment. This may damage
or negatively affect it.
WATERPROOF MODELS
The EDG Fieldscope is waterproof,
and will suffer no damage to the
optical system if submerged or
dropped in water to a maximum
depth of 2 meters for up to 10
minutes.
The EDG Fieldscope offers the
following advantages:
• Can be used in conditions of high
humidity, dust and rain without risk
of damage.
• Nitrogen-filled design makes them
resistant to condensation and
mold.
When using the EDG Fieldscope,
observe the following:
• The unit should not be operated
nor held in running water.
• Any moisture should be wiped off
before adjusting movable parts
(focusing knob, eyepiece, etc.) of
the Fieldscope to prevent damage
and for safety reasons.
To keep your EDG Fieldscope in
excellent condition, Nikon Vision
recommends regular servicing by an
authorized dealer.
27
Jp
En
De
Fr
Es
It
Ru
Jp
En
De
Fr
Es
It
Ru
EDG Fieldscopes Specifications
EDG Fieldscope 85-A
EDG Fieldscope 65-A
EDG Fieldscope 85
EDG Fieldscope 65
28
Models EDG Fieldscope EDG Fieldscope EDG Fieldscope EDG Fieldscope
65-A 65 85-A 85
Type Angled Straight Angled Straight
Prism type Prism type Prism type Prism type
Eective diameter of objective lens 65mm 65mm 85mm 85mm
Close focusing distance 3.3m/10.8 ft. 3.3m/10.8 ft. 5m/16.4 ft. 5m/16.4 ft.
Weight (body only) 1,620g/57.14 oz. 1,560g/55.02 oz. 2,030g/71.60 oz. 2,030g/71.60 oz.
Length (body only) 332mm/13.1 in. 313mm/12.3 in. 398mm/15.7 in. 379mm/14.9 in.
Height (body only) 131mm/5.2 in. 120mm/4.7 in. 131mm/5.2 in. 127mm/5.0 in.
Width (body only) 88mm/3.5 in. 88mm/3.5 in. 102mm/4.0 in. 102mm/4.0 in.
Structure Waterproof (up to 2m for 10 min.) and fog free with nitrogen gas and
O-ring seals (body/eyepiece joint is water resistant)
Body rotation (with a tripod mount) Rotation* Fixed Rotation* Fixed
* There are four click positions (0˚, ±45˚, ±90˚, ±135˚) and the body can be xed with the clamp.
Product code EDG Fieldscope EDG Fieldscope EDG Fieldscope EDG Fieldscope
65-A 65 85-A 85
Body VV VU
Stay-on case CCM CCL
Objective cap mounted OBM OBL
Mount cap mounted LF-1
Case strap SBB
Mount ring mounted PAV
Jp
En
De
Fr
Es
It
Ru
29
Jp
En
De
Fr
Es
It
Ru
Eyepieces Specifications
FEP-20W FEP-38W FEP-50W FEP-75W
TS ring
attachment
FEP-30W
Screw either attachment into the eyepiece for use.
30
DS ring
attachment
FEP-25LER
FEP-20-60

Models FEP-20W FEP-25LER FEP-30W FEP-38W FEP-50W FEP-75W FEP-20-60
Magnication 20x 25x 30x 38x 50x 75x 20-60x
16x 20x 24x 30x 40x 60x 16-48x
Real eld of view 3.3˚ 2.4˚ 2.4˚ 1.9˚ 1.4˚ 1.0˚ 2.2-1.1˚**
4.1˚ 3.0 ˚ 3.0˚ 2.4˚ 1.8˚ 1.2˚ 2.8-1.4˚**
Apparent eld of 60˚ 55.3˚ 64.3˚ 64.3˚ 64.3˚ 64.3˚ 42-60˚**
view* 60˚ 55.3˚ 64.3˚ 64.3˚ 64.3˚ 64.3˚ 42-60˚**
Field of view at 58m/173 ft. 42m/126 ft 42m/126 f t. 33m/99 ft. 24m/73 ft. 17m/52 ft. 38-19m/
1,000m/yds. 115-58 ft.**
72m/215 ft. 52m/157 ft. 52m/157 ft. 42m/126 ft. 31m/94 ft. 21m/63 ft. 49-24m/
147-73 ft.**
Exit pupil 4.3mm 3.4mm 2.8mm 2.2mm 1.7mm 1.1mm 4.3-1.4mm**
4.1mm 3.3mm 2.7mm 2.2mm 1.6mm 1.1mm 4.1-1.4mm**
Relative brightness 18.5 11.6 7.8 4.8 2.9 1.2 18.5-2.0**
16.8 10.9 7.3 4.8 2.6 1.2 16.8-2.0**
Eye relief 20.1mm 32.3mm 25.4mm 17.9mm 17.8mm 17.0mm 18.4-16.5mm**
20.1mm 32.3mm 25.4mm 17.9mm 17.8mm 17.0mm 18.4-16.5mm**
Length 59mm 77mm/3.3 in.
Outer diameter 63mm 63mm/2.5 in. 63mm/2.5 in. 63mm 63mm 63mm 63mm/2.5 in.
Weight 240g 320g/11.29 oz. ***390g/13.76 oz. 230g 230g 230g 330g/11.64 oz.
Structure Waterproof (up to 2m for 10 min.) and fog free with nitrogen gas and
Top row: When attached to EDG Fieldscope 85/85-A, Bottom row: When attached to EDG Fieldscope 65/65-A
*
The number calculated by the formula [tan ω' = Γ x tan ω ]: Apparent field of view: 2ω', Magnification: Γ, Real field of view: 2ω
** At lowest and highest magnifications *** With detachable turn-and-slide eyecup
Product code FEP-20W
TS ring DS ring
Body WA WB
— —
Mount cap (objec tive) mounted ECF
Rubber cap (eyepiece) mounted ECG ECL ECG ECG ECL
Rubber eyecup mounted ACM ABY ACN ABY ACM ACN
Case included CCK
* When shipping, turn-and-slide ring (TS ring) is mounted, DS ring set (ring, rubber cap and rubber eyecup) is included in the box.
O-ring seals (body/eyepiece joint is water resistant)
81mm/13.2 in.: turn-and-slide
79mm/3.1 in.: DS
FEP-25LER
FEP-30W*
WD
74mm 71mm 71mm 99mm/3.9 in.
FEP-38W FEP-50W FEP-75W FEP-20-60
WE WF WG WC
31
Jp
En
De
Fr
Es
It
Ru

Jp
En
De
Fr
Es
It
Ru
Nomenclature (Straight/Angled models)
Objective lens
①
Objective lens cap
②
Sunshade (slide)
③
Focusing ring
④
Eyepiece (optional)
⑤
Eyepiece cap
⑥
Eyepiece release index
⑦
Tripod mount
⑧
Clamp
⑨
Tripod socket (1/4") (3 sockets)
⑩
Video pin holes (4 holes)
⑪
Mount ring
⑫
(Angled model)
①
⑦
⑨
③
④
⑤
⑫
⑥
⑧
②
(Straight model)
⑦
④
⑩
③
⑤
⑫
⑥
①
⑪
⑧
②
32

Eyepiece
①
Rubber eyecup
②
Eyepiece height adjustment ring
③
Zoom ring
④
Eyepiece release lever
⑤
Eyepiece release index
⑥
Eyepiece mount
⑦
TS ring attachment
⑧
DS ring attachment
⑨
①
FEP-20W/38W/ 50W/75W
Jp
①
②
②
③
⑤
⑥
⑦
⑥
⑦
En
De
Fr
Es
It
Ru
⑤
FEP-25LER
⑧
FEP-30W with
TS ring attachment
①
①
②
②
④
⑤
⑥
⑦
33
⑤
⑥
⑦
FEP-30W
⑨
DS ring attachment
FEP-20-60

Mounting and removing eyepiece lens
Jp
En
De
Fr
Es
It
Ru
Mounting
①
①
②
②
Note: If the eyepiece lens
is not inserted into the
Fieldscope suciently, it
cannot be rotated.
Insert the eyepiece into
the Fieldscope body
aligning the indexes of
both sides.
Screw in
counterclockwise until
you hear a click.
Focusing / Sliding sunshade
Focusing
To focus, rotate the focusing ring.
・
Rotating the focusing ring clockwise ①brings distant
objects into focus.
Rotating the focusing ring counterclockwise ② brings
near objects into focus.
①
Focusing ring
Removing
②
34
Push the eyepiece release
lever toward①.
Then rotate the eyepiece
clockwise ② to remove.
①
②
Sliding sunshade
Slide the sunshade with the objective lens cap open.
・
If you keep it closed, sliding movement is inhibited
because of the air pressure inside the sunshade.

Rotating the body (Angled models only)
0˚
45˚
Clamp
90˚
45˚
(Body)
SOC-8
(for 85/85-A
)
Stay-on cases
Accessories
Mount cap
(for 65/65-A
*
SOC-7
Jp
En
De
Fr
Es
)
It
Ru
135˚
Loosen the clamp counterclockwise so that the body can
・
be rotated.
There are four click positions (0˚, ±45˚, ±90˚, ±135˚).
・
Screwing in the clamp xes the body at that angle.
・
90˚
* Depending on the country you purchase
an EDG Fieldscope, these accessories may
be included in a standard package. In other
areas, they are optional accessories.
Eyepieces
135˚
(
)
Eyepiece cap
Rubber eyecup
(for FEP-30W, FEP-25LER
Case strap
*
Mount cap
)
35

Jp
En
De
Fr
Es
It
Ru
Suitability of eyepieces
FEP-20W/-38W/-50W/-75W (turn-and-slide eyecup)
Rotate the eyepiece
height adjustment ring
for setting.
Digiscoping:
Use the rubber eyecup in the
retracted position.
Digital camera bracket can be
attached.
FEP-30W (oers two types of eyecup: DS and TS)
DS ring attachent TS ring attachent
Observation
(Eyeglass wearer):
Rubber eyecup is extended
about 5mm.
Observation
(Non eyeglass wearer):
Rubber eyecup is extended
more than 5mm.
The actual extended length diers
depending on the particular
eyepiece used.
Rotate the rubber
eyecup for setting.
Digiscoping:
Remove security rubber
eyecup for use.
Digital camera bracket can
be attached.
36
Observation:
Attach security rubber
eyecup for use.
Observation
(Eyeglass wearer):
Use the rubber eyecup in
the retracted position.
Observation
(Non eyeglass wearer):
Use the rubber eyecup in
the extended position.

FEP-25 LER (removable rubber eyecup)
Digiscoping:
Remove security rubber
eyecup for use.
Digital camera bracket can be
attached.
Observation:
Attach security rubber eyecup
for use.
FEP-20-60 (turn-and-slide eyecup)
(Digital camera bracket cannot be attached.)
Rotate the rubber eyecup for
setting.
Jp
En
De
Fr
Es
It
Ru
Observation
(Eyeglass wearer):
Use the rubber eyecup in the
retracted position.
Observation
(Non eyeglass wearer):
Use the rubber eyecup in the
extended position.
37

Jp
En
De
Fr
Es
It
Ru
System chart
85-A
SOC-8
FEP-20W
FEP-30W
TS ring attachment
FSA-L2
Nikon digital SLR
cameras
85
65-A
65
SOC-7
Sturdy tripod is recommended
for observation and digiscoping
with D-SLR.
Tripod
FEP-38W
FEP-50W
FEP-75W
FEP-25LER
FEP-20-60
EMA-1
DS ring attachment
Fieldscope
eyepieces
(screw-in type)
FSB-6
FSB-U1
Nikon
COOLPIX
38

EMA-1(Optional accessory)
Attaching a screw-in type Fieldscope eyepiece to an EDG Fieldscope with the
EMA-1.
Note: It may be quite hard to screw in because of the retention of the O-ring, so
ensure that it is screwed in tightly.
Take care to do this, because if the EMA-1 is not screwed in tightly enough,
it will not be airtight.
Jp
En
De
Fr
Es
It
Ru
Correctly mounting EMA-1 and
eyepiece.
not screwed in suciently: O ring is still visible.)
Incorrectly mounted EMA-1
(
39

Jp
En
De
Fr
Es
It
Ru
Fieldscope Digital SLR Camera Attachment FSA-L2
Enables a digital SLR camera to be attached to an EDG Fieldscope. Super telephoto shooting is possible using the
zoom function.
Specications
This product is a zoom-type Digital SLR camera attachment, exclusively for use with EDG Fieldscopes.
Zoom: 3.5x
Composite focal length 500mm f/5.9 - 1,750mm f/21 (when attached to EDG Fieldscope
and aperture: 85/85-A, 35mm-format equivalent)
400mm f/6.2 - 1,400mm f/22 (when attached to EDG Fieldscope
65/65-A, 35mm-format equivalent)
When used with a Nikon DX-format digital SLR camera, the
・
picture angle is equivalent to approx. 1.5x composite focal
length.
Length: 150mm
Weight: 435g (without caps)
Accessories: Mount caps for both sides (BF-1A/LF-1)
Case (CCY)
Scope side
BF-1A
Mount caps
Camera side
LF-1
Case
Fieldscope Digital SLR Camera Attachment FSA-L2 is a product of Nikon Vision Co., Ltd. and is an optional accessory
for the EDG Fieldscope.
40

Nomenclature
⑫ ⑬⑦ ⑤⑧
⑨ ⑩
④
⑥
①
⑫
③
②
⑬
⑭
Body
①
Inserter/ejector sliding lever
②
Inserter/ejector lock-pin
③
Inserter/ejector index
④
Camera inserter/ejector index
⑤
Zoom ring
⑥
Focal length display (for 85mm objective models,
⑦
35mm-format equivalent)
Focal length index
⑧
Camera position index (standard)
⑨
Camera position index (horizontal)
⑩
Clamp screw
⑪
Scope side mount
⑫
Camera side mount
⑬
Signal contact pins
⑭
⑪
Jp
En
De
Fr
Es
It
Ru
41

Jp
Mounting and removing
En
Mounting
De
Fr
Es
It
Ru
1
Insert the FSA-L2 into the EDG Fieldscope aligning the inserter/ejector indexes of
both sides.
2
Screw in the FSA-L2 in the direction of the arrow until you hear a click.
Attach the camera to the FSA-L2, alignng the camera inserter/ejector indexes.
3
Loosen the clamp screw rst. Then align the two camera position indexes, and
tighten up the clamp screw to make the camera position horizontal.
4
Removing
1
Remove the camera by pressing the lens inserter/ejector button.
Slide the inserter/ejector lever in the direction of the arrow, and keep it in
2
position.
3
Rotate the body in the direction of the arrow, and remove the FSA-L2.
Mounting
example
3
4
2
1
2
3
1
42

Shooting
Compatible digital cameras: D3 series, D2 series, D5000, D700, D300, D100, D90, D80, D70 series, D60, D50, D40 series (as of May
Shooting modes: A (Aperture-Priority Auto) mode or M (Manual) mode
Exposure metering: Center-weighted metering
Focus: Manual focus using the focusing ring on the Fieldscope body.
Zoom: Operate using the zoom ring. Rotate clockwise for telephoto side setting, and rotate counterclockwise
Shutter release: To reduce vibration caused by shutter release, please use the following mode/items:
Exposure delay mode, remote cord, self-timer, remote control, Modulite Remote Control Set ML-3, etc.
Fixing to a tripod: It is important to take the anterior/posterior balance into consideration when attaching a tripod.
Fieldscope body.
2009)
When using a Nikon FX-format camera, vignetting occurs with focal length display between
・
500mm and 750mm.
Appropriate aperture using aperture-priority auto mode with lm camera has not
・
been veried.
Matrix metering and spot metering cannot be used.
・
When you move away from the nder during the shooting, prevent light entering with a shield
・
such as an eyepiece cap.
Because the optical system has dierent characteristics from ordinary interchangeable
・
lenses, when the FSA-L2 and a Fieldscope are used for shooting with a digital SLR camera,
exposure may vary with the camera model. Use exposure compensation if necessary.
Exposure compensation may be necessary when used at wide setting.
Aperture and focal length vary depending on the actual zoom setting, however, the aperture
・
and focal length of the camera itself are indicated at 13 and 800.
"Autofocus" and "Manual focus with electronic rangender" function cannot be used.
・
When a lens is used at a telephoto setting, the viewnder image becomes darker because of
・
the changes in F-number. Please take into consideration that in this situation it may be
dicult to focus.
for wide setting.
When using a tripod, please use a sturdy and stable model.
・
Keep a well-balanced position by using the three tripod screw sockets located on the EDG
・
43
Jp
En
De
Fr
Es
It
Ru

Deutsch
Jp
En
De
Fr
Es
It
Ru
Inhalt
Vorsichtsmaßnahmen ....................................................... 45-46
Vorsichtsmaßnahmen bei Gebrauch .......................... 46-47
EDG Fieldscopes/Spezifikationen ................................. 48-49
Okulare/Spezifikationen .................................................. 50-51
Teilebezeichnungen .......................................................... 52-53
Okularlinse einsetzen und entfernen ................................ 54
Scharfeinstellung/Verschiebbare Sonnenblende ........ 54
Drehung des Gehäuses .......................................................... 55
Zubehör ....................................................................................... 55
Passende Okulare ............................................................... 56-57
Systemübersicht ....................................................................... 58
EMA-1 ........................................................................................... 59
FSA-L2 ..................................................................................... 60-63
• Änderungen der Konstruktion und der technischen Daten bleiben
vorbehalten.
• Alle Rechte, auch die des auszugsweisen Nachdrucks (mit Ausnahme kurzer
Zitate in technischen Besprechungen), ohne schriftliche Genehmigung
durch NIKON VISION CO., LTD. bleiben ausdrücklich vorbehalten.
44

Vorsichtsmaßnahmen
VORSICHTSMASSNAHMEN
VOR GEBRAUCH
Vielen Dank für das Vertrauen in
Nikon, das Sie uns mit dem Kauf
dieses Nikon Fieldscope erwiesen
haben.
Bitte befolgen Sie die
nachstehenden Richtlinien
genau, damit stets eine
sachgemäße Handhabung
gewährleistet ist und potenzielle
Gefährdungen vermieden
werden. Vor dem Gebrauch
des Produkts machen Sie
sich bitte gründlich mit den
„VORSICHTSMASSNAHMEN“,
„VORSICHTSMASSNAHMEN
BEI GEBRAUCH“ und den
Anweisungen zur korrekten
Handhabung vertraut. Bewahren
Sie diese Anleitung stets
griffbereit zum sofortigen
Nachschlagen auf.
VORSICHT
Hinweis, bei dessen
Nichtbeachtung die Gefahr
schwerer Verletzungen bzw.
Lebensgefahr droht.
ACHTUNG
Hinweis, bei dessen
Nichtbeachtung die Gefahr von
Personen- oder
Sachschäden droht.
Jp
En
De
Fr
Es
It
Ru
45

Jp
En
De
Fr
Es
It
Ru
Vorsichtsmassnahmen bei gebrauch Vorsichtsmaßnahmen bei Gebrauch
Vorsicht!
Keinesfalls durch das Fernrohr
direkt in die Sonne blicken.
Achtung!
• Dieses Produkt ist zwar
wasserdicht, dennoch sollte die
Einwirkung von Regen,
Spritzwasser, Sand und Schlamm
vermieden werden.
• Bei Einwirkung von Wasser oder
Regen keinesfalls den
Fokussierring drehen.
• Das Fernrohr keinesfalls zerlegen.
• Das Fernrohr keinesfalls an
seinem Gurt hin und her
schwenken, da andernfalls
Verletzungen durch
Schlageinwirkung drohen.
• Das Fernrohr keinesfalls auf einer
unstabilen Unterlage
zurücklassen. Anderfalls droht
Verletzungsgefahr bei
Herunterfallen.
• Wegen der drohenden Unfallund Verletzungsgefahr
keinesfalls während des Gehens
durch das Fernrohr blicken. Sie
könnten gegen ein Hindernis
stoßen und sich verletzen.
46
• Das Fernrohr keinesfalls bei
heißem Wetter im geschlossenen
Pkw oder in der Nähe von
Wärmequellen zurücklassen.
• Wird das Fernrohr plötzlichen
Temperaturschwankungen
ausgesetzt, so können die
Linsenoberflächen beschlagen.
• Keinesfalls das Fernrohrgehäuse
mit Alkohol reinigen.
• Den zum Verpacken dienenden
Polyäthylenbeutel unbedingt so
aufwahren, dass er dem Zugriff
von Kindern entzogen ist.
• Unbedingt dafür sorgen, dass
Kleinkinder nicht versehentlich
die Schutzkappe oder
Augenmuschel verschlucken. Im
Notfall sofort den Arzt
aufsuchen.
• Bei Nutzung der
Gummiaugenmuschel über
längere Zeit können manche
Personen u. U. unter Hautreizung
leiden. Bei entsprechenden
Symptomen ist sofort ein Arzt
aufzusuchen.
PFLEGE UND WARTUNG
Linsen
•
Staubablagerung auf der
Linsenoberfläche mit einem
weichen, ölfreien Pinsel
entfernen.
• Bei Entfernung von Flecken
oder Verschmutzungen (wie
Fingerabdrücken) von der
Linsenoberfläche die Linsen sehr
behutsam mit einem sauberen,
weichen Baumwolllappen oder
einem hochwertigen, ölfreien
Linsenpapier reinigen.
Hartnäckige Verschmutzungen
mit etwas reinem (nicht
denaturiertem) Alkohol
entfernen. Zu diesem
Zweck keinesfalls Samt
oder Papiertaschentücher
verwenden, da sonst Kratzer auf
der Linsenoberfläche drohen.
Lappen, die zur Reinigung des
Gehäuses verwendet werden,
dürfen keinesfalls zu diesem
Zweck für die Linsenoberfläche
wiederverwendet werden.

Reinigung des ED-Objektivs
• Verwenden Sie keinesfalls ein
Objektiv-Reinigungsspray zur
Reinigung der Objektivlinse des
Beobachtungsfernrohrs,
Andernfalls kann der abrupte
Abkühleffekt des verdunstenden
Flüssiggases zum Bersten der
Objketivlinse führen.
Gehäuse
• Den Staub vom Fokussierring mit
einem weichen Pinsel entfernen.
• Die Oberfläche des Gehäuses
mit einem sauberen, weichen
und trockenen Tuch reinigen.
Keinesfalls Waschbenzin,
Farbverdünner oder andere
organische Lösungsmittel
verwenden, da sonst Verfärbung
oder Gummialterung drohen.
Aufbewahlung
• Durch hohe Luftfeuchtigkeit
kann es zum Beschlagen der
Linsenoberfläche oder zu
Schimmelbefall kommen. Daher
das Fernrohr an einem kühlen
und trockenen Ort aufbewahren.
Nach Gebrauch bei Regenwetter
oder in der Nacht das Fernrohr
bei Zimmertemperatur gründlich
trocknen lassen und dann an
einem kühlen und trockenen Ort
aufbewahren.
• Keinesfalls das Fernrohr bei
heißem Wetter in einem
geschlossenen Pkw oder in
der Nähe einer Wärmequelle
zurücklassen. Andernfalls drohen
Beschädigung oder andere
negative Effekte.
WASSERDICHTE MODELLE
EDG FieldscopeBeobachtungsfernrohre sind
wasserdicht und lassen sich bis zu
einer Tiefe von maximal 2 m bis zu
10 Minuten lang im Wasser
eintauchen, ohne dass die Optik
beschädigt wird.
EDG Fieldscope bieten die
folgenden Vorteile:
• Einsatz bei hoher
Luftfeuchtigkeit, Staub und
Regen ohne
Beschädigungsrisiko.
• Stickstofffüllung verhindert
Kondensation und
Schimmelbildung.
Bei Einsatz von EDG FieldscopeFernrohren ist Folgendes zu
beachten:
• Das Gerät sollte nicht in
fließendem Wasser verwendet
noch in dieses gehalten werden.
• Zum Schutz vor Beschädigung
und aus Sicherheitsgründen ist
vor der Einstellung beweglicher
Teile des Fernrohrs (z. B.
Fokussierknopf oder Okular)
etwa vorhandene Feuchtigkeit
abzuwischen.
Damit Sie viele Jahre ungetrübte
Freude an Ihrem EDG Fieldscope
haben, empfiehlt Nikon Vision die
regelmäßige Wartung durch einen
autorisierten Fachhändler.
47
Jp
En
De
Fr
Es
It
Ru

Jp
En
De
Fr
Es
It
Ru
EDG Fieldscopes
EDG Fieldscope 85-A
EDG Fieldscope 65-A
48
EDG Fieldscope 85
EDG Fieldscope 65

Modell EDG Fieldscope EDG Fieldscope EDG Fieldscope EDG Fieldscope
65-A 65 85-A 85
Typ
Abgewinkeltem Prisma Geradem Prisma Abgewinkeltem Prisma Geradem Prisma
Wirkungsvoller Durchmesser
der Objektivlinse
Typ mit Typ mit Typ mit Typ mit
65mm 65mm 85mm 85mm
Kleinste Fokussierentfernung 3,3m 3,3m 5m 5m
Gewicht (ohne Zubehör) 1.620g 1.560g 2.030g 2.030g
Länge (ohne Zubehör) 332mm 313mm 398mm 379mm
Höhe (ohne Zubehör) 131mm 120mm 131mm 127mm
Breite (ohne Zubehör) 88mm 88mm 102mm 102mm
Eigenschaften Wasserdicht (bis zu 10 Min. bei 2m Tiefe); beschlägt mit Stickstogas und
O-Ring-Dichtungen nicht (Gehäuse und Okularansatz sind wasserfest)
Drehbarkeit (auf einem Stativ) Drehbar* Fest Drehbar* Fest
* Es gibt vier Einrastpositionen (0˚,±45˚,±90˚,±135˚); das Gehäuse kann mit einer Verriegelung festgesetzt werden.
Produkt-Code EDG Fieldscope EDG Fieldscope EDG Fieldscope EDG Fieldscope
65-A 65 85-A 85
Gehäuse VV VU
Schutzhülle
Objektivkappe
Gewindekappe
CCM CCL
Bereits angebracht
Bereits angebracht
OBM OBL
LF-1
Tragriemen SBB
Fassungsring
Bereits angebracht
PAV
49
Jp
En
De
Fr
Es
It
Ru

Jp
En
De
Fr
Es
It
Ru
Okulare Spezifikationen
FEP-20W FEP-38W FEP-50W FEP-75W
DS-RingvorsatzTS-Ringvorsatz
FEP-30W
Zur Verwendung den jeweiligen Vorsatz in das Okular schrauben.
50
FEP-25LER
FEP-20-60

Modell FEP-20W FEP-25LER FEP-30W FEP-38W FEP-50W FEP-75W FEP-20-60
Vergrößerung 20x 25x 30x 38x 50x 75x 20-60x
16x 20x 24x 30x 40x 60x 16-48x
Sehfeld objektiv 3,3˚ 2,4˚ 2,4˚ 1,9˚ 1,4˚ 1,0˚ 2,2-1,1˚**
4,1˚ 3,0˚ 3,0˚ 2,4˚ 1,8˚ 1,2˚ 2,8-1,4˚**
Sehfeld subjektiv* 60˚ 55,3˚ 64,3˚ 64,3˚ 64,3˚ 64,3˚ 42-60˚**
60˚ 55,3˚ 64,3˚ 64,3˚ 64,3˚ 64,3˚ 42-60˚**
Sehfeld pro 1,000m/yds. 58m/173 ft. 42m/126 f t 42m/126 ft . 33m/99 ft. 24m/73 ft. 17m/52 ft. 38-19m/
72m/215 ft. 52m/157 ft. 52m/157 ft . 42m/126 ft. 31m/94 ft. 21m/63 ft. 49-24m/
147-73 ft.**
Austrittsblende 4,3mm 3,4mm 2,8mm 2,2mm 1,7mm 1,1mm 4,3-1,4mm**
4,1mm 3,3mm 2,7mm 2,2mm 1,6mm 1,1mm 4,1-1,4mm**
Relative Helligkeit 18,5 11,6 7,8 4,8 2,9 1,2 18,5-2,0**
16,8 10,9 7,3 4,8 2,6 1,2 16,8-2,0**
Auge-Okular-Abstand 20,1mm 32,3mm 25,4mm 17,9mm 17,8mm 17,0mm
20,1mm 32,3mm 25,4mm 17,9mm 17,8mm 17,0mm
Länge 59mm 77mm
79mm: DS
Äußerer Durchmesser 63mm 63mm 63mm 63mm 63mm 63mm 63mm
Gewicht 240g 320g ***390g 230g 230g 230g 330g
Eigenschaften Wasserdicht (bis zu 10 Min. bei 2m Tiefe); beschlägt mit Stickstogas und
Obere Reihe: Bei Anbringung an einem EDG Fieldscope 85/85-A Untere Reihe: Bei Anbringung an einem EDG Fieldscope 65/65-A
* Wert gemäß der Formel [tan ω' = Γx tanω ]: Virtuelles Blickfeld: 2ω', Vergrößerung: Γ, Reelles Blickfeld: 2ω
** Bei der kleinsten und größten Vergrößerung *** Mit abnehmbarer dreh- und verschiebbarer Gummiaugenmuschel
Produkt-Code FEP-20W FEP-25LER
TS ring DS ring
Gehäuse WA WB
— —
Gewindekappe (Objektiv)
Gummikappe (Okular)
Gummiaugenmuschel
Tasche
* Bei der Lieferung ist der dreh- und verschiebbare Ring (TS-Ring) bereits angebracht, der DS-Ring-Satz (Ring, Gummikappe und Gummiaugenmuschel) sind in der
Verpackung enthalten.
O -Ring-Dichtungen nicht (Gehäuse und Okularansatz sind wasserfest)
Bereits
angebracht
Bereits
angebracht
Bereits
angebracht
Enthalten
CCK
81mm: dreh- und
verschiebbar,
WD
ECG ECL ECG
ACM ABY ANC ABY ACM ACN
74mm 71mm 71mm 99mm
*FEP-30W
ECF
FEP-38W FEP-50W FEP-75W FEP-20-60
WE WF WG WC
ECG ECL
115-58 ft.**
18,4-16,5mm
18,4-16,5mm
Jp
En
De
Fr
Es
It
Ru
**
**
51

Jp
En
De
Fr
Es
It
Ru
Teilebezeichnungen (gerade Modelle/Modelle mit Schrägeinblick)
Objektivlinse
①
Abdeckkappe der Objektivlinse
②
Sonnenblende (verschiebbar)
③
Schärfering
④
Okular (optional)
⑤
Okularkappe
⑥
Markierung Okularlösung
⑦
Stativfuß
⑧
Verriegelung
⑨
Stativgewinde (1/4") (3 Gewinde)
⑩
Videoanschlüsse (4 Anschlüsse)
⑪
Fassungsring
⑫
(Modell mit Schrägeinblick)
③
①
⑦
⑨
④
⑤
⑫
⑥
⑧
②
(Gerades Modell)
④
⑩
③
⑦
⑤
⑫
⑥
①
⑪
⑧
②
52

Teilebezeichnungen (Okulare)
Okular
①
Gummiaugenmuschel
②
Ring zur Höheneinstellung Okular
③
Zoomring
④
Lösehebel Okular
⑤
Markierung Okularlösung
⑥
Okulargewinde
⑦
TS-Ringvorsatz
⑧
DS-Ringvorsatz
⑨
①
FEP-20W/38W/ 50W/75W
Jp
①
②
②
③
⑤
⑥
⑦
⑥
⑦
En
De
Fr
Es
It
Ru
⑤
FEP-25LER
①
⑧
FEP-30W mit TS-Ringvorsatz
②
⑤
⑥
⑦
FEP-30W
⑨
DS-Ringvorsatz
①
②
④
⑤
⑥
⑦
FEP-20-60
53

Das Okular einsetzen und entfernen
Jp
En
De
Fr
Es
It
Ru
Einsetzen
①
Das Okular so in das
①
Fieldscope-Gehäuse
einsetzen, dass
beide Markierungen
übereinstimmen.
②
Gegen den Uhrzeigersinn
②
drehen, bis ein Klicken zu
hören ist.
Achtung: Wenn das Okular
nicht richtig im Fieldscope
eingesetzt ist, kann es nicht
gedreht werden.
Scharfeinstellung/Verschiebbare Sonnenblende
Scharfeinstellung
Zur Scharfeinstellung den Schärfering drehen.
・
Durch Drehen des Schärferings im Uhrzeigersin
werden weit entfernte Beobachtungsobjekte scharf
eingestellt.
Durch Drehen des Schärferings entgegen dem
Uhrzeigersin ② werden nahe Beobachtungsobjekte
scharf eingestellt.
Schärfering
①
①
Entfernen
②
54
Die Okularverriegelung in
Richtung ①bewegen.
Dann das Okular entgegen
dem Uhrzeigersinn
drehen, um es abzunehmen.
①
②
②
Verschiebbare Sonnenblende
Zum Verschieben der Sonnenblende muss die
・
Abdeckkappe der Objektivlinse abgenommen sein. Bei
aufgesetzter Abdeckkappe wird die Gleitbewegung wegen
des Luftdrucks in der Sonnenblende gehemmt.

Drehung des Gehäuses (nur Modelle mit
Schrägeinblick)
0˚
45˚
Clamp
90˚
45˚
Zubehör
(Gehäuse)
Gewindekappe
(bei 85/85-A) (bei 65/65-A)
Schutzüllen*
SOC-7SOC-8
Jp
En
De
Fr
Es
It
Ru
135˚
Die Verriegelung entgegen dem Uhrzeigersinn
・
losdrehen, damit sich das Gehäuse drehen lässt.
Es gibt vier Rastpositionen (0˚, ±45˚, ±90˚ und ±135˚).
・
Durch Festschrauben der Verriegelung wird das Gehäuse
・
in der jeweiligen Winkelposition xiert.
90˚
* Je nach dem Bestimmungsland
gehören diese Zubehörteile u.
U. zum Lieferumfang des EDG
Fieldscope. Anderswo gelten sie
als optionales Zubehör.
135˚
(Okulare)
Gummiaugenmuschel
(bei FEP-30W, FEP-25LER)
Tragriemen
(Tasche)*
Okularkappe Gewindekappe
55

Jp
En
De
Fr
Es
It
Ru
Einsatzgebiete von Okularen
FEP-20W/-38W/-50W/-75W (dreh- und verschiebbare Gummiaugenmuschel)
Den Ring zur
Höheneinstellung des
Okulars zur Einstellung
drehen.
Digiscoping:
Gummiaugenmuschel in
Einzugsposition nutzen.
Digitalkameraadapter
montierbar.
Beobachtung
(Brillenträger):
Gummiaugenmuschel um
ca. 5 mm ausgezogen.
FEP-30W (mit zwei möglichen Typen von Gummiaugenmuscheln: DS and TS)
DS-Ringvorsatz TS-Ringvorsatz
Beobachtung (Nicht-
Brillenträger):
Gummiaugenmuschel um
mehr als 5 mm ausgezogen.
Die tatsächliche Auszugslänge
richtet sich nach dem jeweils
genutzten Okular.
Zur Einstellung die
Gummiaugenmuschel
drehen.
Digiscoping: Zum
Gebrauch Sicherheits-
Gummiaugenmuschel
abnehmen.
Digitalkameraadapter
montierbar.
56
Beobachtung:
Zum Gebrauch
die Sicherheits-
Gummiaugenmuschel
anbringen.
Beobachtung
(Brillenträger):
Gummiaugenmuschel in
Einzugsposition nutzen.
Beobachtung (Nicht-
Brillenträger):
Gummiaugenmuschel in
Auszugsposition nutzen.

FEP-25 LER (abnehmbare Gummiaugenmuschel)
Digiscoping: Zum
Gebrauch die Sicherheits-
Gummiaugenmuschel
abnehmen.
Digitalkameraadapter
montierbar.
Beobachtung: Zum
Gebrauch die Sicherheits-
Gummiaugenmuschel
anbringen.
FEP-20-60 (dreh- und verschiebbare Gummiaugenmuschel)
(Digitalkameraadapter nicht montierbar.)
Zur Einstellung die
Gummiaugenmuschel drehen.
Jp
En
De
Fr
Es
It
Ru
Beobachtung (Brillenträger):
Gummiaugenmuschel in
Einzugsposition nutzen.
Beobachtung (Nicht-
Brillenträger):
Gummiaugenmuschel in
Auszugsposition nutzen.
57

Jp
En
De
Fr
85-A
Es
It
Ru
SOC-8
Systemübersicht
FEP-20W
TS-Ringvorsatz
FEP-30W
FSA-L2
Nikon SLR-
Digitalkameras
65-A
65
DS-Ringvorsatz
85
SOC-7
Stativ
Für Beobachtung und Digiscoping mit
SLR-Digitalkamera empehlt sich die
Verwendung eines robusten Stativs.
FEP-38W
FEP-50W
FEP-75W
FEP-25LER
FEP-20-60
EMA-1
Fieldscope-Okulare
(zum Einschrauben)
FSB-6
FSB-U1
Nikon
COOLPIX
58

EMA-1(Optionales Zubehör)
Anbringen eines Okulars mit Schraubgewinde am EDG Fieldscope über EMA-1.
Achtung: Aufgrund des Widerstands des O-Rings ist dies u. U. nur mit Mühe möglich; daher
unbedingt für einen sicheren Sitz sorgen.
Dabei mit Sorgfalt vorgehen, denn bei unzureichend fest eingeschraubtem EMA-1
besteht keine Luftdichtigkeit.
Jp
En
De
Fr
Es
It
Ru
Korrektes Einschrauben von
EMA-1 und Okular
Inkorrekt eingeschraubtes EMA-1
(Nicht fest genug eingeschraubt:
O-Ring ist noch sichtbar.)
59

Jp
En
De
Fr
Es
It
Ru
SLR-Digitalkameraadapter FSA-L2 für Beobachtungsfernrohr
Ermöglicht das Anbringen einer SLR- Digitalkamera am EDG Fieldscope. Superteleaufnahmen sind mithilfe der
Zoomfunktion möglich.
Technische Daten
Dieses Produkt ist ein SLR-Digitalkameravorsatz mit Zoomfunktion, der ausschließlich für EDGBeobachtungsfernrohre bestimmt ist.
Zoom: 3,5-fach
Zusammengesetzte 500mm 1:5.9 – 1.750mm 1:21 (bei Anbringen an
Brennweite und Blende: EDG-Beobachtungsfernrohr 85/85-A, entspricht 35-mm-Format)
400mm 1:6.2 – 1.400mm 1:22 (bei Anbringen an
EDG-Beobachtungsfernrohr 65/65-A, entspricht 35-mm-Format)
Bei Gebrauch mit einer SLR- Digitalkamera (Nikon DX-format)
・
entspricht der Bildwinkel des Objektivs ca. dem 1,5-fachen der
zusammengesetzten Brennweite.
Länge: 150mm
Gewicht: 435g (ohne Kappen)
Zubehör: Fassungskappen für beide Seiten (BF-1A/LF-1)
Etui (CCY)
BF-1A auf
Fernrohrseite
Fassungskappen
LF-1 auf
Kameraseite
Etui
Der SLR-Digitalkameraadapter FSA-L2 für Beobachtungsfernrohr ist ein Produkt von Nikon Vision
Co., Ltd. und Sonderzubehör für das EDG-Beobachtungsfernrohr.
60

Teilebezeichnung
⑫ ⑬⑦ ⑤⑧
⑨ ⑩
④
⑥
①
⑫
③
②
⑬
⑭
Gehäuse
①
Ein-/Ausrasthebel
②
Ein-/Ausrast-Verriegelungsstift
③
Ein-/Ausrast-Index
④
Ein-/Ausrast-Index der Kamera
⑤
Brennweitenring
⑥
Brennweitenanzeige (bei Modellen mit
⑦
85-mm-Objektiv, entspricht 35-mm-Format)
Brennweitenindex
⑧
Kamerapositionsindex (Standard)
⑨
Kamerapositionsindex (horizontal)
⑨
Klemmschraube
⑪
Fassung auf der Fernrohrseite
⑫
Fassung auf der Kameraseite
⑬
Signalkontakte
⑭
⑪
Jp
En
De
Fr
Es
It
Ru
61

Jp
Anbringen und Abnehmen
En
Anbringen
De
Fr
Es
It
Ru
Den FSA-L2 in das EDG-Beobachtungsfernrohr einsetzen und dabei die Ein-/
1
Ausrast-Indizes auf beiden Seiten uchten.
Den FSA-L2 in Pfeilrichtung einschrauben, bis ein Klicken hörbar ist.
2
Die Kamera am FSA-L2 anbringen und dabei die Ein-/Ausrast-Indizes der Kamera
3
uchten.
Zunächst die Klemmschraube losdrehen. Dann die beiden
4
Kamerapositionsindizes uchten und die Klemmschraube anziehen, damit die
Kamera in Horizontalposition xiert ist.
Abnehmen
Durch Drücken der Objektiv-Ein-/Ausrasttaste die Kamera abtrennen.
1
Den Ein-/Ausrasthebel in Pfeilrichtung schieben und in seiner Position belassen.
2
Das Gehäuse in Pfeilrichtung drehen und den FSA-L2 abnehmen.
3
Montagebeispiel
3
4
2
1
2
3
1
62

Fotograeren
Kompatible Digitalkameras: Serie D3, serie D2, serie D5000, D700, D300, D100, D90, D80, D70, Serie D60, D50, serie D40 (Stand
・
Aufnahmemodi: Modus A (Belichtungssteuerung als Zeitautomatik) oder M (manuelle Belichtungssteuerung)
・
Belichtungsmessung: Mittenbetonte Belichtungsmessung
・
・
・
・
Scharfeinstellung: Manuelle Scharfeinstellung mit dem Scharfstellring am Fernrohrgehäuse.
・
・
Zoom: Hierzu den Zoomring entsprechend drehen. Für Teleaufnahmen-Einstellung im Uhrzeigersinn drehen
Auslöserbetätigung: Zur Vibrationsreduzierung bei der Betätigung des Auslösers empehlt sich die Nutzung folgender
Belichtungsverzögerungs-Modus, Synchronkabel, Selbstauslöser, Fernbedienung oder Modulite
・
Anbringen an einem Stativ: Bei Stativeinsatz ist es wichtig darauf zu achten, dass vorderer und hinterer Teil einwandfrei
Mai 2009)
Bei Nutzung einer Nikon FX-Formatkamera kommt es zu Vignettierung bei Brennweiten
zwischen 500 und 750 mm.
Keine Angabe für ein passende Blende im Zeitautomatik-Modus bei herkömmlichen Kameras
mit Film.
Matrix-Messung und Spot-Belichtungsmessung sind nicht möglich.
Wird während der Aufnahme der Sucher freigegeben, unbedingt (z. B. mit einem
Okulardeckel) dafür sorgen, dass kein Licht einfällt.
Da das optische System eine andere Charakteristik als übliche Wechselobjektive hat, kann
bei Einsatz von FSA-L2 und einem Fieldscope zum Fotograeren mit SLR-Digitalkamera
die Belichtung je nach Kameramodell variieren. Gegebenenfalls eine Belichtungskorrektur
vornehmen. Bei Weitwinkeleinstellung ist u. U. eine Belichtungskorrektur erforderlich.
Blende und Brennweite richten sich nach der tatsächlichen Zoomeinstellung, wobei allerdings
die Blende und Brennweite der Kamera selbst 13 bzw. 800 beträgt.
Die Funktionen "Autofokus" und "Manuelle Fokussierelektronik" sind nicht anwendbar.
Bei Teleobjektiveinstellung wird das Sucherbild wegen der anderen Blendenzahl dunkler.
Beachten Sie bitte, dass in diesem Fall die Scharfeinstellung u. U. schwierig ist.
und für Weitwinkeleinstellung entgegen dem Uhrzeigersinn.
Modi/Komponenten:
Remote Control Set ML-3.
Bei Nutzung eines Stativs unbedingt ein robustes und stabiles Modell wählen.
ausbalanciert sind.
Mithilfe der drei Stativgewinde am Gehäuse für eine gut ausbalancierte Position des EDG Fieldscope
・
sorgen.
63
Jp
En
De
Fr
Es
It
Ru

Français
Jp
En
De
Fr
Es
It
Ru
Index
Précautions .................................................. 65-66
Précautions d’utilisation .......................... 66-67
Lunettes terrestres EDG/Spécifications 68-69
Oculaires/Spécifications .......................... 70-71
Nomenclature ............................................. 72-73
Montage et démontage de l’oculaire ..........74
Mise au point/Parasoleil coulissant ............ 74
Rotation du boîtier ............................................ 75
Accessoires .......................................................... 75
Adéquation des oculaires ........................ 76-77
Composition du système ................................ 78
EMA-1 .................................................................... 79
FSA-L2 ............................................................. 80-83
• Les spécifications et la conception sont sujettes à modification sans
préavis.
• Aucune reproduction totale ou partielle, sous quelle que forme que
ce soit, (à l'exception de brèves citations dans des magazines) ne peut
être faite sans autorisation écrite de NIKON VISION CO., LTD.
64

Précautions
PRECAUTIONS AVANT
UTILISATION
Nous vous remercions d'avoir
porté votre choix sur ce Nikon
Fieldscope.
Veuillez respecter strictement
les directives suivantes pour
pouvoir. utiliser correctement
cet appareil et éviter tout danger
potentiel.Avant d'utiliser ce
produit, lisez attentivement
les « RÈGLES DE SÉCURITÉ », «
PRÉCAUTIONS D’UITLISATION
» et les instructions sur l’usage
correct accompagnant le produit.
Conservez ce manuel à portée
de main pour une consultation
facile.
AVERTISSEMENT
Ce symbole vous avertit du fait
qu’une utilisation incorrecte ne
respectant pas les indications de
cette brochure peut se traduire
éventuellement par la mort ou des
blessures graves.
PRÉCAUTION
Ce symbole vous avertit
qu’une utilisation incorrecte ne
respectant pas les indications de
cette brochure peut se traduire
éventuellement par des blessures
ou des pertes matérielles.
Jp
En
De
Fr
Es
It
Ru
65

Régles de sécurité Précautions d’utilisation
Jp
AVERTISSEMENT!
En
Ne regardez jamais directement
De
le soleil à travers la lunette
Fr
terrestre.
Es
It
PRÉCAUTION!
• Bien que ce produit soit
Ru
étanche, évitez la pluie, les
éclaboussures, le sable et la
boue.
• N’agissez pas sur la bague de
mise au point quand elle est
exposée à l’eau ou à la pluie.
• Ne démontez pas la lunette.
• Ne balancez pas la lunette au
bout de sa courroie. Elle
pourrait heurter quelqu’un et
provoquer des blessures.
• Ne laissez pas la lunette
terrestre dans un endroit
instable. Elle pourrait tomber
et provoquer des blessures.
• Ne regardez pas dans la
lunette en marchant. Vous
pourriez heurter quelque
chose et vous blesser.
appareil de chauffage.
• Quand la lunette est exposée à
une variation de température
brutale, de la condensation
peut se former sur la surface
des lentilles.
• N’utilisez pas d’alcool pour
nettoyer le corps de l’appareil.
• Ne laissez pas le sac en
polyéthylène servant à
l’emballage à portée de petits
enfants.
• Prenez garde que des petits
enfants n’avalent pas par
inadvertance un bouchon ou
un œilleton. Si cela se produit,
consultez immédiatement un
médecin.
• Lorsque certaines personnes
utilisent l’œilleton en
caoutchouc pendant
longtemps, elles peuvent
souffrir d’inflammation
cutanée. Si de tels symptômes
apparaissent, consultez
immédiatement un médecin.
ENTRETIEN ET
MAINTENANCE
Lentilles
• Utilisez une brosse douce sans
huile pour éliminer la poussière
à la surface des lentilles.
• En éliminant les souillures
ou taches telles que des
empreintes de doigts de la
surface des lentilles, essuyez
très doucement les lentilles
avec un chiffon en coton
doux et propre, ou un tissu de
qualité pour lentille sans huile
de bonne qualité.
Utilisez une petite quantité
d’alcool pur (non dénaturé)
pour éliminer les taches
rebelles. N’utilisez pas de tissu
en velours ou de mouchoir en
papier ordinaire, ils pourraient
rayer la surface des lentilles. Un
tissu utilisé pour le nettoyage
du corps de l’appareil ne doit
pas être réutilisé sur la surface
des lentilles.
• Ne laissez pas la lunette dans
une voiture par temps chaud
ou ensoleillé, ou près d’un
66

Nettoyage de la lentille ED
• N’utilisez pas de produit de
nettoyage de lentilles sous
forme d’aérosol pour nettoyer
la lentille de l’objectif de la
lunette terrestre. L’effet de
réfrigération rapide dû au gaz
liquéfié pourrait la briser.
Corps principal
• Éliminez la poussière de la
bague de mise au point avec
une brosse douce.
• Nettoyez la surface du corps
avec un chiffon doux, propre
et sec. N’utilisez pas de
benzine, diluant ou autre agent
organique car ils pourraient
provoquer la décoloration ou
l’altération du caoutchouc.
Rangement
• De la condensation ou des
moisissures peuvent se former
sur la surface des lentilles en cas
de forte humidité. Rangez donc
la lunette à un endroit frais et
sec.
Après l’emploi par temps
pluvieux ou pendant la nuit,
laissez-le entièrement sécher
à température ambiante, puis
rangez-le dans un endroit frais
et sec.
• Ne laissez pas la lunette dans
une voiture par temps chaud
ou ensoleillé, ou près d’un
appareil de chauffage. Elle
pourrait être endommagée ou
en subir des effets négatifs.
MODÈLES ÉTANCHES
Les lunettes terrestres EDG
Fieldscope sont étanches, et leur
système optique ne subira pas de
dégâts si elles sont submergées
ou si on les laisse tomber dans
l’eau jusqu’à une profondeur
maximale de 2 m et jusqu’à 10
minutes.
Les lunettes terrestres EDG
Fieldscope offrent les avantages
suivants:
• Elles sont utilisables dans des
conditions de forte humidité,
poussière et pluie sans risques
de dommages.
• La conception à remplissage
d’azote les rend résistantes à la
condensation et aux
moisissures.
Observez les règles suivantes à
l’emploi des lunettes terrestres
EDG Fieldscope:
• L'appareil ne doit pas être
utilisé ni maintenu sous l'eau
courante.
• Toute moisissure doit être
essuyée avant d’ajuster des
parties mobiles (commande
de mise au point, oculaire,
etc.) de la lunette terrestre
pour éviter tout dommage et
pour des raisons de sécurité.
Pour maintenir votre lunette
terrestre EDG Fieldscope en
excellent état, Nikon Vision
recommande un entretien
régulier par un revendeur agréé.
67
Jp
En
De
Fr
Es
It
Ru

Jp
En
De
Fr
Es
It
Ru
Lunettes terrestres EDG
Lunette terrestre EDG 85-A
Lunette terrestre EDG 65-A
68
Lunette terrestre EDG 85
Lunette terrestre EDG 65

Modèles Lunette terrestre Lunette terrestre Lunette terrestre Lunette terrestre
EDG 65-A EDG 65 EDG 85-A EDG 85
Type Type à prisme Type à prisme Type à prisme Type à prisme
en toit droit en toit droit
Diamètre ecace de l’objectif 65mm 65mm 85mm 85mm
Distance de mise au point
rapprochée
3,3m 3,3m 5m 5m
Poids (boîtier uniquement) 1.620g 1.560g 2.030g 2.030g
Longueur (boîtier uniquement) 332mm 313mm 398mm 379mm
Hauteur (boîtier uniquement) 131mm 120mm 131mm 127mm
Largeur (boîtier uniquement) 88mm 88mm 102mm 102mm
Structure Étanche (jusqu’à 2 m et 10 min.), sans buée, rempli avec de l’azote et
joints toriques (le joint boîtier/oculaire est étanche à l'eau)
Rotation du boîtier (avec trépied) Rotation* Fixe Rotation* Fixe
* Il y a quatre positions à déclic (0˚,±45˚,±90˚,±135˚) et le boîtier peut être xé grâce à l'attache.
Code du produit Lunette terrestre Lunette terrestre Lunette terrestre Lunette terrestre
EDG 65-A EDG 65 EDG 85-A EDG 85
Boîtier VV VU
Boîtier inamovible CCM CCL
Capuchon d’objectif monté OBM OBL
Capuchon de monture monté LF-1
Courroie de boîtier SBB
Bague de montage monté PAV
69
Jp
En
De
Fr
Es
It
Ru

Jp
En
De
Fr
Es
It
Ru
Oculaires Caractéristiques
FEP-20W
FEP-38W
FEP-50W FEP-75W
Bague de xation TS
Bague de xation DS
FEP-30W
Vissez l’une des xations sur l'oculaire pour l'utiliser.
70
FEP-25LER
FEP-20-60

Modèles FEP-20W FEP-25LER FEP-30W FEP-38W FEP-50W FEP-75W FEP-20-60
Grossissement 20x 25x 30x 38x 50x 75x 20-60x
16x 20x 24x 30x 40x 60x 16-48x
Champ de vision réel 3,3˚ 2,4˚ 2,4˚ 1,9˚ 1,4˚ 1,0˚ 2,2-1,1˚**
4,1˚ 3,0˚ 3,0˚ 2,4˚ 1,8˚ 1,2˚ 2,8-1,4˚**
Champ de vision 60˚ 55.3˚ 64.3˚ 64.3˚ 64.3˚ 64.3˚ 42-60˚**
apparent* 60˚ 55.3˚ 64.3˚ 64.3˚ 64.3˚ 64.3˚ 42-60˚**
Champ de vision
1000 m/yds. 115-58 ft.**
147-73 ft.**
Pupille de sortie 4,3mm 3,4mm 2,8mm 2,2mm 1,7mm 1,1mm 4,3-1,4mm**
4,1mm 3,3mm 2,7mm 2,2mm 1,6mm 1,1mm 4,1-1,4mm**
Luminosité relative 18,5 11,6 7,8 4,8 2,9 1,2 18,5-2,0**
16,8 10,9 7,,3 4,8 2,6 1,2 16,8-2,0**
Dégagement oculaire 20,1mm 32,3mm 25,4mm 17,9mm 17,8mm 17,0mm
20,1mm 32,3mm 25,4mm 17,9mm 17,8mm 17,0mm
Longueur 59mm 77mm
Diamètre extérieur 63mm 63mm 63mm 63mm 63mm 63mm 63mm
Poids 240g 320g ***390g 230g 230g 230g 330g
Structure Étanche (jusqu’à 2 m et 10 min.), sans buée, rempli avec de l’azote et
Ligne supérieure : si monté sur une lunette terrestre EDG 85/85-A, Ligne inférieure : si monté sur une lunette terrestre EDG 65/65-A
* Le nombre est calculé par la formule [tan ω' = Γ x tanω ]: Champ de vision apparent : 2ω', Grossissement :Γ, Champ de vision réel : 2ω
** Aux grossissements les plus faible et élevé *** Avec oculaire tourner-glisser amovible
Code du produit FEP-20W FEP-25LER
Boîtier WA WB
— —
Capuchon de monture
(objectif)
Capuchon en caoutchouc
(oculaire)
Œilleton en caoutchouc monté ACM ABY ANC ABY ACM ACN
Étui fourni CCK
* À l’expédition, une bague tourner-glisser (bague TS) est montée, un jeu de bague DS (bague, capuchon en caoutchouc et œilleton en caoutchouc) sont fournis
dans la boîte.
à
58m/173 ft. 42m/126 ft 42m/126 ft. 33m/99 ft. 24m/73 ft. 17m/52 ft. 38-19m/
72m/215 ft. 52m/157 ft. 52m/157 ft. 42m/126 ft. 31m/94 ft. 21m/63 ft. 49-24m/
81mm: tourner-glisser
79mm: DS
74mm 71mm 71mm 99mm
joints toriques (le joint boîtier/oculaire est étanche à l'eau)
*FEP-30W
Bague TS
WD
monté ECF
monté ECG ECL ECG ECG ECL
Bague DS
FEP-38W FEP-50W FEP-75W FEP-20-60
WE WF WG WC
18,4-16,5mm
18,4-16,5mm
**
**
71
Jp
En
De
Fr
Es
It
Ru

Jp
En
De
Fr
Es
It
Ru
Nomenclature (modèles droits/inclinés)
Objectif
①
Capuchon d’objectif
②
Parasoleil (coulissant)
③
Bague de mise au point
④
Oculaire (en option)
⑤
Capuchon d’oculaire
⑥
Repère de libération d’oculaire
⑦
Trépied
⑧
Attache
⑨
Socle pour trépied (1/4") (3 douilles)
⑩
Orices des broches vidéo (4 orices)
⑪
Bague de montage
⑫
⑩
(Modèle incliné)
①
(Modèle droit)
①
⑦
⑨
③
④
⑤
⑫
⑥
⑧
②
⑦
④
⑤
③
⑫
⑥
⑪
⑧
②
72

Nomenclature (oculaires)
Oculaire
①
Œilleton en caoutchouc
②
Bague d’ajustement de la hauteur de
③
l’oculaire
Bague de zoom
④
Levier de libération d’oculaire
⑤
Repère de libération d’oculaire
⑥
Monture d'oculaire
⑦
Bague de xation TS
⑧
Bague de xation DS
⑨
①
⑧
FEP-30W avec
bague de xation TS
FEP-20W/38W/ 50W/75W
②
⑨
⑤
⑥
Bague de xation DS
⑦
FEP-30W
Jp
①
②
①
②
③
⑤
⑥
⑦
⑥
⑦
En
De
Fr
Es
It
Ru
⑤
FEP-25LER
①
②
④
⑤
⑥
⑦
FEP-20-60
73

Montage et démontage de l’oculaire
Jp
En
De
Es
Ru
Montage
Fr
①
It
Introduisez l’oculaire dans
①
le boîtier de la lunette
terrestre en alignant les
repères des deux côtés.
Vissez dans le sens inverse
②
②
des aiguilles d’une montre
jusqu’à ce que vous
entendiez un déclic.
Remarque : si l’oculaire n’est
pas introduit susamment
dans la lunette terrestre, il ne
peut pas tourner.
Mise au point / Parasoleil coulissant
Mise au point
Tournez la bague de mise au point pour procéder à la
・
mise au point.
Faites tournez la bague de mise au point dans le sens
des aiguilles d’une montre ①pour mettre au point des
objets éloignés.
Faites tournez la bague de mise au point dans le sens
inverse des aiguilles d’une montre ② pour mettre au
point des objets proches.
Bague de mise
au point
①
Démontage
②
74
Poussez le levier de
libération de l’oculaire vers
.
①
Puis faites tourner l’oculaire
dans le sens des aiguilles
d’une montre② pour le
retirer.
①
②
Parasoleil coulissant
Faites coulisser le parasoleil avec le bouchon d’objectif
・
ouvert. Si vous le laissez fermé, le mouvement de
coulissement est bloqué par la pression de l’air à
l’intérieur du parasoleil.

(uniquement pour les modèles inclinés)
Rotation du boîtier
0˚
45˚
Attache
90˚
135˚
(Boîtier)
45˚
SOC-8
(pour 85/85-A) (pour 65/65-A)
Boîtiers inamovibles*
*Il est possible que ces accessoires
soient fournis en standard selon
90˚
le pays où vous avez acheté la
Fieldscope EDG. Dans d'autres
régions, ces accessoires sont en
option.
Accessories
Capuchon de monture
SOC-7
Jp
En
De
Fr
Es
It
Ru
Courroie de
boîtier*
Desserrez l’attache dans le sens inverse des aiguilles d’une
・
montre pour que le corps puisse pivoter.
Il y a quatre positions à déclic (0˚, ±45˚, ±90˚, ±135˚).
・
Le vissage de l’attache xe le corps selon l'angle choisi.
・
135˚
(Oculaires)
Capuchon d’oculaire Capuchon de monture
Œilleton en caoutchouc
(pour FEP-30W, FEP-25LER)
75

Jp
En
De
Fr
Es
It
Ru
Adéquation des oculaires
FEP-20W/-38W/-50W/-75W (œilleton tourner-glisser)
Tournez la bague
d’ajustement de la
hauteur de l'oculaire
pour le réglage.
Digiscoping : utilisez l’œilleton
en caoutchouc en position
rétractée.
Il est possible de monter un
support pour appareil photo
numérique.
FEP-30W (propose deux types d’oculaires : DS et TS)
Bague de xation DS Bague de xation TS
Observation
(porteurs de lunettes) :
L’œilleton en caoutchouc est
déployé d’environ 5 mm.
Observation
(non porteurs de lunettes) :
l’œilleton de caoutchouc est
déployé de plus de 5 mm.
La longueur de déploiement
réelle varie en fonction de
l’oculaire utilisé.
Faites tourner
l’œilleton de
caoutchouc pour
procéder au
réglage.
Digiscoping:
enlevez l’œilleton de sécurité en
caoutchouc pour l’utilisation.
Il est possible de monter un
support pour appareil photo
numérique.
76
Observation:
montez l’œilleton de
sécurité en caoutchouc
pour l’utilisation.
Observation
(porteurs de lunettes):
utilisez l’œilleton en
caoutchouc en position
rétractée.
Observation
(non porteurs de lunettes):
utilisez l’œilleton en
caoutchouc en position
déployée.

FEP-25 LER (œilleton en caoutchouc amovible)
Digiscoping:
enlevez l’œilleton de sécurité en
caoutchouc pour l’utilisation.
Il est possible de monter un
support pour appareil photo
numérique.
Observation:montez l’œilleton
de sécurité en caoutchouc pour
l’utilisation.
FEP-20-60 (œilleton tourner-glisser)
(Il est impossible de monter un support pour appareil photo numérique.)
Faites tourner l’œilleton de
caoutchouc pour procéder au
réglage.
Jp
En
De
Fr
Es
It
Ru
Observation
(porteurs de lunettes):
utilisez l’œilleton en caoutchouc
en position rétractée.
Observation
(non porteurs de lunettes):
utilisez l’œilleton en caoutchouc
en position déployée.
77

Jp
En
De
Fr
Es
It
Ru
Composition du système
85-A
SOC-8
FEP-20W
FEP-30W
Bague de xation TS
FSA-L2
Reex
numériques
Nikon
85
65-A
65
SOC-7
Un trépied robuste est recommandé
pour l’observation et le digiscoping à
l’aide d’un reex numérique.
Trépied
FEP-38W
FEP-50W
FEP-75W
FEP-25LER
FEP-20-60
EMA-1
Bague de xation DS
Oculaires pour
lunette terrestre
(type à visser)
FSB-6
FSB-U1
Nikon
COOLPIX
78

EMA-1 (accessoire en option)
Fixation d’un oculaire de type à visser pour lunette terrestre sur une
Fieldscope EDG avec l’EMA-1.
Remarque : le vissage peut être dicile en raison du maintien du joint torique, aussi
vériez qu'il est fermement vissé.
Faites particulièrement attention à ce point, car si l’EMA-1 n’est pas
susamment vissé, il ne sera pas étanche à l’air.
Jp
En
De
Fr
Es
It
Ru
Montage correct de l’EMA-1 et de
l’oculaire.
(insusamment vissé : le joint torique est encore
Montage incorrect de l’EMA-1
visible.)
79

Jp
En
De
Fr
Es
It
Ru
Adaptateur FSA-L2 reflex numérique pour lunette terrestre
Permet de monter un reex numérique sur une Fieldscope EDG. La prise de vue au téléobjectif est possible à
l’aide de la fonction zoom.
Caractéristiques
Ce produit est un adaptateur pour reex numérique de type zoom, exclusivement conçu pour une
utilisation avec des Fieldscope EDG.
Zoom: 3,5x
Focale combinée et 500mm f/5.9 – 1.750mm f/21 (xée sur une Fieldscope EDG
ouverture: 85/85-A, équivalent au format 35 mm)
400mm f/6.2 – 1.400mm f/22 (xée sur une Fieldscope EDG
65/65-A, équivalent au format 35 mm)
Lors d’une utilisation avec un reex numérique Nikon DX-format,
・
l’angle de l’image est équivalent à environ 1,5x la focale combinée.
Longueur: 150mm
Poids: 435g (sans les capuchons)
Accessoires: Capuchons de monture pour les deux extrémités (BF-1A/LF-1)
Étui (CCY)
Côté lunette
BF-1A
Capuchons de monture
Côté appareil photo
LF-1
Étui
L’adaptateur FSA-L2 reex numérique pour lunette terrestre est un produit de Nikon Vision Co.,
Ltd. et un accessoire optionnel pour la Fieldscope EDG.
80

Nomenclature
⑫ ⑬⑦ ⑤⑧
⑨ ⑩
④
⑥
①
⑭
Boîtier
①
Levier coulissant d’insertion/éjection
②
Ergot de verrouillage d’insertion/éjection
③
Index d’insertion/éjection
④
Index d’insertion/éjection de l’appareil photo
⑤
Bague de zoom
⑥
Achage de la focale (pour les modèles d’objectifs
⑦
85 mm, équivalent au format 35 mm)
Index de la focale
⑧
Index de position de l’appareil photo (standard)
⑨
Index de position de l’appareil photo (horizontal)
⑨
Vis de serrage
⑪
Monture côté lunette
⑫
Monture côté appareil photo
⑬
Ergots de contact du signal
⑭
Jp
En
De
Fr
Es
It
Ru
⑫
③
②
⑬
⑪
81

Jp
Montage et démontage
En
Montage
De
Fr
Es
It
Ru
Introduisez le FSA-L2 sur la Fieldscope EDG en alignant les index d’insertion/éjection
1
des deux côtés.
Vissez le FSA-L2 dans la direction de la èche jusqu’à ce que vous entendiez un déclic.
2
Montez l’appareil photo sur le FSA-L2, en alignant les index d’insertion/éjection de
3
l’appareil photo.
Desserrez d’abord la vis de serrage. Puis alignez les deux index de position de l’appareil
4
photo, et serrez la vis de serrage pour que la position de l’appareil photo soit
horizontale.
Démontage
1
Démontez l’appareil photo en appuyant sur le bouton d’insertion/éjection de l’objectif.
Faites coulisser le levier d’insertion/éjection dans la direction de la èche et laissez-le
2
dans cette position.
Faites pivoter le boîtier dans la direction de la èche et démontez le FSA-L2.
3
Exemple de
montage
3
4
2
1
2
3
1
82

Prise de vue
Boîtiers numériques Série D3, série D2, D5000, D700, D300, D100, D90, D80, série D70, D60, D50, série D40
compatibles: (à la date de mai 2009)
・
Modes de prise de vue: Mode A (automatique avec priorité à l’ouverture) ou mode M (manuel)
・
Mesure de l’exposition: Mesure pondérée centrale
・
・
・
La correction d’exposition peut s’avérer nécessaire lors d’un réglage large.
・
Mise au point: Mise au point manuelle à l’aide de la bague de mise au point du boîtier de la Fieldscope.
・
・
Zoom : Procédez en utilisant la bague de zoom. Tournez-la dans le sens des aiguilles d’une montre pour un
Relâchement de l’obturateur: Pour réduire les vibrations provoquées par le relâchement de l’obturateur, veuillez utiliser le mode/les
Mode de délai d’exposition, cordon de télécommande, retardateur, télécommande, ensemble de
・
Fixation sur un trépied : Il est important de prendre en considération l’équilibre avant/arrière lors de la xation sur un trépied.
Lors de l’utilisation d’un boîtier Nikon au format FX, un vignettage se produit avec des focales
comprises entre 500 mm et 750 mm.
L’ouverture appropriée en utilisant le mode automatique avec priorité à l’ouverture avec un
boîtier à lm n’a pas été vériée.
La mesure matricielle et la mesure ponctuelle ne peuvent pas être utilisées.
Lorsque vous vous écartez du viseur pendant la prise de vue, masquez-le avec un bouchon
d’occulaire par exemple, an d’éviter que la lumière n’y pénètre.
Comme le système optique possède des caractéristiques diérentes des objectifs
interchangeables, il est possible que l’exposition varie selon le modèle d’appareil photo
lorsque le FSA-L2 et une Fieldscope sont utilisés pour la prise de vue avec un reex
numérique. Utilisez la correction d’exposition si nécessaire.
L’ouverture et la focale varient selon le réglage en cours du zoom bien que l’indication de
l’ouverture et de la focale de l’appareil photo lui-même soient de 13 et 800.
Les fonctions « Autofocus » et « Mise au point automatique avec télémètre électronique » ne
peuvent pas être utilisées.
Lorsqu’un objectif est utilisé un réglage de téléobjectif, l’image dans le viseur devient plus
sombre à cause du changement du nombre F. Veuillez prendre ceci en considération le fait
que la mise au point peut s'avérer dicile dans cette situation.
réglage latéral au téléobjectif et dans le sens inverse des aiguilles d'une montre pour un réglage
large.
éléments suivants :
télécommande Modulite ML-3, etc.
Avec un trépied, utilisez un modèle robuste et stable.
Conservez une bonne position d’équilibre en utilisant les douilles de trépied à visser situées sur le
・
boîtier de la Fieldscope l’EDG.
83
Jp
En
De
Fr
Es
It
Ru

Español
Jp
En
De
Fr
Es
It
Ru
Índice
Precauciones ..................................................................... 85-86
Precauciones para el funcionamiento ..................... 86-87
Catalejos EDG/Especificaciones ................................ 88-89
Oculares/Especificaciones .......................................... 90-91
Nomenclatura .................................................................. 92-93
Colocación y extracción de las lentes oculares ........... 94
Enfoque/Parasol deslizante ............................................... 94
Giro del cuerpo ....................................................................... 95
Accesorios ................................................................................ 95
Adecuación de los oculares ........................................ 96-97
Gráfica del sistema ..................................................................98
EMA-1 ....................................................................................... 99
FSA-L2 ............................................................................ 100-103
• Las especificaciones y el diseño están sujetos a cambios sin previo
aviso.
• Se prohibe la reproducción de este manual en cualquier forma, ya sea
en su totalidad o en parte (excepto citas breves en artículos críticos o
revisiones), sin la autorización escrita de NIKON VISION CO., LTD.
84

Precauciones
PRECAUCIONES ANTES DEL
USO
Le agradecemos por su compra
de un catalejo Nikon.
Cumpla estrictamente las
siguientes guías para utilizar el
equipo correctamente y evitar
problemas potencialmente
graves. Antes de utilizar este
producto, lea detenidamente
las “PRECAUCIONES PARA SU
SEGURIDAD”, las “PRECAUCIONES
PARA EL FUNCIONAMIENTO” y
las instrucciones sobre el uso
correcto que vienen con el
producto. Guarde este manual en
un lugar a mano para su consulta
inmediata.
ADVERTENCIA
Esta indicación le avisa que un uso
incorrecto que no tenga en cuenta
estas instrucciones puede provocar
la muerte o heridas graves.
PRECAUCIÓN
Esta indicación le avisa que un uso
incorrecto que no tenga en cuenta
estas instrucciones puede provocar
heridas o pérdidas materiales.
Jp
En
De
Fr
Es
It
Ru
85

Precauciones para su seguridad y el funcionamiento
Jp
¡ADVERTENCIA!
En
Nunca mire directamente al sol
De
a través del catalejo.
Fr
Es
¡PRECAUCIONES!
• Este producto es a prueba de
It
agua, no obstante, evite la
Ru
lluvia, salpicaduras de agua,
arena y barro.
• No gire el aro de enfoque si ha
quedado expuesto al agua o
lluvia.
• No desarme el catalejo.
• No haga oscilar el catalejo por
su correa.
Puede golpear a alguien y
herirlo.
• No deje el catalejo en un lugar
inestable. Puede caerse y
provocar heridas.
• No mire por el catalejo
mientras camina. Puede
caminar hacia un lugar
peligroso y herirse.
o cerca de equipos que
generen calor.
• Cuando se expone el catalejo a
repentinos cambios de
temperatura puede
condensarse la humedad en la
superficie de las lentes.
• No utilice alcohol para limpiar
el cuerpo principal.
• No deje la bolsa de polietileno
que se utilizó para su embalaje
al alcance de los niños.
• Tenga cuidado de que los niños
pequeños no traguen la tapa o
la cubierta del ocular.
Si esto sucediera, llame
inmediatamente a un médico.
• Algunas personas pueden
sufrir irritación de la piel si
utilizan la visera del ocular de
caucho durante mucho tiempo.
Si se presentara algún síntoma,
consulte inmediatamente con
su médico.
• No deje el catalejo en el coche
en un día caliente o bajo el sol
86
Precauciones para el funcionamiento
CUIDADO Y
MANTENIMIENTO
Lentes
• Cuando limpie el polvo de la
superficie de la lente, utilice un
cepillo suave sin aceite.
• Cuando limpie las manchas
como, por ejemplo, huellas
dactilares de la superficie de la
lente, limpie suavemente con
un paño de algodón suave y
limpio o con papel de calidad
para lentes sin aceite.
Utilice una pequeña
cantidad de alcohol puro (no
desnaturalizado) para limpiar
las manchas rebeldes. No
utilice un paño de terciopelo
o papel tisú común porque
pueden rayar la superficie de
las lentes. No debe utilizar el
mismo paño utilizado para
limpiar el cuerpo para limpiar
la superficie de la lente.
Limpieza del objetivo ED
• No use un limpiador de
objetivo tipo aerosol para
limpiar el objetivo del catalejo.

El efecto de congelación rápida
del gas licuado puede quebrar
el objetivo.
Cuerpo principal
• Limpie el polvo del aro de
enfoque con un cepillo blando.
• Limpie la superficie del cuerpo
con un paño suave y limpio
y un paño seco. No utilice
bencina, diluyente de pintura
u otros líquidos orgánicos
porque pueden hacer que
pierda color o afectar el
caucho.
Para guardar
• Puede condensarse la
humedad o puede aparecer
moho en la superficie de las
lentes en caso de haber mucha
humedad. Guarde el catalejo
en un lugar fresco y seco.
Después de utilizarlo en un
día lluvioso o de noche, seque
completamente a temperatura
ambiente y guarde en un lugar
fresco y seco.
• No deje el catalejo en el coche
en un día caliente o bajo el
sol o cerca de equipos que
generen calor. Puede dañarlo o
afectarlo negativamente.
MODELOS A PRUEBA DE
AGUA
El catalejo EDG es a prueba de
agua y su sistema óptico no
sufrirá daños si se sumerge o se
dejan caer en el agua hasta una
profundidad máxima de 2 metros
durante un tiempo máximo de 10
minutos.
El catalejo EDG ofrece las
siguientes ventajas:
• Puede utilizarse en condiciones
de alta humedad, polvo y lluvia
sin peligro de dañarse.
• El diseño lleno de nitrógeno lo
hace resistente a la
condensación y al moho.
Observe lo siguiente cuando
utilice el catalejo EDG.
• La unidad no debe utilizarse ni
mantenerse bajo agua
corriente.
• Para evitar daños, y por razones
de seguridad, antes de ajustar
las piezas móviles (perilla de
enfoque, ocular, etc.) del
catalejo, debe eliminarse toda
la humedad.
Para mantener su catalejo EDG en
excelentes condiciones, Nikon
Vision recomienda un servicio
regular en un distribuidor
autorizado.
87
Jp
En
De
Fr
Es
It
Ru

Jp
En
De
Fr
Es
It
Ru
Catalejos EDG
Catalejo EDG 85-A
Catalejo EDG 65-A
88
Catalejo EDG 85
Catalejo EDG 65

Especificaciones
Modelos Catalejo EDG Catalejo EDG Catalejo EDG Catalejo EDG
65-A 65 85-A 85
Tipo
con ángulo
Diámetro efectivo del objetivo 65mm 65mm 85mm 85mm
Distancia de enfoque cercano 3,3m 3,3m 5m 5m
Peso (cuerpo solamente) 1.620g 1.560g 2.030g 2.030g
Longitud (cuerpo solamente) 332mm 313mm 398mm 379mm
Altura (cuerpo solamente) 131mm 120mm 131mm 127mm
Anchura (cuerpo solamente) 88mm 88mm 102mm 102mm
Estructura A prueba de agua (hasta 2 metros durante 10 minutos) y sin empañamiento
gracias al gas nitrógeno y las juntas tóricas (la junta cuerpo/ocular es
resistente al agua)
Giro del cuerpo
(con una montura para trípode)
* Hay cuatro posiciones con chasquido (0˚,±45˚,±90˚,±135˚) y el cuerpo puede jarse con el dispositivo de jación.
Código del producto Catalejo EDG Catalejo EDG Catalejo EDG Catalejo EDG
65-A 65 85-A 85
Cuerpo VV VU
Funda para cuando está en uso
(stay-on)
Tapa del objetivo instalada OBM OBL
Tapa de la montura instalada LF-1
Correa de la funda SBB
Anillo de montaje instalado PAV
Tipo prisma Tipo prisma Tipo prisma Tipo prisma
recto
con ángulo
recto
Giro* Fijo Giro* Fijo
CCM CCL
89
Jp
En
De
Fr
Es
It
Ru

Jp
En
De
Fr
Es
It
Ru
Oculares Especificaciones
FEP-20W FEP-38W FEP-50W FEP-75W
Adaptador para anillo DSAdaptador para anillo TS
FEP-30W
Para usar, enrosque en el ocular cualquiera de los adaptadores.
90
FEP-25LER
FEP-20-60

Modelos FEP-20W FEP-25LER FEP-30W FEP-38W FEP-50W FEP-75W FEP-20-60
Aumento 20x 25x 30x 38x 50x 75x 20-60x
16x 20x 24x 30x 40x 60x 16-48x
Campo de visión real 3,3˚ 2,4˚ 2,4˚ 1,9˚ 1,4˚ 1,0˚ 2,2-1,1˚**
4,1˚ 3,0˚ 3,0˚ 2,4˚ 1,8˚ 1,2˚ 2,8-1,4˚**
Campo de visión 60˚ 55.3˚ 64.3˚ 64.3˚ 64.3˚ 64.3˚ 42-60˚**
aparente* 60˚ 55.3˚ 64.3˚ 64.3˚ 64.3˚ 64.3˚ 42-60˚**
Campo de visión a
1,000m/yds. 115-58 ft.**
147-73 ft.**
Pupila de salida 4,3mm 3,4mm 2,8mm 2,2mm 1,7mm 1,1mm 4,3-1,4mm**
4,1mm 3,3mm 2,7mm 2,2mm 1,6mm 1,1mm 4,1-1,4mm**
Brillo relativo 18,5 11,6 7,8 4,8 2,9 1,2 18,5-2,0**
16,8 10,9 7,3 4,8 2,6 1,2 16,8-2,0**
Distancia entre la pupila
de salida y el ocular
Longitud 59mm 77mm
Diámetro externo 63mm 63mm 63mm 63mm 63mm 63mm 63mm
Peso 240g 320g ***390g 230g 230g 230g 330g
Estructura A prueba de agua (hasta 2 metros durante 10 minutos) y sin empañamiento gracias al gas nitrógeno y las
Fila superior: Cuando se acopla a un catalejo EDG 85/85-A, Fila inferior: Cuando se acopla a un catalejo EDG 65/65-A
* El número se calcula mediante la fórmula [tan ω' = Γ x tanω ]: Campo de visión aparente: 2ω', Aumento: Γ, Campo de visión real: 2ω
**Con el menor y el mayor aumento *** Con visera del ocular tipo pliegue deslizante desmontable
Código del producto FEP-20W FEP-25LER
Anillo TS Anillo DS
Cuerpo WA WB
— —
Tapa de la montura (objetivo) instalada ECF
Tapa de caucho (ocular) instalada ECG ECL ECG ECG ECL
Visera del ocular de caucho instalada ACM ABY ANC ABY ACM ACN
Funda incluida CCK
* Cuando sale de la fábrica, está instalado el anillo tipo pliegue deslizante (anillo TS), el juego de anillo DS (anillo, tapa de caucho y visera del ocular de caucho) está incluido en la
caja.
58m/173 ft. 42m/126 ft 42m/126 ft. 33m/99 ft. 24m/73 ft. 17m/52 ft. 38-19m/
72m/215 ft. 52m/157 ft. 52m/157 ft. 42m/126 ft. 31m/94 ft. 21m/63 ft. 49-24m/
20,1mm 32,3mm 25,4mm 17,9mm 17,8mm 17,0mm
20,1mm 32,3mm 25,4mm 17,9mm 17,8mm 17,0mm
81mm:pliegue deslizante
79mm: DS
74mm 71mm 71mm 99mm
juntas tóricas (la junta cuerpo/ocular es resistente al agua)
*FEP-30W
WD
FEP-38W FEP-50W FEP-75W FEP-20-60
WE WF WG WC
18,4-16,5mm
18,4-16,5mm
**
**
91
Jp
En
De
Fr
Es
It
Ru

Jp
En
De
Fr
Es
It
Ru
Nomenclatura (Modelos rectos/con ángulo)
Objetivo
①
Tapa del objetivo
②
Parasol (deslizar)
③
Anillo de enfoque
④
Ocular (opcional)
⑤
Tapa del ocular
⑥
Marca de referencia de liberación
⑦
del ocular
Montura del trípode
⑧
Dispositivo de jación
⑨
Rosca hembra para trípode (1/4")
⑩
(3 roscas hembras)
Oricios para pasador de vídeo
⑪
(4 oricios)
Anillo de la montura
⑫
⑩
(Modelo con ángulo)
③
①
(Modelo recto)
③
①
⑦
⑨
④
⑤
⑫
⑥
⑧
②
⑦
④
⑤
⑫
⑥
⑪
⑧
②
92

Nomenclatura (oculares)
Ocular
①
Visera del ocular de caucho
②
Anillo de ajuste de la altura del ocular
③
Anillo del zoom
④
Palanca de liberación del ocular
⑤
Marca de referencia de liberación del
⑥
ocular
Montura para ocular
⑦
Adaptador para anillo TS
⑧
Adaptador para anillo DS
⑨
①
FEP-20W/38W/ 50W/75W
Jp
①
②
②
③
⑤
⑥
⑦
⑥
⑦
En
De
Fr
Es
It
Ru
⑤
FEP-25LER
①
⑧
FEP-30W con adaptador para anillo TS
FEP-30W
①
②
②
⑨
⑤
⑥
⑦
Adaptador para
anillo DS
④
⑤
⑥
⑦
FEP-20-60
93

Colocación y extracción del ocular
Jp
En
De
Fr
Es
It
Ru
Colocación
①
Inserte el ocular en
①
el cuerpo del catalejo
alineando las marcas de
referencias a ambos lados.
Enrosque hacia la izquierda
②
②
hasta que escuche un
chasquido.
Nota: El ocular no podrá
hacerse girar si no está
sucientemente insertado en
el catalejo.
Enfoque / Parasol deslizante
Enfoque
Para enfocar, gire el anillo de enfoque.
・
Al girar el anillo de enfoque hacia la derecha
se enfocarán los objetos distantes.
Al girar el anillo de enfoque hacia la izquierda ②
se enfocarán los objetos cercanos.
Anillo de enfoque
①
①
Extracción
②
94
Empuje la palanca de
liberación del ocular hacia ①.
A continuación gire el ocular
hacia la derecha ②para
extraer.
①
②
Parasol deslizante
Deslice el parasol con la tapa del objetivo abierta. Si la
・
mantiene cerrada, se inhibirá el movimiento deslizante
debido a la presión del aire dentro del parasol.

Giro del cuerpo (Sólo modelos con ángulo)
0˚
45˚
Clamp
90˚
135˚
(Cuerpo)
45˚
(para 85/85-A) (para 65/65-A)
Fundas para cuando está en uso (stay-on)*
*Dependiendo del país donde haya
90˚
comprado el catalejo EDG, estos
accesorios pueden estar incluidos
en un paquete estándar. En otras
regiones, son accesorios opcionales.
Accesorios
Tapa de la montura
SOC-7SOC-8
Jp
En
De
Fr
Es
It
Ru
Correa de
la funda*
Aoje el dispositivo de jación hacia la izquierda de
・
forma que pueda girarse el cuerpo.
Hay cuatro posiciones con chasquido (0˚, ±45˚, ±90˚,
・
±135˚).
Enroscando el dispositivo de jación se ja el cuerpo en
・
ese ángulo.
135˚
(Oculares)
Tapa del ocular
Visera del ocular de caucho
(para FEP-30W, FEP-25LER)
Tapa de la montura
95

Jp
En
De
Fr
Es
It
Ru
Adecuación de los oculares
FEP-20W/-38W/-50W/-75W (visera del ocular tipo pliegue deslizante)
Para ajustar, gire el anillo
de ajuste de altura del
ocular.
Digiscoping:
Use la visera del ocular
de caucho en la posición
replegada.
Puede acoplarse una
empuñadura para cámara
digital.
se extiende aproximadamente 5
FEP-30W (ofrece dos tipos de visera del ocular: DS y TS)
Adaptador para anillo DS Adaptador para anillo TS
Observación
(persona que utiliza gafas):
La visera del ocular de caucho
mm.
Observación
(persona que no utiliza gafas):
La visera del ocular de caucho
está extendida más de 5 mm.
La longitud real de extensión
varía dependiendo del ocular
especíco utilizado.
Para ajustar,
gire la visera
del ocular de
caucho.
Digiscoping:
Para usar, extraiga la
visera del ocular de
caucho de seguridad.
Puede acoplarse una
empuñadura para cámara
digital.
96
Observación:
Para usar, acople la visera
del ocular de caucho de
seguridad.
Observación
(persona que utiliza gafas):
Use la visera del ocular
de caucho en la posición
replegada.
Observación
(persona que no utiliza gafas):
Use la visera del ocular de
caucho en la posición extendida.

FEP-25 LER (visera del ocular de caucho desmontable)
Digiscoping:
Para usar, extraiga la visera del
ocular de caucho de seguridad.
Puede acoplarse una empuñadura
para cámara digital.
Para usar, acople la visera del ocular
Observación:
de caucho de seguridad.
FEP-20-60 (visera del ocular tipo pliegue deslizante)
(No puede acoplarse una empuñadura para cámara digital.)
Para ajustar, gire la visera del
ocular de caucho.
Jp
En
De
Fr
Es
It
Ru
Observación
(persona que utiliza gafas): Use la
visera del ocular de caucho en la
posición replegada.
Observación
(persona que no utiliza gafas):
Use la visera del ocular de caucho
en la posición extendida.
97

Jp
En
De
Fr
Es
It
Ru
Gráfica del sistema
85-A
SOC-8
FEP-20W
FEP-30W
TS-Ringvorsatz
FSA-L2
Cámaras SLR
digitales Nikon
65-A
65
DS-Ringvorsatz
85
SOC-7
Para observación y digiscoping
con D-SLR se recomienda un
trípode robusto.
Trípode
FEP-38W
FEP-50W
FEP-75W
FEP-25LER
FEP-20-60
EMA-1
Oculares del
catalejo (tipo
enroscable)
FSB-6
FSB-U1
Nikon
COOLPIX
98

EMA-1(Accesorio opcional)
Acoplamiento de un ocular de catalejo tipo enroscable a un catalejo EDG con el EMA-1.
Nota: Asegúrese de que quede bien enroscado ya que puede resultar difícil de enroscar
debido a la retención de la junta tórica.
Cuide de hacer esto, porque si el EMA-1 no está bien enroscado, no será estanco al aire.
Jp
En
De
Fr
Es
It
Ru
Montaje correcto del EMA-1
y el ocular.
EMA-1 montado incorrectamente
(no sucientemente enroscado: la junta tórica
es visible.
)
99

Jp
En
De
Fr
Es
It
Ru
Acoplamiento FSA-L2 de cámara SLR digital para catalejo
Permite acoplar una cámara SLR digital a un catalejo EDG. Es posible fotograar con super telefoto usando la
función del zoom.
Especicaciones
Este producto es un accesorio para cámara SRL digital tipo zoom, para usar exclusivamente con
catalejos EDG.
Zoom: 3,5x
Distancia focal compuesta 500mm f/5.9 – 1.750mm f/21 (cuando se ja al catalejo EDG
y abertura: 85/85-A, equivalente a formato de 35 mm)
400mm f/6.2 – 1.400mm f/22 (cuando se ja al catalejo EDG
65/65-A, equivalente a formato de 35 mm)
Cuando se usa con una cámara SLR digital formato DX
・
de Nikon, el ángulo de la imagen es equivalente a
aproximadamente 1,5x la longitud focal compuesta.
Longitud: 150mm
Peso: 435g (sin capuchones)
Accesorios: Capuchones de montura para ambos lados (BF-1A/LF-1)
Funda (CCY)
100
Lado del catalejo
BF-1A
Lado de la
cámara LF-1
Capuchones de montura
Funda
El acoplamiento FSA-L2 de cámara SLR digital para catalejo es un producto de Nikon Vision Co.,
Ltd. y es un accesorio opcional para el catalejo EDG.
 Loading...