

Page 1
No reproduction in any form of this manual,
in whole or in part (except for brief quotation in
critical articles or reviews), may be made without
written authorization from NIKON CORPORATION.
AF DC-Nikkor
105mm
日本語
被写界深度
接写表
ENGLISH
DEPTH-OF-FIELDTABLE
PHOTOGRAPHICRANGEWITHCLOSE-UPATTACHMENT
DEUTSCH
SCHÄRFENTIEFE-TABELLE
FOTOGRAFISCHEBEREICHE
MITDENNAHAUFNAHME-ZUBHÖR
4〜8頁
33頁
44-45頁
Page9
Page41
Page43
Seite13
Seite42
Seite44-45
FUJI BLDG., 2-3 MARUNOUCHI 3-CHOME, CHIYODA-KU,
TOKYO 100-8331, JAPAN
Printed in Japan ●
f/2 D
付属アクセサリー
72mmスプリング式前キャップ
裏ぶたLF-1
Standard accessories
72mm snap-on front lens cap
Rear lens cap LF-1
Serienmäßiges Zubehör
Aufsteckbarer Frontdeckel 72mmø
Hinter Objektivrückdeckel LF-1
使用説明書
Instruction Manual
Bedienungsanleitung
Manuel d'utilisation
Accessoires standard
Bouchon avant à emboîtement 72mm
Bouchon arriére LF-1
Accesorlos estándar
Tapa frontal a presión de 72mm
Tapa trasera del objetivo LF-1
Accessori standard
Tappo anteriore da 72mm dia.
Tappo posteriore LF-1
Manual de instrucciones
Manuale di istruzioni
FRANÇAIS
PROFONDEURDECHAMP
RAPPORTSOBTENUSENPROXIPHOTOGRAPHEET
PHOTOMACROGRAPHIE
ESPAÑOL
PROFUNDIDADDECAMPO
RANGOSFOTOGRÁFICOS
CONACCESORIOSDEACERCAMIENTO
ITALIANO
PROFUNDITÀ DI CAMPO
OTOGRAFIACONDISPOSITIVIPERRIPRESECLOSE-UP
F
2
Page18
Page42
Page44-45
Página23
Página42
Página44-45
Pagina28
Pagina42
Pagina44-45
33頁
42頁
44-45頁
37
42
44-45
Page 2
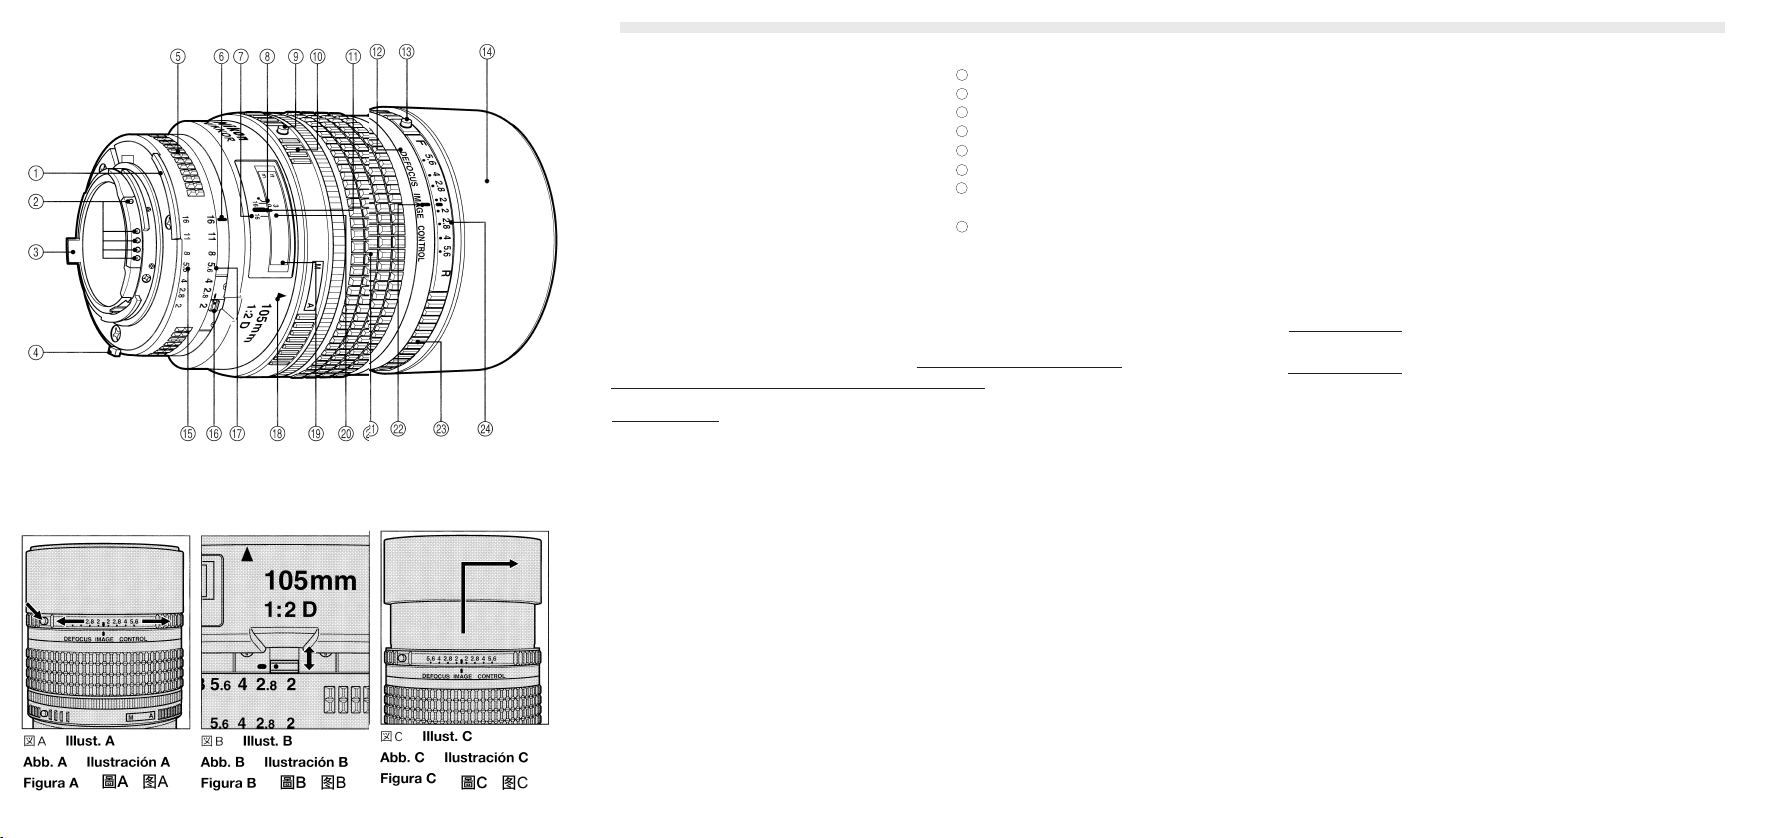
各部の名称
①露出計連動ガイド
②CPU信号接点
③開放F値連動ガイド
④EE連動ガイド
⑤絞りリング
⑥絞り指標・着脱指標
⑦被写界深度目盛:f/16のとき
の被写界深度を表します。
⑧赤外補正マーク(白色)
⑨A-M切換え解除ボタン
はじめに
⑩A-M切換えリング
⑪距離目盛指標
⑫レンズ鏡筒
⑬DCリングロック解除ボタ
ン:DCリングをセットする
際に押します。
⑭ねじ込み式内蔵フード
⑮ファインダー内直読用絞り
目盛
⑯最小絞りロックレバー
17
絞り目盛
18
A-M切換え指標
19
距離目盛窓
20
距離目盛
21
距離リング
22
DCリング指標
23
DCリング:ボケ味のコント
ロールに使用します。
24
DCリング用絞り目盛
このたびは、ニッコールレンズをお買いあげいただきありがとうございます。
ご使用の前に以下の「安全上のご注意」及び製品の使用説明書をよくお読みのうえ、
十分に理解してから正しくお使いください。お読みになった後は、お使いになる方
がいつでも見られる所に必ず保管してください。なお、カメラ本体の使用説明書に
記載されている「安全上のご注意」も併せてお読みください。
安全上のご注意
●分解したり修理・改造をしないでください。
●使用しないときは、レンズにキャップをつけるか太陽光の当たらない所に保管してください。
このレンズはニコンAF[オートフォーカス(ニコン F3AFは除く)]カメラと組み合わせます
と、オートフォーカス撮影が可能です。マニュアル(手動)によるピント合わせもできます。
また、被写体までの距離情報をカメラボディ側に伝達する機能を備え、3D測光機能を持っ
たカメラとの組み合わせ時により的確な露出制御を実現する3D-マルチパターン測光・3DマルチBL調光を可能とします。
このレンズの特徴として、‥‥
‥ニコン独自のDC (Defocus-image Control)機能により主要被写体をシャープに保ったま
ま前後のボケ味を変えることができます。
‥円形に近い形状の絞り羽根を採用しているため自然なボケ形状が得られます。
‥ピント合わせはレンズ部の後群のみを移動するリア・フォーカス方式を採用しているた
め無限遠(∞)から短い撮影距離まで良好な描写が得られます。また、ピント合わせの際に
全長が変わらないため操作性が良く、AF作動も迅速に行えます。
‥通常のポートレート撮影にも適しています。また、内蔵ねじ込み式フード等、便利さも
十分考慮されています。
注 記
・CPU 信号接点はニコン AF(オートフォーカス)カメラボディとの電気伝達を行うため
のものです。汚れたり、キズがついたりしますと、オートフォーカス作動不良の原因と
なります。特にカメラボディ着脱の際にはご注意ください。
・下記のアクセサリーは、このレンズに直接取り付けないでください。取り付けますと、
CPU信号接点を破損します。
オート接写リングPK-1・PK-11、K-1リング、オートリングBR-4・BR-2・K2
(なお、PK-11リングの代わりにはPK-11A、オートリングBR-4にはBR-6、BR-2Aには
をご使用ください。)
・DX-1ファインダー(ニコンF3AF用)と組み合わせてのご使用はできません。
DCリングの使用方法
被写体に対して後方のボケ味を強調する場合は、
‥DCリングロック解除ボタンを押しながら、R(リア)側にDCリングを回転させます。
被写体に対して前方のボケ味を強調する場合は、
‥DCリングロック解除ボタンを押しながらF(フロント)側にDCリングを回転させます。
被写体をシャープに保ったまま最大にボケ味をきれいにするには、DC リングの絞り値をレ
ンズの絞り値と同じにセットします。
また、DC リングを絞り値の数値より大きな数値にセットすることによりソフトフォーカス
的な使い方もできます。
●DCリングのセットはピント合わせの前に行ってください。
ピントを合わせた後、DCリングをセット(回転)させますとピントがズレてしまいます。
ズレた場合は再度ピント合わせを行ってください。(フォーカスロック中に行った場合も
ピントはズレますのでご注意ください。)
●このレンズは、DC リングの目盛を標準(F側の2とR側の2の中央)に合わせた場合に最大
の解像力を発揮します。また、DC リングを回転させることにより距離目盛とピントの
位置にズレが生じますのでご注意ください。DC 機能使用時は、距離リングが無限遠目
盛(∞)の位置を越えて回転するようになっています。なお、最短撮影距離は DC リングの
設定によっては0.9mより大きくなる場合があります。
●DC(ボケ味のコントロール)の効果は被写体の条件(被写体と背景や前景の距離との組
み合わせ等)によって異ります。
●ファインダー内ではDCの効果を確認することが困難なため、試し取りを行ってからご
自分の好みでご使用ください。
54
Page 3
76
最小絞りロックレバー(図B参照)
プログラム撮影時や、シャッター優先による撮影時は、絞りリングを最小絞り目盛り(オ
レンジ色)で固定しておくことができます。最小絞り目盛りでロックする場合には、まずレ
ンズの絞りリングを最小絞り目盛り(16)まで回転させます。次に最小絞りロックレバーを搾
りリングの方向にスライドさせます。このとき最小絞りロックレバーの白色の指標と鏡筒
上のオレンジ色の線が合う位置まで確実にスライドさせてください。ロックを解除すると
きは、ロックするときと反対方向に止まるまで最小絞りロックレバーをスライドさせます。
内蔵フードの使い方(図C)
内蔵レンズフードを使用する場合はレンズ前方に向かって引き出し、反時計方向に止まる
まで回して固定してください。フードを収納する場合は時計方向に回して元の位置に戻し
て収納してください。
レンズ取り扱い上のご注意
●レンズの清掃は、むやみに拭かないで、ホコリを拭う程度にしてください。万一指紋が
ついたときは、柔らかい清潔な木綿の布に市販のレンズクリーナーを少量湿らせ、中心
から外側へ渦巻状に、拭きムラ、拭き残りのないように注意して、軽く拭いてください。
●シンナーやベンジンなどの有機溶剤は絶対に使用しないでください。
●レンズ表面の汚れや傷を防ぐために、NCフィルターの使用をおすすめします。レンズ
の保護には、フードも役立ちます。
●レンズをご使用にならないときは、レンズの前後に必ず付属のレンズキャップをしてお
いてください。
●長期間レンズをお使いにならないときや保管の際は、カビまたはサビを防ぐため、高温
多湿の所や直射日光のあたる所、またナフタリンや樟脳のある所は避けて風通しのよい
場所に保管してください。
●レンズを水に落したり濡らしたりすると部品がサビつくなどして故障の原因となります。
当社サービス機関に点検、修理を依頼してください。
●このレンズは、外観の一部には強化プラスチックを使用していますが、極端に温度が高く
なると変形する場合があります。ストーブの前等、高熱となる場所は避けてください。
ピント合わせ
このレンズはA-M切り換え方式となっております。
ニコンAF(オートフォーカス)カメラとの組み合わせでオートフォーカス撮影を行う場合
は、A-M 切換え解除ボタンを押しながら A-M 切換えリングを回転し、A-M 切り換え指
標をAの位置にセットしてからご使用ください。
マニュアルでピント合わせを行う場合はA-M 切り換え解除ボタンを押しながらA-M 切り換
えリングを回転させ、A-M切り換え指標をMの位置にセットしてご使用ください。
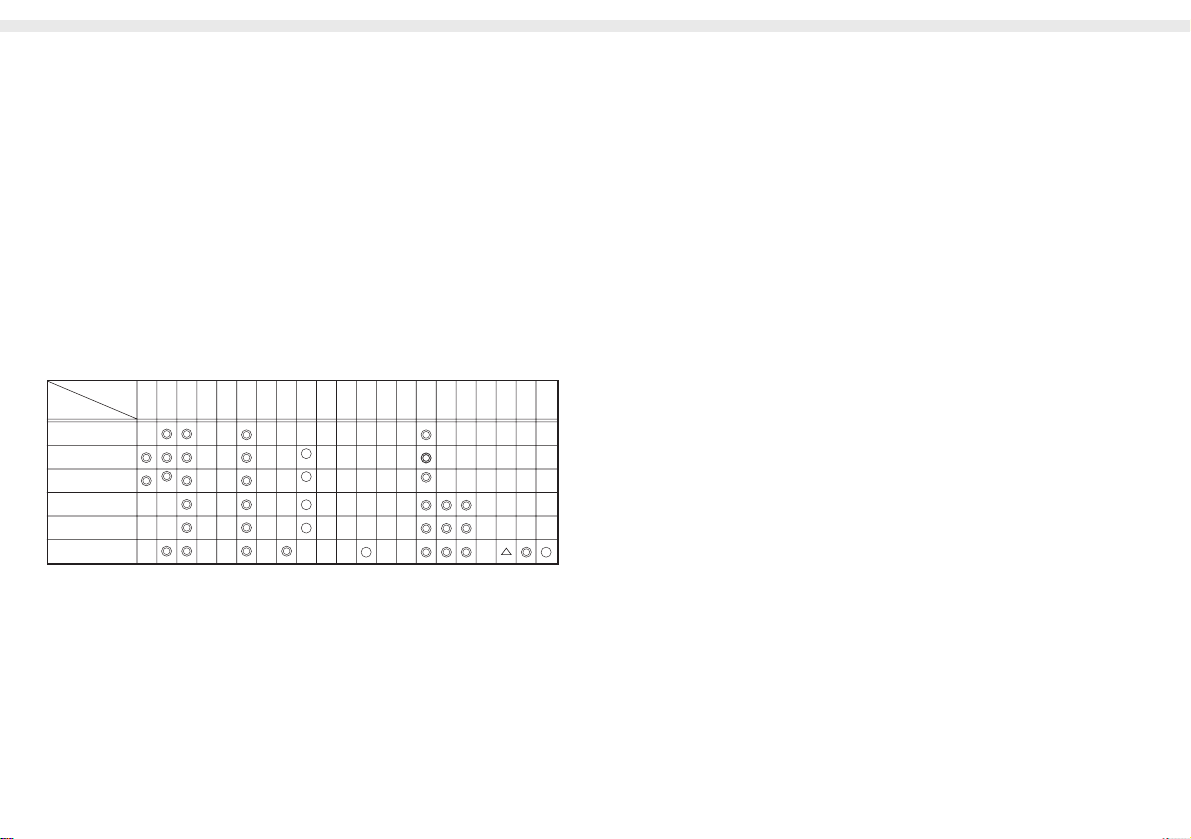
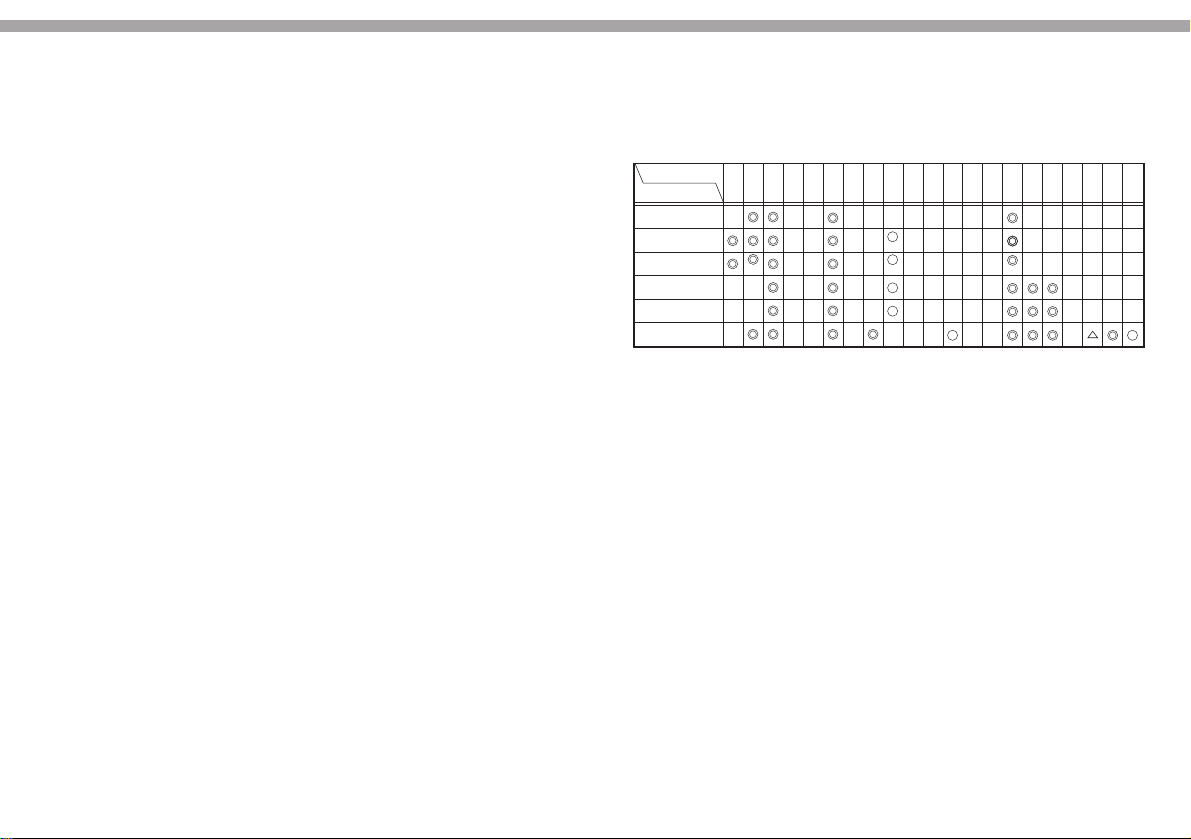
ファインダースクリーンとの組み合わせ
ニコンF6,F5,F4、F3シリーズカメラボディには多種類のファインダースクリー
ンがあります。レンズのタイプや撮影条件に合わせてご使用ください。このレ
ンズに適したファインダースクリーンは下表のとおりです。(なお、ご使用に際
しては必ず各カメラボディの使用説明書を併せてご参照ください)。
■構図の決定やピンと合わせの目的には
◎:最適です。
○:視野の一部が多少見にくくなりますが使用できます。
△:スプリットの合致像は見えますが、ピント合わせは制度上適しません。
():中央部重点測光時の補正値です。
F6カメラの場合、測光値の補正は、カメラのカスタムメニュー「b6:スクリーン補正」を「BorE
以外」にセットして行ないます。B型およびE型以外を使用する場合は、補正量が0でも、「BorE外」
にセットしてください。 F5カメラの場合は、カスタムセッティングNo.18の設定で測光値の補正
を行ないます。F4シリーズカメラの場合は、ファインダースクリーン露出補正ダイヤルを回して補
正を行います。
詳しくはカメラの使用説明書をご覧ください。
空欄:使用不適当です。
ただし、Mスクリーンの場合、撮影倍率 1/1 倍以上の近接撮影に用いられるため、この限
りではありません。
上記以外のカメラでB2/B3、E2/E3、K2/K3スクリーンをご使用の場合は、それぞれB、E、Kス
クリーンの欄をご覧ください。
カメラ
F6
F5(DP-30付き)
F5(DA-30付き)
F4(DP-20付き)
F4(DA-20付き)
F3
スクリーン
EC-B/
EC-E
A/L B C D E G1 G2 G3 G4 H1 H2 H3 H4 J K P M R T U
(
+0.5
)
(
+0.5
)
(
+1.0
)
(
+0.5
)
Page 4

98
NOMENCLATURE
Metercouplingridge Built-inlenshood
CPUcontacts APerture-direct-readoutscale
Apertureindexingpost Minimumaperturelocklever
EEservocouplingpost Aperturescale
Aperturering A-Mindex
Apertureindex/Mountingindex Distancescalewindow
Depth-of-fieldindicators:Show Distancescale
Depthoffieldatf/16. Focusingring
Infraredcompensationindex DCringindex
(whitedot) DCring:Turntoward“R”sideto
A-Mringlockbutton blurthebackgroundortoward
A-Mring “F”sidetoblurforeground.
Distanceindex Aperturescaleforimageblur
Lensbarrel cpntrol
DCringlockbutton:Pushtoturn
DCring
Thank you for purchasing the AF DC-Nikkor 105mm f/2 D lens.
Features of this lens are:
•
Nikon’s DC (Defocus image Control) enables you to defocus the background or
foreground.
•
Rounded diaphragm opening makes out-of focus elements appear more
natural.
• Thanks to Nikon’s Rear Focusing (RF) system, the rear lens elements move inside
the lens while focusing, so there is no increase in the overall length of the lens.
This also provides quicker AF operation and improved durability.
• Built-in lens hood minimizes flare when shooting in bright sunlight.
• Distance information used for 3D Matrix Metering or the 3D Multi-Sensor Balanced
Fill-Flash will be transmitted instantly from the lens to the camera body.
Before using your new lens, read this manual carefully so you get the maximum
value from your lens now and for years to come.
Important!
• Be careful not to soil or demage the CPU contacts.
• Do not attach the following accessories directly to the lens; they could damage
the lens CPU contacts:
Auto Extension Ring PK-1, Auto Extension Ring PK-11, K1, Ring, Auto Ring
BR-4, Macro Adapter Ring BR-2 or K2 Ring.
(Use PK-11A instead of PK-11, BR-6 instead of BR-4, BR-2A instead of BR-2.)
• This lens cannot be used with AF finder DX-1(for the Nikon F3AF).
:105mm
:1:2
:6群6枚(+保護ガラス1枚)
:23°20
:∞〜0.9m、3ft.(併記)
:カメラボディへの撮影距離情報出力可能
:2〜16ファインダー内直読用絞り目盛併記
:ロックレバーによりf/16にロック可能
:自動絞り
:CPU・AI方式のカメラボディでは開放測光、従来方式のカ
メラボディでは絞り込み測光
:ニコンFマウント
:72mm(P=0.75mm)
:約79mm(最大径)×111mm(長さ:バヨネット基準面からレ
ンズ先端まで)、全長119mm
:約640g
仕様
焦点距離
最大口径比
レンズ 構成
画角
距離目盛
距離情報
絞り目盛
最小絞りロック
絞り方式
測光方式
マウント
アタッチメントサイズ
大きさ
質 量(重さ)
別売りアクセサリー
72mmねじ込み式フィルター、
ハードケース CL-38
Page 5
1110
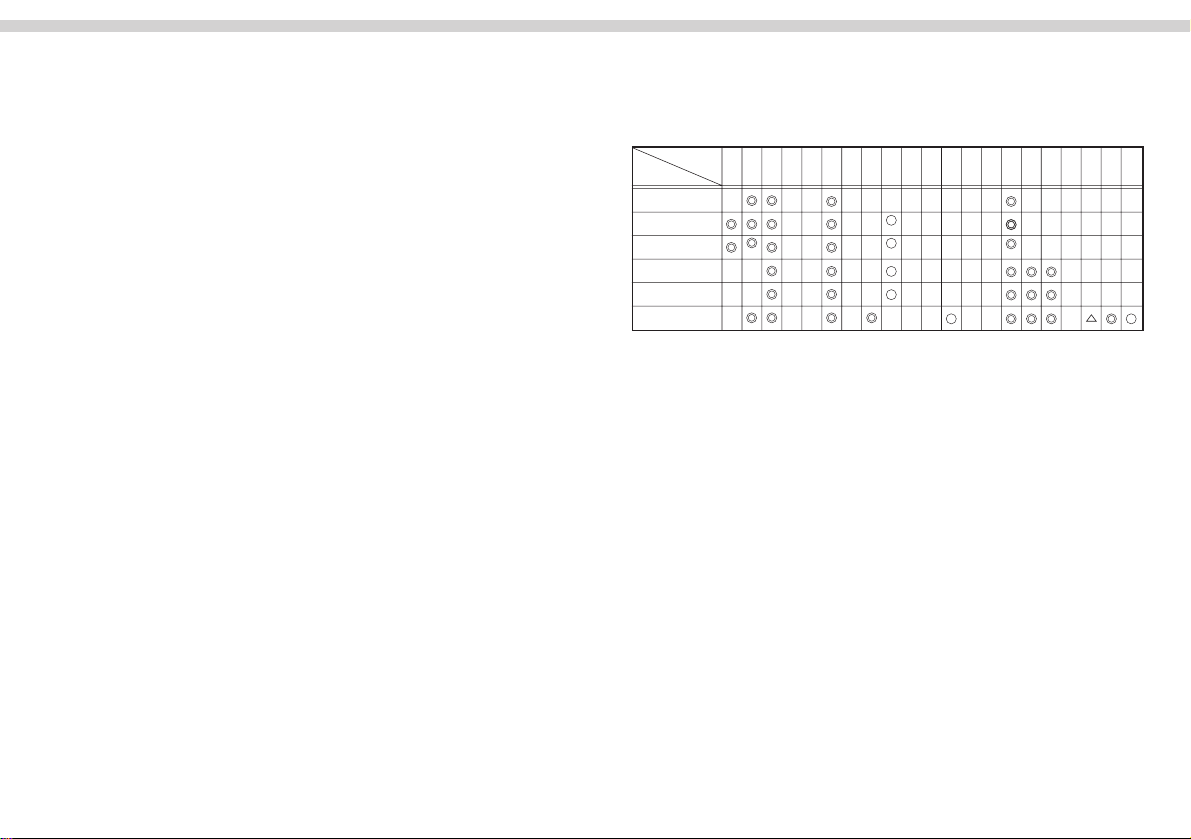
RECOMMENDED FOCUSING SCREEN
Var ious interchangeable focusing screens are available for Nikon cameras to suit
any type of lens or picture-taking situation. Those which are recommended for use
with your lens are listed below.
For determining the frame type and focusing
CONTROLLING DEFOCUS IMAGE–MAKING IMAGE BLUR
While pushing the DC ring lock release button. rotate the DC ring toward the R
(rear)
side to blur the
background. or toward the F (front) side to blue the
foreground (see illudt, A). To effectively blur background or foreground images.
turn the DC ring so the f-number on the DC ring (aligned to the DC ring index) is
same as the aperture in use. Turning the ring beyond the aperture in use lets you
creste a soft-focus effect.
• Defocus control should always be performed before focusing. If you rotate the
DC ring after focusing, or during focus lock in autofocus photography. your
subject will be out of focus.
•
With the DC ring at either the F or R side, the distance scale may not show the
correct distance.
• The effect of defocus image control depends on subject conditions such as
subject-to-background distance. subject
-to-
foreground distance, etc.
• Image blur cannot be verified through the viewfinder. To obtain the desired
effect, take a series of shots with the DC ring at various settings.
FOCUSING
This lens can be used for both autofocus and manual focus.
To select autofocus, while pressing the A-M ring lock release button, turn the AM ring so that “A” aligns with the A-M index. Also, set the camera’s focus mode
selector to autofocus position.
To select manual, turn the A-M ring so “M” aligns with the A-M index. Also, set
the camera’s focus mode selector for manual focus.
• With a Nikon autofocus camera, improperly setting the camera’s focus mode
selector and lens’ A-M ring may damage the camera body.
F6
F5
with DP-30
F5
with DA-30
F4
with DP-20
F4
with DA-20
F3
EC-B/
EC-E
A/L B C D E G1 G2 G3 G4 H1 H2 H3 H4 J K P M R T U
(
+0.5
)
(
+0.5
)
(
+1.0
)
(
+0.5
)
Camera
Screen
◎=
○=
△=
()
=
I
deal
Can be used even though part of the view is a little hard to see
Split image focusing is possible. but focusing is inaccurate
Correction value for center-weighted metering
When using the F6, you can correct the exposure value by setting “b6: Screen
Conpensation” to “Except for B and E” in the Customize menu.
When using a camera model othre than B or E. set this to “Except for B and E”
regardiess of whether the correction weight is set to “0” When using the F5.set the
compensation for the exposure value in custom setting number 18. When using a
camera from the F4 series, turn the exposure adjustment diat for the finder screen to
set the compensation.
For details, reter to the instruction manual for the camera you are using.
Blank: Unsuitable
However, when using the M screen, this value is not used in order to allow you to use a
rate of 1 to 1 or higher for close-up photography.
When using a camera other than one listed above with a B2/B3, E2/E3, or K2/K3 screen
refer to the B, E, or K column respectively.
MINIMUM APERTURE LOCK
For Programmed auto or Shutter-priority auto exposure shooting. use the
minimum aperture lock lever to lock the lens aperture at f/16.
1. Turn the aperture ring so that f/16 on the aperture scale is alignae with the white
aperuture indes dot.
2. Slide the lock lever in the direction of the aperuture ring so the white dot on the
lever aligns with the orange dot (Illust. B).
To release the lock, slide the lever in reverse direction.
USING BUILT-IN LENS HOOD
Pull out the hood and turn it counterclockwise for two rotations (see Illst. C). To
store, turn the hood clodkwise and push back.
Page 6

1312
LENS CARE
• Clean lens suface with a blower brush. To remove dirt and smudges, use a
soft, clean cotton cloth or lens tissue moistened with ethanol (alcohol) or lens
cleaner. Wipe in a circular motion from center to outer edge, taking care not to
leave traces and not to touch the other lens parts.
• Never use thinner or benzine to clean the lens.
•
To protect the lens surface from dirt or damege, use of an NC filter is
recommended at all times. The lens hood also heope protect the lens.
• Cover lens with lens cap when lens is not in use.
• Attach both front and rear caps when the lens is stored separately.
• If you will not use the lens for a long time, protect it from rust and mold by
storing it in a cool, dry place. Also, do not store in direct sunlight, and keep it
away from naphthalene or camphor.
• Be careful not to get the lens wet or drop it in water. Water on the lens may
cause malfunction.
• Reinforced plastic is used on the exterior of the lens unit; to avoid damage,
take extra care to never leave the lens in an excessively hot place.
SPECIFICATIONS
Focal length:
Maximum aperture:
Lens construction:
Picture angle:
Distance scale:
Distance imformation:
Aperture scale:
Minimum aperture lock:
Diaphragm:
Focusing:
Exposure measurement:
Mount:
Attachment size:
Dimensions:
Weight:
105mm
f/2
6 elements in 6 groups (plus built-in rear glass plate
for dust protection)
23°20'
Graduated in meters and feet from 0.9m (3 ft.) to
infinity (∞)
Output into camera body
f/2 to f/16 on both standard and aperture-directreadout scales
Provided
Fully automatic
Nikon Rear Focusing (RF) system
Via full-aperture method for Al cameras or cameras
with CPU interface system; via stop-down method for
other cameras
Nikon bayonet mount
72mm(P=0.75mm)
Approx, 79mm dia. x 111mm extension from the
camera’s lens mounting flenge; overall length is
approx. 119mm
Approx. 620g
OPTIONAL ACCESSORIES
72mm screw – in filters
Hard lens case CL-38
BEZEICHNUNG DER TEILE UND BEDIENUNGSELEMENTE
Steuerkurve
CPU
-
Kontakte
Anschlag für Blendenkupplung
Kupplungsstift für automatische
Blendensteuerung
Blendenring
Blenden-/Montageindex
Schärfentiefenskala
Infrarot–Kompensationsindex
(weißer Punkt)
Entriegelungstaste des A-M Ringes
A-M-Ring
Entfernungsindex
Objectivtubus
DC-Ring-Entriegelungstaste:
Drücken, damit der DC-Ring gedreht
werden kann.
Eingebaute Gegenlichtblende
Skala für direkte Blendenablesung
Hebel für Verriegelung für kleinste
Blende
Blendenskala
A-M-Index
Entfernungsskalenfenster
Entfernungsskala
Einstellring
DC-Ring-index
DC-Ring: Drehen Sie diesen Ring in
Richtung “R”, um den Hintergrund,
und in Richtung “F”, um den
Vordergrund unscharf abzubilden.
Blendenskala zur Steuerung der
Bildunschärfe
Wir danken Ihnen für das Vertrauen, das Sie uns mit dem Kauf des AF DCNikkors 105mm f/2 D erwiesen haben.
Dieses Objektiv zeichnet sich durch die folgenden Besonderheiten aus;
•
Die Nikon Defocus Image Control (DC), eine Art “Ucschärfenstenerung”, die
eine gezielte Beeinflussung der Schärfe im Vorder-und Hintergrund gestattet.
•
Eine Kreisförmige Biendenöffnung, die entscheidend zur harmonischen
Bildstruktur im Unschärfenbereich beitâgt.
•
Nikon Innenfokussierung, die konstante Baulänge, schnelleren AF-Betrieb und
kompakte Bauweise ermöglicht.
•
Eine eingebaute Gegenlichtblende zur wirksamen Abschirmung gegen
seitliches Streulicht.
•
D-Charakteristik zur Nutzung der 3D-Matrixmessung bzw. des 3D-Multi-
Sensor-Aufhellblizes.
Bitte lesen Sie diese Anleitung vor Benutzung des Objektivs aufmerksam durch,
damit Sie mit all seinen Funktionen voll vertraut sind.
Wichtig!
•
Sorgen Sie dafür, daß die AF-Kontakte unter kainen Umstäden verschmutzen
oder beschädigt werden.
•
Setzen Sie bitte folgendes Zubehör nicht an des Objektiv an, da es die AFKontakte beschädigen könnte; Die Automatik-Zwischenringe PK-1 und PK-11, die
Zwischenringe K1 und K2, den Automatikring BR-4 und den Umkehrring BR-2.
(Verwenden Sie PK-11A statt PK-11, BR-6 statt BR-4 und BR-2A statt BR-2).
•
Dieses Objektiv kann nicht mit dem Sudner DX-1 (der Nikon F3AF) verwendet
werden.
Page 7
1514
BEEINFLUSSUNG DER VORDER- UND HINTERGRUNDUNSCHÄRFE
Drehen Sie den DC-Ring unter Druk auf seine Entriegelung in Richtung R (Rear)
zur Verstärkung der Unschärfe im Hintergrund bzw. nach F (Front) zur
Verstärkung der Unschärfe im Vordergrund (siehe Abb. A). Die Blendeneinstellung
am DC-Ring sollte jener am Blendenring entsprechen. Wird der DC-Ring über die
Arbeitsöffung hinaus gedreht, ergibt sich ein zunehmend stärkerer
Weichzeichuungseffekt.
•
Die Einstellung des DC-Rings sollte grundsätzlich vor der Scharfeinstellung
erfolgen, da das Hauptobjekt sonst unschart abgebildet werden kann.
•
Solange sich der DC-Ring nicht in Nullstellung befindet, zaigt die
Entfernungsskala nicht den richtigen Aufnahmeabstand.
• Es versteht sich, daß die Beeinflussung der Unschärfe von Faktoren wie dem
Abstand zwischen Objekt und Hintergrund bzw. Vordergrund abhängt.
• Eine Beurteilung der Schärfenverschiebung im Sucher est nicht möglich. Es
empfiehit sich, mehrere Aufnahmen mit unterschiedlicher Einstellung des DCRings zu machen.
SCHARFEINSTELLUNG
Dieses Objektiv kann mit automatischer (Autofokus) und manueller Scharfeinstellung benutzt werden.
Um auf Autofokusbetrieb zu schalten, drücken Sie die Entriegelungstaste des
A-M-Ringes und drehen diesen Ring gleichzeitig so weit, daß das “A” dem A-MIndex gegenübersteht. Stellen Sie gleichfalls den Fokussier-Betriebsartenwähler
der Kamera aut Autofokus-Position.
Für die manuelle Scharfeinstellung stellen Sie den A-M-Ring auf “M”, so daß
das “M” auf den A-M-Index ausgerichtet ist. Auch der FokussierBetriebsertenwähler der Kamera ist auf “M” zu setzen.
• Durch die nicht korrekte Einstellung des Fokussier-Betriebsartenwählers der
Kamera und des A-M-Objektivringes kann bei einer Nikon-Autofokus-Kamera
das Kameragehäuse beschädigt werden.
EMPFOHLENE EINSTELLSCHEIBEN
Für Nikon-Kameras stehen verschiedene, auswechselbare Einstellscheiben zur
Verfügung, um jedem Objektiv und jeder Aufnahmesituation gerecht zu werden.
Die zur Verwendung mit lhrem Objektiv empfohlenen Einstellscheiben sind
aufgelistet.
Für die gewünschte Bildkomposition und Fokussierung:
F6
F5
mit DP-30
F5
mit DA-30
F4
mit DP-20
F4
mit DA-20
F3
EC-B/
EC-E
A/L B C D E G1 G2 G3 G4 H1 H2 H3 H4 J K P M R T U
(
+0.5
)
(
+0.5
)
(
+1.0
)
(
+0.5
)
Kamera
Einstellscheib
◎=
○=
△=
()
=
optimal geeignet.
verwendbar; ein Teil des Sichtfeldes ist jedoch mehr oder weniger schlecht sichtber.
Überlagerung der Schnittbilder erkennbar; aus Gründen der Präzision jedoch zur
Fokussierung nicht geeignet.
Korrekturwert bei Lichtmessung am zentralen Schwerpunkt
Bei Verwendung einen F6-Kamera stellen Sie zur Korrektur des Lichtwertes in den
Individualeinstellungen den Eintrag “b6: Korrektur für Einstellscheibe” auf “außer” B
und E“. Wenn Sie weder Typ B noch Typ E venwenden, stellen Sie bitte auch bei
einem Korrekturwert von 0 suf “außer B und E”. Bei F5-Kameras kann eine Korrektur
des Lichtwertes in den Individualeinstellungen unter Punkt 18 vorgenommen
werden. Bei Kameras der Serie F4 kann diese Korrektur durch Drehen des
Einstellrades zur Belichtungskorrektur an der Sucherblende vorgenommen werden.
Genaueres entnehmen Sie bitte der Gebrauchsanweisiung Ihren Kamera.
Leers Spalte: Zur verwendung nicht geeigenel.
Da allerdings M - Mattscheiben für Nahaufnahmen mit Aufnehmevergerößerungen von
mehr als 1/1 verwendet werden, kann es hier zu Abweichungen kommen.
Bei Verwendung der Mattscheiben B2/B3, E2/E3 bza. K2/K3 mit anderen als den oben
genannten Kameras siehe die jeweils entsprechenden Spalten für Mattscheiben B, E
bzw. K.
Page 8

1716
VERRIEGELUNG FÜR KLEINSTE BLENDE
Verwenden Sie für Programmautomatik oder Blendenautomatik mit Zeitvorwahi
den Hebel für Verrinegelung für kleinste Blende, um die Blende bei f/16 zu
verriegeln.
1. Drehen Sie den Blendenring so, daß Blende f/16 aut der Blendenskala dem
wißen Blendenindexpunkt gegenüber-steht.
2.
Schieben Sie den Verriegelugshebel in die Richtung des Blendenrings, so daß
der weiße Punkt auf dem Hebel mit dem orangen Punkt ausgerichtet ist (siene
Abb. B).
Zur Freigabe der Verriegelung schieben Sie den Hebel in die umgekehrte
Richtung.
VERWENDUNG DER EINGEBAUTENGEGENLICHTBLENDE
Ziehen Sie die Gegenlichtblende nach vorne und drehan Sie sie zewi
Umdrehungen gegen den Uhrzeigersinn, bis sie verriegelt ist (siehe Abb. C.) Um
sie wieder einzufahren, drehen Sie die Blende im Uhrzeigersinn umd schieben Sie
sie dann zurück.
OBJEKTIVPFLEGE
• Reinigen Sie die Linsenoberfläche zunächst mit einem Blasepinsel. Benutzen
Sie zur weitergehenden Reinigung ein mit reinem Alkohol befeuchtetes weiches
und sauberes Baumwolltuch bzw. Linsenreinigungspapier. Wischen Sie dabei
in einer größer werdenden Kreisbewegung von innen nach außen
• Benutzen Sie unter keinen Umständen Benzin oder Verdünner Zum Reinigen
des Objektivs.
•
Um die Frontlinse vor Schmutz und Beschädigung zu schützen, ist es
empfehlenswert, ein Nikon-Filter NC in das Filtergewinde zu schrauben. Es
kann auch ständig auf dem Objektiv bleiben. Darüber hinaus bewährt sich auch
die Gegenlichtblende als Frontlinsenschutz.
•
Setzen Sie dèn Frontdeckel auf des Objektiv, wenn Sie lhre Kamera nicht
benutzen.
•
Wird das Objektiv einzeln gelagert, bringen Sie Front-und Rückdeckel an.
•
Wenn Sie das Objektiv längere Zeit unbenutzt lassen, bewahren Sie es an
einem kühlen, trockenen Ort auf, um Rost und Schimmelbefall zu vermeiden.
Schützen Sie das Objektiv vor direkter Sonneneinstrahlung und vermeidn Sie
die Nähe von Naphtalin und Kampfer.
•
Schützen Sie das Objektiv vor wasser und Fenchtigkeit. Nässe auf dem
Objektiv kann zu Funktionsstörungen führen.
•
Die Außenbauteile des Objektivs sind aus verstärktem Kunststoffen gefertigt.
Um Schäden vorzubeugen, vermeiden Sie es bitte, das Objektiv extremer Hitze
auszusetzen.
TECHNISCHE DATEN
Brennweite:
Maximale Blendenöffnung:
Optische Konstruktion:
Bildwinkel:
Entfernungsskale:
Entfernungsdaten:
Blendenskala:
Verriegelung für kleinste Blende:
Blendenart:
Scharfeinstellung:
Belichtungsmessung:
Anschluß:
Filtergewinde:
Abmessungen:
Gewicht:
105mm
f/2
6 Linsen in 6 Gruppen (plus hinten
angebrachte staubdichte Glasplatte)
23°20'
Unterteilt in Meter und Fuß und zwar von
0,9 m (3 ft) bis unelndlich (∞)
Werden an Kameras übertragen
f/2 ~ f/16, sowohl auf der Standardskala als
auch auf der Skala für direkte Ablesung
Vorgesehen
Vollautomatisch
Nikon-Rückteil -Fokussier-System (RF)
Offenblendenmessung bei Kameras mit AlBlendenkupplung oder CPU-InterfaceSystem; Arbeitsblendenmessung bei allen
anderen Kameras ohne Al-Blendenkupplung
Nikon-Bajonettanschluß
72 mm (P = 0,75 mm)
ca. 79 mm Durchm. x 111 mm Länge bis
Flansch; Länge über alles ca. 119 mm
ca. 640 g
SONDERZUBEHÖR
72-mm-Einschraubfilter
Fester Objektivköcher CL-38
Page 9

1918
NOMENCLATURE
Index de couplage photométrique
Contacts CPU
Coupleur de l’ouverture
Index de servocommande diaphragme
Bague des ouvertures
Index d’ouverture/Index de montage
Echelle de profondeur de champ:
Affiche profondeur de champ à f/16.
Repère de mise au point en
infrarouge (point blanc)
Bouton de verrouillage de la bague
A-M
Bagye A-M
Repère des distances
Barillet d’objectif
Bouton de blocage de la bague DC:
Presser pour tourner la bague DC
Parasoleil incorporé
Echelle de lecture directe
d’ouvertures
Levier de verrou de l’ouverture
minimale
Echelle des ouvertures
Index A-M
Fenêtre d’échelle des distances
Echelle des distances
Bague de mise au point
Index de la bague DC
Bague DC : Tourner vers le côté “R”
pour rendre flou l’arrière-plan ou
vers le côté “F” pour rendre flou le
premier plan.
Echelle de l’ouverture pour le
contrôle de l’image de
défocalisation
Nous vous remercions d’avoir porté votre choix sur l’objectif AF DC-Nikkor
105mm f/2D.
Ses caractéristiques sont les suivantes:
• Le DC (Defocus lmage Control) Nikon vous permet de défocaliser l’arrière-plan
ou le premier plan.
• L’ouverture arrondie du diaphragme fait paraître les éléments flous plus naturels.
•
Le système de mise au point arrière (RF) Nikon fait entrer les lentilles arrière
dens l’objectif pendant la mise au point de sorte qu’il n’y a pas d’augnentation
de la longueur totale de l’objectif. Cele accèlére également le fonctionnement
AF et améliore la durabilité.
•
Le parasoleil d’objectif intégré réduit la diffusion pendant la prise de vue par
tenps très ensoleillé.
• Les informations de distance utilisées pour la mesure matricielle 3D ou le
dosage auto/flash ambiance multi-capteur sont instantanément transmises de
l’objectif au boîtier.
Avant d’utiliser votre nouvel objectif, veuillez lire attentivement ce mode d’emploi pour
tirer
le meilleur parti de votre objectif tout de suite et pendant de logues années.
i
mportant!
• Veillèr à ne pas salir ou endommager les contacts CPU.
•
Ne pas fixer les accessoires suivants à un objectif, car ils peuvent
endommager les contacts CPU de l’objectif:
Bague d’auto-rallonge PK-1, Bague d’auto-rallonge PK-11, Bague K1, Auto
Bague BR-4, Bague d’adaptateur Macro BR-2 ou Bague K2.
(Utiliser la PK-11A à la place de PK-11, BR-6 à la place de BR-4 et BR-2A à la
place de BR-2.)
• Cet objetif ne peut pas s’employer à l’intention du Viseur AF de DX-1 fixé à
l’appareil F3AF Nikon.
CONTROLE DE L’IMAGE DE DEFOCALISATION––
COMMENT RENDRE L’IMAGE FLOUE
En pressant le bouton de verrouillage de la bague DC, tournez la bague DC vers
le côté R (arrière) pour rendre flou l’arrière-plan, ou vers le côté F (avant) pour
rendre floe le premier plan. (Voir l’illustration A.) Pour effectivement rendre les
images de l’arrière-plan ou du premier plan floues, tournez la bague DC de sorte
que le nombre f sur la bague (aligné sur l’index de la bague DC) corresponde à
l’ouverture utilisée. La rotation de la bague au-delà de l’ouverture utilisée permet
de créer un effet de mise au point souple.
• Le contrôle de défocalisation doit toujours être effectué avant la mise au point.
Si la bague DC est tournée après la mise au point, ou durant te biocage de
mise au point en photographie à mise au point de vue automatique, le sujet ne
sera pas net.
• Quand la bague DC ast du côté F ou R, l’échelle des distances peut ne pas
indiquer la distance correcte.
• L
’
effet de contrôle de l’image de défocalistation dépend des conditions du
sujet, telles que la distance sujet/arrière-plan, la distance sujet/premier plan,
etc.
• Le flou de l’image ne peut pas être vénfié dans le viseur. Effectuez une série de
prises avec la bague DC à différents réglages pour obtenir l’effet souhaité.
MISE AU POINT
Cet objectif peut être utilisé aussi bien pour la mise au point automatique que
pour celle manuelle.
Pour sélectionner la mise au point automatique,
tout en pressant le bouton de
verrouiliage de la bague A-M. tournez la bague A-M de telle manière que “A” soit
aligné avec l’index A-M. D’autre part, réglez le sélecteur de mode de mise au
point de l’appareil sur la position de mise au point automatique.
Pour sélectionner la position “Manual”, tournez la bague A-M de telle manuère
que “M” soit aligné avec l’index A-M. En outre, réglez le sélecteur de mode de
mise au point de l’appareil pour la mise au point manuelle.
•
Avec un appareil Nikon à mise au point manuelie, un réglage incorrect du
sélecteur de mode de mise au point de l’appareil et de la bague A-M pourrait
endommager le boîtier de l’appareil.
Page 10

2120
VERRES DE VISEE RECOMMANDES
Différents verres de visée interchangeables peuvent être montés sur les appareil
photo Nikon, Il sont utilisables avec tous les types d’objectifs et dans toutes les
situations de prise de vue. Les verres de visée recommandés pour chaque
objectif sont répertoriés dans le tableau.
Le cadrage et la mise au point:
F6
F5 avec DP-30
F5 avec DA-30
F4 avec DP-20
F4 avec DA-20
F3
EC-B/
EC-E
A/L B C D E G1 G2 G3 G4 H1 H2 H3 H4 J K P M R T U
(
+0.5
)
(
+0.5
)
(
+1.0
)
(
+0.5
)
Appareil
Verre
optimisé:
utilisable, mais une partie de la vue devient difficile à distinguer:
l’image en zone de réglage médian est visible, mais la netteté de la mise au point
n’est pas optimisée:
valeur de correction lors de la mesure photométrique de la mise au point centrale.
Dans le cas de l’appareil F6. la correction de valeur pohtométrique s’effectue par la
sélection de l’option “Autred que B et E” dans le menu de réglege personnalisable
“b6 : correction d’écran”, Dans le cas de l’utilisation d’un type autre que B ou E, il
convient de sélectionner “Autres que B et E”, même si la valeur corrective est de “0”.
Dans le cas de l’appareil F5, la correction de valeur photométrique s’effectue par le
réglage N° 18 du menu de réglage personnalisable.
Dans le cas d’un appareil de la série F4, la correction s’effectue en tournant le
cadran sélecteur d’exposition du viseur-écran.
Pour de plus amplees informations. veuillez vous reporter à la notice de l’appareil
ohoto.
Case vide : utilisation non appropriée.
Il ne faut toutefois pas tenir compte de cette indication pour le cas de l’écran M, qui est
utilisé pour une prise de vue en “zoom” avec un taux de grossissement supérieur a 1.
Dans le cas de l’utilisation des écrans B2/B3, E2/E3, K2/K3 sur un appareil d’un type
autre que ceux mentionnés ci-dessus, veuillez consulter les paragraphes concemant
respectivement les écrans B, E, K.
VERROU DE L’OUVERTURE MINIMALE
Pour une prise de vues automatique programmée ou priorité obturatiion, utiliser le
levier de verrou de l‘ouverture minimale pour verrouiller l’ouverture minimale(f/16)
1. Tourner la bague des ouvertures de telle manière que f/16 sur le coupleur de
l’ouverture soif aligné avec le repère blanc de l’ouverture.
2. Glisser le levier de verrou vers la direction de la bague des ouvertures de sorte
que le point blanc sur le lavier fasse face au point orange(Illust. B).
Pour relâcher le verrou, glisser le levier dans le sens inverse.
UTILISATION DU PARASOLEIL INCORPORE
Tirez le parasoleil et tournez-le de deux tours dans le sens contraire des auguilles
d’une montre (Illst. C). pour ranger, tournez le parasoleil dans le sens des
aiguilles d’une montre et poussez en arrièe.
SOINS A APPORTER A VOTRE OBJECTIF
• Nettoyez la surface de l’objectif avec un pinceau souflant. Pour enlever la
saleté et les taches, utilisez un chiffon doux en coton ou une étoffe de
nettoyage pour objectif, légèrement imprégné d’alcool éthyliqe ou deliguide
de nettoyage pour objectif. Essuyez avec des mouvements circulaires du
centre vers l’extéieur, en prenent soin de ne pas laisser de traces et de ne pas
toucher les autres parties de l’objectif.
• Ne jamais utiliser des dilluants ou de la benzine pour nettoyer l’objedtif.
• Laisser un filitre NC monté en permanence constitue une bonne protection de
la lentille avant contre la poussière et les chocs. Le bouchon avant est
également une protection efficace de la lentille avant.
• Bouchez l’avant de votre objectif lorsque vous ne vous servez pas de votre
appareil.
• Lorsque votre objectif n’est pas monté, mettez-lui ses bouchons avant et
arrière.
• Si vous n’utilisez pas l’objectif pendant une longue période de temps.
protégez-le contre la rouille et l’umidité en le rangeant dans un endroit sec et
frais. Egalement ne le rangez pas en plein soleil et éloignez-le de la naphtalène
ou du camphre.
• Prenez garde de ne pas nouiller les lentilles, a fortiori de les laisser tombor
dans l’eau, l’eau provoquerait des défaux.
• Certaines piéces à l’extèrieur de l’objectif sont en plastique renforcé ; pour
éviter toute détérioration, ne pas ranger l’objectif dans un endroit
excessivement chaud.
Page 11

2322
CARACTERISTIQUES
Longueur focale:
Ouverture maximum:
Construction optique:
Champ augulaire:
Echelle des distances:
Données relatives à la distance:
Echelle des oubertures:
Verrou de l’ouverture minimale:
Diaphragme:
Mise au point:
Mesure de l’exposition:
Monture:
Taille des accessoires:
Dimensions:
Poids:
105 mm
f/2
6
éléments
en 6 groupes (plus plaque de verre
arière incorporée pour protection contre les
poussières)
23°20'
Graduée en mètres et en pieds depuis 0,9 m
(3 ft) à l’ infini (∞)
Figurent pour le appareils
f/2 à f/16 sur les deux normes et les échelles
de lecture directe d’ouverture
Pourvu
Entièrement automatique
Procédé Nikon de mise au point arrière (RF)
Par la méthode à pleine ouverture pour
appareils Al ou les appareils avec le système
d’interface CPU ; par la méthode à ouverture
réelle avec les autres appareils
Monture à baïonnette Nikon
72 mm (P = 0,75 mm)
Env. 79 mm diam x 111 mm rallonge de la
bride de montage d’objectif de l’appareil ;
longueur hors tout est env. 119 mm
Env. 640g
ACCESSOIRES EN OPTION
Filtres vissants 72 mm
Etui rigide CL-38
NOMENCLATURA
Protuberancia de acoplamiento al
exposimetro
Contactos CPU
Pivote indicador de abertura de
diafragma
Bome dei acoplador EE
Anillo de aberturas
Indicador de
abertura/Indicador de
montaje
Escala de profundidades de camoo:
Indica la profundildad de campo a
f/16.
Indicador de enfoque infrarrojo
(punto blanc)
Botón de bloqueo de anillo A-M
Anillo A-M
Indicador de distancia
Tubo portalentes
Botón de bloqueo de anillo DC: Se
presiona para girar el anillo DC
Parasol incorporado
Escala de lectura directa de
abertura
Palanca de bloqueo de abertura
minima
Escala de aberturas
Indice del selector A-M
Ventanilla de escala de distancias
Escalade distancias
Anillo de enfoque
Indice de anillo DC
Anillo DC: Se gira hacia el lado “R”
para hacer borroso el fondo, o hacia
el lado“F” parahacer borroso el
primer piano.
Escala de abertura para el control
de borrosidad de la imagen
Le agradecemos el haber adquirido el objetivo AF DC-Nikkor de 105 mm f/2D.
Este objetivo tiene las siguientes caracteristicas:
•
El DC (Control de Desenfoque de la imagen) de Nikon le permite desenfocar el
fondo o el primer plano.
•
La abertura redondeada del diafragma hace que los siementos fuera de foco
aparezcan más naturales.
•
Gracias al sistema de Enfoque Trasero (RF) de Nikon, los elementos traseros
del objetivo se mueven en su interior durante el enfoque por lo que no se
produce un alargamiento de la longitud total del objetivo. Con esto el enfoque
antomático es más rápido y el objetivo tendrá una vida útil más larga.
•
La visera incorporada en el objetivo reduce los reflejos cuando hace fotografías
bajo los rayos del sol.
•
La información de distancia utilizada para la medición matricial 3D o para el
flash de relleno equilibrado multisensor 3D se transmitirá instantáneamente del
objetivo a la cámara.
Antes de utilizar su nuevo objetivo, lea cuidadosamente las instrucciones que
sedan a continuación con el fin de obtener los mijores resultados de su objetivo,
ahora y durante muchos años más.
Page 12

2524
¡Importante!
• Tenga cuidado para no ensuciar ni dañar los contactos CPU.
• No monte los siguientes accesorios en el objetivo, pues se pueden dañar los
contactos CPU del mismo.
Anillo
Automático de
Extensión PK-1, Anillo
Automático de Extensión OK-11,
Anillo K1, Anillo Automático BR-4, Anillo
Adaptador Macro BR-2 o Anillo K2
.
(Utilice el
PK-11A, en lugar del OK-11, el BR-6, en lugar del BR-4, y el BR-2A,
en lugar del BR-2.)
• Este objeiivo no puede ser utilizado con el Visor AF DX-1 anexo a la cámara
F3AF de Nikon.
CONTROL DEL DESENFOQUE DE LA IMAGEN ––
HACIENDO UNA IMAGEN BORROSA
Mientras presiona el botón de liberación del seguro de anillo DC, rote el anillo DC
hacia el lado R (posterir) para hacer borroso el fondo, o tacia el lado F
(delantero) para hacer borroso el primer plano (véase la ilustración A). Para
efectivamente hacer borrosas las imágenes del fondo o del primer plano, gire el
anillo DC de manera que el número f en el anillo DC (alineado con el indice en el
anillo DC) se corresponda a la abertura en uso. Girando el anillo más allá de la
abertura en uso le parmite crear un suave efecto de anfoque.
El control de desenfoque siempre se debe efectuar antes del enfoque. Si usted
rota el anillo DC después del enfoque o durante el bloqueo de enfoque en al
fotografia de enfoque automático, su sujeto será desenfocado.
Con el anillo DC ya sea en la posición F o R, la escala de distancia podría no
indicar la distancia correcta.
El efecto del control del desenfoque de la imagen depende de las condiciones
del sujeto, tales como la distancia del sujeto a fondo, distancia del sujeto al
primer plano, etc.
Como usted no puede verificar los resultados a través del visor, efectúe el
encuadre con el anillo DC en varias posiciones para obtener el efecto deseado.
ENFOQUE
Este objetivo puede ser usado tanto para enfoque automático como para
enfoque manual.
Para seleccionar enfoque automático, mientras se presiona el botón de
bloqueo de anillo A-M, gire el anillo A-M de manera que la marca “A” quede
alineada con el índice A-M.
Para seleccionar el enfoque manual, gire el anillo A-M de manera que la marca
“M” quede alineada con el indice A-M. Tamblén fije el selector de modo de
enfoque de la cámara pare enfoque manual.
Con una cámara de enfoque automático Nikon, la fijación incorrecta del
selector de modo de enfoque de la cámara y del anilo A-M del objetivo podria
dañar el cuerpo de la cámara.
PANTALLAS DE ENFOQUE RECOMENDADAS
Existen varias pantallas de enfoque intercambiables para las cámaras Nikon
aptas para todo tipo de objetivo o situación fotográfica. Las pantallas
recomendadas para ser utilizadas con este objetivo aparecen en la lista.
Para decidir la composición y ajustar el foco:
Condición más adecuada
Si bien una parte del campo visual se ve con dificultad. Se puede utilizar.
Puede verse la imagen ajustada pero no es posible entccar con precisión.
Valor de corrección cuando se ajusta la exposición desde el centro.
En el caso de la cámara F6, la correccíón del valor fotométrico se realiza ajustando a
“fuera de B or E” en “b5: corrección de pantalla”en el menú personalizado.
Si se utilizan formas aparte de la B y la E, coloque “fuera de B or E”, aunque el
volumen de corrección sea 0 En el caso de la cámara F5. la corrección del valor
fotométrico se realiza colocando a No. 18 en Ajuste Personalizado. En el caso de las
cámaras Serie F4, la corrección se realiza girando el dial de corrección para la
exposición de la pantalla visora.
Para mayor detalle, rafiérase al manual de Instrucciones de cámara.
En blanco; No es apropiado su uso.
Sin embargo, hay excepciones en el caso de la pantalla M. dado que se utiliza er
fotografia a proximidad con magnificación mayor a 1/1.
En caso de utilizar las pantallas B2/B3, E2/E3, K2/K3 con cámaras distintas a las
mencionadas arriba, Vea las columnas do pantallas B, E, K.
F6
F5
con DP-30
F5
con DA-30
F4
con DP-20
F4
con DA-20
F3
EC-B/
EC-E
A/L B C D E G1 G2 G3 G4 H1 H2 H3 H4 J K P M R T U
(
+0.5
)
(
+0.5
)
(
+1.0
)
(
+0.5
)
Cámara
Pantalla
Page 13

2726
ESPECIFICACIONES
Longitud focal:
Abertura máxima:
Construcción:
Angulo:
Escala de distancias:
Datos de distancia:
Escala de aberturas:
Bloqueo de abertura minima:
Diafragma:
Sistema de enfoque:
Medición de la exposición:
Montura:
Tamaño de los accesorios:
Dimensiones:
Peso:
105 mm
f/2
6 elementos en 6 grupos(más una placa a
prueba de polvo montada en la parte trasera)
23°20'
Graduada en metros y pies, desde 0,9 m(3 pies)
hasta el iniinito (∞)
Salida en las cámaras
f/2
~
f/16 en ambas escalas, la estándar yala de
lectura directa de aberturas
Se suministra
To talmente automático
Sistema de enfoque posterior (RF)de Nikon
Por medio del método de plane abertura para
cámaras Al o cámaras con el sistema de interface
CPU; por medio del método de diafragmado para
otras cámaras.
Tipo bayonete Nikon
72 mm (P = 0.75 mm)
Aprox. 79 mm de diám. x 111 mm de extensión
desde el borde; aprox. 119 mm de longitud(total)
Aprox. 640 g
ACCESORIOS OPCIONALES
Filtros con rosca de 72 mm
Estuche duro CL-38
BLOQUEO DE ABERTURA MINIMA
USO DEL PARASOL INCORPORADO
CUIDADOS DEL OBJETIVO
Para operación automática programada o con prioridad al obturador, utilica la
palanca de seguro de bloqueo de abertura minima para bloquear la abertura del
objetivo en f/16.
1. Gire el anillo de aberturas de manera que la marca f/16 en la escala de
aberturas quede alineado con el punto del indicador de abertura bianco.
2. Deslice la palanca de bloqueo en la dirección del anillo de abertura de tal
manera que el punto blanco de la palanca de alinee con el punto anaranjado.
(Vea la ilustración B.)
Para liberar el bloqueo, deslice la palanca en la dirección inversa.
Tire del parasol y girelo 2 vueltas en el sentido contrario a los punteros del reloj.
(Véase la ilustración C). Para guardarlo, gire el parasol en el sentido de los
punteros del reloj y empújelo de vuelta.
Limpie la superficie del objetivo con un cepillo en pomo. Para elimimar la
suciedad y las manchas, utilice un paño de algodón suave y linpio o un papel
para cristales empapado en stanol (alcohol) o limpiador de cristaless. Limpie
con un movimiento circular del centro al borde exterior, cuidando de no dejar
marcas y de no tocar las otras partes del objetivo.
Para limpiar el objetivo, no utilice nunca ni solvente ni bencina.
Para proteger la superficie del objetivo de polvo o daños se recomienda el uso
de un filtro NC en todo momento. El parasol también ayuda a proteger el
objetivo.
Deje la tapa colocada siempre que no se use el objetivo.
Coloque ambas tapas, la delantera y la trasera, guardando el objetivo por
separedo.
Si usted no va a usar el objetivo por un periodo de tiempo prolongado.
protéjalo contra la oxidación y el moho almacenándolo en un lugar fresco y
seco. Además, no lo almacene a la luz solar directa, y manténgalo alejado de la
naftalina o alcanfor.
Asegúrese de no mojar el objetivo ni dejarlo caer en agua. El agua puede
causar mal funcionamiento del objetivo.
Se utiliza plástico reforzado en las partes extemas de la unidad de objetivo;
para evitar daños, tenga cuidado adicional para nunca dejar el objetivo en un
lugar excesivamente caliente.
Page 14

2928
NOMENCLATURA
Indica di accoppiamento
dell’esposimetro
Contatti CPU
Perno per la misurazione
dell’apertura
Attacco per accoppiamento EE
servo
Anello delle aperture
Indice di apertura/Indice di
montaggio
Scale profondità di campo : mostra
la profondità di campo a f/16.
Indice di componsazione per
infrarossi (punto bianco)
Tasto di fermo anello A-M
Anello A-M
Contrassegno distanza
Cilindro obiettivo
Tasto di fermo anello DC:spingere
girando l’anello DC.
Paralude incorporato
Scala di lettura diretta dell’apertura
Leva del blocco di apertura minima
Scala delle aperture
Indice del selettore A-M
Finestrella scala delle distanze
Scala delle distanze
Anello di messa a fuoco
Indice anello DC
Anello DC: girare verso il lato “R”
per sfocare lo sfondo o verso il lato
“F” per stocare il primo piano
Scala di apertura per il controllo
dell’immagine sfocata
Grazie per aver acquistato l’obiettivo AF DC-Nikkor 105 mm f/2 D.
Le caratteristiche di questo obiettivo sono le seguent:
• Il controllo dell’immagine defocalizzata (DC) della Nikon consente di sfocare lo
sf
ondo o il primo pianc.
• L’apertura del diaframma arrotondata fa apparire più naturali gli elementi non a
fuoco.
• Grazie al sistema di messa a fuoco dello sfondo (RF) della Nikon, gli elementi
posteriori dell’ obiettivo si muovono all’intemo dell’obiettivo durante la messa a
fuoco, in modo che non ci sia alcun aumento nella lunghazza globale
dell’obiettivo. Questo consente anche un’operazione AF più veloce e una
maggiore durevolezza.
• Il paraluce incorporato riduce al minimo l’abbagliamento quendo si riprende
sotto un’intensa luce solare.
•
Le informazioni sulla distanza usate per la misurazione Matrix 3D o per
l’esposizione Fill-Flash con bilanciamento a sensore multiplo 3D saranno
trasmesse istantaneamente dall’ obiettivo al cprpo della fotocamera.
Prima di usare il nuovo obiettivo, lessere con attenzione questo manuale per
ottenere i migliori risultati per molti anni a venire.
Importante:
• Non sporcare o non danneggiare i
contatti
CPU.
• Per evitare di danneggiare i contatti CPU, evitare di attaccare i seguenti
accessori all’ obiettivo:
Anello di auto estensione PK-1, Anello di auto estensione PK-11, Anello K1,
Anello auto BR-4, Anello per messa a fuoco in macro BR-2 o Anello K2.
(Usare il Pk-11A invece del PK-11, BR-6 del BR-4, BR-2A dek BR-2.)
• Questo obiettivo non può essere utilizzato se all’apparecchio Nikon F3AF è già
stato inserito il visore AF DX-1.
CONTROLLO DELL’IMMAGINE DEFOCALIZZATA––
EFFETTO IMMAGINE SFOCATA
Spingendo il tasto di fermo dell’anello DC, ruotare l’anello DC verso il lato R
(retro) per sfocare lo sfondo, o verso il lato F (davanti) per sfocare il Primo piano
(vedere l’illustrazione A). Per stocare in modo efficace le immagini sullo sfondo o
in primo piano, girare l’anello DC in modo che il numero f sull’anello DC (allineato
con l’indice sull’anello DC) corrisponda all’apertura attualmente utilizzata. Se si
gira l’anello oltre l’apertura attualmente utilizzata, è possibile creare un effetto di
messa a fuoco morbida.
• Il controllo di dafocalizzazione deve essere eseguito sempre prima della messa
a fuoco. Se si ruota l’anello DC dopo aver messo a fuoco, o durente il blocco
della messa a fuoco nella fotografia con messa a fuoco automatica, il soggetto
risulterà non a fuoco.
• Con l’anello DC sul lato F o sul lato R, la scala delle distanze può non indicare
la distanza corretta.
• L’effetto del controllo dell’immagine defocalizzata dipende dalle condizioni del
soggetto come la distanza soggetto-sfondo, la distanza soggetto-primo piano,ecc.
• Non è possibile verificare l’effetto di immagine sfocata attraverso il mirino. Per
ottenere l’effetto desiderato, scattare una serie di fotografie con l’anello DC
regolato nelle varie posizioni di regolazione.
MESSA A FUOCO
Questa lente può essere usata sia per la messa a fuoco automatica che per
quella manuale.
Per selezionare la messa a fuoco automatica,
mentre si preme il tasto de fermo
anello A-M, girare l’anello A-M in modo che “A” si allinei con l’indice A-M, lnoltre
regolare il selettore della messa fuoco della macchina fotografica sulla
posizione della messa a fouco automatica.
Per selezionare la messa a fuoco manuale, girare l’anello A-M in modo dhe
“M” si allinei con l’indica A-M. lnoltre, regolare il selettore di modo della messa a
fuoco della mecchina fotografica per la messa a fuoco manuale.
• Con una macchina Nikon a fuoco automatico, la regolazione impropria del
selettore di modo della messa a fuoco e dell’anello della lente A-Me può
danneggiare il corpo della macchina fotografica.
Page 15

3130
SCHERMI DI MESSA A FUOCO RACCOMANDATI
Vari schermi di messa a fuoco sono a disposizione per le fotocamera Nikon per
far fronte ad ogni situazione di presa. Si danno in lista quelli raccomandati per il
Vostro obiettivo.
Ai fini di detarminare un’inquadratura o di impostare la messa a fuoco:
Ideal
E’ottimale.
E’utilizzabile con il campo visivo parzialmente offuscato.
E’ possibile visualizzare l’immagine spezzata, ma la messa a fuoco non è adeguata
per l’insufficiente precisione.
E’il valore di controllo riferito ai casi con la luce laterale sul punto centrale.
Nel caso della fotogamera F6, controllare il valore della luce laterale. impostando il
custom nenu della fotodamera quale “b6:Controllo Schermo” sulla posizione di“tranne B
o E”.
Nel caso di utilizzare i modelli tranne B ed E, impostare il menu sulla posizione di
“tranne B o E”,anche se il valore di controllo risulta 0.
Nel caso della fotocamera F5. controllare il valore della luce laterale, impostando il n. 18
del custom setting.
Nel caso di una fotocamera della serie F4, eseguire il controllo, ruotando il selettore per
iI controllo esposizione dello schermo del mirino.
Per ulteriori informazioni deffagliate, leggere le istruzioni della fotocamera.
Spazio bianco:E’ sconsigliata l’utilizzazione.
Nel caso dello schermo M, tuttavia, non se ne applica la suddetta istruzione, in quanto
asso viene utilizzato nelle riprese avvicinate con l’ingrandimento di ripresa superiore
all’1/1.
Nel caso di utilizzare lo schermo della gamma B2/B3,L2/L3, e K2/K3 con gli altri modelli
de fotocamera da quelli sopraindicati, leggere l’istruzione per il relatiovo schermo,
rispettivamente B.L. e K.
BLOCCO APERTURA MINIMA
Per fotografie automatiche o con precedenza data all’otturatore usare la leva di
blocco dell’apertura miima per bloccare l’apertura dell’obienttivo a f/16.
1. Girare l’anello delle aperture in modo che f/16 sulla scala delle aperture si
allinei con il puntino bianco dell’indice apertura.
2. Spostare la leva di bloccaggio nella derezione dell’ anello di apertura per
allineare il punto bianco della leva con il punto colore arancione. (Vedere la
figura B.)
Per disimpegnare il sistema di bloccaggio, spostate la leva nella derezione
opposta.
USO DEL PARALUCE INCORPORATO
CURE DEGLI OBIETTIVI
Tirar fuori il paraluce e girarlo in senso antiorario pen due giri (vedere la figura C).
Per riporre, girare il paraluce in senso orario e spingerlo indietro.
• Pulire la superficie della lente con uno spazzoline a soffietto. Per rimovere
sporco e macchie, usare un panno di cotone morbido o un panno per lenti
imbevuto di etanolo (alcol) o di un pulitore per lenti. Passare il panno con un
movimento circolare dal centro verso il bordo esterno, facendo attenzione a
non lasciare tracce e a non toccare le altre parti dell’obiettivo.
•
Non usare diluenti o benzina per polire le lenti.
• Per porteggere la superficie di vetro dell’obiettivo da polvere o danni, è
consigliato l’uso di un filtro NC per qualsiasi circostanza. Il paraluce
dell’obiettivo serve anch’esso a proteggere l’obiettivo.
•
Mantenere
il tappo
fissato sull’obiettivo quando quest’ultimo
non viene usato.
• Applicare entrambi i tappi quando
l’obiettivo viene
conservato separatanente.
• Quando non si usa la lente per lungo tempo, è necessario proteggerla dalla
ruggine e dalla muffa, conservandola in un luogo fresco ed asciutto, Non
lasciarla inoltre sotto la luce solare diretta e tanerla lontana da naftalina o
canfora.
• Fare attenzione a non far bagnare l’obiettivo a non farlo cadere in acqua.
Acqua sull’obiettivo può causare malfunzionamenti.
• La plastica rinforzata viene utilizzata sull’esterno dell’obiettivo. Perevitare
eventuali danni, non si deve lasciare l’obiettivo in un posto dove la temperatura
ambiente è eccessivamente elevata.
F6
F5
con DP-30
F5
con DA-30
F4
con DP-20
F4
con DA-20
F3
EC-B/
EC-E
A/L B C D E G1 G2 G3 G4 H1 H2 H3 H4 J K P M R T U
(
+0.5
)
(
+0.5
)
(
+1.0
)
(
+0.5
)
Camera
Screen
Page 16

3332
Lunghezza focale:
Apertura massima:
Costruzione obiettivo:
Angolo di campo:
Scala distanze:
Dati distanze:
Scala diaframmi:
Blocco apertura minima:
Diaframma:
Messa a fuoco:
Misurazione dell’esposizione:
Innesto:
Dimensioni attacco:
Dimensioni:
Peso:
105 mm
f/2
6 elementi in 6 gruppi (piú la piastra di vetro
posteriore incorporata per protezione contro la
polvere)
23°20'
Graduata in metri e piedi da 0,9 m (3 ft)all’infinito
(∞)
Uscita in fotocamere
f/2 a f/16 su entrambe le scale standard e a
lettura diretta dei diaframmi
Inseribile
Completamente automatico
Sistema di messa a fuoco posteriore Nikon(RF)
Con metodo ad apertura massima per le
fotocamere Al o fotocamere con sistema di
Interfaccia CPU; tramite il metodo stop-Down
con le altre forocamere
Nikon a baionetta
72 mm (P = 0,75 mm)
Circa 79 mm diam. x 111 mm estensione dalla
flangia; lunghezza: 119 mm circa (ttotale)
Circa 640g
Filtri a vite da 72 mm diam.
Potraobiettivo duro CL-38
ACCESSORI IN OPZIONE
CARATTERISTICHE TECNICHE
Page 17

3534
Page 18

3736
Page 19

3938
Page 20

4140
DEPTH OF FIELD
Focused
distance
Depth of field
Reproduction ratio
(ft)
1/8
1/11
1/14
1/17
1/23
1/28
1/58
1/∞
3 ft.
4 ft
5 ft
6 ft
8 ft
10 ft
20 ft
∞
f/2 f/2.8 f/4 f/5.6 f/8 f/11 f/16
3’ 11/4”––
2’ 1013/16”
3’ 1/8” ––
2’ 1113/16”
4’ 1/4” ––
3’ 1111/16”
3’ 3/16” ––
2’ 113/4”
3’ 1/4” ––
2’ 1111/16”
3’ 7/16”––
2’ 119/16”
3’ 5/8”––
2’ 113/8”
3’ 7/8”––
2’ 111/8”
4’ 3/8” ––
3’ 119/16”
4’1 3/16”––
3’ 1013/16”
4’111/16”––
3’ 103/8”
4’21/2”––
3’ 93/4”
5’213/16”––
4’ 93/8”
5’ 15/16”––
4’ 11”
5’1 3/8”––
4’ 105/8”
5’ 7/16”––
4’ 111/2”
6’ 1”––
5’ 11”
6’ 11/16”––
5’ 111/4”
6’ 41/4”––
5’ 8 3/16
”
8’11
13
/16”
–
7’ 2 5/8
”
8’ 313/16”
–
7’ 87/16
”
8’ 1 5/16”
–
7’ 1011/16
”
10’ 2”
–
9’ 915/16
”
10’ 6”
–
9’ 63/8
”
11’ 7”
–
8’ 9 1/2
”
21’
–
19’
21’ 6”
–
18’ 7”
20’ 8”
–
19’ 3”
135’
–
∞
69’
–
∞
96’
–
∞
192’
–
∞
271’
–
∞
383’
–
∞
542’
–
∞
23’ 3”
–
18’ 1”
23’ 4”
–
17’ 6”
25’ 1”
–
16’ 7”
28’ 1”
–
15’ 6”
11’ 1”
–
9’ 1 5/16
”
10’ 8”
–
9’ 4 1/4
”
10’ 4”
–
9’ 715/16
”
10’ 3”
–
9’ 91/8
”
8’ 1 7/8”
–
7’ 103/16
”
8’ 211/16”
–
7’ 97/16
”
8’ 51/2”
–
7’ 71/16
”
8’ 8”
–
7’ 51/8
”
6’ 63/16”
–
5’ 6 3/4
”
6’ 215/16”–
5’ 9 1/4
”
6’ 21/16”––
5’ 10”
6’ 17/16”––
5’ 109/16”
5’ 11/16”––
4’ 115/16”
5’115/16”––
4’ 101/8”
5’41/8”––
4’ 83/8”
4’ 13/16” ––
3’ 111/8”
4’ 9/16” ––
3’ 113/8”
Page 21

4342
被写界深度表/
SCHÄRFENTIEFEN-TABELLE/
PROFONDEUR DE CHAMP/PROFUNDEDAD DE CAMPO/
PROFONDITÀ DI CAMPO/
撮影距離
Eingestellte
Entfernung
Distance de
mise au point
Distancia de
enfoque
Distanza messa
fuoco
被写界深度
撮影倍率
Abbildungs maßstab
Rapport de
reproduction
Relación de
reproducción
Rapporto di
riproduzione
Schärfentiefe
Profondeur de champ
Profundidad de campo
Profonditá di campo
(m)
(in.)
f/2
0.90 –
0.90
0.91 –
0.90
0.91 –
0.90
0.91 –
0.89
0.92 –
0.88
0.93 –
0.87
1.26 –
1.15
1.24 –
1.16
1.23 –
1.17
1.22 –
1.18
1.21 –
1.19
1.21 –
1.19
1.21 –
1.19
1.51 –
1.49
1.52 –
1.48
1.52 –
1.48
1.53 –
1.47
1.55 –
1.45
1.57 –
1.44
1.60 –
1.41
2.19 –
1.84
2.13 –
1.88
2.09 –
1.92
2.06 –
1.94
2.04 –
1.96
2.03 –
1.97
2.02 –
1.98
3.05 –
2.95
3.07 –
2.93
3.11 –
2.90
3.15 –
2.86
3.22 –
2.81
3.32 –
2.74
3.48 –
2.64
6.54 –
4.06
5.99 –
4.30
5.66 –
4.48
5.45 –
4.62
5.31 –
4.73
5.15 –
4.86
165 –
∞
117 –∞83 –∞59 –∞41 –∞29 –∞21 –
∞
5.22 –
4.80
0.92 –
0.89
f/2.8 f/4 f/5.6 f/8 f/11 f/16
1/8
1/11
1/14
1/18
1/28
1/47
1/∞
0.9
1.2
1.5
2.0
3.0
5.0
∞
Photographic Range with Close-up Attachment
Close-up Attachment
Lens in normal position
Focused
distance
Subject field
Reproduction
ratio
1/13.1 –
1/1.5
60.7 –
14.7
16.5 –
14.6
18.0 –
15.8
17.1 –
16.5
17.1 –
24.4
12.4 x 18.6 ––
1.4 x 2.2
1.9 x 2.8 ––
1.4 x 2.1
2.3 x 3.5 ––
0.54 x 0.80
2.1 x 3.1 ––
0.48 x 0.71
2.1 x 3.1 ––
0.23 x 0.34
1/2.0 –
1/1.4
1/2.4 –
1/8
1/2.2 –
2.0
1/2.2 –
4.2
Ring PK
Ring PN
Bellows PB-4, PB-5
Bellows PB-6
Extension Bellows PB-6E
*
The first calues are for the PK-11A ring used alone and the other ones for the PK-11A––PK-13, PK-11––PK-13, or
PK-1––PK-3 rings used together. The pk-11 and PK-1 rings cannot be attached dorectly to the lens.
Lens cannot be attached on reverse podition,
Page 22

4544
接写表
/FOTOGRAFISCHE BEREICHE MIT DEM NAHAUFNAHMEZUBEHÖR/RAPPORTS OBTENUS EN PROXIPHOTOGRAPHIE ET
PHOTOMACROGRAPHIE/ RANGOS FOTOGRÁFICOS CON
ACCESORIOS DE ACERCAMIENTO / FOTOGRAFIA CON
DISPOSITIVI PER RIPRESE CLOSE-UP
レンズ正方向
Objektive in Normalstellung
Objectif en position normale
Objetivo en la posición normal
Objettivo in posizione normale
使用器具
Nahaufnahme-zubehör
Accessoires macro
Accesorio de
acercamiento
Dispositivi Close-Up
撮影倍率
Abbildungsmaßstab
Rapport de reproduction
Relación de reproducción
Rapporto di riproduzione
撮影距離
Eingestellte Entfernung
Distance de mise au point
Distancia de enfoque
Distanza messa a fuoco
被写界面積
Aufnahmefeld
Champ couvert
Campo cubierto
Campo del soggetto
PKリング
Zwischenringe PK
Bagues PK
Anillo de la Serie PK
Anello serie PK
PNリング
Zwischenringe PN
Bagues PN
Anillo de la Serie PN
Anello serie PN
ベローズアタッチメント PB-4、PB-5
Balgengerät PB-4 oder PB-5
Soufflet PB-4 PB-5
Fuelles PB-4 y PB-5
Soffietto PB-4, PB-5
ベローズアタッチメント PB-6
Balgengerät PB-6
Soufflet PB-4 PB-6
Fuelles PB-4 y PB-6
Soffietto PB-4, PB-6
エクステンションベ ローズPB-6E
Zusatzbalgen PB-6E
Soufflet additionnel PB-6E
Fuelle de extensión PB-6E
Estensione soffietto PB-6E
1/13.1 ––
1/1.5
154 ––
37.4
42.0 ––
37.1
45.7 ––
40.2
43.5 ––
41.9
43.5 ––
62.1
1/2.0 ––
1/1.4
1/2.4 ––
1/8
1/2.2 ––
2.0
1/2.2 ––
4.2
5.2 x 7.9 ––
0.57 x 0.86
5.2 x 7.9 ––
1.2 x 1.8
5.9 x 8.8 ––
1.4 x 2.0
4.8 x 7.2 ––
3.5 x 5.2
31.5 x 47.2 ––
3.6 x 5.5
PKリングのはじめの数値はPK-11Aリング1個使用のとき、あとの数値はPK-11A〜PK-13リング、PK-11
〜PK-13リングまたはPK-1〜PK-3リングを連結したときのものです。ただし、PK- 1 1 リングおよびPK-1リング
はこのレンズに直接取付けることはできませんのでご注意ください。
レンズを逆向きにしての使用はできません。
Die ersten werte gelten für den Zwischenring PK-11A, wenn dieser allein benutzt wird. Die
anderen Werte gelten für die Kombinationen PK-11A –– PK-13, PK-11 –– PK-13 oder PK-1––
PK-3. Die Zwischenringe PK-11 und PK-1 lassen sich nicht direkt am Objektiv anbringen!
Das
Anbringen dieses Objektivs in
Restrostellung ist nicht möglich.
Les premiéres valeurs sont pour la bague PK-11A utilisée seulement et les autres pour les
bagues PK-11A –– PK-13, PK-11 –– PK-13 ou PK-1 –– PK-3 utilisées ensemble. Toutefois, les
bagues PK-11 et PK-1 ne peuvent être directement fixées à l’objectif.
L’objèctif ne peut pas étre fixé en position retoumé.
I primi valon sono per l’anello PK-11A usato da solo mentre i seguenti sono per gil anello PK11A –– PK-13. PK-11 –– PK-13, o PK-1 –– PK-3 usati assieme. Si tenga comunque pressente
che gil arielli PK-11 e PK-1 non possono essere agganciati direttamente all’objettivo.
Questo objiettivo non puó essere montato nella posizione inversa.
Los primeros valores son para el caso en que se utilice el anillo PK-11A solo y los otros valores
para el caso en que se utilicen los anillos PK-11A –– PK-13, PK-11 –– PK-13, o PK-1 –– PK-3
juntos. Sin embargo, no es posible montar los anillos PK-11 y PK-1 en el objetivo en forma
directa.
No es posible montar el objetivo en posición invertida.
(cm)
 Loading...