

• Read this manual thoroughly before using the camera.
• To ensure proper use of the camera, be sure to read
“For Your Safety” (page x).
• After reading this manual, keep it in a readily accessible
place for future reference.
DIGITAL CAMERA
User's Manual (with Warranty)
En

To get the most from your camera, please be sure to read all
D850 Model Name: N1608
instructions thoroughly and keep them where they will be read
by all who use the product.
Symbols and Conventions
To make it easier to find the information you need, the following
symbols and conventions are used:
This icon marks cautions; information that should be read
D
before use to prevent damage to the camera.
This icon marks notes; information that should be read before
A
using the camera.
This icon marks references to other sections in this manual.
0
Menu items, options, and messages displayed in the camera monitor are
shown in bold.
Throughout this manual, smartphones and tablets are referred to as
“smart devices”.
Camera Settings
The explanations in this manual assume that default settings are used.
A Fo r Your Sa fety
Before using the camera for the first time, read the safety instructions
in “For Your Safety” (0 x).
Nikon User Support
Visit the site below to register your camera and keep up-to-date with the
latest product information. You will find answers to frequently asked
questions (FAQs) and can contact us for technical assistance.
http://www.europe-nikon.com/support
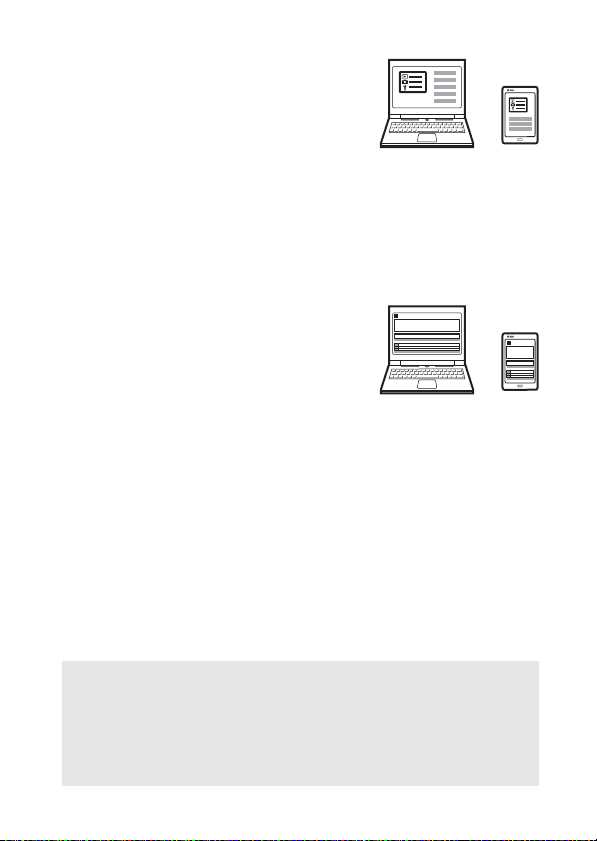
❚❚ The Menu Guide (PDF)
For more information on menu options and
su bje ct s su ch a s ho w to con nec t th e ca mer a to
a printer or television, download the camera
Menu Guide from the Nikon website as
described below. The Menu Guide is in pdf
format and can be viewed using Adobe
Reader or Adobe Acrobat Reader.
1 On your computer, launch a web browser and open the Nikon manual
download site at http://downloadcenter.nikonimglib.com/
2 Navigate to the page for the desired product and download the
manual.
❚❚ Online Manuals (HTML)
To view Nikon manuals in a web browser:
1 Launch the browser and open the Nikon
manual site at
http://onlinemanual.nikonimglib.com/d850/en/
2 Select the desired product and open the
online manual.
D Use Only Nikon Brand Accessories
Only Nikon brand accessories certified by Nikon specifically for use
with your Nikon digital camera are engineered and proven to operate
within its operational and safety requirements. T
ACCESSORIES COULD DAMAGE YOU R CAMERA AND MAY VOID YOUR NIKON
WARRANTY.
HE USE OF NON-NIKON
i
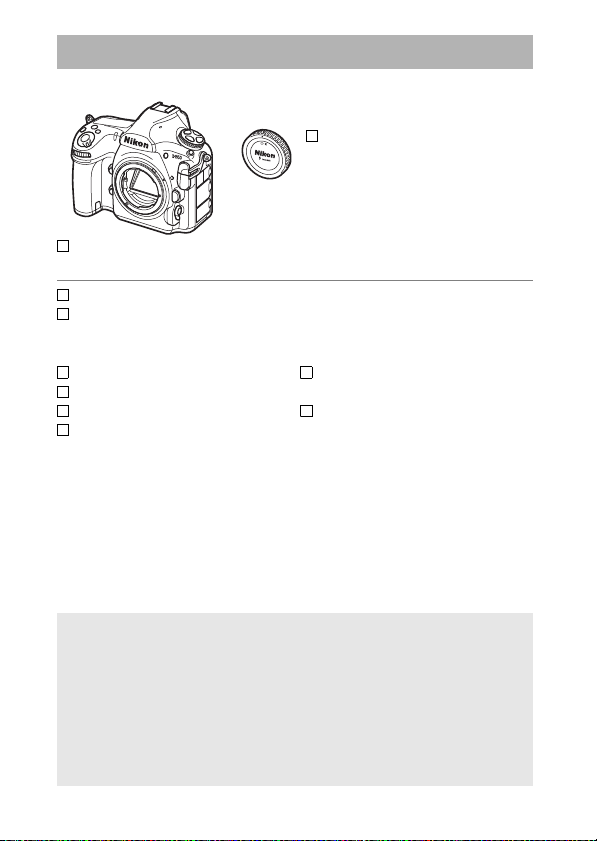
Package Contents
Be sure all items listed here were included with your camera.
BF-1B body cap (0 19)
D850 digital camera
(0 1)
EN-EL15a rechargeable Li-ion battery with terminal cover (0 14, 16)
MH-25a battery charger (comes with either an AC wall adapter or power
cable of a type and shape that varies with the country or region of sale;
0 14)
HDMI/USB cable clip
UC-E22 USB cable
AN-DC18 strap (0 14)
User’s Manual (this guide)
Purchasers of the lens kit option should confirm that the
package also includes a lens. Memory cards are sold separately.
Cameras purchased in Japan display menus and messages in
English and Japanese only; other languages are not supported.
We apologize for any inconvenience this may cause.
A ViewNX-i and Capture NX-D Computer Software
Use ViewNX-i to fine-tune photos or to copy pictures to a computer for
viewing, or Capture NX-D to fine-tune pictures that have been copied
to a computer and to convert NEF (RAW) images to other formats.
These applications are available for download from:
http://downloadcenter.nikonimglib.com/
You can also visit this website for the latest information on Nikon
software, including system requirements.
SnapBridge Connection Guide
(for D-SLR Cameras)
Warranty (printed on the back
cover of this manual)
ii

Table of Contents
Package Contents ......................................................................... ii
For Your Safety .............................................................................. x
Notices.......................................................................................... xiv
Introduction 1
Getting to Know the Camera ...................................................... 1
Camera Body ............................................................................................1
The Control Panel ...................................................................................5
The Viewfinder Display.........................................................................7
The Diopter Adjustment Control ......................................................9
Using the Tilting Monitor.................................................................. 10
Using the Touch Screen .................................................................... 12
First Steps 14
Attach the Camera Strap................................................................... 14
Charge the Battery ..............................................................................14
Insert the Battery and a Memory Card......................................... 16
Attach a Lens......................................................................................... 19
Basic Setup............................................................................................. 21
Tutorial 24
Camera Menus: An Overview.................................................... 24
Using Camera Menus .........................................................................25
Basic Photography and Playback............................................. 30
The Battery Level and Number of Exposures Remaining...... 30
“Point-and-Shoot” Photography.................................................... 32
Viewing Photographs ........................................................................ 35
iii

Live View Photography 37
Autofocus......................................................................................41
Choosing a Focus Mode ....................................................................41
Choosing an AF-Area Mode .............................................................42
Manual Focus ...............................................................................44
Using the i Button ......................................................................45
Split-Screen Display Zoom................................................................48
Silent Live View Photography..........................................................49
Negative Digitizer ................................................................................52
The Live View Display .................................................................54
The Information Display ....................................................................55
Touch Photography (Touch Shutter) .......................................56
Movies 59
Recording Movies........................................................................59
Indices ......................................................................................................64
Using the i Button ..............................................................................65
Image Area: Choosing a Movie Crop.............................................68
Frame Size, Frame Rate, and Movie Quality ...............................69
The Live View Display .........................................................................71
The Information Display ....................................................................72
Taking Photos in Movie Mode.........................................................73
Viewing Movies............................................................................76
Editing Movies .............................................................................78
Trimming Movies .................................................................................78
Saving Selected Frames.....................................................................82
iv

Image Recording Options 83
Image Area ................................................................................... 83
Image Quality............................................................................... 88
Image Size..................................................................................... 91
Using Two Memory Cards..........................................................93
Focus 94
Autofocus ..................................................................................... 94
Autofocus Mode................................................................................... 98
AF-Area Mode .....................................................................................100
Focus Point Selection.......................................................................105
Focus Lock............................................................................................ 108
Manual Focus .............................................................................111
Release Mode 113
Choosing a Release Mode........................................................113
Power Source and Frame Rate......................................................114
Self-Timer Mode (E) .................................................................116
Mirror up Mode (M
UP) ................................................................118
ISO Sensitivity 119
Manual Adjustment ..................................................................119
Auto ISO Sensitivity Control ...................................................121
v

Exposure 124
Metering..................................................................................... 124
Exposure Mode ......................................................................... 126
P: Programmed Auto........................................................................ 128
S: Shutter-Priority Auto.................................................................... 129
A: Aperture-Priority Auto ................................................................ 130
M: Manual ............................................................................................. 131
Long Time-Exposures (M Mode Only) ................................... 133
Shutter-Speed and Aperture Lock ........................................ 136
Autoexposure (AE) Lock.......................................................... 137
Exposure Compensation......................................................... 139
Bracketing.................................................................................. 142
White Balance 156
White Balance Options ............................................................ 156
Fine-Tuning White Balance .................................................... 161
Choosing a Color Temperature.............................................. 163
Preset Manual ........................................................................... 165
Viewfinder Photography ................................................................166
Live View (Spot White Balance).................................................... 169
Managing Presets.............................................................................. 172
Image Enhancement 175
Picture Controls ........................................................................ 175
Selecting a Picture Control ............................................................175
Modifying Picture Controls............................................................ 177
Preserving Detail in Highlights and Shadows..................... 180
Active D-Lighting ..............................................................................180
High Dynamic Range (HDR) .......................................................... 182
vi

Optional Flash Units 187
Using a Flash ..............................................................................187
On-Camera Flash Photography..............................................190
Flash Modes ...............................................................................192
Flash Compensation.................................................................194
FV Lock ........................................................................................196
Flash Info for Shoe-Mounted Units........................................198
Remote Flash Units ...................................................................202
Other Shooting Options 203
The R Button.............................................................................203
Using the Command Dials.......................................................207
The i button ..............................................................................208
Two-Button Reset: Restoring Default Settings....................209
Focus Shift Photography .........................................................212
Non-CPU Lenses ........................................................................218
Location Data.............................................................................221
More About Playback 223
Viewing Images .........................................................................223
Full-Frame Playback..........................................................................223
Thumbnail Playback .........................................................................223
Playback Controls ..............................................................................224
Using the Touch Screen ..................................................................226
The i Button........................................................................................228
Photo Information ....................................................................229
Taking a Closer Look: Playback Zoom...................................238
Protecting Photographs from Deletion................................240
vii

Rating Pictures .......................................................................... 241
Selecting Photos for Upload................................................... 243
Selecting Individual Photos........................................................... 243
Selecting Multiple Photos.............................................................. 244
Deleting Photographs ............................................................. 245
During Playback................................................................................. 245
The Playback Menu .......................................................................... 246
Menu List 248
A Camera Menus
More information on camera menus is available in a Menu Guide that
can be downloaded from the Nikon website (0 i).
D The Playback Menu: Managing Images.......................... 248
C The Photo Shooting Menu: Shooting Options.............. 250
1 The Movie Shooting Menu: Movie Shooting
Options.................................................................................. 256
A Custom Settings: Fine-Tuning Camera Settings............ 260
B The Setup Menu: Camera Setup......................................... 271
N The Retouch Menu: Creating Retouched Copies........... 278
O My Menu/m Recent Settings ............................................. 280
viii

Technical Notes 281
Compatible Lenses....................................................................281
The Nikon Creative Lighting System (CLS)...........................288
Other Accessories......................................................................296
Optional MB-D18 Battery Packs .............................................299
Parts of the MB-D18..........................................................................299
Using the Battery Pack..................................................................... 302
Specifications......................................................................................310
Caring for the Camera ..............................................................311
Storage ..................................................................................................311
Cleaning................................................................................................311
Image Sensor Cleaning....................................................................312
Caring for the Camera and Battery: Cautions......................319
Troubleshooting........................................................................324
Battery/Display ...................................................................................324
Shooting ...............................................................................................325
Playback ................................................................................................328
Bluetooth and Wi-Fi (Wireless Networks) .................................329
Miscellaneous .....................................................................................329
Error Messages...........................................................................330
Specifications.............................................................................336
Lens Kits ......................................................................................351
AF-S NIKKOR 24–120mm f/4G ED VR..........................................351
Approved Memory Cards ........................................................360
Memory Card Capacity.............................................................362
Battery Life .................................................................................365
Index ............................................................................................367
Warranty Terms - Nikon Europe Service Warranty .............377
ix
For Your Safety
To prevent damage to property or injury to yourself or to others, read “For
Your Safety” in its entirety before using this product.
Keep these safety instructions where all those who use this product will read
them.
DANGER: Failure to observe the precautions marked with this icon carries a
high risk of death or severe injury.
WARNING: Failure to observe the precautions marked with this icon could
result in death or severe injury.
CAUTION: Failure to observe the precautions marked with this icon could
result in injury or property damage.
WAR NIN G
• Do not use while walking or operating a motor vehicle.
Failure to observe this precaution could result in accidents or other injury.
• Do not disassemble or modify this product. Do not touch internal parts
that become exposed as the result of a fall or other accident.
Failure to observe these precautions could result in electric shock or other
injury.
• Should you notice any abnormalities such as the product producing
smoke, heat, or unusual odors, immediately disconnect the battery or
power source.
Continued operation could result in fire, burns or other injury.
• Keep dry. Do not handle with wet hands. Do not handle the plug with
wet hands.
Failure to observe these precautions could result in fire or electric shock.
• Do not let your skin remain in prolonged contact with this product
while it is on or plugged in.
Failure to observe this precaution could result in low-temperature burns.
• Do not use this product in the presence of flammable dust or gas such
as propane, gasoline or aerosols.
Failure to observe this precaution could result in explosion or fire.
x
• Do not directly view the sun or other bright light source through the
lens or camera.
Failure to observe this precaution could result in visual impairment.
• Do not aim the flash or AF-assist illuminator at the operator of a motor
vehicle.
Failure to observe this precaution could result in accidents.
• Keep this product out of reach of children.
Failure to observe this precaution could result in injury or product
malfunction. In addition, note that small parts constitute a choking hazard.
Should a child swallow any part of this product, seek immediate medical
attention.
• Do not entangle, wrap or twist the straps around your neck.
Failure to observe this precaution could result in accidents.
• Do not use batteries, chargers, or AC adapters not specifically
designated for use with this product. When using batteries, chargers,
and AC adapters designated for use with this product, do not:
- Damage, modify, forcibly tug or bend the cords or cables, place them
under heavy objects, or expose them to heat or flame.
- Use travel converters or adapters designed to convert from one
voltage to another or with DC-to-AC inverters.
Failure to observe these precautions could result in fire or electric shock.
• Do not handle the plug when charging the product or using the AC
adapter during thunderstorms.
Failure to observe this precaution could result in electric shock.
• Do not handle with bare hands in l ocations exposed to extremely high
or low temperatures.
Failure to observe this precaution could result in burns, or frostbite.
CAUTION
• Do not leave the lens pointed at the sun or other strong light sources.
Light focused by the lens could cause fire or damage to product’s internal
parts. When shooting backlit subjects, keep the sun well out of the frame.
Sunlight focused into the camera when the sun is close to the frame could
cause fire.
xi

• Turn this product off when its use is prohibited. Disable wireless
features when the use of wireless equipment is prohibited.
The radio-frequency emissions produced by this product could interfere
with equipment onboard aircraft or in hospitals or other medical facilities.
• Remove the battery and disconnect the AC adapter if this product will
not be used for an extended period.
Failure to observe this precaution could result in fire or product
malfunction.
• Do not touch moving parts of the lens or other moving parts.
Failure to observe this precaution could result in injury.
• Do not fire the flash in contact with or in close proximity to the skin or
objects.
Failure to observe this precaution could result in burns or fire.
• Do not leave the product where it will be exposed to extremely high
temperatures, for an extended period such as in an enclosed
automobile or in direct sunlight.
Failure to observe this precaution could result in fire or product
malfunction.
DANGER (Batteries)
• Do not mishandle batteries.
Failure to observe the following precautions could result in the batteries
leaking, overheating, rupturing, or catching fire:
- Use only rechargeable batteries approved for use in this product.
- Do not expose batteries to flame or excessive heat.
- Do not disassemble.
- Do not short-circuit the terminals by touching them to necklaces,
hairpins, or other metal objects.
- Do not expose batteries or the products in which they are inserted to
powerful physical shocks.
• Do not attempt to recharge EN-EL15a rechargeable batteries using
chargers not specifically designated for this purpose.
Failure to observe this precaution could result in the batteries leaking,
overheating, rupturing, or catching fire.
• If battery liquid comes into contact with the eyes, rinse with plenty of
clean water and seek immediate medical attention.
Delaying action could result in eye injuries.
xii

WARNING (Batteries)
• Keep batteries out of reach of children.
Should a child swallow a battery, seek immediate medical attention.
• Do not immerse batteries in water or expose to rain.
Failure to observe this precaution could result in fire or product
malfunction. Immediately dry the product with a towel or similar object
should it become wet.
• Discontinue use immediately should you notice any changes in the
batteries, such as discoloration or deformation. Cease charging
EN-EL15a rechargeable batteries if they do not charge in the specified
period of time.
Failure to observe these precautions could result in the batteries leaking,
overheating, rupturing, or catching fire.
• Prior to disposal, insulate battery terminals with tape.
Overheating, rupture, or fire may result should metal objects come into
contact with the terminals. Recycle or dispose of batteries in accord with
local regulations.
• If battery liquid comes into contact with a person's skin or clothing,
immediately rinse the affected area with plenty of clean water.
Failure to observe this precaution could result in skin irritation.
xiii

Notices
•
No p art of t he ma nual s in clud ed w ith
this product may be reproduced,
transmitted, transcribed, stored in a
retrieval system, or translated into
any language in any form, by any
means, without Nikon’s prior written
permission.
• Nikon reserves the right to change
the appearance and specifications
of the hardware and software
described in these manuals at any
time and without prior notice.
Notice for Customers in Canada
CAN ICES-3 B / NMB-3 B
Notices for Customers in Europe
CAUTION: RISK OF EXPLOSION IF BATTERY IS REPLACED BY AN INCORRECT
TYPE. DISPOSE OF USED BATTERIES ACCORDING TO THE INSTRUCTIONS.
This symbol indicates
that electrical and
electronic equipment is
to be collected
separately.
The following apply only
to users in European countries:
• This product is designated for
separate collection at an
appropriate collection point. Do not
dispose of as household waste.
• Separate collection and recycling
helps conserve natural resources
and prevent negative consequences
for human health and the
environment that might result from
incorrect disposal.
• For more information, contact the
retailer or the local authorities in
charge of waste management.
• Nikon will not be held liable for any
damages resulting from the use of
this product.
• While every effort has been made to
ensure that the information in these
manuals is accurate and complete,
we would appreciate it were you to
bring any errors or omissions to the
attention of the Nikon
representative in your area (address
provided separately).
This symbol on the
battery indicates that the
battery is to be collected
separately.
The following apply only
to users in European
countries:
• All batteries, whether marked with
this symbol or not, are designated
for separate collection at an
appropriate collection point. Do not
dispose of as household waste.
• For more information, contact the
retailer or the local authorities in
charge of waste management.
xiv

Notices for Customers in the U.S.A.
The Battery Charger
IMPORTANT SAFETY INSTRUCTIONS—SAVE THESE
INSTRUCTIONS
DANGER—TO REDUCE THE RISK OF FIRE OR ELECTRIC
SHOCK, CAREFULLY FOLLOW THESE INSTRUCTIONS
For connection to a supply not in the U.S.A., use an attachment plug adapter
of the proper configuration for the power outlet if needed. This power unit is
intended to be correctly oriented in a vertical or floor mount position.
Federal Communications Commission (FCC) Radio Frequency Interference Statement
This equipment has been tested and
found to comply with the limits for a
Class B digital device, purs uant to Part 15
of the FCC rules. These limits are
designed to provide reasonable
protection against harmful interference
in a residential installation. This
equipment generates, uses, and can
radiate radio frequency energy and, if
not installed and used in accordance
with the instructions, may cause harmful
interference to radio communications.
However, there is no guarantee that
interference will not occur in a particular
installation. If this equipment does
cause harmful interference to radio or
television reception, which can be
determined by turning the equipment
off and on, the user is encouraged to try
to correct the interference by one or
more of the following measures:
• Reorient or relocate the receiving
antenna.
• Increase the separation between the
equipment and receiver.
• Connect the equipment into an
outlet on a circuit different from that
to which the receiver is connected.
• Consult the dealer or an experienced
radio/television technician for help.
CAUTIONS
Modifications
The FCC requires the user be notified
that any changes or modifications
made to this device that are not
expressly approved by Nikon
Corporation may void the user’s
authority to operate the equipment.
Interface Cables
Use the interface cables sold or
provided by Nikon for your
equipment. Using other interface
cables may exceed the limits of
Class B Part 15 of the FCC rules.
Notice for Customers in the State of
California
WARNING: Handling the cord on this
product may expose you to lead, a
chemical known to the State of
California to cause birth defects or
other reproductive harm. Wash hands
after handling.
Nikon Inc., 1300 Walt Whitman Road,
Melville, New York 11747-3064, U.S.A.
Tel.: 631-547-4200
xv

Power Cable
At voltages over AC 125 V (U.S.A. only): The power cable must be rated for the
voltage in use, be at least AWG no. 18 gauge, and have SVG insulation or
better with a NEMA 6P-15 plug rated for AC 250 V 15 A.
Notice Concerning Prohibition of Copying or Reproduction
Note that simply being in possession of material that has been digitally
copied or reproduced by means of a scanner, digital camera, or other device
may be punishable by law.
• Items prohibited by law from being copied
or reproduced
Do not copy or reproduce paper
money, coins, securities, government
bonds, or local government bonds,
even if such copies or reproductions
are stamped “Sample.”
The copying or reproduction of
paper money, coins, or securities
which are circulated in a foreign
country is prohibited.
Unless the prior permission of the
government has been obtained, the
copying or reproduction of unused
postage stamps or post cards issued
by the government is prohibited.
The copying or reproduction of
stamps issued by the government
and of certified documents
stipulated by law is prohibited.
• Cautions on certain copies and
reproductions
The government has issued cautions
on copies or reproductions of
securities issued by private
companies (shares, bills, checks, gift
certificates, etc.), commuter passes,
or coupon tickets, except when a
minimum of necessary copies are to
be provided for business use by a
company. Also, do not copy or
reproduce passports issued by the
government, licenses issued by
public agencies and private groups,
ID cards, and tickets, such as passes
and meal coupons.
• Comply with copyright notices
Under copyright law, photographs
or recordings of copyrighted works
made with the camera cannot be
used without the permission of the
copyright holder. Exceptions apply
to personal use, but note that even
personal use may be restricted in
the case of photographs or
recordings of exhibits or live
performances.
xvi

Disposing of Data Storage Devices
Please note that deleting images or formatting memory cards or other data
storage devices does not completely erase the original image data. Deleted
files can sometimes be recovered from discarded storage devices using
commercially available software, potentially resulting in the malicious use of
personal image data. Ensuring the privacy of such data is the user’s
responsibility.
Before discarding a data storage device or transferring ownership to another
person, erase all data using commercial deletion software, or format the
device and then completely refill it with images containing no private
information (for example, pictures of empty sky). Care should be taken to
avoid injury when physically destroying data storage devices.
Before discarding the camera or transferring ownership to another person,
you should also use the Reset all settings option in the camera setup menu
to delete any personal network information.
xvii

AVC Patent Portfolio License
THIS PRODUCT IS LICENSED UNDER THE AVC PATENT PORTFOLIO LICENSE FOR THE PERSONAL
AND NON-COMMERCIAL USE OF A CONSU MER TO (i) ENCODE VIDEO IN COMPLIANCE WITH
THE AVC STANDARD (“AVC VIDEO”) AND/OR (ii) DECODE AVC VIDEO THAT WAS ENCODED
BY A CONSUMER ENGAGED IN A PERSONAL AND NON-COMMERCIAL ACTIVITY AND/OR WAS
OBTAINED FROM A VIDEO PROVIDER LICENSED TO PROVIDE AVC VIDEO. NO LICENSE IS
GRANTED OR SHALL BE IMPLIED FOR ANY OTHER USE. ADDITIONAL INFORMATION MAY BE
OBTAINED FROM MPEG LA, L.L.C. SEE http://www.mpegla.com
Use Only Nikon Brand Electronic Accessories
Nikon cameras are designed to the highest standards and include complex
electronic circuitry. Only Nikon brand electronic accessories (including
chargers, batteries, AC adapters, and flash accessories) certified by Nikon
specifically for use with this Nikon digital camera are engineered and proven
to operate within the operational and safety requirements of this electronic
circuitry.
The use of non-Nikon electronic accessories could damage
the camera and may void your Nikon warranty. The use of
third-party rechargeable Li-ion batteries not bearing the
Nikon holographic seal shown at right could interfere with
normal operation of the camera or result in the batteries overheating,
igniting, rupturing, or leaking.
For more information about Nikon brand accessories, contact a local
authorized Nikon dealer.
xviii

A Before Taking Important Pictures
Before tak ing pictures on impor tant occasions (such as at weddings or
before taking the camera on a trip), take a test shot to ensure that the
camera is functioning normally. Nikon will not be held liable for
damages or lost profits that may result from product malfunction.
A Life-Long Learning
As part of Nikon’s “Life-Long Learning” commitment to ongoing
product support and education, continually-updated information is
available on-line at the following sites:
• For u sers in the U.S.A.: http://www.nikonusa.com/
• For users in Europe and Africa: http://www.europe-nikon.com/support/
• For users in Asia, Oceania, and the Middle East: http://www.nikon-asia.com/
Visit these sites to keep up-to-date with the latest product information,
tips, answers to frequently-asked questions (FAQs), and general advice
on digital imaging and photography. Additional information may be
available from the Nikon representative in your area. See the following
URL for contact information: http://imaging.nikon.com/
xix

❚❚ Bluetooth and Wi-Fi (Wireless LAN)
This product is controlled by the United States Export Administration
Regulations (EAR). The permission of the United States government is not
required for export to countries other than the following, which as of this
writing are subject to embargo or special controls: Cuba, Iran, North Korea,
Sudan, and Syria (list subject to change).
The use of wireless devices may be prohibited in some countries or regions.
Contact a Nikon-authorized service representative before using the wireless
features of this product outside the country of purchase.
Notice for Customers in the U.S.A. and Canada
This device complies with part 15 of FCC Rules and Industry Canada’s licenceexempt RSSs. Operation is subject to the following two conditions: (1) this
device may not cause harmful interference, and (2) this device must accept
any interference received, including interference that may cause undesired
operation.
FCC WARNING
The FCC requires the user to be notified that any changes or modifications
made to this device that are not expressly approved by Nikon Corporation
may void the user’s authority to operate the equipment.
FCC Radio Frequency Interference Statement
Note: This equipment has been tested and found to comply with the limits for
a Class B digital device, pursuant to part 15 of the FCC Rules. These limits are
designed to provide reasonable protection against harmful interference in a
residential installation. This equipment generates, uses and can radiate radio
frequency energy and, if not installed and used in accordance with the
instructions, may cause harmful interference to radio communications.
However, there is no guarantee that interference will not occur in a particular
installation. If this equipment does cause harmful interference to radio or
television reception, which can be determined by turning the equipment off
and on, the user is encouraged to try to correct the interference by one or
more of the following measures:
• Reorient or relocate the receiving antenna.
• Increase the separation between the equipment and receiver.
• Connect the equipment into an outlet on a circuit different from that to
which the receiver is connected.
• Consult the dealer or an experienced radio/TV technician for help.
Co-location
This transmitter must not be co-located or operated in conjunction with any
other antenna or transmitter.
Nikon Inc., 1300 Walt Whitman Road, Melville, New York 11747-3064, U.S.A.
Tel.: 631-547-4200
xx

FCC/IC RF Exposure Statement
The available scientific evidence does not show that any health problems are
associated with using low power wireless devices. There is no proof, however,
that these low power wireless devices are absolutely safe. Low power Wireless
devices emit low levels of radio frequency energy (RF) in the microwave range
while being used. Whereas high levels of RF can produce health effects (by
heating tissue), exposure of low-level RF that does not produce heating
effects causes no known adverse health effects. Many studies of low-level RF
exposures have not found any biological effects. Some studies have
suggested that some biological effects might occur, but such findings have
not been confirmed by additional research. This product has been tested and
found to comply with FCC/IC radiation exposure limits set forth for an
uncontrolled environment and meets the FCC radio frequency (RF) Exposure
Guidelines and RSS-102 of the IC radio frequency (RF) Exposure rules. Please
refer to the SAR test report that was uploaded to FCC website.
Notices for Customers in Europe
Hereby, Nikon Corporation declares that the radio equipment
type D850 is in compliance with Directive 2014/53/EU.
The full text of the EU declaration of conformity is available at the following
internet address: http://imaging.nikon.com/support/pdf/DoC_D850.pdf.
xxi

Security
Although one of the benefits of this product is that it allows others to freely
connect for the wireless exchange of data anywhere within its range, the
following may occur if security is not enabled:
• Data theft: Malicious third-parties may intercept wireless transmissions to
steal user IDs, passwords, and other personal information.
• Unauthorized access: Unauthorized users may gain access to the network
and alter data or perform other malicious actions. Note that due to the
design of wireless networks, specialized attacks may allow unauthorized
access even when security is enabled.
• Unsecured networks: Connecting to open networks may result in
unauthorized access. Use secure networks only.
xxii
Introduction
Getting to Know the Camera
Take a few moments to familiarize yourself with camera controls
and displays. You may find it helpful to bookmark this section
and refer to it as you read through the rest of the manual.
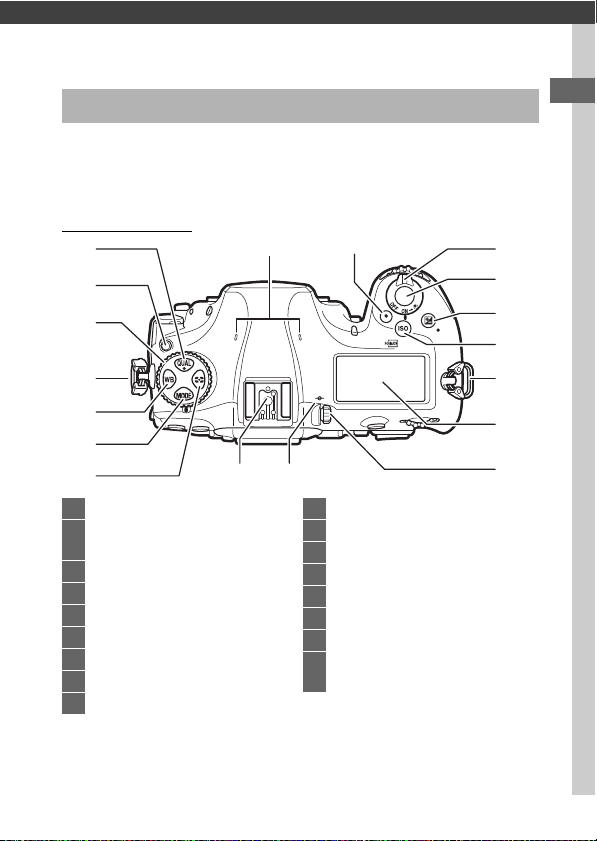
Camera Body
1
8
2
3
4
5
6
7
1 T button ...........................88, 91
2 Release mode dial lock release
.......................................................113
3 Release mode dial ......................113
4 Eyelet for camera strap................ 14
5 U button ...................................156
6 I button.................................. 126
7 Y button......................................124
8 Stereo microphone....................... 65
9 Movie-record button ................... 59
1617
9
10
11
12
13
4
14
15
10 Power switch ................................. 21
11 Shutter-release button................ 32
12 E button.............................. 139, 209
13 S /Q button.................. 119, 271
14 Control panel....................................5
15 Diopter adjustment control..........9
16 Focal plane mark (E) ............... 112
17 Accessory shoe
(for optional flash unit)... 187, 296
1
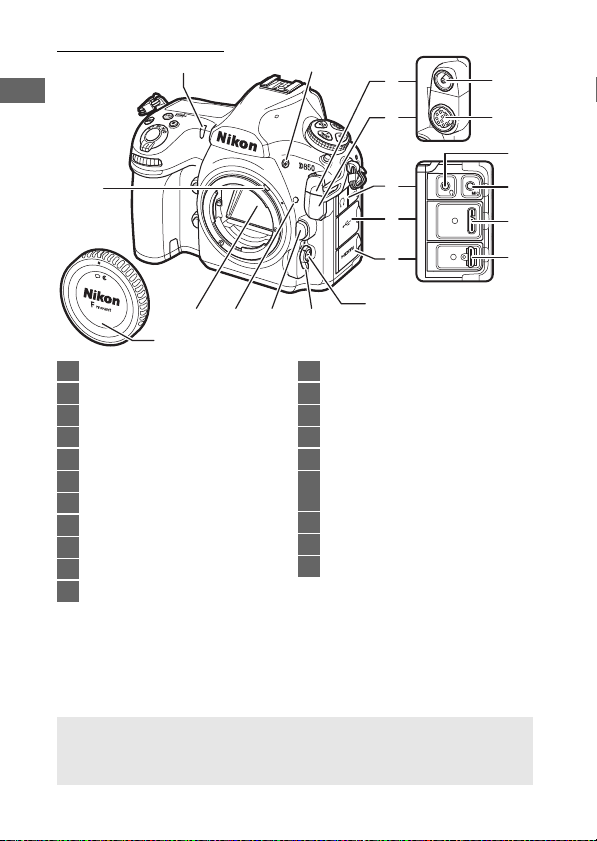
Camera Body (Continued)
2
13
20
13 12 11910
4
5
6
7
8
14
19
18
17
16
15
1 Self-timer lamp ........................... 116
2 Meter coupling lever
3 BKT button.................................... 142
4 Flash sync terminal cover .........188
5 Ten-pin remote terminal cover
6 Audio connector cover
7 USB connector cover
8 HDMI connector cover
9 AF-mode button .....41, 42, 98, 100
10 Focus-mode selector ....41, 94, 111
11 Lens release button.......................20
12 Lens mounting mark....................19
13 Mirror.................................... 118, 315
14 Flash sync terminal .................... 188
15 Ten-pin remote terminal .......... 296
16 Headphone connector..........67, 72
17 Connector for external
microphone................................ 296
18 USB connector ............................ 296
19 HDMI connector ......................... 296
20 Body cap.................................19, 296
D Close the Connector Cover
Close the connector cover when the connectors are not in use. Foreign
matter in the connectors can interfere with data transfer.
2
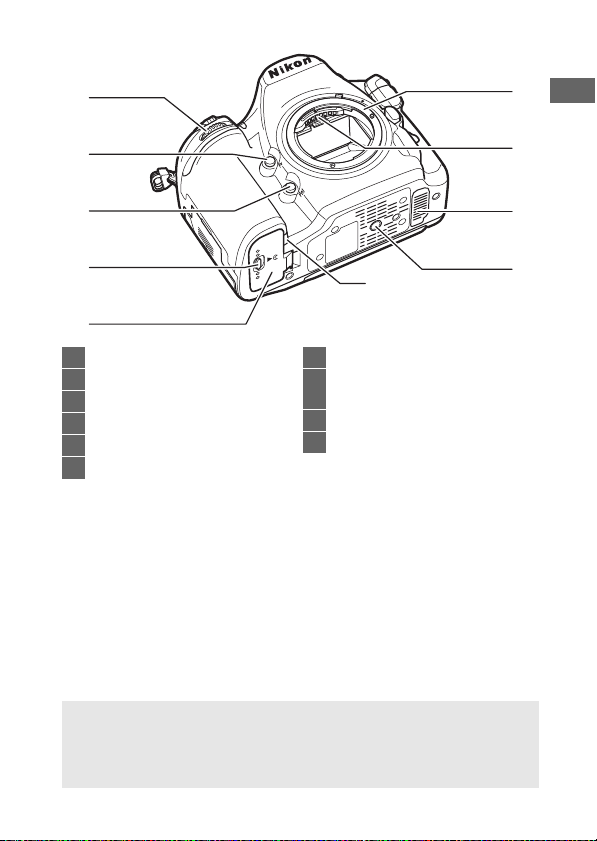
1
3
2
5
4
7
6
9
10
8
1 Sub-command dial
2 Pv button ............. 44, 127, 268, 270
3 Fn1 button ........................... 268, 270
4 Battery-chamber cover latch .....16
5 Battery-chamber cover .........16, 18
6 Lens mount ........................... 19, 112
7 CPU contacts
8 Contact cover for optional MB-D18
multi-power battery pack .......299
9 Tripod socket
10 Power connector cover
D The Speaker
Do not place the speaker in close proximity to magnetic devices.
Failure to observe this precaution could affect the data recorded on
the magnetic devices.
3
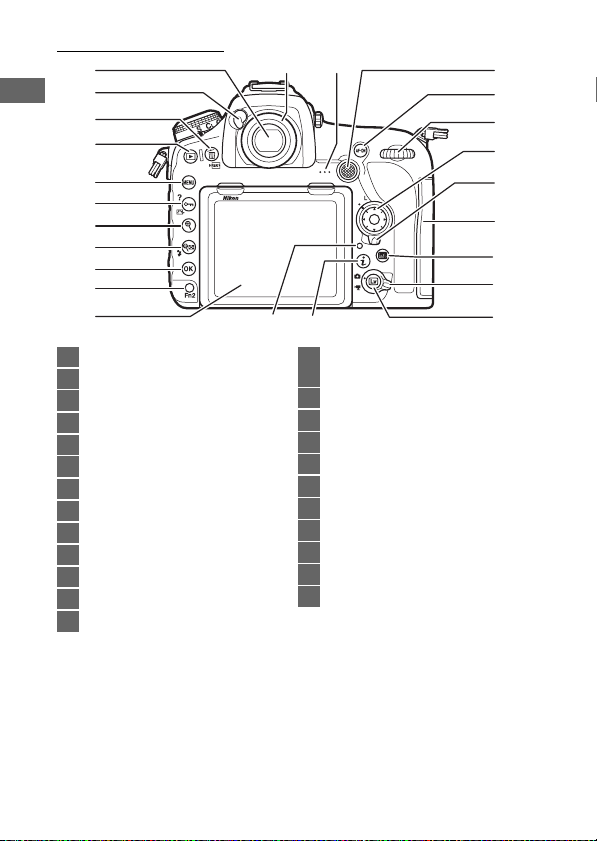
Camera Body (Continued)
3
4
5
6
7
8
9
10
11
2324
19
16
2
1
15
14
20
21
22
17
18
1312
1 Viewfinder ............................7, 9, 116
2 Eyepiece shutter lever............... 116
3 O /Q button................36, 245, 271
4 K button ...............................35, 223
5 G button............................24, 248
6 L/Z/Q button........25, 175, 240
7 X button.................................40, 238
8 W/M button..... 192, 194, 223, 238
9 J button ................................25, 224
10 Fn2 button .................. 242, 268, 270
11
Tilting monitor
12 Viewfinder eyepiece ..............9, 116
13 Speaker ....................................... 3, 76
...10, 12, 37, 59, 223
4
14 Sub-selector
................... 106, 108, 137, 268, 270
15 AF-ON button........ 99, 109, 261, 268
16 Main command dial
17 Multi selector......... 25, 34, 268, 269
18 Focus selector lock..................... 105
19 Memory card slot cover ........16, 18
20 R button ...............55, 72, 198, 203
21 Live view selector................... 37, 59
22 a button ...............37, 59, 169, 270
23 i button .................45, 65, 208, 228
24 Memory card access lamp...........32

The Control Panel
The control panel shows a variety of camera settings when the
camera is on. The items shown here appear the first time the
camera is turned on; information on other settings can be found
in the relevant sections of this manual.
13 5
24
15
14
13
12
11 10 9 8
1 Exposure mode ...........................126
2 Photo shooting menu bank .....250
3 Shutter speed .....................129, 131
4 Battery indicator ........................... 30
5
Aperture (f-number)
6 XQD card icon ..........................16, 93
7 SD card icon .............................16, 93
8 Number of exposures
remaining............................. 31, 362
..........130, 131
9 AF-area mode.............................. 100
10 Autofocus mode ........................... 98
11 White balance.............................. 156
12 Image size (JPEG and TIFF
images) .......................................... 91
13 Image quality ................................ 88
14 B (“clock not set”) indicator
15 Metering .......................................124
A The B (“clock not set”) Indicator
The camera clock is powered by an independent, rechargeable power
source, which is charged as necessary when the main battery is
installed or the camera is powered by an optional power connector
and AC adapter (0 296). Two days of charging will power the clock for
about three months. If the B icon flashes in the control panel, the
clock has been reset and the date and time recorded with any new
photographs will not be correct. Set the clock to the correct time and
date using the Time zone and date > Date and time option in the
setup menu (0 271).
6
7
5

A LCD Illuminators
Power switch
Rotating the power switch
toward
D
backlights for the buttons and
control panel, making it easier
to use the camera in the dark.
After the power switch is
released, the backlights will
remain lit for a few seconds
while the standby timer is active
or until the shutter is released or the power switch is rotated toward
again.
activates the
D
D The Control Panel and Viewfinder Displays
The brightness of the control panel and viewfinder displays varies with
temperature, and the response times of the displays may drop at low
temperatures. This is normal and does not indicate a malfunction.
6

The Viewfinder Display
24 27
342
1
87 9 10 1513 14 1611 20
22
23 2625
1912 17
21
5
6
18
1 Roll indicator
2 AF area brackets...............................9
3 Framing grid (displayed when On
is selected for Custom Setting d9,
Viewfinder grid display) ...265
4 Focus points................. 94, 105, 261
5 Pitch indicator
6 Flicker detection .........................254
7 Focus indicator............ 32, 108, 112
1
2
8 Metering .......................................124
9 Autoexposure (AE) lock............. 137
10 Shutter speed lock icon ...136, 268
11 Shutter speed .....................129, 131
Autofocus mode ........................... 98
12 Aperture lock icon............. 136, 268
13 Aperture (f-number) .........130, 131
Aperture (number of stops)..... 130
7

14 Exposure mode........................... 126
15 Flash compensation
indicator ..................................... 194
16 Exposure compensation
indicator ...................................... 139
17 ISO sensitivity indicator ............ 119
Auto ISO sensitivity
indicator ...................................... 121
18 ISO sensitivity ..............................119
Preset white balance recording
indicator ...................................... 165
Active D-Lighting amount ....... 180
AF-area mode.............................. 100
19 “k” (appears when memory
remains for over 1000
exposures)......................................31
20 Flash-ready indicator
3
....................................................... 187
21 FV lock indicator .........................196
22 Flash sync indicator ................... 266
23 Aperture stop indicator ............ 130
24 Exposure indicator..................... 132
Exposure compensation
display.......................................... 139
25 Low battery warning....................30
26 Exposure/flash bracketing
indicator ...................................... 143
WB bracketing indicator........... 148
ADL bracketing indicator ......... 152
27 Number of exposures
remaining..............................31, 362
Number of shots remaining
before memory buffer fills
.............................................. 115, 362
Exposure compensation value
....................................................... 139
Flash compensation value ....... 194
PC mode indicator
1 Functions as a pitch indicator when camera is rotated to take pictures in “tall” (portrait)
orientation.
2 Functions as a roll indicator when camera is rotated to take pictures in “tall” (portrait)
orientation.
3 Displayed when an optional flash unit is attached (0 187). The flash-ready indicator lights
when the flash is charged.
Note: Display shown with all indicators lit for illustrative purposes.
D No Battery
When the battery is totally exhausted or no battery is inserted, the
display in the viewfinder will dim. This is normal and does not indicate
a malfunction. The viewfinder display will return to normal when a
fully-charged battery is inserted.
8

The Diopter Adjustment Control
AF area brackets
Focus point
Viewfinder not in focus Viewfinder in focus
Lift the diopter adjustment control and
rotate it until the viewfinder display,
focus points, and AF area brackets are in
sharp focus. When operating the control
with your eye to the viewfinder, be
careful not to put your fingers or
fingernails in your eye. Push the diopter
adjustment control back in once you have adjusted focus to yo ur
satisfaction.
A Diopter-Adjustment Viewfinder Lenses
Corrective lenses (available separately;
0 296) can be used to further adjust
viewfinder diopter. Before attaching a
diopter-adjustment viewfinder lens, remove
the DK-17F viewfinder eyepiece by closing
the viewfinder shutter to release the
eyepiece lock (q) and then grasping the
eyepiece lightly between your finger and thumb and unscrewing it as
shown (w).
9

Using the Tilting Monitor
The monitor can be angled and rotated as shown below.
Normal use: The monitor is
normally used in storage
position.
Low-angle shots: Tilt the monitor
up to take shots in live view with
the camera held low.
High-angle shots: Tilt the monitor
down to take shots in live view
with the camera held high.
10

D Using the Monitor
Be particularly careful
not to touch this area.
Rotate the monitor gently, stopping when you feel resistance. Do not
use force. Failure to observe these precautions could damage the
camera or monitor. If the camera is mounted on a tripod, care should
be taken to ensure that the monitor does not contact the tripod.
Do not lift or carry the camera by the monitor. Failure to observe this
precaution could damage the camera. If the monitor is not being used
to take photographs, return it to the storage position.
Do not touch the area to the rear of the
monitor or allow liquid to contact the inner
surface. Failure to observe these precautions
could cause product malfunction.
11

Using the Touch Screen
The touch-sensitive monitor supports the following operations:
Flick
Flick a finger a short distance left or right
across the monitor.
Slide
Slide a finger over the monitor.
Stretch/Pinch
Place two fingers on the monitor and
move them apart or pinch them
together.
12

❚❚ Using the Touch Screen
During playback (0 226), the touch screen can be used to:
• View other images
• Zoom in or out
• View thumbnails
• View movies
During live view, the touch screen can be used to take pictures
(touch shutter; 0 56) or to measure a value for spot white
balance (0 169). The touch screen can also be used for typing
(0 273) or navigating the menus (0 29).
D The Touch Screen
The touch screen responds to static electricity and may not respond
when covered with third-party protective films or when touched with
fingernails or gloved hands. Do not use excessive force or touch the
screen with sharp objects.
D Using the Touch Screen
The touch screen may not respond as expected if you attempt to
operate it while leaving your palm or another finger resting on it in
second location. It may not recognize other gestures if your touch is
too soft, your fingers are moved too quickly or too short a distance or
do not remain in contact with the screen, or if the movement of the
two fingers in a pinch or stretch is not correctly coordinated.
A Enabling or Disabling Touch Controls
Touch controls can be enabled or disabled using the Touch controls
option in the setup menu (0 274).
A See Also
For information on choosing the direction you flick your finger to view
other images in full-frame playback, see B > Touch controls (0 274).
13

First Steps
90°
Attach the Camera Strap
Attach the strap securely to the camera eyelets.
Charge the Battery
Insert the battery and plug the charger in (depending on the
country or region, the charger comes with either an AC wall
adapter or a power cable). An exhausted battery will fully charge
in about two hours and 35 minutes.
• AC wall ad apter: Insert the AC wall adapter into the charger AC
inlet (q). Slide the AC wall adapter latch as shown (w) and
rotate the adapter 90° to fix it in place (e). Insert the battery
and plug the charger in.
AC wall adapter latch
14

• Power c able: After connecting the power cable with the plug in
the orientation shown, insert the battery and plug the cable in.
The CHARGE lamp will flash while the battery charges.
Battery charging Charging complete
D The Battery and Charger
Read and fol low the warning s and cau tions in “For Your S afety ” (0 x) and
“Caring for the Camera and Battery: Cautions” (0 319).
15

Insert the Battery and a Memory Card
Before inserting or removing the battery or memory cards,
confirm that power switch is in the OFF position. Insert the
battery in the orientation shown, using the battery to keep the
orange battery latch pressed to one side. The latch locks the
battery in place when the battery is fully inserted.
Battery latch
Holding the memory card in the orientation shown, slide it
straight into the appropriate slot until it clicks into place.
• XQD memory cards:
• SD memor y cards:
16

D Memory Cards
Write-protect switch
• Memory cards may be hot after use. Observe due caution when
removing memory cards from the camera.
• Turn the power off before inserting or removing memory cards. Do
not remove memory cards from the camera, turn the camera off, or
remove or disconnect the power source during formatting or while
data are being recorded, deleted, or copied to a computer. Failure to
observe these precautions could result in loss of data or in damage to
the camera or card.
• Do not touch the card terminals with your fingers or metal objects.
• Do not bend, drop, or subject to strong physical shocks.
• Do not apply force to the card casing. Failure to observe this
precaution could damage the card.
• Do not expose to water, high levels of humidity, or direct sunlight.
• Do not format memory cards in a computer.
A The Write Protect Switch
SD memory cards are equipped
with a write protect switch to
prevent accidental loss of data.
When this switch is in the “lock”
position, the memory card cannot
be formatted and photos cannot
be deleted or recorded (a warning will be displayed in the monitor if
you attempt to release the shutter). To unlock the memory card, slide
the switch to the “write” position.
A No Memory Card
If no memory card is inserted, the control
panel and viewfinder will show S. If the
camera is turned off with a charged
battery and no memory card inserted,
S wi ll be d ispl ayed i n the contr ol pa nel.
17

❚❚ Removing the Battery and Memory Cards
Removing the Battery
Turn the camera off and open the
battery-chamber cover. Press the battery
latch in the direction shown by the arrow
to release the battery and then remove
the battery by hand.
Removing Memory Cards
After confirming that the memory card access lamp is off, turn
the camera off and open the memory card slot cover. Press the
card in and then release it (q). The memory card can then be
removed by hand (w).
XQD memory cards SD memory cards
18

Attach a Lens
Remove the
camera body cap
Remove the rear lens cap
Mounting mark (camera)
Mounting mark (lens)
Align the mounting
marks
Rotate the lens as shown until it clicks into place
Be careful to prevent dust from entering the camera when the
lens or body cap is removed. The lens generally used in this
manual for illustrative purposes is an AF-S NIKKOR 50mm f/1.4G.
Be sure to remove the lens cap before taking pictures.
19

A Detaching the Lens
Be sure the camera is off when removing or
exchanging lenses. To remove the lens, press
and hold the lens release button (q) while
turning the lens clockwise (w). After
removing the lens, replace the lens caps and
camera body cap.
D CPU Lenses with Aperture Rings
In the case of CPU lenses equipped with an aperture ring (0 284), lock
aperture at the minimum setting (highest f-number).
20

Basic Setup
Power switch
G button
The language option in the setup menu is automatically
highlighted the first time menus are displayed. Choose a
language and set the camera clock.
1 Turn the camera on.
2 Select Language in the setup menu.
Press the G button to display the
camera menus, then highlight
Language in the setup menu and
press 2. For information on using
menus, see “Using Camera Menus”
(0 25).
A Connecting to Smart D evices with SnapBridge
Instal the SnapBridge app to your smart device to
download pictures from the camera or control the camera
remotely. For more information, see the supplied
SnapBridge Connection Guide (for D-SLR Cameras).
21

3 Select a language.
Press 1 or 3 to highlight the desired
language and press J.
4 Select Time zone and date.
Select Time zone and date and press
2.
5 Set time zone.
Select Time zone and press 2. Press
4 or 2 to highlight the local time
zone (the UTC field shows the
difference between the selected time
zone and Coordinated Universal Time,
or UTC, in hours) and press J.
22

6 Turn daylight saving time on or off.
Select Daylight saving time and
press 2. Daylight saving time is off by
default; if daylight saving time is in
effect in the local time zone, press 1
to highlight On and press J.
7 Set the date and time.
Select Date and time and press 2.
Press 4 or 2 to select an item, 1 or 3
to change. Press J when the clock is
set to the current date and time (note
that the camera uses a 24-hour clock).
8 Set date format.
Select Date format and press 2. Press
1 or 3 to choose the order in which
the year, month, and day will be
displayed and press J.
9 Exit to shooting mode.
Press the shutter-release button
halfway to exit to shooting mode.
23

Tutorial
G button
Slider shows position in current
menu.
Menu options
Options in current menu.
Current settings are shown by icons.
Camera Menus: An Overview
Most shooting, playback, and setup
options can be accessed from the camera
menus. To view the menus, press the G
button.
Tabs
Choose from the following menus:
• D: Playback (0 248)
• C: Photo Shooting (0 250)
• 1: Movie Shooting (0 256)
• A: Custom Settings (0 260)
• B: Setup (0 271)
• N: Retouch (0 278)
• O/m: MY MENU or RECENT SETTINGS
(defaults to MY MENU; 0 280)
Help icon (0 25)
24

Using Camera Menus
Move cursor up
Cancel and return
to previous menu
Select highlighted
item or display submenu
Select highlighted
item
Move cursor down
❚❚ Menu Controls
You can navigate the menus via the touch screen or using the
multi selector and J button.
Multi selector
J button
Select highlighted
item
A The d (Help) Icon
If a d icon is displayed at the bottom left corner of the monitor, a
description of the currently selected option or menu can be displayed
by pressing the L (Z/Q) button. Press 1 or 3 to scroll through the
display. Press L (Z/Q) again to return to the menus.
L (Z/Q) button
25

❚❚ Navigating the Menus
G button
Follow the steps below to navigate the menus.
1 Display the menus.
Press the G button to display the
menus.
2 Highlight the icon for the
current menu.
Press 4 to highlight the
icon for the current menu.
3 Select a menu.
Press 1 or 3 to select the desired menu.
4 Position the cursor in the
selected menu.
Press 2 to position the
cursor in the selected
menu.
26

5 Highlight a menu item.
J button
Press 1 or 3 to highlight a
menu item.
6 Display options.
Press 2 to display options
for the selected menu item.
7 Highlight an option.
Press 1 or 3 to highlight
an option.
8 Select the highlighted item.
Press J to select the highlighted item.
To exit without making a selection,
press the G button.
27

Note the following points:
• Menu items that are displayed in gray are not currently
available.
• While pressing 2 or the center of the multi selector generally
has the same effect as pressing J, there are some items for
which selection can only be made by pressing J.
• To exit the menus and return to shooting mode, press the
shutter-release button halfway.
28

❚❚ Using the Touch Screen
You can also navigate the menus using the following touch
screen operations.
Scroll Slide up or down to scroll.
Choose a
menu
Select
options/
adjust
settings
Tap a menu icon to choose a
menu.
Tap menu items to display
options and tap icons or sliders
to change. To exit without
changing settings, tap Z.
29

Basic Photography and Playback
Control panel
Viewfinder
Control panel
The Battery Level and Number of Exposures Remaining
Before taking photographs, check the battery level and number
of exposures remaining as described below.
❚❚ Battery Level
The battery level is shown in the control
panel and viewfinder.
Icon
DescriptionControl panel Viewfin der
L — Battery fully charged.
K —
Battery partially discharged.J —
I —
H d
H
(flashes)
(flashes)
Low battery. Charge battery or ready spare
battery.
d
Shutter release disabled. Charge or exchange
battery.
A Camera Off Display
If the camera is turned off with a battery and
memory card inserted, the memory card
icon and number of exposures remaining
will be displayed (some memory cards may
in rare cases only display this information
when the camera is on).
30

❚❚ Number of Exposures Remaining
SD card slot
XQD card slot
Control panel
Number of exposures
remaining
Control panel
Viewfinder
The camera has two memory card slots:
one for XQD cards and the other for SD
cards. When two cards are inserted, the
role played by each is determined by the
options selected for Primary slot
selection and Secondary slot function;
when Secondary slot function is set to
the default value of Overflow (0 93), the
card in the secondary slot will only be
used when the card in the primary slot is
full.
The control panel display shows what
cards are currently inserted (the example
here shows the display when cards are
inserted in both slots). If an error occurs
(for example, if the memory card is full or
the card in the SD slot is locked), the icon
for the affected card will flash (0 330).
The control panel and viewfinder show
the number of photographs that can be
taken at current settings (values over
1000 are rounded down to the nearest
hundred; e.g., values between 4000 and
4099 are shown as 4.0 k).
31

“Point-and-Shoot” Photography
Focus point
1 Ready the Camera.
When framing photographs in the
viewfinder, hold the handgrip in your
right hand and cradle the camera
body or lens with your left.
When framing photographs in
portrait (tall) orientation, hold the
camera as shown.
2 Frame the photograph.
At default settings, the camera will
focus on the subject in the center
focus point. Frame a photograph in
the viewfinder with the main subject
in the center focus point.
32

3 Press the shutter-release
Focus indicator
Memory card access
lamp
button halfway.
Press the shutter-release
button halfway to focus.
The in-focus indicator (I)
will appear in the
viewfinder when the focus
operation is complete.
Viewfinder display Description
I Subject in focus.
F Focus point is between camera and subject.
H Focus point is behind subject.
FH
(flashes)
Camera unable to focus on subject in focus point
using autofocus (0 110).
4 Shoot.
Smoothly press the
shutter-release button the
rest of the way down to
take the photograph. The
memory card access lamp
will light and the
photograph will be
displayed in the monitor
for a few seconds. Do not eject the memory card or remove or
disconnect the power source until the lamp has gone out and
recording is complete.
33

A The Standby Timer (Viewfinder Photography)
Multi selector
The viewfinder and some control panel displays will turn
off if no operations are performed for about six seconds,
reducing the drain on the battery. Press the shutterrelease button halfway to reactivate the displays.
Exposure meters on Exposure meters off
The length of time before the standby timer expires automatically can
be adjusted using Custom Setting c2 (Standby timer, 0 263).
A The Multi Selector
The multi selector can be used to select the
focus point while the exposure meters are
on (0 105).
34

Viewing Photographs
K button
1 Press the K button.
A photograph will be displayed in the
monitor. The memory card
containing the picture currently
displayed is shown by an icon.
2 View additional pictures.
Additional pictures can be displayed
by pressing 4 or 2 or flicking a finger
left or right over the display (0 226).
To end playback and return to shooting mode, press the
shutter-release button halfway.
A Image Review
When On is selected for Image review in the playback menu (0 249),
photographs are automatically displayed in the monitor after
shooting.
A See Also
For information on choosing a memory card for playback, see
“Playback Controls” (0 224).
35

❚❚ Deleting Unwanted Photographs
O (Q) button
To delete the photograph currently displayed in the monitor,
press the O (Q) button. Note that photographs cannot be
recovered once deleted.
1 Display the photograph.
Display the photograph you wish to
delete as described in “Viewing
Photographs” (0 35). The location of
the current image is shown by an icon
at the bottom left corner of the
display.
2 Delete the photograph.
Press the O (Q) button. A
confirmation dialog will be displayed;
press the O (Q) button again to
delete the image and return to
playback. To exit without deleting the
picture, press K.
A Delete
To delete multiple images or to select the memory card from which
images will be deleted, use the Delete option in the playback menu
(0 246).
36

Live View Photography
Live view selector
a button
Follow the steps below to take photographs in live view.
1 Rotate the live view selector to
C (live view photography).
2 Press the a button.
The mirror will be raised and the view
through the lens will be displayed in
the camera monitor. The subject will
no longer be visible in the viewfinder.
3 Position the focus point.
Position the focus point over your subject as described in
“Choosing an AF-Area Mode” (0 42).
37

4 Focus.
Press the shutter-release button
halfway to focus.
The focus point will flash green and
the shutter release will be disabled while the camera focuses.
If the camera is able to focus, the focus point will be displayed
in green; if the camera is unable to focus, the focus point will
flash red (note that pictures can be taken even when the
focus point flashes red; check focus in the monitor before
shooting). Exposure can be locked by pressing the center of
the sub-selector (0 137); focus locks while the shutterrelease button is pressed halfway.
D Using Autofocus in Live View
Use an AF-S or AF-P lens. The desired results may not be achieved
with other lenses or teleconverters. Note that in live view,
autofocus is slower and the monitor may brighten or darken while
the camera focuses. The focus point may sometimes be displayed
in green when the camera is unable to focus. The camera may be
unable to focus in the following situations:
• The subject contains lines parallel to the long edge of the frame
• The subject lacks contrast
• The subject in the focus point contains areas of sharply
contrasting brightness, or includes spot lighting or a neon sign or
other light source that changes in brightness
• Flicker or banding appears under fluorescent, mercury-vapor,
sodium-vapor, or similar lighting
• A cross (star) filter or other special filter is used
• The subject appears smaller than the focus point
• The subject is dominated by regular geometric patterns
(e.g., blinds or a row of windows in a skyscraper)
• The subject is moving
38

5 Take the picture.
Press the shutter-release button the
rest of the way down to shoot. The
monitor will turn off.
6 Exit live view.
Press the a button to exit live view.
A Exposure Preview
During live view, you can press J to preview
the effects of shutter speed, aperture, and
ISO sensitivity on exposure. Exposure can be
adjusted by ±5 EV (0 139), although only
values between –3 and +3 EV are reflected in
the preview display. Note that the preview
may not accurately reflect the final results
when flash lighting is used, Active D-Lighting (0 180), HDR (high
dynamic range; 0 182), or bracketing is in effect, A (a uto) is se lec ted f or
the Picture Control Contrast parameter (0 178), or p is selected
for shutter speed. If the subject is very bright or very dark, the exposure
indicators will flash to warn that the preview may not accurately reflect
exposure. Exposure preview is not available when A or % is
selected for shutter speed.
39

A Live View Zoom Preview
Press the X button to magnify the view in the monitor up to a
maximum of about 16×. A navigation window will appear in a gray
frame at the bottom right corner of the display. Use the multi selector
to scroll to areas of the frame not visible in the monitor, or press W (M)
to zoom out.
X button Navigation window
A See Also
For information on:
• Choosing how long the monitor remains on during live view, see
A > Custom Setting c4 (Monitor off delay, 0 264).
•
Choosing the roles played by the movie-record button and command
dials and by the center of the multi selector, see
f1 (
Custom control assignment
and f2 (
Multi selector center button, 0
• Preventing unintended operation of the a button, see A > Custom
Setting f8 (Live view button options, 0 270).
) >
Movie record button + y (0268)
A
268).
> Custom Settings
40

Autofocus
Focus-mode selector
To take pictures using
autofocus, rotate the focusmode selector to AF.
Choosing a Focus Mode
The following autofocus modes are available in live view:
Mode Description
Single-servo AF: For stationary subjects. Focus locks when shutter-
release button is pressed halfway. You can also focus by
AF-S
touching your subject in the monitor, in which case focus locks
until you lift your finger from the display to take the photograph.
Full-time-servo AF: For moving subjects. Camera focuses
continuously until shutter-release button is pressed. Focus locks
when shutter-release button is pressed halfway. You can also
AF-F
focus by touching your subject in the monitor, in which case
focus locks until you lift your finger from the display to take the
photograph.
To choose an autofocus mode, press the AF-mode button and
rotate the main command dial until the desired mode is
displayed in the monitor.
AF-mode button Main command
dial
41

Choosing an AF-Area Mode
The following AF-area modes can be selected in live view:
Mode Description
Face- priori ty AF: Use for portraits. The camera automatically
detects and focuses on portrait subjects; the selected subject is
indicated by a double yellow border (if multiple faces are
detected, the camera will focus on the closest subject; to choose
a different subject, use the multi selector). If the camera can no
!
longer detect the subject (because, for example, the subject has
turned to face away from the camera), the border will no longer
be displayed. If you touch the monitor, the camera will focus on
the face closest to your finger and take a photograph when you
lift your finger from the screen.
Wide-area AF: Use for hand-held shots of landscapes and other
non-portrait subjects. Use the multi selector or touch controls to
move the focus point anywhere in the frame, or press the center
5
of the multi selector to position the focus point in the center of
the frame.
Normal-area AF: Focus on a selected spot in the frame. Use the
multi selector or touch controls to move the focus point
anywhere in the frame, or press the center of the multi selector
6
to position the focus point in the center of the frame. A tripod is
recommended.
Pinpoint AF: As for normal-area AF, except that a smaller focus
3
point is used for pinpoint focus on smaller targets.
42

Mode Description
Subject-tracking AF: Position the focus point over your subject and
press the center of the multi selector. The focus point will track
the selected subject as it moves through the frame. To end
tracking, press the center of the multi selector again.
Alternatively, you can start tracking by touching your subject in
the monitor; to end tracking and take a photograph, lift your
finger from the screen. If tracking is already in progress,
&
touching the monitor anywhere will cause the camera to focus
on the current subject, and a photo will be taken when you lift
your finger from the screen. Note that the camera may be
unable to track subjects if they move quickly, leave the frame or
are obscured by other objects, change visibly in size, color, or
brightness, or are too small, too large, too bright, too dark, or
similar in color or brightness to the background.
To choose an AF-area mode, press the AF-mode button and
rotate the sub-command dial until the desired mode is displayed
in the monitor.
AF-mode button Sub-command
dial
43

Manual Focus
X button
Area in focus
To focus in manual focus mode (0 111),
rotate the lens focus ring until the
subject is in focus. To magnify the view in
the monitor for precise focus, press the X
button (0 40).
You can also enable focus peaking, which
uses colored outlines to indicate objects
that are in focus. To enable focus
peaking, press the i button and select an
option other than Off for Peaking level
(0 45).
44
A Previewing Focus During Live View
To temporarily select maximum aperture for an improved focus
preview during live view, press the Pv button; the maximum aperture
indicator (0 54) will be displayed. To return aperture to its original
value, press the button again or focus using autofocus. If the shutterrelease button is pressed all the way down to take a picture during
focus preview, aperture will return to the original value before the
photo is taken.

Using the i Button
i button
The options listed below can be accessed
by pressing the i button during live view
photography. Use the touch screen or
navigate the menu using the multi
selector and J button, pressing 1 or 3
to highlight items, 2 to view options,
and J to select the highlighted option
and return to the i-button menu. Press
the i button again to exit to the shooting
display.
Option Description
Choose image area
Active D-Lighting Adjust Active D-Lighting (0 180).
Electronic front-
curtain shutter
Monitor
brightness
Choose an image area for live view photography
(0 83).
Enable or disable the electronic front-curtain shutter
for mirror-up photography (0 265).
Press 1 or 3 to adjust
monitor brightness for live
view (note that this affects
live view only and has no
effect on photographs or
movies or on the brightness
of the monitor for menus or
playback; to adjust the brightness of the monitor for
menus and playback, use the Monitor brightness
option in the setup menu; 0 271).
45

Option Description
During live view
photography, the white
balance (hue) of the
monitor can be set to a
value different from that
used for photographs
(0 156). This can be
effective if the lighting under which shots are framed
Photo live view
display WB
Split-screen
display zoom
is different from that used when the photographs are
taken, as is sometimes the case when a flash or preset
manual white balance is used. Adjusting the photo
live view display white balance to produce a similar
effect to that used for the actual photographs makes
it easier to picture the results. To use the same white
balance for both the view in the monitor and the
photograph, select None. Monitor white balance is
reset when the camera is turned off, but the last value
used can be selected by pressing the a button while
pressing and holding the U button.
View two separate areas of
the frame side-by-side
(0 48). This option can be
used, for example, to align
buildings with the horizon.
46
Silent live view
photography
Eliminate the sound made by the shutter when
photos are taken (0 49).

Option Description
Area in focus
Objects that are in focus are
indicated by colored
outlines, including during
focus zoom (0 40). Choose
from 3 (high sensitivity), 2
(standard), 1 (low
Peakin g level
sensitivity), and Off; the
higher the setting, the
greater the depth shown as
being in focus. The peaking
color can be changed using
Custom Setting d8
(Peaking highlight color,
0 265).
Negative digitizer
Create positives from color or black-and-white film
negatives (0 52).
47

Split-Screen Display Zoom
Navigation window
Area in focus
Selecting Split-screen display zoom in
the live view photography i button
menu splits the display into two boxes
showing separate areas of the frame
side-by-side at a high zoom ratio. The
positions of the magnified areas are
shown in the navigation window.
Use the X and W (M) buttons to zoom in
and out, or use the L (Z/Q) button to
select a box and press 4 or 2 to scroll
the selected area left or right. Pressing 1
or 3 scrolls both areas up or down
simultaneously. To focus on the subject
at the center of the selected area, press
the shutter-release button halfway. To
exit the split-screen display, press the i button.
48

Silent Live View Photography
To eliminate shutter sounds during live view photography, press
the i button and select On (Mode 1) or On (Mode 2) for Silent
live view photography.
Option Description
Reduce vibrations caused by the shutter when shooting
landscapes and other static subjects. Use of a tripod is
recommended. The maximum frame rate for release mode
H is approximately 6 fps. In CL mode, the user can choose
On (Mode 1)
On (Mode 2)
C
from frame rates of 1–6 fps, but the maximum rate will not
exceed approximately 3 fps regardless of the option
selected. ISO sensitivity (0 119) can be set to values of
from Lo 1 to 25600.
Photographs can be taken at a higher rate than when On
(Mode 1) is selected. In release modes S, Q, E, and M
photograph will be taken each time the shutter-release
button is pressed, while in continuous modes photos will
be taken at approximately 15 fps (C
for a maximum of 3 seconds. Image area is fixed at
DX (24×16), image size at 3600 × 2400, and image quality
at JPEG normal★.
Off Silent live view photography disabled.
L and QC) or 30 fps (CH)
UP, one
49

A Silent Live View Photography
Multiple exposure photography (0 254) and long-exposure noise
reduction are disabled (0 253). In continuous release modes, focus
and exposure are fixed at the values for the first shot in each series.
Flicker or banding may be visible in the monitor and in photographs
under fluorescent, mercury vapor, or sodium lamps (for information on
reducing flicker and banding, see the section on the movie shooting
menu Flicker reduction option, 0 254), while subjects in motion may
appear distorted, particularly if the camera is panned horizontally or
an object moves horizontally at high speed through the frame. Jagged
edges, color fringing, moiré, and bright spots may also appear. Bright
regions or bands may appear in scenes lit by flashing signs and other
intermittent light sources or if the subject is briefly illuminated by a
strobe or other bright, momentary light source.
The amount of time you can continue shooting is shown in place of the
number of exposures remaining.
Silent live view photography can also be enabled or disabled using the
Silent live view photography option in the photo shooting menu
(0 255).
50

A “On (Mode 2)”
The following exposure settings can be adjusted when On (Mode 2) is
selected:
Aperture Shutter speed ISO sensitivity
1
P, S
— — —
A ✔ — —
M ✔ ✔
1 Exposure for mode S is equivalent to mode P.
2 Choose from speeds of from
1
/
30 s to
1
/
8000 s.
2
3
✔
3 Choose from settings of from Lo 1 to 25600. In other exposure modes, ISO sensitivity is set
automatically by the camera.
Exposure compensation can be used to alter exposure by up to ±3 EV.
Exposure can be previewed in the monitor. Pressing J will display an
exposure indicator (0 132) showing the difference between the
selected and metered exposure values; to hide the indicator, press J
again.
A C icon is displayed in the monitor when the shutter is released (in
continuous release modes, the C icon will flash). On (Mode 2) cannot
be combined with some camera features, including flexible program
(0 128), bracketing (0 142), Active D-Lighting (0 180), HDR (high
dynamic range; 0 182), vignette control (0 253), auto distortion
control (0 253), exposure delay mode (0 264), and the Clarity Picture
Control parameter (0 178). If RAW primary - JPEG secondary is
selected for Secondary slot function in the photo shooting menu,
JPEG images will be recorded to the cards in both slots. Image review
is disabled regardless of the option selected for Custom Setting d11
(Live view in continuous mode, 0 266).
A “On (Mode 2)” and Photo Info
The photo info for pictures taken with On (Mode 2) selected for Silent
live view photography and white balance set to v (auto) does not
include color temperature (0 234).
51

Negative Digitizer
To record positives of copies of film negatives, press the i button
and select Color negatives or Monochrome negatives for
Negative digitizer.
1 Position the negatives in front of a featureless white or gray
background.
We recommend using an AF-S Micro NIKKOR 60mm f/2.8G ED
or other micro lens and either natural light or an artificial light
source with a high R
box or a high-CRI fluorescent lamp.
a (color rendering index), such as a light
2 In live view, press the i button,
highlight Negative digitizer, and
press 2.
The colors in the display will be
reversed.
3 Choose the film type.
Highlight Color negatives or
Monochrome negatives and press
J.
4 Compose the shot to capture a frame of the film negative.
52

5 Adjust exposure.
Press J to display brightness
adjustment options and press 1 or 3
to adjust exposure. To view your
subject at a higher magnification,
press X (0 40). Press J to proceed.
6 Take the photograph.
Press the shutter-release button all the way down to take the
photograph and save it in JPEG format.
D Negative Digitizer
No options are available for correcting dust, scratches, or uneven
colors due to faded film. Photos are saved in JPEG format regardless of
the option selected for image quality; photos taken with a JPEG option
selected will be saved at the chosen setting, while photos taken with
NEF (RAW) or TIFF (RGB) selected will be saved in JPEG fine★ format.
Some menu items and features, including bracketing and focus shift,
are unavailable, and optional flash units cannot be used. Exposure
mode is set to A and cannot be changed.
53

The Live View Display
tr
y
q
w
e
Item Description
Time remaining
q
Photo live view display
w
white balance indicator
Maximum aperture
e
indicator
Autofocus mode The current autofocus mode (0 41).
r
AF-area mode The current AF-area mode (0 42).
t
Focus point
y
The amount of time remaining before live
view ends automatically. Displayed if shooting
will end in 30 s or less.
Monitor hue (photo live view display white
balance). Can be adjusted using
view display WB
Displayed when the Pv button is pressed to
select maximum aperture (0 44).
The current focus point. The display varies
with the option selected for AF-area mode.
in the i-button menu (045).
Photo live
D The Count Down Display
A count down will be displayed 30 s before live view ends
automatically (the timer turns red if live view is about to end to protect
the internal circuits or, if an option other than No limit is selected for
Custom Setting c4—Monitor off delay > Live view; 0 264—5 s
before the monitor is due to turn off automatically). Depending on
shooting conditions, the timer may appear immediately when live
view is selected.
54

The Information Display
To hide or display indicators in the monitor, press the R button.
The histogram is only displayed in the exposure preview (0 39)
or when On (Mode 2) is selected for Silent live view
photography (0 49). The virtual horizon and histogram
displays are not available with the negative digitizer.
Virtual horizon
(0 272) Information on Information off
Histogram Framing guides
55

Touch Photography (Touch Shutter)
Touch the monitor to focus and lift your
finger to take the photograph.
Tap the icon shown in the illustration to
choose the operation performed by
tapping the monitor in shooting mode.
Choose from the following options:
Option Description
Touch the monitor to position the focus
point and focus (autofocus only; the touch
(Touch shutter/AF: On)
W
(Touch AF: On)
V
(Touch shutter/AF: Off) Touch shutter and AF disabled.
X
shutter cannot be used to focus when the
focus-mode selector is rotated to M to select
manual focus). Focus locks while your finger
remains on the monitor; to release the
shutter, lift your finger from the screen.
As above, except that lifting your finger f rom
the screen does not release the shutter. If
subject tracking (0 42) is active, you can
focus on the current subject by tapping the
monitor.
For information on touch photography focus, see “Autofocus”
(0 41).
56

D Taking Pictures Using Touch Shooting Options
The shutter-release button can be used to focus and take pictures even
when the W icon is displayed to show that the touch shutter is
enabled. Use the shutter-release button to take photographs in
continuous shooting mode (0 113) and during movie recording.
Touch shooting options can be used only to take pictures one at a time
in continuous shooting mode and cannot be used to take
photographs during movie recording.
The touch screen cannot be used to position the focus point when the
focus selector lock is in the L (lock) position (0 105), but it can still be
used to select the subject when face-priority AF is selected for AF-area
mode (0 42).
In self-timer mode (0 116), focus locks on the selected subject when
you touch the monitor and the timer starts when you lift your finger
from the screen. At default settings, the shutter is released about 10 s
after the timer starts; the delay and number of shots can be changed
using Custom Setting c3 (Self-timer, 0 264). If the option selected for
Number of shots is greater than 1, the camera will automatically take
pictures one after the other until the selected number of shots is
recorded.
57

D Shooting in Live View
To prevent light entering via the viewfinder from interfering with
photographs or exposure, close the viewfinder eyepiece shutter
(0 116).
Although they will not appear in the final picture, jagged edges, color
fringing, moiré, and bright spots may appear in the monitor, while
bright regions or bands may appear in some areas with flashing signs
and other intermittent light sources or if the subject is briefly
illuminated by a strobe or other bright, momentary light source. In
addition, distortion may occur with moving subjects, particularly if the
camera is panned horizontally or an object moves horizontally at high
speed through the frame. Flicker and banding visible in the monitor
under fluorescent, mercury vapor, or sodium lamps can be reduced
using the Flicker reduction option in the movie shooting menu
(0 258), although they may still be visible in the final photograph at
some shutter speeds. When shooting in live view, avoid pointing the
camera at the sun or other strong light sources. Failure to observe this
precaution could result in damage to the camera’s internal circuitry.
Regardless of the option selected for Custom Setting c2 (Standby
timer, 0 263), the standby timer will not expire during shooting.
A Beeps During Live View
A beep may sound if you adjust aperture or use the live view selector
during live view.
58

Movies
Live view selector
a button
Read this section for information on recording and viewing
movies.
Recording Movies
Movies can be recorded in live view.
1 Rotate the live view selector to
1 (movie live view).
2 Press the a button.
The mirror will be raised and the view
through the lens will be displayed in
the camera monitor, modified for the
effects of exposure. The subject will
no longer be visible in the viewfinder.
D The 0 Icon
A 0 icon (0 71) indicates that movies cannot be recorded.
A White Balance
White balance can be set at any time by pressing the U button
and rotating a command dial (0 156).
59

3 Choose a focus mode (0 41).
AF-ON button
4 Choose an AF-area mode (0 42).
A Pinpoint AF
Pinpoint AF is not available in movie
mode.
5 Focus.
Frame the opening shot and press the
AF-ON button to focus. Note that the
number of subjects that can be
detected in face-priority AF drops
during movie recording.
A Focu sing
Focus can also be adjusted by pressing the shutter-release button
halfway before beginning recording, or you can focus manually as
described in “Manual Focus” (0 44).
60

6 Start recording.
Movie-record button
Recording indicator
Time remaining
Press the movie-record button to start
recording. A recording indicator and
the time available are displayed in the
monitor. Exposure can be locked by
pressing the center of the subselector (0 137) or altered by up to
±3 EV using exposure compensation
(0 139); spot metering is not
available. In autofocus mode, the
camera can be refocused by pressing
the AF-ON button or by tapping your
subject in the monitor.
A Audio
The camera can record both video and sound; do not cover the
microphone on the front of the camera during movie recording.
Note that the built-in microphone may record sounds made by the
camera or lens during autofocus, vibration reduction, or changes to
aperture.
61

7 End recording.
Press the movie-record button again
to end recording. Recording will end
automatically when the maximum
length is reached, or the memory card
is full (note that depending on
memory card write speed, shooting
may end before the maximum length is reached).
8 Exit live view.
Press the a button to exit live view.
62

A Exposure Mode
The following exposure settings can be adjusted in movie mode:
1
P, S
A ✔ — —
M ✔ ✔ ✔
1 Exposure for mode S is equivalent to mode P.
2 The upper limit for ISO sensitivity can be selected using the ISO sensitivity
settings > Maximum sensitivity option in the movie shooting menu (0 257).
3 Regardless of the option chosen for ISO sensitivity settings > Maximum
sensitivity or for ISO sensitivity (mode M), the upper limit when On is
selected for Electronic VR in the movie shooting menu is ISO 25600.
4If On is selected for ISO sensitivity settings > Auto ISO control (mode
M) in the movie shooting menu, the upper limit for ISO sensitivity can be selected using the
Maximum sensitivity option.
In exposure mode M, shutter speed can be set to values between
1
and
/
8000 s (the slowest available shutter speed varies with the frame
rate; 0 69). In other exposure modes, shutter speed is adjusted
automatically. If the subject is over- or under-exposed in mode P or S,
end live view and start live view again or select exposure A and adjust
aperture.
Aperture Shutter speed ISO sensitivity
— — —
2, 3
2, 3
3, 4
1
/
25 s
63

Indices
Index
If Index marking is assigned to a control
using Custom Setting g1 (Custom
control assignment, 0 270), you can
press the selected control during
recording to add indices that can be used
to locate frames during editing and
playback (0 76). Up to 20 indices can be
added to each movie.
A See Also
For information on:
• Choosing the role played by the center of the multi selector, see
A > Custom Setting f2 (Multi selector center button;
• Choosing the roles of the Fn1, Fn2, and Pv buttons and the center of
the sub-selector, see A > Custom Setting g1 (Custom control
assignment;
•
Choosing whether the shutter-release button can be used to start live
view or to start and end movie recording, see
(
Custom control assignment
• Preventing unintended operation of the a button, see A > Custom
Setting f8 (Live view button options;
0 270).
) >
Shutter-release button
A
0 270).
0 268).
> Custom Setting g1
(0270).
64

Using the i Button
i button
The options listed below can be accessed
by pressing the i button in movie mode.
Use the touch screen or navigate the
menu using the multi selector and J
button, pressing 1 or 3 to highlight
items, 2 to view options, and J to select
the highlighted option and return to the
i-button menu. Press the i button again
to exit to the shooting display.
Option Description
Choose image area Choose image area for movies (0 68).
Frame size/frame rate Select a frame size and rate (0 69).
Movie quality Choose movie quality (0 69).
Active D-Lighting
Microphone
sensitivity
Attenuator
Frequency response
Adjust Active D-Light ing (0 180). Not available at a
frame sizes of 1920 × 1080 (slow-mo) and 3840 ×
2160 (0 69).
Press 1 or 3 to adjust
microphone sensitivity
(0 258). Both the built-in
and external
microphones (0 296) are
affected.
Reduce microphone gain and prevent audio
distortion when recording movies in loud
environments.
Control the frequency response of the built-in or
external microphones (0 259).
65

Option Description
Highlights
Patte rn 1 Patte rn 2
Wind noise reduction
Destination
Monitor brightness
Multi-selector
power aperture
Multi selector
exposure comp.
Highlight display
Enable or disable wind noise reduction using the
built-in microphone’s low-cut filter (0 259).
When two memory cards are inserted, you can
choose the card to which movies are recorded
(0 256).
Press 1 or 3 to adjust monitor brightness (note
that this affects live view only and has no effect on
photographs or movies or on the brightness of the
monitor for menus or playback; 0 45).
Select Enable to enable power aperture. Press 1 to
widen the aperture, 3 to narrow the aperture.
Selecting Enable allows exposure compensation to
be set by pressing 1 or 3.
If Pattern 1 or Patt ern 2 is selected, shading will be
used to indicate highlights (bright areas of the
frame). The level of brightness needed to trigger
the highlight display can be selected using Custom
Setting g2 (Highlight brightness, 0 270).
Headphone volume
Electronic VR
Press 1 or 3 to adjust headphone volume.
Select On to enable electronic vibration reduction
in movie mode. Not available at frame sizes of 1920
× 1080 (slow-mo) and 3840 × 2160 (0 69). Note
that if the electronic vibration reduction is on, the
angle of view is reduced and the edges of the frame
will be cropped out.
66

Option Description
Area in focus
Choose whether objects
that are in focus will be
indicated by colored
outlines while manual
focus is in effect.
Choose from 3 (high
Peakin g level
sensitivity),
2(standard), 1 (low
sensitivity), and Off; the
higher the setting, the
greater the depth shown
as being in focus. The
peaking color can be changed using Custom
Setting d8 (Peaking highlight color, 0 265).
Peaking is not available at frame sizes of 1920 ×
1080 (slow-mo) and 3840 × 2160 (0 69) or when
Active D-Lighting (0 180) or electronic vibration
reduction is enabled.
A Using an External Microphone
The optional ME-1 stereo microphone or ME-W1 wireless microphone
can be used to record sound for movies (0 296).
A Headphones
Third-party headphones can be used. Note that high sound levels may
result in high volume; particular care should be taken when
headphones are used.
67

Image Area: Choosing a Movie Crop
You can choose an image area using the Image area > Choose
image area option in the movie shooting menu. Select FX to
shoot movies in what is referred to as “FX-based movie format”,
DX to shoot in “DX-based movie format”. The differences
between the two are illustrated below.
FX DX
The sizes of the areas recorded are approximately 35.9 ×
20.2 mm (FX-based movie format) and 23.5 × 13.2 mm (DXbased movie format). Movies shot with a DX-format lens and On
selected for Image area > Auto DX crop (0 84) in the movie
shooting menu are recorded in DX-based movie format, as are all
movies (regardless of the lens used or the option selected for
Image area > Choose image area) with a frame size of 1920 ×
1080 (slow-mo). Enabling electronic vibration reduction by
selecting On for Electronic VR in the i-button menu reduces
the size of the crop, slightly increasing the apparent focal length.
68

Frame Size, Frame Rate, and Movie Quality
The Frame size/frame rate option in the movie shooting menu
is used to choose the movie frame size (in pixels) and frame rate.
You can also choose from two Movie quality options: high and
normal. Together, these options determine the maximum bit
rate, as shown in the following table.
Maximum bit rate
1
Option
3840 × 2160 (4K UHD); 30p
r
3840 × 2160 (4K UHD); 25p
s
3840 × 2160 (4K UHD); 24p
t
A
B
C
1920 × 1080; 60p
1920 × 1080; 50p
1920 × 1080; 30p
1920 × 1080; 25p
1920 × 1080; 24p
1280 × 720; 60p
1280 × 720; 50p
1920 × 1080; 30p ×4
4
(slow-mo)
1920 × 1080; 25p ×4
4
(slow-mo)
1920 × 1080; 24p ×5
4
(slow-mo)
y/y
z/z
1/1
2/2
3/3
4/4
5/5
1 Actual frame rate is 29.97 fps for values listed as 30p, 23.976 fps for value s listed as 24p, and
59.94 fps for values listed as 60p.
2 When this option is selected, movie quality is fixed at “high”.
3 Each movie will be recorded across up to 8 f iles of up to 4 GB each. The number of files and the
length of each file vary with the options selected for Frame size/frame rate and
Movie quality.
4 See “Slow Motion Movies” (0 70).
(Mbps) (★ high
quality/Normal)
2
2
2
144
48/24
24/12
36
29
Maximum length
29 min. 59 s
3
Recording: 3 min.
Playback: 12 min.
Recording: 3 min.
Playback: 15 min.
69

❚❚ Slow-Motion Movies
To record silent slow-motion movies, select 1920×1080; 30p ×4
(slow-mo), 1920×1080; 25p ×4 (slow-mo), or 1920×1080; 24p
×5 (slow-mo) for Frame size/frame rate in the movie shooting
menu. Movies recorded at 4 or 5 times the rated speed are
played back at the rated speed for a slow-motion effect; for
example, movies shot with 1920×1080; 30p ×4 (slow-mo)
selected will be recorded at a frame of roughly 120 fps (120p)
and play back at approximately 30 fps (30p).
Frame rate
Frame size/frame rate
1920 × 1080; 30p ×4 (slow-mo) 120p 30p
1920 × 1080; 25p ×4 (slow-mo) 100p 25p
1920 × 1080; 24p ×5 (slow-mo) 120p 24p
* Actual frame rate is 119.88 fps for values listed as 120p, 29.97 fps for values listed as 30p, and
23.976 fps for values listed as 24p.
Recorded at Plays back at
*
D Slow-Motion Movies
When a slow-motion option is selected, quality is fixed at “normal” and
the image area is fixed at DX, regardless of the lens used or the option
selected for Image area > Choose image area in the movie shooting
menu (0 256). Movies shot with face-priority AF, pinpoint AF, or
subject-tracking AF selected for AF-area mode (0 42) are recorded
using wide-area AF.
70

The Live View Display
iqo
!0
w
e
r
t
y
u
Item Description
“No movie” indicator Indicates that movies cannot be recorded.
q
Wind noise reduction
w
Electronic VR indicator
e
Headphone volume
r
Frequency response The current frequency response (0 259).
t
Microphone sensitivity Microphone sensitivity (0 258).
y
Sound level
u
HDMI recording
i
indicator
Attenuator i ndicator
o
Time remaining The recording time available for movies.
!0
Movie frame size The frame size for movie recording (0 69).
!1
Highlight display
!2
indicator
“No power aperture”
!3
indicator
Displayed when wind noise reduction is on
(0 259).
Displayed when electronic vibration reduction
is on (0 259).
Volume of audio output to headphones.
Displayed when third-party headphones are
connected.
Sound level for audio recording. Displayed in
red if level is too high; adjust microphone
sensitivity accordingly.
Displayed if movies are simultaneously being
recorded to a device connected via HDMI.
Displayed when the attenuator is enabled
(0 259).
Displayed when highlight display is on.
Indicates that power aperture is unavailable.
!1
!2
!3
71

The Information Display
To hide or display indicators in the monitor, press the R button.
Virtual horizon
(0 272) Information on Information off
Histogram Framing guides
D The Count- Down Display
A count down will be displayed 30 s before live view ends
automatically (0 54). Depending on shooting conditions, the timer
may appear immediately when movie recording begins. Note that
regardless of the amount of recording time available, live view will still
end automatically when the timer expires.
A Adjusting Settings During Movie Recording
Headphone volume cannot be adjusted during recording. If an option
other than I (microphone off) is currently selected, microphone
sensitivity can be changed to any setting other than I while recording
is in progress.
72

Taking Photos in Movie Mode
To take photos in movie mode (either in live view or
during movie recording), select Take ph oto s for
Custom Setting g1 (Custom control assignment) >
Shutter-release button (0 270). Photos with an
aspect ratio of 16 : 9 can then be taken at any time by pressing
the shutter-release button all the way down. If movie recording
is in progress, recording will end and the footage recorded to
that point will be saved.
Except at a frame size of 3840 × 2160 (0 69), photographs are
recorded in the format selected for Image quality in the photo
shooting menu (0 88); photos taken at a frame size of
3840 × 2160 are recorded at an image quality of JPEG fine★. For
information on image size, see “Image Size” (0 74). Note that
the exposure for photographs cannot be previewed when the
live view selector is rotated to 1; mode P, S, or A is recommended
but accurate results can be achieved in mode M by previewing
exposure with the live view selector rotated to C.
73

❚❚ Image Size
The size of photos taken in movie mode varies with the image
area (0 256) and the option selected for Image size in the
photo shooting menu (0 91).
Image area Image size Size (pixels)
Large 8256 × 4640
FX
DX
D Recording Movies
Movies are recorded in the sRGB color space. Flicker, banding, or
distortion may be visible in the monitor and in the final movie under
fluorescent, mercury vapor, or sodium lamps or with subjects that are
in motion, particularly if the camera is panned horizontally or an object
moves horizontally at high speed through frame (for information on
reducing flicker and banding, see the section on the movie shooting
menu Flicker reduction option, 0 258). Flicker may also appear while
power aperture is in use. Jagged edges, color fringing, moiré, and
bright spots may also appear. Bright regions or bands may appear in
some areas of the frame with flashing signs and other intermittent
light sources or if the subject is briefly illuminated by a strobe or other
bright, momentary light source. When recording movies, avoid
pointing the camera at the sun or other strong light sources. Failure to
observe this precaution could result in damage to the camera’s internal
circuitry. Note that noise (randomly-spaced bright pixels, fog, or lines)
an d une xpe cted col ors m ay a ppea r if you z oom i n on the v iew thro ugh
the lens (0 40) in movie mode.
Flash lighting cannot be used.
Recording ends automatically if the lens is removed or the live view
selector is rotated to a new setting.
Medium 6192 × 3480
Small 4128 × 2320
Large 5408 × 3040
Medium 4048 × 2272
Small 2704 × 1520
74

A Wireless Remote Controllers and Remote Cords
If Record movies is selected for Custom Setting g1 (Custom control
assignment) > Shutter-release button (0 270), the shutter-release
buttons on optional wireless remote controllers and remote cords
(0 296) can be pressed halfway to start live view or pressed all the way
down to start and end movie recording.
75

Viewing Movies
Movies are indicated by a 1 icon in full-frame playback (0 223).
Tap the a icon in the monitor or press the center of the multi
selector to start playback; your current position is indicated by
the movie progress bar.
1 icon Length Current position/total length
a icon Movie
The following operations can be performed:
To Description
Pause Press 3 to pause playback.
Play
Rewind/
advance
Start
slow-motion
playback
Press the center of the multi selector to resume
playback when movie is paused or during rewind/
advance.
Press 4 to rewind, 2 to advance.
Speed increases with each press,
from 2× to 4× to 8 × to 16×; keep
the control pressed to skip to beginning or end of
movie (first frame is indicated by h in top right corner
of mo nitor, last fram e by i). If playback is paused, the
movie rewinds or advances one frame at a time; keep
the control pressed for continuous rewind or advance.
Press 3 while the movie is paused to start slowmotion playback.
76
progress bar
Volu me Guid e
 Loading...