

Nikon D850 Technical Guide(Useful Features)

Professional
Technical Guide
— Useful Features —
En

Table of Contents
Live View: Pinpoint AF ........................................................ 4
Focus Stacking (Focus Shift Photography) .................... 8
• “Focus Shift Shooting” ..................................................................10
• Before Shooting .............................................................................12
• Focus Shift Photography ..............................................................13
• Suggested Settings .......................................................................16
• Choosing the Number of Shots ..................................................18
• Focus Shift: Tips ..............................................................................21
• Before Stacking ..............................................................................22
• Some Examples of Focus Stacking ............................................23
White Balance Tips and Tricks ......................................... 25
• White Balance Options .................................................................25
• Auto White Balance for Incandescent Lighting ......................27
• Natural Light Auto .........................................................................28
• Color Temperature Information .................................................29
• Measuring Preset Manual White Balance ................................30
Digitizing 35mm Film ...................................................... 32
• What You’ll Need ............................................................................33
• Handling Film .................................................................................36
• Digitizing Negatives ......................................................................36
• Digitizing Positives (Slides) .........................................................39
• Retouching Digitized Photos ......................................................41
2

Muing the Shutter ......................................................... 44
• “Quiet” Versus “Silent” ...................................................................44
• Quiet Shutter-Release Mode .......................................................45
• Silent Photography .......................................................................46
• Movie Stills ......................................................................................47
Focus Peaking .................................................................... 48
Cropping and Zoom .........................................................49
On-Camera Batch NEF (RAW) Processing ..................... 50
• The Benefits of On-Camera Processing ....................................50
• On-Camera NEF (RAW) Processing ............................................51
Auto AF Fine-Tuning ......................................................... 56
Unavailable Menu Options .............................................59
• The Photo Shooting Menu ..........................................................59
• The i-Button Menu (Live View Photography) ........................60
3
Live View: Pinpoint AF
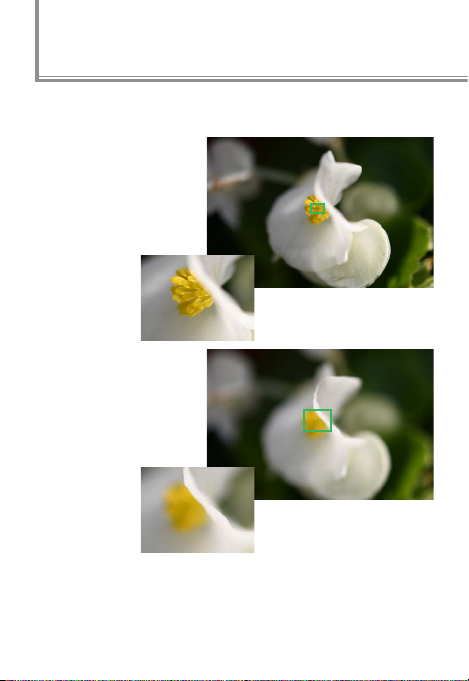
The D850’s live view features a new pinpoint AF-area mode
for more precise focus than ever before.
Pinpoint AF: The camera
focuses precisely on
the intended point
(in this case, the stamens).
Intended focus point (enlarged)
Normal-area AF: The wider
focus area may result in
the camera not focusing on the intended
point.
Intended focus point (enlarged)
4
Follow the steps below to take pictures using pinpoint AF.
Before proceeding, we recommend that you mount the
camera on a tripod and select single-servo autofocus (AF-S).
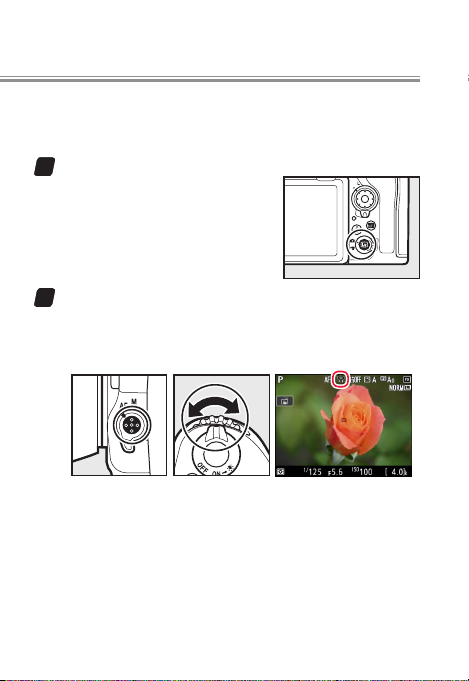
Start live view.
1
Pinpoint AF is available in live
view only. Press the a button
to start live view.
Select 3.
2
Keeping the AF-mode button pressed, rotate the subcommand dial until 3 (pinpoint AF) appears in the
display.
5
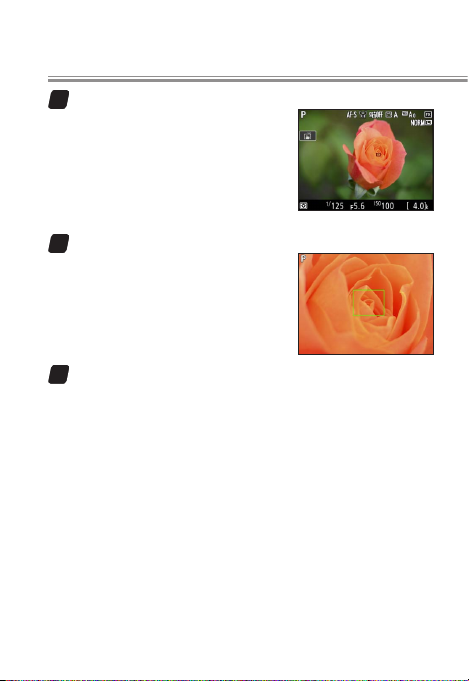
Position the focus point.
3
Use the multi selector or touch
controls to position the focus
point, or press the center of
the multi selector to return the
focus point to the center of the
frame.
Zoom in.
4
For greater accuracy, press the
X button to zoom in on the selected focus point.
Take the picture.
5
Although you can take pictures using the shutter-release button, to prevent blur caused by camera shake
we recommend that you use the remote photography
feature in the SnapBridge app or an optional accessory such as a wireless remote controller or remote cord.
6

Touch Controls
When using touch controls to position
the focus point, note that at default
settings, the shutter will be released
when you lift your nger from the dis‑
play (“touch shutter”); for more accu‑
rate focus, tap the touch shutter icon
to turn the touch shutter o (X).
Live View: Pinpoint AF
7
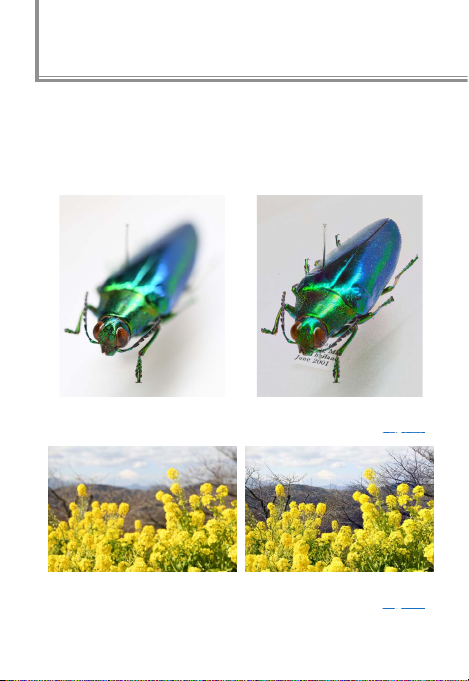
Focus Stacking (Focus Shift Photography)
“Focus stacking” combines photos shot at dierent focus
positions into a single image with increased depth of eld.
The D850’s new focus shift feature, which automatically
varies focus over a series of shots, is used to take photos
that will later be combined using focus stacking.
Normal photograph Focus-stacked image
Normal photograph Focus-stacked image
(for camera settings, see page 23)
(for camera settings, see page 24)
8
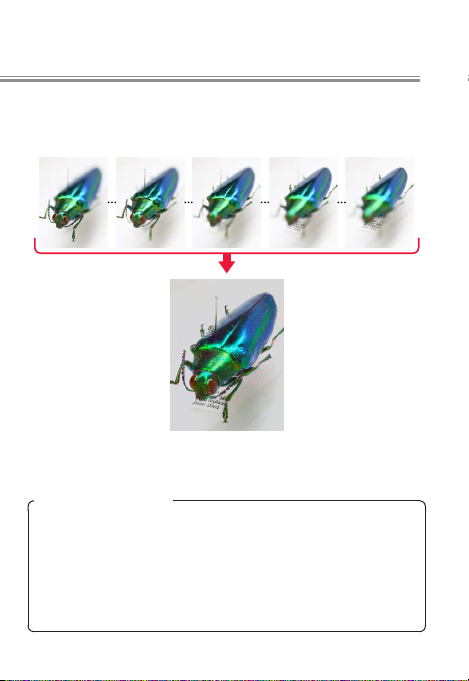
When shooting is complete, you can copy the photos to
a computer and use third-party focus-stacking software
to combine the areas that are in focus into a single image.
The camera takes a series of shots (150 in this
example), which are
used to create a composite image containing only the areas that
are in focus.
Focus-Stacking Software
The following applications support focus stacking. Note that
Nikon neither endorses this software nor guarantees its operation.
• Adobe: Photoshop CC
• Helicon Soft: Helicon Focus
• Zerene Systems: Zerene Stacker
9

“Focus Shift Shooting”
l
The Focus shift shooting item in
the photo shooting menu is used to
adjust settings for focus shift photography. The following options are
available:
• Start: Start shooting. The camera will
change the focus distance by the
selected amount with each shot.
• No. of shots: Choose the number of shots (up to 300) that
you will need when performing focus stacking.
• Focus step width: Choose the amount the focus distance
changes with each shot. The options available range
from 1 to 10: choose lower values for smaller steps, higher values for larger steps.
• Interval until next shot: The time between shots, in seconds.
Select 00 to take photos at approximately 5fps (release
modes S, Cl, Ch, and Mup) or 3fps (release modes Q and QC).
• Exposure smoothing: If On is selected, the camera will adjust
the exposure for each new shot to match the immediately preceding shot.
• Silent photography: Select On to silence the shutter during
shooting.
10

Focus Stacking (Focus Shift Photography)
• Starting storage folder: Highlight options and press 2 to
select or deselect. Choose New folder to create a new
folder for each new focus shift sequence, Reset le num-
bering to reset le numbering to 0001 when a new folder
is created.
11

Before Shooting
l
Use an AF-S or AF-P lens. After mounting the appropriate
lens, choose an exposure mode of A or M so that aperture
does not change during shooting (recommended). Once
settings have been adjusted to your satisfaction, close the
viewnder eyepiece shutter to prevent light entering via
the viewnder interfering with photographs and exposure.
Before shooting begins, mount the camera on a tripod,
disable lens vibration reduction (VR), and select a release
mode other than E. To ensure that shooting is not interrupted, be sure the camera battery is fully charged. If in
doubt, charge the battery before use or use an AC adapter
and power connector (available separately).
Focus shift is available at all image quality settings. Note
that focus shift is unavailable in some situations, including when multiple exposure or HDR shooting is in progress, the camera clock is not set, an incompatible lens is
attached, or no memory card is inserted.
12
Focus Stacking (Focus Shift Photography)
Focus Shift Photography
l
Follow the steps below to take photographs using focus
shift.
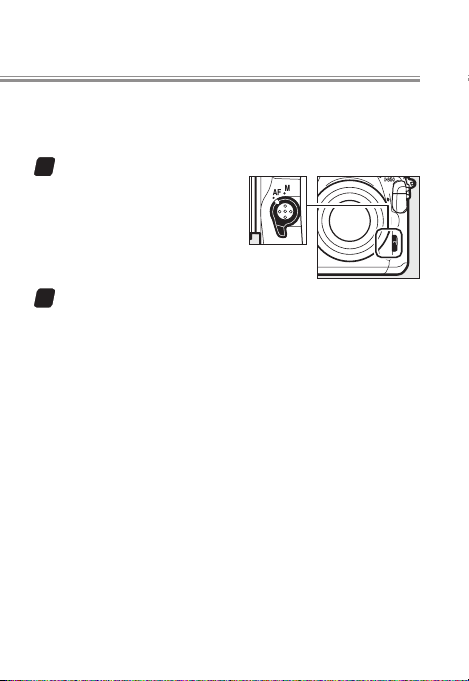
Rotate the focus-mode selector to AF.
1
Focus shift is not available
with manual focus lenses.
Focus.
2
The camera takes a series of shots starting from a selected focus position and continuing toward innity.
The starting focus position should be slightly in front
of the closest point on the subject. Do not move the
camera after focusing.
13
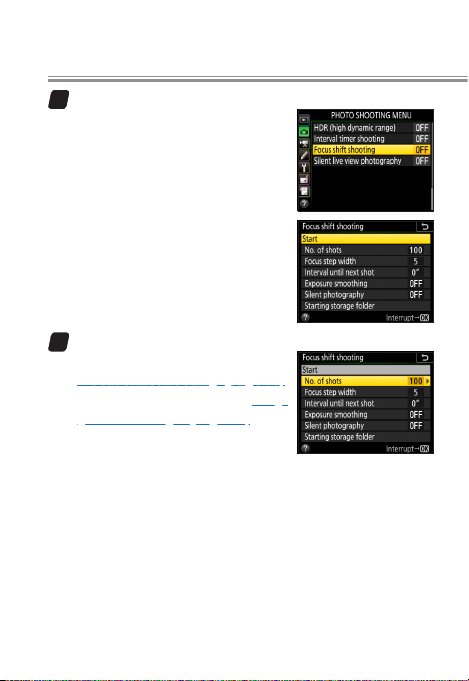
Select Focus shift shooting.
3
In the photo shooting menu,
highlight Focus shift shooting
and press 2 to display focus
shift options.
Adjust settings.
4
Adjust settings as described on
“Focus Shift Shooting” (page 10).
For more information, see “Sug-
gested Settings” (page 16).
14
Focus Stacking (Focus Shift Photography)
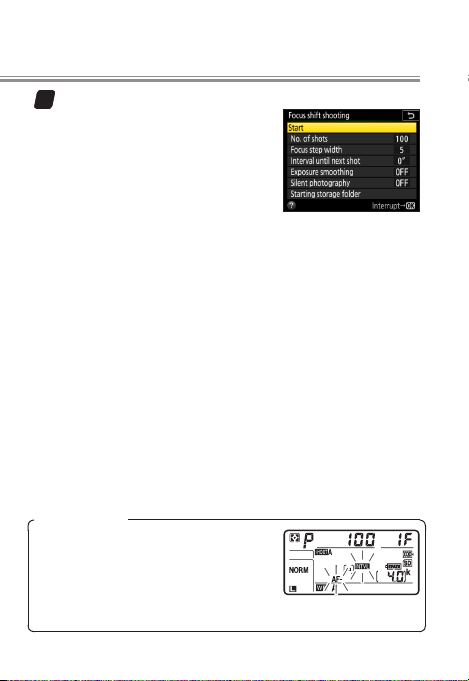
Start shooting.
5
Highlight Start and press J.
Shooting starts after about 3 s.
The camera takes photographs
at the selected interval, beginning at the focus distance selected at the start of shooting
and progressing out toward innity by the selected
focus step distance with each shot. Shooting ends
when the selected number of shots has been taken or
focus reaches innity. To end shooting before all shots
have been taken, select O for Focus shift shooting in
the photo shooting menu or wait until the camera is
between shots and then press J or press the shutterrelease button halfway.
During Shooting
During focus shift photography, the
Q icon will ash in the control pan‑
el. Immediately before the next shot,
the shutter speed display will show
the number of shots remaining.
15

Suggested Settings
l
For focus shift photography, we recommend that settings
be adjusted as described below.
Aperture
For improved contrast out to the edges of the frame, we
generally recommend an aperture 2 to 3 stops from the
maximum for the lens.
ISO Sensitivity
We recommend that you select O for ISO sensitivity settings > Auto ISO sensitivity control and do not change
ISO sensitivity while shooting is in progress.
Focus Shift Settings
No. of shots: You may need over a 100 shots for a close-up
or an insect or other small object, while only a few are
required when photographing a landscape from front to
back with a wide-angle lens. We recommend taking more
shots than you think you’ll need and winnowing them
down during focus stacking. See “Choosing the Number
of Shots” (page 18).
Focus step width: A value of 5 or less is recommended, as
higher settings increase the risk that some areas will be out
of focus when the photos are stacked (page 21). Try experimenting with dierent settings before shooting.
Interval until next shot: 00 is recommended unless you are
using a ash, in which case the interval needs to be long
enough for the ash to charge.
16

Focus Stacking (Focus Shift Photography)
Exposure smoothing: O is recommended if lighting and other
conditions will not change during shooting, On when photographing landscapes and the like under variable lighting.
Silent photography: Choosing On (recommended) limits cam-
era shake and reduces power consumption and wear on
the shutter. Choose O to prevent icker when shooting
under uorescent or mercury-vapor lighting (if icker persists, enable Flicker reduction in the photo shooting menu
or choose a shutter speed adapted to the frequency of the
local power supply: ¹⁄₁₂₅s, ¹⁄₆₀s, or ¹⁄₃₀s for 60 Hz; ¹⁄₁₀₀s, ¹⁄₅₀s,
or ½₅s for 50 Hz).
Starting storage folder: We recommend that you select both
New folder and Reset le numbering. Each sequence of
photos will be numbered from 0001 and stored in its own
folder, which you may nd helpful when copying the images to a computer.
17
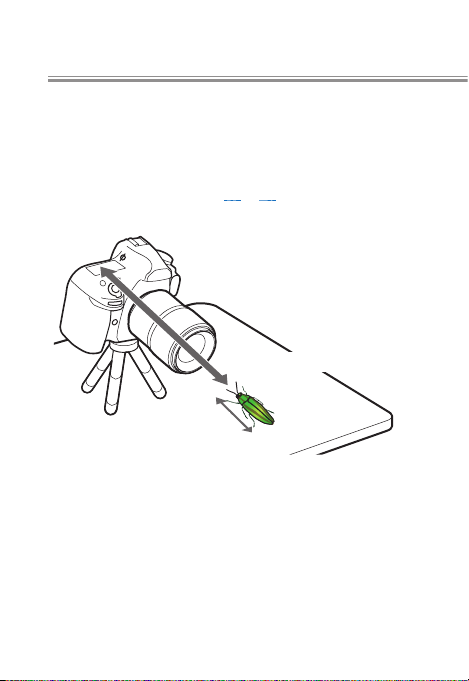
Choosing the Number of Shots
l
The recommended number of shots varies with the lens,
aperture, subject size, focus step width, and the distance
to the subject, measured from the closest point on the
subject to the focal plane mark (E) on the camera body.
The gures given on pages 19 to 20 assume that the camera
and subject are positioned as shown below.
Distance to subject
Subject size
18
 Loading...