

Nikon D850 Setting Guide(Movie Edition)
D-Movie Setting Guide
En

Workflow Buttons and Icons Settings Tips and Tricks Viewing Movies Appendix
Table of Contents
Workflow
Making Movies: Workow ..............4
Buttons and Icons
Frequently-Used Controls ..............6
The Live View Display .....................7
The Live View Display ............................................ 7
The Information Display: Movie Live View .... 7
The Virtual Horizon Display ................................. 9
Settings
Accessing Movie Settings.............10
The i-Button Menu .............................................10
Audio .............................................26
Microphone Sensitivity ......................................26
Attenuator ...............................................................26
Frequency Response ...........................................27
Wind Noise Reduction ........................................27
Headphone Volume ............................................. 28
Focus ..............................................29
Focus Mode ............................................................29
AF Mode ...................................................................29
AF-Area Mode ........................................................30
Focus Peaking ........................................................32
Storage ..........................................33
Movie-Related Controls ......................................11
The Movie Shooting Menu ................................11
Picture Quality ..............................12
Frame Size, Frame Rate, and Movie Quality 12
ISO Sensitivity ........................................................13
White Balance ........................................................14
Picture Controls .....................................................16
High ISO Noise Reduction ................................. 19
Image Area .............................................................. 20
Electronic Vibration Reduction ........................21
Exposure ........................................22
Metering ..................................................................22
Destination .............................................................33
Movie File Type ...................................................... 33
Controls and Displays ...................34
Multi-Selector Power Aperture ........................34
Multi-Selector Exposure Compensation ...... 34
Custom Control Assignments ..........................35
Highlight Display ..................................................38
Monitor Brightness ..............................................39
Monitor O Delay .................................................40
Exposure Mode .....................................................23
Exposure Compensation ....................................24
Active D-Lighting.................................................. 25
Flicker Reduction ..................................................25
2

Workflow Buttons and Icons Settings Tips and Tricks Viewing Movies Appendix
Table of Contents, Continued
Tips and Tricks
Time-Lapse Movie Techniques ....41
“Time-Lapse Movie” .............................................41
“Interval Timer Shooting” ................................... 45
Slow-Motion Movies .....................49
HDMI Output .................................50
Connecting to an HDMI Device ....................... 50
HDMI Options ........................................................50
Viewing Movies
Viewing Tips ..................................52
Ten-Second Advance/Rewind .......................... 52
Appendix
Image Sensor Cleaning ................54
Troubleshooting ...........................55
Keeping the Camera Cool ..................................55
Image Artifacts ......................................................55
Ending Recording ................................................. 55
Unavailable Menu Options ...............................56
D850 Movie Specications ...........58
Skipping to an Index or the Last/First Frame
Slow-Motion Playback ........................................52
Using the Touch Screen ......................................52
... 52
Joining Movie Files Together .......53
3
Workflow Buttons and Icons Settings Tips and Tricks Viewing Movies Appendix
Making Movies: Workflow
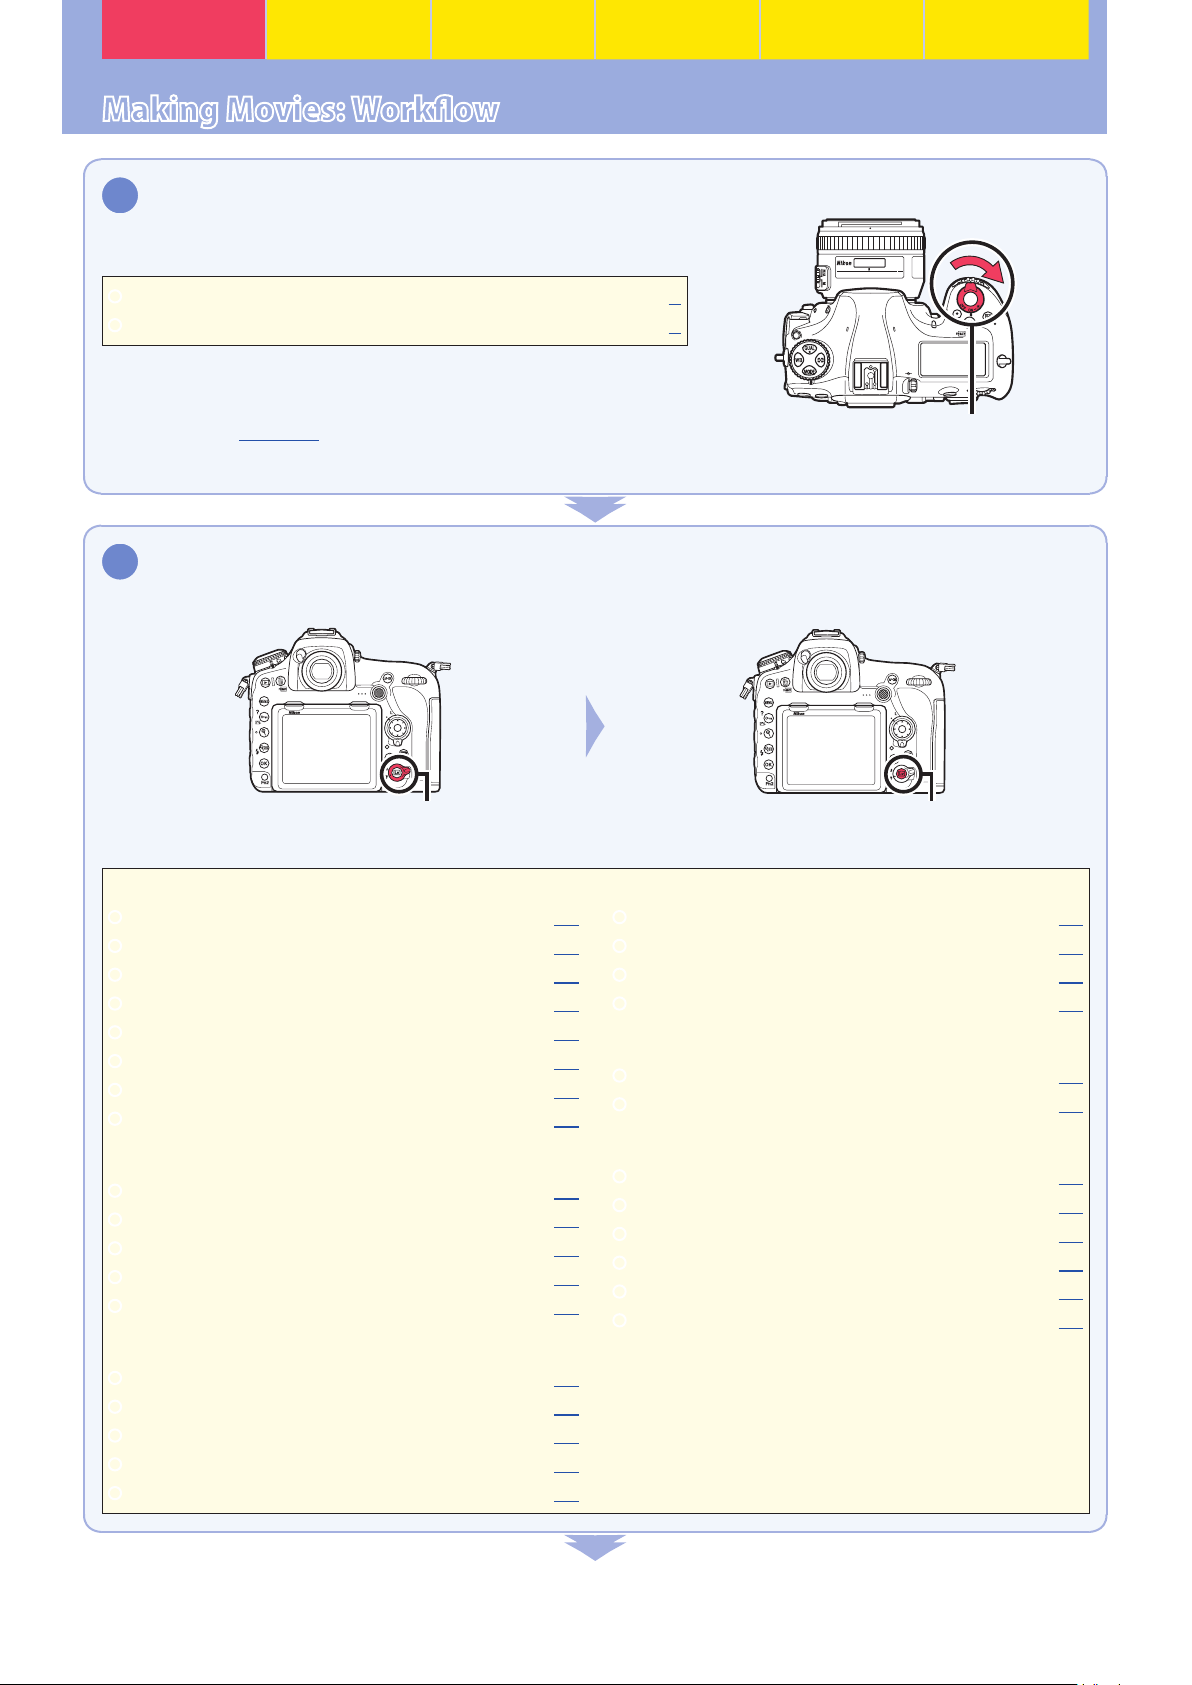
Prepare.
1
Before shooting movies, learn the names and locations of
camera controls as described in the following sections:
Frequently-Used Controls ................................................
The Live View Display ........................................................
An optional AC adapter or battery pack is recommended
for extended recording (for information on compatible accessories, see page58). Before proceeding to the next step,
insert a battery and memory card and turn the camera on.
Start movie live view and adjust camera settings.
2
Rotate the live view selector to 1 (movie live view) and press the a button.
Live view selector a button
Adjust settings before recording. See the following topics:
0
0
6
7
Power switch
Picture Quality
Frame Size and Frame Rate ......................
Movie Quality ................................................
ISO Sensitivity ................................................
White Balance ................................................
Picture Controls ............................................
High ISO Noise Reduction.........................
Image Area .....................................................
Electronic Vibration Reduction ...............
Exposure
Metering ..........................................................
Exposure Mode .............................................
Exposure Compensation ...........................
Active D-Lighting .........................................
Flicker Reduction .........................................
Audio
Microphone Sensitivity ..............................
Attenuator ......................................................
Frequency Response ...................................
Wind Noise Reduction ................................
Headphone Volume ....................................
0
0
0
0
0
0
0
0
0
0
0
0
0
0
0
0
0
0
12
12
13
14
16
19
20
21
22
23
24
25
25
26
26
27
27
28
Focus
Focus Mode ....................................................
AF Mode ..........................................................
AF-Area Mode ...............................................
Focus Peaking................................................
Storage
Destination .....................................................
Movie File Type .............................................
Controls and Displays
Multi-Selector Power Aperture ...............
Multi-Selector Exposure Compensation ...
Custom Control Assignments ..................
Highlight Display..........................................
Monitor Brightness ......................................
Monitor O Delay ........................................
0
0
0
0
0
0
0
0
0
0
0
0
29
29
30
32
33
33
34
34
35
38
39
40
4
Workflow Buttons and Icons Settings Tips and Tricks Viewing Movies Appendix
Making Movies: Workflow, Continued
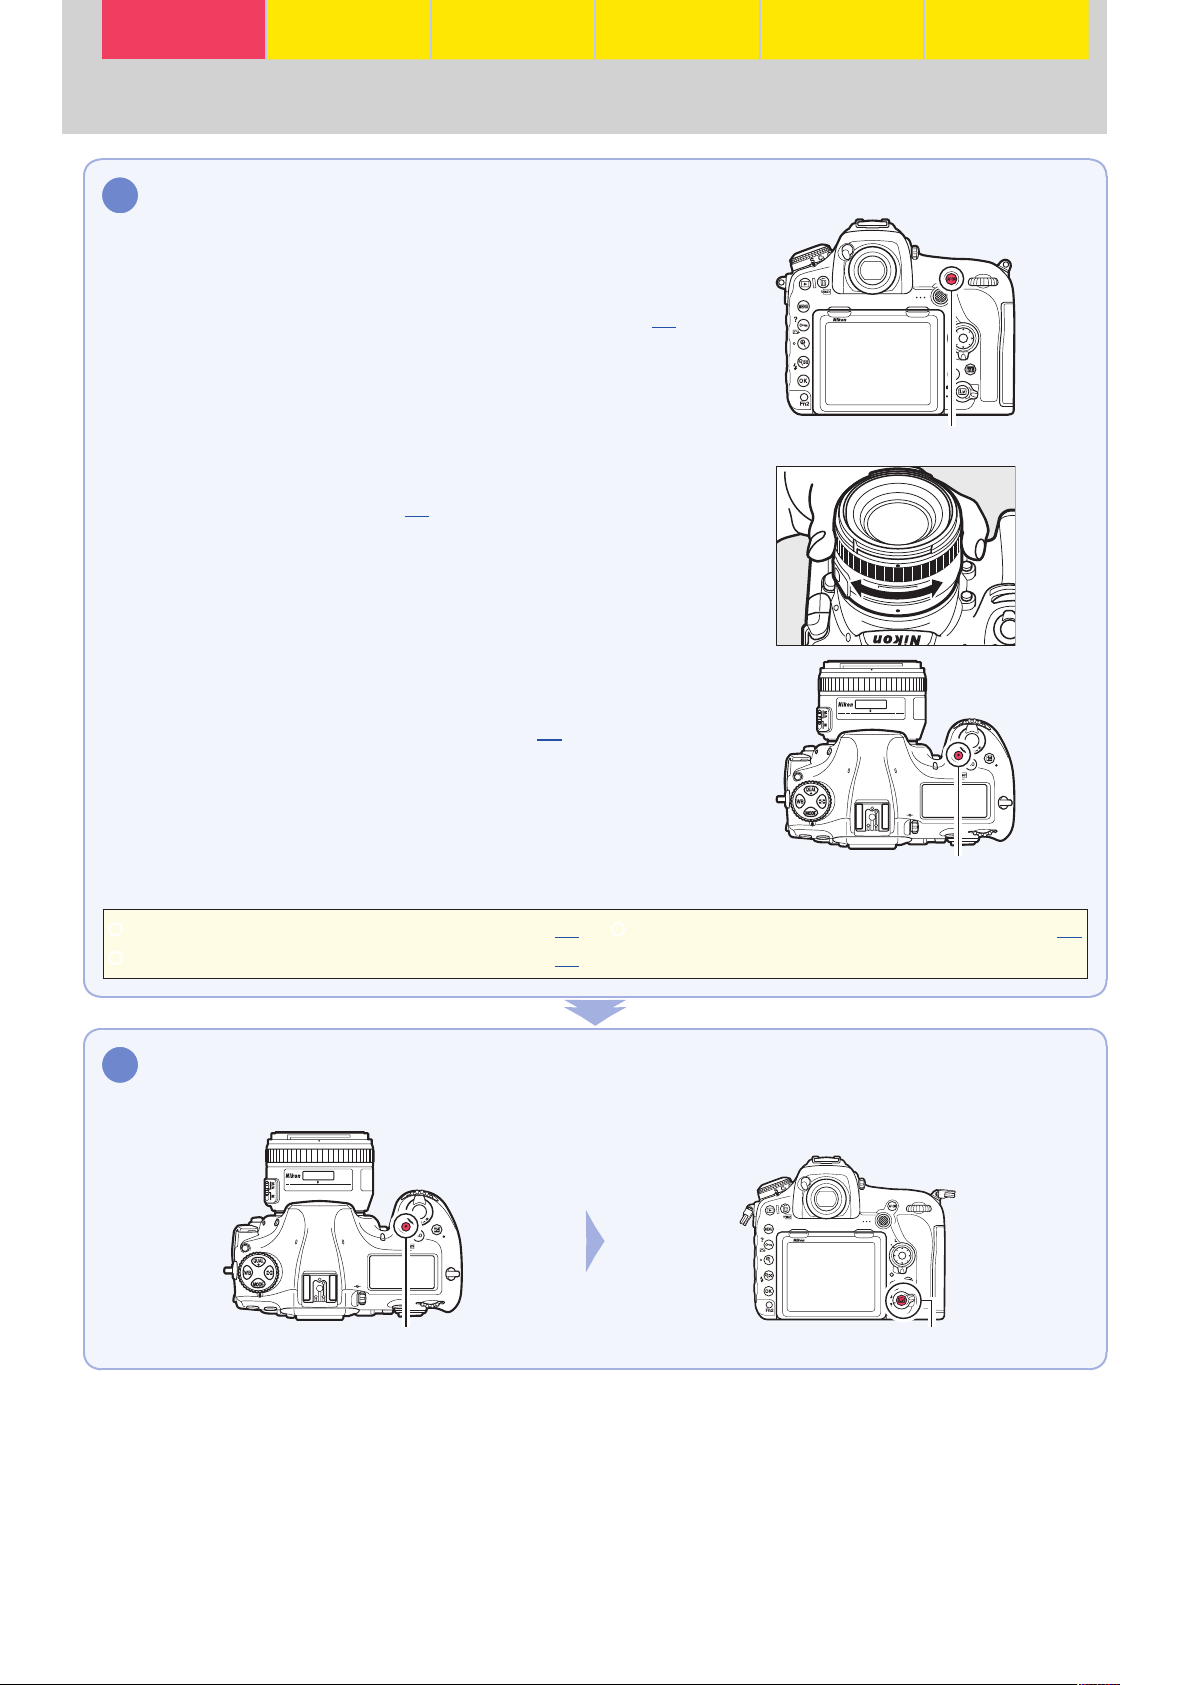
Start recording.
3
If you are using autofocus, focus before shooting. At default
settings, the camera automatically detects and focuses on
faces (! face-priority AF); to focus instead on a selected
area of the frame, choose a dierent AF-area mode (030).
To refocus, tap your subject in the monitor (you can also
refocus using the AF‑ON button or by pressing the shutterrelease button halfway).
AF‑ON button
To focus in manual focus mode, rotate the lens focus ring. If
focus peaking is enabled (035), objects that are in focus
will be indicated by colored outlines, making focus easier
to verify.
To start recording, press the movie-record button. If Record
movies is selected for Custom Setting g1 (Custom control
assignment)> Shutter release button (035), you can in-
stead start and end recording using the shutter-release
button or an optional remote cord or wireless remote controller.
Movie-record button
See the following for additional information:
Time-Lapse Movie Techniques ................
Slow-Motion Movies ...................................
End recording.
4
Press the movie-record button again to end recording, then press the a button to end live view.
0
0
41
49
HDMI Output .................................................
0
50
Movie-record button
a button
5
Workflow Buttons and Icons Settings Tips and Tricks Viewing Movies Appendix
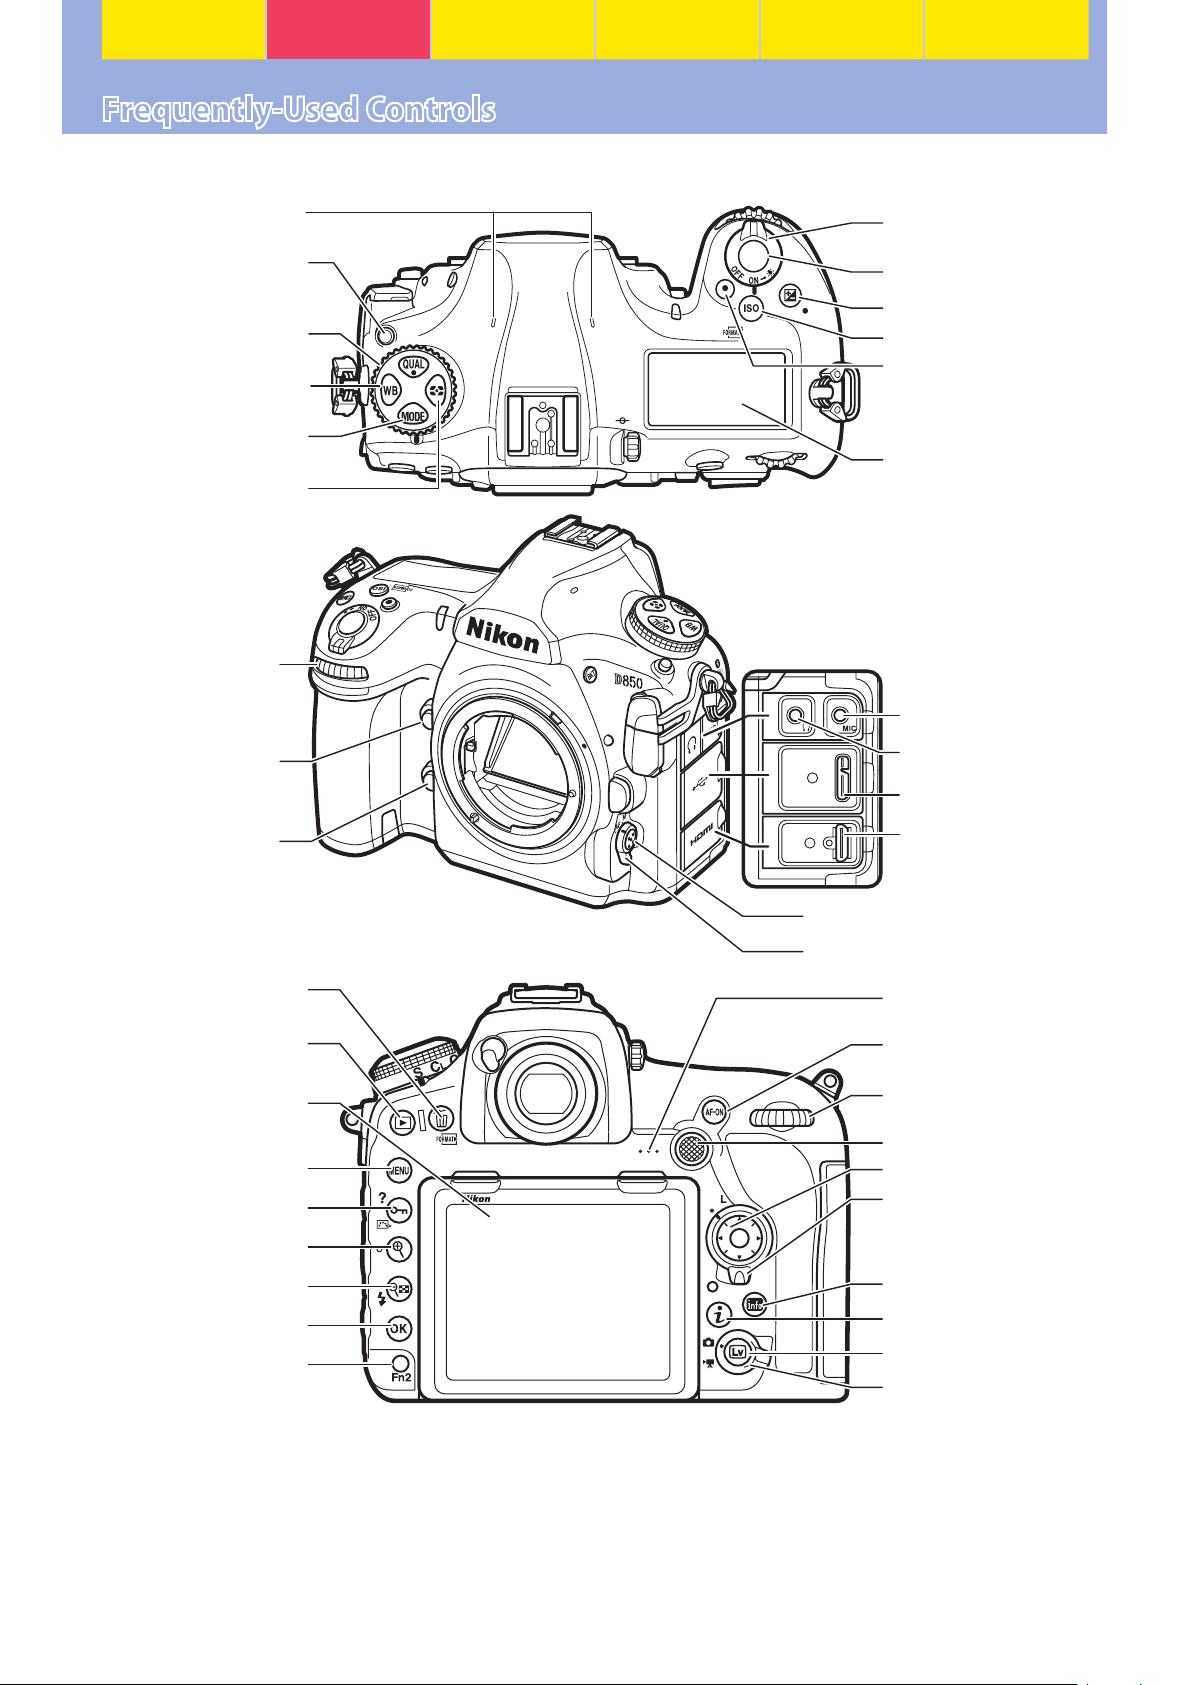
Frequently-Used Controls
The following controls are frequently used during movie recording:
Stereo microphone
Release mode dial lock
release
Release mode dial
U button
I button
Y button
Sub-command dial
Pv button
Power switch
Shutter-release button
E button
S button
Movie-record button
Control panel
Connector for external
microphone
Headphone connector
USB connector
Fn1 button
O (Q) button
K button
Monitor
G button
L (Z/Q) button
X button
W (M) button
J button
Fn2 button
HDMI connector
AF-mode button
Focus-mode selector
Speaker
AF‑ON button
Main command dial
Sub-selector
Multi selector
Focus selector lock
R button
i button
a button
Live view selector
6
Workflow Buttons and Icons Settings Tips and Tricks Viewing Movies Appendix
The Live View Display
The live view display oers exposure preview and controls for monitor brightness, headphone volume, and microphone sensitivity.
The Live View Display
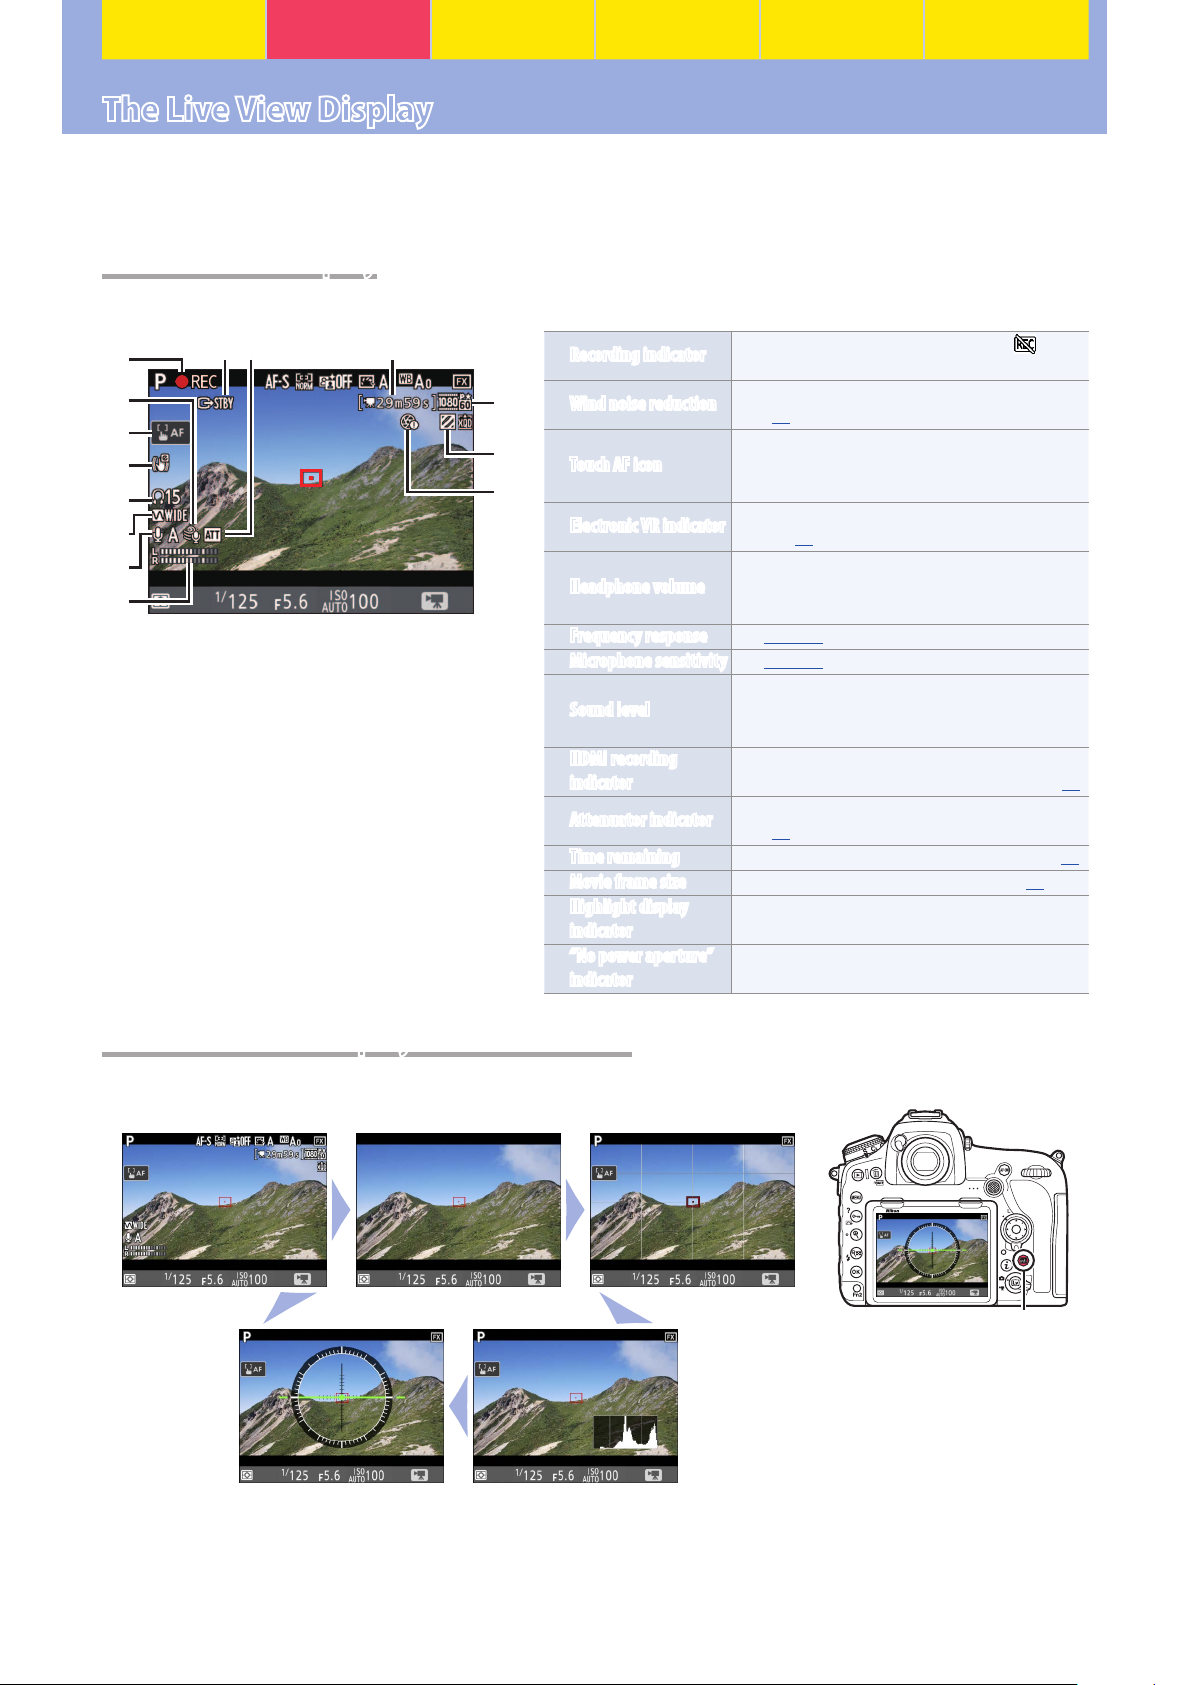
The following are displayed in the monitor during live view and movie recording:
w
e
r
t
y
u
i
oq!0
!1
!2
!3
!4
Recording indicator
q
Wind noise reduction
w
Touch AF icon
e
Electronic VR indicator
r
Headphone volume
t
Frequency response See page27.
y
Microphone sensitivity See page26.
u
Sound level
i
HDMI recording
o
indicator
Attenuator indicator
!0
Time remaining The recording time available for movies (012).
!1
Movie frame size The frame size for movie recording (012).
!2
Highlight display
!3
indicator
“No power aperture”
!4
indicator
Indicates that recording is in progress. is displayed if movies cannot currently be recorded.
Displayed when wind noise reduction is on
(027).
Enable or disable touch AF. When touch AF is
enabled, focus point can be positioned and
autofocus initiated by tapping monitor.
Displayed when electronic vibration reduction is
on (021).
Volume of audio output to headphones. Displayed when third-party headphones are
connected.
Sound level for audio recording. Displayed in red
if level is too high; adjust microphone sensitivity
accordingly.
Displayed if movies are simultaneously being
recorded to a device connected via HDMI (050).
Displayed when the attenuator is enabled
(026).
Appears when highlight display is on.
Indicates that power aperture is unavailable.
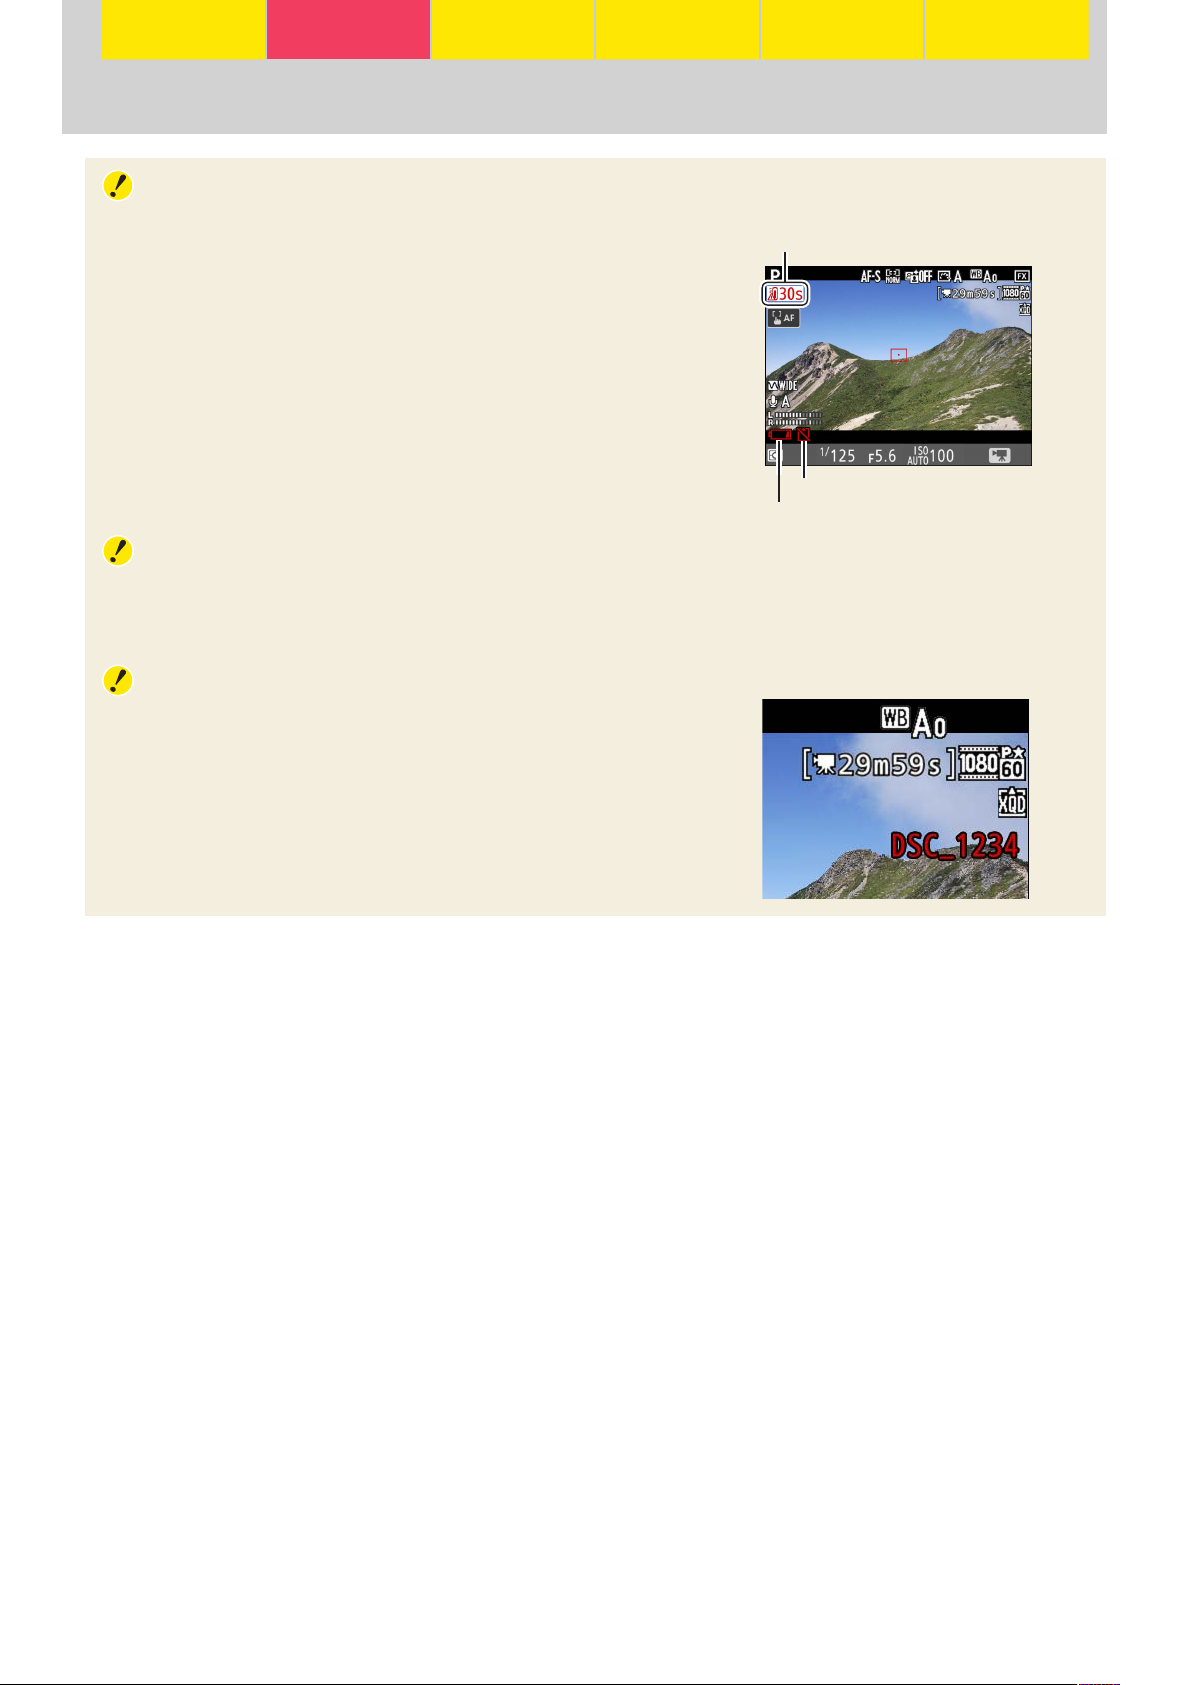
The Information Display: Movie Live View
Press the R button to choose the information displayed in movie mode.
Information on Information o Framing guides
Virtual
horizon
Histogram
R button
7
Workflow Buttons and Icons Settings Tips and Tricks Viewing Movies Appendix
The Live View Display, Continued
Warnings
The warnings at right may be displayed during recording.
Temperature warning (displayed
in red 30s before live view ends)
No memory card
Low battery
The Count-Down Display
A count down will be displayed 30 s before live view ends automatically. The timer turns red if live view
is about to end to protect the internal circuits or, if an option other than No limit is selected for Custom
Setting c4 (Monitor o delay) > Live view, 5 s before the monitor is due to turn o automatically.
FIle Names
During recording, a new le is created when the current le
reaches 4 GB. Normally displayed in white, the le name in
the information display ashes amber 30s and turns red 10s
before a new le is created.
8
Workflow Buttons and Icons Settings Tips and Tricks Viewing Movies Appendix
The Live View Display, Continued
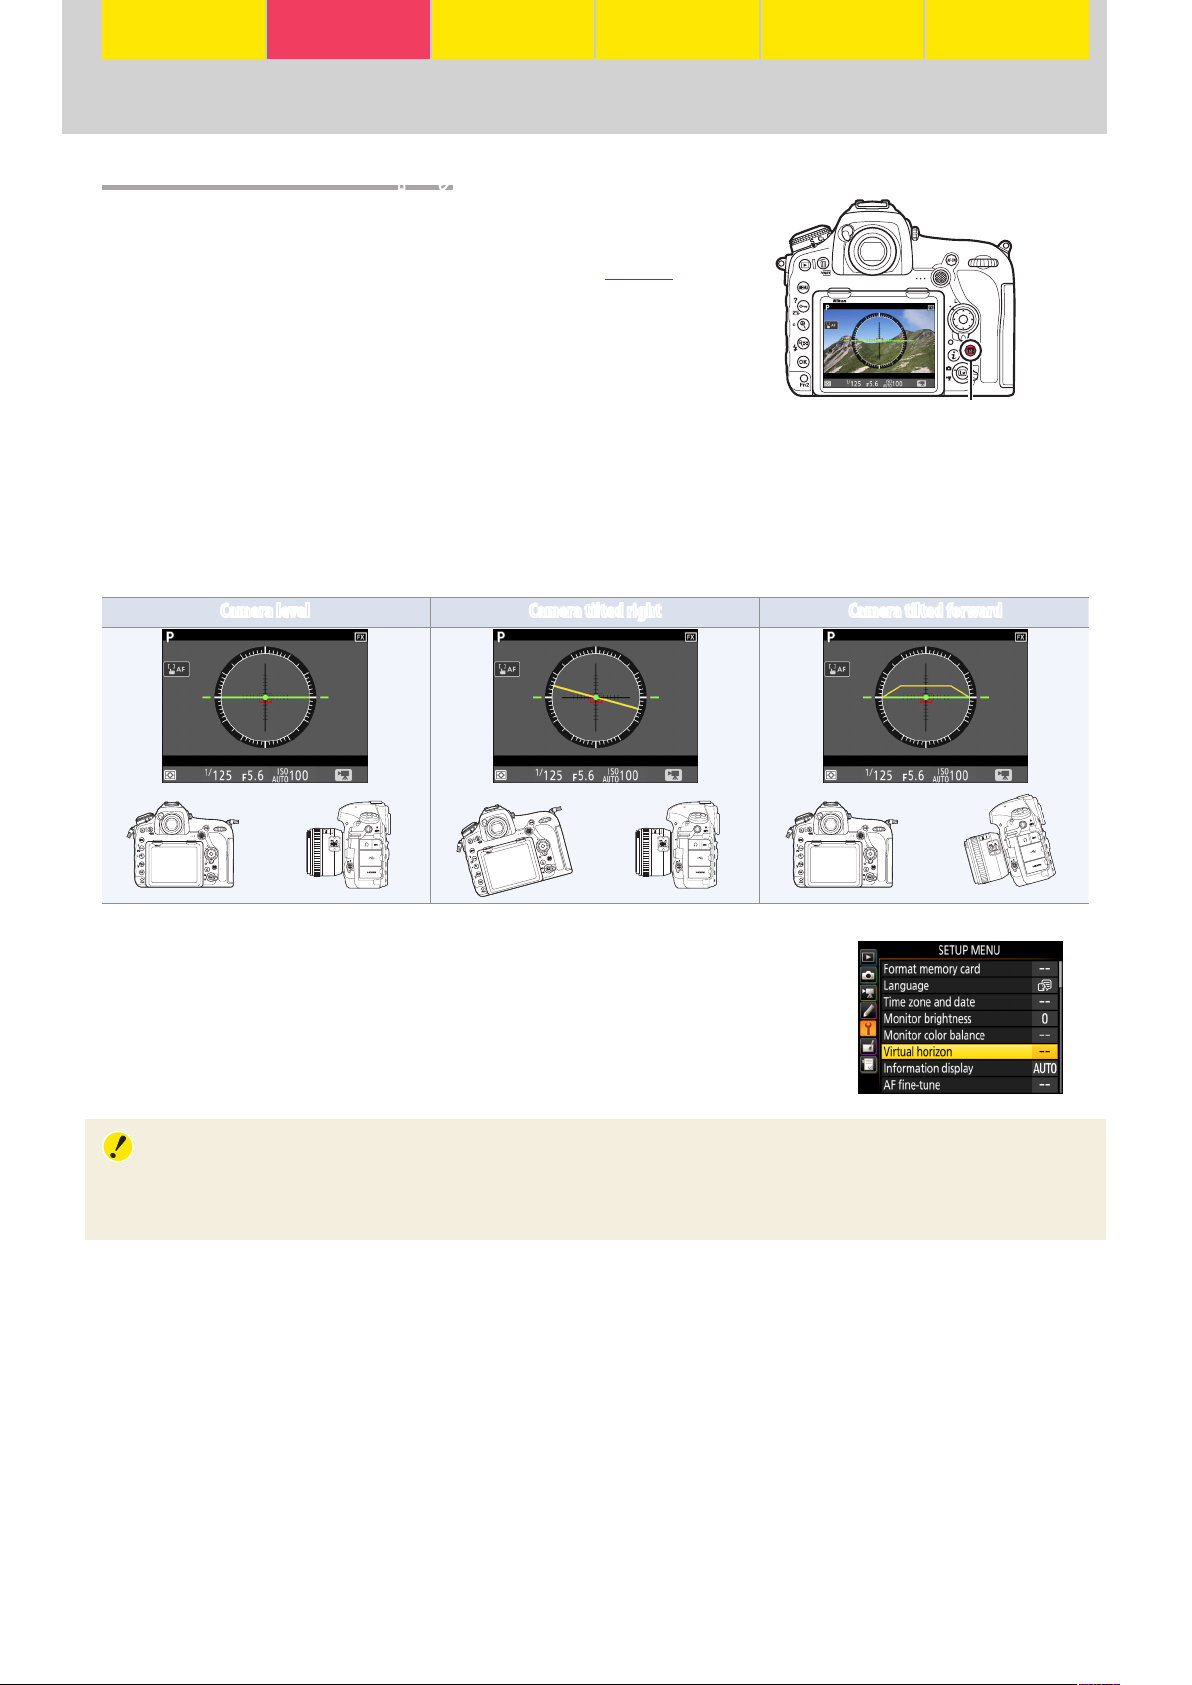
The Virtual Horizon Display
The virtual horizon can be used to help level the camera
when mounting it on a tripod. To view the virtual horizon
in movie mode, use the R button as described on page7.
R button
The virtual horizon shows roll and pitch based on information from the camera tilt sensors. If the
camera is tilted neither left nor right, the roll reference line will turn green, while if the camera is
tilted neither forward nor back, the pitch reference line will turn green and a dot will appear in the
center of the display. Each of the divisions in the gauge around the circumference of the display is
equivalent to 5°.
Camera level Camera tilted right Camera tilted forward
You can also view a virtual horizon using the Virtual horizon option in
the setup menu.
The Virtual Horizon Display
The display is not accurate when the camera is tilted at a sharp angle forward or back. If the camera is
unable to measure tilt, the gauge will vanish from the circumference of the display.
9

Workflow Buttons and Icons Settings Tips and Tricks Viewing Movies Appendix
Accessing Movie Settings
Movie settings can be adjusted in movie mode using any of the following three methods: the
i-button menu, movie-related controls, or the movie shooting menu.
The i-Button Menu
The options listed below can be accessed by pressing the i button
in movie mode:
Option
Choose image area 20
Frame size/frame rate
Movie quality
Active D‑Lighting
Microphone sensitivity
Attenuator
Frequency response
Wind noise reduction
0
12
12
25
26
26
27
27
Destination 33
Monitor brightness
Multi‑selector power aperture
Multi‑selector exposure comp.
Highlight display
Headphone volume
Electronic VR
Peaking level
Option
0
39
34
34
38
28
21
32
i button
Settings can be adjusted without leaving live view, ensuring you never miss a shot. To use the i but-
ton:
Display the i-button menu.
1
With the camera in movie mode, press
the i button to display the i-button
menu.
i button
Select the desired item.
2
Use the touch screen or navigate the menus using the multi selector,
pressing
or 3 to highlight items and 2 to view options for the
1
highlighted item.
Select the desired option.
3
Select an option using touch-screen controls or by pressing
to highlight the desired option and pressing J to select. The
3
i-button menu will be displayed; to exit to the shooting display,
press the i button again.
1
or
10

Workflow Buttons and Icons Settings Tips and Tricks Viewing Movies Appendix
Accessing Movie Settings, Continued
Movie-Related Controls
The following controls can be used for movie recording:
Control Setting
I button Exposure mode 23
U button White balance
Y button Metering
E button Exposure compensation
S button ISO sensitivity
L (Z/Q) button Picture Control
AF-mode button AF mode and AF-area mode
0
14
22
24
13
16
29, 30
Settings can be adjusted without leaving live view,
ensuring you never miss a shot.
The Movie Shooting Menu
The movie shooting menu can be displayed by pressing the G
button and selecting the 1 tab.
Option
Reset movie shooting menu —
File naming —
Destination
Image area
Frame size/frame rate
Movie quality
Movie file type
ISO sensitivity settings
White balance
Set Picture Control
0
33
20
12
12
33
13
14
16
Manage Picture Control —
Active D‑Lighting
High ISO NR
Flicker reduction
Microphone sensitivity
Attenuator
Frequency response
Wind noise reduction
Electronic VR
Time‑lapse movie
Option
0
25
19
25
26
26
27
27
21
41
G button
Accessing Settings
Throughout this chapter, the means by which the settings discussed in each section can be accessed are indicated by check marks in a table like that shown at
right.
i-button menu
Movie-related controls —
Movie shooting menu
11
Workflow Buttons and Icons Settings Tips and Tricks Viewing Movies Appendix
Picture Quality
The settings covered in this section control movie picture quality.
Frame Size, Frame Rate, and Movie Quality
To choose a movie quality option and a frame size and rate for movie recording:
Select the desired item.
1
i-button menu
Movie-related controls —
Movie shooting menu
With the camera in movie mode, press
the i button to display the i-button
menu. Press
or 3 to highlight Frame
1
size/frame rate or Movie quality and
press 2 to view options for the highlighted item.
Select the desired option.
2
Press
or 3 to highlight the desired
1
option and press J to select (frame size
and rate options are listed below; the
options available for Movie quality are
“high” and “normal”). Press the i button
to exit to the shooting display when settings are complete.
Together, Frame size/frame rate and Movie quality determine the maximum bit rate and maximum
length, as shown in the following table.
Frame size/frame rate
r
3840× 2160 (4K UHD); 30p
s
3840× 2160 (4K UHD); 25p
t
3840× 2160 (4K UHD); 24p
y/y 1920× 1080; 60p
z/z 1920× 1080; 50p
1/1 1920× 1080; 30p
2/2 1920× 1080; 25p
3/3 1920× 1080; 24p
4/4 1280× 720; 60p
5/5 1280× 720; 50p
A
1920× 1080; 30p ×4 (slow‑mo)
B
1920× 1080; 25p ×4 (slow‑mo)
C
1920× 1080; 24p ×5 (slow‑mo) —
1. Actual frame rates for values listed as 60p, 30p, and 24p are respectively 59.94 fps, 29.97 fps, and 23.976 fps.
2. Movie quality fixed at “high”.
3. Each movie will be recorded across up to 8 files of up to 4GB each. The number of files and the length of each file vary with the options
selected for Frame size/frame rate and Movie quality.
4. Movie quality fixed at “normal”.
1
Maximum bit rate (Mbps)
144 —
48 24
24 12
4
—
4
36
29
Maximum lengthMovie quality: ★ high Movie quality: normal
2
29min. 59s
Recording: 3min.
Playback: 12min.
Recording: 3min.
Playback: 15min.
3
12
Workflow Buttons and Icons Settings Tips and Tricks Viewing Movies Appendix
Picture Quality, Continued
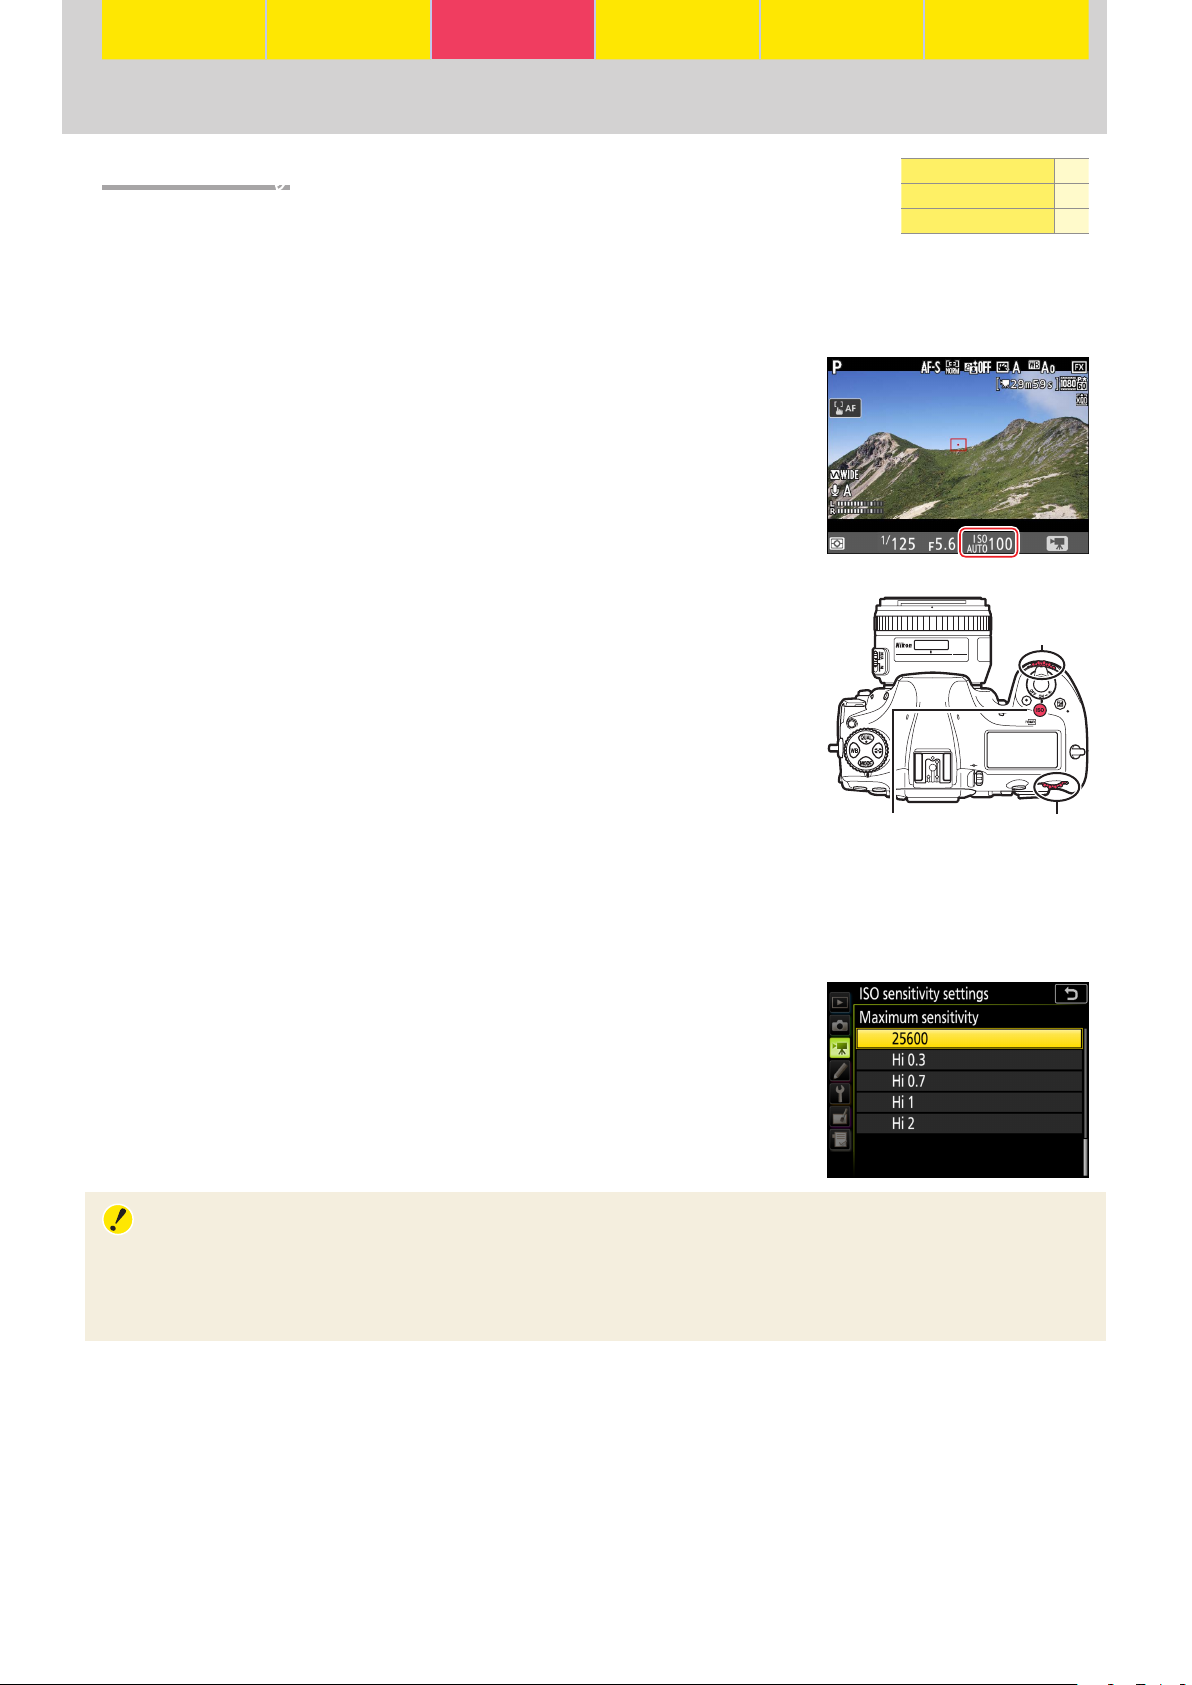
ISO Sensitivity
When exposure mode P, S, or A is selected in movie mode, the camera adjusts
ISO sensitivity automatically. You can, however, choose the upper limit to prevent the camera choosing too high a value. In exposure mode M, you also have
the option of adjusting ISO sensitivity manually.
Exposure Modes P, S, and A
The camera adjusts ISO sensitivity automatically in response to shooting
conditions, choosing from values of from ISO 64 to (at default settings)
Hi2. The current value is displayed in the monitor and control panel.
Exposure Mode M
When the camera is in movie mode, you can enable or disable auto ISO
sensitivity control by keeping the S button pressed and rotating the
sub-command dial; the display shows ISO AUTO when auto ISO sensitivity control is enabled and ISO when it is disabled. When auto ISO sensitivity control is disabled, ISO sensitivity can be manually set to values between ISO 64 and Hi 2 by keeping the S button pressed while rotating
the main command dial. Current ISO sensitivity settings are displayed in
the monitor and control panel.
S button Main command dial
i-button menu —
Movie-related controls
Movie shooting menu
mand dial
Sub-com-
ISO sensitivity can also be adjusted using the ISO sensitivity settings item in the movie shooting
menu. Use Auto ISO control (mode M) to enable or disable auto ISO sensitivity control and ISO sen-
sitivity (mode M) to choose the value used when auto ISO sensitivity control is disabled.
Maximum Sensitivity
To prevent auto ISO sensitivity control setting ISO sensitivity too high,
you can use the ISO sensitivity settings> Maximum sensitivity option
in the movie shooting menu to select an upper limit. Choose from values between ISO 200 and Hi 2. The selected setting applies in modes P,
S, and A and when auto ISO sensitivity control is enabled in mode M.
Auto ISO Sensitivity Control
At high ISO sensitivities, the camera may have diculty focusing and noise (randomly-spaced bright
pixels, fog, or lines) may increase. This can be prevented by choosing a lower value for ISO sensitivity
settings> Maximum sensitivity in the movie shooting menu.
13
Workflow Buttons and Icons Settings Tips and Tricks Viewing Movies Appendix
Picture Quality, Continued
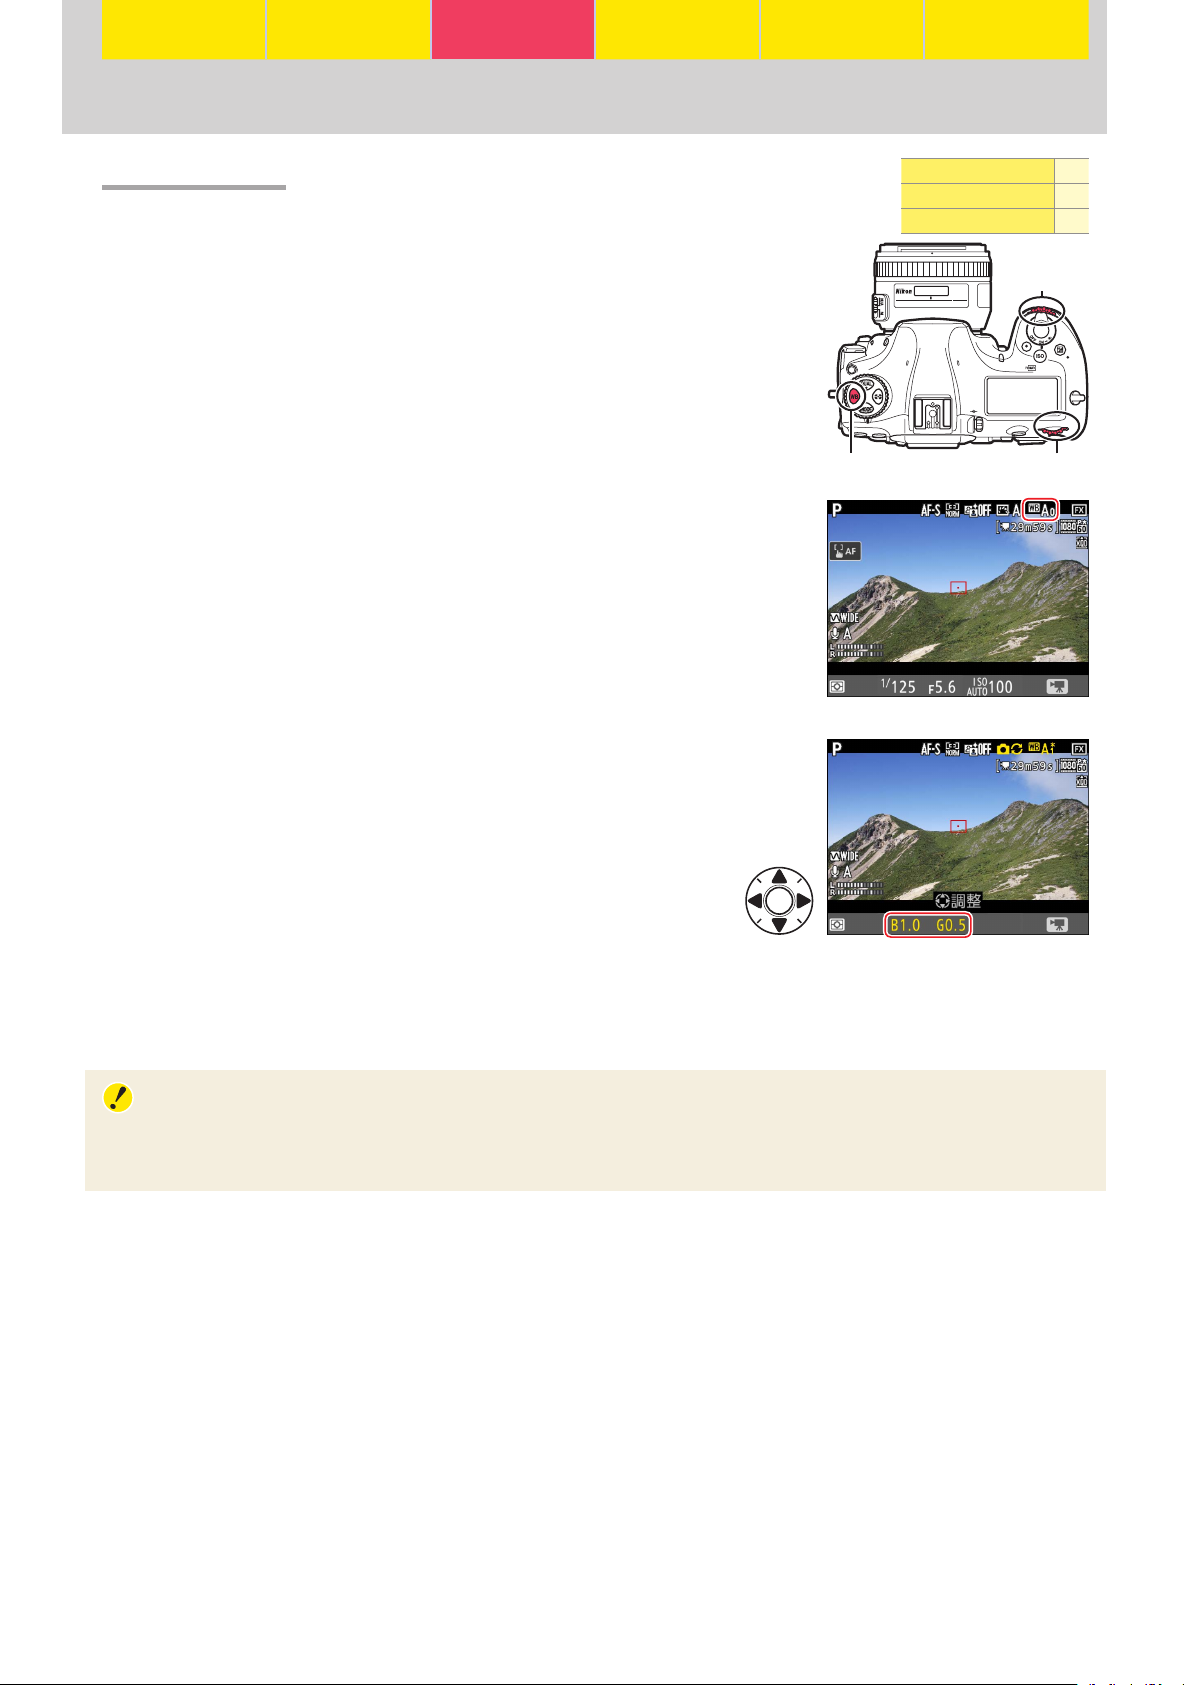
White Balance
Adjust white balance according to lighting conditions.
To select a white balance option without exiting movie mode, press the
U button and rotate the main command dial. The results of the new
setting can be previewed in the monitor. When v (Auto), I (Fluorescent), L (Preset manual), or K (Choose color temp.) is selected, you
can choose a sub-option, white balance preset, or color temperature by
pressing the U button and rotating the sub-command dial.
The current white balance setting is displayed in the monitor and control panel.
Fine-Tuning White Balance in Live View
To ne-tune white balance in live view, hold the U button while using the multi selector. Press
white balance on the amber (A)–blue (B) axis and 1 or 3 to
ne-tune on the green (G)–magenta (M) axis. When K (Choose
color temp.) is selected, the U button can be used to select
the color temperature, although only for the amber (A)–blue (B)
axis: keeping the the U button pressed, press 4 or 2 to highlight a digit and press 1 or 3 to change. To ne-tune preset
manual white balance or to ne-tune color temperature on the
green (G)–magenta (M) axis, use the White balance option in
the movie shooting menu.
or 2 to ne-tune
4
i-button menu —
Movie-related controls
Movie shooting menu
mand dial
U button Main command dial
Sub-com-
“Same as Photo Settings”
Choose Same as photo settings to use the white balance settings currently selected in the photo
shooting menu.
14
Workflow Buttons and Icons Settings Tips and Tricks Viewing Movies Appendix
Picture Quality, Continued
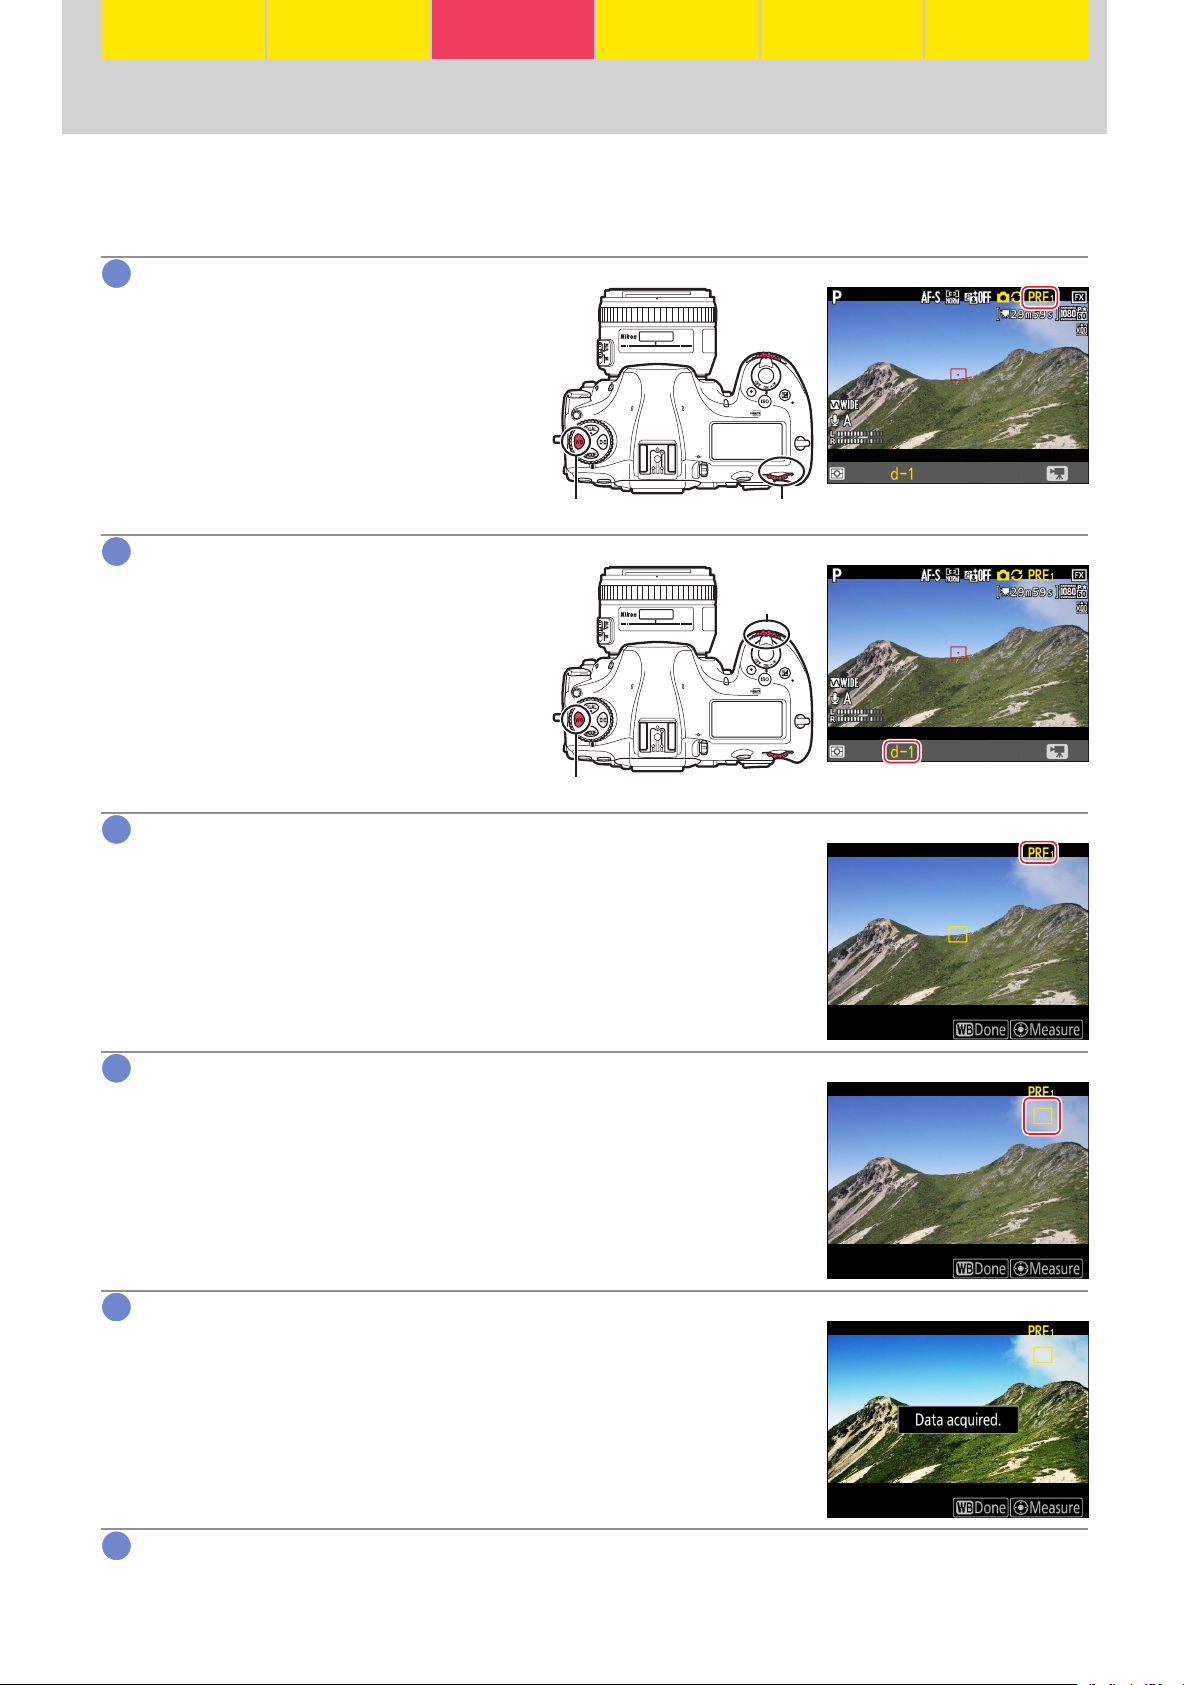
Measuring Preset Manual White Balance in Live View
Use preset manual white balance to measure a custom white balance value for the current light
source and save it for later recall.
Set white balance to L (Preset manual).
1
Press the U button and rotate the main
command dial until L is displayed in
the monitor.
U button Main command dial
Select a preset.
2
Press the U button and rotate the subcommand dial until the desired white
balance preset (d-1 to d-6) is displayed
in the monitor.
Sub-com-
mand dial
U button
Select direct measurement mode.
3
Release the U button briey and then press the button until the
L icon in the monitor starts to ash. A spot white balance target
(r) will be displayed in yellow at the selected focus point.
Position the target over a white or grey area.
4
While L ashes in the display, use the multi selector to position the
r over a white or grey area of the subject. To zoom in on the area
around the target for more precise positioning, press the X button.
You can also measure white balance anywhere in the frame by tapping your subject in the monitor, in which case you can skip Step 5.
Measure white balance.
5
Press the center of the multi selector or press the shutter-release
button all the way down to measure white balance.
Exit direct measurement mode.
6
Press the U button to exit direct measurement mode.
15
Workflow Buttons and Icons Settings Tips and Tricks Viewing Movies Appendix
Picture Quality, Continued
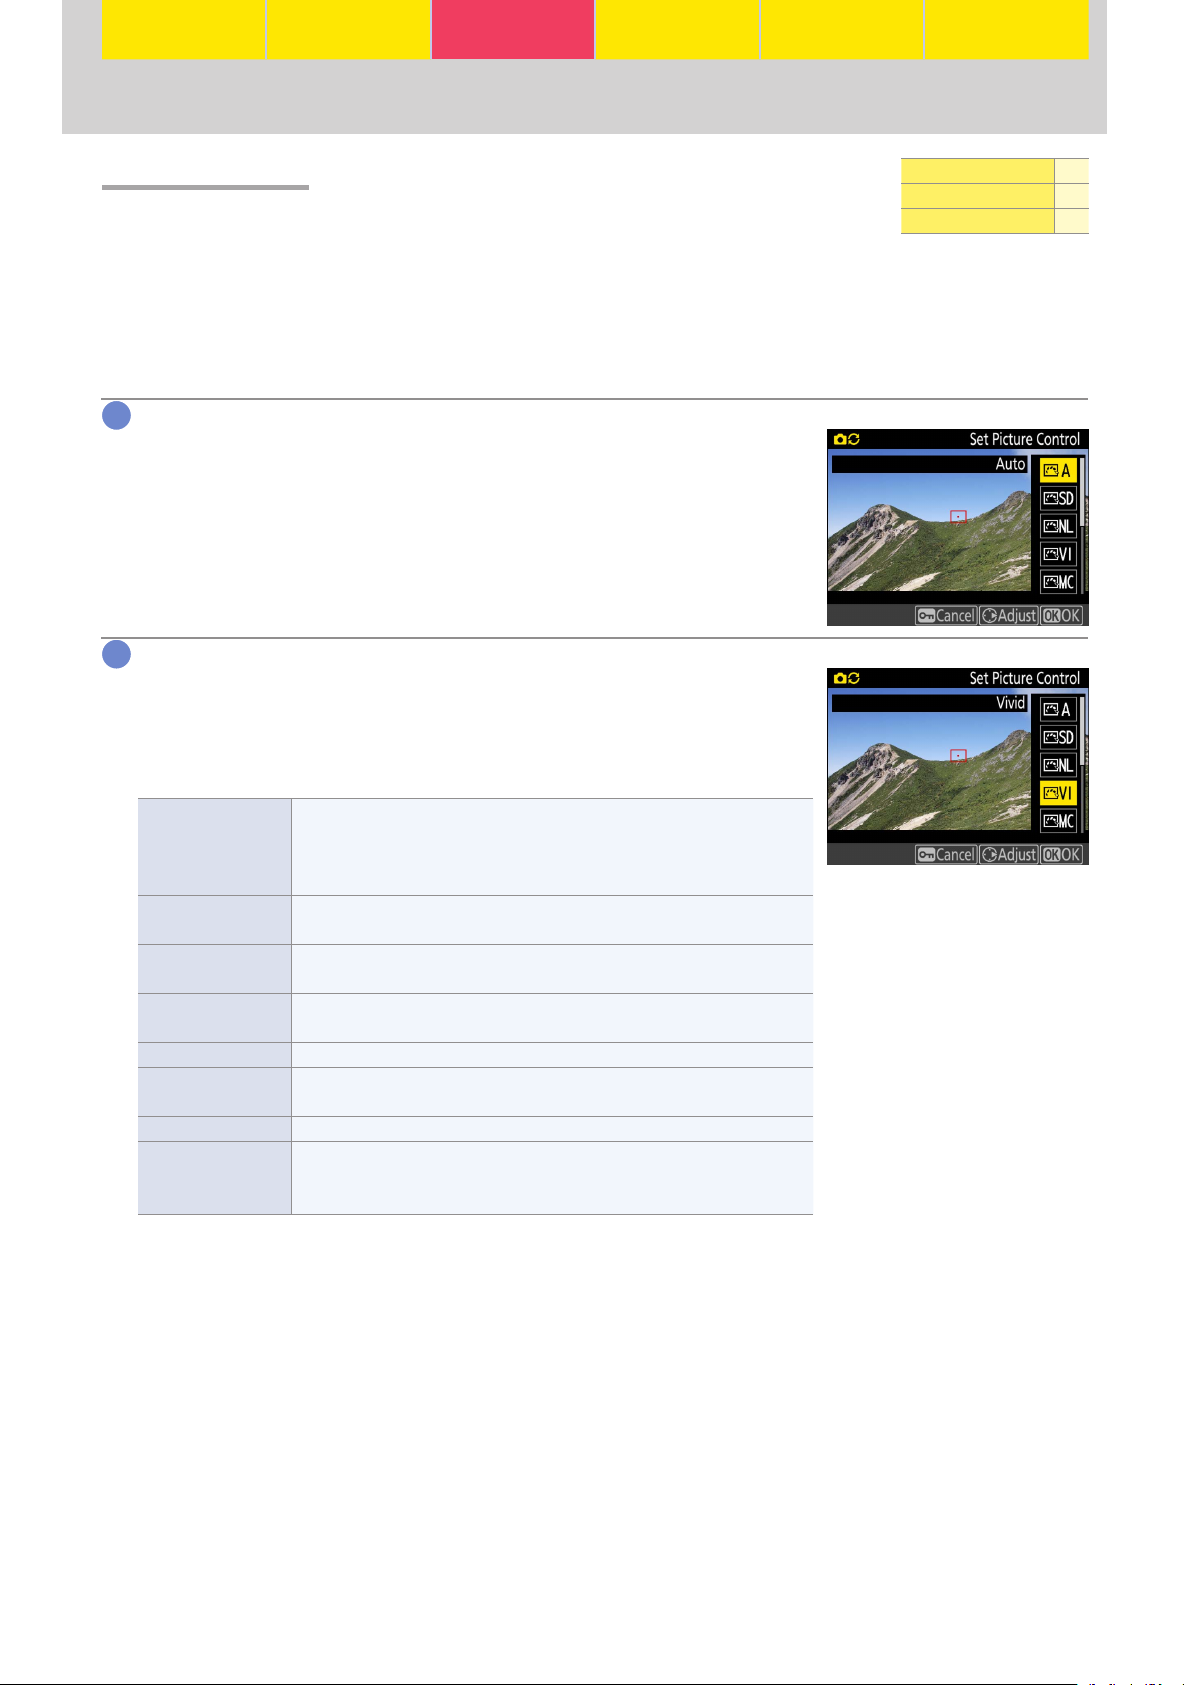
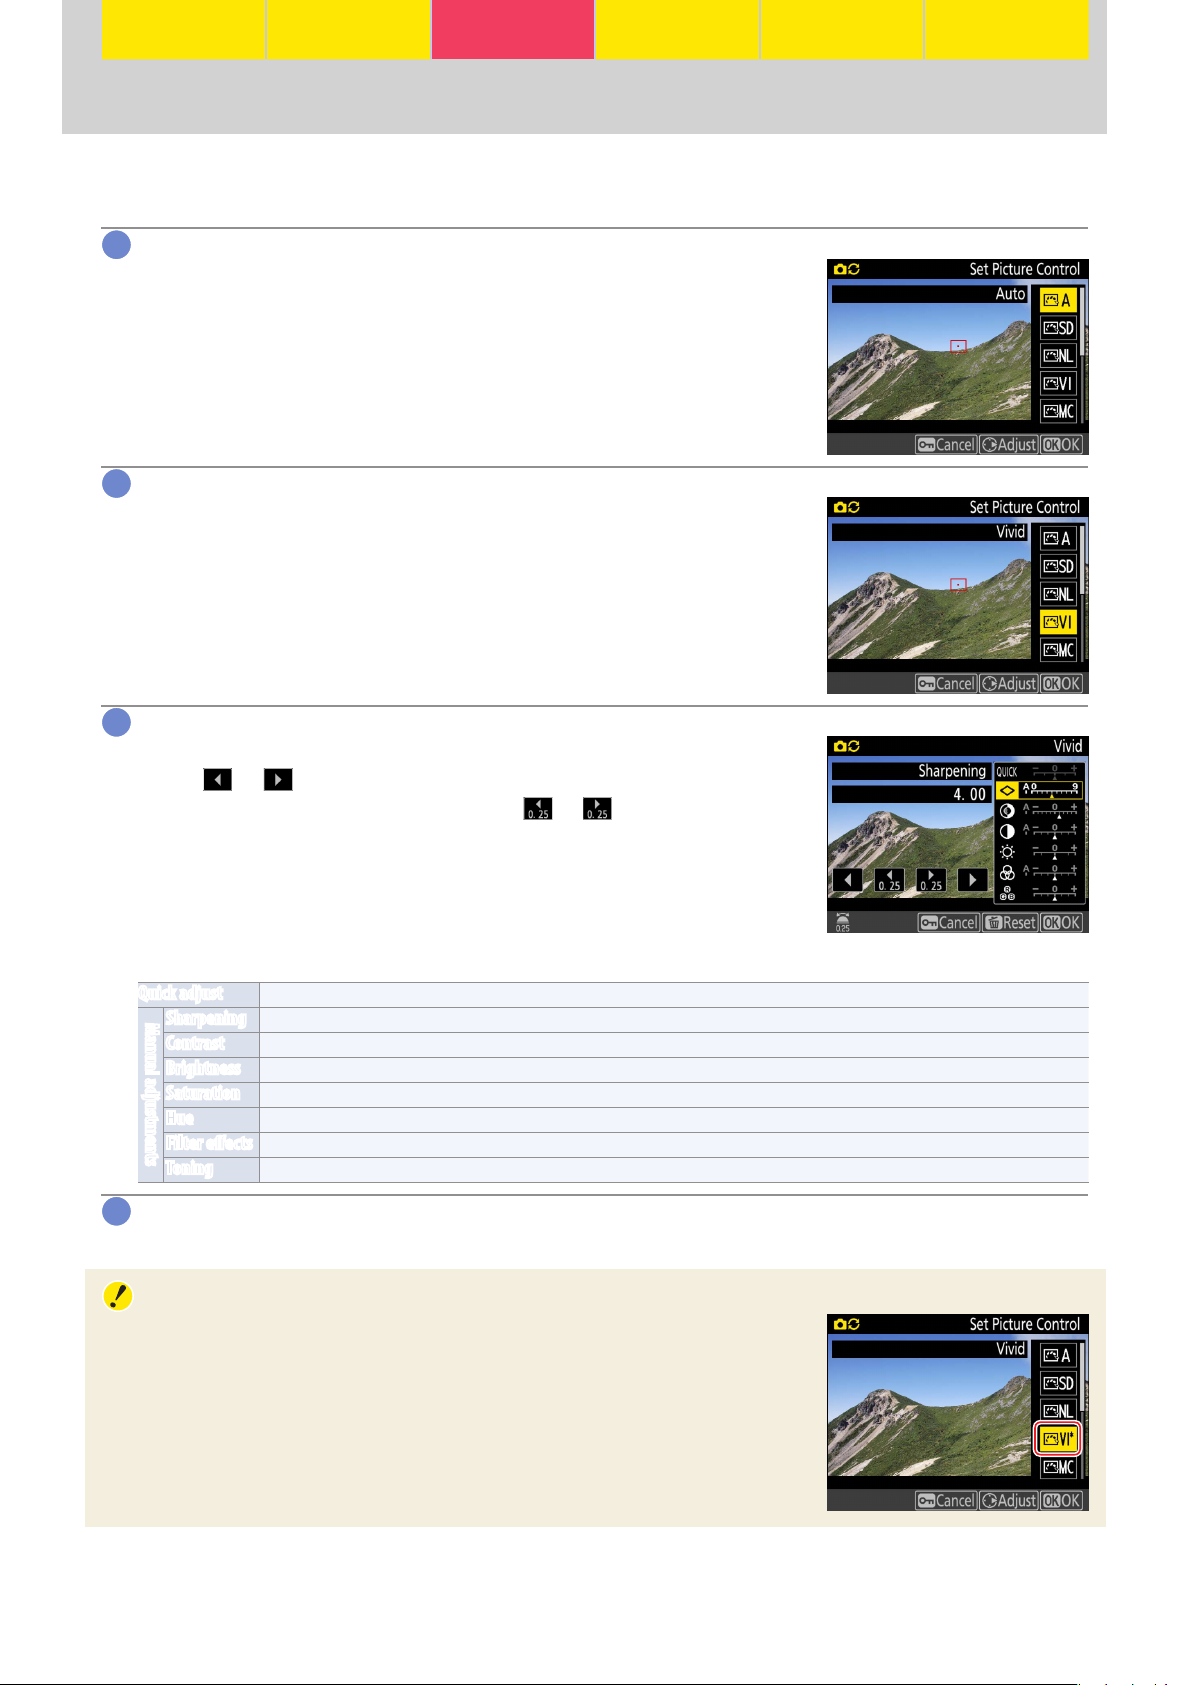
Picture Controls
Choose a Picture Control according to the subject or type of scene. Choose
i-button menu —
Movie-related controls
Movie shooting menu
Same as photo settings to use the Picture Control settings currently selected in
the photo shooting menu, or select Flat to preserve details over a wide tone range, from highlights
to shadows, maximizing the potential for tweaking in post-production. Using Flat with highlightweighted metering minimizes loss of detail in highlights.
To choose a Picture Control without exiting live view:
Display the Picture Control list.
1
In movie mode, press the L (Z/Q) button to view a list of Picture
Controls.
Select a Picture Control.
2
Press
J
or 3 to highlight one of the options listed below and press
1
to select the highlighted item and return to the shooting display.
The display will immediately be updated to show the eects of the
selected Picture Control.
The camera automatically adjusts hues and tones based on the Stan‑
n
Auto
Q
Standard
R
Neutral
S
Vivid
T
Monochrome Record monochrome footage.
o
Portrait
p
Landscape Choose for vibrant landscapes and cityscapes.
q
Flat
dard Picture Control. The complexions of portrait subjects will appear
softer, and such elements as the foliage and sky in outdoor shots more
vivid, than in pictures taken with the Standard Picture Control.
Standard processing for balanced results. Recommended for most situations.
Minimal processing for natural results. Choose for footage that you intend to process in post-production.
Footage is enhanced for a vivid, photoprint effect with emphasis on primary colors.
Footage of portrait subjects is processed to give skin a natural texture
and rounded feel.
Details are preserved over a wide tone range, from highlights to shadows. Choose for footage that will later be extensively processed or retouched.
16
Workflow Buttons and Icons Settings Tips and Tricks Viewing Movies Appendix
Picture Quality, Continued
Modifying Picture Controls in Live View
Individual Picture Control parameters can be ne-tuned without leaving live view.
Display the Picture Control list.
1
In movie mode, press the L (Z/Q) button to view a list of Picture
Controls.
Select a Picture Control.
2
Highlight the desired Picture Control and press
2
.
Adjust settings.
3
Press
or 3 to highlight a setting (see below), then press 4 or 2
1
or tap or in the monitor to choose a value in increments of 1,
or rotate the sub-command dial or tap or to choose a value in
increments of 0.25 (the options available vary with the Picture Control selected). Repeat this step until all settings have been adjusted,
or select a preset combination of settings using Quick adjust. Default settings can be restored by pressing the O (Q) button.
Picture Control Settings
Quick adjust Mute or heighten the effect of the selected Picture Control.
Manual adjustments
Sharpening Control the sharpness of outlines. Select A to adjust sharpening automatically according to the type of scene.
Contrast Adjust contrast manually or select A to let the camera adjust contrast automatically.
Brightness Raise or lower brightness without loss of detail in highlights or shadows.
Saturation Control the vividness of colors. Select A to adjust sharpening automatically according to the type of scene.
Hue Adjust hue.
Filter eects Simulate the effect of color filters on monochrome footage.
Toning Choose the tint used in monochrome footage.
Save changes.
4
Press J to save changes.
Modied Picture Controls
Picture Controls that have been modied from default settings are shown
by an asterisk (“
U”).
17
Workflow Buttons and Icons Settings Tips and Tricks Viewing Movies Appendix
Picture Quality, Continued
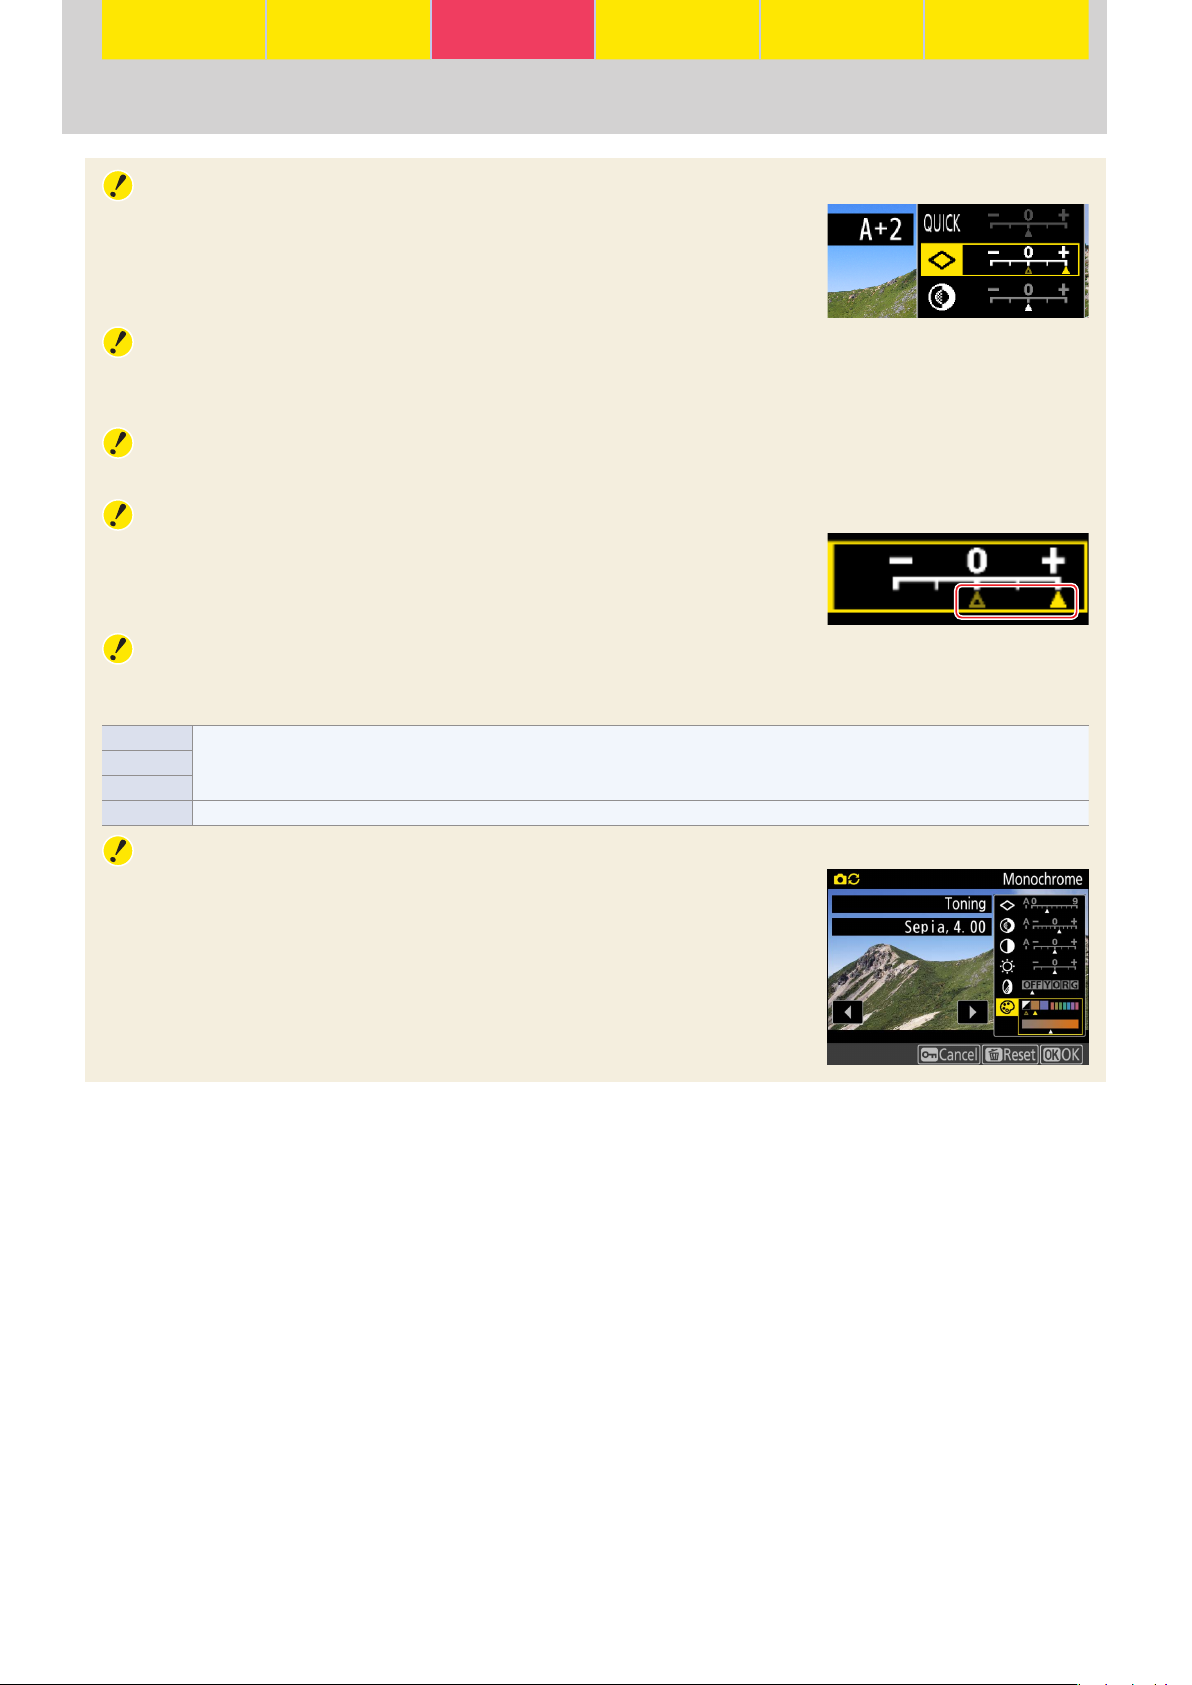
The “n Auto” Picture Control
If n Auto is selected for Set Picture Control, settings can be adjusted in
the range A−2 to A+2. Rotating the sub-command dial has no eect.
“A” (Auto)
Results for auto sharpening, contrast, and saturation vary with exposure and the position of the subject
in the frame. Use a type G, E, or D lens for best results.
Clarity
The Clarity Picture Control setting does not apply to movies.
Previous Settings
The j indicator under the value display in the Picture Control setting menu
indicates the previous value for the setting. Use this as a reference when
adjusting settings.
Filter Eects (Monochrome Only)
The options in this menu simulate the eect of color lters on monochrome footage. The following lter
eects are available:
Y (yellow)
O (orange)
R (red)
G (green) Softens skin tones. Can be used for portraits.
Enhances contrast. Can be used to tone down the brightness of the sky in landscape photographs. Orange produces more
contrast than yellow, red more contrast than orange.
Toning (Monochrome Only)
Pressing
when Toning is selected displays saturation options. Press 4
3
or 2 to adjust saturation. Saturation control is not available when B&W
(black-and-white) is selected.
18
 Loading...