

Technical Guide
Picture Control Edition
En

Table of Contents
Introduction 2
Using Picture Controls 4
Preset Picture Controls 6
Modifying Existing Picture Controls 8
Matching Settings to Your Subject 12
Introduction 2
Using Picture Controls 4
Preset Picture Controls 6
Modifying Existing Picture Controls 8
Modifying Picture Control Parameters: Sample Images ...9
Matching Settings to Your Subject 12
Food .......................................................................................... 12
• Vivid Food Photos ........................................................................12
• Translucent Food Photos .......................................................... 14
Portraits ................................................................................... 16
• Adding Depth ...............................................................................16
• Brightening Colors in Fill-Flash Photos ................................18
• Emphasizing Shadows ...............................................................20
• Bright Lights, Healthy Complexion .......................................22
• High-Contrast Black-and-White..............................................24
Interiors .................................................................................... 26
• Softening Highlights ..................................................................26
• Balancing Interior and Exterior Lighting ............................. 28
• Giving Interiors a Soft, Fuzzy Feel ..........................................30
Wildlife ..................................................................................... 32
• Emphasizing white snow and blue water ...........................32
• Highlighting the main subject ................................................ 34
• Brightening the sky blue ...........................................................36
ii

Managing Custom Picture Controls 38
The Picture Control Utility 42
Managing Custom Picture Controls 38
Creating Custom Picture Controls ...................................... 38
Sharing Custom Picture Controls ........................................ 40
The Picture Control Utility 42
Creating Custom Picture Controls ..................................... 44
• Level Adjustment .........................................................................46
• Using Custom Tone Curves ......................................................48
Importing and Exporting Custom Picture Controls ........ 50
• Importing Controls to the Picture Control Utility ............50
• Saving Custom Picture Controls to a Memory Card ........51
1

Introduction
This D800/D800E Technical Guide, Picture Control Edition helps
those who have mastered the basic techniques described in
the original D800/D800E Technical Guide progress to the next
level: using image enhancement to elevate mere photographs
into works of art. Taking one such image enhancement technique—Picture Controls—as an example, this guide shows
how professional photographers using the D800/D800E
choose and adapt settings according to the situation.
Available with compatible cameras and software, the exible,
fully customizable Nikon Picture Control image enhancement
system lets all photographers, from beginners to professionals, ne-tune color, exposure, and other settings to create
photographs and movies that better re ect their artistic and
creative vision. This guide illustrates how Picture Controls can
be customized on the camera or using the Picture Control
Utility, which lets you preview the e ects of even the smallest
change to Picture Control parameters.
Featuring the D800/D800E, which is equipped with a Picture
Control button for quick access to Picture Controls, this guide
shows how Picture Controls can be used to enhance movies
and photographs alike. Experience the exibility of an image
enhancement system that can be adapted to your subject
and creative intent.
2
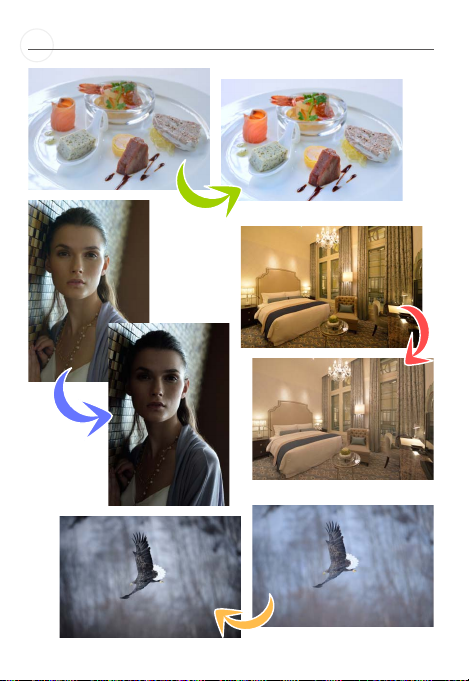
One setting changes the look; changing the look creates new worlds.
3
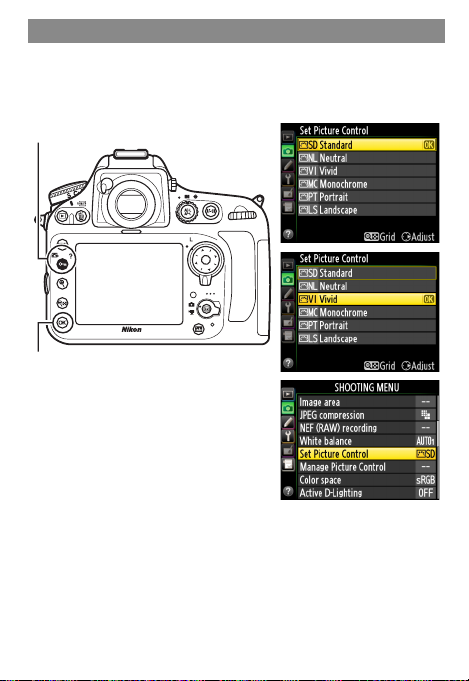
Using Picture Controls
Users of the D800/D800E can display Picture Control settings
by pressing the L (Z/Q) button. Highlight a Picture Con-
trol and press J.
L (Z/Q) button
J button
Picture Controls can also be accessed using the Set Picture Control
option in the shooting menu.
4
Picture Controls
40
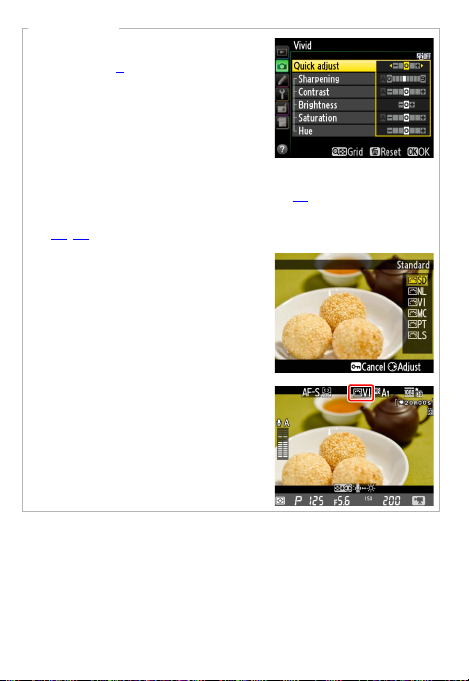
To modify tone, hue, and other parameters (0 88), highlight a Picture
Control in the Picture Control list and
press 2.
The Manage Picture Control option in the shooting menu can
be used to save the modi ed controls (0 3838) or to copy them to
a memory card for use in other cameras or compatible software
(0
40, 5050).
When the L (Z/Q) button is used
to display Picture Controls in live view,
the e ects of the highlighted control
can be previewed in the display.
Picture Controls can also be applied
to movies. Match your choice of Picture Control to your subject for more
vibrant colors or to add atmosphere
by lming in black and white.
5

Preset Picture Controls
Description
Concept
Suggested for
Description
Concept
Suggested for
Description
Concept
Suggested for
The camera’s preset Picture Controls are described below.
Standard (default)
Description Pictures are processed for balanced sharpness, contrast,
Concept Parameters are tuned for an eff ect that appeals to most
Suggested for Snapshots and other general-purpose pictures.
Neutral
Description Extreme exposure is avoided for clean, natural results.
Concept Under- and over-exposure are avoided for natural colors
Suggested for Photographs that will later be processed or retouched to
Vivid
Description Sharpening, contrast, and other settings are enhanced for
Concept A vivid, photoprint look with heightened sharpening and
Suggested for Colorful costumes or street scenes, fresh fruits, fl oral
brightness, saturation (vividness), and hue.
viewers, regardless of the subject. Vividness is slightly
increased for pictures that can be used “as is”, with no
further processing.
and a rich tone range. Images are softened by keeping
sharpening and contrast low.
create unique images; photos of objects that are mostly
black or white or that have soft outlines.
vivid, fresh results with good contrast.
contrast that makes the subject stand out.
arrangements and anywhere you want to emphasize
bright colors or enhance low-contrast subjects.
6

Monochrome
Description
Concept
Suggested for
Description
Concept
Suggested for
Description
Concept
Suggested for
Description Pictures are recorded in monochrome.
Concept Use Filter eff ects to reproduce the eff ects of color fi lters
Suggested for Portraits, snapshots, landscapes, and any other subject
Portrait
Description Settings are adjusted to enhance the complexion of por-
Concept Natural-looking results that brighten and smooth the
Suggested for Portraits.
Landscape
Description Settings are adjusted to lend vividness and depth to
Concept Mid-tone levels are brought down for a calm, composed
Suggested for Wooded hills and valleys and other landscapes featuring
when taking pictures in black-and-white, or use Toning
for monochrome pictures in other tints.
that can be captured in monochrome.
trait subjects.
complexions of portrait subjects and soften curves.
Sharpening and contrast are reduced slightly for a soft
eff ect. Background objects and clothing are rendered using settings similar to the Standard control.
scenes featuring blue skies and green foliage.
eff ect, while vividness is restrained for natural-looking results. Sharpening and contrast are slightly increased.
blue skies and green foliage, as well as cityscapes and
other scenery.
7
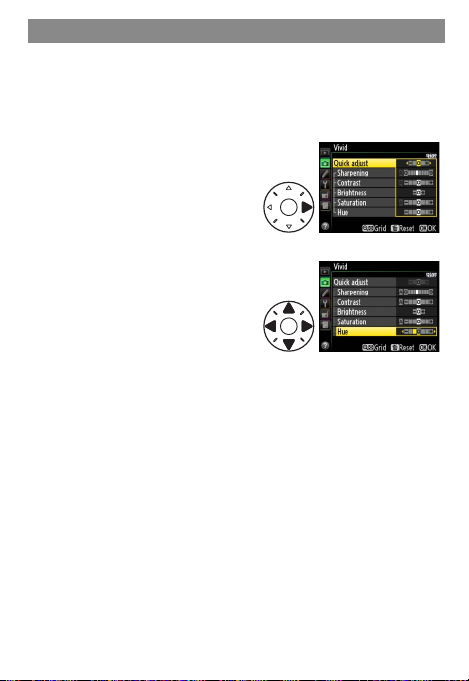
Modifying Existing Picture Controls
Existing Picture Controls can be modi ed to suit the scene
or your creative intent. Choose Quick adjust for a balanced
combination of settings or adjust each parameter manually.
Select a Picture Control.
1
Highlight a Picture Control
in the Picture Control list and
press 2.
Adjust settings.
2
Press 1 or 3 to highlight settings and press 4 or 2 to adjust. Repeat until all settings
have been adjusted, or select
Quick adjust to choose from
preset combinations. Default
settings can be restored by
pressing the O (Q) button.
Press J.
3
8
Modifying Picture Control Parameters: Sample Images
Quick Adjust
Sharpening
Contrast
Quick Adjust Adjust the eff ect of the selected Picture Control by
Sharpening Control the sharpness of outlines. The higher the value,
Contrast Adjust contrast. Choose negative values for softer con-
applying simultaneous adjustments to sharpening,
contrast, and saturation. Not available with Neutral,
Monochrome, or custom Picture Controls.
Quick adjust: –2 Quick adjust: +2
the greater the sharpening.
Sharpening: 0 Sharpening: 9
trast, positive values to preserve details in low-contrast
subjects.
Contrast: –3 Contrast: +3
9
Modifying Existing Picture Controls
Brightness
Non-monochrome Picture Controls only
Saturation
Hue
Modifying Existing Picture Controls
Brightness Adjust brightness without aff ecting exposure.
Brightness: –1 Brightness: +1
Saturation Control the vividness of colors. Lower values reduce
Non-monochrome Picture Controls only
Hue Choose negative values to make reds more purple,
saturation, while higher values increase it.
Saturation: –3 Saturation: +3
blues more green, and greens more yellow, positive
values to make reds more orange, greens more blue,
and blues more purple.
Hue: –3 Hue: +3
10

Modifying Picture Control Parameters: Sample Images
Monochrome Picture Controls only
Filter
e ects
Toning
Modifying Picture Control Parameters: Sample Images
Filter
e ects
Monochrome Picture Controls only
Toning Choose a tint for monochrome pictures.
Hue: The Color Wheel
The hue parameter can be visualized as
a color wheel. Choosing lower values
rotates the wheel counterclockwise, so
that the hues at the top of the wheel
are replaced by their neighbors to the
right. Choosing higher values rotates
the wheel clockwise, so that the hues
at the top of the wheel are replaced by
their neighbors to the left.
Simulate the eff ect of color fi lters when shooting in
monochrome.
Filter eff ect: OFF Filter eff ect: R
Tint: Sepia Tint: Green
11
Matching Settings to Your Subject
Choose and modify Picture Controls according to your goals
and creative intent.
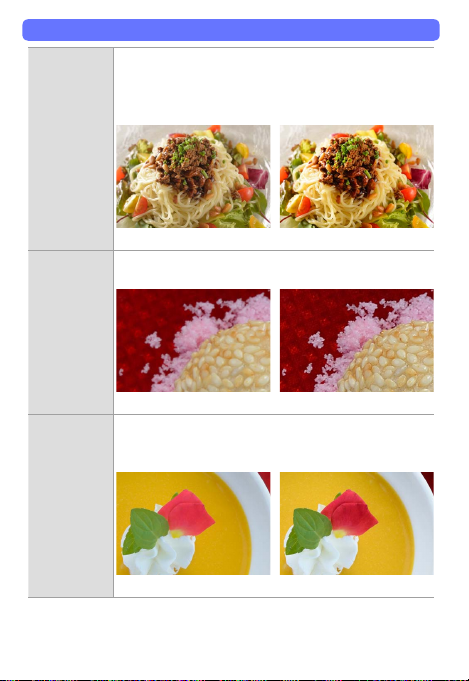
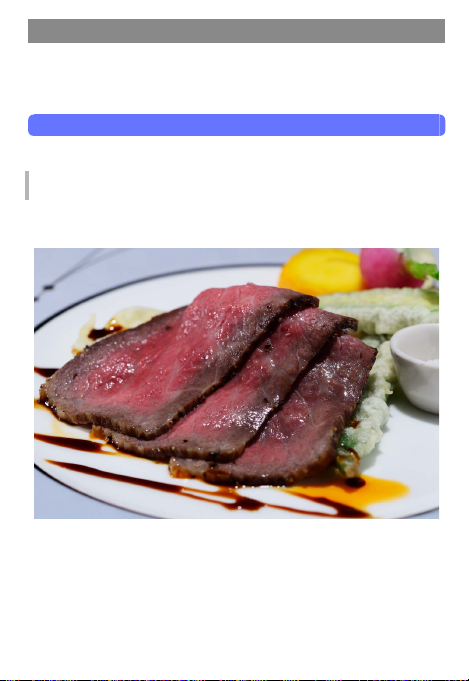
Food
Shoot stimulating, delicious-looking pictures of food.
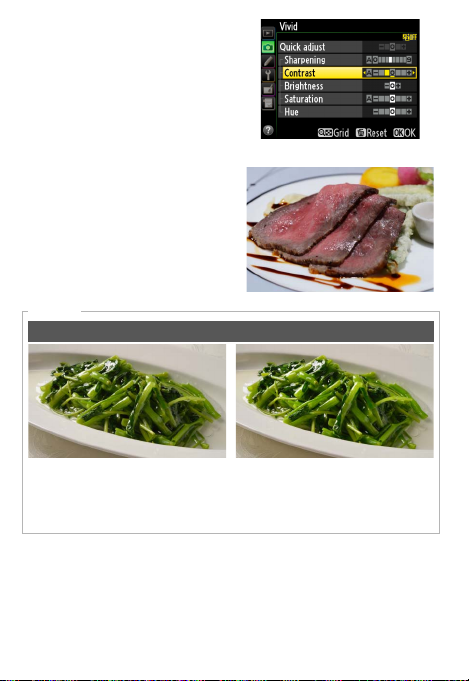
Vivid Food Photos
Selecting Vivid and adjusting contrast makes the roast and
side dishes more vivid and appealing.
■ Lens: AF-S VR Micro-Nikkor 105 mm f/2.8G IF-ED ■ Exposure
mode: Manual (⁄ s, f/11) ■ White balance: Direct sunlight
Note: This photo was shot in 14-bit NEF (RAW) and processed using Capture NX 2. Photo © Noriko Yamaguchi
12
The photo on the previous
page was taken using the Vivid
Picture Control with Contrast
set to –1 to make the meat appear less greasy.
“Vivid” Versus “Standard”
While Standard produces balanced results, Vivid makes the
food look freshly served.
Quick Tip
Greens That Pop
Standard Landscape
The Landscape Picture Control vividly renders dishes that fea-
ture vegetables and other green items.
13
Matching Settings to Your Subject
Matching Settings to Your Subject
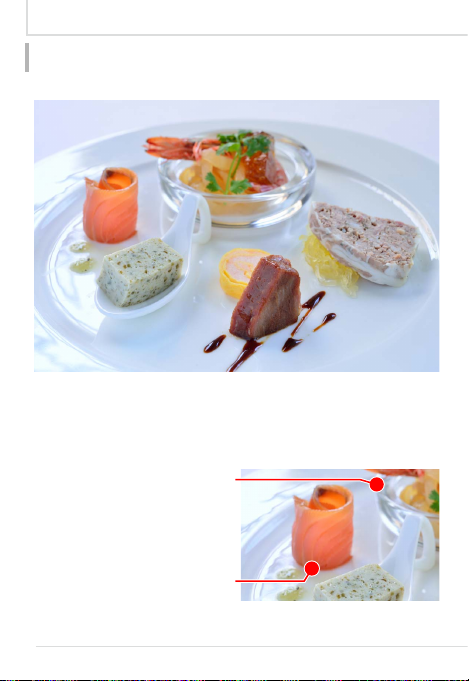
Translucent Food Photos
The Vivid control can be modi ed for a translucent e ect.
■ Lens: AF-S Micro NIKKOR 60 mm f/2.8G ED ■ Exposure mode:
Manual (¼ s, f/11) ■ White balance: Direct sunlight
Note: This photo was shot in 14-bit NEF (RAW) and processed using Capture NX 2. Photo © Noriko Yamaguchi
Contrast and brightness raised
to make glass appear more
Redness increased to bring out
colors in salmon and shrimp.
transparent.
14
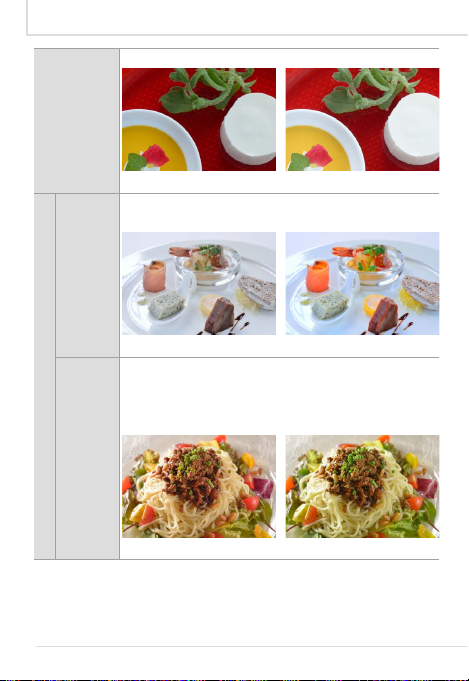
Food
Food
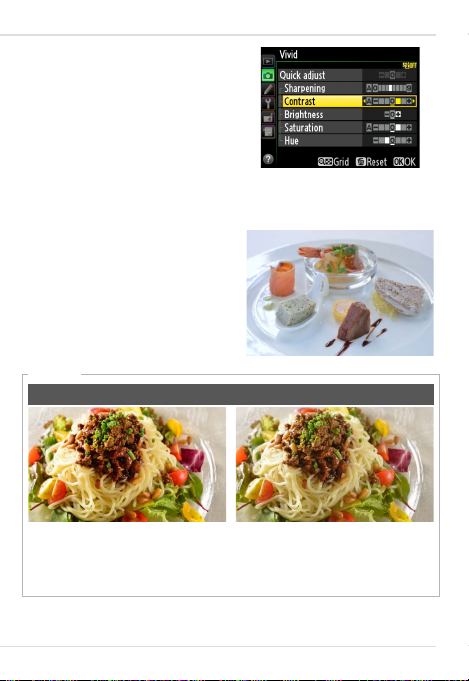
The photo on the previous
page was taken using the Vivid
Pic
ture Control with Contrast,
Brightness, and Saturation set
to +1 and Hue to –1 to suppress
the blue cast from natural light
and bring out the red foods on
the plate.
The Modi ed Versus the Unmodi ed Picture Control
Although the results still re ect
the photographer’s original intent, under some lighting conditions the picture will have a
blue cast that makes red foods
appear more subdued.
Quick Tip
Creating an Ascetic E ect
Vivid Neutral
If Vivid makes food look rich, selecting Neutral before shooting
can lend dishes a certain Spartan appeal.
15

Matching Settings to Your Subject
Matching Settings to Your Subject
Portraits
Improve your portraits with Picture Controls.
Adding Depth
A slight increase in
sharpening adds
depth by heightening the di erences
between in- and
out-of-focus areas.
Sharpening increases separation
between subject
and background.
■ Lens: AF-S NIKKOR 50 mm f/1.4G ■ Exposure mode: Manual (⁄ s,
f/4.5) ■ White balance: Direct sunlight
Note: This photo was shot in 14-bit NEF (RAW) and processed using Capture NX 2. Photo © Daisuke Kumakiri
16

Portraits
Portraits
The photo on the previous page
was taken using the Portrait
Control with Sharpening set to 4.
Other parameters are left at default
values for a soft e ect.
The Modi ed Versus the Unmodi ed Picture Control
Unmodi ed Picture Control Modi ed Picture Control
The modi ed Picture Control sharpens outlines in eyelashes,
hair, and other ne details, preventing the subject appearing
at and two-dimensional.
Picture
17

Matching Settings to Your Subject
Matching Settings to Your Subject
Brightening Colors in Fill-Flash Photos
When using a ll- ash in daylight, increase Saturation to
avoid washed out colors in areas lit by the ash.
Sky is a beautiful
clear blue.
More depth visible
in shaded, underexposed areas of turf.
■ Lens: AF-S NIKKOR 85 mm f/1.4G ■ Exposure mode: Manual (½ s,
f/14) ■ White balance: Direct sunlight
Note: This photo was shot in 14-bit NEF (RAW) and processed using Capture NX 2. Photo © Daisuke Kumakiri
18

Portraits
Portraits
The photo on the previous page
was taken using the Portrait
ture Control with Saturation set to
+3. Sharpening is left at its default
value to suggest motion.
The Modi ed Versus the Unmodi ed Picture Control
Unmodi ed Picture Control Modi ed Picture Control
The modi ed Picture Control makes the sky and grass more
vivid for a balanced e ect that brings the portrait subject to
the fore. The blue of the sky was made still more vivid using
the Capture NX 2 LCH editor.
Pic-
19

Matching Settings to Your Subject
Matching Settings to Your Subject
Emphasizing Shadows
Reducing saturation emphasizes shadows for a still, calm effect in photos taken under low natural light.
Increased contrast
tightens composition.
Reduced saturation produces
near-monochrome
e ect.
■ Lens: AF-S NIKKOR 85 mm f/1.4G ■ Exposure mode: Manual (½ s,
f/5.6) ■ White balance: Direct sunlight
Note: This photo was shot in 14-bit NEF (RAW) and processed using Capture NX 2. Photo © Daisuke Kumakiri
20

Portraits
Portraits
The photo on the previous page
was taken using the Vivid Pic
Control with Contrast set to +1,
Brightness to –1, and Saturation
and Hue to –3 for a tighter overall
composition.
The Modi ed Versus the Unmodi ed Picture Control
Unmodi ed Picture Control Modi ed Picture Control
Where the unmodi ed Picture Control softens the image,
enhancing contrast brings the composition together. It also
suggests strength by changing how the viewer interprets the
subject’s expression.
ture
21

Matching Settings to Your Subject
Matching Settings to Your Subject
Bright Lights, Healthy Complexion
Prevent washed-out, at-looking skin tones for an attractive,
healthy look in photos taken under bright studio lights.
Red increased for
a healthy-looking
complexion.
Saturation
increased to make
redder areas a
darker pink.
■ Lens: AF-S NIKKOR 85 mm f/1.4G ■ Exposure mode: Manual (⁄ s,
f/8) ■ White balance: Flash
Note: This photo was shot in 14-bit NEF (RAW) and processed using Capture NX 2. Photo © Daisuke Kumakiri
22

Portraits
Portraits
The photo on the previous page
was taken using the Portrait
Control with Sharpening set to 1,
Saturation to +1, and Hue to –1.
Contrast is left at its default value
for a softer look.
The Modi ed Versus the Unmodi ed Picture Control
Unmodi ed Picture Control Modi ed Picture Control
With Hue set to –1, the modi ed Picture Control enhances
reds for a cute, pop-art look, while reducing sharpening softens the image.
Picture
23

Matching Settings to Your Subject
Matching Settings to Your Subject
High-Contrast Black-and-White
To record photos in both color and black-and-white, shoot
using the Neutral Picture Control and then experiment with
di erent tints and lters in Capture NX 2.
■ Lens: AF-S NIKKOR 85 mm f/1.4G ■ Exposure mode: Manual (⁄ s,
f/5.6) ■ White balance: Flash
Note: This photo was shot in 14-bit NEF (RAW) and processed using Capture NX 2. Photo © Daisuke Kumakiri
Subject lit with later conversion to
black-and-white in mind.
Increased contrast for silver
screen movie star look.
24

Portraits
The photo on the previous page was
taken using the Neutral Pic
trol and then converted to black-andwhite Monochrome in Capture NX 2
using the Yellow lter, with Contrast
set to +1.
Filter E ects
Orange Red
Green
ture Con-
Filter e ects change the look
of monochrome pictures, particularly lips and skin tones.
Choose a lter with attention
to skin tone and the shadows
in clothing.
Portraits
25

Matching Settings to Your Subject
Matching Settings to Your Subject
Interiors
Create atmosphere with Picture Controls.
Softening Highlights
Bring out natural colors in roses shot under mixed lighting.
■ Lens: AF-S NIKKOR 50 mm f/1.4G ■ Exposure mode: Aperture-
Priority Auto (⁄ s, f/5.6) ■ White balance: Incandescent
Note: This photo was shot in 14-bit NEF (RAW) and processed using Capture NX 2. Photo © Noriko Yamaguchi
Settings are adjusted for natural-
looking colors: white roses that look
white and leaves that look green.
26

Interiors
The picture on the previous page
was taken with the Portrait
Control, with Contrast set to +1
and Hue to +3, softening the image
overall.
The Modi ed Versus the Unmodi ed Picture Control
Unmodi ed: The Portrait Picture Control en-
hances highlights, making it a perfect choice for
bringing out rich details
in a white-colored subject. Here whites and
greens have been further enhanced for an effect close to the desired
results.
Modi ed: Increasing contrast slightly tones down
black outlines, while the
change to hue makes
greens more vivid (for
more information on hue
see page 1111).
Picture
Interiors
27

Matching Settings to Your Subject
Matching Settings to Your Subject
Balancing Interior and Exterior Lighting
Heighten the e ect of looking through a window by emphasizing the contrast between the window frame and the exterior while simultaneously reducing the e ects of the window
glass on the colors in the outdoor scene.
Tone down
mid-tones in the
window frame.
Adjust hue for natural colors in the sky
and buildings.
■ Lens: AF-S NIKKOR 24-70mm f/2.8G ED ■ Exposure mode: Aper-
ture-Priority Auto (½ s, f/11) ■ White balance: Direct sunlight
Note: This photo was shot in 14-bit NEF (RAW) and processed using Capture NX 2. Photo © Noriko Yamaguchi
28

Interiors
The picture on the previous page
was taken with the Landscape Picture Control, with Contrast set to –2,
Brightness to –1, and Hue to –3 to
restore natural colors by reducing the
e ects of the window glass on the sky
and buildings in the exterior scene.
The Modi ed Versus the Unmodi ed Picture Control
Interiors
Standard
Landscape (with hue and
brightness adjustment)
Landscape (with hue adjustment)
The need to slightly emphasize
the concrete in the window
frame makes the higher-contrast Landscape Picture Con-
trol a better choice than Stan-
dard, which would soften the
overall image. The e ects of the
change to Brightness are most
obvious in mid-tones, reducing
the brightness of the window
frame relative to the objects in
the exterior landscape.
29

Matching Settings to Your Subject
Matching Settings to Your Subject
Giving Interiors a Soft, Fuzzy Feel
Interior photos in catalogs can have a hard, didactic feel. Use
Picture Controls to create a soft, warm e ect.
■ Lens: AF-S NIKKOR 14-24mm f/2.8G ED ■ Exposure mode: Manual
(⁄ s, f/11) ■ White balance: Auto (Keep warm lighting colors)
Note: This photo was shot in 14-bit NEF (RAW) and processed using Capture NX 2. Photo © Noriko Yamaguchi
Lower hue for warmer colors.
Lower contrast and satura-
tion for a softer feel overall.
30

Interiors
Interiors
The picture on the previous page
was taken with the Neutral Picture
Control, with Contrast set to –2,
Brightness to +1, and Saturation
and Hue to –3 for reduced vividness
and a calmer feel.
The Modi ed Versus the Unmodi ed Picture Control
Standard: Contrast is heightened for a hard, didactic feel.
Modi ed Picture Control: Contrast and saturation are reduced
for a soft, calm e ect that conveys the comfort of a lived-in
space.
31

Matching Settings to Your Subject
Matching Settings to Your Subject
Wildlife
Make wildlife pictures more impressive.
Emphasizing white snow and blue water
Emphasizing the colors of white snow and river water expresses hushed snow eld in a frigid environment.
■
Lens: AF-S NIKKOR 24-70mm f/2.8G ED ■ Exposure mode: Aperture-
Priority Auto (½ s, f/11) ■ White balance: Choose color temp. (5000K)
Note: This photo was shot in 14-bit NEF (RAW) and processed using Capture NX 2. Photo © Junichi Noguchi
Increased saturation emphasizes the
The high-contrast Landscape Picture
Control makes trees looks clearer.
water color.
32

Wildlife
The picture on the previous page
was taken with the Landscape Picture Control, with Saturation set to
+3 for the clearer water blue and
an impressive feel, while the rest of
the area in the work is almost achromatic.
The Modi ed Versus the Unmodi ed Picture Control
Taken with the Standard Picture Control
without modi cation,
this looks balanced
overall and makes a
softer impression.
The high-contrast
Landscape Picture
Control makes a
sharper impression
with the clearly-outlined trees and riverbank, and increased
saturation makes the
white snow stand out
and slightly brightens the water color.
Wildlife
33

Matching Settings to Your Subject
Matching Settings to Your Subject
Highlighting the main subject
Reduced brightness and/or saturation and increased contrast
highlight the main subject clearly.
■
Lens: AF-S NIKKOR 600mm f/4G ED VR ■ Exposure mode: Aperture-
Priority Auto (⁄ s, f/5) ■ White balance: Choose color temp. (5000K)
Note: This photo was shot in 14-bit NEF (RAW) and processed using Capture NX 2. Photo © Junichi Noguchi
Higher contrast highlights the
Very low saturation purposely
makes the sky color dull to
highlight the subject.
subject.
34

Wildlife
The picture on the previous page
was taken with the Neutral Picture
Control, with Contrast set to +3,
Brightness to –1, and Saturation to
–3 for reduced color of the overall
image and a distinctive feel.
The Modi ed Versus the Unmodi ed Picture Control
Unmodi ed: The
Neutral Picture Con-
trol expresses natural colors for a clean
impression.
Modi ed: In addition to modifying
the Picture Controls,
reducing Vignette
Control by Capture
NX 2 increases quality of the work. Purposely dropping peripheral brightness
of the image is the
e ective expression
especially with ne
background.
Wildlife
35

Matching Settings to Your Subject
Matching Settings to Your Subject
Brightening the sky blue
Brightening the sky blue to a natural extent makes an impressive result in contrast with white feathers of swans.
■
Lens: AF-S NIKKOR 24-70mm f/2.8G ED ■ Exposure mode: Aperture-
Priority Auto (⁄ s, f/5.6) ■ White balance: Choose color temp. (5000K)
Note: This photo was shot in 14-bit NEF (RAW) and processed using Capture NX 2. Photo © Junichi Noguchi
Increased saturation for the
clearer blue of the sky.
Increased brightness empha-
sizes the feather white.
36

Wildlife
The picture on the previous page
was taken with the Landscape Picture Control, with Brightness and
Saturation set to +1. Modifying
Hue could make the sky brighter,
but purposely unmodi ed for a
natural feel.
The Modi ed Versus the Unmodi ed Picture Control
The Standard and
unmodi ed Picture
Control creates a rich
color tone, but the
modi cation will further brighten the sky
and the main swan.
The modi ed Picture
Control makes a clearer image and highlights wings spread
widely.
Wildlife
37

Managing Custom Picture Controls
Picture Controls that have been customized to suit your preferences can be saved to the camera under a new name and
then copied for use in other cameras or software.
Creating Custom Picture Controls
Existing Picture Controls can be modi ed and saved to create
custom Picture Controls.
Select Manage Picture Control > Save/edit.
1
Highlight Manage Picture
Control in the shooting menu
and press 2 to display the options shown at right. Highlight
Save/edit and press 2.
Select a Picture Control.
2
Highlight an existing Picture
Control and press 2.
Edit the Picture Control.
3
Edit the Picture Control as described in “Modifying Existing
Picture Controls” (page 88). To
start over from default settings, press O (Q). Press J
when settings are complete.
38

Select a destination.
4
Select a destination for the
custom Picture Control (C-1
through C-9) and press 2.
Name the custom Picture Control.
5
Enter a name up to 19 characters long. After entering a
name, press J to exit to the
shooting menu.
The new custom Picture Control will be added to the Picture Control list (page 44).
39

Managing Custom Picture Controls
Managing Custom Picture Controls
Sharing Custom Picture Controls
Custom Picture Controls created on a D800/D800E can be
saved to a memory card for use with other cameras.
Select Manage Picture Control > Load/save.
1
Highlight Manage Picture
Control in the shooting menu
and press 2 to display the options shown at right. Highlight
Load/save and press 2.
Copy a custom Picture Control to the memory card.
2
The options shown at right will
be displayed. Highlight Copy
to card and press 2 to view a
list of the custom Picture Controls created with the camera.
Highlight a Picture Control and press 2 to display a list of
destinations (1 through 99), then highlight a destination
and press J to copy the selected Picture Control to the
memory card.
Transfer the memory card.
3
After turning both cameras o , remove the memory card
from the D800/D800E, and then insert it into the destination camera and turn the destination camera on.
40

Sharing Custom Picture Controls
Sharing Custom Picture Controls
Select Manage Picture Control > Load/save.
4
Highlight Manage Picture
Control in the destination
camera shooting menu and
press 2 to display the options shown at right. Highlight
Load/save and press 2.
Copy the control.
5
The options shown at right will
be displayed. Highlight Copy
to camera and press 2 to view
a list of the custom Picture
Controls on the memory card.
Highlight a Picture Control and press 2 to display a list of
destinations (C-1 through C-9), then highlight a destination
and press J to copy the selected Picture Control to the
camera. The control will be added to the camera Picture
Control list (page 44).
41

The Picture Control Utility
The Picture Control Utility is
a computer application used
to manage Picture Controls.
It also lets you adjust Picture
Controls while previewing
the e ect on a sample image
of your choice. The modi cations can be saved as custom
Picture Controls.
Sample image
The Picture Control Utility can be launched from ViewNX 2 or
Capture NX 2.
ViewNX 2
Select File > Launch Picture
Control Utility. If an NEF
(RAW) image is selected when
the utility is launched, the selected picture will be used as
the sample image.
42

Capture NX 2
Open an NEF (RAW) le and
select Camera Settings >
Picture Control in the “Develop” section of the Edit List,
then click the
lect Launch Picture Control
Utility.
When launched from
Capture NX 2, the Picture
Control Utility displays a
default sample image; to
choose a di erent image,
click Sample Image and select an NEF (RAW) le. Note
that the e ects of Active
D-Lighting are not visible in
the sample image, and that
NEF (RAW) images edited
and saved in Capture NX or
CaptureNX2 can not be used.
icon and se-
43

The Picture Control Utility
The Picture Control Utility
Creating Custom Picture Controls
Select a Picture Control.
1
Choose a preset Picture
Control or a custom Picture
Control imported from
the camera or created in
Capture NX 2.
Adjust settings.
2
Adjust settings as described in “Level Adjustment” (page 4646) while
viewing the e ect on the
sample image. To abandon
any changes and start over
from default settings, click
Reset.
44

Creating Custom Picture Controls
Creating Custom Picture Controls
Save the Picture Control.
3
To save the custom Picture
Control under a new name,
click New.
The dialog at right will be
displayed; name the new
control (names may be up
to 18 characters long) and
click OK. The new control
will be added to the Picture
Control list.
To save a custom Picture Control under its existing name,
click Overwrite.
45

The Picture Control Utility
Quick Adjust
Manual
Adjust
Sharpening
Use Custom
Curve
Contrast/
Brightness
The Picture Control Utility
Level Adjustment
The Picture Control Utility
can be used to adjust Picture
Control parameters or create
custom tone curves. To adjust
Picture Control parameters,
enter values in the text boxes
or select Auto to let the camera adjust the parameter automatically according to the
type of scene.
Quick Adjust Adjust the eff ect of the selected Picture Control by apply-
Manual
Adjust
Sharpening Control the sharpness of outlines. Move the slider left to
Use Custom
Curve
Contrast/
Brightness
ing simultaneous adjustments to sharpening, contrast,
and saturation. Not available with [NL] Neutral, [MC]
Monochrome, or custom Picture Controls.
Adjust Picture Control parameters manually. Not available when Quick Adjust is selected.
soften outlines, right to sharpen outlines.
Adjust contrast and brightness using a custom tone
curve. Not available when Contrast/Brightness is selected.
Adjust contrast and brightness using the sliders. Not
available when Use Custom Curve is selected.
46

Creating Custom Picture Controls
Saturation
Hue
Filter E ects
Toning
Custom
Curve
Creating Custom Picture Controls
Saturation Control the vividness of colors. Not available when a
Hue Adjust hue. Not available when a monochrome Picture
Filter E ects Choose a fi lter eff ect from the menu (monochrome Pic-
Toning Choose a tint from the menu and adjust its saturation
Custom
Curve
monochrome Picture Control is selected.
Control is selected.
ture Controls only).
with the slider (monochrome Picture Controls only).
Edit the custom tone curve to adjust contrast and bright-
ness. Click Save to save the curve, or Load to import a
previously saved curve.
47

The Picture Control Utility
The Picture Control Utility
Using Custom Tone Curves
The following picture was taken using a high-contrast custom
tone curve created with the Picture Control Utility.
■ Lens: AF-S VR Micro-Nikkor 105 mm f/2.8G IF-ED ■ Exposure
mode: Manual (⁄ s, f/5.6) ■ White balance: Incandescent
Note: This photo was shot in 14-bit NEF (RAW) and processed using Capture NX 2. Photo © Noriko Yamaguchi
Saturation and hue adjusted
Custom tone curve heightens
for a warmer look.
contrast to make individual
seeds stand out.
48

Creating Custom Picture Controls
The photo on the previous
page was taken with the
Standard Picture Control, using the “S”-shaped custom
tone curve shown at right for
heightened contrast. In addition, Sharpening was set to
Auto, Saturation to +1, and
Hue to –1.
Creating Custom Picture Controls
S-curve: High contrast, food stands
out.
Default curve Reversed S-curve:
Low contrast for a
softer look.
49

The Picture Control Utility
40
The Picture Control Utility
Importing and Exporting Custom Picture Controls
The Picture Control Utility can be used to import custom Picture Controls created on the camera or to export custom Picture Controls from the computer to the camera memory card.
Importing Controls to the Picture Control Utility
Custom Picture Controls created on a D800/D800E camera
can be imported into the Picture Control Utility. Before proceeding, use the camera to copy custom Picture Controls to a
memory card as described in Steps 1 and 2 on page
turn the camera o , remove the memory card and insert it
in a computer card slot or in a card reader connected to the
computer.
Click Import.
1
In the Picture Control Utility,
click Import to import custom
Picture Controls from the
memory card.
Select a Picture Control.
2
The Picture Control Utility will
display a list of the custom Picture Controls on the memory
card; select a control and click
OK. The selected control will
be added to the Picture Control list in the Picture Control
Utility.
40, then
50

Importing and Exporting Custom Picture Controls
Importing and Exporting Custom Picture Controls
Saving Custom Picture Controls to a Memory Card
Follow the steps below to save Custom Picture Controls to a
memory card. The card can then be inserted into a camera
and the Picture Controls copied as described in Steps 4 and
5 on page 4141.
Insert a memory card in the computer.
1
Insert the card in a computer card slot or in a card reader
connected to the computer. Be sure to use only cards that
have been formatted in the camera.
Click Export.
2
Select a custom Picture Control in the Picture Control Utility and click Export.
Select a destination.
3
If the computer detects more
than one memory card, a card
selection dialog will be displayed; highlight a card and
click OK. A list of custom Picture Control slots will be displayed; select a slot and click
OK.
51

Credits
http://www.riviera-r.jp/zushi-marina/english
http://www.thetokyostationhotel.jp/
Food/Interior Photos: Noriko Yamaguchi
Born in Tochigi, Noriko Yamaguchi is a graduate of the Photography Department of the Tokyo Polytechnic
University, Junior College Department. Her work frequently appears in fashion and travel magazines,
where she is known for her unique, translucent compositions. She received the 2
Photo Biennial prize for her work, “Men of Istanbul”, and the 16
sociation Award for “Street Artists”. Her many publications include The Making of the Peninsular Tokyo,
Real-G 1/1 Scale GUNDAM Photographs, and photo anthologies such as Arashiyama Kitcho: Spring, Summer, Autumn, and Winter Dining, Vegetable Sushi, Making Hawaiian Leis: The Joy of Floral Decorations,
and Discarding and Keeping. She is a member of the Japan Professional Photographers Society and likes
travel, cats, and pudding.
Portraits: Daisuke Kumakiri
Daisuke Kumakiri was born in Shinjuku, Tokyo in 1969. He joined the sta of the Daily Gendai newspaper as a news and sports photographer on graduating from the Photography Department of the Tokyo
Polytechnic University, Junior College Department, but has since departed to work freelance. His work
ranges from documentaries through portraits to cooking photos and appears in a variety of media, from
advertisements to magazines. He also holds photography workshops for elementary school students
and the general public. His exhibitions include “Acting: A Year with Actor Kanji Ishimaru” (2010) and
“TOKYO ZOO”, the latter featuring works created with the Nikon D800; he has also held workshops on the
D600. He was a member of the selection committee for the 2011/2012 Camera Grand Prix, helped judge
the 2012 “Bunkyo Highlights Picture Postcard Contest”, serves on the committee for the 2012/2013 JPS
Exhibition, and is a member of the Japan Professional Photographers Society.
Wildlife: Junichi Noguchi
Junichi Noguchi was born in Saitama in 1968. After experiencing a two-wheeled mechanic and a fourwheeled dealer, he joined motor sports’ parts manufacturing, specialized in parts making of works car
participating the World Rally Championship (WRC). In 2000, he retired and moved to Hokkaido to live in
nature. After moving, encountering one Ezo red fox made him start photographing wild animals. Many of
the main magazines which carry his works include the Pudding of Gakken E-mirai Co., Ltd., the GARRRV
of Jitsugyo no Nihon Sha, Ltd. At present, he provides his works to various magazines for photography,
traveling, and nature. His photographs are also used for advertisement for sightseeing, calendars, and so
on. He is a member of the Japan Professional Photographers Society.
th
Japan Magazine Photojournalists As-
nd
Tokyo International
Cuisine: Mutsubi Nouvelle Chinois & Wine
Location: Riviera Zushi Marina (
THE TOKYO STATION HOTEL (
http://www.riviera-r.jp/zushi-marina/english)
http://www.thetokyostationhotel.jp/)
© 2012 Nikon Corporation CS SB3B04 (11)
 Loading...