


Instruction manual/Manuel d’utilisation
En
Fr

English ......................................... p. 2-21
Français ...................................... p. 22-41
English
CONTENTS
[ Introduction]
Introduction ........................................................................ 3
Cautions before use ..................................................... 4-6
[Getting to know the Laser Rangefinder]
Key features ......................................................................... 7
Nomenclature/Composition ......................................... 8
Internal display .................................................................. 9
[Functions]
VR (Vibration Reduction) function ............................ 10
Target priority mode ...................................................... 10
[First step]
Inserting/Replacing battery ........................................ 11
[Mode settings]
Operation overview ....................................................... 12
Changing the distance display unit (m/YD) (F1) .. 13
Changing the measurement display mode (F2) .. 14
Changing the target priority mode (F3) ................. 15
[Measurement]
Adjusting diopter ............................................................ 16
Measuring .......................................................................... 16
Single measurement ...................................................... 17
Continuous measurement ........................................... 17
[Technical notes]
Specifications ............................................................ 18-19
Troubleshooting/Repair ........................................ 20-21

[Introduction]
Thank you for purchasing the Nikon Laser Rangefinder ARROW ID 7000 VR.
Before using this product, please read these instructions thoroughly to ensure correct usage.
After reading, please keep this manual handy for easy reference.
● About the manual
・ No part of the manual included with this product may be reproduced, transmitted, transcribed, stored in a
retrieval system, or translated into any language in any form, by any means, without Nikon’s prior written
permission.
・Nikon will not be held liable for any errors this manual may contain.
・The appearance of this product and its specifications are subject to change without notice.
● About controls for radio interference
・This device complies with Part 15 of the FCC Rules. Operation is subject to the following two conditions:
(1) This device may not cause harmful interference, and
(2) This device must accept any interference received, including interference that may cause undesired
operation.
・This equipment has been tested and found to comply with the limits for a Class B digital device, pursuant
to Part 15 of the FCC Rules and to EU EMC directive. These limits are designed to provide reasonable
protection against harmful interference in a residential installation. This equipment generates, uses and
can radiate radio frequency energy and, if not installed and used in accordance with the instructions, may
cause harmful interference to radio communications. However, there is no guarantee that interference
will not occur in a particular installation. If this equipment does cause harmful interference to radio
or television reception, which can be determined by turning the equipment off and on, the user is
encouraged to try to correct the interference by one or more of the following measures:
• Reorient or relocate the receiving antenna.
• Increase the separation between the equipment and receiver.
• Consult the dealer or an experienced radio/TV technician for help.
This Class B digital apparatus meets all requirements of the Canadian Interference-Causing Equipment
Regulations.
● About measurement results
This Nikon Laser Rangefinder is a basic rangefinder. Its results cannot be used as official evidence.
En
Fr
3

■ Cautions before use
En
Please observe the following
guidelines strictly so you can use
Fr
the equipment properly and
avoid potentially hazardous
problems. Before using this
product, read thoroughly the
“Cautions before use” and
instructions on correct usage
accompanying the product.
Keep this manual within reach
for easy reference.
WARNING
This indication alerts you to the fact
that any improper use ignoring the
contents described herein can result
in potential death or serious injury.
CAUTION
This indication alerts you to the fact
that any improper use ignoring the
contents described herein can result
in potential injury or material loss.
4
SAFETY PRECAUTIONS (Laser)
The Nikon Laser Rangefinder uses an
invisible laser beam. Be sure to
observe the following:
Warning
• Do not press the PWR button while
looking towards the optics from the
objective side. Failure to do this may
negatively affect or damage your
eyes.
• Do not aim at the eye.
• Do not point the laser at people.
• Do not look at the laser with another
optical instrument such as through
lenses or binoculars, nor with the
naked eye. This may result in damage
to the eyes.
• When not measuring, please
keep your fingers away from the
PWR button to avoid accidentally
emitting the laser beam.
• When not in use for an extended
period, please remove the battery
from the body.
• Do not disassemble/remodel/repair
the Nikon Laser Rangefinder. The
emitting laser may be harmful to
your health. A product that has been
disassembled/remodeled/repaired is
not guaranteed by the manufacturer.
• Keep the Nikon Laser Rangefinder
out of reach of children when
stored.
• If the Nikon Laser Rangefinder’s
body cover is damaged, or if it
emits a strange sound due to
dropping or some other cause,
remove the battery immediately
and stop using.

SAFETY PRECAUTIONS
(Monocular)
The Nikon Laser Rangefinder
employs a monocular in its optical
system in order to aim at the target.
Be sure to obser ve the following:
Warning
• Never look directly at the sun, an
intense light or the laser beam
when using the Nikon Laser
Rangefinder.
Cautions
• When not using the Nikon Laser
Rangefinder, do not push the
PWR button.
• Do not use this product while
walking. Failure to observe this
may cause injury or malfunction
as a result of walking into
something, hitting others, falling
or other accidents.
• Do not swing around by the
strap. This may result in hitting
others and cause injury.
• Do not place this product in
an unstable place. Failure to
observe this may result in falling
or dropping and cause injury or
malfunction.
• Keep the plastic bag used to wrap
this product or other small parts
out of reach of children.
• Prevent children from putting
the rubber eyecup or small par ts,
etc. into their mouths. If children
swallow such parts, consult a
doctor immediately.
• If using the rubber eyecup for a
long period of time, some people
may suffer skin inflammation. If any
symptoms occur, stop using it and
consult a doctor immediately.
• When carrying the Nikon Laser
Rangefinder, store it in the case.
• If your Nikon Laser Rangefinder
should fail to operate correctly,
discontinue use immediately and
consult with your local dealer for
instructions on where to send it for
repair.
SAFETY PRECAUTIONS
(Lithium battery)
If handled incorrectly, the battery
may rupture and leak, corroding
equipment and staining clothing.
Be sure to obser ve the following:
• Install the batter y with the + and –
poles positioned correctly.
• The battery should be removed
when exhausted or during
extended periods of non-use.
• Do not short the end terminal of
the battery chamber.
• Do not carry together with keys
or coins in a pocket or bag, it may
short and cause overheating.
• Do not expose the battery to water,
or a flame. Never disassemble the
bat tery.
• Do not charge the lithium battery.
• If liquid from a damaged battery
comes into contact with clothing or
skin, rinse immediately with plenty
of water. If liquid from a damaged
battery enters the eyes, rinse
immediately with clean water, then
consult a doctor.
• When disposing of the battery,
follow your local area regulations.
En
Fr
5
En
SAFETY PRECAUTIONS
Cautions
Fr
• This product is not designed for use
underwater.
• Rain, water, sand and mud should
be removed from the rangefinder
body surface as soon as possible,
using a soft, clean cloth.
• If the Nikon Laser Rangefinder is
exposed to sudden changes in
temperature, water condensation
may occur on lens surfaces. Do
not use the product until the
condensation has evaporated.
• Do not leave the Nikon Laser
Rangefinder in a car on a hot or
sunny day, or near heat-generating
equipment. This may damage or
negatively affect it.
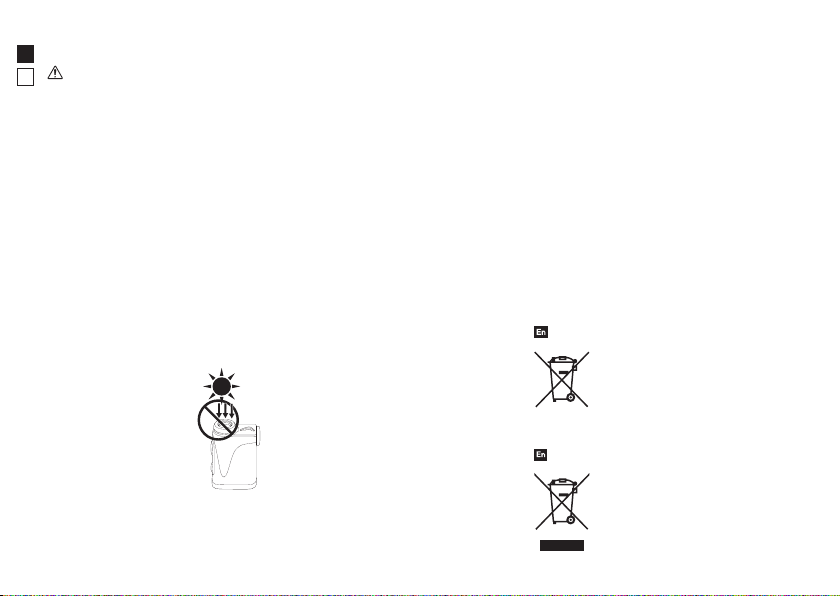
• Do not leave the
eyepiece in direct
sunlight.
The condenser
effect of the lens
may damage the
internal display
surface.
6
CARE AND MAINTENANCE
Lenses
• When removing dust on the lens
surface, use a soft oil-free brush.
• When removing stains or smudges
like fingerprints from the lens
surface, wipe the lenses very gently
with a soft clean cotton cloth or
quality oil-free lens tissue. Use a
small quantity of pure alcohol (not
denatured) to wipe stubborn
smudges. Do not use velvet cloth
or ordinary tissue, as it may scratch
the lens surface. Once the cloth has
been used for cleaning the body, it
should not be used again for the
lens surface.
Main body
• Clean the body surface with a soft,
clean cloth after blowing away dust
with a blower* lightly. Do not use
benzene, thinner, or other cleaners
containing organic solvents.
* A blower is rubber cleaning
equipment that blows air from a
nozzle.
Storage
• Water condensation or mold may
occur on the lens surface because
of high humidity. Therefore, store
the Nikon Laser Rangefinder in a
cool, dry place.
After use on a rainy day or at night,
thoroughly dry it at room
temperature, then store in a cool,
dry place.
Symbol for separate collection applicable in European
countries
This symbol indicates that this battery is to be
collected separately.
The following apply only to users in European
countries.
• This battery is designated for separate collection at an
appropriate collection point. Do not dispose of as
household waste.
• For more information, contact the retailer or the local
authorities in charge of waste management.
Symbol for separate collection applicable in European
countries
This symbol indicates that this product is to be
collected separately.
The following apply only to users in European
countries.
• This product is designated for separate collection at
an appropriate collection point. Do not dispose of as
household waste.
• For more information, contact the retailer or the local
authorities in charge of waste management.

[Getting to know the Laser Rangefinder]
■ Key features
• Measurement range of actual distance:
7.3-915 meters/8-1,000 yards
• VR (Vibration Reduction) function is employed for
reducing the vibrations caused by hand movement
・Horizontal distance mode and actual distance mode
can be easily switched
・Target Priority Switching System for measuring
overlapping subjects
• High-quality 6x finder with multilayer coating
• Larger ocular for easy viewing
• Press and hold down the PWR button to activate the
continuous measurement function
• Automatic power shut-off (approx. 8 sec.
unoperated from standby screen)
• Waterproof and fogproof, but not designed
for underwater usage (the battery chamber is
rainproof)
• Invisible/Eyesafe EN/IEC Class 1M Laser
The Nikon Laser Rangefinder uses an invisible
laser beam for measuring. It measures the time the
laser beam takes to travel from the rangefinder
to the target and back. Laser reflectivity and
measurement results may vary according to
climatic and environmental conditions, as well
as the color, surface finish, size, shape and other
characteristics of the target.
The following conditions facilitate measuring:
• Cloudy weather
• Bright-colored target
• Large-size target
• When laser incidence to the target’s reflective
surface is straight
Measurement may be inaccurate or fail in the
following cases:
• In snow, rain or fog
• Small or slender target
• Black or dark target
• Target has stepped surface
• Moving or vibrating target
• When measuring the surface of water
• Target measured through glass
• When the target is glass or a mirror
• When laser incidence to the target’s reflective
surface is oblique
En
Fr
7

En
■ Nomenclature/Composition
Fr
1
4
1. PWR button (POWER ON/Measurement
button)
2. Monocular objective lens/Laser emission
aperture
2
5
3
7
3. Laser detector aperture
4. MODE button
5. 6x monocular eyepiece
6. Eyecup/Diopter adjustment ring
7. Diopter index
6
8. Strap eyelet
9. Battery chamber cover
10. Battery chamber cover “Open” indication
8
11. Product number label
12. Indication
9
12
• Body ...................................... x1
• Case .......................................x1
8
11
10
Composition
• Strap ......................................x1
• Lithium battery (CR2) ..... x1
■ Internal display
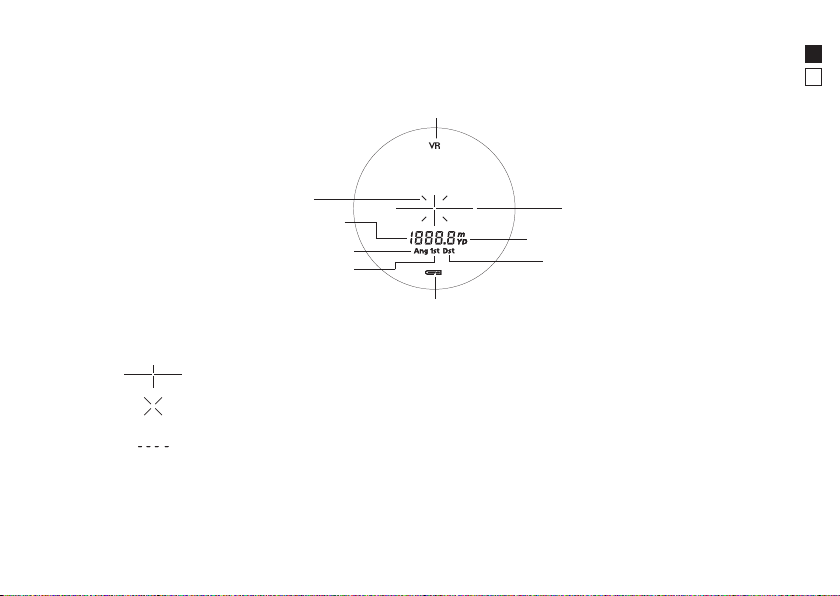
VR (Vibration Reduction) function-employing
model indication
En
Fr
Laser irradiation mark
Distance
Horizontal distance mode
First Target Priority mode
Target mark
Unit of measure (m/yd.)
Distant Target Priority mode
Battery condition
: Aim at the target you want to measure. Position the target at the center of the reticle.
: Appears while the laser is being irradiated for a measurement.
Do not look towards the objective lens side while this mark is shown.
: "Failure to measure" or "Unable to measure"
* Because the internal display of this product is enlarged by the eyepiece, dust may sometimes be seen.
This will not, however, affect the measurement accuracy.
9

[Functions]
En
■ VR (Vibration Reduction) function
Fr
● ON and OFF
The VR (Vibration Reduction) function is activated concurrently when the Laser
Rangefinder is ON.
When the Laser Rangefinder is OFF, the VR (Vibration Reduction) function
automatically turns off.
■ Target priority mode (First Target Priority mode/Distant Target Priority mode)
This Nikon Laser Rangefinder employs the First Target Priority/Distant Target Priority switching system.
(Factory default setting is First Target Priority mode.)
When measuring overlapping subjects:
First Target Priority mode displays the distance of the closest subject and
Distant Target Priority mode displays that of the farthest subject.
10

[First step]
■ Inserting/Replacing battery
1. Type of battery
3V CR2 lithium battery x1
2. Inserting/Replacing battery
2-1. Open the battery chamber cover
Rotate the battery chamber cover counterclockwise and remove it. It may not open easily due to its rubber
packing for water resistance.
2-2. Insert the battery/Replace the old battery with a new one
Insert a new battery correctly positioned following the indication seal inside the chamber.
The [+] pole should be positioned toward the inside of the chamber. If the battery is not inserted correctly, the
Nikon Laser Rangefinder will not operate. When replacing the battery, remove the old battery then insert a new
one.
2-3. Close the battery chamber cover
Rotate the battery chamber cover clockwise to screw it into the body. It may not close easily due to the rubber
packing for water resistance, but continue to turn it all the way until it stops. Confirm that the cover is securely
closed.
3. Battery level indicator
* The battery condition mark in the internal display warns when the battery needs to be replaced.
Display Description
After power on, displays for 2 seconds only.
After power on, displays for 2 seconds only.
Displayed continuously.
Blinks. After blinking 3 times, automatically
powers o.
Sufficient power available.
Power getting low.
Prepare to replace the battery.
Low. Battery should be replaced with a new one.
Power exhausted.
Replace the battery.
En
Fr
11
[Mode settings]
En
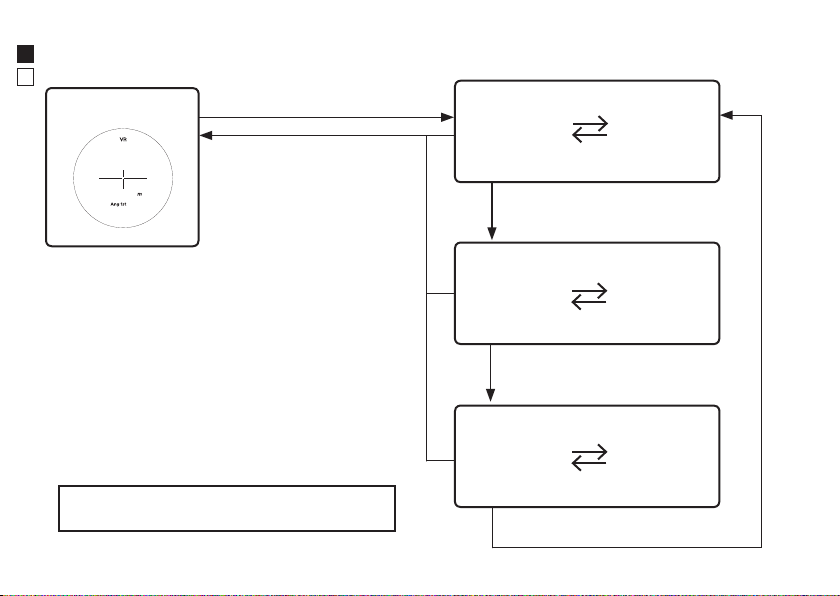
Operation overview
■
Fr
Standby
* Unoperated for 8 seconds or longer returns you to the standby
screen whichever setting mode is displayed.
12
Long press of MODE button
(1.5 seconds or more)
Long press of MODE button
(1.5 seconds or more) or
unoperated for 8 seconds or
longer returns you to the standby
screen whichever setting mode is
displayed.
Changing the distance display
unit (F1)
mYD
Short press of PWR button (less than 1.5
seconds) switches unit.
Short press of MODE button
(less than 1.5 seconds)
Changing the measurement display
mode (F2)
Horizontal
distance mode
Short press of PWR button (less than 1.5
seconds) switches mode.
Short press of MODE button
(less than 1.5 seconds)
Actual distance
mode
Changing the target priority mode
(F3)
First Target
Priority mode
Short press of PWR button (less than 1.5
seconds) switches mode.
Short press of MODE button
(less than 1.5 seconds)
Distant Target
Priority mode
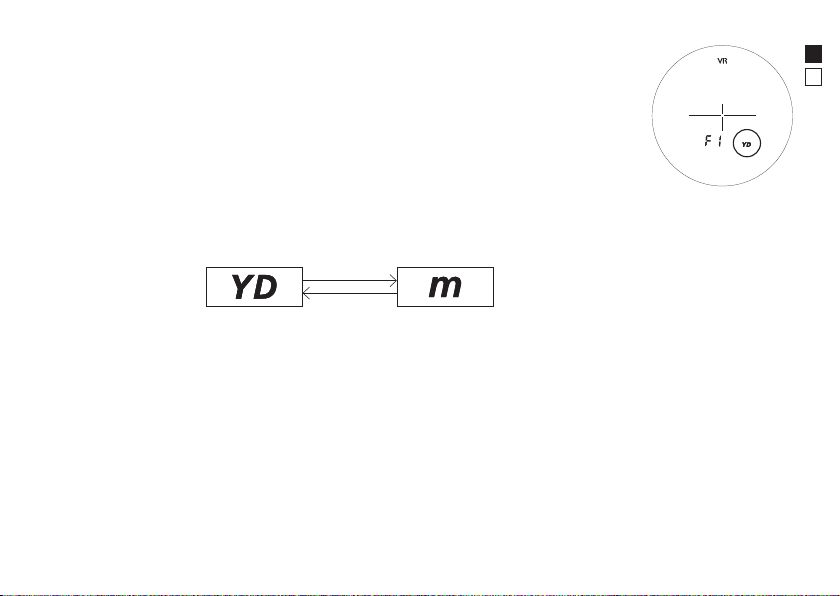
Changing the distance display unit
■
(m/YD) (F1)
Factory default setting is yard (YD).
1. From standby, a long press (1.5 seconds or more) of the MODE button displays
the setting menu of the distance display unit (F1).
2. Short press (less than 1.5 seconds) of the PWR button switches units of meter
and yard.
3. After setting, a short press (less than 1.5 seconds) of the MODE button
displays the setting menu of the measurement display mode (F2).
When setting is completed, a long press (1.5 seconds or more) of the MODE
button or unoperated more than 8 seconds returns you to standby.
En
Fr
13
En
■ Changing the measurement display mode (F2)
Fr
Horizontal distance mode and actual distance mode can be switched.
Factory default setting is horizontal distance mode.
1. From standby, a long press (1.5 seconds or more) of the MODE button, then a short
press (less than 1.5 seconds) of the MODE button displays the setting menu of the
measurement display mode (F2).
2. Short press (less than 1.5 seconds) of the PWR button switches the measurement
display mode.
3. After setting, a short press (less than 1.5 seconds) of the MODE button displays the
setting menu for target priority mode (F3).
When setting is completed, a long press (1.5 seconds or more) of the MODE button
or unoperated more than 8 seconds returns you to standby.
Displayed item differs according to the setting mode.
Horizontal distance mode
Horizontal
distance
14
N/A
Actual distance mode
N/A
Actual
distance

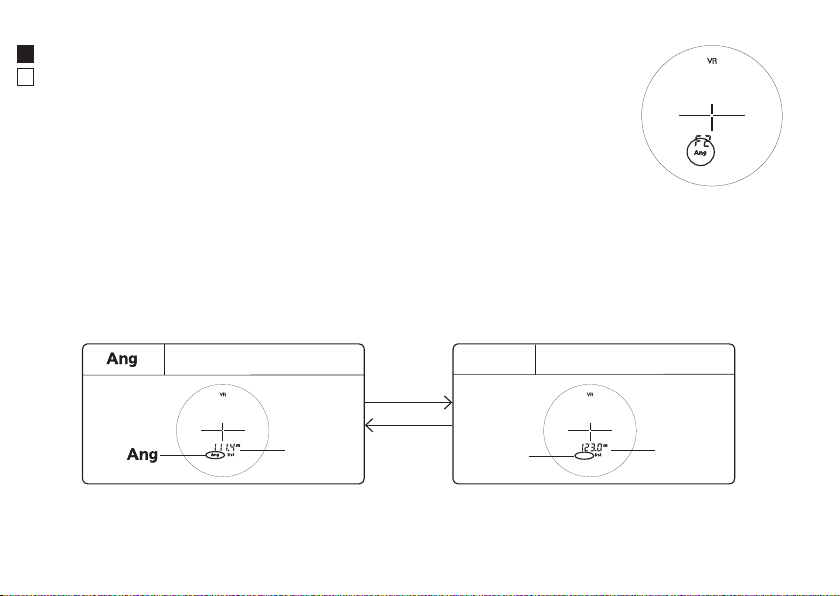
■ Changing the target priority mode (F3)
This Nikon Laser Rangender employs the First Target Priority/Distant Target
Priority switching system.
Factory default setting is First Target Priority mode.
1. From standby, a long press (1.5 seconds or more) of the MODE button, then
a short press (less than 1.5 seconds) of the MODE button twice displays the
setting menu of the target priority mode (F3).
2. Short press (less than 1.5 seconds) of the PWR button switches the target
priority mode.
3. After setting, a long press (1.5 seconds or more) of the MODE button or
unoperated more than 8 seconds returns you to standby.
[First Target Priority mode/Distant Target Priority mode]
When measuring overlapping subjects:
First Target Priority mode displays the distance of the closest subject and
Distant Target Priority mode displays that of the farthest subject.
En
Fr
15

[Measurement]
En
Caution — Controls, adjustments or usage of procedures other than those specified herein may
Fr
produce negative effects or damage to your health due to laser radiation.
* Before measuring, be sure to confirm each mode setting.
Please refer to each section on how to set each mode.
*
■
Adjusting diopter
Adjust the diopter to obtain a clear internal display in the viewfinder.
First, rotate the diopter adjustment ring counterclockwise until it comes to a complete stop.
Next, turn on the power and rotate the diopter adjustment ring back and forth until the internal
display comes into focus.
■
Measuring
1. Turn
on the power.
(Automatic power shut-off after approx. 8 seconds
unoperated.)
2. Aim at the target.
Position the target at the center of the
target mark.
Immediately after power-on
3. Pressing the PWR button starts measurement.
After measurement, the result is displayed for approx. 8 seconds, then power automatically turns off.
If you press the
16
PWR button
Standby
during power-on, another measurement starts.

■ Single measurement
Pressing the PWR button once starts single measurement, then displays the results.
En
Fr
Example of measured
distance display
Example of measurement
failure
■ Continuous measurement
Press and hold down the
During measurement, the measured result is displayed consecutively while the laser irradiation mark is
blinking. If you release your finger from the button, continuous measurement stops.
Standby
PWR button to start continuous measurement up to approx. 8 seconds.
Press PWR button once
Press and hold down the PWR button
Single measurement
Continuous measurement
17

[Technical notes]
En
■ Specifications
Fr
Measurement system
Measurement range
(actual distance)
Distance display (increment) Every 0.1m/yd.
Optical system
Magnification (x) 6
Effec tive diameter of objec tive
lens (mm)
Angular field of view (real) (˚) 7.5
Eye relief (mm) 18.0
Exit pupil (mm) 3.5
Diopter adjustment ±4m
Others
Operating temperature (˚C/˚F) -10 — +50/14 — 122
Operating humidity (%RH) 80 or less (without dew condensation)
Power source
Dimensions (L x H x W) (mm/in.) 99 x 75 x 48/3.9 x 3.0 x 1.9
Weight (g/oz.) Approx. 200/7.1 (without battery)
Structure
Electromagnetic compatibilit y FCC Part15 SubPartB class B, EU:EMC directive, AS/NZS, VCCI classB, CU TR 020
Environment RoHS, WEEE
18
Model ARROW ID 7000 VR
7.3-915 meters/8-1,000 yards
21
-
1
CR2 lithium battery x 1 (DC 3V)
Automatic power shut-off (after approx . 8 sec. unoperated)
Waterproof (up to 1m/3.3 ft. for 10 minutes)*, fogproof
Batter y chamber is rainproof — JIS/IEC protection class 4 (IPX4) equivalent
(under Nikon's testing conditions)**

Model ARROW ID 7000 VR
Laser
Laser classification
IEC60825-1: Class 1M/Laser Product
FDA/21 CFR Part 1040.10:Class I Laser Product
Wavelength (nm) 905
Pulse duration (ns) 9
Output (W) 20
Beam divergence (mrad) Vertical: 1.8, Horizontal: 0.25
* Waterproof models
This Nikon Laser Rangefinder is waterproof, and will suffer no damage to the optical system nor observation if submerged
or dropped in water to a maximum depth of 1 meter/3.3 feet for up to 10 minutes.
The Nikon Laser Rangefinder offers the following advantages:
• Can be used in conditions of high humidity, dust and rain without risk of damage to internal functions.
• Nitrogen-filled design makes it resistant to condensation and mold.
Observe the following when using the Nikon Laser Rangefinder:
• The unit is not a sealed structure, so it should not be operated nor held in running water.
• If any moisture is found on movable parts of this equipment, stop using it and wipe it off.
** The battery chamber is rainproof, not waterproof. Water may enter the device if the Rangefinder is submerged in water. If
water enters the battery chamber, wipe out any moisture and allow time for the chamber to dry.
Battery life
Continuous operation: Approx. 3,300 times (at approx. 20°C)
This figure may differ according to conditions such as temperature and other factors. Use only as a guide.
・ The battery supplied with this Nikon Laser Rangefinder is for operation checking. Due to natural electrical discharge, the life of
this battery will likely be shorter than that noted above.
・ If water enters the battery chamber due to submersion, dry the battery chamber well, then replace the battery.
En
Fr
19

En
■ Troubleshooting/Repair
Fr
If the Nikon Laser Rangefinder fails to function as expected, check the list below before consulting
your local dealer or the store where you purchased it.
● If there is a problem with the product.
Problem Cause/Solution
・Press the PWR button (top of the body).
・Does not turn on
・Check battery is inserted correctly.
・Replace the battery with a new one.
・Unable to measure
・Anomalous result
・Confirm each mode setting.
・Confirm if it can measure a large target close to you (example: a building
approx. 15m/yd. ahead of you).
・Clean the lens surface if necessary.
・Do not know if the VR
(Vibration Reduction)
function is working
・ Cannot turn off the VR
(Vibration Reduction)
function
・There are minute motion
sounds when the power
turns on and off
] is displayed in the
・[
internal display
20
・Compare the vibration of the target in the viewfinder when the Laser
Rangefinder is ON and OFF.
・ While the Laser Rangefinder is ON, the VR (Vibration Reduction) function is
always activated.
・The VR (Vibration Reduction) function is activated concurrently when
the Laser Rangefinder is ON. When the Laser Rangefinder is OFF, the VR
(Vibration Reduction) function automatically turns off.
・The VR (Vibration Reduction) function cannot be switched on and off.
・Due to the VR (Vibration Reduction) system motor, minute motion
sounds occur. These sounds are normal, please continue to use the Laser
Rangefinder.
・ Failure indication. Please contact your local dealer or the store where you
purchased the product.

● If you require a repair, please contact your local dealer or the store where you purchased the product.
Do not repair or disassemble. It may result in a serious incident.
Please note that Nikon is not responsible for any direct or indirect damage if the user attempts repair
or disassembly.
En
Fr
21

En
Fr
Français
SOMMAIRE
[ Introduction]
Introduction ...................................................................... 23
Précautions avant utilisation ............................... 24-26
[Se familiariser avec le télémètre laser]
Caractéristiques principales ........................................ 27
Nomenclature/Composition ....................................... 28
Écran interne ..................................................................... 29
[Fonctions]
Fonction VR (Réduction des Vibrations) ................. 30
Mode de priorité à la cible ........................................... 30
[Première étape]
Insérer/Remplacer la pile ............................................. 31
22
[Configuration du mode]
Description du fonctionnement ................................ 32
Modifier les unités d'affichage de la distance
(m/YD) (F1) ........................................................................ 33
Modifier le mode d'affichage de la mesure (F2) .. 34
Modifier le mode de priorité à la cible (F3) ............ 35
[Mesure]
Réglage dioptrique ........................................................ 36
Mesure ................................................................................ 36
Mesure unique ................................................................. 37
Mesure en continu .......................................................... 37
[Détails techniques]
Spécifications ............................................................ 38-39
Guide de dépistage des pannes/Réparations.. 40-41

[Introduction]
Merci d’avoir choisi le télémètre laser Nikon ARROW ID 7000 VR.
Avant d’utiliser ce produit, veuillez lire soigneusement ces instructions pour en garantir une utilisation correcte.
A la fin de votre lecture, gardez ce manuel à portée de main pour pouvoir vous y référer si nécessaire.
● A propos du manuel
・ Aucune section du manuel de ce produit ne peut être reproduite, transmise, transcrite ou enregistrée dans
un système d’enregistrement, ou traduit dans une autre langue, sous quelle que forme que ce soit, sans
l’autorisation écrite préalable de Nikon.
・Nikon ne saurait être tenu responsable des erreurs éventuelles présentes dans le manuel.
・L’apparence et les spécifications de ce produit sont sujets à modifications sans avertissement.
● A propos des contrôles d’interférences radio
・Cet appareil est conforme à la Partie 15 des Règles FCC. L'utilisation de cet appareil est soumise aux conditions
suivantes :
(1) Cet appareil ne doit pas provoquer des brouillages nuisibles et
(2) Cet appareil doit s'accommoder des brouillages auxquels il est soumis, y compris les brouillages qui peuvent
provoquer des anomalies de fonctionnement.
・Après essais, les caractéristiques de cet appareil ont été jugées comme entrant dans les limites des dispositifs
numériques de la classe B, telles que décrites à la Partie 15 des Règles FCC et de la directive EMC de l'UE. Ces
limites ont été fixées dans le but d'apporter une protection raisonnable contre les brouillages des appareils
domestiques. Cet appareil produit, utilise et peut émettre des fréquences radioélectriques; s'il n'est pas installé
conformément aux instructions, ces ondes peuvent perturber les radiocommunications. Toutefois, même en
cas d'installation conforme aux instructions, il peut arriver qu'un brouillage se produise en raison des conditions
particulières d'installation. Si cet appareil perturbe la réception des émissions de radio ou de télévision, ce dont
on peut s'assurer en le mettant sous tension puis hors tension, l'utilisateur est invité à prendre les mesures
correctives suivantes:
• Modifier l'orientation de l'antenne de réception ou changer son emplacement.
• Augmenter la distance séparant l'appareil du récepteur de radio ou de télévision.
• Consulter le distributeur ou un technicien de radio / télévision expérimenté.
Cet appareil numérique de la classe B est conforme à la norme canadienne relative aux équipements
susceptibles de provoquer des brouillages.
● A propos des résultats de mesure
Ce télémètre laser Nikon est un télémètre d'entrée de gamme. Ses résultats ne peuvent pas être utilisés comme
preuve officielle.
En
Fr
23

■ Précautions avant utilisation
En
Respectez à la lettre les
instructions suivantes pour une
Fr
utilisation adéquate de votre
matériel et pour éviter tout
risque d'accident. Avant d’utiliser
l'appareil, lisez attentivement les
« Précautions avant utilisation »
et le mode d’emploi qui
accompagnent l'appareil.
Conservez ces instructions à
portée de main pour référence.
ATTENTION
Avertit du fait qu’un emploi incorrect
en ignorant les points ci-dessous peut
se traduire par la mort ou de sérieuses
blessures.
PRÉCAUTION
Avertit du fait qu’un emploi incorrect
en ignorant les points ci-dessous peut
se traduire par de sérieuses blessures
ou des dégâts matériels.
24
PRÉCAUTIONS DE SÉCURITÉ
(Laser)
Le télémètre laser Nikon comporte un
faisceau laser invisible. Veillez à
respecter ce qui suit:
Attention
• N'appuyez pas sur le bouton
PWR tout en regardant l'optique
à partir du côté objectif. Sinon,
vos yeux pourrait être affectés ou
endommagés.
• Ne visez pas les yeux.
• Ne pointez pas le faisceau laser vers
d'autres personnes.
• Ne regardez pas le faisceau laser avec
un autre instrument optique, comme
un objectif ou des jumelles, ni à l'œil
nu. Ceci pourrait endommager vos
yeux.
• Si vous n'effectuez pas de mesures,
ne placez pas vos doigts à proximité
du bouton PWR pour éviter d'allumer
le faisceau laser par accident.
• Si vous ne l'utilisez pas pendant une
longue période de temps, veuillez
retirer la pile.
• Ne pas démonter/modifier/réparer
le télémètre laser Nikon. Le laser
émetteur pourrait être nocif pour
votre santé. La garantie constructeur
ne s'applique pas aux produits
qui ont été démontés/modifiés/
réparés.
• Ne laissez pas le télémètre laser
Nikon à la portée des enfants.
• Si le couvercle du boîtier du
télémètre laser est endommagé, ou
s'il émet un bruit étrange en raison
d'une chute ou d'une autre cause,
retirez immédiatement la pile et
cessez d'utiliser l'appareil.

PRÉCAUTIONS DE SÉCURITÉ
(Objectif monoculaire)
Le système optique du télémètre
aser Nikon comporte un objectif
monoculaire pour viser la cible.
Veillez à respecter ce qui suit:
Attention
• Ne regardez jamais directement
le soleil, une lumière intense ou
le faisceau laser, avec le télémètre
laser Nikon.
Précautions
• Si vous n'utilisez pas le télémètre
laser Nikon, n'appuyez pas sur le
bouton PWR.
• N'utilisez pas l'appareil en
marchant. Vous pourriez causer
des blessures ou une panne
en rencontrant un obstacle, en
touchant d'autres personnes, en
tombant ou par le biais d'autres
types d'accidents.
• Ne le balancez pas par la
bandoulière. Vous pourriez
toucher et blesser d'autres
personnes.
• Ne posez pas l'appareil dans des
endroits instables. Ceci pourrait
causer des chutes et créer des
blessures ou des pannes.
• Ne laissez pas le sac en plastique qui a
servi à emballer ce produit ou d'autres
petites pièces à la portée des enfants.
• Empêchez les enfants de porter à la
bouche les œilletons en caoutchouc
ou d'autre petites pièces, etc. Si
des enfants avalaient ce type de
pièces, consultez immédiatement un
médecin.
• Si vous utilisez les oeilletons en
caoutchouc pendant une longue
période de temps, ils peuvent
provoquer une irritation cutanée.
Arrêter d'utiliser l'appareil et consultez
immédiatement un médecin si cela se
produisait.
• Lorsque vous transportez le télémètre
laser Nikon, rangez-le dans son étui.
• Si votre télémètre laser Nikon ne
fonctionne pas correctement,
cessez immédiatement de l'utiliser
et consultez votre revendeur local
pour déterminer la destination de
réparation.
PRECAUTIONS DE SECURITE
(Pile au lithium)
Si elle n'est pas convenablement
manipulée, la pile peut se rompre et fuir,
provoquant la corrosion de l'appareil et
des taches sur les vêtements.
Veillez à respecter ce qui suit:
• Installez la pile manière à ce que les
pôles + et - soient correctement
positionnés.
• La pile doit être retirée quand elle
est déchargée et suite à toute
longue période de non-utilisation.
• Ne court-circuitez pas les contacts
du compartiment à pile.
• Ne la transportez pas à proximité de
clefs ou de pièces dans une poche
ou un sac, il pourrait y avoir un
court-circuit et une surchauffe.
• N'exposez pas la pile à l'eau ou aux
flammes. Ne démontez jamais la pile.
• Ne rechargez jamais le pile au
lithium.
• Si du liquide provenant d'une pile
endommagée venait à entrer en
contact avec un vêtement ou de
la peau, rincez immédiatement à
l'eau claire. Si du liquide provenant
d'une pile endommagée entrait
en contact avec les yeux, rincez
immédiatement à l'eau claire et
consultez un médecin.
• Lorsque vous jetez la pile,
conformez-vous aux lois de
recyclage locales.
En
Fr
25

En
Symbole pour la collecte sélective applicable aux pays
autorités locales responsables de la gestion des ordures.
PRECAUTIONS DE SECURITE
Précautions
Fr
• Le télémètre laser Nikon n'est
pas destiné à une utilisation
sousmarine.
• La pluie, l'eau, le sable et la boue
doivent être retirés de la surface
du boîtier du télémètre dès que
possible au moyen d'un chiffon
doux et propre.
• En cas de changement de
température brutal, de l’eau peut
se condenser sur la surface des
lentilles du télémètre laser Nikon.
N'utilisez pas l'appareil tant que
la condensation n'a pas disparu.
• Ne laissez pas le télémètre laser
dans une voiture par temps
chaud ou ensoleillé, ou près d’un
appareil produisant de la chaleur.
Cela pourrait l'endommager ou
affecter son fonctionnement.
• Ne laissez pas l'oculaire à la
lumière directe du
soleil.
L'effet de
condenseur de
la lentille peut
endommager la
surface de l'écran
interne.
26
SOINS ET ENTRETIEN
Lentilles
• Servez-vous d’un pinceau doux non
gras pour dépoussiérer la surface
des lentilles.
• Pour l'élimination de taches ou
saletés comme les traces de doigts
de la surface des lentilles, essuyez
doucement avec un chiffon doux et
propre ou du papier pour lentilles
non gras de bonne qualité. Un peu
d’alcool pur (non dénaturé) peut
être utilisé pour éliminer les taches
tenaces. L’emploi de velours ou
d’un mouchoir en papier n’est pas
recommandé, parce qu’ils
pourraient rayer la surface des
lentilles. Un chiffon utilisé pour
nettoyer le boîtier ne doit pas être
réutilisé sur la surface des lentilles.
Boîtier principal
• Nettoyez le corps avec un chiffon
doux et propre après avoir retiré
soigneusement les poussières avec
un soufflet*. N'utilisez ni benzène, ni
diluant, ni d'autres produits
nettoyants contenant des agents
organiques.
* Un soufflet est un élément de
nettoyage en caoutchouc qui
souffle de l'air par une petite buse.
Stockage
• De la condensation ou des moisissures
peuvent se former sur la surface des
lentilles en cas de forte humidité. Pour
cette raison, rangez le télémètre laser
Nikon dans un endroit frais et sec.
Après utilisation un jour de pluie ou
pendant la nuit, laissez le sécher
entièrement à température ambiante
avant de le ranger dans un endroit frais
et sec.
européens
Ce symbole indique que cette batterie doit être collectée
séparément.
Les mesures suivantes concernent uniquement les
utilisateurs européens.
• Cette batterie doit être jetée séparément dans un point
de collecte approprié. Ne la jetez pas dans une poubelle
réservée aux ordures ménagères.
• Pour plus d’ informations, contactez le détaillant ou les
autorités locales responsables de la gestion des ordures.
Symbole pour la collecte sélective applicable aux pays
européens
Ce symbole indique que ce produit doit être collectée
séparément.
Les mesures suivantes concernent uniquement les
utilisateurs européens.
• Ce produit doit être jetée séparément dans un point de
collecte approprié. Ne la jetez pas dans une poubelle
réservée aux ordures ménagères.
• Pour plus d’ informations, contactez le détaillant ou les

[Se familiariser avec le télémètre laser]
■ Caractéristiques principales
• Plage de mesure de distance réelle:
7,3-915 mètres/8-1.000 yards
• La fonction de VR (réduction des vibrations) sert à
limiter les effets de vibration des mains
• Il est facile de passer du mode de distance
horizontale au mode de distance réelle et
inversement
• Système de Passage en Priorité à la Cible pour
mesurer les sujets qui se recouvrent
• Télémètre 6x de qualité supérieure avec traitements
multicouches
• Oculaire plus grand pour une lecture simplifiée
• Appuyez et maintenez le bouton PWR enfoncé pour
activer la fonction de mesure en continu
• Mise hors tension automatique (après environ 8
secondes d'inactivité depuis l'écran de veille)
• Étanche et anti-buée, mais le dispositif n'est pas
conçu pour une utilisation sous l’eau (le logement
de la pile est protégé de l'eau)
• Laser EN/IEC de Classe 1M, invisible et sans danger
pour les yeux
Le télémètre laser Nikon utilise un faisceau laser
invisible pour effectuer la mesure. Il mesure le
temps nécessaire au faisceau laser pour effectuer
un aller-retour entre le télémètre et la cible. La
réflectivité du laser et les résultats de mesure
dépendent des conditions environnementales et
climatiques, ainsi que de la couleur, de la finition
de surface, de la taille, de la forme et d'autres
caractéristiques de la cible.
Les conditions suivantes facilitent les mesures:
• Temps couvert
• Cible de couleur vive
• Cible de grande taille
• L’incidence du laser est perpendiculaire à la surface
réfléchissante de la cible
Les mesures peuvent être imprécises ou peuvent
échouer dans les cas suivants:
• Temps de neige, pluie ou brouillard
• Cible petite ou mince
• Cible noire ou sombre
• La cible a une surface étagée
• La cible bouge ou vibre
• La cible est un plan d'eau
• La cible est visée à travers un verre
• La cible est en verre ou en miroir
• L’incidence du laser est oblique sur la surface
réfléchissante de la cible
En
Fr
27
En
■ Nomenclature/Composition
Fr
1
4
1. Bouton PWR (Bouton POWER ON/
Mesure)
2. Objectif monoculaire/
Ouverture de l'émetteur laser
3. Ouverture du détecteur laser
2
5
3
6
7
4. Bouton MODE
5. Oculaire monoculaire 6x
6. Œilleton/Bague de réglage dioptrique
7. Index dioptrique
8. Œillet pour courroie
9. Couvercle du logement des piles
10. Indication « Ouvert » pour le couvercle
8
du logement des piles
11. Étiquette de référence du produit
12. Indications
9
12
• Boîtier .............................. x1
• Housse ............................ x1
28
11
Composition
• Lanière ............................ x1
• Pile au lithium (CR2) ... x1
10

■ Écran interne
Indication de l'utilisation de la
fonction VR (réduction des vibrations)
En
Fr
Marque d'irradiation laser
Distance
Mode distance horizontale
Mode Priorité à la Première Cible
Repère de cible
Unité de mesure (m/yd.)
Mode Priorité à la Cible Distante
Indicateur d'état de la pile
: Visez la cible que vous souhaitez mesurer. Positionnez la cible au centre du réticule.
: S'affiche lorsque le laser est utilisé pour une mesure.
Ne regardez pas du côté de l’objectif tant que cette marque est visible.
: « Échec de la mesure » ou « mesure de distance impossible »
* Comme l’afficheur interne de ce produit est agrandi par l’oculaire, il est parfois possible d’observer de la
poussière. Cependant, ceci n’affecte pas la précision de la mesure.
29

[Fonctions]
En
Fonction VR (réduction des vibrations)
■
Fr
● Activation et désactivation
La fonction VR (réduction des vibrations) s'active à la mise sous tension du télémètre.
A la mise hors tension du télémètre laser, la fonction VR (réduction des vibrations) se
désactive automatiquement.
Mode de priorité à la cible (mode de Priorité à la Première Cible/mode de Priorité à la
■
Cible Distante)
Ce télémètre laser Nikon utilise le système de commutation Priorité à la Première Cible/Priorité à la Cible
Distante.
(Le réglage par défaut est le mode de Priorité à la Première Cible.)
Pour la mesure de sujets qui se recouvrent:
Le mode de Priorité à la Première Cible donne la distance au sujet le plus proche et
le mode de Priorité à la Cible Distante donne la distance au sujet le plus éloigné.
30

[Première étape]
Insérer/Remplacer la pile
■
1. Type de pile
Pile au lithium 3V CR2 x1
2. Insérer/Remplacer la pile
2-1. Ouvrez le couvercle du logement de la pile
Tournez le couvercle du compartiment de la pile dans le sens inverse des aiguilles d'une montre et retirez-
le. Il peut être difficile à ouvrir à cause du joint d'étanchéité.
2-2. Insérez la pile/Remplacez la pile usagée par une pile neuve
Insérez une nouvelle pile et orientez-la selon le sens indiqué dans le compartiment. Le pôle [+] doit être
positionné vers l'intérieur du compartiment. Si la pile n'est pas positionnée correctement, le télémètre laser
Nikon ne fonctionnera pas. Pour remplacer la pile, sortez d'abord la pile usagée. Puis, insérez la nouvelle.
2-3. Fermez le couvercle du logement de la pile
Tournez le couvercle du compartiment de la pile dans le sens des aiguilles d'une montre pour la visser dans
le boîtier. Il peut être difficile à fermer à cause du joint d'étanchéité, mais continuez à le tourner jusqu'au
bout. Vérifiez que le compartiment est bien fermé.
3. Indicateur de niveau de charge de la pile
* La marque d'état de la pile indique la nécessité de remplacer la pile sur l'écran interne.
Ne s’ache que pe ndant 2 secondes après l a mise
sous tensio n.
Ne s’ache que pe ndant 2 secondes après l a mise
sous tension.
S’ache en continu.
Clignote. S’arrête automatiquement après avoir
clignoté 3 fo is.
Achage Description
Charge susante pour le fonctionnement.
Le niveau de charge de la pile devient faible.
Préparez-vous a remplacer la pile.
Le niveau de charge de la pile est faible.
La pile doit être remplacée.
La pile est usée.
Veuillez remplacer la pile.
En
Fr
31

[Configuration du mode]
En
Description du fonctionnement
■
Fr
Veille
* Une période d'inactivité d'au moins 8 secondes ramène
l'appareil à l'écran de veille quel que soit le mode aché.
32
Pression prolongée sur le bouton MODE
(1,5 secondes ou plus)
Pression prolongée sur le bouton
MODE (1,5 secondes ou plus) ou une
période d'inactivité d'au moins 8
secondes ramènent l'appareil à l'écran
de veille, quel que soit le mode.
Modier les unités d'achage de
la distance (F1)
mYD
Pression courte sur le bouton PWR (moins de
1,5 secondes) change les unités.
Pression courte sur le bouton MODE
(moins de 1,5 secondes)
Modier le mode d'achage de la
mesure (F2)
Mode distance
horizontale
Pression courte sur le bouton PWR (moins de
1,5 secondes) change le mode.
Pression courte sur le bouton MODE
(moins de 1,5 secondes)
Mode distance
réelle
Modier le mode de priorité à la
cible (F3)
Mode de Priorité à
la Première Cible
Pression courte sur le bouton PWR (moins de
1,5 secondes) change le mode.
Pression courte sur le bouton MODE
(moins de 1,5 secondes)
Mode de Priorité à
la Cible Distante

Modifier les unités d'affichage de la distance (m/YD) (F1)
■
Le réglage par défaut est le yard (YD).
1. Depuis la position de veille, une pression prolongée (1,5 secondes ou plus)
sur le bouton MODE permet d'afficher le menu des unités d'affichage de la
distance (F1).
2. Une pression courte sur le bouton PWR (moins de 1,5 secondes) permet
passer des mètres aux yards.
3. Une fois réglé, une pression courte sur le bouton MODE (moins de 1,5
secondes) permet d'afficher le menu du mode d'affichage de la mesure (F2).
Lorsque le réglage est terminé, une pression prolongée sur le bouton MODE
(1,5 secondes ou plus) ou une période d'inactivité d'au moins 8 secondes
ramènent l'appareil à l'écran de veille.
En
Fr
33

En
Modifier le mode d'affichage de la mesure (F2)
■
Fr
Il est possible de passer du mode de distance horizontale au mode de distance
réelle et inversement.
Le réglage par défaut est le mode de mesure de distance horizontale.
1. Depuis la position de veille, une pression prolongée (1,5 secondes ou plus) sur
le bouton MODE, suivie d'une pression courte sur le bouton MODE (moins de 1,5
secondes) permet d'afficher le menu du mode d'affichage de la mesure (F2).
2. Une pression courte sur le bouton PWR (moins de 1,5 secondes) permet de
changer le mode d'achage de la mesure.
3. Une fois réglé, une pression courte sur le bouton MODE (moins de 1,5 secondes)
permet d'afficher le menu des paramètres du mode de priorité à la cible (F3).
Lorsque le réglage est terminé, une pression prolongée sur le bouton MODE (1,5
secondes ou plus) ou une période d'inactivité d'au moins 8 secondes ramènent
l'appareil à l'écran de veille.
Le paramètre affiché dépend du mode de réglage.
Mode distance horizontale
Distance
horizontale
34
Sans objet
Sans objet
Mode distance réelle
Distance
réelle

■ Modifier le mode de priorité à la cible (F3)
Ce télémètre laser Nikon utilise le système de commutation Priorité à la Première
Cible/Priorité à la Cible Distante.
Le réglage par défaut est le mode de Priorité à la Première Cible.
1. A partir du mode de veille, une pression prolongée (1,5 secondes ou plus) sur le
bouton MODE suivie de deux courtes pressions (moins de 1,5 secondes) sur le
bouton MODE permet d'acher le menu des paramètres du mode de priorité à
la cible (F3).
2. Une pression courte sur le bouton PWR (moins de 1,5 secondes) permet de
changer le mode de priorité à la cible.
3. Lorsque le réglage est terminé, une pression prolongée sur le bouton MODE (1,5
secondes ou plus) ou une période d'inactivité d'au moins 8 secondes ramènent
l'appareil à l'écran de veille.
[Mode de Priorité à la Première Cible/mode de Priorité à la Cible Distante]
Pour la mesure de sujets qui se recouvrent:
Le mode de Priorité à la Première Cible donne la distance au sujet le plus proche et
le mode de Priorité à la Cible Distante donne la distance au sujet le plus éloigné.
En
Fr
35

[Mesure]
En
Mise en garde — Les contrôles, les ajustements ou l’utilisation d’autres procédures que celles spécifiées
dans ce document peuvent engendrer des effets négatifs ou des dommages pour votre santé, dus aux
Fr
émissions laser.
*Avant d'effectuer une mesure, veillez à confirmer chaque paramètre du mode.
Veuillez consulter chaque section pour définir chacun des modes.
*
■ Réglage dioptrique
Réalisez le réglage dioptrique pour obtenir un affichage interne net dans le viseur.
Tout d’abord, faites tourner la bague de réglage dioptrique dans le sens inverse des aiguilles d’une
montre jusqu’à ce qu’elle s’arrête complètement. Ensuite, mettez l'appareil sous tension et faites tourner
la bague de réglage dioptrique dans un sens puis dans l'autre jusqu'à ce que l'afficheur interne soit net.
■ Mesure
1. Mettez l'appareil sous tension.
(Arrêt automatique après environ 8 secondes de
non-utilisation.)
Immédiatement après
En veille
2. Visez la cible.
Positionnez la cible au centre du réticule.
la mise sous tension
3. Une pression sur le bouton PWR déclenche une mesure.
Une fois la mesure terminée, les résultats mesurés s'affichent pendant 8 secondes environ, puis l'appareil
se met automatiquement hors tension. Si vous appuyez sur le bouton PWR pendant la phase de mise sous
tension, une autre mesure démarrera.
36

■ Mesure unique
Une seule pression sur le bouton PWR déclenche une mesure unique, puis affiche les résultats.
En
Fr
Exemple d’affichage de
distance mesurée
Exemple d’échec de
mesure
■ Mesure en continu
Appuyez et maintenez le bouton PWR pour prendre une mesure continue, pendant 8 secondes au
maximum. Pendant la mesure, la marque d’émission laser clignote puis le résultat mesuré s’affiche.
Si vous relâchez le bouton, la mesure continue s’arrête.
Veille
Appuyez une fois sur le bouton PWR
Appuyez et maintenez le bouton PWR
Mesure unique
Mesure en continu
37

[Détails techniques]
En
■ Spécifications
Fr
Système de mesure
Plage de mesure (distance réelle) 7,3-915 mètres/8-1.000 yards
Affichage de distance (incrément) Tous les 0,1m/yd.
Système optique
Grossissement (x) 6
Diamètre effectif de la lentille de l’objectif (mm) 21
Champ angulaire (réel) (°) 7,5
Dégagement oculaire (mm) 18,0
Pupille de sortie (mm) 3,5
Réglage dioptrique ±4m
Autres
Température de fonctionnement (˚C/˚F) -10 — +50/14 — 122
Humidité ambiante de fonctionnement (%RH) 80 ou moins (sans condensation)
Alimentation
Dimensions (L x H x l) (mm/in.) 99 x 75 x 48/3,9 x 3,0 x 1,9
Poids (g/oz.) Environ 200/7,1 (sans la pile)
Structure
Compatibilité
électromagnétique
Environnement RoHS, WEEE
38
Modèle ARROW ID 7000 VR
-
1
1 pile CR2 au lithium (3V CC)
Arrêt automatique (après environ 8 secondes de non-utilisation)
Étanche ( jusqu'à 1 mètre/3,3 pieds pendant 10 minutes)*, anti-buée
Le logement de la pile est protégé de l'eau — équivalent à une protection
de classe 4 JIS/IEC (IPX4) (dans les conditions de test de Nikon)**
FCC Chapitre15 Sous-PartieB classe B, EU:EMC directive, AS/NZS,
VCCI classeB, CU TR 020

Modèle ARROW ID 7000 VR
Laser
Classification laser
IEC60825-1 : Classe 1M/Produit Laser
FDA/21 CFR Partie 1040.10 : Produit Laser de Classe 1
Longueur d'onde (nm) 905
Durée d'impulsion (ns) 9
Puissance de sortie (W) 20
Divergence du faisceau (mrad) Verticale : 1,8/Horizontale : 0,25
* Modèles étanches
Le télémètre laser Nikon est étanche et son système optique et d'observation ne subira pas de dégâts s'il est immergé ou
tombe dans l'eau jusqu'à une profondeur maximale de 1 mètre/3,3 pieds et s'il n'y demeure pas plus de 10 minutes.
Le télémètre laser Nikon offre les avantages suivants:
• Peut être utilisé dans des conditions de forte humidité, poussière et pluie sans risque de dommage aux fonctions internes.
• Une conception avec remplissage d’azote le rend résistant à la condensation et aux moisissures.
Observez les consignes suivantes lors de l'utilisation d'un télémètre laser Nikon:
• L'appareil n'étant pas parfaitement étanche, il ne doit pas être placé ni être utilisé sous un courant d'eau.
• Si vous trouvez de l'humidité sur les parties mobiles de l'appareil, arrêtez de l'utiliser et essuyez-la.
** Le logement de la pile est protégé de l'eau, mais il n'est pas étanche. De l'eau peut pénétrer dans l'appareil si le télémètre est
immergé. Dans ce cas, essuyez soigneusement le logement de la pile et attendez qu'il soit parfaitement sec.
Durée de vie de la pile
Fonctionnement continu : Environ 3.300 fois (à environ 20°C)
Cette valeur peut varier selon la température et d'autres facteurs. Utiliser uniquement comme indication.
• La pile fournie avec ce télémètre laser Nikon sert à en vérifier le fonctionnement. A cause de la décharge naturelle, la
durée de vie de la pile sera probablement plus courte que la valeur ci-dessus.
• Si de l'eau rentrait dans le compartiment suite à une immersion, séchez bien le logement de la pile, et remplacez la pile.
En
Fr
39

En
■ Guide de dépistage des pannes/Réparations
Fr
Si le télémètre laser Nikon ne fonctionne pas comme prévu, consultez cette liste avant de contacter votre
revendeur local ou le magasin où vous l’avez acheté.
● Si il y a un problème avec le produit.
Problème Cause/Solution
・Ne s’allume pas
・Impossible d’effectuer une
mesure
・Résultat anormal
・Vérifier le fonctionnement
de la fonction VR
(réduction des vibrations)
・Impossible de désactiver la
fonction VR (réduction des
vibrations)
・De légers bruits sont émis
à la mise sous tension et à
la mise hors tension
・[
] s'affiche à l'écran
40
・Appuyez sur le bouton PWR (sur le dessus du boîtier).
・Vérifiez la position de la pile.
・Remplacez la pile avec une pile neuve.
・Confirmez chaque paramètre du mode.
・Confirmez que vous pouvez mesurer une cible large et proche (par exemple:
un bâtiment situé à environ 15m/yd. devant vous).
・Nettoyez la surface de la lentille si nécessaire.
・Comparez les vibrations de la cible dans le viseur lorsque le télémètre laser est
allumé et éteint.
・ A la mise sous tension du télémètre laser, la fonction VR (réduction des
vibrations) est toujours activée.
・La fonction VR (réduction des vibrations) s'active à la mise sous tension du
télémètre laser. A la mise hors tension du télémètre laser, la fonction VR
(réduction des vibrations) se désactive automatiquement.
・Il n'est pas possible d'activer et de désactiver la fonction VR (réduction des
vibrations).
・Le moteur du système VR (réduction des vibrations) peut produire un léger
bruit. Ce bruit est normal, continuez à utiliser le télémètre laser.
・ Indique une erreur. Veuillez contacter votre revendeur ou le magasin dans
lequel vous avez acheté le produit.

● Si vous avez besoin d’une réparation, veuillez contacter votre revendeur local ou le magasin dans
lequel vous avez acheté le produit.
Ne réparez pas et ne démontez pas le produit. Un incident sérieux pourrait se produire.
Veuillez noter que Nikon n’est pas responsable des dommages directs ou indirects en cas de tentative
de réparation ou de démontage de la part de l’utilisateur.
En
Fr
41


NIKON VISION CO., LTD.
Printed in China (297K)1E/1606
 Loading...