Nikon AF-S Zoom-Nikkor 17-35mm f/2.8D IF-ED User Guide [de]

AF-S Zoom-Nikkor

17–35mm f/2.8D IF-ED


(P.2–11)

User's Manual

(PP.12–19)

Benutzerhandbuch

(S. 20–25)

Manuel d'utilisation

(P. 26–31)

Manual del usuario

(PP. 32–37)

Manuale d'uso

(PP. 38–43)


(P. 44–59)


(P. 60–65)


Jp

En

De

Fr

Es

It

Sc

Tc

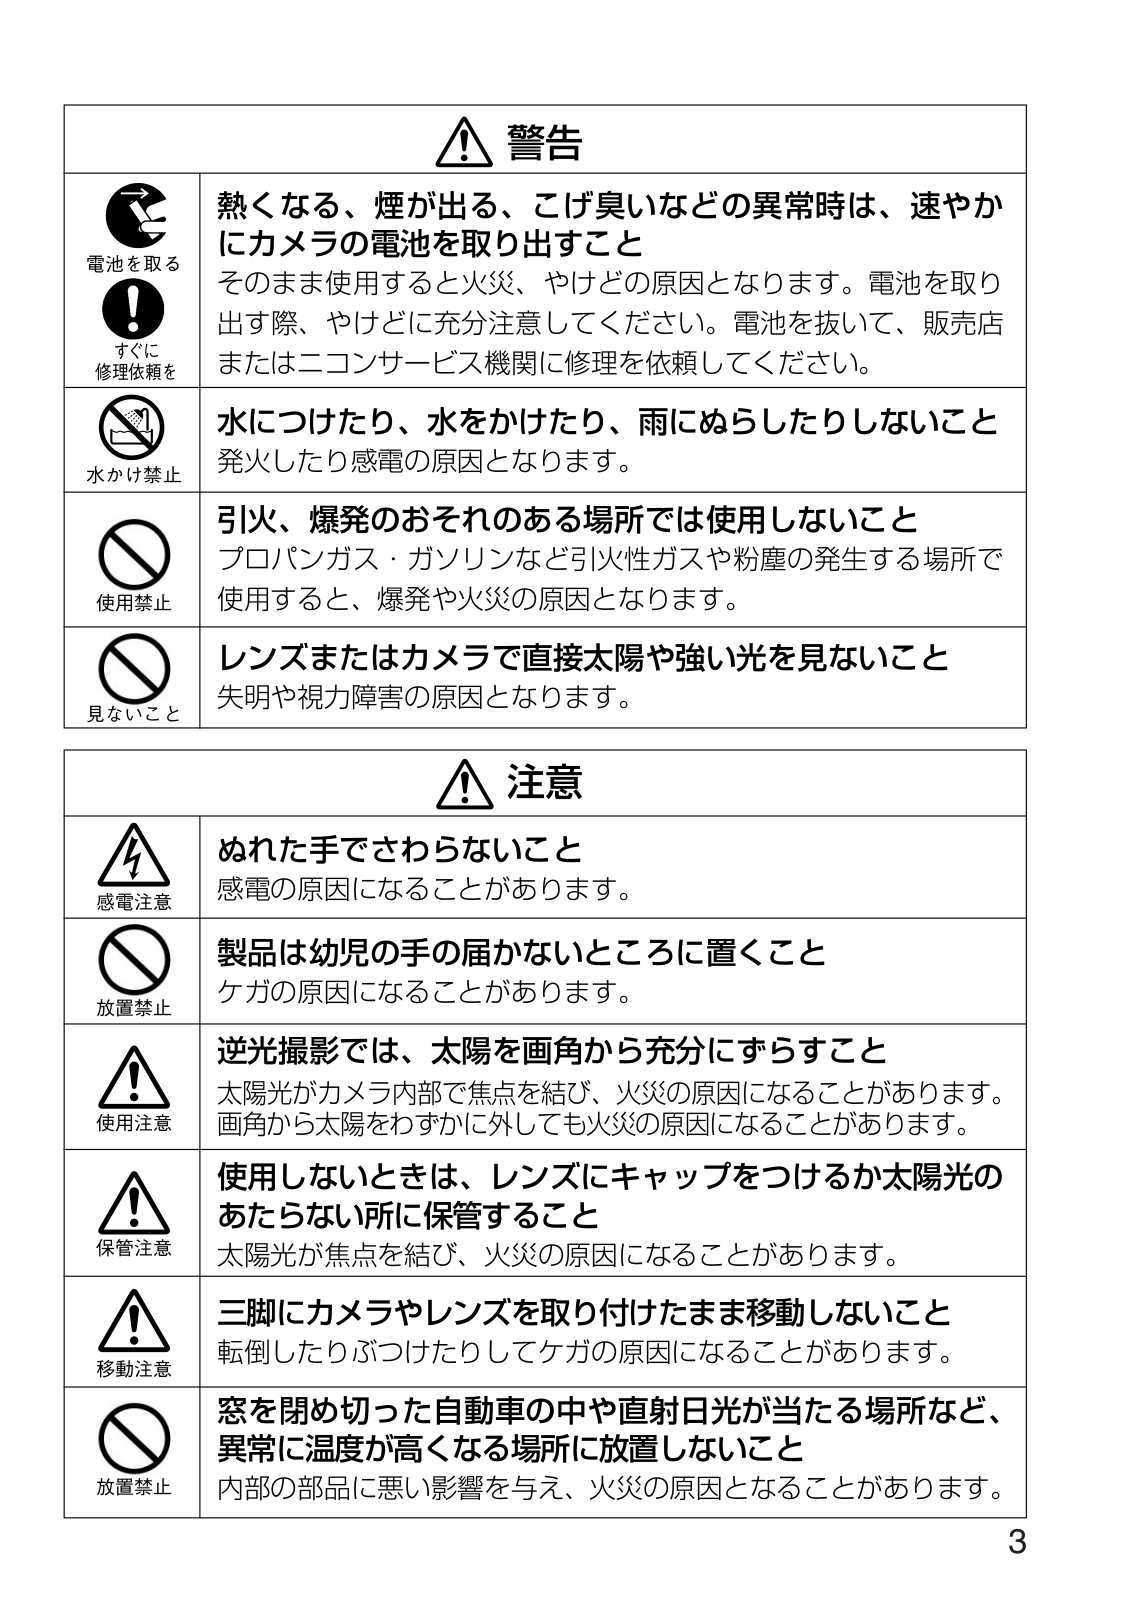
警告

注意

2

修理依頼を

使用禁止

あたらない所に保管すること

3

1

4

Nikon AF-S Zoom-Nikkor 17-35mm f/2.8D IF-ED User Guide

2

5

Jp

1

!


2


"


3


# EE


4


$ F


5


% CPU


6


&


7


(


8


)


9


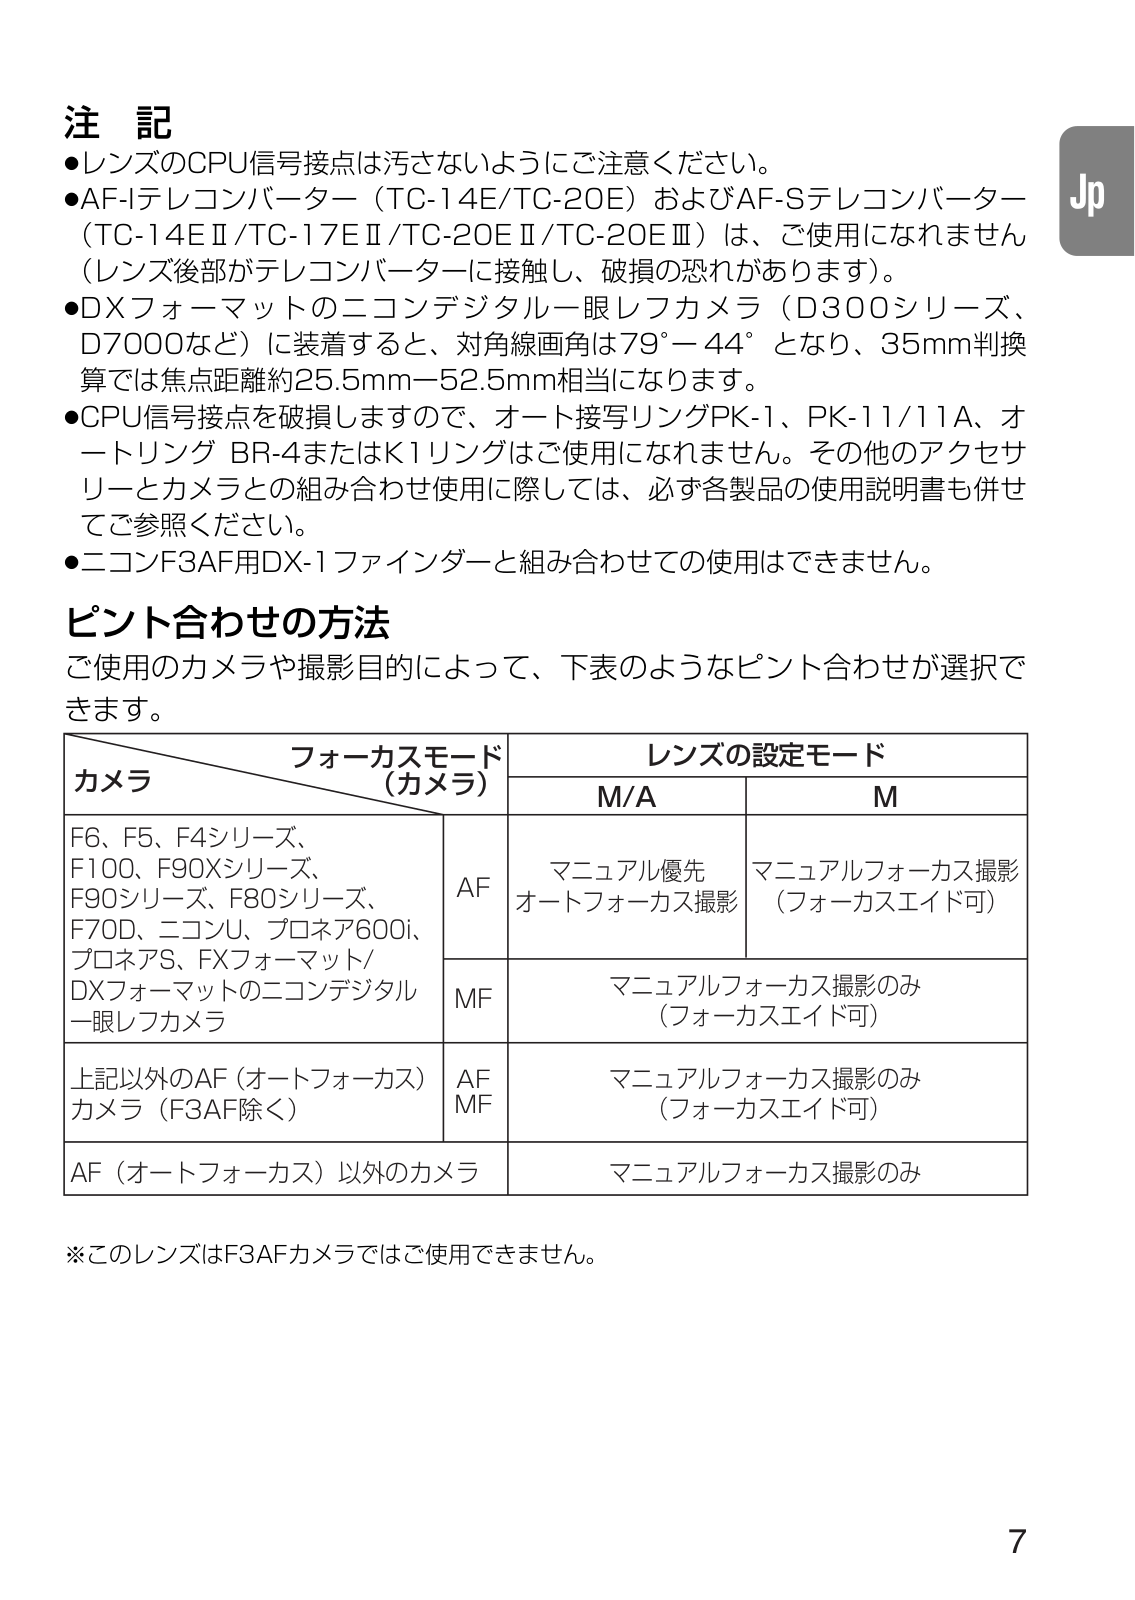
このレンズは、高速で静かなAF F 6 F 5 F 4 F 1 0 0 F90X/F90/F80 F70D U 600i

S D3 D300AF AF

3DA F F 3 A F

ED

F F2.8 0.28mIF

6

AF

CPU

AF-I TC-14E/TC-20E AF-S JpTC-14E /TC-17E /TC-20E /TC-20E

DX D300 D7000 79° 44° 35mm25.5mm 52.5mm

CPU PK-1 PK-11/11ABR-4 K1

F3AF DX-1

F6 F5 F4

F100 F90X

F90 F80 F70D U 600iS FX / DX MF

AF AF

F3AF MF

M/A M

AF

F3AF

7

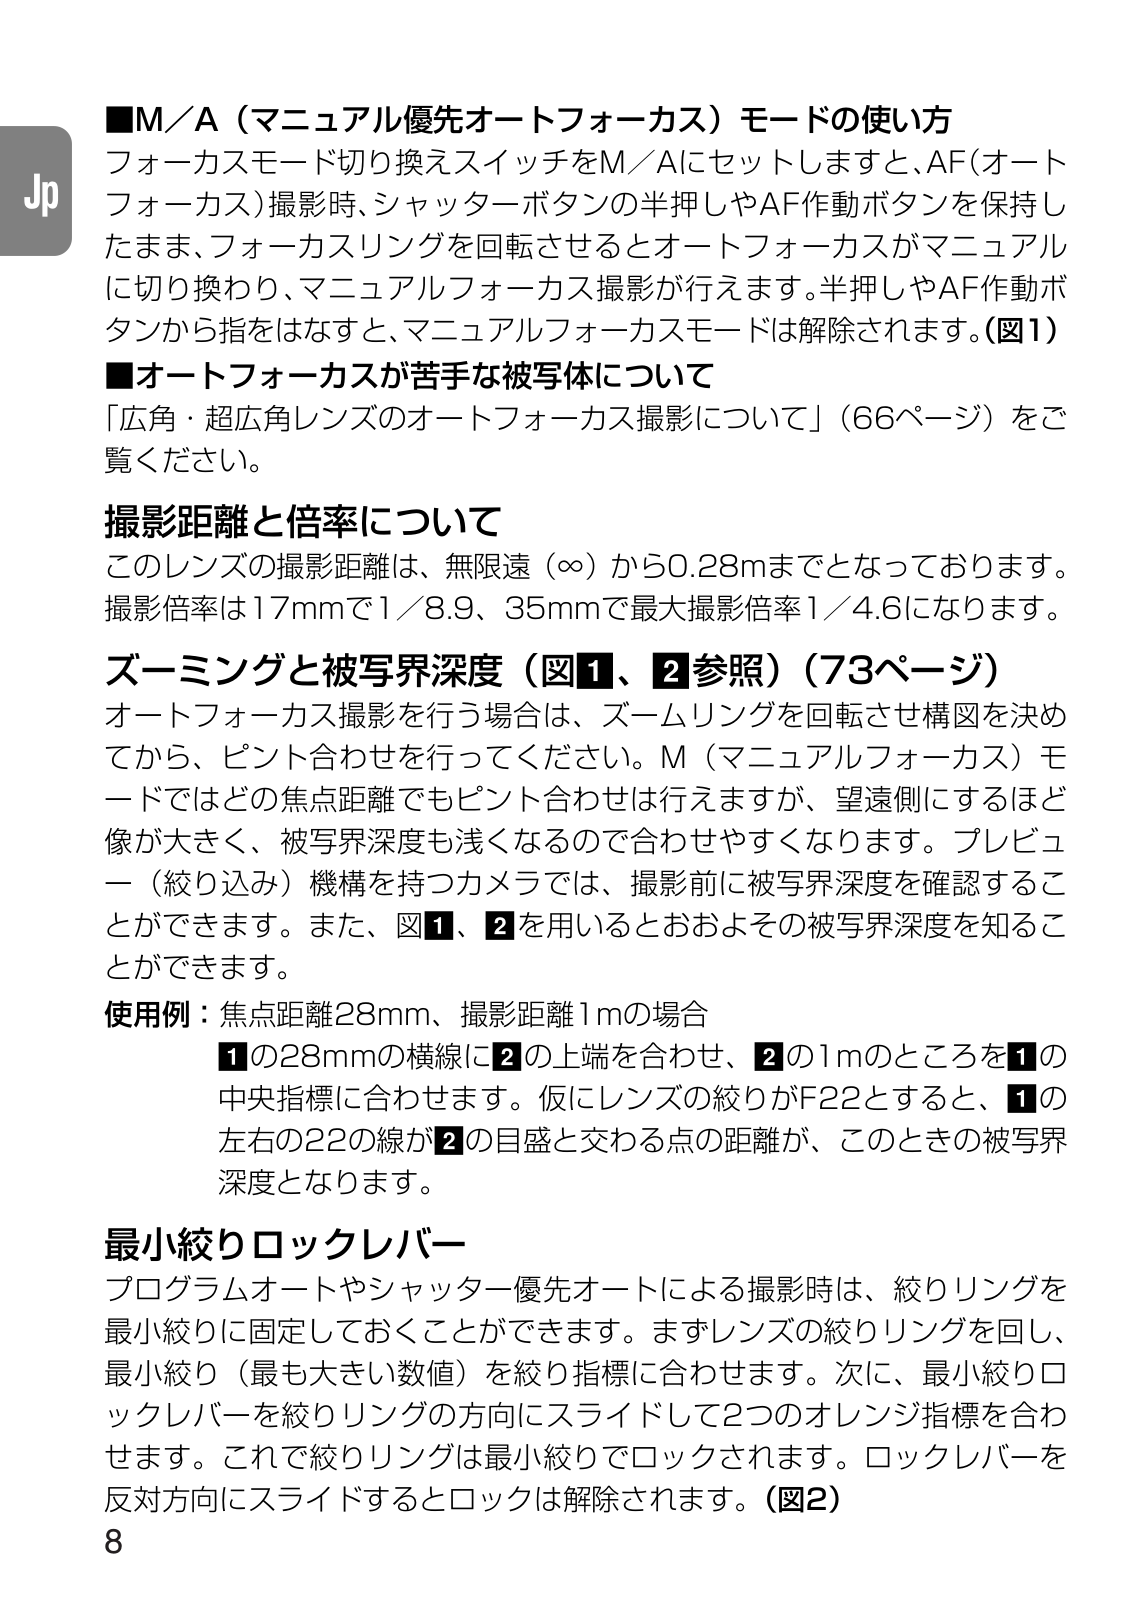
■M A

M A AF Jp AF AF 1

66

∞ 0.28m17mm 1 8.9 35mm 1 4.6

1 2 73

てから、ピント合わせを行ってください。M1 2

28mm 1m 1 28mm 2 2 1m 1F22 122 2

ックレバーを絞りリングの方向にスライドして2 2

8


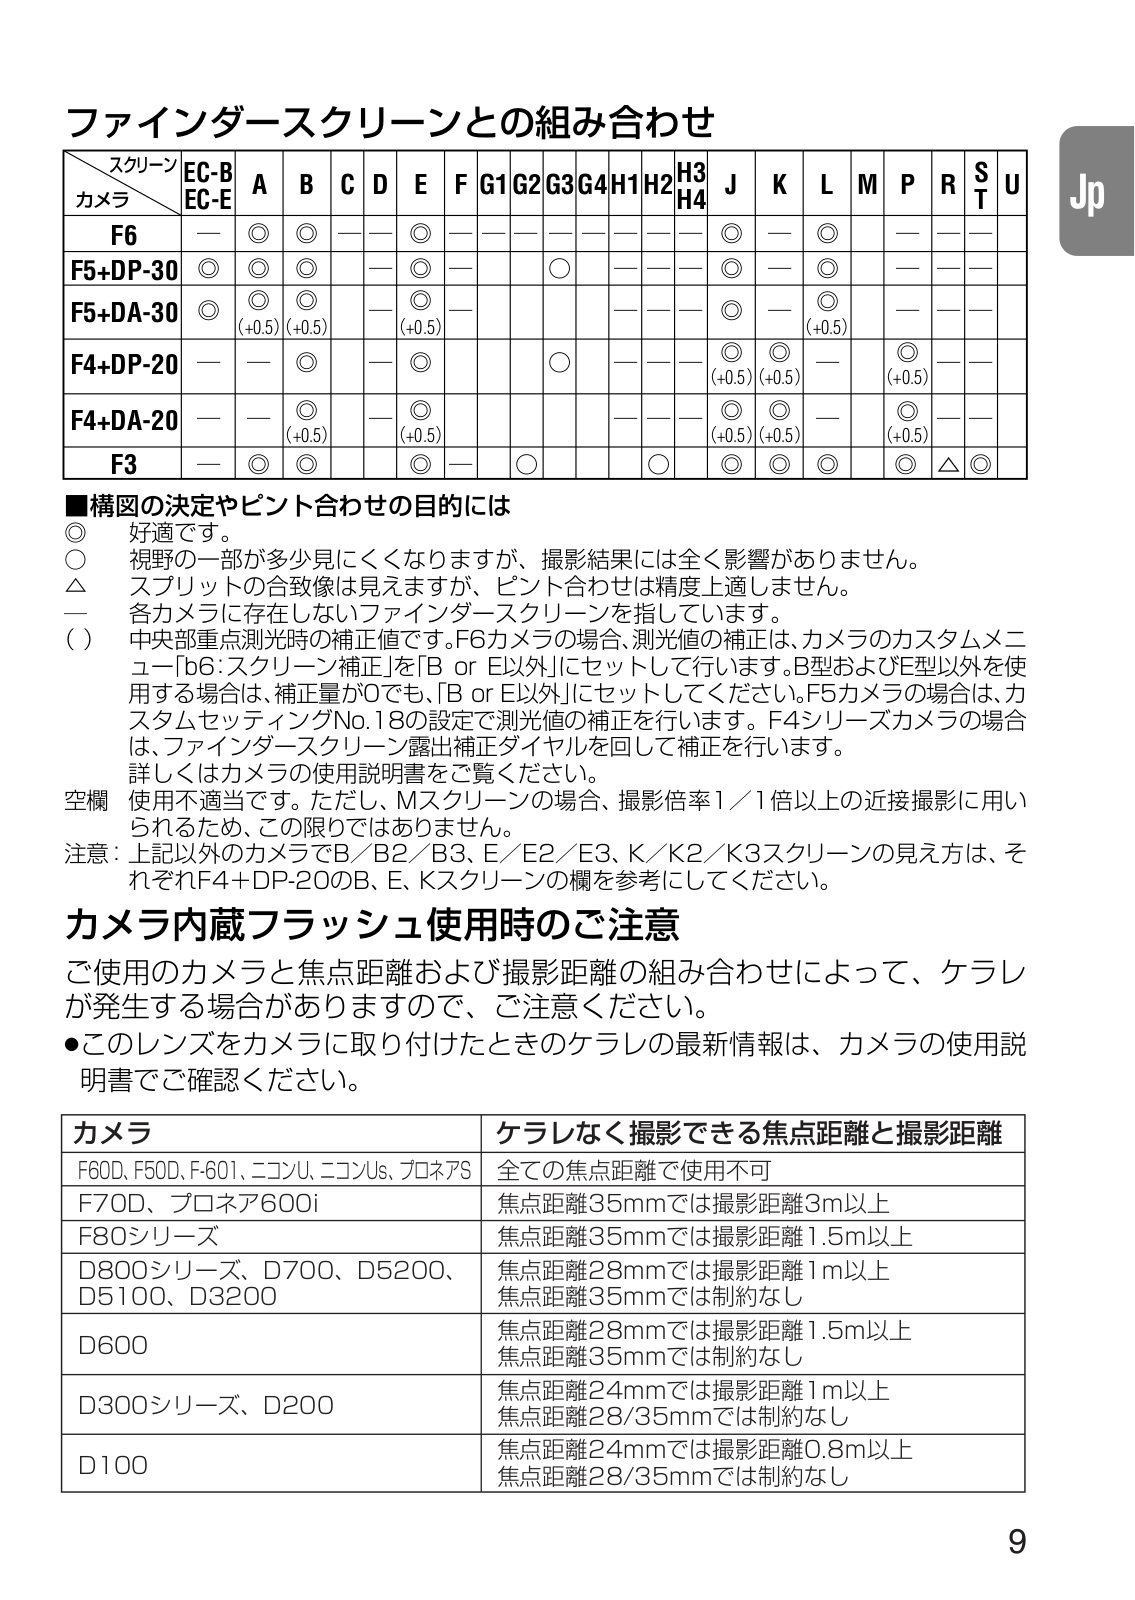
EC-B

A

B


C

D

E

F

G1

G2

G3

G4

H1

H2

H3

J

K

L

M

P

R

S

U

Jp


EC-E


H4

T

F6


F5+DP-30


F5+DA-30


+0.5 +0.5


+0.5


+0.5


F4+DP-20


+0.5 +0.5

+0.5


F4+DA-20


─ ─


+0.5


+0.5


+0.5 +0.5

+0.5


F3


F6b6 B or E B E0 B or E F5No.18 F4

M 1 1

B B2 B3 E E2 E3 K K2 K3F4 DP-20 B E K


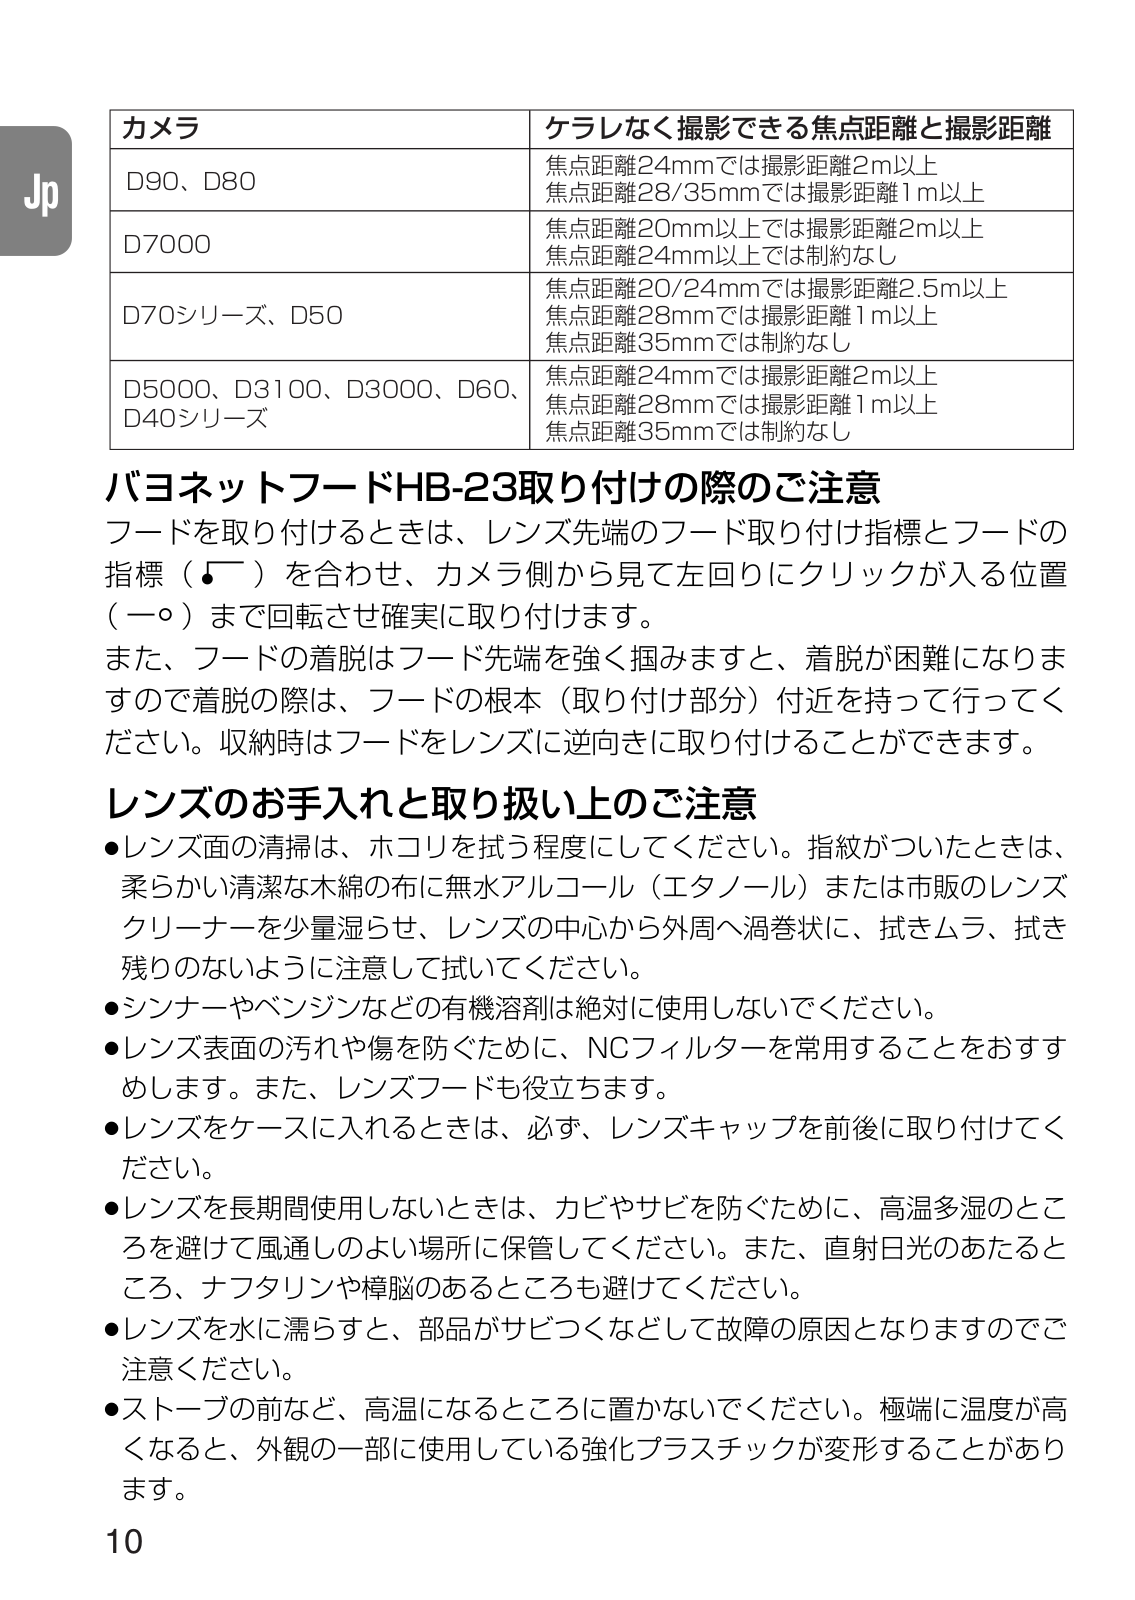
F60D F50D F-601 U Us S


F70D 600i

35mm 3

F80

35mm 1.5

D800 D700 D5200

28mm 1

D5100 D3200

35mm

D600

28mm 1.5m

35mm


D300 D200

24mm 1

28/35mm


D100

24mm 0.8

28/35mm


9


Jp

D90 D80


24mm 2


28/35mm 1


D7000


20mm 2


24mm


20/24mm 2.5


D70 D50


28mm 1


35mm


D5000 D3100 D3000 D60


24mm 2


D40


28mm 1


35mm


HB-23

ださい。収納時はフードをレンズに逆向きに取り付けることができます。

● ● NC ● ● ● ●

10

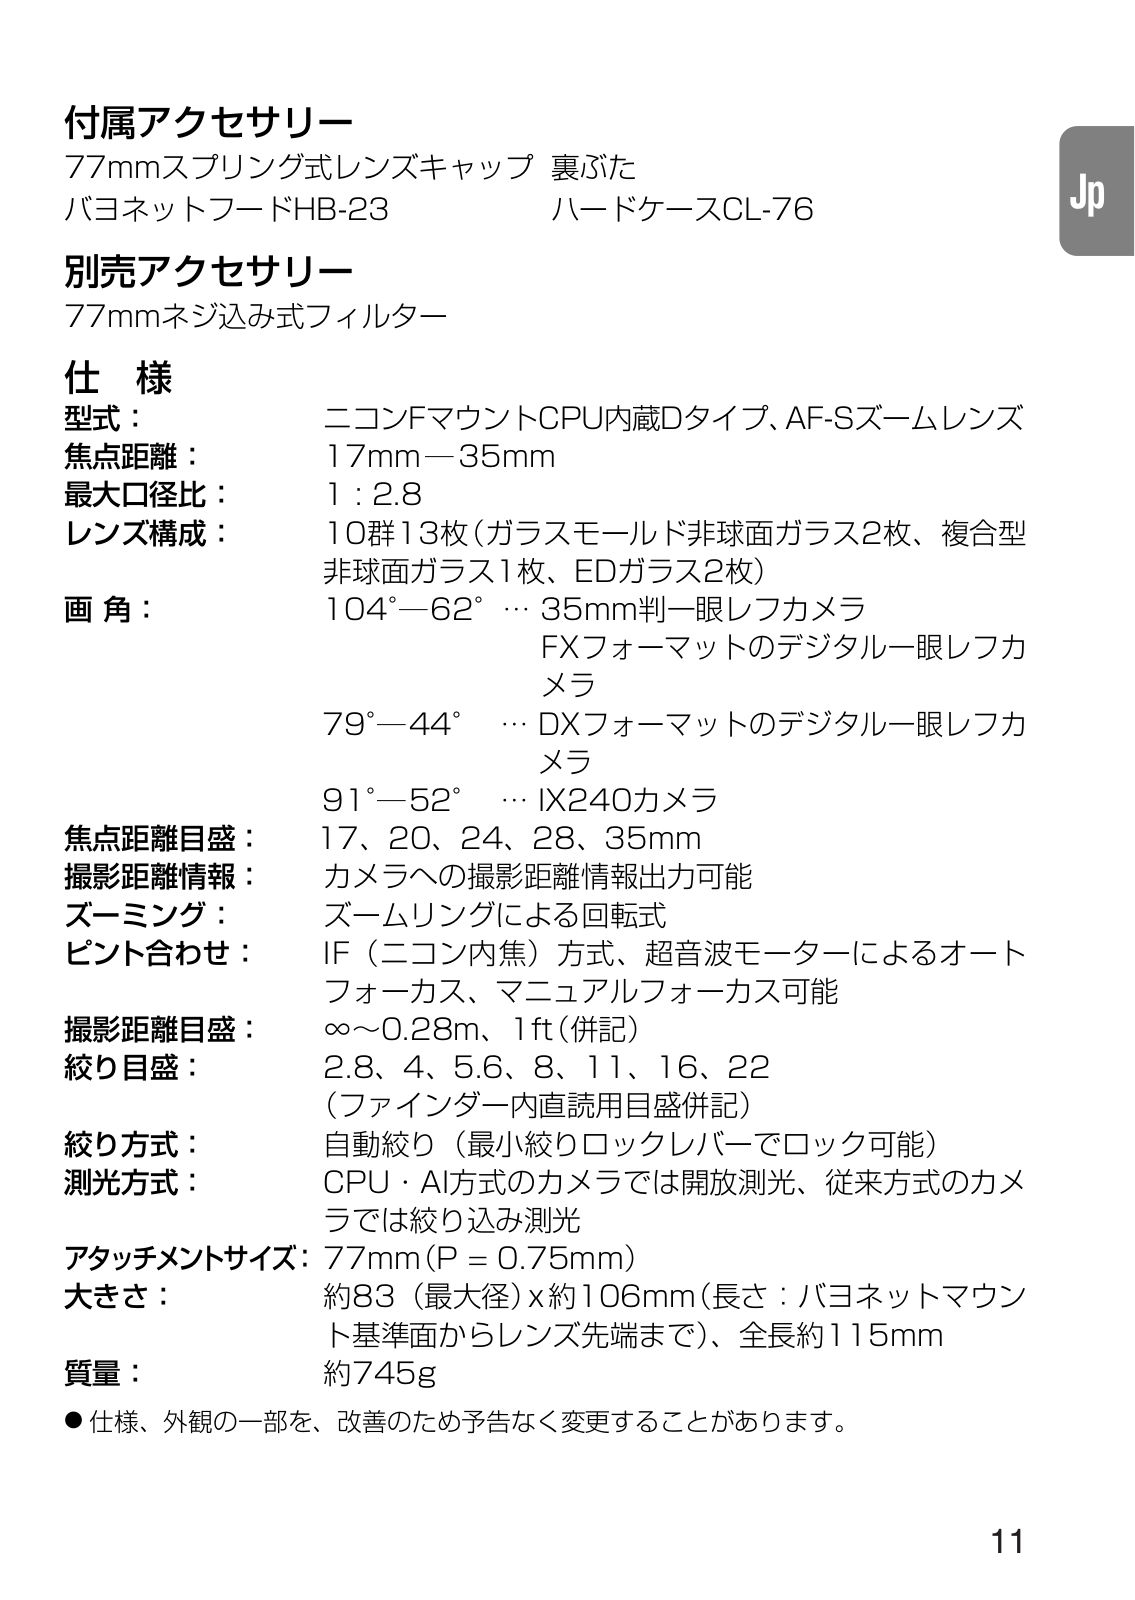
77mm

HB-23

CL-76

Jp


77mm


F CPU D AF-S


17mm―35mm


1 : 2.8


10 13 2


1 ED 2


104°―62°… 35mm


FX


79°―44° … DX


91°―52° … IX240


17 20 24 28 35mm


IF


∞ 0.28m 1ft


2.8 4 5.6 8 11 16 22


CPU AI


77mm P = 0.75mm


83 x 106mm


115mm


745g


11

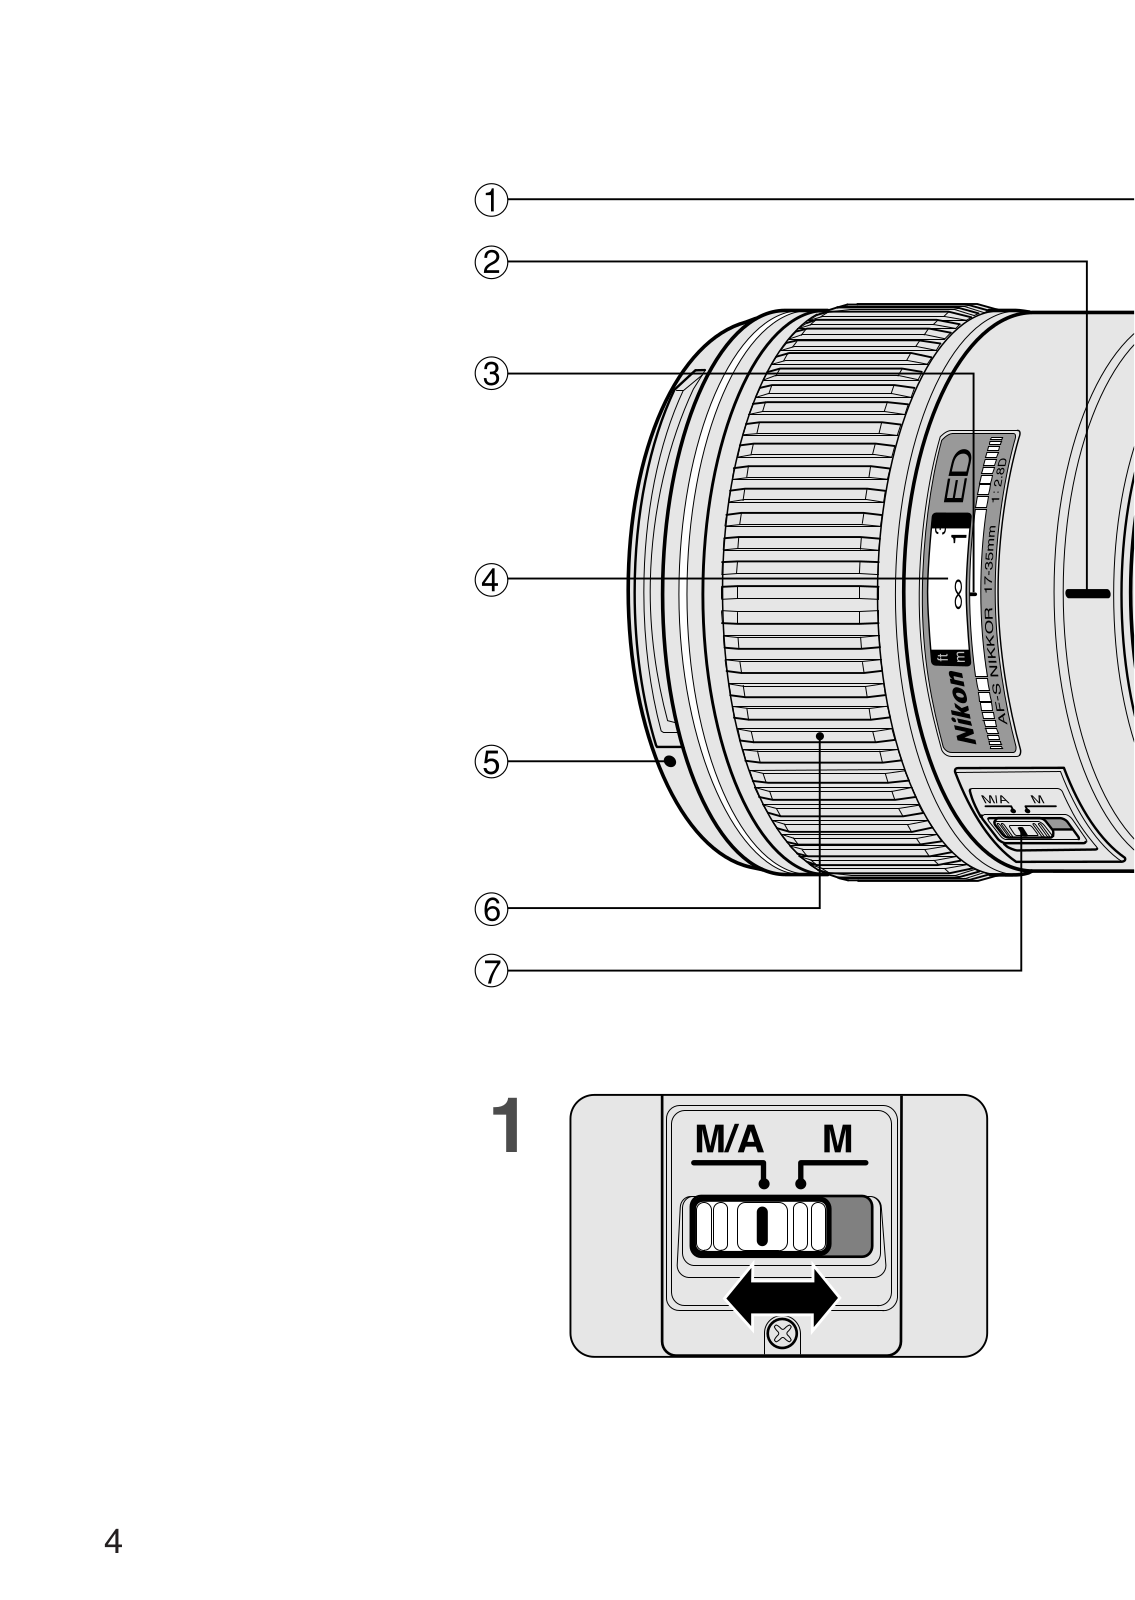
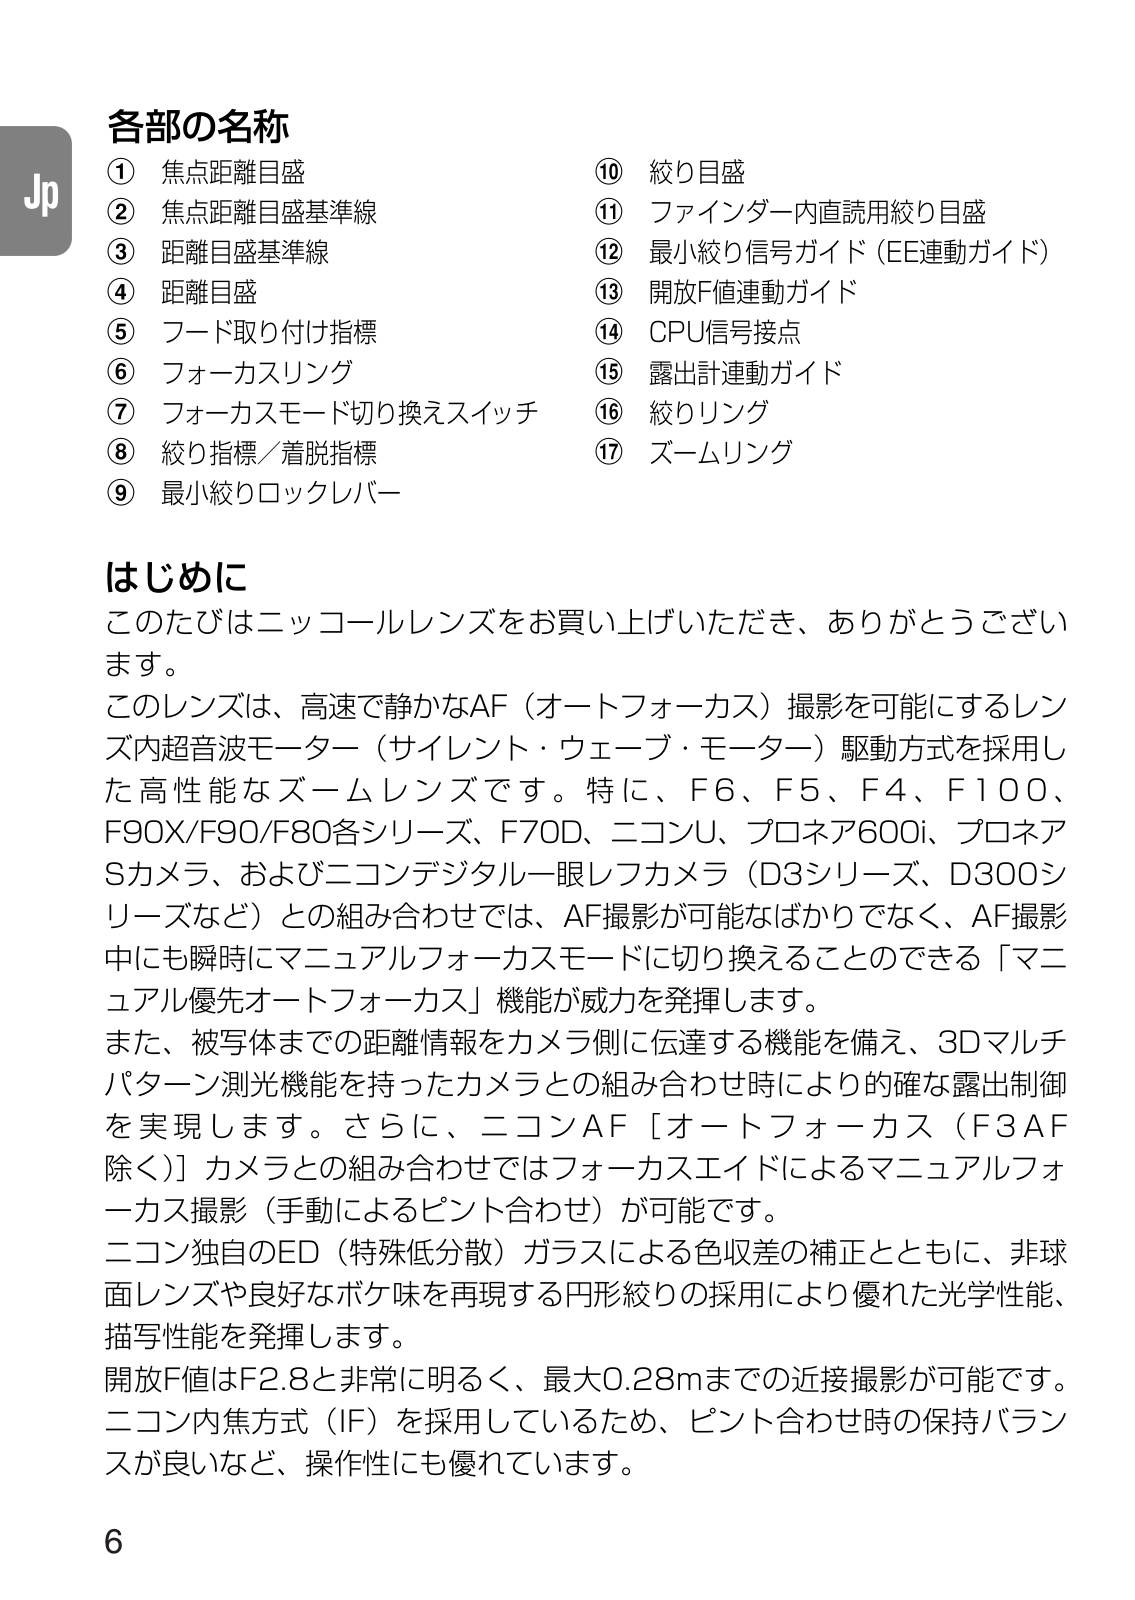
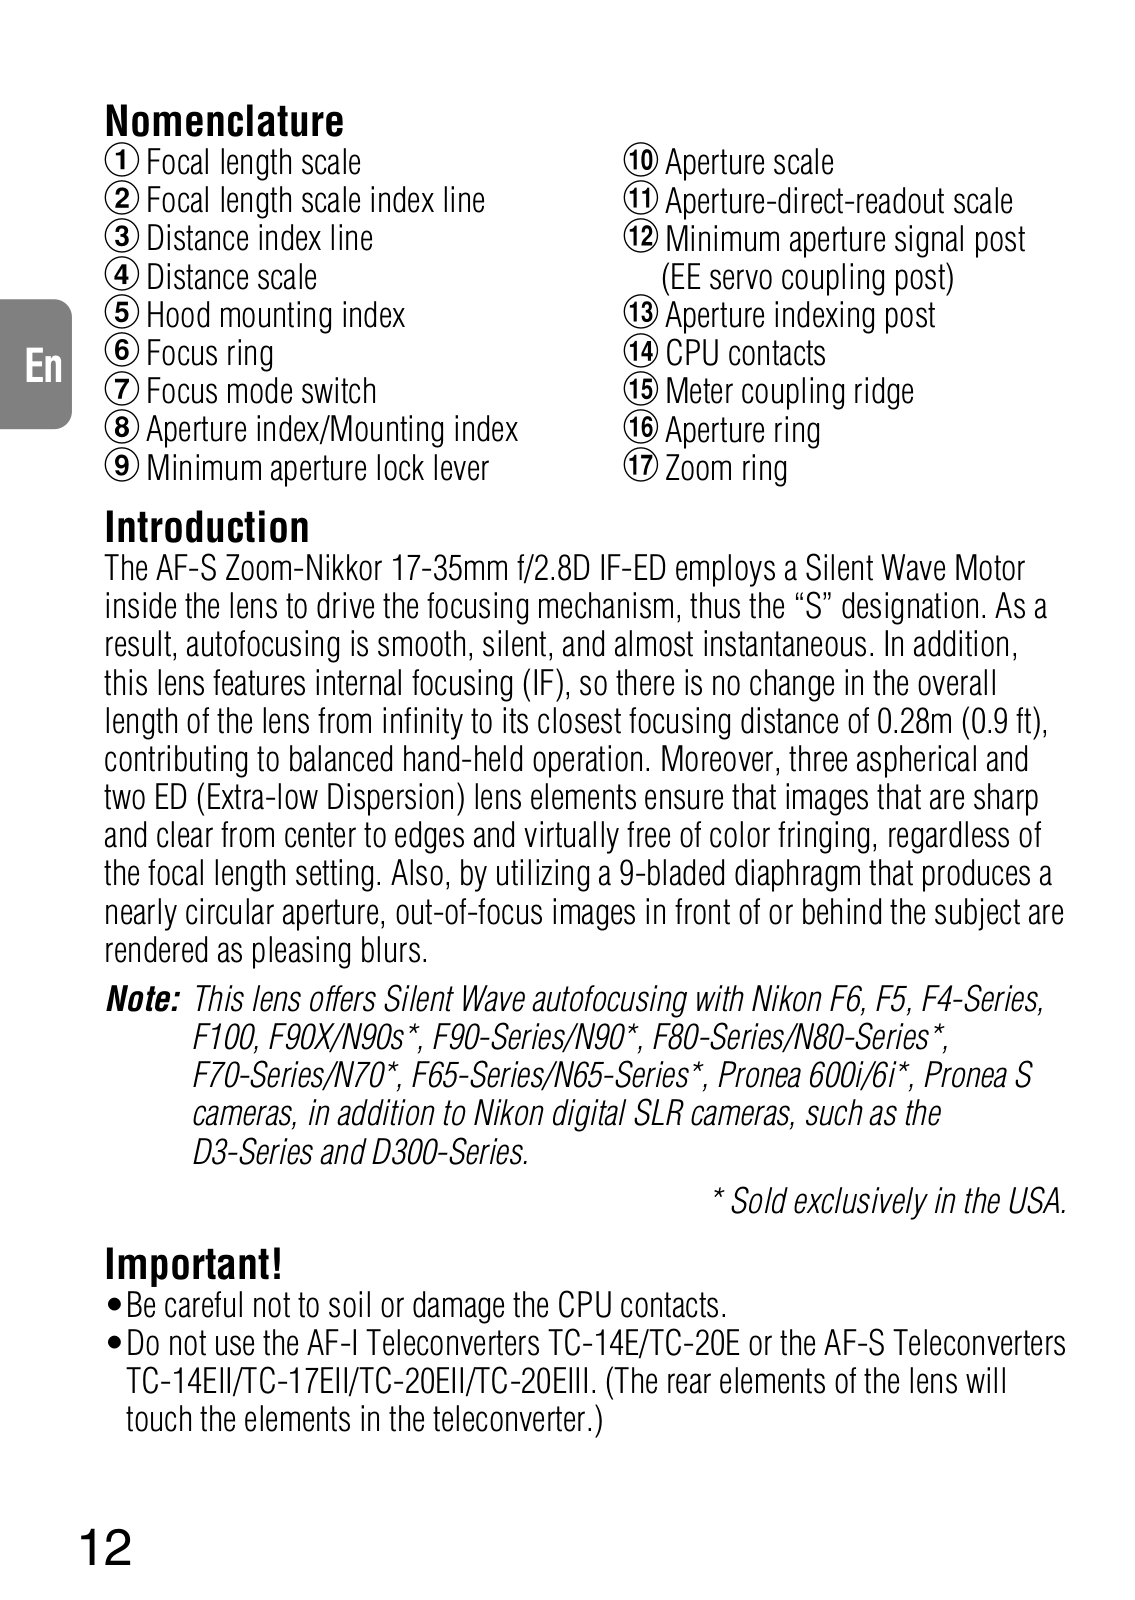
Nomenclature


1Focal length scale

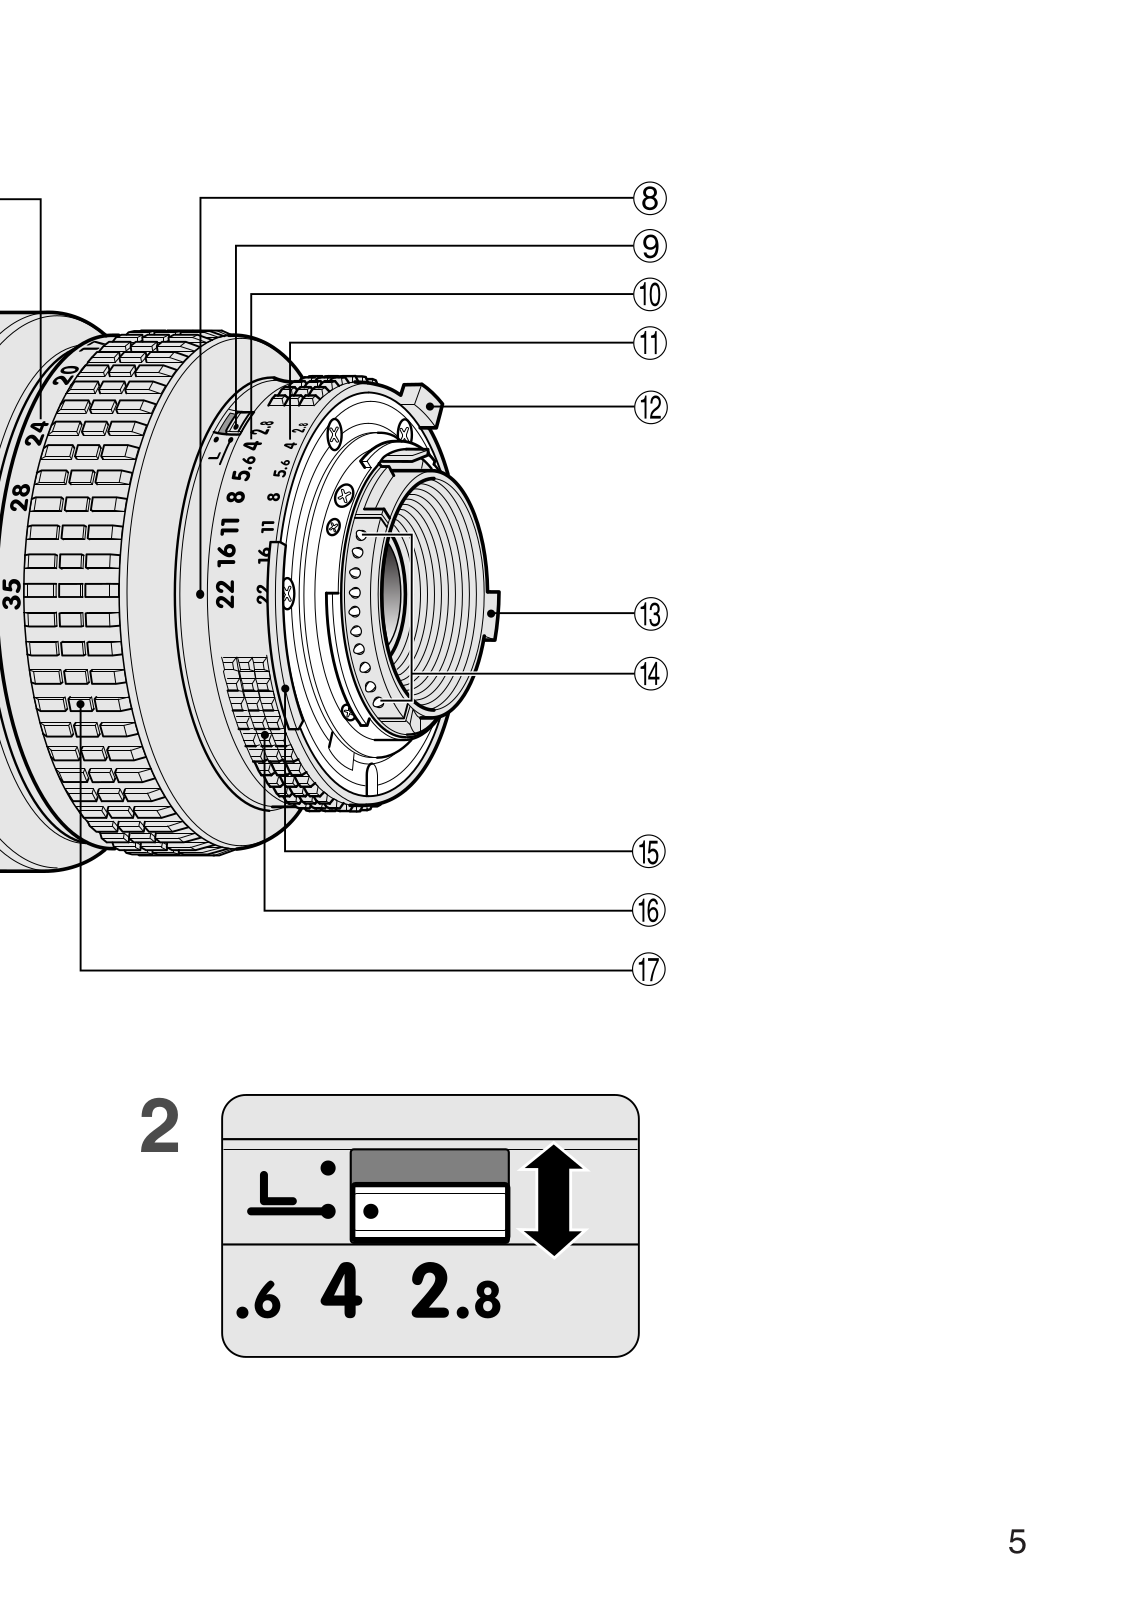
!Aperture scale


2Focal length scale index line

"Aperture-direct-readout scale


3Distance index line

#Minimum aperture signal post


4Distance scale

(EE servo coupling post)


5Hood mounting index

$Aperture indexing post

En

6Focus ring

%CPU contacts

7Focus mode switch

&Meter coupling ridge


8Aperture index/Mounting index

(Aperture ring


9Minimum aperture lock lever

)Zoom ring

Introduction

The AF-S Zoom-Nikkor 17-35mm f/2.8D IF-ED employs a Silent Wave Motor inside the lens to drive the focusing mechanism, thus the “S” designation. As a result, autofocusing is smooth, silent, and almost instantaneous. In addition, this lens features internal focusing (IF), so there is no change in the overall length of the lens from infinity to its closest focusing distance of 0.28m (0.9 ft), contributing to balanced hand-held operation. Moreover, three aspherical and two ED (Extra-low Dispersion) lens elements ensure that images that are sharp and clear from center to edges and virtually free of color fringing, regardless of the focal length setting. Also, by utilizing a 9-bladed diaphragm that produces a nearly circular aperture, out-of-focus images in front of or behind the subject are rendered as pleasing blurs.

Note: This lens offers Silent Wave autofocusing with Nikon F6, F5, F4-Series, F100, F90X/N90s*, F90-Series/N90*, F80-Series/N80-Series*, F70-Series/N70*, F65-Series/N65-Series*, Pronea 600i/6i*, Pronea S cameras, in addition to Nikon digital SLR cameras, such as the D3-Series and D300-Series.

* Sold exclusively in the USA.

Important!

•Be careful not to soil or damage the CPU contacts.

•Do not use the AF-I Teleconverters TC-14E/TC-20E or the AF-S Teleconverters TC-14EII/TC-17EII/TC-20EII/TC-20EIII. (The rear elements of the lens will touch the elements in the teleconverter.)

12

•When mounted on Nikon DX format digital SLR cameras, such as the D300Series and D7000, the lens’ picture angle becomes 79°-44° and its 35mm equivalent focal length is approx. 25.5-52.5mm.

•Do not attach the following accessories to the lens, as they might damage the lens CPU contacts: Auto Extension Ring PK-1, PK-11/11A, Auto Ring BR-4 and K1 Ring. Other accessories may not be suitable when this lens is used

with certain camera bodies. For details, refer to user’s manual for each En product.

•This lens is not compatible when used with a Nikon F3AF camera with the AF Finder DX-1 attached.

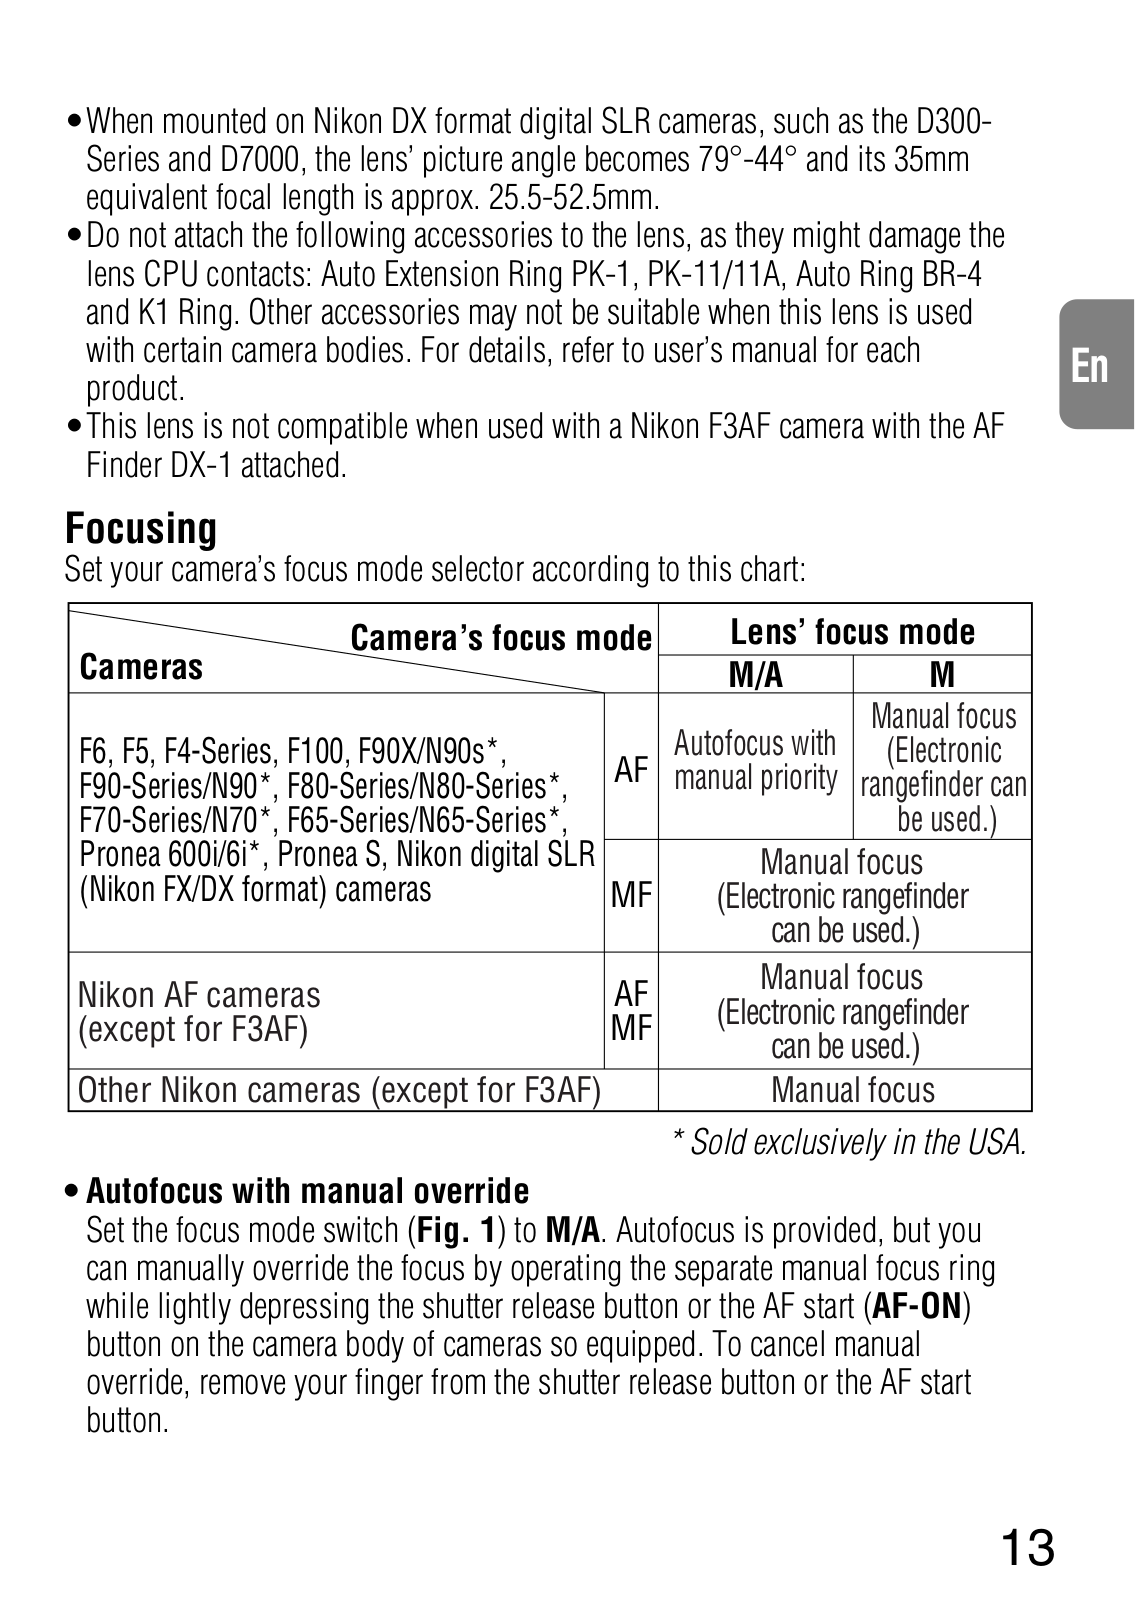
Focusing

Set your camera’s focus mode selector according to this chart:

Camera’s focus mode

Lens’ focus mode

Cameras


M/A

M


Autofocus with

Manual focus

F6, F5, F4-Series, F100, F90X/N90s*,

AF

(Electronic

F90-Series/N90*, F80-Series/N80-Series*,

manual priority

rangefinder can

F70-Series/N70*, F65-Series/N65-Series*,


be used.)

Pronea 600i/6i*, Pronea S, Nikon digital SLR


Manual focus

(Nikon FX/DX format) cameras

MF

(Electronic rangefinder


can be used.)

Nikon AF cameras

AF

Manual focus

(Electronic rangefinder

(except for F3AF)

MF

can be used.)


Other Nikon cameras (except for F3AF)


Manual focus

* Sold exclusively in the USA.

Autofocus with manual override

Set the focus mode switch (Fig. 1) to M/A. Autofocus is provided, but you can manually override the focus by operating the separate manual focus ring while lightly depressing the shutter release button or the AF start (AF-ON) button on the camera body of cameras so equipped. To cancel manual override, remove your finger from the shutter release button or the AF start button.

13

Getting good results with autofocus

Refer to “Notes on using wide or super-wide angle AF Nikkor lenses” (p. 66).

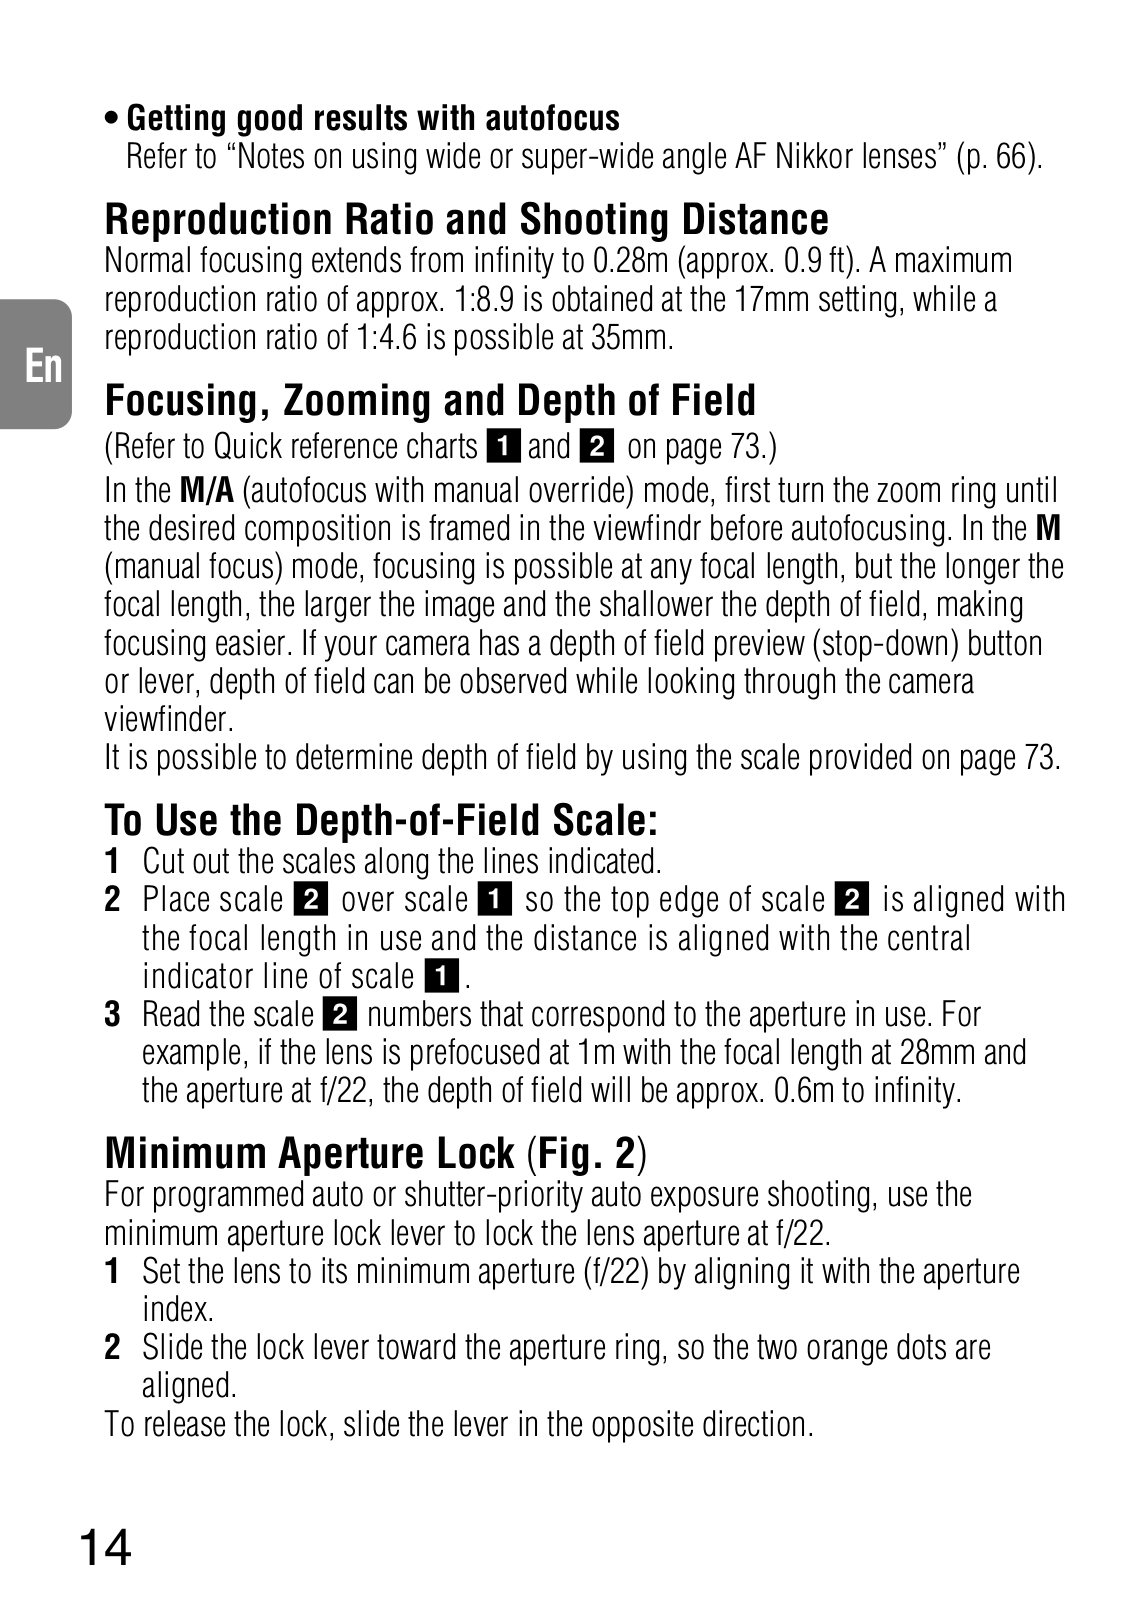
Reproduction Ratio and Shooting Distance

Normal focusing extends from infinity to 0.28m (approx. 0.9 ft). A maximum reproduction ratio of approx. 1:8.9 is obtained at the 17mm setting, while a

reproduction ratio of 1:4.6 is possible at 35mm.

En

Focusing, Zooming and Depth of Field

(Refer to Quick reference charts 1and 2 on page 73.)

In the M/A (autofocus with manual override) mode, first turn the zoom ring until the desired composition is framed in the viewfindr before autofocusing. In the M (manual focus) mode, focusing is possible at any focal length, but the longer the focal length, the larger the image and the shallower the depth of field, making focusing easier. If your camera has a depth of field preview (stop-down) button or lever, depth of field can be observed while looking through the camera viewfinder.

It is possible to determine depth of field by using the scale provided on page 73.

To Use the Depth-of-Field Scale:

1Cut out the scales along the lines indicated.

2Place scale 2 over scale 1 so the top edge of scale 2 is aligned with the focal length in use and the distance is aligned with the central indicator line of scale 1.

3Read the scale 2numbers that correspond to the aperture in use. For example, if the lens is prefocused at 1m with the focal length at 28mm and the aperture at f/22, the depth of field will be approx. 0.6m to infinity.

Minimum Aperture Lock (Fig. 2)

For programmed auto or shutter-priority auto exposure shooting, use the minimum aperture lock lever to lock the lens aperture at f/22.

1Set the lens to its minimum aperture (f/22) by aligning it with the aperture index.

2Slide the lock lever toward the aperture ring, so the two orange dots are aligned.

To release the lock, slide the lever in the opposite direction.

14

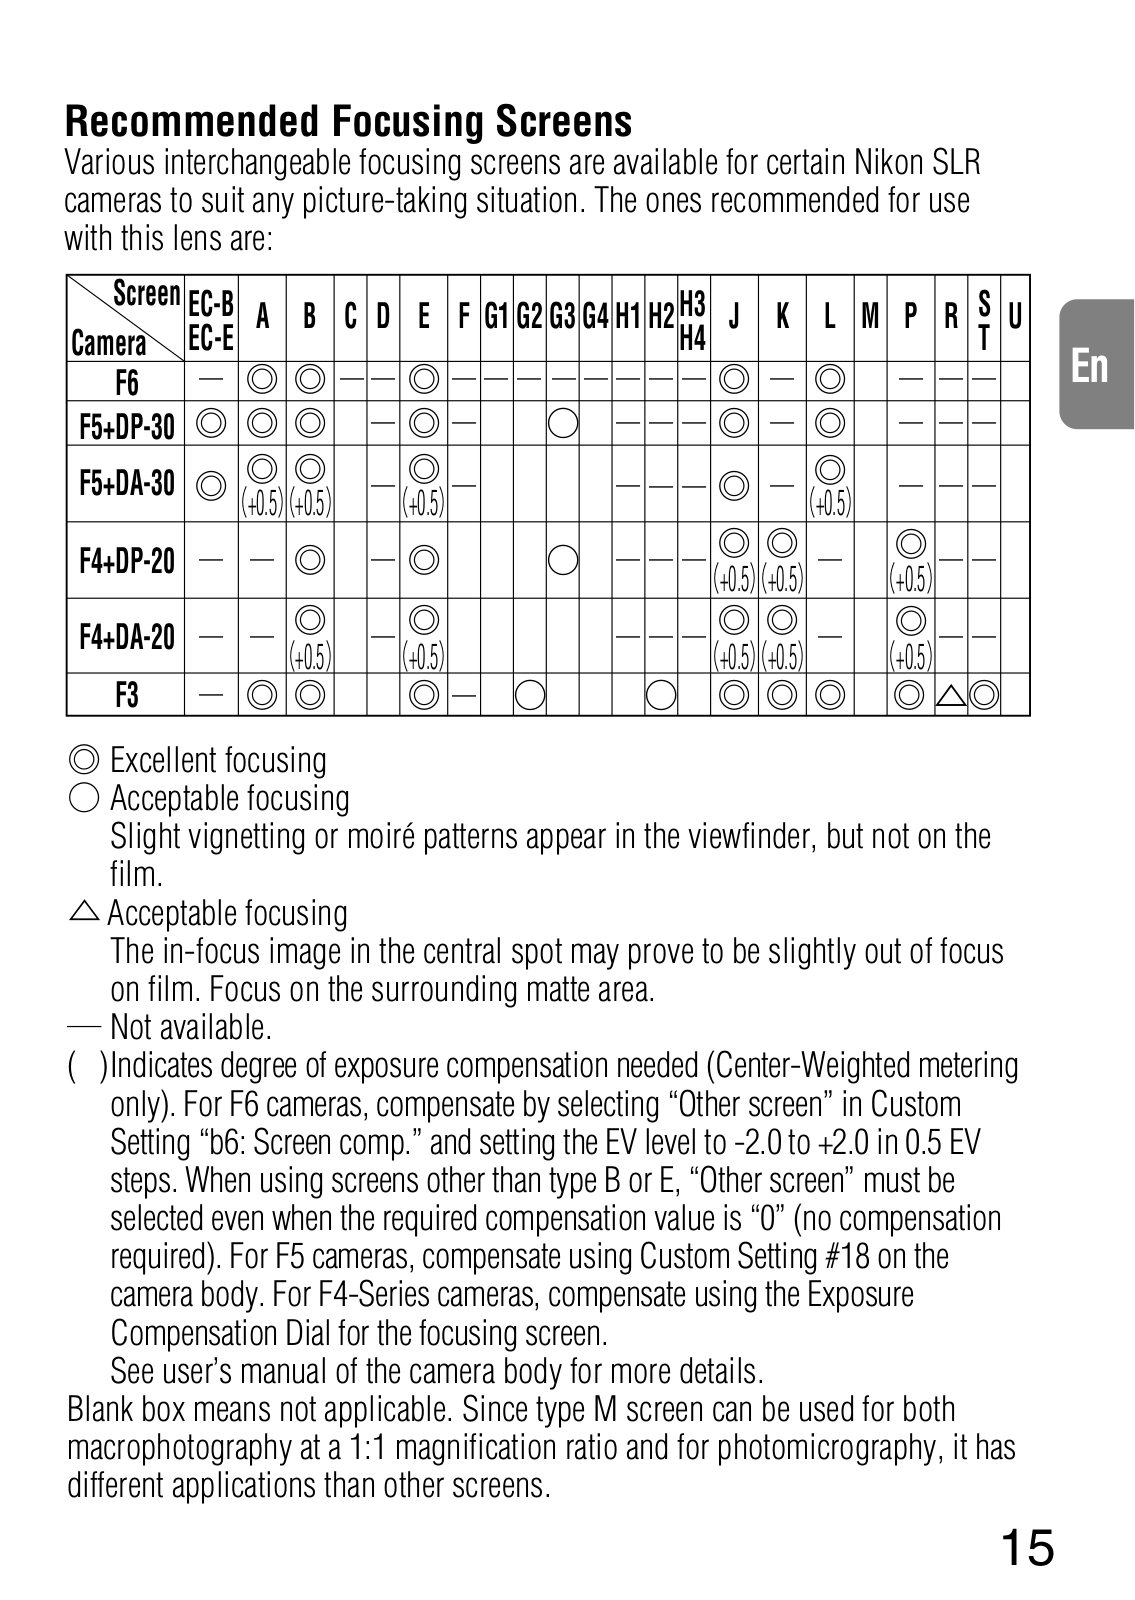
Recommended Focusing Screens

Various interchangeable focusing screens are available for certain Nikon SLR cameras to suit any picture-taking situation. The ones recommended for use with this lens are:

Screen

EC-B

A

B

C

D

E

F

G1

G2

G3

G4

H1

H2

H3

J

K

L

M

P

R

S

U


Camera

EC-E

H4

T


En

F6


F5+DP-30


F5+DA-30


+0.5 +0.5

+0.5


+0.5


F4+DP-20

─ ─


+0.5 +0.5


+0.5


F4+DA-20

─ ─


+0.5

+0.5


+0.5 +0.5


+0.5


F3


Excellent focusing

Acceptable focusing

Slight vignetting or moiré patterns appear in the viewfinder, but not on the

film.

Acceptable focusing

The in-focus image in the central spot may prove to be slightly out of focus on film. Focus on the surrounding matte area.

― Not available.

( )Indicates degree of exposure compensation needed (Center-Weighted metering only). For F6 cameras, compensate by selecting “Other screen” in Custom Setting “b6: Screen comp.” and setting the EV level to -2.0 to +2.0 in 0.5 EV steps. When using screens other than type B or E, “Other screen” must be selected even when the required compensation value is “0” (no compensation required). For F5 cameras, compensate using Custom Setting #18 on the camera body. For F4-Series cameras, compensate using the Exposure Compensation Dial for the focusing screen.

See user’s manual of the camera body for more details.

Blank box means not applicable. Since type M screen can be used for both macrophotography at a 1:1 magnification ratio and for photomicrography, it has different applications than other screens.

15

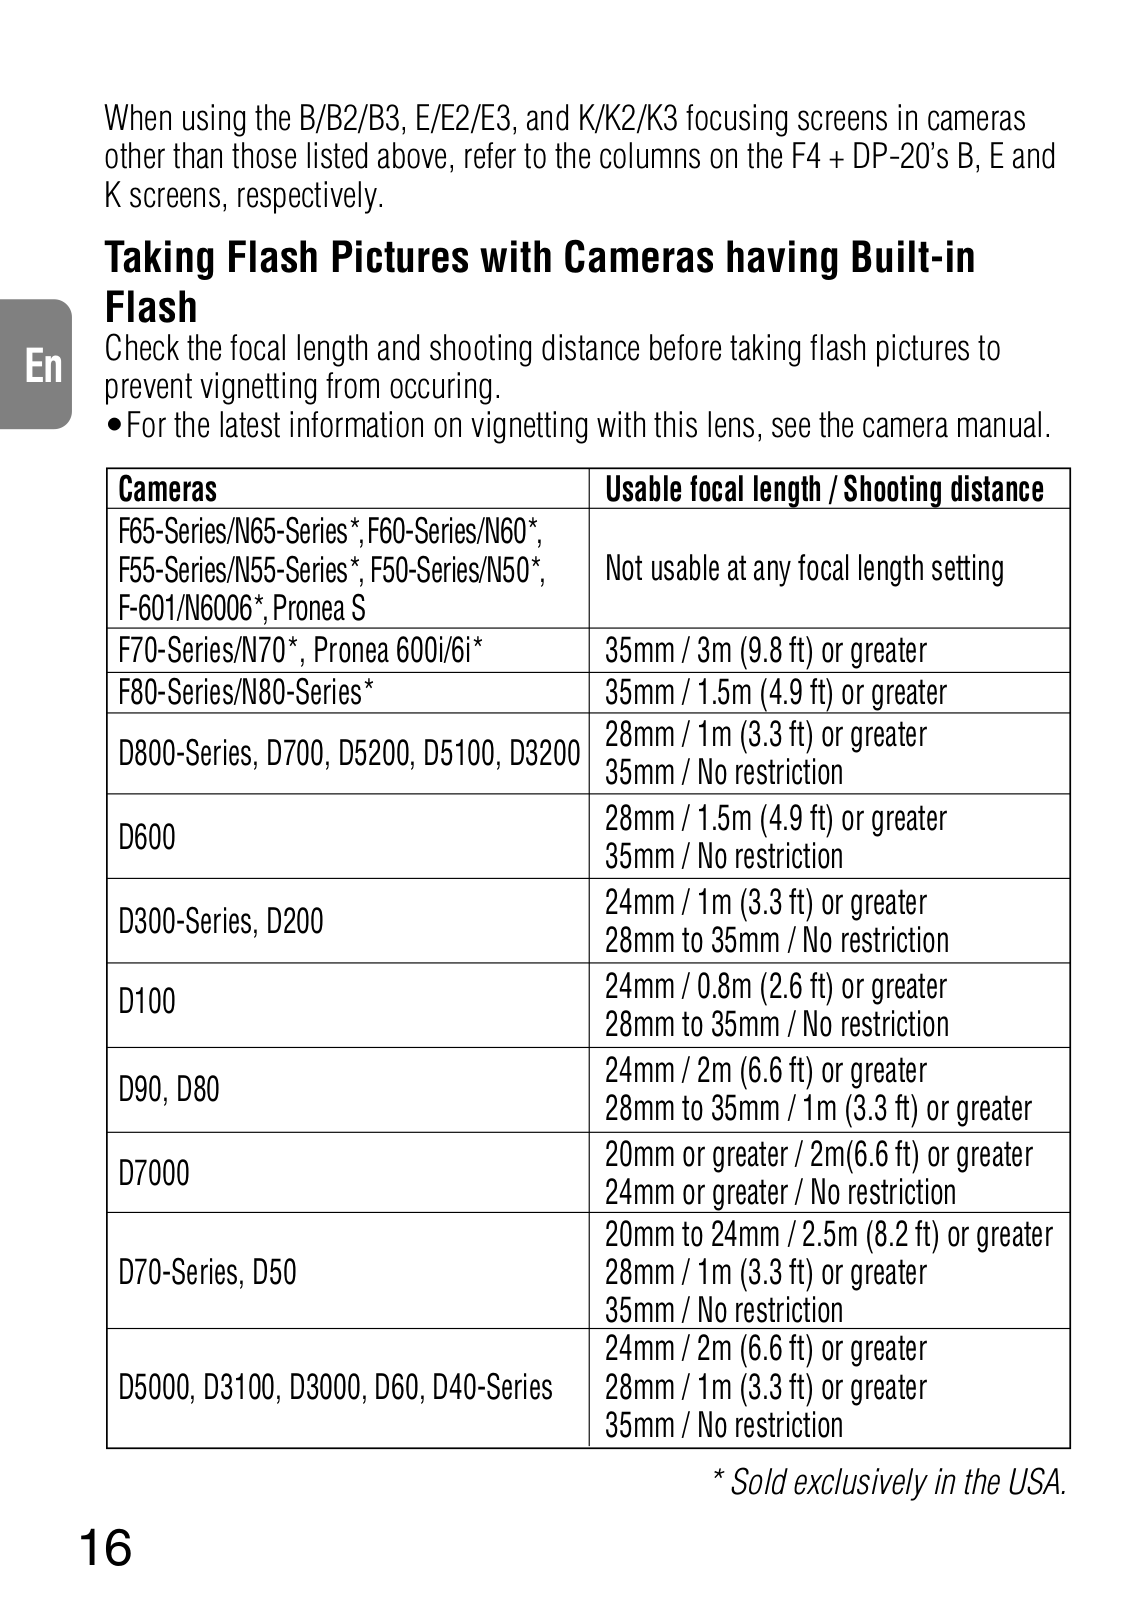
When using the B/B2/B3, E/E2/E3, and K/K2/K3 focusing screens in cameras other than those listed above, refer to the columns on the F4 + DP-20’s B, E and K screens, respectively.


Taking Flash Pictures with Cameras having Built-in


Flash


En

Check the focal length and shooting distance before taking flash pictures to

prevent vignetting from occuring.


•For the latest information on vignetting with this lens, see the camera manual.


Cameras

Usable focal length / Shooting distance


F65-Series/N65-Series*,F60-Series/N60*,

Not usable at any focal length setting


F55-Series/N55-Series*, F50-Series/N50*,


F-601/N6006*,Pronea S


F70-Series/N70*, Pronea 600i/6i*

35mm / 3m (9.8 ft) or greater


F80-Series/N80-Series*

35mm / 1.5m (4.9 ft) or greater


D800-Series, D700, D5200, D5100, D3200

28mm / 1m (3.3 ft) or greater


35mm / No restriction


D600

28mm / 1.5m (4.9 ft) or greater


35mm / No restriction


D300-Series, D200

24mm / 1m (3.3 ft) or greater


28mm to 35mm / No restriction


D100

24mm / 0.8m (2.6 ft) or greater


28mm to 35mm / No restriction


D90, D80

24mm / 2m (6.6 ft) or greater


28mm to 35mm / 1m (3.3 ft) or greater


D7000

20mm or greater / 2m(6.6 ft) or greater


24mm or greater / No restriction


20mm to 24mm / 2.5m (8.2 ft) or greater


D70-Series, D50

28mm / 1m (3.3 ft) or greater


35mm / No restriction


24mm / 2m (6.6 ft) or greater


D5000, D3100, D3000, D60, D40-Series

28mm / 1m (3.3 ft) or greater


35mm / No restriction


* Sold exclusively in the USA.

16

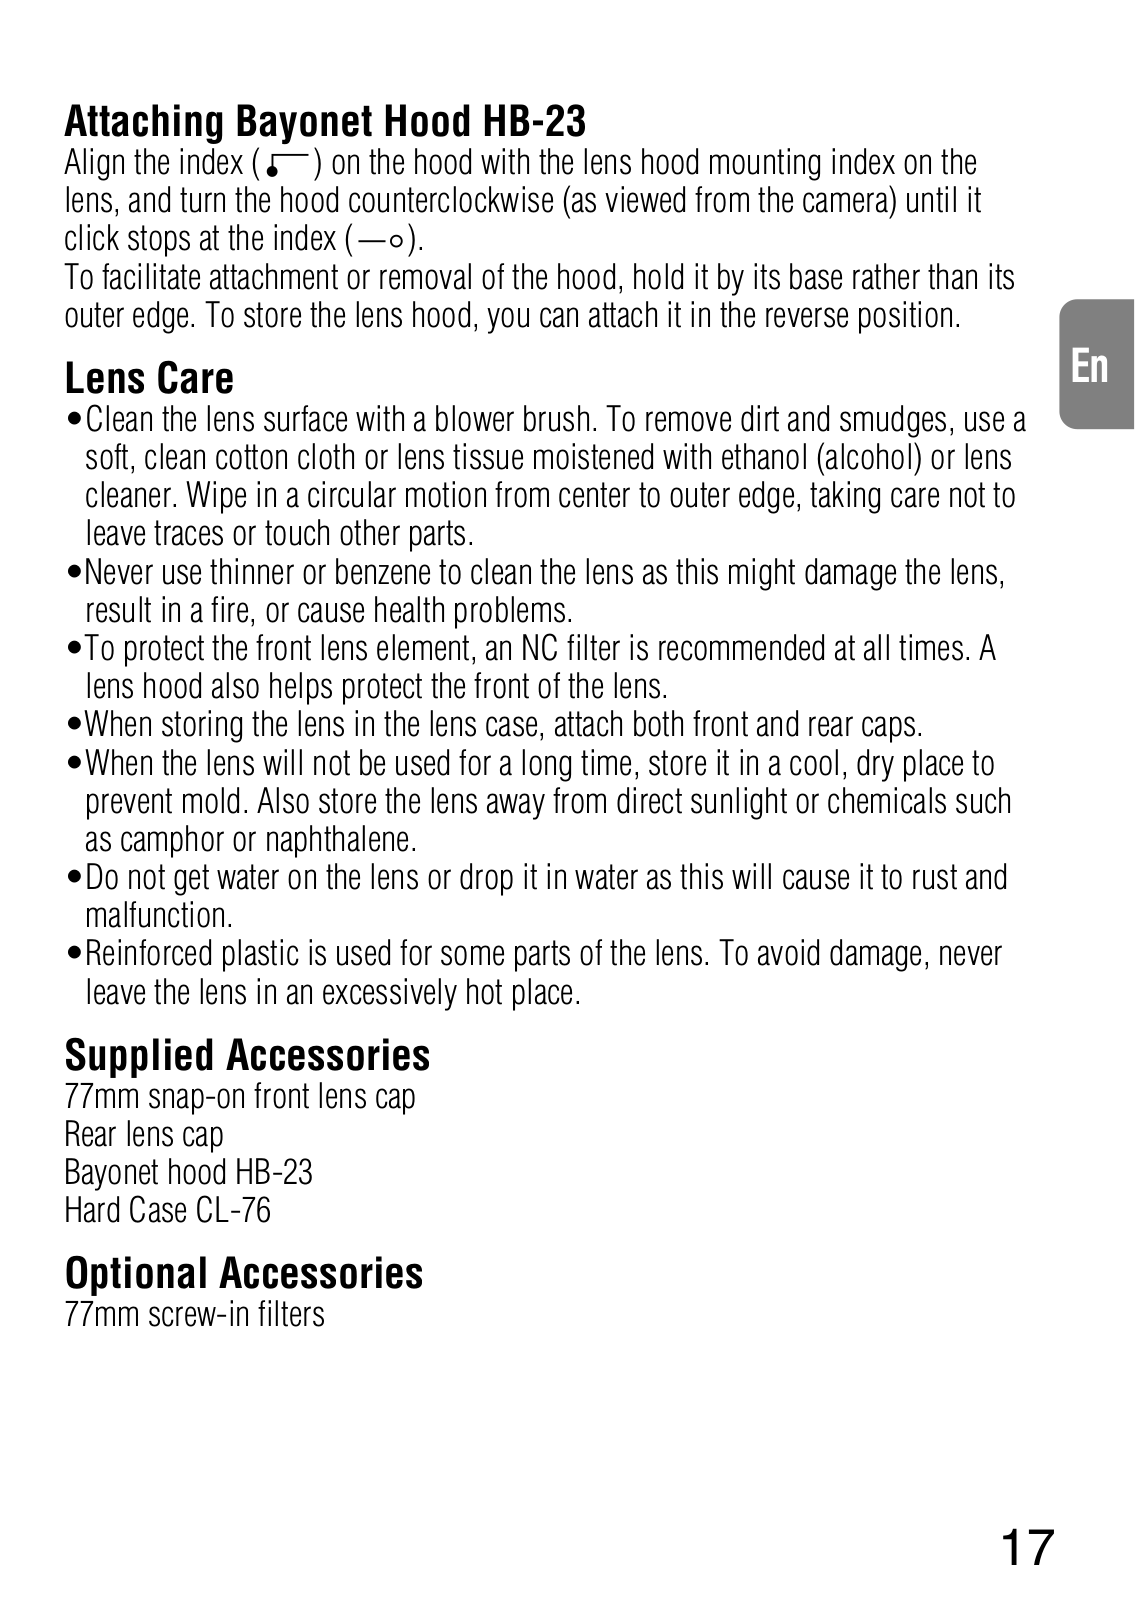
Attaching Bayonet Hood HB-23

Align the index (


) on the hood with the lens hood mounting index on the


lens, and turn the hood counterclockwise (as viewed from the camera) until it

click stops at the index (

).

To facilitate attachment or removal of the hood, hold it by its base rather than its outer edge. To store the lens hood, you can attach it in the reverse position.

Lens Care En

•Clean the lens surface with a blower brush. To remove dirt and smudges, use a soft, clean cotton cloth or lens tissue moistened with ethanol (alcohol) or lens cleaner. Wipe in a circular motion from center to outer edge, taking care not to leave traces or touch other parts.

•Never use thinner or benzene to clean the lens as this might damage the lens, result in a fire, or cause health problems.

•To protect the front lens element, an NC filter is recommended at all times. A lens hood also helps protect the front of the lens.

•When storing the lens in the lens case, attach both front and rear caps. •When the lens will not be used for a long time, store it in a cool, dry place to

prevent mold. Also store the lens away from direct sunlight or chemicals such as camphor or naphthalene.

•Do not get water on the lens or drop it in water as this will cause it to rust and malfunction.

•Reinforced plastic is used for some parts of the lens. To avoid damage, never leave the lens in an excessively hot place.

Supplied Accessories

77mm snap-on front lens cap Rear lens cap

Bayonet hood HB-23 Hard Case CL-76

Optional Accessories

77mm screw-in filters

17

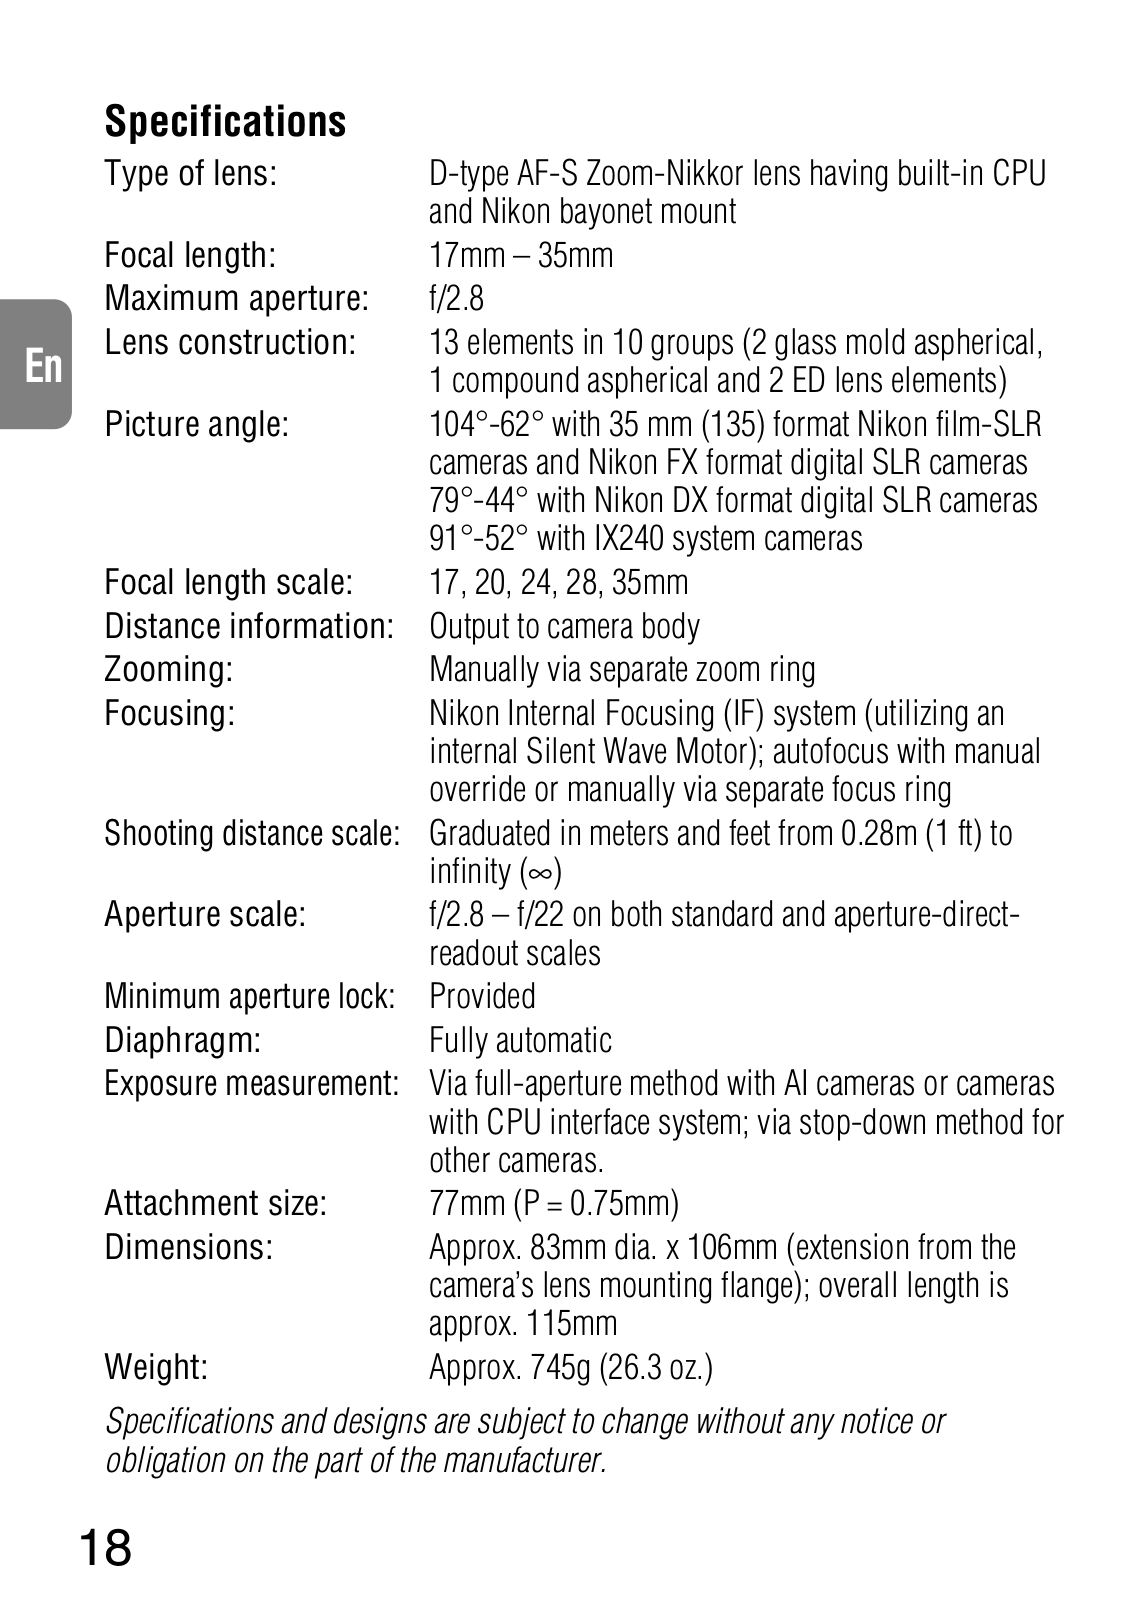
Specifications


Type of lens:

D-type AF-S Zoom-Nikkor lens having built-in CPU


and Nikon bayonet mount


Focal length:

17mm – 35mm


Maximum aperture:

f/2.8

En

Lens construction:

13 elements in 10 groups (2 glass mold aspherical,


1 compound aspherical and 2 ED lens elements)


Picture angle:

104°-62° with 35 mm (135) format Nikon film-SLR


cameras and Nikon FX format digital SLR cameras


79°-44° with Nikon DX format digital SLR cameras


91°-52° with IX240 system cameras


Focal length scale:

17, 20, 24, 28, 35mm


Distance information:

Output to camera body


Zooming:

Manually via separate zoom ring


Focusing:

Nikon Internal Focusing (IF) system (utilizing an


internal Silent Wave Motor); autofocus with manual


override or manually via separate focus ring


Shooting distance scale:

Graduated in meters and feet from 0.28m (1 ft) to


infinity ()


Aperture scale:

f/2.8 – f/22 on both standard and aperture-direct-


readout scales


Minimum aperture lock:

Provided


Diaphragm:

Fully automatic


Exposure measurement:

Via full-aperture method with AI cameras or cameras


with CPU interface system; via stop-down method for


other cameras.


Attachment size:

77mm (P = 0.75mm)


Dimensions:

Approx. 83mm dia. x 106mm (extension from the


camera’s lens mounting flange); overall length is


approx. 115mm


Weight:

Approx. 745g (26.3 oz.)

Specifications and designs are subject to change without any notice or obligation on the part of the manufacturer.

18

En

19

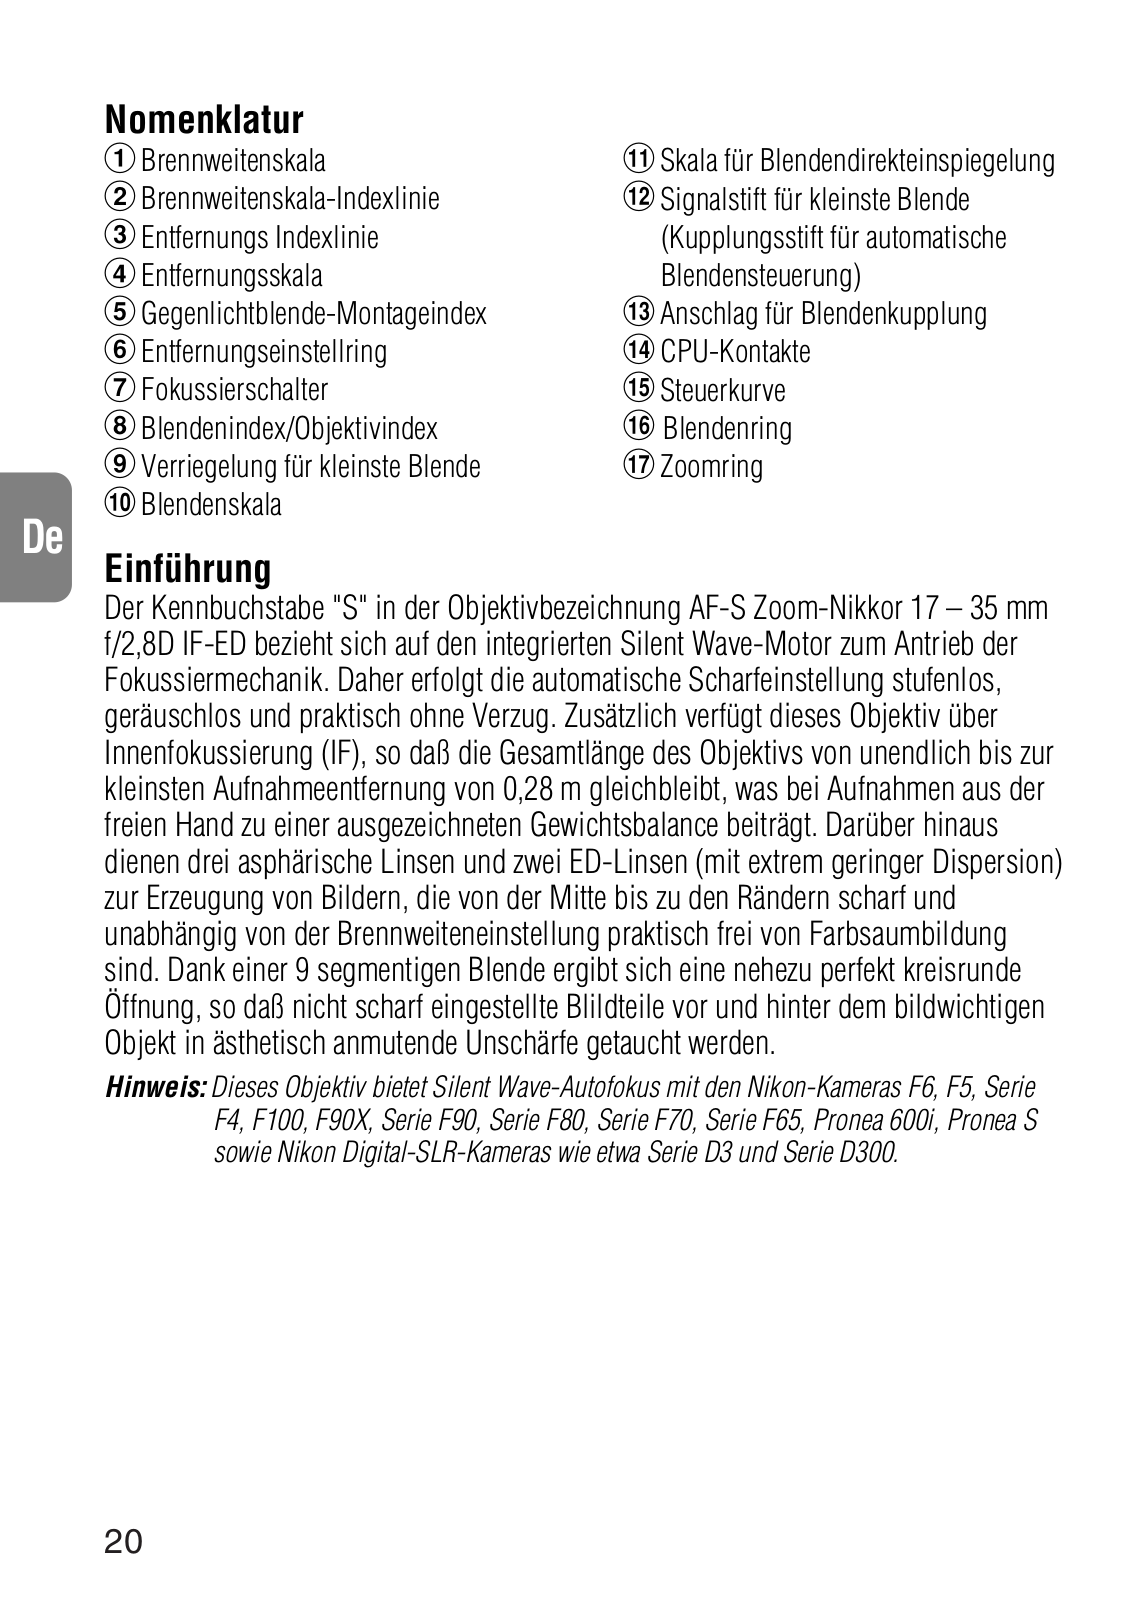
Nomenklatur

1Brennweitenskala

2Brennweitenskala-Indexlinie

3Entfernungs Indexlinie

4Entfernungsskala

5Gegenlichtblende-Montageindex

6Entfernungseinstellring

7Fokussierschalter

8Blendenindex/Objektivindex

9Verriegelung für kleinste Blende !Blendenskala

De

Einführung

"Skala für Blendendirekteinspiegelung

#Signalstift für kleinste Blende (Kupplungsstift für automatische Blendensteuerung)

$Anschlag für Blendenkupplung %CPU-Kontakte

&Steuerkurve

(Blendenring )Zoomring

Der Kennbuchstabe "S" in der Objektivbezeichnung AF-S Zoom-Nikkor 17 – 35 mm f/2,8D IF-ED bezieht sich auf den integrierten Silent Wave-Motor zum Antrieb der Fokussiermechanik. Daher erfolgt die automatische Scharfeinstellung stufenlos, geräuschlos und praktisch ohne Verzug. Zusätzlich verfügt dieses Objektiv über Innenfokussierung (IF), so daß die Gesamtlänge des Objektivs von unendlich bis zur kleinsten Aufnahmeentfernung von 0,28 m gleichbleibt, was bei Aufnahmen aus der freien Hand zu einer ausgezeichneten Gewichtsbalance beiträgt. Darüber hinaus dienen drei asphärische Linsen und zwei ED-Linsen (mit extrem geringer Dispersion) zur Erzeugung von Bildern, die von der Mitte bis zu den Rändern scharf und unabhängig von der Brennweiteneinstellung praktisch frei von Farbsaumbildung sind. Dank einer 9 segmentigen Blende ergibt sich eine nehezu perfekt kreisrunde Öffnung, so daß nicht scharf eingestellte Blildteile vor und hinter dem bildwichtigen Objekt in ästhetisch anmutende Unschärfe getaucht werden.

Hinweis: Dieses Objektiv bietet Silent Wave-Autofokus mit den Nikon-Kameras F6, F5, Serie F4, F100, F90X, Serie F90, Serie F80, Serie F70, Serie F65, Pronea 600i, Pronea S sowie Nikon Digital-SLR-Kameras wie etwa Serie D3 und Serie D300.

20

Achtung!

•Halten Sie die CPU-Kontakte peinlich sauber, und schützen Sie sie vor Beschädigung!

•Die AF-I-Telekonverter TC-14E/TC-20E und AF-S-Telekonverter TC-14EII/ TC-17EII/TC-20EII/TC-20EIII können nicht verwendet werden. (Die Hinterglieder des Objektivs berühren den Telekonverter.)

•Bei Verwendung des Objektivs mit einer digitalen Nikon-Spiegelreflexkamera (DX-Format) beträgt der Bildwinkel 79°-44°. Dies entspricht dem Bildwinkel eines Objektivs mit einer Brennweite von ca. 25,5-52,5 mm an einer Kleinbildkamera.

•Folgendes Zubehör darf nicht an das Objektiv angesetzt werden, da es die CPUKontakte beschädigen könnte: Automatik-Zwischenring PK-1, PK-11/PK-11A, Automatikring BR-4 und Zwischenring K1. Anderes Zubehör kann bei Verwendung

des Objektivs mit gewissen Kameramodellen ungeeignet sein. Einzelheiten De entnehmen Sie bitte das jeweiligen Benutzerhandbuch.

•Das Objektiv ist nicht zur Verwendung mit der Nikon F3AF mit angesetztem AF-Sucher DX-1 geeignet.

Fokussieren

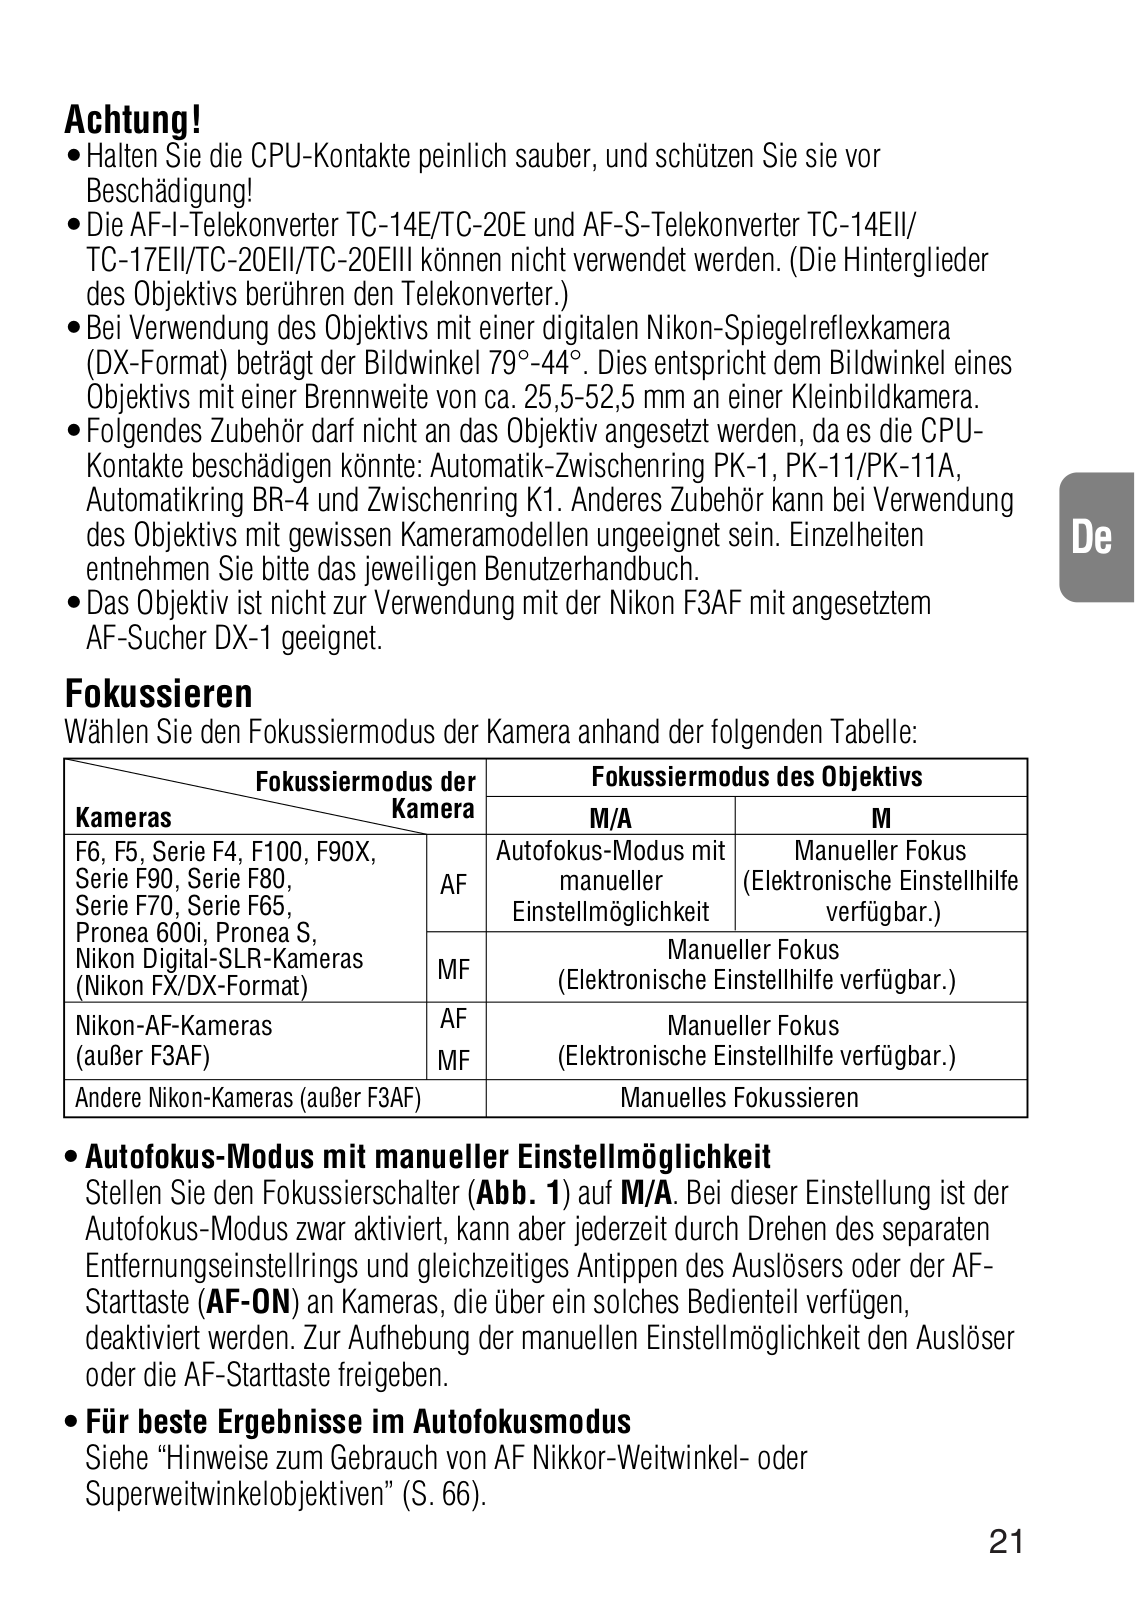
Wählen Sie den Fokussiermodus der Kamera anhand der folgenden Tabelle:

Fokussiermodus der

Fokussiermodus des Objektivs

Kameras

Kamera

M/A

M


F6, F5, Serie F4, F100, F90X,


Autofokus-Modus mit

Manueller Fokus

Serie F90, Serie F80,

AF

manueller

(Elektronische Einstellhilfe

Serie F70, Serie F65,


Einstellmöglichkeit

verfügbar.)

Pronea 600i, Pronea S,


Manueller Fokus

Nikon Digital-SLR-Kameras

MF

(Elektronische Einstellhilfe verfügbar.)

(Nikon FX/DX-Format)


Nikon-AF-Kameras

AF

Manueller Fokus

(außer F3AF)

MF

(Elektronische Einstellhilfe verfügbar.)

Andere Nikon-Kameras (außer F3AF)

Manuelles Fokussieren

Autofokus-Modus mit manueller Einstellmöglichkeit

Stellen Sie den Fokussierschalter (Abb. 1) auf M/A. Bei dieser Einstellung ist der Autofokus-Modus zwar aktiviert, kann aber jederzeit durch Drehen des separaten Entfernungseinstellrings und gleichzeitiges Antippen des Auslösers oder der AFStarttaste (AF-ON) an Kameras, die über ein solches Bedienteil verfügen, deaktiviert werden. Zur Aufhebung der manuellen Einstellmöglichkeit den Auslöser oder die AF-Starttaste freigeben.

Für beste Ergebnisse im Autofokusmodus

Siehe “Hinweise zum Gebrauch von AF Nikkor-Weitwinkel- oder Superweitwinkelobjektiven” (S. 66).

21

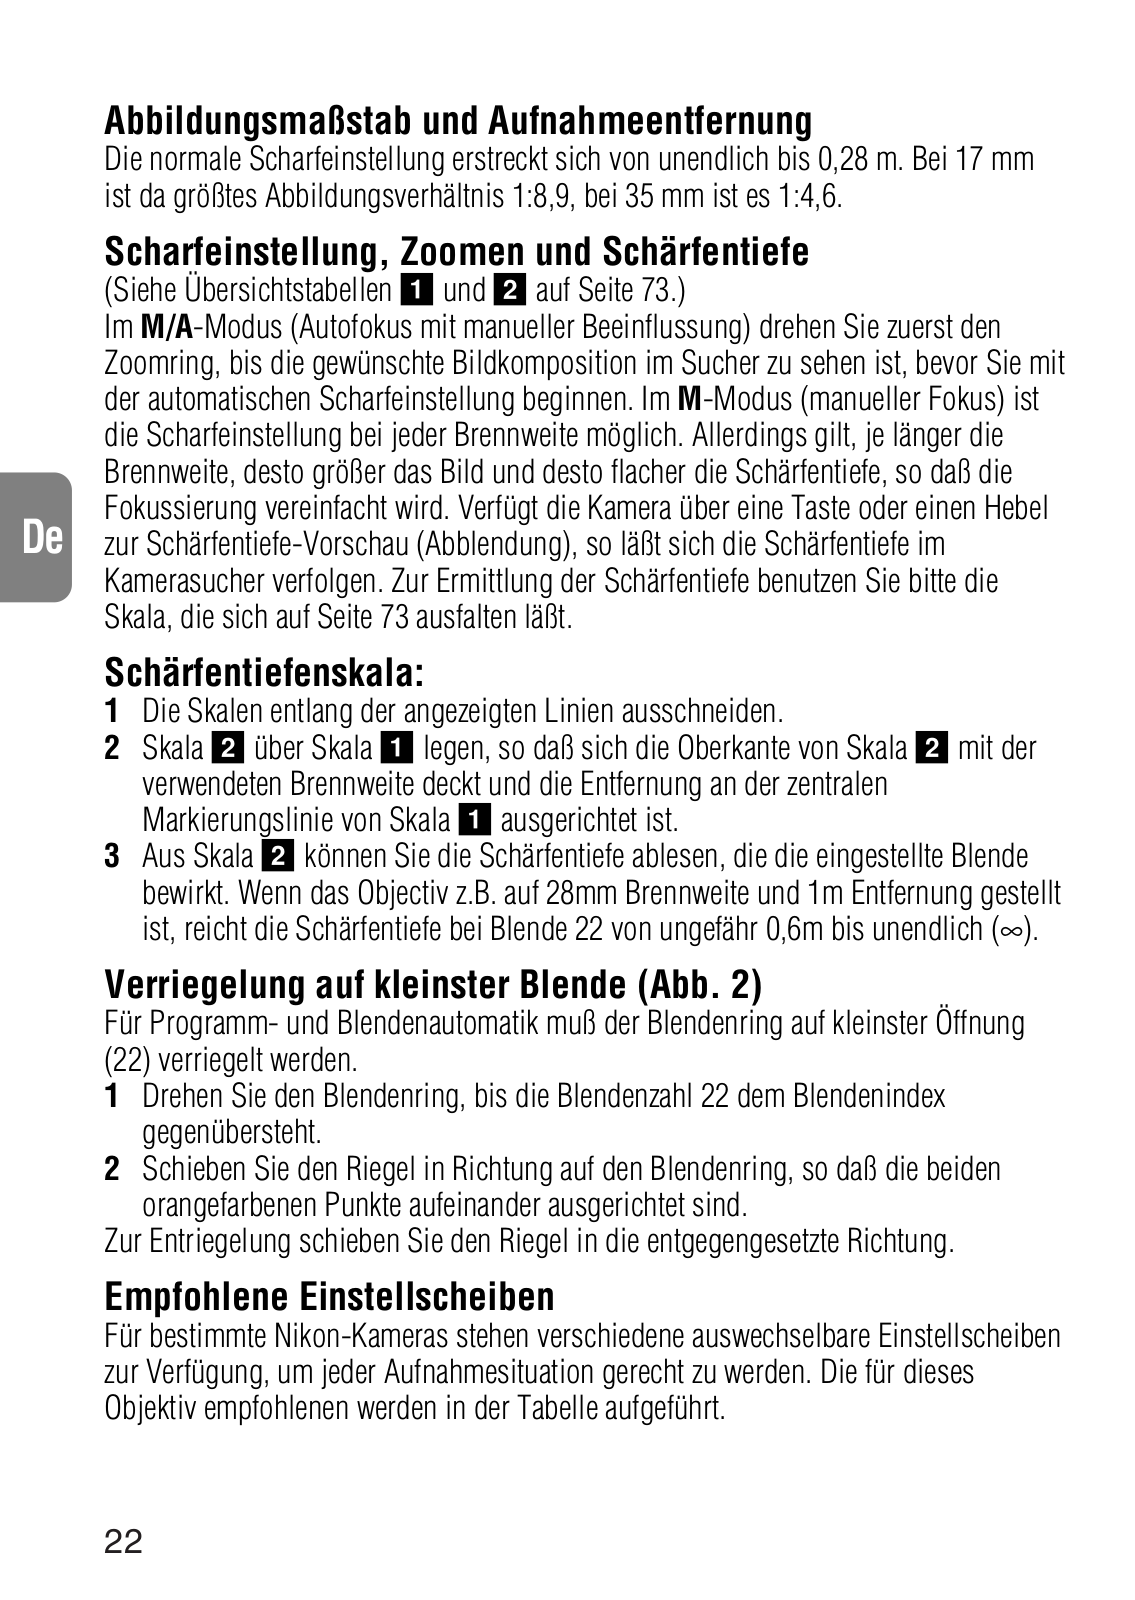
Abbildungsmaßstab und Aufnahmeentfernung

Die normale Scharfeinstellung erstreckt sich von unendlich bis 0,28 m. Bei 17 mm ist da größtes Abbildungsverhältnis 1:8,9, bei 35 mm ist es 1:4,6.

Scharfeinstellung, Zoomen und Schärfentiefe

(Siehe Übersichtstabellen 1und 2auf Seite 73.)

Im M/A-Modus (Autofokus mit manueller Beeinflussung) drehen Sie zuerst den Zoomring, bis die gewünschte Bildkomposition im Sucher zu sehen ist, bevor Sie mit der automatischen Scharfeinstellung beginnen. Im M-Modus (manueller Fokus) ist die Scharfeinstellung bei jeder Brennweite möglich. Allerdings gilt, je länger die Brennweite, desto größer das Bild und desto flacher die Schärfentiefe, so daß die Fokussierung vereinfacht wird. Verfügt die Kamera über eine Taste oder einen Hebel

De zur Schärfentiefe-Vorschau (Abblendung), so läßt sich die Schärfentiefe im Kamerasucher verfolgen. Zur Ermittlung der Schärfentiefe benutzen Sie bitte die Skala, die sich auf Seite 73 ausfalten läßt.

Schärfentiefenskala:

1Die Skalen entlang der angezeigten Linien ausschneiden.

2Skala 2über Skala 1legen, so daß sich die Oberkante von Skala 2mit der verwendeten Brennweite deckt und die Entfernung an der zentralen Markierungslinie von Skala 1ausgerichtet ist.

3Aus Skala 2können Sie die Schärfentiefe ablesen, die die eingestellte Blende

bewirkt. Wenn das Objectiv z.B. auf 28mm Brennweite und 1m Entfernung gestellt ist, reicht die Schärfentiefe bei Blende 22 von ungefähr 0,6m bis unendlich ().

Verriegelung auf kleinster Blende (Abb. 2)

Für Programmund Blendenautomatik muß der Blendenring auf kleinster Öffnung (22) verriegelt werden.

1Drehen Sie den Blendenring, bis die Blendenzahl 22 dem Blendenindex gegenübersteht.

2Schieben Sie den Riegel in Richtung auf den Blendenring, so daß die beiden orangefarbenen Punkte aufeinander ausgerichtet sind.

Zur Entriegelung schieben Sie den Riegel in die entgegengesetzte Richtung.

Empfohlene Einstellscheiben

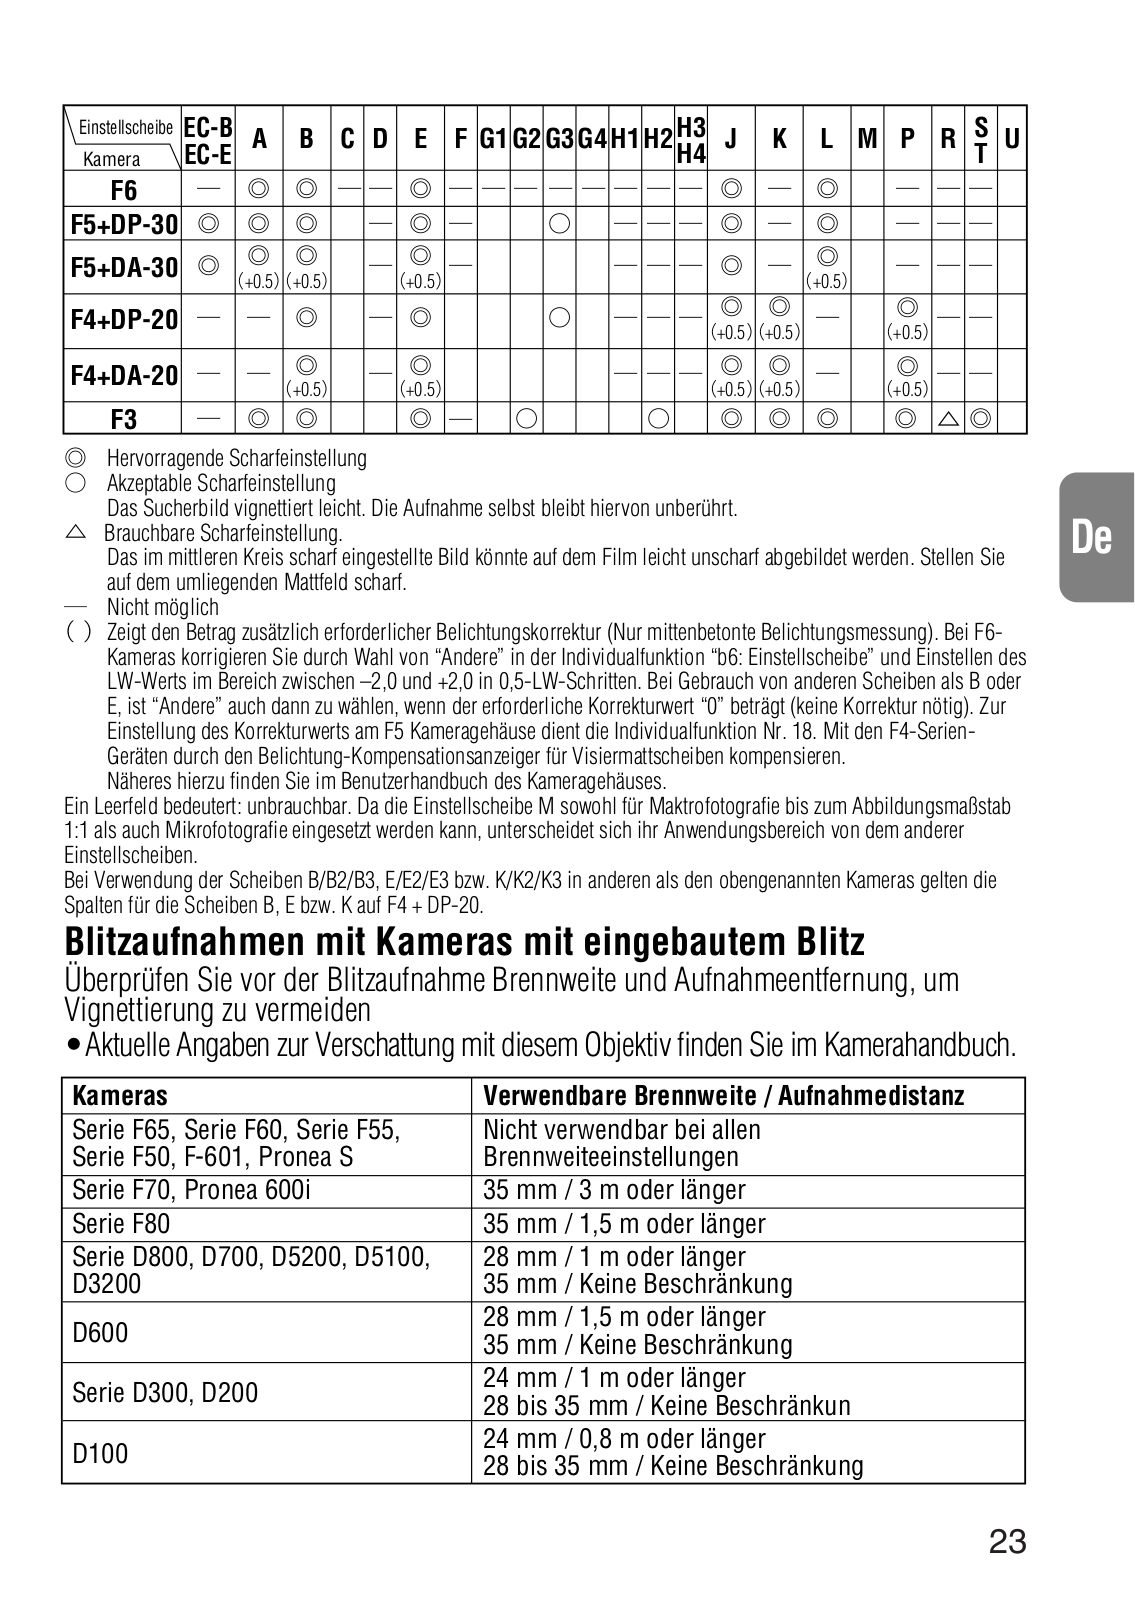
Für bestimmte Nikon-Kameras stehen verschiedene auswechselbare Einstellscheiben zur Verfügung, um jeder Aufnahmesituation gerecht zu werden. Die für dieses Objektiv empfohlenen werden in der Tabelle aufgeführt.

22

Einstellscheibe

EC-B

A B C D E F G1 G2 G3 G4 H1 H2

H3

J K L M P R

S

U

Kamera

EC-E

H4

T


F6

─ ─ ─ ─ ─ ─ ─ ─ ─ ─ ─ ─ ─ ─ ─


F5+DP-30


─ ─

─ ─ ─ ─

─ ─ ─


F5+DA-30


─ ─


─ ─ ─ ─

─ ─ ─


+0.5 +0.5

+0.5


+0.5


F4+DP-20

─ ─ ─

─ ─


+0.5 +0.5

+0.5


F4+DA-20


─ ─ ─ ─

─ ─


+0.5

+0.5


+0.5 +0.5

+0.5


F3

─ ○


Hervorragende Scharfeinstellung


○ Akzeptable Scharfeinstellung


Das Sucherbild vignettiert leicht. Die Aufnahme selbst bleibt hiervon unberührt.

De

Brauchbare Scharfeinstellung.

Das im mittleren Kreis scharf eingestellte Bild könnte auf dem Film leicht unscharf abgebildet werden. Stellen Sie

auf dem umliegenden Mattfeld scharf.


Nicht möglich

Zeigt den Betrag zusätzlich erforderlicher Belichtungskorrektur (Nur mittenbetonte Belichtungsmessung). Bei F6Kameras korrigieren Sie durch Wahl von “Andere” in der Individualfunktion “b6: Einstellscheibe” und Einstellen des LW-Werts im Bereich zwischen –2,0 und +2,0 in 0,5-LW-Schritten. Bei Gebrauch von anderen Scheiben als B oder E, ist “Andere” auch dann zu wählen, wenn der erforderliche Korrekturwert “0” beträgt (keine Korrektur nötig). Zur Einstellung des Korrekturwerts am F5 Kameragehäuse dient die Individualfunktion Nr. 18. Mit den F4-Serien- Geräten durch den Belichtung-Kompensationsanzeiger für Visiermattscheiben kompensieren.

Näheres hierzu finden Sie im Benutzerhandbuch des Kameragehäuses.

Ein Leerfeld bedeutert: unbrauchbar. Da die Einstellscheibe M sowohl für Maktrofotografie bis zum Abbildungsmaßstab 1:1 als auch Mikrofotografie eingesetzt werden kann, unterscheidet sich ihr Anwendungsbereich von dem anderer Einstellscheiben.

Bei Verwendung der Scheiben B/B2/B3, E/E2/E3 bzw. K/K2/K3 in anderen als den obengenannten Kameras gelten die Spalten für die Scheiben B, E bzw. K auf F4 + DP-20.

Blitzaufnahmen mit Kameras mit eingebautem Blitz

Überprüfen Sie vor der Blitzaufnahme Brennweite und Aufnahmeentfernung, um Vignettierung zu vermeiden

•Aktuelle Angaben zur Verschattung mit diesem Objektiv finden Sie im Kamerahandbuch.

Kameras

Verwendbare Brennweite / Aufnahmedistanz

Serie F65, Serie F60, Serie F55,

Nicht verwendbar bei allen

Serie F50, F-601, Pronea S

Brennweiteeinstellungen

Serie F70, Pronea 600i

35 mm / 3 m oder länger

Serie F80

35 mm / 1,5 m oder länger

Serie D800, D700, D5200, D5100,

28 mm / 1 m oder länger

D3200

35 mm / Keine Beschränkung

D600

28 mm / 1,5 m oder länger

35 mm / Keine Beschränkung


Serie D300, D200

24 mm / 1 m oder länger

28 bis 35 mm / Keine Beschränkun


D100

24 mm / 0,8 m oder länger

28 bis 35 mm / Keine Beschränkung


23

Loading...
+ 53 hidden pages