

NIKON AF-S VR ZOOM-NIKKOR 70-300MM F-4.5-5.6G IF-ED User Manual

AF-S VR Zoom-Nikkor
70-300mm f/4.5-5.6
IF-ED
使用説明書
User’s Manual (PP. 14 – 23)
Benutzerhandbuch (S. 24 – 33)
Manuel d’utilisation (P. 34 – 43)
Manual del usuario (PP. 44 – 53)
Manuale d’uso (PP. 54 – 63)
(P. 4 – 13)
(P. 64 – 77)
(P. 78 – 87)
p
J
En
De
Fr
Es
It
Ck
Ch

M
OFF
MAL
ACTIVE
2
M/A
M
ON
OFF
NORMAL
ACTIVE
M/A
M
ON
OFF
NORMAL
ACTIVE
15 12 10348
A
B
3
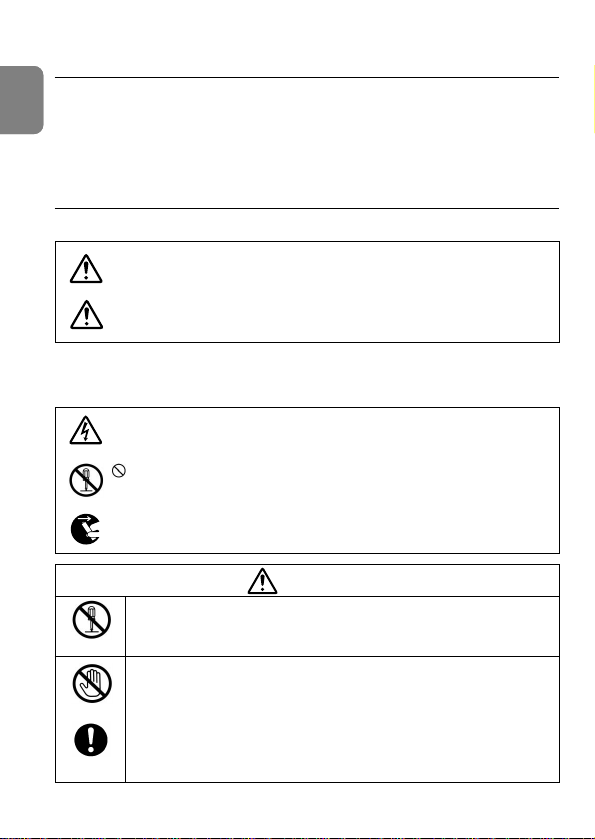
安全上のご注意
ご使用の前に「安全上のご注意」をよくお読みのうえ、正しくお使いください。
Jp
この「安全上のご注意」は製品を安全に正しく使用していただき、あなたや他の
人々への危害や財産への損害を未然に防止するために、重要な内容を記載しています。
お読みになった後は、お使いになる方がいつでも見られる所に必ず保管してくだ
さい。
表示について
表示と意味は次のようになっています。
この表示を無視して、誤った取り扱いをすると、人が死亡または重傷を負
警告
う可能性が想定される内容を示しています。
この表示を無視して、誤った取り扱いをすると、人が傷害を負う可能性が
注意
想定される内容および物的損害の発生が想定される内容を示しています。
お守りいただく内容の種類を、次の絵表示で区分し、説明しています。
絵表示の例
△ 記号は、注意(警告を含む)を促す内容を告げるものです。図の中や近くに具
体的な注意内容(左図の場合は感電注意)が描かれています。
記号は、禁止の行為(してはいけないこと)を告げるものです。図の中や近く
に具体的な禁止内容(左図の場合は分解禁止)が描かれています。
● 記号は、行為を強制すること(必ずすること)を告げるものです。図の中や近
くに具体的な強制内容(左図の場合は電池を取り出す)が描かれています。
警告
分解したり、修理や改造をしないこと
分解禁止
接触禁止
修理依頼を
感電したり、異常動作をしてケガの原因となります。
落下などによって破損し、内部が露出したときは、露出
部に手を触れないこと
感電したり、破損部でケガをする原因となります。カメラの電池
を抜いて、販売店またはニコンサービス機関に修理を依頼してく
ださい。
すぐに
4Jp4

電池を取る
すぐに
修理依頼を
水かけ禁止
使用禁止
見ないこと
感電注意
放置禁止
使用注意
保管注意
移動注意
放置禁止
警告
熱くなる、煙が出る、こげ臭いなどの異常時は、速やか
にカメラの電池を取り出すこと
そのまま使用すると火災、やけどの原因となります。電池を取り
出す際、やけどに充分注意してください。電池を抜いて、販売店
またはニコンサービス機関に修理を依頼してください。
水につけたり、水をかけたり、雨にぬらしたりしないこと
発火したり感電の原因となります。
引火、爆発のおそれのある場所では使用しないこと
プロパンガス・ガソリンなど引火性ガスや粉塵の発生する場所で
使用すると、爆発や火災の原因となります。
レンズまたはカメラで直接太陽や強い光を見ないこと
失明や視力障害の原因となります。
注意
ぬれた手でさわらないこと
感電の原因になることがあります。
製品は幼児の手の届かないところに置くこと
ケガの原因になることがあります。
逆光撮影では、太陽を画角から充分にずらすこと
太陽光がカメラ内部で焦点を結び、火災の原因になることがあります。
画角から太陽をわずかに外しても火災の原因になることがあります。
使用しないときは、レンズにキャップをつけるか太陽光の
あたらない所に保管すること
太陽光が焦点を結び、火災の原因になることがあります。
三脚にカメラやレンズを取り付けたまま移動しないこと
転倒したりぶつけたりしてケガの原因になることがあります。
窓を閉め切った自動車の中や直射日光が当たる場所など、
異常に温度が高くなる場所に放置しないこと
内部の部品に悪い影響を与え、火災の原因となることがあります。
5Jp5
Jp

:
カメラ
手ブレ
補正
オート
フォーカス
露出モード
P
※1
SAM
FXフォーマット/DXフォーマットの
ニコンデジタル一眼レフカメラ
F6、F5、F100、F80シリーズ、
ニコンU2、ニコンU
プロネア600i、プロネアS
※2
F4シリーズ、F90Xシリーズ、
F90シリーズ、F70D
ニコンUs、F60D、F50D、F-401シリーズ
F-801シリーズ、F-601M
F3AF、F-601、F-501、
MFカメラ(F-601Mを除く)
○
○ ○ ○ ○ ○
× ×
○ ○ ○ ○ ○ ○
×
○ ○ ○ ○ ○
× ○ ○ ○ × ×
○ ○ ○ ○
× × ○ ○ × ×
× × × × × ×
○:使用可 ×:使用不可
機 能
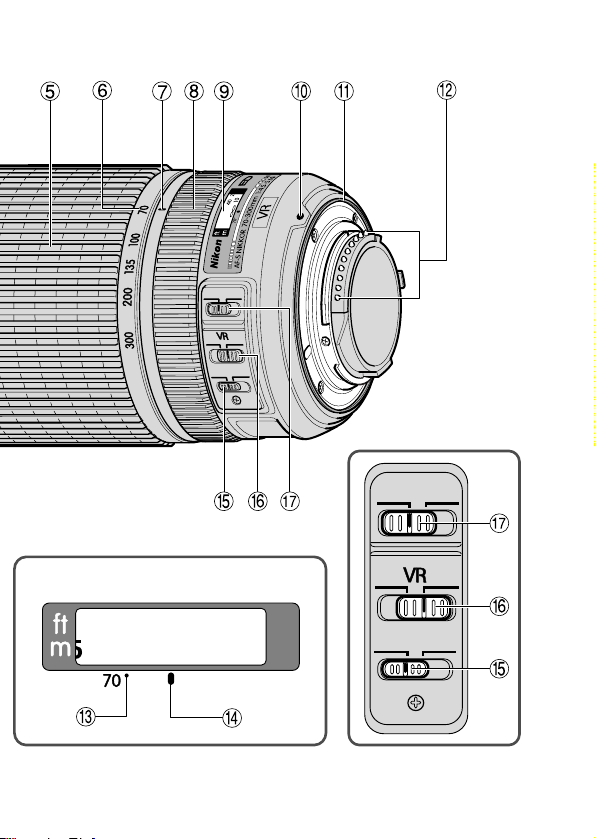
各部の名称
1 フード(P.11)
Jp
2 フード取り付け指標(P.11)
3 フードセット指標(P.11)
4 フード着脱指標(P.11)
5 ズームリング(P.10)
6 焦点距離目盛
7 焦点距離目盛基準線
8 フォーカスリング(P.8)
9 距離目盛
! レンズ着脱指標
( )参照頁
" レンズマウントゴムリング(P.7)
# CPU信号接点(P.7)
$ 赤外補正マーク(焦点距離70mm時)
(P.8)
% 距離目盛基準線
& 手ブレ補正モード切り換えスイッチ
(P.9)
( 手ブレ補正スイッチ(P.9)
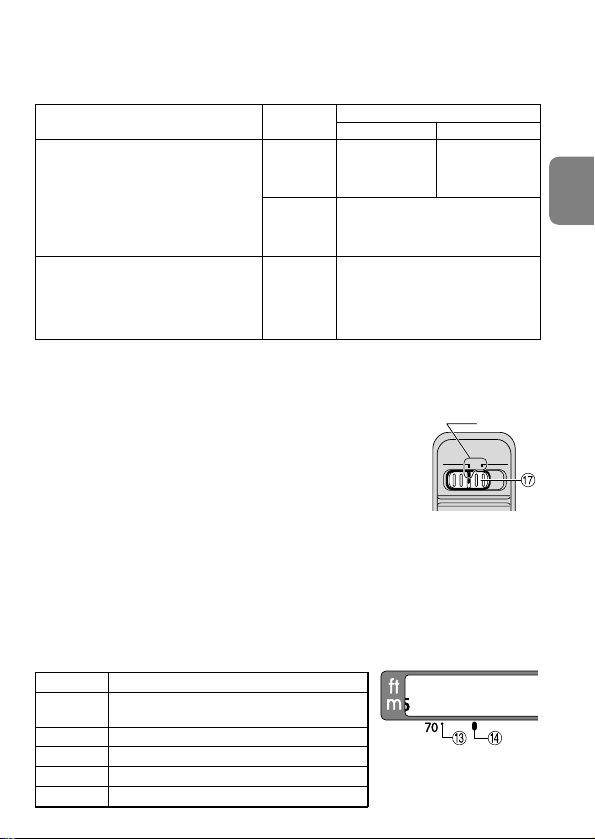
) フォーカスモード切り換えスイッチ
(P.8)
カメラ別の使用可能機能表
使用できる機能には制限・制約がある場合があります。カメラの使用説明書もご
確認ください。
※1:PにはAUTO(オート)モード、イメージプログラムモードを含みます。
※2:Mモードの設定はありません。
●
手ブレ補正が使用できないカメラでは、必ず、手ブレ補正スイッチ(を[OFF]に
してください。特に、プロネア600iでは、このスイッチを[ON]にしたままにす
ると、電池を消耗することがあります。
6

1.はじめに
このたびはニッコールレンズをお買い上げいただき、誠にありがとうございます。
このレンズは、手ブレ補正機能(VRⅡ)および、高速で静かなAF(オートフォ
ーカス)撮影を可能にするレンズ内超音波モーター(サイレント・ウェーブ・モ
ーター)駆動方式を採用した高性能なズームレンズです。
■ 主な特長
●
手ブレ補正機能(VRⅡ)を使用すると、使わないときと比べ約4段分*シャ
ッタースピードを遅くして撮影できるため、シャッタースピードの選択範囲が
広がり、幅広い領域で手持ち撮影が可能です。(*:当社測定条件によります。
また、手ブレ補正効果は、撮影者や撮影条件によって異なります。)
●
通常の手ブレを補正する[NORMAL]モードと、乗り物に乗っている等、揺
れの激しい撮影条件での手ブレを補正する[ACTIVE]モードの切り換えが可
能です。
●
手ブレか流し撮りかを自動検出し、流し撮りでも手ブレ補正機能の威力を発揮
([NORMAL]モード時)します。
●
AF(オートフォーカス)撮影およびMF(マニュアルフォーカス)撮影の切り
換えが簡単にできるフォーカスモード切り換えスイッチを装備しています。
●
AF撮影中にも瞬時にマニュアルフォーカスモードに切り換えることのできる
「マニュアル優先オートフォーカス」機能を装備しています。
●
被写体までの距離情報をカメラ側に伝達する機能を備え、3D測光機能を持っ
たカメラとの組み合わせでは、より的確な露出制御を実現します。
●
ニコン独自のED(特殊低分散)ガラスによる色収差の補正とともに、良好な
ボケ味が得られる円形絞りの採用により優れた光学性能、描写性能を発揮しま
す。
●
最短撮影距離1.5m(ズーム全域)までの近接撮影が可能です。
■ 注 記
●
レンズのCPU信号接点#は汚さないようにご注意ください。
●
DXフォーマットのニコンデジタル一眼レフカメラ(D300シリーズ、D90な
ど)に装着すると、対角線画角は22°50′―5°20′となり、35mm判換
算では焦点距離約105mm―450mm相当になります。
●
レンズマウントゴムリング"が破損した場合は、そのまま使用せず販売店ま
たはニコンサービス機関に修理を依頼してください。
Jp
7
2.ピント合わせの方法
レンズの設定モード
カメラ
MM/A
マニュアル
フォーカス撮影
フォーカス
エイド可
マニュアルフォーカス撮影のみ
(F-601Mを除きフォーカスエイド可)
マニュアルフォーカス撮影のみ
(フォーカスエイド可)
マニュアル優先
オートフォーカス
撮影
ニコンUs、F60D、F50D、
F-801シリーズ、F-401シリーズ、F-601M
FXフォーマット/DXフォーマットの
ニコンデジタル一眼レフカメラ、F6、F5、
F4シリーズ、F100、F90Xシリーズ、
F90シリーズ、F80シリーズ、F70D、
ニコンU2、ニコンU、
プロネア600i、プロネアS
カメラの
フォーカス
モード
AF
(C/S)
AF
(C/S)
MF
MF
( )
指標
70mm
100mm
135mm
200mm
300mm
焦点距離 補正位置の目安
赤外補正マーク$に合わせ直してください。(3.9mm)
1.6mm
0.7mm
0.2mm
0mm(補正の必要はありません)
15 12 10348
ご使用のカメラや撮影目的によって、下表のようなピント合わせが選択できます。
Jp
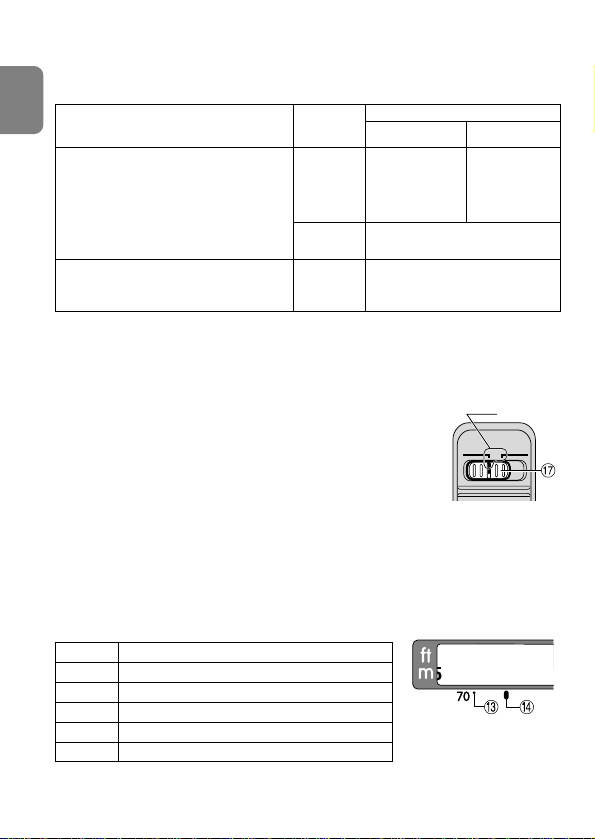
■M/A(マニュアル優先オートフォーカス)モードの使い方
1 フォーカスモード切り換えスイッチ)を[M/A]にセットします。
●
スイッチは、指標が合うようにセットしてください。
2 AF(オートフォーカス)撮影時、シャッターボタンを半
押ししたまま、あるいはカメラのAF作動ボタンを保持し
たまま、フォーカスリング8を手で回転させると、瞬時
にMF(マニュアルフォーカス)撮影が行えます。
3 シャッターボタンの半押しやAF作動ボタンを再度操作す
るとAFで撮影が可能となります。
赤外補正マーク$
赤外フィルムで撮影する場合には、ピント合わせを補正する必要があります。ま
ず、マニュアルでピントを合わせ、そのときの撮影距離を下表に従って合わせ直
してから、赤外撮影用フィルター(R60)を付けて撮影してください。
8
M/A
M
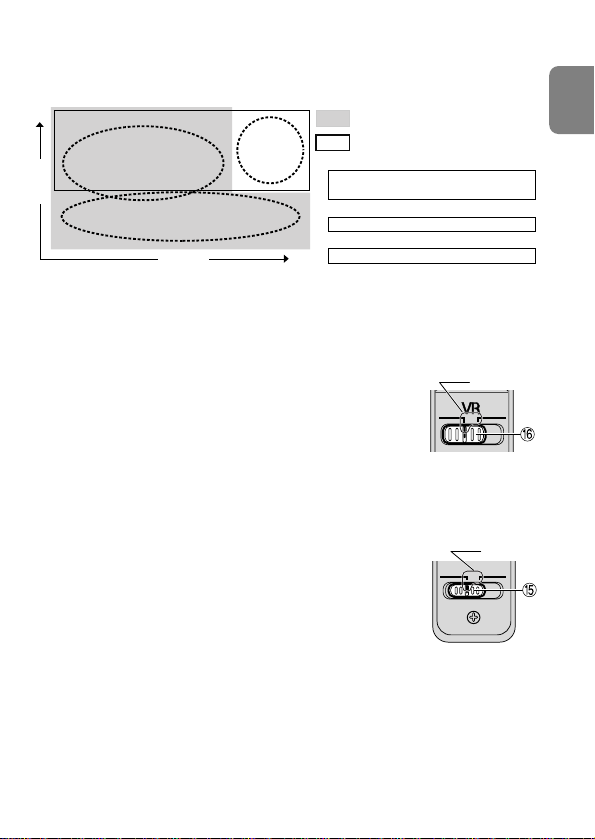
3.手ブレ補正機能(VRⅡ)
[NORMAL]モードで対応
パンニング
(流し撮り)
手ブレ
[ACTIVE]モードで対応
激しい揺れ
例)乗り物等
での揺れ
大
高
周
波
数
振 幅
手ブレ補正
[NORMAL]モードまたは
[ACTIVE]モードで対応
パンニング(流し撮り)での手ブレ補正
[NORMAL]モードで対応
激しい揺れでの手ブレ補正
[ACTIVE]モードで対応
指標
指標
■ 手ブレ補正機能の概念図
■ 手ブレ補正の効果
シャッタースピードで約4段分*の手ブレを補正します。(*:当社測定条件によ
ります。また、手ブレ補正効果は、撮影者や撮影条件によって異なります。)
■ 手ブレ補正機能の使い方
1 手ブレ補正スイッチ(を[ON]にセットします。
●
スイッチは、指標が合うようにセットしてください。
2 シャッターボタンを半押しすると手ブレを補正します。
このときファインダー内の画像のブレも補正するため、
ピント合わせが容易で、フレーミングしやすくなります。
3 手ブレ補正スイッチ(を[OFF]にセットすると、手ブ
レを補正しません。
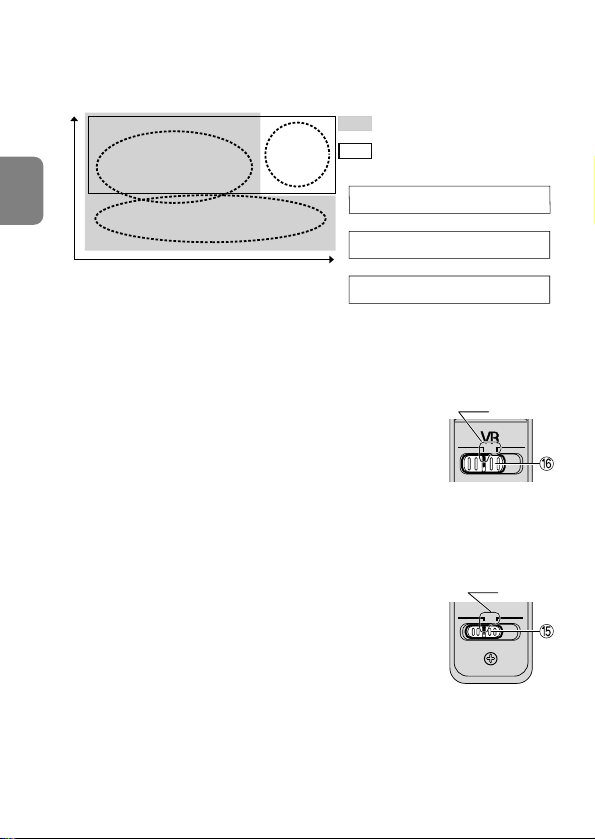
■ 手ブレ補正モード切り換えスイッチ&の使い方
NORMAL:主に、通常の手ブレを補正します。パンニン
グに対応し、流し撮りも行えます。
ACTIVE:乗り物に乗っている等、揺れの激しい条件での
ブレから通常の手ブレを補正します。このモー
ドではパンニング自動検出は行いません。
●
スイッチは、指標が合うようにセットしてください。
■ 手ブレ補正使用時のご注意
●
シャッターボタンを半押し後、ファインダー像が安定してから撮影することを
おすすめします。
●
流し撮りする場合は、必ず[NORMAL]モードにしてください。[NORMAL]
モードでは、流し撮りなどでカメラの向きを大きく変えた場合、流した方向の
手ブレ補正は機能しません。例えば、流し撮りで横方向にパンニングすると、
縦方向の手ブレだけが補正され、流し撮りが行えます。
ON
NORMAL
ACTIVE
Jp
OFF
9

●
手ブレ補正の原理上、シャッターレリーズ後にファインダー像がわずかに動く
ことがありますが、異常ではありません。
●
Jp
手ブレ補正中にカメラの電源スイッチをOFFにしたり、レンズを取り外したり
しないでください。(その状態でレンズを振るとカタカタ音がすることがあり
ますが、故障ではありません。カメラの電源スイッチを再度ONにすれば、音
は消えます。)
●
F80シリーズ、ニコンU2、ニコンU、D700、D300シリーズ、D200、
D100、D90、D80、D70シリーズ、D5000、D3000、D60、D50、
D40シリーズの内蔵フラッシュ充電中には、手ブレ補正は行いません。
●
三脚を使用するときは、手ブレ補正スイッチ(を[OFF]にしてください。
ただし、三脚を使っても雲台を固定しないときや、一脚を使用するときには、
スイッチを[ON]にすることをおすすめします。
●
AF作動ボタンのあるカメラ(D3シリーズ、D300シリーズ、F6など)で、
AF作動ボタンを押しても、手ブレ補正は作動しません。
4.ズーミングと被写界深度(P.88)
撮影を行う場合は、ズームリング5を回転させ構図を決めてから、ピント合わ
せを行ってください。プレビュー(絞り込み)機構を持つカメラでは、撮影前に
被写界深度を確認することができます。
●
距離目盛は目安であり、被写体までの距離を保証するものではありません。
5.ズーミングと開放F値の変化
このレンズはズーミングにより、開放F値が最大2/3段変化します。
ただし、この変化量はカメラが自動的に補正するため、露出を決める際に考慮す
る必要はありません。また、内蔵露出計使用時やTTL調光によるフラッシュ撮影
時はもとより、外部露出計使用時やTTL調光以外でのフラッシュ撮影においても
カメラに表示される絞り値を使用すれば、ズーミングによる開放F値変化に対す
る補正は不要です。
6.絞り値の設定
絞り値は、カメラ側で設定してください。
10
7.バヨネットフードHB-361の取り付け、取り外し
32 4
スクリーン
カメラ
F5+DP-30
◎ ―
◎ ―
―
―
―
―
― ◎ ― ◎
― ◎ ― ◎
G1/G2
G3/G4
BCE
EC-B
EC-E
FJKLMPU
F4+DP-20
F4+DA-20
F5+DA-30
A
◎
◎
◎
◎
◎
◎
◎◎―
―
◎
◎
◎
◎
◎
◎
◎
◎
F6
― ― ― ―◎ ◎ ◎◎ ― ― ◎
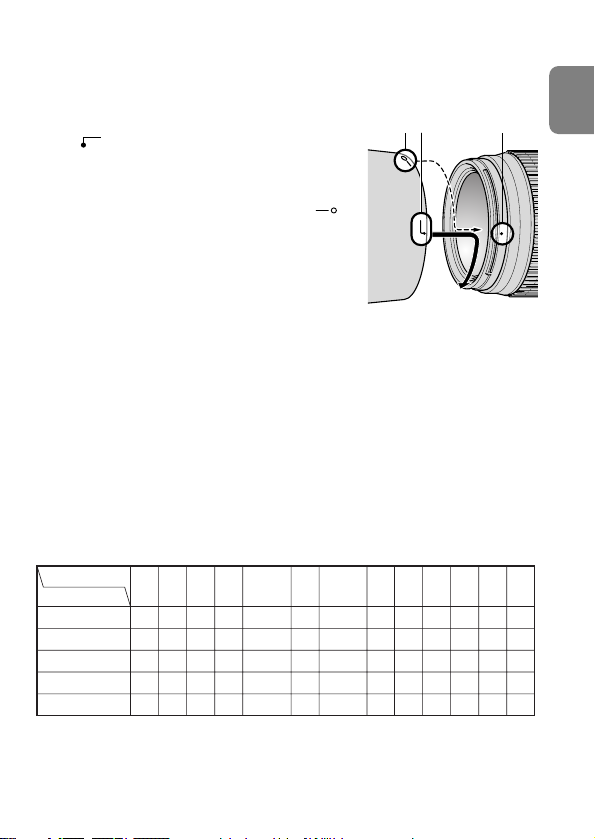
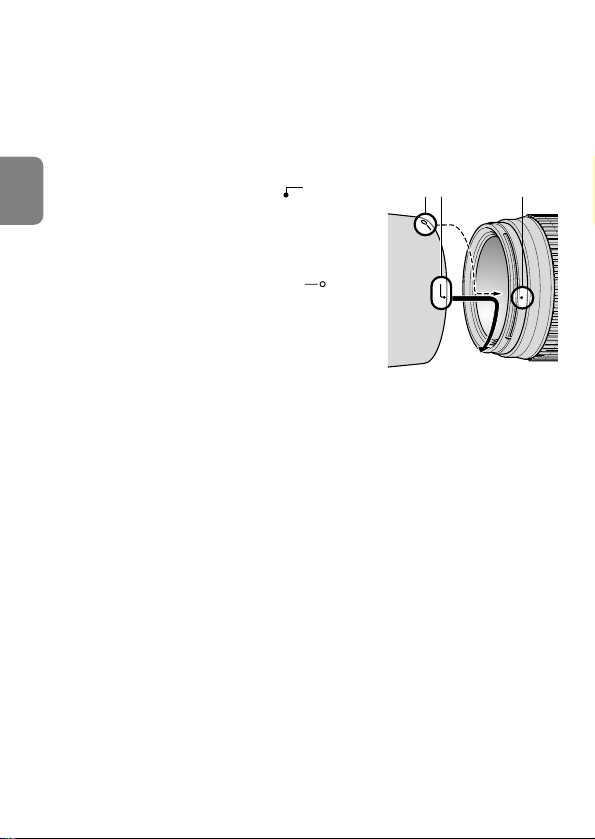
■取り付け方
レンズ先端のフード着脱指標4とフード取り付け
指標( 、2ヶ所のいずれか)2を合わせて、
時計回りにカチッと音がするまでフード1を回転
させ、確実に取り付けます。
●
フード着脱指標4とフードセット指標( )
3が合っていることを確認してください。
●
フードが正しく取り付けられないと撮影画面に
ケラレを生じますのでご注意ください。
●
フード先端を強くつかむと着脱が困難になりま
す。着脱の際は、フードの根元(フード取り付
け指標部分)付近を持って回転させてください。
●
収納時はフードを逆向きにしてレンズに取り付けることができます。
■取り外し方
フードの根元(フード取り付け指標部分)付近を持ち、反時計回りにフードを回
転させて取り外します。
8.カメラ内蔵フラッシュ使用時のご注意
ケラレ(写真の一部に影ができる)を防止するため、レンズフード1は取り外
して使用してください。
9.ファインダースクリーンとの組み合わせ
Jp
11

■構図の決定やピント合わせの目的には
◎: 好適です
―: 各カメラに存在しないファインダースクリーンです。
Jp
(): 中央部重点測光時の補正値です。F6カメラの場合、測光値の補正は、カメラの
カスタムメニュー「b6:スクリーン補正」を「B orE以外」にセットして行いま
す。B型およびE型以外を使用する場合は、補正量が0でも、「Bor E以外」にセ
ットしてください。F5カメラの場合は、カスタムセッティングNo.18の設定で
測光値の補正を行います。F4シリーズカメラの場合は、ファインダースクリー
ン露出補正ダイヤルを回して補正を行います。
詳しくはカメラの使用説明書をご覧ください。
空欄: 使用不適当です。ただし、Mスクリーンの場合、撮影倍率1/1倍以上の近接撮影
に用いられるため、この限りではありません。
注意
・上記以外のカメラでB、Eスクリーンをご使用の場合は、それぞれB、Eスクリーンの
欄をご覧ください。
10.レンズのお手入れと取り扱い上のご注意
●
レンズ面の清掃は、ホコリを拭う程度にしてください。指紋がついたときは、
柔らかい清潔な木綿の布に無水アルコール(エタノール)または市販のレンズ
クリーナーを少量湿らせ、レンズの中心から外周へ渦巻状に、拭きムラ、拭き
残りのないように注意して拭いてください。
●
シンナーやベンジンなどの有機溶剤は絶対に使用しないでください。
●
レンズ表面の汚れや傷を防ぐためには、NCフィルターをお使いいただけます。
また、レンズフード1も役立ちます。
●
レンズをケースに入れるときは、必ず、レンズキャップを前後に取り付けてく
ださい。
●
レンズを長期間使用しないときは、カビやサビを防ぐために、高温多湿のとこ
ろを避けて風通しのよい場所に保管してください。また、直射日光のあたると
ころ、ナフタリンや樟脳のあるところも避けてください。
●
レンズを水に濡らすと、部品がサビつくなどして故障の原因となりますのでご
注意ください。
●
ストーブの前など、高温になるところに置かないでください。極端に温度が高く
なると、外観の一部に使用している強化プラスチックが変形することがあります。
12

11.付属アクセサリー
●
67mmスプリング式レンズキャップ LC-67●裏ぶた LF-1
●
バヨネットフード HB-36●ソフトケース CL-1022
12.別売アクセサリー
●
67mmネジ込み式フィルター
13.使用できないアクセサリー
●
テレコンバーター:全種類●オート接写リング:PKリング全種類
●
Kリング:全種類●オートリング:BR-4●ベローズアタッチメント:全種類
※その他のアクセサリーでも、使用できない場合があります。アクセサリーの使用説
明書でご確認ください。
14.仕 様
型式: ニコンFマウントCPU内蔵Gタイプ、AF-Sズームレンズ
焦点距離: 70mm― 300mm
最大口径比: 1:4.5― 5.6
レンズ構成: 12群17枚(EDレンズ2枚)
画角: 34
焦点距離目盛: 70、100、135、200、300mm
撮影距離情報: カメラへの撮影距離情報出力可能
ズーミング: ズームリングによる回転式
ピント合わせ: IF(ニコン内焦)方式、超音波モーターによるオートフォーカ
手ブレ補正: ボイスコイルモーター(VCM)によるレンズシフト方式
撮影距離目盛: ∞〜1.5m、5ft.(併記)
最短撮影距離: 1.5m(ズーム全域)
絞り羽根枚数: 9枚(円形絞り)
絞り方式: 自動絞り
絞りの範囲: 焦点距離70mm時 f4.5―32、300mm時 f5.6―40
測光方式: 開放測光
アタッチメントサイズ
大きさ: 約80(最大径)× 143.5mm(バヨネットマウント基準面
質量: 約745g
●
仕様、外観の一部を、改善のため予告なく変更することがあります。
°20―8°10
22
°50―5°
°40―6°
27
ス、マニュアルフォーカス可能
:67mm(P=0.75mm)
からレンズ先端まで)
…35mm判一眼レフカメラ
20′ … DXフォーマットのデジタル
40′ … IX240カメラ
FXフォーマットのデジタル
一眼レフカメラ
一眼レフカメラ
13
Jp

Notes on Safety Operations
CAUTION
Do not disassemble
Touching the internal parts of the camera or lens could result in injury. Repairs should be
performed only by qualified technicians. Should the camera or lens break open as the
result of a fall or other accident, take the product to a Nikon-authorized service
representative for inspection after unplugging the product and/or removing the battery.
EnEn
Turn off immediately in the event of malfunction
Should you notice smoke or an unusual smell coming from the camera or lens, remove
the battery immediately, taking care to avoid burns. Continued operation could result
in injury.
After removing or disconnecting the power source, take the product to a Nikonauthorized service representative for inspection.
Do not use the camera or lens in the presence of flammable gas
Operating electronic equipment in the presence of flammable gas could result in an
explosion or fire.
Do not look at the sun through the lens or viewfinder
Viewing the sun or other strong light sources through the lens or viewfinder could
cause permanent visual impairment.
Keep out of reach of children
Particular care should be taken to prevent infants from putting the batteries or other
small parts into their mouths.
Observe the following precautions when handling the camera and
lens
• Keep the camera and lens unit dry. Failure to do so could result in fire or electric shock.
• Do not handle or touch the camera or lens unit with wet hands. Failure to do so
could result in electric shock.
• When shooting with back-lighting, do not point the lens at the sun or allow sunlight
to pass directly down the lens as this may cause the camera to overheat and possibly
cause a fire.
• When the lens will not be used for an extended period of time, attach both front and
rear lens caps and store the lens away from direct sunlight. Failure to do so could
result in a fire, as the lens may focus sunlight onto a flammable object.
14

Cameras
Vibration reduction Autofocus
Exposure mode
P*1SAM
Nikon digital SLR (Nikon FX/DX format)
cameras
F6, F5, F100, F80-Series/N80-Series*,
F75-Series/N75-Series*,
F65-Series/N65-Series*
Pronea 600i/6i*, Pronea S*
2
F4-Series, F90X/ N90s*, F90-Series/N90*,
F70-Series/N70*
F60-Series/ N60*, F55-Series/N55-Series*,
F50-Series/N50*, F-401x/N5005*,
F-401s/ N4004s*, F-401/N4004*
F-801s/N8008s*, F-801/N8008*,
F-601
M/N6000*
F3AF, F-601/N6006*, F-501/N2020**,
Nikon MF cameras
(except F-601
M/N6000*)
쑗쑗쑗쑗쑗쑗
҂҂
쑗쑗쑗쑗쑗쑗
҂ 쑗쑗쑗쑗쑗
҂ 쑗쑗쑗҂҂
쑗쑗쑗쑗
҂҂쑗쑗҂҂
҂҂҂҂҂҂
Function
쑗: Possible ҂: Impossible
Nomenclature
1 Lens hood (p.20)
2 Lens hood attachment index (p.20)
3 Lens hood setting index (p.20)
4 Lens hood mounting index (p.20)
5 Zoom ring (p.19)
6 Focal length scale
7 Focal length index line
8 Focus ring (p.17)
9 Distance scale
! Mounting index
( )
: Reference page
" Lens mount rubber gasket (p.16)
# CPU contacts (p.16)
$ Infrared compensation index
(at 70mm) (p.17)
% Distance index line
& Vibration reduction mode switch
(p.18)
( Vibration reduction ON/OFF switch
(p.18)
) Focus mode switch (p.17)
Usable cameras and available functions
There may be some restrictions or limitation for available functions. Refer to your
camera user’s manual for details.
En
*Sold exclusively in the USA. **Sold exclusively in the USA and Canada.
*1 P includes AUTO (General-Purpose Program) and Vari-Program System.
*2 Manual (M) is not available.
• If this lens is used with cameras not compatible with vibration reduction, set the
vibration reduction ON/OFF switch ( to [OFF]. With a Pronea 600i/6i camera, in
particular, battery power may become quickly depleted if this switch is left [ON].
15

1. Introduction
Thank you for purchasing the AF-S VR Zoom-Nikkor 70-300mm f/4.5-5.6G IF-ED lens.
This is a high-performance zoom lens featuring special Vibration Reduction (VR2)
and high-speed Internal Focusing (IF) mechanisms. It also employs a Silent (S) Wave
Motor to drive the focusing mechanism.
■ Major features
• Pictures can be taken at shutter speeds approx. 4 stops* slower than is possible
En
without using a VR2 lens, thus expanding the range of usable shutter speed
options and making shooting without a tripod at various zoom settings much easier.
(*Under Nikon measurement conditions. The effects of vibration reduction vary
depending on individual and shooting conditions.)
• Two vibration reduction modes are available: (1) the [NORMAL] mode for reducing
camera shake, and (2) the [ACTIVE] mode for reducing camera shake when taking
pictures from a moving vehicle.
• Panning is also possible, as the lens automatically distinguishes panning from
camera shake (in [NORMAL] mode) and vibration reduction works effectively.
• Autofocus (A) or manual (M) mode can easily be selected with the Focus mode
switch.
• Autofocusing with manual override is provided, allowing instant change from
autofocusing to manual focusing.
• More accurate exposure control is possible when this is mounted on a Nikon camera
having 3D Matrix Metering capability, because subject distance information is
transferred from the lens to the camera body.
• The use of two ED (extra-low dispersion) lens elements ensures sharp pictures
virtually free of color fringing. Also, by utilizing a 9-blade diaphragm that produces a
nearly circular aperture, out-of-focus images in front of or behind the subject are
rendered as pleasing blurs.
• The closest focusing distance possible is 1.5m or 4.9 ft. (at all zoom settings).
■ Important
• Be careful not to soil or damage the CPU contacts #.
• When mounted on Nikon DX format digital SLR cameras, such as the D300-Series
and D90, the lens’ picture angle becomes 22°50’- 5°20’ and its 35mm equivalent
focal length range is approx. 105mm -450mm.
• If the lens mount rubber gasket " is damaged, be sure to visit the nearest Nikon
authorized dealer or service center for repair.
16
Lens’ focus mode
Cameras
MM/A
Camera’s
focus mode
Nikon digital SLR (Nikon FX/DX format)
cameras, F6, F5, F4-Series, F100,
F90X/N90s*, F90-Series/N90*,
F80-Series/N80-Series*, F75-Series/
N75-Series*, F70-Series/N70*,
F65-Series/N65-Series*,
Pronea 600i/6i*, Pronea S
F55-Series/N55-Series*,
F60-Series/N60*, F50-Series/N50*,
F-801s/N8008s*, F-801/N8008*,
F-601
M/N6000*, F-401x/N5005*,
F-401s/ N4004s*, F-401/N4004*
AF
(C/S)
MF
AF
(C/S)
MF
Manual focus
(Focus assist is available,
except with the F-601
M/N6000*.)
Autofocus with
manual priority
Manual focus
(Focus assist
is available.)
Manual focus
(Focus assist is available.)
* Sold exclusively in the USA.
15 12 10348
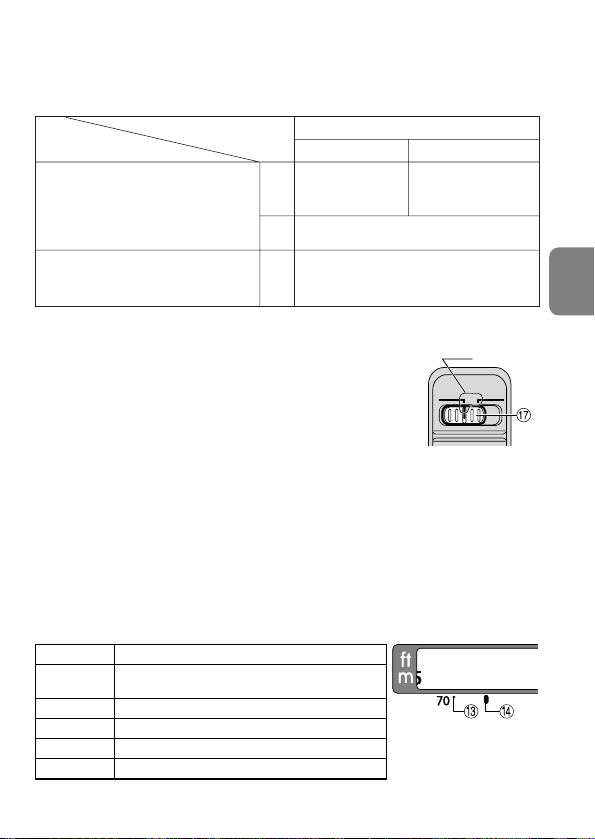
2. Focusing
Compensation from distance index line %
70 mm Shift the distance scale to the infrared
compensation index $. (3.9 mm)
100 mm 1.6 mm
135 mm 0.7 mm
200 mm 0.2 mm
300 mm 0 mm (No compensation is necessary)
Focal length
Set your camera’s focus mode selector according to this chart.
■ Autofocus with manual override (M/A mode)
1 Set the Focus mode switch ) to [M/A].
Note: Be sure to set the switch so that the indicator aligns with
[M/A] precisely.
2 Autofocus is provided, but you can manually override the focus
by operating the separate Focus ring 8 while lightly depressing
the shutter release button or the AF start (AF-ON) button on the
camera.
3 To cancel manual override, again lightly depress the shutter
release button or the AF start button on the camera. This will return the camera to
autofocus mode.
■ Infrared compensation
With infrared film, manual compensation must be made to the focused distance. First,
focus manually on the subject. Rotate the focus ring 8 to realign the distance scale
referring to the table below. Attach a red (R60) filter for infrared photography, and
then shoot.
M/A
En
Indicator
M
17
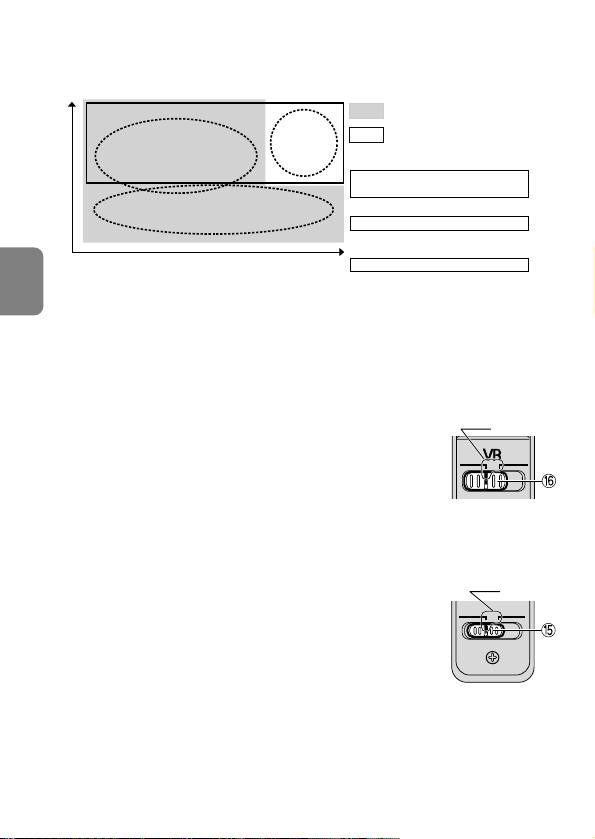
Panning shots
Camera shake
Number of vibrations
Strength of vibration
Camera shake
when taking pictures
from a moving
vehicle
Set the vibration reduction mode
switch to [NORMAL].
Set the vibration reduction mode
switch to [ACTIVE].
When taking pictures
Set the vibration reduction mode switch
to either [NORMAL] or [ACTIVE]
When taking panning shots
Set the vibration reduction mode switch
to [NORMAL].
When taking pictures from a moving vehicle
Set the vibration reduction mode switch
to [ACTIVE].
3. Vibration reduction mode (VR@)
■ Basic concept of vibration reduction
En
■ The effects of vibration reduction
Pictures can be taken at shutter speeds approx. 4 stops* slower than is possible
without using a VR2 lens.(*Under Nikon measurement conditions. The effects of
vibration reduction vary depending on individual and shooting conditions.)
■ Setting the vibration reduction ON/OFF switch
1 Set the Vibration reduction ON/OFF switch ( to [ON].
Note: Be sure to set the switch so that the indicator aligns
with [ON] precisely.
2 Vibration is reduced when the shutter release button is lightly
pressed. Because vibration is reduced in the viewfinder, auto/manual
focusing and exact framing of the subject are made easier.
3 To cancel the vibration reduction mode, set the Vibration
reduction ON/OFF switch ( to [OFF].
■Setting the vibration reduction mode switch &
NORMAL: The vibration reduction mechanism primarily reduces
ACTIVE: The vibration reduction mechanism reduces camera
18
camera shake, making smooth panning shots
possible.
shake when taking pictures and those from a moving
vehicle. In this mode, the lens does not automatically
distinguish panning from camera shake.
Note:Be sure to set the switch so that the indicator aligns with
[NORMAL] or [ACTIVE] precisely.
Indicator
ON
NORMAL
OFF
Indicator
ACTIVE

■Notes on using vibration reduction
• Wait until the image in the viewfinder stops vibrating before fully depressing the
shutter release button after you have lightly pressed the shutter release button.
• When taking panning shots, be sure to set the vibration reduction mode switch to
[NORMAL]. If you move the camera in a wide arc when panning, vibration in the direction
of that movement is not affected. For example, if you pan the camera horizontally, only
vibration in the vertical direction is reduced, making smooth pans much easier.
• Due to the characteristics of the vibration reduction mechanism, the image in the
viewfinder may become blurred after releasing the shutter. This is not a malfunction.
• Do not turn the camera power OFF or remove the lens from the camera while the
vibration reduction mode is in operation. (Otherwise, the lens may emit a chattering
noise if the camera is shaken. This is not a malfunction. Turn the camera power ON
again to correct this.)
• With F80-Series/N80-Series, F75-Series/N75-Series, F65-Series/N65-Series, D700,
D300-Series, D200, D100, D90, D80, D70-Series, D5000, D3000, D60, D50 and
D40-Series cameras featuring a built-in flash, vibration reduction does not work
while the built-in flash is recycling.
• When the lens is mounted on a tripod, set the vibration reduction ON/OFF switch (
to [OFF]. However, set the switch to [ON] when using a tripod without securing the
tripod head, or when using a monopod.
• With AF cameras featuring an AF start (AF-ON) button, such as D3-Series,
D300-Series and F6 models, vibration reduction will not operate even if the
AF-ON button is depressed.
4. Focusing, zooming, and depth of field (p.88)
First turn the zoom ring 5 until the desired composition is framed in the viewfinder
before focusing. If your camera has a depth of field preview (stop-down) button or
lever, depth of field can be observed while looking through the camera viewfinder.
• The distance scale does not indicate the precise distance between the subject and
the camera. Values are approximate and should be used only as a general guide.
En
5. Variable maximum apertures
Zooming the lens from 70mm to 300mm decreases the maximum aperture approx. 2/3
of an f/stop. For cameras with TTL metering, there is no need to adjust the aperture.
Likewise, for TTL auto flash photography with Nikon Speedlights, no adjustment is
required. When using a separate exposure meter or taking photographs in the non-TTL
flash mode, select the appropriate aperture value according to the focal length setting
as displayed on the camera.
19
6. Setting the aperture
32 4
Set the aperture on the camera body.
7. Using bayonet hood HB-36 1
■ Attaching the hood
Align the lens hood attachment index ( )
En
hood (either one of the two indexes) with the lens hood
mounting index 4 on the lens, and turn the hood 1
clockwise until it click stops to secure.
• Make sure that the lens hood mounting index
aligns with the lens hood setting index ( ) 3.
• If the lens hood is not correctly attached, vignetting
can occur.
• To facilitate attachment or removal of the hood, hold
it by its base (around the lens hood attachment index)
rather than its outer edge.
• To store the lens hood, attach it in the reverse position.
■ Detaching the hood
While holding the base of the hood (near the lens hood attachment index) rather than
its outer edge, turn it counterclockwise to detach.
2 on the
4
8. Flash pictures using cameras with a built-in flash
To prevent vignetting, do not use a lens hood 1.
20

9. Recommended focusing screens
Various interchangeable focusing screens are available for certain Nikon SLR cameras
to suit any picture-taking situation. The ones recommended for use with this lens are:
Screen
Camera
F6
F5+DP-30
F5+DA-30
F4+DP-20
F4+DA-20
BCE
A
EC-B
EC-E
: Excellent focusing
—: Not available.
( ): Indicates degree of exposure compensation needed (Center-Weighted metering
only). For F6 cameras, compensate by selecting “Other screen” in Custom
Setting “b6: Screen comp.” and setting the EV level to -2.0 to +2.0 in 0.5 EV
steps. When using screens other than type B or E, “Other screen” must be
selected even when the required compensation value is “0” (no compensation
required). For F5 cameras, compensate using Custom Setting #18 on the camera
body. For F4-Series cameras, compensate using the Exposure Compensation Dial
for the focusing screen.
See user’s manual of the camera body for more details.
Blank box means not applicable. Since type M screen can be used for both macrophotography at a 1:1 magnification ratio and for photomicrography, it has different
applications than other screens.
• When using the B and E focusing screens in cameras other than those listed above,
refer to the columns for the B and E screens.
G1/G2
FJKLMPU
G3/G4
En
21

10. Lens care
• Clean the lens surfaces with a blower brush. To remove dirt and smudges, use a
soft, clean cotton cloth or lens tissue moistened with ethanol (alcohol) or lens
cleaner. Wipe in a circular motion from center to outer edge, taking care not to leave
traces or touch other parts of the lens.
• Never use thinner or benzene to clean the lens as this might damage it, result in a
fire, or cause health problems.
En
• To protect the front lens element, an NC filter is available. A lens hood 1 also helps
protect the front of the lens.
• When storing the lens in its lens case, attach both front and rear caps.
• When the lens will not be used for a long time, store it in a cool, dry place to
prevent mold. Also store the lens away from direct sunlight or chemicals such as
camphor or naphthalene.
• Do not get water on the lens or drop it in water as this will cause it to rust and
malfunction.
• Reinforced plastic is used for certain parts of the lens. To avoid damage, never leave
the lens in an excessively hot place.
11. Standard accessories
• 67mm snap-on front lens cap LC-67 • Rear lens cap LF-1
• Bayonet hood HB-36 • Flexible lens pouch CL-1022
12. Optional accessories
• 67mm screw-in filters
13. Incompatible accessories
• Teleconverters (all models) • Auto Ring BR-4 and all models of Auto Extension
Ring PK, K Ring and Bellows focusing attachment.
Other accessories may not be suitable for use with this lens. For details, carefully read
your accessories user’s manual.
22

14. Specifications
Type of lens: G-type AF-S Zoom-Nikkor lens with built-in CPU and Nikon
Focal length: 70mm–300mm
Maximum aperture: f/4.5–5.6
Lens construction: 17 elements in 12 groups (2 ED lens elements)
Picture angle: 34˚20’– 8˚10’ with 35 mm (135) format Nikon film-SLR
Focal length scale: 70, 100, 135, 200, 300mm
Distance information:
Zoom control: Manually via separate zoom ring
Focusing: Nikon Internal Focusing (IF) system (utilizing an internal
Vibration reduction: Lens-shift method using voice coil motors (VCMs)
Shooting distance scale:
Closest focus distance:
No. of diaphragm blades:
Diaphragm: Fully automatic
Aperture range: f/4.5 to f/32 (at 70mm), f/5.6 to f/40 (at 300mm)
Exposure measurement:
Attachment size: 67mm (P = 0.75mm)
Dimensions: Approx. 80mm dia. x 143.5mm extension from the camera’s
Weight: Approx. 745g (26.3 oz)
Specifications and designs are subject to change without any notice or obligation on
the part of the manufacturer.
bayonet mount
cameras and Nikon FX format digital SLR cameras
22˚50’– 5˚20’ with Nikon DX format digital SLR cameras
27˚40’– 6˚40’ with IX240 system cameras
Output to camera body
Silent Wave Motor); manually via separate focus ring
Graduated in meters and feet from 1.5m (5 ft.) to infinity (∞)
1.5m (4.9 ft.) at all zoom settings
9 pcs. (rounded)
Via full-aperture method
lens mount flange
En
23

Hinweise für sicheren Betrieb
ACHTUNG
Keinesfalls zerlegen.
Beim Berühren der Innenteile von Kamera oder Objektiv droht Verletzungsgefahr.
Überlassen Sie Reparaturen unbedingt ausschließlich qualifizierten Technikern. Kommt es
durch einen heftigen Stoß (z.B. Fall auf den Boden) zu einem Bruch von Kamera oder
Objektiv, so trennen Sie zunächst das Produkt vom Stromnetz bzw. entnehmen die
Batterie(n) und geben es dann an eine autorisierte Nikon-Servicestelle zur Überprüfung ab.
Bei einer Störung sofort die Stromversorgung ausschalten.
Bei Entwicklung von Rauch oder ungewöhnlichem Geruch durch Kamera oder Objektiv
entnehmen Sie sofort die Batterie(n); dabei vorsichtig vorgehen, denn es besteht
Verbrennungsgefahr. Bei einem Weiterbetrieb unter diesen Umständen droht
De
Verletzungsgefahr.
Nach dem Abtrennen von der Stromversorgung geben Sie das Gerät an eine autorisierte
Nikon-Servicestelle zur Überprüfung ab.
Kamera oder Objektiv keinesfalls bei Vorhandensein von
brennbarem Gas einsetzen.
Wird elektronisches Gerät bei brennbarem Gas betrieben, so droht u.U. Explosionsoder Brandgefahr.
Keinesfalls durch Objektiv oder Sucher in die Sonne blicken.
Beim Betrachten der Sonne oder anderer starker Lichtquellen durch Objektiv oder
Sucher droht eine permanente Schädigung des Sehvermögens.
Dem Zugriff von Kindern entziehen.
Es ist unbedingt dafür zu sorgen, dass Kleinkinder keine Batterien oder andere
Kleinteile in den Mund nehmen können.
Beim Umgang mit Kamera und Objektiv unbedingt die folgenden
Vorsichtmaßnahmen beachten:
• Schützen Sie die Kamera und das Objektiv vor Feuchtigkeit. Andernfalls droht Brand-
oder Stromschlaggefahr.
• Handhaben oder berühren Sie die Kamera bzw. das Objektiv keinesfalls mit nassen
Händen. Andernfalls droht Stromschlaggefahr.
•
Bei Gegenlichtaufnahmen nicht das Objektiv gegen die Sonne richten oder das Sonnenlicht
direkt durch das Objektiv eintreten lassen. Dies könnte eine Überhitzung der Kamera
verursachen und ein Brand könnte die Folge sein.
• Vor einem längeren Nichtgebrauch des Objektivs bringen Sie den vorderen und
hinteren Deckel an und bewahren das Objektiv geschützt vor direkter
Sonnenlichteinwirkung auf. Andernfalls droht Brandgefahr wegen möglicher
Fokussierung von Sonnenlicht durch das Objektiv auf brennbare Gegenstände.
24

Nomenklatur
Kameras
Bildstabilisator (VR)
Autofokus
Belichtungssteuerung
P*1SAM
Nikon Digital-SLR-Kameras
(Nikon FX/DX-Format)
F6, F5, F100, F80-Serie,
F75-Serie, F65-Serie
Pronea 600i, Pronea S*2
F4-Serie, F90X, F90-Serie,
F70-Serie
F60-Serie, F55-Serie, F50-Serie,
F-401x, F-401s, F-401
F-801s, F-801, F-601
M
F3AF, F-601, F-501
Nikon MF Kameras
(außer F-601
M)
Funktion
: Möglich : Nicht möglich
1 Gegenlichtblende (S.30)
2 Montagemarkierung der
Gegenlichtblende (S.30)
3 Kontrollmarkierung der
Gegenlichtblende (S.30)
4 Montagemarkierung für
Gegenlichtblende (S.30)
5 Zoomring (S.29)
6 Brennweitenskala
7 Brennweitenskala-Indexlinie
8 Entfernungseinstellring (S.27)
( )
: Seitennummer
! Montagemarkierung
" Dichtungsmanschette (S.26)
# CPU-Kontakte (S.26)
$ Infrarot-Kompensationsindex (bei
70mm) (S.27)
% Markierung für Entfernungsskala
& Schalter zur Vibrationsreduktion
(VR-Schalter) (S.28)
( Schalter für Bildstabilisator (VR)
(S.28)
) Fokusschalter (S.27)
9 Entfernungsskala
Verwendbare Kameras und verfügbare Funktionen
Möglicherweise gibt es hinsichtlich der verfügbaren Funktionen Einschränkungen.
Informationen hierzu finden Sie im Benutzerhandbuch zu Ihrer Kamera.
De
*1 P schließt die Automatik (AUTO) und Motivprogramme mit ein.
*2 Manuelle Belichtungssteuerung (M) nicht möglich.
• Wenn Sie dieses Objektiv mit einer Kamera verwenden, die die Bildstabilisatorfunktion (VR)
nicht unterstützt, sollten Sie den Schalter für den Bildstabilisator ( am Objektiv auf [OFF]
stellen. Insbesondere bei der Kamera Pronea 600i wird die Batterie u. U. schnell erschöpft,
wenn der Schalter sich in der [ON]-Stellung befindet.
25

1. Einführung
Wir danken Ihnen, dass Sie sich für das AF-S VR Zoom-Nikkor 70-30 mm f4,5-5,6G
IF-ED entschieden haben. Dieses hochwertige Tele-Zoomobjektiv bietet spezielle
Mechanismen zur Vibrationsreduktion (VR2) und zur schnellen internen Fokussierung
(IF). Außerdem wird der Fokussiermechanismus durch einen Silent-Wave-Motor (S)
betrieben.
■ Die wichtigsten Merkmale
• Aufnahmen bei Verschlusszeiten ermöglicht der Bildstabilisator (VR2)
verwacklungsfreie Aufnahmen mit um bis zu vier Lichtwertstufen* längeren
Verschlusszeiten als beim Fotografieren ohne VR-Technik, auf diese Weise werden
der Bereich der verfügbaren Verschlusszeitoptionen erweitert und Teleaufnahmen
ohne Stativ erheblich vereinfacht. (*unter Nikon-Testbedingungen; der Ausmaß des
De
Effekts des Bildstabilisators ist abhängig vom Fotografen und den
Aufnahmebedingungen.)
• Zwei Vibrationsreduktionsmodi stehen zur Verfügung: (1) der [NORMAL]-Modus zur
Reduktion von Kameraverwacklungen und (2) der [ACTIVE]-Modus zur Reduktion
von Kameraverwacklungen bei Aufnahmen aus einem bewegten Fahrzeug.
• Der Bildstabilisator unterscheidet automatisch zwischen Verwacklung und
absichtlichen Schwenkbewegungen, sodass das Objektiv bei Kameraschwenks (im
[NORMAL]-Modus) diesen nicht fälschlicherweise entgegenwirkt.
• Der Fokusschalter gestattet das Umschalten zwischen Autofokus (A) und manuellem
Fokus (M).
• Auch wenn der Autofokus aktiviert ist, können Sie jederzeit manuell eingreifen
(Priorität der manuellen Scharfeinstellung).
• Das Objektiv überträgt die eingestellte Entfernung an die Kamera und ermöglicht so
eine präzisere Belichtungssteuerung (3D-Matrixmessung).
• Zwei Linsenelemente aus hochwertigem ED-Glas (extra geringe Dispersion)
gewährleisten scharfe Abbildungen frei von Farbsaumbildung. Neun
Blendenlamellen sorgen für eine nahezu kreisrunde Blendenöffnung, so daß
außerhalb des Schärfenbereichs vor und hinter dem Motiv liegende Elemente in
ansprechende Unschärfe getaucht werden.
• Die Naheinstellgrenze beträgt 1,5 m (bei allen Zoomeinstellungen).
■ Wichtige Hinweise
• Halten Sie die CPU-Kontakte # sauber und schützen Sie sie vor Beschädigung.
• Bei Verwendung des Objektivs an einer digitalen Nikon-Spiegelreflexkamera mit
DX-Format, wie der D300-Serie oder der D90, beträgt der Bildwinkel 22°50’ – 5°20’
und der Brennweitenbereich entspricht 105 – 450 mm bei einer Kleinbildformatkamera.
• Bei einer Beschädigung der Dichtungsmanschette " sollten Sie das Objektiv beim
nächsten Nikon-Vertragshändler bzw.bei einer Nikon-Reparaturwerkstatt zur
Reparatur abgeben.
26
2. Fokussteuerung
Wählen Sie anhand der folgenden Tabelle eine von der Kamera unterstützte
Fokussteuerung:
Fokussteuerung
Kameras
Nikon Digital-SLR-Kameras (Nikon
FX/DX-Format), F6, F5, F4-Serie, F100,
F90X, F90-Serie, F80-Serie, F75-Serie,
F70-Serie, F65-Serie,
Pronea 600i, Pronea S
F55-Serie, F60-Serie, F50-Serie, F-801s,
F-801, F-601M, F-401x, F-401s, F-401
(Kamera)
■ Autofokus mit Priorität der manuellen Scharfeinstellung (M/A-Modus)
1 Stellen Sie den Fokusschalter ) auf [M/A].
Hinweis: Dabei muss der Schalter so eingestellt sein, dass die
Markierung genau mit der Aufschrift [M/A] fluchtet.
2 Bei dieser Einstellung ist der Autofokus-Modus zwar aktiviert,
kann aber jederzeit durch Drehen des separaten
Entfernungseinstellrings 8 und gleichzeitigem Antippen des
Auslösers oder der AF-Starttaste (AF-ON) an Kamera deaktiviert werden.
3 Drücken Sie den Auslöser bis zum ersten Druckpunkt oder die AF-Start-Taste der
Kamera, wenn Sie nicht mehr manuell in die Fokussierung eingreifen wollen.
Daraufhin schaltet die Kamera auf Autofokus-Modus zurück.
■ Infrarotkompensierung
Bei Aufnahmen auf Infrarotfilm muss die Scharfeinstellung von Hand korrigiert
werden. Zu diesem Zweck fokussieren Sie zunächst das Aufnahmeobjekt manuell.
Drehen Sie den Entfernungseinstellring 8 zur Nachstellung der Entfernungsskala
anhand der nachstehenden Tabelle. Bringen Sie ein Rotfilter (R60) für
Infrarotfotografie an und machen Sie dann Ihre Aufnahmen.
Brennweite
70 mm Verschieben der Entfernungsskala zum
100 mm 1,6 mm
135 mm 0,7 mm
200 mm 0,2 mm
300 mm 0 mm (keine Kompensation erforderlich)
Kompensation von Markierung für Entfernungsskara
Infrarot-Kompensationsindex $. (3,9 mm)
Fokussteuerung (Objektiv)
%
Manueller Fokus (mit
elektronischer
Einstellhilfe)
15 12 10348
Autofokus mit
AF
Priorität der man.
(C/S)
Scharfeinstellung
MF
AF
(C/S)
MF
Manueller Fokus
(mit elektronischer Einstellhilfe)
Manueller Fokus (mit elektronischer
Einstellhilfe; keine Einstellhilfe bei F-601
M/A
MM/A
Markierung
M
De
M)
27
3. Bildstabilisator (VR@)
■ Grundlagen des Vibrationsausgleichs
Kameraverwacklungen
bei Aufnahmen
Kameraverwacklungen
Kameraschwenks
Anzahl der Vibrationen
Stärke der Vibrationen
De
■ Die Effekte der Vibrationsreduktion
aus einem
bewegten
Fahrzeug
Aufnahmen bei Verschlusszeiten ermöglicht der Bildstabilisator (VR2)
verwacklungsfreie Aufnahmen mit um bis zu vier Lichtwertstufen* längeren
Verschlusszeiten als beim Fotografieren ohne VR-Technik. (*unter NikonTestbedingungen; der Ausmaß des Effekts des Bildstabilisators ist abhängig vom
Fotografen und den Aufnahmebedingungen.)
■ Der Schalter für den Bildstabilisator (VR)
1 Stellen Sie den Schalter für den Bildstabilisator
Hinweis: Dabei muss der Schalter so eingestellt sein, dass die
Markierung genau mit der Aufschrift [ON] fluchtet.
2 Wenn der Auslöser bis zum ersten Druckpunkt gedrückt wird,
werden Verwacklungsbewegungen ausgeglichen. Da dies auch
für das Sucherbild gilt, wird die automatische oder manuelle Fokussierung und die
Ausrichtung auf das Motiv erleichtert.
3 Stellen Sie den Schalter ( auf [OFF], um den Bildstabilisator zu deaktivieren.
■ Stellungen des Vibrationsreduktions-Schalters &
NORMAL:Der Vibrationsreduktions-Mechanismus verringert
Kameraverwacklungen und ermöglicht gleichmäßige
Kameraschwenks.
ACTIVE: Der Vibrationsreduktions-Mechanismus reduziert das
Verwackeln der Kamera beim Fotografieren aus einem
Fahrzeug in Bewegung. In diesem Modus unterscheidet
das Objektiv nicht automatisch zwischen Kameraschwenks und
Verwacklungen.
Hinweis: Dabei muss der Schalter so eingestellt sein, dass die Markierung
genau mit der Aufschrift [NORMAL] oder [ACTIVE] fluchtet.
Einstellung des VR-Schalters auf
[NORMAL]
Einstellung des VR-Schalters auf
[ACTIVE]
Bei normalen Aufnahmen
Den VR-Schalter auf [NORMAL]
oder [ACTIVE] stellen.
Bei Schwenkaufnahmen
Den VR-Schalter auf [NORMAL] stellen.
Bei Aufnahmen aus einem
Fahrzeug in Bewegung
Den VR-Schalter auf [ACTIVE] stellen.
(
auf [ON].
ON
NORMAL
Markierung
OFF
Markierung
ACTIVE
28

■ Hinweise zur Verwendung des Bildstabilisators
• Warten Sie, bis sich das Bild im Sucher stabilisiert hat, bevor Sie den Auslöser nach
kurzem Antippen ganz herunterdrücken.
• Bei Kameraschwenks muss der Vibrationsreduktions-Schalter auf [NORMAL] gesetzt
sein. Wenn Sie die Kamera in einem weiten Bogen bewegen (z. B. bei einem
Kameraschwenk), sind Vibrationen in die Richtung dieser Bewegung nicht betroffen.
Wenn Sie die Kamera z. B. horizontal schwenken, werden nur vertikale Vibrationen
reduziert, so dass gleichmäßige Kameraschwenks möglich werden.
• Aufgrund der Eigenschaften des Bildstabilisators kann das Sucherbild nach dem
Auslösen des Verschlusses leicht unscharf erscheinen. Dies ist kein Anzeichen für
eine Gerätestörung.
• Schalten Sie die Kamera nicht aus und nehmen Sie das Objektiv nicht ab, solange
der VR-Modus eingeschaltet ist. (Andernfalls erzeugt das Objektiv u. U. ein
klapperndes Geräusch, wenn es bewegt wird. Dies ist keine Fehlfunktion. Schalten
Sie die Kamera wieder ein und die VR-Funktion aus.)
• Bei Kameras der F80-Serie, F75-Serie, F65-Serie, D700, D300-Serie, D200, D100,
D90, D80, D70-Serie, D5000, D3000, D60, D50 und D40-Serie steht die VRFunktion nicht zur Verfügung, während das integrierte Blitzgerät aufgeladen wird.
•Stellen Sie den Schalter (für den Bildstabilisator auf [OFF], wenn Sie ein Stativ
benutzen. Wenn Sie dagegen ein Stativ ohne verriegelten Stativkopf oder ein
Einbeinstativ verwenden, stellen Sie den Schalter auf [ON].
• Bei AF-Kameras mit einer AF-Starttaste (AF-ON) wie etwa die Modelle der D3-Serie,
D300-Serie und F6 wird die VR-Funktion durch das Drücken dieser Taste nicht aktiviert.
4. Scharfeinstellung, Zoomen und Tiefenschärfe (S.88)
Drehen Sie am Zoomring 5, bis die gewünschte Bildkomposition im Sucher zu sehen
ist, bevor Sie die Scharfeinstellung vornehmen. Verfügt die Kamera über eine Taste
oder einen Hebel zur Schärfentiefe-Vorschau (Abblendung), lässt sich die Schärfentiefe
im Kamerasucher überprüfen.
• Die Entfernungsskala zeigt nicht den genauen Abstand zwischen Motiv und Kamera
an. Die Werte sind Näherungswerte und können nur als Richtlinie dienen.
5. Gleitende Lichtstärke/zwei Blendenindizes
Beim Durchfahren des Brennweitenbereichs von 70 mm auf 300 mm verringert sich
die Anfangsöffnung um ca. 2/3 Blende. Kameras mit Innenmessung gleichen dies
automatisch aus. Auch bei TTL-Blitzautomatik mit einem Nikon Blitzgerät ist keine
Korrektur erforderlich. Bei Verwendung eines externen Belichtungsmessers oder bei
Aufnahmen im Computer-Blitzmodus wählen Sie den passenden Blendenindex
entsprechend der an der Kamera angezeigten Brennweiteneinstellung.
De
29
 Loading...