

Page 1
日本語
English
Deutsch
Français
Español
Italiano
使用説明書が紛失または損傷した場合は、当社サービス機関に新しい使用説明書をお求めください(有償)。
No reproduction in any form of this manual,
in whole or in part (except for brief quotation in
critical articles or reviews), may be made without
written authorization from NIKON CORPORATION.
FUJI BLDG., 2-3 MARUNOUCHI 3-CHOME, CHIYODA-KU,
TOKYO 100-8331, JAPAN
Printed in Japan ●
HB7C00301001(80)
8MNJA332-07 ■
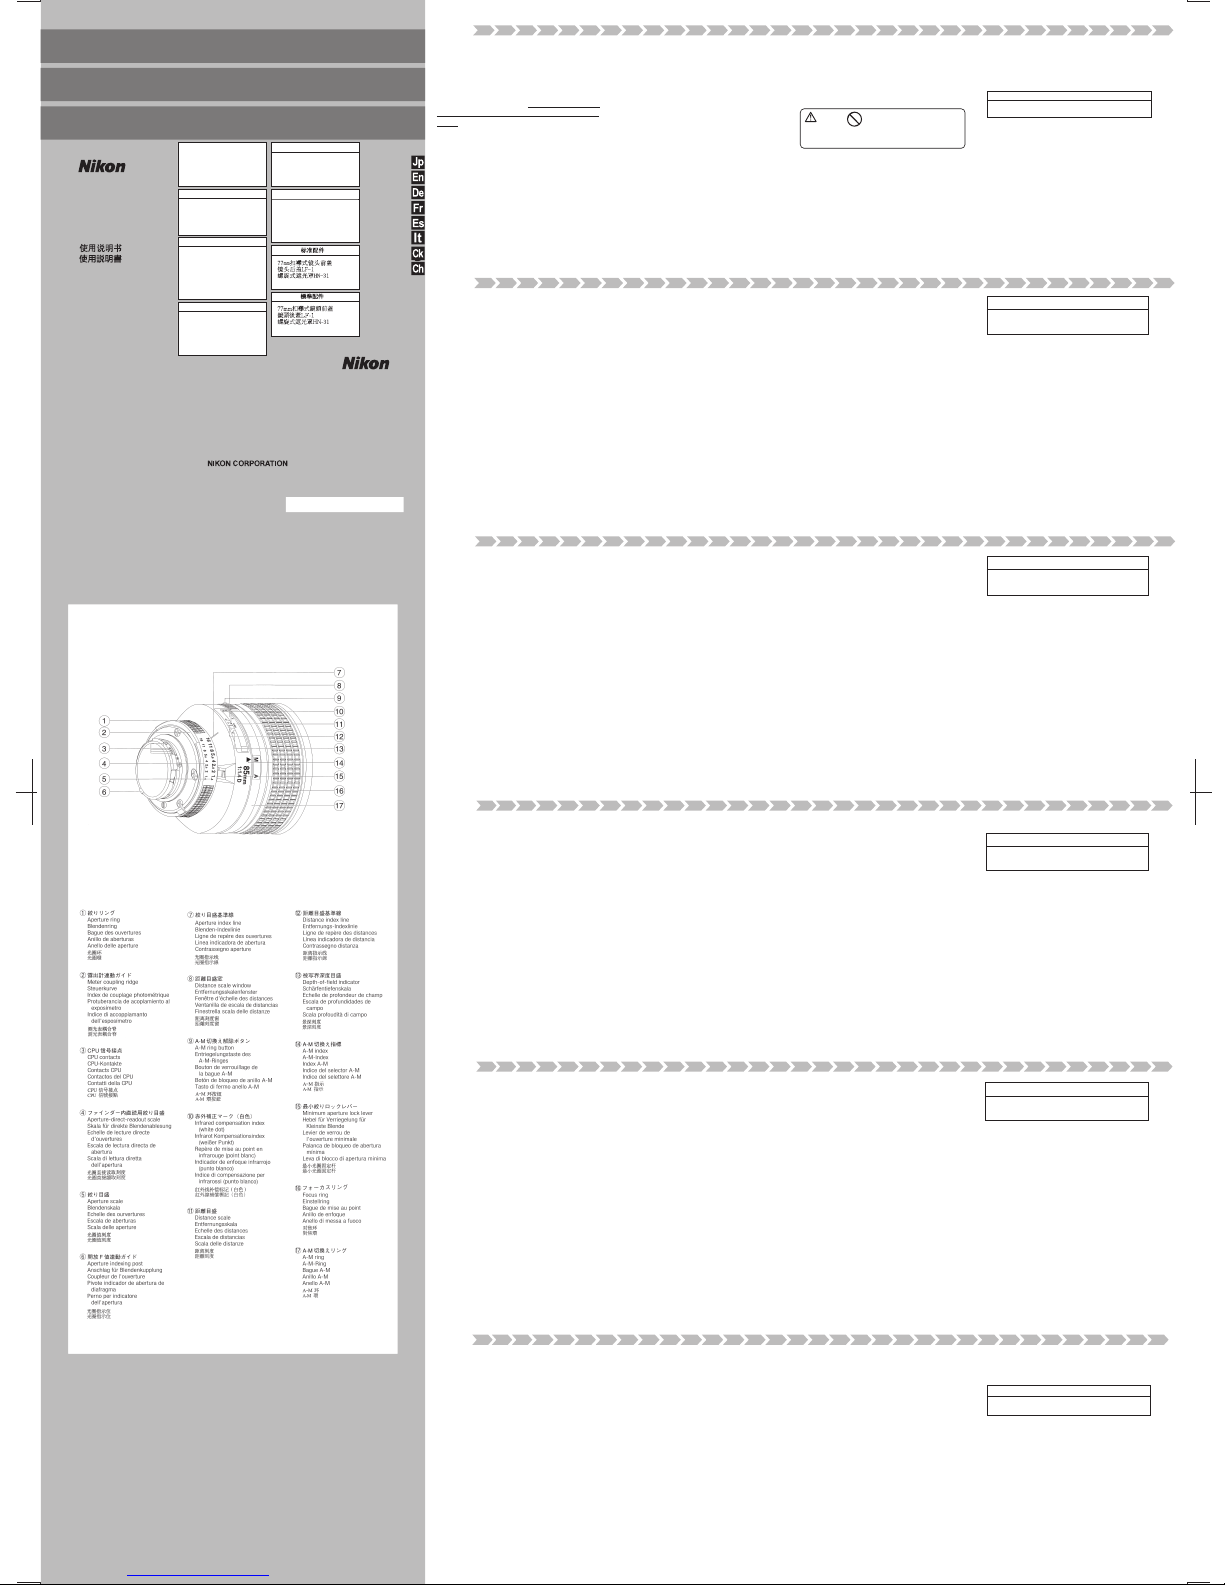
AF Nikkor
85mm
f/1.4D IF
使用説明書
Instruction Manual
Bedienungsanleitung
Manuel d'utilisation
Manual de instrucciones
Manuale di istruzioni
付属アクセサリー
77mmスプリング式前キャップ
裏ぶたLF-1
ねじ込みフードHN-31
Standard accessories
Accessoires standard
Accessori standard
Accesorlos estándar
Serienmäßiges Zubehör
77mm snap-on front lens cap
Rear lens cap LF-1
Screw-in lens hood HN-31
Bouchon avant à emboîtement
77mm
Bouchon arriére LF-1
Parasoleil vissant HN-31
Tapa frontal de presión a 77mm
Tapa trasera del pbjetivo LF-1
Parasol con rosca de HN-31
Tappo frontale da 77mm
Coperchio postericre LF-1
Cappuccio a vite HN-31 per
obiettivo
Aufsteckbarer Frontdeckel
77mmø
Hinter Objektivdeckel
LF-1
Einschraub-Sonnenblende
HN-31
はじめに
このたびは、ニッコールレンズをお買い上げいただきありが
とうございます。
ご使用の前に以下の「安全上のご注意」及び製品の使用説明
書をよくお読みのうえ、十分に理解してから正しくお使いく
ださい。お読みになった後は、お使いになる方がいつでも見
られる所に必ず保管して下さい。なお、カメラ本体の使用説
明書に記載されている「安全上のご注意」も併せてお読みく
ださい。
安全上のご注意
●分解したり修理・改造をしないでください。
●使用しないときは、レンズにキャップをつけるか太陽光の当
らない所に保管してください。
このレンズは、ニコンAF[オートフォーカス(F3AF除く)]カメラと
組み合わせますと、オートフォーカス撮影が可能です。マニュアル(手
動)によるピント合わせも行えます。さらに撮影距離情報を取り入れ
たカメラとの組み合わせでは、撮影距離情報をカメラボディに 伝達
する機能を備えています。
このレンズの特長として
●円形型絞りの採用により自然なボケ形状が得られます。
●近距離補正機能により良好な描写が得られます。
●内焦方式の採用 によりAF(オー トフォーカス)作 動が迅速に行
えます。
●ポートレート撮影、部隊撮影や比較的暗い室内、夜景の撮影 に
威
力を発揮します
注記
●下記のアクセサリーはCPU信号接点等を損傷しますので、直接この
レンズに取り付けないでください。
オート接写リングPK-1・PK-11 リング、オートリングBR-4・BR-2
(なお、PK-11 の代わりには PK-11A、BR-4 の代わりには BR-6 を
ご使用ください。)
上記以外のアクセサリーにつきましても、カメラボディとの組み合
わせにより、ご使用できないことがあります。アクセサリーの使用
に際しては、必ず各カメラの使用説明書も併せてご参照ください。
●DX-1ファインダー(ニコンF3AF用)と組み合わせて のご使用は
できません。
ピント合わせ
このレンズはA-M 切換え方式になっています。A(オートフォーカス)
M(マニュアル)の切換えは、カメラボディ側の設定を切換えることな
く、レンズ側のA-M 切換え解除ボタンで簡単に行えます。オートフォ
ーカス撮影を行う場合は、A-M 切換え解除ボタンを押しながら A-M 切
換えリングを回転し、A の位置にセットしてご使用ください。(マニュ
アルでご使用の場合はMの位置にセットしてください。)
最小絞りロックレバー(裏面図A.参照)
プログラム撮影時や、シャッター優先による撮影時は、絞りリングを
最小目盛で固定することができます。ロック方法は、まずレンズの絞
りリングを回転させ、最小絞り目盛(16)を距離目盛基準線に合わせ
ます。最小絞りロックレバーを絞りリングの方向にスライドさせると
ロックされます。ロックの解除は、ロックしたときと反対方向にロッ
クレバーをスライドさせることにより行えます。
ファインダースクリーンとの組み合わせ(裏面参照)
ニコンF6、F5、F4 およびF3シリーズカメラボディには多種類のファイ
ンダースクリーンがあり、レンズのタイプや撮影条件に合わせて最適なも
のを選ぶことができます。このレンズに適したファインダースクリーンは
裏の表のとおりです。(なお、ご使用に際しては必ず各カメラボディの使用
説明書を併せてご参照ください。)
レンズ取り扱い上のご注意
●レンズの清掃は、ホコリを拭う程度にしてください。万一指紋や汗
がついたときは、柔らかい清潔な木綿の布に市販のレンズク リー
ナーを少量湿らせ、中心から外側へ渦巻状に、拭きムラ、拭き残り
のないように注意しながら軽く拭きます。
●レンズ表面の汚れや 傷を防ぐために、NC フィルターの使用をお
すすめします。レンズの保護には、フードも役立ちます。
●レンズをご使用にならないときは、傷や汚れ防止のためレン ズの
前後に必ず付属のキャップをしておいてください。
●レンズを水に濡らした場合は、当社サービス機関に点検修理 を依
頼してください。部品がサビつ いたりして故障の 原因となります
のでご注意ください。
●長期間レンズをお使いにならないときや保管の際は、カビま たは
サビを防ぐため、高温多湿の所や直射日光のあたる所、またナフタ
リンや樟脳のある所は避けて、風通しのよい場所に保管して くだ
さい。
●このレンズは、外観の一部に強化プラスチックを使用してお りま
すが、極端に温度が高くなると変形する場合があります。ストーブ
の前等、高熱となる場所に置くことは避けてください。
77mmねじ込み式フィルターソフトケースCL-0915
別売りアクセサリー
仕様
焦 点 距 離
最 大 口 径 比
レ ン ズ 構 成
画 角
撮 影 距 離 情 報
距 離 目 盛
絞 り 目 盛
最 小 絞 り ロ ッ ク
絞 り 方 式
測 光 方 式
マ ウ ン ト
アタッチメントサイズ
大 き さ
質 量 ( 重 さ )
:85mm
:1:1.4
:8 群9 枚
:28°30
:∞〜0.85m、3ft(併記)
:1.4〜16 ファインダー内直読用絞り目盛併記
:カメラボディへの撮影距離情報出力可能
:ロックレバーにより f/16にロック可能
:自動絞り
:CPU・AI 方 式のカメラボディでは開放測光、
従来方式のカメラボディでは絞り込み測光
:ニコン Fマウント
:77mm(P
=
0.75mm)
:約 80mm(最大径)×72.5mm(長さ:バヨネ
ット基 準面か らレ ンズ先 端ま で)、全長約
82mm
:約 550g
警告
使用禁止
シンナー やベン ジンを使 用しな いこ
と
火災や健康障 害の原因と なります。
製品を破 損しま す。
Thank you for your kind patronage of Nikkor.
Before using you new lens, please read the following
carefully so that you can get the most out of you lens
now and for year s to come. When this lens is m ounted
to Nikon AF camera bodies (not inc luding the F3AF),
it can be used for both auto and manual focus. When it
is mounted to a camera body with the object-distanceinformation analysis function, object distance imforma-tion
can be transferred to the camera body.
The main features of this lens are as follows:
•
Rounde d diaphragm for more n atural out- of focus
images.
•
Close-Range Correction (CEC) system for sharp images
at close range.
•
Inner focus mechanism for quick focusing.
In addition, thi s lens is well suited for portraiture,
night-time photography, and shooting under staglights.
Important!
•
Be careful not to soil or demage the CPU contacts.
•
Do no t attach the following accesso ries to the lens, as
they might damage the lens CPU co ntacts:
Auto Extension Ring pK-1, Auto Extension Ring
PK-11, Auto Ring BR- 4, Auto R ing BR-2 (use PK-11A
instead of PK-11 and BR-6 inst ead of BR-4.)
•
Other accessories may not be suitable for use with
certain camera bodies. For details, refer to the camera
instruction manual.
•
This lens cannot be used with the AF Finder DX-1 that is
attached to the Nikon F3AF camera.
Focusing
This le ns can be used in both autofocus and manual
focus mode. To select autofocus, simply push the A -M
ring button an d rotate the A-M ring until it clicka at “A”.
To select man al focus, push the A-M rin g button a nd
rotate the A-M ring until it clicks at “M”. There is no
meed to adjust the focus mode selector on the camera
body.
Minimun Aperture Lock lever
(illst A. See the reverse.)
For programmed auto or shutter-prior ity auto exposure
shooting, u se the min imum aperture lock lever to lock
the lens aperture at f/ 16.
1. Set the lens to its minimum aperture(f/16).
2. Slide the lock lever in the direction of the aperture
ring to align the white dot on the lever with the orange dot.
To release the lock, slide the lever in the opposite direction.
Recommended Focusing Screens
(See the reverse)
Various interchangeable focusing screens are available
for Nikon F6-, F5-,F4- and F3- series cameras to suit any
type of lens or picture-taking si tuation. Those W hich are
recommended for use with this lens are list ed in the table
(see the,reverse).For details, also refer to t he specific
camera's instruction ma nual.
Lens Care
•
Clean lens surface with a blower bru sh. To remove
dirt and smudg es, use a s oft, clean cotton cloth or
lens tissue moist ened with lens cleaner (separately
availavle). Wip e in a circular motion from cent er to
outer e dge, taking care not to leave tra ces and not
to touch the other lens par ts.
•
To proect the lens surface from dirt or damage, the use of
an NC filter is recommended at all times. The lens hood
also helps to protect the lens.
•
To protect the lens surface from dir t or damage, replace
both the front and rear caps whenever the len s is not in
use.
•
Do not splash water on the le ns or drop it in the water
because this will cause it to r ust and malfunction.
•
If you will not use the lens for a long time, protect it from
rust and mo ld by storing it in a cool, dry plce. Allso,
do not store in dir ect sunlight, and keep it away f rom
naphthalene or camphor.
•
Reinforced plasitic is used for some parts of th lens
exterior; to avoid demage, never leave the lens in an
excessively hot place.
Optional Accessories
77mm screw-in filters
Flexible lens pouch CL-0915
Specifications
Focal length : 85mm
Maximum aperture :
f/1.4
Lens construction : 9 elements in 8 groups
Picture angle :
28°30'
Distance scale : Graduated in meters and feet from
0.85m (3ft.) to infinity ()
Distance information :
Output to camera boky
Aperture scale : f/1.4 to f/16 on both standard and
aperture-direct-readout scales
Minimum aperture lock : Provided
Diaphragm : Fully automatic
Exposure measurement : Full-
aperture method for Al cameras or
cameras with CPU interface system; stop down method for the other cameras
Mount :
Nikon bayonet mount
Attachment size : 77mm (P=0.75mm)
Dimensions :
Approx.80mm dia. x 72.5mm extension
:
from the camera's lens mounting flange,
overall length approx. 82mm
Weight : Approx.550g
Technische Daten
Vielen Dank für das Vertrauen, das Sie Nikon
entgegenbringen. Bitte lesen Sie die folgende
Beschreibung sorgfältig durch, damit Sie viele Jahre
ungetrübte Freude an diesem Objektiv haben. Wenn
das Objektiv auf ein Nikon AF Kameragehäuse (dies
schließt das F3AF nicht ein) montiert ist, kann es
sowohi für automatische als auch manuelle
scharfeinstellung verwendet werden. Wenn es auf
einem Kameragehäuse mit Objektab stand
Informati onsanalysef unktion montier t ist , kö nnen
Objektabs tandsinform ationen zum Kamer agehäuse
übertragen werden.
Dieses Objektiv hat die folgenden Funktionen:
•
Die Ringblendenfunktion g ibt lhnen eine natürliche
Hintergrundsunschä rfe.
•
Aberratonskorrekutur be Na haufnahmen gibt lhnen
scharfe Bilder.
•
Der lnnenfokussiermec hanismus ermöglicht eine
schnele Scharfeinstellun g.
•
Dieses Objektiv ist gut für Por trätaufnahmen,
Nachtfotographie und Aufnahmen b ei
Bühnenbeleuchtung gee ignet.
Wichtig!
•
Sorgen Die dafür, daß die CPU-Kontakte u nter keinen
Umständen Verschmutzen oder bedchäd igt werden.
•
Setzen Sie bitte folgendes Zubehör nicht an das Objektiv,
da es die CPU-kontakte beschädigen könnte:
•
Die Automatik- Zwischenringe PK -1 und PK-11, den
Automatikring BR-2 und BR-4. (Verwenden Sie PK-11A
statt PK-11 und BR-6 statt BR-4.)
•
A nderes Zu behör ist mögliche rweise für bestimmt e
Kameras nicht geeignet. Lesen Sie sorgfältig die
Anleitungen zu ihrer Kame ra.
•
Dieses Ob jektiv kann nicht mit dem AF Sucher DX-1
der Nikon F3AF verwendet werden.
Scharfeinstellung
Dieses Objektiv kann sowohl für automatische als auch
manuelle Scharfeinstellung verwendet werden. Um
automatische Fokussierung einzustellen, drücken Sie
nur den A-M Knopf und drehen den A-M Ring soweit,
bis er bei “A” einrastet. Um manuelle Fokussierung
einzustellen, drücken Sie den A-M Knop f und drehen
den A-M Ring soweit, bis er bei “M” einrastet. Der
Fokussier-Betr iebsertenwähl er am Kamera gehäuse
braucht nicht eingestellt zu werden.
Verriegelung der kleinsten Blende
(Bild A. Siehe Rückseite.)
Verriegeln Sie mit dem Schieber den Blendenring bei f/16,
wenn Sie Programm-oder Blendenautomatik verwenden.
1. Stellen Sie den B lendenring auf den kleinste Wert
(f/16).
2. Schieben Sie den Verriegelungshebel in Richtung des
Blendenrings, bis der weiße Punkt aut dem Hebel
dem orange Punkt gegenübersteht.
Schieben Sie d en Hebel in di e entgeg engesetzte
Richtimg, um wieder zu entr iegeln.
Empfohlene Einstellscheiben (Siehe Rückseite)
Für Nikon Kameras der Serien F6, F5, F4 und F3 stehen
verschied ene auswe chselbare Einstell scheiben
zur Verfügung, um jedem Obj ektiv und jeder
Aufnahmesituation gerecht zu werden . D ie für dieses
Objektiv empfohl enen werden in der Tabelle aufge führt
(siehe Rücks eite). Für wei tere Einzelheiten siehe a uch
Bedienungsanleitung de r Kamera.
Objektivpflege
•
Re inigen Sie die Linsenobe rfläche zunächst mit
einem Blasepinsel. Benutzen Sie zur weitergehenden
Reinigung ein mit Linsenreinigungsmittel (gasond ert
erhältlich) befeuch tetes weiches und s auberes
Baumwolltuch. W ischen Sie deb ei in einer größer
werdenden Kreisbeweg ung von innen nach außen,
und achten Sie dabei darauf, daß Sie keine Spuren
hinterlassen oder andere Teile des Objektivs berühren.
•
Die Frontlinse des Objektivs s ollte grundsätzlich durch
ein Filter NC vor Staub und Beschädigung geschützt
werden. Auch die Gegen lichtblende bewähr t sich als
Frontlinsenschutz.
•
Um die Linsenoberfl äche vor Schmutz oder
Beschädigung zu bewahren, stets die vordere un d
hintere Schutzkappe vorm und hinten aufsetzen, wenn
das Objektiv richt benutzt wird.
•
Schützen Sie d as Objektiv unbedingt vor Wasser, das
zu Korrosion und Betriebsst örungen führt.
•
Wenn Sie das Objec tiv Iängere Zeit unbenutz t lassen,
bewahren Sir as an einem kühlen, trockenen Ort auf,
um Rost und Schimmelbefall zu ver meiden. Schützen
Sie das Objek tiv vor direkter S onneneinstrahlung und
vermeiden Sie die Nähe von Naph talin und Kampfer.
•
Bestimmte äußere Bauteile des Objektivs sind aus
verstärkt em Kunsts toff gefe rtigt. Um Schäden zu
vermeiden, d arf das Objektiv m iemals Plätzen mit
extrem hoher Wärme ausgese tzt werden.
Brennweite
GröBte Blende
Optik
Bildwinkel
Entfernungsskala
Entfernungsdaten
Blendenskala
Verriegelung für
keinste Blende
Blendentyp
Belichtungsmessung
Objektivfassung
Frontgewinde
Abmessungen
Gewicht
: 85mm
: f/1.4
: 9 Elemente in 8 Gruppen
28°30'
: In Meter und Fuß von 0.85m (3ft) bis
Unendlich ().
: Werden an Kameras überturagen
Bende 1.4 bis 16 auf der Standardskala
und auf der Skara für direkte
Blendenablesung
: Vorgesehen
: vollautomatisch
:
Offenblendenmessung bei allen anderen
Kameras mit Al-Blendenkupplung oder
CPU-Interface-System;
Arbeitsblendenmessung bei anderen
Kameras
: Nikon-Bajonettanschluß
: 77mm (P=0,75mm)
: ca. 80mm Durchm. x 72,5mm Länge bis
Flansch; Gesamtläge ca. 82mm
: ca. 550g
Einschraubfilter 77mmø
Objektivbeutel CL-0915
SonderZubehör
Filtres vissants 77mm
Pouchette souple CL-0915
Accessoires optionnels
Caractéristiques
Longueur focale
Ouverture maximum
Construction optique
Champ angulaire
Echelle des distances
Données relatives
à la destance
Echelle des ouvertures
Verrou de l’ouverture
minimale
Diaphragme
Mesure de l’exposition
Monture
Taille des accessoires
Dimensions
Poids
: 85mm
: f/1.4
:
9
élements en 8 grpupes
: 28°30'
:
Graduée en mètues et en pieds depuis
0.85m(3ft.) à l'infini ()
: Figurent pour les appareils
: f/1,4 à f/16 sur les deux normes et les
échelles de lecture directe d’ouverture
: Pourvu
: Entièrement automatique
:
Par la méthode à pleine ouverture avec les
appareils Al ou les appareils avec
à
système d’interface CPU; par la méthode à
ouverture réelles avec les autres apareils
: Monture à baïonnette Nikon
: 77mm (P=0,75mm)
:
Env. 80mm diam. x 72,5mm rallonge de
la bride de montage d’objectif de
l’apareil: longueur hors-tout est env.
82mm.
: Env. 550g
Nous vous remercions d'être fidèle à Nikon.
Lisez attentivement les paragraphes suivants, les
quelques minutes ainsi passées vous per mettront de
tiere le meilleur de votre appareil tout de suite et pour
des années. Fixé sur un boîtier Nikon AF (sauf F3AF).
cet objectif permet auss i bie n la mis e au poin t
sutomatique que manuelle. Quand il est monté sur un
boîtier à fonction d'analyse de l'information de distance
du sujet, cette inform ation peut être transférée au
boîtier.
Cet objectif inclut les fonctions suivantes:
•
La fonction de diaphragme circulaire vous par met
d'obtenir un flou naturel.
•
La fonction de correction des aberrations on prise de
vue rapproché vous offer une image nette.
•
Le mécanisme de mise au point interne accélère la
mise au point.
•
Cet objectif convient très bien pour les portraits, la
photographie de nuit ou sous les projecteurs d'une
scène.
Important!
•
Veiller à ne pas salir ou endommager les contacts CPU.
•
Ne pas fixer les accessoires suivants à un objectif, car
ils peuvent endommager les contacts CPU de l'objectif:
Bague d'auto-rallonge PK-1, Bagre d'auto-rallonge
PK-11, Auto Bague BR-4, Auto Bague BR-2, (Utiliser
la PK-11A à la place de PK-11 et la BR-6 à la place de
BR-4.)
•
Les autres accessoires peuvent ne pas convenir à
certains boîtiers. Pour les détails, lire attentivement
•
Les autres accessoires peuvent ne pas convenir à
certains boîtiers. Pour les détails, lire attentivement le
manuel d'utilisation de l'appareil.
•
Cet objectif ne peut pas s'employer à l'intention du
viseur AF de DX-1 fixé à l'appareil F3AF Nikon.
Mise au point
Cet objectif est utilisable à la fois en mise au point
automatique et manuelle. Pour sélectionner la mise au
point automatique, poussez le bouton A-M et tournez la
bague A-M jusqu' à son déclic em “A”. Pour la mise au
point manuelle, poussez le bouton A-M et tournez la
bague A-M jusqu' à son déclic en “M”. ll est inutile de
régler le sélecteur de mode de mise au point sur le
boîtier.
Levier de verrouillage d’ouverture minimum
(illust. A. Voir le verso.)
Pour une prise de vues automatique programmée ou
priorité obturation, utiliser le levier de verrou de
l’ouverture minimale pour verrouiller l'ouverture
minimale (f/16).
1. Régler l’objectif sur son oúverture mìnimale (f/16).
2. Glisser le levier de verrou vers la direction de la bague
des ouvertures de sorte que le point blanc sur
le levier fasse face au point orange.
Pour relâcher le verrou, glisser le levier dans le sens
inverse.
Verres de visée recommandés (Voir le verso.)
Divers verres de visée interchangeables sont disponibles
pour les appareils Nikon des séries F6, F5, F4 et F3 pour
convenir à tout type de situation d’objectif ou de prise de
vues. Ceux qui sont recommandés pour l’utilisation avec
cat objectif sont inscrits dans la liste du tableau (voir le
verso). Pour plus de d étails, se référer aussi au mode
d’emploi de l’appareil spécifique.
Soins à apporter à votre objectif
•
Nettoyer la surface de la lentille avec une brosse
soufflante. Pour éliminer la saleté et l es taches,
utiliser un chiffon en coton doux et prpre ou un tissu
pour lentille imbibé d e produit de nettoyage pour
lentilles (en vente sépar ée), Essuyer dans un
mouvement circulaire du centre vers l’extérìeur, en
prenant soin de ne pas laisser de traces et de ne pas
toucher les autres parties de l’objectif.
•
Laisser un filtre NC monté en permanence constitue une
bonne protection de la lentille avant contre la poussière
et les chocs. Le bouchon avant est également une
protection efficace de la lentille avant.
•
Pour protéger la surface de l’objectif contre la saleté et
les dommages, rebouchez l’avant et l’arrière de votre
objectif lorsqu e vous ne vous servez p as de votre
appareil.
•
Ne pas éclabousser d’eau sur l’objectif ni le faire
tomber dans l’eau car ceci provoquerait de la rouille
et un mauvais fonctionnement.
•
Si vous n’utilisez pas l’objectif pendant une longue
période de temps, protégez-le c ontre la rouille et
l’humidité en le rangeant dans un endroit sec et frais.
Egalement ne le rangez pas en plein soleil et tenez-le
éloigné de la naphtaline ou du camphre.
•
Certaines pièces exté rieures de l’objectif sont en
plastique renforcé; pour éviter toute détérioration, ne
pas ranger l’objectif dans un e ndroit excessivement
chaud.
Accesorios opcionales
Especificaciones
Filtros con rosca de 77mm
Estuche flexible CL-0915
:85mm
:f1.4
:
9 elementos en 8 groupos
:28°30'
:
Graduada en metros y pies, desde 0,85m
(3ft.) hasta infinito ( )
:
Salida al cuerpo de la cámara
:
f/1.4––f/16 tanto que en la escala
normal y la de lectura directa de la
abertura
:
Incluído
:
Totalmente automático
:
Por medio del método de plane abertura
en cámaras Al o cámaras con sistema de
interaz de CPU,por medio del método de
diafragmado en otras cámaras
Gracias por utilizar los productos Nikon.
Antes de utilizar su nuevo objetivo, lea cuidadosamente
las siguientes instrucciones, con e l fin de obtener el
mejor rendimiento de su nuevo objetivo ahora y durante
muchos años más. El objetivo montado al cuerpo de
una cámera AF de Nikon (excluyendo el modelo F3AF),
puede usarse tanto para el enfoque automáti co como
manual. Cuando sea montad o a una cámara con la
función de análisis de información de l a distancia del
objeto, la información de la distancia del objeto puede
transferirse al cuerpo de la cámara.
Este objetivo tiene también las siguientes
caracteristicas:
•
El diafragma circular produce imágenes fuera de fobo
de aspecto más natural.
•
La corr ección de ab erraciones en tomas de cor ta
distancia ofrece una imagen nítida.
•
El mecanismo interno de enfoque posibilita el enfoque
rápido.
•
Además,es adecuago para retratos, fotografías
nocturnas y tomas bajo iluminación de escenario.
¡Importante!
•
Tenga cuidado para no ensuciar ni dañar los
contactos del CPU.
•
No monte los siguientes accesorios en el objetivo, pues se
pueden dañar los cont actos CP U del mismo: Anillo
Automático de Extensi ón PK-1, Anillo Autom ático de
Extensión PK-11, Anillo Automático BR-4 o Anillo
Automático BR-2. (Utilice el PK-11A en lugar del PK-11, y
el BR-2A en lugar del BR-2.)
•
Otros accexorios pueden resultar onadecuados para su
uso con cier tos tipos de cuerpo de cámara.
para más
detalles, refirérase al manual de instrucciones de la
cámara.
•
Este objetivo no poede ser utilizado con el Visor AF
DX-1 anexo a la cámara F3AF de Nikon.
Enfoque
Este objet ivo puede usa rse tanto en el modo
automàtico como manual. Para la selección del modo
de enfoque, debe ajustarse el anillo A-Mdel objetivo a
la posición apo poade. Para seleccionar el enfoq ue
automático, debe pulsarse el botón A-M y girar el anillo
A-M hasta que quede retenido en la posición “A”.
(Para saleccionar el enfoque manual, debe girarse el
anillo A-M hasta que quede retenido en la posición
“M”.) No es necesario ajustar el mode de enfoque en
el cuerpo de la cámara.
Palanca de bloqueo de abertura minima
(Ilustr. A. Véase la vuelta.)
Para operación automática programada o con prioridad
al
obturador, utilice l a palanca de seguro de abe rtura
mínima para bloquear la abertura del objetivo en f/16.
1
.Coloque el objetivo a su abertura mínima (f/16).
2.
Deslice la palanca de bloqueo en la dirección del
anillo de abertura de tal manera que el punto blanco
de la palanca se alinee con el punto anaranjado.
Para liberar el bloqueo deslice la palanca en la
dirección opuesta.
Pantallas de enfoque recomendadas
(Véase la vuelta.)
Existen varias pantallas de enfoque intercambiables para
las cámaras de la serie F6, F5, F4 y F3 de Nikon aptes
para todo tipo de objetivo o situación fotográfica.
Las pan tallas que se rec omiendan con este objetivo
aparecen en la lista de la tabla. Para más detalles, vea
asimismo el manual de instrucciones de la cámera de que
se trate.
Cuidado del objetivo
•
La superficie del objetivo deberá limpiarse con cepillo
soplador. Para eliminar la suciedad y las manchas, se
utilizará un paño de algodón suave y limpio o papel de
seda para lente humedeci do con limpiador de lente
(disponible por separado). Limpiar frotando
circularmente desde el centro hacia el borde exterior,
tomando la precaución de no dejar trazas y sin tocar las
demás partes del objetivo.
•
Para proteger la superficie del objetivo contra el polvo o
algún daño, se recomienda el uso permanente del filtro
NC. El paras ol también servirá com o protección del
objetivo.
•
Para proteger la superficie de la lente contra la suciedad o
el daño, colocar las tapas delantera y trasera mientras no
se use el objetivo.
•
Que no salte agua sobre el objetivo ni lo defe caer en el
agua pues esto hará que se oxide y que functione mal.
•
Cuando no se utilice el objetivo durante un período
prolongado, deberá protegerse contra la oxidación y
el moho, g uardando en un lugar fr esco y seco.
Además, no deberá exponerse a la luz solar directa y
mantenerse alejado de la naftalina o el alcanfor.
•
Algunas de las partes exteriores del objetivo utilizan
plástico reforzado; para evitar avería, no debe
dejarse el objetivo en lugar es excesivamen te
calientes.
Longitud focal
Abertura máxima
Construcción del objetivo
Escala de distancias
Escala de aberturas
Datos de distancias
Escale de aberturae
Bloqueo de abertura
minima
Diafragne
Medición de la exposición
Montaje
:A bayoneta Nikon
T
amaño del accesorio
:
77mm (P=0,75mm)
Dimensiones
:
Aprox. 80mm diám. x 72.5mm desde la
pestaña de montaje; aprox. 82mm largo
(total
Peso
: Aprox. 550g
Accessori opzionali
Filtri a vite da 77mm
Portaobiettivo morbido CL-0915
Caratteristiche tecniche
: 85mm
: f/1,4
: 9 elementi in 8 gruppi
: 28°30'
:
Graduate in metri e piedi da0.85m (3ft)
all’infinito ().
: Uscita al corpo della macchina
: f/1.4 a f/16 sia sulla scala normale che
sulla scala di lettura diretta delle apenrtre
Inseribile
: Completamante automatico
: Con metodo ad apertura massima per le
macchine Al o macchine con sistema di
interfaccia CPU; tramite il sistema stop-
Down con le altre
: Nikon a baionetta
:77mm (P=0.75mm)
:ca. 80mm diam. x 72,5mm estensione
della flangia; lunghezza totale ca. 82mm
ca.550gr
Lunghezza focale
Apertura massima
Costruzione obiettivo
Angolo di campo
Scala distanze
Dati distanze
Scala aperture
Blocco apertura minima
Diaframma
Misurazione
dell’esposizione
Innesto
Informazioni sulla
Dimensioni attacco
Dimensioni
Peso
Grazie per aver acquistato un apparecchio Nikon.
Prima di utilizzare il muovo objettivo. leggere
attentamente la seguenti istruzioni per ottenere i
migliori risultati per molti anni a venire. Quando
l’obiettivo viene montato sul corpo di un apparecchio
fotografic o Nikon AF (ec cetto l’F3A F), puó esse re
useto sia con la messa a fuoco auto matica che c on
quella manuale. Quan do vien e monta to sul coro di un
apparacchio fotografic o dotato della funzione di anali si
delle infor mazioni–oggetto–dista mza, l’informazi one sulla
distanza dell’ogget to puó essere trasmessa al corp o
dell’apparecchio fotografico.
Questo obietteivo ha le setuenti caratteristiche:
• Un diaframma c ircolare che assi cura una sfumatur a
naturale dello sfondo.
• La correzione delle aberrazioni nelle fotografie a distanza
ravvicinata che assicura un’immagine nitida.
• ll meccanismo interno di messa a fuoco permette una
r
apida messa a fuoco .
• Questo obi ettivo é part i colarment e adatto per rit ratti,
fotografie di notte e all’ill uminazione de scane.
Importante!
•
Non sporcare o non dannegiare i contatti CPU.
•
Per evitare di danneggiare i contatti CPU, evitare di attaccare
i seguenti accessori all’obiettivo: Anello di auto estansione
PK-1, Anello de auto estansione PK-11, Anello suto BR-4,
Anello auto BR–2 (usare il PK-11A invece del PK-11 e ill),
Anello L1 e Anello auto BR-2 (usare il BR-2A).
•
Altri accessori possono non essere adatti all’uso con
alcuni apparechi. Per i particolari, leggere
attentamante
il manuale di istruzioni dell’apparecchio.
•
Questo obiettivonon puó ess ere utilizzato se
all’apparecchio Nikon F3 AF è giá stato inserito il
Visore AF DX-1.
Massa a fuoco
Questo ovie ttivo può assere us ato sia nel modo di
messa a fuoco automatica che in quello di me ssa a
fuoco manuale. Per selezionare il modo di messa a
fuoco, basta impostare l’ane llo A-M sui corpo
dell’obiettivo nella giusta po sizione. Per selezi onare la
messa a fuoco automatica , premere il tasto A-M e
ruotare l’anello A-M fino a che scatta nella posizione
“A”. (Per selezionare la me ssa a fuoco manuale ruo tare
l’anello A-M fino a che scatt a nella posizione “M”.) Non
occore impostare il mode di messa a fu oco sui corpo
della macchina fotografica.
Leva di blocco di apertura minima
(Leva di bloco de apertura minima)
Per fotografie eseguite in modo automatico o con precedenza
data all’otturatore, usate la leva di blocco dell’apertura minima
per bloccare l’apertura dell’obiettivo a f/16.
1. Posizionare la lente alla sua apertura minima (f/16).
2. Spostate la leva di bloccaggio in direzione dell’anello di
apertura in modo che il punto bianco della leva si allinei
con il punto arancione.
per disattivare il biocco, fate scivolare la leva nella direzione
opposta.
Schermi di messa a fuoco raccomandati
(Vedi nella tabla.)
Vari schermi di messa a fuoco i ntercambiabili sono
disponibili per le fotocamera delle serie Nikon F6, F5, F4
ed F3 adatti a qualsiasi tipo de obiettivo o situazione per
fotografie. Quelli raccomandati per l’uso con questo obiettivo
sono elencati mella lista. Per maggiori dettagli, consultate il
manuale di istruzioni della fotocamera.
Cura degli obiettivi
•
Pulire la superficie degli obiettivi con un soffietto. Per togliere
sporco e grasso, usare un panno in cotone morbido e pulito
o della carta velina inumidita con un apposto preparato per la
pulizia delle lenti (dosponibile a par te). Pulire con movimento
a spirale dai centro ai bordi
facendo attenzione a non lasciare
tracce circolari e a non toccare altre parti.
•
Per proteggere la superficie di vetro d ell’obiettivo contro
polvere o danni, è con sigliato l’uso di un filtro NC per
qualsiasi circostanza. ll paraluce dell’obiettivo serve anch’esso
a proteggere l’obiettivo.
•
Per proteggere de sporco o danneggiamenti la superficie delle
lenti, rimettere sempre a loro posto entrambi i tappi anteriore e
posteriore quendo l’obiettivo non viene usato.
•
Non spruzzare acqua sull’obiettivo e non immergerlo, dato che
esso può arrugginire o guastarsi.
•
Quando non si usa l’obiettivo per lungo te mpo, è necessario
proteggerlo dalla ruggine e dalla muffa, conser vandolo in un
luogo fresc o ed esciut to. Non lasc iarlo inoltre sotto la luce
solare diretta e tener lo lontano da naftalina o canfora.
•
ll plastico rinfor zato viene utilizzato pe r alcuni pezzi esterior i
dell’obiettivo. Per evitare ogni danno, non si deve lasciare
l’obiett ivo in un p osto d ove la temperat ura amb iente è
eccessivamente elevata.
Page 2
■
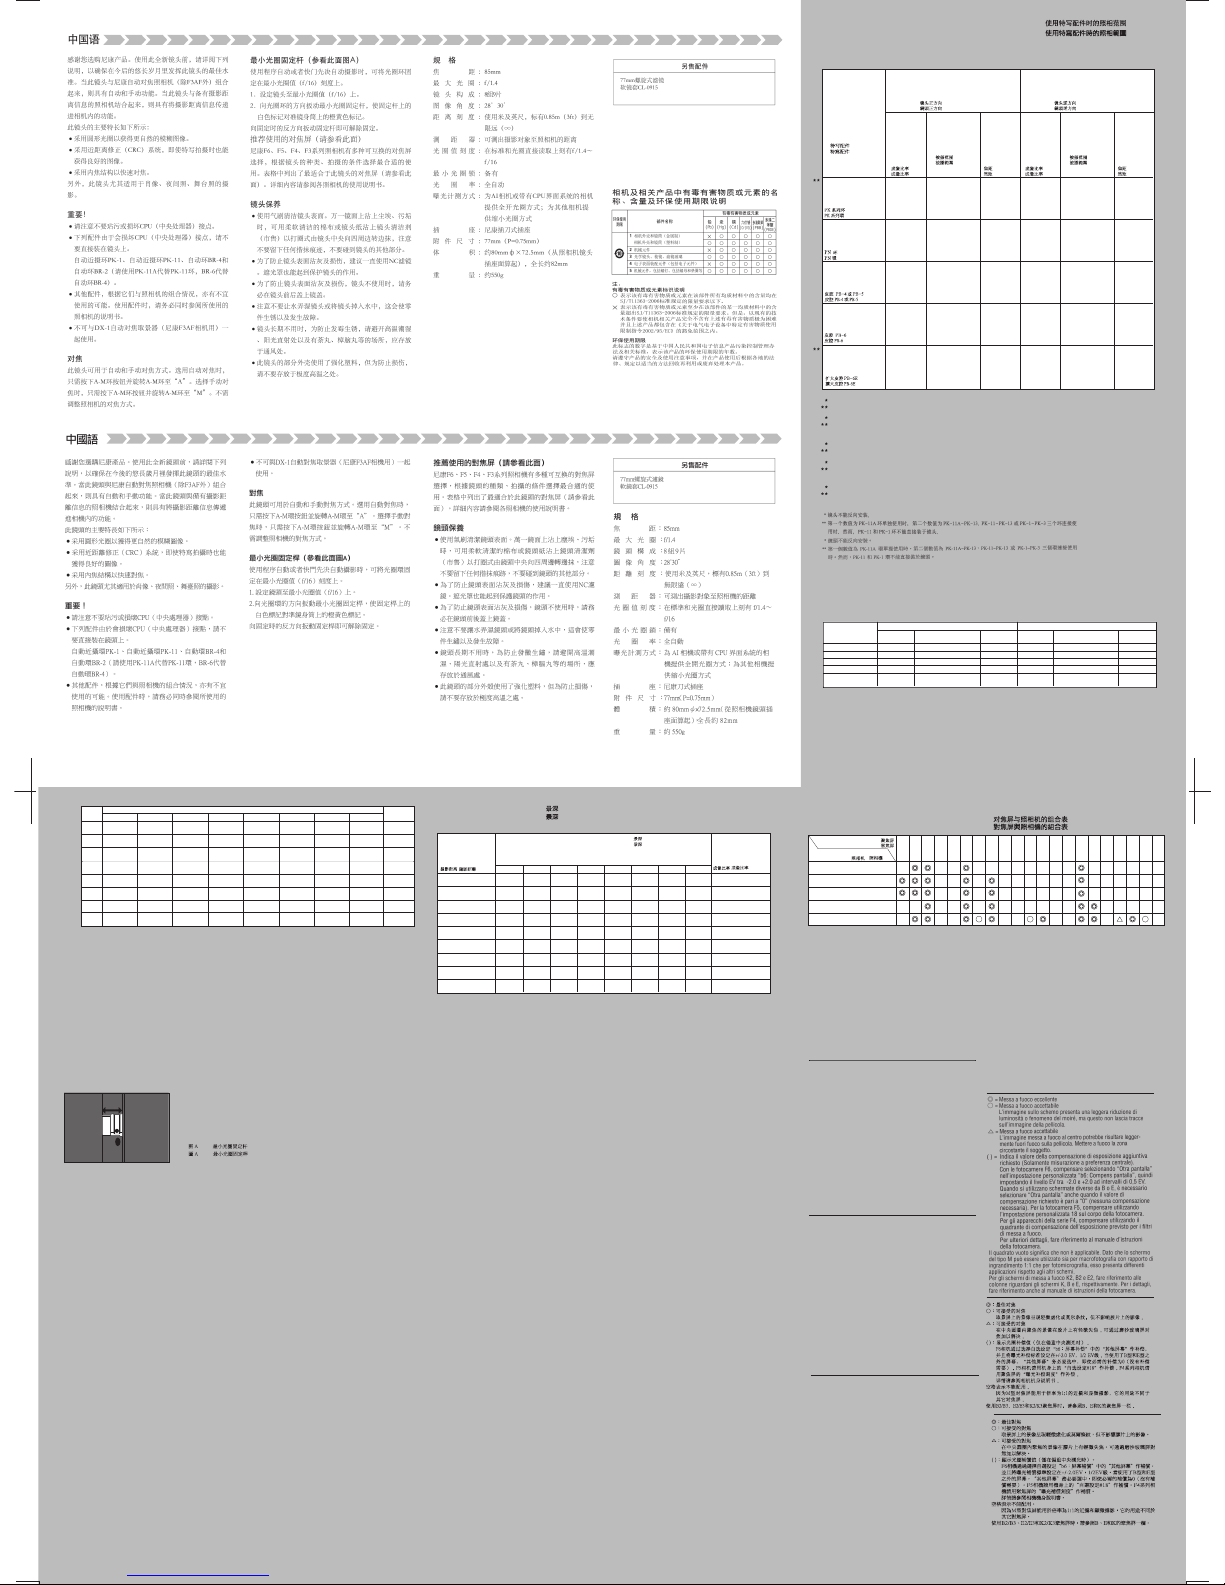
Depth of Field
Focused
distance
Depth of field
Reproduction
ratio
(ft)
3
4
5
7
10
15
30
∞
1/9.5
1/13.2
1/16.8
1/24.0
1/34.8
1/52.8
1/106.6
1/∞
f/1.4 f/2 f/2.8 f/4 f/5.6 f/8 f/11 f/16
3’ 1/8”–
2’ 11 13/16”
4’ 5/16”–
3’11 11/16”
5’ 1/2”–
4’11 7/16”
7’1 1/16”–
6’10 15/16”
10’2”–
9’ 9 13/16 ”
15’ 5”–
14’ 7”
31’ 10” –
28’ 4”
508’–
∞
3’ 3/16”–
2’11 3/4”
4’ 7/16”–
3’11 1/2”
5’ 11/16”–
4’11 1/4”
7’1 1/2”–
6’10 1/2”
10’3”–
9’ 8 7/8 ”
15’ 7”–
14’ 5”
32’ 8” –
27’ 8”
356’–
∞
3’ 5/16”–
2’11 5/8”
4’ 5/8”–
3’11 3/8”
5’1 1/16”–
4’10 15/16”
7’2 1/8”–
6’9 15/16”
10’4”–
9’ 6 ”
15’ 10”–
14’ 2”
33’ 11” –
26’ 10”
254’–
∞
3’ 7/16”–
2’11 1/2”
4’ 7/8”–
3’11 1/16”
5’1 1/2”–
4’10 9/16”
7’3 1/16”–
6’9 1/16”
10’ 6”–
9’6 1/16”
16’ 3”–
13’ 10”
35’ 11” –
25’ 9”
178’–
∞
3’ 5/8”–
2’11 5/16”
4’1 1/4”–
3’11 3/4”
5’2 1/8”–
4’10 ”
7’4 3/8”–
6’8”
10’ 9”–
9’3 3/4”
16’ 11”–
13’ 5”
39’ –
24’ 4”
127’–
∞
3’ 15/16”–
2’11 1/16”
4’1 7/8”–
3’10 1/4”
5’3 1/16”–
4’9 3/16”
7’6 7/16”–
6’6 3/8”
11’ 2”–
9’ 5/8”
17’ 10”–
12’ 11”
44’ 10”–
22’ 6”
89’–
∞
3’1 5/16”–
2’10 3/4”
4’2 5/8”–
3’9 5/8”
5’4 5/16”–
4’8 1/4”
7’9 3/16”–
6’4 1/2”
11’ 8”–
8’8 15/16”
29’ 3”–
12’ 3”
55’ 3”–
20’ 8”
65’–
∞
3’2 1/16”–
2’10 3/16”
4’3 7/8”–
3’8 5/8”
5’6 1/2”–
4’6 11/16”
8’2 1/8”–
6’1 9/16”
12’ 8”–
8’3 5/16”
22’ 3”–
11’ 4”
90’ 1”–
18’ 1”
44’–
∞
■被写界深度表
■
Schärfentiefen-Tabelle
■
Profondeur de champ
■
Profundidad de campo
■
Profondità di campo
■
■
撮影距離
被写界深度
Eingestellte
Distanz
Distance de mise au point
Distancia de enfoque
Distanza messa afuoco
Schärfentiefe
Profondeur de champ
Profundidad de campo
Profonditá di campo
撮影倍率
Abbildungsmaßstab
Rapport de reproduction
Relación de reproducción
Rapporto di riproduzione
f/1.4 f/2 f/2.8 f/4 f/5.6 f/8 f/11 f/16
0,893 –
0,812
0,893 –
0,812
1,06 –
0,945
1,04 –
0,962
1,03 –
0,972
1,02 –
0,980
1,01 –
0,986
1,01 –
0,990
1,01 –
0,993
1,30 –
1,12
1,66 –
1,37
1,61 –
1,41
1,58 –
1,43
1,55 –
1,45
1,54 –
1,47
1,53 –
1,48
1,52 –
1,48
2,31 –
1,77
3,79 –
2,49
3,50 –
2,63
3,35 –
2,72
3,23 –
2,80
3,16 –
2,85
3,11 –
2,90
3,08 –
2,92
7,79 –
3,70
37,2 –
5,83
20,0 –
6,69
15,7 –
7,35
13,4 –
7,98
12,2 –
8,47
11,5 –
8,88
11,0 –
9,17
14 –∞20 –∞27 –∞39 –∞54 –∞78 –∞109 –
∞
155 –
∞
10,7 –
9,41
5,16 –
4,85
5,23 –
4,79
5,33 –
4,71
5,49 –
4,59
5,71 –
4,45
6,08 –
4,25
6,63 –
4,03
3,06 –
2,95
2,02 –
1,98
2,03 –
1,97
2,05 –
1,95
2,07 –
1,94
2,10 –
1,91
2,14 –
1,88
2,20 –
1,83
1,51 –
1,49
1,21 –
1,19
1,21 –
1,19
1,22 –
1,18
1,22 –
1,18
1,23 –
1,17
1,25 –
1,16
1,26 –
1,14
1,01 –
0,995
0,854 –
0,846
0,855 –
0,845
0,857 –
0,843
0,860 –
0,840
0,864 –
0,836
0,871 –
0,830
0,879 –
0,823
0.85
1.0
1.2
1.5
2
3
5
10
∞
1/8.77
1/10.6
1/13.0
1/16.5
1/22.5
1/34.3
1/57.8
1/116.7
1/∞
図A 最小絞りロックレバー
Illst. A Minimum aperture lock lever
Bild A Verriegelung der kleinsten Blende
Illust. A
Levier de verrouillage d’ouverture minimum
Illust. A Palacca de bloqueo de abertra minima
Illust. A Leva di biocco di apertura minima
■
接写表
■
Fotografische Bereiche mit dem Nahaufnahme-Zubehör
■
Rapports obtenus en proxiphotographie et photomacrographie
■
Distancia de fotografiado con la lente de aproximeción
■
Ftotographia con dispositivi pr riprese Close-up
■
■
使用器具
Nahaufnahme-Zubehör
Accessoires macro
Accesorio utilizado
Dispositivi Close-Up
PKリング
Zwischenringe PK
Bagues PK
Anillo de la Serie PK
Anello serie PK
PNリング
Zwischenringe PN
Bagues PN
Anillo de la Serie PN
Anello serie PN
ベローズアタッチメント
PB-4、PB-5
Balgengerät PB-4 oder PB-5
Soufflet PB-4 ou PB-5
Fuelles PB-4 o PB-5
Soffietto PB-4 o PB-5
ベローズアタッチメント
PB-6
Balgengerät PB-6
Soufflet PB-6
Fuelles PB-6
Soffietto PB-6
エクステンションベローズPB-6E
Zusatzbalgen PB-6E
Soufflet additionnel PB-6E
Fuelle de extensión PB-6E
Estensione soffietto
PB-6E
撮影倍率
Abbildungs maßstab
Rapport de
r
eproduction
Relación de
reproducción
Rapporto di
riproduzione
被写界面積
Aufnahmefeld
Champ couvert
Campo cubierto
Campo del soggetto
撮影距離
Eingestellte
Entfernung
Distance de mise
au point
Distancia de
enfoque
Distanza messa
a fuoco
撮影倍率
Abbildungs maßstab
Rapport de
r
eproduction
Relación de
reproducción
Rapporto di
riproduzione
被写界面積
Aufnahmefeld
Champ couvert
Campo cubierto
Campo del soggetto
撮影距離
Eingestellte
Entfernung
Distance de mise
au point
Distancia de
enfoque
Distanza messa
a fuoco
レンズ正方向
Objektive in Normalstellung
Objectif en position normale
Objetivo en la posición normal
Obiettivo alla posizione normale
レンズ逆向き
Objektive in Reprostellung
Objectif en position retournée
Objetivo en la posición invertida
Obiettivo alla posizione inversa
レンズを逆向きにしての使用はできません。
PKリングのはじめの数値はPK-11Aリング1個使用のとき、あとの数値はPK-11A〜PK-13リング、PK-11〜PK13リングまたはPK-1〜PK-3リングを連結し
たときのものです。ただし、PK-11リングおよびPK-1リングはこのレンズに直接取り付けることはできませんのでご注意ください。
Das Anbringen dieses Objektivs in Retrostellung ist nicht möglich.
Die ersten Werte gelten für den Zwischenring PK-11A, wenn dieser allein benutzt wird. Die anderen Werte geltn für die
Kombinationen Pk-11A––PK-13, PK-11––PK-13 oder PK-1––PK-3. Die Zwischenringe PK-11 und PK-1 lassen sich nicht
direkt am Objectiv anbringen!
L’objectif ne peut pas être fixé en position retourné.
Les premières valeurs sont pour la bague PK-11A utilisée seule et les autres pour les bagues PK-11A––PK-13, PK-11––PK13 ou PK-1––PK-3 utilisées ensemble. Toutefois, les bagues PK-11 et PK-1 ne peuvent être derectement fixées à l’objectif.
No es posible montar el objetivo en posición invertida.
Los primeros valored corresponden al case de utilizar sólo el anillo PK-11A y los otros valores cuando se utilicen los anillos
PK-11A––PK-13, PK-11––PK-13 o PK-1––PK-3 juntos. Sin embargo, no es posible montar directamente los anillos PK-11
y PK-1 en el objetivo.
Questo obíettivo non puó essere montato nella posizione inversa.
I primi valori sono per l’anello PK-11A usato da solo mentre i seguenti sono per gli anelli PK-11A––PK-13, PK-11––PK-13,
o PK-1––PK-3 usati assieme. Si tenga comunque presente che gll anelli PK-11 e PK-1 non possono essere agganciati
direttamente all’obienttivo.
1/10,6–1/1,4
1/1,6–1/1,3
1/2,0–2,2
1/1,8–2,4
1/1,8–5,20
105 – 31,2
32,9 – 30.96
35,0 – 35,5
33.7 – 37.24
33,7 – 56,99
–
–
–
–
–
–
–
–
–
–
–
–
–
–
–
25,5 x 38,3 – 3,25 x 4,87
3,89 x 5,83 – 0,98 x 1,47
4.74 x 7.12 – 1,1 x 1,65
4,25 x 6.38 – 0.98 x 1.47
4,25 x 6.38 – 0.47 x 0.70
**
■
Photographic range with close-up attachment
Close-up
attachment
Reproduction
ratio
Focused
distance
Subject field
Lens in normal position
Reproduction
ratio
Focused
distance
Subject field
Lens in reverse position
*
PK-series rings
PN-rings
Bellows PB-4 or PB-5
Bellows PB-6
Extension bellows
PB-6E
1/10.6 – 1/1.4
1/1.6 – 1/1.3
1/2.0 – 2.2
1/1.8 – 2.4
1/1.8 – 5.20
41.34 – 12.28
12.95 – 12.19
13.78 – 13.98
13.27 – 14.66
13.27 – 22.44
–
–
–
–
–
–
–
–
–
–
–
–
–
–
–
10.04 x 15.08 – 1.28 x 1.92
1.53 x 2.30 – 0.39 x 0.58
1.87 x 2.28 – 0.43 x 0.58
1.67 x 2.51 – 0.39 x 0.58
1.67 x 2.51 – 0.19 x 0.28
Lens cannot be attached in reverse position.
The first values are for the PK-1A rubg used alone and the other one for the PK-11A––PK-13, PK-11––PK-13 or
PK-1––PK-3 rings used together. However, the PK-11 and PK-1 rings cannot be attached dirctly to the lens.
**
*
スクリーン、Screen,
Einstellscheibe Verre, Pantalla,
カメラ、
Camera, Kamera,
Appareil, Cámera,
(+0.5)
■構図の決定やピント合わせの目的には
◎:最適です。
○:視野の一部が多少見にくくなりますが使用できます。
△:スプリットの合 致像は見えますが、 ピント合わせには 精度上適
しません。
():中央部重点測光時の補正値です。
F6カメラの場合、測光値 の補正は、カメラのカスタ ムメニュー
「b6:スクリーン補正」を「B or E以外」にセットして行い ま
す。B型およびE型以外を使用する場合は、補正量が0でも、「B
or E以外」にセットしてくだ さい。F5カメラの場合は、カスタ
ムセッティングNo. 18の設定で測光値の 補正を行います。F4 シ
リーズカメラの場 合は、ファインダー スクリーン露出補 正ダイ
ヤルを回して補正を行います。
詳しくはカメラの使用説明書をご覧ください。
空欄:使用不適当です。
ただし、Mスクリーンの場合、撮影倍率1/1倍以上の近接撮影
に用いられるため、この限りではありません。
上記以外のカメラでB2/B3、E2/E 3、K2/K3スクリーンをご使用の
場合は、それぞれB、E、Kスクリーンの欄をご覧ください。
F6
F5+DP-30
F5+DA-30
F4+DP-20/DA-20
F3
EC-B
A/L B C D E G1 G2 G3 G4 H1 H2 H3 H4 J K/P M R T U F
◎ = Excellent focusing
○ = Acceptable focusing
Slight vignetting or moire phenomenon affects screen image, but film
image shows no traces of this.
△ = Acceptable focusing
The in-focus image in the central circular area may prove to be slightly out
of focus on the film. Focus on the surrounding matte area.
( ) = Indicates degree of exposure compensation needed (Center-Weighted
metering only).
For F6 cameras, compensate by selecting “Other screen” in Custom
Setting “b6: Screen comp.” and setting the EV level to –2.0 to +2.0 in 0.5
EV steps. When using screens other than type B or E, “Other screen”
must be selected even when the required compensation value is “0” (no
compensatio required). For F5 cameras, compensate using Custom
Setting #18 on the camera body. For F4-Series cameras, compensate
using the Exposure Compensation Dial for the focusing screen.
See instruction manual of the camera body for more details.
Blank box means not applicable.
Since type M screen can be used for both macrophotography at 1:1
magnification ratio and for photomicrography, it has different applications
than other screens.
When using the B2/B3, E2/E3 and K2/K3 focusing screens in cameras other
than those listed above, refer to the columns for the B, E and K screens.
◎ = Mise au point excellente
○ = Mise au point passable
Léger vignettage ou effets de moire sur l’image du verre, mais le film ne
présente aucune trace de ces phénomènes.
△ = Mise au point passable
L’image de la zone circulaire centrale paraît légèrement brouillée. Mise au
point autour de la zone tressée.
( ) = Indique la compensation de l’exposition additionnelle requise (Mesure
pondérée centrale uniquement).
Pour les appareils F6, corrigez en sélectionnant “Activ.: autre” dans le
réglage personnalisé “b6: Plage visée” et en réglant le niveau IL de –2,0 à
+2,0 par pas de 0,5 IL. Lorsque vous utilisez des verres autres que ceux
de type B ou E, il faut sélectionner “Activ.: autre” même lorsque la valeur
de correction est de “0” (pas de correction nécessaire). Pour les appareils
F5, compenser en utilisant le réglage personnalisé
n 18 sur I’appareil. Pour les appareils de la série F4, compenser en utilisant le
cadran de compensation de l’exposition prévu pour les filtres de mise au
point.
Voyez le manuel d’instructions de I’appareil photo pour plus de détails.
Les cases vides désignent des verres inutillisables.
Comme le verre de type M est utilisé pour la macro photographie à un
rapport d’agrandissement de 1:1 aussi bien que pour la photomicrographie,
son utilisation est différente de celle des autres verres.
Lors de I’utiIisation de verres B2/B3, E2/E3 ou K2/K3 dans des appareils autres
que ceux indiqués cidessus, se reporter aux colonnes sur verres B, E, et K.
◎ = Enfoque excelente
○ = Enfoque aceptable
Ligero viñeteo o fenómeno de moiré afecta la imagen de la pantalla, pero
la imagen de la película no es afectada por esto.
△ = Enfoque aceptable
La imagen en foco en el área circular central puede resultar ligeramente
fuera de foco en la película. Enfoque en el área mate circundante.
( ) = Indica la cantidad de compensación adicional necesaria (Solamente
medición ponderada central).
Para cámaras F6, compense seleccionando “Otra pantalla” en el ajuste
personal del usuario “b6: Compens pantalla” y ajustando el nivel EV a
–2,0 a +2,0 en pasos de 0,5 EV. Cuando se utilice una pantalla que no sea
de tipo B o E, debe seleccionarse “Otra pantalla” incluso cuando el valor
de compensación requerido sea “0” (no se requiere compensación). Para
la cámara F5 compense usando el ajuste personal del usuario No. 18 en el
cuerpo de la cámara. Para las cámaras de la serie F4, compense usando el
dial de compensación de exposición para las pantallas de entoque.
Para más detalles, consulte el manual de instrucciones de la cámara.
Los espacios en blanco corresponden a los casos inaplicables.
Como la pantalla del tipo M se usa para la macrofotografía con una
relación de aumento de 1:1 y para la microfotografía, su aplicación difiere
de las demás pantallas.
Cuando se utilicen las pantallas de enfoque B2/B3, E2/E3 y K2/K3 en cámaras
distintas de las relacionadas arriba, ver las columnas correspondientes a las
pantallas B, E y K.
■ファインダースクリーンとの組み合わせ表
■
Table of Recommended Foucusing Screens
Tabelle der empfohlenen Einstellscheiben
Tableau des verres de visée recommandés
Tabla de pantallas de enfoque recomendadas
Tableau des verres de visée recomendadas
■
■
■
■
■
■
◎ = Ausgezeichnete Scharfeinstellung
○ = Brauchbare Scharfeinstellung
Leichte Vignettierung oder Moiré im Sucherbild, nicht je-doch auf dem Film.
△ = Brauchbare Scharfeinstellung
Der in der Suchermitte schar f erscheinende Aufnahme-gegenstand kann
auf dem Film liecht unschart sein. Fo-kussierung auf dem
Einstellscheiben-Umfeld.
( ) = Zeigt den Betrag zusätzlich erforderlicher Belichtungskorrektur (Nur
mittenbetonte Belichtungsmessung).
Bei F6-kameras korrigieren Sie durch Wahl von “Andere” in der
Individualfunktion “b6: Einstellscheibe” und Einstellen des LW-Werts im
Bereich zwischen –2,0 und +2,0 in 0,5-LW-Schritten. Bei Gebrauch von
anderen Scheiben als B oder E, ist “Andere” auch dann zu wählen, wenn
der erforderliche Korrekturwert “0” beträgt (keine korrektur nötig). Zur
Einstellung des Korrekturwerts am F5 Kameragehäuse dient die
Individualfunktion Nr. 18. Mit den F4-Serien-Geräten durch den
Belichtung-kompensationsanzeiger für Visiermattscheiben kompensieren.
Näheres hierzu finden Sie in der Bedienungsanleitung des Kameragehäuses.
Ein Leerfeld bedeutet unbrauchbar.
Da die Einstellscheibe Typ M für Makrofotografie bei einem
Abbildungsverhätnis von 1:1 sowie für Mikrofotografie verwendet wird,
unterscheidet sich ihre Anwendung von den anderen Einstellscheiben.
Bei Verwendung der Scheiben B2/B3, E2/E3 bzw. K2/K3 in anderen als den
obengenannten Kameras gelten die Spalten für die Scheiben B, E und K.
(cm)
(in.)
(m)
 Loading...