

Nikon AF-P DX NIKKOR 70-300mm f/4.5-6.3G ED, AF-P DX NIKKOR 70-300mm f/4.5-6.3G ED VR user's Guide [ar]
Page 1
English
Para Sua Segurança
AAAVISOS
AAPRECAUÇÕES
■■Peças da Objetiva (Figura)
■■Montar e Remover a Objectiva
■■Focagem
■■Zoom
■■Profundidade de Campo
■■Abertura
■■Unidades de Flash Incorporado
■■Redução da Vibração (VR, Apenas AF-P DX NIKKOR
70–300 mm f/4.5–6.3G ED VR)
■■O Para-sol da Objetiva Opcional
■■Cuidados com a Objetiva
■■Acessórios Fornecidos
■■Acessórios Compatíveis
■■Especifi cações
Tipo
Distância focal
Abertura máxima
Construção da objetiva
Ângulo de visão
Escala de distâncias focais
Informações da distância
Zoom
Focagem
Redução da vibração (apenas
AF-P DX NIKKOR 70–300 mm
f/4.5–6.3G ED VR)
Distância de focagem mínima
Lâminas do diafragma
Diafragma
Alcance da abertura
Medição
Tamanho do ltro
Dimensões
Peso
For Your Safety
AAWARNINGS
AACAUTIONS
■■Parts of the Lens (Figure)
■■Attaching and Removing the Lens
■■Focus
■■Zoom
■■Depth of Field
■■Aperture
■■Built-in Flash Units
■■Vibration Reduction (VR, AF-P DX NIKKOR 70–300 mm
f/4.5–6.3G ED VR Only)
■■The Optional Lens Hood
■■Lens Care
■■Supplied Accessories
■■Compatible Accessories
■■Specifi cations
Type
Focal length
Maximum aperture
Lens construction
Angle of view
Focal length scale
Distance information
Zoom
Focusing
Vibration reduction
(AF-P DX NIKKOR
70–300 mm f/4.5–6.3G
ED VR only)
Minimum focus distance
Diaphragm blades
Diaphragm
Aperture range
Metering
Filter-attachment size
Dimensions
Weight
Pour votre sécurité
AAAVERTISSEMENTS
AAMISES EN GARDE
■■Parties de l’objectif (Figure)
■■Fixer et retirer l’objectif
■■Mise au point
■■Zoom
■■Profondeur de champ
■■Ouverture
■■Flash intégré
■■Réduction de vibration (VR, AF-P DX NIKKOR 70–300 mm
f/4.5–6.3G ED VR uniquement)
■■Parasoleil optionnel
■■Entretien de l’objectif
■■Accessoires fournis
■■Accessoires compatibles
■■Caractéristiques
Type
Focale
Ouverture maximale
Construction optique
Angle de champ
Échelle des focales
Information de
distance
Zoom
Mise au point
Réduction de vibration
(AF-P DX NIKKOR
70–300 mm f/4.5–6.3G
ED VR uniquement)
Distance minimale de
mise au point
Lamelles de diaphragme
Diaphragme
Plage des ouvertures
Mesure
Diamètre de xation
pour ltre
Dimensions
Poids
Français
Português
中文版(简体)
AF-P DX NIKKOR 70–300mm f/4.5–6.3G ED VR
AF-P DX NIKKOR 70–300mm f/4.5–6.3G ED
En
User’s Manual
Fr
Manuel d’utilisation
Pt
Manual do Utilizador
Sc
使用说明书
使用說明書
Tc
Id
Manual bagi Pengguna
Ar
Printed in Thailand
7MA0317K-01
Figure /Figure /Figura /图
Before using this product, please carefully read both these instructions and
the camera manual. The illustrations in these instructions show an AF-P DX
NIKKOR 70–300 mm f/4.5–6.3G ED VR lens.
Note: DX lenses are for use with Nikon DX-format digital single-lens refl ex
cameras. The angle of view of a lens on a DX-format camera is equivalent
to that of a lens with a focal length about 1.5 × longer mounted on a 35
mm format camera.
This lens does not support D4-series, D3-series, D2-series, D1-series, D800series, D700, D610, D600, D300-series, D200, D100, D90, D80, D70-series,
D60, D50, D40-series, D7000, D5100, D5000, D3200, D3100 or D3000 digital
SLR cameras or fi lm SLR cameras. When using it with a D5500, D5300, or
D3300, be sure the camera fi rmware has been updated to the latest version.
If the camera is off or the standby timer has expired, the focus ring can
not be used to focus the camera and rotating the zoom ring will cause the
subject to go out of focus. Before focusing, turn the camera on or restart the
standby timer by pressing the shutter-release button halfway.
Autofocus and rangefi nder features are supported at all focal lengths.
When using this lens, ignore any sections of the camera manual listing autofocus and rangefi nder restrictions for lenses with a maximum aperture
slower than f/5.6.
For Your Safety
WARNINGS
• Do not disassemble or modify. In the event of malfunction, the product should
be repaired only by a qualifi ed technician. Should the product break open
as the result of a fall or other accident, avoid touching exposed parts. Failure to observe these precautions could result in electric shock or other
injury.
• Turn the camera o immediately in the event of malfunction. Should you notice
smoke or an unusual smell coming from the equipment, immediately unplug the AC adapter and remove the camera battery, taking care to avoid
burns. Continued operation could result in fi re or injury. After removing
the battery, take the equipment to a Nikon-authorized service center for
inspection.
• Keep dry. Do not expose the product to water or handle with wet hands.
Failure to observe this precaution could result in fi re or electric shock.
• Do not use in the presence of ammable gas. Operating the equipment at fi lling
stations or in the presence of propane or other fl ammable gas or dust
could result in explosion or fi re.
• Do not look at the sun through the lens or the camera view nder. Viewing the sun
or other bright light source through the lens or viewfi nder could cause
permanent visual impairment.
CAUTIONS
• Keep out of reach of children. Failure to observe this precaution could result in
injury or product malfunction.
• Do not focus sunlight through the lens. Sunlight focused through the lens
could cause fi re. When shooting backlit subjects keep the sun well out of
the frame; if the lens will not be used for an extended period, replace the
lens caps and store out of direct sunlight.
• Do not overheat. Do not leave the product in locations exposed to extremely high temperatures, such as in an enclosed vehicle in direct sunlight,
or wrap the product in a towel or handkerchief or otherwise cover the
product while it is in use. Failure to observe these precautions could result
in fi re or product malfunction.
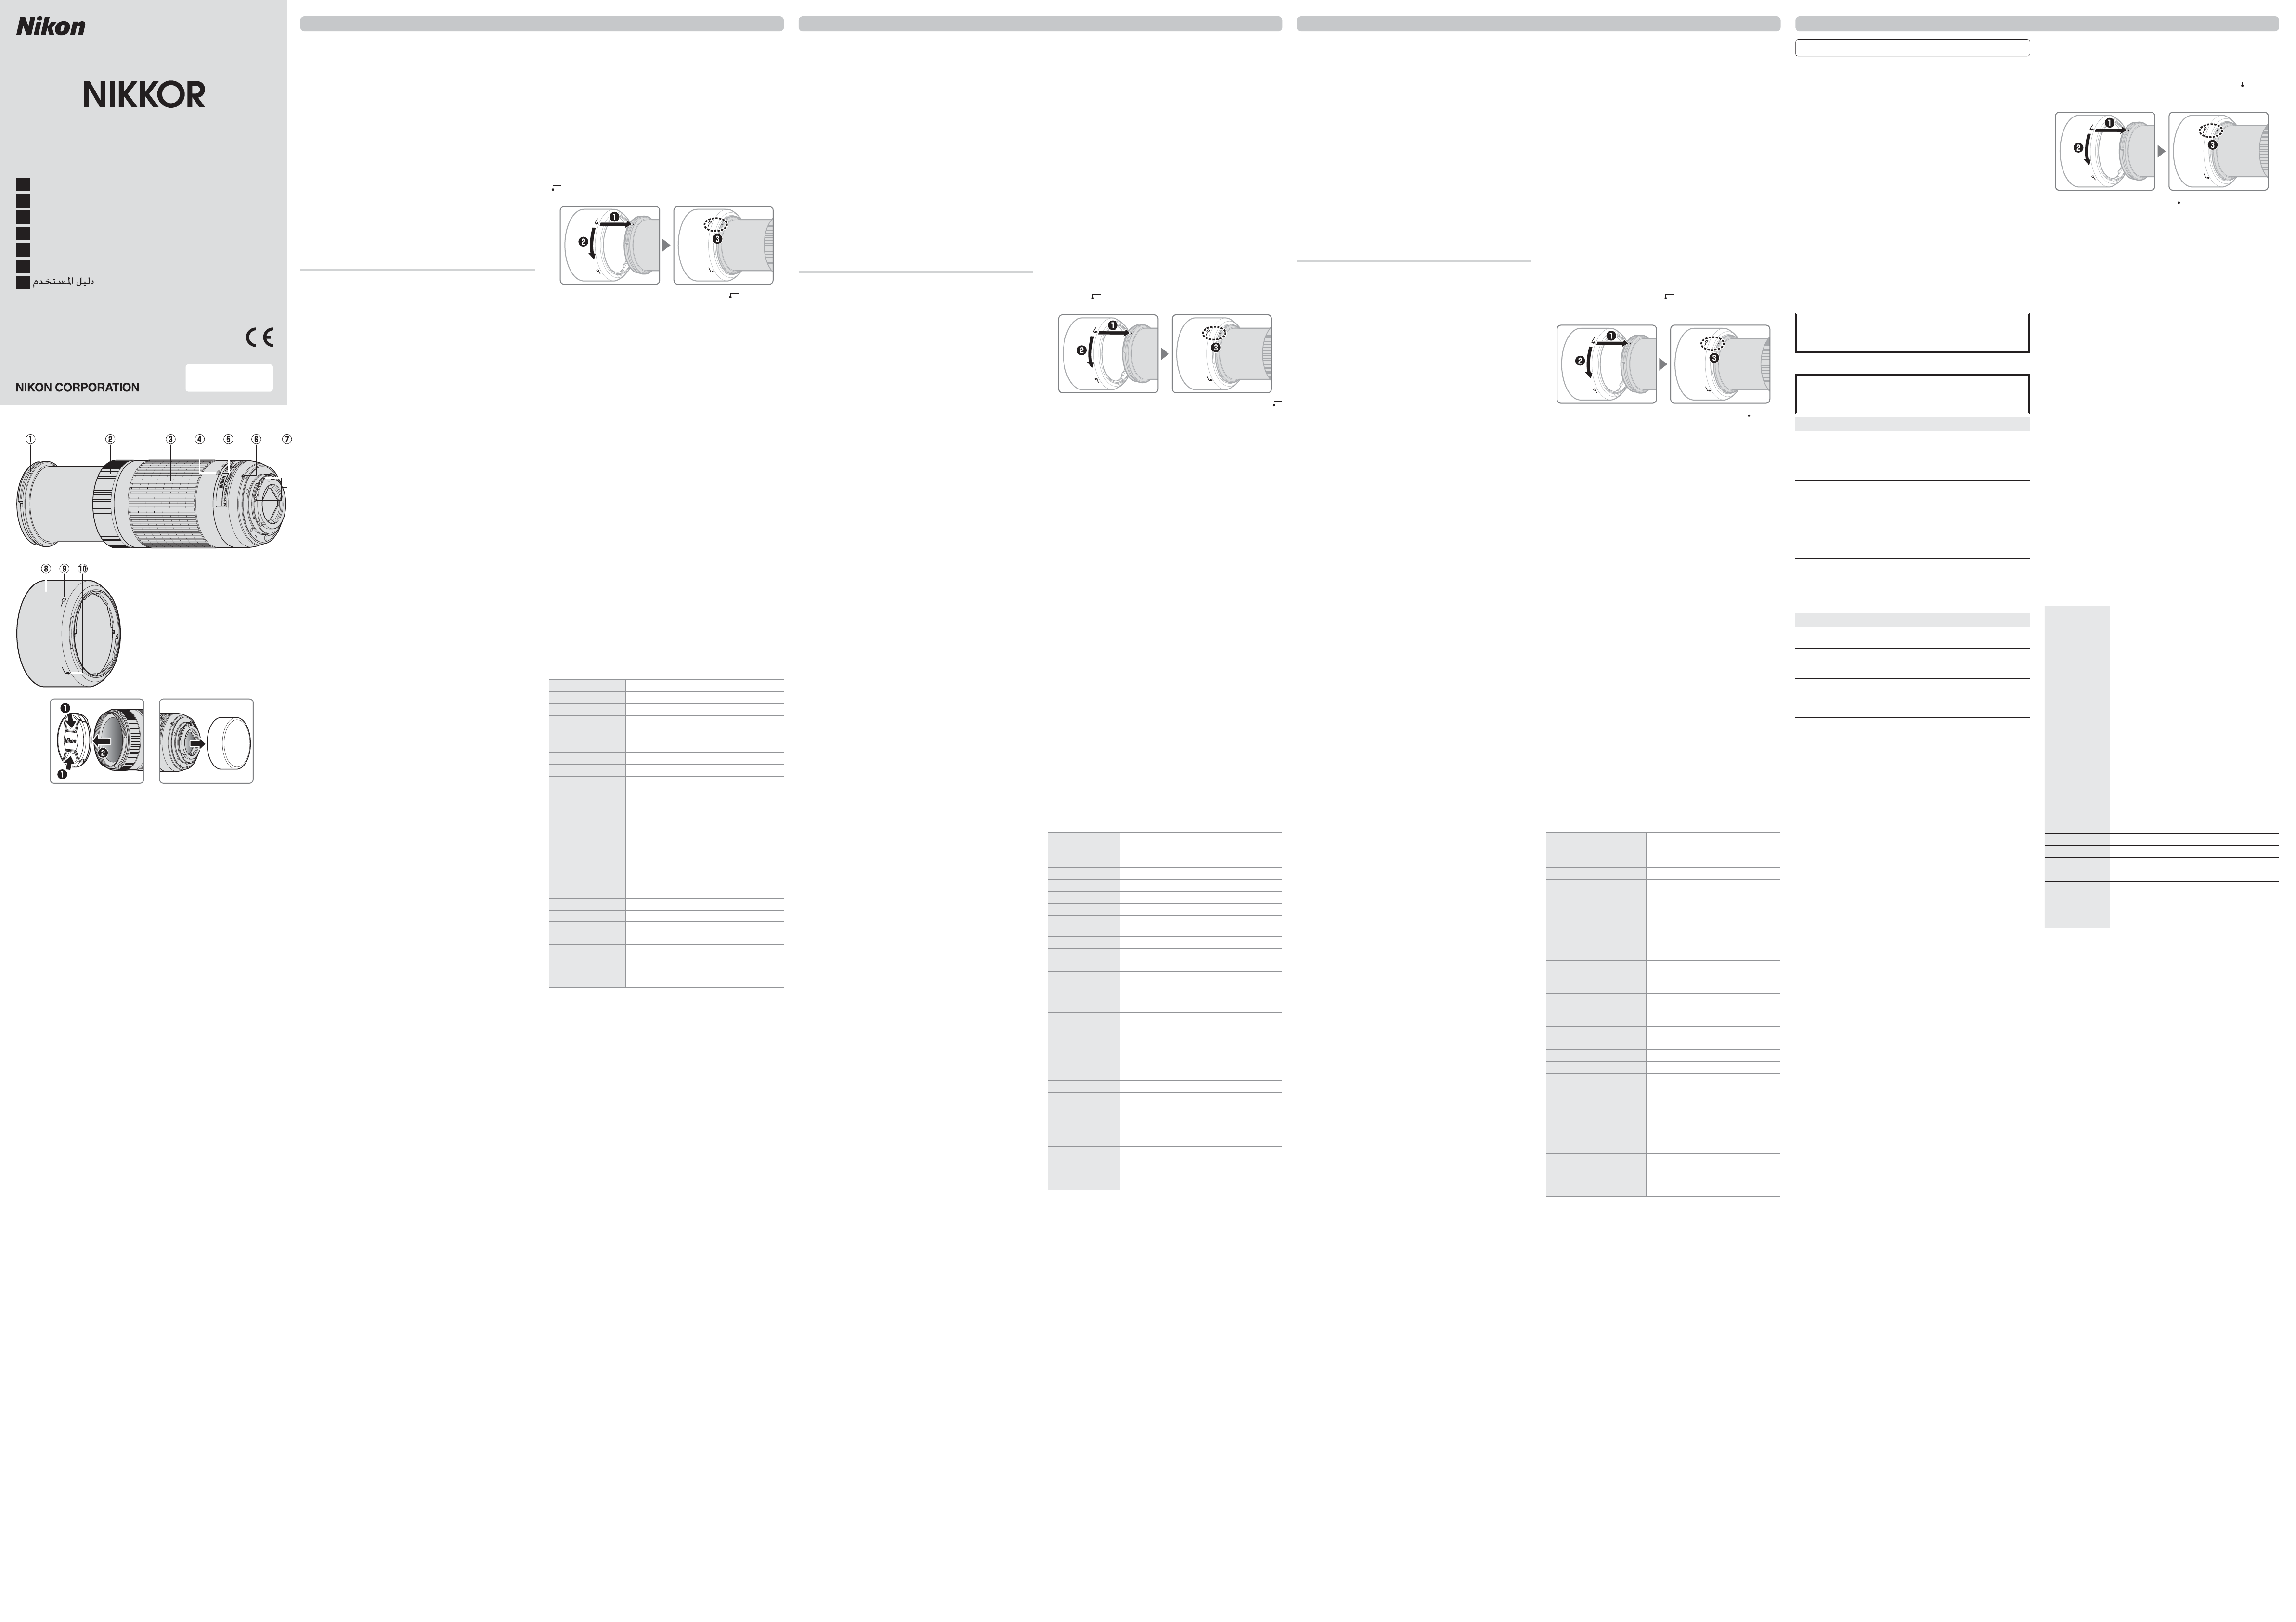
Parts of the Lens (Figure)
Lens hood mounting mark
q
Focus ring
w
Zoom ring
e
Focal length scale
r
Focal length mark
t
Lens mounting mark
y
CPU contacts
u
Lens hood *
i
Lens hood lock mark
o
Lens hood alignment mark
!0
* Optional.
Attaching and Removing the Lens
Attaching the Lens
Turn the camera off and remove the camera body cap.
z
Remove the rear lens cap.
x
Attach the lens.
c
Keeping the lens mounting mark aligned with the mounting
mark on the camera body, position the lens in the camera’s
bayonet mount and then rotate the lens counter-clockwise until it clicks into place with the lens mounting mark at the top.
Removing the Lens
Turn the camera off .
z
Remove the lens.
x
To remove the lens, press the camera lens release button
while turning the lens clockwise.
Focus
Focus mode is determined by the camera focus mode. See the camera
manual for information on camera focus mode selection. Users of D810series, Df, D750, D7200, D7100, or D5200 cameras should note that if the
standby timer is allowed to expire, the focus position will change when
the timer is restarted. Refocus before shooting. Longer standby times are
recommended for manual focus and in other situations in which you may
not release the shutter immediately after focusing.
Autofocus
Focus is adjusted automatically when the camera is in autofocus mode. The
focus ring can also be used to focus the camera if the shutter-release button is kept pressed halfway (or if the AF-ON button is kept pressed); this is
known as “autofocus with manual override” (M/A). Autofocus will resume
when the shutter-release button is pressed halfway (or the AF-ON button is
pressed) a second time. Note that touching the focus ring while autofocus
is in eff ect will change the focus position.
Manual Focus
When the camera is in manual focus mode, focus can be adjusted by rotating the lens focus ring.
Zoom
Before focusing, rotate the zoom ring to adjust the focal length and frame
the photograph.
Depth of Field
If the camera off ers depth-of-fi eld preview, depth of fi eld can be previewed
in the viewfi nder.
Aperture
Aperture is adjusted using camera controls.
Built-in Flash Units
When using the built-in fl ash on cameras equipped with a built-in fl ash
unit, remove the lens hood to prevent vignetting (shadows created where
the end of the lens obscures the built-in fl ash).
Vibration Reduction (VR, AF-P DX NIKKOR 70–300 mm
f/4.5–6.3G ED VR Only)
Vibration reduction (VR) is available when an AF-P DX NIKKOR 70–300 mm
f/4.5–6.3G ED VR lens is mounted on the camera and the shutter-release
button is pressed halfway. Vibration reduction can be turned on and off using the Optical VR option in the camera menus; when on, it reduces blur
caused by camera shake, allowing shutter speeds up to 4.0 stops slower
than would otherwise be the case, increasing the range of shutter speeds
available. The eff ects of VR on shutter speed are measured according to
Camera and Imaging Products Association (CIPA) standards; FX-format lens-
es are measured using FX-format digital cameras, DX-format lenses using
DX-format cameras. Zoom lenses are measured at maximum zoom.
Using Vibration Reduction: Notes
• When using vibration reduction, press the shutter-release button halfway
and wait for the image in the viewfi nder to stabilize before pressing the
shutter-release button the rest of the way down.
• When vibration reduction is active, the image in the viewfi nder may be
blurred after the shutter is released. This does not indicate a malfunction.
• When the camera is panned, vibration reduction applies only to motion
that is not part of the pan (if the camera is panned horizontally, for example, vibration reduction will be applied only to vertical shake), making
it much easier to pan the camera smoothly in a wide arc.
• If the camera is equipped with a built-in fl ash, vibration reduction will be
disabled while the fl ash charges.
• Vibration reduction is generally recommended when the camera is
mounted on a tripod, although you may prefer to turn it off depending
on shooting conditions and the type of tripod.
• Vibration reduction is recommended when the camera is mounted on a
monopod.
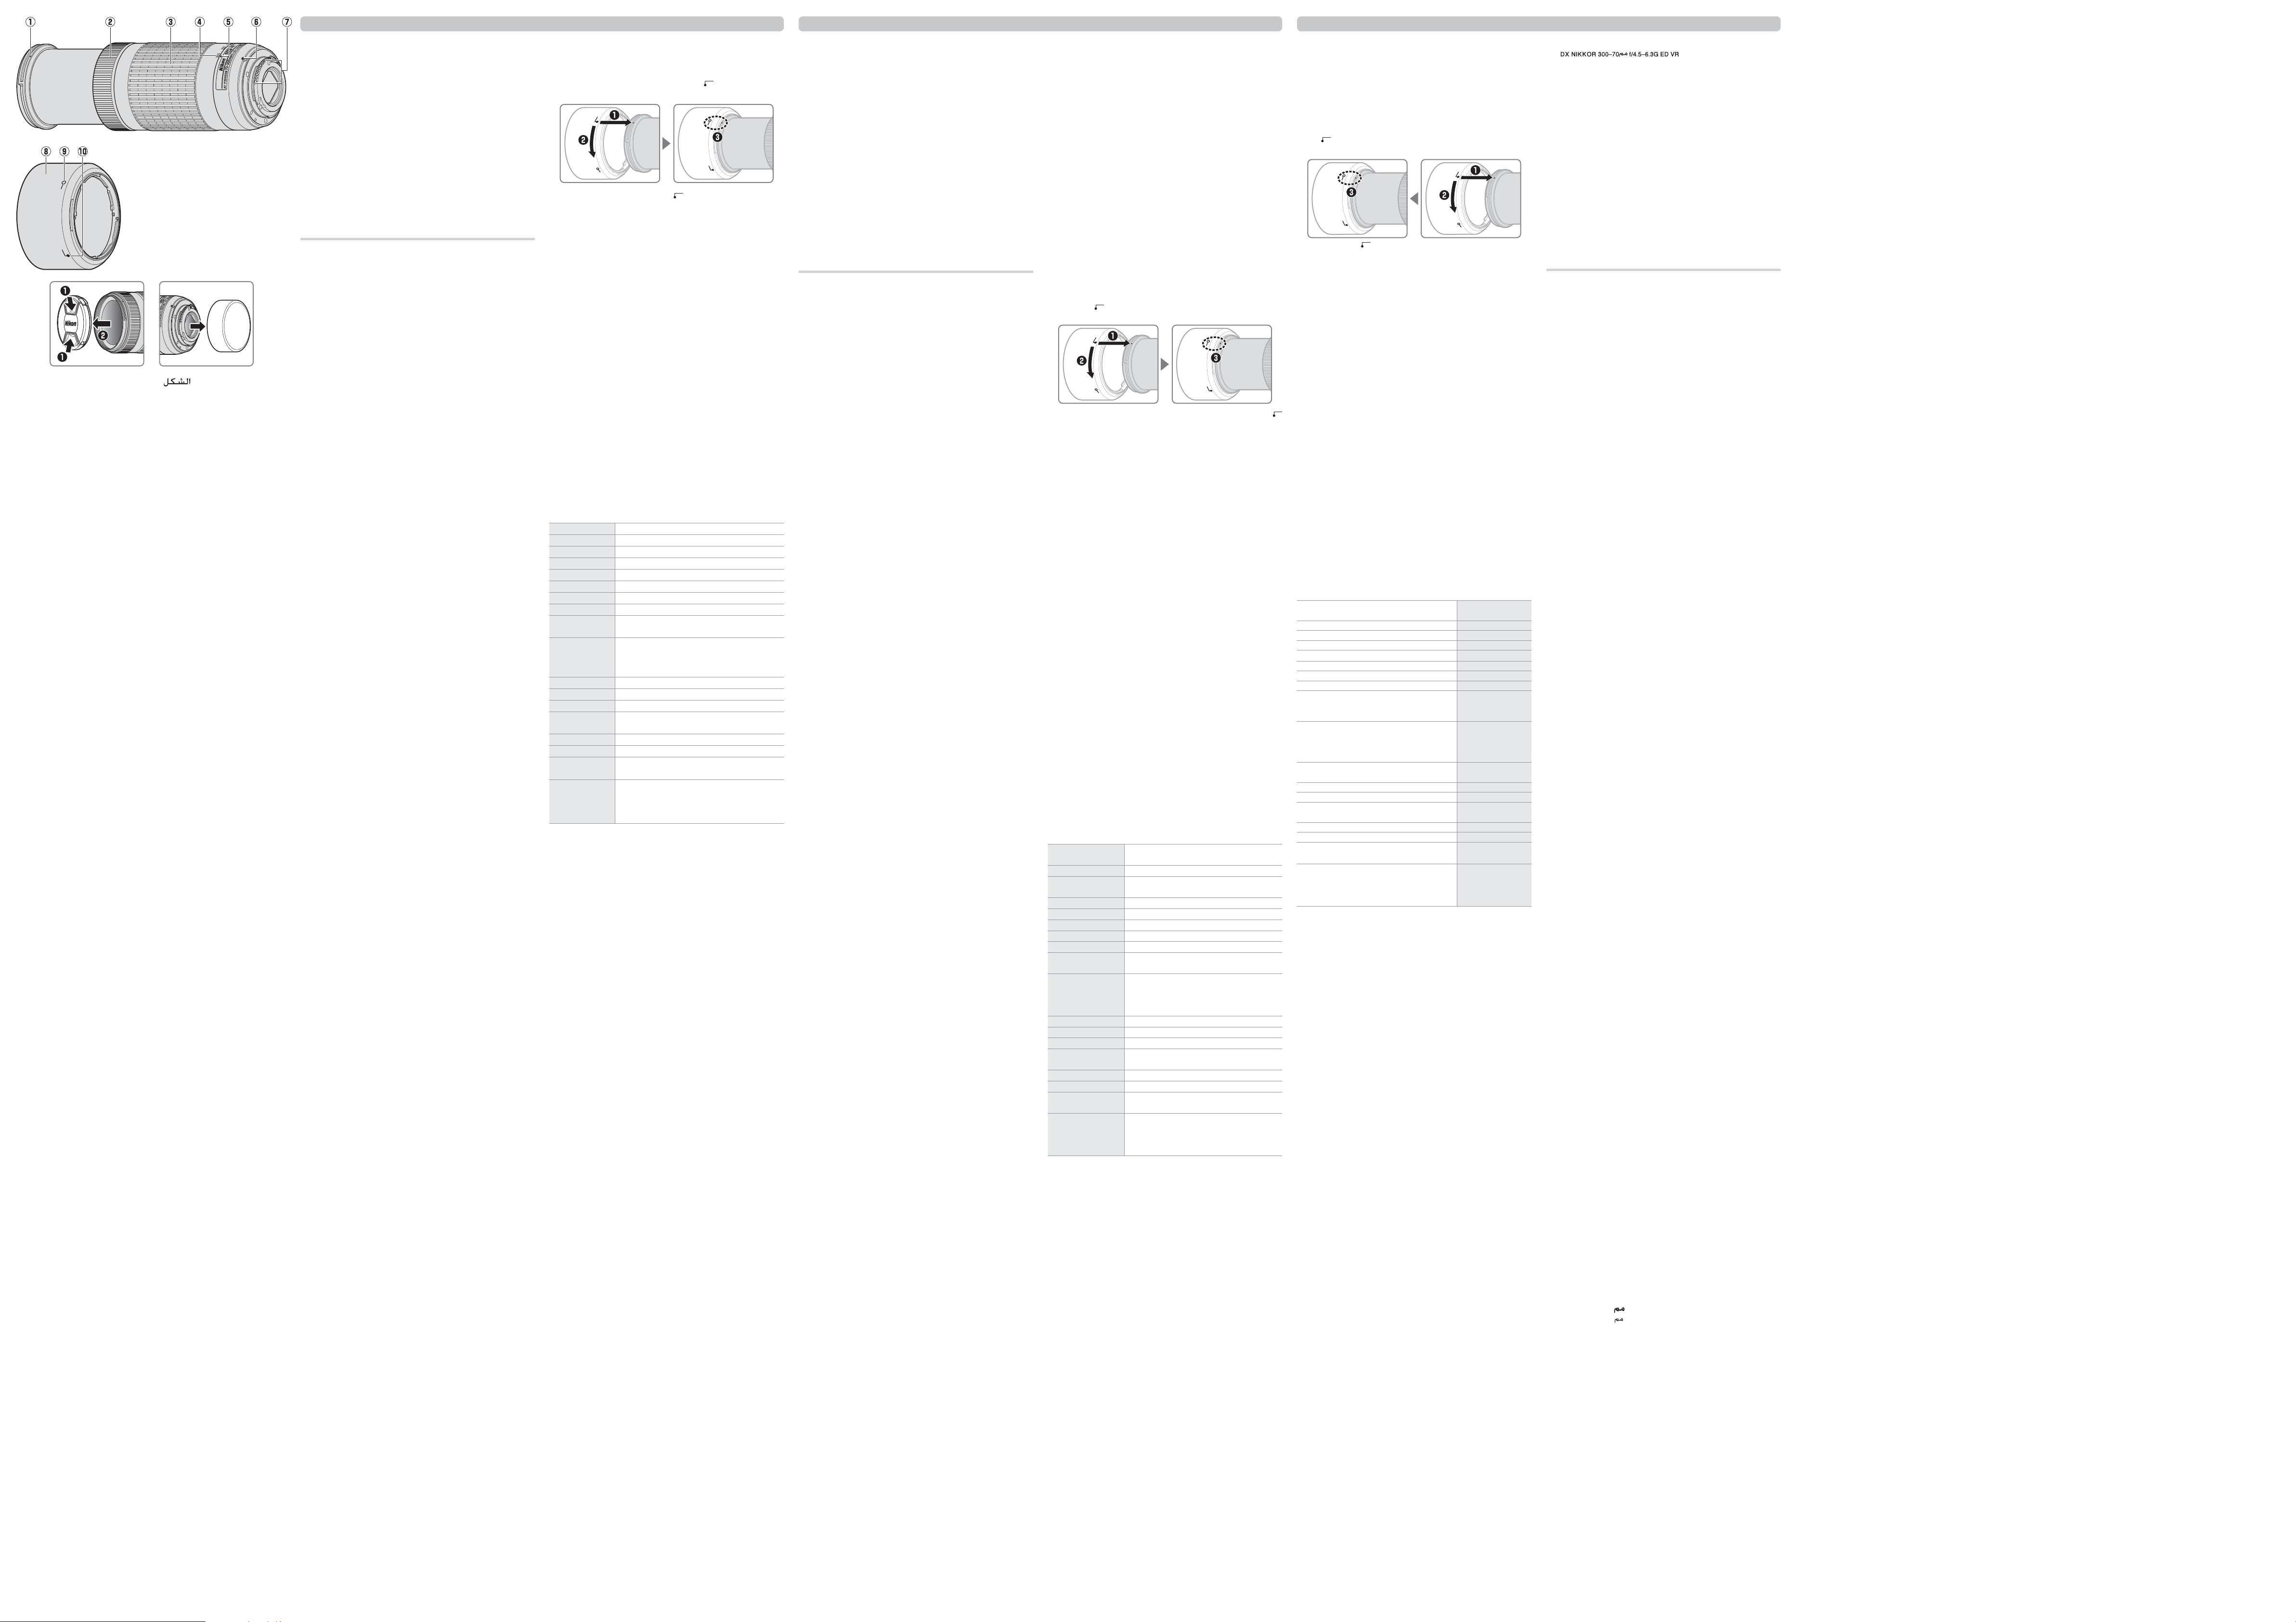
The Optional Lens Hood
The lens hoods protect the lens and block stray light that would otherwise
cause fl are or ghosting.
Attaching the Hood
Align the lens hood mounting mark (
( ) and then rotate the hood (w) until the ● mark is aligned with the lens
hood lock mark (—).
When attaching or removing the hood, hold it near the symbol on its
base and avoid gripping it too tightly. Vignetting may occur if the hood
is not correctly attached. The hood can be reversed and mounted on the
lens when not in use. When the hood is reversed, it can be attached and
removed by rotating it while holding it near the lock mark (—).
Lens Care
• Do not pick up or hold the lens or camera using only the lens hood.
• Keep the CPU contacts clean.
• Use a blower to remove dust and lint from the lens surfaces. To remove
smudges and fi ngerprints, apply a small amount of ethanol or lens cleaner to a soft, clean cotton cloth or lens-cleaning tissue and clean from the
center outwards using a circular motion, taking care not to leave smears
or touch the glass with your fi ngers.
• Never use organic solvents such as paint thinner or benzene to clean the
lens.
• The lens hood or NC fi lters can be used to protect the front lens element.
• Attach the front and rear caps before placing the lens in its lens case.
• If the lens will not be used for an extended period, store it in a cool, dry
location to prevent mold and rust. Do not store in direct sunlight or with
naphtha or camphor moth balls.
• Keep the lens dry. Rusting of the internal mechanism can cause irreparable damage.
• Leaving the lens in extremely hot locations could damage or warp parts
made from reinforced plastic.
Supplied Accessories
• 58 mm snap-on Front Lens Cap LC-58
• Rear Lens Cap
Compatible Accessories
• 58 mm screw-on fi lters
• Bayonet Hood HB-77
• Lens Case CL-1020
• Rear Lens Cap LF-4
Specifi cations
Type Type G AF-P DX lens with built-in CPU and F mount
Focal length 70 – 300 mm
Maximum aperture f/4.5 – 6.3
Lens construction 14 elements in 10 groups (including 1 ED lens element)
Angle of view 22°50 – 5°20
Focal length scale Graduated in millimeters (70, 100, 135, 200, 300)
Distance information Output to camera
Zoom Manual zoom using independent zoom ring
Focusing Autofocus controlled by stepping motor; separate
focus ring for manual focus
Vibration reduction
(AF-P DX NIKKOR
70–300 mm f/4.5–6.3G
ED VR only)
Minimum focus distance 1.1 m (3.7 ft) from focal plane at all zoom positions
Diaphragm blades 7 (rounded diaphragm opening)
Diaphragm Fully automatic
Aperture range • 70 mm focal length: f/4.5 – 22
Metering Full aperture
Filter-attachment size 58 mm (P = 0.75 mm)
Dimensions Approx. 72 mm maximum diameter × 125 mm
Weight AF-P DX NIKKOR 70-300mm f/4.5-6.3G ED VR:
Nikon reserves the right to change the specifi cations of the hardware described
in this manual at any time and without prior notice.
Lens shift using voice coil motors (VCMs)
• 300 mm focal length: f/6.3 – 32
(distance from camera lens mount ange)
Approx. 415 g (14.7 oz)
AF-P DX NIKKOR 70-300mm f/4.5-6.3G ED :
Approx. 400 g (14.2 oz)
●
) with the lens hood alignment mark
Avant d’utiliser cet objectif, veuillez lire attentivement ces instructions et le
manuel de l’appareil photo. Les illustrations utilisées dans les explications
sont celles d’un objectif AF-P DX NIKKOR 70–300 mm f/4.5–6.3G ED VR.
Remarque : Les objectifs DX sont destinés à être utilisés avec les refl ex numériques
Nikon DX. L’angle de champ d’un objectif fi xé sur un appareil photo de format DX
est égal à environ 1,5 × celui d’un objectif fi xé sur un appareil photo 24 × 36 mm.
Cet objectif n’est pas compatible avec les refl ex numériques suivants : gamme
D4, gamme D3, gamme D2, gamme D1, gamme D800, D700, D610, D600,
gamme D300, D200, D100, D90, D80, gamme D70, D60, D50, gamme
D40, D7000, D5100, D5000, D3200, D3100 et D3000 ainsi qu’avec les refl ex
argentiques. En cas d’utilisation avec un D5500, D5300 ou D3300, veillez à bien
mettre à jour au préalable le microprogramme (fi rmware) de l’appareil photo.
Si l’appareil photo est éteint ou s’est mis en mode veille, la bague de mise
au point ne peut pas être utilisée pour eff ectuer la mise au point et le sujet
ne sera pas net si la bague de zoom est tournée. Avant d’eff ectuer la mise
au point, rallumez l’appareil photo ou annulez son mode veille en appuyant
sur le déclencheur à mi-course.
L’autofocus et le télémètre fonctionnent à toutes les focales. Lorsque
vous utilisez cet objectif, ne tenez pas compte des sections du manuel de
l’appareil photo faisant référence à des restrictions en matière d’autofocus
et de télémètre avec une ouverture maximale moins lumineuse que f/5.6.
Pour votre sécurité
AVERTISSEMENTS
• Ne démontez pas ou ne modi ez pas le produit. En cas de dysfonctionnement,
ce produit ne doit être réparé que par un technicien qualifi é. Si ce produit
se casse suite à une chute ou à un autre accident, évitez de toucher
les parties exposées. Le non-respect de ces consignes de sécurité peut
provoquer un choc électrique ou d’autres blessures.
• En cas de dysfonctionnement, mettez immédiatement l’appareil photo hors tension.
En cas d’apparition de fumée ou d’une odeur inhabituelle provenant
du matériel, débranchez immédiatement l’adaptateur secteur et retirez
l’accumulateur de l’appareil photo, en faisant attention de ne pas vous
brûler. Continuer d’utiliser le matériel risque de provoquer un incendie ou
des blessures. Une fois l’accumulateur retiré, apportez votre matériel à un
centre Nikon agréé pour le faire contrôler.
• Gardez le produit au sec. N’exposez pas ce produit à l’eau ou ne le manipulez
pas avec les mains mouillées. Le non-respect de cette consigne de
sécurité peut provoquer un incendie ou un choc électrique.
• N’utilisez pas le matériel en présence de gaz in ammables. La manipulation du
matériel dans des stations-service ou en présence de propane, d’autres gaz
infl ammables ou de poussière peut provoquer une explosion ou un incendie.
• Ne regardez pas le soleil à travers l’objec tif ou le viseur de l’appareil photo. L’observation
du soleil ou de toute autre source lumineuse puissante à travers l’objectif ou
le viseur peut provoquer des troubles irrémédiables de la vision.
MISES EN GARDE
• Conservez hors de portée des enfants. Le non-respect de cette consigne de
sécurité peut provoquer des blessures ou le dysfonctionnement du produit.
• Ne focalisez pas les rayons du soleil à travers l’objectif. Les rayons du soleil
focalisés à travers l’objectif peuvent provoquer un incendie. Lorsque vous
photographiez des sujets à contre-jour, maintenez le soleil loin du cadre ;
si vous n’avez pas l’intention d’utiliser l’objectif avant longtemps, remettez
en place ses bouchons et rangez-le à l’abri de la lumière directe du soleil.
• Ne surchau ez pas le produit. Ne laissez pas ce produit dans des lieux exposés
à des températures très élevées, comme dans une voiture fermée en plein
soleil. N’emballez pas ce produit dans une serviette, un mouchoir ou ne
le recouvrez pas de quelque manière que ce soit lorsque vous l’utilisez. Le
non-respect de ces consignes de sécurité peut provoquer un incendie ou
le dysfonctionnement du produit.
Parties de l’objectif (Figure)
Repère de montage du parasoleil
q
Bague de mise au point
w
Bague de zoom
e
Échelle des focales
r
Repère de l’échelle des focales
t
Repère de montage de l’objectif
y
Contacts du microprocesseur
u
Parasoleil *
i
Repère de verrouillage du parasoleil
o
Repère d’alignement du parasoleil
!0
* Optionnel.
Fixer et retirer l’objectif
Fixer l’objectif
Mettez l’appareil photo hors tension et retirez son bouchon de boîtier.
z
Retirez le bouchon arrière de l’objectif.
x
Fixez l’objectif.
c
En maintenant le repère de montage de l’objectif aligné avec le repère
de montage sur le boîtier de l’appareil photo, positionnez l’objectif
dans la monture à baïonnette de l’appareil, puis faites tourner
l’objectif dans le sens opposé des aiguilles d’une montre jusqu’à ce
qu’il s’emboîte, le repère de montage de l’objectif vers le haut.
Retirer l’objectif
Mettez l’appareil photo hors tension.
z
Retirez l’objectif.
x
Pour retirer l’objectif, maintenez la commande de déverrouillage
de l’objectif enfoncée tout en faisant tourner l’objectif dans le
sens des aiguilles d’une montre.
Mise au point
Le mode de mise au point est celui sélectionné sur le boîtier. Reportez-vous
au manuel d’utilisation de l’appareil photo pour en savoir plus sur la sélection
du mode de mise au point. Il est à noter pour les utilisateurs des appareils
photo gamme D810, Df, D750, D7200, D7100 ou D5200 que si le boîtier entre
en mode veille, la zone mise au point changera lorsque le mode veille sera
annulé. Eff ectuez de nouveau la mise au point avant la prise de vue. Il est
préconisé de sélectionner de plus longues temporisations pour le mode veille
en mise au point manuelle ou dans les situations où le déclenchement risque
de ne pas intervenir immédiatement après la mise au point.
Autofocus
La mise au point est réglée automatiquement lorsque l’appareil photo est en
mode autofocus. La bague de mise au point permet également de faire le point
si vous maintenez le déclencheur appuyé à mi-course (ou si vous maintenez
la commande AF-ON appuyée) ; cette fonction est appelée « autofocus à
priorité manuelle » (M/A). L’autofocus reprend lorsque vous appuyez sur le
déclencheur à mi-course (ou lorsque vous appuyez sur la commande AF-ON)
une seconde fois. Notez que si vous touchez la bague de mise au point pendant
le fonctionnement de l'autofocus, le réglage de mise au point change.
Mise au point manuelle
Lorsque l’appareil photo est en mode de mise au point manuelle, il est possible
d’ajuster la mise au point en tournant la bague de mise au point de l’objectif.
Zoom
Avant de faire la mise au point, tournez la bague de zoom pour régler la
focale et cadrer la photographie.
Profondeur de champ
Si l’appareil photo dispose de la fonction d’aperçu de profondeur de champ,
la profondeur de champ peut être prévisualisée dans le viseur.
Ouverture
Réglez l’ouverture à l’aide des commandes de l’appareil photo.
Flash intégré
Lorsque vous utilisez le fl ash intégré d’un appareil photo qui en est équipé,
retirez le parasoleil pour éviter le vignettage (ombres créées là où l’extrémité
de l’objectif occulte le fl ash intégré).
Réduction de vibration (VR, AF-P DX NIKKOR 70–300 mm
f/4.5–6.3G ED VR uniquement)
La réduction de vibration (VR) est disponible lorsqu’un objectif AF-P DX
NIKKOR 70–300 mm f/4.5–6.3G ED VR est monté sur le boîtier et que vous
appuyez sur le déclencheur à mi-course. La réduction de vibration peut
être activée ou désactivée en passant par l’option VR optique des menus
de l’appareil photo ; lorsqu’elle est activée, cette fonction réduit le fl ou
provoqué par le bougé de l’appareil photo, permettant d’utiliser des vitesses
d’obturation jusqu’à 4,0 fois plus lentes que celles utilisées sinon, augmentant
ainsi la plage de vitesses d’obturation disponibles. Les eff ets de la réduction
de vibration sur la vitesse d’obturation ont été mesurés selon les normes CIPA
(Camera and Imaging Products Asssociation) ; les objectifs de format FX sont
évalués avec des boîtiers numériques de format FX, et les objectifs de format
DX avec des boîtiers de format DX. Les mesures des zooms sont eff ectuées en
position de zoom maximale.
Utiliser la réduction de vibration : Remarques
• Lorsque vous utilisez la réduction de vibration, appuyez sur le déclencheur
à mi-course et attendez que l’image se stabilise dans le viseur avant
d’appuyer sur le déclencheur jusqu’en fi n de course.
• Lorsque la réduction de vibration est activée, l’image dans le viseur peut être
fl oue une fois le déclencheur relâché. Cela n’indique pas un dysfonctionnement.
• Lorsque vous eff ectuez un fi lé panoramique, la réduction de vibration
s’applique uniquement au mouvement ne faisant pas partie du fi lé (par
exemple, si l’appareil photo est utilisé pour faire un fi lé horizontal, la
réduction de vibration ne s’applique qu’au tremblement vertical). Il est
ainsi beaucoup plus facile de réaliser de longs fi lés panoramiques.
• Si l’appareil photo est équipé d’un fl ash intégré, la réduction de vibration
est désactivée pendant que le fl ash se charge.
• La réduction de vibration est généralement recommandée lorsque
l’appareil photo est monté sur un trépied, mais vous pouvez aussi la
désactiver selon les conditions de prise de vue et le type de trépied.
• Il est recommandé d’utiliser la réduction de vibration lorsque l’appareil
photo est fi xé sur un monopode.
Parasoleil optionnel
Le parasoleil protège l’objectif et bloque la lumière diff use pouvant causer
de la lumière parasite ou une image fantôme.
Fixation du parasoleil
Alignez le repère de montage du parasoleil (
du parasoleil ( ), puis tournez le parasoleil (w) jusqu’à ce que le repère ●
soit aligné sur le repère de verrouillage du parasoleil (—
Lors de la fi xation ou du retrait du parasoleil, tenez-le près du symbole
sur sa base, et évitez de le serrer trop fermement. Un vignettage peut se
produire si le parasoleil n’est pas correctement attaché. Le parasoleil peut
être retourné et monté sur l’objectif lorsqu’il n’est pas utilisé. Lorsque le
parasoleil est retourné, vous pouvez le fi xer ou le retirer en le faisant pivoter
tout en le tenant au niveau du repère de verrouillage (—).
Entretien de l’objectif
• Ne prenez pas ou ne tenez pas l’objectif ou l’appareil photo en saisissant
uniquement le parasoleil.
• Maintenez les contacts du microprocesseur propres.
• Utilisez une souffl ette pour enlever la poussière et les peluches sur la surface de
l’objectif. Pour eff acer les taches et les traces de doigt, imprégnez un morceau
de tissu propre en coton avec une petite quantité d’éthanol ou de nettoyant
pour objectif ou utilisez une lingette de nettoyage d’objectif, et nettoyez avec
un mouvement circulaire à partir du centre vers l’extérieur, tout en prenant
soin de ne pas laisser de taches, ni de toucher le verre avec vos doigts.
• N’utilisez jamais de solvants organiques comme un diluant à peinture ou
du benzène pour nettoyer l’objectif.
• Le parasoleil ou les fi ltres NC peuvent être utilisés pour protéger la lentille
avant.
• Fixez les bouchons avant (à emboîtement) et arrière avant de ranger
l'objectif dans sa valise de transport.
• Si vous n’avez pas l’intention d’utiliser l’objectif pendant une période
prolongée, rangez-le dans un endroit frais et sec pour éviter la moisissure
et la rouille. Ne le rangez pas à la lumière directe du soleil ou avec des
boules antimites de naphtaline ou de camphre.
• Tenez l’objectif au sec. La formation de rouille sur le mécanisme interne
peut causer des dégâts irréparables.
• Laisser l’objectif dans des endroits extrêmement chauds peut endommager
ou déformer les éléments composés de plastique renforcé.
Accessoires fournis
• Bouchon avant d’objectif encliquetable 58 mm LC-58
• Bouchon arrière d’objectif
Accessoires compatibles
• Filtres à vis 58 mm
• Parasoleil à baïonnette HB-77
• Étui pour objectif CL-1020
• Bouchon arrière d’objectif LF-4
Caractéristiques
Type
Focale
Ouverture maximale
Construction optique
Angle de champ
Échelle des focales
Information de
distance
Zoom
Mise au point
Réduction de vibration
(AF-P DX NIKKOR
70–300 mm f/4.5–6.3G
ED VR uniquement)
Distance minimale de
mise au point
Lamelles de diaphragme
Diaphragme
Plage des ouvertures
Mesure
Diamètre de xation
pour ltre
Dimensions
Poids
Nikon se réserve le droit de modifi er les caractéristiques du matériel décrit dans
ce manuel à tout moment et sans préavis.
Objectif AF-P DX de type G avec microprocesseur
intégré et monture F
70 – 300 mm
f/4.5 – 6.3
14 lentilles en 10 groupes (dont 1 lentille en verre ED)
– 5°20
22°50
Graduée en millimètres (70, 100, 135, 200, 300)
Communiquée au boîtier de l’appareil photo
Zoom manuel utilisant une bague de zoom indépendante
Autofocus commandé par un moteur pas à pas et
bague de mise au point pour la mise au point manuelle
Décentrement avec voice coil motors (VCMs)
1,1 m depuis le plan focal à toutes les focales
7 (diaphragme circulaire)
Intégralement automatique
• Focale 70 mm : f/4.5 – 22
• Focale 300 mm : f/6.3 – 32
Pleine ouverture
58 mm (P = 0,75 mm)
Environ 72 mm de diamètre maximum × 125 mm
(distance à partir du plan d’appui de la monture d’objectif de
l’appareil photo)
AF-P DX NIKKOR 70-300 mm f/4.5-6.3G ED VR : Environ
415 g
AF-P DX NIKKOR 70-300 mm f/4.5-6.3
400 g
●) sur le repère d’alignement
).
G ED
: Environ
Antes de utilizar este produto, por favor, leia com atenção tanto estas
instruções como o manual da câmara. As ilustrações nestas instruções
mostram uma objetiva AF-P DX NIKKOR 70–300 mm f/4.5–6.3G ED VR.
Nota: As objetivas DX devem ser usadas com câmaras refl ex de objetiva simples
digitais de formato DX da Nikon. O ângulo de visão de uma objetiva numa
câmara de formato DX é equivalente à de uma objetiva com uma distância
focal cerca de 1,5 × mais longa montada numa câmara de formato 35 mm.
Esta objetiva não suporta as câmaras digitais SLR ou câmaras de fi lmar SLR da série
D4, série D3, série D2, série D1, série D800, D700, D610, D600, série D300, D200,
D100, D90, D80, série D70, D60, D50, série D40, D7000, D5100, D5000, D3200,
D3100 ou D3000. Quando a utilizar com uma D5500, D5300 ou D3300, certifi quese de que o fi rmware da câmara foi atualizado para a versão mais recente.
Se a câmara estiver desligada ou o temporizador de espera expirar, o anel de
focagem não pode ser usado para focar a câmara e rodar o anel de zoom fará
com que o motivo fi que desfocado. Antes de focar, ligue a câmara ou reinicie o
temporizador de espera premindo ligeiramente o botão de disparo do obturador.
As funções de focagem automática e de telemetria são suportadas por
todas as distâncias focais. Ao utilizar esta objetiva, ignore quaisquer
secções do manual da câmara que listem restrições à focagem automática
e telemetria para objetivas com uma abertura máxima inferior a f/5.6.
Para Sua Segurança
AVISOS
• Não desmontar nem modi car. Em caso de mau funcionamento, o produto
deve ser reparado apenas por um técnico qualifi cado. Se o produto se
partir e abrir como resultado de uma queda ou outro acidente, evite tocar
nas peças expostas. A não observância destas precauções poderá resultar
em choque elétrico ou outras lesões.
• Desligar imediatamente a câmara em caso de avaria. Se notar fumo ou um
odor estranho com origem no equipamento, desligue imediatamente o
adaptador CA e remova a bateria da câmara, tendo cuidado para evitar
queimaduras. A operação continuada pode resultar em incêndio ou lesão.
Após remover a bateria, leve o equipamento a um centro de assistência
autorizado da Nikon para inspeção.
• Manter seco. Não exponha o produto a água nem o manuseie com as
mãos molhadas. A não observância desta precaução poderá resultar em
incêndio ou choque elétrico.
• Não utilizar na presença de gás in amável. Trabalhar com o equipamento em
postos de gasolina ou na presença de gás propano ou outro gás ou pó
infl amável pode resultar em explosão ou incêndio.
• Não olhar para o sol através da objetiva ou do visor da câmara. Visualizar o sol ou
outra fonte de iluminação forte através da objetiva ou visor pode causar
incapacidade visual permanente.
PRECAUÇÕES
• Manter fora do alcance das crianças. A não observância desta precaução
poderá resultar em lesões ou avaria do produto.
• Não focar a luz solar através da objetiva. A luz do sol focada através da objetiva pode
causar incêndio. Ao fotografar motivos em contraluz, mantenha o sol fora do
enquadramento; se a objetiva não for utilizada durante um período prolongado,
volte a colocar a tampa da objetiva e armazene longe de luz solar direta.
• Não aquecer em demasia. Não deixe o produto em locais expostos a
temperaturas extremamente altas, tal como num veículo fechado sob luz
solar direta, nem embrulhe o produto numa toalha ou lenço ou de outra
forma o cubra enquanto este estiver a ser utilizado. A não observância
destas precauções poderá resultar em incêndio ou avaria do produto.
Peças da Objetiva (Figura)
Marca de montagem do para-sol da objetiva
q
Anel de focagem
w
Anel de zoom
e
Escala de distâncias focais
r
Marca de distâncias focais
t
Marca de montagem da objetiva
y
Contactos CPU
u
Para-sol da objetiva *
i
Marca de bloqueio do para-sol da objetiva
o
Marca de alinhamento do para-sol da objetiva
!0
* Opcional.
Montar e Remover a Objectiva
Montar a objectiva
Desligar a câmara e remova a tampa do corpo da câmara.
z
Remover a tampa da objectiva traseira.
x
Montar a objectiva.
c
Mantendo a marca de montagem da objectiva alinhada com a
marca de montagem no corpo da câmara, posicione a objectiva
no encaixe de baioneta da câmara e depois rode a objectiva no
sentido oposto ao dos ponteiros do relógio até fazer um clique
no seu lugar, com a marca de montagem da objectiva para cima.
Remover a objectiva
Desligar a câmara.
z
Remover a objectiva.
x
Para remover a objetiva, prima o botão de desbloqueio da
objetiva da câmara enquanto roda a objetiva na direção dos
ponteiros do relógio.
Focagem
O modo de focagem é determinado pelo modo de focagem da câmara.
Consulte o manual da câmara para informação sobre a seleção do modo de
focagem da câmara. Os utilizadores das câmaras série D810, Df, D750, D7200,
D7100 ou D5200 devem notar que, se for permitido que o temporizador
de espera expire, a posição de focagem muda quando o temporizador for
reiniciado. Foque de novo antes de disparar. São recomendados tempos de
espera mais longos para a focagem manual e em outras situações em que
pode não disparar o obturador imediatamente após focar.
Focagem Automática
A focagem é ajustada automaticamente quando a câmara está no modo
de focagem automática. O anel de focagem também pode ser utilizado
para focar a câmara se o botão de disparo do obturador for mantido
ligeiramente premido (ou se o botão AF-ON for mantido premido); este
processo denomina-se "focagem automática com opção manual" (M/A).
A focagem automática será retomada quando o botão de disparo do
obturador for ligeiramente premido (ou o botão AF-ON for premido) uma
segunda vez. Note que tocar no anel de focagem enquanto a focagem
automática estiver em vigor altera a posição de focagem.
Focagem Manual
Quando a câmara está no modo de focagem manual, a focagem pode ser
ajustada rodando o anel de focagem da objetiva.
Zoom
Antes de focar, rode o anel de zoom para ajustar a distância focal e enquadrar
a fotografi a.
Profundidade de Campo
Se a câmara oferecer pré-visualização de profundidade de campo, a
profundidade de campo pode ser pré-visualizada no visor.
Abertura
A abertura é ajustada utilizando os controlos da câmara.
Unidades de Flash Incorporado
Quando usar o fl ash incorporado em câmaras equipadas com uma unidade
de fl ash incorporado, remova o para-sol da objetiva para evitar a vinhetagem
(sombras criadas onde o fi nal da objetiva obscurece o fl ash incorporado).
Redução da Vibração (VR, Apenas AF-P DX NIKKOR
70–300 mm f/4.5–6.3G ED VR)
A redução da vibração (VR) está disponível quando uma objetiva AF-P DX
NIKKOR 70–300 mm f/4.5–6.3G ED VR está montada na câmara e o botão
de disparo do obturador é ligeiramente premido. A redução da vibração
pode ser ligada e desligada utilizando a opção VR ótico nos menus da
câmara; quando ligada, reduz o efeito tremido causado pela vibração da
câmara, permitindo velocidades do obturador até 4,0 passos mais lentos que
o que seria normalmente o caso, aumentando as velocidades do obturador
disponíveis. Os efeitos da VR na velocidade do obturador são medidos
de acordo com as normas da Camera and Imaging Products Association
(CIPA); as objetivas de formato FX são medidas utilizando câmaras digitais
de formato FX e as objetivas de formato DX utilizando câmaras de formato
DX. As objetivas de zoom são medidas com o zoom no máximo.
Utilizar a Redução da Vibração: Notas
• Ao utilizar a redução da vibração, prima ligeiramente o botão de disparo
do obturador e espere que a imagem no visor estabilize antes de premir
completamente o botão de disparo do obturador.
• Quando a redução da vibração está ativa, a imagem no visor poderá fi car
desfocada após o obturador ser disparado. Isto não indica mau funcionamento.
• Quando a câmara é orientada, a redução da vibração aplica-se apenas
ao movimento que não faz parte da orientação (se a câmara estiver
orientada horizontalmente, por exemplo, a redução da vibração será
aplicada apenas à vibração vertical), tornando muito mais fácil orientar a
câmara suavemente num arco amplo.
• Se a câmara estiver equipada com um fl ash incorporado, a redução da
vibração será desativada enquanto o fl ash carrega.
• A redução da vibração é geralmente recomendada quando a câmara está
montada num tripé, apesar de poder preferir desligá-la dependendo das
condições fotográfi cas e do tipo de tripé.
• É recomendado que utilize a redução da vibração quando a câmara está
montada num monopé.
O Para-sol da Objetiva Opcional
Os para-sóis da objetiva protegem a objetiva e bloqueiam a luz dispersa
que causaria de outro modo refl exo ou efeito fantasma.
Montar o Para-sol
Alinhe a marca de montagem do para-sol da objetiva (●) com a marca de
alinhamento do para-sol da objetiva (
que a marca ● esteja alinhada com a marca de bloqueio do para-sol da
objetiva (—).
Ao montar ou remover o para-sol, segure-o perto do símbolo na sua
base e evite apertá-lo em demasia. Pode ocorrer vinhetagem se o parasol não estiver montado corretamente. O para-sol pode ser revertido e
montado na objetiva quando não estiver a ser utilizado. Quando o parasol estiver invertido, pode ser montado e removido rodando-o enquanto o
segura perto da marca de bloqueio (—).
Cuidados com a Objetiva
• Não pegue ou segure a objetiva ou a câmara utilizando apenas o para-sol
da objetiva.
• Mantenha os contactos CPU limpos.
• Utilize uma pera de ar para remover pó e sujidade das superfícies da
objetiva. Para remover manchas e impressões digitais, aplique uma
pequena quantidade de etanol ou produto de limpeza de objetivas num
pano macio e limpo de algodão ou pano de limpeza de objetivas e limpe
do centro para fora utilizando um movimento circular, tendo cuidado
para não deixar nódoas nem tocar no vidro com os seus dedos.
• Nunca utilize solventes orgânicos como diluente ou benzeno para limpar
as objetivas.
• O para-sol da objetiva ou os fi ltros NC podem ser utilizados para proteger
o elemento de objetiva frontal.
• Monte as tampas traseira e frontal de encaixe antes de colocar a objetiva
na bolsa da objetiva.
• Se a objetiva não for utilizada durante um período extenso, armazene
num local fresco e seco para evitar bolor e ferrugem. Não armazene sob
luz solar direta ou com bolas de naftalina ou cânfora.
• Mantenha a objetiva limpa. Ferrugem no mecanismo interno pode causar
danos irreparáveis.
• Deixar a objetiva em locais extremamente quentes pode danifi car ou
deformar peças feitas de plástico reforçado.
Acessórios Fornecidos
• Tampa Frontal da Objetiva de encaixe de 58 mm LC-58
• Tampa Traseira da Objetiva
Acessórios Compatíveis
• Filtros de rosca de 58 mm
• Para-sol da Baioneta HB-77
• Bolsa da Objetiva CL-1020
• Tampa Traseira da Objetiva LF-4
Especifi cações
Tipo Objetiva de tipo G AF-P DX com CPU
Distância focal 70 – 300 mm
Abertura máxima f/4.5 – 6.3
Construção da objetiva
Ângulo de visão 22°50 – 5°20
Escala de distâncias focais
Informações da distância Enviadas para a câmara
Zoom Zoom manual utilizando o anel de zoom
Focagem
Redução da vibração (apenas
AF-P DX NIKKOR 70–300 mm
f/4.5–6.3G ED VR)
Distância de focagem mínima 1,1 m do plano focal em todas as posições
Lâminas do diafragma 7 (abertura redonda do diafragma)
Diafragma Completamente automático
Alcance da abertura • Distância focal de 70mm: f/4.5 – 22
Medição Abertura completa
Tamanho do ltro 58 mm (P = 0,75 mm)
Dimensões Aprox. 72 mm de diâmetro máximo ×
Peso AF-P DX NIKKOR 70–300 mm f/4.5–6.3G
A Nikon reserva-se o direito de alterar todas as especifi cações do hardware
descritas neste manual a qualquer momento e sem aviso prévio.
) e depois rode o para-sol (w) até
incorporado e montagem F
14 elementos em 10 grupos (incluindo 1 elemento
de objetiva ED)
Graduada em milímetros (70, 100, 135, 200, 300)
independente
Focagem automática controlada por um
motor de passos; anel de focagem separado
para focagem manual
Deslocamento da lente utilizando voice
coil motors (VCMs)
de zoom
• Distância focal de 300 mm: f/6.3 – 32
125 mm (distância do rebordo de montagem da
objetiva da câmara)
ED VR: Aprox. 415 g
AF-P DX NIKKOR 70–300 mm f/4.5–6.3G
ED: Aprox. 400 g
使用产品前请仔细阅读本使用说明书,并请妥善保管。
说明书中的插图显示的均为
镜头。
ED VR
注意
照相机上镜头的视角,相当于安装在
为该镜头
本镜头不支持
700
D
70
D
3200
D
相机。将镜头用于
件已更新至最新版本。
若照相机处于关闭状态或待机定时器时间已耗尽,对焦环将无法用
于照相机对焦,且旋转变焦环将导致拍摄对象变得模糊。进行对
焦前,请先开启照相机或通过半按快门释放按钮重新启动待机定时
器。
在所有焦距下均支持自动对焦和测距仪功能。使用本镜头时,请忽
略照相机说明书中的以下内容部分 :最大光圈低于
自动对焦和测距仪限制。
■
为预防发生伤害、损失或其他事故,请在使用本产品前仔细阅读
“安全须知”,并以正确的方法使用。请在阅读之后妥善保管本说明
书,以便随时查阅。
A
A
镜头适用于尼康DX格式数码单镜反光照相机。DX格式
:
DX
倍的镜头的视角。
1.5
、
610
D
系列、
、
D
安全须知
警告
注意
系列、
4
D
、
600
D
、
60
D
以及
3100
(有可能造成人员死亡或负重伤的事项)
(有可能造成人身伤害或物品损害的事项)
AF-P DX
3
D
、
300
D
、
50
D
D
数码单镜 反光照相机和胶卷单镜反光照
3000
D
、
5500
D
系列、
D
系列、
系列、
40
或
5300
D
尼克尔
35
mm
系列、
2
200
D
3300
D
70–300
mm f/4.5–6.3G
格式照相机上焦距约
系列、
1
D
、
D
7000
D
时, 请 确 保 照 相 机 固
100
、
D
f/5.
、
5100
6
D
90
D
、
的镜头时的
800
系列、
、
D
5000
D
80
图示和符号的实例
(不允许进行的行为)符号。
禁止
F
(必须进行的行为)符号。
执行
C
警告
A
禁止 切勿自行拆解、修理或改装。
F
当产品由于跌落而破损使得内部外露时,切勿用手触碰
禁止
F
C
F
F
F
C
C
F
■
q
w
e
r
t
y
u
i
o
!0
另购。
*
■
外露部分。
否则将会导致触电或受伤。
当发现产品变热、冒烟或发出焦味等异常时,请立刻取
出照相机中的电池或切断照相机电源(电源适配器)。
执行
若放任不管,将会导致起火或烫伤。
取出电池或切断电源时,请小心勿被烫伤。
请委托尼康售后服务中心或尼康特约维修店进行修理。
切勿使产品被水淋湿。
禁止
勿用湿手触碰。
否则将导致触电或起火。
切勿在有可能起火、爆炸的场所使用。
禁止
在液化石油气 站、汽油加油站等会产生易燃性气体、粉
尘的场所使用产品,将会导致起火或爆炸。
切勿使用镜头或照相机直接观看太阳或强光。
禁止
否则将会导致失明或视觉损伤。
注意
A
切勿在婴幼儿伸手可及之处保管本产品。
执行
否则将会导致受伤或故障。
进行背光拍摄时,务必使太阳充分偏离视角。
执行
不使用时,请盖上镜头盖,或者存放在没有阳光照射处。
阳光会聚焦,并将导致起火。
切勿置于高温的地方(如夏天封闭的车内或直射阳光
下)。
禁止
切勿将产品用手帕或毛巾包裹着使用。
否则将会导致故障或起火。
镜头部件(图)
镜头遮光罩安装标记
对焦环
变焦环
焦距刻度
焦距标记
镜头安装标记
接点
CPU
镜头遮光罩
镜头遮光罩锁定标记
镜头遮光罩对齐标记
*
安装和取下镜头
安装镜头
关闭照相机并取下照相机机身盖。
z
取下镜头后盖。
x
安装镜头。
c
将镜头安装标记和照相机机身上的安装标记对齐,再将镜头
插入照相机的卡口中,然后逆时针旋转镜头直至其卡入正确
位置发出咔嗒声,此时镜头安装标记在顶部。
取下镜头
关闭照相机。
z
取下镜头。
x
若要取下镜头,请按住照相机镜头释放按钮并顺时针旋转镜
头。
对焦
■
对焦模式由照相机对焦模式决定。有关选择照相机对焦模式的信
息, 请 参 阅 照 相 机 说 明 书。
或
7100
D
重新启动待机定时器时,对焦位置将会发生改变。请在拍摄前重新
对焦。当进行手动对焦以及在对焦后可能无法立即释放快门的其他
情况下,推荐您选择较长的待机时间。
照相机用户须注意,若任由待机定时器时间耗尽,
5200
D
810
D
系列、Df、
D
750
、
D
7200
自动对焦
当照相机处于自动对焦模式时,对焦会自动调整。若持续半按快门
释放按钮(或持续按下
机对焦;这就是所谓的“手动优先的自动对焦”(
快门释放按钮(或按下
在自动对焦处于有效状态时触碰对焦环将会改变对焦位置。
按钮),您也可使用对焦环进行照相
AF-ON
M/A
按钮)时将恢复自动对焦。请注意,
AF-ON
)。再次半按
手动对焦
当照相机处于手动对焦模式时,可通过旋转镜头对焦环来调整对
焦。
变焦
■
对焦之前,请旋转变焦环调整焦距并进行构图。
景深
■
若照相机支持景深预览,景深将可在取景器中进行预览。
光圈
■
请使用照相机控制调整光圈。
内置闪光灯组件
■
当使用配备有一个内置闪光灯组件的照相机上的内置闪光灯时,请
取下镜头遮光罩以避免产生渐晕(因镜头末端遮挡内置闪光灯光线
所产生的阴影)。
减震(
■
f/4.5–6.3G ED VR
当照相机上安装了
镜头且半按快门释放按钮时,减震(VR)可用。您可使用照相机
菜单中的光学减震选项开启和关闭减震 ;减震开启时可减少照相
机震动所引起的模糊,从而使快门速度可比一般情况时最多降低
约
档,同时增加可用快门速度的范围。减震对快门速度的影响
4.0
是根据日本相机影像器材工业协会(
格式镜头时使用的是FX格式数码照相机,测量DX格式镜头时使
用的是
,仅限于
VR
AF-P DX
尼克尔
70–300
mm
)
尼克尔
AF-P DX
格式照相机。变焦镜头是在最大变焦设定下进行的测量。
DX
70–300
mm f/4.5–6.3G ED VR
)标准所测量 ;测量
CIPA
FX
使用减震:注意事项
•
使用减震时,请先半按快门释放按钮,然后待取景器中的图像稳
定之后再完全按下快门释放按钮。
•
启用减震时,取景器中的图像在您释放快门后可能会变得模糊。
这并非故障。
•
转动照相机时,减震仅应用于非转动部分的动作(例如,若照相
机进行水平转动,则减震将仅应用于垂直方向的震动),因而更易
于以较大幅度平稳地转动照相机。
•
若照相机配备有内置闪光灯,闪光灯充电时减震将无法使用。
•
当照相机固定于三脚架时,一般推荐使用减震,但根据拍摄环境
和三脚架类型的不同,有时可能选择关闭减震更合适。
•
当照相机固定于单脚架时,推荐使用减震。
另购的镜头遮光罩
■
镜头遮光罩可保护镜头并阻挡可能导致杂光或鬼影的散射光线。
安装遮光罩
将镜头遮光罩安装标记(●)与镜头遮光罩对齐标记( )对齐,
然后旋转遮光罩(w)直至●标记与镜头遮光罩锁定标记(
对齐。
、
、
安装或取下遮光罩时,请在其底部的
免握得太紧。若未正确安装好遮光罩,则可能会产生渐晕。不使用
时,可将遮光罩反转并固定在镜头上。遮光罩被反转时,在锁定标
记( —
■
•
•
•
•
•
•
•
•
•
•
■
•
•
■
•
•
•
•
■
)附近将其握住,然后通过旋转即可安装或取下遮光罩。
镜头保养
拿起或持握镜头或照相机时,切勿仅持拿镜头遮光罩。
保持CPU
用吹气球去除镜头表面的灰尘和浮屑。若要去除污点和指纹,可
使用一块滴有少许乙醇或镜头清洁剂的干净软棉布或镜头清洁
纸,以圆周运动方 式从 里向外进 行 清 洁。注意不 要留下污渍,也
不要用手指碰触玻璃。
切勿使用涂料稀释剂或苯等有机溶剂清洁镜头。
镜头遮光罩或
将镜头放入镜头套之前,请先盖好后盖和插入式前盖。
若在较长时间内不使用镜头,请将其存放在阴凉干燥的地方以防
止发霉和生锈。切不可存放在直射阳光下,也不可与石脑油或樟
脑丸一起存放。
保持镜头干燥。内部构造生锈将导致无法挽回的损坏。
将镜头放置在过于炎热的地方将会使强化塑料部件受损或变形。
运输产品时,请在包装箱内装入足够多的缓冲材料,以减少(避
免) 由 于 冲 击 导 致 产 品 损 坏。
随附配件
58
镜头后盖
兼容的配件
58
卡口式镜头遮光罩
镜头套
镜头后盖
技术规格
类型
焦距
最大光圈
镜头结构
视角
焦距刻度
距离信息
变焦
对焦
减震(仅限于
AF-P DX
70–300
接点清洁。
搭扣式镜头前盖
mm
旋入式滤镜
mm
1020
CL-
LF-
尼克尔
mm
滤镜可用于保护前部镜片组件。
NC
58
LC-
77
HB-
4
带内置
CPU和F
70
300
–
mm
f/4.5 – 6.
10组14
22°50
以毫米为单位(70、
输出到照相机
使用独立变焦环的手动变焦
可进行由步 进马达 控制的自动对焦,也具备用
于手动对焦的独立对焦环
使用音圈马达(
3
片(包括1枚ED镜片组件)
′
°20′
5
–
f/4.5–6.3G ED
)
VR
最近对焦距离
光圈叶片
光圈
光圈范围
测光
滤镜附件尺寸
尺寸
重量
尼康公司保留可随时更改说明书内载之硬件技术规格的权利,而无
须事先通知。
、
(至焦平面,所有变焦位置)
1.1
m
片(圆形光圈孔)
7
全自动
•
•
全开光圈测光
58
约
头卡口边缘 开始的距离)
AF-P DX
约
AF-P DX
约
70
300
mm
72
415
400
mm
mm
(
mm
g
g
焦距 :
焦距 :
P = 0.75 mm
(最大直径)×
尼克尔
尼克尔
标记附近将其握住,并避
卡口的G型
AF-P DX
100、135、200、300
)的镜头位移
VCM
f/4.5 – 22
32
f/6.3 –
)
125
mm
70–300
mm f/4.5–6.3G ED VR:
70–300
mm f/4.5–6.3G ED :
镜头
(从照相机镜
)
—
)
Page 2
繁體中文
Ș
Ț
Ț
Ț
ǎ
Demi Keamanan Anda
AAPERINGATAN
AAPERINGATAN
■■Bagian-bagian Lensa (Gambar)
■■Memasang dan Melepas Lensa
■■Fokus
■■Zoom
■■Kedalaman Ruang
■■Bukaan Diafragma
■■Unit Lampu Kilat Terpasang
■■Pengurang Guncangan (VR, AF-P DX NIKKOR 70–
300 mm f/4.5–6.3G ED VR Saja)
■■Tudung Lensa Opsional
■■Perawatan Lensa
■■Aksesori yang Disertakan
■■Aksesori Kompatibel
■■Spesifi kasi
Tipe
Panjang fokal
Bukaan diafragma
maksimal
Konstruksi lensa
Sudut gambar
Skala panjang fokal
Informasi jarak
Zoom
Memfokus
Pengurang guncangan
(AF-P DX NIKKOR
70–300 mm f/4.5–6.3G
ED VR Saja)
Jarak fokus minimum
Bilah diafragma
Diafragma
Kisaran bukaan
Pengukuran
Ukuran tambahan lter
Dimensi
Berat
在使用本產品前,請仔細閱讀這些指南和相機說明書。
說明書中的插圖顯示的均為
6.3G ED VR
注意:
上鏡頭的畫角,相當於安裝在
倍的鏡頭的畫角。
本鏡頭不支援
鏡頭。
DX 鏡頭適用於尼康 DX 格式數碼單鏡反光相機。DX 格式相機
D4 系列、D3 系列、D2 系列、D1 系列、D800 系列、
AF-P DX NIKKOR 70–300 mm f/4.5–
35 mm 格式相機上焦距約為該鏡頭 1. 5
D700、D610、D600、D300 系列、D200、D100、D90、D80、D70
系列、D60、D50、D40 系列、D7000、D5100、D5000、D3200、
D3100 以及 D3000 數碼單鏡反光相機和菲林單鏡反光相機。將鏡頭用
於 D5500、D5300 或 D3300 時, 請 確 保 相 機 韌 體 已 更 新 至 最 新 版 本。
若相機處於關閉狀態或待機定時時間已耗盡,對焦環將無法用於相機
對焦,且旋轉變焦環將導致主體變得模糊。進行對焦前,請先開啟相
機或透過半按快門釋放按鍵重新啟動待機定時。
在所有焦距下均支援自動對焦和測距器功能。使用本鏡頭時,請忽略
相機說明書中的以下內容部分:最大光圈低於
焦和測距器限制。
f/5.6 的鏡頭時的自動對
另購的遮光罩
■
遮光罩可保護鏡頭並阻擋可能導致眩光或鬼影的散射光線。
安裝遮光罩
將遮光罩接環標記(●)與遮光罩對齊標記( )對齊,然後旋轉遮
光罩(w)直至
安裝或取下遮光罩時,請在其底部的 標記附近將其握住,並避免握
得太緊。若未正確安裝好遮光罩,則可能會產生邊暈。不使用時,可將
遮光罩反轉並固定在鏡頭上。遮光罩被反轉時,在鎖定標記(—
近將其握住,然後透過旋轉即可安裝或取下遮光罩。
● 標記與遮光罩鎖定標記(—
)對齊。
)附
安全須知
鏡頭保養
警告
A
•
勿自行拆解或改裝。遇到故障時,本產品只能由有資格的維修技師進
行修理。若本產品因為跌落或其他意外事故造成破損,請不要觸碰外
露的零件,否則可能導致觸電或其他傷害事故。
•
發生故障時立刻關閉相機。當您發現本裝置冒煙或發出異味時,請立
刻拔下
AC 變壓器的插頭並取出相機電池,注意避免被灼傷。若在此
情形下繼續使用,將可能導致火災或受傷。請在取出電池後,將裝置
送到尼康授權維修服務中心進行檢查維修。
•
保持乾爽。切勿使本產品接觸到水,也不要用濕手接觸,否則可能導
致火災或觸電。
•
勿在易燃氣體環境中使用。在加油站或者有丙烷氣或其他易燃氣體或
粉塵的環境中操作本裝置可能導致爆炸或火災。
•
圖 /Gambar /
勿透過鏡頭或相機觀景器觀看太陽。透過鏡頭或觀景器觀看太陽或
其他明亮光源,可能會導致永久性的視覺損傷。
注意事項
A
•
勿在兒童伸手可及之處保管本產品。若不遵守此注意事項,可能會導
致受傷或產品故障。
•
勿透過鏡頭聚焦陽光。陽光透過鏡頭聚焦可能會引起火災。拍攝逆光
主體時,請不要讓太陽進入構圖範圍;若將在較長時間內不使用鏡頭,
請蓋好鏡頭蓋並將其存放在遠離直射陽光的地方。
•
勿加熱。請勿將本產品置於極其高溫的場所(如直射陽光下封閉的車
內),也不要在使用期間用毛巾或手帕裹住本產品或者遮蓋本產品,
否則可能導致火災或產品故障。
鏡頭部件(圖)
■
遮光罩接環標記
q
對焦環
w
變焦環
e
焦距尺
r
焦距標記
t
鏡頭接環標記
y
CPU接點
u
*
遮光罩
i
遮光罩鎖定標記
o
遮光罩對齊標記
!0
* 另購。
安裝和取下鏡頭
■
安裝鏡頭
關閉相機並取下相機機身蓋。
z
取下鏡頭後蓋。
x
安裝鏡頭。
c
將鏡頭接環標記和相機機身上的接環標記對齊,再將鏡頭插入相機
的刺刀式接環中,然後逆時針旋轉鏡頭直至其卡入正確位置發出喀
嚓聲,此時鏡頭接環標記在頂部。
取下鏡頭
關閉相機。
z
取下鏡頭。
x
若要取下鏡頭,請按住相機鏡頭釋放按鍵並順時針旋轉鏡頭。
對焦
■
對焦模式由相機對焦模式決定。有關選擇相機對焦模式的資訊,請參
見相機說明書。D810 系列、Df、D750、D7200、D7100 或 D5200 相
機用戶須注意,若任由待機定時時間耗盡,重新啟動待機定時將會改
變對焦位置。請在拍攝前重新對焦。當進行手動對焦以及在對焦後可
能無法立即釋放快門的其他情況下,建議您選擇較長的待機時間。
■
•
拿起或持握鏡頭或相機時,切勿僅持拿遮光罩。
•
保持CPU 接點清潔。
•
用吹氣球去除鏡頭表面的灰塵和浮屑。若要去除污點和指紋,可使用
一塊滴有少許乙醇或鏡頭清潔劑的乾淨軟棉布或鏡頭清潔紙,以圓
周運動方式從裡向外進行清潔。注意不要留下污漬,也不要用手指碰
觸玻璃。
•
切勿使用塗料稀釋劑或苯等有機溶劑清潔鏡頭。
•
遮光罩或
•
將鏡頭放入鏡頭套之前,請先蓋好後蓋和插入式前蓋。
•
若在較長時間內不使用鏡頭,請將其存放在陰涼乾爽的地方以防止
發霉和生銹。切不可存放在直射陽光下,也不可與石腦油或樟腦丸一
起存放。
•
保持鏡頭乾爽。內部構造生銹將導致無法挽回的損壞。
•
將鏡頭放置在過於炎熱的地方將會使強化塑膠部件受損或變形。
■
•
58 mm 扣入式鏡頭前蓋 LC-58
•
鏡頭後蓋
■
•
58 mm 旋入式濾鏡
•
刺刀式遮光罩
•
鏡頭套
•
鏡頭後蓋
■
類型 帶內置 CPU 和 F接環的G 型 AF-P DX鏡頭
焦距 70 – 30 0 mm
最大光圈 f/4.5– 6.3
鏡頭結構 10 組 14 片(包括 1 個 ED 鏡片元件)
畫角 22°50′ – 5°20′
焦距尺 以毫米為單位 (70、100、135、200、300)
距離資訊 輸出主體與相機之間的距離資訊
變焦 使用獨立變焦環的手動變焦
對焦 可進行由步進 馬達控制的自動對焦,也具備用於手
減震(
DX NIKKOR 70–
300 mm f/4.5–
6.3G ED VR
最短對焦距離 1.1 m(至焦平面,所有變焦位置)
光圈葉片 7 片(圓形光圈孔)
光圈 全自動
光圈範圍
測光 全開光圈測光
濾鏡接口大小 58 mm(P = 0.75 mm)
尺寸 約 72 mm(最大直徑)×12 5 mm(從相機鏡頭接
重量
NC 濾鏡可用於保護前部鏡片元件。
隨附配件
兼容的配件
HB-77
CL-1020
LF-4
技術規格
動對焦的獨立對焦環
僅限於 AF-P
使用音圈馬達(VCM)的鏡片移動
)
•
70 mm 焦距:f/4.5 – 22
•
300 mm 焦距:f/6.3 – 32
環邊緣開始的距離)
AF-P DX NIKKOR 70–300 mm f/4.5–6.3G ED VR:
約 415 g
AF-P DX NIKKOR 70–300 mm f/4.5–6.3G ED:
約 400 g
尼康公司保留可隨時更改說明書內載之硬件技術規格的權利,而無須
事先通知。
自動對焦
當相機處於自動對焦模式時,對焦會自動調整。若持續半按快門釋放
按鍵(或持續按下 AF-ON 按鍵),您也可使用對焦環進行相機對焦;
這就是所謂的“自動對焦(連手動優先)”(M/A)。再次半按快門釋放
按鍵(或按下
處於有效狀態時觸碰對焦環將會改變對焦位置。
AF-ON 按鍵)時將恢復自動對焦。請注意,在自動對焦
手動對焦
當相機處於手動對焦模式時,可透過旋轉鏡頭對焦環來調整對焦。
變焦
■
對焦之前,請旋轉變焦環調整焦距並進行構圖。
景深
■
若相機支援景深預覽,景深將可在觀景器中進行預覽。
光圈
■
請使用相機控制調整光圈。
內置閃光燈元件
■
當使用配備有一個內置閃光燈元件的相機上的內置閃光燈時,請取下
遮光罩以避免產生邊暈(因鏡頭末端遮擋內置閃光燈光線所產生的陰
影)。
VR,僅限於 AF-P DX NIKKOR 70–300 mm f/4.5–
減震(
■
6.3G ED VR
當相機上安裝了 AF-P DX NIKKOR 70–300 mm f/4.5–6.3G ED VR 鏡
頭且半按快門釋放按鍵時,減震(VR)可用。您可使用相機選單中的
光學減震 選項開啟和關閉減震;減震開啟時可減少相機震動所引起的
模糊,從而使快門速度可比一般情況時最多降低
用快門速度的範圍。減震對快門速度的影響是根據相機與影像產品協
CIPA)標準所測量;測量 FX 格式鏡頭時使用的是 FX 格式數碼相
會(
機, 測 量 DX 格式鏡頭時使用的是 DX 格式相機。變焦鏡頭是在最大
變焦設定下進行的測量。
)
使用減震:注意事項
•
使用減震時,請先半按快門釋放按鍵,然後待觀景器中的影像穩定之
後再完全按下快門釋放按鍵。
•
啟用減震時,觀景器中的影像在您釋放快門後可能會變得模糊。這並
非故障。
•
當相機進行搖攝時,減震僅套用於非搖攝部分的動作(例如,若相機
進行水平搖攝,則減震將僅套用於垂直方向的震動),因而更易於以
較大幅度平穩地移動相機。
•
若相機配備有內置閃光燈,閃光燈充電時減震將無法使用。
•
當相機固定於三腳架時,一般建議使用減震,但根據拍攝條件和三
腳架類型的不同,有時可能選擇關閉減震更合適。
•
當相機固定於單腳架時,建議使用減震。
4.0 檔, 同 時 增 加 可
INDONESIAN
Sebelum menggunakan produk ini, mohon membaca dengan seksama
baik petunjuk ini maupun buku petunjuk kamera. Ilustrasi dalam petunjuk
ini menunjukkan lensa AF-P DX NIKKOR 70–300 mm f/4.5–6.3G ED VR.
Catatan: Lensa DX adalah bagi penggunaan dengan kamera digital refl eks
lensa tunggal format-DX Nikon. Sudut gambar dari lensa pada kamera
format-DX adalah setara lensa dengan panjang fokal sekitar 1,5 × lebih
panjang yang terpasang pada kamera format 35mm.
Lensa ini tidak mendukung seri D4, seri D3, seri D2, seri D1, seri D800,
D700, D610, D600, seri D300, D200, D100, D90, D80, seri D70, D60, D50, seri
D40, D7000, D5100, D5000, D3200, D3100 atau kamera SLR digital D3000
atau kamera SLR fi lm. Saat menggunakannya dengan D5500, D5300, atau
D3300, pastikan fi rmware kamera telah diperbarui ke versi terbarunya.
Apabila kamera mati atau pewaktu siaga telah berakhir, cincin fokus tidak
dapat digunakan untuk memfokus kamera dan memutar cincin zoom akan
menyebabkan subyek ke luar fokus. Sebelum memfokus, hidupkan kamera atau
mulai ulang pewaktu siaga dengan menekan setengah tombol pelepas rana.
Fitur fokus otomatis dan jendela jangkauan didukung pada seluruh
panjang fokal. Saat menggunakan lensa ini, abaikan bagian manapun dari
buku petunjuk kamera yang mencantumkan pembatasan fokus otomatis
dan jendela jangkauan bagi lensa dengan bukaan diafragma maksimal
lebih lambat daripada f/5.6.
Demi Keamanan Anda
PERINGATAN
• Jangan membongkar atau memodi kasi. Apabila terjadi kegagalan fungsi,
produk sebaiknya diperbaiki hanya oleh teknisi berpengalaman. Apabila
produk pecah terbelah akibat dari terjatuh atau kecelakaan lainnya,
hindari menyentuh bagian yang terbuka. Gagal mematuhi pencegahan
ini dapat menimbulkan sengatan listrik atau cedera lainnya.
• Segera matikan kamera apabila terjadi kegagalan fungsi. Apabila Anda melihat
ada asap atau bau tidak biasa muncul dari unit produk, segera cabut
adaptor AC dan keluarkan baterai kamera, sambil berhati-hati agar tidak
terbakar. Melanjutkan pengoperasian dapat menyebabkan kebakaran
atau cedera. Setelah melepas baterai, bawalah unit produk ke pusat servis
resmi Nikon untuk pemeriksaan.
• Jaga agar tetap kering. Jangan paparkan produk ke air atau menangani
dengan tangan basah. Gagal mematuhi pencegahan ini dapat
menyebabkan kebakaran atau sengatan listrik.
• Jangan gunakan di daerah yang mengandung gas mudah terbakar. Menggunakan
unit produk di pom bensin atau saat ada gas propana atau gas mudah
terbakar lain atau debu dapat memicu ledakan atau kebakaran.
• Jangan melihat langsung ke matahari melalui lensa atau jendela bidik kamera.
Memandang ke matahari atau sumber cahaya kuat lainnya melalui lensa
atau jendela bidik dapat menyebabkan gangguan penglihatan menetap.
PERINGATAN
• Jauhkan dari jangkauan anak-anak. Gagal mematuhi pencegahan ini dapat
menyebabkan cedera atau kegagalan fungsi produk.
• Jangan memfokus cahaya matahari melalui lensa. Cahaya matahari yang terfokus
melalui lensa dapat menimbulkan kebakaran. Saat memotret subjek
diterangi dari belakang, sebisanya jauhkan cahaya matahari dari bingkai; jika
lensa tidak akan digunakan untuk jangka panjang, pasang kembali penutup
lensa dan simpan di tempat yang tidak kena cahaya matahari langsung.
• Jangan biarkan kepanasan. Jangan tinggalkan produk di lokasi yang
terpapar pada suhu teramat tinggi, seperti dalam kendaraan tertutup
dengan cahaya matahari langsung, atau membungkus produk dengan
handuk atau saputangan ataupun menutupi produk selama penggunaan.
Gagal mematuhi pencegahan ini dapat menyebabkan kebakaran atau
kegagalan fungsi produk.
Bagian-bagian Lensa (Gambar)
Tanda pemasangan tudung lensa
q
Cincin fokus
w
Cincin zoom
e
Skala panjang fokal
r
Tanda panjang fokal
t
Tanda pemasangan lensa
y
Kontak CPU
u
Tudung lensa *
i
Tanda kunci tudung lensa
o
Tanda kesejajaran tudung lensa
!0
* Opsional.
Memasang dan Melepas Lensa
Memasang Lensa
Matikan kamera dan lepaskan tutup badan kamera.
z
Lepaskan tutup lensa belakang.
x
Pasang lensa.
c
Sejajarkan tanda pemasangan lensa dengan tanda pemasangan
pada badan kamera, posisikan lensa dalam dudukan bayonet
kamera dan lalu putar lensa berlawanan arah jarum jam hingga
klik di tempatnya dengan tanda pemasangan lensa berada di atas.
Melepas Lensa
Matikan kamera.
z
Lepaskan lensa.
x
Untuk melepas lensa, tekan tombol pelepas lensa kamera sambil
memutar lensa searah jarum jam.
Fokus
Mode fokus ditentukan oleh mode fokus kamera. Bacalah buku petunjuk
kamera untuk informasi tentang pemilihan mode fokus kamera. Pengguna dari
kamera seri D810, Df, D750, D7200, D7100, atau D5200 sebaiknya mencatat
bahwa jika pewaktu siaga dibiarkan berakhir, posisi fokus akan berubah saat
pengatur waktu dimulai ulang. Fokus ulang sebelum pemotretan. Waktu
siaga lebih panjang disarankan bagi fokus manual dan dalam situasi lain di
mana Anda mungkin tidak dapat melepas rana segera setelah memfokus.
Fokus Otomatis
Fokus disetel secara otomatis saat kamera ada di mode fokus otomatis.
Cincin fokus juga dapat digunakan untuk memfokus kamera jika tombol
pelepas rana tetap ditekan setengah (atau jika tombol AF-ON tetap ditekan);
ini dikenal sebagai “fokus otomatis dengan pengaturan manual” (M/A).
Fokus otomatis akan berlanjut saat tombol pelepas rana ditekan setengah
(atau tombol AF-ON ditekan) kedua kalinya. Catat bahwa penyentuhan
cincin fokus selama fokus otomatis aktif akan merubah posisi fokus.
Fokus Manual
Saat kamera ada di mode fokus manual, fokus dapat disetel oleh pemutaran
cincin fokus lensa.
Zoom
Sebelum memfokus, putar cincin zoom untuk menyetel panjang fokal dan
bingkailah foto.
Kedalaman Ruang
Apabila kamera menawarkan pratinjau kedalaman bidang, kedalaman
bidang dapat dipratinjau di jendela bidik.
Bukaan Diafragma
Bukaan disesuaikan menggunakan kontrol kamera.
Unit Lampu Kilat Terpasang
Saat menggunakan lampu kilat terpasang pada kamera yang dilengkapi
dengan unit lampu kilat terpasang, lepaskan tudung lensa untuk mencegah
vinyet (bayangan yang tercipta di mana ujung dari lensa menghalangi
lampu kilat terpasang).
Menggunakan Pengurang Guncangan: Catatan
• Ketika menggunakan pengurang guncangan, tekan tombol pelepas rana
setengah dan tunggu hingga gambar di jendela bidik stabil sebelum
menekan tombol pelepas rana sepenuhnya.
• Ketika pengurang guncangan sedang aktif, gambar pada jendela bidik
mungkin mengabur setelah rana dilepaskan. Ini tidak mengindikasikan
kegagalan fungsi.
• Saat kamera diliput, pengurang guncangan berlaku hanya ke gerakan
yang bukan merupakan bagian dari liputan (jika kamera diliput
secara horisontal, sebagai contoh, pengurang guncangan hanya akan
diberlakukan pada goyangan vertikal), menjadikannya jauh lebih mudah
untuk meliput kamera dengan lancar pada sudut lebar.
• Apabila kamera dilengkapi dengan lampu kilat terpasang, pengurang
guncangan akan dinonaktifkan ketika lampu kilat diisi dayanya.
• Pengurang guncangan biasanya disarankan saat kamera dipasang
pada tripod, meskipun Anda mungkin lebih memilih mematikannya
tergantung pada kondisi pemotretan dan jenis tripod.
• Pengurang guncangan disarankan saat kamera dipasang pada sebuah
monopod.
Tudung Lensa Opsional
Tudung lensa melindungi lensa dan mencegah masuknya berkas cahaya
yang dapat menyebabkan silau atau gambar ganda.
Memasang Tudung
Sejajarkan tanda pemasangan tudung lensa (●) dengan tanda garis arah
tudung lensa (
) dan lalu putar tudungnya (w) hingga tanda ● sejajar
dengan tanda pengunci tudung lensa (—).
Saat memasang atau melepaskan tudung, peganglah di dekat simbol
pada dasarnya dan hindari menggenggam terlalu kencang. Vinyet dapat
terbentuk jika tudung tidak terpasang dengan benar. Tudung dapat dibalik
dan dipasang pada lensa saat tidak digunakan. Saat tudung dibalik, ia dapat
dipasang dan dilepas dengan memutarnya seraya menggenggamnya
dekat tanda kunci (—).
Perawatan Lensa
• Jangan memungut atau memegang lensa atau kamera hanya pada
tudung lensanya.
• Jaga agar kontak CPU tetap bersih.
• Gunakan blower untuk menghilangkan debu dan kotoran dari permukaan
lensa. Untuk menghilangkan noda dan sidik jari, teteskan sedikit ethanol
atau cairan pembersih lensa ke kain katun lembut dan bersih atau ke tisu
pembersih lensa dan bersihkan dari tengah bergerak melingkar ke luar,
usahakan agar tidak meninggalkan noda atau menyentuh kaca dengan
jari Anda.
• Jangan gunakan pelarut organik seperti tiner cat atau bensin untuk
membersihkan lensa.
• Tudung lensa atau fi lter NC dapat digunakan untuk melindungi elemen
lensa depan.
• Pasang tutup selip depan dan belakang sebelum meletakkan lensa ke
dalam kotaknya.
• Apabila lensa tidak akan digunakan dalam waktu lama, simpanlah di
tempat yang sejuk dan kering untuk mencegah jamur dan karat. Jangan
menyimpan di tempat yang terkena cahaya matahari langsung atau
bersama nafta atau kapur barus.
• Jaga lensa agar tetap kering. Karat pada mekanisme internal dapat
menyebabkan kerusakan yang tidak dapat diperbaiki.
• Meninggalkan lensa di tempat yang sangat panas dapat merusak atau
melengkungkan bagian yang terbuat dari plastik penguatan.
Aksesori yang Disertakan
• Tutup Lensa Depan 58 mm snap-on LC-58
• Tutup Lensa Belakang
Aksesori Kompatibel
• Filter ulir 58 mm
• Tudung Bayonet HB-77
• Kotak Lensa CL-1020
• Tutup Lensa Belakang LF-4
Spesifi kasi
Tipe Lensa tipe G AF-P DX dengan CPU terpasang dan
dudukan F
Panjang fokal 70 – 300 mm
Bukaan diafragma
maksimal
Konstruksi lensa 14 elemen dalam 10 grup (termasuk 1 elemen lensa ED)
Sudut gambar 22°50 – 5°20
Skala panjang fokal Gradasi dalam milimeter (70, 100, 135, 200, 300)
Informasi jarak Output ke kamera
Zoom Zoom manual menggunakan cincin zoom mandiri
Memfokus Fokus otomatis dikendalikan oleh motor langkah;
f/4.5 – 6.3
cincin fokus terpisah bagi fokus manual
Pengurang guncangan
(AF-P DX NIKKOR
70–300 mm f/4.5–6.3G
ED VR Saja)
Jarak fokus minimum 1,1 m dari bidang fokal pada seluruh posisi zoom
Bilah diafragma 7 (bukaan diafragma lingkaran)
Diafragma Otomatis penuh
Kisaran bukaan • Panjang fokal 70 mm: f/4.5 – 22
Pergeseran lensa menggunakan voice coil motor
(VCM)
• Panjang fokal 300 mm: f/6.3 – 32
Pengukuran Bukaan penuh
Ukuran tambahan lter 58 mm (P = 0,75 mm)
Dimensi Garis tengah maksimum sekitar 72 mm ×
125 mm (jarak dari kelepak pemasangan lensa kamera)
Berat AF-P DX NIKKOR 70–300 mm f/4.5–6.3G ED VR:
Sekitar 415 g
AF-P DX NIKKOR 70–300 mm f/4.5–6.3G ED:
Sekitar 400 g
Nikon memiliki hak untuk mengubah spesifi kasi dari perangkat keras
sebagaimana dijelaskan dalam buku petunjuk ini kapan saja dan tanpa
pemberitahuan terlebih dahulu.
ǠŰǾŰ ǚžƾƇŽȚ ȬǞſȶ ǍƁǞƫƄŽȚ ȲȚǞŲȖ ƿƉŲ ǝƴƸưƪů ȯƾƲƁȘ ǚƬƱů NjŻ ǙſȖ Ǖž ȆǚűȤǽȚ
.ǚűȤǽȚ
■ ǀƁȤƾƸƄųǽȚ ǀŴNjƯŽȚ ǀƸŻȚȶ
ȶȖ ǃƀǞƄŽȚ ƿƃƉů NjŻ ǠƄŽȚ ȜǍŰƾƶƄƵŽȚ ȜȔƾǤȁȚ ƿƆƇůȶ ǀŴNjƯƴŽ ǀƁƾƵŲ ǀŴNjƯŽȚ ǀƸŻȚȶ ǍźǞů
.ȜȤǞƫŽȚ ȵǞƪů
ǀŴNjƯŽȚ ǀƸŻȚȶ ǀƃƸżǍů
ȤȢȖ ǛŰ ( ) ǀŴNjƯŽȚ ǀƸŻȚȶ ǀžƾƲƄŴȚ ǀžǾŸ Ǖž (●) ǀŴNjƯŽȚ ǀƸŻȚȶ ƿƸżǍů ǀžǾŸ ȸȣƾŲ
—{) ǀŴNjƯŽȚ ǀƸŻȚȶ ǚƱŻ ǀžǾŸ Ǖž ● ǀžǾŸ ȜȚȣƾƇž ǛƄů ȴȖ ǟŽȘ (w) ǀŴNjƯŽȚ ǀƸŻȚȶ
.(
ƾƷůNjŸƾŻ ǟƴŸ ȢǞűǞƵŽȚ ǎžǍŽȚ ǜž țǍƲŽƾŮ ƾƷƳƉžȖ ȆǀŴNjƯŽȚ ǀƸŻȚȶ Ǚź ȶȖ ƿƸżǍů NjƶŸ
ǚƳƪŮ ǀƸŻȚǞŽȚ ƿƸżǍů ȳNjŸ ǀŽƾŲ Ǡź ǀźǍųȥ ǍƷƮů NjŻ
.ǗƶƯŮ ƾƷŮ ȱƾƉžȁȚ ƿƶƆůȶ
NjƶŸ .ȳȚNjƈƄŴǽȚ ȳNjŸ ǀŽƾŲ Ǡź ǀŴNjƯŽȚ ǟƴŸ ƾƷƃƸżǍůȶ ǀƸŻȚǞŽȚ ǏƳŸ ǜƳƵƁ .ljƸƇǧ
ǜž țǍƲŽƾŮ ƾƷŮ ȱƾƉžȁȚ ȔƾƶŰȖ ƾƷůȤȚȢȘ ȲǾų ǜž ƾƷƳźȶ ƾƷƃƸżǍů ǜƳƵƁ ȆǀƸŻȚǞŽȚ ǏƳŸ
—{) ǚƱƲŽȚ ǀžǾŸ
.(
■ ǀŴNjƯŽƾŮ ǀƁƾƶƯŽȚ
ǀƯƭŻ ǟŽȘ ǀŴNjƯŽȚ ǗƮƶž ȶȖ ȲǞſƾƅƁȁȚ ǜž ǚƸƴŻ ȤȚNjƲž ǗǤȖ ȆǕŮƾǧLjȚ ȝƾƵƫŮȶ ǕƲƃŽȚ
żǍƵŽȚ ǜž ǀŴNjƯŽȚ ǗƮſȶ ǀŴNjŸ ǗƸƮƶů ǚƁNjƶž ǟŽȘ ȶȖ ǀƱƸƮſȶ ǀƵŸƾſ ǀƸƶƭŻ ȧƾƵŻ
.ǙƯŮƾǧƺŮ ȟƾűǎŽȚ ǏƵŽ ȶȖ ȝƾƈƭŽ ȱǍů ȳNjƯŽ ȵƾƃƄſǽȚ Ǖž ȆǀƁǍǣȚȢ ǀżǍŲ Ǡź ȟȤƾƈŽȚ ǞƇſ
ȹ
ȚNjŮȖ ȳNjƈƄƉů ǽ
ȝȚǍż ȶȖ ƾƄźƾſ Ǖž ȶȖ ǍŵƾƃƵŽȚ ǏƵƪŽȚ ȔǞǤ Ǡź ƾƷſǎƈů ǽ
.ȖNjǧ ȶȖ ǜƱŸ ȴǞƳů ƿƶƆƄŽ
.ǀƅƯŽȚ ȤǞźƾż
.ǀźƾű ǀŴNjƯŽȚ ǠƴŸ ǔźƾŲ
.ǝŲǾǧȘ ǜƳƵƁ
.ȷǞƲƵŽȚ ǙƸƄŴǾƃŽȚ
■ ǀƲźǍƵŽȚ ȝȚȤȚǞƉƉżȁȚ
■ ǀƲźȚǞƄƵŽȚ ȝȚȤȚǞƉƉżȁȚ
■ ȝƾƱǧȚǞƵŽȚ
ȜNjŸƾŻȶ CPU ȜNjŲǞŮ ȜǎƷƆž G ȬǞƶŽȚ ǜž AF-P DX ǀŴNjŸ
F ƿƸżǍů
Ǜž 300–70 ȸȤƻƃŽȚ ȲǞƭŽȚ
f/4.5 – 6.3 ǀƇƄƱƴŽ ǟƫŻLjȚ NjƇŽȚ
(NjŲȚȶ ED ǍƫƶŸ ǚƵƪƁ) ǀŸǞƵƆž 10 Ǡź ǍƫƶŸ 14
c20 °5 – c50 °22
( 300 Ȇ200 Ȇ135 Ȇ100 Ȇ70) ȸǍƄƵƸƴƴž ȟȤNjů
ȚǍƸžƾƳŽȚ ǟŽȘ ȟǍų
ȸȤƻƃŽȚ ȲǞƭŽȚ ȷǞƄƉž
ǀźƾƉƵŽȚ ȝƾžǞƴƯž
ǀƴƲƄƉž ȳȶȥ ǀƲƴŲ ȳȚNjƈƄŴƾŮ ȸȶNjƁ ȳȶȥ
ȱǍƇƵŽȚ ǀƭŴȚǞŮ ǠǣƾƲƴƄŽȚ ȸȤƻƃŽȚ ǎƸżǍƄŽȚ Ǡź ǛƳƇƄŽȚ ǛƄƁ
ǎƸżǍƄŽȚ ǓƃƬŽ ǀƴƫƱƶž ȸȤƻŮ ǎƸżǍů ǀƲƴŲȶ ȑȸǞƭƈŽȚ
ƾȹƁȶNjƁ ȸȤƻƃŽȚ
ȝƾŴNjƯƴŽ) ȥȚǎƄƀǽȚ ǚƸƴƲů
(VCMs) ǠůǞǧ Ǘƴž ȝƾżǍƇƵŮ ǀŴNjŸ ǙƁǍƇů
ȳȶǎŽȚ ȬƾǤȶȖ ǀźƾż Ǡź ǀƁȤƻƃŽȚ ǀźƾƉƵŽȚ ǜž ǍƄž 1.1
(ǀƁǍǣȚȢ ƿűƾŲ ǀƇƄź) 7
AF-P DX NIKKOR 300–
70 Ǜž f/4.5–6.3G ED VR
ǀźƾƉƵŽ ǟſȢLjȚ NjƇŽȚ
ǀƇƄƱŽȚ ƿűƾŲ ȝȚǍƱŵ
ǚžƾƳŽƾŮ ǠǣƾƲƴů
• f/ 4.5–22 :Ǜž 70 ȸȤƻŮ ȲǞŶ
• f/ 6.3–32 :Ǜž 300 ȸȤƻŮ ȲǞŶ
ǀƴžƾż ǀƇƄƱŽȚ
(Ǜž 0.75=P) Ǜž 58
ljŵǍƵŽȚ ǍƭŻ ȦƾƸŻ
ǀƱŵ ǜž ǀźƾƉƵŽȚ) ȹƾƃƁǍƲů Ǜž 125 × ǍƭŻ ǟƫŻȖ Ǜž 72
(ȚǍƸžƾƳŽȚ ǟƴŸ ǀŴNjƯŽȚ ƿƸżǍů
AF-P DX NIKKOR 300–70 Ǜž f/4.5–6.3G ED VR:
415 ƾƃƁǍƲů ȳȚǍű
AF-P DX NIKKOR 300–70 Ǜž f/4.5–6.3G ED:
400 ȹƾƃƁǍƲů ȳȚǍű
ȸȖ Ǡź ǚƸŽNjŽȚ Țnjƀ Ǡź ȜȢȤȚǞŽȚ ȜǎƷűLjƾŮ ǀǧƾƈŽȚ ȝƾƱǧȚǞƵŽȚ ǍƸƸưů Ǡź ǘƇŽƾŮ ȴǞƳƸſ ǔƱƄƇů
.ǘƃƉž ȤƾƭųȘ ȴȶNjŮȶ ǁŻȶ
ȬǞƶŽȚ
ǀŴNjƯŽȚ ǜƁǞƳů
ȜȤǞƫŽȚ ǀƁȶȚȥ
ȳȶȥ
ȸȤƻƃŽȚ ǎƸżǍƄŽȚ
ǓƲź
ǎƸżǍƄŽȚ
ǀƇƄƱŽȚ ƿűƾŲ
ǀƇƄƱŽȚ Ȱƾƭſ
ȜǍƁƾƯƵŽȚ
ȢƾƯŮLjȚ
ȴȥǞŽȚ
• ǠŰǾŰ ǚžƾŲ ǟƴŸ ǀƃżǍž ȚǍƸžƾƳŽȚ ȴǞƳů ƾžNjƶŸ ȥȚǎƄƀǽȚ ǚƸƴƲů ȳȚNjƈƄŴƾŮ ȜȢƾŸ ljƫƶ
Ɓ
Ƚ
ȳǞŴǍŽȚ ǜƸƃů .ǃƄƶƵŽȚ Țnjƀ ȳȚNjƈƄŴȚ ǚƃŻ ǀƁƾƶƯŮ ȚǍƸžƾƳŽȚ ǚƸŽȢȶ ȝƾƵƸƴƯƄŽȚ ȵnjƀ ȜȔȚǍŻ ǟűǍƁ
.
ǀŴNjŸ ȝƾƵƸƴƯƄŽȚ ȵnjƀ Ǡź ǀƸƇƸǤǞƄŽȚ
ȝȚȣ ǀƉżƾƯŽȚ ǀƸƵŻǍŽȚ ȴǞƳƸſ ȝȚǍƸžƾż Ǖž ȳȚNjƈƄŴǾŽ ǀƫƫƈž DX ȝƾŴNjŸ :ǀƮŲǾž
•.ȳNjƲŽȚ ȸȢƾŲȖ ǚžƾŲ ǟƴŸ ȚǍƸžƾƳŽȚ ƿƸżǍů NjƶŸ ȥȚǎƄƀǽȚ ǚƸƴƲƄŮ ǟǧǞƁ
ȴǞƳů DX ǀưƸǧ ȚǍƸžƾż ǟƴŸ ǀŴNjƯŽ ȜȤǞƫŽȚ ǀƁȶȚȥ .DX ǀưƸǧ ȝȚȣ ȜNjŲȚǞŽȚ ǀŴNjƯŽȚ
ǀưƸƫŮ ȚǍƸžƾż ǟƴŸ ǀƃdžżǍž ȲǞŶȖ ×1.5 ǠŽȚǞŲ ȸȤƻŮ ȲǞƭŮ ǀŴNjƯŽ ȜȤǞƫŽȚ ǀƁȶȚǎŽ ǀƁȶƾƉž
ȆD2 ǀƴƉƴƉŽȚ ȆD3 ǀƴƉƴƉŽȚ ȆD4 ǀƴƉƴƉŽȚ ǜž ȝȚǍƸžƾƳŽȚ ǛŸNjů ǽ ǀŴNjƯŽȚ ȵnjƀ
ȆD100 ȆD200 ǀƴƉƴƉŽȚ ȆD300 ȆD600 ȆD610 ȆD700 ȆD800 ǀƴƉƴƉŽȚ ȆD1 ǀƴƉƴƉŽȚ
ȆD3200 ȆD5000 ȆD5100 ȆD7000 ǀƴƉƴƉŽȚ ȆD40 ȆD50 ȆD60 ǀƴƉƴƉŽȚ ȆD70 ȆD80 ȆD90
ƾƷžȚNjƈƄŴȚ NjƶŸ .ȳǾźȀŽ SLR ȝȚǍƸžƾż ȶȖ ǀƸƵŻǍŽȚ SLR ȝȚǍƸžƾż ǜž D3000 ȶȖ D3100
Ǜů NjŻ ȚǍƸžƾƳƴŽ ǁŮƾƅŽȚ ǃžƾſǍƃŽȚ ȴȖ Njżƺů ȆD3300 ȶȖ D5300 ȶȖ D5500 ǀƴƉƴƉŽȚ Ǖž
.ȤȚNjǧȘ ȞNjŲȖ ǟŽȘ ǝƅƁNjƇů
ȳȚNjƈƄŴȚ ǜƳƵƁ ǽ ǝſƼź ȆȢȚNjƯƄŴǽȚ ǁŻƻž ǁŻȶ ǟƬƲſȚ ȶȖ ǀƲƴưž ȚǍƸžƾƳŽȚ ǁſƾż ȚȣȘ
ƿƃƉƄƁ ȯǞŴ ȳȶǎŽȚ ǀƲƴŲ ǍƁȶNjůȶ ȚǍƸžƾƳƴŽ ȸȤƻƃŽȚ ǎƸżǍƄŽȚ ǓƃƬŽ ȸȤƻƃŽȚ ǎƸżǍƄŽȚ ǀƲƴŲ
ȚǍƸžƾƳŽȚ ǚƸưƪƄŮ ǛŻ ȆȸȤƻƃŽȚ ǎƸżǍƄŽȚ ȔȚǍűȘ ǚƃŻ .ȸȤƻƃŽȚ ǎƸżǍƄŽȚ ȜǍǣȚȢ ǜž ȯNjƷŽȚ ȢƾƯŮȘ Ǡź
.ǗƫƄƶƵŽȚ ǟƄŲ ǘŽƾưŽȚ ǍƁǍƇů Ȥȥ ǟƴŸ ǓưƬŽƾŮ ȢȚNjƯƄŴǽȚ ǁŻƻž ǚƸưƪů NjŸȖ ȶȖ
ȲȚǞŶLjȚ ǕƸƵű Ǡź ǀžǞŸNjž ǠſȶǍƄƳŽȁȚ ȷNjƵŽȚ ǜƸƯžȶ ǠǣƾƲƴƄŽȚ ȸȤƻƃŽȚ ǎƸżǍƄŽȚ Ǒǣƾƫų
ȚȹȢǞƸŻ ǜƵƬƄů ȚǍƸžƾƳŽȚ ǚƸŽȢ ǜž ȳƾƉŻȖ ǀƁȖ ǚƀƾƆů ȆǀŴNjƯŽȚ ȵnjƀ ȳȚNjƈƄŴȚ NjƶŸ .ǀƁȤƻƃŽȚ
ȴǞƳů ǠƄŽȚ ȝƾŴNjƯƴŽ ǀƃƉƶŽƾŮ ǠſȶǍƄƳŽȁȚ ȷNjƵŽȚ ǜƸƯžȶ ǠǣƾƲƴƄŽȚ ȸȤƻƃŽȚ ǎƸżǍƄŽȚ ǟƴŸ
.f/5.6 ǜž ƺƭŮȖ ƾƷŽ ȷǞƫƲŽȚ ǀƇƄƱŽȚ
ǙƄžǾŴ ǚűȖ ǜž
.ƾƷŽȿNjƯů ȶȖ ǀƁȤƾƭƃŽȚ ǙƳƱů ǽ
ǏƵƴů ǽ ȆǍųȕ ȞȢƾƇŽ ȶȖ ȪǞƲƉŽ ǀƆƸƄſ ǝŲƾƄƱſȚȶ ǃƄƶƵŽȚ ǍƉż ǀŽƾŲ Ǡź .ǓƲź ǚƀƻž
ȶȖ ǀƸŮǍƷż ǀžNjǧ ȞȶNjŲ Ǡź ƿƃƉƄƁ NjŻ ȝƾŶƾƸƄŲǽȚ ȵnjƀ ȬƾƃůȚ ȳNjŸ .ǀźǞƪƳƵŽȚ ȔȚǎűLjȚ
•.ǓƲź ǀŴNjƯŽȚ ǀƸŻȚȶ ȳȚNjƈƄŴƾŮ ȚǍƸžƾƳŽȚ ȶȖ ǀŴNjƯŽȚ ǙƉƵů ȶȖ ǓƲƄƴů ǽ
•.CPU ȜNjŲȶ ǚƸǧǞů ȯȚǍŶȖ ǀźƾƮſ ǟƴŸ ǔźƾŲ
• ǜž ǑƴƈƄƴŽ .ǀŴNjƯŽȚ ljƭŴ ǟƴŸ ǜž ǀŽƾƉƶŽȚȶ ǀŮǍůLjȚ ǜž ǑƴƈƄƴŽ ǀŲȶǍž ȳNjƈƄŴȚ
ȚǍƸžƾƳŽȚ ǀƁȤƾƭŮ ȬǎſȚȶ ȢȢǍƄƵŽȚ ȤƾƸƄŽȚ ȲǞƇž ǚƫźȚ ȆȥƾƷƆŽȚ ǜž ǀƁȢƾŸ ǍƸŹ ǀƇǣȚȤ ȶȖ ȴƾųȢ
.ǃƄƶƵŽȚ Ǡź ǚƭŸ ȞȶNjŲ ǀŽƾŲ Ǡź ȜǍŵƾƃž ȚǍƸžƾƳŽȚ ǘƴŹȚ
Ǡź ȤȚǍƵƄŴǽȚ ȸȢƻƁ NjŻ .ȰȶǍƇŮ ǀŮƾǧȁȚ ƿƶƆƄŽ ȤnjƇŽȚ ǠųǞů ƿƆƁ ȆȤǞƱŽȚ ǟƴŸ
ȚǍƸžƾƳŽƾŮ ǝűǞů ȆǀƁȤƾƭƃŽȚ ǀŽȚȥȘ NjƯŮ .ǘƁǍŲ țǞƪſ ȶȖ ǀŮƾǧȂŽ ȩǍƯƄŽȚ ǟŽȘ ȳȚNjƈƄŴǽȚ
•.ǀŴNjƯŽȚ ǗƸƮƶů ȩǍưŮ ǜƁǎƶƃŽȚ ȶȖ ȴƾƀNjŽȚ ǗƱƈž ǚƅž ȸǞƬŸ ƿƁnjž
•.ǠžƾžLjȚ ǀŴNjƯŽȚ ǍƫƶŸ ǀƁƾƵƇŽ NC ȝƾƇŵǍž ȶȖ ǀŴNjƯŽȚ ǀƸŻȚȶ ȳȚNjƈƄŴȚ ǜƳƵƁ
•.ƾƷƄƃƸƲŲ Ǡź ǀŴNjƯŽȚ ǕǤȶ ǚƃŻ ǠƱƴƈŽȚȶ ǠžƾžLjȚ ǜƁȔƾƭưŽȚ ƿżȤ
• ȯƾűȶ ȢȤƾŮ ȴƾƳž Ǡź ƾƷŮ ǔƱƄŲȚ ȆȜNjƄƵž ȜǍƄƱŽ ǀŴNjƯŽȚ ȳȚNjƈƄŴȚ ǛƄƁ ǜŽ ǀŽƾŲ Ǡź
• ǽ Ǘƴů ȬǞŻȶ Ǡź ƿƃƉƄƁ NjŻ ǀƸƴųȚNjŽȚ ǚƵƯŽȚ ǀƸŽȕ ȖNjǧ
• ǜž ǀŸǞƶƫƵŽȚ ȔȚǎűLjȚ ȵǞƪƁ ȶȖ ǗƴƄƁ NjŻ ȜȤȚǍƇŽȚ ȜNjƁNjŵ ǕŻȚǞž Ǡź ǀŴNjƯŽȚ ȱǍů
ǟŽȘ ȤƾƃưŽȚ ȶȖ ȲƾƯƄŵǾŽ ǀƴŮƾŻ ȷǍųȖ ȝȚȥƾŹ ȶȖ ȴƾŮȶǍƃŽȚ ȢǞűȶ Ǡź ȶȖ ǀƂƃƯƄŽȚ ȝƾƭƇž
.ȚǍƸžƾƳŽƾŮ ȨƾƈŽȚ ǍƮƶƵŽȚ ǜƸƯž ȶȖ ǀŴNjƯŽȚ ȲǾų ǜž ǏƵƪŽȚ ǟŽȘ ǍƮƶů ǽ
NjŻ ǍƮƶƵŽȚ ǜƸƯž ȶȖ ǀŴNjƯŽȚ ȲǾų ǜž ȷǍųLjȚ ǀƯŶƾƉŽȚ ȔǞƬŽȚ ȤȢƾƫž ȶȖ ǏƵƪŽȚ ǟŽȘ
.ȲƾƯƄŵǾŽ ǀƴŮƾŻ ȝȚȥƾŹ ǓŴȶ ǃƄƶƵŽȚ ȳNjƈƄƉů ǽ
.ǑƇƱƴŽ NjƵƄƯž ȴǞƳƸſ ǀžNjų ǎżǍž ǟŽȘ
ǍƯů ǽ
ȿ
.ǀƸǣƾŮǍƷż ǀžNjǧ ȶȖ ǘƁǍŲ ǟŽȘ ȸȢƻƁ NjŻ ǝƸƃƶƄŽȚ
.ȤƾƫŮȁȚ ǟƴŸ ȜȤNjƲŽȚ Ǡź ǀƵǣȚȢ ǀŮƾǧȘ ǟŽȘ ȸȢƻƁ
.ȲƾƱŶLjȚ ȲȶƾƶƄž ǜŸ ȚȹNjƸƯŮ ǔƱƇƁ
•\Ǜž 58 ǍƭŻ LC-58 ȥȚǍŶ ǓưǤ ǠžƾžȖ ǀŴNjŸ ȔƾƭŹ
•ȥȚǍŶ ǠƱƴų ǀŴNjŸ ȔƾƭŹ
ǚƯűȚ ǀƸƱƴƈŽȚ ȜȔƾǤȁȚ ȝȚȣ ȯȚNjƀLjȚ ǍƁǞƫů NjƶŸ .ǘƁǍŲ țǞƪſ Ǡź ǀŴNjƯŽȚ ǀƭŴȚǞŮ
ǀŴNjƯŽȚ ǍƃŸ ǏƵƪŽȚ ȔǞǤ ǎżǍů ǽ
ǀƸƭŹȖ ȲNjƃƄŴȚ ȆǀƴƁǞŶ ȜǍƄƱŽ ȳNjƈƄƉƄȽŴ ǀŴNjƯŽȚ ǜƳů ǛŽ ȚȣȘ ȑȤƾŶȁȚ ȟȤƾų ǏƵƪŽȚ
•ǀƸƃŽǞŽ ǀŴNjƯƴŽ ȝƾƇŵǍž Ǜž 58
•HB-77 ȥȚǍŶ ǀƶƶƉž ȜNjŸƾƲŮ ǀŴNjŸ ǀƸŻȚȶ
•CL-1020 ǀŴNjƯŽȚ ǀƃƸƲŲ
•LF-4 ȥȚǍŶ ǠƱƴų ǀŴNjŸ ȔƾƭŹ
Njű ǀƸŽƾŸ ȜȤȚǍŲ ȝƾűȤNjŽ ǀǤǍƯž ǜżƾžȖ Ǡź ǃƄƶƵŽȚ ȱǍƄů ǽ
ȹ
Ǡƭưů ȶȖ ǚƁNjƶž ȶȖ ǀƱƪƶƵŮ ǃƄƶƵŽȚ Ǡƭưů ȶȖ ǍŵƾƃƵŽȚ ǏƵƪŽȚ ȔǞǤ Ǡź ǀƲƴưž ȜȤƾƸŴ
.ǃƄƶƵŽƾŮ ǚƭŸ ȶȖ ǘƁǍŲ ǟŽȘ ȸȢƻƁ NjŻ ȝƾƷƸƃƶƄŽȚ ȵnjƀ ȬƾƃůȚ ȳNjŸ .ǝžȚNjƈƄŴȚ ȔƾƶŰȖ ǃƄƶƵŽȚ
.ǍŵƾƃƵŽȚ ǏƵƪŽȚ ȔǞǤ ǜŸ ȚȹNjƸƯŮ ƾƷſǎųȶ ǀŴNjƯŽȚ
.ȜNjǣȚǎŽȚ ȜȤȚǍƇŽȚ ƿƶƆů
ǀŴNjƯŽȚ ǀƸŻȚȶ ƿƸżǍů ǀžǾŸ q
ȸȤƻƃŽȚ ǎƸżǍƄŽȚ ǀƲƴŲ w
ȸȤƻƃŽȚ ȲǞƭŽȚ ȷǞƄƉž r
ȸȤƻƃŽȚ ȲǞƭŽȚ ǀžǾŸ t
ǀŴNjƯŽȚ ƿƸżǍů ǀžǾŸ y
CPU ȜNjŲȶ ǚƸǧǞů ȯȚǍŶȖ u
ǀŴNjƯŽȚ ǀƸŻȚȶ ǚƱŻ ǀžǾŸ o
ǀŴNjƯŽȚ ǀƸŻȚȶ ǀžƾƲƄŴȚ ǀžǾŸ !0
.ȚǍƸžƾƳŽȚ ǛƉű ȔƾƭŹ ȲȥȖȶ ȚǍƸžƾƳŽȚ ǚƸưƪů ǗŻȶȖ
.ǠƱƴƈŽȚ ǀŴNjƯŽȚ ȔƾƭŹ ȲȥȖ
ǛƉű ǟƴŸ ȜȢǞűǞƵŽȚ ƿƸżǍƄŽȚ ǀžǾƯŽ ǀƁȣƾƇž ǀŴNjƯŽȚ ƿƸżǍů ǀžǾŸ ǚƯűȚ
ǛŻ ǛŰ ȚǍƸžƾƳŽȚ ǟƴŸ ȜȢǞűǞƵŽȚ ƿƸżǍƄŽȚ ȜNjŸƾŻ ǜŴ ǟƴŸ ǀŴNjƯŽȚ ǕǤȶ ȆȚǍƸžƾƳŽȚ
ȝǞǧ ȜȤNjƫȽž ƾƷſƾƳž Ǡź ǍƲƄƉů ȴȖ ǟŽȘ ǀŸƾƉŽȚ țȤƾƲŸ ǏƳŸ ǀŴNjƯŽȚ ǍƁȶNjƄŮ
.ǟƴŸLjƾŮ ǀŴNjƯŽȚ ƿƸżǍů ǀžǾŸ ȢǞűȶ Ǖž ȜǍƲſ
.ȚǍƸžƾƳŽȚ ǚƸưƪů ǗŻȶȖ
.ǀŴNjƯŽȚ ǀŽȚȥƼŮ ǛŻ
ȵƾƆůȚ Ǡź ǀŴNjƯŽȚ ǍƁȶNjů Ǖž ȚǍƸžƾƳŽƾŮ ǀŴNjƯŽȚ ǍƁǍƇů Ȥȥ ǟƴŸ ǓưǤȚ ȆǀŴNjƯŽȚ ǙƱŽ
ǚƸŽȢ ǕűȚȤ .ȚǍƸžƾƳƴŽ ȸȤƻƃŽȚ ǎƸżǍƄŽȚ ǕǤȶ ȲǾų ǜž ȸȤƻƃŽȚ ǎƸżǍƄŽȚ ǕǤȶ NjƁNjƇů ǛƄƁ
ǟƴŸ ǠưƃƶƁ .ȚǍƸžƾƳƴŽ ȸȤƻƃŽȚ ǎƸżǍƄŽȚ ǕǤȶ ȤƾƸƄųȚ ǜŸ ȝƾžǞƴƯž ǟƴŸ ȲǞƫƇƴŽ ȚǍƸžƾƳŽȚ
ȶȖ D7100 ȶȖ D7200 ȶȖ D750 ȶȖ Df ȶȖ D810 ǀƴƉƴƉŽȚ ȶȖ ǜž ȝȚǍƸžƾƳŽȚ ǠžNjƈƄƉž
ȸȤƻƃŽȚ ǎƸżǍƄŽȚ ǕǤǞž ȴƼź ȆǠƬƲƶƁ ǟƄŲ ȢȚNjƯƄŴǽȚ ǁŻƻž ȱǍů ȚȣȘ ǝſȖ ǀƮŲǾž D5200
ǟǧǞƁ .ǍƁǞƫƄŽȚ ǚƃŻ ȸȤƻƃŽȚ ǎƸżǍƄŽȚ ǓƃǤ NjŸȖ .ǁŻƻƵŽȚ ǚƸưƪů ȜȢƾŸȘ NjƶŸ ǍƸưƄƸŴ
ǠƄŽȚ ȷǍųLjȚ ǗŻȚǞƵŽȚ Ǡźȶ ȸȶNjƸŽȚ ȸȤƻƃŽȚ ǎƸżǍƄƴŽ ǀƃƉƶŽƾŮ ȢȚNjƯƄŴǾŽ ȲǞŶȖ ȝƾŻȶȖ ȤƾƸƄųƾŮ
.ȸȤƻƃŽȚ ǎƸżǍƄŽȚ ǓƃǤ NjƯŮ ȤǞƱŽȚ ǟƴŸ ǘŽƾưŽȚ ǍƁǍƇƄŮ ƾƷƸź ȳǞƲů ǽ NjŻ
ǠǣƾƲƴƄŽȚ ȸȤƻƃŽȚ ǎƸżǍƄŽ
.ǠǣƾƲƴů ȸȤƻŮ ǎƸżǍů ǕǤȶ Ǡź ȚǍƸžƾƳŽȚ ȴǞƳů ƾžNjƶŸ ƾȹƸǣƾƲƴů ȸȤƻƃŽȚ ǎƸżǍƄŽȚ ǓƃǤ ǛƄƁ
ǓưƬŽȚ ǁƴǧȚȶ ȚȣȘ ȚǍƸžƾƳŽȚ ǎƸżǍů ǓƃƬŽ ȸȤƻƃŽȚ ǎƸżǍƄŽȚ ǀƲƴŲ ȳȚNjƈƄŴȚ ƾȹƬƁȖ ǜƳƵƁ
ȯǍƯȽƁ Țnjƀȶ ȑ(AF-ON Ȥȥ ǟƴŸ ǓưƬŽȚ ǁƴǧȚȶ ȚȣȘ ȶȖ) ǗƫƄƶƵŽȚ ǟƄŲ ǘŽƾưŽȚ ǍƁǍƇů Ȥȥ ǟƴŸ
ȸȤƻƃŽȚ ǎƸżǍƄŽȚ ȯƾƶƂƄŴȚ ǛƄƸŴ .(M/A) «ǠǣƾƲƴů ȔƾưŽȘ Ǖž ǠǣƾƲƴů ȸȤƻŮ ǎƸżǍů» ǛŴƾŮ
Ȥȥ ǟƴŸ ǓưƬŽȚ NjƶŸ ȶȖ) ǗƫƫƄƶƵŽȚ ǟƄŲ ǘŽƾưŽȚ ǍƁǍƇů Ȥȥ ǟƴŸ ǓưƬŽȚ NjƶŸ ǠǣƾƲƴƄŽȚ
ȸȤƻƃŽȚ ǎƸżǍƄŽȚ ǚƵŸ ȔƾƶŰȖ ȸȤƻƃŽȚ ǎƸżǍƄŽȚ ǀƲƴŲ ǏƵŽ ȴȖ ǔŲǽ .ǀƸſƾŰ ȜǍž (AF-ON
.ȸȤƻƃŽȚ ǎƸżǍƄŽȚ ǕǤȶ ǍƸƸưů ǟŽȘ ȸȢƻƸŴ ǠǣƾƲƴƄŽȚ
ȸȶNjƸŽȚ ȸȤƻƃŽȚ ǎƸżǍƄŽ
ǍƁȶNjƄŮ ȸȤƻƃŽȚ ǎƸżǍƄŽȚ ǓƃǤ ǜƳƵƁ ȆȸȶNjƸŽȚ ȸȤƻƃŽȚ ǎƸżǍƄŽȚ ǕǤȶ Ǡź ȚǍƸžƾƳŽȚ ȴǞƳů ƾžNjƶŸ
.ǀŴNjƯƴŽ ȸȤƻƃŽȚ ǎƸżǍƄŽȚ ǀƲƴŲ
ǚųȚȢ ȜȤǞƫŽȚ ǓƃǤȶ ȸȤƻƃŽȚ ȲǞƭŽȚ ǚƁNjƯƄŽ ȳȶǎŽȚ ǀƲƴŲ ȤȢȖ ȆȸȤƻƃŽȚ ǎƸżǍƄŽȚ ǓƃǤ ǚƃŻ
ǜƸƯž ȲǾų ǜž ȰƾƭƶŽȚ ǘƵŸ ǀƶƁƾƯž ǜƳƵƁ ȆȰƾƭƶŽȚ ǘƵƯŽ ǀƶƁƾƯž ǍźǞů ȚǍƸžƾƳŽȚ ǁſƾż ȚȣȘ
.ȚǍƸžƾƳŽƾŮ ǀǧƾƈŽȚ ǛƳƇƄŽȚ ljƸůƾƱž ȳȚNjƈƄŴƾŮ ǀŴNjƯŽȚ ǀƇƄź ǚƁNjƯů ǛƄƁ
ǀƇƄƱƴŽ ǟƫŻLjȚ NjƇŽȚȶ ȳȶǎŽȚ
.1 EV ȲNjƯƵŮ ǀƇƄƱƴŽ ǟƫŻLjȚ NjƇŽȚ ǍƸƸưů ǟŽȘ ȸȢƻƁ ȳȶǎŽȚ ȲNjƯž Ǡź ǍƸƸưƄŽȚ
ǀƸŻȚȶ Ǚź ȆǠƴųȚȢ ȧǾź ȜNjŲǞŮ ȜǎƷƆƵŽȚ ȝȚǍƸžƾƳƴŽ ǠƴųȚNjŽȚ ȧǾƱŽȚ ȳȚNjƈƄŴȚ NjƶŸ
ȧǾƱŽȚ ȔǞǤ ǀŴNjƯŽȚ ȯȚǍŶȖ ǘƸƯů ƾžNjƶŸ ƾƷƶƁǞƳů ǛƄƁ ȲǾŷ) ǀźǍųǎŽȚ ƿƶƆƄŽ ǀŴNjƯŽȚ
AF-P DX NIKKOR 300–70 f/4.5–6.3G ED VR ǀŴNjŸ ƿƸżǍů NjƶŸ (VR) ȥȚǎƄƀǽȚ ǚƸƴƲů ǍźȚǞƄƁ
ȯƾƲƁȘȶ ǚƸưƪů ǜƳƵƁ .ǗƫƄƶƵŽȚ ǟƄŲ ǘŽƾưŽȚ ǍƁǍƇů Ȥȥ ǟƴŸ ǓưƬŽȚȶ ȚǍƸžƾƳŽȚ ǟƴŸ
ǀƸŮǍƯŽȚ
.Ǜž 35
.ȷǍųȖ ǀŮƾǧȘ
.ƾȹźƾű ǝƸƴŸ ǔźƾŲ
.ǘƁǍŲ ȶȖ ȤƾƆƱſȚ
.ǃƄƶƵŽȚ ǚƭŸ Ǡź
ȳȶǎŽȚ ǀƲƴŲ e
*ǀŴNjƯŽȚ ǀƸŻȚȶ i
.ȸȤƾƸƄųȚ *
ǀŴNjƯŽȚ ƿƸżǍů
.ǀŴNjƯŽȚ ƿȿżȤ
ǀŴNjƯŽȚ ǀŽȚȥ
.ǀŸƾƉŽȚ țȤƾƲŸ
.ȤƾŶȁȚ
.ǍƮƶƵŽȚ
.(ǠƴųȚNjŽȚ
A ȝȚǍƁnjƇů
• Ǡƶź NjƁ ǟƴŸ ǃƄƶƵŽȚ ǀſƾƸǧ ƿƆƁ ȆǚƭŸ ȞȶNjŲ ǀŽƾŲ Ǡź
• ȞƾƯƃſȚ ǀƮŲǾž ǀŽƾŲ Ǡź
• Țnjƀ ȬƾƃůȚ ȳNjŸ .ȴƾƄƴƄƃž ȱȚNjƁȶ ǝƉƵƴů ȶȖ ȔƾƵƴŽ ǃƄƶƵŽȚ ȩ
• Ǡź ȥƾƷƆŽȚ ǚƸưƪů ȸȢƻƁ NjŻ
• ǍƮƶŽȚ
A ȝƾƷƸƃƶů
• ȶȖ ǀŮƾǧȘ Ǡź ƿƃƉƄƁ NjŻ ȝƾƵƸƴƯƄŽȚ ȵnjƀ ȬƾƃůȚ ȳNjŸ
• ȵǎƸżǍů ǛƄƁ ȸnjŽȚ ǏƵƪŽȚ ȔǞǤ ƿƃƉƄƁ NjŻ .
• ǚƅž ȆȚ
■ (ǚƳƪŽȚ) ǀŴNjƯŽȚ ȔȚǎűȖ
■ ǀŴNjƯŽȚ ȲǞƇž ǀŽȚȥȘȶ ƿƸżǍů
z
x
c
z
x
■ ȸȤƻƃŽȚ ǎƸżǍƄŽȚ
■ ȳȶȥ
■ ȰƾƭƶŽȚ ǘƵŸ
■ ǀƇƄƱŽȚ
■ ǀƸƴųȚNjŽȚ ȧǾƱŽȚ ȝȚNjŲȶ
■ (ǓƲź NIKKOR 300–70 f/4.5–6.3 G ED VR ȶ VR ȝƾŴNjƯƴŽ) ȥȚǎƄƀǽȚ ǚƸƴƲů
ȑȚǍƸžƾƳŽȚ ǛǣȚǞŻ Ǡź VR ȸǍƫƃŽȚ ȥȚǎƄƀǽȚ ǚƸƴƲů ȤƾƸų ȳȚNjƈƄŴƾŮ ȥȚǎƄƀǽȚ ǚƸƴƲů ǚƸưƪů
Pengurang Guncangan (VR, AF-P DX NIKKOR 70–
300 mm f/4.5–6.3G ED VR Saja)
Pengurang guncangan (VR) tersedia saat lensa AF-P DX NIKKOR 70–
300 mm f/4.5–6.3G ED VR dipasang pada kamera dan tombol pelepas
rana ditekan setengah. Pengurang guncangan dapat dihidupkan dan
dimatikan menggunakan opsi VR Optikal di menu kamera; saat hidup,
ia mengurangi kabur disebabkan oleh kamera goyang, mengijinkan
ȲǞǧǞŮ ȠƾƵƉƴŽ ȚǍƸžƾƳŽȚ ȥȚǎƄƀȚ ǝƃƃƉƁ ȸnjŽȚ ǐƁǞƪƄŽȚ ǜž ǚƴƲƁ ǝſƼź ȆǝƴƸưƪů NjƶŸ
NjƁǎƁ ƾƵž ȆǙŽȣ ǍƸŹ Ǡź ȲƾƇŽȚ ǝƸƴŸ ȴǞƳƸŴ ƾƵž ƺƭŮȖ ǗŻǞů ȝȚǍž 4.0 ǟŽȘ ǘŽƾưŽȚ ȝƾŸǍŴ
ƾȹƲƃŶ ǘŽƾưŽȚ ǀŸǍŴ ǟƴŸ ȥȚǎƄƀǽȚ ǚƸƴƲů ȝȚǍƸŰƺů ȦƾƲȽů .ǀŲƾƄƵŽȚ ǘŽƾưŽȚ ȝƾŸǍŴ Ȱƾƭſ ǜž
ǍƁǞƫƄŽȚ ȝƾƆƄƶžȶ ȝȚǍƸžƾƳŽȚ ȢƾƇůǽ ǀƸŴƾƸƲŽȚ ȝƾƱǧȚǞƵƴŽ
ǀưƸƫŮ ȝƾŴNjƯŽȚ ȦƾƲȽů ƾƵż ȑ(CIPA) Camera and Imaging Products Association
ȳȚNjƈƄŴƾŮ DX ǀưƸƫŮ ȝƾŴNjƯŽȚȶ ȆFX ǀưƸƫŮ ǀƸƵŻǍŽȚ ȝȚǍƸžƾƳŽȚ ȳȚNjƈƄŴƾŮ FX
.ǍƸƃƳů ǟƫŻȖ NjƶŸ ȳȶǎŽȚ ȝƾŴNjŸ ȦƾƲȽů .DX ǀưƸƫŮ ȝȚǍƸžƾƳŽȚ
kecepatan rana hingga 4.0 berhenti lebih lambat dari yang seharusnya,
yang meningkatkan rentang kecepatan rana tersedia. Efek dari VR pada
kecepatan rana diukur menurut standar Asosiasi Produk Pencitraan dan
Ksamera (CIPA); lensa format-FX diukur menggunakan kamera digital
format-FX, lensa format-DX menggunakan kamera format-DX. Lensa zoom
diukur pada zoom maksimal.
.ǀƁƾƷƶŽȚ ǟƄŲ ǘŽƾưŽȚ ǍƁǍƇů Ȥȥ ǟƴŸ ǓưƬŽȚ ǚƃŻ ǍƮƶƵŽȚ ǜƸƯž Ǡź ȜȤǞƫŽȚ ǍƲƄƉů
ȝƾƮŲǾž :ȥȚǎƄƀǽȚ ǚƸƴƲů ȳȚNjƈƄŴ
• ǟƄŲ ǍƮƄſȚȶ ǀƭưǤ Ǘƫſ ǘŽƾưŽȚ ǍƁǍƇů Ȥȥ ǓưǤȚ ȆȥȚǎƄƀǽȚ ǚƸƴƲů ȳȚNjƈƄŴȚ NjƶŸ
• ǍƁǍƇů NjƯŮ ǀŵǞƪž ǍƮƶƵŽȚ ǜƸƯž Ǡź ȜȤǞƫŽȚ ȴǞƳů NjŻ ȆȥȚǎƄƀǽȚ ǚƸƴƲů ǚƵŸ ȔƾƶŰȖ
.ȔȚȢLjȚ Ǡź ȤǞƫŻ ȶȖ ǚƭŸ ǟƴŸ Țnjƀ ȲNjƁ ǽ .ǘŽƾưŽȚ
• ǜž Ȕǎű NjƯů ǽ ǠƄŽȚ ǀżǍƇŽȚ ǟƴŸ ǓƲź ȥȚǎƄƀǽȚ ǚƸƴƲů ǘƸƃƭů ǛƄƁ ȆȚǍƸžƾƳŽȚ ǍƁȶNjů NjƶŸ
ǘƸƃƭů ǛƄƸŴ ȆȲƾƅƵŽȚ ǚƸƃŴ ǟƴŸ ȆǠƲźȖ ǚƳƪŮ ȚǍƸžƾƳŽȚ ǍƁȶNjů ǀŽƾŲ Ǡź) ȚǍƸžƾƳŽȚ ǍƁȶNjů
ȚǍƸžƾƳŽȚ ǍƁȶNjů NjƶŸ ǚƷŴȖ ǍžLjȚ ǚƯƆƁ ƾž Ȇ(ǓƲź ǀƸŴȖǍŽȚ ǀżǍƇŽȚ ǟƴŸ ȥȚǎƄƀǽȚ ǚƸƴƲů
.ǍƸƃż ǠŴǞŻ ǚƳƪŮ ǀŴǾƉŮ
• ǜƇŵ ȔƾƶŰȖ ȥȚǎƄƀǽȚ ǚƸƴƲů ȯƾƲƁȘ ǛƄƸŴ ȆǠƴųȚȢ ȧǾƱŮ ȜǎƷƆž ȚǍƸžƾƳŽȚ ǁſƾż ȚȣȘ
.ȧǾƱŽȚ
2016 Nikon Corporation
©
 Loading...