

Nikon 900 User Manual

DIGITAL CAMERA
COOLPIX 900
Contents
Cautions
Safety Precautions
A Note on Memory Cards
Other Cautions
Overview
Parts and Accessories
What’s in this Package
Optional Accessories
Parts of the COOLPIX 900
The Control Panel and Color LCD Monitor
Through the Viewfinder
First Steps
Attaching the Camera Strap
Putting Batteries in Your Camera
Using the AC Adapter
Inserting and Removing Memory Cards
Checking the Battery Level
Choosing a Language for the Menus
Setting the Time and Date
Basic Photography (A-REC)
Reference Manual
Basic Photography: Reference
Using the Flash
Focus Settings
Using the Self-Timer
Image Quality
- 1 -

Advanced Settings (M-REC)
The Shooting Menu
Exposure Compensation
Metering Method
Continuous (Digital Motor Drive)
White Balance
Image Adjustment
Extra Functions
LCD Brightness
Auto Off
Formatting Memory Cards
LCD On/Off
Restoring Default Settings
Playback
The Playback Menu
Deleting Multiple Photographs from Memory
Slideshow
Protecting Photographs from Deletion
Hiding Photographs
Auto Off
Specifications
Connections
Connecting the Camera to a Television
Reading Memory Cards with a Computer
Connecting the Camera to a Computer
Caring for Your Camera
Cleaning
Storage
Troubleshooting
General Problems
Error Messages
Contents
- 2 -
Cautions
Symbol
• The reproduction of this manual in whole or in part is
prohibited save in cases in which Nikon’s prior permission
has been obtained.
• The information contained in this manual is subject to change
without notice.
• Nikon has made every effort to produce a perfect manual,
but should you find any mistakes, we would be grateful if you
would kindly let us know. The address of Nikon’s
representative in your area is provided separately.
• Nikon is not liable for damages resulting from the use of this
product.
The symbols in this manual signify important safety precautions. All passages marked with this indication should be read
prior to installation to prevent injury to yourself or to others.
These indications are also placed in the table of contents to
mark passages that should be read before use.
✔ Symbol
The ✔ symbols in this manual signify the need for caution when
using the product. These indications are placed in sections that
should be read before operation to prevent damage to the
product.
Trademark Information
Macintosh is a registered trademark of Apple Computer Inc.
Microsoft is a registered trademark, and Windows a trademark, of Microsoft
corporation.
IBM PC/AT is a trademark of International Business Machines Corporation.
CompactFlash is a trademark of SanDisk Corporation.
Adobe and Acrobat are registered trademarks of Adobe Systems Inc.
All other trade names mentioned in this manual are trademarks or registered
trademarks of their respective holders.
Cautions
- 3 -

Federal Communications Commission (FCC)
Radio Frequency Interference Statement
This equipment has been tested and found to comply with the
limits for a Class B digital device, pursuant to Part 15 of the FCC
Rules. These limits are designed to provide reasonable protection against harmful interference in a residential installation. This
equipment generates, uses, and can radiate radio frequency
energy and, if not installed and used in accordance with the
instructions, may cause harmful interference to radio communications. However, there is no guarantee that interference will
not occur in a particular installation. If this equipment does
cause harmful interference to radio or television reception,
which can be determined by turning the equipment off and on,
the user is encouraged to try to correct the interference by one
or more of the following measures:
• Reorient or relocate the receiving antenna.
• Increase the separation between the equipment and
receiver.
• Connect the equipment into an outlet on a circuit different
from that to which the receiver is connected.
• Consult the dealer or an experienced radio/television
technician for help.
CAUTIONS
Modifications
The FCC requires the user to be notified that any changes or
modifications made to this device that are not expressly approved by Nikon Corporation may void the user's authority to
operate the equipment.
Serial Cables
Use the serial cables provided with your COOLPIX 900 (see
page 12 of this manual). Using other interface cables may
exceed the limits of Class B Part 15 of the FCC rules.
Notice for customers in Canada
CAUTION
This class B digital apparatus meets all requirements of the
Canadian Interference Causing Equipment Regulations.
ATTENTION
Cet appareil numérique de la classe B respecte toutes les
exigences du Règlement sur le matériel brouilleur du Canada.
Notice for customers in European countries
Cautions
ACHTUNG
Dieses Gerät entspricht den Bestimmungen der EG-Direktive
87/308/EEC zur Störungsunterdrückung. Lärmemission kleiner
70 dBA.
- 4 -
Safety Precautions
Be sure to observe the following safety precautions when using
and storing your COOLPIX 900.
•
Do not look directly at the sun through the viewfinder
Viewing the sun or other strong light source through the
viewfinder could cause permanent visual impairment.
• Turn off immediately in the event of malfunction
Should you notice smoke or an unusual smell coming from
the camera or the AC adapter (available separately), unplug
the AC adapter and remove the batteries immediately,
taking care to avoid burns. Continued operation could result
in injury. After removing the batteries, take the camera to an
authorized Nikon service center for repairs.
• Do not use in the presence of flammable gas
Do not use electronic equipment in the presence of
flammable gas, as this could result in explosion or fire.
• Do not place camera strap around neck
Placing the camera strap around your neck could result in
strangulation. Special care should be taken to avoid placing
the strap around the neck of an infant or child.
• Observe proper precautions when handling batteries
Batteries may leak or explode if improperly handled. Observe
the following precautions when handling batteries for use in
this camera.
• Turn the selector dial to OFF before replacing the batteries.
If you are using the AC adapter, be sure to unplug the
camera.
• Use only 1.5V AA (LR6) batteries. Alkaline batteries are
recommended, but nickel-cadmium (NiCd), nickel metalhydride (NiMH), and lithium batteries may also be used.
Note however that the battery indicator may not function
properly with these types. Because of their short life-span,
the use of manganese batteries is not recommended. Using
other types of battery could cause fire.
• When inserting batteries, align their positive (+) and negative
(-) poles as shown in the label at the entry to the battery
chamber.
• Do not disassemble
Touching the camera’s internal parts could result in injury. In
the event of a malfunction, the camera should be repaired
only by a qualified technician. Should the camera break open
as the result of a fall or other accident, remove the batteries
and/or AC adapter and then take the camera to an
authorized Nikon service center for repairs.
Safety Precautions
- 5 -

• When replacing the main batteries, replace all batteries at
the same time using only one type of battery. Do not mix
batteries of different types or use old batteries together with
new.
• Do not attempt to recharge, short, or disassemble the
batteries.
• Do not expose the batteries to flame or to excessive heat or
moisture.
• Batteries are prone to leakage when fully discharged. To
avoid damage to the camera, be sure to remove the
batteries when no charge remains.
• When the camera is used continuously for a long time on
battery power, the batteries may become hot. Due caution
should be observed when removing the batteries.
• Use appropriate cables
When connecting cables to the serial and video jacks, be
sure to use only the cables provided for the purpose.
•
Observe proper precautions when using the AC adapter
An AC adapter for the COOLPIX 900 is available for
separate purchase. Improper use of this adapter could result
in fire or electric shock. Observe the following precautions
when using the AC adapter with your camera.
•
Use only the adapter and cable sold for the COOLPIX 900 in
your region.
fire or electric shock.
• Be sure to use a voltage appropriate to the cable provided
with your adaptor. Depending on the country of purchase,
the cable provided will be rated for 100–120V or 220–240.
Using any other adapter or cable could result in
• The adapter is for indoor use only. Use batteries when
operating your COOLPIX 900 out of doors.
• Be careful not to damage the power cord’s protective
insulation. Do not cut or abrade the cord, expose the cord
to heat or flame, or place heavy objects on the cord. When
removing the cord from a power outlet, pull on the adapter;
never pull directly on the cord itself. Should the cord be
damaged, return it to your retailer for a replacement.
Continued use could result in fire or electric shock.
• Do not use the AC adapter near water, or expose the cord
to steam or moisture. Do not handle the AC adapter when
your hands are wet.
• Do not expose the adapter to heat or flame.
• Do not disassemble.
• Unplug the adapter when not in use, when replacing the
batteries, and when cleaning the adapter or putting it away.
• Keep out of reach of children
Particular care should be taken to prevent infants from
putting the camera’s batteries or other small parts into their
mouths.
• Do not walk while looking through viewfinder
Walking while looking through the camera’s viewfinder or
color LCD monitor could result in a fall or other injury.
• Observe caution when operating the flash
Using the flash close to your subject’s eyes could cause
temporary visual impairment.
Safety Precautions
- 6 -

•
Do not put fingers or clothing into the camera hinge
The COOLPIX 900 features a hinged body which allows the
lens and viewfinder to rotate 270º. Be careful not to catch
your fingers, hair, or clothing in the hinge.
• When using the viewfinder
When operating the selector dial with your eye to the
viewfinder, care should be taken not to put your finger in
your eye accidentally.
A Note on Memory Cards
The COOLPIX 900 uses Compact Flash flash-memory cards to
store photographs. While the COOLPIX 900 can be used with
any make of compact flash-memory that conforms to Compact
Flash specifications, it does not perform equally well with all
makes of card. The use of Nikon compact flash-memory cards
is recommended.
Other Cautions
To ensure that you can continue to enjoy the use of your
COOLPIX 900, you should observe the following precautions.
✔ Do not touch the lens with your fingers
The proper procedure for cleaning the camera’s lens is
described in “Caring for Your Camera.”
✔ Handle the lens and moving parts with care
Do not apply force to the lens or to the battery, card, or
connector covers. These parts are especially susceptible to
damage. Do not attempt to rotate the lens and viewfinder past
the limits of the hinge. When carrying the camera, do not pick
the camera up by the lens.
Safety Precautions
- 7 -

✔ Do not cut power when the camera is on
Do not unplug the camera or remove the batteries while the
camera is on, or while data are being recorded or items deleted
from memory. Forcibly cutting power to the camera in these
circumstances could result in loss of data or in damage to the
camera’s internal circuitry or memory. For this reason, it would
not be advisable to carry the camera from one place to another
while it is connected to the AC adapter, as this could result in
the camera becoming unplugged accidentally.
✔ Turn the camera off before connecting the AC
adapter
Be sure the camera is off before connecting the AC adapter.
✔ Do not drop
Your camera may malfunction if subjected to strong shocks or
vibration.
✔ Keep free of salt, sand, and dust
After using your camera at the beach or seaside, wipe off any
sand or salt with a lightly dampened cloth and then dry your
camera thoroughly.
✔ Avoid sudden changes in temperature
Sudden changes in temperature, such as occur when entering or
leaving a heated building on a cold day, can cause condensation
inside the camera. To prevent condensation, place the camera
in its carrying case or a plastic bag before exposing it to sudden
changes in temperature.
✔ Batteries
When you turn the camera on, check the battery level
displayed in the control panel to determine whether the
batteries need to be replaced. See “Checking the Battery Level”
for a description of the battery level indicator.
✔ Keep away from strong magnetic fields
Do not use or store your camera in the vicinity of equipment
that produces strong electromagnetic radiation or magnetic
fields. The magnetic fields produced by equipment such as
radio transmitters or household television sets could cause
interference on the color LCD monitor, damage data stored on
the flash memory card, or affect the camera’s internal circuitry.
✔ Keep dry
The COOLPIX 900 is not waterproof, and may malfunction if
immersed in water or exposed to high levels of humidity.
Other Cautions
Use only 1.5V AA (LR6) batteries. Alkaline batteries are
recommended, but nickel-cadmium (NiCd), nickel metalhydride (NiMH), and lithium batteries may also be used. Note
however that the battery indicator may not function properly
with these types of battery.
On cold days, the capacity of batteries tends to
decrease. When taking pictures outside in cold weather, keep a
spare set of warm batteries on hand.
- 8 -

Notice concerning prohibition of copying or
reproduction
Note that simply being in possession of material which has been
copied or reproduced by means of a digital camera may be
punishable by law.
• Items prohibited by law from being copied or reproduced
Do not copy or reproduce paper money, coins, securities,
government bonds, or local government bonds, even if such
copies or reproductions are stamped “Sample”.
The copying or reproduction of paper money, coins, or
securities which are circulated in a foreign country is
prohibited.
Unless the prior permission of the government has been
obtained, the copying or reproduction of unused postage
stamps or post cards issued by the government is prohibited.
The copying or reproduction of stamps issued by the
government and certified documents stipulated by law is
prohibited.
• Cautions on certain copies and reproductions
The government has issued cautions on copies or reproductions of securities issued by private companies (shares, bills,
checks, gift certificates, etc.), commuter passes, or coupon
tickets, except when a minimum of necessary copies are to
be provided for business use by a company. Also, do not
copy or reproduce passports issued by the government,
licenses issued by public agencies and private groups, ID
cards, and tickets, such as passes and meal coupons.
• Comply with copyright notices
The copying or reproduction of copyrighted creative works
such as books, music, paintings, woodcut prints, maps, drawings, movies, and photographs is prohibited except when it is
done for personal use at home or for similar restricted and
non-commercial use.
Other Cautions
- 9 -

Overview
Thank you for buying a Nikon COOLPIX 900 digital camera.
The COOLPIX 900 is a full-featured digital camera with optical
and digital zoom and a built-in flash. In automatic mode the
camera’s programmed autofocus, autoexposure, auto whitebalance, and matrix metering allow for “point-and-shoot”
photography that produces excellent results in a variety conditions. The menu-driven manual mode offers a choice of metering methods, exposure compensation, and white balance programs in addition to a variety of digital effects. Photographs
taken in either mode can be played back instantly on the camera’s
color LCD monitor, or the camera can be connected to a
television for demonstration or playback to an audience. The
COOLPIX 900 can also be attached to a computer, where your
images and recordings can be viewed using the Nikon View
software provided with your camera, or edited for use in other
applications.
The COOLPIX 900 offers the following features:
• The COOLPIX 900’s charge-coupled device, or CCD, which
serves as the camera’s digital film and shutter, offers a resolu-
tion of 1,280 × 960 pixels (1,228,800 pixels). The camera is
also equipped with a VGA mode for recording images with a
resolution of 640 × 480 pixels, which allows more photo-
graphs to be stored and reduces the time needed to record
each photograph.
•
Photographs are stored on removable compact flash-memory
cards. With JPEG compression, the four-megabyte card
provided with the camera can store up to twelve photo-
graphs of 1,280 × 960 pixels with little loss of
higher-quality photographs, and up to twenty
graphs at the camera’s maximum compression ratio.
• The camera’s motor-driven optical zoom and autofocus
make it possible to create high-resolution photographs with
magnifications of up to ×3. A focus setting of macro close-
up is provided for taking photographs at ranges as close as
8 cm (3″).
This manual explains how to use and care for your COOLPIX
900. The next chapter, “Parts and Accessories,” introduces you
to the parts of the camera. This is followed by “First Steps,”
which outlines the steps you will take after you remove the
camera from the box, from inserting the batteries to taking your
first photographs and playing them back. “Basic Photography:
Reference” explains basic image-quality, focus, and flash settings,
while “Advanced Settings” describes the more advanced settings
available when the selector dial is set to M-REC. The “Play-
back” chapter details the camera’s playback function, which
allows you to view and delete the photographs stored in memory.
Information on connecting your camera to a computer or
television set may be found in “Connections.” The final sections,
“Caring for Your Camera” and “Troubleshooting,” describe how
to take care of your COOLPIX 900 and what to do when
things go wrong. Please read all instructions carefully to ensure
that you get the most from your camera.
detail, up to six
-four photo-
Overview
- 10 -

Note: The illustrations in this manual are composites. Photo-
graphs taken with the COOLPIX 900 may differ from those shown
here.
Note: The illustrations in this manual show the color LCD moni-
tor used in the NTSC-compatible model of the COOLPIX 900.
Owing to differences in video standards, the PAL-compatible model
will display items in positions slightly different from those shown
here.
Overview
- 11 -

Parts and Accessories
This chapter identifies the parts of the COOLPIX 900 and lists
the items packaged with your camera or available separately as
options.
What’s in this Package
Purchasers of the COOLPIX 900 should find that the package
contains all the items listed below. Should you notice that
anything is missing or damaged, contact your retailer immediately.
OFF
PLAY
A
REC
M
Y
T
I
L
A
U
Q
DIGTAL CAMERA
COOLPIX 900 digital camera (1)
EC-8CF 8MB compact
flash-memory card (1)
Lens cap (1)
Carrying case (1)
AA (LR6) alkaline
batteries (4)
SC-E900 serial cable (IBM
PC/AT RS-232C) (1)
Software CD-ROM (1) containing
Macintosh and Windows browser
software
Reference CD-ROM (1) containing on-line reference manuals
and Adobe Acrobat Reader
SC-E900M serial cable (Macintosh
RS-232C/RS-422) (1)
User’s guide (1)
“Open Me First” envelope (1)
Fast Track guide (1)
Camera strap (1)
EG-900 video
Parts and Accessories: What’s in this Package
cable (1)
- 12 -
Optional Accessories
At the time of writing, the following optional accessories were
available for the COOLPIX 900. Contact your local Nikon
representative or retailer for details.
• Fish-eye lens-adapter FC-E8
• Wide-angle lens-adapter WC-E24
• Multi-Flash Bracket Unit SK-E900
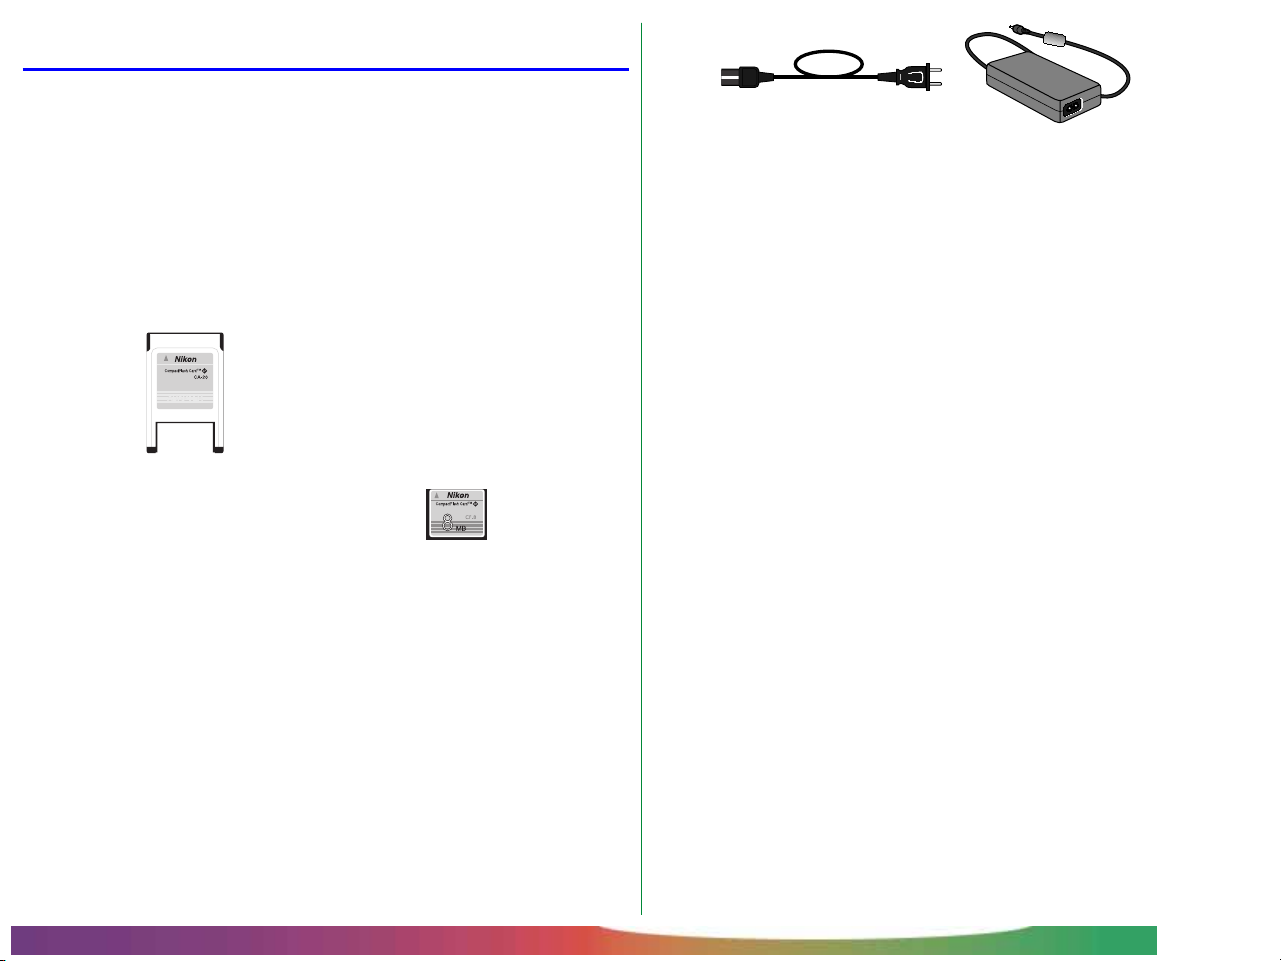
EC-AD1 PC-card
adapter
8MB, 15MB, 30MB, and
48MB compact flash-
memory cards
EH-30 AC adapter
(shape of cable depends on
country of purchase)
Parts and Accessories: Optional Accessories
- 13 -
Parts of the COOLPIX 900
[6]
CARD
[7] [8]
AUTO
SLOW
[15]
[1]
[3]
[2]
[4]
[11]
[5]
m
1
m
:
4
2
.
.
7
4
1
-
8
.
5
R
Z
O
O
K
O
K
I
M
N
FINE
-
3
NORMAL
.
6
BASIC
[12] [13] [14]
M
REC
[9]
OFF
RECA
WT
PLAY
[16]
[10]
[17]
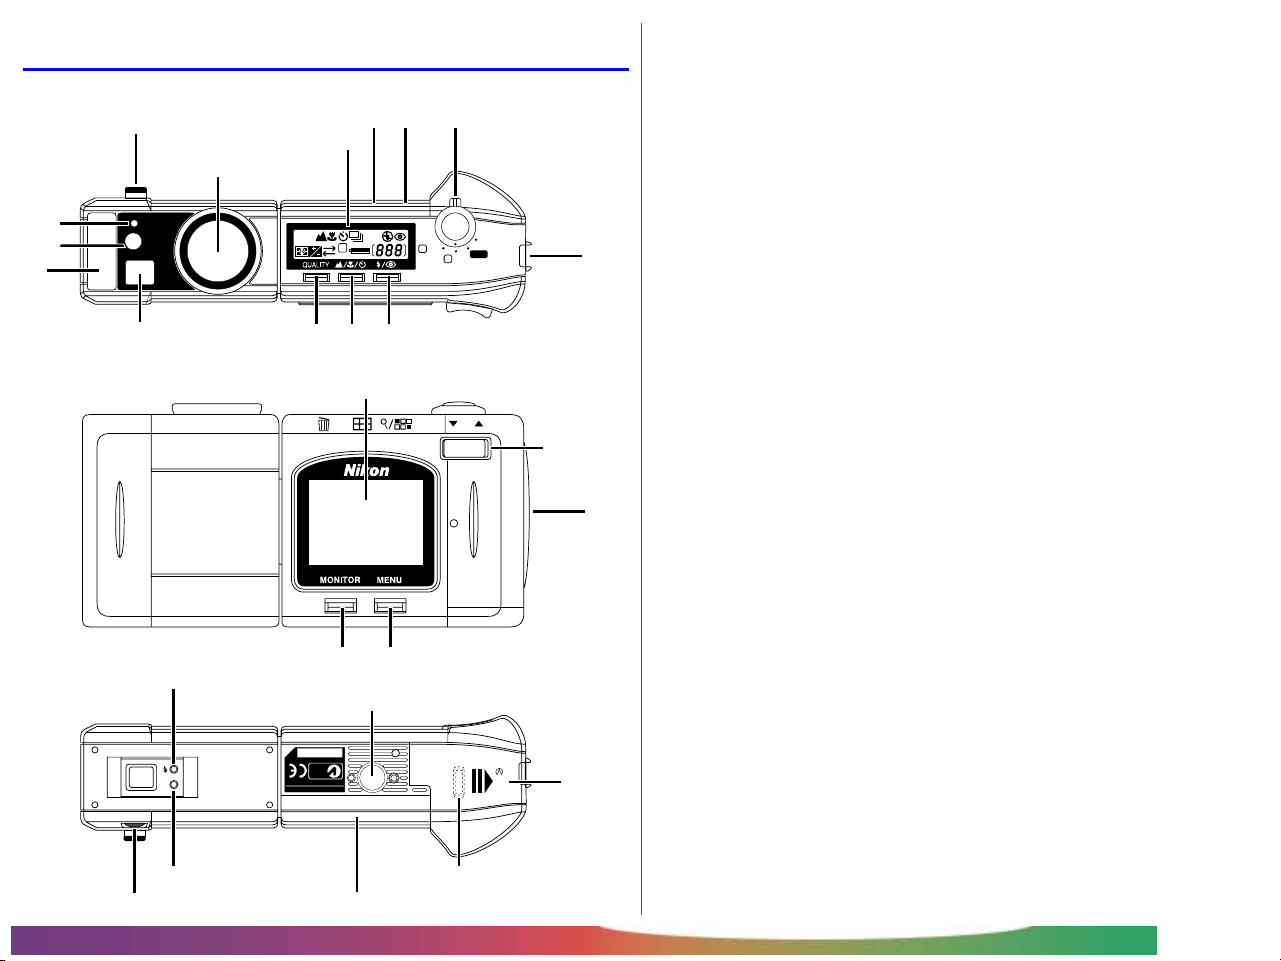
[ 1] Speedlight (flash)
[ 2] Red-eye reduction lamp
[ 3] Photocell
[ 4] Terminal for synchro-flash
unit
[ 5] Lens
[ 6] Control panel
[ 7] Connector for AC adapter
(under cover)
[ 8] Connector for video cable
(under cover)
[ 9] Selector dial/Shutter-release
button
[10] Connector for serial cable
(under cover)
[11] Viewfinder window
[12] QUALITY/Delete button
[13] Focus/Thumbnail button
[14] Flash/Multiple Selection
button
[15] Color LCD monitor
[16] Zoom switch
[17] Hole for camera strap
[18] MONITOR button
[19] MENU button
[20] Flash indicator
[21] Tripod connector
[22] Battery cover
[23] Diopter dial for adjusting
viewfinder focus
[24] Autofocus lamp
[25] Compact flash memory card
slot (under cover)
[26] Battery cover release button
[18]
[19]
[20]
[21]
NIKON CORP.
MADE IN JAPAN
[23]
AF
[24]
N150
4.8V/6V = 0.9A/0.8A (PAL)
Nikon
DIGITAL CAMERA E900S
CARD
[25]
PUSH
[26]
BATT.
Parts and Accessories: Parts of the COOLPIX 900
[22]
- 14 -
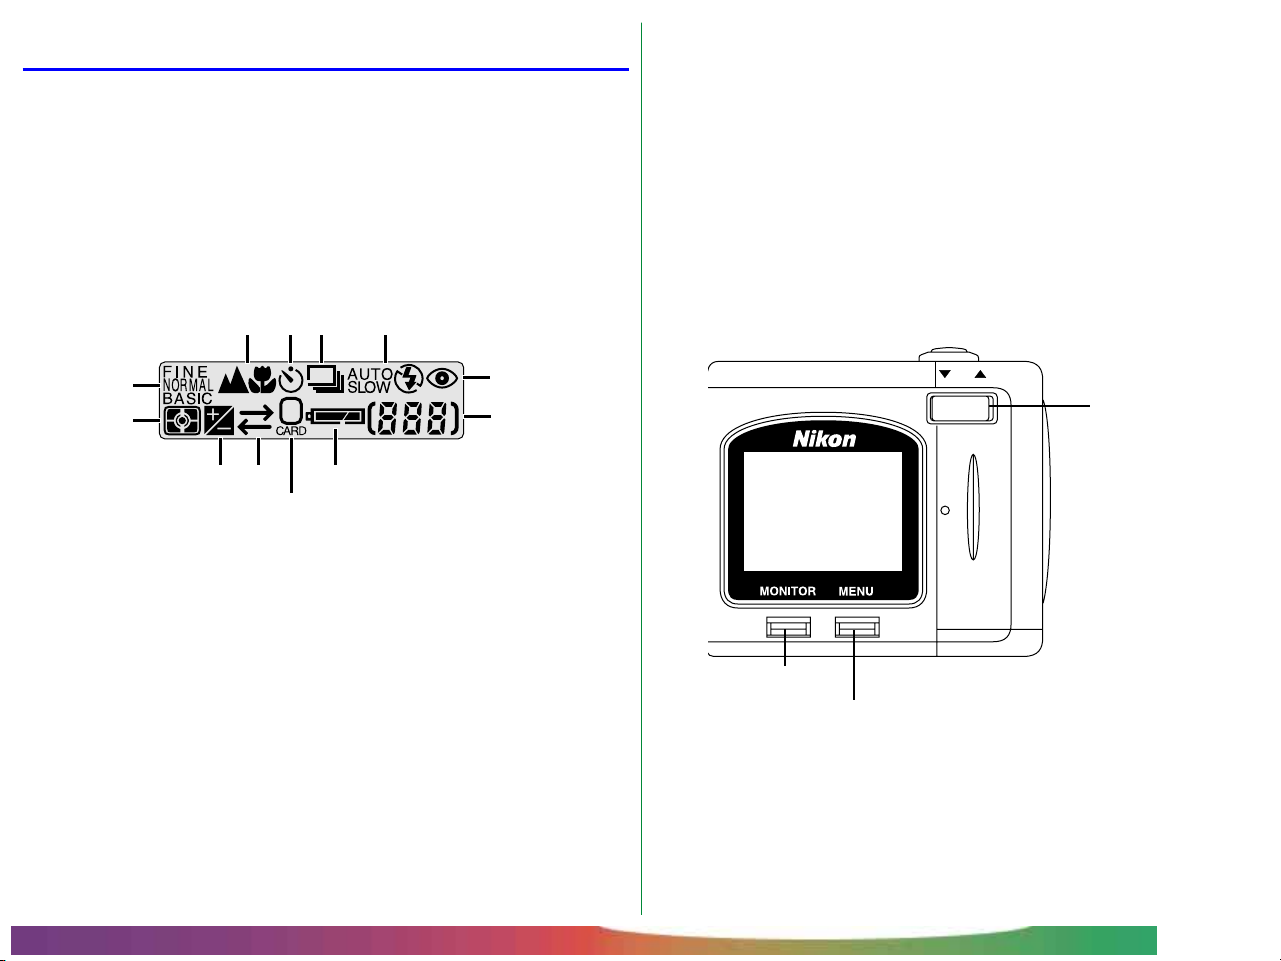
The Control Panel and Color LCD Monitor
The COOLPIX 900 is equipped with two displays, one a blackand-white control panel giving the current camera settings, and
the other a color LCD monitor that in addition to displaying
information on current settings also shows the view through the
lens. The color LCD monitor is also used to play back images
when the selector dial is set to PLAY.
[2] [3] [4] [5]
The color LCD monitor shows the view through the camera’s
lens, adjusted for such settings as white balance, exposure, and
digital zoom. The MONITOR button below the monitor
controls whether camera settings will be shown superimposed
on the image from the lens, and can also be used to turn the
monitor off, increasing battery life. In manual (M-REC) and
playback (PLAY) modes, pressing the MENU button causes the
settings menus for the current mode to be displayed. The
zoom-out (W/▼) and zoom-in (T/▲) buttons are used to
highlight the various menu items, while the item currently
highlighted can be chosen using the shutter button.
[1]
[8]
[10][9]
[11]
[ 1] Image quality
[ 2] Focus setting
[ 3] Self-timer
[ 4] Digital motor-drive
[ 5] Flash mode
[ 6] Red-eye reduction indicator
[ 7] Number of exposures remaining
at current image quality setting
[12]
[ 8] Metering mode
[ 9] Exposure compensation
[10] Data transfer icon
[11] Memory card indicator
[12] Battery indicator
[6]
[7]
Note: The brightness and contrast of the control panel display
will vary with temperature and age. After six to seven years of
normal use, the display may become difficult to read. In this case,
you may wish to have a replacement installed by your local Nikon
representative (please note that there is a charge for replacement).
Parts and Accessories: The Control Panel and Color Monitor
WT
MONITOR button
MENU button
Zoom switch
When the monitor is on and camera settings are displayed,
pressing the MONITOR button will hide the camera settings.
Pressing the button a second time will turn the monitor off. To
turn the monitor on, press the MONITOR button once.
Note: The monitor may be difficult to read in bright light.
- 15 -
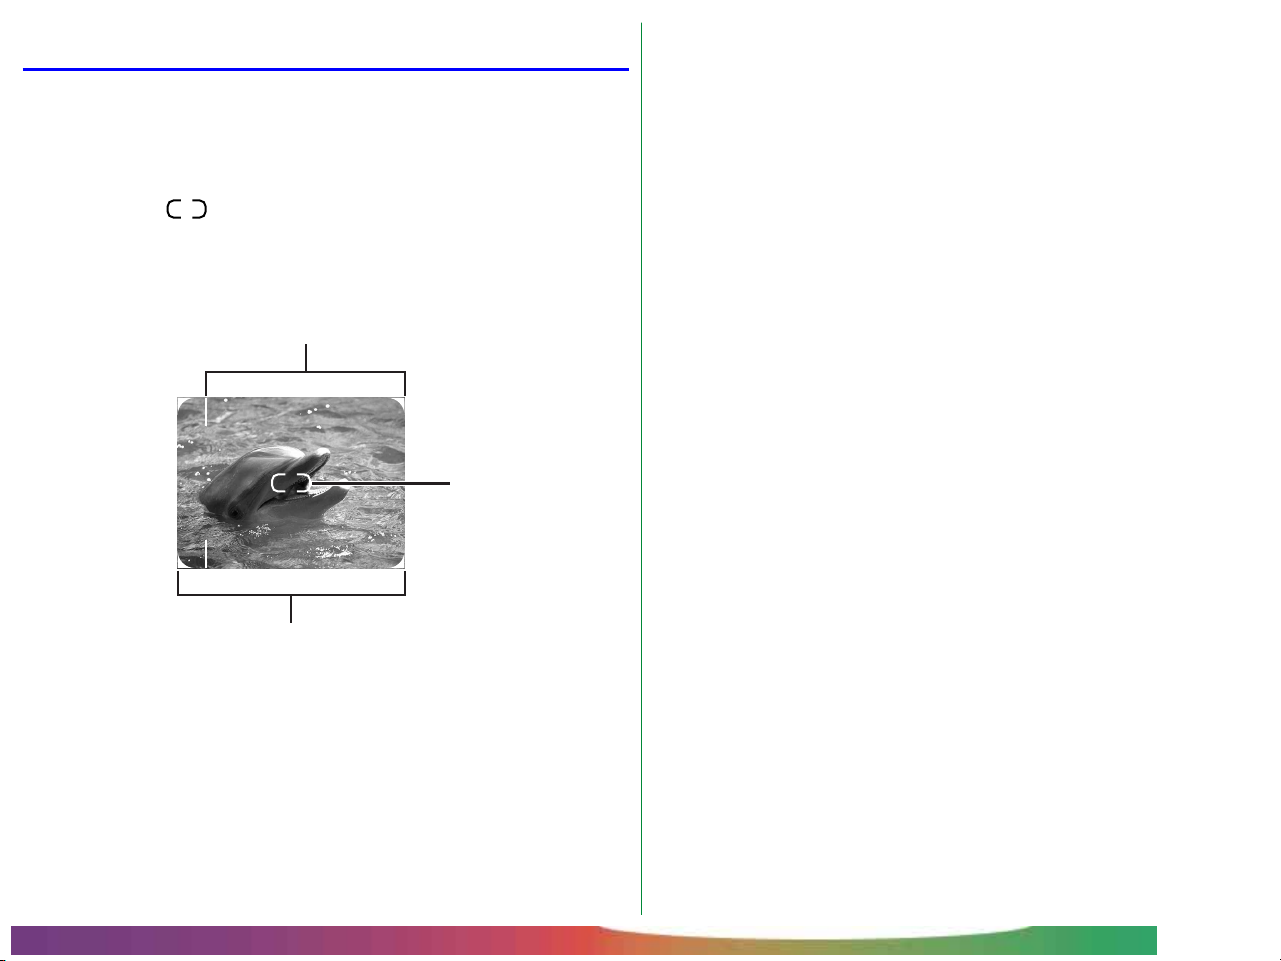
Through the Viewfinder
The viewfinder contains two frames. The frame on the left is
used when taking pictures at a range of 50 cm (twenty inches)
or more, that on the right when composing photographs for
macro close-up at ranges of 8 – 50 cm (3˝ – 20˝). The point
marked by the indicator in the center of the viewfinder is
used as the focus point for the autofocus operation. For the
best results when using programmed autofocus, compose your
photographs so that the subject is at the focus point.
[1]
[2]
Beneath the viewfinder is a “diopter dial,” which allows users
compensate for individual differences in vision by making fine
adjustments to viewfinder focus. Should you find that the view
through the viewfinder is out of focus even when the image in
the color LCD monitor is in focus, adjust viewfinder focus by
turning the diopter dial.
[3]
[1] Macro close-up field-of-view
Use this frame when composing photographs in macro close-up mode
[2] Focus point indicator
[3] Field of view (normal mode)
Parts and Accessories: Through the Viewfinder
- 16 -
First Steps
This chapter guides you through the steps you will take after
removing the camera from the box, from inserting the batteries
to making your first photographs and playing them back. Before
you will be able to use your camera, you will need to:
• attach the camera strap
• insert batteries or connect the AC adapter
• insert the compact flash memory card
• choose the language to be used in the setting and playback menus
• set the camera’s clock-calendar to the current date and
time
These tasks are detailed on the pages that follow. Once these
steps have been completed, your camera will be ready to take
photographs and play them back as described at the end of this
chapter. More detailed information on camera settings and on
playing images back may be found in the chapters following.
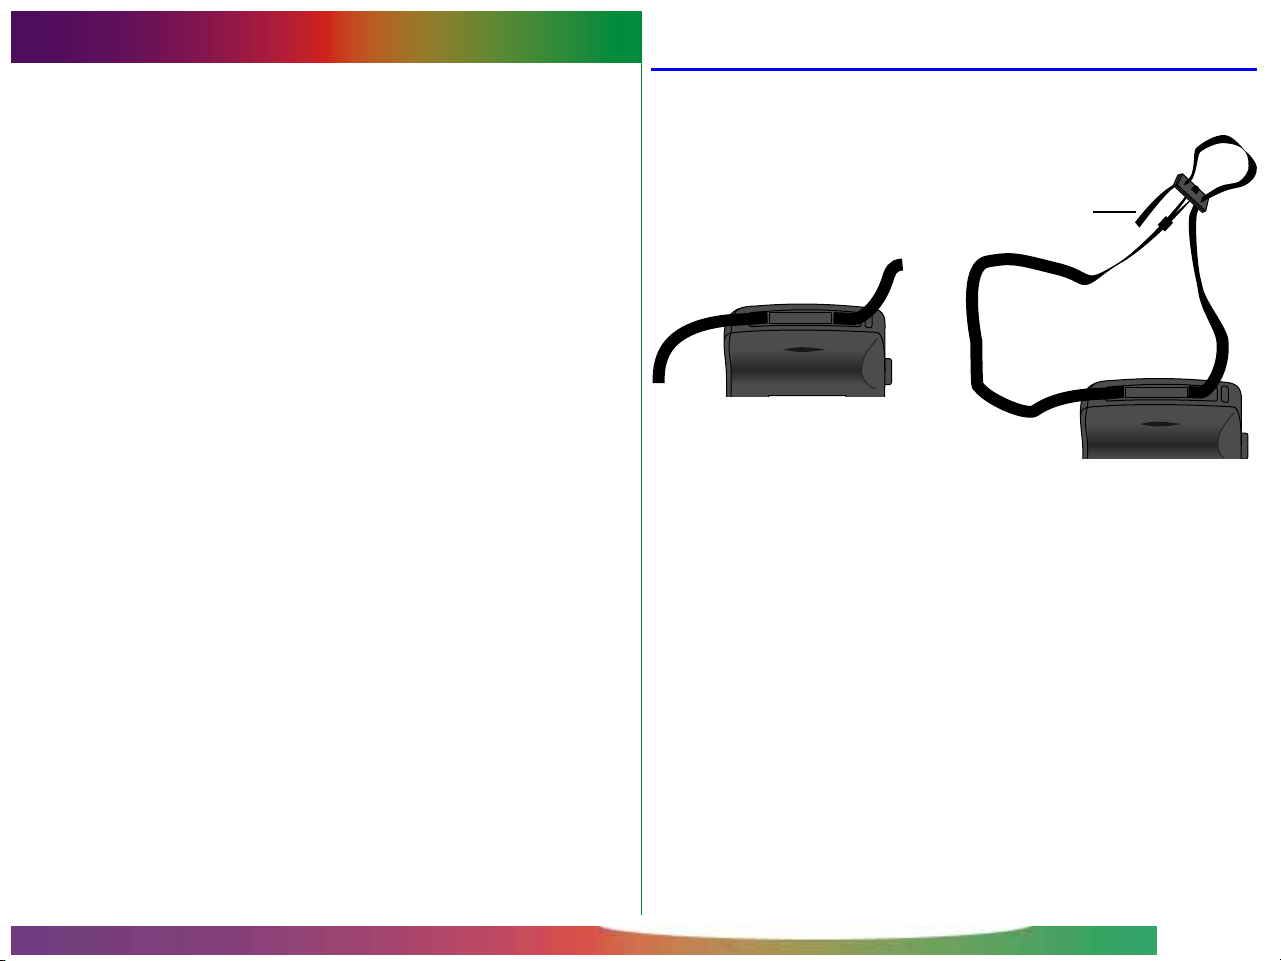
Attaching the Camera Strap
Attach the camera strap as shown below.
Note: Feed at least 5 cm (2″) of
the strap through the final hole.
Keep the strap over your shoulder or around your wrist when
carrying the camera.
First Steps
- 17 -
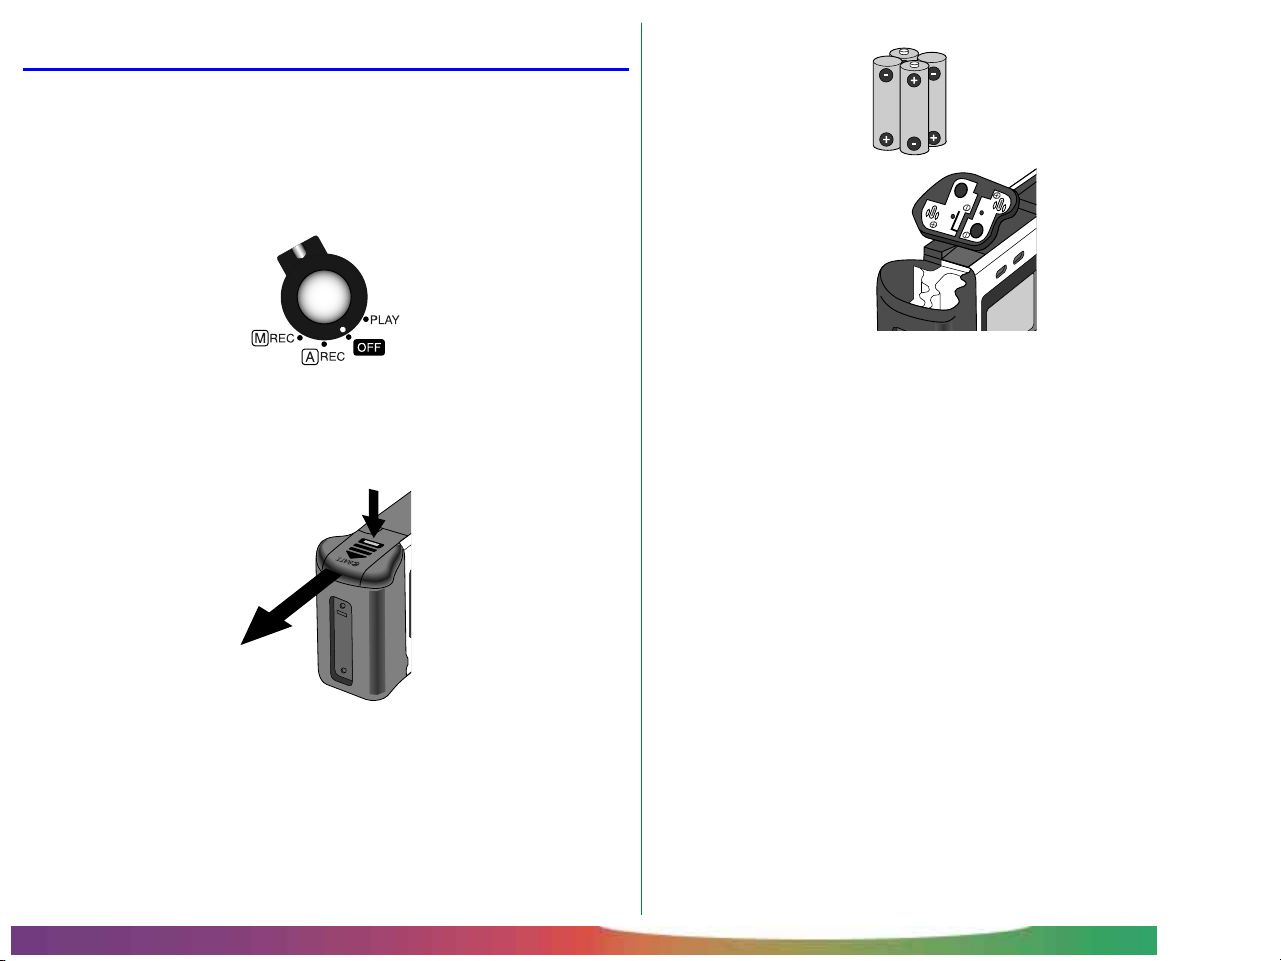
Putting Batteries in Your Camera
When putting new batteries in your camera, first rotate the
selector dial to OFF (if you are using the AC adapter, you
should also unplug the camera). If the camera is on a tripod,
the camera must be removed from the tripod before the
batteries can be replaced.
Turn the camera upside down and unlatch the battery chamber
by pushing the button and sliding the cover away from the
camera. Then raise and open the lid.
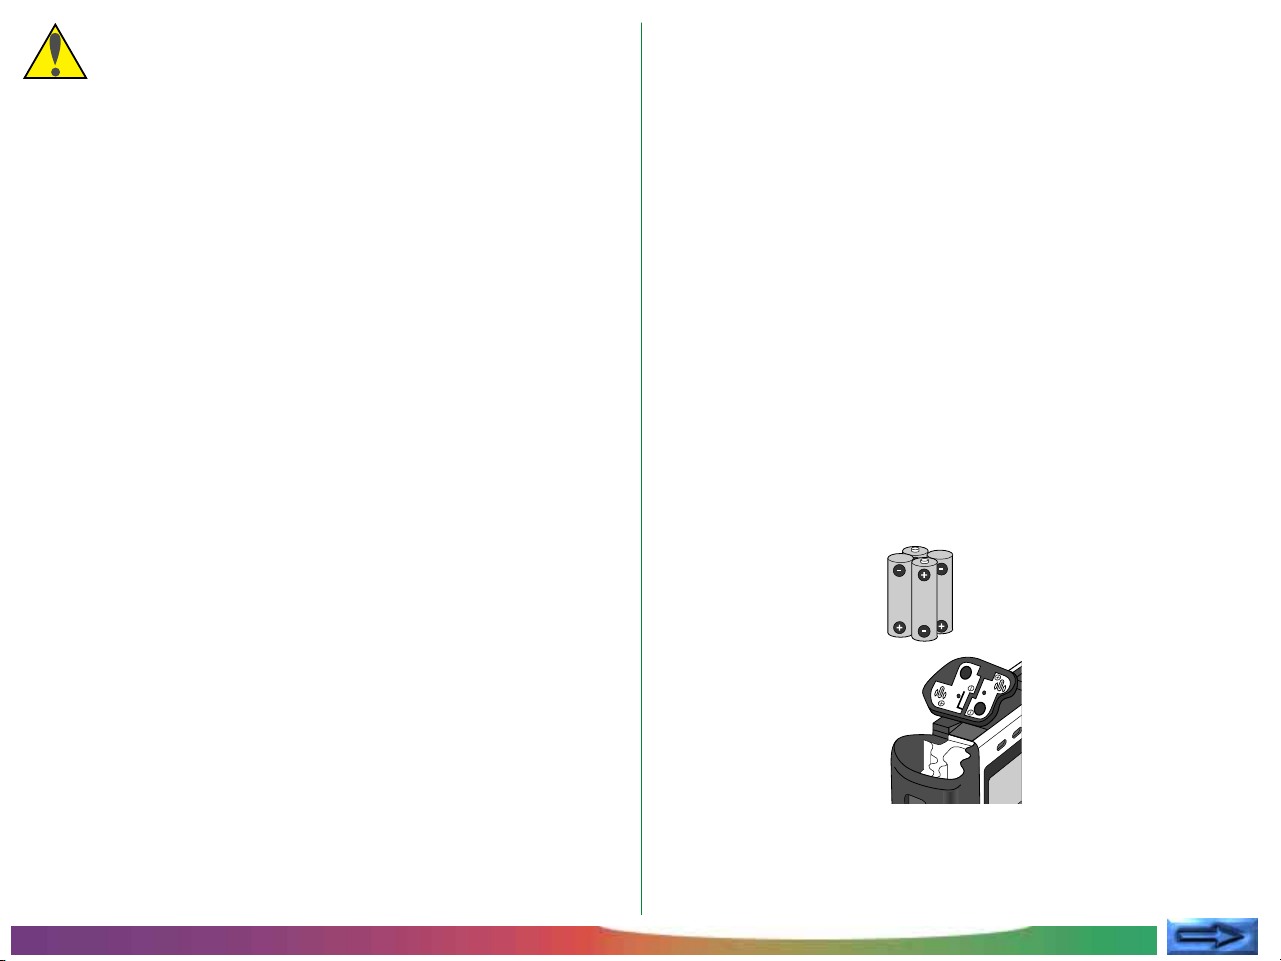
Insert the batteries with the positive (+) and negative (-) poles
aligned as shown in the label at the entry to the battery chamber.
Use only 1.5V AA (LR-6) batteries (alkaline batteries are recommended, but nickel-cadmium, nickel metal-hydride, and
lithium batteries may also be used) and be sure that all batteries
are of the same type and model; do not mix batteries of different types or use new batteries together with old. Avoid using
old batteries, as the battery indicator may not be able to display
their level accurately. Once the batteries have been replaced,
close the cover and slide it back until it latches.
Note: The camera’s clock-calendar is powered by a separate
rechargable battery. When you put batteries in your camera for
the first time or after a long period of storage, wait a few hours for
the clock battery to recharge before removing the main batteries.
Once the clock battery has charged, removing the batteries will not
affect the clock-calendar.
Note: Photographs stored on the flash memory card are not
affected when the batteries are removed. All manual-mode settings, with the exceptions of the date and language, will however
be reset.
First Steps: Putting Batteries in Your Camera
- 18 -
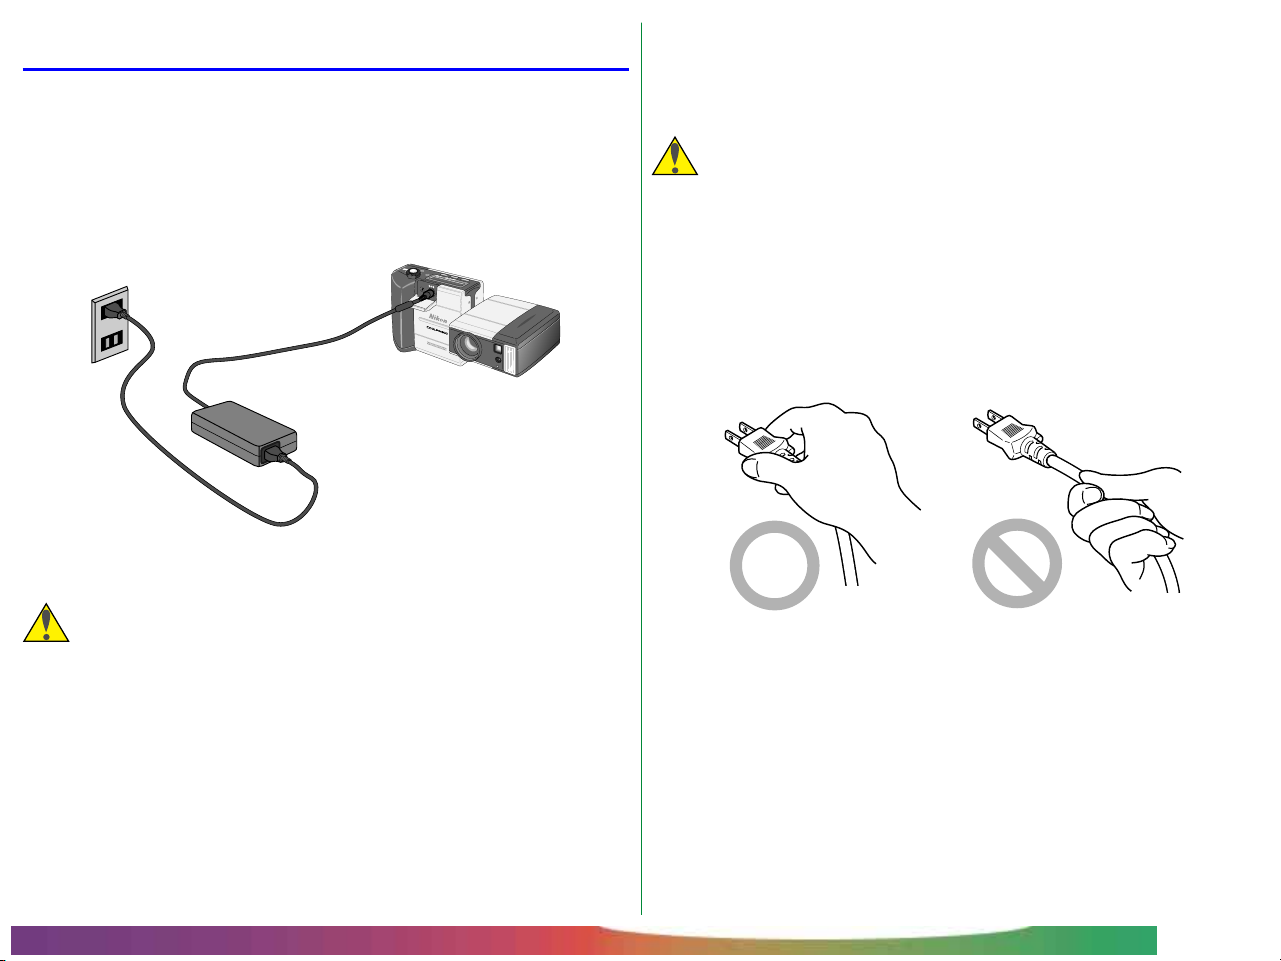
Using the AC Adapter
An AC adapter is available separately for the COOLPIX 900.
When connecting the AC adapter, first make sure that the
camera is off. Plug the power cable into the AC adapter. Then
open the door which covers the DC IN and VIDEO OUT
connectors and insert the power jack into the connector labeled DC IN.
F
F
O
Y
A
L
P
A
C
E
R
M
LITY
A
U
Q
VIDEO
D
C
IN
OUT
3
2
* The shape of the power cable
1
depends on the country of purchase
Plug the power cable into a power outlet. You are now ready
to turn the camera on.
6.5V
DIGTAL CAMERA
When operating the camera with the AC adapter, take care
that the camera does not accidentally become unplugged. Do
not carry the camera from one place to another while it is
connected to the adapter.
Caution: The adapter is for indoor use only. Use batteries
when operating the camera out of doors.
When leaving the camera unattended, unplug the power cord
from the outlet, then unplug the adapter from the camera and
remove the power cable from the adapter. Unplug the power
cord by pulling by the plug, not by tugging on the cable. Pulling
on the cable rather than the plug could damage its protective
insulation, leading to fire or electric shock.
Caution: Use only the cable provided with your EH-30.
Depending on the country of purchase, the cable provided will be
rated for power sources of 100–120V or 220–240V. Be sure to
use a power source appropriate to the cable provided in your
country or region. Using another cable or incorrect voltage could
result in fire or electric shock.
First Steps: Using the AC Adapter
- 19 -
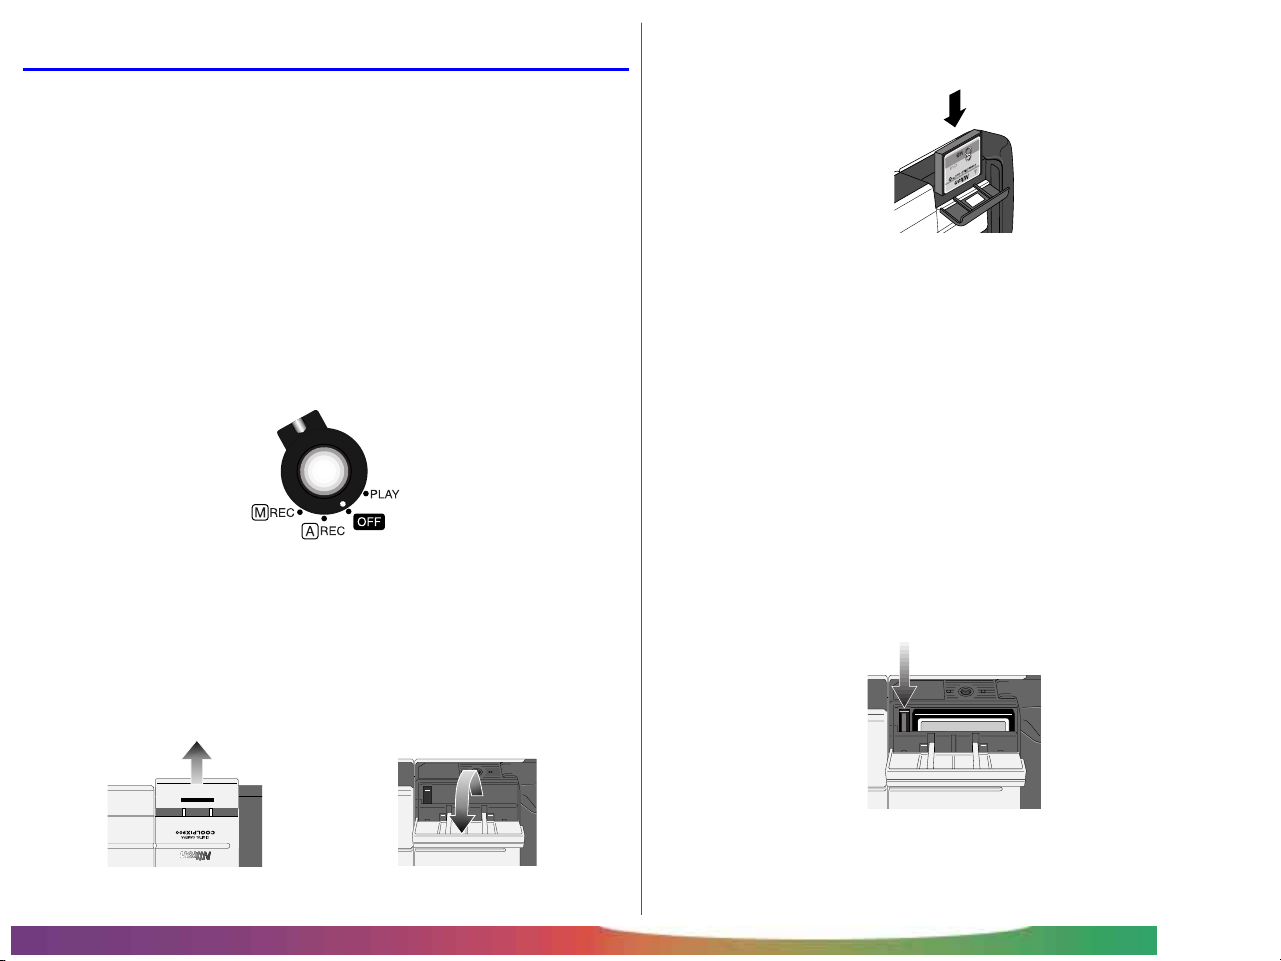
Inserting and Removing Memory Cards
The COOLPIX 900 records photographs on compact flashmemory cards. The camera is sold with an eight-megabyte
memory card; additional cards of up to forty-eight megabytes
can be purchased separately.
Note: When buying memory cards for the COOLPIX 900, it is
recommended that you purchase Nikon-made cards. Other cards
may not perform to specifications.
You will need to insert a memory card in your camera before
you will be able to take photographs. Cards can only be inserted in, and removed from, the camera when the selector dial
is set to OFF.
✔Caution: Inserting memory cards when the power is on could
render the card unusable.
If the camera is on a tripod, remove it from the tripod before
inserting or removing memory cards. To insert a card, turn the
camera upside down. Then lift the card-slot cover up and flip it
open.
Insert the card as shown below, sliding it in until it is firmly in
place at the back of the slot.
✔Caution: Be sure to insert the card as shown in the illustra-
tion, with the connectors towards the bottom of the slot and the
label facing out. Inserting the card upside-down or backwards
could result in damage to the camera or to the card.
Compact flash memory cards can be removed from the camera
without loss of data. Once removed from the camera, the
cards can be stored or placed in a card adapter (sold separately) to be read by any computer equipped with a Type II PC
card slot. Before removing the card from the camera, turn the
selector dial to OFF. If the camera is on a tripod, remove it
from the tripod. Turn the camera upside down, lift up the cardslot cover and flip it open. Push the card-release button until
the card can be removed by hand.
Nikon
First Steps: Inserting and Removing Memory Cards
✔Caution: Memory cards may become hot during use. Ob-
serve due caution when removing memory cards immediately after
the power has been turned off.
- 20 -

Checking the Battery Level
Before using your camera, you should check the battery level to
be sure that the batteries do not need to be replaced. To
check the battery level, turn the selector dial to M-REC, A-REC,
or PLAY. A battery indicator will appear in the control panel
on top of the camera. An identical indicator will appear in the
LCD monitor when camera settings are displayed. At critical
battery levels, a flashing battery icon will appear in the monitor
regardless of whether camera settings are currently displayed or
not.
Battery level normal
Low battery—replace batteries as soon as possible
Battery level critical—replace batteries before use
If nothing at all is showing in the control panel display, either the
batteries are not correctly installed or the batteries are dead.
Check to see that the batteries have been installed correctly. If
this does not solve the problem, insert new batteries and check
the battery level as shown above.
Note: At low battery levels, you may find that the camera will
not record images under some settings. There may also not be
enough power to charge the flash, in which case the flash will
automatically be set to “Off.” At critical levels, the camera will not
record a photograph when the shutter button is fully pressed.
Note that the camera will not display the battery level correctly
if lithium, NiCd, or nickel hydride batteries are used, if the
batteries have been replaced with used batteries, or if the
batteries do not meet performance standards.
First Steps: Checking the Battery Level
- 21 -
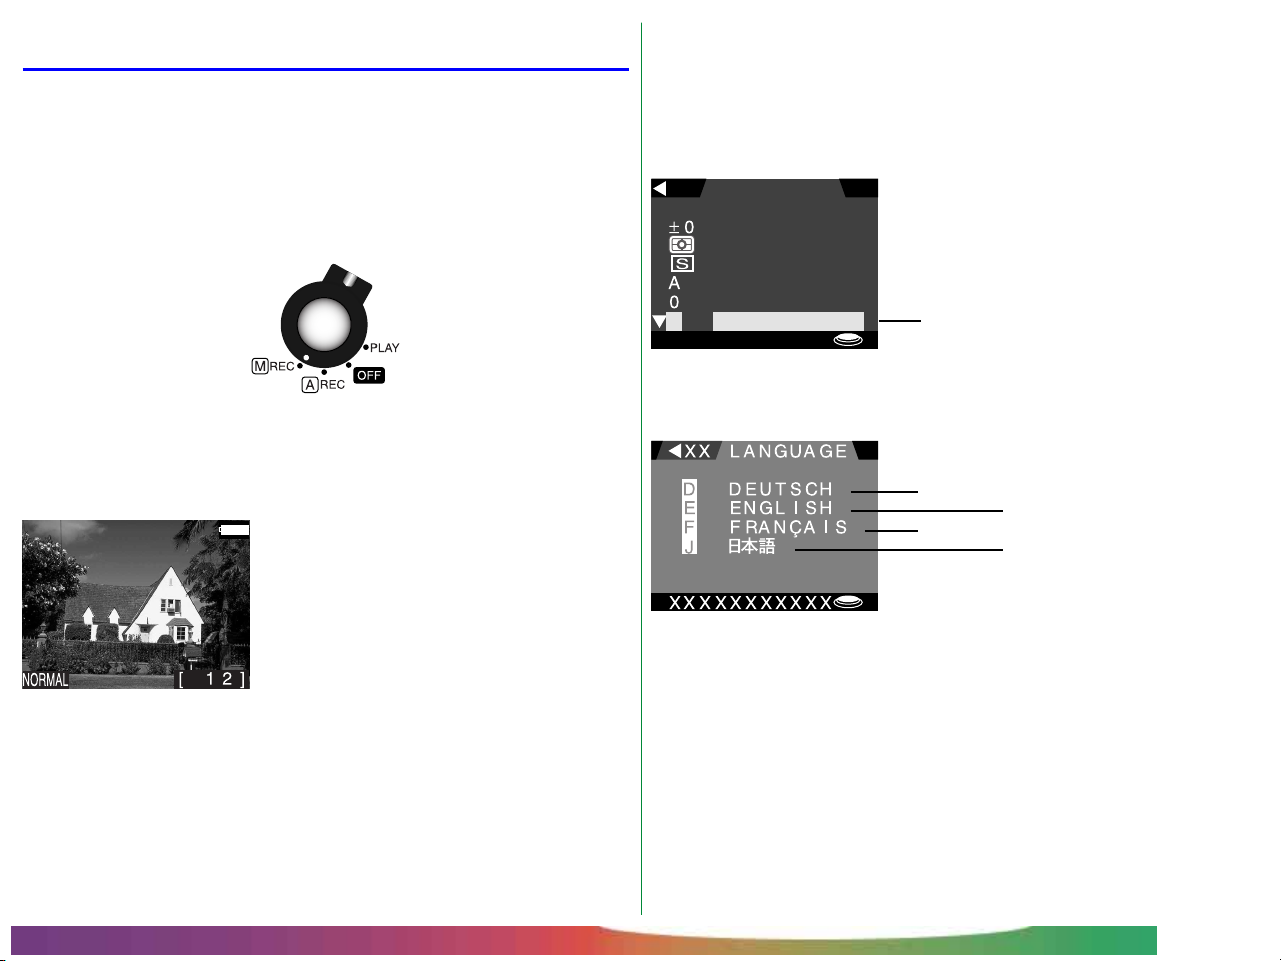
Choosing a Language for the Menus
For the display of messages and menu items in its LCD monitor,
the COOLPIX 900 offers a choice of English, French, German,
and Japanese. When you first turn your camera on, you may
find that the menus are in a language other than English. To
select a new language for the display, turn the selector dial to
M-REC.
Wait one or two seconds for the camera to start up. The color
LCD monitor should show the camera’s current settings superimposed on the view through the lens.
Note: If there is no card currently in the
camera, in place of the camera settings the
monitor will show a message indicating that
no card is present. If the monitor is blank,
press the MONITOR button until the view
through the camera’s lens is visible. Should
the monitor remain blank, check whether the
control panel on top of the camera is on. If
not, rotate the selector dial to OFF and check
that the batteries are properly inserted or
that the AC adapter is connected and
plugged in.
Press the MENU key to bring up the shooting menu. If the
menu is not in English, press the zoom-out switch (W/▼) until
the last item in the first page of options is selected (in the
illustrations below, “XXX…” has been substituted for the
letters actually appearing in the display).
XX XXXXXX XX
XXXXXX XXXX
XXXXXX XXXX
XXXXXX XXXX
XXXXXX XXXX
XXXXXX XXXX
XXXXXX XXXX
X
XXX XXXXXXXX
Select the last item in the
first page of options
With the last item selected, press the shutter button. The
following menu will appear.
German
French
English
Japanese
Select the desired language using the zoom switch and then
press the shutter button to register your choice. The menus
and dialogs shown in the color LCD monitor will then be
displayed in the chosen language.
First Steps: Choosing a Language for the Menus
- 22 -
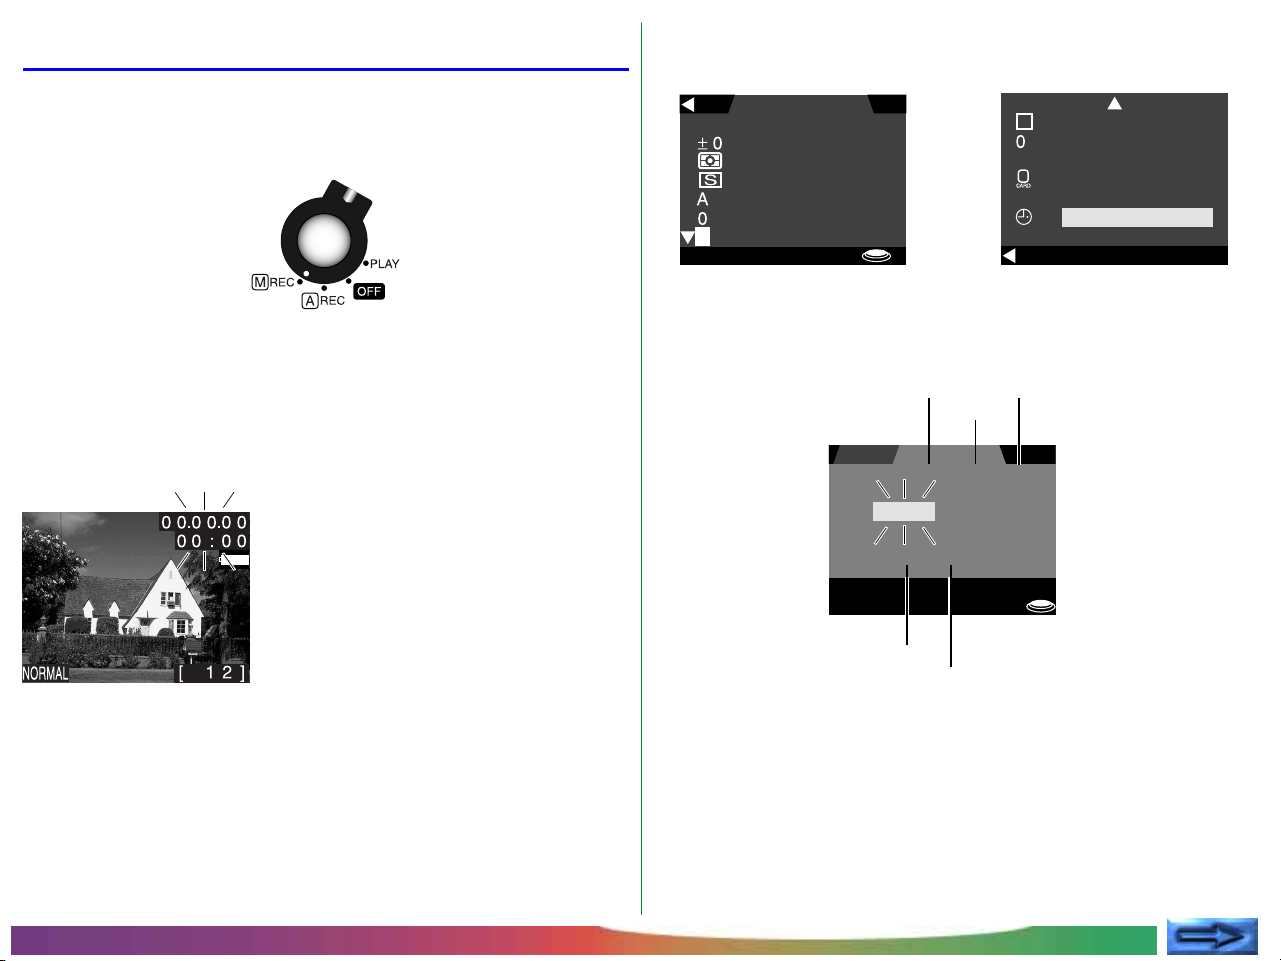
Setting the Time and Date
BK SHOOT I NG
EXP.+/–
ME TER I N G
CON T I N UOUS
LANGUAGE
SET➔SHUT T ER
E
IMG ADJUST
WH I T E BAL
DA TE
YMD
9198.01.01
00:00
SET ➔SHUT T ER
ADJ . ➔▼▲ZOOM SW
▲
▼
The camera’s clock-calendar is not set at the factory. When
you first turn on your camera, you will need to set the time and
date. To do so, turn the selector dial to M-REC.
Wait one or two seconds for the camera to complete start-up.
The color LCD monitor should show the camera’s current
settings superimposed on the view through the lens. If the date
has yet to be set, the date “00.00.00/00:00” will be shown
flashing at the top right corner of the display.
Note: If there is no card currently in the
camera, in place of the camera settings the
monitor will show a message indicating that
no card is present. If the monitor is blank,
press the MONITOR button until the view
through the camera’s lens is visible. Should
the monitor remain blank, check whether the
control panel on top of the camera is on. If
not, rotate the selector dial to OFF and check
that the batteries are properly inserted or
that the AC adapter is connected and
plugged in.
Press the MENU button to display the shooting menu shown
below at left.
EXTRA FUNC
LCD BRIGHT
03 s AUTO OFF
CARDFORMAT
ON
LCD ON/OFF
DATE
RCESET ALL
BK
SET➔SHUT T ER
Press the zoom-out switch (W/▼) until the DATE item in the
second page of the shooting menu is selected as shown above
at right, then press the shutter button to display the date menu.
Year
Hour
Minute
Day
Month
First Steps: Setting the Time and Date
- 23 -

The item currently selected for editing will flash. Edit the se-
lected item by pressing the zoom-in switch (T/▲) to increase its
value or the zoom-out switch (W/▼) to decrease its value.
Pressing the zoom switch once changes the value of the selected item by one, while holding the switch down causes the
value to change rapidly. When the maximum value is reached,
pressing the zoom-in switch will return the selected item to its
minimum value.
To select the next item for editing, press the shutter button.
To change the order in which the month, day, and year are
displayed, highlight the letters showing the current order (Y M
D in the example above), then press the zoom switch to cycle
through the settings in the order Y M D (year/month/day) M
D Y (month/day/year), D M Y (day/month/year). Pressing the
shutter button when the desired order is highlighted will set the
date and return you to the previous menu. If an invalid combination of month and day, such as 02/30, is chosen, the camera
will automatically set the date to the first of the following month
when changes are saved. To exit the date menu without
making any changes, press the MENU button.
Note: The clock-calendar is powered by a separate, rechargeable
battery, which is charged as necessary when the main batteries are
in place or the AC adapter is connected. If the camera has been
stored with the main batteries removed for a long period of time,
the clock may need to be reset. Once the main batteries have
been reinserted, the clock battery will recharge in a few hours,
during which time the batteries should be left in the camera.
First Steps: Setting the Time and Date
- 24 -
 Loading...