

Page 1
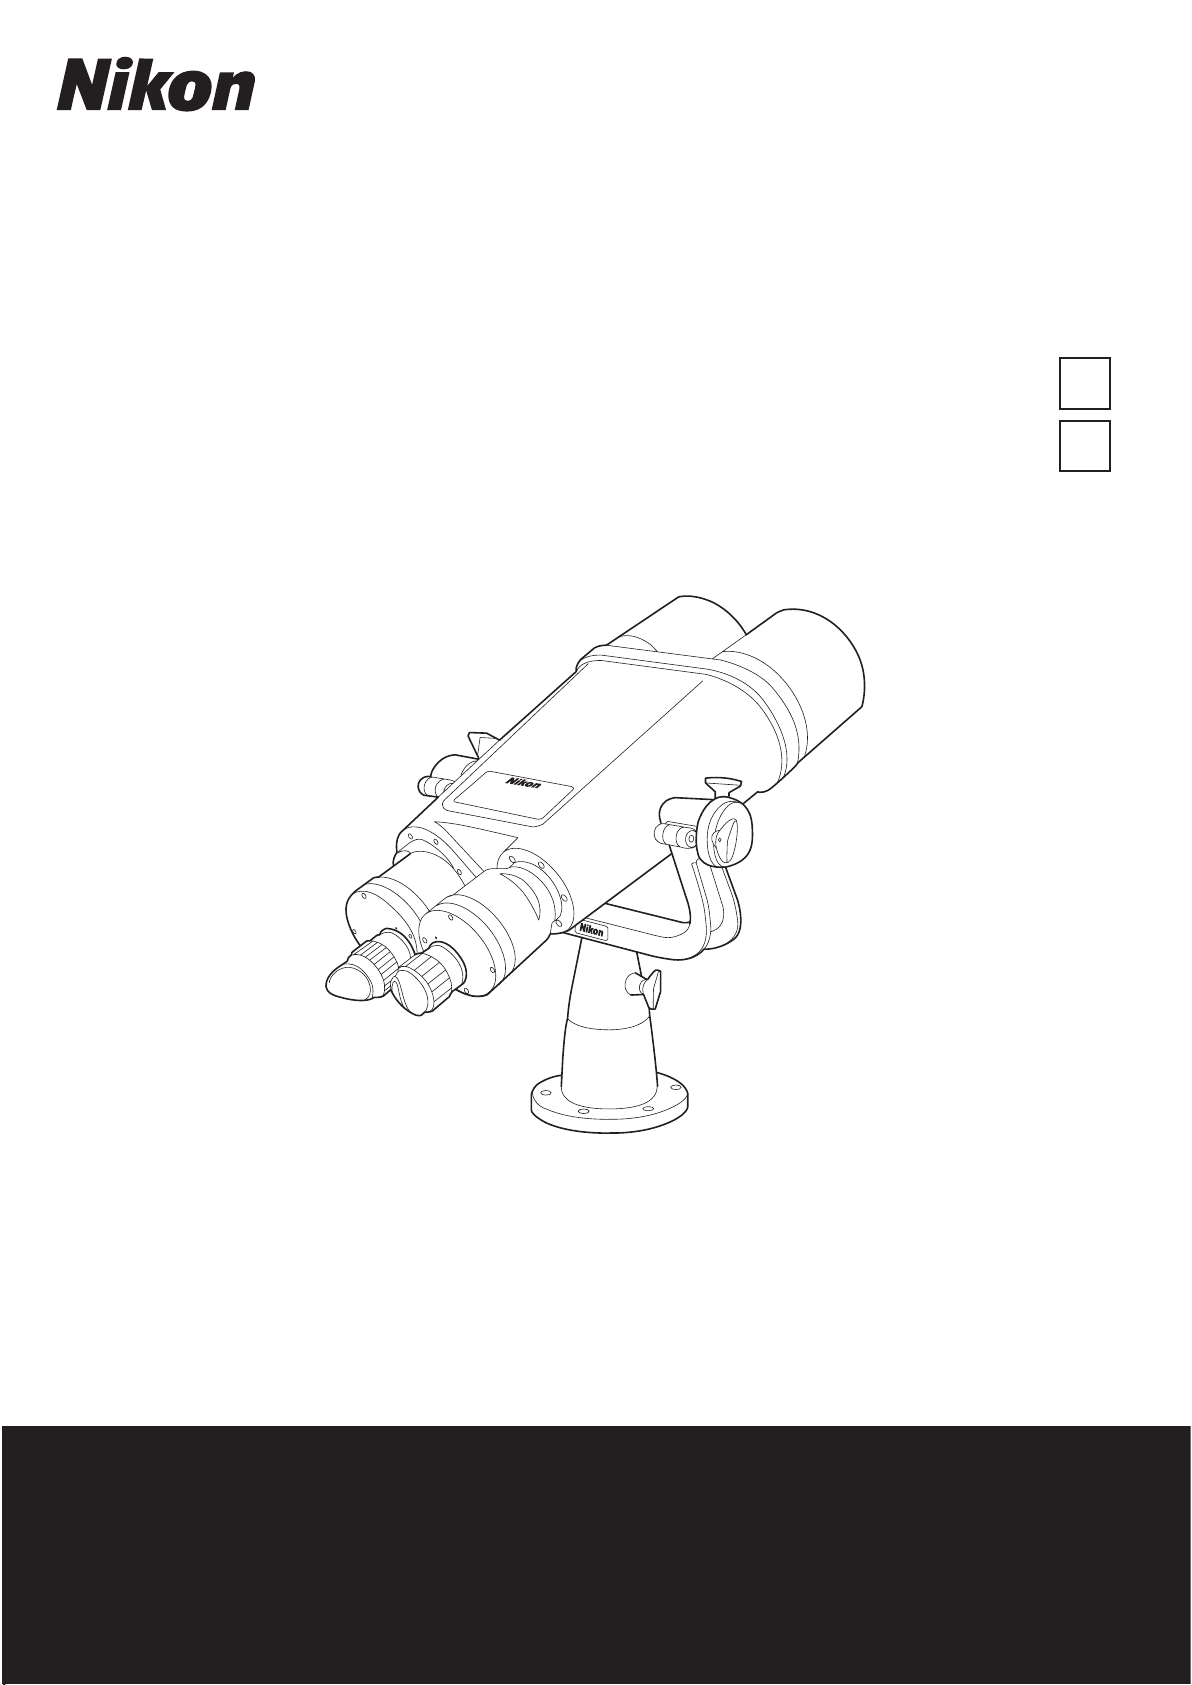
大型双眼望遠鏡/
Binocular telescopes
Jp
En
20×120
Ⅳ/25×120
使用説明書/Instruction manual
Page 2

Jp
En
はじめに
■ 本書について
このたびは、ニコン大型双眼望遠鏡をお買い上げいただき、まことにありがとうございます。
製品をお使いになる前に本書をよくお読みになり、正しくお使いください。
お読みになった後は、いつでも見られるところに保管してください。
●
使用説明書について
• 使用説明書の一部または全部を無断で転載することは、固くお断りいたします。
• 本書のイラストは、実際と異なる場合があります。
• 使用説明書の誤りなどについての補償はご容赦ください。
• 製品の外観、仕様、性能は予告なく変更することがありますので、ご了承ください。
安全上・使用上のご注意
この使用説明書には、あなたや他の人々への危害や財産への損害を未然に防ぎ、この製品を安全にお使いいただ
くために、守っていただきたい事項を記載しています。内容をよく理解してから、製品をご使用ください。
警告
この表示を無視して、誤った取り扱いをすると、人が死亡または、重傷を負う可能性が想定される内容を示して
います。
注意
この表示を無視して、誤った取り扱いをすると、人が傷害を負う可能性が想定される内容および、物的損害のみ
の発生が想定される内容を示しています。
■ 双眼鏡に関する安全上のご注意
警告
この製品で絶対に太陽を見ないでください!太陽や強い光をのぞくと、目を痛めたり、失明する恐れがあります。
使用時には細心の注意を払って太陽を絶対に見ないようにしてください。
注意
• この製品の包装に使用されているポリ袋などを、小さなお子さまの手の届くところに置かないでください。口
や鼻をふさぎ、窒息の原因になることがあります。
• この製品の眼幅調整や視度調整を行うとき、指をはさみ、けがをすることがあります。小さなお子さまの使用
につきましては、特にご注意ください。
• お子さまが部品や付属品を誤って飲み込まないようご注意ください。万一、飲み込んだ場合は、すぐに医師の
診断を受けてください。
• この製品を不安定な場所に置かないでください。倒れたり、落ちたりしてけがや故障の原因となることがあり
ます。
• この製品のツノ型目当てやキャップなどは、長期間の使用や保管の間に劣化し、衣類などを汚すことがありま
す。ご使用になる前に点検し、劣化による異常が見られた場合は、ニコンのサービス機関にご相談ください。
• 長時間この製品を使用すると、ゴム製のツノ型目当てにより、皮膚に炎症を起こすことがあります。症状が現
れた場合、直ちに使用を中止して医師の診断を受けてください。
• 分解しないでください。この製品の修理はニコンのサービス機関に依頼してください。
■ 架台に関する安全上のご注意
注意
• 架台を台やスタンドなどに取り付けるときは、ボルトやナットでしっかりと固定してください。
• 架台に本体を取り付けるときは、本体取りつけつまみをしっかりと締めてください。
■ 取り扱い・操作に関するご注意
• プリズムボックスを制限以上に開かないようにしてください。また、各種つまみや視度調整リングなどの回転
部も、制限以上に回さないでください。
• この製品に衝撃を与えないでください。
• 取り付け・取り外しの際に落とすなどして強い衝撃を与えた場合は、すぐにお買い上げ店、またはニコンのサー
ビス機関にご相談ください。
2
Page 3
• この製品の向きや角度を変えるときは、各可動部が破損しないよう、無理な力を加えず、可動範囲内でゆっく
1
8
9
0
2
5
りと動かしてください。
• この製品の向きや角度を変えるときは、無理な力を加えず、必ず各種つまみを緩めてから行ってください。調
節後は、各種つまみを必ず締め付けて本体を固定してください。
■ 手入れ・保守に関するご注意
● レンズ
レンズ面をクリーニングするときは、手で直接触らないようご注意ください。ゴミやホコリはブロアー
払ってください。ブロアーで落ちない指紋や油脂などの汚れは、乾いた柔らかい布やメガネ拭きなどでレンズの
中央から外側に円を描くようにゆっくりと拭き取ってください。強く拭いたり、硬いもので拭いたりすると、レ
ンズに傷を付けることがあります。汚れが取れないときは、レンズクリーナー液(市販)で湿らせた柔らかい布
で軽く拭いてください。
特にレンズの表面は、水滴がついたまま自然乾燥しますと乾燥時にレンズ表面が変質することがありますのでご
注意ください。
※ノズルから空気をいきおいよく吹き出すことができるゴム製の清掃道具
●
本体
視度調整リングなどの回転部に入った砂・ゴミは、ハケでよく払ってください。
本体のお手入れは、ブロアーでゴミやホコリを吹き払った後、柔らかい清潔な布で軽く拭いてください。とくに、
海辺等で使ったあとは、湿った柔らかい清潔な布で塩分を拭き取り、次に乾いた布で軽く拭いて乾かしてくださ
い。ベンジンやシンナーなどの有機溶剤や、有機溶剤を含むクリーナーなどを汚れ落としに使わないでください。
※
で吹き
Jp
En
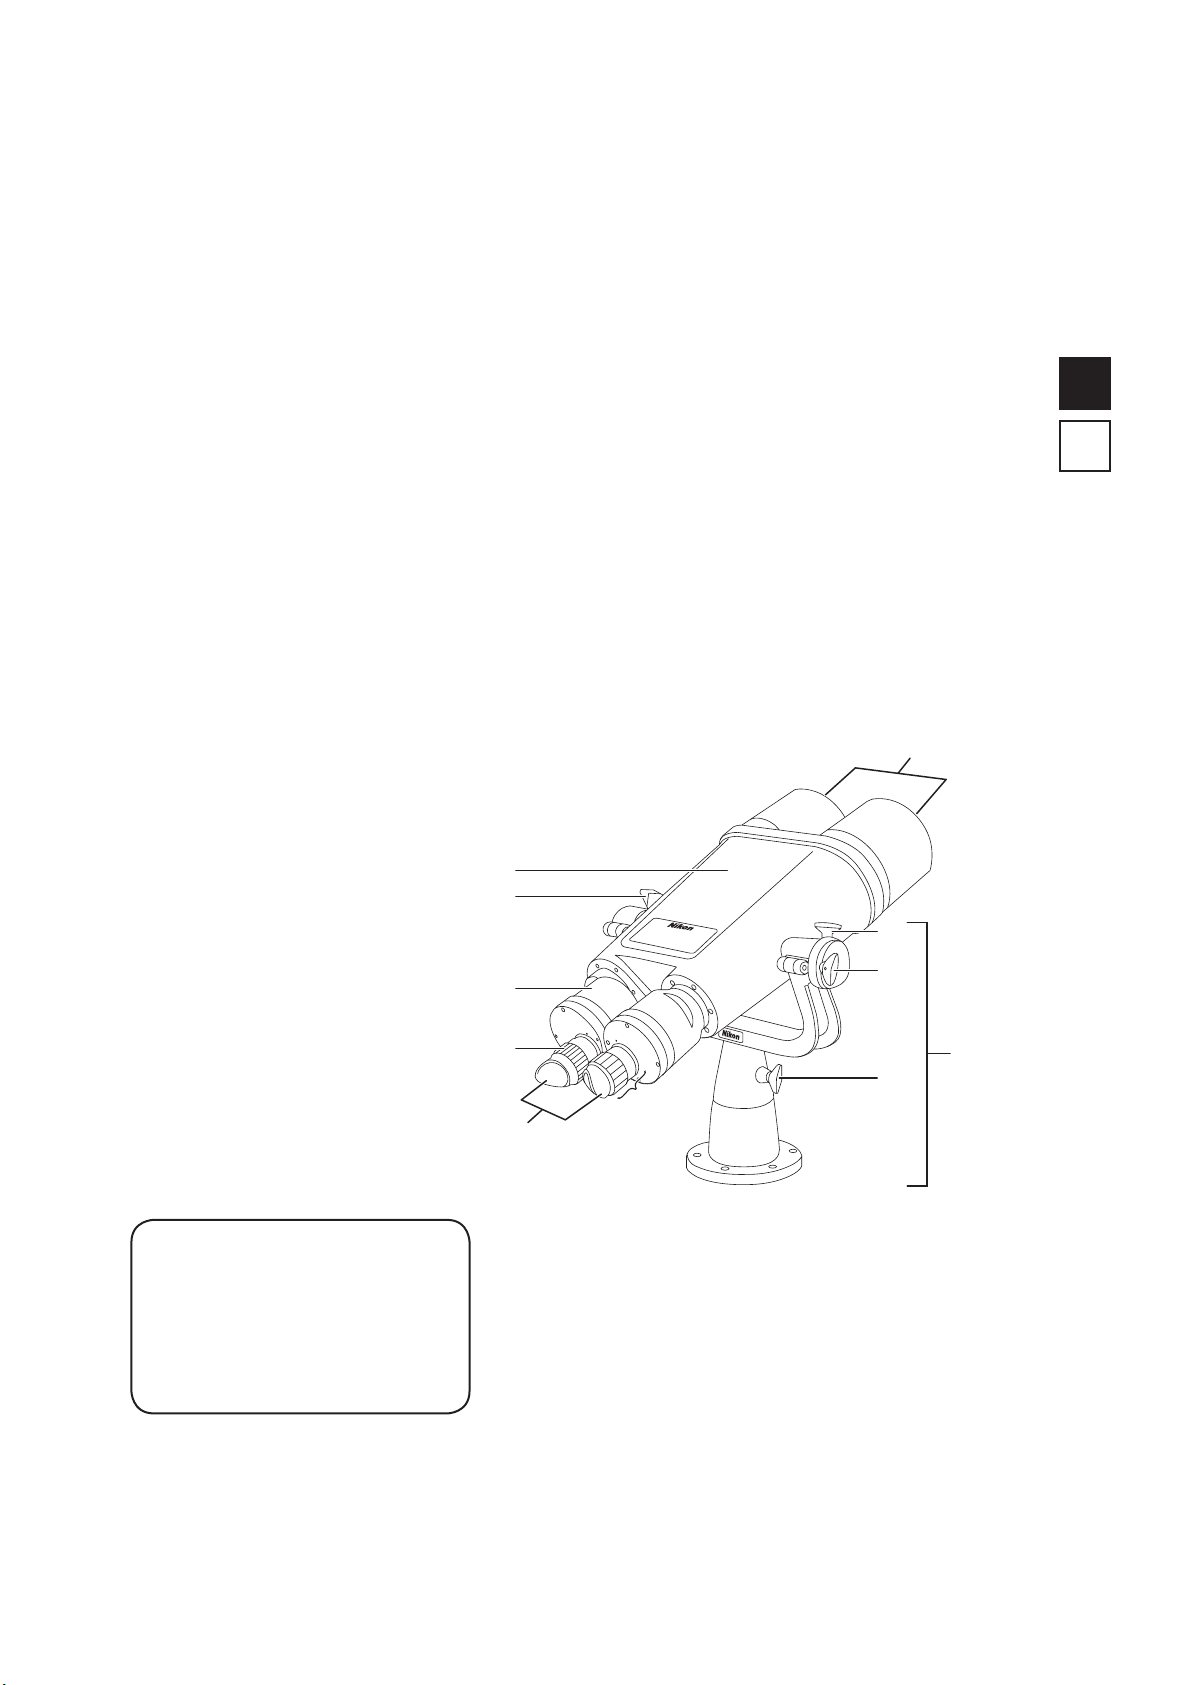
各部の名称(本体・架台)
対物レンズ
1
本体取りつけつまみ
2
俯仰固定つまみ
3
旋回固定つまみ
4
架台
5
接眼レンズ
6
ツノ型目当て
7
視度調整リング
8
プリズムボックス
9
本体
0
構成
大型双眼望遠鏡本体
接眼レンズキャップ × 2
対物レンズキャップ × 2
ツノ型目当て × 2
ビニールカバー × 1
架台 × 1
× 1
※1
※1
※1
※2
2
3
4
6
7
※ 1 ご購入時は本体に取り付けられています。
※
2 ご購入のセットによっては構成に含まれない場合があります。
3
Page 4
大型双眼望遠鏡の設置方法
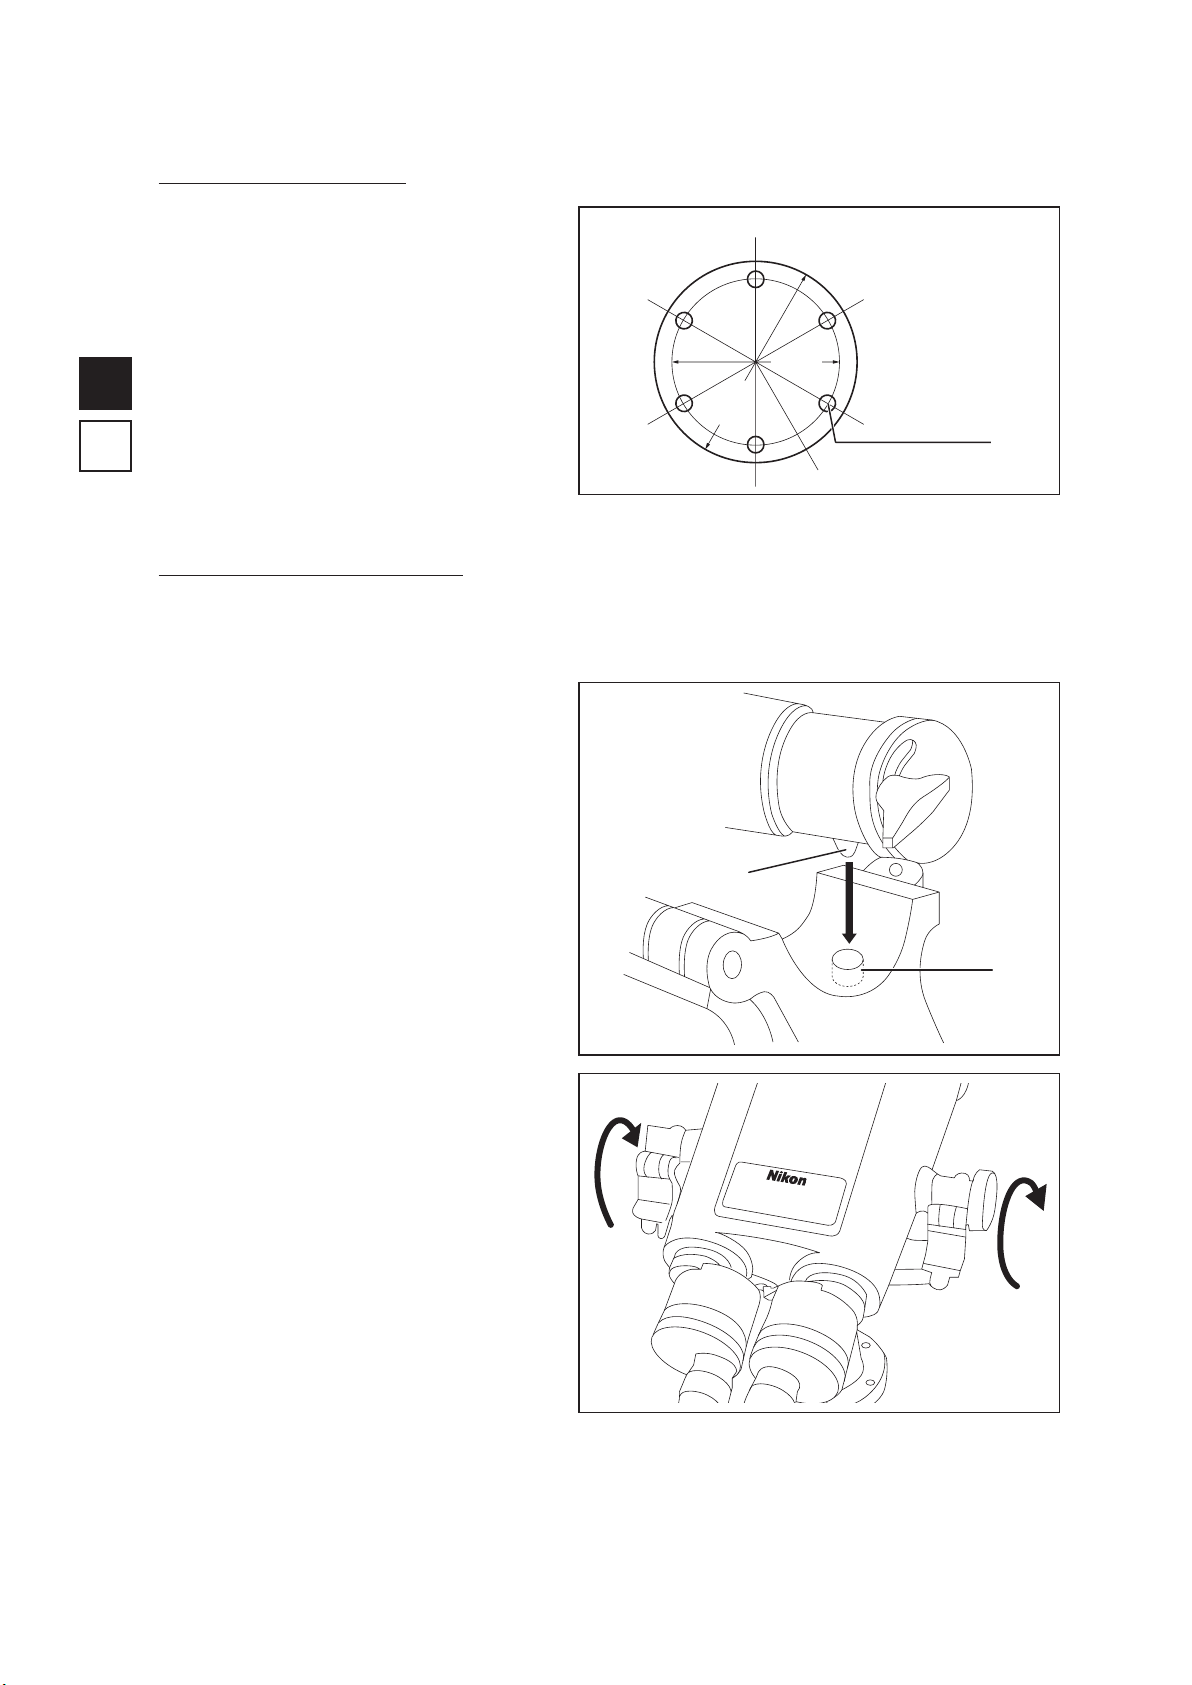
架台を任意の台に取り付ける
Jp
En
1. 任意の台に12 mm(1/2 in.)のネジ穴また
は通し穴を
6か所開けます。
A
架台底面の寸法図
• 架台底面の取り付け穴(A)に合致するよ
うに穴を開けてください。
2. 架台を台に取り付けます。
• 12 mm(1/2 in.)のボルトか、ボルトお
よびナットを使用し、架台と台をしっかり
と固定してください。
大型双眼望遠鏡を架台に取り付ける
※ 大型双眼望遠鏡が重いため、落下させないよう、十分ご注意ください。
148 mm
180 mm
1. 架台の本体取りつけつまみ(2か所)をゆるめて左右の軸受けふたを開きます。
• 架台は、Nikon ロゴが手前にくるのが取り付け時の正しい向きです。
2. 本体を架台にのせます。
B
• 本体右側にあるピンを架台右側にあるピン
穴に入れてください(
B)。
6-13.5 mm
(等分)
3. 左右の軸受けふたを閉じ(C)、それぞれの本
体取りつけつまみをしっかりと締めます。
ピン
ピン穴
C
4
Page 5
大型双眼望遠鏡の使用方法
ツノ型目当てについて
本体にツノ型目当てが装着されているため、眼鏡をご使用の場合は、眼鏡を外してください。
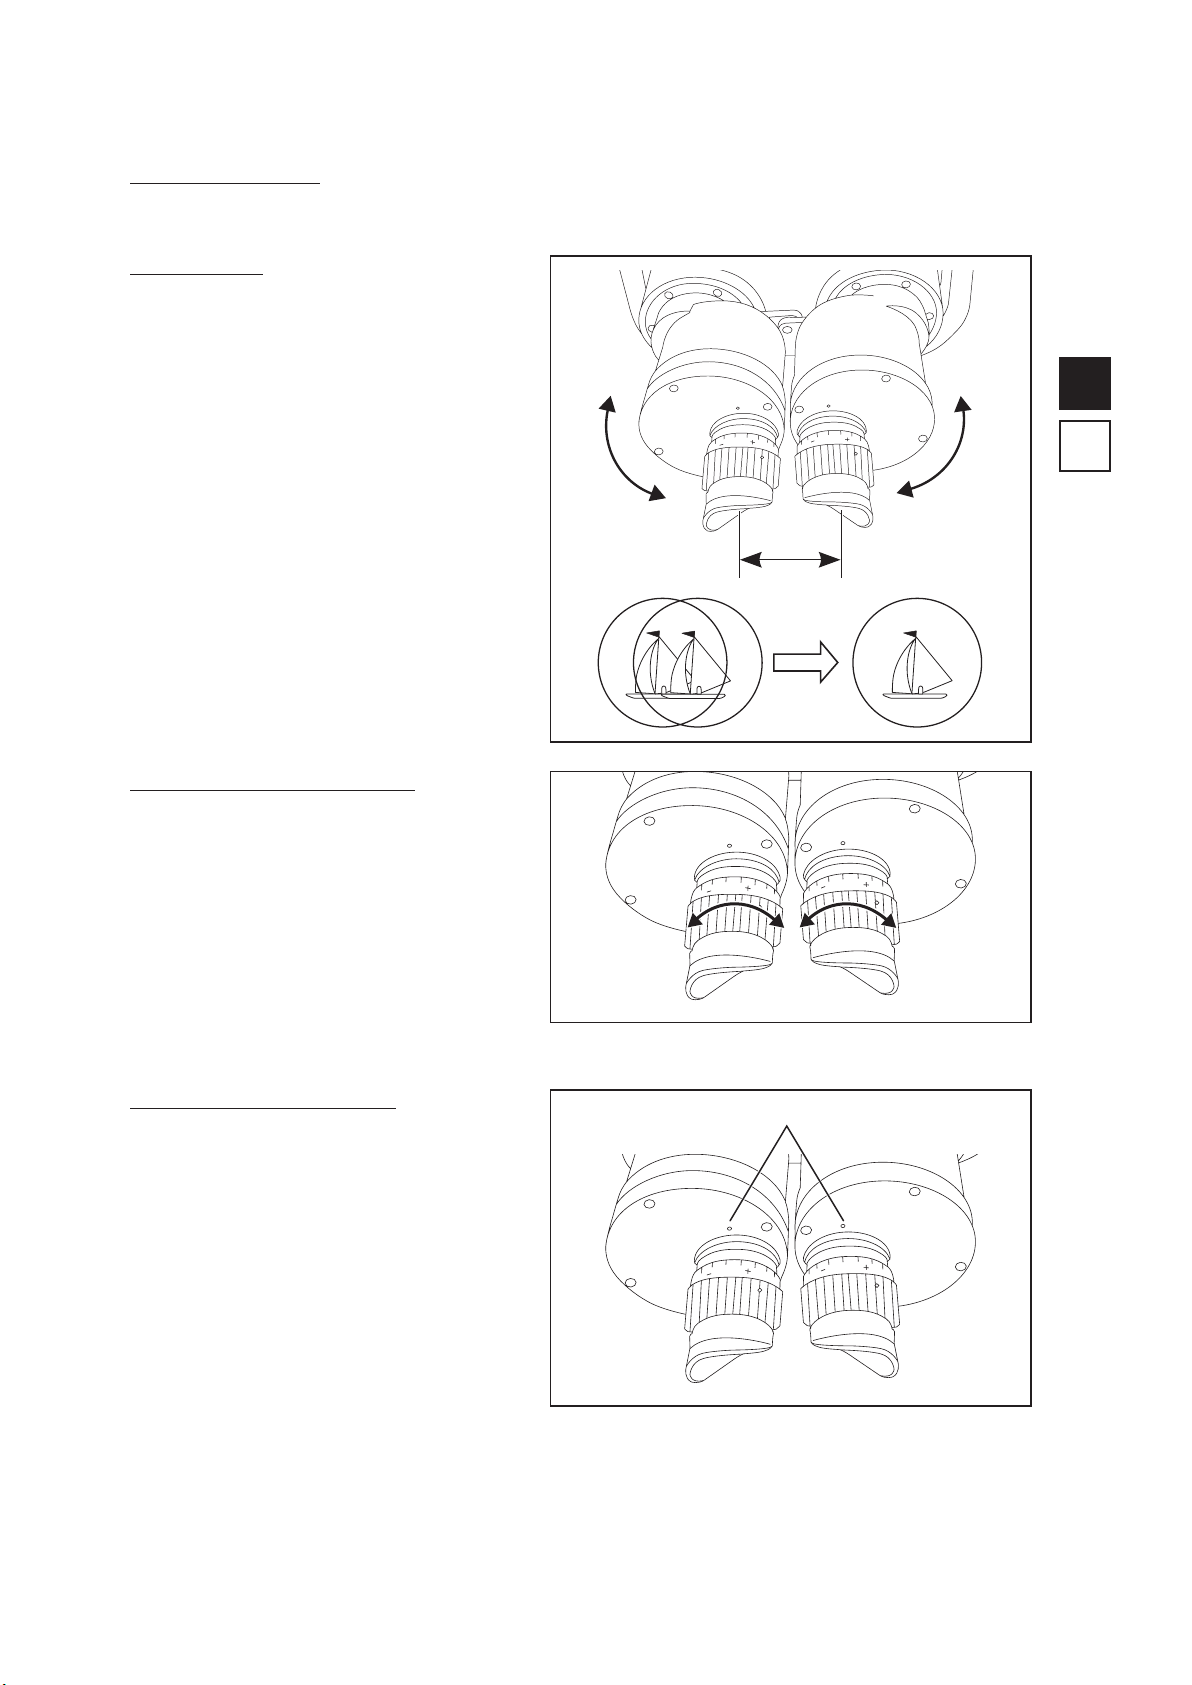
眼幅を合わせる
• 接眼レンズを覗き込み、プリズムボックスを
(D)の矢印のように開閉して、視野がひとつの
円になるように調整します。
ピント合わせ(視度調整)を行う
※ この双眼鏡は単独繰出し(IF:Individual
Focus
)式です。
• 右目・左目それぞれで目標物にピントを合わ
せます(
E)。
D
Jp
0
E
0
0
0
En
視度調整リングの目盛について
• ピントが合った時の指標(F)が指す目盛を控
えておくと、ピントを再度合わせるときに便
利です。
F
指標
0
0
5
Page 6

Jp
En
本体の向きや上下の角度を調節する
● 向きを変える:本体を360°水平に回転(旋回)
することができます。
1. 架台の旋回固定つまみを反時計回りに回して
緩めます(
2. 向きを調節し、旋回固定つまみを時計回りに
回して締めます。
G)。
G
旋回固定
つまみ
●上下の角度(俯仰)を変える:上に70°~下に
30°の範囲で本体の角度を調整できます。
1. 左手で接眼レンズまたはプリズムボックスを
持って本体をしっかり支えます。
2. 右手で本体の俯仰固定つまみを反時計回りに
回して緩めます(
• 緩めると対物レンズ側に本体が傾きますの
で、衝撃を与えないよう、しっかりと左手
で支えてください。
3. 角度を調節し、俯仰固定つまみを時計回りに
回して締めます。
H)。
H
俯仰固定つまみ
大型双眼望遠鏡の使用後は、各種つまみを必ず締め付けて本体および架
台が固定されていることを確認してください。
6
Page 7

性能
■ 本体
型名 20×120 IV 25×120
倍率 (×) 20 25
対物レンズ有効径 (mm) 120 120
実視界 (˚) 3.0 2.9
見掛視界 (˚)
1,000 m
※1
先の視界 (m) 52 50
55.3 64.7
Jp
ひとみ径 (mm) 6.0 4.8
明るさ 36.0 23.0
アイレリーフ (mm) 20.8 18.9
最短合焦距離 (m) 133 210
長さ (mm) 680 672
幅 (mm) 454 454
高さ(mm) 160 160
質量(重さ)(kg) 14 14
眼幅調整範囲 (mm) 58-74 58-74
視度調整範囲(m-1) -5 - +3 -5 - +3
構造 防水 (2 m/10分間)※2と窒素ガス充填
※ 1 ISO 14132-1:2002 に基づいた見掛視界の表記数値。
関係式 [tanω’= Γ × tanω]で算出した値。見掛視界:2ω ’、 倍 率 : Γ 、実視界:2ω
2 2 mの水深に 10 分間浸かっても影響のない防水設計(水中での使用はできません)。
※
■ 架台
仰角(˚) 70
En
俯角(˚) 30
旋回角(˚) 360
高さ(mm) 407
幅(mm) 406
質量(重さ)(kg) 5.5
7
Page 8

Jp
防水・防曇について
• この製品は2 mの水深に10 分間水没させても内部光学系に影響のない防水設計になっています。
• 雨風の当たる場所や、湿気の多い場所などの悪条件下で使用しても、内部機能を損ねることがありません。
• 乾燥窒素の充填により、曇りやカビが生じにくくなっています。
使用上の注意点 :
• 水中での使用はできません。また流水などで強い水圧をかけないでください。
• 本体可動部に水滴が付いたときは操作することをやめ、水滴を拭き取るようにしてください。
なお、防水性能を保持するために、定期的に点検を受けられることをおすすめします。
レンズの清掃に際して
双眼鏡の対物レンズの清掃に、エアゾールタイプのダストクリーナーを使用するときは、缶を立ててレンズ面より
以上離し、気化した液化ガスが一点に集中しないように動かしながら、十分に注意して清掃してください。
30 cm
En
アフターサービスについて
お買い上げいただきましたニコン大型双眼望遠鏡を、安心してご愛用いただきますよう、次のとおり修理、アフター
サービスを行っております。
• 本製品の補修用性能部品(その製品の機能を維持するために必要な部品)は、製造打ち切り後も8 年間を目安に
保有しております。ご使用いただいております製品が修理可能かどうかにつきましては、ご購入店、またはニコ
ンのサービス機関へお問い合わせください。
• ニコンのサービス機関につきましては、「ニコンサービス機関のご案内」をご覧下さい。
付記
水没、火災、落下等による故障または破損で全損と認められる場合は、修理が不可能となります。なお、この故障
または破損の程度の判定はニコンのサービス機関におまかせください。
8
Page 9

Introduction
■ Read this First
Thank you for purchasing the Nikon Binocular telescope.
Before using the product, read this manual thoroughly to ensure proper use.
After reading this manual, keep it in a readily accessible place for future reference.
About the manual
●
•No part of the manual may be reproduced, transmitted, transcribed, stored in a retrieval system, or
translated into any language in any form, by any means, without Nikon’s prior written permission.
•Illustrations shown in this manual may differ from the actual product.
•Nikon will not be held liable for any errors this manual may contain.
•The appearance, specifications, and capabilities of this product are subject to change without notice.
SAFETY AND OPERATION PRECAUTIONS
Strictly observe the guidelines contained in this manual in order to use this product safely and
prevent possible injury or property damage to you and others. Understand the contents thoroughly
for correct use of the product.
WARNING
This indicates that improper use by ignoring the contents described herein can result in potential death or
serious injury.
CAUTION
This indicates that improper use by ignoring the contents described herein can result in potential injury or
material loss.
Jp
En
Notice for customers in the State of California
WARNING:
This product contains chemicals including Lead which is known to the State of California to
cause cancer and birth defects or other reproductive harm. For more information go to www.
P65Warnings.ca.gov.
■ SAFETY PRECAUTIONS (Binoculars)
WARNING
Never look at the sun directly while using binoculars.
Looking directly at the sun or intense light may seriously damage the eyes or cause blindness.
CAUTION
•Keep the plastic bag used to wrap this product or other small parts out of reach of children. The bag may
block their mouths and noses and cause them to suffocate.
•Your fingers may get pinched when you adjust the interpupillary distance or diopter. Be particularly
careful when letting small children use the product.
•Be careful of children inadvertently swallowing small parts or accessories. If children swallow such parts,
see a doctor immediately.
•Do not leave this product in an unstable place. It may fall and cause injury or malfunction.
•The horn-shaped eyecups and caps of this product may deteriorate when used or stored over long periods
and may stain clothes. Check them before use, and consult with a Nikon authorized service representative
if you find a defect due to deterioration.
•Using the rubber horn-shaped eyecups for extended periods of time may cause skin inflammation. If you
develop any symptoms, stop use and see a doctor immediately.
•Do not disassemble. Repair should be referred to a Nikon authorized service representative.
■ SAFETY PRECAUTIONS (Fork mount)
CAUTION
•When attaching the fork mount to a base or pillar stand, firmly secure the fork mount with bolts and nuts.
•When attaching the fork mount to the body, firmly tighten the body fixing screw.
9
Page 10

■ HANDLING AND OPERATION PRECAUTIONS
8
9
0
2
5
•Do not open the prism box beyond the limit. Also, do not rotate rotating parts such as knobs and the
diopter adjustment rings beyond their limits.
•Do not subject this product to physical shock.
•If you subject the product to strong physical shock by dropping it during attachment or removal, consult
with your local dealer or a Nikon authorized service representative immediately.
•When changing the orientation or angle of this product, move it carefully within the movable range
without applying excessive force so that the movable parts are not damaged.
•When changing the orientation or angle of this product, make sure to loosen the screws first without
applying excessive force. After adjustment, make sure to tighten the screws to secure the body.
Jp
En
■CARE AND MAINTENANCE PRECAUTIONS
LENS
●
Be careful that you do not directly touch the lens surface with your hands when cleaning it. Remove dust or
lint with a blower*. For fingerprints or other stains that cannot be removed with a blower, wipe the lens with
a dry soft cloth or cleaning cloth for eyeglasses, using a spiral motion that starts at the center of the lens and
working towards the edges. Wiping too firmly or wiping with a hard material may damage the lens. If this
fails, gently wipe the lens using a cloth lightly dampened with commercial lens cleaner.
Be careful because the quality of the lens surface coating in particular may change and deteriorate if it is air
dried with water drops present.
* A rubber cleaning tool that blows air from a nozzle.
MAIN BODY
●
Remove dust trapped in the rotating parts of the diopter adjustment rings, etc. with a soft brush.
After gently removing dust with a blower, clean the body surface with a soft, clean cloth. After use at a
seaside, wipe off salt that may be on the body surface with a damp, soft, clean cloth, and then wipe with a
dry cloth. Do not use benzene, thinner, or other cleaners containing organic solvents.
Nomenclature (body, fork mount)
Objective lens
1
Body fixing screw
2
Tilting clamp screw
3
Rotation clamp screw
4
Fork mount
5
Eyepiece lens
6
Horn-shaped eyecup
7
Diopter adjustment ring
8
Prism box
9
Body
0
1
2
3
10
6
7
ITEMS SUPPLIED
Binocular telescope body ×1
Eyepiece lens cap ×2
Objective lens cap ×2
Horn-shaped eyecup ×2
Vinyl cover ×1
Fork mount ×1
*1 Attached to the body at the time of purchase.
*2 May be not included in the items supplied depending on the purchased set.
*1
*1
*1
*2
4
Page 11

Installation procedures for the binocular telescope
Attaching the fork mount to a base
1. Make six 12 mm (1/2 in.) screw holes or
through holes in a base.
•Make the holes so that they match the
attachment holes at the bottom of the
fork mount (A).
2. Attach the fork mount to the base.
•Use 12 mm (1/2 in.) bolts, or bolts and
nuts, to firmly fasten the fork mount and
base.
Dimensional drawing of the bottom of the fork mount
A
148 mm
180 mm
6-13.5 mm
Attaching the binocular telescope to the fork mount
* Make sure not to drop the binocular telescope because it is heavy.
1. Loosen the two body fixing screws on the fork mount and open the left and right shaft holder lids.
•The correct attachment orientation of the fork mount is when the Nikon logo is in front of you.
2. Place the body on the fork mount.
•Insert the pin on the right side of the
body into the pin hole on the right side
of the fork mount (B).
B
Jp
En
3. Close the left and right shaft holder lids
(C), and firmly tighten the body fixing
screws.
Pin
Pin hole
C
11
Page 12

Usage procedures for the binocular telescope
Horn-shaped eyecups
If you are wearing eyeglasses, remove them because horn-shaped eyecups are attached to the body.
Jp
En
Adjusting the interpupillary distance
•Look into the eyepieces, open and close the
prism box as shown in the arrows in (D), and
adjust so that your view becomes a single
circle.
Adjusting the focus (diopter adjustment)
* The binocular telescope is the individual
focusing type.
•Adjust the focus on the target for each eye
(E).
D
0
E
0
0
0
12
About the scale on the diopter
adjustment rings
•These are useful for taking note of the scale
indicated on the index (F) when the focus is
adjusted, and re-adjusting the focus.
F
Index
0
0
Page 13

Adjusting the orientation and tilting
angle of the body
Changing the orientation: You can rotate
●
the body horizontally in 360 degrees.
1. Rotate the rotation clamp screw on the
fork mount counter-clockwise to loosen it
(G).
2. Adjust the orientation, and rotate the
rotation clamp screw clockwise to tighten
it.
Changing the tilting angle: You can adjust
●
the angle of the body from 70 degrees
above to 30 degrees below.
1. Hold the eyepiece lens or prism box with
your left hand to firmly support the body.
2. Rotate the tilting clamp screw on the
body counter-clockwise with your right
hand to loosen it (H).
•When it is loosened, the body will tilt to
the objective lens side. Firmly support
the body with your left hand so that the
body is not subjected to physical impact.
3. Adjust the angle, and rotate the tilting
clamp screw clockwise to tighten it.
G
Jp
Rotation
clamp screw
En
H
Tilting clamp screw
After using the binocular telescope, make sure to tighten the screws
and check that the body and fork mount are secured.
13
Page 14

Jp
Specifications
■ Body
Model 20×120 IV 25×120
Magnification (×) 20 25
Objective diameter (mm) 120 120
Angular field of view (real) (˚) 3.0 2.9
Angular field of view (apparent) (˚)
Field of view at 1,000 m/yd. (m/ft) 52/156 50/150
*1
55.3 64.7
En
Exit pupil (mm) 6.0 4.8
Relative brightness 36.0 23.0
Eye relief (mm) 20.8 18.9
Close focusing distance (m/ft) 133/436.4 210/689.0
Length (mm/in.) 680/26.8 672/26.5
Width (mm/in.) 454/ 17.9 454/ 17.9
Height (mm/in.) 160/6. 3 160/6. 3
Weight (kg/oz.) 14/493.8 14/493.8
Interpupillary distance adjustment (mm/
in.)
Diopter adjustment (m
Structure
-1
) -5 - +3 -5 - +3
Waterproof (up to 2 m/6.6 ft for 10 minutes)
filled
58-74/2.3-2.9 58-74/2.3-2.9
*2
and nitrogen gas
*1 Apparent field of view is calculated based on the ISO14132-1:2002 standard
The number calculated by the formula [tan ω’ = Γ x tanω ]: Apparent field of view: 2ω’,
Magnification: Γ , Real field of view: 2ω
*2 The binocular telescope is waterproof, and will suffer no damage to the optical system if
submerged or dropped in water to a maximum depth of 2 m/6.6 ft for up to 10 minutes.
14
■ Fork mount
Tilting angle (Upward) (°) 70
Tilting angle (Downward) (°) 30
Horizontal rotation (°) 360
Height (mm/in.) 407/16.0
Width (mm/in.) 406/16.0
Weight (kg/oz.) 5. 5/194.0
Page 15

About waterproof and fogproof:
•All models shown are waterproof, and will suffer no damage to the optical system if submerged or dropped
in water to a maximum depth of 2 m (6.6 ft) meter for up to 10 minutes .
•Can be used in conditions of high humidity, dust and rain without risk of damage.
•Nitrogen-filled design makes them resistant to condensation and mold.
Observe the following when using these products:
•The binocular telescope cannot be used underwater. Also, do not subject it to strong water pressure such as
from running water.
•Any moisture should be wiped off before adjusting movable parts of these products to prevent damage.
To keep your binocular telescope in excellent condition, regular servicing by authorized dealer is
recommended.
Jp
Cleaning lens
When cleaning the binocular telescope’s objective lenses using an aerosol-type dust cleaner, make sure to
hold the can upright at least 30 cm (11.8 in.) from the lens surface while moving the can to avoid focusing the
vaporized liquid gas on one point.
En
15
Page 16

Printed in Japan, 868C_3_1909
 Loading...