

Page 1
MS
MmwpMMkip
Nikon
mmmww
Instruction Manual
Bedienungsanleitung
Manuel d'utilisation
Manual de instrucciones
Manuale di istruzioni
m
Page 2
j\»
A
s>±±©cait
agzt
A
sir.
A
mm\z,
mit(Lziz^vfci\iit)(D'n^ismtf%z>coz-^-o
i^<tzmm$i$m±ft®(£®®m&i&tiwmit)tmftt\zuz?.
€
A
flUMfit
«S§jt
mw
Page 3
«>ftt!!5
tCCHSMHK
0
0
Bid*
KMht
A
7.h3u/7tf-mic§Sf>t^rj:uj:5ICT5^i:
!(f
\CWJZ •
%m(Dm\Z7,
A^i
h'3'vttWtrmAZ.t.1'
s«a*
0
BWMik
3
Page 4
-Ht
4
2.8
Page 5
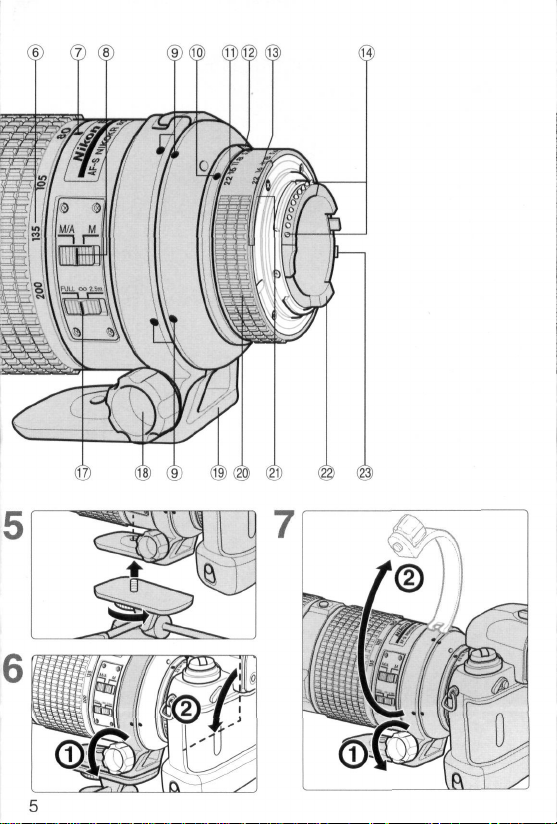
© ® ®
©
©®
®®
®@©
©(§>@ @
7
Page 6
§g|5GD£ffc
© SiSiffi
©
mmmmm
® 77-fV^-rtlsIffllxDgffi
® CPUS^g*
® estyv?
® x-~>?uv?
®
® Epffiitto*y
® SBMEWS
(§) $DU>?
® mm
x?m&:®.jE—5>-{-y4i>yv- • o^-y • =E—$>-)EiW5K£Sffib
t^lC.
F5, F4> F90X, F90S~>U-X^y5, F70D, 8£Uyn*
T^OOu 7n^7S^y5t©li*^fet*IrlS, AFJiiJtfprfg&tt'frD
Z?&<.
AFffl|^lCfeP0|ICx'-zL77Jb7^-^X;E- h*IC«3DJft^.5C
tfflt:'$Sr^-a77JWI^/r-h7^-*Xj«fig. AFJIfPSlCAF^ft
:£-ScD»»IHHi5HlcSJSZf$S7a—^T-MffifflSI^.^^ y?, b>
XUTrfflfv hB©*fttf"C£-37#-;fc;*a>.yi77lf5'>&<!£> l£^©«$
a*tlBg^}forct)^^t©ffl^^t>tie(Cci;D6*)ffi&ffiHdSSIl^*il-S-
53D-^JU?7^->ilJ3t
SB-27,
SB-26, SB-25ftfflBf)„ &6E. ZH>AFW- h-7*-£3.
(F3 AFPt<)]^y77tt'x-i-i©ffl*^t)t*I!B7^-*7I-< He
H7JI/7 *-ts?.mz(!£mz&z>£yh-&iDtt)ffo!mz'?o
mmFmaF2.8t$m\zm?><-
•
SD-^U^BLII^PIB^ bi^ (SB-28,
£3^
i&^&uuT.Ttf-ysfji^Bf
UBTC©
6
Page 7
ate
•
CPU«^&'S;£«aU*-r©T:1 Jf-MtffU^PK-l, PK-11/11A. -A
-buy? BR-4i=rcBKi uv^ttC'ffifflic&ns-eAjo ^fflffi©7Xiz-<7
fewt+rc^ps<rdsru
•-D>F3 AFfflDX-l
Ct6ffl©*^5^WeiWICj:or, TSffldoStfV
-~~^7J-«i-F(W5)
1lX=5 ~~~~~~~~~^
F5.
F4vU-X
F90X~>U-X
F90->U-X. F70D
AFCf-b7:J—737J
£>5(F3AFSK)
AF(^--h-7^-tiX)W^©S^5
sssccu^xiSFaAF^x^riicffifflr-ssti-Aj.
• M/A(V=^7'JHI$t^-h7*-^7.):E- K©«!U?5
7x-t}X=E-W]m?LZ'(y?-%M/MCl2y hU^lfi, AFC*-1-?
:7
7^V2-<t*I^£totirfflffiJfll3:"C"'SS;-e/u„
h-SfctttflWrsSI-o
AF
M
c
s
AF
M
bVXCQfSS^-
c
s
M/A
V-a7Jb^*-^ZJil5CD*
(?*-ftXI-Tr-'SJ)
V ~
3.7)17
(yt- ftxi-fKqr)
x,-a77JU^*-*X}li5©S>
t*
(7*-ftT.I-f'
7t
-£>7,mzoyfr
M
KBJ)
(M/A=E-
AFC*Hn,
B^^Bigirse: ttfr^st. 2.5miyrtic®^j*tfS5»^is
HjEfflHTgi«A.X5CDao
h-77r-7JX)ffim
Sf^8t£>^[C2.5mUU:ICPM6nrU£
Cfflffl^^X^'75F^"°o-2.5m"[C-b7hTSt, tfVh^tot+CD
"FULL"
IC-fe-7hL^-ro(H2)
7
Page 8
»,£S§8!
80mm
1
05mm
135mm
200mm
If lEfifflfflgS (Sg8tgS8Lt©JgMSr)
1.3mm(arf5)
0.6mm
0.3mm
0.2mm
3Lsji-%movy?(D?5mz7.^jFL&mmmtsi-uy::JmM%€itx
Jaft£ft(;:7.^Kt"3<ha-^IJ!gi;£n^0(EI4)
8
Page 9
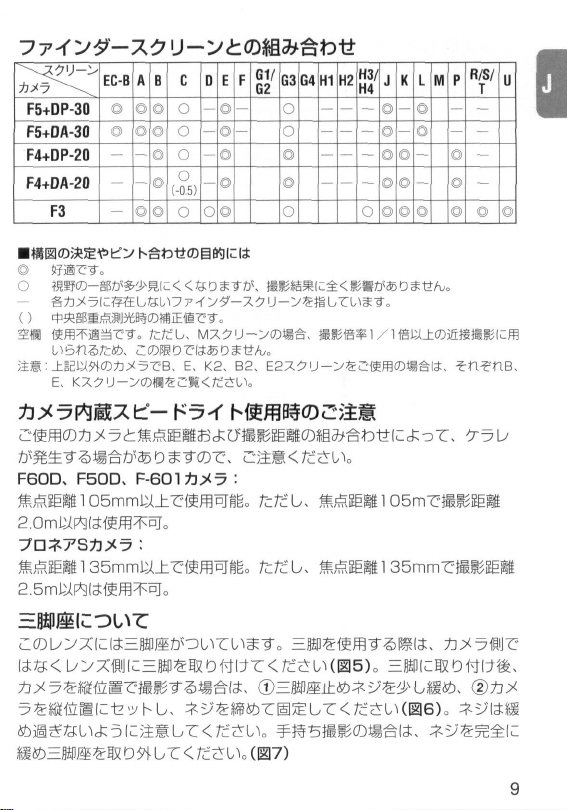
?7'(y9-x2iJ-y£am3*at>it
EC-B
F5+DP-30
F5+DA-30
F4+DP-20
F4+DA-20
F3
O
O
(-0.5)
81/
G3 G4 HI H2
G2
H3/
H4
'
mi
T
aat:±BEti^ffl»^5rB. E. K2,
E.
KXi7U->©ii%crit<eau.
F60D,
F50D.
F-601^^5
BS.
Eax^u->sc«ffl©«Sre. ^n?tiB,
:
*^E«ll05mmW±Z?fieffl5j«B. fcftfU iu£» 105ml:Si»Sgit
2.0miUP*3Bffiffl;lRr.
a*Sgltl35mmm±T;'ffifflpIigo fcftfU tuSEK135mmr-«»SIK
S.5miyrtl*fBffl^BT.
ia&< L»XflllC=l»€ilD<\fWr<fc*$U(B6). EMcKDttttft,
»feEBPffi*ISDWbr<«SUM7)
9
Page 10

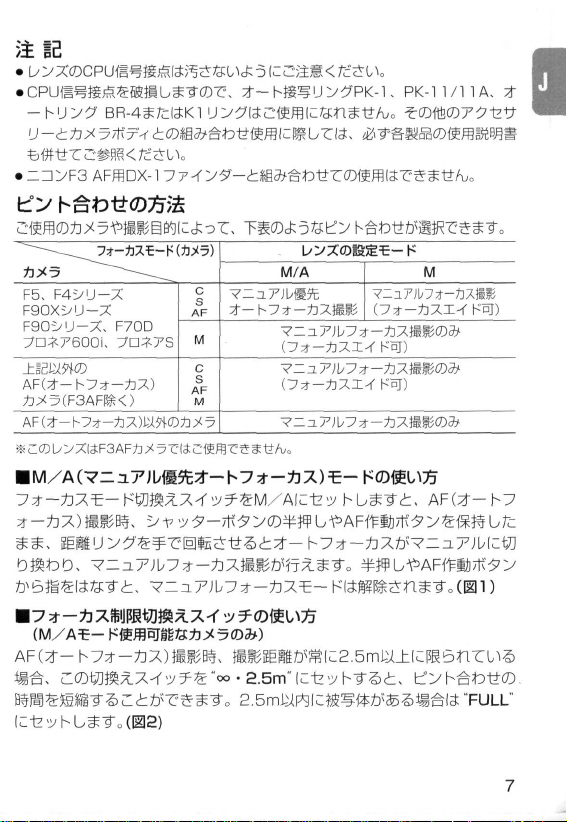
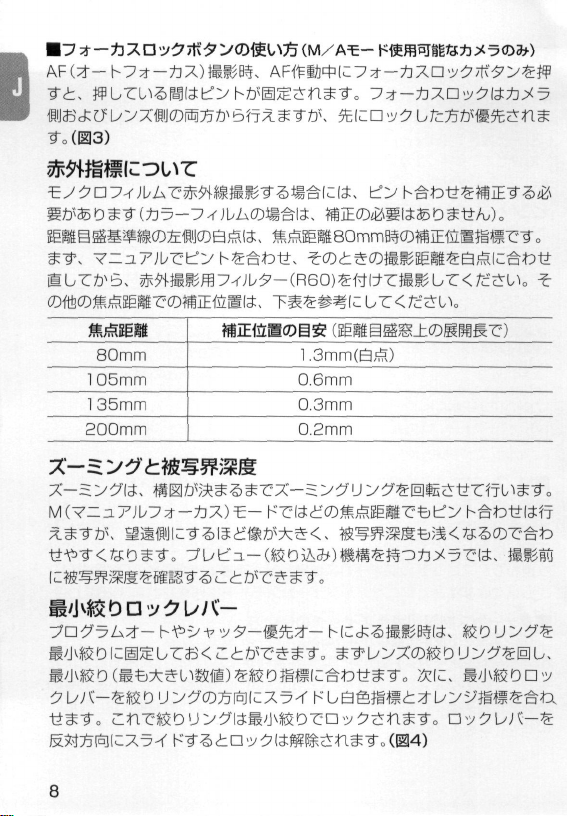
fflic5^si^raau©j;i^«pif!^ssur<rcsi^ *fc,
3t©StStC3, ^75'lJ^^SK©SSi:C5:6®»r<rc^tlo
• Ly^X^TklOlb-rt, SSff<ttt;o<fcfc!;UTS{P¥©]IH£»D3e-r
«S/c LF-1
A'3*'.vh7-KHB-17
A-Rr-XCL-73
BI^B
77mmft
77mmPM^7f JkS'-lfffl?- K HN-34(HN-29»Cffi«lC»nS1*A/)
l^iA^iO
-f )bS-
(F^ITO
-C
Jk$>-£^C)
xLO>A-5—TC-14BS
xLOiVA"—3>-TC-2CHS
xU=l>A-2-TC-14E
xbD>A-^-TC-20E
10
Page 11
ft
m
MJSXBB-
80mm
B^PStb : 1 : 2.8
\JVXM.
BS : 30" 10' -12° 20'
Mtssmsm-immm-
••
14P1
so,
oo~i.5m,
wmmvum • t> x 5
mOB®-- 2.8- 4, 5.6, 8, 11, 16, 22
»JvR0D<y$ : D7^LyA-(C[|;Df/22(CD-7i75Jfg
HM05S
••
CPU • Al£s»oa;><57ff7Vr»ltR»3fc 8BR£3
7t-WSiMMX-f7?:Full(oo~l.5m)i;«
x-s.y9:
x-s.y?vy?\z&zlmE£,
—200mm
8ft(ED^X5#0
105, 135,
200mm
5ftmm
nt',?<< ^w&w&wmjMm
©* X 5/It xVCIiix D iA^iJ^
~2.5m©2Sia«^
3
an
-?0y\* : ~U>FV5>h
TfvWJbWX.'.
*5£ : tt88mm(«*8)xW207mm(SS : K3*u/ hS
» H
: Wl
77mm
(P
= 0.75mm)
*@^5U>XftHSD, ±Sfi215mm
580g(EI«XDftttBi)
«1450g(=Mffi«U)
11
Page 12
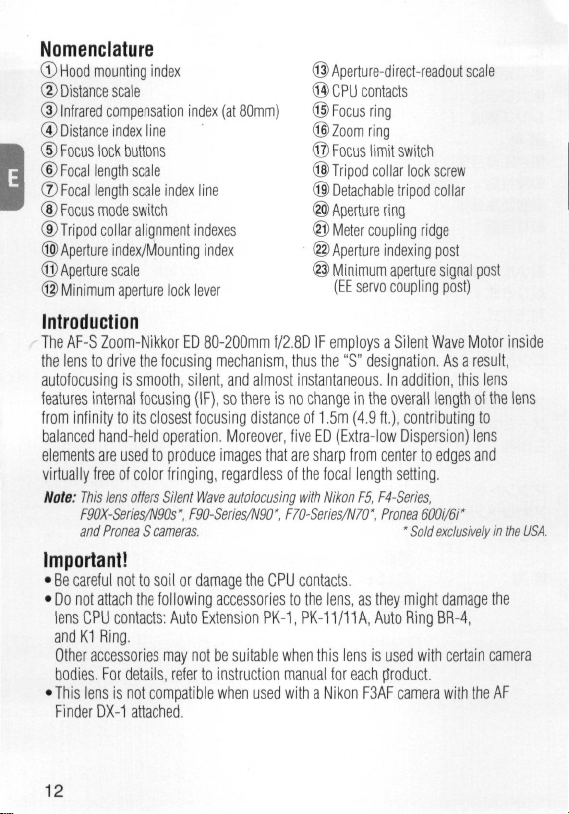
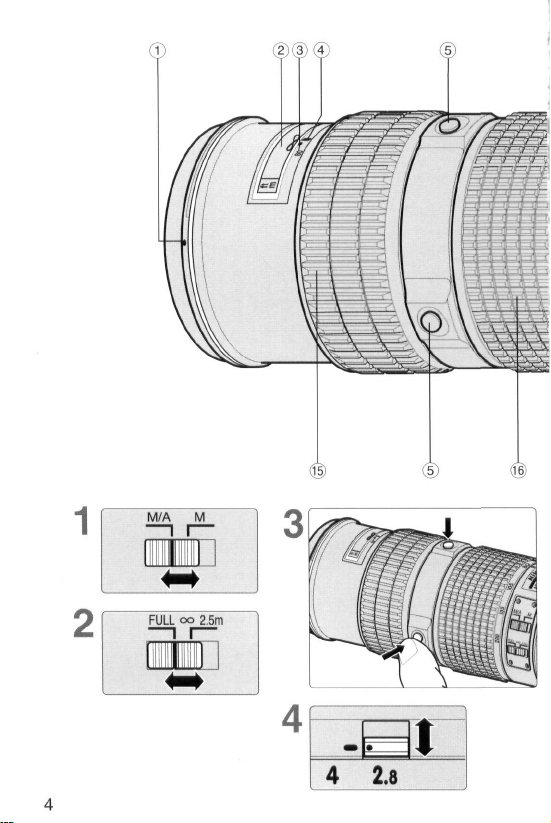
Nomenclature
©Hood mounting index ©Aperture-direct-readoutscale
© Distance scale ®
® Infrared compensation index (at 80mm) © Focus ring
©Distance index line ©Zoom ring
© Focus lock buttons © Focus I imit switch
© Focal length scale © Tripod collar lock screw
® Focal length scale index line © Detachable tripod collar
© Focus mode switch © Aperture ring
® Tripod collar alignment indexes @ Meter coupling ridge
©Aperture index/Mounting index ©Aperture indexing post
® Aperture scale @ Minimum aperture signal post
© Minimum aperture lock lever (EE servo coupling post)
CPU
contacts
Introduction
The AF-S Zoom-Nikkor ED 80-200mm f/2.8D IF employs a Silent Wave Motor inside
the lens to drive the focusing mechanism, thus the "S" designation. As a result,
autofocusing is smooth, silent, and almost instantaneous. In addition, this lens
features internal focusing (IF), so there is no change in the overall length of the lens
from infinity to its closest focusing distance of 1.5m (4.9 ft.), contributing to
balanced hand-held operation. Moreover, five ED (Extra-low Dispersion) lens
elements are used to produce images that are sharp from center to edges and
virtually free of color fringing, regardless of the focal length setting.
Note:
This lens offers Silent Wave autofocusing with Nikon
F90X-Series/N90s",
and Pronea S
F90-Series/N90*, F70-Series/N70",
cameras.
*
F5,
F4-Series,
Pronea
6001/61*
Sold exclusively in the
USA.
Important!
•
Be
careful not to soil or damage the CPU contacts.
• Do not attach the following accessories to the lens, as they might damage the
lens CPU contacts: Auto Extension
and K1 Ring.
Other accessories may not be suitable when this lens is used with certain camera
bodies. For details, refer to instruction manual for each product.
• This lens is not compatible when used with a Nikon F3AF camera with the AF
Finder DX-1 attached.
PK-1,
PK-11/11A, Auto Ring BR-4,
12
Page 13
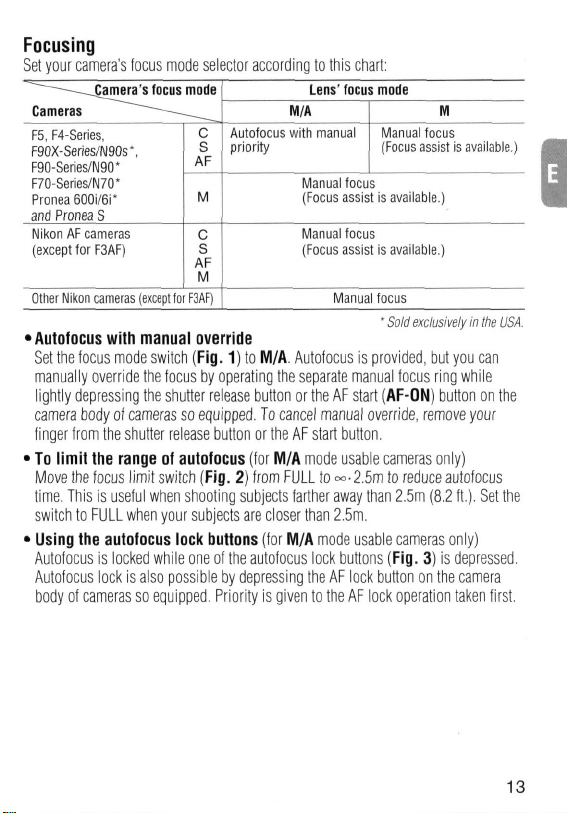
Focusing
Set your camera's focus mode selector according to this chart:
—_fjamera's focus mode
Cameras ~~~~—-___^
Autofocus with manual
F5,
F4-Series,
F90X-Series/N90s*,
F90-Series/N90*
F70-Series/N70*
Pronea600i/6i*
and Pronea S
Nikon AF cameras
(except for F3AF)
Other Nikon cameras (except for F3AF)
•
Autofocus with manual override
Set the focus mode switch (Fig.
C
S
priority
AF
M
C
S
AF
M
1)
to M/A. Autofocus
manually override the focus by operating the separate manual focus ring while
lightly depressing the shutter release button or the AF start (AF-ON) button on the
camera body of cameras so equipped. To cancel manual override, remove your
finger from the shutter release button or the AF start button.
•
To limit the range
of
autofocus (for M/A mode usable cameras only)
Move the focus limit switch (Fig. 2) from FULL to °°-2.5m to reduce autofocus
time.
This
is
useful when shooting subjects farther away than 2.5m (8.2 ft.). Set the
switch to FULL when your subjects are closer than 2.5m.
•
Using the autofocus lock buttons (for M/A mode usable cameras only)
Autofocus
is
locked while one of the autofocus lock buttons (Fig.
Autofocus lock is also possible by depressing the AF lock button on the camera
body of cameras so equipped. Priority is given to the AF lock operation taken first.
Lens'
focus mode
M/A
Manual focus
(Focus assist is available.)
Manual focus
(Focus assist is available.)
Manual focus
(Focus assist is available.)
Manual focus
*
Sold exclusively
is
provided, but you can
M
in
3)
is depressed.
the
USA.
13
Page 14
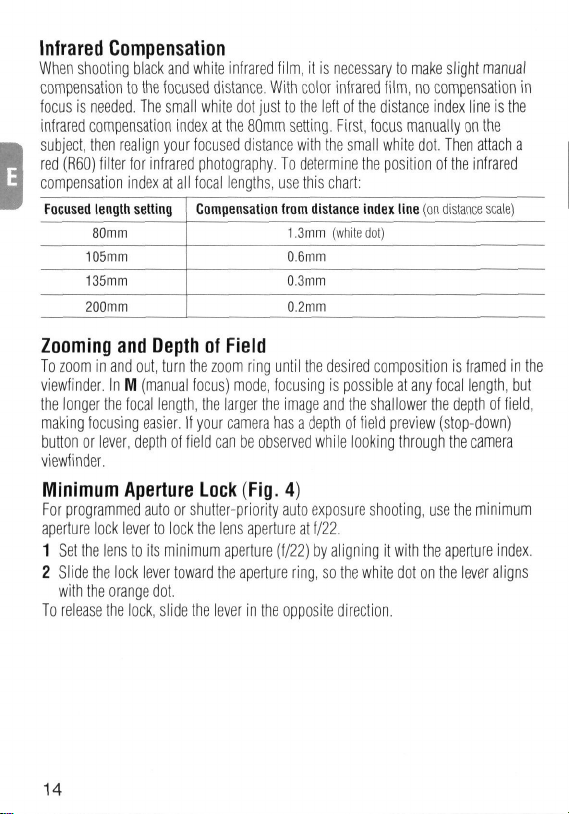
Infrared Compensation
When shooting black and white infrared
compensation to the focused distance. With color infrared
focus
is
needed. The small white dot just to the left of the distance index line is the
infrared compensation index at the 80mm setting. First, focus manually on the
subject, then realign your focused distance with the small white dot. Then attach
red (R60) filter for infrared photography. To determine the position of the infrared
compensation index at all focal lengths, use this chart:
Focused length setting
80mm
105mm
135mm
200mm
Compensation from distance index line (on distance scale)
film,
it is
necessary to make slight manual
film,
1.3mm (white dot)
0.6mm
0.3mm
0.2mm
no compensation
in
a
Zooming and Depth
of
Field
To zoom in and out, turn the zoom ring until the desired composition is framed in the
viewfinder. In M (manual focus) mode, focusing
the longer the focal length, the larger the image and the shallower the depth of
making focusing easier.
button
or
lever, depth of field can be observed while looking through the camera
If
your camera has a depth of field preview (stop-down)
is
possible at any focal length, but
field,
viewfinder.
Minimum Aperture Lock (Fig.
4)
For programmed auto or shutter-priority auto exposure shooting, use the minimum
aperture lock lever to lock the lens aperture at f/22.
1 Set the lens to its minimum aperture (f/22) by aligning
2 Slide the lock lever toward the aperture
ring,
so the white dot on the lever aligns
it
with the aperture index.
with the orange dot.
To release the lock, slide the lever in the opposite direction.
14
Page 15
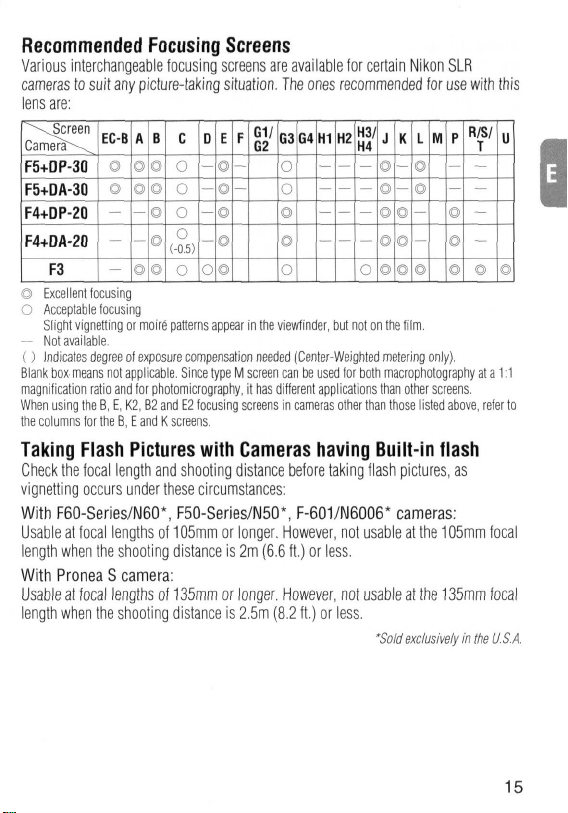
Recommended Focusing Screens
Various interchangeable focusing screens are available for certain Nikon SLR
cameras to suit any picture-taking situation. The ones recommended for use with this
lens are:
above,
mi
T
refer to
EC-B
F5+DP-30
F5+DA-30
F4+DP-20
F4+DA-20
F3
O Excellent focusing
O Acceptable focusing
Slight vignetting or moire patterns appear in the viewfinder, but not on the film.
-- Not available.
() Indicates degree ot exposure compensation needed (Center-Weighted metering only).
Blank
box-
means
magnification ratio and for photomicrography, it has different applications than other screens.
When using the B, E, K2, B2 and
the columns tor the B, E and K screens.
not applicable. Since type M screen can be used for both macrophotography at a 1:1
O
(-0.5)
O
E2
focusing screens in cameras other than those listed
G3
G4 H1 H2
o
Taking Flash Pictures with Cameras having Built-in flash
Check the focal length and shooting distance before taking flash pictures, as
vignetting occurs under these circumstances:
With F60-Series/I\l60*, F50-Series/N50*, F-601/N6006* cameras:
Usable at focal lengths of 105mm or longer, However, not usable at the 105mm focal
length when the shooting distance is 2m (6.6 ft.) or less.
With Pronea S camera:
Usable at focal lengths of 135mm or longer. However, not usable at the 135mm focal
length when the shooting distance is 2.5m (8.2 ft.) or less.
'Sold
exclusively
in
the
U.S.A.
15
Page 16
Using a Tripod
This lens
is
tripod collar instead
camera
the camera
comfortable hand-held shooting,
Completely unscrew the tripod collar lock screw, then remove the collar.
equipped with a detachable rotating tripod collar. Attach the tripod
of
90° to
the right
to
the vertical position
the camera (Fig.
or
left. Loosen the tripod collar lock screw © slightly, turn
5). For
@,
and tighten
the
tripod collar can
vertical shooting,
the
screw. (Fig.
be
detached (Fig.
you
6) For
Lens Care
•
Clean
the
lens surface with a blower brush.
soft, clean cotton cloth
cleaner. Wipe
leave traces
•
Never use thinner
in a fire,
•
To protect the front lens element,
hood also helps protect the front
•
When storing
•
When
prevent
camphor
•
Do
malfunction.
•
Reinforced plastic
the lens
or
or
cause health problems.
the
lens will
mold.
or
naphthalene.
not
get water on
in an
or
in a
touch other parts.
the
Also store the lens away from direct sunlight
excessively
lens tissue moistened with ethanol (alcohol)
circular motion from center
or
benzene
lens
in the
not
be used
the
lens
or
is
used
for
hot
to
clean
an NC
of
lens case, attach both front and rear caps.
for a
drop
some parts
place.
To
remove dirt and smudges, use
to
outer edge, taking care
the
lens as this might damage the lens, result
filter
is
the lens.
long time, store
it in
recommended
water as this will cause
of
the lens.
it in a cool,
at
all times. A lens
dry
or
chemicals such
it to
To
avoid damage, never leave
Supplied Accessories
77mm snap-on front lens
Rear lens
cap LF-1
Bayonet hood
Hard Case CL-73
HB-17
cap
Optional Accessories
77mm screw-in filters, including circular polarizing filter
Lens hood HN-34
(HN-29
not
Teleconverters TC-14E, TC-20E
Teleconverters TC-14B, TC-201
for
77mm circular polarizing filter
usable)
can rotate
more
7).
or
lens
not to
place
to
rust and
to the
the
a
as
16
Page 17

Specifications
Focal length:
Maximum aperture:
Lens construction:
Picture angle:
Focal length scale:
Distance scale:
Distance information:
Aperture scale:
Minimum aperture lock:
Diaphragm:
Exposure measurement:
Focusing:
Focusing limit switch:
Zooming:
Tripod mounting:
Mount:
Attachment size:
Dimensions:
Weight:
80mm-200mm
f/2.8
18 elements in 14 groups (5
30"10'-12°20'
ED
elements)
80,105,135,200mm
Graduated in meters and feet from 1,5m (5 ft,) to infinity (~)
Output to camera body
f/2.8—f/22 on both standard and aperture-direct-readout scales
Provided
Fully automatic
Via full-aperture method with Al cameras or cameras
with CPU interface system; via stop-down method for other
cameras.
Nikon Internal Focusing (IF) system (utilizing an internal Silent
Wave Motor); manually via separate focus ring
Provided;
two ranges available:
FULL (infinity to 1,5m [4.9 ft.]) or ~-2.5m (8.2 ft.)
Manually via separate zoom ring
Detachable tripod mounting
indices every
Nikon bayonet mount
77mm (P=0.75mm)
Approx. 88mm dia. x 207mm extension from the camera's lens
mounting flange; overall length is approx. 215mm
Approx. 1580g (3.5 lb.) with tripod
approx, 1450g (3.2 lb.) lens only
90°
collar;
rotatable through 360°,
collar;
17
Page 18

Nomenklatur
©Gegenlichtblende-Montage index ©SkalafiirBlendendirekteinspiegelung
©Entfernungsskala ©CPU-Kontakte
® Infrarot-Kompensationsindex (bei 80mm) © Entfernungseinstellring
® Entfernungs Indexlinie © Zoom-Ring
© Fokussier-Verriegelungstasten © Fokussier-Begrenzungsschalter
© Brennweitenskala @ Feststellschraube des Stativanschlusses
® Brennweitenskala-lndexlinie ©Abnehmbarer StativanschluB
©Fokussierschalter ©Blendenring
© Positionierindizes des Stativanschlusses @ Steuerkurve
® Blendenindex/Obiektivindex ® Anschlag fur Blendenkupplung
© Blendenskala @ Signalstift
@ Verriegelung (Or kleinste Blende furautomatische Blendensteuerung)
fur kleinste Blende
(Kupplungsstift
Einfiihrung
Der Kennbuchstabe "S" in der Objektivbezeichnung AF-S Zoom-Nikkor ED
80-200 mm f/2,8D IF bezieht sich auf den integrierten Silent Wave-Motor zum
Antrieb der Fokussiermechanik. Daher erfolgt die automatische Scharfeinstellung
stufenlos, gerauschlos und praktisch ohne Verzug. Zusatzlich verfugt dieses Objektiv
uber Innenfokussierung (IF), so daB die Gesamtlange des Objektivs von unendlich
bis zur kleinsten Aufnahmeentfernung von 1,5 m gleichbleibt, was bei Aufnahmen
aus der freien Hand zu einer ausgezeichneten Gewichtsbalance beitragt. Dariiber
hinaus dienen funf ED-Einzellinsen (mit extrem geringer Dispersion) zur Erzeugung
von Bildern, die von der Mitte bis zu dem Randem scharf und unabhangig von der
Brennweiteneinstellung praktisch frei von Farbsaumbildung sind.
Hinweis:
Dieses Objektiv bietel Silent Wave-Autofokus
Serie
F90X,
Serie
F90,
Serie
F70,
Pronea
mit
den Nikon-Kameras
600i
und Pronea
S.
F5,
Serie
F4,
Achtung!
• Halted Sie die CPU-Kontakte peinlich sauber, und schiitzen Sie sie vor
Beschadigung!
• Folgendes Zubehor dart nicht an das Objektiv angesetzt werden, da es die CPUKontakte beschadigen konnte: Automatik-Zwischenring
Automatikring BR-4 und Zwischenring K. Anderes Zubehor kann bei Verwendung
des Objektivs mit gewissen Kameramodellen ungeeignet sein. Einzelheiten
entnehmen Sie bitte der jeweiligen Bedienungsanleitung.
• Das Objektiv ist nicht zur Verwendung mit der Nikon F3AF mit angesetztem
AF-Sucher DX-1 geeignet.
PK-1,
PK-11/PK-11A,
18
Page 19

Fokussieren
Wahlen Sie den Fokussiermodus der Kamera anhand der folgenden Tabelle:
——-.Jokussiermodus der
Kameras -J^™
F5,
Serie F4, Serie F90X,
Serie F90,
Serie F70,
Pronea 600i
und Pronea S
Nikon-AF-Kamera
(auRer F3AF)
Anclere Nikon-Kameras (auBer F3AF)
•
Autofokus-Modus mit manueller Einstellmdglichkeit
3
C
Autofokus-Modus mit
S
manueller
AF
Einstellmdglichkeit
M
C
S
AF
M
Stellen Sie den Fokussierschalter (Abb.
Autofokus-Modus zwar aktiviert, kann aber jederzeit durch Drehen des separaten
Entfernungseinstellrings und gleichzeitiges Antippen des Auslosers Oder der AFStarttaste (AF-ON) an Kameras, die uber ein solches Bedienteil verfugen,
deaktiviert werden. Zur Aufhebung der manuellen Einstellmdglichkeit den Ausloser
oder die AF-Starttaste freigeben.
•
Begrenzung des Autofokusbereichs (nur bei Kameras mit M/A-Modus)
Zur Reduzierung der Autofokuszeit ist der Fokussier-Begrenzungsschalter (Abb.
von Wahlbereich FULL auf °°-2,5 m zu stellen. Dies ist nutzlich zur Aufnahme von
Objekten in schnelier Bewegung, die weiter als 2,5 m entfernt
mit Aufnahmeentfernungen unter 2,5 m stellen Sie den Schalter auf FULL.
•
Nutzung der Fokussier-Verriegelungstasten
(nur bei Kameras mit M/A-Modus)
Wahrend eine der drei Fokussier-Verriegelungstasten (Abb.
der Autofokus-Modus verriegelt. Diese Funktion laBt sich auch durch Drucken der
AF-Verriegelungstaste an Kameras aufrufen, die uber diese Taste verfugen. Dabei
hat die AF-Verriegelung Vorrang.
Fokussiermodus des Objektivs
M/A
Manuelles Fokussieren
(Entfernungsmessung verfugbar)
Manuelles Fokussieren
(Entfernungsmessung verfugbar)
Manuelles Fokussieren
1)
auf M/A. Bei dieser Einstellung ist der
Manuelles
Fokussieren (Entfernungsmessung verfugbar)
M
sind.
Bei Objekten
3)
gedruckt ist, bleibt
2)
19
Page 20

Infrarotkompensierung
Bei Aufnahmen auf SchwarzweiB-lnfrarotfilm muB die Scharfeinstellung geringfiigig
von Hand korrigiert werden. Farb-lnfrarotfilm dagegen benotigt keine
Fokuskompensierung. Der kleine weiOe Punkt links neben der Entfemungsindexlinie
ist der Infrarotkompensierungs-lndex bei der 80-mm-Einstellung. Zu diesem Zweck
fokussieren Sie zunachst das Aufnahmeobjekt manuell und fluchten dann die
Fokussierentfernung erneut mit dem kleinen weiBen Punkt. Danachsetzen Sie ein
Rotfilter (R60) fur Infrarotfotografie vor. Zur Ermittlung der Position des
Infrarotkompensierungs-lndex ist bei alien Brennweiten anhand der folgenden
Tabelle vorzugehen:
Brennweite
80mm
105mm
135mm
200mm
Kompensation von Entfernungs-lndexlinie (am Entferungsskalenfenster)
1,3mm (weiRer Punkt)
0,6mm
0,3mm
0,2mm
Zoomen
Zum Zoomen drehen Sie den Zoom-Ring, bis die gewiinschte Bildkomposition
Sucher zu sehen ist. Im
und
Scharfentiefe
M-Modus
(manueller Fokus) ist die Scharfeinstellung bei
im
jeder Brennweite moglich. Allerdings gilt, je langer die Brennweite, desto grbBer das
Bild und desto flacher die Scharfentiefe, so daB die Fokussierung vereinfacht
wird.
Verfugt die Kamera iiber eine Taste oder einen Hebel zur Scharfentiefe-Vorschau
(Abblendung), sc laBt sich die Scharfentiefe im Kamerasucher verfolgen.
Verriegelung
auf
kleinster Blende
(Abb.
4)
Fur Programm- und Blendenautomatik muB der Blendenring auf kleinster Offnung
(22) verriegelt werden.
1 Drehen Sie den Blendenring, bis die Blendenzahl 22 dem Blendenindex
gegenubersteht.
2 Schieben Sie den Riegel
in
Richtung auf den Blendenring, so daB der Riegel auf
den orangefarbenen Punkt ausgerichtet ist.
Zur Entriegelung schieben Sie den Riegel in die entgegengesetzte Richtung.
20
Page 21

Empfohlene Einstellscheiben
Fur bestimmte Nikon-Kameras stehen verschiedene auswechselbare Einstellscheiben
zur Verfugung, um jeder Aufnahmesituation gerecht zu werden. Die zur Verwendung
"mil diesem Objektiv empfohlenen sind nachstehend aufgelistet:
Einstellsctteibe
Kamera
F5+DP-30
F5+DA-30
F4+DP-20
F4+DA-20
O Hervorragende Scharfeinstellung
O Akzeptable Scharfeinstellung
— Nlcht moglich
() Zeigt den Betrag zusatzlich erforderlicher Belichtungskorrektur (nur bei mittenbetonter Messung).
Ein Leerfeld bedeutert: unbrauchbar. Da die Einstellsctieibe M sowohl fur Maktrofotografie bis mm
AbbildungsmaBstab 1:1 als auch Mikrofotogratie eingesetzt werden kann, unterscheidet sich ihr
Anwendungsbereich von dem anderer Einstellscheiben.
Bei Verwendung der Scheiben B, E, K2, B2 bzw. E2 in anderen als den obengenannten Kameras gelten
die Spalten fur die Scheiben B, E und K.
Blitzaufnahmen
Brennweite und Aufnahmeentfernung vor der Blitzaufnahme kontrollieren, da unter
den folgenden Umsta'nden eine Vignettierung erfolgt.
Bei Kameras der Serie F60, Serie F50 und
Moglich bei Brennweiten von 105 mm Oder langer—allerdings nur dann, wenn die
Aufnahmeentfernung maximal 2 m betragt.
Bei Kamera Pronea
Moglich bei Brennweiten von 135 mm Oder langer—allerdings nur dann, wenn die
Aufnahmeentfernung maximal 2,5 m betragt.
EC-B
O
(-0.5)
F3 O O
Das Sucherbild vignettiert leicht. Die Aufnahme selbst bleibt hiervon unberuhrt.
mit
Kameras
G3 G4 H1 H2
o
O
mit
eingebautem Blitz
F-601:
S:
mi
T
21
Page 22

Verwendung eines Stativs
Dieses Objektiv
die Gewichtsverteilung zwischen Kamera und Objektiv ausgeglichen
Stativ nicht an der
Aufnahmerichtung konnen
Sie
die
vertikale Position
StativanschluB
diesem Fall drehen
dann den StativanschluB
Pflege
•
Saubern
einem sauberen, weichen Baumwolltuch Oder Optik-Reinigungspapier, das
ethanol (Alkohol) Oder Optik-Reinigungsflussigkert anfeuchten. Wischen
kreisfb'rmigen Bewegungen
zuruckbleiben.
•
Verwenden
Beschadigungen fiihren, Gesundheitsschaden verursachen Oder
kdnnte,
•
Zum Schutz
Gegegenlichtblende wirkt
•
Bei Aufbewahrung des Objektivs
aufgesetzt
•
Bei langerer Nichtbenutzung solIte das Objektiv an einem kuhlen, trockenen
aufbewahrt werden. Halten
Chemikalien wie Kampfer Oder Naphthalan
•
Halten
fiihren kann.
•
Einige Teile des Objektivs bestehen aus verstarktem Kunststoff. Lassen
deshalb nie an ubermaBig heiBen Orten zuruck!
mit
einem abnehmbaren, drehbaren StativanschluB
Kamera,
sondern am StativanschluB an
Sie die
Feststellschraube des Stativanschlusses etwas
©,
und Ziehen
fur
beguemeres Aufnehmen aus
Sie die
des
Objektivs
Sie
Glasflachen
Sie
keinesfalls Verdiinnung Oder Benzin
der
Frontlinse empfiehlt es
sein.
Sie
das Objektiv von Wasser
Kamera urn
Sie die
Feststellschraube des Stativanschlusses heraus und nehmen
ab.
mit
einem Blasepinsel. Staub und Flecken entfenen
von der
als
zusatzlicher Frontlinsenschutz.
in
Sie
das Objektiv von direkter Sonneneinstrahlung Oder
90°
nach rechts Oder links drehen. Losen
Schraube an (Abb. 6). AuBerdem laBt sich
der
freien Hand abnehmen (Abb.
Mitte nach auBen, ohne daB Wischspuren
sich,
stets
seinem Kocher sollten beide Objektivceckel
fern,
fern,
das
zur
ist
ausgestattet. Damit
ist,
(Abb. 5). Fur
©,
drehen Sie die Kamera
zur
Reinigung,
ein
NC-Filter aufgesetzt zu lassen.
Korrosion und zu Betriebsstorungen
bringen
da
dieses
ein
Feuerauslosen
Zubehor
Aufsteckbarer 77-mm-Frontobjektivdeckel
Objektivruckdeckel
Bajonett-Gegenlichtblende
Fester Objektivkocher CL-73
LF-1
HB-17
vertikale
Sie mit
Sie mit
Sie in
zu
Ort
Sie
das Objektiv
Sie das
in
der
7). In
Die
22
Page 23

Sonderzubehor
Weiter 77-mm-Einschraubfilter, einschliefilich Zirkularpolarisationsfilter
Gegenlichtblende HN-34 fur 77-mm-Zirkularpolarisationsfilter (HN-29 nicht verwendbar)
Telekonverter
Telekonverter
TC-14E,
TC-14B,
TC-20E
TC-201
Technische Daten
Brennweite:
Maximale Blendenoffnung:
Optischer Aufbau:
Bildwinkel:
Brennweitenskala:
Entfernungsskala:
Entfernungsdaten:
Blendenskala:
Verriegelungfiir
kleinste Blende:
Blendenart:
Belichtungsmessung
Fokussiersystem:
Fokussier-Begrenzungsschalter:
Zoomen:
Stativbefestigung:
Objektivfassung:
BefestigungsgroBe;
Abmessungen:
Gewicht:
80-200 mm
f/2,8
18 Linsen in 14 Gruppen (5 ED-Linsen)
30°10' -12°20'
80,105,135,200 mm
Unterteitt in Meter und FuB, undzwar von 1,5 m bis
unendlichH
Ausgabe an die Kamera
f/2,8
-f/22,
Skala fur Blendendirekteinspiegelung
Vorhanden
Vollautomatisch
Offenblendenmessung bei Kameras mit Al-
Blendenkupplung oder CPU-Interface-System;
Arbeitsblendenmessung bei alien anderen Kameras
Innenfokussierung nach dem Nikon-IF-System (mittels
integriertem Silent Wave-Motor); manuell Liber separaten
Fokussierring
Vorhanden; zwei Wahlbereiche: FULL (unendlich bis
1,5 m) oder °°-2,5m
manuell iiber separaten Zoom-Ring
abnehmbarer StativanschluB, drehbar urn 360° mit Indizes
in Abstanden von 90°
Nikon-Bajonettfassung
77 mm (P =
ca.
Gesamtlangeca. 215mm
ca.
sowohl auf der Standardskala als auch der
0,75mm)
88 mm Durchm. x 207 mm Lange bis Flansch;
1580 g mit StativanschluB, ca. 1450 g nur Objektiv
23
Page 24

Nomenclature
© Index de montage de pare-soleil
© Echelle des distances @ Contacts CPU
(1)
Repere
de
mise
au
point
en
© Ligne de repere des distance ® Bague de zoom
© Boutons de verrouillage de mise au point © Commutateur limiteur de mise
© Echelle de focale
® Ligne d'index d'echelle de focale ® Collier du trepied amovible
® Commutateur de mode de mise au point @ Bague des ouvertures
® Index d'alignement de collier du trepied ® Index de couplage du posemetre
® Index d'ouverture/index de montage ® Douille d'indexation d'ouverture
©
® Echel le des ouvertures
@ Levier
de
verrouillage d'ouverture minimale <
infrarouge
@
(a
80mm) ©Bague de mise ail point
Echelle de
Vis de
@
lecture directe
verrouillage
Levier de signal
levier de
servo
de I'ouverture
au
de
collier du trepied
d'ouverture minimale
c
°uplage EE)
point
Introduction
Le AF-S Zoom-Nikkor ED 80200mm
a
I'objectif
pour controler le mecanisme de mise au point, d'ou designation "S". II en
resulte une mise au point automatique reguliere, silencieuse et presque instantanee.
De plus, cet objectif permet aussi la mise au point interne (IF), de sorte qu'il n'y a pas
de modification de la longueur totale de
point la plus rapprochee de 1,5 m, ce qui contribue a un fonctionnement avec une
tenue en main bien equilibree. De plus, cinq lentilles ED (a tres faible dispersion)
sont utilisees pour produire des images nettes du centre jusqu'aux bords et
virtuellement exemptes de frangeage des couleurs, quel que soit le
Note:
Cet
objectif
permet
la
serie
F4,
serie
mise
F90X/N90S*,
1/2.8D
IF utilise un moteur Silent Wave integre
I'objectif
de
au
point
automatique Silent Wave avec
serie
F90/N90",
serie
I'infini
a la distance de mise au
r^glage
les
F70/N70*,
'Vendu exclusivement
appareils Nikon
Pronea
de focale.
600i/6i'
aux
Etats-Unis.
et Pronea
Important
•
Veiller a ne pas salir ni endommager les contacts electroniques.
• Ne pas essayer de mooter les accessoires suivants, car ils risquent d'abimer
les contacts: Bague d'auto-rallonge
Bague K1,
D'autres
accessoires peuvent ne pas convenir lorsque
certains boitiers. Se referer aux manuels d'instruction.
• Cet objectif
n'est
pas compatible avec le boitier F3AF equipe du viseur DX1.
PK-1,
PK-11/PK-11
A,
Bague auto BR-4 et
I'objectif
est utilise avec
F5,
24
Page 25

Mise au point
Reglez le selecteur de mise au point de
-^JVIode tie mise au point
Appareil
F5,
serie F4,
serie F90X/N90S*,
serie F90/N90*,
serie F70/N70*,
Pronea 600i/6i* et Pronea S
Appareils Nikon AF
(sauf F3AF)
Autres appareils Nikon (sauf F3AF)
——~— ie
I'appareil
•Autofocus avec priorite manuelle
Reglez le selecteur de mode de mise au point (Fig. 1) a M/A Cela permet la mise
au point automatique, mais
sur la bague de mise au point manuelle separte en pressant legerement
declencheur ou le bouton de demarrage AF (AF-ON) sur I'appareil, sur un appareil
qui en est pourvu. Pour annuler la priorite manuelle, relachez le declencheur ou
bouton de demarrage AF.
•
Pour limiter la plage autofocus
(seulement sur les appareils possedant le mode M/A)
Amenez I'interrupteur de fin de course de mise au point (Fig. 2) de FULL a«.. 2,5
pour reduire le temps requis pour I'autofocus.
sujets situes a plus de 2,5 m. Reglez I'interrupteur a FULL pour des sujets a moins
de2,5m.
•
Emploi des boutons de verrouillage autofocus (seulement sur les appareils
possedant le mode M/A)
L'autofocus est verrouille quand un des boutons de verrouillage autofocus (Fig.
est presse. Le verrouillage autofocus est aussi possible en appuyant sur le bouton
de demarrage AF sur
I'appareil
donnee a I'operation en verrouillage AF.
I'appareil
conformement a ce tableau:
Mode de mise au point de
C
S
AF
M
C
S
AF
M
il
est possible d'utiliser la priorite manuelle en agissant
M/A
Autofocus avec
priorite manuel
Miseau point manuelle
(assistance a la mise au point disponible)
Miseau point manuelle
(assistance a la mise au point disponible)
Mise au point manuelle
"Vendu exclusivement
I'objectit
Miseau point manuelle
(assistance a la mise au
point disponible)
M
aux
Eiats-Unis.
le
C'est
pratique pour prendre des
(sur un appareil qui en est pourvu). La priorite est
le
m
3)
25
Page 26

Correction infrarouge
Avec un film infrarouge noir et blanc, une petite correction manuelle de la distance de
mise au point est requise. Avec le film couleur, aucune correction de mise au point
n'est
necessaire. Le petit point blanc a cote de la ligne de
I'index
de correction infrarouge au reglage 80 mm. Mettez d'abord le sujet au point
manuellement, puis realignez la distance de mise au point sur le petit point blanc.
Montez alors un filtre rouge (R60) pour la photographie infrarouge. Utilisez ce
tableau pour determiner la position de
I'index
de correction infrarouge a toutes les
focales:
Dinstance de mise
au point
80mm
105mm
135mm
200mm
Zoom
et
profondeur
Pour le zoom vers le gros plan
Compensation a partir de la ligne de
repere des distances (sur fenetre d'echelle des distances)
1,3mm (point blanc)
0,6mm
0,3mm
0,2mm
de
champ
et
le plan general, tournez la bague de zoom jusqu'a
ce que la composition souhaitee soit cadree dans le viseur. En mode M (mise au
point manuelle), la mise au point est possible a toutes les focales, mais plus la focale
est longue, plus
I'image
est grande et plus la profondeur de champ est reduite, ce qui
facilite la mise au point. Si votre appareil est pourvu d'un bouton ou levier de
preVisionnage de la mise au point (ouverture reelle), vous pourrez observer
profondeur de champ en regardant dans le viseur.
Blocage
d'ouverture
minimale
(Fig.
En mode Programme ou Auto priorite vitesse, reglez puis verrouillez le diaphragme
sur I'ouverture minimale (f/22).
1 Reglez le diaphragme sur I'ouverture mini (f/22) en alignant sur le repere
d'ouverture.
2 Glissez le curseur de blocage vers la bague de diaphragme de fagon a ce que
point blanc du curseur soit aligne avec le point orange.
Pour debloquer, glissez le curseur dans
I'autre
direction.
4)
I'echelle
des distances est
la
le
26
Page 27

Ecrans de mise an point recommandes
Divers ecrans de mise au point sont disponibles pour certains appareils Nikon SLR
qui s'adaptent a toutes les conditions de prise de vues. Les ecrans recommandes
avec cet objectif sont listes ci-dessons.:
Verre
Appareil
F5+DP-30
F5+DA-30
F4+DP-20
F4+DA-20
© Mise au point excellente
O Mise au point passable
— Nondisponible
() Indique la compensation de I'exposition additionnelle requise (mesure centrale ponderee
Un blanc indique aucune application. Du fait que le verre M peut etre utilise pour la macropbotographie
a un rapport d'agradissement 1:1 et pour la photomicrograpbie, il a des applications differentes de
celles des autres verres.
Lors de I'utilisation de verres B, E, K2, B2 ou
ci-dessus, se reporter aux colonnes correspondantes.
EC-B
F3
Un vignetage affecte
trace de
ceci.
seulement).
O
(-0.5)
O
I'image
du verre. L'image sur la pellicule ne porte cependant aucune
G3 G4 H1 H2
E2
dans des appareils autres que ceux indiques
mi
T
Prise de vues au flash avec un appareil a flash integre
Verifiez la distance focale et le distance de prise de vue avant le prendre des photos
au
flash,
car
il
peut y avoir vignettage dans les conditions suivantes.
Avec les appareils de serie F60/N60*, serie F50/N50*, F-601/N6006*:
Utilisable a des focales de 105 mm ou plus. Non utilisable a une tocale de 105 mm
quand la distance de prise de vue est de 2 m ou moins.
Avec I'appareil Pronea
Utilisable a des focales de 135 mm ou plus. Non utilisable a une focale de 135 mm
quand la distance de prise de vue est de 2,5 m ou moins.
S:
'Vendu
exclusivement
aux
Etats-Unis.
27
Page 28

Utilisation
Cet objectif est equipe d'un collier de trepied rotatif amovible. Pour repartir
egalement le poids entre
trepied au lieu de la camera (Fig. 5). Pour la prise de vue verticale, vous pouvez
tourner
blocage du collier de trepied ©, tournez
la vis. (Fig. 6) Pour une prise de vue plus confortable, le collier du trepied peut etre
detache (Fig. 7). Desserrez completement la vis de blocage du collier de trepied,
puis retirezle collier.
Soin
• Nettoyer la surface de
poussieres ou les traces, utiliser de preference un tissu de colon doux, ou un tissu
optique, legerement humidifie avec de
mouvement circulaire partant du centre.
• Ne jamais employer de solvant ou de benzenes qui pourrait endommager
prendre feu ou nuire a la sante.
•
II
est recommande d'utiliser un filtre NC en permanence, pour proteger la
frontale. Un paresoleil assure egalement une bonne protection contre les chocs.
• Lors du rangement de
bouchons avant et arriere.
•
En
endroit frais, sec et aere pour eviter les moisissures. Tenir le materiel eloigne des
sources de lumiere, et des produits chimiques (camphre, naphtaline, etc.).
• Eviter les projections d'eau ainsi que I'immersion, qui peut provoquer larouilleet
des dommages irreparables.
• Divers materiaux de synthese sont utilises dans la fabrication. Pour eviter tout
probleme, ne pas soumettre
d'un
trepied
I'appareil
et
I'objectif,
attachez le trepied au collier de
I'appareil
de 90° vers la droite ou la gauche. Desserrez legerement la vis de
de
I'objectif
cas d'inutilisation pour une longue periode, entreposer le materiel dans un
I'objectif
I'objectif
I'objectif
I'appareil
en position verticale @, et serrez
avec un pinceau soufflant. Pour enlever les
I'alcool
ethylique (ethanol). Essuyer en
I'objectif,
dans son
etui,
penser a remettre en place les
a de fortes chaleurs.
lentil le
Accessoires fournis
Bouchon avant d'objectif diametre 77 mm
Bouchon arriere LF-1
Parasoleil ba'i'onnette HB-17
Etui rigide CL-73
28
Page 29

Accssoires
Autres filtres vissants 77 mm, y compris filtre polarisant circulaire
Parasoleil HN-34 pour filtre polarisant circulaire 77 mm (HN-29 non utiUsable)
Teleconvertisseurs TC-14E, TC-20E
Teleconvertisseurs TC-14B, TC-201
en
option
Caracteristiques
Focale:
Ouverture maximale:
Construction optique:
Champ angulaire:
Focales:
Echelle des distances:
Informations sur
la distance: '
Echelle des ouvertures:
Verrouillage douverture
minimale:
Diaphragme:
Mesure de I'exposition:
Miseau point:
Commutateur limiteur de
mise au point:
Zooming:
Montage sur trepied:
Monture:
Taille desaccessoires:
Dimensions:
Poids:
80-200 mm
f/2,8
18 elements en 14 groupes (5 elements ED)
30o10'-12o20'
80,105,135,200 mm
Graduee
en
metres et pieds de 1,5 m (5 ft.) a Mini (<*>)
A
I'appareil
f/2.8 - f/22 pour les echelles standard et de lecture directe
de
I'ouverture
Oui
Entierement automatique
Via mettiode pleine ouverture avec les appareil Al ou
appareils avec systeme d'interface CPU; par fermeture pou
les autres appareils
Systeme Internal Focusing (IF) Nikon (utilisant un moteur
a ondes silencieux interne); manuel par bague de mise au
pointseparee
Fourni;
deux plages disponibles: FULL (infini a 1,5 m) ou
=*>-2,5
m.
Manuel avec bague de zoom separee
Collier de montage sur trepied amovible; rotation a 360°,
index tousles 90°
BaTonnette
77 mm (P = 0,75
Env. 88mm diam. x 207 mm rallonge de la bride de
montage d'objectif de I'appareil; longuer hors-tout est env.
215 mm
Env. 1580 g avec collier pour
seulement
mm)
trepied;
env. 1450 g objectif
Page 30

Nomenclatura
© Indice de montura de parasol
© Escala de distancias
® Indicador de enfoque infrarrojo (a 80mm)
© Linea indicadora de distancias ©Anillo de zoom
© Botones de bloqueo de enfoque
© Escala de distancias focales
® Linea
de
indice de escala de distancia focal
©Interruptor de modo de enfoque ©Anillo de aberturas
©
Indices para el alineamiento del
© Indice de aberturas/indice
© Escala de apertura
@ Palanca de fijacion de apertura minima
®
®
©
©
®
©
collar
del tripode
de
monturas
®
@
©
(
Escala de lectura directa de apertura
Contactos
CPU
Anillo de enfoque
Conmutador de limite de enfoque
Tomillo
de
fijacion del collar
Collar del tripode desmontable
Protuberancia de acoplamiento al
Poste de indice de apertura
Borne de serial de abertura minima
Borne
de
ac°P|ador
Introduction
El AF-S Zoom Nikkor ED 80-200
dentro
del
objetivo para accionar
definition "S". En consecuencia,
practicamente instantaneo. Ademas, este objetivo bene
que
no
haya
un
de
de la
cambio
enfoque
camara
mas
en su
distancia
balance
baja) utilizados para producir imagenes nftidas desde
virtualmente libre
Nota:
Este objetivo tiene
Series
F4,
de
Series
mezcla
F90X/N90S',
mm
el
mecanismo
el
enfoque automatico
en la
longitud total
cercana
de 1,5 m (4,9
mano. Ademas,
de
colores,
un
enfoque automatico
Series
f/2,8D
sea
F90/N9O',
IF
utiliza
de
enfoque
del
objetivo desde
pies), para
hay
cinco lentes
cual sea
de
onda silenciosa
Series
un
motor
y, por lo
es mas
un
enfoque interno
que
de ED
el
centra
el
ajuste
F70/N70",
*
De
venta exclusiva
de
suave, silencioso
el
infinito hasta
pueda tener
a los
de
con
jlmportante!
•
Tener cuidado
•
No montar
contactos
BR-4o Anillo K1.
Puede
determinados cuerpos
instrucciones de cada producto.
•
Este objetivo
Visor
en el
de la
que
otros accesorios
no se
AFDX-1.
de no
manchar o danar
objetivo
CPU: Anillo
de
puede usar
los
los
siguientes accesorios,
de
Autoextensidn
no
sean apropiados cuando
camara. Para
mas
con
una camara Nikon F3AF
contactos
de la
CPU.
ya que
PK-1,
podrian danar
PK-11/PK-11A, Anillo Auto
se usa
detalles,
ver el
manual
que
del
tripode
exposimetro
EE
)
onda silenciosa
tanto,
la
(IF)
para
su
un
mejor
(Dispersion extra
bordes
y
distancia focal.
las
camaras Nikon
Pronea
600i/6r y Prooea S.
en
los
los
este objetivo
con
de
lleve montado
y
F5,
EE UU.
el
30
Page 31

Enfoque
Ajuste el selector de mode- de enfoque de su camara de acuerdo con este cuadro:
——^JVIodo de enfoque de la
Camaras
F5,
Series F4,
Series F90X/N90S*.
Series F90/N90*,
Series F70/N70*,
Pronea600i/6i*yProneaS
Camara AFde Nikon
(excepto para F3AF)
Otras camara Nikon (excepto F3AF)
•
Enfoque automatico con prioridad manual
C
Enfoque
S
automatico con
AF
prioridad manual
M
C
S
AF
M
Ajuste el interrupter de modo de enfoque (Fig.
enfoque automatico pero puede dar prioridad al enfoque manual con el anillo de
enfoque manual mientras oprime ligeramente el obturador o el botdn del inicio de
AF (AF-ON) en el cuerpo de la camara si existe. Para cancelar la prioridad manual,
levante el dedo del obturador o del boton de inicio de AF.
•
Para limitar
la
gama del enfoque automatico (solo para camaras que
utilicen el modo M/A)
Mueva el interruptor de limite de enfoque (Fig.
el tiempo de enfoque automatico. Es util para hacer tomas de sujetos que estan a mas
de 2,5 m. Mueva el interruptor a FULL cuando el sujeto esta a menos de 2,5 m.
•
Utilizacion de los botones de bloqueo del enfoque automatico
(solo para camaras que utilicen el modo M/A)
El enfoque automatico se bloquea mientras este oprimiendo uno de los botones de
bloqueo del enfoque automatico (Fig. 3). El bloqueo del enfoque automatico
tambien es posible oprimiendo el boton de bloqueo de AF en el cuerpo de las
camaras donde existe. Se da prioridad a la operacidn de bloqueo de AF que se
hace primero.
Modo de enfoque del objetivo
M/A
Enfoque manual
(Con ayuda de enfoque)
Enfoque manual
(Con ayuda de enfoque)
1)
2)
Enfoque manual
(Con ayuda de enfoque.)
Enfoque manual
*
De
venla exclusiva
a M/A. Se dispone de un
de FULL a
~-
2,5 m para reducir
M
en
los
EE UU.
31
Page 32

Compensacion de infrarrojos
Cuando se hacen fotografias con pelicula de infrarrojos en bianco y negro, es
necesario hacer una ligera compensacion manual en la distancia de enfoque. Con
la
pelfcula de infrarrojos en color no es necesaria ninguna compensacion de enfoque.
El punto bianco pequeno a la izquierda de la linea indice de distancia es el fndice de
compensacion de infrarrojos en la posicion de 80 mm. Enfoque primero
manualmente sobre el sujeto y cambie la alienacion de la distancia enfocada en
el
punto bianco pequeno. Instale a continuacibn un filtro rojo (R60) para la fotograffa
por infrarrojos. Para determinar la posicion del indice de compensacion de
infrarrojos para todas las distancias focales. utilice este cuadro:
Distance de enfoque
80mm
105mm
135mm
200mm
Compensacion desde la linea indicadora
de distancia (en la escala de distancias)
1,3mm (punto bianco)
0,6mm
0,3mm
0,2mm
Acercamiento con zoom y profundidad de campo
Para acercarse y alejarse con el zoom gire el anillo de zoom hasta obtener el marco
perfecto para su composicion, en el visor. En el modo M (enfoque manual), es
posible enfocar a cualquier distancia focal pero a mayor distancia focal mayor es
imagen y mas corta la profundidad de campo, para facilitar el enfoque. Si su camara
tiene un botdn o palanca de previsualizacidn de profundidad de campo (cierre de iris)
puede observarse la profundidad de campo mientras mira por el visor de la camara.
Bloqueo de
la
apertura minima (Fig.
4)
Para disparar con exposicidn automata programada o automata con prioridad
obturador, utilizar la palanca de bloqueo de la apertura minima para fijar la apertura
del objetivo en f/22.
1 Ajustar el objetivo a su apertura minima (f/22) alineandolo con el indice de
apertura.
2 Deslizar la palanca de bloqueo hacia el anillo de aperturas de manera que el punto
bianco de la palanca coincida con el punto naranja.
Para desbloquearlo, deslizar la palanca en la direccibn opuesta.
la
al
32
Page 33

Pantallas de enfoque recomendadas
Hay diferentes pantallas de enfoque intercambiables para algunas camaras SLR de
Nikon apropiados para cualquier situacion fotografica. Las recomendadas para
utilizar con este objetivo son las que aparecen en la lista a continuacibn.
Pentalla
Camara
F5+DP-30
F5+DA-30
F4+DP-20
F4+DA-20
© Enfoque excelente
O Enfoque aceptable
- No existe
() Indica la cantidad de compensacidn adicional necesaria (solo medicion ponderada
Los blancos signjfican inaplicable. Como la pantalla de tipo M se usa para macrofotografia a una razon
de aumento de 1:1 asi como para microfotografia, su aplicacidn es distinta a la de las demas pantallas,
Cuando se utilicen las pantallas de enfoque B, E, K2, B2 y
arriba,
EC-B G3
O
O
(-0.5)
F3
Ligero vineteo afecta la imagen de la pantalla, pero la imagen de la pelicula no es afectada por esto.
ver las columnas correspondientes a las pantallas B, E y K.
O
H2
G4
H1
O
O
E2
en camaras distintas de las relacionadas
en
el centra).
R/S/
T
Cuando se hacen fotograffas con flash en camara con flash
incorporado
Verifique la distancia focal y distancia al objeto antes de hacer fotograffas con flash
ya que puede producirse un efecto de vineteo en las siguientes condiciones:
Con las camaras de
Se pueden utilizar a distancias focales de 105 mm o mas largas. Sin embargo,
no utilice con una distancia focal de 105 mm cuando se hace una fotografia a
2 m o menos.
Con
la
camara Pronea
Se puede utilizar a distancias focales de 135 mm o mas largas. Sin embargo
no utilice con una distancia focal de 135 mm cuando se hace una fotografia a
2,5 m o menos.
la
serie F60/N60*, serie F50/N50*, F-601/N6006*:
S:
*
De
venta exclusiva
en
los
EE UU
Page 34

Uso de un tripode
Este objetivo tiene un collar del tripode giratorio desmontable. Para distribuir
uniformemente el peso entre la camara y el objetivo, monte el tripode en el collar del
tripode en lugar de hacerlo en la camara (Fig. 5). Para las tomas verticales, puede
girar la camara 90° hacia la derecha o izquierda. Afloje ligeramente el tornillo de
fijacion del collar del tripode ©, gire la camara a su posicidn vertical @ y apriete el
tornillo.
(Fig. 6) Para hacer tomas camara en mano mas cdmodo, puede desmontar
el collar del tripode (Fig. 7). Desatornille completamente el tornillo de fijacion del
collar del tripode y retire el collar:
Forma de cuidar el objetivo
• Limpiar la superficie del objetivo con un cepillo soplador. Para eliminar la
suciedad o las huellas, utilizar un trapo de algoddn suave y limpio o papel especial
para objetivos humedecido en etanol (alcohol) o limpiador de objetivos. Limpiar
describiendo un movimiento circular del centra hacia fuera, teniendo cuidado de
no dejar restos ni tocar otras partes.
• No usar en ningun caso disolvente o benceno para limpiar el objetivo ya que podrfa
danarlo,
provocar un incendio o causar problemas sanitarios.
•Se recomienda utilizar en todo momenta un filtro NC para proteger el elemento
frontal del objetivo. Tambien un parasol contribuira a proteger la parte frontal del
objetivo.
•Cuando se guarde el objetivo en su estuche, colocarle las dos tapas.
• Cuando no se vaya a utilizar el objetivo durante largo tiempo, guardarlo en
un lugar fresco y seco para evitar la formacion de moho. Guardar el objetivo,
ademas, lejos de la luz solar directa o de productos quimicos tales como alcanfor
o naftalina.
• No mojar el objetivo ni dejarlo caer al agua, ya que se oxidaria y no
funcionaria
• Algunas partes del objetivo son de plastico reforzado. Para evitar danos, no dejarlo
nunca en un lugar excesivamente caliente.
bien.
Accesorios suministrados
Tapa frontal de presidn a 77 mm
Tapa trasera de objetivo If-1
Parasol de bayoneta HB-17
Estuche dura CL-73
34
Page 35

Accesorios opcionales
Otros filtros con rosea de 77 mm incluyendo el filtro polarizador circular
Visera del objetivo HN-34 para filtro polarizador circular de 77 mm (no se puede
utilizarelHN-29)
Teleconvertidores TC-14E, TC-20E
Teleconvertidores TC-14B, TC-201
Especificaciones
Distancia focal; 80 mm-200 mm
Abertura maxima:
Estructura del objetivo:
Angulo de imagen:
Escala de distancias
focales:
Escala de distancias:
Informacion de distancia:
Escala de aberturas:
Bloqueo de abertura minima:
Diafragma:
Medicion de exposicion:
Enfoque:
Conmutador de limite
de enfoque:
Zoom:
Montura de tripode:
Montura:
Tamafio de accesorios:
Dimensiones:
Peso:
f/2,8
18 lentes
en
30° 10' -12°20'
80,105,135,200 mm
Calibrado
infinito (<«>)
Salida al cuerpo de la camara
f/2,8—f/22 en escalas normales y de lectura directa de
aberturas
Instalado
Totalmente automatico
Metodo de abertura total con camaras Al o camaras con
sistema de interfase
para otras camara.
Sistema de enfoque inferno de Nikon (IF) (con un motor
Silent Wave inferno); manual por anillo de enfoque
independiente
Instalado; hay dos posiciones: FULL (total de infinito a
1,5 m [4,9 pies])
Manual mediante anillo
Collar de montura de tripode desmontabel rotacibn hasta
360°,
Montura debayoneta Nikon
77 mm (P=0,75mm)
Aprox. 88 mm de diam. x 207 mm desde la pestana de
montaje; aprox. 215mm de longitud (total)
Aprox. 1580 g (3,5 libra) con el collar de tripode; aprox.
1450 (3,2 libra) solo para el objetivo
14 grupos (5 lentes ED)
en
metros y pies desde 1,5 m (5 pies) a
CPU;
metodo de reduccion de parada
o~-2,5
m (8,2 pies)
de
zoom independiente
indices cada 90°
Page 36

Nomenclatura
© Indice di montaggio del paraluce ©Scala di lettura diretta delle aperture
© Scala delle distanze ® Contatti CPU
®
Indice di
compensazione per infrarossi
® Contrassegno distanza ® Anello dello zoom
©Pulsanti di blocco della messa a fuoco @ Interruttore
©Scala della lunghezza focale ® Vite di fissaggio del collare del treppied
(Z) Linea indice della
© Interruttore del modo di messa a fuoco @ Anello di apertura
©
India di allineamento del collare del treppiede
® Indice delle aperture/lndice di montaggio @ Perno per misurazione dell'apertura
© Scala delle aperture ® Attacco
@ Leva di blocco di apertura minima
scala
della lunghezza focale ® Collare del treppiede staccabile
(a 80mm)
© Anello di messa a fuoco
di
fine
corsa della messa a
® Indice di accoppiamento dell'esposimetro
(
di segnale di
attacco Per
apertura minima
accoppiamento
EE
fuoco
servo)
Introduzione
L'AF-S
Zoom-Nikkor ED 80-200mm f/2.8D IF utilizza un motore Silent Wave
all'interno dell'obiettivo per azionare il meccanismo di messa a fuoco (da qui la
denominazione "S"). La messa a fuoco automatica risulta quindi facile, silenziosa e
quasi istantanea. Questo obiettivo e dotato inoltre di messa a fuoco interna (IF),
cosicche non vi sono cambiamenti nella lunghezza complessiva dell'obiettivo
dall'infinito alia distanza di messa a fuoco piu ravvicinata (1,5 m), il che consente
una maggiore maneggevolezza durante
cinque elementi ED a dispersione extra bassa, alio scopo di ottenere immagini nitide
dal centra ai bordi e praticamente prive di frangiatura del colore, indipendentemente
dall'impostazione della lunghezza focale.
Nota:
Questo obiettivo consents la messa a fuoco automatica
F5,
serie
F4,
serie
F90X,
serie
I'uso.
F90,
serie
Per
I'obiettivo
F70,
vengono inoltre utilizzati
in
Pronea BOOi e Pronea S
Silent Wave con le fotocamere Nikon
Importante!
• Fate attenzione a non sporcare o danneggiare i contatti CPU.
•Gli accessori elencati non vanno montati su questo obiettivo, in quanto potrebbero
danneggiarne i contatti CPU: Anello di Prolunga Automatico PK-1, PK-11/PK-11A,
Anello Auto BR-4, Anello K1.
Altri accessori, nell'impiego con determinati corpi camera, possono risultare
inadatti.
Per maggiori dettagli, consultate i relativi manuali di istruzioni.
•Quest'ottica non e utilizzabile abbinata alia fotocamera Nikon F3AF con il mirino
autofocus DX-1 montato.
36
Page 37

Messa a fuoco
Posizionare
alia seguente tabella:
•
•
•
il
selettore del modo di messa a fuoco
-—_Modo di messa a fuoco
Fotocamere
F5,
serie F90X,
serie F90,
serie F70,
Pronea 600i e ProneaS
Fotocamere Nikon AF
(tranne F3AF)
Altre fotocamere Nikon (tranne F3AF)
~~——Jella fotocamera
serie F4,
C
Messa a fuoco
S
automatica con
AF
precedenza manuale
M
C
s
AF
M
Messa a fuoco automatica con esclusione per
del la
fotocamera in conformita
Modo di messa a fuoco dell'obiettivo
M/A
Messa a fuoco manuale
(Aiuto per la messa fuoco disponibile)
Messa a fuoco manuale
(Aiuto per la messa fuoco disponibile)
Messa a fuoco manuale
Messa a fuoco manuale
(Aiuto per la messa fuoco
disponibile)
il
funzionamento
M
in manuale
Posizionare
messa a fuoco automatica funziona, ma e possibile escludere manualmente
messa a fuoco agendo sull'anello di messa a fuoco manuale separato mentre
preme leggermente
I'interruttore
del modo di messa a fuoco (Fig. 1) su M/A. Cosf la
il
pulsante di rilascio dell'otturatore o
il
pulsante di avvio AF
la
si
(AF-ON)sulcorpodellafotocameranegliapparecchichenesonoprowisti. Per
annullare
I'esclusione
manuale, togliere
il
dito dal pulsante di rilascio
dell'otturatore o dal pulsante di avvio AF.
Come limitare
(solo per fotocamere utilizzabili
Spostare
per ridurre
la
gamma della messa a fuoco automatica
I'interruttore
il
tempo di messa a fuoco automatica. Questa funzione e utile quando
in
modo M/A)
di fine corsa della messa a fuoco (Fig. 2) da FULL a <»•
2,5 m
riprendono soggetti situati a una distanza maggiore di 2,5 m. Posizionare
I'interruttore
Uso dei pulsanti
(solo
su FULL quando
per fotocamere
il
soggetto si trova a una distanza inferiore ai 2,5 m.
di
blocco della messa a fuoco automatica
utilizzabili in modo M/A)
Tenendo premuto uno dei pulsanti di blocco della messa a fuoco automatica
(Fig.
3), la messa a fuoco automatica viene disabilitata.
fuoco automatica pud essere azionato anche premendo
II
blocco della messa a
il
pulsante di blocco AF sul
corpo della fotocamera negli apparecchi che ne sono prowisti. La precedenza viene
data all'operazione di blocco AF eseguita per prima.
si
37
Page 38

Compensazione dell'infrarosso
Quando si effettuano riprese con pellicole all'infrarosso
necessario compensare leggermente in manuale la distanza messa a fuoco. Con
pellicole all'infrarosso a colori, non occorre eseguire alcuna compensazione della
messa a fuoco. II puntino bianco immediatamente a sinistra della linea indice delle
distanze e
I'indice
per la compensazione dell'infrarosso con imposfazione sugli
80 mm. Per prima cosa, mettere a fuoco manualmente
la distanza messa a fuoco rispetto al puntino bianco. A questo punto, applicare un
filtro rosso (R60) per fotografia all'infrarosso. Per determinare la posizione dell'indice
di compensazione dell'infrarosso per tutte le lunghezze focali, usare la seguente
tabella:
Distanza della messa
a fuoco
80mm
105mm
135mm
200mm
Compensazione rial
contrassegno distanza (sulla finestrella scala delle distanze)
1,3mm (puntino bianco)
0,6mm
0,3mm
0,2mm
in
bianco e nero,
il
soggetto, quindi riallineare
e
le
Zoom e profondita
Per zoomare in awicinamento e in allontanamento, ruotare
di
campo
I'anello
dello zoom finche
la composizione desiderata e contenuta nel mirino. In modo M (messa a tuoco
manuale), la messa a fuoco e possibile con qualunque lunghezza focale; tuttavia,
maggiore e la lunghezza focale, piu grande sara I'immagine e minore sara
la
profondita di campo (cid facilita la messa a fuoco). Se la vostra fotocamera e dotata
di un pulsante o di una leva per I'anteprima della profondita
di
campo (Stop-Down),
e possibile osservare la profondita di campo guardando nel mirino della fotocamera.
Blocco al diaframma minimo (Fig. 4)
Per la ripresa nei modi di esposizione automata Programmata o a Priorita dei
tempi,
fate uso della leva di blocco al diaframma minimo, per mantenere prefissato
il
valoref/22.
1 Regolate
2 Spingete la leva di blocco verso
il
diaframma al valore minimo, f/22, allineandolo all'indice delle aperture.
I'anello
diaframmi
in
modo che
il
punto bianco
sulla leva risulti allineato al punto arancione.
Per liberare la leva, spingetela nella direzione opposta.
38
Page 39

Schermi di messa a fuoco consigliati
Per alcune fotocamere SLR Nikon sono disponibili vari schermi
intercambiabili adatti a ogni situazione di ripresa. Gli schermi consigliati per
con questo obiettivo sono elencati sotto.
\J5chermo
FolocameraX
F5+DP-30
F5+DA-30
F4+DP-20
F4+DA-20
© Messa a fuoco eccellente
O Messa a fuoco accettabile
— Non disponibile.
() Indica il valore della compensazione di esposizione aggiuntiva richiesto (solo a misurazione
II quadrato vuoto non e applicable. Come lo schermo del tipo M pud essere utilizzato per
macrofotografia con rapporto di ingrandimento 1:1 e fotomicrografia, esso presenta differenti
applicazioni che agli altri schermi.
Impiegando gli schermi B, E, K2, B2 ed E2 con fotocamere diverse da quelle elencate sopra, fate
riferimento alle rispettive colonne delle versioni B, E e K.
Quando si scattano fotografie con
EC-B
O
(-0.5)
F3
L'immagine
sullo schermo presenta una riduzione di luminosita o tracce di fenomeno del moire.
Questo pero non lascia tracce sulla pellicola.
a preferenza centrale).
O
G3 G4 H1 H2
O
il
flash utilizzando
o
di
messa a fuoco
I'uso
mi
T
fotocamere con flash incorporato
Controllare la distanza focale e la distanza di ripresa prima di scattare le fotografie,
quanta la vignettatura si verifica nelle seguenti condizioni:
Con le fotocamere serie F60, serie F50,
Utilizzabile per lunghezze focali
di
una lunghezza focale di 105 mm se la distanza di ripresa e pari a 2 m o inferiore
Con la fotocamera Pronea
Utilizzabile per lunghezze focali
S:
di
una lunghezza focale di 135 mm se la distanza di ripresa e pari a 2,5 m o inferiore.
F-601:
105 mm o superiori. Non utilizzabile, tuttavia, per
135 mm o superiori. Non utilizzabile, tuttavia, per
in
39
Page 40

Uso del treppiede
Questo obiettivo e dotato di collare del treppiede rotante staccabile. Per distribuire
equamente il peso tra la fotocamera e I'obiettivo, applicare il treppiede al relativo
collare anziche alia fotocamera (Fig. 5). Per le riprese verticali, e possibile ruotare la
fotocamera di 90° verso destra o verso sinistra. Allentare leggermente la vite di
fissaggio del collare del treppiede ©, ruotare la fotocamera in posizione verticale
@, quindi stringere la vite (Fig. 6). Inoltre, per una maggiore maneggevolezza, il
collare del treppiede pud essere staccato (Fig. 7). Svitare completamente la vite di
fissaggio del collare del treppiede, quindi rimuovere il collare.
Cura e manutenzione dell'obiettivo
• Pulite la superficie delle lenti con un pennello a pompetta. Per rimuovere impronte
e macchie, fate uso di un fazzoletto di cotone, soffice e pulito, o di una cartina
ottica leggermente imbevuti con alcool o con I'apposito liquido "lens cleaner".
Strofinate delicatamente con movimento circolare dal centra verso I'esterno,
facendo attenzione a non lasciare tracce o toccare altre parti.
• Per la pulizia non utilizzate mai solventi o benzina, che potrebbero danneggiare
I'obiettivo, causare incendi o problemi di intossicazione.
• Per la protezione della lente frontale e buona norma tenere sempre montato un filtro
NC.
Anche il paraluce contribuisce validamente a proteggere la parte anteriore
dell'obiettivo.
• Prima di porre I'obiettivo nell'astuccio o in borsa, montate entrambi i coperchi
protettivi.
•
Se
rimane a lungo inutilizzato, riponetelo in un ambiente fresco e ventilato per
prevenire la formazione di muffe. Tenetelo inoltre lontano dal sole o da agenti
chimici come canfora o naftalina.
• Non bagnatelo e fate attenzione che non cada in acqua. La formazione di ruggine
potrebbe danneggiarlo in modo irreparabile.
• Alcune parti della montatura sono realizzate in materiale plastico rinforzato. Per
evitare danni non lasciate mai I'obiettivo in un luogo eccessivamentecaldo.
Accessori in dotazione
Tappo anteriore da 77 mm dia. 77 mm
Tappo posteriore LF-1
Paraluce a baionetta HB-17
Portaobiettivo dura CL-73
40
Page 41

Accessori opzionali
Altri filtri a vite da 77 mm, compreso un filtro polarizzatore circolare
Paraluce HN-34 per filtro polarizzatore circolare da 77 mm (HN-29 non utilizzabile)
Teleconverter TC-14E, TC-20E
Teleconverter TC-14B, TC-201
Caratteristiche tecniche
Lunghezza focale:
Apertura massima:
Costruzione obiettivo:
Angolo di campo:
Scala della lunghezza focale:
Scala delle distanze:
Dati distanze:
Scala delle aperture:
Blocco apertura minima:
Diaframma:
Misurazione dell esposizione:
Messa a fuoco:
Interruttore di fine
corsa della messa a fuoco:
Zoom:
Montaggio su treppiede:
Innesto:
Misura dell'accessorio:
Dimensioni:
Peso:
80 mm-200 mm
f/2.8
18 elementi in 14 gruppi (5 elementi ED)
30° 10'-12° 20'
80,105,135,200 mm
Graduata in metri e piedi da 1,5 m (5 ft.) all'infinito H
Uscita verso il corpo fotocamera
f/2.8 -f/22 sia sulfa scala standard che sulfa scala di
lettura diretta delle aperture
Inseribile
Completamente automatico
Con metodo ad apertura massima per le fotocamere Al o
per quelle con sistema di interfaccia
Stop-Down per le altre fotocamere.
Sistema di messa a fuoco interna (IF) Nikon (utilizza un
motore interno Silent
messa a fuoco separato
In dotazione; due gamme disponibili: FULL (da infinito a
1,5m)oppure°°-2,5m
Manuale mediante anello dello zoom separato
Collare di montaggio su treppiede staccabile; girevole su
360°,
indici ogni 90°
Nikon a baionetta
Wave);
CPU;
con metodo
manuale mediante anello di
77 mm (P=0,75mm)
ca.
88 mm diam. x 207 mm estensione della flangia;
lunghezza totaleca. 215 mm
Circa 1580 g con il collare del treppiede; circa 1450 g il
solo obiettivo
41
Page 42

®
JtmMmmmmm
® gr*M£*Hif§7K(T80mm)
(14) CPUtt.fi
© ft«W
© $«w
©
mmm&
©
ttmmttz
®
®
*•#*/«*)»*
® AHJs'lJf
©
»/h*fflDiJEff
BUS
AF-S$«H/gj?^KED80-200mm f/2.8D IFWS*rt**#»*K#S,3i, Kf#5&5tt
«ss,
sffBs-eiws
"S"
aw-, «s*^ffiga*tsu»ii,
¥„ Ml-, #«Mjftffi*fW* (IF), »feiC&mcPRJffiMl.5# (4.9ft.)
ffi* ! *Stiti*«»^aaj3(t«!iSfflTEKF5. F4*?H, F90X*?i|/N90s*. F90f,?i|/
N90*.
F70£?iJ/N70*, Pronea600i/6i»SPtDneaSffitt,(*ttffi*HAfF).
M**8Hr#
(2i>
m'bJtmmikiti.
(.EEmm^m
»»#>«IM-^
ffi
• ?±«^5#ttJtffitfCPUtt,i(
• ^Wn^itfMi**!***, WMnWCPUftftfi, S§j#ffiMPK-l,
11
A,
gsOTBR-^KlUs,
• ^SU^g^f DX-l AFStf:Sl»/E)*F3AFffitJl-©ffifflo
42
0
PK-11/
Page 43

ttft
&-fm$mmsmm£,
——^mmrn^t.
«m
~~~———__
F5.
F4f;?il.
F90XS?!l/N90s«,
F90*W/N90»,
F70S?!|/N70*,
Pronea
600iy6i*SPronea
/BSAFffifll
(F3AFISM-)
KflkJEigfflJl
(F3AFi^F)
*«ffi*a,t,«
ft#*s*5«F£ttjfca-M/A(Bi)Bt, flHrs?w*, fiwsa»M*±w^
•
PISIJ
g rnnmm
*#XM8IRifc?F£(J&B2X
liWfijffiT2.5n)
ll.'IJ.
• &m g sd5t«i«!S (ttffijffFM/A*Jt«ia)
WAFfiffl, sa«iif*ifc#««±. AF#.ffl*fF*^r56*fFffl„
£E*tttMI
••
«*»ii*iC
M/A
c
sa*r*»*8**
s
AF
rftiKMi
M
S
c
s
AF
M
({JUMHWAII
(#*8BJRMUI)
We*« (#*tM*«s:9l«8)
^SRi!
itsm)
M.FULL1" • 2.5mff[sl*MgsW»= ftS&IBJE
(8.2ft) WffiS±<*„ ffl«±*KT2.5m»t, n»ff*f£S
M
it5fc*©*tfff«t±i*, «)g:»«®*tT*6.&, H$safea?itjf
(R60)
43
Page 44

*S§ig^
80mm
105mm
135mm
200mm
1<MMMX (S4)
mgftf/22tefia±.
1.&&MtSftgt!i*.
JHftSTft/jN*ffl (f/22)
SEfSS^StfMg (SSgSS'JS±)
1.3mm
(6,6)
0.6mm
0.3mm
0.2mm
o
tns#tt«&i#,
if«a£ff*affl&B<i#t&]„
g-#*.«PBiaffl^JE)*SLRffiftWttfBIfflIi£fl<)ai5«ft„
C
0
0
0
0
(-0.5)
0
E
F
G3
G4 H1
G2
-
©
-
-
©
-
©
-
-
©
©
0
0
0
©
©
-
-
-
-
0
F5+DP-30
F5+DA-30
F4+DP-20
F4+DA-20
F3
© : «li«»
EC-B
e
§
-
-
-
A
§
@
-
-
©
B
8
§
©
©
©
G1/
D
O : njamm
SfiSWSfSffl.
H*MSIM8SfflriaiWffli : lit*:IS*aiT««S»*asna»,
*».
am,
E, K2,
B2ttE2mmmw,
MNB.
Emttmtem-m.
44
H2
-
-
-
-
H3
H4
L
M
©
©
-
-
©
Hit, *&
-
-
P
©
©
&
R/S/
T
-
-
-
-
©
U
•
/
J
K
-
-
©
-
-
©
©
-
©
-
©
©
©
0
©
Page 45

ffiffl¥F60jR?fl/N60*, F50jR?H/N50*, F-601/N6006*ffl#l : jSfflT
"l05mmK±iSffi, {Bffl$SM&£2m (6.6ft) WTftt, ^gffiffll05mmlfg
ffifflTPronea Sffifll : JtfflTl35mmW±fMS§, fi»»E««2.5m (8.2ft)
TStt, ^Sffiffll35mmftS§„
*fXffi*Ht±
J
«„
J
o
LU
ffita&Tsiefi®, ^sjtg«fr(a6)„ insae^-mittttStti^*,
llmmmiU^WMM.
HMLF-1 -ffniSHB-17 iMSCL-73
&»«*#
77mmlSA5^it.ii, fifelHiltlt
4t*¥HN-34177mmBiBt« (*fiffl^HN-29)
iia$f&3tTC-14E, TC-20E
Jlfiff»HTC-14B. TC-201
45
Page 46

to
Si
S±ftH
fli^faji
mmfts.
mmms.
n^m&
mm&m
%nn&
ft/j^Htt
%
m
«#;!•
W
«
miNHfc?F
g
«
$»=»&
s
m
s^R-t
R
^t
•
•
80mm - 200mm
f/2.8
14tJa»4>*181^tt (5ED7Gf+)
30°
10
' -
12° 20
'
80,
105.
135#J200mm
WSS 1.5m
ffifflfJl±
172.8
£: ffi&
^gsft
AlffitasSiSftCPUM^^JffifA, *ffl^*H*jt, *ftffi«
M*ffl*§/M£lM7fiL
/airtsui
f-ffiMffl»,a:$«W
£ i
Id^o
» -2.5m (8.2ft.)
(5ft.) M5cK@(~)
-f/22, #«a«*Hi®iSli»]S
(IF)
mi
(ftffli*i^»»*»^^ji)
ISfflHftffiH : FULL (SKES 1.5m [4.9ft.]) gg
¥-eiMi$*W
: Hii^SlW.
JE««Wl5g
77mm(P=0.75mm)
aS^88mm. ix««)207mm, MiM§W,«t*:«£flfc&fi<l&
fc*«J*215mm
«J1580g(3.5«f), f=HPIg
«J1450g(3.2B|), ffi«*
BTSI^360° , fg»*90°
46
Page 47

*ffS
CD mytwsmmii
®
SggKtlS
®
e^m?ififfi^ c s^80mm) © rnmrn
© »{Ii; © ®««
®
©
Magnuses
CPUSIA
© mmmm ® ^iseMBS
©
mmm
© Hipsaiiejyi
ST
® «SgfJgg|S ® HBIBSBIga
©
%wnm ®
tk'bytmmmn
(EE^HS?^)
ftfit
AF-S«<iii/@^WED80-200mm f/2.8D IFlS§®lr*l8?l!fPl$?«JfiI • Kfll
IIKJSSB
•
Kffwefffm "s" isit • im'mmmmmmm
*
»SWB
B#^# • MR • ^mmmmm^mnw)' mmzmi£Mm~s.\.5*(4m.)
fflmfmmmm
•
msmmgfmm
•
#&• • wmTsmEDimmw)
nmmsts.
am
•MFFmmmmcpvim
•
••
*mmmmimmmMMmmi§,mv5 • v4wi • F9ox*?g/N90s* - P9o»?ii/
N90* • F703R?!I/N70* - Pronea 600i/6i*»Pronea SHM(*8£)SttBft)'
•
•^mmrmmmmmmm • u&imcpuim • g«#ffiWPK-i -
PK-11/11A
- gli«BR-4ffiKUa-
t*iisjg?sffi*»ffls±ift • m-mmwrn • wis» • mmmms
wmmm
-
47
Page 48

MM
mTm^mmmmma
-—^jsmwmm^
mt ~~—~-—_
F5 - F435?IJ
F90XS^!J/N90s*
F90^5IJ/N90*
F703S9IJ/N70*
Pronca 600i/6i*SPronca
JgltAFW
nmsemm
(F3AFKtflO
*«ii3SH!iifi
•
•
•
•
S
•
c
siartM««*»
s
AF
M
c
s
AF
M
fflmmmx
M/A
M
?«•»« (W*s**«ii/ig)
¥««*
(Wiwwawitg)
¥ffiR»
mmmsmmstg&M/A
ffi(AF-oN) ° mmi£&&?mm$mAm$mm^m • &m$m;fmm
•
mm i mmum (naffl^M/A«^a«)
mmmmmimm t nmz)
en)
-
^FULLM~
n# • «wg»i^ • m»s$fFWiz:w¥
°
•
2.5msiHi«5§ijftf£ • mm
£iy,stiiiiK2.5m (8.2i\) a^ttwitt • «±isfiR2.5mB# - nwsmfM.
FULL
•
•
mm nmmm. (iiafflMM/AM^gti)
mAFMi < mmfflktwant - Anammi^Mm^m^m
•
ummm
mtmmmtmm
mm - mvmmwmmommm
48
•
mw&mmm. • nm^&mmmmm • mmm
-
^&mmmmmmmg.mm&&.
•
Page 49

mm
MSgiSS
80mm
105mm
135mm
200mm
(>m)
as • siM&siffl«*as*&fif^
mtmmmtmm (mmmmi.)
1.3mm(fiH5)
fi'hftHli£(B4)
5£&f/22fl%m± •
1.
at mmm* mm* • aeissafrs^ffl (f/22)
2.smgfwt
faftge •
ffiii5E#±s*ias5ftJi!fieiiii
immwrnm
0.6mm
0.3mm
0.2mm
•
-
-
EC-B
B
A
C
F5+DP-30
F5+DA-30
F4+DP-20
F4+DA-20
F3
o:
Bimmm
( ): itemfflffiifirffi (Mffi+^BKSWf)
sfiKwaisM • mTkMay&mmmmmi • itscktsmmTsmmmimtm • ant • ^s
litis-
mmB
• E •
§
©
©
§
-
-
-
K2 -
0
Co)
©
0
0
-
@
0
-
©
(-0.5)
©
©
0
B2«E283$£S$ • «#MB • mm%$m-M
G1/
F
D
-
-
-
-
0
©
©
©
©
a
G3
62
G4 H1
0
0
©
©
0
E
-
-
H3
/
H4
0
K
J
-
-
©
-
©
-
©
©
-
-
©
©
©
©
H2
-
-
-
-
-
-
-
-
•
9
©
-
-
©
R/S/
-
©
©
©
U
P
T
-
-
-
-
-
©
©
L
M
49
Page 50

lErnmuT
f£fflMF60^5lJ/N60* « F5O&50/N5O* - F-601/N6006*ffl+§ : ilfflR
105mmtt±HE • ffifMWEJiffi2m
f£fflJj«Pronea Sfflflg : J|ffl»135imnJJl±flMME • ffift»!E8iffi2.5m (8.2ft)
• imm%Mft2.M •
mmsmmmmm • m^m±*m
(6.6ft)IXm • ^gffiffll05mmitgg .
•
*flffiitHttig
•
5) • sasipf • "Binfffl«is]fe^i6]^^ii9()° • mmwfo-m^wmmfj
CD • fiffisitftssfitB© • fmsmm® (W)
mmmmmmmmmmmmimt - i±mmwm
mmm& •
•mmjmmmmm£mmmm
mmr^&mt^Tmmmmmzmm
• mmmmmmm •
- tixmwmmmmmff-jx
•
HWWFIIHJ^M
•
mm*®. • mm
mm-
m&mim -
iimmmmmwm
HHLF-I
-unmwB-M
«&*CL-73
mw&m
77mmJSAiCifJl ' feSBIfiifJl il3fl^HN-34S77mm|KIiia (^RgfflRHN-29) il{$!ffitfSTC-14E - TC-20E 5SSWMSTC-14B-TC-201 50
Page 51

i Sg : 80mm~200mm
\± % m •• f/2.8
14«flP4';Pri 8fB?cfr (5ED7G#)
30"
10
'-12° 20'
80-
105 • 135?P200mm
tlfig 1.5m (5ft.) SMKit (°°)
4ffl«±
f/2.8~f/22 • wmmmwsmmm
SBfi
JSKftas^
S2ffi • ilfflUfllBlI : FULL (MSitMl .5m [4.9ft.])
°°~2.5m (8.2ft.)
(IF)
«yij (f£ffl[?jss«SJi,iiii)
M
mmw&mm
77mm (P=().75mm)
Sflft88mm - JIS3f$207mm • Mf&fflttifSigcSmffi
Wllfl:fife215mm
^1580g(3.5{f)'iitHBa?
»1450g(3.2Sf)'fiifSI
51
Page 52

Nikon
•rUM*M«WMFt**»<JS*u(*«)„
No reproduction in any form of this manual,
quotation
in
NIKON CORPORATION.
critical articles
NIKON CORPORATION
FUJI BLDG.,
TOKYO
2-3
100-8331,
or
reviews), may be made without written authorization from
MARUNOUCHI 3-CHOME, CHIYODA-KU,
JAPAN
in
whole
or
in part (except
Printed in Japan
for
brief
T8H030C101
C€
(K393)
80
 Loading...