

Page 1
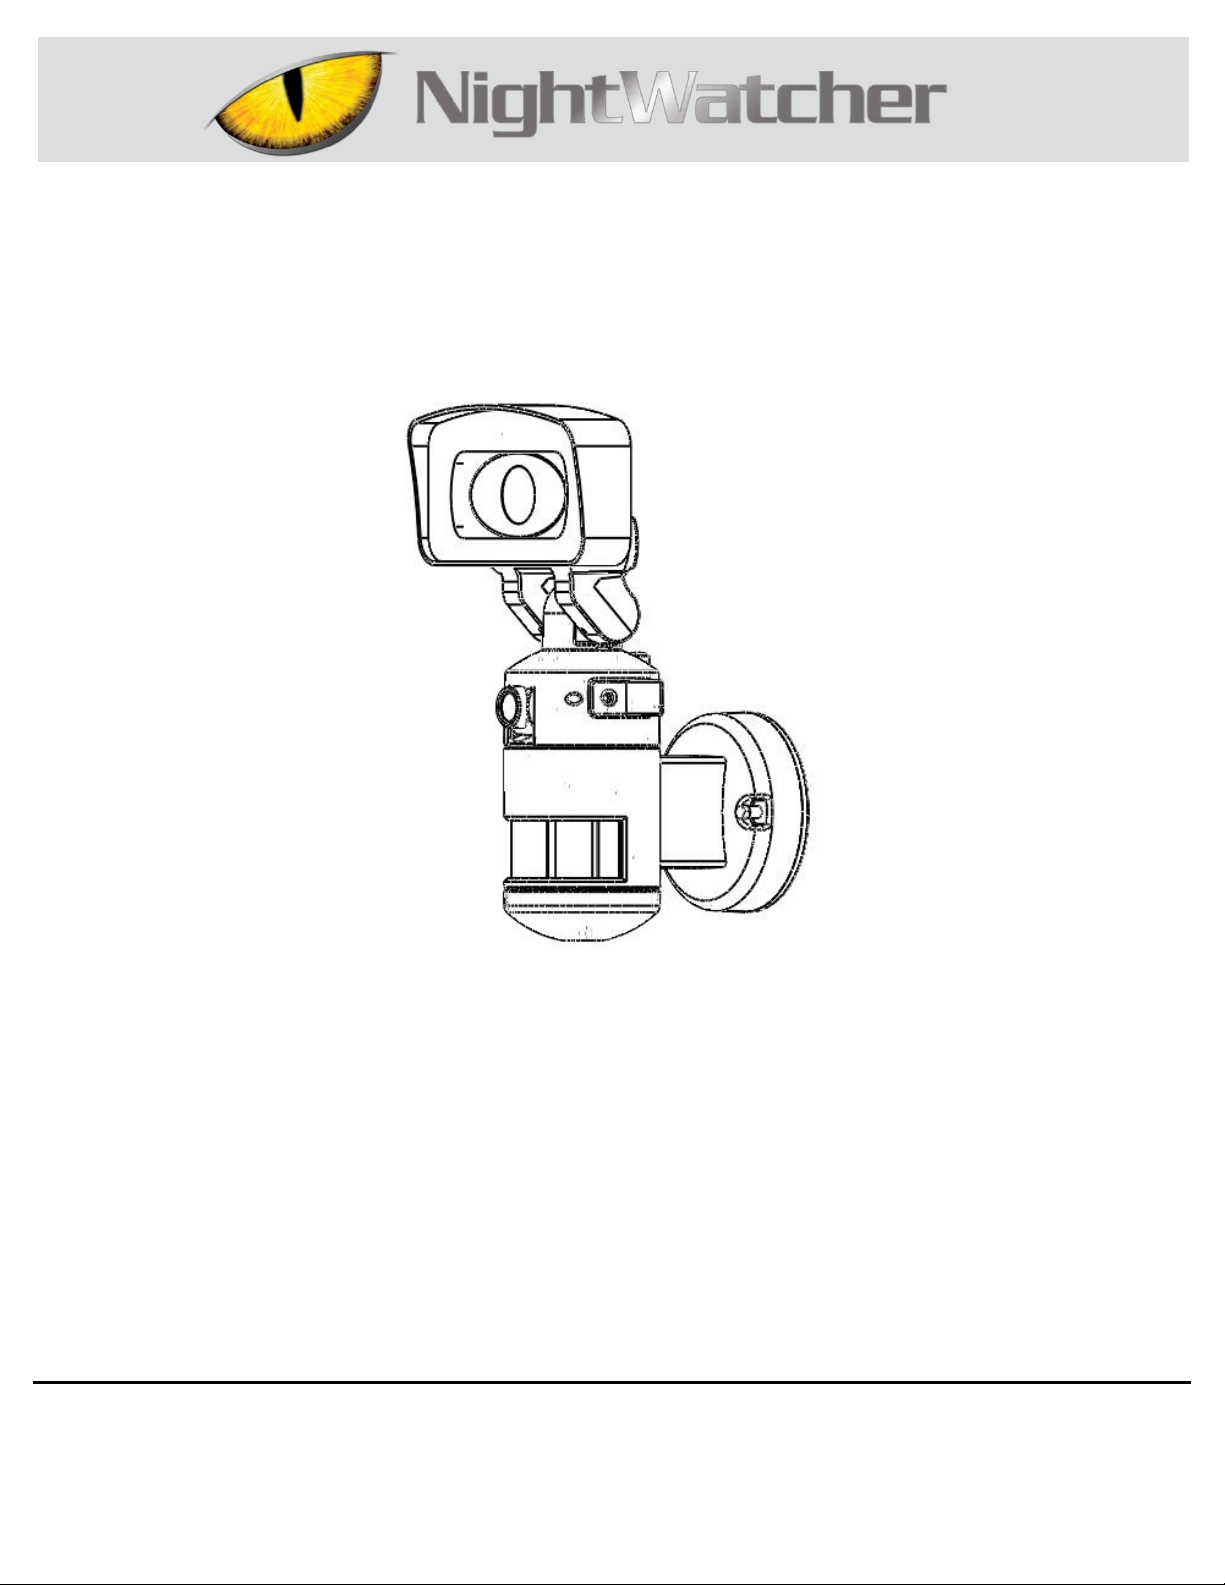
Model #NW720
USER GUIDE
MOTORIZED LED FLOOD LIGHT WITH CAMERA
CAN WE HELP?
Questions, problems, missing parts? Before returning to the store call
Nightwatcher Customer Service:
0845 900 6764
Or Email: [email protected]
THANK YOU
We appreciate the trus t and confidence you have placed in Nightwatcher through the purchase of this mot or ized LED f lood light
with camera. We strive to continually create quality products designed to enhance your hom e. Visit us online to see our full line of
products available for y our hom e im pr ov em ent needs. Thank you for choosing Nightwatcher!
Page 2
Table of Contents
Safety Information
WARNING:
risks.
CAUTION:
surfaces.
IMPORTANT:
This light fixture must be grounded.
Warranty
Table of Contents…………………………………………2
Safety Informatio n….…………………………………….2
Warranty…………………………...……………………….2
What Is Covered………………… ………………………2
What Is Not Covered………………………………………2
1. This device complies with Part 15 of the FCC Rules.
Operation is subject to the following two conditions:
(1) this device may not cause harmful interference,
and (2) this device must ac c ept any interference
received, including interference that may cause
undesired operation.
2. This equipment has been tested and found to
comply with the limits for a Class B digital device,
pursuant to Part 15 of the FCC Rules. T hese limits
are designed to provi de r easonabl e pr otection
against harmful interference in a residential
install ation. This equipment generates, uses and can
radiate radio f r equenc y ener gy and, if not installed
and used in accordance with t he instr uc tions, may
cause harmful interference to radio communications.
However, there is no guarantee that interferenc e will
not occur in a partic ular installation. If this equipment
does cause harmful int erference to radio or
televi sion reception, which can be determined by
turning the equipm ent off and on, the user is
encouraged to try to cor r ect the interference by one
or more of the following measures:
□ Reorient or reloc ate the receiving antenna.
□ Increase the separation between the equipment and
receiver.
□ Connect the equipm ent into an outlet on a circuit
different f r om that t o which the r ec eiv er is
connected.
□ Consult the dealer or an experienced radio/TV
technician for help.
Installation…………………………………………………6
Programming your Nigh twat cher……………………..7
Troubleshooting…………………………………………11
Care and Cleaning………………………………………12
3. The installation of this light fixture must be done by a
qualified elec trician.
4. The motion sensor may not operat e c or r ec tly if it is
installed:
□ Near the outlet of a cent r al heating boiler.
□ Near an air condition unit.
□ Pointing directly at moving vehicles.
□ Within sight of refl ec tion from moving water.
□ Where other lights could be pointed onto the sensor.
Changes or modification to this unit not exp ress ly
app rov ed by th e part y resp onsi ble for complian ce
cou ld void th e user a uthor ity t o oper ate th e
equipment.
This Ni ghtwatcher NW720 is a precisi on elec tro nic
device. Do not attempt to service t his camera
yourself, as opening or removing covers may
expose you to the danger of electric shock or other
Do not immerse the light fixture in the water.
Do not mount th e light fixture a gai nst fl am mable
2
Page 3

12 MONTH WARRANTY WHAT IS COVERED
12 month limited warranty from date of purchase. Please retain proof of purchase. The manufact ur er reserves the right to replace or repair the f aulty unit.
WHAT IS NOT COVERED
The warranty does not cov er dam age to t he unit t hat may occur as a result of improper installation. This product is
designed to ill umi nate, it will not prevent the perpetrati on of any act, legal or illegal. The m anufacturer assumes no liability
for any damage to property , injury to person, or death.
3 www.nightwatchersecurity.co.uk
Please contact 0845 900 6764 for further assistance.
Page 4
Pre-installation
NOTE:
the circuit breaker is in the “ OFF” p osition.
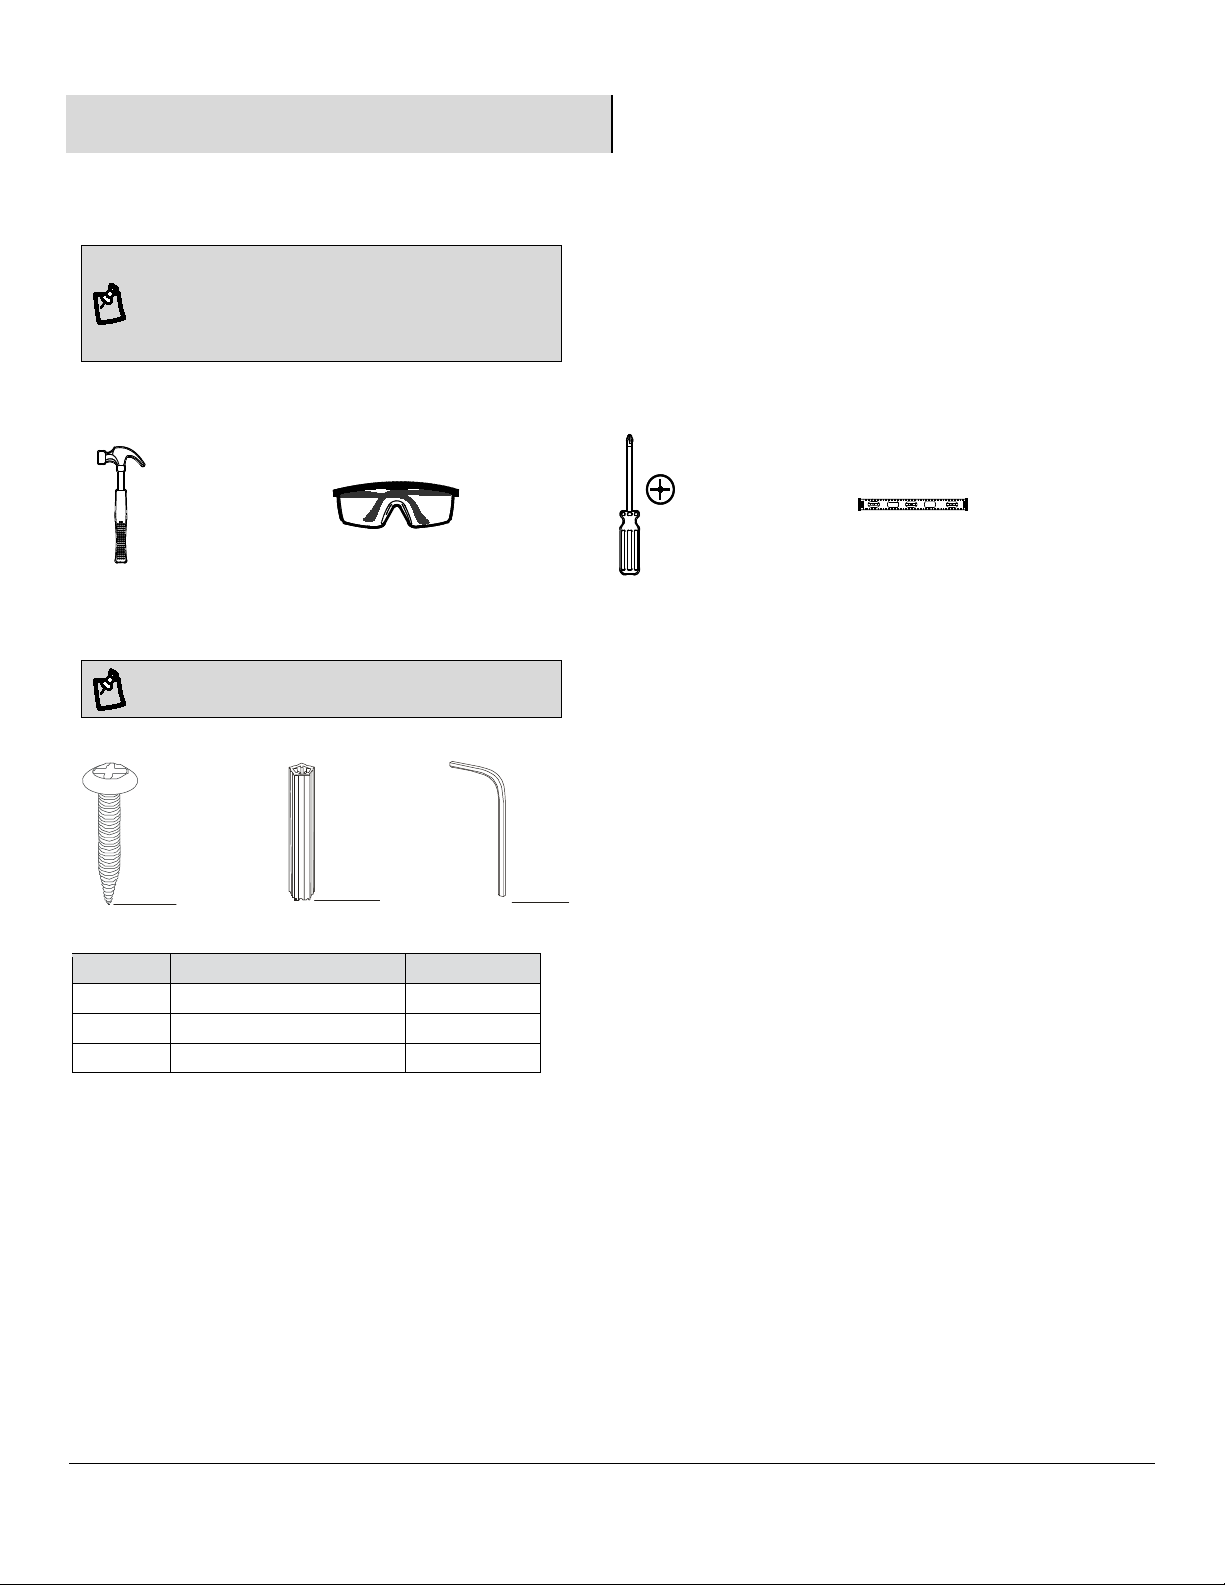
Part
Description
Quantity
AA
Drywall screw
2
BB
Plastic masonry plug
2
CC
Allen Key
1
CC
AA
BB
PLANNING INSTALLATION
Never attempt to turn the light head by hand as this can damage the internal motor component s.
Before attempting any installation or
mai nten ance, ensure that th e electrical su pply i s
switched off and the circuit f uses r emoved or
TOOLS REQUIRED
Hammer
HARDWARE INCLUDED
NOTE: H ardware not sho w n to actual size.
Safety
goggles
Phillips
screwdriver
Level
4
Page 5

Pre-installation (continued)
Passive infrared sensor
(with conti nuousl y detect function)
Sensor Range
Minimum of 10m x 220°
Power Source
AC240V
Light Source
1PC AC 11W LED
Time Adjustment
Fixed at 3 minutes approx..
IP rating
IP55 (Weather-Proof)
use
Part
Description
Quant
ity
A
Screw nut
2
B
Backplate screw
2
C
EVA Gasket
1
D
Micro SD card and SD
adaptor
1
E
User manual
1
NOTE:
security or prevent illegal entry.
D
- Records 20 second video events at 10fps. 1280x720
- Effectiv e vi ewing angle: 60 deg
A B D E C
PACKAGE CONTENTS
Nightwatcher NW720 is desi gned t o i l luminate, video and
make ver bal announcement when the detection area is
entered by a person and will detect a moving heat source.
There is no guarantee impl ied that it wil l provide total
SPECIFICATIONS
Detection Method
Suitable for outdoor s permanent
5 www.nightwatchersecurity.co.uk
Please contact 0845 900 6764 for further assistance.
pixels (VGA)
- Built in Micro SD card slot for Micro SD memory card
- Micro SD card slot for additional storage, max memory
size up to 32GB (SDHC)
- Micro SD card video file format: FAT or FAT16 (SD)、
FAT32 (SDHC)
- Automatic exposure control, white balance and
sharpness
Page 6
Nightwatcher NW720 Overview
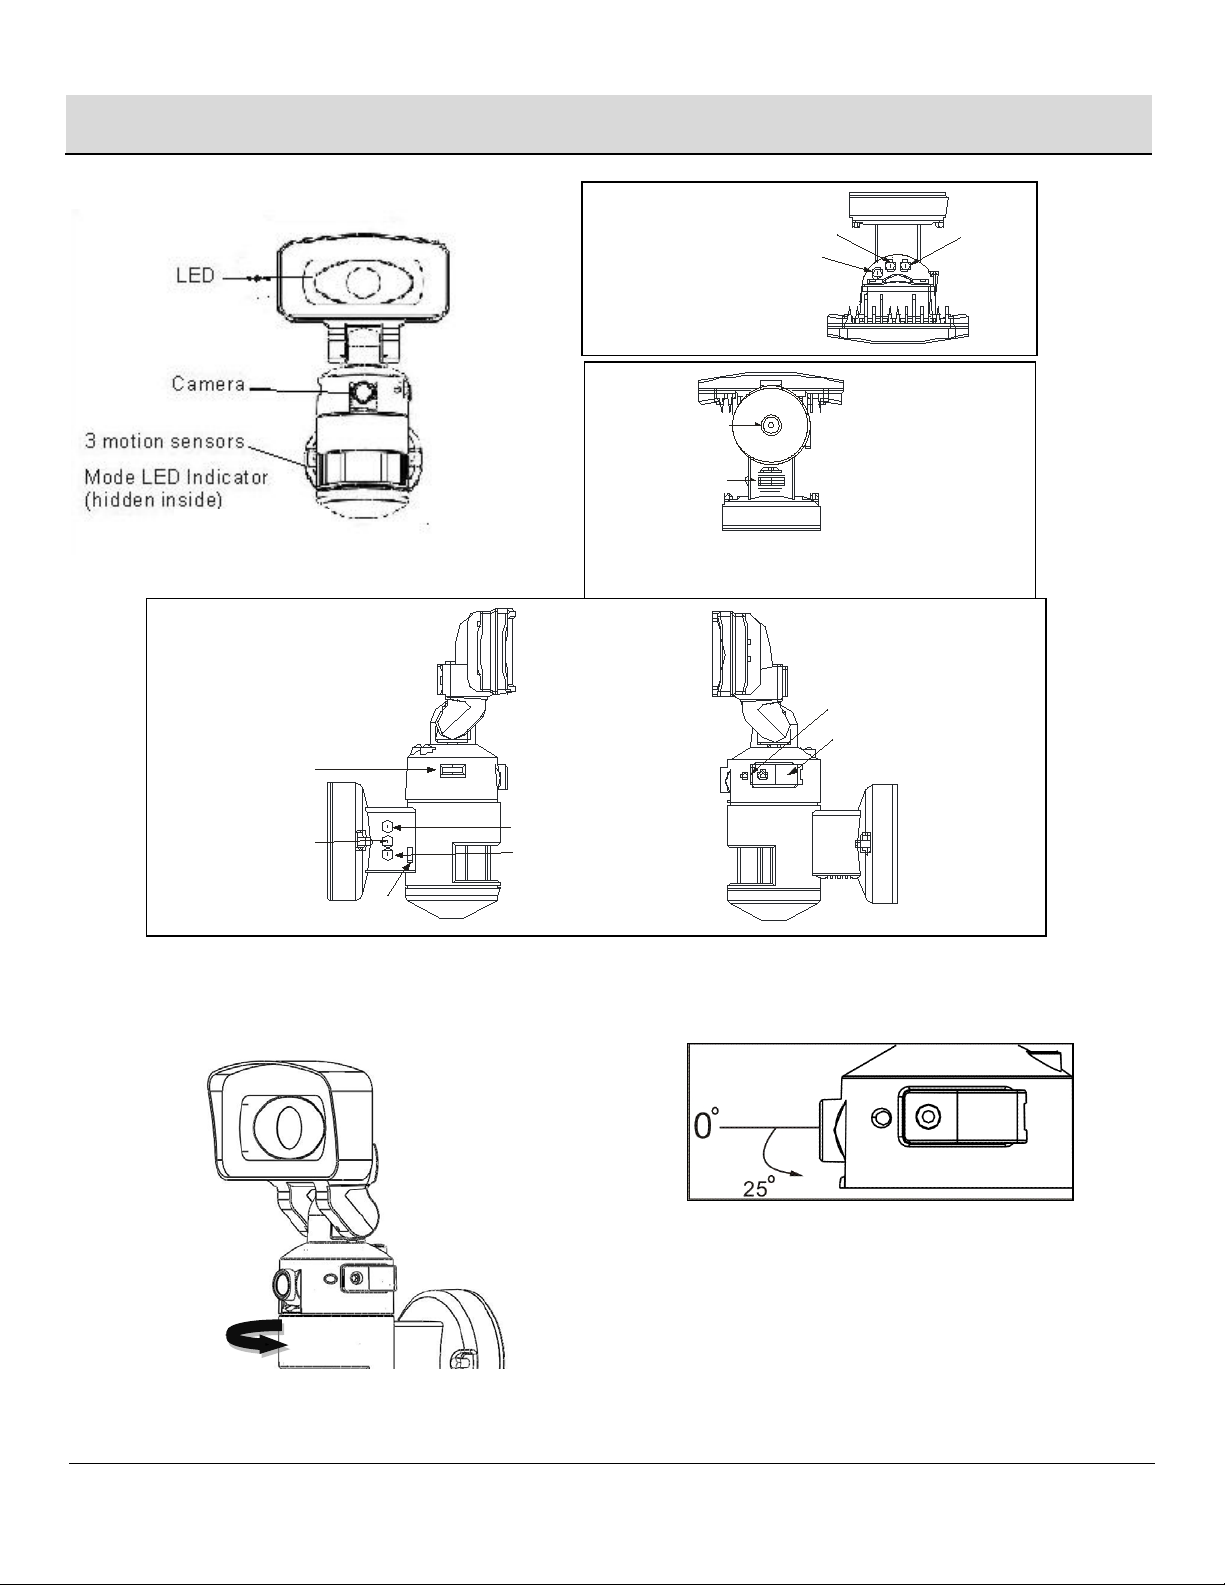
Front View
TIME/DATE SET
OFF/REC RESET
MODE Button
Speaker
Bottom View
AUDIO MODE
SET/REC
PLAY/ERASE
MIC
LCD
Waterpr oof Cover
LED Indic ator
Side View
Right 70。
Left 70。
6
Camera angle adj ustable downward by 25
degrees
Page 7
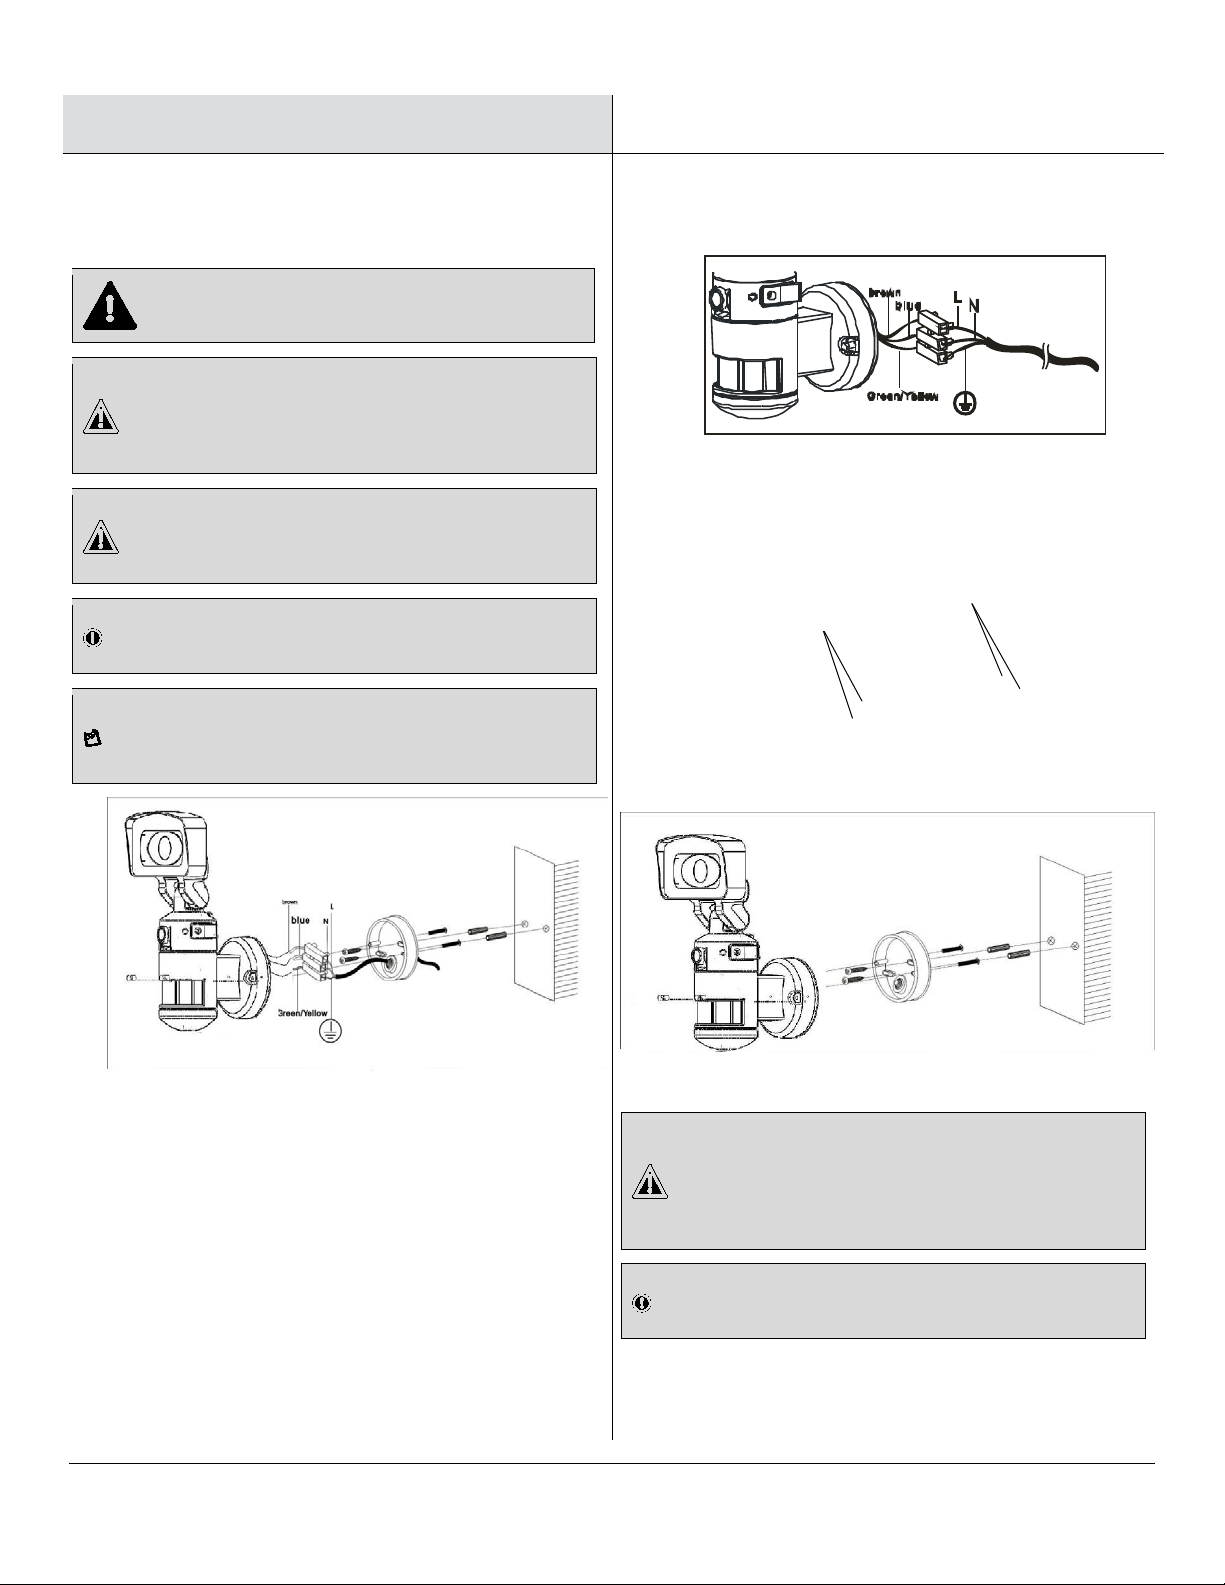
Installation
1
2
DANGER:
not sure, please contact your retailer.
CAUTION:
product.
CAUTION:
since this may cause irreparable damage to the eye .
IMPORTANT:
before connection.
NOTE:
detector.
CAUTION:
button after switching on.
IMPORTANT:
after i nstallation.
CC
BB
Mounting and wiring the light
fixture
Incorrect v oltage may cause electric shock. If y ou are
Do not rem ove the tap e until you finis h the installation.
If the ta pe comes off t he light, pleas e replace i t or ho ld
the l ight head to avoid swivel ing and damage t o the
Mounting and wiring the light
fixture (Continued)
Installing your Nightwatcher NW720 on a
wall or building surface
LED lamps are ext remely b r ight. Under no
ci r cums t ances should you stare into an LE D beam
Please make sure the voltage a nd pol arit y are correct
To ensure correct operation of the sensor, mount the
light fixture so that the traffic passes across the
□ Place plastic masonry plugs (CC) into desired
surface aligning holes as shown below.
□ Feed the cable through the back mounting box,
using caution t o av oid abr asi on to the cable.
□ Wir e the unit (A) as follows: (Ensure al l wires are
connected securely and that no loose strands are
exposed)
□ Make sure the pol ari ty is correct. Double check the
connections aft er wiri ng. Errors may damage the
motion sensor or cause a fir e haz ar d.
□ Using a screwdriver, fasten the unit (A) dir ectly to
surface using drywall screws (BB).
7 www.nightwatchersecurity.co.uk
Please contact 0845 900 6764 for further assistance.
Please allow 1 m inute warm-up time after switching
on.
Do not touch NW720 during warm-up time t o avoi d
interruption of start-up sequence. Push the RESET
Remove plastic lens cover from camera and the tape
Page 8

8
Page 9
Operation
1
2
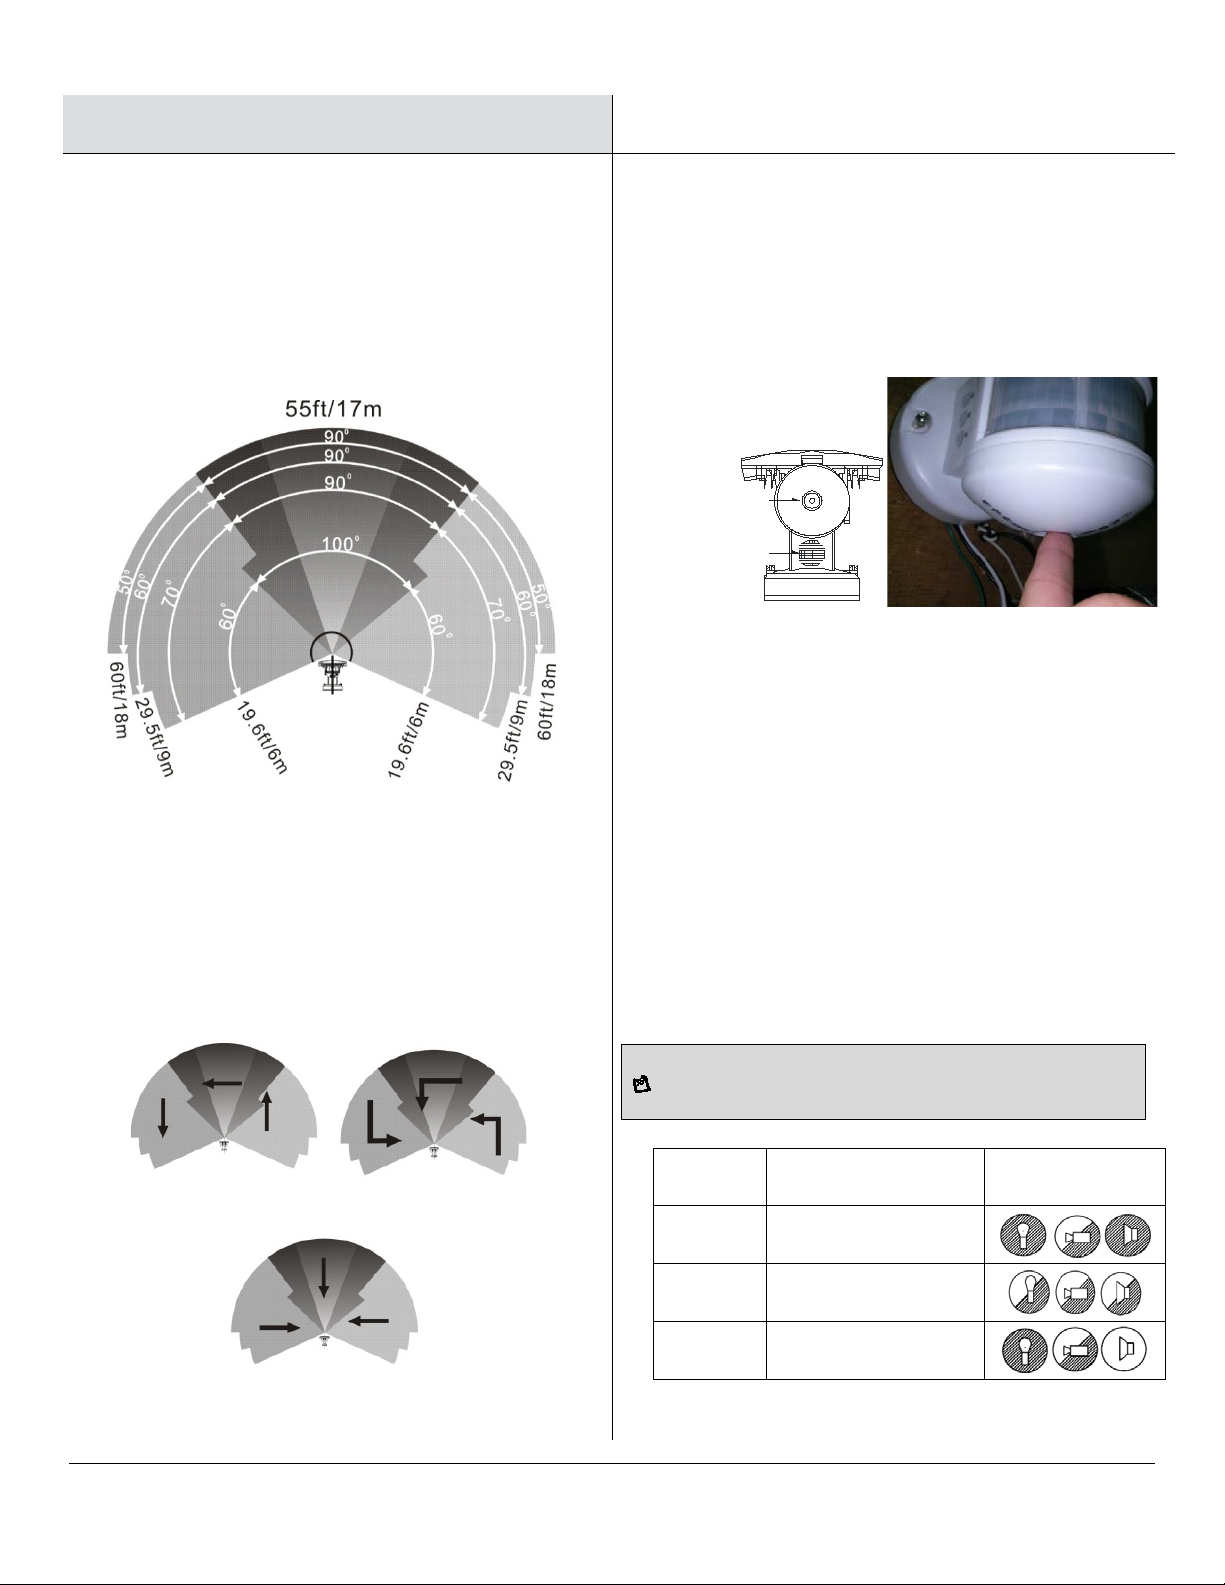
□ This li ght is equipped with three motion sensors:
□ Selecting wor k ing mode: The Mode LED Indicator
MODE Button
Speaker
NOTE:
audio will be triggered for the following 30 seconds.
Top
Good Sensitivit y
Less Sensitivit y
Detection range
zone 1 covers 60 degrees, zone 2 100 degr ees and
zone 3 60 degrees; a total 220 degree max imum.
The distance range will vary from a minimum of 10
metres, depending on out door temperature;
Ensuring correct operation
□ To ensure correct operation of the sensor, mount
the light fixt ur e so that t he traff ic passes across the
motion sensor.
Adjusting the settings
hidden inside t he lens will displ ay different LED lights
when switching t o diff er ent modes. The LED light will
turn off after 30 seconds.
□ Mode 1: RED (default setting)
- Camera will follow moti on and record during the
day and night
- Light will illuminate at night only
- Speaker will operate at night only
□ Mode 2: ORA N GE
- Camera will follow motion and r ec or d dur ing the day
and night
- Light illuminat es during the day and night
- Speaker operates duri ng the day and night
□ Mode 3: GREEN
- Camera will follow motion and r ec or d dur ing the day
and night
- Light will ill umi nate at night only
- Speaker will operate during the day only
9 www.nightwatchersecurity.co.uk
Please contact 0845 900 6764 for further assistance.
For abov e 3 modes , after the audio is triggered, no
Mode 1
(Default)
Mode 2
Mode 3
Mode LED indicator
(Hidden inside the lens)
RED
ORANGE
GREEN
Symbol
Page 10

10
Page 11
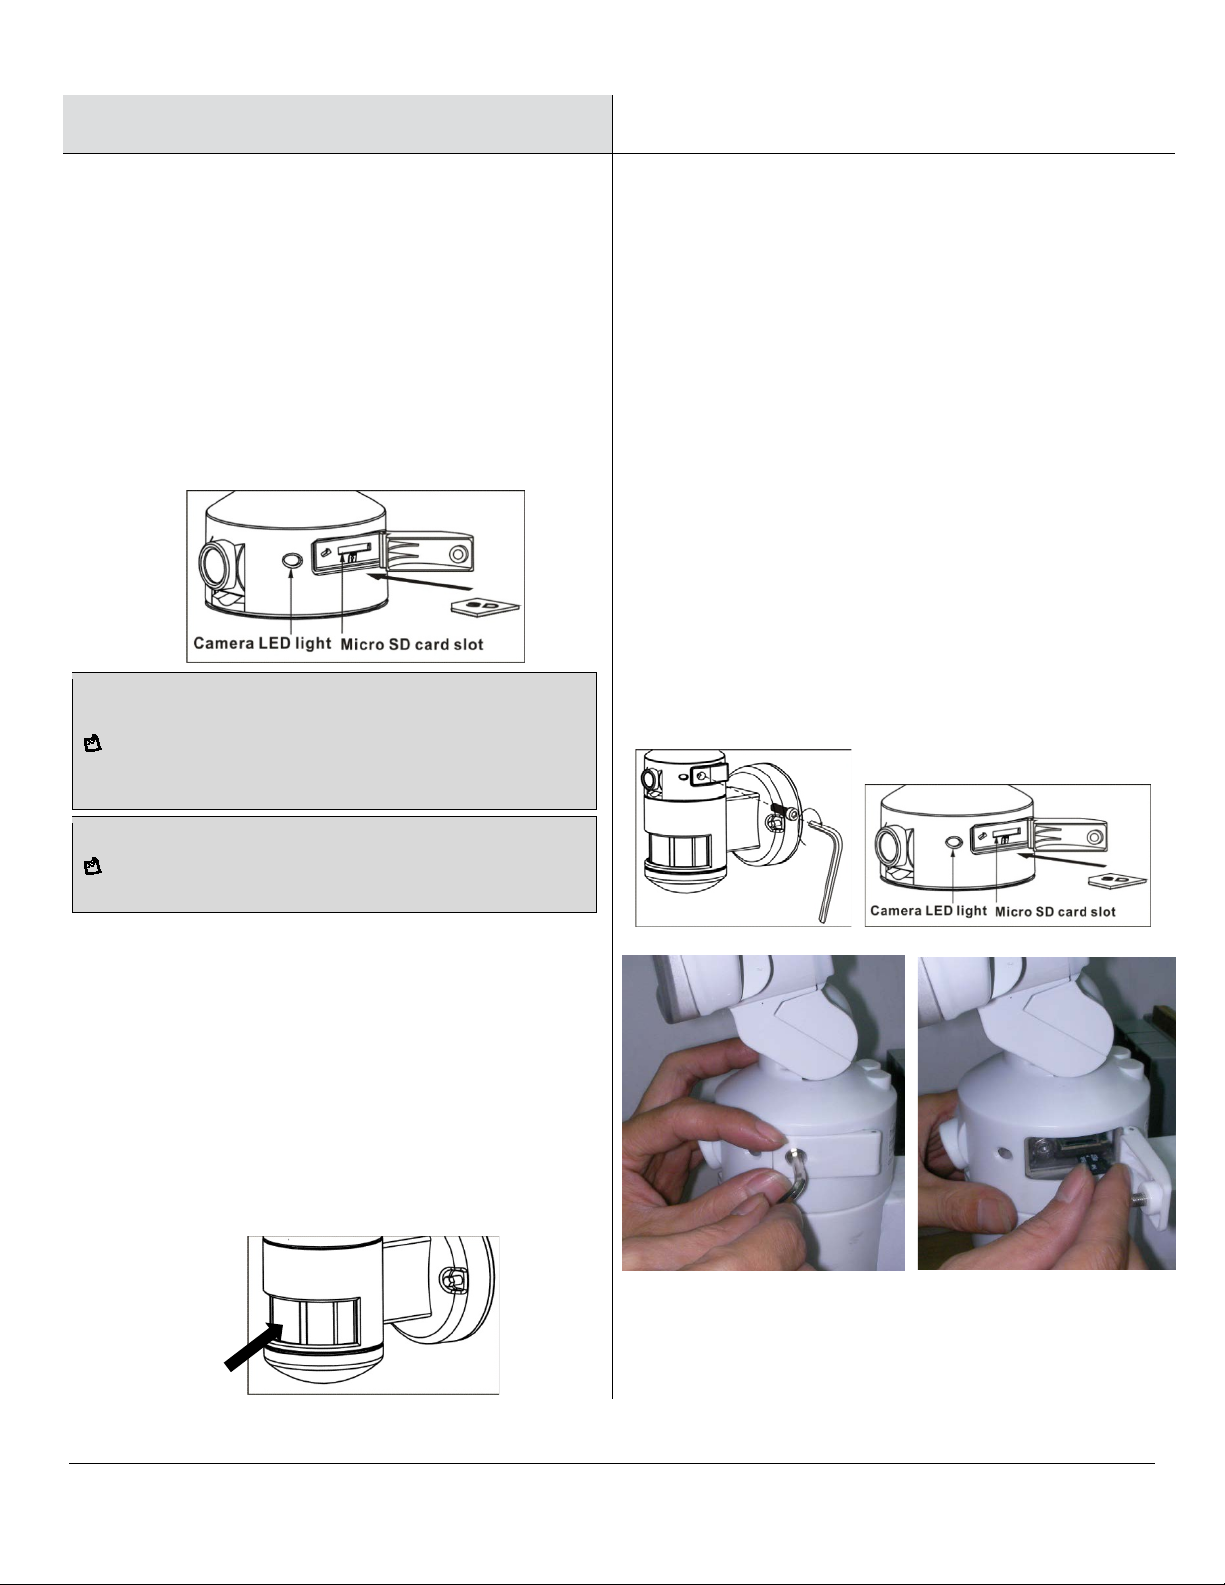
Operation (con tinued)
3
4
Camera LED indicator
NOTE:
working, press the mode button once.
NOTE:
Micro SD card is remo ved from the slot).
□ If you want to remov e the Mic r o S D card to view
LED indicator
□ Indic ates the function status of the unit by different
color LED lights.
- Red: Micro SD card is not inserted i nto the Micro
SD slot or the system is malfunc tioning.
- Green: The unit is recor ding.
- LED Off: Standby mode; the unit is ready to
record.
Before removing Micro SD card from the slot, please
press and hold the mode button on the bottom of the
Nightwatcher NW720 for 3 seconds to stop the light
turning – the LED will fla sh or ange. T o resume
Removing and formatting the
SD card
recorded files, pr ess and hold t he m ode button on the
bottom of the Nightwatcher NW720 for 3 seconds to
stop the light turning, then press OFF/REC button
and take out the SD card withi n 30 seconds.
□ To remove Micro S D card, open the compartment
using the provided All en k ey and push i n Micro S D
card to eject then pull out.
Formatting the SD card
□ Format the SD card each time it is removed and files
are viewed on your PC, after saving to your PC.
Please follow these steps for formatting;
- Place Micro SD card into the SD adaptor suppl ied
- Place the adaptor in a spare SD slot on y our PC
- Right click on the SD card loc ation
- Select Format
- Ensure the correct file system is selected FAT16
( or FAT ) for SD and FAT32 for SDHC
- Select quick format
: Wh en OFF/REC b utton is pressed, remove Micro SD
card within 30 seconds (now the LED will turn red after
PIR LED indicator
□ If the LED flashes an orange light continuously this
indicates that the motor of Nightwatcher NW720 is
now in an abnormal state and requires a simple
reset. The light may stop tur ning automatically in
this state. Please simply switch off /on the main
power to reboot the dev ic e.
□ - External force: In most cases, the light head is
blocked by object s or is blown by strong wind and is
unable to turn properly. The hidden LED
indicator will fl ash i n or ange to signal users the
abnormal situation.
11 www.nightwatchersecurity.co.uk
Please contact 0845 900 6764 for further assistance.
Page 12

Operation (con tinued)
5
6
NOTE:
working, press the mode button once.
TIME/DATE SET
OFF/REC RESET
AUDIO MODE
SET/REC
PLAY/E
RASE
MIC
□ Recording:
On-board controls
Before removing Micro SD card from the slot, please
press and hold the mode button on the bottom of the
Nightwatcher NW720 for 3 seconds to stop the light
turning – the LED will fla sh or ange. T o resume
□ Reset but ton: restore functions to default settings
- Press RESET button once each time you turn on
unit.
- In case of system malfunction, please press once.
OFF/REC: Please press OFF/REC button to
remove Micro SD card. Pl ease remov e c ar d within
30 seconds of pressing the OFF/ RE C butt on to
avoid loss of data.
□ Audio mode: for selecting which audi o m essage
will play when motion sensor detect s movement.
- Pre-set default is “silent mode”
- Push once for “doorbell c him e”
- Push again for “dog barki ng”
- Push once more for the message you recorded
(Message 1)
- Push again for additional message you recorded
(Message 2- you can record up t o 2 messages at a
time)
Recording audio message
1. Press the SET/REC button for 3 seconds, and you
will hear a single beep. Aft er the beep, start recording
your message by talking into the microphone (see fig.
9). Push the button again to stop recording, and you
will hear a series of 2 beeps, meaning the recording
is finished. If you do not push the but ton again after
you have recorded the message, the r ec or ding will
stop automatic ally aft er 10 seconds.
2. Nightwatcher NW720 can hold 2 self-recorded
messages. If you hav e recorded one m essage,
repeat above step f or message 2.
3. If you hear a series of 3 beeps when you want to
record your message by pressing the S E T/REC
button for 3 seconds, this means the self-recorded
messages are full, please erase previous messages.
□ Play/Erase: allows you to listen to and erase
messages
1. If you have only rec or ded 1 message, push the
button one time to li sten to rec or ded M essage 1. If
you wish to erase it, press the PLAY /ERASE button
and hold it for 3 seconds. You will hear a series of 2
beeps, indicati ng the message has been erased.
2. If you have recorded 2 messages, push the button
one time to listen to the fir st m essage, and push it
again to listen to t he second message. If you want to
erase a message, select that message, and after
listeni ng to it, push the P LA Y/E RA SE but ton and hold
it for 3 seconds to erase it.
3. If message 1 is erased, message 2 will
automatic ally bec om e message 1. T he nex t message
you record will then become the new message 2.
12
Page 13
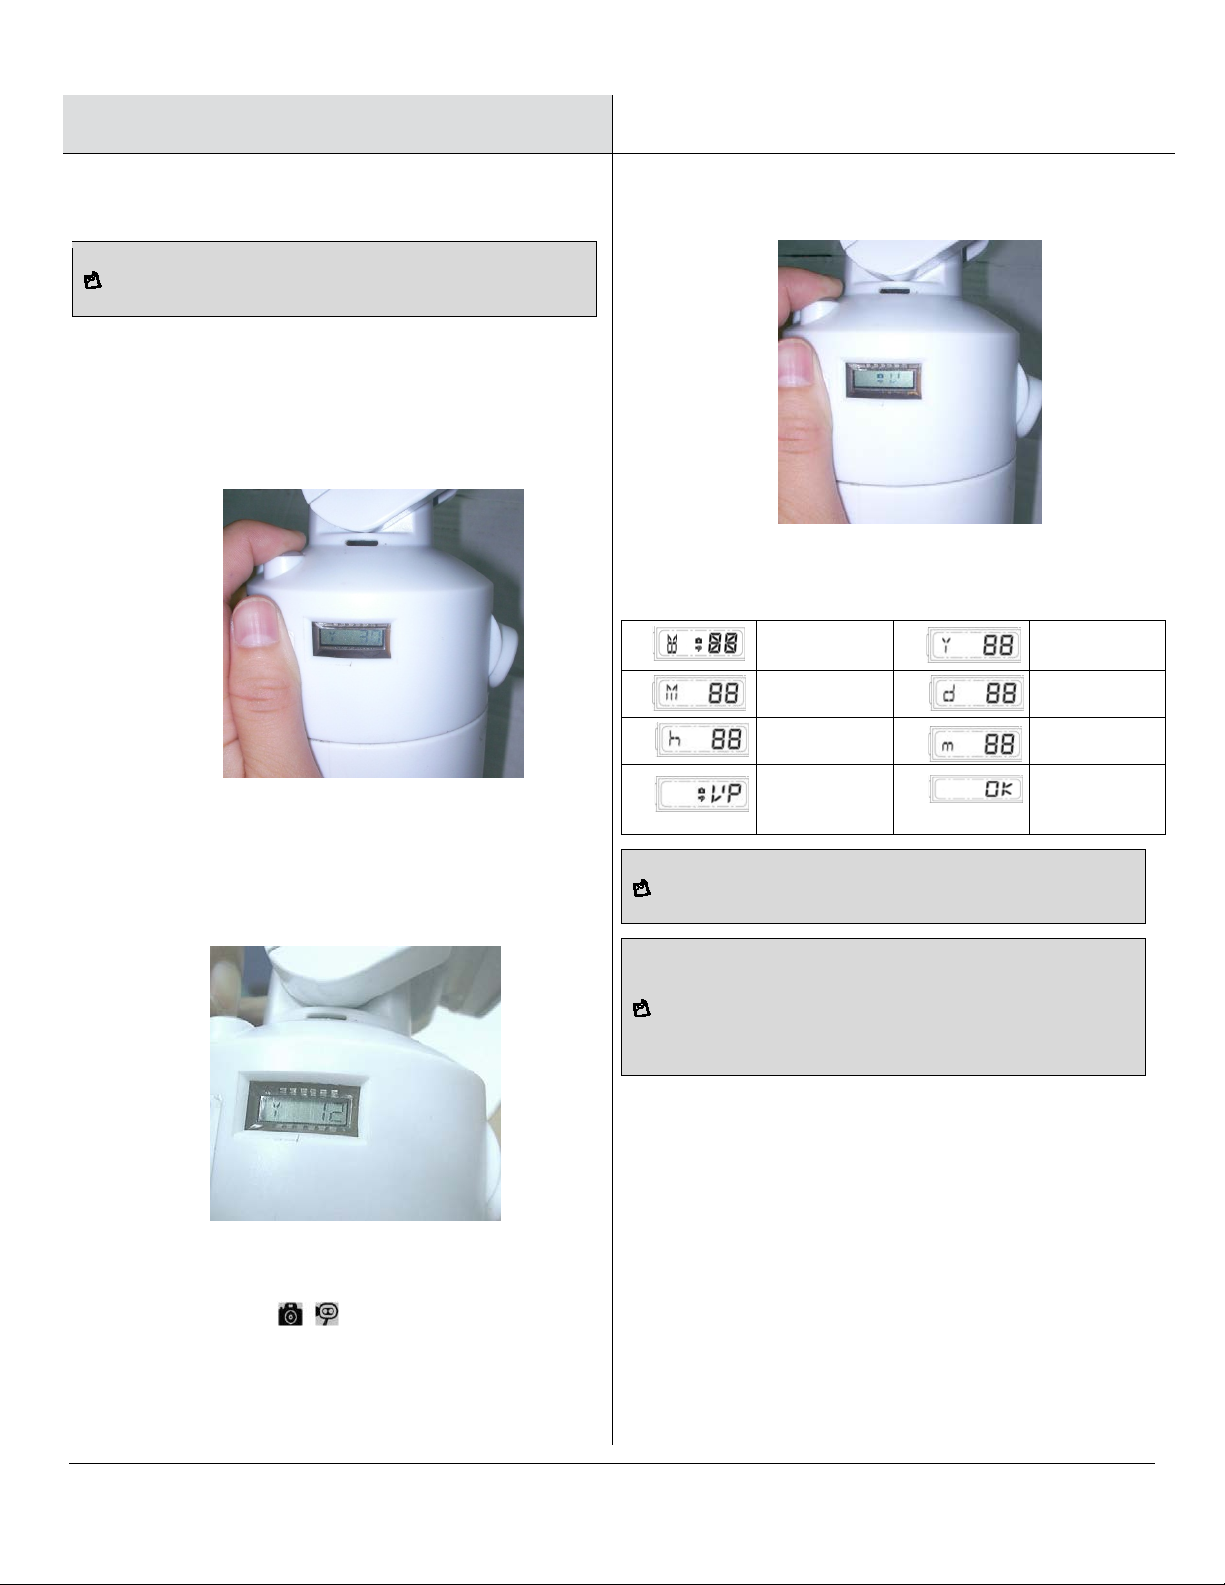
Operation (con tinued)
7
8
NOTE:
record.
LCD screen will shut off aut om atically 10 seconds
YEAR
Setting
MONTH
Setting
DATE
Setting
HOUR
Setting
MINUTE
Setting
VIDEO/
Setting
NOTE:
time and date have been retained
NOTE:
setting, VIDEO after a power outage
Setting the time and date
Time and Date must be set on the unit or it will not
□ This will allow the security video taken by
Nightwatcher NW720 to display the correct date and
time it was taken.
1. Push TIME/DATE SET button for 3 seconds. The
LCD screen will flash 3 tim es i ndic ating you have
entered Time/Date setting mode.
2. “YEAR” setting: “Y” and “10” are displayed on the
screen. Push the TIME/DATE SET button to set year
from “10-99”. Holding this button for 3 seconds will
enable rapid scrolling through numbers. If the button
has not been pressed for 3 seconds, it will
automatic ally save the year and advance to allow you
to set the month.
Setting the time and date
5. On the “P” (photo) setti ng, Nightwatcher NW720 will
take a series of digital photographs at a rate of 1-3 photos
every second when the motion sensor is triggered
①
③
⑤
⑦
In the event of a power outage please check that the
Start
PHOTO
②
④
⑥
⑧
Finish
3. Repeat this same procedur e for the TIME.
4. “VIDEO/PHOTO” setti ng: when entering this mode,
these two icons
screen. Push the button t o c hoose “V” ( Vi deo) or “P”
(Photo). If you have not pushed any buttons for 3
seconds, “OK” will appear on the screen, indicating it
has automatically saved the current settings. The
13 www.nightwatchersecurity.co.uk
Please contact 0845 900 6764 for further assistance.
and “V” appear on the
The NW720 c omes supplied with a 3 day standby
battery for the Time and Date. (This should be
sufficient in most cases)
NB: f or video/ photo setting, it will resume t o the default
Page 14
Operation (con tinued)
later
3
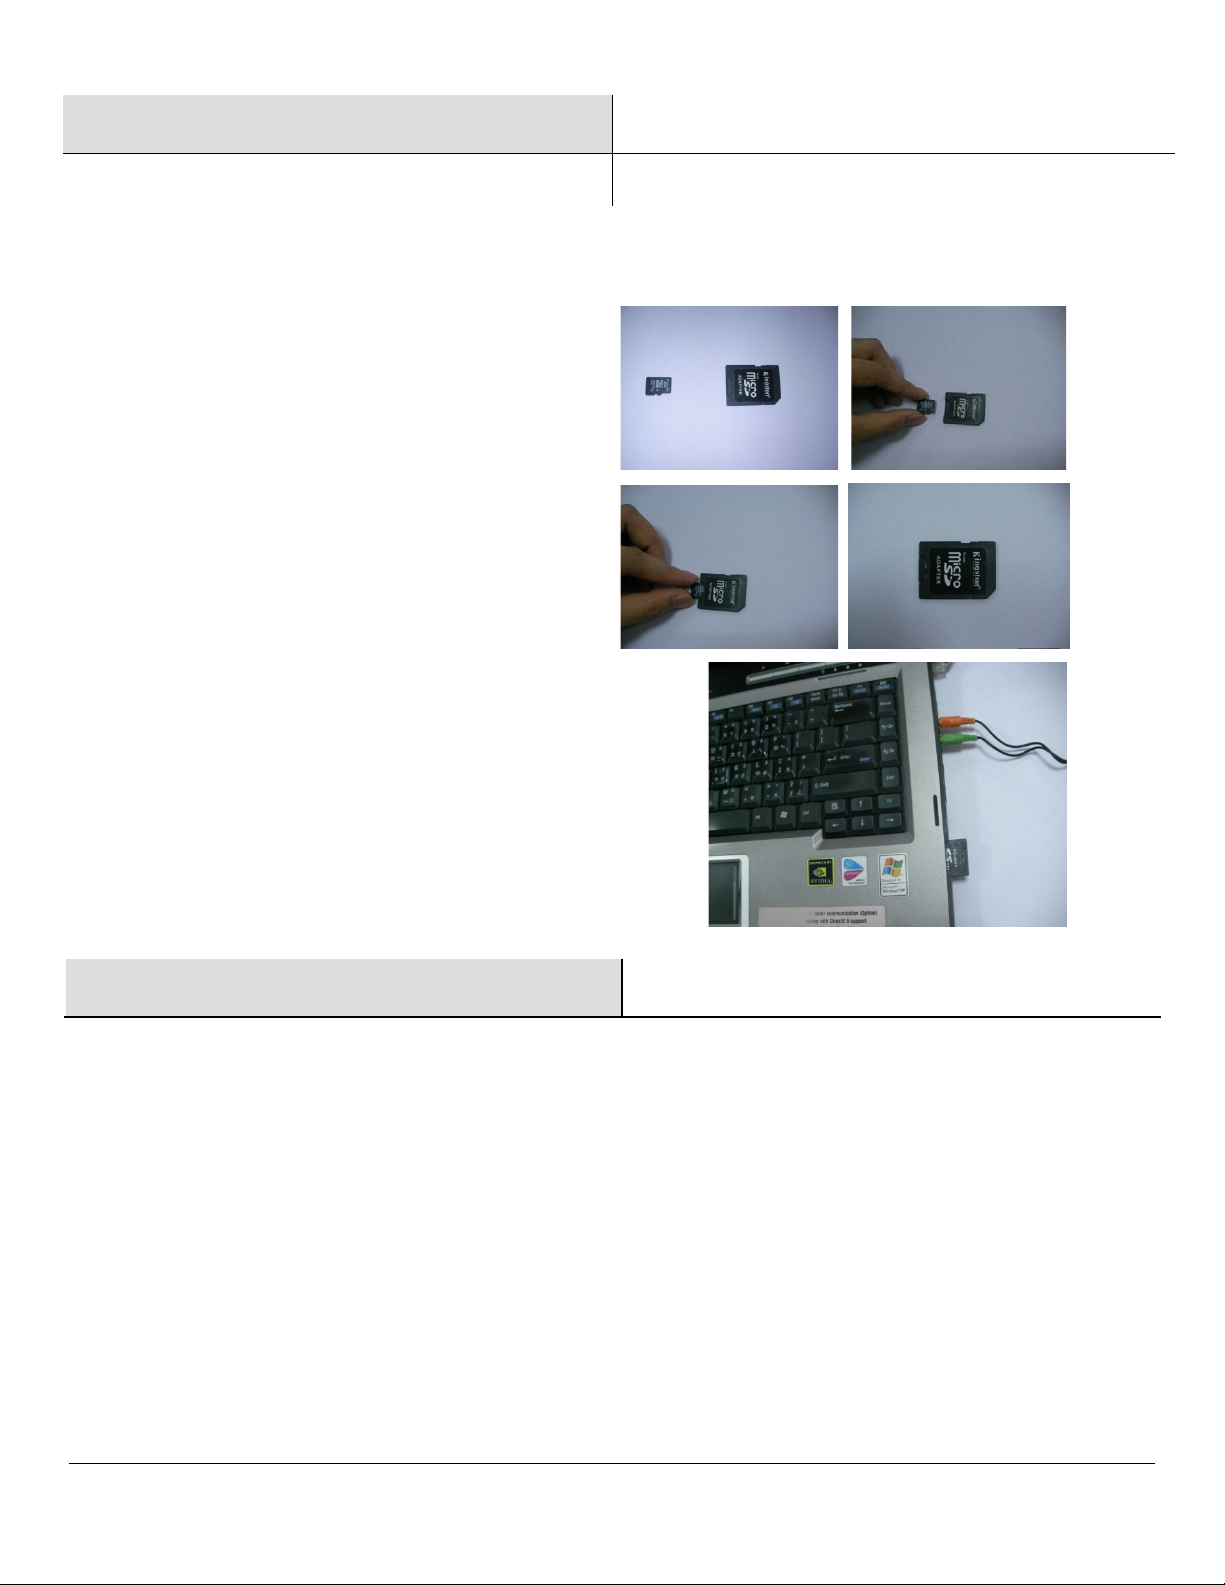
Viewin g image by comput e r thr ough an SD card
Viewing recorded videos
reader.
□ Press the push button on the bottom of the unit for
3 seconds to disable the unit.
□ Open the waterproofed cover on the NW720.
□ Press OFF/ RE C butt on and take it out the Micro SD
card within 30 seconds.
□ To remove Micro S D card, push i n Micro SD card to
eject then pull out.
□ Press the push button on the bottom of the unit to
set to normal operational mode.
□ If your computer has an SD card slot you may
insert the SD card directly into the computer.
Otherwise you will need t o use ei ther the micro SD
card adaptor (included) or USB SD card adaptor
(not supplied)
□ Once your c om puter is powered on, i nsert the SD
adapter into your com puter. Regardless of whether
you are using Windows or MAC OS, your SD card
should be recognized by y our c om puter aft er a few
seconds.
□ Follow the instructions of your computer to view the
contents of the rem ov able stor age dev ice (SD
card). Each recorded event will be listed in order by
date. Simply clic k on the filename to view the file.
Troubleshooting
1. The LED Light he a d doe s n ot m ov e .
This may occur when an ev ent causes the head to move out of alignment or obstructs the movement of the light head.
Remedy: Turn the mains power off for about 10 secon ds and then turn back on. The light should go t hr ough it s set
up routine and adj ust the head f or pr oper oper ation.
2. The Night Watcher has stopped recording to the SD Card
Remedy: The date needs to be set c or r ectly for the Night Watcher to record. If there has been a prol onged power
outage, the date m ay need to be reset. Chec k the LED beside the c amera lens. It should be GREEN when it is
recording. If it is RED press the reset but ton on top of the unit. If it remai ns RED check t hat t he SD card is i nstalled
correctly.
3. There are no recorded files on the SD card
The SD card may have been removed inc or r ectly and the f iles may be corrupted, or the SD card may be in the wrong
format. Remedy: Format the SD card (FAT format for SD and FAT32 format for SDHC).
4. The computer is unable to open the files on the micro SD card
You may need to update your computer’s drivers for your card reader, or use a USB card r eader .
5. The camera LED indi cat or is flashing red or staying red.
This may occur when a power failur e oc c ur s during recording. This may be caused by either of 3 issues:
14
Page 15

Care and Cleaning
F.A.Q. (Frequ ently Asked Questions) Section
A. Hidden files which will occupy the space of SD card; B. Bad sector; C. SD card is damaged
Remedy: Re-format SD c ar d for A and B situati on. (Please check page 8 “To format the SD Card” for details.) If the
SD card can’t be formatted or can’t be read because it is damaged, pl ease purchase a replacement SD card.
□ The Nightwatcher NW720 i s designed t o be weather r esi stant. Never attem pt to immer se the unit in water or any
other liqui d. Thi s will dam age the unit and void the warranty.
□ Use a sof t lens cloth for cleaning camera lens. Avoid touching lens with finger s.
□ Remove dirt or stains with a soft clot h dam pened with water or neutral detergent .
□
15 www.nightwatchersecurity.co.uk
Please contact 0845 900 6764 for further assistance.
Page 16

Q: Powering up the unit the first time
A: Make sure date and time is setup correctly.
- Check if the card is properl y l ocked in the unit.
- Make sure the SD card is pushed to lock (y ou will hear the click) when you insert the card int o the car d sl ot in t he unit.
- To test the SD card, put into a computer , and chec k if you can copy the file into the SD card without any problem
- Check the format method, t he S D card is suppli ed in FAT format, so always select FAT, not FAT32.
Q. How many videos does the SD card hold?
A: The included Micro SD card will hold approximately 500 video events of 20 seconds each. Higher c apaci ty Micro SD
cards may also be used for added storage, up to a maximum storage capacity of 32GB. Please note that the capacity of
micro SD card used in this unit will not be 100% used in or der to work properly. 1-2GB micro SD card will reserve 100MB
and 4GB-32GB(SDHC) micr o SD card will r eserve 500MB.
Q: What happens when the card is full?
A: It automatically over writes the oldest file with the latest pictur es or video – this means you do not have to remove the
SD card unless you wish to review or save the video files
Q: Can I view a live image?
A: No, t he NW720 records only.
Q: Can I change the “light illumination time”?
A: No, it has been programmed to illuminat e f or 3 minutes per motion detection. If movement continues in the area, the
light will continue to illuminate.
Q. Can I transfer pictures from the camera via cable?
A: No you can’t . You will need to remove the SD card and use the micro SD adaptor or USB micro SD card adaptor
(included). Pl ease see Step 4: Vi ewing v ideo in the programming instruc tions.
Q: Can the Lux setting be changed?
A: No this is fixed for optimum performanc e
Q: Why does the camera LED indicator stay red l ight wh en the mi cro SD card is already installed?
A: The micro SD card is not properly locked in the unit ; please remove and install it again. If it still stay s red light, please
check by placing the mic r o SD card in a spare SD slot on your PC/laptop. If your PC/lapt op can’t r ead or find the mic r o SD
card, the micro SD card may be damaged.
16
 Loading...