

Page 1
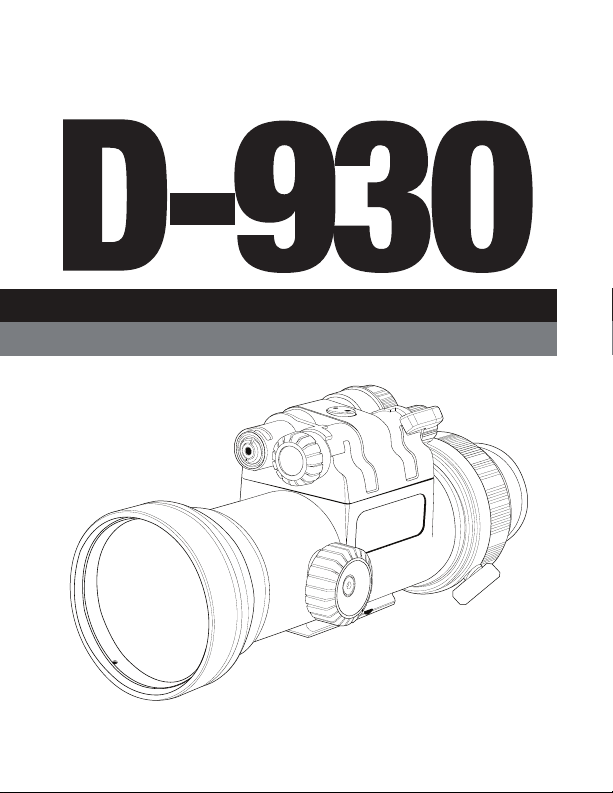
Clip-On Night Vision Weapon Sights
Operator Manual
NIGHT OPTICS USA, INC | www.nightoptics.com
Page 2

TABLE OF CONTENTS
General Information
General Information 1
Kit Components & Optional Accessories 1
Technical Specications 2
System Controls 3
Night Vision Characteristics 4
Glossary of Terms 5-6
Principals of Operation
Preventive Maintenance Check 6-7
Image Intensier Inspection 7-8
Operating Procedures 9
Mounting Procedures 9
IR Illuminator Mounting (Optional) 9
Battery Installation 10
Preparation for Storage 10
Operations Under Unusual Conditions 11
Troubleshooting Procedures 12
Cleaning the NO/D-930 13
Equipment Limitations 14
Warnings and Cautions 14
Warranty 15
Limitations of Liability 15
Return & Exchange 16
Export Restrictions 17
Page 3
DAY/NIGHT CLIPON WEAPON SIGHT NO/D930
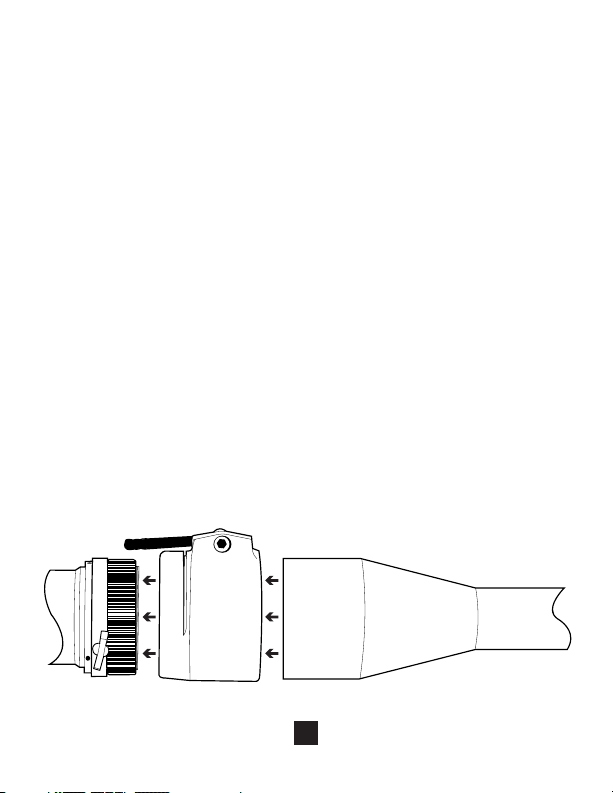
The unique NO/D-930 Night vision Weapon Sight attaches to the front of virtually
any 1-10x daytime riescope to quickly convert to full night vision capability. The
NO/D-930 does not require a rail on which to mount or any boresighting. Once
mounted, it uses the aiming point provided by the daytime scope.
The NO/D-930 kit provides a quick-attachment adaptor as well as adaptors for
threaded attachment to various riescopes.
Lightweight and rugged, the NO/D-930 converts virtually any daytime riescope
into a powerful night weapon sight.
KIT COMPONENTS
NO/D-930 Night Vision Clip-On Weapon Sight
Generation 3 Image Intensier Tube
Hard Travel/Storage Case
Adaptor for Riescope
Operating Manual
Lens Tissue
CR123 Battery (1)
D-930
D-930
Adaptor
OPTIONAL ACCESSORIES
Custom adaptors for multiple scope brands
IR-200 LR IR Illuminator 805 nm
IR-K3 ELR IR Illuminator 805 nm
IR-K2 ELR Pro IR Illuminator 805 nm
IR-940 ELR IR Illuminator 940nm
IR-VS Variable Power Switch
IR-PS Remote Pressure Switch
IR-WM 1913 Weaver Mount
Battery (CR123)
Day Scope
1
Page 4
TECHNICAL SPECIFICATIONS
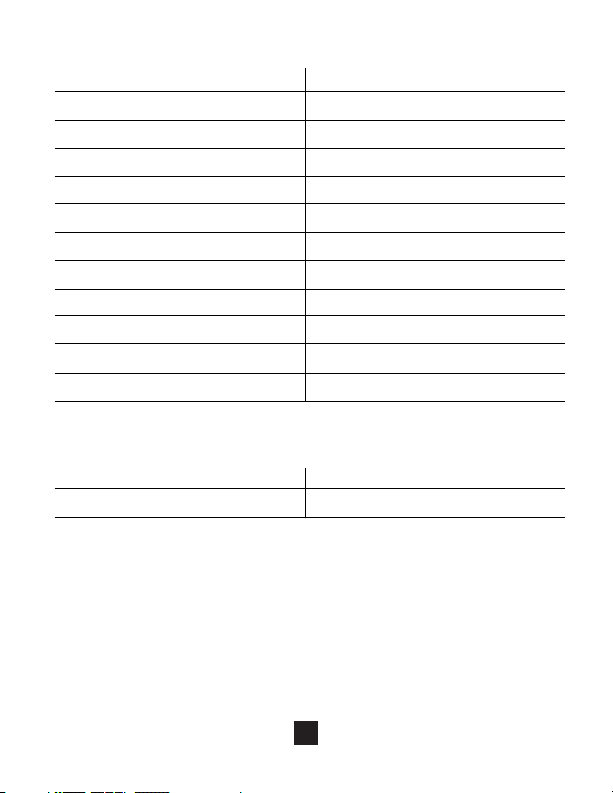
Image Intensier Generation 3
Magnication 1x
f number / t number f1.5 / 1.6
Field of View@1000 Yards 8.8° 13 yard
Range of Focus 15m to ∞
Weather Resistant Waterproof
IR Illuminator Optional
Battery Type / Life 3v CR123 (1) / 60 hours
Dimensions 7.4“ x 2.7“ x 2.8“
Weight 22 oz
Operating Temperature -40°F to 122°F
Warranty 2 Years
IMAGE INTENSIFIER TUBE
Generation 3 FOM Export Variant
Generation 3AG Autogated, Manual Gain
2
Page 5
SYSTEM CONTROLS
1
5
6
2
3
8
7
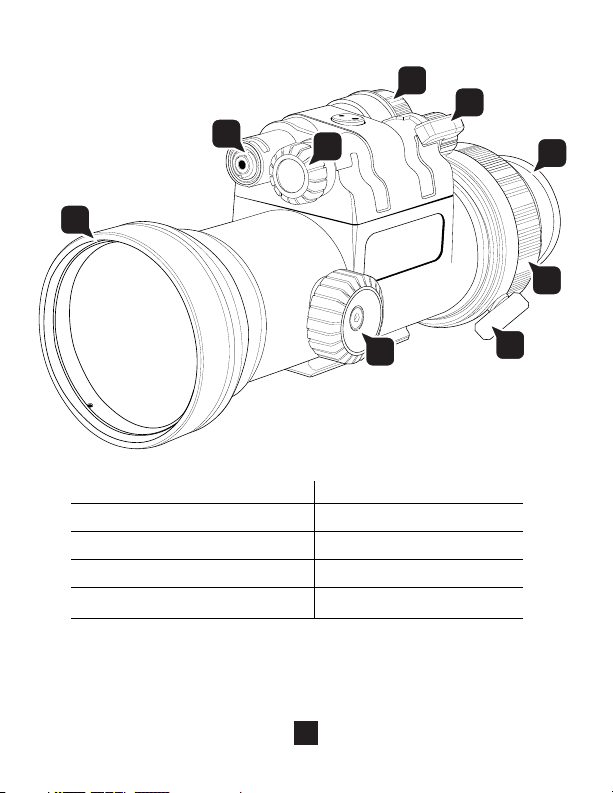
1. Objective Lens
2. Remote Plug
3. Variable Gain Control
4. Focus Adjustment
5. Battery Compartment Cap
3
4
6. Power ON/OFF Switch
7. Dioptic Ring
8. Eyepiece Lens
9. Position Lock
9
Page 6

NIGHT VISION CHARACTERISTICS
Monochromatic Image
Night Vision Devices produce a monochromatic image. You will not be able to see any
dierentiation between colors. In particular, red and green lights will both appear green.
Take care to verify color dierences with unaided vision. Exercise extreme caution when
operating aircraft, ground vehicles, or marine vessels while using night vision equipment.
Color Sensitivity
Night Vision Devices are more responsive to red and white lights than green and blue lights.
Because of this, distant red and white lights may appear closer than green or blue lights.
Exercise extreme caution when using these lights for navigation. Periodically verify the
distances to these lights with your unaided eyes.
Extreme Darkness
Night Vision Devices are eective under most dark conditions including overcast starlight.
They are not practical in an extremely dark environment such as in a tunnel where there is
no natural ambient light. Without sucient ambient light, the operator may notice
pinpoint-size sparkles (scintillation or noise) in the image area. These sparkles are small
amounts of energy generated inside the image intensier that strike the phosphor screen
and are an indication that the device is working.
Contrast Reversal
Night Vision Devices detect light that cannot be seen by the human eye. This light is often
referred to as being in the near-infrared light spectrum. The existence of this light and the
manner in which it reects is not normally visible to the naked eye. For this reason, objects
that normally appear lighter than their surroundings may appear dark against a light
background. In addition, the output image of the Night Vision Device is dependent on the
reective quality of the objects the operator sees in the viewing area. Objects that appear
light during the day but have a dull surface may appear duller when viewed through a Night
Vision Device. All of these factors must be taken into account when utilizing a Night Vision
Device for observation or navigation purposes.
Depth Perception
Night Vision does not present normal depth perception. Use extreme caution when using a
Night Vision Device where reliance upon depth perception is important.
Fog and Rain
Night Vision Devices are very responsive to reected ambient light; therefore, fog or heavy
rain can reect too much light toward the Night Vision Device and may seriously degrade its
performance.
4
Page 7

GLOSSARY OF TERMS
BLACK SPOTS
These are cosmetic blemishes in the image intensier or dirt or debris between the image lenses.
BRIGHT SPOTS
These can be defects in the image area produced by the NO/D-930. This condition is caused by a aw in the
lm on the microchannel plate. A bright spot is a small nonuniform, bright area that may icker or appear
constant. Bright spots usually go away when the light is blocked out and are cosmetic blemishes that are
signal induced.
CAUTION
Condition, practices, or procedures that must be observed to avoid damage to equipment, destruction of
equipment, or a long term health hazard.
CHICKEN WIRE
An irregular pattern of dark thin lines in the eld of view either throughout the image area or in parts of the
image area. Under the worst case condition, these lines will form hexagonal or square-wave shaped lines.
DARK (OR DARK AREA)
A place in which there is very little light. It does not mean total darkness. Generally, this means conditions
similar to a quarter-moon or starlit night.
DARK ADAPTED
Having one’s eyes adjusted to the device’s output under low-light conditions.
DIOPTER
A unit of measure used to dene eye correction. Adjustments to the eyepiece focus ring will produce a
clearer image in each eye.
EDGE GLOW
This is a defect in the image area of the NO/D-930. Edge glow is a bright area (sometimes sparkling) in the
outer portion of the viewing area.
EMISSION POINT
A steady or uctuating pinpoint of bright light in the image area and does not go away when all light is
blocked from the objective lens. The position of an emission point within the image area does not move.
An emission point should not be confused with a point light source in the distance.
FIXED-PATTERN NOISE
This is a cosmetic blemish in the image area characterized by a faint hexagonal (honeycomb) pattern
throughout the viewing area that most often occurs at high-light levels or when viewing very bright lights.
Fixed-pattern noise is inherent in the structure of the ber optics and can be seen in every image intensier
if the light level is high enough.
FLASHING
This is a defect in the image area of the NO/D-930. The image appears to icker or ash.
FLICKER
See “Flashing.”
GAIN
This is the number of times a night vision device amplies light input.
IMAGE INTENSIFIER ASSEMBLY
An electro-optical device that detects and amplies ambient light to produce a visual image.
5
Page 8

GLOSSARY OF TERMS continued...
INFINITY FOCUS
Adjustment of the objective lens so that a distant object, such as a star or the point light on a distant tower,
forms the sharpest image.
MICROCHANNEL PLATE
A current-multiplying optical disk that intensies the electron image produced by the photocathade.
NOTE
Essential information of special importance, interest, or aid in job performance.
PHOTOCATHODE
The input optic of an image intensier that absorbs light energy and in turn releases electrical energy in the
form of an electron image.
SCINTILLATION
A faint, random, sparking eect throughout the image area. Scintillation is a normal characteristic of the
image intensier assembly and should not be confused with emission points. Scintillation is more
pronounced under low-light conditions. Also called “video noise.”
SHADING
The viewed image should be a full circle. If shading is present, you will not see a fully circular image. Shading
is indicative of a dying photocathode and is caused by a defective vacuum seal of the image intensier.
Shading is very dark and you cannot see an image through it.
WARNING
Conditions, practices, or procedures that must be observed to avoid personal injury or loss of life.
PREVENTIVE MAINTENANCE CHECKS
Item
Interval Procedure
#
Before/After
1.
Before/After
2.
Before/After
3.
Location
(Item to
Check/Service)
Inspect lens for dirt, ngerprint residue,
Optical Surfaces
External Surfaces Cracked or damaged.
Battery Cap/
Compartment
chips, or cracks. If necessary, clean and
dry lens with water and lens tissue.
Inspect for cracks or damage. Scratches
and gouges are OK if Operation is not
eected.
Check to make sure battery cap is
present and operable. Remove battery
and inspect for corrosion, moisture or
cracks. Ensure o-ring is present and is
not dry or cracked. Battery Cap retainer
is present and clear of damage.
Not Fully Mission
Capable if:
Scratches or chips
hinder vision with
device turned on, or
if cracks are present.
Cap is missing,
corroded or
damaged. O-ring is
missing or cracked.
Battery Cap retainer
is missing or
damaged.
6
Page 9
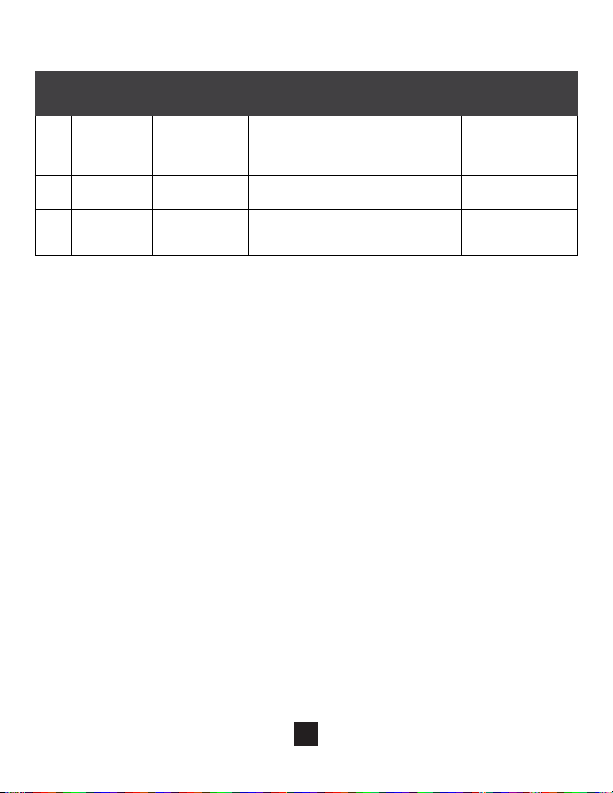
PREVENTIVE MAINTENANCE CHECKS continued...
Item
Interval Procedure
#
Before/After
4.
Before/After
5.
Before/After
6.
Location
(Item to
Check/Service)
Power ON/OFF
Switch
Variable Gain Cracked or damaged.
Viewed Image
Turn the switch from OFF to ON. Each
position should have a denite
stopping point. Inspect for broken or
missing knob.
Check for free movement and
operation per Instruction
Refer to Image Intensier Inspection to
inspect for operational defects.
Not Fully Mission
Capable if:
Switch has no
denite stopping
points or knob is
broken or missing.
Flickering, Flashing,
edge glow, or
shading is observed.
IMAGE INTENSIFIER INSPECTION
As directed in the Preventative Maintenance Table, image intensier assembly operation must
be checked before each use. This section provides information for the operator concerning
what to look for, how to look for it, and how to determine if the NO/D-930 should be returned
to the manufacturer.
WARNING - Perform the following inspection in the dark!
There are two groups of “defects” that you may encounter - operational defects and cosmetic
blemishes. Operational defects are an immediate cause to reject the NO/D-930. Cosmetic
blemishes are not a cause for rejection unless they become severe enough to interfere with
the ability to perform the operation. The rejection of any NO/D-930 for cosmetic defects must
be based on an outdoor evaluation.
OPERATIONAL DEFECTS
These defects relate to the reliability of the image intensier and are an indication of
instability. If identied, they are an immediate cause for rejecting the NO/D-930. They include
shading, edge glow, ashing, ickering, and intermittent operation.
1) Shading - If shading is present, you will not see a fully circular image. Shading is very dark
and you will not see an image through it. Shading always begins on the edge and migrates
inward eventually across the entire image area. Shading is a high contrast area with a distinct
line of demarcation. Return the NO/D-930 to the manufacturer.
NOTE - Make sure the shading is not the result of improper eye-relief adjustment.
7
Page 10

OPERATIONAL DEFECTS continued...
2) Edge Glow - Edge glow is a bright area (sometimes sparkling) in the outer portion of the
viewing area. To check for edge glow, block out all light by cupping a hand over the lense. If
the image tube is displaying edge glow the bright area will still show up. Return the NO/D-930
to the manufacturer.
3) Flashing, Flickering, or intermittent Operation - The image may appear to icker or ash.
If there is more than one icker, check for loose battery cap or weak battery. If the battery
check doesn’t correct problem, Return the NO/D-930 to the manufacturer.
COSMETIC BLEMISHES
These are usually the result of manufacturing imperfections that do not aect image intensier
reliability and are normally not a cause for rejecting the NO/D-930. However, some types of
blemishes can get worse over time and interfere with the ability to perform the operation. The
following are cosmetic blemishes:
1) Bright Spots - A bright spot is a small, nonuniform, bright area that may icker or appear
constant. Not all bright spots make the NO/D-930 rejectable. Cup your hand over the lense to
block out all light. If the bright spot remains, return the NO/D-930 to the manufacturer. Bright
spots usually go away when the light is blocked out. Make sure any bright spot is not simply a
bright area in the scene you are viewing. Bright spots are acceptable if they do not interfere
with the ability to view the outside scene and the ability to perform the operation.
2) Emission Points - A steady or uctuating pinpoint of bright light in the image area and
does not go away when all light is blocked from the objective lens of the device. The position
of the emission point within the image area does not move. Not all emission points make the
NO/D-930 rejectable. Make sure any emission point is not simply a point light source in the
scene you are viewing. Emission points are acceptable if they do not interfere with the ability
to perform the operation.
3) Black Spots - These are cosmetic blemishes in the image intensier or dirt or debris
between the lenses. Black spots are acceptable as long as they do not interfere with viewing
the image. No action is required if this condition is present unless the spots interfere with the
operator’s ability to perform the operation.
4) Fixed-Pattern Noise - This is usually a cosmetic blemish characterized by a faint hexagonal
(honeycomb) pattern throughout the viewing area that most often occurs at high-light levels
or when viewing very bright lights. This pattern can be seen in every image intensier if the
light level is high enough. This condition is acceptable as long as the pattern does not interfere
with viewing the image and interfere with the ability to perform the operation.
5) Chicken Wire - An irregular pattern of dark thin lines in the eld of view either throughout
the image area or in parts of the image area. Under the worst case condition, these lines will
form hexagonal or square-wave shaped lines. No action is required if this condition is present
unless it interferes with viewing the image and interferes with the operator’s ability to perform
the operation.
8
Page 11

OPERATING PROCEDURES
• Make sure the power switch is in the OFF position.
• Install battery as stated in directions
• Attach the device before objective of daytime scope as stated in directions
• Turn device ON and make sure device is working properly.
• Adjust focus accordingly.
Do not turn the device ON during daytime without the protective lens
WARNING
cap/daylight lter on.
MOUNTING PROCEDURES
• Attach proper scope adapter to Objective Lens.
• On the scope, loosen the NO/D-930 Dioptic Ring Fastener.
• While holding the scope in place, attach the the NO/D-930 by turning the device or Dioptic
Ring counter-clockwise until tight.
• Secure the scope by tightening the Dioptic Ring Fastener.
• Adjust the NO/D-930 focus adjustment knob for a sharper image.
• Adjust Gain if necessary according to light conditions.
IR ILLUMINATOR MOUNTING (Optional)
• Mount the 1913 Weaver Rail onto the NO/D-930.
• Turn tightening screw until mount is secure.
• Mount IR Illuminator onto 1913 Weaver Rail.
• Tighten screw until Illuminator is secure.
• Adjust IR focus accordingly.
The IR Illuminator is a light that is invisible to the unaided eye for use
during conditions of extreme darkness. However, the light from the
illuminator can be detected by using night vision equipment.
WARNING
9
Page 12

BATTERY INSTALLATION
1) Remove battery cap by turning counter-clockwise.
2) Inspect compartment for any corrosion and/or moisture.
3) Insert new CR123 Battery into compartment negative end down.
4) Replace battery cap and tighten.
Do not carry batteries in pockets containing metal objects such as coins, keys, etc.
Metal objects can cause batteries to short circuit and become very hot.
Lithium batteries contain sulpher dioxide gas under pressure and should be handled in
the following manner
• Do not heat, puncture, disassemble, short circuit, attempt to recharge, or otherwise
tamper with the batteries.
• Turn OFF the equipment if the battery compartment becomes unusually hot. If
possible, wait until the batteries have cooled before removing them.
• The batteries have safety vents to prevent explosion. When they are venting gas, you
will smell it (very irritating) or hear the sound of gas escaping. When the safety vents
have operated, the batteries are fairly safe from bursting, but will be hot and must be
handled with care.
• If you inhale sulpher dioxide, seek medical attention.
WARNING
WARNING
DANGER OF EXPLOSION
PREPARATION FOR STORAGE
1) Shutdown - Perform the following procedures to shut down the device:
A) Turn the device ON/OFF Switch to the OFF position.
B) Disconnect the device from the scope.
C) Remove battery.
2) Packaging after Use
A) Open battery compartment and remove battery.
B) Inspect the battery compartment for corrosion or moisture. Clean and dry if necessary.
C) Replace the battery cap.
D) Place the device in the carrying case.
10
Page 13

OPERATION UNDER UNUSUAL CONDITIONS
Operating in Dusty or Sandy Areas
1) Avoid pointing the device into the wind unless necessary for operation.
2) Keep the carrying case closed unless removing or replacing items.
3) Ensure that all dust and sand is removed from the device and carrying case after operation.
4) Keep lens cap closed at all times unless during observation preparation and operation.
Operation in dusty or sandy areas can pit and scratch the optical elements and
damage the mechanical components unless the precautions given here are observed.
Operating in Rainy or Humid Conditions
1) Keep the carrying case and storage case closed unless removing or replacing items.
2) Dry the device and all components after exposure to rain or high humidity and before storage.
This will prevent mildew from forming in the case.
3) Do NOT store device in a wet carrying case or a wet storage case.
Operation in rainy or humid conditions can cause corrosion and deterioration of the
Operating in Salt Water Areas
1) After exposure to salt water, clean the exterior of the device and all
components with fresh water.
2) Dry all items completely (do NOT disassemble).
3) Use lens paper to clean the objective lens and the eyepiece lens.
device unless the precautions given here are observed.
WARNING
WARNING
11
Page 14
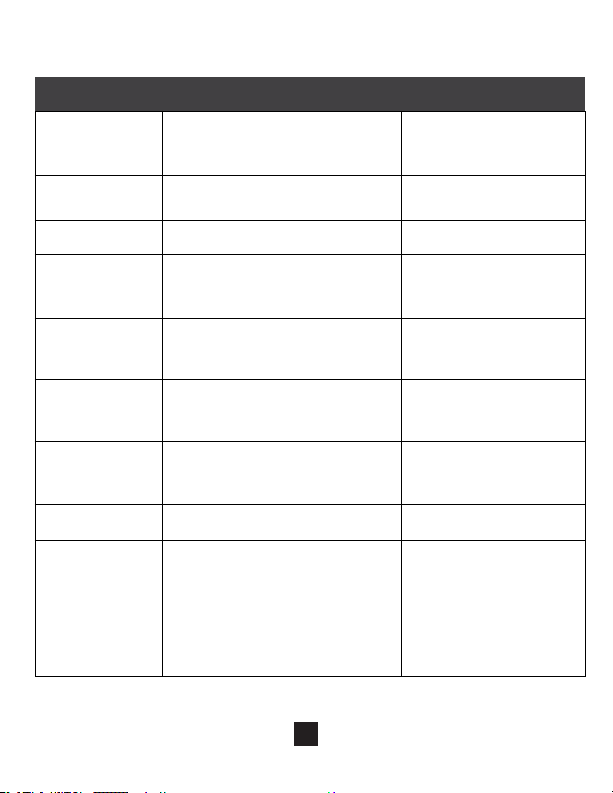
TROUBLESHOOTING PROCEDURES
MALFUNCTION TEST OR INSPECTION CORRECTIVE ACTION
No visible image
Image ickers,
ashes, or clicking
is heard
Image dimmer
than usual
Device fails to
activate
Poor image quality
Diopter adjustment
cannot be made
Battery
compartment
dicult to open
Device does not
shut OFF
Device does not
shut OFF when
exposed to
high-light
a) Objective lens cap has not been removed.
b) Battery cap is loose
c) Incorrect Battery installation
d) Weak battery
Normal for new battery to cause this for
rst ve minutes.
a) Weak batteries Replace the batteries
a) Visual.
b) Check for defective, missing or
improperly installed batteries.
a) Check objective lens or eyepiece focus.
b) Check for fogging or dirt on lens.
a) Check to see if Diopter Ring Fastener is
tightended.
b) Check to see if the Diopter Ring is bent or
broken.
a) Visually inspect for the presence of an
o-ring.
b) Check for damaged battery cap.
Visual
Visual
Perform the following test in a daylight of
bright room light (not uorescent light).
Place the lens cap on the objective lens. Turn
device on and observe that they shut o
within 70 (+30) seconds after energized.
Turn device OFF and then ON to reenergize.
a) Remove cap
b) Tighten cap
c) Re-insert battery correctly
d) Replace battery
If condition continues contact
manufacturer for service
instructions.
a) Turn switch to OFF position
and turn ON.
b) Replace battery or install
correctly.
a) Refocus.
b) If image quality is still poor,
contact manufacturer for
assistance.
a) Loosen Diopter Ring Fastener.
b) If damaged, contact
manufacturer for assistance.
a) If o-ring is missing, contact
manufacturer for assistance.
b) If damaged, return to
manufacturer.
a) Remove Batteries.
b) Return device to manufacturer.
If damaged, return to
manufacturer.
12
Page 15

CLEANING THE NO/D930
Optics
Always clean the optics with a suitable optical cleaning cloth. Do not use detergents or
excessive moisture to clean any part of the Device.
Battery / Battery Compartment
Any Night Vision Device that is to be stored for a long or undetermined amount of time must
have the batteries removed.
Moisture
The Night Vision Device is water resistant. No warranties or guarantees apply to a Night
Vision Device that has been submerged in water. Take great care when using any night vision
in a wet environment as the image intensier tube is sensitive to moisture.
Salt Water
If the Night Vision Device is exposed to a salt water environment, wipe it o with a clean cloth
slightly dampened with fresh water and dry it thoroughly.
• The device is a precision electro-optical instrument and must be handled carefully.
• Do not scratch the external lense surfaces or touch them with your fingers.
CAUTION
13
Page 16

EQUIPMENT LIMITATIONS
To avoid physical and equipment damage when using the NO/D-930, carefully read and
understand the following safety precautions.
• The NO/D-930 requires some night light (moonlight, starlight, etc.) to operate. The level of
performance depends upon the level of light.
• Night light is reduced by passing cloud cover, while operating under trees, in building
shadows, etc.
• The device is less effective when viewing into shadows and other darkened areas.
• The device is less effective through rain, fog, sleet, snow or smoke.
• The device will not “see” through dense smoke.
WARNINGS AND CAUTIONS
• Do not forget to turn device OFF when not in use. If you do not plan to use the device for a
period of time, remove the batteries.
• Keep lens cap on when the device is not in use.
• Avoid contact with dust, steam, and gas.
• The NO/D-930 is not harmful for its user or environment.
• Do not disassemble: It will void your warranty!
• Never use in daylight conditions without the lens cap on.
• Never point the device at a bright light source. If the device shuts off automatically after
directing it at a bright light source, turn the unit OFF and wait for 1-2 minutes before turning
the unit back ON.
• Adverse atmospheric conditions such as fog, smog, or haze and a lack of ambient light
(moon or starlight) may decrease the eective viewing distance. All technical data for this
unit was compiled in a controlled environment
14
Page 17

WARRANTY
The NO/D-930 is covered by a limited 2 year warranty from time of sale. The warranty is valid
only for the original purchaser.
The manufacturer warrants its products to be free from defects in material and workmanship
during the warranty period. If the product proves to be defective during this period, the
manufacturer will repair the original product or replace it with a like product at the sole
discretion of the manufacturer.
This limited warranty does not cover:
1. Any product on which the serial number has been defaced, modied, or removed.
2. Any product that has experienced deterioration or a malfunction from: accidents, misuse,
neglect, re, water, lighting or other acts of nature, unauthorized product modication or
failure to follow instructions supplied with the product, repair or attempted repair by anyone
not authorized to do so, use of supplies or parts not meeting manufacturer’s specications,
normal wear and tear, and/or extreme wear and tear caused by battleeld conditions or other
extreme environments.
No other warranties, expressed or implied, are valid without an agreement in writing provided
by the manufacturer.
All shipping involved in warranty work / replacement is the sole responsibility of the purchaser.
LIMITATIONS OF LIABILITY
Night Optics USA, Inc. will not be liable for any claims, actions, suits, proceedings, costs,
expenses, damages or liabilities arising out of the use of this product. Operation and use of this
product are the sole responsibility of the Customer. Night Optics USA, Inc.’s sole responsibility
is limited to providing the products and service outlined herein in accordance with the terms
and conditions of this Agreement. The provision of products sold and services performed by
Night Optics USA, Inc. to the Customer shall not be interpreted, construed, or regarded, either
expressly or implied, as being for the benet or creating any obligation toward any third party
of legal entity outside Night Optics USA, Inc. and Customer; Night Optics USA, Inc.’s obligations
under this Agreement extend solely to the Customer.
Night Optics USA, Inc.’s liability hereunder for damages, regardless of the form or action,
shall not exceed the fees or other charges paid to Night Optics USA, Inc. by the Customer or
the Customer’s dealer. Night Optics USA, Inc. shall not, in any event, be liable for special,
indirect, incidental, or consequential damages, including, but not limited to, lost income,
lost revenue, or lost prot, whether such damages were foreseeable or not at the time of
purchase, and whether or not such damages arise out of breach of warranty, a breach of
agreement, negligence, strict liability, or any other theory of liability.
15
Page 18

RETURN AND EXCHANGE POLICY
Within 10 days:
You may return any or all of your equipment for any reason within 10 days (starts on the date the
merchandise was received by the customer and ends on the date the merchandise has been
received at Night Optics USA, Inc.’s facilities) of purchase for a full refund (minus the shipping
charge). Note: If the shipping charge has not been invoiced (ground shipments, discounts,
promotions, etc.), the actual shipping cost WILL be deducted from the amount of the refund.
Within 30 days:
You may return any or all of your equipment for any reason within 30 days (starts on the date the
merchandise was received by the customer and ends on the date the merchandise has been
received at Night Optics USA, Inc.’s facilities) of purchase for a refund (minus the shipping charge)
subject to 15% re-stocking fee . Note: If the shipping charge has not been invoiced (ground
shipments, discounts, promotions, etc.), the actual shipping cost WILL be deducted from the
amount of the refund.
After 30 days:
No returns for refund will be accepted after 30 days of receipt of merchandise.
Exchange or Upgrade:
You may return any or all of your equipment for exchange or upgrade within 60 days (starts on
the date the merchandise was received by the customer and ends on the date the merchandise
has been received at Night Optics USA, Inc.’s facilities) of purchase.
You must return the original box intact with all components. All components must be in like-new
condition. All returns must be accompanied by RMA number (contact Night Optics USA, Inc.
PRIOR to returning the merchandise), original receipt and will only be granted to the actual
purchaser whose name appears on the receipt.
Return acceptance conditions:
You must return the original box intact with all components. All components must be in like-new
condition. All returns must be accompanied by RMA number (contact Night Optics USA, Inc.
PRIOR to returning the merchandise), original receipt and will only be granted to the actual
purchaser whose name appears on the receipt.
At our discretion, we may decline your return or charge you a fee for missing items or items that
we determine are damaged or require service. All cash or check transactions will be refunded by
check. Checks take a minimum of four to six weeks for processing. Credit card transactions will be
refunded to the credit card account used for the initial transaction.
16
Page 19

EXPORT RESTRICTIONS
While all Gen 3 and some Gen 2+ require export licenses, all night vision products are subject to
United States Export rules and regulations. Valid export licenses may be issued by the U.S.
Department of Commerce or the U.S. Department of State, Directorate of Defense Trade
Controls, in accordance with the International Tra c in Arms Regulation (ITAR), Title 22, Code
of Federal Regulation 120-130.
Consult Night Optics USA, Inc. for additional information regarding export requirements.
[email protected]
17
Page 20

NOTES
Page 21
NIGHT OPTICS USA, INC
15182 Triton Lane, Suite 101 | Huntington Beach, CA 92649
Ph: (714) 899-4475 | Fax: (714) 899-4485
 Loading...