


Trasmitter
EN - User and installation instructions
Nice
KRONO 1WW
KRONO 6WW
KRONO 1WC

1 – English
ENGLISH
Complete instructions translated from Italian
1 - PRODUCT DESCRIPTION AND INTENDED USE
This product is a wall mounting radio transmitter belonging to the Era KRONO
series. The following models are available:
KRONO 6WW KRONO 1WW KRONO 1WC
Power supply 1 battery mains power
Transmission wireless wired
Channels 6 1
Installation
onto a wall mount
(removable transmitter)
recessed into the
wall (fixed transmitter)
The transmitter is intended to control roll-up sunscreens, awnings and shutters. It
can be used for sending manual commands, or programmed to operate at set times
of the day throughout the week, for sending automatic commands; it can also be
programmed to send randomly timed commands (“Holiday” mode) to simulate the
presence of occupants in the home when no-one is present. Any use other than
those described in this manual is to be considered improper and prohibited!
2 - INSTALLING THE TRANSMITTER
2.1 Transmitter power supply and wall-mounting
• KRONO 1WW and KRONO 6WW only: see fig. 1, 2 and 3.
CAUTION – Before you install the wall mount definitively, make sure that the
automation receives the transmitted commands when the transmitter is fitted to
the mount. Warning! - The range of transmitters and the reception of receivers is
strongly affected by other devices (e.g. alarms, RF headphones, etc.) operating on
the same frequency in your area. In these cases, the manufacturer cannot provide any
guarantee regarding the actual range of its devices. To reduce this risk, do not install
the transmitter close to or in contact with metal structures, as they can significantly
reduce its range. Discharged batteries can also reduce the unit’s range by 20 - 30%.
• KRONO 1WC only: see la fig. 1, 2 and 4.
3 - SPECIFIC PRECAUTIONS FOR KRONO 6WW
READ CAREFULLY!
• The transmitter has six number keys. Each of these corresponds to a single transmission channel which is independent of the others. When the
transmitter is memorized, one or more automations may be assigned to each
channel. This means that up to 6 groups of automations can be created, so
that one channel = one group.
• The automation groups are created when the transmitter is memorized, when
you are prompted to select to which channel you wish to assign the automation in question.
Once multiple automations have been assigned to different channels, thus
creating “automation groups”, you must consider the following when using
the transmitter:
a) before you send a command, you must select the group (or
groups) andhence the channel (channels) on which the command
is to be transmitted;
b) a command addressed to a group is executed simultaneously by all
automations in the group.
• The transmitter can control:
a) one automation group at a time, by selecting a channel and immediately
transmitting a command on it;
b) multiple automations groups at once, by first selecting several channels
and immediately transmitting a command on them.
4 - BASIC SETTINGS
When the transmitter is powered up for the first time, the system immediately asks
you to enter the basic parameters by running PROCEDURE 1.
If you wish to postpone this procedure, quit it by pressing ESC.
The basic parameters can be memorized or modified at a later time as follows:
– to set ALL the parameters: you must first run PROCEDURE 10 (cancels the
entire memory) and then run PROCEDURE 1.
– to change ONLY SOME of the parameters (previously memorized with Proce-
dure 1): run PROCEDURE 1.A.
5 - MEMORISING THE TRANSMITTER
To memorize the transmitter in the automation’s memory, run PROCEDURE 2.
Alternatively, you can run the procedure indicated in the automation’s manual, but
only where indicated as “MODE II” or “MODE 2”; before doing so, you must set the
transmitter to MAN mode (see Chapter 6).
6 - OVERVIEW OF THE TRANSMITTER’S
OPERATING MODES
The transmitter has 4 operating modes:
– PROG = PROGRAMMING mode
– AUT = AUTOMATIC mode
– MAN = MANUAL mode
– VAC = “HOLIDAY” mode (simulates the presence of occupants in the ho-
me)
For further information, refer to the tables in the section “4 transmitter
operating modes”.
• Each mode can be set by the user by setting the MODE switch to its 4 positions
(the display will show the symbol for the current mode).
• When a mode is set, it inhibits operation of the transmitter in its other modes.
7 - PROGRAMMING THE TRANSMITTER
The transmitter can be programmed with the following procedures:
• INITIAL BASIC PROGRAMMING
– Procedure 1 - basic settings.
– Procedure 2 - memorises the transmitter in the automation.
• PROGRAMMING EVENTS and other activities for events
– Procedure 3 - creates a new event.
– Procedure 4 - modifies an existing event.
– Procedure 5 - duplicates an existing event.
– Procedure 6 - disables or re-enables an existing event.
– Procedure 7 - definitively deletes an existing event.
• PROGRAMMING EXTRA FUNCTIONS
– Procedure 8 - password for preventing unauthorised access to Programming
mode.
– Procedure 9 - keypad lock for preventing unauthorised use of Manual mode.
– Procedure 10 - deletes the entire memory and restores the factory settings.
• “NFC” PROGRAMMING
– Procedure 11 - configuration with a smartphone and dedicated APP..
7.1 Precautions when creating a new event
• Before you program a new event, we recommend that you note the values you
wish to set each parameter to in Table B (at the end of the manual). The table is
very helpful for planning the events you wish to create and provides a log of existing events and their features.
• The transmitter can memorize up to 30 events.
• For the transmitter to execute the events, the “MODE” switch must be set to
“AUT” or “VAC”.
• The sequence of items in Procedure 3 (create a new event) is as follows.
– CHANNEL (KRONO 6WW only): selects the channel/s (using the numerical keys).
– TYPE OF MANOEUVRE: selects the manoeuvre: up (UP) or down (DOWN).
– PARTIAL MANOEUVRE (optional parameter): used to set the level for the partial
manoeuvre. The level can be set by specifying the time during which the motor
must function to bring the curtain to the desired point: value between 1 and 240
seconds (default setting: 5 seconds).
– DAY/S OF THE WEEKS: sets the day (or days/all days, as desired) on which the
transmitter is to execute the event.
– TIME OF EVENT: three options are available:
• “TIME”: sets the exact time at which the event is to be executed.
• “SUNRISE” or “SUNSET”: sets the advance (-0:01 minutes to -9:59 hours) or delay (+0:01 minutes to +9:59 hours) relative to local sunrise or sunset, at which the
event is to be executed.
– CLIMATE SENSORS ON/OFF (KRONO 1WW and KRONO 6WW only): ena-
bles/ disables the climate sensors. For example: if an event has the SENSORS
function set to “ON”, it enables the automation to receive commands from the climate sensors when the event is executed. Reception remains enabled (ON) until
the transmitter executes an event which sets the SENSORS function to “OFF”.
– “HOLIDAY” FUNCTION (occupancy simulation): setting this function “ON”
in an event tells the transmitter that the event must be executed at random and
always different times of the day, relative to the time scheduled by the user for the
event. The function simulates the presence of people in the home even when noone is present.
– NAME OF EVENT: assigns a code (“E1” to “E30”) to the event being created.
7.2 Precautions when programming the extra functions
• Password (PIN) to prevent unauthorised access to Programming mode
You can create a 4 digit password (PIN) to prevent unauthorised persons using the
Programming environment. Once you have created a personal PIN (the product has
no PIN when it leaves the factory) the system will prompt you to enter the PIN when
you attempt to enter Programming mode by setting the MODE switch to PROG.
– To create or delete a PIN: run PROCEDURE 8.
– To enter a PIN (when prompted to do so), proceed as follows.
1. Set the MODE switch to PROG.

English – 2
2.
If a PIN has been programmed, the wording “PIN” and the digits “0000”
will display, the first digit will be flashing.
3.
Press p or q to increment or decrement the first digit of the PIN; then
press OK to confirm: the digit will turn steady on and the second PIN
digit will start flashing.
4.
Press p or q to increment or decrement the second digit of the PIN;
then press OK to confirm: the digit will turn steady on and the third PIN
digit will start flashing.
5.
Press p or q to increment or decrement the third digit of the PIN; then
press OK to confirm: the digit will turn steady on and the fourth PIN digit
will start flashing.
6.
Press p or q to increment or decrement the fourth digit of the PIN;
then press OK to confirm: if the PIN is correct, the SET icon will display
flashing, if it is not, you will have to repeat the procedure.
• Keypad lock to prevent unauthorised access to Manual mode
You can lock the keypad to prevent unauthorised persons using the transmitter when
the MODE switch is set to MAN.
– To lock or unlock the keypad: run PROCEDURE 9.
• Deleting the ENTIRE memory of the transmitter and restoring the facto-
ry settings
You can restore the transmitter’s factory settings and delete its ENTIRE memory
with PROCEDURE 10. This procedure deletes all basic settings, all events and all
data, including any PIN you may have programmed.
8 - BATTERY REPLACEMENT
• KRONO 1WW and KRONO 6WW only
When “B” displays, the battery is exhausted and must be replaced as soon as
possible. In this situation, there is a risk that the commands may not be sent properly
to the automations. To replace the battery, remove the transmitter from its wall
mount, remove the back panel cover with a screwdriver (fig. 3-B) and replace the
exhausted battery with a new one of the same type (fig. 3-D).
Note – Removing the power supply for a short time (this applies to KRONO 1WC as
well) does not delete the basic settings and events from the unit’s memory.
• Disposing of batteries
Warning! – Discharged batteries contain pollutant substances and therefore must
never be disposed of as normal waste. Dispose of them in observance of local sorted
waste disposal regulations.
PRODUCT DISPOSAL
As in installation, also at the end of product lifetime, the disassembly and scrapping
operations must be performed by qualified personnel.
This product is made of various types of materials, some of which can be recycled
while others must be scrapped. Seek information on the recycling and disposal
systems required by local regulations in your area for this product category. Warning!
– certain parts of the product may contain polluting or hazardous substances that,
if released into the environment, may seriously damage the environment and human
health. As indicated by the symbol, disposal of this product in domestic waste is
strictly prohibited. Separate the waste into categories for disposal, according to the
methods set out by legislation in force in your area, or return the product to the
retailer when purchasing a new version. Warning! – local regulations may include the
application of heavy fines in the event of improper disposal of this product.
• Packaging materials must be disposed of in accordance with local regulations.
TECHNICAL SPECIFICATION OF PRODUCT
Version
KRONO 1WW
(1 channel, wireless)
KRONO 6WW
(6 channels, wireless)
KRONO 1WC
(1 channel, wired)
Power supply
3 V with one CR2450 lithium battery
(life approx.: 2 years with 10 events/day)
120/230 Vac (50/60Hz)
Frequency 433.92 MHz ±100kHz -
Radiated power estimated <1 mW
Protection Class (IP) 40
Estimated range (m) 200 m in open space; 25 m indoors (*) -
Coding 66 Bit; 4,5 million billion combinations
Clock resolution 1 minute
Clock precision ±150 seconds/year
Maximum number of events
memorisable
30
Ambient temperature for operating (°C
min ... max)
+ 5 ... + 35
Dimensions (mm) 80 x 80 x 20h 80 x 80 x 50h
Weight (g) 85 95
• All technical specifications stated herein refer to an ambient temperature of 20° C (± 5° C).
• NICE reserves the right to make changes to products at any time when deemed necessary, maintaining the same intended use and functionality.
(*) - The range of transmitters and the reception of receivers is strongly affected by other devices (e.g. alarms, RF headsets, etc.) operating on the same frequency in your
area. Nice cannot provide any guarantee with regard to the actual range of its devices under such conditions

3
KRONO 1WW / KRONO 6WW only
A
B
1
2
3
C
rimuovere la
protezione
2
1
D
E
F
4
KRONO 1WC only
OFF
A B C
D
NO1 NO2 N L
Power
INPUT
100 - 240V
50 - 60HZ
960W, 4A
Moteur
RELAY, OUTPUT
2x (480W, 2A)
E
1 2 3 4
F G
Ø = 3,5 mm
10 mm
H
2 hex socket head self-tapping screws for plastic.
M SCE OK
MODE
M SCE OK
MODE
2
150 cm
1
3 – English

English – 4
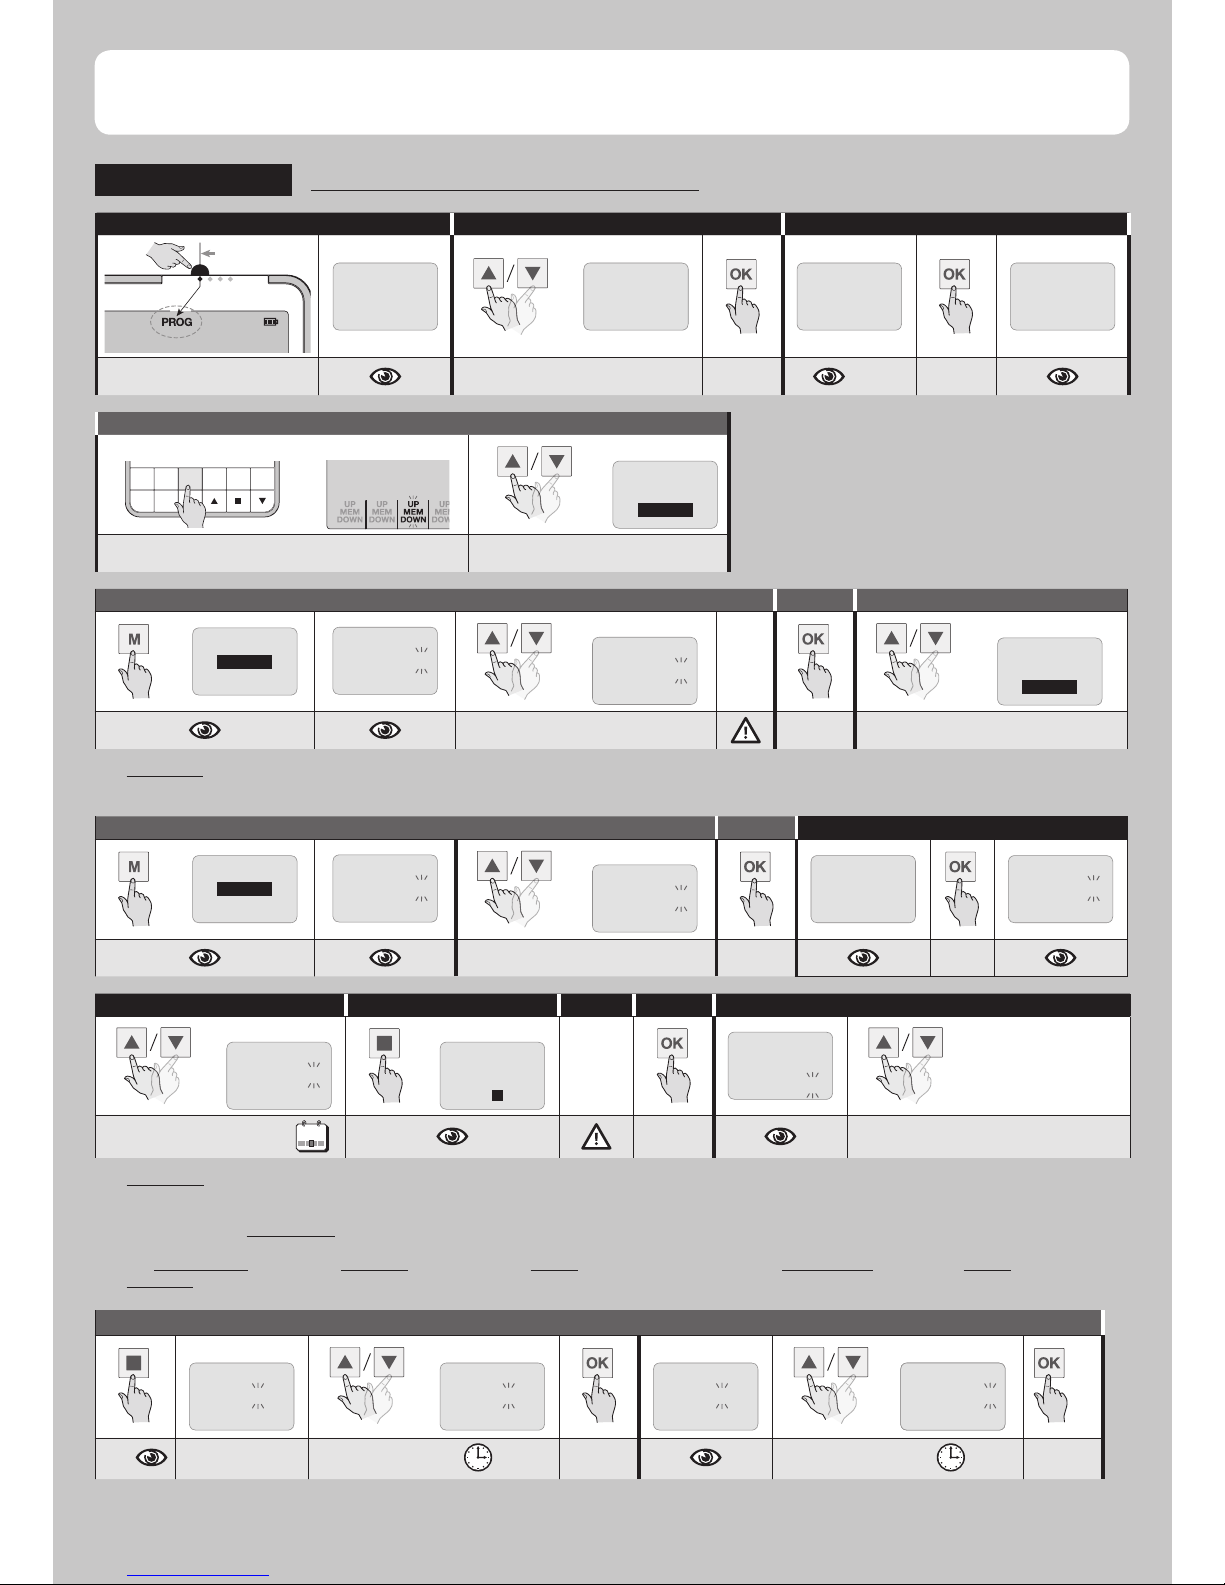
INITIAL BASIC PROGRAMMING
PROCEDURE 1
- To set the transmitter’s BASIC PARAMETERS when it is powered on for the first time or
after having deleted its entire memory.
1 2
KRONO 1WW
KRONO 6WW
KRONO 1WC
(example) (example)
12/24 H
12
(example)
FIR 001
12/24 H
24
all icons firmware version
power the transmitter on
select the time format:
12 (AM-PM) / 24
3 4 5
g
TIME
00:00
(example) (example) (example) (example)
TIME
20:00
TIME
20:00
TIME
20:45
TIME
20:45
00.00.00 00
set the current Hour set the current Minute
g5
6 7
g
(example) (example) (example) (example) (example)
TIME
20:45
00.00.20 17
TIME
20:45
00.00.20 17
TIME
20:45
00.04.20 17
TIME
20:45
00.04.20 17
TIME
20:45
28.04.20 17
set the current Year set the current Month set the current Day
g7
8
(example)
SUMMER/WINTER
MANUAL
(example)
TIME
20:45
28.06.20 17
M T W T SF S
SUMMER/WINTER
AUTO
set the mode for switching between
summer and winter time: AUTO /
MANUAL
9
ZONE
CITY 1
(example)
ZONE
CITY 13
set the city code:
see Table A page 12 (*A)
END
(*A) The “ZONE” parameter sets the geographical location in which the transmitter is installed. To find the correct value (city code) to use in the procedure, refer to Table
“A” page 12. This setting enables the system to automatically calculate the local time of sunrise and sunset.

5 – English
PROCEDURE 1.A
- To MODIFY A previously programmed BASIC SETTING:
• “TIME” (internal date and time);
• “12/24H” (time format);
• “SUMMER/WINTER” (mode for switching between summer and winter time);
• “ZONE” (geographical location of the transmitter).
1 2
MODE
SET
SET
TIME
12/24 H
SUMMER/WINTER
ZONE
(example)
SET
TIME
12/24 H
SUMMER/WINTER
ZONE
select one of the 4 parameters: TIME • 12/24H
• SUMMER/WINTER • ZONE
3 4 - continua ...
(example)
Continue programming by identifying the step with the selected parameter in
PROCEDURE 1; now modify it and memorize the new value by pressing OK.
• To modify a new parameter, repeat PROCEDURE 1.A.
SET
TIME
12/24 H
SUMMER/WINTER
ZONE
PROCEDURE 2
- To MEMORIZE the transmitter in the automation
WARNINGS
• This procedure requires you to have another transmitter, already memorized in the same automation in Mode I or Mode 1 (refer to the automation’s manual).
• KRONO 6WW only – Since the procedure requires you to select a “group”, i.e. a transmission channel to which to assign the automation, read the information given in
par. “3 - SPECIFIC PRECAUTIONS FOR KRONO 6WW” page 1.
• Since the transmitter will be memorized by all receivers in the transmitter’s range, before starting the procedure shut off power to any motors and receivers you do not
wish to memorize the transmitter.
• A 60 second timeout starts to count down every time you release a key. If you do not press the next key required by the procedure within this time, the motor will perform
6 movements to indicate that the procedure has been aborted.
• During the programming, the motor makes a set number of brief movements (up and down
) in “response” the installer’s commands. Count these movements re-
gardless of their direction.
• Repeat the procedure for each automation you will be controlling with the transmitter.
1 2 3 4 5.A
ON
M ESC OK
MODE
Ú
MODE
= =
(example)
2 3 4 5 6
M ESC
1
power up the motor
on the transmitter you are
memorizing:
select MAN awning at halfway position
select the channel:
1 - 2 - 3 - 4 - 5 - 6
5.B 6 7 8 9
10 sec
Ú
x 3
M ESC OK
MODE
Ú
5 sec
3
Warning! - If the awning makes 6
movements the motor’s memory is
full and the new transmitter has not
been memorized.
on the previously
memorized transmitter:
on the transmitter you are
memorizing:
END

English – 6
4 TRANSMITTER OPERATING MODES
“PROG” mode
PROGRAMMING mode
• To enable PROG mode, set the MODE switch to its first position (from the
left).
MODE
PROG mode enables the user to program the transmitter for all its automatic
operations: for instance, entering the basic parameters (time and day settings,
etc.), creation of “events” (i.e. the instructions for automatically executing the
commands programmed by the user), modification, copying, disabling and
deleting the above, creating a PIN for access to programming mode, and so on.
What is an EVENT?
An event is an instruction which automatically transmits a command,
under the conditions specified by the user in the instruction itself when
he creates it.
An event contains the type of command transmitted to the automation (open/ close,
total/partial manoeuvre) and the time conditions in which it is to be executed by the
transmitter once these conditions obtain (days of the week, at a specific time of day or
at the local time of sunrise or sunset, etc.). Examples: an event may be a command
to set the partial position of a shutter in the living room at 8:37 every Saturday and
Sunday; another event might be a command to raise an outdoors awning at 18:50
every day of the week.
MODE
+
)
=
( + )
=
+
)
=
Tue
Event “E1”
Event “E2”
Event “E3”
(procedures)
4321
Programmations
and creation
of events
(
SunSatFri
(
Thu
Fri
• To create an event refer to Procedure 3; to modify, copy, disable or delete an event,
refer to Procedures 4, 5, 6 and 7.
• During the execution of any procedure, you can abort programming at any time and
quit the procedure by pressing ESC.
“AUT” mode
AUTOMATIC OPERATING mode
• To enable AUT mode, set the MODE switch to its second position (from the
left).
MODE
AUT mode enables the transmitter to control the automation automatically,
executing all user programmed events.
M ESC OK
MODE
( )
=
ri
+
FriTu e
Event “E3”
Tue
!
Fri
!
Data
dell’evento
Esecuzione
dell’evento
When the transmitter is set
to AUT mode...
• The transmitter does not permit the user to send manual commands to the automation.
• The “Holiday” function in events. When the transmitter is set to AUT operation
mode, it performs ALL the created events; however, does not perform the “Holiday”
function, although in events, this function is activated (ON). Note - The “Vacancy”
function set to ON is performed by the transmitter only when it is set in the VAC
operation mode.
• Display. At the beginning, the display shows AUT, the current time, date and day
of the week. It also shows the last command sent to the automation (the KRONO
6WW displays the last command sent to each channel).
• Climate sensors ON / OFF. When the transmitter executes an event in which the
SENSORS function is set to “ON”, the automations are set to receive commands
from the climate sensors. Reception remains enabled (ON) until the transmitter executes an event which sets the SENSORS function to “OFF”. The display will show
the status of the last command sent under the SENSORS icon: ON / OFF. For
KRONO 6WW: if nothing appears beneath the SENSORS icon it means that the
event was addressed to multiple channels and that the settings (ON / OFF) of each
channel were discordant.

7 – English
“MAN” mode
MANUAL OPERATING mode
• To enable MAN mode, set the MODE switch to its third position (from the left).
MODE
MAN mode enables the user to control the automation manually using the following
keys:
– keys 1, 2, 3, 4, 5, 6 (KRONO 6WW only) = select the channel/s to which the
command is to be sent.
– key p = sends an Up command.
– key q = sends a Down command.
– key ¢ = immediately stops the movement.
– key M = pressed several times it allows for selecting the activation or deactiva-
tion (ON / OFF) of the sensors.
– key OK = sends the “sensors ON” / “sensors OFF” command.
– key ESC = to exit procedure of ON / OFF selection of climate sensors.
OK
MODE
M
On/
Off
Exit
ESC
When the transmitter is set
to MAN mode...
• The system does not allow the transmitter to automatically executes ALL the
events created by the user.
• Display. The display shows MAN and the current time. At the beginning, displa-
yed for 1 minute also the current date and day of the week.
• Sending a manoeuvre command. 01. (KRONO 6WW only) select one or
more channels assigned to the automation groups to which you are sending
the command; 02. send the command with the respective key (p = UP; q =
DOWN; ¢ = to stop the maneuver in progress): the display visualises “UP” or
“DOWN” or “STOP”, depending on the key pressed.
• Climate sensors ON / OFF (function not present in the KRONO 1WC). To
enable/disable the reception of the Sun and Rain climate sensor commands,
proceed as follows.
– For KRONO 6WW
To understand which was the last ON/OFF command sent to the sensors
managed by a channel: 01. press the key corresponding to the desired channel
and check that icon (ON / OFF) that appears below the SENSORS icon.
02. Lastly, exit the check by pressing the key of the same channel. 03. To
check other channels, repeat the operation for each desired channel.
To send an ON / OFF command to the sensors: 01. select one or more
desired channels: at each selection the ON / OFF icon appears fixed(*1). 02.
Press key M repeatedly to select the desired setting: ON (enables reception of
sensor commands) or OFF(*2) (disables reception). The selected icon flashes.
03. Lastly, press OK to confirm and send the setting (the SENSORS icon and
the selected option flash simultaneously).
––––––
(*1) - If nothing appears below the SENSORS icon, it means that discordant ON / OFF
settings were previously sent to the selected channels.
(*2) - The reception of Wind sensor commands cannot be disabled.
– For KRONO 1WW
To send an ON / OFF command to the sensors: 01. Press key M repea-
tedly to select the desired setting: ON (enables reception of sensor commands)
or OFF(*1) (disables reception). The selected icon flashes. 02. Lastly, press OK
to confirm and send the setting: the SENSORS icons and the selected option
flash simultaneously.
––––––
(*1) - The reception of Wind sensor commands cannot be disabled.
“VAC” mode
“HOLIDAY” OPERATING mode
• To enable VAC mode, set the MODE switch to its fourth position (from the
left).
MODE
VAC mode enables the transmitter to control the automation automatically, but ONLY
with events which have the “Holiday” function enabled (i.e. set to “ON”). VAC
mode functions like AUT mode, with the sole difference that every time the event is
executed the transmitter randomly changes the time of execution set by the user,
applying an advance (of -1 to -75 minutes) or delay (of +1 to +75 minutes) which is
always different. The function simulates the presence of people in the home even when
no-one is present.
M ESC OK
MODE
( )
=+
Event “E3”
Tue
!
Fri
!
-1...-75
minutes
+1...+75
(programmed time)
VAC (random time)
VAC
Data
dell’evento
uzionEsec e
dell’evento
FriTue
When the transmitter is set
to VAC mode...
• The transmitter does not permit the user to send manual commands to the automation.
• The “Holiday” function in events. When the transmitter is set in the VAC operation mode, it performs ALL the created events. Also, apply the “Holiday” function
only to events that have this feature enabled (ON setting).
• Display. At the beginning, the display shows VAC, the current time, date and day
of the week. It also shows the last command sent to the automation (the KRONO
6WW displays the last command sent to each channel).
• Climate sensors ON / OFF. Refer to the description of AUT mode.
English – 8
PROGRAMMING EVENTS and other activities for events
PROCEDURE 3
- To create and memorize A NEW EVENT
1 2 3
MODE
SET
EVENTS
SET
EVENTS
EVENTS
NEW
MODIFY
NEW
CHAN-MAN
select EVENTS
(NEW)
4.A - KRONO 6WW only
(example) (example) (example)
2 3 4 5 6
M ESC
1
UP
MEM
DOWN
select the channel: 1 - 2 - 3 - 4 - 5 - 6
select the type of manoeuvre:
UP / DOWN
4.A.1 solo per KRONO 6WW. Passo opzionale. 4.A.2 4.B KRONO 1WW/1WC only
UP
MEM
DOWN
NEW
5CHAN-MAN
(example)
(*A)
(example)
NEW
16
UP
MEM
DOWN
scegliere il tempo per la manovra parziale:
1 ... 240 secondi
select the type of manoeuvre:
UP / DOWN
(*A) DO NOT run step 4.A.2 immediately but repeat step 4.A (and step 4.A.1, if desired) for each additional channel you wish to select. Step 4.A.2 must be executed only
when all desired channels have been selected.
4.B.1 KRONO 1WW/1WC only. Optional step.. 4.B.2 5
UP
MEM
DOWN
NEW
5CHAN-MAN
(example)
NEW
DAY
NEW
DAY MON
NEW
16
set the time for the partial manoeuvre:
1 ... 240 seconds
5.1 5.2 5.3 6
(example) (example)
(*B)
NEW
TM TIME
3 options (*C)
• TIME (step 6.A)
• SUNRISE (step 6.B)
• SUNSET (step 6.B)
NEW
DAY THU
NEW
DAY THU
M T W T SF S
*
select
one day /all days (ALL)
THU
select the TIME OF THE EVENT
(*B) DO NOT run step 5.3 immediately, but repeat steps 5.1 and 5.2 for each day you wish to select. Step 5.3 must be executed only when all desired days have been
selected.
(*C) Select one of the three options. • TIME (step 6.A): sets the exact time (hour and minutes) at which the transmitter is to execute the event. • SUNRISE or SUNSET
(step 6.B): sets an interval of time in advance of the event (-0:01 minutes to -9:59 hours) or delay (+0:01 minutes to +9:59 hours), relative to the local time of sunrise
or sunset. Warning! - For the correct operation of the “Sunrise” / “Sunset” function, check the setting of the “ZONE” parameter in PROCEDURE 1 step 9. The result is
that morning events (“Sunrise”) are anticipated in the summer and delayed in the winter. On the other hand, evening events (“Sunset”) are delayed in the summer and
anticipated in the winter.
6.A - “TIME” option
(example) (example) (example) (example)
NEW
00:00
TM TIME
NEW
23:00
TM TIME
NEW
23:00
TM TIME
NEW
23:49
TM TIME
NEW
23:49
TM TIME
set the HOUR
set the MINUTES

9 – English
6.B - SUNRISE / SUNSET option
(example) (example) (example) (example)
NEW
0:00
TM SUNSET
NEW
2:00
TM SUNSET
NEW
2:00
TM SUNSET
NEW
2:35
TM SUNSET
set the NUMBER OF HOURS:
from -9 ... 0 ... +9
set the MINUTES
7 - Function NOT present in KRONO 1WC 8
NEW
SENSOR OFF
(example)
NEW
VAC OFF
(example)
NEW
SENSOR ON
NEW
VAC ON
function sensors: ON/OFF (*D)
function holiday: ON/OFF (*E)
(*D) Sun/Rain climate sensors ON/OFF. • If an event has this function set to “ON”, when it is executed by the transmitter it enables reception of climate sensor commands
by the automations (if present). Reception remains enabled (ON) until the transmitter executes an event which sets the function to “OFF”. • Caution! – The Wind sensor
cannot be disabled.
(*E) “Holiday” function (occupancy simulation). • Events with this function enabled (“ON”) are executed by the transmitter at random and always different times, relative
to the time programmed by the user. When the event is executed, the transmitter moves the time of execution randomly, by applying an advance (-1 to -75 minutes)
or delay (+1 to +75 minutes) which is always different. The function simulates the presence of people in the home even when no-one is present. • Important - In AUT
mode the transmitter does not execute the “Holiday” function, whether or not it is programmed in any events. The “Vacancy” function set to ON is only performed by
the transmitter when it is set to VAC mode.
9 (only available names are displayed) 10
(example) (example)
NEW
SAVE OK
NEW
NAME E1
NEW
NAME E14
(first available name)
select the name of the event:
from E1 to E30
Save
END
PROCEDURE 4
- To MODIFY an existing EVENT
1 2 3
MODE
SET
EVENTS
SET
EVENTS
EVENTS
NEW
MODIFY
EVENTS
NEW
MODIFY
select EVENTS
select MODIFY
4 (only existing events are displayed) 5 6 continua ...
(example) (example)
NEW
CHAN-MAN
/
NEW
DAY
/ ...
MODIFIABLE
PARAMETERS (*A):
(Channel: KRONO
6WW only), Day, Time,
Sensors, Holiday,
Event name.
MODIFY
E1
E1
MODIFY
E14
E14
(first existing event)
select the EVENT for modification select the PARAMETER for modification:
(*A) To modify the value of the parameter, see PROCEDURE 3. If you wish to modify further parameters, repeat steps 5 and 6 for each parameter. On completion, save all
modifications by selecting “SAVE” (with the keys p / q) and press OK.
PROCEDURE 5
- To DUPLICATE an existing EVENT
(and then modify it)
This can be useful when you wish to create a new event quickly, which is similar to an existing one with only a few differences. First duplicate the original event and then
modify it with Procedure 4.
1 2 3
MODE
SET
EVENTS
SET
EVENTS
EVENTS
NEW
MODIFY
COPY
NEW
MODIFY
segliere EVENTS
segliere COPY

English – 10
4 5
(example) (example) (example) (example)
COPY
E1
E1
COPY
E14
E14
COPY
PASTE E1
E14
COPY
PASTE E7
E14
(first existing event)
(primo nome)
select the EVENT to copy
select a Name (*A)
for the copied event
(*A) All codes from E1 to E30 display: those already assigned to events (the codes with the symbol *), and those not yet assigned, excluding the code for the original event
you copied in step 4.
6 PROCEDURE 3 ...
(example)
Use PROCEDURE 3 to modify and memorize the
new values.
COPY
PASTE E7 ok
E14
END (B*)
(*B) CAUTION! - If you press OK, and “OVERWRT” displays, this means that the name you have selected in step 5 has already been assigned to an event. You can now
either delete the existing event by overwriting it; to do so, press OK again. Otherwise, you can abort the procedure by pressing ESC and choose a different name from
those appearing on the list.
PROCEDURE 6
- To DISABLE OR RE-ENABLE an existing EVENT
1 2 3
MODE
SET
EVENTS
SET
EVENTS
EVENTS
NEW
MODIFY
PAUSE
COPY
DELETE
select EVENTS
select PAUSE
4 (only existing events are displayed) 5
(example) (example) (example) (example)
PASUE
E1
E1
(first existing event)
PAUSE
E14
E14
PAUSE
NOPAUSE
E14
PAUSE
OKPAUSE
E14
select the EVENT (*A)
NO = enable the event;
OK = disable the event
END
(*A) Disabled events are displayed with the symbol * next to them.
PROCEDURE 7
- To DEFINITIVELY DELETE an existing EVENT
1 2 3
MODE
SET
EVENTS
SET
EVENTS
EVENTS
NEW
MODIFY
MODIFY
COPY
DELETE
select EVENTS
select DELETE
4 (only existing events are displayed) 5
(example) (example)
DELETE
DELETE NO
E14
(esempio)
ESC
DELETE
E1
E1
DELETE
E14
E14
DELETE
DELETE OK
E14
(primo evento esistente)
select the EVENT for deletion
OK = delete
NO = not delete
(*A)
END
(*A) Check that you have selected the right event. If you have any doubts, press ESC to abort and quit the procedure before you press OK in step 5.

11 – English
PROGRAMMING EXTRA FUNCTIONS
PROCEDURE 8
- To CREATE A PASSWORD (PIN) (the password controls access to Programming mode).
CAUTION! - At step 2, keep pressed the ESC key; immediately press the OK key and then release the two keys.
1 2 3
MODE
ESC OK
PIN 00 00
(example)
PIN 00 00
(example)
PIN 30 00 PIN 37 00
select the first digit:
from 1 to 9 (not 0)
select the second digit:
from 1 to 9 (not 0)
4 5
PIN 00 00
(example)
PIN 00 00
(example)
SET
EVENTS
PIN 37 60 PIN 37 62
select the third digit:
from 1 to 9 (not 0)
select the fourth digit:
from 1 to 9 (not 0)
END
PROCEDURE 8.A
- To DISABLE AN EXISTING PASSWORD (PIN) (the password controls access to
Programming mode).
Run PROCEDURE 8 and enter “0” in steps 2, 3, 4 and 5.
PROCEDURE 9
- To LOCK/UNLOCK THE KEYPAD (the locked keypad limits manual use of the transmitter
only when the MODE selector is set to Manual Mode).
CAUTION! - At step 3, keep pressed the ESC key; immediately press the M key and then release the two keys.
To lock the
keypad
1 2 3 4
2 3 4 5 6
M OKESC
1
MODE
M
ESC
LOCK
2345 6
M OKESC
1
1 sec.
END
To unlock the
keypad
1 2 3 4
2345 6
M OKESC
1
MODE
M
ESC
UNLOCK
2345 6
M OKESC
1
1 sec.
END
PROCEDURE 10
- Deleting the ENTIRE memory of the transmitter and restoring the factory settings
1
MODE
ESC
MODE
ESC ESC
CONF.RESET
ESC
select AUT hold down key ... select PROG ... release the key!
END

English – 12
“NFC” PROGRAMMING
PROCEDURE 11
- To PROGRAM the transmitter via smartphone (the device is fully configurable with
smartphones, equipped with NFC technology, through the dedicated APP downloadable from GooglePlay).
1 2 3
Only for ANDROID
NFC
Ñ
Each parameter will be viewable and
editable from a smartphone.
Move the
smartphone closer to
the transmitter
(*A)
(*A) Make sure the smartphone is positioned in the direction of the aerial of the transmitter.
Table A - City List to set the Planetary Time
EUROPA
Austria Code
Graz 1
Innsbruck 2
Linz 3
Salzburg 4
Vienna 5
Belgio Code
Antwerpen 6
Bruxelles 7
Bielorussia Code
Gomel 8
Minsk 9
Danimarca Code
Copenhagen 10
Finlandia Code
Helsinki 11
Francia Code
Bordeaux 12
Brest 13
Dijon 14
Grenoble 15
Le Mans 16
Lille 17
Limoges 18
Lyon 19
Marseilles 20
Monaco 21
Montpellier 22
Nancy 23
Nantes 24
Orleans 25
Paris 26
Reims 27
Rennes 28
Rouen 29
Toulo 30
Germania Code
Augsburg 31
Berlin 32
Cologne 33
Dresden 34
Frankfurt 35
Hamburg 36
Hanover 37
Munich 38
Nuremberg 39
Grecia Code
Athens 40
Thessaloniki 41
Irlanda Code
Dublin 42
Italia Code
Bari 43
Firenze 44
Milano 45
Napoli 46
Palermo 47
Roma 48
Torino 49
Venezia 50
Norvegia Code
Oslo 51
Olanda Code
Amsterdam 52
Rotterdam 53
Polonia Code
Gorgow-Wielkopolski 54
Krakow 55
Lodz 56
Lublin 57
Olsztyn 58
Poznan 59
Warsaw 60
Wroclaw 61
Portogallo Code
Lisbon 62
Porto 63
Regno Unito Code
Edinburgh 64
London 65
Manchester 66
Romania Code
Bucurest 67
Cluj Napoca 68
Russia Code
Moscow 69
St. Petersburg 70
Slovenia Code
Ljubljana 71
Maribor 72
Spagna Code
Barcelona 73
Bilbao 74
Madrid 75
Malaga 76
Seville 77
Valencia 78
Villadolid 79
Zaragoza 80
Svizzera Code
Genève 81
Zurich 82
Svezia Code
Stockholm 83
Turchia Code
Istambul 84
Ucraina Code
Kyiv 85
Odessa 86
STATI UNITI
Code
Chicago 87
Dallas 88
Denver 89
Los Angeles 90
Miami 91
New York 92
AMERICA CENTRALE
Code
Havana 93
Mexico City 94
SUD AMERICA
Code
Bogotà 95
Buenos Aires 96
Lima 97
Rio de Janeiro 98
Santiago 99
Sao Paulo 100
Sucre 101
CANADA
Code
Montreal 102
Toronto 103
Vancouver 104
ASIA
Code
Abu Dhabi 105
Adana 106
Dubai 107
Hong Kong 108
Mumbai 109
New Dehli 110
Pechino-Beijing 111
Shanghai 112
Singapore 113
Tokyo 114
AFRICA
Code
Abuja 115
Algiers 116
Casablanca 117
El Cairo 118
Johannesburg 119
Marrakesh 120
Tunis 121
AUSTRALIA
Code
Brisbane 122
Melbourne 123
Perth 124
Sydney 125

13 – English
Table B - For planning events and recording memorized ones
E1 ... E30 = name of
event
- Tm = time of execution
- Sr = Sunrise
- Ss = Sunset
- Time (hour:minutes)
- Weekdays: Mon = Monday, Tue =
Tuesday, Wed = Wednesday, Thu = Thursday, Fri
= Friday, Sat = Saturday, Sun = Sunday.
- Type of manoeuvre:
p / q
- 1 ... 6 = Channels (KRONO 6WW only).
- C = Complete manoeuvre
- P+sec. = Partial manoeuvre
- Sens. = sensors
on / off
- Vac. = holiday
on / off
E1 ... E30 Tm / Sr / Ss Mon Tue Wed Thu Fri Sat Sun 1 2 3 4 5 6 Sens. Vac.
E1 = living room
awning
Tm, ore 8:35
p
C ON ON
E2 = living room
awning
Ss, -0:45
q q q q q
p, 15s OFF ON
esempi

English – 14
SIMPLIFIED EU DECLARATION OF CONFORMITY
Hereby Nice S.p.A. declares that the radio equipment type KRONO 1WW, KRONO 6WW is in compliance with Directive 2014/53/EU.
The full text of the EU declaration of conformity is available at the following internet address: https://www.niceforyou.com/en/support.

IDV0514A00EN_31-01-2018_DIGITAL VERSION
www.niceforyou.com
Nice SpA
Via Pezza Alta, 13
31046 Oderzo TV Italy
info@niceforyou.com
 Loading...