

Page 1
Page 2

TABLE OF CONTENT
Cautions ….……………………………………………………………………………….……3
1 Key Features……………………………………………………………………………….. 4
2 System Requirements………………………………………………………………………4
3 Package Content…………………………………………………………………………….5
4 Before Using………………………………………………………………………………….5
5 Keys Description……………………………………………………………………………..7
6 Power On/Off………………………………………………………………………………...8
7 Basic operation………………………………………………………………………………8
8 Playing music………………………………………………..……………………………….9
9 Playing videos………………………………………………………………………………10
10 Viewing photos………………………………………………………………………...….11
11 Reading E-book………………………………………………………………………….12
12 Browsing all files…………………………………………………………………………..13
13 Voice Recording…………………………………………………………………………..13
14 Deleting files …………………………………………………………………………….. 14
-1-
Page 3

15 Customizing Settings…………………………………………………………………….15
16 Troubleshooting…………………………………………………………………………..18
17 Technical Specifications………………………………………………………………….21
18
Notice………………………………………………………………………………………22
Precautions………………………………………………………………………………..23
19
20 Listening caution………………………………………………………………………….24
21 FCC Caution………………………………………………………………………………25
22 FCC Compliance………………………………………………………………………….26
-2-
Page 4

Cautions
Do not subject the device to severe impact or drop it from high position.
Do not use the player in extreme hot or cold, dusty or damp field. Do not
expose it to direct sunshine.
Back up the data frequently in case of accident data loss.
Avoid using the player in strong magnetic field.
Keep the device away from water or other liquids. In the event that water or
other liquids enter the device, power off the product immediately, and clean
the device.
Do not use chemical solution to clean the device in order to avoid corrosion.
Clean it with a dry cloth.
We are not responsible for the damages or lost data caused by malfunction,
misusing, repairing the device or battery replacement.
Do not attempt to disassemble, repair or modify the product. This will
invalidate guarantee.
The design of the player or actual display may be different from what is shown
in this manual. It should be subject to the actual display or design.
-3-
Page 5

1 Key Features
MP3&WMA Player
AVI Video player
JPEG image viewer
Folder Navigation
Voice Recorder
Removable Storage Device
Built-in rechargeable lithium-ion battery
Customized settings
2 System Requirements
Hardware: IBM PC & Compatible PC, Notebook with USB interface
Operating System: Windows98/SE, Windows Me, Windows2000/XP
-4-
Page 6

3 Package Content
Please check the package for the following items. If any one of them is missing,
ase contact the vendor:
ple
Main Unit
Stereo earphones
USB cable
User Manual
Driver CD
Earphone Jack Converter
4 Before Using
4.1 Connect to a PC and download audio files
This player is plug & play for WIN2000/XP/ME OS. But for Windows98/SE, you are
required to install a driver before connection (See “Driver Installation” section for
tails). To connect it with PC for transferring files,
de
(1) Plug the larger end of the USB cable to the USB port of the PC, and plug the
sm
aller end to the USB port of the player.
(2) When the “ ” icon appear at the right bottom of the PC screen, double click
“My Computer” on the desktop, you see a removable disk which indicates the
-5-
Page 7

player. Just use the removable disk as a regular local disk, copying files from
or to it.
4.2 Removing the player from the PC safely
For Windows2000/XP:
(1) Left click the icon at the right hand corner of the taskbar.
(2) Click the pop-up mini-window with message of “Stop the USB Mass Storage
Device –Drive (X)”.
(3) When you are prompted to remove the device, pull out the player.
For Win98, please make sure the data transfer is completed before unplugging the
MP3 player.
4.3 Charge the battery
The device has a built-in lithium-ion rechargeable battery. It is charged via USB
connection. You are required to charge it before you use it for the first time. It takes
about 3 hours to fully charge the battery.
To charge the battery, connect the larger end of the USB cable to the USB interface of
PC, and connect the other smaller end of the USB cable to the USB interface of this
player. The device is connected to PC and being charged. If you want to know the
-6-
Page 8
charge progress, disconnect the device safely by clicking the “ ”icon. You see an
animating battery icon indicating charge progress. When the icon becomes green, the
battery is fully charge.
Notice:
For maximum performance, lithium-ion batteries need to be used often. If you
don’t use the device often, be sure to recharge the battery at least once per
month.
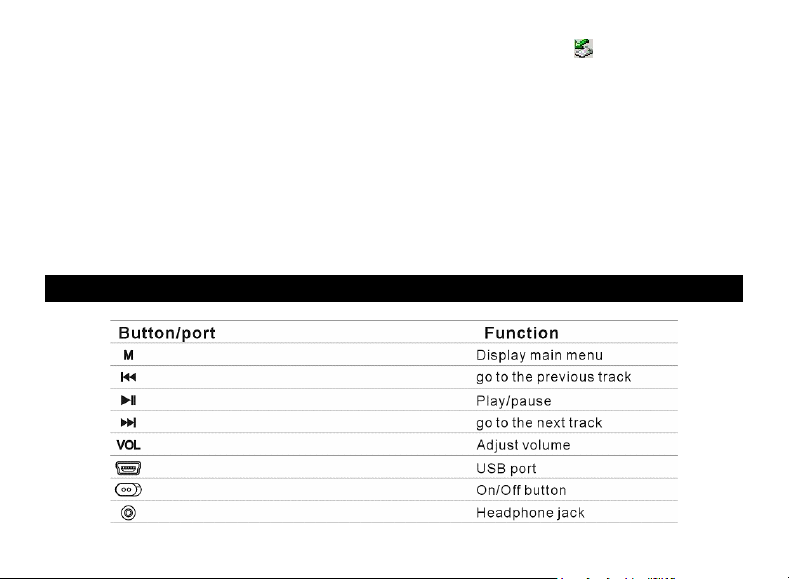
5 Keys Description
-7-
Page 9

6 Power On/Off
To power on,
(1) Switch on the POWER button.
(2) Press and hold the key until you see prompt on the display.
To power off,
(1) Press and hold the key until you see prompt on the display.
(2) Switch off the POWER button.
Note: This player has a power-saving feature which enables the device to power
off automatically if it is idle for about 3 minutes.
7 Basic operation
Function Operation
Play/Pause Press the PLAY/PAUSE button to play or pause.
Adjust Volume (1) Shortly press the VOL button to see a volume adjustment
icon animating.
(2) Press the PREVIOUS/NEXT button to decrease or
increase volume.
-8-
Page 10

(3) Press the VOL button to confirm.
Move to the
previous file
Move to the next file Shortly press the NEXT button.
Fast Forward Press and hold the NEXT button.
Rewind Press and hold the PREVIOUS button.
Lock/unlock buttons Hold down the Play/Pause and VOL button simultaneously.
A-B Repeat To repeat a specified section of a track,
8.1 Enter the music mode
Press and hold the MENU button to display the main menu. Use the PREVIOUS/NEXT
Shortly press the PREVIOUS button.
(1) During playing, shortly press the VOL button to enter A-B
repeat mode.
(2) Press the MENU button to select the start point.
(3) Press the MENU button again to select the end point.
To stop A-B repeat, press the MENU button first, and then
press the VOL button to exit.
8 Playing music
-9-
Page 11

button to select “Music”menu, and press the MENU button to confirm selection. Now
you are in the MUSIC mode, refer music playing to the basic operations.
8.2 Folder navigation
To navigate through folders:
(1) In the MUSIC mode, shortly press the MENU button to enter folder navigation
mode.
(2) Press the PREVIOUS/NEXT button to select a folder or track, and press the MENU
button to confirm selection.
9 Playing videos
(1) Press and hold the MENU button to display the main menu.
(2) Use the PREVIOUS/NEXT button to select “Video”menu, and press the MENU
button to enter the video player mode.
(3) Press the PREVIOUS/NEXT button to search a video file that you want to play, and
press the MENU button to play. For detail information about playing, see the “Basic
Operation”section. (Note: During playing, you can shortly press the MENU button
to enter folder navigation mode.)
-10-
Page 12

Note: This player can only play AVI videos. For other formats, you need to use the
converting tool included on the driver CD to convert them. For detail information about
the converter, see AVI Converter Quick User Guide on the CD.
10 Viewing photos
To view photos,
(1) Press and hold the MENU button to display the main menu.
(2) Select “Photo”and press the MENU button to confirm.
(3) Press the PREVIOUS/NEXT button to select a folder or image, and press the
MENU to confirm.
(4) Select the photo that you want to display and press the MENU button to enlarge it
to full screen.
(5) In the full screen mode, you can press the PREVIOUS/NEXT button to display the
previous or the next photo. Press the PLAY/PAUSE to start auto slide show, or
press the MENU button to enter folder navigation mode.
Note: Some images may not be displayed. Try to use an image viewer (Microsoft - Paint
for example) to convert them to JPEG format.
-11-
Page 13

11 Reading E-book
11.1 Reading
(1) Press and hold the MENU button to display the main menu.
(2) Select “E-book”and press the MENU button to confirm.
(3) Press the PREVIOUS/NEXT button to select a .txt file, and press the MENU button
to open the selected file.
(4) Press the PREVIOUS/NEXT button to page up/down, or press the PLAY/PAUSE
button to page up/down automatically (by setting the time interval between 1 and 5
in Settings/Auto Slide show/Text).
(5) During reading, you can use the bookmark to mark the page for resuming reading
later. For information about bookmark, see “Using bookmark”section.
11.2 Using bookmark
(1) Go to the page that you want to mark.
(2) Press and hold the VOL button to show up a “Save Bookmark”window for
saving bookmark.
(3) Press the PREVIOUS/NEXT button to select one line on the menu and press
the MENU button to confirm. The bookmark is saved. It starts from the first
line of current page.
-12-
Page 14

(4) To read the page that you marked, shortly press the VOL button to show up
the “Load Bookmark”window. Select the bookmark and press the MENU
button to confirm. You will be guided to that page.
Note: Some TXT file may not be read. This may because its format is not
supported. Skip it or reload another file.
12 Browsing all files
To browse all files stored in the player,
(1) Press and hold the MENU button to display the main menu.
(2) Select “Explorer”,and press the MENU button to enter the browser mode.
(3) Press PREVIOUS/NEXT button to select a file that you want to view, and
press the MENU button to play or display it.
13 Voice Recording
Record
(1) Press and hold the MENU button to display the main menu.
(2) Select“Record”,and press the MENU button to enter the recorder mode.
(3) Shortly press the PLAY/PAUSE button to start recording. During recording,
-13-
Page 15

you can press the PLAY/PAUSE button to pause/resume recording.
(4) Shortly press the MENU button to stop and save recording.
Play recordings
To play the recording, switch to the MUSIC mode, enter folder navigate mode,
search and play the recording file.
14 Deleting files
To delete a file,
(1) In the folder navigation mode, select the file that you want to delete.
(2) Press and hold the VOL button until a dialogue box shows up.
(3) Use the PREVIOUS/NEXT button to select “YES” and press the MENU button
to confirm.
-14-
Page 16

Customizing Settings
15
To customize the player settings:
(1) On the main menu, select the “Settings” item and press the MENU button to
en
ter the system settings mode.
(2) Press the PREVIOUS/NEXT button to select setting item and press the MENU
on to confirm or press the VOL button to cancel/return.
butt
Music Repeat mode
Once(Play current track once and then
stop)
Repeat One (Repeat current track)
Folder Once (Play all audio files in the
current f
Folder Rep.(Repeat all audio files in
the current folder)
Normal(Play all audio files stored in the
player and stop after playing all)
Repeat All(Repeat all audio files stored
in the player)
Intro(Play the first 10 seconds of every
-15-
older and stop after playing)
Page 17

audio file)
Order(Play audio files in order)Play mode
Shuffle(Play audio files randomly)
Preset EQ Normal, 3D, Rock, Pop, Classical,
Bass, Jazz, User EQ
User EQ
(User-defined
equalizer setting)
(1) Press the VOL button to switch EQ
column.
(2) Press the PREVIOUS/NEXT
on to adjust value.
butt
(3) Repeat pressing the VOL button
until the cursor is on the YES
button, and then press the MENU
button to confirm.
(4) Go to the EQ Select menu, and
select User EQ to enable the
alizer setting.
equ
-16-
Page 18

Auto slide show
Display
System
REC Quality High Quality, General QualityRecord
REC Volume +1、+2、+3、+4、+5
TEXT (Set interval between the previous and the next page
when the device is in auto page up/down mode.)
Photo (Set interval between the previous and the next slide
in auto slide show mode.)
Backlight 5 seconds, 10 seconds, 15 seconds, 20
seconds, 30 seconds, Always On.
Brightness (Set the brightness of the screen)
Backlight mode Normal
Power Save (Turn off the screen when
there is no activity within a certain time)
About - Information about the product
Upgrade - Upgrade the firmware
Load Default - Restore the player to default setting
-17-
Page 19

Sleep Timer
(Set the continuous
playing time before
the player is turned off
tomatically.)
au
Language
Problem Possible Cause Solution
Off, 10 minutes, 15 minutes, 30 minutes, 60 minutes, 120
minutes
Select language in which the on-screen texts are displayed.
Troubleshooting
16
The LCD displays
no
thing when the
vice is started.
de
The player has no The keys are locked by Unlock the Hold switch by
Battery is too low. Charge the battery.
Unlock the Hold switch by
The keys are locked.
-18-
lding down the PLAY/PAUSE
ho
d VOL button.
an
Page 20

response when the
Play button is pressed
to play an audio.
No sound when
playing an audio file.
Hold switch holding down the PLAY/PAUSE
and VOL button.
The volume is too low. Adjust the volume.
Bad audio file. Delete or skip the file.
The player cannot be
connected to the PC.
The displayed time is
changing constantly.
The PC has error
when you plug and
unplug the player.
Total memory Part of memory is used
The USB interface is not
supported by PC’s
motherboard.
The bit rate of the MP3
file is changing during
playback.
The player is
disconnected from the
PC abruptly while
transferring files.
-19-
Update or replace the PC’s
motherboard.
Try to use fixed bit rate to
compress the MP3 file.
Do not disconnect the player
from the PC when transferring
files.
Page 21

displayed on the
player is not in
accordance with the
marked amount.
Some of MP3 files
cannot be played
properly.
The video cannot be
played.
The photo cannot be
displayed
to store programs and
display characters.
The MP3 file is
compressed by a
standard, such as
MPEG I Layer 1 or
Layer 2 that the player
does not support.
The file format is not
supported.
The video data is
corrupted
The file format is not
supported
-20-
1. Delete the unsupported MP3
files.
2. Use MPEG I Layer 3
standard to compress the
unsupported MP3 files.
Make sure the video is in AVI
format. If not, use the provided
converting tool to convert it.
Skip it or reload another file
Try to use an image editor
(Microsoft - Paint for example)
to convert it.
Page 22

The device supports a
The image resolution is
beyond limitation of the
device.
The TXT file cannot be
read
Item Specification
Capacity 128MB or above
Battery Type Rechargeable Lithium Battery
Battery Life Approx. 7 Hours
LCD Display 2.0-inch TFT screen
Earphone Power 5mW+5mW
Video Format AVI (XviD)
Audio Format MP3, WMA
The file format is not
supported.
Technical Specifications
17
-21-
maximum resolution of 3520 X
2816. Make sure resolution of
the image does not excess this
limitation.
Skip it or reload another file.
Page 23

Photo Format JPEG
Image Resolution 3520 X 2816 (Max.)
Record Format WAV (High: 16kbps/16KHz; General: 16kbps/8KHz)
Bit Rate MP3: 8-320kbps; WMA: 32-384kbps
SNR >90dB
USB Port USB2.0
Operational Temperature 0℃ ~ +55℃
Storage Temperature
Operational Relative
Humidity *
Storage Relative Humidity *
Make sure all keys are enabled before operation. If they are locked, hold down the
PLAY/PAUSE and VOL button to unlock them.
Please charge the battery immediately when the display indicates low battery, or
the device will be powered off automatically.
-20℃ ~ +55℃
20% ~ 90% (40℃)
20% ~ 93% (40℃)
Notice
18
-22-
Page 24

Please disconnect the player from PC properly to avoid data loss.
The transfer rate displayed on the PC may be different depending on the operating
system. Exact transfer rate should be subject to the player's indication.
When the recorded voice file is too large, the response of the device may be slow.
Precautions
19
1). When not using the player for an extended period of time, remove the batteries to
avoid damage due to leakage. (Apply to Models that come with AAA or AA battery)
2). Do not use the player in extremely hot, cold, dusty or damp environments.
3). Make sure the HOLD key is in the unlock position before using the player (otherwise
controls will not function).
4). Avoid dropping or striking the unit .This may cause external and internal physical
damage to the player.
5). Replace battery with new one if: (Apply to Models that come with AAA or AA battery)
a) The battery level icon displays
(An empty battery)
b) The players powers off automatically and off again when restarted.
-23-
Page 25

c) No response when pressing keys with HOLD off and battery installed
6). To prevent damage from static shock, never use the player in very dry conditions.
7). When player is being formatted or transferring a file, do not interrupt the connection.
Otherwise, data may be corrupt of lost.
8). When the player is used as a portable HD, please use only per instructions.
Otherwise, permanent data loss could occur.
Listening caution
20
Do not play your headphones or earphones at a high volume. Hearing experts advise
against continuous extended play.
If you experience a ringing in your ears, reduce volume or discontinue use.
Do not use while operating a motorized vehicle. It may create a traffic hazard and is
illegal in many areas.
You should use extreme caution or temporarily discontinue use in potentially hazardous
situations.
Even if your headphones or earphones are the open-air type designed to let you hear
outside sounds, don’t turn up the volume so high that you can’t hear what’s around you.
Sound can be deceiving. Over time your hearing “comfort level”adapts to higher
-24-
Page 26

volumes of sound. So what sounds “normal”can actually be loud and harmful to your
hearing.
Guard against this by setting your equipment at a safe level BEFORE your hearing
adapts.
To establish a safe level:
Start your volume control at a low setting.
Slowly increase the sound until you can hear it comfortably and clearly, and without
distortion. Once you have established a comfortable sound level:
Leave it there.
FCC Caution
21
This equipment has been tested and found to comply with limits for Class B digital
device, pursuant to part 15 of the FCC Rules.
These limits are designed to provide reasonable protection against harmful interference
in a residential installation. This equipment generates uses and can radiate radio
frequency energy and, if not installed and used in accordance with the instructions, may
cause harmful interference to radio or television reception, which can be determined by
-25-
Page 27

turning the equipment off and on, the user is encouraged to try to correct the
interference by one or more of the following measures:
1. Reorient or relocate the receiving antenna.
2. Increase the separation between the equipment and the receiver.
3. Connect the equipment into an outlet on a circuit different from that to which the
receiver is connected.
4. Consult the dealer or an experience radio/TV technician for help.
FCC Compliance
22
To assure continued compliance, following the attached installation
instructions.
Use only the provided shielded the interface cables when connecting to
computer.
Any unauthorized changes or modifications to this equipment would void the user’s
authority to operate this device.
-26-
Page 28

This device complies with Part 15 of the FCC Rules. Operation is subject to the following
two conditions: (1) this device may not cause harmful interference, and (2) this device
must accept any interference received, including interference that may cause undesired
ope
ration.
Industry Canada Requirement:
The Class B digital apparatus complies with Canadian ICES-003.
Other names of system and products mentioned in these instructions are
usually the registered trademark or trademarks of the manufacturers who
veloped the system or product concerned.
de
This manual was correct and complete at the time of printing. However, specifications
d updates can occur at any time without prior notice.
an
No part of this manual may be copied, republished, reproduced, transmitted or
-27-
Page 29

distributed in any way without prior written consent of Nextar, Inc. Any unauthorized
distribution of this manual is expressly forbidden.
© 2008 Nextar (Hong Kong) Limited. Nextar is a trademark and service mark of Nextar
(Hong Kong) Limited. All other brand names, trademarks and service marks are
property of their owners.
Nextar may find it necessary to modify, amend or otherwise change or update this
manual. We reserve the right to do this at any time, without any prior notice. All
specifications and features are subject to change without notice. All screen shots
shown are simulated and may not represent the actual screen on production units sold
to consumers.
-28-
Page 30

For instruction manuals, updated drivers or other information, be sure to visit our
website at:
w.Nextar.com
ww
Or write us at:
Nextar
1 Fairplex Dr.
166
La Verne, CA 91750
USA
Copyright © 2008
We are seriously concerned about environmental protection, and we hope
that you share our concern as well. For more information regarding our
recycling program, please visit us at http://www.nextar.com/green or call
us at 1-888-849-0846
-29-
 Loading...