

Page 1

MA206 | Digital MP3 Player
Instruction Manual
Page 2

Table of Contents
1. Locating the controls.......................................................................................2
2. Basic operation............................................................................................... 3
3. Operating buttons........................................................................................... 7
4. Play music..................................................................................................... 9
5. Voice recording.............................................................................................. 13
6. Playing recorder les..................................................................................... 16
7. Jpeg album viewing....................................................................................... 18
8. Telephone book............................................................................................. 20
9. E-book........................................................................................................... 21
10. Video playback............................................................................................ 23
11. System settings........................................................................................... 24
12. Using the player as a USB disk.................................................................. 28
13. Upgrading the rmware...............................................................................29
14. Other settings..............................................................................................31
15. Trouble shooting..........................................................................................39
16. Specications..............................................................................................39
17. AMV converting tool....................................................................................40
Page 3

THANK YOU FOR YOUR PURCHASE
FEATURES OVERVIEW
* Please read this manual carefully before
using your new player.
* Contents in this manual may change at
any time without notice
* If the actual operations of your player
does not appear to be the same as
the instructions in this manual, please
visit www.Nextar.com for updated
instructions or notices
INTRODUCTION
This MP3 player is part of a brand new generation
of portable digital music devices, supporting
MP3/WAV music formats, AMV format play,
JPEG photograph support and E-book text
reading .All of this is part of a high-quality, easy
to use design. Thank you for selecting a Nextar
MP3 player!
• Unique design that is comfortable to
hold and easy to use
• Multi-Code Support: This unit can
support and play MP1, MP2, MP3,
WMA, WMV, ASF and WAV Music
formats
• Firmware Upgradeable:The latest
rmware updates can be downloaded
from the Nextar website to keep your
unit up to date
• Removable Disk: Manipulate les via
the "mobile disk" in "My PC" without
any additional programs on your PC
(drive program needs to be installed
for operating systems prior to Windows
2000). Use this unit as a removable
drive, storing les, music or anything
you want (drivers required for operating
systems prior to Windows 2000)
• Private Space Disk Mode: With the
utility included on the software CD, you
can partition the memory of this unit into
2 or more separate drives and encrypt
these partitions to keep others from
accessing your les and information.
1
Page 4
• Record/ Replay: The player supports
recording through the built-in
microphone and saves the les as WAV
or ACT formats.
• 7 Preset EQ settings: Normal, Rock,
Pop, Classic, Soft, Jazz and DBB
• Multi-play Mode: Normal, Repeat One,
Folder, Repeat Folder, Repeat All,
Random, Intro.
• Auto Power Off and Sleep Timer: You
may set the Sleep Timer or Auto Power
Off mode for convenience or to save
battery power.
• GUI (Graphic User Interface) Menu:
Easy to read, icon based display
makes navigation and operation simple
Important Notices
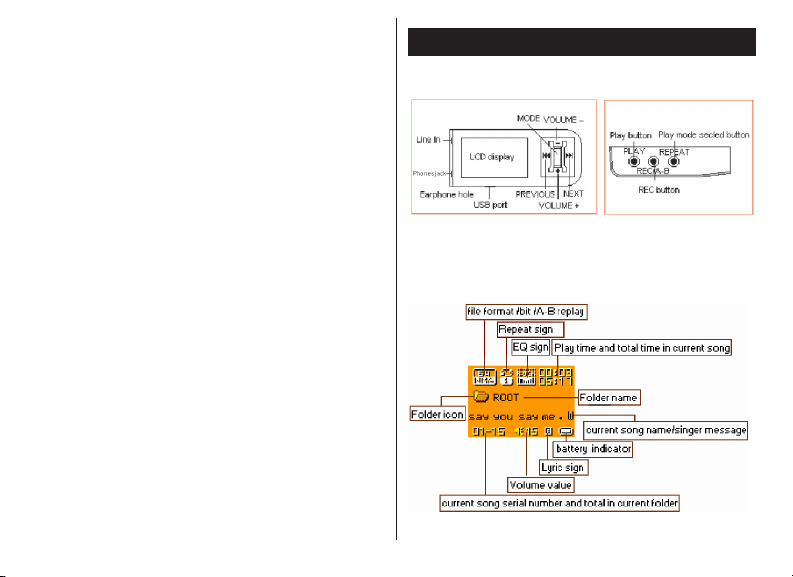
1. LOCATING THE CONTROLS
Appearance & Buttons
v
LCD Display
2
Page 5
Battery Indicator:
The player has a 9-level battery monitoring
system.
Indicates that the battery is currently
fully charged
Indicates low battery power and the
battery should be charged
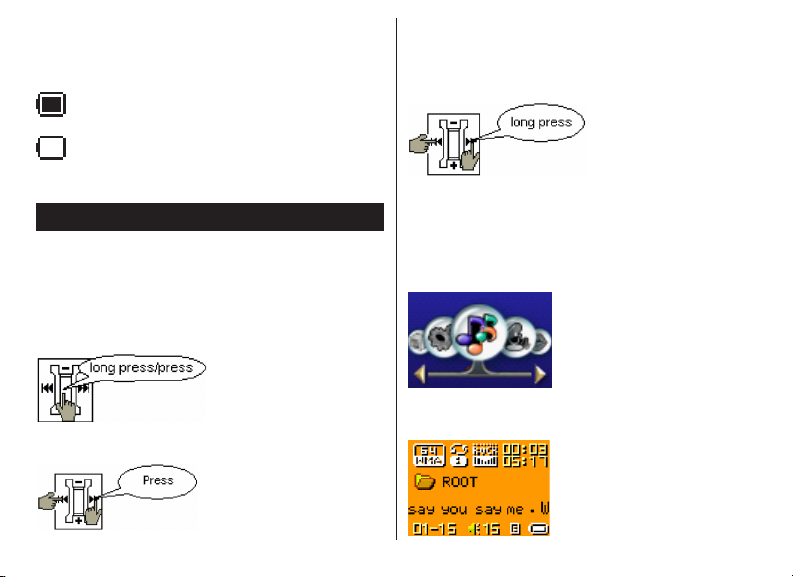
2. BASIC OPERATION
Entering The Menus
Press MODE button to enter the menus,
including main menu, (press and hold MODE
button at Stop state), Submenu at Play state
(press to enter) and submenu at stop state
(press to enter).
Fast forward or fast reverse when
playing
this does not work when playing AMV les
Entering Different Modes
You may enter different modes from the
main menu.
Main menu:
(Press and hold MODE button to enter)
Browsing
To browse music les or menu options:
Music mode:
3
Page 6
Record mode:
System setting:
Voice mode:
JPEG Album:
E-book:
USB mode:
* Note: press and hold Mode button to
return to the main menu from these
submenus. when connecting the USB
cable to your PC, the unit will enter
USB mode.
4
Page 7
Volume Control
When playing, from the main interface of the
Music mode, Voice mode , press and hold
the V+ or V-buttons to adjust volume.
* When connecting the USB cable to your
PC, the player will turn on automatically
and will enter the USB mode
* Volume cannot be adjusted when
playing AMV les
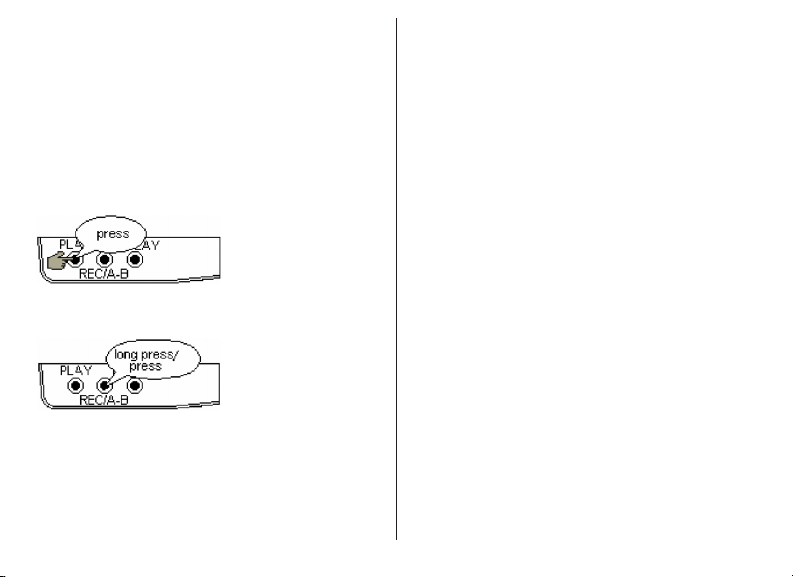
Power On/Off
1. Turn on automatically
* After pushing the Power button (OFF/
ON), the player will turn on automatically
and enter power -on logo interface:
2. Manual Power ON/OFF
* when the player is OFF, press and hold
the Play button to turn the unit on
* when the player ON, press and hold the
Play button to turn the unit OFF
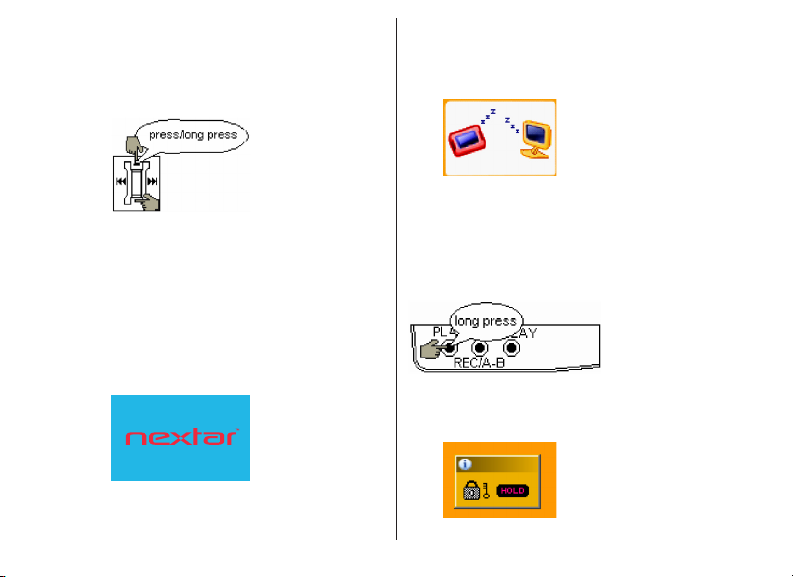
Lock Function (HOLD)
When Hold is ON, the following will be
displayed:
5
Page 8
* When HOLD is on, all buttons will be
locked from operating (i.e.: buttons and
controls are locked).
* HOLD also functions as the “Write
Protection”, preventing data from
being written to the unit via the USB
connection.
Play& Stop (and Pause when recording)
Record/Pause (press and release), Stop
Recording (press and hold)
* Note: You may press the Play button to
exit from any menu or option interface
6
Page 9

3. OPERATING BUTTONS
For Music mode and Voice modes:
Buttons Operation Stop Status Play Status Play Submenu Stop Submenu
PLAY
MODE
V+
V-
REC/A-B
REPEAT
Press and
hold
Press Play Stop Exit the menu Exit the menu
Press and
hold
Press
Press Next song Play next song Switch submenu Switch submenu
Press and
hold
Press Previous song Play previous song Switch submenu Switch submenu
Press and
hold
Press
Press and
hold
Press
Press and
hold
Press Start recording Enter A-B replay mode X
Press and
hold
Press and
hold/press
Power off Power off Power off Power off
Enter main menu Enter main menu Enter main menu Enter main menu
Enter Stop
submenu
Continuous
forward browse
Backward browse Fast backward
Volume increases
one step
Volume increases Volume increases X X
Decreases volume
one step
Decreases volume Decreases volume X X
Enter Play submenu
Fast forward
Volume increases
one step
Decreases volume
one step
Conrm current
option or enter
next submenu
Continuous
forward
Continuous
backward
X X
X X
Conrm current option
or enter next submenu
Continuous forward
Continuous backward
X
Start recording Enter A-B replay mode X X
X
Enter to select repeat
mode interface
X X
7
Page 10

For Record Mode:
Operation Action Stop Status Record Status
PLAY
MODE
REC/A-B
Press and hold Turn off Stop recording
Press Start recording Pause recording
Press and hold Enter main menu X
Press Enter Record submenu X
Press Start recording Pause recording
press and hold Start recording Stop recording
8
Page 11
4. PLAY MUSIC
How to play DRM music
System Requirement:
* Windows XP+SP2;
* Windows Media Player 10.3646
or above (New install do not
upgrade from old version);
Although you can copy music les from
somewhere, you can't get the DRM license.
Only Windows XP support MTP(Media
Transfer Protocol).
You can setup the player as a
U-disk or MTP device.
How to add DRM music
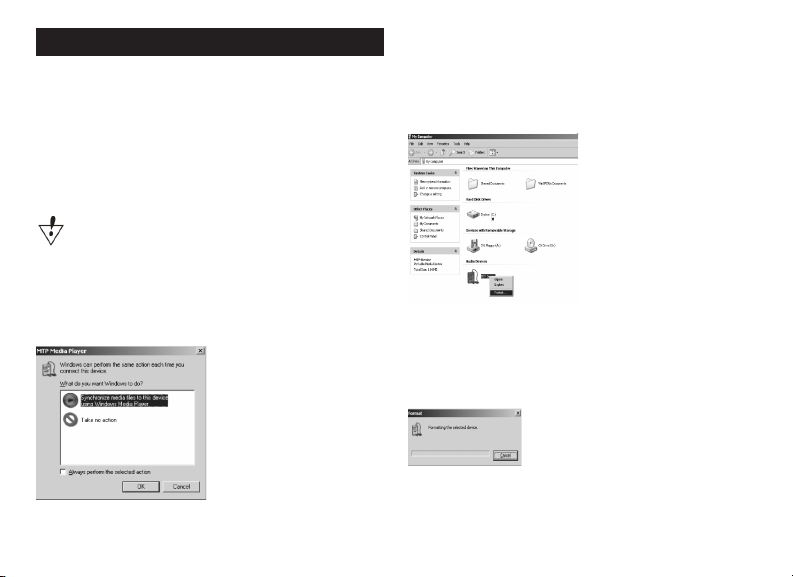
1). Connect player to PC, after 10 seconds
a dialog will be appear, select "Take no
action" or click "Cancel" button to continue.
2). Open "My Computer", clean up
the device as the following steps:
a). Click the MTP device icon use
the right button of the mouse,
and then select "Format";
b). Waiting for the format
processing until nish.
3). Run "WMP10"(Windows Media Player
10), the "MTP" device will be discovered.
9
Page 12
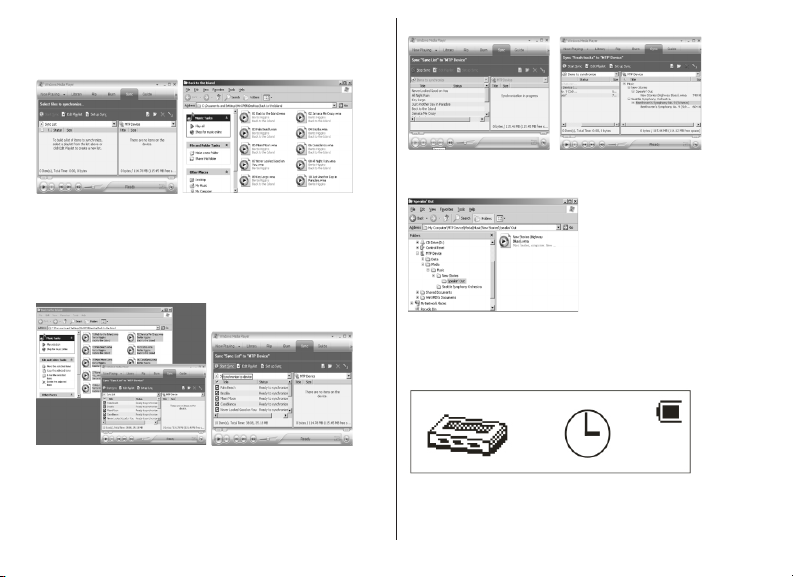
Select "Sync",and then open the local folder
where your music les saved.
4). Select all music you want tosync to
player, and drag them to the"SyncList"
on the left side of WMP 10, click"Start
Sync" to begin downloading:
5). When nish downloading, you can see
the music les on the right side of WMP 10.
Browser "My Computer", you can see
the les already downloaded to player.
6). Disconnect the player, it will
make ID3 Playlist automatic, this
will cost about 8 seconds.
7). Then the player will process DRM
licence, it will cost 5~10 seconds.
10
Page 13
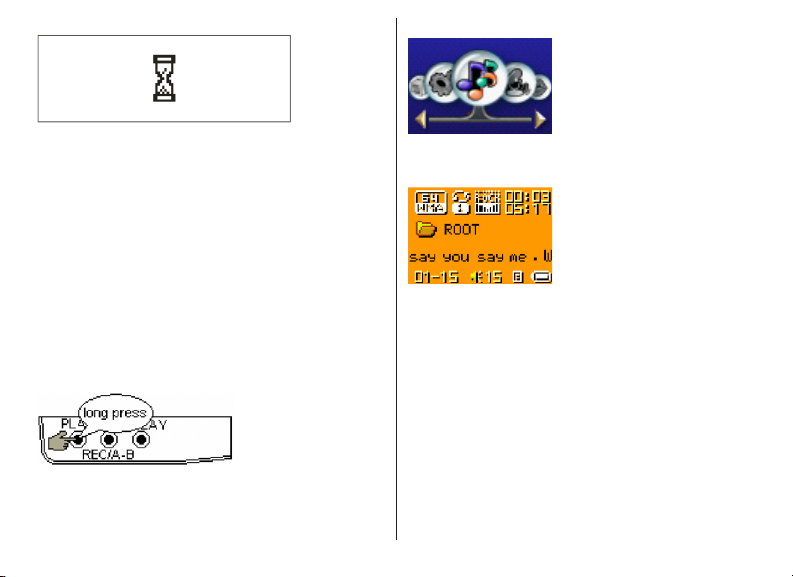
How to play
At rst, you must enter into System
setup and set up the "DRM Time", set
it to current time, otherwise the DRM
music can't beplayed accurately.
After setting up "DRM Time", you can go
back to music mode to play and listen to
music.
Basic Operation
1. Connect the earphones as shown below.
2. Press and hold PLAY button to power on
3. Enter the main menu
4. Press MODE button to enter the Music
mode
5. Choose music
button: To choose previous music or
AMV.
button: To choose next music or
AMV.
6. Volume control
V- button: To decrease volume.
V+ button: To increase volume
11
Page 14
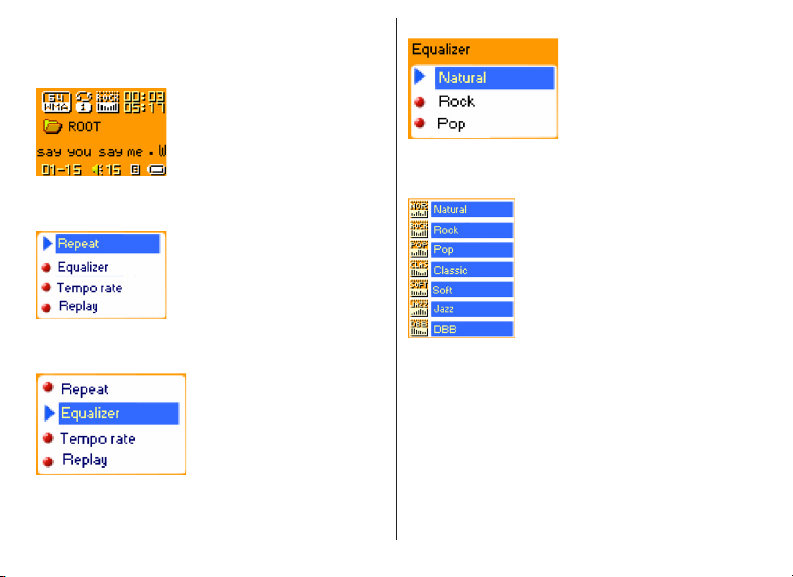
EQUALIZER Mode
1.When playing music
2.Press the MODE button to enter Play
Submenu
3.Press button to choose Equalizer menu
option
4.Press the MODE button to enter EQ mode
selection Menu.
Equalizer options corresponding icons list
as below:
5.Press button to switch EQ settings, and
press MODE button to conrm selection
Lyric Display
This player supports “*.LRC” LRC (lyric les
(users can download les from internet),
and lyrics will be displayed while the music
is playing (like Karaoke)
12
Page 15

How to use lyric les?
Save the lyric le with the same name as
that of the corresponding music le. For
example:
Music le name: GiGi-Sky.mp3
Lyric le name: GiGi-Sky.mp3.
How to know whether the lyric les
exist?
If the current song has matching lyric les,
the lyric sign will be displayed at the right
bottom of the display in music mode.
1. If the current song has matching lyric
les
2. Press and hold MODE to enter the Lyric
interface when playing.
3. Press MODE button to return to Music
play mode.
5. VOICE RECORDING
Note: Voice recording uses signicant
battery power. Make sure your battery is
fully charged
This player can save up to 99 voice les per
directory
Instant Recording
Press REC button to start immediate
recording from any player mode (other than
if playing music or recording via the line-in)
13
Page 16

1. Start recording.
2. Pause recording. (Time icon ickers)
3. Continue recording.
4. Stop recording.
Recording in Record Mode
1.Enter the main menu.
2. Press button to choose recording mode.
3. Press MODE button to enter Record
mode
4. Press Play button to start recording.
5. Other operations are the same as those of
“Instant Recording” except that Play instead
of REC should be pressed.
14
Page 17

NOTE: The recorded le is saved in the
current folder set in “Recording Stop
submenu/ /Local Folder”
* If “Overow” is displayed on the LCD,
the player”™s memory is full. Please
delete other les to make space
available.
* If “over record” is displayed on the
LCD, the current directory has already
had 99 recording les. Please switch to
another directory.
* Only Play and REC/A-B buttons function
while recording
Select Recording Type
1. At the record mode stop interfaces
2.Press Mode button to enter record mode
submenu
3.Press button to select “REC type”
option
4.press MODE button to enter this
submenu:
15
Page 18

5. Press (button to select desired recording
type )
6. Press MODE to conrm the type
selected
7. Press PLAY button to start recording
Note: Voice Control means the player will
only record when it senses sound. When
silent, the unit will pause the recording
6. PLAYING RECORDED FILES
1. Enter the main menu:
2. Press button to choose “Voice mode”
3. Press Mode button to enter Voice mode
interface
4. Press PLAY button to start playing.
* Converting ACT format les to WAV
format les The ACT le format can
save signicant space when making
voice recordings. However this format
is not compatible with other playback
devices (like your PC). The ACT format
les can be converted to WAV format
les through the accessory installation
tools that are on the CD shipped with
this unit .
16
Page 19

1. Run “Sound Convert Tool” program, and
click “Open” button.
2. Choose the ACT format les needing
convert
* Note: This tool can also convert from
WAV to MP3 le formats
7. JPEG ALBUM VIEWING
This function supporting all JPEG formats
1. At the main menu
3. Click the “Convert” button to start
converting
Press button to choose “JPEG Album”
option:
17
Page 20

2. press MODE button to select the desired
image if there are no pictures the display will
indicate “No les”
3. Press /V+ button to choose desired
picture, and then press Play button to
display the image:
4. Press /V+/V-//V+ button to browse
picture in sequence (only suitable for
“Manual play”)
View Album
1. At the picture be selected state:
2. Press MODE button to enter picture
submenu
3. Press button to select the “play set“
option:
18
Page 21

4. press MODE button to enter the interface
as follows
5. Press button to choose “Manual play”
or “Auto play” options, and then press
MODE button to conrm.
6. When choosing the “play” option you will
see the following display:
8. The unit will now automatically display all
pictures in the selected directly for the set
amount of time.
Note: when playing pictures, press and hold
MODE to fast exit from picture interface
and return to the main menu; at any menu
oroption interface, press Play button to exit
from picture interface.
8.TELEPHONE BOOK
First time, the user can nd the le
‘Setup_enu_v1.1.exe’ in drive disc CD.
Then install this software on
the PC as following steps
7. press / button to adjust “Auto play”
speed (Unit: sec. press MODE button to
conrm
19
Page 22

Connect the mp3 with the PC,
pressing the start menu to nd
the Flary Address software:
Select the le menu to choose the Input
Data to nd the le (TelAddbk.dat) in your
mp3, and then press the open button.
Fill in team name in the blank and
press the Append Grouping button:
Select the le menu to choose the
new, and then you will nd the le
‘C:\Program Files\Flary\TelAddbk.
dat’, then copy the le in your mp3
Select the team you added, and then key
in the Name and the TEL you want to add.
Press the New Card button and you can
see the name and Tel No. in the right blank.
20
Page 23

Add the whole information
as the above steps:
Press the Save button and Quit.
Disconnect the mp3 to PC.
Enter the main menu to select
Telephone mode and you will nd
you added Tel information.
9.E-BOOK
3. Press MODE button to enter text le be
selected, if there are no text les, the display
will show ”No les”
This unit can read les in TXT format:
1. At the main menu
2. Press button to choose “E-Book”
4. Press button to select desired text le
to read, and then press Play button to enter
text interface
21
Page 24

5. Press / button to turn the pages in
sequence (only suitable for “Manual play”)
Reading setting
1. At the text le be selected menu
2. Press MODE button to enter submenu of
the selected text le
3. Press button to choose “setting”:
4. press MODE button enter the interface as
follows:
5. Press button to choose “Manual play”
or “auto play” options, and then press
MODE button to conrm.
6. When “auto play” is chosen, the following
will be shown:
22
Page 25

lutions are converted into one format theVBox is able to show. For further details,
take a look at the Windows help les.
7. Press / button to adjust “auto play”
speed (how long each page is displayed
until it is turned to the next) (Unit: sec. press
MODE button to conrm.
Note: when playing text les or books,
press and hold MODE to fast exit from book
interface and return to the main menu; any
menu or option interface, press Play button
to exit from book interface
10. VIDEO PLAYBACK
Video playback
The MP3 Player is able to display videos
in AMV format. You can create videos in
AMV format by using the Movie-Converter
tool shipped with the product.AVI, WMV,
ASF, RM, MPG, MPEG, MOV and VOB
are accepted as source les. By using the
converter the differing frequences and reso-
Go to Music mode to playback
videos (p. 16, Playback music).
Connecting external devices
The MP3 Player has a Line-ln input
where you can connect external devices
for voice recording. The recording
quality is max. 32K in WAV format.
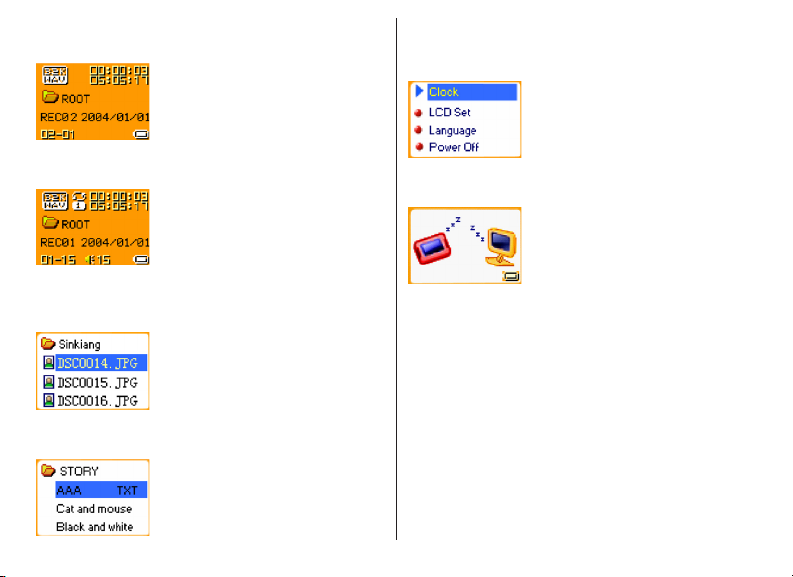
11. SYSTEM SETTINGS
System parameters can be set from this
menu. Please note that some of these
settings will change every time you upgrade
the system rmware:
At the main menu,
23
Page 26

Press MODE button to System Setting
interface is as follows:
Parameter Overview
Record time
LCD set
Language
Power Off
Replay mode Set Replay mode states
Online Mode
Memory info.
Firmware
Version
Set the time and date when
recorded le are saved
Set LCD backlight mode
to save power
Set different languages
to be displayed
Set a xed time after which the
player will turn off automatically
An option specially designed
for “Private Space” function
Show total memory capacity
and percentage used
Show rmware version
Firmware
Upgrading
Exit Exit from current interface
Special for rmware upgrading
“Record Time” Parameter Instructions:
1. System Setting Interface
2. Press Mode to enter Record Time
Interface
3. Press V+ to set time using the format:
“YY-MM-DD” (Press V- to set in reverse
sequence)
4.press / button to adjust numbers
24
Page 27

5. Press Mode button to conrm and exit the
current interface.
“LCD set” Parameter Instructions:
The steps below allow you to set the LCD
backlight parameters:
1. At System Setting interface, press key
to select “LCD set” option
2. Press Mode button to enter “LCD set”
submenu:
3. Press button to choose, and press
MODE button to conrm and enter adjust
interface as follows (e.g.: Black):
4. Press / button to adjust time (Unit
second) and press MODE to conrm and
exit.
Brightness
Set light and shade contrast of OLCD
screen
Darkle mode
Set xed period of time (unit: second)
when no operation on keys, the player may
turn darkle screen automatically. If “0” is
selected, function is turned off.
Black mode
Set xed period of time (unit: second) when
no operation on keys, the backlight will turn
25
Page 28

off automatically. If “0” is selected, function
is turned off.
“Language” setting
1. At System setting interface, press /
button to select “Language” icon:
2. Press Mode button to enter “Language”
setting interface:
3. Press or button to select desired
language.
Simple Chinese, English, Trad Chinese
4. Press Mode to conrm to exit.
Power Off
Operating steps are identical to the
Language setting steps.
Off Time mode refers to a period of time
(unit: second) at which the unit will turn it off
““ if not keys have been pressed while the
unit is in “Stop” mode (ie: not playing). If “0”
is selected, the function is turned off. Sleep
Timer refers to a period of time (unit: minute)
for the player to turn off automatically when
no keys are pressed, regardless of the
mode the unit is in. This includes even
when the player is playing music. This
function is specially designed for listening
to music before sleeping. Note: Setting of
Sleep Timer is valid only once and the set
time will be cleared after power off. To use
this function again, the Sleep Time must be
reset.
Replay Mode
Operating steps identical to the Equalizer
setting steps
26
Page 29

Manual Replay means that in A-B Replay
Mode the endpoint B can be set manually
only.
Firmware Upgrade
This option is only for use in Firmware
upgrades
Auto Replay means that in A-B Replay Mode
the endpoint B can be set automatically. (this
is particularly useful for audio books)
Online Mode
Operating steps identical to the Equalizer
setting steps Some operating systems (those
before Windows 2K SP4) cannot support
two drive letters assigned to one USB disk.
Thus, if the “Private Space” function is on,
choose which disk you are going to use, i.e.,
“single ordinary disk” or “single encrypted
disk” so that the correct drive will be shown
once the unit is connected to your PC.
Memory Info
The number displayed represents total
memory capacity of the unit and the
percentage refers the capacity used.
Firmware Version
Operating steps identical to Language
setting steps
12. USING THE PLAYER AS A USB DISK
This player supports standard USB disk
functions with the following operating systems:
Windows98 (driver required), Windows 2K
and above (no driver required), Mac OS 10.3
and above and Linux 2.4.2 and above.
This player supports power supply via USB.
This player also supports Suspend Mode.
How to connect to your PC:
Power on the player and plug the USB cable
into the player and your PC to enter USB
Mode. The player may display one of
three modes after connecting to your PC:
27
Page 30

1. Waiting state
2. Downloading state
3.Uploading state
13. UPGRADING THE FIRMWARE
This player supports rmware upgrading and
maintenance via the special tools installed
on your PC from the installation CD. Enter
the main menu.
1. Press button to select “System
Setting”
2. Press MODE button to enter System
Setting.
28
Page 31

3. Press button to choose “Firmware
upgrade” option
4. Press MODE button to enter “rmware
upgrade” interface:
5. Connect the player to your PC
6. Run the “MP3 Player Update” program
that was installed on your PC from the
included installation CD, then click “Select
new rmware le” button. Your PC should
display a screen similar to this one:
7. Choose new rmware program (It may be
on the included CD, or you can download
from www.Nextar.com)
29
Page 32

8. Click “Start” button to begin the rmware
update process:
9. Once the upgrade is completed and
successful, the display should show:
Notice: Firmware upgrade is an operation to
optimize the performance of the player.
In correct operation of rmware upgrading may
cause the player to work abnormally or not at
all. Please read this manual carefully before
attempting a rmware upgrade. Users should
have a basic knowledge in computer operation.
Only install and upgrade rmware specic for
your unit. Do not use other rmware for other
Nextar units or from other manufacturers.
Doing so may result in you player not working
properly, or not working at all.
14. OTHER SETTINGS
Select Folders (At Stop Submenu)
Users can save les in different folders
(folders should be created on your PC in
advance), to manage and play les according
to different types. The player supports up to
99 subdirectories.
1. At the Stop interface. (Current example is
in Music Mode, but folders can be selected
in Record mode, Voice Mode, JPEG Album
mode and E-book mode also.)
30
Page 33

2. Press MODE button to enter Stop
Submenu.
Delete File (At Stop Submenu)
Files can be deleted from the corresponding
modes: Music Mode, Voice Mode .
1.At the stop interface.
3. Press MODE button again to enter Select
Folder interface.
4. Press or buttons to choose folders.
5. Press MODE button to conrm the folders
selected. Note: The same folder name can
be given to folders in each of the above
modes. All are independent of the other.
2.Press MODE button to enter stop
submenu
3. Press buttons to choose “Delete”
option.
4. Press MODE button to enter Delete le
folder
31
Page 34

5. Press MODE button to enter Delete le
folder submenu
Note: “Delete All” means to delete all the
relevant les in current mode in current
folder. (For example, at Music Mode
executing “Delete All” , all the music les
in current folder may be deleted, while les
stored under the other modes will not be
deleted.)
Note: When deleting les on your PC, please
take care to” Safely Remove” the player
before pulling out USB cable; otherwise les
may not be deleted.
Play Mode (Play Submenu)
Press REPEAT button to enter the directly.
6. Press button to choose “Delete” or
“Delete all” .
7. Press MODE button to conrm and
deletion starts.
Enter Play Submenu to enter.
When playing music and recorded les,
different play modes can be selected. (such
as Repeat, shufe, etc.) The rst option
in the Play Submenu is Play Mode. The
player will play les according to the mode
selected.
32
Page 35

Tempo Rate (Play Submenu)
When playing music (MP3 format only) or
recorded les, different tempo rates can be
set (faster or slower) without changing the
pitch of the sound les
1. When playing music
2. Press MODE button to enter Play
Submenu is as follows:
3. Press button to choose Tempo Rate
option
4. Press MODE button to enter Tempo Rate
interface is as follows:
5.Press button to quicken tempo and
press button to slow down tempo.
33
Page 36

Replay Mode
Press REC/A-B button to enter the mode
directly.
Enter Play Submenu to enter.
Replay Mode Submenus: A-B Replay
1. At Music Mode or Voice Mode
2. Press Mode to enter Play Submenu.
4. Press Mode to enter Replay.
: “A” ashes in Replay Mode icon and
start point is to be set.
5. Press to set “A” start point.
After “A” is set, “B” ashes in icon , and
endpoint B is to be set.
3. Press to select “Replay” .
6. Press to set “B” endpoint.
34
Page 37

Replay icon stops ashing and A-B
segment replay begins. When replay times
count up to times set in advance, the player
will quit the Replay Mode.
At Replay Mode, pressing can set “A”
again to select another segment. (Setting of
replay times refers to “Replay Times” in the
previous section.
Follow Read (This function does not exist
in Voice Mode)
1. Replaying A-B segment, Press ( to enter
Follow Read Mode.
2. Replay icon changes to Follow Read
icon, and start recording sound of users is
recorded. The recording time is as long as
the A-B segments.
3. After recording time, the icon changes
to , and the original sound is played. Press
(button to enter Comparison mode.
At this mode, pressing (button will return to
A-B Replay Mode.
Comparison (This function does not exist
in Voice Mode)
1. Replay icon changes to and the recorded
sound of users is played.
2. After playing the recorded sound, the icon
changes to, and original sound is played
3. After playing the original sound, the
recorded sound is played again. The whole
procedure will continue (without limitation by
Replay Times) until press Mode to exit.
In this mode, pressing ( will return to Follow
Read Mode.
For the three modes above, pressing Mode
will exit from Replay Mode directly.
Replay Times (Play Submenu)
Operating steps identical to Backlight
setting steps. Replay times mean that after
A-B segment has been replayed up to xed
number of times, it will exit from Replay
Mode.
35
Page 38

Replay Gap (Play Submenu)
Operating steps identical to Backlight setting
steps. Replay gap adds a gap of silence
between each replay (unit: seconds).
Private Space Overview
Private Space function
Partition and Encryption Functions Some
users may have the need to hide information
on their unit from unauthorized access. This
is often the case when multiple users share
the unit. By allowing users to create
separate partitions on their unit, and then
encrypt those partitions, Nextar has solved
this problem.
his MP3. Now, the function of "dream space"
solves that problem. Using the included
utilities, users can separate the disk into
two partitions with optional proportions.
Two drives will show up on the computer
(Windows 2K needs SP4, or you will nd
one disk only). Choose "single normal disk"
or "single encrypted disk" under "system
setup/online mode" and encrypt one of the
disks to hide the content. This data cannot
be viewed without a password. This is
"dream space".
1. Connect player to PC
2. Run the MP3 player disk tools
Users can divide USB disk into two partitions
(of any size) with tools provided with the
player. (again, note previous warnings that
you must have Windows 2K SP4 installed
to use the partition function. Otherwise
you must encrypt the entire drive). To use
“Dream Space” :
In the past, MP3 users who wanted others
to see his individual data could only delete
their privacy settings while friends borrowed
3. Format rst, choose the "encrypt subarea"
option, choose appropriate content
4. Input username at "new username", input
password at "new password", input the
same password at "conrm password", click
"start" to begin the partitioning
5. Finish the partition and follow the prompts;
6. PC will ask to restart, press "Yes"
36
Page 39

7. You will nd two disks after rebooting (Win
2K SP3 and earlier will nd one)
8. There are three les in the encrypted, two
hidden les and an executable le
9. Run "RdiskDecrypt.exe", input username
and password in dialogue box
10. You must input user name and password
every time you connect it with a PC.
2. Run the MP3 Player Disk Tool, which is
available in the included CD and needs to
be installed on the user’s PC
Attention: Data in disk will be erased
if you separate the disk into two sections,
please back up the data on the disk
beforehand. Uniting two disks into one disk
will also clean out the data.
Warning: Do not lose your username
and password. You can only erase the
Encrypted disk by uniting partitions,
which will erase the les.
1. Connect the player to your PC.
3. First you will see format tools. Choose
“partition and encryption”, then choose
appropriate capacity for encrypted partition,
select “Set username and password” and
enter your user name and password. Input
user name in “new user name”. Input password
in “new password”, and then input the same
password in “new password” conrmation.
Click start to create the partition.
37
Page 40

4. Once partitioning is complete, you will
see the following message:
5. You will be asked to restart yourcomputer
6. Two disks will be seen after re-starting (or
only one if using an OS prior to Windows 2K
SP4 version)
7. Double click the encrypted partition. There
will be three les, two of which are hidden
les, one of which is executable le, and
disk space is 300K (in the example below).
8. Run executable le "RdiskDecrypt.exe" ,
input user name and password in dialogue
box. If correct, you can unencrypt the
partition (disk) and view/manipulate the les
on the drive
Notice: Save any data you have on the
disk prior to partitioning. Partitioning will
delete any les stored on the drive.
Warning: Don’t lose your user name
and password, otherwise you will not able to
access the encrypted partition.
15. TROUBLE SHOOTING
No sound is heard from headphones.
• Check whether Volume is set to “0”
38
Page 41

• Make sure headphone plug is secure.
• Check whether the headphone plug is
dirty.
• Corrupted/damaged MP3 les may
sound very poor, or not play at all.
Conrm that your le(s) are good (check
them on your PC)
Characters in OLED are illegible or
difcult to read
• Check whether the right language has
been selected.
Downloading of music les fails.
• Check whether USB cable is damaged;
conrm it is connected properly.
• Check whether drivers are installed
correctly (if required).
• Check whether the player’s memory is
full.
16. SPECIFICATIONS
General
• PC connection: USB2.0 (FS) (Read:
1000K Byte, Write: 1000-900K Byte)
• Flash memory:64MB,128MB, 256M,
512MB,1GB,2GB
• Max Play time: 5 hours
• Operating System Compatibility:
Windows98/SE/ME/2K/XP, Mac OS 10,
Linux 2.4.2
• Working temperature: -5°C to 40°C
• Multilingual
Recording
• Sample rate: 8KHz
• Recording format: WAV, ACT, MP3
• Recording time: 35 hours (ACT,128M
Flash)
• Formats: MP3, WMA, WMV,ASF
• Max output of headphone: L=10mW,
R=10mW, 32Ohm
Music
• Music formats supported: MP1, MP2,
MP3, WMA, WMV, AMV,ASF, WAV
• MP3 bit rate: 8Kbps-320Kbps
• WMA, WMV, ASF bit rate: 5Kbps384Kbps
• Frequency response: 20Hz to 20KHz
• SNR: 85dB
39
Page 42

Note: Product design and specication may
change at any time without notice.
17. AMV CONVERTING TOOL
Summarize
Because this player has a full color, highresolution screen, movies can be viewed on
it. The AMV Converting Tool can convert a
variety of common video le formats to the
AMV le format, which can play on this unit.
Video formats supported for converting are
as follows: AVI format les (*.avi), Windows
Media format les (*.Asf, *.wmv), MPEG1
format le (*.mpg, *.mpeg), Real play les
(*.rm), QuickTime format (*.mov), MPEG2
format (*.Vob)
Note: This tool temporarily supports the AVI
RM format only‚
Important: Users must upgrade to
Windows Media Player 9.0 (or later) for
Windows98, Windows Me, Windows2000
and WindowsXP operating systems, (Win98
and Win 2000 may need install the Image
Accelerator Diver. Go to www. Nextar.com
for more info)
Conversion Instructions:
Step 1: Run the "Movie Convert Tool
"program to activate the tool. Your PC
should display the following:
Step 2: Click the indicated button to choose
the movie le you want to convert:
You should then see the following display:
40
Page 43

In this screen select the type of le you are
converting from and then select the le from
the directory where your movie les are
stored> Click the "Open" button and the
display will return to the Movies Convert Tool
main interface. From the main screen, Click
"PLAY" button to play the selected video
Step 4: Click the button (as shown) to
choose le name and directory for your new
converted le:
Step 3:
If your movie contains audio, go to the next
step. If you want to insert different audio,
Click on the "Insert new audio frequency
le" box. Then using the directory button
on the right, nd the audio le you want to
insert See below:
Click the " Begin Convert" button to begin
the conversion process:
Once conversion is complete and successful,
the following will be displayed:
41
Page 44

No part of this manual may be copied, republished, reproduced, transmitted
or distributed in any way without prior written consent of Nextar, Inc. Any
unauthorized distribution of this manual is expressly forbidden.
"Nextar, a trademark of Nextar (Hong Kong) Limited (pending)."
Nextar may nd it necessary to modify, amend or otherwise or update this manual.
We reserve the right to do this at any time, without any prior notice. All specications
and features are subject to change without notice. All specications and features
are subject to change without notice. All screen shots shown are sinulated and
may not represent the actual screen on production units sold to consumers.
For instruction manuals, updated drivers or other
information, be sure to visit our website at:
WWW.Nextar.com
or write us at:
Nextar
1661 Fairplex Dn
LaVerne, CA USA 91750
copyright © 2006
42
 Loading...