

Page 1

Page 2

Page 3
Instruction Manual
Thank you for purchasing our Digital MP3 Player. This uniquely designed device
combines an MP3 Player and removable Flash Memory drive all in one unit. You can
move and store files between computers and enjoy your MP3 music collection anytime
and anywhere.
Multiple Format Support
Supports MP3 and WMA (Windows Media Audio) files
Voice recorder
Voice recording for voice notes capability
19 Preset equalizer
Built-In equalizer can be set to 19 different preset and customized settings.
Multiple Playback Modes
Unique A-B repeat function allows users to specifically select playback
USB Connection
Quick connection to high-speed USB 2.0 port.
Page 4
rechargeable Battery
Li-Ion rechargeable battery with up to 15 hour playback time
Before using the unit please read this manual carefully to obtain the best
possible performance from your player. Keep this manual for future
reference
Installing driver for Windows 98. (driver is not required for Windows Me
or above)
a. Connect the MP3 Player to the USB port of PC, “Find new
hardware”
appears on the screen, click “Search latest driver for this device”.
b. Insert the driver CD in to CD-ROM, and then click “Next”.
Select “Look in” to direct the installation directory to the “Drivers” files in
driver CD, then click Yes. PC will install the Win 98 driver automatically.
Page 5
We suggest the player to be charged for 12 hours for the initial
use and 2 to 3 hours next time.
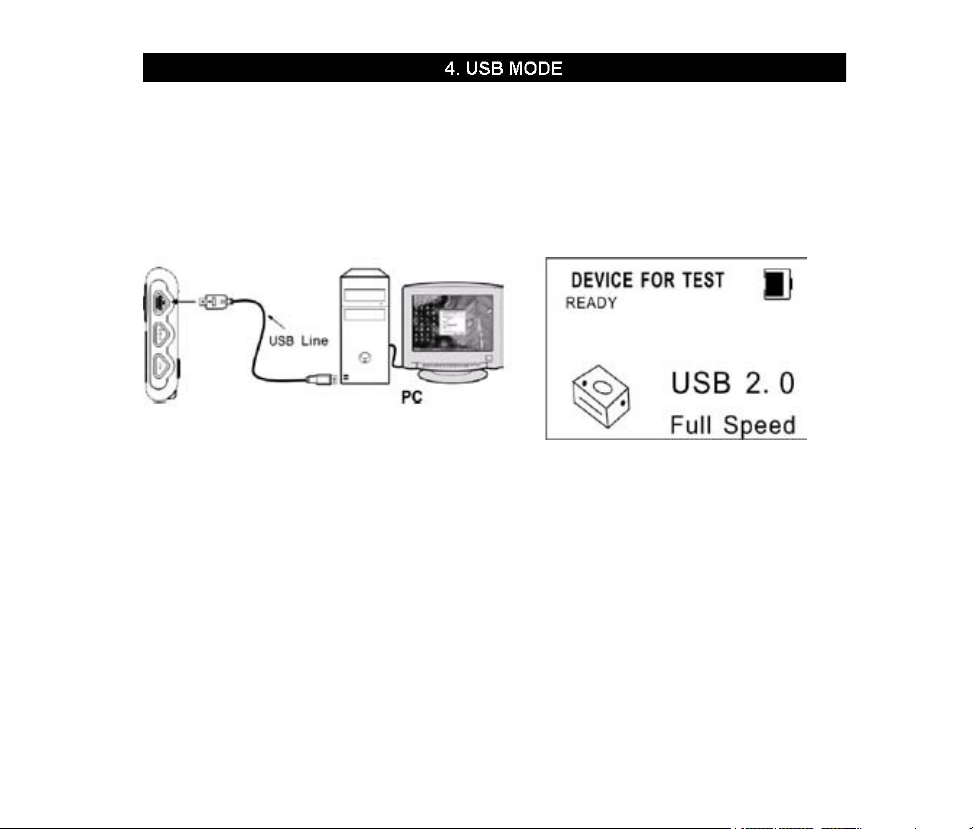
Connecting a PC as USB
Before operation, plug one end of the USB cable into your PC and the other
end into the MP3 player.
downloading MP3 music
a. Writing refers to copying files from the computer and pasting
them into the device.
Page 6

b. Reading refers copying files from the device and pasting them
into the computer.
Attention: The MP3 player with memory under 128MB cannot be formatted to FAT-32 in the operation system,
since the original software has the high speed flash feature.
Removing USB device
a. Double click the Safely Remove Hardware icon in taskbar:
b. From Safely Remove Hardware screen, highlight the “USB
Mass Storage Device ”item, then click the “Stop” button. “Stop to Hardware
Device” window appears on the screen as shown below.
Page 7
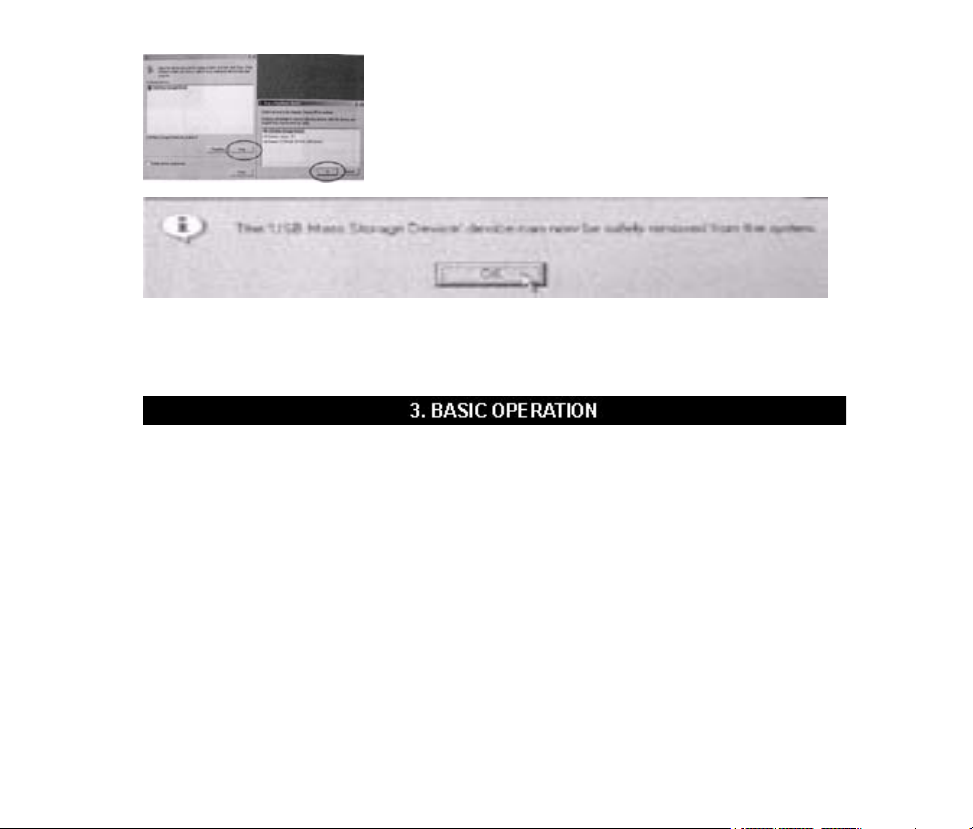
notice: Never unplug the USB cable during data transmitting to avoid any failure to the player; after data
transmitting, please do not disconnect the player from PC until “Device can now be safely removed” appears; while
using USB function, all other buttons will be
nonfunctional. Refer to the FAQ for any lost files, I/O
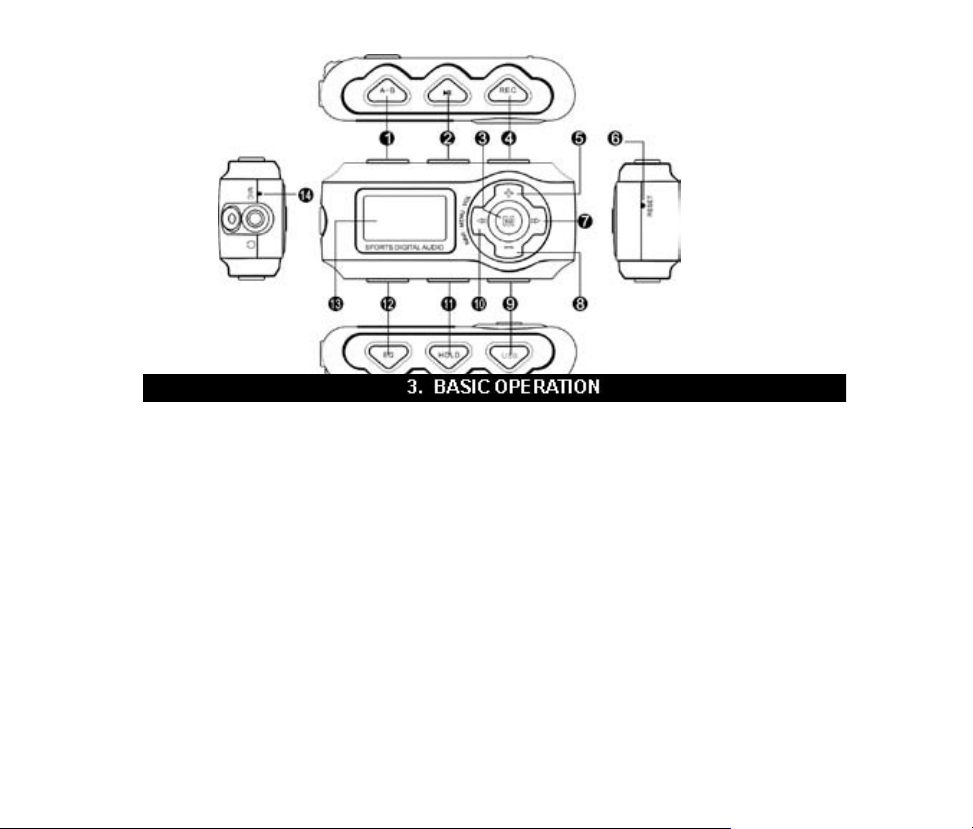
Buttons and functions
1 A-B/REP
2 Play/Pause/Stop
3 M button
4 REC
Page 8

5 Vol+
6 Reset
7 Next
8 Vol
9 USB port
10 Last
11 Hold
12 EQ
13 LCD display
14 Microphone
Page 9
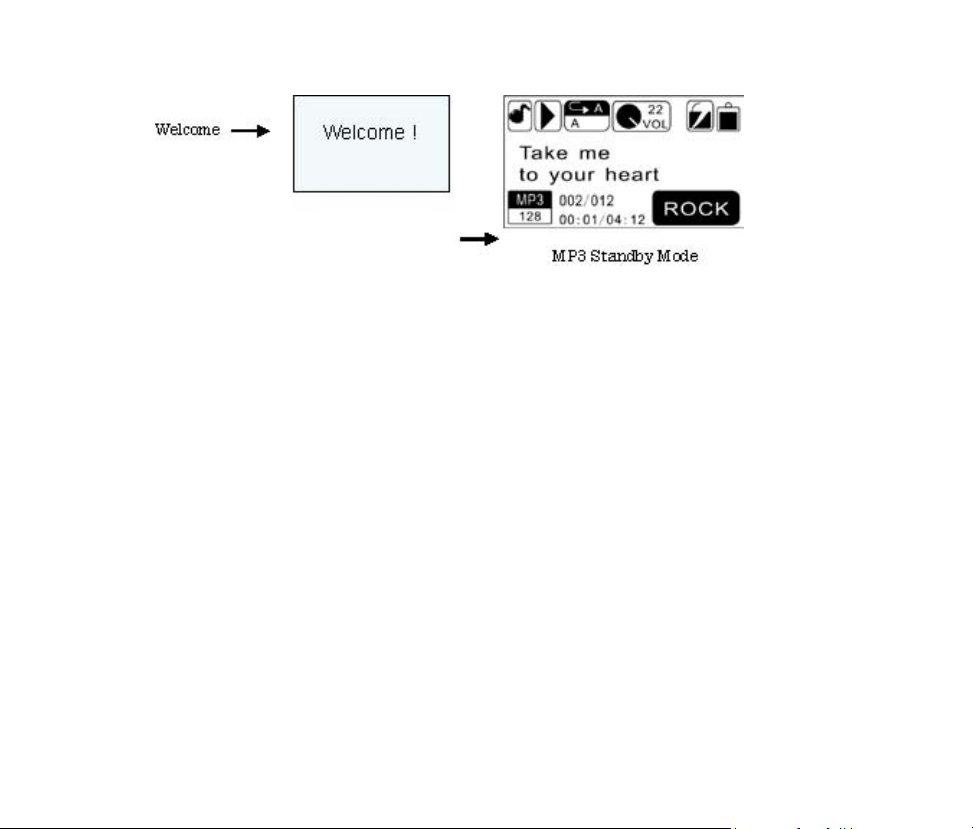
Turning on/off
ٛ a. From shutdown mode, press the ►|| button to power the
player on and display the “welcome” text, then enter into MP3 standby
mode.
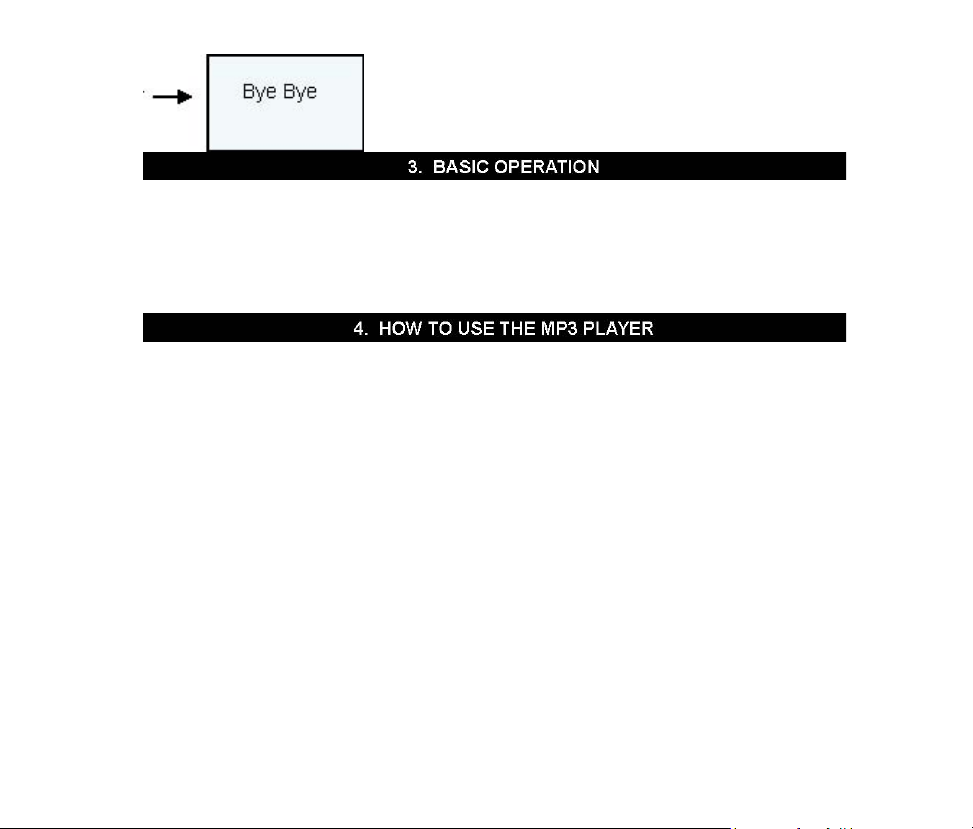
ٛ b. From MP3 standby, pause and play mode, keep pressing ►||
Page 10
button, the system will save the data and enter shutdown mode.
Power Off
Page 11
Menu function
From standby, pause or play mode, keep pressing M button to enter main
setting mode.
Press the ►► or ◄◄ button to select: Music, Voice, FM Radio, Songbydir,
Delete, Utility, Settings. Repress the M button to enter the appointed option.
Play MP3 files
From standby, play or pause mode: keep pressing the M button to enter the
main menu, press the or button to select the music mode, repress the M
button to enter.
ٛ
a. .. From MP3 standby mode, you can press the ►|| button to play MP3
music as well as pause and resume playing.
ٛ
b. From MP3 standby or play mode, you can press the ►► or ◄◄
button to select last or next ... music.
Page 12
ٛ
c. From play mode, you can press the ►► or ◄◄ button to fast
backward or forward this music.
ٛ
d. From play mode, you can press V + or V- button to adjust volume.
ٛ
e. From MP3 any mode, keep pressing ►|| button. The player will
save the data and enter shut
ٛ
f. Press the EQ button to change the sound effect quickly. Keep
pressing the EQ button to change the play mode quickly.
..... down mode.
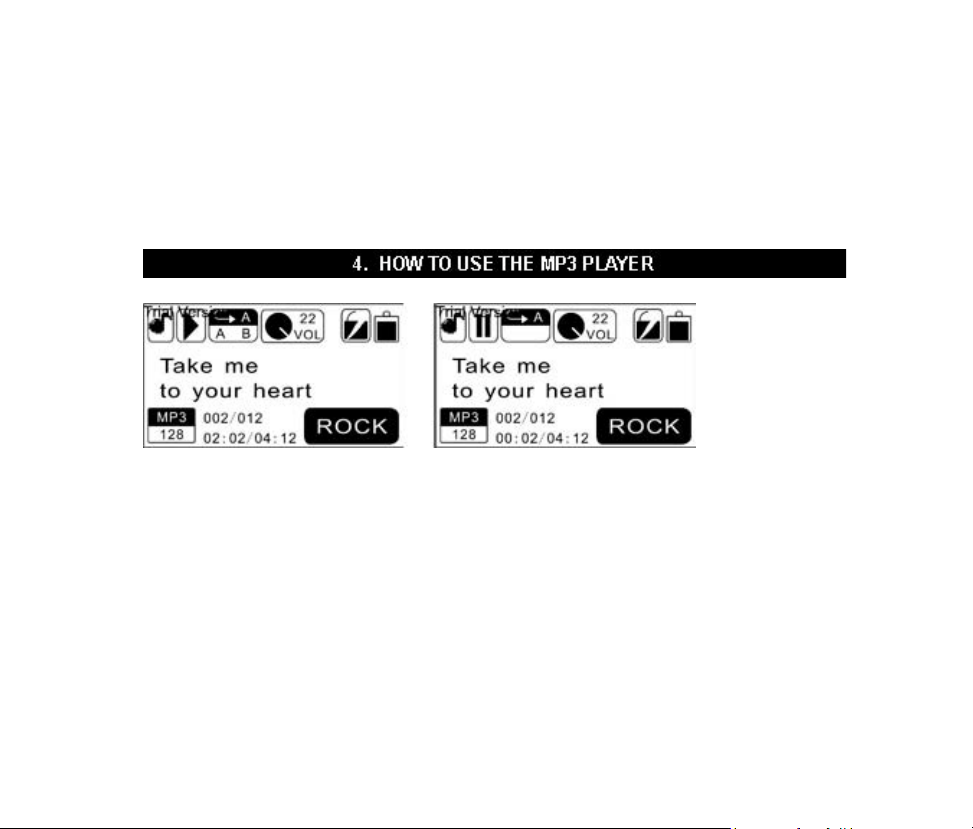
ٛ g. A-B play mode Under the MP3 or voice play mode:
ٛ Press the A-B button to select start point A.
ٛ Press the A-B button to select end point B. MP3 will play between
A-B.
Page 13

ٛ Press the A-B button again to cancel the setting and resume
playing MP3 or voice.
Record Mode
ٛ From MP3 or voice standby mode, keep pressing the REC button
to enter the record ......standby mode.
ٛ Press the ►|| button to begin recording, repress to pause
recording. Press the ►|| button third time to resume recording.
ٛ Keep pressing the ►|| button to stop and save recording in WAV
format then enter into ...voice standby mode
ٛ Press the►|| button to play the voice file, repress this button to
pause, and repress a third time to resume.
Page 14

Play Mode
From MP3 standby, play or pause mode: keep pressing the M button to
enter the main menu, press the ►►
or ◄◄ button to select the Voice mode,
repress the M button to enter.
ٛ From voice, or any mode, keep pressing ►|| button the player will
save data and enter ... shutdown mode.
ٛ Keep pressing the EQ button to change the play mode quickly.
Page 15

note:
The EQ selection will be unavailable when playing the voice files.
From play or pause mode: keep pressing the M button to enter the main
menu, press the ►►
or ◄◄ button to select the FM radio mode, repress the
M button to enter. The player will play under the FM default channel.
a. Keep pressing the EQ button to enter the auto scan function. It will save
the station .... automatically after scanning the station. If tuning is still
inadequate, you can keep press-ing the ►|| button to enter the manual
tuning mode. A hand icon appears on the screen. Then press the ►►
or
◄◄ button to adjust FM frequency by 0.1 MHz / each time.
Page 16

ٛ b. Under the FM playing mode, press the ►► button to auto scan
to the next available station, press the ◄◄ button to auto scan the last
available station.
ٛ c. Under the manual tuning mode: if there is no operation for 5s, it
will play the last ............ FM station as default station.
d. Press the A-B button to skip to the last FM station. Press the REC
button to skip to the next FM station.
reminder: At least 30 stations can be saved.
FM recording
Under the FM playing mode, keep pressing the REC button to enter the
record stand by mode, press the ►|| button to begin recording, press
again to pause, keep pressing the
►|| button to stop and save recording in WAV format then return to the FM
Page 17

playing mode.
“Songbydir” function
From play or pause mode: keep pressing the M button to enter the main
menu, press the ►► or ◄◄ button to select the Songbydir mode, repress
the M button to enter. The music and folder under the root directory
appears on the screen.
a. Select to play the music under root directory:
..... 1. You can press the V+ or V- button to find the root directory and press
the M button to confirm playing all the songs under this root directory
of a:/.
Page 18

“Navigation” function
From play or pause mode: keep pressing the M button to enter the main
menu, press the ►►
or ◄◄ button to select the Navigation mode, repress
the M button to enter. The music and folder under the root directory
appears on the screen.
a. Select to play the music under root directory:
..... 1. You can press the V+ or V- button to find the root directory and press
the M button to confirm playing all the songs under this root directory
of a:/.
Page 19

.... 2. Or press the V+ or V- button to select the song which you want to
listen. Press the M button to confirm playing the selected song firstly
b. Select to play the music in the folder and sub-folder:
1. You can press the V+ or V- button to find the relative folder and press
M to confirm ... playing all songs in this folder.
Page 20

2. You can press the V+ or V- button to find a certain folders and press M to
enter. .... Press the ►► button to enter it’s sub-folder, repress the M
button to confirm playing all songs in this sub-folder. If you select a
certain song in this sub-folder to play, the . .................... songs in the folder
of this selected sub-folder can not be played.
Delete function
From MP3 standby, play or pause mode: keep pressing the M button to
enter the main
Page 21

DELETE ALL: Under the Delete mode, press the ►►| or |◄◄ button to
select “delete all”, press the M button to enter the delete selection mode,
repress the ►►| or |◄◄ but-ton to select YES or NO, If you select YES,
repress the M button to confirm deleting all the files in this device. Select NO
to exit.
Page 22

Delete function
DELETE ALL
From play or pause mode: keep pressing the M button to enter the main
menu, press the ►►|
pedometer, stopwatch and exit. Repress the M button to enter. Select the
exit to return to the upper setting.
or |◄◄ button to select the Utility mode. It includes:
Page 23

Pedometer
Under the Utility mode, press the ►►| or |◄◄ button to select
the pedometer, press the M button to enter. The pedometer
will record the steps one by one with the player is shaken once
time. You can press
the EQ button to reset the data. Press the MENU button to exit.
Pedometer
How to listen to music and use Pedometer at the same time, and what
are steps?
From the Music function consumer has to press M button, then press right
button to get to Utility. Press M, then select Pedometer.
Page 24

Pedometer will shut off automatically if there is no movement.
It depends on how you set up the Stop off timing and you can adjust the
automatic shut off in the SETTINGS function under Stop Off.
Can the number of steps be saved/paused and then restarted?
No, it can’t save the steps.
Stopwatch
Under the Utility mode, press the ►►|
or |◄◄ button to select the
stopwatch, press the M button to enter. You can press the A-B button to
begin work and repress the AB button to pause. Press the EQ button to reset and press the MENU button
to exit.
Page 25

Exit: return to the previous setting.
From play or pause mode: keep pressing the M button to enter into main
menu, press the ►►
or ◄◄ button to select the Settings mode, repress the
M button to enter submenu. It includes Language, EQ, Play mode, FM band,
Record type, Contrast, Timer off, Music resume, Reset, About, Exit. Press
the M button to enter the appointed submenu.
Language
Under the settings mode, press the ►►| or |◄◄ button to select the
languages, press the M button to enter, and repress the ►►|
or |◄◄
button to select the language options. They are English, German, French,
Spanish, Italian, Portuguese, Dutch, and Russian. Repress the M button to
save. Select the exit to return to the upper setting.
EQ
Under the settings mode, press the ►►|
or |◄◄ button to select
the equalizer, press the M button to enter, and repress the ►►|
◄◄ button to select the equalizer options. They are Dance, Full
|
Bass & Treble, Full Treble, Large Hall, Live, Party, Reggae, Ska,
Soft Music, Soft Rock, Techno. Press the M button to save and
or
Page 26

select exit to return to the upper setting.
Play mode
Under the settings mode, press the ►►| or |◄◄ button to select
the play mode, press the M button to enter, and repress the ►►|
or |◄◄ button to select the play mode options. They are Normal,
Repeat one, repeat all, Random, Random & Rep. Press the M
button to save.
Reminder: The Random and Random & Repeat cannot be used when you play the voice files.
FM band
Press the ►► or ◄◄ button to select the Europe Band and Japan
Band. Press the M button to save and select exit to return to the
upper setting.
Record type
Press the ►►
or ◄◄ button to select the bit rate of recording. The
recording frequency includes: 7KHZ, 11KHZ, 16KHZ, 22KHZ ,32KHZ,
44KHZ ,48KHZ and
Page 27

Exit. Press the MENU button to save and select exit to return to the upper
setting.
Contrast
Press the ►►
or ◄◄ button to adjust the brightness, after
which you can press the MENU button to save.
Timer off (To choose Stop off and Sleep off functions)
Select from Stop off, Sleep off, exit. Press the M button to enter.
Stop off
When the player is not playing music, it will turn off automatically to save the power
by certain time.
Under Timer Setting press>> or << button to select
The time you want the unit to go off from 00 MIN to 30 MIN.
Sleep off
When you want your player to automatically Stop Playing after a certain
amount of time, 00 up to 3 Hours you can adjust with this setting. Under the
Page 28

Timer setting press the >> or << button to select the time you want it to
automatically shut off 10 MIN, 15 MIN, 30 MIN, 60MIN, 90MIN, 2HR, 3HR.
Backlight setting
Under the Timer setting, press the ( or ( button to select the backlight
setting. Backlight setting includes: Always on, 10s off, 20s off, 30s off,
40s off, 50s off , 60s off and 2mins. Press the M button to save.
Exit return to the upper menu.
Music resume
Select YES to use this function. Select NO to exit.
Reset
Select YES return to the default setting. Select NO to exit.
About
You can check the total memory of the unit and available memory capacity.
Page 29

Exit Return to the SETTINGS menu.
Lock function
On any playback mode, Keep pressing the Hold button until there is a LOCK
icon appears on the screen. It means the buttons are locked. You must keep
pressing the Hold button again until an UNLOCK icon appears on the screen
and then the buttons can be used availably.
Locked: Unlocked:
Reset function
If the player can’t be used normally, please use a small
Page 30

plastic stick or dielectric to reset the player.
Rechargeable Mode
Built in environmental protection chargeable battery in the player, Insert one
end of the USB cable to the PC and the other end into the MP3 player; the
MENU button indicator light will always on while charging. The play time is
more than 10 hours after charge.
plug into ports
lyric sync
Page 31

This player supports lyric sync function.
Notice: The lyric name shall be the same as music with extension of *. LRC and saved in the same directory, and
only the lyrics with time indication can be displayed properly.
Technical specifications
Bit rate: 32~320Kbps (Mp3) 32~192Kbps (WMA)
SNR: >90db
Dynamic range: >80(1KHZ)
Distortion: <0.05% (REFERENCE LEVEL: 0dB (MP3) 1 mW
USB interface: USB2.0 full speed
Memory: 128MB/256MB/512MB/1GB
Size: 80.3*38.8*28mm
Working condition: Humidity <85%, -10~40
Condition of storage: Humidity<90%, normal temperature
Output: 5mW*2
Battery life: >10h, (display on)
Weight: <45g
Language: English, German, French, Spanish,
4mW -52dB/-62dB (VOICE, REFERENCE FREQUENCY:1KHZ)
Italian Portuguese, Dutch, Russian Lyric sync ID3 information display.
__
Page 32

Symptoms Causes Solutions
No display or display
LOW BATTERY after
pressing the ►| |
button.
No sound during
playing.
The battery is out of
power.
1. Volume is too low,
or without music in
the player, or battery
low. 2. The MP3 or
WMA file is broken.
Please charge.
1. Adjust the volume, or charge during
downloading. 2. Download the documents
again. Be sure to “Safely Remove
Hardware”.
Unable to write or read
files after connection or
MP3 player can not be
recognized by PC.
The USB is not
connected to PC
properly.
Connect to the USB interface again and
verify PC identified the removable disk.
Page 33

Symptoms Causes Solutions
The individually compressed MP3 files
can not be played.
No response after
pressing button.
Can not open the
disk or prompt I/O
error after connecting
PC.
The MP3 files currently are compressed
with different compress rate and format,
while this player supports the standard
compressed MP3 only, please do not
adopts layer one or two compression.
HOLD switch is on, buttons are locked.
Caused by some improper operation. Firstly, connect USB
Download the standard
MP3 files again.
Keep pressing the HOLD
button to unlock
cable and click relative
upgrad-ing process.
Secondly, keep pressing
the PLAY button and
release until the
upgrading dialog box
appears after scanning,
then press START to
format and upgrade will
solve the problem.
Page 34

drM function
Warning : Download operation of WMA music with DRM protection On
Window 98SE/ Window ME / Windows 2K/ Windows XP, music with DRM
should be transferred by Windows Media Player 9.0 and 10.0 version (10.0
version for Windows XPonly) to player.
Other download operation will probably cause player to not read the music
with DRM file.
Operation introduction
On Window 98SE/ Window ME / Windows 2K/ Windows XP, user should
upgrade Windows Media Player to 9.0 or 10.0 version ( 10.0 version only for
Windows XP).
System may request to download the license in case user does not
download the music with DRM properly from the website.
In this case, user needs to download the license from music publisher as
instructed of Microsoft® website, shown in the operating window.
On Windows Media Player 10.0 version (Windows XP only)
Page 35

1) Connect player to PC2) Choose the desired WMA music with DRM.3)
Click Right button of mouse and choose “Add to Sync list”
4) On the open windows , choose
“Sync ” option.5) On “Sync ” window,
choose the desired WMA music with
DRM as step 2) And choose
“Removable Disk” 6) Click “start Sync“
to transfer the WMA music with DRM to
player.
Page 36

1). Never use the player while driving or operating a vehicle to avoid traffic accidents,
which may also be against the law in some districts. Take care while walking,
especially crossing the street. 2). Please also do not listen in extremely high volume to
avoid hearing loss. Wherever with potential risks, please stop using the player for
safety purpose.
3). Please insert the earphone prior to turn on the player, which can not only avoid
damaging the earphone but keep the player in good condition.
4). Keep the player clean and never store the player close to a heat source or dirty,
humid or rainy places and avoid direct sunlight.
Page 37

5). If the surface is dirty, please clean with soft cloth, wet with clean water or soft
abluent and never clean the case with alcohol or diluents. 6). Never use the player in
extremely dry environment to avoid static. 7). Never disconnect the player from PC
abruptly during downloading, uploading and formatting to avoid program failure.
Warning: When the player is used as removable disk, please follow the proper file
download and upload procedures. Our company assumes no responsibility for any file
lost due to misuse.
No part of this manual may be copied, republished, reproduced, transmitted or distributed in
any way without prior written consent of Nextar, Inc. Any unauthorized distribution of this
manual is expressly forbidden.
Nextar may find it necessary to modify, amend or otherwise change or update this manual.
We reserve the right to do this at any time, without any prior notice. All specifications
and features are subject to change without notice. All screen shots shown are simulated
and may not represent the actual screen on production units sold to consumers.
For instruction manuals, updated drivers or other information, be sure to visit our
website at:
www.Nextar.com
Or write us at:
Nextar
Page 38

1661 Fairplex Dr.
La Verne, CA USA 91750
Copyright © 2006
 Loading...