

Page 1
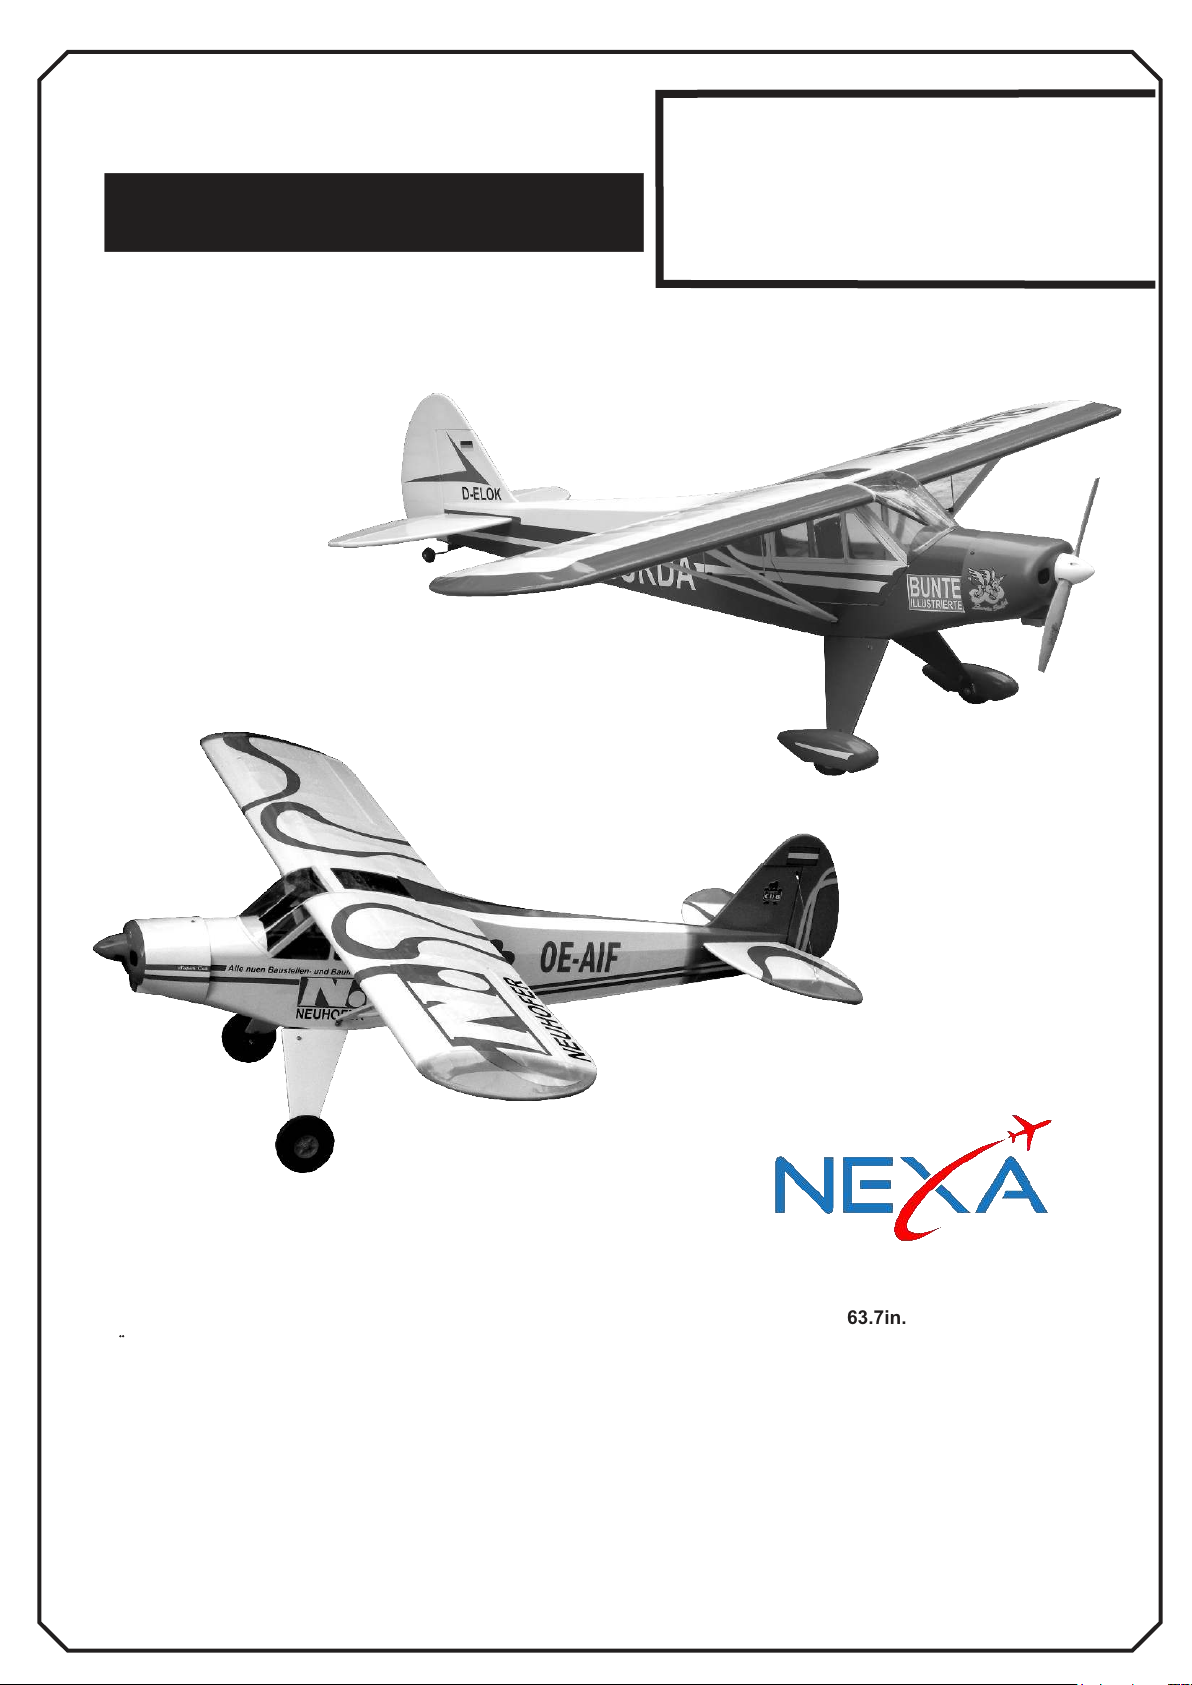
Radio control model
R/C Flugmodell
PIPER PA-18
INSTRUCTION MANUAL
MONTAGEANLEITUNG
SUPER CUB
Designed for brushless electric motors (.46-.52 class glow conversion optional)
Entwickelt für Brushless Elektro Motoren (7,5 -8,5cc Glühzündermotor Einbau möglich)
Floats available as an option! (No. C4682)
Schwimmer als Sonderzubehör erhältlich! (Best.Nr.C4682)
TECHNISCHE DATEN
Spannweite 1620mm
Lange 1250mm
Elektroantrieb (siehe nächste Seite)
Verbrennerantrieb 7.5cc 2-T / 8.5cc 4-T
Fernsteuerung 5 Kanal / 4 -5 Servos
WARNING! This radio controlled model is NOT a toy. If modified or flown carelessly it could go out of control and
cause serious human injury or property damage. Before flying your airplane, ensure the air field is spacious enough.
Always fly it outdoors in safe areas and seek professional advice if you are unexperienced.
ACHTUNG! Dieses ferngesteuerte Modell ist KEIN Spielzeug! Es ist für fortgeschrittene Modellflugpiloten bestimmt,
die ausreichende Erfahrung im Umgang mit derartigen Modellen besitzen Bei unsachgemäßer Verwendung kann
hoher Personen- und/oder Sachschaden entstehen. Fragen Sie in einem Modellbauverein in Ihrer Nähe um
professionelle Unterstützung, wenn Sie Hilfe im Bau und Betrieb benötigen. Der Zusammenbau dieses Modells ist
durch die vielen Abbildungen selbsterklärend und ist für fortgeschrittene, erfahrene Modellbauer bestimmt.
SPECIFICATIONS
Wingspan 63.7in.
Length 49.2 in.
Electric Motor (See next page)
Glow Engine .46 2Stroke / .52 4-Stroke
Radio 5 Channel / 4 -5 Servos
Page 2
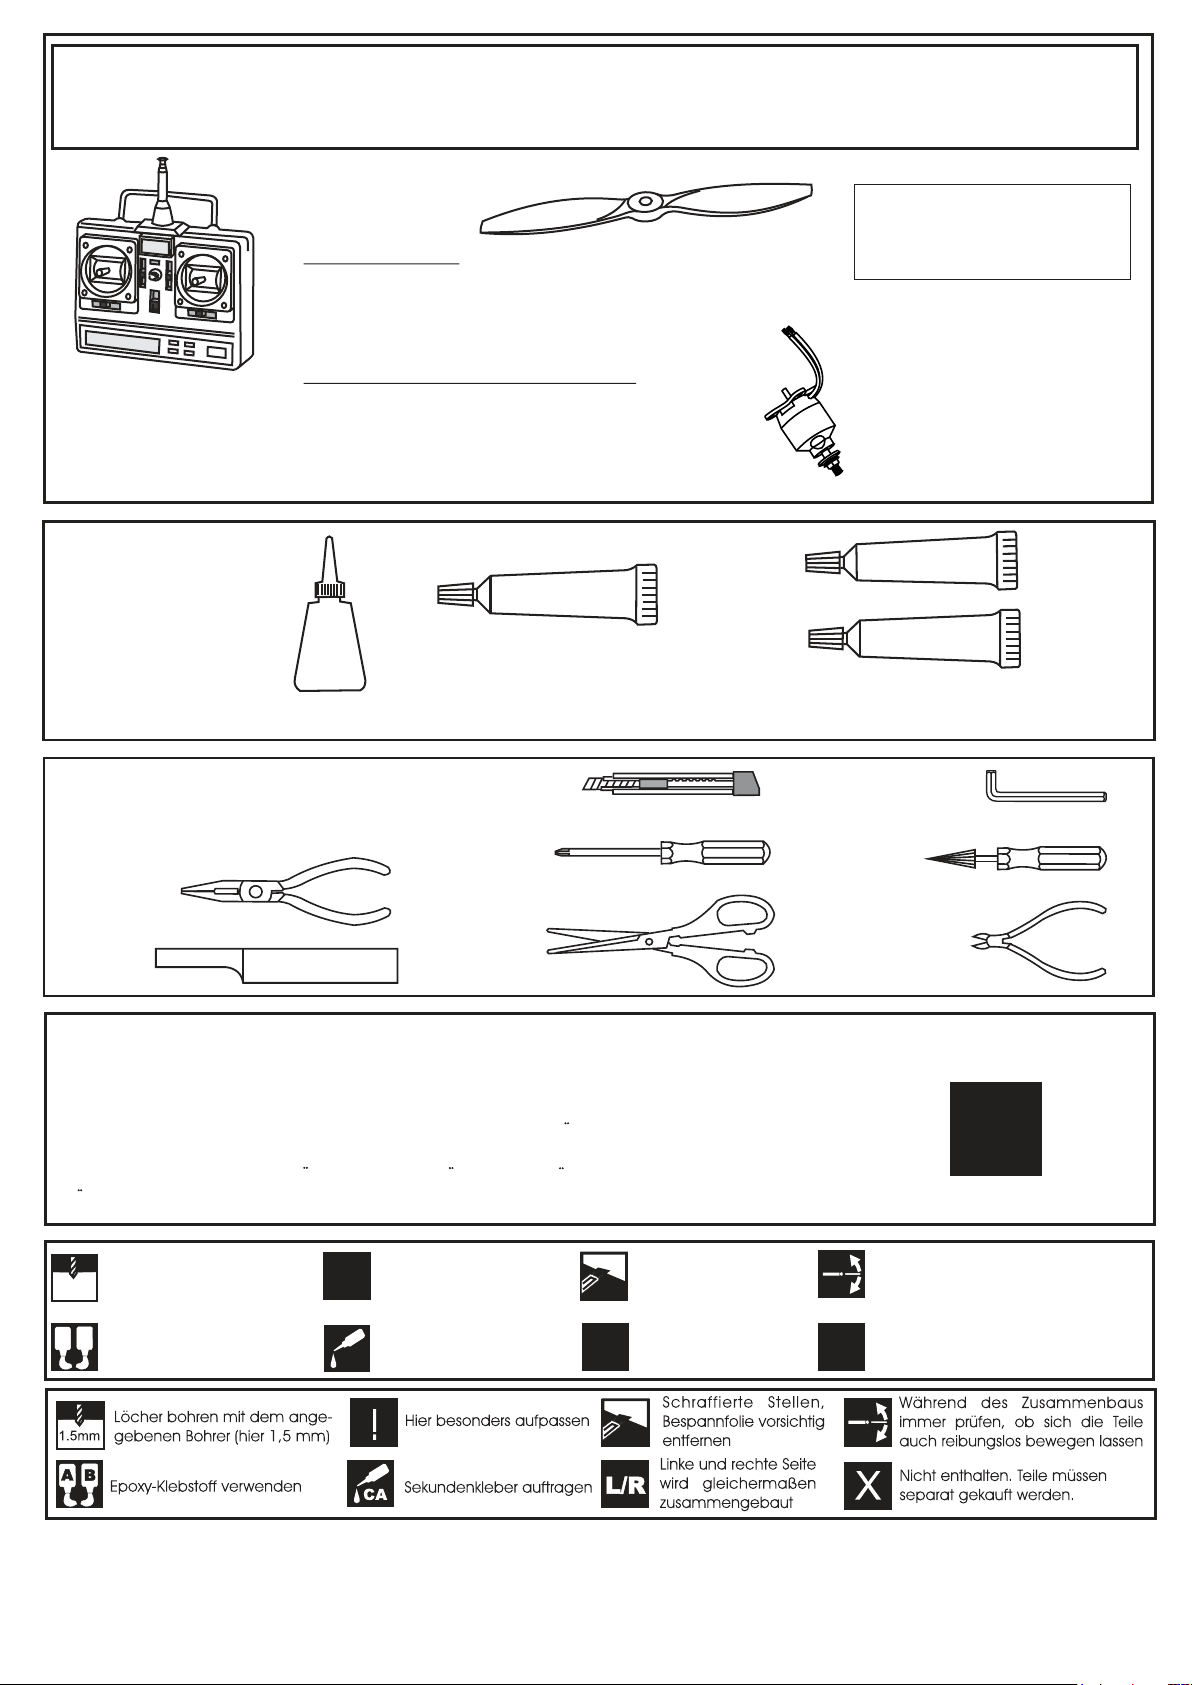
RECOMMENDED ACCESSORIES (Purchase separately)
Empfohlenes Zubehör (Nicht im Lieferumfang enthalten)
Egänzungskit Verbrenner
(Tank + Motorträger)
5 - channel radio
5 - Kanal
Fernsteuerung
Antrieb Standard:
BOOST 40 Brushless Combo Set, Best.Nr. C2983
LiPo Battery RED POWER 3200-3S, Best.Nr. C3164
Luftschraube 12*6, Best.Nr. C1937
Antrieb Tuning (Kraftvoller Kunstflug):
BOOST 60 Brushless Combo Set, Best.Nr. C3174
LiPO Akku RED POWER 4250-5S, Best.Nr. C4547
Luftschraube 13*8, Best.Nr. C2846
SILICON
Best.Nr. C4165
EPOXY A
1 x Servo S4020
(für Seitenruder)
Best.Nr. C1687
3 x Servo S4020
(für Höhen- und Querruder)
Best.Nr. C4995
Cyanoacrylate Glue
Sekundenkleber
CA
Silicon Glue
Silikonkleber
Epoxy Glue (30 minutes type)
Epoxy-Klebstoff (30min)
Tool Required/ Empfohlenes Werkzeug
.........................................................
.........................................................
.........................................................
.........................................................
.........................................................
.........................................................
.........................................................
.........................................................
.........................................................
.........................................................
.........................................................
The pre-covered film on ARF kit may wrinkle due to variations of temperature.
Store model in a cool and dry place for awile.
Then, staring with low heat, you may carefully use a hair dryer to smooth out wrinkels.
Die Bespannung des Modells kann durch Temeratureinflusse erschlaffen oder Falten
werfen z.b bei zu starker Sonnenenstrahlung oder Hitze.
Stellen Sie das Modell zunachst an einen kuhlen Platz fur eine bestimmte Zeit. Danach
konnen Sie versuchen die restlichen Falten vorstichtig mit einem Haartrockner zu behandeln.
EPOXY B
!
Drill holes using the stated
1.5mm
size of drill
(in this case 1.5 mm Ø)
A
B
Use epoxy glue
CONVERSION TABLE
1.0mm = 3/64”
1.5mm = 1/16”
2.0mm = 5/64”
2.5mm = 3/32”
3.0mm = 1/8”
4.0mm = 5/32”
5.0mm = 13/64”
6.0mm = 15/64”
Take particular care here
!
Apply cyano glue
CA
10mm = 13/32”
12mm = 15/32”
15mm = 19/32”
20mm = 51/64”
Hatched-in areas:
remove covering
film carefully
Assemble left and right
L/R
sides the same way.
25mm = 1”
30mm = 1-3/16”
45mm = 1-51/64”
Check during assembly that these
parts move freely, without binding
Not included.
These parts must be
X
purchased separately
Page 3
1
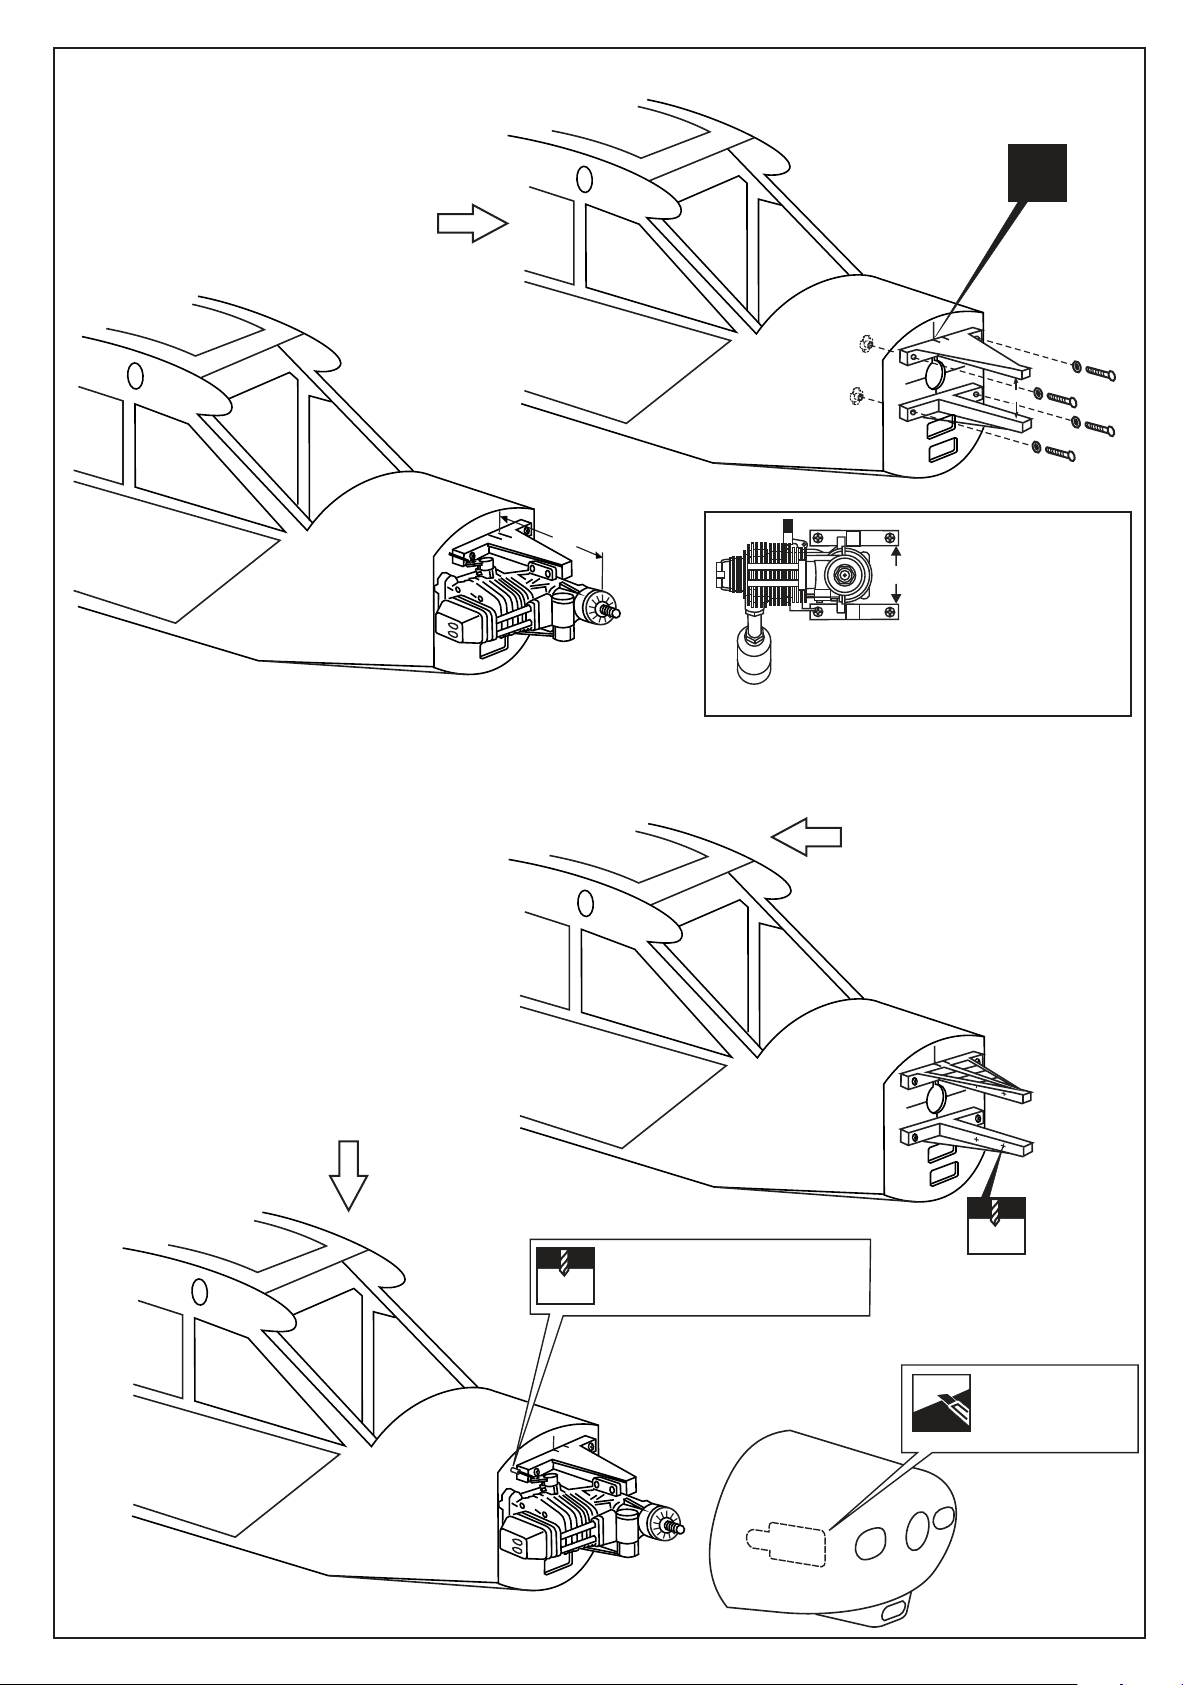
Securely attach the engine mount to the
A
fire-wall using the four 4x25mm screws.
Note the side thrust for motor!
Sturz und Zug beachten!
Position the engine on the engine mount beams so the
B
distance from the prop hubto the fire-wall is 102mm/(4”).
Using a pencil, mark th engine mounting plate where
the four holes are to be drilled. Note: Mark the mounting
plate through the engine mounting flanges.
102mm
the mounting plate and so they are
almost touching both sides of the
FRONT VIEW
engine crankcase.
Align the mark on both
mounts with the center
mark on the fire-wall
Set the engine on the
engine mounting beams.
A
Adjust the spacing of
the beams so they are
centered in relation to
Remove the engine and drill
C
a 3.5mm hole through the
beam at each of the four marks
made in Step B.
!
A
Reposition the engine on the mounting
D
beams, aligning it with the holes drilled
in Step 3. Insert one 3x25mm screw through
each of the mounting holes. Apply Silicon
to each of the 3x25mm screws and firmly
secure the engine to the motor mount using
four 3mm nut.
Drill the hole through the fire-wall
for the plastic pushrod tube
2.5mm
Note: It may be easier to temporarily remove the throttle
arm from the engine to insert the Z bend of throttle push-rod.
3.5mm
Trim the cowling for
engine and muffler.
Then, position the
cowling in place.
Page 4
2
A
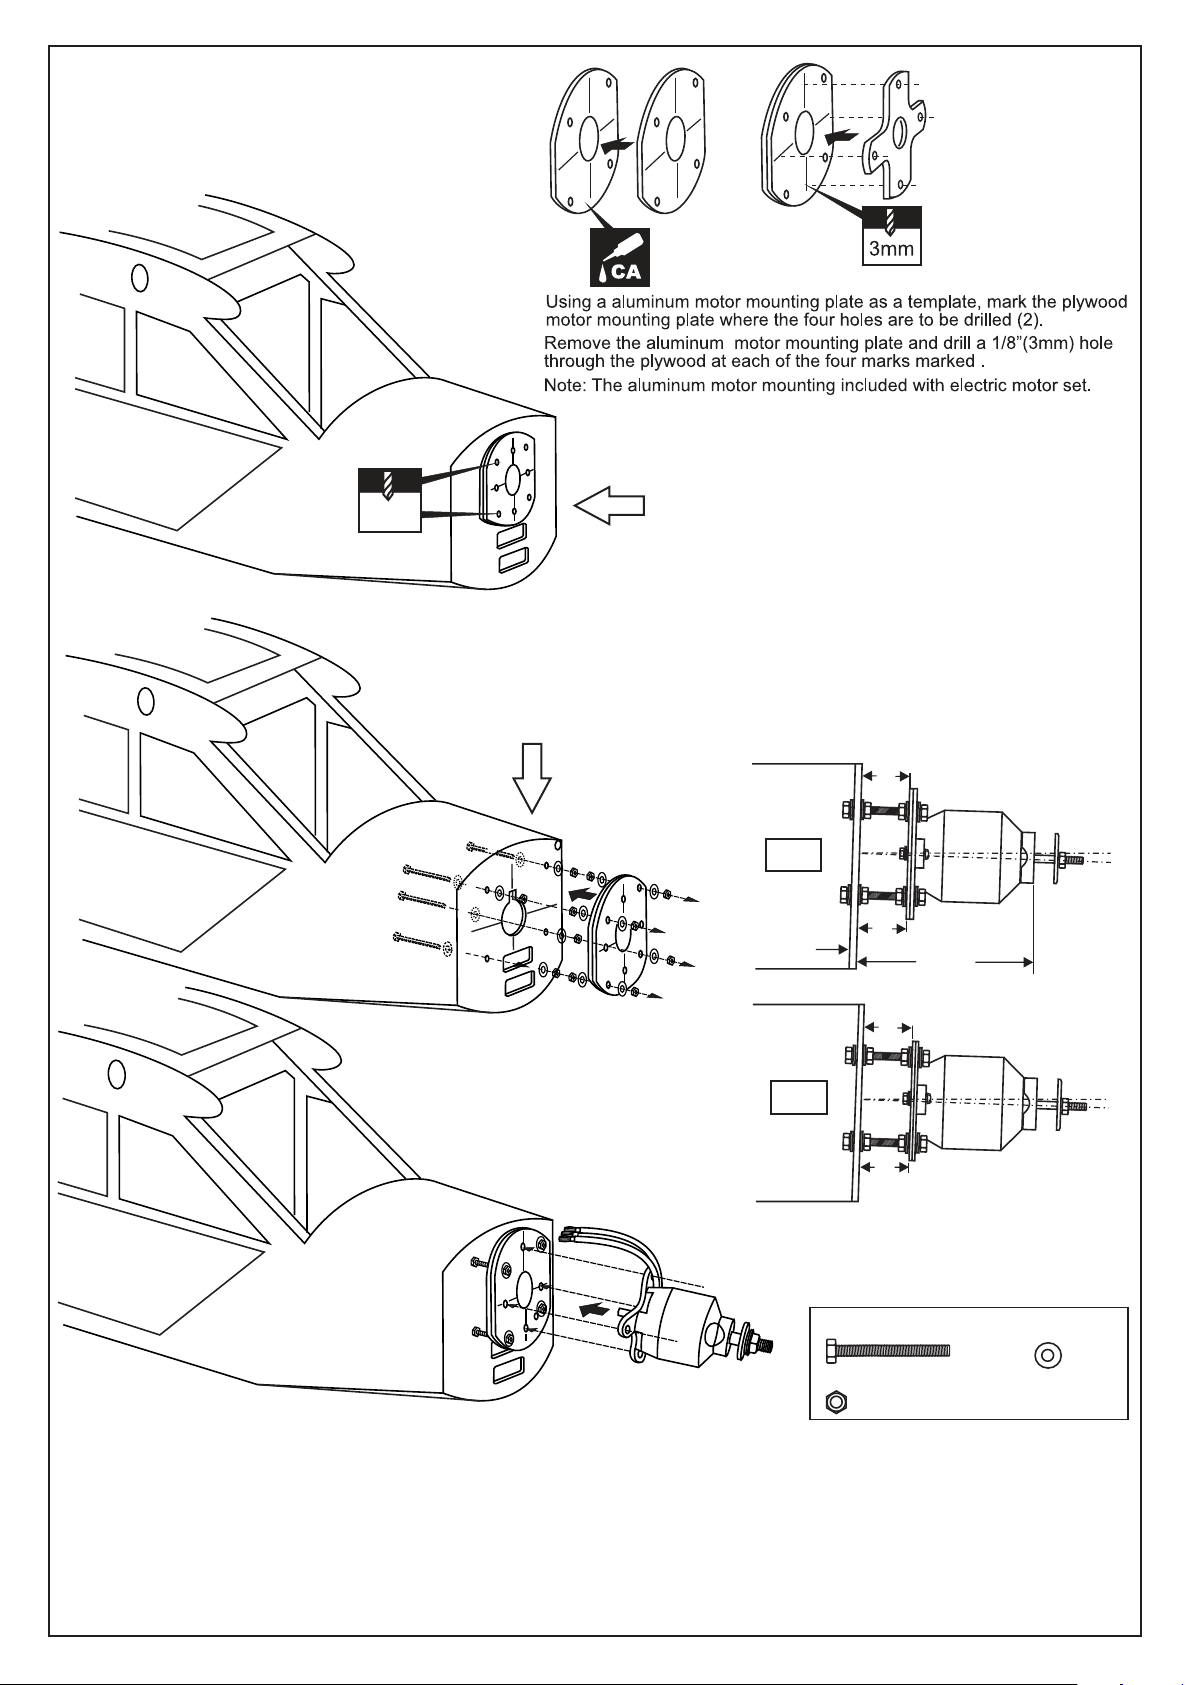
Using a plywood motor mounting plate as a template,
C
13/64”
5mm
Push the four 5x35mm bolts through the fire-wall as shown (5).
D
Reposition the plywood motor mounting plate and secure
it in place with twelve 5xmm nuts and washers (6).
Note: B=B’(Side-view) and A=A’(Top-view)
mark the fire wall where the four holes are to be drilled .
Remove the plywood motor mounting plate and drill a
13/64”(5mm) hole through the fire-wall at each of the four
marks marked above.
B
SIDE-VIEW / Seitenansicht
B
Attach the aluminum motor mounting
plate on to the motor and secure it in
place with four screws ( included with
motor set).
B=B’
Firewall
Motorspant
A=A’
B’
90mm
(3.54”)
A
A’
! Engine thrust on balk head
is already adjust at factory
Sturz und Zug beachten!
TOP-VIEW / Draufsicht
5x35 screw
5mm nut
X12
5mm washer
X4
X16
Sperrholztrager Platten zusammenkleben, wie gezeigt ausrichten
und Locher bohren.
Motor nach untenstehendem Schema einbauen.
Fur optimale Leistung empfehlen wir folgende Komponenten:
-Brushless-Motor
-Brushless Regler
-LiPO 3700-5S
-Luftschraube 12*6 - 13*8
For maximum performance, we recommended
the following:
-Brushless-Motor
-Brushless Regler
-LiPO Battery 3700-5S
-Propeller 12*6 - 13*8
Page 5
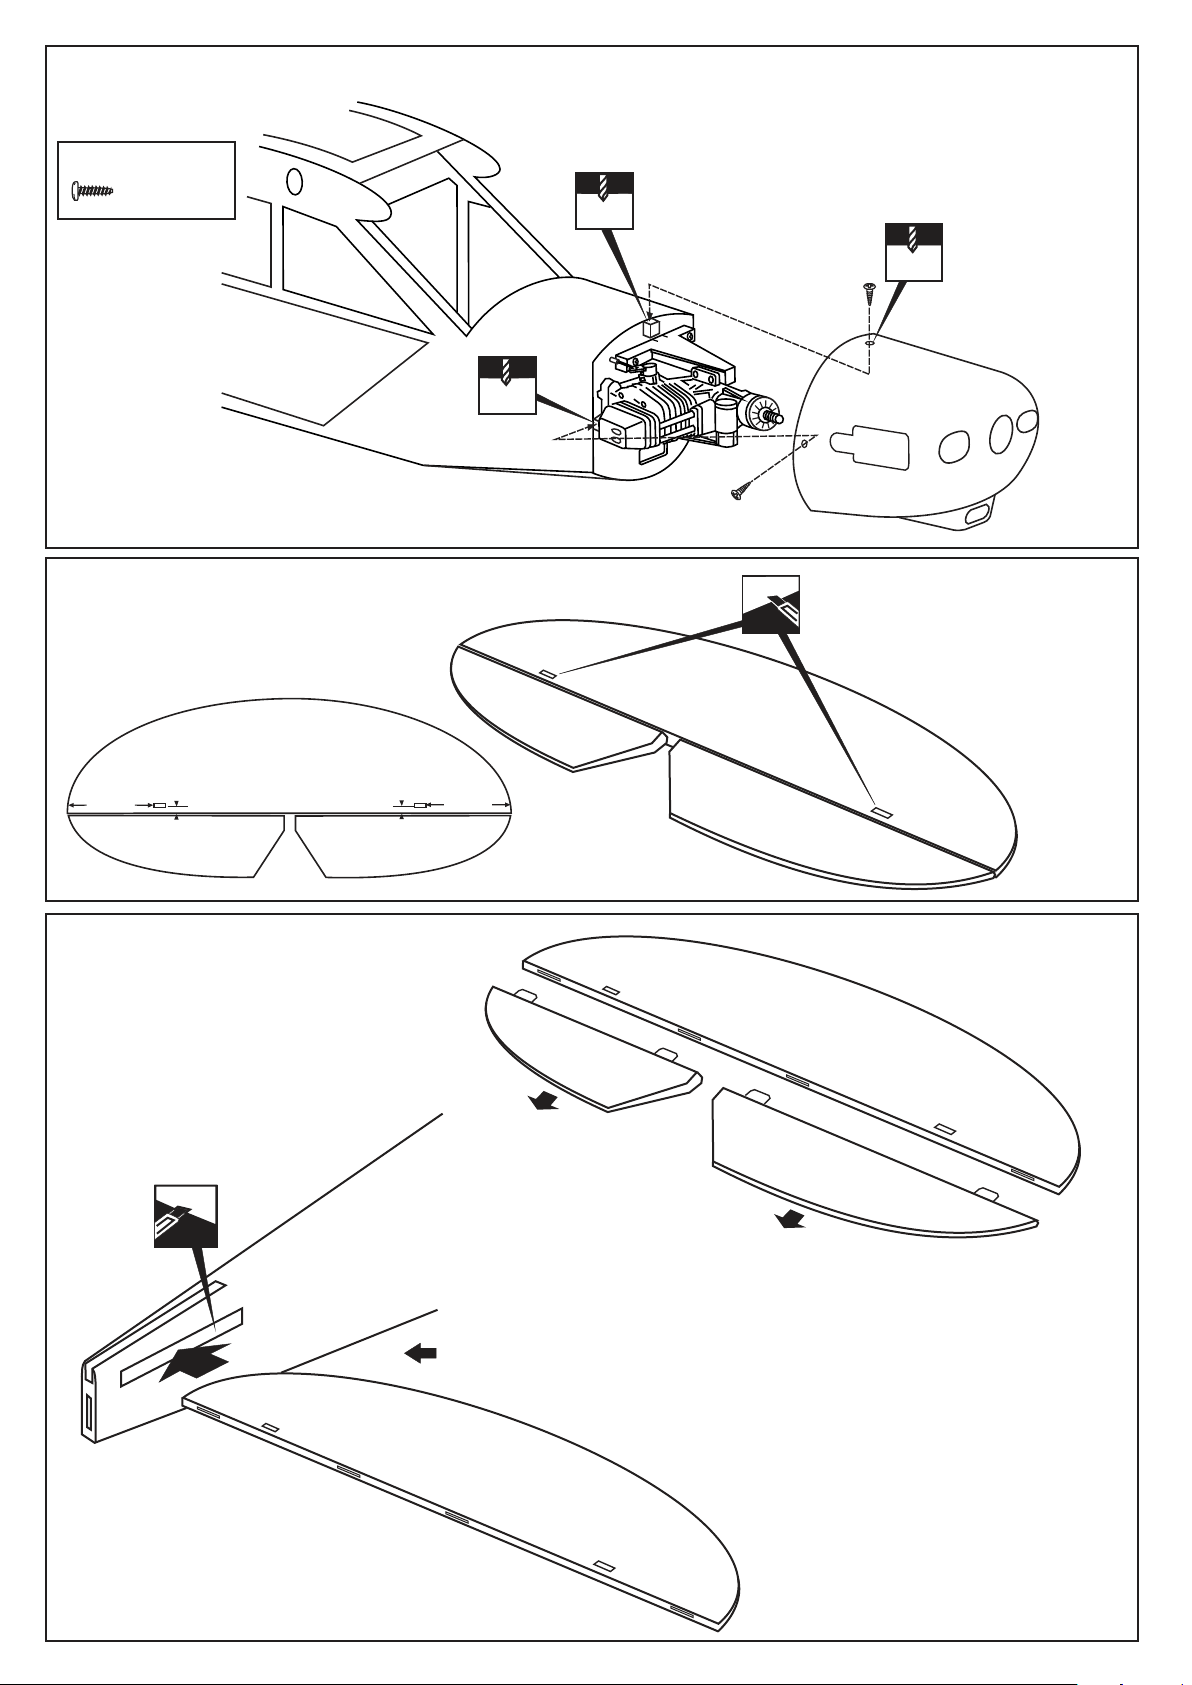
3
2.5x8mm screw
............3
4
2.mm
2.mm
2.mm
Cut two slots (3x7mm and 3mm deep)
along the trailing edge of the horizontal
stabilizer.
TOP VIEW / Draufsicht
85mm
5
HORIZONTAL STABILIZER
TOP VIEW / Draufsicht
4mm
Full the elevator out of the
horizontal stabilizer.
5A
Cut away only
the film both side
4mm
85mm
5B
Page 6
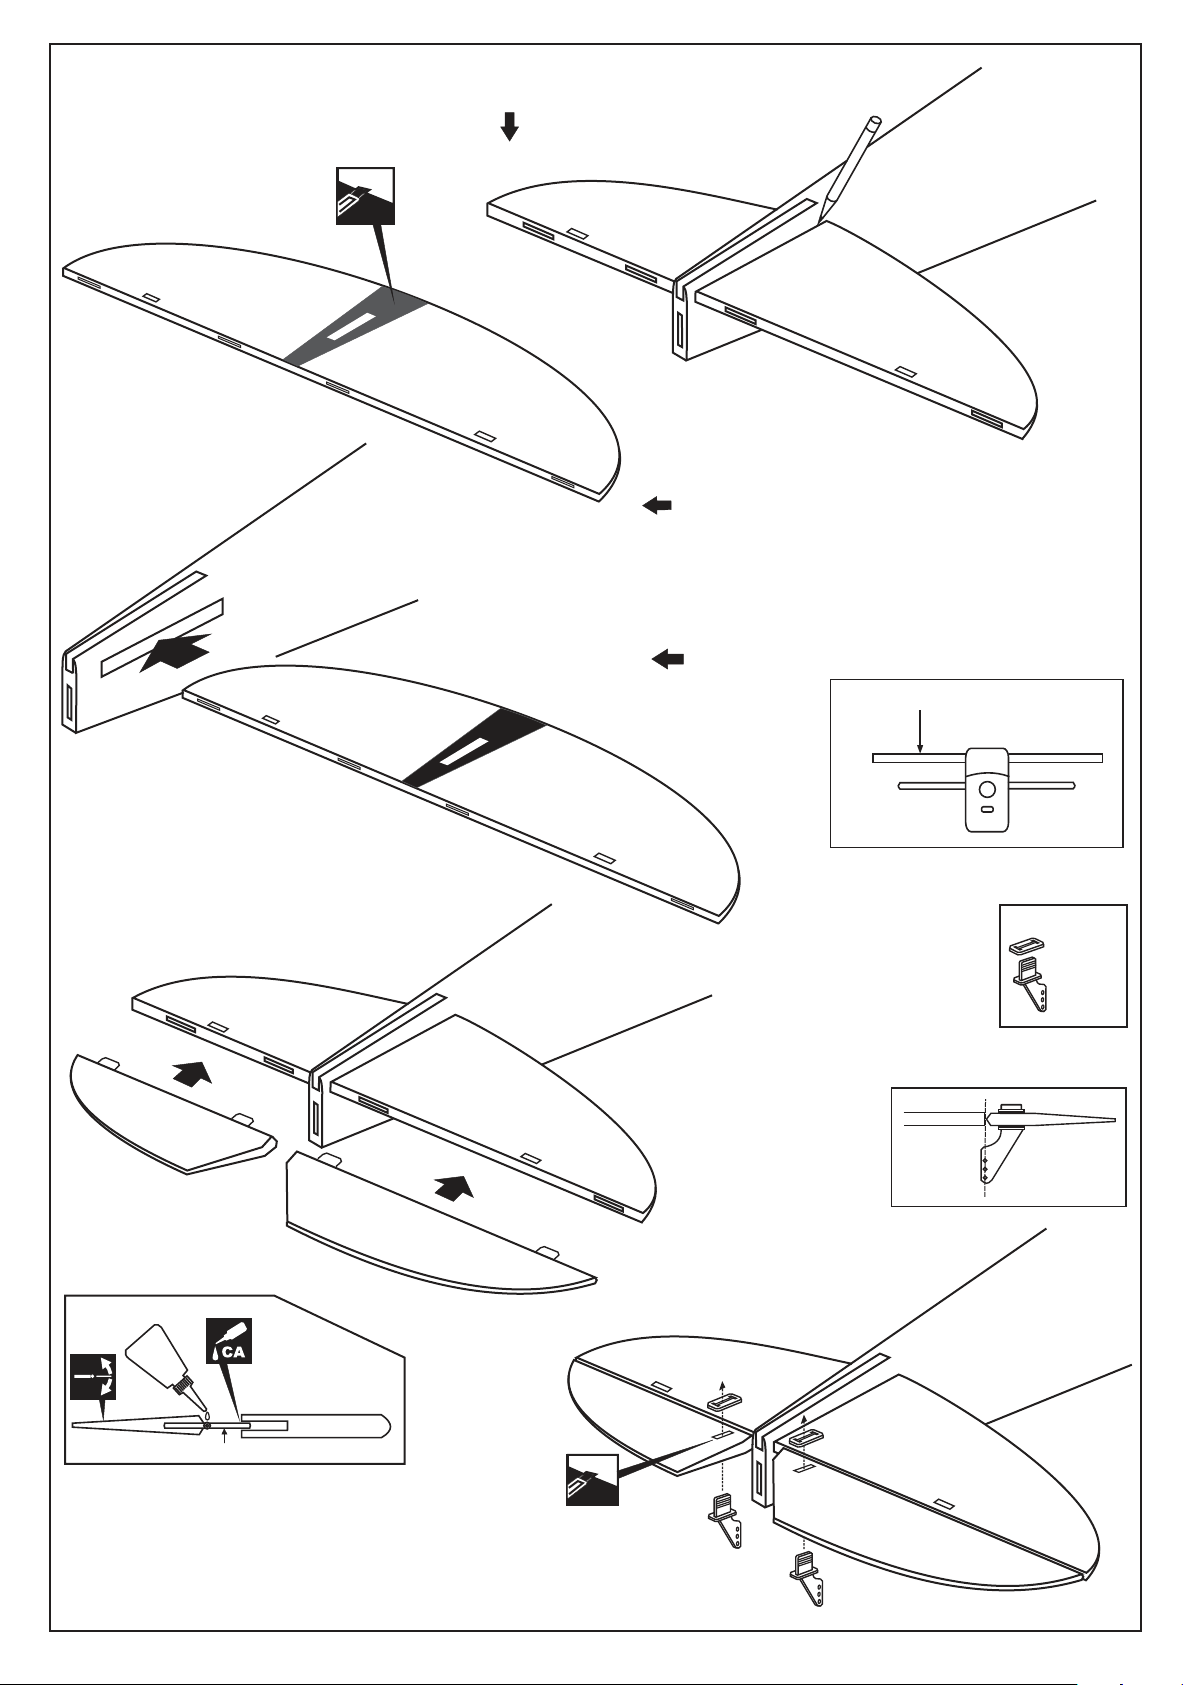
6
Cut away only
the covering
both side
6A
When you are satisfied with the alignment,
use a pencil to trace around the top and
bottom of the stabilizer where it meets the
fuselage.
Remove the horizontal stabilizer from the fuselage.
6B
Using the sharp hobby knife, carefully cut away the
covering inside the lines which were marked above.
* WARNING: When removing any covering from the airframe,
please ensure that you secure the cut edge with CA or similar
cement. This will ensure the covering remain tight.
Install the horizontal stabilizer into the fuselage and
6C
adust the alignment as described in steep 5B. Secure
the horizontal stabilizer in place using CA glue.
Note: the hole on the center of
the stabilizer must be coincidental
with the center line of the fuselage.
! Securely glue together If coming off during
fly, you lose control of your air plane.
6D
Aluminum wing joiner
B=B’
B
Note: The slots for the control horn
installation are pre- cut at factory.
B’
Control horn
...........2
Petroleum jelly
Hinge
Apply a thin layer of machine oil or petroleum jelly
to only the pivot point of the hinges on the elevator,
then push the elevator and its hinges into the hinge
slots in the trailing edge of the horizontal stabilizer.
There should be a minimal hinge gap.
When satisfied with the and alignment, hinge the
elevator to the horizontal stabilizer using CA glue.
STABILIZER
6E
Cut away only
the covering.
Page 7
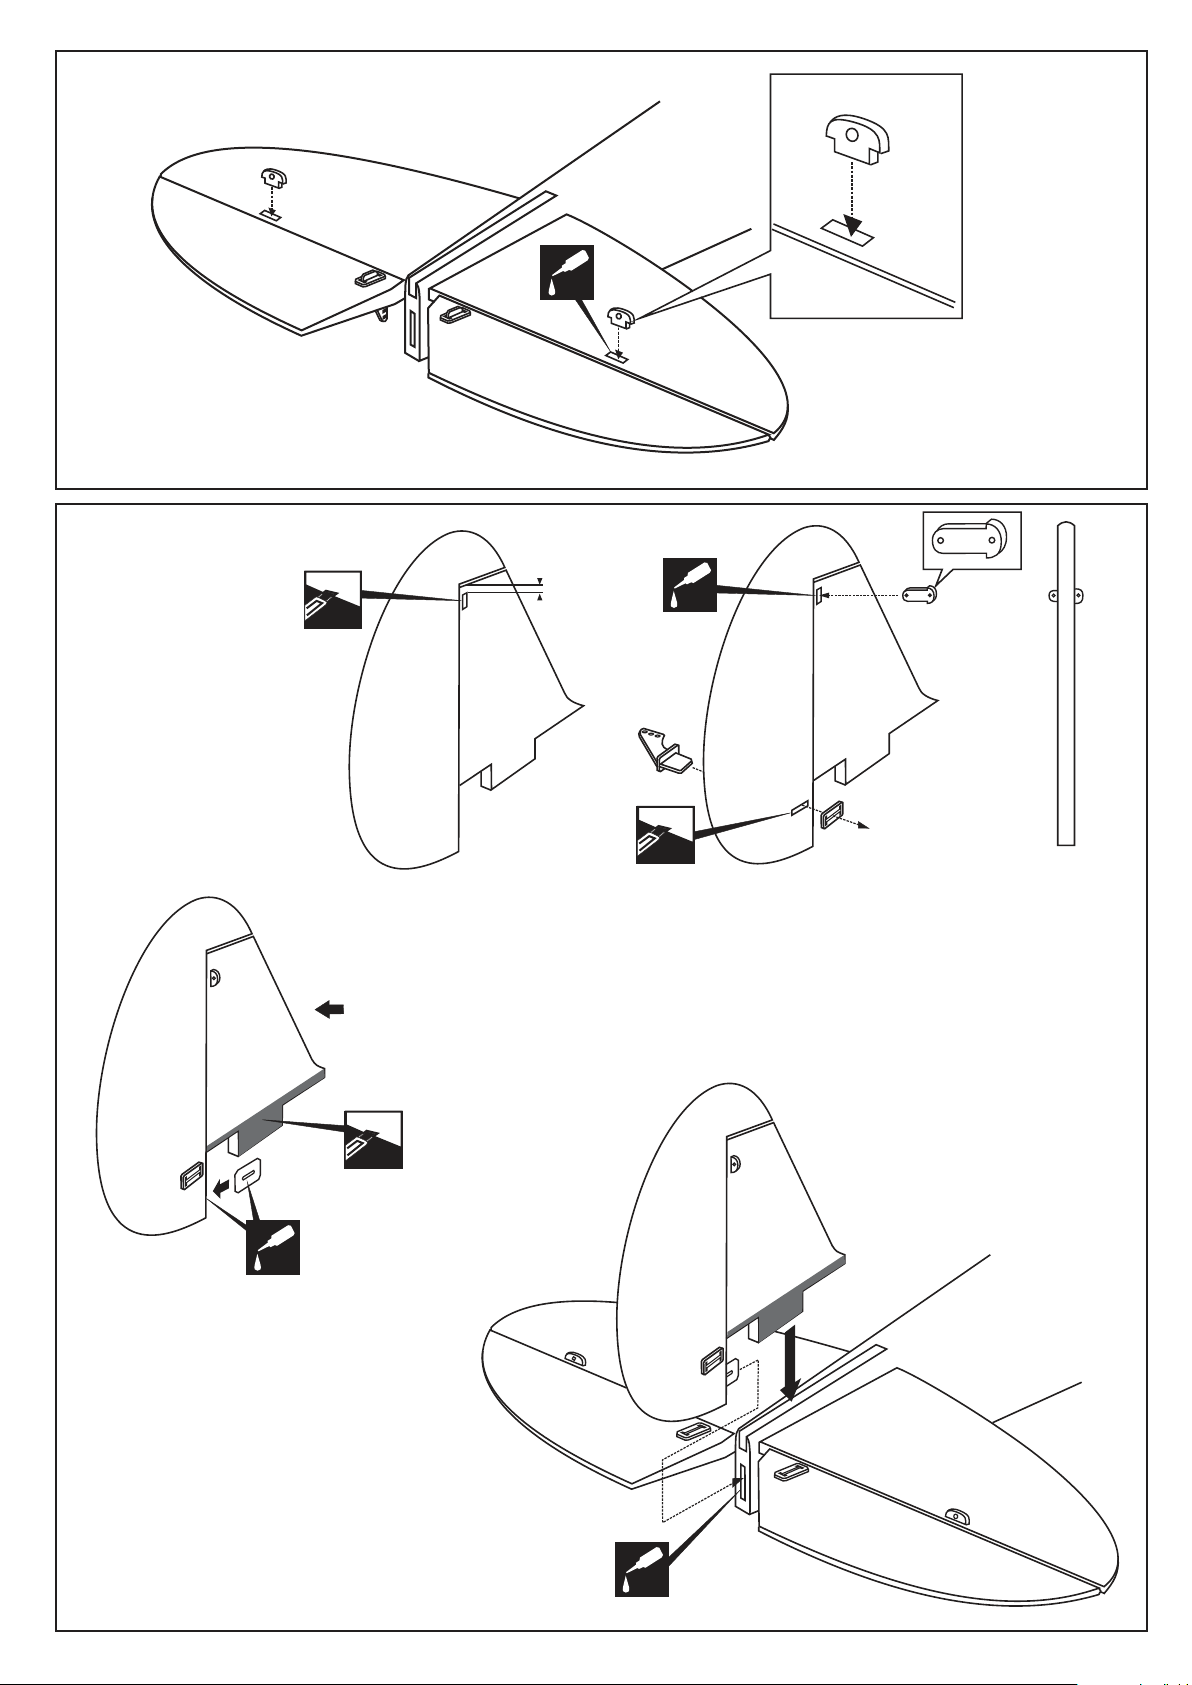
7
CA
8
Cut a slots (3x7mm and through
both the covering and balsa wood)
along the trailing edge of the
vertical stabilizer.
Paper hinge
10mm
Cut away only
the covering
Trial fit the vertical stabilizer in place. Check the alignment of the vertical stabilizer.
If the parts will join, but with a gaps, sand or trim the parts a little at a time until the parts meet
exactly with no gaps.
When you are satisfied with the alignment, use a pencil to trace around the left and right of the
stabilizer where it meets the fuselage.
Remove the vertical stabilizer from the fuselage. Using the sharp hobby knife, carefully cut
away the covering inside the lines which were marked above.
Cut away the covering
where the vertical stabilizer
meet the fuselage.
CA
FRONT-VIEW
CA
Install the vertical stabilizer into the fuselage and
adust the alignment. Secure the vertical stabilizer
in place using CA glue.
! Securely glue together If coming off during
fly, you lose control of your air plane.
CA
Page 8
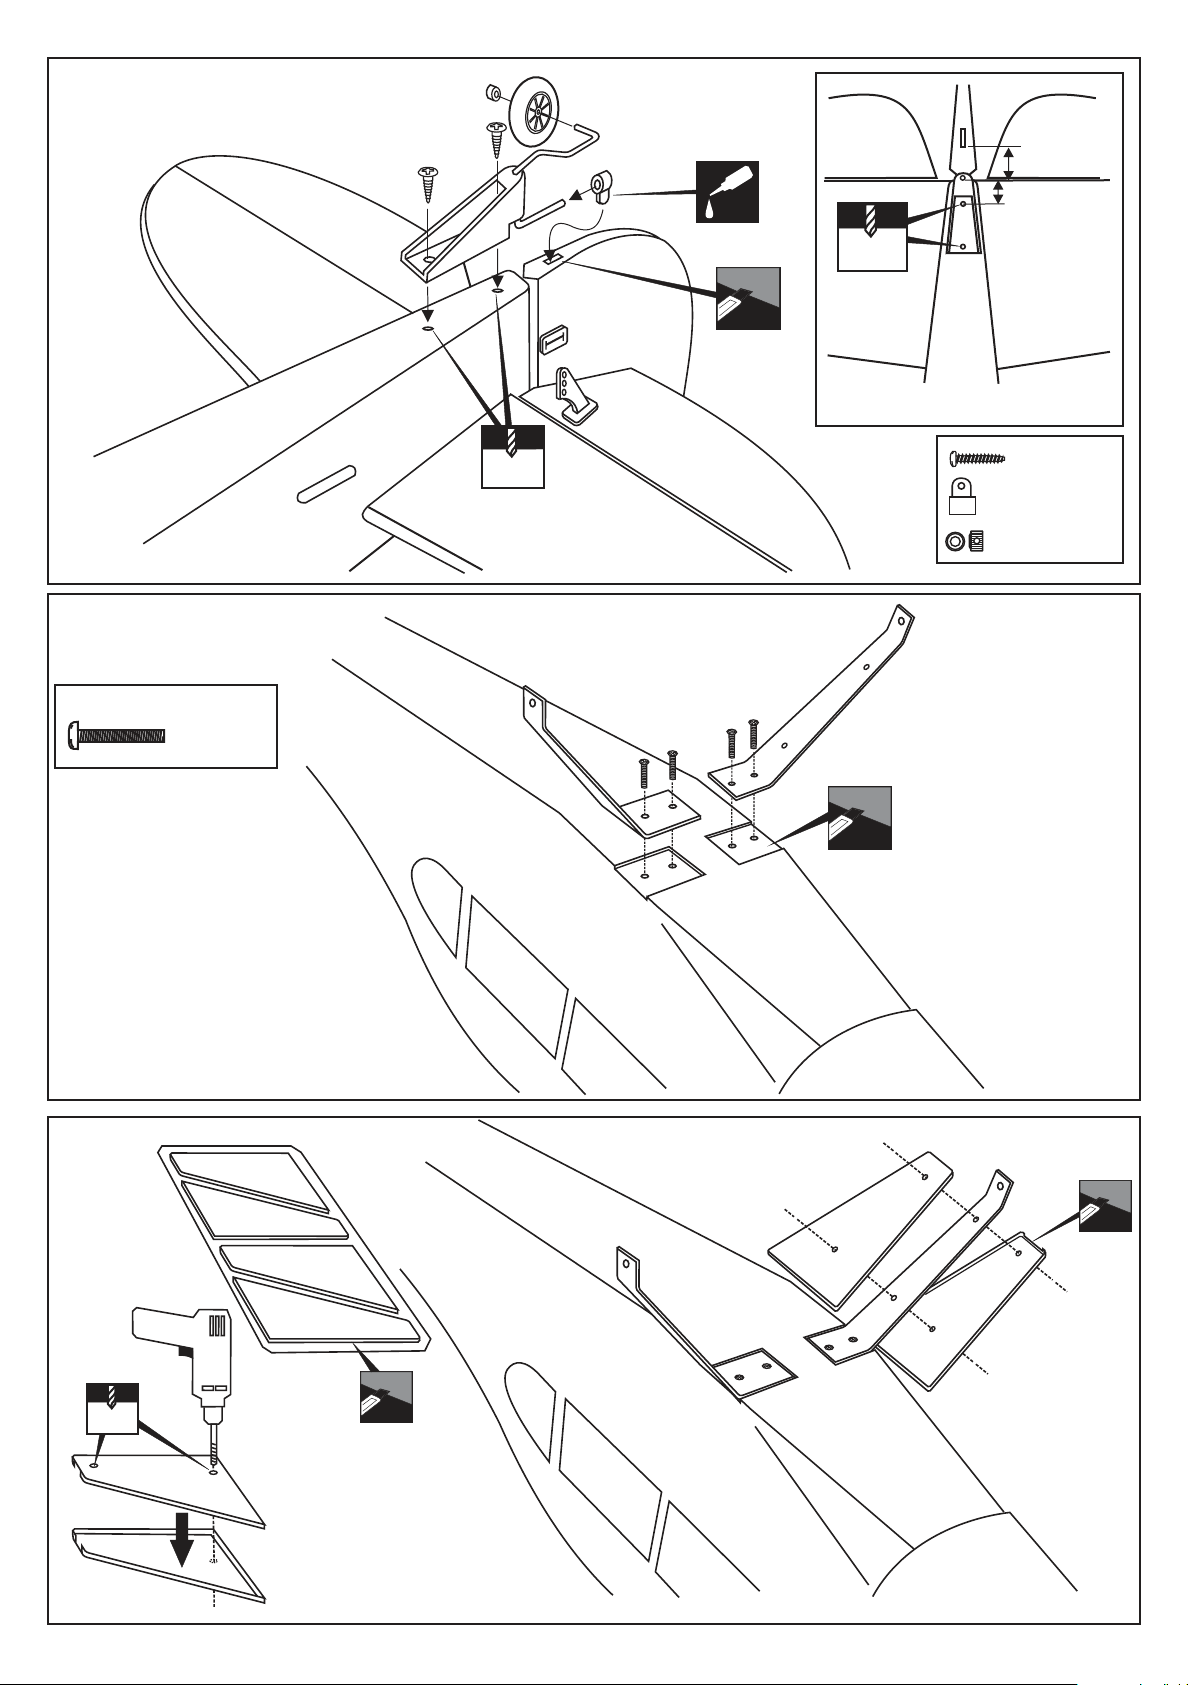
9
1/8(3mm) screw
Collar
CA
Cut away the
covering and
balsa wood
0.5~0.6in.
12~15mm
0.3in.
8mm
1/16
1.5mm
BOTTOM - VIEW / Unteransicht
10
4X20mm screw
............4
* WARNING: When removing any covering
from the airframe, please ensure that you
secure the cut edge with CA or similar cement.
This will ensure the covering remain tight.
1/16
1.5mm
3x12..........2
........................1
........................1
Cut away only the covering
11
3mm
Page 9
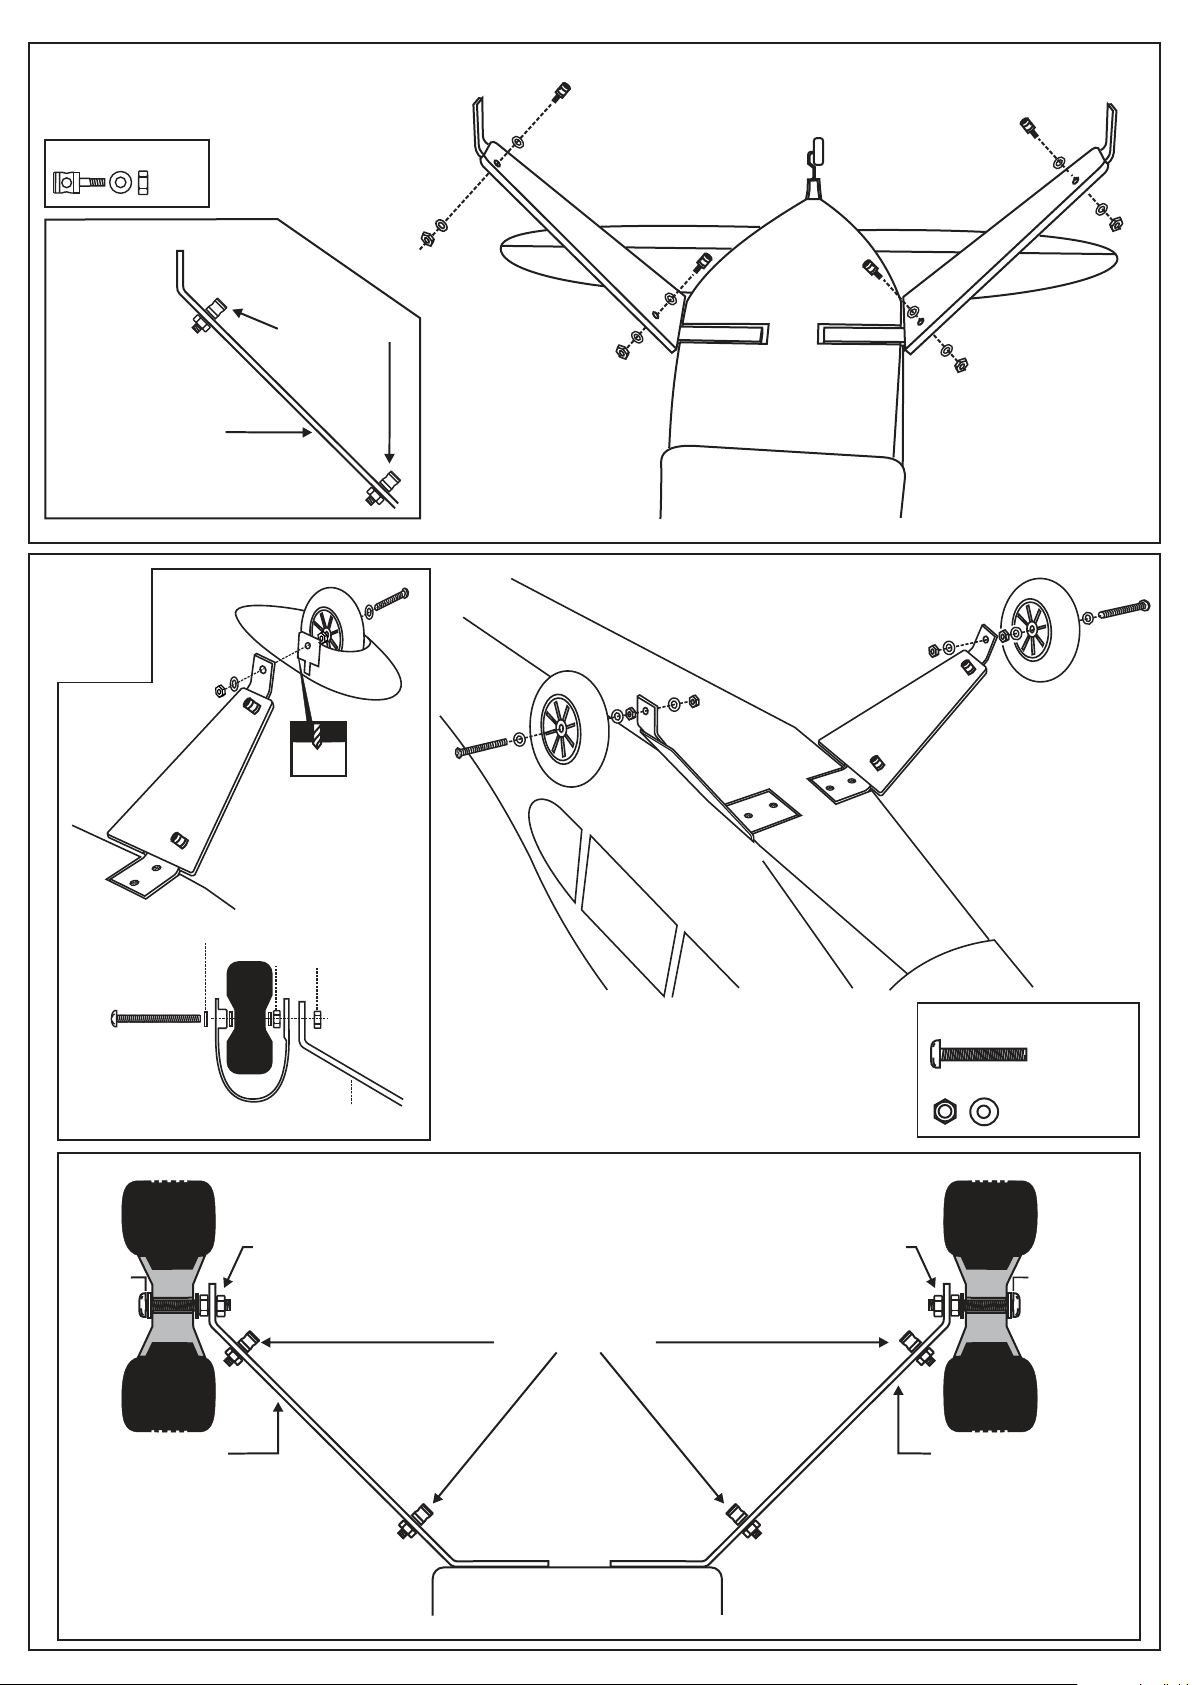
12
Connector
......4
Aluminum landing
gear
Hauptfahrwerk
13
3mm connector
3mm connector
3mm connector
BOTTOM - VIEW / Unteransicht
4x40mm screw
BURDA VERSION
4x30mm
screw
4mm
4mm washer
4mm nut
Aluminum landing gear
4mm nut
AUSTRIA VERSION
4X40mm screw
............2
4mm nut-washer
4mm nut
4x30mm
screw
Aluminum landing
gear
Hauptfahrwerk
3mm connector
Aluminum landing
gear
Hauptfahrwerk
FUSELAGE
Page 10
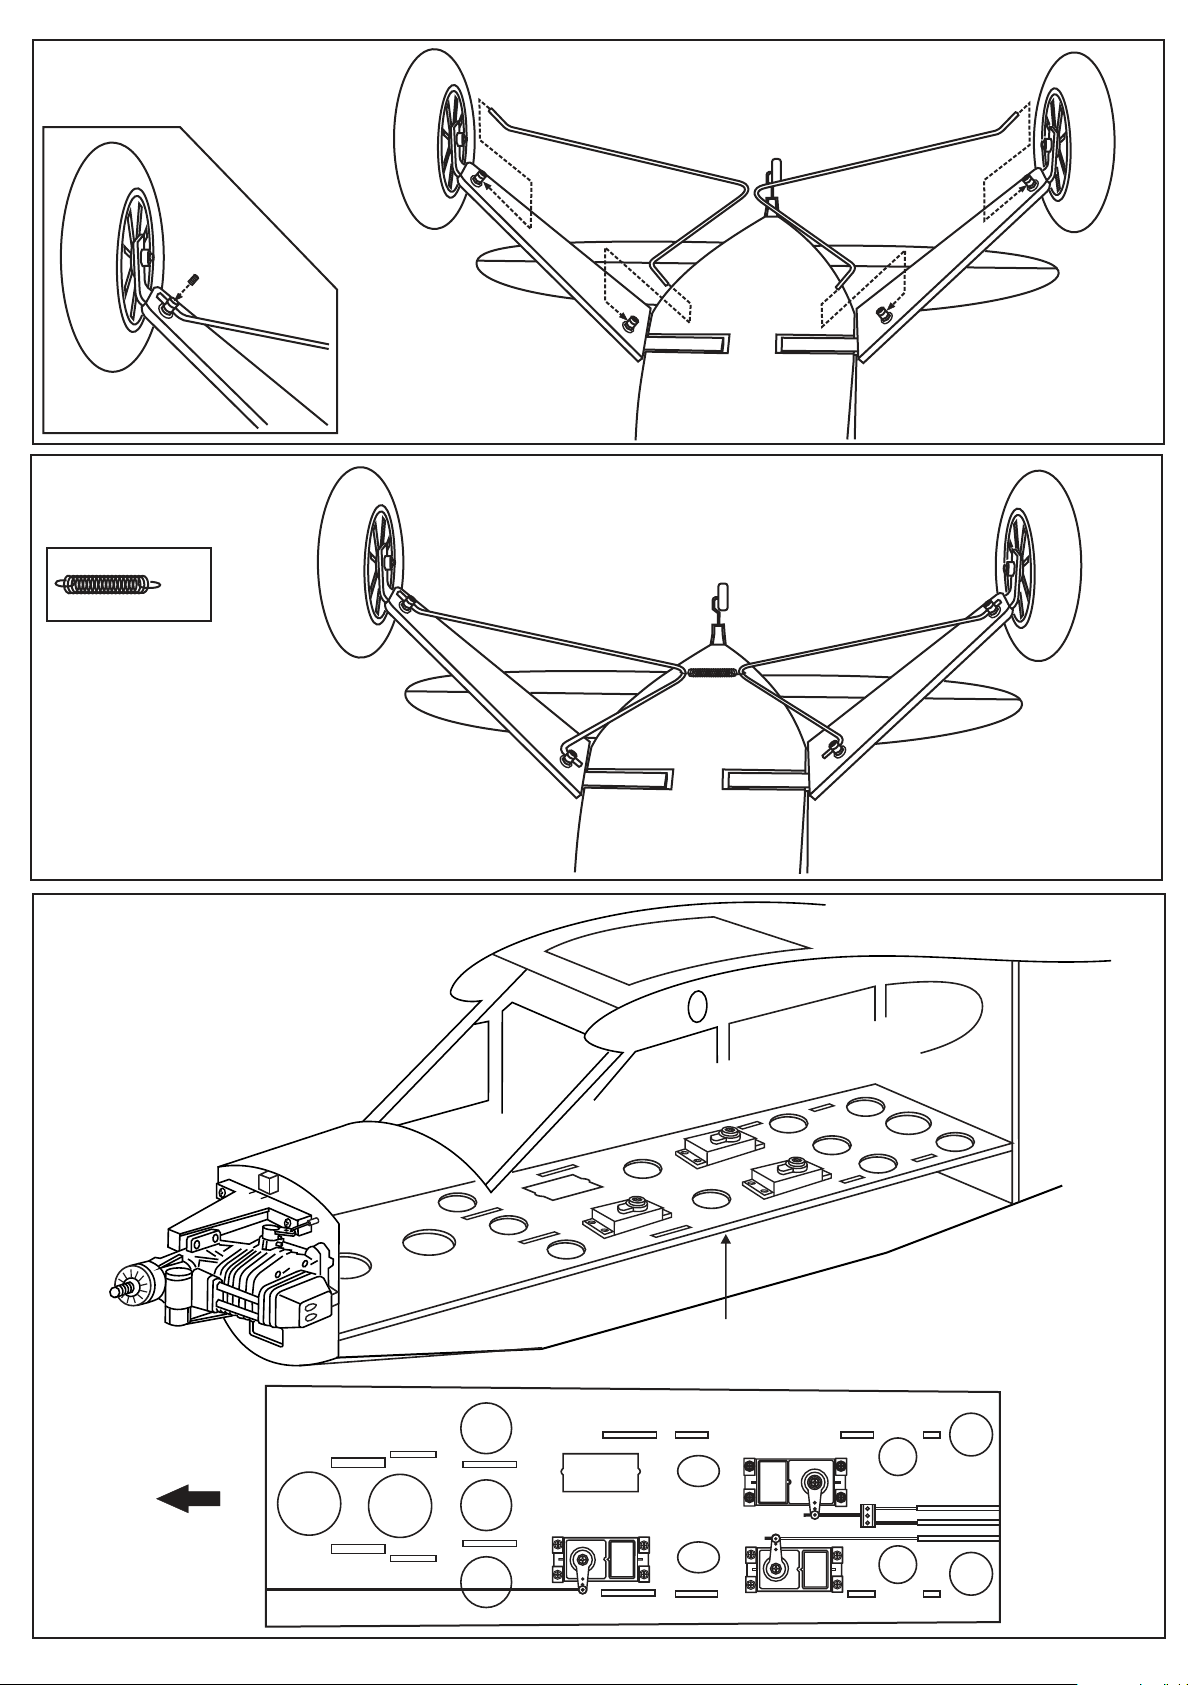
14
15
...1
16
Servo tray
TOP VIEW
Servo tray
Elevator servo
FRONT
Elevator pushrod
Throttle servo
Throttle pushrod
Rudder servo
Page 11
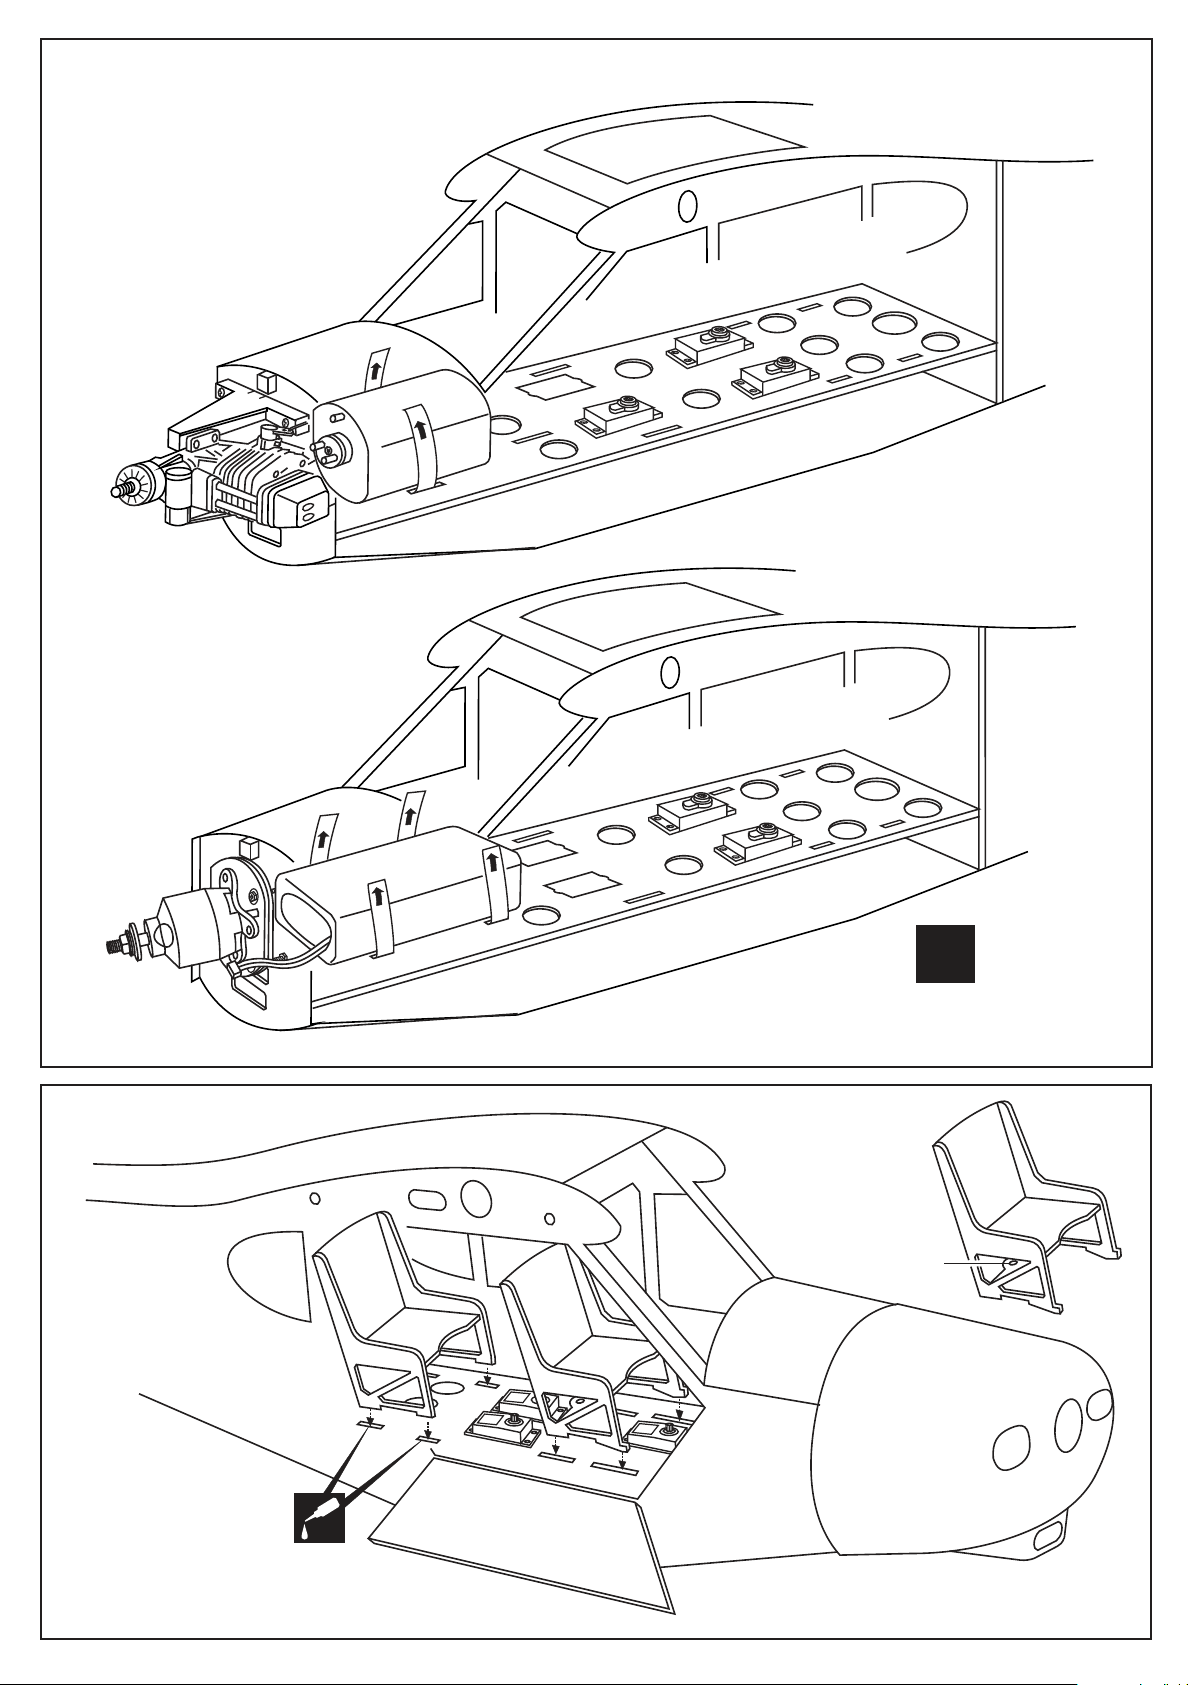
17
18
Magnetic seating
(front seating only)
Magnetic piece.
Tipp
Fasten battery or
fuel tank with hook
X
and loop straps
CA
Page 12
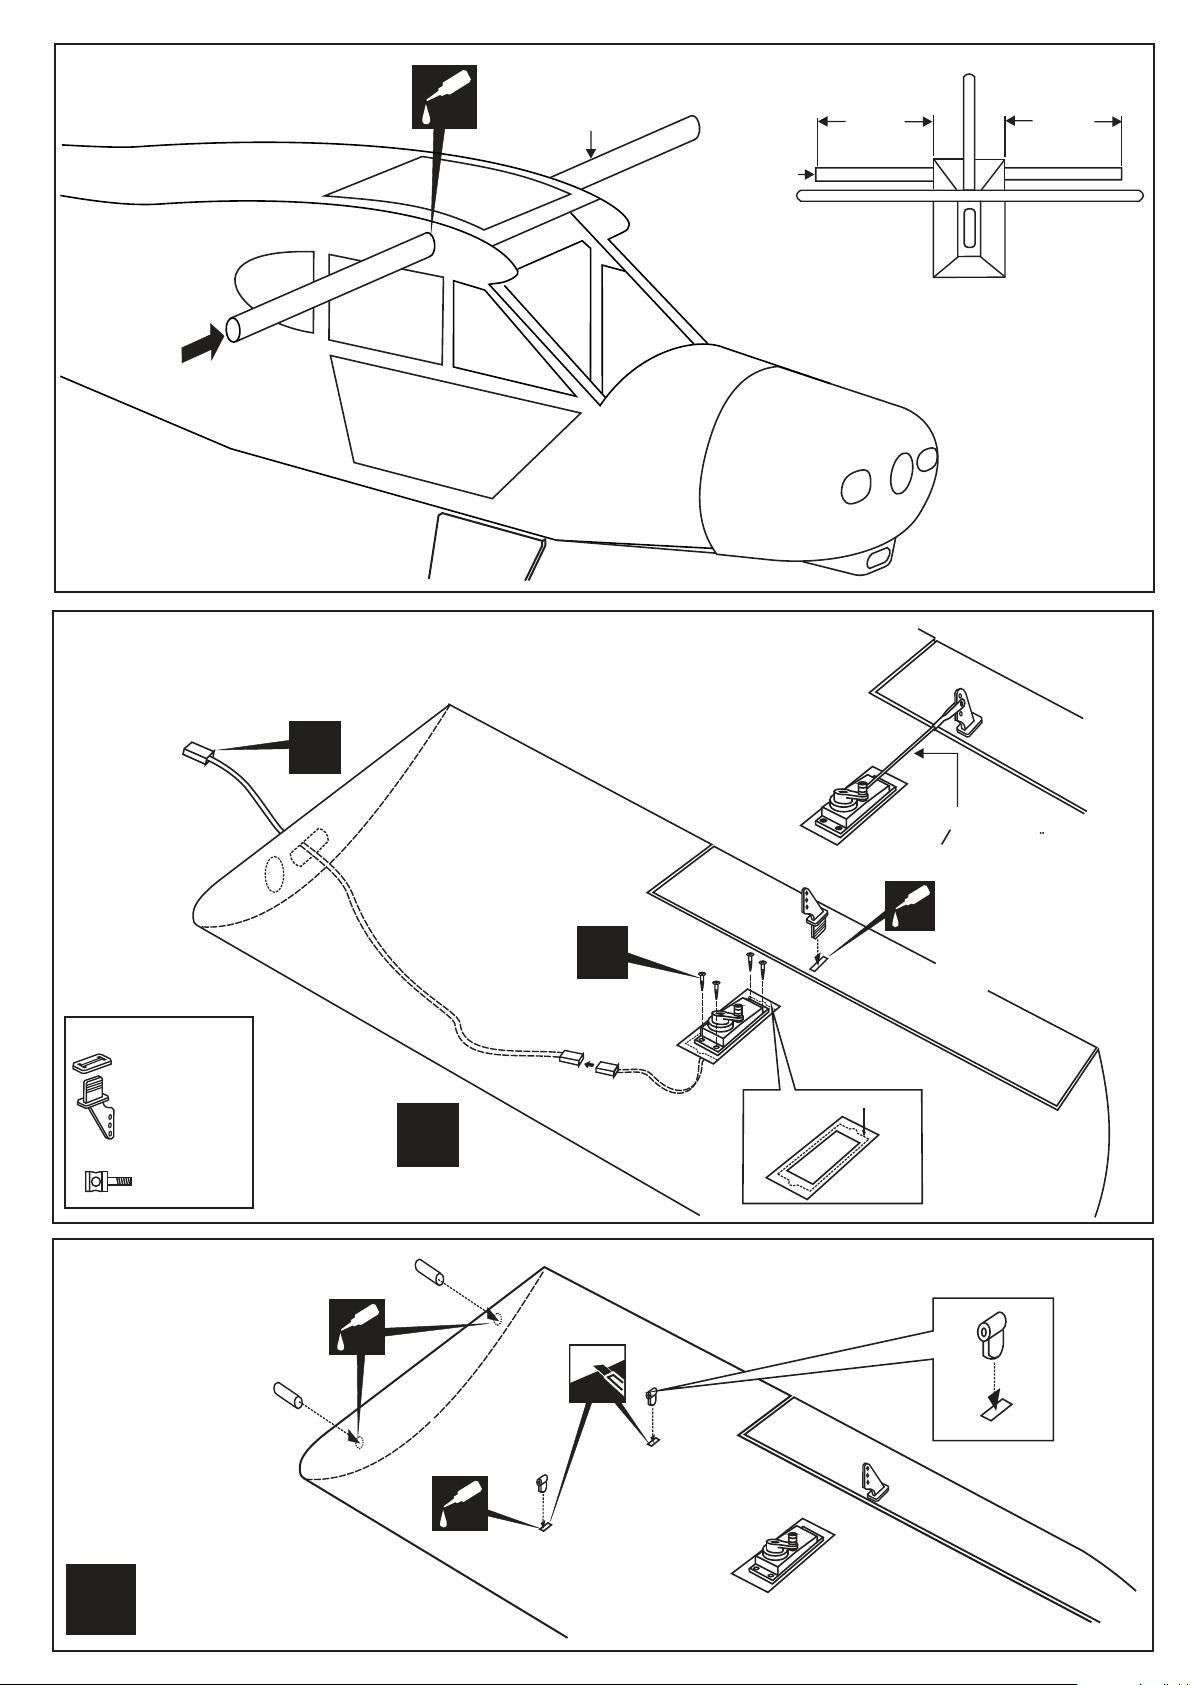
19
Note: check the length (B=B’) of the
aluminum tube with the fuselage before glue.
20
CA
Aluminum tube
Aluminum
tube
B
B=
B’
B’
Aileron extension
cord
Plastic control horn
.....................2
Linkage Stopper set
..................2
21
X
X
L/R
BOTTOM - VIEW / Unteransicht
CA
Aileron pushrod
1.2mm O Alenk-Gestange
Trial fit the control horn into
the slot.
CA
If the parts will join, but with
a gaps, sand or trim the parts
a little at a time until the parts
meet exactly with no gaps.
Cut here for standard servo
BOTTOM - VIEW / Unteransicht
L/R
Cut away only
the covering
CA
Assemble left and right
side the same way
Page 13
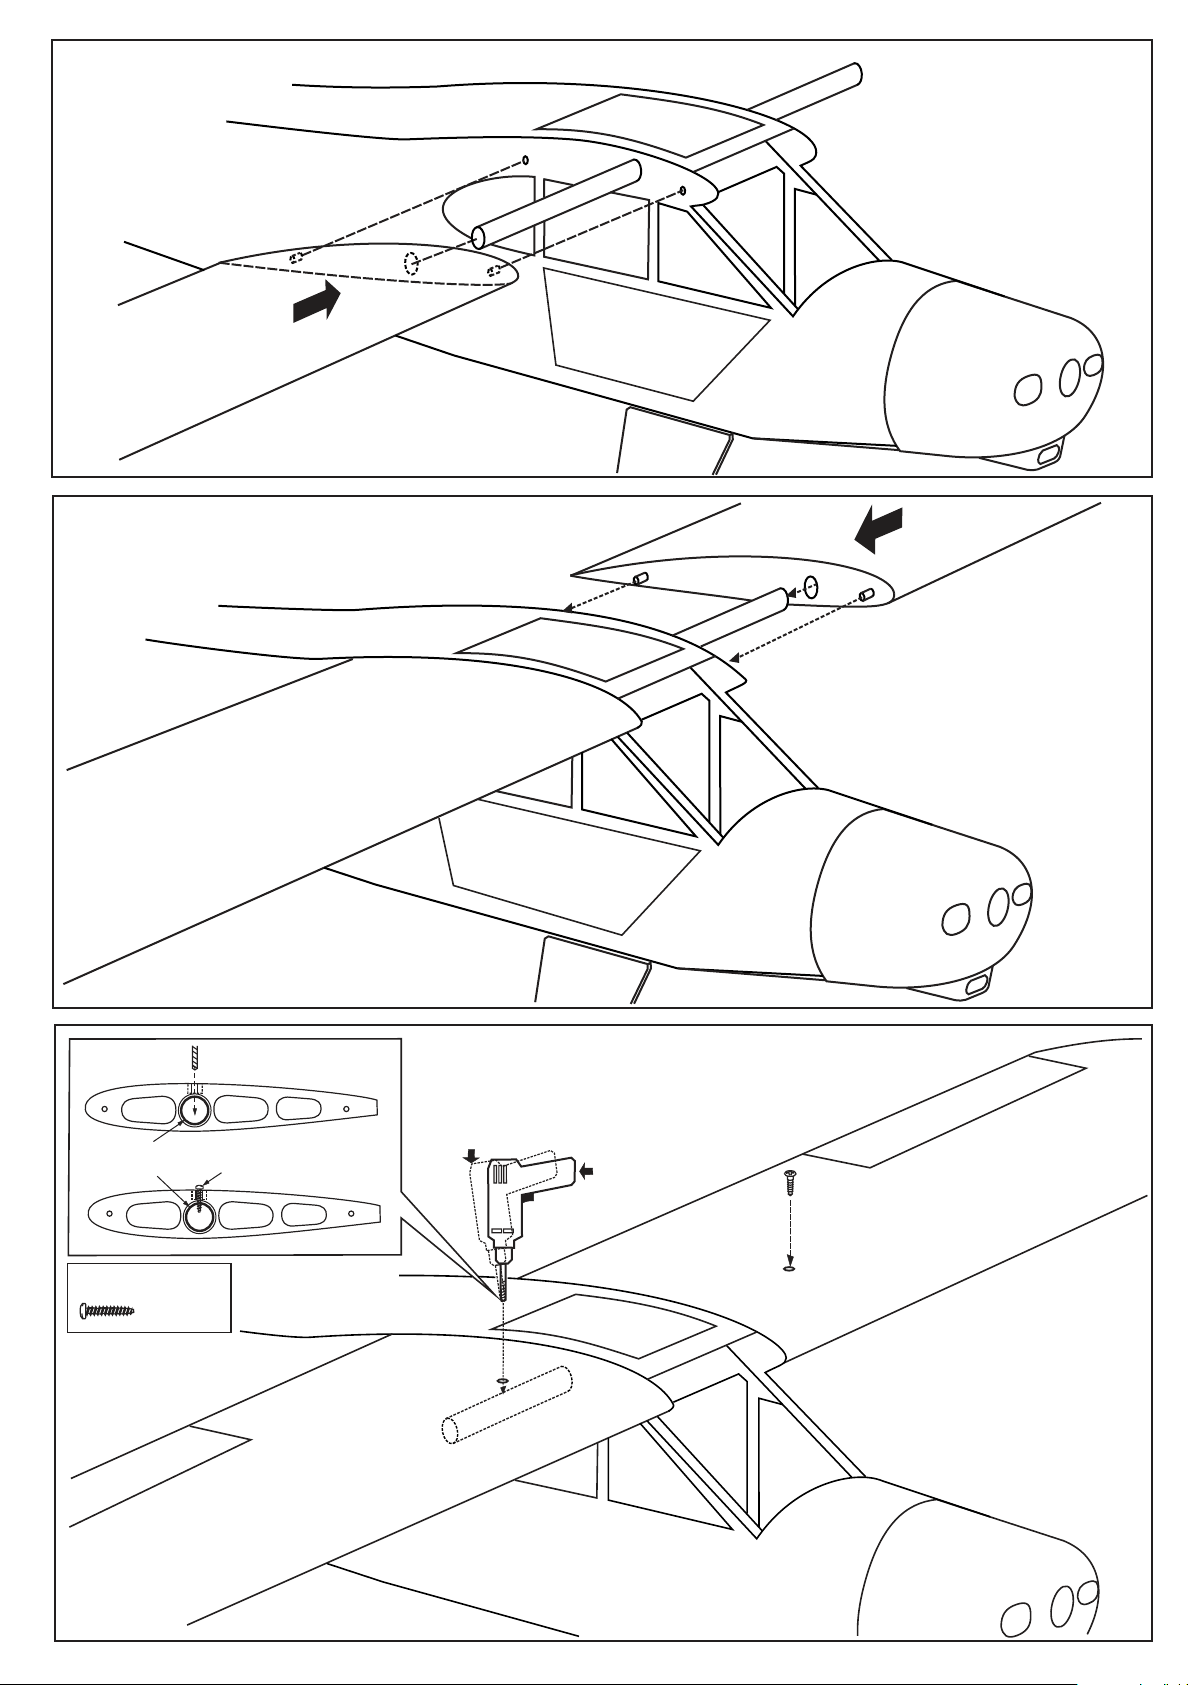
22
23
TOP
Aluminum
tube inside
3x15mm screw
.........2
24
2.mm drill bit
3x15mm screw
A
B
Note: The hole on the surface of the top of the
wing are pre-drilledat factory.
Secure the wing in place
WRONG
A
using 3x15mm screw.
RIGHT
B
Page 14
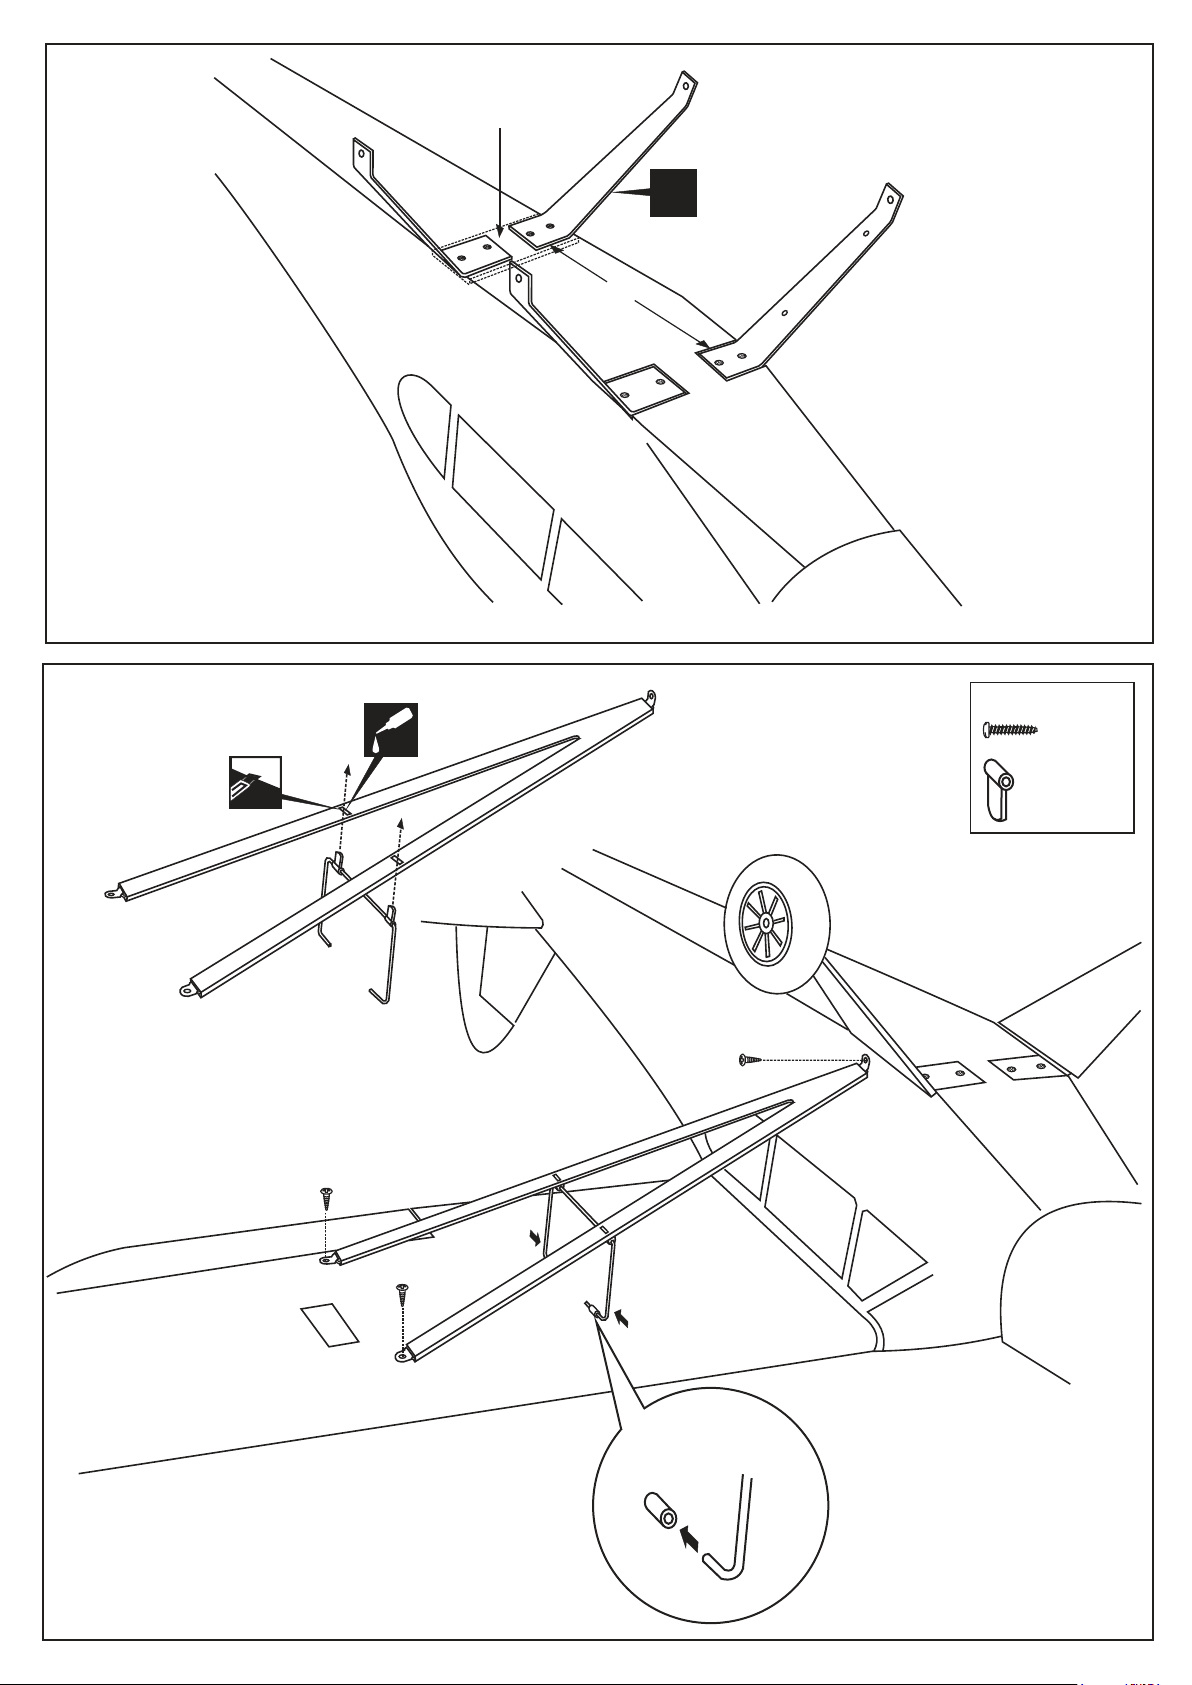
25
Rear landing gear mount
X
220mm
BOTTOM - VIEW / Unteransicht
IF YOU ARE USING FLOATS
Note: The rear landing gear mount is
pre-installed at factory
Rear landing gear
not included
26
Cut away only
the covering
A
C
CA
3x15mm screw
.........6
.........4
C
C
B
Page 15
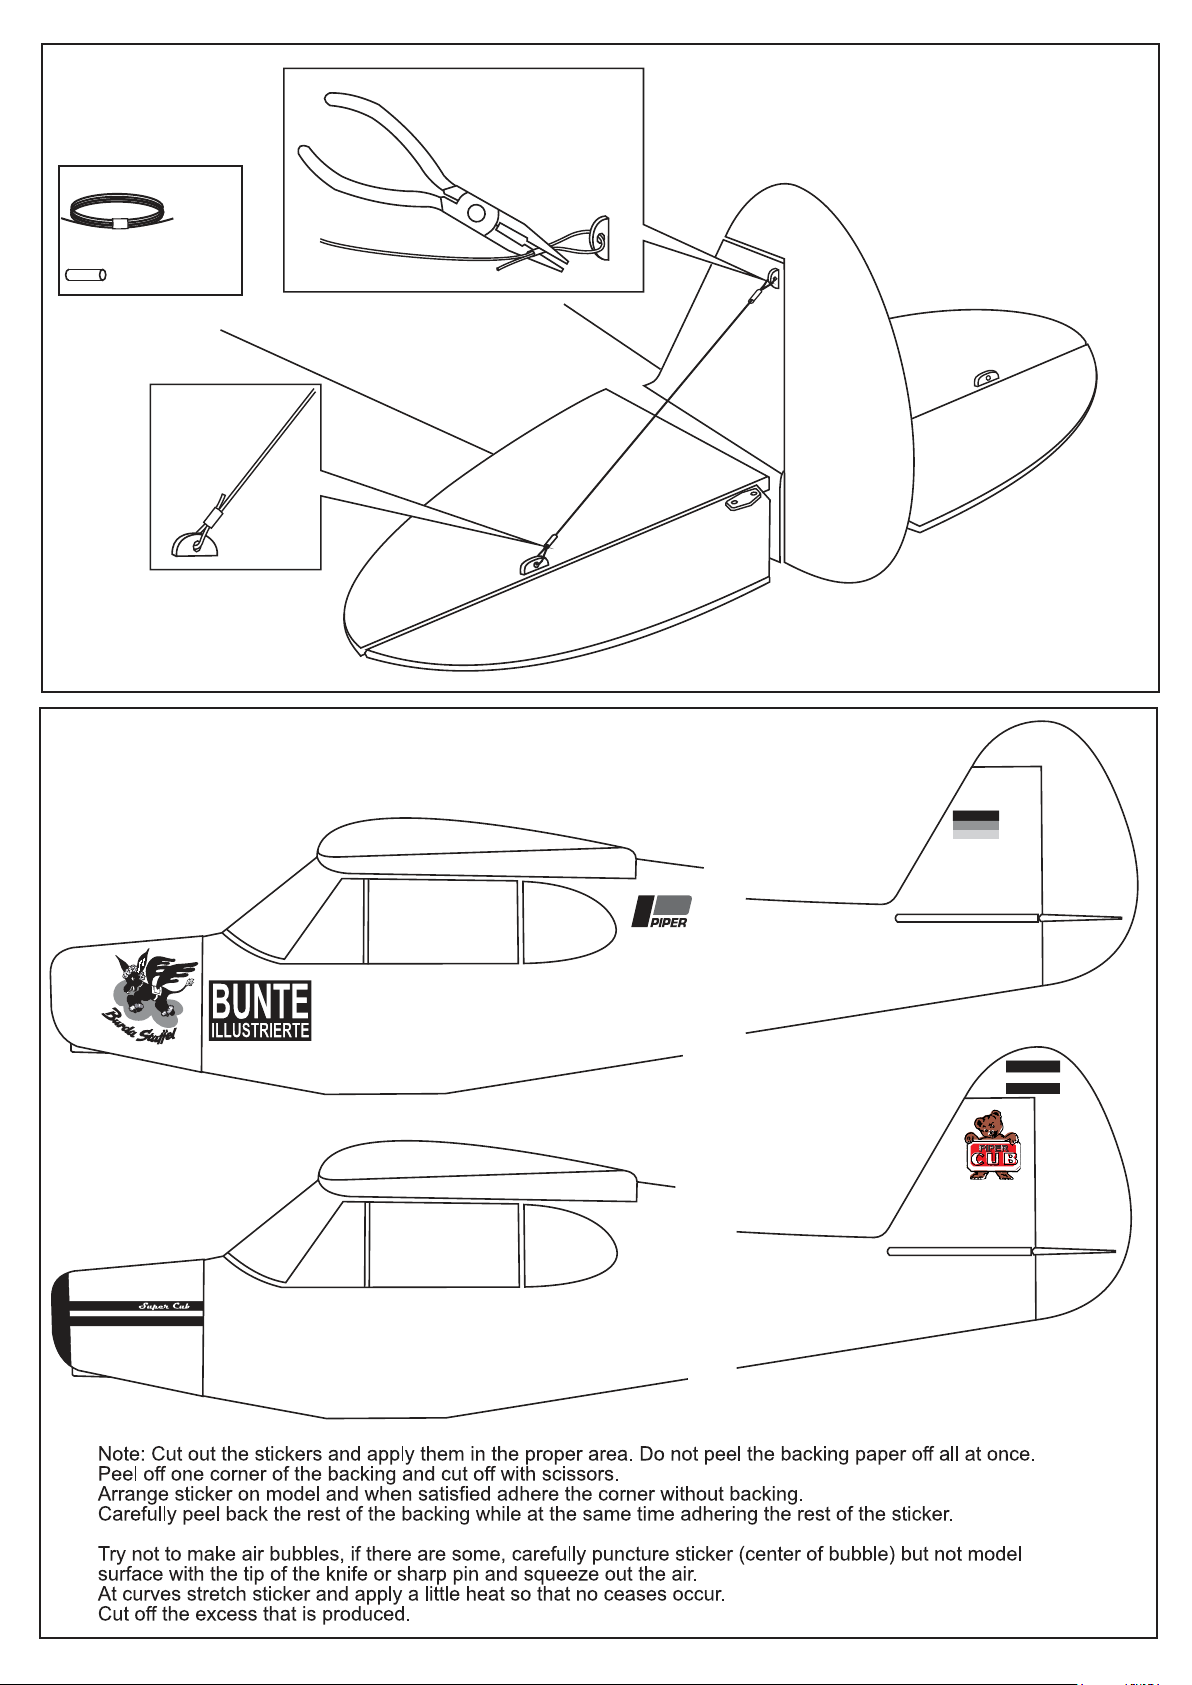
27
0.5mm dia. Cable
...1 roll
2mm metal tube
.....................4
28
Page 16
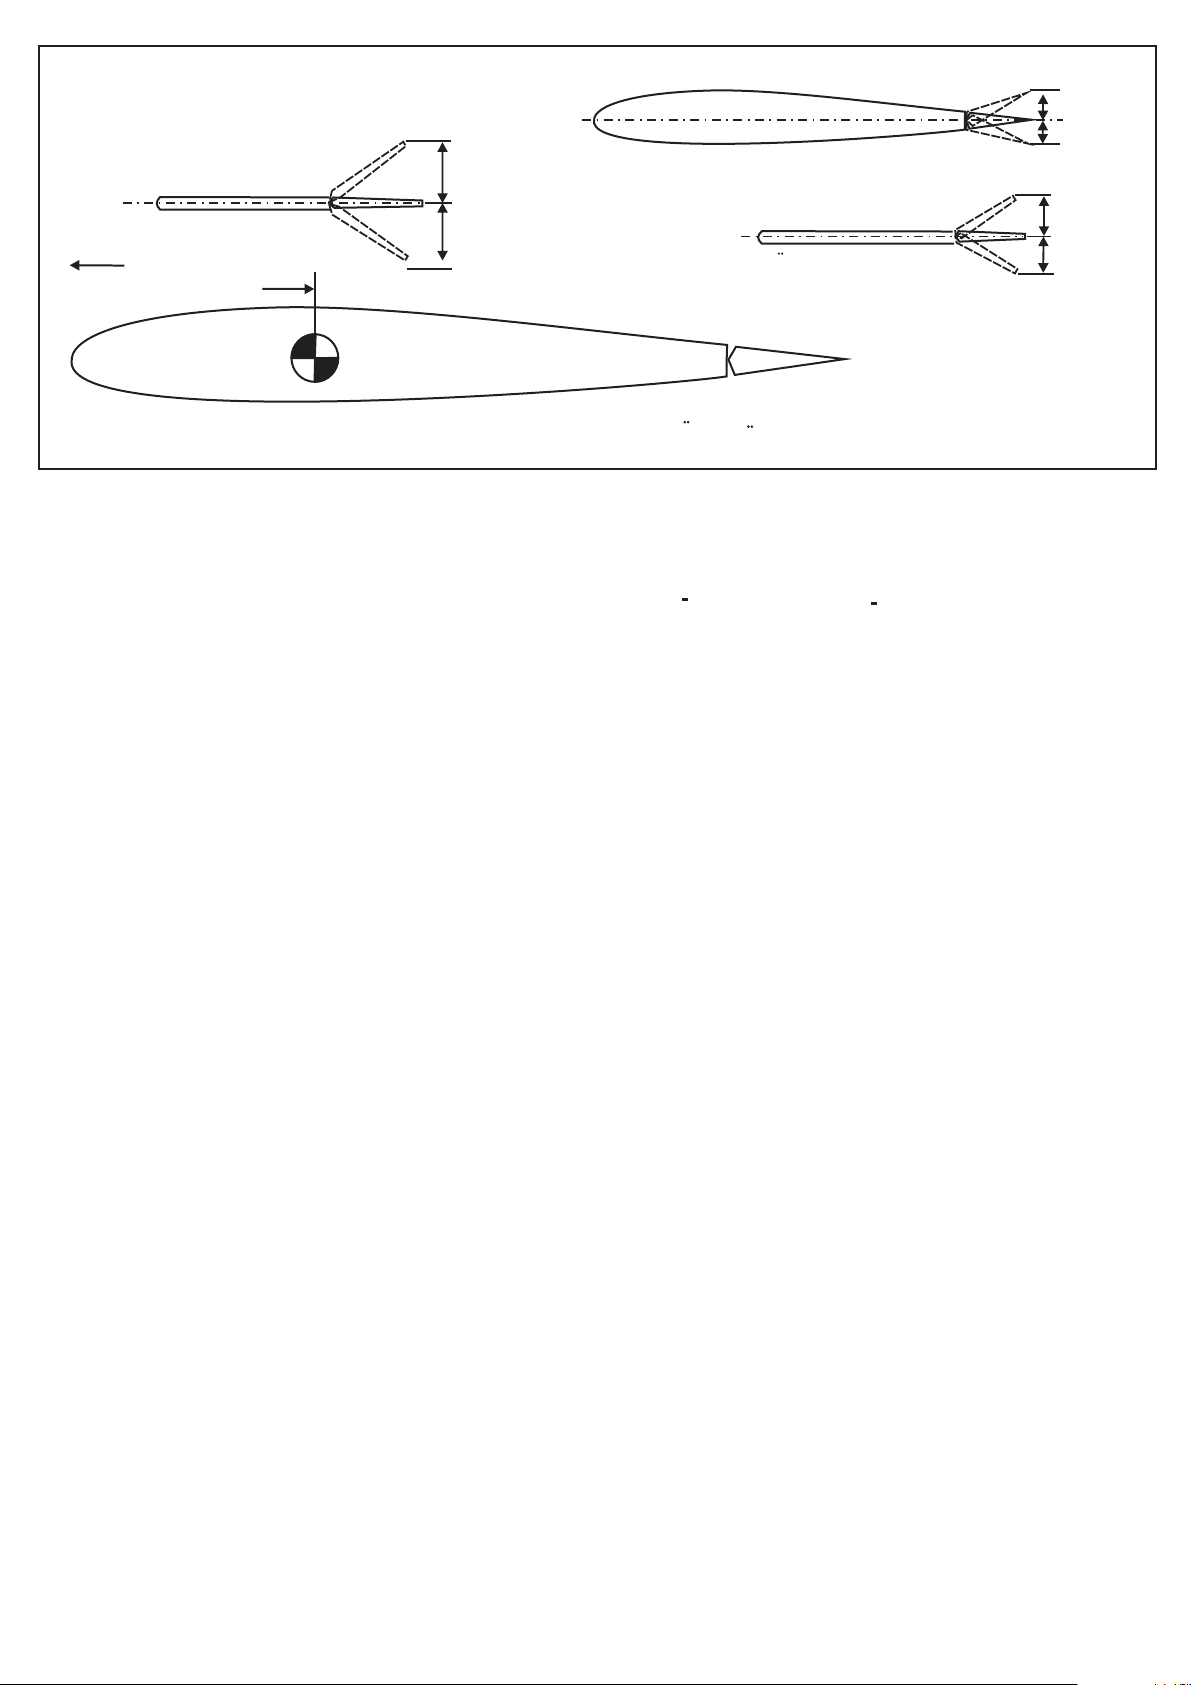
29
Rudder
Aileron
10mm
10mm
Querruderausschlag
20mm
Seitenruderausschlag
20mm
Elevator
Hohenruderausschlag
65 ~ 70mm
Do not try to fly an out-of balance model!
Uberprufen Sie vor dem Flug den Schwerpunkt.
IMPORTANT:
WARNING !
Do not put in a large-than recommended engine. A bigger engine does not necessarily mean better performance.
Please do not clean your model with pure alcohol, only use liquid soap with water or use glass cleaner
to clean the surface of your model and keep the colors from fading.
All details are subject to change
without notice !
Technische Anderungen und Irrtumer
vorbehalten !
10mm
10mm
 Loading...