

Page 1
ACWS Series Air Compressor
User’s Manual
Page 2

ii
Warranty
Newport Corporation warrants that this product will be free from defects in
material and workmanship and will comply with Newport’s published
specifications at the time of sale for a period of one year from date of
shipment. If found to be defective during the warranty period, the product
will either be repaired or replaced at Newport's option.
To exercise this warranty, write or call your local Newport office or
representative, or contact Newport headquarters in Irvine, California. You
will be given prompt assistance and return instructions. Send the product,
freight prepaid, to the indicated service facility. Repairs will be made and the
instrument returned freight prepaid. Repaired products are warranted for the
remainder of the original warranty period or 90 days, whichever first occurs.
Limitation of Warranty
The above warranties do not apply to products which have been repaired or
modified without Newport’s written approval, or products subjected to
unusual physical, thermal or electrical stress, improper installation, misuse,
abuse, accident or negligence in use, storage, transportation or handling. This
warranty also does not apply to fuses, batteries, or damage from battery
leakage.
This warranty is in lieu of all other warranties, expressed or implied,
including any implied warranty of merchantability or fitness for a particular
use. Newport Corporation shall not be liable for any indirect, special, or
consequential damages resulting from the purchase or use of its products.
First printing 2016
© 2016 by Newport Corporation, Irvine, CA. All rights reserved. No part of
this manual may be reproduced or copied without the prior written approval
of Newport Corporation.
This manual has been provided for information only and product
specifications are subject to change without notice. Any change will be
reflected in future printings.
Newport Corporation
1791 Deere Avenue
Irvine, CA, 92606 USA
Part No. 90080320 Rev. A
Page 3

iii
Table of Contents
Warranty ................................................................................................. ii
Table of Contents .................................................................................. iii
List of Figures .........................................................................................v
1 Safety Precautions 6
1.1 Safety Information .........................................................................6
1.2 General Warnings ..........................................................................6
1.3 Air Compressor Safety Warnings ..................................................7
2 Installation 8
2.1 Unpacking and Inspection .............................................................8
2.2 Parts List ........................................................................................8
2.3 Storage ...........................................................................................8
2.4 Preparation for Use ........................................................................8
2.4.1 Work area set up ................................................................9
2.4.2 Initial air compressor set up ..............................................9
2.5 Operation .....................................................................................11
2.5.1 Turn on/off air compressor ..............................................11
2.5.2 Adjusting the outlet pressure ...........................................11
2.5.3 Air compressor operations ...............................................11
3 Maintenance 12
4 Troubleshooting 15
Section 5 – Factory Service 17
3.1 Maintenance Schedule .................................................................12
3.2 Maintenance Instructions .............................................................13
3.2.1 Checking oil level ............................................................13
3.2.2 Draining air tank condensate ...........................................13
3.2.3 Draining the air outlet filter .............................................13
3.2.4 Checking the pressure relief valve ..................................14
4.1 Troubleshooting Guide ................................................................15
4.2 Obtaining Factory Service ...........................................................17
Page 4

iv
5 Service Form 18
Page 5

v
List of Figures
Figure 1 Remove rubber plug and install air intake filter ............................. 9
Figure 2 Remove rubber plug on the oil pipe .............................................. 10
Figure 3 Add oil and check oil level ........................................................... 10
Figure 4 ACWS Parts .................................................................................. 11
Figure 5 Outlet filter bottom knob .............................................................. 13
Page 6
6
WARNING
Warning is used to indicate dangers that could result in personal
injury.
CAUTION
Caution is used to indicate situations that may result in damage
to components of your air compressors.
1 Safety Precautions
1.1 Safety Information
The following are definitions of the Warnings, Cautions and Notes that are
used throughout this manual to call your attention to important information
regarding your safety, the safety and preservation of your equipment or an
important tip.
1.2 General Warnings
Observe these general warnings when operating or servicing this equipment:
Read the operating instructions and recommendations before using the
compressor.
Make sure the compressor is kept upright at all times.
Heed all warnings on the unit and in the operating instructions.
Do not use the compressor if the switch does not turn it on and off. Any
compressor that cannot be controlled with the switch is dangerous and must
be repaired.
Disconnect power before cleaning and servicing the equipment. Do not
use liquid or aerosol cleaners; use only a damp lint-free cloth.
Lockout all electrical power sources before servicing the equipment.
To avoid explosion, do not operate this equipment in an explosive
atmosphere.
Page 7

WARNING
Save these instructions and always read instructions before
operations.
1.3 Air Compressor Safety Warnings
Observe these safety warnings when operating the air compressor:
Do not operate compressor with any damaged hose(s) or after the compressor or
attachments have been dropped or damaged.
The pressure relief valve is calibrated and sealed by the manufacturer. Do not
tamper with it or change the setting.
Risk of bursting - Do not adjust regulator higher than maximum stated pressure of
attachment.
Risk of injury - Do not direct air stream at people or animals.
To reduce the risk of electric shock, do not expose to rain. Store indoors.
Do not use to supply breathing air.
Drain Tank monthly after use. Internal rust causes tank failure and explosion. It
may be necessary to do more often when operated in high humidity.
Add correct amount of compressor oil. Operating with low or no oil causes
permanent damage and voids warranty.
7
Compressor head gets hot during operation. Do not touch it or allow children
nearby during or immediately following operation.
The use of accessories or attachments not recommended by the manufacturer may
result in a risk of injury to person.
Industrial applications must follow OSHA guidelines.
Page 8

8
WARNING
You are urged to save the packaging material in case you need
to ship your equipment in the future. Also, do not dispose of the
shipping restraints. They are reusable and needed for the
integrity of the system during shipment.
CAUTION
Packed compressors must be stored in a dry, well ventilated,
dust free area, with an ambient temperature between -10 to 40 °C
maximum.
2 Installation
2.1 Unpacking and Inspection
Unpack the air compressor unit and all of the hardware. Inspect all of the
parts for shipping damage. Inform Newport Corporation and shipping
company immediately for any visible damages to the parts.
2.2 Parts List
Parts included with the ACWS compressor:
Compressor unit (with air intake filter)
Oil bottle
Instruction manual
Product certificate
2.3 Storage
Store the air compressor properly before and after use.
2.4 Preparation for Use
Read and understand the safety instructions before using Newport ACWS
Series air compressor.
Page 9

CAUTION
Be careful about high heat or high humidity conditions as you
will need to replace the filter and oil much more frequently.
WARNING
The compressor is shipped without oil. Please add oil before
use. Running the air compressor with the incorrect amount of oil
will cause damage to the unit and void the warranty. To prevent
damage, do not use with overfilled or low oil.
2.4.1 Work area set up
Designate a work area that is clean and dry, with a cool
ambient temperature (up to 34 °C).
Locate the compressor on a flat level surface to ensure proper
pump lubrication and to prevent damage to the unit. Keep
12’’ of space around the unit to allow air circulation.
Intake air must be free from dirt, coarse solids, abrasive
particles and gaseous impurities.
Route the power cord properly to prevent tripping or exposing
the power cord to possible damage.
2.4.2 Initial air compressor set up
9
1) Remove the rubber plug on the air intake pipe and put on the air
intake filter included with the compressor.
Figure 1 Remove rubber plug and install air intake filter
2) Remove the rubber plug on the oil pipe.
Page 10

10
WARNING
To prevent serious injury from burns, do not add or change the
oil while the compressor is in operation.
CAUTION
Use ROLOIL-SINCOM/32E oil with ACWS compressors. Using
other types of oil will void the warranty and likely damage the
unit.
Figure 2 Remove rubber plug on the oil pipe
3) Carefully cut the tip of the funnel cap included with the air
compressor, remove the round cap from the bottle of oil included
and put the funnel cap on securely.
4) Carefully add oil to the oil pipe. Add around 500 ml oil and check
the oil sight glass on the other side of the air compressor.
Figure 3 Add oil and check oil level
5) Fill the tank with oil until the level is aligned with the red OIL
mark on the sign next to the sight glass.
6) Refit the rubber plug to the oil pipe to cover the port opening.
7) Refit the air intake filter if removed while filling with oil
Page 11

2.5 Operation
2.5.1 Turn on/off air compressor
Make sure that the power supply voltage is the same with what’s indicated on
the data label: 230V/50 Hz or 115V/60 Hz. Use only 3-pole receptacles that
accept the compressor’s plug.
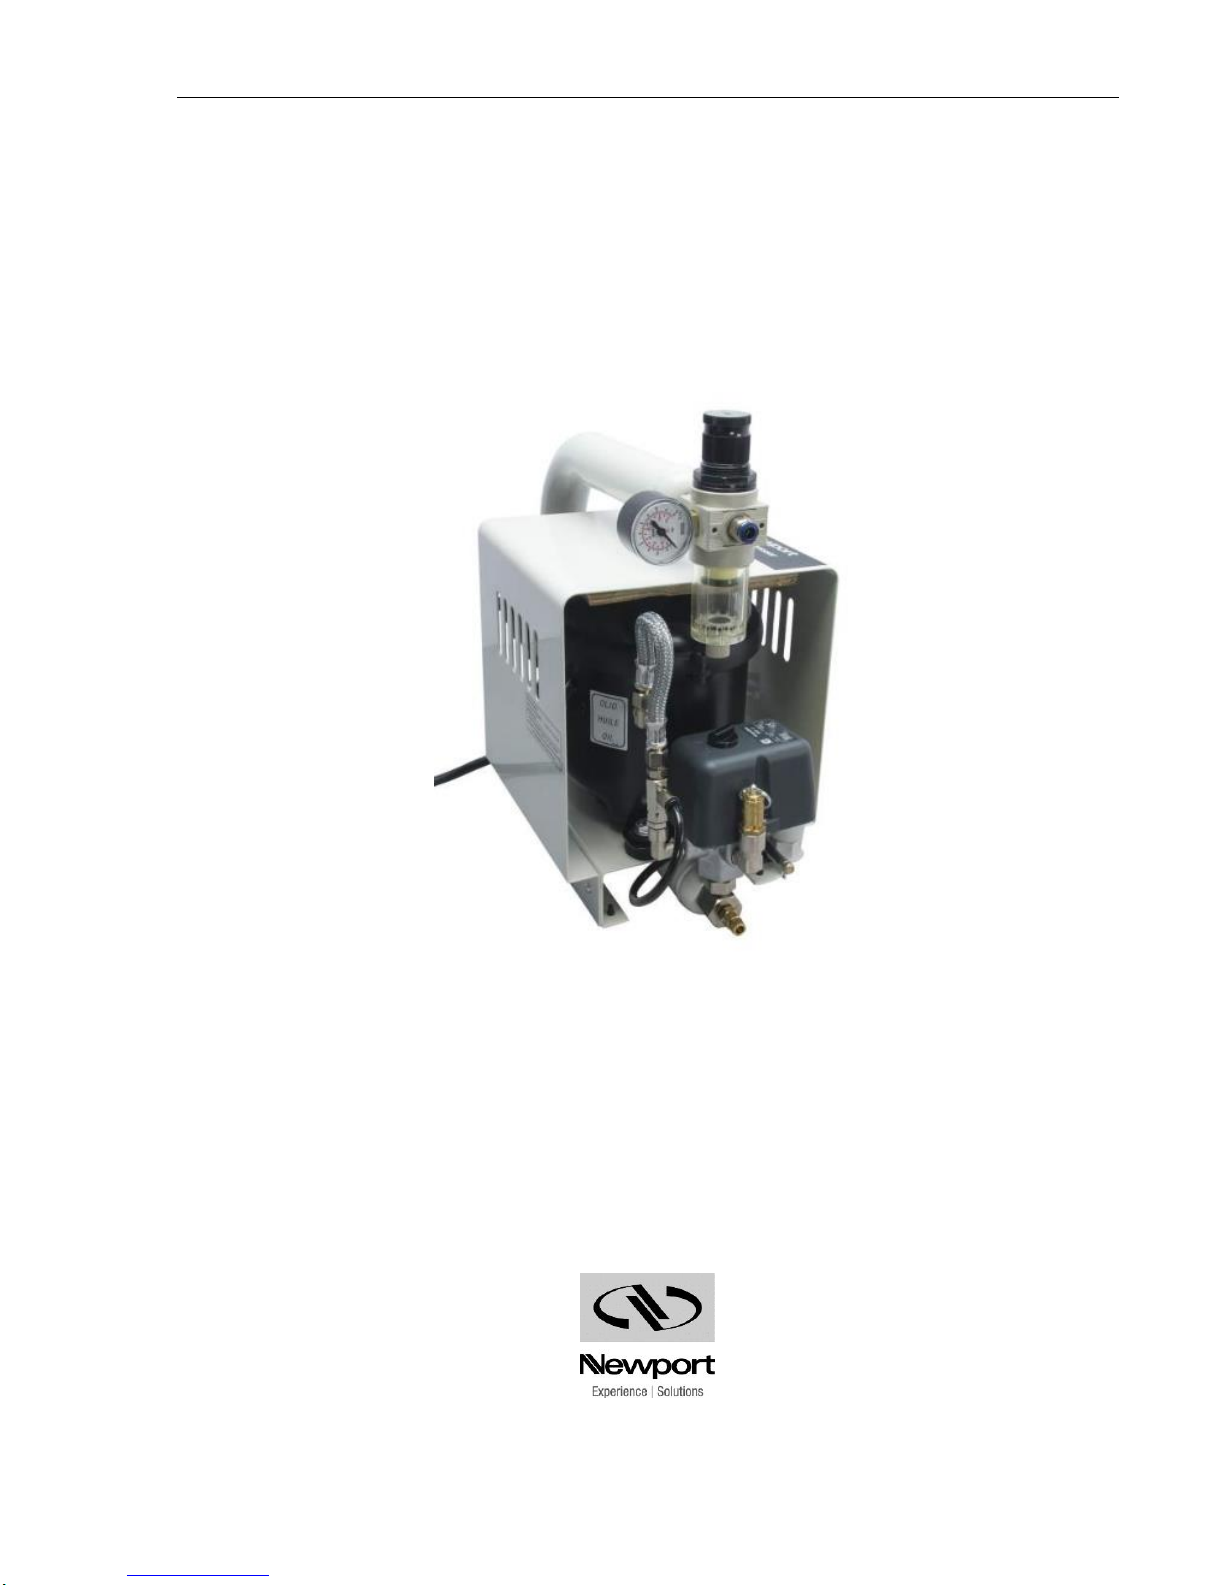
The on/off switch is located on the top of the pressure switch (see Figure 4).
To switch the unit on, turn the switch to position “1”. When switched on, the
compressor starts to build up pressure until the tank reaches the maximum
allowed pressure (8 bar/120 psi). The unit will then be automatically
switched off until air is used and the pressure in the tank drops to the
minimum operating pressure (6 bar/90 psi), at which point the compressor
automatically switches on.
11
CWS Parts
2.5.2 Adjusting the outlet pressure
Outlet pressure can be adjusted using the knob on the filter/regulator so that
the air output is enough for the application, but the output will not exceed the
maximum air pressure specified by the application. Turn the knob clockwise
to increase the pressure and counter-clockwise to decrease pressure.
2.5.3 Air compressor operations
When properly installed, the compressor will operate within less than 50%
duty cycle. Check air connections and leaks regularly to prevent overheating
caused by compressor operating with larger than 50% duty cycle. Contact
Newport technical support if the air compressor is operating with larger than
50% duty cycle.
Figure 4 A
Page 12

12
WARNING
Do not perform any maintenance until the unit is cooled down.
CAUTION
The environment in which the compressor is used, and the
frequency of use can affect how often you need to perform the
above maintenances. For example, under high humidity
condition, drain condensate weekly or daily to prevent damage
to the unit.
3 Maintenance
3.1 Maintenance Schedule
Following are general guidelines for maintenance checks of the air
compressor.
Weekly:
Check for oil leaks, abnormal noise or vibration.
Monthly:
Check oil level.
Drain the condensate that has collected in the air tank. It may be necessary to
do more often when operated in high humidity.
Drain the water collected in the air outlet filter.
Clean the compressor using a soft cloth. Wipe off any oil or dirt.
Check compressor efficiency (make sure all nuts and bolts are tight, check for
air leaks, pressure hose wear, pipe fittings and electrical connections).
Every 3 months:
Check the air intake filter. Replace if necessary.
Annually:
Replace oil.
Check pressure relief valve function.
Page 13

3.2 Maintenance Instructions
3.2.1 Checking oil level
Check oil level through the sight glass weekly to make sure the oil level is
aligned with the red marker line next to the sight glass (See Figure 3). Add or
remove oil as needed.
3.2.2 Draining air tank condensate
Run the compressor to pressurize the air tank, then switched off the
compressor.
Move the air compressor to an appropriate place for draining
purposes.
Use a container underneath the drain valve to prevent spilling.
Slightly tilt your ACWS Series air compressor forward and release
the drain valve (see Figure 4, open about a ¼ turn) to let the
condensate out.
13
Close the drain valve.
3.2.3 Draining the air outlet filter
Run the compressor to pressurize the air tank, then switch off the
compressor.
Use a container below the filter to prevent any spilling.
Turn the knob underneath the air outlet filter open to let moisture out
(see Figure 4).
Close the knob when finished.
Figure 5 Outlet filter bottom knob
Page 14

14
3.2.4 Checking the pressure relief valve
Run the compressor to pressurize the air tank, then switch off the
compressor.
Gently pull the ring at the end of the pressure relief valve to see if air
is released. If so, your pressure relief valve is functioning. If not,
please contact customer service.
Page 15

Problem
Possible Causes
Possible Solutions
Compressor adding oil
process takes too long
Rubber cap on the air intake port is not
taken off.
Take off the rubber cap on the air intake
pipe port.
Compressor does not start
or restart
No power at outlet.
Reset circuit breaker, or have outlet
serviced by a qualified technician.
Power cord not plugged in properly.
Check that cord is plugged in securely.
Pressure in air tank too high.
Operate the pressure relief valve to
exhaust some of the tank pressure.
Thermal overload switch active
When cooled, the compressor will
automatically turn on at the suitable
temperature.
Leaking non-return valve.
Check for air leaking from the valve.
Unscrew the valve
cap and remove the rubber seal. Clean the
rubber seal and its seat with a dry
cloth. Refit the seal and the valve cap. If
leakage persists replace the valve.
Broken starter relay.
Contact customer service
Faulty condenser
Contact customer service
Compressor does not reach
maximum pressure
Air leak
Apply soapy water to joints while the air
compressor is pressurized. Look for air
bubbles to identify the air leak. Tighten up
connections that has air leak. Contact
customer service if not able to resolve.
Air intake filter clogged
Clean or replace the filter
Failure in the non-return valve
Contact customer service
Compressor runs but
pressure increases too
slowly
Rubber cap on the air intake port is not
taken off.
Take off the rubber cap on the air intake
pipe port.
Air intake filter clogged
Clean or replace the filter
Air leak
Apply soapy water to joints while the air
compressor is pressurized. Look for air
bubbles to identify the air leak. Tighten up
connections that has air leak. Contact
customer service if not able to resolve.
4 Troubleshooting
4.1 Troubleshooting Guide
15
Page 16

16
The compressor starts and
stops more
frequently than usual
Large amount of condensate in air tank.
Remove condensate.
Air leak
Apply soapy water to joints while the air
compressor is pressurized. Look for air
bubbles to identify the air leak. Tighten up
connections that has air leak. Contact
customer service if not able to resolve.
The compressor does not
switch on
when pressure is under the
minimum
level and/or does not
switch off at max.
pressure
Defective pressure switch
Contact customer service
The compressor gets very
hot and/or
uses a lot of oil
Oil level incorrect
Check oil level and make sure the correct
amount of oil is in the compressor
Wrong oil used in compressor
Drain and refill with correct oil.
Air leak
Apply soapy water to joints while the air
compressor is pressurized. Look for air
bubbles to identify the air leak. Tighten up
connections that has air leak. Contact
customer service if not able to resolve.
Air intake filter clogged
Clean or replace the filter
Outside air temperature too high
Move air compressor to a cooler location
or add ventilation.
Compressor starts when no
air is tapped
Air leak
Apply soapy water to joints while the air
compressor is pressurized. Look for air
bubbles to identify the air leak. Tighten up
connections that has air leak. Contact
customer service if not able to resolve.
Compressor stops after
working normally
Thermal protection
The motor incorporates automatic thermal
protection which stops the compressor
when the oil temperature is too high. The
compressor can be restarted after approx
50 minutes.
Page 17

Section 5 – Factory Service
4.2 Obtaining Factory Service
To obtain information concerning factory service, contact Newport
Corporation or your Newport representative. Please have the following
information available.
1. Model number.
2. Purchase order number.
3. Complete description of the problem.
17
If components are to be returned to Newport Corporation, you will be given a
Return Number, which you should reference in your shipping documents.
Please fill out the service form located on the next page, and have the
information ready when contacting Newport Corporation. Include the
completed service form with any parts or components that are returned.
Page 18

18
5 Service Form
Vibration Control Products
Name RETURN AUTHORIZATION #
Company (Please obtain prior to return of item)
Address
Country Date
P.O. Number Phone Number
Item(s) Being Returned:
Model # Serial # (or manufacturing date)
Description
Reason for return of goods (please list any specific problems)
Please Describe the Problem:
(Attach additional sheets as necessary)
Where is the Equipment Installed?
(factory, controlled laboratory, out-of-doors, etc.)
Maximum Air Pressure available? Regulated? Yes No
Any additional information. (If special modifications have been made by the
user, please describe below).
 Loading...