

Page 1

300B Series Temperature Controllers
User’s Manual
Page 2

ii
EU Declaration of Conformity
We declare that the accompanying product, identified with the mark,
complies with requirements of the Electromagnetic Compatibility Directive,
89/336/EEC and the Low Voltage Directive 73/23/EEC.
Model Number: Model 325B and 350B Series Temperature Controllers
Year mark affixed: 2004
Type of Equipment: Electrical equipment for measurement, control and
laboratory use
Standards Applied:
Compliance was demonstrated to the following standards to the extent
applicable:
BS EN61326-1: 1997+A1+A2 “Electrical equipment for measurement,
control and laboratory use – EMC requirements”
This equipment meets the CISPR 11 Class A Group 1 radiated and conducted
emission limits.
BS EN 61000-3-2:2001, Harmonic current emissions, Class A
BS EN 61000-3-3:2002, Voltage fluctuations and flicker
IEC 61010-1:2001 second edition “Safety requirements for electrical
equipment for measurement, control and laboratory use”
Alain Danielo Dan Dunahay
VP European Operations Director of Quality Systems
Zone Industrielle 1791 Deere Avenue
45340 Beaune-la-Rolande, France Irvine, Ca. USA
Page 3

Preface iii
Warranty
Newport Corporation warrants that this product will be free from defects in
material and workmanship and will comply with Newport’s published
specifications at the time of sale for a period of one year from date of
shipment. If found to be defective during the warranty period, the product
will either be repaired or replaced at Newport's option.
To exercise this warranty, write or call your local Newport office or
representative, or contact Newport headquarters in Irvine, California. You
will be given prompt assistance and return instructions. Send the product,
freight prepaid, to the indicated service facility. Repairs will be made and the
instrument returned freight prepaid. Repaired products are warranted for the
remainder of the original warranty period or 90 days, whichever first occurs.
Limitation of Warranty
The above warranties do not apply to products which have been repaired or
modified without Newport’s written approval, or products subjected to
unusual physical, thermal or electrical stress, improper installation, misuse,
abuse, accident or negligence in use, storage, transportation or handling. This
warranty also does not apply to fuses, batteries, or damage from battery
leakage.
THIS WARRANTY IS IN LIEU OF ALL OTHER WARRANTIES,
EXPRESSED OR IMPLIED, INCLUDING ANY IMPLIED WARRANTY
OF MERCHANTABILITY OR FITNESS FOR A PARTICULAR USE.
NEWPORT CORPORATION SHALL NOT BE LIABLE FOR ANY
INDIRECT, SPECIAL, OR CONSEQUENTIAL DAMAGES RESULTING
FROM THE PURCHASE OR USE OF ITS PRODUCTS.
First printing 2004
© 2004 by Newport Corporation, Irvine, CA. All rights reserved. No part of
this manual may be reproduced or copied without the prior written approval
of Newport Corporation.
This manual has been provided for information only and product
specifications are subject to change without notice. Any change will be
reflected in future printings.
Newport Corporation
1791 Deere Avenue
Irvine, CA, 92606
USA
Part No. 41247-01, Rev. B
Page 4

iv
Confidentiality & Proprietary Rights
Reservation of Title:
The Newport programs and all materials furnished or produced in connection
with them ("Related Materials") contain trade secrets of Newport and are for
use only in the manner expressly permitted. Newport claims and reserves all
rights and benefits afforded under law in the Programs provided by Newport
Corporation.
Newport shall retain full ownership of Intellectual Property Rights in and to
all development, process, align or assembly technologies developed and other
derivative work that may be developed by Newport. Customer shall not
challenge, or cause any third party to challenge the rights of Newport.
Preservation of Secrecy and Confidentiality and Restrictions to Access:
Customer shall protect the Newport Programs and Related Materials as trade
secrets of Newport, and shall devote its best efforts to ensure that all its
personnel protect the Newport Programs as trade secrets of Newport
Corporation. Customer shall not at any time disclose Newport's trade secrets
to any other person, firm, organization, or employee that does not need
(consistent with Customer's right of use hereunder) to obtain access to the
Newport Programs and Related Materials. These restrictions shall not apply
to information (1) generally known to the public or obtainable from public
sources; (2) readily apparent from the keyboard operations, visual display, or
output reports of the Programs; 3) previously in the possession of Customer
or subsequently developed or acquired without reliance on the Newport
Programs; or (4) approved by Newport for release without restriction.
Service Information
This section contains information regarding factory service for the source.
The user should not attempt any maintenance or service of the system or
optional equipment beyond the procedures outlined in this manual. Any
problem that cannot be resolved should be referred to Newport Corporation.
Page 5

Preface v
Technical Support Contacts
North America & Asia Europe
Newport Corporation Service Dept.
1791 Deere Ave. Irvine, CA 92606
Telephone: (949) 253-1694
Telephone: (800) 222-6440 x31694
Asia
Newport Opto-Electronics
Technologies
253 Aidu Road, Bld #3, Flr 3, Sec C,
Shanghai 200131, China
Telephone: +86-21-5046 2300
Fax: +86-21-5046 2323
Newport Corporation Calling Procedure
If there are any defects in material or workmanship or a failure to meet
specifications, promptly notify Newport's Returns Department by calling
1-800-222-6440 or by visiting our website at www.newport.com/returns
warranty period to obtain a Return Material Authorization Number (RMA#).
Return the product to Newport Corporation, freight prepaid, clearly marked with the
RMA# and we will either repair or replace it at our discretion. Newport is not
responsible for damage occurring in transit and is not obligated to accept products
returned without an RMA#.
Newport/MICRO-CONTROLE S.A.
Zone Industrielle
45340 Beaune la Rolande, FRANCE
Telephone: (33) 02 38 40 51 56
within the
E-mail: rma.service@newport.com
When calling Newport Corporation, please provide the customer care representative
with the following information:
••••
Your Contact Information
••••
Serial number or original order number
••••
Description of problem (i.e., hardware or software)
To help our Technical Support Representatives diagnose your problem, please note the
following conditions:
••••
Is the system used for manufacturing or research and development?
••••
What was the state of the system right before the problem?
••••
Have you seen this problem before? If so, how often?
••••
Can the system continue to operate with this problem? Or is the system non-
operational?
••••
Can you identify anything that was different before this problem occurred?
Page 6

vi
Table of Contents
EU Declaration of Conformity............................................................... ii
Warranty................................................................................................ iii
Technical Support Contacts ................................................................... v
Table of Contents
List of Figures
List of Tables
......................................................................... vi
............................................................................. viii
................................................................................. ix
1 Safety Precautions 11
1.1 Definitions and Symbols ............................................................ 11
1.1.1 CSA Mark with “C” and “US” Indicators .......................11
1.1.2 European Union CE Mark ...............................................11
1.1.3 Alternating voltage symbol .............................................11
1.1.4 On ....................................................................................12
1.1.5
Off....................................................................................12
1.1.6 Fuses ................................................................................12
1.1.7
Frame or Chassis .............................................................12
1.1.8 Protective Conductor Terminal ...................................13
1.2 Warnings and Cautions............................................................... 13
1.2.1 General Warnings............................................................13
1.2.2 General Cautions .............................................................14
1.2.3 Summary of Warnings and Cautions...............................15
1.3 Location of Warnings ................................................................. 16
1.3.1
Rear Panel........................................................................16
2 General Information 17
2.1 Introduction ................................................................................ 17
2.2 Accessories ................................................................................. 20
3 Getting Started 21
3.1 Unpacking and Handling............................................................ 21
3.2 Inspection for Damage ............................................................... 21
3.3 Available Options and Accessories............................................ 21
3.4 Parts List..................................................................................... 22
3.5 Choosing and Preparing a Suitable Work Area.......................... 22
3.6 Electrical Requirements.............................................................. 22
3.7 Power Supplies ........................................................................... 23
Page 7

Preface vii
4 System Operation 25
4.1 Front Panel.................................................................................. 25
4.1.1 AC Power Switch ............................................................25
4.1.2 Analog Output .................................................................25
4.1.3 Mode Switch....................................................................26
4.1.4 Output Section .................................................................26
4.1.5 Status ...............................................................................27
4.1.6 Display.............................................................................27
4.1.7 Control Knob ...................................................................28
4.2 Rear Panel................................................................................... 28
4.2.1 USB Interface ..................................................................28
4.2.2 Sensor Select Switch .......................................................28
4.2.3 TE Driver Output Connector ...........................................28
4.2.4 AC Power Inlet ................................................................29
4.2.5 Frame or Chassis Terminal..............................................29
4.2.6 Power Inlet Socket...........................................................29
5 Computer Interfacing 31
5.1 Memory ...................................................................................... 31
5.2 Commands and Queries.............................................................. 31
6 Software Application 45
6.1 Overview .................................................................................... 45
6.2 Connection.................................................................................. 45
6.3 General Usage ............................................................................ 46
6.3.1 LDD Tab..........................................................................46
6.3.2 TEC Tab ..........................................................................47
6.4 Menu Structure ........................................................................... 47
7 Principles of Operation 49
7.1 Introduction ................................................................................ 49
7.2 Thermistor .................................................................................. 49
7.2.1 The Steinhart-Hart Equation............................................50
7.2.2 Table of Constants...........................................................51
7.3 Working With IC Sensors .......................................................... 52
7.3.1 AD590 Series IC Sensors ................................................52
7.3.2 LM135/335 Series IC Sensors.........................................53
7.4 Using Thermo-Electric Modules ................................................ 53
7.5 Mounting Considerations ........................................................... 54
Page 8

viii
7.6 PID Tuning ................................................................................. 55
7.6.1 PID Control Loop .......................................................55
7.6.2 P Loop .............................................................................56
7.6.3 PI Loop ............................................................................56
7.6.4 PID Loop .........................................................................57
7.7 Model 300B Series Setup ........................................................... 58
7.7.1 Rack Mounting Model 300B Series Units.......................58
7.7.2 Model 300B Series Operating Checklist .........................58
8 Maintenance and Service 61
8.1 Enclosure Cleaning..................................................................... 61
8.2 Fuse Replacement....................................................................... 61
8.3 Obtaining Service ....................................................................... 62
8.4 Service Form .............................................................................. 63
List of Figures
Figure 1 CSA mark with “C” and “US” Indicators ................................ 11
Figure 2 CE Mark................................................................................... 11
Figure 3 Alternating Voltage Symbol .................................................... 11
Figure 4 On Symbol ............................................................................... 12
Figure 5 Off Symbol............................................................................... 12
Figure 6 Fuse Symbol............................................................................. 12
Figure 7 Frame or Chassis Terminal Symbol......................................... 12
Figure 8 Protective Conductor Terminal ................................................ 13
Figure 9 AC Receptacle Warning Label................................................. 14
Figure 10 Locations of warnings on the rear panel .................................. 16
Figure 11 Front Panel Layout (325B shown) ........................................... 25
Figure 12 Rear Panel ................................................................................ 28
Figure 13 Application front panel (TEC Tab) .......................................... 45
Figure 14 Application front panel when communicating (LDD Tab)...... 46
Figure 15 Thermistor Resistance versus Temperature ............................. 51
Figure 16 TE Module Configuration........................................................ 53
Figure 17 Mounting arrangement of a TE module, heat sink and laser
diode......................................................................................... 54
Figure 18 Basic block diagram of a temperature control system ............. 55
Figure 19 Proportional Temperature Controller Block Diagram ............. 56
Figure 20 PI Temperature Controller Block Diagram.............................. 57
Figure 21 PID Temperature Controller Block Diagram ........................... 57
Figure 22 Fuse Replacement .................................................................... 61
Page 9

Preface ix
List of Tables
Table 1 Specifications Tables ............................................................... 19
Table 2 Command Summary ................................................................ 33
Table 3 Comparison of Curve Fitting Equations .................................. 51
Table 4 Thermistor Constants ............................................................... 52
Page 10

x
This page is intentionally left blank.
Page 11

1 Safety Precautions
1.1 Definitions and Symbols
The following terms and symbols are used in this documentation and also
appear on the Model 300B Series Temperature Controllers where safetyrelated issues occur.
1.1.1 CSA Mark with “C” and “US” Indicators
Figure 1 CSA mark with “C” and “US” Indicators
The presence of the CSA mark with “C” and “US” indicates that it has been
designed, tested and certified as complying with all applicable U.S. and
Canadian safety standards.
1.1.2 European Union CE Mark
Figure 2 CE Mark
The presence of the CE Mark on Newport Corporation equipment means that
it has been designed, tested and certified as complying with all applicable
European Union (CE) regulations and recommendations.
1.1.3 Alternating voltage symbol
This international symbol implies an alternating voltage or current.
11
Figure 3 Alternating Voltage Symbol
Page 12

12 Safety Precautions
1.1.4 On
Figure 4 On Symbol
The On Symbol in the figure above represents a power switch position on the
Model 300B Series Temperature Controllers. This symbol represents a
Power On condition.
1.1.5 Off
Figure 5 Off Symbol
The Off Symbol in the figure above represents a power switch position on the
Model 300B Series Temperature Controllers. This symbol represents a
Power Off condition.
1.1.6 Fuses
The fuse symbol in the figure above identifies the fuse location on the Model
300B Series Temperature Controllers.
1.1.7 Frame or Chassis
Figure 7 Frame or Chassis Terminal Symbol
This symbol identifies the frame or chassis terminal.
Figure 6 Fuse Symbol
Page 13

Safety Precautions 13
1.1.8 Protective Conductor Terminal
Figure 8 Protective Conductor Terminal
The protective conductor terminal symbol in the above figure identifies the
location of the bonding terminal, which is bonded to conductive accessible
parts of the enclosure for safety purposes. The intent is to connect it to an
external protective earthing system through the power cord.
1.2 Warnings and Cautions
The following are definitions of the Warnings, Cautions and Notes that are
used throughout this manual to call your attention to important information
regarding your safety, the safety and preservation of your equipment or an
important tip.
Situation has the potential to cause bodily harm or death.
Situation has the potential to cause damage to property or equipment.
Additional information the user or operator should consider.
1.2.1 General Warnings
Observe these general warnings when operating or servicing this equipment:
•••• Heed all warnings on the unit and in the operating instructions.
•••• Do not use this equipment in or near water.
•••• This equipment is grounded through the grounding conductor of the power
cord.
•••• Route power cords and other cables so they are not likely to be damaged.
•••• Disconnect power before cleaning the equipment. Do not use liquid or
aerosol cleaners; use only a damp lint-free cloth.
WARNING
CAUTION
NOTE
•••• Lockout all electrical power sources before servicing the equipment.
•••• To avoid fire hazard, use only the specified fuse(s) with the correct type
number, voltage and current ratings as referenced in the appropriate
Page 14

14 Safety Precautions
locations in the service instructions or on the equipment. Only qualified
service personnel should replace fuses.
•••• To avoid explosion, do not operate this equipment in an explosive
atmosphere.
•••• Qualified service personnel should perform safety checks after any
service.
1.2.2 General Cautions
Observe these cautions when operating or servicing this equipment:
•••• Before applying power, carefully read the warning label placed over the
AC power input receptacle in back of the instrument.
Figure 9 AC Receptacle Warning Label
•••• If this equipment is used in a manner not specified in this manual, the
protection provided by this equipment may be impaired.
•••• To prevent damage to equipment when replacing fuses, locate and correct
the problem that caused the fuse to blow before re-applying power.
•••• Do not block ventilation openings.
•••• Use only the specified replacement parts.
•••• Follow precautions for static sensitive devices when handling this
equipment.
•••• This product should only be powered as described in the manual.
•••• There are no user-serviceable parts inside the Model 300B Series
Temperature Controllers.
•••• To prevent damage to the equipment, read the instructions in the
equipment manual for proper input voltage.
•••• Damage may occur if Voltage Select tumbler is turned without removing
from the Input Power device.
Page 15

Safety Precautions 15
1.2.3 Summary of Warnings and Cautions
The following general warning and cautions are applicable to this instrument:
WARNING
Before operating the Model 300B Series Temperature Controllers, please
read and understand all of Section 1.
WARNING
Do not attempt to operate this equipment if there is evidence of shipping
damage or you suspect the unit is damaged. Damaged equipment may
present additional hazards to you. Contact Newport technical support for
advice before attempting to plug in and operate damaged equipment.
WARNING
To avoid electric shock, connect the instrument to properly earth-grounded,
3-prong receptacles only. Failure to observe this precaution can result in
severe injury.
WARNING
To reduce the risk of electric shock or damage to the instrument, turn the
power switch off and disconnect the power cord before replacing a fuse.
WARNING
Before cleaning the enclosure of the Model 300B Series Temperature
Controllers, the AC power cord must be disconnected from the wall socket.
CAUTION
Make sure that the selector is set at the position that corresponds to your
mains voltage. Follow directions in section 4.2.4 to properly set tumbler.
CAUTION
There are no user serviceable parts inside the Model 300B Series
Temperature Controllers. Work performed by persons not authorized by
Newport Corporation will void the warranty. For instructions on obtaining
warranty repair or service, please refer to Section 8.
All units are factory preset to operate at 108-132VAC, 60Hz
CAUTION
Page 16
16 Safety Precautions
r
1.3 Location of Warnings
1.3.1 Rear Panel
Electrical Hazard
(Series 325B shown)
MAX Powe
Fuse info
Frame or Chassis
Terminal
Figure 10 Locations of warnings on the rear panel
Page 17

2 General Information
2.1 Introduction
The intended use of the 300B Series Temperature Controllers is to precisely
control the temperature of a thermo-electric (TE) cooler in a closed loop
system using a variety of possible temperature sensors as the feedback. They
offer a combination of features, performance, and value that is unmatched by
other laser diode temperature controllers.
Three operating modes are user selectable: constant R (thermistor), constant
T (IC sensors), or constant ITE (TE cooler), while delivering high output
power from 60 Watts to 130 Watts.
Quiet, safe and stable output current results from a P-I-D control circuitry
with complete flexibility for adjustment through the Newport LDD/TEC
Application software (included) or user developed programs. The PID control
algorithm is implemented to achieve optimal stability and settling
performance along with an ITE current limit setting to protect TE coolers from
damage, regardless of operating mode.
The P-I-D control loop renders performance for fast settling onto a low noise,
bipolar current output in three operating modes: 1) constant thermistor
resistance, 2) constant Temperature as monitored by an IC sensor, or 3)
constant peltier-cooler (thermo-electric) temperature. A user adjustable TEcooler current limit setting unconditionally protects the TE modules from
damage by excessive drive current independent of the operating mode. The
Model 300B Series of temperature controllers are compatible with
thermistors, AD590 and LM135/335 Series IC temperature sensors.
Temperature readings are displayed in °C when using IC sensors and
provided as an option when using thermistors. A USB interface is standard
feature in all models, permitting interfacing to a PC to control from
Newport’s LDD/TEC Application software or user’s developed application
using the included LabVIEW drivers.
Additional Benefits
1. Preset display lets you adjust operating setpoint before switching the
output on
2. Low noise, bipolar current output
3. Wide TEC temperature range from -50 to +150°C
17
Page 18

18 General Information
4. Analog interface provides remote control capability
Specifications
Model 325B Model 350B
Output
Type Bipolar, constant current source
TEC Control Loop Type Hybrid P-I-D
Maximum Current (A) ±2.5 ±5
Compliance Voltage (V) 7 11
Available Output Power (W) 17.5 55
Accuracy (mA) ±5 ±9
Resolution (mA) 0.042 0.084
Ripple/Noise (mA rms) <0.03 <0.03
Current Limit
Range (A) 0–2.52 0–5.05
Accuracy (mA) ±5 ±9
Resolution (mA) 0.042 0.084
Stability
Short-Term Stability (1 h) 0.001°C
Long-Term Stability (24 h) 0.005°C
Display
Range
Temperature (oC) -50.0 to +150.0°C
Resistance (10 µA) (kΩ)
Resistance (100 µA) (kΩ)
TE Current (A) -2.50 to +2.50 -5.00 to +5.00
Resolution
Temperature 0.1°C
Resistance (10 µA) (Ω)
Resistance (100 µA) (Ω)
TE Current (mA) 10
Accuracy
Temperature ±0.1°C
Resistance (10 µA)
Resistance (100 µA)
TE Current ±10 ±10
0.1–200.0
0.01–20.00
100
10
±100Ω
±10Ω
Page 19

General Information 19
Temperature Sensors
Sensor Type
Temperature Control Resolution 0.01°C 0.1°C 0.1°C 0.1°C
Temp. Sensor Control Accuracy (at 25°C) ±0.2°C ±0.5°C ±1.0°C ±3.0°C
Sensor Bias 10/100 µA +12 V 1 mA 1 mA
Thermistor
NTC 2-wire
AD592CN LM135AH LM335AZ
Overall Specifications
Voltage Requirements ~100/120/220/240 VAC +/-10%, 50–60Hz
Power Requirements
Chassis Ground 4 mm banana jack
Size (H x W x D) [in. (mm)] 3.5 (88) x 8.5 (215) x 12.6 (320)
Weight [lb (kg)] 8.9 (4.05)
Operating Temperature
Operating Altitude 3000 m (10,000 feet)
Storage Temperature
Storage Relative Humidity <85% humidity non-condensing
Safe Use Environment Indoor
Electrical Class 1
Pollution Degree 2
Transient Overvoltage Category 2
Connectors
Output Connectors TE Module and Sensor 15-pin female D-sub
Analog Output BNC
USB Connector Type B
325B MAX POWER = 60W
350B MAX POWER = 130W
0°C to 40°C
(<90% humidity non-condensing)
-29°C to + 60°C
Table 1 Specifications Tables
Page 20

20 General Information
2.2 Accessories
The Model 300B Series Temperature Controllers come with a line cord for
connection to AC power. To order accessories use the following part
numbers:
Model Description
300-02 Temperature Controller Cable
300-04 TEC/Mount Cable
300-16 10.0 kW Thermistor (±0.2°C)
300-22 AD592CN IC Sensor (-45°C to +125°C Range)
35-RACK Rack Mount Kit
Page 21

3 Getting Started
3.1 Unpacking and Handling
It is recommended that the Model 300B Series Temperature Controllers be
unpacked in a lab environment or work site. Unpack the system carefully;
small parts and cables are included with the instrument. Inspect the box
carefully for loose parts before disposing of the packaging. You are urged to
save the packaging material in case you need to ship your equipment in the
future.
3.2 Inspection for Damage
The Model 300B Series Temperature Controllers are carefully packaged at
the factory to minimize the possibility of damage during shipping. Inspect
the box for external signs of damage or mishandling. Inspect the contents for
damage. If there is visible damage to the instrument upon receipt, inform the
shipping company and Newport Corporation immediately.
WARNING
Do not attempt to operate this equipment if there is evidence of shipping
damage or you suspect the unit is damaged. Damaged equipment may
present additional hazards to you. Contact Newport technical support for
advice before attempting to plug in and operate damaged equipment.
3.3 Available Options and Accessories
Model 300B Series Temperature Controllers:
325B 2.5Amp Temperature Controller
350B 5.0Amp Temperature Controller
Accessories:
300-02 Temperature Controller Cable
300-04 TEC/Mount Cable
300-16 10.0 kW Thermistor (±0.2°C)
300-22 AD592CN IC Sensor (-45°C to +125°C Range)
35-RACK Rack Mount Kit
21
Page 22

22 Getting Started
Newport Corporation also supplies temperature controlled mounts, lenses,
and other accessories. Please consult with your representative for additional
information.
3.4 Parts List
The following is a list of parts included with the Model 300B Series
Temperature Controllers:
1. User’s manual (CD) and a Printed Copy
2. Power cord
3. Temperature Controller
4. Fuses (2 pieces)
5. Temperature Controller Cable (Optional)
6. Temperature Controller /Mount Cable (Optional)
7. Rack Mount Kit (Optional)
8. Certificate of Calibration
If you are missing any hardware or have questions about the hardware you
have received, please contact Newport Corporation.
3.5 Choosing and Preparing a Suitable Work Area
The Model 300B Series Temperature Controllers may be placed on any
reasonably firm table or bench during operation (or Rack mounted with
accessory 35-RACK). The front legs of the unit can be pulled out to tilt the
unit at an angle, if desired.
Provide adequate distance between the Model 300B Series Temperature
Controllers and adjacent walls for ventilation purposes. Approximately 2inch spacing for all surfaces is adequate.
CAUTION
The primary means for disconnection from the AC mains is disconnecting
the power cord from the instrument. Do not position this instrument that
makes it difficult to disconnect the power cord.
3.6 Electrical Requirements
Before attempting to power up the unit for the first time, the following
precautions must be followed:
Page 23

Getting Started 23
WARNING
To avoid electric shock, connect the instrument to properly earth-grounded,
3-prong receptacles only. Failure to observe this precaution can result in
severe injury.
•••• Have a qualified electrician verify the wall socket that will be used is
properly polarized and properly grounded.
•••• Set the mains selector tumbler to the voltage that matches the power outlet
AC voltage. Follow directions in section 4.2.4 to properly set tumbler.
3.7 Power Supplies
AC power is supplied through the rear panel input power connector that
provides in-line transient protection and RF filtering. The input power
connector contains the fuses and the switch to select series or parallel
connection of the transformer primaries for operation at 100VAC, 120VAC,
220VAC or 240VAC. Refer to paragraph 4.2.4 before applying power.
Page 24

24 Getting Started
This page is intentionally left blank.
Page 25

4 System Operation
WARNING
4.1 Front Panel
The front panel of the Model 300B Series Temperature Controllers is
arranged for easy operation. Six distinct areas, each with a specific set of
related functions, and a control knob are located on the front panel, as shown
in Figure 11 below.
Before operating the Model 300B Series Temperature
Controllers, please read and understand all of Section 1.
4.1.1 AC Power Switch
When the AC power is turned on the unit starts up with the OUTPUT off,
display in SETPOINT mode, and mode of operation in either R/T or ITE
mode depending upon the mode selected when the unit was last turned OFF.
4.1.2 Analog Output
A BNC connector can be used to monitor the temperature sensor value.
The transfer function of the output is dependent on the sensor type selected.
25
Figure 11 Front Panel Layout (325B shown)
Page 26

26 System Operation
The thermistor current selection values are either 10µA or 100µA and result
in either 100 kΩ/V or 10 kΩ/V respectively. Both IC sensors have a transfer
function of 100°C/V.
Analog Output Level, VDC (BNC Connector)
R/T or I
TE
MODE
Range Output Voltage Level Corresponding R/T Value
100µA 0 to 2V 0 to 20 kΩ
10µA 0 to 2V 0 to 200 kΩ
AD590 -0.50V to +1.50V -50.0°C to +150°C
LM135 -0.50V to +1.50V -50.0°C to +150°C
LM335 -0.40V to +1.00V -40.0°C to +100°C
4.1.3 Mode Switch
The Model 300B Series can be operated in either 1) constant R (thermistor
resistance), 2) constant T (thermistor and IC sensors), or 3) constant ITE
mode. The R/T mode is used with temperature sensors and the ITE mode to
maintain a constant output current. If constant T mode is selected and the
sensor type is a thermistor, all temperature to resistance conversions are done
using the Steinhart-Hart equation. Please refer to “TEC:CONST” command
to modify the sensor constants
.
4.1.4 Output Section
Output ON Switch
Pushing this switch allows current flow to the TE module. The output stays
on, as indicated by the green LED above, until the switch is pushed again or
an error condition occurs.
Error Indicator LED
An ERROR condition occurs when there is an open circuit to the TE module
or temperature sensing device. The output current is automatically turned off.
Once the device is replaced or reconnected, pushing the output switch twice
will clear the error indication and restore the output on condition.
Limiting Indicator LED
This LED lights up whenever the output current reaches a user adjustable
threshold, limiting the current flow to the TE module. It usually occurs
during initial startup as the drive circuitry attempts to reach equilibrium.
Page 27

System Operation 27
4.1.5 Status
The STATUS indicator LEDs show whether the device under temperature
control is being heated or cooled.
4.1.6 Display
A 3 1/2 digit green LED display is located in the top center of the front panel.
It reads in kΩ when displaying a thermistor resistance value, °C when
displaying an IC sensor temperature or temperature equivalent to a thermistor
resistance value, or Amps when in the constant current ITE mode. Pushing the
switch cycles through the display values as described below. Display modes
can be toggled with the output on or off.
SETPOINT Display
The SETPOINT display mode is used to set the appropriate output value
using the rotary control knob before turning the OUTPUT on. Once the
control level is set, the OUTPUT may be turned on and the actual SENSOR
or CURRENT value can be monitored.
LIMIT SET Display
This mode allows setting output current limit level with the control knob.
R/TEMP Display
The actual temperature sensor value is monitored in this mode. The value
displayed depends on the sensor being used and the mode of operation.
See table below for details.
Thermistor kΩ °C °C
IC Sensors Not Applicable °C °C
R MODE T MODE I
TE
MODE
CURRENT Display
This readout monitors the actual current level in Amps being supplied to the
TE module. When the OUTPUT is first selected this current value may be as
high as the LIMIT value. As the temperature stabilizes the output current will
decrease.
Indicator LEDs
To the right of the numeric display are three LEDs which indicate
measurement units: 1) resistance in kΩ, 2) temperature in °C, or 3) output
current in Amps.
Page 28

28 System Operation
A
4.1.7 Control Knob
The knob control on the right side of the front panel sets the appropriate
reference value corresponding to either resistance (thermistor), temperature
(thermistor and IC sensors), or TE current (ITE) to be maintained by the Model
300B Series Temperature Controller.
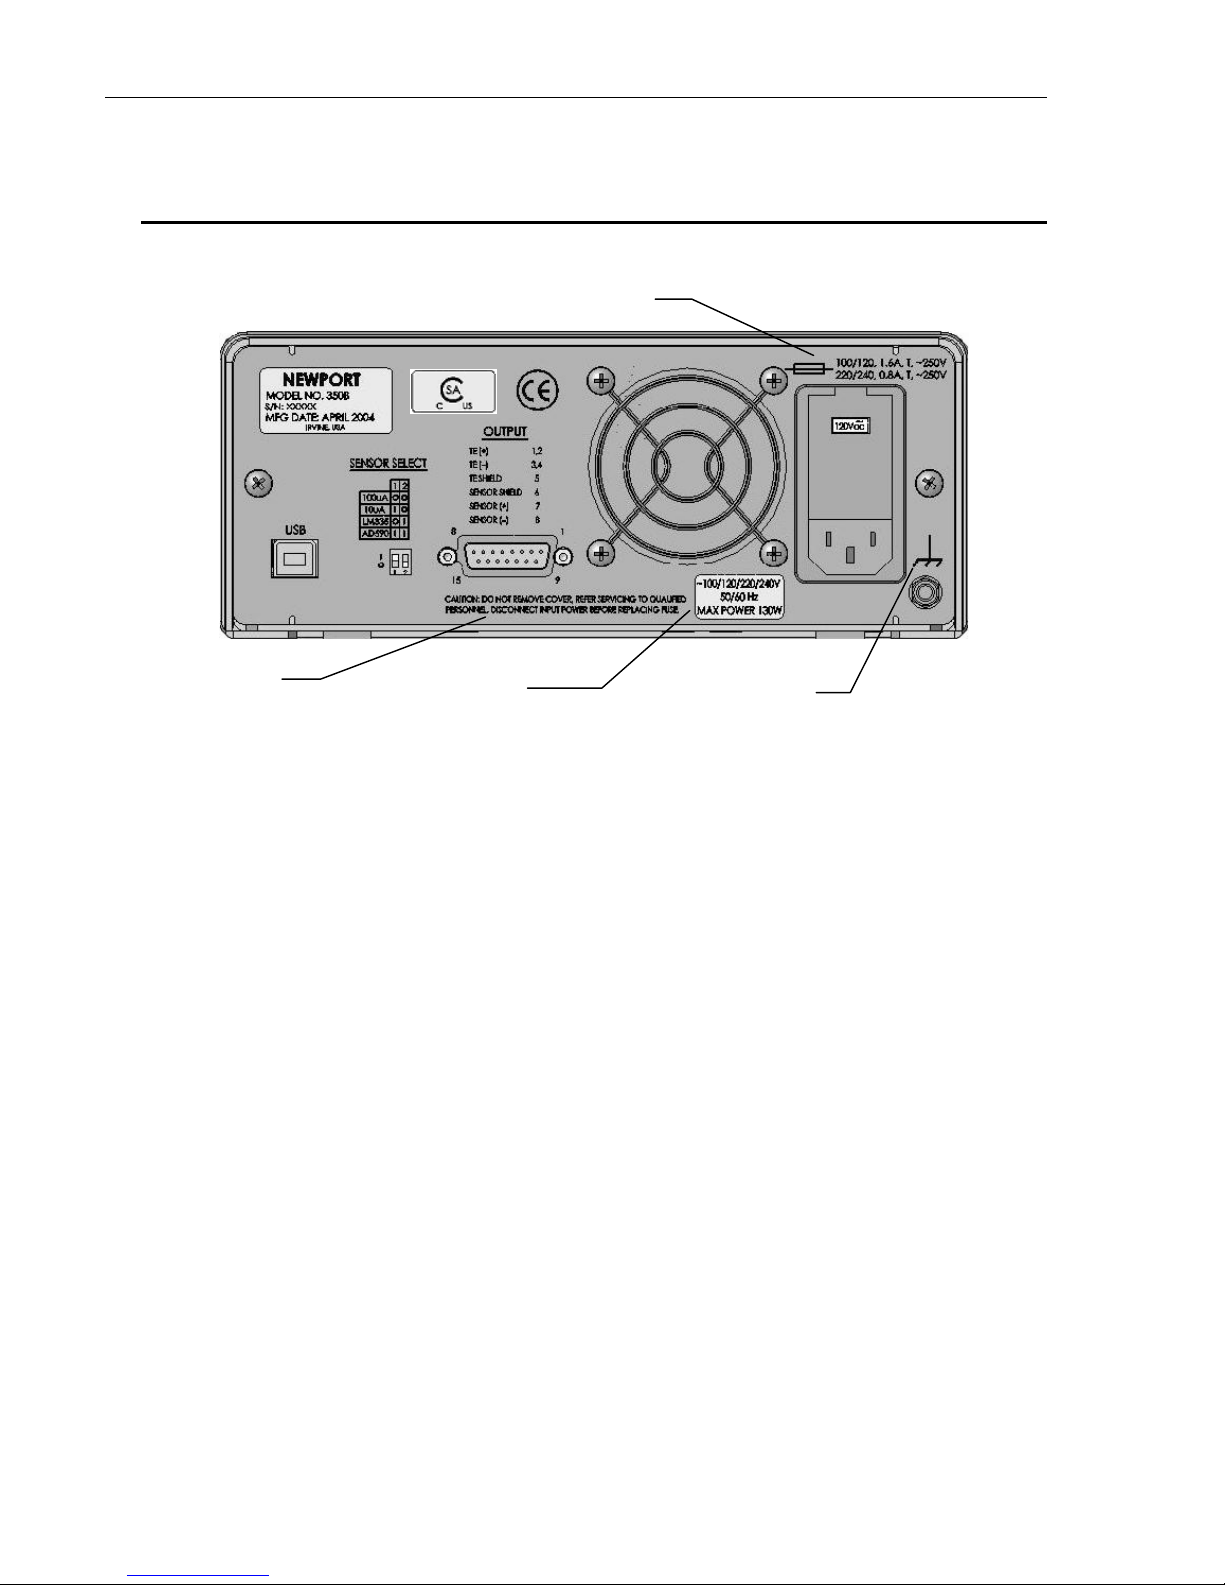
4.2 Rear Panel
Figure 12 shows the layout of the rear panel that contains OUTPUT and USB
connectors, the sensor select switch, and the AC power inlet.
CE
Label
Model
Number
Label
CSA
Label
Voltage
Setting &
Fuse
USB
Port
Sensor
Select
Sensor
Select
Switch
Output
Table
4.2.1 USB Interface
The instrument is designed to communicate with standard USB interfaces.
The cable required is a USB A/ B connection cable.
4.2.2 Sensor Select Switch
This dual-position DIP switch is used to select the appropriate bias for each
one of the sensor types. The switch position for each sensor is printed on the
rear panel next to the switch.
TE Driver
Output
Figure 12 Rear Panel
C Power
Inlet
4.2.3 TE Driver Output Connector
Connections to the TE module and temperature sensor are made using a 15pin, D-sub connector respectively. There are two pins each for the TE+ and
Page 29

System Operation 29
TE- Connections to provide redundancy and reduce the voltage drop in the
cable.
Wire Color
Pin # Connection (300-02 cable)
1 & 2 TE + RED
3 & 4 TE - BLACK
5 TE SHIELD
6 SENSOR SHIELD
7 SENSOR + GREEN
8 SENSOR - WHITE
4.2.4 AC Power Inlet
The input voltage setting is indicated in a small window on the face of the
power module. A small screwdriver is needed to flip down the panel once
the AC line cord is removed. Carefully remove plastic tumbler and reinsert it
to show the appropriate power grid voltage. The fuse is also located behind
this panel and can be pulled out, for replacement with the appropriate size, as
indicated on the back panel.
All units are preset at the factory for operation at 108-132VAC, 60HZ.
The fuse must be changed for 198-242VAC and 216-264VAC operation.
Select
• 100VAC for operation at 90-110VAC, 60Hz
• 120VAC for operation at 108-132VAC, 60Hz
• 220VAC for operation at 198-242VAC, 50Hz
• 240VAC for operation at 216-264VAC, 50Hz
The line cord supplied with each unit should be plugged only into a properly
grounded three-prong outlet to prevent electrical shock in the event of an
internal short circuit to the metal cabinet.
4.2.5 Frame or Chassis Terminal
This terminal provides the means to connect to the enclosure.
4.2.6 Power Inlet Socket
Plug the included power cord into the Power Inlet Socket on the rear of the
instrument, then plug the power cord into a wall socket with proper earth
grounding.
Page 30

30 System Operation
This page is intentionally left blank
Page 31

5 Computer Interfacing
5.1 Memory
The calibration constants and other temperature controller parameters that
must be retained even when the power is removed from the unit are stored in
an electrically erasable programmable memory (EEPROM).
5.2 Commands and Queries
There are two types of device commands: commands that cause the
instrument to take a desired action, and queries that return a stored value or
state of the instrument. Queries must end with a question mark (?), while
commands may require parameter(s) to follow:
TEC:LIMit:I 2.00
For example, the value “2.00” in the command TEC:LIMit:I 2.00, sets the
output current limit at 2.00. Table 2 below summarizes all the commands
and queries supported by the instrument. The command/query MUST
contain all of the letters which are shown in upper case in this table. The
lower case letters shown with the commands are optional, and may be used
for clarity.
The commands may be sent to the instrument in either upper or lower case or
in any combination. For example, the following commands are equal:
TEC:LIMit:I 2.00
TEC:LIM:I 2.00
tec:LIM:I 2.00
TeC:Lim:I 2.00
COMMAND EXECUTION:
The controller interprets the commands in the order they are received and
execute them sequentially. If a set of commands have to be executed closer
to each other, these commands can be sent to the controller simultaneously
by creating a command string with semicolon (;) used as a command
separator. The command string length should not exceed 50 characters. In
the example shown below, a command string was created with semicolon
31
Page 32

32 Computer Interfacing
separating 5 queries. The controller responds to this command string with a
response that has 5 values using a comma (,) as a separator.
COMMAND STRING:
TEC:OUT?;TEC:SET:I?;TEC:I?;TEC:SET:R?;ERR?
INSTRUMENT RESPONSE:
0,1.25,0.00,10.00,0
COMMAND TERMINATION:
All commands sent to the instrument must be terminated by <Carriage
Return><Line Feed>.characters. All responses sent out by the instrument are
terminated by the same characters.
NOTE
For compatibility, some commands have optional entries; such as
can also be
TEC:ITE (I)
TEC:I
. Options are shown in Table 2 as parenthesis; such as
. After Table 2, each command and query is detailed
TEC:ITE
.
, which
Page 33

Computer Interfacing 33
Commands common to both Temperature Controllers and Laser Diode Drivers:
Command Syntax Command Description Remarks
*CLS
Clear status and response
buffer command
*IDN?
*RCL
Identification Query
Recall Settings Restore instrument to setup state stored in its non-
volatile local memory
*RST
*SAV
Reset Instrument
Save Settings Save instrument’s current settings in its non-volatile
local memory
*STB?
Status Byte Query Returns “message available” and “error message
available” status and “output out of tolerance” status
ADDRess
ADDRess?
ERRors?
ERRSTR?
HWTemp?
LOCAL
Address Command Sets the controller USB address
Address Query Returns the controller’s USB address
Error query Returns error code
Error string query Returns error string
Temperature query Returns instrument temperature in deg. C
Return to local mode Makes front panel buttons active
Commands specific to Temperature Controllers:
Command Syntax Command Description Remarks
TEC:CONST
TEC sensor constants command
TEC:CONST?
TEC:GAIN:PID
TEC:GAIN:PID?
TEC:ITE(I)
TEC:ITE? (I?)
TEC:LIMit:ITE(I)
TEC:LIMit:ITE? (I?)
TEC:MODE:ITE(I)
TEC:MODE:R
TEC:MODE:T
TEC:MODE?
TEC:OUTput
TEC:OUTput?
TEC:R
TEC:R?
TEC:SENsor?
TEC:SET:ITE? (I?)
TEC:SET:R?
TEC:SET:T?
TEC:T
TEC:T?
TEC sensor constants query
TEC PID settings
TEC PID settings query
TEC I
TEC measured I
TEC I
TEC I
I
set point
TE
query
TE
current limit set
TE
current limit set query
TE
mode
TE
Resistance mode Valid if sensor is thermistor
Temperature mode Valid for thermistor and IC sensors
TEC mode query
TEC output enable/disable
TEC output enable status query
TEC thermistor set point Valid if sensor is thermistor
TEC measured R query Valid if sensor is thermistor
TEC sensor type setting query
TEC I
set point query
TE
TEC thermistor set point query Valid if sensor is thermistor
TEC temperature set point query Valid for thermistor and IC sensors
TEC temperature set point Valid for thermistor and IC sensors
TEC measured temperature query Valid for thermistor and IC sensors
Table 2 Command Summary
Page 34

34 Computer Interfacing
*CLS
Description
Syntax
Remarks
Clear status and response buffer command
*CLS
The *CLS command is used to clear the status byte register and the response buffer.
This command may be issued if query commands and their responses fall out of sync
with each other.
See Also
*STB?
*IDN?
Description
Syntax
Remarks
Identification query.
*IDN?
This query will cause the instrument to return an identification string.
Model
name
Firmware
version #
Firmware
date
Controller
Serial #
NEWPORT XXXX vYYY mm/dd/yy, SN ZZZZ
Examples:
NEWPORT 325B v2.00 05/17/04,SN 1
NEWPORT 350B v2.00 05/17/04,SN 1
*RCL
Description
Syntax
Value 0 Restores Factory Default settings
1 Restores last saved working setting
2 Restores last saved user settings
Remarks
Recall command.
*RCL value
Argument Value Description
The recall command restores the instrument to the setup state which was last saved using
*SAV Command.
See Also
*RST, *SAV
*RST
Description
Syntax
Remarks
See Also
Reset command.
*RST
The reset command performs a device reset.
*RCL
Page 35

Computer Interfacing 35
*SAV
Description
Syntax
2 Saves current settings to user settings
Save command.
*SAV value
Argument Value Description
Value 0 Invalid
1 Saves current settings to working settings
Remarks
The save command stores the current state of the instrument in non-
volatile local memory. This state is then recalled by using the *RCL recall command.
See Also
*RCL
*STB?
Description
Syntax
Remarks
Status Byte Register query.
*STB?
The Read Status Back query allows the programmer to read the Status Byte Register.
Response
Description
Status Byte Register bit 0 Reserved
bit 1 Reserved
bit 2 Reserved
bit 3 Reserved
bit 4 Message Available
bit 5 Reserved
bit 6 Reserved
bit 7 Error Message Available
ADDRess
Description
Syntax
Remarks The
USB address command.
ADDRess value
ADDRess command sets the instrument USB address. After changing USB address,
the communication with the instrument has to be re-initialized. This can be accomplished
by calling “InitSystem” function in the DLL available in the CD provided with the
instrument.
Argument Value Description
Value 0 Reserved
1 to 99 Valid USB address range
See Also
ADDRess?
Page 36

36 Computer Interfacing
ADDRess?
Description
Syntax
Remarks The
USB address query.
ADDRess?
ADDRess query returns the controller’s USB address.
Response Value Description
address 0 Reserved
1 to 99 Valid USB address range
See Also
ADDRess
ERRors?
Description
Syntax
Remarks
ERRors?
Error query.
The ERRors? query returns a list of commands and device errors which have occurred
since the last query. These errors are indicated by a number that corresponds to the type
of error which occurred.
Response Description
Error code Error code number, 0 if no errors
See Also
ERRSTR?
Error Messages
0
NO ERROR
No errors exist in the output buffer.
115 IDENTIFIER NOT VALID
The issued command does not exist. Check the command syntax.
200 REMOTE MODE
Instrument is presently in remote mode. As a result, the rotary knob, “MODE” and “OUTPUT” switches
have been made inactive. Issue “LOCAL” command to make the knob and switches active.
201 VALUE OUT OF RANGE
The specified parameter is out of range. Refer to the description of issued command for valid parameter
range.
402 SENSOR OPEN
The output has been turned OFF because the input voltage from AD590 sensor is less than –0.50V or
voltage from LM135/335 sensor is greater than 1.50V. Once the fault is corrected, “TEC:OUTput 1”
command must be issued once to clear the error indication, and a second time to restore current to the TE
module.
Page 37

Computer Interfacing 37
405 COMP VOLTAGE LIMIT ERROR
The output has been turned OFF because the forward voltage drop of a TE module exceeds the
compliance voltage specified in the Specification table. Once the fault is corrected, “TEC:OUTput 1”
command must be issued once to clear the error indication, and a second time to restore current to the TE
module.
409 SENSOR CHANGE
The output has been turned OFF because a sensor change was done by modifying the sensor select switch
setting. Sensor select switch is located in the rear panel of the instrument.
415 SENSOR CHANGE
The output has been turned OFF because the input voltage from AD590 sensor is greater than 1.50V or
voltage from LM135/335 sensor is less than –0.50V. Once the fault is corrected, “TEC:OUTput 1”
command must be issued once to clear the error indication, and a second time to restore current to the TE
module.
419 MODE CHANGE
The output has been turned OFF because a mode change was commanded using either “TEC:MODE:I” or
“TEC:MODE:R” or “TEC:MODE:T” commands.
420 SENSOR MISMATCH
The command issued is not supported for the selected sensor type. This message is obtained when an IC
sensor is selected, and resistance related commands are issued.
901 SYSTEM OVER TEMPERATURE ERROR
The output has been turned OFF because temperature inside the instrument has exceeded 75 degC. Once
the fault is corrected, “TEC:OUTput 1” command must be issued once to clear the error indication, and a
second time to restore current to the TE module.
ERRSTR?
Description
Syntax
Remarks
See Also
ERRSTR?
HWTemp?
Description
Syntax
Remarks
Hardware (chassis) temperature query.
HWTemp?
The HWTemp? query returns the value of the hardware temperature measurement.
Error string query.
The ERRSTR? query returns a list of commands and device error numbers along with
the corresponding error text strings which have occurred since the last query.
Response Description
Error code, “text” Error code and text for error code as per chapter, 0 if no errors
ERRors?
Page 38

38 Computer Interfacing
Response Description
measured temp Measured temperature in °C
This measurement is updated approximately once every 225 milliseconds.
LOCAL
Description
Syntax
Remarks
Return to local mode (from USB remote)
LOCAL
Returns the controller to local mode after being placed in remote mode by the USB
interface. The instrument will be set to Local Mode if no commands are sent to it via its
USB interface for 10-seconds.
TEC:CONST
Description
Syntax
Remarks
TEC sensor constants command.
TEC:CONST C1, C2, C3
The TEC:CONST command sets the TEC constants for the Steinhart-Hart equation for
thermistors.
Argument Description
For thermistors
C1 ±9.999 x 10
C2 ±9.999 x 10
C3 ±9.999 x 10
-3
Steinhart-Hart constants
-4
-7
See Also
TEC:CONST?
TEC:CONST?
Description
Syntax
Remarks
See Also
TEC sensor constants query.
TEC:CONST?
The TEC:CONST? query returns the TEC constants for the Steinhart-Hart equation for
thermistors.
Response Description
C1 See TEC:CONST for a description of these constants.
C2
C3
TEC:CONST
Page 39

Computer Interfacing 39
TEC:GAIN:PID
Description
Syntax
Remarks
TEC PID controller gain constants command.
TEC:GAIN:PID Kp,Ki,Kd
The TEC:GAIN:PID command sets the proportional, integral and derivative control
gain constants.
Argument Value Description
Kp 1 to 1000 Proportional gain constant
Ki 1 to 1000
Kd 1 to 1000
Examples
TEC:GAIN:PID 50,2,20
Action: sets Kp to 50; Ki to 2; Kd to 20
See Also
TEC:GAIN:PID?
TEC:GAIN:PID?
Description
Syntax
Remarks
TEC PID controller gain constants query.
TEC:GAIN:PID?
The TEC:GAIN:PID? command returns the proportional, integral and derivative control
gain constants.
Response Description
Kp Proportional gain constant
Ki
Kd Derivative gain constant
Integr
al gain constant
Integr
al gain constant
Derivative gain constant
See Also
TEC:GAIN:PID
TEC:ITE(I)
Description
Syntax
Remarks
See Also
TEC ITE set point command.
TEC:ITE set point
The TEC:ITE command sets the TEC control current set point.
Argument Description
set point set point in Amps
TEC:ITE?, TEC:LIMit:ITE, TEC:SET:ITE?
TEC:ITE?(I?)
Description
TEC measured ITE query.
Page 40

40 Computer Interfacing
Syntax
Remarks
TEC:ITE?
The TEC:ITE? query returns the value of the measured TEC output current.
Response Description
measured output Current in Amps
The TEC current is constantly measured and updated, regardless of the TEC mode of
operation.
This measurement is updated approximately once every 225 milliseconds.
See Also
TEC:ITE
TEC:LIMit:ITE
Description
Syntax
Remarks
TEC ITE current limit command
TEC:LIMit:ITE limit
The TEC:LIMit:ITE command sets the TEC ITE current limit value.
Argument Description
limit Limit in Amps
The factory default current limit is 50% of the maximum current.
See Also
TEC:ITE
TEC:LIMit:ITE?
Description
Syntax
Remarks
See Also
TEC ITE current limit query
TEC:LIMit:ITE?
The TEC:LIMit:ITE? query returns the value of the TEC current limit.
Response Description
limit Limit in Amps
TEC:LIMit:ITE
TEC:MODE:ITE(I)
Description
Syntax
Remarks
TEC ITE mode command.
TEC:MODE:ITE
The TEC:MODE:ITE command selects TEC constant current mode.
Changing modes causes the output to be forced off, and the new mode's set point value
will be displayed.
See Also
TEC:I, TEC:MODE?
Page 41

Computer Interfacing 41
TEC:MODE:R
Description
Syntax
Remarks
TEC R mode command.
TEC:MODE:R
The TEC:MODE:R command selects TEC constant thermistor resistance mode.
Since sensor resistance (or linear sensor reference) is a function of temperature, this mode
also controls the TEC output temperature, but it bypasses the use of the conversion
constants for set point calculation. This allows finer control of temperature in cases
where the sensor's temperature model (and therefore the constants) is not known.
Changing modes causes the output to be forced off, and the new mode's set point value
will be displayed.
See Also
TEC:MODE?, TEC:R
TEC:MODE:T
Description
Syntax
Remarks
TEC temperature mode command.
TEC:MODE:T
The TEC:MODE:T command selects TEC constant temperature mode.
Since TEC temperature is derived from thermistor or RTD resistance, or, linear sensor
current or voltage, constant R and T modes are related. In T mode the set point is
converted to resistance voltage or current by using the appropriate constants and
conversion model.
Changing modes causes the output to be forced off, and the new mode's set point value
will be displayed.
See Also
TEC:MODE?, TEC:T
TEC:MODE?
Description
Syntax
Remarks
See Also
TEC control mode query.
TEC:MODE?
The TEC:MODE? query returns the selected TEC control mode.
Response Value Description
mode ITE constant current
R constant R
T constant T
TEC:MODE:ITE, TEC:MODE:R, TEC:MODE:T
Page 42

42 Computer Interfacing
TEC:OUTput
Description
Syntax
Remarks
TEC output enable command.
TEC:OUTput enable
The TEC:OUTput command enables or disables the TEC output.
Argument Value Description
enable 0 off
1 on
After the output is turned on, it may be useful to wait until the output is stable (within
tolerance) before performing further operations.
See Also
TEC:OUTput?
TEC:OUTput?
Description
Syntax
Remarks
TEC output enable query.
TEC:OUTput?
The TEC:OUTput? query returns the status of the TEC output.
Response Value Description
enable 0 off
1 on
Although the status of the switch is on, the output may not have reached the set point
value.
See Also
TEC:OUTput
TEC:R
Description
Syntax
Remarks
See Also
TEC:R set point
The TEC:R command sets the TEC constant thermistor set point.
TEC:R?
TEC R set point command.
Argument Description
set point Thermistor set point in k Ohms
Page 43

Computer Interfacing 43
TEC:R?
Description
Syntax
Remarks
TEC measured R query.
TEC:R?
The TEC:R? query returns the value of the TEC thermistor measurement.
Response Description
R value
This measurement is updated approximately once every 225 milliseconds.
See Also
TEC:R
TEC:SENsor?
Description
Syntax
Remarks
See Also
TEC sensor select query.
TEC:SENsor?
The TEC:SENsor? query returns the sensor type. This value is a coded representation of
the sensor type/thermistor current. Refer to the The Steinhart-Hart Equation, Section
7.2.1, for further details.
Response Description
sensor 1 Thermistor at 100 µA drive
2 Thermistor at 10 µA drive
3 LM335
4 AD590
TEC:SENsor
TEC:SET:ITE?(I?)
Measured Thermistor resistance in k Ohms
Description
Syntax
Remarks
TEC ITE set point query.
TEC:SET:ITE?
The TEC:SET:ITE? query returns the TEC constant current set point value.
Response Description
set point ITE set point in Amps
See Also
TEC:I
TEC:SET:R?
Description
Syntax
Remarks
TEC R set point query.
TEC:SET:R?
The TEC:SET:R? query returns the TEC constant thermistor set point value.
Page 44

44 Computer Interfacing
Response Description
set point
Thermistor set point in k Ohms
See Also
TEC:R
TEC:SET:T?
Description
Syntax
Remarks
See Also
TEC temperature set point query.
TEC:SET:T?
The TEC:SET:T? query returns the TEC constant temperature set point value in °C.
Response Description
set point Set point in °C
TEC:T
TEC:T
Description
Syntax
Remarks
TEC temperature set point command.
TEC:T
The TEC:T command sets the TEC constant temperature set point.
Argument Description
set point Set point in °C
See Also
TEC:SET:T?, TEC:T?
TEC:T?
Description
Syntax
Remarks
See Also
TEC:T?
The TEC:T? query returns the value of the TEC temperature measurement.
TEC:T
TEC measured temperature query.
Response Description
measured temp Measured temperature in °C
This measurement is updated approximately once every 225 milliseconds.
Page 45

6 Software Application
6.1 Overview
The 300B/500B Controllers have a USB 2.0 connector on the back of the unit
that is used to connect to a computer. This connector will work with USB 1.0
and 1.1 also, as it is fully backwards compatible.
Provided on the CD that comes with the unit is an installation for a software
application that communicates with the 300B/500B using the USB port. The
installation installs the USB drivers that are required to use USB communication.
The design of the software is to allow the user to remotely control the
functions of the instrument.
6.2 Connection
Set the USB (Virtual) Address and click the CONNECT button to start
communicating with the instrument.
USB Virtual
Address
Connect Button
45
Figure 13 Application front panel (TEC Tab)
Page 46

46 Software Application
6.3 General Usage
This software application allows the user to setup and monitor the instrument
remotely.
The controls on the instrument are available in the software in a very easy to
read and change format.
Mode
Switch
Communication
Indicator
Figure 14 Application front panel when communicating (LDD Tab)
The software has two tabs, one for the (300B) TEC specific functions, and
one for the (500B) LDD functions. The individual TEC and LDD specific
tabs have two columns labeled on the top as CONTROLS and READBACK.
6.3.1 LDD Tab
CONTROLS:
LDD Mode - Sets I/P mode of control
Output Enable - Turns on/off the output
LD Current - Sets the forward laser current
PD Current - Sets the monitor diode (PD) current
LD Limit - Set the maximum limit for forward current
Page 47

Software Application 47
Range - Set the operating range - Low/High
READBACK:
Output Enable - Displays output on/off state
LD Current - Displays the forward laser current
PD Current - Displays the monitor diode (PD) current
Bandwidth - Displays the current bandwidth setting
6.3.2 TEC Tab
CONTROLS:
TEC Mode - Sets R/T/I mode of control
Output Enable - Turns on/off the output
Temp/R - Sets the Temperature or Resistive setpoint
ITE - Sets TEC Current
ITE Limit - Set the maximum limit for TEC current
READBACK:
Output Enable - Displays output on/off state
Temp/R - Displays the Temperature or Resistance
ITE - Displays the TEC Current
The Laser Output Current Level display on the bottom is a visual indicator of
the current readback for forward current (LD Current), with the upper limit of
LD Limit.
On the very bottom are an Error indicator light and a display of the last
Errors, if any.
6.4 Menu Structure
To Exit the application go to the File menu and select Exit.
The Edit/TEC Settings menu option had additional TEC settings, such as PID
gain settings.
The Edit/Advanced Properties menu option had additional property settings,
including search for instruments and data logging options.
The File/Print will print the window.
The Help/About will show information about the application.
Page 48

48 Software Application
This page is intentionally left blank
Page 49

7 Principles of Operation
7.1 Introduction
Three factors must be taken into account when optimizing the operation of a
Model 300B Series Temperature Controller: selection of both the appropriate
temperature sensor and TE module heat sink, and the manner in which they
are mounted. Selecting the proper thermistor to cover a specific temperature
range of operation is a simple but important procedure. The proper TE
module must be selected to remove the heat dissipated by the laser diode or
other device. Finally, the arrangement of the TE module and the heat sink, as
well as the heat sink size, are crucial in maximizing the heat transfer
efficiency.
7.2 Thermistor
Model 300B Series Temperature Controllers are designed to operate using a
thermistor as one of the temperature sensing devices. Temperature is
displayed as a resistance (kΩ) corresponding to the temperature of the
thermistor. The actual temperature of the thermistor can be determined from
the manufacturers curves or tables listing temperature vs. resistance. Two
precision current sources, 10µA and 100µA, are used to generate a voltage
across the thermistor and it is this voltage that is read on the front display.
For the 10µA current source the maximum resistance that can be displayed is
200.0 kΩ, while for the 100µA source the maximum reading is 20.0 kΩ.
The minimum resistance value that can accurately be read is 200 ohms
(100µA current source). These two current values allow a wide range of
temperatures to be controlled by the Model 300B Series Temperature
Controllers. Different ranges of temperatures can be adjusted for by selecting
the proper thermistor value. The following table illustrates this point:
Temperature vs. Thermistor Resistance
Thermistor value @ 25°C 1k 10k 100k
200 kΩ -75°C -37°C -11°C
100 kΩ -66°C -24°C 25°C
20 kΩ -40°C 8°C 65°C
10 kΩ -27°C 25°C 85°C
1 kΩ 25°C 93°C >150°C
100 kΩ 100°C >150°C >150°C
100 Ω 100°C >150°C >150°C
49
Page 50

50 Principles of Operation
Careful thermistor value selection therefore enables control over a wide
temperature range.
The temperature resolution and thermistor sensitivity must also be taken into
account. Thermistors achieve their highest sensitivity at the lower end of their
temperature range. Therefore, the lower the absolute temperature to be
maintained, the lower the resistance value the thermistor should be. For
example, to operate at 0°C a 5k ohm thermistor would be the best selection
while at 100°C a 100k ohm thermistor would be a better selection.
The rule of thumb is to operate the thermistor near the lower end of its
temperature range and use the 100µA current bias. Please contact Newport’s
applications engineers if you have any questions regarding the selection of
the proper thermistor for your application.
Thermistors have large resistance variations over temperature. Therefore,
users should check if the thermistor resistance value over the desired
temperature range, times the thermistor current (10µA or 100µA) is inside the
voltage span of 0 to 2V for proper operation of the thermal feedback loop.
This can be checked by monitoring the voltage at the front panel BNC
connector (Analog Output).
7.2.1 The Steinhart-Hart Equation
The Steinhart-Hart equation is used to derive temperature from the non-linear
resistance of an NTC (Negative Temperature Coefficient) thermistor.
Two terminal thermistors have a non-linear relationship between temperature
and resistance. The resistance versus temperature characteristics for a family
of similar thermistors is shown in Figure15. The resistance-versustemperature relationship for most common negative temperature coefficient
(NTC) thermistors can be accurately modeled by a polynomial expansion
relating the logarithm of resistance to inverse temperature. The SteinhartHart equation is one such expression and is given as follows:
3
1/T = C1 + C2 (Ln R) + C3 (Ln R)
Where T is in Kelvin. To convert T to °C, subtract 273.15.
Once the three constants C1, C2, and C3 are accurately determined, only
small errors in the calculation of temperature over wide temperature ranges
exist. Table3 shows the results of using the equation to fit the resistance
verses temperature characteristic of a common 10 k Ohm (at room
temperature) thermistor. The equation will produce temperature calculation
errors of less than 0.01°C over the range -20 °C to 50 °C.
Page 51

Principals Of Operation 51
Figure 15 Thermistor Resistance versus Temperature
Error T (°°°°C)
R1 T Actual Third Order
Fit. Eq. 1
97072 -20.00 -0.32
55326 -10.00 -0.06
32650 0.00 0.09
19899 10.00 0.15
12492 20.00 0.13
10000 25.00 0.08
8057 30.00 0.01
5326 40.00 -0.20
3602 50.00 -0.50
Table 3 Comparison of Curve Fitting Equations
2
The constants C1, C2, and C3 may all be expressed in the form n.nnn
simplifying entry into the 300B.
7.2.2 Table of Constants
We have listed some common thermistors and included the appropriate
calibration constants for the temperature range -20 °C to 50 °C in Table 4.
Model 300B, by default, uses the BetaTHERM 10K3A2 thermistor values.
1
Resistance of a 10K, Fenwal UUA41J1 thermistor.
2
Constants C1 = 1.125 * 10-3
C2 = 2.347 * 10
C3 = 0.855 * 10
-4
-7
Page 52

52 Principles of Operation
Manufacturer C1*10
BetaTHERM 10K3 1.129241 2.341077 0.877547
BetaTHERM 0.1K1 1.942952 2.989769 3.504383
BetaTHERM 0.3K1 1.627660 2.933316 2.870016
BetaTHERM 1K2 1.373419 2.771785 1.999768
BetaTHERM 1K7 1.446659 2.682454 1.649916
BetaTHERM 2K3 1.498872 2.379047 1.066953
BetaTHERM 2.2K3 1.471388 2.376138 1.051058
BetaTHERM 3K3 1.405027 2.369386 1.012660
BetaTHERM 5K3 1.287450 2.357394 0.950520
BetaTHERM 10K3 1.129241 2.341077 0.877547
BetaTHERM 10K4 1.028444 2.392435 1.562216
BetaTHERM 30K5 0.933175 2.213978 1.263817
BetaTHERM 30K6 1.068981 2.120700 0.901954
BetaTHERM 50K6 0.965715 2.106840 0.858548
BetaTHERM 100K6 0.827111 2.088020 0.805620
BetaTHERM 1M9 0.740239 1.760865 0.686600
Table 4 Thermistor Constants
7.3 Working With IC Sensors
Two IC temperature sensors may be used with the Model 300B Series
Temperature Controllers, the AD590 Series and the LM135/335 Series. Both
come in several different package types having various accuracy and stability
characteristics. These temperature sensors are easy to use and give a
temperature reading directly in °C on the Model 300B Series display.
Sensor selection is accomplished in the Sensor Select block of the TEC
board, LM135/335 and AD590 IC temperature sensors may also be selected.
The AD590 has a +12 VDC bias voltage, and the LM135/335 has a 1mA bias
current.
-3
C2*10-4 C3*10-7
The output of the Sensor Select block of the TEC board is a voltage which is
proportional to the actual temperature. This voltage is fed to the A/D
converter which provides a digital measurement to the microprocessor, and is
also fed to the PID control loop to close the feedback loop when the
temperature is being controlled.
7.3.1 AD590 Series IC Sensors
The AD590 Series devices are two-terminal IC temperature sensing devices,
which produce an output current directly proportional to the absolute
temperature at 1µA/°K. The AD590 Series sensor is particularly useful in
remote sensing applications where long cable lengths are used, due to its high
impedance current output. A linear output is displayed in °C on the Model
300B Series Temperature Controller, which makes it ideally suited for most
temperature sensing applications. The recommended upper operating limit for
AD590 Series devices is 150°C.
Page 53

Principals Of Operation 53
7.3.2 LM135/335 Series IC Sensors
The LM135/335 Series devices are similar to the AD590 in that they are two
terminal devices and their output is directly proportional to absolute
temperature. Operating like a two terminal zener diode, the LM135/335
Series temperature sensors have a breakdown voltage directly proportional to
absolute temperature at +10mV/°K. When using the LM135/335 Series
sensors, voltage drops resulting from using long cables will introduce
inaccuracies in the temperature display measurement.
7.4 Using Thermo-Electric Modules
Thermo-electric (TE) modules are semiconductor devices that act as heat
pumps when a voltage is applied to them. This effect is called Peltier cooling
or heating. The direction of the current flow determines whether the TE
module is cooling or heating a device such as a laser diode or IR detector. A
TE module consists of a matrix of thermoelectric couples made of p-type and
n-type semiconductor material. A TE module can be fabricated with as few as
one couple or with as many as several hundred couples sandwiched between
two ceramic plates. The ceramic plates form the top and bottom of the TE
module and provide structural integrity as well as electrical insulation from,
and thermal conduction to, the heat sink and the device being cooled or
heated.
Model 300B Series Temperature Controllers are designed to control the rate
and amount of cooling or heating through the use of a feedback loop. The
arrangement of the TE module in the cooling mode is shown in Figure 16.
When a positive DC voltage is applied to the n-type element, electrons pass
from the p-type to the n-type elements and the temperature decreases as heat
is absorbed by the cold side of the TE module. The heat absorbed is
proportional to the amount of current flowing through the TE module and the
number of p-type and n-type elements in the TE module.
Figure 16 TE Module Configuration
Page 54

54 Principles of Operation
It is necessary to remove the heat from the hot side of the TE module. The
amount of heat to be dissipated is equal to the heat pumped from the cold side
plus the input power to the TE module. Although the amount of cooling is
proportional to the current flowing through the TE module, the power
dissipated by Joule heating (input power heating) in the TE module is
proportional to the square of the current. Half of this heat must be pumped
from the cold side of the TE module. When exceeding a maximum current
value (Imax), which is device dependent, the net cooling of the TE module
decreases because Joule heating is increasing at a greater rate than Peltier
cooling. The manufacturer of the TE module will state the maximum current
for each TE module and this current value should not be exceeded.
The LIMIT SET feature on the Model 300B Series Temperature Controllers
allows you to limit the maximum current flowing through the TE module.
7.5 Mounting Considerations
The physical arrangement of the TE module, thermistor, heatsink, and the
device to be cooled or heated are crucial to the operation of a Model 300B
Series Temperature Controller. This arrangement determines the thermal load
and the rate of heat dissipation to which the control circuitry must respond.
To achieve optimum temperature control the thermal path between the device
to be cooled or heated and the face of the TE module must be as short as
possible and must have high thermal conductivity.
This arrangement also determines the delay that the control circuitry must
respond to, and affects the gain setting of the control loop. Another factor that
must be taken into account is the mass of the heat sink required to dissipate
heat from the TE module. The better the heat sink dissipates heat, thus
reducing the thermal gradient across the TE module, the more efficient the
TE module is at removing heat from the device being cooled.
Figure 17 shows an arrangement that optimizes the cooling and temperature
stability achievable with the Model 300B Series Temperature Controller.
Two TE modules connected in parallel are shown in the diagram. The actual
connection of the TE module depends on the manufacturer’s specifications
for the voltage drop across the TE module and its current requirement.
Figure 17 Mounting arrangement of a TE module, heat sink and laser diode
Page 55

Principals Of Operation 55
p
7.6 PID Tuning
The basic block diagram of a temperature control system is shown in Figure 18.
The main objective of this control system is to insure that the deviation between
actual temperature and desired temperature setpoint is within acceptable limits.
The temperature controller attains this by monitoring the actual temperature
(output of temperature sensor), comparing this value to a desired setpoint, and
driving the TE module (heating/cooling the mount). There are various ways in
which the performance of such a control loop can be quantified: settling time,
overshoot, etc. In Model 300B series instruments, a PID control algorithm is
implemented to achieve optimal stability and settling performance.
Temperature
Set
oint
Temperature
Controller
325B, 350B)
(Model
Thermo-Electric
(TE) Module
Temperature Sensor
(Thermistor, AD590,
LM335…)
Temperature Controlled Mounts
(Model 700, 740, 760 series)
Figure 18 Basic block diagram of a temperature control system
7.6.1 PID Control Loop
The PID term comes from the proportional, integral and derivative gain
factors that are at the basis of the control loop calculation. The common
equation given for it is:
∫
where Kp = proportional gain factor
Ki = integral gain factor
Kd = derivative gain factor
e = instantaneous error (
u = temperature controller (
de
KdteKeKu
⋅+⋅+⋅=
dip
dt
desired temperature setpoint minus actual temperature)
current that drives the TE module)
Page 56

56 Principles of Operation
The problem for most users is to get a feeling for this formula, especially
tune
when trying to
the PID loop.
gain factors to obtain a certain system response, a challenging task to achieve
without some basic understanding of its behavior.
The following paragraphs explain the PID components and their operation.
7.6.2 P Loop
Let us start with the simplest type of closed loop control, the P (proportional)
loop. The diagram in Figure 19 shows its configuration.
Tuning
the PID means changing its three
Temperature
Setpoint
e
+
-
x Kp
u
Temperature
Controller
Thermo-Electric
(TE) Module
Temperature Sensor
Figure 19 Proportional Temperature Controller Block Diagram
The controller continuously compares the actual temperature, as reported by
the temperature sensor, to the desired temperature (setpoint). The difference
e
is the temperature following error. It amplifies this error (by multiplying it
Kp
with
) and generates a control signal (current) that drives the TE module.
There are a few conclusions that could be drawn from studying this block
diagram:
• The control signal is
proportional
to the temperature following
error.
• There must be a following error in order to drive the TE module.
• Small errors cannot be corrected if they do not generate enough
current for the TE module to overcome any thermodynamic effects
from the mounts.
• Increasing the
much of it will generate instabilities and oscillations.
7.6.3 PI Loop
To eliminate the small errors that cannot be compensated by P loop alone, an
integral
the error continuously and the value, multiplied by the
added to the control signal (Figure 20).
term can be added to the control loop. This term integrates (adds)
Kp
gain reduces the necessary following error but too
Ki
gain factor, is
Page 57

Principals Of Operation 57
+
+
+
Temperature
Setpoint
The result is that the contribution of integral term to the control signal will
increase until it reduces the temperature following error to zero. While this is
desirable for many situations, the integral term can have a severe
destabilizing effect on the control loop if increased too much.
7.6.4 PID Loop
The third term of the PID loop is the
rate of change of temperature following error by
following error does not change, the contribution of derivative term to the
control signal is zero. Figure 21 shows the PID control loop diagram.
Temperature
Setpoint
-
e
-
x Kp
Thermo-Electric
u
(TE) Module
x Kp
x Ki
x Kd
x Ki
Controller
Temperature Sensor
derivative
Thermo-Electric
u
(TE) Module
Temperature Sensor
term. This term amplifies the
Kd
gain factor. If the
∫e
Temperature
Figure 20 PI Temperature Controller Block Diagram
e
∫e
de
dt
The derivative term adds a damping effect which helps prevent oscillations
and temperature overshoot. It also supports achieving optimal stability and
settling time.
Figure 21 PID Temperature Controller Block Diagram
Page 58

58 Principles of Operation
7.7 Model 300B Series Setup
Setting up the Model 300B Series Temperature Controller is a simple
procedure.
An AC power cord, supplied with each unit, must be plugged into a properly
grounded outlet. The tilt up feet, at the bottom of the unit, may be extended to
enhance the viewing angle of the front panel. Connection to TE modules and
temperature sensors are made with one of the accessory cables (part #300-02
or #300-04).
7.7.1 Rack Mounting Model 300B Series Units
Two units, either Model 300B’s or Model 500B’s or one of each, may be
mounted side by side in the standard rack mount kit (part #35-RACK).
Remove the four feet on the bottom of the instrument. Use the screws
supplied with the rack mount kit and secure the bottom of the unit(s) to the
bracket using the two original front feet mounting positions. After tightening
the screws the unit(s) may be slid into a 19" rack and secured to the side rails.
7.7.2 Model 300B Series Operating Checklist
The following steps should be followed when operating a Model 300B Series
Temperature Controller.
a. Check the AC voltage selection of the unit to be sure that it is
compatible with the outlet to be used. All units are factory preset for
operation from 108–132VAC.
b. Connect the temperature sensor and TE module to the 15-pin output
connector.
c. Check that the proper temperature sensor bias is selected.
d. Turn on the AC power switch and the unit will start-up with the output
to the TE module off. The display will be in the PRESET mode.
e. Before setting any values on the DISPLAY select the operating mode,
R/T or I
TE
.
f. Change the display to the LIMIT display mode and set the maximum
current allowed to the TE module. For this, push the display button
until the LIMIT SET LED is lit. Turn the control knob until the display
shows the desired limit current.
NOTE
The maximum current is specified by the manufacturer and must not be exceeded or
damage to the TE module may occur.
Page 59

Principals Of Operation 59
g. If the operating set-point has not been set or needs to be changed,
select the PRESET display mode and use the control knob to set the
correct value. The operating temperature, resistance or TE current is
set before turning the OUTPUT on.
h. The OUTPUT can now be turned on and the Model 300B Series
Temperature Controller will automatically control the temperature or
I
TE
. Push the OUTPUT switch once to turn the current on to the TE
module and a second time to turn the current off. If there is an error
condition the current will not turn on and the ERROR indicator LED
will come on. If this occurs verify that the temperature sensor and TE
connections are correct. After an ERROR condition has occurred the
OUTPUT switch must be pushed once to reset the control circuitry.
After the fault is corrected and the circuitry is reset the OUTPUT
switch can be pushed a second time and the output current will turn on.
i. During the operation of the Model 300B Series Temperature
Controller any of the parameters may be displayed and the status of the
Model 300B Series Temperature Controller may be monitored.
NOTE
Newport Corporation is not in any way responsible for any damage to any device
used in conjunction with the Model 300B Series products.
Page 60

60 Principles of Operation
This page is intentionally left blank
Page 61

8 Maintenance and Service
CAUTION
There are no user serviceable parts inside the Model 300B Series
Temperature Controllers. Work performed by persons not authorized by
Newport Corporation will void the warranty.
8.1 Enclosure Cleaning
WARNING
Before cleaning the enclosure of the Model 300B Series Temperature
Controller, the AC power cord must be disconnected from the wall socket.
The enclosure may be cleaned with a soft cloth dampened with either a mild soapy water
solution or Isopropyl Alcohol. Do not use any other chemicals or solutions.
8.2 Fuse Replacement
Pry open door to remove fuses
Figure 22 Fuse Replacement
61
Page 62

62 Maintenance and Service
WARNING
To reduce the risk of electric shock or damage to the instrument,
turn the power switch off and disconnect the power cord before
replacing a fuse.
If a fuse blows:
1. Disconnect the power cord from the controller
2. Pry open tab at top of power receptacle and open panel to access fuses. (See Figure22)
3. Replace the fuse(s).
Use only 5mm x 20mm fuses as indicated below
Fuse Replacement
1.6 Amp, (T), 250V 100/120VAC
0.8 Amp, (T), 250V 220/240VAC
Line Voltage
4. Reconnect the power cord and turn on the instrument.
5. If the problem persists, contact Newport Corporation for service.
8.3 Obtaining Service
The Model 300B Series Temperature Controller contains no user serviceable parts. To
obtain information regarding factory service, contact Newport Corporation or your Newport
representative. Please have the following information available:
1. Instrument model number (on the rear panel)
2. Instrument serial number (on rear panel)
3. Description of the problem.
If the instrument is to be returned to Newport Corporation, you will be given a Return
Number, which you should reference in your shipping documents. Please fill out a copy of
the service form, located on the following page, and have the information ready when
contacting Newport Corporation. Return the completed service form with the instrument.
Page 63

Maintenance and Service
8.4 Service Form
Newport Corporation
U.S.A. Office: 800-222-6440
FAX: 949/253-1479
Name _______________________________ Return Authorization #__________________
(Please obtain RA# prior to return of item)
Company ________________________________________________________________________
(Please obtain RA # prior to return of item)
Address ________________________________ ____________________Date _________________
Country _______________________ Phone Number ______________________________________
P.O. Number ___________________ FAX Number _______________________________________
Item(s) Being Returned:
Model # _______________________ Serial # __________________________
Description _______________________________________________________________________
Reason for return of goods (please list any specific problems):
63
Page 64

64 Maintenance and Service
Notes:
 Loading...